1
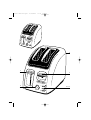
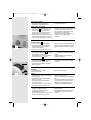
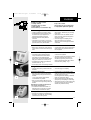
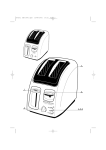
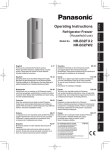
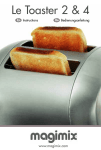
Avanti SEB 2001.qxd
13/06/2001
15:21
Page 1
AVANTI
Avanti SEB 2001.qxd
13/06/2001
15:21
Page 2
7
1
3
2
4-5-6
Avanti SEB 2001.qxd
13/06/2001
15:21
Page 3
FRANÇAIS
Caractéristiques de l’appareil
1
2
3
4
Bouton de commande du chariot
Bouton de réglage thermostat (6 positions)
Manette de surélévation
Bouton de réchauffage (suivant modèle)
5 Bouton d’Annulation/Stop
6 Bouton de décongélation (suivant modèle)
7 Poignée de transport (derrière l’appareil)
Avant la première utilisation
• Déballer l’appareil et enlever tous les
autocollants.
• L’emballage de votre grille-pain est recyclable,
mais il peut également vous être utile pour
retourner l’appareil à une station de service
agréée.
• Lire le mode d’emploi et suivre attentivement les
instructions d’utilisation.
Début de fonctionnement
• A la première utilisation, mettre le bouton de
réglage sur la position minimum.
• Faire fonctionner le grille-pain à vide. Cela évitera
l’odeur désagréable d'appareil neuf.
s
Mode d’emploi - Fig. 1 et 2
• Votre grille pain permet de griller tous les pains :
baguette, pain de mie, pain de campagne, pain
congelé... quelle que soit l'épaisseur des
tranches, jusqu'à 3,5 cm environ.
• La commande de fonctionnement est située en
haut sur le côté gauche de l’appareil. (Fig. 1)
• Le bouton thermostat réglable à 6 positions se
trouve sur le devant de l’appareil.
1
• Le grille pain est équipé d’une manette de
surélévation pour saisir plus facilement le pain.
Lorsque le grillage est terminé, l’appui sur ce
bouton remonte le pain à votre convenance. Ne
pas utiliser ce bouton lorsque le cycle de grillage
est en cours. (Fig. 2)
Fonctionnement
2
• Vérifier que le plateau ramasse-miettes est bien
verrouillé sous le grille-pain. (voir Fig. 6)
• Dérouler complètement le cordon d’alimentation
et brancher.
Réglage du thermostat
• Régler le thermostat sur la position désirée,
suivant la nature et l’épaisseur du pain :
1-2 très légèrement grillé,3 légèrement grillé
4-5 bien grillé, 6 très grillé
• Après quelques essais vous serez vite familiarisé
avec ces réglages. Il est conseillé de réduire le
réglage du thermostat lorsque vous n’utilisez
pas toute la capacité choisie de l’appareil.
s
Mise en place des tranches de pain - Fig. 3
• Le bouton de commande de fonctionnement
étant en position haute, disposer les tranches
de pains.
3
Mise en marche
• Abaisser le bouton de commande. En appuyant,
la commande se verrouille en position basse. Les
grilles de maintien s’ajustent automatiquement
selon l’épaisseur des tranches et les centres
entre les éléments chauffants qui sont alors
activés.
• Sur ce modèle électronique, la commande de
fonctionnement ne s’enclenche en position
basse que lorsque l’appareil est branché.
• Il est possible que ce fonctionnement soit gêné
par des débris, des poussières restant trop
longtemps à l’intérieur de l’appareil. Il suffit alors
de manœuvrer plusieurs fois la touche de
commande pour l’enclencher, néanmoins bien se
référer aux conseils d’entretien et de nettoyage.
• Les tranches ne doivent pas dépasser les grilles,
la partie qui dépasse ne pouvant être grillée.
3
Avanti SEB 2001.qxd
13/06/2001
15:21
Page 4
Arrêt
• En fin de cuisson, la commande de fonctionnement se déverrouille automatiquement, les
Arrêt en cours de cycle
• Vous pouvez interrompre le grillage à tout
moment en appuyant sur le bouton d’annulation
«STOP» s
, le pain sera remonté automatiquement (par exemple si vous vous apercevez
que vous avez fait un mauvais réglage ou si vous
jugez que votre pain est suffisamment grillé).
• Si des tranches de pain restent coincées entre
les grilles, débrancher, et attendre que l’appareil
tranches de pain sont remontées et le grille-pain
cesse de fonctionner.
refroidisse avant de retirer le pain. Ne pas utiliser
d’objet métallique (cuillère, couteau ...).
• Si vous grillez des petits pains aux raisins,
enlever les raisins qui risquent de se détacher
car ceux-ci peuvent endommager l’appareil.
s
Modèle «DELUXE» • Fonctions spécifiques - Fig. 4
Réchauffage / Reheat
• Pour réchauffer des toasts (temps fixe, court),
abaissez le bouton de commande du grille-pain,
appuyer sur la touche «Réchauffage / reheat».
• L’appareil va fonctionner pendant un temps
court, quelle que soit la position du bouton de
réglage situé entre 1 et 6.
4
Décongélation / Frozen
• Pour griller du pain congelé, régler le degré de
grillage souhaité entre 1 et 6 en fonction du type
de pain à griller, armez le grille-pain, appuyer sur
la touche «Décongélation / Frozen».
Annulation / Stop
• Pour arrêter le cycle de grillage ou annuler les
autres fonctions, appuyer sur le bouton
annulation «STOP» s .
1
5
3
• Un temps supplémentaire de grillage sera
automatiquement sélectionné.
• A la fin du cycle, le pain est mis à disposition, le
grille-pain cesse de fonctionner.
• Le pain est mis à disposition, le grille-pain cesse
de fonctionner.
Accessoires réchauffe petits-pains
s
2
• A la fin du cycle, le pain est mis à disposition, le
grille-pain cesse de fonctionner.
Description :
1 Support petits pains (vendu séparément)
2 Bouton de commande
Utilisation :
• Dérouler complètement le cordon d’alimentation
et brancer.
• Positionner le support petits pains (appui avantarrière).
• Régler le temps de cuisson sur la position
désirée (bouton 3) de 1 à 3 maxi.
• Disposer les petits pains, les croissants, etc ...
sur les fils supports.
Précautions :
• Ne jamais placer les petits pains ou les
croissants directement sur l’ouverture
supérieure de l’appareil.
• Ne pas utiliser l’appareil pour cuire ou
décongeler des repas surgelés.
4
(selon modèle) - Fig. 5
3 Bouton de réglage thermostat 6 positions
• Abaisser le levier de mise en marche situé à
gauche de l’appareil.
• Lorsque le levier de mise en marche remonte, les
petits pains sont prêts.
• En fin d’utilisation, laisser refroidir l’appareil et
débrancher-le. Vous pourrez ranger le support
petits pains une fois refroidi sur l’arrière de
l’appareil.
• Vous ne devez pas utiliser l’appareil pour griller
simultanément des tranches de pain et
réchauffer des petits pains.
Avanti SEB 2001.qxd
13/06/2001
15:21
Page 5
s
Entretien et nettoyage - Fig. 6, 7 et 8
6
• Avant tout entretien, débrancher et laisser
refroidir l’appareil.
• Après avoir déverrouillé le plateau ramassemiettes, et l’avoir vidé, retourner l’appareil à
l’envers pour faire tomber les croûtes et les
débris qui peuvent rester entre les éléments
chauffants. Il est recomandé de nettoyer le
plateau ramasse-miettes régulièrement. - Fig. 6
• Ne jamais intervenir à l’intérieur de l’appareil
avec un objet métallique sous peine de
détériorations graves.
• Essuyer l’extérieur de l’appareil et le cordon avec
un linge humide. Sécher.
• Ne pas utiliser de produits d’entretien trop
agressifs ou abrasifs, de produits à nettoyer les
fours ou de l’eau de Javel.
• Ne pas enrouler le cordon autour du corps de
l’appareil. Un range-cordon est situé sous
l’appareil. - Fig. 7
• Une poignée située à l’arrière de l’appareil vous
permet de le transporter plus facilement. - Fig. 8
7
8
«Sous réserve de modifications»
5
Avanti SEB 2001.qxd
13/06/2001
15:21
Page 6
CONSIGNES DE SÉCURITÉ
Prévention des accidents domestiques :
• La sécurité de cet appareil est conforme aux règles
techniques et aux normes en vigueur.
• Directive Compatibilité Electro magnétique 89/336/CEE
modifié 92/31/CEE et 93/68/CEE.
• Directive Basse tension 73/23/CEE modifiée 93/68/CEE.
• Compte-tenu de la diversité des normes en vigueur, si cet
appareil est utilisé dans un pays différent de celui où il a été
acheté, faites-le vérifier par une station service agréée. *
• Branchez toujours l’appareil sur une prise reliée à la terre.
• Ne laissez pas le cordon pendre ou toucher les parties
chaudes de l’appareil.
• Ne débranchez pas l’appareil en tirant sur le cordon.
• N’utilisez qu’une rallonge en bon état, avec une prise reliée à
la terre, et avec un fil conducteur de section au moins égale
au fil fourni avec le produit.
• Vérifiez que la tension du réseau correspond bien à celle
indiquée sur l’appareil (courant alternatif seulement).
• Afin d’éviter les chocs électriques, ne plongez jamais le fil
électrique, la prise de courant ou l’appareil dans l’eau ou un
autre liquide.
• Assurez-vous que l’installation électrique est suffisante pour
alimenter un appareil de cette puissance.
• Ne pas utiliser d’ustensiles en métal qui pourraient provoquer
des courts-circuits (cuillère, couteau …).
Lorsqu’on utilise des appareils électriques, il y a un certain nombres de règles
élémentaires qu'il faut toujours respecter, en particulier les suivantes :
• Lisez entièrement le mode d’emploi et suivez attentivement
les instructions d’utilisation.
• Ne jamais laisser l’appareil fonctionner sans surveillance et
particulièrement à chaque premier grillage ou changement
de réglage.
• Ne pas laisser l’appareil à la portée des enfants.
• Le levier de commande doit être en position haute quand
vous branchez ou débranchez l’appareil.
• Ne pas porter ou déplacer l’appareil pendant l’utilisation.
• Utilisez un plan de travail stable à l’abri des projections
d’eau.
• Ne placez pas l’appareil à proximité d’une source de chaleur.
• Débranchez l’appareil après chaque utilisation ou avant de le
nettoyer
• Avant chaque utilisation, vérifiez que le plateau ramassemiettes est bien verrouillé sous le grille-pain.
• N’introduisez pas dans l’appareil des trop grosses tranches
de pain susceptibles de coincer le mécanisme du grille-pain.
• En fin de cycle, si les tranches de pain restaient coincées
entre les grilles, débranchez, et attendre que l’appareil
refroidisse avant de retirer le pain.
• Ne placez jamais de papier, carton ou plastique dans, sur ou
sous l’appareil.
• Ne pas poser de pain, croissants, ou autres pâtisseries sur le
dessus de l’appareil, car un accessoire réchauffe petits-pains
est prévu sur certains modèles.
• N’utilisez pas l’appareil simultanément pour le grillage du
pain et le réchauffage des viennoiseries.
• Ne jamais poser de plat, assiette, barquette ou papier
aluminium sur l’accessoire support petits pains. Ne pas
•
•
•
•
•
•
•
•
•
utiliser le grille-pain pour cuire ou décongeler des plats
surgelés.
Ne pas utiliser l’appareil si :
- celui-ci a un cordon défectueux ;
- l’appareil est tombé et présente des détériorations visibles
ou des anomalies de fonctionnement.
Dans ce cas l’appareil doit être envoyé au Centre de Service
Après-Vente agréé le plus proche* afin d’éviter tout danger.
N’utilisez l’appareil que dans la maison.
N’utilisez pas l’appareil comme une source de chaleur.
Le pain peut brûler, aussi l’appareil ne doit pas être utilisé à
proximité de matériaux combustibles tels que rideaux,
étagères, meubles...
Ne pas couvrir l’appareil pendant son fonctionnement. S’il
arrivait que certaines parties du produit s’enflamment, ne
tentez jamais de les éteindre avec de l’eau. Débranchez
l’appareil et étouffez les flammes avec un linge humide.
Ne rangez pas de produits inflammables à proximité de
l’appareil.
N’utilisez pas d’accessoires non recommandés par le
fabricant, ni des accessoires d’une autre marque que celle
de votre appareil.
Cet appareil a été conçu pour un usage domestique
uniquement, toute utilisation professionnelle, non appropriée
ou non conforme au mode d’emploi n’engage ni la
responsabilité, ni la garantie du fabricant.
Pour votre sécurité, ne démontez jamais l’appareil par vousmême ; faites appel à un Centre Service Agréé*.
*(voir liste jointe)
Gardez précieusement ces instructions
Avanti SEB 2001.qxd
13/06/2001
15:21
Page 7
NEDERLAND
Beschrijving van het apparaat
1 Bedieningsknop van de broodlift
2 Thermostaatknop voor de bruiningsgraad (6
standen)
3 Hendel voor de extra hoge uitneemstand
4 Toets voor opwarmstand (niet op alle modellen)
5 Stoptoets voor handmatig uitschakelen
6 Toets voor diepvriesstand (niet op alle modellen)
7 Handgreep voor het verplaatsen
(aan achterzijde)
Vóór het eerste gebruik
• Het apparaat uitpakken en eventuele stickers
verwijderen.
• Het verpakkingsmateriaal van uw broodrooster is
geschikt voor recycling, maar is ook handig om
te bewaren als het apparaat eventueel voor
reparatie verzonden moet worden.
• Deze gebruiksaanwijzing helemaal doorlezen en
de instructies zorgvuldig opvolgen.
De eerste keer aanzetten
• Zet de thermostaatknop voordat u de broodrooster daadwerkelijk gaat gebruiken op de
laagste stand.
• Door de broodrooster nu één keer zonder brood
te gebruiken, verdwijnt de onaangename nieuwe
geur en heeft u daar bij het toasten straks geen
last van.
s
Gebruiksaanwijzing - Fig. 1 en 2
• Uw broodrooster is geschikt voor alle gangbare
soorten wit en bruin brood (stokbrood,
vloerbrood, knip, boerenbrood en (halve)
bolletjes, enz.), vers of diepgevroren, tot een
dikte van de sneden van ongeveer 3,5 cm.
• De bedieningsknop van de broodlift bevindt
zich linksboven aan de voorkant van het
apparaat. - (Fig. 1)
• De thermostaatknop met 6 standen bevindt zich
1
in het midden onderaan op de voorkant van het
apparaat.
• Deze broodrooster is voorzien van een lift met
extra hoge stand voor het gemakkelijk uitnemen
van het brood. Zodra het brood klaar is, drukt u
op de knop rechtsboven op de voorzijde van het
apparaat, om de broodlift in de extra hoge stand
te zetten. Deze knop niet tijdens het toasten
gebruiken. - (Fig. 2)
Het gebruik van de broodrooster
2
• Controleer voor gebruik of de broodkruimelklep aan
de onderzijde goed vergrendeld is. (zie Fig. 6)
• Rol het snoer volledig uit en steek de stekker in
het stopcontact.
Het instellen van de juiste bruiningsgraad
• Stel de thermostaatknop in op de gewenste
stand, al naar gelang het soort en de dikte van
het brood :
1-2 heel licht geroosterd, 3 licht geroosterd,
4-5 vrij donker geroosterd, 6 donker geroosterd
• Na een paar keer zult u snel weten welke
instelling het meest geschikt is voor welk soort
brood. De instellingen gelden voor 2 sneden
brood. Kies een lagere stand als u maar één
sneetje brood roostert.
s
De sneden brood in de broodlift plaatsen - Fig. 3
• Zorg ervoor dat de broodlift (links) omhoog staat
en zet de sneden brood in de broodgleuven.
3
Aanzetten
• Beweeg de knop voor de broodlift naar beneden.
Door te drukken zet u de lift in de onderste stand
vast. Het apparaat gaat aan. De roosters in de
broodgleuven houden het brood vast en centreren
het ten opzichte van de verwarmingselementen.
• Bij de elektronische modellen blijft de broodlift
alleen in de laagste stand staan als de stekker
zich in het stopcontact bevindt.
• Na verloop van tijd kunnen kruimels en stof het
vastzetten van de liftknop bemoeilijken. Beweeg
de liftknop dan een aantal malen omhoog en
omlaag, tot hij weer goed vastklikt.
7
Avanti SEB 2001.qxd
13/06/2001
15:21
Page 8
Einde van de roostertijd
• Zodra het brood klaar is, klikt de liftknop
automatisch los, het brood komt omhoog
Uitzetten tijdens het roosteren
• U kunt het roosteren altijd onderbreken door de
«stop/cancel» s
toets in te drukken. Het
brood springt dan vanzelf omhoog. Dit kan
handig zijn als u merkt dat de broodrooster te
hoog is ingesteld en het brood al goed is.
• Mocht het brood in een broodgleuf klem komen
te zitten, haal dan de stekker uit het stopcontact,
wacht tot het apparaat is afgekoeld voordat u het
en het apparaat schakelt uit.
brood uit de gleuf verwijdert. Gebruik hierbij nooit
een metalen voorwerp (vork, mes, lepel e.d.).
• Voor het roosteren van krentenbrood en halve
krentenbollen dient u eerst de losse
krenten/rozijnen te verwijderen. Deze kunnen in
het apparaat vallen en beschadigingen
veroorzaken.
s
Model «de Luxe» • Speciale functies - Fig. 4
Opnieuw verwarmen
• Voor het opnieuw verwarmen van afgekoeld
geroosterd brood (korte, vast ingestelde tijd).
• U drukt de broodliftknop naar beneden en
drukt op de toets «Reheat».
• Het brood wordt in deze functie kort verwarmd,
4
Roosteren van diepvriesbrood
• Voor het roosteren van diepgevroren brood, eerst
de gewenste bruiningsgraad kiezen
(thermostaatstand 1-6), het brood laten zakken
en vervolgens de toets
indrukken.
Handmatig uitschakelen
• Voor het eerder stoppen met roosteren of het
annuleren van eventuele andere functies
(bijv. opwarmen, diepvriesstand), de stoptoets
«STOP» indrukken s .
1
5
3
• De roostertijd wordt nu automatisch enigszins
verlengd.
• Als het brood klaar is komt het omhoog en
schakelt het apparaat uit.
• Het brood komt direct omhoog en het apparaat
schakelt uit.
Accessoire voor het verwarmen van broodjes (niet op alle modellen) - Fig. 5
s
2
ongeacht de stand van de thermostaatknop (1-6).
• Na de vast-ingestelde opwarmtijd komt het brood
automatisch omhoog en schakelt het apparaat
uit.
Beschrijving :
1 Broodjeshouder (los verkrijgbaar)
2 Knop voor de broodlift
3 Thermostaatknop (6 standen)
Gebruik :
• Het snoer helemaal uitrollen en de stekker in het
stopcontact steken.
• De broodjeshouder op het apparaat plaatsen
(steunt voor en achter).
• De verwarmtijd instellen (thermostaatknop,
kiezen uit stand 1,2 of 3).
• De broodjes of croissants in de houder plaatsen.
• De broodlift aan de linker voorzijde van het
apparaat naar beneden drukken.
• Zodra de broodlift omhoog komt, zijn de broodjes
klaar.
• Laat het apparaat nadat u klaar bent afkoelen en
haal de stekker uit het stopcontact. Eenmaal
afgekoeld kunt u de broodjeshouder aan de
achterzijde van de broodrooster opbergen.
Voorzorgsmaatregelen :
• Broodjes en croissants nooit zonder
broodjeshouder bovenop het apparaat,
over de broodgleuven, leggen.
• De broodrooster niet gebruiken voor tosti's of het
opwarmen of ontdooien van kant-en-klare
diepvriesproducten.
• Nooit tegelijkertijd broodjes verwarmen (met de
broodjeshouder) en brood roosteren (in het
apparaat).
8
Avanti SEB 2001.qxd
13/06/2001
15:21
Page 9
s
Schoonmaken - Fig. 6, 7 en 8
6
• Voor elke schoonmaak- en onderhoudsbeurt de
stekker uit het stopcontact halen en het apparaat
laten afkoelen.
• De kruimelklep losmaken en leegmaken. Het
apparaat ondersteboven keren om resterende
kruimels en stukjes korst uit het apparaat te
schudden. Het apparaat op deze wijze regelmatig
legen. De kruimelklep schoonmaken. - Fig. 6
• Nooit met een metalen voorwerp in het
binnenwerk van de broodrooster komen. Hierdoor
zou u het apparaat ernstig kunnen beschadigen.
• De buitenkant van de broodrooster en het snoer
met een vochtig doekje afnemen en afdrogen.
• Geen schuurmiddelen en agressieve
schoonmaakproducten, zoals ovenreiniger en
bleekmiddel, gebruiken.
• Het snoer niet rond het apparaat wikkelen. Aan
de onderzijde van de broodrooster bevindt zich
een snoeropwikkeling. - Fig. 7
• Aan de achterzijde van het apparaat bevindt zich
een handgreep om de broodrooster gemakkelijk
te kunnen verplaatsen. - Fig. 8
7
8
«Wijzigingen voorbehouden»
9
Avanti SEB 2001.qxd
13/06/2001
15:21
Page 10
VEILIGHEIDSVOORSCHRIFTEN
Voorkom huishoudelijke ongevallen :
• Dit apparaat voldoet aan de geldende veiligheidseisen en normen:
- richtlijn 89/336/EEG van 03/06/89 als gewijzigd in richtlijn
92/31/EEG en richtlijn 93/68/EEG inzake elektromagnetische
compatibiliteit.
- richtlijn 73/23/EEG als gewijzigd in richtlijn 93/68/EEG
inzake elektrisch materiaal bestemd voor gebruik binnen
bepaalde spanningsgrenzen;
• Gezien de verscheidenheid van geldende normen verdient
het aanbeveling dit toestel bij een erkend reparateur te laten
repareren wanneer het gebruikt wordt in een land waarin het
niet gekocht is.*
• Deze broodrooster is uitsluitend geschikt voor
wisselspanning. Kijk of de spanning op de broodrooster
gelijk is aan die op de meter bij u thuis.
• Kijk of het vermogen dat op de meter is aangegeven
voldoende is voor het vermogen van de broodrooster.
• Sluit de broodrooster alleen aan op een geaard stopcontact.
• Laat het netsnoer niet hangen (u kunt erover struikelen) of in
aanraking komen met de hete delen van de broodrooster.
• Trek nooit het netsnoer aan het snoer uit de stopcontact,
maar aan de stekker.
• Gebruik alleen een onbeschadigd verlengsnoer met geaarde
stekers en van dezelfde dikte als het meegeleverde snoer.
• Pas op voor elektrische schokken; doop of steek het
netsnoer, de stekker of de broodrooster zelf nooit in water of
in een andere vloeistof.
• Gebruik geen metalen voorwerpen (lepels, messen e.d.) om
de toast uit de broodrooster te halen - dit kan kortsluiting
veroorzaken.
Bij het gebruik van elektrische apparaten is het van belang, een aantal elementaire
voorzorgsmaatregelen in acht te nemen, en wel in het bijzonder deze :
• Lees de handleiding volledig en aandachtig en volg de daarin
verstrekte instructies nauwlettend op.
• Laat de broodrooster bij gebruik nooit zonder toezicht, zeker
niet wanneer u het voor het eerst gebruikt of wanneer u de
thermostaatstand heeft veranderd.
• Houd de broodrooster buiten het bereik van kinderen.
• De broodliftknop moet in de bovenste stand staan wanneer
u de broodrooster in- of uitschakelt.
• De broodrooster mag niet worden verplaatst of gedragen
terwijl hij in gebruik is.
• Plaats de broodrooster op een stabiele plaats waar hij niet
natgespat kan worden.
• Houd de broodrooster uit de buurt van hittebronnen.
• Neem na gebruik of voor het reinigen van de broodrooster de
stekker uit de stopcontact.
• Kijk, voor u de broodrooster in gebruik neemt, of de
kruimellade naar behoren vergrendeld is.
• Gebruik geen al te dikke sneden brood, deze kunnen
beklemd raken.
• Mocht er brood tussen de roosters beklemd raken, haal dan
de stekker uit de stopcontact, wacht tot de broodrooster
afgekoeld is en verwijder pas dan het brood.
• Plaats in geen geval papier, karton of plastic in, op of onder
de broodrooster.
• Plaats geen brood, croissants of iets dergelijks bovenop de
broodrooster; bepaalde modellen hebben een broodwarmer.
• Gebruik de broodrooster niet tegelijkertijd voor brood
roosteren en brood opwarmen.
• Zet in geen geval borden, schalen, bakjes of zilverpapier op
de broodwarmer. Gebruik de broodrooster in geen geval
voor het koken of ontdooien van diepvriesmaaltijden.
• Gebruik de broodrooster niet wanneer:
- het netsnoer defect is;
- de broodrooster gevallen, zichtbaar beschadigd of duidelijk
defect is.
Laat een defect of beschadigd broodrooster repareren door
een erkend reparateur*, dat voorkomt ongevallen.
• Gebruik de broodrooster uitsluitend binnenshuis.
• Gebruik de broodrooster niet als verwarming of hittebron.
• Brood is brandbaar; gebruik de broodrooster dus niet in de
nabijheid van brandbare materialen als gordijnen,
boekenplanken, meubels e.d.
• Dek de broodrooster niet af tijdens het gebruik. Mochten
bepaalde delen van de broodrooster vlam vatten, blus dan
nooit met water, maar trek de stekker uit de stopcontact en
doof de vlam met een natte doek.
• Houd brandbare stoffen uit de buurt van de broodrooster.
• Gebruik met deze broodrooster geen accessoires die de
fabrikant niet aanbevolen heeft; gebruik geen merkvreemde
accessoires.
• De broodrooster is uitsluitend geschikt voor huishoudelijk
gebruik. Bij professioneel, oneigenlijk of gebruik niet in
overeenstemming met de handleiding vervalt de
aansprakelijkheid van de fabrikant alsmede de garantie.
• Knutsel nooit zelf aan de broodrooster, dat kan gevaarlijk zijn.
Laat het apparat repareren door een erkend reparateur.*
*(Zie bijgevoegde lijst)
Deze handleiding zorgvuldig bewaren
Avanti SEB 2001.qxd
13/06/2001
15:21
Page 11
ENGLISH
Features of the toaster
1
2
3
4
Loading command
Browning control, 6 positions
Hi-lift command
Reheat button (on selected model only)
5 Stop / Cancel button
6 Frozen button (on selected model only)
7 Carrying handle (behind the appliance)
Before using for the first time
• Unpack the appliance and remove any labels.
• The packaging box may be recycled, but it may
be useful for returning the appliance to an
authorised Service Dealer if necessary.
• Read the manual and carefully follow the
instructions.
• If the appliance is to be used in a country other
than that of purchase, it should be checked by an
approved Service Centre (See After Sales
Service section). Standards may vary according
to the country.
• Check that the crumb door, situated under the
toaster, is correctly clipped onto the appliance.
Connect to the mains.
• Unwind the supply cord completely. You can
shorten the length of the cord by loosely
wrapping it once around the pegs at the bottom
of the toaster.
First time use
• Before using for the first time, set the «browning
control» button to minimum without inserting any
bread.
• Load the toaster. Using it for the first time without
bread will remove any unpleasant odours from
the new appliance.
s
Instruction for use - Fig. 1 and 2
• Your toaster is ideal for standard sized and
country sized sliced white or wheat, fresh or
frozen bread. It is also suitable for bagels,
English muffins, rolls and other pastries (without
filling) up to a thickness of 1.4 inches (3.5 cm).
• The loading lever is situated on the left side of
the toaster, at the top. - Fig. 1
• The «browning control» with 6 settings is situated
1
on the front of the appliance.
• The toaster includes a HI-LIFT feature to facilitate
the removal of the bread. Once toasting is
completed (top right lever), press the Hi-Lift
button to raise the toasts higher. Do not use the
Hi-Lift button during toasting. - Fig. 2
Using the toaster
2
• Check that the crumb tray is locked underneath
the toaster.
• Unwind the supply cord completely.
Setting the browning control
• Select the browning control to the appropriate
setting depending on the type and thickness of
the bread :
1-2 very slighty toasted, 3 slighty toasted,
4-5 well toasted, 6 very toasted
• After trying out the toaster a few times you will
quickly get to know the right setting for each type
of bread.
Remember, this will need to be altered to suit
your own taste and according to :
• The freshness and texture of the bread - For
bread older than one or two days, use a lower
number setting as it will toast more quickly.
• For fresh bread, very fresh teacakes, English
muffins and frozen bread, use a higher setting as
they take slightly longer to toast.
For some types of brown bread E.g. Wholemeal
bread, use a slightly higher setting.
• When the toaster is hot, the bread toasts more
quickly and may need adjusting to a lower setting.
• When toasting more than one slice of bread, they
must be of the same size, type and thickness
otherwise, they will brown unevenly.
s
3
Inserting the slices of bread - Fig. 3
• Place the slices of bread in the slots. Make sure
the slices do not overlap each other. The loading
command must be in the up position.
11
Avanti SEB 2001.qxd
13/06/2001
15:21
Page 12
Making toast
• To load the toaster, press down the loading
command until it locks in position, toasting
begins. The metal grills will automatically
adjust to the thickness of the slices.
• On electronic models, the loading lever can
only be locked in the lower position when the
appliance is plugged in.
Stopping the toasting process
• Once toasted, the operating control is
automatically unlocked, the slices of bread
Interrupting toasting process
• The toaster has a «STOP / CANCEL» s
function. So that you can interrupt the toasting
process at any time by pressing the «STOP /
CANCEL» button. The bread will automatically
pop up. (For example, if you realise that the
settings are not properly adjusted or if you think
the bread is sufficiently toasted).
• If the bread jams in the slots and the elements
do not switch off, remove the plug from the wall
come up and the toaster stops working.
outlet and wait for the appliance to cool down.
Then carefully remove the bread from the toaster
slot, taking care not to touch the heating
elements.
• When toasting currant buns or teacakes,
remove any loose currants from the bread
before placing them in the toaster. Loose
currants may fall into the appliance and
damage the toaster.
s
«Deluxe» model • Specific function - Fig. 4
Reheat
• To reheat toast (fixed, short time) lower the bread
into the toaster and press the «reheat» button.
• The toaster will heat up independently from the
setting of the browning control (1 and 6).
4
• After extended use, crumbs or dust may block the
locking system. To correct this, simply press down
the loading command several times successively
to lock it and please refer to maintenance and
cleaning tips.
Frozen
• To toast bread straight from the freezer, select
the browning level desired on the dial from 1
to 6. Lower the bread into the toaster, and press
the «frozen» button.
Stop / Cancel
• To stop the toaster at any time or cancel the
other functions, press the «STOP / CANCEL» s
button.
12
• At the end of the cycle, the bread will pop up
automatically and the toaster switches off.
• The appropriate toasting time will be
automatically selected.
• At the end of the cycle, the bread will pop up and
the toaster switches off.
• The bread pops up, the toaster switches off.
Avanti SEB 2001.qxd
13/06/2001
15:21
Page 13
s
Bread roll toaster accessories
1
Description :
1 Bread roll holder (sold separately)
2 Loading command
5
3 Browning control 6 positions
Instructions for use :
• Unwind the power cord to its fullest extent and
connect.
• Insert the bread roll holder (fore-back clips).
• Set toasting time (button 3) to desired position
(1 to 3 max.).
• Lay the buns, bread rolls or croissants directly on
the bread holder.
• Press down the loading command located to the
left of the appliance.
2
3
(depending on the model) - Fig. 5
Warning :
• Never place bread rolls or croissants directly on
the upper aperture of the appliance.
• Never use the appliance to warm up or defrost
frozen food trays.
• The bread rolls (croissants, etc.) will be ready
when the lever has risen.
• After use, allow the toaster to cool and
disconnect the appliance. Once the bread roll
holder has cooled, attach to rear of the
appliance.
• Never warm up bread rolls, croissants, etc., and
toast bread at the same time.
s
Maintenance and cleaning - Fig. 6, 7 and 8
6
• To clean the toaster, unclip, open the crumb door
and wipe it clean. Also turn the appliance upside
down and shake out any pieces of bread that
may be stuck between the grills. (We recommend
that your clean the crumb door regularly). - Fig. 6
• Never insert any hard object into the bread slot
as this could damage the heating elements.
• To clean the exterior and the cord, wipe it down
with a damp cloth. Let it dry before using it again.
• Do not use scouring powders, abrasive pads,
wire or steel wool, oven cleaners or bleach.
• Never wrap the cord around the outside of the
appliance during or after use. A cord storage is
located under the appliance. - Fig. 7
• To move the toaster, a carrying handle is located
behind the appliance. - Fig. 8
7
8
«Subject to modifications !»
13
Avanti SEB 2001.qxd
13/06/2001
15:21
Page 14
SAFETY INSTRUCTIONS
To prevent any accidents :
• This toaster complies with the safety rules and conditions in
effect, and with the following directives
• Always plug the toaster into an earthed socket
• Electromagnetic Compatibility Directive 89/336/CEE modified by Directives 92/31/CEE and 93/68/CEE.
• Do not let the cord hang and keep out of reach of children.
Do not leave the cord in contact with the warm parts of the
appliance.
• Low Voltage Directive 73/23/CEE modified by Directive
93/68CEE.
• Do not disconnect the appliance by pulling on the cord.
• Given the many standards in effect, if this toaster is used in
a country other than the country where it was purchased,
have it verified by an approved service centre*.
• Use extension cords which are in good condition, with an
earthed connection, and with a minimum rating of 10A.
• Check that the electricity supply voltage corresponds to the
voltage indicated on the device (ac current only).
• In order to avoid electric shock, do not immerse the cord, the
plug or the toaster in water or any other liquid.
• Check that the electricity installation is sufficient to supply the
power required by this appliance.
• Do not use metal ustensils in the toasting mechanism, which
could cause short circuits or electric shock.
When using electrical appliances, basic safety precautions should always be followed
including the following :
• Read all instructions and keep this «User’s Guide».
• Do not let the toaster operate unattended, particularly when
toasting for the first time or when changing settings.
• Keep out of reach of children.
• The toaster must always be upright when plugged in and
unplugged.
• Do not move the toaster when it is in operation.
• Use a stable work top, away from any contact with water
• Keep this toaster away from sources of heat (gas, electric
burner, heated oven).
• Always unplug the toaster and let it cool before any cleaning.
• After every cleaning, check that the crumb door is correctly
clipped onto the appliance.
• Do not try and toast very thick slices of bread which could
block the toasting mechanism.
• If the bread jams in the slots after toasting and the elements
do not swich off, disconnect the plug quickly from the wall
socket and wait for the appliance to cool down before
attempting to remove the bread.
• Do not put paper, cardboard or plastic in, on or under the
toaster.
• Do not place bread, buns, croissants or other pastries
directly on top of the toaster because a bread-warmer
accessory is available on some models only.
• Never use the toaster for toasting bread and re-heating
pastries/croissants at the same time.
• Never place a plate, paper, aluminium foil on the roll warmer.
Do not use it for cooking or de-frosting frozen food.
• Do not use this appliance if :
- The toaster or cord is faulty
- It has fallen or shows visible damage or operating problems
In any of these cases, the appliance must be sent to the
nearest approved aftersales service centre* in order to avoid
any risks.
• Do not use outdoors. This appliance is for household use only
• Do not use this appliance as a source of heat.
• Bread can burn. Therefore, do not use this appliance near
any flammable materials such as curtains, under shelving or
wall cupboards, etc.
• Do not cover this appliance while in use.
• If flames were to arise from parts of the toaster, never
attempt to extinguish them with water. Unplug the appliance
and smother the flames with a damp cloth.
• Do not store inflammable products near or under the place
where the toaster is stored.
• Do not use accessories which have not been recommended
by the manufacturer or accessories from any other brand of
toaster.
• This product has been designed for domestic use only. Any
professional use, inappropriate use or failure to comply with
the instructions, the manufacturer accepts no responsibility
and the guarantee will not apply.
• For your personal safety, do not dismantle the toaster
yourself. Use the services of an approved service centre*.
*(see enclosed list)
Keep these instructions for future reference
Avanti SEB 2001.qxd
13/06/2001
15:21
Page 15
Wiring Instructions
(for U.K. only)
WARNING : All appliances must be earthed
Important : The wires in this lead are coloured in accordance with the following codes :
Brown
Green and
Green and Yellow : Earth
or
yellow or
Red
green
Brown : Live
Fit correct fuse
Blue : Neutral
Blue or
E
N
L
black
Use cable gripper
• Connect the Green/Yellow wire to the terminal in
the plug marked «E» or by the earth symbol
or coloured Green or coloured Green and Yellow.
• Connect the Brown wire to the terminal in the
plug marked «L» or coloured Red.
About your factory fitted plug
• Connect the Blue wire to the terminal in the plug
marked «N» or coloured Black.
• A 13 amp fuse should be fitted when the
appliance is connected to a BS 1363A plug.
• Seek professional advice if you are unsure of the
correct procedure for the above.
(for U.K. only - supplied with selected models)
• The cord is already fitted with a plug
incorporating an appropriate fuse. If the plug
does not fit your socket outlet, see paragraph
below. Should you need to replace the fuse in the
plug supplied an appropriately rated approved BS
1362 fuse must be used (refer to wiring
instructions for fuse rating).
• If the plug supplied does not fit your socket
outlet, it should be removed from the mains lead
and disposed of safely. The flexible cord
insulation should be stripped back as appropriate
and a suitable alternative plug fitted. The
replacement plug must be equipped with an
appropriate fuse.
• If the plug has external access to the fuse (nonrewirable type plug) please note that the fuse
cover is an important part of the plug. Please
ensure that it is always refitted correctly. If you
lose this cover please do not use the plug. You
may contact Tefal UK Limited for a replacement.
Customer relations helpline
• For help and advice please call our customer
relations team on :
- 0845 602 1454 - UK
(calls charged at local rate)
- (01) 412 3000 - Ireland
15
13/06/2001
15:21
Page 16
S.A. SEB 21261 SELONGEY Cedex - R.C. Dijon B 302 412 226
Réf. 0740126 B - Updated 06/01 - All right reserved
Conception : FD Graphic - F 21120 Gémeaux
Avanti SEB 2001.qxd