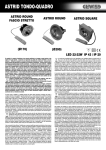
1
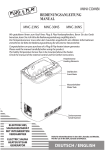
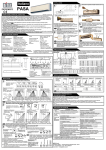
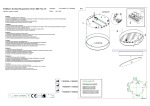
TECHNISCHE MERKMALE:
Vorgesehene Stromversorgung 230V
Glühlampen:
WANDLEUCHTE/DECKENLEUCHTE FLAT 30 = 230V 2x9W G23 :
WANDLEUCHTE/DECKENLEUCHTE FLAT 30 = 230V MAX 1x100W R7s (78 mm )
WANDLEUCHTE/DECKENLEUCHTE FLAT 40 = 230V 2x18W 2G11
WANDLEUCHTE/DECKENLEUCHTE FLAT 40 = 230V MAX 1x200W R7s (117 mm )
WANDLEUCHTE/DECKENLEUCHTE FLAT 50 = 230V 2x24W 2G11
WANDLEUCHTE/DECKENLEUCHTE FLAT 50 = 230V MAX 1x300W R7s (117 mm )
WANDLEUCHTE/DECKENLEUCHTE FLAT 60 = 230V 4x36W 2G11
: man empfiehlt einen OSRAM- -Leuchtkörper. Im Fall von Anwendung einer anderen Marke, die
seitlichen Diffusoren demontieren, um die Leuchtkörper einstecken zu können.
Montageanweisungen und Betriebsanleitungen:
' BEI DER MONTAGE AN DER WAND MÜSSEN DIE ÖSEN D WIE IM BILD ANGEGEBEN SEIN.
' Die elektrischen Kabel durch den Kabeldurchgang A einführen und das Gerät an der Wand/Decke mittels
der Ösen B und durch die Anwendung der mitgelieferten Dübel befestigen. Während dieser Operation die
Unterlegscheiben C unter die Schraubenköpfe legen. Die Ösen B können drehen, um eventuelle Bohrungsfehler zu korrigieren.
' Die elektrischen Anschlüsse an der eigens dazu bestimmten Klemme durchführen. Das/die Leuchtmittel
einstecken.
' Die Zylinder E lockern, ohne sie ganz zu entfernen. Den Diffusorschirm F auf den Lampenkörper positionieren und die Zylinder E mit der Hand anschrauben.
' MONTAGE UNDERSETZEN DER DIFFUSOREN
' Für die Montage und das Ersetzen der seitlichen Diffusoren G die beiden Schrauben H abschrauben,
und die Federn L entfernen.
' Zum Ersetzen des mittleren Diffusors M die Muttern O und die entsprechenden Halterungen abschrauben.
Achtung:
F Die Sicherheit des Geräts wird nur mit der angemessenen Anwendung dieser Anweisungen garantiert;
deswegen ist es notwendig, dass man sie aufbewahrt.
F Die Hülsen, wenn in Ausstattung, auf die Versorgungskabel aufstecken.
F Die Spannung ausschalten, bevor man das Leuchtmittel ersetzt.
F Im Fall von Ersetzen ein Leuchtmittel mit gleicher Spannung und Leistung des originalen verwenden (wie
auf dem Schildchen angegeben).
F Die Ausgangsbohrung der Versorgungskabel aus der Wand mit der Eingangsbohrung des Geräts entsprechen lassen, indem man den eventuell übrigbleibenden Kabelteil im Innern des Geräts entfernt.
Nur für Beleuchtungsgeräte mit Halogenlampen (Fassung R7s).
F Leuchtmittel mit verstärktem Faden, geeignet für die Anwendung in universaler Stellung, verwenden.
F Das Gerät soll ohne Schutzabschirmung nicht funktionieren.
F Im Fall von Bruch die Abschirmung sofort auswechseln.
F Das Leuchtmittel niemals mit bloßen Händen berühren; sollte das doch vorkommen, es mit Alkohol reinigen
ZEICHENERKLÄRUNG DES LEISTUNGSSCHILDES
Mit doppelter Isolierung geschütztes Gerät, Klasse II
IL POTERE DELLA LUCE
ISTRUZIONI DI MONTAGGIO
E FUNZIONAMENTO
ASSEMBLING
AND OPERATING INSTRUCTIONS
MONTAGEANLEITUNGEN
UND BETRIEB
ASSEMBLAGE
ET MODE D’EMPLOI
Gerät, das für eine Installation auf normalerweise entflammbaren Oberflächen geeignet ist.
Gerät, das für eine Installation nur auf nicht entflammbaren Oberflächen geeignet ist.
Das Symbol bezeichnet den Mindestabstand des Geräts vom beleuchteten Gegenstand.
Die beschädigten Abschirmungen auswechseln (rechteckig).
Die beschädigten Abschirmungen auswechseln (rund).
IP40
Gegen das Eindringen von Festkörpen größer als 1 mm, geschützt.
Bescheinigung der Echtheit und der Qualität
Wir garantieren die Echtheit des Produkts, die totale Qualität der verwendeten Rohstoffe und der durchgeführten Verarbeitungen. Wir bestätigen, dass das Produkt strengen Überprüfungen und Kontrollen
gemäß der Sicherheitsrichtlinie unterzogen wurde. Immer ausschließlich Originalersatzteile verwenden.
Das Gerät wurde gemäß der Europäischen Richtlinie EN 60598 hergestellt.
CARACTÉRISTIQUES TECHNIQUES:
Alimentation de réseau prévue 230V
Ampoules:
APPLIQUE/PLAFONNIER FLAT 30 = 230V 2x9W G23 :
APPLIQUE/PLAFONNIER FLAT 30 = 230V MAX 1x100W R7s (78 mm )
APPLIQUE/PLAFONNIER FLAT 40 = 230V 2x18W 2G11
APPLIQUE/PLAFONNIER FLAT 40 = 230V MAX 1x200W R7s (117 mm )
APPLIQUE/PLAFONNIER FLAT 50 = 230V 2x24W 2G11
APPLIQUE/PLAFONNIER FLAT 50 = 230V MAX 1x300W R7s (117 mm )
APPLIQUE/PLAFONNIER FLAT 60 = 230V 4x36W 2G11
: il est conseillé d’utiliser des lampes OSRAM. En cas d’utilisation d’une autre marque, démonter les
diffuseurs latéraux pour pouvoir insérer les lampes.
Instructions de montage et de fonctionnement:
' EN CAS D’INSTALLATION MURALE, LES TROUS D DEVRONT ÊTRE POSITIONNÉES COMME LE
MONTRE LE DESSIN.
' Faire passer les câbles d’alimentations à travers le passe- -câble A et fixer l’appareil au mur ou au plafond
à travers les trous B en utilisant les chevilles fournies avec l’appareil. Pendant cette opération placer les rondelles C sous les têtes des vis. Les trous B peuvent tourner pour corriger les éventuelles erreurs de perçage.
' Effectuer les connexions électriques à la borne correspondante. Insérer la/les lampes.
' Desserrer les petits cylindres E sans les enlever complètement. Positionner l’écran du diffuseur F sur le
corps de l’appareil et serrer les petits cylindres E de façon manuelle.
' MONTAGE ET REMPLACEMENT DES DIFFUSEURS
' Pour monter et remplacer les diffuseurs latéraux G, dévisser les vis H et enlever les ressorts L.
' Pour le remplacement du diffuseur central M, dévisser les écrous O et les arrêts correspondants.
FLAT
Lampada da parete / soffitto
Wall / ceiling lamp
Wandleuchte / Deckenleuchte
Applique / Plafonnier
Attention:
F La sécurité de l’appareil n’est garantie que si les instructions suivantes sont convenablement respectées.
Il est donc nécessaire de les conserver.
F Calez les gaines, si elles sont fournies, sur les câbles d’alimentation.
F Débranchez le luminaire avant toute intervention.
F Employer exclusivement des lampes du type et de la puissance indiqués sur la plaque de l’appareil.
F Faites correspondre le trou de sortie des câbles d’alimentation du mur au trou d’entrée de l’appareil et
éliminez le câble en excédent à l’intérieur de ce dernier.
Uniquement pour les appareils d’éclairage avec une lampe halogène (fixation — R7s).
F Utilisez des lampes ayant un filament renforcé qui sont appropriées à un emploi en position universelle.
F L’appareil ne doit pas fonctionner sans l’écran de protection.
F Remplacez immédiatement l’écran de protection en cas de rupture.
F Ne touchez pas la lampe à mains nues, toutefois, si cela se produit nettoyez- -la avec de l’alcool
LEGENDE DES DONNEES DE LA PLAQUETTE
Appareil protégé avec un double isolement, classe II
Appareil pouvant être monté directement sur des surfaces normalement inflammables.
Appareil pouvant être monté exclusivement sur des surfaces non combustibles.
Le symbole indique la distance minimum de l’appareil par rapport au sujet éclairé.
Remplacez les écrans de protection endommagés (rectangulaire).
Remplacez les écrans de protection endommagés (rond).
IP40
Protégé contre la pénétration des corps solides aux dimension supérieures à 1 mm
Attestation d’authenticité et de qualité
Nous garantissons l’authenticité du produit, la qualité totale des matières premières utilisées et des traitements exécutés. Nous confirmons que le produit a été soumis à des vérifications sévères et à des contrôles
répondant à la réglementation de sécurité. N’utilisez que des pièces de rechange originales. L’appareil est
construit conformément à la réglementation européenne EN 60598.
STATUS s.r.l.
20010 Bernate Ticino (Mi) Italy via Vittorio Veneto, 21/23
tel. 02.9759911 / fax 02.97599130
internet
http://www.status.it
CARATTERISTICHE TECNICHE:
Alimentazione di rete prevista 230V
Lampadine:
TECHNICAL CHARACTERISTICS:
Electrical supply 230V
Bulbs:
PARETE/SOFFITTO FLAT 30 = 230V 2x9W G23 :
PARETE/SOFFITTO FLAT 30 = 230V MAX 1x100W R7s (78 mm )
PARETE/SOFFITTO FLAT 40 = 230V 2x18W 2G11
PARETE/SOFFITTO FLAT 40 = 230V MAX 1x200W R7s (117 mm )
PARETE/SOFFITTO FLAT 50 = 230V 2x24W 2G11
PARETE/SOFFITTO FLAT 50 = 230V MAX 1x300W R7s (117 mm )
PARETE/SOFFITTO FLAT 60 = 230V 4x36W 2G11
: si consiglia lampadina OSRAM. Nel caso di utilizzo di altra marca, smontare i diffusori
laterali per poter inserire le lampadine.
WALL/CEILING FLAT 30 = 230V 2x9W G23 :
WALL/CEILING FLAT 30 = 230V MAX 1x100W R7s (78 mm )
WALL/CEILING FLAT 40 = 230V 2x18W 2G11
WALL/CEILING FLAT 40 = 230V MAX 1x200W R7s (117 mm )
WALL/CEILING FLAT 50 = 230V 2x24W 2G11
WALL/CEILING FLAT 50 = 230V MAX 1x300W R7s (117 mm )
WALL/CEILING FLAT 60 = 230V 4x36W 2G11
: it is advisable to use an OSRAM lamp. In case you choose another brand, dismantle
the side diffusers to arrange the lamps.
Istruzioni di montaggio e funzionamento:
' NEL MONTAGGIO A PARETE LE ASOLE ”D” DOVRANNO TROVARSI COME INDICATE
NEL DISEGNO.
' Far passare i cavi elettrici attraverso il passacavo A e fissare l’apparecchio a parete/soffitto
mediante le asole B utilizzando i tasselli in dotazione. Durante questa operazione mettere sotto
le teste delle viti le rondelle C. Le asole B possono ruotare per correggere eventuali errori di
forature.
' Eseguire i collegamenti elettrici all’apposito morsetto. Inserire la/le lampadine.
' Allentare senza toglierle completamente i cilindretti E. Posizionare lo schermo diffusore F sul
corpo lampada ed avvitare manualmente i cilindretti E.
' MONTAGGIO E SOSTITUZIONE DIFFUSORI
' Per il montaggio e la sostituzione dei diffusori laterali G, svitare le viti H e rimuovere le mollette L.
' Per la sostituzione del diffusore centrale M, svitare i dadi O e relativi fermi.
Mounting and operation instructions:
' IN CASE OF WALL INSTALLATION, THE SLOTS D MUST BE PLACED AS SHOWN IN
THE DRAWING.
' Route the electrical cables through the cable fittings A and anchor the device to the wall/ceiling through the slots B, using the supplied anchors. Place the washers C under the screw
heads. The slots B can be rotated to correct any hole drilling error.
' Connect the wires to the corresponding terminal. Insert the bulb/s.
' Loosen the small cylinder E, but do not remove them. Place the diffuser shield F on the lamp
body and tighten the cylinder E.
' DIFFUSER MOUNTING AND REPLACEMENT
' To install and replace the side diffuser G, loosen the screws H and remove the springs L.
' To replace the middle diffuser M, loosen the nuts O and their retainers.
Attention:
F This equipment is guaranteed only when used as indicated in these instructions. Therefore
they should be kept for future reference.
F Place the conduits, if supplied, on the power supply cables.
F Prior to any work on the fixture always disconnect the power.
F Only use lamps of the type and wattage indicated on the rating plate.
F Make sure that the power supply cable hole on the wall matches the device hole and eliminate any excess cable in the device.
Only for luminaires with halogen lamps (R7s socket).
F Use lamps with a reinforced filament, suitable for any installation position.
F Do not use the device without its protection screen.
F Immediately replace the protection screen, in case of failure.
F Only use lamps of the type and wattage indicated on the rating plate.
Attenzione:
F La sicurezza dell’apparecchio è garantita solo con l’uso appropriato delle presenti istruzioni,
pertanto è necessario conservarle.
F Calzare le guaine, se in dotazione, sui cavi di alimentazione.
F Disinserire la tensione prima di sostituire la lampadina.
F In caso di sostituzione utilizzare una lampadina di uguale tensione e potenza dell’originale
(come da targhetta).
F Far corrispondere il foro di uscita cavi di alimentazione dal muro con il foro di ingresso
dell’apparecchio eliminando l’eventuale eccedenza di cavo all’interno dell’apparecchio.
Solo per apparecchi di illuminazione con lampade alogene (attacco R7s).
F Usare lampadine con filamento rinforzato adatte ad uso in posizione universale.
F L’apparecchio non deve funzionare senza lo schermo di protezione.
F Sostituire immediatamente lo schermo di protezione in caso di rottura.
F Non toccare la lampadina con le mani nude, qualora ciò avvenisse pulirla con alcool
RATING READIN KEY
This device has a Class II double- -insulation protection
This device can be installed on normal flammable surfaces. (inflammable)
LEGENDA DATI DI TARGA
This device can only be installed on non- -combustible surfaces. (not- -inflammable surface)
Apparecchio protetto con doppio isolamento, classe II
The symbol indicates the min. distance between the device and the illuminated subject.
Apparecchio adatto ad essere installato su superfici normalmente infiammabili.
Replace the damaged protection screens (rectangular).
Apparecchio adatto ad essere installato solo su superfici non combustibili.
Replace the damaged protection screens (round).
Il simbolo indica la distanza minima dell’apparecchio al soggetto illuminato.
IP40
Sostituire gli schermi di protezione danneggiati (rettangolare).
Authenticity and quality certificate
We hereby guarantee that this is an original product and the best raw materials and processes
were used. The product underwent strict checks and tests, in compliance with the safety standards. Only use original spare parts. The device was manufactured in compliance with the European Norm EN 60598.
Sostituire gli schermi di protezione danneggiati (rotondo).
IP40
Protetto dalla penetrazione di corpi solidi di dimensioni superiori ad 1 mm
Attestato di autenticità e qualità
Garantiamo l’autenticità del prodotto, la totale qualità delle materie prime impiegate e delle
lavorazioni eseguite. Confermiamo che il prodotto è stato sottoposto a severe verifiche e controlli, in aderenza alla normativa di sicurezza. Usare sempre e soltanto ricambi originali. L’apparecchio è costruito in conformità alla normativa europea EN 60598.
D
B
B
D
M
E
D
B
Protected aganist the penetration of solid objects greater than 1 mm.
E
F
O
F
A
M
B
G
D
L
C
G
H
revisione del 24.04.2003