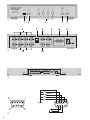
1
FARB-QUAD-PROZESSOR COLOUR QUAD PROCESSOR TVSP-44COL Best.-Nr. 18.1040 BEDIENUNGSANLEITUNG INSTRUCTION MANUAL MODE D’EMPLOI ISTRUZIONI PER L’USO VEILIGHEIDSVOORSCHRIFTEN CONSEJOS DE SEGURIDAD ŚRODKI BEZPIECZEŃSTWA SIKKERHEDSOPLYSNINGER SÄKERHETSFÖRESKRIFTER TURVALLISUUDESTA ZOOM PIP VCR PLAY FREEZE AUTO Fz Set 4 5 TVSP-44COL COLOUR VIDEO QUAD PROCESSOR 1 Seq 1 2 VIDEO2 7 VIDEO3 3 4 3 6 VIDEO1 2 8 VIDEO4 9 VCR IN 11 MON1 75Ω ON 10 ALARM DIP DC 12V 1A 1 2 3 4 LOOP1 LOOP2 LOOP3 LOOP4 VCR OUT 12 MON2 13 VIDEO1 VIDEO2 VIDEO3 VIDEO4 VCR IN MON1 75Ω ON ALARM DIP DC 12V 1A 1 2 3 4 2x 2x LOOP1 LOOP2 LOOP3 LOOP4 VCR OUT MON2 SENSOR 4 SENSOR 3 SENSOR 2 5 1 SENSOR 1 GROUND NC COM NO 9 2 6 D A CH F B CH NL B PL Bevor Sie einschalten … GB Wir wünschen Ihnen viel Spaß mit Ihrem neuen Gerät von MONACOR. Bitte lesen Sie die Bedienungsanleitung vor dem Betrieb gründlich durch. Nur so lernen Sie alle Funktionsmöglichkeiten kennen, vermeiden Fehlbedienungen und schützen sich und Ihr Gerät vor eventuellen Schäden durch unsachgemäßen Gebrauch. Heben Sie die Anleitung für ein späteres Nachlesen auf. Der deutsche Text beginnt auf der Seite 4. Avant toute installation … We wish you much pleasure with your new MONACOR unit. Please read these operating instructions carefully prior to operating the unit. Thus, you will get to know all functions of the unit, operating errors will be prevented, and yourself and the unit will be protected against any damage caused by improper use. Please keep the operating instructions for later use. The English text starts on page 10. I Nous vous souhaitons beaucoup de plaisir à utiliser cet appareil MONACOR. Lisez ce mode d'emploi entièrement avant toute utilisation. Uniquement ainsi, vous pourrez apprendre lʼensemble des possibilités de fonctionnement de lʼappareil, éviter toute manipulation erronée et vous protéger, ainsi que lʼappareil, de dommages éventuels engendrés par une utilisation inadaptée. Conservez la notice pour pouvoir vous y reporter ultérieurement. La version française se trouve page 16. Voor u inschakelt … E Innan du slår på enheten Vi önskar dig mycket glädje med din nya MONACOR produkt. Läs igenom säkerhetsföreskrifterna innan enheten tas i bruk för att undvika skador till följd av felaktig hantering. Behåll instruktionerna för framtida bruk. Säkerhetsföreskrifterna återfinns på sidan 29. Antes de la utilización … Le deseamos una buena utilización para su nuevo aparato MONACOR. Por favor, lea los consejos de seguridad detalladamente antes de hacer funcionar el aparato para protejerse y protejer la unidad de cualquier daño causado por una mala utilización, guarde las instrucciones para una utilización posterior. Los consejos de seguridad pueden encontrarse en la página 28. DK Życzymy zadowolenia z nowego produktu MONACOR. Prosimy zapoznać się z informacjami dotyczącymi bezpieczeństwa przed użytkowaniem urządzenia, w ten sposób zdrowie użytkownika nie będzie zagrożone, a urządzenie nie ulegnie uszkodzeniu. Instrukcję należy zachować do wglądu. Informacje dotyczące bezpieczeństwa znajdują się na stronie 28. S Prima di accendere … Vi auguriamo buon divertimento con il vostro nuovo apparecchio di MONACOR. Leggete attentamente le istruzioni prima di mettere in funzione l'apparecchio. Solo così potete conoscere tutte le funzionalità, evitare comandi sbagliati e proteggere voi stessi e l'apparecchio da eventuali danni in seguito ad un uso improprio. Conservate le istruzioni per poterle consultare anche in futuro. Il testo italiano inizia a pagina 22. Wij wensen u veel plezier met uw nieuw toestel van MONACOR. Lees de veiligheidsvoorschriften grondig door, alvorens het toestel in gebruik te nemen. Zo behoedt u zichzelf en het toestel voor eventuele schade door ondeskundig gebruik. Bewaar de handleiding voor latere raadpleging. De veiligheidsvoorschriften vindt u op pagina 28. Przed uruchomieniem … Before switching on … Før du tænder … Tillykke med dit nye MONACOR produkt. Læs sikkerhedsanvisningerne nøje før ibrugtagning, for at beskytte Dem og enheden mod skader, der skyldes forkert brug. Gem manualen til senere brug. Sikkerhedsanvisningerne findes på side 29. FIN Ennen kytkemistä … Toivomme Sinulle paljon miellyttäviä hetkiä uuden MONACOR laitteen kanssa. Ennen laitteen käyttöä Sinua huolellisesti tutustumaan turvallisuusohjeisiin. Näin vältyt vahingoilta, joita virheellinen laitteen käyttö saattaa aiheuttaa. Ole hyvä ja säilytä käyttöohjeet myöhempää tarvetta varten. Turvallisuusohjeet löytyvät sivulta 29. 3 D A CH 1 Übersicht der Bedienelemente und Anschlüsse → siehe Abbildungen auf der Seite 2 8 1.1 Frontseite 1 Taste „ /ZOOM“ für den Quad-Modus und die Zoom-Funktion a Zum Schalten auf das Quad-Bild die Taste kurz drücken, im Quad-Betrieb leuchtet die LED über der Taste. b Zum Ein-/Ausschalten der Zoom-Funktion (nur im Vollbild-Modus möglich) die Taste 2 Sek. gedrückt halten; bei eingeschalteter Funktion wird „(Z)“ eingeblendet. Mehr Informationen zum Einstellen dieser Funktion → siehe Kap. 7.2.1. 2 Taste „Seq/PIP“ für die Sequenzschaltung und das Anzeigeformat „Bild im Bild“ a Zum Ein-/Ausschalten der Sequenzschaltung die Taste kurz drücken, bei eingeschalteter Funktion leuchtet die LED über der Taste. b Zum Aufrufen/Verlassen des Anzeigeformats „Bild im Bild“ die Taste 2 Sek. gedrückt halten. Mehr Informationen zum Einstellen der Kanäle für dieses Format → siehe Kap. 7.4. 3 Zifferntasten bzw. Cursor-Tasten a zur Kanalanwahl für die Vollbilddarstellung b zum Navigieren im Bildschirmmenü (Tasten und ) bzw. zum Ändern von Einstellungen im Bildschirmmenü (Tasten und ) 4 Taste „Fz/VCR PLAY“ für die Freeze-Funktion und den Videorecorder-Wiedergabebetrieb a Zum Ein-/Ausschalten der Freeze-Funktion (nur im Vollbild-Modus möglich) die Taste kurz drücken, bei eingeschalteter Funktion leuchtet die LED über der Taste und „(F)“ wird eingeblendet. b Zum Ein-/Ausschalten des Videorecorder-Wiedergabebetriebs die Taste 2 Sek. gedrückt halten; bei eingeschalteter Funktion leuchtet die LED über der Taste und „VCR PLAYBACK“ wird eingeblendet. 5 Taste „Set/AUTO“ für das Bildschirmmenü a Zum Aufrufen des Hauptmenüs oder eines Untermenüs die Taste kurz drücken, bei aufgerufenem Bildschirmmenü leuchtet die LED über der Taste. b Zum Verlassen des Hauptmenüs oder eines Untermenüs die Taste 2 Sek. gedrückt halten. 1.2 Rückseite 6 BNC-Eingangsbuchsen „VIDEO 1“ bis „VIDEO 4“ zum Anschluss der Kameras 7 Impedanzumschalter 1 bis 4 für die Videoeingänge „VIDEO 1“ bis „VIDEO 4“ (6): obere Schalterposition 75 Ω Der Eingang ist mit 75 Ω abgeschlossen; erforderlich, wenn kein Gerät am jeweiligen Durchschleifausgang „LOOP“ (12) angeschlossen ist. 4 9 10 11 12 13 2 untere Schalterposition ∞ Der Eingang ist hochohmig; erforderlich, wenn ein weiteres Gerät am jeweiligen Durchschleifausgang „LOOP“ angeschlossen ist. Wiedergabeeingang „VCR IN“ für die Videorecorderwiedergabe: Anschluss an den Videoausgang des Recorders Videoausgänge „MON 1“ und „MON 2“ zum Anschluss von zwei Monitoren 9-polige Sub-D-Buchse „ALARM“ für die Alarmanschlüsse (→ Abb. 4) Pin 1: Alarm-Eingang 1 Pin 2: Alarm-Eingang 2 Pin 3: Alarm-Eingang 3 Pin 4: Alarm-Eingang 4 Pin 5: Masse Pin 6: Masse Pin 7: Alarmausgang: NO-Kontakt des Relais Pin 8: Alarmausgang: gemeinsamer Kontakt des Relais Pin 9: Alarmausgang: NC-Kontakt des Relais Stromversorgungsbuchse „DC 12V 1A“ zum Anschluss des mitgelieferten Netzgerätes BNC-Ausgangsbuchsen „LOOP 1“ bis „LOOP 4“ zum Herausführen der durchgeschleiften Signale der Eingänge „VIDEO 1“ bis „VIDEO 4“ (6) BNC-Ausgangsbuchse „VCR OUT“ für die Videorecorder-Aufzeichnung des Quad-Bilds: Anschluss an den Videoeingang des Recorders Hinweise für den sicheren Gebrauch Die Geräte (Quad-Prozessor und Steckernetzgerät) entsprechen allen erforderlichen Richtlinien der EU und sind deshalb mit gekennzeichnet. WARNUNG Das Netzgerät wird mit lebensgefährlicher Netzspannung versorgt. Nehmen Sie deshalb niemals selbst Eingriffe am Netzgerät vor. Durch unsachgemäßes Vorgehen besteht die Gefahr eines elektrischen Schlages. Beachten Sie auch unbedingt folgende Punkte: G Die Geräte sind nur zur Verwendung im Innenbereich geeignet. Schützen Sie sie vor Tropf- und Spritzwasser, hoher Luftfeuchtigkeit und Hitze (zulässiger Einsatztemperaturbereich 0 – 40 °C). G Stellen Sie keine mit Flüssigkeit gefüllten Gefäße, z. B. Trinkgläser, auf den Quad-Prozessor. G Nehmen Sie den Quad-Prozessor nicht in Betrieb bzw. trennen Sie das Netzgerät sofort vom Netz: 1. wenn sichtbare Schäden an den Geräten vorhanden sind, 2. wenn nach einem Sturz oder Ähnlichem der Verdacht auf einen Defekt besteht, 3. wenn Funktionsstörungen auftreten. Lassen Sie die Geräte in jedem Fall in einer Fachwerkstatt reparieren. G G Verwenden Sie für die Reinigung nur ein trockenes, weiches Tuch, niemals Chemikalien oder Wasser. Werden die Geräte zweckentfremdet, falsch angeschlossen, nicht richtig bedient oder nicht fachgerecht repariert, kann keine Haftung für daraus resultierende Sach- oder Personenschäden und keine Garantie für die Geräte übernommen werden. Sollen die Geräte endgültig aus dem Betrieb genommen werden, übergeben Sie sie zur umweltfreundlichen Entsorgung einem örtlichen Recyclingbetrieb. 3 Anwendungsmöglichkeiten Dieser Farb-Video-Quad-Prozessor ist für den Einsatz in Video-Überwachungsanlagen konzipiert. Das Gerät ermöglicht eine Live-Überwachung in verschiedenen Anzeigeformaten (Vollbild, Quad-Bild, Bild-im-Bild, Digital-Zoom). Außerdem lässt sich ein Videorecorder zur Aufzeichnung und anschließender Wiedergabe anschließen. Die Aufzeichnung der Bilder erfolgt ausschließlich im Quad-Format, unabhängig von der für die Live-Überwachung gewählten Monitordarstellung. Das Gerät verfügt über einen internen Video-Bewegungsmelder, die Bewegungserkennung lässt sich für jeden Kanal separat einstellen. Jedem Kanal ist außerdem ein Alarmeingang für die Auswertung eines externen Alarms zugeordnet. Ein Relais mit Umschaltkontakt NO/NC bietet die Möglichkeit, einen Alarm mit einem externen Gerät weiterzuverarbeiten. Alle Alarmereignisse werden protokolliert und können über das Bildschirmmenü eingesehen werden. 4 Rack-Montage Das Gerät kann als Tischgerät aufgestellt oder über die beiden beiliegenden Montagewinkel in ein Rack (482 mm/19") eingebaut werden. Für den Rackeinbau die Schrauben auf der rechten und linken Seite abschrauben und die Montagewinkel mit den beiliegenden Schrauben nach Abb. 3 anschrauben. Im Rack wird 1 Höheneinheit (= 44,45 mm) benötigt. 5 Video- und Alarmanschlüsse 5.1 Kamerasignale Bis zu vier Kameras können an die Eingangsbuchsen „VIDEO 1“ bis „VIDEO 4“ (6) angeschlossen werden. Soll ein Kamerasignal auf einer weiteren Videoanlage ausgewertet werden, kann dieses am jeweils darunter gelegenen Durchschleifausgang „LOOP“ (12) abgenommen und weitergeleitet werden. Die Impedanzanpassung erfolgt über den jeweiligen DIP-Schalter (7). Er ist in diesem Fall in die untere Position auf „∞ “ (hochohmig) einzustellen. Wird kein Gerät am Durchschleifausgang angeschlossen, für den richtigen Leitungsabschluss den jeweiligen Schalter in die obere Position „75 Ω“ stellen. 5.2 Monitore D Bis zu zwei Monitore können an die Buchsen „MON 1“ und „MON 2“ (9) angeschlossen werden. Über beide Monitore lassen sich die gleichen Anzeigeformate und das Bildschirmmenü aufrufen. A CH 5.3 Videorecorder Zur Aufzeichnung der Kamerabilder den Video-Eingang eines Videorecorders mit der Buchse „VCR OUT“ (13) verbinden. Das Aufnahmesignal am Ausgang „VCR OUT“ ist, unabhängig von der gewählten Monitordarstellung für die Live-Überwachung, immer das Quad-Bild. Für die Wiedergabe von Aufzeichnungen den Video-Ausgang des Videorecorders mit der Buchse „VCR IN“ (8) verbinden. 5.4 Alarmverbindungen (Abb. 4) Über die 9-polige Sub-D-Buchse „ALARM“ (10) stehen vier Alarmeingänge und ein Alarmausgang zur Verfügung. Als Alarmsensoren können z. B. Bewegungsmelder oder Lichtschranken eingesetzt werden, die mit einem Schließkontakt (NO = normally open) ausgestattet sind. Die Sensoren jeweils an Masse (Pin 5 oder 6) und an die folgenden Kontakte anschließen: Sensor für Kanal 1 an Pin 1 Sensor für Kanal 2 an Pin 2 Sensor für Kanal 3 an Pin 3 Sensor für Kanal 4 an Pin 4 Als potentialfreier Alarmausgang steht ein Relais mit Umschaltkontakt zur Verfügung. An den Alarmausgang kann z. B. ein akustischer oder optischer Alarmgeber angeschlossen werden oder der Alarmeingang eines Videorecorders. Im Normalzustand ist der NC-Kontakt (Pin 9) gegen den gemeinsamen Kontakt COM (Pin 8) geschlossen und der NO-Kontakt (Pin 7) offen. Im Alarmfall ist der NC-Kontakt offen und der NO-Kontakt schließt gegen den gemeinsamen Kontakt COM. 6 Inbetriebnahme Das beiliegende Netzgerät an die Buchse „DC 12V 1A“ (11) anschließen und in eine Steckdose (100 – 240 V~, 50/60 Hz) stecken: Das Gerät ist damit eingeschaltet. Nach der Inbetriebnahme ist ein kurzer Signalton zu hören und das Gerät schaltet auf das Quad-Bild. Zuerst die Farbnorm einstellen, mit der die angeschlossenen Geräte arbeiten. Dazu die folgenden drei Tasten gleichzeitig drücken: PAL: „Fz“ (4) + „Set“ (5) + „2“ (3) NTSC: „Fz“ (4) + „Set“ (5) + „3“ (3) Über das Bildschirmmenü kann der Quad-Prozessor auf die Bedürfnisse der jeweiligen Anwendung eingestellt werden → siehe Kap. 9. 5 D 7 Live-Überwachung A CH 7.1 Quad-Bild (Vierfachbild) Zum Schalten auf das Quad-Bild die Taste „ /ZOOM“ (1) kurz drücken, die LED darüber leuchtet: Im QuadBetrieb wird, zur Darstellung von bis zu vier Kamerakanälen gleichzeitig, der Bildschirm in vier Viertel unterteilt. Ist an einem Kameraeingang keine Kamera angeschlossen, so wird das zugeordnete Viertel dunkel dargestellt und „NO VIDEO“ darin eingeblendet. 7.2 Vollbild Um auf Vollbilddarstellung eines Kamerakanals zu schalten, die entsprechende Zifferntaste (3) drücken. Die LED über der jeweiligen Taste leuchtet. 7.2.1 Zoom-Funktion In der Vollbilddarstellung kann ein Bildausschnitt „herangezoomt“, d. h. zweifach vergrößert angezeigt, werden. 1) Um in den Zoom-Modus zu schalten, die Taste „ / ZOOM“ (1) 2 Sekunden gedrückt halten. Im Bild erscheint die Einblendung „(Z)“ und links oben ein Rahmen, der den Bildausschnitt eingrenzt, der vergrößert angezeigt werden soll. 2) Mit den Tasten , , und (3) den Rahmen je nach gewünschtem Bildausschnitt verschieben. 3) Um den gewählten Bildausschnitt vergrößert anzuzeigen, die Taste „ /ZOOM“ kurz drücken. Um wieder zurück in den Auswahlmodus für den Bildausschnitt zu schalten, die Taste erneut kurz drücken. 4) Um den Zoom-Modus ganz zu verlassen, die Taste „ /ZOOM“ 2 Sekunden gedrückt halten. Das Gerät wechselt dann auf das Quad-Bild. 7.2.2 Freeze-Funktion (Standbild) Bei der Vollbilddarstellung lässt sich das momentane Bild „einfrieren“, d. h. als Standbild anzeigen. Zum Einschalten der Freeze-Funktion die Taste „Fz/VCR PLAY“ (4) kurz drücken: Die LED über der Taste leuchtet und im Bild wird „(F)“ eingeblendet. Zum Ausschalten der Funktion die Taste erneut kurz drücken. 7.3 Sequenzschaltung Um diese Betriebsart einzuschalten, die Taste „Seq/ PIP“ (2) kurz drücken: Die automatische Weiterschaltung der Kamerakanäle und des Quad-Bilds startet. Die LED über der Taste leuchtet. Zusätzlich leuchtet jeweils die LED zu der momentan gezeigten Ansicht. Kamerakanäle ohne gültiges Videosignal werden bei der Bildsequenzschaltung automatisch übersprungen. Im Menü AUTO SEQUENCE (Kap. 9.6) lassen sich die gewünschte Bildfolge und Bildverweilzeit einstellen. Zum Beenden der Sequenzschaltung die Taste „Seq/ PIP“ erneut kurz drücken oder eine andere Taste am Gerät betätigen. 6 7.4 Bild-im-Bild (PIP = picture-in-picture) Um auf „Bild-im-Bild“ zu schalten, die Taste „Seq/PIP“ (2) 2 Sekunden gedrückt halten: Auf dem Bildschirm erscheint das Vollbild von Kanal 1, in das rechts unten das Bild von Kanal 2 in 1/4-Größe eingeblendet ist. 1) Solange im Vollbild der Name für den Kanal blinkt, kann mit der Taste oder (3) der Kanal für die Vollbilddarstellung ausgewählt werden. Nach der Auswahl des Kanals zur Bestätigung die Taste „Seq/ PIP“ drücken: Der Kanal erscheint als Vollbild, die entsprechende LED des Kanals leuchtet. 2) Nach der Bestätigung der Kanalwahl für das Vollbild, blinkt im verkleinerten Bild der Name für den Kanal. Solange er blinkt, kann mit der Taste oder der Kanal für die Bildeinblendung ausgewählt werden. Nach der Auswahl des Kanals zur Bestätigung die Taste „Seq/PIP“ drücken: Der Kanal erscheint als Bildeinblendung, die entsprechende LED des Kanals leuchtet. 3) Zum Verlassen dieses Anzeigeformats die Taste „Seq/PIP“ erneut 2 Sekunden gedrückt halten. 8 Wiedergabe einer Aufzeichnung Die Taste „Fz/VCR PLAY“ (4) 2 Sekunden gedrückt halten; die LED darüber leuchtet. Auf dem Bildschirm erscheinen die aufgezeichneten Kamerabilder im Quad-Format und die Einblendung „VCR PLAYBACK“. – Um das Bild eines Kanals genauer zu betrachten, die Zifferntaste (3) des Kanals drücken: Das entsprechende Viertel des Quad-Bilds wird auf Vollbilddarstellung vergrößert und im Bild erscheint die Einblendung „(Z)“ für „Zoom“. Zum Zurückschalten auf das Quad-Bild die Taste „ /ZOOM“ (1) drücken. – Um während der Wiedergabe das Bild „einzufrieren“, die Taste „Fz/VCR PLAY“ (4) kurz drücken. Im Bild wird „(F)“ für „Freeze“ eingeblendet. Um die FreezeFunktion wieder auszuschalten, die Taste erneut kurz drücken. Zum Ausschalten des Videorecorder-Wiedergabebetriebs die Taste „Fz/VCR PLAY“ 2 Sekunden gedrückt halten. Hinweise: a Während des Videorecorder-Wiedergabebetriebs ist keine Alarmauslösung über den internen Video-Bewegungsmelder möglich. b Die im Menü TITLE SETUP (Kap. 9.1) festgelegten Namen für die Kamerakanäle sind in den aufgezeichneten Bildern nur eingeblendet, wenn zum Zeitpunkt der Aufnahme für die Live-Überwachung das Quad-Format angewählt wurde. c Die Alarmanzeigen „L1234“ (bei Verlust eines Videosignals, siehe Kap. 10.1) und „M1234“ (bei Ansprechen des internen Video-Bewegungsmelders, siehe Kap. 10.2) sind in den aufgezeichneten Bildern nur eingeblendet, wenn zum Zeitpunkt der Aufnahme für die Live-Überwachung das QuadFormat oder das PIP-Format angewählt wurde. 9 Einstellungen über das Bildschirmmenü Um das Gerät optimal an die Überwachungsanlage anzupassen, lassen sich viele Betriebsparameter über ein Bildschirmmenü einstellen. Für die Bedienung des Menüs sind folgende Tasten erforderlich: Taste „Set/AUTO“ (5): zum Aufrufen (Taste kurz drücken) und Verlassen (Taste 2 Sekunden gedrückt halten) der Menüseiten Tasten , , und (3): und zum Navigieren im Menü, und zum Ändern der Einstellungen Zum Aufrufen des Menüs (nicht möglich im Videorecorder-Wiedergabebetrieb) die Taste „Set/AUTO“ kurz drücken: Das Gerät schaltet in den Quad-Modus und die Seite des Hauptmenüs wird eingeblendet: MENU: TITLE SETUP DATE/TIME DECODER SETUP SENSITIVITY EVENT LIST AUTO SEQUENCE OTHER KEY LOCK : OFF Das gewünschte Untermenü mit der Taste oder anwählen. Das aktuell angewählte Untermenü blinkt. Soll das Hauptmenü verlassen werden, die Taste „Set/ AUTO“ 2 Sekunden gedrückt halten. Wird bei aufgerufenem Bildschirmmenü für 15 Sekunden keine Taste betätigt, blendet sich das Menü automatisch aus. 9.1 TITLE SETUP (Kanalnamen festlegen) Ist das Untermenü „TITLE SETUP“ angewählt, die Taste „Set/AUTO“ kurz drücken, um es aufzurufen. TITLE SETUP: CH1 CH2 CH3 CH4 : : : : CHANNEL1 CHANNEL2 CHANNEL3 CHANNEL4 In diesem Menü kann für jeden Kanal ein Name festgelegt werden, der in das Bild eingeblendet wird [für die Live-Überwachung erfolgt die Einblendung in jedem Anzeigeformat, für die über die Buchse „VCR OUT“ (13) aufgezeichneten Bilder siehe Hinweis b in Kap. 8]. Hinweis: Bei aufgerufenem Bildschirmmenü sind die Kameranamen ausgeblendet. Mit der Taste oder die jeweilige Stelle anwählen und mit der Taste oder das gewünschte Zeichen auswählen. Zum Verlassen des Untermenüs und Zurückkehren in das Hauptmenü die Taste „Set/AUTO“ 2 Sekunden gedrückt halten. 9.2 DATE/TIME (Datum und Uhrzeit einstellen) Ist das Untermenü „DATE/TIME“ angewählt, die Taste „Set /AUTO“ kurz drücken, um es aufzurufen. DATE/TIME: D DATE : 24-01-07 TIME : 22:30:13 SHOW : YES A CH In diesem Menü können eingestellt werden: – in der Zeile „DATE“ das aktuelle Datum (Tag – Monat – Jahr) – in der Zeile „TIME“ die aktuelle Uhrzeit (Stunden : Minuten : Sekunden) – in der Zeile „SHOW“ „YES“ (Datum und Uhrzeit eingeblendet) oder „NO“ (Datum und Uhrzeit ausgeblendet) Mit der Taste oder die jeweilige Stelle anwählen und mit der Taste oder die Einstellung vornehmen. Zum Verlassen des Untermenüs und Zurückkehren in das Hauptmenü die Taste „Set/AUTO“ 2 Sekunden gedrückt halten. 9.3 DECODER SETUP (Bildeinstellungen) Ist das Untermenü „DECODER SETUP“ angewählt, die Taste „Set /AUTO“ kurz drücken, um es aufzurufen. BRIGHTNESS:33 CONTRAST:33 SHARPNESS:33 SAT_U:33 SAT_V:33 HUE:33 BRIGHTNESS:33 CONTRAST:33 SHARPNESS:33 SAT_U:33 SAT_V:33 HUE:33 BRIGHTNESS:33 CONTRAST:33 SHARPNESS:33 SAT_U:33 SAT_V:33 HUE:33 BRIGHTNESS:33 CONTRAST:33 SHARPNESS:33 SAT_U:33 SAT_V:33 HUE:33 In diesem Menü können die Videosignale der vier Kamerakanäle in Helligkeit („BRIGHTNESS“), Kontrast („CONTRAST“), Schärfe („SHARPNESS“), Farbsättigung („SAT_U“ und „SAT_V“) und Farbton („HUE“) angepasst werden. Mit der Taste oder die jeweilige Zeile anwählen und mit der Taste oder den Wert einstellen (Einstellbereich: 0 – 63). Zum Verlassen des Untermenüs und Zurückkehren in das Hauptmenü die Taste „Set/AUTO“ 2 Sekunden gedrückt halten. 9.4 SENSITIVITY (Bewegungsmelder einstellen) Ist das Untermenü „SENSITIVITY“ angewählt, die Taste „Set/AUTO“ kurz drücken, um es aufzurufen. SENSITIVITY: CH1 CH2 CH3 CH4 : : : : OFF OFF OFF OFF In diesem Menü kann für jeden Kanal die Empfindlichkeit für den internen Video-Bewegungsmelder eingestellt [„1“ (min.) bis „7“ (max.)] bzw. die Bewegungserkennung ganz ausgeschaltet („OFF“) werden. 7 D A CH Mit der Taste oder die jeweilige Zeile anwählen und mit der Taste oder die Einstellung vornehmen. 9.7 OTHER (Alarmeinstellungen, Einstellungen zur Bildspiegelung und zur Darstellung des Quad-Bilds) Zum Verlassen des Untermenüs und Zurückkehren in das Hauptmenü die Taste „Set/AUTO“ 2 Sekunden gedrückt halten. Ist das Untermenü „OTHER“ angewählt, die Taste „Set /AUTO“ kurz drücken, um es aufzurufen. OTHER: 1.BUZZER: 9.5 EVENT LIST (Alarmprotokoll) Ist das Untermenü „EVENT LIST“ angewählt, die Taste „Set /AUTO“ kurz drücken, um es aufzurufen. EVENT LIST: (PAGE1) NO CH A/L/M DD-MM-YY HH:MM:SS 01 1 A 22-01-07 20:15:13 02 4 L 19-01-07 15:21:40 03 3 A 06-01-07 03:39:28 04 4 M 05-01-07 01:03:34 In diesem Menü sind, fortlaufend durchnummeriert und nach dem Zeitpunkt des Auftretens geordnet, die 20 letzten Alarmereignisse auf zwei Menüseiten aufgelistet. Mit den Tasten , , und kann zwischen den Seiten gewechselt werden. Nach der jeweiligen Listennummer (Spalte „NO“) sind angegeben: – der vom Alarm betroffene Kanal (Spalte „CH“) – die Alarmart (Spalte „A/L/M“): A = externer Alarm, L = Verlust des Videosignals, M = Alarm durch den internen Bewegungsmelder – das Datum des Alarms (Spalte „DD-MM-YY“) – die Uhrzeit des Alarms (Spalte „HH:MM:SS“) Zum Verlassen des Untermenüs und Zurückkehren in das Hauptmenü die Taste „Set/AUTO“ 2 Sekunden gedrückt halten. 9.6 AUTO SEQUENCE (Einstellungen für die Sequenzschaltung) Ist das Untermenü „AUTO SEQUENCE“ angewählt, die Taste „Set/AUTO“ kurz drücken, um es aufzurufen. AUTO SEQUENCE: CH1 CH2 CH3 CH4 QUAD TIME : : : : : : ON ON ON ON ON 05 SEC 2.MIRROR: CH1 CH2 CH3 CH4 : : : : OFF OFF OFF OFF 3.BORDER : WHITE Über den 1. Menüpunkt „BUZZER“ lässt sich, getrennt für die drei Alarmarten, einstellen, wie der Quad-Prozessor auf eine Alarmauslösung reagiert (siehe auch Kap. 10 „Alarmfunktionen“): – Zeile „LOSS“ Soll bei Verlust eines Signals an einem der Kameraeingänge (6) ein Alarmsignal ertönen, in der Zeile die Dauer des Alarmtons (1 – 99 Sekunden) einstellen. Soll bei Verlust eines Videosignals kein Alarmsignal ertönen, die Zeile auf „OFF“ stellen. – Zeile „MOTION“ Soll bei Alarmauslösung durch den internen Bewegungsmelder ein Alarmsignal ertönen und das Alarmrelais ansprechen, in dieser Zeile die Alarmzeit (1 – 99 Sekunden) einstellen. Nach Ablauf der Alarmzeit wird der Alarmsummer ausgeschaltet und das Alarmrelais zurückgesetzt. Soll bei Alarmauslösung durch den internen Bewegungsmelder weder der Summer noch das Relais ansprechen, die Zeile auf „OFF“ stellen. – Zeile „ALARM“ Soll bei Alarmauslösung durch einen angeschlossenen Alarmsensor ein Alarmsignal ertönen und das Alarmrelais ansprechen, in dieser Zeile die Alarmzeit (1 – 99 Sekunden) einstellen. Nach Ablauf der Alarmzeit wird der Alarmsummer ausgeschaltet und das Alarmrelais zurückgesetzt. Soll bei externem Alarm weder der Summer noch das Relais ansprechen, die Zeile auf „OFF“ stellen. Über den 2. Menüpunkt „MIRROR“ kann für jeden Kamerakanal eine Bildspiegelung („ON“) eingestellt werden. Mit der Taste oder die jeweilige Zeile anwählen und mit der Taste oder die Einstellung vornehmen. Über den 3. Menüpunkt „BORDER“ lässt sich auswählen, wie das Quad-Bild auf dem Bildschirm erscheint: – „WHITE“: weiße Trennlinien zwischen den vier Kamerabildern – „BLACK“: schwarze Trennlinien zwischen den vier Kamerabildern – „OFF“: keine Trennlinien zwischen den vier Kamerabildern Mit der Taste oder die jeweilige Zeile anwählen und mit der Taste oder die Einstellung vornehmen. Zum Verlassen des Untermenüs und Zurückkehren in das Hauptmenü die Taste „Set/AUTO“ 2 Sekunden gedrückt halten. Zum Verlassen des Untermenüs und Zurückkehren in das Hauptmenü die Taste „Set/AUTO“ 2 Sekunden gedrückt halten. In diesem Menü kann jeder Kamerakanal sowie das Quad-Bild für die Sequenzschaltung (→ Kap. 7.3) eingeschaltet („ON“) oder ausgeschaltet („OFF“) werden. In der Zeile „TIME“ kann die Bildverweilzeit (1 – 99 Sekunden) eingestellt werden. 8 LOSS : 05 SEC MOTION : 05 SEC ALARM : 05 SEC 9.8 KEY LOCK (Tastensperre) 10.3 Externer Alarm Mit der Taste oder die Zeile „KEY LOCK“ anwählen und mit der Taste oder die Tastensperre einschalten („ON“) oder ausschalten („OFF“). Ist die Einstellung „ON“ gewählt, sind bei nicht aufgerufenem Bildschirmmenü die Tasten (1) – (4) gesperrt, so dass für die Live-Überwachung ein Wechsel der Anzeigeformate nicht mehr möglich ist. Das Menü lässt sich jedoch auch weiterhin aufrufen und mit den Tasten „Set/AUTO“ und , , und bedienen. Registriert das Gerät einen externen Alarm an einem Alarmeingang und ist im Menü „OTHER“ (Kap. 9.7) in der Zeile „ALARM“ eine Alarmzeit eingestellt: – schaltet das Gerät für die Live-Überwachung auf das Vollbild des betroffenen Kanals (Wird externer Alarm für mehrere Kanäle gleichzeitig ausgelöst, schaltet das Gerät alle 2 Sekunden zwischen den Vollbildern der betroffenen Kanäle um.) – ertönt ein Alarmsignal – spricht das Alarmrelais an Nach Ablauf der Alarmzeit wird der Alarmsummer ausgeschaltet, das Alarmrelais zurückgesetzt und das Gerät wechselt in den Quad-Modus (zum Beenden aller Alarmvorgänge vor Ablauf der Alarmzeit eine beliebige Taste drücken). Ist dagegen im Menü „OTHER“ in der Zeile „ALARM“ die Einstellung „OFF“ gewählt, schaltet das Gerät auf das Quad-Bild. Es wird kein Alarmton abgegeben und das Alarmrelais ist deaktiviert. 10 Alarmfunktionen Ein Alarm kann ausgelöst werden durch: – den Verlust des Signals an einem der Kameraeingänge (6), z. B. bei einem Kameradefekt – den internen Video-Bewegungsmelder – einen an der Buchse ALARM (10) angeschlossenen Alarmsensor (externer Alarm) Jede Alarmauslösung wird mit Datum und Uhrzeit in einer Ereignisliste (Kap. 9.5) protokolliert. D A CH 11 Technische Daten 10.1 Verlust eines Videosignals Registriert das Gerät den Verlust eines Videosignals, erscheint im Quad- und im PIP-Format die Einblendung „L1234“, wobei die Ziffer, die dem betroffenen Kanal entspricht, blinkt. Ist im Menü „OTHER“ (Kap. 9.7) in der Zeile „LOSS“ eine Alarmzeit eingestellt, ertönt für die Dauer der Alarmzeit ein Alarmsignal (zum Ausschalten des Alarmsummers vor Ablauf der Alarmzeit eine beliebige Taste drücken). Ist in der Zeile „LOSS“ dagegen die Einstellung „OFF“ gewählt, wird kein Alarmton abgegeben. Sobald wieder ein Videosignal am Eingang anliegt, wird der Alarm automatisch abgeschaltet. Synchronisation: . . . . . CCIR, horizontal 15 625 Hz, vertikal 50 Hz Farbnorm: . . . . . . . . . . PAL,NTSC Auflösung: . . . . . . . . . 720 × 576 pixel (hor. × vert.) Bildfrequenz: . . . . . . . 50 Halbbilder/s Videopegel: . . . . . . . . 1 Vss/75 Ω Alarm 4 Alarmeingänge: . . Schließer (NO) mit gemeinsamer Masse 1 Alarmausgang: . . . Relais mit Umschaltkontakt (NO/NC), max. Schaltlast: 12 V /1 A, 24 V~/1 A Einsatztemperatur: . . . 0 – 40 °C 10.2 Alarmauslösung durch den internen Bewegungsmelder Bei einer Bewegungserkennung wird im Quad-Format und im PIP-Format kurz „M1234“ eingeblendet, wobei die Ziffer, die dem betroffenen Kanal entspricht, blinkt. Ist im Menü „OTHER“ (Kap. 9.7) in der Zeile „MOTION“ eine Alarmzeit eingestellt, ertönt ein Alarmsignal und das Alarmrelais spricht an. Nach Ablauf der Alarmzeit wird der Alarmsummer ausgeschaltet und das Alarmrelais zurückgesetzt (zum Ausschalten des Summers und Zurücksetzen des Relais vor Ablauf der Alarmzeit eine beliebige Taste drücken). Ist in der Zeile „MOTION“ dagegen die Einstellung „OFF“ gewählt, wird kein Alarmton abgegeben und das Alarmrelais ist deaktiviert. Hinweis: Die Bewegungserkennung muss für den jeweiligen Kanal eingeschaltet sein (→ Kap. 9.4, Menü „SENSITIVITY“), sonst wird kein Alarm ausgelöst. Stromversorgung: . . . . 12 V /1 A (über beiliegendes Netzgerät an 100 – 240 V~, 50/60 Hz) Abmessungen: . . . . . . 210 × 50 × 215 mm Gewicht: . . . . . . . . . . . 1,7 kg Anschlüsse Videoanschlüsse: . . BNC-Buchsen Alarmanschluss: . . . 9-polige Sub-D-Buchse Stromversorgung: . . Kleinspannungsbuchse für einen Stecker mit den Maßen 5,5/2,1 mm (∅ außen/ innen), Mittelkontakt = Pluspol Änderungen vorbehalten. Diese Bedienungsanleitung ist urheberrechtlich für MONACOR ® INTERNATIONAL GmbH & Co. KG geschützt. Eine Reproduktion für eigene kommerzielle Zwecke – auch auszugsweise – ist untersagt. 9 GB 1 lower switch position ∞ The input is of high impedance; required if another unit is connected to the respective fedthrough output “LOOP”. Operating Elements and Connections → see figures on page 2 1.1 Front panel 1 Button “ /ZOOM” for the quad mode and the zoom function a To switch to the quad picture, shortly press the button, the LED above the button lights up in the quad mode b To switch the zoom function on and off (only possible in the full screen mode), keep the button pressed for 2 seconds; with the function switched on, “(Z)” is inserted. More information about the adjustment of this function → see chapter 7.2.1. 2 Button “Seq /PIP” for the sequential switching and the display format “picture in picture” a To switch the sequential switching on and off, shortly press the button, with the function switched on, the LED above the button lights up. b To call/exit the display format “picture in picture”, keep the button pressed for 2 seconds. More information about the adjustment of the channels for this format → see chapter 7.4. 3 Numerical keys or cursor keys a For channel selection for the full screen display b To navigate in the on-screen menu (buttons and ) or to change adjustments in the onscreen menu (buttons and ) 4 Button “Fz/VCR PLAY” for the freeze function and the reproduction mode of the video recorder a To switch the freeze function on and off (only possible in the full screen mode), shortly press the button, with the function switched on, the LED above the button lights up and “(F)” is inserted. b To switch the reproduction mode of the video recorder on and off, keep the button pressed for 2 seconds; with the function switched on, the LED above the button lights up and “VCR PLAYBACK” is inserted. 5 Button “Set/AUTO” for the on-screen menu a To call the main menu or a submenu, shortly press the button, with the on-screen menu called, the LED above the button lights up. b To exit the main menu or a submenu, keep the button pressed for 2 seconds. 1.2 Rear panel 6 BNC input jacks “VIDEO 1” to “VIDEO 4” for connection of the cameras 7 Impedance selector switch 1 to 4 for the video inputs “VIDEO 1” to “VIDEO 4” (6): upper switch position 75 Ω The input is terminated with 75 Ω; required if no unit is connected to the respective fed-through output “LOOP” (12). 10 8 Reproduction input “VCR IN” for the reproduction of the video recorder: connection to the video output of the recorder 9 Video outputs “MON 1” and “MON 2” for connection of two monitors 10 9-pole Sub D jack “ALARM” for the alarm connections (→ fig. 4) pin 1: alarm input 1 pin 2: alarm input 2 pin 3: alarm input 3 pin 4: alarm input 4 pin 5: ground pin 6: ground pin 7: alarm output: NO contact of the relay pin 8: alarm output: common contact of the relay pin 9: alarm output: NC contact of the relay 11 Power supply jack “DC 12V 1A” for connection of the supplied power supply unit 12 BNC output jacks “LOOP 1” to “LOOP 4” for routing out the fed-through signals of the inputs “VIDEO 1” to “VIDEO 4” (6) 13 BNC output jack “VCR OUT” for the recording of the quad picture of the video recorder: connection to the video input of the recorder 2 Safety Notes The units (quad processor and plug-in power supply unit) correspond to all required directives of the EU and are therefore marked with . WARNING The power supply unit is supplied with hazardous mains voltage. Leave servicing to skilled personnel only. Inexpert handling or modification of the unit may cause an electric shock hazard. It is essential to observe the following items: G The units are suitable for indoor use only. Protect them against dripping water and splash water, high air humidity, and heat (admissible ambient temperature range 0 – 40 °C). G Do not place any vessels filled with liquid, e. g. drinking glasses, on the quad processor. G Do not set the quad processor into operation, or immediately disconnect the power supply unit from the mains socket if 1. there is visible damage to the units, 2. a defect might have occurred after a drop or similar accident, 3. malfunctions occur. The units must in any case be repaired by skilled personnel. G G For cleaning only use a dry, soft cloth, never use chemicals or water. No guarantee claims for the units and no liability for any resulting personal damage or material damage will be accepted if the units are used for other purposes than originally intended, if they are not correctly connected, operated, or not repaired in an expert way. If the units are to be put out of operation definitively, take them to a local recycling plant for a disposal which is not harmful to the environment. 3 Rack Mounting The unit can be placed as a table top unit or be installed into a rack (482 mm/19") via the two supplied mounting brackets. For the rack installation unscrew the screws on the right side and left side and screw the mounting brackets with the supplied screws according to fig. 3. One rack space (= 44.45 mm) is required in the rack. 5 GB Up to two monitors can be connected to the jacks “MON 1” and “MON 2” (9). Via both monitors the same display formats and the on-screen menu can be called. 5.3 Video recorder To record camera pictures, connect the video input of a video recorder to the jack “VCR OUT” (13). The recording signal at the output “VCR OUT” is always the quad picture, independent of the selected monitor display for the live surveillance. For the reproduction of recordings connect the video output of the video recorder to the jack “VCR IN” (8). Applications This colour video quad processor is designed for applications in video surveillance systems. The unit allows a live surveillance in different display formats (full screen, quad picture, picture-in-picture, digital zoom). Furthermore, a video recorder may be connected for recording and subsequent reproduction. The recording of the pictures is exclusively made in the quad format, independent of the monitor display selected for the live surveillance. The unit has an internal video motion detector, the motion recognition can separately be adjusted for each channel. An alarm input is furthermore assigned to each channel for the evaluation of an external alarm. A relay with change-over contact NO/NC offers the possibility to process an alarm with an external unit. All alarm events are recorded and can be regarded via the on-screen menu. 4 5.2 Monitors Video and Alarm Connections 5.1 Camera signals Up to four cameras may be connected to the input jacks “VIDEO 1” to “VIDEO 4” (6). If a camera signal is to be evaluated on another video system, it can be picked up at the fed-through output “LOOP” (12) located below and passed on. The impedance is matched via the respective DIP switch (7). It has to be adjusted in this case in the lower position to “∞” (high impedance). If no unit is connected to the fed-through output, set the respective switch to the upper position “75 Ω” for the correct termination of the cable. 5.4 Alarm connections (fig. 4) Via the 9-pole Sub D jack “ALARM” (10) four alarm inputs and an alarm output are available. As alarm sensors e. g. motion detectors or light barriers can be used which are equipped with a closing contact (NO = normally open). Connect the sensors respectively to ground (pin 5 or 6) and to the following contacts: sensor for channel 1 to pin 1 sensor for channel 2 to pin 2 sensor for channel 3 to pin 3 sensor for channel 4 to pin 4 As a floating alarm output a relay with change-over contact is available. At the alarm output e. g. an acoustic or visual alarm device may be connected or the alarm input of a video recorder. In normal condition the NC contact (pin 9) is closed against the common contact COM (pin 8) and the NO contact (pin 7) is open. In case of alarm the NC contact is open and the NO contact closes against the common contact COM. 6 Setting into Operation Connect the supplied power supply unit to the jack “DC 12V 1A” (11) and to a socket (100 – 240 V~, 50/60 Hz): Thus, the unit is switched on. After setting into operation, a short signal can be heard and the unit switches to the quad picture. First adjust the colour standard the units connected use. For this purpose press the following three buttons at the same time: PAL: “Fz” (4) + “Set” (5) + “2” (3) NTSC: “Fz” (4) + “Set” (5) + “3” (3) Via the on-screen menu the quad processor can be adjusted to the requirements of the respective application → see chapter 9. 11 GB 7 Live Surveillance 7.1 Quad picture (quadruple picture) To switch to the quad picture, shortly press the button “ /ZOOM” (1), the LED above it lights up: In the quad mode the screen is subdivided into four quarters for the simultaneous display of up to four camera channels. If no camera is connected to a camera input, the assigned quadrant is displayed in dark and “NO VIDEO” is inserted into it. 7.2 Full screen To switch to the full screen display of a camera channel, press the corresponding numerical key (3). The LED above the respective button lights up. 7.2.1 Zoom function In the full screen display a picture cutout can be zoomed in; displayed in twofold magnification. 1) To switch to the zoom mode, keep the button “ /ZOOM” (1) pressed for 2 seconds. In the picture the insertion “(Z)” appears and on the top left a frame which limits the picture cutout to be displayed in a magnified way. 2) Displace the frame with the buttons , , , and (3) according to the desired picture cutout. 3) To display the selected picture cutout in a magnified way, shortly press the button “ /ZOOM”. To switch back to the selection mode for the picture cutout, shortly press the button again. 4) To exit the zoom mode completely, keep the button “ /ZOOM” pressed for 2 seconds. Then the unit changes to the quad picture. 7.2.2 Freeze function (still picture) For the full screen display the present picture can be “frozen”, i. e. shown as a still picture. To switch on the freeze function, shortly press the button “Fz/VCR PLAY” (4): The LED above the button lights up and “(F)” is inserted in the picture. To switch off the function, shortly press the button again. 7.3 Sequential switching To switch on this operating mode, shortly press the button “Seq/PIP” (2): The automatic sequential switching of the camera channels and the quad picture starts. The LED above the button lights up. Additionally, the LED lights up in each case with the presently shown display. Camera channels without valid video signal are automatically skipped during the sequential switching of pictures. In the menu AUTO SEQUENCE (chapter 9.6) the desired picture sequence and the picture dwell time can be adjusted. To terminate the sequential switching, shortly press the button “Seq/PIP” again or actuate another button on the unit. 12 7.4 Picture-in-picture (PIP) To switch to “picture-in-picture”, keep the button “Seq/PIP” (2) pressed for 2 seconds: The full screen of channel 1 is displayed in which in the lower right corner the picture of channel 2 is inserted in 1/4 size. 1) As long as the name for the channel flashes in the full screen, the channel for the full screen display can be selected with the button or (3). After the selection of the channel, press the button “Seq/PIP” to confirm: The channel appears as a full screen picture, the corresponding LED of the channel lights up. 2) After confirming the channel selection for the full screen picture, the name for the channel flashes in the reduced picture. As long as it flashes, the channel for the picture insertion can be selected with the button or . After the selection of the channel press the button “Seq/PIP” to confirm: The channel appears as a picture insertion, the corresponding LED of the channel lights up. 3) To exit this display format, keep the button “Seq/PIP” pressed again for 2 seconds. 8 Reproduction of a Recording Keep the button “Fz/VCR PLAY” (4) pressed for 2 seconds; the LED above it lights up. The recorded camera pictures appear in the quad format and the insertion “VCR PLAYBACK” appears on the screen. – To view the picture of a channel more precisely, press the numerical key (3) of the channel: The corresponding quadrant of the quad picture is magnified to full screen reproduction and the insertion “(Z)” for “zoom” appears in the picture. To switch back to the quad picture, press the button “ /ZOOM” (1). – To “freeze” the picture during reproduction, shortly press the button “Fz/VCR PLAY” (4). “(F)” for “freeze” is inserted in the picture. To switch off the freeze function, shortly press the button again. To switch off the reproduction mode of the video recorder, keep the button “Fz/VCR PLAY” pressed for 2 seconds. Notes: a During the reproduction mode of the video recorder no alarm triggering via the internal video motion detector is possible. b The names for the camera channels defined in the menu TITLE SETUP (chapter 9.1) are only inserted in the recorded pictures if the quad format has been selected at the time of the recording for the live surveillance. c The alarm displays “L1234” (in case of loss of a video signal, see chapter 10.1) and “M1234” (if the internal video motion detector responds, see chapter 10.2) are only inserted in the recorded pictures if the quad format or the PIP format has been selected at the time of the recording for the live surveillance. 9 Adjustments via the On-Screen Menu To match the unit to the surveillance system in an optimum way, many operating parameters can be adjusted via an on-screen menu. For the operation of the menu the following buttons are required: Button “Set/AUTO” (5): to call (shortly press button) and to exit (keep button pressed for 2 seconds) the menu pages buttons , , , and (3): and to navigate in the menu, and to change the adjustments To call the menu (not possible in the reproduction mode of the video recorder), shortly press the button “Set/AUTO”: The unit switches to the quad mode and the page of the main menu is inserted: GB DATE/TIME: DATE : 24-01-07 TIME : 22:30:13 SHOW : YES In this menu it is possible to adjust: – the present date in the line “DATE” (day – month – year) – the present time in the line “TIME” (hours: minutes: seconds) – in the line “SHOW” “YES” (date and time inserted) or “NO” (date and time extinguished) Select the respective position with the button and make the adjustment with the button or or . To exit the submenu and to return to the main menu, keep the button “Set/AUTO” pressed for 2 seconds. MENU: TITLE SETUP DATE/TIME DECODER SETUP SENSITIVITY EVENT LIST AUTO SEQUENCE OTHER KEY LOCK : OFF 9.3 DECODER SETUP (picture adjustments) If the submenu “DECODER SETUP” is selected, shortly press the button “Set/AUTO” to call it. . BRIGHTNESS:33 CONTRAST:33 SHARPNESS:33 SAT_U:33 SAT_V:33 HUE:33 BRIGHTNESS:33 CONTRAST:33 SHARPNESS:33 SAT_U:33 SAT_V:33 HUE:33 For exiting the main menu, keep the button “Set/AUTO” pressed for 2 seconds. If no button is actuated for 15 seconds with the on-screen menu called, the menu is automatically extinguished. BRIGHTNESS:33 CONTRAST:33 SHARPNESS:33 SAT_U:33 SAT_V:33 HUE:33 BRIGHTNESS:33 CONTRAST:33 SHARPNESS:33 SAT_U:33 SAT_V:33 HUE:33 Select the desired submenu with the button The presently selected submenu flashes. or 9.1 TITLE SETUP (defining channel names) If the submenu “TITLE SETUP” is selected, shortly press the button “Set/AUTO” to call it. TITLE SETUP: CH1 CH2 CH3 CH4 : : : : CHANNEL1 CHANNEL2 CHANNEL3 CHANNEL4 To exit the submenu and to return to the main menu, keep the button “Set/AUTO” pressed for 2 seconds. In this menu a name which is inserted in the picture can be defined for each channel [for the live surveillance, the insertion is made in any display format, for the pictures recorded via the jack “VCR OUT” (13) see note b in chapter 8]. Note: With the on-screen menu called the camera names are extinguished. Select the respective place with the button the desired character with the button or In this menu the video signals of the four camera channels can be matched regarding brightness, contrast, sharpness, colour saturation (“SAT_U” and “SAT_V”), and hue. Select the respective line with the button or and adjust the value (adjusting range : 0 – 63) with the button or . or . and 9.4 SENSITIVITY (adjusting the motion detector) If the submenu “SENSITIVITY” is selected, shortly press the button “Set/AUTO” to call it. SENSITIVITY: CH1 CH2 CH3 CH4 : : : : OFF OFF OFF OFF 9.2 DATE/TIME In this menu the sensitivity for the internal video motion detector can be adjusted [“1” (min.) to “7” (max.)] for each channel or the motion recognition can be completely switched OFF. Select the respective line with the button or and make the adjustment with the button or . If the submenu “DATE/TIME” is selected, shortly press the button “Set/AUTO” to call it. To exit the submenu and to return to the main menu, keep the button “Set/AUTO” pressed for 2 seconds. To exit the submenu and to return to the main menu, keep the button “Set/AUTO” pressed for 2 seconds. 13 GB 9.5 EVENT LIST (alarm protocol) If the submenu “EVENT LIST” is selected, shortly press the button “Set/AUTO” to call it. EVENT LIST: (PAGE1) NO CH A/L/M DD-MM-YY HH:MM:SS 01 1 A 22-01-07 20:15:13 02 4 L 19-01-07 15:21:40 03 3 A 06-01-07 03:39:28 04 4 M 05-01-07 01:03:34 If the submenu “OTHER” is selected, shortly press the button “Set/AUTO” to call it. OTHER: 1.BUZZER: In this menu the last 20 alarm events are listed on two menu pages, consecutively numbered and arranged according to the time they occurred. It is possible to change between the pages with the buttons , , , and . After the respective list number (column “NO”) the following items are indicated: – the channel concerned by the alarm (column “CH”) – the type of alarm (column “A/L/M”): A = external alarm L = loss of the video signal M = alarm by the internal motion detector – the date of the alarm (column “DD-MM-YY”) – the time of the alarm (column “HH:MM:SS”) To exit the submenu and to return to the main menu, keep the button “Set/AUTO” pressed for 2 seconds. 9.6 AUTO SEQUENCE (adjustments for the sequential switching) If the submenu “AUTO SEQUENCE” is selected, shortly press the button “Set/AUTO” to call it. AUTO SEQUENCE: CH1 CH2 CH3 CH4 QUAD TIME : : : : : : ON ON ON ON ON 05 SEC In this menu each camera channel and the quad picture for the sequential switching (→ chapter 7.3) can be switched ON or OFF. In the line “TIME” the picture dwell time (1 – 99 seconds) can be adjusted. Select the respective line with the button make the adjustment with the button or 9.7 OTHER (alarm adjustments, adjustments for mirror-inverted display of the picture and for reproduction of the quad picture) or . and To exit the submenu and to return to the main menu, keep the button “Set/AUTO” pressed for 2 seconds. LOSS : 05 SEC MOTION : 05 SEC ALARM : 05 SEC 2.MIRROR: CH1 CH2 CH3 CH4 : : : : OFF OFF OFF OFF 3.BORDER : WHITE Via the first menu item “BUZZER” it is possible to adjust separately for the three alarm types how the quad processor responds to an alarm triggering (also see chapter 10 “Alarm functions”): – line “LOSS” For an alarm signal to sound in case of signal loss at one of the camera inputs (6), adjust the time of the alarm sound (1 – 99 seconds) in the line. If no alarm signal is to sound in case of loss of a video signal, set the line to “OFF”. – line “MOTION” For an alarm signal to sound in case of alarm triggering by the internal motion detector and the alarm relay to respond, adjust the alarm time (1 – 99 seconds) in this line. After the alarm time has expired, the alarm buzzer is switched off and the alarm relay is reset. If neither the buzzer nor the relay is to respond in case of alarm triggering by the internal motion detector, set the line to “OFF”. – line “ALARM” For an alarm signal to sound in case of alarm triggering by a connected alarm sensor and the alarm relay to respond, adjust the alarm time (1 – 99 seconds) in this line. After the alarm time has expired, the alarm buzzer is switched off and the alarm relay is reset. If neither the buzzer nor the relay is to respond in case of external alarm, set the line to “OFF”. Via the second menu item “MIRROR” a mirror-inverted display of the picture can be switched ON for each camera channel. Via the third menu item “BORDER” it can be selected how the quad picture appears on the screen: – “WHITE”: white separating lines between the four camera pictures – “BLACK”: black separating lines between the four camera pictures – “OFF”: no separating lines between the four camera pictures Select the respective line with the button make the adjustment with the button or or . and To exit the submenu and to return to the main menu, keep the button “Set/AUTO” pressed for 2 seconds. 14 9.8 KEY LOCK 10.3 External alarm Select the line “KEY LOCK” with the button or and switch the key lock ON or OFF with the button or . If the adjustment “ON” has been selected, the buttons (1) – (4) are locked with the on-screen menu not called so that it is not possible any more to change the display formats for the live surveillance. However, the menu can still be called and operated with the keys “Set/AUTO” and , , , and . When the unit records an external alarm at an alarm input and an alarm time has been adjusted in the menu “OTHER” (chapter 9.7) in the line “ALARM”: – the unit switches for live surveillance to the full screen picture of the channel concerned (If an external alarm is triggered for several channels at the same time, the unit switches every 2 seconds between the full screen pictures of the channels concerned.) – an alarm signal sounds – the alarm relay responds After the alarm time has expired, the alarm buzzer is switched off, the alarm relay is reset, and the unit changes to the quad mode (to terminate all alarm proceedings before the alarm time has expired, press any button). However, if the adjustment “OFF” has been selected in the menu “OTHER” in the line “ALARM”, the unit switches to quad picture. No alarm sound will be emitted and the alarm relay is deactivated. 10 Alarm Functions An alarm can be triggered by: – the loss of the signal at one of the camera inputs (6), e. g. in case of a camera defect – the internal video motion detector – an alarm sensor connected to the jack ALARM (10) [external alarm] Each alarm triggering will be recorded with date and time in an event list (chapter 9.5). 10.1 Loss of a video signal 11 Specifications If the unit records the loss of a video signal, the insertion “L1234” appears in the quad and PIP formats and the number corresponding to the channel concerned flashes. If an alarm time has been adjusted in the menu “OTHER” (chapter 9.7) in the line “LOSS”, an alarm signal sounds for the time of the alarm (to switch off the alarm buzzer before the alarm time has expired, press any button). However, if the adjustment “OFF” has been selected in the line “LOSS”, no alarm sound will be emitted. As soon as a video signal is present at the input, the alarm is automatically switched off. Synchronization: . . . . . CCIR, horizontal 15 625 Hz, vertical 50 Hz 10.2 Alarm triggering by the internal motion detector Ambient temperature: . 0 – 40 °C In case of a movement recognition “M1234” is shortly inserted in the quad format and PIP format. The number which corresponds to the channel concerned flashes. If an alarm time has been adjusted in the menu “OTHER” (chapter 9.7) in the line “MOTION”, an alarm signal sounds and the alarm relay responds. After the alarm time has been expired, the alarm buzzer is switched off and the alarm relay is reset (to switch off the buzzer and to reset the relay before the alarm time has expired, press any button). However, if in the line “MOTION” the adjustment “OFF” has been selected, no alarm sound is emitted and the alarm relay is deactivated. Note: The motion recognition must be switched on for the respective channel (→ chapter 9.4, menu “SENSITIVITY”), otherwise no alarm will be triggered. GB Colour standard: . . . . . PAL, NTSC Resolution: . . . . . . . . . 720 × 576 pixels (hor. × vert.) Picture frequency: . . . 50 fields/s Video level: . . . . . . . . . 1 Vpp/75 Ω Alarm 4 alarm inputs: . . . . . closing contact (NO) with common ground 1 alarm output: . . . . . relay with change-over contact (NO/NC), max. switching load: 12 V /1 A, 24 V~/1 A Power supply: . . . . . . . 12 V /1 A (via supplied power supply unit connected to 100 – 240 V~, 50/60 Hz) Dimensions: . . . . . . . . 210 × 50 × 215 mm Weight: . . . . . . . . . . . . 1.7 kg Connections video connections: . . BNC jacks alarm connection: . . 9-pole Sub D jack power supply: . . . . . low voltage jack for a plug with the dimensions 5.5/2.1 mm (∅ outside/inside) centre contact = positive pole Subject to technical modification. All rights reserved by MONACOR ® INTERNATIONAL GmbH & Co. KG. No part of this instruction manual may be reproduced in any form or by any means for any commercial use. 15 F B CH 1 Eléments et branchements → voir schémas page 2 1.1 Face avant 1 Touche “ /ZOOM” pour le mode Quad et la fonction Zoom a pour commuter sur lʼimage Quad, appuyez brièvement sur la touche, en mode Quad, la LED audessus de la touche brille. b pour activer/désactiver la fonction zoom (possible uniquement en mode image plein écran), maintenez la touche enfoncée 2 secondes : si la fonction est activée, “(Z)” sʼaffiche. Vous trouverez plus dʼinformations sur cette fonction → chapitre 7.2.1 2 Touche “Seq/PIP” pour la commutation de séquence et le format dʼaffichage “image dans lʼimage” a pour activer/désactiver la commutation de séquence, appuyez brièvement sur la touche, la LED au-dessus de la touche brille lorsque la fonction est activée. b pour appeler/quitter le format dʼaffichage “image dans lʼimage”, maintenez la touche enfoncée 2 secondes. Vous trouverez plus dʼinformations sur le réglage des canaux pour ce format → chapitre 7.4. 3 Touches numériques ou touches curseur a pour la sélection des canaux pour une visualisation image plein écran b pour naviguer sur le menu écran (touches et ) ou pour modifier les réglages dans le menu écran (touches et ) 4 Touche “Fz/VCR PLAY” pour la fonction Gel dʼimage et le fonctionnement lecture magnétoscope a Pour allumer/éteindre la fonction Gel (possible uniquement en mode image plein écran), appuyez brièvement sur la touche, lorsque la fonction est activée, la LED au-dessus de la touche brille et “(F)” sʼaffiche. b Pour allumer/éteindre le fonctionnement lecture magnétoscope, maintenez la touche enfoncée 2 secondes ; lorsque la fonction est activée, la LED au-dessus de la touche brille et “VCR PLAYBACK” sʼaffiche. 5 Touche “Set/AUTO” pour le menu écran a pour appeler le menu principal ou un sousmenu, appuyez brièvement sur la touche, la LED au-dessus de la touche brille lorsque le menu écran est appelé. b pour quitter le menu écran ou un sous-menu, maintenez la touche enfoncée 2 secondes. 1.2 Face arrière 6 Prises dʼentrée BNC “VIDEO 1” à “VIDEO 4” pour brancher les caméras 7 Sélecteurs dʼimpédance 1 à 4 pour les entrées vidéo “VIDEO 1” à “VIDEO 4” (6) : 16 8 9 10 11 12 13 2 – position supérieure de lʼinterrupteur 75 Ω lʼentrée est terminée avec 75 Ω ; nécessaire si aucun appareil nʼest relié à la sortie de repiquage correspondante “LOOP” (12). – position inférieure de lʼinterrupteur ∞ lʼentrée est haute impédance ; nécessaire lorsquʼun autre appareil est relié à la sortie de repiquage correspondante “LOOP”. Entrée lecture “VCR IN” pour la lecture magnétoscope : branchement à la sortie vidéo du magnétoscope Sorties vidéo “MON 1” et “MON 2” pour brancher deux moniteurs Prise Sub-D 9 pôles “ALARM” pour les branchements dʼalarme (→ schéma 4) pin 1 : entrée alarme 1 pin 2 : entrée alarme 2 pin 3 : entrée alarme 3 pin 4 : entrée alarme 4 pin 6 : masse pin 6 : masse pin 7 : sortie alarme : contact NO du relais pin 8 : sortie alarme : contact commun du relais pin 9 : sortie alarme : contact NC du relais Prise dʼalimentation “DC 12V 1A” pour brancher le bloc secteur livré Prises de sortie BNC “LOOP 1” à “LOOP 4” pour sortir les signaux repiqués des entrées “VIDEO 1” à “VIDEO 4” (6) Prise de sortie BNC “VCR OUT” pour lʼenregistrement magnétoscope de lʼimage quad : branchement à lʼentrée vidéo du magnétoscope Conseils dʼutilisation et de sécurité Les appareils (séquenceur quad et bloc secteur) répondent à toutes les directives nécessaires de lʼUnion Européenne et portent donc le symbole . AVERTISSEMENT Le bloc secteur est alimenté par une tension dangereuse. Ne touchez jamais lʼintérieur de lʼappareil car, en cas de mauvaise manipulation, vous pourriez subir une décharge électrique. Respectez scrupuleusement les points suivants : G Les appareils ne sont conçus que pour une utilisation en intérieur. Protégez-les de tout type de projections dʼeau, des éclaboussures, dʼune humidité de lʼair élevée et de la chaleur (plage de température de fonctionnement autorisée : 0 – 40 °C). G En aucun cas, vous ne devez poser dʼobjet contenant du liquide ou un verre sur le séquenceur quad. G Ne faites jamais fonctionner le séquenceur quad ou débranchez immédiatement le bloc secteur lorsque : 1. des dommages visibles sur les appareils apparaissent, 2. après une chute ou accident similaire, vous avez un doute au sujet de lʼétat de lʼappareil. 3. des défaillances apparaissent. Dans tous les cas, les dommages doivent être réparés par un technicien spécialisé. G Pour nettoyer les appareils, utilisez uniquement un chiffon sec et doux, en aucun cas de produits chimiques ou dʼeau. G Nous déclinons toute responsabilité en cas de dommages matériels ou corporels résultants si les appareils sont utilisés dans un but autre que celui pour lequel ils ont été conçus, sʼils ne sont pas correctement branchés, utilisés ou réparés par une personne habilitée ; en outre, la garantie deviendrait caduque. Lorsque les appareils sont définitivement retirés du service, vous devez les déposer dans une usine de recyclage à proximité pour contribuer à leur élimination non polluante. 3 Possibilités dʼutilisation Ce séquenceur quad vidéo couleur est conçu pour une utilisation dans des installations de vidéo surveillance. Lʼappareil permet une surveillance live dans divers formats dʼaffichage (image plein écran, image quad, image dans lʼimage, zoom digital). En outre, il est possible de connecter un magnétoscope pour lʼenregistrement et la lecture consécutive. Lʼenregistrement des images sʼeffectue exclusivement en format quad, indépendamment de la visualisation moniteur choisie pour la surveillance live. Lʼappareil dispose dʼun détecteur vidéo interne de mouvements, la détection de mouvements se règle séparément pour chaque canal. Une entrée dʼalarme est attribuée à chaque canal pour lʼexploitation dʼune alarme externe. Un relais avec contact de commutation NO/NC permet de traiter une alarme avec un appareil externe. Tous les événements dʼalarme sont référencés et peuvent être visualisés sur le menu écran. 4 Montage en rack Lʼappareil peut être posé sur une table ou placé dans un rack 482 mm/19" via les deux étriers de montage livrés. Pour le montage en rack, dévissez les vis sur le côté gauche et le côté droit et vissez les étriers de montage avec les vis livrées selon le schéma 3. Une unité est nécessaire (= 44,45 mm). 5 Branchements vidéo et dʼalarme 5.1 Signaux de caméra Quatre caméras au plus peuvent être reliées aux prises dʼentrée “VIDEO 1” à “VIDEO 4” (6). Si un signal de caméra doit être exploité sur une autre installation vidéo, il peut être pris à la sortie pour repiquage située dessous “LOOP” (12) et redirigé. Lʼadaptation dʼimpédance sʼeffectue via lʼinterrupteur DIP (7) correspondant, dans ce cas, il faut le régler sur la position inférieure sur “∞” (haute impédance). Si aucun appareil nʼest relié à la sortie pour repiquage, mettez lʼinterrupteur correspondant sur la position supérieure “75 Ω” pour une terminaison correcte de la ligne. F B CH 5.2 Moniteurs Deux moniteurs au plus peuvent être reliés aux prises “MON 1” et “MON 2” (9). Les mêmes formats dʼaffichage et le menu écran peuvent être appelés sur les deux moniteurs. 5.3 Magnétoscope Pour enregistrer les images des caméras, reliez lʼentrée vidéo dʼun magnétoscope à la prise “VCR OUT” (13). Le signal dʼenregistrement à la sortie “VCR OUT” est, indépendamment de la visualisation choisie sur le moniteur pour la surveillance live, toujours en image quad. Pour la lecture dʼenregistrements, reliez la sortie vidéo du magnétoscope à la prise “VCR IN” (8). 5.4 Connexions dʼalarme (schéma 4) Via la prise Sub-D 9 pôles “ALARM” (10), quatre entrées dʼalarme et une sortie dʼalarme sont disponibles. Des détecteurs de mouvements p. ex. ou des barrières lumineuses, équipés dʼun contact de fermeture (NO = normally open) peuvent être installés comme capteurs dʼalarme. Reliez les capteurs respectivement à la masse (pin 5 ou 6) et aux contacts suivants : capteur pour canal 1 au pin 1 capteur pour canal 2 au pin 2 capteur pour canal 3 au pin 3 capteur pour canal 4 au pin 4 Un relais avec contact de commutation est disponible comme sortie dʼalarme flottante. Un capteur dʼalarme acoustique ou optique ou lʼentrée alarme dʼun magnétoscope peut être relié à la sortie alarme. En état normal, le contact NC (pin 9) est fermé contre le contact commun COM (pin 8) et le contact NO (pin 7) ouvert. En cas dʼalarme, le contact NC est ouvert et le contact NO se ferme contre le contact commun COM. 6 Fonctionnement Reliez le bloc secteur livré à la prise “DC 12V 1A” (11) puis à une prise secteur (100 – 240 V~, 50/60 Hz) : lʼappareil est ainsi allumé. Après la mise en fonction, un bref signal est audible, lʼappareil passe en image quad. Réglez tout dʼabord la norme couleur avec laquelle les appareils reliés fonctionnent. Pour ce faire, appuyez simultanément sur les trois touches : PAL: “Fz” (4) + “Set” (5) + “2” (3) NTSC: “Fz” (4) + “Set” (5) + “3” (3) Via le menu écran, le processeur quad peut être réglé selon les besoins spécifiques à chaque utilisation → chapitre 9. 17 F B CH 7 Surveillance live 7.1 Image quad (image divisée en 4) Pour commuter sur lʼimage quad, appuyez brièvement sur la touche “ /ZOOM” (1), la LED au-dessus brille : en mode quad, lʼécran est divisé en quatre segments pour visualiser simultanément jusquʼà quatre canaux de caméras. Si aucune caméra nʼest reliée à une entrée de caméra, le segment correspondant est assombri et “NO VIDEO” sʼaffiche dans le segment. 7.2 Image plein écran Pour commuter sur la visualisation image plein écran dʼun canal de caméra, appuyez sur la touche numérique correspondante (3). La LED au-dessus de la touche correspondante brille. 7.2.1 Fonction zoom En image plein écran, on peut zoomer sur un segment, cʼest-à-dire quʼil peut être affiché agrandi deux fois. 1) Pour commuter en mode zoom, maintenez la touche “ /ZOOM” (1) enfoncée deux secondes. Sur lʼimage, “(Z)” sʼaffiche et en haut à gauche un cadre délimitant le segment dʼimage qui doit être affiché agrandi. 2) Avec les touches , , et (3), déplacez le cadre selon le segment voulu. 3) Pour afficher le segment choisi plus grand, appuyez brièvement sur la touche “ /ZOOM”. Pour revenir au mode de sélection pour le segment dʼimage, appuyez une nouvelle fois brièvement sur la touche. 4) Pour quitter complètement le mode zoom, maintenez la touche “ /ZOOM” enfoncée deux secondes. Lʼappareil revient à lʼimage quad. 7.2.2 Fonction Freeze (gel – image fixe) En visualisation image plein écran, on peut geler lʼimage en cours, cʼest-à-dire lʼafficher en image fixe. Pour activer la fonction Gel, appuyez brièvement sur la touche “Fz/VCR PLAY” (4) : la LED au-dessus de la touche brille et sur lʼimage, “(F)” sʼaffiche. Pour désactiver la fonction, appuyez une nouvelle fois brièvement sur la touche. 7.3 Commutation de séquence Pour activer ce mode de fonctionnement, appuyez brièvement sur la touche “Seq/PIP” (2) : la commutation automatique des canaux de caméras et de lʼimage quad démarre. La LED au-dessus de la touche brille. En plus, la LED de la vue en cours brille. Les canaux de caméra sans signal vidéo valable sont automatiquement sautés lors de la commutation de séquences dʼimages. Dans le menu AUTO SEQUENCE (chapitre 9.6), on peut régler la suite dʼimage souhaitée et la durée dʼaffichage. Pour quitter la commutation de séquence, appuyez une nouvelle fois brièvement sur la touche “Seq/PIP” ou activez une autre touche sur lʼappareil. 18 7.4 Image dans lʼimage (PIP = picture in picture) Pour commuter sur le mode “image dans lʼimage”, maintenez la touche “Seq/PIP” (2) enfoncée 2 secondes : sur lʼécran, lʼimage plein écran du canal 1 dans laquelle lʼimage du canal 2 est incrustée en bas à droite à 1/4 de sa taille, est visible. 1) Tant que dans lʼimage plein écran, le nom du canal clignote, le canal pour la visualisation plein écran peut être sélectionné avec la touche ou (3). Une fois le canal sélectionné, appuyez sur la touche “Seq/PIP” pour confirmer : le canal apparaît en image plein écran, la LED correspondante du canal clignote. 2) Une fois la sélection du canal pour lʼimage plein écran confirmée, le nom pour le canal clignote dans lʼimage réduite. Tant quʼil clignote, le canal pour lʼincrustation de lʼimage peut être sélectionné avec la touche ou . Une fois le canal sélectionné, appuyez sur la touche “Seq/PIP” pour confirmer : le canal apparaît en incrustation, la LED correspondante du canal brille. 3) Pour quitter ce format dʼaffichage, maintenez la touche “Seq/PIP” enfoncée 2 secondes. 8 Lecture dʼun enregistrement Maintenez la touche “Fz/VCR PLAY” (4) enfoncée 2 secondes : la LED au-dessus brille. Sur lʼécran, on peut voir les images enregistrées au format quad et le message “VCR PLAYBACK”. – Pour mieux voir lʼimage dʼun canal, appuyez sur la touche numérique (3) du canal : le quart correspondant de lʼimage quad est agrandi en image plein écran et dans lʼimage “(Z)” sʼaffiche pour signaler le zoom. Pour revenir à lʼimage quad, appuyez sur la touche “ /ZOOM” (1). – Pour geler lʼimage pendant la lecture, appuyez brièvement sur la touche “Fz/VCR PLAY” (4). “(F)” pour “Freeze” sʼaffiche dans lʼimage. Pour désactiver la fonction Gel, appuyez brièvement sur la touche. Pour quitter le mode de lecture magnétoscope, maintenez la touche “Fz/VCR PLAYBACK” enfoncée 2 secondes. Conseils : a) Pendant le mode lecture magnétoscope, aucun déclenchement dʼalarme via le détecteur vidéo interne de mouvement nʼest possible. b) Les noms déterminés dans le menu TITLE SETUP (chapitre 9.1) pour les canaux des caméras ne sont affichés dans les images enregistrées que lorsque le format quad a été sélectionné au moment de lʼenregistrement pour la surveillance live. c) Les messages dʼalarme “L1234” (en cas de perte dʼun signal vidéo, voir chapitre 10.1) et “M1234” (lorsque le détecteur vidéo interne de mouvements réagit, voir chapitre 10.2), ne sʼaffichent dans les images enregistrées que lorsquʼau moment de lʼenregistrement pour la surveillance live, le format quad ou le format PIP a été sélectionné. 9 Réglages via le menu écran Pour régler de manière optimale lʼappareil par rapport à lʼinstallation de surveillance, de nombreux paramètres de fonctionnement peuvent se régler via le menu écran. Pour lʼutilisation du menu, les touches suivantes sont nécessaires : – touche “Set/AUTO” (5) : pour appeler (touche enfoncée brièvement) et pour quitter (touche maintenue enfoncée 2 secondes) les pages du menu. – touches , , et (3) : et pour naviguer dans le menu et pour modifier les réglages Pour appeler le menu (impossible en mode lecture magnétoscope) appuyez brièvement sur la touche “Set/AUTO” : lʼappareil passe en mode quad et la page du menu principal sʼaffiche. MENU: TITLE SETUP DATE/TIME DECODER SETUP SENSITIVITY EVENT LIST AUTO SEQUENCE OTHER KEY LOCK : OFF Sélectionnez le sous-menu souhaité avec la touche ou . Le sous-menu sélectionné clignote. Pour quitter le menu principal, maintenez la touche “Set/AUTO” enfoncée 2 secondes ; si aucune touche nʼest activée lorsque le menu écran est appelé pour 15 secondes, le menu sʼéteint automatiquement. 9.1 TITLE SETUP (déterminer le nom du canal) Si le sous-menu “TITLE SETUP” est sélectionné, appuyez brièvement sur la touche “Set/AUTO” pour lʼappeler. TITLE SETUP: CH1 CH2 CH3 CH4 : : : : CHANNEL1 CHANNEL2 CHANNEL3 CHANNEL4 Dans ce menu, on peut fixer un nom pour chaque canal, il sera affiché dans lʼimage [pour la surveillance live, lʼincrustation se fait dans chaque format dʼaffichage ; pour les images enregistrées via la prise “VCR OUT” (13), voir conseil b, chapitre 8]. Conseil : lorsque le menu écran est appelé, les noms de caméras ne sʼaffichent pas. Avec la touche ou , sélectionnez lʼendroit respectif et avec la touche ou , sélectionnez le signe voulu. Pour quitter le sous-menu et revenir au menu principal, maintenez la touche “Set/AUTO” enfoncée 2 secondes. 9.2 DATE/TIME (réglage date et heure) Si le sous-menu “DATE/TIME” est sélectionné, appuyez brièvement sur la touche “Set/AUTO” pour lʼappeler. DATE/TIME: F DATE : 24-01-07 TIME : 22:30:13 SHOW : YES B CH Dans ce menu, on peut régler : – dans la ligne “DATE”, la date actuelle (jour – mois – année) – dans la ligne “TIME”, lʼheure actuelle (heures, minutes, secondes) – dans la ligne “SHOW” : “YES” (date et heure affichées) ou “NO” (date et heure non affichées). Avec la touche ou , sélectionnez la position correspondante et avec la touche ou , effectuez le réglage. Pour quitter le sous-menu et revenir au menu principal, maintenez la touche “Set/AUTO” enfoncée 2 secondes. 9.3 DECODER SETUP (réglages d’images) Si le sous-menu “DECODER SETUP” est sélectionné, appuyez brièvement sur la touche “Set/AUTO” pour lʼappeler. BRIGHTNESS:33 CONTRAST:33 SHARPNESS:33 SAT_U:33 SAT_V:33 HUE:33 BRIGHTNESS:33 CONTRAST:33 SHARPNESS:33 SAT_U:33 SAT_V:33 HUE:33 BRIGHTNESS:33 CONTRAST:33 SHARPNESS:33 SAT_U:33 SAT_V:33 HUE:33 BRIGHTNESS:33 CONTRAST:33 SHARPNESS:33 SAT_U:33 SAT_V:33 HUE:33 Ce menu permet dʼadapter les signaux vidéo des quatre canaux de caméra pour la luminosité (“BRIGHTNESS”), contraste (“CONTRAST”), netteté (“SHARPNESS”), saturation des couleurs (“SAT_U” et “SAT_V”) et la couleur (“HUE”). Avec la touche ou , sélectionnez la ligne correspondante et avec la touche ou , sélectionnez la valeur (plage de réglage 0 – 63). Pour quitter le sous-menu et revenir au menu principal, maintenez la touche “Set/AUTO” enfoncée 2 secondes. 9.4 SENSITIVITY (réglage du détecteur de mouvements) Si le sous-menu “SENSITIVITY” est sélectionné, appuyez brièvement sur la touche “Set/AUTO” pour lʼappeler. SENSITIVITY: CH1 CH2 CH3 CH4 : : : : OFF OFF OFF OFF Ce menu permet de régler pour chaque canal la sensibilité pour le détecteur vidéo interne de mouvements [“1” (min.) à “7” (max.)] ou de désactiver complètement la détection de mouvement (“OFF”). 19 F B CH Avec la touche ou , sélectionnez la ligne correspondante et avec la touche ou , effectuez le réglage. 9.7 OTHER (réglages d’alarme, réglages pour inverser l’image et affichage de l’image quad) Pour quitter le sous-menu et revenir au menu principal, maintenez la touche “Set/AUTO” enfoncée 2 secondes. Si le sous-menu “OTHER” est sélectionné, appuyez brièvement sur la touche “Set/AUTO” pour lʼappeler. OTHER: 9.5 EVENT LIST (protocole d’alarme) Si le sous-menu “EVENT LIST” est sélectionné, appuyez brièvement sur la touche “Set/AUTO” pour lʼappeler. EVENT LIST: (PAGE1) NO CH A/L/M DD-MM-YY HH:MM:SS 01 1 A 22-01-07 20:15:13 02 4 L 19-01-07 15:21:40 03 3 A 06-01-07 03:39:28 04 4 M 05-01-07 01:03:34 Dans ce menu, on peut lister les 20 derniers événements dʼalarme, numérotés en suivant et triés selon le moment dʼintervention, sur deux pages de menu. Avec les touches , , et , on peut changer de page. Selon le numéro de liste (colonne “NO”), sont indiqués : – le canal concerné par lʼalarme (colonne “CH”) – le type dʼalarme (colonne “A/L/M”) : A = alarme externe L = perte de signal vidéo M = alarme par le détecteur interne de mouvements – la date de lʼalarme (colonne “DD-MM-YY”) – lʼheure de lʼalarme (colonne “HH:MM:SS”) Pour quitter le sous-menu et revenir au menu principal, maintenez la touche “Set/AUTO” enfoncée 2 secondes. 9.6 AUTO SEQUENCE (réglages pour la commutation de séquences) Si le sous-menu “AUTO SEQUENCE” est sélectionné, appuyez brièvement sur la touche “Set/AUTO” pour lʼappeler. AUTO SEQUENCE: CH1 CH2 CH3 CH4 QUAD TIME : : : : : : ON ON ON ON ON 05 SEC Ce menu permet dʼactiver (“ON”) ou désactiver (“OFF”) chaque canal de caméra et lʼimage quad pour la commutation de séquence (→ chapitre 7.3). Dans la ligne “TIME”, la durée dʼaffichage (1 – 99 secondes) peut être réglée. Avec la touche ou , sélectionnez la ligne correspondante et avec la touche ou , sélectionnez le réglage. Pour quitter le sous-menu et revenir au menu principal, maintenez la touche “Set/AUTO” enfoncée 2 secondes. 1.BUZZER: LOSS : 05 SEC MOTION : 05 SEC ALARM : 05 SEC 2.MIRROR: CH1 CH2 CH3 CH4 : : : : OFF OFF OFF OFF 3.BORDER : WHITE Via le point 1 du menu “BUZZER”, réglez, séparément pour les trois types dʼalarme, la façon dont le séquenceur réagit à un déclenchement dʼalarme (voir chapitre 10 “fonctions dʼalarme”) : – ligne “LOSS” Si en cas de perte de signal à une des entrées de caméra (6), un signal dʼalarme doit retentir, réglez la durée du signal dʼalarme (1 – 99 secondes) dans la ligne. Si en cas de perte de signal vidéo aucun signal ne doit retentir, mettez la ligne sur “OFF”. – ligne “MOTION” Si en cas de déclenchement dʼalarme par le détecteur interne de mouvements, un signal dʼalarme doit retentir, et si le relais dʼalarme doit répondre, réglez la durée de lʼalarme (1 – 99 secondes) dans la ligne. Une fois la durée écoulée, le buzzer est déconnecté et le relais est réinitialisé. Si en cas de déclenchement par le détecteur interne de mouvements ni le buzzer ni le relais ne doivent répondre, mettez la ligne sur “OFF”. – ligne “ALARM” Si en cas de déclenchement dʼalarme par un capteur dʼalarme relié, un signal dʼalarme doit retentir, et si le relais dʼalarme doit répondre, réglez la durée de lʼalarme (1 – 99 secondes) dans la ligne. Une fois la durée écoulée, le buzzer est déconnecté et le relais est réinitialisé. Si en cas dʼalarme externe, ni le buzzer ni le relais ne doivent répondre, mettez la ligne sur “OFF”. Via le point 2 du menu “MIRROR”, pour chaque canal de caméra, lʼimage peut être inversée (“ON”). Via le point 3 du menu “BORDER”, on peut sélectionner la façon dont lʼimage quad apparaît sur lʼécran : – “WHITE” : lignes banches de séparation entre les quatre images des caméras – “BLACK” : lignes noires de séparation entre les quatre images des caméras – “OFF” : aucune ligne de séparation entre les quatre images des caméras Avec les touches ou , sélectionnez la ligne correspondante et effectuez le réglage avec la touche ou . Pour quitter le sous-menu et revenir au menu principal, maintenez la touche “Set/AUTO” enfoncée 2 secondes. 20 9.8 KEY LOCK (verrouillage) 10.3 Alarme externe Avec la touche ou , sélectionnez la ligne “KEY LOCK” et avec la touche ou , activez le verrouillage des touches (“ON”) ou désactivez-le (“OFF”). Si le réglage “ON” est sélectionné, les touches (1) à (4) sont verrouillées lorsque le menu écran nʼest pas appelé de telle sorte que pour une surveillance live, un changement des formats dʼaffichage nʼest plus possible. Le menu peut cependant être appelé et utilisé avec les touches “Set/AUTO” et , , et . Si lʼappareil enregistre une alarme externe à une des entrées dʼalarme et si dans le menu “OTHER” (chapitre 9.7) une durée dʼalarme est réglée dans la ligne “ALARM” : – lʼappareil commute sur lʼimage plein écran du canal concerné pour la surveillance live. (Si une alarme externe est déclenchée simultanément pour plusieurs canaux, lʼappareil commute toutes les deux secondes entre les images plein écran des canaux concernés.) – un signal dʼalarme retentit – le relais dʼalarme répond Une fois la durée dʼalarme écoulée, le buzzer est déconnecté, le relais dʼalarme réinitialisé et lʼappareil passe en mode quad (pour quitter tous les processus dʼalarme avant la fin de la durée réglée, appuyez sur une touche). Si en revanche dans le menu “OTHER” dans la ligne “ALARM” le réglage est sur “OFF”, lʼappareil passe en mode quad. Aucun son nʼest émis et le relais dʼalarme est désactivé. 10 Fonctions dʼalarme Une alarme peut être déclenchée par : – la perte du signal à une des entrées de caméras (6), par exemple par un dysfonctionnement de la caméra – le détecteur vidéo interne de mouvements – un capteur dʼalarme relié à la prise ALARM (10) [alarme externe] Chaque déclenchement dʼalarme est listé dans une liste dʼévénements avec mention de la date et de lʼheure (chapitre 9.5). F B CH 11 Caractéristiques techniques 10.1 Perte dʼun signal vidéo Si lʼappareil enregistre une perte de signal vidéo, le message “L1234” sʼaffiche au format Quad et PIP : le chiffre correspondant au canal concerné clignote. Si dans le menu “OTHER” (chapitre 9.7) une durée dʼalarme est réglée dans la ligne “LOSS”, un signal dʼalarme retentit pour la durée de lʼalarme (pour déconnecter le buzzer avant la fin de lʼalarme, appuyez sur une touche). Si dans la ligne “LOSS” en revanche, le réglage “OFF” est sélectionné, aucun son dʼalarme ne retentit. Dès quʼun signal vidéo est à nouveau présent à lʼentrée, lʼalarme est automatiquement déconnectée. 10.2 Déclenchement dʼalarme par le détecteur interne de mouvements En cas de détection de mouvement, au format quad et au format PIP, “M1234” sʼaffiche brièvement : le chiffre correspondant au canal concerné clignote. Si dans le menu “OTHER” (chapitre 9.7) une durée dʼalarme est réglée dans la ligne “MOTION”, un signal dʼalarme retentit et le relais dʼalarme répond. Une fois la durée dʼalarme écoulée, le buzzer est déconnecté et le relais dʼalarme est réinitialisé (pour déconnecter le buzzer et réinitialiser le relais avant la fin de lʼalarme, appuyez sur une touche). Si dans la ligne “MOTION” en revanche, le réglage “OFF” est sélectionné, aucun son dʼalarme ne retentit et le relais dʼalarme est désactivé. Conseil : la détection de mouvements doit être activée pour le canal respectif (→ chapitre 9.4 menu “SENSITIVITY”), sinon aucune alarme nʼest déclenchée. Synchronisation : . . . . . CCIR, horizontal 15 625 Hz, vertical 50 Hz Norme couleur : . . . . . . PAL, NTSC Résolution : . . . . . . . . . 720 × 576 pixel (hor. × vert.) Fréquence des images : 50 trames/s Niveau vidéo : . . . . . . . 1 Vcc/75 Ω Alarme 4 entrées dʼalarme : . fermeture (NO) avec masse commune 1 sortie dʼalarme : . . . relais avec contact de commutation (NO/NC), max. charge : 12 V /1 A, 24 V~/1 A Température fonc. : . . . 0 – 40 °C Alimentation : . . . . . . . . 12 V /1 A (via bloc secteur livré relié à 100 – 240 V~, 50/60 Hz) Dimensions : . . . . . . . . 210 × 50 × 215 mm Poids : . . . . . . . . . . . . . 1,7 kg Branchements Branchements vidéo : prises BNC Branchement alarme : prise Sub-D 9 pôles Alimentation : . . . . . . prise alimentation basse tension pour une fiche aux dimensions 5,5/2,1 mm (∅ extérieur/intérieur), contact médian = pôle plus Tout droit de modification réservé. Notice d'utilisation protégée par le copyright de MONACOR ® INTERNATIONAL GmbH & Co. KG. Toute reproduction même partielle à des fins commerciales est interdite. 21 I 1 Elementi di comando e collegamenti → vedi illustrazioni a pagine 2 1.1 Pannello frontale 1 Tasto “ /ZOOM” per la modalità quad e per la funzione zoom a Per attivare lʼimmagine quad premere brevemente il tasto; durante il funzionamento quad, il LED sopra il tasto rimane acceso. b Per attivare/disattivare la funzione zoom (possibile solo nella modalità a schermo intero) tenere premuto il tasto per 2 secondi; con la funzione attivata si vede “(Z)”. Per altre informazioni sullʼimpostazione della funzione → vedi cap. 7.2.1. 2 Tasto “Seq/PIP” per la rappresentazione sequenziale e per il formato di visualizzazione “immagine nellʼimmagine” a Per attivare/disattivare la rappresentazione sequenziale premere il tasto brevemente; con la funzione attivato, il LED sopra il tasto rimane acceso. b Per chiamare/abbandonare il formato di visualizzazione “immagine nellʼimmagine” tener premuto il tasto per 2 secondi. Per altre informazioni sullʼimpostazione dei canali per questo formato → vedi cap. 7.4. 3 Tasti numerici e freccia a Per selezionare il canale nella rappresentazione a schermo intero b Per navigare nel menù sullo schermo (tasti e ) oppure per modificare le impostazioni nel menù sullo schermo (tasti e ) 4 Tasto “Fz/VCR PLAY” per la funzione immagine ferma (freeze) e per la riproduzione con il videoregistratore a Per attivare/disattivare la funzione freeze (possibile solo nella modalità a schermo intero) premere il tasto brevemente, con la funzione attivato, il LED sopra il tasto rimane acceso e si vede “(F)”. b Per attivare/disattivare la riproduzione con il videoregistratore tener premuto il tasto per 2 secondi; con la funzione attivato, il LED sopra il tasto rimane acceso e si vede “VCR PLAYBACK”. 5 Tasto “Set/AUTO” per il menù sullo schermo a Per chiamare il menù principale o un sottomenù premere il tasto brevemente; con il menù presente sullo schermo, il LED sopra il tasto rimane acceso. b Per uscire dal menù principale o da un sottomenù tener premuto il tasto per 2 secondi. 1.2 Pannello posteriore 6 Prese dʼingresso BNC “VIDEO 1” a “VIDEO 4” per il collegamento delle telecamere 7 Commutatore dellʼimpedenza 1 a 4 per gli ingressi video “VIDEO 1” a “VIDEO 4” (6): posizione superiore del commutatore 75 Ω Lʼingresso è terminato con 75 Ω; obbligatorio 22 8 9 10 11 12 13 2 quando alla relativa uscita passante “LOOP” (12) non è collegato nessun apparecchio. posizione inferiore del commutatore ∞ Lʼingresso è ad alta impedenza; obbligatorio quando alla relativa uscita passante “LOOP” (12) è collegato un ulteriore apparecchio. Ingresso di riproduzione “VCR IN” per la riproduzione con un videoregistratore: collegamento con lʼuscita video del registratore Uscite video “MON 1” e “MON 2” per il collegamento di due monitor Presa sub-D 9 poli “ALARM” per i contatti dʼallarme (→ Fig. 4) Pin 1: Ingresso allarme 1 Pin 2: Ingresso allarme 2 Pin 3: Ingresso allarme 3 Pin 4: Ingresso allarme 4 Pin 5: Massa Pin 6: Massa Pin 7: Uscita allarme: contatto NA del relè Pin 8: Uscita allarme: contatto comune del relè Pin 9: Uscita allarme: contatto NC del relè Presa dʼalimentazione “DC 12V 1A” per il collegamento dellʼalimentatore in dotazione Prese dʼuscita BNC “LOOP 1” a “LOOP 4” per far uscire il segnale fatto passare degli ingressi “VIDEO 1” a “VIDEO 4” (6) Presa dʼuscita BNC “VCR OUT” per la registrazione dellʼimmagine quad con un videoregistratore: collegamento con lʼingresso video del registratore Avvertenze di sicurezza Gli apparecchi (processore quad e alimentatore a spina) sono conformi a tutte le direttive richieste dellʼUE e pertanto porta la sigla . AVVERTIMENTO Lʼalimentatore funziona con pericolosa tensione di rete. Non intervenire mai personalmente al suo interno! La manipolazione scorretta può provocare una scarica elettrica pericolosa. Si devono osservare assolutamente anche i seguenti punti: G Gli apparecchi sono previsti solo per lʼuso allʼinterno di locali. Proteggerli dallʼacqua gocciolante e dagli spruzzi dʼacqua, da alta umidità dellʼaria e dal calore (temperatura dʼimpiego ammessa fra 0 e 40 °C). G Non depositare sul processore quad dei contenitori riempiti di liquidi, p. es. bicchieri. G Non mettere in funzione il processore quad e staccare subito lʼalimentatore dalla rete se: 1. gli apparecchi presentano dei danni visibili; 2. dopo una caduta o dopo eventi simili sussiste il sospetto di un difetto; 3. gli apparecchi non funzionano correttamente. G G Per la riparazione rivolgersi sempre ad unʼofficina competente. Per la pulizia usare solo un panno morbido, asciutto; non impiegare in nessun caso prodotti chimici o acqua. Nel caso dʼuso improprio, di collegamenti sbagliati, dʼimpiego scorretto o di riparazione non a regola dʼarte degli apparecchi, non si assume nessuna responsabilità per eventuali danni consequenziali a persone o a cose e non si assume nessuna garanzia per gli apparecchi. Se si desidera eliminare gli apparecchi definitivamente, consegnarli per lo smaltimento ad unʼistituzione locale per il riciclaggio. 3 Possibilità dʼimpiego Questo processore video quad a colori è stato realizzato per lʼimpiego in impianti di sorveglianza video. Lʼapparecchio permette la sorveglianza video con vari formati di visualizzazione (a schermo intero, immagine quad, immagini nellʼimmagine, zoom digitale). Inoltre è possibile collegare un videoregistratore per la registrazione con successiva riproduzione. La registrazione dellʼimmagine avviene esclusivamente nel formato quad, indipendentemente dalla rappresentazione sul monitor scelta per la sorveglianza video. Lʼapparecchio dispone di un segnalatore video interno di movimento; il riconoscimento di movimento può essere impostato separatamente per ogni canale. A ogni canale è inoltre assegnato un ingresso dʼallarme per lʼevaluazione dellʼallarme esterno. Un relè con contatto di commutazione NA/NC offre la possibilità di elaborare un allarme con un dispositivo esterno. Tutti gli eventi dʼallarme vengono protocollati e possono essere visionati attraverso il menù sullo schermo. 4 Montaggio in rack Lʼapparecchio può essere collocato su un tavolo oppure può essere montato con i due angoli di montaggio in dotazione in un rack (482 mm/19"). Per il montaggio in rack svitare le viti sul lato destro e sinistro e avvitare i angoli di montaggio con lʼaiuto delle viti in dotazione, come illustrato in fig. 3. Nel rack è richiesta unʼunità di altezza (= 44,45 mm). 5 Contatti video e allarme 5.1 Segnali delle telecamere Alle prese dʼingresso “VIDEO 1” e “VIDEO 4” (6) si possono collegare fino a 4 telecamere. Se il segnale di una telecamera deve essere elaborato su un altro impianto video, tale segnale può essere prelevato alla relativa uscita passante sottostante “LOOP” (12) per essere poi inoltrato. Lʼadattamento dellʼimpedenza avviene per mezzo del relativo dipswitch (7). In questo caso deve essere messo in posizione inferiore su “∞” (alta impedenza). Se allʼuscita passante non è collegato nessun apparecchio, per una corretta terminazione occorre mettere il relativo interruttore in posizione superiore “75 Ω”. I 5.2 Monitor Alle prese “MON 1” e “MON 2” (9) si possono collegare fino a 2 monitor. Con entrambi i monitor si possono chiamare gli stessi formati di visualizzazione e il menù sullo schermo. 5.3 Videoregistratore Per registrare le immagini delle telecamere collegare lʼingresso video di un videoregistratore con la presa “VCR OUT” (13). Il segnale di registrazione allʼuscita “VCR OUT” è sempre quello dellʼimmagine quad, indipendentemente dal tipo di rappresentazione scelto sul monitor per la sorveglianza dal vivo. Per la riproduzione di registrazioni collegare lʼuscita video del videoregistratore con la presa “VCR IN” (8). 5.4 Contatti dʼallarme (fig. 4) Tramite la presa sub-D 9 poli “ALARM” (10) sono disponibili quattro ingressi dʼallarme e unʼuscita dʼallarme. Come sensori dʼallarme si possono usare per esempio dei segnalatori di movimento o delle fotocellule equipaggiati con un contatto di lavoro NA. Collegare i sensori con la massa (pin 5 o 6) e con i seguenti contatti: sensore per canale 1 al pin 1 sensore per canale 2 al pin 2 sensore per canale 3 al pin 3 sensore per canale 4 al pin 4 Come uscita dʼallarme senza potenziale è disponibile un relè con contatto di commutazione. Allʼuscita dʼallarme si può collegare, per esempio, un segnalatore acustico o ottico oppure lʼingresso dʼallarme di un videoregistratore. In condizioni normali, il contatto NC (pin 9) è chiuso contro il comune COM (pin 8) e il contatto NA (pin 7) è aperto. In caso dʼallarme, il contatto NC è aperto e il contatto NA chiude contro il comune COM. 6 Messa in funzione Collegare lʼalimentatore in dotazione con la presa “DC 12V 1A” (11) e inserirlo in una presa di rete (100 – 240 V~, 50/60 Hz): lʼapparecchio è acceso. Dopo la messa in funzione si sente un breve segnale acustico e lʼapparecchio va in modalità quad. Impostare per prima cosa la norma colore con la quale gli apparecchi collegati lavorano. Per fare ciò premere contemporaneamente i tre tasti seguenti: PAL: “Fz” (4) + “Set” (5) + “2” (3) NTSC: “Fz” (4) + “Set” (5) + “3” (3) Attraverso il menù sullo schermo, il processore quad può essere regolato secondo le varie applicazioni → vedi cap. 9. 23 I 7 Sorveglianza dal vivo 7.1 Immagine quad (quadrupla) Per attivare lʼimmagine quad, premere brevemente il tasto “ /ZOOM” (1), il LED sovrastante si accende: nella modalità quad, per la rappresentazione contemporanea di un massimo di 4 telecamere, lo schermo viene suddiviso in quattro parti. Se ad un ingresso non è collegato nessuna telecamera, il relativo quarto di schermo rimane buio e si legge “NO VIDEO”. 7.2 Immagine a schermo intero Per passare alla rappresentazione a schermo intero di un canale premere il relativo tasto numerico (3). Il LED sopra il tasto si accende. 7.2.1 Funzione zoom Nella rappresentazione a schermo intero è possibile zoomare un particolare dellʼimmagine che può essere ingrandito due volte. 1) Per attivare la modalità zoom, tener premuto il tasto “ /ZOOM” (1) per 2 secondi. Nellʼimmagine appare “(Z)” e in alto a sinistra una cornice che delimita il particolare da ingrandire. 2) Con i tasti , , e (3) si sposta la cornice sul particolare desiderato. 3) Per visualizzare il particolare ingrandito, premere brevemente il tasto “ /ZOOM”. Per ritornare alla modalità di selezione del particolare, premere ancora brevemente il tasto. 4) Per uscire dalla modalità zoom, tener premuto il tasto “ /ZOOM” per 2 secondi. Lʼapparecchio passa allʼimmagine quad. 7.2.2 Funzione freeze (immagine ferma) Durante la rappresentazione a schermo intero è possibile “congelare” lʼimmagine attuale che viene visualizzata come immagine ferma. Per attivare la funzione freeze, premere brevemente il tasto “Fz/VCR PLAY” (4): il LED sopra il tasto si accende e nellʼimmagine si vede “(F)”. Per disattivare la funzione premere unʼaltra volta brevemente il tasto. 7.3 Rappresentazione sequenziale Per attivare questa modalità, premere brevemente il tasto “Seq/PIP” (2): la sequenza automatica dei canali delle telecamere e dellʼimmagine quad viene avviata. Il LED sopra il tasto si accende. In più è acceso il LED della visualizzazione in funzione in quel momento. I canali senza segnale video valido vengono saltati automaticamente durante la rappresentazione sequenziale. Nel menù AUTO SEQUENCE (cap. 9.6) si possono impostare lʼordine desiderato delle immagini e la loro durata sullo schermo. Per terminare la rappresentazione sequenziale premere ancora brevemente il tasto “Seq/PIP” o azionare un altro tasto dellʼapparecchio. 24 7.4 Immagine nellʼimmagine (PIP = picture-in-picture) Per attivare la modalità PIP tener premuto per 2 secondi il tasto “Seq/PIP” (2): sullo schermo appare lʼimmagine a schermo intero del canale 1 dove, in basso a destra, è inserita lʼimmagine del canale 2 con un quarto di grandezza. 1) Finché il nome del canale lampeggia nellʼimmagine a schermo intero, con il tasto o (3) si può scegliere il canale per la rappresentazione a schermo intero. Dopo la scelta del canale premere “Seq/PIP” per conferma: il canale appare a schermo intero e il LED del canale si accende. 2) Dopo la conferma della scelta del canale per lʼimmagine a schermo intero, nellʼimmagine rimpicciolita lampeggia il nome per il canale. Finché sta lampeggiando, con il tasto o si può selezionare il canale per lʼimmagine da inserire. Dopo la scelta del canale premere “Seq/PIP” per conferma: il canale appare inserito nellʼimmagine grande e il LED del canale si accende. 3) Per uscire da questo formato di visualizzazione tener premuto ancora per 2 secondi il tasto “Seq/PIP”. 8 Riproduzione di una registrazione Tener premuto per 2 secondi il tasto “Fz/VCR PLAY” (4); il LED sovrastante si accende. Sullo schermo appaiono le immagini registrate nel formato quad e si vede “VCR PLAYBACK”. – Per guardare meglio lʼimmagine di un canale premere il tasto numerico (3) del canale: il relativo quarto dellʼimmagine quad viene ingrandito a schermo intero e nellʼimmagine si vede “(Z)” per “Zoom”. Per ritornare allʼimmagine quad premere il tasto “ /ZOOM” (1). – Per “congelare” lʼimmagine durante la riproduzione premere brevemente il tasto “Fz/VCR PLAY” (4). Nellʼimmagine si vede “(F)” “Freeze” (immagine ferma). Per disattivare la funzione freeze, premere ancora brevemente il tasto. Per disattivare la riproduzione dal videoregistratore tener premuto per 2 secondi il tasto “Fz/VCR PLAY”. N.B.: a Durante la riproduzione dal videoregistratore non è possibile che un allarme scatti attraverso il segnalatore video interno di movimento. b I nomi dei canali delle telecamere impostati nel menù TITLE SETUP (cap. 9.1) si vedono nelle immagini registrate solo se al momento della registrazione è stato scelto il formato quad per la sorveglianza dal vivo. c Le indicazioni “L1234” (perdita di un segnale video, vedi cap. 10.1) e “M1234” (risposta del segnalatore video interno di movimento, vedi cap. 10.2) si vedono nelle immagini registrate solo se al momento della registrazione è stato scelto il formato quad o PIP per la sorveglianza dal vivo. 9 Impostazioni attraverso il menù sullo schermo Per adattare lʼapparecchio in modo ottimale allʼimpianto di sorveglianza video, molti parametri di funzionamento possono essere impostati attraverso un menù sullo schermo. Per usare il menù sono richiesti i seguenti tasti: Tasto “Set/AUTO” (5): per chiamare (premere brevemente) e abbandonare (tener premuto per 2 secondi) le pagine del menù Tasti , e e , e (3): per navigare nel menù, per modificare le impostazioni Per chiamare il menù (non è possibile durante la riproduzione dal videoregistratore) premere brevemente il tasto “Set/AUTO”: lʼapparecchio passa alla modalità quad e si vede la pagina del menù principale: MENU: TITLE SETUP DATE/TIME DECODER SETUP SENSITIVITY EVENT LIST AUTO SEQUENCE OTHER KEY LOCK : OFF Scegliere il sottomenù desiderato con il tasto Il sottomenù scelto lampeggia. DATE/TIME: DATE : 24-01-07 TIME : 22:30:13 SHOW : YES In questo menù si possono impostare: – nella riga “DATE” la data attuale (giorno – mese – anno) – nella riga “TIME” lʼora attuale (ore : minuti : secondi) – nella riga “SHOW” “YES” (data e ora visualizzate) oppure “NO” (data e ora non visualizzate) Con il tasto o scegliere il punto di inserimento e con il tasto o eseguire lʼimpostazione. Per uscire dal sottomenù e per tornare nel menù principale tener premuto per 2 secondi il tasto “Set/AUTO”. Se è scelto il sottomenù “ DECODER SETUP “, premere brevemente il tasto “Set/AUTO” per aprirlo. o . 9.1 TITLE SETUP (determinare i nomi delle telecamere) Se è scelto il sottomenù “TITLE SETUP”, premere brevemente il tasto “Set/AUTO” per aprirlo. TITLE SETUP: : : : : I Se è scelto il sottomenù “DATE/TIME”, premere brevemente il tasto “Set/AUTO” per aprirlo. 9.3 DECODER SETUP (regolazioni dell’immagine) Per uscire dal menù principale tener premuto per 2 secondi il tasto “Set/AUTO”. Se con il menù attivo sullo schermo non si aziona nessun tasto per 15 secondi, il menù sparisce automaticamente. CH1 CH2 CH3 CH4 9.2 DATE/TIME (impostare data e ora) CHANNEL1 CHANNEL2 CHANNEL3 CHANNEL4 In questo menù, per ogni canale si può determinare un nome che viene visualizzato nellʼimmagine [per la sorveglianza dal vivo, tale visualizzazione avviene in ogni formato; per le immagini registrate tramite la presa “VCR OUT” (13), vedi nota b in cap. 8]. N.B.: Se è chiamato il menù sullo schermo, i nomi delle telecamere non sono visualizzati. Con il tasto o scegliere il punto di inserimento e con il tasto o scegliere il carattere desiderato. Per uscire dal sottomenù e per tornare nel menù principale tener premuto per 2 secondi il tasto “Set/AUTO”. BRIGHTNESS:33 CONTRAST:33 SHARPNESS:33 SAT_U:33 SAT_V:33 HUE:33 BRIGHTNESS:33 CONTRAST:33 SHARPNESS:33 SAT_U:33 SAT_V:33 HUE:33 BRIGHTNESS:33 CONTRAST:33 SHARPNESS:33 SAT_U:33 SAT_V:33 HUE:33 BRIGHTNESS:33 CONTRAST:33 SHARPNESS:33 SAT_U:33 SAT_V:33 HUE:33 In questo menù è possibile adattare i segnali video dei quattro canali video relativi a luminosità (“BRIGHTNESS”), contrasto (“CONTRAST”), fuoco (“SHARPNESS”), saturazione (“SAT_U” e “SAT_V”) e tonalità (“HUE”). Con il tasto o scegliere la relativa riga e con il tasto o impostare il valore (campo di regolazione: 0 – 63). Per uscire dal sottomenù e per tornare nel menù principale tener premuto per 2 secondi il tasto “Set/AUTO”. 9.4 SENSITIVITY (regolare il segnalatore di movimento) Se è scelto il sottomenù “SENSITIVITY”, premere brevemente il tasto “Set/AUTO” per aprirlo. SENSITIVITY: CH1 CH2 CH3 CH4 : : : : OFF OFF OFF OFF In questo menù, per ogni canale è possibile regolare la sensibilità per il segnalatore video interno di movimento [“1” (min.) fino a “7” (max.)] oppure si può disattiva- 25 I re completamente il riconoscimento di movimento (“OFF”). Con il tasto o scegliere la relativa riga e con il tasto o eseguire la regolazione. Per uscire dal sottomenù e per tornare nel menù principale tener premuto per 2 secondi il tasto “Set/AUTO”. 9.7 OTHER (regolazione degli allarmi, per l’immagine specchiata e per la rappresentazione dell’immagine quad) Se è scelto il sottomenù “OTHER”, premere brevemente il tasto “Set/AUTO” per aprirlo. OTHER: 1.BUZZER: 9.5 EVENT LIST (protocollo degli allarmi) Se è scelto il sottomenù “EVENT LIST”, premere brevemente il tasto “Set/AUTO” per aprirlo. EVENT LIST: (PAGE1) NO CH A/L/M DD-MM-YY HH:MM:SS 01 1 A 22-01-07 20:15:13 02 4 L 19-01-07 15:21:40 03 3 A 06-01-07 03:39:28 04 4 M 05-01-07 01:03:34 In questo menù sono elencati su due pagine del menù, con numerazione continua e ordinati secondo il momento in cui si sono manifestati, gli ultimi 20 eventi dʼallarme. Con i tasti , , e si può cambiare fra le pagine. Dopo il numero dellʼelenco (colonna “NO”) sono indicati: – il canale interessato dallʼallarme (colonna “CH”) – il tipo dʼallarme (colonna “A/L/M”): A = allarme esterno, L = perdita del segnale video, M = allarme dal segnalatore interno di movimento – la data dellʼallarme (colonna “DD-MM-YY”) – lʼora dellʼallarme (colonna “HH:MM:SS”) Per uscire dal sottomenù e per tornare nel menù principale tener premuto per 2 secondi il tasto “Set/AUTO”. 9.6 AUTO SEQUENCE (impostazioni per la rappresentazione sequenziale) Se è scelto il sottomenù “AUTO SEQUENCE”, premere brevemente il tasto “Set/AUTO” per aprirlo. AUTO SEQUENCE: CH1 CH2 CH3 CH4 QUAD TIME : : : : : : ON ON ON ON ON 05 SEC In questo menù è possibile attivare (“ON”) o disattivare (“OFF”) per ogni canale nonché per lʼimmagine quad la rappresentazione sequenziale (→ cap. 7.3). Nella riga “TIME” si può determinare la durata dellʼimmagine (1 – 99 secondi). Con il tasto o scegliere la relativa riga e con il tasto o eseguire la regolazione. Per uscire dal sottomenù e per tornare nel menù principale tener premuto per 2 secondi il tasto “Set/AUTO”. LOSS : 05 SEC MOTION : 05 SEC ALARM : 05 SEC 2.MIRROR: CH1 CH2 CH3 CH4 : : : : OFF OFF OFF OFF 3.BORDER : WHITE Con il primo punto del menù, “BUZZER”, è possibile regolare, separatamente per i tre tipi dʼallarme, come il processore quad deve reagire quando scatta un allarme (vedi anche cap. 10 “Funzioni dʼallarme”): – Riga “LOSS” Se in caso di perdita del segnale di uno degli ingressi per le telecamere (6) si vuole sentire un segnale dʼallarme, impostare nella riga la durata del segnale dʼallarme (1 – 99 secondi). Se in caso di perdita del segnale video non si vuole avere nessun segnale acustico, impostare la riga con “OFF”. – Riga “MOTION” Se in caso dʼallarme tramite il segnalatore interno di movimento deve essere emesso un segnale dʼallarme acustico e se il relè dʼallarme deve reagire, impostare in questa riga la durata dellʼallarme (1 – 99 secondi). Trascorsa la durata dellʼallarme, il buzzer dʼallarme viene disattivato e il relè viene resettato. Se in caso di allarme dal segnalatore interno di movimento non devono reagire né il buzzer né il relè, impostare la riga con “OFF”. – Riga “ALARM” Se in caso dʼallarme tramite un sensore collegato dʼallarme deve essere emesso un segnale acustico dʼallarme e se il relè dʼallarme deve reagire, impostare in questa riga la durata dellʼallarme (1 – 99 secondi). Trascorsa la durata dellʼallarme, il buzzer dʼallarme viene disattivato e il relè viene resettato. Se in caso di allarme esterno non devono reagire né il buzzer né il relè, impostare la riga con “OFF”. Con il secondo punto del menù, “MIRROR”, per ogni canale si può impostare il rispecchiamento dellʼimmagine (“ON”). Con il terzo punto del menù, “BORDER”, si può determinare come lʼimmagine quad appare sullo schermo: – “WHITE”: linee bianche di separazione fra le quattro immagini – “BLACK”: linee nere di separazione fra le quattro immagini – “OFF”: nessuna linea di separazione fra le quattro immagini Con il tasto o scegliere la relativa riga e con il tasto o eseguire la regolazione. Per uscire dal sottomenù e per tornare nel menù principale tener premuto per 2 secondi il tasto “Set/AUTO”. 26 9.8 KEY LOCK (blocco dei tasti) 10.3 Allarme esterno Con il tasto o scegliere la riga “KEY LOCK” e con il tasto o attivare (“ON”) o disattivare (“OFF”) il blocco dei tasti. Se è scelta lʼimpostazione “ON”, senza il menù sullo schermo, i tasti (1) – (4) sono bloccati, in modo che non è possibile modificare i formati di visualizzazione durante la sorveglianza dal vivo. Tuttavia, il menù può sempre essere chiamato e lo si può usare con i tasti “Set/AUTO” e , , e . Se lʼapparecchio registra un allarme esterno ad un ingresso per allarmi e se nel menù “OTHER” (cap. 9.7) nella riga “ALARM” è impostata la durata dellʼallarme: – lʼapparecchio, per la sorveglianza dal vivo, passa allʼimmagine a schermo intero del canale interessato (Se per più canali scatta contemporaneamente un allarme esterno, lʼapparecchio passa ogni 2 secondi fra le immagini a schermo intero dei canali interessati.) – viene emesso un segnale acustico dʼallarme – reagisce il relè dʼallarme Trascorsa la durata dellʼallarme, il buzzer dʼallarme viene disattivato, il relè viene resettato e lʼapparecchio passa alla modalità quad (per terminare tutti gli allarmi prima del termine della durata prevista premere un qualsiasi tasto). Se invece nel menù “OTHER” nella riga “ALARM” è scelta lʼimpostazione “OFF”, lʼapparecchio passa alla modalità quad. Non viene emesso nessun segnale acustico dʼallarme e il relè dʼallarme è disattivato. 10 Funzioni dʼallarme Un allarme può scattare da: – la perdita del segnale di uno degli ingressi per telecamere (6), p. es. per un difetto della telecamera – un segnalatore video interno di movimento – un sensore dʼallarme collegato con la presa ALARM (10) [allarme esterno] Ogni allarme scattato viene protocollato in un elenco degli eventi con data e ora (cap. 9.5). 10.1 Perdita di un segnale video 11 Dati tecnici Se lʼapparecchio registra la perdita di una segnale video, nei formati quad e PIP si vede “L1234”, dove lampeggia la cifra corrispondente al canale interessato. Se nel menù “OTHER” (cap. 9.7), nella riga “LOSS” è impostata la durata dellʼallarme, per tale durata viene emesso un segnale acustico dʼallarme (per disattivare il buzzer dʼallarme prima del termine della durata prevista premere un qualsiasi tasto). Se nella riga “LOSS” è scelta invece lʼimpostazione “OFF”, non viene emesso nessun segnale dʼallarme. Non appena allʼingresso è nuovamente presente un segnale video, lʼallarme viene disattivato automaticamente. Sincronizzazione: . . . . CCIR, orizzontale 15 625 Hz, verticale 50 Hz 10.2 Allarme dal segnalatore interno di movimento Temperatura dʼesercizio: 0 – 40 °C In caso di riconoscimento di un movimento nei formati quad e PIP, viene visualizzato brevemente “M1234”, dove lampeggia la cifra corrispondente al canale interessato. Se nel menù “OTHER” (cap. 9.7), nella riga “MOTION” è impostata la durata dellʼallarme, viene emesso un segnale acustico dʼallarme e il relè dʼallarme reagisce. Trascorsa la durata dellʼallarme, il buzzer dʼallarme viene disattivato e il relè viene resettato (per disattivare il buzzer dʼallarme e per resettare il relè prima del termine della durata prevista premere un qualsiasi tasto). Se nella riga “ MOTION “ è scelta invece lʼimpostazione “OFF”, non viene emesso nessun segnale dʼallarme e il relè dʼallarme è disattivato. N.B.: Il riconoscimento di movimento deve essere attivato per il relativo canale (→ cap. 9.4, Menü “SENSITIVITY”), altrimenti non scatta nessun allarme I Norma colori: . . . . . . . . PAL, NTSC Risoluzione: . . . . . . . . . 720 × 576 pixel (orizz. × vert.) Frequenza immagini: . . 50 semiimmagini/s Livello video: . . . . . . . . 1 Vpp/75 Ω Allarme 4 ingressi dʼallarme: . contatto di lavoro (NA) con massa comune 1 uscita dʼallarme: . . . relè con contatto di commutazione (NA/NC), max. potenza: 12 V /1 A, 24 V~/1 A Alimentazione: . . . . . . . 12 V /1 A (tramite alimentatore in dotazione con 100 – 240 V~, 50/60 Hz) Dimensioni: . . . . . . . . . 210 x 50 x 215 mm Peso: . . . . . . . . . . . . . . 1,7 kg Contatti Contatti video: . . . . . . prese BNC Contatto dʼallarme . . . presa sub-D 9 poli Alimentazione: . . . . . presa per alimentazione DC con spinotto di 5,5/2,1 mm (∅ esterno/interno), contatto centrale = positivo Con riserva di modifiche tecniche. La MONACOR ® INTERNATIONAL GmbH & Co. KG si riserva ogni diritto di elaborazione in qualsiasi forma delle presenti istruzioni per l'uso. La riproduzione – anche parziale – per propri scopi commerciali è vietata. 27 NL B Lees aandachtig de onderstaande veiligheidsvoorschriften, alvorens het apparaat in gebruik te nemen. Voor meer informatie over de bediening van het apparaat raadpleegt u de anderstalige handleidingen. Veiligheidsvoorschriften De apparaten (quadprocessor en netadapter) zijn allemaal in overeenstemming met de EU-Richtlijnen en dragen daarom het -kenmerk. WAARSCHUWING De netspanning van de netadapter is levensgevaarlijk. Open het apparaat niet, want door onzorgvuldige ingrepen loopt u het risico van elektrische schokken. Let eveneens op het volgende: G E De apparaten zijn uitsluitend geschikt voor gebruik binnenshuis. Vermijd druip- en spatwater, plaatsen met een hoge vochtigheid en uitzonderlijk warme plaatsen (toegestaan omgevingstemperatuurbereik: 0 – 40 °C). Por favor, antes del uso del aparato observar en todo caso los consejos de seguridad siguientes. Si informaciones adicionales son necesarias para la operación del aparato, estas se encuentran en el texto inglés de estas instrucciones. Consejos de seguridad Las unidades (secuenciador quad y unidad de alimentación) corresponden a todas las Directivas requeridas por la UE y por ello están marcadas con . ADVERTENCIA La unidad de alimentación se alimenta mediante un voltaje peligroso. Deje el mantenimiento sólo en manos de personal especializado. Una manipulación inexperta puede causar un peligro de descarga eléctrica. Es esencial que preste atención a los puntos siguientes: G PL Plaats geen met vloeistof gevulde voorwerpen zoals drinkglazen, etc. op de quadprocessor. G Schakel de quadprocessor niet in en trek onmiddellijk de netadapter uit het stopcontact, wanneer: 1. de apparaten zichtbaar beschadigd zijn, 2. er een defect zou kunnen optreden nadat een apparaat bijvoorbeeld gevallen is, 3. een apparaat slecht functioneert. De apparaten moeten in elk geval hersteld worden door een gekwalificeerd vakman. G Gebruik voor de reiniging uitsluitend een droge, zachte doek. Gebruik in geen geval chemicaliën of water. G In geval van ongeoorloofd of verkeerd gebruik, verkeerde aansluiting, foutieve bediening of van herstelling door een niet-gekwalificeerd persoon vervalt de garantie en de verantwoordelijkheid voor hieruit resulterende materiële of lichamelijke schade. Wanneer de apparaten definitief uit bedrijf worden genomen, bezorg ze dan voor verwerking aan een plaatselijk recyclagebedrijf. G No ponga objetos que contengan líquido sobre el secuenciador quad, p. ej. vasos de bebida. G No ponga el secuenciador quad en marcha y desconecte la unidad de alimentación de la red inmediatamente: 1. en caso de daño visible en las unidades, 2. si ha ocurrido un defecto tras una caída de una unidad o un accidente similar, 3. si ocurren disfunciones. Las unidades deben ser reparadas por personal especializado en cualquier caso. G Para limpiar utilice sólo un paño seco y suave, no utilice nunca productos químicos o agua. G No se asumirá ninguna garantía ni se aceptará ninguna responsabilidad si las unidades se usan para otros fines diferentes a los originalmente concebidos, si no están correctamente conectadas o utilizadas, o si no se reparan de manera experta. Si las unidades se deben retirar del funcionamiento definitivamente, llévelas a un centro de reciclaje local para su disposición no contaminante para el medio ambiente. Las unidades sólo están indicadas para un uso en interior. Protéjalas de goteos y salpicaduras de agua, humedad elevada del aire, y calor (gama de temperatura ambiente admisible: 0 – 40 °C). Przed użyciem urządzenia należy przeczytać uważnie poniższą instrukcję obsługi i zachować tekst do wglądu. Więcej informacji dotyczących obsługi urządzenia znajduje się w innych wersjach językowych niniejszej instrukcji obsługi. Bezpieczeństwo użytkowania Urządzenia (dzielnik ekranu i zasilacz) spełniają wymogi norm obowiązujących w Unii Europejskiej, zostały więc oznaczone symbolem . UWAGA Zasilacz jest zasilany prądem elektrycznym o wysokim napięciu. Obsługę techniczną urządzenia należy zlecić specjaliście! Nieprawidłowe użytkowanie urządzenia może spowodować porażenie prądem. Należy przestrzegać następujących zaleceń: G Urządzenia przeznaczone są do użytku jedynie wewnątrz pomieszczeń. Należy chronić je przed bezpośrednim kontaktem z wodą, działaniem wilgoci oraz wysokiej temperatury (dopuszczalna temperatura otoczenia pracy: 0 – 40 °C). 28 G G Na obudowie urządzenia nie wolno stawiać pojemników z płynem (np. szklanek). G Należy przerwać użytkowanie urządzenia oraz niezwłocznie wyjąć wtyczkę sieciową z gniazda: 1 jeśli istnieje widoczne uszkodzenie urządzenia, 2 jeśli uszkodzenie mogło powstać na skutek upuszczenia urządzenia lub podobnego wypadku, 3 jeśli urządzenie nie działa prawidłowo. Naprawy mogą być dokonywane tylko przez wyszkolony personel. G Do czyszczenia urządzenia należy używać suchej, miękkiej tkaniny. Nie wolno stosować wody ani chemicznych środków czyszczących. G Producent ani dostawca nie ponoszą odpowiedzialności za wynikłe szkody (uszkodzenie sprzętu lub obrażenia użytkownika), jeśli urządzenie używano niezgodnie z przeznaczeniem, nieprawidłowo podłączono, obsługiwano bądź poddano nieautoryzowanej naprawie. Po całkowitym zakończeniu eksploatacji urządzenia należy oddać je do punktu utylizacji odpadów, aby uniknąć zanieczyszczenia środowiska. Læs nedenstående sikkerhedsoplysninger opmærksomt igennem før ibrugtagning af enheden. Bortset fra sikkerhedsoplysningerne henvises til den engelske tekst. Vigtige sikkerhedsoplysninger Enhederne (quad-processor og strømforsyningsenhed) overholder alle påkrævede EU regulativer og er derfor mærket med . ADVARSEL Strømforsyningsenheden benytter livsfarlig netspænding. Overlad servicering til autoriseret personel. Forkert håndtering kan forårsage fare for elektrisk stød. Vær altid opmærksom på følgende: G Quad-processoren og strømforsyningsenheden er kun beregnet til indendørs brug. Beskyt enhederne mod vanddråber og -stænk, høj luftfugtighed og varme (tilladt omgivelsestemperatur 0 – 40 °C). Ge akt på säkerhetsinformationen innan enheten tas i bruk. Skulle ytterliggare information behövas kan den återfinnas i Manualen för andra språk. Säkerhetsföreskrifter Enheterna (quad processor och nätdel) uppfyller EU direktiven och är därför märkta med symbolen . VARNING Nätdelen använder livsfarligt hög spänning internt. For att undvika en elektrisk stöt, öppna aldrig chassiet på egen hand utan överlåt all service till auktoriserad verkstad. Ge ovillkorligen även akt på följande: G Enheterna är endast avsedda för inomhusbruk. Skydda de mot vätskor, hög luftfuktighet och hög värme (tillåten omgivningstemperatur 0 – 40 °C). G Placera inte föremål innehållande vätskor, t. ex. dricksglas, på quad processorn. Ole hyvä ja huomioi joka tapauksessa seuraavat turvallisuuteen liittyvät seikat ennen laitteen käyttöä. Laitteen toiminnasta saa lisätietoa tarvittaessa tämän laitteen muunkielisistä käyttöohjeista. G Undgå at placere væskefyldte genstande, som f. eks. glas, ovenpå quad-processoren. G Tag ikke quad-processoren i brug og tag straks strømforsyningsenheden ud af stikkontakten i følgende tilfælde: 1. hvis der er synlig skade på quad-processoren eller strømforsyningsenheden. 2. hvis der kan være opstået skade, efter at enheden er tabt eller lignende. 3. hvis der forekommer fejlfunktion. Enhederne skal altid repareres af autoriseret personel. G Til rengøring må kun benyttes en tør, blød klud; der må under ingen omstændigheder benyttes kemikalier eller vand. G Hvis quad-processoren eller strømforsyningsenheden benyttes til andre formål, end den oprindeligt er beregnet til, hvis den ikke er tilsluttet korrekt, hvis den betjenes forkert, eller hvis den ikke repareres af autoriseret personel, omfattes eventuelle skader ikke af garantien. Hvis enhederne skal tages ud af drift for bestandigt, skal de bringes til en lokal genbrugsstation for bortskaffelse. G Använd inte quad processorn och ta omedelbart ut nätdelen ur eluttaget om något av följande fel uppstår: 1. Om det finns synliga skador på quad processorn eller nätdelen. 2. Om någon av enheterna skadats av fall ed. 3. Om enheterna har andra felfunktioner. Enheterna skall alltid lagas på verkstad av utbildad personal. G Rengör endast med en mjuk och torr trasa, använd aldrig kemikalier eller vatten vid rengöring. G Om quad processorn eller nätdelen används för andra ändamål än avsett, om den monteras eller används på fel sätt eller inte repareras av auktoriserad personal upphör alla garantier att gälla. I dessa fall tas inget ansvar för uppkommen skada på person eller materiel. G Älä ota laitetta käyttöön tai välittömästi irrota virtalähde pistokkeesta jos 1. quad prosessorista tai virtalähteessä on näkyvä vaurio, 2. putoaminen tai muu vastaava vahinko on saattanut aiheuttaa vaurion, 3. laitteessa esiintyy toimintahäiriöitä. Kaikissa näissä tapauksissa laite tulee toimittaa valtuutettuun huoltoliikkeeseen. G Käytä puhdistamiseen pelkästään kuivaa, pehmeää kangasta. Älä käytä kemikaaleja tai vettä. G Laitteen takuu raukeaa, eikä valmistaja, maahantuoja tai myyjä ota vastuuta mahdollisista välittömistä tai välillisistä vahingoista, jos laitetta (tai sen virtalähdettä) on käytetty muuhun kuin alkuperäiseen käyttötarkoitukseen, laitetta on taitamattomasti käytetty tai kytketty, tai laitetta on huollettu muussa kuin valtuutetussa huollossa. Nämä laiteet (quad prosessori ja virtalähde) täyttävät kaikki niihin kohdistuvat EU-direktiivit ja niille on myönnetty hyväksyntä. Liitettävä virtalähde toimii hengenvaarallisella jännitteellä. Jätä huoltotoimet valtuutetulle huoltoliikkeelle. Epäpätevä huolto ja käsittely saattavat aiheuttaa sähköiskun vaaran. Huomioi seuraavat seikat: G Nämä laitteet soveltuvat käytettäviksi ainoastaan sisätiloissa. Suojaa laite kosteudelta, vedeltä ja kuumuudelta (sallittu ympäröivä lämpötila 0 – 40 °C). G Ole hyvä äläkä laita laitteen päälle mitään nestettä sisältävää astiaa esim. juomalasia. S Om quad processorn och nätdelen skall kasseras bör de lämnas in till återvinning. Turvallisuudesta VAROITUS DK FIN Kun laite joskus poistetaan lopullisesti käytöstä, huolehdi, että laite hävitetään asianmukaisesti jätteen käsittelylaitoksessa. 29 ® MONACOR INTERNATIONAL GmbH & Co. KG • Zum Falsch 36 • 28307 Bremen • Germany A-0702.99.02.04.2011 Copyright © by MONACOR INTERNATIONAL. All rights reserved.