1
SY
INSTRUCTION MANUAL
NOTICE D’INSTRUCTIONS
MANUAL DE INSTRUCCIONES
BA
G
FED
C
A
L K
H
5
4
M
L M
J K
H I
F G
D E
B C
J I
6
Design and Quality
IKEA of Sweden
ENGLISH
FRANÇAIS
ESPAÑOL
4
30
56
ENGLISH
CONTENTS
IMPORTANT SAFETY INSTRUCTIONS
Safety Precautions ............................................................................................................................................................................................................................................................................
For safe operation ............................................................................................................................................................................................................................................................................
To extend the service life of your sewing machine ...................................................................................................................................................................................................................
Repair or adjustment ........................................................................................................................................................................................................................................................................
5
6
6
6
Parts of the sewing machine ..........................................................................................................................................................................................................................................................
Sewing machine accessories ..........................................................................................................................................................................................................................................................
Key to symbols ...................................................................................................................................................................................................................................................................................
7
8
9
Preparations
Get started ..........................................................................................................................................................................................................................................................................................
Wind bobbin thread .........................................................................................................................................................................................................................................................................
Install the bobbin ..............................................................................................................................................................................................................................................................................
Thread the top thread and needle ...............................................................................................................................................................................................................................................
Pull up the bobbin thread ...............................................................................................................................................................................................................................................................
10
11
12
13
14
Start sewing
Straight stitch ......................................................................................................................................................................................................................................................................................
Zigzag stitch .......................................................................................................................................................................................................................................................................................
Decorative stitch ................................................................................................................................................................................................................................................................................
Blind stitch ...........................................................................................................................................................................................................................................................................................
Buttonholes .........................................................................................................................................................................................................................................................................................
Zip .........................................................................................................................................................................................................................................................................................................
15
16
17
18
19
20
Maintenance
Remove a presser foot .....................................................................................................................................................................................................................................................................
Attach a presser fot ..........................................................................................................................................................................................................................................................................
Change the needle ...........................................................................................................................................................................................................................................................................
Change the light bulb ......................................................................................................................................................................................................................................................................
Adjust thread tension .......................................................................................................................................................................................................................................................................
Clean the feed dogs .........................................................................................................................................................................................................................................................................
Clean the shuttle assembly .............................................................................................................................................................................................................................................................
21
21
22
23
24
25
26
Trouble shooting ................................................................................................................................................................................................................................................................................
28
4
ENGLISH
IMPORTANT SAFETY INSTRUCTIONS
Thank you for choosing our product.
This sewing machine is one of the latest household sewing machines and
has many advanced features. For a full description of the features and
instructions on how to use them, please read all instructions in this manual
carefully before using the sewing machine.
This sewing machine is intended for HOUSEHOLD use.
Save these instructions for future use.
Safety precautions:
7RPLQLPLVHWKHULVNRIEXUQVÀUHHOHFWULFVKRFNRUSHUVRQDOLQMXU\LWLVHVsential that you read and follow the safety precautions below:
DANGER - To reduce the risk of electric shock:
An appliance should never be left unattended when plugged in. Always
unplug this appliance from the electric outlet immediately after using and
before cleaning.
Always unplug before relamping. Replace bulb with same type rated
Watts.
Never operate this appliance if it has been a damaged cord or plug, if it
is not working properly, if it has been dropped or damaged, or dropped
into water. Return the appliance to the nearest authorized dealer or service
centre for examination, repair, electrical adjustment.
Never operate the appliance with the air opening blocked. Keep the air
openings of the sewing machine and foot control free of accumulation of lint,
dust, and loose cloth.
.HHSÀQJHUVDZD\IURPDOOPRYLQJSDUWV6SHFLDOFDUHLVUHTXLUHGDURXQG
the sewing machine needle.
Always use the proper needle plate. The wrong plate can cause the needle
to break.
Do not use bent needles.
'RQRWSXOORUSXVKIDEULFZKLOHVWLWFKLQJ,WPD\GHÁHFWWKHQHHGOHFDXVLQJ
it to break.
Switch the sewing machine off (“0”) when making any adjustments in the
needle area, such as threading needle, changing needle, threading bobbin,
or changing presser foot, etc.
WARNING7RUHGXFHWKHULVNRIEXUQVÀUHHOHFWULFFKRFNRULQMXU\WR
persons:
Always unplug sewing machine from the electrical outlet when removing
covers, lubricating, or when making any other user servicing adjustments
mentioned in the instruction manual.
Do not allow to be used as a toy. Close attention is necessary when this
appliance is used by or near children.
Never drop or insert any object into any opening.
Use this appliance only for its intended use as described in this manual. Use
only attachments recommended by the manufacturer as contained in this
manual.
Do not use outdoor.
Do not operate where aerosol (spray) products are being used or where
oxygen is being administrated.
5
ENGLISH
To disconnect, turn all controls to the off (“0”) position, then remove plug
from outlet.
Never operate on soft surfaces such as a bed or couch where the air
openings may be blocked.
Do not unplug by pulling on cord. To unplug, grasp the plug, not the cord.
SAVE THESE INSTRUCTIONS
For safe operation:
Never look away from the needle while sewing. And do not touch the
hand wheel, take-up lever, needle or other moving parts.
Turn off the power switch and unplug the cord from the wall socket when:
<RXDUHÀQLVKHGRSHUDWLQJWKHVHZLQJPDFKLQH
- You need to replace or remove the needle or any other parts
- A power failure occurs during use
- Maintaining the sewing machine
- Leaving the sewing machine unattended
Do not place any object on the foot pedal.
Insert the power plug directly into the wall socket. Do not use an extension
cord.
To extend the service life of your sewing machine:
Do not store the sewing machine in direct sunlight or in wet rooms or
high humidity areas. Do not use or store the machine in places where the
temperature is high, such as near a portable heater, iron, halogen lamp,
etc.
Use only neutral soaps or mild detergents to clean the case. Never use
benzene, thinner or abrasive cleaners - they can damage the case and
the sewing machine.
Take care not to drop or hit the sewing machine.
Ensure correct installation by following the instructions provided in this
manual when replacing or installing any components, presser feet, needle
or other parts.
6
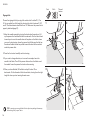
Repair or adjustment
In the event a repair or adjustment is needed, please consult the
troubleshooting guide in the back of the manual.
7KHFRQWHQWRIWKHLQVWUXFWLRQPDQXDODQGSURGXFWVSHFLÀFDWLRQVRIWKLV
product are subject to change without notice.
ENGLISH
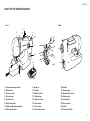
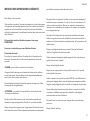
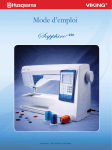
PARTS OF THE SEWING MACHINE
Front
Back
10
7
4
11
12
M
L M
J K
H I
F G
D E
B C
BA
A
C
5
4
L K
J I H G
6
3
9
8
FED
6
13
5
14
1
16
15
18
17
19 20
21
24
22
23
2
1. Accessories compartment
2. Bobbin case
3. Tension control
4. Take up lever
5. Thread cutter
6. Top thread guide
7. Bobbin winding thread guide
8. Stitch selector dial
9. Spool pin
10. Handle
11. Bobbin winder
12. Bobbin stop
13. Reverse button
14. Foot control
15. Presser foot
16. Presser foot screw
17. Needle
18. Thread guide
19. Needle holder screw
20. Needle plate
21. Hand wheel
22. Power switch
23. Socket
24. Presser foot lifter
7
ENGLISH
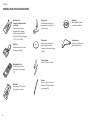
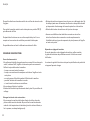
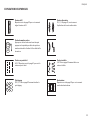
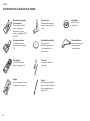
SEWING MACHINE ACCESSORIES
Presser foot
(comes installed on the
machine)
Used when you sew
straight stitch, zigzag
stitch, decorative stitch
and blind stitch (see page
15, 16, 17 and 18).
Zip foot
Used when you sew in a
zip (see page 20).
Buttonhole foot
Used when you sew
buttonholes (see page
19).
Needles
See page 22 for how to
change the needle.
8
Spool pin
Additional spool pin to
be placed on top of the
existing one.
Bobbins
Wind bobbin thread
onto these bobbins.
Felt pads
Place under a spool of
top thread to make it
rotate more smoothly and
TXLHWO\
Screwdriver
Used for adjustments
and maintenance.
Seam ripper
Used to unpick stitches.
Brush
Used to clean dust and
ÀEUHVRIIWKHIHHGGRJV
(see page 25).
ENGLISH
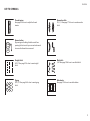
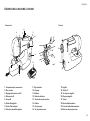
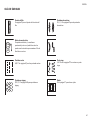
KEY TO SYMBOLS
Thread tension
See page 24 for how to adjust the thread
tension.
Decorative stitch
G, H, I, J. See page 17 for how to sew decorative
stitch.
Reverse button
By pressing and holding this button and then
pressing the foot control you can sew backwards
to secure the thread at a seam end.
Straight stitch
A, B, C. See page 15 for how to sew straight
stitch.
Blind stitch
L, M. See page 18 for how to sew blind stitch.
Zigzag
D, E, F, K. See page 16 for how to sew zigzag
stitch.
Buttonholes
See page 19 for how to sew buttonholes.
1
4
2
3
9
ENGLISH
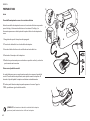
PREPARATIONS
5
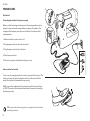
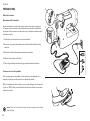
Get started
Connecting the machine to the power supply
0DNHVXUHWKDWWKHYROWDJHDQGIUHTXHQF\RIWKHVHZLQJPDFKLQHDUHWKH
same as in your main power supply before you plug in the machine. The
YROWDJHDQGWKHIUHTXHQF\DUHVKRZQRQWKHODEHORQWKHERWWRPRIWKH
sewing machine.
1
1. Make sure that the power switch is off.
2. Plug the power cord into the machine´s socket.
3. Plug the power cord into the wall socket.
4. Press the power switch.
5. Pull out the spool pin and place the extra pin on top.
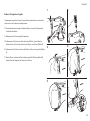
How to use the foot control
You can vary the sewing speed by how hard you press the foot control. The
harder you press, the faster the machine sews. If you lift your foot off the
pedal, the machine will automatically stop sewing.
NB: The type of foot pedal used in this machine has either the mark ‘Jegon’
or ‘FDM’. The mark on the foot pedal should match the mark on the sewing
machine plug socket.
TIP! To get an idea of the sewing speed, try pressing the foot control before
threading the machine.
10
2
3
ENGLISH
1
2
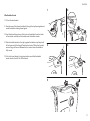
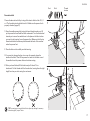
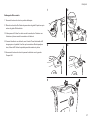
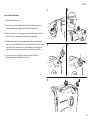
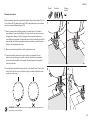
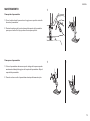
Wind bobbin thread
1. Pull out the hand wheel.
2. Unwind some of the thread and feed it through the top thread guide and
round the bobbin winding thread guide.
3
M
L M
J K
H I
F G
D E
B C
L K
A
G
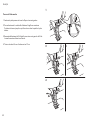
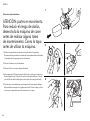
4. Slide the bobbin winder to the right, against the bobbin stop. Keep hold
of the loose end of the thread. Press the foot control. When the thread is
secured, let go of the end. Release the foot control when the bobbin is
fully wound.
A
H
5
I
6
J
3. Feed the thread through one of the holes in the bobbin, from the inside
to the outside, and then put the bobbin onto the bobbin winder.
4
5. Push in the hand wheel to its original position and slide the bobbin
winder back to the left. Cut off the thread.
L K
L K
5
G
FED
BA
H
C
A
L K
I
5
4
M
L M
J K
H I
F G
D E
B C
J
6
11
ENGLISH
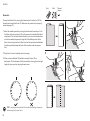
1
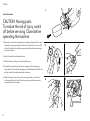
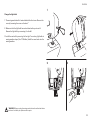
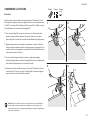
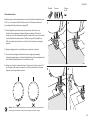
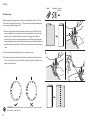
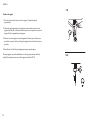
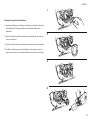
Install the bobbin
CAUTION: Moving parts.
To reduce the risk of injury, switch
off before servicing. Close before
operating the machine.
1. Remove the accessories compartment by pulling it leftwards. Then open
the bobbin case by pushing down the latch on the left on the cover. Pull
out the little latch on the bobbin case and pull the bobbin case straight
out of the machine.
2
3
4
5
2. Install the bobbin into the bobbin case.
3. Pull the thread into the groove in the bobbin case.
4. Now pull the thread under the tension spring and into the opening.
Leave about 15 cm of thread hanging out of the bobbin case. When you
pull the thread, the bobbin should spin clockwise.
5. Install the bobbin case back into the sewing machine, so that the pin
RQWKHFDVHÀWVLQWRWKHKROH&ORVHWKHFRYHUDQGSXWWKHDFFHVVRULHV
compartment back into place.
12
ENGLISH
2
1
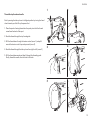
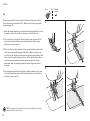
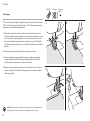
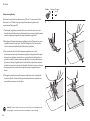
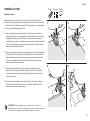
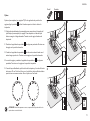
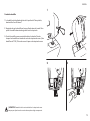
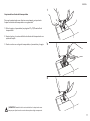
Thread the top thread and needle
Start by moving the take up lever to its highest position by turning the hand
wheel towards you. Also lift up the presser foot.
M
L M
J K
H I
F G
D E
B C
L K
FED
4
G
BA
H
1. Place the spool of sewing thread onto the spool pin so that the thread
comes from the back of the spool.
A
I
5
J
6
C
2. Feed the thread through the top thread guide.
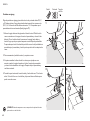
4. Feed the thread through the take up lever from right to left. (arrow 3)
6
M
K L M
I J
L K
J
3. Pull the thread down through the tension control (arrow 1) and pull it
around the tension control loop and upwards (arrow 2).
4
3
5. Pull the thread downwards and feed it through the threading point.
Finally, thread the needle, from the front to the back.
6
5
A
F G
D E
B C
4
6
5
A
F G
D E
B C
4
6
5
6
5
A
F G
D E
B C
4
6
5
A
F G
D E
B C
4
13
ENGLISH
1
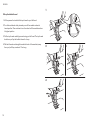
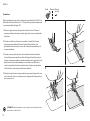
Pull up the bobbin thread
1. Lift the presser foot and hold the top thread in your left hand.
2. Turn the hand wheel slowly towards you until the needle reaches its
lowest position. Then continue to turn the wheel until the needle reaches
its highest position.
3. Pull the top thread carefully upwards using your left hand. The top thread
should now pull up the bobbin thread in a loop.
4. Pull both threads and straight towards the back of the machine (away
from you) until they are about 15 cm long.
2
4
14
3
ENGLISH
START SEWING
Foot
Stich
Thread
tension
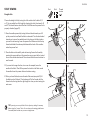
Straight stitch
Choose the straight stitch by turning the stitch selector dial to either A, B
or C. You can adjust the stitch length by choosing the slots in between A, B
and C. The thread tension should be from 2-6. Make sure the presser foot is
properly attached (page 21).
1
2
3
4
1. Move the needle upwards by turning the hand wheel towards you. Lift
up the presser foot and feed the fabric underneath. Turn the hand wheel
towards you to move the needle down to the place on the fabric where
you want to start sewing. Lower the presser foot. Make sure that the top
thread and bobbin thread are pulled towards the back of the machine
under the presser foot.
2. Press the foot control carefully and start sewing. Secure the thread by
pressing the reverse button at the same time as you press the foot control
to sew a few stitches backwards. Then release the button and continue to
sew forwards.
3. If you want to change direction, at a corner for example, leave the
needle in the fabric. Then lift the presser foot and turn the fabric round
the needle. Lower the presser foot and continue sewing.
:KHQ\RXKDYHÀQLVKHGVHFXUHWKHHQGRIWKHVHDPVHHSRLQW/LIW
the fabric and pull it about 15 cm backwards. Cut the threads with the
thread cutter, leaving them the right length for when you start sewing the
next seam.
TIP! 7U\VHZLQJRQDVFUDSRIIDEULFÀUVWWRDGMXVWDQ\VHWWLQJVLIQHFHVVDU\
before using the “proper” fabric. You can also use the sewing guidelines on
the needle plate to make sure you sew a straight seam.
15
ENGLISH
Foot
Stich
Thread
tension
Zigzag stitch
Choose the zigzag stitch by turning stitch selector dial to either D, E, F or
K. You can adjust the stitch length by choosing the slots in between D, E, F
and K. The thread tension should be from 1-5. Make sure the presser foot is
properly attached (page 21).
1
2
3
4
1. Move the needle upwards by turning the hand wheel towards you. Lift
up the presser foot and feed the fabric underneath. Turn the hand wheel
towards you to move the needle down to the place on the fabric where
you want to start sewing. Lower the presser foot. Make sure that the top
thread and bobbin thread are pulled towards the back of the machine
under the presser foot.
2. Press the foot control carefully and start sewing.
3. If you want to change direction, at a corner for example, leave the
needle in the fabric. Then lift the presser foot and turn the fabric round
the needle. Lower the presser foot and continue sewing.
:KHQ\RXKDYHÀQLVKHGOLIWWKHIDEULFDQGSXOOLWDERXWFP
backwards. Cut the threads with the thread cutter, leaving them the right
length for when you start sewing the next seam.
TIP! 7U\VHZLQJRQDVFUDSRIIDEULFÀUVWWRDGMXVWDQ\VHWWLQJVLIQHFHVVDU\
before using the “proper” fabric.
16
ENGLISH
Foot
Stich
Thread
tension
Decorative stitch
Choose the decorative stitch by turning stitch selector dial to either G, H, I
or J. The thread tension should be from 6-8. Make sure the presser foot is
properly attached (page 21).
1
2
3
4
1. Move the needle upwards by turning the hand wheel towards you. Lift
up the presser foot and feed the fabric underneath. Turn the hand wheel
towards you to move the needle down to the place on the fabric where
you want to start sewing. Lower the presser foot. Make sure that the top
thread and bobbin thread are pulled towards the back of the machine
under the presser foot.
2. Press the foot control carefully and start sewing.
3. If you want to change direction, at a corner for example, leave the
needle in the fabric. Then lift the presser foot and turn the fabric round
the needle. Lower the presser foot and continue sewing.
:KHQ\RXKDYHÀQLVKHGOLIWWKHIDEULFDQGSXOOLWDERXWFP
backwards. Cut the threads with the thread cutter, leaving them the right
length for when you start sewing the next seam.
TIP! 7U\VHZLQJRQDVFUDSRIIDEULFÀUVWWRDGMXVWDQ\VHWWLQJVLIQHFHVVDU\
before using the “proper” fabric.
17
ENGLISH
Foot
Stich
Thread
tension
Blind stitch
Choose the blind stitch by turning stitch selector dial to either L or M. The
thread tension should be from 1-4. Make sure the presser foot is properly
attached (page 21).
1
1. Move the needle upwards by turning the hand wheel towards you. Fold
the fabric as shown in picture. Lift up the presser foot and feed the fabric
underneath. Turn the hand wheel towards you to move the needle down
so that the needle just passes through left of the folded portion of the
fabric. Lower the presser foot. Make sure that the top thread and bobbin
thread are pulled towards the back of the machine under the presser
foot.
2. Press the foot control carefully and start sewing.
:KHQ\RXKDYHÀQLVKHGOLIWWKHIDEULFDQGSXOOLWDERXWFP
backwards. Cut the threads with the thread cutter, leaving them the right
length for when you start sewing the next seam.
TIP! 7U\VHZLQJRQDVFUDSRIIDEULFÀUVWWRDGMXVWDQ\VHWWLQJVLIQHFHVVDU\
before using the “proper” fabric.
18
2
3
ENGLISH
Foot
1
Buttonholes
Make sure that the buttonhole foot is properly attached (see page 21).
Choose setting
to the left.
Stich
on the stitch selector and pull the top and bobbin threads
1. Slide the buttonhole foot forwards to measure the length of the
buttonhole. Use the guidelines on the buttonhole foot. Lower the
buttonhole foot and needle. Slowly sew one side of the buttonhole until
you reach the end of the buttonhole foot. Finish with the needle in the left
hand position.
2. Change the stitch setting to and sew a few stitches. Finish with the
needle to the right.
3. Change the stitch setting to and sew all the way back until your
guidelines on the buttonhole foot are aligned. Finish with the needle in
the right hand position.
4. Change the stitch setting to and sew a few stitches. Finish with the
needle to the left.
:KHQ\RXKDYHÀQLVKHGOLIWWKHIDEULFDQGSXOOLWDERXWFP
backwards. Cut the threads with the thread cutter, leaving them the right
length for when you start sewing the next seam. Cut open the buttonhole
using the seam ripper.
4
2
3
1
2
3
4
3
TIP! 7U\VHZLQJRQDVFUDSRIIDEULFÀUVWWRDGMXVWDQ\VHWWLQJVLIQHFHVVDU\
before using the “proper” fabric.
4
2
1
4
2
19
ENGLISH
Foot
Stich Thread
tension
Zip
Choose the straight stitch by turning stitch selector dial to either A, B or C.
The thread tension should be from 1-4. Make sure the zip foot is properly
attached (page 21).
1
2
3
4
1. Move the needle upwards by turning the hand wheel towards you. Install
the zip foot so that the needle can only sew to the left of the foot.
2. Pin or tack the zip to the fabric. Place the fabric under the zip foot. Pull
the top thread and bobbin thread towards the back of the machine
before you lower the zip foot.
3. When you sew the right-hand side of the zip onto the fabric, let the teeth
of the zip run alongside the edge of the zip foot. Before you get to the
top of the zip, lift the zip foot and unzip the zip, keeping the needle in the
fabric. Lower the zip foot and sew the rest of the right-hand side. Secure
the seam by pressing the reverse button and sewing a few stitches
backwards, and then releasing the button and sewing a few stitches
forwards.
4. Now change the position of the zip foot so that the needle can only sew
on the right-hand side. Sew the left-hand side of the zip to the fabric in
the same way as in point 3.
TIP! 7U\VHZLQJRQDVFUDSRIIDEULFÀUVWWRDGMXVWDQ\VHWWLQJVLIQHFHVVDU\
before using the “proper” fabric.
20
ENGLISH
MAINTENANCE
1
2
1
2
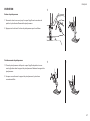
Remove a presser foot
1. Turn the hand wheel towards you to move the needle into the highest
position. Lift the presser foot.
2. Press the lever on the back of the presser foot holder to release the
presser foot. Do not apply force to remove the presser foot.
Attach a presser foot
1. Position the presser foot so that the pin on the foot is directly
under the groove in the presser foot holder. Lower the presser foot
holder.
2. When you lift the presser foot holder again, the foot will be
securely attached.
21
ENGLISH
1-2
Change the needle
1. Turn the hand wheel towards you to lift the needle. Then lower the
presser foot.
2. Release the needle by turning the needle holder screw anti-clockwise.
7KHVFUHZPD\EHYHU\WLJKWWKHÀUVWWLPH\RXXQVFUHZLW5HPRYHWKH
needle from the needle holder.
,QVWDOOWKHQHZQHHGOHLQWRWKHQHHGOHKROGHUZLWKWKHÁDWVLGHIDFLQJ
away from you. Push the needle upwards into the needle holder as far as
possible.
4. Tighten the screw on the needle holder securely.
Do not use needles that are bent or blunt, because they easily damage the
fabric. This machine uses a standard needle size 90/14.
22
3-4
ENGLISH
1
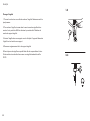
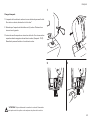
Change the light bulb
1. The sewing machine bulb is located behind the front cover. Remove the
cover by loosening the screw on the back.*
6
5
2. Make sure that the light bulb has cooled down before you touch it.
Remove the light bulb by unscrewing it to the left.
4
3. Install the new bulb by screwing it to the right. You can buy light bulbs in
sewing machine shops. (Use 15 W bulbs). Install the cover back onto the
sewing machine.
2
3
* WARNING! Always unplug the sewing machine from the wall socket before
you leave it or before you replace machine parts.
23
ENGLISH
1
RIGHT
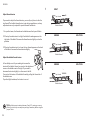
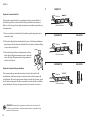
Adjust thread tension
Top thread
If you need to adjust the thread tension, you usually only have to alter the
top thread. The bobbin thread tension is set during manufacture, and any
DGMXVWPHQWVDUHRQO\UHTXLUHGIRUVSHFLDOWKUHDGVDQGIDEULFV
Bobbin thread
1. In a perfect seam, the threads are locked between the layers of fabric.
2. If the top thread tension is too tight, the bobbin thread appears on the
right side of the fabric. Decrease the thread tension slightly to solve the
problem.
2
WRONG
SOLUTION
Top thread
3. If the top thread tension is too loose, the top thread appears on the back
of the fabric. Increase the thread tension slightly.
Bobbin thread
Adjust the bobbin thread tension
In the unlikely event of you needing to increase the
tension of the bobbin thread, you can turn the adjustment
screw on the bobbin case to the right. If you need to
decrease the tension slightly, turn the screw to the left.
You can test the tension of the bobbin thread by pulling the thread out of
the bobbin case.
If you feel slight resistance, the tension is correct.
3
WRONG
Top thread
Bobbin thread
TIPS! 0RVWIDEULFVUHTXLUHWHQVLRQEHWZHHQDQG7U\VHZLQJRQDVFUDS
RIIDEULFÀUVWVRWKDW\RXFDQDGMXVWDQ\VHWWLQJVLIQHFHVVDU\EHIRUHXVLQJWKH
“proper” fabric.
24
SOLUTION
ENGLISH
1
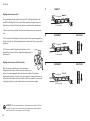
Clean the feed dogs
It is important that you clean the feed dogs regularly to keep the sewing
machine working optimally.*
1. Remove the needle and the presser foot (see pages 21 and 22). Unscrew
the needle plate.
&OHDQÀEUHVDQGGXVWIURPWKHWHHWKRIWKHIHHGGRJVXVLQJWKHEUXVK
3. Install the needle plate, presser foot and needle back onto the machine.
2
3
* WARNING! Always unplug the sewing machine from the wall socket before
you leave it or before you replace machine parts.
25
ENGLISH
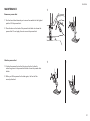
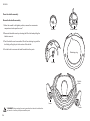
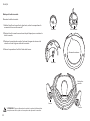
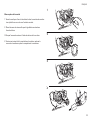
Clean the shuttle assembly
Dismantle the shuttle assembly
1. Move the needle to its highest position, remove the accessories
compartment and open the cover.*
Bobbin
Bobbin case
2. Remove the bobbin case by releasing the little latch and pulling the
bobbin case out.
3. Push the shuttle race levers aside. Lift out the retaining ring and the
shuttle by pulling the pin in the centre of the shuttle.
4. Use the brush to remove dust and threads from the parts.
Retaining ring
Shuttle
Shuttle
driver
Lever
* WARNING! Always unplug the sewing machine from the wall socket before
you leave it or before you replace machine parts.
26
Lever
ENGLISH
1
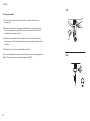
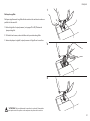
Install the shuttle assembly
1. Hold the shuttle by the pin and carefully insert it into the shuttle race. It
must form a circle with the shuttle driver.
,QVHUWWKHUHWDLQLQJULQJVRWKDWWKHORZHUSLQÀWVLQWRWKHJURRYHDWWKH
bottom.
2
3. Lock the retaining ring into place using the shuttle race levers.
4. Finish by installing the bobbin case into the machine, closing the cover
and putting the accessories compartment back into place.
3
4
BA
FED
C
A
H G
5
4
27
ENGLISH
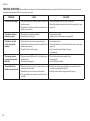
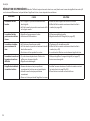
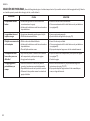
TROUBLE SHOOTING Warning! Be sure to always turn the hand wheel towards you (counterclockwise). Turning it the other way may cause
damage to the needle or fabric, and you may be injured.
PROBLEM
28
CAUSE
SOLUTION
The stitches form loops
7KHWRSWKUHDGKDVQRWEHHQWKUHDGHGWKURXJKWKH 7KUHDGWKHQHHGOHIURPWKHIURQWWRWKHEDFN
needle correctly.
7KUHDGWKHEREELQWKUHDGLQWRWKHEREELQFDVHFRUUHFWO\VHH
7KHEREELQWKUHDGKDVQRWEHHQWKUHDGHGLQWRWKH
page 12).
bobbin case correctly.
The stitches shrink or
the fabric puckers
7KHQHHGOHLVWRRELJIRUWKHIDEULF
7KUHDGWHQVLRQLVWRRWLJKW
The fabric is not fed
evenly through the
machine
7KHTXDOLW\RIWKHWKUHDGLVQRWJRRGHQRXJK
8VHDEHWWHUWKUHDG
7KHEREELQWKUHDGKDVQRWEHHQWKUHDGHGLQWRWKH 7KUHDGWKHEREELQWKUHDGLQWRWKHEREELQFDVHFRUUHFWO\VHH
bobbin case correctly.
page 12).
<RXSXOOWKHIDEULFZKLOHVHZLQJ
/HWWKHPDFKLQHIHHGWKHIDEULFWKURXJK
automatically.
The sewing machine
is noisy and sews with
GLIÀFXOW\
7KHUHDUHWUDFHVRIÁXIIDQGRLOLQWKHIHHGGRJVRU
needle holder.
7KHQHHGOHLVGDPDJHG
The needle hits the
bobbin case and breaks
7KHUHWDLQLQJULQJLVQRWLQWKHFRUUHFWSRVLWLRQDQG ,QVWDOOWKHUHWDLQLQJULQJDQGEREELQFDVHDFFRUGLQJWRWKH
the levers are not locked.
instructions (see page 26 and 27).
7KHEREELQFDVHLVQRWLQWKHFRUUHFWSRVLWLRQ
)HHGWKHIDEULFZKLOHVHZLQJLQVWHDGRIIRUFLQJLW
)RUFLQJWKHIDEULFPD\FDXVHWKHQHHGOHWREHQG
or break.
8VHDVPDOOHUQHHGOH
$GMXVWWKHWRSWKUHDGWHQVLRQVHHSDJH
&OHDQWKHIHHGGRJVDQGQHHGOHKROGHU
(see page 25).
,QVWDOODGLIIHUHQWQHHGOH
ENGLISH
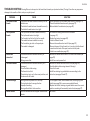
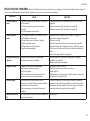
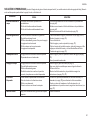
TROUBLE SHOOTING Warning! Be sure to always turn the hand wheel towards you (counterclockwise). Turning it the other way may cause
damage to the needle or fabric, and you may be injured.
PROBLEM
CAUSE
SOLUTION
The bobbin thread
breaks
7KHEREELQKDVEHHQLQVWDOOHGLQFRUUHFWO\LQWRWKH
bobbin case.
7KHEREELQWKUHDGKDVEHHQWKUHDGHGLQFRUUHFWO\
7KHEREELQWKUHDGWHQVLRQLVWRRWLJKW
,QVWDOOWKHEREELQLQWRWKHEREELQFDVHFRUUHFWO\VHHSDJH
7KUHDGWKHEREELQWKUHDGFRUUHFWO\VHHSDJH
5HGXFHEREELQWKUHDGWHQVLRQVHHSDJH
The top thread
breaks
7KHWRSWKUHDGKDVEHHQWKUHDGHGLQFRUUHFWO\
7KHWRSWKUHDGWHQVLRQLVWRRWLJKW
7KHWKUHDGLVWRRWKLFNRUWKLQIRUWKHQHHGOH
7KHQHHGOHKDVEHHQLQVWDOOHGLQFRUUHFWO\
7KHWKUHDGKDVJRWVWXFNRQWKHVSRROSLQV
7KHQHHGOHLVGDPDJHG
5HWKUHDGWKHVHZLQJPDFKLQHDQGWKHQHHGOH
(see page 13).
5HGXFHWKHWHQVLRQVHHSDJH
,QVWDOODGLIIHUHQWWKUHDG
5HPRYHWKHQHHGOHDQGUHLQVWDOOLWVHHSDJH
5HPRYHWKHVSRRORIWRSWKUHDGWXUQLWURXQGVRWKDWWKHWKUHDG
comes from the back of the spool, and use the felt pads.
,QVWDOODQHZQHHGOHVHHSDJH
Stitches are
missed out
7KHQHHGOHKDVEHHQLQVWDOOHGLQFRUUHFWO\RU
is damaged.
:URQJSUHVVHUIRRW
5HPRYHWKHQHHGOHDQGUHLQVWDOOLWRULQVWDOODQHZQHHGOHVHH
page 22).
,QVWDOOWKHFRUUHFWSUHVVHUIRRW
The needle breaks
7KHQHHGOHKDVEHHQLQVWDOOHGLQFRUUHFWO\RULV
damaged.
)RUFHWKHIDEULFZKLOHVHZLQJ
7KHWKUHDGLVWRRWKLFN
7KHUHWDLQLQJULQJLVQRWLQWKHFRUUHFWSRVLWLRQDQG
the levers are not locked.
5HPRYHWKHQHHGOHDQGLQVWDOODQHZRQHVHHSDJH
)HHGWKHIDEULFZKLOHVHZLQJLQVWHDGRIIRUFLQJLW
8VHDWKLQWKUHDG
,QVWDOOWKHUHWDLQLQJULQJDQGEREELQFDVHDFFRUGLQJWRWKH
instruction (see page 26 and 27).
Thread blockage
6HZLQJZKHQWKHSUHVVHUIRRWLVOLIWHGXS
7XUQLQJKDQGZKHHOLQZURQJGLUHFWLRQ
,PSURSHUWKUHDGLQJ
6HZLQJZLWKRXWIDEULFLQWKHPDFKLQH
&XWWKHXSSHUWKUHDGUHPRYHEREELQFDVHUHWDLQLQJULQJDQG
shuttle (see page 26) to remove accumulated thread.
5HSODFHWKHVKXWWOHUHWDLQLQJULQJDQGEREELQFDVHLQWKHFRUUHFW
position according to the assembly instructions (see page 27).
Loss of tension
'XVWDFFXPXODWHGLQVLGHWKHXSSHUWKUHDGWHQVLRQ
device.
5HWKUHDG
29
FRANÇAIS
SOMMAIRE
IMPORTANTES INSTRUCTIONS DE SECURITE
Mesures de sécurité ..........................................................................................................................................................................................................................................................................
Pour un fonctionnement sûr ............................................................................................................................................................................................................................................................
Prolongez la durée de vie de votre machine .............................................................................................................................................................................................................................
Réparation ou réglage de la machine ........................................................................................................................................................................................................................................
31
32
32
32
Éléments de la machine à coudre .................................................................................................................................................................................................................................................
Accessoires de la machine a coudre ............................................................................................................................................................................................................................................
Explication des symboles ................................................................................................................................................................................................................................................................
33
34
35
Préparations
Début de la couture ..........................................................................................................................................................................................................................................................................
%RELQDJHGXÀOGHFDQHWWH .............................................................................................................................................................................................................................................................
Mise en place de la canette ...........................................................................................................................................................................................................................................................
(QÀOHUOHÀOG·DLJXLOOHHWO·DLJXLOOH ...................................................................................................................................................................................................................................................
7LUH]VXUOHÀOGHFDQHWWH .................................................................................................................................................................................................................................................................
36
37
38
39
40
Commencer la couture
Couture au point droit .......................................................................................................................................................................................................................................................................
Point zigzag ........................................................................................................................................................................................................................................................................................
Couture décorative ...........................................................................................................................................................................................................................................................................
Couture invisible ................................................................................................................................................................................................................................................................................
Boutonnières .......................................................................................................................................................................................................................................................................................
Fermeture à glissière ........................................................................................................................................................................................................................................................................
41
42
43
44
45
46
Entretien
Enlever le pied presseur ...................................................................................................................................................................................................................................................................
Positionnement du pied presseur ..................................................................................................................................................................................................................................................
Changer l’aiguille ..............................................................................................................................................................................................................................................................................
Changer l’ampoule ...........................................................................................................................................................................................................................................................................
5pJODJHGHODWHQVLRQGXÀO ............................................................................................................................................................................................................................................................
Nettoyer les griffes ...........................................................................................................................................................................................................................................................................
Nettoyer la boîte à navette ............................................................................................................................................................................................................................................................
47
47
48
49
50
51
52
En cas de problème ..........................................................................................................................................................................................................................................................................
54
30
FRANÇAIS
INSTRUCTIONS IMPORTANTES DE SÉCURITÉ
Merci d’avoir choisi ce produit.
Cette machine à coudre est l’une des plus récentes sur le marché et propose
de nombreuses fonctionnalités perfectionnées. Pour obtenir une description
complète de ces fonctionnalités et connaître les instructions d’utilisation,
veuillez lire intégralement le mode d’emploi contenu dans cette notice avant
toute utilisation.
Cette machine à coudre est destinée uniquement à un usage
DOMESTIQUE.
Conserver ces instructions pour une utilisation ultérieure.
Précautions de sécurité
3RXUpYLWHUOHVULVTXHVGHEUOXUHG·LQFHQGLHGHFKRFpOHFWULTXHRXGH
blessure, il est essentiel de lire et de suivre les précautions de sécurité
suivantes :
DANGER²SRXUUpGXLUHOHULVTXHGHFKRFpOHFWULTXH
Un appareil électroménager ne doit jamais être laissé sans surveillance
ORUVTX·LOHVWEUDQFKp7RXMRXUVGpEUDQFKHUFHWDSSDUHLOLPPpGLDWHPHQW
après l’avoir utilisé et avant de le nettoyer.
Toujours débrancher l’appareil avant de remplacer son ampoule. Utiliser
XQHDPSRXOHGHYROWDJHLGHQWLTXH
ATTENTION²SRXUUpGXLUHOHULVTXHGHEUOXUHG·LQFHQGLHGHFKRF
pOHFWULTXHRXGHEOHVVXUH
Ne doit pas être utilisé comme un jouet. Une attention particulière est
QpFHVVDLUHORUVTXHFHWDSSDUHLOHVWXWLOLVpSDURXjSUR[LPLWpG·HQIDQWV
8WLOLVHUFHWDSSDUHLOXQLTXHPHQWSRXUO·XVDJHDXTXHOLOHVWGHVWLQpFRPPH
GpFULWGDQVFHWWHQRWLFH8WLOLVHUXQLTXHPHQWOHVDFFHVVRLUHVUHFRPPDQGpV
par le fabricant comme contenu dans cette notice.
Ne jamais utiliser cet appareil si un câble ou une prise est endommagé, s’il
ne fonctionne pas correctement, s’il a subi un choc ou s’il est abîmé, ou s’il
a été en contact avec de l’eau. Dans ce cas, rapporter cet appareil à un
revendeur ou un centre de service agréé pour un examen, une réparation
RXXQUpJODJHpOHFWULTXH
1HMDPDLVXWLOLVHUO·DSSDUHLOVLXQHRXYHUWXUHGHYHQWLODWLRQHVWEORTXpH
9HLOOHUjFHTXHOHVRXYHUWXUHVGHYHQWLODWLRQGHODPDFKLQHjFRXGUHHWOD
pédale ne soient jamais obstruées par des peluches, de la poussière ou des
résidus de tissu.
Éloigner vos doigts des parties en mouvement. Faire particulièrement
attention à l’aiguille de la machine à coudre.
8WLOLVHUXQLTXHPHQWODSODTXHjDLJXLOOHDSSURSULpH8QHDXWUHSODTXHj
aiguille pourrait casser l’aiguille.
Ne pas utiliser d’aiguilles tordues.
Ne pas tirer et ne pas pousser le tissu pendant la couture. Ceci pourrait
tordre l’aiguille et la casser.
Arrêter la machine en la mettant en position OFF (0) avant d’effectuer tout
DMXVWHPHQWHWUpJODJHGDQVOD]RQHGHO·DLJXLOOHSDUH[HPSOHSRXUHQÀOHU
O·DLJXLOOHFKDQJHUG·DLJXLOOHHQÀOHUODFDQHWWHRXFKDQJHUGHSLHGSUHVVHXU
7RXMRXUVGpEUDQFKHUODPDFKLQHDYDQWGHUHWLUHUOHFRXYHUFOHGHOXEULÀHU
la machine et d’effectuer toute opération d’entretien ou de réglage
mentionnée dans la notice d’utilisation.
1HMDPDLVYHUVHURXLQVpUHUGHVFRUSVpWUDQJHUVGDQVXQHTXHOFRQTXH
ouverture.
Ne pas utiliser à l’extérieur.
31
FRANÇAIS
Ne pas faire fonctionner dans des endroits où on utilise des aérosols ou de
l’oxygène.
Pour arrêter la machine, mettre tous les interrupteurs en position OFF (0)
SXLVGpEUDQFKHUODÀFKH
1HMDPDLVIDLUHIRQFWLRQQHUVXUXQHVXUIDFHVRXSOHWHOOHTX·XQOLWRXXQ
FDQDSpFDUOHVRXYHUWXUHVGHYHQWLODWLRQSRXUUDLHQWrWUHEORTXpHV
1HSDVGpEUDQFKHUHQWLUDQWOHFkEOHPDLVHQVDLVLVVDQWODÀFKH
1HWWR\H]ODPDFKLQHXQLTXHPHQWDYHFGXVDYRQRXXQGpWHUJHQWGRX[1H
la nettoyez jamais avec du benzène, des diluants ou des produits abrasifs
TXLULVTXHUDLHQWG·HQGRPPDJHUODKRXVVHGHSURWHFWLRQHWODPDFKLQH
(YLWH]GHIDLUHWRPEHUODPDFKLQHRXGHOXLSRUWHUGHVFRXSV
$VVXUH]YRXVG·HIIHFWXHUGHVLQVWDOODWLRQVFRUUHFWHVHQVXLYDQWOHV
instructions fournies dans ce manuel en cas de remplacement ou
d’installation de tous types de composants, du pied presseur, de l’aiguille
ou toute autre partie.
Réparation ou réglage de la machine
CONSERVER CES INSTRUCTIONS
Pour un fonctionnement sûr
1HTXLWWH]SDVO·DLJXLOOHGXUHJDUGTXDQGYRXVFRXVH]1HWRXFKH]SDVOH
YRODQWOHUHOHYHXUGHÀOO·DLJXLOOHRXWRXWHDXWUHSDUWLHHQPRXYHPHQW
Veillez à toujours débrancher la machine :
ORUVTXHYRXVDYH]WHUPLQpODFRXWXUH
ORUVTXHYRXVDYH]EHVRLQGHUHPSODFHURXG·HQOHYHUO·DLJXLOOHRXWRXWH
autre pièce.
- en cas de panne d’électricité pendant l’utilisation de la machine.
- pendant l’entretien de la machine à coudre.
- si vous laissez la machine sans surveillance.
Ne pas placer d’objet sur la pédale.
%UDQFKH]ODÀFKHpOHFWULTXHGLUHFWHPHQWGDQVODSULVH1HSDVXWLOLVHUGH
rallonge.
Prolongez la durée de vie de votre machine :
1HSDVUDQJHUODPDFKLQHjODOXPLqUHGLUHFWHGXVROHLORXGDQVGHV
pièces ou des zones très humides. Ne pas utiliser la machine dans des
endroits où la température est très élevée (près d’un réchaud allumé, un
fer à repasser, une lampe halogène, etc).
32
En cas de réparation ou de réglage de la machine, veuillez consulter
OHJXLGHGHUpVROXWLRQVGHVSUREOqPHVFRXUDQWVjODÀQGHFHPDQXHO
d’utilisation.
/HFRQWHQXGXJXLGHG·LQVWUXFWLRQVDLQVLTXHOHVVSpFLÀFDWLRQVGHSURGXLWGH
cet appareil peuvent changer.
FRANÇAIS
ÉLÉMENTS DE LA MACHINE À COUDRE
Face avant
Arrière
10
7
4
11
12
M
L M
J K
H I
F G
D E
B C
BA
A
C
5
4
L K
J I H G
6
3
9
8
FED
6
13
5
14
1
16
18
17
15
19 20
21
24
22
23
2
1. Compartiments à accessoires
2. Bloc canette
5pJODJHGHODWHQVLRQGXÀO
5HOHYHXUGHÀO
&RXSHÀO
*XLGHÀOG·DLJXLOOH
*XLGHÀOGXERELQRLU
8. Sélection de motif de piqûre
9. Tige à bobine
10. Poignée
11. Bobinoir
12. Butée du bobinoir
13. Touche de marche arrière
14. Pédale
15. Pied presseur
16. Vis du pied presseur
17. Aiguille
*XLGHÀO
19. Vis du pince-aiguille
20. Plaque à aiguille
21. Volant
22. Bouton d’alimentation
23. Prise du câble d’alimentation
24. Releveur de pied presseur
33
FRANÇAIS
ACCESSOIRES DE LA MACHINE A COUDRE
Pied presseur
(installé sur la machine)
À utiliser pour les points
droits, zigzag, point
décoratif et points
invisibles (voir page 41,
42, 43 et 44).
Pied fermeture à glissière
S’utilise pour coudre une
fermeture à glissière (voir
p. 46).
Pied boutonnière
S’utilise pour coudre des
boutonnières (voir page
45).
Aiguilles
Reportez-vous à la page
48 pour voir comment
changer d’aiguille.
34
Tige à bobine
Tige à bobine
supplémentaire à placer
sur la tige existante.
Canettes
%RELQH]OHÀOVXUFHV
canettes.
Rondelles de feutre
À placer sous la bobine
GHÀOVXSpULHXUHSRXU
TX·HOOHWRXUQHIDFLOHPHQW
Tournevis
Utilisés pour les réglages
et l’entretien.
Découseur
S’utilise pour défaire des
points de couture.
Brosse
Sert à retirer la poussière
HWOHVÀEUHVGHVJOLVVLqUHV
(voir page 51).
FRANÇAIS
EXPLICATION DES SYMBOLES
7HQVLRQGXÀO
Reportez-vous à la page 50 pour voir comment
UpJOHUODWHQVLRQGXÀO
Couture décorative
G, H, I, J. En page 43, vous trouverez
l’explication de la couture décorative.
Touche de marche arrière
Appuyez sur la touche de marche arrière puis
appuyez sur la pédale pour faire des points en
PDUFKHDUULqUHDÀQG·DUUrWHUOHÀOHQGpEXWHWÀQ
de couture.
Couture au point droit
A, B, C. Reportez-vous à la page 41 pour voir la
couture au point droit.
Couture invisible
L, M. Voir en page 44 comment faire une
couture invisible.
Point zigzag
D, E, F, K. Voir en page 42 comment réaliser le
point zigzag.
Boutonnières
Reportez-vous à la page 45 pour voir comment
coudre des boutonnières.
1
4
2
3
35
FRANÇAIS
PRÉPARATIONS
5
Début de la couture
Branchement de la machine
$YDQWGHEUDQFKHUODPDFKLQHjFRXGUHDVVXUH]YRXVTXHOHYROWDJHHW
ODIUpTXHQFHGHODPDFKLQHVRQWLGHQWLTXHVjFHX[GHYRWUHDOLPHQWDWLRQ
SULQFLSDOH9RXVWURXYHUH]FHVLQIRUPDWLRQVVXUO·pWLTXHWWHHQGHVVRXVGHOD
machine à coudre.
1
9HLOOH]jFHTXHODPDFKLQHQHVRLWSDVEUDQFKpH
2. Branchez le cordon d’alimentation dans la prise d’alimentation de la
machine.
3. Branchez le câble d’alimentation dans la prise murale.
4. Mettez l’interrupteur sur Marche.
5. Tirez la tige à bobine et placez la tige supplémentaire par-dessus.
Comment se servir de la pédale
Plus vous appuyez sur la pédale, plus la machine coud rapidement. La
PDFKLQHV·DUUrWHGHFRXGUHTXDQGYRXVUHOkFKH]ODSpGDOH
1%VXUODSpGDOHGHFHWWHPDFKLQHYRXVSRXYH]GLVWLQJXHUVRLWODPDUTXH
¶-HJRQ·RX¶)'0·&HWWHPDUTXHGRLWrWUHLGHQWLTXHjFHOOHGHODSULVHGHOD
machine à coudre.
Astuce ! Pour avoir une idée de la vitesse de couture, appuyez sur la pédale
DYDQWO·HQÀODJH
36
2
3
FRANÇAIS
1
2
%RELQDJHGXÀOGHFDQHWWH
1. Tournez le bouton du volant en position débrayée.
'pURXOH]XQERXWGHÀOHWIDLWHVOHSDVVHUGDQVOHJXLGHÀOVXSpULHXUSXLV
DXWRXUGXJXLGHÀOGXERELQRLU
)DLWHVSDVVHUOHÀOGDQVO·XQGHVWURXVGHODFDQHWWHGHO·LQWpULHXUYHUV
l’extérieur et placez ensuite la canette sur le bobinoir.
M
L M
J K
H I
F G
D E
B C
L K
G
A
H
3
A
I
3RXVVH]OHERELQRLUYHUVODGURLWHYHUVOHEXWRLU7HQH]O·H[WUpPLWpGXÀO
HWDSSX\H]VXUODSpGDOH8QHIRLVTXHODFDQHWWHDHIIHFWXpTXHOTXHV
WRXUVOkFKH]OHÀO/kFKH]ODSpGDOHTXDQGODFDQHWWHHVWSOHLQH
5
J
6
4
5. Resserrez le bouton du volant et poussez le bobinoir vers la gauche.
&RXSH]OHÀO
L K
L K
5
G
FED
BA
H
C
A
L K
I
5
4
M
L M
J K
H I
F G
D E
B C
J
6
37
FRANÇAIS
1
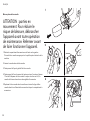
Mise en place de la canette
ATTENTION : parties en
mouvement. Pour réduire le
ULVTXHGHEOHVVXUHGpEUDQFKHU
l’appareil avant toute opération
de maintenance. Refermer avant
de faire fonctionner l’appareil.
2
3
4
5
1. Retirez le compartiment d’accessoires en le tirant vers la gauche.
2XYUH]OHEORFFDQHWWHHQDSSX\DQWVXUOHSHWLWORTXHWHWUHWLUH]OHGHOD
machine.
2. Insérez la canette dans le bloc canette.
)DLWHVSDVVHUOHÀOSDUOHJXLGHÀOGXEORFFDQHWWH
)DLWHVSDVVHUOHÀOVRXVOHUHVVRUWGHWHQVLRQSXLVSDUO·RXYHUWXUH/DLVVH]
FPGHÀOGpSDVVHUGXEORFFDQHWWH/RUVTXHYRXVWLUH]VXUOHÀOOD
canette doit tourner dans le sens des aiguilles d’une montre.
5. Replacez le bloc canette dans la machine en insérant la tige du bloc
FDQHWWHGDQVOHWURX5HPHWWH]OHFRXYHUFOHDLQVLTXHOHFRPSDUWLPHQWj
accessoires.
38
FRANÇAIS
2
1
(QÀOHUOHÀOG·DLJXLOOHHWO·DLJXLOOH
Commencez par mettre le levier à sa position la plus élevée en tournant le
volant vers vous. Soulevez le pied presseur.
M
L M
J K
H I
F G
D E
B C
L K
FED
4
G
BA
H
3ODFH]ODERELQHVXUODWLJHjERELQHGHIDoRQjFHTXHOHÀOSDVVHSDU
l’arrière de la bobine.
A
I
5
J
6
C
)DLWHVSDVVHUOHÀOSDUOHJXLGHÀOVXSpULHXU
)DLWHVSDVVHUOHÀOSDUOHUHOHYHXUGHÀOGHODGURLWHYHUVODJDXFKHÁqFKH
3).
6
M
K L M
I J
L K
J
)DLWHVSDVVHUOHÀOSDUOHFRQWU{OHGHWHQVLRQÁqFKHSXLVIDLWHVOH
SDVVHUDXWRXUGHODERXFOHGHWHQVLRQGHÀOSXLVYHUVOHKDXWÁqFKH
4
3
7LUH]OHÀOYHUVOHEDVHWHQÀOH]OHGDQVOHJXLGHÀO(QVXLWHHQÀOH]OHÀO
dans le chas de l’aiguille, de l’avant vers l’arrière.
6
5
A
F G
D E
B C
4
6
5
A
F G
D E
B C
4
6
5
6
5
A
F G
D E
B C
4
6
5
A
F G
D E
B C
4
39
FRANÇAIS
1
7LUH]VXUOHÀOGHFDQHWWH
6RXOHYH]OHSLHGSUHVVHXUHWWHQH]OHÀOSDUYRWUHPDLQJDXFKH
7RXUQH]OHQWHPHQWOHYRODQWDÀQG·DEDLVVHUO·DLJXLOOHDXPD[LPXP
&RQWLQXH]jWRXUQHUMXVTX·jFHTX·HOOHVHWURXYHGDQVODSRVLWLRQODSOXV
élevée.
5HPRQWH]GpOLFDWHPHQWOHÀOG·DLJXLOOHDYHFYRWUHPDLQJDXFKH/HÀOGH
la canette monte en faisant une boucle.
7LUH]VXUOHVGHX[ÀOVYHUVO·DUULqUHHQYLURQFP
2
4
40
3
FRANÇAIS
COMMENCER LA COUTURE
Pédale
Couture
Tension
GXÀO
Point droit
Sélectionnez la couture droite en tournant le bouton. Choisissez A, B ou C.
Pour ajuster la longueur des points, réglez le bouton sur les encoches entre
$%HW&/DWHQVLRQGXÀOGHERELQHGRLWrWUHHQWUHHW9HLOOH]jFHTXH
OHSLHGSUHVVHXUVRLWFRUUHFWHPHQWÀ[pSDJH
1
2
3
4
1. Pour remonter l’aiguille, tournez le volant vers vous. Soulevez le pied
presseur et placez le tissu dessous. Tournez le volant vers vous pour
placer l’aiguille à l’endroit où vous allez coudre. Baissez le pied presseur.
2. Appuyez doucement sur la pédale et commencez à coudre. Arrêtez la
FRXWXUHHQIDLVDQWTXHOTXHVSRLQWVHQPDUFKHDUULqUHHQDSSX\DQWVXUOD
touche arrière tout en appuyant sur la pédale. Puis relâchez le bouton et
continuez à coudre vers l’avant.
3. Si vous voulez changer de direction, dans un angle par exemple,
soulevez le pied presseur en laissant l’aiguille dans le tissu et déplacez le
tissu. Baissez le pied presseur et continuez à coudre.
4. Après avoir terminé, arrêtez la couture (voir point 2). Soulevez le tissu et
WLUH]OHHQYLURQFPYHUVO·DUULqUH&RXSH]OHVÀOVjODERQQHORQJXHXU
SRXUODFRXWXUHVXLYDQWHjO·DLGHGXFRXSHÀO
Astuce ! Faire un essai de couture sur un bout de tissu vous permettra de
PLHX[UpJOHUODPDFKLQHDYDQWGHYRXVDWWDTXHUjYRWUHRXYUDJH9RXV
SRXYH]DXVVLYRXVVHUYLUGHVOLJQHVGHJXLGDJHVXUODSODTXHjDLJXLOOHSRXU
être sûr de coudre droit.
41
FRANÇAIS
Pédale
Couture
Tension
GXÀO
Point zigzag
Sélectionnez le point zigzag en positionnant le sélectionneur de point sur D,
E, F ou K. Vous pouvez régler la longueur des points en sélectionnant entre
'()HW./DWHQVLRQGXÀOGRLWrWUHHQWUHHW9HLOOH]jFHTXHOHSLHG
SUHVVHXUVRLWFRUUHFWHPHQWÀ[pSDJH
1
2
3
4
1. Positionnez l’aiguille en position haute en tournant le volant vers vous.
Soulevez le pied presseur et placez le tissu en dessous. Tournez le volant
YHUVYRXVMXVTX·jFHTXHO·DLJXLOOHVHWURXYHjO·HQGURLWGXWLVVXRYRXV
DOOH]FRXGUH%DLVVH]OHSLHGSUHVVHXU$VVXUH]YRXVTXHOHÀOG·DLJXLOOH
HWOHÀOGHODFDQHWWHVRLHQWWLUpVYHUVO·DUULqUHGHODPDFKLQHVRXVOHSLHG
presseur.
2. Appuyez doucement sur la pédale et commencez à coudre.
3. Si vous souhaitez changer de direction, dans un angle par exemple,
laissez l’aiguille dans le tissu. Soulevez le pied presseur et tournez le
tissu. Baissez le pied presseur et continuez à coudre.
4. Quand vous avez terminé, soulevez le tissu et tirez-le environ 15 cm vers
O·DUULqUH&RXSH]OHVÀOVjODERQQHORQJXHXUSRXUODFRXWXUHVXLYDQWHj
O·DLGHGXFRXSHÀO
Astuce ! Faire un essai de couture sur un bout de tissu vous permettra de
PLHX[UpJOHUODPDFKLQHDYDQWGHYRXVDWWDTXHUjYRWUHRXYUDJH
42
FRANÇAIS
Pédale
Couture
Tension
GXÀO
Couture décorative
Sélectionnez la couture décorative en tournant la molette de sélection vers
*+,RX-/DWHQVLRQGXÀOGRLWrWUHHQWUHHW$VVXUH]YRXVG·DYRLU
FRUUHFWHPHQWÀ[pOHSLHGSUHVVHXUSDJH
1
2
3
4
1. Placez l’aiguille en position haute en tournant le volant vers vous.
Soulevez le pied presseur et placez le tissu en dessous. Tournez le
YRODQWYHUVYRXVDÀQG·DEDLVVHUO·DLJXLOOHjO·HQGURLWGXWLVVXRYRXVDOOH]
FRXGUH$EDLVVH]OHSLHGSUHVVHXU9HLOOH]jFHTXHOHÀOG·DLJXLOOHHW
OHÀOGHFDQHWWHVRLHQWSODFpVYHUVO·DUULqUHGHODPDFKLQHVRXVOHSLHG
presseur.
2. Appuyez légèrement sur la pédale pour commencer à coudre.
3. Si vous voulez changer de direction, dans un angle par exemple,
soulevez le pied presseur en laissant l’aiguille dans le tissu et déplacez le
tissu. Baissez le pied presseur et continuez à coudre.
4. Après avoir terminé, soulevez le tissu et tirez-le vers l’arrière environ 15
FP&RXSH]OHVÀOVDYHFOHFRXSHÀOHQYHLOODQWjOHVODLVVHUjODERQQH
longueur pour la prochaine couture.
Astuce ! Faire un essai de couture sur un bout de tissu vous permettra de
PLHX[UpJOHUODPDFKLQHDYDQWGHYRXVDWWDTXHUjYRWUHRXYUDJH
43
FRANÇAIS
Pédale
Couture Tension
GXÀO
Couture invisible
Sélectionnez la couture invisible en positionnant le sélectionneur de points
VXU/RX0/DWHQVLRQGXÀOGRLWrWUHHQWUHHW9HLOOH]jFHTXHOHSLHG
SUHVVHXUVRLWFRUUHFWHPHQWÀ[pSDJH
1
1. Placez l’aiguille en position haute en tournant le volant vers vous. Pliez le
WLVVXFRPPHLQGLTXpVXUOHGHVVLQ6RXOHYH]OHSLHGSUHVVHXUHWSRXVVH]OH
WLVVXHQGHVVRXV7RXUQH]OHYRODQWYHUVYRXVGHIDoRQjFHTXHO·DLJXLOOH
GHVFHQGHHWWUDYHUVHOHF{WpJDXFKHGHODSDUWLHSOLpHGXWLVVX$EDLVVH]
OHSLHGSUHVVHXU9HLOOH]jWLUHUOHVÀOVG·DLJXLOOHHWGHFDQHWWHYHUV
l’arrière de la machine sous le pied presseur.
2. Appuyez légèrement sur la pédale et commencez à coudre.
3. Après avoir terminé, soulevez le tissu et tirez-le vers l’arrière, à environ 15
FP&RXSH]OHVÀOVDYHFOHFRXSHÀOHQOHVODLVVDQWjODERQQHORQJXHXU
pour la couture suivante.
Astuce ! Faire un essai de couture sur un bout de tissu vous permettra de
PLHX[UpJOHUODPDFKLQHDYDQWGHYRXVDWWDTXHUjYRWUHRXYUDJH
44
2
3
FRANÇAIS
Pédale
1
Boutonnières
9HLOOH]jFHTXHOHSLHGERXWRQQLqUHVRLWFRUUHFWHPHQWÀ[pYRLUSDJH
Sélectionnez le point DYHFODWRXFKHGHVSRLQWVHWWLUH]OHVÀOVG·DLJXLOOHHW
de la canette vers la gauche.
Couture
4
2
3
1
2
)DLWHVJOLVVHUOHSLHGERXWRQQLqUHYHUVO·DYDQWDÀQGHPHVXUHUOD
ORQJXHXUGHODERXWRQQLqUH6HUYH]YRXVGHODSODTXHGHJXLGDJHGX
pied boutonnière. Abaissez le pied boutonnière et l’aiguille. Cousez
VRLJQHXVHPHQWXQF{WpGHODERXWRQQLqUHMXVTX·jFHTXHYRXVDUULYLH]j
ODÀQGXSLHGERXWRQQLqUH7HUPLQH]DYHFO·DLJXLOOHHQSRVLWLRQJDXFKH
&KDQJH]GHPRWLIGHSLTUH HWFRXVH]TXHOTXHVSRLQWV7HUPLQH]DYHF
l’aiguille en position droite.
&KDQJH]GHPRWLIGHSLTUH et cousez en sens inverse de façon à
DOLJQHUOHVGHX[F{WpVGHODERXWRQQLqUH7HUPLQH]DYHFO·DLJXLOOHHQ
position droite.
4
2
1
&KDQJH]GHPRWLIGHSLTUH HWFRXVH]TXHOTXHVSRLQWV7HUPLQH]DYHF
l’aiguille en position gauche.
5. Après avoir terminé, soulevez le tissu et tirez-le environ 15 cm à l’arrière.
&RXSH]OHVÀOVDYHFOHFRXSHÀOHQYHLOODQWjODLVVHUODERQQHORQJXHXU
pour la couture suivante. Découpez ensuite la boutonnière à l’aide du
découseur.
3
4
3
Astuce ! Faire un essai de couture sur un bout de tissu vous permettra de
PLHX[UpJOHUODPDFKLQHDYDQWGHYRXVDWWDTXHUjYRWUHRXYUDJH
4
2
45
FRANÇAIS
Pédale
Couture Tension
GXÀO
Fermeture à glissière
&KRLVLVVH]OHSRLQWGURLWHQVpOHFWLRQQDQW$%RX&/DWHQVLRQGXÀOGRLW
rWUHHQWUHHW9HLOOH]jFHTXHOHSLHGjIHUPHWXUHjJOLVVLqUHVRLW
FRUUHFWHPHQWÀ[pSDJH
1
2
3
4
1. Positionnez l’aiguille en position haute en tournant le volant vers vous.
,QVWDOOH]OHSLHGjIHUPHWXUHjJOLVVLqUHGHIDoRQjFHTXHO·DLJXLOOHSXLVVH
FRXGUHXQLTXHPHQWjJDXFKHGXSLHGjIHUPHWXUHjJOLVVLqUH
2. Épinglez ou bâtissez la fermeture à glissière au tissu. Placez le tissu sous
OHSLHGjIHUPHWXUHjJOLVVLqUH7LUH]OHÀOG·DLJXLOOHHWOHÀOGHFDQHWWH
vers l’arrière puis baissez le pied à fermeture à glissière.
3RXUFRXGUHOHF{WpGURLWGHODIHUPHWXUHjJOLVVLqUHVXUOHWLVVX
positionnez les dents de la fermeture à glissière le long du bord du pied
jIHUPHWXUHjJOLVVLqUH$YDQWG·DUULYHUMXVTX·HQKDXWGHODIHUPHWXUHj
glissière, relevez le pied à fermeture à glissière et ouvrez la fermeture à
glissière en laissant l’aiguille dans le tissu. Baissez le pied à fermeture à
JOLVVLqUHHWWHUPLQH]ODFRXWXUHGXF{WpGURLW$UUrWH]ODFRXWXUHHQIDLVDQW
TXHOTXHVSRLQWVHQPDUFKHDUULqUHSXLVGHQRXYHDXTXHOTXHVSRLQWV
droits.
&KDQJH]ODSRVLWLRQGXSLHGjIHUPHWXUHjJOLVVLqUHSRXUTXHO·DLJXLOOH
VHSODFHjGURLWH&RXVH]OHF{WpJDXFKHGHODIHUPHWXUHjJOLVVLqUHHQ
SURFpGDQWFRPPHSRXUOHF{WpGURLW
Astuce ! Faire un essai de couture sur un bout de tissu vous permettra de
PLHX[UpJOHUODPDFKLQHDYDQWGHYRXVDWWDTXHUjYRWUHRXYUDJH
46
FRANÇAIS
ENTRETIEN
1
2
1
2
Enlever le pied presseur
7RXUQH]OHYRODQWYHUVYRXVMXVTX·jFHTXHO·DLJXLOOHVHWURXYHGDQVOD
position la plus élevée. Remontez le pied presseur.
2. Appuyez sur le levier à l’arrière du pied presseur pour le relâcher.
Positionnement du pied presseur
3ODFH]OHSLHGSUHVVHXUGHIDoRQjFHTXHO·DLJXLOOHGXSLHGVHWURXYH
sous la glissière dans le support du pied presseur. Abaissez le support du
pied presseur.
/RUVTXHYRXVUHOqYHUH]OHVXSSRUWGXSLHGSUHVVHXUOHSLHGVHUD
FRUUHFWHPHQWÀ[p
47
FRANÇAIS
1-2
Changer l’aiguille
7RXUQH]OHYRODQWYHUVYRXVDÀQGHVRXOHYHUO·DLJXLOOH$EDLVVH]HQVXLWHOH
pied presseur.
2. Pour enlever l’aiguille, tournez dans le sens inverse des aiguilles d’une
PRQWUH/DYLVSHXWrWUHGLIÀFLOHjGpYLVVHUODSUHPLqUHIRLV'pWDFKH]OD
ensuite du support aiguille.
,QVpUH]O·DLJXLOOHGDQVVRQVXSSRUWDYHFOHF{WpSODWjO·RSSRVp5HPRQWH]
l’aiguille tout en haut de son support.
4. Resserrez soigneusement la vis du support aiguille.
8WLOLVH]WRXMRXUVGHVDLJXLOOHVHQSDUIDLWpWDWDÀQGHQHSDVDEvPHUOHWLVVX
Cette machine à coudre fonctionne avec une aiguille standard de taille
90/14.
48
3-4
FRANÇAIS
1
Changer l’ampoule
1. L’ampoule de la machine à coudre se trouve derrière le panneau frontal.
Pour retirer ce dernier, dévissez la vis à l’arrière*.
6
$WWHQGH]TXHO·DPSRXOHDLWUHIURLGLHDYDQWG·\WRXFKHU'pYLVVH]ODHQ
tournant vers la gauche.
5
4
3. Insérez la nouvelle ampoule en vissant vers la droite. Vous trouverez des
ampoules dans les magasins de machines à coudre. (Ampoule : 15 W).
Remettez le panneau frontal sur la machine à coudre.
2
3
* ATTENTION ! Toujours débrancher la machine à coudre de l’alimentation
SULQFLSDOHDYDQWGHODTXLWWHURXGHUHPSODFHUGHVSLqFHVGHODPDFKLQH
49
FRANÇAIS
1
5pJODJHGHODWHQVLRQGXÀO
Fil d’aiguille
6LYRXVDYH]EHVRLQGHUpJOHUODWHQVLRQGXÀOLOVXIÀWJpQpUDOHPHQWGH
PRGLÀHUOHÀOG·DLJXLOOH/DWHQVLRQGXÀOGHFDQHWWHHVWUpJOpHGXUDQWOD
IDEULFDWLRQHWVHXOVOHVÀOVHWWLVVXVVSpFLDX[UHTXLqUHQWGHVDMXVWHPHQWV
'DQVXQHFRXWXUHSDUIDLWHOHVÀOVVRQWHQWUHODFpVHQWUHOHVFRXFKHVGX
tissu.
CORRECT
Fil de canette
2
INCORRECT
6LODWHQVLRQGXÀOG·DLJXLOOHHVWWURSVHUUpHOHÀOGHFDQHWWHDSSDUDvWVXU
OHF{WpGURLWGXWLVVX'LPLQXH]OpJqUHPHQWODWHQVLRQGXÀOSRXUUpVRXGUHOH
problème.
Fil d’aiguille
6LODWHQVLRQGXÀOG·DLJXLOOHHVWWURSOkFKHFHOXLFL
apparaît sur l’envers du tissu. Augmentez légèrement la
WHQVLRQGXÀO
Fil de canette
5pJODJHGHODWHQVLRQGXÀOGHFDQHWWH
Dans le cas peu probable où vous auriez besoin
G·DXJPHQWHUODWHQVLRQGXÀOGHFDQHWWHYRXVSRXYH]
tourner la vis de réglage du bloc canette vers la droite. Pour baisser
légèrement la tension, tournez la vis vers la gauche. Vous pouvez tester la
WHQVLRQGXÀOGHFDQHWWHHQWLUDQWOHÀOKRUVGXEORFFDQHWWH6LYRXVVHQWH]
XQHOpJqUHUpVLVWDQFHF·HVWTXHODWHQVLRQHVWFRUUHFWHPHQWUpJOpH
ASTUCES ! Pour la plupart des tissus, il faut une tension entre 3 et 5. Faire
un essai de couture sur un bout de tissu vous permettra de mieux régler la
PDFKLQHDYDQWGHYRXVDWWDTXHUjYRWUHRXYUDJH
50
3
INCORRECT
Fil d’aiguille
Fil de canette
SOLUTION
SOLUTION
FRANÇAIS
1
Nettoyer les griffes
1HWWR\H]UpJXOLqUHPHQWOHVJULIIHVDÀQGHPDLQWHQLUODPDFKLQHjFRXGUHHQ
parfait état de marche*.
1. Retirez l’aiguille et le pied presseur (voir pages 47 et 48). Dévissez la
SODTXHjDLJXLOOH
O·DLGHG·XQHEURVVHHQOHYH]OHVÀEUHVHWODSRXVVLqUHGHVJULIIHV
,QVpUH]ODSODTXHjDLJXLOOHOHSLHGSUHVVHXUHWO·DLJXLOOHVXUODPDFKLQH
2
3
* ATTENTION ! Toujours débrancher la machine à coudre de l’alimentation
SULQFLSDOHDYDQWGHODTXLWWHURXGHUHPSODFHUGHVSLqFHVGHODPDFKLQH
51
FRANÇAIS
Nettoyer la boîte à navette
Démontez la boîte à navette
1. Mettez l’aiguille sur la position la plus haute, retirez le compartiment à
accessoires et ouvrez le couvercle.*
Canette
Bloc canette
5HWLUH]ODERvWHjFDQHWWHHQVRXOHYDQWOHSHWLWORTXHWSRXUHQH[WUDLUHOD
boîte à canette.
3. Déplacez la coursière de navette. Soulevez la bague de retenue et la
navette en tirant la tige au milieu de la navette.
(QOHYH]ODSRXVVLqUHHWOHVÀOVjO·DLGHGHODEURVVH
Anneau de retenue
Navette
L’entraînenavette
Levier
* ATTENTION ! Toujours débrancher la machine à coudre de l’alimentation
SULQFLSDOHDYDQWGHODTXLWWHURXGHUHPSODFHUGHVSLqFHVGHODPDFKLQH
52
Levier
FRANÇAIS
1
Mise en place de la navette
1. Tenez la navette par l’axe et introduisez-la dans la coursière de manière
jFHTX·HOOHIRUPHXQFHUFOHDYHFO·HQWUDvQHQDYHWWH
3ODFH]O·DQQHDXGHUHWHQXHDÀQTXHODWLJHLQIpULHXUHHQWUHGDQV
l’encoche du bas.
%ORTXH]O·DQQHDXGHUHWHQXHjO·DLGHGHVOHYLHUVGHODFRXUVLqUH
2
4. Terminez en insérant le bloc canette dans la machine, replacez le
couvercle et remettez en place le compartiment à accessoires.
3
4
BA
FED
C
A
H G
5
4
53
FRANÇAIS
RÉSOLUTION DES PROBLÈMES Attention ! Veillez à toujours tourner le volant vers vous (dans le sens inverse des aiguilles d’une montre). Si
YRXVOHWRXUQH]GLIIpUHPPHQWFHODSHXWDEvPHUO·DLJXLOOHRXOHWLVVXHWYRXVULVTXHULH]GHYRXVEOHVVHU
PROBLÈME
54
CAUSE
SOLUTION
La machine fait des
boucles.
/HÀOG·DLJXLOOHQ·DSDVpWpFRUUHFWHPHQWHQÀOp
dans l’aiguille.
/HÀOGHODFDQHWWHQ·DSDVpWpFRUUHFWHPHQWHQÀOp
sur la tige à canette.
(QÀOH]OHÀOGDQVO·DLJXLOOHGHO·DYDQWYHUVO·DUULqUH
(QÀOH]OHÀOGHODFDQHWWHFRUUHFWHPHQWGDQVOHERvWLHUj
canette (voir page 38).
La machine fait des
points serrés ou le tissu
fronce.
L’aiguille est trop grosse pour le tissu.
/DWHQVLRQGXÀOHVWH[FHVVLYH
Utilisez une aiguille plus petite.
5pJOH]ODWHQVLRQGXÀOG·DLJXLOOHYRLUSDJH
La machine n’entraîne
pas correctement le
tissu.
/HÀOQ·HVWSDVG·DVVH]ERQQHTXDOLWp
/HÀOGHFDQHWWHQ·DSDVpWpFRUUHFWHPHQWLQWURGXLW
dans le bloc canette.
Vous tirez sur le tissu pendant la couture.
&KRLVLVVH]XQÀOGHPHLOOHXUHTXDOLWp
(QÀOH]OHÀOGHODFDQHWWHFRUUHFWHPHQWGDQVOHERvWLHUj
canette (voir p. 38).
La machine doit effectuer un entraînement régulier du tissu.
La machine à coudre est
bruyante et coud avec
GLIÀFXOWp
Il y a des traces de peluches et d’huile sur les
griffes ou sur le support aiguille.
L’aiguille est endommagée.
Nettoyez les griffes et le support d’aiguille (voir page 51).
Insérez une autre aiguille.
L’aiguille heurte la boîte
à canette et se brise.
L’anneau de retenue n’est pas positionné
FRUUHFWHPHQWHWOHVOHYLHUVQHVRQWSDVEORTXpV
La boîte à canette n’est pas positionnée
correctement.
Forcer sur le tissu peut tordre l’aiguille ou la casser.
Installez l’anneau de retenue et la boîte à canette en suivant
les instructions (voir page 52 et 53).
Placez le tissu en cousant au lieu de le forcer.
FRANÇAIS
RÉSOLUTION DES PROBLÈMES Attention ! Veillez à toujours tourner le volant vers vous (dans le sens inverse des aiguilles d’une montre). Si
YRXVOHWRXUQH]GLIIpUHPPHQWFHODSHXWDEvPHUO·DLJXLOOHRXOHWLVVXHWYRXVULVTXHULH]GHYRXVEOHVVHU
PROBLÈME
CAUSE
/HÀOGHFDQHWWHVH
casse.
La canette n’a pas été correctement insérée dans
le bloc canette.
/HÀOGHODFDQHWWHQ·DSDVpWpFRUUHFWHPHQW
introduit.
/HÀOGHODFDQHWWHHVWWURSWHQGX
Insérez correctement la canette dans le boîtier à canette (voir
page 38).
(QÀOH]FRUUHFWHPHQWOHÀOGHFDQHWWHYRLUSDJH
'LPLQXH]ODWHQVLRQGXÀOGHFDQHWWHYRLUSDJH
/HÀOG·DLJXLOOHVH
casse.
/HÀOG·DLJXLOOHQ·DSDVpWpFRUUHFWHPHQWLQWURGXLW
/HÀOG·DLJXLOOHHVWWURSWHQGX
/HÀOHVWWURSJURVRXWURSÀQSRXUO·DLJXLOOH
L’aiguille a été mal insérée.
/HÀOHVWFRLQFpVXUODWLJHjERELQH
L’aiguille est endommagée.
5pHQÀOH]OHÀOVXUODPDFKLQHHWVXUO·DLJXLOOHYRLUSDJH
Diminuez la tension (voir page 50).
,QVpUH]XQDXWUHÀO
Enlevez l’aiguille et remettez-la correctement (voir page 48).
(QOHYH]ODERELQHGXÀOG·DLJXLOOHWRXUQH]ODGHIDoRQjFHTXH
OHÀOYLHQQHGHO·DUULqUHGHODERELQHHWXWLOLVH]OHVURQGHOOHVHQ
feutre.
Insérez une autre aiguille (voir page 48).
Les points ne sont pas
réguliers.
L’aiguille est mal insérée ou endommagée.
Le pied presseur n’est pas adapté.
Enlevez l’aiguille et réinsérez-la correctement ou changez
d’aiguille (voir page 48).
Utilisez un pied presseur adapté.
L’aiguille se casse.
L’aiguille est mal mise ou endommagée.
Vous forcez sur le tissu en cousant.
/HÀOHVWWURSpSDLV
L’anneau de retenue n’est pas dans la bonne
SRVLWLRQHWOHVOHYLHUVQHVRQWSDVEORTXpV
Remplacez l’aiguille (voir p 48).
Guidez le tissu en cousant au lieu de le forcer.
8WLOLVH]XQÀOÀQ
Installez l’anneau de retenue et la boîte à canette en suivant les
instructions (voir page 52 et 53).
/HÀOHVWEORTXp
Vous cousez avec le pied presseur relevé.
Vous tournez le volant dans la mauvaise direction.
/HÀOQ·HVWSDVPLVFRUUHFWHPHQW
Vous cousez sans avoir inséré de tissu dans la
machine.
&RXSHUOHÀOVXSpULHXUUHWLUHUODERvWHjFDQHWWHO·DQQHDXGH
UHWHQXHHWODQDYHWWHYRLUSDJHSRXUUHWLUHUOHÀODFFXPXOp
Remettre en place la navette, l’anneau de retenue et la boîte à
canette en suivant les instructions (voir page 53).
Baisse de tension du
ÀO
De la poussière s’est accumulé dans le dispositif de
WHQVLRQGXÀOVXSpULHXU
5HPHWWUHOHÀO
SOLUTION
55
ESPAÑOL
ÍNDICE
INSTRUCCIONES IMPORTANTES DE SEGURIDAD
Instrucciones de seguridad .............................................................................................................................................................................................................................................................
Para un funcionamiento seguro .....................................................................................................................................................................................................................................................
3URORQJDODYLGD~WLOGHODPiTXLQDGHFRVHU ...........................................................................................................................................................................................................................
Reparaciones o ajustes ...................................................................................................................................................................................................................................................................
57
58
58
58
&RPSRQHQWHVGHODPiTXLQDGHFRVHU .......................................................................................................................................................................................................................................
$FFHVRULRVGHODPiTXLQDGHFRVHU .............................................................................................................................................................................................................................................
Guía de símbolos ..............................................................................................................................................................................................................................................................................
59
60
61
Preparativos
Inicio .....................................................................................................................................................................................................................................................................................................
Pasa el hilo al devanador ...............................................................................................................................................................................................................................................................
Ajuste del portabobinas .................................................................................................................................................................................................................................................................
Pasa el hilo y enhébralo ..................................................................................................................................................................................................................................................................
Cómo colocar los hilos .....................................................................................................................................................................................................................................................................
62
63
64
65
66
Empezar a coser
Puntadas rectas .................................................................................................................................................................................................................................................................................
Puntada en zigzag ............................................................................................................................................................................................................................................................................
Puntadas decorativas ......................................................................................................................................................................................................................................................................
Punto ciego .........................................................................................................................................................................................................................................................................................
Ojales ...................................................................................................................................................................................................................................................................................................
Cremalleras ........................................................................................................................................................................................................................................................................................
67
68
69
70
71
72
Mantenimiento
&yPRTXLWDUHOSUHQVDWHODV ............................................................................................................................................................................................................................................................
Cómo poner el prensatelas ............................................................................................................................................................................................................................................................
Cambio de aguja ..............................................................................................................................................................................................................................................................................
Cambio de bombilla ........................................................................................................................................................................................................................................................................
Ajuste de la tensión del hilo ...........................................................................................................................................................................................................................................................
Limpieza de los dientes del transportador ................................................................................................................................................................................................................................
Limpieza del conjunto de la lanzadera .......................................................................................................................................................................................................................................
73
73
74
75
76
77
78
Solución de problemas ..................................................................................................................................................................................................................................................................
80
56
ESPAÑOL
INSTRUCCIONES IMPORTANTES DE SEGURIDAD
Gracias por elegir nuestro producto.
(VWDPiTXLQDGHFRVHUHVXQDGHODVPiVUHFLHQWHVHQHOPHUFDGR\RIUHFH
varias funciones avanzadas. Para obtener una descripción completa de
estas funciones y conocer las instrucciones de uso, lee atentamente el modo
GHXVRTXHDSDUHFHHQHVWHPDQXDODQWHVGHXWLOL]DUODPiTXLQDGHFRVHU
Esta máquina de coser se ha diseñado únicamente para uso
DOMÉSTICO.
Conserva estas instrucciones para consultarlas en el futuro.
1RXWLOLFHVHOSURGXFWRVLHOFDEOHRHOHQFKXIHHVWiQGDxDGRVVLQRIXQFLRQD
FRUUHFWDPHQWHVLKDVXIULGRGDxRVJROSHVRKDHVWDGRHQFRQWDFWRFRQ
agua. En estos casos llévalo a un centro autorizado y de servicios para su
análisis, reparación y ajuste.
1RXWLOLFHVODPiTXLQDVLODDEHUWXUDGHYHQWLODFLyQHVWXYLHUDREVWUXLGD1R
SHUPLWDVTXHVHDFXPXOHSROYRKLORVRUHVWRVGHWHMLGRHQODDEHUWXUDGH
ventilación o el pedal.
Mantén los dedos alejados de las partes en movimiento y presta especial
atención a la zona de la aguja.
Precauciones de seguridad:
3DUDHYLWDUHOULHVJRGHTXHPDGXUDVLQFHQGLRGHVFDUJDHOpFWULFDRGDxRV
SHUVRQDOHVHVIXQGDPHQWDOTXHOHDV\VLJDVODVVLJXLHQWHVLQVWUXFFLRQHVGH
seguridad:
Utiliza siempre la placa del transportador adecuada. En caso contrario la
aguja podría romperse.
ATENCIÓN: para reducir el riesgo de descarga eléctrica:
&XDQGRFRVDVQRHPSXMHVQLWLUHVGHODWHODSRUTXHODDJXMDSRGUtD
romperse.
No se debe dejar nunca sin vigilancia un aparato eléctrico cuando está
enchufado. Desenchufa siempre este aparato después de utilizarlo y antes
de limpiarlo.
Desenchúfalo siempre antes de reemplazar la bombilla. Utiliza bombillas
del mismo voltaje.
ATENCIÓN:SDUDUHGXFLUHOULHVJRGHTXHPDGXUDVLQFHQGLRGHVFDUJD
HOpFWULFDRGDxRVSHUVRQDOHV
Este producto no se debe utilizar como juguete. Presta especial atención, si
ORXVDVFHUFDGHORVQLxRV
Utiliza el producto solo como se describe en este manual. Usa solo los
accesorios recomendados por el fabricante, como aparecen en este
manual.
No utilices agujas deformadas.
'HVFRQHFWDODPiTXLQD´µDQWHVGHUHDOL]DUFXDOTXLHUDMXVWHDOUHGHGRU
de la aguja como enhebrar el hilo en la aguja o en el guiahílos, cambiar la
aguja, el prensatelas, etc.
'HVHQFKXIDVLHPSUHODPiTXLQDDQWHVGHDEULUODWDSDGHDSOLFDUDFHLWH
SDUDPiTXLQDVGHFRVHURUHDOL]DUFXDOTXLHURWURDMXVWHPHQFLRQDGRHQHO
manual de instrucciones.
1RLQVHUWHVQLGHMHVFDHUQLQJ~QREMHWRHQODVDEHUWXUDVGHODPiTXLQD
6RORVHGHEHXWLOL]DUODPiTXLQDHQHOLQWHULRU
1RXWLOLFHVODPiTXLQDHQDPELHQWHVHQ]RQDVGRQGHVHDGPLQLVWUHR[tJHQR
o se utilicen aerosoles.
57
ESPAÑOL
3DUDGHVFRQHFWDUODPiTXLQDFRORFDWRGRVORVFRQWUROHVHQSRVLFLyQ´µ\
desenchufa de la corriente eléctrica.
1RXWLOLFHVODPiTXLQDVREUHVXSHUÀFLHVEODQGDVFRPRFDPDVRGLYDQHV
SRUTXHODVDEHUWXUDVGYHQWLODFLyQSRGUtDQREVWUXLUVH
1RGHVHQFKXIHVODPiTXLQDWLUDQGRGHOFDEOH
CONSERVA ESTAS INSTRUCCIONES.
Para un funcionamiento seguro:
&XDQGRFRVDVQRDSDUWHVODPLUDGDGHODDJXMDHQQLQJ~QPRPHQWR1R
WRTXHVHOYRODQWHODSDODQFDGHOSUHQVDWHODVODDJXMDQLFXDOTXLHURWUD
parte en movimiento.
'HVFRQHFWD\GHVHQFKXIDODPiTXLQDVLHPSUHTXH
- Hayas terminado de coser.
1HFHVLWHVUHHPSOD]DURTXLWDUODDJXMDRFXDOTXLHURWUDSLH]D
(QFDVRGHDYHUtDHOpFWULFDGXUDQWHHOXVRGHODPiTXLQD
&XDQGRUHDOLFHVHOPDQWHQLPLHQWRGHODPiTXLQDGHFRVHU
&XDQGRGHMHVODPiTXLQDVLQYLJLODQFLD
1RFRORTXHVREMHWRVVREUHHOSHGDOGHODPiTXLQD
,QVHUWDHOHQFKXIHGLUHFWDPHQWHHQODWRPDGHFRUULHQWH1RXWLOLFHVFDEOHV
de extensión.
Prolonga la vida útil de la máquina de coser:
1RJXDUGHVODPiTXLQDGHFRVHUGLUHFWDPHQWHH[SXHVWDDODOX]GHOVRO
QLHQOXJDUHVR]RQDVPX\K~PHGDV1RXWLOLFHVQLJXDUGHVODPiTXLQD
en espacios con la temperatura muy alta, como cerca de una estufa
encendida, una plancha, una lámpara halógena, etc.).
3DUDOLPSLDUODPiTXLQDXWLOL]D~QLFDPHQWHXQMDEyQRGHWHUJHQWHVXDYH
1XQFDODOLPSLHVFRQEHQFHQRGLVROYHQWHVQLSURGXFWRVDEUDVLYRVTXH
SRGUtDQGDxDUHODUPD]yQ\ODPiTXLQD
,QWHQWDTXHODPiTXLQDQRFDLJDDOVXHORRUHFLEDJROSHV
58
&RPSUXHEDTXHODLQVWDODFLyQHVODFRUUHFWDVLJXLHQGRODVLQVWUXFFLRQHV
TXHVHSURSRUFLRQDQHQHVWHPDQXDOFXDQGRUHHPSODFHVRLQVWDOHV
FXDOTXLHUWLSRGHHOHPHQWRGHOSUHQVDWHODVGHODDJXMDXRWUDSDUWH
Reparaciones o ajustes
Cuando necesites realizar ajustes o reparaciones, consulta la guía de
VROXFLyQGHSUREOHPDVTXHDSDUHFHDOÀQDOGHHVWHPDQXDO
(OFRQWHQLGRGHOPDQXDOGHLQVWUXFFLRQHV\ODVHVSHFLÀFDFLRQHVGHO
producto están sujetas a cambios sin previo aviso.
ESPAÑOL
COMPONENTES DE LA MÁQUINA DE COSER
Frente
Trasera
10
7
4
11
12
M
L M
J K
H I
F G
D E
B C
BA
A
C
5
4
L K
J I H G
6
3
9
8
FED
6
13
5
14
1
16
18
17
19 20
15
21
24
22
23
2
1. Compartimento accesorios
2. Compartimento de bobinas
3. Regulador de tensión
4. Palanca
5. Cortahílos
6. Guiahílos superior
7. Guía del tensor del devanador
8. Selector de puntada
9. Portacarretes
10. Asa
11. Tensor del devanador
12. Tope del devanador
13. Botón de marcha atrás
14. Pedal de control
15. Prensatelas
16. Tornillo de ajuste del prensatelas
17. Aguja
18. Guiahílos
19. Tornillo del soporte de agujas
20. Placa del transportador
21. Volante
22. Interruptor
23. Enchufe
24. Palanca del prensatelas
59
ESPAÑOL
ACCESORIOS DE LA MÁQUINA DE COSER
60
Prensatelas (integrado
en la máquina)
Se usa para puntadas
rectas, en zigzag,
decorativas y punto
ciego (ver páginas 67, 68,
69 y 70).
Portacarretes
Portacarretes adicional
para colocar encima del
inicial.
Devanador
Pasa el hilo al
devanador.
Prensacremalleras
Se utiliza para coser
cremalleras (ver página
72).
$OPRKDGLOODVGHÀHOWUR
Colocar bajo el
SRUWDFDUUHWHSDUDTXH
rote suavemente, sin
hacer ruido.
Destornilladores
Se usan para ajustar
piezas y para el
mantenimiento.
Prensaojales
Se utiliza para hacer
ojales (ver página 71).
Cortador
Se usa para descoser
puntadas.
Agujas
Ver en la página 74 cómo
se cambian las agujas.
Cepillo
Utilízalo para limpiar de
SROYR\ÀEUDVORVGLHQWHV
del transportador, (ver
página 77).
ESPAÑOL
GUÍA DE SÍMBOLOS
Tensión del hilo
Ver página 76 para el ajuste de la tensión del
hilo.
Puntadas decorativas
G, H, I, J. Ver página 69 para las puntadas
decorativas.
Botón de marcha atrás
Si aprietas este botón y lo mantienes
presionado junto con el pedal de control se
puede coser hacia atrás para rematar el hilo al
ÀQDOGHXQDFRVWXUD
Puntadas rectas
A,B, C. Ver página 67 para las puntadas rectas.
Punto ciego
L, M. Ver en la página 70 la costura con punto
ciego.
Puntada en zigzag
D, E, F, K. Ver página 68 para puntadas en
zigzag.
Ojales
Ver la página 71 para hacer ojales.
1
4
2
3
61
ESPAÑOL
PREPARATIVOS
5
Inicio
ConectaR la máquina de coser a la corriente eléctrica
$QWHVGHHQFKXIDUODPiTXLQDGHFRVHUDODFRUULHQWHHOpFWULFDFRPSUXHED
TXHHOYROWDMH\ODIUHFXHQFLDHOpFWULFDVRQORVPLVPRV(OYROWDMH\OD
IUHFXHQFLDDSDUHFHQHQODHWLTXHWDGHODSDUWHLQIHULRUGHODPiTXLQDGH
coser.
1
$VHJ~UDWHGHTXHHOLQWHUUXSWRUHVWpDSDJDGR
&RQHFWDHOFDEOHHOpFWULFRDOHQFKXIHGHODPiTXLQD
3. Inserta el cable eléctrico en el enchufe de corriente eléctrica.
(QFLHQGHHOLQWHUUXSWRUGHODPiTXLQD
5. Desliza los portacarretes para colocarlos en posición vertical y coloca los
portacarretes extra encima.
Cómo usar el pedal de control
La velocidad para coser se regula presionando más o menos el pedal de
FRQWURO&XDQWRPiVIXHUWHSUHVLRQHVPiVUiSLGRFRVHUiODPiTXLQD$O
OHYDQWDUHOSLHGHOSHGDOODPiTXLQDVHGHWLHQHDXWRPiWLFDPHQWH
3'VREUHSHGDOGHHVWDPiTXLQDSXHGHDSDUHFHUODPDUFD¶-HJRQ·R
¶)'0·TXHGHEHVHULJXDODODGHOHQFKXIH
¡CONSEJO!3DUDKDFHUWHXQDLGHDGHODYHORFLGDGGHODPiTXLQD
SUHVLRQDHOSHGDODQWHVGHFRORFDUHOKLORHQODPiTXLQD
62
2
3
ESPAÑOL
1
2
Pasa el hilo al devanador
1. Tira del volante hacia fuera
2. Toma el hilo y pásalo alrededor del guiahílos de la parte superior y
pásalo alrededor del guiahílos de la bobina del devanador.
3. Enhebra el hilo por uno de los agujeros de la bobina desde el interior
hacia el exterior, y después pon la bobina en el devanador.
M
L M
J K
H I
F G
D E
B C
L K
G
A
H
3
A
I
4. Desliza el devanador hacia la derecha contra el tope del devanador.
6XMHWDHOH[WUHPRÀQDOGHOKLOR3LVDHOSHGDOGHFRQWURO&XDQGRWHQJDV
controlado el hilo, pasa todo el hilo al devanador. Levanta el pie del
SHGDOGHFRQWUROFXDQGRFRPSUXHEHVTXHHOGHYDQDGRUHVWiOOHQR
5
J
6
4
5. Coloca de nuevo el volante en su posición original, desliza el
GHYDQDGRUKDFLDODL]TXLHUGD\FRUWDHOKLOR
L K
L K
5
G
FED
BA
H
C
A
L K
I
5
4
M
L M
J K
H I
F G
D E
B C
J
6
63
ESPAÑOL
1
Colocación del portabobinas
ATENCIÓN: partes en movimiento.
3DUDUHGXFLUHOULHVJRGHGDxRV
GHVHQFKXIDODPiTXLQDGHFRVHU
antes de realizar alguna tarea
de mantenimiento. Cierra la tapa
DQWHVGHXWLOL]DUODPiTXLQD
2
3
4
5
4XLWDHOFRPSDUWLPHQWRGHDFFHVRULRVWLUDQGRKDFLDODL]TXLHUGD
'HVSXpVDEUHHOSRUWDERELQDVWLUDQGRGHODSHTXHxDSDODQFDVLWXDGDD
ODL]TXLHUGDGHODWDSDSDUDVDFDUORWRWDOPHQWH
2. Coloca la bobina en el portabobinas.
3. Coloca el hilo en la ranura del portabobinas.
4. Ahora empuja el hilo bajo el resorte del tensor y sácalo por la abertura.
Deja colgando unos 15 cm de hilo por fuera del portabobinas. Cuando
tires del hilo la bobina debe girar en el sentido de las agujas del reloj.
3RQGHQXHYRHOSRUWDERELQDVHQODPiTXLQDGHIRUPDTXHHOYiVWDJR
GHOSRUWDERELQDVHQFDMHHQHODJXMHURTXHOOHYD&LHUUDODWDSD\FRORFD
de nuevo el compartimento de los accesorios en su lugar.
64
ESPAÑOL
2
1
Pasa el hilo y enhébralo
Mueve el tirahílos hasta su posición más elevada girando el volante hacia
ti. También levanta el prensatelas.
M
L M
J K
H I
F G
D E
B C
L K
FED
4
G
BA
H
&RORFDHOFDUUHWHGHKLORSDUDFRVHUHQHOSRUWDFDUUHWHVGHPDQHUDTXH
el hilo salga por la parte de detrás del carrete.
A
I
5
J
6
C
2. Pasa el hilo por el agujero de la parte superior del guiahílos.
3DVDHOKLORSRUHOWLUDKtORVGHL]TXLHUGDDGHUHFKDÁHFKD
6
M
K L M
I J
L K
J
%DMDHOKLORKDVWDHOUHJXODGRUGHWHQVLyQÁHFKD\URGpDORFRQHOKLOR
ÀQDOL]DQGRFRQHOH[WUHPRKDFLDDUULEDÁHFKD
4
3
5. Tira del hilo hacia abajo y pásalo por los puntos de enhebrado. Por
último, enhebra la aguja pasando el hilo de delante hacia atrás.
6
5
A
F G
D E
B C
4
6
5
A
F G
D E
B C
4
6
5
6
5
A
F G
D E
B C
4
6
5
A
F G
D E
B C
4
65
ESPAÑOL
1
Cómo colocar los hilos
1. Levanta el prensatelas y sujeta el extremo del hilo con la mano
L]TXLHUGD
0XHYHGHVSDFLRHOYRODQWHKDFLDWLKDVWDTXHODDJXMDTXHGHHQVX
SRVLFLyQPiVEDMD$FRQWLQXDFLyQPXHYHGHQXHYRHOYRODQWHSDUDTXH
ODDJXMDTXHGHHQORPiVDOWR
&RQODPDQRL]TXLHUGDWLUDFRQFXLGDGRGHOH[WUHPRGHODKHEUDGHO
portahílos hacia arriba. El hilo de la parte superior ahora debería tirar
de la hebra de hilo del portabobinas formando un bucle.
2
7RPDDPERVKLORV\WLUDKDVWDTXHPLGDQXQRVFPHQWRQFHVSiVDORV
KDFLDODSDUWHWUDVHUDGHODPiTXLQDGHFRVHU
4
66
3
ESPAÑOL
EMPEZAR A COSER
Pedal
Puntada
Tensión
del hilo
Puntadas rectas.
Elige la puntada recta girando el selector de puntadas hasta A, B o C.
Puedes ajustar el largo de puntada seleccionando las ranuras entre A, B o
&/DWHQVLyQGHOKLORGHEHHVWDUHQWUH&RPSUXHEDTXHHOSUHQVDWHODV
HVWpFRUUHFWDPHQWHÀMDGRSiJLQD
1
2
3
4
1. Mueve la aguja hacia arriba girando el volante hacia ti. Levanta el
prensatelas y coloca la tela debajo. Gira el volante hacia ti para mover
ODDJXMDKDFLDDEDMR\KDFLDHOOXJDUSRUHOTXHTXLHUHVHPSH]DUD
FRVHU%DMDHOSUHQVDWHODV&RPSUXHEDTXHWDQWRODKHEUDGHOSRUWDKLORV
FRPRODGHOSRUWDERELQDVTXHGDQEDMRHOSUHQVDWHODV\KDFLDODSDUWH
SRUWHULRUGHODPiTXLQDGHFRVHU
2. Pisa suavemente el pedal de control y empieza a coser. Pisa suavemente
el pedal de control y empieza a coser. Refuerza el hilo presionando el
ERWyQGHPDUFKDDWUiVDOPLVPRWLHPSRTXHSLVDVHOSHGDOGHFRQWURO
y das unas puntadas hacia atrás. Suelta el botón de marcha atrás y
continúa cosiendo hacia adelante.
6LTXLHUHVFDPELDUODGLUHFFLyQGHODFRVWXUDSRUHMHPSORHQXQD
HVTXLQDPDQWpQODDJXMDFODYDGDHQODWHOD/HYDQWDHOSUHQVDWHODV
y mueve la tela alrededor de la aguja. Después baja el prensatelas y
continúa cosiendo.
&XDQGRKD\DVWHUPLQDGRUHPDWDHOÀQDOGHODFRVWXUDSXQWRXQRV
15 cm hacia atrás. Corta los hilos con el cortahilos y deja una hebra
VXÀFLHQWHSDUDSRGHUFRVHUGHQXHYR
¡CONSEJO! Antes de empezar a coser, comprueba los ajustes de la
PiTXLQDVREUHXQUHWDOGHWHOD7DPELpQSXHGHVXWLOL]DUODVJXtDVGHFRVWXUD
GHODSODFDGHOWUDQVSRUWDGRUSDUDDVHJXUDUWHGHTXHFRVHVUHFWR
67
ESPAÑOL
Pedal
Puntada
Tensión
del hilo
Puntadas en zigzag
Elige la puntada en zigzag girando el selector de puntadas hasta D, E, F,
o K. Puedes ajustar el largo de puntada seleccionando las ranuras entre
'()R./DWHQVLyQGHOKLORGHEHHVWDUHQWUH&RPSUXHEDTXHHO
SUHQVDWHODVHVWpFRUUHFWDPHQWHÀMDGRSiJLQD
1
2
3
4
1. Mueve la aguja hacia arriba girando el volante hacia ti. Dobla la tela
como se muestra en la imagen. Levanta el prensatelas y coloca la tela
debajo. Gira el volante hacia ti para mover la aguja hacia abajo y
KDFLDHOOXJDUSRUHOTXHTXLHUHVHPSH]DUDFRVHU%DMDHOSUHQVDWHODV
&RPSUXHEDTXHWDQWRODKHEUDGHOSRUWDKLORVFRPRODGHOSRUWDERELQDV
TXHGDQEDMRHOSUHQVDWHODV\KDFLDODSDUWHSRUWHULRUGHODPiTXLQDGH
coser.
2. Pisa suavemente el pedal de control y empieza a coser.
6LTXLHUHVFDPELDUODGLUHFFLyQGHODFRVWXUDSRUHMHPSORHQXQD
HVTXLQDPDQWpQODDJXMDFODYDGDHQODWHOD/HYDQWDHOSUHQVDWHODV
y mueve la tela alrededor de la aguja. Después baja el prensatelas y
continúa cosiendo.
4. Cuando hayas terminado, levanta la tela y tira de ella unos 15 cm hacia
DWUiV&RUWDORVKLORVFRQHOFRUWDKLORV\GHMDXQDKHEUDVXÀFLHQWHSDUD
poder coser de nuevo.
¡CONSEJO! Antes de empezar a coser, comprueba los ajustes de la máTXLQDVREUHXQUHWDOGHWHOD
68
ESPAÑOL
Pedal
Puntada
Tensión
del hilo
Puntada decorativa
Elige la puntada decorativa girando el selector de puntadas hasta G, H, I o
-/DWHQVLyQGHOKLORGHEHHVWDUHQWUH&RPSUXHEDTXHHOSUHQVDWHODV
HVWpFRUUHFWDPHQWHÀMDGRSiJLQD
1
2
3
4
1. Mueve la aguja hacia arriba girando el volante hacia ti. Levanta el
prensatelas y coloca la tela debajo. Gira el volante hacia ti para mover
ODDJXMDKDFLDDEDMR\KDFLDHOOXJDUSRUHOTXHTXLHUHVHPSH]DUD
FRVHU%DMDHOSUHQVDWHODV&RPSUXHEDTXHWDQWRODKHEUDGHOSRUWDKLORV
FRPRODGHOSRUWDERELQDVTXHGDQEDMRHOSUHQVDWHODV\KDFLDODSDUWH
SRUWHULRUGHODPiTXLQDGHFRVHU
2. Pisa suavemente el pedal de control y empieza a coser.
6LTXLHUHVFDPELDUODGLUHFFLyQGHODFRVWXUDSRUHMHPSORHQXQD
HVTXLQDPDQWpQODDJXMDFODYDGDHQODWHOD/HYDQWDHOSUHQVDWHODV
y mueve la tela alrededor de la aguja. Después baja el prensatelas y
continúa cosiendo.
4. Cuando hayas terminado levanta la tela y tira de ella unos 15 cm hacia
DWUiV&RUWDORVKLORVFRQHOFRUWDKLORV\GHMDXQDKHEUDVXÀFLHQWHSDUD
poder coser de nuevo.
¡CONSEJO! Antes de empezar a coser, comprueba los ajustes de la máTXLQDVREUHXQUHWDOGHWHOD
69
ESPAÑOL
Pedal
Puntada Tensión
del hilo
Puntada ciega
Elige la puntada ciega girando el selector de puntadas hasta L o M. La
WHQVLyQGHOKLORGHEHHVWDUHQWUH&RPSUXHEDTXHHOSUHQVDWHODVHVWp
FRUUHFWDPHQWHÀMDGRSiJLQD
1
1. Mueve la aguja hacia arriba girando el volante hacia ti. Dobla la tela
como se muestra en la imagen. Levanta el prensatelas y coloca la tela
debajo. Gira el volante hacia ti para mover la aguja hacia abajo y
KDFLDHOOXJDUSRUHOTXHTXLHUHVHPSH]DUDFRVHU%DMDHOSUHQVDWHODV
&RPSUXHEDTXHWDQWRODKHEUDGHOSRUWDKLORVFRPRODGHOSRUWDERELQDV
TXHGDQEDMRHOSUHQVDWHODV\KDFLDODSDUWHSRUWHULRUGHODPiTXLQDGH
coser.
2. Pisa suavemente el pedal de control y empieza a coser.
3. Cuando hayas terminado levanta la tela y tira de ella hacia atrás unos
FP&RUWDORVKLORVFRQHOFRUWDKLORV\GHMDXQDKHEUDVXÀFLHQWHSDUD
poder coser de nuevo.
¡CONSEJO! Antes de empezar a coser, comprueba los ajustes de la máTXLQDVREUHXQUHWDOGHWHOD
70
2
3
ESPAÑOL
Pedal
Puntada
1
Ojales
Ajusta el prensaojales (ver página 73). En el regulador de posición de
agujas elige la posición
L]TXLHUGD
y sitúa la hebra superior e inferior hacia la
4
2
3
1
2
'HVOL]DKDFLDDGHODQWHHOSUHQVDRMDOHVSDUDFRPSUREDUHOWDPDxRGHO
ojal. Baja el prensaojales y la aguja. Cose despacio un lado del ojal
hasta conseguir el largo deseado. Termina con la aguja situada a la
L]TXLHUGD
2. Cambia el regulador de puntada
la aguja en la posición derecha.
y da algunas puntadas. Termina con
3. Cambia el regulador de puntada . Haz la costura de este lado con el
PLVPRODUJRTXHHORWUR7HUPLQDFRQODDJXMDHQODSRVLFLyQGHUHFKD
4. Levanta la aguja y cambia el regulador de puntada a y ds algunas
SXQWDGDV7HUPLQDFRQODDJXMDHQODSRVLFLyQL]TXLHUGD
&XDQGRKD\DVÀQDOL]DGRTXLWDODWHODGHODPiTXLQD\WLUDGHHOODKDFLD
DWUiVXQRVFP&RUWDORVKLORVFRQHOFRUWDKLORV\GHMDVXÀFLHQWHKHEUD
para iniciar una nueva costura. Abre el ojal con el cortador.
3
4
3
¡CONSEJO! Antes de empezar a coser, comprueba los ajustes de la máTXLQDVREUHXQUHWDOGHWHOD
4
2
1
4
2
71
ESPAÑOL
Pedal
Puntada Tensión
del hilo
Cremalleras
Elige la puntada recta girando el selector de puntadas hasta A, B o C. La
WHQVLyQGHOKLORGHEHHVWDUHQWUH&RPSUXHEDTXHHOSUHQVDWHODVHVWp
FRUUHFWDPHQWHÀMDGRSiJLQD
1
2
3
4
1. Mueve la aguja hacia arriba girando el volante hacia ti. Coloca el
SUHQVDFUHPDOOHUDVGHPDQHUDTXHODDJXMDVyORFRVDSRUODL]TXLHUGD
del mismo.
3UHQGHFRQDOÀOHUHVRKLOYDQDODFUHPDOOHUDDODWHOD6LW~DODWHOD
bajo el prensacremalleras. Pasa las hebras del portahílos y del
SRUWDERELQDVKDFLDODSDUWHWUDVHUDGHODPiTXLQDDQWHVGHEDMDUHO
prensacremalleras.
3. Cuando cosas la parte derecha de la cremallera coloca los dientes
DOERUGHGHOSUHQVDFUHPDOOHUDV$QWHVGHOOHJDUDOÀQDOGHODFRVWXUD
levanta el prensacremalleras y ábrela manteniendo la aguja en la tela.
Baja de nuevo el prensacremalleras y termina de coser. Remata la
costura apretando el botón de marcha atrás y dando unas puntadas.
Suelta el botón y da otras puntadas hacia delante.
&DPELDODSRVLFLyQGHOSUHQVDFUHPDOOHUDVSDUDTXHODDJXMDVyORFRVD
SRUODGHUHFKD&RVHODFUHPDOOHUDSRUODL]TXLHUGDGHODPLVPDIRUPD
TXHHQHOSXQWR
¡CONSEJO! Antes de empezar a coser, comprueba los ajustes de la máTXLQDVREUHXQUHWDOGHWHOD
72
ESPAÑOL
MANTENIMIENTO
1
2
1
2
Cómo quitar el prensatelas
1. Gira el volante hacia ti para colocar la aguja en su posición más alta.
Levanta el prensatelas.
2. Presiona la palanca de la parte trasera del soporte del prensatelas
SDUDTXHVHVXHOWH1RKD\TXHKDFHUIXHU]DSDUDTXLWDUOR
Cómo poner el prensatelas
&RORFDHOSUHQVDWHODVGHPDQHUDTXHHOYiVWDJRGHODSUHQVDTXHGH
exactamente debajo del agujero del soporte del prensatelas. Baja el
soporte del prensatelas.
2. Cuando vuelvas a subir el prensatelas estará perfectamente sujeto.
73
ESPAÑOL
1-2
Cambio de aguja
1. Gira el volante hacia ti para subir la aguja. Y después baja el
prensatelas.
2. Libera la aguja girando el portaagujas en el sentido contrario a las
DJXMDVGHOUHORM(OWRUQLOORSXHGHHVWDUPX\ÀUPHODSULPHUDYH]TXHOR
hagas. Quita la aguja del portaagujas.
&RORFDODQXHYDDJXMDHQHOSRUWDDJXMDVGHIRUPDTXHHOODGRSODQR
TXHGHDOFRQWUDULRGHOWX\R(PSXMDODDJXMDKDFLDDUULEDWRGRORTXH
puedas.
$WRUQLOODHOWRUQLOORGHOSRUWDDJXMDVSDUDTXHTXHGHVHJXUR
1RXVHVDJXMDVTXHHVWpQGREODGDVRVLQÀORSRUTXHSXHGHQGDxDUHO
WHMLGR(VWDPiTXLQDGHFRVHUXWLOL]DDJXMDVHVWiQGDU
74
3-4
ESPAÑOL
1
Cambio de bombilla
/DERPELOODHVWiORFDOL]DGDGHWUiVGHODWDSDIURQWDO3DUDTXLWDUOD
desatornilla el tornillo lateral.*
6
$VHJ~UDWHGHTXHODERPELOODVHKD\DHQIULDGRDQWHVGHWRFDUOD3DUD
TXLWDUODERPELOODGHVHQUyVFDODJLUDQGRKDFLDODL]TXLHUGD
5
4
3. Ajusta la bombilla nueva enroscándola hacia la derecha. Puedes
FRPSUDUODVERPELOODVHQWLHQGDVGHYHQWDGHPiTXLQDVGHFRVHU8VDU
ERPELOODVGH:&RORFDGHQXHYRODWDSDHQODPiTXLQDGHFRVHU
2
3
*¡ATENCIÓN! 'HVHQFKXIDGHODFRUULHQWHHOpFWULFDODPiTXLQDGHFRVHU
VLHPSUHTXHGHMHVGHXVDUODRDQWHVGHUHHPSOD]DUDOJ~QFRPSRQHQWH
75
ESPAÑOL
1
Ajuste de la tensión del hilo
Guiahílos
3DUDDMXVWDUODWHQVLyQGHOKLORQRUPDOPHQWHVyORKD\TXHPRGLÀFDUOD
tensión del guiahílos. La tensión del hilo del portabobinas se realiza en
IiEULFD\VyORKD\TXHKDFHUDOJ~QDMXVWHSDUDFRVHUWHMLGRVHVSHFLDOHVFRQ
hilos especiales.
(QXQDFRVWXUDELHQUHDOL]DGDORVKLORVGHEHQTXHGDULQWHJUDGRVHQOD
trama de la tela.
CORRECTO
Hilo de la bobina
2
2. Si la hebra del guiahílos está demasiado tenso, el hilo del portabobinas
DSDUHFHUiHQHOODGRGHUHFKRGHOWHMLGR3DUDUHVROYHUORGHEHUiVDÁRMDU
un poco la tensión del hilo.
INCORRECTO
Guiahílos
3. Si la hebra del guiahílos está demasiado suelta la
hebra del portabobinas aparecerá por la parte de
atrás del tejido. Deberás aumentar ligeramente la
tensión de la hebra.
Hilo de la bobina
3
INCORRECTO
Ajuste de la tensión del portabobinas
(QHOVXSXHVWRGHTXHQHFHVLWHVDXPHQWDUODWHQVLyQGHODKHEUDGHO
SRUWDERELQDVVyORWLHQHVTXHJLUDUDODGHUHFKDHOWRUQLOORGHDMXVWHGHO
SRUWDERELQDV(QFDVRGHTXHTXLHUDVUHODMDUODWHQVLyQGHODKHEUDJLUDHO
WRUQLOORKDFLDODL]TXLHUGD3XHGHVFRPSUREDUODWHQVLyQGHOKLORVDFiQGROR
del portabobinas. Si notas una ligera resistencia, la tensión es correcta.
¡CONSEJO! 0XFKRVWHMLGRVUHTXLHUHQXQDWHQVLyQHQWUHORVQ~PHURV\
5. Haz una prueba sobre un retal para poder cambiar los ajustes si fuera
necesario, antes de coser.
76
SOLUCIÓN
Guiahílos
Hilo de la bobina
SOLUCIÓN
ESPAÑOL
1
Limpieza de los dientes del transportador
3DUDTXHODPiTXLQDGHFRVHUIXQFLRQHFRUUHFWDPHQWHHVLPSRUWDQWH
limpiar los dientes del transportador con regularidad. *
1. Quita la aguja y el prensatelas (ver páginas 73 y 74). Desatornilla el
transportador.
2. Limpia el polvo y los restos de hilo de los dientes del transportador con
ayuda del cepillo.
3. Vuelve a colocar en su lugar el transportador, el prensatelas y la aguja.
2
3
*¡ATENCIÓN! 'HVHQFKXIDGHODFRUULHQWHHOpFWULFDODPiTXLQDGHFRVHU
VLHPSUHTXHGHMHVGHXVDUODRDQWHVGHUHHPSOD]DUDOJ~QFRPSRQHQWH
77
ESPAÑOL
Limpieza del conjunto de la lanzadera
Cómo desmontarlo.
6LW~DODDJXMDHQVXSRVLFLyQPiVDOWDTXLWDHOFRPSDUWLPHQWRGHORV
accesorios y levanta la tapa. *
Bobina
Portabobinas
4XLWDHOSRUWDERELQDVDSUHWDQGRODSHTXHxDSDODQFD\VDFDHO
portabobinas del todo.
3. Empuja hacia los lados las palancas de la lanzadera. Saca el anillo de
UHWHQFLyQ\ODODQ]DGHUDSUHVLRQDQGRHOYiVWDJRTXHKD\HQHOFHQWUR
de la lanzadera.
Anillo de retención
4. Usa el cepillo para limpiar de polvo e hilos todos los componentes.
Lanzadera
Guía de la
lanzadera
Palanca
*¡ATENCIÓN! 'HVHQFKXIDGHODFRUULHQWHHOpFWULFDODPiTXLQDGHFRVHU
VLHPSUHTXHGHMHVGHXVDUODRDQWHVGHUHHPSOD]DUDOJ~QFRPSRQHQWH
78
Palanca
ESPAÑOL
1
Montaje del conjunto de la lanzadera
1. Sujeta la lanzadera por el vástago e insértalo con cuidado en la ranura
GHODODQ]DGHUD7LHQHTXHTXHGDUHQHOFHQWURGHOYRODQWHGHOD
lanzadera.
,QVHUWDHODQLOORGHUHWHQFLyQGHIRUPDTXHHOYiVWDJRLQIHULRUVHDMXVWH
en la ranura inferior.
2
3. Ajusta el anillo de retención por medio de las palancas de la lanzadera.
3RU~OWLPRFRORFDGHQXHYRHOSRUWDERELQDVHQODPiTXLQDFLHUUDOD
tapa y coloca de nuevo el compartimento de los accesorios en su lugar.
3
4
BA
FED
C
A
H G
5
4
79
ESPAÑOL
SOLUCIÓN DE PROBLEMAS ¡Atención! Asegúrate de girar el volante siempre hacia ti ( en sentido contrario al de las agujas del reloj). Hacerlo
HQHOVHQWLGRRSXHVWRSXHGHGDxDUODDJXMDODWHODRVXIULUGDxRVW~
PROBLEMA
80
CAUSA
SOLUCIÓN
Las puntadas forman
bucles
La hebra del guiahílos no se ha enhebrado
correctamente en la aguja.
La hebra de la bobina no está bien colocada en
el portabobinas.
Enhebra el hilo de atrás hacia delante.
Coloca correctamente el hilo de la bobina en el portabobinas
(ver página 64).
Las puntadas tiran o el
tejido se arruga
La aguja es demasiado grande para el tejido.
El hilo está demasiado tirante.
8VDXQDDJXMDPiVSHTXHxD
Ajusta la tensión del guiahilos (ver pág. 76).
El tejido no avanza recto
en la máquina
(OKLORQRWLHQHODFDOLGDGVXÀFLHQWH
La hebra de la bobina no está bien colocada en
el portabobinas.
Tiras del tejido mientras coses.
Usa un hilo de mejor calidad.
Coloca correctamente el hilo de la bobina en el portabobinas
(ver página 64).
'HMDTXHODPiTXLQDKDJDFRUUHUODWHODDXWRPiWLFDPHQWH
La máquina de coser
hace ruido y cose con
GLÀFXOWDG
Hay restos de pelusa o de aceite en los dientes
del transportador y del soporte de agujas.
La aguja está estropeada.
Limpia los dientes del transportador y del soporte de agujas
(ver página 77).
Cambia la aguja.
La aguja golpea el
portabobinas y se
rompe.
El anillo de retención no está en la posición
FRUUHFWD\ODVSDODQFDVQRHVWiQEORTXHDGDV
El portabobinas no está en la posición correcta.
Si fuerzas la tela, podrías causar la rotura de la
aguja o doblarla.
Monta el anillo de retención y el portabobinas según las
instrucciones (ver pág. 78 y 79).
'HMDTXHODPiTXLQDKDJDDYDQ]DUODWHODDPHGLGDTXH
coses, en lugar de forzarla.
ESPAÑOL
SOLUCIÓN DE PROBLEMAS ¡Atención! Asegúrate de girar el volante siempre hacia ti ( en sentido contrario al de las agujas del reloj). Hacerlo
HQHOVHQWLGRRSXHVWRSXHGHGDxDUODDJXMDODWHODRVXIULUGDxRVW~
PROBLÈME
CAUSA
SOLUCIÓN
El hilo de la bobina se
rompe
La bobina no está bien ajustada en el
portabobinas.
El hilo de la bobina está mal colocado.
El hilo de la bobina está demasiado tenso.
Coloca correctamente el hilo de la bobina en el portabobinas
(ver pág. 64).
Enhebra correctamente el hilo de la bobina en el portabobinas
(ver pág. 64).
Reduce la tensión del hilo de la bobina (ver pág. 76).
El hilo del guiahílos se
rompe
El hilo no está bien colocado en el guiahílos.
El guiahílos está muy tirante
(OKLORHVGHPDGLDGRJUXHVRRÀQRSDUDODDJXMD
La aguja está mal colocada
El hilo se atasca en los portacarretes.
La aguja está estropeada.
Vuelve a enhebrar la aguja y a colocar el hilo (ver pág. X 65 X).
Reduce la tensión (ver pág. 76).
Usa un hilo distinto.
Quita la aguja y vuelve a ajustarla (ver pág. 74).
4XLWDHOFDUUHWHGHOJXLDKtORVVXSHULRUJtUDORGHIRUPDTXHHOKLOR
VDOJDSRUGHWUiVGHOFDUUHWH\XVDODVDOPRKDGLOODVGHÀHOWUR
Cambia de aguja (ver pág. 74).
La máquina no cose
La aguja está mal colocada o está estropeada.
El prensatelas no es el adecuado.
Quita la aguja y vuelve a ajustarla o cambia de aguja (ver pág.
74).
Usa el prensatelas adecuado.
La aguja se rompe
La aguja está mal colocada o está estropeada.
Tiras del tejido mientras coses.
El hilo es demasiado grueso.
El anillo de retención no está en la posición
FRUUHFWD\ODVSDODQFDVQRHVWiQEORTXHDGDV
Quita al aguja y pon una nueva (ver pág. 74)
+D]FRUUHUODWHODDPHGLGDTXHFRVHVHQOXJDUGHIRU]DUOD
8WLOL]DXQKLORÀQR
Monta el anillo de retención y el portabobinas según las
instrucciones (ver pág. 78 y 79).
El hilo está
bloqueado.
Coser cuando el prensatelas está levantado.
Girar el volante en la dirección errónea.
El hilo no es adecuado.
&RVHUVLQFRORFDUXQDWHODHQODPiTXLQD
&RUWDHOKLORTXLWDHOSRUWDERELQDVHODQLOORGHUHWHQFLyQ\OD
lanzadera (ver pág. 78) para eliminar los hilos acumulados.
Vuelve a colocar la lanzadera, el anillo de retención y el
portabobinas en la posición correcta, según las instrucciones (ver
pág. 79).
Falta de tensión
Hay polvo acumulado en el guiahílos de la parte
superior.
Vuelve a enhebrar.
81