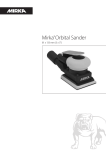
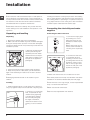
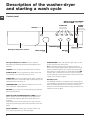
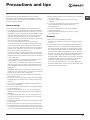
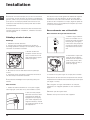
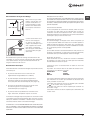
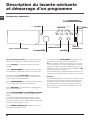
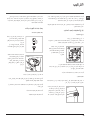
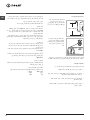
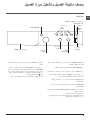
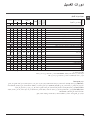
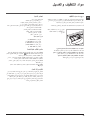
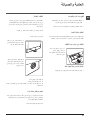
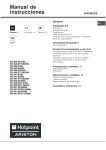
Download Instructions for use

Transcript
Instructions for use
WASHER-DRYER
!
F
GB
English,1
Français,15
AR
This symbol reminds you to read this instruction manual.
GB
Contents
, 29
Installation, 2-3-4-5
Unpacking and levelling
Connecting the electricity and water supplies
The first wash cycle
Technical data
Description of the washer-dryer and
starting a wash cycle, 6-7
Control panel
Indicator lights
Starting a wash cycle
Wash cycles, 8
Table of wash cycles
IWDC 7085
Personalisation, 9
Setting the temperature
Setting the drying cycle
Functions
Detergents and laundry, 10
Detergent dispenser drawer
Preparing the laundry
Garments requiring special care
Load balancing system
Precautions and tips, 11
General safety
Disposal
Care and maintenance, 12
Cutting off the water or electricity supply
Cleaning the washer-dryer
Cleaning the detergent dispenser drawer
Caring for the door and drum of your appliance
Cleaning the pump
Checking the water inlet hose
Troubleshooting, 13
Service, 14
1
Installation
GB
! This instruction manual should be kept in a safe place for
future reference. If the washer-dryer is sold, transferred or
moved, make sure that the instruction manual remains with
the machine so that the new owner is able to familiarise
himself/herself with its operation and features.
! Read these instructions carefully: they contain vital infor-
Levelling the machine correctly will provide it with stability,
help to avoid vibrations and excessive noise and prevent it
from shifting while it is operating. If it is placed on carpet or
a rug, adjust the feet in such a way as to allow a sufficient
ventilation space underneath the washer-dryer.
mation relating to the safe installation and operation of the
appliance.
Connecting the electricity and water
supplies
Unpacking and levelling
Connecting the water inlet hose
Unpacking
1. Remove the washer-dryer from its packaging.
2. Make sure that the washer-dryer has not been damaged
during the transportation process. If it has been damaged,
contact the retailer and do not proceed any further with the
installation process.
3. Remove the 4 protective
screws (used during transportation) and the rubber
washer with the corresponding spacer, located on the
rear part of the appliance
(see figure).
1. Connect the supply pipe
by screwing it to a cold
water tab using a ¾ gas
threaded connection (see
figure).
Before performing the connection, allow the water to
run freely until it is perfectly
clear.
2. Connect the inlet hose
to the washer-dryer by
screwing it onto the corresponding water inlet of the
appliance, which is situated on the top right-hand
side of the rear part of the
appliance (see figure).
4. Close off the holes using the plastic plugs provided.
5. Keep all the parts in a safe place: you will need them
again if the washer-dryer needs to be moved to another
location.
3. Make sure that the hose is not folded over or bent.
! Packaging materials should not be used as toys for
children.
! The water pressure at the tap must fall within the values
indicated in the Technical details table (see next page).
Levelling
! If the inlet hose is not long enough, contact a specialised
shop or an authorised technician.
1. Install the washer-dryer on a flat sturdy floor, without resting it up against walls, furniture cabinets or anything else.
2. If the floor is not perfectly
level, compensate for any
unevenness by tightening
or loosening the adjustable front feet (see figure);
the angle of inclination,
measured in relation to the
worktop, must not exceed
2°.
2
! Never use second-hand hoses.
! Use the ones supplied with the machine.
Connecting the drain hose
65 - 100 cm
Connect the drain hose,
without bending it, to a
draining duct or a wall drain
situated between 65 and
100 cm from the floor;
alternatively, place it over
the edge of a basin, sink
or tub, fastening the duct
supplied to the tap (see
figure). The free end of
the hose should not be
underwater.
! We advise against the use of hose extensions; in case of
absolute need, the extension must have the same diameter as the original hose and must not exceed 150 cm in
length.
Electric connection
Before plugging the appliance into the mains socket, make
sure that:
• the socket is earthed and in compliance with the applicable law;
• the socket is able to sustain the appliance’s maximum power load indicated in the Technical details table (see page 5);
Replacing the fuse:
When replacing a faulty fuse, a 13 amp ASTA approved
fuse to BS 1362 should always be used, and the fuse
cover re-fitted. If the fuse cover is lost, the plug must not
be used until a replacement is obtained.
Replacement fuse covers:
If a replacement fuse cover is fitted, it must be of the
correct colour as indicated by the coloured marking or the
colour that is embossed in words on the base of the plug.
Replacements can be obtained directly from your nearest
Service Depot.
Removing the plug:
If your appliance has a non-rewireable moulded plug and
you should wish to re-route the mains cable through partitions, units etc., please ensure that either:
the plug is replaced by a fused 13 ampere re-wearable
plug bearing the BSI mark of approval.
or:
the mains cable is wired directly into a 13 amp cable outlet, controlled by a switch, (in compliance with BS 5733)
which is accessible without moving the appliance.
Disposing of the plug:
Ensure that before disposing of the plug itself, you make
the pins unusable so that it cannot be accidentally inserted
into a socket.
Instructions for connecting cable to an alternative plug:
Important: the wires in the mains lead are coloured in
accordance with the following code:
Green & Yellow
Earth
Blue
Neutral
Brown
Live
As the colours of the wires in the lead may not correspond
with the coloured markings identifyng the terminals in your
plug, proceed as follows:
Connect Green & Yellow wire to terminal marked E or
or coloured Green or Green & Yellow.
Connect Brown wire to terminal marked L or coloured
Red.
Connect Blue wire to terminal marked N or coloured Black.
• the supply voltage is included within the values i
ndicated on the Technical details table
(see page 5);
• the socket is compatible with the washing machine’s plug. If this is not the case, replace the socket or the plug.
Your appliance is now supplied with a 13 amp fused plug
it can be plugged into a 13 amp socket for immediate use.
Before using the appliance please read the instructions
below.
WARNING - THIS APPLIANCE MUST BE EARTHED.
THE FOLLOWING OPERATIONS SHOULD BE CARRIED
OUT BY A QUALIFIED ELECTRICIAN.
3
GB
GB
If a 13 amp plug (BS 1363) is used it must be fitted with a
13 amp fuse, either in the plug or adaptor or at the distribution board.
If you are in any doubt the electrical supply to your machine, consult a qualified electrician before use.
How to connect an alternative plug:
The wires in this mains lead are coloured in accordance
with the following code:
BLUE
NEUTRAL (N)
BROWN
LIVE (L)
GREEN & YELLOW
EARTH (E)
Disposing of the appliance:
When disposing of the appliance please remove the plug
by cutting the mains cable as close as possible to the plug
body and dispose of it as described above.
GREEN &
YELLOW
BROWN
BLUE
13 ampere fuse
CROSS-BAR
CORD GRIP
! The washing machine should not be installed in an
outdoor environment, not even when the area is sheltered,
because it may be very dangerous to leave it exposed to
rain and thunderstorms.
! When the washing machine is installed, the mains socket
must be within easy reach.
! Do not use extensions or multiple sockets.
! The power supply cable must never be bent or dangerously compressed.
! The power supply cable must only be replaced by an
authorised serviceman.
Warning! The company denies all liability if and when these
norms are not respected.
4
The first wash cycle
Once the appliance has been installed, and before you use
it for the first time, run a wash cycle with detergent and no
laundry, using the wash cycle 2.
Technical data
Model
IWDC 7085
Dimensions
width 59.5 cm
height 85 cm
depth 53,5 cm
Capacity
from 1 to 7 kg for the wash programme;
from 1 to 5 kg for the drying programme
Electrical
connections
please refer to the technical data plate fixed
to the machine
Water connections
maximum pressure 1 MPa (10 bar)
minimum pressure 0.05 MPa (0.5 bar)
drum capacity 52 litres
Spin speed
up to 800 rotations per minute
Energy rated
programmes
according to
regulation
EN 50229
Wash: programme 2; temperature 60°C;
run with a load of 7 kg.
Drying: first drying cycle performed with a 2 kg
load and the DRYING knob on the
setting;
Second drying cycle performed with a 5 kg load
and the DRYING knob on the
setting.
GB
This appliance conforms to the following EC
Directives:
- 89/336/EEC dated 03/05/89 (Electromagnetic Compatibility) and subsequent
modifications
- 2002/96/EC
- 2006/95/EC Low Voltage)
5
Description of the washer-dryer
and starting a wash cycle
GB
Control panel
WASH CYCLE PROGRESS/
DELAY TIMER indicator lights
FUNCTION
ON/OFF button
buttons with
indicator lights
TEMPERATURE
Detergent dispenser drawer
knob
Detergent dispenser drawer: used to dispense
detergents and washing additives (see “Detergents and
laundry”).
ON/OFF button: switches the washer-dryer on and off.
WASH CYCLE knob: programmes the wash cycles. During the wash cycle, the knob does not move.
FUNCTION buttons with indicator light: used to select the
available functions. The indicator light corresponding to the
selected function will remain lit.
TEMPERATURE knob: sets the temperature or the cold
wash cycle (see “Personalisation”).
DRYING knob: used to set the desired drying programme
(see “Personalisation”).
WASH CYCLE PROGRESS/DELAY TIMER indicator
lights: used to monitor the progress of the wash cycle.
The illuminated indicator light shows which phase is in
progress.
If the Delay Timer function has been set, the time remaining until the wash cycle starts will be indicated (see next
page).
DOOR LOCKED indicator light: indicates whether the
door may be opened or not (see next page).
6
button with
indicator light
DOOR LOCKED
knob
WASH CYCLE
START/
PAUSE
DRYING
indicator light
knob
START/PAUSE button with indicator light: starts or temporarily interrupts the wash cycles.
N.B. To pause the wash cycle in progress, press this
button; the corresponding indicator light will flash orange,
while the indicator light for the current wash cycle phase
will remain lit in a fixed manner. If the DOOR LOCKED
indicator light is switched off, the door may be opened.
To start the wash cycle from the point at which it was interrupted, press this button again.
Standby mode
This washing machine, in compliance with new energy saving regulations, is fitted with an automatic standby system
which is enabled after about 30 minutes if no activity is
detected. Press the ON-OFF button briefly and wait for the
machine to start up again.
Indicator lights
The indicator lights provide important information.
This is what they can tell you:
Delayed start
If the DELAY TIMER function has been activated (see “Personalisation”), after the wash cycle has been started the
indicator light corresponding to the selected delay period
will begin to flash:
Wash cycle phase indicator lights
Once the desired wash cycle has been selected and has begun, the indicator lights switch on one by one to indicate which
phase of the cycle is currently in progress.
Wash
Rinse
Spin/Drain
Drying
End of wash cycle
Note: when the drying cycle has finished, the DRYING
knob should be returned to the “0” position.
As time passes, the remaining delay will be displayed and
the corresponding indicator light will flash:
The set programme will start once the selected time delay
has expired.
Function buttons and corresponding indicator lights
When a function is selected, the corresponding indicator
light will illuminate.
If the selected function is not compatible with the programmed wash cycle, the corresponding indicator light will flash
and the function will not be activated.
If the selected function is not compatible with another
function which has been selected previously, the indicator
light corresponding to the first function selected will
flash and only the second function will be activated; the
indicator light corresponding to the enabled option will
remain lit.
Door locked indicator light
When the indicator light is on, the porthole door is locked
to prevent it from being opened; make sure the indicator
light is off before opening the door (wait approximately 3
minutes). To open the door during a running wash cycle,
press the START/PAUSE button; the door may be opened
once the DOOR LOCKED indicator light turns off.
Starting a wash cycle
1. Switch the washer-dryer on by pressing the ON/OFF button. All indicator lights will switch on for a few seconds, then they
will switch off and the START/PAUSE indicator light will pulse.
2. Load the laundry and close the door.
3. Set the WASH CYCLE knob to the desired programme.
4. Set the washing temperature (see “Personalisation”).
5. Set the drying cycle if necessary (see “Personalisation”).
6. Measure out the detergent and washing additives (see “Detergents and laundry”).
7. Select the desired functions.
8. Start the wash cycle by pressing the START/PAUSE button and the corresponding indicator light will remain lit in a fixed
manner, in green.
To cancel the set wash cycle, pause the machine by pressing the START/PAUSE button and select a new cycle.
indicator light will switch on. The door can be opened once the DOOR LOCKED
9. At the end of the wash cycle the
indicator light turns off. Take out your laundry and leave the appliance door ajar to make sure the drum dries completely.
Switch the washer-dryer off by pressing the ON/OFF button.
7
GB
Wash cycles
Table of wash cycles
Wash cycles
GB
Description of the wash cycle
Detergents
Max. Max.
temp. speed Drying
Main Fabric
(°C) (rpm)
Prewash
wash softener
Max.
load
(kg)
Cycle
duration
Daily
1 Cotton with prewash: extremely soiled whites.
90°
800




7
171’
2 Cotton: extremely soiled whites.
90°
800

-


7
155’
2 Cotton (1): heavily soiled whites and resistant colours.
60°
800

-


7
153’
2 Cotton (2): lightly soiled whites and delicate colours.
40°
800

-


7
147’
3 Cotton: heavily soiled whites and resistant colours.
60°
800

-


7
130’
4 Coloured Cotton: lightly soiled whites and delicate colours.
40°
800

-


7
92’
5 Synthetics: lightly soiled resistant colours.
60°
800

-


3
85’
Special
6 Wool: for wool, cashmere, etc.
40°
600
-
-


1,5
55’
7 Silk/Curtains: for garments in silk and viscose, lingerie.
30°
0
-
-


1
55’
8 Jeans
40°
800

-


3
80’
9 Sport Light
30°
600
-
-


68
10 Sport Shoes
30°
600
-
-


3
Max. 2
pairs
11 Cotton dry
-
-

-
-
-
5
-
12 Synthetics dry
-
-

-
-
-
3
-
30°
800

-


0,5
35’
Rinse
-
800

-
-

7
36
Spin
-
800

-
-
-
7
16
Drain
-
0
-
-
-
-
7
2
50’
Drying
13 Express Wash & Dry
Partial wash cycles
The information contained in the table is intended as a guide only.
For all Test Institutes:
1) Test wash cycle in compliance with regulation EN 50229: set wash cycle 2 with a temperature of 60°C.
2) Long wash cycle for cottons: set wash cycle 2 with a temperature of 40°C.
Specials wash cycles
Sport Light (wash cycle 9) is for washing lightly soiled sports clothing fabrics (tracksuits, shorts, etc.); for best results,
we recommend not exceeding the maximum load indicated in the “Table of wash cycles”. We recommend using a
liquid detergent and dosage suitable for a half-load.
Sport Shoes (wash cycle 10) is for washing sports shoes; for best results, do not wash more than 2 pairs (fabric)
simultaneously.
Express Wash & Dry (wash cycle 13) was designed to wash and dry lightly soiled garments quickly. This cycle may
be used to wash and dry a laundry load of up to 0.5 kg in just 35 minutes.
To achieve optimum results, use liquid detergent and pre-treat cuffs, collars and stains.
8
Personalisation
Setting the temperature
Turn the TEMPERATURE knob to set the wash temperature (see Table of wash cycles).
The temperature may be lowered, or even set to a cold wash . The washer-dryer will automatically prevent you from selecting a temperature which is higher than the maximum value set for each wash cycle.
Setting the drying cycle
Table of Drying times
(guideline values)
Turn the DRYING knob to select the desired drying
Fabric
Max.
Cupboard Henger Iron
Load type
option. There are two options:
type
load (kg) dry
dry
dry
A - Based on time: From 40 minutes to 180.
Clothing of diffeB - Based on the desired laundry dryness level:
Cotton
rent sizes, Terry
5
250
210
190
Iron dry : suitable for clothes which will need ironing
towels
afterwards. the remaining dampness softens creases,
making them easier to remove.
Synthe- Sheets, Shirts, Py3
180
130
115
: ideal for clothes which do not need to
Hanger dry
jamas, socks, etc.
tics
be dried fully.
Cupboard dry : suitable for laundry which can be put
back in a cupboard without being ironed.
If your laundry load to be washed and dried is much greater than the maximum stated load (see adjacent table), perform the wash
cycle, and when the cycle is complete, divide the garments into groups and put some of them back in the drum. At this point,
follow the instructions provided for a “Drying only” cycle. Repeat this procedure for the remainder of the load.
Drying only
Use the cycle selector knob to select a drying cycle (11-12) in accordance with the type of fabric. The desired drying level or
time may also be set using the DRYING knob.
Functions
The various wash functions available with this washer-dryer will help to achieve the desired results, every time.
To activate the functions:
1. Press the button corresponding to the desired function;
2. the function is enabled when the corresponding indicator light is illuminated.
Note:
- If the selected function is not compatible with the programmed wash cycle, the corresponding indicator light will flash and
the function will not be activated.
- If the selected function is not compatible with another function which has been selected previously, the indicator light corresponding to the first function selected will flash and only the second function will be activated; the indicator light corresponding to the enabled option will remain lit.
Selecting this option enables you to suitably adjust drum rotation, temperature and water to a reduced load of lightly soiled
cotton and synthetic fabrics (refer to the “Table of wash cycles”). “
” enables you to wash in less time thereby saving
water and electricity. We suggest using a liquid detergent suitably measured out to the load quantity.
800-400
Press this button to reduce the spin speed.
Easy iron
By selecting this function, the wash and spin cycles will be modified in order to reduce the formation of creases. At the end of
the cycle the Washer-dryer will perform slow rotations of the drum; the indicator lights for the EASY IRON and START/PAUSE
options will flash (the first one green, the second orange) and the “END” indicator light turns on. To end the cycle, press the
START/PAUSE button or the EASY IRON button.
For the 7 wash cycle, the machine will end the cycle while the laundry is soaking and the EASY IRON and START/PAUSE
indicator lights will flash. To drain the water so that the laundry may be removed, press the START/PAUSE button or the EASY
IRON button.
(Iron dry).
Note: If you also want to run the drying cycle, this option is enabled only if combined with level
Delay timer
This timer delays the start time of the wash cycle by up to 9 hours. Press the button repeatedly until the indicator light corresponding to the desired delay time switches on. The fourth time the button is pressed, the function will be disabled.
N.B. Once the START/PAUSE button has been pressed, the delay time can only be modified by decreasing it until launching
the set programme.
9
GB
Detergents and laundry
GB
Detergent dispenser drawer
Good washing results also depend on the correct dose of
detergent: adding too much detergent will not necessarily result in a more efficient wash, and may in fact cause
build up on the inside of your appliance and contribute to
environmental pollution.
! Do not use hand washing detergents because these
create too much foam.
Open the detergent dispenser drawer and pour
in the detergent or washing
additive, as follows.
1
2
3
compartment 1: Pre-wash detergent (powder)
compartment 2: Detergent for the wash cycle
(powder or liquid)
Liquid detergent should only be poured in immediately
prior to the start of the wash cycle.
compartment 3: Additives (fabric softeners, etc.)
The fabric softener should not overflow the grid.
Preparing the laundry
• Divide the laundry according to:
- the type of fabric/the symbol on the label
- the colours: separate coloured garments from whites.
• Empty all garment pockets and check the buttons.
• Do not exceed the listed values, which refer to the weight
of the laundry when dry:
Durable fabrics: max. 7 kg
Synthetic fabrics: max. 3 kg
Delicate fabrics: max. 2 kg
Wool: max. 1,5 kg
Silk: max. 1 kg
How much does your laundry weigh?
1 sheet 400-500 g
1 pillow case 150-200 g
1 tablecloth 400-500 g
1 bathrobe 900-1200 g
1 towel 150-250 g
Garments requiring special care
Wool: all wool garments can be washed using programme
6, even those carrying the “hand-wash only”
label. For
best results, use special detergents and do not exceed 1,5
kg of laundry.
10
Silk: use special wash cycle 7 to wash all silk garments.
We recommend the use of special detergent which has
been designed to wash delicate clothes.
Curtains: fold curtains and place them in a pillow case or
mesh bag. Use wash cycle 7.
Jeans: Turn garments inside-out before washing and use
a liquid detergent. Use programme 8.
Load balancing system
Before every spin cycle, to avoid excessive vibrations and
to distribute the load in a uniform manner, the drum rotates
continuously at a speed which is slightly greater than the
washing rotation speed. If, after several attempts, the load
is not balanced correctly, the machine spins at a reduced
spin speed. If the load is excessively unbalanced, the
washer-dryer performs the distribution process instead of
spinning. To encourage improved load distribution and balance, we recommend small and large garments are mixed
in the load.
Precautions and tips
! This washer-dryer was designed and constructed in
accordance with international safety regulations. The following information is provided for safety reasons and must
therefore be read carefully.
General safety
• This appliance was designed for domestic use only.
• This appliance is not intended for use by persons (including children) with reduced physical, sensory or mental
capabilities, or lack of experience and knowledge, unless
they have been given supervision or instruction concerning use of the appliance by a person responsible for
their safety. Children should be supervised to ensure that
they do not play with the appliance.
– Do not dry unwashed items in the tumble dryer.
– Items that have been soiled with substances such as
cooking oil, acetone, alcohol, petrol, kerosene, spot removers, turpentine, waxes and wax removers should be
washed in hot water with an extra amount of detergent
before being dried in the tumble dryer.
– Items such as foam rubber (latex foam), shower caps,
waterproof textiles, rubber backed articles and clothes or
pillows fitted with foam rubber pads should not be dried
in the tumble dryer.
– Fabric softeners, or similar products, should be used
as specified by the fabric softener instructions.
– The final part of a tumble dryer cycle occurs without
heat (cool down cycle) to ensure that the items are left
at a temperature that ensures that the items will not be
damaged.
WARNING: Never stop a tumble dryer before the end of
the drying cycle unless all items are quickly removed and
spread out so that the heat is dissipated.
• Do not touch the machine when barefoot or with wet or
damp hands or feet.
• Do not pull on the power supply cable when unplugging
the appliance from the electricity socket. Hold the plug
and pull.
• Do not open the detergent dispenser drawer while the
machine is in operation.
• Do not touch the drained water as it may reach extremely high temperatures.
• Never force the porthole door. This could damage the
safety lock mechanism designed to prevent accidental
opening.
• If the appliance breaks down, do not under any circumstances access the internal mechanisms in an attempt
to repair it yourself.
• Always keep children well away from the appliance while
it is operating.
• The door can become quite hot during the wash cycle.
• If the appliance has to be moved, work in a group of two
or three people and handle it with the utmost care. Never
try to do this alone, because the appliance is very heavy.
• Before loading laundry into the washer-dryer, make sure
the drum is empty.
• During the drying phase, the door tends to get quite hot.
• Do not use the appliance to dry clothes that have been washed with flammable solvents (e.g. trichlorethylene).
• Do not use the appliance to dry foam rubber or similar elastomers.
• Make sure that the water tap is turned on during the drying cycles.
Disposal
•Disposing of the packaging materials:
observe local regulations so that the packaging may be
re-used.
•The European Directive 2002/96/EC relating to Waste
Electrical and Electronic Equipment (WEEE) states that
household appliances should not be disposed of using
the normal solid urban waste cycle. Exhausted appliances should be collected separately in order to optimise
the cost of re-using and recycling the materials inside the
machine, while preventing potential damage to the atmosphere and to public health. The crossed-out dustbin
is marked on all products to remind the owner of their
obligations regarding separated waste collection.
For more information relating to the correct disposal of
household appliances, owners should contact their local
authorities or appliance dealer.
11
GB
Care and maintenance
GB
Cutting off the water and electricity
supplies
Cleaning the pump
• Turn off the water tap after every wash cycle. This will limit wear on the hydraulic system inside the washer-dryer
and help to prevent leaks.
The washer-dryer is fitted with a self-cleaning pump which
does not require any maintenance. Sometimes, small items
(such as coins or buttons) may fall into the pre-chamber
which protects the pump, situated in its bottom part.
• Unplug the washer-dryer when cleaning it and during all
maintenance work.
! Make sure the wash cycle has finished and unplug the
appliance.
Cleaning the washer-dryer
To access the pre-chamber:
The outer parts and rubber components of the appliance
can be cleaned using a soft cloth soaked in lukewarm
soapy water. Do not use solvents or abrasives.
1. using a screwdriver,
remove the cover panel on
the lower front part of the
washer-dryer (see figure);
Cleaning the detergent dispenser drawer
Remove the dispenser by
raising it and pulling it out
(see figure).
Wash it under running water; this operation should be
repeated frequently.
2. unscrew the lid by rotating it anti-clockwise (see
figure): a little water may
trickle out. This is perfectly
normal;
Caring for the door and drum of your
appliance
• Always leave the porthole door ajar in order to prevent
unpleasant odours from forming.
3. clean the inside thoroughly;
4. screw the lid back on;
5. reposition the panel, making sure the hooks are securely
in place before you push it onto the appliance.
Checking the water inlet hose
Check the inlet hose at least once a year. If there are any
cracks, it should be replaced immediately: during the wash
cycles, water pressure is very strong and a cracked hose
could easily split open.
! Never use second-hand hoses.
12
Troubleshooting
Your washer-dryer could fail to work. Before contacting the Technical Assistance Centre (see “Assistance”), make sure that
the problem cannot be not solved easily using the following list.
GB
Problem:
Possible causes / Solutions:
The Washer-dryer does not switch
on.
• The appliance is not plugged into the socket fully, or is not making contact.
• There is no power in the house.
The wash cycle does not start.
• The Washer-dryer door is not closed properly.
• The ON/OFF button has not been pressed.
• The START/PAUSE button has not been pressed.
• The water tap has not been opened.
• A delayed start has been set.
The Washer-dryer does not take
in water (the indicator light for
the first wash cycle stage flashes
rapidly).
• The water inlet hose is not connected to the tap.
• The hose is bent.
• The water tap has not been opened.
• There is no water supply in the house.
• The pressure is too low.
• The START/PAUSE button has not been pressed.
The Washer-dryer continuously
takes in and
drains water.
• The drain hose is not fitted at a height between 65 and 100 cm from the floor
(see “Installation”).
• The free end of the hose is under water (see “Installation”).
• The wall drainage system is not fitted with a breather pipe.
If the problem persists even after these checks, turn off the water tap, switch the appliance off and contact the Assistance Service. If the dwelling is on one of the upper floors of
a building, there may be problems relating to water drainage, causing the Washer-dryer
to fill with water and drain continuously. Special anti-draining valves are available in shops
and help to avoid this inconvenience.
The Washer-dryer does not drain or
spin.
• The wash cycle does not include draining: some wash cycles require the drain
phase to be started manually.
• The “Easy iron” option has been activated: To complete the wash cycle, press
the START/PAUSE button (see “Wash cycles and options”).
• The drain hose is bent (see “Installation”).
• The drainage duct is clogged.
The Washer-dryer vibrates a lot
during the spin cycle.
• The drum was not unlocked correctly during installation (see “Installation”).
• The Washer-dryer is not level (see “Installation”).
• The Washer-dryer is trapped between cabinets and walls (see “Installation”).
The Washer-dryer leaks.
• The water inlet hose is not screwed on properly (see “Installation”).
• The detergent dispenser drawer is blocked (for cleaning instructions, see “Care
and maintenance”).
• The drain hose is not fixed properly (see “Installation”).
The “functions” indicator lights and the
“start/pause” indicator light flash, while one
of the “phase in progress” indicator lights
and the “door locked” indicator light will
remain lit in a fixed manner.
• Switch off the machine and unplug it, wait for approximately 1 minute and then
switch it back on again.
If the problem persists, contact the Technical Assistance Service.
There is too much foam.
• The detergent is not suitable for machine washing (it should display the text
“for Washer-dryers” or “hand and machine wash”, or the like).
• Too much detergent was used.
The washer-dryer does not dry.
•
•
•
•
•
The appliance is not plugged into the socket, or not enough to make contact.
There has been a power failure.
The appliance door is not shut properly.
A delayed start has been set.
DRYING knob is in the 0 position.
13
Service
GB
Before calling for Assistance:
• Check whether you can solve the problem alone (see “Troubleshooting”);
• Restart the programme to check whether the problem has been solved;
• If this is not the case, contact an authorised Technical Assistance Centre using the telephone number provided on the
guarantee certificate.
! Always request the assistance of authorised technicians.
Have the following information to hand:
• the type of problem;
• the appliance model (Mod.);
• the serial number (S/N).
This information can be found on the data plate applied to the rear of the washer-dryer, and can also be found on the front of
the appliance by opening the door.
14
Mode d’emploi
LAVANTE-SÉCHANTE
!
FR
Ce symbole vous rappelle de lire ce mode d’emploi.
FR
Français
Sommaire
Installation, 16-17-18-19
Déballage et mise à niveau
Raccordements eau et électricité
Premier cycle de lavage
Caractéristiques techniques
Description du lavante-séchante et démarrage d’un programme, 20-21
Bandeau de commandes
Voyants
Démarrage d’un programme
IWDC 7085
Programmes, 22
Tableau des programmes
Personnalisations, 23
Sélection de la température
Sélectionner le séchage
Fonctions
Produits lessiviels et linge, 24
Tiroir à produits lessiviels
Triage du linge
Linge ou vêtements particuliers
Système d’équilibrage de la charge
Précautions et conseils, 25
Sécurité générale
Mise au rebut
Entretien et soin, 26
Coupure de l’arrivée d’eau et du courant
Nettoyage du lavante-séchante
Nettoyage du tiroir à produits lessiviels.
Entretien du hublot et du tambour
Nettoyage de la pompe
Contrôle du tuyau d’arrivée de l’eau
Anomalies et remèdes, 27
Assistance, 28
15
Installation
FR
! Conserver ce mode d’emploi pour pouvoir le consulter à
tout moment. En cas de vente, de cession ou de déménagement, veiller à ce qu’il suive toujours le lavante-séchante
pour que son nouveau propriétaire soit informé sur son
mode de fonctionnement et puisse profiter des conseils
correspondants.
Une bonne mise à niveau garantit la stabilité de l’appareil
et évite qu’il y ait des vibrations, du bruit et des déplacements en cours de fonctionnement. Si la machine est
posée sur de la moquette ou un tapis, régler les pieds de
manière à ce qu’il y ait suffisamment d’espace pour assurer une bonne ventilation.
! Lire attentivement les instructions: elles fournissent des
conseils importants sur l’installation, l’utilisation et la sécurité de l’appareil.
Raccordements eau et électricité
Déballage et mise à niveau
Déballage
1. Déballer le lavante-séchante.
2. Contrôler que le lavante-séchante n’a pas été endommagé pendant le transport. S’il est abîmé, ne pas le
raccorder et contacter le vendeur.
3. Enlever les 4 vis de
protection servant au transport, le caoutchouc et la
cale, placés dans la partie
arrière (voir figure).
4. Boucher les trous à l’aide des bouchons plastique
fournis.
5. Conserver toutes ces pièces: il faudra les remonter en
cas de transport du lavante-séchante.
! Les pièces d’emballage ne sont pas des jouets pour
enfants.
Mise à niveau
1. Installer le lavante-séchante sur un sol plat et rigide,
sans l’appuyer contre des murs, des meubles ou autre.
2. Si le sol n’est pas parfaitement horizontal, visser
ou dévisser les pieds de
réglage avant (voir figure)
pour niveler l’appareil; son
angle d’inclinaison, mesuré
sur le plan de travail, ne doit
pas dépasser 2°.
16
Raccordement du tuyau d’arrivée de l’eau
1. Reliez le tuyau d’alimentation en le vissant à un robinet d’eau froide à embout
fileté 3/4 gaz (voir figure).
Faire couler l’eau jusqu’à ce
qu’elle soit limpide et sans
impuretés avant de raccorder.
2. Raccorder le tuyau d’arrivée de l’eau au lavanteséchante en le vissant à la
prise d’eau prévue, dans
la partie arrière en haut à
droite (voir figure).
3. Attention à ce que le tuyau ne soit pas plié ou écrasé.
! La pression de l’eau doit être comprise entre les valeurs
indiquées dans le tableau des Caractéristiques techniques
(voir page ci-contre).
! Si la longueur du tuyau d’alimentation ne suffit pas,
s’adresser à un magasin spécialisé ou à un technicien
agréé.
! N’utiliser que des tuyaux neufs.
! Utiliser ceux qui sont fournis avec l’appareil.
Raccordement du tuyau de vidange
65 - 100 cm
Raccordez le tuyau d’évacuation, sans le plier, à un
conduit d’évacuation ou
à une évacuation murale
placés à une distance du
sol comprise entre 65 et
100 cm;
ou bien accrochez-le à un
évier ou à une baignoire, dans ce cas, fixez le
support en plastique fourni
avec l’appareil au robinet
(voir figure). L’extrémité
libre du tuyau d’évacuation
ne doit pas être plongée
dans l’eau.
Remplacement du fusible:
En cas de remplacement d’un fusible défectueux, utilisez toujours
des fusibles de 13 ampères ASTA conformes au standard BS1362
et remontez le couvercle du fusible. Si vous avez perdu le couvercle
du fusible, n’utilisez pas la fiche tant que la pièce manquante n’aura
pas été remplacée.
Couvercles des fusibles:
Si vous remplacez le couvercle du fusible, veillez à ce que
sa couleur soit bien celle qui est indiquée par le code ou
l’indication colorée à la base de la fiche. Pour toute pièce
détachée, adressez-vous directement au centre d’assistance
technique le plus proche de chez vous.
Démontage de la fiche:
Si l’électroménager est équipé d’une fiche incorporée qui
ne peut pas être câblée à nouveau et s’il faut faire passer le
câble à travers des divisions, des unités, etc. contrôlez que:
la fiche est bien remplacée par une autre câblable à nouveau
de 13 ampères portant la marque BSI
ou bien:
que le câble est bien raccordé directement à la prise de 13
ampères, contrôlée par un interrupteur (conforme BS 5733)
accessible sans qu’il faille déplacer l’électroménager.
! L’utilisation de tuyaux de rallonge est absolument dé-
Elimination de la fiche:
Avant d’éliminer la fiche, rendez les broches inutilisables
de manière à ce que la fiche ne puisse pas être branchée
accidentellement dans une prise.
Branchement électrique
Instructions pour le raccordement du câble à une fiche
alternative:
Important: les couleurs des fils du câble de réseau correspondent à la codification suivante:
Jaune/Vert
Terre
Bleu Neutre
Marron
Alimenté
conseillée, si vous ne pouvez vraiment pas faire autrement
vous devrez utiliser un tuyau de même diamètre et de
longueur maximum de 150 cm.
Avant de brancher votre électroménager à la prise de courant,
contrôlez que:
• la prise est bien avec terre et conforme aux réglementations applicables en la matière;
• la prise électrique est bien apte à supporter la puissance maximum de l’électroménager figurant sur la plaquette des caractéristiques (voir page 19);
• la tension d’alimentation est bien comprise entre les valeurs figurant sur la plaquette des caractéristiques (voir page 19);
• la prise est bien compatible avec la fiche du lave-
linge. Autrement, remplacez la prise ou la fiche.
Les couleurs des fils du câble pourraient ne pas correspondre
aux indications de couleur qui identifient les broches de la
fiche, procédez comme suit:
raccordez le fil jaune/vert à la borne repérée par la lettre E
ou
ou de couleur verte ou jaune/vert
raccordez le fil marron à la borne repérée par la lettre L ou
de couleur rouge
raccordez le fil bleu à la borne repérée par la lettre N ou de
couleur noire.
Votre électroménager dispose à présent d’une fiche moulée
13 ampères qui peut être branchée dans une prise compatible pour utilisation immédiate. Veuillez lire les instructions
suivantes avant d’utiliser votre électroménager.
ATTENTION - L’ELECTROMENAGER DOIT ETRE RACCORDE A LA MASSE. LES OPERATIONS DECRITES CI-APRES
DOIVENT ETRE EFFECTUEES PAR UN ELECTRICIEN
QUALIFIE.
17
FR
FR
En cas d’utilisation d’une fiche de 13 ampères (BS 1363),
installez un fusible de 13 ampères dans la fiche ou sur
l’adaptateur ou sur la carte de distribution.
En cas de doute sur l’alimentation électrique de votre électroménager, faites appel à un électricien qualifié avant de le
mettre en service.
Raccordement d’une fiche alternative:
les couleurs des fils du câble de réseau correspondent à la
codification suivante:
BLEU NEUTRE (N)
MARRON
ALIMENTE (L)
JAUNE/VERT TERRE (E)
Elimination de l’électroménager:
Lors de la mise au rebus de l’électroménager, débarrassez-le de sa fiche en coupant le câble d’alimentation le
plus près possible de cette dernière et éliminez comme
décrit précédemment.
GREEN &
YELLOW
BROWN
BLUE
13 ampere fuse
CROSS-BAR
CORD GRIP
! Votre lave-linge ne doit pas être installé dehors, même
à l’abri, car il est très dangereux de le laisser exposé à la
pluie et aux orages.
! Après installation du lave-linge, la prise de courant doit
être facilement accessible.
! N’utilisez ni rallonges ni prises multiples.
! Le câble ne doit être ni plié ni écrasé.
! Le câble d’alimentation ne doit être remplacé que par
des techniciens agréés.
Attention! Nous déclinons toute responsabilité en cas de
non respect des normes énumérées ci-dessus.
Premier cycle de lavage
Avant la première mise en service de l’appareil, effectuer
un cycle de lavage avec un produit lessiviel mais sans linge
et sélectionner le programme 2.
18
Caractéristiques techniques
Modèle
IWDC 7085
Dimensions
largeur 59,5 cm
hauteur 85 cm
profondeur 53,5 cm
Capacité
de 1 à 7 kg pour le lavage;
de 1 à 5 kg pour le séchage
Raccordements
électriques
Voir la plaque signalétique appliquée
sur la machine
Raccordements
hydrauliques
pression maximale 1 MPa (10 bar)
pression minimale 0,05 MPa (0,5 bar)
capacité du tambour 52 litres
Vitesse d’essorage
jusqu’à 800 tours minute
Programmes de
contrôle selon la
norme EN 50229
lavage: programme 2; température 60°C;
effectué avec une charge de 7 kg.
séchage: premier séchage effectué
avec 2 kg de charge et bouton SECHAGE amené sur position
.
deuxième séchage effectué avec 5 kg
de charge et bouton SECHAGE amené
sur position
.
FR
Cet appareil est conforme aux Directives
Communautaires suivantes:
- 89/336/CEE du 03/05/89 (Compatibilité électromagnétique) et modifications
suivantes
- 2002/96/CE
- 2006/95/CE (Basse Tension)
19
Description du lavante-séchante
et démarrage d’un programme
FR
Bandeau de commandes
Voyants DÉROULEMENT
CYCLE/DÉPART DIFFÉRÉ
Touche ON/OFF
FONCTION
Bouton
PROGRAMMES
Tiroir à produits lessiviels: pour charger les produits
lessiviels et les additifs (voir “Produits lessiviels et linge”).
Touche ON/OFF: pour allumer ou éteindre le lavanteséchante.
Bouton PROGRAMMES: pour sélectionner les programmes. Pendant le programme, le bouton ne tournera pas.
Touches avec voyants FONCTION: pour sélectionner
les fonctions disponibles. Le voyant correspondant à la
fonction sélectionnée restera allumé.
Bouton TEMPÉRATURE: pour sélectionner la température ou un lavage à froid (voir “Personnalisations”).
Bouton SÉCHAGE: pour sélectionner le séchage désiré
(voir “Personnalisations”).
Voyants DÉROULEMENT CYCLE/DÉPART DIFFÉRÉ:
pour suivre le stade d’avancement du programme de
lavage.
Le voyant allumé indique la phase de lavage en cours.
Si la fonction “Départ différé” (départ différé) a été sélectionnée, ils indiquent le temps restant jusqu’au démarrage
du programme (voir page ci-contre).
Voyant HUBLOT VERROUILLÉ: indique si la porte est
verrouillée (voir page ci-contre).
20
PAUSE
Voyant
Bouton
TEMPÉRATURE
Tiroir à produits lessiviels
Touche avec
voyant START/
Touches avec voyants
Bouton
HUBLOT
VERROUILLÉ
SÉCHAGE
Touche avec voyant START/PAUSE: pour démarrer les
programmes ou les interrompre momentanément.
N.B.: pour effectuer une pause du lavage en cours, appuyer sur cette touche, le voyant correspondant se mettra à
clignoter en orange tandis que celui de la phase en cours
restera allumé fixe. Si le voyant HUBLOT VERROUILLÉ
est éteint, on peut ouvrir la porte.
Pour faire redémarrer le lavage exactement de l’endroit où
il a été interrompu, appuyer une nouvelle fois sur la touche.
Stand-by
Ce lavante-séchante, conformément aux nouvelles normes
en vigueur dans le domaine de l’économie d’énergie, est
équipée d’un système d’extinction automatique (veille)
activé après environ 30 minutes d’inutilisation. Appuyez
brièvement sur la touche ON/OFF et attendre que la machine soit réactivée.
Voyants
Les voyants fournissent des informations importantes.
Voilà ce qu’ils signalent:
Départ différé
Si la fonction “Départ différé” a été activée (voir “Personnalisations”), le voyant correspondant au temps sélectionné se
mettra à clignoter, après avoir lancé le programme:
Voyants phase en cours
Une fois que le cycle de lavage sélectionné a démarré,
les voyants s’allument progressivement pour indiquer son
stade d’avancement:
Lavage
Rinçage
Essorage/Vidange
Séchage
Fin de Lavage
Remarque: une fois le cycle de séchage terminé, il faut
ramener le bouton SÉCHAGE sur “0”.
Au fur et à mesure que le temps passe, le temps restant
est affiché avec clignotement du voyant correspondant.
Quand le retard sélectionné touche à sa fin le programme
sélectionné démarre.
Touches fonction et voyants correspondants
La sélection d’une fonction entraîne l’allumage du voyant
correspondant.
Si la fonction sélectionnée est incompatible avec le programme sélectionné, le voyant correspondant se met à
clignoter et la fonction n’est pas activée.
Si l’fonction sélectionnée est incompatible avec une autre
fonction précédemment sélectionnée, le voyant correspondant à la première fonction se met à clignoter et seule
la deuxième fonction est activée, le voyant de la touche
s’allume au fixe.
Voyant hublot verrouillé
Le voyant allumé indique que le hublot est verrouillé pour
en empêcher l’ouverture. Attendre que le voyant cesse de
clignoter avant d’ouvrir la porte (3 minutes environ). Pour
ouvrir le hublot tandis qu’un cycle est en cours, appuyer
sur la touche START/PAUSE; si le voyant HUBLOT VERROUILLÉ est éteint, on peut ouvrir le hublot.
Démarrage d’un programme
1. Allumer le lavante-séchante en appuyant sur la touche ON/OFF. Tous les voyants s’allument pendant quelques secondes
puis s’éteignent, seul le voyant START/PAUSE flashe.
2. Charger le linge et fermer le hublot.
3. Sélectionner à l’aide du bouton PROGRAMMES le programme désiré.
4. Sélectionner la température de lavage (voir “Personnalisations”).
5. Sélectionner le séchage si nécessaire (voir “Personnalisations”).
6. Verser les produits lessiviels et les additifs (voir “Produits lessiviels et linge”).
7. Sélectionner les fonctions désirées.
8. Appuyer sur la touche START/PAUSE pour démarrer le programme, le voyant correspondant vert restera allumé en fixe.
Pour annuler le cycle sélectionné, appuyer sur la touche START/PAUSE pour placer l’appareil en pause et choisir un nouveau
cycle.
9. A la fin du programme, le voyant END s’allume. Quand le voyant HUBLOT VERROUILLÉ s’éteint, on peut ouvrir le hublot. Sortir le linge et laisser le hublot entrouvert pour faire sécher le tambour. Eteindre le lavante-séchante en appuyant sur la
touche ON/OFF.
21
FR
Programmes
Tableau des programmes
Programmes
FR
Description du Programme
Temp.
maxi.
(°C)
Vitesse
maxi
(tours
minute)
Séchage
Lessive
Charge
Durée
maxi
cycle
PréAssou(Kg)
Lavage
lavage
plissant
Programmes Quotidiens
1
Coton avec Prélavage: blancs extrêmement sales.
90°
800




7
171’
2
Coton: blancs extrêmement sales.
90°
800

-


7
155’
2
Coton (1): blancs et couleurs résistantes très sales.
60°
800

-


7
153’
2
Coton (2): blancs et couleurs délicates très sales.
40°
800

-


7
147’
3
Coton rapide: blancs et couleurs résistantes très sales.
60°
800

-


7
130’
4
Coton couleurs: blancs peu sales et couleurs délicates.
40°
800

-


7
92’
5
Synthétiques: couleurs résistantes très sales.
60°
800

-


3
85’
600
-
-


1,5
55’
Spéciaux
6
Laine: pour laine, cachemire, etc.
40°
7
Soie et Voilage: pour linge en soie, viscose, lingerie.
30°
0
-
-


1
55’
8
Jeans
40°
800

-


3
80’
9
Sport Léger
30°
600
-
-


68
30°
600
-
-


3
Max. 2
paires
11 Coton
-
-

-
-
-
5
-
12 Synthétiques
-
-

-
-
-
3
-
30°
800

-


0,5
35’
Rinçage
-
800

-
-

7
36
Essorage
-
800

-
-
-
7
16
Vidange
-
0
-
-
-
-
7
2
10 Baskets
50’
Séchage
13 Lavage & Séchage Express
Programmes partiaux
Les données dans le tableau sont reprises à titre indicatif.
Pour tous les instituts qui effectuent ces tests :
1) Programme de contrôle selon la norme EN 50229: sélectionner le programme 2 et une température de 60°C.
2) Programme coton long: sélectionner le programme 2 et une température de 40°C.
Programmes spéciaux
Sport Léger(programme 9): est spécialement conçu pour laver des textiles vêtements de sport (survêtements, shorts, etc.)
peu sales; pour obtenir d’excellents résultats nous recommandons de ne pas dépasser la charge maximale indiquée dans le
“Tableau des programmes”. Nous recommandons d’utiliser de la lessive liquide, avec une dose pour la demi-charge.
Baskets (programme 10): est spécialement conçu pour laver des chaussures de sport; pour obtenir d’excellents résultats
nous recommandons de ne pas en laver plus de 2 paires à la fois (tissu).
Lavage & Séchage Express (programme 13): spécialement conçu pour laver et sécher du linge peu sale en un rien de
temps. La sélection de ce cycle permet de laver et de sécher jusqu’à 0,5 kg de linge en à peine 35 minutes.
Pour obtenir de meilleurs résultats, utiliser une lessive liquide ; pré-traiter les cols, les poignets et les taches.
22
Personnalisations
Sélection de la température
Tourner le bouton TEMPÉRATURE pour sélectionner la température de lavage (voir Tableau des programmes).
La température peut être abaissée jusqu’au lavage à froid ( ).
La machine interdira automatiquement toute sélection d’une température supérieure à la température maximale prévue pour
chaque programme.
Tableau temps de Séchage (Valeurs indicatives)
Sélectionner le séchage
Tourner le bouton SÉCHAGE pour sélectionner le type
Type
Charge
Sur
Repasde séchage souhaité. Deux possibilités sont offertes:
Armoire
de
Type de charge
max.
Ceintre
sage
A - En fonction du temps: de 40 à 180 minutes.
tissu
(kg)
B - En fonction du niveau de séchage:
Linge de différenRepassage : linge légèrement humide, facile à repasser.
Coton
tes dimensions,
5
250
210
190
Sur Ceintre
: linge sec prêt à ranger.
serviettes éponge
Armoire : linge très sec, conseillé pour serviettes
Draps, chemises,
Syntheéponge et peignoirs.
pyjamas, chausset3
180
130
115
Si, exceptionnellement, la charge de linge à laver et faire
tiques
tes etc.
sécher dépasse la charge maximum prévue (voir tableau
temps de Séchage), procéder au lavage et une fois le programme terminé, séparer votre linge et en réintroduire une partie
dans le tambour. Suivre à présent les instructions pour procéder au “Séchage seulement”. Procéder de même pour le linge
restant. Un cycle de refroidissement est toujours prévu quand le séchage est terminé.
Séchage seulement
Tourner le bouton PROGRAMMES jusqu’à la position de séchage (11-12) adaptée au type de textile puis sélectionner la durée
du cycle de séchage souhaitée à l’aide du bouton SÉCHAGE.
Fonctions
Les différentes fonctions de lavage prévues par le lavante-séchante permettent d’obtenir la propreté et le blanc souhaités.
Pour activer les fonctions:
1. appuyer sur la touche correspondant à la fonction désirée;
2. l’allumage du voyant correspondant signale que la fonction est activée.
Remarque:
- Si la fonction sélectionnée est incompatible avec le programme sélectionné, le voyant correspondant se met à clignoter et
la fonction n’est pas activée.
- Si l’fonction sélectionnée est incompatible avec une autre fonction précédemment sélectionnée, le voyant correspondant à
la première fonction se met à clignoter et seule la deuxième fonction est activée, le voyant de la touche s’allume au fixe.
La sélection de cette fonction permet d’optimiser les mouvements mécaniques, la température et l’eau en fonction d’une
” permet de laver en faisant des
charge réduite de coton et synthétiques peu sales (voir “Tableau des programmes”). “
économies considérables de temps et de consommations d’eau et d’énergie. Il est conseillé d’utiliser une dose de lessive
liquide adaptée à la charge.
800-400
En appuyant sur cette touche on réduit la vitesse de l’essorage.
Repassage facile
En cas de sélection de cette fonction, le lavage et l’essorage seront dûment modifiés pour réduire la formation de plis. À la fin
du cycle de lavage, le lave-linge fait tourner le tambour lentement; le voyant de la fonction REPASSAGE FACILE et celui de
START/PAUSE se mettent à clignoter (le premier en vert, le second en orange) et l’inscription “END” s’allume. Pour compléter le
cycle, il faut appuyer sur la touche START/PAUSE ou sur la touche REPASSAGE FACILE. Pour le programme 7 l’appareil arrive
au bout du cycle en laissant le linge tremper, le voyant REPASSAGE FACILE clignote et celui de START/PAUSE se mettent à
clignoter. Pour vidanger l’eau et sortir le linge, appuyer sur la touche START/PAUSE ou sur la touche REPASSAGE FACILE.
Note: si vous voulez aussi effectuer le séchage, ce bouton agit uniquement s’il est utilisé avec le niveau “Repassage”
.
Départ différé
Pour différer la mise en marche de la machine jusqu’à 9 heures. Appuyer plusieurs fois de suite sur la touche jusqu’à ce que le voyant
correspondant au retard souhaité s’allume. A la quatrième pression sur la touche, la fonction se désactive.
N.B: Après avoir appuyé sur la touche START/PAUSE, le retard programmé ne peut être modifié que pour le diminuer jusqu’à
lancer le programme sélectionné.
23
FR
Produits lessiviels et linge
FR
Tiroir à produits lessiviels
Un bon résultat de lavage dépend aussi d’un bon dosage
de produit lessiviel: un excès de lessive ne lave pas mieux,
il incruste l’intérieur du lavante-séchante et pollue l’environnement.
! Ne pas utiliser de lessives pour lavage à la main, elles
moussent trop.
Sortir le tiroir à produits
lessiviels et verser la lessive
ou l’additif comme suit.
1
2
3
bac 1: Lessive prélavage (en poudre)
bac 2: Lessive lavage (en poudre ou liquide)
Versez la lessive liquide juste avant la mise en marche.
bac 3: Additifs (adoucissant, etc.)
L’assouplissant ne doit pas déborder de la grille.
! N’utilisez pas de lessives pour lavage à la main, elles
génèrent trop de mousse.
Triage du linge
• Trier correctement le linge d’après:
-
le type de textile / le symbole sur l’étiquette.
-
les couleurs: séparer le linge coloré du blanc.
• Vider les poches et contrôler les boutons.
• Ne pas dépasser les valeurs indiquées correspondant au
poids de linge sec :
Textiles résistants: 7 kg max.
Textiles synthétiques: 3 kg max.
Textiles délicats: 2 kg max.
Laine: 1,5 kg max.
Soie: 1 kg max.
Combien pèse le linge ?
1 drap 400-500 g
1 taie d’oreiller 150-200 g
1 nappe 400-500 g
1 peignoir 900-1200 g
1 serviette éponge 150-250 g
Linge ou vêtements particuliers
Laine: grâce au programme 6 vous pouvez laver à la
machine tous vos vêtements en laine, y compris ceux qui
portent l’étiquette “ lavage à la main uniquement “
.
Pour obtenir d’excellents résultats utilisez un produit lessiviel spécial et ne dépassez pas une charge de 1,5 kg.
24
Soie: sélectionner le programme de lavage spécial 7 pour
vêtements en soie. Il est conseillé d’utiliser une lessive
spéciale pour linge délicat.
Voilage: pliez-les bien et glissez-les dans une taie d’oreiller
ou dans un sac genre filet. Sélectionner le programme 7.
Jeans: mettez les jeans à l’envers avant de les laver et utilisez
une lessive liquide. Sélectionnez le programme 8.
Système d’équilibrage de la charge
Avant tout essorage, pour éviter toute vibration excessive
et répartir le linge de façon uniforme, le lavante-séchante
fait tourner le tambour à une vitesse légèrement supérieure
à la vitesse de lavage. Si au bout de plusieurs tentatives,
la charge n’est toujours pas correctement équilibrée,
l’appareil procède à un essorage à une vitesse inférieure
à la vitesse normalement prévue. En cas de déséquilibre
excessif, le lavante-séchante préfère procéder à la répartition du linge plutôt qu’à son essorage. Pour une meilleure
répartition de la charge et un bon équilibrage, nous conseillons de mélanger de grandes et petites pièces de linge.
Précautions et conseils
! Ce lavante-séchante a été conçu et fabriqué conformément aux normes internationales de sécurité. Ces consignes sont fournies pour des raisons de sécurité, il faut les
lire attentivement.
Sécurité générale
• Cet appareil est conçu pour un usage domestique.
• Cet appareil n’est pas destiné à être utilisé par des personnes (enfants compris) dont les capacités physiques,
sensorielles ou mentales sont réduites ou qui ne disposent pas des connaissances ou de l’expérience nécessaires, à moins qu’elles n’aient été formées et encadrées pour l’utilisation de cet appareil par une personne
responsable de leur sécurité. Surveiller les enfants pour
s’assurer qu’ils ne jouent pas avec l’appareil.
- Ne pas mettre sécher du linge non lavé.
- Le linge contaminé avec des substances telles que
de l’huile de cuisson, de l’acétone, de l’alcool, de
l’essence, du kérosène, des détachants, de l’essence de térébenthine, de la cire et des substances pour
l’enlever, doit être lavé à l’eau chaude avec une dose
supplémentaire de lessive avant d’être introduit dans le
sèche-linge.
- Des objets en mousse expansée (mousse de latex),
des bonnets de douche, des textiles imperméables, des
articles doublés de caoutchouc et des vêtements ou
des coussins ayant des parties en mousse de latex ne
doivent pas être séchés en sèche-linge.
- En cas d’utilisation d’assouplissants ou de tout autre
produit similaire, se conformer aux instructions du
fabricant.
- La partie finale d’un cycle du sèche-linge se produit
sans chaleur (cycle de refroidissement) pour éviter tout
endommagement du linge.
ATTENTION: Ne jamais arrêter le sèche-linge avant
la fin du programme de séchage. Dans ce cas, sortir
immédiatement tout le linge et l’étendre pour le faire
refroidir rapidement.
• Ne jamais toucher l’appareil si l’on est pieds nus et si
les mains sont mouillées ou humides.
• Ne jamais tirer sur le câble pour débrancher la fiche de
la prise de courant.
• Ne pas ouvrir le tiroir à produits lessiviels si la machine
est branchée.
• Ne pas toucher à l’eau de vidange, elle peut atteindre
des températures très élevées.
• Ne pas forcer pour ouvrir le hublot : le verrouillage de
sécurité qui protège contre les ouvertures accidentelles
pourrait s’endommager.
• En cas de panne, éviter à tout prix d’accéder aux mécanismes internes pour tenter une réparation.
• Veiller à ce que les enfants ne s’approchent pas de
l’appareil pendant son fonctionnement.
• Pendant le lavage, le hublot a tendance à chauffer.
• Deux ou trois personnes sont nécessaires pour déplacer l’appareil avec toutes les précautions nécessaires.
Ne jamais le déplacer tout seul car il est très lourd.
• Avant d’introduire le linge, s’assurer que le tambour est
bien vide.
• Pendant le séchage, le hublot a tendance à chauffer.
• Ne mettez pas à sécher du linge lavé avec des solvants
inflammables (trichloréthylène par ex.).
• Ne mettez pas à sécher du caoutchouc-mousse ou des
élastomères du même genre.
• Vérifiez qu’au cours du séchage, le robinet de l’eau soit
bien ouvert.
Mise au rebut
• Mise au rebut du matériel d’emballage :
se conformer aux réglementations locales de manière à ce
que les emballages puissent être recyclés.
• La directive européenne 2002/96/CE sur les déchets
d’équipements électriques et électroniques prévoit que
les électroménagers ne peuvent pas être traités comme
des déchets solides urbains ordinaires. Les appareils
usagés doivent faire l’objet d’une collecte séparée pour
optimiser le taux de récupération et de recyclage des
matériaux qui les composent et empêcher tout danger
pour la santé et pour l’environnement. Le symbole de
la poubelle barrée est appliqué sur tous les produits pour
rappeler qu’ils font l’objet d’une collecte sélective.
Pour tout autre renseignement sur la collecte des
électroménagers usés, prière de s’adresser au service
public préposé ou au vendeur.
25
FR
Entretien et soin
FR
Coupure de l’arrivée d’eau et du courant
• Fermer le robinet de l’eau après chaque lavage. Cela
réduit l’usure de l’installation hydraulique du lavanteséchante et évite tout danger de fuites.
Nettoyage de la pompe
Le lavante-séchante est équipé d’une pompe autonettoyante qui n’exige aucune opération d’entretien. Il peut
toutefois arriver que de menus objets (pièces de monnaie,
boutons) tombent dans la préchambre qui protège la pompe, placée en bas de cette dernière.
• Débrancher la fiche de la prise de courant lors de tout
nettoyage du lavante-séchante et pendant tous les travaux d’entretien.
! S’assurer que le cycle de lavage est bien terminé et
débrancher la fiche.
Nettoyage du lavante-séchante
Pour accéder à cette préchambre:
Pour nettoyer l’extérieur et les parties en caoutchouc,
utiliser un chiffon imbibé d’eau tiède et de savon. N’utiliser
ni solvants ni abrasifs.
1. démonter le panneau
situé à l’avant du lavanteséchante à l’aide d’un
tournevis (voir figure);
Nettoyage du tiroir à produits lessiviels.
Soulever le tiroir et le tirer
vers soi pour le sortir de son
logement (voir figure).
Le laver à l’eau courante;
effectuer cette opération
assez souvent.
2. dévisser le couvercle en
le tournant dans le sens
inverse des aiguilles d’une
montre (voir figure): il est
normal qu’un peu d’eau
s’écoule;
Entretien du hublot et du tambour
• Il faut toujours laisser le hublot entrouvert pour éviter la
formation de mauvaise odeurs.
3. nettoyer soigneusement l’intérieur;
4. revisser le couvercle;
5. remonter le panneau en veillant à bien enfiler les crochets dans les fentes prévues avant de le pousser contre
l’appareil.
Contrôle du tuyau d’arrivée de l’eau
Contrôler le tuyau d’alimentation au moins une fois par an.
Procéder à son remplacement en cas de craquèlements
et de fissures: car les fortes pressions subies pendant le
lavage pourraient provoquer des cassures.
! N’utiliser que des tuyaux neufs.
26
Anomalies et remèdes
Il peut arriver que le lavante-séchante ne fonctionne pas bien. Avant d’appeler le Service de dépannage (voir “Assistance”),
contrôler s’il ne s’agit pas par hasard d’un problème facile à résoudre à l’aide de la liste suivante.
Anomalies:
Causes / Solutions possibles:
Le lavante-séchante ne s’allume pas.
• La fiche n’est pas branchée dans la prise de courant ou mal branchée.
• Il y a une panne de courant.
Le cycle de lavage ne démarre pas.
• Le hublot n’est pas bien fermé.
• La touche ON/OFF n’a pas été enfoncée.
• La touche START/PAUSE n’a pas été enfoncée.
• Le robinet de l’eau n’est pas ouvert.
• Un départ différé a été sélectionné (voir “Personnalisations”).
Il n’y a pas d’arrivée d’eau (le
voyant de la première phase de
lavage clignote rapidement).
• Le tuyau d’arrivée de l’eau n’est pas raccordé au robinet.
• Le tuyau est plié.
• Le robinet de l’eau n’est pas ouvert.
• Il y a une coupure d’eau.
• La pression n’est pas suffisante.
• La touche START/PAUSE n’a pas été enfoncée.
Le lavante-séchante prend l’eau et
vidange continuellement.
• Le tuyau de vidange n’est pas installé à une distance du sol comprise entre 65
et 100 cm (voir “Installation”).
• L’extrémité du tuyau de vidange est plongée dans l’eau (voir “Installation”).
• L’évacuation murale n’a pas d’évent.
Si après ces vérifications, le problème persiste, fermer le robinet de l’eau, éteindre la machine et appeler le service Assistance. Si l’appartement est situé en
étage dans un immeuble, il peut y avoir des phénomènes de siphonnage qui font
que le lavante-séchante prend et évacue l’eau continuellement. Pour supprimer
cet inconvénient, on trouve dans le commerce des soupapes spéciales antisiphonnage.
Le lavante-séchante ne vidange
pas et n’essore pas.
• Le programme ne prévoit pas de vidange: pour certains programmes, il faut la
faire partir manuellement.
• La fonction REPASSAGE FACILE est activée: pour compléter le programme, appuyer sur la touche START/PAUSE (“Personnalisations”).
• Le tuyau de vidange est plié (voir “Installation ”).
• La conduite d’évacuation est bouchée.
Le lavante-séchante vibre beaucoup pendant l’essorage.
• Le tambour n’a pas été débloqué comme il faut lors de l’installation du lavante-séchante (voir “Installation”).
• Le lavante-séchante n’est pas posé à plat (voir “Installation”).
• Le lavante-séchante est coincé entre des meubles et le mur (voir “Installation”).
Le lavante-séchante a des fuites.
• Le tuyau d’arrivée de l’eau n’est pas bien vissé (voir “Installation”).
• Le tiroir à produits lessiviels est bouché (pour le nettoyer voir “Entretien et soin”).
• Le tuyau de vidange n’est pas bien fixé (voir “Installation”).
Les voyants des options et le voyant
START/PAUSE clignotent. Le voyant
du phase de lavage et le voyant hublot
bloqué restent fixes.
• Eteindre l’appareil et débrancher la fiche de la prise de courant, attendre 1
minute environ avant de rallumer.
Si l’anomalie persiste, appeler le service d’assistance.
Il y a un excès de mousse.
• Le produit de lavage utilisé n’est pas une lessive spéciale machine (il faut qu’il y
ait l’inscription “pour lavante-séchante”, “main et machine”, ou autre semblable).
• La quantité utilisée est excessive.
Le lavante-séchante ne sèche pas.
•
•
•
•
•
La fiche n’est pas branchée dans la prise de courant ou mal branchée.
Il y a une panne de courant.
Le hublot n’est pas bien fermé.
Un départ différé a été sélectionné.
le bouton SÉCHAGE est sur la position 0.
27
FR
Assistance
FR
Avant d’appeler le service après-vente:
• Vérifier si on ne peut pas résoudre l’anomalie par ses propres moyens (voir “Anomalies et Remèdes”);
• Remettre le programme en marche pour contrôler si l’inconvénient a disparu;
• Autrement, contacter le Centre d’Assistance technique agréé au numéro de téléphone indiqué sur le certificat de garantie.
! Ne jamais s’adresser à des techniciens non agréés.
Communiquer:
• le type de panne;
• le modèle de l’appareil (Mod.);
• son numéro de série (S/N).
Ces informations se trouvent sur la plaque signalétique apposée à l’arrière du lavante-séchante et à l’avant quand on ouvre la
porte hublot.
28
‫تعليمات االستخدام‬
‫ماكينة غسيل‬
‫هﺬا اﻟﺮﻣﺰ ﻳﺬآﺮك ﺑﻘﺮاءة آﺮاﺳﺔ اﻟﺘﻌﻠﻴﻤﺎت هﺬﻩ‪.‬‬
‫‪AR‬‬
‫عربي‬
‫المحتويات‬
‫‪AR‬‬
‫التركيب‪30-31-32-33 ،‬‬
‫إفراغ المحتويات وتحديد المستوى‬
‫وصل إمدادات الكهرباء والماء‬
‫دورة الغسيل األولى‬
‫البيانات التقنية‬
‫وصف ماكينة الغسيل وتشغيل دورة الغسيل‪‎34-35 ،‬‬
‫لوحة التحكم‬
‫المصابيح المؤشرة‬
‫تشغيل دورة الغسيل‬
‫دورات الغسل‪36 ،‬‬
‫جدول دورات الغسيل‬
‫التخصيصات‪37 ،‬‬
‫‪IWDC 7085‬‬
‫ضبط درجة الحرارة‬
‫إعداد دورة التجفيف‬
‫الوظائف‬
‫مواد التنظيف والغسيل‪38 ،‬‬
‫درج وعاء مواد التنظيف‬
‫دورة التبييض‬
‫تحضير الغسيل‬
‫مالبس تتطلب عناية خاصة‬
‫نظام موازنة الحمل‬
‫وسائل حذر ونصائح‪39 ،‬‬
‫الوقاية العامة‬
‫التخلص‬
‫العناية والصيانة‪10 ،‬‬
‫قطع إمداد الماء أو الكهرباء‬
‫تنظيف ماكينة الغسيل‬
‫تنظيف درج وعاء مواد التنظيف‬
‫العناية بباب وبرميل الجهاز لديك‬
‫ّ‬
‫المضخة‬
‫تنظيف‬
‫فحص خرطوم إدخال الماء‬
‫استكشاف المشاكل وحلها‪11 ،‬‬
‫الخدمة‪12 ،‬‬
‫‪29‬‬
‫التركيب‬
‫‪AR‬‬
‫! يجب االحتفاظ بدليل التعليمات هذا في مكان آمن لمراجعته في المستقبل‪ .‬إذا تم‬
‫بيع الجهاز‪ ،‬إرساله أو نقله‪ ،‬تأكد من أن دليل التعليمات قد أرفق بالماكينة بحيث‬
‫يتمكن مالكوها الجدد من التعرف على عملها وخصائصها‪.‬‬
‫! اقرأ هذه التعليمات بعناية‪ :‬إنها تحتوي على معلومات هامة فيما يتعلق بالتركيب‬
‫اآلمن وتشغيل الجهاز‪.‬‬
‫إفراغ المحتويات وتحديد المستوى‬
‫تحديد مستوى الماكينة بشكل صحيح سيمنحها الثبات‪ ،‬سيساعد على تحاشي‬
‫االرتجاجات والضجيج الزائد وسيمنعها من االنحراف أثناء العمل‪ .‬إذا تم وضعها‬
‫في خزانة أو على بساط‪ ،‬قم بمعايرة األرجل بنفس الطريقة لتوفير فسحة تهوئة‬
‫كافية تحت ماكينة الغسيل‪.‬‬
‫وصل إمدادات الكهرباء والماء‬
‫وصل خرطوم إدخال الماء‬
‫إفراغ المحتويات‬
‫‪ .1‬قم بوصل خرطوم التزويد بواسطة‬
‫تثبيته لولبيا في حنفية الماء البارد‬
‫باستخدام توصيل غاز ¾ مم ّدد (أنظر‬
‫الرسم)‪.‬‬
‫قبل إنجاز التوصيل‪ ،‬أتح للماء أن‬
‫يتدفق بحرية حتى يصبح نظيفا تماما‪.‬‬
‫‪ .1‬أخرج ماكينة الغسيل من رزمتها‪.‬‬
‫‪ .2‬تأكد من أنه لم يلحق ضرر بماكينة الغسيل خالل عملية الشحن‪ .‬إذا لحق بها‬
‫ّ‬
‫بالموزع وال تنفذ أية عملية تركيب إضافية‪.‬‬
‫ضرر‪ ،‬اتصل‬
‫‪ .3‬فك البراغي الـ ‪ 4‬الواقية‬
‫(المستخدمة خالل الشحن) ومطاط‬
‫الماكينة مع حافظ المسافة المالئم‬
‫الموجود في الجهة الخلفية من‬
‫الجهاز)‪.‬‬
‫‪ .2‬قم بتوصيل فتحة المدخل بماكينة‬
‫الغسيل‪ ،‬عن طريق تثبيتها لولبيا‬
‫داخل مدخل الماء المالئم في الجهاز‪،‬‬
‫الموجود في الجهة اليمنى العليا‬
‫في الجزء الخلفي من الجهاز(انظر‬
‫الرسم)‪.‬‬
‫‪ .4‬أغلق الفتحات باستخدام األغطية البالستيكية المزودة‪.‬‬
‫‪ .5‬أبق كل األجزاء في مكان آمن‪ :‬سوف تحتاجها مرة أخرى في حال تم نقل‬
‫ماكينة الغسيل إلى موقع آخر‪.‬‬
‫! يجب عدم استخدام مواد التعبئة كألعاب لألوالد‪.‬‬
‫معوجة‪.‬‬
‫‪ .3‬تأكد من أن الفوهة غير مثنية أو‬
‫ّ‬
‫تحديد المستوى‬
‫‪ .1‬قم بتركيب ماكينة الغسيل على أرضية مستوية ومتينة‪ ،‬من دون وضعها مقابل‬
‫الجدران‪ ،‬الخزائن‪،‬األثاث أو أي أمر آخر‪.‬‬
‫‪ .2‬إذا لم تكن األرضية مستوية تماما‪،‬‬
‫قم بتعويض أي تفاوت بواسطة شد‬
‫أو فك أرجل المعايرة األمامية (انظر‬
‫الرسم)؛ على قياس زاوية االنحناء‬
‫‪‎‬‏‪.‬‬
‫مقارنة بمسطح العمل‪ ،‬أال يتعدى ‪2°‬‬
‫‬
‫! على ضغط الماء في الحنفية أن يكون في نطاق القيم المشار إليها في جدول‬
‫البيانات التقنية (انظر الصفحة التالية)‪.‬‬
‫!إذا لم يكن خرطوم اإلدخال طويال بما فيه الكفاية‪ ،‬اتصل بمتجر متخصص أو‬
‫بفني معتمد‪.‬‬
‫! ال تستخدم الخراطيم المستعملة أبدا‪.‬‬
‫! استخدم تلك المرفقة بالماكينة‪.‬‬
‫وصل خرطوم تصريف الماء‬
‫قم بتوصيل خرطوم تصريف الماء‪،‬‬
‫من دون ثنيه‪ ،‬بأنبوب تصريف أو‬
‫بتصريف جداري على ارتفاع يتراوح‬
‫بين ‪ 65‬وحتى ‪ 100‬سم عن األرض؛‬
‫‪65 - 100 cm‬‬
‫أو قم بتثبيته على طرف الحوض أو‬
‫المغسلة‪ ،‬مع تثبيت األنبوب المزوّد‬
‫بالحنفية (أنظر الرسم)‪ .‬على الطرف‬
‫الحر من الخرطوم أال يكون تحت‬
‫الماء‪.‬‬
‫! نحن ال ننصح باستخدام إطاالت الخرطوم؛ إذا كان ذلك ضروريا جدا‪ ،‬فعلى‬
‫اإلطاالت أن تكون بنفس قطر الخرطوم األصلي على أال يتعدى طوله ‪ 150‬سم‪.‬‬
‫التوصيالت الكهربائية‬
‫قبل توصيل الجهاز بمقبس شبكة الكهرباء الرئيسية‪ ،‬تأكد من أن‪:‬‬
‫مؤرض ويذعن لكل القوانين الواجب تطبيقها؛‬
‫• المقبس ّ‬
‫• المقبس قادر على الصمود أمام قدرة الطاقة القصوى في الجهاز المشار اليها‬
‫في جدول جدول التفاصيل (انظر صفحة ‪)5‬؛‬
‫أصبح جهازك اآلن مزودا بقابس مصهره ‪ 13‬أمبير‪ ،‬ويمكن إدخاله إلى مقبس‬
‫‪ 13‬أمبير لالستخدام الفوري‪ .‬قبل استخدام الجهاز‪ ،‬يرجى قراءة المعلومات أدناه‪.‬‬
‫مؤرضا‪.‬‬
‫تحذير ‪ -‬يجب أن يكون هذا الجهاز ّ‬
‫يجب تنفيذ العمليات التالية من قبل أخصائي كهرباء مؤهل‪.‬‬
‫تبديل المصهر‪:‬‬
‫عند تبديل مصهر معطوب‪ ،‬من مصهر ‪ ASTA 13‬أمبير معتمد إلى ‪BS‬‬
‫‪ 1362‬يجب أن يكون دائما مستخدما‪ ،‬وإعادة مالءمة غالف المصهر‪ .‬في حال‬
‫فقدان غالف المصهر‪ ،‬ال يجب استخدام القابس إال عند الحصول على بديل‪.‬‬
‫تبديل أغلفة المصهر‪:‬‬
‫في حال كان غالف المصهر مالئما‪ ،‬يجب أن يكون من اللون الصحيح المشار‬
‫إليه في مفتاح األلوان أو اللون البارز بالكلمات على قاعدة القابس‪ .‬يمكن الحصول‬
‫على قطع الغيار من أقرب مركز خدمة إليك‪.‬‬
‫إزالة القابس‪:‬‬
‫إذا كان جهازك مزودا بقابس معطوب ال يمكن إعادة تغليفه‪ ،‬وأنت ترغب في‬
‫إعادة توجيه كبل شبكة الكهرباء الرئيسية عبر التوزيعات‪ ،‬الوحدات وغيرها‪،‬‬
‫الرجاء تأكد من‪:‬‬
‫أنه تم تبديل القابس بقابس يمكن إعادة تغليفه ومصهره ‪ 13‬أمبير يحمل عالمة‬
‫‪ BSI‬لالعتماد‪.‬‬
‫أو‪:‬‬
‫أن كبل شبكة الكهرباء الرئيسية موصول مباشرة بمنفذ كبل ‪ 13‬أمبير‪ ،‬يتحكم به‬
‫مفتاح كهربائي يسهل الوصول إليه دون تحريك الجهاز‪( ،‬بالتوافق مع‬
‫‪.)BS 5733‬‬
‫التخلص من الجهاز‪:‬‬
‫الشعب غير قابلة لالستخدام بحيث ال يتم إدخالها‬
‫تأكد قبل تخلصك من الجهاز أن ُ‬
‫في المقبس عن طريق الخطأ‪.‬‬
‫تعليمات وصل الكبل بقابس بديل‪:‬‬
‫هام‪ :‬األسالك في توصيل شبكة الكهرباء الرئيسية ملونة وفق الكود التالي‪:‬‬
‫األرضي‬
‫أصفر وأخضر‬
‫محايد‬
‫‬
‫أزرق‬
‫مباشر‬
‫‬
‫بني‬
‫• فولطية التزويد مدرجة بين القيم المشار إليها ي جدول البيانات التقنية‬
‫(أنظر صفحة ‪;)5‬‬
‫• المقبس متوافق مع قابس ماكينة الغسيل‪ .‬إذا لم يكن االمر كذلك‪ ،‬قم بتبديل‬
‫المقبس أو القابس‪.‬‬
‫‪31‬‬
‫‪AR‬‬
‫في حال لم تتوافق ألوان األسالك في التوصيل مع مفاتيح األلوان المعرفة في‬
‫‪AR‬‬
‫نهائيات القابس لديك‪ ،‬تصرف على النحو التالي‪:‬‬
‫قم بتوصيل السلك األصفر واألخضر بالنهائية المشار إليها بـ ‪ E‬أو‬
‫أو باللون‬
‫األخضر أو األخضر واألصفر‪.‬‬
‫قم بتوصيل السلك البني بالنهائية المشار إليها بـ ‪ L‬أو الملونة باللون األحمر‪.‬‬
‫قم بتوصيل السلك األزرق بالنهائية المشار إليها بـ ‪ N‬أو الملونة باللون األسود‪.‬‬
‫في حال تم استخدام قابس ‪ 13‬أمبير (‪ )BS 1363‬يجب أت يتالءم مع‬
‫مصهر ‪ 13‬أمبير‪ ،‬إما في القابس أو في المحوّل أو في لوحة التوزيع‪.‬‬
‫إذا كان لديك أي شك بخصوص التزويد الكهربائي للماكينة لديك‪ ،‬قم باستشارة‬
‫أخصائي كهرباء مؤهل قبل االستخدام‪.‬‬
‫كيفية وصل قابس بديل‪:‬‬
‫األسالك في توصيل شبكة الكهرباء الرئيسية ملونة وفق الكود التالي‪:‬‬
‫غير مشحون (‪)N‬‬
‫‬
‫أزرق‬
‫مباشر (‪)L‬‬
‫‬
‫بني‬
‫أرضي (‪)E‬‬
‫أخضر وأصفر‬
‫التخلص من الجهاز‪:‬‬
‫عند التخلص من الجهاز‪ ،‬الرجاء أزل القابس بواسطة قطع كبل الشبكة الكهربائية‬
‫أقرب ما يكون إلى هيكل القابس وتخلص منه كما هو مبين أعاله‪.‬‬
‫ﺍﻷﺧﻀﺮ ﻭﺍﻷﺻﻔﺮ‬
‫ﻣﺼﻬﺮ ‪ 13‬ﺃﻣﺒﻴﺮ‬
‫ﻣﺴﻜﺔ ﺍﻟﺴﻠﻚ‬
‫ﺍﻟﻌﺮﺿﻴﺔ‬
‫ﺍﻟﺒﻨﻲ‬
‫ﺍﻷﺯﺭﻕ‬
‫! يجب عدم تركيب ماكينة الغسيل في بيئة خارجية‪ ،‬حتى في األماكن المسقوفة‪،‬‬
‫ألنه من الخطر تركها معرضة للشتاء والعواصف‪.‬‬
‫! على مقبس شبكة الكهرباء الرئيسية أن يبقى سهل الوصول بعد تركيب ماكينة‬
‫الغسيل‪.‬‬
‫! ال تستخدم كبالت اإلطالة أو المقابس المتعددة‪.‬‬
‫! على كبل تزويد الطاقة أال يكون معوجا أو مضغوطا بشكل يشكل خطرا‪.‬‬
‫! يجب فحص كبل تزويد الطاقة بانتظام وتبديله من قبل فنّي مؤهل فقط‪.‬‬
‫‪32‬‬
‫تحذير! تخلي الشركة طرفها من المسؤولية إذا لم يتم التقيد بهذه المعايير‪.‬‬
‫‪AR‬‬
‫البيانات التقنية‬
‫الطراز‬
‫‪IWDC 7085‬‬
‫األبعاد‬
‫العرض ‪ 59.5‬سم‬
‫االرتفاع ‪ 85‬سم‬
‫العمق‪ 53.5.‬سم‬
‫السعة‬
‫من ‪ 1‬وحتى ‪ 7‬كغم لبرنامج الغسيل؛‬
‫من ‪ 1‬وحتى ‪ 5‬كغم لبرنامج التجفيف‬
‫التوصيالت الكهربائية‬
‫الرجاء راجع لوحة البيانات التقنية الملصقة على‬
‫الماكينة‬
‫توصيالت الماء‬
‫الحد األقصى للضغط ‪MPa ‎1‬‏(‪ 10‬بار)‬
‫الحد األدنى للضغط ‪MPa ‎0.05‬‏(‪ 0.5‬بار)‬
‫سعة البرميل ‪ 52‬لترا‬
‫سرعة العصر‬
‫برامج تقييم الطاقة وفق‬
‫التنظيمات‬
‫‪EN 50229‬‬
‫حتى ‪ 800‬دورة في الدقيقة‬
‫الغسيل‪ :‬البرنامج ‪2‬؛ درجة الحرارة ‪ 60‬مئوي؛‬
‫باستخدام حمل مقداره ‪ 7‬كغم‪ .‬التجفيف‪ :‬يتم إنجاز‬
‫دورة التجفيف االولى بـ‬
‫مستوى‬
‫‪ 2‬كغم من الحمل‪ ،‬باستخدام‬
‫التجفيف‪ .‬يتم إنجاز دورة التجفيف الثاني بحمل‬
‫مقداره ‪ 5‬كغم بواسطة اختيار‬
‫مستوى‬
‫التجفيف‪.‬‬
‫يذعن هذا الجهاز إلرشادات ‪EC:‬‬
‫ ‪ 89/336/EEC‬من تاريخ ‪03/05/89‬‬‫(تطابق المغناطينسية الكهربائية) والتعديالت‬
‫الالحقة‬
‫ ‪( 2006/95/EC‬الفولطية المنخفضة)‬‫‪2002/96/EC -‬‬
‫‬
‫وصف ماكينة الغسيل وتشغيل دورة الغسيل‬
‫‪AR‬‬
‫لوحة التحكم‬
‫المصابيح المؤشرة برنامج دورة الغسيل‪/‬‬
‫عداد الوقت المؤجل‬
‫زر مع مصباح‬
‫مؤشر‬
‫بدء‪/‬إيقاف‬
‫‏مؤقت‬
‫أزرار مع مصابيح‬
‫مؤشرة‬
‫الوظيفة‬
‫مفتاح درحة‬
‫الحرارة‬
‫مصباح مؤشر‬
‫إقفال الباب‬
‫زر تشغيل‪/‬إيقاف تشغيل‬
‫ﻣﻘﺒﺾ‬
‫درﺟﺔ اﻟﺤﺮارة‬
‫مفتاح دورة‬
‫الغسيل‬
‫درج وعاء مواد التنظيف‬
‫درج وعاء مواد التنظيف‪ :‬يتم استخدامه لتوزيع مواد التنظيف ومضافات الغسيل‬
‫(انظر "مواد التظيف والغسيل")‪.‬‬
‫مصباح مؤشر إقفال الباب‪ :‬يشير إما إلى إن الباب مفتوح أم ال (انظر الصفحة‬
‫التالية)‪.‬‬
‫زر تشغيل‪/‬إيقاف تشغيل‪ :‬لتشغيل ماكينة الغسيل وإيقاف تشغيلها‪.‬‬
‫زر ومصباح مؤشر بدء‪/‬إيقاف مؤقت‪ :‬يبدأ أو يعترض مؤقتا دورات الغسيل‪.‬‬
‫مالحظة‪:‬إليقاف دورة الغسيل الجارية بشكل مؤقت‪ ،‬اضغط هذا الزر؛ سيومض‬
‫المصباح المؤشر المالئم باللون البرتقالي‪ ،‬بينما يبقى المصباح المؤشر لمرحلة‬
‫دورة الغسيل الحالية مضاء بشكل ثابت‪ .‬إذا انطفأ المصباح المؤشر إلغالق‬
‫الباب سيكون باإلمكان فتح الباب‪.‬‬
‫لبدء دورة الغسيل من النقطة التي تم اعتراضها‪ ،‬اضغط هذا الزر مجددا‪.‬‬
‫زر دورة الغسيل‪ :‬يبرمج دورات الغسيل‪ .‬خالل دورة الغسيل‪ ،‬ال يتحرك المفتاح‪.‬‬
‫أزرار مع مصابيح مؤشرة للوظيفة‪ :‬يتم استخدامه الختيار الوظائف المتوفرة‪.‬‬
‫المصباح المؤشر المالئم للوظيفة المختارة سيبقى مضاء‪.‬‬
‫مفتاح درجة الحرارة‪ :‬لضبط درجة الحرارة أو دورة الغسيل البارد (أنظر‬
‫"التخصيصات")‪.‬‬
‫مفتاح التجفيف ‪ :‬يتم استخدامه لضبط برنامج التجفيف المرغوب به ( أنظر‬
‫“التخصيصات”)‪.‬‬
‫مصابيح مؤشرة برنامج دورة الغسيل‪/‬عداد الوقت المؤجل‪ :‬يتم استخدامها لرصد‬
‫برنامج دورة الغسيل‪.‬‬
‫يظهر المصباح المؤشر للمرحلة الجارية‪.‬‬
‫إذا تم ضبط وظيفة عداد الوقت المؤجل‪ ،‬فسيتم اإلشارة إلى الوقت المتبقي حتى‬
‫بدء دورة الغسيل (أنظر الصفحة التالية)‪.‬‬
‫‬
‫المؤشرات‬
‫توفر المؤشرات معلومات هامة‪.‬‬
‫هذا ما يمكنها أن تخبرك به‪:‬‬
‫المصابيح المؤشرة لمرحلة دورة الغسيل‬
‫فور اختيار دورة الغسيل المرغوب بها وبدءها‪ ،‬تضيئ المصابيح المؤشرة‪ ،‬الواحد تلو‬
‫الآخر للإشارة إلى الدورة التي تعمل حاليا‪.‬‬
‫غسيل‬
‫تشغيل مؤجل الوقت‬
‫إذا تم تشغيل وظيفة عداد الوقت المؤجل (انظر "التخصيصات")‪ ،‬بعد أن بدأت‬
‫دورة الغسيل‪ ،‬فسيبدأ المصباح المؤشر المالئم لفترة الوقت المؤجل المختارة‬
‫بالوميض‪:‬‬
‫شطف‬
‫عصر‪/‬تصريف‬
‫التجفيف‬
‫نهاية دورة الغسيل‬
‫مالحظة‪ :‬عند انتهاء دورة التجفيف‪ ،‬يجب إعادة مفتاح التجفيف إلى الوضع "‪. "0‬‬
‫مع مرور الوقت‪ ،‬سيتم عرض الوقت المؤجل المتبقي‪ ،‬والمصباح المؤشر المالئم‬
‫سيومض‪:‬‬
‫سيبدأ البرنامج الذي تم إعداده بعد انتهاء وقت المهلة‪.‬‬
‫أزرار الوظائف والمصابيح المؤشرة الملائمة‪.‬‬
‫عند اختيار وظيفة‪ ،‬سيضيء المصباح المؤشر المالئم‪.‬‬
‫إذا لم تكن الوظيفة المختارة تتوافق مع دورة الغسيل المبرمجة‪ ،‬سيومض‬
‫المصباح المؤشر المالئم ولن يتم تشغيل الوظيفة‪.‬‬
‫إذا لم تكن الوظيفة المختارة متوافقة مع وظيفة أخرى تم اختيارها سابقا‪ ،‬سيومض‬
‫المصباح المؤشر المالئم للوظيفة أالولى وسيتم تنشيط الوظيفة الثانية فقط؛‬
‫سيضيء المصباح المؤشر المالئم للخيار النشط بشكل ثابت‪.‬‬
‫المصباح المؤشر إلقفال الباب‬
‫إذا كان هذا المصباح المؤشر مشغال‪ ،‬فسيكون باب الجهاز مغلقا لتحاشي فتحه؛‬
‫تأكد من أن المؤشر منطفئ قبل فتح الباب (انتظر حوالي ‪ 3‬دقائق)‪ .‬لفتح الباب‬
‫خالل دورة غسيل قيد التنفيذ‪ ،‬اضغط زر بدء‪/‬إيقاف مؤقت؛ يمكن فتح الباب بينما‬
‫يكون مؤشر إقفال الباب منطفئ فقط‪.‬‬
‫! الوميض السريع لضوء مؤشر إقفال الباب يشير إلى خلل (أنظر "استكشاف‬
‫المشاكل وحلها")‪.‬‬
‫تشغيل دورة الغسيل‬
‫لغسيل‪-‬ماكينة التجفيف بواسطة الضغط على زر بدء‪/‬إيقاف التشغيل‪ .‬ستضيئ كل المصابيح المؤشرة لثوان قليلة‪ ،‬بعدها ستنطفئ والمصباح المؤشر‬
‫‪.1‬‬
‫للبدء‪/‬إيقاف مؤقت سيومض‪.‬‬
‫‪ .2‬قم بإدخال الغسيل وأغلق الباب‪.‬‬
‫‪ .3‬اضبط مفتاح دورة الغسيل للبرنامج المرغوب‪.‬‬
‫‪ .4‬اضبط درجة حرارة الغسيل (أنظر "التخصيصات")‪.‬‬
‫‪ .5‬اضبط دورة التجفيف إذا اقتضى األمر (أنظر "التخصيصات")‪.‬‬
‫‪ .6‬قم بقياس مواد التنظيف ومضافات الغسيل (انظر "مواد التظيف والغسيل")‪.‬‬
‫‪ .7‬اختر الوظائف المرغوب بها‪.‬‬
‫‪ .8‬قم بتشغيل دورة الغسيل بواسطة الضغط على زر بدء‪/‬إيقاف مؤقت وسيبقى المصباح المؤشر مضاء بشكل ثابت‪ ،‬باألخضر‪.‬‬
‫إللغاء ضبط دورة الغسيل‪ ،‬أوقف الماكينة بشكل مؤقت بواسطة الضغط على زر بدء‪/‬إيقاف واختر دورة جديدة‪.‬‬
‫‪ .9‬عند انتهاء دورة الغسيل‬
‫سيضيء المصباح المؤشر‪ .‬يمكن فتح الباب بينما يكون مؤشر إقفال الباب مطفأ‪ .‬أخرج غسيلك واترك باب الجهاز مفتوح جزئيا للتأكد‬
‫من أن البرميل قد جف تماما‪ .‬قم بإطفاء ماكينة الغسيل‪-‬ماكينة التجفيف بواسطة الضغط على زر بدء‪/‬إيقاف التشغيل‪.‬‬
‫‪35‬‬
‫‪AR‬‬
‫دورات الغسيل‬
‫دورات الغسيل‬
‫‪AR‬‬
‫جدول دورات الغسيل‬
‫وصف دورة الغسيل‬
‫سرعة‬
‫درجة‬
‫حرارة ‪ .‬قصوى التجفيف‬
‫قصوى (دورة في‬
‫(‪ )C°‬الدقيقة)‬
‫حمل أقصى (كغم)‬
‫مواد التنظيف‬
‫مدة الدورة‬
‫التجفيف‬
‫ما قبل‬
‫الغسيل‬
‫عادية‬
‫المطرية عادية‬
‫غسيل المادة‬
‫ّ‬
‫يومي‬
‫‪90°‬‬
‫‪800‬‬
‫‪ 2‬القطنيات‪ :‬الغسيل األبيض المتسخ جدا‪.‬‬
‫‪90°‬‬
‫‪800‬‬
‫‪ 2‬القطنيات (‪ :)1‬المالبس البيضاء المتسخة جدا واأللوان الثابتة‪.‬‬
‫‪60°‬‬
‫‪800‬‬
‫‪l‬‬
‫‪l‬‬
‫‪l‬‬
‫‪l‬‬
‫‬‫‪-‬‬
‫‪l‬‬
‫‪l‬‬
‫‪l‬‬
‫‪l‬‬
‫‪l‬‬
‫‪l‬‬
‫‪7‬‬
‫‪ 2‬القطنيات (‪ :)2‬المالبس البيضاء وذات األلوان الناعمة المتسخة جدا‪.‬‬
‫‪40°‬‬
‫‪800‬‬
‫‪l‬‬
‫‪-‬‬
‫‪l‬‬
‫‪l‬‬
‫‪7‬‬
‫‪147‬‬
‫‪ 3‬القطنيات‪ :‬المالبس البيضاء المتسخة جدا واأللوان الثابتة‪.‬‬
‫‪60°‬‬
‫‪800‬‬
‫‪l‬‬
‫‪-‬‬
‫‪l‬‬
‫‪l‬‬
‫‪7‬‬
‫‪130‬‬
‫‪40°‬‬
‫‪800‬‬
‫‪l‬‬
‫‪-‬‬
‫‪l‬‬
‫‪l‬‬
‫‪7‬‬
‫‪92‬‬
‫‪ 5‬األقمشة االصطناعية‪ :‬المالبس ذات األلوان الثابتة المتسخة جدا‪.‬‬
‫‪60°‬‬
‫‪800‬‬
‫‪l‬‬
‫‪-‬‬
‫‪l‬‬
‫‪l‬‬
‫‪3‬‬
‫‪85‬‬
‫‪ 6‬الصوف‪ :‬للصوف‪ ،‬الكاشمير‪ ،‬وما شابه ذلك‪.‬‬
‫‪40°‬‬
‫‪600‬‬
‫‪ 7‬الحرير‪/‬الستائر‪ :‬لألقمشة الحريرية والبيسكوزا‪ ،‬مالبس النساء الداخلية‪.‬‬
‫‬‫‬‫‪l‬‬
‫‪-‬‬
‫‬‫‬‫‬‫‪-‬‬
‫‪l‬‬
‫‪l‬‬
‫‪l‬‬
‫‪l‬‬
‫‪l‬‬
‫‪l‬‬
‫‪l‬‬
‫‪l‬‬
‫‪1,5‬‬
‫‪-‬‬
‫‪l‬‬
‫‪l‬‬
‫الحد‬
‫األقصى‬
‫زوجان‬
‫‪-‬‬
‫‪-‬‬
‫‪5‬‬
‫‪-‬‬
‫‪-‬‬
‫‪3‬‬
‫‪-‬‬
‫‪0,5‬‬
‫‪7‬‬
‫‪ 1‬قطنيات مع مرحلة ما قبل الغسيل‪ :‬الغسيل األبيض المتسخ جدا‪.‬‬
‫‪4‬‬
‫القطنيات الملونة ‪ :‬المالبس البيضاء وذات األلوان الناعمة المتسخة قليال‪.‬‬
‫خاص‬
‫‪30°‬‬
‫‪0‬‬
‫‪ 8‬بنطاالت جينز‬
‫‪40°‬‬
‫‪800‬‬
‫‪ 9‬رياضي خفيف‬
‫‪30°‬‬
‫‪600‬‬
‫‪ 10‬أحذية رياضية‬
‫‪30°‬‬
‫‪600‬‬
‫‪-‬‬
‫‪ 11‬تجفيف القطنيات‬
‫‪-‬‬
‫‪-‬‬
‫‪l‬‬
‫‪-‬‬
‫‪ 12‬تجفيف األقمشة االصطناعية‬
‫‪-‬‬
‫‪-‬‬
‫‪l‬‬
‫‪-‬‬
‫‪-‬‬
‫‪30°‬‬
‫‪800‬‬
‫‪l‬‬
‫‪-‬‬
‫‪l‬‬
‫‪l‬‬
‫شطف‬
‫‪-‬‬
‫‪800‬‬
‫عصر‬
‫‪-‬‬
‫‪800‬‬
‫التصريف‬
‫‪-‬‬
‫‪0‬‬
‫‪l‬‬
‫‪l‬‬
‫‪-‬‬
‫‬‫‬‫‪-‬‬
‫‬‫‬‫‪-‬‬
‫‪l‬‬
‫‬‫‪-‬‬
‫‪7‬‬
‫‪171‬‬
‫‪7‬‬
‫‪155‬‬
‫‪153‬‬
‫‪1‬‬
‫‪3‬‬
‫‪-‬‬
‫‪-‬‬
‫‪-‬‬
‫‪3‬‬
‫‪55‬‬
‫‪55‬‬
‫‪80‬‬
‫‪-‬‬
‫‪-‬‬
‫‪-‬‬
‫‪68‬‬
‫‪-‬‬
‫‪50‬‬
‫‪-‬‬
‫التجفيف‬
‫‪ 13‬غسيل وتجفيف إكسبرس‬
‫‪-‬‬
‫‪35‬‬
‫‪-‬‬
‫دورات الغسيل الجزئية‬
‫‪7‬‬
‫‪7‬‬
‫‪-‬‬
‫‪-‬‬
‫‪-‬‬
‫‪36‬‬
‫‪16‬‬
‫‪2‬‬
‫‪-‬‬
‫‪-‬‬
‫‪-‬‬
‫المعلومات التي يحويها الجدول للداللة فقط‪.‬‬
‫لكافة معاهد االختبارات‪:‬‬
‫‪ )1‬قم بفحص دورة الغسيل بالاذعان للتنظيم ‪ :EN 50229‬اضبط دورة الغسيل ‪ 2‬مع درجة حرارة ‪.60°‬‬
‫‪ )2‬دورة غسيل طويلة للقطنيات‪ :‬اضبط دورة الغسيل ‪ 2‬مع درجة حرارة ‪.40°‬‬
‫دورات الغسيل الخاصة‬
‫رياضة خفيفة (دورة الغسيل ‪ )9‬لغسيل أنسجة المالبس الرياضية المتسخة قليال (مالبس التدريب‪ ،‬الشورتات وما شابه)؛ للحصول على أفضل النتائج‪ ،‬نحن ننصح‬
‫بعدم تعدي الحد األقصى من الحمل المشار إليه في "جدول دورات الغسيل"‪ .‬نحن ننصح باستخدام مواد التنظيف السائلة المالئمة والتي يتم قياسها وفقا لكمية الحمل‪.‬‬
‫األحذية الرياضية (دورة الغسيل ‪ )10‬لغسيل األحذية الرياضية؛ للحصول على أفضل النتائج‪ ،‬ال تغسل أكثر من زوجين من األحذية في نفس الوقت‪.‬‬
‫غسيل وتجفيف إكسبرس (دورة الغسيل ‪ )13‬تم تصميم دورة الغسيل هذه لغسل وتجفيف المالبس المتسخة قليال بسرعة‪ :‬يمكن استخدام هذه الدورة لغسيل وتجفيف‬
‫الغسيل بحمل يصل حتى ‪ 0.5‬كغم بـ ‪ 35‬دقيقة فقط‪.‬‬
‫للوصول إلى النتائج األمثل‪ ،‬استخدم مواد التنظيف السائلة وما قبل التعامل مع الثنيات‪ ،‬القبات والبقع‪.‬‬
‫‪36‬‬
‫التخصيصات‬
‫ضبط درجة الحرارة‬
‫‪AR‬‬
‫أدر مفتاح درجة الحرارة لضبط درجة حرارة الغسيل (انظر جدول دورات الغسيل)‪.‬‬
‫يمكن خفض درجة الحرارة أو حتى إعدادها للغسيل البارد ‪ .‬ستمنعك ماكينة الغسيل ‪ -‬ماكينة التجفيف أوتوماتيكيا من اختيار درجة حرارة أعلى من القيمة القصوى‬
‫المحددة لكل دورة غسيل‪.‬‬
‫جدول أوقات التجفيف‬
‫إعداد دورة التجفيف‬
‫أدر مفتاح التجفيف إلعداد نوع التجفيف المرغوب به‪ .‬هناك خياران‪:‬‬
‫‪ - A‬يعتمد على الوقت‪ :‬من ‪ 40‬وحتى ‪ 180‬دقيقة‪.‬‬
‫موجهة)‬
‫(قيم ّ‬
‫نوع القماش‬
‫نوع الحمل‬
‫القطنيات‬
‫‪ -A‬يعتمد على مستوى جفاف الغسيل المرغوب به‪:‬‬
‫التجفيف للكي ‪ :‬مالئم للمالبس التي تحتاج إلى الكي الحقا‪ .‬الرطوبة المتبقية‬
‫األقمشة‬
‫تطري التجاعيد‪ ،‬وتجعل إزاتها أسهل‪.‬‬
‫ّ‬
‫االصطناعية‬
‫‪ :‬إنه أمثل للمالبس التي ال تحتاج إلى تجفيف كامل‪.‬‬
‫التجفيف للتعليق‬
‫التجفيف المعد للخزانة ‪ :‬مالئم للغسيل الذي يمكن إعادة وضعه في الخزانة من دون كيه‪.‬‬
‫حمل‬
‫أقصى‬
‫(كغم)‬
‫التجفيف المعد‬
‫للخزانة‬
‫تجفيف‬
‫للتعليق‬
‫التجفيف‬
‫للكي‬
‫مالبس بأحجام مختلفة‪،‬‬
‫أقمشة المنشفة‬
‫‪5‬‬
‫‪250‬‬
‫‪210‬‬
‫‪190‬‬
‫بلوزات‪ ،‬قمصان‪،‬‬
‫بيجامات‪ ،‬جوارب وما شابه‬
‫‪3‬‬
‫‪180‬‬
‫‪130‬‬
‫‪115‬‬
‫إذا تعدى حمل الملابس لديك للغسيل والتجفيف الحد الأقصى من الحمل المحد (أنظر الجدول المجاور)‪ ،‬قم بإنجاز دورة الغسيل‪ ،‬وعند انتهاء الدورة‪ ،‬قم بتصنيف الأقمشة وضع جزءا‬
‫منها في البرميل مرة أخرى‪ .‬في هذه النقطة‪ ،‬اتبع التعليمات المعدة لدورة "التجفيف فقط"‪ .‬كرر هذه العملية لما تبقى من الحمل‪.‬‬
‫التجفيف فقط‬
‫استخدم مفتاح اختيار الدورة لاختيار دورة التجفيف (‪ )11-12‬بما يتالئم مع نوع األقمشة‪ .‬يمكن إعداد مستوى التجفيف والوقت أيضا باستخدام زر التجفيف‪.‬‬
‫الوظائف‬
‫وظائف الغسيل المتنوعة المتوفرة في ماكينة الغسيل‪-‬ماكينة التجفيف هذه ستساعدك في الحصول على النتائج المرادة‪ ،‬في كل مرة‪.‬‬
‫لتشغيل الوظائف‪:‬‬
‫‪ .1‬اضغط الزر المالئم للوظيفة المرغوبة؛‬
‫‪ .2‬سيبدأ عمل الوظيفة عندما يضيء المصباح المؤشر المالئم‪.‬‬
‫مالحظة‪ :‬إذا ومض المصباح المؤشر بسرعة‪ ،‬فهذا يشير إلى أن هذه الوظيفة المعينة ال يمكن اختيارها بالتزامن مع دورة الغسيل المختارة‪.‬‬
‫اختيار هذا الخيار يمكنك من ضبط ثبات دوران البرميل‪ ،‬درجة الحرارة والماء لتقليل حمل القطنيات المتسخة قليلا والأقمشة الاصطناعية (راجع جدول "دورات الغسيل")‪ .‬‬
‫"‬
‫" يمكنك من الغسل بوقت أقل وبذلك توفير الماء والكهرباء‪ .‬نحن نقترح استخدام مواد التنظيف السائلة المالئمة والتي يتم قياسها وفقا لكمية الحمل‪.‬‬
‫! يجب عدم استخدام هذه الوظيفة بالتزامن مع دورات الغسيل ‪. , , ,13 ,12 ,11 ,10 ,9 ,8 ,7 ,6 ,2 ,1‬‬
‫‪800-400‬‬
‫اضغط هذا الزر لتقليل سرعة العصر‪.‬‬
‫! يجب عدم استخدام هذه الوظيفة بالتزامن مع دورات الغسيل ‪,13 ,12 ,11 ,7‬‬
‫‪.‬‬
‫الكي السهل‬
‫ظيفة‪ ،‬يتم تعديل دورة الغسيل والعصر بهدف خفض تكون التجعدات‪ .‬عند انتهاء الدورة ستقوم ماكينة الغسيل‪/‬التجفيف بدورات بطيئة للبرميل؛‬
‫ستومض المصابيح المؤشرة للكي السهل والبدء‪/‬اإليقاف المؤقت (األول باللون األخضر والثاني باللون البرتقالي) وسيضي المؤشر "‪ . "END‬إلنهاء الدورة‪ ،‬اضغط زر بدء‪/‬‬
‫إيقاف مؤقت أو زر الكي السهل‪ .‬لدورة الغسيل رقم ‪ 7‬ستنهي الماكينة الدورة بينما يتم نقع الغسيل؛ سيومض مؤشر "الكي السهل" ومؤشر بدء‪/‬إيقاف مؤقت ‪ .‬لتصريف الماء‬
‫حتى يتم إخراج الغسيل‪ ،‬اضغط زر بدء‪/‬إيقاف مؤقت أو زر الكي السهل‪.‬‬
‫! يجب عدم استخدام هذه الوظيفة بالتزامن مع دورات الغسيل ‪ . , ,13 ,12 ,11 ,10 ,9 ,6‬ملاحظة‪ :‬إذا كنت ترغب أيضا بتشغيل دور التجفيف‪ ،‬فهذا الخيار متاح‬
‫(التجفيف للكي)‪.‬‬
‫فقط إذا كان متوافقا مع المستوى‬
‫عداد الوقت المؤجل‬
‫يؤجل العداد بداية دورة الغسيل حتى ‪ 9‬ساعات‪ .‬اضغط الزر بشكل متكرر حتى يضيئ المصباح المؤشر المالئم للوقت المؤجل المرغوب‪ .‬في المرة الرابعة التي‬
‫يُضغط فيها على الزر‪ ،‬سيتم إيقاف إشغال الوظيفة‪.‬‬
‫مالحظة‪ :‬بعد الضغط على زر بدء‪/‬إيقاف مؤقت‪ ،‬يمكن تعديل الوقت المؤجل فقط بواسطة تقليله حتى يتم تشغيل البرنامج الذي تم إعداده‪.‬‬
‫! هذه اإلمكانية يمكن تشغيلها مع كل البرامج‪.‬‬
‫‪37‬‬
‫مواد التنظيف والغسيل‬
‫‪AR‬‬
‫درج وعاء مواد التنظيف‬
‫تحضير الغسيل‬
‫تعتمد نتائج الغسيل الجيدة أيضا على كمية مواد التنظيف‪ :‬إن إضافة مواد تنظيف‬
‫أكثر مما يجب ال يزيد فاعلية الغسيل بالضرورة‪ ،‬يمكن أن يؤدي إلى انسداد في‬
‫األجزاء الداخلية من الجهاز لديك وحتى يمكن أن يلوث البيئة‪.‬‬
‫قسم الغسيل حسب ما يلي‪:‬‬
‫ّ‬
‫ ‪ -‬نوع القماش‪ /‬الرمز على الالصقة‬
‫ ‪ -‬األلوان‪ :‬افصل بين المالبس الملونة والبيضاء‪.‬‬
‫• قم بإفراغ جيوب كافة المالبس وافحص األزرار‪.‬‬
‫• ال تتعدى القيم المدرجة في القائمة‪ ،‬التي تعود لوزن الغسيل عندما يكون جافا‪:‬‬
‫ األقمشة الثابتة‪ :‬حد أقصى ‪ 7‬كغم‬
‫ األقمشة االصطناعية‪ :‬حد أقصى ‪ 3‬كغم‬
‫ األقمشة الناعمة‪ :‬حد أقصى ‪ 2‬كغم‬
‫ الصوف‪ :‬حد أقصى ‪ 1,5‬كغم‬
‫حرير‪ :‬حد أقصى ‪ 1‬كغم‬
‫! ال تستخدم المواد المعدة للغسيل باليد ألنها يمكن أن تطلق رغوة فائضة‪.‬‬
‫افتح درج وعاء مواد التنظيف واسكب‬
‫مواد التنظيف أو مضافات الغسيل‪،‬‬
‫كما يلي‪.‬‬
‫‪3‬‬
‫‪2‬‬
‫‪1‬‬
‫الحجرة ‪ :1‬مواد التنظيف المعدة لما قبل الغسيل (مسحوق)‬
‫قبل سكب مادة التنظيف‪ ،‬تأكد من أنه تم إزالة الحجرة اإلضافية ‪.4‬‬
‫الحجرة ‪ :2‬مواد التنظيف المعدة لدورة الغسيل (مسحوق أو سائل)‬
‫يجب سكب المواد السائلة فقط قبل بدء دورة الغسيل مباشرة‪.‬‬
‫الحجرة ‪ :3‬الملحقات (المواد المطرّية للغسيل وما شابه)‪.‬‬
‫يجب على المطري أال يزيد عن ارتفاع الشبكة‪.‬‬
‫كم يزن الغسيل لديك؟‬
‫‬
‫‬
‫‬
‫‬
‫‬
‫شرشف واحد ‪ 400-500‬غم‬
‫غطاء وسادة واحد ‪ 150-200‬غم‬
‫مفرش طاولة واحد ‪ 400-500‬غم‬
‫برنس حمام واحد ‪900-1200‬غم‬
‫منشفة واحدة ‪ 150-250‬غم‬
‫مالبس تتطلب عناية خاصة‬
‫الصوف‪ :‬يمكن غسل جميع األقمشة الصوفية باستخدام البرنامج ‪ ،6‬وحتى تلك‬
‫التي تحمل الصقة "الغسيل باليد فقط"‬
‫‪ .‬للحصول على أفضل النتائج‪ ،‬استخدم‬
‫مواد التنظيف الخاصة وال تتعدى ‪ 1.5‬كغم من الغسيل‪.‬‬
‫الحرير‪ :‬استخدم دورة الغسيل الخاصة ‪ 7‬لغسل كافة ملبوسات الحرير‪ .‬نوصي‬
‫باستخدام مادة التنظيف الخاصة المصممة لغسل المالبس الناعمة‪.‬‬
‫الستائر‪ :‬قم بطي الستائر وضعها داخل غطاء وسادة أو كيس شبكي‪ .‬استخدم‬
‫دورة الغسيل ‪.7‬‬
‫الجينز‪ :‬قم بقلب األقمشة قبل غسيلها واستخدم مواد تنظيف سائلة‪ .‬استخدم‬
‫البرنامج ‪.8‬‬
‫نظام موازنة الحمل‬
‫موحد‪ ،‬يدور‬
‫لتحاشي االرتجاج الزائد قبل كل دورة عصر ولتوزيع الحمل بشكل ّ‬
‫البرميل باستمرار بسرعة تزيد بعض الشيء عن سرعة دوران عملية الغسيل‪ .‬في‬
‫حال لم يتوازن الحمل بالشكل الصحيح بعد عدة محاوالت‪ ،‬تقوم الماكينة بالعصر‬
‫بسرعة عصر مخفضة‪ .‬إذا لم يكن الحمل موازنا بشكل كبير‪ ،‬تنجز الماكينة‬
‫عملية التوزيع بدل العصر‪ .‬لتشجيع توزيع محسن للحمل وموازنته‪ ،‬نوصي بدمج‬
‫المالبس الكبيرة والصغيرة في الحمل‪.‬‬
‫‬
‫وسائل حذر ونصائح‬
‫! تم تصميم ماكينة الغسيل وتصنيعه طبقا لمواصفات األمان العالمية‪ .‬يتم تزويد‬
‫التحذيرات التالية ألسباب وقائية ويجب قراءتها بعناية‪.‬‬
‫‪AR‬‬
‫الوقاية العامة‬
‫• تم تصميم هذا الجهاز لالستخدام المنزلي فقط‪.‬‬
‫• يجب استخدام ماكينة الغسيل من قبل البالغين فقط‪ ،‬بموجب التعليمات المزودة في هذا‬
‫الدليل‪.‬‬
‫• ال تالمس الماكينة وأنت حافي القدمين أو بيدين ورجلين مبللتين أو رطبتين‪.‬‬
‫• ال تقم بسحب كبل تزويد الطاقة عند فصل الجهاز عن مقبس شبكة الطاقة‬
‫الكهربائية‪ .‬امسك القابس واسحبه‪.‬‬
‫• ال تفتح درج وعاء مواد التنظيف بينما تكون الماكينة قيد التشغيل‪.‬‬
‫• ال تالمس ماء الصرف‪ ،‬حيث يمكن أن يكون بدرجة حرارة عالية جدا‪.‬‬
‫• ال تدفع باب الفتحة بشدة‪ :‬يمكن لذلك أن يتلف ميكانيكية قفل األمان المصمم‬
‫لمنع فتحه عن غير قصد‪.‬‬
‫• إذا تعطل الجهاز‪ ،‬ال تحاول بأي حال من األحوال‪ ،‬الوصول إلى األجهزة‬
‫الداخلية في محاولة لتصليحها بنفسك‪.‬‬
‫• أبق األطفال بعيدين عن الجهاز دائما أثناء عمله‪.‬‬
‫• يمكن للباب أن يصبح ساخنا بعض الشيء خلال دورة الغسيل‪.‬‬
‫• إذا كانت هناك حاجة لنقل الجهاز‪ ،‬نفذ العمل بمجموعة من شخصين أو ثالثة‬
‫أشخاص وتعاملوا معه بمنتهى الحذر‪ .‬ال تحاول أبدا القيام بذلك لوحدك‪ ،‬ألن‬
‫الجهاز ثقيل جدا‪.‬‬
‫• قبل إدخال الغسيل إلى ماكينة الغسيل‪ ،‬تأكد من أن البرميل فارغ‪.‬‬
‫• خالل مرحلة التجفيف يصبح الباب ساخنا جدا‪.‬‬
‫• ال تستخدم الجهاز لتجفيف المالبس التي تم غسلها بمنظفات قابلة لالشتعال‬
‫(مثال‪ ،‬األثيلين ثالثي الكلور)‪.‬‬
‫• ال تستخدم الجهاز لتجفيف المطاط االسفنجي أو أنواع المطاط الصناعي‬
‫المشابه‪.‬‬
‫• تأكد من أن حنفية الماء مفتوحة خالل دورات التجفيف‪.‬‬
‫التخلص‬
‫• التخلص من مواد التعبئة‪ :‬تقيّد بالقوانين المحلية حيث يمكن لمواد التعبئة أن‬
‫يعاد تصنيعها‪.‬‬
‫• التوجيهات الأوروبية ‪ 2002/96/EC‬فيما يتعلق بالأجهزة الكهربائية التالفة‬
‫واألجهزة اإللكترونية التالفة تتطلب عدم التخلص من األجهزة الكهربائية‬
‫المنزلية القديمة عن طريق خدمات القمامة البلدية العادية‪ .‬يجب جمع األجهزة‬
‫القديمة على انفراد بهدف جعل استرداد وإعادة تدوير المواد التي تحتوي عليها‬
‫بشكل أمثل وتقليل التأثير على صحة الناس وعلى البيئة رمز "سلة القمامة‬
‫الدائرية" المشطوبة على المنتج يذكرك بالتزامك أنه عند التخلص من الجهاز‬
‫يجب جمعه على حدة‪.‬‬
‫يتوجب على المستهلكين الاتصال بسلطتهم المحلية أو بتاجر التجزءة فيما يتعلق‬
‫بالمعلومات المتعلقة بالطريقة الصحيحة للتخلص من جهازهم القديم‪.‬‬
‫‬
‫العناية والصيانة‬
‫‪AR‬‬
‫قطع إمداد الماء والكهرباء‬
‫ّ‬
‫المضخة‬
‫تنظيف‬
‫• قم بإقفال حنفية الماء بعد كل دورة غسيل‪ .‬سيحد هذا من تآكل النظام‬
‫الهيدروليكي داخل ماكينة الغسيل ويساعد على منع التسربات‪.‬‬
‫ماكينة الغسيل مزودة بمضخة للتنظيف الذاتي‪ ،‬حيث ال تحتاج إلى أية عناية‬
‫في أي وقت‪ .‬في بعض األحيان‪ ،‬يمكن للقطع الصغيرة (مثل القطع النقدية أو‬
‫األزرار) أن تسقط داخل الحجرة األولية التي تحمي المضخة‪ ،‬والموجودة في‬
‫جزئها األسفل‪.‬‬
‫• افصل الماكينة عن الكهرباء عند تنظيفها أو أثناء أي عمل صيانة‪.‬‬
‫! تأكد من انتهاء دورة الغسيل وافصل الجهاز عن الكهرباء‪.‬‬
‫تنظيف ماكينة الغسيل‬
‫يمكن تنظيف األجزاء الخارجية والقطع المطاطية في الماكينة باستخدام خرقة‬
‫نظيفة مبللة بالماء الفاتر والصابون‪ .‬ال تستخدم المواد المذيبة أو الكاشطة‪.‬‬
‫للوصول إلى الحجرة األولية‪:‬‬
‫‪ .1‬باستخدام مفك براغي‪ ،‬أزل غطاء‬
‫اللوحة من الجهة األمامية السفلى في‬
‫ماكينة الغسيل (انظر الرسم)؛‬
‫تنظيف درج وعاء مواد التنظيف‬
‫أزل الوعاء بواسطة رفعه وسحبه‬
‫إلى الخارج (أنظر الرسم)‪.‬‬
‫قم بغسله تحت الماء المتدفق؛ يجب‬
‫تكرار هذه العملية‪.‬‬
‫‪ .2‬فك الغطاء بواسطة إدارته بعكس‬
‫عقارب الساعة (أنظر الرسم)‪ :‬يمكن‬
‫للقليل من الماء أن يخرج إلى الخارج‪.‬‬
‫هذا أمر طبيعي؛‬
‫العناية بباب وبرميل الجهاز لديك‬
‫• أترك باب الفتحة مفتوحا دائما لتحاشي تكوّن الروائح الكريهة‪.‬‬
‫‪ .3‬نظف الجزء الداخلي تماما؛‬
‫‪ .4‬أعد تركيب الغطاء في مكانه؛‬
‫‪ .5‬أعد تركيب اللوحة‪ ،‬وتأكد من أن العقفات مثبتة بأمان في مكانها قبل أن تدفعها‬
‫باتجاه الجهاز‪.‬‬
‫فحص خرطوم إدخال الماء‬
‫افحص فوهة الخرطوم مرة في السنة على األقل‪ .‬إذا كانت هناك أية شقوق‪ ،‬يجب‬
‫تبديلها فورا‪ .‬خالل دورات الغسيل‪ ،‬يكون ضغط الماء قويا جدا ويمكن للفوهة‬
‫المتشققة أن تتشقق لتنفتح بسهولة‪.‬‬
‫! ال تستخدم الخراطيم المستعملة أبدا‪.‬‬
‫‪1‬‬
‫استكشاف المشاكل وحلها‬
‫شل في العمل فجأة‪ .‬قبل االتصال بمركز المساعدة التقنية (أنظر "الخدمة") تأكد من أن المشكلة ال يمكن حلها بسهولة باستخدام الجدول التالي‬
‫‪.‬‬
‫المحتملة‪/‬‬
‫األسباب‬
‫الحلول‪" :‬الخدمة") تأكد من أن المشكلة ال يمكن حلها بسهولة باستخدام الجدول التالي‬
‫التقنية (أنظر‬
‫بمركز المساعدة‬
‫شل في العمل فجأة‪ .‬قبل االتصال‬
‫المشكلة‪:‬‬
‫‪.‬‬
‫ال يمكن تشغيل ماكينة الغسيل‪.‬‬
‫دورة الغسيل ال تبدأ بالعمل‪.‬‬
‫ماكينة الغسيل ال تمتلئ بالماء (الضوء المؤشر‬
‫لمرحلة الغسيل األولى يومض بسرعة)‪.‬‬
‫• الجهاز غير موصل بالمقبس الكهربائي بشكل كامل‪ ،‬أو أنه لا يحدث تماس‪.‬‬
‫• يوجد انقطاع كهرباء في البيت‪.‬‬
‫•‬
‫•‬
‫•‬
‫•‬
‫•‬
‫‬
‫•‬
‫•‬
‫•‬
‫•‬
‫•‬
‫•‬
‫باب ماكينة الغسيل غير مقفل بشكل صحيح‪.‬‬
‫لم يتم الضغط على زر تشغيل‪/‬إيقاف تشغيل‪.‬‬
‫لم يتم الضغط على زر بدء التشغيل‪/‬إيقاف مؤقت‪.‬‬
‫لم يتم فتح حنفية الماء‪.‬‬
‫تم ضبط بداية مؤجلة (انظر "التخصيصات")‪.‬‬
‫خرطوم دخول الماء غير متصل بالحنفية‪.‬‬
‫الخرطوم ملتوي‪.‬‬
‫لم يتم فتح حنفية الماء‪.‬‬
‫يوجد انقطاع في تزويد الماء في البيت‪.‬‬
‫الضغط منخفض أكثر مما يجب‪.‬‬
‫لم يتم الضغط على زر بدء التشغيل‪/‬إيقاف مؤقت‪.‬‬
‫ماكينة الغسيل تمتلئ بالماء وتفرغ منه بشكل متكرر‪.‬‬
‫• خرطوم التصريف غير مركب على ارتفاع يتراوح بين ‪ 65‬وحتى ‪ 100‬سم عن األرض( "انظر‬
‫التعليمات")‪.‬‬
‫• الطرف الحر من الخرطوم تحت الماء (أنظر "التركيب")‪.‬‬
‫• نظام التصريف الجداري غير مزود بأنبوب تنفس‪.‬‬
‫إذا بقيت المشكلة حتى بعد هذه الفحوص‪ ،‬أقفل حنفية الماء‪ ،‬أوقف تشغيل الجهاز واتصل بمركز المساعدة‬
‫التقنية‪ .‬إذا كان المسكن في أحد الطوابق العلوية من المبنى‪ ،‬فمن الممكن أن تكون هناك مشاكل متعلقة‬
‫بتصريب الماء‪ ،‬تسبب لماكنة الغسيل االمتالء بالماء وإفراغه بشكل متكرر‪ .‬هناك صمامات خاصة متوفرة‬
‫في الحوانيت لمنع التصريف‪ ،‬وهي تساعد على تحاشي هذه المشكلة‪.‬‬
‫ماكينة الغسيل ال تصرف الماء أو ال تعصر‪.‬‬
‫• دورة الغسيل ال تشمل التصريف‪ :‬بعض دورات الغسيل تتطلب تشغيل مرحلة التصريف يدويا‪.‬‬
‫• خرطوم التصريف ملتوي (أنظر "التركيب")‪.‬‬
‫• أنبوب التصريف مسدود‪.‬‬
‫ماكينة الغسيل تهتز كثيرا خالل دورة العصر‪.‬‬
‫• لم يتم إزالة قفل البرميل بشكل صحيح خالل عملية التركيب (أنظر "التركيب")‪.‬‬
‫• الماكينة غير مستوية (أنظر "التركيب")‪.‬‬
‫• الماكينة عالقة بين خزانات وجدران (أنظر "التركيب")‪.‬‬
‫يوجد تسرب في ماكينة الغسيل‪.‬‬
‫• مدخل خرطوم الماء غير مثبت بشكل صحيح (أنظر "التركيب")‪.‬‬
‫• حجرة مواد التنظيف مسدودة (لتعليمات التنظيف‪ ،‬أنظر "العناية والصيانة")‪.‬‬
‫• خرطوم التصريف غير مثبت في مكانه بشكل صحيح (أنظر "التركيب")‪.‬‬
‫تومض مؤشرات "مراحل البرنامج" وإقفال الباب بشكل‬
‫سريع‪.‬‬
‫• قم بإيقاف تشغيل الماكينة وافصلها عن الكهرباء‪ ،‬انتظر حوالي دقيقة واحدة ثم أعد تشغيلها مرة أخرى‪.‬‬
‫ إذا بقيت المشكلة‪ ،‬اتصل بخدمة المساعدة التقنية‪.‬‬
‫يوجد الكثير من الرغوة‪.‬‬
‫• مواد التنظيف غير مالئمة لماكينة الغسيل (يجب أن تطابق الوصف “لماكينات الغسيل” أو “للغسيل اليدوي‬
‫وماكينات الغسيل”‪ ،‬أو التعليمات المشابهة)‪.‬‬
‫• تم استخدام كمية مواد تنظيف أكثر مما يجب‪.‬‬
‫ماكينة الغسيل‪-‬التجفيف ال ‬
‫• الجهاز غير موصل بالمقبس الكهربائي بشكل كامل‪ ،‬أو أنه غير موصل بشكل كاف ليحدث تماس‪.‬‬
‫• حدث انقطاع في الطاقة‪.‬‬
‫• باب ماكينة الغسيل غير مقفل بشكل صحيح‪.‬‬
‫• تم إعداد بدء مؤجل‪.‬‬
‫• ‬
‫مفتاح التجفيف موجود في اإلعداد ‪.O‬‬
‫ ‬
‫‪11‬‬
‫‪AR‬‬
‫الخدمة‬
‫قبل استدعاء المساعدة‪:‬‬
‫• افحص فيما إذا كان بإمكانك حل المشكلة بنفسك (أنظر "استكشاف المشاكل وحلها")؛‬
‫• أعد تشغيل البرنامج للفحص فيما إذا تم حل المشكلة؛‬
‫• إذا لم يكن األمر كذلك‪ ،‬اتصل بمركز مساعدة تقني معتمد بواسطة رقم الهاتف‬
‫‪AR‬‬
‫! اطلب دائما مساعدة فنّي مؤهل‪.‬‬
‫الرجاء خذ بعين االعتبار المعلومات التالية‪:‬‬
‫• نوع المشكلة؛‬
‫• طراز الجهاز (‪).Mod‬؛‬
‫• الرقم التسلسلي (‪.)S/N‬‬
‫ه المعلومات في لوحة البيانات في الجهة الخلفية من ماكينة الغسيل‪ ،‬ويمكن إيجادها أيضا في الجهة األمامية من الجهاز بواسطة فتح الباب‪.‬‬
‫‪1‬‬
)4
"!
195081334.02
02/2014 - Xerox Fabriano
)4
""