1
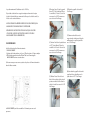
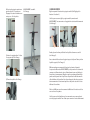
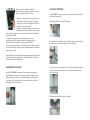
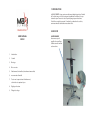
The MAXI CLIMBER®is a fully integrated exerciser inspired by the activity of rock cl demanding but rewarding sport that challenges the complete body to work all t muscle groups. It’s efficient, it’s fast and it’s fun. It combines the calorie burning wor 1. INTRODUCTION targeted muscle toning movements. Le MAXI CLIMBER® est un exerciseur entièrement intégré inspiré par l’activité GET EADY TO B E sport A BETTER, FIRMER AND EALTHIER deRl’escalade, un à la fois exigeant et H gratifiant, unYOU! défi pour le corps tout entier pour l’exercice de tous les principaux groupes musculaires. Il est efficace, rapide et amusant. Il combine la combustion des calories, aux mouvement de tonification musculaire ciblés. 2. Safety USER User MANUAL Manual INDEX INDEX 2. SÉCURITÉ WARNING AVERTISSEMENT Assurez-vous que la Make sure the locking goupille de verrouillage pin is secured est fixée avant debefore monter getting on the machine sur la machine 1. Introduction 1.Introduction 2. Safety 2.Sécurité 3. Assembly 4. Getting Started 3.Montage 5. Interval Workout (Strength Training) 4. Mise en route 6. Alternate Movements 5. Entraînement à intervalles (entraînement musculaire) 7. All in one workout timer, calorie step counter 6. mouvements alternatifs 7. Tout en un : temporisateur d’entraînement, calorimètre et compteur de pas 8. Réglage en hauteur 9. Pliage et stockage 8. Height Adjustment 9. Folding and Storage AVERTISSEMENT •DES BLESSURES GRAVES PEUVENT SE PRODUIRE SI CES PRÉCAUTIONS NE PAS PRISES. •Lisez le mode d’emploi avant d’utiliser la machine. •CONSULTEZ VOTRE MÉDECIN avant de commencer un programme d’exercice. •Gardez la tête, les membres , les doigts et les cheveux à l’abri de toutes les pièces mobiles et inspectez la machine avant chaque utilisation. •Ne l’utilisez pas s’il avère endommagé ou inutilisable. •N’utilisez la machine que pour l’usage prévu. •Soyez prudent en montant et en descendant la machine. CONSIGNES IMPORTANTES SUR LA SÉCURITÉ IMPORTANT : Veuillez lire et suivre attentivement toutes les instructions avant d’utiliser votre MAXI CLIMBER®. • SOYEZ TOUJOURS PRUDENT EN MONTANT ET EN DESCENDANT THE MAXI CLIMBER®. LISEZ LES INSTRUCTIONS POUR LA FACON DE MONTER ET DE DESCENDRE CONVENABLEMENT SUR/DU MAXI CLIMBER®. • TENEZ LES PARTIES DU CORPS, DES MAINS ET DES PIEDS, DE LA POULIE SUR LE DOS DU CAPOT ET DES PÉDALES PLIANTES ET DES RAILS MOBILES, DES BLESSURES GRAVES PEUVENT SURVENIR SI PARTIE DU CORPS, TELS QUE LES MAINS OU LES PIEDS SONT PLACÉS SUR CES PIÈCES EN MOUVEMENT. • GARDEZ LE MAXI CLIMBER ® HORS DE LA PORTÉE DES ENFANTS. Le MAXI CLIMBER® n’est pas un jouet et il n’est pas destiné à être utilisé par ou près des enfants et des animaux. Veuille garder les enfants et les animaux de compagnie éloignés du MAXI CLIMBER® lors de son utilisation, ainsi que lorsque le produit est laissé sans surveillance. • Consultez votre médecin avant de commencer un programme d’exercice ou un régime alimentaire, surtout si vous avez des doutes sur votre niveau physique et de forme physique et votre aptitude générale à l’exercice avec le MAXI CLIMBER®. • Si vous ressentez une douleur ou une gêne inhabituelle pendant l’exercice, arrêtez votre séance d’entraînement et consulter un médecin avant de poursuivre. • Lorsque vous utilisez le MAXI CLIMBER® suivez les instructions contenues dans ce livret. N’utilisez pas le produit pour d’autres exercices ou des mouvements qui ne sont pas contenus dans ce livret. UTILISER UNIQUEMENT LE MAXI CLIMBER® SUR UNE SURFACE PLATE ET STABLE. NE PAS UTILISER LE MAXI CLIMBER® SUR UN PETIT TAPIS POUVANT SE DÉPLACER PENDANT L’EXERCICE. NE VOUS SURMENEZ PAS ! CESSER IMMÉDIATEMENT CET EXERCICE OU TOUTE AUTRE EXERCICE EN CAS DE FAIBLESSE, DE VERTIGE, DE SOUFFLE OU TOUTE AUTRE GENE PHYSIQUE. • NE PAS UTILISER LE MAXI CLIMBER® SANS VOUS APPUYER SUR L’UNE DES POIGNÉES. • Pour éviter les risques de blessures à votre visage , ne vous penchez pas contre le MAXI CLIMBER® au cours de l’exercice tout en tenant les poignées fixes. Voir l’image pour la posture corporelle appropriée. F aites toujours cet exercice avec une posture droite parallèle au MAXI CLIMBER® avec les bras en position demi étendu. • Utilisez uniquement des accessoires et des pièces supplémentaires préconisées par le fabricant. N’utilisez pas d’autres outils ou accessoires non préconisé par le fabricant sous peine d’annuler la garantie. • Toujours choisir le bon niveau qui convient le mieux à votre force physique et à votre souplesse d’entraînement. • Connaissez vos limites et entrainez-vous en les respectant. Faites toujours preuve de bon sens lors de l’exercice. Si vous avez des questions concernant votre programme d’exercice, veuillez consulter votre médecin. • N’UTILISEZ PAS LE MAXI CLIMBER® s’il est endommagé de quelque manière. Inspectez avant chaque utilisation. Le non-respect de cet avertissement peut entraîner des blessures pendant l’exercice. • N’utilisez la machine que pour l’usage prévu, comme décrit ici. • Ne remplaces pas les pièces par des pièces provenant d’autres équipements ou d’autres fabricants. Utilisez uniquement des pièces fournies par le fabricant. • INNOVENTIONS INTERNATIONAL, LLC. DÉCLINE TOUTE RESPONSABILITÉ EN CAS DE BLESSURES CORPORELLES OU DE DOMMAGE DE BIEN ENTRAINÉ OU INDIRECTEMENT CAUSÉS PAR L’UTILISATION DU MAXI CLIMBER®. • Le poids maximum de l’utilisateur est de 110 Kilos. • Ce produit est destiné à un usage domestique seulement et n’est pas destiné à des installations commerciales telles que les clubs de santé, les hôtels ou des centres de fitness. • NE VOUS PENCHEZ EN ARRIÈRE NI REDRESSEZ LES BRAS PARCE QUE LA MACHINE PEUT DEVENIR INSTABLE ET SE RETOURNER. • CONSERVER CES INSTRUCTIONS ET VEILLER A CE QUE LES AUTRES UTILISATEURS LISENT CES INSTRUCTIONS AVANT D’UTILISER LE MAXI CLIMBER® POUR LA PREMIÈRE FOIS. 3. ASSEMBLAGE La boîte doit contenir les éléments suivants : 1. LE MAXI CLIMBER® 2. Système de en 6 jours 3. Plan de régime à 7 étapes simples 3. Adésintoxication ssembly 4. CD d’entraînement à intervalles Rockin’ Out Lors du montage du The box must contain the following: MAXI CLIMBER® suivez ces instructions : 1. The MAXI CLIMBER® 2. The 6-‐Day MAXI CLIMBER® Detox System A) Assurez-vous que vous avez reçu toutes les pièces et éléments énumérés The MAXI C:LIMBER® Meal Plan with 7 Simple Steps dans le tableau3. suivant 4. The Rockin’ Out CD When assembling the MAXI CLIMBER® please follow these instructions: A) Make sure you received all the listed parts and contents in the following chart. (B) Insérez 2 vis n° 8 dans la grande (E) Retirez la goupille de sécurité 6. (E) Remove safety pin #6. See picture. barre “U” 2 (Voir le tableau). Placez l’image. (B) Insert 2 screws #8 in the large "u" bar #2 (See Voir chart). Place washers #9 and nut #5, #8 screw (B) I nsert 2 s crews # 8 i n t he l arge " u" b ar # 2 ( See c hart). Place washers #9 and nut #5, #8 screw lesarondelles on nd tighten w9, ith l’écrous wrench #5, A. la vis 8 et on a nd t ighten w ith w rench # A. serrez avec la clé “A”. Assurez-vous (E) Remove safety pin #6. See picture. Make sure iserré. t’s tightened. See picture. que c’est Voir l’image. Make sure it’s tightened. See picture. (E) Remove safety pin #6. See picture. (B) Insert 2 screws #8 in the large "u" bar #2 (See chart). Place washers #9 and nut #5, #8 screw on and tighten with wrench #A. Make sure it’s tightened. See picture. (F) Pull-‐open the back supporting bar and lower the middle arm (F) Ouvrez See picture. en tirant la barre de support arrière et abaissez le bras du (F) Pull-‐open the back supporting bar and lower the middle arm jusqu’à ce qu’il soit (C) Insert 2 screws #8 in the small "u" bar # 7(See cmilieu hart). Place washers #9 and nut parallèle #5 # 8 s crew See picture. (C)aInsérez 2wvis on nd tighten ith 8wdans rench #laA. petite barre au sol. Voir l’image. (F) Pull-‐open he back supporting bar naut nd #lower he middle arm en “U” 7 (voir tableau). Placez (C) Insert 2 screws #8 in the small les "u" bar #7(See chart). Ptlace washers #9 and 5 #8 stcrew Make sure it’s tightened. See picture. See picture. rondelles 9 etwl’écrou 5 et #laA. vis 8 et on and tighten ith wrench serrez avec la clé “A”. Assurez-vous Make sure serré. it’s tightened. See picture. que c’est Voir l’image. (C) Insert 2 screws #8 in the small "u" bar #7(See chart). Place washers #9 and nut #5 #8 screw on and tighten with wrench #A. Make sure it’s tightened. See picture. (G) Get the safety pin in to secure the middle arm with the sma (D) Remove the loose nut on the fixed screw at t he base of the foot and insert the rounded tip of cable #4 into the fixed screw. Tighten the nut (G) using w rench # A. S ee t he p Get the safety pin in to icture. secure the middle arm with the small de sécurité (G) Introduisez la goupille fixer bras avecthe la rounded tip (D) Remove the loose nut on the fixed screw at the base leof the fdu oot milieu and insert pour (G) Get tbarre he safety p“U” in in 7.to Voir secure the middle arm with the small (D) Retirez l’écrou lâche de la vis petite en l’image. of cable #4 into the fixed screw. Tighten the nut using wrench #A. See the picture. fixée à la base du pied et insérez la arrondie dunut câble 4 fdans la at the base of the foot and insert the rounded tip pointe (D) Remove the loose on the ixed screw of into the fixed screw. ighten the nut using wrench #A. See the picture. viscable fixe.#4 Serrez l’écrou avecTla clé “A”. Voir l’image. Le MAXI CLIMBER® peut être assemblé en 15 minutes par une seule personne. (H) Insérez les poignées supérieures MMAXI assemblé. AXI CLIMBER® CLIMBER® Assembled. See picture. gauche et droite 1. Assurez-vous Voir l’image. d’appuyer le bouton dehandles fixation avec (H) Insert the upper left and right #1. Make sure you press with your thumb, the securing push button. See ples ictures. votre pouce . Voir photos. 4. MISE EN ROUTE Réglez en premier la hauteur des poignées mobile (Voir Réglage de la 4. Getting à Started hauteur la section 8). First you need to adjust the height of the moving handles (See Height adjustment in section 8). Une fois que vous avez réglé les poignées mobiles, montez sur le Once you have adjusted the moving handles, get on the MAXI CLIMBER® by placing one hand MAXI CLIMBER® avec une main sur la poignée fixe et saisissez-la fermement over the fixed handle (Voir l’image 1). and grab it firmly (Picture 1). (H) Insert the upper left and right handles #1. Make sure you press with your thumb, the (H) Insert the upper left and right handles #1. Make sure you press with your thumb, the securing ush button. ictures. rt the upper left and right handles #p1. Make sure you Spee ress pw ith your thumb, the securing push button. See pictures. g push button. See pictures. (I) Insert the fixed handles # 10 into the main body. See picture. 1 (Picture 1) t the fixed handles # 10 into the main body. See picture. (J)Open the pedals. See picture. (I) Insérez les poignées fixes 10 dans (I) nsert the fixed handles 10 into the main body. See picture. le IIcorps principal. Voir## l’image. (I) nsert the fixed handles 10 into the main body. See picture. Perform a few up and down movements (about 2 minutes) when using your MAXI CLIMBER® (J)Open the pedals. See picture. (J)Open the ples edals. See picture. (J) Ouvrez pédales. Voir l’image. 4. Getting Started Avec main saisissez poignée opposée piedand surthe for the votre first time and libre before actually sla tarting your w orkout to get et placez used to l’autre the machine la pédale opposée (Voir l’image 3). 3 (Picture 3) Then place the same side foot over the pedal and stand on it (Picture 2). With your free hand Ensuite, placez le même pied latéral sur la pédale et tenez-vous sur elle grab the opposite (voir l’image 2).handle and place your other foot on the opposite pedal. (Picture 3) the pedals. See picture. 2 (Picture 2) Effectuez quelques mouvements de haut en bas (environ 2 minutes) lorsque vous utilisez votre MAXI CLIMBER® pour la première fois et avant de commencer réellement votre séance d’entraînement pour vous habituer à la machine et au mouvement. Rappelons que le mouvement alternatif des jambes ne doit jamais être tel que la base du pied touche effectivement le châssis inférieur de la machine. Vous devez changer de direction au niveau du mouvement vers le haut avant que la base du pied ne touche le châssis inférieur de la machine. First you need to adjust the height of the moving handles (See Height adjustment in section 8). L’idée est d’effectuer un seul mouvement et fluide vers le haut et vers le bas avec vos bras et les jambes. Once you have adjusted the moving handles, get on the MAXI CLIMBER® by placing one hand over the fixed handle and grab it firmly (Picture 1). que vous êtes familier avec le mouvement, vous pouvez placer et Une fois saisir les poignées mobiles l’une l’autre pour commencer votre entraînement. motion. Remember that the alternating movement of your legs should never be such that the base of the foot actually touches the bottom frame of the machine. You should change direction to the upward movement before the base of the foot touches the bottom frame of the machine. The idea is to perform one single up and down fluid movement with your arms and legs. 5. Workout 6.ALTERNATE MOVEMENTS 6. Mouvements alternatifs Once Le you are familiar with d’exercice the movement, you can place and grab the très moving handles :o6 ne jours after par semaine programme MAXI CLIMBER® est simple the other to begin your current workout. Biceps Stepping BICEPS You can target your biceps by holding the hand grip with your hands facing towards you. See Vous pouvez cibler vos biceps en tenant la poignée avec vos mains vers vous You can perform a simple step workout by placing both hands on the fixed handles target the movement in your legs. See picture below. picture below. 1). (voir l’image et 10 min de séances d’entraînement que vous pouvez effectuer en fonction 5. Wde orkout votre niveau de fitness. Il vous suffit de suivre le rythme des airs sur le CD qui accompagne votre musique MAXI CLIMBER® : The MAXI CLIMBER® exercise program is a very simple 6 days per week, 10 min workout that you can perform depending on your level of fitness by following the beat of the tunes on the CD included with yde our base MAXI CLIMBER® • Titres 1-3 Music as follows: Tune Beats Workout: • Titres intermédiaires 4-6 Basic Tracks 1-‐3 Intermediate racks 4-‐6 7-9 • TitresTavancés Advanced Tracks 7-‐9 • Titres master 10-12 Master Tracks 10-‐12 1 STEPPING 2 7. All in one Workout timer, step and calorie counter. Vous pouvez effectuerWith unethe séance de stepping simple en plaçant les deux included workout monitor you can count your workout time and the total calor mains sur les poignées fixes et en ciblant le mouvement de vos jambes burned. The workout monitor also keeps track of the total accumulated steps on the machine (voir l’image 2). Before starting your workout, reset the monitor by pushing the red button for at leas seconds until you see a "0" on the screen. Once you reset it, the monitor will automatically st timing, adding the steps and the calories burned. It will stop as soon as you finish your worko LE DEbegin VOS PERFORMANCES It wREGISTRE ill restart when you moving your legs again. 7. POUR TENIR AVEC LE TOUT-EN-UN : CHRONOMÈTRE, CALORIMÈTRE ET COMPTEUR DE PAS Ce moniteur vous permet de garder la trace de votre temps d’entraînement les calories brûlées, et les pas accumulées. Avant de commencer votre séance d’entraînement, réinitialisez le moniteur en appuyant sur le bouton rouge pendant au moins 3 secondes jusqu’à ce que vous voyez un “0” sur l’écran. Une fois la réinitialisation terminé, le moniteur démarre automatiquement calories brûlées. Il s’arrête le chronométrage, en ajoutant les pas et les dès que vous avez terminé votre entraînement. Il redémarre lorsque vous commencez à bouger vos jambes. 6.ALTERNATE MOVEMENTS Biceps seconds until you see a "0" on the screen. Once you reset it, the monitor will automatically start timing, adding the steps and the calories burned. It will stop as soon as you finish your workout. It will restart when you begin moving your legs again. Pour basculer entre les fonctionnalités de chronométrage et enregistrement dans votre écran, faites-le en appuyant sur sur le bouton : 1. Lorsque vous appuyez sur le bouton une fois, vous allez commencer la fonctionnalité de comptage des pas pour cette séance d’entraînement. L’écran affiche le message suivant : CNT 2. Lorsque vous appuyez deux fois sur le bouton, vous pouvez activer une fonctionnalité de chronométrage pour enregistrer la durée de votre séance d’entraînement. L’écran affiche le message suivant : TMR 3. Lorsque vous appuyez sur le bouton trois fois, vous recevrez des informations sur les résultats cumulatifs de toutes vos séances d’entraînement. L’écran affiche le message suivant : TOT CNT 4. Lorsque vous appuyez sur le bouton quatre fois, vous obtiendrez le total des calories brûlées lors de chaque séance d’entraînement. L’écran affiche le message suivant : CAL 9. PLIAGE ET STOCKAGE 9.Folding and Storage 9.Folding Storage occupe très peu de place, car il peut facilement être plié Leaxi Climber takes up very little space as it can be easily folded by performing the following MAXIand CLIMBER® M enaxi Climber takes up very little space as it can be easily folded by performing the following procédant comme suit : M steps: steps: (a) emove the lasafety pin. See icture. (Voir l’image). (a)REnlevez goupille depsécurité (a) Remove the safety pin. See picture. (b) Lift the middle bar until it is set between the double front bars and vertical to the ground. (b) Lift the middle bar until it is set between the double front bars and vertical to the ground. (b)pSoulevez la barre du milieu jusqu’à ce qu’elle se trouve entre les doubles See icture. See picture. barres avant et en verticale par rapport au sol (Voir l’image). Pour réinitialiser les fonctionnalités d’enregistrement, appuyez sur le bouton et maintenez-le enfoncé pendant trois secondes (Remarque : la troisième fonctionnalité n’est pas réinitialisation). 8. RÉGLAGES DE HAUTEUR Avec leaMAXI CLIMBER® vous permet de choisir parmi cinq réglages de 8. Height djustments (c) Hold the back bar and move it towards the opposite front double bar until they are parallel with each other and vertical to the floor. See picture. (c) Tenez la barre arrière et déplacez-là vers la double barre frontale opposée jusqu’à ce qu’elles soient parallèles avec l’autre et perpendiculairement au sol (voir tableau). (c) Hold the back bar and move it towards the opposite front double bar until they are parallel with each other and vertical to the floor. See picture. hauteur différents pour que vous puissiez personnaliser l’appareil à votre There are five different height settings in the Maxi Climber so you can customize the machine taille. Appuyez avec votre pouce sur le bouton illustré dans l’image tout to your individual size. Press with your thumb the push-‐button shown in the picture, and at the en déplaçant, avec l’autre main, le jalon correspondant en fonction de la same time, with your opposite hand, move the respective post up or down according to your configuration désirée. Voir l’image. desired setting. See picture. (d) back the safety See picture. de (d)Put Remettez lapin. goupille (d) Put back the safety pin. See picture. 9.Folding and Storage Maxi Climber takes up very little space as it can be easily folded by performing the following steps: (a) Remove the safety pin. See picture. sécurité (Voir image).