1
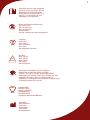
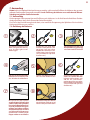
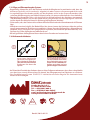
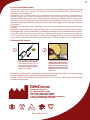
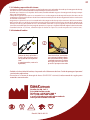
Primed® Halberstadt Medizintechnik GmbH Gebrauchsanweisung Stuhldrainage System DIARFLEX® advanced Instructions for use Stool Management System DIARFLEX® advanced Mode d’emploi Système de drainage des selles DIARFLEX® advanced Istruzioni per l'uso Sistemadienteroclismaevacuativo DIARFLEX®advanced Instrucciones de uso Sistema de drenaje de heces DIARFLEX®advanced Инструкция по использованию Системадренированиястула DIARFLEX®advanced REF 20762 0482 1 - Gebrauchsanweisung beachten - Observe the instructions for use - Respecter du mode d‘emploi - Rispettare le istruzioni per l‘uso - Siga las instrucciones de uso - Соблюдать инструкцию 2 Latex NON STERILE - Nicht zur Wiederverwendung - Do not Re-use - Ne pas rèutiliser - Non reutilizzare - No reutilizar - не для повторного использования - Latexfrei - Latex free - Sans Látex - Privi di lattice - Sin Latex - He cодержит латекса - Unsteril - Non sterile - Non stérile - Non sterile - No estéril - Не стерильно - Vor Hitze und direkter Sonne schützen - Protect from heat and direct sunlight - Tenir à l´abri de la chaleur et du soleil direct - Proteggere dal calore e dalla luce diretta del sole - Proteger del calor y de la luz directa del sol - Защищать от воздействия высокой температуры и прямых солнечных лучей PHT DEHP - enthält DEHP - contains DEHP - contient du DEHP - contiene DEHP - contiene DEHP - Содержит диэтилгексилфталат - Hersteller - Manufacturer - Fabricant - Produttore - Fabricante - Изготовитель DIARFLEX® advanced Stuhldrainage System Gebrauchsanweisung Nur für den Gebrauch an einem Patienten geeignet. Wiederverwendung dieses Produktes kann zu einer Veränderung seiner mechanischen oder biologischen Eigenschaften führen. Dies kann Produktversagen, allergische Reaktionen oder bakterielle Infektionen verursachen. Sterilisation (zur Wiederverwendung) kann die Funktion beeinträchtigen. Nicht für eine Anwendung von mehr als 29 Tagen vorgesehen. D Nicht Steril: Das Stuhldrainage System DIARFLEX® advanced wird nicht steril geliefert und ist größtenteils aus Silikon gefertigt. Alle Komponenten des Systems sind latexfrei. Inhaltsverzeichnis 1. Verwendungszweck 2. Beschreibung des Stuhldrainage Systems DIARFLEX® advanced 3. Kontraindikationen 4. Warnhinweise 5. Vorsichtsmaßnahmen 6. Unerwünschte Nebenwirkungen 7. Anwendung 7.1. Vorbereitung 7.2. Einführung des Katheters 7.3. Pflege und Überwachung des Systems 7.4. Entfernen des Katheters 1. Verwendungszweck Das Stuhldrainage System DIARFLEX® advanced ist für die Ableitung von flüssigem und halbflüssigem Stuhl vorgesehen und gewährleistet dessen sicheres Auffangen bei bettlägerigen oder immobilen und inkontinenten Patienten. Das Stuhldrainage System DIARFLEX® advanced d i e n t d e r I n f e k t i o n s ko n t ro l l e, t rä g t z u r Geruchsreduktion und Wahrung der Patientenwürde bei und steigert die Versorgungseffizienz. 2. Beschreibung des Stuhldrainage Systems DIARFLEX® advanced Das Stuhldrainage System DIARFLEX® advanced besteht aus einem Silikon-Katheterschlauch, einem Auffang- beutel sowie 2 Ersatzbeuteln mit je 1,5 Litern Volumen, einer Spritze und zwei Beutelaufhängungen. Der Silikon-Katheterschlauch, welcher mit einer geruchsdichten Beschichtung versehen ist, ist mit einem Niederdruckballon (blauer Ballon) an dem einen Ende und einem Anschluss für den Auffangbeutel an dem anderen Ende ausgestattet und besitzt ein großes Lumen für die Ableitung des Stuhls sowie zwei kleine Hilfslumen, die über zwei Konnektoren kontrolliert werden: Ein Konnektor (mit blauer Markierung und Aufdruck „45ml“) dient zum Füllen/ Entleeren des Niederdruckballons und ein zweiter Konnektor (mit Aufdruck „Irrig.“) bietet Zugang zum Spüllumen. Die beigelegte Spritze mit Luer- Anschluss kann sowohl zum Befüllen/ Entleeren des Ballons als auch zum Spülen des Systems verwendet werden. Der Silikon-Katheterschlauch enthält im mittleren Lumen einen Probeentnahmeport, der zum Spülen des Katheters bzw. zur Entnahme von Stuhlproben genutzt werden kann. Am Auffangbeutelanschluss des Katheterschlauches befindet sich ein Schlauchstopfen, der zum zeitweiligen Verschluss des Katheterschlauches beim Beutelwechsel verwendet werden kann. 2 3 3. Kontraindikationen - Nicht verwenden bei Patienten mit bekannter Empfindlichkeit oder Allergien gegen die in diesem Produkt verwendeten Materialien (z.B. Silikon). - Nicht verwenden, wenn das Rektum des Patienten das Füllvolumen des Niederdruckballons nicht aufnehmen kann oder wenn der Analkanal stark verengt ist. - Nicht bei Patienten mit festem Stuhl verwenden. - Nicht bei Patienten einsetzen, bei denen vor kurzem (weniger als 6 Wochen) eine rektale Anastomose oder eine Anal- oder Sphinkterrekonstruktion durchgeführt wurde. - Nicht bei Patienten mit kompromittierter Rektalwandintegrität verwenden ( z.B. ischämische Proktitis). 4. Warnhinweise (Die Warnhinweise unbedingt beachten, da es sonst zu Verletzungen des Patienten kommen könnte!) - Nicht verwenden, wenn die Verpackung geöffnet oder beschädigt ist. - Den Niederdruckballon nur mit der in der Anwendung angegebenen Wassermenge füllen, keine unzulässige Flüssigkeitsmenge oder -art bzw. heiße Flüssigkeiten verwenden. - Den Niederdruckballon nicht überfüllen. - Rektalblut sollte untersucht werden, um sicherzustellen, dass keine Anzeichen einer Drucknekrose vorhanden sind. Bei Anzeichen einer Drucknekrose wird empfohlen, den Katheter zu entfernen. - Zur Spülung des Systems keine mechanischen Pumpgeräte verwenden. - Bei Patienten mit kompromittierter Darmwandintegrität keine Spülungen vorsehen. - Ein übermäßiges und anhaltendes Ziehen am Katheter kann zu einer Erosion des Analkanals bzw. Anoderms oder zur Abwanderung des Niederdruckballons in den Analkanal führen. 5. Vorsichtsmaßnahmen - Nicht sterilisieren. - DIARFLEX® advanced ist nicht für den pädiatrischen Gebrauch indiziert. - DIARFLEX® advanced ist nicht für den Gebrauch über 29 Tage indiziert. - Patienten mit schwacher Sphinkterfunktion können den Katheter bei normalem Gebrauch ausstoßen. - Bei Patienten, deren Rektum durch eine strahlenverursachte Struktur verändert wurde oder deren Rektum von Strahlenprokitis befallen ist, ist äußerste Vorsicht geboten. - Patienten mit schwerem Tenesmus oder Patienten, die nach der Einführung des Katheters Tenesmus oder starke Schmerzen verspüren, tolerieren eventuell den Katheter nicht. In diesem Fall sollte der Katheter entfernt werden. 6. Unerwünschte Nebenwirkungen Mit dem Gebrauch einer rektalen Stuhldrainage können folgende unerwünschte Nebenwirkungen auftreten: - Perforation - Drucknekrose - Verlust des Spinktertonus - Obstruktion - Infektion - Übermäßiges Austreten von Stuhl 4 7. Anwendung Hinweis: Um eine optimale Katheterleistung zu erzielen, sollte vor dem Einführen des Katheters der gesamte geformte Stuhl aus dem Darm entfernt werden. Vor der Einführung des Katheters muss außerdem das Rektum unbedingt von jeglichem Stuhl befreit werden. 7.1. Vorbereitung Die bevorzugte Patientenposition zur Einführung des Katheters ist die linkslaterale Knie-Brust-Position. Andere Positionen sind je nach Zustand des Patienten möglich. Das Ziel bei der Positionierung besteht darin, eine maximale Entspannung des Sphinkters für eine leichte Kathetereinführung zu erzielen. 7.2. Einführung des Katheters 50 0 10 00 l m 00 45 15 45 ml 10 20 30 40 50 Entfernen Sie über den blauen Konnektor die gesamte Luft aus dem Niederdruckballon mit Hilfe einer Luer-Spritze (anschließend Spritze entfernen) l m Den Niederdruckballon und die Rektalöffnung großzügig mit Gleitmittel beschichten 45 Katheterschlauch mit dem Schraubverschluss a m A u ff a n g b e u t e l befestigen 10 45 ml 20 30 40 50 Erfassen Sie den beschichteten Katheter am hinteren Ende des Niederdruckballons Führen Sie den Katheter in das distale Rektum ein Mit einer an der Spitze angefeuchteten Katheterspritze (nicht im Lieferumfang enhalten) kanneineStuhlprobeentnahme über den Probeentnahmeport erfolgen.Dazuistdieserzuöffnen, die Spitze einzuführen und eine ausreichende Stuhlmenge zu entnehmen. Danach ist die Klappe wieder zu verschließen. Katheterschlauch durch vorsichtiges Ziehen und Loslassen positionieren Niederdruckballon mit einer Luer-Spritze über den blauen Konnektor mit 40-45 ml raumtemperiertem Wasser oder Kochsalzlösung befüllen (anschließend Spritze entfernen) 5 7.3. Pflege und Überwachung des Systems - Regelmäßig überprüfen, dass der Katheter und der Auffangbeutel so positioniert sind, dass der Katheterschlauch nicht verdreht, abgeknickt oder extern zusammengedrückt wird. - In regelmäßigen Abständen prüfen, ob der Katheter nicht in den Darm abwandert (der schwarze Markierungsring am Ablaufschlauch sollte sich immer außerhalb des Anus befinden). - Regelmäßig überprüfen, dass sich kein Stuhl im Ablaufschlauch des Katheters ansammelt (Zur Behebung können Sie mit der Hand durch eine geführte Pressbewegung den Stuhl von außen durch den Ablaufschlauch in Richtung Auffangbeutel drücken) - Sicherstellen, dass der Patient nicht auf dem Ablaufschlauch oder den Konnektoren der Hilfslumen liegt. - Mindestens zweimal täglich (bei Bedarf öfter) das innere Lumen des Katheterschlauches spülen, um die angesammelte Stuhlmasse zu entfernen. Hierzu über den Spülanschluss (Konnektor mit Aufdruck „Irrig.“) mit einer Luer- Spritze Wasser injizieren (anschließend Spritze entfernen). Das Spülwasser in den Auffangbeutel abfließen lassen. - Bei voll gefülltem Auffangbeutel diesen durch einen Ersatzbeutel austauschen. 7.4. Entfernen des Katheters 45 m l 45 ml 10 20 30 40 50 Entfernen Sie mit Hilfe einer Luer-Spritze die gesamte Flüssigkeit aus dem Niederdruckballon über den blauenKonnektor. Entfernen Sie dann die Spritze Reiben Sie die Rektalöffnung mit Gleitmittel ein, fassen Sie den Katheter kurz hinter dem Rektaleingang und ziehen Sie den Niederdruckballon vorsichtig und mit gleichmäßigem Druck heraus - Auf Grund der Elastizität des Katheters kann es beim Entfernen vorkommen, dass dieser sehr plötzlich aus dem Anus austritt. Bitte achten Sie darauf, das Pflegepersonal vor Spritzern zu schützen. - Das Stuhldrainage System DIARFLEX® advanced nach den Regeln für kontaminier te Materialien entsorgen. Primed® Halberstadt Medizintechnik GmbH Straße des 20. Juli 1 D-38820 Halberstadt Tel.: +49(0)3941/668-6 Fax: +49(0)3941/668-24565 email: [email protected] www.primed-halberstadt.de 2 Latex PHT NON STERILE Rev.01/2013-02-22 DEHP DIARFLEX® advanced Stool Management System Instructions for Use Single patient use only. Re-use of this product can lead to a change of its mechanical or biological characteristics. This can cause the product to fail, allergic reactions or bacterial infections. Sterilisation (for re-use) can impair its function. EN This System is not intended to be used for more than 29 days. Non Sterile: The DIARFLEX® advanced stool drainage system is delivered non sterile and is largely made from silicones. All the components of the system are latex-free. Table of contents 1. Intended Use 2. Description of the Stool Management System DIARFLEX®advanced 3. Contraindications 4. Warnings 5. Precautions 6. Adverse Events 7. How to use 7.1. Preparation 7.2. Insertion of the catheter 7.3. Care and Monitoring of the System 7.4. Removal of the Catheter 1. Intended Use The Stool Management System DIARFLEX® advanced is intended to safely and effectively divert and collect liquid or semi-liquid stools. It is indicated for bedridden or immobilised, incontinent patients, in order to reduce the external contact with potentially infectious microorganisms both for the nursing staff and the patient. The Stool Management System DIARFLEX® advanced helps to reduce dermatological complications and to minimise the developement of unpleasant odours and enhances the efficiancy of care provision. 2. Description of the Stool Management System DIARFLEX® advanced The Stool Management System DIARFLEX® advanced consists of a silicone catheter hose, a throw-away collection bag (as well as 2 replacement bags) of 1,5 litres volume, as well as a syringe and two hangers for fixing the system to the patient‘s bed. The silicone catheter hose, which features an odour-tight coating, is equipped with a low pressure balloon (blue balloon) on the insertion end and a connector for the collection bag on the other end. It features one large lumen for stool drainage, as well as two small auxiliary lumens controlled via two connectors: A connector (with a blue marking and with “45ml“ printed on it) is used for filling and emptying the low pressure balloon, and a second connector (marked with “Irrig.“) provides access to the irrigation lumen. The enclosed syringe with Luer connector can be used both for filling and emptying the balloon, as well as for flushing the system. The silicone catheter hose has a sampling port in the central lumen, which can be used for irrigating the catheter and taking a stool sample. The collection bag connector on the catheter hose includes a hose plug, which can be used to seal the hose temporarily when exchanging the collection bag. 6 7 3. Contraindications - Do not use in patients with known sensitivity or allergies to materials used in this product or (silicone for example). - Do not use if the patient's distal rectum cannot accommodate the inflated volume of the low pressure ballon, or if the distal rectum/anal canal is severely strictured. - Do not use on patients with firm stools. - Do not use on patients who have recently (under 6 weeks) undergone a rectal anastomosis or an anal or sphincter reconstruction. - Do not use on patients with compromised rectal wall integrity (e.g. ischemic proctitis). 4. Warnings (Failure to comply with the following warnings may result in patient injury) - Do not use if the packing is opened or damaged. - Do not use improper amount or type of fluids for balloon inflations, never use hot liquids. - Rectal blood should be examined, in order to guarantee that there are no signs of pressure necrosis present. If pressure necrosis is evident discontinue use and remove the catheter. - Do not over inflate the low pressure ballon. - Do not connect mechanical pumping devices for the irrigation. - Do not irrigate patients with compromised intestinal wall integrity. - Excessive prolonged traction on the catheter can lead to an erosion of the anal passage or the low pressure balloon can migrate into the anal canal. 5. Precautions - Do not sterilise. - DIARFLEX® advanced is not intended for paediatric use. - DIARFLEX® advanced is not intended for use longer than 29 days. - Patients with very weak sphincter function may expel the catheter under normal use. - Utmost caution should be observed in patients whose rectum may be altered by stricture due to radiation or affected with radiation proctitis. - Patients with severe tenesmus, or patients who experience tenesmus or severe pain after insertion of the catheter, may not tolerate the catheter in place. In this case the catheter should be removed. 6. Adverse Events The following adverse events may be associated with the use of the Stool Management System: - Perforation - Pressure necrosis - Loss of spincter tone - Obstruction - Infection - Excessive leakage of fecal contents 8 7. How to use Note: To optimise the catheter system performance the colon should be evacuated of formed and semi-formed stool prior to use. In all cases, the rectum should be cleared of all stool prior to catheter insertion. 7.1. Preparation The preferred patient position for catheter insertion is the left lateral knee-chest position (the patient’s clinical situation may dictate the use of an alternate position). The goal of patient positioning is to maximise sphincter relaxation to ease catheter insertion. 7.2. Insertion of the catheter 50 0 10 00 l m 00 45 15 45 ml 10 20 30 40 50 Withdraw all air from the Low Pressure Ballon via the Blue Connector (and then disconnect the syringe) l m Generously apply lubricant to thedeflatedLowPressureBallon and the rectal opening 45 With the screw cap, fasten the Catheter Hose to the Collection Bag 10 45 ml 20 30 40 50 Grasp the lubricated catheter at the rear end of the Low Pressure Ballon Introduce the catheter into the distal rectum A catheter syringe with a moistened tip (not included in the scope of supply) can be used to take a stool sample via the sampling port. This is done by opening the port, inserting the syringe and removing an appropriately sized stool sample. The lid must then be sealed again. Gently tug and release to position the Low Pressure Cuff and to confirm that the catheter fits tension free With a Luer Syringe, fill the Low Pressure Ballon via the Blue Connector with 40-45 ml lukewarm water or saline solution (then disconnect the syringe) 9 7.3. Care and Monitoring of the System - Frequently verify that the catheter and collection bag are positioned so that the catheter drain tube is not twisted, kinked or externally compressed. - Check that the catheter does not migrate into the intestine (the black reference ring on the tube must always be outside the anus). - Frequently verify that waste is not accumulating in the catheter drain tube. (To correct, you can press the stool manually from outside with a guided movement, through the drain tube in the direction of the collection bag) - Make sure that the patient is not lying on the catheter drain tube or catheter connectors. - At least twice daily (more frequently if required), flush the inside of the catheter drain tube to remove any accumulated faecal matter: To do this, inject water into the flush port connector (with “Irrig.” printed on it) with a syringe. Let the rinsing water flow into the collection bag and disconnect the syringe. - Replace the collection bag with a replacement bag when it is full. 7.4. Removal of the Catheter 45 m l 45 ml 10 20 30 40 50 Deflate the Low Pressure Ballon by connecting a Luer Syringe to the Blue Connector and slowly aspirating all liquids. Then, disconnect the syringe Rub the rectal opening with lubricant, grasp the catheter shortly behind the rectal entrance and withdraw the LowPressureBallooncarefully and by applying steady traction - Due to the elastic nature of the device the removal procedure may result in the abrupt exit of the catheter from the anus. Care should be taken to protect caregiver from splatter. - Dispose of the stool drainage system DIARFLEX ® advanced in accordance with the regulations for contaminated material. Primed® Halberstadt Medizintechnik GmbH Straße des 20. Juli 1 D-38820 Halberstadt Phone: +49(0)3941/668-6 Fax: +49(0)3941/668-24565 mail: [email protected] www.primed-halberstadt.de 2 Latex PHT NON STERILE Rev.01/2013-02-22 DEHP Système de drainage des selles DIARFLEX® advanced Mode d‘emploi Utilisation pour un seul patient. Une réutilisation de ce produit peut entraîner une modification des propriétés mécaniques et biologiques. Cela peut provoquer une défaillance du produit, des réactions allergies ou des infections bactériennes. Une stérilisation (en vue de sa réutilisation) peut compromettre le fonctionnement. FR Ce système n‘est pas conçu pour une application de plus de 29 jours. Non stérile: Le drainage des selles DIARFLEX® advanced est livré non stérile et principalement fabriqué á base de matériaux en silicone. Aucun composant du système ne contient du latex. Sommaire 1. But d‘utilisation 2. Description du Système de drainage des selles DIARFLEX® advanced 3. Contraindications 4. Avertissements 5. Précautions 6. Effets indésirables 7. Utilisation 7.1. Préparation 7.2. Introduction du cathéter 7.3. Entretien et surveillance du système 7.4. Extraction du cathéter 1. But d‘utilisation Le système de drainage des selles DIARFLEX® advanced est destiné à l’évacuation des selles liquides et semi-liquides et garantit la récupération sûre des selles des patients alités ou immobiles et incontinents. Le système de drainage des selles DIARFLEX® advanced sert à contrôler les infections, contribue à réduire les odeurs et à conserver la dignité du patient et augmente l’efficacité des soins. 2. Description du Système de drainage des selles DIARFLEX® advanced Le système de drainage des selles DIARFLEX® advanced est composé d’un tube de cathéter en silicone, d’une poche collectrice et de deux poches de chacune 1,5 litre, d’une seringue et de deux systèmes d’attache pour la poche collectrice. Le tube en silicone du cathéter pourvu d’un revêtement anti-odeur est équipé d’un ballonnet basse pression (ballonnet bleu) sur une extrémité et d’un raccord pour la poche collectrice sur l’autre extrémité ; il possède un grand canal pour l’évacuation des selles et deux petits canaux auxiliaires qui sont contrôlés via deux connecteurs : Un connecteur (marque bleue et inscription „45ml“) permet de remplir / de vider le ballonnet basse pression et un deuxième connecteur (portant l’inscription „Irrig“) offre un accès au canal d’irrigation. La seringue fournie dotée d’un raccord Luer peut être utilisée pour remplir / vider le ballonnet et également pour irriguer le système. Le tube en silicone du cathéter contient, au niveau du canal central, un dispositif de prélèvement qui peut être utilisé pour le rinçage du cathéter ou pour retirer les prélèvements de selles. Le raccord de la poche collectrice du tube du cathéter est pourvu d’un bouchon qui permet de fermer momentanément le tube du cathéter pendant le changement de la poche. 10 11 3. Contraindications - Ne pas utiliser sur des patients ayant une sensibilité ou une allergie connue aux composants utilisés dans ce produit (au silicone par exemple). - Ne pas utiliser sur des patients dont la partie rectale ne peut s’accommoder du volume du ballonnet basse pression ou si le canal anal est très étroit. - Ne pas utiliser sur des patients ayant des selles solides. - Ne pas utiliser sur des patients ayant subi récemment (moins de 6 semaines) une anastomose colo-rectale ou une reconstruction anale ou du sphincter. - Ne pas utiliser sur des patients dont l’intégrité de la paroi rectale est compromise (par ex. rectite ischémique). 4. Avertissements (Respecter impérativement les avertissements, sous risque d’entraîner, le cas échéant, des blessures du patient) - Ne pas utiliser si l’emballage est ouvert ou endommagé. - Emplir le ballonnet à basse pression uniquement avec la quantité d’eau indiquée dans l’application ; ne pas utiliser de quantités, de liquides non autorisés ou de liquides chauds. - Ne pas surgonfler le ballonnet basse pression. - Le sang issu du rectum doit être examiné pour s’assurer de l’absence de signes de nécrose de compression. En présence d’un signe de nécrose de compression, il est conseillé d’extraire le cathéter. - Ne pas utiliser de pompes mécaniques pour irriguer le cathéter. - Pour les patients souffrant d’une altération de l’intégrité de la paroi intestinale, aucune irrigation n’est envisagée. - Ne pas tirer sur le cathéter de façon excessive et prolongée pour éviter une érosion du canal anal ou de l’anoderm ou un déplacement du ballonnet basse pression dans le canal anal. 5. Précautions - Ne pas stériliser. - DIARFLEX® advanced n’est pas recommandé pour l’usage pédiatrique. - DIARFLEX® advanced n’est pas recommandé pour une utilisation au-delà de 29 jours. - Les patients ayant une fonction sphinctérienne altérée peuvent éjecter le cathéter dans des conditions d’utilisation normales. - Pour les patients dont la structure du rectum a été modifiée à la suite d’une irradiation ou dont le rectum est affecté par une rectite due à une irradiation, une prudence toute particulière s´impose. - Les patients souffrant d’un sévère ténesme ou ceux qui ressentent un ténesme ou de fortes douleurs après l’introduction du cathéter, ont éventuellement une intolérance à celui-ci. Dans ce cas, il faut extraire le cathéter. 6. Effets indésirables Les effets secondaires indésirables suivants peuvent apparaître lors de l’utilisation d’un drainage rectal des selles : - Per foration Nécrose de compression Per te du tonus sphinctérien Obstruction Infection Emission excessive de selles 12 7. Utilisation Remarque: Pour optimiser la performance du cathéter, évacuer de l’intestin toutes les selles formées avant d’insérer le cathéter. Toutes les selles doivent en tout cas être évacuées du rectum avant d’insérer le cathéter. 7.1. Préparation La position idéale pour insérer le cathéter est de coucher le patient sur le côté gauche avec ses genoux contre son torse. D’autres positions sont possibles si les conditions cliniques le permettent. Le but du positionnement est d’obtenir une relaxation maximale du sphincter facilitant l’introduction du cathéter. 7.2. Introduction du cathéter 50 0 10 00 l m 00 45 15 45 ml 10 20 30 40 50 Retirer tout l‘air du ballonet basse pression par le connecteur bleu à l‘aide d ‘u n e s e r i n g u e Lu e r (enlever ensuite la seringue) l m Enduire abondamment le ballonet basse pression et l‘ouverture anale avec du gel lubrifiant 45 Fixer le tube de cathéter avec le bouchon à vis de la poche collectrice 10 45 ml 20 30 40 50 Saisir le cathéter enduit par l‘extrémité arriere du ballonet basse pression Introduire le cathéter dans le rectum distal Avec une seringue de cathéter (non fournie) humectée au niveau de la pointe, le prélèvement de selles peut être effectué via le dispositif de prélèvement. Pour cela, ouvrir ce dernier, introduire la pointe et prélever une quantité suffisante de selles. Après le prélèvement, il suffit de refermer le bouchon. Positionner le tube de cathéter en le tirant et en le relâchant avec précaution Remplir le ballonet basse pression avec 40-45 ml d‘eau tempérée ou de solution saline à l‘aide d‘une seringue Luer par le connecteur bleu (enlever ensuite la seringue) 13 7.3. Entretien et surveillance du système - Contrôler régulièrement que le cathéter et la poche collectrice sont positionnés de manière à ne pas tordre, replier ou comprimer de l’extérieur le tube d’évacuation. - Vérifier que le cathéter ne se déplace pas dans l’intestin (la bague repère noire sur le tube de drainage doit toujours se trouver hors de l’anus). - Vérifier régulièrement que les selles ne s’accumulent pas dans le tube de drainage du cathéter (Pour véhiculer les selles, vous pouvez exercer une pression avec la main pour les amener de l’extérieur à travers le tube d’évacuation vers la poche collectrice.). - S’assurer que le patient ne repose pas sur le tube de drainage ou les connecteurs des canaux d’injection auxiliaires. - Rincer au moins deux fois par jour (plus souvent si nécessaire) le canal intérieur du tube de drainage du cathéter pour ôter le volume des selles accumulées. Pour cela, injecter de l’eau avec une seringe Luer-Lock par le raccord d’irrigation (connecteur avec „Irrig.“). Laisser l’eau d’irrigation s’écouler dans la poche collectrice et enlever la seringue. - Remplacer la poche collectrice entièrement remplie par une poche de rechange (non comprise). 7.4. Extraction du cathéter 45 m l 45 ml 10 20 30 40 50 Retirer tout le liquide du ballonnet basse pression par le connecteur bleu à l‘aide d‘une seringue Luer (enlever ensuite la seringue) Enduire l‘overture anale avec un lubrifiant, saisir le cathéter juste après l‘entrée du rectum et retirer le ballonnet avec précaution et en exerçant une pression régulière - Le cathéter peut se dégager très vite de l’anus du fait de son élasticité. Veiller à protéger le personnel soignant contre les éclaboussures. - Procéder à la mise au rebut du système de drainage des selles DIARFLEX® advanced selon les règles relatives aux composants contaminés. Primed® Halberstadt Medizintechnik GmbH Straße des 20. Juli 1 D-38820 Halberstadt Téléphone: +49(0)3941/668-6 Fax: +49(0)3941/668-24565 émail: [email protected] www.primed-halberstadt.de 2 Latex PHT NON STERILE Rev.01/2013-02-22 DEHP Sistema di enteroclisma evacuativo DIARFLEX®advanced Istruzioni per l‘uso Destinato all'uso individuale di un solo paziente. Il riutilizzo di questo prodotto può provocarne l'alterazione del funzionamento meccanico o l'insorgere di complicanze di tipo biologico. Le conseguenze possono essere rottura dell'apparecchio, reazioni allergiche o infezioni batteriche. La sterilizzazione (per il riutilizzo) può alterarne il funzionamento. Il sistema non è previsto per un utilizzo di oltre 29 giorni. IT Non sterile: Il sistema di enterodisma evacuativo DIARFLEX® advanced è fornito non sterile et realizzato in gran parte con materiali siliconici. Tutti i componenti del sistema sono privi di lattice. Indice 1. Scopo d‘utilizzo 2. Descrizione dell'enteroclisma evacuativo DIARFLEX® advanced 3. Controindicazioni 4. Avvertenze 5. Precauzioni 6. Effetti collaterali indesiderati 7. Modo d'uso 7.1. Preparazione 7.2. Inserimento del catetere 7.3. Cura e controllo del sistema 7.4. Rimozione del catetere 1. Scopo d‘utilizzo Il sistema di enteroclisma evacuativo DIARFLEX® advanced è destinato al drenaggio di feci liquide e semiliquide e ne garantisce la raccolta sicura in pazienti allettati o immobili e incontinenti. Il sistema per il drenaggio rettale DIARFLEX® advanced serve a controllare le infezioni, contribuisce a ridurre gli odori e a preservare la dignità del paziente; inoltre incrementa l'efficienza dell'assistenza. 2. Descrizione dell'enteroclisma evacuativo DIARFLEX® advanced Il sistema di enteroclisma evacuativo DIARFLEX® advanced è costituito da un flessibile in silicone, un sacchetto di raccolta e due sacchetti di ricambio ciascuno con una capacità di 1,5 litri, una siringa e due supporti per sacchetto. Il flessibile catetere in silicone con rivestimento ermetico antiodori è provvisto di un palloncino a bassa pressione (palloncino blu) ad una estremità e un raccordo per il sacchetto di raccolta all'altra; inoltre, presenta un grande lume per il drenaggio delle feci e due piccoli lumi ausiliari che vengono controllati da due connettori: Un connettore (con contrassegno blu e indicazione "45 ml" in rilievo) è utilizzato per il riempimento/svuotamento del palloncino a bassa pressione e un secondo connettore (con indicazione"Irrig." in rilievo) offre accesso al lume di risciacquo. La siringa in dotazione con attacco Luer può essere utilizzata sia per il riempimento/ svuotamento del palloncino sia per il risciacquo del sistema. Il flessibile catetere in silicone contiene un port nel lume medio il quale può essere utilizzato per sciacquare il catetere o effettuare un prelievo di feci. Il raccordo per il sacchetto di raccolta è provvisto di un tappo del flessibile utilizzabile per la chiusura temporanea del catetere flessibile durante la sostituzione del sacchetto. 14 15 3. Controindicazioni - Non utilizzare per pazienti con sensibilità accertata o allergie ai materiali impiegati per questo prodotto, ad es. al silicone. - Non utilizzare nel caso in cui il canale rettale del paziente non sia in grado di accogliere il volume totale del palloncino a bassa pressione o quando il canale anale è fortemente occluso. - Non utilizzare in pazienti con feci dure. - Non utilizzare con pazienti che hanno subito da poco (meno di 6 settimane) una anastomosi rettale o che sono stati sottoposti a una ricostruzione anale o dello sfintere. - Non utilizzare in pazienti la cui integrità delle pareti rettali è compromessa (ad es. affetti da proctite ischemica). 4. Avvertenze (Osservare scrupolosamente le istruzioni per l'uso, in caso contrario sussiste il pericolo di provocare lesioni al paziente) - Non utilizzare il prodotto quando l'imballaggio è aperto o danneggiato. - Il palloncino a bassa pressione va gonfiato esclusivamente secondo le quantità indicate nelle istruzioni, non impiegare quantità di liquido non ammesse o liquidi caldi. - Non eccedere con il riempimento del palloncino a bassa pressione. - Qualora si manifestasse sanguinamento rettale sarà necessario accertarsi che questo non sia segnale di necrosi da compressione. Nel caso in cui si manifestassero segnali di necrosi da compressione, rimuovere il catetere. - Non utilizzare dispositivi meccanici a pompa per l'irrigazione. - Non effettuare irrigazioni in pazienti con pareti intestinali compromesse. - Tirare eccessivamente e ripetutamente il catetere può provocare erosione del canale anale o dell'anoderma, oppure provocare lo spostamento del palloncino a bassa pressione all'interno del canale anale. 5. Precauzioni - Non sterilizzare. - DIARFLEX® advanced non è indicato per uso pediatrico. - DIARFLEX® advanced non è indicato per un uso che si prolunghi oltre i 29 giorni. - I pazienti con attività debole dello sfintere possono espellere il catetere durante l'uso normale. - L'uso con pazienti in cui il retto ha subito delle modifiche in seguito a trattamenti di irraggiamento o il cui retto è affetto da proctite da irradiazione richiede particolare attenzione. - È possibile che i pazienti con tenesmo rettale debole, o pazienti che manifestano tenesmo, o dolori forti dopo l'inserimento del catetere, non siano in grado di tollerare il catetere. In questo caso il catetere andrà tolto. 6. Effetti collaterali indesiderati N e l co r s o d e l l ' u s o d i u n e n t e ro c l i s m a e va c ua t i vo re t t a l e p o s s o n o m a n i f e s t a r s i i seguenti effetti collaterali indesiderati: - Per forazione Necrosi da compressione Perdita di tono dello sfintere Ostruzione Infezione Transito fecale eccessivo 16 7. Modo d'uso Avvertenza: Per un uso ottimale del catetere sarebbe opportuno rimuovere previamente le incrostazioni fecali presenti sulle pareti intestinali. In ogni caso, prima dell'inserimento del catetere, bisognerebbe sgomberare il retto dagli escrementi. 7.1. Preparazione Per l'inserimento del catetere il paziente dovrebbe preferibilmente distendersi sul fianco sinistro con appoggio del torace e del ginocchio. Eventuali altre posizioni sono possibili per adattarsi alle condizioni del paziente. La scelta della posizione deve mirare a far raggiungere il massimo rilassamento dello sfintere in modo da agevolare l'inserimento del catetere. 7.2. Introduction du cathéter 50 0 10 00 l m 00 45 15 45 ml 10 20 30 40 50 Attraverso il connettore blu, rimuovere tutta l‘aria dal palloncino a bassa pressione con l‘ausilio di una siringa Luer (poi rimuovere anche la siringa) l m Appliccare abbondante lubrificante sul palloncino a bassa pressione e sull‘apertura rettale 45 Fissare il flessibile catetere con chiusura a vite sul sacchetto di raccolta 10 45 ml 20 30 40 50 Afferrare il catetere lubrificato all‘estremità posteriore del palloncino a bassa pressione Introdurre il catetere nel retto distale Il prelievo delle feci può essere effettuato con una siringa del catetere (non fornita in dotazione), dopo averne inumidito la punta, attraverso il port predisposto per il prelievo. Aprire quindi il suddetto, inserirvi la punta e prelevare una quantità di feci sufficiente. Dopodiché richiudere il tappo Posizionare il flessibile catetere effettuando con cautela movimento di trazione e rilascio Riempire il palloncino a bassa pressione con 40-45 ml di acqua a temperatura ambiente o di soluzione salina attraverso il connettore blu servendosi di una siringa Luer (poi rimuovere anche la siringa) 17 7.3. Cura e controllo del sistema - Controllare regolarmente che il catetere e la sacca di evacuazione siano collocati in modo tale che l'insieme non si pieghi o si scolleghi ed evitare che eventuali pressioni esterne ne comprimano i componenti. - Controllare che il catetere non entri in contatto con le pareti intestinali (l'anello nero di contrassegno sulla sacca di evacuazione deve restare sempre all'esterno dell'ano). - Verificare regolarmente che non si accumulino escrementi nel tubo flessibile di evacuazione del catetere (Per la rimozione è possibile premere manualmente le feci con un movimento di pressione guidato dall'esterno attraverso il flessibile di drenaggio in direzione del sacchetto di raccolta.). - Accertarsi che il paziente non si appoggi sulla sacca di evacuazione o sugli attacchi dei lumi ausiliari. - Controllare almeno due volte al giorno (o più spesso se necessario) che il lume interno compia il drenaggio della sacca di evacuazione in modo da rimuovere la massa di deposito di escrementi. A questo scopo iniettare acqua attraverso l'attacco di drenaggio (attacco provvisto) con una siringa luer lock. Far defluire l'acqua di drenaggio nella sacca di evacuazione. - Sostituire la sacca di evacuazione piena con una sacca di ricambio (non in dotazione). 7.4. Rimozione del catetere 45 m l 45 ml 10 20 30 40 50 Con l‘ausilio di una siringa Luer rimuovere tutto il liquido dal palloncino a bassa pressione attraverso il connettoreblu(poi rimuovere anche la siringa) Applicare lubrificante sull‘apertura rettale. Afferrare il catetere poco dietro l‘ingresso rettale ed estrarre con cautela il palloncino a bassa pressione applicando una pressione uniforme - Data l'elasticità del catetere, ci potrebbe essere un'espulsione improvvisa dall'ano. Per questo motivo, il personale operante deve premunirsi delle adeguate protezioni. - Smaltire il sistema di enteroclisma evacuativo DIARFLEX® advanced rispettando le norme inerenti ai materiali contaminati. Primed® Halberstadt Medizintechnik GmbH Straße des 20. Juli 1 D-38820 Halberstadt Telefono: +49(0)3941/668-6 Fax: +49(0)3941/668-24565 e-mail: [email protected] www.primed-halberstadt.de 2 Latex PHT NON STERILE Rev.01/2013-02-22 DEHP Sistema de drenaje de heces DIARFLEX®advanced Instrucciones de uso Únicamente para el uso en un paciente. La reutilización de este producto puede causar una modificación de sus propiedades mecánicas o biológicas. Esto puede conllevar el fallo del producto, reacciones alérgicas o infecciones bacterianas. La esterilización (para la reutilización) puede afectar su función. ES El sistema no está previsto para una aplicación superior a 29 días. No estéril: La mayor parte del sistema de drenaje de heces DIARFLEX® advanced está elaborado con silicona. Todos los componentes del sistema no contienen látex. Indice 1. Uso previsto 2. Descripción del sistema de drenaje de heces DIARFLEX® advanced 3. Contraindicaciones 4. Advertencias 5. Medidas de precaución 6. Efectos secundarios no deseados 7. Aplicación 7.1. Preparación 7.2. Introducción del catéter 7.3. Cuidado y supervisión del sistema 7.4. Retirada del catéter 1. Uso previsto El sistema de drenaje de heces DIARFLEX® advanced está destinado para la difusión de líquidos y medio líquidos defecados garantizando la recogida segura de los mismos en pacientes que están en la cama, en pacientes que no se pueden mover o en pacientes que sufren incontinencia. El sistema de drenaje de heces DIARFLEX® advanced sirve para controlar la infección, contribuye a reducir el olor y a proteger la dignidad del paciente. Incrementa la eficiencia de la asistencia. 2. Descripción del sistema de drenaje de heces DIARFLEX® advanced 18 El sistema de drenaje de heces DIARFLEX® advanced se compone de un manguito de catéter de silicona, una bolsa recolectora, dos bolsas de recambio con una capacidad de 1,5 litro, de una inyección y de dos bolsas en suspensión. El manguito del catéter de silicona, que cuenta con un revestimiento antiolor, está equipado con un globo de baja presión (globo azul) en una punta y con un enlace para la bolsa recolectora en la otra punta y dispone de un gran lumen para la difusión de las defecaciones y dos pequeños lúmenes auxiliares que están controlados a través de dos conectores: Un conector (con la marca impresa en azul "45 ml") sirve para llenar/vaciar el globo de baja presión y un segundo conector (con la impresión„Irrig.“) da acceso al lumen de lavado. Se puede utilizar la inyección adjunta con el enlace Luer tanto para llenar/vaciar el globo como para limpiar el sistema. El manguito del catéter de silicona contiene un puerto de toma de muestras en el lumen central que puede utilizarse para la irrigación del catéter o para la extracción de muestras de heces. En el conector de la bolsa recolectora del manguito del catéter, se dispone de un obturador que puede utilizarse para el cierre temporal del manguito del catéter mientras se realiza el cambio de bolsa. 19 3. Contraindicaciones - No utilizar con pacientes con sensibilidad o alergias conocidas contra los materiales utilizados para este producto, p.ej.: Silicona - No utilizar cuando el recto del paciente no pueda alojar el volumen de llenado del balón de baja presión o cuando el canal anal estuviese pronunciadamente estrechado. - No utilizar con pacientes con heces duras. - No utilizar con pacientes en los cuales se hubiera realizado recientemente (menos de 6 semanas) una anastomosis rectal o una reconstrucción anal o de esfínter. - No debe utilizarse en pacientes con integridad comprometida de la pared rectal (p.ej. proctitis isquémica). 4. Advertencias (Es imprescindible observar las advertencias, para evitar lesiones del paciente) - No utilizar si el embalaje está abierto o dañado. - Llenar el balón de baja presión únicamente con la cantidad de agua indicada en la aplicación, no utilizar cantidades o tipos de líquidos no admitidos ni utilizar líquidos calientes. - No llenar excesivamente el balón de baja presión. - Se debería analizar la sangre rectal, para asegurar que no haya signos de una necrosis por compresión. En caso de signos de una necrosis por compresión, se recomienda retirar el catéter. - No utilizar bombas mecánicas para el lavado. - En pacientes cuya integridad de la pared rectal estuviese comprometida, no prever lavados. - Tirar excesiva o prolongadamente del catéter puede causar una erosión del canal anal, resp. del anodermo, o el desplazamiento del balón de baja presión al canal anal. 5. Precauzioni - No esterilizar. - DIARFLEX® advanced no está indicado para uso pediátrico. - DIARFLEX® advanced no está indicado para el uso durante más de 29 días. - Los pacientes con una función débil del esfínter pueden expulsar el catéter con el uso normal. - Con pacientes cuyo recto fue modificado por una estructura causada por rayos o cuyo recto está afectado por proctitis por radiación, se debe ejercer la máxima precaución. - Los pacientes con tenesmo grave o los pacientes que sientan tenesmo o dolores fuertes después de la introducción del catéter, eventualmente no toleren el catéter. En este caso el catéter debe ser retirado. 6. Effetti collaterali indesiderati Con la utilización de un drenaje rectal de heces se pueden presentar los siguientes efectos secundarios no deseables: - Per foración Necrosis por compresión Pérdida del tono del esfínter Obstrucción Infección Cantidad excesiva de deposición 20 7. Aplicación: Nota: Para obtener un rendimiento óptimo del catéter, antes de introducirlo se deben quitar del intestino todas las heces ya formadas. En todos los casos, las heces del recto deben haber sido retiradas antes de introducir el catéter. 7.1. Preparación: La posición preferente del paciente para la introducción del catéter es la posición rodilla-pecho lateral izquierda. Otras posiciones son posibles, dependiendo del estado del paciente. El objetivo del posicionamiento consiste en obtener la relajación máxima del esfínter para una introducción fácil del catéter. 7.2. Introducción del catéter 50 0 10 00 l m 00 45 15 45 ml 10 20 30 40 50 Elimine todo el aire del globo de baja presión a través del conector azul con ayuda de una inyección Luer (a continuación, retirar la inyección) l m Cubrir el globo de baja presión y la apertura rectal con una buena cantidad de lubricante 45 Sujetar el manguito del catéter con el cierre del catéter en la bolsa recolectora 10 45 ml 20 30 40 50 Coger el catéter cubierto en la punta trasera del globo de baja presión Introducir el catéter en el recto distal A través del puerto de toma de muestras, puede extraerse una muestra de heces con una jeringa de catéter con la punta humedecida (no incluida en el volumen de suministro). Para ello, abra el puerto de toma de muestras, introduzca la punta y extraiga la cantidad necesaria de heces. Tras esto, vuelva a cerrar el puerto. Colocar y soltar el manguito del catéter deslizándolo cuidadosamente Rellenar el globo de baja presión con una inyección Luer a través del conector azul con 40-45 ml de agua a temperatura ambiente (a continuación, retirar la inyección) 21 7.3. Cuidado y supervisión del sistema - Comprobar regularmente que el catéter y la bolsa colectora estén colocados de modo que la manguera de drenaje del catéter no esté retorcida, doblada o comprimida por una fuerza exterior. - Verificar que el catéter no se desplace al intestino (el anillo indicador negro en la manguera de drenaje siempre debe estar fuera del ano). - Comprobar regularmente que no se acumulen heces en la manguera de drenaje del catéter (Presione con la mano para retirar las defecaciones desde fuera manteniendo la presión de la manguito del catéter en dirección de la bolsa recolectora.). - Asegurar que el paciente no esté recostado sobre la manguera de drenaje o los conectores del lumen auxiliar. - Por lo menos dos veces al día (y con más frecuencia si fuera necesario), lavar el lumen interior de la manguera de drenaje del catéter, para quitar las heces acumuladas. Para ello se inyecta agua por la conexión de lavado (conector con anillo rojo) con una jeringa de punta Luer. Dejar que el agua del lavado salga a la bolsa colectora. - Cuando la bolsa esté llena, cambiarla por la bolsa de repuesto (no forma parte del suministro). 7.4. Retirada del catéter 45 m l 45 ml 10 20 30 40 50 Elimine todo el líquido del globo de baja presión a través del conector azul con ayuda de una inyección Luer (a continuación, retirar la inyección) Frotar la apertura rectal con lubricante, mantener un instante el catéter detrás de la entrada rectal y retirar cuidadosamente el globo de baja presión con una presión proporcionada - Debido a la elasticidad del catéter, éste puede salir súbitamente del ano. Cuidar de proteger al personal sanitario de salpicaduras. - Desechar el sistema de drenaje de heces DIARFLEX® advanced observando las reglas para materiales contaminados. Primed® Halberstadt Medizintechnik GmbH Straße des 20. Juli 1 D-38820 Halberstadt Telefónico: +49(0)3941/668-6 Fax: +49(0)3941/668-24565 e-mail: [email protected] www.primed-halberstadt.de 2 Latex PHT NON STERILE Rev.01/2013-02-22 DEHP Система дренирования стула DIARFLEX®advanced Инструкция по использованию RU Только для применения на одном пациенте. Повторное использование настоящего продукта может привести к изменению его механических или биологических свойств. Это может вызвать отказ продукта, аллергические реакции или бактериальные инфекции. Стерилизация (с целью повторного использования) может оказать отрицательное воздейс твие на работоспособнос ть сис темы. Система предусмотрена для применения в течение макс. 29 дней. Не стерильно: Система дренажа стула DIARFLEX® advanced в большинстве случаев изготовлена из силиконовых материалов. Все компоненты системы не содержат латекс. оглавлéние 1. Цель применения 2. Описание системы дренирования стула DIARFLEX® advanced 3. Противопоказания 4. Предупредительные указания 5. Меры предосторожности 6. Нежелательные побочные действия 7. Применение 7.1. Подготовка пациента и системы дренирования стула 7.2. Введение катетера 7.3. Обслуживание и контроль системы 7.4. Удаление катетера 1. Цель применения Система дренирования стула DIARFLEX® advanced предусмотрена для отвода жидкого и полужидкого стула и обеспечивает его надежное перехватывание у лежачих или неподвижных пациентов и пациентов, страдающих недержанием. Система дренирования стула DIARFLEX® advanced предназначена для контроля инфекции, способствует подавлению запаха, сохранению достоинства пациента и увеличивает эффективность оказания помощи. 2. Описание системы дренирования стула DIARFLEX ® advanced 22 Система дренирования стула DIARFLEX® advanced состоит из силиконового шланга катетера, улавливающего мешочка, а также 2 запасных мешочков с объемом 1,5 л, шприца и 2 подвесных устройства для мешочков. Силиконовый шланг катетера с запахонепроницаемым покрытием оснащен баллоном низкого давления (синий баллон) на одном конце и соединительным звеном для улавливающего мешочка на другом конце и имеет большой внутренний канал для отвода стула, а также 2 маленьких вспомогательных внутренний канал, контролируемых через 2 соединительных звена: Соединительное звено (с помощью синей маркировки и напечатанного текста "45 мл") служит для наполнения/ опорожнения баллона низкого давления, а второе Соединительное звено (с напечатанным текстом"Irrig. (Промывание)") предлагает доступ к промывочному просвету. Приложенный шприц с винтовым соединением типа Люэр может использоваться как для наполнения /опорожнения баллона, так и для промывки системы. В среднем канале силиконового шланга катетера расположен порт для взятия проб, который может быть использован для промывания катетера либо для взятия проб кала. В месте подсоединения сборного мешочка к шлангу катетера расположена пробка шланга, которая применяется для временного закрытия шланга катетера во время замены мешочка. 23 3. Противопоказания - не использовать на пациентах с известной чувствительностью или аллергиями на используемые в указанном продукте материалы/например, силикон - не использовать, если прямая кишка пациента не может принимать заливаемый объем низкого давления баллоны или если анальный канал сильно сужен. - не использовать на пациентах с твердым стулом. - не использовать на пациентах, у которых недавно проводился (менее чем 6 недель) ректальный анастомоз или анальная или сфинктерная реконструкция. - не использовать на пациентах со скомпрометированной целостностью ректальной стенки (например, ишемический проктит). 4. Предупредительные указания (Соблюдение предупредительных указаний обязательно, поскольку пациент может получить травмы) - Не использовать, если упаковка открыта или повреждена. - Наполнять баллон низкого давления только указанным в применении количеством воды, не использовать недопустимые количества или вид жидкости, а также горячие жидкости, не переполнять баллон низкого давления. - Должна быть исследована ректальная кровь, чтобы убедиться в отсутствии каких-либо признаков некроза (омертвения) от прижатия. При признаке некроза от прижатия рекомендуется удалять катетер. - Для полоскания не использовать никаких механических насосных устройств. 5. Меры предосторожности - Не производить стерилизацию. - DIARFLEX® advanced не показан для педиатрического использования. - DIARFLEX® advanced не показан для использования более 29 дней. - У пациентов со слабой функцией сфинктера катетер при обычном использовании может выталкиваться. - В отношении пациентов, прямая кишка которого была подвергнута изменению структурой, вызванной воздействием излучения, или прямая кишка которых поражена лучевым проктитом, необходима крайняя осторожность. - Пациенты с тяжелыми тенезмами или пациенты, испытывающие после внедрения катетера тенезмы или сильные боли, возможно, не переносят катетер. В этом случае катетер должен удаляться. 6. Нежелательные побочные действия С использованием ректального системы дренирования стула могут иметь место следующие нежелательные побочные действия: - Перфорация Омертвение от прижатия Потеря тонуса сфинктера Окклюзия (непроходимость) Инфекция Чрезмерное выделение стула 24 7. Применение Указание: Для обеспечения оптимальной эффективности катетера, перед введением катетера из кишки должен удаляться весь сформированный стул. В любом случае перед введением катетера из прямой кишки должен быть удален весь стул. 7.1. Подготовка пациента и системы дренирования стула Предпочтительным положением пациента для введения катетера является левостороннее коленно-грудное положение. Другие положения возможны в зависимости от состояния пациента. Целью при определении положения является достижение максимального расслабления сфинктера для облегчения введения катетера. 7.2. Введение катетера 50 0 10 00 l m 00 45 15 45 ml 10 20 30 40 50 Удалить через синий соединитель весь воздух из баллона низкого давления с помощью шприца Luer (затем удалить шприц Luer) l m Баллон низкого давления и ректальное отверстие обильно покрыть смазочным средством 45 Закрепить шланг катетера с помощью резьбовой пробки на улавливающем мешочке 10 45 ml 20 30 40 50 Взять покрытый смазкой катетер за задний конец баллона низкого давления Ввес ти к атетер в дистальную прямую кишку Взятие пробы кала осуществляется с помощью увлажненного на конце катетерного шприца (не входит в объем поставки) через порт для взятия проб. Для этого сначала необходимо открыть порт, ввести в его отверстие шприц и затем взять достаточное количество кала. После этого порт следует снова закрыть Установитьвопределенное положение шланг катетера пу тем ос торожного вытаскивания и отпускания Баллон низкого давления с помощью шприца Luer заполнить через синий соединитель 40-45 мл воды с комнатной температ урой или физиологическим раствором (затем удалить шприц Luer) 25 7.3. Обслуживание и контроль системы - Регулярно проверять, чтобы катетер и улавливающие мешочки были расположены таким образом, чтобы отводной шланг катетера не скручивался, не перегибался или не сдавливался с внешней стороны. - Проверять, чтобы катетер не перемещался в кишку (черное маркировочное кольцо в отводном шланге всегда должно находиться за пределами заднего прохода). - Регулярно проверять, чтобы в отводном шланге катетера не накапливался стул (Для удаления Вы можете вручную путем выполнения движения надавливания выдавить стул снаружи отводным шлангом в направлении улавливающего мешочка.). - Убедиться в том, чтобы пациент не лежал на отводном шланге или соединительных звеньях вспомогательных отверстий. - Минимум дважды в день (при необходимости более часто) прополаскивать внутреннее отверстие катетера отводного шланга для удаления накопившейся массы стула. Впрыснуть для этого воду через промывочное соединение (соединительное звено) с помощью шприца с винтовым соединением типа Люэр. - Слить промывочную воду в улавливающий мешочек. - При полном заполнении улавливающего мешочка заменить его запасным мешочком (не входит в объем поставки). 7.4. Удаление катетера 45 m l 45 ml 10 20 30 40 50 Удалить с помощью шприца Luer всю жидкость из баллона низкого давления через синий соединитель (затем удалить шприц Luer) Смазать рек та льное отверстие смазочным средством, захватить катетер сразу за р е к та л ь н ы м в ход о м и осторожно, под равномерным надавливанием вытащить баллон низкого давления - Из-за своей эластичности катетер может очень внезапно выходить из заднего прохода. Следить за тем, чтобы обслуживающий персонал был защищен от разбрызгивания. - Производить надлежащую утилизацию системы дренирования стула по правилам, предназначенным для зараженных материалов. Primed® Halberstadt Medizintechnik GmbH Straße des 20. Juli 1 D-38820 Halberstadt телефо́н: +49(0)3941/668-6 телефа́кс: +49(0)3941/668-24565 эма́ль: [email protected] www.primed-halberstadt.de 2 Latex PHT NON STERILE Rev.01/2013-02-22 DEHP Primed® Halberstadt Medizintechnik GmbH Straße des 20. Juli 1 D-38820 Halberstadt Tel.: +49(0)3941/668-6 Fax: +49(0)3941/24 565 email: [email protected] www.primed-halberstadt.de