1
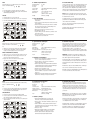
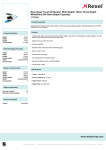
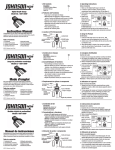
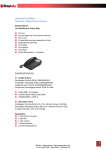
1. Kit Contents
Universal Digital Protractor
Model No. 1454-0000
4. Operating Instructions
Description
Universal Digital Protractor
3V CR 2032 Lithium Battery
Blades: 70mm, 150mm, 300mm
Calibration Square
Hard Case
Instruction Manual
Qty.
1
1
1 each
1
1
1
2. Features and Functions
Instruction
Manual
Congratulations on your choice of this
Universal Digital Protractor. We
suggest you read this instruction
manual thoroughly before using the
instrument. Save this instruction
manual for future use.
• Stainless steel construction
• Easy to read LCD
• Zero setting at any position of the measuring range
• Fine adjustment for easy setting of a desired angle
• Locking lever to prevent accidental adjustment
• Blade can be locked
• Changeable direction
3. Location of Part/Components
Blade
Fine-Adjustment
Wheel
Control Panel
Table of Contents
1. Kit Contents
2. Features and Functions
3. Location of Parts/Components
4. Operating Instructions
5. Using the Product
6. Technical Specifications
7. Care and Handling
8. Product Warranty
Lock Lever
Blade Lock
Base
Battery
Compartment Cover
Battery Installation
1. Make sure the Digital Protractor is turned off.
2. Remove the battery compartment, located below the key pad,
by inserting a small flat head screwdriver into the side notch
of the battery compartment and gently slide the battery
compartment out of the unit.
3. Install the new CR2032 battery into the tray with the positive
(+) side facing down.
4. Replace the battery cover.
Note: Always remove the battery before storing the instrument.
5. Using the Product
Button Functions
PRESET
1. Push this button once to enter the setting mode.
2. LCD will show a single row of digits with a flashing 0.
3. A single press will change the value of the flashing 0.
4. A long press will toggle the unit to the next 0.
5. After the preset value is entered, press the ZERO button
once to exit.
6. The LCD will display the set value and show a double row
of digits.
©2013 Johnson Level & Tool
1. Contenu de la trousse
Rapporteur d'angle universel numériquer
Modèle no 1454-0000
Qté
1
1
1 de chaque
1
1
1
2. Caractéristiques et fonctions
Mode
d'emploi
Nous vous félicitons d'avoir choisi ce
rapporteur d'angle universel
numérique. Nous vous suggérons de
lire attentivement ce mode d'emploi
avant d'utiliser cet appareil. Conservez
ce mode d'emploi pour pouvoir vous y
référer ultérieurement.
Table des matières
1. Contenu de la trousse
2. Caractéristiques et fonctions
3. Emplacement des pièces et
composants
4. Consignes d'utilisation
4. Consignes d'utilisation
Description
Rapporteur d'angle universel numérique
Pile au lithium CR2032 3 V
Lames : 70 mm, 150 mm, 300 mm
Équerre d'étalonnage
Étui rigide
Mode d'emploi
5. Utilisation de l'appareil
6. Spécifications techniques
7. Entretien et manipulation
8. Garantie du produit
• Construction en acier inoxydable
• Écran à CL facile à lire
• Réglage à zéro dans n'importe quelle position de
l'étendue de mesure
• Réglage fin pour régler facilement l'angle désiré
• Levier de verrouillage pour éviter les réglages accidentels
• Lame verrouillable
• Direction modifiable
3. Emplacement des pièces et composants
Lame
Molette de
réglage fin
Levier de
verrouillage
Panneau de
commande
Verrou de la lame
Base
Couvercle du compartiment de la pile
Insertion de la pile
1. Assurez-vous que le rapporteur d'angle numérique est éteint.
2. Retirez le compartiment de la pile situé sous le clavier en
insérant la pointe d'un tournevis à tête plate dans l'encoche
latérale du compartiment de la pile et faites doucement
glisser celui-ci hors de l'appareil.
3. Insérez la nouvelle pile CR2032 dans le plateau en orientant
le pôle positif (+) vers le bas.
4. Remettez le compartiment de la pile en place.
Remarque : Retirez toujours la pile avant de ranger l'appareil.
5. Utilisation de l'appareil
Fonctions des touches
PRÉRÉGLAGE («PRESET»)
1. Appuyez une fois sur cette touche pour passer au mode de réglage.
2. L'écran à CL affichera une rangée de chiffres avec un «0»
clignotant.
3. Appuyez une fois pour changer la valeur du «0» clignotant.
4. Tenez la touche enfoncée pour passer au prochain «0».
5. Une fois la valeur de préréglage entrée, appuyez une fois sur
la touche «ZERO» pour sortir du mode de réglage.
6. L'écran affichera la valeur réglée ainsi que deux rangées de
chiffres.
©2013 Johnson Level & Tool
1. Contenido del Kit
Transportador digital universal
Modelo 1454-0000
4. Instrucciones de operación
Descripción
Transportador digital universal
Batería de litio CR2032 3V
Reglillas: 70mm, 150mm, 300mm
Escuadra de calibración
Estuche duro de transporte
Manual de instrucciones
Cantidad
1
1
Una de cada una
1
1
1
2. Características y funciones
Manual de
instrucciones
Felicitaciones por la compra de este
transportador digital universal. Le
sugerimos leer detenidamente y en su
totalidad el manual de instrucciones
antes de utilizar el instrumento. Guarde
este manual de instrucciones para
consultarlo en el futuro.
• Construcción en acero inoxidable
• Pantalla LCD para fácil lectura
• Configuración a cero en cualquier posición dentro del
rango de medición
• Ajustes finos para fácil configuración del ángulo deseado
• Palanca de bloqueo para prevenir ajustes accidentales
• La reglilla se puede bloquear
• Dirección cambiable
3. Ubicación de partes / componentes
Reglilla
Ajuste fino rueda
Tabla de contenido
1. Contenido del kit
2. Características y funciones
3. Ubicación de partes / componentes
4. Instrucciones de operación
©2013 Johnson Level & Tool
5. Utilización del producto
6. Especificaciones técnicas
7. Cuidado y manejo
8. Garantía del producto
Palanca de
bloqueo
Cubierta del compartimiento para batería
Panel de control
Bloqueo de reglilla
Base
Instalación de la batería
1. Asegúrese de que el transportador está apagado.
2. Retire el compartimiento para batería ubicado en la parte
inferior del teclado, insertando la punta de un destornillador
plano angosto en la muesca lateral del compartimiento para
batería. Deslice el compartimiento hacia fuera.
3. Instale la batería CR2032 nueva con el polo positivo (+)
hacia abajo.
4. Vuelva a instalar la cubierta del compartimiento para batería.
Nota: Retire siempre la batería antes de guardar el instrumento.
5. Utilización del producto
Botones / Funciones
CONFIGURACIÓN (PRESET)
1. Presione una vez este botón para activar el modo Configuración.
2. La pantalla mostrará una sola fila de dígitos con un “0” titilante.
3. Una sola presión del botón cambiará el valor del “0” titilante.
4. Una presión larga alternará la unidad al “0” siguiente.
5. Después de que se ha establecido el valor de configuración,
presione el botón Cero una vez para desactivar la función.
6. La pantalla mostrará el valor configurado y dos filas de
dígitos aparecerán en la pantalla.
MODE
Press this button once to toggle between 0-90°, 0-180° and
0-360°. The LCD will display:
+/1. Press this button to change the direction of the display.
2. If the LCD displays 340°00’00" after a push of this button the
LCD will display 020°00’00".
ZERO/ON
1. Push this button once to turn on the unit.
2. Push this button once while the unit is on to zero set any degree.
3. Push and hold this button in for 4 seconds to turn the unit off.
Use acute angle
attachment for 0-15
MODE
Appuyez une fois sur cette touche pour passer de 0-90°, à
0-180° et à 0-360°. L'écran affichera :
+/1. Appuyez sur cette touche pour changer la direction de l'affichage.
2. Si l'écran affiche «340°00’00"», il affichera «020°00’00"»
lorsque vous aurez appuyé une fois sur cette touche.
REMISE À ZÉRO/MARCHE («ZERO/ON»)
1. Appuyez une fois sur cette touche pour mettre l'appareil en marche.
2. Alors que l'appareil est en marche, appuyez une fois sur cette
touche pour régler n'importe degré à zéro.
3. Appuyez sur cette touche et tenez-la enfoncée pendant
4 secondes pour éteindre l'appareil.
Utilisez attachement
á angle aigu pour
0-15
MODO
Presione una vez este botón para alternar entre 0-90°, 0-180° y
0-360°. La pantalla mostrará:
+/1. Presiones este botón para cambiar la dirección de la pantalla.
2. Si la pantalla muestra 340°00’00" después de presionar el
botón la pantalla mostrará 020°00’00".
CERO/ENCENDIDO
1. Presione una vez este botón para encender la unidad.
2. Presione este botón una vez mientras la unidad está encendida
para configurar cualquier medición (grado) a 0.0.
3. Presione y mantenga presionado este botón por 4 segundos para
apagar la unidad.
Utilice apego ángulo
de 0-15
6. Technical Specifications
8. Product Warranty
Measuring Range:
Resolution:
Accuracy:
Power Supply:
Battery Life:
Working Temp:
Dimensions:
Johnson Level & Tool offers a one year limited warranty on each
its products. You can obtain a copy of the limited warranty for
aJohnson Level & Tool product by contacting Johnson Level &
Tool's Customer Service Department as provided below or by
visiting us online at www.johnsonlevel.com. The limited warranty
for each product contains various limitations and exclusions.
Weight:
0 - 360°
30"
±5’
1 3V CR2032 Lithium Battery (included)
Approx. 1 year
32ºF to 104ºF (0ºC to 40°C)
5.5" x 1.5" x 2.5"
(139mm x 38mm x 63mm)
0.740 lbs. (0.336Kg)
7. Care and Handling
• Avoid exposing unit to shock vibrations and extreme
temperatures.
• Before moving or transporting the unit, make sure that the
unit is turned off.
• Remove the battery when storing the unit for an extended
time (more than three months) to avoid damage to the
unit should the battery deteriorate.
• Always store the unit in its case when not in use.
• Avoid getting the unit wet.
• Keep the unit dry and clean. Remove any moisture or dirt
with a soft, dry cloth.
• Do not use harsh chemicals, strong detergents or
cleaning solvents to clean the unit.
NOTE: The user is responsible for the proper use and care of the
product. It is the responsibility of the user to verify the calibration of
the instrument before each use.
For further assistance, or if you experience problems with this
product that are not addressed in this instruction manual, please
contact our Customer Service Dept.
In the U.S., contact Johnson Level & Tool’s Customer Service
Department at 888-9-LEVELS.
In Canada, contact Johnson Level & Tool’s Customer Service
Department at 800-346-6682.
6. Spécifications techniques
8. Garantie du produit
Étendue de mesure :
Résolution :
Précision :
Alimentation :
Durée de la pile :
Température d'utilisation :
Dimensions :
Tous les outils de Johnson Level & Tool sont couverts par une
garantie limitée de trois ans. Vous pouvez obtenir une copie de
la garantie limitée pour votre produit Johnson Level & Tool en
appelant le Service à la clientèle de Johnson Level & Tool,
au numéro indiqué ci-après, ou en visitant le site
www.johnsonlevel.com. La garantie limitée sur chaque produit
comprend certaines restrictions et exclusions qui peuvent varier.
Poids :
0 - 360°
30 po
±5’
1 pile au lithium CR2032 3 V (incluse)
Environ 1 an
0°C à 40°C (32°F à 104°F)
139mm x 38mm x 63mm
(5,5 po x 1,5 po x 2,5 po)
0,336Kg (0,740 lbs.)
7. Entretien et manipulation
• Évitez d’exposer l’instrument aux vibrations causées par
les chocs et aux températures extrêmes.
• Avant de déplacer ou de transporter l’instrument,
assurez-vous qu’il est éteint.
• Retirez les piles lorsque vous rangez l’instrument pendant un
certain temps (plus de trois mois) pour éviter d’endommager
l’instrument si les piles venaient à se détériorer.
• Évitez d’exposer l’instrument à l’eau.
• Veillez à ce que l’instrument soit toujours sec et propre.
Enlevez l’humidité ou la poussière à l’aide d’un chiffon
doux et sec.
• N’utilisez pas de produits chimiques forts, de détergents
abrasifs ni de solvants pour nettoyer l’instrument.
REMARQUE : L’utilisateur est responsable de l’utilisation et de
l’entretien appropriés de ce produit. Il incombe à l’utilisateur de
bien calibrer l’appareil avant chaque utilisation.
Pour obtenir de l’aide ou si, lors de l’utilisation de ce produit, vous
notez des problèmes qui ne sont pas mentionnés dans le présent
manuel d’instructions, veuillez communiquer avec notre Service à
la clientèle.
Aux États-Unis, composez le 888 9-LEVELS afin de communiquer
avec le Service à la clientèle de Johnson Level & Tool.
Au Canada, composez le 800 346-6682 afin de communiquer avec
le Service à la clientèle de Johnson Level & Tool.
6. Especificaciones técnicas
8. Garantía del producto
Rango de medición:
Resolución:
Precisión:
Fuente de poder:
Vida de la batería:
Temperatura de trabajo:
Dimensiones:
0 - 360°
30"
±5’
1 batería de litio CR2032 3V (incluida)
Aproximadamente 1 año
32°F a 104°F (0°C a 40°C)
5.5" x 1.5" x 2.5"
(139mm x 38mm x 63mm)
Johnson Level & Tool ofrece una garantía limitada de tres años para
cada uno de sus productos. Puede obtener una copia de la garantía
limitada de un producto Johnson Level & Tool comunicándose con el
Departamento de Servicio al Cliente de Johnson Level & Tool según se
indica debajo o visitando nuestra página Web en www.johnsonlevel.com.
La garantía limitada para cada producto contiene varias limitaciones
y exclusiones.
Peso:
0.740 lbs. (0.336Kg)
7. Cuidado y manejo
• Evite sacudir la unidad para que no la afecten las
vibraciones y exponerla a temperaturas extremas.
• Antes de mover o transportar la unidad, asegúrese de que
esté apagada.
• Retire las baterías cuando guarda la herramienta por un
período largo (más de 3 meses) para evitar que se dañe la
unidad si se deterioran las baterías.
• Evite que se moje.
• Mantenga la unidad la unidad seca y limpia. Elimine
humedad o suciedad con un paño seco y suave.
• No utilice químicos abrasivos, detergentes fuertes ni
disolventes de limpieza para limpiar la unidad.
NOTA: El usuario es el responsable del uso correcto y del cuidado
del producto. El usuario es responsable de verificar la calibración
del instrumento antes de cada uso.
Para obtener más ayuda, o si tiene problemas con un producto que
no se mencione en este manual de instrucciones, comuníquese
con el Departamento de Servicio al Cliente.
En Estados Unidos, comuníquese con el Departamento de Servicio
al Cliente de Johnson Level & Tool llamando al 888-9-LEVELS.
En Canadá, comuníquese con el Departamento de Servicio al
Cliente de Johnson Level & Tool llamando al 800-346-6682.