1
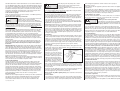
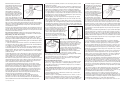
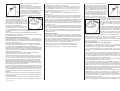
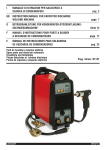
D
GB Basic Electro-Plating Set
F Mode d’emploi pour le set de base Galvano
Order No. 547-420-2
No comm. 547-420-2
Electro-Plating
Galvaniser, galvanisation
– how does it work? The following sketch shows a basic set-up to
roughly explain electro-plating. A metallic object, such as a key, is placed
in a glass container filled with an electrolyte (e.g. copper electrolyte)
opposite a piece of copper material. Both parts are attached to wires.
The electrolyte, a so-called galvanic bath, contains copper, albeit in a
chemical solution that makes the metal invisible. If the copper material
is connected to the positive pole of a DC source – such as a battery –
and the key to the negative pole, current will flow through the bath and
invisible copper ions will travel to the key and settle on it as a visible
copper coating. Without exIllus. 1
plaining the physical details,
this is a simple way of showing
the electro-plating process.
The SELVA Electro-Plating Set
is based upon the same principles and the similarities can
quickly be recognized.
Ça marche comment ? L’esquisse suivante d’un montage expérimental
doit montrer les relations à grands traits. Dans un conteneur en verre
qui est rempli d’un électrolyte (p. ex. un électrolyte cuivre) on accroche
d’un côté un objet métallique (p. ex. une clé) et de l’autre un morceau
de plaque de cuivre. Les deux objets sont fixés avec des fils de fer.
Dans l’électrolyte, le soi-disant bain électrolytique, il y a du cuivre, mais en
solution chimique ce qui fait le métal invisible. Lorsque nous raccordons
une source de courant continu (p. ex. une pile) avec le pôle positif à la
plaque de cuivre et avec le pôle
Figure 1
négatif à la clé, le courant coule
à travers le bain, et les particules de cuivre invisibles marchent en direction de la clé et
se déposent sur la surface en
tant que couche de cuivre
visible.
Sans expliquer les détails
physiques ici, I’expérience
montre de façon très simple
« le principe galvanique ».
Pour les techniques GALVANO
pour bricoleurs on utilise
exactement le principe décrit
ici. On peut vite reconnaître
les relations.
Arbeitsanleitung für Galvano-Grundset
Bestell-Nr. 547-420-2
Galvanisieren, Galvanik
– wie funktioniert das eigentlich? Die nachfolgende Skizze einer Versuchsanordnung soll die Zusammenhänge in ganz groben Zügen deutlich
machen. In eine Glaswanne, die mit einem Elektro-lyten (z.B. einem
Kupfer-Elektrolyten) gefüllt ist, wird auf der einen Seite ein metallischer
Gegenstand (z.B. Schlüssel) und auf der anderen Seite ein Stück Kupferblech eingehängt. Beide Teile sind mit Drähten befestigt. Im Elektrolyt,
dem sogenannten galvanischen Bad, befindet sich Kupfer, allerdings in
chemisch gelöster Form, wodurch das Metall unsichtbar ist.
Schließen wir jetzt eine Gleichstromquelle (z.B. Batterie) mit dem Pluspol
an das Kupferblech und mit
Bild 1
dem Minuspol an den Schlüssel
an, dann fließt Strom durch
das Bad, und die unsichtbaren
Kupferteilchen wandern zum
Schlüssel und schlagen sich
auf der Oberfläche als sichtbare Kupferschicht ab.
Ohne hier die physikalischen
Einzelheiten zu erklären, zeigt
der Versuch in einfachster
Form das »galvanische Prinzip«.
Bei den HEIM-GALVANOTechniken wird genau das hier
beschriebene Prinzip verwendet.
Die Zusammenhänge lassen
sich schnell erkennen.
Das Tamponverfahren
1. Das Säubern und Polieren
Der zu galvanisierende Gegenstand muss völlig sauber und hochglänzend
poliert sein. Mit dem beigefügten Metallputzmittel oder einem ähnlichen
Putzmittel und Lappen oder Papiertaschentuch den Gegenstand so lange
behandeln, bis er makellosen Hochglanz zeigt. Je besser der Hochglanz,
um so schöner wird nachher die galvanische Auflage. Der galvanische
Überzug gleicht keine rauhe Oberfläche oder gar Kratzer aus! Wenn nur
zum Schutz galvanisiert wird, z.B. mit Nickel als Schutz gegen Rost, ist
Hochglanz nicht erforderlich.
2. Das Galvanisiergerät
Den richtigen Galvanisierkopf und das richtige Bild 2
Schwämmchen wählen (siehe Tabelle). Das
entsprechende Schwämmchen in Wasser einweichen und wieder gut ausdrücken. Das jetzt
nur noch feuchte Schwämmchen mit der einen
Öse (Loch) an einem Haken des Galvanisierkopfes einhängen, vorsichtig
Vergolden
Elektrolyt
Gold
Galvanisierkopf
Edelstahl
(ohne Kennzeichnung)
Schwämmchen
gelb
Versilbern
Silber
Edelstahl
(ohne Kennzeichnung)
rot
Verkupfern
Kupfer I
Kupfer II
Kupfer
Kupfer
blau
violett
Vernickeln
Nickel
Nickel (durch kleine, runde
Eindruckpunkte nahe der
Haken gekennzeichnet)
grün
1004 466-347-5 DEF
The Tampon Method
1. Cleaning and Polishing
The object must be completely
clean and highly polished.
Use the metal cleaner that is
included or a similar cleaning
agent together with a cloth or
paper towel to polish the object
until it shows a high gloss without blemishes. The better the surface, the
better the plating will be. The plating will not equalize a rough surface
or cover scratches! If the plating is just meant for protection (e.g. nickel
against rust), a high-gloss finish is not necessary.
2. The Electro-Plating Unit
Choose the proper applicator tip and sponge Illus. 2
(see table below).
Soak the sponge in water and squeeze it to
remove excess moisture. Place the sponge
over the tip and hook it on both sides (Illus. 2). Fit the applicator tip to
the tube of the plating unit.
Elektrolyte
Applicator Tip
Sponge
Goldplating
Gold
Stainless steel
(no marking)
Yellow
Silverplating
Silver
Stainless steel
(no marking)
Red
Copperplating
Copper I
Copper II
Copper
Copper
Blue
Violet
Nickelplating
Nickel
Nickel (small dimples near
the hooks)
Green
All sponges are identical, but have different colors so that they can be
identified and re-used with the same electrolytes. If different electrolytes
are allowed to come in contact with each other, they may become inactive.
3. The Power Supply
Use a 3V DC power supply with a diam. 2.5mm plug,
approx. 250–300 mAmps.
Please do not use a higher current!
Le procédé par tamponnement
1. Nettoyage et polissage
L’objet à galvaniser doit être absolument propre et poli brillant. Traiter
l’objet avec le produit à nettoyer les métaux cijoint ou un autre produit
similaire et un chiffon ou un mouchoir en papier jusqu’à ce qu’il montre
une brillance parfaite. Meilleure la brillance, plus beau le revêtement
galvanique. La couche galvanique n’égalise ni une surface rugueuse ni
des rayures. Lorsqu’on ne galvanise que pour la protection, p. ex. avec
nickel comme protection contre la rouille, la brillance n’est pas nécessaire.
2. Appareil à galvaniser
Electrolyte
Tête de l’appareil à galvaniser
Eponge
Dorer
Or
Acier spécial
(sans marquage)
jaune
Argenter
Argent
Acier spécial
(sans marquage)
rouge
Cuivrer
Cuivre I
Cuivre II
Cuivre
Cuivre
bleue
violette
Nickeler
Nickel
Nickel (marqué par de petites
impressions rondes
près des crochets)
verte
Choisir la tête de l’appareil à galvaniser et l’éponge correctes (voir
table). Faire tremper l’éponge appropriée
Figure 2
dans l’eau et presser la bien. Puis fixer
l’éponge humide avec le trou sur un crochet
de la tête de l’appareil à galvaniser, tirer
l’éponge avec précaution au-dessus de la
über denselben ziehen und mit dem anderen Loch am zweiten Haken fixieren. Den Galvanisierkopf dann in das Rohr des Galvanisiergeräts stecken.
Die verschieden gefärbten Schwämmchen sind von gleicher Beschaffenheit, jedoch soll es die Färbung dem Anwender ermöglichen, für einen
bestimmten Elektrolyten das gleiche Schwämmchen immer wieder zu
verwenden. Der Grund: Verunreinigungen oder Vermischungen untereinander können Elektrolyte unwirksam werden lassen.
Guide the plug into the plating unit so that it
engages easily. The tip of the plug must be
connect to the positive pole.
Illus. 3
For a first try, batteries can be used (2 fresh 1.5V C
alkaline batteries), positive poles up.
For serious plating, always use a power supply. When using the latter,
do not leave batteries in the plating unit.
3. Die Stromversorgung
Durch ein Netzgerät mit einem 2,5mm-Stecker. 3 Volt Gleichspannung,
ca. 250–300 mA Stromstärke.
Bitte keine höhere Spannung verwenden.
Den Stecker nur soweit in den Galvanisierstab
+ Ø 2,5 mm
einführen, dass er leicht einrastet!
An der Spitze des Steckers muss Plus sein.
Bild 3
Für einen ersten Versuch können auch Batterien
verwendet werden (2 Babyzellen mit je 1,5 Volt), aber bitte nur frische
Alkaline-Batterien verwenden! Pluspole nach oben. Wer ernsthaft galvanisieren möchte, verwendet jedoch ein Netzteil. Bitte keine Batterien
im Gerät belassen, wenn mit einem Netzgerät gearbeitet wird.
4. Das Galvanisieren
Den zu galvanisierenden Gegenstand an der Krokodilklemme des Galvanisierstab-Kabels anklemmen. Ein wenig Elektrolyt in einen kleinen
Kunststoff- oder Glasbehälter gießen. Zunächst nur ein wenig, später
je nach Bedarf mehr, aber immer nur soviel, wie gebraucht wird.
Es empfiehlt sich nämlich nicht, eine kleine Restmenge Elektrolyt, die oft
verunreinigt und mehr oder weniger verbraucht ist, am Ende zurückzufüllen. Mit dem Elektrolyt kann so lange galvanisiert werden, bis die
Metallabscheidung aufhört. Der Elektrolyt ist dann erschöpft und muss
ersetzt werden.
Der mit dem Schwämmchen überzogene Galvanisierkopf wird in den
Elektrolyten getaucht, dann wird der Gegenstand über dem ElektrolytBehälter mit etwas Druck und langsamen, ruhigen Bewegungen
bestrichen.
Wichtiger Hinweis: Den Elektrolyten nicht etwa wie Farbe auf den Gegenstand auftragen. Beim Galvanisieren wird nichts aufgetragen, sondern
durch die Wirkung des Stromes werden die Metall-Ionen auf der Oberfläche des Gegenstandes abgeschieden. Dieser Vorgang braucht seine
Zeit und es muss eine gute Berührung zwischen Schwämmchen und
Gegenstand vorhanden sein. Den Galvanisierkopf deshalb nicht verkanten. Wer den Elektrolyten »wie Farbe aufträgt«, unterbricht dauernd
den Stromkreis, der Strom kann immer nur kurzfristig fließen, und das
Ergebnis wird entsprechend schlecht sein.
Also: Das Schwämmchen ruhig auf dem Gegenstand belassen und mit
leichtem Druck hin- und herreiben. Das Schwämmchen zwischendurch
immer wieder tauchen und dadurch tropfnass halten.
5. Die Nachbehandlung
Sobald die galvanische Schicht die gewünschte Stärke erreicht hat,
den Gegenstand unter fließendem Wasser spülen und abtrocknen.
Danach mit Poliertuch, Papiertaschentuch oder weichem Lappen kräftig
polieren, bis alle matten Stellen verschwunden sind und Hochglanz
entsteht. Gegebenenfalls gesamten Vorgang wiederholen. Das Metallputzmittel ist nicht für das Endpolieren vorgesehen.Will sich jedoch der
Hochglanz am Schluss nicht richtig einstellen, kann es wie folgt angewandt werden: Das Metallputzmittel nur dünn mit dem Finger auf den
Gegenstand auftragen. Danach vollständig antrocknen lassen, bis ein
weiß-grauer Belag sichtbar wird, erst dann vorsichtig polieren.
Der erste Versuch
Nehmen Sie eine Zweipfennigmünze und reinigen Sie diese gründlichst
mit Lappen, Küchenpapier und Metallputzmittel, dann gut abspülen.
Die Münze muss am Schluss wie neu aussehen. Jetzt nehmen Sie
einen Streifen Küchen-Alufolie, an den Sie die Krokodilklemme des
4. Electro-Plating
Hook the object to be plated to the crocodile clamp of the plating unit.
Pour a small amount of electrolyte into a plastic or glass dish. Start
with little liquid and add as required since used electrolytes should not
be saved. Electrolytes can be used until metal is no longer deposited:
The electrolyte is then spent and has to be replaced.
The applicator tip with sponge is dipped into the electrolyte, then the
object is held over the electrolyte dish and treated with slow and steady motions of the applicator tip.
Please note: Electrolytes are not applied to an object as paint would be.
Electro-plating does not add a layer, the applied current causes metal
ions to be transferred to the object’s surface. This process takes time
and a good contact between sponge and object is required. Do not set
the sponge on edge. Applying the electrolyte »like paint« interrupts the
flow of current and the result will be poor. Ergo: Rest the sponge on the
object and move it back and forth. Dip the sponge every now and then
to keep it soaking wet.
1004 466-347-5 DEF
+
Ø 2,5 mm
5. Finishing
As soon as the plating has reached the desired strength, wash the object
under running water and dry it off. Polish it with a polishing cloth, a paper
napkin or a soft rag until all mat areas disappear and a high polish is
achieved. If necessary, repeat the polishing action. The metal polish is not
meant for final finishing, however, if a good polish cannot be obtained,
it can be used as follows: Apply a thin coat of metal polish with a finger.
Let it dry completely (grayish appearance), then polish carefully.
The First Try
Take a copper coin and thoroughly clean it with a cloth, paper towel and
metal polish. Rinse it well. After polishing, the coin should look as new.
Take a strip of aluminum foil and
Illus. 4
hook the crocodile clamp of the
plating unit to it (Illus. 4).
Place the coin onto the strip for
a good contact. Pour a few milliliters of silver electrolyte into a
small dish. Soak the sponge of the
applicator tip well, then rub the
coin slowly and steadily without
interruption. The coin will almost
immediately change to a bluishblack color. After approx. 1 minute, rinse the coin in water and polish it
with a cloth. A blank silver finish will appear from under the dark coating.
Pour the almost unused silver electrolyte back into its bottle, then plate
the other side of the coin with gold electrolyte. This plating, too, will need
to be polished.
In between the two plating processes, do not forget to change the sponge
and rinse out the dish! After finishing, rinse all parts with water.
Corroded applicator tips need to be cleaned up.
Before doing any further plating work, please read these instructions
to the end.
Facts to Know
• In normal use, electrolytes do no harm. They should, however, be kept
out of the reach of children and away from foods. Eyes should be protected
since electrolytes can be caustic (immediately rinse with clear water).
tête de l’appareil à galvaniser et fixer l’autre trou de l’éponge au
deuxième crochet.
Puis mettre la tête de l’appareil à galvaniser dans le tube de l’appareil
à galvaniser.
Les éponges de couleurs différentes sont d’une qualité égale, mais la
coloration doit permettre à l’utilisateur d’utiliser toujours la même éponge pour un certain électrolyte. La raison en est: des contaminations ou
des mélanges peuvent rendre les électrolytes inefficaces.
3. Alimentation en courant
Par une unité d’alimentation de courant continu avec un connecteur
de 2,5 mm, tension continue de 3 Volt, intensité de courant d’env.
250 à 300 mA.
+ Ø 2,5 mm
N’utilisez pas une tension plus forte.
N’introduisez le connecteur que si profondément
Figure 3
dans le tube de l’appareil de galvanisation qu’il
s’encliquette facilement ! Le pôle positif doit se trouver à la tête du
connecteur.
Pour une première expérience on peut égale-ment utiliser des piles
(piles rondes avec 1,5 Volt chacune), mais seulement des piles alcalines
fraîches. Pôles positifs en haut. Celui qui veut galvaniser sérieusement,
utilise pourtant une unité d’alimentation. Ne laissez pas des piles dans
l’appareil, lorsque vous travaillez avec une unité d’alimentation.
4. La galvanisation
Coincer l’objet à galvaniser à la pince crocodile du câble de l’appareil
de galvanisation. Verser un peu d’électrolyte dans un petit conteneur en
matière plastique ou verre. Proportionner la quantité selon vos besoins.
En effet il ne convient pas de reverser dans le flacon une petite quantité
résiduelle de l’électrolyte qui est souvent contaminée ou plus ou moins
consumée. On peut galvaniser avec l’électrolyte aussi longtemps que le
métal ne se dépose plus. L’électrolyte est alors épuisé et doit être remplacé.
Immerger la tête de l’appareil de galvanisation recouverte de l’éponge dans
l’électrolyte, puis enduire l’objet au-dessus du conteneur de l’électrolyte
avec une certaine pression, et de mouvements lents et calmes.
Remarque importante: Ne pas appliquer l’électrolyte sur l’objet comme
une peinture. Lors de la galvanisation on n’applique rien, mais par l’effet
du courant les ions de métal sont déposés sur la surface de l’objet.
Cette procédure dure un certain temps, et le contact entre l’éponge
et l’objet doit être bon. C’est pourquoi il ne faut pas coincer la tête de
l’appareil de galvanisation. Celui qui « applique l’électrolyte comme une
peinture », interrompt toujours le circuit de courant; le courant ne peut
couler que momentanément, et en conséquence le résultat sera mauvais.
Donc: Laisser l’éponge sur l’objet et frotter la avec une légère pression.
Immerger l’éponge de temps en temps pour qu’elle soit toujours trempée.
5. Traitement ultérieur
Aussitôt que la couche électrolytique a obtenu l’épaisseur désirée, laver
l’objet sous l’eau courante et essuyer le. Puis polir fortement avec un
chiffon à polir, un mouchoir en papier ou un chiffon mou, jusqu’à ce que
tous les taches ternes aient disparu et la surface brille. En cas de besoin
répéter toute la procédure. Le produit à nettoyer les métaux n’est pas
prévu pour le polissage final. Lorsqu’à la fin, la surface ne brille pas
parfaitement, on peut procéder comme suit: N’appliquer qu’une couche
mince du produit à nettoyer les métaux avec le doigt sur l’objet. Puis
laisser sécher complètement jusqu’à ce qu’une couche blanche-grise
devienne visible, puis polir avec précaution.
La première expérience
Prenez une pièce de monnaie de dix centimes et nettoyez-la profondément avec un chiffon, un essui-tout et un produit à nettoyer les métaux,
puis lavez-la très bien.
A la fin la pièce de monnaie doit paraître nouvelle. Maintenant prendre
Galvanisierstabes anklemmen
Bild 4
(siehe Bild 4). Die Münze auf den
Streifen legen, und schon haben
Sie einen guten Kontakt.
In einen kleinen Kunststoffoder Glas-behälter ein paar ml
Silber-Elektrolyt gießen. Das
Schwämmchen am Galvanisierkopf gut tränken, dann damit die
Münze langsam und ruhig, ohne
abzusetzen, bestreichen. Sie
sehen, dass die Münze sofort die
Farbe verändert und blau-schwarz wird. Nach ca. 1 min, die Münze
mit Wasser spülen und danach mit einem Lappen polieren. Unter der
dunklen Schicht kommt die blanke Silberauflage zutage.
Den noch kaum gebrauchten Silber-Elektrolyten wieder zurückschütten,
dann den Vorgang mit Gold-Elektrolyt auf der anderen Seite der Münze
wiederholen. Auch die Goldauflage verlangt nach dem Galvanisieren
ein gründliches Polieren.
Zwischen den beiden Galvanisiervorgängen, den Schwämmchenwechsel
und das Spülen der Wanne nicht vergessen! Am Ende alle Teile gut mit
Wasser reinigen. Wenn die Galvanisierköpfe nach einiger Zeit korrodiert
sind, diese wieder blank machen.
Vor weiteren Versuchen empfehlen wir dringend, die Gebrauchsanleitung zu Ende zu lesen! Sie bewahren sich dadurch vor Misserfolgen.
Einige Dinge, die man wissen muss:
• Die Elektrolyte sind bei normalem Gebrauch ungefährlich. Sie sollten
jedoch von Kindern (TÜV-Empfehlung: Für Jugendliche ab 12 Jahre
geeignet) und Lebensmitteln ferngehalten werden. Auch nicht in die Augen
bringen, da sie dort zum Teil ätzend wirken (ggfs. sofort mit Wasser spülen
und den Arzt aufsuchen).
• Sollte ein Kleinkind aus Versehen einmal von den Elektrolyten etwas
verschlucken, dann rufen Sie bitte folgende Telefon-Nr. an: 089/41402211.
Sie erhalten von dort fachärztlichen Rat.
• Die Elektrolyte niemals mischen! Stets auf größte Sauberkeit achten.
Vorbereitungsarbeiten, z.B. das Reinigen des Metalls, immer sehr sorgfältig ausführen. Wenn der galvanische Überzug nicht zur Zufriedenheit
ausfällt, liegt es oft daran, dass vor dem Galvanisieren nicht sorgfältig
gearbeitet wurde.
• Beim Galvanisieren nicht zu früh aufhören. Lieber etwas länger galvanisieren, damit die Schicht eine gut deckende Dicke bekommt. Dies ist
insbesondere beim Rostschutz durch eine Nickel- oder Kupferauflage
wichtig (Elektrolyte: siehe Zusatz-Angebot von Verbrauchsmaterial).
Wer einen besonders guten Rostschutz wünscht, verkupfert zuerst und
galvanisiert danach Nickel in nicht zu dünner Schicht auf. Eine Zwischenspülung des Gegenstandes während des Galvanisiervorganges kann
unter Umständen für den Niederschlag förderlich sein.
• Den Gegenstand beim Galvanisieren immer nur mit dem nassen
Schwämmchen berühren. Eine direkte Berührung mit dem metallenen
Galvanisierkopf vermeiden, denn dadurch würde sehr viel Strom verbraucht, was bei Verwendung von Batterien natürlich ungünstig ist.
• Darauf achten, dass die Krokodilklemme (-) nicht das Aufsteckrohr
am Galvanisiergerät oder den Galvanisierkopf (+) berührt. Der Stromkreis wäre dann geschlossen und die Batterien schnell leer bzw.,
das Netzgerät überlastet. Auch beim Einpacken des Gerätes diesen
Hinweis beachten, wenn Batterien im Gerät sind.
• Beginnt der Galvanisiervorgang bei Silber und Kupfer nicht in
Sekunden, ist zunächst der Stromfluss zu prüfen. Am einfachsten
geht das, wenn man ein Taschenlampenbirnchen mit dem Gewinde an
die Krokodilklemme hält und mit dem Mittelpol des Birnchens den
1004 466-347-5 DEF
• If a small child accidentally swallows some electrolyte, please contact
a physician for advice.
• Never mix electrolytes! Always observe cleanliness. Preparatory work,
such as cleaning the metal, should be done very carefully. If the plating
results are not satisfactory, it may be due to insufficient preparation.
• Do not stop the plating process too soon. It is better to plate longer
to achieve better coverage. This is particularly important when nickelor copper-plating for rust protection. An excellent rust protection can be
achieved by first copper- and then nickel-plating the object. A rinsing
during the process can be of advantage.
• During plating, touch the object with the wet sponge tip only. Avoid
direct contact with the metal applicator tip since this would cause very
high energy consumption.
• Please make sure that the crocodile clamp (-) does not touch the tube
of the applicator unit or the applicator tip (+). This short-circuits the batteries
causing them to discharge or the power supply could be overloaded. This
is particularly important when packing the unit away with batteries installed.
• If the plating process with silver or copper
Illus. 5
does not begin within seconds, first check
the flow of current. That can be done by
holding the thread of a flashlight bulb to
the crocodile clamp while holding the bulb’s
center contact against the applicator tip.
The bulb should now light up (Illus. 5).
• If you are not entirely sure if the applicator tip is connected to »+«, you can do
the following experiment:
Take half of a potato. Stick two copper
Illus. 6
wires into the cut surface with a gap of
approx. 0.5–1 mm between the wires.
Connect the wires to the crocodile clamp
and the applicator tip. After approx. 2 to
5 minutes, a bluish green ring will form
around the positive pole (Illus. 6).
• Some metal objects are protected by
invisible coats of lacquer. These have to be
completely removed with solvents.
Anodized objects cannot be plated at all.
• If unused electrolytes show sediments of crystals or flakes
(caused by cold storage conditions), these will disappear after heating
the electrolyte to 25 to 40 °C and shaking it.
• If, during plating, the sponges discolor, e.g., dark blue during goldplating, this is a normal process. The discoloration can be partially
washed out and the sponges re-used.
Electro-Plating Characteristics
• Gold electrolyte contains pure 24-carat gold. The concentration is less
than in, e.g., copper electrolytes – making the plating process slower.
• If Copper II electrolyte is used with the tampon process, it needs to
be diluted with water (1:1).
• Tin- and zinc-plated objects (screws are often zinc-plated) cannot
be plated directly with Copper II. The copper transfer will be poor and
there might be black discoloration. In such cases, plate with Copper I
electrolyte.
• When plating with silver, a bluish discoloration may occur but will
disappear during polishing.
• Before copper- or silver-plating stainless steel or chrome, a coat of
nickel has to be applied first. A base nickel coat can also be advantageous before gold-plating. It is best to perform a test. If batteries are
used, a nickel base coat is mandatory. When nickel-plating, apply the
une bande de papier aluminium
Figure 4
à laquelle vous coincez la pince
crocodile de l’appareil de galvanisation (voir figure 4).
Mettre la pièce de monnaie sur
la bande, et vous avez un bon
contact. Verser quelques ml
d’électrolyte argent dans un petit
conteneur en matière plastique
ou en verre. Bien imbiber
l’éponge à la tête de l’appareil
de galvanisation, puis enduire
la pièce de monnaie lentement
et calmement sans arrêt. Vous verrez que la pièce de monnaie change
la couleur tout de suite et devient bleue-noire. Après environ 1 min.
Iaver la pièce de monnaie avec de l’eau et puis polir avec un chiffon.
Au-dessous de la couche sombre on voit le revêtement argenté brillant.
Reverser l’électrolyte argent à peine utilisé dans le flacon, puis répéter
la procédure avec l’électrolyte or sur l’autre côté de la pièce de monnaie.
Le revêtement or demande également un polissage rigoureux après la
galvanisation.
Entre les deux procédures de galvanisation, ne pas oublier de remplacer
l’éponge et de laver le conteneur ! A la fin nettoyer toutes les pièces
rigoureusement avec de l’eau. Lorsque les têtes de l’appareil de galvanisation sont corrodées après un certain temps, il faut les polir de nouveau.
Avant de faire d’autres expériences nous recommandons avec insistance
de lire le mode d’emploi jusqu’à la fin ! Vous vous protégez contre des
échecs.
Quelques choses qu’il faut savoir:
• Les électrolytes ne sont pas dangereux en cas d’une utilisation
normale. Cependant il faut les éloigner des enfants (recommandation
du TÜV = contrôle technique: appropriés pour des jeunes à partir
de 12 ans) et des aliments. Ne pas mettre aux yeux, comme ils ont un
effet caustique (en cas de besoin rincer tout de suite avec de l’eau).
• Si un petit enfant avale par mégarde un peu d’électrolyte, veuillez
téléphoner le numéro du centre anti-poison respectif. Vous y recevrez
un conseil spécialiste.
• Ne jamais mélanger les électrolytes ! Veiller toujours à la pureté maximum. Effectuer les travaux préparatoires, tels que le nettoyage du
métal, toujours avec beaucoup de précaution. Lorsque le revêtement
galvanique n’est pas satisfaisant, la raison en est souvent que l’on
n’a pas travaillé diligemment avant la galvanisation.
• Ne pas cesser de galvaniser trop bientôt. Galvaniser plutôt plus longtemps afin que le revêtement reçoive une épaisseur bien couvrante.
C’est trés important pour la protection contre la corrosion par un revêtement nickel ou cuivre (électrolytes: voir offre complémentaire de matériel
d’usage). Celui qui désire une protection contre la corrosion particulièrement bonne, cuivre d’abord et galvanise après une couche pas trop
mince de nickel. Il peut être utile de laver l’objet pendant la procédure
de galvanisation.
• Ne toucher l’objet lors de la galvanisation qu’avec l’éponge mouillée.
Eviter un contact direct avec la tête de l’appareil de galvanisation
métallique afin d’éviter une grande consommation de courant ce qui
est naturellement très défavorable si l’on utilise des piles.
• Veiller à ce que la pince crocodile (-) ne touche pas le tube de
l’appareil de galvanisation ou la tête de l’appareil de galvanisation (+).
Le circuit de courant serait fermé, les piles seraient vides très vite et
l’unité d’alimentation surchargée. Respecter ce fait également lors de
l’emballage de l’appareil, s’il y a des piles dans l’appareil.
• Si la procédure de galvanisation pour l’argent et le cuivre ne com-
Galvanisierkopf berührt. Das Birnchen
muss dann aufleuchten.
• Wenn Sie nicht ganz sicher sind, ob der
Galvanisierkopf auf »Plus« geschaltet ist,
können Sie folgendes Experiment machen:
Sie nehmen eine halbe Kartoffel und stecken
2 Kupferdrähte in einem Abstand von
ca. 0,5 bis 1 cm in die Schnittfläche. Die
Drähte verbinden Sie mit der schwarzen
Krokodilklemme und dem Galvanisierkopf.
Nach ca. 2–5 min bildet sich um den
Bild 6
Pluspol ein bläulich-grüner Ring.
• Manche Metallgegenstände sind mit unsichtbaren Lacken überzogen. Diese Schutzlacke müssen vor dem Galvanisieren durch
ein Lösungsmittel, z.B. Verdünner o.ä., entfernt werden. Eloxierte Gegenstände lassen
sich überhaupt nicht galvanisieren.
• Zeigen sich in den Fläschchen mit unverbrauchtem Elektrolyt einmal Kristalle oder
Flocken (entstanden durch zu kaltes Lagern),
so verschwinden diese durch leichtes Erwärmen auf 25–40° C und
Schütteln.
• Wenn sich die Schwämmchen beim Galvanisieren verfärben
(z.B. dunkelblau beim Vergolden), so ist dies normal. Zum Teil lässt sich
die Verfärbung wieder auswaschen.
Bild 5
Einige Besonderheiten beim Galvanisieren
• Der Gold-Elektrolyt enthält echtes, 24karätiges – also reines – Gold.
Die Konzentration muss zwangsläufig geringer sein als beispielsweise
beim Kupfer-Elektrolyten. Der Niederschlag erfolgt deshalb beim Galvanisieren auch etwas langsamer.
• Wird der Kupfer-II-Elektrolyt (Verbrauchsmaterial/Zusatzangebot)
beim Tamponverfahren verwendet, ist er 1:1 mit Wasser zu verdünnen.
• Verzinnte Metalle (z.B. Weißblech) und verzinkte Gegenstände
(Schrauben sind oft verzinkt) können nicht direkt mit Kupfer-II galvanisiert
werden, weil dann neben einer wenig guten Kupferabscheidung teilweise
Schwarzfärbung eintritt. In solchen Fällen mit Kupfer-I (Verbrauchsmaterial/
Zusatzangebot) galvanisieren.
• Beim Galvanisieren mit Silber tritt meist zunächst eine bläuliche
Färbung ein, die aber beim Polieren verschwindet.
• Will man Edelstahl (z.B. Nirosta) oder Chrom verkupfern oder versilbern, muss vorher vernickelt werden. Auch beim Vergolden empfiehlt
sich oft eine Vorvernickelung. Am besten zunächst eine Probe machen.
Bei der Verwendung von Batterien muss auf jeden Fall vorvernickelt
werden. Beim Galvanisieren mit Nickelelektrolyt (Verbrauchsmaterial/
Zusatzangebot), mit dem Galvanisierkopf kreisende Bewegungen ausführen, da sonst in der Abscheidung Absätze auftreten können. Kopf mit
dem Schwämmchen immer gut nass halten.
Wer verchromte Teile galvanisieren möchte, sollte ein Netzgerät verwenden,
da die nicht konstante Spannung bei Batteriebetrieb eventuell zu unbefriedigenden Ergebnissen führen kann. Die Nickelschicht auf Edelstahl
oder Chrom (gelblich-silbern) braucht nicht besonders dick zu sein, da
sie nur einen Haftgrund darstellt. Sie muss allerdings den Untergrund
abdecken.
• Messing, Kupfer, Nickel und Eisen lassen sich unmittelbar galvanisieren.
Auf Eisen als erste Schicht Kupfer-I-Elektrolyt (Verbrauchsmaterial/Zusatzangebot) aufbringen.
• Soll Zinn oder Blei vergoldet oder versilbert werden, empfiehlt sich
folgender Weg: Nach den üblichen Vorbereitungsarbeiten zunächst mit
1004 466-347-5 DEF
electrolyte with circular motions to avoid edges in the plated surface.
Keep the applicator sponge wet at all times.
To electro-plate chrome parts, a power supply should be used since
the unstable current from batteries can cause unsatisfactory results.
The nickel plating on stainless steel or chrome does not have to be
particularly heavy since it is only used as a base. It does, however,
have to cover the entire surface.
• Brass, copper, nickel and iron can be plated directly. On iron, use
Copper I first.
• To gold- or silver-plate tin or lead, proceed as follows: After preparing
the object, first plate with Copper I (not too thin), then apply a heavy
coat of nickel and polish. Now, other applications, such as gold, can
follow. If no base coat is applied, the gold-plating can disappear in the
relatively soft base metal. This is particularly true if the surface is relatively rough and does not have a good polish. The disappearance can
even happen at a later time making it very important to carefully apply
the two base coats.
• Aluminum, too, can be electro-plated. First, thoroughly clean the object
with a scouring powder (e.g. Ajax) and a damp cloth. The scouring powder
has to remove the top layer (i.e. the oxidation) from the aluminum surface.
Rinse and dry, then clean with metal polish and rinse again. Now apply
a base coat of Copper II. With aluminum, the plating process will be
slower than usual.
Partial Electro-Plating
If parts of an object are masked, these parts will not be plated. Highly
unusal effects can be created by having different metallic finishes right
next to each other. The masking can be done with lacquer (e.g. nailpolish)
that can afterwards be removed with nailpolish remover or solvent.
Example: Using diluted nailpolish, draw initials onto a copper bracelet.
Silver-plate the bracelet, then remove the nailpolish. The initials now
appear copper-colored on a silver-plated background.
There are, of course, many more interesting possibilties to try!
Further plating projects can be realized with the SELVA ElectroPlating Supplementary Set No. 547-421-1 (immersion plating).
mence pas en secondes, il faut d’abord
Figure. 5
contrôler le circuit de courant. La méthode
la plus simple est de tenir le filetage d’une
ampoule électrique d’une lampe torche à la
pince crocodile et de toucher la tête de l’appareil de galvanisation avec le pôle central
de l’ampoule. L’ampoule doit alors s’allumer.
• Si vous n’êtes pas tout à fait sûrs que
la tête de l’appareil de galvanisation est sur
« positif », vous pouvez faire l’expérience
suivante: vous prenez une demie pomme
de terre et enfoncez deux fils en cuivre à une distance de 0,5 à 1 cm
environ dans la surface de coupe. Vous
Figure 6
raccordez les fils avec la pince crocodile
noire et la tête de l’appareil de galvanisation. Après 2 à 5 minutes environ un anneau bleu-vert se forme autour du pôle
positif.
• Certains objets métalliques sont recouverts de laques invisibles. Il faut enlever
ces laques de protection avant la galvanisation par un solvant, p. ex. un diluant ou
quelque chose de semblable. Des objets
oxydés électrolytiquement ne peuvent pas
du tout être galvanisés.
• Si des cristaux ou flocons (résultant par un stockage trop froid) se
montrent dans les flacons avec un électrolyte non consommé, ceux-ci
disparaissent en les chauffant à 25 à 40° C et en les secouant.
• Il est normal que les éponges changent de couleur lors de la galvanisation (p. ex. bleu foncé lors du dorage). En partie la coloration peut
être enlevée par lavage.
Quelques particularités lors de la galvanisation
• L’électrolyte or contient or pur de 24 carats. La concentration doit
être inévitablement plus faible qu’avec l’électrolyte cuivre par exemple.
Le dépôt est donc en peu plus lent lors de la galvanisation.
• Si l’on utilise l’électrolyte cuivre II (matériel d’usage / offre complémentaire) avec le procédé par tamponnement, il faut le diluer 1:1 avec
de l’eau.
• Des métaux étamés (p. ex. fer-blanc) et des objets zingués (les vis
sont souvent zinguées) ne peuvent pas être galvanisés directement
avec du cuivre II, parce qu’en dehors d’un dépôt moins bon de cuivre,
une coloration partielle noire se montre. Dans ces cas galvaniser avec
cuivre I (matériel d’usage / offre complémentaire).
• Lors de la galvanisation avec argent une coloration bleuâtre apparaît
d’abord qui disparaît pourtant lors du polissage.
• Si l’on veut cuivrer ou argenter de l’acier spécial (p. ex. Nirosta)
ou du chrome, il faut les nickeler auparavant. Le même s’applique au
dorage. De toute façon faire un essai d’abord. Si l’on utilise des piles,
il faut nickeler en tout cas. Lors de la galvanisation avec l’électrolyte
nickel (matériel d’usage / offre complémentaire) faire des rotations avec
la tête de l’appareil de galvanisation afin d’éviter des discontinuités dans
le dépôt. Tenir la tête toujours trempée avec l’éponge.
Celui qui veut galvaniser des pièces chromées devrait utiliser une unité
d’alimentation en courant, comme la tension non constante lors de
l’opération en batterie peut mener aux résultats non satisfaisants.
Le revêtement de nickel sur l’acier spécial ou chrome (jaune-argenté)
ne doit pas être très épais, comme il n’est qu’une couche de fond.
Il doit pourtant recouvrir le fond.
• Le laiton, le cuivre, le nickel et le fer peuvent être galvanisés directement. Sur le fer appliquer comme première couche l’électrolyte cuivre I
Kupfer-I galvanisieren (nicht zu dünn), dann polieren. Danach eine gut
deckende Nickelschicht aufgalvanisieren und wieder polieren. Jetzt
können andere Schichten, z.B. Gold, folgen. Unterlässt man die Vorgalvanisierung, kann es vorkommen, dass die Goldauflage teilweise im
verhältnismäßig weichen Grundmetall verschwindet. Dies trifft besonders
dann zu, wenn die Oberfläche keinen guten Hochglanz zeigt, d.h., wenn
sie verhältnismäßig rauh ist. Das Verschwinden kann auch noch nach
einiger Zeit passieren, weshalb es sich lohnt, die beiden Vorschichten
sorgfältig und sauber aufzutragen.
• Auch Aluminium kann galvanisiert werden. Den Gegenstand zuerst
mit Scheuerpulver (z.B. VIM oder ATA) und feuchtem Lappen gründlich
blankputzen. Das Scheuerpulver muss dabei wie Feinst-schmirgel die
oberste Haut (d.h. die Oxidschicht) des Aluminiums entfernen.
Deshalb soll dabei ziemlich trocken gearbeitet werden. Danach spülen,
abtrocknen und mit Metallputzmittel nochmals gut reinigen und wiederum
spülen. Danach die erste Auflage mit Kupfer-II galvanisieren. Die Abscheidung vollzieht sich in diesem Fall etwas langsamer als sonst.
Teilweises Galvanisieren durch Abdecken
Deckt man einen Teil des Gegenstandes ab, verhindert also an dieser
Stelle die Galvanisierung, so kann man sehr reizvolle Effekte erzielen,
denn man erzielt schließlich zwei oder mehr unterschiedliche Metalloberflächen nebeneinander. Das Abdecken kann durch Lack – z.B. Fingernagellack – erfolgen, der anschließend mit Nagellackentferner oder
Verdünnung wieder beseitigt wird.
Ein Beispiel: Man schreibt Namensanfangsbuchstaben mit verdünntem
Nagellack auf ein kupfernes Armband, welches versilbert werden soll.
Nach dem Versilbern wird der Lack entfernt, die Buchstaben stehen dann
kupferfarben im silbernen Umfeld.
Es gibt natürlich noch viele andere Möglichkeiten für diese Technik.
Weitere Anwendungen eröffnet das SELVA Galvano-Ergänzungs-Set
Nr. 547-421-1 (Galvanisieren im Tauchbad).
1004 466-347-5 DEF
(matériel d’usage / offre complémentaire).
• Si l’on veut dorer ou argenter l’étain ou plomb, la procédure suivante
est recommandée: après les travaux préparatoires habituels galvaniser
d’abord avec cuivre I (pas trop mince), puis polir. Puis galvaniser une
couche bien couvrante de nickel et polir de nouveau. Maintenant les autres
couches, p. ex. or, suivent. Si l’on omet la prégalvanisation, il peut
arriver que le revêtement d’or disparaît en partie dans le métal de base
relativement mou. C’est le cas en particulier lorsque la surface ne
montre pas une bonne brillance, c’est-à-dire lorsqu’elle est relativement
rugueuse. Le revêtement d’or peut disparaître encore après quelque
temps. C’est pourquoi ça vaut la peine d’appliquer les deux premières
couches diligemment et proprement.
• L’aluminium peut aussi être galvanisé. Nettoyer l’objet avec un produit à
récurer (p. ex. VIM ou ATA) et un chiffon humide. Le produit à récurer
doit enlever la peau supérieure (c’est-à-dire la couche oxyde) de
l’aluminium comme un papier d’émeri très fin. C’est pourquoi il faut travailler relativement sèchement. Puis laver, essuyer et nettoyer encore
une fois avec un produit à nettoyer le métal et laver de nouveau. Puis
galvaniser la première couche avec cuivre II. Le cuivre se dépose dans
ce cas un peu plus lentement.
Galvanisation partielle par couverture
Si l’on couvre une partie de l’objet, c’est-à-dire si l’on empêche donc
la galvanisation à cet endroit, on peut réaliser des effets très alléchants,
car on obtient deux ou plus surfaces de métal différentes l’une à côté de
l’autre. On peut couvrir l’objet par une laque – p. ex. vernis à ongles –
qui est éliminée après avec un solvant ou un diluant.
Un exemple: On écrit des lettres initiales d’un nom avec du vernis à
ongles dilué sur un bracelet cuivré qui doit être argenté.
Après l’argentage la laque est enlevée, les lettres se trouvent en cuivre
dans un environnement argenté.
Il y a naturellement encore beaucoup d’autres possibilités pour cette
technique.
Autres applications sont ouvertes par le Set Complémentaire Galvano de
SELVA no. 547421-1 (galvanisation par immersion).