1
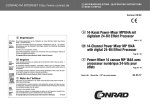
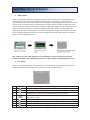
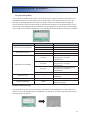
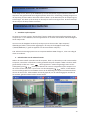
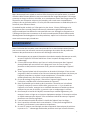
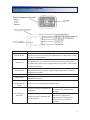
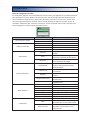
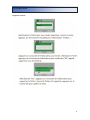
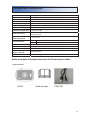
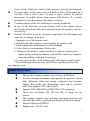
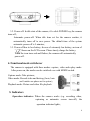
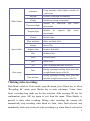
Gebruikershandleiding Sports DV PSC1331HD 90x120mm 105克铜版纸黑白印刷 INFORMATIE Wij willen u hartelijk danken voor de aankoop van deze camera. Dankzij de ingebouwde hoogwaardige chip, levert deze camera high definition video met beelden met een hoog dynamisch bereik. De beelden ondersteunen AVI Video formaat, en daarom worden zulke heldere beelden geleverd. Dit apparaat heeft een uniek en zeer goed draagbaar ontwerp, waardoor u kunt genieten van een praktisch, veilig en kleurrijk dagelijks leven. Wij vragen u voordat u het apparaat zal gebruiken deze handleiding goed door te lezen en deze te bewaren voor latere raadpleging. Deze handleiding is gebaseerd op informatie volgens meest recente gegevens. Scherm en diagrammen die gebruikt worden in deze handleiding dienen als visuele informatie voor deze digitale camera. Door ontwikkelingen binnen de Research & Development en door product partijen kan het voorkomen dat deze afbeeldingen afwijken van die in de handleiding, de actuele functionaliteit van deze camera is daaraan navenant. WAARSCHUWINGEN Voordat u de camera zal gebruiken, dient u eerst zorgvuldig deze waarschuwingen door te lezen om u te verzekeren van een juist en veilig gebruik van de camera, hierdoor zal ook de beste prestaties en een langere levensduur worden bereikt. Houdt de camera uit de buurt van direct zonlicht, dit geldt tevens voor de lens van de camera, de beeldsensor van de camera zou hierdoor kunnen beschadigen; Let op dat er geen water of zand in de camera kan komen tijdens gebruik op het strand of bij het water. Water, zand, stof of kleine deeltjes die zout bevatten kunnen de camera beschadigen; Laat de camera niet in contact komen met stof of chemische stoffen. U dient de camera te bewaren op een koele, droge en goed geventileerde ruimte. Bewaar de camera niet op een plaats met een hoge temperatuur, hoge vochtigheid of veel stof om storingen te voorkomen; Indien u de camera langere tijd wilt bewaren, dient deze regelmatig te worden gebruikt. Voordat u de camera gebruikt controleert u dan eerst of deze goed werkt; Indien er vuil of stof zich heeft opgehoopt op de camera of lens, kunt u deze reinigen met een zachte, schone en droge doek. In het geval er zand op de camera of lens zit, kunt u deze het beste verwijderen door zacht te blazen. Reinig deze in geen geval met een doek anders zou het oppervlak van de camera of lens kunnen krassen; Voor het reinigen van de lens, dient u eerst het zand weg te blazen, daarna kunt de lens reinigen met een doekje of papier speciaal bestemd voor optische instrumenten. Indien noodzakelijk, kunt u de lens reinigen met een schoonmaakmiddel. Het is streng verboden om de camera te reinigen met een organische oplossing; Raak het oppervlak van de lens nooit met de vingers aan; Indien u de geheugenkaart van de camera voor het eerst gaat gebruiken. Maakt u dan eerst en back-up van de data. Daarna kunt u de geheugenkaart eenmalig formatteren; Een externe TF kaart is een precies elektronisch component. De volgende oorzaken kunnen schade of verlies van data tot gevolg hebben: 1. Onjuist gebruik van de geheugenkaart; 2. Gebogen, gevallen kaarten of kaarten die ergens tegen aan zijn gestoten; 3. Statisch veld of een elektromagnetisch veld in de omgeving; 4. Het verwijderen van de geheugenkaart of onderbreking van de voeding van de camera, terwijl u de kaart aan het gebruiken bent op de camera of de computer (bijv. terwijl u deze afleest, beschrijft of formatteert); 1 WAARSCHUWINGEN 5. Indien het metalen gedeelte van de kaart in contact komt met een vinger of een metalen voorwerp; 6. Aan het einde van de levensduur van de geheugenkaart (koop regelmatig een nieuwe geheugenkaart). PRODUCTINFORMATIE Dit product heeft een compact ontwerp en een eenvoudige installatie; Dankzij de ingebouwde hoogwaardige chip, levert deze camera high definition video met beelden met een hoog dynamisch bereik. Zelfs bij een lage belichting kan een video worden opgenomen, tevens ondersteunt het AVI video formaat; Ondersteunt VGA (640 x 480) en HD (1280 x 720); Keuze uit drie beeld afmetingen (5M, 3M en 1M); Dit product biedt een tijd en datum watermerk functie, tevens kan tijdens de opname de tijd en datum tegelijk worden getoond; Standaard high-speed USB2.0; Tenminste max. 32G TF kaart; Dit product heeft een panorama functie, hiermee kunt u een nieuwe opname de oude overlappen, zodat u één overlappende opname kunt maken; Dit product is uitgerust met een weergavefunctie, waarmee u ter plekke de opgenomen video kunt bekijken op de display. Het ondersteunt tevens afspelen vanaf een computer. SYSTEEM VEREISTEN Systeem Vereisten Besturingssysteem CPU RAM Geluidskaart, Videokaart CD Driver Hard Disk Overig Microsoft Windows2000, XP, Vista,7 Intel Pentium III 800MHz of later of gelijkwaardig CPU Minimaal 512 MB Geluidskaart of Videokaart met DirectX8 ondersteuning of hogere versie 4 keer de snelheid of sneller Meer dan 500MB vrije ruimte 1 standaard USB 1.1 of USB 2.0 interface 2 OMSCHRIJVING EN KNOPPEN Knop/Indicator Aan/Uit Knop Sluiter Omhoog Knop OK Knop Omlaag Knop Modus Schakelaar Status Indicator Functie Zet de camera aan of schakelt hem uit. Indien het menu is geopend, kunt u schakelen tussen normaal (effect parameters en herhalen van beeld, video) en Set-up menu Bij opname in de Video modus, wordt deze gebruikt om het opnemen te starten/stoppen; In Foto modus wordt deze gebruikt als sluiter; om een video af te spelen (in Afspeel modus); als bevestiging (bij bewerking van het menu). Digitaal Inzoomen (Video/Foto modus); menu keuze (na opening van het menu); pauze en hervatten (tijdens het afspelen en opnemen in de Afspeel modus). Openen/Verlaten menu. Afspelen stoppen (tijdens herhalen video). Digitaal Uitzoomen (Video/Foto modus); menu keuze (na opening van het menu). Schakelen tussen verschillende modi: Fotograferen, Video, Herhalen. In de Uit stand, zal de indicator blijven branden De bovenste is de Oplaad indicator. indien de camera is aangesloten om op te laden. Deze zal knipperen tijdens het fotograferen en het zal blijven branden indien de De onderste is de Status indicator camera is aangesloten op een computer draagbare schijf. 3 HET EERSTE GEBRUIK 1. Opladen van de ingebouwde lithium batterij Als de camera uit staat, indien de camera is aangesloten op een computer, zal het opladen beginnen. Op dat moment zal de Oplaad indicator branden, wanneer de batterij is opgeladen zal de indicator uitgaan. Over het algemeen zal het ongeveer 2 – 4 uur duren voordat de batterij volledig is opgeladen. 2. Gebruik Geheugenkaart Volg de instructies zoals aangegeven op de sleuf voor de geheugenkaart, u dient de FT kaart in de sleuf te schuiven totdat deze er volledig in zit. Om de FT kaart eruit halen dient u zachtjes op het uiteinde van de FT kaart te drukken, de kaart zal er nu vanzelf uitkomen. N.B.: De camera is niet voorzien van een ingebouwde geheugenkaart, een externe geheugenkaart is dus noodzakelijk. 4 HET EERSTE GEBRUIK 3. Aan-/Uitzetten ¾ Aanzetten: Houd de POWER knop ongeveer 3 seconden ingedrukt, het scherm zal aangaan en de camera zal in de opstart status gaan; ¾ Uitzetten: Indien de camera enige tijd niet in gebruik is, kunt op de POWER knop drukken, de camera zal zich uitschakelen; Automatische uitschakeling: Indien de camera 5 minuten (door de fabriek ingestelde tijd)niet gebruikt wordt, zal deze zich automatisch uitschakelen; ¾ Uitschakeling doordat de batterij bijna leeg is: indien de batterij bijna leeg is, zal het icoon op het LCD scherm verschijnen. U dient dan de batterij op te laden. Indien het icoon rood wordt en gaat knipperen zal de camera automatisch uitgeschakeld worden. 4. Modus Schakelaar De camera is uitgerust met drie verschillende modi: Foto, Video en Afspeel modus. Nadat u de camera heeft aangezet, kunt u kiezen uit de drie mogelijkheden door middel van de Modus Schakelaar. 5. Indicators Status Indicator: Oplaad Indicator: Indien de camera in werking is (bijv. opnemen van videobeelden, fotograferen of automatische uitschakeling van het scherm) zal de indicator branden; Constant branden van deze indicator geeft aan dat u de batterij dient op te laden. 5 BEDIENING VAN HET APPARAAT 6. Video modus Zet, door middel van de schakelaar, de camera in de Video modus, druk op de Sluiterknop in de Preview status, om het opnemen te starten. Om het opnemen te stoppen, drukt u nogmaals op de Sluiterknop. De camera zal automatisch stoppen met opnemen indien er onvoldoende ruimte is op de geheugenkaart: 1 2 3 4 5 6 7 8 9 00:00:01 Tijd, geeft 1 sec. aan voordat opname begint (of 1 sec. opnametijd tijdens opname); Modus icoon: geeft huidige (video) modus aan; Loop Recording: geeft de huidige (3min) loop recording tijd aan Filmformaat: geeft huidige (720p) filmformaat aan; Geeft aan dat een geheugenkaart aanwezig is; Vergroting van digitale zoom: d.m.v. de Omhoog-/Omlaag knop kunt u de zoom aanpassen 1x – 4x; Batterij icoon: geeft huidige batterijstatus aan; Witbalans icoon: geeft de huidige (automatische) witbalans modus aan; Lichtmeter icoon: geeft de huidige (centraal gewogen) lichtmeting aan. 6 BEDIENING VAN HET APPARAAT Video Setup Menu In video modus, drukt u op de OK knop om het menu te openen, daarna kunt u d.m.v. de Omhoogen Omlaagknop uw keuze selecteren. Bij het maken van uw keuze zal de achtergrond hiervan oplichten. Druk op de Sluiterknop om het submenu te openen. In het submenu kunt u d.m.v. de Omhoog- en Omlaagknop uw keuze selecteren, druk nogmaals op de sluiterknop voor bevestiging of om terug te keren naar het hoofdmenu. In het hoofdmenu drukt u op OK om het menu te verlaten. Hoofdmenu Video formaat Opname Interval Submenu 1280 x 720 640 x 480 Uit 1min 3min 5min Centraal Lichtmeting modus Multi-focus Punt Automatisch Daglicht Witbalans Bewolkt TL licht Gloeilamp Speciale effecten Normaal Zwart Wit Antiek Negatief Rood Groen Blauw Uit Datum Datum stempel Datum en Tijd Omschrijving Hoge Resolutie formaat Lage Resolutie formaat Zonder interval Interval opnametijd 1 minuut Interval opnametijd 3 minuten Interval opnametijd 5 minuten Lichtmeting op basis van het centrale gedeelte Lichtmeting op basis van meerdere punten Lichtmeting op basis van één punt Gebruikt de automatische afstelling, in de meeste gevallen geschikt Geschikt voor daglicht omgevingslicht Geschikt voor bewolkte omgevingslicht Geschikt voor TL omgevingslicht Geschikt voor gloeilamp omgevingslicht Normaal effect Zwart Wit effect Retro ouderwets effect Negatief opname effect Roodachtig effect Groenachtig effect Blauwachtig effect Geen weergave van datum of tijd Tijdens fotograferen/opname afbeelding van datum in rechter benedenhoek Tijdens fotograferen/opname afbeelding van datum en tijd in rechter benedenhoek 7 BEDIENING VAN HET APPARAAT 7. Video opname Zet d.m.v. de Modus schakelaar de camera op Video modus, selecteer d.m.v. de Omlaagknop het “Recording Int” menu, druk op de Sluiterknop om het submenu te openen, u kunt kiezen uit Uit/1min/3min/5min interval. Druk op OK om te bevestigen en druk nogmaals op OK om het menu te verlaten. Door op de Sluiterknop te drukken start u de video opname. Tijdens het opnemen zal de camera de opname automatisch stoppen na de door u ingestelde tijd (1min, 3min of 5min) hierna zal gelijk het opnemen worden hervat voor de volgende sectie (bijv.: indien u de intervaltijd heeft ingesteld op 5 minuten, zal de opname na 5 minuten automatisch stoppen en daarna weer worden hervat). Indien de geheugenkaart vol is zal de eerst opgenomen sectie worden gewist om plaats te maken voor de volgende sectie, enz. N.B. : Nadat u op “Off” heeft gedrukt in het “Recording Int” menu, zal de camera normaal opnemen. Normaal opnemen heeft geen limiet en zal pas stoppen als de geheugenkaart vol .is 8. Foto modus Zet d.m.v. de Modus schakelaar de camera op Foto. Eenmaal in de preview status, drukt u op de Sluiterknop of druk in het midden van het LCD scherm voor een genomen foto. 1 2 3 4 5 6 7 8 9 9999 Teller: telt het aantal genomen foto’s of nog beschikbare foto’s; Modus icoon: geeft de huidige (Foto) status aan; Afbeelding formaat: klik hierop om uw keuze te selecteren: 1M/3M/5M; Geeft aan dat er momenteel een geheugenkaart in de camera zit; Vergroting van digitale Zoom: d.m.v. de Omhoog/Omlaagknop kunt u de zoom aanpassen: 1x – 4x; Batterij icoon: geeft huidige batterijstatus aan; Zelfontspanner: geeft de huidige (10sec.) zelfontspanner tijd aan; Witbalans icoon: geeft de huidige (automatisch) witbalans modus aan; Lichtmeting icoon: geeft de huidige (centraal gewogen) witbalans aan. 8 BEDIENING VAN HET APPARAAT Foto Setup Menu In Foto modus, drukt u op de OK knop om het menu te openen, daarna kunt u d.m.v. de Omhoog- en Omlaagknop uw keuze selecteren. Bij het maken van uw keuze zal de achtergrond hiervan oplichten. Druk op de Sluiterknop om het submenu te openen. In het submenu kunt u d.m.v. de Omhoog- en Omlaagknop uw keuze selecteren, druk nogmaals op de sluiterknop voor bevestiging of om terug te keren naar het hoofdmenu. In het hoofdmenu drukt u op OK om het menu te verlaten. Hoofdmenu Fotoformaat Beeldkwaliteit Submenu 2592 x 1944 2048 x 1536 1280 x 960 Uitstekend Goed Normaal Centraal Lichtmeting modus Multi-focus Punt Automatisch Witbalans Daglicht Bewolkt TL licht Gloeilamp Belichting / Uit 2s Zelfontspanner 10s Speciale effecten Burst Normaal Zwart Wit Ouderwets Negatief Rood Groen Blauw Uit Datum Datum stempel Datum en Tijd Omschrijving 5 megapixel resolutie 3 megapixel resolutie 1 megapixel resolutie Beste beeldkwaliteit Goede beeldkwaliteit Normale beeldkwaliteit Lichtmeting op basis van het centrale gedeelte Lichtmeting op basis van meerdere punten Lichtmeting op basis van één punt Gebruikt de automatische afstelling, in de meeste gevallen geschikt Geschikt voor daglicht omgevingslicht Geschikt voor bewolkte omgevingslicht Geschikt voor TL omgevingslicht Geschikt voor gloeilamp omgevingslicht d.m.v. Links en Rechts knop kunt u de belichtingscompensatie aanpassen Maakt één foto per keer Maakt na 2 sec. een foto met zelfontspanner Maakt na 10 sec. een foto met zelfontspanner Maakt achter elkaar foto’s Normaal effect Zwart wit effect Retro ouderwets effect Negatief effect Roodachtig effect Groenachtig effect Blauwachtig effect Geen weergave van datum of tijd Tijdens fotograferen/opname afbeelding van datum in rechter benedenhoek Tijdens fotograferen/opname afbeelding van datum en tijd in rechter benedenhoek 9 BEDIENING VAN HET APPARAAT 9. Afspeel modus Nadat u de camera heeft aangezet, zet u deze in de Afspeel modus: 1 2 3 4 Modus icoon: geeft de huidige (Afspeel) modus aan; Geeft aan dat er momenteel 1 bestand van de totaal 1 bestand is; Geeft aan dat het huidige bestand is vergrendeld; Geeft het huidige (AVI video) formaat aan. Afspeel Menu Opties Hoofdmenu Vergrendeling Bestand Bestand Wissen Dia Show Submenu Ver-/ontgrendel dit bestand Vergrendel alles Ontgrendel alles Wis dit bestand Wis alles Start Interval Herhaal Omschrijving Ver-/ontgrendel dit bestand Vergrendel alle bestanden Ontgrendel alle bestanden Wis huidig bestand Wis alle bestanden Start de dia show 1 se c- 10 sec interval Ja/Nee Afspelen Video Clips: Voor het afspelen van een video opname, drukt u op de Sluiterknop om te starten, druk op de Omhoog knop om te pauzeren, druk weer op de Sluiterknop om te stoppen. 10 BEDIENING VAN HET APPARAAT Wissen van een Bestand: 11 BEDIENING VAN HET APPARAAT 10. Systeem Setup Menu In Foto, Video of Afspeel modus, drukt u op de OK knop om het menu te openen, hierna drukt u op de POWER knop om over te schakelen naar het Setup menu. In het Setup menu kunt u d.m.v. de Omhoog- en Omlaagknop uw keuze selecteren. Bij het maken van uw keuze zal de achtergrond hiervan oplichten. Druk op de Sluiterknop om het submenu te openen. In het submenu kunt u d.m.v. de Omhoog- en Omlaagknop uw keuze selecteren, druk nogmaals op de sluiterknop voor bevestiging of om terug te keren naar het hoofdmenu. In het hoofdmenu drukt u op OK om het menu te verlaten. Hoofdmenu Automatisch Direct Bekijken Spanningsfrequentie Submenu Uit 1 seconde 3 seconden 50Hz 60Hz 1 minuut Automatisch uitschakelen 3 minuten 5 minuten Uit Datum en Tijd / Formatteren Ja/Nee Fabrieksinstellingen Ja/Nee Omschrijving Niet direct bekijken na opname 1 sec. na opname bekijken 3 sec. na opname bekijken Ingesteld op 50 Hz Ingesteld op 60 Hz De camera wordt automatisch bij niet gebruik na 1 minuut uitgeschakeld De camera wordt automatisch bij niet gebruik na 3 minuten uitgeschakeld De camera wordt automatisch bij niet gebruik na 5 minuten uitgeschakeld Automatisch uitschakelen uitzetten Instellen van Datum en Tijd instellingen Formatteren van de geheugenkaart Terugzetten naar de fabrieksinstellingen Instellen van Datum en Tijd: Druk op de OK knop om het menu te openen, druk daarna op de POWER knop om het submenu te openen. Druk op de Omlaag knop om “Date&Time” te selecteren, druk daarna op de Sluiterknop om het setup scherm te openen. 12 BEDIENING VAN HET APPARAAT In het setup scherm, drukt u op de POWER knop om het item (datum, tijd) te selecteren dat u wilt aanpassen. Het geselecteerde item zal geel oplichten. Druk d.m.v. de Omhoog-/Omlaag knoppen om de aanpassing te doen. Nadat u alles heeft voltooid, drukt u op de Sluiterknop om de aanpassing (en) te bevestigen. Of u drukt op de OK knop om de setup te wissen en terug te keren. Druk als laatste op de OK knop om de Setup modus te verlaten. TOEPASSING OP DE COMPUTER 1. Aansluiten op de computer De camera is voorzien van een “plug and play” functie. Nadat u de camera heeft aangesloten op de computer d.m.v. een USB kabel, zet u het apparaat aan en zal deze overschakelen naar de draagbare harde schijf modus. Het icoon van de draagbare harde schijf verschijnt op het scherm onder “Mijn Computer”. Afbeeldingen/video’s zullen worden opgeslagen in de map van de draagbare harde schijf: I:\DCIM\100MEDIA (“I” geeft het apparaat van de verwisselbare schijf aan). N.B.: Indien het besturingssysteem van uw computer Windows 2000 of hoger is, is het niet nodig de driver te installeren. 2. Gebruik maken van de webcam functies Nadat u de camera heeft verbonden met de computer, drukt u op de OK knop om de camera modus te openen, controleert u of de driver reeds is geïnstalleerd op uw computer. Nadat u de driver heeft geïnstalleerd, zal deze aan “Start Alle Programma’s” worden toegevoegd, tevens zal het snelkoppeling icoon verschijnen. Wanneer de camera is aangesloten op de computer en in de camera modus staat, kunt u op het icoon van de snelkoppeling klikken, zal het AMCAP scherm worden geopend. In het AMCAP scherm zal de afbeelding verschijnen overeenkomend met die van de camera lens. Indien AMCAP niet wordt geopend, kan de video doorgegeven worden via het netwerk, gebruik makend van de camera functie. 13 TECHNISCHE GEGEVENS Technische Gegevens Beeldsensor Functie modus Lens Digitale Zoom Sluiter LCD Scherm Afbeelding resolutie Video Resolutie Witbalans Belichtingscompensatie Bestand Formaat Opslag medium USB Interface Stroomvoorziening Afmetingen (L x B x H) Gewicht 1.3 megapixel (CMOS) Video, Foto, Afspelen, Draagbare schijf, Webcam F3.2 f=6.0mm 4x Elektronische sluiter 1.77”TFT scherm 5M (2592 x 1944), 3M (2048 x 1536), 1M (1280 x 960) VGA: 640 x 480 (60 beelden/seconde; 720P: 1280 x 720 (30 beelden/seconde) Automatisch/Daglicht/Bewolkt/TL licht/Gloeilamp -2.0 ~ +2.0 EV (Exposure Value) Video AVI Image JPEG TF Kaart (Max.32GB) Hig-speed USB 2.0 interface Ingebouwde 3.7V oplaadbare lithium batterij 68 x 48 x 29mm ± 46,5g maximale opnametijd bedraagt 29 minuten per video Standaard Verpakking 14 Mode d’emploi Sports DV PSC1331HD INFORMATION Merci beaucoup d’avoir acheté ce caméra. Grâce à une puce très performante, ce produit offre des vidéos à haute définition avec une continuité des images dynamiques. Les images prennent en charge les fichiers AVI Vidéo, et en conséquence obtenir des images nettes. Ce dispositif a une conception unique et très portable, pour rende votre vie quotidienne pratique, sûre et pleine de couleur. S’Il vous plaît lisez attentivement ce mode d’emploi et le conserver pour référence future. Ce mode d’emploi est basé sur l’information le plus récent. L’écran d’affichage et les diagrammes dans ce mode d’emploi offrent une présentation spécifique et directe du caméra numérique. Des différences sont possibles entre ces affichages et illustrations et l’affichage réel que vous constaterez sur la caméra numérique du fait de la différence de développement technologique et le lot de production, auquel cas les fonctions réelles de cette caméra seront qui prévaudront. AVERTISSEMENT Avant l’utilisation de la caméra, nous vous prions de lire ce avertissement attentivement, pour assurez-vous une utilisation correcte et sans danger du caméra afin de profiter du maximum des performances en lecture et afin d’allonger sa durée de vie. N’entreposez pas cet appareil photo dans les endroits exposés directement au soleil, et tenez l’objectif à l’écart du soleil direct. Sinon le capteur d’image peut être endommagé. S’il vous plaît essayez d’éviter que l’eau et le sable n’entrent pas dans l’appareil photo pendant que vous utilisez-le à la plage ou à l’eau. De l’eau, le sable, la poussière ou des particules contenant du sel, pourraient endommager l’appareil photo ; Tenez l’appareil photo loin de la poussière ou de matériel chimique. Il faut en tout cas garder-le dans un endroit sec et frais avec beaucoup de ventilation. Ne placer pas l’appareil photo dans un endroit à haute température, à l’humidité ou dans un endroit poussiéreux, afin d’éviter un fonctionnement anormal ; En cas de stockage à long terme, il faut utiliser l’appareil régulièrement. Avant l’utilisation, contrôlez bien la fonctionnement de l’appareil; Dans l’éventualité que la saleté ou de la poussière s’accumule sur la lentille de l’objectif, nettoyez-la avec un chiffon doux, propre et sec.. si il y a du sable sur l’appareil ou la lentille, nettoyez-les en soufflant doucement. N’oubliez pas de ne nettoyez-les pas avec un chiffon, ça pourrait rayer et endommager le surface ; Pour nettoyer la lentille de l’objectif, commencez par souffler légèrement, puis nettoyez-la avec un linge ou un tissu pour équipement optique. Si nécessaires utilisez un liquide nettoyant pour objectif. Il est strictement interdit de nettoyer l’appareil photo avec une solution organique ; Il est strictement interdit de toucher la lentille de l’objectif avec les doigts ; Pour la première utilisation de la carte mémoire, s’il vous plaît sauvegardez les données, puis formatez la carte mémoire uniquement ; Un carte TF externe sont fabriqué avec des composants électroniques de précision. La perte ou l’e й ndommage des données peut être causé par le motifs suivants ; 1 AVERTISSEMENT 1. 2. 3. 4. 5. L’utilisation incorrecte de la carte mémoire ; Carte courbée, fendue ou ébréchée ; Température haute et l’humidité ou la lumière directe du soleil; Tout près des champs statiques ou électromagnétiques ; Retire de la carte mémoire ou un interférence de l’alimentation de l’appareil photo en regardant la carte mémoire sur l’appareil photo ou l’ordinateur (p.e. pendant la lecture, l’écriture ou le formatage) ; 6. Contact entre la surface de métal de la carte mémoires avec les doigts ou un objet métallique. 7. Au-delà de la durée de vie de la carte mémoire (Veuillez acheter régulièrement une nouvelle carte mémoire). INFORMATION DU PRODUIT Ce produit est de design compact et facile d’installer ; Grâce à une puce très performante, ce produit offre des vidéos à haute définition avec une continuité des images dynamiques. Même lors d’un très faible luminosité, le vidéo peut être enregistré, puis l’appareil photo prend en charge au format AVI Vidéo ; L’enregistrement de vidéo est compatible avec le mode VGA (640 x 480) et HD (1280 x 720) ; Les dimensions de 5M, 3M et 1M sont disponibles pour prendre les photos; Ce produit est compatible avec la fonction filigrane pour l’heure et la date et la cassette vidéo peut afficher l’heure et la date en cours simultanément ; Compatible avec USB2.0 ; Compatible avec les cartes SD jusqu’au maximum de 32GB ; Le mode d’enregistrement de couverture de circulation adoptée pour ce produit peut couvrir les images originales avec des nouvelles pour continuer avec des enregistrements circulaires. Ce produit prend en charge les fonctions de sortie vidéo et de lecture instantanée. Les continus vidéo enregistrés peuvent être visionnés sur place grâce à l’écran installé sur l’appareil. En plus, elle est compatible avec la lecture sur le téléviseur et l’ordinateur. CONFIGURATION REQUISE Configuration Requise Système d’exploitation Microsoft Windows2000, Xp, Vista,7 Intel Pentium III de plus de 800MHz, ou CPU de performance CPU équivalente Mémoire interne Supérieure à 512MB Carte de son et Les cartes doivent être compatibles avec DirectX8 ou version graphique supérieur Lecteur CD Vitesse 4 fois ou supérieur Disque dur Espace disponible de plus de 500MB Autres Un port USB 1.1 ou 2.0 standard 2 PRÉSENTATION ET CLAVIER Touche/Indicateur Marche/Arrêt L’obturateur Touche Haut Touche OK Touche Bas Bouton de changement de mode Fonction Pour démarrer ou éteindre l’appareil photo. En ouvrant le menu, basculer entre le men principal (les paramètres et la lecture de l’image ou vidéo) et le sous-menu. En mode enregistrement vidéo, il fonctionne pour démarrer/arrêter l’enregistrement ; en mode photo ça fonctionne comme obturateur ; en mode lecture pour lire les enregistrements des vidéos ; confirmation (en utilisant le menu). Zoom digital avant (mode photo/vidéo) ; sélection de menu (après l’ouverture du menu) ; pauser, redémarrage (mode lecture, lisant et enregistrant un vidéo). Ouvrir/Quitter le menu. Arrêter la lecture (mode lecture vidéo). Zoom digital arrière (mode photo/vidéo) ; sélection menu (après l’ouverture du menu). Basculer entre les mode photo/vidéo/lecture. Celui d’en haut est l’indicateur de chargement Les indicateurs lumineux Celui d’en bas est l’indicateur de fonctionnement Dans l’état Arrêt, s’allume quand le chargeur est branché pour charger. Dans l’état de photo il clignote une fois et il clignote en permanence si l’appareil est branché avec un dispositif portable. 3 UTILISATION 1. Chargement de la batterie au lithium intégrée Connectez l’appareil photo à l’ordinateur pour le chargement en mode éteint. L’indicateur lumineux pour le chargement s’allume alors et s’éteindra lorsque le chargement sera terminé. En général, l’appareil peut se charger complètement en 2 – 4 heures. 2. Utilisation de la carte mémoire Insérez la carte mémoire dans la fente pour carte en tenant compte de la gravure concave sur le côté de la fente pour carte mémoire jusqu'à ce qu’elle soit complètement insérée. Pour sortir la carte TF, appuyez doucement sur l’extrémité de la carte vers l’intérieur et elle s’éjectera. Remarque : Cet appareil photo n’est pas doté d’une mémoire interne, alors assurez-vous d’avoir inséré une carte mémoire avant utilisation. 3. Mettre en marche/Éteindre Mettre en marche : appuyez sur la touche POWER pendant 3 secondes, l’écran s’allume et la caméra entre en mode de démarrage. 4 UTILISATION ¾ Éteindre : Appuyez sur la touche POWER une fois en condition inactive et la caméra s’éteindra. Extinction automatique : Lorsque le temps d’inactivité de la caméra vidéo atteint le temps pour l’extinction automatique, elle s’éteindra automatiquement pour économiser l’énergie. Le temps par défaut d’extinction automatique pour l’appareil photo est de 5 minutes. ¾ Extinction en cas de coupure d’alimentation : lorsque la batterie est insuffisamment chargée, l’écran d’affichage LCD affichera l’icône . Veuillez la recharger rapidement. Lorsque l’icône passe au rouge et se met à clignoter, la caméra s’éteindra automatiquement. 4. Conversion entre les modes de fonctionnalités Trois modes sont disponibles avec cette caméra vidéo, à savoir le mode photo, vidéo et lecture. Une fois que l’appareil est allumé vous pouvez basculer entre les trois modes au moyen du bouton changement du mode. Mode Photo : Prendre des photos Mode Vidéo : Enregistrer les vidéos Mode Lecture : Regarder les images et vidéos 5. Indicateurs lumineux Indicateur lumineux de fonctionnement : Lorsque l’appareil photo est occupé (comme p.e. en enregistrement, prise de photo, économiseur d’écran automatique), l’indicateur d’état occupé s’allumera. Indicateur lumineux de chargement : L’indicateur lumineux est allumé en permanence pour rappeler à l’utilisateur que l’appareil est en train de se charger. 6. Mode Vidéo Lorsque la sélection de mode est positionnée sur le mode vidéo, appuyez sur la touche de l’obturateur une fois ou cliquez sur le centre de l’écran LCD une fois pour commencer l’enregistrement vidéo en état de prévisualisation ; appuyez sur la touche de l’obturateur de nouveau si vous souhaitez arrêter l’enregistrement vidéo et la caméra arrêtera également l’enregistrement vidéo lorsque la carte mémoire sera pleine ou que l’alimentation sera insuffisante durant la période d’enregistrement vidéo. 5 UTILISATION 1 2 3 4 5 6 7 8 9 00:00:01 Le minuteur, signifie qu’il manque 1 seconde pour l’enregistrement (1 seconde enregistré) ; L’icône de mode: Indique que la caméra est en mode d’enregistrement vidéo ; Enregistrement intervalle en boucle: indique que le temps réglé actuel est 3 minutes ; Taille d’image vidéo: indique que la taille actuelle est 720p; Indique que actuellement une carte mémoire a été insérée ; Fonc on de zoom numérique: par les touches haut/bas vous pouvez régler le zoom pour une variété de réglage de 1 x – 4 x ; L’icône de ba rie: : Indique le niveau de la ba erie actuel; L’icône Balance des blancs: indique que le mode actuel de la balance des blancs est réglé automa quement ; L’icône Photométrie: indique que l’op on actuel est Centrale. 6 UTILISATION Menu de configuration de vidéo En mode vidéo, appuyez sur la touche OK pour ouvrir le menu, puis appuyez sur les touches haut/bas pour sélectionner le menu. Quand vous avez fait votre choix le fond de l’élément sélectionné sera mis en surbrillance. Appuyez sur la touche de l’obturateur pour entrer le sous menu. Dans le sousmenu vous pouvez faire votre sélection par les touches haut/bas et appuyez une autre fois sur la touche de l’obturateur pour confirmer et retourner au menu principal. Dans le menu principal vous pouvez appuyez sur la touche OK pour quitter le menu. Hoofdmenu Dimensions de l’image Vidéo par intervalle Submenu 1280 x 720 640 x 480 OFF 1min 3min 5min Centrale Photométrie Multi Moyenne Automatique Lumière jour Balance des blancs Nuageux Lampes fluorescents Lampes incandescences Effets spéciaux Normal Noir et Blanc Antique Négatif Rouge Vert Bleu Désactivé Date Cachet Date Date et l’heure Omschrijving Haute Résolution Basse Résolution Intervalle désactivée Intervalle est fixée à 1 minute Intervalle est fixée à 3 minutes Intervalle est fixée à 5 minutes Le photo se base sur le centre de l’image Le photo se base sur une grande variété de conditions de prise de vue Le photo se base sur la moyenne pour l’ensemble de l’image L’appareil photo choisit la meilleure balance, approprié pour presque toutes situations Approprié pour prendre les photos en extérieur Approprié pour prendre les photos à l’ombre Approprié sous les lampes fluorescentes Approprié sous les lampes incandescences Effet normal Effet noir et blanc Effet rétro Effet negatif de l’image Effet rouge Effet vert Effet bleu La fonction est désactivé En mode photo/vidéo l’estampillage de la date dans le coin inférieur droit En mode photo/vidéo l’estampillage de la date et l’heure dans le coin inférieur droit 7 UTILISATION 7. Enregistrement Vidéo Appuyez sur la touche Changement de Mode, ouvrez le menu, appuyez sur les touche haut/bas pour sélectionner le menu « Recording Int », appuyez sur la touche de l’obturateur pour entrer dans le sous-menu, vous avez les options Off, 1min, 3min, 5min pour faire un vidéo par intervalle en boucle. Appuyez sur la touche OK pour confirmer et appuyez un autre fois pour quitter le menu. En appuyant la touche de l’obturateur vous pouvez commencer l’enregistrement. Pendant l’enregistrement l’appareil photo arrêt après le temps que vous avez choisit 1min, 3min, 5min et recommence automatiquement l’enregistrement suivant. (p.e. : si vous avez sélectionné 5 min, après 5 minutes l’enregistrement s’arrêt et recommence la section suivante). En cas que la carte mémoire est pleine, le premier fichier enregistré sera supprimé pour obtenir l’espace, ça se répète de la même manière. Remarque : Si vous avez sélectionné OFF dans le menu « Recording Int » et vous avez quitté le menu, l’appareil photo enregistrera normalement. L’enregistrement normal est sans limite de temps et s’arrêtera seulement quand la carte mémoire est pleine. 8. Mode Photo Positionnez la touche changement de mode sur la position Photo, appuyez sur la touche de l’obturateur ou cliquez sur le centre de l’écran pour prendre une photo. 1 2 3 4 9999 Contre: indique le nombre de photos déjà prises/pouvant encore être prises ; Icône de mode: indique que le mode actuel est Photo; Taille de l’image, sélectionner entre les options: 1M/3M/5M; Indique que la carte mémoire est actuellement insérée; 5 Icône zoom numérique, par les touches Haut/Bas vous pouvez régler : 1x – 4x; 6 7 Icône de batterie: indique le niveau actuel de la batterie; Icône retardateur: le retardateur actuellement est mis à 10 secondes; Icône balance des blancs: indique que la balance des blancs est actuellement en mode automatique; Icône Photométrie: indique que actuellement la photométrie est en mode Centrale . 8 9 8 UTILISATION Menu de configuration de Photo En mode Photo, appuyez sur la touche OK pour ouvrir le menu, puis appuyez sur les touches haut/bas pour sélectionner le menu. Quand vous avez fait votre choix le fond de l’élément sélectionné sera mis en surbrillance. Appuyez sur la touche de l’obturateur pour entrer le sous-menu. Dans le sous-menu vous pouvez faire votre sélection par les touches haut/bas et appuyez une autre fois sur la touche de l’obturateur pour confirmer et retourner au menu principal. Dans le menu principal vous pouvez appuyez sur la touche OK pour quitter le menu. Menu principal Taille de l’image Qualité de l’image Mode Photométrie Sous-menu 2592 x 1944 2048 x 1536 1280 x 960 Optimale Bonne Normale Centrale Multi Moyenne Automatique Balance des blancs Lumière jour Nuageux Lampes fluorescents Lampes incandescences Compensation de la valeur d’exposition / OFF 2s Retardateur 10s Effets spéciaux Cachet date Burst Normal Noir et blanc Antique Négatif Rouge Vert Bleu OFF Date Date et l’heure Description 5 mégapixel résolution 3 mégapixel résolution 1 mégapixel résolution Une qualité meilleure Une qualité bonne Une qualité normale Le photo se base sur le centre de l’image Le photo se base sur une grande variété de conditions de prise de vue Le photo se base sur la moyenne pour l’ensemble de l’image L’appareil photo choisit la meilleure balance, approprié pour presque toutes situations Approprié pour prendre les photos en extérieur Approprié pour prendre les photos à l’ombre Approprié sous les lampes fluorescentes Approprié sous les lampes incandescences Par les touches Haut/Bas vous pouvez régler la compensation Prend une Photo à la fois Prend une Photo après une intervalle de 2 secondes Prend une Photo après une intervalle de 10 secondes Prend les photos en succession Effet normal Effet noir et blanc Effet rétro Effet négatif de l’image Effet rouge Effet vert Effet bleu La fonction est désactivé En mode photo/vidéo l’estampillage de la date dans le coin inférieur droit En mode photo/vidéo l’estampillage de la date et l’heure dans le coin inférieur droit 9 UTILISATION 9. Mode Lecture Après avoir démarré, mettez l’appareil photo en mode Lecture 1 2 3 4 Icône de mode: indique que actuellement l’appareil est en mode Lecture; Indique qu’il y a un seul ficher dans le dossier actuel/ un fichier au total; Indique que le fichier actuel est verrouillé; Indique que le fichier conteneur actuel est AVI Vidéo. Menu de configuration Lecture En mode Lecture, appuyez sur la touche OK pour ouvrir le menu, puis appuyez sur les touches haut/bas pour sélectionner le menu. Quand vous avez fait votre choix le fond de l’élément sélectionné sera mis en surbrillance. Appuyez sur la touche de l’obturateur pour entrer le sous-menu. Dans le sous-menu vous pouvez faire votre sélection par les touches haut/bas et appuyez une autre fois sur la touche de l’obturateur pour confirmer et retourner au menu principal. Dans le menu principal vous pouvez appuyez sur la touche OK pour quitter le menu. Hoofdmenu Submenu Verrouiller/déverrouiller ce fichier Verrouillage fichier Supprimer fichier Diaporama Verouiller tout Déverrouiller tout Supprimer ce fichier Supprimer tout Démarrage Intervalle Répéter Omschrijving Verrouille/déverrouille le fichier actuel Verrouille tous fichiers Déverouille tous fichiers Supprime le fichier actuel Supprime tous les fichiers Démarrage du diaporama Intervalle de 1 sec- 10 sec Oui/Non Lecture de Vidéo Pour mettre en lecture, appuyez sur la touche de l’obturateur, appuyez la touche haut pour mettre la lecture en pause, appuyez une autre fois sur la touche de l’obturateur pour arrêter la lecture. 10 UTILISATION Supprimer le fichier 11 UTILISATION Menu de configuration Système En mode Photo, Vidéo ou Lecture, appuyez sur la touche OK pour ouvrir le menu, puis appuyez sur la touche POWER pour sélectionner le menu de configuration. Appuyez sur les touches haut/bas pour sélectionner le menu. Quand vous avez fait votre choix le fond de l’élément sélectionné sera mis en surbrillance. Appuyez sur la touche de l’obturateur pour entrer le sous-menu. Dans le sous-menu vous pouvez faire votre sélection par les touches haut/bas et appuyez une autre fois sur la touche de l’obturateur pour confirmer et retourner au menu principal. Dans le menu principal vous pouvez appuyez sur la touche OK pour quitter le menu. Menu principal Sous-menu OFF Lecture automatique Fréquence nominale 1 seconde 3 secondes 50Hz 60Hz 1 minute Arrêt automatique 3 minutes 5 minutes Date et l’heure Formater Paramètres par défaut OFF / Oui/Non Oui/Non Description La fonction lecture automatique désactivé Lecture après 1 secondes Lecture après 3 secondes Réglé à 50 Hz Réglé à 60 Hz Le caméra s’éteint automatiquement après 1 minute d’inactivité Le caméra s’éteint automatiquement après 3 minute d’inactivité Le caméra s’éteint automatiquement après 5 minute d’inactivité Désactiver la fonction Réglage de la date et l’heure Formater la carte mémoire Rétablir les paramètres par défaut Réglage de la date et l’heure Appuyez sur la touche OK pour ouvrir le menu, puis vous appuyez sur la touche POWER pour entrer le menu de configuration. Appuyez sur la touche bas pour sélectionner « Date&Time », appuyez sur la touche de l’obturateur, la fenêtre de configuration s’affiche. 12 UTILISATION Dans la fenêtre de configuration vous appuyez sur la touche OK pour sélectionner l’élément que vous voulez modifier (La date et l’heure). L’élément sélectionné sera mis en surbrillance jaune. Modifiezles par les touches haut/bas, appuyez sur la touche de l’obturateur pour confirmer la modification, ou appuyez sur la touche OK pour annuler la modification et quitter le menu. Finalement appuyez sur la touche OK pour quitter le mode de configuration. APPLICATION SUR L’ORDINATEUR 1. Connectez à l’ordinateur La caméra est fournie avec la fonction Plug and play. Connectez l’appareil photo à l’ordinateur avec le câble USB en mode allumé, il passera alors en mode dispositif de stockage de masse USB. L’icône de disque amovible apparaitra dans la fenêtre « My Computer » (Ordinateur). Les photos/vidéos que vous avez pris sont enregistrées dans le dossier I:\DCIM\100MEDIA (« I »indique le disque amovible de cet appareil) dans le disque amovible. Remarque : Si la fonction de disque amovible est utilisée sous Windows 2000 ou un système d’exploitation Windows de version supérieure, il n’est pas nécessaire d’installer le pilote. 2. Utilisez la fonction webcam Connectez la caméra à l’ordinateur, appuyez sur la touche OK pour passer en mode caméra. Avant d’utiliser la fonction caméra, assurez-vous bien que le pilote est installé. Après l’installation du pilote, « SPCA1628 PC Driver »sera ajouté dans le menu « Démarrer Tous Programmes », le raccourci s’affichera. Une fois installé et passé en mode caméra le raccourci s’affichera, la fenêtre AMCAP s’ouvrira. Dans la fenêtre AMCAP, l’image correspondant avec celui de la caméra s’affichera. Si le logiciel de AMCAP se n’ouvre pas, le vidéo peut être transmis par le réseau en usant la fonction caméra. 13 PARAMÈTRES TECHNIQUES Capteur d’image Mode de fonctionnalité Objectif de la caméra Zoom numérique Obturateur Écran d’affichage LCD Résolution de l’image Résolution d’image vidéo Balance des blancs Compensation de la valeur d’exposition Formats de fichier Moyen de stockage Interface USB Alimentation Dimensions (longueur x largeur x hauteur) Poids 1.3 méga pixels (CMOS) Vidéo, Photo, Lecture, disque amovible, webcam F3.2 F=6.0mm 4 fois Obturateur Électronique Écran TFT 1.77” 5M (2592 x 1944), 3M (2048 x 1536), 1M (1280 x 960) VGA: 640 x 480 (60 images/seconde; 720P: 1280 x 720 (30 images/seconde) Automatique/Lumière jour/nuageux/Lampes Fluorescents/Lampes incandescences -2.0 ~+2.0 EV Vidéo AVI Image JPEG Carte TF (prend en charge jusqu’à 32GB) High-speed USB 2.0 Batterie lithium 3,7V rechargeable intégrée 68 x 48 x 29mm Environs 46,5 grammes durée maximale d'enregistrement est de 29 minutes par vidéo Paquet Standard 14 Product Manual Sports DV PSC1331HD Functions Thank you for purchasing this camera. In virtue of high performance chip applied, this product features high definition video with strong continuous dynamic images. The images support AVI video format, and thus clear pictures can be achieved. This device adopts a unique and super portable design, which benefits a convenient, safe and colorful daily life for you in various fields. Please make sure to carefully read this manual and keep it properly for future reference. This manual is worked out based on updated information. Screen display and diagrams used in this manual are for detailed and visualized introduction for this digital camera. Because of technical R&D and product lots, the displays and diagrams may vary with the actual digital camera, and that is subject to the actual function of the camera. Precautions Before using the camera, please carefully read the precautions to ensure a correct and safe use of the camera, and to achieve the best performance and a prolonged lifespan of it. Keep the camera away from direct sunlight, and keep lens of the camera away from directing sunshine. Otherwise, image sensor of the camera may be damaged; Please be careful with the camera to avoid water or sand entering the camera while using it on sand beach or by water. Water, sand, dust or particles containing salt may damage the camera; Keep the camera away from contacting dust and chemical materials. It is a must to keep the camera at a cool and dry place with god ventilation. Do not place the camera at a place with high temperature, humidity or with much dusts to prevent abnormal operation caused to the camera; During long-term storage, regular use of the camera is required. Before using it, please check if it can normally operate; In case of dirt or dust accumulated on the camera or lens, clean them with a piece of soft, clean and dry cloth. In case of sand on the camera or lens, it is to gently blow the sands off. Do remember not to clean it a 1 piece of cloth. Otherwise, surface of the camera or lens may be damaged; To clean surface of the camera lens, it is firstly to blow off the sands on it, and then clean it with a piece of mop or paper suitable for optical instruments. If needed, please clean camera with cleanser. It is strictly prohibited to clean the camera with organic solution; Touching surface of the lens with finger is strictly prohibited; In case of the first time of using memory card of the camera, please firstly make a back-up of the data, and then format the memory card in a one-off way; External TF card is a precise electronic component. The followings may cause loss or damage of the data: 1. Improper use of the memory card; 2. Bended card, fallen cards or impact against the memory card 3. High temperature and humidity or direct sunlight; 4. Static field or electromagnetic field nearby; 5. Taking out the memory card or interference with the camera power supply during visiting the memory card with the camera or computer (meaning reading, writing or formatting); 6. Contact metal surface of the memory card with finger or metal article; 7. Beyond lifespan of the memory card (Please regularly purchase the new memory card). About the Product This product features compact size and easy installation; In virtue of high performance chip applied, the product features high definition video and strong continuous and dynamic images. Even under low illumination, video can be recorded, and it also supports AVI video format; Support VGA (640x480) and HD (1280x720) capturing; Three sizes (including 5M, 3M and 1M) of image are for option; This product supports time and date watermark function, and time and date can be synchronously displayed while recording; Support high-speed USB2.0; Support max. 32G TF card; 2 This product adopts loop coverage recording method and the new recording can automatically cover the former images achieving an endless rolling recording; This product is equipped with on-site replay function. You may check the video recorded on-site with the display. It also supports replay with computer. System Requirements System Requirements Operation system Microsoft Windows2000, XP, Vista, 7 CPU Above Intel Pentium III 800MHz or equivalent CPU Memory Sound card, card CD driver Minimum 512MB video Sound card and video card should support DirectX8 or higher version 4 times of speed of faster Hard disk Over 500MB free space Others 1 standard USB1.1 or USB2.0 interface Appearance and key introduction Mode switch: -Photograph -Video -Replay Lens 3 Shutter Operation indicator Power On/Off Charging indicator Up key LCD TFT OK key Down key Key/Indicato Function r Power On/Off Power the camera on or off. When opening the menu, switch over between normal (effect parameters and replay of image, video) and setup menu. In recording video mode, it is used to start/stop recording; in capture Shutter mode, it is used as a shutter; it is used to play the video (in replay mode); confirmation (when operating the menu). Digital zoom in (capture/video mode); menu selection (after opening the Up key menu); pause, continue playing (when playing and recording video in OK key Open/exit from menu. Stop playing (when replaying video) replay mode) Down key Mode switch Digital zoom out (capture/video mode); menu selection (after opening the menu); Switch over among modes of capture, video, replay The upper one is a charging Operation indicator indicator. The lower one is an operation indicator. In power-off state, it keeps constant lighting when the charger is connected for charging. It flashes once during capturing, and it keeps constant lighting when connected with computer portable disk. 4 Start Use 1. Charge built-in lithium battery Charger indicator lights USB 线 In power-off state, when the camera is connected with computer, charging begins. At this time, the charger indicator lights and it turns off when charged full. Generally, it costs 2-4 hours to charge full. 2. Use memory card 1. Following the instructions carved by slot of the memory card, it is to insert FT card into the card slot till entirely inserted; 2. To take the FT card out, after gently pressing the end of the memory card inwards, the card will reject out; Note: The camera is not equipped with a built-in memory, and thus a memory card is required. 3. Power On/Off: 3.1 Power-on: If to press and hold POWER key for 3 seconds, the screen starts up and the camera enters startup state; 5 3.2. Power-off: In idle state of the camera, if to click POWER key, the camera turns off; Automatic power-off: When idle time set for the camera reaches, it automatically turns off to save power. The default time of the system automatic power-off is 5 minutes; 3.3. Power-off due to low battery: In case of extremely low battery, an icon of “ ”shown on the LCD screen. Please timely charge the battery. When the icon turns red and flashes, the camera will automatically power off. 4. Functional mode switchover The camera is equipped with three modes: capture, video and replay mode. After power-on, the modes can be switched over with MODE switch. Capture mode: Take pictures; Video mode: Record video and driving (5min, 3min and 1minfor one phase are for option.); Playback mode: Picture and video file playback 5. Indicators Operation indicator: When the camera works (e.g. recording video, capturing or automatic screen turn-off), the operation indicator lights; 6 Charger indicator: Constant lighting is to remind user that the camera is being charged. 6 Video mode When pushing Mode switch to video mode, click shutter in preview state to start recording video; to stop video recording, it is to click it again. It will also automatically stop recording in case that no free room left in the memory card or the battery is over low: 1 00:00:01: time-meter, indicating 1 second left for recording (indicating 1 second recorded during recording); 2 : mode icon: indicates the current mode is video recording; 3 :loop recording video time icon: indicates the current loop video recording time is 3 minutes; 4 5 6 : movie size: indicates the current movie size is 720P; : indicates currently a memory card is inserted; : magnification of digital zoom: press Up and down key to adjust zoom among 1x-4x; 7 8 : battery icon: indicates current battery level; : white balance icon: indicates the current white balance mode is automatic; 9 :metering icon: indicates it is currently the pan overall perspective metering. 7 Video menu setup In video mode, press OK key to open menu, and then press Up and Down key to select menu. When selecting menu, background of the selected item will be highlighted. Press Shutter to enter sub-menu. In sub-menu, press Up and Down key for selection, press Shutter for confirmation and back to main menu. In the main menu, press OK key to exit from the menu. ▲Video menu Video menu options Main menu Video format Sub-menu High resolution format 640X480 Medium resolution format Off 1min Recording int Description 1280x720 3min 5min Central metering Metering Multi-point mode metering Point metering Power-off driving record Set driving record to 1 minute as a repeating phase. Set driving record to 3 minutes as a repeating phase. Set driving record to 5 minutes as a repeating phase. Metering subject to the central area Metering subject to multi-points Metering subject to one point 8 Automatic White balance Suitable for daylight environment Cloudy Suitable for cloudy environment Tungsten light Normal White and black Antique Negative film Suitable for Suitable for source tungsten light source Normal effect White and black effect Retro effect Negative film effect Reddish effect Greenish effect Blue Bluish effect Date and time light environment Red Date fluorescent environment Green Off Date stamp most cases; Daylight Fluorescent light Special effect Using automatic white balance, suitable for Turn off printing date/time on the file During capturing/recording video, print date on right bottom corner of the file During capturing/recording video, print date and time on right bottom corner of the file 7 Driving video recording: Push Mode switch to Video mode, open the menu, press Down key to select “Recording Int” menu, press Shutter key to enter sub-menu, “1min, 3min, 5min” recording loop mode are for free selection. After pressing OK key for confirmation, press OK key again to exit from the menu. When Shutter is pressed, it starts video recording. During video recording, the camera will automatically stop recording video based on 1min, 3min, 5min selected, and immediately starts next section of video recording (e.g. when 5min is selected in 9 the menu, the camera will automatically stop when 5min recording reached, and starts next section of video recording). When the memory card is full, the earliest recoded section of file will be deleted for corresponding room for further recording, and it repeats in such a method. ▲Open video recording menu ▲Select loop recording time and press OK to confirm. ▲Exit from menu and press Shutter to start loop video recording Note: After selecting OFF in “Recording Int” menu, when existed from the menu, the camera turns to normal video recording. Normal recording is beyond the limit of time, and it will not stop until the memory card is full. 8 Capture mode: Push Mode switch to Capture mode. Press Shutter once in preview state or click center of LCD for a picture taken: 1 9999: Counter: indicates quantity of pictures taken or available to be taken; 2 : mode icon: indicates it is currently the mode of capture; 3 4 5 : movie size: click this icon to select among 1M/3M/5M; : indicates currently a memory card is inserted; : magnification of digital zoom: press Up and down key to adjust zoom among 1x-4x; 6 : battery icon: indicates current battery level; 10 :Self-timer icon: indicates the current self-timer mode is set to 10 7 seconds; 8 : white balance icon: indicates the current white balance mode is automatic; :metering icon: indicates it is currently the pan overall perspective 9 metering. Capture menu setup In capture mode, press OK key to open menu, and then press Up and Down key to select menu. When selecting menu, background of the selected item will be highlighted. Press Shutter to enter sub-menu. In sub-menu, press Up and Down key for selection, press Shutter for confirmation and back to main menu. In the main menu, press OK key to exit from the menu. Capture menu options Main menu Sub-menu ▲Capture menu Description 2592x1944 5 megapixel resolution Image 2048X1536 3 megapixel resolution size 1280X960 1 megapixel resolution Excellent Best quality image Image quality Good Normal Central metering Metering mode megapixel resolution Point metering Good image quality General quality image Metering subject to the central area Metering subject to multi-points Metering subject to one point 11 Automatic White most cases; Daylight Suitable for daylight environment Cloudy Suitable for cloudy environment balance Fluorescent light Tungsten light Exposure Using automatic white balance, suitable for / Off Suitable for fluorescent light source tungsten light source environment Suitable for environment Use Left and Right key to adjust exposure compensation Use general single shot mode Capture 2s Use 2sec. delay self-timer mode mode 10s Use 10sec. delay self-timer mode Continuous shooting` Normal White and black Antique Special effect Negative film Red Normal effect White and black effect Retro effect Negative film effect Reddish effect Green Greenish effect Blue Bluish effect Off Date Use continuous shooting Date stamp Turn off printing date/time on the file During capturing/recording video, print date on right bottom corner of the file During capturing/recording video, print Date and time date and time on right bottom corner of the file 12 9 Playback mode: 9.1 After power-on, push Mode switch back to Playback mode: 1 :mode icon: indicates it is currently the mode of playback; 2 : Indicates that there is one file in current folder/totally one folder; 3 4 : indicates that the current folder is locked; : indicates the current file is an AVI video file. 9.2 Playback menu setup In playback mode, press OK key to open menu, and then press Up and Down key to select menu. When selecting menu, background of the selected item will be highlighted. Press Shutter to enter sub-menu. In sub-menu, press Up and Down key for selection, press Shutter for confirmation and back to main menu. In the main menu, press OK key to exit from the menu. ▲Playback menu Playback menu options Main menu File lockup Sub-menu Lock/unlock this file Lock all Description Lock/unlock this file Lock all files 13 Unlock all File deletion Delete this file Delete all Start Slide show Unlock al files Delete the current file Delete all files Start playing slide show Interval 1sec.~10sec. Repeat Yes/No 9.3 Play movie clips: During playing, press Shutter key to play, press Up key for pause, press Shutter key to stop playing. 9.4 Delete file: 1) After selecting the file to be deleted, open the menu, press Up and Down key to select “Delete…”. 2)Press Shutter key to enter, after selecting “One”, press Shutter key for confirmation ). “All” means to delete all files.) 14 3) After selecting “Yes”, press Shutter key to delete the file. When the file is deleted, press OK key to exit from the menu. 10 System setup menu: In capture, video recording or playback mode, press OK key to open menu, and then press Power key to switch over to setup menu. In setup menu, press Up and Down key for selecting menu. When selecting menu, background of the selected item will be highlighted. Press Shutter to enter sub-menu. In sub-menu, press Up and Down key for selection, press Shutter for confirmation and back to main menu. In the main menu, press OK key to exit from the menu. ▲System setup menu System setup menu options Main menu Automatic playback Power frequency Automatic shutdown Sub-menu Off Description No playback performed after capture 1 second Playback performed 1 second later after capture 3 seconds Playback performed 3 seconds later after capture 50Hz 60Hz 1 minute Se to 50Hz light source frequency Set to 60Hz Playback performed 1 second later after capture Automatic shutdown performed in case of 1 minute idle 3 minutes Playback performed 3 seconds later after capture 5 minutes Playback performed 5 seconds later after capture 15 OFF Cancel automatic shutdown Date and time / Format Yes/No Format memory card Set up date and time format Default value Yes/No Back to default value Setting date and time: Press OK key to open the menu, and then press Power key to enter setup menu. Press Down key to select “Date&Time” item, and press Shutter key to enter setup window. In setup window, press Power key to elect the item to be adjusted (Date, time). The selected item will be highlighted in yellow. Then press Up key or Down key for adjustment. At completion of adjustment, press Shutter key to confirm the adjustment, or press OK key to cancel the setup and return. Finally press PK key to exit from setup mode. Application in PC 1. Connect with PC The camera is equipped with function of plug and play. In power-in state, after connecting this device to the computer with USB cable, it can be switched over to portable hard disk mode. Portable hard disk icon will be shown in the window of “My Computer”. Images/video shot by you are stored in portable hard disk folder 16 I:\DCIM\100MEDIA (“I” indicates equipment portable hard disk) Note: If to use portable hard disk function in Windows 2000 operation system or higher version, it is not needed to install driver. 2. Use computer camera function After connecting the camera with the computer, press OK key to enter camera mode. Before using camera function, it is a must to make sure that driver has already been installed on the computer. After installing the driver, “SPCA1628 PC Driver” is added in “Start→All procedures” menu, and there in it. When the camera is connected with the is a shortcut icon of ), computer and entering camera mode, if to click this shortcut icon ( AMCAP window will be opened. In the window of AMCAP, the image corresponding to the camera lens will be displayed. When AMCAP software is not opened, video can be transmited through network by using camera function. Make sure that Preview is 17 Technical Parameters Image sensor 1.3 megapixel (CMOS) Function mode Video, capture, car mode, portable disk, PC cam Lens F3.2 Digital zoom 4x f=6.0mm Shutter Electronic shutter LCD display 1.77”TFT screen Image resolution 5M(2592×1944), 3M(2048×1536), 1M(1280×960) Video resolution VGA: 640x480 (60 frame/second); 720P:1280x720 (30 frame/second) White balance Automatic /Sunny / Cloudy / Fluorescent light / Tungsten light Exposure -2.0 ~ +2.0 File format Video AVI Image JPEG Storage medium TF card (Max. support 32GB) USB interface High-speed USB 2.0 interface Power supply Built-in 3.7V chargeable lithium battery Dimensions (LxWxH) 68*48*29mm Weight Roughly 46.5g maximum recording time is 29 minutes for each video Standard package Camera User Manual USB cable 18


![3 Cliquez sur [Installer].](http://vs1.manualzilla.com/store/data/006787798_1-b7982ea2836d79fcb2bb1ff2a5fe9d4a-150x150.png)