1
G
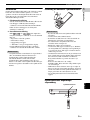
Blu-ray Disc Player
Lecteur Blu-ray Disc
BD-S673
BD-S673
English
Owner’s Manual
Mode d’emploi
Bedienungsanleitung
Bruksanvisning
Manuale di istruzioni
Manual de Instrucciones
Gebruiksaanwijzing
Français
Deutsch
Svenska
Italiano
Español
USB
Nederlands
© 2012 Yamaha Corporation
Printed in China BD-S673/G-1
Important notes for users in the
U.K.
Mains plug
This apparatus is fitted with an approved 13 Amp
plug. To change a fuse in this type of plug proceed
as follows:
1 Remove fuse cover and fuse.
2 Fix new fuse which should be a BS1362 5 Amp,
A.S.T.
3 Refit the fuse cover.
If the fitted plug is not suitable for your jack outlets,
it should be cut off and an appropriate plug fitted in
its place.
If the mains plug contains a fuse, this should have a
value of 5 Amp. If a plug without a fuse is used, the
fuse at the distribution board should not be greater
than 5 Amp.
Note: The severed plug must be disposed to avoid a
possible shock hazard should it be inserted into a 13
Amp jack elsewhere.
How to connect a plug
The wires in the mains lead are coloured with the
following code:
blue = neutral (N), brown = live (L).
• As these colours may not correspond with the
colour markings identifying the terminals in your
plug, proceed as follows:
– Connect the blue wire to the terminal marked N
or coloured black
– Connect the brown wire to the terminal marked
L or coloured red.
– Do not connect either wire to the earth terminal
in the plug, marked E (or e) or coloured green (or
green and yellow).
Before replacing the plug cover, make certain that
the cord grip is clamped over the sheath of the lead not simply over the two wires.
Copyright in the U.K.
Recording and playback of material may require
consent. See Copyright Act 1956 and The
Performer’s Protection Acts 1958 to 1972.
Caution-i En
VAROITUS
Muiden kuin tässä esitettyjen toimintojen säädön tai
asetusten muutto saattaa altistaa vaaralliselle säteilylle tai
muille vaarallisille toiminnoille.
DK
Advarsel: Usynlig laserstråling ved åbning når
sikkerhedsafbrydere er ude af funktion. Undgå utsættelse
for stråling.
Bemærk: Netafbryderen p er sekundært indkoblet og
ofbryder ikke strømmen fra nettet. Den indbyggede netdel
er derfor tilsluttet til lysnettet så længe netstikket sidder i
stikkontakten.
N
Observer: Nettbryteren p er sekundert innkoplet. Den
innebygdenetdelen er derfor ikke frakoplet nettet så lenge
apparatet er tilsluttet nettkontakten.
S
Klass 1 laseraparat
Varning! Om apparaten används på annat sättþän i denna
bruksanvisning specificerats, kan användaren utsättas för
osynlig laserstrålning, som överskrider gränsen för
laserklass 1.
Observera! Strömbrytaren p är sekundärt kopplad och
inte bryter inte strömmen från nätet. Den inbyggda
nätdelen är därför ansluten till elnätet så länge
stickproppen sitter i vägguttaget.
SF
Luokan 1 laserlaite
Varoitus! Laitteen käyttäminen muulla kuin tässä
käyttöohjeessa mainitulla tavalla saattaa altistaa käyttäjän
turvallisuusluokan 1 ylittävälle näkymättömälle
lasersäteilylle.
Oikeus muutoksiin varataan. Laite ei saa olla alttiina
tippu-ja roiskevedelle.
Toiminnanvalitsin p on kytketty toisiopuolelle, eikä se
kytke laitetta irti sähköverkosta. Sisäänrakennettu verkkoosa on kytkettynä sähköverkkoon aina silloin, kun pistoke
on pistorasiassa.
VARO!
AVATTAESSA JA SUOJALUKITUS
OHITETTAESSA OLET ALTTIINA
NÄKYMÄTTÖMÄLLE LASERSÄTEILYLLE.
ÄLÄ KATSO SÄ TEESEEN.
VARNING!
OSYNLIG LASERSTRÅLNING NÄR DENNA DEL
ÄR ÖPPNAD OCH SPÄRREN ÄR URKOPPLAD.
BETRAKTA EJ STRÅLEN.
Este equipamento cumpre os requisitos essenciais da
Directiva 1999/5/CE do Parlamento Europeu e do Conselho
(Directiva RTT).
O exoplismos autos plhroi tis basikes apaits ths koinotikhs
odhgias EU R&TTE 1999/5/E.
Dette udstyr opfylder de Væsentlige krav i EU’s direktiv
1999/5/EC om Radio- og teleterminaludstyr.
Dette utstyret er i overensstemmelse med hovedkravene i
R&TTE-direktivet (1999/5/EC) fra EU.
Tämä laite vastaa EU:n radio- ja telepäätelaitedirektiivin (EU
R&TTE Directive 1999/5/EC) vaatimuksia.
• We, the manufacturer (Yamaha Corporation) hereby declare
that this equipment (Blu-ray Disc Player), model BD-S673
is in compliance with the essential requirements and other
relevant provisions of Directive 1999/5/EC.
• This product is limited to indoor use only.
• Frequencies used by this product may be prohibited to use in
some counties. As a user of this product, you have
responsibilities to use this product only in the intended
countries and confirm that this product is set to use
frequencies and channels that are allowed to use in your
country. Violators may be punishable by law of the country.
For information about laws of each country, please refer to
“ERC/REC 70-03”.
• Nous, le fabricant (Yamaha Corporation) déclarons que cet
équipement (Lecteur Blu-ray Disc), modèle BD-S673, est
conforme aux exigences essentielles et autres dispositions
pertinentes de la directive européenne 1999/5/CE.
• Ce produit est uniquement destiné à une utilisation en
intérieur.
• Les fréquences utilisées par l’appareil pourraient être
interdites dans certains pays. En tant qu’utilisateur du
produit, c’est à vous qu’il incombe d’employer l’appareil là
où la loi vous y autorise, et de vérifier que ce produit
fonctionne sur des fréquences et canaux dont l’utilisation est
permise dans votre pays. Toute violation pourrait entraîner
des poursuites conformément à la loi du pays. Pour en
savoir plus sur les lois de chaque pays, lisez “ERC/REC 7003”.
• Wir, der Hersteller (Yamaha Corporation), erklären hiermit,
dass dieses Gerät (Blu-ray Disc-Player), Modell BD-S673
die grundlegenden Anforderungen der Richtlinie 1999/5/EG
erfüllt.
• Dieses Gerät ist ausschließlich auf den Gebrauch in
geschlossenen Räumen ausgelegt.
• Gewisse in diesem Gerät verwendete Frequenzen mögen in
manchen Ländern nicht zulässig sein. Als Benutzer dieses
Geräts obliegt es Ihrer Verantwortung sicherzustellen, dass
dieses Gerät nur in Ländern eingesetzt wird, für die es
bestimmt ist, und dass es auf Frequenzen und Kanäle
eingestellt ist, die in Ihrem Land zulässig sind.
Gesetzesverletzungen sind je nach Land entsprechend
strafbar. Näheres zu den Gesetzen einzelner Länder finden
Sie unter „ERC/REC 70-03“.
• Vi, tillverkaren (Yamaha Corporation) deklarerar härmed att
denna utrustning (Blu-ray Disc-spelare), modell BD-S673
uppfyller huvuddelarna i kraven och andra relevanta delar
av direktiv 1999/5/EC.
• Den här produkten får bara användas inomhus.
• Frekvenser som används av den här produkten kan vara
förbjudna att använda i vissa länder. Som användare av den
här produkten är det ditt ansvar att bara använda produkten i
avsedda länder och kontrollera att produkten är inställd på
att använda frekvenser och kanaler som är tillåtna i det
landet. Överträdelser kan beivras enligt landets lagar. För
information om lagarna i resp. land, se “ERC/REC 70-03”.
• Con la presente il produttore (Yamaha Corporation) dichiara
che questa apparecchiatura (lettore Blu-ray Disc), modello
BD-S673 è conforme ai requisiti essenziali della Direttiva
Europea R&TTE 1999/5/CE.
• Il prodotto è destinato all’utilizzo esclusivo in interni.
• Le frequenze utilizzate dal prodotto in alcuni paesi
potrebbero essere vietate. Come utenti del prodotto, avete la
responsabilità di utilizzarlo esclusivamente nei paesi
previsti, accertandovi che sia impostato per l’uso delle
frequenze e dei canali consentiti dal vostro paese. I
trasgressori potrebbero essere punibili secondo le leggi
vigenti del paese di utilizzo. Per informazioni sulle leggi di
ciascun paese, fare riferimento a “ERC/REC 70-03”.
• Nosotros, el fabricante (Yamaha Corporation) por la
presente declaramos que este equipo (reproductor Blu-ray
Disc), modelo BD-S673 cumple los requisitos principales y
otras disposiciones de la Directiva 1999/5/CE.
• Este producto está limitado para su uso exclusivo en
interiores.
• La utilización de las frecuencias que emplea este producto
puede estar prohibida en algunos países. Como usuario de
este producto, usted es responsable de utilizarlo únicamente
en los países para los que está destinado y confirmar que el
producto está configurado para utilizar frecuencias y canales
cuyo uso está permitido en su país. Los infractores puede ser
condenados por la legislación nacional. Consulte “ERC/
REC 70-03” para obtener información sobre las leyes de
cada país.
• De fabrikant (Yamaha Corporation) verklaart hierbij dat
deze apparatuur (Blu-ray Disc-speler), model BD-S673,
voldoet aan de essentiële vereisten en andere relevante
bepalingen van richtlijn 1999/5/EG.
• Dit product kan alleen binnenshuis gebruikt worden.
• Door dit product gebruikte frequenties kunnen mogelijk
verboden zijn in sommige landen. Als gebruiker van dit
product bent u ervoor verantwoordelijk dat dit product
alleen gebruikt wordt in landen waarvoor het bedoeld is en
bevestigt u dat dit product wordt ingesteld om alleen die
frequenties en kanalen te gebruiken die toegestaan zijn in
uw land. Overtreders kunnen gestraft worden door de wetten
van het land. Voor informatie over de wetgeving in elk land,
zie “ERC/REC 70-03”.
AT
BE
CY
CZ
DK
EE
FI
DE
GR
HU
IE
IT
LV
LT
FR
LU
MT
NL
PL
PT
SK
SI
ES
SE
GB
IS
LI
NO
CH
BG
RO
Caution-ii En
Caution: Read this before operating your unit.
1
2
3
4
5
To assure the finest performance, please read this manual
carefully. Keep it in a safe place for future reference.
Install this sound system in a well ventilated, cool, dry, clean
place-away from direct sunlight, heat sources, vibration, dust,
moisture, and/or cold. For proper ventilation, allow the
following minimum clearances.
Top : 10 cm (4 in)
Rear: 10 cm (4 in)
Side: 10 cm (4 in)
Locate this unit away from other electrical appliances,
motors, or transformers to avoid humming sounds.
Do not expose this unit to sudden temperature changes from
cold to hot, and do not locate this unit in an environment with
high humidity (i.e. a room with a humidifier) to prevent
condensation inside this unit, which may cause an electrical
shock, fire, damage to this unit, and/or personal injury.
Avoid installing this unit where foreign object may fall onto
this unit and/or this unit may be exposed to liquid dripping or
splashing. On the top of this unit, do not place:
– Other components, as they may cause damage and/or
discoloration on the surface of this unit.
– Burning objects (i.e. candles), as they may cause fire,
damage to this unit, and/or personal injury.
– Containers with liquid in them, as they may fall and
liquid may cause electrical shock to the user and/or
damage to this unit.
6
7
8
9
10
11
12
13
14
15
16
17
Do not cover this unit with a newspaper, tablecloth, curtain,
etc. in order not to obstruct heat radiation. If the temperature
inside this unit rises, it may cause fire, damage to this unit,
and/or personal injury.
Do not plug in this unit to a wall outlet until all connections
are complete.
Do not operate this unit upside-down. It may overheat,
possibly causing damage.
Do not use force on switches, knobs and/or cords.
When disconnecting the power cable from the wall outlet,
grasp the plug; do not pull the cable.
Do not clean this unit with chemical solvents; this might
damage the finish. Use a clean, dry cloth.
Only voltage specified on this unit must be used. Using this
unit with a higher voltage than specified is dangerous and
may cause fire, damage to this unit, and/or personal injury.
Yamaha will not be held responsible for any damage resulting
from use of this unit with a voltage other than specified.
To prevent damage by lightning, keep the power cable
disconnected from a wall outlet or this unit during a lightning
storm.
Do not attempt to modify or fix this unit. Contact qualified
Yamaha service personnel when any service is needed. The
cabinet should never be opened for any reasons.
When not planning to use this unit for long periods of time
(i.e. vacation), disconnect the AC power plug from the wall
outlet.
Be sure to read the “Troubleshooting” section on common
operating errors before concluding that this unit is faulty.
Before moving this unit, press p to set this unit to the
standby mode, and disconnect the AC power plug from the
wall outlet.
Caution-iii En
18 Condensation will form when the surrounding temperature
changes suddenly. Disconnect the power cable from the
outlet, then leave this unit alone.
19 When using this unit for a long time, this unit may become
warm. Turn the power off, then leave this unit alone for
cooling.
20 Install this unit near the AC outlet and where the AC power
plug can be reached easily.
21 The batteries shall not be exposed to excessive heat such as
sunshine, fire or the like.
Do not use this unit within 22 cm (9 inches) of persons
with a heart pacemaker implant or defibrillator implant.
This unit is not disconnected from the AC power source
as long as it is connected to the wall outlet, even if this
unit itself is turned off by p. This state is called the
standby mode. In this state, this unit is designed to
consume a very small quantity of power.
WARNING
TO REDUCE THE RISK OF FIRE OR ELECTRIC
SHOCK, DO NOT EXPOSE THIS UNIT TO RAIN OR
MOISTURE.
The laser component in this product is capable of
emitting radiation exceeding the limit for Class 1.
LASER Specification:
Class 1 LASER Product
Wave length: 790 nm (CDs)/658 nm (DVDs)/405 nm (BDs)
Laser output: max. 1 mW
LASER SAFETY
This unit employs a laser. Due to possible eye injury, only
a qualified service person should remove the cover or
attempt to service this device.
DANGER
This unit emits visible laser radiation when open. Avoid
direct eye exposure to beam. When this unit is plugged
into the wall outlet, do not place your eyes close to the
opening of the disc tray and other openings to look into
inside.
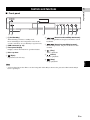
Contents
1. Introduction
1
4. Settings
What you can do with this Player ..................... 2
Supplied parts .................................................... 2
About discs and files ......................................... 3
SETUP menu ..................................................... 28
3
4
4
4
4
Example of SETUP menu operation............................. 30
General Setting.............................................................. 31
Display Setting.............................................................. 33
Audio Setting ................................................................ 35
System Information....................................................... 35
About the audio output formats .................................... 36
About the video output formats .................................... 37
Controls and functions ...................................... 5
Software upgrade ............................................. 38
Front panel...................................................................... 5
Remote control ............................................................... 6
Upgrading the software ................................................. 38
Types of discs/files that can be used with this Player ....
Loading a disc.................................................................
Disc precautions .............................................................
Notice for watching 3D video images ............................
Cinavia technology.........................................................
Rear panel ..................................................................... 10
HDMI connection .............................................. 12
Connecting to the HDMI terminal................................ 12
Connection for the playback of Blu-ray 3D Discs ....... 12
Video connections ........................................... 13
Connecting to the component/video jack ..................... 13
Audio connections ........................................... 14
Connecting to the digital audio jack/terminal............... 14
Connecting to the audio jacks....................................... 15
Power ............................................................................ 39
Basic operation.............................................................. 39
Disc playback................................................................ 39
Picture ........................................................................... 40
Sound ............................................................................ 40
Network......................................................................... 40
Messages on the screen ................................................. 41
Glossary ............................................................ 42
Specifications ................................................... 43
Connecting to the NETWORK terminal ...................... 16
Connecting to the USB connector ................................ 16
General .......................................................................... 43
Audio performance ....................................................... 43
Input/output................................................................... 43
Copyright ...................................................................... 44
Other connections ........................................... 17
Index .................................................................. 45
Network and USB connection ......................... 16
(at the end of this manual)
Information about software ....................................i
3. Playback
Initial Wizard/Easy Setup................................. 18
Setting with the Initial Wizard/Easy Setup................... 18
HOME/MEDIA menu ......................................... 18
Playing back photo/music/video................................... 18
Using network content.................................................. 20
21
21
22
23
Launching Netflix......................................................... 23
Advanced playback operation ........................ 24
24
25
26
26
26
27
27
27
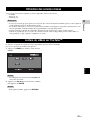
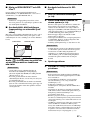
■ About this manual
– This manual describes how to operate this Player
using a remote control except when it is not
available. Some of these operations are also
available using the front panel buttons.
– Notes contain important information about safety
and operating instructions. Hint(s) indicates a tip for
your operation.
– This manual is printed prior to production. Design
and specifications are subject to change in part as a
result of improvements, etc. In case of differences
between the manual and the product, the product has
priority.
The icons used in this manual
Icons are used to indicate available buttons/functions for a
particular format. For details on playable discs and
formats, see page 3.
BD : BD-Video
DVD : DVD-Video, DVD-VR, DVD+VR
CD : Audio CD
VIDEO : Video files
MUSIC : Audio files
PHOTO : Photo files
1 En
English
Connecting to the REMOTE CONTROL jacks ........... 17
Connecting the power cable ......................................... 17
On Screen menu............................................................
Status menu...................................................................
Using Bookmark...........................................................
Program play.................................................................
Using Search ................................................................
Enjoying BONUSVIEW™ and BD-Live™.................
Using Picture in Picture function
(secondary audio/video playback) ...........................
Using the feature of BD-Live™ ...................................
4
Troubleshooting ............................................... 39
Introduction to connections............................ 10
Using network services ...................................
Playing videos from YouTube™ .....................
Playing photos from Picasa™ Web Album....
Playing videos from Netflix™ .........................
3
5
5. Additional information
2. Connection
2
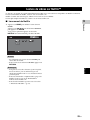
INTRODUCTION
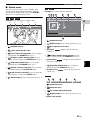
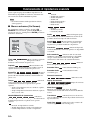
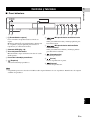
What you can do with this Player
\
p. 18
\
p. 24
\
p. 27
Play back Video, Music, Photo files on a disc/USB memory device* \
p. 18
Easy setting for language, resolution, screen aspect ratio
You can perform language and TV settings.
Play back commercially-released Blu-ray Disc™/Blu-ray 3D™/
DVD/CD discs*
In addition to Blu-ray Discs, this Player also supports playback of a variety of other discs.
Play back BONUSVIEW™, BD-Live™, etc.*
You can enjoy additional movies on the latest Blu-ray Discs.
Files recorded on discs/USB memory devices can be played back with this Player.
Play back Video, Music, Photo files on a Home Network Server* **
\
p. 20
\
p. 31
\
p. 21
PC contents can be played back with TV or AV receiver by connecting this Player to a network
server.
Operation with the remote control of TV, AV receiver, etc.
Connecting devices with an HDMI cable, you can control devices with a single remote control
using the HDMI Control function.
Streaming Playback contents on the Network Services**
You can instantly enjoy videos over the internet with this Player.
* For details on playable discs and formats, see page 3.
** Network setting is needed to use this function.
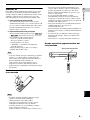
Supplied parts
Make sure the following accessories are provided with the product.
Remote control
2 En
Batteries (×2)
(AAA, R03, UM-4)
Audio/Video cable
Power cable
1
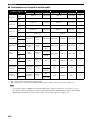
About discs and files
– 12 cm (5”) and 8 cm (3”) discs can be played back in
this Player. Do not use an 8 cm (3”) to 12 cm (5”)
adapter.
– Use discs that conform to compatible standards as
indicated by the presence of official logos on the
disc label. Playback of discs not complying with
these standards is not guaranteed. In addition, the
image quality or sound quality is not guaranteed
even if the discs can be played back.
Media Type
Recording Format
BD-ROM/BD-R/
BD-RE
BD-Video/Data files
DVD-ROM
DVD-Video
DVD-R/DVD-R
DL/DVD-RW
DVD-Video/DVD-VR/AVCHD/Data files
DVD+R/DVD+R
DL/DVD+RW
DVD-Video/DVD+VR/AVCHD/Data files
CDDA/HDCD
CD-R/CD-RW
CDDA/Data files
USB*
Data files
DLNA
Data files
BD-Video
VIDEO
DivX (.divx)
MKV with DivX
format (.mkv)
MKV with H.264
(.mkv)
MPEG PS (.mpeg/
.mpg)
MPEG TS (.ts)
MPEG-4 (.mp4)
VOB (.vob)
AVI (.avi)
ASF (.asf)
WMV (.wmv)
DVD-Video
Region code “1” or “ALL”
1
ALL
Playable photo
file formats
PHOTO
JPEG (.jpeg/.jpg)
GIF (.gif)
PNG (.png)
Notes
– Playback of a file listed in the chart above is not
guaranteed depending on methods of file creation or
codecs used.
– A copyright protected file cannot be played back.
– When using DLNA, a file needs to meet the DLNA
sever requirement.
– Blu-ray Disc/DVD video operations and functions
may be different from the explanations in this
manual and some operations may be prohibited due
to disc manufacturer’s settings.
– If a menu screen or operating instructions are
displayed during playback of a disc, follow the
operating procedure displayed.
– Playback for some of the discs may not be possible
depending on the disc.
– Finalize all recording media that is played back in
this Player.
– “Finalize” refers to a recorder processing a recorded
disc so that it will play in other players/recorders as
well as this Player. Only finalized discs can be
played back in this Player. (This Player does not
have a function to finalize discs.)
– Playback of all files on the disc, USB memory
device and network is not guaranteed.
– A copyright protected file cannot be played back via
USB memory device and network.
Audio file requirement
– Sampling frequency: within 32 - 48 kHz (MP3/
WMA), LPCM 44.1 kHz/16 bit/Stereo (WAV),
192 kHz/24 bit (FLAC)
– Bitrate: within 8 - 320 kbps (MP3), 32 - 192 kbps
(WMA)
WMV file requirement
– WMV9, maximum resolution is 1,920 × 1,080.
3 En
English
MUSIC
Playable video
file formats
Region code “A” or “ABC”
Notes
* This Player is compatible with a USB memory device
formatted with FAT 16/32 and NTFS.
MP3 (.mp3)
WMA (.wma)
AAC (.aac/.m4a)
WAV (.wav)
FLAC (.flac)
– Blu-ray Disc/DVD video players and discs have
region codes, which dictate the regions in which a
disc can be played. Verify the region code mark on
the rear panel of this Player.
– For a Blu-ray Disc, the disc can be played back on
this Player with the same region code mark, or the
region code “ABC” mark.
– For a DVD disc, the disc can be played back on this
Player with the same region code mark, or the region
code “ALL” mark.
Examples of region codes
CD-ROM
Playable audio
file formats
Region management information for
Blu-ray Disc/DVD videos
Introduction
■ Types of discs/files that can be
used with this Player
About discs and files
■ Loading a disc
– Insert the disc with the label facing up.
– In case of the disc recorded on both sides, face down
the side to play back.
Notes
– Playback may begin automatically, depending on the
disc and setting of this Player.
– The menu may be displayed first, depending on the disc.
– The disc load time may vary depending on the disc.
■ Disc precautions
Be careful of scratches and dust
– Blu-ray Disc, DVD and CD discs are sensitive to dust,
fingerprints and especially scratches. A scratched disc
may not be able to be played back. Handle discs with
care and store them in a safe place.
Proper disc storage
Place the disc in the center of the disc case
and store the case and disc upright.
Avoid storing discs in locations subject to
direct sunlight, close to heating appliances
or in locations of high humidity.
■ Notice for watching 3D video
images
– Some people may experience discomfort (such as
eye strain, fatigue, or nausea) while watching 3D
video images. We recommend that all viewers take
regular breaks while watching 3D video images.
– If you experience any discomfort, stop watching the
3D video images until the discomfort subsides.
Consult a doctor if you experience severe
discomfort.
– Read the owner’s manuals (Blu-ray Disc and TV)
and/or the caution messages that appear on the TV
carefully.
– The vision of young children (especially those under
six years old) is still under development. Consult
your doctor (such as a pediatrician or eye doctor)
before allowing young children to watch 3D video
images.
– Adults should supervise young children to ensure
they follow the recommendations described above.
■ Cinavia technology
– Cinavia technology is a part of the content protection
system included in your Blu-ray Disc Player.
Note
– The following messages may be displayed and
playback stopped or audio outputs temporarily
muted by your Blu-ray Disc player if you are playing
an unauthorized copy of content that is protected by
Cinavia technology.
These messages are displayed in English only.
Do not drop discs or subject them to
strong vibrations or impacts.
Avoid storing discs in locations where
there are large amounts of dust or
moisture.
Handling precautions
– If the surface is soiled, wipe gently with a
soft, damp (water only) cloth. When
wiping discs, always move the cloth from
the center hole toward the outer edge.
– Do not use record cleaning sprays,
benzene, thinner, static electricity
prevention liquids or any other solvent.
– Do not touch the surface.
– Do not stick paper or adhesive labels to the disc.
– If the playing surface of a disc is soiled or scratched,
the Player may decide that the disc is incompatible
and eject the disc tray, or it may fail to play the disc
correctly. Wipe any dirt off the playing surface with
a soft cloth.
Cleaning the pick up lens
– Never use commercially available cleaning discs.
The use of these discs can damage the lens.
– Request the nearest service center approved by
Yamaha to clean the lens.
4 En
Playback stopped. The content being played is
protected by Cinavia™ and is not authorized
for playback on this device.
For more information, see http://www.cinavia.com.
Message Code 1.
Audio outputs temporarily muted. Do not adjust
the playback volume. The content being played
is protected by Cinavia™ and is not authorized
for playback on this device.
For more information, see http://www.cinavia.com.
Message Code 3.
Cinavia Notice
This product uses Cinavia technology to limit the use of
unauthorized copies of some commercially-produced film
and videos and their soundtracks. When a prohibited use
of an unauthorized copy is detected, a message will be
displayed and playback or copying will be interrupted.
More information about Cinavia technology is provided at
the Cinavia Online Consumer Information Center at
http://www.cinavia.com. To request additional
information about Cinavia by mail, send a postcard with
your mailing address to: Cinavia Consumer Information
Center, P.O. Box 86851, San Diego, CA, 92138, USA.
1
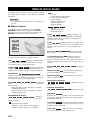
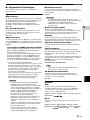
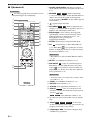
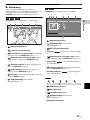
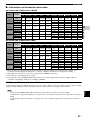
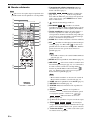
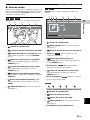
Controls and functions
Introduction
■ Front panel
USB
1 2
3
1 p (On/Standby)
Turns this Player on/Sets to standby mode.
Press and hold p on the front panel for more than 5
seconds, and release to reset this Player (system reset).
2 USB connector (p. 16)
3 Front panel display
Displays various information for operational status.
4
5 6 7
(Eject)
Opens/Closes the disc tray.
9
0
(Search backward/Skip backward):
Press to skip backward, and press and hold to search
backward.
7
(Search forward/Skip forward):
Press to skip forward, and press and hold to search
forward.
8
(Play)
Starts a playback.
9
(Pause)
Pauses a playback.
0
(Stop)
Stops a playback.
English
6
4 Disc tray door
5
8
Note
– A factory-fitted protective film covers the front panel of this Player. Remove the protective film from the Player
before operating it.
5 En
Controls and functions
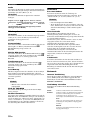
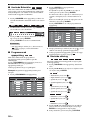
■ Remote control
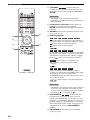
1 Infrared signal transmitter: Outputs infrared
signal. Aim this window to the remote control sensor
(p. 9).
Note
–
will appear on the top left corner of the screen
when the pressed button is not available.
1
2
3
4
PROGRAM
MARKER
DIGEST
ZOOM
R
G
Y
B
SUBTITLE
ANGLE
5
6
7
8
9
0
AUDIO
CLEAR
SEARCH
PIP
SETUP
2ND
AUDIO
HOME
TOP MENU
SHUFFLE
REPEAT
A B
POP-UP MENU
2 MARKER DVD VIDEO : Sets Bookmark (p. 26) at
a specified point of a movie. After Bookmark is set, to
select the set point you want to jump to, press
DIGEST. You can set up to 12 Bookmarks.
C
3
D
E
F
G
H
I
J
K
4 PROGRAM DVD CD : Sets the order of playback
(p. 26). You can set up to 15 tracks (for an audio disc)
or titles/chapters (DVD-Video).
L
6 CLEAR: Clears entered number/set item.
M
7 PIP BD : Turns on/off the Picture in Picture (p. 27).
: Opens/closes the disc tray.
5 Number buttons: Enters numbers, or during
playback, jumps to the track/chapter corresponding to
the number you input. These buttons may not be
available depending on the disc type and playback
condition.
PIP Mark (
) is displayed on the screen when this
function is available. You can also select this item from
On Screen menu (p. 24).
ENTER
Note
RETURN
ON SCREEN
– PIP Mark is displayed only when the PIP Mark is set
to on (p. 32).
8 SETUP: Displays SETUP menu screen (p. 28).
A
B
NETFLIX
STATUS
9 2ND AUDIO BD : Selects the secondary audio of the
Picture in Picture (p. 27) or audio commentaries. The
Secondary Audio Mark (
) is displayed on the
screen when this function is available (p. 35). You can
also select this item from On Screen menu (p. 24).
Note
– Secondary Audio Mark is displayed only when
Secondary Audio Mark is set to on (p. 32).
0 HOME: Displays the HOME menu screen (p. 18).
A NETFLIX: Starts Netflix (p. 23).
B STATUS: Displays the playback information (p. 25).
C DIGEST PHOTO : Shows 12 photo thumbnails.
When thumbnails are displayed, you can proceed to
the next/previous page with
/
.
DVD
VIDEO : Displays Bookmark select bar
(p. 26).
D p: Turns this Player on or sets it to standby mode.
E ZOOM DVD VIDEO PHOTO : Zooms in/out.
The size of the screen will change each time you press
the button (zoom in/out: 3 steps each).
F Color buttons BD : Use these buttons according to
on-screen instructions.
6 En
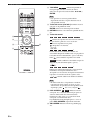
Controls and functions
G SUBTITLE BD DVD VIDEO : Changes subtitle
languages (p. 43) if available. You can also select this
item from On Screen menu (p. 24).
1
Introduction
H ANGLE BD DVD : Changes the camera angle if
video is recorded with multiple angles. The Angle
Mark (
) is displayed on the screen when this
function is available. You can also select this item
from On Screen menu (p. 24).
Note
– Angle Mark is displayed only when the Angle Mark
is set to on (p. 32).
I AUDIO BD DVD : Changes the audio language or
format. You can also select this item from On Screen
menu (p. 24).
J SEARCH BD DVD CD VIDEO MUSIC :
Jumps to a specified point during playback. For details
on this function, refer to “Using Search” (p. 26). You
can also select this item from status menu (p. 25).
K SHUFFLE DVD
CD
VIDEO
MUSIC
PHOTO : Selects shuffle play mode (p. 24).
L REPEAT BD
DVD
CD
VIDEO
MUSIC
PHOTO : Changes repeat mode. Repeat mode shown
below will change each time you press the button.
English
: Repeats the title being played back.
: Repeats the chapter being played back.
: Repeats the folder being played back.
: Repeats all tracks/files on the disc.
: Repeats the track/file being played back.
M A/B BD DVD CD VIDEO MUSIC : Plays back
a specific part you want to repeat.
1 Press A/B at the scene where you want to set the
start point. “A-” is displayed on the screen.
2 Press A/B again at the scene where you want to set
the end point. “A-B” is displayed on the screen.
Repeat playback starts.
3 To cancel the repeat playback, press A/B. “A-B”
disappears and the repeat playback is finished.
Note
– This function cannot be performed depending on the
specifications of the disc.
Continued to the next page. \
7 En
Controls and functions
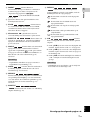
N TOP MENU BD DVD : Displays the top menu
screen if the disc contains a menu. Select the desired
item using 5/a/2/3 and ENTER.
PROGRAM
MARKER
DIGEST
ZOOM
R
G
Y
B
Note
– Specific operations may be different depending on
the disc. Follow the instructions of each menu
screen.
SUBTITLE
ANGLE
O Cursor buttons (5/a/2/3): Moves the focus in
the menu screen.
ENTER: Selects the focused menu/item.
AUDIO
CLEAR
SEARCH
SHUFFLE
PIP
SETUP
REPEAT
2ND
AUDIO
HOME
A B
TOP MENU
POP-UP MENU
N
O
P
P RETURN: Returns to the previous menu or screen,
etc.
R
ENTER
RETURN
ON SCREEN
S
Q
Q Control buttons
BD
DVD
CD
VIDEO
MUSIC
PHOTO
: Stops playback. To stop playback completely,
press this button twice.
: Pauses playback.
: Plays back contents.
/
DVD CD VIDEO MUSIC :
Searches backward/forward. The search speed will
change each time you press the button (search
backward/forward: 5 steps each). Press
to resume
normal playback.
BD
NETFLIX
STATUS
PHOTO : Changes the speed of a slide show (slower/
faster: 3 steps).
/
DVD CD VIDEO MUSIC :
Press for instant search/replay. Instant search skips the
content 30 seconds. Instant replay replays the content
from 10 seconds before.
BD
/
: Skips backward/forward.
Note
– Depending on the disc, this Player resumes playback
from the point that where the Player was previously
stopped. To play back from the beginning, press
twice and then
.
R POP-UP/MENU BD DVD : Displays pop-up
menu. The menu contents displayed vary depending
on the disc. For details on how to see and operate the
pop-up menu, refer to the manual for the disc.
The top menu screen may be displayed by pressing
POP-UP/MENU depending on the DVD.
S ON SCREEN: Displays On Screen menu (p. 24).
8 En
Controls and functions
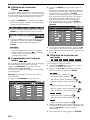
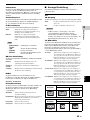
ID function
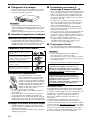
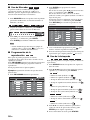
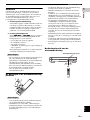
Loading the batteries in the remote
control
1
1 Remote control setting
To change the ID from ID1 to ID2, press and hold
the red color button and 2 of number button
simultaneously for 7 seconds. To change the ID
from ID2 to ID1, press and hold the red color button
and 1 of number button simultaneously for 7
seconds.
2 Main unit setting
Press and hold
and
on the
front panel simultaneously for 2 seconds to display
current ID when:
– No disc is inserted in this Player.
– The disc tray is closed.
– Playback is stopped.
– “NO DISC” is displayed on the front panel
display.
Keep pressing and holding the keys for another 2
seconds to change the ID between ID1 and ID2.
Notes
3
2
Notes
– Change both batteries when the operation range of
the remote control decreases.
– Use AAA, R03, UM-4 batteries.
– Make sure that the polarities are correct. Refer to the
illustration inside the battery compartment.
– Remove the batteries if the remote control is not to
be used for an extended period of time.
– Do not use old batteries together with new ones.
– Do not use different types of batteries (such as
alkaline and manganese batteries) together. Read the
packaging carefully as these different types of
batteries may have the same shape and color.
– If the batteries have leaked, dispose of them
immediately. Avoid touching the leaked material or
letting it come into contact with clothing, etc. Clean
the battery compartment thoroughly before installing
new batteries.
– Do not throw away batteries with general house
waste; dispose of them correctly in accordance with
your local regulations.
– Keep batteries away from children. If a battery is
accidentally swallowed, contact your doctor
immediately.
– When not planning to use the remote control for long
periods of time, remove the batteries from the
remote control.
– Do not charge or disassemble the supplied batteries.
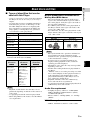
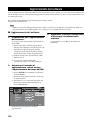
Approximate operating range of
remote control
Remote control sensor
USB
30°
30°
6 m (20 ft)
9 En
English
– If the remote control is without batteries for a few
minutes or if exhausted batteries remain in the
remote control, the remote control ID is
automatically set to ID1. If you want to use the
remote control in ID2 setting, install new batteries
and set the remote control ID again.
– When this Player is reset, its remote control ID will
be ID1.
1
Introduction
You can change the remote control ID to prevent
unwanted operation of the other Yamaha player such as
DVD player. If you have changed the remote control ID,
make sure that you select the same ID for the main unit.
The default setting is ID1.
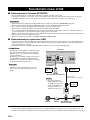
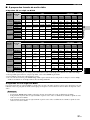
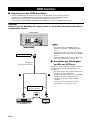
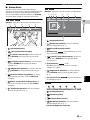
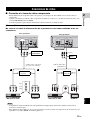
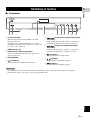
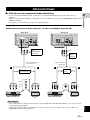
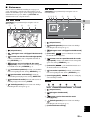
CONNECTION
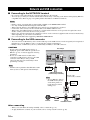
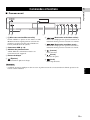
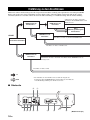
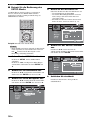
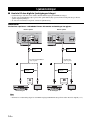
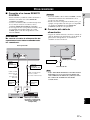
Introduction to connections
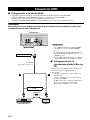
Find the corresponding connection method on your video/audio equipment. We recommend that you use the HDMI
terminal which provides high quality digital audio and video on a single connection. If you use the other terminals/jacks,
connect the video first. Then connect the audio.
Connect video and audio to AV
receiver with an HDMI cable.
HDMI terminal on
AV receiver? *
HDMI terminal on TV?
Refer to owner’s manual
of AV receiver.
HDMI terminal on TV?
START
Connect video to TV with an HDMI cable.
Use AV receiver?
Connect video to AV receiver.
HDMI terminal on TV?
Connect video and audio to TV with an HDMI cable.
Connect video to TV.
Yes
* When you connect to an AV receiver that cannot output the sound,
input via its HDMI terminal, refer to the owner’s manual of your AV
receiver.
No
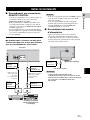
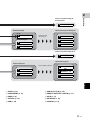
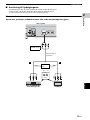
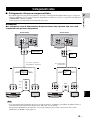
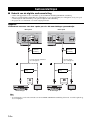
■ Rear panel
0
9
AC IN
VIDEO OUT
Y
PB
DIGITAL OUT
COAXIAL
HDMI
NETWORK
AUDIO OUT
L
R
OUT
IN
REMOTE CONTROL
VIDEO
PR
COMPONENT
1 2 3
10 En
OPTICAL
4
USB
5
6
7
8
(Europe model)
2
Connection
Video and audio connection to
AV receiver
A HDMI (p. 12)
Audio connection to AV receiver
Video connection
to TV
A’ HDMI (p. 12)
Connect audio to AV
receiver.
D COAXIAL (p. 14)
or
to AV receiver
E
OPTICAL (p. 14)
B COMPONENT (p. 13)
or
or
F L/R (p. 15)
C VIDEO (p. 13)
Video and audio connection to TV
A’ HDMI (p. 12)
English
Audio connection to TV
Video connection to TV
Connect audio to TV.
D’ COAXIAL (p. 14)
or
B’ COMPONENT (p. 13)
E’ OPTICAL (p. 14)
or
or
C’ VIDEO (p. 13)
F’ L/R (p. 15)
1 VIDEO (p. 13)
6 AUDIO OUT (L/R) (p. 15)
2 COMPONENT (p. 13)
7 REMOTE CONTROL (OUT/IN) (p. 17)
3 HDMI (p. 12)
8 AC IN (p. 17)
4 OPTICAL (p. 14)
9 NETWORK (p. 16)
5 USB (p. 16)
0 COAXIAL (p. 14)
11 En
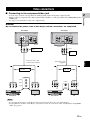
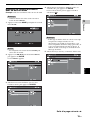
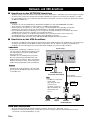
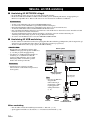
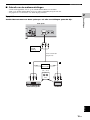
HDMI connection
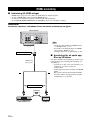
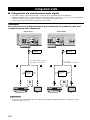
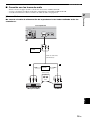
■ Connecting to the HDMI terminal
–
–
–
–
You can enjoy high quality digital picture and sound through the HDMI terminal.
Firmly connect an HDMI cable (commercially available) to the HDMI terminals.
See page 36 for information on the audio/video output formats.
Use HIGH SPEED HDMI cables that have the HDMI logo (as shown on the back cover).
Caution!
Do not connect the power cable of this Player until all connections are completed.
This Player
VIDEO OUT
Y
PB
DIGITAL OUT
COAXIAL
HDMI
NETWORK
VIDEO
PR
COMPONENT
OPTICAL
USB
Hints
– When you use the HDMI Control function,
refer to the “HDMI Control” (p. 31).
– For information on the output mode of HDMI
terminal, refer to the “HDMI” (p. 35).
– When no picture is displayed, refer to
“Troubleshooting” (p. 40).
To HDMI terminal
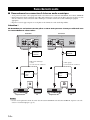
■ Connection for the playback
of Blu-ray 3D Discs
HDMI cable
(commercially available)
To enjoy Blu-ray 3D Discs on this Player, you need
the following equipment and connections:
– You need a TV and an AV receiver (if you
need) that have 3D functionality.
– All the components must be connected with
HDMI cables.
– A Blu-ray Disc should contain 3D images.
– You need to set 3D Output in Display Setting
A’
(p. 33) to Auto.
A
To HDMI input terminal
HDMI IN
AV receiver
12 En
TV
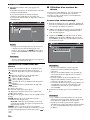
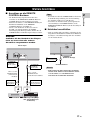
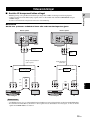
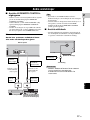
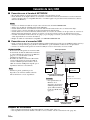
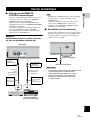
Video connections
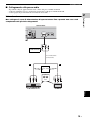
■ Connecting to the component/video jack
Caution!
2
Connection
– You can enjoy accurate color reproduction and high quality images through the component jacks.
– Firmly connect a component video cable (commercially available) or a video pin cable to the COMPONENT jacks/
VIDEO jack.
– See page 37 for information on the video output formats.
Do not connect the power cable of this Player until all connections are completed.
This Player
VIDEO OUT
Y
This Player
VIDEO OUT
DIGITAL OUT
COAXIAL
Y
HDMI
PB
PB
DIGITAL OUT
COAXIAL
HDMI
NETWORK
NETWORK
PR
VIDEO
COMPONENT
(Green)
(Red)
(Blue)
OPTICAL
PR
VIDEO
COMPONENT
USB
OPTICAL
To COMPONENT
jacks
USB
(Yellow)
To VIDEO
jack
B
B’
Audio/Video cable
(supplied)
C
C’
To video
input jack
To component
input jacks
COMPONENT IN
(Yellow)
(Yellow)
Y
(Green)
(Green)
(Yellow)
PB
(Blue)
(Blue)
PR
(Red)
(Green)
(Blue)
(Red)
(Red)
VIDEO
AV INPUT
AV receiver
TV
AV receiver
TV
Notes
– If you play back the image via VCR, the image may deteriorate due to the copy guard function.
– To enjoy Blu-ray 3D discs on this Player, you need to connect an AV receiver, a TV, and this Player using HDMI
cables. See page 12.
13 En
English
Component video cable
(commercially available)
Audio connections
■ Connecting to the digital audio jack/terminal
– You can connect audio equipment or the TV to the COAXIAL jack/OPTICAL terminal.
– Firmly connect a Coaxial digital audio cable (commercially available) or optical cable (commercially available) to
the coaxial digital audio jack or optical digital audio terminal.
– See page 36 for information on the audio output formats.
Caution!
Do not connect the power cable of this Player until all connections are completed.
This Player
This Player
VIDEO OUT
Y
PB
VIDEO OUT
DIGITAL OUT
COAXIAL
Y
HDMI
PB
DIGITAL OUT
COAXIAL
HDMI
NETWORK
NETWORK
AUDIO OUT
L
R
PR
VIDEO
COMPONENT
OPTICAL
PR
VIDEO
COMPONENT
USB
OPTICAL
USB
To COAXIAL
jack
To OPTICAL
terminal
Coaxial digital audio cable
(commercially available)
D
D’
Optical cable
(commercially available)
E
To coaxial
input jack
AV receiver
E’
To optical
input terminal
COAXIAL
OPTICAL
AV INPUT
DIGITAL AUDIO IN
TV
AV receiver
TV
Hint
– For information on the output mode of COAXIAL jack/OPTICAL terminal, refer to the “Coaxial / Optical” (p. 35).
14 En
Audio connections
■ Connecting to the audio jacks
– You can connect audio equipment or the TV to the AUDIO OUT L/R jacks.
– Firmly connect an Audio/Video cable (supplied) to the AUDIO OUT L/R jack.
– See page 36 for information on the audio output formats.
2
Caution!
Connection
Do not connect the power cable of this Player until all connections are completed.
This Player
DIGITAL OUT
COAXIAL
DMI
NETWORK
AUDIO OUT
OUT
L
R
IN
REMOTE CONTROL
USB
(Red)
To AUDIO OUT
L/R jack
(White)
OPTICAL
Audio/Video cable
(supplied)
English
F
F’
To audio L/R
input jack
(White) (Red)
AV receiver
R
AUDIO IN
(Red)
L
(White)
(Red)
(White)
AUDIO
TV
15 En
Network and USB connection
■ Connecting to the NETWORK terminal
– PC contents can be played back by connecting this Player to the network.
– You can enjoy a variety of contents with interactive functions by connecting to the internet when playing BD-Live
compatible discs. Refer to page 27 regarding further information on BD-Live functions.
Notes
–
–
–
–
–
Firmly connect a network cable (commercially available) to the NETWORK terminal.
Use only an STP (shielded twisted pair) network cable.
When using the internet, a broadband internet connection as shown below is required.
Connect the other connector of the network cable to the hub/broadband router.
When using a broadband internet connection, a contract with an internet service provider is required. For more
details, contact your nearest internet service provider.
– Refer to the operation manual of the equipment you have as the connected equipment and connection method may
differ depending on your internet environment.
– Use a network cable/router supporting 10BASE-T/100BASE-TX.
■ Connecting to the USB connector
– You can connect a USB memory device for Local Storage to the USB connector on the rear panel (or front panel) of
this Player to save the BD-Live data, or to upgrade the software of this Player.
– Firmly connect a USB memory device (commercially available) to the USB connector.
CAUTION:
– Do not remove the USB memory device or
unplug the power cable while the operations for
BD-Live (p. 27) or software upgrade are being
performed.
– Do not use a USB extension cable when
connecting a USB memory device to the USB
connector of this Player. Using a USB
extension cable may prevent the Player from
performing correctly.
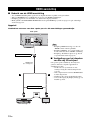
This Player
VIDEO OUT
Y
PB
DIGITAL OUT
COAXIAL
HDMI
NETWORK
AUDIO OUT
L
R
VIDEO
PR
COMPONENT
OPTICAL
USB
Note
– Yamaha cannot guarantee that all brands’ USB
memory devices will operate with this Player.
To USB
connector
To NETWORK
terminal
USB memory device
(commercially available)
Network cable
(commercially available)
Hint
– To save BD-Live data on
the USB memory device
on the front panel, set
Local Storage to Front
USB (p. 31).
To LAN
terminal
LAN
Internet
Modem
Hub or
broadband router
After connecting
– When you set the Network setting manually, refer to “Network” (p. 32).
– To play back the PC contents on your network, refer to “Using network content” (p. 20).
16 En
PC
Other connections
■ Connecting to the REMOTE
CONTROL jacks
Caution!
– For details about the SCENE function, refer to the
owner’s manual supplied with your Yamaha AV
receiver.
– You can connect a Yamaha component (such as CD
player) supports the SCENE function to the
REMOTE CONTROL (OUT) jack of this Player.
2
Connection
– You can transmit and receive the remote control
signals by connecting to the REMOTE CONTROL
(OUT/IN) jacks.
– Firmly connect monaural 3.5 mm mini plug cables
(commercially available) to the REMOTE
CONTROL (OUT/IN) jacks.
– If your AV receiver is a Yamaha product and has the
capability to transmit SCENE control signals, you
can control the Player with the SCENE function.
Hints
■ Connecting the power cable
– After all connections are completed, plug the
supplied power cable into the AC IN on the rear of
the Player. Then plug into AC outlet.
Do not connect the power cable of this
Player until all connections are completed.
AC IN
This Player
RK
AUDIO OUT
L
R
OUT
IN
REMOTE CONTROL
(Europe model)
To AC inlet
Monaural 3.5 mm
mini plug cable
(commercially
available)
To REMOTE
CONTROL (IN)
jack
Monaural 3.5 mm mini
plug cable
(commercially available)
To AC outlet
English
To REMOTE
CONTROL
(OUT) jack
Note
– TO PREVENT RISK OF ELECTRIC SHOCK, DO
NOT TOUCH THE UN-INSULATED PARTS OF
ANY CABLES WHILE THE POWER CABLE IS
CONNECTED.
To remote
control out
jack
To remote
control in
jack
REMOTE CONTROL IN
Yamaha component
REMOTE CONTROL OUT
Infrared signal receiver
or Yamaha component
(such as AV receiver)
17 En
PLAYBACK
Initial Wizard/Easy Setup
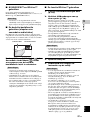
■ Setting with the Initial Wizard/Easy Setup
Initial Wizard/Easy Setup allows you to set language, resolution, and screen aspect ratio easily. Initial Wizard screen is
displayed when you turn this Player on for the first time after purchase. Same setting can be performed from SETUP
menu = System = Easy Setup.
1 When Easy Setup screen is displayed, press ENTER to
start Easy Setup.
2 Set the language, resolution, and screen aspect ration
by following the on-screen messages.
Notes
– When no picture is displayed after Initial Wizard/
Easy Setup is completed, refer to “Troubleshooting”
(p. 40).
– A warning message concerning 3D video playback
appears when this Player is turned on. Press ENTER
to dismiss the message or CLEAR to disable it
(p. 31).
HOME/MEDIA menu
HOME and MEDIA menus allow you to browse and play multi-media files on data discs, USB memory devices and your
network.
Note
Icons on the top of MEDIA menu
– For details on playable discs and formats, see page 3.
: Plays back the disc on the tray, or displays contents
in the data disc.
: Displays contents in the USB memory device
connected to the USB connector.
: Searches for a DLNA (p. 20) server on the network.
: Displays contents on the connected DLNA server.
■ Playing back photo/music/video
Basic operation
2/3/5/a: Moves the focus.
2: Returns to the parent folder.
HOME: Moves to/exits HOME menu screen.
ENTER: Confirms the folder/file.
PIP
SETUP
2ND
AUDIO
HOME
TOP MENU
REPEAT
A B
POP-UP MENU
ENTER
RETURN
18 En
ON SCREEN
HOME/MEDIA menu
Common operations for playing back
files in a selected folder
4 Select the Photo, Music, Video or AVCHD folder you
want to play back, then press ENTER.
To return to the parent folder, press 2 or select
.
Example: Selecting a movie file on a USB memory
device
Note
– Stop the playback of the video before you move to
MEDIA menu screen.
3
Playback
1 Press HOME to move to HOME menu screen.
Note
– Note that the only the file type selected on this step
will be displayed in the following step. For example,
if you selected Photo folder in this step, only photo
files are displayed after this step. When you want to
play back other than photo, return to this step and
select file type again.
Hint
– The HOME menu screen may differ depending on
the model.
5 Select the folder(s) containing the file you want to play
back.
2 Press 2/3/5/a to select MEDIA, then press ENTER.
MEDIA screen appears.
English
3 Select the item which contains the file you want to play
back, then press ENTER.
Continued to the next page. \
19 En
HOME/MEDIA menu
6 Select the file you want to play back, then press
ENTER.
When a video file is selected, playback starts.
When a music file is selected, status screen is displayed
and playback starts.
When a photo file is selected, slide show starts.
■ Using network content
This Player is DLNA certified (p. 42). You can manage
photo, music and video contents stored on DLNA servers
on your home network.
Playing back shared contents
1 To play back files on your PC, install a DLNA server
software, such as Windows Media Player 12, and share
files you want to play back.
2 Turn on the PC with DLNA server software installed or
the DLNA device connected to your home network.
3 Press HOME to display HOME menu screen. Then
select MEDIA to move to MEDIA menu. The DLNA
servers connected to the network are listed on the
screen.
Hint
– To enjoy slide show with music, press HOME to
return to the HOME menu screen while music is
played back, and select photo file.
Note
– The displayed file may not be played back
depending on the content.
Operations for viewing photos
While viewing photos, the buttons on the remote control
work as shown below.
: Stops slide show and returns to the file browser.
: Pauses a slide show.
: Plays a slide show.
: Moves to a next photo.
: Moves to a previous photo.
: Makes a slide show faster in 3 steps.
: Makes a slide show slower in 3 steps.
5: Inverts a photo.
a: Reflects a photo.
2: Rotates a photo counterclockwise.
3: Rotates a photo clockwise.
ZOOM: Zooms in/out a photo (zoom in/out: 3 steps each).
5/a/2/3: Pans in zoom mode when a photo is larger
than the screen.
DIGEST: Switches to thumbnail mode (p. 6). When
thumbnails are displayed, you can proceed to the next/
previous page with
/
.
20 En
Notes
– If your DLNA server is not listed, select DLNA
Search to find it.
– Depending on the DLNA server, this Player may
need to be permitted from the server.
– To play the file on the DLNA server, this Player and
the server must be connected to the same access
point.
– The file requirements may not always be compatible.
There may be some restrictions depending on file
features and DLNA sever capability.
4 Select the file you want to play back.
Notes
– The playback and operating quality may be affected
by your home network condition.
– The files from removable media such as USB
memory devices or DVD-drive on your media
server, may not be shared properly.
Using network services
You can instantly watch the videos that the following network services provide.
– YouTube
– Picasa (p. 22)
– Netflix (p. 23)
3
Notes
Playback
– Access to content provided by third parties requires a high speed internet connection and may also require account
registration and a paid subscription.
– Third party content services may be changed, suspended, interrupted, or discontinued at any time without notice,
and Yamaha disclaims any liability in connection with such occurrences.
– Some content may only be available for specific countries and may be presented in specific languages.
– Yamaha does not represent or warrant that content services will continue to be provided or available for a particular
period of time, and any such warranty, express or implied, is disclaimed.
Playing videos from YouTube™
You can watch movies from YouTube over the internet using this Player.
The services may be changed without notice.
1 Press HOME to display HOME menu screen.
English
Hint
– The HOME menu screen may differ depending on
the model.
2 Press 2/3/5/a to select YouTube, then press
ENTER.
Hint
– To exit from YouTube, press RETURN.
21 En
Playing photos from Picasa™ Web Album
You can watch photos from Picasa Web Album over the internet using this Player.
The service may be changed without notice.
1 Register your user name and password on the computer
before you use Picasa Web Album.
2 Press HOME to display HOME menu screen.
Press 2/3/5/a to select Picasa, then press ENTER.
Hint
– The HOME menu screen may differ depending on
the model.
3 When you access Picasa from this Player for the first
time, select the New User icon and enter your
registered user name and password.
Hint
– To exit from Picasa, press RETURN.
22 En
Playing videos from Netflix™
You can instantly watch movies and TV episodes from Netflix over the internet using this Player. To become a Netflix
member, visit www.netflix.com .
Netflix is available in certain countries. Unlimited membership required.
More information at www.netflix.com
3
■ Launching Netflix
Playback
1 Press HOME to display HOME menu screen.
Press 2/3/5/a to select NETFLIX, then press
ENTER.
You can also press NETFLIX on the remote control to
launch Netflix.
Hints
English
– The HOME menu screen may differ depending on
the model.
– To return to the HOME menu screen, press
RETURN.
Notes
– When a software upgrade is required, an update
notice appears when you select Netflix. In this case,
perform the software upgrade.
– For details on Netflix, refer to the Netflix website on
www.netflix.com .
– To deactivate Netflix, refer to “Netflix Information”
(p. 32).
23 En
Advanced playback operation
This chapter explains playback of commercially available
Blu-ray Discs, DVDs, CDs, and recorded DVD-RW/R
discs.
Note
– For the basic playback operation, see page 6.
■ On Screen menu
To display On Screen menu, press ON SCREEN. After
that, press 5/a/2/3 to select an item, then press ENTER
to operate the desired function.
DVD
–
–
–
–
–
–
–
Normal
Shuffle CH (chapter)
Shuffle TT (title)
Shuffle All
Random CH (chapter)
Random TT (title)
Random All
VIDEO
MUSIC
PHOTO
– Normal
– Shuffle F (folder)
– Random F (folder)
Audio BD DVD VIDEO : Shows audio language/
signal of a Blu-ray Disc/DVD currently selected. You can
select the desired type of audio.
Angle BD DVD : Shows the currently-selected angle
number. If the video is recorded with multiple angles, you
can change the angle.
Subtitle BD DVD VIDEO : Shows the currentlyselected subtitle language when the subtitle is provided.
On Screen menu contains following items.
Title BD DVD VIDEO : Shows the title number being
played back. You can skip to the desired title by selecting
it from this item.
Chapter BD DVD VIDEO : Shows the chapter
number being played back. You can skip to the desired
chapter by selecting it from this item.
Track/File CD VIDEO MUSIC PHOTO : Shows
track/file number being played back. You can skip to the
desired track/file by selecting it from this item.
Time BD DVD CD VIDEO MUSIC : Shows the
playback time. Select display type from the following:
– Elapsed playback time of the title, chapter, disc,
track or file
– Remaining playback time of the title, chapter, disc,
track or file
Mode/Play Mode
DVD CD VIDEO MUSIC PHOTO : Shows current
playback mode. You can select playback mode from the
following:
Subtitle Style BD : Shows the currently-selected
subtitle style. This function is available only for Video-file
external subtitle. You can select the desired text style of
subtitle.
Bitrate BD DVD CD VIDEO
bitrate of the audio/video signal.
MUSIC : Shows
Second Video BD : Turns the PIP on/off (p. 6).
Second Audio BD : Turns the secondary audio on/off
(p. 6).
Ins Search
BD
DVD
CD
VIDEO
MUSIC : Skips 30 seconds.
CD
VIDEO
MUSIC : Replays the content
Ins Replay
BD
DVD
from 10 seconds before.
Slide Show PHOTO :
Shows slide show speed. You can select the slide show
speed from Slow/Medium/Fast.
Transition PHOTO : Shows how photo appears on the
screen. You can select the transition type.
CD
– Normal: Normal playback.
– Shuffle: Random playback without repetition.
– Random: Random playback with repetition.
24 En
Code Page VIDEO : Selects character code of subtitle
you added to DivX video (p. 42).
Advanced playback operation
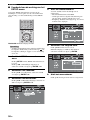
■ Status menu
This shows various settings, such as subtitles, angle
settings and the title/chapter/track number currently
played back. To display status menu, press STATUS.
Status menu contains following menus.
BD
DVD
CD
MUSIC
Example: Icons when playing a music file
VIDEO
Example: Icons when playing a Blu-ray Disc
2
1
3
4
3
5
Playback
8 7
1
2
3
4
6
(Playback status)
(Disc type/video file icon)
(Title number being played): You can jump to
specified title with SEARCH button (p. 7).
(Chapter number being played): You can
jump to specified chapter with SEARCH button (p. 7).
(Elapsed playback time): You can jump to
specified point with SEARCH button (p. 7).
(Subtitle currently selected): You can change
the subtitle language with SUBTITLE button.
7
(Audio currently selected): You can change the
audio language or format with AUDIO button.
8
(Repeat mode): Shows current repeat mode (p. 7).
1
(Playback status)
2
(Repeat mode): Shows current repeat mode (p. 7).
3
(Disc type/music file icon)
4 (Artwork) MUSIC : Displays artwork if the file
contains it.
5
(Track/file number being played): You can
jump to specified track with SEARCH button (p. 7).
6 (Information) MUSIC : Displays music information
if the file contains them.
7
(Elapsed playback time): You can jump to
specified point with SEARCH button (p. 7).
8 (Progress bar) MUSIC : Shows progress status of
current song.
PHOTO
1
(Playback status)
2
(Photo file icon)
3
(File number being displayed)
4
(Repeat mode): Shows current repeat mode (p. 7).
5 (Slide show speed)
25 En
English
5
6
Advanced playback operation
■ Using Bookmark
DVD
VIDEO
This allows you to set Bookmark at the specified point of
the video. After Bookmark is set, you can move to the
point you set using this function. You can set up to 12
Bookmarks.
1 Press MARKER during playing back the movie to set
Bookmark. Bookmark number, and the status are
displayed.
2 Press ENTER to program playback order.
For audio disc, press 5/a to select a desired track then
press ENTER.
For DVD-Video disc, select a desired title (shown as
TT) and chapter (shown as CH) instead of a track.
To clear a set track, select the track you want to clear,
then press CLEAR.
Press RETURN to cancel the Program play.
2 After Bookmark is set, press DIGEST to display
Bookmark select bar.
3 Press 2/3 to select the Bookmark you want to play
back, then press ENTER.
Press CLEAR to delete the selected Bookmark.
Note
– When playback is finished (e.g., ejecting the disc,
pressing
twice), Bookmarks are automatically
deleted.
■ Program play
DVD
CD
3 After programming is finished, press
start program playback.
to set and
4 To cancel program play, stop playback completely by
pressing
twice.
■ Using Search
BD
DVD
CD
VIDEO
MUSIC
PHOTO
This allows you to program playback order of audio disc
tracks or DVD chapters.
Press PROGRAM during playback to display the
PROGRAM window to program playback order.
You can program up to 15 tracks/chapters.
This allows you to jump to the specified point during
playback.
Example: Programming the playback order of CD tracks
2 Press 5/a/2/3 to select one of the item below, then
press ENTER.
1 Press PROGRAM during playback.
1 Press SEARCH during playback. Status bar appears.
BD DVD :
– Title number (shown as
)
– Chapter number (shown as
)
– Elapsed title time (shown as
)
– Elapsed chapter time (shown as
)
CD :
– Track number (shown as
)
– Elapsed track time (shown as
)
– Elapsed disc time (shown as
VIDEO
)
MUSIC :
– File number (shown as
)
– Elapsed file time (shown as
)
PHOTO :
– File number (shown as
)
3 Press 5/a or number buttons to set/adjust the value of
the focused item, and press ENTER to jump to the
specified point.
4 To close the status bar, press STATUS.
26 En
Advanced playback operation
■ Enjoying BONUSVIEW™ and BDLive™
■ Using the feature of BD-Live™
This Player supports BONUSVIEW (p. 42) (BD-ROM
Profile 1 Version 1.1) and BD-Live (p. 42) (BD-ROM
Profile 2) playback functions.
1. Set the Network setting (p. 32).
Note
■ Using Picture in Picture function
(secondary audio/video playback)
BD-Video that includes secondary audio and video
compatible with Picture in Picture can be played back
with secondary audio and video simultaneously as a small
video in the corner.
Primary video
Secondary video
BD-Live data is saved in a USB memory device
connected to this Player. To enjoy these functions,
connect a USB memory device supporting USB 2.0
High Speed (480 Mbit/s) to the USB connector that
you select on Local Storage (p. 31). The default
setting is the USB connector on the rear panel.
– BUDA folder is created automatically in the USB
memory device when necessary.
– If there is insufficient storage space, the data will not
be copied/downloaded. Delete unneeded data or use
a new USB memory device.
– Some time may be required for the data to load
(read/write).
3
Playback
– Functions and playback method vary depending on
the disc. See the guidance on the disc or the supplied
user’s manual.
2. Connect the USB memory device
to this Player (p. 16).
Notes
Notes
– To listen to secondary audio, make sure that the
Audio Output setting (Coaxial / Optical or HDMI) is
set to PCM or Reencode (p. 35).
– Depending on the disc, to listen to secondary audio,
you may need to set secondary audio to on from the
top menu of the disc (p. 8).
– The secondary audio and video for Picture in Picture
may automatically play back and be removed
depending on the content. Also, playable areas may
be restricted.
3. Play back the disc.
English
While PIP Mark (
) or Secondary
Audio Mark (
) is displayed, press
PIP to turn the Picture in Picture
function on/off.
– Yamaha cannot guarantee that all brands’ USB
memory devices will operate with this Player.
– Do not use a USB extension cable when connecting
a USB memory device to the USB connector of the
Player. Using a USB extension cable may prevent
the Player from performing correctly.
4. Run BD-Live according to the
instructions on the disc.
Notes
– Regarding playback method of BD-Live contents,
etc., perform the operations in accordance with the
instructions in the Blu-ray Disc manual.
– To enjoy BD-Live functions, perform the network
connection (p. 16) and Network settings (p. 32).
– Refer to “BD-Live Connection” (p. 33) regarding the
setup to restrict access to BD-Live contents.
– The time required to download the provided
programs into the USB memory device connected to
this Player varies depending on the internet
connection speeds and the data volume of the
programs.
– BD-Live programs provided through the internet
may not be able to display the connection depending
on the status (upgrading) of the provider. In such
cases, take out the disc and try again.
– If the BD-Live screen does not appear for a while
after you select the BD-Live function in the Blu-ray
Disc menu, the USB memory device may not have
enough free space. In such cases, eject the disc from
the Player, and then erase the data in the USB
memory device using the “Format” menu in the
“Local Storage” (p. 31).
27 En
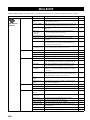
SETTINGS
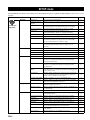
SETUP menu
The SETUP menu enables various audio/visual settings and adjustments for functions using the remote control unit.
Menu/Submenu
Item
System
Screen Saver
Sets screen saver on/off.
31
Disc Auto Playback
Sets this Player to start disc playback automatically.
31
HDMI Control
Sets this Player to receive control signal from the remote
control of your TV/AV receiver.
31
Network Control
Sets the control via Ethernet to on/off.
31
Load Default
Resets all settings to the default setting except Security
setting.
31
General Setting
Playback
Security
Network
28 En
Page
Upgrade
Performs upgrade of this Player.
31
Easy Setup
Sets language, resolution, screen aspect ratio.
31
Local Storage
Displays status of Local Storage (p. 31), formats Local
Storage and selects the front/rear USB connector for Local
Storage.
31
Displays a warning message concerning 3D video playback
when this Player is turned on.
31
OSD
Selects the language for On Screen Display.
31
Menu
Prioritizes the language for disc menu.
31
Audio
Prioritizes the language for audio.
32
Subtitle
Prioritizes the language for subtitle.
32
Closed Caption
Sets the closed caption to on/off.
32
Angle Mark
Sets to display the Angle Mark when Blu-ray Disc/DVD with
multiple angles is played back.
32
PIP Mark
Sets to display the PIP Mark when Blu-ray Disc/DVD with
Picture in Picture is played back.
32
Secondary Audio
Mark
Sets to display the Secondary Audio Mark when Blu-ray
Disc/DVD with secondary audio is played back.
32
Last Memory
Sets this Player to remember the last playback position of a
disc when it is set to standby mode or the disc tray is opened.
32
DivX(R) VOD
DRM
Displays registration code for DivX(R) video.
Netflix Information
Deactivates this Player from Netflix and displays ESN
(Electronic Serial Number).
32
Change Password
Changes password for Parental Control and Country Code.
32
Parental Control
Sets the Parental Control depending on the disc content.
32
Country Code
Sets your Country Code.
32
Internet Connection
Sets the internet connection to Enable/Disable.
32
Connection Setting
Sets a network connection method.
32
Information
Displays network information screen.
33
Connection Test
Performs the network connection test.
33
IP Setting
Sets the IP setting to Auto/Manual.
33
BD-Live
Connection
Sets the BD-Live connection to Permitted/Partial Permitted/
Prohibited.
33
DLNA
Sets the DLNA to Enable/Disable.
33
Proxy Setting
Sets the proxy setting.
33
3D Playback
Message
Language
Function
32
SETUP menu
Menu/Submenu
TV
Display Setting
Audio Output
Function
Page
Selects 3D or 2D videos.
33
TV Screen
Sets the screen aspect ratio of the connected TV, and adjust
the video output.
33
Video Out Select
Selects the resolution of video output.
34
TV System
Selects the TV System from NTSC/PAL/Multi.
34
Color Space
Selects Color Space from YCbCr 4:4:4/YCbCr 4:2:2/Full
RGB/RGB.
34
HDMI Deep Color
Selects HDMI Deep Color from 30 bits/36 bits/48 bits/Off.
34
HDMI 1080p 24Hz
Sets HDMI 1080p 24Hz to auto/off.
34
Lip Sync
Adjusts the lag between video and audio, such as when the
mouth movement is out of sync with the voice.
34
Video Mode
Adjusts the visual image.
34
Color Adjust
Adjusts Brightness/Saturation/Hue for each color.
35
Noise Reduction
Sets the level of Noise Reduction.
35
De-interlacing
Mode
Sets how to detect the video signal.
Coaxial / Optical
Selects the output mode of COAXIAL jack/OPTICAL
terminal from Bitstream/PCM/Reencode/Off.
35
HDMI
Selects the output mode of HDMI terminal from Bitstream/
PCM/Reencode/Off.
35
Downsampling
Selects the digital audio signal down sampling frequency
from 48K/96K/192K.
35
35
Audio Setting
4
Settings
Video Process
Item
3D Output
35
DRC
Sets the DRC (Dynamic Range Compression).
Speaker Setting
2ch Downmix
Sets the audio output from AUDIO OUT L/R jack.
35
Post Process
UpMix
Multi-channelizes the 2-channel audio signal.
35
Displays software version and MAC address (p. 43).
29 En
English
35
System
Information
SETUP menu
■ Example of SETUP menu
operation
You need to call up the SETUP menu screen to perform
settings for this Player. The following is the explanation
for basic operations of the SETUP menu.
SUBTITLE
4. Enter password.
Enter your password with number buttons.
– The default password is 0000.
– You cannot move to the next setting screen until
you have input the correct password.
– To change the password, refer to “Change
Password” (p. 32).
ANGLE
AUDIO
CLEAR
PIP
SEARCH
SHUFFLE
SETUP
TOP MENU
2ND
REPEAT
POP-UP MENU
ENTER
RETURN
ON SCREEN
Example: Setting Parental Control
Note
– Some items cannot be set during playback. In this
case, press
twice to stop playback completely
before setting.
5. Select a next item.
Press 5/a to select the Parental Control Level for
Blu-ray Disc/DVD, then press ENTER.
1. Display the SETUP menu screen.
Press SETUP to display the SETUP menu screen.
Press 2/3 to select General Setting, then press
ENTER or a.
2. Select a Submenu.
Press 5/a to select Security, then press ENTER or
cursor 3.
3. Select a menu item.
Press 5/a to select Parental Control, then press
ENTER or cursor 3.
30 En
6. Exit the menu screen.
Press 2 to return to the previous menu.
SETUP menu
■ General Setting
The default settings are marked with “ ”.
*
System
Screen Saver
You can set the screen saver to on/off.
When set to on, this Player will switch to screen saver
mode if there is no operation for 3 minutes. After that, this
Player will turn to standby mode when there is no
operation for 27 minutes.
On*, Off
On*, Off
HDMI Control
You can set the Player to receive control signal from a
TV/AV receiver compatible with the HDMI Control
function via an HDMI cable (p. 12).
On, Off*
• Automatic input select function
When you start playback of this Player, the input
selector of the TV (and an AV receiver if this Player is
connected to the TV via the AV receiver) is switched
to this Player automatically. TV Power is turned on
automatically depending on the TV.
• Automatic power off function
When you turn off the TV while this Player is in stop
mode and the SETUP menu screen is not displayed,
the power of this Player is also turned off
automatically.
Notes
– When Network Control is enable, power
consumption during standby mode increases due to
network control function.
– When set to On, the system startup time is
decreased.
Load Default
You can reset all settings of this Player to default setting
except Security setting (p. 32). For details on default
settings, see pages 28–35.
Upgrade
You can upgrade the software manually from USB
Storage or Network. For details on software upgrade, refer
to “Software upgrade” (p. 38).
4
Easy Setup
You can perform Easy Setup (p. 18).
Local Storage
You can display Local Storage information, format Local
Storage, and select Front USB/Rear USB to save the BDLive data.
To format (empty) the “BUDA” folder in the USB
memory device, select Information and press ENTER
when “Format” is focused on the screen.
Front USB, Rear USB*
English
Using HDMI Control function
Using the HDMI Control function, you can interactively
operate this Player with your TV (HDMI Control
function supported).
When you connect this Player to the TV compatible with
the HDMI Control function using an HDMI cable and
set HDMI Control in the SETUP menu to on (p. 31), you
can perform the function listed below.
On, Off*
Settings
Disc Auto Playback
You can set Disc Auto Playback to on/off. When set to on,
a disc will play back automatically after loading.
Network Control
You can set control via Ethernet to On/Off. This Player
employs Yamaha Network Control protocol (YNC).
Hint
– Local Storage is used as an auxiliary memory when
Blu-ray Disc is played back.
3D Playback Message
You can turn on or off a warning message concerning 3D
video playback that appears on the TV when this Player is
turned on.
On*, Off
Notes
Language
– HDMI Control function may not work properly
depending on the TV.
– Functions other than ones shown above may work
depending on the TV or AV receiver.
– In order to make the HDMI Control function
available, set up settings for the HDMI Control
function on ALL components (this Player, TV,
and AV receiver). Certain operation may also be
required.
– Each function may be set independently to
activate/deactivate depending on the TV.
– Refer to the operation manuals supplied with the
TV and/or AV receiver for details regarding setup.
– When set to on, power consumption during
standby mode increases due to HDMI Control
function.
OSD
You can select the language for On Screen Display which
is the messages or menu displayed on the screen such as
SETUP menu.
English, Français , Español , Deutsch , Italiano , Svenska ,
,
Nederlandse ,
Menu
You can prioritize the language for disc menu.
English, Français ,
, Español , Deutsch , Italiano ,
Nederlandse , Portuguese, Danish, Svenska , Finnish,
Norwegian,
, Korean, Japanese, More
31 En
SETUP menu
Audio
You can prioritize the audio language for Blu-ray Disc/
DVD playback. For details on setting items, see “Menu”
(p. 31).
Subtitle
You can prioritize the language for Subtitle.
English, Français ,
, Español , Deutsch , Italiano ,
Nederlandse , Portuguese, Danish, Svenska , Finnish,
Norwegian,
, Korean, Japanese, More, Off
(The default settings in [Language] differ depending on
your model.)
Playback
Closed Caption
You can set to display the closed caption (p. 42) when
Blu-ray Disc/ DVD with closed caption is played back.
On*, Off
Angle Mark
You can set to display the Angle Mark (
) when
Blu-ray Disc/DVD with multiple angles is played back.
On*, Off
PIP Mark
You can set to display the PIP Mark (
) when Blu-ray
Disc with picture in picture (p. 27) is played back.
On*, Off
Secondary Audio Mark
You can set to display the Secondary Audio Mark (
)
when Blu-ray Disc with secondary audio is played back.
On*, Off
Last Memory
You can set whether this Player remembers the last
playback position of a disc when it is set to standby mode
or the disc tray is opened.
On*, Off
Note
– Some discs are not compatible with this function.
DivX(R) VOD DRM
You can display registration code for DivX(R) video.
Netflix Information
You can deactivate this Player from Netflix and display
ESN (Electronic Serial Number). To activate this Player
again, refer to “Playing videos from Netflix™” (p. 23).
ESN (Electronic Serial Number) is a unique number that
allows you to use Netflix streaming.
32 En
Security
Change Password
You can set the password for changing the Parental
Control Level and Country Code. Refer to “Parental
Control” (p. 32) and “Country Code” (p. 32).
Notes
– The default password is 0000.
– If you forget the password, refer to
“Troubleshooting” (p. 39) and set all the Security
settings to their default settings.
Parental Control
In some Blu-ray Discs/DVDs, a control level for disc
viewing is set depending on the age of the viewer. You
can set the Parental Control shown on the screen
depending on the disc content.
The password (see “Change Password” on p. 32) needs to
be entered before the Parental Control Levels is set.
After you set the Parental Control, when you play back a
disc with level higher than current Parental Control Level,
or you want to change the Parental Control Level, a dialog
box will pop up to ask you to enter the password.
Off*, 1–8
Country Code
You can set the Country Code you live in. The password
(see “Change Password” on p. 32) needs to be entered
before the Country Code is set. This setting may be used
for rating of Parental Control and disc playback.
Network
Internet Connection
Set this item to Enable when you use BD-Live (p. 27), DLNA
(p. 20), software upgrade from the network (p. 38), and the
other network functions.
Enable*, Disable
Connection Setting
You can select a network connection method.
Wired*
Connects the network using Ethernet.
Wireless
Connects the network using a wireless LAN.
You can select settings for a wireless LAN
connection. Follow the on-screen instructions to
proceed.
Scan
Searches for an access point. You can connect the
access point that is found.
Manual
You can manually set information for an access
point.
SETUP menu
Information
You can display network information screen. On this
screen, you can view the information of Interface
(Ethernet), Address Type, IP Address, Subnet Mask,
Default Gateway, and DNS.
■ Display Setting
Connection Test
You can perform an internet connection test. If the test is
failed, please check “IP Setting” (p. 33) and perform the
test again.
3D Output
You can select 3D or 2D video output from this Player.
IP Setting
You can configure the network settings.
Select to automatically configure the network
settings of this Player with the DHCP server.
Manual
Select to configure the network settings (IP Address,
Subnet Mask, Default Gateway, and DNS) manually.
Hints
–
–
–
–
Numeric keys
2/3
CLEAR
ENTER
Enters characters.
Moves the highlight.
Deletes a character.
Saves the settings and exits from
the menu.
BD-Live Connection
You can set access restriction to BD-Live contents.
Permitted
Allows all BD-Live discs to connect the network.
Partial
Permitted*
Allows only discs with owner certification.
Prohibited
Prohibits all BD-Live discs to connect the network.
Enable*, Disable
Proxy Setting
You can set Proxy Setting. Set to Disable for normal use.
Set to Enable to set the proxy setting.
Enable
Enables proxy host and proxy port setting.
Disable*
Sets proxy server to disable. Select this item when
proxy server is not used.
Proxy Host
Sets proxy host.
Proxy Port
Sets proxy port.
Auto*
This Player automatically selects 3D or 2D videos.
Off
This Player always selects 2D videos.
Note
– Even if you set “3D Output” to “Auto” and play
back a Blu-ray 3D Disc, this Player selects 2D
images depending on the connection and the setting
of TV, etc (p. 12).
TV Screen
You can set the screen aspect ratio of the connected TV,
and adjust the video output.
If you switch your TV (i.e. because you have bought a
new one) and the screen aspect ratio of the connected TV
changes, you will have to change the TV Screen setting.
16:9 Full
4
Select this when this Player is connected to a TV
with a 16:9 screen. When a 4:3 aspect ratio video is
played back, the video is displayed as shown below.
16:9 Normal* Select this when this Player is connected to a TV
with a 16:9 screen. When a 4:3 aspect ratio video is
played back, the video is displayed as shown below.
4:3 Pan Scan Select this when this Player is connected to a TV
with a 4:3 screen. When a 16:9 aspect ratio video is
played back, the video is displayed as shown below.
4:3 Letter Box Select this when this Player is connected to a TV
with a 4:3 screen. When a 16:9 aspect ratio video is
played back, the video is displayed as shown below.
Original
image size
On 16:9 (wide screen) TV
16:9 Full
16:9 Normal
4:3
Original
image size
On 4:3 TV
4:3 Pan Scan
4:3 Letter Box
16:9
33 En
English
DLNA
You can set the DLNA (p. 42) to Enable/Disable. When
you do not use the DLNA function, set to Disable.
TV
Settings
Auto*
The default settings are marked with “ * ”.
SETUP menu
Video Out Select
You can select the video output resolution from HDMI,
COMPONENT, and VIDEO. For more details on output
formats, refer to “About the video output formats” (p. 37).
HDMI
When set to Auto, resolution is set to the maximum
resolution according to the connected TV.
When set to Disc Native, the original resolution and
video frequency, recorded in the Blu-ray Disc or
DVD that is played back, are used. You can use a
video up-converter function of an external device.
When other than a Blu-ray Disc or DVD is played
back, the resolution and video frequency will work
as Auto.
If a Blu-ray Disc or DVD whose resolution and
video frequency are not compatible with the
connected TV, no image will be output. In this case,
stop playback, and select an option other than Disc
Native.
Auto*, Disc Native, 480i/576i, 480p/576p,
720p, 1080i, 1080p
HDMI Deep Color
When your TV and/or AV receiver is compatible with
Deep Color (p. 42), set this item according to your TV/AV
receiver. This function is available when this Player is
connected with an HDMI cable.
30 bits, 36 bits, 48 bits, Off*
HDMI 1080p 24Hz
This outputs the BD-Video encoded in 24Hz frame rate in
HDMI 1080p 24Hz. Smoother video playback may be
available with this function. This function is available
when your TV/AV receiver support this function, and this
Player is connected with an HDMI cable. For more details
on output formats, refer to “About the video output
formats” (p. 37).
Auto*, Off
Note
COMPONENT You can select only 480p/576p or 480i/576i.
– This setting is disabled when output resolution is
other than 1080p.
480p/576p, 481i/576i*
VIDEO
This works as same as 480i/576i.
Notes
– To output HD audio (Dolby TrueHD or DTS-HD
Master Audio) from HDMI terminal, set Video Out
Select to Auto or more than 720p.
– If a TV is connected with an HDMI cable, default
setting will be HDMI.
– If a TV is not connected with an HDMI cable,
default setting is VIDEO.
TV System
You can select TV System from PAL, NTSC and Multi.
Set the same TV System as your TV set. For more details
on output formats, refer to “About the video output
formats” (p. 37).
NTSC, PAL, Multi
(The default setting differs depending on your model.)
Color Space
You can select the Color Space (p. 42) output from
HDMI. This function is available when this Player is
connected with an HDMI cable.
YCbCr 4:4:4* Sets Color Space to YCbCr 4:4:4.
YCbCr 4:2:2
Sets Color Space to YCbCr 4:2:2.
Full RGB
When RGB is set and white and black on the screen
are too faint, select this item. This setting is effective
when a connected component supports RGB 0–255
range.
RGB
Outputs video signal at normal signal range.
Note
– This function is only available on TVs that support
this function.
Lip Sync
You can set/adjust the Lip Sync (p. 43) function.
Auto*
This Player adjusts the Lip Sync function
automatically.
Manual
You can adjust the Lip Sync function manually. You
can set the delay of the audio for 2D and 3D contents
independently.
2D
3D
Off
This Player does not adjust the Lip Sync function.
Video Process
Video Mode
You can select Video Mode below.
Standard*
The image is most natural and well-balanced. This
mode suits for normal use.
Vivid
The image is more vivid and sharp.
Cinema
The image suits for watching movie in dark room.
Custom
You can adjust the visual image manually. Press
5/a to select the parameter, then press 2/3 to
adjust the figure.
Brightness
Adjusts the overall brightness of the image.
Saturation
Adjusts the richness of the color in the projected
image.
Hue
Adjusts the tint of the projected image.
Contrast
Adjusts the bright areas (white levels) in the image.
Sharpness
Adjusts the sharpness of objects in the video.
CTI
Smoothes out the edges of color images. Color
images are rendered more distinct.
The default settings are 0.
34 En
SETUP menu
Color Adjust
You can adjust Brightness/Saturation/Hue for each color
(Red/Green/Blue/Yellow/Cyan/Magenta). To use this
function, set Video Mode to Custom. For details on the
setting items, see “Video Mode” (p. 34).
The default settings are 0.
Noise Reduction
You can set the Noise Reduction to a level of 0 to 3. 0 is
off, and 3 is the maximum level.
DRC
You can set the DRC (Dynamic Range Compression)
(p. 42) to on/off/Auto. When set to Auto, DRC is
automatically turned on for a source with DRC
information in Dolby TrueHD format. DRC makes the
strong sound such as plosive sound lower, and
conversations more audible. It is useful when you watch
movies in the night.
Off, On, Auto*
0, 1, 2*, 3
Speaker Setting
2ch Downmix
You can select down mix method to analog 2-ch from
Stereo or Lt/Rt.
Auto*, Film, Video
Lt/Rt
■ Audio Setting
Select this item if this unit is connected to a Dolby
Pro Logic decoder. Sound from rear speakers is
mixed to the 2-ch stereo sound.
Stereo*
Changes channel output to stereo, which only
delivers sound from the two front speakers.
The default settings are marked with “ * ”.
Audio Output
Post Process
Coaxial / Optical
You can select the output mode of COAXIAL jack and
OPTICAL terminal. For more details on output formats,
refer to “About the audio output formats” (p. 36).
UpMix
You can multi-channelize the 2-channel audio signal. To
multi-channelize, select DTS NEO:6, then select Cinema
or Music mode.
Bitstream
Off*, DTS NEO:6
Outputs digital signal without any processing.
Secondary Audio is not output.
Outputs 2-channel PCM.
Reencode*
Outputs Bitstream with Secondary Audio.
■ System Information
Off
Mutes sound.
Software version and MAC address (p. 43) are displayed.
HDMI
You can select the output mode of HDMI terminal. For
details on setting items, see “Coaxial / Optical” (p. 35). For
more details on output formats, refer to “About the audio
output formats” (p. 36).
Bitstream*, PCM, Reencode, Off
Note
– To output HD audio (Dolby TrueHD or DTS-HD
Master Audio) from HDMI terminal, set Video Out
Select to Auto or more than 720p (p. 34).
Downsampling
You can select digital audio signal down-sample
frequency. This function is effective for the audio signal
output from the COAXIAL jack/OPTICAL terminal.
48K*
The highest sampling rate of digital PCM output is
48 kHz.
96K
The highest sampling rate of digital PCM output is
96 kHz.
192K
The highest sampling rate of digital PCM output is
192 kHz.
35 En
English
PCM
4
Settings
De-interlacing Mode
You can select how to detect the video signal. Set to Auto
for normal use. When horizontal stripping noise appears
on the screen, set this to Film/Video to remove the noise.
SETUP menu
■ About the audio output formats
Source format
PCM 2ch
PCM 5.1ch
PCM 7.1ch
HDMI
Bitstream
with SA* or
BCS**
PCM 2ch
without SA*
or BCS**
with SA* or
BCS**
PCM 5.1ch
PCM 7.1ch
PCM up to
5.1ch
Dolby Digital
Plus
PCM up to
7.1ch
Dolby
TrueHD
PCM up to
7.1ch
DTS
PCM up to
5.1ch
with SA* or
DTS HD High BCS**
Resolution
without SA*
or BCS**
DTS HD High
Resolution
PCM up to
7.1ch
with SA* or
BCS**
DTS-HD
Master Audio without SA*
or BCS**
DTS-HD
Master Audio
PCM up to
7.1ch
without SA*
or BCS**
with SA* or
Dolby Digital BCS**
Plus
without SA*
or BCS**
Dolby
TrueHD
DTS
with SA* or
BCS**
without SA*
or BCS**
with SA* or
BCS**
without SA*
or BCS**
Dolby Digital
PCM
PCM 2ch
MIXED 2CH
Reencode
–
Dolby Digital
2ch
PCM 2ch
Dolby Digital
PCM 2ch
2ch
Dolby Digital
PCM 2ch
Dolby Digital
PCM 2ch
PCM 7.1ch
Dolby Digital
Dolby Digital
Bitstream
PCM 5.1ch
without SA*
or BCS**
with SA* or
BCS**
COAXIAL / OPTICAL
Reencode
PCM 2ch
without SA*
or BCS**
with SA* or
BCS**
PCM
2ch
Dolby Digital
PCM 2ch
Dolby Digital Dolby Digital
2ch
2ch
2ch
PCM 2ch
Dolby Digital
2ch
Dolby Digital
PCM 2ch
Dolby Digital
2ch
Dolby Digital
PCM 2ch
Dolby Digital
2ch
DTS
PCM 2ch
DTS
2ch
DTS
PCM 2ch
DTS
2ch
DTS
PCM 2ch
DTS
2ch
Dolby Digital
Dolby Digital
Plus
Dolby Digital
Dolby
TrueHD
DTS
DTS
DTS HD High
Resolution
DTS
DTS-HD
Master Audio
* “SA” is a Secondary Audio.
** “BCS” is a button click sound, the sound effect for pop-up menus, etc.
Notes
– When Coaxial / Optical or HDMI is set to Bitstream, secondary audio is not output. (p. 35)
– To output HD audio (Dolby TrueHD or DTS-HD Master Audio) from HDMI terminal, set Video Out Select to
Auto or more than 720p (p. 34).
36 En
SETUP menu
■ About the video output formats
When TV System is set to NTSC
Video Out Select
Contents
Output
terminal
HDMI
Auto
Disc Native
*1
*2
off
BD-Video
HDMI
without
COMPONENT
1080p/24Hz
VIDEO
content
*1
*3
*2
off
*1
*3
*2
*2
*1
*1
HDMI
DVD-Video COMPONENT
VIDEO
HDMI
Others
COMPONENT
VIDEO
*2
1080p 24Hz
*2
1080i
1080p 24Hz/
1080i 60Hz
60Hz *4
off
off
1080p 60Hz 1080i 60Hz
off
off
1080p 60Hz 1080i 60Hz
off
off
1080p 60Hz 1080i 60Hz
off
off
COMPONENT
VIDEO
720p
480p/576p
480i/576i
480p/576p
480i/576i
–
720p 60Hz
480p
480i
480p
480i
480i
480i
480i
480i
480i
480i
480i
480i
480i
480i
480i
480p
480i
480p
480i
480i
480i
480i
480i
480i
480i
480i
480i
480i
480i
480i
480p
480i
480p
480i
480i
480p
480i
480p
480i
480i
480i
480i
480i
480i
480i
480p
480i
480p
480i
480i
480p
480i
480p
480i
480i
480i
480i
480i
480i
480i
off
720p 60Hz
off
720p 60Hz
off
720p 60Hz
off
4
Settings
BD-Video
HDMI
with
1080p/24Hz COMPONENT
content
VIDEO
1080p
When TV System is set to PAL
Video Out Select
Contents
Output
terminal
HDMI
Disc Native
BD-Video
HDMI
with
1080p/24Hz COMPONENT
content
VIDEO
*1
1080p 24Hz
*2
off
BD-Video
HDMI
without
COMPONENT
1080p/24Hz
VIDEO
content
*1
*3
*2
off
*1
*3
*2
*2
*1
*1
*2
*2
HDMI
DVD-Video COMPONENT
VIDEO
HDMI
Others
COMPONENT
VIDEO
1080p
1080i
1080p 24Hz/
1080i 50Hz
50Hz *4
off
off
1080p 50Hz 1080i 50Hz
off
off
1080p 50Hz 1080i 50Hz
off
off
1080p 50Hz 1080i 50Hz
off
off
COMPONENT
VIDEO
720p
480p/576p
480i/576i
480p/576p
480i/576i
–
720p 50Hz
576p
576i
576p
576i
576i
576i
576i
576i
576i
576i
576i
576i
576i
576i
576i
576p
576i
576p
576i
576i
576i
576i
576i
576i
576i
576i
576i
576i
576i
576i
576p
576i
576p
576i
576i
576p
576i
576p
576i
576i
576i
576i
576i
576i
576i
576p
576i
576p
576i
576i
576p
576i
576p
576i
576i
576i
576i
576i
576i
576i
off
720p 50Hz
off
720p 50Hz
off
720p 50Hz
off
*1 Resolution will be set to the maximum resolution supported by the connected TV. For example, when the maximum
resolution supported by the connected TV is 1080p, the resolution will be set to 1080p.
*2 Video might not be output because HDMI output has priority.
*3 Resolution will be that of the source disc.
*4 If Auto is set for HDMI 1080p 24Hz and the connected TV supports 1080p 24Hz content, 1080p 24 Hz will be output
instead of 1080p 50/60 Hz.
When TV System is set to Multi
When TV System is set to Multi, video signal is output at the same frequency as the source. Refer to the tables above for
details on the frequency setting of the TV and resolution of the output video signal.
Notes
– HDMI 1080p 24Hz setting is disabled when output resolution is other than 1080p.
– When TV System is set to NTSC and video source is not 60 Hz, the video output signal is converted to 60 Hz.
– When TV System is set to PAL and video source is not 50 Hz, the video output signal is converted to 50 Hz.
37 En
English
Auto
Software upgrade
Some of the newly released Blu-ray Discs cannot be played back unless you upgrade this Player software to the latest
version. We recommend upgrading the software of this Player with software upgrade so that this Player is operated based
on the latest software.
To check for the availability of a software upgrade, visit
http://download.yamaha.com/
Note
– Do not remove the USB memory device, set this Player to standby mode or unplug the power cable/LAN cable
while the software upgrade is being performed.
■ Upgrading the software
1. Prepare for the software upgrade.
When you upgrade the software from USB Storage:
1 Save the upgrade file package to the appropriate
folder on the USB memory device. For more
details, refer to the procedure document attached
with the upgrade file package.
2 Connect the USB memory device.
Skip step 2.
When you upgrade the software from Network:
Confirm that this Player is connected to the
network.
2. Select the upgrade method and
start upgrade from SETUP menu.
1 Press SETUP to display SETUP menu screen.
2 Select General Setting = System = Upgrade.
3 Select the item which contains the upgrade file
package from USB Storage/Network.
The system will search for upgrade file package.
38 En
3. Upgrade the software by following
the on-screen messages.
Upgrade is completed. The system will be reset.
ADDITIONAL INFORMATION
Troubleshooting
Refer to the table below when this Player does not function properly. If the problem you are experiencing is not listed
below or if the instruction below does not help, turn off this Player, disconnect the power cable, and contact the nearest
authorized Yamaha dealer or service center.
■ Power
Problem
Possible causes and solutions
No power.
– Connect the AC power cable properly.
– Press p on the front panel to turn on the power.
The Player power is turned off.
– The power will be automatically turned off after 30 continuous minutes of inactivity (no
playback).
5
■ Basic operation
Possible causes and solutions
– Use the remote control within its operating range. (p. 9)
– Replace the batteries. (p. 9)
– Check the ID settings for the main unit and the remote control. The remote control ID
on the main unit may be changed after the main unit is reset. In this case, verify the
remote control ID on the main unit, and set it again if needed. (p. 9)
Buttons do not work.
– Press and hold p on the front panel for more than 5 seconds, and release to reset this
Player.
– To completely reset this Player, unplug the power cable from the AC outlet for 10
seconds or more, plug the power cable to the AC outlet again, and then turn on this
Player.
Password is forgotten.
– Press and hold
and
on the front panel simultaneously when no disc is inserted
and playback is stopped to set all the settings including Security settings (p. 32) of this
Player to their default settings. After the power is turned off automatically, press p to
turn on the power again.
Additional information
Problem
The remote control does not work.
English
■ Disc playback
Problem
Possible causes and solutions
The Player cannot play a disc.
–
–
–
–
–
–
–
Video stops.
– The Player will stop if it senses shock or vibration.
The Player makes a snapping sound
when starting playback or loading a
disc.
– These sounds are not malfunctions of the Player but are normal operating conditions.
Take out the disc and clean it. (p. 4)
Make sure that the disc is loaded properly (aligned in disc tray and label-side up). (p. 4)
Use a disc supported by the Player. (p. 3)
Remove the disc and then check whether the Player supports the disc or not. (p. 3)
Check the region code. (p. 3)
Check whether the disc is defective by trying another disc.
The CD-R/RW, DVD+R/RW/R DL, and DVD-R/RW/R DL must be finalized. (p. 3)
39 En
Troubleshooting
■ Picture
Problem
Possible causes and solutions
No picture.
– Make sure that the cables are connected correctly. (p. 10)
– Make sure that the connected TV or the AV receiver is set to the correct input. (p. 10)
– With no disc inserted, or playback stopped, press and hold
and
on the front
panel simultaneously to set video resolution to the default value.
If a picture is still not output, press and hold
on the front panel for approximately 5
seconds to switch NTSC/PAL.
– When set to Disc Native, a signal that is not compatible with the connected TV is
output. Change the setting to output a signal that is compatible with the connected TV.
(p. 34)
Screen freezes and operation buttons
do not work.
– Press , then restart playback.
– Turn off the power and turn on the power again.
– Press and hold p on the front panel for more than 5 seconds, and release to reset this
Player.
Video is not output with the desired
resolution.
– Set to the desired resolution. (p. 34)
Wide-screen video appears vertically
stretched, or black bands appear at the
top and bottom of the screen. Or 4:3
video appears horizontally stretched.
– Change the aspect ratio of your TV. (p. 33)
Square noise (mosaic) appears on the
screen.
– Blocks in images may be visible in scenes with rapid movement due to the
characteristics of digital image compression technology.
The playback screen will be disturbed if
DVD video is recorded to a VCR, or
played back through a VCR.
– This Player complies with analog copy protection. Some discs contain a copy
prohibiting signal. If you try to play back such discs through a VCR, or record to a VCR
and play back the signal, the copy protection will prevent normal playback.
Audio is not output, or images are not
played back properly.
– The audio may not be output or the images may not be played back properly for some
discs in which copyright-protected contents are recorded.
■ Sound
Problem
Possible causes and solutions
No sound, or sound is distorted.
–
–
–
–
Left and right channels of audio are
reversed, or sound comes out of only
one side.
– Check the audio connection. (p. 10)
Audio is not output, or images are not
played back properly.
– The audio may not be output or the images may not be played back properly for some
discs in which copyright-protected contents are recorded.
Cannot hear the desired audio type and/
or number of channels.
– Refer to Audio Output setting and “About the audio output formats”. (p. 35, p. 36)
Cannot hear the sound of PIP
(secondary audio).
– Set Coaxial / Optical or HDMI to PCM/Reencode. (p. 35)
– To hear secondary audio, press 2ND AUDIO. (p. 6)
– Depending on the disc, you may need to set secondary audio on the top menu of the
disc. (p. 8)
Check that the audio cable is connected correctly. (p. 10)
Turn the volume of TV or AV receiver up.
There is no sound during still mode, fast forward, and fast reverse. (p. 8)
Audio may not be output depending on the audio recording status, such as when audio
other than an audio signal or non-standard audio is recorded for the audio content. (p. 3)
■ Network
Problem
Cannot connect to the Internet.
40 En
Possible causes and solutions
– When connecting to the Internet by selecting Wired in Connection Setting, connect the
Network cable properly. (p. 32)
– Turn on the connected equipment, such as broadband router or modem.
– Connect the broadband router and/or modem properly.
– If Wireless is selected in Connection Setting, and when you want to connect to the
Internet using Ethernet, select Wired properly. (p. 32)
– Properly select Wireless in Connection Setting when you want to connect to the Internet
using a wireless LAN. (p. 32)
Troubleshooting
Problem
Possible causes and solutions
Cannot detect the DLNA server.
– Verify that this Player can connect to the network normally. Refer to “Connection
Test”. (p. 33)
– Turn on the connected equipment, such as broadband router or the server.
– Confirm the Player and the server are connected to the same access point.
– Depending on the DLNA server, the Player may need to be permitted from the server.
– Depending on the DLNA server, it needs to change a firewall setting.
Cannot play the file on the DLNA server.
– Make sure the file is playable. (p. 3)
– Check your DLNA server’s setting.
– The playback and operating quality may be affected by your home network condition.
Cannot connect to the Internet via
Wireless LAN.
– Make sure that the wireless LAN router is turned on.
– Depending on the surrounding environment, such as the wall material, radio wave
receiving condition, or obstacles between the Player and the wireless LAN router, the
communication distance may be shortened. Move the Player and the wireless LAN
router closer to each other.
– Devices that use a 2.4 GHz frequency band, such as a microwave, Bluetooth, or digital
cordless device, may interrupt the communication. Move the Player away from such
devices, or turn off such devices.
– If the Internet connection using a wireless LAN is still not successful by the above two
solutions, try using Ethernet by selecting Wired in Connection Setting. (p. 32)
Wireless network is not found or
distorted.
– If Scan is performed but the wireless network is not found or distorted, press RETURN
to return to the previous screen, and try Scan again. If the desired wireless router is still
not detected, press RETURN to select Manual.
– Make sure that the wireless network is not disturbed by microwave ovens, DECT
phones, or other neighboring Wi-Fi devices.
– Microwave ovens, DECT phones or other wireless devices in your neighborhood might
disturb the wireless network. Turn off these devices.
– Make sure that the firewalls in your network allow access to the wireless connection of
this Player.
– If the wireless network does not work properly in your home, try the wired network
connection.
■ Messages on the screen
– The following messages appear on the TV screen in case the disc you tried to play back is not appropriate or the
operation is not correct.
Error message
Possible causes and solutions
Unsupported File
– The file is not supported with this Player. See “Types of discs/files that can be used with this Player”
(p. 3).
Wrong region code!
– The disc is an incompatible region code. See “Region management information for Blu-ray Disc/
DVD videos” (p. 3).
Network has FAILED.
– This Player cannot be connected to the network. Check connection (p. 16) and Network setting (p. 32).
Network is OK, proxy has
FAILED.
– This Player cannot be connected to the proxy server. See “Proxy Setting” (p. 33).
BD-Live connection is
prohibited in SETUP menu.
– BD-Live connection is prohibited. See “BD-Live Connection” (p. 33).
Upgrade has failed for some
reason!
– Upgrade is failed. Check if the upgrade file is corrupted or unreadable.
IP Setting is not valid! Please
reset…
– The IP Setting entered is not valid. Enter the correct information again.
41 En
5
English
– Verify that this Player can connect to the Internet normally. Refer to “Connection Test”.
(p. 33)
– Connect USB memory device properly. Check that the USB memory device is
connected to the USB connector of this Player. (p. 16)
– Check if the Blu-ray Disc supports BD-Live.
– Connect the USB memory device formatted in FAT16, FAT32, or NTFS.
– It is recommended to connect the USB memory device with at least 2 GB of free space.
If there is not enough free space, format the USB memory device. (p. 31)
– Refer to the supplied user’s manual of the disc or consult the disc manufacturer.
Additional information
Cannot download BD-Live contents.
Glossary
AVCHD
AVCHD is a new format (standard) for high definition
video cameras that can be used to record and play highresolution HD images.
BD-Live™
BD-Live is a Blu-ray Disc standard that utilizes a
network connection, enabling this Player to go online to
download promotional videos and other data.
BDMV
BDMV (Blu-ray Disc Movie) refers to one of the
application formats used for BD-ROM which is one of
the Blu-ray Disc specifications. BDMV is a recording
format equivalent to DVD-Video of the DVD
specification.
Blu-ray 3D™
Blu-ray 3D enables you to view full high definition 3D
images.
BONUSVIEW™
BONUSVIEW compatible discs let you simultaneously
enjoy video sub-channel for two screens, audio subchannel and sub-titles. A small screen appears within
the main screen during playback (Picture in Picture).
Closed Caption
Closed captions are kind of subtitle, and the difference
between subtitles and captions is that subtitles are
intended for hearing persons and captions are for the
hearing impaired. Subtitles rarely show all of the audio.
For example, captions show sound effects (e.g., “phone
ringing” and “footsteps”), while subtitles do not. Before
you select this setting, please ensure that the disc
contains closed caption information.
Color Space
Color Space is a color range that can be represented.
RGB is a color space based on the RGB color model
(red, green and blue) and is typically used for PC
monitors. YCbCr is a color space based on a luminance
signal (Y) and two color difference signals (Cb and Cr).
Deep Color
Deep Color refers to the use of various color depths in
displays, up from the 24-bit depths in previous versions
of the HDMI specification. This extra bit depth allows
HDTVs and other displays go from millions of colors to
billions of colors and eliminate on-screen color banding
for smooth tonal transitions and subtle gradations
between colors. The increased contrast ratio can
represent many times more shades of gray between
black and white. Also Deep Color increases the number
of available colors within the boundaries defined by the
RGB or YCbCr color space.
42 En
DLNA
DLNA (Digital Living Network Alliance) provides easy
sharing of digital media through network in the home,
and you can enjoy digital contents stored on your
DLNA-server-software-installed PC or other DLNA
compatible device with your TV via this Player. To
connect this Player to your DLNA servers, some
settings for the DLNA server or device are required. For
details, refer to your DLNA server software or DLNA
device.
DivX®
DivX® is a digital video format created by DivX, LLC,
a subsidiary of Rovi Corporation. This is an official
DivX Certified® device that plays DivX video. Visit
divx.com for more information and software tools to
convert your files into DivX videos.
Dolby Digital
A sound system developed by Dolby Laboratories Inc.
that gives movie theater ambience to audio output when
the product is connected to a Dolby Digital processor or
amplifier.
Dolby Digital Plus
A sound system developed as an extension to Dolby
Digital. This audio coding technology supports 7.1
multi-channel surround sound.
Dolby TrueHD
Dolby TrueHD is a lossless coding technology that
supports up to 8 channels of multi-channel surround
sound for the next generation optical discs. The
reproduced sound is true to the original source bit-forbit.
DRC (Dynamic Range Control)
DRC lets you adjust the range between the loudest and
softest sounds (dynamic range) for playback at average
volume. Use this when it is hard to hear dialog, or
during times when playback may disturb neighbors.
DTS
This is a digital sound system developed by DTS, Inc.
for use in cinemas.
DTS-HD High Resolution Audio
DTS-HD High Resolution Audio is a new technology
developed for the next generation high definition optical
disc format.
DTS-HD Master Audio
DTS-HD Master Audio is a lossless audio compression
technology developed for the next generation high
definition optical disc format.
Glossary
FLAC
Lip Sync
FLAC (Free Lossless Audio Codec) is an open file
format for lossless audio data compression. While
inferior in compression rate to other lossy compressed
audio formats, it can often provide higher audio quality.
HDMI
HDMI (High-Definition Multimedia Interface) is an
interface that supports both video and audio on a single
digital connection. The HDMI connection carries
standard to high definition video signals and multichannel audio signals to AV components such as HDMI
equipped TVs, in digital form without degradation.
Letterbox (LB 4:3)
A screen size with black bars on the top and bottom of
the image to allow viewing of wide-screen (16:9)
material on a connected 4:3 TV.
Linear PCM Sound
Mac address
The Mac address is a unique value assigned to a network
device for identification purposes.
Pan Scan (PS 4:3)
A screen size that cuts off the sides of the image to allow
viewing of wide-screen (16:9) material on a connected
4:3 TV.
Subtitles
These are the lines of text appearing at the bottom of the
screen which translate or transcribe the dialog. They are
recorded on many DVDs and Blu-ray Discs.
x.v.Color
x.v.Color reproduces a greater range of color than
before, showing almost all of the colors that the human
eye can detect.
5
Additional information
Linear PCM is a signal recording format used for Audio
CDs and on some DVD and Blu-ray Discs. The sound
on Audio CDs is recorded at 44.1 kHz with 16 bits.
(Sound is recorded between 48 kHz with 16 bits and 96
kHz with 24 bits on DVD discs and between 48 kHz
with 16 bits and 192 kHz with 24 bits on Blu-ray Discs.)
Lip Sync, an abbreviation for lip synchronization, is a
technical term that involves both a problem and a
capability of maintaining audio and video signals
synchronized during post-production and transmission.
Whereas the audio and video latency requires complex
end-user adjustments, HDMI incorporates an automatic
audio and video syncing capability that allows devices
to perform this synchronization automatically and
accurately without user interaction.
Specifications
■ Input/output
Power supply
[U.S.A. and Canada models].................................. AC 110–240 V, 60 Hz
[Central and South America model] .................AC 110–240 V, 50/60 Hz
[Australia model] ................................................... AC 110–240 V, 50 Hz
[U.K., Europe and Russia model] .......................... AC 110–240 V, 50 Hz
[China model]......................................................... AC 110–240 V, 50 Hz
[Asia model]......................................................AC 110–240 V, 50/60 Hz
Power consumption (Normal) .............................................................. 20 W
Power consumption (Standby) ................................................. 0.5 W or less
Dimensions (W × H × D, including protrusions) ......... 435 × 86 × 257 mm
(17-1/8 × 3-3/8 × 10-1/8 in)
Weight ..................................................................................2.8 kg (6.2 lbs.)
HDMI output .............................................................. Type A connector × 1
480i/576i/480p/576p/720p/1080i/1080p/1080p@24Hz,
Deep Color, x.v. Color support
Component video output ..............................................Y: 1 Vp-p (75 ohms)
PB, PR: 0.7 Vp-p (75 ohms)
Video output......................................................................1 Vp-p (75 ohms)
Digital output.......................................................... Optical × 1, Coaxial × 1
Analog audio output ..............................................................Mixed 2 ch × 1
USB ............................................................................ Type A connector × 2
Wireless LAN.................................................. Standard: IEEE 802.11 b/g/n
Frequency range: 2.4GHz band
Other equipment ........................................................... Remote IN/OUT × 1
Ethernet × 1
■ Audio performance
Audio output level (1 kHz, 0 dB)
Blu-ray Disc/DVD/CD-DA.........................................................2 ± 0.3 V
Signal to noise ratio
Blu-ray Disc/DVD/CD-DA............................................................ 110 dB
Dynamic range
Blu-ray Disc/DVD ......................................................................... 105 dB
CD-DA ........................................................................................... 100 dB
Harmonic distortion (1 kHz)
Blu-ray Disc/DVD/CD-DA............................................................0.003%
Frequency Response
Blu-ray Disc/DVD ............................. 4 Hz to 22 kHz (48 kHz Sampling)
4 Hz to 44 kHz (96 kHz Sampling)
CD-DA ...............................................................................4 Hz to 20 kHz
Specifications are subject to change without notice.
43 En
English
■ General
Specifications
■ Copyright
– Audio-visual material may consist of copyrighted
works which must not be recorded without the
authority of the owner of the copyright. Refer to
relevant laws in your country.
– This item incorporates copy protection technology
that is protected by U.S. patents and other
intellectual property rights of Rovi Corporation.
Reverse engineering and disassembly are prohibited.
– Manufactured under license from Dolby
Laboratories. Dolby and the double-D symbol are
trademarks of Dolby Laboratories.
– Manufactured under license under U.S. Patent Nos:
5,956,674; 5,974,380; 6,226,616; 6,487,535;
7,212,872; 7,333,929; 7,392,195; 7,272,567 & other
U.S. and worldwide patents issued & pending. DTSHD, the Symbol, & DTS-HD and the Symbol
together are registered trademarks & DTS-HD
Master Audio is a trademark of DTS, Inc. Product
includes software. © DTS, Inc. All Rights Reserved.
– “Blu-ray Disc™”, “Blu-ray™”, “Blu-ray 3D™”,
“BD-Live™”, “BONUSVIEW™”, and the logos are
trademarks of the Blu-ray Disc Association.
–
is a trademark of DVD Format/Logo
Licensing Corporation.
– “HDMI,” the “HDMI” logo and “High-Definition
Multimedia Interface” are trademarks, or registered
trademarks of HDMI Licensing LLC.
– “x.v.Color” and “x.v.Color” logo are trademarks of
Sony Corporation.
– “AVCHD” and the “AVCHD” logo are trademarks
of Panasonic Corporation and Sony Corporation.
– Java and all Java-based trademarks and logos are
trademarks or registered trademarks of Sun
Microsystems, Inc. in the United States and/or other
countries.
– This product is licensed under the AVC patent
portfolio license and VC-1 patent portfolio license
for the personal and non-commercial use of a
consumer to (i) encode video in compliance with the
AVC Standard and VC-1 Standard (“AVC/VC-1
Video”) and/or (ii) decode AVC/VC-1 Video that
was encoded by a consumer engaged in a personal
and non-commercial activity and/or was obtained
from a video provider licensed to provide AVC/VC1 Video. No license is granted or shall be implied for
any other use. Additional information may be
obtained from MPEG LA, LLC.
See http://www.mpegla.com.
– Windows Media Player is a registered trademark or
trademark of Microsoft corporation in the United
States and/or other countries.
– YouTube and the YouTube logo, Picasa and the
Picasa logo are trademarks of Google. Inc.
– Netflix and the Netflix logo are the registered
trademarks of Netflix, Inc.
– DLNA and DLNA CERTIFIED are trademarks and/
or service marks of Digital Living Network Alliance.
– Copyright 2004-2010 Verance Corporation.
Cinavia™ is a Verance Corporation trademark.
Protected by U.S. Patent 7,369,677 and worldwide
patents issued and pending under license from
Verance Corporation. All rights reserved.
44 En
– The Wi-Fi CERTIFIED Logo is a certification mark
of the Wi-Fi Alliance.
– DivX®, DivX Certified®, DivX Plus® HD and
associated logos are trademarks of Rovi Corporation
or its subsidiaries and are used under license.
– DivX Certified® to play DivX® and DivX Plus®
HD (H.264/.MKV) video up to 1080p HD including
premium content.
ABOUT DIVX VIDEO: DivX® is a digital video format
created by DivX, LLC, a subsidiary of Rovi
Corporation. This is an official DivX Certified® device
that plays DivX video. Visit divx.com for more
information and software tools to convert your files into
DivX videos.
ABOUT DIVX VIDEO-ON-DEMAND: This DivX
Certified® device must be registered in order to play
purchased DivX Video-on-Demand (VOD) movies. To
obtain your registration code, locate the DivX VOD
section in your device setup menu. Go to vod.divx.com
for more information on how to complete your
registration.
ADDITIONAL INFORMATION
Index
■
Numerics
2ch Downmix, SETUP menu ...............35
2ND AUDIO, remote control ................6
3D Output, SETUP menu ....................33
3D Playback Message, SETUP menu
.........................................................31
■
A
■
B
BD-Live ...............................................27
BD-Live Connection, SETUP menu ....33
Bitrate, On Screen menu ......................24
Bookmark .............................................26
■
C
G
General Setting, SETUP menu .............31
■
H
HDMI 1080p 24Hz, SETUP menu ......34
HDMI connection .................................12
HDMI Control function ........................31
HDMI Control, SETUP menu ..............31
HDMI Deep Color, SETUP menu .......34
HDMI, SETUP menu ...........................35
HOME menu ........................................18
HOME, remote control ...........................6
■
I
Information, SETUP menu ...................33
Initial Wizard .......................................18
Ins Replay, On Screen menu ................24
Ins Search, On Screen menu ................24
Internet Connection, SETUP menu ......32
IP Setting, SETUP menu ......................33
■
L
Language, SETUP menu ......................31
Last Memory, SETUP menu ................32
Lip Sync, SETUP menu .......................34
Load Default, SETUP menu ................31
Local Storage, SETUP menu ...............31
■
M
Netflix ..................................................23
Netflix Information, SETUP menu ......32
Network connection .............................16
Network Control, SETUP menu ..........31
Network, SETUP menu ........................32
Noise Reduction, SETUP menu ...........35
Number buttons, remote control ............6
■
■
D
Data disc playback ...............................18
De-interlacing Mode, SETUP menu ....35
DIGEST, remote control ........................6
Disc Auto Playback, SETUP menu .....31
Display Setting, SETUP menu .............33
DivX(R) VOD DRM, SETUP menu ...32
DLNA, SETUP menu ..........................33
Downsampling, SETUP menu .............35
DRC, SETUP menu .............................35
■
E
Easy Setup ............................................18
Easy Setup, SETUP menu ...................31
ENTER, remote control .........................8
ESN (Electronic Serial Number) .........32
MARKER, remote control .....................6
MEDIA menu .......................................18
Menu, SETUP menu ............................31
Mode/Play Mode, On Screen menu .....24
■
N
O
On Screen menu ...................................24
ON SCREEN, remote control ................8
OSD, SETUP menu ..............................31
Other connections .................................17
■
P
Parental Control, SETUP menu ...........32
Picture in Picture function ....................27
PIP Mark, SETUP menu ......................32
PIP, remote control .................................6
Playback, SETUP menu .......................32
POP UP/MENU, remote control ............8
Post Process, SETUP menu ..................35
Program play ........................................26
PROGRAM, remote control ...................6
Proxy Setting, SETUP menu ................33
R
Remote control ...................................... 6
REPEAT, remote control ....................... 7
RETURN, remote control ...................... 8
■
S
Screen Saver, SETUP menu ................ 31
Search function .................................... 26
SEARCH, remote control ...................... 7
Second Audio, On Screen menu .......... 24
Second Video, On Screen menu .......... 24
Secondary Audio Mark, SETUP menu
......................................................... 32
Security, SETUP menu ........................ 32
SETUP menu ....................................... 28
SETUP menu operation ....................... 30
SETUP, remote control ......................... 6
SHUFFLE, remote control .................... 7
Slide Show, On Screen menu .............. 24
Software upgrade ................................. 38
Speaker Setting, SETUP menu ............ 35
Status menu ......................................... 25
STATUS, remote control ....................... 6
Subtitle Style, On Screen menu ........... 24
Subtitle, On Screen menu .................... 24
SUBTITLE, remote control ................... 7
Subtitle, SETUP menu ......................... 32
System Information, SETUP menu ..... 35
System, SETUP menu ......................... 31
■
T
Time, On Screen menu ........................ 24
Title, On Screen menu ......................... 24
TOP MENU, remote control ................. 8
Track/File, On Screen menu ................ 24
Transition, On Screen menu ................ 24
TV Screen, SETUP menu .................... 33
TV System, SETUP menu ................... 34
TV, SETUP menu ................................ 33
■
U
Upgrade of software ............................ 38
Upgrade, SETUP menu ....................... 31
UpMix, SETUP menu ......................... 35
USB connection ................................... 16
USB content playback ......................... 18
■
V
Video connection ................................. 13
Video Mode, SETUP menu ................. 34
Video Out Select, SETUP menu ......... 34
Video output formats ........................... 37
Video Process, SETUP menu .............. 34
■
Y
YouTube playback ............................... 21
■
Z
ZOOM, remote control .......................... 6
45 En
5
English
Change Password, SETUP menu .........32
Chapter, On Screen menu ....................24
CLEAR, remote control .........................6
Closed Caption, SETUP menu .............32
Coaxial / Optical, SETUP menu ..........35
Code Page, On Screen menu ................24
Color Adjust, SETUP menu .................35
Color buttons, remote control ................6
Color Space, SETUP menu ..................34
Connection Setting, SETUP menu .......32
Connection Test, SETUP menu ...........33
Control buttons, remote control .............8
Country Code, SETUP menu ...............32
Cursor buttons, remote control ..............8
■
Additional information
A/B, remote control ...............................7
Angle Mark, SETUP menu ..................32
Angle, On Screen menu .......................24
ANGLE, remote control ........................7
Audio connection .................................14
Audio file requirement ...........................3
Audio output formats ...........................36
Audio Output, SETUP menu ...............35
Audio Setting, SETUP menu ...............35
Audio, On Screen menu .......................24
AUDIO, remote control .........................7
Audio, SETUP menu ...........................32
■
Attention : Veuillez lire ce qui suit avant d’utiliser l’appareil.
1
2
3
4
5
Pour utiliser l’appareil au mieux de ses possibilités, lisez
attentivement ce mode d’emploi. Conservez-le
soigneusement pour référence.
Installez cet appareil dans un endroit frais, bien aéré, sec et
propre - à l’abri de la lumière du soleil, des sources de
chaleur, des vibrations, des poussières, de l’humidité et/ou du
froid. Pour une aération correcte, tenez compte des distances
minimales suivantes.
Haut : 10 cm
Arrière : 10 cm
Côtés : 10 cm
Placez l’appareil loin des équipements, moteurs et
transformateurs électriques, pour éviter les ronflements
parasites.
N’exposez pas l’appareil à des variations brutales de
température, ne le placez pas dans un environnement très
humide (par exemple dans une pièce contenant un
humidificateur) car cela peut entraîner la condensation
d’humidité à l’intérieur de l’appareil, qui elle-même peut être
responsable de décharge électrique, d’incendie, de dommage
à l’appareil ou de blessure corporelle.
Evitez d’installer l’appareil dans un endroit où des objets
peuvent tomber, ainsi que là où l’appareil pourrait être exposé
à des éclaboussures ou des gouttes d’eau. Sur le dessus de
l’appareil, ne placez pas :
– d’autres appareils qui peuvent endommager la surface
de l’appareil ou provoquer sa décoloration.
– des objets se consumant (par exemple, une bougie)
qui peuvent être responsables d’incendie, de
dommage à l’appareil ou de blessure corporelle.
– des récipients contenant des liquides qui peuvent être
à l’origine de décharge électrique ou de dommage à
l’appareil.
6
7
8
9
10
11
12
13
14
Ne couvrez pas l’appareil d’un journal, d’une nappe, d’un
rideau, etc. car cela empêcherait l’évacuation de la chaleur.
Toute augmentation de la température intérieure de l’appareil
peut être responsable d’incendie, de dommage à l’appareil ou
de blessure corporelle.
Ne branchez pas la fiche du cordon d’alimentation de
l’appareil sur une prise secteur tant que tous les
raccordements n’ont pas été effectués.
Ne pas faire fonctionner l’appareil à l’envers. Il risquerait de
chauffer et d’être endommagé.
N’exercez aucune force excessive sur les commutateurs, les
boutons et les cordons.
Pour débrancher la fiche du cordon d’alimentation au niveau
de la prise secteur, saisissez la fiche et ne tirez pas sur le
cordon.
Ne nettoyez pas l’appareil au moyen d’un solvant chimique,
ce qui pourrait endommager la finition. Utilisez un chiffon
sec et propre.
N’alimentez l’appareil qu’à partir de la tension prescrite.
Alimenter l’appareil sous une tension plus élevée est
dangereux et peut être responsable d’incendie, de dommage à
l’appareil ou de blessure corporelle. Yamaha ne saurait être
tenue responsable des dommages résultant de l’alimentation
de l’appareil sous une tension autre que celle prescrite.
Pour empêcher tout dommage causé par les éclairs,
déconnectez la cordon d’alimentation de la prise murale
pendant un orage.
Ne tentez pas de modifier ni de réparer l’appareil. Consultez
le service Yamaha compétent pour toute réparation qui serait
requise. Le coffret de l’appareil ne doit jamais être ouvert,
quelle que soit la raison.
Attention-i Fr
15 Si vous envisagez de ne pas vous servir de l’appareil pendant
une longue période (par exemple, pendant les vacances),
débranchez la fiche du cordon d’alimentation au niveau de la
prise secteur.
16 Lisez la section intitulée « Guide de dépannage » où figure
une liste d’erreurs de manipulation communes avant de
conclure que l’appareil présente une anomalie de
fonctionnement.
17 Avant de déplacer l’appareil, appuyez sur p pour placer
l’appareil en veille puis débranchez la fiche du cordon
d’alimentation au niveau de la prise secteur.
18 La condensation se forme lorsque la température ambiante
change brusquement. En ce cas, débranchez la fiche du
cordon d’alimentation et laissez l’appareil reposer.
19 La température de l’appareil peut augmenter en raison d’une
utilisation prolongée. En ce cas, coupez l’alimentation de
l’appareil et laissez-le au repos pour qu’il refroidisse.
20 Installez cet appareil à proximité de la prise secteur et à un
emplacement où la fiche du câble d’alimentation est
facilement accessible.
21 Les piles ne doivent pas être exposées à une chaleur extrême,
par exemple au soleil, à une flamme, etc.
N’utilisez pas cet appareil à moins de 22 cm d’une
personne portant un stimulateur cardiaque ou un
défibrillateur.
Cet appareil n’est pas déconnecté du secteur tant qu’il
reste branché à la prise de courant, même si l’appareil
en soi est éteint par la touche p. Il se trouve alors « en
veille ». Dans cet état, l’appareil consomme une très
faible quantité de courant.
AVERTISSEMENT
POUR RÉDUIRE LES RISQUES DINCENDIE OU
DE DÉCHARGE ÉLECTRIQUE, N’EXPOSEZ PAS
CET APPAREIL À LA PLUIE OU À L’HUMIDITÉ.
Le laser de cet appareil peut émettre un rayonnement
dépassant les limites de la classe 1.
Caractéristiques du LASER :
Produit LASER de Classe 1
Longueur d’onde : 790 nm (pour les CD)/658 nm (pour les
DVD)/405 nm (pour les Blu-ray)
Puissance du laser : max. 1 mW
SÉCURITÉ LASER
L’appareil utilise un laser. En raison des risques de
blessure des yeux, le retrait du couvercle ou les
réparations de l’appareil devront être confiés
exclusivement à un technicien d’entretien qualifié.
DANGER
Risque d’exposition au laser en cas d’ouverture. Eviter
l’exposition directe des yeux au faisceau. Lorsque cet
appareil est branché à la prise de courant, ne pas approcher
les yeux de l’ouverture du plateau changeur et des autres
ouvertures pour regarder à l’intérieur.
Table des matières
1. Introduction
1
4. Paramètres
Possibilités offertes par ce lecteur................... 2
Accessoires fournis ........................................... 2
À propos des disques et des fichiers............... 3
Types de disques/fichiers utilisables avec ce lecteur......
Chargement d’un disque.................................................
Précautions d’emploi pour les disques ...........................
Précautions concernant le visionnage d’images vidéo
3D...............................................................................
Technologie Cinavia.......................................................
3
4
4
Menu SETUP ..................................................... 28
Exemple d’utilisation du menu SETUP ........................ 30
Réglages Généraux ....................................................... 31
Paramètres vidéo ........................................................... 33
Paramètres audio ........................................................... 35
Système d’information .................................................. 35
À propos des formats de sortie audio............................ 36
À propos des formats de sortie vidéo............................ 37
4
4
Mise à niveau logicielle.................................... 38
Commandes et fonctions .................................. 5
Mise à niveau du logiciel .............................................. 38
Panneau avant ................................................................. 5
Télécommande................................................................ 6
Guide de dépannage ........................................ 39
2. Raccordements
Présentation des raccordements ................... 10
Panneau arrière ............................................................. 10
Raccordements HDMI ...................................... 12
Raccordement à la borne HDMI................................... 12
Raccordement pour la lecture de disques Blu-ray
3D............................................................................. 12
Raccordements vidéo ...................................... 13
Raccordement aux connecteurs composante/vidéo ...... 13
Raccordements audio...................................... 14
Raccordement au connecteur/à la borne audio
numérique................................................................. 14
Raccordement aux connecteurs audio .......................... 15
Raccordements réseau et USB ....................... 16
Raccordement à la borne NETWORK ......................... 16
Raccordement au connecteur USB ............................... 16
Autres raccordements ..................................... 17
Raccordement aux connecteurs REMOTE
CONTROL............................................................... 17
Raccordement du cordon d’alimentation...................... 17
Wizard Initial/Installation facile ....................... 18
Préconfiguration à l’aide de Wizard Initial/Installation
facile......................................................................... 18
Menu HOME/MEDIA ......................................... 18
Lecture de photo/musique/vidéo .................................. 18
Utilisation d’un contenu du réseau ............................... 20
21
21
22
23
Lancement de Netflix ................................................... 23
Mode de lecture avancé................................... 24
Menu à l’écran ..............................................................
Menu d’état...................................................................
Utilisation de la fonction Signet ...................................
Programmation de l’ordre de lecture ............................
Utilisation de la fonction de recherche ........................
Utilisation des fonctions BONUSVIEW™ et
BD-Live™................................................................
Utilisation de la fonction d’incrustation
(lecture audio/vidéo secondaire) ..............................
Utilisation de la fonction BD-Live™ ...........................
24
25
26
26
26
27
27
27
3
4
5
Alimentation.................................................................. 39
Opérations de base ........................................................ 39
Lecture de disque .......................................................... 39
Image............................................................................. 40
Son ................................................................................ 40
Réseau ........................................................................... 40
Messages d’erreur à l’écran .......................................... 41
Glossaire ........................................................... 42
Caractéristiques techniques ........................... 43
Généralités .................................................................... 43
Performances audio....................................................... 43
Entrée/Sortie.................................................................. 43
Droits d’auteur .............................................................. 44
Index .................................................................. 45
(à la fin de ce mode d’emploi)
Information about software ....................................i
■ À propos de ce manuel
– Ce manuel explique comment utiliser ce lecteur à
l’aide de la télécommande (chaque fois que cela est
possible). Certaines opérations peuvent également
être réalisées à l’aide des boutons prévus sur le
panneau avant du lecteur.
– Les notes attirent votre attention sur des points
importants au sujet de la sécurité et du mode de
fonctionnement du lecteur. Les astuces vous donnent
des conseils au sujet d’une fonction ou d’une
opération particulière.
– Ce manuel a été imprimé avant la mise en
production du lecteur. La conception et les
caractéristiques techniques sont susceptibles d’être
modifiées dans le cadre des améliorations apportées
au produit. Si vous constatez des différences entre le
manuel et le produit, c’est ce dernier qui a priorité.
Icônes utilisées dans ce manuel
Les icônes représentent les touches/fonctions disponibles
pour un format spécifique. Pour en savoir plus sur les
types et formats de disques compatibles, voir page 3.
BD : BD Vidéo
DVD : DVD vidéo, DVD-VR, DVD+VR
CD : CD audio
VIDEO : Fichiers vidéo
MUSIC : Fichiers audio
PHOTO : Fichiers image
1 Fr
Français
3. Playback
Utilisation des services réseau.......................
Lecture de vidéos sur YouTube™ ..................
Lecture de photos sur Picasa™ Albums
Web ................................................................
Lecture de vidéos sur Netflix™ ......................
5. Informations complémentaires
2
INTRODUCTION
Possibilités offertes par ce lecteur
\
p. 18
Lecture des disques Blu-ray Disc™/Blu-ray 3D™/DVD/CD en vente
\
dans le commerce*
p. 24
Réglage facile de la langue, de la résolution et du format d’image
Ce lecteur permet de définir la langue qui convient et les paramètres relatifs au téléviseur.
Outre les disques Blu-ray, ce lecteur permet également de lire de nombreux autres formats de
disques.
\
p. 27
\
p. 18
\
p. 20
Contrôle à distance des appareils (téléviseur, ampli-tuner AV, etc.)
\
à l’aide de la télécommande
p. 31
Lecture BONUSVIEW™, BD-Live™, etc.*
Ce lecteur permet de profiter des bonus disponibles à partir des dernières versions de disques
Blu-ray.
Lecture des fichiers Vidéo, Musique et Photo enregistrés sur
disque/clé USB*
Ce lecteur est prévu pour lire le contenu des disques/périphériques mémoire USB enregistrés.
Lecture des fichiers Vidéo, Musique et Photo enregistrés sur un
serveur de réseau domestique* **
Il est possible de lire le contenu d’un ordinateur sur un téléviseur ou un ampli-tuner AV en
raccordant ce lecteur à un serveur de réseau.
Il suffit de connecter vos appareils à l’aide d’un câble HDMI pour pouvoir les commander à
l’aide de la fonction Contrôle HDMI de la télécommande.
Visionnage en streaming des contenus sur services de réseau**
\
p. 21
Ce lecteur permet de visionner directement des vidéos disponibles sur internet.
* Pour en savoir plus sur les types et formats de disques compatibles, reportez-vous à la page 3.
** Il est nécessaire de définir un paramètre de configuration réseau pour tirer parti de cette fonction.
Accessoires fournis
Assurez-vous que le produit a été livré avec tous les accessoires suivants.
Télécommande
2 Fr
Piles (×2)
(AAA, R03, UM-4)
Câble audio/vidéo
Cordon d’alimentation
1
À propos des disques et des fichiers
– Ce lecteur accepte les disques de 12 cm et de 8 cm.
Aucun adaptateur 8 cm-12 cm n’est nécessaire.
– Utilisez des disques conformes aux standards
compatibles indiqués par les logos officiels présents
sur l’étiquette du disque. La lecture de disques non
conformes à ces standards n’est pas garantie. En
outre, le fait de pouvoir lire ces disques ne garantit ni
la qualité d’image ni la qualité du son.
Type de disque
Format d’enregistrement
BD-ROM/BD-R/
BD-RE
BD Video/Fichiers de données
DVD-ROM
DVD Video
DVD-R/DVD-R
DL/DVD-RW
DVD Video/DVD-VR/AVCHD/Fichiers de
données
DVD+R/DVD+R
DL/DVD+RW
DVD Video/DVD+VR/AVCHD/Fichiers de
données
CDDA/Fichiers de données
Fichiers de données
Fichiers de données
MUSIC
VIDEO
DivX (.divx)
MKV avec format
DivX (.mkv)
MKV avec H.264
(.mkv)
MPEG PS (.mpeg/
.mpg)
MPEG TS (.ts)
MPEG-4 (.mp4)
VOB (.vob)
AVI (.avi)
ASF (.asf)
WMV (.wmv)
ALL
Formats de
fichiers image
compatibles
PHOTO
JPEG (.jpeg/.jpg)
GIF (.gif)
PNG (.png)
Remarques
– La lecture d’un fichier figurant dans le tableau cidessus n’est pas garantie selon les méthodes de
création de fichier ou les codecs utilisés.
– Il n’est pas possible de lire un fichier dont les droits
d’auteur sont protégés.
– Lorsque le DLNA est utilisé, un fichier doit répondre
aux exigences du serveur DLNA.
– Les opérations et fonctions des Blu-ray Disc/DVD
vidéo peuvent différer des explications données dans
ce mode d’emploi et certaines opérations peuvent
être interdites en raison de réglages effectués par le
fabricant du disque.
– Si un écran de menu ou des instructions de
fonctionnement s’affichent pendant la lecture d’un
disque, suivez les indications affichées.
– Certains disques peuvent ne pas être lus.
– N’oubliez pas de finaliser tous les supports
d’enregistrement que vous avez l’intention de lire
sur ce lecteur.
– La « finalisation » désigne un traitement effectué
durant l’enregistrement d’un disque, de sorte que ce
disque puisse être lu à la fois sur ce lecteur et sur
d’autres lecteurs/enregistreurs. Seuls les disques
finalisés peuvent être lus sur ce lecteur. (Ce lecteur
ne possède pas de fonction pour finaliser les disques.)
– La lecture de l’ensemble des fichiers contenus sur le
disque, le périphérique mémoire USB et le réseau
n’est pas garantie.
– Il n’est pas possible de lire un fichier dont les droits
d’auteur sont protégés, via un périphérique mémoire
USB ou le réseau.
Configuration requise pour la lecture
des fichiers audio.
– Fréquence d’échantillonnage : entre 32 et 48 kHz
(MP3/WMA), LPCM 44,1 kHz/16 bits/Stéréo
(WAV), 192 kHz/24 bits (FLAC)
– Débit binaire : 8 à 320 kbits/s (MP3), 32 à 192 kbits/
s (WMA)
Configuration requise pour la lecture
des fichiers WMV
– WMV9, résolution maximale de 1 920 × 1 080.
3 Fr
Français
MP3 (.mp3)
WMA (.wma)
AAC (.aac/.m4a)
WAV (.wav)
FLAC (.flac)
Formats de
fichiers vidéo
compatibles
DVD Video
Code de région « A » ou « ABC » Code de région « 1 » ou « ALL »
Remarques
* Ce lecteur est compatible avec une clé USB formatée
aux formats FAT 16/32 et NTFS.
Formats de
fichiers audio
compatibles
BD Video
1
CDDA/HDCD
CD-R/CD-RW
DLNA
– Les lecteurs et disques Blu-ray Disc/DVD vidéo
comportent des codes régionaux qui déterminent la
région dans laquelle un disque pourra être lu.
Vérifiez la mention du code de région sur le panneau
arrière de ce lecteur.
– Pour un Blu-ray Disc, le disque peut être lu sur ce
lecteur s’il porte la même mention de code de région
ou la mention de code de région « ABC ».
– Pour un disque DVD, le disque peut être lu sur ce
lecteur s’il porte la même mention de code de région
ou la mention du code de région « ALL ».
Exemples de codes de région
CD-ROM
USB*
Information sur la gestion des régions
pour les Blu-ray Disc/DVD vidéo.
Introduction
■ Types de disques/fichiers
utilisables avec ce lecteur
À propos des disques et des fichiers
■ Chargement d’un disque
– Insérez le disque avec la face imprimée vers le haut.
– Dans le cas d’un disque enregistré des deux côtés,
tournez la face à lire vers le bas.
Remarques
– La lecture peut commencer automatiquement en
fonction du disque et du réglage choisi pour ce lecteur.
– Avec certains disques, il est possible que le menu soit
affiché en premier.
– La durée de chargement du disque peut varier selon le disque.
■ Précautions d’emploi pour les disques
Attention aux rayures et à la poussière
– Les disques Blu-ray Disc, DVD et CD sont sensibles à la
poussière, aux traces de doigts et particulièrement aux rayures.
Un disque rayé risque de ne pas pouvoir être lu sur ce lecteur.
Manipulez les disques avec soin et rangez-les en lieu sûr.
Rangement correct des disques
Posez le disque au centre de son boîtier et
rangez le boîtier et le disque en position
verticale.
Évitez de ranger les disques dans des
endroits exposés aux rayons directs du
soleil, à proximité d’appareils de chauffage
ou dans des endroits très humides.
Ne faites pas tomber les disques et ne les
soumettez pas à de fortes vibrations ni à
des chocs violents.
Évitez de ranger les disques dans des
endroits très poussiéreux ou très humides.
■ Précautions concernant le
visionnage d’images vidéo 3D
– Il se pourrait que certaines personnes éprouvent une
gêne ou un malaise (fatigue visuelle, épuisement ou
nausée) lors du visionnage de supports vidéo 3D.
Nous recommandons à tous les utilisateurs de faire
une pause à intervalles réguliers lors du visionnage
de supports vidéo 3D.
– En cas de gêne ou malaise quelconque, arrêtez le
visionnage du support vidéo 3D et attendez que la
gêne ou le malaise soit passé. En cas de malaise
sérieux, consultez un médecin.
– Lisez attentivement les modes d’emploi (Blu-ray
Disc et téléviseur) et/ou les consignes de sécurité
affichées sur le téléviseur.
– La vue est toujours en cours de développement chez
les enfants en bas âge (plus particulièrement en
dessous de six ans). Veuillez consulter un médecin
(pédiatre ou oculiste) avant de laisser des enfants en
bas âge regarder des supports vidéo 3D.
– Les jeunes enfants doivent toujours être sous la
surveillance d’un adulte pour s’assurer que les
consignes ci-dessus sont appliquées.
■ Technologie Cinavia
– La technologie Cinavia fait partie du système de
protection du contenu dans votre lecteur Blu-ray Disc.
Remarque
– Votre lecteur Blu-ray Disc peut afficher les
messages suivants, s’arrêter ou couper
provisoirement le son des sorties audio si vous lisez
une copie non autorisée d’un contenu protégé par la
technologie Cinavia.
Ces messages sont affichés en anglais uniquement.
Arrêt de la lecture. Le contenu que vous
visionnez est protégé par Cinavia™ et sa
lecture sur cet appareil n’est pas autorisée.
Pour de plus amples informations, consultez le site
http://www.cinavia.com. Code message 1.
Précautions de manipulation
– Si la surface du disque est encrassée,
essuyez-la délicatement avec un chiffon
doux et humide (à l’eau uniquement).
Lorsque vous essuyez un disque, déplacez
toujours le chiffon du centre vers le bord.
– N’utilisez pas de nettoyants en atomiseur
contenant du benzène, du diluant, des
liquides de protection contre l’électricité
statique ou tout autre solvant.
– Ne touchez pas la surface du disque.
– Ne collez pas de papier ou des étiquettes adhésives
sur les disques.
– Si la surface de lecture d’un disque est encrassée ou
rayée, le lecteur peut en déduire que le disque est
incompatible et éjecter le plateau de disque ou bien le
disque risque de ne pas être lu correctement. Essuyez
la saleté sur la surface de lecture avec un chiffon doux.
Nettoyage de la lentille du capteur optique
– N’utilisez jamais de disque de nettoyage en vente
dans le commerce. L’utilisation de ces disques peut
endommager la lentille.
– Confiez le nettoyage de la lentille au SAV agréé par
Yamaha le plus proche.
4 Fr
Arrêt provisoire du son. N’ajustez pas le
volume. Le contenu que vous visionnez est
protégé par Cinavia™ et sa lecture sur cet
appareil n’est pas autorisée.
Pour de plus amples informations, consultez le site
http://www.cinavia.com. Code message 3.
Information Cinavia
Ce produit utilise la technologie Cinavia afin de limiter
l’utilisation de copies non autorisées de certains films et
de certaines vidéos produits à des fins commerciales et de
leurs bandes son originales. Lorsqu’une utilisation
interdite d’une copie non autorisée est détectée, un
message sera affiché et la lecture ou la copie sera
interrompue.
Des informations complémentaires concernant la
technologie Cinavia peuvent être obtenues auprès du
centre Cinavia d’information des consommateurs en ligne
à l’adresse suivante http://www.cinavia.com. Pour obtenir
par courrier des informations complémentaires concernant
Cinavia, envoyez un courrier mentionnant votre adresse
postale à : Cinavia Consumer Information Center, P.O.
Box 86851, San Diego, CA, 92138, États-Unis.
1
Commandes et fonctions
Introduction
■ Panneau avant
USB
1 2
3
1 p (Mise sous tension/Mise en veille)
Permet d’allumer ce lecteur ou de le mettre en veille.
Maintenez le bouton p du panneau avant enfoncé
pendant 5 secondes au moins pour réinitialiser le
lecteur (réinitialisation du système).
4
5 6 7
4 Plateau de disque
5
(Éjection)
Ouvre/referme le plateau de disque.
9
0
6
(Recherche arrière/Saut arrière) :
Exercer une simple pression pour un saut arrière ou
maintenir enfoncé pour une recherche vers l’arrière.
7
(Recherche avant/Saut avant) :
Exercer une simple pression pour un saut avant ou
maintenir enfoncé pour une recherche vers l’avant.
8
(Lecture)
Lance la lecture.
9
(Pause)
Effectue une pause.
0
(Arrêt)
Interrompt la lecture.
2 Connecteur USB (p. 16)
3 Afficheur du panneau avant
Affiche différentes informations relatives au
fonctionnement de l’appareil.
8
Remarque
Français
– Un film de protection appliqué en usine recouvre le panneau avant de ce lecteur. Retirez le film de protection du
lecteur avant de l’utiliser.
5 Fr
Commandes et fonctions
■ Télécommande
1 Émetteur de signaux infrarouges : Envoie des
signaux infrarouges. Dirigez l’émetteur de la
télécommande vers le capteur de l’appareil de
destination (p. 9).
Remarque
–
apparaît dans le coin supérieur gauche de l’écran
si la fonction correspondant à la touche n’est pas
disponible.
1
2
C
3
4
PROGRAM
MARKER
DIGEST
ZOOM
R
G
Y
B
SUBTITLE
ANGLE
5
6
7
8
9
0
AUDIO
CLEAR
SEARCH
SHUFFLE
PIP
SETUP
REPEAT
2ND
AUDIO
HOME
A B
TOP MENU
POP-UP MENU
D
E
F
G
H
I
J
K
L
M
2 MARKER DVD VIDEO : Permet de définir un
Signet (p. 26) au niveau d’un point précis d’un film.
Après avoir défini un Signet, pour sélectionner le point
auquel vous voulez accéder directement, appuyez sur
DIGEST. Vous avez la possibilité de définir jusqu’à 12
signets.
3
: Ouvre/referme le plateau de disque.
4 PROGRAM DVD CD : Permet de définir l’ordre
de lecture (p. 26). Vous pouvez établir une liste
comportant jusqu’à 15 plages (dans le cas d’un disque
audio) ou 15 titres/chapitres (dans le cas d’un DVD
vidéo).
5 Touches numériques : Permettent de saisir des
nombres ou de passer directement, en cours de lecture,
à la plage ou au chapitre correspondant au numéro
saisi. Ces touches risquent de ne pas être disponibles
selon le type de disque et les conditions de lecture.
6 CLEAR : Efface le numéro saisi ou l’entrée définie.
7 PIP BD : Active/désactive la fonction d’incrustation
ENTER
RETURN
ON SCREEN
(image dans l’image) (p. 27). Marque PIP (
)
apparaît sur l’écran lorsque cette fonction est
disponible. Vous pouvez également sélectionner cette
fonction à partir du menu à l’écran (p. 24).
Remarque
A
B
NETFLIX
STATUS
– Marque PIP s’affiche à condition d’avoir activé la
fonction Marque PIP (p. 32).
8 SETUP : Affiche l’écran de menu SETUP (p. 28).
9 2ND AUDIO BD : Active les données audio
secondaires pour les incrustations (image dans l’image)
(p. 27) ou les commentaires audio. Deuxième Marque
Audio (
) apparaît sur l’écran lorsque cette fonction
est disponible (p. 35). Vous pouvez également
sélectionner cette fonction à partir du menu à l’écran
(p. 24).
Remarque
– Deuxième Marque Audio s’affiche à condition
d’avoir activé la fonction Deuxième Marque Audio
(p. 32).
0 HOME : Permet d’afficher l’écran de menu HOME
(p. 18).
A NETFLIX : Lance Netflix (p. 23).
B STATUS : Affiche diverses informations au sujet du
mode de lecture (p. 25).
6 Fr
Commandes et fonctions
L REPEAT BD
DVD
CD
VIDEO
MUSIC
PHOTO : Permet de changer de mode de répétition.
Appuyez plusieurs fois de suite sur cette touche pour
faire votre choix parmi les différents modes proposés.
: Répète le titre en cours de lecture.
D p : Permet d’allumer ce lecteur ou de le mettre en
veille.
: Répète le chapitre en cours de lecture.
E ZOOM DVD VIDEO PHOTO : Effectue un zoom
avant/arrière. Chaque nouvelle pression sur la touche
grossit ou réduit progressivement la vue à l’écran
(jusqu’à 3 incréments dans chaque sens).
: Répète l’intégralité des plages/fichiers du
disque.
: Répète la plage ou le fichier en cours de lecture.
F Touches de couleur BD : Servez-vous de ces
touches conformément aux instructions à l’écran.
G SUBTITLE BD DVD VIDEO : Permet de
changer la langue des sous-titres (p. 43) lorsque cela
est possible. Vous pouvez également sélectionner cette
fonction à partir du menu à l’écran (p. 24).
H ANGLE DVD BD : Permet de changer l’angle de
vue de la caméra si la vidéo est enregistrée sous
plusieurs angles de prise de vue. Marque Angle (
)
apparaît sur l’écran lorsque cette fonction est
disponible. Vous pouvez également sélectionner cette
fonction à partir du menu à l’écran (p. 24).
Remarque
1
Introduction
C DIGEST PHOTO : Donne un aperçu des photos par
planche de 12 photos miniatures. Dans ce mode de
visualisation, accédez à la page suivante/précédente à
l’aide des touches
/
.
DVD VIDEO : Affiche la barre de sélection Signet
(p. 26).
: Répète le dossier en cours de lecture.
M A/B BD DVD CD VIDEO MUSIC : Permet de
lire un morceau ou une scène que vous souhaitez
répéter.
1 Appuyez sur A/B à l’endroit où vous souhaitez
commencer la lecture. « A- » apparaît à l’écran.
2 Appuyez à nouveau sur A/B à l’endroit où vous
souhaitez terminer la lecture. « A-B » apparaît à
l’écran. La lecture en boucle commence.
3 Pour annuler la lecture en boucle, appuyez sur A/B.
« A-B » disparaît de l’écran pour indiquer que la
lecture en boucle est terminée.
Remarque
– Les conditions d’exécution de cette fonction sont
liées aux spécifications du disque.
– Marque Angle s’affiche à condition d’avoir activé la
fonction Marque Angle (p. 32).
Français
I AUDIO BD DVD : Permet de changer la langue de
diffusion ou le format audio. Vous pouvez également
sélectionner cette fonction à partir du menu à l’écran
(p. 24).
J SEARCH BD DVD CD VIDEO MUSIC :
Permet de passer directement à un point indiqué
pendant la lecture. Pour en savoir plus sur cette
fonction, reportez-vous à la section « Utilisation de la
fonction de recherche » (p. 26). Vous pouvez
également sélectionner cette fonction à partir du menu
d’état (p. 25).
K SHUFFLE DVD
CD
VIDEO
MUSIC
PHOTO : Sélectionne le mode de lecture aléatoire
(p. 24).
Suite à la page suivante. \
7 Fr
Commandes et fonctions
N TOP MENU BD DVD : Affiche l’écran du menu
principal si le disque contient un menu. Sélectionnez
l’option voulue à l’aide des touches 5/a/2/3 et
ENTER.
PROGRAM
MARKER
DIGEST
ZOOM
R
G
Y
B
Remarque
SUBTITLE
– Étant donné que certaines opérations varient en
fonction du disque, conformez-vous aux instructions
affichées dans chaque écran de menu.
ANGLE
AUDIO
CLEAR
SEARCH
PIP
SETUP
2ND
AUDIO
HOME
TOP MENU
REPEAT
A B
POP-UP MENU
N
R
P RETURN : Permet de revenir au menu ou à l’écran
précédent, etc.
Q Touches de contrôle
O
P
O Touches de curseur (5/a/2/3) : Déplacent la
sélection (entrée en surbrillance) sur l’écran de menu.
ENTER : Sélectionne le menu ou la fonction en
surbrillance.
SHUFFLE
BD
ENTER
RETURN
ON SCREEN
S
Q
DVD
CD
VIDEO
MUSIC
PHOTO
: Interrompt la lecture. Pour arrêter complètement
la lecture, appuyez deux fois sur cette touche.
: Effectue une pause.
: Lance la lecture.
/
NETFLIX
STATUS
BD DVD CD VIDEO MUSIC :
Effectue une recherche arrière/avant. Chaque nouvelle
pression sur la touche fait varier progressivement la
vitesse de recherche (jusqu’à 5 incréments dans
chaque sens). Appuyez sur
pour reprendre la
lecture dans des conditions normales.
PHOTO : Change la vitesse du diaporama (plus lent/
plus rapide : 3 incréments).
/
DVD CD VIDEO MUSIC :
Appuyez sur cette touche pour la recherche/la
relecture instantanée. La fonction de recherche
instantanée effectue un saut du contenu de 30
secondes. La relecture instantanée permet de revenir
10 secondes en arrière.
BD
/
: Effectue un saut arrière/avant.
Remarque
– Selon le disque, le lecteur reprend la lecture au point
du dernier arrêt. Pour reprendre la lecture depuis le
début, appuyez deux fois sur
, puis sur
.
R POP-UP/MENU BD DVD : Affiche un menu
contextuel. Le contenu du menu affiché dépend du
disque. Pour en savoir plus sur l’accès au menu
contextuel et sur son fonctionnement, consultez les
instructions du disque.
Selon le DVD, vous pouvez afficher l’écran du menu
principal en appuyant sur POP-UP/MENU.
S ON SCREEN : Affiche le menu à l’écran (p. 24).
8 Fr
Commandes et fonctions
Fonction ID
1 Réglage de la télécommande
Pour changer l’ID d’ID1 à ID2, maintenez le bouton
rouge et la touche numérique 2 enfoncés en même
temps pendant 7 secondes. Pour changer l’ID d’ID2
à ID1, maintenez le bouton rouge et la touche
numérique 1 enfoncés en même temps pendant 7
secondes.
2 Réglage de l’appareil principal
Maintenez les boutons
et
sur le panneau avant enfoncés en même temps
pendant 2 secondes pour afficher l’ID actuel
lorsque :
– Aucun disque n’est inséré dans le lecteur.
– Le plateau de disque est fermé.
– La lecture est arrêtée.
– « NO DISC » s’affiche sur le panneau avant.
Continuez à maintenir les touches enfoncées
pendant encore 2 secondes pour changer l’ID de
ID1 à ID2 et vice versa.
Remarques
Portée approximative de la
télécommande
Capteur de télécommande
USB
30°
Français
– Lorsque la télécommande ne contient aucune pile
pendant quelques minutes, ou si des piles déchargées
restent dans la télécommande, l’ID de la
télécommande passe automatiquement sur ID1. Si
vous souhaitez utiliser la télécommande en
configuration ID2, insérez des piles neuves et
définissez de nouveau l’ID de la télécommande.
– Lorsque le lecteur est réinitialisé, l’ID de sa
télécommande sera ID1.
30°
6 mètres
Insertion des piles dans la
télécommande
1
1
Introduction
Vous pouvez changer l’ID de la télécommande pour
empêcher le contrôle de l’autre lecteur Yamaha, tel que le
lecteur DVD. Si vous avez changé l’ID de la
télécommande n’oubliez pas de sélectionner le même ID
pour l’appareil principal. Le réglage par défaut est ID1.
– Retirez les piles si vous n’avez pas l’intention
d’utiliser la télécommande pendant une période
prolongée.
– N’utilisez pas des piles usagées associées à des piles
neuves.
– N’associez pas différents types de piles (telles que
des piles alcaline et des piles au manganèse). Lisez
attentivement les instructions figurant sur
l’emballage, ces différents types de piles pouvant
avoir la même forme et la même couleur.
– Si les piles ont fuit, mettez-les immédiatement au
rebut. Évitez de toucher les matières qui ont fuit ou
de les laisser entrer en contact avec les vêtements,
etc. Nettoyez soigneusement le compartiment des
piles avant d’y insérer de nouvelles piles.
– Ne jetez pas les piles avec les ordures ménagères :
mettez-les au rebut conformément aux
réglementations nationales en vigueur.
– Conservez les piles hors de portée des enfants. Si
une pile est avalée par accident, contactez
immédiatement votre médecin.
– Retirez les piles lorsque vous prévoyez de ne pas
utiliser la télécommande pendant une longue
période.
– Ne rechargez pas ou ne désassemblez pas les piles
fournies.
3
2
Remarques
– Changer les deux piles lorsque la portée de la
télécommande diminue.
– Utilisez des piles AAA, R03, UM-4.
– Assurez-vous que les polarités sont correctes.
Reportez-vous à l’illustration figurant à l’intérieur
du compartiment des piles.
9 Fr
RACCORDEMENTS
Présentation des raccordements
Déterminez le mode de raccordement qui convient pour votre appareil vidéo/audio. Nous vous conseillons d’utiliser la
borne HDMI, car celle-ci garantit un signal audio et vidéo numérique de haute qualité via une seule connexion. Si vous
utilisez d’autres bornes/connecteurs, effectuez les raccordements vidéo avant les raccordements audio.
Effectuez la connexion vidéo et audio avec
l’ampli-tuner AV à l’aide d’un câble HDMI.
Borne HDMI sur
l’ampli-tuner AV ? *
Borne HDMI sur le
téléviseur ?
Voir le mode d’emploi de
l’ampli-tuner AV.
Borne HDMI sur le
téléviseur ?
POINT
Effectuez la connexion vidéo au téléviseur à
l’aide du câble HDMI.
Utilisation d’un amplituner AV ?
Effectuez la connexion vidéo à l’amplituner AV.
Borne HDMI sur le
téléviseur ?
Effectuez la connexion vidéo et audio au téléviseur à l’aide du
câble HDMI.
Effectuez la connexion vidéo au téléviseur.
Oui
* Si aucun son n’est émis par la borne HDMI de votre ampli-tuner AV,
reportez-vous au mode d’emploi de l’ampli-tuner AV.
Non
■ Panneau arrière
0
9
AC IN
VIDEO OUT
Y
PB
DIGITAL OUT
COAXIAL
HDMI
NETWORK
AUDIO OUT
L
R
OUT
IN
REMOTE CONTROL
VIDEO
PR
COMPONENT
1 2 3
10 Fr
OPTICAL
4
USB
5
6
7
8
(Modèle pour l’Europe)
2
Raccordements
Raccordement vidéo et audio à
l’ampli-tuner AV
A HDMI (p. 12)
Raccordement audio à l’ampli-tuner AV
Raccordement vidéo
au téléviseur
A’ HDMI (p. 12)
Effectuez la connexion
audio à l’ampli-tuner AV.
D COAXIAL (p. 14)
ou
à l’ampli-tuner AV
E
B COMPONENT (p. 13)
OPTICAL (p. 14)
ou
ou
F L/R (p. 15)
C VIDEO (p. 13)
Raccordement vidéo et audio au
A’ HDMI (p. 12)
Raccordement audio au téléviseur
Raccordement vidéo au téléviseur
Effectuez la connexion
audio au téléviseur.
D’ COAXIAL (p. 14)
Français
ou
B’ COMPONENT (p. 13)
E’ OPTICAL (p. 14)
ou
ou
C’ VIDEO (p. 13)
F’ L/R (p. 15)
1 VIDEO (p. 13)
6 AUDIO OUT (L/R) (p. 15)
2 COMPONENT (p. 13)
7 REMOTE CONTROL (OUT/IN) (p. 17)
3 HDMI (p. 12)
8 AC IN (p. 17)
4 OPTICAL (p. 14)
9 NETWORK (p. 16)
5 USB (p. 16)
0 COAXIAL (p. 14)
11 Fr
Raccordements HDMI
■ Raccordement à la borne HDMI
–
–
–
–
La borne HDMI offre une image et un son numériques de qualité supérieure.
Reliez fermement chaque extrémité du câble HDMI (disponible dans le commerce) aux bornes HDMI appropriées.
Reportez-vous à la page 36 pour en savoir plus sur les formats de sortie audio/vidéo disponibles.
Utilisez exclusivement des câbles HIGH SPEED HDMI portant le logo HDMI (tel qu’ illustré sur la quatrième de
couverture).
Attention !
Ne branchez pas ce lecteur sur une prise secteur tant que vous n’avez pas effectué tous
les raccordements nécessaires.
Ce lecteur
VIDEO OUT
Y
PB
DIGITAL OUT
COAXIAL
HDMI
NETWORK
VIDEO
PR
COMPONENT
OPTICAL
USB
Astuces
– Si vous utilisez la fonction Contrôle HDMI,
reportez-vous à la section « Contrôle HDMI »
(p. 31).
– Pour en savoir plus sur le mode de sortie de la
borne HDMI, reportez-vous à la section
« HDMI » (p. 35).
– Si aucune image n’apparaît sur le téléviseur,
reportez-vous à la section « Guide de
dépannage » (p. 40).
Vers le port HDMI
Câble HDMI
(en vente dans le commerce)
■ Raccordement pour la lecture
de disques Blu-ray 3D
La lecture de disques Blu-ray 3D sur ce lecteur
requiert les raccordements et éléments suivants :
– Il vous faut un téléviseur et (le cas échéant) un
ampli-tuner AV compatibles avec la lecture de
supports vidéo 3D.
A’
– Tous les éléments doivent être raccordés avec
des câbles HDMI.
– Le disque Blu-ray Disc doit offrir un contenu
3D.
– Vous devez régler Sortie 3D dans Paramètres
vidéo (p. 33) sur Auto.
A
Vers la borne d’entrée
HDMI
HDMI IN
Ampli-tuner AV
12 Fr
TV
Raccordements vidéo
■ Raccordement aux connecteurs composante/vidéo
Attention !
Ne branchez pas ce lecteur sur une prise secteur tant que vous n’avez pas effectué tous
les raccordements nécessaires.
Ce lecteur
VIDEO OUT
Y
Ce lecteur
VIDEO OUT
DIGITAL OUT
COAXIAL
Y
HDMI
PB
PB
DIGITAL OUT
COAXIAL
HDMI
NETWORK
NETWORK
PR
VIDEO
COMPONENT
(Vert)
(Bleu)
(Rouge)
OPTICAL
PR
VIDEO
COMPONENT
USB
OPTICAL
Vers les connecteurs
COMPONENT
USB
(Jaune)
Vers le connecteur
VIDEO
Câble vidéo composante
(en vente dans le
commerce)
B’
Câble audio/vidéo
(fourni)
C
C’
Vers le
connecteur
d’entrée
vidéo
Vers les connecteurs
d’entrée composante
COMPONENT IN
(Jaune)
(Jaune)
(Vert)
Y
(Jaune)
(Bleu)
(Vert)
PB
(Rouge)
(Vert)
(Bleu)
(Rouge)
(Bleu)
PR
VIDEO
AV INPUT
Ampli-tuner AV
TV
Ampli-tuner AV
TV
Remarques
– Si vous lisez limage par le biais d’un magnétoscope, celle-ci peut être déformée en raison de la fonction de
protection contre la copie.
– Pour lire des disques Blu-ray 3D sur ce lecteur, raccordez un ampli-tuner AV, un téléviseur et ce lecteur à l’aide de
câbles HDMI. Voir page 12
13 Fr
Français
B
(Rouge)
2
Raccordements
– Les connecteurs composante/vidéo vous offriront une image de qualité supérieure et une reproduction fidèle des
couleurs.
– Reliez fermement chaque extrémité d’un câble vidéo composante (en vente dans le commerce) ou d’un câble RCA
vidéo aux connecteurs COMPONENT ou au connecteur VIDEO.
– Reportez-vous à la page 37 pour en savoir plus sur les formats de sortie vidéo disponibles.
Raccordements audio
■ Raccordement au connecteur/à la borne audio numérique
– Vous pouvez raccorder votre équipement audio ou le téléviseur au connecteur COAXIAL ou à la borne OPTICAL.
– Reliez fermement chaque extrémité d’un câble audio numérique coaxial ou d’un câble optique (tous deux en vente
dans le commerce) aux connecteurs audio numériques coaxiaux ou aux bornes audio numériques optiques
appropriés.
– Reportez-vous à la page 36 pour en savoir plus sur les formats de sortie audio disponibles.
Attention !
Ne branchez pas ce lecteur sur une prise secteur tant que vous n’avez pas effectué tous
les raccordements nécessaires.
Ce lecteur
Ce lecteur
VIDEO OUT
Y
PB
VIDEO OUT
DIGITAL OUT
COAXIAL
HDMI
Y
PB
DIGITAL OUT
COAXIAL
HDMI
NETWORK
NETWORK
AUDIO OUT
L
R
PR
VIDEO
COMPONENT
OPTICAL
PR
VIDEO
COMPONENT
USB
OPTICAL
USB
Vers le
connecteur
COAXIAL
Vers le port
OPTICAL
Câble audio numérique
coaxial
(en vente dans le commerce)
D
D’
Vers le
connecteur
d’entrée
coaxial
Ampli-tuner AV
Câble optique
(en vente dans le commerce)
E
E’
Vers la borne
d’entrée
optique
COAXIAL
OPTICAL
AV INPUT
DIGITAL AUDIO IN
TV
Ampli-tuner AV
TV
Astuce
– Pour en savoir plus sur le mode de sortie du connecteur COAXIAL ou de la borne OPTICAL, reportez-vous à la
section « Coaxial / Optique » (p. 35).
14 Fr
Raccordements audio
■ Raccordement aux connecteurs audio
– Vous pouvez raccorder votre équipement audio ou le téléviseur aux connecteurs de sortie audio droite et gauche
(AUDIO OUT L/R) de ce lecteur.
– Reliez fermement l’extrémité du câble audio/vidéo (fourni) aux connecteurs AUDIO OUT L/R.
– Reportez-vous à la page 36 pour en savoir plus sur les formats de sortie audio disponibles.
Ne branchez pas ce lecteur sur une prise secteur tant que vous n’avez pas effectué tous
les raccordements nécessaires.
Ce lecteur
Raccordements
Attention !
2
DIGITAL OUT
COAXIAL
DMI
NETWORK
AUDIO OUT
OUT
L
R
IN
REMOTE CONTROL
Vers le
connecteur
AUDIO OUT
L/R
(Rouge)
USB
(Blanc)
OPTICAL
Câble audio/vidéo
(fourni)
F
F’
Français
Vers les
connecteurs
d’entrée audio
L/R
(Blanc) (Rouge)
Ampli-tuner AV
R
AUDIO IN
(Rouge)
L
(Blanc)
(Rouge)
(Blanc)
AUDIO
TV
15 Fr
Raccordements réseau et USB
■ Raccordement à la borne NETWORK
– Il est possible de lire le contenu d’un ordinateur en reliant ce lecteur à un réseau.
– La connexion à Internet vous donne accès à une grande variété de bonus interactifs lors de la lecture de disques
compatibles BD-Live. Pour en savoir plus au sujet des fonctions BD-Live, reportez-vous à la page 27.
Remarques
–
–
–
–
–
Reliez fermement un câble réseau (disponible dans le commerce) à la borne NETWORK appropriée.
Utilisez exclusivement un câble réseau blindé à paire torsadée STP (Shielded Twisted Pair).
Une connexion Internet haut débit (telle qu’illustrée ci-dessous) est nécessaire.
Reliez l’autre extrémité du câble réseau au concentrateur/routeur haut débit.
Une connexion Internet haut débit nécessite un abonnement auprès d’un fournisseur d’accès à Internet. Adressezvous au fournisseur d’accès à Internet le plus proche pour en savoir plus.
– Reportez-vous au mode d’emploi de votre équipement, car la méthode de connexion et l’appareil raccordé peuvent
différer selon votre environnement Internet.
– Utilisez un câble réseau/routeur compatible 10BASE-T/100BASE-TX.
■ Raccordement au connecteur USB
– Vous pouvez insérer une clé USB pour disposer d’un Espace de stockage externe dans le connecteur USB situé sur
le panneau arrière (ou avant) du lecteur, dans le but de sauvegarder des données BD-Live ou d’effectuer la mise à
niveau du logiciel de ce lecteur.
– Reliez fermement une clé USB (disponible dans le commerce) au connecteur USB approprié.
ATTENTION :
– Ne retirez pas la clé USB et ne débranchez pas
le cordon d’alimentation tant que l’opération
BD-Live (p. 27) ou la mise à niveau logicielle
n’est pas terminée.
– N’utilisez pas de rallonge USB pour raccorder
une clé USB au connecteur USB du lecteur.
L’utilisation d’une rallonge USB peut entraîner
un dysfonctionnement du lecteur.
Ce lecteur
VIDEO OUT
Y
PB
DIGITAL OUT
COAXIAL
HDMI
NETWORK
AUDIO OUT
L
R
VIDEO
PR
COMPONENT
OPTICAL
USB
Remarque
– Yamaha ne saurait garantir que ce lecteur
fonctionne avec toutes les marques de clés
USB.
Vers le
connecteur
USB
Vers le port
NETWORK
Clé USB
(en vente dans le commerce)
Câble réseau
(en vente dans le commerce)
Astuce
– Pour sauvegarder les
données BD-Live sur la
clé USB sur le panneau
avant, réglez Espace de
stockage externe sur
USB en façade (p. 31).
Vers le
port LAN
LAN
Internet
Modem
Concentrateur ou
routeur haut débit
PC
Après le raccordement
– Si vous souhaitez définir manuellement le paramètre de configuration Réseau, reportez-vous à la section « Réseau » (p. 32).
– Pour lire le contenu d’un ordinateur sur votre réseau, reportez-vous à la section « Utilisation d’un contenu du réseau » (p. 20).
16 Fr
Autres raccordements
■ Raccordement aux connecteurs
REMOTE CONTROL
Attention !
Ne branchez pas ce lecteur sur une prise
secteur tant que vous n’avez pas effectué
tous les raccordements nécessaires.
– Pour en savoir plus sur la fonction SCENE, reportezvous au mode d’emploi fourni avec votre amplituner AV Yamaha.
– Vous avez la possibilité de relier un appareil
Yamaha (tel qu’un lecteur CD) disposant de la
fonction SCENE au connecteur REMOTE
CONTROL (OUT) de ce lecteur.
■ Raccordement du cordon
d’alimentation
2
Raccordements
– Vous pouvez transmettre et recevoir les signaux de
commande à distance grâce aux connecteurs
REMOTE CONTROL (OUT/IN).
– Reliez fermement les extrémités des câbles mono
avec fiches mini-jack de 3,5mm (en vente dans le
commerce) aux connecteurs REMOTE CONTROL
(OUT/IN) appropriés.
– Si votre ampli-tuner AV est un produit Yamaha et
peut transmettre des signaux de commande SCENE,
vous pouvez commander le lecteur à l’aide de la
fonction SCENE.
Astuces
– Après avoir effectué tous les raccordements
nécessaires, branchez une extrémité du cordon
d’alimentation fourni sur le connecteur AC IN à
l’arrière du lecteur. puis branchez l’autre extrémité
du cordon sur une prise secteur.
Ce lecteur
AC IN
RK
AUDIO OUT
L
R
OUT
IN
REMOTE CONTROL
Vers le
connecteur
d’alimentation
Vers le connecteur
REMOTE
CONTROL (OUT)
Vers la prise secteur
Français
Câble mono avec
fiches mini-jack
de 3,5mm
(en vente dans le
commerce)
Vers le connecteur
REMOTE
CONTROL (IN)
(Modèle pour l’Europe)
Remarque
Câble mono avec fiches
mini-jack de 3,5mm
(en vente dans le
commerce)
Vers le
connecteur
REMOTE
CONTROL IN
– AFIN DE RÉDUIRE LES RISQUES
D’ÉLECTROCUTION, NE TOUCHEZ PAS LES
PIÈCES NON ISOLÉES DES CÂBLES LORSQUE
LE CORDON D’ALIMENTATION EST
BRANCHÉ.
Vers le connecteur
REMOTE
CONTROL OUT
REMOTE CONTROL IN
Appareil Yamaha
REMOTE CONTROL OUT
Récepteur de signaux
infrarouges ou appareil
Yamaha (ampli-tuner AV,
par exemple)
17 Fr
PLAYBACK
Wizard Initial/Installation facile
■ Préconfiguration à l’aide de Wizard Initial/Installation facile
La fonction Wizard Initial/Installation facile permet de définir facilement la langue, la résolution et le format d’image.
L’écran Wizard Initial s’affiche lors de la première mise sous tension de ce lecteur effectuée juste après l’achat de votre
appareil. Vous pouvez procéder aux mêmes réglages à partir du menu SETUP = Système = Installation facile.
1 Dès que l’écran Installation facile apparaît, appuyez
sur ENTER pour préconfigurer votre lecteur
(Installation facile).
2 Définissez la langue, la résolution et le format d’écran
en suivant les instructions affichées à l’écran.
Remarques
– Si aucune image n’apparaît sur le téléviseur à l’issue
de la procédure Wizard Initial/Installation facile,
reportez-vous à la section « Guide de dépannage »
(p. 40).
– Un avertissement concernant la lecture de supports
vidéo 3D apparaît à la mise sous tension de ce
lecteur. Appuyez sur ENTER pour faire disparaître
le message ou sur CLEAR pour éviter qu’il s’affiche
à nouveau (p. 31).
Menu HOME/MEDIA
Les menus HOME et MEDIA permettent de passer en revue et lire des fichiers multimédia sur des disques de données,
sur des clés USB et sur votre réseau.
Remarque
– Pour en savoir plus sur les types et formats de
disques compatibles, reportez-vous à la page 3.
■ Lecture de photo/musique/vidéo
Opérations de base
2/3/5/a : Déplacent la sélection (entrée en
surbrillance).
2 : Revient au dossier parent.
HOME : Accède à l’écran du menu HOME ou quitte cet
écran.
ENTER : Confirme le dossier/fichier choisi.
PIP
SETUP
2ND
AUDIO
HOME
TOP MENU
REPEAT
A B
POP-UP MENU
ENTER
RETURN
18 Fr
ON SCREEN
Icônes affichées dans la partie
supérieure du menu MEDIA
: Permet de lire le contenu du disque introduit dans le
plateau ou d’afficher le contenu du disque de données.
: Permet d’afficher le contenu de la clé USB
connectée au connecteur USB.
: Permet de rechercher un serveur DLNA (p. 20) sur
le réseau.
: Permet d’afficher le contenu du serveur DLNA
reconnu.
Menu HOME/MEDIA
Procédure de lecture des fichiers
dans un dossier donné
Exemple : Sélection d’un fichier vidéo sur une clé USB
4 Sélectionnez le dossier Photo, Musique, Vidéo, ou
AVCHD à lire, puis appuyez sur ENTER.
Pour revenir au dossier parent, appuyez sur 2 ou
sélectionnez
.
Remarque
– Arrêtez la lecture de la vidéo avant d’accéder à
l’écran du menu MEDIA.
3
Playback
1 Appuyez sur la touche HOME pour déplacer l’écran du
menu HOME.
Remarque
Astuce
– La configuration de l’écran du menu HOME peut
varier selon le modèle.
– Seul le type de fichier choisi au cours de cette étape
sera présenté à l’étape suivante. Si vous
sélectionnez, par exemple, le dossier Photo, vous
verrez uniquement des fichiers image par la suite. Si
vous n’avez plus l’intention de lire des photos, il
suffit de revenir à cette étape et de sélectionner un
autre type de fichier.
5 Sélectionnez le(s) dossier(s) contenant le fichier à lire.
2 Appuyez sur 2/3/5/a pour sélectionner MEDIA,
puis appuyez sur ENTER.
L’écran MEDIA apparaît.
Français
3 Sélectionnez la source du fichier que vous avez
l’intention de lire, puis appuyez sur ENTER.
Suite à la page suivante. \
19 Fr
Menu HOME/MEDIA
6 Sélectionnez le fichier à lire, puis appuyez sur
ENTER.
Si le fichier sélectionné est un fichier vidéo, la lecture
commence immédiatement.
S’il s’agit d’un fichier de musique, la lecture
commence après l’affichage d’un écran d’état.
S’il s’agit d’un fichier image, le diaporama commence
immédiatement.
■ Utilisation d’un contenu du
réseau
Ce lecteur est certifié DLNA (p. 42). Cela signifie que
vous pouvez gérer tout contenu à base de photos,
musiques et vidéos stocké sur des serveurs DLNA de
votre réseau domestique.
Lecture d’un contenu partagé
1 Pour lire des fichiers sur votre ordinateur, installez un
logiciel serveur DLNA, tel que Windows Media Player
12, et partagez les fichiers en question.
2 Allumez l’ordinateur sur lequel vous avez installé le
logiciel serveur DLNA ou l’appareil DLNA relié à
votre réseau domestique.
3 Appuyez sur HOME pour afficher l’écran de menu
HOME. Puis sélectionnez MEDIA pour accéder au
menu MEDIA. La liste des serveurs DLNA connectés
est présentée à l’écran.
Astuce
– Pour présenter un diaporama avec un fond sonore,
commencez par écouter la musique qui vous
intéresse, puis appuyez sur HOME pour revenir à
l’écran de menu HOME et sélectionnez le fichier
image.
Remarque
– Selon le contenu du fichier affiché, vous risquez de
ne pas pouvoir lancer la lecture.
Opérations de visualisation des
photos
Lorsque vous visionnez des photos, les boutons de la
télécommande fonctionnent de la façon suivante.
: Arrête le diaporama et revient à l’explorateur de
fichiers.
: Effectue une pause au cours du diaporama.
: Lance la lecture du diaporama.
: Passe à la photo suivante.
: Passe à la photo précédente.
: Accélère la vitesse de défilement du diaporama
(3 incréments).
: Ralentit la vitesse de défilement du diaporama
(3 incréments).
5 : Inverse une photo.
a : Crée une copie miroir d’une photo.
2 : Fait pivoter une photo dans le sens contraire des
aiguilles d’une montre.
3 : Fait pivoter une photo dans le sens des aiguilles d’une
montre.
ZOOM : Effectue un zoom avant/arrière (jusqu’à
3 incréments dans chaque sens).
5/a/2/3 : Effectue un panoramique en mode de
zoom lorsque la taille de la photo est supérieure aux
dimensions de l’écran.
DIGEST : Passe en mode d’aperçu sous forme de
miniatures (p. 7). Dans ce mode de visualisation, accédez
à la page suivante/précédente à l’aide des touches
/
.
20 Fr
Remarques
– Si votre serveur DLNA n’est pas répertorié,
choisissez la fonction DLNA Search pour le
rechercher.
– Selon le serveur DLNA utilisé, il est possible que
vous deviez autoriser l’utilisation de ce lecteur à
partir du serveur.
– Pour lire le fichier sur le serveur DLNA, il est
indispensable d’utiliser le même point d’accès pour
connecter ce lecteur et le serveur.
– L’exécution des fichiers peut poser des problèmes de
compatibilité en raison des restrictions liées aux
caractéristiques des fichiers et à la capacité du
serveur DLNA.
4 Sélectionnez le fichier que vous avez l’intention de
lire.
Remarques
– Les conditions de fonctionnement de votre réseau
domestique peuvent avoir une incidence sur le mode
d’exécution et la qualité de lecture du fichier.
– Le partage des fichiers provenant de supports
amovibles (tels que des clés USB ou un lecteur DVD
de votre serveur multimédia) risque de poser des
problèmes.
Utilisation des services réseau
Vous pouvez à tout moment regarder des vidéos disponibles sur le réseau suivant.
– YouTube
– Picasa (p. 22)
– Netflix (p. 23)
3
Remarques
Playback
– L’accès aux contenus proposés par des tiers nécessite une connexion internet haut débit et peut en outre requérir un
compte utilisateur ainsi qu’un abonnement payant.
– Les contenus offerts par ces services tiers peuvent être modifiés, interrompus ou suspendus à tout moment et cela
sans avis préalable ; Yamaha décline toute responsabilité liée à de tels changements.
– Certains contenus pourraient être disponibles uniquement dans certains pays et dans certaines langues.
– Yamaha ne garantit pas que ces services de contenus resteront offerts ou disponibles pour une durée définie, et
toute garantie de ce type, explicite ou implicite, est exclue.
Lecture de vidéos sur YouTube™
Ce lecteur vous permet de regarder les vidéos disponibles sur le site internet YouTube.
Ces services peuvent être modifiés sans préavis.
1 Appuyez sur HOME pour afficher l’écran de menu
HOME.
Français
Astuce
– La configuration de l’écran du menu HOME peut
varier selon le modèle.
2 Appuyez sur 2/3/5/a pour sélectionner YouTube,
puis appuyez sur ENTER.
Astuce
– Pour quitter YouTube, appuyez sur RETURN.
21 Fr
Lecture de photos sur Picasa™ Albums Web
Ce lecteur vous permet de regarder des photos sur Picasa Albums Web via Internet .
Ce service peut être modifié sans préavis.
1 Enregistrez votre nom et votre mot de passe sur votre
ordinateur avec d’utiliser Picasa Albums Web.
2 Appuyez sur HOME pour afficher l’écran de menu
HOME.
Appuyez sur 2/3/5/a pour sélectionner Picasa,
puis appuyez sur ENTER.
Astuce
– La configuration de l’écran du menu HOME peut
varier selon le modèle.
3 Lorsque vous accédez pour la première fois à Picasa à
partir de ce lecteur, sélectionnez l’icône Nouvel
utilisateur et saisissez votre nom d’utilisateur et votre
mot de passe.
Astuce
– Pour quitter Picasa, appuyez sur RETURN.
22 Fr
Lecture de vidéos sur Netflix™
Ce lecteur vous permet de regarder immédiatement les films et les séries télévisées disponibles sur Netflix via Internet.
Pour devenir membre de Netflix, visitez le site www.netflix.com.
Netflix est offert dans certains pays. Adhésion nécessaire au service illimité.
Pour de plus amples informations, rendez-vous sur www.netflix.com.
3
■ Lancement de Netflix
Playback
1 Appuyez sur HOME pour afficher l’écran de menu
HOME.
Appuyez sur 2/3/5/a pour sélectionner NETFLIX,
puis appuyez sur ENTER.
Vous pouvez également appuyer sur la touche
NETFLIX de la télécommande pour lancer Netflix.
Astuces
– La configuration de l’écran du menu HOME peut
varier selon le modèle.
– Pour revenir à l’écran du menu HOME, appuyez sur
RETURN.
Français
Remarques
– Lorsqu’il est nécessaire de mettre à jour le logiciel,
un avis de mise à jour est affiché lorsque vous
sélectionnez Netflix. Dans ce cas, effectuez la mise à
jour du logiciel.
– Pour toute information complémentaire à propos de
Netflix, reportez-vous au site Web Netflix à
l’adresse www.netflix.com.
– Pour désactiver Netflix, reportez-vous à la section
« «Information Netflix» » (p. 32).
23 Fr
Mode de lecture avancé
Ce chapitre traite de la lecture des disques Blu-ray, DVD,
CD vendus dans le commerce et des disques DVD-RW/R
enregistrés.
Remarque
– Les opérations de lecture de base sont décrites à la
page 6.
■ Menu à l’écran
Pour afficher ce menu, appuyez sur la touche ON
SCREEN. Il suffit ensuite d’appuyer sur 5/a/2/3
pour passer d’une option à l’autre, puis d’appuyer sur
ENTER pour agir sur la fonction en question.
DVD
–
–
–
–
–
–
–
Normal
Lecture Aléatoire CH (chapitre)
Lecture Aléatoire TT (titre)
Lecture aléatoire
Aléatoire CH (chapitre)
Aléatoire TT (titre)
Aléatoire Totalité
VIDEO
MUSIC
PHOTO
– Normal
– Aléatoire F (dossier)
– Random F (dossier)
Audio BD DVD VIDEO : Indique la langue ou le
signal de diffusion audio du disque Blu-ray Disc/DVD
actuellement sélectionné. Vous pouvez sélectionner le
type de son de votre choix.
Angle BD DVD : Indique le numéro de l’angle de vue
actuellement sélectionné. Si la vidéo est enregistrée sous
plusieurs angles de prise de vue, vous êtes libre d’en
changer.
Sous-titres BD DVD VIDEO : Indique la langue
des sous-titres actuellement sélectionnée le cas échéant.
Le menu à l’écran contient les options suivantes.
Titre BD DVD VIDEO : Indique le numéro du titre
en cours de lecture. Il suffit de sélectionner le titre qui
vous intéresse pour y accéder directement.
Chapitre BD DVD VIDEO : Indique le numéro du
chapitre en cours de lecture. Il suffit de sélectionner le
chapitre qui vous intéresse pour y accéder directement.
Plage/Fichier CD VIDEO MUSIC PHOTO :
Indique le numéro de la plage ou du fichier en cours de
lecture. Il suffit de sélectionner la plage ou le fichier qui
vous intéresse pour y accéder directement.
Heure BD DVD CD VIDEO MUSIC : Affiche la
durée de lecture. Sélectionnez le type d’information qui
vous intéresse :
– Durée de lecture écoulée de la plage ou du titre/
chapitre/disque/fichier
– Durée de lecture restante de la plage ou du titre/
chapitre/disque/fichier
Mode/Modèle de lecture
DVD CD VIDEO MUSIC PHOTO : Indique le
mode de lecture actuel. Vous avez le choix entre trois
modes de lecture :
CD
– Normal : Lecture normale.
– Aléatoire : Lecture aléatoire sans répétition.
– Random : Lecture aléatoire avec répétition.
le style de Sous-titres BD : Indique le style des
sous-titres actuellement sélectionné. Cette fonction
concerne uniquement les sous-titres externes de fichiers
vidéo. Choisissez le style de texte des sous-titres qui vous
intéresse.
Bitrate BD DVD CD VIDEO MUSIC : Indique le
débit binaire du signal audio/vidéo.
Deuxième Vidéo BD : Active/désactive la fonction
d’incrustation PIP (image dans limage) (p. 6).
Deuxième Audio BD : Active/désactive les données
audio secondaires (p. 6).
Recherche instantanée
BD
DVD
CD
VIDEO
MUSIC : Effectue un saut de
30 secondes.
Relecture instantanée
BD
DVD
CD
VIDEO
MUSIC : Permet de revenir
10 secondes en arrière dans la vidéo.
Diaporama PHOTO :
Indique la vitesse du diaporama. Vous avez le choix entre
trois vitesses différentes de la plus lente à la plus rapide :
Ralenti/Moyen/Rapide.
Transitions PHOTO : Indique la façon dont les photos
sont présentées à l’écran. Vous pouvez changer le type de
transition selon l’effet voulu.
Code Page VIDEO : Sélectionne le code de caractère
du sous-titre ajouté à la vidéo DivX (p. 42).
24 Fr
Mode de lecture avancé
■ Menu d’état
Ce menu propose différents réglages, tels que les soustitres, l’angle de vue ou le numéro du titre, du chapitre, ou
de la plage en cours de lecture. Pour afficher le menu
d’état, appuyez sur la touche STATUS. Ce menu contient
les sous-menus suivants.
BD
DVD
CD
MUSIC
Exemple : Icônes affichées lors de la lecture d’un fichier
de musique
123 4
5
6
7
VIDEO
3
2
1
3
8 7
4
Playback
Exemple : Icônes affichées lors de la lecture d’un disque
Blu-ray Disc
5
6
8
1
1
2
3
4
6
7
8
2
(Mode de répétition) : Affiche le mode de
répétition actuel (p. 7).
3
(Icône du type de disque/fichier de
musique)
(Icône du type de disque/fichier vidéo)
(Numéro du titre en cours de lecture) : Vous
pouvez passer directement au titre voulu à laide de la
touche SEARCH (p. 7).
(Numéro du chapitre en cours de lecture) :
Vous pouvez passer directement au chapitre voulu à
l’aide de la touche SEARCH (p. 7).
(Durée de lecture écoulée) : Vous pouvez
passer directement au moment voulu à l’aide de la
touche SEARCH (p. 7).
(Sous-titre actuellement sélectionné) : Vous
pouvez changer la langue des sous-titres à l’aide de la
touche SUBTITLE.
(Son actuellement sélectionné) : Vous pouvez
changer la langue de diffusion ou le format audio à
l’aide de la touche AUDIO.
(Mode de répétition) : Affiche le mode de
répétition actuel (p. 7).
4 (Illustration) MUSIC : Affiche une des images du
fichier, si le fichier en contient.
5
(Numéro de la plage ou du fichier en cours
de lecture) : Vous pouvez passer directement à la
plage voulue à l’aide de la touche SEARCH (p. 7).
6 (Informations) MUSIC : Affiche des informations
relatives à la musique, si le fichier en contient.
7
(Durée de lecture écoulée) : Vous pouvez
passer directement au moment voulu à l’aide de la
touche SEARCH (p. 7).
8 (Barre de progression) MUSIC : Affiche le
niveau de progression de la chanson en cours.
PHOTO
1
(Lecture en cours)
2
(Icône du fichier image)
3
(Numéro du fichier en cours d’affichage)
4
(Mode de répétition) : Affiche le mode de
répétition actuel (p. 7).
5 (Vitesse du diaporama)
25 Fr
Français
5
(Lecture en cours)
(Lecture en cours)
Mode de lecture avancé
■ Utilisation de la fonction
Signet DVD VIDEO
Vous pouvez repérer un point précis de la vidéo à l’aide
d’un Signet. Une fois le Signet créé, cette fonction permet
d’accéder directement au point correspondant de la vidéo.
Vous avez la possibilité de définir jusqu’à 12 signets.
1 Appuyez sur MARKER en cours de lecture du film
pour insérer un Signet. Le numéro et l’état du Signet
sont automatiquement affichés.
2 Appuyez sur ENTER pour programmer l’ordre de
lecture.
Dans le cas d’un disque audio, appuyez sur 5/a pour
sélectionner chacune des plages dans l’ordre où vous
souhaitez les lire, puis appuyez sur ENTER.
Dans le cas d’un disque DVD vidéo, sélectionnez des
titres (représentés par les lettres TT) et des chapitres
(représentés par les lettres CH) au lieu des plages.
Pour retirer une plage de la liste programmée,
sélectionnez la plage, puis appuyez sur CLEAR.
Pour annuler la lecture du programme, appuyez sur
RETURN.
2 Après avoir défini un Signet, appuyez sur la touche
DIGEST pour afficher la barre de sélection Signet.
3 Appuyez sur 2/3 pour sélectionner le Signet auquel
vous souhaitez accéder, puis appuyez sur ENTER.
Pour effacer le Signet sélectionné, appuyez sur
CLEAR.
Remarque
– Une fois la lecture terminée (après avoir éjecté le
disque ou appuyé deux fois sur
, par exemple),
les signets que vous aviez définis sont
automatiquement effacés.
■ Programmation de l’ordre de
lecture DVD CD
Il est possible de programmer l’ordre de lecture des plages
d’un disque audio ou des chapitres d’un DVD.
Appuyez sur PROGRAM en cours de lecture pour
afficher la fenêtre PROGRAMME.
Vous avez la possibilité de programmer un maximum de
15 plages/chapitres.
Exemple : Programmation de l’ordre de lecture des
plages d’un CD
1 Appuyez sur PROGRAM en cours de lecture.
3 Une fois la programmation terminée, appuyez sur
pour valider et commencer la lecture du programme.
4 Pour annuler la lecture d’un programme, appuyez deux
fois sur
.
■ Utilisation de la fonction de
recherche
BD
DVD
CD
VIDEO
MUSIC
PHOTO
Cette fonction permet d’accéder directement à un point
précis du support en cours de lecture.
1 Appuyez sur SEARCH en cours de lecture. Cela a
pour effet d’afficher la barre d’état.
2 Appuyez sur 5/a/2/3 pour sélectionner lune des
entrées suivantes, puis appuyez sur ENTER.
BD DVD :
– Numéro du titre (symbolisé par
)
– Numéro du chapitre (symbolisé par
)
– Durée du titre écoulée (symbolisée par
)
– Durée du chapitre écoulée (symbolisée par
CD :
– Numéro de la plage (symbolisé par
)
)
– Durée de la plage écoulée (symbolisée par
)
– Durée du disque écoulée (symbolisée par
VIDEO MUSIC :
– Numéro du fichier (symbolisé par
)
– Durée du fichier écoulée (symbolisée par
PHOTO :
– Numéro du fichier (symbolisé par
)
)
)
3 Appuyez sur 5/a ou sur les touches numériques pour
choisir/ajuster la valeur de l’entrée en surbrillance, puis
appuyez sur ENTER pour accéder au point
correspondant.
4 Pour fermer la barre d’état, appuyez sur STATUS.
26 Fr
Mode de lecture avancé
■ Utilisation des fonctions
BONUSVIEW™ et BD-Live™
■ Utilisation de la fonction BDLive™
Ce lecteur prend en charge les fonctions de lecture
BONUSVIEW (p. 42) (BD-ROM Profil1 Version1.1) et
BD-Live (p. 42) (BD-ROM Profil2).
1. Définissez les paramètres de
configuration du réseau (p. 32).
Remarque
■ Utilisation de la fonction
d’incrustation
(lecture audio/vidéo secondaire)
Si vous disposez d’un disque BD vidéo contenant des
données audio et vidéo secondaires compatibles avec la
fonction d’incrustation (image dans limage), vous avez la
possibilité de lire ces données dans un coin de l’écran en
même temps que le contenu principal.
Image principale
Image secondaire
2. Connectez la clé USB à ce lecteur
(p. 16).
3
Les données BD-Live sont sauvegardées sur la clé
USB connectée à ce lecteur. Pour bénéficier de ces
fonctions, insérez une clé USB compatible 2.0 haut
débit (480 Mbits/s) sur le connecteur USB
sélectionné dans Espace de stockage externe (p. 31).
Le réglage par défaut correspond au connecteur USB
situé sur le panneau arrière.
– Un dossier BUDA est créé automatiquement sur la
clé USB, si besoin est.
– Si l’espace de stockage est insuffisant, les données
ne seront pas copiées/téléchargées. Dans ce cas,
supprimez les données inutiles ou utilisez une
nouvelle clé USB.
– Le chargement des données peut prendre un certain
temps (lecture/écriture).
Playback
– Les fonctions et la méthode de lecture varient en
fonction du disque. Pour en savoir plus, reportezvous aux instructions figurant sur le disque ou sur le
mode d’emploi fourni.
Remarques
– Yamaha ne saurait garantir que ce lecteur fonctionne
avec toutes les marques de clés USB.
– N’utilisez pas de rallonge USB pour raccorder une
clé USB au connecteur USB du lecteur. L’utilisation
d’une rallonge USB peut entraîner un
dysfonctionnement du lecteur.
3. Lancez la lecture du disque.
4. Exécutez BD-Live conformément
aux instructions du disque.
Remarques
Remarques
– Pour écouter les données audio secondaires,
n’oubliez pas de régler le paramètre de Sortie audio
(Coaxial / Optique ou HDMI) sur PCM ou Reencode
(p. 35).
– Sur certains disques, il peut être nécessaire d’activer
également les données audio secondaires dans le
menu principal du disque (p. 8).
– Le son et l’image secondaires en incrustation
peuvent être lus et supprimés automatiquement en
fonction du contenu. Les zones affichables peuvent
également être limitées.
– Suivez les consignes fournies dans la notice du disque
Blu-ray Disc pour lire les contenus BD-Live, etc.
– Pour tirer parti des fonctions BD-Live, effectuez la
connexion au réseau (p. 16) et définissez les
paramètres de configuration Réseau (p. 32).
– Reportez-vous à la section « Connection BD-Live »
(p. 33) si vous souhaitez restreindre l’accès aux
contenus BD-Live.
– Le temps nécessaire pour télécharger les
programmes en ligne sur la clé USB connectée à ce
lecteur varie selon la vitesse de votre connexion
Internet et le volume des données de ces
programmes.
– Les programmes BD-Live fournis via Internet ne
pourront peut-être pas afficher la connexion en
fonction du statut du fournisseur (mise à jour). Dans
de tels cas, retirez le disque et essayez à nouveau.
– Si l’écran BD-Live n’apparaît pas après avoir
sélectionné la fonction BD-Live dans le menu du
disque Blu-ray Disc, il se peut que l’espace disponible
sur la clé USB ne soit pas suffisant. Dans ce cas,
éjectez le disque du lecteur et effacez des données sur
la clé USB à l’aide du menu « Formater » dans
« Espace de stockage externe » (p. 31).
27 Fr
Français
Lorsque le symbole Marque PIP (
)
ou Deuxième Marque Audio (
) est
affiché, appuyez sur PIP pour activer/
désactiver la fonction d’incrustation
(image dans limage).
PARAMÈTRES
Menu SETUP
Le menu SETUP offre différents réglages audio/vidéo des fonctions au moyen de la télécommande.
Menu/sous-menu
Système
Réglages
Généraux
Paramètre
Économiseur
d’écran
Lecture automatique
du disque
Contrôle HDMI
Pilotage réseau
Insérer les
paramètres par
défaut
Mettre à niveau
Installation facile
Espace de stockage
externe
Langue
Playback
3D Message de la
Réécoute
Affichage à l’écran
Menu
Audio
Sous-titres
Sous-titres pour
malentendants
Marque Angle
Marque PIP
Deuxième Marque
Audio
Dernière Mémoire
DivX(R) VOD
DRM
Information Netflix
Securité
Réseau
Modification du mot
de passe
Controle Parental
Code pays
Connection Internet
Configuration de
Connexion
Information
Test de connexion
Configuration IP
Connection BDLive
DLNA
Paramètres Proxy
28 Fr
Description
Permet d’activer/désactiver l’économiseur d’écran.
Configure le lecteur afin de démarrer automatiquement la
lecture du disque.
Configure le lecteur afin de recevoir le signal de commande
en provenance de la télécommande de votre téléviseur/amplituner AV.
Permet d’activer/désactiver le contrôle via Ethernet.
Rétablit tous les paramètres par défaut à l’exception du
paramètre Securité.
Lance la mise à niveau du lecteur.
Permet de définir la langue, la résolution et le format
d’image.
Affiche l’état de Espace de stockage externe (p. 31), formate
Espace de stockage externe et sélectionne le connecteur USB
à l’avant/arrière pour Espace de stockage externe.
Affiche un avertissement concernant la lecture de supports
vidéo 3D à la mise sous tension de ce lecteur.
Permet de choisir la langue des menus ou messages affichés à
l’écran.
Permet de choisir la langue préférée pour le menu du disque.
Permet de choisir la langue préférée pour les données audio.
Permet de choisir la langue préférée pour les sous-titres.
Permet d’activer/désactiver la fonction de sous-titrage pour
les malentendants (appelée Closed Caption).
Permet d’afficher le symbole d’angle de vue (Marque Angle)
lors de la lecture de disques Blu-ray Disc/DVD contenant des
scènes prises sous plusieurs angles.
Permet d’afficher le symbole d’image dans l’image (Marque
PIP) lors de la lecture de disques Blu-ray Disc/DVD offrant
cette possibilité.
Permet d’afficher le symbole de données audio secondaires
(Deuxième Marque Audio) lors de la lecture de disques
Blu-ray Disc/DVD contenant ce type de données.
Permet de mémoriser le dernier emplacement de lecture d’un
disque quand l’appareil passe en veille ou que vous ouvrez le
plateau.
Permet d’afficher le code d’enregistrement des films au
format DivX(R).
Déconnecte ce lecteur de Netflix et affiche le NSE (Numéro
de série électronique).
Permet de changer le mot de passe pour les paramètres
Controle Parental et Code pays.
Permet de régler le paramètre Controle Parental en fonction
du contenu du disque.
Permet de définir votre Code pays.
Permet d’activer ou de désactiver la connexion Internet
(Permettre/Désactivé).
Permet de définir une méthode de connexion au réseau
Permet d’afficher un écran d’informations au sujet du réseau.
Permet d’effectuer un test de connexion au réseau.
Permet de régler le paramètre IP sur Auto/Manuel.
Permet de régler la connexion BD-Live sur Autorisé/
Partiellement autorisé/Interdit.
Permet d’activer ou de désactiver la fonction DLNA
(Permettre/Désactivé).
Permet de configurer le paramètre proxy.
Page
31
31
31
31
31
31
31
31
31
31
31
32
32
32
32
32
32
32
32
32
32
32
32
32
32
33
33
33
33
33
33
Menu SETUP
Menu/sous-menu
TV
Paramètre
Sortie 3D
Ecran TV
Sélectionnez la
sortie vidéo
Système TV
Espace de couleur
Paramètres
vidéo
HDMI Deep Color
Sortie audio
HDMI
Paramètres
audio
Echantillonnage
Inférieur
DRC
Configuration
Haut-Parleur
Post process
Mixage en 2 canaux
stéréo
UpMix
Permet de changer Système TV entre NTSC/PAL/Multi.
Permet de changer Espace de couleur entre YCbCr 4:4:4/
YCbCr 4:2:2/Full RGB/RGB.
Permet de changer HDMI Deep Color entre 30 bits/36 bits/48
bits/Non.
Permet d’activer/désactiver le paramètre HDMI 1080p 24Hz.
Modifie le retard entre la vidéo et l’audio, par exemple si la
voix et le mouvement de la bouche sont désynchronisés.
Règle la perception visuelle de limage.
Permet de régler la Luminosité/Saturation/Nuance pour
chaque couleur.
Permet de régler le niveau de Réduction de bruit.
Permet de régler la manière de détecter le signal vidéo.
Permet de choisir le mode de sortie du connecteur
COAXIAL/de la borne OPTICAL.
entre Bitstream/PCM/Reencode/Non.
Permet de choisir le mode de sortie de la borne HDMI entre
Bitstream/PCM/Reencode/Non.
Permet de choisir la fréquence de sous-échantillonnage du
signal audio numérique entre 48K/96K/192K.
Permet d’activer/désactiver la fonction DRC (Dynamic
Range Compression).
Permet de configurer la sortie audio des connecteurs AUDIO
OUT L/R.
Reproduit en multicanal le signal audio 2 canaux.
Permet d’afficher la version logicielle et l’adresse MAC
(p. 42).
Page
33
33
34
34
34
34
34
34
34
35
35
35
4
Paramètres
Processus Vidéo
HDMI 1080p 24Hz
Synchronisation
audio/vidéo
Video Mode
Ajustement de la
couleur
Réduction de bruit
Désentrelacement
vidéo
Coaxial / Optique
Description
Permet de choisir le mode vidéo 3D ou 2D.
Permet de régler le format d’écran du téléviseur raccordé
ainsi que la sortie vidéo.
Permet de sélectionner la résolution de la sortie vidéo.
35
35
35
35
35
35
35
Système
d’information
Français
29 Fr
Menu SETUP
■ Exemple d’utilisation du menu
SETUP
Les réglages du lecteur se font à partir de l’écran du menu
SETUP. Vous trouverez ci-dessous des explications sur
les opérations de base du menu SETUP.
SUBTITLE
ANGLE
AUDIO
CLEAR
PIP
SEARCH
SETUP
TOP MENU
2ND
4. Entrez un mot de passe.
Saisissez votre mot de passe à l’aide des touches
numériques.
– Le mot de passe par défaut est 0000.
– Vous ne pourrez pas accéder à l’écran de réglage
suivant tant que vous n’aurez pas saisi le bon mot
de passe.
– Pour changer de mot de passe, reportez-vous à la
section « Modification du mot de passe » (p. 32).
SHUFFLE
REPEAT
POP-UP MENU
ENTER
RETURN
ON SCREEN
Exemple : Réglage du paramètre Controle Parental
Remarque
– Certaines fonctions ne peuvent pas être réglées en
cours de lecture. Pour pouvoir les configurer,
appuyez deux fois sur le bouton
afin d’arrêter
complètement la lecture.
5. Sélectionnez le réglage voulu.
Appuyez sur 5/a pour sélectionner le niveau voulu
pour le paramètre Controle Parental des disques
Blu-ray Disc/DVD, puis appuyez sur ENTER.
1. Affichez l’écran du menu SETUP.
Appuyez sur la touche SETUP pour afficher l’écran
du menu SETUP.
Appuyez sur 2/3 pour sélectionner Réglages
Généraux, puis appuyez sur ENTER ou a.
2. Sélectionnez un sous-menu.
Appuyez sur 5/a pour sélectionner Securité, puis
appuyez sur ENTER ou 3.
3. Sélectionnez une option de menu.
Appuyez sur 5/a pour sélectionner Controle
Parental, puis appuyez sur ENTER ou 3.
30 Fr
6. Quittez l’écran du menu.
Appuyez sur 2 pour revenir au menu précédent.
Menu SETUP
■ Réglages Généraux
Les réglages par défaut sont signalés par « * ».
Système
Économiseur d’écran
Ce paramètre permet d’activer ou de désactiver
l’économiseur d’écran.
En cas d’activation, le lecteur affiche l’économiseur
d’écran au bout de 3 minutes d’inactivité, puis passe en
mode de veille si aucune opération n’a lieu dans les 27
minutes qui suivent.
Oui*, Non
Oui*, Non
Contrôle HDMI
Vous pouvez configurer le lecteur de façon à ce qu’il reçoive un
signal de commande d’un téléviseur/ampli-tuner AV compatible
avec la fonction Contrôle HDMI via un câble HDMI (p. 12).
Oui, Non*
Utilisation de la fonction Contrôle HDMI
La fonction Contrôle HDMI permet de piloter ce lecteur, de
façon interactive, via votre téléviseur (à condition que ce
dernier soit compatible avec la fonction Contrôle HDMI).
Vous devez raccorder ce lecteur à un téléviseur (compatible
avec la fonction Contrôle HDMI) au moyen d’un câble
HDMI et activer le paramètre Contrôle HDMI dans le menu
SETUP (p. 31) pour profiter des fonctions décrites ci-dessous.
Remarques
– Lorsque le Pilotage réseau est activé, la
consommation d’énergie en mode veille augmente
en raison de la fonction de pilotage du réseau.
– De la même façon, avec le paramètre sur Oui, la
durée de démarrage du système est plus courte.
Insérer les paramètres par défaut
Vous avez la possibilité de rétablir tous les paramètres par
défaut du lecteur à l’exception du paramètre Securité
(p. 32). Pour en savoir plus au sujet des paramètres par
défaut, reportez-vous aux pages 28-35.
Mettre à niveau
Ce paramètre permet de procéder à une mise à niveau
manuelle du logiciel Avec une clé USB ou à partir du
Réseau. Pour en savoir plus à ce sujet, reportez-vous à la
section « Mise à niveau logicielle » (p. 38).
Installation facile
Ce paramètre permet de procéder à une Installation facile
du lecteur (p. 18).
Espace de stockage externe
Vous pouvez afficher les informations relative à l’Espace
de stockage externe, formater l’Espace de stockage
externe et sélectionner USB en façade/USB à l’arrière
pour sauvegarder des données BD-Live.
Pour formater (vider) le dossier « BUDA » sur la clé USB,
sélectionnez Information et appuyez sur ENTER lorsque
« Formater » est en surbrillance à l’écran.
USB en façade, USB à l’arrière*
Astuce
– L’Espace de stockage externe fait office de mémoire
auxiliaire pendant la lecture d’un disque Blu-ray Disc.
3D Message de la Réécoute
Permet d’activer et de désactiver l’affichage sur le
téléviseur d’un avertissement concernant la lecture de
supports vidéo 3D à la mise sous tension de ce lecteur.
Oui*, Non
Remarques
– La fonction Contrôle HDMI risque de ne pas
fonctionner correctement avec certains téléviseurs.
– Il est possible que vous ayez accès à des fonctions
différentes de celles décrites ci-dessus selon le
modèle de téléviseur ou d’ampli-tuner AV utilisé.
– Pour bénéficier des avantages de la fonction
Contrôle HDMI, réglez le paramètre de la fonction
Contrôle HDMI sur TOUS les appareils (ce lecteur,
le téléviseur et l’ampli-tuner AV). Certaines
opérations supplémentaires peuvent être requises.
– Chaque fonction peut être réglée indépendamment afin
d’être activée/désactivée selon le téléviseur utilisé.
– Pour en savoir plus sur la configuration, consultez
les modes d’emploi fournis avec le téléviseur et/ou
l’ampli-tuner AV.
– Si le paramètre est réglé sur Oui, la consommation
d’énergie en mode veille augmente en raison de
l’utilisation de la fonction Contrôle HDMI.
4
Langue
Affichage à l’écran
Vous avez la possibilité de sélectionner la langue des messages
ou menus affichés à l’écran (menu SETUP, par exemple).
English, Français , Español , Deutsch , Italiano , Svenska ,
Nederlandse ,
,
Menu
Ce paramètre permet de choisir votre langue de
prédilection pour le menu du disque.
English, Français ,
, Español , Deutsch , Italiano ,
Nederlandse , Portugais, Danois, Svenska , Finnois,
Norvégien,
, Coréen, Japonais, Plus
31 Fr
Français
• Fonction de sélection d’entrée automatique
Lorsque vous lancez la lecture sur ce lecteur, le
sélecteur d’entrée du téléviseur (et de l’ampli-tuner
AV si le lecteur est raccordé au téléviseur via un
ampli-tuner AV) commute automatiquement sur ce
lecteur. Le téléviseur peut également s’allumer
automatiquement selon le modèle de téléviseur utilisé.
• Fonction d’extinction automatique
Si vous éteignez le téléviseur alors que le lecteur est à
l’arrêt et que l’écran du menu SETUP n’est pas affiché,
le lecteur est automatiquement mis hors tension.
Oui, Non*
Paramètres
Lecture automatique du disque
Ce paramètre permet d’activer ou de désactiver la fonction
Lecture automatique du disque. En cas d’activation, la
lecture du disque commence automatiquement dès que
vous chargez le disque dans le lecteur.
Pilotage réseau
Permet de régler le contrôle via Ethernet sur Oui/Non. Ce
lecteur utilise le protocole Yamaha Network Control
(YNC).
Menu SETUP
Audio
Ce paramètre permet de choisir votre langue de
prédilection pour la lecture des disques Blu-ray Disc/
DVD. Pour plus de détails à ce sujet, reportez-vous à la
section « Menu » (p. 31).
Sous-titres
Ce paramètre permet de choisir votre langue de
prédilection pour les Sous-titres.
English, Français ,
, Español , Deutsch , Italiano ,
Nederlandse , Portugais, Danois, Svenska , Finnois,
Norvégien,
, Coréen, Japonais, Plus, Non
(Les réglages par défaut du paramètre [Langue] diffèrent
selon le modèle du lecteur.)
Playback
Sous-titres pour malentendants
Ce paramètre permet d’afficher les sous-titres destinés aux
malentendants (p. 43) lors de la lecture d’un Blu-ray Disc/
DVD contenant ce type de sous-titre.
Oui*, Non
Marque Angle
Ce paramètre permet d’afficher le symbole d’angle de vue
(Marque Angle) (
) lors de la lecture d’un
disqueBlu-ray Disc/DVD contenant des scènes prises sous
plusieurs angles.
Oui*, Non
Marque PIP
Ce paramètre permet d’afficher le symbole d’image dans
l’image (Marque PIP) (
) lors de la lecture d’un disque
Blu-ray Disc offrant la possibilité d’incruster une image
dans un coin de l’image principale (p. 27).
Oui*, Non
Deuxième Marque Audio
Ce paramètre d’afficher le symbole de données audio
secondaires (Deuxième Marque Audio) (
) lors de la
lecture d’un disque Blu-ray Disc contenant ce type de
données.
Oui*, Non
Dernière Mémoire
Ce paramètre permet de définir si le lecteur mémorise ou
non le dernier emplacement de lecture d’un disque quand
l’appareil passe en veille ou que vous ouvrez le plateau.
Oui*, Non
Remarque
– Certains disques ne sont pas compatibles avec cette
fonction.
DivX(R) VOD DRM
Ce paramètre permet d’afficher le code d’enregistrement
des films au format DivX(R).
Information Netflix
Vous pouvez déconnecter ce lecteur de Netflix et afficher
le NSE (Numéro de série électronique). Pour connecter à
nouveau ce lecteur, reportez-vous à la section « «Lecture
de vidéos sur Netflix™» » (p. 23). Le NSE (Numéro de
série électronique) est un numéro unique qui permet
d’utiliser le streaming de Netflix.
32 Fr
Securité
Modification du mot de passe
Vous avez la possibilité de définir le mot de passe
applicable aux fonctions Controle Parental et Code pays.
Reportez-vous à la section « Controle Parental » (p. 32) et
« Code pays » (p. 32).
Remarques
– Le mot de passe par défaut est 0000.
– Si vous avez oublié le mot de passe, reportez-vous à
« Guide de dépannage » (p. 39) et réglez tous les
paramètres Securité sur leurs valeurs par défaut.
Controle Parental
Ce lecteur permet de limiter l’accès au contenu de certains
disques Blu-ray selon l’âge du public. Il suffit pour cela de
configurer le paramètre Controle Parental en fonction du
contenu du disque.
Le mot de passe (voir « Modification du mot de passe » en
p. 32) a besoin d’être saisi avant de régler les niveaux de
Controle Parental.
Une fois la fonction Controle Parental configurée, une
boîte de dialogue invitera l’utilisateur à saisir ce mot de
passe s’il charge un disque d’un niveau de filtrage
supérieur au niveau Controle Parental actuellement défini,
ou s’il souhaite modifier le niveau Controle Parental.
Non*, 1–8
Code pays
Ce paramètre permet de définir le Code pays dans lequel
vous vivez. Avant de configurer le paramètre Code pays,
vous devez d’abord choisir un mot de passe (voir la
section «Modification du mot de passe» p. 32). Ce
paramètre peut servir à évaluer le niveau de filtrage du
Controle Parental et à autoriser la lecture du disque en
fonction du pays.
Réseau
Connection Internet
N’oubliez pas d’activer la connexion Internet (en réglant ce
paramètre sur Permettre) si vous comptez utiliser les fonctions
BD-Live (p. 27) et DLNA (p. 20), procéder à la mise à niveau
du logiciel à partir du réseau (p. 38) ou avoir recours aux
autres fonctions du réseau.
Permettre*, Désactivé
Configuration de Connexion
Vous pouvez sélectionner une méthode de connexion au
réseau.
Wired*
Permet de se connecter au réseau via Ethernet.
Sans Fil
Permet de se connecter au réseau en utilisant un
LAN sans fil.
Vous pouvez choisir les paramètres pour une
connexion LAN sans fil. Pour cela, suivez les
instructions à l’écran.
Scan
Recherche un point d’accès. Vous pouvez vous
connecter au point d’accès trouvé.
Manuel
Vous pouvez saisir manuellement les informations
relatives à un point d’accès.
Menu SETUP
Information
Permet d’afficher un écran d’informations au sujet du
réseau. Ce paramètre permet d’afficher un écran
d’informations au sujet du réseau de manière à connaître
l’interface (Ethernet), le Type d’adresse, l’Adresse IP, le
Masque sous-réseau, la Default Gateway et le DNS
utilisés.
Test de connexion
Vous pouvez effectuer un test de connexion Internet. En
cas d’échec, vérifiez la « Configuration IP » (p. 33) et
recommencez le test.
Auto*
Manuel
Choisissez cette option pour configurer
automatiquement les paramètres de réseau de ce
lecteur avec le serveur DHCP.
Choisissez cette option pour configurer
manuellement les paramètres de réseau (Adresse IP,
Masque sous-réseau, Default Gateway et DNS).
Astuces
– Touches
numériques
– 2/3
– CLEAR
– ENTER
Permettent de saisir des
caractères.
Déplacent la mise en surbrillance.
Efface un caractère.
Permet de sauvegarder les
réglages et de quitter le menu.
Connection BD-Live
Ce paramètre permet de restreindre l’accès aux contenus
BD-Live.
Autorisé
Tous les disques BD-Live sont autorisés à se
connecter au réseau.
Partiellement Seuls les disques avec identification du propriétaire
sont autorisés.
autorisé*
Auto*
Le lecteur sélectionne automatiquement le mode
vidéo 3D ou 2D selon le support.
Non
Le lecteur sélectionne toujours le mode vidéo 2D.
Remarque
– Même si vous avez réglé « Sortie 3D » sur « Auto »
et lisez un disque Blu-ray 3D, il se peut que le
lecteur sélectionne le mode vidéo 2D selon la
connexion et les réglages du téléviseur, etc (p. 12).
Ecran TV
Vous pouvez régler le format d’image du téléviseur
raccordé et modifier la sortie vidéo.
Si vous changez de téléviseur (vous en achetez un
nouveau, par exemple) et que le format d’image du
téléviseur raccordé est différent, vous devrez alors
modifier le paramètre Ecran TV.
16:9 Plein
Sélectionnez ce réglage si vous raccordez le lecteur à
un téléviseur au format 16:9. En cas de lecture d’une
vidéo au format 4:3, l’illustration ci-après représente
la façon dont les images sont affichées à l’écran.
16:9 Normal* Sélectionnez ce réglage si vous raccordez le lecteur à
un téléviseur au format 16:9. En cas de lecture d’une
vidéo au format 4:3, l’illustration ci-après représente
la façon dont les images sont affichées à l’écran.
4:3 Pan Scan Sélectionnez ce réglage si vous raccordez le lecteur à
un téléviseur au format 4:3. En cas de lecture d’une
vidéo au format 16:9, l’illustration ci-après
représente la façon dont les images sont affichées à
l’écran.
4:3 Boîte à
lettre
Aucun disque BD-Live n’est autorisé à se connecter
au réseau.
DLNA
Ce paramètre permet d’activer ou de désactiver
(Permettre/Désactivé) la fonction DLNA (p. 42). Si vous
n’utilisez pas la fonction DLNA, réglez ce paramètre sur
Désactivé.
Format
d’image
d’origine
Sélectionnez ce réglage si vous raccordez le lecteur à
un téléviseur au format 4:3. En cas de lecture d’une
vidéo au format 16:9, l’illustration ci-après
représente la façon dont les images sont affichées à
l’écran.
Sur un téléviseur 16:9 (grand écran)
16:9 Plein
16:9 Normal
Permettre*, Désactivé
Paramètres Proxy
Ce paramètre permet de configurer les Paramètres Proxy.
Réglez ce paramètre sur Désactivé dans le cadre d’une
utilisation normale. Réglez ce paramètre sur Permettre
pour configurer les paramètres proxy.
Permettre
Permet de régler l’hôte proxy et le port proxy.
Désactivé*
Désactive le serveur proxy. Choisissez ce réglage si
vous ne comptez pas utiliser de serveur proxy.
Hôte Proxy
Permet de configurer l’hôte proxy.
Port Proxy
Permet de configurer le port proxy.
4
4:3
Format
d’image
d’origine
Sur un téléviseur 4:3
4:3 Pan Scan
4:3 Boîte à lettre
16:9
■ Paramètres vidéo
Les réglages par défaut sont signalés par « * ».
33 Fr
Français
Interdit
Sortie 3D
Permet de choisir le mode vidéo 3D ou 2D de ce lecteur.
Paramètres
Configuration IP
Permet de configurer les paramètres de réseau.
TV
Menu SETUP
Sélectionnez la sortie vidéo
Vous pouvez choisir la résolution de sortie vidéo entre
HDMI, COMPONENT et VIDEO. Pour en savoir plus sur
les formats de sortie disponibles, reportez-vous à la
section «À propos des formats de sortie vidéo» (p. 37).
HDMI Deep Color
Réglez ce paramètre en fonction de votre téléviseur et/ou
ampli-tuner AV si ceux-ci sont compatibles avec la
technologie Deep Color (p. 42). Cette fonction est disponible
à condition de raccorder ce lecteur via un câble HDMI.
HDMI
Si vous réglez ce paramètre sur Auto, le lecteur
sélectionne automatiquement la résolution maximale
en fonction du téléviseur raccordé.
Lorsqu’il est réglé sur Format vidéo du disque
original, la résolution et la fréquence vidéo
originales, enregistrés sur le Blu-ray Disc ou le DVD
en cours de lecture, sont utilisées. Vous pouvez
utiliser la fonction de convertisseur vidéo ascendant
d’un appareil externe.
Lors de la lecture d’un support autre qu’un Blu-ray
Disc ou un DVD, la résolution et la fréquence vidéo
fonctionnent en mode Auto.
Si un Blu-ray Disc ou un DVD ont une résolution et
une fréquence vidéo qui ne sont pas compatibles avec
le téléviseur raccordé, aucune image ne sera restituée.
Dans ce cas, arrêtez la lecture et choisissez une
option autre que Format vidéo du disque original.
30 bits, 36 bits, 48 bits, Non*
Auto*, Format vidéo du disque original, 480i/
576i, 480p/576p, 720p, 1080i, 1080p
– Ce paramètre est désactivé pour toute résolution de
sortie autre que 1080p.
Synchronisation audio/vidéo
Ce paramètre permet de définir/régler la fonction
Synchronisation audio/vidéo (p. 43).
COMPONENT Vous ne pouvez sélectionner que les options 480p/
576p ou 480i/576i.
480p/576p, 481i/576i*
VIDEO
Similaire à l’option 480i/576i.
Remarques
– Pour reproduire de l’audio HD (Dolby TrueHD ou
DTS-HD Master Audio) depuis la borne HDMI,
réglez Sélectionnez la sortie vidéo sur Auto ou sur
un réglage supérieur à 720p.
– Si un téléviseur est raccordé avec un câble HDMI, le
réglage par défaut sera HDMI.
– Si un téléviseur n’est pas raccordé avec un câble
HDMI, le réglage par défaut est VIDEO.
Système TV
Le paramètre Système TV permet de choisir l’une des
normes de diffusion suivantes : PAL, NTSC et Multi.
Choisissez le même réglage pour Système TV que sur
votre téléviseur. Pour en savoir plus sur les formats de
sortie disponibles, reportez-vous à la section « À propos
des formats de sortie vidéo » (p. 37).
HDMI 1080p 24Hz
Ce paramètre a pour effet de reproduire le signal BD
Vidéo codé à une vitesse de 24 Hz sous forme de signal
HDMI 1080p 24Hz. Cela permet, dans certains cas,
d’améliorer la fluidité des images. Cette fonction est
disponible à condition d’utiliser un téléviseur/ampli-tuner
AV compatible et de raccorder ce lecteur au moyen d’un
câble HDMI. Pour en savoir plus sur les formats de sortie
disponibles, reportez-vous à la section « À propos des
formats de sortie vidéo » (p. 37).
Auto*, Non
Remarque
Auto*
Ce lecteur règle automatiquement la fonction
Synchronisation audio/vidéo.
Manuel
Vous pouvez régler la fonction Synchronisation
audio/vidéo manuellement. Vous pouvez régler le
retard du son indépendamment pour les supports
vidéo 2D et 3D.
2D
3D
Non
Ce lecteur n’effectue aucun réglage de la fonction
Synchronisation audio/vidéo.
Processus Vidéo
Video Mode
Vous pouvez sélectionner Video Mode ci-dessous.
Standard*
L’image est très naturelle et équilibrée. Ce mode est
approprié dans le cadre d’une utilisation normale.
Vivid
L’image est plus nette et éclatante.
NTSC, PAL, Multi
(Les réglages par défaut diffèrent selon le modèle du lecteur.)
Cinema
Cette image est adaptée au visionnage d’un film dans
une pièce sombre.
Espace de couleur
Ce paramètre permet de sélectionner le modèle de
représentation colorimétrique en sortie (Espace de couleur) qui
convient (p. 43) en mode HDMI. Cette fonction est disponible
à condition de raccorder ce lecteur via un câble HDMI.
Custom
Vous pouvez régler l’image visuelle manuellement.
Appuyez sur 5/a pour sélectionner le paramètre,
puis appuyez sur 2/3 pour régler sa valeur.
Luminosité
Règle la luminosité générale de l’image.
Saturation
Règle la saturation des couleurs de l’image projetée.
Nuance
Ajuste la teinte de l’image projetée.
Contraste
Ajuste les zones claires (niveaux de blanc) de l’image.
Netteté
Ce paramètre permet de régler la netteté des objets
de la vidéo.
CTI
Lisse les bords des images en couleur. Les images en
couleur ont alors un rendu plus distinct.
YCbCr 4:4:4* Permet de régler Espace de couleur sur YCbCr 4:4:4.
YCbCr 4:2:2
Permet de régler Espace de couleur sur YCbCr 4:2:2.
Full RGB
Lorsque RGB est réglé et que le blanc et le noir à
l’écran sont trop pâles, sélectionnez ce réglage. Ce
paramètre est valide lorsque le composant raccordé
prend en charge la plage RGB 0-255.
RGB
Émet le signal vidéo dans la plage de signaux normale.
Remarque
– Cette fonction est disponible uniquement sur les
téléviseurs compatibles.
34 Fr
Les valeurs par défaut sont équivalentes à 0.
Menu SETUP
Ajustement de la couleur
Vous pouvez régler les paramètres Luminosité/Saturation/
Nuance pour chaque couleur (Rouge/Vert/Bleu/Jaune/
Cyan/Magenta). Pour utiliser cette fonction, réglez Video
Mode sur Custom. Pour plus de détails à ce sujet,
reportez-vous à la section «Video Mode» (p. 34).
Echantillonnage Inférieur
Ce paramètre permet de sélectionner la fréquence de souséchantillonnage du signal audio. Cette fonction s’applique
à la sortie du signal audio du connecteur COAXIAL/de la
borne OPTICAL.
La fréquence d’échantillonnage la plus élevée de la
sortie PCM numérique équivaut à 48kHz.
Réduction de bruit
Vous pouvez régler Réduction de bruit sur un niveau de 0
à 3. La valeur 0 désactive la fonction, 3 indique le niveau
maximum.
96K
La fréquence d’échantillonnage la plus élevée de la
sortie PCM numérique équivaut à 96kHz.
192K
La fréquence d’échantillonnage la plus élevée de la
sortie PCM numérique équivaut à 192kHz.
0, 1, 2*, 3
DRC
Ce paramètre permet d’activer ou de désactiver la fonction
DRC (Dynamic Range Compression) (p. 42) ou de la
régler sur Auto. Lorsqu’il est réglé sur Auto, la fonction
DRC est automatiquement activée sur les sources
contenant des informationsDRC au format Dolby
TrueHD. La fonction DRC a pour effet d’atténuer un son
trop puissant et de rendre les dialogues et conversations
plus audibles. Cela est particulièrement utile lorsque vous
regardez des films tard dans la nuit.
Désentrelacement vidéo
Vous pouvez régler la manière de détecter le signal vidéo.
Réglez ce paramètre sur Auto dans le cadre d’une
utilisation normale. En présence de parasites en bandes
horizontales à l’écran, réglez ce paramètre sur Film/Vidéo
pour supprimer ces parasites.
Auto*, Film, Vidéo
■ Paramètres audio
4
Paramètres
48K*
Les valeurs par défaut sont équivalentes à 0.
Non, Oui, Auto*
Les réglages par défaut sont signalés par « * ».
Configuration Haut-Parleur
Sortie audio
Coaxial / Optique
Ce paramètre permet de choisir le mode de sortie du
connecteur COAXIAL et de la borne OPTICAL. Pour en
savoir plus sur les formats de sortie disponibles, reportezvous à la section «À propos des formats de sortie audio»
(p. 36).
Bitstream
PCM
Génère un signal PCM sur 2 canaux.
Reencode*
Génère un signal Bitstream avec les données audio
secondaires.
Non
Coupe le son.
HDMI
Ce paramètre permet de choisir le mode de sortie de la borne
HDMI. Pour plus de détails à ce sujet, reportez-vous à la
section «Coaxial / Optique» (p. 35). Pour en savoir plus sur
les formats de sortie disponibles, reportez-vous à la section
« À propos des formats de sortie audio » (p. 36).
Gauche/
Droite
Choisissez ce réglage si l’appareil est raccordé à un
décodeur Dolby Pro Logic. Le son des deux
enceintes arrière est mixé sur 2 canaux stéréo.
Stéréo*
Modifie la sortie de canal sur stéréo, ce qui reproduit
uniquement le son sur les deux enceintes avant.
Post process
UpMix
Vous pouvez reproduire le signal audio 2 canaux en son
multicanal. Pour ceci, sélectionnez DTS NEO:6, puis le
mode Cinema ou Musique.
Non*, DTS NEO:6
■ Système d’information
Ce paramètre permet d’afficher la version logicielle et
l’adresse MAC (p. 42).
Bitstream*, PCM, Reencode, Non
Remarque
– Pour reproduire de l’audio HD (Dolby TrueHD ou
DTS-HD Master Audio) depuis la borne HDMI,
réglez Sélectionnez la sortie vidéo sur Auto ou sur
un réglage supérieur à 720p (p. 34).
35 Fr
Français
Génère un signal numérique sans aucun traitement.
Les données audio secondaires ne sont pas prises en
compte.
Mixage en 2 canaux stéréo
Vous pouvez sélectionner la méthode de mixage sur 2
canaux analogiques : Stéréo ou Gauche/Droite.
Menu SETUP
■ À propos des formats de sortie audio
Format de la source
PCM 2 canaux
PCM 5.1
canaux
PCM 7.1
canaux
Dolby Digital
avec SA* ou
BCS**
avec SA* ou
BCS**
DTS
PCM 5.1 canaux
sans SA* ou
BCS**
avec SA* ou
BCS**
sans SA* ou
BCS**
avec SA* ou
BCS**
sans SA* ou
BCS**
Dolby Digital
Bitstream
PCM 7.1 canaux
PCM jusqu’à
5.1 canaux
Dolby Digital
Plus
PCM jusqu’à
7.1 canaux
Dolby
TrueHD
PCM jusqu’à
7.1 canaux
DTS
PCM jusqu’à
5.1 canaux
MIXED 2CH
Reencode
–
Dolby Digital
2ch
PCM 2 canaux
Dolby Digital
PCM 2 canaux
2ch
Dolby Digital
PCM 2 canaux
Dolby Digital
PCM 2 canaux
PCM 7.1 canaux
Dolby Digital
PCM
PCM 2 canaux
PCM 5.1 canaux
sans SA* ou
BCS**
avec SA* ou
BCS**
COAXIAL/OPTIQUE
Reencode
PCM 2 canaux
sans SA* ou
BCS**
avec SA* ou
BCS**
PCM
PCM 2 canaux
sans SA* ou
BCS**
avec SA* ou
Dolby Digital BCS**
Plus
sans SA* ou
BCS**
Dolby
TrueHD
HDMI
Bitstream
2ch
2ch
Dolby Digital
PCM 2 canaux
2ch
2ch
Dolby Digital Dolby Digital PCM 2 canaux Dolby Digital
2ch
Dolby Digital
Dolby Digital
Plus
Dolby Digital PCM 2 canaux Dolby Digital
2ch
Dolby Digital PCM 2 canaux Dolby Digital
2ch
Dolby Digital
Dolby
TrueHD
DTS
avec SA* ou
DTS HD High BCS**
Resolution
sans SA* ou
BCS**
DTS HD High
Resolution
DTS
PCM jusqu’à
7.1 canaux DTS HD High
Resolution
avec SA* ou
BCS**
DTS-HD
Master Audio sans SA* ou
BCS**
DTS-HD
Master Audio
PCM jusqu’à
7.1 canaux
DTS
PCM 2 canaux
DTS
2ch
DTS
PCM 2 canaux
DTS
2ch
DTS
PCM 2 canaux
DTS
2ch
DTS
DTS-HD
Master Audio
* « SA » désigne les données audio secondaires (Secondary Audio).
** « BCS » représente le son émis lors du clic d’un bouton, l’effet sonore pour les menus contextuels, etc.
Remarques
– Si le paramètre Coaxial / Optique ou HDMI est réglé sur Bitstream, aucune donnée audio secondaire n’est émise.
(p. 35)
– Pour reproduire de l’audio HD (Dolby TrueHD ou DTS-HD Master Audio) depuis la borne HDMI, réglez
Sélectionnez la sortie vidéo sur Auto ou sur un réglage supérieur à 720p (p. 34).
36 Fr
Menu SETUP
■ À propos des formats de sortie vidéo
Si Système TV est réglé sur NTSC
Table des
matières
Borne de
sortie
Auto
Format vidéo
du disque
original
*1
1080p 24Hz
*2
Désactivé
*1
*3
*2
Désactivé
*1
*3
*2
*2
*1
*1
*2
*2
1080p
1080i
1080p 24Hz/
1080i 60Hz
60Hz *4
Désactivé
Désactivé
1080p 60Hz 1080i 60Hz
Désactivé
Désactivé
1080p 60Hz 1080i 60Hz
Désactivé
Désactivé
1080p 60Hz 1080i 60Hz
Désactivé
Désactivé
COMPONENT
VIDEO
720p
480p/576p
480i/576i
480p/576p
480i/576i
–
720p 60Hz
480p
480i
480p
480i
480i
480i
480i
480p
480i
480i
480p
480p
480i
480p
480p
480i
480i
480i
480i
480i
480i
480i
480i
480i
480i
480i
480i
480i
480i
480p
480i
480i
480p
480p
480i
480p
480p
480i
480i
480i
480i
480i
480i
480i
480i
480i
480i
480i
480i
480i
480i
480i
480i
480i
480i
480i
480i
480i
480i
480i
Désactivé
720p 60Hz
Désactivé
720p 60Hz
Désactivé
720p 60Hz
Désactivé
4
Paramètres
BD-Video
HDMI
avec
un contenu COMPONENT
1080p/24Hz
VIDEO
HDMI
BD-Video
sans contenu COMPONENT
1080p/24Hz
VIDEO
HDMI
DVD-Video COMPONENT
VIDEO
HDMI
Autres
COMPONENT
VIDEO
Sélectionnez la sortie vidéo
HDMI
Si Système TV est réglé sur PAL
Table des
matières
Borne de
sortie
BD-Video
avec
un contenu
1080p/24Hz
HDMI
BD-Video
sans contenu
1080p/24Hz
DVD-Video
Autres
Sélectionnez la sortie vidéo
HDMI
Auto
Format vidéo
du disque
original
*1
1080p 24Hz
1080p
1080i
1080p 24Hz/
1080i 50Hz
50Hz *4
COMPONENT
VIDEO
720p
480p/576p
480i/576i
480p/576p
480i/576i
–
720p 50Hz
576p
576i
576p
576i
576i
576i
576i
576i
576i
576i
576i
576i
576i
COMPONENT
VIDEO
*2
Désactivé
Désactivé
Désactivé
Désactivé
576i
576i
HDMI
*1
*3
1080p
50 Hz
1080i 50Hz
720p 50Hz
576p
576i
576p
576i
576i
COMPONENT
VIDEO
*2
Désactivé
Désactivé
Désactivé
Désactivé
576i
576i
576i
576i
576i
576i
576i
576i
576i
576i
HDMI
*1
*3
1080p
50 Hz
1080i 50Hz
720p 50Hz
576p
576i
576p
576i
576i
576i
576i
576p
576i
576i
576i
576i
576i
*2
*2
Désactivé
Désactivé
Désactivé
576p
576i
HDMI
*1
*1
1080p
50 Hz
1080i 50Hz
720p 50Hz
576p
576i
576p
576i
576i
Désactivé
576p
576i
576i
576i
576p
576i
576i
576i
576i
576i
COMPONENT
VIDEO
*2
*2
Désactivé
Désactivé
*1 La résolution sera définie sur la résolution maximale prise en charge par le téléviseur raccordé. Par exemple, lorsque
la résolution maximale prise en charge par le téléviseur raccordé est de 1080p, la résolution sera définie sur 1080p.
*2 Il est possible que la vidéo ne soit pas reproduite, car la sortie HDMI est prioritaire.
*3 La résolution correspond à celle du disque source.
*4 Si vous sélectionnez Auto pour HDMI 1080p 24Hz et que le téléviseur raccordé prend en charge le contenu 1080p
24 Hz, la résolution est de 1080p 24 Hz au lieu de 1080p 50/60 Hz.
Si Système TV est réglé sur Multi
Lorsque Système TV est réglé sur Multi, le signal vidéo est émis à la même fréquence que la source. Reportez-vous aux
tableaux ci-dessous pour plus de détails sur le réglage de fréquences sur le téléviseur et la résolution du signal de sortie
vidéo.
Remarques
– Le paramètre HDMI 1080p 24Hz est désactivé lorsque la résolution de sortie est différente de 1080p.
– Si le paramètre Système TV est réglé sur NTSC et que la source vidéo est différente de 60 Hz, le signal de sortie
vidéo est converti en 60 Hz.
– Si le paramètre Système TV est réglé sur PAL et que la source vidéo est différente de 50 Hz, le signal de sortie
vidéo est converti en 50 Hz.
37 Fr
Français
COMPONENT
VIDEO
Mise à niveau logicielle
Certains disques Blu-ray récents ne peuvent être lus que si vous mettez à niveau le logiciel de ce lecteur. Il est
recommandé de procéder à une mise à niveau logicielle de sorte que le lecteur bénéficie de la dernière version du
logiciel.
Pour savoir si une nouvelle mise à niveau logicielle est disponible, rendez-vous sur le site Web suivant :
http://download.yamaha.com/
Remarque
– Ne retirez pas le disque/la clé USB, ne mettez pas le lecteur en mode veille ou ne débranchez pas le cordon
d’alimentation/câble de connexion au réseau local tant que la mise à niveau n’est pas terminée.
■ Mise à niveau du logiciel
1. Préparez la mise à niveau du
logiciel.
Si vous effectuez la mise à niveau à partir du Avec
une clé USB :
1 Enregistrez le fichier de mise à niveau dans le
dossier approprié sur le disque/la clé USB. Pour
en savoir plus, reportez-vous aux instructions
fournies avec le fichier de mise à niveau.
2 Connectez la clé USB.
Passez à l’étape 2.
Si vous effectuez la mise à niveau à partir du
Réseau :
Assurez-vous que le lecteur est raccordé au
réseau.
2. Sélectionnez la méthode de mise à
niveau et lancez la mise à niveau à
partir du menu SETUP.
1 Appuyez sur SETUP pour afficher l’écran de
menu SETUP.
2 Choisissez Réglages Généraux = Système =
Mettre à niveau.
3 Sélectionnez l’élément contenant le fichier de
mise à niveau : Avec une clé USB/Réseau.
Le système recherche le fichier de mise à niveau.
38 Fr
3. Effectuez la mise à niveau du
logiciel en suivant les instructions
affichées à l’écran.
Une fois la mise à niveau terminée, le système est
réinitialisé.
INFORMATIONS COMPLÉMENTAIRES
Guide de dépannage
Reportez-vous au tableau suivant si ce lecteur ne fonctionne pas convenablement. Si l’anomalie constatée n’est pas
mentionnée ou si les actions correctives suggérées sont sans effet, mettez le lecteur hors tension, débranchez le cordon
d’alimentation et prenez contact avec un revendeur agréé ou le service après-vente de Yamaha.
■ Alimentation
Anomalies
Causes possibles et solutions
Le lecteur ne s’allume pas.
– Vérifiez si le cordon d’alimentation est branché correctement.
– Pensez à appuyer sur le bouton p sur le panneau avant pour mettre le lecteur sous
tension.
L’alimentation du lecteur est coupée.
– L’alimentation est automatiquement coupée au bout de 30 minutes d’inactivité (pas de
lecture).
■ Opérations de base
Causes possibles et solutions
– Utilisez la télécommande dans son rayon d’action. (p. 9)
– Remplacez les piles. (p. 9)
– Vérifiez les paramètre d’ID de l’appareil principal et de la télécommande. L’ID de la
télécommande peut être modifiée lorsque l’appareil principal est réinitialisé. Dans ce
cas, vérifiez l’ID de la télécommande sur l’appareil principal, et réglez-la à nouveau si
nécessaire. (p. 9)
Les touches ne fonctionnent pas.
– Maintenez le bouton p du panneau avant enfoncé pendant 5 secondes au moins pour
réinitialiser le lecteur.
– Pour procéder à une réinitialisation complète du lecteur, débranchez le cordon
d’alimentation de la prise secteur pendant 10 secondes ou plus, rebranchez-le à la prise
secteur, puis allumez le lecteur.
Vous avez oublié le mot de passe.
– Maintenez les boutons
et
du panneau avant enfoncés simultanément en veillant
à ce que le lecteur ne contienne pas de disque et soit à l’arrêt pour initialiser tous les
paramètres Securité (p. 32) du lecteur. Après la mise hors tension automatique du
lecteur, appuyez sur p pour le remettre sous tension.
Informations complémentaires
Anomalies
La télécommande ne fonctionne pas.
5
■ Lecture de disque
Causes possibles et solutions
– Retirez le disque et nettoyez-le. (p. 4)
– Assurez-vous que le disque est inséré correctement (bien aligné sur le plateau de disque
et face imprimée vers le haut). (p. 4)
– Utilisez un disque compatible avec le lecteur. (p. 3)
– Retirez le disque et assurez-vous que le lecteur prend en charge ce type de disque. (p. 3)
– Vérifiez le code de région. (p. 3)
– Vérifiez si le disque est défectueux en essayant de lire un autre disque.
– Assurez-vous que les disques CD-R/RW, DVD+R/RW/R DL et DVD-R/RW/R DL ont
été finalisés. (p. 3)
La vidéo s’arrête.
– Le lecteur s’arrête s’il ressent des chocs ou des vibrations.
Le lecteur produit un bruit sec au
démarrage de la lecture ou à l’insertion
d’un disque.
– Ces bruits ne sont pas le signe d’un dysfonctionnement du lecteur, mais sont le reflet de
conditions de fonctionnement normal.
39 Fr
Français
Anomalies
Le lecteur ne peut pas lire le disque.
Guide de dépannage
■ Image
Anomalies
Causes possibles et solutions
Absence d’image.
– Assurez-vous que les câbles sont branchés correctement. (p. 10)
– Assurez-vous que l’entrée sélectionnée sur le téléviseur ou l’ampli-tuner AV raccordé
au lecteur est correcte. (p. 10)
– Lorsqu’aucun disque n’est inséré ou lorsque la lecture est arrêtée, appuyez et maintenez
les boutons
et
du panneau avant enfoncés simultanément pour réinitialiser la
résolution vidéo.
Si aucune image n’apparaît, appuyez et maintenez le bouton
du panneau avant
enfoncé pendant 5 secondes environ pour commuter sur NTSC/PAL.
– Lorsqu’il est réglé sur Format vidéo du disque original, un signal non compatible avec
le téléviseur raccordé est émis. Modifiez le réglage afin d’émettre en sortie un signal
compatible avec le téléviseur raccordé. (p. 34)
L’écran se fige et les touches n’ont
aucun effet.
– Appuyez sur , puis redémarrez la lecture.
– Éteignez, puis rallumez le lecteur.
– Maintenez le bouton p du panneau avant enfoncé pendant 5 secondes au moins pour
réinitialiser le lecteur.
– Choisissez la résolution appropriée. (p. 34)
La résolution de la vidéo n’est pas celle
qui convient.
La vidéo grand écran apparaît étirée
verticalement ou des bandes noires
apparaissent en haut et en bas de
l’écran, ou limage 4:3 est étirée dans le
sens horizontal.
Des carrés (effet de mosaïque)
apparaissent à l’écran.
L’image présente des distorsions
lorsque le DVD vidéo est enregistré sur
un magnétoscope ou lu par
l’intermédiaire d’un magnétoscope.
Aucun son n’est émis ou les images ne
sont pas lues correctement.
– Changez le format d’image du téléviseur. (p. 33)
– Ce type de parasite est lié à la technologie de compression des images numériques
notamment dans les scènes rapides.
– Ce lecteur se conforme à la protection contre la copie analogique. Certains disques
contiennent un signal empêchant la copie. Si vous essayez de lire un tel disque par
l’intermédiaire d’un magnétoscope, ou de l’enregistrer sur un magnétoscope et de lire le
signal, la protection contre la copie empêchera la lecture normale.
– Les disques sur lesquels est enregistré un contenu avec protection des droits d’auteur
peuvent présenter ce type de problème.
■ Son
Anomalies
Pas de son ou le son est déformé.
Les pistes audio gauche et droite sont
inversées ou le son n’est émis que d’un
côté.
Aucun son n’est émis ou les images ne
sont pas lues correctement.
Le type de son et/ou le nombre de
canaux voulu n’est pas disponible.
Aucun son (données audio secondaires)
n’est émis pour la fonction
d’incrustation PIP (image dans l’image).
Causes possibles et solutions
– Vérifiez si le câble audio est raccordé correctement. (p. 10)
– Augmentez le volume du téléviseur ou de l’ampli-tuner AV.
– Rappelez-vous qu’aucun son n’est produit en mode arrêt sur image, lors de l’avance
rapide et du retour rapide. (p. 8)
– Le son peut ne pas être émis selon l’état d’enregistrement audio, par exemple, lorsqu’un
son autre qu’un signal audio ou un son non standard est enregistré comme contenu
audio. (p. 3)
– Vérifiez la connexion audio. (p. 10)
– Les disques sur lesquels est enregistré un contenu avec protection des droits d’auteur
peuvent présenter ce type de problème.
– Reportez-vous au paramètre Sortie audio et à la section .«À propos des formats de sortie
audio». (p. 35, p. 36)
– Réglez le paramètre Coaxial / Optique ou HDMI sur PCM/Reencode. (p. 35)
– Pour écouter les données audio secondaires, appuyez sur 2ND AUDIO. (p. 6)
– Sur certains disques, il peut être nécessaire d’activer en plus les données audio
secondaires dans le menu supérieur du disque (p. 8).
■ Réseau
Anomalies
Impossible de se connecter à Internet.
40 Fr
Causes possibles et solutions
– Lorsque vous vous connectez à Internet en choisissant Wired dans Configuration de
Connexion, raccordez le câble réseau correctement. (p. 32)
– Vérifiez si l’équipement raccordé (routeur haut débit ou modem) est sous tension.
– Assurez-vous que le routeur haut débit et/ou le modem est connecté correctement.
– Si Sans Fil est choisi dans Configuration de Connexion, et lorsque vous souhaitez vous
connecter à internet en utilisant Ethernet, sélectionnez correctement Wired. (p. 32)
– Sélectionnez correctement Sans Fil dans Configuration de Connexion lorsque vous
souhaitez vous connecter à Internet en utilisant un LAN sans fil. (p. 32)
Guide de dépannage
Anomalies
Causes possibles et solutions
Impossible de télécharger le contenu
BD-Live.
Impossible de détecter le serveur DLNA.
Impossible de se connecter à Internet
via le LAN sans fil.
Le réseau sans fil n’est pas détecté ou
est perturbé.
– Les messages suivants apparaissent sur l’écran du téléviseur si le disque que vous essayez de lire ne convient pas ou
si l’opération est incorrecte.
Message d’erreur
Causes possibles et solutions
Fichier non supporté
– Le fichier n’est pas reconnu par le lecteur. Voir la section « Types de disques/fichiers utilisables avec
ce lecteur » (p. 3).
Code zone incorrect
– Le code de région du disque n’est pas compatible. Voir la section «Information sur la gestion des
régions pour les Blu-ray Disc/DVD vidéo.» (p. 3).
Echec réseau
– Le lecteur ne peut pas être connecté au réseau. Vérifiez la connexion (p. 16) et le paramètre de
configuration du réseau (p. 32).
Réseau OK, échec proxy
– Le lecteur ne peut pas être connecté au serveur proxy. Voir la section « Paramètres Proxy » (p. 33).
La fonction BD-LIVE n’est
pas autorisée dans le Menu
SETUP.
– La connexion BD-Live est interdite. Voir la section « Connection BD-Live » (p. 33).
La mise à jour a échoué
– La mise à niveau a échoué. Assurez-vous que le fichier de mise à niveau n’est pas corrompu ou
illisible.
Adresse IP incorrecte! Merci
de recommencer...
– L’Configuration IP saisie n’est pas valide. Ressaisissez l’information correcte.
41 Fr
Français
■ Messages d’erreur à l’écran
5
Informations complémentaires
Impossible de lire le fichier sur le
serveur DLNA.
– Vérifiez que le lecteur peut se connecter normalement à Internet. Reportez-vous à la
section «Test de connexion». (p. 33)
– Vérifiez si la clé USB est insérée correctement. Assurez-vous que la clé USB est reliée
au connecteur USB du lecteur. (p. 16)
– Vérifiez si le disque Blu-ray Disc prend en charge la fonction BD-Live.
– Utilisez une clé USB au format FAT16, FAT32 ou NTFS.
– Il est recommandé de connecter une clé USB possédant au moins 2Go d’espace libre. Si
l’espace disponible n’est pas suffisant, formatez la clé USB. (p. 31)
– Reportez-vous au mode d’emploi fourni avec le disque ou contactez son fabricant.
– Vérifiez que le lecteur peut se connecter normalement au réseau. Reportez-vous à la
section «Test de connexion». (p. 33)
– Vérifiez si l’équipement raccordé (routeur haut débit ou serveur) est sous tension.
– Assurez-vous d’utiliser le même point d’accès pour connecter le lecteur et le serveur.
– Selon le serveur DLNA utilisé, il est possible que vous deviez autoriser l’utilisation de
ce lecteur à partir du serveur.
– Selon le serveur DLNA utilisé, il peut être nécessaire de modifier un des paramètres du
pare-feu.
– Assurez-vous que le format du fichier est reconnu. (p. 3)
– Vérifiez le paramètre de configuration de votre serveur DLNA.
– Les conditions de fonctionnement de votre réseau domestique peuvent avoir une
incidence sur le mode d’exécution et la qualité de lecture du fichier.
– Assurez-vous que le routeur du LAN sans fil est sous tension.
– En fonction de l’environnement immédiat, tel que le matériau dont les murs sont
constitués, les conditions de réception des ondes radio, ou les obstacles existant entre le
lecteur et le routeur LAN sans fil, la distance de communication peut être réduite.
Rapprochez le lecteur et le routeur LAN sans fil l’un de l’autre.
– Les appareils utilisant une bande de fréquence de 2,4 GHz, tels qu’un four à microondes, un appareil numérique sans fil ou Bluetooth, sont susceptibles d’interrompre la
communication. Éloignez le lecteur de ces appareils ou mettez-les hors tension.
– Si la connexion Internet utilisant un LAN sans fil ne peut toujours pas être rétablie en
appliquant les deux solutions ci-dessus, essayer d’utiliser Ethernet en sélectionnant
Wired dans Configuration de Connexion. (p. 32)
– Si la fonction Scan est exécutée mais que le réseau sans fil n’est pas détecté ou est
perturbé, appuyez sur RETURN pour revenir à l’écran précédent, et essayez de relancer
la fonction Scan à nouveau. Si le routeur sans fil recherché n’est toujours pas détecté,
appuyez sur RETURN pour sélectionner la fonction Manuel.
– Assurez-vous que le réseau sans fil n’est pas perturbé par un four à micro-ondes, un
téléphone DECT ou tout autre appareil Wi-Fi présent dans l’environnement immédiat.
– Les fours à micro-ondes, les téléphones DECT ou les autres appareils sans fil présent
dans votre environnement immédiat sont susceptibles de perturber le réseau sans fil.
Mettez ces appareils hors tension.
– Assurez-vous que les pare-feux de votre réseau permettent d’accéder à la connexion
sans fil de ce lecteur.
– Si le réseau sans fil ne fonctionne pas correctement chez vous, essayez d’utiliser la
connexion réseau filaire.
Glossaire
Adresse Mac
L’adresse Mac est une valeur unique attribuée à un
périphérique réseau à des fins d’identification.
AVCHD
AVCHD désigne un nouveau format (norme) pour les
caméras vidéo haute définition qui permet d’enregistrer
et de lire des images HD de haute résolution.
BD-Live™
BD-Live est une norme Blu-ray Disc utilisant une
connexion réseau, permettant à ce lecteur de se mettre
en ligne pour télécharger des vidéos promotionnelles
ainsi que d’autres données.
BDMV
BDMV (abréviation de Blu-ray Disc Movie) fait
référence à un des formats d’application utilisés pour les
BD-ROM, lequel correspond à une des spécifications
des disques Blu-ray. BDMV est un format
d’enregistrement équivalent au DVD vidéo de la
spécification DVD.
Blu-ray 3D™
Le format Blu-ray 3D permet de bénéficier d’images 3D
en haute définition (Full HD).
Boîte à lettre (LB 4:3)
Format d’écran avec des bandes noires en haut et en bas
de l’image permettant de regarder un contenu grand
écran (16:9) sur un téléviseur 4:3 raccordé.
BONUSVIEW™
Les disques compatibles BONUSVIEW permettent de
bénéficier simultanément d’un sous-canal vidéo pour un
système à deux écrans, d’un sous-canal audio et de soustitres. Un petit écran apparaît en incrustation (image
dans l’image) à l’intérieur de l’écran principal pendant
la lecture.
Deep Color
Deep Color fait référence aux différentes profondeurs de
couleurs utilisées pour l’affichage, limitées à 24 bits
dans les versions précédentes de la norme HDMI.
L’augmentation de la profondeur de couleurs permet
aux appareils haute définition (HDTV) et autres
systèmes d’affichage de simuler non plus des millions
de couleurs, mais des milliards de couleurs et d’éliminer
ainsi le phénomène de stries (color banding). Vous
obtenez ainsi des dégradés plus subtils et des transitions
encore plus douces entre les couleurs. Le taux de
contraste plus élevé permet, en outre, de représenter un
plus grand nombre de nuances de gris entre le noir et le
blanc. La technologie Deep Color a également pour
effet d’augmenter le nombre de couleurs disponibles
dans le cadre de l’espace colorimétrique RGB ou
YCbCr.
DLNA
DLNA (Digital Living Network Alliance) permet de
partager facilement des données multimédia numériques
par l’intermédiaire d’un réseau domestique. Vous
pouvez, en outre, diffuser sur votre téléviseur le contenu
numérique provenant d’un ordinateur (sur lequel vous
avez installé le logiciel serveur DLNA) ou de tout autre
appareil compatible DLNA via ce lecteur. Pour relier ce
lecteur à votre serveur DLNA, il est nécessaire
d’effectuer certains réglages au niveau du serveur
DLNA ou de l’appareil utilisé. Pour en savoir plus,
reportez-vous à la documentation de votre logiciel
serveur DLNA ou de l’appareil DLNA.
DivX®
DivX® est un format vidéo numérique crée par DivX,
LLC, une filiale de Rovi Corporation. Ce lecteur est un
appareil DivX Certified® original qui permet de lire de
la vidéo DivX. Visitez le site www.divix.com pour
obtenir des informations supplémentaires et des
utilitaires de conversion vous permettant de convertir
vos fichiers au format vidéo DivX.
Dolby Digital
Un système sonore développé par Dolby Laboratories
Inc. recréant l’ambiance d’une salle de cinéma sur la
sortie audio lorsque l’appareil est raccordé à un
processeur ou à un amplificateur Dolby Digital.
Dolby Digital Plus
Un système sonore développé comme extension du
Dolby Digital. Cette technologie de codage audio prend
en charge le son surround 7.1 multicanaux.
Dolby TrueHD
Le Dolby TrueHD consiste en une technologie de
codage sans perte prenant en charge jusqu’à 8 canaux de
son surround multicanaux pour les disques optiques de
dernière génération. Le son restitué est fidèle à la source
d’origine bit par bit.
DRC (Dynamic Range Compression)
La fonction DRC permet d’ajuster la plage entre les
niveaux sonores minimal et maximal (plage dynamique)
pour une lecture à volume moyen. Elle est très pratique
pour écouter plus distinctement un dialogue ou pour
éviter de déranger les voisins.
DTS
Il s’agit d’un système sonore numérique mis au point
par DTS, Inc. et utilisé dans les cinémas.
DTS-HD High Resolution Audio
DTS-HD High Resolution Audio est une nouvelle
technologie mise au point pour le format de disque
optique haute définition de la dernière génération.
DTS-HD Master Audio
DTS-HD Master Audio est une technologie de
compression audio sans perte, mise au point pour le
format de disque optique haute définition de la dernière
génération.
42 Fr
Glossaire
Espace de couleur
Sous-titres
Le terme Espace de couleur désigne la gamme des
couleurs pouvant être représentée. RGB est un espace
colorimétrique basé sur le modèle de couleur RGB (soit
RVB, rouge, vert et bleu) et destiné essentiellement aux
écrans d’ordinateurs. YCbCr est un espace
colorimétrique basé sur un signal de luminance (Y) et
sur deux signaux de différenciation des couleurs (Cb et
Cr).
FLAC
FLAC (Free Lossless Audio Codec) est un format de
fichier libre permettant la compression de données audio
sans perte. Bien que son taux de compression soit
inférieur à ceux d’autres format de compression audio à
perte, il fournit souvent un qualité audio supérieure.
HDMI
Pan Scan (PS 4:3)
Format d’écran ayant pour effet de couper les côtés de
l’image pour regarder les contenus grand écran (16:9)
sur un téléviseur 4:3 raccordé.
Son PCM linéaire
Le PCM linéaire est un format d’enregistrement des
signaux utilisé pour les CD audio et certains disques
DVD et Blu-ray. Le son sur un CD audio est enregistré à
une fréquence d’échantillonnage de 44,1 kHz sur 16
bits. (alors qu’il est enregistré entre 48 kHz sur 16 bits et
96 kHz sur 24 bits sur des disques DVD et entre 48 kHz
sur 16 bits et 192 kHz sur 24 bits sur des disques
Blu-ray).
Sous-titres pour malentendants
Les sous-titres pour malentendants sont une sorte de
sous-titres, la différence est dans le fait que les soustitres sont destinés aux personnes entendantes et les
sous-titres pour malentendants aux personnes
malentendantes. Les sous-titres reflètent rarement tous
les sons.
Par exemple, les sous-titres pour malentendants
indiquent les effets sonores (sonnerie de téléphone,
bruits de pas, ...), alors que cela n’est pas le cas dans les
sous-titres ordinaires. Avant d’activer ce paramètre,
assurez-vous que le disque contient effectivement des
informations relatives aux sous-titres pour
malentendants.
Synchronisation audio/vidéo
Synchronisation audio/vidéo, une abréviation de la
synchronisation audio/vidéo, un terme technique
indiquant la capacité à maintenir la synchronisation des
signaux audio et vidéo au cours de la postproduction et
de l’émission. Alors que le réglage du décalage audio/
vidéo nécessite des opérations complexes de la part de
l’utilisateur, l’interface HDMI comporte une fonction de
synchronisation audio/vidéo automatique. L’appareil
effectue donc ce réglage automatiquement et
précisément, sans aucune interaction de l’utilisateur.
x.v.Color
x.v.Color reproduit une plus grande plage de couleurs
qu’auparavant en affichant pratiquement toutes les
couleurs que l’œil humain peut détecter.
Français
Caractéristiques techniques
■ Généralités
Alimentation
[Modèles pour les États-Unis et le Canada]............CA 110-240 V, 60 Hz
[Modèles pour l’Amérique centrale et du Sud]
........................................................................... CA 110-240 V, 50/60 Hz
[Modèle pour l’Australie] .......................................CA 110-240 V, 50 Hz
[Modèles pour le R.-U., l’Europe et la Russie].......CA 110-240 V, 50 Hz
[Modèle pour la Chine] ...........................................CA 110-240 V, 50 Hz
[Modèle pour l’Asie]......................................... CA 110-240 V, 50/60 Hz
Consommation électrique (normale) .................................................... 20 W
Consommation électrique (veille) ....................................... 0,5 W ou moins
Dimensions (L × H × P, éléments saillants inclus) ...... 435 × 86 × 257 mm
Poids .................................................................................................... 2,8 kg
■ Performances audio
Niveau de sortie audio (1 kHz, 0 dB)
Blu-ray Disc/DVD/CD-DA.........................................................2 ± 0,3 V
Rapport signal/bruit
Blu-ray Disc/DVD/CD-DA............................................................ 110 dB
Gamme dynamique
Blu-ray Disc/DVD ......................................................................... 105 dB
CD-DA ........................................................................................... 100 dB
Distorsion harmonique (1 KHz)
Blu-ray Disc/DVD/CD-DA............................................................0,003%
5
Informations complémentaires
HDMI (High-Definition Multimedia Interface) est une
interface multimédia haute définition prenant en charge
les signaux vidéo et audio sur une seule connexion
numérique. La connexion HDMI assure le transport des
signaux vidéo standard haute définition et des signaux
audio multicanaux vers des appareils audiovisuels,
comme des téléviseurs équipés HDMI, sous une forme
numérique sans dégradation.
Il s’agit des lignes de texte apparaissant au bas de
l’écran traduisant ou transcrivant les dialogues. Ils sont
enregistrés sur de nombreux disques DVD et Blu-ray.
Réponse en fréquence
Blu-ray Disc/DVD
.............................. 4 Hz à 22 kHz (48 kHz, fréquence d’échantillonnage)
4 Hz à 44 kHz (96 kHz, fréquence d’échantillonnage)
CD-DA ................................................................................ 4 Hz à 20 kHz
■ Entrée/Sortie
Sortie HDMI......................................................... Connecteur de type A × 1
480i/576i/480p/576p/720p/1080i/1080p/1080p@24Hz,
Prise en charge de Deep Color, x.v. Color
Sortie vidéo composante .............................................Y : 1 Vp-p (75 ohms)
PB, PR : 0,7 Vp-p (75 ohms)
Sortie vidéo .......................................................................1 Vp-p (75 ohms)
Sortie numérique ..................................................Optique × 1, Coaxiale × 1
Sortie audio analogique.............................................Mixée en 2 canaux × 1
USB ...................................................................... Connecteur de type A × 2
LAN Sans fil...................................................... Norme : IEEE 802.11 b/g/n
Gamme de fréquence : bande 2,4 GHz
Autre connecteur ......................................................... Remote IN/OUT × 1,
Ethernet × 1
Les caractéristiques techniques sont susceptibles d’être modifiées sans
préavis.
43 Fr
Caractéristiques techniques
■ Droits d’auteur
– Le support audio-visuel peut être composé d’œuvres
soumises à des droits d’auteur qui ne peuvent être
enregistrées sans l’autorisation du détenteur du droit
d’auteur. Consultez les lois applicables dans votre
pays.
– Cet appareil incorpore une technologie de protection
des droits d’auteur protégée par des brevets
américains et autres droits de propriété intellectuelle
de Rovi Corporation. La rétroingénierie et le
désossage de cette technologie sont interdits.
– Fabriqué sous licence de Dolby Laboratories. Dolby
et le symbole double D sont des marques
commerciales de Dolby Laboratories.
– Fabriqué sous licence sous les numéros de brevets
américains : 5956674 ; 5974380 ; 6226616 ;
6487535 ; 7212872 ; 7333929 ; 7392195 ; 7272567
et autres brevets américains et mondiaux délivrés et
en instance. DTS-HD, le symbole, DTS-HD et le
symbole associé sont des marques déposées et DTSHD Master Audio est une marque commerciale de
DTS, Inc. Le produit inclut le logiciel. © DTS, Inc.
Tous droits réservés.
– « Blu-ray Disc™ », « Blu-ray™ », « Blu-ray
3D™ », « BD-Live™ », « BONUSVIEW™ » et les
logos sont des marques commerciales de la Blu-ray
Disc Association.
–
est une marque de DVD Format/Logo
Licensing Corporation.
– « HDMI », le logo « HDMI » et « High-Definition
Multimedia Interface » sont des marques
commerciales ou des marques déposées de HDMI
Licensing LLC.
– « x.v.Color » et le logo « x.v.Color » sont des
marques commerciales de Sony Corporation.
– « AVCHD » et le logo « AVCHD » sont des
marques commerciales de Panasonic Corporation et
de Sony Corporation.
– Java ainsi que toutes les marques et logos basés sur
Java sont des marques commerciales ou déposées de
Sun Microsystems, Inc. aux États-Unis et/ou dans
d’autres pays.
– Ce produit est utilisé sous licence en vertu de la
licence des portefeuilles de brevets AVC et VC-1
pour l’utilisation à des fins personnelles et non
commerciales qui accorde le droit au consommateur
de (i) coder de la vidéo conformément aux normes
AVC et VC-1 (« vidéo AVC/VC-1 ») et/ou (ii)
décoder de la vidéo AVC/VC-1 codée par un
consommateur à des fins personnelles et non
commerciales et/ou obtenue d’un fournisseur
autorisé à fournir de la vidéo AVC/VC-1. Aucune
licence n’est accordée ou ne sera considérée comme
allouée pour toute autre utilisation. De plus amples
informations sont disponibles auprès de MPEG LA,
LLC.
Visitez http://www.mpegla.com.
– Windows Media Player est une marque déposée ou
une marque commerciale de Microsoft corporation
aux États-Unis et/ou dans d’autres pays.
– YouTube et le logo YouTube, Picasa et le logo
Picasa sont des marques commerciales de Google.
Inc.
44 Fr
– Netflix et le logo Netflix sont des marques déposées
de Netflix, Inc.
– DLNA et DLNA CERTIFIED sont des marques de
commerce et/ou des marques de service de Digital
Living Network Alliance.
– Copyright 2004-2010 Verance Corporation.
Cinavia™ est une marque commerciale de Verance
Corporation protégée par le brevet américain numéro
7369677 et par d’autres brevets mondiaux délivrés et
en attente sous licence de Verance Corporation.
Tous droits réservés.
– Le logo Wi-Fi CERTIFIED est une marque de
certification de Wi-Fi Alliance.
– DivX®, DivX Certified®, DivX Plus® HD et les
logos associés sont des marques déposées de Rovi
Corporation ou de ses filiales et sont concédées sous
licence.
– DivX Certified® pour lire des vidéos HD DivX® et
DivX Plus® HD (H.264/.MKV) jusqu’à 1080p
incluant du contenu supplémentaire.
A PROPOS DE LA VIDEO DivX : DivX® est un
format vidéo numérique crée par DivX, LLC, une filiale
de Rovi Corporation. Ce lecteur est un appareil DivX
Certified® original qui permet de lire de la vidéo DivX.
Visitez le site www.divix.com pour obtenir des
informations supplémentaires et des utilitaires de
conversion vous permettant de convertir vos fichiers au
format vidéo DivX.
A PROPOS DE LA VIDÉO A LA DEMANDE DivX :
Cet appareil DivX Certified® doit être enregistré pour
pouvoir lire du contenu DivX Video-on-Demand
(VOD). Pour générer le code d’enregistrement, repérez
la section DivX VOD dans le menu de configuration
(SETUP) de l’appareil. Visitez le site www.divix.com
pour savoir comment effectuer l’enregistrement.
INFORMATIONS COMPLÉMENTAIRES
Index
■
Numéros
2ND AUDIO, télécommande ................6
3D Message de la Réécoute, menu
SETUP .............................................31
■
A
■
B
BD-Live ...............................................27
Bitrate, menu à l’écran .........................24
■
C
■
D
Dernière Mémoire, menu SETUP ........32
Désentrelacement vidéo, menu
SETUP .............................................35
Deuxième Audio, menu à l’écran ........24
Deuxième Marque Audio, menu
SETUP .............................................32
Deuxième Vidéo, menu à l’écran ........24
Diaporama, menu à l’écran ..................24
DIGEST, télécommande ........................7
DivX(R) VOD DRM, menu SETUP ...32
DLNA, menu SETUP ..........................33
Données disques, lecture ......................18
DRC, menu SETUP .............................35
■
E
Echantillonnage Inférieur, menu
SETUP .............................................35
Économiseur d’écran, menu SETUP ...31
Ecran TV, menu SETUP ......................33
ENTER, télécommande .........................8
Espace de couleur, menu SETUP ........34
F
Fonction incrustation ............................27
■
H
HDMI 1080p 24Hz, menu SETUP ......34
HDMI Deep Color, menu SETUP .......34
HDMI, menu SETUP ...........................35
Heure, menu à l’écran ..........................24
HOME, menu .......................................18
HOME, télécommande ...........................6
■
I
Information Netflix, menu SETUP ......32
Information, menu SETUP ...................33
Insérer les paramètres par défaut, menu
SETUP .............................................31
Installation facile ..................................18
Installation Facile, menu SETUP .........31
■
L
Langue, menu SETUP ..........................31
le style de Sous-titres, menu à
l’écran ..............................................24
Lecture automatique du disque, menu
SETUP .............................................31
■
M
MARKER, télécommande .....................6
Marque Angle, menu SETUP ..............32
Marque PIP, menu SETUP ..................32
MEDIA, menu ......................................18
Menu à l’écran ......................................24
Menu, menu SETUP ............................31
Mettre à niveau, menu SETUP .............31
Mise à niveau du logiciel .....................38
Mise à niveau logicielle .......................38
Mixage en 2 canaux stéréo, menu
SETUP .............................................35
Mode/Modèle de lecture, menu à
l’écran ..............................................24
Modification du mot de passe, menu
SETUP .............................................32
■
N
Netflix ..................................................23
NSE (Numéro de série électronique) ...32
Numérique, touches de
télécommande ....................................6
■
O
■
R
Raccordement audio ............................ 14
Raccordement réseau ........................... 16
Raccordement USB ............................. 16
Raccordement vidéo ............................ 13
Raccordements HDMI ......................... 12
Recherche instantanée, menu à
l’écran .............................................. 24
Recherche, fonction ............................. 26
Réduction de bruit, menu SETUP ....... 35
Réglages généraux, menu SETUP ....... 31
Relecture instantanée, menu à
l’écran .............................................. 24
REPEAT, télécommande ....................... 7
Réseau, menu SETUP ......................... 32
RETURN, télécommande ...................... 8
■
S
SEARCH, télécommande ...................... 7
Securité, menu SETUP ........................ 32
Sélectionnez la sortie vidéo, menu
SETUP ............................................. 34
SETUP, menu ...................................... 28
SETUP, télécommande .......................... 6
SETUP, utilisation du menu ................ 30
SHUFFLE, télécommande .................... 7
Signet ................................................... 26
Sortie 3D, menu SETUP ...................... 33
Sortie audio, menu SETUP .................. 35
Sous-titres pour malentendants, menu
SETUP ............................................. 32
Sous-titres, menu à l’écran .................. 24
Sous-titres, menu SETUP .................... 32
STATUS, télécommande ....................... 6
SUBTITLE, télécommande ................... 7
Synchronisation audio/vidéo, menu
SETUP ............................................. 34
Système d’information, menu
SETUP ............................................. 35
Système TV, menu SETUP ................. 34
Système, menu SETUP ....................... 31
■
T
Télécommande ...................................... 6
Test de connexion, menu SETUP ........ 33
Titre, menu à l’écran ............................ 24
TOP MENU, télécommande ................. 8
Transitions, menu à l’écran ................. 24
TV, menu SETUP ................................ 33
■
U
ON SCREEN, télécommande ................8
UpMix, menu SETUP ......................... 35
USB contenu, lecture ........................... 18
■
■
P
Paramètres audio, menu SETUP ..........35
Paramètres Proxy, menu SETUP .........33
Paramètres vidéo, menu SETUP ..........33
Pilotage réseau, menu SETUP .............31
PIP, télécommande .................................6
Plage/fichier, menu à l’écran ................24
Playback, menu SETUP .......................32
POP UP/MENU, télécommande ............8
Post process, menu SETUP ..................35
Processus Vidéo, menu SETUP ...........34
PROGRAM, télécommande ...................6
V
Video Mode, menu SETUP ................. 34
Vidéo, formats de sortie ...................... 37
■
W
Wizard Initial ....................................... 18
■
Y
YouTube, lecture ................................. 21
■
Z
ZOOM, télécommande .......................... 7
45 Fr
5
Français
Chapitre, menu à l’écran ......................24
CLEAR, télécommande .........................6
Coaxial / Optique, menu SETUP .........35
Code page, menu à l’écran ...................24
Code pays, menu SETUP .....................32
Configuration de Connexion, menu
SETUP .............................................32
Configuration Haut-Parleur, menu
SETUP .............................................35
Configuration IP, menu SETUP ..........33
Configuration requise pour la lecture des
fichiers audio. ....................................3
Connection BD-Live, menu SETUP ....33
Connection Internet, menu SETUP .....32
Contrôle HDMI, fonction ....................31
Contrôle HDMI, menu SETUP ............31
Controle Parental, menu SETUP .........32
Contrôle, touches de télécommande ......8
Couleur, touches de télécommande .......7
Curseur, touches de télécommande .......8
■
Programmation de l’ordre de lecture ... 26
Informations complémentaires
A/B, télécommande ...............................7
Affichage à l’écran, menu SETUP ......31
Ajustement de la couleur, menu
SETUP .............................................35
Angle, menu à l’écran ..........................24
ANGLE, télécommande .........................7
Audio, formats de sortie .......................36
Audio, menu à l’écran ..........................24
Audio, menu SETUP ...........................32
AUDIO, télécommande .........................7
Autres raccordements ..........................17
Espace de stockage externe, menu
SETUP .............................................31
État, menu ............................................25
Vorsicht: Vor der Bedienung dieses Geräts durchlesen.
1
2
3
4
5
Um optimales Leistungsvermögen sicherzustellen, lesen Sie
bitte die Anleitung aufmerksam durch. Bewahren Sie die
Anleitung danach für spätere Nachschlagzwecke sorgfältig
auf.
Installieren Sie dieses Gerät an einem gut belüfteten,
trockenen, sauberen Ort - entfernt von direktem Sonnenlicht,
Wärmequellen, Erschütterungen, Staub, Feuchtigkeit und
Kälte. Für eine sachgemäße Belüftung sollten folgende
Mindestabstände gewährleistet sein.
Oben: 10 cm
Hinten: 10 cm
Seiten: 10 cm
Stellen Sie dieses Gerät entfernt von anderen elektrischen
Haushaltgeräten, Motoren oder Transformatoren auf, um
Brummgeräusche zu vermeiden.
Setzen Sie dieses Gerät keinen plötzlichen
Temperaturänderungen von kalt auf warm aus, und stellen
Sie dieses Gerät nicht an Orten mit hoher Luftfeuchtigkeit auf
(z.B. in Räumen mit Luftbefeuchtern), um Kondensation im
Inneren des Gerätes zu vermeiden, da es anderenfalls zu
elektrischen Schlägen, Feuer, Beschädigung dieses Gerätes
und/oder zu persönlichen Verletzungen kommen kann.
Vermeiden Sie die Aufstellung dieses Gerätes an Orten, an
welchen Fremdkörper in das Gerät fallen können bzw. an
welchen Flüssigkeiten auf das Gerät verschüttet werden
können. Stellen Sie auf der Oberseite des Gerätes niemals
Folgendes auf:
– Andere Komponenten, da diese Beschädigung und/
oder Verfärbung der Oberfläche dieses Gerätes
verursachen können.
– Brennende Objekte (z.B. Kerzen), da diese Feuer,
Beschädigung des Gerätes und/oder persönliche
Verletzungen verursachen können.
– Mit Flüssigkeiten gefüllte Behälter, da diese umfallen
und die Flüssigkeit auf das Gerät verschütten können,
wodurch es zu elektrischen Schlägen für den
Anwender und/oder zu Beschädigung des Gerätes
kommen kann.
6
7
8
9
10
11
12
13
14
Decken Sie dieses Gerät niemals mit Zeitungen, Tischdecken,
Vorhängen usw. ab, damit die Wärmeabfuhr nicht behindert
wird. Falls die Temperatur im Inneren des Gerätes ansteigt,
kann es zu Feuer, Beschädigung des Gerätes und/oder zu
persönlichen Verletzungen kommen.
Schließen Sie dieses Gerät erst an eine Wandsteckdose an,
nachdem alle anderen Anschlüsse ausgeführt wurden.
Stellen Sie dieses Gerät niemals mit der Unterseite nach oben
auf, da es sonst beim Betrieb zu Überhitzung mit möglichen
Beschädigungen kommen kann.
Wenden Sie niemals Gewalt bei der Bedienung der Schalter,
Knöpfe und/oder Kabel an.
Wenn Sie das Netzkabel von der Wandsteckdose abtrennen,
fassen Sie immer den Netzstecker an; ziehen Sie niemals an
dem Kabel.
Reinigen Sie dieses Gerät niemals mit chemisch behandelten
Tüchern; anderenfalls kann das Finish beschädigt werden.
Verwenden Sie ein reines, trockenes Tuch.
Verwenden Sie nur die für dieses Gerät vorgeschriebene
Netzspannung. Falls Sie eine höhere als die vorgeschriebene
Netzspannung verwenden, kann es zu Feuer, Beschädigung
dieses Gerätes und/oder zu persönlichen Verletzungen
kommen. Yamaha kann nicht verantwortlich gemacht werden
für Schäden, die auf die Verwendung dieses Gerätes mit einer
anderen als der vorgeschriebenen Spannung zurückzuführen
sind.
Um Beschädigungen durch Blitzschlag zu vermeiden, ziehen
Sie den Netzstecker von der Netzdose ab, wenn es ein
Gewitter gibt.
Versuchen Sie niemals ein Modifizieren oder Ändern dieses
Gerätes. Falls eine Wartung erforderlich ist, wenden Sie sich
bitte an einen Yamaha-Kundendienst. Das Gehäuse sollte
niemals selbst geöffnet werden.
Vorsicht-i De
15 Falls Sie das Gerät für längere Zeit nicht verwenden (z.B.
während der Ferien), ziehen Sie den Netzstecker von der
Netzdose ab.
16 Lesen Sie unbedingt den Abschnitt „Fehlersuche“ durch, um
übliche Bedienungsfehler zu berichtigen, bevor Sie auf eine
Störung des Gerätes schließen.
17 Bevor Sie dieses Gerät an einen anderen Ort transportieren,
drücken Sie die Netztaste p, um das Gerät auf den
Bereitschaftsmodus zu schalten, und ziehen Sie danach den
Netzstecker von der Netzdose ab.
18 Es kommt zu Kondensatbildung, wenn die
Umgebungstemperatur plötzlich ändert. Ziehen Sie den
Netzstecker von der Netzdose ab, und lassen Sie das Gerät
ruhen.
19 Falls Sie das Gerät für längere Zeit in Betrieb halten, kann
sich das Gerät erwärmen. Schalten Sie die Stromversorgung
aus, und lassen Sie danach das Gerät abkühlen.
20 Stellen Sie dieses Gerät in die Nähe der Steckdose und so auf,
dass der Netzstecker gut zugänglich ist.
21 Die Batterien dürfen nicht starker Hitze wie direktem
Sonnenschein, Feuer o.ä. ausgesetzt werden.
Verwenden Sie dieses Gerät nicht weniger als 22 cm
entfernt von Personen mit einem Herzschrittmacher
oder einem implantierten Defibrillator.
Dieses Gerät ist nicht vom Netz abgetrennt, so lange der
Netzstecker an eine Netzdose angeschlossen ist, auch
wenn das Gerät selbst ausgeschaltet wurde mit p.
Dieser Status wird als Bereitschaftsmodus bezeichnet.
Auch in diesem Status weist das Gerät einen geringen
Stromverbrauch auf.
WARNUNG
UM DIE GEFAHR EINES FEUERS ODER EINES
ELEKTROSCHOCKS ZU VERMEIDEN, DARF DAS
GERÄT WEDER REGEN NOCH FEUCHTIGKEIT
AUSGESETZT WERDEN.
Die Laser-Komponente in diesem Produkt kann eine
Strahlung abgeben, die den Grenzwert der Klasse 1
übersteigt.
LASER-Spezifikation:
LASER-Produkt der Klasse 1
Wellenlänge: 790 nm (CD)/658 nm (DVD)/405 nm (BD)
Laser-Ausgang: max. 1 mW
VORSICHT MIT DEM LASER
Dieses Gerät enthält einen Laser. Um unnötige
Augenverletzungen zu vermeiden, sollten Sie alle
Wartungs- und Reparaturarbeiten einem qualifiziertem
Wartungstechniker überlassen.
GEFAHR
Sichtbare Laserstrahlen bei geöffneter Abdeckung.
Achten Sie darauf, nicht direkt in den Laserstrahl zu
blicken. Wenn dieses Gerät an eine Netzdose
angeschlossen ist, blicken Sie niemals in die Öffnung der
Disc-Schublade oder in andere Öffnungen.
Inhalt
1. Einleitung
1
4. Einstellungen
Verwendungszweck des Players ...................... 2
Lieferumfang ...................................................... 2
Info zu Discs und Dateien ................................. 3
Mit diesem Player kompatible Discs/Dateien ................
Disc einlegen ..................................................................
Vorsichtsmaßnahmen für Disks......................................
Hinweise zum Betrachten von 3D-Videobildern............
Cinavia-Technologie ......................................................
3
4
4
4
4
Bedienungselemente und deren
Funktionen ...................................................... 5
Vorderseite...................................................................... 5
Fernbedienung ................................................................ 6
SETUP-Menü ..................................................... 28
Beispiel für die Bedienung des SETUP-Menüs............ 30
Allgemeine Einstellungen ............................................. 31
Anzeige Einstellung ...................................................... 33
Audio-Einstellungen ..................................................... 35
Systeminformation ........................................................ 35
Übersicht der Audioausgangsformate ........................... 36
Übersicht der Videoausgangsformate ........................... 37
Software-Upgrade............................................. 38
Einführung zu den Anschlüssen .................... 10
Rückseite ...................................................................... 10
HDMI-Anschluss............................................... 12
Anschluss an den HDMI-Anschluss............................. 12
Anschluss zur Wiedergabe von Blu-ray 3D-Discs ....... 12
Video-Anschlüsse ............................................ 13
Anschluss an die Component-/Video-Buchse .............. 13
Audio-Anschlüsse............................................ 14
Anschluss an die digitale Audiobuchse ........................ 14
Anschluss an die Audiobuchsen ................................... 15
Netzwerk- und USB-Anschluss....................... 16
Anschluss an den NETWORK-Anschluss ................... 16
Anschluss an den USB-Anschluss................................ 16
Weitere Anschlüsse ......................................... 17
Anschluss an die REMOTE CONTROL-Buchsen....... 17
Netzkabel anschließen .................................................. 17
3
4
Aktualisierung der Software ......................................... 38
5. Zusätzliche Informationen
Fehlersuche ...................................................... 39
2. Anschlüsse
2
5
Strom............................................................................. 39
Grundlegende Bedienung.............................................. 39
Disc-Wiedergabe........................................................... 39
Bild................................................................................ 40
Ton ................................................................................ 40
Netzwerk ....................................................................... 40
Meldungen auf dem Bildschirm.................................... 41
Glossar .............................................................. 42
Technische Daten............................................. 43
Allgemeines .................................................................. 43
Audioleistung ................................................................ 43
Eingänge/Ausgänge ...................................................... 43
Urheberrecht.................................................................. 44
Index .................................................................. 45
(am Ende dieser Anleitung)
Information about software ....................................i
3. Wiedergabe
Konfigurationshilfe/Einfaches
Konfigurationsmenü .................................... 18
Einstellungen über Konfigurationshilfe/Einfaches
Konfigurationsmenü................................................. 18
HOME/MEDIA-Menü ......................................... 18
Wiedergabe von Foto/Musik/Video ............................. 18
Verwenden von Netzwerkinhalten ............................... 20
21
21
22
23
Starten von Netflix........................................................ 23
Erweiterte Wiedergabebedienung .................. 24
Bildschirmmenü............................................................
Status-Menü..................................................................
Verwenden von Lesezeichen ........................................
Programmwiedergabe...................................................
Verwenden der Suche ..................................................
Spaß mit BONUSVIEW™ und BD-Live™.................
Verwenden der Bild-in-Bild-Funktion (Zweitbild/
Zweitton-Wiedergabe) .............................................
Verwenden der BD-Live™-Funktion...........................
24
25
26
26
26
27
27
27
– Dieses Handbuch beschreibt die Bedienung des
Players über die Fernbedienung, sofern eine
vorhanden ist. Einige dieser Funktionen sind auch
über die Tasten auf der Vorderseite aufrufbar.
– Hinweise enthalten wichtige Informationen über die
Sicherheit und die Bedienung. Über Tipp(s) erhalten
Sie einen Tipp zur Bedienung.
– Dieses Handbuch wird vor der Herstellung gedruckt.
Gestaltung und technische Daten des Produkts
können sich aufgrund von Produktverbesserungen
usw. unterscheiden. Sollten Unterschiede zwischen
den in diesem Handbuch enthaltenen Informationen
und dem Produkt bestehen, hat das Produkt Priorität.
In diesem Handbuch verwendete
Symbole
Es werden die folgenden Symbole verwendet, um die
verfügbaren Tasten/Funktionen für ein bestimmtes Format
anzudeuten. Einzelheiten zu den abspielbaren Discs und
Formaten finden Sie unter Seite 3.
BD : BD-Video
DVD : DVD-Video, DVD-VR, DVD+VR
CD : Audio-CD
VIDEO : Videodateien
MUSIC : Audiodateien
PHOTO : Fotodateien
1 De
Deutsch
Verwenden von Netzwerkdiensten .................
Videos von YouTube™ abspielen...................
Wiedergabe von Fotos von
Picasa™-Webalbum .....................................
Wiedergabe von Videos von Netflix™............
■ Über dieses Handbuch
EINLEITUNG
Verwendungszweck des Players
Leichte Einstellung von Sprache, Auflösung, Bildseitenverhältnis
\
S. 18
\
S. 24
\
S. 27
\
S. 18
\
S. 20
\
S. 31
\
S. 21
Sie können die Sprach- und Fernsehereinstellungen vornehmen.
Wiedergabe im Handel erhältlicher Blu-ray Disc™/Blu-ray 3D™/
DVD/CD-Discs*
Zusätzlich zu Blu-ray-Discs unterstützt dieser Player die Wiedergabe vieler weiterer Discs.
Wiedergabe von BONUSVIEW™, BD-Live™ usw.*
Genießen Sie zusätzliche Filme auf den neuesten Blu-ray-Discs.
Wiedergabe von Video, Musik, Fotos von einer Disc/einem
USB-Speichergerät*
Mit diesem Player können Dateien, die auf Discs/USB-Speichergeräten gespeichert sind,
wiedergegeben werden.
Wiedergabe von Video, Musik, Fotos von einem
Heimnetzwerkserver* **
Wird der Player an einen Netzwerkserver angeschlossen, können Computerinhalte mittels
TV- oder AV-Receiver wiedergegeben werden.
Bedienung über Fernbedienung von TV, AV-Receiver, usw.
Beim Anschluss von Geräten mittels HDMI-Kabel können Sie die Geräte über die Funktion
HDMI Steuerung mit einer einzigen Fernbedienung bedienen.
Streaming-Wiedergabe von Netzwerkdienstinhalten**
Sie können mit diesem Player direkt Videos im Internet betrachten.
* Einzelheiten zu den abspielbaren Discs und Formaten finden Sie auf Seite 3.
** Für die Verwendung dieser Funktion ist die Netzwerkeinstellung notwendig.
Lieferumfang
Bitte vergewissern Sie sich, dass dem Gerät das folgende Zubehör beiliegt.
Fernbedienung
2 De
Batterien (×2)
(AAA, R03, UM-4)
Audio-/Video-Kabel
Netzkabel
1
Info zu Discs und Dateien
– Mit diesem Player können 12-cm- und 8-cm-Discs
wiedergegeben werden. Verwenden Sie keinen
8-cm-auf-12-cm-Adapter.
– Verwenden Sie Discs, die mit den nachstehend
angegebenen Normen kompatibel sind, was durch
die Kennzeichnung mit den offiziellen Logos auf der
Disc angegeben ist. Die Wiedergabe von Discs, die
nicht diesen Normen entsprechen, kann nicht
garantiert werden. Darüber hinaus kann keine
einwandfreie Bild- oder Tonqualität garantiert
werden, selbst wenn die Discs abspielbar sind.
Medientyp
BD-ROM/BD-R/
BD-RE
Regionalcode „A“ oder „ABC“
DVD-Video
DVD-Video/DVD-VR/AVCHD/
Datendateien
DVD+R/DVD+R
DL/DVD+RW
DVD-Video/DVD+VR/AVCHD/
Datendateien
CD-ROM
CDDA/HDCD
CD-R/CD-RW
CDDA/Datendateien
USB*
Datendateien
DLNA
Datendateien
Abspielbare
Abspielbare
Abspielbare
Audiodateiformate Videodateiformate Fotodateiformate
VIDEO
DVD-Video
Regionalcode „1“ oder „ALL“
1
ALL
Hinweise
* Dieser Player ist mit einem USB-Speichergerät
kompatibel, das als FAT 16/32 oder NTFS formatiert
ist.
PHOTO
JPEG (.jpeg/.jpg)
GIF (.gif)
PNG (.png)
– Blu-ray Disc/DVD-Video-Bedienung und Funktionen können von den Erläuterungen in dieser
Anleitung abweichen und manche Bedienfunktionen
können aufgrund von Einstellungen des DiscHerstellers gesperrt sein.
– Falls ein Menü oder Bedienungsanweisungen während
der Wiedergabe einer Disc angezeigt werden, folgen
Sie bitte dem angezeigten Bedienungsverfahren.
– Einige der Discs können in Abhängigkeit von der
Disc u.U. nicht abgespielt werden.
– Finalisieren Sie beim Brennen alle Datenträger, die
mit diesem Player wiedergegeben werden sollen.
– „Finalisieren“ weist hier auf die Bearbeitung einer
bespielten Disc durch ein Aufnahmegerät hin, sodass
diese auf Playern/Rekordern einschließlich diesem
Player abgespielt werden kann. Mit diesem Player
können nur finalisierte Discs wiedergegeben
werden. (Dieser Player besitzt keine Funktion zum
Finalisieren von Discs.)
– Es kann nicht garantiert werden, dass alle Dateien
auf einer Disc, einem USB-Speichergerät und im
Netzwerk wiedergegeben werden können.
– Die Wiedergabe einer kopiergeschützten Datei ist über
USB-Speichergerät und Netzwerk nicht möglich.
Hinweise
– Abhängig vom Verfahren der Dateierstellung oder
den verwendeten Codecs kann die Wiedergabe einer
Datei, die in der Übersicht oben aufgeführt ist, nicht
garantiert werden.
– Eine urheberrechtliche geschützte Datei kann nicht
wiedergegeben werden.
– Bei der Verwendung von DLNA muss eine Datei
den DLNA-Serveranforderungen entsprechen.
Voraussetzungen für Audiodateien
– Abtastfrequenz: innerhalb von 32 bis 48 kHz (MP3/
WMA), LPCM 44,1 kHz/16 Bit/Stereo (WAV),
192 kHz/24 Bit (FLAC)
– Bitrate: innerhalb von 8 bis 320 kbps (MP3), 32 bis
192 kbps (WMA)
Voraussetzungen für WMV-Dateien
– WMV9, die maximale Auflösung beträgt 1.920 ×
1.080.
3 De
Deutsch
DivX (.divx)
MKV im Format
DivX (.mkv)
MKV mit H.264
(.mkv)
MPEG PS (.mpeg/
.mpg)
MPEG TS (.ts)
MPEG-4 (.mp4)
VOB (.vob)
AVI (.avi)
ASF (.asf)
WMV (.wmv)
Beispiele für Regionalcodes
BD-Video
DVD-R/DVD-R
DL/DVD-RW
MUSIC
– Blu-ray Disc/DVD-Video-Player und -Discs weisen
Regionalcodes auf, welche die Regionen vorgeben,
in denen eine Disc abgespielt werden kann.
Überprüfen Sie die Kennzeichnung für den
Regionalcode auf der Rückseite des Players.
– Bei einer Blu-ray Disc kann die Disc auf diesem Player
wiedergegeben werden, wenn sie den gleichen
Regionalcode oder den Regionalcode „ABC“ aufweist.
– Bei einer DVD-Disc kann die Disc auf diesem Player
wiedergegeben werden, wenn sie den gleichen
Regionalcode oder den Regionalcode „ALL“ aufweist.
Datenträger-Format
BD-Video/Datendateien
DVD-ROM
MP3 (.mp3)
WMA (.wma)
AAC (.aac/.m4a)
WAV (.wav)
FLAC (.flac)
Regionverwaltungsinformationen für
Blu-ray Disc/DVD-Videos
Einleitung
■ Mit diesem Player kompatible
Discs/Dateien
Info zu Discs und Dateien
■ Disc einlegen
– Legen Sie die Disc mit nach oben weisender Beschriftung ein.
– Bei beidseitig bespielten Discs wenden Sie die
abzuspielende Seite nach unten.
Hinweise
– Je nach Disc und Einstellung dieses Players startet
die Wiedergabe automatisch.
– Je nach Disc wird ggf. das Menü zuerst angezeigt.
– Die Ladezeit kann je nach der Disc unterschiedlich sein.
■ Vorsichtsmaßnahmen für Disks
Discs vor Kratzern und Staub schützen
– Blu-ray Disc-, DVD- und CD-Discs sind empfindlich
gegen Staub, Fingerabdrücke und besonders Kratzer.
Eine verkratzte Disc ist möglicherweise nicht mehr
abspielbar. Handhaben Sie die Discs mit Sorgfalt und
bewahren Sie sie an einem sicheren Ort auf.
Korrekte Lagerung von Discs
Legen Sie die Disc in die Mitte der DiscHülle und lagern Sie Hülle und Disc
senkrecht.
Vermeiden Sie die Aufbewahrung der Disc
an Orten mit direkter Sonneneinstrahlung,
in der Nähe von Heizkörpern oder Orten
mit hoher Luftfeuchtigkeit.
Lassen Sie Discs nicht fallen und setzen
Sie sie keinen starken Vibrationen oder
Erschütterungen aus.
Vermeiden Sie die Lagerung von Discs an
sehr staubigen oder feuchten Orten.
Handhabungsvorschriften
– Falls die Oberfläche verschmutzt ist,
wischen Sie sie mit einem weichen, (nur
mit Wasser) angefeuchteten Tuch
behutsam ab. Wischen Sie Discs stets
vom Mittelloch zum Rand hin ab.
– Verwenden Sie keine SchallplattenReinigungssprays, Benzol, Verdünner,
Antistatikflüssigkeiten oder andere
Lösungsmittel.
– Vermeiden Sie eine Berührung der Oberfläche.
– Bekleben Sie Discs nicht mit Papier oder Aufklebern.
– Falls die Abspielfläche einer Disc beschmutzt oder
verkratzt ist, beurteilt der Player die Disc möglicherweise
als inkompatibel und fährt die Disclade aus oder er gibt
die Disc nicht korrekt wieder. Wischen Sie Schmutz auf
der Abspielfläche mit einem weichen Tuch ab.
Reinigen der Abtastlinse
– Verwenden Sie auf keinen Fall handelsübliche
Reinigungsdiscs. Der Gebrauch solcher Discs kann
die Linse beschädigen.
– Lassen Sie die Linse von der nächsten von Yamaha
zugelassenen Kundendienststelle reinigen.
4 De
■ Hinweise zum Betrachten von
3D-Videobildern
– Bei manchen Menschen können beim Betrachten von
3D-Videobildern Augenübermüdung, Erschöpfung
oder gar Unwohlsein auftreten. Wir empfehlen
deshalb allen Zuschauern, regelmäßige Pausen beim
Betrachten von 3D-Videobildern einzulegen.
– Sollten Sie sich unwohl fühlen, unterbrechen oder
verlassen Sie bitte die Vorführung, bis Sie sich wieder
besser fühlen. Ziehen Sie einen Arzt zu Rate, falls das
Unwohlsein öfter auftritt oder besonders schlimm ist.
– Lesen Sie die Bedienungsanleitungen (Blu-ray Disc
und Fernsehgerät) aufmerksam durch und beachten Sie
eventuelle Warnmeldungen auf Ihrem TV-Bildschirm.
– Die Sehkraft von Kindern (vor allem im Alter unter
sechs Jahren) befindet sich noch in der
Entwicklungsphase. Fragen Sie Ihren Arzt (z. B.
Kinder- oder Augenarzt) um Rat, bevor Sie Kindern
das Betrachten von 3D-Videobildern erlauben.
– Kinder sollten das Gerät nur unter elterlicher
Überwachung benutzen und dabei unbedingt die
weiter oben gegebenen Ratschläge befolgen.
■ Cinavia-Technologie
– Die Cinavia-Technologie ist Teil des Kopierschutzsystems,
das in den Blu-ray Disc-Player integriert ist.
Hinweis
– Möglicherweise werden die folgenden Meldungen
angezeigt und die Wiedergabe wird angehalten oder
die Audioausgabe wird vorübergehend vom Blu-ray
Disc-Player stumm geschaltet, wenn Sie eine
unautorisierte Kopie von Inhalten wiedergeben, die
durch die Cinavia-Technologie geschützt sind.
Diese Meldungen werden nur auf Englisch angezeigt.
Abspielen gestoppt. Der abzuspielende
Medieninhalt ist durch Cinavia™ geschützt und
ist nicht für eine Wiedergabe auf diesem Gerät
autorisiert.
Für weitere Informationen besuchen Sie
http://www.cinavia.com. Meldungscode 1.
Tonausgabe wurde vorübergehend abgeschaltet.
Korrigieren Sie nicht die Lautstärke der
Wiedergabe. Der abzuspielende Medieninhalt ist
durch Cinavia™ geschützt und ist nicht für eine
Wiedergabe auf diesem Gerät autorisiert.
Für weitere Informationen besuchen Sie
http://www.cinavia.com. Meldungscode 3.
Cinavia-Hinweis
Dieses Produkt nutzt Cinavia-Technologie, um die Verwendung
unautorisierter Kopien einiger im Handel erhältlicher Filme und
Videos sowie ihrer Tonspuren einzuschränken. Wenn die
verbotene Nutzung einer unautorisierten Kopie erkannt wird,
wird eine Meldung angezeigt und die Wiedergabe bzw. der
Kopiervorgang wird unterbrochen.
Ausführliche Informationen zur Cinavia-Technologie finden
Sie im Cinavia Online Consumer Information Center unter
http://www.cinavia.com. Um ergänzende Informationen
über Cinavia per Post zu erhalten, senden Sie eine Postkarte
mit Ihrer Postanschrift an Cinavia Consumer Information
Center, P.O. Box 86851, San Diego, CA, 92138, USA.
1
Bedienungselemente und deren Funktionen
Einleitung
■ Vorderseite
USB
1 2
3
1 p (Ein/Bereitschaft)
Schaltet den Player ein/versetzt ihn in den
Bereitschaftsmodus.
Halten Sie p auf der Vorderseite länger als fünf
Sekunden gedrückt und lassen Sie die Taste dann los,
um den Player zurückzusetzen (Zurücksetzung des
Systems).
4
5 6 7
8
9
0
6
(Rücklauf/Suchrücklauf):
Drücken für Rücklauf und gedrückt halten für
Suchrücklauf.
7
(Vorlauf/Suchvorlauf):
Drücken für Vorlauf und gedrückt halten für
Suchvorlauf.
2 USB-Anschluss (S. 16)
8
3 Display der Vorderseite
Zeigt verschiedene Informationen über den
Betriebsstatus an.
(Wiedergabe)
Startet die Wiedergabe.
9
(Pause)
Hält die Wiedergabe an.
4 Klappe der Disclade
0
(Stopp)
Stoppt die Wiedergabe.
5
(Auswerfen)
Öffnet/schließt die Disclade.
Hinweis
– Eine werkseitig angebrachte Schutzfolie bedeckt die Vorderseite dieses Players. Entfernen Sie die Schutzfolie vom
Player, bevor Sie ihn bedienen.
Deutsch
5 De
Bedienungselemente und deren Funktionen
■ Fernbedienung
1 Infrarotsender: Gibt ein Infrarotsignal aus. Zielen
Sie damit auf den Fernbedienungssensor (S. 9).
Hinweis
–
wird in der linken oberen Ecke des Bildschirms
angezeigt, wenn die gedrückte Taste nicht verfügbar
ist.
1
2
C
3
4
PROGRAM
MARKER
DIGEST
ZOOM
R
G
Y
B
SUBTITLE
ANGLE
5
6
7
8
9
0
AUDIO
CLEAR
SEARCH
PIP
SETUP
2ND
AUDIO
HOME
TOP MENU
SHUFFLE
REPEAT
A B
POP-UP MENU
L
M
3
: Öffnet/schließt die Disclade.
4 PROGRAM DVD CD : Richtet die Reihenfolge der
Wiedergabe ein (S. 26). Sie können bis zu 15 Tracks
(für eine Audio-Disc) oder Titel/Kapitel (für ein DVDVideo) einrichten.
5 Zifferntasten: Geben Sie hierüber Zahlen ein oder
springen Sie während der Wiedergabe zum
entsprechend nummerierten Track/Kapitel. Diese
Tasten sind je nach Disctyp und Wiedergabebedingung
eventuell nicht vorhanden.
6 CLEAR: Löscht eingegebene Zahlen/eingerichtete
Punkte.
7 PIP BD : Aktiviert/deaktiviert die Bild-in-BildFunktion (S. 27). Es wird Bild im Bild Anzeige (
)
auf dem Bildschirm angezeigt, wenn diese Funktion
verfügbar ist. Sie können diese Funktion auch über das
Bildschirmmenü auswählen (S. 24).
ENTER
RETURN
D
E
F
G
H
I
J
K
2 MARKER DVD VIDEO : Setzt ein Lesezeichen
(S. 26) an einem festgelegten Punkt in einem Film.
Nachdem das Lesezeichen gesetzt wurde, können Sie
mit der Taste DIGEST zum gewünschten Punkt
springen. Sie können bis zu 12 Lesezeichen setzen.
ON SCREEN
Hinweis
– Der Bild im Bild Anzeige wird nur angezeigt, wenn
der Bild im Bild Anzeige aktiviert ist (S. 32).
A
B
8 SETUP: Zeigt das SETUP-Menü an (S. 28).
NETFLIX
STATUS
9 2ND AUDIO BD : Wählt die Zweittonfunktion der
Bild-in-Bild-Funktion (S. 27) oder der
Audiokommentare aus. Es wird der Zweittonauswahl
(
) auf dem Bildschirm angezeigt, wenn diese
Funktion verfügbar ist (S. 35). Sie können diese
Funktion auch über das Bildschirmmenü auswählen
(S. 24).
Hinweis
– Die Zweittonauswahl wird nur angezeigt, wenn die
Zweittonauswahl aktiviert ist (S. 32).
0 HOME: Zeigt das Menü HOME an (S. 18).
A NETFLIX: Startet Netflix (S. 23).
B STATUS: Zeigt die Wiedergabeinformationen an
(S. 25).
C DIGEST PHOTO : Zeigt 12 Vorschaubilder von
Fotos an. Wenn Vorschaubilder angezeigt werden,
können Sie über
/
zur vorherigen/nächsten
Seite wechseln.
DVD VIDEO : Zeigt die LesezeichenAuswahlleiste an (S. 26).
6 De
Bedienungselemente und deren Funktionen
D p: Schaltet den Player ein oder in den
Bereitschaftsmodus.
M A/B BD DVD CD VIDEO MUSIC : Gibt einen
bestimmten Teil wieder, der wiederholt werden soll.
1 Drücken Sie A/B an der Stelle, an der Sie den
Anfangspunkt setzen möchten. „A-“ wird auf dem
Bildschirm angezeigt.
F Farbtasten BD : Verwenden Sie diese Tasten gemäß
den Anweisungen auf dem Bildschirm.
2 Drücken Sie A/B an der Stelle erneut, an der Sie
den Endpunkt setzen möchten. „A-B“ wird auf dem
Bildschirm angezeigt. Die wiederholte Wiedergabe
wird gestartet.
G SUBTITLE BD DVD VIDEO : Ändert die
Sprache der Untertitel (S. 43), falls diese verfügbar
sein sollten. Sie können diese Funktion auch über das
Bildschirmmenü auswählen (S. 24).
3 Um die wiederholte Wiedergabe abzubrechen,
drücken Sie A/B. „A-B“ wird ausgeblendet und die
wiederholte Wiedergabe wird aufgehoben.
H ANGLE BD DVD : Wechselt den Kamerawinkel,
wenn das Video in mehreren Blickwinkeln
aufgenommen wurde. Es wird der Kamerawinkel
(
) auf dem Bildschirm angezeigt, wenn diese
Funktion verfügbar ist. Sie können diese Funktion
auch über das Bildschirmmenü auswählen (S. 24).
Einleitung
E ZOOM DVD VIDEO PHOTO : Vergrößert/
verkleinert. Mit jedem Drücken der Taste ändert sich
die Größe des Bildschirms (vergrößern/verkleinern: je
drei Schritte).
1
Hinweis
– Diese Funktion kann je nach technischen Daten der
Disc ggf. nicht durchgeführt werden.
Hinweis
– Der Kamerawinkel wird nur angezeigt, wenn der
Kamerawinkel aktiviert ist (S. 32).
I AUDIO BD DVD : Ändert die Audiosprache oder
das Audioformat. Sie können diese Funktion auch
über das Bildschirmmenü auswählen (S. 24).
J SEARCH BD DVD CD VIDEO MUSIC :
Springt zu einem festgelegten Punkt während der
Wiedergabe. Weitere Einzelheiten zu dieser Funktion
finden Sie unter „Verwenden der Suche“ (S. 26). Sie
können diese Funktion auch über das Status-Menü
auswählen (S. 25).
K SHUFFLE DVD
CD
VIDEO
MUSIC
L REPEAT BD
DVD
CD
VIDEO
Deutsch
PHOTO : Legt den Wiedergabemodus der
Zufallswiedergabe fest (S. 24).
MUSIC
PHOTO : Ändert die Wiederholeinstellung. Mit
jedem Drücken der Taste ändert sich die
Wiederholeinstellung wie unten dargestellt.
: Wiederholt den Titel, der gerade wiedergegeben
wird.
: Wiederholt das Kapitel, das gerade
wiedergegeben wird.
: Wiederholt den Ordner, der gerade
wiedergegeben wird.
: Wiederholt alle Tracks/Dateien auf der Disc.
: Wiederholt den Track/die Datei, die gerade
wiedergegeben wird.
Fortsetzung auf der nächsten Seite. \
7 De
Bedienungselemente und deren Funktionen
N TOP MENU BD DVD : Zeigt das Top-Menü an,
wenn die Disc ein Menü enthält. Wählen Sie den
gewünschten Punkt über 5/a/2/3 und ENTER.
PROGRAM
MARKER
DIGEST
ZOOM
R
G
Y
B
Hinweis
– Bestimmte Bedienungen können sich je nach Disc
unterscheiden. Führen Sie die Anweisungen der
jeweiligen Menübildschirme aus.
SUBTITLE
ANGLE
O Cursortasten (5/a/2/3): Versetzt die Markierung
im Menü.
ENTER: Wählt das hervorgehobene Menü/Element
aus.
AUDIO
CLEAR
SEARCH
PIP
SETUP
2ND
AUDIO
HOME
TOP MENU
SHUFFLE
REPEAT
N
R
Q Steuertasten
BD
O
P
P RETURN: Kehrt zum vorherigen Menü oder
Bildschirm usw. zurück.
A B
POP-UP MENU
ENTER
RETURN
ON SCREEN
S
Q
DVD
CD
VIDEO
MUSIC
PHOTO
: Stoppt die Wiedergabe. Um die Wiedergabe
vollständig zu unterbrechen, drücken Sie diese Taste
zweimal.
: Hält die Wiedergabe an.
: Gibt den Inhalt wieder.
/
NETFLIX
STATUS
BD DVD CD VIDEO MUSIC :
Nimmt einen Rücklauf/Vorlauf vor. Mit jedem
Drücken der Taste ändert sich die Vor-/
Rücklaufgeschwindigkeit (Rücklauf/Vorlauf: je fünf
Schritte). Drücken Sie
, um die normale
Wiedergabe fortzusetzen.
PHOTO : Ändert die Geschwindigkeit einer Diashow
(schneller/langsamer: 3 Schritte).
/
DVD CD VIDEO MUSIC :
Taste drücken, um eine Sofortsuche/erneute
Wiedergabe zu bewirken. Über die Sofortsuche wird
in der Wiedergabe des Inhalts um 30 Sekunden nach
vorne gesprungen. Über die Sofortwiedergabe wird
der Inhalt von vor zehn Sekunden erneut angezeigt.
BD
/
: Überspringt einen Abschnitt rückwärts/
vorwärts.
Hinweis
– Je nach Disc setzt der Player die Wiedergabe an der
Stelle fort, wo er zuvor gestoppt wurde. Zum
Abspielen ab dem Anfang drücken Sie zweimal
,
dann
.
R POP-UP/MENU BD DVD : Zeigt das Pop-UpMenü an. Die angezeigten Menüpunkte sind je nach
Disc unterschiedlich. Näheres zum Aufrufen und
Bedienen des Popup-Menüs finden Sie in der
Bedienungsanleitung der Disc.
Je nach der DVD wird das Top-Menü durch Drücken
von POP-UP/MENU angezeigt.
S ON SCREEN: Zeigt das Bildschirmmenü an (S. 24).
8 De
Bedienungselemente und deren Funktionen
1
Hinweise
Sie können die Fernbedienungs-ID ändern, um eine
ungewollte Bedienung eines anderen Yamaha-Players,
wie beispielsweise eines DVD-Players, zu vermeiden.
Wenn Sie die Fernbedienungs-ID geändert haben, müssen
Sie sicherstellen, dass Sie die gleiche ID für das
Hauptgerät verwenden. Die Standardeinstellung lautet
ID1.
– Tauschen Sie beide Batterien aus, wenn sich die
Funktionsreichweite der Fernbedienung verringert.
– Verwenden Sie Batterien vom Typ AAA, R03,
UM-4.
– Vergewissern Sie sich, dass Sie die Batterien mit der
richtigen Polarität einlegen. Beachten Sie die
Darstellung im Batteriefach.
– Entnehmen Sie die Batterien, wenn Sie die
Fernbedienung für längere Zeit nicht benutzen.
– Verwenden Sie nicht alte und neue Batterien
zusammen.
– Verwenden Sie nicht unterschiedliche Batteriearten
zusammen (wie z. B. Alkali- und Manganbatterien).
Lesen Sie sich die Informationen auf der
Verpackung sorgfältig durch, da diese Batterien die
gleiche Form und Farbe haben können.
– Wenn die Batterien ausgelaufen sind, entsorgen Sie
sie sofort. Berühren Sie das ausgelaufene Material
nicht und lassen Sie es nicht in Kontakt mit der
Kleidung usw. kommen. Reinigen Sie das
Batteriefach sorgfältig, bevor Sie neue Batterien
einlegen.
– Entsorgen Sie Batterien nicht mit dem
Haushaltsmüll, sondern korrekt und in Einklang mit
den lokalen Vorschriften.
– Halten Sie Batterien von Kindern fern. Wenden Sie
sich umgehend an einen Arzt, wenn eine Batterie
versehentlich verschluckt wurde.
– Wenn Sie die Fernbedienung längere Zeit nicht
verwenden werden, entfernen Sie die Batterien aus
der Fernbedienung.
– Laden Sie die mitgelieferten Batterien nicht auf und
zerlegen Sie sie nicht.
1 Fernbedienungseinstellung
Um die ID von ID1 auf ID2 zu ändern, halten Sie
die rote Taste gedrückt und betätigen Sie 2 der
Zahlentasten gleichzeitig für sieben Sekunden. Um
die ID von ID2 auf ID1 zu ändern, halten Sie die
rote Taste gedrückt und betätigen Sie 1 der
Zahlentasten gleichzeitig für sieben Sekunden.
2 Hauptgeräteeinstellung
Halten Sie
und
auf der
Vorderseite gleichzeitig für zwei Sekunden
gedrückt, um die aktuelle ID anzuzeigen, wenn:
– Keine Disc in den Player eingelegt ist.
– Die Disclade geschlossen ist.
– Die Wiedergabe angehalten wurde.
– „NO DISC“ auf dem Frontdisplay angezeigt
wird.
Halten Sie die Tasten für weitere zwei Sekunden
gedrückt, um die ID zwischen ID1 und ID2 zu
ändern.
Hinweise
Wirkungsbereich der Fernbedienung
Fernbedienungssensor
Deutsch
– Befinden sich für wenige Minuten keine Batterien in
der Fernbedienung oder verbleiben verbrauchte
Batterien in der Fernbedienung, wird die
Fernbedienungs-ID automatisch auf ID1 gesetzt.
Wenn Sie die Fernbedienung in der ID2-Einstellung
verwenden möchten, legen Sie neue Batterien ein
und richten Sie die Fernbedienungs-ID erneut ein.
– Wenn der Player zurückgesetzt wird, ist die
Fernbedienungs-ID ID1.
USB
Batterien in die Fernbedienung
einlegen
1
Einleitung
ID-Funktion
30°
30°
6m
3
2
9 De
ANSCHLÜSSE
Einführung zu den Anschlüssen
Machen Sie an Ihren Audio-/Videogeräten die entsprechenden Anschlüsse ausfindig. Wir empfehlen die Verwendung der HDMIBuchse, mit der über eine einzige Verbindung eine hohe digitale Audio- und Videoqualität erreicht wird. Falls Sie die anderen
Anschlüsse (Buchsen) verwenden, nehmen Sie zuerst die Videoverbindung vor. Anschließend folgt dann die Audioverbindung.
HDMI-Buchse am
AV-Receiver? *
HDMI-Buchse am
Fernseher?
Schließen Sie die Video- und AudioAnschlüsse mittels HDMI-Kabel an den
AV-Receiver an.
Siehe
Bedienungsanleitung des
AV-Receivers.
HDMI-Buchse am
Fernseher?
START
Anschluss von Video an TV mittels HDMI-Kabel.
AV-Receiver verwenden?
Anschluss von Video an AV-Receiver.
HDMI-Buchse am
Fernseher?
Schließen Sie die Video- und Audio-Anschlüsse mittels HDMI-Kabel an das
Fernsehgerät an.
Anschluss von Video an TV.
Ja
* Bei Anschluss an einen AV-Receiver, bei dem die Ausgabe des
Toneingangs über die HDMI-Buchse nicht möglich ist, sehen bitte Sie
in der Bedienungsanleitung des AV-Receivers nach.
Nein
■ Rückseite
0
9
AC IN
VIDEO OUT
Y
PB
DIGITAL OUT
COAXIAL
HDMI
NETWORK
AUDIO OUT
L
R
OUT
IN
REMOTE CONTROL
VIDEO
PR
COMPONENT
1 2 3
10 De
OPTICAL
4
USB
5
6
7
8
(Modell für Europa)
2
Anschlüsse
Video- und Audio-Anschluss an
AV-Receiver
A HDMI (S. 12)
Audio-Anschluss an AV-Receiver
Videoanschluss
an TV
A’ HDMI (S. 12)
Anschluss von Audio an
AV-Receiver.
D COAXIAL (S. 14)
oder
an AV-Receiver
E
B COMPONENT (S. 13)
OPTICAL (S. 14)
oder
oder
F L/R (S. 15)
C VIDEO (S. 13)
Video- und Audio-Anschluss an TV
A’ HDMI (S. 12)
Audio-Anschluss an TV
Video-Anschluss an TV
Anschluss von Audio an
TV.
D’ COAXIAL (S. 14)
oder
B’ COMPONENT (S. 13)
E’ OPTICAL (S. 14)
oder
oder
C’ VIDEO (S. 13)
1 VIDEO (S. 13)
6 AUDIO OUT (L/R) (S. 15)
2 COMPONENT (S. 13)
7 REMOTE CONTROL (OUT/IN) (S. 17)
3 HDMI (S. 12)
8 AC IN (S. 17)
4 OPTICAL (S. 14)
9 NETWORK (S. 16)
5 USB (S. 16)
0 COAXIAL (S. 14)
Deutsch
F’ L/R (S. 15)
11 De
HDMI-Anschluss
■ Anschluss an den HDMI-Anschluss
–
–
–
–
Über denn HDMI-Anschluss können Sie eine hohe digitale Bild- und Tonqualität genießen.
Verbinden Sie ein HDMI-Kabel (im Fachhandel erhältlich) fest mit dem HDMI-Anschluss.
Näheres über die Audio-/Video-Ausgangsformate finden Sie auf Seite 36.
Verwenden Sie HIGH SPEED HDMI-Kabel mit HDMI-Logo (wie auf der Rückseite angezeigt).
Vorsicht!
Schließen Sie das Netzkabel des Players nicht an, bevor nicht alle anderen Anschlüsse
vorgenommen wurden.
Dieser Player
VIDEO OUT
Y
DIGITAL OUT
COAXIAL
HDMI
PB
NETWORK
VIDEO
PR
COMPONENT
OPTICAL
USB
Tipps
– Bei Verwendung der HDMI SteuerungFunktion beachten Sie „HDMI Steuerung“
(S. 31).
– Informationen über den Ausgangsmodus des
HDMI-Anschlusses finden Sie unter „HDMI“
(S. 35).
– Wenn kein Bild angezeigt wird, schlagen Sie
bitte unter „Fehlersuche“ nach (S. 40).
An HDMI-Anschluss
■ Anschluss zur Wiedergabe
von Blu-ray 3D-Discs
HDMI-Kabel
(im Fachhandel erhältlich)
Um Blu-ray 3D-Discs auf diesem Player genießen
zu können, brauchen Sie folgende Geräte und
Anschlüsse:
– Ein Fernsehgerät und (gegebenenfalls) einen
AV-Receiver mit 3D-Funktion.
– Sämtliche Komponenten müssen mit HDMIA’
Kabeln miteinander verbunden werden.
– Die Blu-ray Disc-Disc sollte 3D-Bilder
enthalten.
– Sie müssen 3D Ausgang unter Anzeige
Einstellung (S. 33) auf Auto setzen.
A
An HDMIEingangsanschluss
HDMI IN
AV-Receiver
12 De
TV
Video-Anschlüsse
■ Anschluss an die Component-/Video-Buchse
Vorsicht!
2
Anschlüsse
– Der Anschluss über die Component-Buchsen ermöglicht eine besonders getreue Farbwiedergabe und hohe
Bildqualität.
– Schließen Sie ein Component-Video-Kabel (im Fachhandel erhältlich) oder ein Audio-/Video-Kabel fest an die
COMPONENT-Buchsen/VIDEO-Buchse an.
– Eine Übersicht der Videoausgangsformate finden Sie auf Seite 37.
Schließen Sie das Netzkabel des Players nicht an, bevor nicht alle anderen Anschlüsse
vorgenommen wurden.
Dieser Player
VIDEO OUT
Y
Dieser Player
VIDEO OUT
DIGITAL OUT
COAXIAL
Y
HDMI
PB
PB
DIGITAL OUT
COAXIAL
HDMI
NETWORK
NETWORK
PR
VIDEO
COMPONENT
(grün)
(rot)
(blau)
OPTICAL
PR
VIDEO
COMPONENT
USB
OPTICAL
An
COMPONENTBuchsen
(gelb)
An VIDEOBuchse
Audio-/VideoKabel
(im Lieferumfang
enthalten)
Component-Video-Kabel
(im Fachhandel erhältlich)
B
B’
USB
C
C’
An die
ComponentEingangsbuchsen
An VideoEingangsbuchse
Deutsch
COMPONENT IN
(gelb)
(gelb)
Y
(grün)
(grün)
(gelb)
PB
(blau)
(grün)
(blau)
(rot)
(blau)
PR
(rot)
(rot)
VIDEO
AV INPUT
AV-Receiver
TV
AV-Receiver
TV
Hinweise
– Wenn Sie das Bild über einen Videorekorder wiedergeben, kann sich durch die Kopierschutzfunktion eine
verschlechterte Bildqualität ergeben.
– Um auf diesem Player Blu-ray 3D-Discs zu genießen, müssen Sie Ihren AV-Receiver, Ihren Fernseher und diesen
Player mit HDMI-Kabeln verbinden. Siehe Seite 12.
13 De
Audio-Anschlüsse
■ Anschluss an die digitale Audiobuchse
– Sie können ein Audiogerät oder einen Fernseher an die COAXIAL-Buchse/OPTICAL-Buchse anschließen.
– Schließen Sie ein Koaxial-Digitalaudiokabel (im Fachhandel erhältlich) oder ein Lichtleiterkabel (im Fachhandel
erhältlich) an die Koaxial-Digitalaudiobuchse oder die optische digitale Audiobuchse an.
– Eine Übersicht der Audioausgangsformate finden Sie auf Seite 36.
Vorsicht!
Schließen Sie das Netzkabel des Players nicht an, bevor nicht alle anderen Anschlüsse
vorgenommen wurden.
Dieser Player
Dieser Player
VIDEO OUT
Y
PB
VIDEO OUT
DIGITAL OUT
COAXIAL
Y
HDMI
PB
DIGITAL OUT
COAXIAL
HDMI
NETWORK
NETWORK
AUDIO OUT
L
R
PR
VIDEO
COMPONENT
OPTICAL
PR
VIDEO
COMPONENT
USB
OPTICAL
USB
An
COAXIALBuchse
An OPTICALAnschluss
Koaxial-Digitalaudiokabel
(im Fachhandel erhältlich)
D
D’
Lichtleiterkabel
(im Fachhandel erhältlich)
E
An
Koaxialeingan
gsbuchse
AV-Receiver
E’
An optische
Eingangsbuchse
COAXIAL
OPTICAL
AV INPUT
DIGITAL AUDIO IN
TV
AV-Receiver
TV
Tipp
– Informationen über den Ausgangsmodus der COAXIAL-/OPTICAL-Buchse finden Sie unter „Coaxial / Optical“
(S. 35).
14 De
Audio-Anschlüsse
■ Anschluss an die Audiobuchsen
– Sie können ein Audiogerät oder einen Fernseher an die AUDIO OUT L/R-Buchse anschließen.
– Schließen Sie ein Audio-/Video-Kabel (im Lieferumfang enthalten) fest an die AUDIO OUT L/R-Buchse an.
– Eine Übersicht der Audioausgangsformate finden Sie auf Seite 36.
Vorsicht!
Dieser Player
Anschlüsse
Schließen Sie das Netzkabel des Players nicht an, bevor nicht alle anderen Anschlüsse
vorgenommen wurden.
2
DIGITAL OUT
COAXIAL
DMI
NETWORK
AUDIO OUT
OUT
L
R
IN
REMOTE CONTROL
USB
(rot)
An AUDIO OUT
L/R-Buchse
(weiß)
OPTICAL
Audio-/Video-Kabel
(im Lieferumfang
enthalten)
F
F’
An Audio-L/REingangsbuchse
(weiß)
(rot)
AV-Receiver
(rot)
R
AUDIO IN
(weiß)
(rot)
L
Deutsch
(weiß)
AUDIO
TV
15 De
Netzwerk- und USB-Anschluss
■ Anschluss an den NETWORK-Anschluss
– Wird dieser Player mit einem Netzwerk verbunden, ist die Wiedergabe von Inhalten auf einem Computer möglich.
– Sie können auf verschiedene Inhalte mit interaktiven Funktionen zugreifen, wenn Sie beim Abspielen von BDLive-kompatiblen Discs eine Verbindung mit dem Internet herstellen. Auf Seite 27 finden Sie Informationen über
die BD-Live-Funktionen.
Hinweise
–
–
–
–
–
Verbinden Sie ein Netzwerkkabel (im Fachhandel erhältlich) fest mit dem NETWORK-Anschluss.
Verwenden Sie ausschließlich ein abgeschirmtes verdrilltes Netzwerkkabel.
Für die Nutzung des Internets ist, wie unten gezeigt, eine Breitband-Internetverbindung erforderlich.
Schließen Sie den anderen Stecker des Netzwerkkabels an den Hub oder Breitband-Router an.
Für eine Breitband-Internetverbindung ist ein Vertrag mit einem Internetanbieter erforderlich. Für nähere
Auskünfte hierzu wenden Sie sich bitte an einen Internetanbieter.
– Orientieren Sie sich bitte an der Bedienungsanleitung des verwendeten Geräts, da die Geräte und
Anschlussmethoden je nach Internetumgebung unterschiedlich sein können.
– Netzwerkkabel und Router müssen den 10BASE-T/100BASE-TX-Standard unterstützen.
■ Anschluss an den USB-Anschluss
– Sie können ein USB-Speichergerät für Speichermedium an den USB-Anschluss auf der Rückseite (oder Vorderseite)
des Players anschließen, um die BD-Live-Daten zu speichern oder die Software des Players zu aktualisieren.
– Verbinden Sie ein USB-Speichergerät (im Fachhandel erhältlich) fest mit dem USB-Anschluss.
VORSICHT:
– Während der Ausführung von BD-Live (S. 27)
oder der Software-Aktualisierung dürfen weder
das USB-Speichergerät noch das Netzkabel
abgezogen werden.
– Verbinden Sie ein USB-Speichergerät nicht
über ein USB-Verlängerungskabel mit dem
USB-Anschluss des Players. Eine einwandfreie
Funktion des Players ist bei Verwendung eines
USB-Verlängerungskabels nicht gewährleistet.
Dieser Player
VIDEO OUT
Y
PB
DIGITAL OUT
COAXIAL
HDMI
NETWORK
AUDIO OUT
L
R
VIDEO
PR
COMPONENT
OPTICAL
USB
Hinweis
– Yamaha kann nicht garantieren, dass die USBSpeichergeräte aller Marken mit diesem Player
verwendbar sind.
An USBAnschluss
An NETWORKAnschluss
USB-Speichergerät
(im Fachhandel erhältlich)
Tipp
– Um BD-Live-Daten auf
einem USBSpeichergerät an der
Vorderseite zu
speichern, setzen Sie
Speichermedium auf
USB Vorderseite
(S. 31).
Internet
Modem
Netzwerkkabel
(im Fachhandel erhältlich)
An LANAnschluss
LAN
Hub oder
Breitband-Router
PC
Nach dem Anschließen
– Wenn Sie die Einstellung Netzwerk manuell vornehmen, beachten Sie „Netzwerk“ (S. 32).
– Informationen über die Wiedergabe von Inhalten auf einem Computer über das Netzwerk finden Sie unter
„Verwenden von Netzwerkinhalten“ (S. 20).
16 De
Weitere Anschlüsse
■ Anschluss an die REMOTE
CONTROL-Buchsen
Vorsicht!
– Informationen über die SCENE-Funktion finden Sie
in der Bedienungsanleitung, die im Lieferumfang
des Yamaha-AV-Receivers enthalten ist.
– Sie können ein Yamaha-Gerät (wie beispielsweise
einen CD-Player) mit SCENE-Funktion an die
REMOTE CONTROL-Buchse (OUT) dieses Players
anschließen.
2
Anschlüsse
– Die Fernbedienungssignale können über den
Anschluss an die REMOTE CONTROL-Buchsen
(OUT/IN) übertragen und empfangen werden.
– Schließen Sie Mono-3,5-mm-Miniklinkenkabel (im
Fachhandel erhältlich) an die REMOTE
CONTROL-Buchsen (OUT/IN) an.
– Wenn es sich bei Ihrem AV-Receiver um ein
Produkt von Yamaha handelt, das SCENESteuerungssignale übertragen kann, können Sie die
SCENE-Funktion zur Bedienung des Players nutzen.
Tipps
■ Netzkabel anschließen
– Nach Vornahme aller Anschlüsse verbinden Sie das
mitgelieferte Netzkabel mit AC IN auf der Rückseite
des Players. Anschließend folgt dann der Anschluss
an eine Netzsteckdose.
Schließen Sie das Netzkabel des Players
nicht an, bevor nicht alle anderen
Anschlüsse vorgenommen wurden.
AC IN
Dieser Player
RK
AUDIO OUT
L
R
OUT
IN
REMOTE CONTROL
An
Wechselstromeingang
An REMOTE
CONTROLBuchse (OUT)
Mono-3,5-mmMiniklinkenkabel
(im Fachhandel erhältlich)
Zur
FernbedienungsEingangsbuchse
Zur Netzsteckdose
Hinweis
– BERÜHREN SIE BEI ANGESCHLOSSENEM
NETZKABEL KEINE UNISOLIERTEN TEILE
VON KABELN, DA ANDERENFALLS
STROMSCHLAGGEFAHR BESTEHT.
Zur
FernbedienungsAusgangsbuchse
REMOTE CONTROL IN
Yamaha-Gerät
REMOTE CONTROL OUT
Infrarotsignal-Empfänger
oder Yamaha-Gerät (wie
AV-Receiver)
17 De
Deutsch
Mono-3,5-mmMiniklinkenkabel
(im Fachhandel
erhältlich)
An REMOTE
CONTROLBuchse (IN)
(Modell für Europa)
WIEDERGABE
Konfigurationshilfe/Einfaches Konfigurationsmenü
■ Einstellungen über Konfigurationshilfe/Einfaches Konfigurationsmenü
Mit Konfigurationshilfe/Einfaches Konfigurationsmenü können Sie problemlos die Sprache, Auflösung und das
Bildseitenverhältnis festlegen. Der Konfigurationshilfe-Bildschirm wird angezeigt, wenn Sie diesen Player zum ersten
Mal nach dem Kauf einschalten. Die gleiche Einstellung kann über das Menü SETUP = System = Einfaches
Konfigurationsmenü vorgenommen werden.
1 Wird der Bildschirm Einfaches Konfigurationsmenü
angezeigt, drücken Sie ENTER, um Einfaches
Konfigurationsmenü zu starten.
2 Legen Sie die Sprache, Auflösung und das
Bildseitenverhältnis fest, indem Sie die Anweisungen
auf dem Bildschirm befolgen.
Hinweise
– Wenn nach Abschluss von Konfigurationshilfe/
Einfaches Konfigurationsmenü kein Bild angezeigt
wird, schlagen Sie unter „Fehlersuche“ nach (S. 40).
– Beim Einschalten dieses Players erscheint eine
Warnmeldung hinsichtlich der Wiedergabe von
3D-Videos. Drücken Sie ENTER, um diese
Meldung auszublenden, oder CLEAR, um sie zu
deaktivieren (S. 31).
HOME/MEDIA-Menü
Über die Menüs HOME und MEDIA können Sie Multimediadateien auf Datendiscs, USB-Speichergeräten und im
Netzwerk durchsuchen und wiedergeben.
Hinweis
Symbole über dem MEDIA-Menü
– Einzelheiten zu den abspielbaren Discs und
Formaten finden Sie auf Seite 3.
: Gibt die Disc im Fach wieder oder zeigt die Inhalte
auf der Datendisc an.
: Zeigt die Inhalte auf dem USB-Speichergerät an,
das an den USB-Anschluss angeschlossen ist.
: Sucht nach einem DLNA-Server (S. 20) im
Netzwerk.
: Zeigt die Inhalte auf dem angeschlossenen DLNAServer an.
■ Wiedergabe von Foto/Musik/
Video
Grundlegende Bedienung
2/3/5/a: Verschiebt die Markierung.
2: Kehrt zum übergeordneten Ordner zurück.
HOME: Wechselt zum HOME-Menü und beendet dieses.
ENTER: Bestätigt den Ordner/die Datei.
PIP
SETUP
2ND
AUDIO
HOME
TOP MENU
REPEAT
A B
POP-UP MENU
ENTER
RETURN
18 De
ON SCREEN
HOME/MEDIA-Menü
Allgemeine Bedienungsschritte für die
Wiedergabe von Dateien in einem
ausgewählten Ordner
Beispiel: Auswahl einer Filmdatei auf einem USBSpeichergerät
4 Wählen Sie die den Foto-, Musik-, Video- oder
AVCHD-Ordner aus, der wiedergegeben werden soll,
und drücken Sie ENTER.
Um zum übergeordneten Ordner zurückzukehren,
drücken Sie 2 oder wählen Sie
.
Hinweis
3
Wiedergabe
– Halten Sie die Wiedergabe des Videos an, bevor Sie
zum MEDIA-Menü wechseln.
1 Drücken Sie HOME, um das HOME-Menü
aufzurufen.
Hinweis
Tipp
– Je nach Modell kann das HOME-Menü
unterschiedlich aussehen.
2 Drücken Sie 2/3/5/a, um MEDIA auszuwählen, und
drücken Sie dann ENTER.
Der Bildschirm MEDIA wird angezeigt.
– Beachten Sie, dass im nächsten Schritt nur der
Dateityp angezeigt wird, der in diesem Schritt
ausgewählt wurde. Wenn Sie beispielsweise in
diesem Schritt den Foto-Ordner ausgewählt haben,
werden nach diesem Schritt nur Fotodateien
angezeigt. Wenn Sie etwas anderes als Fotos
wiedergeben möchten, kehren Sie zu diesem Schritt
zurück und wählen Sie den entsprechenden Dateityp
aus.
5 Wählen Sie den Ordner aus, in dem die Datei enthalten
ist, die wiedergegeben werden soll.
Deutsch
3 Wählen Sie das Element aus, in dem die Datei
enthalten ist, die wiedergegeben werden soll, und
drücken Sie ENTER.
Fortsetzung auf der nächsten Seite. \
19 De
HOME/MEDIA-Menü
6 Wählen Sie die Datei aus, die wiedergegeben werden
soll, und drücken Sie ENTER.
Wird eine Videodatei ausgewählt, startet die
Wiedergabe.
Wird eine Musikdatei ausgewählt, wird der
Statusbildschirm angezeigt und die Wiedergabe startet.
Wird eine Fotodatei ausgewählt, startet die Diashow.
■ Verwenden von Netzwerkinhalten
Dieser Player ist DLNA-zertifiziert (S. 42). Sie können
Fotos, Musiktitel und Videos verwalten, die auf DLNAServern in Ihrem Heimnetzwerk gespeichert sind.
Wiedergabe freigegebener Inhalte
1 Um Dateien auf Ihrem Computer wiederzugeben,
installieren Sie eine DLNA-Server-Software, wie
beispielsweise Windows Media Player 12, und geben
Sie die Dateien frei, die Sie wiedergeben möchten.
2 Schalten Sie den Computer ein, auf dem die DLNAServer-Software installiert oder an den das mit Ihrem
Heimnetzwerk verbundene DLNA-Gerät
angeschlossen ist.
Tipp
3 Drücken Sie HOME, um das HOME-Menü
aufzurufen. Wählen Sie dann MEDIA, um zum Menü
MEDIA zu wechseln. Die mit dem Netzwerk
verbundenen DLNA-Server werden auf dem
Bildschirm aufgelistet.
– Um die Diashow mit Musikuntermalung zu
betrachten, drücken Sie HOME, um zum HOMEMenü zurückzukehren, während Musik
wiedergegeben wird, und wählen Sie die Fotodatei
aus.
Hinweis
– Je nach Inhalt wird die angezeigte Datei eventuell
nicht wiedergegeben.
Bedienungsschritte für die
Betrachtung von Fotos
Während des Betrachtens von Fotos haben die Tasten auf
der Fernbedienung die unten dargestellten Funktionen.
: Hält die Diashow an und kehrt zum Dateibrowser
zurück.
: Setzt die Diashow auf Pause.
: Gibt die Diashow wieder.
: Wechselt zum nächsten Foto.
: Wechselt zum vorherigen Foto.
: Erhöht die Geschwindigkeit der Diashow in drei
Schritten.
: Verringert die Geschwindigkeit der Diashow in
drei Schritten.
5: Invertiert ein Foto.
a: Spiegelt ein Foto.
2: Dreht ein Foto gegen den Uhrzeigersinn.
3: Dreht ein Foto im Uhrzeigersinn.
ZOOM: Vergrößert/verkleinert ein Foto (vergrößern/
verkleinern: je drei Schritte).
5/a/2/3: Schwenkt im Vergrößerungs-/
Verkleinerungsmodus, wenn ein Foto größer als der
Bildschirm sein sollte.
DIGEST: Wechselt in den Vorschaumodus (S. 6). Wenn
Vorschaubilder angezeigt werden, können Sie über
/
zur vorherigen/nächsten Seite wechseln.
20 De
Hinweise
– Wird Ihr DLNA-Server nicht aufgelistet, wählen Sie
DLNA-Suche aus, um ihn zu suchen.
– Je nach DLNA-Server muss dieser Player vom
Server zugelassen werden.
– Um die Datei auf dem DLNA-Server
wiederzugeben, müssen dieser Player und der Server
mit dem gleichen Zugangspunkt verbunden sein.
– Die Dateianforderungen sind eventuell nicht immer
kompatibel. Es können Einschränkungen in Bezug
auf Dateifunktionen und DLNA-Serverfunktionen
vorliegen.
4 Wählen Sie die Datei aus, die wiedergegeben werden
soll.
Hinweise
– Die Wiedergabe und Bedienungsqualität können
vom Zustand des Heimnetzwerkes beeinträchtigt
werden.
– Dateien auf Wechseldatenträgern, wie USBSpeichergeräten oder DVD-Laufwerken auf Ihrem
Medienserver, werden eventuell nicht
ordnungsgemäß freigegeben.
Verwenden von Netzwerkdiensten
Sie können die Videos folgender Netzwerke direkt betrachten.
– YouTube
– Picasa (S. 22)
– Netflix (S. 23)
3
Hinweise
Wiedergabe
– Der Zugang zu von Drittanbietern zur Verfügung gestellten Inhalten erfordert eine schnelle Internetverbindung und
kann eventuell erst nach der Einrichtung und Registrierung eines Accounts oder eines kostenpflichtigen Abos
erfolgen.
– Inhaltsdienste von Drittanbietern können jederzeit ohne vorherige Mitteilung geändert, ausgesetzt, unterbrochen
oder eingestellt werden. In solchen Fälle lehnt Yamaha jegliche Haftung ab.
– Manche Inhalte stehen nur in bestimmten Ländern und/oder in bestimmten Sprachen zur Verfügung.
– Yamaha ist nicht für Inhaltsdienste von Drittanbietern verantwortlich und gewährt keinerlei Garantie, dass deren
Inhalte dauerhaft oder auch nur über eine bestimmte Zeitspanne hinweg zur Verfügung gestellt werden.
Videos von YouTube™ abspielen
Mit diesem Player können Sie YouTube-Videos im Internet ansehen.
Dieser Dienst kann ohne Vorankündigung geändert werden.
1 Drücken Sie HOME, um das HOME-Menü
aufzurufen.
Deutsch
Tipp
– Je nach Modell kann das HOME-Menü
unterschiedlich aussehen.
2 Drücken Sie 2/3/5/a, um YouTube auszuwählen,
und drücken Sie dann ENTER.
Tipp
– Um YouTube zu verlassen, drücken Sie RETURN.
21 De
Wiedergabe von Fotos von Picasa™-Webalbum
Mit diesem Player können Sie Fotos von einem Picasa-Webalbum im Internet ansehen.
Dieser Dienst kann ohne Vorankündigung geändert werden.
1 Registrieren Sie Ihren Benutzernamen und das
Kennwort auf dem Computer, bevor Sie PicasaWebalbum verwenden.
2 Drücken Sie HOME, um das HOME-Menü
aufzurufen.
Drücken Sie 2/3/5/a, um Picasa auszuwählen, und
drücken Sie dann ENTER.
Tipp
– Je nach Modell kann das HOME-Menü
unterschiedlich aussehen.
3 Wenn Sie zum ersten Mal über diesen Player auf
Picasa zugreifen, wählen Sie das Symbol „New User“
(Neuer Benutzer) und geben Sie den registrierten
Benutzernamen und das Kennwort ein.
Tipp
– Um Picasa zu verlassen, drücken Sie RETURN.
22 De
Wiedergabe von Videos von Netflix™
Mit diesem Player können Sie sofort Filme und Serien von Netflix über das Internet wiedergeben. Besuchen Sie
www.netflix.com, um Mitglied bei Netflix zu werden.
Netflix ist in verschiedenen Ländern verfügbar. Unbegrenzte Mitgliedschaft erforderlich.
Weitere Informationen unter www.netflix.com.
3
■ Starten von Netflix
Wiedergabe
1 Drücken Sie HOME, um das HOME-Menü
aufzurufen.
Drücken Sie 2/3/5/a, um NETFLIX auszuwählen,
und drücken Sie dann ENTER.
Sie können auch NETFLIX auf der Fernbedienung
betätigen, um Netflix zu starten.
Tipps
– Je nach Modell kann das HOME-Menü
unterschiedlich aussehen.
– Um zum HOME-Menü zurückzugelangen, drücken
Sie RETURN.
Hinweise
Deutsch
– Wenn ein Software-Upgrade erforderlich ist, wird
ein Aktualisierungshinweis angezeigt, wenn Sie
Netflix auswählen. Führen Sie in diesem Fall das
Software-Upgrade durch.
– Ausführliche Informationen zu Netflix finden Sie
auf der Netflix-Website unter www.netflix.com.
– Um Netflix zu deaktivieren, schlagen Sie unter
„Netflix Information“ (S. 32) nach.
23 De
Erweiterte Wiedergabebedienung
In diesem Kapitel wird die Wiedergabe von im
Fachhandel erhältlichen Blu-ray-Discs, DVDs, CDs und
selbst aufgenommenen DVD-RW/R-Discs beschrieben.
Hinweis
– Informationen über die grundlegende Bedienung zur
Wiedergabe finden Sie auf Seite 6.
■ Bildschirmmenü
Um das Bildschirmmenü aufzurufen, drücken Sie ON
SCREEN. Drücken Sie danach 5/a/2/3, um ein
Element auszuwählen, und dann ENTER, um die
gewünschte Funktion aufzurufen.
DVD
–
–
–
–
–
–
–
Normal
Zufall CH (Kapitel)
Zufall TT (Titel)
Zufallswiedergabe Alle
Zufalls-CH (Kapitel)
Random TT (Titel)
Random All
VIDEO
MUSIC
PHOTO
– Normal
– Shuffle F (Ordner)
– Random F (Ordner)
Audio BD DVD VIDEO : Zeigt die Audiosprache/das
Audiosignal der aktuell ausgewählten Blu-ray Disc/DVD
an. Sie können die Audio-Einstellungen ändern.
Winkel BD DVD : Zeigt die gegenwärtig ausgewählte
Blickwinkelnummer an. Falls das Video mehrere
Blickwinkel enthält, können Sie den Blickwinkel
wechseln.
Untertitel BD DVD VIDEO : Zeigt die gegenwärtig
ausgewählte Untertitelsprache an, wenn Untertitel
vorhanden sind.
Das Bildschirmmenü enthält die folgenden Elemente.
Titel BD DVD VIDEO : Zeigt die Nummer des
laufenden Titels an. Sie können zum gewünschten Titel
wechseln, indem Sie diesen hier auswählen.
Kapitel BD DVD VIDEO : Zeigt die Nummer des
laufenden Kapitels an. Sie können zum gewünschten
Kapitel wechseln, indem Sie dieses hier auswählen.
Track/Datei CD VIDEO MUSIC PHOTO : Zeigt
die Nummer des laufenden Tracks/der laufenden Datei an.
Sie können zum gewünschten Track/zur gewünschten
Datei wechseln, indem Sie diesen/diese hier auswählen.
Zeit BD DVD CD VIDEO MUSIC : Zeigt die
Spielzeit an. Wählen Sie den Anzeigetyp aus den
folgenden Optionen aus:
– Abgelaufene Spielzeit des Titels, des Kapitels, der
Disc, des Tracks oder der Datei
– Verbleibende Spielzeit des Titels, des Kapitels, der
Disc, des Tracks oder der Datei
Mode/Play Mode
DVD CD VIDEO MUSIC PHOTO : Zeigt den
aktuellen Wiedergabemodus an. Sie können den
Wiedergabemodus aus den folgenden Optionen
auswählen:
CD
– Normal: Normale Wiedergabe.
– Shuffle: Jeder Track wird einmal in zufälliger
Reihenfolge und ohne Wiederholung
wiedergegeben.
– Random: Zufällige Wiedergabe. Es kann zu
Wiederholungen kommen.
24 De
Untertitel Modus BD : Zeigt die gegenwärtig
ausgewählte Untertitelsprache an, wenn Untertitel
vorhanden sind. Diese Funktion steht nur für externe
Untertitel einer Videodatei zur Verfügung. Sie können den
gewünschten Textstil der Untertitel auswählen.
Bitrate BD DVD CD VIDEO MUSIC : Zeigt die
Bitrate des Audio-/Video-Signals an.
Zweitvideo BD : Schaltet die Bild-in-Bild-Funktion
ein/aus (S. 6).
Zweitton BD : Schaltet die Zweittonfunktion ein/aus
(S. 6).
Schnellsuche
BD
DVD
CD
VIDEO
MUSIC : Springt um 30
Sekunden.
Sofortwiedergabe
BD
DVD
CD
VIDEO
MUSIC : Zeigt den Inhalt
von vor zehn Sekunden erneut an.
Diashow PHOTO :
Zeigt die Geschwindigkeit der Diashow an. Sie können
die Geschwindigkeit der Diashow unter Zeitlupe/Mittel/
Schnell auswählen.
Übergang PHOTO : Zeigt an, wie Fotos auf dem
Bildschirm angezeigt werden. Sie können den
Übergangstyp auswählen.
Codepage VIDEO : Wählt den Zeichencode der
Untertitel aus, die Sie zum DivX-Video hinzugefügt
haben (S. 42).
Erweiterte Wiedergabebedienung
■ Status-Menü
Hierüber werden unterschiedliche Einstellungen
angezeigt, wie beispielsweise Untertitel, Blickwinkel und
aktuell wiedergegebene Titel-/Kapitel-/Tracknummer.
Um das Status-Menü aufzurufen, drücken Sie STATUS.
Das Status-Menü enthält die folgenden Untermenüs.
BD
DVD
CD
MUSIC
Beispiel: Symbole bei der Wiedergabe einer Musikdatei
123 4
5
6
7
VIDEO
3
Beispiel: Symbole bei Wiedergabe einer Blu-ray Disc
3
8 7
4
5
Wiedergabe
2
1
6
8
1
2
1
2
3
4
5
6
8
(Disctyp/Videodateisymbol)
(Laufende Titelnummer): Sie können über die
Taste SEARCH zum festgelegten Titel wechseln
(S. 7).
(Laufende Kapitelnummer): Sie können über
die Taste SEARCH zum festgelegten Kapitel
wechseln (S. 7).
(Abgelaufene Spielzeit): Sie können über die
Taste SEARCH zum festgelegten Punkt springen
(S. 7).
(Untertitel aktuell ausgewählt): Sie können
die Untertitelsprache über die Taste SUBTITLE
auswählen.
(Aktuell ausgewählte Audiosprache): Sie
können die Audiosprache über die Taste AUDIO
auswählen.
(Wiederholungsmodus): Zeigt den aktuellen
Wiederholungsmodus an (S. 7).
3
(Wiederholungsmodus): Zeigt den aktuellen
Wiederholungsmodus an (S. 7).
(Disctyp/Musikdateisymbol)
4 (Bebilderung) MUSIC : Zeigt Bebilderung an, wenn
diese in der Datei enthalten ist.
5
(Laufende Track-/Dateinummer): Sie können
über die Taste SEARCH zum festgelegten Track
wechseln (S. 7).
6 (Informationen) MUSIC : Zeigt
Musikinformationen an, wenn diese in der Datei
enthalten sein sollten.
7
(Abgelaufene Spielzeit): Sie können über die
Taste SEARCH zum festgelegten Punkt springen
(S. 7).
8 (Fortschrittsleiste) MUSIC : Zeigt den Fortschritt
des aktuellen Lieds an.
PHOTO
1
(Wiedergabestatus)
2
(Fotodateisymbol)
3
(Laufende Dateinummer)
4
(Wiederholungsmodus): Zeigt den aktuellen
Wiederholungsmodus an (S. 7).
5 (Geschwindigkeit der Diashow)
25 De
Deutsch
7
(Wiedergabestatus)
(Wiedergabestatus)
Erweiterte Wiedergabebedienung
■ Verwenden von
Lesezeichen DVD
VIDEO
Hierüber können Sie ein Lesezeichen am festgelegten
Punkt im Video setzen. Nachdem ein Lesezeichen gesetzt
wurde, können Sie zu dem Punkt springen, an dem diese
Funktion eingerichtet wurde. Sie können bis zu 12
Lesezeichen setzen.
1 Drücken Sie während der Wiedergabe des Films
MARKER, um Lesezeichen festzulegen. Die
Lesezeichen-Nummer und der Status werden
angezeigt.
2 Drücken Sie ENTER, um die Wiedergabereihenfolge
zu programmieren.
Bei einer Audio-Disc drücken Sie 5/a zur Wahl des
gewünschten Tracks und drücken Sie dann ENTER.
Bei einer DVD-Video-Disc wählen Sie den
gewünschten Titel (angezeigt als TT) und das
gewünschte Kapitel (angezeigt als CH) anstelle eines
Tracks.
Um einen Track zu löschen, wählen Sie den
entsprechenden Track aus und drücken CLEAR.
Drücken Sie RETURN, um die Programmwiedergabe
abzubrechen.
2 Nach der Einrichtung eines Lesezeichen drücken Sie
DIGEST, um die Lesezeichen-Auswahlleiste
anzuzeigen.
3 Drücken Sie 2/3 zur Auswahl des Lesezeichen, ab
dem die Wiedergabe erfolgen soll, und drücken Sie
dann ENTER.
Drücken Sie CLEAR, um das ausgewählte
Lesezeichen zu löschen.
Hinweis
– Nach Abschluss der Wiedergabe (z. B. Auswerfen
der Disc, zweimal Drücken von
), werden die
Lesezeichen automatisch gelöscht.
■ Programmwiedergabe
DVD
CD
Hierüber können Sie die Wiedergabereihenfolge der
Audio-Disc-Tracks oder DVD-Kapitel programmieren.
Drücken Sie PROGRAM während der Wiedergabe, um
das PROGRAMM-Fenster für die Programmierung der
Wiedergabereihenfolge aufzurufen.
Sie können bis zu 15 Tracks/Kapitel programmieren.
Beispiel: Programmieren der Wiedergabereihenfolge
von CD-Tracks
1 Drücken Sie während der Wiedergabe PROGRAM.
3 Nach Abschluss der Programmierung drücken Sie
,
um die Programmwiedergabe einzurichten und zu starten.
4 Um die Programmwiedergabe abzubrechen, halten Sie
die Wiedergabe vollständig an, indem Sie zweimal
drücken.
■ Verwenden der Suche
BD
DVD
CD
VIDEO
MUSIC
PHOTO
Hierüber können Sie während der Wiedergabe an einen
bestimmten Punkt wechseln.
1 Drücken Sie während der Wiedergabe SEARCH. Die
Statusleiste wird angezeigt.
2 Drücken Sie 5/a/2/3, um einen der unten
angegebenen Punkte auszuwählen, und drücken Sie
dann ENTER.
BD DVD :
– Titelnummer (angezeigt als
)
– Kapitelnummer (angezeigt als
)
– Abgelaufene Spielzeit (angezeigt als
)
– Abgelaufene Kapitelzeit (angezeigt als
CD :
– Tracknummer (angezeigt als
)
)
– Abgelaufene Trackzeit (angezeigt als
)
– Abgelaufene Disczeit (angezeigt als
VIDEO MUSIC :
– Dateinummer (angezeigt als
)
– Abgelaufene Dateizeit (angezeigt als
PHOTO :
– Dateinummer (angezeigt als
)
)
)
3 Drücken Sie 5/a oder die Zifferntasten, um den Wert
des hervorgehobenen Punkts einzurichten/anzupassen,
und drücken Sie dann ENTER, um zum festgelegten
Punkt zu wechseln.
4 Um die Statusleiste zu schließen, drücken Sie STATUS.
26 De
Erweiterte Wiedergabebedienung
■ Spaß mit BONUSVIEW™ und BDLive™
Dieser Player unterstützt die Wiedergabefunktionen von
BONUSVIEW (S. 42) (BD-ROM-Profil 1 Version 1.1)
und BD-Live (S. 42) (BD-ROM-Profil 2).
Hinweis
■ Verwenden der Bild-in-BildFunktion (Zweitbild/ZweittonWiedergabe)
Bei BD-Videos, die Zweitbild und -ton für die Bild-inBild-Funktion unterstützen, lässt sich in einem kleinen
Fenster unten rechts auf dem Bildschirm zusätzlich zum
Hauptbild ein Zweitbild mit eigenem Ton anzeigen.
Hauptbild
Zweitbild
BD-Live-Daten werden auf einem an diesen Player
angeschlossenem USB-Speichergerät gespeichert.
Um diese Funktionen nutzen zu können, schließen
Sie ein USB-Speichergerät, das USB 2.0 High Speed
(480 Mbit/s) unterstützt, an den USB-Anschluss an,
den Sie unter Speichermedium ausgewählt haben
(S. 31). Als Standard ist der USB-Anschluss der
Rückseite voreingestellt.
– Der BUDA-Ordner wird, wenn notwendig,
automatisch auf dem USB-Speichergerät erstellt.
– Wenn der Speicherplatz nicht ausreicht, werden die
Daten nicht kopiert/heruntergeladen. Löschen Sie in
diesem Fall nicht mehr benötigte Daten oder
verwenden Sie ein anderes USB-Speichergerät.
– Das Laden (Lesen/Schreiben) der Daten kann eine
Weile dauern.
3
Wiedergabe
– Die Funktionen und die Wiedergabeart sind je nach
Disc unterschiedlich. Befolgen Sie die Anweisungen
auf der Disc oder im mitgelieferten
Benutzerhandbuch.
2. Schließen Sie das USBSpeichergerät an den Player an
(S. 16).
Hinweise
– Yamaha kann nicht garantieren, dass USBSpeichergeräte aller Marken mit diesem Player
verwendbar sind.
– Verbinden Sie ein USB-Speichergerät nicht über ein
USB-Verlängerungskabel mit dem USB-Anschluss
des Players. Eine einwandfreie Funktion des Players
ist bei Verwendung eines USB-Verlängerungskabels
nicht gewährleistet.
3. Spielen Sie die Disc ab.
Während Bild im Bild Anzeige (
)
oder Zweittonauswahl (
)
wiedergegeben werden, drücken Sie
PIP, um die Bild-in-Bild-Funktion zu
aktivieren/deaktivieren.
Hinweise
■ Verwenden der BD-Live™Funktion
1. Nehmen Sie die
Netzwerkeinstellung vor (S. 32).
Hinweise
– Beziehen Sie sich für Angaben zur Wiedergabeart
und Bedienung von BD-Live-Inhalten usw. auf die
Gebrauchsanweisung der Blu-ray Disc.
– Um BD-Live-Funktionen genießen zu können,
nehmen Sie den Netzwerkanschluss (S. 16) und die
Netzwerk-Einstellungen (S. 32) vor.
– Näheres zur Begrenzung des Zugriffs auf BD-LiveInhalte finden Sie unter „BD-Live-Verbindung“
(S. 33).
– Wie viel Zeit benötigt wird, um Programme auf das
an diesem Player angeschlossene USBSpeichergerät herunterzuladen, hängt von der
Internetverbindung sowie der Datenmenge ab.
– Es kann vorkommen, dass über das Internet
verfügbare BD-Live-Programme in Abhängigkeit
des Anbieters und der Internetverbindung nicht
angezeigt werden können. Nehmen Sie in solchen
Fällen die Disc heraus und legen sie wieder ein.
– Falls der BD-Live-Bildschirm längere Zeit nach
Wählen der BD-Live-Funktion im Blu-ray DiscMenü nicht angezeigt wird, verfügt das USBSpeichergerät möglicherweise nicht über genügend
freien Speicherplatz. Nehmen Sie in solchen Fällen
die Disc heraus und löschen Sie dann die Daten auf
dem USB-Speichermedium über das Menü „Format“
unter Speichermedium (S. 31).
27 De
Deutsch
– Zur Zweitton-Wiedergabe müssen Sie die AudioAusgang-Einstellung (Coaxial / Optical oder HDMI)
auf PCM oder Neuberechnen setzen (S. 35).
– Je nach Disc müssen Sie, um die ZweittonWiedergabe zu ermöglichen, die Funktion der
Zweitton-Wiedergabe im Top-Menü der Disc
aktivieren (S. 8).
– Je nach Inhalt kann die Zweitton und -bildWiedergabe der Bild-in-Bild-Funktion automatisch
erscheinen und verschwinden. Außerdem kann der
Wiedergabebereich beschränkt sein.
4. Führen Sie BD-Live gemäß den
Anweisungen auf der Disc aus.
EINSTELLUNGEN
SETUP-Menü
Im SETUP-Menü können Sie mit der Fernbedienung verschiedene Bild-, Ton- und Funktionseinstellungen vornehmen.
Menü/Untermenü
System
Allgemeine
Einstellungen
Sprache
Wiedergabe
Sicherheit
Netzwerk
28 De
Element
Funktion
Seite
Bilds.Schoner
Aktiviert/deaktiviert den Bildschirmschoner.
31
Disc AutoWiedergabe
Richtet diesen Player darauf ein, die Disc-Wiedergabe
automatisch zu starten.
31
HDMI Steuerung
Stellt diesen Player auf den Empfang von Steuersignalen von
der Fernbedienung des TV/AV-Receivers ein.
31
Netzwerksteuerung
Aktiviert/deaktiviert die Kontrolle über das Ethernet.
31
Werkseinstellung
laden
Stellt sämtliche Einstellungen, außer der SicherheitEinstellung, auf die Werksvorgaben zurück.
31
Upgrade
Führt die Aktualisierung des Players durch.
31
Einfaches
Konfigurationsmenü
Richtet Sprache, Auflösung, Bildseitenverhältnis ein.
Speichermedium
Zeigt den Status von Speichermedium (S. 31) an, formatiert
Speichermedium und wählt den front-/rückseitigen USBAnschluss für Speichermedium aus.
31
3D Wiedergabe
Information
Beim Einschalten dieses Players erscheint eine
Warnmeldung hinsichtlich der Wiedergabe von 3D-Videos.
31
OSD
Wählt die Sprache des Bildschirmmenüs aus.
31
31
Menü
Legt die Priorität der Sprache für das Discmenü fest.
31
Audio
Legt die Priorität der Audiosprache fest.
32
Untertitel
Legt die Priorität der Untertitelsprache fest.
32
Untertitel
Aktiviert/deaktiviert die geschlossenen Untertitel (Closed
Captions).
32
Kamerawinkel
Stellt ein, ob der Kamerawinkel bei der Wiedergabe von
Blu-ray Disc/DVD mit mehreren Blickwinkeln anzuzeigen
ist.
32
Bild im Bild
Anzeige
Stellt ein, ob die Bild im Bild Anzeige bei der Wiedergabe
von Blu-ray Disc/DVD mit Bild-in-Bild-Funktion
anzuzeigen ist.
32
Zweittonauswahl
Stellt ein, ob die Zweittonauswahl bei der Wiedergabe von
Blu-ray Disc/DVD mit Zweitton anzuzeigen ist.
32
Last Memory
Sorgt dafür, dass dieser Player beim Schalten in den
Bereitschaftsmodus oder beim Öffnen der Disclade die
zuletzt wiedergegebene Position einer Disc speichert.
32
DivX (R) VODDRM
Zeigt Registrierungscode für DivX(R)-Video an.
Netflix Information
Deaktiviert diesen Player bei Netflix und zeigt die ESN
(Electronic Serial Number) an.
32
Passwort ändern
Ändert das Kennwort für die Alterskontrolle und den
Ländercode.
32
32
Alterskontrolle
Richtet die Alterskontrolle je nach dem Inhalt einer Disc ein.
32
Ländercode
Richtet den Ländercode ein.
32
Internet Verbindung
Richtet die Internetverbindung auf Aktivieren/Deaktivieren
ein.
32
Verbindung
einstellen
Legt ein Verfahren für die Netzwerkverbindung fest.
Information
Zeigt den Bildschirm der Netzwerkinformationen an.
33
Verbindungstest
Führt den Test der Netzwerkverbindung durch.
33
IP Einstellungen
Richtet die IP-Einstellung auf Auto/Manuell ein.
33
BD-LiveVerbindung
Richtet die BD-Live-Verbindung auf Erlaubt/Teilweise
erlaubt/Verboten ein.
33
32
DLNA
Richtet DLNA auf Aktivieren/Deaktivieren ein.
33
Proxy-Einstellung
Richtet die Proxyeinstellung ein.
33
SETUP-Menü
Menü/Untermenü
TV
Anzeige
Einstellung
Audio-Ausgang
AudioEinstellungen
Funktion
Seite
Wählt zwischen 3D- und 2D-Videos aus.
33
TV Bildschirm
Stellt das Bildseitenverhältnis für den angeschlossenen
Fernseher und den Videoausgang ein.
33
Video Ausgabe
Wählt die Auflösung des Videoausgangs aus.
34
TV-System
Wählt das TV-System aus NTSC/PAL/Multi.
34
Farbraum
Wählt Farbraum unter YCbCr 4:4:4/YCbCr 4:2:2/Voll RGB/
RGB aus.
34
HDMI Deep Color
Wählt HDMI Deep Color unter 30 bit/36 bit/48 bits/Aus aus.
34
HDMI 1080p 24Hz
Setzt HDMI 1080p 24Hz auf Auto/Aus.
34
Lip Sync
Passt die Verzögerung zwischen Video und Audio an,
beispielsweise wenn die Lippenbewegungen nicht synchron
zur Sprache sind.
34
Video-Modus
Passt das visuelle Bild an.
34
Farbanpassung
Passt Helligkeit/Farbsätt/Farbton für jede Farbe an.
35
Rauschunterdrückung
Richtet den Pegel für Rauschunterdrückung ein.
35
De-Interlacing
Modus
Richtet ein, wie das Videosignal erkannt wird.
Coaxial / Optical
Wählt den Ausgabemodus des COAXIAL-Anschlusses/
OPTICAL-Anschlusses unter Bitstream/PCM/
Neuberechnen/Aus aus.
35
HDMI
Wählt den Ausgabemodus des HDMI-Anschlusses unter
Bitstream/PCM/Neuberechnen/Aus aus.
35
Downsampling
Wählt die Down-Sampling-Frequenz des digitalen
Audiosignals aus 48K/96K/192K.
35
35
DRC
Richtet die DRC (Dynamic Range Compression) ein.
35
Lautsprechereinstellung
2 Kanal Downmix
Richtet die Audio-Ausgabe von der AUDIO OUT L/RBuchse ein.
35
Post-Prozess
Upmix
Führt eine Mehrkanalisierung des 2-Kanal-Audiosignals
durch.
35
4
Einstellungen
Videokonfigurationsmenü
Element
3D Ausgang
Zeigt die Software-Version und die MAC-Adresse an (S. 43).
35
Systeminformation
Deutsch
29 De
SETUP-Menü
■ Beispiel für die Bedienung des
SETUP-Menüs
Um Einstellungen für diesen Player vornehmen zu
können, müssen Sie das SETUP-Menü aufrufen.
Nachstehend wird die grundlegende Bedienung des
SETUP-Menüs erläutert.
SUBTITLE
4. Geben Sie das Passwort ein.
Geben Sie Ihr Passwort über die Zifferntasten ein.
– Das Standardpasswort lautet 0000.
– Der nächste Einstellungsbildschirm erscheint
nicht, solange nicht das korrekte Passwort
eingegeben wurde.
– Informationen über das Ändern des Passworts
finden Sie unter „Passwort ändern“ (S. 32).
ANGLE
AUDIO
CLEAR
PIP
SEARCH
SETUP
TOP MENU
2ND
SHUFFLE
REPEAT
POP-UP MENU
ENTER
RETURN
ON SCREEN
Beispiel: Einrichten der Alterskontrolle
Hinweis
– Einige Funktionen können während der Wiedergabe
nicht eingerichtet werden. Drücken Sie in diesem
Fall
zweimal, um die Wiedergabe vor der
Einstellung vollständig anzuhalten.
5. Wählen Sie das nächste Element
aus.
Drücken Sie 5/a, um die Stufe für die
Alterskontrolle für Blu-ray Disc/DVD auszuwählen,
und drücken Sie dann ENTER.
1. Rufen Sie das SETUP-Menü auf.
Drücken Sie SETUP, um das SETUP-Menü
aufzurufen.
Drücken Sie 2/3, um Allgemeine Einstellungen
auszuwählen, und drücken Sie dann ENTER oder
a.
2. Wählen Sie ein Untermenü aus.
Drücken Sie 5/a, um Sicherheit auszuwählen, und
drücken Sie dann ENTER oder den Cursor 3.
6. Schließen Sie das Menü.
3. Wählen Sie einen Menüpunkt aus.
Drücken Sie 5/a, um Alterskontrolle auszuwählen,
und drücken Sie dann ENTER oder den Cursor 3.
30 De
Drücken Sie 2, um zum vorherigen Menü
zurückzukehren.
SETUP-Menü
■ Allgemeine Einstellungen
Die Werkseinstellungen sind mit einem Sternchen „* “
gekennzeichnet.
Netzwerksteuerung
Sie können die Kontrolle über das Ethernet auf Ein/Aus
setzen. Dieser Player nutzt das Protokoll Yamaha Network
Control (YNC).
Ein, Aus*
Bilds.Schoner
Sie können den Bildschirmschoner aktivieren oder deaktivieren.
Ist der Bildschirmschoner aktiviert, wechselt der Player in den
Bildschirmschonermodus, wenn 3 Minuten lang keine
Bedienung erfolgt. Erfolgt weitere 27 Minuten keine
Bedienung, wechselt der Player in den Bereitschaftsmodus.
Hinweise
– Ist Netzwerksteuerung aktiviert, erhöht sich die
Leistungsaufnahme während des Bereitschaftsmodus
aufgrund der Netzwerkkontrollfunktion.
– Ist Ein aktiviert, sinkt die für den Systemstart
benötigte Zeit.
Werkseinstellung laden
Sie können alle Einstellungen dieses Players,
ausgenommen der für Sicherheit, auf die Werksvorgaben
zurücksetzen (S. 32). Weitere Informationen über die
Werksvorgaben finden Sie auf den Seiten 28–35.
Upgrade
Sie können die Software manuell per USB oder über
Netzwerk aktualisieren. Weitere Einzelheiten zur SoftwareAktualisierung finden Sie unter „Software-Upgrade“ (S. 38).
Einfaches Konfigurationsmenü
Sie können Einfaches Konfigurationsmenü durchführen
(S. 18).
Speichermedium
Sie können Speichermedium-Informationen anzeigen,
Speichermedium formatieren und USB Vorderseite/USB
Rückseite für die Speicherung von BD-Live-Daten
auswählen.
Um den BUDA-Ordner auf dem USB-Speichermedium zu
formatieren (leeren), drücken Sie Information und dann
ENTER, wenn „Format“ auf dem Bildschirm
hervorgehoben ist.
Ein*, Aus
Disc Auto-Wiedergabe
Sie können die Disc Auto-Wiedergabe aktivieren oder
deaktivieren. Bei Aktivierung wird die Disc nach dem
Laden automatisch wiedergegeben.
Ein*, Aus
HDMI Steuerung
Sie können den Player auf den Empfang von Steuersignalen
über das HDMI-Kabel von einem TV/AV-Receiver einrichten,
der mit der HDMI Steuerung-Funktion kompatibel ist (S. 12).
Ein, Aus*
Verwenden der HDMI Steuerung-Funktion
Mit der HDMI Steuerung-Funktion können Sie diesen
Player und Ihren (HDMI Steuerung-kompatiblen)
Fernseher interaktiv bedienen.
Wenn Sie diesen Player mittels HDMI-Kabel an einen
Fernseher anschließen, der mit der HDMI SteuerungFunktion kompatibel ist, und die HDMI SteuerungFunktion im SETUP-Menü aktivieren (S. 31), können
Sie die unten aufgelisteten Funktionen durchführen.
Hinweise
– Je nach Fernseher funktioniert die Funktion
HDMI Steuerung eventuell nicht richtig.
– Je nach Fernseher und AV-Receiver sind andere
als die oben erwähnten Funktionen verfügbar.
– Um die Funktion HDMI Steuerung verfügbar zu
machen, nehmen Sie Einstellungen für die
Funktion HDMI Steuerung an ALLEN
Komponenten (dieser Player, TV und AVReceiver) vor. Gewisse zusätzliche
Bedienungsvorgänge können erforderlich sein.
– Abhängig vom Fernseher können einzelne
Funktionen separat aktiviert bzw. deaktiviert
werden.
– Näheres zum Einstellen des Fernsehers und/oder
AV-Receivers finden Sie in den mitgelieferten
Bedienungsanleitungen.
– Ist diese Option aktiviert, erhöht sich die
Leistungsaufnahme im Bereitschaftsmodus
aufgrund der HDMI Steuerung-Funktion.
USB Vorderseite, USB Rückseite*
Tipp
– Speichermedium dient als Hilfsspeicher bei der
Wiedergabe einer Blu-ray Disc.
3D Wiedergabe Information
Sie können die Warnmeldung hinsichtlich der 3DVideowiedergabe, die beim Einschalten des Players
erscheint, ein- oder ausschalten.
Ein*, Aus
Sprache
OSD
Sie können die Sprache für die Bildschirmanzeige
auswählen. Hierbei handelt es sich um die Meldungen
oder die Menüs, die auf dem Bildschirm angezeigt
werden, z. B. das SETUP-Menü.
English, Français , Español , Deutsch , Italiano , Svenska ,
Nederlandse ,
,
Menü
Sie können die Priorität der Sprache für das Discmenü
festlegen.
English, Français ,
, Español , Deutsch , Italiano ,
Nederlandse , Portugiesisch, Dänisch, Svenska , Finnisch,
Norwegisch,
, Koreanisch, Japanisch, Weitere
31 De
Deutsch
• Automatische Eingangswahlfunktion
Wenn Sie die Wiedergabe dieses Players starten, wird
die Eingangswahl des Fernsehers (sowie eines AVReceivers, über den der Fernseher ggf. angeschlossen
ist) automatisch auf diesen Player eingestellt. Der
Fernseher wird ggf. automatisch eingeschaltet.
• Automatisches Ausschalten
Wenn der Fernseher ausgeschaltet wird, während die
Wiedergabe dieses Players gestoppt ist, und das
SETUP-Menü nicht angezeigt wird, wird dieser
Player ebenfalls automatisch ausgeschaltet.
4
Einstellungen
System
SETUP-Menü
Audio
Sie können die Priorität der Audiosprache für die Blu-ray
Disc-/DVD-Wiedergabe festlegen. Weitere Informationen
dazu finden Sie unter „Menü“ (S. 31).
Untertitel
Sie können die Priorität der Sprache der Untertitel
festlegen.
English, Français ,
, Español , Deutsch , Italiano ,
Nederlandse , Portugiesisch, Dänisch, Svenska , Finnisch,
Norwegisch,
, Koreanisch, Japanisch, Weitere, Aus
(Die Standardeinstellungen unter [Sprache] variieren
abhängig von Ihrem Modell.)
Wiedergabe
Untertitel
Sie können auswählen, ob die Untertitel angezeigt werden
sollen (S. 43), wenn eine Blu-ray Disc/DVD mit
Untertiteln wiedergegeben wird.
Ein*, Aus
Kamerawinkel
Sie können einstellen, ob der Kamerawinkel (
) bei der
Wiedergabe von Blu-ray Disc/DVD mit mehreren
Blickwinkeln angezeigt werden soll.
Ein*, Aus
Bild im Bild Anzeige
Sie können einstellen, ob die Bild im Bild Anzeige (
)
angezeigt werden soll, wenn eine Blu-ray Disc mit Bildin-Bild-Funktion (S. 27) wiedergegeben wird.
Ein*, Aus
Zweittonauswahl
Sie können einstellen, ob die Zweittonauswahl (
)
angezeigt werden soll, wenn eine Blu-ray Disc mit
Zweitton wiedergegeben wird.
Ein*, Aus
Last Memory
Mit dieser Option können Sie einstellen, ob dieser Player
beim Schalten in den Bereitschaftsmodus oder beim
Öffnen der Disclade die zuletzt wiedergegebene Position
einer Disc speichert.
Ein*, Aus
Hinweis
– Manche Discs sind mit dieser Funktion
inkompatibel.
DivX (R) VOD-DRM
Sie können den Registrierungscode für das DivX(R)Video anzeigen.
Netflix Information
Sie können diesen Player bei Netflix deaktivieren und die
ESN (Electronic Serial Number) anzeigen. Um den Player
wieder zu aktivieren, schlagen Sie unter „Wiedergabe von
Videos von Netflix™“ (S. 23) nach. Die ESN (Electronic
Serial Number) ist eine eindeutige Nummer, mit der Sie
das Streaming über Netflix nutzen können.
Sicherheit
Passwort ändern
Sie können das Passwort für die Änderung der
Alterskontrolle und des Ländercodes einrichten. Siehe
„Alterskontrolle“ (S. 32) und „Ländercode“ (S. 32).
Hinweise
– Das Standardpasswort lautet 0000.
– Wenn Sie Ihr Passwort vergessen haben, sehen Sie
unter„ Fehlersuche“ nach (S. 39) und setzen Sie alle
Sicherheit-Einstellungen auf die Werksvorgaben
zurück.
Alterskontrolle
Manche Blu-ray-Discs/DVDs sind mit einer
Altersbegrenzung für die Wiedergabe versehen. Sie
können die auf dem Bildschirm angezeigte Alterskontrolle
je nach Discinhalt einrichten.
Das Passwort (siehe „Passwort ändern“ auf S. 32) muss
eingegeben werden, bevor die Stufen für die
Alterskontrolle eingerichtet werden können.
Nachdem Sie die Alterskontrolle eingerichtet haben,
erscheint ein Dialogfeld, wenn Sie eine Disc mit einer
höheren Stufe als der aktuellen Stufe für die
Alterskontrolle wiedergeben oder wenn Sie die
Alterskontrolle ändern. In diesem Dialogfeld werden Sie
aufgefordert, ein Passwort einzugeben.
Aus*, 1–8
Ländercode
Sie können den Ländercode für das Land einrichten, in
dem Sie wohnen. Das Passwort (siehe „Passwort ändern“
auf S. 32) muss eingegeben werden, bevor der Ländercode
eingerichtet wird. Diese Einstellung kann für die
Einstufung der Alterskontrolle und die Disc-Wiedergabe
verwendet werden.
Netzwerk
Internet Verbindung
Setzen Sie diese Option auf Aktivieren, wenn Sie BD-Live
(S. 27), DLNA (S. 20), das Software-Upgrade über das
Netzwerk (S. 38) und andere Netzwerkfunktionen nutzen.
Aktivieren*, Deaktivieren
Verbindung einstellen
Sie können ein Verfahren für die Netzwerkverbindung
auswählen.
Wired*
Verbindet sich über Ethernet mit dem Netzwerk.
Drahtlos
Verbindet sich über ein WLAN mit dem Netzwerk.
Sie können die Einstellungen für eine WLANVerbindung festlegen. Befolgen Sie die
Anweisungen auf dem Bildschirm, um fortzufahren.
Scan
Sucht nach einem Zugangspunkt. Sie können eine
Verbindung mit dem gefundenen Zugangspunkt
herstellen.
Manuell
Sie können manuell die Informationen für einen
Zugangspunkt festlegen.
32 De
SETUP-Menü
Information
Sie können einen Bildschirm mit Netzwerkinformationen
anzeigen. Auf diesem Bildschirm können Sie die
Informationen für Interface (Ethernet), Adressentyp, IP
Adresse, Subnetzmaske, Standard Gateway und DNS
ansehen.
■ Anzeige Einstellung
Verbindungstest
Sie können einen Internetanschlusstest durchführen. Sollte
der Test fehlschlagen, prüfen Sie „IP Einstellungen“
(S. 33) und führen Sie den Test erneut durch.
3D Ausgang
Sie können zwischen 3D- oder 2D- Videoausgabe wählen.
Auto*
Der Player wählt automatisch zwischen 3D- und 2DVideos aus.
IP Einstellungen
Sie können die Netzwerkeinstellungen konfigurieren.
Aus
Der Player wählt immer 2D-Videos aus.
Manuell
Wählen Sie diese Option zur automatischen
Konfiguration der Netzwerkeinstellungen dieses
CD-Players mit dem DHCP-Server.
Wählen Sie diese Option zur manuellen
Konfiguration der Netzwerkeinstellungen (IP
Adresse, Subnetzmaske, Standard Gateway und
DNS).
Tipps
– Numerische
Tasten
– 2/3
– CLEAR
– ENTER
Zur Eingabe von Zeichen.
Ändert die Hervorhebung.
Löscht ein Zeichen.
Speichert die Einstellungen und
beendet das Menü.
BD-Live-Verbindung
Sie können Zugriffsbeschränkungen auf BD-Live-Inhalte
einrichten.
Erlaubt
Hierüber können alle BD-Live-Discs eine
Verbindung zum Netzwerk aufbauen.
Teilweise
erlaubt*
Lässt nur Discs mit Besitzer-Zertifizierung zu.
Verboten
Hierüber wird die Verbindung mit dem Netzwerk für
alle BD-Live-Discs unzulässig.
Aktivieren*, Deaktivieren
Proxy-Einstellung
Sie können die Proxy-Einstellung einrichten. Wählen Sie
die Option Deaktivieren für den normalen Gebrauch.
Wählen Sie Aktivieren, um die Proxy-Einstellung
vorzunehmen.
Aktivieren
4
Hinweis
– Selbst wenn Sie „3D Ausgang“ auf „Auto“
eingestellt haben, kann der Player bei der
Wiedergabe einer Blu-ray 3D-Disc 2D-Bilder
wählen - dies hängt von der Art der Anschlüsse, der
Einstellung Ihres Fernsehers usw. ab (S. 12).
TV Bildschirm
Sie können das Bildseitenverhältnis des angeschlossenen
Fernsehers auswählen und den Videoausgang einstellen.
Falls sich das Bildschirmformat des angeschlossenen
Fernsehers geändert hat (weil Sie z. B. ein neues
Fernsehgerät gekauft haben), müssen Sie die Einstellung
von TV Bildschirm ändern.
16:9 Voll
Wählen Sie diese Option aus, wenn der Player an
einen Fernseher mit einem Bildseitenverhältnis von
16:9 angeschlossen ist. Wenn ein Video mit einem
Bildseitenverhältnis von 4:3 wiedergegeben wird,
erfolgt die Wiedergabe wie unten angegeben.
16:9 Normal* Wählen Sie diese Option aus, wenn der Player an
einen Fernseher mit einem Bildseitenverhältnis von
16:9 angeschlossen ist. Wenn ein Video mit einem
Bildseitenverhältnis von 4:3 wiedergegeben wird,
erfolgt die Wiedergabe wie unten angegeben.
4:3 Pan Scan Wählen Sie diese Option aus, wenn der Player an
einen Fernseher mit einem Bildseitenverhältnis von
4:3 angeschlossen ist. Wenn ein Video mit einem
Bildseitenverhältnis von 16:9 wiedergegeben wird,
erfolgt die Wiedergabe wie unten angegeben.
4:3 Letterbox Wählen Sie diese Option aus, wenn der Player an
einen Fernseher mit einem Bildseitenverhältnis von
4:3 angeschlossen ist. Wenn ein Video mit einem
Bildseitenverhältnis von 16:9 wiedergegeben wird,
erfolgt die Wiedergabe wie unten angegeben.
OriginalBildgröße
Auf einem 16:9-Fernseher (Breitbild)
16:9 Voll
16:9 Normal
Aktiviert den Proxy-Host und die ProxyAnschlusseinstellung.
Deaktivieren* Mit dieser Option wird der Proxy-Server deaktiviert.
Wählen Sie diesen Punkt aus, wenn der ProxyServer nicht verwendet wird.
Proxy Host
Richtet den Proxy Host ein.
Proxy Port
Richtet den Proxy-Anschluss ein.
4:3
OriginalBildgröße
Auf einem 4:3-Fernseher
4:3 Pan Scan
4:3 Letterbox
16:9
33 De
Deutsch
DLNA
Sie können DLNA (S. 42) auf Aktivieren oder
Deaktivieren einstellen. Wenn Sie die DLNA-Funktion
nicht nutzen, wählen Sie die Option Deaktivieren.
TV
Einstellungen
Auto*
Die Werkseinstellungen sind mit einem Sternchen „* “
gekennzeichnet.
SETUP-Menü
Video Ausgabe
Sie können die Videoausgangsauflösung unter HDMI,
COMPONENT oder VIDEO auswählen. Weitere
Informationen über die Ausgabeformate finden Sie unter
„Übersicht der Videoausgangsformate“ (S. 37).
HDMI Deep Color
Wenn Ihr TV und/oder AV-Receiver mit Deep Color
(S. 42) kompatibel ist, stellen Sie diese Funktion gemäß
Ihrem TV/AV-Receiver ein. Diese Funktion ist verfügbar,
wenn der Player mit einem HDMI-Kabel angeschlossen ist.
HDMI
30 bit, 36 bit, 48 bits, Aus*
Ist die Option Auto eingerichtet, wird die Auflösung
auf die für den angeschlossenen Fernseher maximale
Option eingerichtet.
Wenn Native Diskwiedergabe eingestellt ist, werden
die ursprüngliche Auflösung und Videofrequenz
verwendet, die auf der abgespielten Blu-ray Disc
oder DVD aufgezeichnet sind. Sie können eine
Video-Aufwärtswandlerfunktion eines externen
Geräts verwenden.
Wenn ein anderes Medium als eine Blu-ray Disc oder
DVD wiedergegeben wird, werden die Auflösung
und Videofrequenz als Auto übernommen.
Wenn eine Blu-ray Disc oder DVD verwendet wird,
deren Auflösung und Videofrequenz nicht mit dem
angeschlossenen Fernsehgerät kompatibel sind, wird
kein Bild ausgegeben. Stoppen Sie in diesem Fall die
Wiedergabe und wählen Sie eine andere Option als
Native Diskwiedergabe.
Auto*, Native Diskwiedergabe, 480i/576i,
480p/576p, 720p, 1080i, 1080p
COMPONENT Sie können nur 480p/576p oder 480i/576i
auswählen.
480p/576p, 481i/576i*
VIDEO
HDMI 1080p 24Hz
Mit dieser Option wird BD-Video mit einer Bildrate von
24 Hz in HDMI 1080p 24Hz ausgegeben. Über diese
Funktion kann die Wiedergabe des Videos geglättet
werden. Diese Funktion ist verfügbar, wenn Ihr TV/AVReceiver diese Funktion unterstützt und wenn der Player
mittels HDMI-Kabel angeschlossen ist. Weitere
Informationen über die Ausgabeformate finden Sie unter
„Übersicht der Videoausgangsformate“ (S. 37).
Auto*, Aus
Hinweis
– Diese Einstellung ist deaktiviert, wenn eine andere
Ausgabeauflösung als 1080p verwendet wird.
Lip Sync
Sie können die Funktion Lip Sync (S. 43) einstellen/
anpassen.
Auto*
Der Player passt die Funktion Lip Sync automatisch
an.
Manuell
Sie können die Lip Sync-Funktion manuell
anpassen. Sie können die Audioverzögerung für 2Dund 3D-Inhalte jeweils separat einstellen.
Die Funktion entspricht der von 480i/576i.
Hinweise
– Um HD-Audio (wie beispielsweise Dolby TrueHD
oder DTS-HD Master Audio) über den HDMIAnschluss auszugeben, stellen Sie die Video
Ausgabe auf Auto oder höher als 720p ein.
– Wenn ein Fernsehgerät über ein HDMI-Kabel
angeschlossen ist, ist die Standardeinstellung HDMI.
– Wenn ein Fernsehgerät nicht über ein HDMI-Kabel
angeschlossen ist, ist die Standardeinstellung VIDEO.
TV-System
Für das TV-System kann zwischen PAL, NTSC und Multi
ausgewählt werden. Wählen Sie das TV-System Ihres
Fernsehers. Weitere Informationen über die
Ausgabeformate finden Sie unter „Übersicht der
Videoausgangsformate“ (S. 37).
NTSC, PAL, Multi
(Die Standardeinstellung variiert abhängig von Ihrem Modell.)
Farbraum
Sie können die Farbraum-Ausgabe (S. 42) aus HDMI
auswählen. Diese Funktion ist verfügbar, wenn der Player
mit einem HDMI-Kabel angeschlossen ist.
YCbCr 4:4:4* Richtet Farbraum auf YCbCr 4:4:4 ein.
YCbCr 4:2:2
Richtet Farbraum auf YCbCr 4:2:2 ein.
Voll RGB
Wählen Sie diese Option aus, wenn RGB
eingerichtet ist und Weiß und Schwarz auf dem
Bildschirm zu schwach angezeigt werden. Diese
Einstellung ist effektiv, wenn ein angeschlossenes
Gerät den Bereich RGB 0–255 unterstützt.
RGB
Gibt ein Videosignal im normalen Signalbereich aus.
Hinweis
– Diese Funktion ist nur bei Fernsehern verfügbar, die
diese Funktion unterstützen.
34 De
2D
3D
Aus
Der Player passt die Funktion Lip Sync nicht an.
Videokonfigurationsmenü
Video-Modus
Sie können den Video-Modus unten auswählen.
Standard*
Das Bild ist besonders natürlich und ausgeglichen.
Dieser Modus ist für die normale Verwendung
geeignet.
lebhaft
Das Bild ist klarer und schärfer.
Kino
Diese Option ist für das Betrachten von Filmen in
dunklen Räumen geeignet.
Nutzer
Sie können das visuelle Bild manuell anpassen.
Drücken Sie 5/a, um den Parameter auszuwählen,
und drücken Sie dann 2/3, um die Zahl anzupassen.
Helligkeit
Passt die Gesamthelligkeit des Bildes an.
Farbsätt
Passt die Sättigung der Farbe des Bildes an.
Farbton
Passt den Farbton des Bildes an.
Kontrast
Passt die hellen Bereiche (Weißstufen) im Bild an.
Schärfe
Passt die Schärfe der Objekte im Video an.
CTI
Macht die Kanten von Farbbildern weicher.
Farbbilder werden klarer gerendert.
Die Standardeinstellung ist jeweils 0.
SETUP-Menü
Farbanpassung
Sie können Helligkeit/Farbsätt/Farbton für jede Farbe
(Rot/Grün/Blau/Gelb/Cyan/Magenta) anpassen. Um diese
Funktion zu nutzen, setzen Sie Video-Modus auf Nutzer.
Weitere Informationen zu den Einstellungselementen
finden Sie unter „Video-Modus“ (S. 34).
Downsampling
Sie können die Down-Sampling-Frequenz des digitalen
Audiosignals auswählen. Diese Funktion ist für die
Audiosignalausgabe über die COAXIAL-Buchse/
OPTICAL-Buchse effektiv.
Die höchste Sampling-Rate der digitalen PCMAusgabe beträgt 48 kHz.
Rauschunterdrückung
Sie können die Rauschunterdrückung auf einen Wert
zwischen 0 und 3 einstellen. 0 bedeutet deaktiviert und 3
ist der maximale Pegel.
96K
Die höchste Sampling-Rate der digitalen PCMAusgabe beträgt 96 kHz.
192K
Die höchste Sampling-Rate der digitalen PCMAusgabe beträgt 192 kHz.
0, 1, 2*, 3
DRC
Sie können die DRC (Dynamic Range Compression)
(S. 42) aktivieren/deaktivieren/auf Auto setzen. DRC wird
automatisch für eine Quelle mit DRC-Informationen im
Dolby TrueHD-Format aktiviert, wenn die Einstellung
Auto ausgewählt ist. DRC sorgt dafür, dass laute Töne,
wie beispielsweise Explosionen, geschwächt und
Gespräche besser verständlich werden. Dies ist nützlich,
wenn Sie nachts Filme anschauen.
De-Interlacing Modus
Sie können auswählen, wie das Videosignal erkannt wird.
Wählen Sie die Option Auto für den normalen Gebrauch.
Wählen Sie die Option Film/Video, falls horizontale
Streifen auf dem Bildschirm erscheinen sollten.
Auto*, Film, Video
■ Audio-Einstellungen
Die Werkseinstellungen sind mit einem Sternchen
gekennzeichnet.
4
Einstellungen
48K*
Die Standardeinstellung ist jeweils 0.
Aus, Ein, Auto*
„*
“
Audio-Ausgang
Coaxial / Optical
Sie können den Ausgabemodus der COAXIAL-Buchse
und der OPTICAL-Buchse einstellen. Weitere
Informationen über die Ausgabeformate finden Sie unter
„Übersicht der Audioausgangsformate“ (S. 36).
Bitstream
Gibt ein digitales Signal ohne Verarbeitung aus. Der
Zweitton wird nicht ausgegeben.
PCM
Gibt 2-Kanal-PCM aus.
Lautsprechereinstellung
2 Kanal Downmix
Sie können aus Stereo oder Lt/Rt die Downmix-Methode
zu einem analogem 2-Kanal auswählen.
Lt/Rt
Wählen Sie diese Option, wenn das Gerät an einen
Dolby Pro Logic-Decoder angeschlossen ist. Der
Ton aus den hinteren Lautsprechern wird auf 2Kanal-Stereoton gemischt.
Stereo*
Ändert die Kanalausgabe auf Stereo, wodurch nur
Ton aus den beiden Frontlautsprechern ausgegeben
wird.
Neuberechnen* Gibt Bitstream mit Zweitton aus.
Aus
Schaltet den Ton auf stumm.
Upmix
Sie können eine Mehrkanalisierung des 2-KanalAudiosignals durchführen. Um eine Mehrkanalisierung
vorzunehmen, wählen Sie DTS NEO:6 und dann den
Modus Kino oder Musik.
Aus*, DTS NEO:6
Bitstream*, PCM, Neuberechnen, Aus
Hinweis
– Um HD-Audio (wie beispielsweise Dolby TrueHD
oder DTS-HD Master Audio) über den HDMIAnschluss auszugeben, stellen Sie die Video
Ausgabe auf Auto oder höher als 720p ein (S. 34).
■ Systeminformation
Software-Version und MAC-Adresse (S. 43) werden
angezeigt.
35 De
Deutsch
HDMI
Sie können den Ausgabemodus des HDMI-Anschlusses
auswählen. Weitere Informationen dazu finden Sie unter
„Coaxial / Optical“ (S. 35). Weitere Informationen über die
Ausgabeformate finden Sie unter „Übersicht der
Audioausgangsformate“ (S. 36).
Post-Prozess
SETUP-Menü
■ Übersicht der Audioausgangsformate
Quellformat
PCM-2ch
PCM-5.1ch
PCM-7.1ch
HDMI
Bitstream
mit ZT* oder
MTT**
PCM-2ch
ohne ZT* oder
MTT**
mit ZT* oder
MTT**
PCM-5.1ch
PCM-7.1ch
PCM bis
5.1ch
mit ZT* oder
Dolby Digital MTT**
Dolby Digital
Plus
Plus
ohne ZT* oder
MTT**
PCM bis
7.1ch
Dolby
TrueHD
DTS
ohne ZT* oder
MTT**
mit ZT* oder
MTT**
ohne ZT* oder
MTT**
mit ZT* oder
MTT**
ohne ZT* oder
MTT**
Dolby
TrueHD
PCM bis
7.1ch
DTS
PCM bis
5.1ch
mit ZT* oder
DTS HD High MTT**
DTS HD High
Resolution
Resolution
ohne ZT* oder
MTT**
PCM bis
7.1ch
mit ZT* oder
MTT**
DTS-HD
DTS-HD
Master Audio ohne ZT* oder Master Audio
MTT**
PCM bis
7.1ch
PCM
PCM-2ch
MIXED 2CH
Neuberechnen
–
Dolby Digital
2ch
PCM-2ch
Dolby Digital
PCM-2ch
2ch
Dolby Digital
PCM-2ch
Dolby Digital
PCM-2ch
PCM-7.1ch
Dolby Digital
Dolby Digital
Dolby Digital
PCM-5.1ch
ohne ZT* oder
MTT**
mit ZT* oder
MTT**
COAXIAL / OPTICAL
Neuberechnen Bitstream
PCM-2ch
ohne ZT* oder
MTT**
mit ZT* oder
MTT**
PCM
2ch
Dolby Digital
PCM-2ch
Dolby Digital Dolby Digital
2ch
2ch
2ch
PCM-2ch
Dolby Digital
2ch
Dolby Digital
PCM-2ch
Dolby Digital
2ch
Dolby Digital
PCM-2ch
Dolby Digital
2ch
DTS
PCM-2ch
DTS
2ch
DTS
PCM-2ch
DTS
2ch
DTS
PCM-2ch
DTS
2ch
Dolby Digital
Dolby Digital
Plus
Dolby Digital
Dolby
TrueHD
DTS
DTS
DTS HD High
Resolution
DTS
DTS-HD
Master Audio
* „ZT“ steht für Zweitton.
** „MTT“ steht für Maustastenton, d. h. der Ton, der beim Öffnen von Popup-Menüs, usw. ausgegeben wird.
Hinweise
– Wenn Coaxial / Optical oder HDMI auf Bitstream eingerichtet sind, wird kein Zweitton ausgegeben. (S. 35)
– Um HD-Audio (wie beispielsweise Dolby TrueHD oder DTS-HD Master Audio) über den HDMI-Anschluss
auszugeben, stellen Sie die Video Ausgabe auf Auto oder höher als 720p ein (S. 34).
36 De
SETUP-Menü
■ Übersicht der Videoausgangsformate
Wenn das TV-System auf NTSC eingerichtet ist
Video Ausgabe
Inhalt
HDMI
Ausgang
Auto
*1
*2
1080p
1080i
1080p 24 Hz/
1080p 24 Hz
1080i 60Hz
60 Hz *4
Aus
*1
*3
*2
Aus
*1
*3
*2
*2
*1
*1
*2
*2
Aus
Aus
1080p 60Hz 1080i 60Hz
Aus
Aus
1080p 60Hz 1080i 60Hz
Aus
Aus
1080p 60Hz 1080i 60Hz
Aus
Aus
COMPONENT
VIDEO
720p
480p/576p
480i/576i
480p/576p
480i/576i
–
720p 60Hz
480p
480i
480p
480i
480i
480i
480i
480p
480i
480i
480p
480p
480i
480p
480p
480i
480i
480i
480i
480i
480i
480i
480i
480i
480i
480i
480i
480i
480i
480p
480i
480i
480p
480p
480i
480p
480p
480i
480i
480i
480i
480i
480i
480i
480i
480i
480i
480i
480i
480i
480i
480i
480i
480i
480i
480i
480i
480i
480i
480i
Aus
720p 60Hz
Aus
720p 60Hz
Aus
720p 60Hz
Aus
Wenn das TV-System auf PAL eingerichtet ist
Video Ausgabe
Inhalt
HDMI
Ausgang
Auto
BD-Video
mit
1080p/
24-Hz-Inhalt
BD-Video
ohne 1080p/
24-Hz-Inhalt
DVD-Video
Andere
HDMI
COMPONENT
VIDEO
HDMI
COMPONENT
VIDEO
HDMI
COMPONENT
VIDEO
HDMI
COMPONENT
VIDEO
*1
Native
Diskwiedergabe
1080p
1080i
1080p 24 Hz/
1080p 24 Hz
1080i 50Hz
50 Hz *4
*2
Aus
*1
*3
*2
Aus
*1
*3
*2
*2
*1
*1
*2
*2
Aus
Aus
1080p 50Hz 1080i 50Hz
Aus
Aus
1080p 50Hz 1080i 50Hz
Aus
Aus
1080p 50Hz 1080i 50Hz
Aus
Aus
COMPONENT
VIDEO
720p
480p/576p
480i/576i
480p/576p
480i/576i
–
720p 50Hz
576p
576i
576p
576i
576i
576i
576i
576p
576i
576i
576p
576p
576i
576p
576p
576i
576i
576i
576i
576i
576i
576i
576i
576i
576i
576i
576i
576i
576i
576p
576i
576i
576p
576p
576i
576p
576p
576i
576i
576i
576i
576i
576i
576i
576i
576i
576i
576i
576i
576i
576i
576i
576i
576i
576i
576i
576i
576i
576i
576i
Aus
720p 50Hz
Aus
720p 50Hz
Aus
720p 50Hz
Aus
4
Einstellungen
BD-Video
HDMI
mit
1080p/
COMPONENT
24-Hz-Inhalt
VIDEO
HDMI
BD-Video
ohne 1080p/ COMPONENT
24-Hz-Inhalt
VIDEO
HDMI
DVD-Video COMPONENT
VIDEO
HDMI
Andere
COMPONENT
VIDEO
Native
Diskwiedergabe
Wenn das TV-System auf Multi eingerichtet ist
Wenn TV-System auf Multi eingerichtet ist, wird das Videosignal mit der gleichen Frequenz wie die Quelle ausgegeben.
Informationen über die Frequenzeinstellung des Fernsehers und die Auflösung des Ausgangsvideosignals finden Sie in
den Tabellen oben.
Hinweise
– Die HDMI 1080p 24Hz-Einstellung ist deaktiviert, wenn eine andere Ausgabeauflösung als 1080p verwendet
wird.
– Wenn das TV-System auf NTSC eingerichtet ist und die Videoquelle nicht 60 Hz ist, wird das VideoAusgangssignal in 60 Hz konvertiert.
– Wenn das TV-System auf PAL eingerichtet ist und die Videoquelle nicht 50 Hz ist, wird das VideoAusgangssignal in 50 Hz konvertiert.
37 De
Deutsch
*1 Die Auflösung wird auf die maximal vom angeschlossenen Fernsehgerät unterstützte Auflösung festgelegt. Wenn z.
B. die maximal vom angeschlossenen Fernsehgerät unterstützte Auflösung 1080p beträgt, wird die Auflösung auf
1080p festgelegt.
*2 Möglicherweise wird kein Video ausgegeben, da die HDMI-Ausgabe Priorität hat.
*3 Die Auflösung entspricht der Quelldisc.
*4 Wenn Auto für HDMI 1080p 24Hz eingestellt ist und das angeschlossene Fernsehgerät 1080p 24-Hz-Inhalt
unterstützt, wird 1080p 24 Hz statt 1080p 50/60 Hz ausgegeben.
Software-Upgrade
Manche der neuesten Blu-ray-Discs sind ohne Aktualisierung der Player-Software nicht abspielbar. Wir empfehlen, dass
Sie die Software dieses Players über das Software-Upgrade aktualisieren, damit der Player mit der neuesten Software
betrieben werden kann.
Ob ein Software-Upgrade verfügbar ist, erfahren Sie auf der Seite:
http://download.yamaha.com/
Hinweis
– Entnehmen Sie nicht das USB-Speichergerät, versetzen Sie den Player nicht in den Bereitschaftsmodus und
ziehen Sie weder Netzkabel noch LAN-Kabel, während das Software-Upgrade durchgeführt wird.
■ Aktualisierung der Software
1. Bereiten Sie sich auf das
Software-Upgrade vor.
Bei Aktualisierung der Software über USB:
1 Speichern Sie die Upgrade-Dateien im
entsprechenden Ordner auf dem USBSpeichergerät. Weitere Einzelheiten finden Sie
im Dokument, das mit den Upgrade-Dateien
geliefert wird.
2 Schließen Sie das USB-Speichergerät an.
Wechseln Sie zu Schritt 2.
Bei Aktualisierung der Software über Netzwerk:
Stellen Sie sicher, dass der Player mit dem
Netzwerk verbunden ist.
2. Wählen Sie die Upgrade-Methode
aus und starten Sie das Upgrade
über das SETUP-Menü.
1 Drücken Sie SETUP, um das SETUP-Menü
aufzurufen.
2 Wählen Sie Allgemeine Einstellungen = System
= Upgrade.
3 Wählen Sie unter USB/Netzwerk das Element
aus, in dem die Aktualisierungsdateien enthalten
sind.
Das System sucht nach Upgrade-Dateipaketen.
38 De
3. Aktualisieren Sie die Software,
indem Sie die Meldungen auf dem
Bildschirm befolgen.
Das Upgrade ist abgeschlossen. Das System wird
zurückgesetzt.
ZUSÄTZLICHE INFORMATIONEN
Fehlersuche
Suchen Sie eine Lösung aus der unten angegebenen Tabelle, wenn dieser Player nicht richtig funktionieren sollte. Falls
Ihr Problem hier nicht aufgeführt wird oder die vorgeschlagene Lösung keine Abhilfe schafft, schalten Sie diesen Player
aus, ziehen Sie das Netzkabel ab und wenden Sie sich an den nächsten Yamaha-Händler oder -Kundendienst.
■ Strom
Problem
Mögliche Ursache und Lösung
Kein Spannungsversorgung.
– Schließen Sie das Netzkabel richtig an.
– Drücken Sie p auf der Vorderseite, um die Stromversorgung einzuschalten.
Die Stromversorgung des Players
schaltet sich aus.
– Die Stromversorgung wird automatisch nach 30 Minuten Inaktivität (keine
Wiedergabe) ausgeschaltet.
5
■ Grundlegende Bedienung
Mögliche Ursache und Lösung
– Benutzen Sie die Fernbedienung innerhalb ihres Wirkungsbereichs. (S. 9)
– Wechseln Sie die Batterien aus. (S. 9)
– Prüfen Sie die ID-Einstellungen für das Hauptgerät und die Fernbedienung. Die
Fernbedienungs-ID des Hauptgeräts kann geändert werden, nachdem das Hauptgerät
zurückgesetzt wurde. Überprüfen Sie in diesem Fall die Fernbedienungs-ID am
Hauptgerät, und legen Sie sie bei Bedarf erneut fest. (S. 9)
Die Tasten funktionieren nicht.
– Halten Sie p auf der Vorderseite länger als fünf Sekunden gedrückt und lassen Sie die
Taste dann los, um den Player zurückzusetzen.
– Um diesen Player vollständig zurückzusetzen, ziehen Sie das Netzkabel für etwa 10
Sekunden aus der Steckdose, schließen Sie dann das Netzkabel wieder an die Steckdose
an und schalten Sie den Player ein.
Das Passwort wurde vergessen.
– Achten Sie darauf, dass sich keine Disc im Laufwerk befindet und dass die Wiedergabe
gestoppt ist. Halten Sie anschließend gleichzeitig
und
auf der Vorderseite
gedrückt, um alle Einstellungen, einschließlich den Sicherheit-Einstellungen (S. 32),
dieses Players auf die Werksvorgaben zurückzusetzen. Nachdem sich die
Stromversorgung automatisch abgeschaltet hat, drücken Sie p, um sie wieder
einzuschalten.
Zusätzliche Informationen
Problem
Die Fernbedienung funktioniert nicht.
■ Disc-Wiedergabe
Problem
Mögliche Ursache und Lösung
– Nehmen Sie die Disc heraus und reinigen Sie sie. (S. 4)
– Vergewissern Sie sich, dass die Disc korrekt eingelegt ist (in der Disclade zentriert und
mit der Beschriftung nach oben). (S. 4)
– Verwenden Sie eine Disc, die vom Player unterstützt wird. (S. 3)
– Entnehmen Sie die Disc und prüfen Sie, ob der Player die Disc unterstützt. (S. 3)
– Prüfen Sie den Regionalcode. (S. 3)
– Prüfen Sie, ob die Disc defekt ist, indem Sie eine andere Disc ausprobieren.
– Die CD-R/RW, DVD+R/RW/R DL und DVD-R/RW/R DL müssen jeweils finalisiert
sein. (S. 3)
Video stoppt.
– Der Player stoppt, wenn er Erschütterungen oder Vibrationen erkennt.
Der Player erzeugt beim
Wiedergabestart oder beim Einlegen
einer Disc ein Schnappgeräusch.
– Diese Geräusche sind normale Betriebsgeräusche und kein Hinweis auf eine Störung.
39 De
Deutsch
Der Player kann die Disc nicht
wiedergeben.
Fehlersuche
■ Bild
Problem
Mögliche Ursache und Lösung
Kein Bild.
– Vergewissern Sie sich, dass die Kabel korrekt angeschlossen sind. (S. 10)
– Vergewissern Sie sich, dass der angeschlossene Fernseher oder AV-Receiver auf den
korrekten Eingang eingestellt ist. (S. 10)
– Halten Sie
und
an der Vorderseite gleichzeitig gedrückt, um die
Videoauflösung auf den Standardwert einzustellen, während keine Disc eingelegt ist
bzw. die Wiedergabe gestoppt wurde.
Wenn noch immer kein Bild ausgegeben wird, halten Sie
an der Vorderseite
ungefähr fünf Sekunden lang gedrückt, um NTSC/PAL umzuschalten.
– Wenn die Option auf Native Diskwiedergabe gesetzt ist, wird ein Signal ausgegeben,
das nicht mit dem angeschlossenen Fernsehgerät kompatibel ist. Ändern Sie die
Einstellung zur Ausgabe eines Signals, das mit dem angeschlossenen Fernsehgerät
kompatibel ist. (S. 34)
Bildschirm blockiert und die
Bedienungstasten sind wirkungslos.
– Drücken Sie
und starten Sie dann erneut die Wiedergabe.
– Schalten Sie die Stromversorgung aus und wieder ein.
– Halten Sie p auf der Vorderseite länger als fünf Sekunden gedrückt und lassen Sie die
Taste dann los, um den Player zurückzusetzen.
– Stellen Sie die gewünschte Auflösung ein. (S. 34)
Das Video wird nicht in der gewünschten
Auflösung wiedergegeben.
Breitbild-Video erscheint vertikal gedehnt,
oder schwarze Balken erscheinen am
oberen und unteren Bildrand. Video mit
4:3-Format erscheint horizontal gedehnt.
Rechteckrauschen (Mosaik) erscheint
auf dem Bildschirm.
Das Wiedergabebild kann gestört sein,
wenn DVD-Videomaterial auf einem
Videorekorder aufgezeichnet oder über
einen Videorekorder wiedergegeben wird.
Ton wird nicht ausgegeben oder die
Bilder werden nicht einwandfrei
wiedergegeben.
– Ändern Sie das Bildseitenverhältnis Ihres Fernsehers. (S. 33)
– Bei Szenen, die schnelle Bewegungen enthalten, können aufgrund der Eigenschaften
des digitalen Bildkomprimierungsverfahrens mosaikartige Blöcke im Bild sichtbar sein.
– Dieser Player ist mit dem analogen Kopierschutzsystem kompatibel. Manche Disks
enthalten ein Kopierschutzsignal. Falls Sie versuchen, eine solche Disk über einen
Videorekorder wiederzugeben oder auf einem Videorekorder aufzuzeichnen und
wiederzugeben, verhindert der Kopierschutz eine normale Wiedergabe.
– Bei manchen Discs, die mit kopiergeschütztem Material bespielt sind, ist eventuell
keine Tonausgabe oder einwandfreie Bildwiedergabe möglich.
■ Ton
Problem
Kein Ton oder der Ton ist verzerrt.
Der linke und rechte Tonkanal sind
vertauscht oder der Ton wird nur auf
einer Seite ausgegeben.
Ton wird nicht ausgegeben oder die
Bilder werden nicht einwandfrei
wiedergegeben.
Ton nicht im gewünschten Audioformat
und/oder Anzahl Kanäle.
Der Ton der Bild-in-Bild-Funktion
(Zweitton) ist nicht hörbar.
Mögliche Ursache und Lösung
–
–
–
–
Prüfen Sie, ob das Audiokabel korrekt angeschlossen ist. (S. 10)
Drehen Sie die Lautstärke Ihres Fernsehers oder AV-Receivers hoch.
Bei Standbildwiedergabe sowie beim Vor- und Rücklauf erfolgt keine Tonwiedergabe. (S. 8)
Je nach Zustand der Audioaufzeichnung, z. B. wenn ein anderer Ton als ein
Audiosignal oder ein nicht standardgemäßes Audiosignal als Audioinhalt aufgezeichnet
ist, erfolgt u. U. keine Tonausgabe. (S. 3)
– Prüfen Sie den Audio-Anschluss. (S. 10)
– Bei manchen Discs, die mit kopiergeschütztem Material bespielt sind, ist eventuell
keine Tonausgabe oder einwandfreie Bildwiedergabe möglich.
– Siehe Audio-Ausgang-Einstellung und „Übersicht der Audioausgangsformate“. (S. 35,
S. 36)
– Stellen Sie Coaxial / Optical oder HDMI auf PCM/Neuberechnen ein. (S. 35)
– Um den Zweitton hören zu können, drücken Sie 2ND AUDIO. (S. 6)
– Je nach Disc müssen Sie die Funktion der Zweitton-Wiedergabe im Top-Menü der Disc
aktivieren (S. 8).
■ Netzwerk
Problem
Internet-Verbindung nicht herstellbar.
40 De
Mögliche Ursache und Lösung
– Wenn Sie eine Verbindung zum Internet herstellen, indem Sie Wired unter Verbindung
einstellen auswählen, schließen Sie das Netzwerkkabel ordnungsgemäß an. (S. 32)
– Schalten Sie das angeschlossene Gerät, wie beispielsweise einen Breitband-Router oder
ein Modem, ein.
– Schließen Sie den Breitband-Router und/oder das Modem richtig an.
– Wenn Drahtlos unter Verbindung einstellen ausgewählt ist und wenn Sie eine
Internetverbindung über Ethernet herstellen möchten, wählen Sie ordnungsgemäß
Wired aus. (S. 32)
– Wählen Sie ordnungsgemäß Drahtlos unter Verbindung einstellen aus, wenn Sie die
Internetverbindung über ein WLAN herstellen möchten. (S. 32)
Fehlersuche
Mögliche Ursache und Lösung
– Überprüfen Sie, ob sich dieser Player normal mit dem Internet verbinden kann. Siehe
„Verbindungstest“. (S. 33)
– Schließen Sie das USB-Speichergerät richtig an. Prüfen Sie, ob das USB-Speichergerät
an den USB-Anschluss des Players angeschlossen ist. (S. 16)
– Prüfen Sie, ob die Blu-ray Disc BD-Live unterstützt.
– Schließen Sie das als FAT16, FAT32 oder NTFS formatierte USB-Speichergerät an.
– Es wird empfohlen, ein USB-Speichergerät mit einem Mindestspeicherplatz von 2 GB
anzuschließen. Formatieren Sie das USB-Speichergerät, wenn nicht genügend
Speicherplatz vorhanden sein sollte. (S. 31)
– Sehen Sie in der mitgelieferten Bedienungsanleitung der Disc nach oder fragen Sie den
Hersteller.
– Überprüfen Sie, ob sich dieser Player normal mit dem Netzwerk verbinden kann. Siehe
„Verbindungstest“. (S. 33)
– Schalten Sie das angeschlossene Gerät, wie beispielsweise einen Breitband-Router oder
den Server, ein.
– Bestätigen Sie, dass Player und Server mit dem gleichen Zugangspunkt verbunden sind.
– Je nach DLNA-Server muss dieser Player vom Server zugelassen werden.
– Abhängig vom DLNA-Server muss eine Firewall-Einstellung geändert werden.
– Stellen Sie sicher, dass die Datei abspielbar ist. (S. 3)
– Prüfen Sie die DLNA-Server-Einstellungen.
– Die Wiedergabe und Bedienungsqualität können vom Zustand des Heimnetzwerkes
beeinträchtigt werden.
– Stellen Sie sicher, dass der WLAN-Router eingeschaltet ist.
– Abhängig von der Umgebung, wie dem Wandmaterial, dem Empfangsstatus der
Funkwellen oder Hindernissen zwischen dem Player und dem WLAN-Router, kann sich
die Kommunikationsentfernung verkürzen. Stellen Sie den Player und den WLANRouter näher aneinander.
– Geräte, die den 2,4-GHz-Frequenzbereich verwenden, wie z. B. Mikrowellengeräte,
Bluetooth oder kabellose Digitalgeräte, können die Kommunikation unterbrechen.
Stellen Sie den Player weiter entfernt von solchen Geräten auf oder schalten Sie solche
Geräte aus.
– Wenn die Internetverbindung über ein WLAN auch anhand der beiden oben
aufgeführten Lösungen nicht erfolgreich hergestellt werden kann, versuchen Sie es mit
einer Ethernet-Verbindung, indem Sie Wired unter Verbindung einstellen auswählen.
(S. 32)
– Wenn Scan ausgeführt wird, aber das WLAN nicht gefunden werden kann oder der
Empfang gestört ist, betätigen Sie RETURN, um zum vorherigen Bildschirm
zurückzukehren, und führen Sie Scan erneut aus. Wenn der gewünschte WLAN-Router
noch immer nicht erkannt wird, betätigen Sie RETURN, um Manuell auszuwählen.
– Stellen Sie sicher, dass das WLAN nicht durch Mikrowellengeräte, DECT-Telefone
oder benachbarte Wi-Fi-Geräte gestört wird.
– Mikrowellengeräte, DECT-Telefone oder andere Drahtlosgeräte in der Nähe können
das WLAN stören. Schalten Sie solche Geräte aus.
– Stellen Sie sicher, dass die Firewall in Ihrem Netzwerk einen Zugriff durch den Player
auf die Drahtlos-Verbindung zulässt.
– Wenn das WLAN nicht ordnungsgemäß funktioniert, versuchen Sie es mit einer
kabelgebundenen Netzwerkverbindung.
Der DLNA-Server wird nicht erkannt.
Eine Wiedergabe der Datei auf dem
DLNA-Server ist nicht möglich.
Internet-Verbindung über WLAN nicht
herstellbar.
Das WLAN wird nicht gefunden oder der
Empfang ist gestört.
– Die folgenden Meldungen erscheinen auf dem Fernsehschirm, falls die Disc, die Sie abspielen wollen, ungeeignet
ist oder eine falsche Bedienung erfolgt.
Fehlermeldung
Mögliche Ursache und Lösung
Nicht unterstütztes Format
– Die Datei wird vom Player nicht unterstützt. Siehe „Mit diesem Player kompatible Discs/Dateien“
(S. 3).
Falscher Regionalcode!
– Die Disc hat einen inkompatiblen Regionalcode. Siehe „Regionverwaltungsinformationen für
Blu-ray Disc/DVD-Videos“ (S. 3).
Netzwerkfehler.
– Der Player kann nicht mit dem Netzwerk verbunden werden. Prüfen Sie die Verbindung (S. 16) und
die Netzwerkeinstellung (S. 32).
Netzwerk ist OK, Proxyfehler.
– Der Player kann nicht mit dem Proxy-Server verbunden werden. Siehe „Proxy-Einstellung“ (S. 33).
BD-Live Verbindung im
Setup nicht aktiviert Setup
nicht aktiviert.
– Die BD-Live-Verbindung ist nicht zulässig. Siehe „BD-Live-Verbindung“ (S. 33).
Upgrade konnte nicht
ausgeführt werden.
– Das Upgrade ist fehlgeschlagen. Prüfen Sie, ob die Upgrade-Datei beschädigt oder unlesbar ist.
IP-Einstellungen sind nicht
passende, bitte machen Sie
einen reset.
– Die eingegebene IP Einstellungen ist nicht gültig. Geben Sie die korrekten Informationen erneut ein.
41 De
Deutsch
■ Meldungen auf dem Bildschirm
5
Zusätzliche Informationen
Problem
Ein Herunterladen von BD-Live-Inhalten
ist nicht möglich.
Glossar
AVCHD
AVCHD ist ein neues Format (Standard) für HDCamcorder zur Aufzeichnung und Wiedergabe von
hochauflösenden Videobildern.
BD-Live™
BD-Live ist ein Blu-ray Disc-Standard, der eine
Netzwerkverbindung nutzt und dem Player ermöglicht,
online zu gehen, um Werbevideos und andere Daten
herunterzuladen.
BDMV
BDMV (Blu-ray Disc Movie) bezeichnet eines der für
BD-ROM verwendeten Anwendungsformate und ist in
den Blu-ray Disc-Spezifikationen enthalten. BDMV ist
ein Aufnahmeformat, das DVD-Video bei der DVDSpezifikation entspricht.
Blu-ray 3D™
Blu-ray 3D erlaubt Ihnen das Abspielen
hochauflösender 3D-Bilder.
BONUSVIEW™
Über BONUSVIEW-kompatible Discs können Sie
gleichzeitig Video-Kanal für zwei Bildschirme, AudioUnterkanal und Untertitel genießen. Innerhalb des
Hauptbildschirms wird während der Wiedergabe (Bild
in Bild) ein kleiner Bildschirm eingeblendet.
Deep Color
Deep Color bezieht sich auf den Einsatz
unterschiedlicher Farbtiefen in der Anzeige, von den 24Bit-Tiefen früherer Versionen der HDMI-Spezifikation
aufwärts. Das Extra-Bit Tiefe ermöglicht HDTVs und
anderen Anzeigegeräten, statt Millionen Farben
Milliarden anzuzeigen und Farbbänder auf dem
Bildschirm für sanfte Tonübergänge und gleichmäßige
Abstufungen zwischen den Farben zu eliminieren.
Durch das erhöhte Kontrastverhältnis können sehr viel
mehr Grauschattierungen zwischen Schwarz und Weiß
dargestellt werden. Darüber hinaus erhöht Deep Color
die Anzahl der verfügbaren Farben innerhalb der durch
die RGB- oder YCbCr-Farbräume festgelegten Grenzen.
DLNA
Über DLNA (Digital Living Network Alliance) ist eine
leichte Freigabe digitaler Medien über das Netzwerk
zuhause möglich. Darüber hinaus können Sie über
diesen Player mit Ihrem Fernsehgerät digitale Inhalte
genießen, die auf Ihrem Computer mit installierter
DLNA-Server-Software oder anderen DLNAkompatiblen Geräten gespeichert sind. Um diesen
Player an Ihren DLNA-Server anzuschließen, müssen
einige Einstellungen für Ihren DLNA-Server oder das
Gerät vorgenommen werden. Einzelheiten finden Sie in
den Beschreibungen Ihrer DLNA-Server-Software oder
des DLNA-Geräts.
42 De
DivX®
DivX® ist ein digitales Videoformat von DivX, LLC,
einem Tochterunternehmen von Rovi Corporation. Dies
ist ein offizielles DivX Certified®-Gerät zur
Wiedergabe von DivX-Video. Besuchen Sie divx.com
für weitere Informationen und Software-Tools zur
Konvertierung von Dateien in DivX-Video.
Dolby Digital
Ein von Dolby Laboratories Inc. entwickeltes
Soundsystem, das der Audioausgabe das Ambiente
eines Kinos verleiht, wenn das Gerät an einen Dolby
Digital-Prozessor oder -Verstärker angeschlossen wird.
Dolby Digital Plus
Ein zur Erweiterung von Dolby Digital entwickeltes
Soundsystem. Diese Toncodiertechnologie unterstützt
7.1-Mehrkanal-Surround-Sound.
Dolby TrueHD
Dolby TrueHD ist eine verlustfreie
Codierungstechnologie, die bis zu 8-Kanal-SurroundSound für die nächste Generation der optischen Discs
unterstützt. Der reproduzierte Sound ist Bit für Bit eine
getreue Abbildung des Originaltons.
DRC (Dynamic Range Control)
DRC ermöglicht die Einstellung des Bereichs zwischen
dem lautesten und dem leisesten Ton (Dynamikbereich)
für Wiedergabe mit durchschnittlicher Lautstärke.
Verwenden Sie diese Einstellung, wenn die Dialoge
schlecht hörbar sind oder wenn die Wiedergabe die
Nachbarn stören könnte (z. B. nachts).
DTS
Hierbei handelt es sich um ein von DTS, Inc. für den
Einsatz in Kinos entwickeltes digitales Soundsystem.
DTS-HD High Resolution Audio
DTS-HD High Resolution Audio ist eine neue
Technologie, die für die nächste Generation optischer
Disc-Formate mit hoher Auflösung entwickelt wurde.
DTS-HD Master Audio
DTS-HD Master Audio ist eine verlustfrei wirkende
Audio-Komprimiertechnik, die für die nächste
Generation optischer Disc-Formate mit hoher
Auflösung entwickelt wurde.
Farbraum
Farbraum ist ein Farbbereich, der dargestellt werden
kann. RGB ist ein Farbraum, der auf dem RGBFarbmodell (Rot, Grün und Blau) basiert und
üblicherweise für Computermonitore zum Einsatz
kommt. YCbCr ist ein Farbraum, der auf einem
Luminanzsignal (Y) und zwei Farbunterschiedssignalen
(Cb und Cr) basiert.
FLAC
FLAC (Free Lossless Audio Codec) ist ein offenes
Dateiformat für die verlustlose Komprimierung von
Audiodaten. Es weist gegenüber anderen verlustbehaftet
komprimierten Audioformaten zwar eine schlechtere
Komprimierungsrate auf, kann aber häufig eine höhere
Audioqualität bieten.
Glossar
HDMI
Mac-Adresse
HDMI (High-Definition Multimedia Interface) ist eine
Schnittstelle, die sowohl Video als auch Audio über
einen einzigen digitalen Anschluss unterstützt. Die
HDMI-Schnittstelle überträgt Videosignale mit
Standard- oder hoher Auflösung sowie MehrkanalAudiosignale in digitaler Form ohne
Signalverschlechterung an AV-Geräte wie ein HDMItaugliches Fernsehgerät.
Die Mac-Adresse ist ein eindeutiger Wert, der einem
Netzwerkgerät zu Identifikationszwecken zugeordnet
wird.
Pan Scan (PS 4:3)
Ein Bildschirmformat, das die Seiten des Bilds
abschneidet, um die Wiedergabe von Breitbild-Software
(16:9) auf einem angeschlossenen Fernsehgerät des
Formats 4:3 zu ermöglichen.
Untertitel
Letterbox (LB 4:3)
Bildschirmformat mit schwarzen Balken am oberen und
unteren Bildrand, um die Wiedergabe von BreitbildSoftware (16:9) auf einem angeschlossenen
Fernsehgerät mit Format 4:3 zu ermöglichen.
Linearer PCM-Ton
Lip Sync
Lip Sync steht für Lippensynchronisierung. Dieser
Begriff bezieht sich sowohl auf das Problem als auch
auf die Möglichkeit der Aufrechterhaltung der
Synchronizität zwischen Audio- und Videosignalen
während der Nachbearbeitung und Übertragung.
Während die Audio- und Videolatenz komplexe
Anpassungen durch den Benutzer erfordert, beinhaltet
HDMI eine automatische Audio- und
Videosynchronisierung, über die Geräte ohne
Benutzereinwirkung automatisch und genau eine
Synchronisierung durchführen können.
Untertitel
Dies sind die auf DVD-Discs aufgezeichneten
Textzeilen, die am unteren Bildrand erscheinen und den
Dialog übersetzen oder schriftlich anzeigen. Bei vielen
DVD- und Blu-ray-Discs sind Untertitel verfügbar.
x.v.Color
x.v.Color reproduziert eine erweiterte Farbpalette und
kann fast sämtliche Farben darstellen, die vom
menschlichen Auge erfassbar sind.
5
Zusätzliche Informationen
Linearer PCM-Ton ist ein bei einer Audio-CD und
manchen DVD- und Blu-ray-Discs verwendetes
Signalaufzeichnungsformat. Der Ton auf der Audio-CD
wird mit 44,1 kHz/16 Bit aufgenommen. (Auf DVDDiscs erfolgt die Tonaufnahme zwischen 48 kHz mit 16
Bit und 96 kHz mit 24 Bit und auf Blu-ray-Discs mit 48
kHz mit 16 Bit und 192 kHz mit 24 Bit.)
Closed Captions (geschlossene Untertitel) sind eine Art
Untertitel. Der Unterschied zwischen Untertiteln und
Captions liegt darin, dass Untertitel für hörende
Menschen sind und Captions für Hörgeschädigte.
Untertitel zeigen selten den gesamten Ton.
Captions zeigen beispielsweise auch Toneffekte (z. B.
„Das Telefon klingelt“ und „Schritte“). Bei Untertiteln
ist dies nicht der Fall. Bevor Sie diese Einstellung
auswählen, stellen Sie sicher, dass auf der Disk Closed
Captions (geschlossene Untertitel) enthalten sind.
Technische Daten
Stromversorgung
[Modell für USA und Kanada]....... 110–240 V Wechselspannung, 60 Hz
[Modell für Südamerika]........... 110–240 V Wechselspannung, 50/60 Hz
[Modell für Australien] .................. 110–240 V Wechselspannung, 50 Hz
[Modell für Europa und Russland]
........................................................ 110–240 V Wechselspannung, 50 Hz
[Modell für China] ......................... 110–240 V Wechselspannung, 50 Hz
[Modell für Asien]..................... 110–240 V Wechselspannung, 50/60 Hz
Leistungsaufnahme (normal)................................................................ 20 W
Leistungsaufnahme (Bereitschaft).............................................. max. 0,5 W
Abmessungen (B × H × T, einschließlich vorstehender Teile)
.................................................................................... 435 × 86 × 257 mm
Gewicht ............................................................................................... 2,8 kg
■ Audioleistung
Audioausgangspegel (1 kHz, 0 dB)
Blu-ray Disc/DVD/CD-DA.........................................................2 ± 0,3 V
Signal-Rausch-Abstand
Blu-ray Disc/DVD/CD-DA............................................................ 110 dB
Dynamikbereich
Blu-ray Disc/DVD ......................................................................... 105 dB
CD-DA ........................................................................................... 100 dB
Harmonische Verzerrung (1 kHz)
Blu-ray Disc/DVD/CD-DA............................................................0,003%
Frequenzgang
Blu-ray Disc/DVD .................. 4 Hz bis 22 kHz (48 kHz Abtastfrequenz)
4 Hz bis 44 kHz (96 kHz Abtastfrequenz)
CD-DA ............................................................................. 4 Hz bis 20 kHz
■ Eingänge/Ausgänge
HDMI-Ausgang............................................................... Typ-A-Buchse × 1
480i/576i/480p/576p/720p/1080i/1080p/1080p bei 24 Hz,
Deep Color, x.v. Farbunterstützung
Component-Video-Ausgang......................................... Y: 1 Vp-p (75 Ohm)
PB, PR: 0,7 Vp-p (75 Ohm)
Videoausgang .................................................................... 1 Vp-p (75 Ohm)
Digitalausgang......................................................... optisch × 1, koaxial × 1
Analoger Audio-Ausgang .....................................................Mixed 2 ch × 1
USB ................................................................................. Typ-A-Buchse × 2
WLAN............................................................. Standard: IEEE 802.11 b/g/n
Frequenzbereich: 2,4-GHz-Band
Andere Geräte .............................................................. Remote IN/OUT × 1
Ethernet × 1
Änderungen der technischen Daten ohne Vorankündigung vorbehalten.
43 De
Deutsch
■ Allgemeines
Technische Daten
■ Urheberrecht
– Audiovisuelles Material kann urheberrechtlich
geschützt sein und darf eventuell ohne Genehmigung
des Eigentümers der Urheberrechte nicht
aufgenommen werden. Beziehen Sie sich auf die
entsprechenden nationalen Gesetze.
– Dieses Gerät enthält
Urheberrechtsschutztechnologie, die durch
bestimmte US-Patente und andere geistige
Eigentumsrechte von Rovi Corporation geschützt ist.
Reverse Engineering und Disassemblierung sind
verboten.
– Hergestellt unter Lizenz von Dolby Laboratories.
Dolby und das Doppel-D-Logo sind Markenzeichen
von Dolby Laboratories.
– Hergestellt unter Lizenz gemäß den US-PatentNummern: 5,956,674; 5,974,380; 6,226,616;
6,487,535; 7,212,872; 7,333,929; 7,392,195;
7,272,567 sowie anderer in den USA oder weltweit
erteilter oder beantragter Patente. DTS-HD, das
Symbol und DTS-HD zusammen mit dem Symbol
sind eingetragene Markenzeichen und DTS-HD
Master Audio ist ein Markenzeichen von DTS, Inc.
Das Produkt beinhaltet Software. © DTS, Inc. Alle
Rechte vorbehalten.
– „Blu-ray Disc™“, „Blu-ray™“, „Blu-ray 3D™“,
„BD-Live™“, „BONUSVIEW™“ und die Logos
sind Markenzeichen der Blu-ray Disc Association.
–
ist ein Markenzeichen der DVD Format/Logo
Licensing Corporation.
– „HDMI“, das „HDMI“-Logo und „High-Definition
Multimedia Interface“ sind Markenzeichen bzw.
eingetragene Markenzeichen von HDMI Licensing
LLC.
– „x.v.Color“ und das „x.v.Color“-Logo sind
Markenzeichen der Sony Corporation.
– „AVCHD“ und das „AVCHD“-Logo sind
Markenzeichen der Panasonic Corporation und Sony
Corporation.
– Java und alle Java-bezogenen Marken und Logos
sind Warenzeichen bzw. eingetragene Warenzeichen
von Sun Microsystems, Inc. in den Vereinigten
Staaten und/oder anderen Ländern.
– Dieses Produkt unterliegt den PatentportfolioLizenzen für AVC und VC-1, laut denen ein
Benutzer für den persönlichen und
nichtkommerziellen Gebrauch dazu ermächtigt ist,
(i) Video im AVC Standard und VC-1 Standard
(AVC/VC-1 Video) zu codieren und/oder (ii) AVC/
VC-1 Video zu decodieren, die durch einen Benutzer
für den persönlichen und nichtkommerziellen
Gebrauch codiert wurde und/oder von einem
Anbieter erhalten wurde, welcher über eine Lizenz
zum Anbieten von AVC/VC-1 Video verfügt. Eine
Lizenz für andere Zwecke wird weder erteilt noch
impliziert. Zusätzliche Informationen können von
MPEG LA, LLC eingeholt werden.
Siehe http://www.mpegla.com.
– Windows Media Player ist ein eingetragenes
Markenzeichen oder ein Markenzeichen der
Microsoft Corporation in den USA und/oder anderen
Ländern.
44 De
– YouTube und das YouTube-Logo, Picasa und das
Picasa-Logo sind Markenzeichen von Google. Inc.
– Netflix und das Netflix-Logo sind eingetragene
Markenzeichen von Netflix, Inc.
– DLNA und DLNA CERTIFIED sind Markenzeichen
und/oder Dienstleistungsmarken der Digital Living
Network Alliance.
– Copyright 2004-2010 Verance Corporation.
Cinavia™ ist ein Verance CorporationMarkenzeichen. Geschützt durch US-Patent
7,369,677 sowie anderer in den USA oder weltweit
erteilter oder beantragter Patente unter Lizenz von
Verance Corporation. Alle Rechte vorbehalten.
– Das Wi-Fi CERTIFIED-Logo ist eine
Zertifizierungsmarke von Wi-Fi Alliance.
– DivX®, DivX Certified®, DivX Plus® HD und
zugehörige Logos sind Markenzeichen von Rovi
Corporation oder ihrer Tochterunternehmen und
unterliegen Lizenzbedingungen.
– DivX Certified® zur Wiedergabe von DivX®- und
DivX Plus® HD (H.264/.MKV) mit bis zu 1080p
HD einschließlich Premium-Content.
HINWEIS ZU DIVX VIDEO: DivX® ist ein digitales
Videoformat von DivX, LLC, einem
Tochterunternehmen von Rovi Corporation. Dies ist ein
offizielles DivX Certified®-Gerät zur Wiedergabe von
DivX-Video. Besuchen Sie divx.com für weitere
Informationen und Software-Tools zur Konvertierung
von Dateien in DivX-Video.
HINWEIS ZU DIVX VIDEO-ON-DEMAND: Dieses
DivX Certified®-Gerät muss registriert werden, damit
DivX Video-on-Demand (VOD)-Inhalte wiedergegeben
werden können. Die Erstellung des Registrierungscodes
erfolgt über den Bereich DivX VOD im Setup-Menü des
Geräts. Auf vod.divx.com finden Sie weitere
Informationen zur Vervollständigung Ihrer Registration.
ZUSÄTZLICHE INFORMATIONEN
Index
■
Numerics
2 Kanal Downmix, SETUP-Menü .......35
2ND AUDIO, Fernbedienung ................6
3D Ausgang, SETUP-Menü ................33
3D Wiedergabe Information,
SETUP-Menü ..................................31
■
A
■
B
BD-Live ...............................................27
BD-Live-Verbindung,
SETUP-Menü ..................................33
Bedienung des SETUP-Menüs ............30
Bild im Bild Anzeige,
SETUP-Menü ..................................32
Bild-in-Bild-Funktion ..........................27
Bilds.Schoner, SETUP-Menü ..............31
Bildschirmmenü ...................................24
Bitrate, Bildschirmmenü ......................24
■
C
CLEAR, Fernbedienung ........................6
Coaxial / Optical, SETUP-Menü .........35
Codepage, Bildschirmmenü .................24
Cursortasten, Fernbedienung .................8
■
D
■
E
Einfaches Konfigurationsmenü ............18
Einfaches Konfigurationsmenü,
SETUP-Menü ..................................31
ENTER, Fernbedienung .........................8
ESN (Electronic Serial Number) .........32
■
F
Farbanpassung, SETUP-Menü .............35
Farbraum, SETUP-Menü .....................34
Farbtasten, Fernbedienung .....................7
Fernbedienung .......................................6
Information, SETUP-Menü ..................33
Internet Verbindung, SETUP-Menü ....32
IP Einstellungen, SETUP-Menü ..........33
SHUFFLE, Fernbedienung .................... 7
Sicherheit, SETUP-Menü .................... 32
Sofortwiedergabe, Bildschirmmenü .... 24
Software-Upgrade ................................ 38
Speichermedium, SETUP-Menü ......... 31
Sprache, SETUP-Menü ....................... 31
STATUS, Fernbedienung ...................... 6
Status-Menü ......................................... 25
Steuertasten, Fernbedienung .................. 8
SUBTITLE, Fernbedienung .................. 7
Suchfunktion ........................................ 26
System, SETUP-Menü ........................ 31
Systeminformationen,
SETUP-Menü .................................. 35
■
■
■
I
K
Kamerawinkel, SETUP-Menü .............32
Kapitel, Bildschirmmenü .....................24
Konfigurationshilfe ..............................18
■
L
Ländercode, SETUP-Menü ..................32
Last Memory, SETUP-Menü ...............32
Lautsprechereinstellung,
SETUP-Menü ...................................35
Lesezeichen ..........................................26
Lip Sync, SETUP-Menü ......................34
■
M
MARKER, Fernbedienung .....................6
MEDIA-Menü ......................................18
Menü, SETUP-Menü ............................31
Mode/Play Mode, Bildschirmmenü .....24
■
N
T
Titel, Bildschirmmenü ......................... 24
TOP MENU, Fernbedienung ................. 8
Track/Datei, Bildschirmmenü ............. 24
TV Bildschirm, SETUP-Menü ............ 33
TV, SETUP-Menü ............................... 33
TV-System, SETUP-Menü .................. 34
■
U
Übergang, Bildschirmmenü ................. 24
Untertitel Modus, Bildschirmmenü ..... 24
Untertitel, Bildschirmmenü ................. 24
Untertitel, SETUP-Menü ..................... 32
Upgrade der Software .......................... 38
Upgrade, SETUP-Menü ...................... 31
Upmix, SETUP-Menü ......................... 35
USB-Anschluss .................................... 16
■
V
ON SCREEN, Fernbedienung ................8
OSD, SETUP-Menü .............................31
Verbindung einstellen,
SETUP-Menü .................................. 32
Verbindungstest, SETUP-Menü .......... 33
Video Ausgabe, SETUP-Menü ........... 34
Videoanschluss .................................... 13
Video-Ausgangsformate ...................... 37
Videokonfigurationsmenü,
SETUP-Menü .................................. 34
Video-Modus, SETUP-Menü .............. 34
Voraussetzungen für Audiodateien ....... 3
■
■
Netflix ..................................................23
Netflix Information, SETUP-Menü .....32
Netzwerk, SETUP-Menü .....................32
Netzwerkanschluss ...............................16
Netzwerksteuerung, SETUP-Menü ......31
■
O
P
Passwort ändern, SETUP-Menü ...........32
PIP, Fernbedienung ................................6
POP-UP/MENU, Fernbedienung ...........8
Post-Prozess, SETUP-Menü ................35
PROGRAM, Fernbedienung ..................6
Programmwiedergabe ..........................26
Proxy-Einstellung, SETUP-Menü ........33
■
R
Rauschunterdrückung,
SETUP-Menü ...................................35
REPEAT, Fernbedienung .......................7
RETURN, Fernbedienung ......................8
■
S
Schnellsuche, Bildschirmmenü ............24
SEARCH, Fernbedienung ......................7
SETUP, Fernbedienung ..........................6
SETUP-Menü .......................................28
W
Weitere Anschlüsse ............................. 17
Werkseinstellung laden,
SETUP-Menü .................................. 31
Wiedergabe von Datendiscs ................ 18
Wiedergabe von USB-Inhalten ............ 18
Wiedergabe, SETUP-Menü ................. 32
Winkel, Bildschirmmenü ..................... 24
■
Y
YouTube-Wiedergabe ......................... 21
■
5
Z
Zeit, Bildschirmmenü .......................... 24
Zifferntasten, Fernbedienung ................ 6
ZOOM, Fernbedienung ......................... 7
Zweitton, Bildschirmmenü .................. 24
Zweittonauswahl, SETUP-Menü ......... 32
Zweitvideo, Bildschirmmenü .............. 24
45 De
Deutsch
De-Interlacing Modus,
SETUP-Menü ..................................35
Diashow, Bildschirmmenü ...................24
DIGEST, Fernbedienung .......................6
Disc Auto-Wiedergabe,
SETUP-Menü ..................................31
DivX (R) VOD-DRM,
SETUP-Menü ..................................32
DLNA, SETUP-Menü .........................33
Downsampling, SETUP-Menü ............35
DRC, SETUP-Menü ............................35
H
HDMI 1080p 24Hz, SETUP-Menü ......34
HDMI Deep Color, SETUP-Menü .......34
HDMI Steuerung, Funktion .................31
HDMI Steuerung, SETUP-Menü .........31
HDMI, SETUP-Menü ..........................35
HDMI-Anschluss .................................12
HOME, Fernbedienung ..........................6
HOME-Menü .......................................18
Zusätzliche Informationen
A/B, Fernbedienung ...............................7
Allgemeine Einstellungen,
SETUP-Menü ..................................31
Alterskontrolle, SETUP-Menü ............32
ANGLE, Fernbedienung ........................7
Anzeige Einstellung, SETUP-Menü ....33
Audio, Bildschirmmenü .......................24
AUDIO, Fernbedienung .........................7
Audio, SETUP-Menü ...........................32
Audio-Anschlüsse ................................14
Audio-Ausgang, SETUP-Menü ...........35
Audio-Ausgangsformate ......................36
Audio-Einstellungen, SETUP-Menü ...35
■
Observera: Läs detta innan enheten tas i bruk.
1
2
3
4
5
Läs noga denna bruksanvisning för att kunna ha största
möjliga nöje av enheten. Förvara bruksanvisningen nära till
hands för framtida referens.
Installera anläggningen på en väl ventilerad plats där det är
svalt, torrt, rent och se till att den inte utsätts för direkt solljus,
värmekällor, vibrationer, damm, fukt och/eller kyla. Lämna
följande mellanrum för ventilation.
Över: 10 cm
Bakom: 10 cm
Sidor: 10 cm
Placera enheten på behörigt avstånd från andra elapparater,
motorer, transformatorer och annat som kan orsaka
störningar.
Utsätt inte enheten för hastiga temperaturväxlingar och
placera den inte på ett ställe där luftfuktigheten är hög (t.ex.
nära en luftfuktare) då fuktbildning i enheten skapar risk för
brand, elstötar, skador på enheten eller personskador.
Placera inte enheten på ett ställe där främmande föremål kan
tränga in i den eller där den kan utsättas för droppar eller
vattenstänk. Placera aldrig det följande ovanpå enheten:
– Övriga apparater då sådana kan orsaka skador och/
eller missfärgning av enhetens hölje.
– Brännbara föremål (t.ex. stearinljus) då sådana skapar
risk för brand, skador på enheten och/eller
personskador.
– Vätskebehållare som kan falla och spilla vätska över
enheten, vilket skapar risk för elstötar och/eller skador
på enheten.
6
7
8
9
10
11
12
13
14
15
16
Täck aldrig över enheten med en tidning, duk, gardin el.dyl.
då detta skapar risk för överhettning. En alltför hög
temperatur inuti enheten kan leda till brand, skador på
enheten och/eller personskador.
Anslut inte enheten till ett vägguttag förrän samtliga övriga
anslutningar slutförts.
Använd aldrig enheten vänd upp och ned. Detta kan leda till
överhettning som orsakar skador.
Hantera inte tangenter, reglage och kablar onödigt hårdhänt.
Fatta tag i själva kontakten när nätkabeln kopplas bort från
vägguttaget; dra aldrig i kabeln.
Använd aldrig några kemiska lösningar för rengöring då
dessa kan skada ytbehandlingen. Använd en ren, torr trasa.
Använd endast den spänning som står angiven på enheten.
Anslutning till en strömkälla med högre spänning än den
angivna kan orsaka brand, skador på enheten och/eller
personskador. Yamaha åtar sig inget ansvar för skador
beroende på att enheten används med en spänning utöver den
angivna.
Koppla bort nätkabeln från vägguttaget för att undvika skador
p.g.a. blixtnedslag om ett åskväder uppstår.
Försöka aldrig att utföra egna reparationer. Kontakta en
kvalificerad tekniker från Yamaha om servicebehov
föreligger. Du får inte under några omständigheter ta av
höljet.
Koppla bort nätkabeln från vägguttaget om enheten inte ska
användas under en längre tid (t.ex. under semestern).
Läs avsnittet ”Felsökning” om vanligt förekommande
driftsproblem innan du förutsätter att enheten är söndrig.
Observera-i Sv
17 Innan enheten flyttas ska du trycka på strömknappen p för att
ställa den i beredskapsläge och sedan koppla bort nätkabeln
från vägguttaget.
18 Kondensation (imma) uppstår, om den omgivande
temperaturen plötsligt ändras. Koppla i så fall loss nätkabeln
från nätuttaget och låt apparaten vila.
19 Vid långvarig användning kan det hända att apparaten blir
väldigt varm. Slå i så fall av strömmen och låt apparaten vila
tills den har svalnat.
20 Installera receivern nära ett nätuttag och där stickkontakten
lätt kan kommas åt.
21 Utsätt inte batterierna för kraftig värme från exempelvis
solljus, eld eller liknande.
Använd inte den här enheten närmare än 22 cm från
personer med pacemaker eller defibrillatorimplantat.
Den här enheten är inte bortkopplad från nätströmmen
så länge den är inkopplad i vägguttaget, även om själva
enheten är avstängd med p. Detta tillstånd kallas för
beredskapsläget (standby). Enheten är konstruerad för
att förbruka en mycket liten mängd ström i detta
tillstånd.
VARNING
UTSÄTT INTE ENHETEN FÖR REGN ELLER
FUKT DÅ DETTA SKAPAR RISK FÖR BRAND
ELLER ELSTÖTAR.
Laserkomponenten i denna apparat kan avge en
strålning som överskrider gränsvärdet för klass 1.
LASER-specifikationer:
Klass 1 LASER-produkt
Våglängd:
790 nm (CD)/658 nm (DVD)/405 nm (BD)
Laseruteffekt: max. 1 mW
LASERSÄKERHET
Apparaten använder sig av en laser. På grund av risken för
ögonskador bör ingen annan än en kvalificerad reparatör
öppna höljet eller försöka reparera apparaten.
FARA!
Apparaten avger synlig laserstrålning i öppet läge. Undvik
direkt ögonkontakt med strålen. Placera inte ögonen i
närheten av skivfacket eller någon annan öppning för att
titta in i apparaten, medan apparaten är ansluten till ett
nätuttag.
Innehåll
1. Introduktion
1
4. Inställningar
Vad du kan göra med den här spelaren ........... 2
Medföljande delar............................................... 2
Om skivor och filer............................................. 3
Typer av skivor/filer som kan användas med denna
spelare ........................................................................
Ladda en skiva ................................................................
Försiktighetsåtgärder gällande skivor.............................
Att observera när du tittar på videobilder i 3D...............
Cinavia-teknik ................................................................
SETUP-menyn................................................... 28
Exempel på användning av SETUP-menyn.................. 30
Allmäna Inställningar.................................................... 31
Display inställningar ..................................................... 33
Ljudinställning .............................................................. 35
System information ....................................................... 35
Angående format för ljudutmatning.............................. 36
Angående format för videoutmatning ........................... 37
3
4
4
4
4
Programvaruuppgradering .............................. 38
Kontroller och funktioner .................................. 5
Uppgradera programvaran ............................................ 38
Frontpanel....................................................................... 5
Fjärrkontroll.................................................................... 6
Introduktion till anslutningar........................... 10
Bakre panel ................................................................... 10
HDMI-anslutning............................................... 12
Anslutning till HDMI-uttaget ....................................... 12
Anslutning för att spela upp Blu-ray 3D-skivor ........... 12
Videoanslutningar ............................................ 13
Ansluta till komponent/video-uttaget ........................... 13
Ljudanslutningar .............................................. 14
Ansluta till den digitala Ijudutgången/uttaget .............. 14
Anslutning till ljudutgångarna ...................................... 15
Nätverks- och USB-anslutning........................ 16
Anslutning till NETWORK-uttaget.............................. 16
Anslutning till USB-anslutning .................................... 16
Andra anslutningar .......................................... 17
Ansluta till REMOTE CONTROL-utgångarna............ 17
Ansluta nätkabeln ......................................................... 17
3. Spela upp
Installationsguide/Snabbinstallation.............. 18
Inställning med Installationsguide/Snabbinstallation... 18
HOME/MEDIA-menyn ....................................... 18
Spela upp foto/musik/video.......................................... 18
Använda nätverksinnehåll ............................................ 20
21
21
22
23
4
5
5. Ytterligare information
24
25
26
26
26
27
27
27
Ström............................................................................. 39
Grundläggande funktioner ............................................ 39
Skivuppspelning............................................................ 39
Bild................................................................................ 40
Ljud ............................................................................... 40
Nätverk.......................................................................... 40
Meddelanden på skärmen.............................................. 41
Ordlista .............................................................. 42
Specifikationer.................................................. 43
Allmänt.......................................................................... 43
Ljudprestanda................................................................ 43
ln-/Utgångar .................................................................. 43
Upphovsrätt................................................................... 44
Index .................................................................. 45
(I slutet av denna bruksanvisning)
Information about software ....................................i
■ Om denna handbok
– Denna handbok beskriver hur du använder denna
spelare med en fjärrkontroll förutom när
fjärrkontrollen inte är tillgänglig. Vissa av dessa
handlingar kan även utföras med knapparna på
frontpanelen.
– Anteckningarna innehåller viktig information om
säkerhet och användningsinstruktioner. Tips
indikerar ett tips om användning.
– Denna handbok trycktes innan tillverkning. Design
och specifikationer kan ändras som resultat av
förbättringar, o.s.v. Om det finns skillnader mellan
handboken och produkten, har produkten prioritet.
Ikonerna som används i denna
handbok
Ikoner används för att indikera tillgängliga knappar/
funktioner för ett visst format. För information om
uppspelningsbara skivor och format, se sidan 3.
BD : BD-Video
DVD : DVD-Video, DVD-VR, DVD+VR
CD : Ljud-CD
VIDEO : Videofiler
MUSIC : Ljudfiler
PHOTO : Fotofiler
1 Sv
Svenska
Starta Netflix................................................................. 23
Avancerade uppspelningsfunktioner ............. 24
Skärmmeny...................................................................
Statusmeny....................................................................
Använda Bokmärke ......................................................
Programmerad uppspelning..........................................
Använda sökning .........................................................
Njuta av BONUSVIEW™ och BD-Live™..................
Använda bild-i-bild-funktionen
(uppspelning av sekundärt ljud/video) .....................
Använda funktionen för BD-Live™.............................
3
Felsökning......................................................... 39
2. Anslutning
Använda nätverkstjänster ...............................
Spela upp video från YouTube™ ....................
Spela upp foton från Picasa™ Web Album....
Spela upp video från Netflix™ ........................
2
INTRODUKTION
Vad du kan göra med den här spelaren
Enkel inställning för språk, upplösning, skärmformat
\
s. 18
\
s. 24
\
s. 27
\
s. 18
\
s. 20
\
s. 31
\
s. 21
Du kan göra språk- och TV-inställningar.
Spela upp kommersiellt utgivna Blu-ray Disc™/Blu-ray 3D™/DVD/
CD-skivor*
Utöver Blu-ray-skivor kan spelaren även spela upp ett antal andra typer av skivor.
Spela upp BONUSVIEW™, BD-Live™, etc.*
Du kan se fler filmer på de senaste Blu-ray-skivorna.
Spela upp Video, Musik och Fotofiler på en skiva/USB
minnesenhet*
Filer som spelats in på skivor/USB minnesenheter kan spelas upp med denna spelare.
Spela upp Video, Musik och Fotofiler på en
Hemmanätverksserver* **
PC-innehåll kan spelas upp med en TV- eller AV-mottagare genom att ansluta denna spelare till
en nätverksserver.
Användning med fjärrkontrollen för TV:n, AV-mottagaren, o.s.v.
Om du ansluter enheter med en HDMI-kabel, kan du styra enheter med en fjärrkontroll med
HDMI Control-funktionen.
Strömma uppspelningsinnehåll på nätverkstjänsterna**
Du kan direkt få tillgång till video över Internet med denna spelare.
* Information om uppspelningsbara skivor och format finns på sidan 3.
** Nätverksinställningar krävs för att använda denna funktion.
Medföljande delar
Kontrollera att följande delar medföljer produkten.
Fjärrkontroll
2 Sv
Batterier (×2)
(AAA, R03, UM-4)
Ljud/videokabel
Strömkabel
1
Om skivor och filer
– 12 cm och 8 cm skivor kan spelas upp med denna
spelare. Använd inte en 8 cm till 12 cm-adapter.
– Använd skivor som överensstämmer med
kompatibla normer såsom anges av officiella
logotyper på skivetiketten. Vi kan inte garantera
uppspelning av skivor som inte uppfyller dessa
normer. Vi kan ej heller garantera optimal bild- eller
ljudkvalitet, även om skivorna kan spelas upp.
Materialtyp
Inspelningsformat
BD-ROM/BD-R/
BD-RE
BD-Video/Datafiler
DVD-ROM
DVD-Video
DVD-Video/DVD-VR/AVCHD/Datafiler
DVD+R/DVD+R
DL/DVD+RW
DVD-Video/DVD+VR/AVCHD/Datafiler
CD-ROM
CDDA/HDCD
CD-R/CD-RW
CDDA/Datafiler
USB*
Datafiler
DLNA
Datafiler
MUSIC
BD-Video
Regionskod ”A” eller ”ABC”
Spelbara
videofilsformat
VIDEO
ALL
Kommentarer
Spelbara
fotofilsformat
PHOTO
JPEG (.jpeg/.jpg)
GIF (.gif)
PNG (.png)
Kommentarer
– Det går inte att garantera att du kan spela upp alla
filer som anges i diagrammet ovan beroende på hur
filen skapats eller vilka codecs som använts.
– En copyrightskyddad fil kan inte spelas upp.
– När du använder DLNA måste en fil uppfylla
DLNA-serverns krav.
– Blu-ray Disc/DVD-video: åtgärder och funktioner
för BD/DVD-video kan skilja sig från förklaringarna
i denna bruksanvisning och vissa manövreringar kan
vara otillåtna beroende på skivtillverkarens
inställningar.
– Om en menyskärm eller instruktionsmeddelanden
visas vid uppspelning av en skiva ska du följa de
angivna anvisningarna.
– Beroende på skivan ifråga är det möjligt att vissa
skivor inte kan spelas upp.
– Slutbehandla alla inspelningsmedier som spelas upp
i denna spelare.
– ”Slutbehandla” betyder att en brännare behandlar en
inspelad skiva så att den kan spelas på såväl denna
spelare som andra spelare/brännare. Enbart
slutbehandlade skivor kan spelas upp på denna
spelare. (Denna spelare har ingen funktion för att
slutbehandla skivor.)
– Uppspelning av alla filer på skivan, USBminnesenheten eller nätverket garanteras inte.
– Upphovsrättsskyddade filer kan inte spelas upp via
en USB-minnesenhet eller nätverket.
Ljudfilskrav
– Samplingsfrekvens: inom 32 - 48 kHz (MP3/WMA),
LPCM 44,1 kHz/16 bitars/Stereo (WAV), 192 kHz/
24 bit (FLAC)
– Bithastighet: inom 8 - 320 kbit/sek (MP3), 32 192 kbit/sek (WMA)
Krav för WMV-filer
– WMV9, max. upplösning 1 920 × 1 080.
3 Sv
Svenska
DivX (.divx)
MKV med DivXformat (.mkv)
MKV med H.264
(.mkv)
MPEG PS (.mpeg/
.mpg)
MPEG TS (.ts)
MPEG-4 (.mp4)
VOB (.vob)
AVI (.avi)
ASF (.asf)
WMV (.wmv)
DVD-Video
Regionskod ”1” eller ”ALL”
1
* Den här spelaren är kompatibel med en USBminnesenhet som formaterats med FAT 16/32 och
NTFS.
MP3 (.mp3)
WMA (.wma)
AAC (.aac/.m4a)
WAV (.wav)
FLAC (.flac)
– Blu-ray Disc/DVD-videospelare och -skivor är
märkta med regionskoder som anger i vilka regioner
skivan kan spelas. Kontrollera
regionskodmarkeringen på spelarens baksida.
– För en Blu-ray Disc, kan skivan spelas upp på den
här spelaren med samma regionskodsmarkering eller
regionskoden ”ABC”.
– För en DVD-skiva, kan skivan spelas upp på den här
spelaren med samma regionskodsmarkering eller
regionskoden ”ALL”.
Exempel på regionskoder
DVD-R/DVD-R
DL/DVD-RW
Spelbara
ljudfilsformat
Regionshanteringsinformation för
Blu-ray Disc/DVD-video
Introduktion
■ Typer av skivor/filer som kan
användas med denna spelare
Om skivor och filer
■ Ladda en skiva
– Sätt i skivan med etikettsidan vänd uppåt.
– På en skiva som är inspelad på båda sidor ska sidan
du vill spela upp vara vänd nedåt.
Kommentarer
– Uppspelning påbörjas automatiskt beroende på
skivan och spelarens inställning.
– Menyn kanske visas först, beroende på skiva.
– Skivladdningstiden kan variera beroende på skiva.
■ Försiktighetsåtgärder gällande
skivor
Akta dig för repor och damm
– Skivtyperna Blu-ray Disc, DVD och CD är känsliga
för damm, fingeravtryck och speciellt repor. En repig
skiva kan kanske inte spelas upp. Hantera skivorna
försiktigt och förvara dem på ett tryggt ställe.
Förvaring av skivor
Placera skivan mitt i skivasken och
försvara asken och skivan upprätt.
Undvik att förvara skivor på ställen som
utsätts för solsken, nära värmekällor eller
på ställen med hög luftfuktighet.
Tappa ej skivan och utsätt den inte för
hårda stötar eller vibrationer.
Undvik att förvara skivor på ställen där det
är väldigt dammigt eller fuktigt.
Hanteringsföreskrifter
– Om ytan blir smutsig ska du torka av den
med en mjuk, fuktig trasa (endast vatten).
När du torkar skivor bör du alltid föra
trasan från mitten och utåt.
– Använd inte skivrengöringssprejer,
bensol, thinner, vätska mot statisk
elektricitet eller andra lösningar.
– Vidrör aldrig skivytan med fingrarna.
– Fäst inte papper eller etiketter på skivan.
– Om skivans spelyta är smutsig eller repig kan
spelaren besluta att skivan är inkompatibel och stöta
ur skivan eller spela upp den felaktigt. Torka av
smuts på spelytan med en mjuk trasa.
Rengöring av pickuplinsen
– Använd aldrig kommersiellt tillgängliga
rengöringsskivor. Dessa skivor kan orsaka skador på
linsen.
4 Sv
– Uppsök närmaste av Yamaha godkänd
serviceverkstad för rengöring av linsen.
■ Att observera när du tittar på
videobilder i 3D
– Vissa människor upplever obehag (såsom astenopi,
trötthet eller illamående) när de tittar på videobilder i
3D. Vi rekommenderar att du då och då tar pauser
medan du tittar på videobilder i 3D.
– Om du upplever något obehag ska du sluta titta på
videobilderna i 3D tills obehaget går över. Rådgör
med en läkare om du känner av ett allvarligt obehag.
– Läs noggrant bruksanvisningarna (Blu-ray Disc och
TV) eller viktiga meddelanden som visas på TV:n.
– Synen hos småbarn (speciellt barn under sex år)
utvecklas fortfarande. Rådgör med din läkare (som
t.ex. en barnläkare eller ögonläkare) innan du låter
småbarn titta på videobilder i 3D.
– Vuxna bör övervaka småbarn för att se till att de
följer rekommendationerna som givits ovan.
■ Cinavia-teknik
– Cinavia-teknik är en del av det
innehållsskyddssystem som ingår i din Blu-ray Discspelare.
Kommentar
– Följande meddelanden kan visas och uppspelningen
stoppas eller ljudutmatningen tillfälligt avbrytas av
din Blu-ray Disc-spelare om du spelar upp en
obehörig kopia av innehåll som skyddas av Cinaviateknik.
Dessa meddelanden visas bara på engelska.
Uppspelningen stoppad. Det uppspelade
innehållet skyddas av Cinavia™ och det är inte
tillåtet att spela upp det på denna apparat.
För mer information, se http://www.cinavia.com.
Meddelandekod 1.
Ljudet har tillfälligt dämpats. Justera inte
uppspelningsvolymen. Det uppspelade innehållet
skyddas av Cinavia™ och det är inte tillåtet att
spela upp det på denna apparat.
För mer information, se http://www.cinavia.com.
Meddelandekod 3.
Cinavia-information
Den här produkten använder Cinavia-teknik som
begränsar användningen av obehöriga kopior av vissa
spelfilmer och videoklipp samt deras ljud. När en kopia
som inte får spelas upp känns av visas ett meddelanden
och uppspelningen eller kopieringen avbryts.
Mer information om Cinavia-teknik finns på Cinavia
Online Consumer Information Center på
http://www.cinavia.com. Om du vill få mer information
om Cinavia via post skickar du ett vykort med din
postadress till: Cinavia Consumer Information Center,
P.O. Box 86851, San Diego, CA, 92138, USA.
1
Kontroller och funktioner
Introduktion
■ Frontpanel
USB
1 2
1 p (På/standby)
Slår på spelaren/ställer den i standby-läge.
Tryck och håll ned p på frontpanelen i cirka
5 sekunder för att återställa spelaren
(systemåterställning).
3
4
5 6 7
4 Skivfackets lucka
5
(Mata ut)
Öppnas/stänger skivfacket.
9
0
6
(Söka bakåt/hoppa bakåt):
Tryck för att hoppa bakåt, och håll intryckt för att söka
bakåt.
7
(Söka framåt/hoppa framåt):
Tryck för att hoppa framåt, och håll intryckt för att
söka framåt.
8
(Spela upp)
Påbörjar uppspelning.
9
(Paus)
Pausar uppspelningen.
0
(Stopp)
Stoppar uppspelningen.
2 USB-anslutning (s. 16)
3 Frontpanelens display
Visar information om användningsstatus.
8
Kommentar
– En fabriksmonterad skyddsfilm täcker spelarens frontpanel. Ta bort skyddsfilmen innan du börjar använda spelaren.
Svenska
5 Sv
Kontroller och funktioner
■ Fjärrkontroll
1 Infraröd signalsändare: Skickat ut en infraröd
signal. Sikta mot detta fönster med fjärrkontrollsensorn
(s. 9).
Kommentar
–
visas längst upp till vänster på skärmen när den
nedtryckta knappen inte är tillgänglig.
1
2
C
3
4
PROGRAM
MARKER
DIGEST
ZOOM
R
G
Y
B
SUBTITLE
ANGLE
5
6
7
8
9
0
AUDIO
CLEAR
SEARCH
SHUFFLE
PIP
SETUP
REPEAT
2ND
AUDIO
HOME
A B
TOP MENU
D
E
F
G
H
I
J
K
2 MARKER DVD VIDEO : Ställer in Bokmärke
(s. 26) vid en angiven plats i en film. När Bokmärke har
ställts in kan du välja den punkt du vill hoppa till
genom att trycka på DIGEST. Du kan ställa in upp till
12 bokmärken.
3
: Öppnar/stänger skivfacket.
4 PROGRAM DVD CD : Ställer in uppspelningens
ordning (s. 26). Du kan ställa in upp till 15 spår (för en
ljudskiva) eller titlar/kapitel (DVD-video).
5 Sifferknappar: Anger nummer, eller hoppar till
spåret/kapitlet som motsvarar det inmatade numret
under uppspelning. De här knapparna är ev. inte
tillgängliga beroende på skivtyp och
uppspelningsförhållanden.
L
6 CLEAR: Raderar angivet nummer/inställt objekt.
M
7 PIP BD : Slår på/stänger av bild-i-bild-funktionen
POP-UP MENU
(s. 27). Bild i Bild (
) visas på skärmen när denna
funktion är tillgänglig. Du kan även välja detta objekt
från menyn på skärmen (s. 24).
ENTER
Kommentar
RETURN
ON SCREEN
– Bild i Bild visas endast när Bild i Bild har ställts in
(s. 32).
8 SETUP: Visar SETUP-menyskärmen (s. 28).
A
B
NETFLIX
STATUS
9 2ND AUDIO BD : Väljer det sekundära ljudet för
bild-i-bild (s. 27) eller ljudkommentarer. Secondary
Audio (
) visas på skärmen när denna funktion är
tillgänglig.(s. 35). Du kan även välja detta objekt från
menyn på skärmen (s. 24).
Kommentar
– Secondary Audio visas endast när Secondary Audio
har ställts in (s. 32).
0 HOME: Visar HOME menyskärmen (s. 18).
A NETFLIX: Startar Netflix (s. 23).
B STATUS: Visar uppspelningsinformation (s. 25).
C DIGEST PHOTO : Visar 12 fotominiatyrer. När
miniatyrer visas kan du fortsätta till nästa/föregående
sida med
/
.
DVD
VIDEO : Visar Bokmärke valfältet (s. 26).
D p: Aktiverar spelaren eller ställer in den på standbyläge.
E ZOOM DVD VIDEO PHOTO : Zoomar in/ut.
Storleken på skärmen ändras varje gång du trycker på
knappen (zooma in/ut: 3 steg vardera).
F Färgknappar BD : Använd dessa knappar enligt
instruktionerna på skärmen.
6 Sv
Kontroller och funktioner
G SUBTITLE BD DVD VIDEO : Ändrar
undertextspråk (s. 43) om tillgängligt. Du kan även
välja detta objekt från menyn på skärmen (s. 24).
1
Introduktion
H ANGLE BD DVD : Ändrar kameravinkel om
videon spelades in med flera vinklar. Kameravinkel
(
) visas på skärmen när denna funktion är
tillgänglig. Du kan även välja detta objekt från
skärmmenyn (s. 24).
Kommentar
– Kameravinkel visas endast när Kameravinkel har
ställts in (s. 32).
I AUDIO BD DVD : Ändrar ljudspråk eller format.
Du kan även välja detta objekt från menyn på skärmen
(s. 24).
J SEARCH BD DVD CD VIDEO MUSIC :
Hoppar till en angiven punkt under uppspelning. Mer
information om denna funktion finns i ”Använda
sökning” (s. 26). Du kan även välja detta objekt från
statusmenyn (s. 25).
K SHUFFLE DVD
CD
VIDEO
MUSIC
PHOTO : Väljer shuffle-uppspelningsläge (s. 24).
L REPEAT BD
DVD
CD
VIDEO
MUSIC
PHOTO : Ändrar upprepningsläge. Upprepningsläget
som visas nedan ändras med varje knapptryck.
: Upprepar titeln som spelas upp.
: Upprepar kapitlet som spelas upp.
: Upprepar mappen som spelas upp.
: Upprepar alla spår/filer på skivan.
: Upprepar det spår/den fil som spelas upp.
M A/B BD DVD CD VIDEO MUSIC : Spelar upp
en specifik del som du vill upprepa.
1 Tryck på A/B vid scenen där du vill ställa in
startpunkten. ”A-” visas på skärmen.
Svenska
2 Tryck på A/B igen vid scenen där du vill ställa in
slutpunkten. ”A-B” visas på skärmen. Upprepad
uppspelning påbörjas.
3 Om du vill avbryta upprepa uppspelning trycker du
på A/B. ”A-B” försvinner och den repeterade
uppspelningen avbryts.
Kommentar
– Denna funktion kan ibland inte utföras beroende på
skivans specifikationer.
Fortsättning på nästa sida. \
7 Sv
Kontroller och funktioner
N TOP MENU BD DVD : Visar översta
menyskärmen om skivan innehåller en skivmeny. Välj
önskat objekt med 5/a/2/3 och ENTER.
PROGRAM
MARKER
DIGEST
ZOOM
R
G
Y
B
Kommentar
– Specifika handlingar kan skilja sig från de som anges
här beroende på skivan. Följ instruktionerna på varje
menyskärm.
SUBTITLE
ANGLE
O Markörknappar (5/a/2/3): Flyttar fokus i
menyskärmen.
ENTER: Väljer markerad meny/objekt.
AUDIO
CLEAR
SEARCH
SHUFFLE
PIP
SETUP
REPEAT
2ND
AUDIO
HOME
A B
TOP MENU
POP-UP MENU
N
O
P
P RETURN: Återgår till föregående meny eller skärm.
Q Kontrollknappar
R
ENTER
RETURN
BD
DVD
CD
VIDEO
MUSIC
PHOTO
: Stoppar uppspelning. Tryck på denna knapp två
gånger för att stoppa uppspelningen helt.
: Pausar uppspelning.
: Spelar upp innehåll.
ON SCREEN
S
/
DVD CD VIDEO MUSIC :
Söker framåt/bakåt. Sökningshastigheten ändras med
varje knapptryck (sök bakåt/framåt: 5 steg vardera).
Tryck på
för att återuppta normal uppspelning.
BD
Q
NETFLIX
STATUS
PHOTO : Ändrar hastigheten på ett bildspel
(långsammare/snabbare: 3 steg).
/
BD
DVD
CD
VIDEO
MUSIC :
Tryck på för snabbsökning/återuppspelning.
Snabbsökning hoppar 30 sekunder framåt.
Snabbåteruppspelning spelar upp innehållet från
10 sekunder innan igen.
/
: Hoppar bakåt/framåt.
Kommentar
– Beroende på skivan återtar spelaren uppspelningen
från den punkt där den senast stoppades. För att
spela upp från början, tryck på
två gånger och
sedan på
.
R POP-UP/MENU BD DVD : Visar popup-menyn.
Menyinnehållet som visas kan variera beroende på
skivan. För detaljer om hur popup-menyn kan visas
och manövreras, se skivans bruksanvisning.
Beroende på DVD-skivan, kan toppmenyskärmen
visas genom att trycka på POP-UP/MENU .
S ON SCREEN: Visar Skärmmenyn (s. 24).
8 Sv
Kontroller och funktioner
ID-funktion
Isättning av batterier i fjärrkontrollen
1
1 Fjärrkontrollinställning
Om du vill ändra ID från ID1 till ID2, håller du den
röda knappen och 2 intryckta samtidigt i
7 sekunder. Om du vill ändra ID från ID2 till ID1,
håller du den röda knappen och 1 intryckta
samtidigt i 7 sekunder.
2 Huvudenhetsinställning
Håll
och
på frontpanelen
intryckta samtidigt i 2 sekunder så visas det aktuella
ID:t när:
– Ingen skiva i den här spelaren.
– Skivfacket är stängt.
– Uppspelningen stoppas.
– ”NO DISC” visas på frontpanelens display.
Fortsätt hålla knapparna intryckta i ytterligare
2 sekunder för att växla ID mellan ID1 och ID2.
Kommentarer
– Om fjärrkontrollen är utan batterier i några minuter
eller om förbrukade batterier lämnas kvar i
fjärrkontrollen, ändras fjärrkontrollens ID
automatiskt till ID1. Om du vill använda
fjärrkontrollen i ID2-inställning sätter du i nya
batterier och ställer sedan in fjärrkontrollens ID igen.
– När den här spelaren återställs har den fjärrkontrollID ID1.
1
Introduktion
Du kan ändra fjärrkontrollens ID för att förhindra oönskad
kontroll av den andra Yamaha-spelaren, t.ex. DVDspelaren. Om du har ändrat fjärrkontrollens ID måste du
kontrollera att du valt samma ID för huvudenheten.
Standardinställningen är ID1.
3
2
Kommentarer
– Byt ut båda batterierna när fjärrkontrollens räckvidd
försämras.
– Använd AAA, R03, UM-4-batterier.
– Kontrollera att batterierna är vända åt rätt håll. Se
illustrationen på insidan av batterifacket.
– Ta ur batterierna om fjärrkontrollen inte ska
användas under en längre tid.
– Blanda inte gamla och nya batteriet.
– Använd inte olika typer av batterier (t.ex. alkaliska
och manganbatterier) samtidigt. Läs förpackningen
noga eftersom dessa olika typer av batterier kan ha
samma färg och form.
– Om batterierna har läckt, måste du genast kasta bort
dem. Undvik att beröra det utläckta ämnet eller låta
det komma i kontakt med kläder och liknande.
Rengör batterifacket noga innan du sätter i nya
batterier.
– Kasta inte bort batterier i det vanliga
hushållsavfallet. Kasta bort dem enligt lokala regler
och förordningar.
– Håll batterier borta från barn. Om någon sväljer ett
batteri av misstag måste läkare kontaktas omgående.
– Om du inte tänker använda fjärrkontrollen under en
längre period bör du ta ut batterierna ur den.
– De medföljande batterierna får inte laddas eller
öppnas.
Fjärrkontrollens ungefärliga
styromfång
Svenska
Fjärrkontrollsensor
USB
30°
30°
6m
9 Sv
ANSLUTNING
Introduktion till anslutningar
Leta upp motsvarande anslutningsmetod på din video-/audioutrustning. Vi rekommenderar att HDMI-uttaget används,
vilket ger ett högkvalitativt digitalt ljud och bild genom en enda anslutning. Om andra uttag/jack används bör video
anslutas först. Anslut sedan ljudet.
Anslut video och ljud till
AV-mottagaren med en
HDMI-kabel.
HDMI-uttag på
AV-mottagare? *
HDMI-uttag på TV?
Se AV-mottagarens
bruksanvisning.
HDMI-uttag på TV?
START
Anslut video till TV med en HDMI-kabel.
Använder du AVmottagare?
Anslut video till AV-mottagare.
HDMI-uttag på TV?
Anslut video och ljud till TV med en HDMI-kabel.
Anslut video till TV.
Ja
* När du ansluter till en AV-mottagare som inte kan mata ut ljudet som
kommer in via HDMI-uttaget ska du hänvisa till AV-mottagarens
bruksanvisning.
Nej
■ Bakre panel
0
9
AC IN
VIDEO OUT
Y
PB
DIGITAL OUT
COAXIAL
HDMI
NETWORK
AUDIO OUT
L
R
OUT
IN
REMOTE CONTROL
VIDEO
PR
COMPONENT
1 2 3
10 Sv
OPTICAL
4
USB
5
6
7
8
(Modell för Europa)
2
Anslutning
Video- och ljudanslutning till
AV-mottagaren
A HDMI (s. 12)
Ljudanslutning till AV-mottagare
Videoanslutningar
till TV
A’ HDMI (s. 12)
Anslut ljud till
AV-mottagare.
D COAXIAL (s. 14)
eller
till AV-mottagare
E
B COMPONENT (s. 13)
OPTICAL (s. 14)
eller
eller
F L/R (s. 15)
C VIDEO (s. 13)
Video- och ljudanslutning till TV
A’ HDMI (s. 12)
Ljudanslutning till TV
Anslut video till TV
Videoanslutning till TV.
D’ COAXIAL (s. 14)
eller
B’ COMPONENT (s. 13)
E’ OPTICAL (s. 14)
eller
eller
C’ VIDEO (s. 13)
F’ L/R (s. 15)
Svenska
1 VIDEO (s. 13)
6 AUDIO OUT (L/R) (s. 15)
2 COMPONENT (s. 13)
7 REMOTE CONTROL (OUT/IN) (s. 17)
3 HDMI (s. 12)
8 AC IN (s. 17)
4 OPTICAL (s. 14)
9 NETWORK (s. 16)
5 USB (s. 16)
0 COAXIAL (s. 14)
11 Sv
HDMI-anslutning
■ Anslutning till HDMI-uttaget
–
–
–
–
HDMI-uttaget sörjer för en hög bild- och ljudkvalitet för digitala signaler.
Anslut en HDMI-kabel (säljs separat) till HDMI-uttagen.
Se sida 36 för information angående format för ljud-/videoutmatning.
Använd HIGH SPEED HDMI-kablar med HDMI-logotypen (visas på bakre omslaget).
Observera!
Anslut inte spelarens strömkabel innan alla andra anslutningar har gjorts.
Denna spelare
VIDEO OUT
Y
DIGITAL OUT
COAXIAL
HDMI
PB
NETWORK
VIDEO
PR
COMPONENT
OPTICAL
USB
Tips
– När du använder funktionen HDMI Control,
se ”HDMI Control” (s. 31).
– Information om utmatningsläget för HDMIuttaget finns i ”HDMI” (s. 35).
– Om ingen bild visas, se ”Felsökning” (s. 40).
Till HDMI-uttag
■ Anslutning för att spela upp
Blu-ray 3D-skivor
För att du ska kunna använda Blu-ray 3D-skivor på
denna spelare behöver du följande utrustning och
anslutningar:
– Du behöver en TV och en AV-mottagare (om
du behöver en sådan) som har 3Dfunktionalitet.
– Alla komponenter måste anslutas med HDMIkablar.
– Blu-ray Disc-skivan ska innehålla 3D-bilder.
A’
– Du måste ställa in 3D uppspelning i Display
inställningar (s. 33) på Auto.
HDMI-kabel
(säljs separat)
A
Till HDMI-ingång
HDMI IN
AV-mottagare
12 Sv
TV
Videoanslutningar
■ Ansluta till komponent/video-uttaget
2
Anslutning
– Bildåtergivning av hög kvalitet med naturtrogna färger kan erhållas via komponentvideoutgångarna.
– Anslut en komponentvideokabel (säljs separat) eller en videokabel med stift till COMPONENT-uttagen/
VIDEO-uttaget.
– Se sida 37 för information angående format för videoutmatning.
Observera!
Anslut inte spelarens strömkabel innan alla andra anslutningar har gjorts.
Denna spelare
VIDEO OUT
Y
Denna spelare
VIDEO OUT
DIGITAL OUT
COAXIAL
Y
HDMI
PB
PB
DIGITAL OUT
COAXIAL
HDMI
NETWORK
NETWORK
PR
VIDEO
COMPONENT
(Grön)
(Vit)
(Blå)
OPTICAL
PR
VIDEO
COMPONENT
USB
OPTICAL
Till COMPONENTutgångar
USB
(Gul)
Till VIDEOutgång
Komponentvideokabel
(säljs separat)
B
Ljud/videokabel
(medföljer)
B’
C
C’
Till videoingången
Till
komponentingångarna
COMPONENT IN
(Gul)
(Gul)
(Grön)
Y
(Blå)
(Grön)
(Blå)
(Vit)
(Grön)
(Gul)
PB
VIDEO
AV INPUT
AV-mottagare
TV
AV-mottagare
TV
Kommentarer
– Vid bildåtergivning via en videobandspelare kan funktionen för kopieringsskydd orsaka försämrad bildkvalitet.
– För att kunna använda Blu-ray 3D-skivor i denna spelare måste du ansluta en AV-mottagare, en TV och denna
spelare med HDMI-kablar. Se sidan.12
13 Sv
Svenska
(Blå)
PR
(Vit)
(Vit)
Ljudanslutningar
■ Ansluta till den digitala Ijudutgången/uttaget
– Ljudutrustningen eller TV:n kan anslutas till COAXIAL-utgångarna/OPTICAL-uttaget.
– Anslut en koaxial-ljudkabel (säljs separat) eller optisk kabel (säljs separat) till koaxial digital-uttaget eller det
optiska digitala ljuduttaget.
– Se sida 36 för information angående format för ljudutmatning.
Observera!
Anslut inte spelarens strömkabel innan alla andra anslutningar har gjorts.
Denna spelare
Denna spelare
VIDEO OUT
Y
PB
VIDEO OUT
DIGITAL OUT
COAXIAL
Y
HDMI
PB
DIGITAL OUT
COAXIAL
HDMI
NETWORK
NETWORK
AUDIO OUT
L
R
PR
VIDEO
COMPONENT
OPTICAL
PR
VIDEO
COMPONENT
USB
OPTICAL
USB
Till COAXIALutgång
Till OPTICALuttag
Koaxial digital ljudkabel
(säljs separat)
D
D’
Till koaxialingången
AV-mottagare
Optisk kabel
(säljs separat)
E
E’
Till den optiska
ingången
COAXIAL
OPTICAL
AV INPUT
DIGITAL AUDIO IN
TV
AV-mottagare
TV
Tips
– Information om utmatningsläget för COAXIAL-utgången/OPTICAL-uttaget finns under Koaxial / Optisk (s. 35).
14 Sv
Ljudanslutningar
■ Anslutning till ljudutgångarna
– Ljudutrustningen eller TV:n kan anslutas till AUDIO OUT L/R-utgångarna.
– Anslut en ljud-/videokabel (medföljer) till AUDIO OUT L/R-utgången.
– Se sida 36 för information angående format för ljudutmatning.
2
Observera!
Anslutning
Anslut inte spelarens strömkabel innan alla andra anslutningar har gjorts.
Denna spelare
DIGITAL OUT
COAXIAL
DMI
NETWORK
AUDIO OUT
OUT
L
R
IN
REMOTE CONTROL
USB
(Vit)
Till AUDIO
OUT L/R-utgång
(Röd)
OPTICAL
Ljud/videokabel
(medföljer)
F
F’
Till ljud L/Ringång
(Röd)
(Vit)
(Vit)
Svenska
AV-mottagare
R
AUDIO IN
(Röd)
L
(Vit)
(Röd)
AUDIO
TV
15 Sv
Nätverks- och USB-anslutning
■ Anslutning till NETWORK-uttaget
– PC-innehåll kan spelas upp genom att ansluta spelaren till nätverket.
– Ett brett innehåll med interaktiva funktioner kan erhållas genom anslutning till internet vid uppspelning av
BD-Live-kompatibla skivor. Hänvisa till sida 27 för mer information om BD-Live-funktioner.
Kommentarer
–
–
–
–
–
Anslut en nätverkskabel (säljs separat) till NETWORK-uttaget.
Använd endast en nätverkskabel av typen STP (shielded twisted pair).
En bredbandsanslutning till internet enligt bilden nedan behövs för att använda internet.
Anslut nätverkskabelns andra kontakt till hubben/bredbandsroutern.
När en bredbandsanslutning till internet används krävs ett kontrakt med en internetleverantör. Kontakta en lokal
internetleverantör för närmare information.
– Vi hänvisar till bruksanvisningen till den utrustning som innehas, eftersom ansluten utrustning och
anslutningsmetod kan skilja sig åt beroende på aktuell internetmiljö.
– Använd en nätverkskabel/router som stöder 10BASE-T/100BASE-TX.
■ Anslutning till USB-anslutning
– Du kan ansluta en USB-minnesenhet för Lagringsplats till USB-anslutning på bakpanelen (eller frontpanelen) på
spelaren för att spara BD-Live-data eller för att uppgradera spelarens programvara.
– Anslut en USB-minnesenhet (säljs separat) till USB-anslutning.
OBSERVERA:
– Koppla inte loss USB-minnesenheten eller
nätkabeln under pågående åtgärder för BD-Live
(s. 27) eller programvaruuppgradering.
– Använd inte en USB-förlängningskabel vid
anslutning av en USB-minnesenhet till
spelarens USB-anslutning. Om en USBförlängningskabel används kan spelaren
hindras från att fungera korrekt.
Denna spelare
VIDEO OUT
Y
DIGITAL OUT
COAXIAL
HDMI
PB
NETWORK
AUDIO OUT
L
R
VIDEO
PR
COMPONENT
OPTICAL
USB
Kommentar
– Yamaha kan inte garantera att USBminnesenheter av alla märken fungerar med
denna spelare.
Till USBanslutning
Till NETWORKuttag
USB-minnesenhet
(säljs separat)
Nätverkskabel
(säljs separat)
Tips
– För att spara BD-Livedata på USBminnesenheten på
frontpanelen, ställ in
Lagringsplats till
USB på framsidan
(s. 31).
Till LANuttag
LAN
Internet
Modem
Hubb eller
bredbandsrouter
Efter anslutning
– När du ställer in Nätverk-inställningen manuellt, se ”Nätverk ” (s. 32).
– Spela upp PC-innehåll över ditt nätverk, se ”Använda nätverksinnehåll” (s. 20).
16 Sv
Dator
Andra anslutningar
■ Ansluta till REMOTE CONTROLutgångarna
Observera!
– Information om SCENE-funktionen finns i
bruksanvisningen som medföljde din AV-mottagare
från Yamaha.
– Du kan ansluta en komponent från Yamaha (t.ex. en
CD-spelare) som kan användas med SCENEfunktionen till utgången REMOTE CONTROL
(OUT) på denna spelare.
2
Anslutning
– Du kan överföra och motta fjärrkontrollens signaler
genom att ansluta till utgångarna REMOTE
CONTROL (OUT/IN).
– Anslut enkanals 3,5 mm minikontaktkablar (säljs
separat) till utgångarna REMOTE CONTROL
(OUT/IN).
– Om din AV-mottagare är en produkt från Yamaha
och har möjlighet att överföra SCENE-styrsignaler
kan du styre spelaren med SCENE-funktionen.
Tips
■ Ansluta nätkabeln
– När alla anslutningar har slutförts ska du koppla in
den medföljande strömkabeln i AC IN på baksidan
av spelaren. Anslut den sedan till ett nätuttag.
Anslut inte spelarens strömkabel innan
alla andra anslutningar har gjorts.
Denna spelare
RK
AC IN
AUDIO OUT
L
R
OUT
IN
REMOTE CONTROL
(Modell för Europa)
Till nätingång
Till REMOTE
CONTROLutgången (OUT)
Till REMOTE
CONTROLutgången (IN)
Till nätuttag
Kommentar
Enkanals 3,5 mm
minikontaktkabel
(säljs separat)
Enkanals 3,5 mm
minikontaktkabel
(säljs separat)
– MINSKA RISKEN FÖR ELSTÖTAR GENOM
ATT EJ VIDRÖRA OISOLERADE
KABELDELAR NÄR NÄTKABELN ÄR
ANSLUTEN.
Till
fjärrkontrol
lens utgång
Till fjärrkontrollingång
Yamaha komponent
Svenska
REMOTE CONTROL IN
REMOTE CONTROL OUT
Infraröd signalmottagare
eller Yamaha-komponent
(såsom en AV-mottagare)
17 Sv
SPELA UPP
Installationsguide/Snabbinstallation
■ Inställning med Installationsguide/Snabbinstallation
Med Installationsguide/Snabbinstallation kan du enkelt ställa in språk, upplösning och skärmförhållande.
Installationsguide-skärmen visas när du slår på denna spelare för första gången efter köpet. Samma inställning kan
utföras från SETUP-menyn = System = Snabbinstallation.
1 När skärmen Snabbinstallation visas, trycker du på
ENTER för att starta Snabbinstallation.
2 Ställ in språket, upplösningen och skärmförhållandet
genom att följa meddelandena på skärmen.
Kommentarer
– Om ingen bild visas när Installationsguide/
Snabbinstallation har slutförts, se ”Felsökning”
(s. 40).
– Ett varningsmeddelande med avseende på
uppspelning av 3D-video visas när denna spelare är
på. Tryck på ENTER för att avfärda meddelandet
eller CLEAR för att avaktivera det (s. 31).
HOME/MEDIA-menyn
Med HOME- och MEDIA-menyerna kan du bläddra i och spela upp multimediafiler på dataskivor, USB-minnesenheter
och ditt nätverk.
Kommentar
Ikoner längst upp i MEDIA-menyn
– Information om uppspelningsbara skivor och format
finns på sidan 3.
: Spelar upp skivan i facket eller visar innehållet på
dataskivan.
: Visar innehållet i USB-minnesenheten som är
ansluten till USB-anslutning.
: Söker efter en DLNA-server (s. 20) i nätverket.
: Visar innehållet på den anslutna DLNA-servern.
■ Spela upp foto/musik/video
Grundläggande funktioner
2/3/5/a: Flytta fokus.
2: Återgår till den överordnade mappen.
HOME: Flyttar till/avslutar HOME-menyskärmen.
ENTER: Bekräftar mapp/fil.
PIP
SETUP
2ND
AUDIO
HOME
TOP MENU
REPEAT
A B
POP-UP MENU
ENTER
RETURN
18 Sv
ON SCREEN
HOME/MEDIA-menyn
Vanliga åtgärder för uppspelning av
filer i en vald mapp
Exempel: Välja en filmfil från en USB-minnesenhet
4 Välj den Foto, Musik, Video eller AVCHD-mapp du
vill spela upp och tryck sedan på ENTER.
För att återgå till den överordnade mappen, tryck på 2
eller välj
.
Kommentar
– Stoppa uppspelningen av videon innan du går till
MEDIA-menyskärmen.
3
Spela upp
1 Tryck på HOME för att flytta till HOMEmenyskärmen.
Kommentar
– Observera att endast den filtyp som väljs i detta steg
visas i följande steg. Till exempel, om du valde
Foto-mappen i detta steg, visas endast fotofiler efter
detta steg. När du vill spela upp något annat än foton
ska du återgå till det här steget och välja filtyp igen.
Tips
– HOME-menyskärmen kan se olika ut beroende på
modellen.
5 Välj mappen/mapparna som innehåller filen som du
vill spela upp.
2 Tryck på 2/3/5/a för att välja MEDIA och tryck
sedan på ENTER.
MEDIA-skärmen visas.
Svenska
3 Välj objektet som innehåller filen som du vill spela upp
och tryck på ENTER.
Fortsättning på nästa sida. \
19 Sv
HOME/MEDIA-menyn
6 Välj filen som du vill spela upp och tryck på ENTER.
När en videofil väljs, startar uppspelningen.
När en musikfil väljs, visas statusskärmen och
uppspelningen påbörjas.
När en fotofil väljs, startar bildspelet.
■ Använda nätverksinnehåll
Den här spelaren är DLNA-certifierad (s. 42). Du kan
hantera foton, musik- och videoinnehåll som sparats på
DLNA-servrar i ditt hemmanätverk.
Spela upp delat innehåll
1 Spela upp filer på din PC genom att installera DLNAserverprogramvara, t.ex. Windows Media Player 12
och dela filerna som du vill spela upp.
2 Slå på PC:n med DLNA-serverprogramvaran
installerad eller DLNA-enheten ansluten till ditt
hemmanätverk.
3 Tryck på HOME för att visa HOME-menyskärmen.
Välj sedan MEDIA för att flytta till MEDIA-menyn.
DLNA-servrarna som är anslutna till nätverket visas i
listan på skärmen.
Tips
– Upplev bildspel med musik genom att trycka på
HOME för att återgå till HOME-menyskärmen när
musik spelas och välj en fotofil.
Kommentar
– Den visade filen kanske inte spelas upp beroende på
innehållet.
Funktioner för visning av foton
När du visar foton fungerar knapparna på fjärrkontrollen
enligt följande.
: Stoppar bildspelet och återgår till fillistan.
: Gör paus i ett bildspel.
: Spelar upp ett bildspel.
: Flyttar till nästa foto.
: Flyttar till föregående foto.
: Gör ett bildspel snabbare i 3 steg.
: Gör ett bildspel långsammare i 3 steg.
5: Inverterar ett foto.
a: Skapar en spegelbild av ett foto.
2: Roterar ett foto motsols.
3: Roterar ett foto medsols.
ZOOM: Zoomar in/ut på ett foto (zooma in/ut: 3 steg
vardera).
5/a/2/3: Panorerar i zoomläget när ett foto är större
än skärmen.
DIGEST: Växlar till miniatyrläge (s. 6). När miniatyrer
visas kan du fortsätta till nästa/föregående sida med
/
.
20 Sv
Kommentarer
– Om din DLNA-server inte finns i listan väljer du
DLNA Sökning för att hitta den.
– Beroende på DLNA-servern, kanske spelaren inte
behöver tillstånd från servern.
– För att spela upp filen på DLNA-servern måste
spelaren och servern vara anslutna till samma
åtkomstpunkt.
– Kraven för filen kanske inte alltid är kompatibla. Det
kan finnas vissa begränsningar beroende på
filfunktioner och DLNA-serverns förmåga.
4 Välj filen som du vill spela upp.
Kommentarer
– Kvaliteten och funktionen av uppspelningen kan
påverkas av ditt hemmanätverks tillstånd.
– Filer från borttagbara media som USBminnesenheter eller DVD-enheten på din
mediaserver kanske inte delas ordentligt.
Använda nätverkstjänster
Du kan direkt titta på video som följande nätverkstjänster erbjuder.
– YouTube
– Picasa (s. 22)
– Netflix (s. 23)
3
Kommentarer
Spela upp
– För att få tillgång till innehåll som tillhandahålls av tredje part behövs en snabb Internetuppkoppling. Eventuellt
krävs även en registrering av konto och ett betalt abonnemang.
– Tjänster från tredje part kan ändras, stängas av, avbrytas eller pausas när som helst utan föregående meddelande.
Yamaha frånsäger sig allt ansvar vid sådana händelser.
– En del innehåll kan enbart vara tillgängligt för vissa länder och kan presenteras på vissa bestämda språk.
– Yamaha kan inte garantera att tjänster kommer fortsätta att tillhandahållas eller vara tillgängliga för en given
tidsperiod, och Yamaha frånsäger sig varje sådant garantianspråk, uttalat eller underförstått.
Spela upp video från YouTube™
Du kan titta på filmer från YouTube över Internet med denna spelare.
Tjänsterna kan komma att ändras utan föregående meddelande.
1 Tryck på HOME för att visa HOME-menyskärmen.
Tips
– HOME-menyskärmen kan se olika ut beroende på
modellen.
2 Tryck på 2/3/5/a för att välja YouTube och tryck
sedan på ENTER.
Svenska
Tips
– För att avsluta YouTube, tryck på RETURN.
21 Sv
Spela upp foton från Picasa™ Web Album
Du kan titta på filmer från Picasa Web Album över Internet med denna spelare.
Tjänsterna kan komma att ändras utan föregående meddelande.
1 Registrera ditt användarnamn och lösenord på datorn
innan du använder Picasa Web Album.
2 Tryck på HOME för att visa HOME-menyskärmen.
Tryck på 2/3/5/a för att välja Picasa och tryck sedan
på ENTER.
Tips
– HOME-menyskärmen kan se olika ut beroende på
modellen.
3 När du använder Picasa från den här spelaren för första
gången väljer du ikonen Ny användare och anger ditt
registrerade användarnamn och lösenord.
Tips
– För att avsluta Picasa, tryck på RETURN.
22 Sv
Spela upp video från Netflix™
Du kan titta på filmer och TV-program från Netflix över Internet med denna spelare. Du registrerar dig för Netflix på
www.netflix.com.
Netflix är tillgängligt i vissa länder. Obegränsat medlemskap krävs.
Mer information finns på www.netflix.com
3
■ Starta Netflix
Spela upp
1 Tryck på HOME för att visa HOME-menyskärmen.
Tryck på 2/3/5/a för att välja NETFLIX och tryck
sedan på ENTER.
Du kan också trycka på NETFLIX på fjärrkontrollen
för att starta Netflix.
Tips
– HOME-menyskärmen kan se olika ut beroende på
modellen.
– För att återgå till HOME-menyskärmen, tryck på
RETURN.
Kommentarer
– När en programvaruuppgradering krävs, visas ett
meddelande när du väljer Netflix. I så fall utför du
uppgraderingen.
– Mer information om Netflix finns på Netflix
webbplats på www.netflix.com.
– Information om hur du avaktiverar Netflix finns i
”Netfix Information” (s. 32).
Svenska
23 Sv
Avancerade uppspelningsfunktioner
Detta kapitel förklarar uppspelning av kommersiellt
tillgängliga Blu-ray-skivor, DVD-skivor, CD-skivor och
inspelade DVD-RW/R-skivor.
Kommentar
– Grundläggande uppspelningsfunktioner förklaras på
sida 6.
■ Skärmmeny
Visa skärmmenyn genom att trycka på ON SCREEN.
Tryck sedan på 5/a/2/3 för att välja ett objekt och tryck
sedan på ENTER för att använda den önskade funktionen.
DVD
–
–
–
–
–
–
–
Normal
Shuffle CH (kapitel)
Shuffle TT (titel)
Shuffle Alla
Random CH (kapitel)
Random TT (titel)
Random Alla
VIDEO
MUSIC
PHOTO
– Normal
– Shuffle F (mapp)
– Random F (mapp)
Ljud BD DVD VIDEO : Visar ljudspråk/signalen för
Blu-ray Disc/DVD-skivan som har valts. Det går att välja
önskad typ av ljud.
Vinkel BD DVD : Visar det valda vinkelnumret. Om
videon spelats in med olika vinklar går det att växla
mellan dessa.
Textning BD DVD VIDEO : Visar det aktuella valda
undertextspåret när undertexter är tillgängliga.
Skärmmenyn innehåller följande objekt.
Titel BD DVD VIDEO : Visar titelnumret som spelas
upp. Du kan hoppa till den önskade titeln genom att välja
den här.
Kapitel BD DVD VIDEO : Visar kapitelnumret som
spelas upp. Du kan hoppa till det önskade kapitlet genom
att välja det här.
Spår/Fil CD VIDEO MUSIC PHOTO : Visar spåret/
filen som spelas upp. Du kan hoppa till önskat spår/fil
genom att välja det här.
Tid BD DVD CD VIDEO MUSIC : Visar
uppspelningstid. Välj hur tiden visas från följande
alternativ:
– Spelad tid för titeln, kapitlet, skivan, spåret eller
filen
– Återstående tid för titeln, kapitlet, skivan, spåret
eller filen
Mode/Spelläge
DVD CD VIDEO MUSIC PHOTO : Visar aktuellt
uppspelningsläge. Du kan välja uppspelningsläge från
följande alternativ:
Subtitle Style BD : Visar aktuellt val av stil för
undertexter. Denna funktion är endast tillgänglig för
externa undertexter i videofiler. Du kan välja önskad
textstil för undertexter.
Bitrate BD DVD CD VIDEO MUSIC : Visar
bithastighet för ljud-/videosignalen.
Second Video BD : Aktiverar/avaktiverar PIP (bild-ibild) (s. 6).
Second Audio BD : Aktiverar/avaktiverar sekundärt
ljud (s. 6).
Ins Sök
BD
DVD
CD
VIDEO
MUSIC : Hoppar
30 sekunder.
Ins återuppspelning
BD DVD CD VIDEO MUSIC : Spelar upp
innehållet från 10 sekunder innan igen.
Bildspel PHOTO :
Visar hastighet för bildspelet. Du kan välja
bildspelshastighet från Långsam/Medium/Snabb.
Övergång PHOTO : Visar hur fotot visas på skärmen.
Du kan välja en övergångstyp.
CD
– Normal: Normal uppspelning.
– Shuffle: Slumpvis uppspelning utan upprepning.
– Random: Slumpvis uppspelning med upprepning.
24 Sv
Codepage VIDEO : Väljer teckenkod för undertext som
du har lagt till DivX video (s. 42).
Avancerade uppspelningsfunktioner
■ Statusmeny
Detta visar olika inställningar, t.ex. undertexter,
vinkelinställningar och den titel/kapitel/spårnummer som
spelas upp. Visa statusmenyn genom att trycka på
STATUS. Statusmenyn innehåller följande menyer.
BD
DVD
CD
MUSIC
Exempel: Ikoner vid uppspelning av musikfiler
123 4
5
6
7
VIDEO
Exempel: Ikoner vid uppspelning av Blu-ray Disc
2
1
3
3
5
Spela upp
8 7
4
6
8
1
1
2
(Ikon för skivtyp/videofil)
(Titelnummer som spelas upp): Du kan hoppa
till angiven titel med SEARCH-knappen (s. 7).
4
(Kapitelnummer som spelas upp): Du kan
hoppa till angivet kapitel med SEARCH-knappen
(s. 7).
6
2
(Upprepningsläge): Visar aktuellt
upprepningsläge (s. 7).
3
(Ikon för skivtyp/musikfil)
(Uppspelningsstatus)
3
5
(Uppspelningsstatus)
(Förfluten speltid): Du kan hoppa till angiven
plats med SEARCH-knappen (s. 7).
(Vald undertext): Du kan ändra språket för
undertexten med SUBTITLE-knappen.
7
(Valt ljud): Du kan ändra språket eller formatet för
ljud med AUDIO-knappen.
8
(Upprepningsläge): Visar aktuellt
upprepningsläge (s. 7).
4 (Omslag) MUSIC : Visar omslag om filen innehåller
det.
5
(Spår/filnummer som spelas upp): Du kan
hoppa till angivet spår med SEARCH-knappen (s. 7).
6 (Information) MUSIC : Visar musikinformation om
filen innehåller det.
7
(Förfluten speltid): Du kan hoppa till angiven
plats med SEARCH-knappen (s. 7).
8 (Förloppsindikator) MUSIC : Visar förloppsstatus
för den aktuella låten.
PHOTO
(Uppspelningsstatus)
2
(Ikon för fotofil)
3
(Filnummer som visas)
4
Svenska
1
(Upprepningsläge): Visar aktuellt
upprepningsläge (s. 7).
5 (Bildspelets hastighet)
25 Sv
Avancerade uppspelningsfunktioner
■ Använda Bokmärke
DVD
VIDEO
Med denna funktion kan du ställa in Bokmärke vid en
angiven plats i videon. Efter Bokmärke har ställts in kan
du flytta till platsen som ställdes in med denna funktion.
Du kan ställa in upp till 12 bokmärken.
1 Tryck på MARKER under uppspelning av filmen för
att ställa in Bokmärke. Bokmärke-numret och statusen
visas.
2 Tryck på ENTER för att programmera
uppspelningsordningen.
För ljudskivor trycker du på 5/a för att välja ett
önskat spår och trycker sedan på ENTER.
För DVD-videoskivor väljer du en önskad titel (visas
som TT) och kapitel (visas som CH) istället för ett
spår.
Radera ett inställt spår genom att välja spåret som du
vill radera och trycka på CLEAR.
Tryck på RETURN för att avbryta programmerad
uppspelning.
2 När Bokmärke har ställts in trycker du på DIGEST för
att visa fältet för val av Bokmärke.
3 Tryck på 2/3 för att välja den Bokmärke du vill spela
upp och tryck sedan på ENTER.
Tryck på CLEAR för att ta bort vald Bokmärke.
Kommentar
– När uppspelningen är klar (d.v.s. skivan matas ut,
trycks två gånger), raderas bokmärken
automatiskt.
■ Programmerad
uppspelning DVD
CD
Med denna funktion kan du programmera
uppspelningsordningen för ljudskivespår eller
DVD-kapitel.
Tryck på PROGRAM under uppspelning för att visa
PROGRAM-fönstret och programmera
uppspelningsordningen.
Du kan programmera högst 15 spår/kapitel.
Exempel: Programmera uppspelningsordning för f
CD-spår
1 Tryck på PROGRAM under uppspelning.
3 När programmeringen är klar trycker du på
för att
ställa in och starta programmerad uppspelning.
4 Avbryt programmerad uppspelning genom att stoppa
uppspelning helt, tryck två gånger på
.
■ Använda sökning
BD
DVD
CD
VIDEO
MUSIC
PHOTO
Med denna funktion kan du hoppa till en angiven plats
under uppspelning.
1 Tryck på SEARCH under uppspelning. Statusraden
visas.
2 Tryck på 5/a/2/3 för att välja ett av objekten nedan
och tryck sedan på ENTER.
BD
DVD :
– Titelnummer (visas som
)
– Kapitelnummer (visas som
– Spelad tid (visas som
)
)
– Spelad kapiteltid (visas som
CD :
– Spårnummer (visas som
)
)
– Spelad spårtid (visas som
)
– Spelad skivtid (visas som
VIDEO MUSIC :
– Filnummer (visas som
– Spelad filtid (visas som
)
)
)
PHOTO :
– Filnummer (visas som
)
3 Tryck på 5/a eller sifferknapparna för att ställa in/
justera värdet för ett fokuserat objekt och tryck på
ENTER för att hoppa till en angiven plats.
4 Stäng statusraden genom att trycka på STATUS.
26 Sv
Avancerade uppspelningsfunktioner
■ Njuta av BONUSVIEW™ och BDLive™
■ Använda funktionen för BDLive™
Denna spelare stöder uppspelningsfunktioner för
BONUSVIEW (s. 42) (BD-ROM Profile 1 Version 1.1)
och BD-Live (s. 42) (BD-ROM Profile 2).
1. Ställ in nätverksinställningen
(s. 32).
Kommentar
■ Använda bild-i-bild-funktionen
(uppspelning av sekundärt ljud/
video)
BD-video som innehåller sekundärt ljud och video och är
kompatibel med bild-i-bild-visning, kan spelas av med
sekundärt ljud och video samtidigt som en liten bildruta i
hörnet.
Primär video
Sekundär video
2. Anslut USB-minnesenheten till
denna spelare (s. 16).
BD-Live-data sparas i ett USB-minne anslutet till
denna spelare. För att njuta av dessa funktioner
ansluter du ett USB-minne som stödjer USB 2.0
High Speed (480 Mbit/s) till USB-anslutning som du
valde på Lagringsplats (s. 31). Standardinställningen
är USB-anslutning på den bakre panelen.
– BUDA-mappen skapas automatiskt i USBminnesenheten vid behov.
– Data kopieras/nedladdas inte om lagringsutrymmet
är otillräckligt. Radera i så fall onödiga data eller
använd en ny USB-minnesenhet.
– Laddning (läsning/skrivning) av data kan ta en tid.
3
Spela upp
– Funktioner och uppspelningsmetod kan variera
beroende på skivan. Se vägledningen på skivan eller
den medföljande handboken.
Kommentarer
När Bild i Bild (
) eller Secondary
Audio (
) visas trycker du på PIP för
att aktivera/avaktivera funktionen
bild-i-bild.
Kommentarer
3. Spela upp skivan.
4. Kör BD-Live enligt instruktionerna
på skivan.
Kommentarer
– Följ anvisningarna i bruksanvisningen till Blu-ray
Disc-skivan för korrekt uppspelningsmetod av BDLive-innehåll osv.
– Använd BD-Live-funktioner genom att utföra
nätverksanslutning (s. 16) och göra Nätverkinställningar (s. 32).
– Se BD-Live anslutning (s. 33) angående
inställningar för att begränsa åtkomst till BD-Liveinnehåll.
– Den tid det tar att ladda ner försedda program till
USB-minnesenheten ansluten till spelaren beror på
hastigheten på Internetanslutningen och
programmets datavolym.
– BD-Live-program som förses genom Internet kanske
inte kan visa anslutningen beroende på leverantörens
status (uppgradering). Ta i sådana fall ut skivan och
försök igen.
– Om BD-Live-skärmen inte dyker upp en stund efter
att du valt BD-Live-funktionen i Blu-ray Discmenyn, kan USB-minnesenheten inte ha tillräckligt
med plats i minnet. I sådana fall bör du ta ut skivan
ur spelaren och radera data i USB-minnesenheten
med Format-menyn i ”Lagringsplats” (s. 31).
27 Sv
Svenska
– Om du vill lyssna på sekundärt ljud ska du
kontrollera att inställningen för Ljudutgång
(Koaxial / Optisk eller HDMI) är inställd på PCM
eller Reencode (s. 35).
– Beroende på skiva kanske du måste aktivera
sekundärt ljud i skivans översta meny för att lyssna
på sekundärt ljud (s. 8).
– Beroende på innehållet kan det hända att sekundärt
ljud och video för bild-i-bild-visning spelas upp och
tas bort automatiskt. Vidare kan spelbara områden
vara begränsade.
– Yamaha kan inte garantera att USB-minnesenheter
av alla märken går att använda med denna spelare.
– Använd inte en USB-förlängningskabel vid
anslutning av en USB-minnesenhet till spelarens
USB-anslutning. Om en USB-förlängningskabel
används kan spelaren hindras från att fungera
korrekt.
INSTÄLLNINGAR
SETUP-menyn
SETUP-menyn tillåter att olika ljud-/bildinställningar och justeringar av funktioner utförs med hjälp av fjärrkontrollen.
Meny/undermeny
Objekt
System
Skärmsläckare
Aktiverar/avaktiverar skärmsläckaren.
Automatisk
skivuppspelning
Ställer in spelaren på att starta skivuppspelning automatiskt.
HDMI Control
Ställer in spelaren för att ta emot kontrollsignalen från
fjärrkontrollen på TV/AV-mottagaren.
31
Nätverkskontroll
Ställer in kontroll via Ethernet på på/av.
31
Ladda Default
Återställer alla inställningar till standardvärdena med
undantag av inställningen Säkerhet.
31
Uppgradera
Uppgraderar spelaren.
31
Snabbinstallation
Ställer in språk, upplösning, skärmformat.
31
Lagringsplats
Visar status för Lagringsplats (s. 31), formaterar
Lagringsplats och väljer den främre/bakre USB-anslutning
för Lagringsplats.
31
Meddelande vid 3D
uppspelning
Visar ett varningsmeddelande med avseende på uppspelning
av 3D-video när denna spelare är påslagen.
31
OSD
Väljer språk för visning på skärmen.
31
Meny
Prioriterar språket för skivmenyn.
31
Ljud
Prioriterar språket för ljud.
32
Textning
Prioriterar språket för undertexter.
32
Textning
Ställer in parentesundertexter på på/av.
32
Kameravinkel
Ställer in visning av Kameravinkel när en Blu-ray Disc/DVD
inspelad i flera vinklar spelas upp.
32
Bild i Bild
Ställer in visning av Bild i Bild när en Blu-ray Disc/DVD
med bild-i-bild spelas upp.
32
Secondary Audio
Ställer in visning av Secondary Audio när en Blu-ray Disc/
DVD inspelad med sekundärt ljud spelas upp.
32
Last Memory
Ställer in denna spelare så att den kommer ihåg det senaste
uppspelningsstället när den är i vänteläget eller skivhållaren
är i öppet läge.
32
Allmäna
Inställningar
Språk
Spela upp
Säkerhet
Nätverk
28 Sv
Funktion
Sidan
31
31
DivX(R) VOD
DRM
Visar registreringskoden för DivX(R)-video.
Netfix Information
Avaktiverar den här spelaren på Netflix och visar ESN
(Electronic Serial Number).
32
32
Ändra lösenord
Byter lösenord för Föräldrakontroll och Landskod.
32
Föräldrakontroll
Ställer in Föräldrakontroll beroende på skivans innehåll.
32
Landskod
Ställer in din Landskod.
32
Internetuppkoppling
Ställer in Internetanslutningen på Möjliggöra/Inaktivera.
32
32
Anslutningsinställning
Ställer in en nätverksanslutningsmetod.
Information
Visar skärmen med nätverksinformation.
33
Anslutningstest
Utför nätverksanslutningstest.
33
IP inställningar
Ställer in IP-inställningen på Auto/Manual.
33
BD-Live anslutning
Ställer in BD-Live-anslutningen på Tillåten/Delvis Tillåten/
Förbjuden.
33
DLNA
Ställer in DLNA på Möjliggöra/Inaktivera.
33
Proxyinställning
Ställer in proxy-inställningen.
33
SETUP-menyn
Meny/undermeny
TV
Display
inställningar
Ljudutgång
Funktion
Sidan
Väljer 3D- eller 2D-video.
33
TV Screen
Ställer in skärmformatet för den anslutna TV:n och justerar
videoutmatningen.
33
Inställning för
videoutgång
Väljer upplösning för videoutsignalen.
TVsystem
Ställer in TVsystem på NTSC/PAL/Multi.
34
Färgrymd
Väljer Färgrymd från YCbCr 4:4:4/YCbCr 4:2:2/Full RGB/
RGB.
34
HDMI Deep Color
Väljer HDMI Deep Color från 30 bits/36 bits/48 bits/Av.
34
HDMI 1080p 24Hz
Ställer in HDMI 1080p 24Hz på auto/av.
34
Läppsynk
Justerar fördröjningen mellan bild och ljud, t.ex. när
munrörelserna inte är synkroniserade med rösten.
34
Videoläge
Justerar bilden.
34
Justera färg
Justerar Ljusstyrka/Färgmättnad/Färgton för varje färg.
35
Brusreducering
Ställer in nivån för Brusreducering.
35
De-interlacing läge
Ställer in hur du vill känna av videosignalen.
35
Koaxial / Optisk
Väljer utmatningsläget för COAXIAL-uttaget/OPTICAL
-uttaget från Bitstream/PCM/Reencode/Av.
35
HDMI
Väljer utmatningsläget för HDMI-uttaget från Bitstream/
PCM/Reencode/Av.
35
Downsampling
Väljer nedsamplingsfrekvens för den digitala ljudsignalen
mellan 48K/96K/192K.
35
35
Ljudinställning
DRC
Ställer in DRC (Dynamic Range Compression).
Högtalarinställning
Nedmixning till 2kanals
Ställer in ljudutmatningen från AUDIO OUT L/R-utgången.
Post Process
Uppmixningsfunktion
Skapar flera kanaler utifrån den 2-kanaliga ljudsignalen.
34
4
Inställningar
Video Process
Objekt
3D uppspelning
35
35
Visar programvaruversion och MAC-adress (s. 43).
35
System
information
Svenska
29 Sv
SETUP-menyn
■ Exempel på användning av
SETUP-menyn
Du måste öppna SETUP-menyskärmen för att utföra
inställningarna på spelaren. Nedan förklaras de
grundläggande manövreringarna för SETUP-menyn.
SUBTITLE
4. Ange lösenord.
Ange ditt lösenord med sifferknapparna.
– Standardlösenordet är 0000.
– Du kan inte gå vidare till nästa inställningsskärm
förrän du matat in rätt lösenord.
– Byt lösenordet enligt ”Ändra lösenord” (s. 32).
ANGLE
AUDIO
CLEAR
PIP
SEARCH
SHUFFLE
SETUP
TOP MENU
2ND
REPEAT
POP-UP MENU
ENTER
RETURN
ON SCREEN
Exempel: Ställa in Föräldrakontroll
Kommentar
– Vissa objekt kan inte ställas in under uppspelning. I
detta fall trycker du två gånger på
för att stoppa
uppspelningen innan du utför inställningen.
5. Välj nästa menypost.
Tryck på 5/a för att välja Föräldrakontroll-nivån
för Blu-ray Disc/DVD och tryck sedan på ENTER.
1. Ta fram SETUP-menyskärmen.
Tryck på SETUP för att visa SETUP-menyskärmen.
Tryck på 2/3 för att välja Allmäna Inställningar
och tryck sedan på ENTER eller a.
2. Välj en undermeny.
Tryck på 5/a för att välja Säkerhet och tryck sedan
på ENTER eller 3.
6. Avsluta menyskärmen.
3. Välj en menypost.
Tryck på 5/a för att välja Föräldrakontroll och
tryck sedan på ENTER eller 3.
30 Sv
Tryck på 2 för att återgå till föregående meny.
SETUP-menyn
■ Allmäna Inställningar
Standardinställningarna är markerade med ” ”.
*
System
Skärmsläckare
Du kan ställa in skärmsläckaren på på/av.
När den aktiveras växlar spelaren till skärmsläckarläge om
den inte används på 3 minuter. Efter detta återgår spelaren
till vänteläget när den inte används på 27 minuter.
På*, Av
På*, Av
HDMI Control
Du kan göra en inställning så att spelaren mottar en
kontrollsignal från en TV/AV-mottagare som är
kompatibel med funktionen HDMI Control via en HDMIkabel (s. 12).
På, Av*
Använda HDMI Control-funktionen
Med hjälp av HDMI Control kan interaktiv
manövrering utföras av spelaren och TV:n (om
funktionen HDMI Control stöds).
När du ansluter spelaren till en TV som är kompatibel
med HDMI Control med en HDMI-kabel och ställer in
HDMI Control i SETUP-menyn på (s. 31), kan du utföra
funktionerna nedan.
• Funktion för automatiskt ingångsval
När uppspelning påbörjas på spelaren, så växlar TV:ns
ingångsväljare (och en AV-mottagare om spelaren är
ansluten till TV:n via AV-mottagaren) automatiskt om
till spelaren. Beroende på TV:n så kan det vara möjligt
att slå på TV:n automatiskt.
• Funktion för automatiskt avslagning
Om TV:n stängs av medan spelaren är i stopp-läge och
SETUP-menyskärmen inte visas, stängs även spelaren
av automatiskt.
På, Av*
Kommentarer
– När du aktiverar Nätverkskontroll ökar
strömförbrukningen i beredskapsläge pga.
nätverkskontrollfunktionen.
– När du väljer På tar det kortare tid för systemet att
starta.
Ladda Default
Du kan återställa alla inställningar för spelaren till
standardvärdena, med undantag av inställningen Säkerhet
(s. 32). Information om standardinställningar finns på
sidorna 28-35.
Uppgradera
Du kan uppgradera programvaran manuellt från USB Lagring
eller Nätverk. Mer information om programvaruuppgradering
finns i ”Programvaruuppgradering” (s. 38).
Snabbinstallation
Du kan utföra Snabbinstallation (s. 18).
Lagringsplats
Du kan visa Lagringsplats-information, formatera
Lagringsplats och välja , USB på framsidan/USB på
baksidan för att spara BD-Live-data.
Formatera (töm) mappen ”BUDA” i USB-minnesenheten
genom att välja Information och trycka på ENTER när
”Format” är markerat på skärmen.
USB på framsidan, USB på baksidan*
Tips
– Lagringsplats används som extraminne när en
Blu-ray Disc spelas upp.
Meddelande vid 3D uppspelning
Du kan slå på eller stänga av ett varningsmeddelande, med
avseende på 3D-video som visas på TV:n, när spelaren är
påslagen.
På*, Av
Språk
OSD
Du kan välja språket för visning på skärmen, d.v.s.
meddelanden eller menyn som visas på skärmen som
SETUP-menyn.
English, Français , Español , Deutsch , Italiano , Svenska ,
Nederlandse ,
,
Meny
Du kan prioritera språket för skivmenyn.
English, Français ,
, Español , Deutsch , Italiano ,
Nederlandse , Portugisiska, Danska, Svenska , Finska,
Norska,
, Koreanska, Japanska, Mer
31 Sv
Svenska
Kommentarer
– HDMI Control fungerar kanske inte som den ska
beroende på TV:n.
– Andra funktioner än de ovannämnda kan fungera,
beroende på TV:n och AV-mottagaren.
– För att göra HDMI Control tillgänglig, ställ in
inställningar för HDMI Control på ALLA
komponenter (Spelaren, TV:n och AVmottagaren). Det kan även behövas vissa
manöver.
– Varje funktion kan ställas in självständigt för att
aktiveras/avaktiveras beroende på TV:n.
– Se bruksanvisningen som medföljer din TV och/
eller AV-mottagare för detaljer kring inställning.
– När du aktiverar den här funktionen ökar
strömförbrukningen i vänteläget pga. HDMI
Control-funktionen.
4
Inställningar
Automatisk skivuppspelning
Du kan ställa in Automatisk skivuppspelning på på/av.
När denna funktion är aktiverad spelas en skiva upp
automatiskt när den sätts i.
Nätverkskontroll
Du kan ställa in kontroll via Ethernet på På/Av. Den här
spelaren har YNC-protokollet (Yamaha Network
Control).
SETUP-menyn
Ljud
Du kan prioritera ljudspråket för uppspelning av Blu-ray
Disc/DVD. Information om inställningar finns i Meny
(s. 31).
Textning
Du kan prioritera språket för Textning.
English, Français ,
, Español , Deutsch , Italiano ,
Nederlandse , Portugisiska, Danska, Svenska , Finska,
Norska,
, Koreanska, Japanska, Mer, Av
(Standardinställningarna i [Språk] skiljer sig beroende på
din modell.)
Spela upp
Textning
Du kan ställa in visning av parentesundertexter (s. 43) när
Blu-ray Disc/DVD med parentesundertexter spelas upp.
På*, Av
Kameravinkel
Du kan ställa in visning av Kameravinkel (
) när
Blu-ray Disc/DVD med flera vinklar spelas upp.
På*, Av
Bild i Bild
Du kan ställa in visning av Bild i Bild (
Disc med bild-i-bild (s. 27) spelas upp.
Ändra lösenord
Du kan ställa in ett lösenord för att ändra Föräldrakontrollnivån och Landskod. Se ”Föräldrakontroll” (s. 32) och
”Landskod” (s. 32).
Kommentarer
– Standardlösenordet är 0000.
– Om du glömmer lösenordet, se ”Felsökning” (s. 39)
och ställ in alla Säkerhet-inställningar till sina
standardvärden.
Föräldrakontroll
På vissa Blu-ray-skivor/DVD-skivor ställs kontrollnivån
för visning av skivan in beroende på tittarens ålder. Du
kan ställa in Föräldrakontroll som visas på skärmen
beroende på innehåll.
Lösenordet (se ”Ändra lösenord” på s. 32) måste anges
innan Föräldrakontroll-nivåerna ställs in.
När du har ställt in Föräldrakontroll och spelar en skiva
med en nivå som är högre än den aktuella
Föräldrakontroll-nivån, eller om du vill ändra
Föräldrakontroll-nivån, visas en dialogruta som ber dig
ange lösenordet.
Av*, 1–8
) när Blu-ray
På*, Av
Secondary Audio
Du kan ställa in visning av Secondary Audio (
Blu-ray Disc med sekundärt ljud spelas upp.
Landskod
Du kan ställa in Landskod för ditt land. Lösenordet (se
”Ändra lösenord” på s. 32) måste anges innan Landskod
ställs in. Denna inställning kan användas för att ställa in
Föräldrakontroll och skivuppspelning.
) när
På*, Av
Last Memory
Du kan ställa in denna spelare så att den kommer ihåg det
senaste uppspelningsstället när den är i vänteläget eller
skivhållaren är i öppet läge.
På*,
Säkerhet
Av
Nätverk
Internetuppkoppling
Ställ in detta objekt på Möjliggöra när du använder BD-Live
(s. 27), DLNA (s. 20), programvaruuppgradering från
nätverket (s. 38) och andra nätverksfunktioner.
Möjliggöra*, Inaktivera
Anslutningsinställning
Du kan välja en nätverksanslutningsmetod.
Kommentar
Wired*
Ansluter nätverket med Ethernet.
– Vissa skivor är inte kompatibla med denna funktion.
Trådlös
Ansluter nätverket med ett trådlöst LAN.
Du kan välja inställningar för en trådlös LANanslutning. Följ instruktionerna på skärmen.
DivX(R) VOD DRM
Du kan visa registreringskoden för DivX(R)-video.
Netfix Information
Du kan avaktivera den här spelaren på Netflix och visa
ESN (Electronic Serial Number). Information om hur du
aktiverar spelaren igen finns i ”Spela upp video från
Netflix™” (s. 23). ESN (Electronic Serial Number) är ett
unikt nummer som gör det möjligt att använda Netflixströmning.
32 Sv
Scan
Söker efter en åtkomstpunkt. Du kan ansluta till den
åtkomstpunkt som hittas.
Manual
Du kan ange information manuellt för en
åtkomstpunkt.
SETUP-menyn
Information
Du kan visa en skärm med nätverksinformation. På denna
skärm kan du se information om gränssnitt (Ethernet),
Adresstyp, IP adress, Subnet mask, Standardgateway och
DNS.
■ Display inställningar
Anslutningstest
Du kan utföra ett Internet-anslutningstest. Om testet inte
lyckas ska du kontrollera ”IP inställningar” (s. 33) och
utföra testet igen.
3D uppspelning
Du kan välja videoutmatning i 3D eller 2D från denna
spelare.
Auto*
Denna spelare väljer automatiskt 3D- eller 2D-video.
IP inställningar
Du kan konfigurera nätverksinställningarna.
Av
Denna spelare väljer alltid 2D-video.
Välj att automatiskt konfigurera denna spelares
nätverksinställningar med DHCP-servern.
Manual
Välj att konfigurera nätverksinställningarna (IP
adress, Subnet mask, Standardgateway och DNS)
manuellt.
Tips
–
–
–
–
Siffertangenter
2/3
CLEAR
ENTER
Matar in tecken.
Flyttar markeringen.
Raderar ett tecken.
Sparar inställningen och går ur
menyn.
BD-Live anslutning
Du kan ställa in åtkomstbegränsning för BD-Liveinnehåll.
Tillåten
Låter alla BD-Live ansluta till nätverket.
Delvis
Tillåten*
Endast skivor med ägarintyg tillåts.
Förbjuden
Förbjuder alla BD-Live att ansluta till nätverket.
DLNA
Du kan ställa in DLNA (s. 42) på Möjliggöra/Inaktivera.
När du inte använder DLNA-funktionen, ska du ställa in
Inaktivera.
Möjliggöra*, Inaktivera
Proxyinställning
Du kan ställa in Proxyinställning. Ställ in på Inaktivera för
normal användning. Ställ in på Möjliggöra för att ange
proxy-inställningen.
Aktiverar proxy-värd och proxy-portinställning.
Inaktivera*
Avaktiverar proxy-servern. Välj detta objekt när
ingen proxy-server används.
Proxy Host
Ställer in proxy-värd.
Proxy Port
Ställer in proxy-port.
4
Kommentar
– Även om du ställer in ”3D uppspelning” till ”Auto”
och spelar upp Blu-ray 3D-skivor, väljer denna
spelare 2D-bilder utifrån anslutning, TV:ns
inställning osv. (och s. 12).
TV Screen
Du kan ställa in skärmformatet för den anslutna TV:n och
justera videoutmatningen.
Om du byter TV (d.v.s. om du köper en ny) och den nya
TV:n har ett annat skärmformat än den tidigare, så
behöver du ändra inställningen TV Screen.
16:9 Full
Välj detta när spelaren är ansluten till en TV med
skärmformatet 16:9. När en video med
skärmformatet 4:3 spelas upp, visas videon enligt
bilden nedan.
16:9 Normal* Välj detta när spelaren är ansluten till en TV med
skärmformatet 16:9. När en video med
skärmformatet 4:3 spelas upp, visas videon enligt
bilden nedan.
4:3 Pan Scan Välj detta när spelaren är ansluten till en TV med
skärmformatet 4:3. När en video med skärmformatet
16:9 spelas upp, visas videon enligt bilden nedan.
4:3 Letter Box Välj detta när spelaren är ansluten till en TV med
skärmformatet 4:3. När en video med skärmformatet
16:9 spelas upp, visas videon enligt bilden nedan.
Ursprunglig
bildstorlek
På 16:9 (bredskärm) TV
16:9 Full
16:9 Normal
4:3
Ursprunglig
bildstorlek
På 4:3 TV
4:3 Pan Scan
4:3 Letter Box
16:9
33 Sv
Svenska
Möjliggöra
TV
Inställningar
Auto*
Standardinställningarna är markerade med ” * ”.
SETUP-menyn
Inställning för videoutgång
Du kan välja videoupplösning mellan HDMI,
COMPONENT och VIDEO. Mer information om
utmatningsformat finns i ”Angående format för
videoutmatning” (s. 37).
HDMI Deep Color
När din TV och/eller AV-mottagare är kompatibel med
Deep Color (s. 42) ska du ställa in detta alternativ enligt
din TV/AV-mottagare. Denna funktion är tillgänglig när
spelaren är ansluten med en HDMI-kabel.
HDMI
30 bits, 36 bits, 48 bits, Av*
När du ställer in Auto ställs upplösningen in på det
högsta värdet för den anslutna TV:n.
Om du väljer Läser skiva, används den ursprungliga
upplösningen och videofrekvensen som spelats in på
Blu-ray Disc eller DVD-skivan. Du kan använda en
videouppskalare på en annan enhet.
Om något annat än en Blu-ray Disc eller DVD-skiva
spelas upp, används upplösningen och
videofrekvensen enligt Auto.
Om en Blu-ray Disc eller DVD-skiva vars
upplösning och videofrekvens inte är kompatibla
med den anslutna TV:n, visas ingen bild. I det här
fallet avslutar du uppspelningen och väljer ett annat
alternativ än Läser skiva.
HDMI 1080p 24Hz
Detta matar ut BD-video som kodats med 24Hz
ramhastighet i HDMI 1080p 24Hz. Denna funktion kan ge
jämnare videouppspelning. Denna funktion är tillgänglig
när din TV/AV-mottagare stöder funktionen, och när
denna spelare är ansluten med en HDMI-kabel. Mer
information om utmatningsformat finns i ”Angående
format för videoutmatning” (s. 37).
Auto*, Av
Kommentar
Auto*, Läser skiva, 480i/576i, 480p/576p,
720p, 1080i, 1080p
– Denna inställning avaktiveras när
utmatningsupplösningen är inställt på något annat än
1080p.
COMPONENT Du kan bara välja 480p/576p eller 480i/576i.
480p/576p, 481i/576i*
VIDEO
Fungerar på samma sätt som 480i/576i.
Kommentarer
– Om du vill mata ut HD-ljud (Dolby TrueHD eller
DTS-HD Master Audio) från HDMI-terminalen,
ställer du in Inställning för videoutgång på Auto eller
mer än 720p.
– Om en TV ansluts med en HDMI-kabel, blir
standardinställningen HDMI.
– Om en TV inte ansluts med en HDMI-kabel, blir
standardinställningen VIDEO.
TVsystem
Du kan välja TVsystem från PAL, NTSC och Multi. Ställ
in samma TVsystem som din TV har. Mer information om
utmatningsformat finns i ”Angående format för
videoutmatning” (s. 37).
NTSC, PAL, Multi
(Standardinställningen skiljer sig beroende på din modell.)
Färgrymd
Du kan välja Färgrymd (s. 42) från HDMI. Denna
funktion är tillgänglig när spelaren är ansluten med en
HDMI-kabel.
YCbCr 4:4:4* Ställer in Färgrymd på YCbCr 4:4:4.
YCbCr 4:2:2
Ställer in Färgrymd på YCbCr 4:2:2.
Full RGB
När RGB är inställt och vita och svarta nyanser på
skärmen är för bleka, väljer du det här alternativen.
Den här inställningen är effektiv när en ansluten
komponent hanterar RGB 0-255-intervallet.
RGB
Matar ut videosignalen i det normala
signalintervallet.
Kommentar
– Denna funktion är endast tillgänglig på TV-apparater
som stöder funktionen.
Läppsynk
Du kan ställa in/justera Läppsynk-funktionen (s. 43).
Auto*
Denna spelare justerar Läppsynk-funktionen
automatiskt.
Manual
Du kan ställa in/justera Läppsynk-funktionen
manuellt. Du kan ställa in fördröjningen av ljud för
2D- och 3D-innehåll oberoende av varandra.
2D
3D
Av
Denna spelare justerar inte Läppsynk-funktionen.
Video Process
Videoläge
Du kan ställa in Videoläge nedan.
Standard*
Bilden är mest naturlig och välbalanserad. Det här
läget passar för normal användning.
Vivid
Bilden är mer livfull och skarp.
Cinema
Bilden passar för filmtittande i mörka rum.
Anpassad
Du kan justera bilden manuellt. Tryck på
5/a för att välja parametern och tryck på 2/3 för
att justera.
Ljusstyrka
Justerar bildens allmänna ljusstyrka.
Färgmättnad
Justera färgmättnaden i bilden.
Färgton
Justerar bildens färgnyans.
Kontrast
Justerar de ljusa områdena (vitnivåer) i bilden.
Skärpa
Justera skärpan på föremål i bilden.
CTI
Jämnar ut kanterna i färgbilder. Färgbilder renderas
mer distinkt.
Standardinställningarna är 0.
34 Sv
SETUP-menyn
Justera färg
Du kan justera Ljusstyrka/Färgmättnad/Färgton för varje
färg (Röd/Grön/Blå/Gul/Cyan/Magenta). Om du vill
använda den här funktionen ställer du in Videoläge på
Anpassad. Information om inställningar finns i
”Videoläge” (s. 34).
Standardinställningarna är 0.
Brusreducering
Du kan ställa in Brusreducering på en nivå mellan 0 och
3. 0 är av och 3 är den maximala nivån.
0, 1, 2*, 3
Auto*, Film, Video
■ Ljudinställning
Standardinställningarna är markerade med ” * ”.
Ljudutgång
Koaxial / Optisk
Du kan välja utmatningsläge för COAXIAL-utgången och
OPTICAL-uttaget. Mer information om utmatningsformat
finns i ”Angående format för ljudutmatning” (s. 36).
Bitstream
Matar ut en digital signal utan bearbetning.
Sekundärt ljud matas inte ut.
PCM
Skickar ut 2-kanals PCM.
Reencode*
Matar ut Bitstream med sekundärt ljud.
Av
Stänger av ljudet.
Av, På, Auto*
Högtalarinställning
Nedmixning till 2-kanals
Du kan välja nedmixningsmetod till 2 analoga kanaler
från Stereo eller Lt/Rt.
Lt/Rt
Välj detta alternativ när enheten är ansluten till en
Dolby Pro Logic-avkodare. Ljudet från de bakre
högtalarna mixas till 2-kanaligt stereoljud.
Stereo*
Ändrar kanalutmatning till stereo, vilket bara ger
ljud från de två fronthögtalarna.
4
Inställningar
De-interlacing läge
Du kan välja hur du vill känna av videosignalen. Ställ in
på Auto för normal användning. När horisontellt bandbrus
visas på skärmen ställer du in det här alternativet på Film/
Video för att eliminera bruset.
DRC
Du kan ställa in DRC (Dynamic Range Compression)
(s. 42) på på/av/Auto. Om du ställer in Auto, aktiveras
DRC automatiskt för en källa med DRC-information i
Dolby TrueHD-format. DRC gör starka ljud, t.ex.
explosioner, svagare och konversationer mer tydliga.
Detta är användbart när du ser på filmer på natten.
Post Process
Uppmixningsfunktion
Du kan skapa flera kanaler utifrån den 2-kanaliga
ljudsignalen. Om du vill skapa flera kanaler, väljer du
DTS NEO:6 och sedan Cinema- eller Musik-läge.
Av*, DTS NEO:6
■ System information
Programvaruversion och MAC-adress (s. 43) visas.
HDMI
Du kan välja utmatningsläget för HDMI-uttaget.
Information om inställningar finns i ”Koaxial / Optisk”
(s. 35). Mer information om utmatningsformat finns i
”Angående format för ljudutmatning” (s. 36).
Bitstream*, PCM, Reencode, Av
Kommentar
Svenska
– Om du vill mata ut HD-ljud (Dolby TrueHD eller
DTS-HD Master Audio) från HDMI-uttaget, ställer
du in Inställning för videoutgång på Auto eller mer
än 720p (s. 34).
Downsampling
Du kan ställa in nedsamplingsfrekvensen för digitala
ljudsignaler. Denna funktion är effektiv för
ljudsignalutmatningen från COAXIAL-utgången/
OPTICAL-uttaget.
48K*
Den högsta samplingshastigheten för digital PCMutmatning är 48 kHz.
96K
Den högsta samplingshastigheten för digital PCMutmatning är 96 kHz.
192K
Den högsta samplingshastigheten för digital PCMutmatning är 192 kHz.
35 Sv
SETUP-menyn
■ Angående format för ljudutmatning
Källformat
PCM 2ch
PCM 5.1ch
PCM 7.1ch
HDMI
Bitstream
med SA* eller
BCS**
PCM 2ch
utan SA* eller
BCS**
med SA* eller
BCS**
PCM 5.1ch
PCM 7.1ch
PCM upp till
5.1ch
med SA* eller
Dolby Digital BCS**
Dolby Digital
Plus
Plus
utan SA* eller
BCS**
PCM upp till
7.1ch
Dolby
TrueHD
DTS
utan SA* eller
BCS**
med SA* eller
BCS**
utan SA* eller
BCS**
med SA* eller
BCS**
utan SA* eller
BCS**
Dolby Digital
Dolby
TrueHD
PCM upp till
7.1ch
DTS
PCM upp till
5.1ch
PCM
PCM 2ch
MIXED 2CH
Reencode
–
Dolby Digital
2-kanals
PCM 2ch
Dolby Digital
PCM 2ch
2-kanals
Dolby Digital
PCM 2ch
Dolby Digital
PCM 2ch
PCM 7.1ch
Dolby Digital
Dolby Digital
Bitstream
PCM 5.1ch
utan SA* eller
BCS**
med SA* eller
BCS**
KOAXIAL / OPTISK
Reencode
PCM 2ch
utan SA* eller
BCS**
med SA* eller
BCS**
PCM
2-kanals
Dolby Digital
PCM 2ch
Dolby Digital Dolby Digital
2-kanals
2-kanals
2-kanals
PCM 2ch
Dolby Digital
2-kanals
Dolby Digital
PCM 2ch
Dolby Digital
2-kanals
Dolby Digital
PCM 2ch
Dolby Digital
2-kanals
DTS
PCM 2ch
DTS
2-kanals
DTS
PCM 2ch
DTS
2-kanals
DTS
PCM 2ch
DTS
2-kanals
Dolby Digital
Dolby Digital
Plus
Dolby Digital
Dolby
TrueHD
DTS
med SA* eller
DTS HD High BCS**
DTS HD High
Resolution
Resolution
utan SA* eller
BCS**
DTS
PCM upp till
7.1ch
DTS HD High
Resolution
med SA* eller
BCS**
DTS-HD
DTS-HD
Master Audio utan SA* eller Master Audio
BCS**
PCM upp till
7.1ch
DTS
DTS-HD
Master Audio
* ”SA” är sekundärt ljud.
** ”BCS” är ett knappklickljud, ljudeffekt för popup-menyer m.m.
Kommentarer
– När Koaxial / Optisk eller HDMI ställs in på Bitstream matas inte sekundärt ljud ut. (s. 35)
– Om du vill mata ut HD-ljud (Dolby TrueHD eller DTS-HD Master Audio) från HDMI-uttaget, ställer du in
Inställning för videoutgång på Auto eller mer än 720p (s. 34).
36 Sv
SETUP-menyn
■ Angående format för videoutmatning
När TVsystem ställs in på NTSC
Inställning för videoutgång
Innehåll
Utgångsterm
inal
HDMI
Auto
Läser skiva
BD-Video
HDMI
med
1080p/24Hz- COMPONENT
innehåll
VIDEO
*1
1080p 24Hz
*2
av
BD-Video
utan 1080p/
24Hzinnehåll
*1
*3
HDMI
COMPONENT
VIDEO
HDMI
COMPONENT
VIDEO
HDMI
Övrigt
COMPONENT
VIDEO
av
*1
*3
*2
*2
*1
*1
*2
*2
COMPONENT
1080i
1080p 24Hz/
1080i 60Hz
60Hz *4
av
av
av
av
av
480p/576p
480i/576i
–
720p 60Hz
480p
480i
480p
480i
480i
720p 60Hz
720p 60Hz
av
1080p 60Hz 1080i 60Hz
av
480i/576i
av
1080p 60Hz 1080i 60Hz
av
480p/576p
av
1080p 60Hz 1080i 60Hz
av
VIDEO
720p
720p 60Hz
av
480i
480i
480i
480i
480i
480i
480i
480i
480i
480i
480p
480i
480p
480i
480i
480i
480i
480i
480i
480i
480i
480i
480i
480i
480i
480p
480i
480p
480i
480i
480p
480i
480p
480i
480i
480i
480i
480i
480i
480i
480p
480i
480p
480i
480i
480p
480i
480p
480i
480i
480i
480i
480i
480i
480i
4
Inställningar
DVD-Video
*2
1080p
När TVsystem ställs in på PAL
Inställning för videoutgång
Innehåll
BD-Video
med
1080p/24Hzinnehåll
Utgångsterm
inal
HDMI
COMPONENT
VIDEO
BD-Video
utan 1080p/
24Hzinnehåll
COMPONENT
DVD-Video
COMPONENT
HDMI
VIDEO
HDMI
VIDEO
HDMI
Övrigt
COMPONENT
VIDEO
HDMI
Auto
Läser skiva
*1
1080p 24Hz
*2
av
*1
*3
*2
av
*1
*3
*2
*2
*1
*1
*2
*2
1080p
1080i
1080p 24Hz/
1080i 50Hz
50Hz *4
av
av
1080p 50Hz 1080i 50Hz
av
av
1080p 50Hz 1080i 50Hz
av
av
1080p 50Hz 1080i 50Hz
av
av
COMPONENT
VIDEO
720p
480p/576p
480i/576i
480p/576p
480i/576i
–
720p 50Hz
576p
576i
576p
576i
576i
av
720p 50Hz
av
720p 50Hz
av
720p 50Hz
av
576i
576i
576i
576i
576i
576i
576i
576i
576i
576i
576p
576i
576p
576i
576i
576i
576i
576i
576i
576i
576i
576i
576i
576i
576i
576p
576i
576p
576i
576i
576p
576i
576p
576i
576i
576i
576i
576i
576i
576i
576p
576i
576p
576i
576i
576p
576i
576p
576i
576i
576i
576i
576i
576i
576i
*1 Upplösningen ställs in på den högsta upplösning som stöds av den anslutna TV:n. Ett exempel: när den högsta
upplösningen som stöds av den anslutna TV:n är 1080p, ställs upplösningen in på 1080p.
*2 Ingen bild matas ev. ut eftersom HDMI-utgången har prioritet.
*3 Källskivans upplösning används.
*4 Om Auto har valts för HDMI 1080p 24Hz och den anslutna TV:n stöder 1080p 24 Hz-innehåll, matas 1080p 24 Hz ut
istället för 1080p 50/60 Hz.
När TVsystem är inställt på Multi, matas videosignalen ut med samma frekvens som källan. Se tabellerna ovan för mer
information om TV:ns frekvensinställning och videoutsignalens upplösning.
Kommentarer
– HDMI 1080p 24Hz avaktiveras när utmatningsupplösningen är inställd på något annat än 1080p.
– När TVsystem ställs in på NTSC och videokällan inte är 60 Hz, konverteras videons utmatningssignal till 60 Hz.
– När TVsystem ställs in på PAL och videokällan inte är 50 Hz, konverteras videons utmatningssignal till 50 Hz.
37 Sv
Svenska
När TVsystem ställs in på Multi
Programvaruuppgradering
Vissa av de nyligen utgivna Blu-ray-skivorna kan inte spelas upp såvida du inte uppgraderar spelarens programvara till
den senaste versionen. Vi rekommenderar att du uppgraderar spelarens programvara med programvaru-uppgradering så
att spelaren fungerar med den senaste programvaran.
Kontrollera om det finns tillgängliga uppgraderingar genom att besöka
http://download.yamaha.com/
Kommentar
– Ta inte ut USB-minnesenheten, försätt inte spelaren i standby-läge och koppla inte ur strömkabeln/LAN-kabeln
när uppgraderingen utförs.
■ Uppgradera programvaran
1. Förbered programvaruuppgradering.
När du uppgraderar programvara från USB Lagring:
1 Spara uppgraderingsfilen i en lämplig mapp på
USB-minnesenheten. Mer information finns i
informationsdokumentet som medföljer
uppgraderingspaketet.
2 Anslut USB-minnesenheten.
Hoppa över steg 2.
När du uppgraderar programvara från Nätverk:
Bekräfta att spelaren är ansluten till nätverket.
2. Välj uppgraderingsmetod och
starta uppgraderingen från SETUPmenyn.
1 Tryck på SETUP för att visa SETUPmenyskärmen.
2 Välj Allmäna Inställningar = System =
Uppgradera.
3 Välj det objekt som innehåller
uppgraderingspaketet från USB Lagring/Nätverk.
Systemet söker efter uppgraderingspaketet.
38 Sv
3. Uppgradera programvaran genom
att följa meddelandena på
skärmen.
Uppgradering slutförs. Systemet kommer att
återställas.
YTTERLIGARE INFORMATION
Felsökning
Vi hänvisar till tabellen nedan när spelaren inte fungerar korrekt. Om du upplever ett problem som inte finns beskrivet
nedan eller om föreskrifterna nedan inte hjälper, stäng av spelaren, koppla ur strömkabeln och kontakta närmaste
Yamaha-återförsäljare eller serviceverkstad.
■ Ström
Problem
Tänkbara orsaker och lösningar
Ingen ström.
– Anslut nätkabeln ordentligt.
– Tryck på p på frontpanelen för att slå på strömmen.
Strömmen till spelaren slås av.
– Strömmen stängs automatiskt av efter 30 minuters inaktivitet (ingen uppspelning).
■ Grundläggande funktioner
Problem
5
Tänkbara orsaker och lösningar
– Använd fjärrkontrollen inom angivet styromfång. (s. 9)
– Byt batterierna i fjärrkontrollen. (s. 9)
– Kontrollera ID-inställningarna för huvudenheten och fjärrkontrollen. Fjärrkontroll-ID
på huvudenheten kan ändras när huvudenheten har återställts. I så fall kontrollerar du
fjärrkontroll-ID på huvudenheten, och ställer in det igen om det behövs. (s. 9)
Knapparna fungerar inte.
– Tryck och håll ned p på frontpanelen i cirka 5 sekunder för att återställa spelaren.
– Återställ spelaren helt genom att koppla ur strömkabeln från nätuttaget i 10 sekunder
eller mer, koppla in strömkabeln till nätuttaget igen och slå på strömmen till spelaren.
Glömt lösenord.
– Tryck på och håll samtidigt
och
intryckta på frontpanelen när ingen skiva sitter
i och uppspelningen är stoppad för att ställa in alla Säkerhet-inställningar (s. 32) på
denna spelare till sina standardinställningar. Efter att strömmen automatiskt slagits av,
tryck på p för att slå på strömmen igen.
Ytterligare information
Fjärrkontrollen fungerar inte.
■ Skivuppspelning
Problem
Tänkbara orsaker och lösningar
– Ta ur skivan och rengör den. (s. 4)
– Se till att sätta i skivan på rätt sätt (mitt i skivfacket och med etikettsidan vänd uppåt).
(s. 4)
– Använd en skivtyp som stöds av spelaren. (s. 3)
– Ta ut skivan och kontrollera om spelaren stöder skivan eller inte. (s. 3)
– Kontrollera regionskoden. (s. 3)
– Kontrollera om det är fel på skivan genom att pröva med en annan skiva.
– CD-R/RW, DVD+R/RW/R DL och DVD-R/RW/R DL skivor måste slutbehandlas.
(s. 3)
Video stoppas.
– Spelaren stoppas om den känner av stötar eller vibrationer.
Spelaren avger ett knäppande ljud när
avspelning startas eller vid isättning av
en skiva.
– Dessa ljud tyder inte på något fel på spelaren utan är normala driftsbetingelser.
Svenska
Spelaren kan inte spela upp en skiva.
39 Sv
Felsökning
■ Bild
Problem
Tänkbara orsaker och lösningar
Ingen bild.
– Kontrollera att alla kablar anslutits på rätt sätt. (s. 10)
– Kontrollera att den anslutna TV:n eller AV-mottagaren är inställd på rätt ingångskälla.
(s. 10)
– Om ingen skiva är isatt eller uppspelningen är stoppad, håller du ned
och
på
frontpanelen samtidigt för att ställa in videoupplösningen på standardvärdet.
Om ingen bild ändå visas, håller du ned
på frontpanelen i ca. 5 sekunder för att
växla mellan NTSC/PAL.
– Om du valt Läser skiva, skickas en signal som inte är kompatibel med den anslutna
TV:n ut. Ändra inställningen för att skicka ut en signal som är kompatibel med den
anslutna TV:n. (s. 34)
Skärmen fryses och
funktionsknapparna fungerar inte.
– Tryck på
och starta sedan uppspelningen på nytt.
– Slå av strömmen och slå sedan på den igen.
– Tryck och håll ned p på frontpanelen i cirka 5 sekunder för att återställa spelaren.
Video matas inte ut med önskad
upplösning.
– Ställ in på önskad upplösning. (s. 34)
Bredskärmsbilder ter sig utsträckta
vertikalt, eller det uppträder svarta band
överst och underst på skärmen. Eller
4:3-videon visas utsträckt vågrätt.
– Ändra TV:ns bildformat. (s. 33)
Fyrkantiga störningar (mosaikmönster)
uppträder på skärmen.
– Sådana störningar kan uppträda i scener med hastiga rörelser beroende av egenskaperna
för digital bildkomprimeringsteknik.
Den uppspelade bilden utsätts för
störningar om en DVD-skiva spelas in på
en videobandspelare eller spelas upp
via en videobandspelare.
– Denna spelare tillämpar analogt kopieringsskydd. Vissa skivor innehåller en signal som
förbjuder kopiering. Detta kopieringsskydd förhindrar normal uppspelning om du
försöker att spela upp en sådan skiva på en videobandspelare eller spela in via en
videobandspelare och sedan spela upp signalen.
Inget ljud matas ut eller bilder spelas
inte upp korrekt.
– För vissa skivor innehållande upphovsrättsskyddat material kan det hända att ljudet inte
matas ut eller att bilder inte spelas av korrekt.
■ Ljud
Problem
Tänkbara orsaker och lösningar
Inget ljud eller förvrängt ljud.
–
–
–
–
Vänster och höger ljudkanal är
omkastade, eller ljudet matas bara ut
från ena sidan.
– Kontrollera ljudanslutningen. (s. 10)
Inget ljud matas ut eller bilder spelas
inte upp korrekt.
– För vissa skivor innehållande upphovsrättsskyddat material kan det hända att ljudet inte
matas ut eller att bilder inte spelas av korrekt.
Kan inte höra den önskade ljudtypen
och/eller antal kanaler.
– Se inställningen Ljudutgång och ”Angående format för ljudutmatning”. (s. 35, s. 36)
Inget ljud hörs med PIP (bild-i-bild)
(sekundärt ljud).
– Ställ in Koaxial / Optisk eller HDMI på PCM/Reencode. (s. 35)
– Lyssna på sekundärt ljud genom att trycka på 2ND AUDIO. (s. 6)
– Beroende på skivan kanske du måste ställa in sekundärt ljud i skivans översta meny.
(s. 8)
Kontrollera att Ijudkabeln är ansluten på rätt sätt. (s. 10)
Höj ljudet på TV:n eller AV-mottagaren.
Inget ljud hörs vid visning av en stillbild eller snabbspolning framåt/bakåt. (s. 8)
Ljudet matas kanske inte ut beroende på inspelningsstatus, t.ex. om skivan är inspelad
med ljud utöver rena ljudsignaler eller ljud som skiljer sig från normala ljudsignaler.
(s. 3)
■ Nätverk
Problem
Spelaren ansluter inte till Internet.
40 Sv
Tänkbara orsaker och lösningar
– När du ansluter till Internet genom att välja Wired i Anslutningsinställning, ansluter du
nätverkskabeln på rätt sätt. (s. 32)
– Aktivera ansluten utrustning, som bredbandsrouter eller modem.
– Anslut bredbandsroutern och/eller modemet ordentligt.
– Om Trådlöst har valts i Anslutningsinställning och när du vill ansluta till Internet med
Ethernet, väljer du Wired. (s. 32)
– Välj Trådlöst i Anslutningsinställning när du vill ansluta till Internet med ett trådlöst
LAN. (s. 32)
Felsökning
Problem
Tänkbara orsaker och lösningar
Det går inte att ladda ned BD-Liveinnehåll.
– Kontrollera att spelaren kan anslutna till Internet. Se ”Anslutningstest”. (s. 33)
– Anslut USB-minnesenheten ordentligt. Kontrollera att USB-minnesenheten är ansluten
till USB-anslutning på denna spelare. (s. 16)
– Kontrollera om Blu-ray Disc-skivan stöder BD-Live.
– Anslut en USB-minnesenhet som formaterats med FAT16, FAT32 eller NTFS.
– Vi rekommenderar att du ansluter en USB-minnesenhet med minst 2 GB ledigt
utrymme. Om det inte finns tillräckligt med utrymme ska du formatera USBminnesenheten. (s. 31)
– Se den medföljande bruksanvisningen för skivan eller konsultera skivtillverkaren.
Det går inte att hitta DLNA-servern.
–
–
–
–
–
Det går inte att spela upp filen på DLNAservern.
– Kontrollera att filen är spelbar. (s. 3)
– Kontrollera inställningarna för din DLNA-server.
– Kvaliteten och funktionen av uppspelningen kan påverkas av ditt hemmanätverks
tillstånd.
Kan inte ansluta till Internet via trådlöst
LAN.
– Kontrollera att den trådlösa LAN-routern är påslagen.
– Beroende på den omgivande miljön, t.ex. väggarnas material,
radiomottagningsförhållandena eller hinder mellan spelaren och den trådlösa LANroutern, kan kommunikationsavståndet kortas. Flytta spelaren och den trådlösa LANroutern närmare varandra.
– Enheter som använder 2,4 GHz-frekvensbandet, t.ex. mikrovågsugnar, Bluetooth eller
digitala trådlösa enheter, kan störa kommunikationen. Flytta spelaren bort från sådana
enheter eller stäng av dem.
– Om Internet-anslutningen som använder ett trådlöst LAN fortfarande inte fungerar trots
ovanstående förslag, försöker du använda Ethernet genom att välja Wired i
Anslutningsinställning. (s. 32)
Det trådlösa nätverket hittas inte eller
störs.
– Om Scan utförs men det trådlösa nätverket inte hittas eller störs, trycker du på
RETURN för att återgå till föregående skärmbild och försöker sedan Scan igen. Om
den önskade trådlösa routern fortfarande inte hittas, trycker du på RETURN för att välja
Manual.
– Se till att det trådlösa nätverket inte störs av mikrovågsugnar, DECT-telefoner eller
andra närliggande Wi-Fi-enheter.
– Mikrovågsugnar, DECT-telefoner eller andra trådlösa enheter i närheten kan störa det
trådlösa nätverket. Stäng av de enheterna.
– Se till att brandväggarna i nätverket tillåter åtkomst till spelarens trådlösa anslutning.
– Om det trådlösa nätverket inte fungerar på rätt sätt, försök med en kabelanslutning.
Kontrollera att spelaren kan anslutna till nätverket. Se ”Anslutningstest”. (s. 33)
Aktivera ansluten utrustning, som bredbandsrouter eller server.
Bekräfta att spelaren och servern är anslutna till samma åtkomstpunkt.
Beroende på DLNA-server, kanske spelaren inte behöver tillstånd från servern.
Beroende på DLNA-server, kan det vara nödvändigt att ändra en brandväggsinställning.
5
Ytterligare information
■ Meddelanden på skärmen
– Följande meddelanden visas på TV-skärmen om du försökt spela upp en olämplig skiva eller utfört en felaktig
manöver.
Felmeddelande
Tänkbara orsaker och lösningar
– Filen stöds inte av denna spelare. Se ”Typer av skivor/filer som kan användas med denna spelare”
(s. 3).
Fel regionskod!
– Skivan har en inkompatibel regionskod. Se ”Regionshanteringsinformation för Blu-ray Disc/DVDvideo” (s. 3).
Nätverket är FELAKTIGT.
– Denna spelare kan inte anslutas till nätverket. Kontrollera anslutningen (s. 16) och
nätverksinställningen (s. 32).
Nätverket är OK, proxy är
FELAKTIG.
– Denna spelare kan inte anslutas till proxy-servern. Se ”Proxyinställning” (s. 33).
BD-Live anslutningen är
avaktiverad i SETUP menyn.
– BD-Live-anslutning är förbjuden. Se ”BD-Live anslutning” (s. 33).
Uppgraderingen har
misslyckats av någon
anledning!
– Uppgradering misslyckades. Kontrollera om uppgraderingsfilen är skadad eller oläsbar.
IP inställningen är felaktig.
Vänligen återställ…
– Den angivna IP inställningar är ogiltig. Ange rätt information igen.
41 Sv
Svenska
Saknar stöd för denna fil
Ordlista
AVCHD
AVCHD är ett nytt format (standard) för videokameror
med hög upplösning som kan användas för att spela in
och spela upp HD-bilder i hög upplösning.
BD-Live™
BD-Live är en Blu-ray Disc-standard som använder en
nätverksanslutning, så att spelaren kan ansluta till
Internet och hämta videomaterial och andra data.
BDMV
BDMV (Blu-ray Disc Movie) hänvisar till ett av de
applikationsformat som används för BD-ROM som är
en av Blu-ray Disc-specifikationerna. BDMV är ett
inspelningsformat som motsvarar DVD-Video för
DVD-specifikationen.
Blu-ray 3D™
Med Blu-ray 3D kan du visa högupplösta 3D-bilder.
BONUSVIEW™
Med BONUSVIEW-kompatibla skivor kan du visa en
videounderkanal för två skärmar, ljudunderkanalen och
undertexter samtidigt. En liten skärm visas inom den
större skärmen under uppspelning (bild-i bild).
Deep Color
Deep Color hänvisar till användning av olika färgdjup i
displayer, upp från 24 bitars djup i tidigare versioner av
HDMI-specifikationen. Detta extra bitdjup gör det
möjligt för HDTV och andra displayer att gå från
miljoner färger till miljarder färger och eliminera
färgband på skärmen för att ge jämna
färgtonsövergångar och subtila graderingar mellan
färger. Det ökade kontrastförhållandet kan representera
många gånger fler grå färgtoner mellan svart och vitt.
Deep Color ökar även antalet tillgängliga färger inom
gränserna som definieras av färgutrymmet RGB eller
YCbCr.
DLNA
DLNA (Digital Living Network Alliance) erbjuder
enkel delning av digitala medier genom nätverket i
hemmet och du kan uppleva digitalt innehåll som lagrats
på en PC som installerats med DLNAserverprogramvara eller en annan DLNA-kompatibel
enhet med din TV via denna spelare. Om du vill ansluta
denna spelare till dina DLNA-servrar krävs vissa
inställningar för DLNA-servern eller -enheten. Hänvisa
till DLNA-serverprogramvaran eller DLNA-enheten för
information.
DivX®
DivX® är ett digitalt videoformat som skapats av DivX,
LLC, ett dotterbolag till Rovi Corporation. Detta är en
officiell DivX Certified®-enhet som spelar upp DivXvideo. Besök divx.com för mer information och
programverktyg för att konvertera dina filer till DivXvideo.
Dolby Digital
Ett ljudsystem utvecklat av Dolby Laboratories Inc. som
ger ljudet samma effekt som i en biosalong när
produkten är ansluten till en processor eller förstärkare
som kan hantera Dolby Digital.
42 Sv
Dolby Digital Plus
Ett ljudsystem utvecklat som är en utökning av Dolby
Digital. Denna ljudkodningsteknik stöder flerkanals 7.1surroundljud.
Dolby TrueHD
Dolby TrueHD är en förlustfri kodningsteknik som
stöder upp till 8 kanaler av flerkanals surroundljud för
nästa generation av optiska skivor. Ljudet återger den
ursprungliga ljudkällan helt naturtroget.
DRC (Dynamic Range Control)
DRC gör det möjligt att justera omfånget mellan de
kraftigaste och svagaste ljuden (det dynamiska
omfånget) för avspelning på en medelhög volym.
Använd detta när det är svårt att höra dialog eller när
uppspelning kan störa grannarna.
DTS
Detta är ett digitalt ljudsystem utvecklat av DTS, Inc.
för användning i biografer.
DTS-HD High Resolution Audio
DTS-HD High Resolution Audio är en ny teknik
utvecklad för nästa generations optiska skivformat med
hög upplösning.
DTS-HD Master Audio
DTS-HD Master Audio är en förlustfri
ljudkomprimeringsteknik utvecklad för nästa
generations optiska skivformat med hög upplösning.
Färgrymd
Färgrymd är ett färgintervall som kan representeras.
RGB är ett färgutrymme baserat på färgmodellen RGB
(röd, grön och blå) och används normalt för PCskärmar. YCbCr är ett färgschema som är baserat på en
luminanssignal (Y) och två färgskillnadssignaler (Cb
och Cr).
FLAC
FLAC (Free Lossless Audio Codec) är ett öppet
filformat för förlustfri ljuddatakomprimering. Även om
det har sämre komprimeringsgrad jämfört med andra
förlustgivande komprimerade ljudformat, kan det ofta
ge högre ljudkvalitet.
HDMI
HDMI (High-Definition Multimedia Interface =
multimediagränssnitt med hög upplösning) är ett
gränssnitt som stöder både bild och ljud med en enskild
digital anslutning. En HDMI-anslutning omvandlar
standard till högupplösta bildsignaler och
flerkanalsljudsignaler för AV-komponenter, såsom en
HDMI-utrustad TV i digital form, utan någon
försämring.
Letter Box (LB 4:3)
Ett skärmformat med svarta band överst och underst på
bilden som medger visning av bredskärmsbilder (16:9)
på en TV av formatet 4:3.
Ordlista
Läppsynk
Parentesundertexter
Läppsynk, en förkortning för läppsynkronisering, är en
teknisk term som rör både ett problem och en funktion
för att synkronisera ljud- och videosignaler under
efterproduktion och överföring. Där ljud- och
videolatensen kräver komplexa justeringar av
slutanvändare, har HDMI en funktion för automatisk
synkronisering av ljud och bild som gör det möjligt för
enheter att utföra denna synkronisering automatiskt och
exakt utan inblandning av användaren.
Linear PCM Sound
Mac-adress
Mac-adressen är en unik värdetilldelning för en
nätverksenhet som används för identifiering.
Undertexter
Dessa är textraderna på undersidan av skärmen som
översätter eller skriver ut dialogen. Dessa är inspelade
på många DVD- och Blu-ray-skivor.
x.v.Color
x.v.Color återger ett större omfång färger än tidigare och
tillåter visning av nästan alla färger som det mänskliga
ögat kan uppfatta.
Pan Scan (PS 4:3)
Ett skärmformat som skär av sidorna på bilden för att
tillåta visning av bredskärmsbilder (16:9) på en TV av
formatet 4:3.
Specifikationer
■ Allmänt
■ ln-/Utgångar
Strömförsörjning
[Modell i USA och Kanada] ...................................AC 110-240 V, 60 Hz
[Modell i Central- och Sydamerika] ................. AC 110-240 V, 50/60 Hz
[Modell i Australien]...............................................AC 110-240 V, 50 Hz
[Modell i Storbritannien, Europa och Ryssland].....AC 110-240 V, 50 Hz
[Modell i Kina]........................................................AC 110-240 V, 50 Hz
[Modell i Asien] ................................................ AC 110-240 V, 50/60 Hz
Strömförbrukning (normal) .................................................................. 20 W
Effektförbrukning (beredskapsläge)................................0,5 W eller mindre
Mått (B × H × D inkl. utstickande delar) ...................... 435 × 86 × 257 mm
Vikt ...................................................................................................... 2,8 kg
HDMI-utgång .................................................................. Typ A-kontakt × 1
480i/576i/480p/576p/720p/1080i/1080p/1080p@24Hz,
Deep Color, x.v. Färgstöd
Komponentvideoutgång ..............................................Y: 1 Vp-p (75 ohm)
PB, PR: 0,7 Vp-p (75 ohm)
Videoutgång......................................................................1 Vp-p (75 ohm)
Digital utgång.......................................................... Optisk × 1, koaxial × 1
Analog ljudutmatning..................................................Blandat 2 kanaler × 1
USB ................................................................................. Typ A-kontakt × 2
Trådlöst LAN .................................................. Standard: IEEE 802.11 b/g/n
Frekvensomfång: 2,4 GHz-bandet
Annan utrustning .......................................................... Remote IN/OUT × 1
Ethernet × 1
■ Ljudprestanda
Rätten till ändring av tekniska data förbehålles.
Svenska
Ljudutnivå (1 kHz, 0 dB)
Blu-ray Disc/DVD/CD-DA.........................................................2 ± 0,3 V
Signal/brusförhållande
Blu-ray Disc/DVD/CD-DA............................................................ 110 dB
Dynamikomfång
Blu-ray Disc/DVD ......................................................................... 105 dB
CD-DA ........................................................................................... 100 dB
Harmonisk distorsion (1 kHz)
Blu-ray Disc/DVD/CD-DA............................................................0,003%
Frekvensomfång
Blu-ray Disc/DVD ............................ 4 Hz till 22 kHz (48 kHz sampling)
4 Hz till 44 kHz (96 kHz sampling)
CD-DA ............................................................................. 4 Hz till 20 kHz
5
Ytterligare information
Linjär PCM är ett signalinspelningsformat som används
för ljud-CD och vissa DVD- och Blu-ray-skivor. Ljudet
på ljud-CD inspelas vid 44,1 kHz med 16 bitar. (Ljudet
spelas in mellan 48 kHz med 16 bitar och 96 kHz med
24 bitar för DVD-videoskivor och mellan 48 kHz med
16 bitar och 192 kHz med 24 bitar för Blu-ray-skivor.)
Parentesundertexter är en typ av undertext. Skillnaden
mellan undertexter och parentesundertexter är att
undertexter är avsedda för personer som kan höra och
parentesundertexter är avsedda för hörselskadade.
Undertexter visar sällan alla ord i ljudspåret.
Till exempel visar parentesundertexter ljudeffekter (t.ex.
”telefon ringer” och ”fotsteg”), medan undertexter inte
visar detta. Innan du väljer denna inställning ska du
kontrollera att skivan innehåller information för
parentesundertexter.
43 Sv
Specifikationer
■ Upphovsrätt
– Audiovisuellt material kan bestå av
upphovsrättsskyddade verk som ej får spelas in utan
upphovsrättsinnehavarens tillstånd. Upplys dig om
gällande lagar i detta avseende.
– Denna produkt införlivar teknik för kopieringsskydd
som skyddas av patent i USA och annan immateriell
egendomsrätt tillhörande Rovi Corporation. Omvänd
ingenjörskonst och isärtagning är förbjudet.
– Tillverkat under licens från Dolby Laboratories.
Dolby och den dubbla D-logotypen är varumärken
som tillhör Dolby Laboratories.
– Tillverkat under licens under amerikanaska patent
med nummer: 5,956,674; 5,974,380; 6,226,616;
6,487,535; 7,212,872; 7,333,929; 7,392,195;
7,272,567 och andra utfärdade eller ansökta patent i
USA och resten av världen. DTS-HD, symbolen och
DTS-HD samt symbolen tillsammans är registrerade
varumärken och DTS-HD Master Audio är ett
varumärke som tillhör DTS, Inc. Produkten
inkluderar mjukvara. © DTS, Inc. Med ensamrätt.
– ”Blu-ray Disc™”, ”Blu-ray™”, ”Blu-ray 3D™”,
”BD-Live™”, ”BONUSVIEW™” och logotyperna
är varumärken som tillhör Blu-ray Disc Association.
–
är ett varumärke som tillhör DVD Format/
Logo Licensing Corporation.
– ”HDMI”, logotypen ”HDMI” och High-Definition
Multimedia Interface är varumärken eller
registrerade varumärken som tillhör HDMI
Licensing LLC.
– ”x.v.Color” och ”x.v.Color”-logotypen är
varumärken som tillhör Sony Corporation.
– ”AVCHD” och logotypen ”AVCHD” är varumärken
som tillhör Panasonic Corporation och Sony
Corporation.
– Java och alla Java-baserade varumärken och
logotyper är varumärken eller registrerade
varumärken som tillhör Sun Microsystems, Inc. i
USA och/eller i övriga länder.
– Denna produkt är licensierad enligt patentportföljen
för AVC och VC-1 för personligt och icke
kommersiellt bruk där en användare får (i) koda
video i enlighet med AVC-standarden och VC-1standarden (AVC/VC-1 Video) och/eller (ii) koda
AVC/VC-1 Video kodad av en användare som
medverkat i en personlig och icke kommersiell
aktivitet och/eller erhållits från en videoleverantör
med licens att tillhandahålla AVC/VC-1 Video.
Ingen licens ges eller skall anges för något annat
bruk. Vidare information kan erhållas från MPEG
LA, LLC. Se http://www.mpegla.com.
– Windows Media Player är ett registrerat varumärke
eller varumärke som tillhör Microsoft corporation i
U.S.A. och/eller i andra länder.
– YouTube och YouTube-logotypen, Picasa och
Picasa-logotypen är varumärken som tillhör Google.
Inc.
– Netflix och Netflix-logotypen är registrerade
varumärken som tillhör Netflix, Inc.
– DLNA och DLNA CERTIFIED är varumärken och/
eller tjänstemärken som tillhör Digital Living
Network Alliance.
44 Sv
– Copyright 2004-2010 Verance Corporation.
Cinavia™ är ett Verance Corporation-varumärke.
Skyddat av patent 7,369,677 i USA och andra patent
gällande över hela världen, som utfärdats eller
ansökts under licens från Verance Corporation. Med
ensamrätt.
– Wi-Fi CERTIFIED-logotypen är ett
certifieringsmärke som tillhör Wi-Fi Alliance.
– DivX®, DivX Certified®, DivX Plus® HD och
tillhörande logotyper är varumärken som tillhör Rovi
Corporation eller dess dotterbolag och används
under licens.
– DivX Certified® för att spela upp DivX® och DivX
Plus® HD-video (H.264/.MKV) upp till 1080p HD
med premiuminnehåll.
ABOUT DIVX VIDEO: DivX® är ett digitalt
videoformat som skapats av DivX, LLC, ett dotterbolag
till Rovi Corporation. Detta är en officiell DivX
Certified®-enhet som spelar upp DivX-video. Besök
divx.com för mer information och programverktyg för
att konvertera dina filer till DivX-video.
ABOUT DIVX VIDEO-ON-DEMAND: denna DivX
Certified®-enhet måste registreras för att kunna spela
upp inköpta DivX Video-on-Demand (VOD)-filmer. För
att få tillgång till registreringskoden, gå till DivX VODsektionen i inställningsmenyn för enheten. Gå till
vod.divx.com för mer information om hur du gör klar
din registrering.
YTTERLIGARE INFORMATION
Index
■
Siffror
2ND AUDIO, fjärrkontroll ....................6
3D uppspelning, SETUP-menyn ..........33
■
A
■
B
BD-Live ...............................................27
BD-Live anslutning, SETUP-menyn ...33
Bild i Bild, SETUP-menyn ..................32
Bild-i-bild-funktionen ..........................27
Bildspel, Skärmmeny ...........................24
Bitrate, Skärmmeny .............................24
Bokmärke .............................................26
Brusreducering, SETUP-menyn ..........35
■
C
CLEAR, fjärrkontroll .............................6
Codepage, Skärmmeny ........................24
■
D
De-interlacing läge, SETUP-menyn ....35
DIGEST, fjärrkontroll ............................6
Display inställningar,
SETUP-menyn .................................33
DivX(R) VOD DRM,
SETUP-menyn .................................32
DLNA, SETUP-menyn ........................33
Downsampling, SETUP-menyn ...........35
DRC, SETUP-menyn ...........................35
■
E
■
I
Information, SETUP-menyn ................33
Ins återuppspelning, Skärmmeny .........24
Ins Sök, Skärmmeny ............................24
Installationsguide .................................18
Inställning för videoutgång,
SETUP-menyn .................................34
Internetuppkoppling, SETUP-menyn .....32
IP inställningar, SETUP-menyn ...........33
■
J
Justera färg, SETUP-menyn .................35
■
K
Kameravinkel, SETUP-menyn .............32
Kapitel, Skärmmeny .............................24
Koaxial / Optisk, SETUP-menyn .........35
Kontrollknappar, fjärrkontroll ................8
■
L
Ladda Default, SETUP-menyn ............31
Lagringsplats, SETUP-menyn ..............31
Landskod, SETUP-menyn ....................32
Läppsynk, SETUP-menyn ....................34
Last Memory, SETUP-menyn ..............32
Ljud, SETUP-menyn ............................32
Ljud, Skärmmeny .................................24
Ljudanslutning ......................................14
Ljudfilskrav ............................................3
Ljudinställning, SETUP-menyn ...........35
Ljudutgång, SETUP-menyn .................35
Ljudutmatningsformat ..........................36
■
M
■
O
T
ON SCREEN, fjärrkontroll ....................8
OSD, SETUP-menyn ...........................31
Övergång, Skärmmeny .........................24
■
P
Parentestextning, SETUP-menyn .........32
PIP, fjärrkontroll ....................................6
POP UP/MENU, fjärrkontroll ................8
Post Process, SETUP-menyn ...............35
U
Uppgradera, SETUP-menyn ................ 31
Uppgradering av programvara ............. 38
Uppmixningsfunktion,
SETUP-menyn ................................ 35
Uppspelning av dataskiva .................... 18
Uppspelning av USB-innehåll ............. 18
USB-anslutning ................................... 16
■
V
Video Process, SETUP-menyn ............ 34
Videoanslutningar ................................ 13
Videoläge, SETUP-menyn .................. 34
Videoutmatningsformat ....................... 37
Vinkel, Skärmmeny ............................. 24
■
Y
YouTube-uppspelning ......................... 21
■
5
Z
ZOOM, fjärrkontroll .............................. 6
45 Sv
Svenska
HDMI 1080p 24Hz, SETUP-menyn ....34
HDMI Control, SETUP-menyn ...........31
HDMI Control-funktionen ...................31
HDMI Deep Color, SETUP-menyn .....34
HDMI, SETUP-menyn ........................35
HDMI-anslutning .................................12
Högtalarinställning, SETUP-menyn ....35
HOME, fjärrkontroll ..............................6
S
Säkerhet, SETUP-menyn ..................... 32
SEARCH, fjärrkontroll .......................... 7
Second Audio, Skärmmeny ................. 24
Second Video, Skärmmeny ................. 24
Secondary Audio, SETUP-menyn ....... 32
SETUP, fjärrkontroll ............................. 6
SETUP-menyn ..................................... 28
SHUFFLE, fjärrkontroll ........................ 7
Skärmmeny .......................................... 24
Skärmsläckare, SETUP-menyn ........... 31
Snabbinstallation ................................. 18
Snabbinstallation, SETUP-menyn ....... 31
Sökfunktion ......................................... 26
Spår/Fil, Skärmmeny ........................... 24
Spela upp, SETUP-menyn ................... 32
Språk, SETUP-menyn ......................... 31
STATUS, fjärrkontroll .......................... 6
Statusmeny .......................................... 25
Subtitle Style, Skärmmeny .................. 24
SUBTITLE, fjärrkontroll ....................... 7
System information, SETUP-menyn .... 35
System, SETUP-menyn ....................... 31
■
N
■
H
■
■
■
F
R
REPEAT, fjärrkontroll .......................... 7
RETURN, fjärrkontroll .......................... 8
MARKER, fjärrkontroll .........................6
Markörknappar, fjärrkontroll .................8
Meddelande vid 3D uppspelning,
SETUP-menyn .................................31
MEDIA-menyn ....................................18
Meny, SETUP-menyn ..........................31
Mode/Spelläge, Skärmmeny ................24
Färgknappar, fjärrkontroll ......................6
Färgrymd, SETUP-menyn ...................34
Fjärrkontroll ...........................................6
Föräldrakontroll, SETUP-menyn .........32
■
■
Textning, SETUP-menyn .................... 32
Textning, Skärmmeny ......................... 24
Tid, Skärmmeny .................................. 24
Titel, Skärmmeny ................................ 24
TOP MENU, fjärrkontroll ..................... 8
TV Screen, SETUP-menyn ................. 33
TV, SETUP-menyn ............................. 33
TVsystem, SETUP-menyn .................. 34
Nätverk, SETUP-menyn ......................32
Nätverksanslutning ...............................16
Nätverkskontroll, SETUP-menyn ........31
Nedmixning till 2-kanals,
SETUP-menyn .................................35
Netfix Information, SETUP-menyn .....32
Netflix ..................................................23
Nummerknappar, fjärrkontroll ...............6
ENTER, fjärrkontroll .............................8
ESN (Electronic Serial Number) .........32
PROGRAM, fjärrkontroll ...................... 6
Programmerad uppspelning ................. 26
Programvaruuppgradering ................... 38
Proxyinställning, SETUP-menyn ........ 33
Ytterligare information
A/B, fjärrkontroll ...................................7
Allmäna Inställningar,
SETUP-menyn .................................31
Andra anslutningar ...............................17
Ändra lösenord, SETUP-menyn ..........32
ANGLE, fjärrkontroll ............................7
Anslutningsinställning,
SETUP-menyn .................................32
Anslutningstest, SETUP-menyn ..........33
Användning av SETUP-menyn ...........30
AUDIO, fjärrkontroll .............................7
Automatisk skivuppspelning,
SETUP-menyn .................................31
HOME-menyn ......................................18
Attenzione: prima di usare quest’unità.
1
2
3
4
5
Per assicurarsi le migliori prestazioni dell’unità, leggere
questo manuale per intero. Conservarlo poi in un luogo sicuro
per poterlo riutilizzare al momento del bisogno.
Installare l’unità in una posizione ben ventilata, fresco
asciutta e pulita - lontano da luce solare diretta, sorgenti di
calore, vibrazioni, polvere, umidità e/o freddo. Per
un’adeguata entilazione mantenere le seguenti distanze.
Sopra: 10 cm
Retro: 10 cm
Ai lati: 10 cm
Installare quest’unità lontano da elettrodomestici, motori o
trasformatori, perché possono causare ronzi.
Non esporre quest’unità a variazioni repentine della
temperatura ambiente e non installarle in stanze molto umide
(ad esempio dove è in uso un umidificatore) per evitare che in
essa si formi condensa, che a sua volta può causare
folgorazioni, incendi, guasti e/o ferite.
Evitare di installare l’unità in una posizione dove possano su
di essa cadere oggetti o liquidi. Inoltre, non posare su di essa:
– Altri componenti, dato che possono causare danni e/o
lo scolorimento della superficie dell’apparecchio.
– Candele o altri oggetti che bruciano, dato che possono
causare incendi, danni all’unità e/o ferite a persone.
– Contenitori di liquidi, dato che possono cadere e
causare folgorazioni all’utente e guasti a quest’unità.
6
7
8
9
10
11
12
13
14
15
16
17
Non coprire quest’unità con giornali, tovaglie, tende o altro
per non impedirne la dispersione del calore. Se la temperatura
al suo interno dovesse salire, può causare incendi, guasti e/o
ferite.
Non collegare quest’unità ad una presa di corrente sino a che
tutti i suoi collegamenti sono completi.
Non usare l’unità capovolta. Potrebbe surriscaldarsi e
guastarsi.
Non agire con forza eccessiva su interruttori, manopole e/o
cavi.
Per scollegare un cavo, tirare la spina e mai il cavo stesso.
Non pulire mai quest’unità con solventi ed altre sostanze
chimiche. Essi possono danneggiarne le finiture. Usare
semplicemente un panno soffice e pulito.
Usare solo corrente elettrica del voltaggio indicato. L’uso di
voltaggi superiori è pericoloso e può causare incendi, guasti
e/o ferite. Yamaha non può venire considerata responsabile di
danni risultanti dall’uso di quest’unità con un voltaggio
superiore a quello prescritto.
Per evitare danni dovuti a fulmini, scollegare il cavo di
alimentazione dalla presa durante temporali.
Non tentare di modificare o riparare quest’unità. Affidare
qualsiasi riparazione a personale qualificato Yamaha. In
particolare, non aprirla mai per alcun motivo.
Se si prevede di non dover fare uso di quest’unità per qualche
tempo, ad esempio per andare in vacanza, scollegarne la spina
di alimentazione dalla presa di corrente.
Prima di concludere che l’unità è guasta, non mancate di
leggere la sezione di questo manuale dedicata alla
“Risoluzione dei problemi”.
Prima di spostare quest’unità, premere il pulsante p
portandolo nella modalità di attesa e scollegare la spina di
alimentazione di CA dalla presa di corrente.
Attenzione-i It
18 Quando la temperatura ambiente cambia improvvisamente, si
forma condensa. Scollegare il cavo di alimentazione dalla
presa di corrente e lasciare riposare l’apparecchio.
19 Se viene usata a lungo, quest’unità si può surriscaldare.
Spegnerla e lasciarla riposare perché si raffreddi.
20 Installare quest’unità vicino ad una presa di corrente alternata
dove la spina del cavo di alimentazione possa venire
facilmente raggiunta.
21 Le batterie vanno protette da calore eccessivo, ad esempio
luce solare diretta, fiamme, e così via.
Non utilizzare questa unità entro un raggio di 22 cm da
persone a cui è stato impiantato un pacemaker cardiaco
o un defibrillatore impiantabile.
Questa unità non viene scollegata dalla fonte di
alimentazione CA fintanto che essa rimane collegata
alla presa di rete, ciò anche se l’unità viene spenta col
comando p. Questo stato viene chiamato modo di
standby. In questo stato l’unità consuma una quantità
minima di corrente.
AVVERTENZA
PER RIDURRE IL RISCHIO DI INCENDI E
FOLGORAZIONI, NON ESPORRE QUEST’UNITÀ
A PIOGGIA O UMIDITÀ.
Il laser contenuto in questo prodotto è in grado di
emettere radiazioni eccedenti i limiti fissati per la Classe
1.
Specifiche LASER:
Prodotto con LASER classe 1
Lunghezza d’onda: 790 nm (CDs)/658 nm (DVDs)/405 nm
(BDs)
Emissione laser: max. 1 mW
SICUREZZA DEL LASER
Quest’unità impiega un laser. Poiché è possibile causare
lesioni agli occhi, solo personale qualificato di assistenza
tecnica deve aprire la copertura o cercare di riparare
questo dispositivo.
PERICOLO
Radiazioni laser visibili emitte quando aperto. Evitare
l’esposizione agli occhi diretta al raggio laser. Quando
quest’unità è collegata ad una presa a muro, non
avvicinare gli occhi all’apertura del cassetto del disco o ad
altre aperture per guardare all’interno.
Indice
1. Introduzione
1
4. Impostazioni
Cosa è possibile fare con questo lettore ......... 2
Dotazione ............................................................ 2
Informazioni su dischi e file .............................. 3
Menu SETUP ..................................................... 28
3
4
4
4
4
Esempio di funzionamento del menu SETUP............... 30
Impostazione Generale.................................................. 31
Impostazione Display.................................................... 33
Impostazione Audio ...................................................... 35
Informazioni di sistema................................................. 35
Informazioni sui formati di uscita audio ....................... 36
Informazioni sui formati di uscita video ....................... 37
Comandi e funzioni ............................................ 5
Aggiornamento del software ........................... 38
Pannello anteriore ........................................................... 5
Telecomando .................................................................. 6
Aggiornamento del software ......................................... 38
Tipi di dischi/file utilizzabili con questo lettore.............
Caricamento di un disco .................................................
Precauzioni per i dischi...................................................
Avviso sulla visione di immagini video 3D ...................
Tecnologia Cinavia.........................................................
Pannello posteriore ....................................................... 10
Collegamento HDMI ......................................... 12
Collegamento al terminale HDMI ................................ 12
Collegamento per la riproduzione di dischi Blu-ray
3D............................................................................. 12
Collegamenti video .......................................... 13
Collegamento alla presa component/video................... 13
Collegamenti audio .......................................... 14
Collegamento alla presa/terminale audio digitale ........ 14
Collegamento alle prese audio...................................... 15
Collegamento di rete e collegamento USB .... 16
Collegamento al terminale NETWORK....................... 16
Collegamento al connettore USB ................................. 16
Altri collegamenti ............................................. 17
Collegamento alle prese REMOTE CONTROL .......... 17
Collegamento del cavo di alimentazione...................... 17
3. Riproduzione
Initial Wizard/Installazione rapida................... 18
Impostazione con Initial Wizard/Installazione
rapida........................................................................ 18
Menu HOME/MEDIA ......................................... 18
Riproduzione di foto/musica/video .............................. 18
Uso dei contenuti della rete .......................................... 20
21
21
22
23
Avvio di Netflix............................................................ 23
Funzionamento di riproduzione avanzata...... 24
24
25
26
26
26
27
27
27
Alimentazione ............................................................... 39
Funzionamento di base.................................................. 39
Riproduzione disco ....................................................... 39
Immagine ...................................................................... 40
Suono ............................................................................ 40
Rete ............................................................................... 40
Messaggi su schermo .................................................... 41
Glossario ........................................................... 42
Dati tecnici ........................................................ 43
Dati generali.................................................................. 43
Prestazioni audio ........................................................... 43
Ingresso/uscita............................................................... 43
Copyright ...................................................................... 44
Indice analitico.................................................. 45
(alla fine di questo manuale)
Information about software ....................................i
■ Informazioni su questo manuale
– Il presente manuale descrive il funzionamento di
questo lettore mediante l’uso di un telecomando,
tranne nel caso in cui questo non sia disponibile.
Alcune di queste funzioni sono anche disponibili
mediante l’uso dei tasti del pannello anteriore.
– Le note contengono importanti informazioni sulle
istruzioni di sicurezza e di funzionamento. I
suggerimenti indicano consigli sul funzionamento.
– Questo manuale è stampato prima della produzione.
Design e specifiche sono soggetti a modifica in parte
come risultato di miglioramenti ecc. In caso di
differenze tra il manuale e il prodotto, il prodotto ha
la priorità.
Le icone utilizzate in questo manuale
Le icone sono utilizzate per indicare i tasti e le funzioni
disponibili per un particolare formato. Per dettagli sui
dischi e sui formati riproducibili, consultare pagina
pagina 3.
BD : BD Video
DVD : DVD-Video, DVD-VR, DVD+VR
CD : CD Audio
VIDEO : file Video
MUSIC : file Audio
PHOTO : file di Foto
1 It
Italiano
Menu a schermo (On Screen) .......................................
Menu di stato ................................................................
Uso dei Bookmark ........................................................
Riproduzione programmata ..........................................
Uso della ricerca ..........................................................
Riproduzione di BONUSVIEW™ e BD-Live™ .........
Uso della funzione Picture in Picture
(riproduzione audio/video secondario) ....................
Uso della funzione di BD-Live™.................................
4
Risoluzione dei problemi ................................. 39
Introduzione ai collegamenti........................... 10
Uso dei servizi di rete ......................................
Riproduzione di video da YouTube™.............
Riproduzione di foto da Picasa™ Web
Album ............................................................
Riproduzione di video da Netflix™ .................
3
5
5. Informazioni aggiuntive
2. Collegamenti
2
INTRODUZIONE
Cosa è possibile fare con questo lettore
Facile impostazione di lingua, risoluzione, rapporto di aspetto
dello schermo
\
p. 18
\
p. 24
\
p. 27
Riproduzione di file Video, Musica o di Foto su disco/dispositivo di
\
archiviazione USB*
p. 18
Lingua e impostazioni TV personalizzabili dall’utente.
Riproduzione di dischi Blu-ray Disc™/Blu-ray 3D™/DVD/CD
disponibili in commercio*
Oltre ai dischi Blu-ray il presente lettore supporta la riproduzione di una varietà di altri dischi.
Riproduzione di BONUSVIEW™, BD-Live™ ecc.*
È possibile apprezzare i filmati aggiuntivi presenti nei dischi Blu-ray più recenti.
Il lettore è in grado di riprodurre i file registrati su dischi/dispositivi di archiviazione USB.
Riproduzione di file Video, Musica o di Foto su un server di rete
domestica* **
\
p. 20
\
p. 31
\
p. 21
Collegando il lettore a un server di rete, è possibile la riproduzione di contenuti PC con il TV o il
ricevitore AV.
Funzionamento mediante telecomando TV, ricevitore AV ecc.
Collegando i dispositivi con un cavo HDMI, è possibile gestirli con un unico telecomando
mediante la funzione Controllo HDMI.
Riproduzione in streaming di contenuti sui servizi di rete**
Con questo lettore è possibile apprezzare all’istante i video in Internet.
* Per dettagli sui dischi e formati riproducibili, consultare pagina 3.
** Per utilizzare questa funzione è necessaria l’impostazione della rete.
Dotazione
Accertarsi che i seguenti accessori siano in dotazione con il prodotto.
Telecomando
2 It
Batterie (×2)
(AAA, R03, UM-4)
Cavo Audio/Video
Cavo di alimentazione
1
Informazioni su dischi e file
– In questo lettore è possibile riprodurre dischi da
12 cm e da 8 cm. Non utilizzare un adattatore da
8 cm a 12 cm.
– Utilizzare dischi che rispettano le norme compatibili
come indicato dalla presenza dei loghi ufficiali
sull’etichetta del disco. La riproduzione dei dischi
non conformi a tali norme non è garantita. Inoltre
non è garantita la qualità dell’immagine o del suono
anche se fosse possibile riprodurre i dischi.
Tipo di
supporto
Formato di registrazione
Informazioni sulla gestione della
regione per Blu-ray Disc/DVD video
– I lettori video e i dischi Blu-ray Disc/DVD sono
muniti di codici regionali che impongono le regioni
in cui un disco può essere riprodotto. Verificare il
codice regionale sul pannello posteriore del lettore.
– Per un Blu-ray Disc, il disco può essere riprodotto su
questo lettore con lo stesso codice regionale o con il
codice regionale “ABC”.
– Per un disco DVD, il disco può essere riprodotto su
questo lettore con lo stesso codice regionale o con il
codice regionale “ALL”.
Esempi di codici regionali
BD-ROM/BD-R/
BD-RE
BD-Video/file di dati
DVD-ROM
DVD-Video
DVD-R/DVD-R
DL/DVD-RW
DVD-Video/DVD-VR/AVCHD/file di dati
DVD+R/DVD+R
DL/DVD+RW
DVD-Video/DVD+VR/AVCHD/file di dati
BD-Video
Codice regionale “A” o “ABC”
DVD-Video
Codice regionale “1” o “ALL”
1
ALL
CDDA/HDCD
CD-R/CD-RW
CDDA/file di dati
Note
USB*
File di dati
DLNA
File di dati
– Le operazioni e le funzioni relative a Blu-ray Disc/
DVD video possono essere diverse dalle spiegazioni
riportate in questo manuale e alcune di esse possono
essere vietate a causa delle impostazioni del
produttore del disco.
– Se durante la riproduzione di un disco vengono
visualizzate una schermata di menu o istruzioni
operative, seguire la procedura di funzionamento
visualizzata.
– A seconda del disco, la riproduzione di alcuni dischi
potrebbe non essere possibile.
– Finalizzare tutti i supporti di registrazione che
vengono riprodotti in questo lettore.
– Per “Finalizzazione” si intende il processo di
registrazione di un disco registrato in modo tale da
essere riproducibile anche in altri lettori/registratori
oltre che in questo lettore. Solo i dischi finalizzati
possono essere riprodotti in questo lettore. (Il lettore
non ha una propria funzione per finalizzare dischi).
– Non è garantita la riproduzione di tutti i file presenti
su disco, dispositivo di archiviazione USB e rete.
– Non è possibile riprodurre un file protetto da
copyright attraverso un dispositivo di archiviazione
USB o una rete.
* Questo lettore è compatibile con un dispositivo di
archiviazione USB formattato in FAT 16/32 e NTFS.
Formati di file
video
riproducibili
MUSIC
VIDEO
MP3 (.mp3)
WMA (.wma)
AAC (.aac/.m4a)
WAV (.wav)
FLAC (.flac)
DivX (.divx)
MKV con formato
DivX (.mkv)
MKV con H.264
(.mkv)
MPEG PS (.mpeg/
.mpg)
MPEG TS (.ts)
MPEG-4 (.mp4)
VOB (.vob)
AVI (.avi)
ASF (.asf)
WMV (.wmv)
Formati di file di
foto riproducibili
PHOTO
JPEG (.jpeg/.jpg)
GIF (.gif)
PNG (.png)
Note
– A seconda dei codec o dei metodi utilizzati per la
creazione di un file, non è garantita la riproduzione
di tale file anche se è elencato nella tabella riportata
sopra.
– Non è possibile riprodurre un file protetto da
copyright.
– Quando si utilizza lo standard DLNA, è necessario
che il file rispetti i requisiti del server DLNA.
Requisiti di file audio
– Frequenza di campionamento: entro 32 - 48 kHz
(MP3/WMA), LPCM 44,1 kHz/16 bit/Stereo
(WAV), 192 kHz/24 bit (FLAC)
– Bitrate: entro 8 - 320 kbps (MP3), 32 - 192 kbps
(WMA)
Requisiti di file WMV
– WMV9, la risoluzione massima è 1.920 × 1.080.
3 It
Italiano
CD-ROM
Formati di file
audio
riproducibili
Introduzione
■ Tipi di dischi/file utilizzabili con
questo lettore
Informazioni su dischi e file
■ Caricamento di un disco
– Inserire il disco con l’etichetta rivolta verso l’alto.
– Nel caso di un disco registrato su entrambi i lati,
girare verso il basso il lato da riprodurre.
Note
– La riproduzione può cominciare automaticamente a
seconda del disco e delle impostazioni del lettore.
– A seconda del disco, potrebbe apparire prima il menu.
– Il tempo necessario per caricare il disco può variare a
seconda del disco.
■ Precauzioni per i dischi
Fare attenzione ai graffi e alla polvere
– I dischi Blu-ray Disc, DVD e CD sono sensibili alla
polvere, alle impronte digitali e soprattutto ai graffi.
Un disco graffiato potrebbe non essere riproducibile.
Maneggiare i dischi con cura e conservarli in un luogo
sicuro.
Conservazione appropriata dei dischi
Collocare il disco al centro della sua
custodia e conservare la custodia e il disco
in posizione verticale.
Evitare di conservare i dischi in luoghi
esposti alla luce solare diretta, vicino ad
apparecchiature di riscaldamento o in
luoghi molto umidi.
Non fare cadere i dischi, né sottoporli a
forti vibrazioni o colpi.
Evitare di conservare i dischi in luoghi
molto polverosi o molto umidi.
Precauzioni di utilizzo
– Se la superficie è sporca, pulirla
delicatamente con un panno morbido e
inumidito (solo con acqua). Quando si
puliscono i dischi, muovere il panno
sempre dal foro centrale verso il bordo
esterno.
– Non utilizzare spray detergenti per dischi,
benzene, solvente, liquidi di prevenzione
per l’elettricità statica o altri solventi.
– Non toccare la superficie.
– Non attaccare carta o etichette adesive al disco.
– Se la superficie di riproduzione di un disco è sporca
o graffiata, il lettore può ritenere il disco
incompatibile e quindi espellerlo oppure può non
riprodurre correttamente il disco. Eliminare qualsiasi
traccia di sporco dalla superficie di riproduzione con
un panno morbido.
Pulizia della lente del pickup
– Non utilizzare mai i dischi di pulizia disponibili in
commercio. L’uso di questi dischi può danneggiare
la lente.
4 It
– Rivolgersi al più vicino centro di assistenza Yamaha
autorizzato per la pulizia della lente.
■ Avviso sulla visione di immagini
video 3D
– Alcune persone potrebbero avvertire disturbi (come
per esempio affaticamento della vista, stanchezza o
nausea) durante la visione di immagini video 3D. Si
consiglia agli spettatori di prendersi pause
periodiche durante la visione di immagini video 3D.
– In caso di disturbi, interrompere la visione fino a
quando il disturbo non scompare. Rivolgersi a un
medico in caso di disturbi gravi.
– Leggere attentamente i manuali di istruzioni
(Blu-ray Disc e TV) e/o i messaggi di avviso che
appaiono sul TV.
– La vista dei bambini piccoli (specialmente di quelli
al di sotto dei sei anni di età) è ancora in fase di
sviluppo. Rivolgersi al proprio medico (pediatra od
oculista) prima di consentire la visione di immagini
video 3D a bambini piccoli.
– I bambini devono essere sorvegliati dagli adulti
affinché seguano le raccomandazioni sopra descritte.
■ Tecnologia Cinavia
– La tecnologia Cinavia fa parte del sistema di
protezione dei contenuti di cui è dotato il presente
lettore Blu-ray Disc.
Nota
– È possibile che la riproduzione venga interrotta o che
l’audio sia temporaneamente disattivato e che il
lettore Blu-ray Disc visualizzi i seguenti messaggi,
qualora si cerchi di riprodurre una copia non
autorizzata di contenuti protetti dalla tecnologia
Cinavia.
Questi messaggi sono visualizzati soltanto in inglese.
Riproduzione bloccata. Il contenuto riprodotto è
protetto da Cinavia™ e se ne vieta la riproduzione
su questo dispositivo.
Per ulteriori informazioni, vedere l’indirizzo
http://www.cinavia.com. Codice messaggio 1.
Uscita audio temporaneamente disattivata. Non
regolare il volume di riproduzione. Il contenuto
eseguito è protetto da Cinavia™ e se ne vieta la
riproduzione su questo dispositivo.
Per ulteriori informazioni, recarsi all’indirizzo
http://www.cinavia.com. Codice messaggio 3.
Avviso Cinavia
Questo prodotto utilizza la tecnologia Cinavia per limitare
l’uso di copie non autorizzate di video e film in
commercio e relative colonne sonore. Quando si identifica
un uso vietato di una copia non autorizzata, un messaggio
appare e la riproduzione o masterizzazione si interrompe.
Per ulteriori informazioni sulla tecnologia Cinavia
consultare il Centro informazioni consumatori Cinavia
online all’indirizzo http://www.cinavia.com. Per
richiedere ulteriori informazioni su Cinavia per posta,
inviare una cartolina con il proprio indirizzo a: Cinavia
Consumer Information Center, P.O. Box 86851, San
Diego, CA, 92138, USA.
1
Comandi e funzioni
Introduzione
■ Pannello anteriore
USB
1 2
3
1 p (On/Standby)
Attiva il lettore/lo imposta in modalità Standby.
Tenere premuto p sul pannello anteriore per più di 5
secondi e rilasciarlo per ripristinare il lettore (ripristino
sistema).
4
5 6 7
4 Coperchio del vassoio del disco
5
(Estrai)
Apre/chiude il vassoio del disco.
9
0
6
(Ricerca all’indietro/Precedente):
Premere per passare alla traccia precedente e tenere
premuto per la ricerca all’indietro.
7
(Ricerca in avanti/Successivo):
Premere per passare alla traccia successiva e tenere
premuto per la ricerca in avanti.
8
(Riproduzione)
Avvia la riproduzione.
9
(Pausa)
Mette in pausa la riproduzione.
0
(Arresto)
Arresta la riproduzione.
2 Connettore USB (p. 16)
3 Display del pannello anteriore
visualizza diverse informazioni sullo stato di
funzionamento del lettore.
8
Nota
– Una pellicola protettiva applicata in fabbrica copre il pannello anteriore del lettore. Rimuovere la pellicola protettiva
dal lettore prima di utilizzarlo.
Italiano
5 It
Comandi e funzioni
■ Telecomando
1 Trasmettitore a infrarossi: Fa uscire il segnale a
infrarossi. Puntare questa finestra verso il sensore del
telecomando (p. 9).
Nota
–
viene visualizzato nell’angolo in alto a sinistra
dello schermo quando il tasto premuto non è
disponibile.
1
2
3
4
PROGRAM
MARKER
DIGEST
ZOOM
R
G
Y
B
SUBTITLE
ANGLE
5
6
7
8
9
0
AUDIO
CLEAR
SEARCH
SHUFFLE
PIP
SETUP
REPEAT
2ND
AUDIO
HOME
A B
TOP MENU
2 MARKER DVD VIDEO : Imposta il Bookmark
(p. 26) in un punto specifico del filmato. Una volta
impostato il Bookmark, premere DIGEST per
selezionare il punto impostato al quale saltare. È
possibile impostare fino a 12 Bookmark.
C
3
D
E
F
G
H
I
J
K
4 PROGRAM DVD CD : Imposta l’ordine di
riproduzione (p. 26). È possibile impostare fino a
15 tracce (per un disco audio) o titoli/capitoli (DVD
video).
L
M
: Apre/chiude il vassoio del disco.
5 Tasti numerici: Immettono numeri oppure, durante
la riproduzione, consentono il salto alla traccia/capitolo
corrispondente al numero indicato. I tasti potrebbero
non essere disponibili a seconda del tipo di disco e
delle condizioni di riproduzione.
6 CLEAR: Cancella il numero immesso o la voce
impostata.
POP-UP MENU
ENTER
RETURN
ON SCREEN
7 PIP BD : Attiva/disattiva la funzione Picture in
Picture (p. 27). Quando questa funzione è disponibile
viene visualizzato Segno PIP (
) sullo schermo. È
inoltre possibile selezionare questa voce dal menu a
schermo (p. 24).
Nota
– Segno PIP è disponibile solo se Segno PIP è
impostato su Acceso (p. 32).
A
B
NETFLIX
STATUS
8 SETUP: Visualizza la schermata del menu SETUP
(p. 28).
9 2ND AUDIO BD : Seleziona l’audio secondario di
Picture in Picture (p. 27) o commenti sonori. Quando
questa funzione è disponibile viene visualizzato
Simbolo audio secondario (
) sullo schermo (p. 35).
È inoltre possibile selezionare questa voce dal menu a
schermo (p. 24).
Nota
– Simbolo audio secondario è disponibile solo se
Simbolo audio secondario è impostato su Acceso
(p. 32).
0 HOME: Visualizza la schermata del menu HOME
(p. 18).
A NETFLIX: Avvia Netflix (p. 23).
B STATUS: Visualizza le informazioni di riproduzione
(p. 25).
6 It
Comandi e funzioni
DVD VIDEO : Visualizza la barra di selezione dei
Bookmark (p. 26).
D p: Attiva il lettore o lo imposta in modalità Standby.
E ZOOM DVD VIDEO PHOTO : Ingrandisce/
rimpicciolisce. A ogni pressione del tasto le
dimensioni dello schermo cambiano (ingrandimento/
rimpicciolimento: 3 fasi ognuna).
F Tasti colore BD : Utilizzare questi tasti in base alle
istruzioni a schermo.
M A/B BD DVD CD VIDEO MUSIC : Riproduce
una parte specifica che si desidera ripetere.
1 Premere A/B sulla scena che si desidera impostare
come inizio. Sullo schermo viene visualizzato “A-”.
2 Premere nuovamente A/B sulla scena che si
desidera impostare come fine. Sullo schermo viene
visualizzato “A-B”. Ha inizio la sequenza ripetuta.
1
Introduzione
C DIGEST PHOTO : Mostra 12 miniature di foto.
Quando le miniature vengono visualizzate, è possibile
passare alla pagina successiva/precedente con
/
.
3 Per annullare la sequenza ripetuta, premere A/B.
“A-B” scompare e la sequenza ripetuta termina.
Nota
– A seconda delle caratteristiche del disco, potrebbe
non essere possibile eseguire questa funzione.
G SUBTITLE BD DVD VIDEO : Modifica le
lingue dei sottotitoli (p. 43), se disponibile. È inoltre
possibile selezionare questa voce dal menu a schermo
(p. 24).
H ANGLE BD DVD : Modifica l’angolo della
videocamera se il video è registrato con angolazioni
multiple. Quando questa funzione è disponibile viene
visualizzato Segno Angolo (
) sullo schermo. È
inoltre possibile selezionare questa voce dal menu a
schermo (p. 24).
Nota
– Segno Angolo è disponibile solo se Segno Angolo è
impostato su Acceso (p. 32).
I AUDIO BD DVD : Modifica la lingua o il formato
dell’audio. È inoltre possibile selezionare questa voce
dal menu a schermo (p. 24).
J SEARCH BD DVD CD VIDEO MUSIC :
Salta a un punto specifico durante la riproduzione. Per
dettagli su questa funzione, consultare la sezione “Uso
della ricerca” (p. 26). È inoltre possibile selezionare
questa voce dal menu di stato (p. 25).
K SHUFFLE DVD
CD
VIDEO
MUSIC
PHOTO : Seleziona la modalità di riproduzione
shuffle (p. 24).
L REPEAT BD
DVD
CD
VIDEO
MUSIC
Italiano
PHOTO : Modifica la modalità di ripetizione. Ad
ogni pressione del tasto la modalità di ripetizione
cambia, come indicato qui di seguito.
: Ripete il titolo attualmente riprodotto.
: Ripete il capitolo attualmente riprodotto.
: Ripete la cartella attualmente riprodotta.
: Ripete tutte le tracce/i file nel disco.
: Ripete la traccia/il file attualmente riprodotti.
Continua alla pagina successiva. \
7 It
Comandi e funzioni
N TOP MENU BD DVD : Visualizza la schermata
del menu principale, se il disco contiene un menu.
Selezionare la voce desiderata con 5/a/2/3 e
ENTER.
PROGRAM
MARKER
DIGEST
ZOOM
R
G
Y
B
Nota
SUBTITLE
– A seconda del disco le operazioni specifiche
potrebbero essere diverse. Seguire le istruzioni di
ogni schermata di menu.
ANGLE
AUDIO
CLEAR
SEARCH
PIP
SETUP
2ND
AUDIO
HOME
TOP MENU
REPEAT
P RETURN: Torna al menu o alla schermata precedente
ecc.
A B
POP-UP MENU
N
R
Q Tasti di comando
BD
O
P
O Tasti cursore (5/a/2/3): Spostano la selezione
nella schermata del menu.
ENTER: Seleziona il menu/la voce selezionata.
SHUFFLE
ENTER
RETURN
ON SCREEN
S
Q
DVD
CD
VIDEO
MUSIC
PHOTO
: Arresta la riproduzione. Per arrestare
completamente la riproduzione, premere questo tasto
due volte.
: Mette in pausa la riproduzione.
: Riproduce i contenuti.
/
NETFLIX
STATUS
BD DVD CD VIDEO MUSIC :
Ricerca all’indietro/in avanti. A ogni pressione del
tasto la velocità di ricerca cambia (ricerca all’indietro/
in avanti: 5 fasi ognuna). Premere
per riprendere
la riproduzione normale.
PHOTO : Modifica la velocità di uno slide show (più
lento/più veloce: 3 fasi).
/
BD
DVD
CD
VIDEO
MUSIC :
Premere per la ricerca/ripetizione istantanea. La
ricerca istantanea salta il contenuto di 30 secondi. La
ripetizione istantanea ripete il contenuto degli ultimi
10 secondi riprodotti.
/
: Salta all’indietro/in avanti.
Nota
– A seconda del disco, il lettore riprende la
riproduzione dal punto in cui era stato messo in
pausa. Per effettuare la riproduzione dall’inizio,
premere due volte
e quindi
.
R POP-UP/MENU BD DVD : Visualizza il menu
pop-up. I contenuti del menu visualizzato variano a
seconda del disco. Per dettagli sul metodo di
visualizzazione del menu pop-up e sul suo
funzionamento, consultare il manuale del disco.
La schermata del menu principale potrebbe essere
visualizzata premendo POP-UP/MENU a seconda
del DVD.
S ON SCREEN: Visualizza il menu a schermo (p. 24).
8 It
Comandi e funzioni
Funzione ID
1 Impostazione del telecomando
Per cambiare ID da ID1 a ID2, tenere premuti
simultaneamente il tasto rosso e il tasto numerico 2
per 7 secondi. Per cambiare ID da ID2 a ID1, tenere
premuti simultaneamente il tasto rosso e il tasto
numerico 1 per 7 secondi.
2 Impostazione dell’unità principale
Tenere premuti simultaneamente i tasti
e
sul pannello anteriore per 2 secondi
per visualizzare l’ID corrente quando:
– Non sono caricati dischi nel lettore.
– Il vassoio del disco è chiuso.
– La riproduzione è in arresto.
– “NO DISC” è visualizzato sul display del
pannello anteriore.
Tenere premuti i tasti per altri 2 secondi per
cambiare l’ID tra ID1 e ID2.
1
Introduzione
È possibile cambiare l’ID del telecomando per prevenire
l’azionamento indesiderato di altri lettori Yamaha, per
esempio del lettore DVD. Se l’ID del telecomando è stato
cambiato, verificare di aver selezionato lo stesso ID
dell’unità principale. L’impostazione predefinita è ID1.
– Non usare assieme tipi differenti di batterie (per
esempio batterie alcaline e batterie al manganese).
Leggere attentamente la confezione, dato che le
batterie suddette, benché differenti, possono avere
forme e colori identici.
– In caso di perdita dalle batterie, gettarle
immediatamente. Evitare di toccare il materiale
fuoriuscito e non lasciarlo venire a contatto con gli
indumenti ecc. Pulire accuratamente il vano prima di
installare delle batterie nuove.
– Non gettare le batterie tra i normali rifiuti domestici;
smaltire le batterie in accordo con le
regolamentazioni locali.
– Tenere le batterie fuori dalla portata dei bambini. Se
la batteria viene ingerita, consultare immediatamente
un medico.
– Se si prevede di non utilizzare il telecomando per
lunghi periodi di tempo, rimuovere le batterie dal
telecomando.
– Non ricaricare o smontare le batterie in dotazione.
Campo operativo approssimativo del
telecomando
Sensore del telecomando
Note
USB
– Se il telecomando resta privo di batterie per qualche
minuto o se contiene batterie esaurite, l’ID del
telecomando viene impostato automaticamente su
ID1. Per utilizzare il telecomando con
l’impostazione ID2, inserire batterie nuove e
impostare nuovamente l’ID del telecomando.
– Quando il lettore è ripristinato, l’ID del telecomando
diventa ID1.
30°
30°
6m
Caricamento delle batterie nel
telecomando
1
3
2
Italiano
Note
– Sostituire entrambe le batterie quando il campo
operativo del telecomando diminuisce.
– Utilizzare batterie AAA, R03, UM-4.
– Assicurarsi che la polarità sia corretta. Vedere
l’illustrazione all’interno del vano batterie.
– Se il telecomando non verrà utilizzato per lungo
tempo, rimuovere le batterie.
– Non usare batterie vecchie insieme a batterie nuove.
9 It
COLLEGAMENTI
Introduzione ai collegamenti
Trovare il metodo di collegamento corrispondente sul proprio apparecchio audio/video. Si raccomanda di utilizzare il
terminale HDMI che fornisce audio e video di alta qualità in un singolo collegamento. Se si utilizzano gli altri terminali/
prese, collegare prima il video. e procedere poi con il collegamento audio.
Collegare video e audio al
ricevitore AV con un cavo HDMI.
Terminale HDMI su
ricevitore AV? *
Terminale HDMI sul TV?
Consultare il manuale di
istruzioni del ricevitore
AV.
Terminale HDMI sul TV?
INIZIO
Collegare il video al TV con un cavo HDMI.
Utilizzare un ricevitore
AV?
Collegare il video al ricevitore AV.
Terminale HDMI sul TV?
Collegare video e audio al TV con un cavo HDMI.
Collegare il video al TV.
Sì
* Se ci si collega a un ricevitore AV che non può far uscire il suono
attraverso il suo terminale HDMI, consultare il manuale di istruzioni
del ricevitore AV.
No
■ Pannello posteriore
0
9
AC IN
VIDEO OUT
Y
PB
DIGITAL OUT
COAXIAL
HDMI
NETWORK
AUDIO OUT
L
R
OUT
IN
REMOTE CONTROL
VIDEO
PR
COMPONENT
1 2 3
10 It
OPTICAL
4
USB
5
6
7
8
(Modello per l’Europa)
2
Collegamenti
Collegamento video e audio al
ricevitore AV
A HDMI (p. 12)
Collegamento audio al ricevitore AV
Collegamento video
al TV
A’ HDMI (p. 12)
Collegare l’audio al
ricevitore AV.
D COAXIAL (p. 14)
o
al ricevitore AV
E
OPTICAL (p. 14)
B COMPONENT (p. 13)
o
o
F L/R (p. 15)
C VIDEO (p. 13)
Collegamento video e audio al TV
A’ HDMI (p. 12)
Collegamento audio al TV
Collegamento video al TV
Collegare l’audio al TV.
D’ COAXIAL (p. 14)
o
B’ COMPONENT (p. 13)
E’ OPTICAL (p. 14)
o
o
C’ VIDEO (p. 13)
F’ L/R (p. 15)
6 AUDIO OUT (L/R) (p. 15)
2 COMPONENT (p. 13)
7 REMOTE CONTROL (OUT/IN) (p. 17)
3 HDMI (p. 12)
8 AC IN (p. 17)
4 OPTICAL (p. 14)
9 NETWORK (p. 16)
5 USB (p. 16)
0 COAXIAL (p. 14)
Italiano
1 VIDEO (p. 13)
11 It
Collegamento HDMI
■ Collegamento al terminale HDMI
–
–
–
–
È possibile apprezzare immagini e suoni digitali di elevata qualità tramite il terminale HDMI.
Collegare saldamente un cavo HDMI (disponibile in commercio) ai terminali HDMI.
Vedere pagina 36 per informazioni sui formati di uscita audio/video.
Utilizzare cavi HIGH SPEED HDMI con il logo HDMI (come mostrato sul retro della confezione).
Attenzione!
Non collegare il cavo di alimentazione di questo lettore fino a quando non sono stati
completati tutti gli altri collegamenti.
Questo lettore
VIDEO OUT
Y
PB
DIGITAL OUT
COAXIAL
HDMI
NETWORK
VIDEO
PR
COMPONENT
OPTICAL
USB
Suggerimenti
– Se si utilizza la funzione Controllo HDMI,
consultare la sezione “Controllo HDMI”
(p. 31).
– Per informazioni sulla modalità di uscita del
terminale HDMI, consultare la sezione
“HDMI” (p. 35).
– Se non appare alcuna immagine, consultare la
sezione “Risoluzione dei problemi” (p. 40).
Al terminale HDMI
■ Collegamento per la
riproduzione di dischi Blu-ray
3D
Cavo HDMI
(disponibile in commercio)
Per riprodurre i dischi Blu-ray 3D sul lettore, sono
necessarie le seguenti apparecchiature e
collegamenti:
– Un TV e un ricevitore AV (eventuale) con
A’
funzioni 3D.
– Tutti i componenti devono essere collegati
tramite cavi HDMI.
– Il Blu-ray Disc deve contenere immagini 3D.
– È necessario impostare Uscita 3D in
Impostazione Display (p. 33) su Auto.
A
Al terminale di ingresso
HDMI
HDMI IN
Ricevitore AV
12 It
TV
Collegamenti video
■ Collegamento alla presa component/video
Attenzione!
Non collegare il cavo di alimentazione di questo lettore fino a quando non sono stati
completati tutti gli altri collegamenti.
Questo lettore
VIDEO OUT
Y
Questo lettore
VIDEO OUT
DIGITAL OUT
COAXIAL
Y
HDMI
PB
PB
DIGITAL OUT
COAXIAL
HDMI
NETWORK
NETWORK
PR
VIDEO
COMPONENT
(Verde)
(Rosso)
OPTICAL
(Blu)
2
Collegamenti
– È possibile apprezzare una precisa riproduzione del colore e immagini di alta qualità tramite le prese component.
– Collegare saldamente un cavo video component (disponibile in commercio) o un cavo con spinotti video alle prese
COMPONENT o alla presa VIDEO.
– Vedere pagina 37 per informazioni sui formati di uscita video.
PR
VIDEO
COMPONENT
USB
OPTICAL
Alle prese
COMPONENT
USB
(Giallo)
Alla presa
VIDEO
Cavo video component
(disponibile in commercio)
B
B’
Cavo Audio/Video
(in dotazione)
C
C’
Alle prese
di ingresso
component
Alla presa
d’ingresso
video
COMPONENT IN
(Giallo)
(Giallo)
Y
(Giallo)
(Verde)
PB
(Blu)
(Verde)
PR
(Rosso)
(Verde)
(Blu)
(Blu)
(Rosso)
(Rosso)
VIDEO
AV INPUT
Italiano
Ricevitore AV
TV
Ricevitore AV
TV
Note
– Se si tenta di riprodurre l’immagine attraverso un videoregistratore, l’immagine può risultare di qualità scadente a
causa dell’intervento della funzione di protezione dalle copie non autorizzate.
– Per riprodurre dischi Blu-ray 3D sul lettore, è necessario collegare questo lettore, un ricevitore AV e un TV
utilizzando cavi HDMI. Vedere pagina 12.
13 It
Collegamenti audio
■ Collegamento alla presa/terminale audio digitale
– È possibile collegare apparecchiature audio o il TV alla presa COAXIAL/terminale OPTICAL.
– Collegare saldamente un cavo audio digitale Coassiale (disponibile in commercio) o un cavo ottico (disponibile in
commercio) alla presa audio digitale coassiale o al terminale audio digitale ottico.
– Vedere pagina 36 per informazioni sui formati di uscita audio.
Attenzione!
Non collegare il cavo di alimentazione di questo lettore fino a quando non sono stati
completati tutti gli altri collegamenti.
Questo lettore
Questo lettore
VIDEO OUT
Y
PB
VIDEO OUT
DIGITAL OUT
COAXIAL
Y
HDMI
PB
DIGITAL OUT
COAXIAL
HDMI
NETWORK
NETWORK
AUDIO OUT
L
R
PR
VIDEO
COMPONENT
OPTICAL
PR
VIDEO
COMPONENT
USB
OPTICAL
USB
Alla presa
COAXIAL
Al terminale
OPTICAL
Cavo audio digitale coassiale
(disponibile in commercio)
D
D’
Cavo ottico
(disponibile in commercio)
E
Alla presa
d’ingresso
coassiale
Ricevitore AV
E’
Al terminale
d’ingresso
ottico
COAXIAL
OPTICAL
AV INPUT
DIGITAL AUDIO IN
TV
Ricevitore AV
TV
Suggerimento
– Per informazioni sulla modalità di uscita della presa COAXIAL/terminale OPTICAL, consultare la sezione
“Coassiale / Ottico” (p. 35).
14 It
Collegamenti audio
■ Collegamento alle prese audio
– È possibile collegare apparecchiature audio o il TV alle prese AUDIO OUT L/R.
– Collegare saldamente un cavo Audio/Video (in dotazione) alla presa AUDIO OUT L/R.
– Vedere pagina 36 per informazioni sui formati di uscita audio.
2
Attenzione!
Questo lettore
Collegamenti
Non collegare il cavo di alimentazione di questo lettore fino a quando non sono stati
completati tutti gli altri collegamenti.
DIGITAL OUT
COAXIAL
DMI
NETWORK
AUDIO OUT
OUT
L
R
IN
REMOTE CONTROL
USB
(Rosso)
Alla presa
AUDIO OUT L/R
(Bianco)
OPTICAL
Cavo Audio/Video
(in dotazione)
F
F’
Alla presa di
ingresso audio
L/R
(Bianco) (Rosso)
Ricevitore AV
R
AUDIO IN
(Rosso)
L
(Bianco)
(Rosso)
(Bianco)
AUDIO
TV
Italiano
15 It
Collegamento di rete e collegamento USB
■ Collegamento al terminale NETWORK
– È possibile la riproduzione di contenuti PC collegando il lettore alla rete.
– È possibile apprezzare una grande varietà di contenuti con funzioni interattive collegandosi a Internet durante la
riproduzione di dischi BD-Live compatibili. Consultare pagina 27 per ulteriori informazioni sulle funzioni BDLive.
Note
–
–
–
–
–
Collegare saldamente un cavo di rete (disponibile in commercio) al terminale NETWORK.
Utilizzare esclusivamente un cavo di rete schermato STP (Shielded Twisted Pair).
Per utilizzare Internet è necessaria una connessione a banda larga come mostrato qui di seguito.
Collegare l’altro connettore del cavo di rete all’hub/router a banda larga.
Nel caso si utilizzi una connessione Internet a banda larga è necessario un contratto con un fornitore di servizi
Internet. Per maggiori dettagli contattare il fornitore di servizi Internet più vicino.
– Consultare il manuale distruzioni del dispositivo dal momento che l’apparecchio collegato e il metodo di
connessione possono differire a seconda del proprio ambiente Internet.
– Utilizzare un cavo/router di rete che supporti 10BASE-T/100BASE-TX.
■ Collegamento al connettore USB
– È possibile collegare un dispositivo di archiviazione USB per Archivio locale al connettore USB sul pannello
posteriore (o sul pannello anteriore) del lettore per salvare i dati BD-Live o aggiornare il software del lettore.
– Collegare saldamente un dispositivo di archiviazione USB (disponibile in commercio) al connettore USB.
ATTENZIONE:
– Non rimuovere il dispositivo di archiviazione
USB o scollegare il cavo di alimentazione
durante l’esecuzione delle operazioni BD-Live
(p. 27) o durante l’aggiornamento del software.
– Non utilizzare un cavo di prolunga USB
quando si collega un dispositivo di
archiviazione USB al connettore USB del
lettore. L’utilizzo di un cavo di prolunga USB
potrebbe impedire il corretto funzionamento del
lettore.
Nota
– Yamaha non può garantire che tutte le marche
di dispositivi di archiviazione USB funzionino
correttamente con il lettore.
Questo lettore
VIDEO OUT
Y
PB
DIGITAL OUT
COAXIAL
HDMI
NETWORK
AUDIO OUT
L
R
VIDEO
PR
COMPONENT
OPTICAL
USB
Al
connettore
USB
Al terminale
NETWORK
Dispositivo di archiviazione USB
(disponibile in commercio)
Cavo di rete
(disponibile in commercio)
Suggerimento
– Per salvare i dati BDLive sul dispositivo di
archiviazione USB sul
pannello anteriore,
impostare Archivio
locale su USB Frontale
(p. 31).
Al
terminale
LAN
Internet
Modem
Hub o
router a banda larga
PC
Dopo aver effettuato i collegamenti
– Quando si configura manualmente l’impostazione Rete, consultare la sezione “Rete” (p. 32).
– Per riprodurre i contenuti PC sulla propria rete, consultare la sezione “Uso dei contenuti della rete” (p. 20).
16 It
Altri collegamenti
■ Collegamento alle prese REMOTE
CONTROL
Attenzione!
Non collegare il cavo di alimentazione di
questo lettore fino a quando non sono stati
completati tutti gli altri collegamenti.
– Per dettagli relativi alla funzione SCENE, consultare
il manuale di istruzioni in dotazione con il ricevitore
AV Yamaha.
– È possibile collegare un componente Yamaha (quale
un lettore CD) che supporta la funzione SCENE alla
presa REMOTE CONTROL (OUT) di questo
lettore.
2
Collegamenti
– È possibile trasmettere e ricevere i segnali del
comando a distanza collegandosi alle prese
REMOTE CONTROL (OUT/IN).
– Collegare saldamente cavi mini RCA da 3,5 mm
monoaurali (disponibili in commercio) ai terminali
REMOTE CONTROL (OUT/IN).
– Se il ricevitore AV è un prodotto Yamaha ed è in
grado di trasmettere segnali di comando SCENE, è
possibile controllare il lettore con la funzione
SCENE.
Suggerimenti
■ Collegamento del cavo di
alimentazione
– Una volta completati tutti i collegamenti, inserire il
cavo di alimentazione in dotazione nell’ingresso AC
IN sul lato posteriore del lettore, quindi inserirlo
nella presa CA esterna.
Questo lettore
AC IN
RK
AUDIO OUT
L
R
OUT
IN
REMOTE CONTROL
(Modello per l’Europa)
All’ingresso CA
Alla presa
REMOTE
CONTROL
(OUT)
Alla presa
REMOTE
CONTROL (IN)
Alla presa CA
Nota
Cavo mini RCA
da 3,5 mm
monoaurale
(disponibile in
commercio)
Cavo mini RCA da
3,5 mm monoaurale
(disponibile in
commercio)
– PER PREVENIRE IL PERICOLO DI SCOSSE
ELETTRICHE NON TOCCARE LE PARTI NON
ISOLATE DEI CAVI MENTRE IL CAVO DI
ALIMENTAZIONE È COLLEGATO.
Alla presa
remote
control out
Alla presa
remote
control in
REMOTE CONTROL IN
REMOTE CONTROL OUT
Italiano
Componente Yamaha
Ricevitore a segnali infrarossi
o componente Yamaha
(es., un ricevitore AV)
17 It
RIPRODUZIONE
Initial Wizard/Installazione rapida
■ Impostazione con Initial Wizard/Installazione rapida
Initial Wizard/Installazione rapida consente l’agevole impostazione di lingua, risoluzione e rapporto di aspetto dello
schermo. La schermata di Initial Wizard viene visualizzata quando il lettore viene attivato per la prima volta dopo
l’acquisto. È possibile eseguire la stessa impostazione dal menu SETUP = Sistema = Installazione rapida.
1 Quando viene visualizzata la schermata Installazione
rapida, premere ENTER per avviare Installazione
rapida.
2 Impostare la lingua, la risoluzione e il rapporto di
aspetto dello schermo attenendosi ai messaggi
visualizzati sullo schermo.
Note
– Se non appare alcuna immagine dopo il
completamento di Initial Wizard/Installazione
rapida, consultare la sezione “Risoluzione dei
problemi” (p. 40).
– Quando il lettore viene acceso, appare un messaggio
di avviso riguardante la riproduzione di video 3D.
Premere ENTER per ignorare il messaggio o
CLEAR per disabilitarlo (p. 31).
Menu HOME/MEDIA
I menu HOME e MEDIA consentono di sfogliare e quindi riprodurre file multimediali presenti su data disc, dispositivi di
archiviazione USB e sulla propria rete.
Nota
– Per dettagli sui dischi e formati riproducibili,
consultare pagina 3.
■ Riproduzione di foto/musica/
video
Funzionamento di base
2/3/5/a: Spostano la selezione.
2: Torna alla cartella precedente.
HOME: Passa alla/esce dalla schermata menu HOME.
ENTER: Conferma la cartella/file.
PIP
SETUP
2ND
AUDIO
HOME
TOP MENU
REPEAT
A B
POP-UP MENU
ENTER
RETURN
18 It
ON SCREEN
Icone nella parte superiore del menu
MEDIA
: Riproduce il disco sul vassoio, oppure visualizza i
contenuti nel data disc.
: Visualizza i contenuti presenti sul dispositivo di
archiviazione USB collegato al connettore USB.
: Ricerca un server DLNA (p. 20) sulla rete.
: Visualizza i contenuti presenti sul server DLNA
collegato.
Menu HOME/MEDIA
Operazioni comuni per la riproduzione
dei file in una cartella selezionata
Esempio: Selezione del file di un filmato su un
dispositivo di archiviazione USB
4 Selezionare la cartella Foto, Musica, Video o AVCHD
che si desidera riprodurre, quindi premere ENTER.
Per tornare alla cartella precedente, premere 2 o
selezionare
.
Nota
– Arrestare la riproduzione del video prima di portarsi
alla schermata del menu MEDIA.
3
Riproduzione
1 Premere HOME per passare alla schermata del menu
HOME.
Nota
Suggerimento
– La schermata del menu HOME può differire a
seconda del modello.
– Tenere presente che nella fase successiva verrà
visualizzato solo il tipo di file selezionato in questa
fase. Ad esempio, se in questa fase si seleziona la
cartella Foto, da ora in poi verranno visualizzati solo
file di foto. Quando si desidera riprodurre file diversi
dalle foto, ritornare a questa fase e selezionare un
nuovo tipo di file.
5 Selezionare la cartella contenente il file che si desidera
riprodurre.
2 Premere 2/3/5/a per selezionare MEDIA, quindi
premere ENTER.
Viene visualizzata la schermata MEDIA.
3 Selezionare la voce che contiene il file che si desidera
riprodurre, quindi premere ENTER.
Italiano
Continua alla pagina successiva. \
19 It
Menu HOME/MEDIA
6 Selezionare il file che si desidera riprodurre, quindi
premere ENTER.
Quando viene selezionato un file video, parte la
riproduzione.
Quando viene selezionato un file musicale, viene
visualizzata la schermata di stato e quindi parte la
riproduzione.
Quando viene selezionato un file di foto, parte uno
slide show (presentazione tipo diapositive).
■ Uso dei contenuti della rete
Questo lettore è certificato DLNA (p. 42). È possibile
gestire contenuti di foto, musica e video archiviati su
server DLNA nella propria rete domestica.
Riproduzione di contenuti condivisi
1 Per riprodurre file sul PC, installare il software di un
server DLNA, come ad es. Windows Media Player 12,
e condividere i file che si desidera riprodurre.
2 Accendere il PC con il software del server DLNA
installato oppure il dispositivo DLNA collegato alla
propria rete domestica.
3 Premere HOME per visualizzare la schermata del
menu HOME. Quindi, selezionare MEDIA per passare
al menu MEDIA. I server DLNA collegati alla rete
sono elencati sulla schermata.
Suggerimento
– Per godersi lo slide show con una base musicale,
premere HOME per tornare alla schermata del menu
HOME mentre viene riprodotta la musica e
selezionare il file di foto.
Nota
– Il file visualizzato potrebbe non essere riprodotto a
seconda del contenuto.
Operazioni per la visualizzazione delle
foto
Durante la visualizzazione delle foto, i tasti sul
telecomando funzionano come indicato qui di seguito.
: Arresta lo slide show e torna al browser dei file.
: Mette in pausa lo slide show.
: Riproduce uno slide show.
: Passa alla foto successiva.
: Passa alla foto precedente.
: Accelera lo slide show in 3 fasi.
: Rallenta lo slide show in 3 fasi.
5: Capovolge una foto.
a: Riflette una foto.
2: Ruota una foto in senso antiorario.
3: Ruota una foto in senso orario.
ZOOM: Ingrandisce/rimpicciolisce una foto
(ingrandimento/rimpicciolimento: 3 fasi ognuna).
5/a/2/3: Esegue una panoramica in modalità zoom
quando una foto è più grande dello schermo.
DIGEST: Passa alla modalità miniature (p. 7). Quando le
miniature vengono visualizzate, è possibile passare alla
pagina successiva/precedente con
/
.
20 It
Note
– Se il proprio server DLNA non è presente
nell’elenco, selezionare Ricerca DLNA per cercarlo.
– A seconda del server DLNA, questo lettore potrebbe
necessitare dell’autorizzazione da parte del server.
– Per riprodurre il file sul server DLNA, il lettore e il
server devono essere necessariamente connessi al
medesimo punto di accesso.
– I requisiti dei file potrebbero non essere sempre
compatibili. Potrebbero verificarsi alcune restrizioni
dipendenti dalle caratteristiche del file e dalla
capacità del server DLNA.
4 Selezionare il file che si desidera riprodurre.
Note
– La riproduzione e la qualità del funzionamento
potrebbero essere influenzate dalle condizioni della
propria rete domestica.
– I file provenienti da supporti rimovibili, quali i
dispositivi di archiviazione USB o DVD il proprio
media server, potrebbero non essere riprodotti in
modo corretto.
Uso dei servizi di rete
È possibile guardare all’istante i video offerti dai seguenti servizi di rete.
– YouTube
– Picasa (p. 22)
– Netflix (p. 23)
3
Note
Riproduzione
– L’accesso ai contenuti offerti da terzi richiede una connessione Internet ad alta velocità ed eventualmente la
registrazione di un account e di un abbonamento a pagamento.
– I servizi di contenuti di terzi possono subire modifiche, sospensioni, interruzioni o dismissioni in qualsiasi
momento senza preavviso. Yamaha non si assume alcuna responsabilità in merito.
– Alcuni contenuti potrebbero essere disponibili solamente per determinati paesi e presentati in determinate lingue.
– Yamaha non dichiara né garantisce che i servizi di contenuti continueranno a essere forniti o disponibili per un
determinato periodo di tempo e nega qualunque garanzia, esplicita o implicita, in tal senso.
Riproduzione di video da YouTube™
Con il lettore è possibile guardare i filmati di YouTube in Internet.
I servizi possono subire modifiche senza preavviso.
1 Premere HOME per visualizzare la schermata del
menu HOME.
Suggerimento
– La schermata del menu HOME può differire a
seconda del modello.
2 Premere 2/3/5/a per selezionare YouTube, quindi
premere ENTER.
Suggerimento
– Per uscire da YouTube, premere RETURN.
Italiano
21 It
Riproduzione di foto da Picasa™ Web Album
Con il lettore è possibile guardare le foto salvate su Picasa Web Album in Internet.
Il servizio può subire modifiche senza preavviso.
1 Registrare il proprio nome utente e la password sul
computer prima di utilizzare Picasa Web Album.
2 Premere HOME per visualizzare la schermata del
menu HOME.
Premere 2/3/5/a per selezionare Picasa, quindi
premere ENTER.
Suggerimento
– La schermata del menu HOME può differire a
seconda del modello.
3 Quando si accede a Picasa da questo lettore per la
prima volta, selezionare l’icona Nuovo utente e inserire
il nome utente e la password registrati.
Suggerimento
– Per uscire da Picasa, premere RETURN.
22 It
Riproduzione di video da Netflix™
Con il lettore è possibile guardare istantaneamente film ed episodi di serie televisive da Netflix in Internet. Per
informazioni su come diventare membro di Netflix, visitare www.netflix.com.
Netflix è disponibile in determinati Paesi. È necessario disporre dell’iscrizione al servizio illimitato.
Per ulteriori informazioni visitare il sito www.netflix.com.
3
■ Avvio di Netflix
Riproduzione
1 Premere HOME per visualizzare la schermata del
menu HOME.
Premere 2/3/5/a per selezionare NETFLIX, quindi
premere ENTER.
Per avviare Netflix è anche possibile premere
NETFLIX sul telecomando.
Suggerimenti
– La schermata del menu HOME può differire a
seconda del modello.
– Per tornare al menu HOME, premere RETURN.
Note
– Quando è richiesto un aggiornamento del software,
viene visualizzato il messaggio corrispondente
quando si seleziona Netflix. In tal caso, eseguire
l’aggiornamento del software.
– Per informazioni su Netflix, visitare il sito Internet di
Netflix all’indirizzo www.netflix.com .
– Per disattivare Netflix, consultare “Informazioni su
Netflix” (p. 32).
Italiano
23 It
Funzionamento di riproduzione avanzata
Questo capitolo spiega la modalità di riproduzione dei
dischi Blu-ray disponibili in commercio, dei DVD e dei
CD, nonché dei dischi DVD-RW/R registrati.
Nota
– Per il funzionamento della riproduzione di base,
vedere pagina 6.
■ Menu a schermo (On Screen)
Per visualizzare il menu a schermo, premere ON
SCREEN. Successivamente, premere 5/a/2/3 per
selezionare una voce, quindi premere ENTER per attivare
la funzione desiderata.
DVD
–
–
–
–
–
–
–
Normale
Shuffle CH (capitolo)
Shuffle TT (titolo)
Shuffle All
Random CH (capitolo)
Random TT (titolo)
Random All
VIDEO
MUSIC
PHOTO
– Normale
– Shuffle F (cartella)
– Casuale F (cartella)
Audio BD DVD VIDEO : Mostra la lingua/segnale
audio del Blu-ray Disc/DVD attualmente selezionato. È
possibile selezionare il tipo di audio desiderato.
Angolo BD DVD : Mostra il numero di angolazione
attualmente selezionato. Se il video è registrato in più
angolazioni, è possibile modificare l’angolazione.
Sottotitolo BD DVD VIDEO : Mostra la lingua dei
sottotitoli attualmente selezionata quando sono disponibili
i sottotitoli.
Il menu a schermo contiene le seguenti voci.
Titolo BD DVD VIDEO : Mostra il numero del titolo
attualmente riprodotto. È possibile passare al titolo
desiderato selezionandolo da questa voce.
Capitolo BD DVD VIDEO : Mostra il numero del
capitolo in corso di riproduzione. È possibile passare al
capitolo desiderato selezionandolo da questa voce.
Brano/File CD VIDEO MUSIC PHOTO : Mostra il
numero di traccia/file attualmente riprodotto. È possibile
passare alla traccia/al file desiderato selezionandolo da
questa voce.
Stile sottotitolo BD : Mostra lo stile dei sottotitoli
attualmente selezionato. Questa funzione è disponibile
solo per sottotitoli di file video esterni. È possibile
selezionare lo stile di testo dei sottotitoli desiderato.
Bitrate BD DVD CD VIDEO
bitrate del segnale audio/video.
MUSIC : Mostra il
Secondo Video BD : Attiva/disattiva il PIP (p. 6).
Secondo Audio BD : Attiva/disattiva l’audio
secondario (p. 6).
Ricerca Instantanea
BD
DVD
CD
VIDEO
MUSIC : Salta 30 secondi.
Tempo BD DVD CD VIDEO MUSIC : Mostra il
tempo di riproduzione. Selezionare il tipo di
visualizzazione desiderata scegliendo tra le opzioni
seguenti:
– Tempo di riproduzione trascorso del titolo, capitolo,
disco, traccia o file
– Tempo di riproduzione rimanente del titolo, capitolo,
disco, traccia o file
Replay Instantaneo
Modalità/Modalità di riproduzione
Transizione PHOTO : Mostra il modo in cui una foto
viene visualizzata sullo schermo. È possibile selezionare il
tipo di transizione.
DVD
CD
VIDEO
MUSIC
PHOTO : Mostra la
modalità di riproduzione attuale. È possibile selezionare la
modalità di riproduzione scegliendo tra le opzioni
seguenti:
CD
– Normale: La riproduzione normale.
– Shuffle: Riproduzione casuale senza ripetizione.
– Casuale: Riproduzione casuale con ripetizione.
24 It
BD
DVD
CD
VIDEO
MUSIC : Ripete il contenuto
degli ultimi 10 secondi riprodotti.
Slide Show PHOTO :
Mostra la velocità dello slide show. È possibile
selezionare la velocità dello slide show tra Lento/Medio/
Veloce.
Code Page VIDEO : Seleziona il codice carattere del
sottotitolo aggiunto al video DivX (p. 42).
Funzionamento di riproduzione avanzata
■ Menu di stato
Mostra varie impostazioni, quali l’impostazione dei
sottotitoli, dell’angolazione e il numero di titolo/capitolo/
traccia in corso di riproduzione. Per visualizzare il menu
di stato, premere STATUS. Il menu di stato contiene i
seguenti menu.
BD
DVD
CD
MUSIC
Esempio: Le icone durante la riproduzione di file
musicali
123 4
5
6
7
VIDEO
3
2
1
3
8 7
4
Riproduzione
Esempio: Le icone durante la riproduzione di Blu-ray
Disc
5
6
8
1
2
1
2
3
4
(Stato di riproduzione)
(Icona tipo disco/file video)
(Numero titolo in riproduzione): È possibile
saltare a un titolo specifico con il tasto SEARCH
(p. 7).
(Numero capitolo in riproduzione): È
possibile saltare a un capitolo specifico con il tasto
SEARCH (p. 7).
3
(Stato di riproduzione)
(Modalità di ripetizione): Mostra la modalità di
ripetizione attuale (p. 7).
(Icona tipo disco/file musicale)
4 (Immagine) MUSIC : Visualizza l’eventuale
immagine contenuta nel file.
5
(Numero brano/file in riproduzione): È
possibile saltare a una traccia specifica con il tasto
SEARCH (p. 7).
6 (Informazioni) MUSIC : Visualizza le eventuali
informazioni musicali contenute nel file.
5
(Tempo di riproduzione trascorso): È
possibile saltare a un punto specifico con il tasto
SEARCH (p. 7).
7
6
(Sottotitoli attualmente selezionati): È
possibile modificare la lingua dei sottotitoli con il tasto
SUBTITLE.
8 (Barra di progresso) MUSIC : Mostra lo stato di
progresso della canzone corrente.
7
(Audio attualmente selezionato): È possibile
modificare la lingua o il formato dell’audio con il tasto
AUDIO.
8
(Modalità di ripetizione): Mostra la modalità di
ripetizione attuale (p. 7).
(Tempo di riproduzione trascorso): È
possibile saltare a un punto specifico con il tasto
SEARCH (p. 7).
PHOTO
(Stato di riproduzione)
2
(Icona file di foto)
3
(Numero di file in visualizzazione)
4
Italiano
1
(Modalità di ripetizione): Mostra la modalità di
ripetizione attuale (p. 7).
5 (Velocità slide show)
25 It
Funzionamento di riproduzione avanzata
■ Uso dei Bookmark
DVD
VIDEO
Questa funzione consente l’impostazione di un Bookmark
in uno specifico punto del video. Una volta impostato il
Bookmark, è possibile portarsi al punto impostato
mediante questa funzione. È possibile impostare fino a 12
Bookmark.
Per i dischi DVD video, selezionare il titolo (indicato
con TT) e il capitolo (indicato con CH) desiderato
invece della traccia.
Per cancellare una traccia impostata, selezionare la
traccia da cancellare, quindi premere CLEAR.
Premere RETURN per annullare la riproduzione
programmata.
1 Premere MARKER durante la riproduzione del filmato
per impostare il Bookmark. Vengono visualizzati il
numero del Bookmark e lo stato.
2 Una volta impostato il Bookmark, premere DIGEST
per visualizzare la barra di selezione dei Bookmark.
3 Premere 2/3 per selezionare il Bookmark che si
desidera riprodurre, quindi premere ENTER.
Premere CLEAR per eliminare il Bookmark
selezionato.
Nota
– Una volta terminata la riproduzione (per es.
espellendo il disco o premendo per due volte
), i
bookmark vengono eliminati automaticamente.
■ Riproduzione
programmata
3 Terminata la programmazione, premere
per
impostare e avviare la riproduzione programmata.
4 Per annullare la riproduzione programmata, arrestare
completamente la riproduzione premendo due volte il
tasto
.
■ Uso della ricerca
BD
DVD
CD
Questa funzione consente di programmare l’ordine di
riproduzione delle tracce di un disco audio o dei capitoli di
un DVD.
Premere PROGRAM durante la riproduzione per
visualizzare la finestra PROGRAM per programmare
l’ordine di riproduzione.
È possibile programmare fino a 15 tracce/capitoli.
Esempio: Programmazione dell’ordine di riproduzione
delle tracce di un CD
1 Premere PROGRAM durante la riproduzione.
DVD
CD
VIDEO
MUSIC
PHOTO
Questa funzione consente il salto a uno specifico punto
durante la riproduzione.
1 Premere SEARCH durante la riproduzione. Viene
visualizzata la barra di stato.
2 Premere 5/a/2/3 per selezionare una delle voci qui
di seguito, quindi premere ENTER.
BD
DVD :
– Numero titolo (indicato con
)
– Numero capitolo (indicato con
)
– Tempo trascorso del titolo (indicato con
)
– Tempo trascorso del capitolo (indicato con
CD :
– Numero brano (indicato con
)
)
– Tempo trascorso della traccia (indicato con
– Tempo trascorso del disco (indicato con
VIDEO MUSIC :
– Numero file (indicato con
)
)
)
– Tempo trascorso del file (indicato con
)
PHOTO :
– Numero file (indicato con
2 Premere ENTER per programmare l’ordine di
riproduzione.
Per i dischi audio, premere 5/a per selezionare la
traccia desiderata, quindi premere ENTER.
26 It
)
3 Premere 5/a o i tasti numerici per impostare/regolare
il valore della voce selezionata, quindi premere
ENTER per saltare al punto specifico.
4 Per chiudere la barra di stato, premere STATUS.
Funzionamento di riproduzione avanzata
■ Riproduzione di BONUSVIEW™ e
BD-Live™
Questo lettore supporta le funzioni di riproduzione
BONUSVIEW (p. 42) (BD-ROM Profilo 1 Versione 1.1)
e BD-Live (p. 42) (BD-ROM Profilo 2).
Nota
■ Uso della funzione Picture in
Picture
(riproduzione audio/video
secondario)
Un BD video che comprende audio e video secondari
compatibili con la funzione Picture in Picture può essere
riprodotto simultaneamente con audio e video secondario
come video in miniatura nell’angolo.
Video principale
Video secondario
3
Riproduzione
– Le funzioni e il metodo di riproduzione variano a
seconda del disco. Consultare la guida del disco o il
manuale d’uso in dotazione.
I dati BD-Live sono salvati in un dispositivo di
archiviazione USB collegato a questo lettore. Per
usufruire di queste funzioni, collegare un dispositivo
di archiviazione USB che supporti lo standard USB
2.0 High Speed (480 Mbit/s) al connettore USB
selezionato nell’Archivio locale (p. 31).
L’impostazione predefinita è il connettore USB sul
pannello posteriore.
– Quando necessario, la cartella BUDA viene creata
automaticamente nel dispositivo di archiviazione
USB.
– Se lo spazio di memoria è insufficiente i dati non
verranno copiati/scaricati. Cancellare i dati non
necessari o utilizzare un nuovo dispositivo di
archiviazione USB.
– Per il caricamento dei dati (lettura/scrittura) potrebbe
essere necessario del tempo.
Note
– Yamaha non può garantire che tutte le marche di
dispositivi di archiviazione USB funzionino
correttamente con il lettore.
– Non utilizzare un cavo di prolunga USB quando si
collega un dispositivo di archiviazione USB al
connettore USB del lettore. L’utilizzo di un cavo di
prolunga USB potrebbe impedire il corretto
funzionamento del lettore.
3. Riprodurre il disco.
Quando viene visualizzato Segno PIP
(
) o Simbolo audio secondario (
),
premere PIP per attivare o disattivare
la funzione Picture in Picture.
Note
■ Uso della funzione di BD-Live™
1. Impostare la rete (p. 32).
2. Collegare il dispositivo di
archiviazione USB a questo lettore
(p. 16).
Note
– Per quanto riguarda il metodo di riproduzione dei
contenuti di BD-Live ecc., eseguire le operazioni in
base alle istruzioni presenti nel manuale del Blu-ray
Disc.
– Per usufruire delle funzioni di BD-Live, eseguire la
connessione di rete (p. 16) e le impostazioni di Rete
(p. 32).
– Consultare la sezione “Connessione BD-Live” (p.
33) per l’impostazione dell’accesso limitato ai
contenuti BD-Live.
– Il tempo richiesto per scaricare i programmi forniti
nel dispositivo di archiviazione USB connesso al
lettore varia a seconda della velocità di connessione
a Internet e al volume dati dei programmi.
– I programmi BD-Live forniti tramite Internet
potrebbero non essere in grado di visualizzare la
connessione a seconda dello stato (aggiornamento)
del provider. In tali casi, espellere il disco e
riprovare.
– Se la schermata BD-Live non appare dopo aver
selezionato la funzione BD-Live nel menu del
Blu-ray Disc, il dispositivo di archiviazione USB
potrebbe non avere spazio sufficiente. In tali casi,
espellere il disco dal lettore, quindi cancellare i dati
contenuti nel dispositivo di archiviazione USB
utilizzando il menu “Formato” nell’“Archivio
locale” (p. 31).
27 It
Italiano
– Per ascoltare l’audio secondario, accertarsi che
l’impostazione Uscita audio (Coassiale / Ottico o
HDMI) sia PCM o Ricodifica (p. 35).
– A seconda del disco, per ascoltare l’audio
secondario, potrebbe essere necessario impostare
l’audio secondario su Acceso nel menu principale
del disco (p. 8).
– L’audio e il video secondario per la funzione Picture
In Picture potrebbero essere riprodotti
automaticamente ed essere rimossi a seconda del
contenuto. Quindi le aree riproducibili potrebbero
essere limitate.
4. Eseguire BD-Live in base alle
istruzioni presenti sul disco.
IMPOSTAZIONI
Menu SETUP
Il Menu SETUP abilita varie impostazioni e regolazioni audio/visive per le funzioni utilizzando il telecomando.
Menu/Menu secondario
Sistema
Impostazione
Generale
Lingua
Riproduzione
Sicurezza
Rete
28 It
Voce
Funzione
Pagina
Screen Saver
Imposta l’attivazione/disattivazione dello screen saver.
31
Auto Riproduzione
disco
Imposta la riproduzione automatica del disco al momento del
suo inserimento nel lettore.
31
Controllo HDMI
Imposta la ricezione del segnale di comando del lettore dal
telecomando del proprio TV o del proprio ricevitore AV.
31
Controllo Network
Imposta l’attivazione/disattivazione del controllo via
Ethernet.
31
Caricare le
impostazioni
predefinite
Ripristina tutte le impostazioni ai valori di fabbrica ad
eccezione dell’impostazione Sicurezza.
31
Aggiornamento
Esegue l’aggiornamento del lettore.
31
Installazione rapida
Imposta lingua, risoluzione, rapporto di aspetto dello
schermo.
31
Archivio locale
Visualizza lo stato dell’Archivio locale (p. 31), formatta
l’Archivio locale e seleziona il connettore USB anteriore/
posteriore per l’Archivio locale.
31
Messaggio di
riproduzione in 3D
Quando il lettore viene acceso, visualizza un messaggio di
avviso riguardante la riproduzione di video 3D.
31
31
OSD
Seleziona la lingua per l’On Screen Display.
Menu
Imposta la lingua prioritaria per il menu disco.
32
Audio
Imposta la lingua prioritaria per l’audio.
32
Sottotitolo
Imposta la lingua prioritaria per i sottotitoli.
32
Closed Caption
Imposta l’attivazione/disattivazione della Closed Caption.
32
Segno Angolo
Imposta la visualizzazione del Segno Angolo quando viene
riprodotto un Blu-ray Disc/DVD con angolazioni multiple.
32
Segno PIP
Imposta la visualizzazione del Segno PIP quando viene
riprodotto un Blu-ray Disc/DVD con Picture in Picture.
32
Simbolo audio
secondario
Imposta la visualizzazione del Simbolo audio secondario
quando viene riprodotto un Blu-ray Disc/DVD con audio
secondario.
32
Ultimo salvataggio
Imposta il lettore in modo da memorizzare la posizione
dell’ultima riproduzione di un disco quando è impostato in
modalità Standby o si apre il vassoio del disco.
32
DivX(R) VOD
DRM
Visualizza il codice di registrazione per i video DivX(R).
Informazioni su
Netflix
Disattiva il presente lettore da Netflix e visualizza l’ESN
(Electronic Serial Number).
Cambiare password
Cambia la password per Parental Control e Codice del paese.
32
Parental Control
Imposta il Parental Control a seconda dei contenuti del disco.
32
Codice del paese
Imposta il proprio Codice del paese.
32
Connessione
Internet
Imposta la connessione Internet su Attivare/Disattivare.
Impostazione
connessione
Imposta un metodo di connessione alla rete.
Informazioni
Visualizza la schermata delle informazioni sulla rete.
Prova connessione
Esegue la prova di connessione alla rete.
33
Impostazioni IP
Regola l’impostazione IP su Auto/Manuale.
33
Connessione BDLive
Imposta la connessione BD-Live su Permesso/Permesso
parziale/Vietato.
33
DLNA
Imposta il DLNA su Attivare/Disattivare.
33
Impostazione Proxy
Regola l’impostazione Proxy.
33
32
32
32
32
33
Menu SETUP
Menu/Menu secondario
TV
Impostazione
Display
Funzione
Pagina
Seleziona i video 3D o 2D.
33
Teleschermo
Imposta il rapporto di aspetto dello schermo del TV
collegato e regola l’uscita video.
33
Selezione Uscita
Video
Seleziona la risoluzione dell’uscita video.
Sistema TV
Seleziona Sistema TV tra NTSC/PAL/Multi.
34
Spazio colorato
Seleziona Spazio colorato tra YCbCr 4:4:4/YCbCr 4:2:2/Full
RGB/RGB.
34
HDMI Deep Color
Seleziona HDMI Deep Color tra 30 bits/36 bits/48 bits/
Spento.
34
HDMI 1080p 24Hz
Imposta HDMI 1080p 24Hz su auto/spento.
34
Lyp Sync
Regola il ritardo tra video e audio, per esempio se il labiale è
fuori sincrono rispetto alla voce.
34
34
Modalità video
Regola l’immagine visiva.
34
Regolazione colore
Regola i valori di Luminosità/Saturazione/Tinta per ogni
colore.
35
Riduzione del
rumore
Imposta il livello di Riduzione del rumore.
Modalità
deinterlacciamento
Imposta il metodo di rilevamento del segnale video.
Coassiale / Ottico
Seleziona la modalità di uscita della presa COAXIAL/del
terminale OPTICAL tra Bitstream/PCM/Ricodifica/Spento.
35
HDMI
Seleziona la modalità di uscita del terminale HDMI tra
Bitstream/PCM/Ricodifica/Spento.
35
Downsampling
Seleziona la frequenza di sotto-campionamento (Down
Sampling) del segnale audio digitale tra 48K/96K/192K.
35
DRC
Imposta DRC (Dynamic Range Compression, Compressione
di gamma dinamica).
35
Impostazione
diffusori
Downmix 2 canali
Imposta l’uscita audio dalla presa AUDIO OUT L/R.
Post Process
Upmix
Trasmettere in modalità multicanale il segnale audio a 2
canali.
Uscita audio
Impostazione
Audio
4
Impostazioni
Video Process
Voce
Uscita 3D
35
35
35
35
Visualizza la versione del software e l’indirizzo MAC
(p. 43).
35
Informazioni di
sistema
Italiano
29 It
Menu SETUP
■ Esempio di funzionamento del
menu SETUP
È necessario richiamare la schermata del menu SETUP
per eseguire le regolazioni sul lettore. Quella che segue è
la spiegazione per il funzionamento di base del menu
SETUP.
SUBTITLE
4. Immettere la password.
Immettere la propria password con i tasti numerici.
– La password predefinita è 0000.
– Non è possibile passare alla schermata successiva
finché non è stata inserita la password corretta.
– Per cambiare la password, consultare la sezione
“Cambiare password” (p. 32).
ANGLE
AUDIO
CLEAR
PIP
SEARCH
SETUP
TOP MENU
2ND
SHUFFLE
REPEAT
POP-UP MENU
ENTER
RETURN
ON SCREEN
Esempio: impostazione di Parental Control
Nota
– Non è possibile impostare alcune voci durante la
riproduzione. In questo caso, premere due volte
per arrestare completamente la riproduzione prima di
iniziare le impostazioni.
5. Selezionare una voce successiva.
Premere 5/a per selezionare il livello del Parental
Control per Blu-ray Disc/DVD, quindi premere
ENTER.
1. Visualizzare la schermata del
menu SETUP.
Premere SETUP per visualizzare la schermata del
menu SETUP.
Premere 2/3 per selezionare Impostazione
Generale, quindi premere ENTER o a.
2. Selezionare un sottomenu.
Premere 5/a per selezionare Sicurezza, quindi
premere ENTER o il tasto cursore 3.
3. Selezionare una voce del menu.
Premere 5/a per selezionare Parental Control,
quindi premere ENTER o il tasto cursore 3.
30 It
6. Uscire dalla schermata del menu.
Premere 2 per tornare al menu precedente.
Menu SETUP
■ Impostazione Generale
Le impostazioni predefinite sono contrassegnate con “
* ”.
Sistema
Screen Saver
È possibile impostare l’attivazione/disattivazione dello
screen saver.
Se è impostato su Acceso, il lettore passerà alla modalità
screen saver se non avverranno operazioni per 3 minuti.
Dopodiché, il lettore passerà alla modalità Standby se non
avverranno operazioni per 27 minuti.
Acceso*, Spento
Acceso*, Spento
Controllo HDMI
È possibile impostare il lettore per ricevere il segnale di
comando proveniente da un TV o da un ricevitore AV
compatibile con la funzione Controllo HDMI attraverso
un cavo HDMI (p. 12).
Acceso, Spento*
Uso della funzione Controllo HDMI
Utilizzando la funzione Controllo HDMI, è possibile far
funzionare il lettore in modo interattivo con il proprio
TV (con il supporto della funzione Controllo HDMI).
Se si collega il lettore a un TV compatibile con la funzione
Controllo HDMI utilizzando un cavo HDMI e impostando
Controllo HDMI nel menu SETUP su Acceso (p. 31), è
possibile eseguire le funzioni elencate qui di seguito.
• Funzione di selezione automatica dell’ingresso
Quando si inizia la riproduzione del lettore, il selettore
d’ingresso del TV (e di un ricevitore AV se il lettore è
collegato al TV tramite ricevitore AV) verrà commutato
automaticamente al lettore. L’accensione del TV avviene
automaticamente a seconda del tipo di apparecchio TV.
• Funzione di disattivazione automatica
Se si spegne il TV mentre il lettore è in modalità di arresto
e la schermata del menu SETUP non è visualizzata, anche
il lettore verrà automaticamente spento.
Note
Note
– Se è attivato Controllo Network, il consumo
energetico durante la modalità Standby aumenta a
causa della funzione di controllo di rete.
– Se impostato su Acceso, il tempo di avvio del
sistema diminuisce.
Caricare le impostazioni predefinite
È possibile azzerare tutte le impostazioni del lettore ai
valori di fabbrica ad eccezione dell’impostazione
Sicurezza (p. 32). Per dettagli sulle impostazioni
predefinite, vedere le pagine 28-35.
Aggiornamento
È possibile aggiornare il software manualmente tramite
Archiviazione su chiave USB o Rete. Per dettagli
sull’aggiornamento del software, consultare la sezione
“Aggiornamento del software” (p. 38).
4
Installazione rapida
L’utente può eseguire l’Installazione rapida (p. 18).
Archivio locale
È possibile visualizzare le informazioni sull’Archivio
locale, formattare l’Archivio locale e selezionare USB
Frontale/USB Posteriore per salvare i dati BD-Live.
Per formattare (svuotare) la cartella “BUDA” sul
dispositivo di archiviazione USB, selezionare
Informazioni e premere ENTER quando “Formato” è
selezionato sullo schermo.
USB Frontale, USB Posteriore*
Suggerimento
– Archivio locale viene utilizzato come memoria
ausiliaria durante la riproduzione del Blu-ray Disc.
Messaggio di riproduzione in 3D
È possibile attivare o disattivare il messaggio di avviso
riguardante la riproduzione 3D che appare sul TV quando
si accende il lettore.
Acceso*, Spento
Lingua
OSD
È possibile selezionare la lingua dell’On Screen Display
che rappresenta i messaggi o il menu visualizzati sullo
schermo quali il menu SETUP.
English, Français , Español , Deutsch , Italiano , Svenska ,
Nederlandse ,
,
31 It
Italiano
– La funzione Controllo HDMI potrebbe non
funzionare correttamente a seconda del tipo di TV.
– Funzioni diverse rispetto a quelle elencate in
precedenza potrebbero funzionare a seconda del
tipo di TV o di ricevitore AV.
– Per poter rendere disponibile la funzione
Controllo HDMI, regolare le impostazioni della
funzione Controllo HDMI su TUTTI i componenti
(il lettore, il TV e il ricevitore AV). Potrebbero
essere necessarie anche altre operazioni.
– È possibile attivare e disattivare ogni funzione in
modo indipendente a seconda del tipo di TV.
– Consultare il manuale di istruzioni in dotazione
con il TV e/o il ricevitore AV per ulteriori dettagli
riguardanti le impostazioni.
– Se attivato, il consumo energetico durante la
modalità Standby aumenta a causa della funzione
Controllo HDMI.
Acceso, Spento*
Impostazioni
Auto Riproduzione disco
È possibile impostare l’attivazione/disattivazione dell’Auto
Riproduzione disco. Se è impostato su Acceso, dopo il
caricamento avverrà la riproduzione automatica del disco.
Controllo Network
È possibile impostare il controllo via Ethernet su Acceso/
Spento. Il lettore utilizza il protocollo Yamaha Network
Control (YNC).
Menu SETUP
Menu
È possibile impostare la lingua prioritaria per il menu
disco.
English, Français ,
, Español , Deutsch , Italiano ,
Nederlandse , Portoghese, Danese, Svenska , Finlandese,
Norvegese,
, Coreano, Giapponese, Altro
Audio
È possibile impostare la lingua prioritaria dell’audio per la
riproduzione del Blu-ray Disc/DVD. Per dettagli sulle
voci di impostazione, vedere “Menu” (p. 32).
Sottotitolo
È possibile impostare la lingua prioritaria per Sottotitolo.
English, Français ,
, Español , Deutsch , Italiano ,
Nederlandse , Portoghese, Danese, Svenska , Finlandese,
Norvegese,
, Coreano, Giapponese, Altro, Spento
(Le impostazioni predefinite in [Lingua] differiscono a
seconda del modello.)
Riproduzione
Closed Caption
È possibile impostare la visualizzazione del Closed
Caption (p. 42) quando viene riprodotto un Blu-ray Disc/
DVD con Closed Caption.
Acceso*, Spento
Segno Angolo
È possibile impostare la visualizzazione del Segno Angolo
(
) quando viene riprodotto un Blu-ray Disc/DVD con
angolazioni multiple.
Acceso*, Spento
Segno PIP
È possibile impostare la visualizzazione del Segno PIP
(
) quando viene riprodotto un Blu-ray Disc con la
funzione Picture in Picture (p. 27).
Acceso*, Spento
Simbolo audio secondario
È possibile impostare la visualizzazione del Simbolo
audio secondario (
) quando viene riprodotto un
Blu-ray Disc con audio secondario.
Acceso*, Spento
Ultimo salvataggio
È possibile impostare il lettore in modo da memorizzare la
posizione dell’ultima riproduzione di un disco quando è
impostato in modalità Standby o si apre il vassoio del
disco.
Acceso*,
Spento
Nota
– Alcuni dischi non sono compatibili con questa
funzione.
DivX(R) VOD DRM
È possibile visualizzare il codice di registrazione per i
video DivX(R).
32 It
Informazioni su Netflix
È possibile disattivare il presente lettore da Netflix e
visualizzare l’ESN (Electronic Serial Number). Per
attivare nuovamente il lettore, consultare “Riproduzione
di video da Netflix™” (p. 23). L’ESN (Electronic Serial
Number) è un numero univoco che consente di utilizzare
lo streaming Netflix.
Sicurezza
Cambiare password
È possibile impostare la password per modificare il livello
di Parental Control e Codice del paese. Consultare la
sezione “Parental Control” (p. 32) e “Codice del paese”
(p. 32).
Note
– La password predefinita è 0000.
– Se si dimentica la password, consultare “Risoluzione
dei problemi” (p. 39) e impostare tutte le
impostazioni di Sicurezza sui valori predefiniti.
Parental Control
In alcuni dischi Blu-ray/DVD, è impostato un livello di
controllo per la visione del disco in base all’età dello
spettatore. È possibile impostare il Parental Control
mostrato sullo schermo a seconda dei contenuti del disco.
La password (vedere “Cambiare password” a p. 32) va
immessa prima di impostare i livelli del Parental Control.
Dopo aver impostato il Parental Control, se viene
riprodotto un disco che presenta un livello di Parental
Control maggiore rispetto al livello corrente, oppure se si
desidera modificare il livello del Parental Control, verrà
visualizzata una finestra di dialogo a comparsa che
richiederà l’immissione della password.
Spento*, 1–8
Codice del paese
È possibile impostare il Codice del paese del paese in cui
si vive. La password (vedere “Cambiare password” a p.
32) va immessa prima di impostare il Codice del paese.
Questa impostazione è utilizzabile per classificare il
Parental Control e la riproduzione del disco.
Rete
Connessione Internet
Impostare questa voce su Attivare quando si utilizza BD-Live
(p. 27), DLNA (p. 20), l’aggiornamento del software dalla rete
(p. 38) e le altre funzioni della rete.
Attivare*, Disattivare
Impostazione connessione
È possibile selezionare un metodo di connessione alla rete.
Wired*
Wireless
Collega la rete tramite Ethernet.
Collega la rete tramite una LAN wireless.
È possibile selezionare le impostazioni per una
connessione LAN wireless. Attenersi alle istruzioni a
schermo per procedere.
Scan
Cerca un punto di accesso. È possibile collegare il
punto di accesso trovato.
Manuale
È possibile impostare manualmente un punto di
accesso.
Menu SETUP
Informazioni
È possibile visualizzare la schermata delle informazioni
sulla rete. In questa schermata, è possibile visualizzare le
informazioni di Interfaccia (Ethernet), Tipo di indirizzo,
Indirizzo IP, Subnet Mask, Gateway predefinito e DNS.
■ Impostazione Display
Prova connessione
È possibile eseguire un test della connessione Internet. Se
la prova non va a buon fine, verificare le “Impostazioni
IP” (p. 33) e quindi eseguire nuovamente la prova.
Uscita 3D
È possibile selezionare l’uscita video 3D o 2D per il
lettore.
Impostazioni IP
È possibile configurare le impostazioni di rete.
Selezionare per configurare automaticamente le
impostazioni di rete di questo lettore con il server
DHCP.
Manuale
Selezionare per configurare manualmente le
impostazioni di rete (Indirizzo IP, Subnet Mask,
Gateway predefinito, e DNS).
Suggerimenti
–
–
–
–
Tasti numerici
2/3
CLEAR
ENTER
Inseriscono i caratteri.
Sposta la selezione.
Cancella un carattere.
Salva le impostazioni e esce dal
menu.
Connessione BD-Live
È possibile impostare le restrizioni di accesso ai contenuti
BD-Live.
Permesso
Consente la connessione alla rete a tutti i dischi BDLive.
Permesso
parziale*
Consente l’accesso solo ai dischi con la
certificazione del produttore.
Vietato
Proibisce la connessione alla rete a tutti i dischi BDLive.
DLNA
È possibile impostare il DLNA (p. 42) su Attivare/
Disattivare. Se non si utilizza la funzione DLNA,
impostare su Disattivare.
Attivare*, Disattivare
Impostazione Proxy
È possibile regolare le Impostazione Proxy. Impostare su
Disattivare per l’uso normale. Impostare su Attivare per
attivare l’impostazione proxy.
Attiva le impostazioni Proxy Host e Proxy Port.
Disattivare*
Imposta il server Proxy su Disattivato. Selezionare
questa voce quando il server Proxy non viene
utilizzato.
Proxy Host
Imposta il Proxy Host.
Proxy Port
Imposta la Proxy Port.
Auto*
Questo lettore seleziona automaticamente i video 3D
o 2D.
Spento
Questo lettore seleziona sempre i video 2D.
4
Nota
– Pur impostando “Uscita 3D” su “Auto” e
riproducendo un disco Blu-ray 3D, il lettore
seleziona le immagini 2D a seconda del
collegamento e delle impostazioni del TV ecc.
(p. 12).
Teleschermo
È possibile impostare il rapporto di aspetto del TV
collegato e regolare l’uscita video.
Se si cambia il TV (ad es. per l’acquisto di uno nuovo) e il
rapporto di aspetto dello schermo del TV collegato
cambia, sarà necessario cambiare l’impostazione
Teleschermo.
16:9 Intero
Selezionare questa impostazione quando il lettore
viene collegato a un TV con schermo 16:9. Quando
viene riprodotto un video con rapporto di aspetto 4:3,
viene visualizzato come illustrato qui di seguito.
16:9 Normale* Selezionare questa impostazione quando il lettore
viene collegato a un TV con schermo 16:9. Quando
viene riprodotto un video con rapporto di aspetto 4:3,
viene visualizzato come illustrato qui di seguito.
4:3 Pan Scan Selezionare questa impostazione quando il lettore
viene collegato a un TV con schermo 4:3. Quando
viene riprodotto un video con rapporto di aspetto
16:9, viene visualizzato come illustrato qui di
seguito.
4:3 Letter Box Selezionare questa impostazione quando il lettore
viene collegato a un TV con schermo 4:3. Quando
viene riprodotto un video con rapporto di aspetto
16:9, viene visualizzato come illustrato qui di
seguito.
Dimensioni
originali
dell’immagine
Su TV 16:9 (wide screen)
16:9 Intero
16:9 Normale
Italiano
Attivare
TV
Impostazioni
Auto*
Le impostazioni predefinite sono contrassegnate con “ * ”.
4:3
Dimensioni
originali
dell’immagine
Su TV 4:3
4:3 Pan Scan
4:3 Letter Box
16:9
33 It
Menu SETUP
Selezione Uscita Video
È possibile selezionare la risoluzione di uscita video tra
HDMI, COMPONENT e VIDEO. Per ulteriori dettagli sui
formati di uscita, consultare la sezione “Informazioni sui
formati di uscita video” (p. 37).
HDMI Deep Color
Se il proprio TV e/o il ricevitore AV è compatibile con
Deep Color (p. 42), impostare questa voce in base al
proprio TV/ricevitore AV. Questa funzione è disponibile
quando il lettore è collegato con un cavo HDMI.
HDMI
30 bits, 36 bits, 48 bits, Spento*
Se impostata su Auto, la risoluzione viene impostata
automaticamente alla risoluzione massima del TV
collegato.
Se è impostato Disco nativo, vengono utilizzate la
risoluzione originale e la frequenza video registrate
nel Blu-ray Disc o DVD in riproduzione. È possibile
utilizzare la funzione di conversione up video di un
dispositivo esterno.
Quando viene riprodotta una sorgente diversa da un
Blu-ray Disc o un DVD, la risoluzione e la frequenza
video funzioneranno come Auto.
Se si cerca di riprodurre un Blu-ray Disc o un DVD
la cui risoluzione e la cui frequenza video non sono
compatibili con il TV collegato, non verrà trasmessa
alcuna immagine. In tal caso, interrompere la
riproduzione e selezionare un’opzione diversa da
Disco nativo.
Auto*, Disco nativo, 480i/576i, 480p/576p,
720p, 1080i, 1080p
COMPONENT È possibile selezionare solo 480p/576p o 480i/576i.
480p/576p, 481i/576i*
VIDEO
Funziona allo stesso modo di 480i/576i.
HDMI 1080p 24Hz
Questa impostazione trasmette il BD video codificato in
frame rate 24Hz in HDMI 1080p 24Hz. Con questa
funzione potrebbe essere disponibile una riproduzione
video più scorrevole. Questa funzione è disponibile se il
proprio TV/ricevitore AV la supporta e se il lettore è
collegato con un cavo HDMI. Per ulteriori dettagli sui
formati di uscita, consultare la sezione “Informazioni sui
formati di uscita video” (p. 37).
Auto*, Spento
Nota
– Questa impostazione è disattivata se la risoluzione di
uscita è diversa da 1080p.
Lyp Sync
È possibile impostare/regolare la funzione Lyp Sync
(p. 43).
Auto*
Note
– Per emettere audio in alta definizione (per esempio
Dolby TrueHD o DTS-HD Master Audio) dal
terminale HDMI, impostare Selezione Uscita Video
su Auto o su un valore superiore a 720p.
– Se è collegato un TV con un cavo HDMI,
l’impostazione predefinita sarà HDMI.
– Se non è collegato un TV con un cavo HDMI,
l’impostazione predefinita sarà VIDEO.
Sistema TV
È possibile selezionare Sistema TV tra PAL, NTSC e
Multi. Impostare lo stesso Sistema TV che è impostato nel
TV. Per ulteriori dettagli sui formati di uscita, consultare
la sezione “Informazioni sui formati di uscita video”
(p. 37).
NTSC, PAL, Multi
(L’impostazione predefinita differisce a seconda del modello.)
Spazio colorato
È possibile selezionare l’uscita Spazio colorato (p. 43) da
HDMI. Questa funzione è disponibile quando il lettore è
collegato con un cavo HDMI.
YCbCr 4:4:4* Imposta Spazio colorato su YCbCr 4:4:4.
YCbCr 4:2:2
Imposta Spazio colorato su YCbCr 4:2:2.
Full RGB
Se è impostata l’opzione RGB e i colori bianco e
nero a schermo sono troppo tenui, selezionare questa
voce. Questa impostazione è effettiva quando un
componente collegato supporta la gamma RGB 0–
255.
RGB
Emette il segnale video alla gamma di segnale
normale.
Nota
– Questa funzione è disponibile solo su TV che
supportano tale funzione.
34 It
Manuale
Spento
Questo lettore regola automaticamente la funzione
Lyp Sync.
È possibile regolare manualmente la funzione Lyp
Sync. È possibile impostare il ritardo dell’audio
individualmente per i contenuti 2D e 3D.
2D
3D
Questo lettore non regola la funzione Lyp Sync.
Video Process
Modalità video
È possibile selezionare le Modalità video indicate di
seguito.
Standard*
L’immagine è più naturale e bilanciata. Questa
modalità è adatta all’uso normale.
Vivid
L’immagine è più vivace e nitida.
Cinema
L’immagine è adatta per la visione di film in
ambienti scuri.
Personalizzato È possibile regolare manualmente l’immagine
visiva. Premere
5/a per selezionare il parametro, quindi premere
2/3 per regolare la figura.
Luminosità
Regola la luminosità generale dell’immagine.
Saturazione
Regola la saturazione del colore dell’immagine
proiettata.
Tinta
Regola la tinta dell’immagine proiettata.
Contrasto
Regola le aree luminose (livelli di bianco)
nell’immagine.
Nitidezza
Regola la nitidezza degli oggetti nel video.
CTI
Smussa i bordi delle immagini a colori. Le immagini
a colori vengono rese in modo più distinto.
Le impostazioni predefinite sono pari a 0.
Menu SETUP
Regolazione colore
È possibile regolare i valori di Luminosità/Saturazione/
Tinta per ogni colore (Rosso/Verde/Blu/Giallo/Ciano/
Magenta). Per utilizzare questa funzione, impostare
Modalità video su Personalizzato. Per dettagli sulle voci di
impostazione, vedere “Modalità video” (p. 34).
Downsampling
È possibile selezionare la frequenza di sottocampionamento (Down Sampling) del segnale audio
digitale. Questa funzione è effettiva per l’uscita del
segnale audio dalla presa COAXIAL/dal terminale
OPTICAL.
Le impostazioni predefinite sono pari a 0.
48K*
La frequenza di campionamento più alta dell’uscita
PCM digitale è 48 kHz.
96K
La frequenza di campionamento più alta dell’uscita
PCM digitale è 96 kHz.
192K
La frequenza di campionamento più alta dell’uscita
PCM digitale è 192 kHz.
Riduzione del rumore
È possibile impostare Riduzione del rumore su un livello
da 0 a 3. 0 disattiva l’impostazione, mentre 3 è il livello
massimo.
0, 1,
2*,
3
Auto*, Film, Video
■ Impostazione Audio
DRC
È possibile impostare DRC (Dynamic Range
Compression, Compressione di gamma dinamica)
(p. 42) su Acceso/Spento/Auto. Se impostato su Auto,
DRC viene attivato automaticamente per una sorgente con
informazioni DRC in formato Dolby TrueHD. DRC
ottimizza la qualità del suono, rendendo più chiare le
conversazioni. È utile principalmente quando si guardano
film di notte.
Le impostazioni predefinite sono contrassegnate con “ * ”.
Spento, Acceso, Auto*
Uscita audio
Impostazione diffusori
Coassiale / Ottico
È possibile selezionare la modalità di uscita della presa
COAXIAL e del terminale OPTICAL. Per ulteriori
dettagli sui formati di uscita, consultare la sezione
“Informazioni sui formati di uscita audio” (p. 36).
Downmix 2 canali
È possibile selezionare il metodo di downmix analogico a
2 canali tra Stereo o Lt/Rt.
Bitstream
Fa uscire il segnale digitale senza alcuna
elaborazione. Non avviene l’uscita dell’Audio
secondario.
PCM
Fa uscire il PCM a 2 canali.
Ricodifica*
Fa uscire Bitstream con Audio secondario.
Spento
Silenzia il suono.
HDMI
È possibile selezionare la modalità di uscita del terminale
HDMI. Per dettagli sulle voci di impostazione, vedere
“Coassiale / Ottico” (p. 35). Per ulteriori dettagli sui formati
di uscita, consultare la sezione “Informazioni sui formati di
uscita audio” (p. 36).
Lt/Rt
Selezionare questa voce se l’unità è collegata a un
decoder Dolby Pro Logic. L’audio emesso dagli
altoparlanti posteriori viene miscelato all’audio
stereo a 2 canali.
Stereo*
Imposta l’uscita sui canali stereo, trasmettendo
l’audio solo dai due altoparlanti anteriori.
4
Impostazioni
Modalità deinterlacciamento
È possibile impostare il metodo di rilevamento del segnale
video. Impostare su Auto per l’uso normale. Se sullo
schermo compaiono disturbi a strisce orizzontali,
impostare su Film/Video per eliminare i disturbi.
Post Process
Upmix
È possibile trasmettere il segnale audio a 2 canali in
modalità multicanale. Per trasmettere in modalità
multicanale, selezionare DTS NEO:6, quindi selezionare
la modalità Cinema o Musica.
Spento*, DTS NEO:6
Bitstream*, PCM, Ricodifica, Spento
Nota
Sono visualizzate la versione del software e l’indirizzo
MAC (p. 43).
35 It
Italiano
– Per emettere audio in alta definizione (per esempio
Dolby TrueHD o DTS-HD Master Audio) dal
terminale HDMI, impostare Selezione Uscita Video
su Auto o su un valore superiore a 720p (p. 34).
■ Informazioni di sistema
Menu SETUP
■ Informazioni sui formati di uscita audio
Formato sorgente
PCM 2ch
PCM 5.1ch
PCM 7.1ch
HDMI
Bitstream
con SA* o
BCS**
PCM 2ch
senza SA* o
BCS**
con SA* o
BCS**
PCM 5.1ch
PCM 7.1ch
PCM fino a
5.1ch
Dolby Digital
Plus
PCM fino a
7.1ch
Dolby
TrueHD
PCM fino a
7.1ch
DTS
PCM fino a
5.1ch
con SA* o
DTS HD High BCS**
Resolution
senza SA* o
BCS**
DTS HD High
Resolution
PCM fino a
7.1ch
con SA* o
BCS**
DTS-HD
Master Audio senza SA* o
BCS**
DTS-HD
Master Audio
PCM fino a
7.1ch
senza SA* o
BCS**
con SA* o
Dolby Digital BCS**
Plus
senza SA* o
BCS**
Dolby
TrueHD
DTS
con SA* o
BCS**
senza SA* o
BCS**
con SA* o
BCS**
senza SA* o
BCS**
Dolby Digital
PCM
PCM 2ch
MIXED 2CH
Ricodifica
–
Dolby Digital
2ch
PCM 2ch
Dolby Digital
PCM 2ch
2ch
Dolby Digital
PCM 2ch
Dolby Digital
PCM 2ch
PCM 7.1ch
Dolby Digital
Dolby Digital
Bitstream
PCM 5.1ch
senza SA* o
BCS**
con SA* o
BCS**
COAXIAL / OPTICAL
Ricodifica
PCM 2ch
senza SA* o
BCS**
con SA* o
BCS**
PCM
2ch
Dolby Digital
PCM 2ch
Dolby Digital Dolby Digital
2ch
2ch
2ch
PCM 2ch
Dolby Digital
2ch
Dolby Digital
PCM 2ch
Dolby Digital
2ch
Dolby Digital
PCM 2ch
Dolby Digital
2ch
DTS
PCM 2ch
DTS
2ch
DTS
PCM 2ch
DTS
2ch
DTS
PCM 2ch
DTS
2ch
Dolby Digital
Dolby Digital
Plus
Dolby Digital
Dolby
TrueHD
DTS
DTS
DTS HD High
Resolution
DTS
DTS-HD
Master Audio
* “SA” sta per Audio secondario (Secondary Audio).
** “BCS” sta per suono di clic del tasto (Button Click Sound), l’effetto sonoro per i menu a comparsa ecc.
Note
– Se Coassiale / Ottico o HDMI sono impostati su Bitstream, l’audio secondario non viene emesso. (p. 35)
– Per emettere audio in alta definizione (per esempio Dolby TrueHD o DTS-HD Master Audio) dal terminale
HDMI, impostare Selezione Uscita Video su Auto o su un valore superiore a 720p (p. 34).
36 It
Menu SETUP
■ Informazioni sui formati di uscita video
Se Sistema TV è impostato su NTSC
Selezione Uscita Video
Indice
Terminale di
uscita
HDMI
Auto
Disco nativo
BD video
HDMI
con
contenuto COMPONENT
1080p/24Hz
VIDEO
*1
1080p 24Hz
*2
spento
BD video
senza
contenuto
1080p/24Hz
*1
*3
HDMI
COMPONENT
VIDEO
HDMI
COMPONENT
VIDEO
HDMI
Altri
COMPONENT
VIDEO
spento
*1
*3
*2
*2
*1
*1
*2
*2
1080i
1080p 24Hz/
1080i 60Hz
60Hz *4
spento
spento
1080p 60Hz 1080i 60Hz
spento
spento
1080p 60Hz 1080i 60Hz
spento
spento
1080p 60Hz 1080i 60Hz
spento
spento
COMPONENT
VIDEO
720p
480p/576p
480i/576i
480p/576p
480i/576i
–
720p 60Hz
480p
480i
480p
480i
480i
spento
720p 60Hz
spento
720p 60Hz
spento
720p 60Hz
spento
480i
480i
480i
480i
480i
480i
480i
480i
480i
480i
480p
480i
480p
480i
480i
480i
480i
480i
480i
480i
480i
480i
480i
480i
480i
480p
480i
480p
480i
480i
480p
480i
480p
480i
480i
480i
480i
480i
480i
480i
480p
480i
480p
480i
480i
480p
480i
480p
480i
480i
480i
480i
480i
480i
480i
4
Impostazioni
DVD-Video
*2
1080p
Se Sistema TV è impostato su PAL
Selezione Uscita Video
Indice
BD video
con
contenuto
1080p/24Hz
Terminale di
uscita
HDMI
COMPONENT
VIDEO
BD video
senza
contenuto
1080p/24Hz
COMPONENT
DVD-Video
COMPONENT
HDMI
VIDEO
HDMI
VIDEO
HDMI
Altri
COMPONENT
VIDEO
HDMI
Auto
Disco nativo
*1
1080p 24Hz
*2
spento
*1
*3
*2
spento
*1
*3
*2
*2
*1
*1
*2
*2
1080p
1080i
1080p 24Hz/
1080i 50Hz
50Hz *4
spento
spento
1080p 50Hz 1080i 50Hz
spento
spento
1080p 50Hz 1080i 50Hz
spento
spento
1080p 50Hz 1080i 50Hz
spento
spento
COMPONENT
VIDEO
720p
480p/576p
480i/576i
480p/576p
480i/576i
–
720p 50Hz
576p
576i
576p
576i
576i
spento
720p 50Hz
spento
720p 50Hz
spento
720p 50Hz
spento
576i
576i
576i
576i
576i
576i
576i
576i
576i
576i
576p
576i
576p
576i
576i
576i
576i
576i
576i
576i
576i
576i
576i
576i
576i
576p
576i
576p
576i
576i
576p
576i
576p
576i
576i
576i
576i
576i
576i
576i
576p
576i
576p
576i
576i
576p
576i
576p
576i
576i
576i
576i
576i
576i
576i
*1 La risoluzione sarà impostata sulla risoluzione massima supportata dal televisore collegato. Per esempio, se la
risoluzione massima supportata dal televisore collegato è 1080p, la risoluzione sarà impostata su 1080p.
*2 È possibile che il video non venga emesso perché l’uscita HDMI ha la priorità.
*3 La risoluzione sarà quella del disco sorgente.
*4 Se è impostato Auto per HDMI 1080p 24Hz e il televisore collegato supporta la risoluzione 1080p a 24Hz, la
risoluzione sarà 1080p a 24 Hz invece di 1080p a 50/60 Hz.
Se Sistema TV è impostato su Multi
Se Sistema TV è impostato su Multi, il segnale video viene emesso alla stessa frequenza della sorgente. Vedere le tabelle
sopra per dettagli sull’impostazione di frequenza del TV e sulla risoluzione del segnale video in uscita.
– L’impostazione HDMI 1080p 24Hz è disattivata se la risoluzione di uscita è diversa da 1080p.
– Se Sistema TV è impostato su NTSC e la sorgente video non è 60 Hz, il segnale video in uscita viene convertito a
60 Hz.
– Se Sistema TV è impostato su PAL e la sorgente video non è 50 Hz, il segnale video in uscita viene convertito a
50 Hz.
37 It
Italiano
Note
Aggiornamento del software
Non è possibile riprodurre alcuni dischi Blu-ray di recente produzione fino a quando non viene aggiornato il software del
lettore all’ultima versione. Si raccomanda di aggiornare il software del lettore in modo che lo stesso possa funzionare con
il software più recente.
Per verificare la disponibilità di aggiornamenti per il software, visitare
http://download.yamaha.com/
Nota
– Durante l’esecuzione dell’aggiornamento del software, non rimuovere il dispositivo di archiviazione USB, non
impostare il lettore in modalità Standby e non scollegare il cavo di alimentazione/cavo LAN.
■ Aggiornamento del software
1. Preparazione per l’aggiornamento
del software.
Se si aggiorna il software tramite Archiviazione su
chiave USB:
1 Salvare il pacchetto dei file di aggiornamento
nella apposita cartella presente sul dispositivo di
archiviazione USB. Per maggiori dettagli,
consultare la documentazione sulla procedura
allegata al pacchetto dei file di aggiornamento.
2 Collegare il dispositivo di archiviazione USB.
Saltare la fase 2.
Se si aggiorna il software tramite Rete:
accertarsi che il lettore sia collegato alla rete.
2. Selezionare il metodo di
aggiornamento, quindi avviare
l’aggiornamento dal menu SETUP.
1 Premere SETUP per visualizzare la schermata
del menu SETUP.
2 Selezionare Impostazione Generale = Sistema
= Aggiornamento.
3 Selezionare la voce contenente il pacchetto dei
file di aggiornamento dall’Archiviazione su
chiave USB/dalla Rete.
Il sistema cercherà il pacchetto dei file di
aggiornamento.
38 It
3. Aggiornare il software attenendosi
ai messaggi visualizzati sullo
schermo.
L’aggiornamento è completato. Il sistema sarà
ripristinato.
INFORMAZIONI AGGIUNTIVE
Risoluzione dei problemi
Consultare la tabella qui di seguito nel caso il lettore non funzioni correttamente. Se il problema riscontrato non risultasse
elencato qui di seguito o se le istruzioni fornite non fossero d’aiuto, spegnere il lettore, scollegare il cavo di
alimentazione e contattare il più vicino rivenditore o centro di assistenza Yamaha autorizzato.
■ Alimentazione
Problema
Possibili cause e soluzioni
Nessuna alimentazione.
– Collegare correttamente il cavo di alimentazione CA.
– Premere p sul pannello anteriore per attivare l’alimentazione.
L’alimentazione del lettore si spegne.
– L’alimentazione si spegnerà automaticamente dopo 30 minuti continui di inattività
(nessuna riproduzione).
5
■ Funzionamento di base
Possibili cause e soluzioni
– Usare il telecomando nei limiti del suo campo d’azione. (p. 9)
– Sostituire le batterie. (p. 9)
– Controllare gli ID impostati per l’unità principale e il telecomando. L’ID del
telecomando sull’unità principale potrebbe cambiare dopo il ripristino dell’unità
principale. In questo caso, controllare l’ID del telecomando sull’unità principale e, se
necessario, impostarlo nuovamente. (p. 9)
I tasti non funzionano.
– Tenere premuto p sul pannello anteriore per più di 5 secondi e rilasciarlo per
ripristinare il lettore.
– Per azzerare completamente il lettore, scollegare il cavo di alimentazione dalla presa
CA per almeno 10 secondi, collegare nuovamente il cavo di alimentazione alla presa
CA e quindi riaccendere il lettore.
La password è stata dimenticata.
– Tenere premuti simultaneamente
e
sul pannello anteriore quando non è inserito
alcun disco e la riproduzione è arrestata per riportare tutte le impostazioni, comprese le
impostazioni di Sicurezza (p. 32) del lettore, ai loro valori predefiniti. Una volta
disattivata automaticamente l’alimentazione, premere p per riaccendere nuovamente il
lettore.
Informazioni aggiuntive
Problema
Il telecomando non funziona.
■ Riproduzione disco
Problema
Possibili cause e soluzioni
– Estrarre il disco e pulirlo. (p. 4)
– Accertarsi che il disco sia stato caricato correttamente (allineato nel vassoio del disco
con l’etichetta rivolta verso l’alto). (p. 4)
– Utilizzare un disco supportato dal lettore. (p. 3)
– Rimuovere il disco e quindi controllare se il lettore lo supporta o meno. (p. 3)
– Controllare il codice regionale. (p. 3)
– Controllare se il disco è difettoso tentando con un altro disco.
– I CD-R/RW, i DVD+R/RW/R DL e i DVD-R/RW/R DL devono essere finalizzati.
(p. 3)
Il video si interrompe.
– Il lettore si arresta se rileva scosse o vibrazioni.
Il lettore emette un suono di scatto
quando si inizia la riproduzione o il
caricamento del disco.
– Questi suoni non indicano un malfunzionamento del lettore, ma sono normali
condizioni di funzionamento.
Italiano
Il lettore non riesce a riprodurre il disco.
39 It
Risoluzione dei problemi
■ Immagine
Problema
Possibili cause e soluzioni
Nessuna immagine.
– Accertarsi che i cavi siano stati collegati correttamente. (p. 10)
– Accertarsi che il TV o il ricevitore AV collegato sia impostato sull’ingresso corretto.
(p. 10)
– Senza nessun disco inserito, o con la riproduzione interrotta, tenere premuto
contemporaneamente
e
sul pannello anteriore per impostare la risoluzione
video sui valori predefiniti.
Se ciononostante non viene visualizzata alcuna immagine, tenere premuto per circa
5 secondi
sul pannello anteriore per passare a NTSC/PAL.
– Se è impostato Disco nativo, viene emesso un segnale non compatibile con il TV
collegato. Modificare l’impostazione per emettere un segnale compatibile con il TV
collegato. (p. 34)
Lo schermo si blocca e i tasti operativi
non funzionano.
– Premere , quindi riavviare la riproduzione.
– Spegnere il lettore e quindi riaccenderlo.
– Tenere premuto p sul pannello anteriore per più di 5 secondi e rilasciarlo per
ripristinare il lettore.
Il video non viene emesso con la
risoluzione desiderata.
– Impostare la risoluzione desiderata. (p. 34)
Il video wide-screen appare allungato
verticalmente o appaiono delle bande
nere sopra o sotto lo schermo. Oppure il
video 4:3 appare allungato
orizzontalmente.
– Modificare il rapporto di aspetto del proprio TV. (p. 33)
Sullo schermo appaiono immagini di
disturbo quadrate (mosaici).
– Immagini in blocchi possono essere visibili nelle scene con movimento rapido a causa
delle caratteristiche della tecnologia di compressione dell’immagine digitale.
La schermata di riproduzione sarà
disturbata se il DVD video viene
registrato su un videoregistratore o
riprodotto tramite un videoregistratore.
– Questo lettore è compatibile con la protezione da copia analogica. Alcuni dischi
contengono un segnale che proibisce l’eventuale copia. Se si tenta di leggere tali dischi
tramite un videoregistratore o di registrare su un videoregistratore e riprodurre il
segnale, la protezione da copia ne impedirà la normale lettura.
L’audio non viene emesso o le immagini
non vengono riprodotte correttamente.
– L’audio potrebbe non essere emesso o le immagini non essere riprodotte correttamente
su alcuni dischi in cui sono registrati contenuti protetti da copyright.
■ Suono
Problema
Possibili cause e soluzioni
Non viene emesso alcun suono o
vengono emessi suoni distorti.
– Controllare che il cavo audio sia collegato correttamente. (p. 10)
– Aumentare il volume del TV o del ricevitore AV.
– Non c’è suono durante un fermo immagine, durante l’avanzamento rapido e la
riproduzione rapida al contrario. (p. 8)
– L’audio potrebbe non essere emesso a seconda dello stato di registrazione dell’audio,
come quando viene registrato come contenuto audio un tipo di audio diverso da un
segnale audio oppure audio non in formato standard. (p. 3)
I canali sinistro e destro dell’audio sono
invertiti o il suono proviene solo da un
lato.
– Verificare i collegamenti audio. (p. 10)
L’audio non viene emesso o le immagini
non vengono riprodotte correttamente.
– L’audio potrebbe non essere emesso o le immagini non essere riprodotte correttamente
su alcuni dischi in cui sono registrati contenuti protetti da copyright.
Non si riesce a sentire il tipo di audio e/o
il numero dei canali desiderati.
– Consultare le impostazioni Uscita audio e “Informazioni sui formati di uscita audio”.
(p. 35, p. 36)
Impossibile sentire il suono del PIP
(audio secondario).
– Impostare Coassiale / Ottico o HDMI su PCM/Ricodifica. (p. 35)
– Per ascoltare l’audio secondario, premere 2ND AUDIO. (p. 6)
– A seconda del disco, potrebbe essere necessario impostare l’audio secondario nel menu
superiore del disco (p. 8).
■ Rete
Problema
Impossibile collegarsi a Internet.
40 It
Possibili cause e soluzioni
– Per collegarsi a Internet selezionando Wired in Impostazione connessione, collegare
correttamente il cavo di rete. (p. 32)
– Accendere il dispositivo collegato, quale un router o un modem a banda larga.
– Collegare correttamente il router e/o il modem a banda larga.
– Se è selezionato Wireless in Impostazione connessione e se si desidera collegarsi a
Internet tramite Ethernet, selezionare Wired. (p. 32)
– Selezionare Wireless in Impostazione connessione se si desidera collegarsi a Internet
tramite una LAN wireless. (p. 32)
Risoluzione dei problemi
Problema
Possibili cause e soluzioni
Impossibile scaricare i contenuti BDLive.
– Verificare che questo lettore possa collegarsi a Internet normalmente. Consultare
“Prova connessione” (p. 33)
– Collegare correttamente il dispositivo di archiviazione USB. Controllare che il
dispositivo di archiviazione USB sia collegato al connettore USB del lettore. (p. 16)
– Controllare che il Blu-ray Disc supporti BD-Live.
– Collegare un dispositivo di archiviazione USB formattato in FAT16 o FAT32 o NTFS.
– Si raccomanda di collegare un dispositivo di archiviazione USB con almeno 2 GB di
spazio libero. Se non è presente spazio sufficiente, formattare il dispositivo di
archiviazione USB. (p. 31)
– Consultare il manuale di istruzioni in dotazione con il disco o rivolgersi al produttore
del disco.
Impossibile rilevare il server DLNA.
– Verificare che questo lettore possa collegarsi alla rete normalmente. Consultare “Prova
connessione” (p. 33)
– Accendere il dispositivo collegato, quale un router a banda larga o il server.
– Accertarsi che il lettore e il server siano collegati allo stesso punto di accesso.
– A seconda del server DLNA, il lettore potrebbe necessitare dell’autorizzazione da parte
del server.
– A seconda del server DLNA, è necessario modificare l’impostazione del firewall.
– Accertarsi che il file sia riproducibile. (p. 3)
– Verificare le impostazioni del server DLNA.
– La riproduzione e la qualità del funzionamento potrebbero essere influenzate dalle
condizioni della propria rete domestica.
Impossibile collegarsi a Internet tramite
una LAN wireless.
– Accertarsi che il router LAN wireless sia acceso.
– A seconda dell’ambiente circostante, per esempio del materiale che compone le pareti,
delle condizioni di ricezione delle onde radio o degli ostacoli che si frappongono tra il
lettore e il router LAN wireless, è possibile che la distanza di comunicazione risulti
ridotta. Avvicinare maggiormente il lettore e il router LAN wireless.
– I dispositivi che utilizzano una banda di frequenza 2,4 GHz, come forni a microonde,
dispositivi Bluetooth o dispositivi cordless digitali, possono interrompere la
comunicazione. Allontanare il lettore da tali dispositivi oppure spegnerli.
– Se la connessione a Internet tramite una LAN wireless continua a non funzionare
nonostante le due soluzioni proposte sopra, provare a connettersi tramite Ethernet
selezionando Wired in Impostazione connessione. (p. 32)
La rete wireless non è stata trovata o
risulta distorta.
– Se viene eseguito Scan, ma la rete wireless non viene trovata o risulta distorta, premere
RETURN per tornare alla schermata precedente, quindi provare nuovamente a eseguire
Scan. Se il router wireless desiderato continua a non essere rilevato, premere RETURN
per selezionare Manuale.
– Accertarsi che la rete wireless non sia disturbata da forni a microonde, telefoni cordless
DECT o altri dispositivi Wi-Fi nelle vicinanze.
– I forni a microonde, i telefoni cordless DECT o gli altri dispositivi wireless nelle
vicinanze possono disturbare la rete wireless. Spegnere questi dispositivi.
– Accertarsi che i firewall presenti nella rete consentano l’accesso alla connessione
wireless del presente lettore.
– Se la rete wireless non funziona correttamente all’interno dell’abitazione, provare a
utilizzare la connessione di rete cablata (wired).
Informazioni aggiuntive
Impossibile riprodurre il file sul server
DLNA.
5
■ Messaggi su schermo
– Nel caso in cui il disco che si tenta di riprodurre non sia idoneo oppure l’operazione non sia corretta, sul
teleschermo vengono visualizzati i seguenti messaggi.
Messaggio di errore
Possibili cause e soluzioni
– Il file non è supportato da questo lettore. Vedere “Tipi di dischi/file utilizzabili con questo lettore”
(p. 3).
Codice regione errato!
– Il disco presenta un codice regionale incompatibile. Vedere “Informazioni sulla gestione della
regione per Blu-ray Disc/DVD video” (p. 3).
Rete è fallita.
– Il lettore non può essere collegato alla rete. Verificare la connessione (p. 16) e le impostazioni della
rete (p. 32).
Rete è OK, proxy è fallito.
– Il lettore non può essere collegato al server Proxy. Vedere “Impostazione Proxy” (p. 33).
Nel menu SETUP non è
autorizzata la connessione
BD-Live.
– La connessione BD-Live è proibita. Vedere “Connessione BD-Live” (p. 33).
L’aggiornamento non è
riuscito per qualche ragione!
– L’aggiornamento non è riuscito. Verificare se il file di aggiornamento è corrotto o illeggibile.
L’impostazione IP non è
valida! Cancellare ...
– Le Impostazioni IP inserite non sono valide. Immettere nuovamente le informazioni corrette.
41 It
Italiano
File non supportato
Glossario
AVCHD
AVCHD è un nuovo formato (standard) per le
videocamere ad alta definizione utilizzabile per
registrare e riprodurre immagini HD ad alta risoluzione.
BD-Live™
BD-Live è uno standard Blu-ray Disc che utilizza la
connessione di rete, consentendo al lettore di accedere
online per scaricare video promozionali e altri dati.
BDMV
BDMV (Blu-ray Disc Movie) si riferisce a uno dei
formati applicativi utilizzati per BD-ROM che
rappresenta una delle specifiche del Blu-ray Disc.
BDMV è un formato di registrazione equivalente al
DVD Video della specifica DVD.
Blu-ray 3D™
Blu-ray 3D consente di visualizzare le immagini 3D in
alta definizione.
BONUSVIEW™
I dischi compatibili con BONUSVIEW consentono di
apprezzare contemporaneamente sub-canale video per
due schermate, sub-canale audio e sottotitoli. Viene
visualizzata una piccola schermata all’interno della
schermata principale durante la riproduzione (Picture in
Picture).
Closed Caption
Le Closed Caption sono un particolare genere di
sottotitoli, la cui differenza con i normali sottotitoli sta
nel fatto che i sottotitoli sono previsti per persone
normo-udenti mentre le Caption sono previste per
persone non-udenti. I sottotitoli raramente riportano
l’audio completo.
A titolo di esempio, le Caption riportano gli effetti
sonori (es., “lo squillo di un telefono” e “il rumore dei
passi”), mentre i sottotitoli no. Prima di selezionare
questa impostazione, accertarsi che il disco contenga le
informazioni Closed Caption.
Deep Color
Deep Color si riferisce all’uso di varie profondità di
colore nelle visualizzazioni, a partire dalle profondità a
24-bit nelle precedenti versioni delle specifiche HDMI.
Questa profondità di bit extra consente agli HDTV e ad
altre visualizzazioni di passare da milioni di colori a
miliardi di colori, eliminando così il banding del colore
on screen per transizioni tonali uniformi e sottili
gradazioni tra i colori. L’aumentato rapporto di
contrasto può rappresentare più volte un maggior
numero di gradazioni di grigio tra il nero e il bianco.
Deep Color aumenta inoltre il numero dei colori
disponibili all’interno dei limiti definiti dallo spazio
colorato RGB o YCbCr.
42 It
DivX®
DivX® è un formato video digitale creato da DivX,
LLC, un’affiliata di Rovi Corporation. Questo è un
dispositivo DivX Certified® ufficiale che riproduce
video DivX. Visitare divx.com per maggiori
informazioni e per gli strumenti software per convertire
i propri file in video DivX.
DLNA
DLNA (Digital Living Network Alliance) fornisce
un’agevole condivisione dei supporti digitali attraverso
la rete domestica e quindi è possibile apprezzare
attraverso questo lettore i contenuti digitali archiviati sul
proprio PC su cui è installato un software del server
DLNA o altro dispositivo DLNA compatibile con il
proprio TV. Per connettere il lettore ai propri server
DLNA, sono necessarie alcune impostazioni per il
server o il dispositivo DLNA. Per dettagli, consultare il
software del server DLNA o il dispositivo DLNA.
Dolby Digital
Un sistema sonoro sviluppato da Dolby Laboratories
Inc. che fornisce qualità da sala cinematografica
all’uscita audio quando il prodotto è collegato a un
processore o amplificatore Dolby Digital.
Dolby Digital Plus
Un sistema sonoro sviluppato come estensione di Dolby
Digital. Questa tecnologia di codificazione audio
supporta audio surround 7.1 multicanale.
Dolby TrueHD
Dolby TrueHD è una tecnologia di codificazione senza
perdita di qualità che supporta fino a 8 canali di suono
surround multicanale per i dischi ottici di ultima
generazione. Il suono riprodotto è fedele alla fonte
originale bit per bit.
DRC (Dynamic Range Control, Gamma di controllo
dinamica)
DRC consente di regolare la gamma tra i suoni a volumi
più alti e quelli più bassi (gamma dinamica) per la
riproduzione a un volume medio. Utilizzare questa
funzione quando è difficile sentire i dialoghi, oppure nel
caso la riproduzione disturbi i vicini.
DTS
Questo è un sistema sonoro digitale sviluppato da DTS,
Inc. per l’uso nei cinema.
DTS-HD High Resolution Audio
DTS-HD High Resolution Audio è una nuova
tecnologia sviluppata per la nuova generazione di dischi
ottici ad alta definizione.
DTS-HD Master Audio
DTS-HD Master Audio è una nuova tecnologia di
compressione audio lossless sviluppata per la nuova
generazione di dischi ottici ad alta definizione.
Glossario
FLAC
Pan Scan (PS 4:3)
FLAC (Free Lossless Audio Codec) è un formato libero
per la compressione di dati audio lossless. Benché
inferiore a livello di tasso di compressione rispetto agli
altri formati audio lossless, spesso è in grado di fornire
una qualità audio superiore.
HDMI
HDMI (High-Definition Multimedia Interface =
Interfaccia multimediale ad alta definizione) è
un’interfaccia che supporta sia video che audio in un
singolo collegamento digitale. Il collegamento HDMI
porta il segnale standard a segnali video ad alta
definizione e segnali audio multicanale a componenti
AV, quali TV muniti di HDMI, in formato digitale senza
degradazione.
Indirizzo Mac
Letter Box (LB 4:3)
Dimensione dello schermo che taglia la parte superiore e
inferiore dell’immagine per consentire la visione ad
ampio schermo (16:9) su un TV 4:3 collegato.
Lyp Sync
Lyp Sync, abbreviazione di Lip Synchronization
(sincronizzazione labiale), è un termine tecnico che
indica sia un problema che la funzione utilizzata per
mantenere sincronizzati i segnali audio e video in fase di
post produzione e trasmissione. Mentre la latenza audio/
video richiede regolazioni complesse da parte
dell’utente, HDMI integra una funzione di
sincronizzazione audio/video che consente ai dispositivi
di eseguirla in modo automatico, senza interazioni da
parte dell’utente.
Sottotitoli
Righe di testo che appaiono sul fondo dello schermo che
traducono o trascrivono il dialogo. Sono registrate su
molti dischi DVD e Blu-ray.
Spazio colorato
Spazio colorato è una gamma di colori che possono
essere rappresentati. RGB è uno spazio colorato basato
sul modello di colore RGB (Red, Green and Blue, vale a
dire rosso, verde e blu) e viene tipicamente utilizzato per
i monitor PC. YCbCr è uno spazio colorato basato su un
segnale di luminanza (Y) e due segnali di differenza di
colore (Cb e Cr).
Suono lineare PCM
Il PCM lineare è un formato di registrazione del segnale
utilizzato per i CD audio e per alcuni DVD e dischi
Blu-ray. Il suono sui CD audio è registrato a 44,1 kHz
con 16 bit. (Sui dischi DVD il suono è registrato tra 48
kHz con 16 bit e 96 kHz con 24 bit mentre sui dischi
Blu-ray è tra 48 kHz con 16 bit e 192 kHz con 24 bit.)
x.v.Color
x.v.Color riproduce una gamma di colore maggiore di
prima, mostrando pressoché tutti i colori che l’occhio
umano può rilevare.
5
Informazioni aggiuntive
L’indirizzo Mac è un valore unico assegnato a un
dispositivo in rete per scopi di identificazione.
Dimensione dello schermo che taglia i lati
dell’immagine per consentire la visione ad ampio
schermo (16:9) su un TV 4:3 collegato.
Dati tecnici
■ Dati generali
Alimentazione
[Modelli per Stati Uniti e Canada]......................... CA 110–240 V, 60 Hz
[Modello per Centro e Sudamerica]..................CA 110–240 V, 50/60 Hz
[Modello per l’Australia] ....................................... CA 110–240 V, 50 Hz
[Modello per Regno Unito, Europa e Russia]........ CA 110–240 V, 50 Hz
[Modello per la Cina] ............................................. CA 110–240 V, 50 Hz
[Modello per l’Asia]..........................................CA 110–240 V, 50/60 Hz
Consumo di alimentazione (Normale) ................................................. 20 W
Consumo di alimentazione (Standby) .................................... 0,5 W o meno
Dimensioni (L × A × P, incluse le parti sporgenti) ...... 435 × 86 × 257 mm
■ Prestazioni audio
Livello di uscita audio (1 kHz, 0 dB)
Blu-ray Disc/DVD/CD-DA.........................................................2 ± 0,3 V
Rapporto segnale rumore
Blu-ray Disc/DVD/CD-DA............................................................ 110 dB
Gamma dinamica
Blu-ray Disc/DVD ........................................................................ 105 dB
CD-DA ........................................................................................... 100 dB
Distorsione armonica (1 kHz)
Blu-ray Disc/DVD/CD-DA............................................................0,003%
■ Ingresso/uscita
Uscita HDMI .............................................................. Connettore tipo A × 1
480i/576i/480p/576p/720p/1080i/1080p/1080p @ 24Hz,
Supporto Deep Color, x.v. Color
Uscita componente video ..............................................Y: 1 Vp-p (75 ohm)
PB, PR: 0,7 Vp-p (75 ohm)
Uscita video......................................................................1 Vp-p (75 ohm)
Uscita digitale..........................................................Ottica × 1, coassiale × 1
Uscita audio analogica ..........................................................Mixed 2 ch × 1
USB ............................................................................ Connettore tipo A × 2
Wireless LAN.................................................. Standard: IEEE 802.11 b/g/n
Gamma di frequenza: banda 2,4GHz
Altri apparecchi in uscita............................................. Remote IN/OUT × 1,
Ethernet × 1
I dati tecnici sono soggetti a modifiche senza preavviso.
43 It
Italiano
Peso ..................................................................................................... 2,8 kg
Risposta in frequenza
Blu-ray Disc/DVD
........................Da 4 Hz a 22 kHz (48 kHz, frequenza di campionamento)
Da 4 Hz a 44 kHz (96 kHz, frequenza di campionamento)
CD-DA .......................................................................... Da 4 Hz a 20 kHz
Dati tecnici
■ Copyright
– Il materiale audiovisivo potrebbe consistere di lavori
soggetti a copyright che non devono essere registrati
senza l’autorizzazione del proprietario del copyright.
Si prega di fare riferimento alle leggi specifiche del
paese di appartenenza.
– Questo prodotto incorpora la tecnologia anticopia
protetta ai sensi dei brevetti USA e di altri diritti
sulla proprietà intellettuale di Rovi Corporation. La
ricostruzione e la scomposizione sono proibiti.
– Prodotto con licenza da Dolby Laboratories. Il logo
Dolby e il simbolo della doppia D sono marchi di
fabbrica di Dolby Laboratories.
– Prodotto con licenza ai sensi dei brevetti USA n.:
5,956,674; 5,974,380; 6,226,616; 6,487,535;
7,212,872; 7,333,929; 7,392,195; 7,272,567 e altri
brevetti statunitensi e mondiali registrati o in corso
di registrazione. DTS-HD, il relativo simbolo e
DTS-HD e il simbolo insieme sono marchi di
fabbrica registrati e DTS-HD Master Audio è un
marchio di fabbrica di DTS, Inc. Il prodotto
comprende software. © DTS, Inc. Tutti i diritti
riservati.
– “Blu-ray Disc™”, “Blu-ray™”, “Blu-ray 3D™”,
“BD-Live™”, “BONUSVIEW™” e i relativi loghi
sono marchi di fabbrica di Blu-ray Disc Association.
–
è un marchio di fabbrica di DVD Format/
Logo Licensing Corporation.
– “HDMI”, il logo “HDMI” e “High-Definition
Multimedia Interface” sono marchi di fabbrica o
marchi registrati di HDMI Licensing LLC.
– “x.v.Color” e il logo “x.v.Color” sono marchi di
fabbrica di Sony Corporation.
– Il “AVCHD” e il logo “AVCHD” sono marchi di
fabbrica di Panasonic Corporation e Sony
Corporation.
– Java e tutti i marchi e loghi basati su Java sono
marchi di fabbrica o marchi di fabbrica registrati di
Sun Microsystems, Inc. negli Stati Uniti e/o in altri
paesi.
– Questo prodotto è concesso in licenza in base ai
termini della licenza d’uso del portafoglio di brevetti
AVC e della licenza d’uso del portafoglio di brevetti
VC-1 per uso personale e non commerciale del
consumatore per (i) la codifica video in conformità
con lo standard AVC e con lo standard VC-1
(“AVC/VC-1 Video”) e/o (ii) la decodifica video
AVC/VC-1 decodificata dal consumatore attuata in
attività personale e non commerciale e/o è stata
ottenuta da un fornitore video provvisto di licenza
per la fornitura video AVC/VC-1. Non si concede
alcuna licenza o non sarà implicita per altri usi.
Ulteriori informazioni sono ottenibili da MPEG LA,
LLC.
Consultare http://www.mpegla.com.
– Windows Media Player è un marchio di fabbrica
registrato o un marchio di fabbrica di Microsoft
corporation negli Stati Uniti e/o altri paesi.
– YouTube e il logo YouTube, Picasa e il logo Picasa
sono marchi di fabbrica di Google. Inc.
– Netflix e il logo Netflix sono marchi di fabbrica
registrati di Netflix, Inc.
44 It
– DLNA e DLNA CERTIFIED sono marchi di
fabbrica e/o marchi di servizio di Digital Living
Network Alliance.
– Copyright 2004-2010 Verance Corporation.
Cinavia™ è un marchio di fabbrica di Verance
Corporation. Protetto dal brevetto statunitense n.
7,369,677 e da brevetti mondiali registrati o in corso
di registrazione con licenza di Verance Corporation.
Tutti i diritti riservati.
– Il logo Wi-Fi CERTIFIED è un marchio di
certificazione di Wi-Fi Alliance.
– DivX®, DivX Certified®, DivX Plus® HD e i loghi
associati sono marchi di fabbrica registrati di Rovi
Corporation o delle sue affiliate e sono utilizzati con
licenza.
– DivX Certified® per riprodurre video DivX® e
DivX Plus® HD (H.264/.MKV) fino a 1080p HD,
inclusi contenuti premium.
INFORMAZIONI SUI VIDEO DIVX:DivX® è un
formato video digitale creato da DivX, LLC, un’affiliata
di Rovi Corporation. Questo è un dispositivo DivX
Certified® ufficiale che riproduce video DivX. Visitare
divx.com per maggiori informazioni e per gli strumenti
software per convertire i propri file in video DivX.
INFORMAZIONI SUL SERVIZIO DIVX VIDEO-ONDEMAND: il dispositivo DivX Certified® deve essere
registrato per riprodurre contenuti DivX Video-onDemand (VOD). Per generare il codice di registrazione,
individuare la sezione DivX VOD nel menu di
impostazione del dispositivo. Visitare vod.divx.com per
maggiori informazioni su come completare la
registrazione.
INFORMAZIONI AGGIUNTIVE
Indice analitico
■
Numerics
2ND AUDIO, telecomando ...................6
■
A
■
B
BD-Live ...............................................27
Bitrate, menu a schermo
(On Screen) ......................................24
Bookmark .............................................26
Brano/file, menu a schermo
(On Screen) ......................................24
■
C
■
I
Impostazione Audio, menu SETUP .....35
Impostazione connessione, menu
SETUP .............................................32
Impostazione diffusori, menu
SETUP .............................................35
Impostazione Display, menu SETUP ...33
Impostazione Generale, menu
SETUP .............................................31
Impostazione Proxy, menu SETUP ......33
Impostazioni IP, menu SETUP ............33
Informazioni di sistema, menu
SETUP .............................................35
Informazioni su Netflix, menu
SETUP .............................................32
Informazioni, menu SETUP .................33
Initial Wizard .......................................18
Installazione rapida ..............................18
Installazione rapida, menu SETUP ......31
■
L
Lingua, menu SETUP ..........................31
Lyp Sync, menu SETUP ......................34
Cambiare password, menu SETUP ......32
Capitolo, menu a schermo
(On Screen) ......................................24
Caricare le impostazioni predefinite,
menu SETUP ...................................31
CLEAR, telecomando ............................6
Closed Caption, menu SETUP .............32
Coassiale / Ottico, menu SETUP .........35
Code Page, menu a schermo
(On Screen) ......................................24
Codice del paese, menu SETUP ..........32
Connessione BD-Live, menu
SETUP .............................................33
Connessione Internet, menu SETUP ...32
Contenuti USB, riproduzione ..............18
Controllo HDMI, menu SETUP ..........31
Controllo Network, SETUP menu .......31
■
■
ON SCREEN, telecomando ...................8
OSD, menu SETUP ..............................31
D
■
E
ENTER, telecomando ............................8
ESN (Electronic Serial Number) .........32
■
F
Funzionamento del menu SETUP ........30
Funzione Controllo HDMI ...................31
Funzione di ricerca ...............................26
Funzione Picture in Picture ..................27
■
H
HDMI 1080p 24Hz, menu SETUP ......34
■
N
Netflix ..................................................23
■
■
O
P
Parental Control, menu SETUP ...........32
PIP, telecomando ....................................6
POP UP/MENU, telecomando ...............8
Post Process, menu SETUP ..................35
PROGRAM, telecomando ......................6
Prova connessione, menu SETUP ........33
■
R
Regolazione colore, menu SETUP .......35
REPEAT, telecomando ..........................7
Replay instantaneo, menu a schermo
(On Screen) ......................................24
Requisiti di file audio .............................3
Rete, collegamento ...............................16
Rete, menu SETUP ..............................32
RETURN, telecomando .........................8
Ricerca instantanea, menu a schermo
(On Screen) ......................................24
■
S
Screen Saver, menu SETUP ................ 31
SEARCH, telecomando ......................... 7
Secondo Audio, menu a schermo
(On Screen) ..................................... 24
Secondo Video, menu a schermo
(On Screen) ..................................... 24
Segno Angolo, menu SETUP .............. 32
Segno PIP, menu SETUP .................... 32
Selezione Uscita Video, menu
SETUP ............................................. 34
SETUP, menu ...................................... 28
SETUP, telecomando ............................ 6
SHUFFLE, telecomando ....................... 7
Sicurezza, menu SETUP ..................... 32
Simbolo audio secondario, menu
SETUP ............................................. 32
Sistema TV, menu SETUP .................. 34
Sistema, menu SETUP ........................ 31
Slide Show, menu a schermo
(On Screen) ..................................... 24
Sottotitolo, menu a schermo
(On Screen) ..................................... 24
Sottotitolo, menu SETUP .................... 32
Spazio colorato, menu SETUP ............ 34
Stato, menu .......................................... 25
STATUS, telecomando .......................... 6
Stile sottotitolo, menu a schermo
(On Screen) ..................................... 24
SUBTITLE, telecomando ...................... 7
■
5
T
Tasti colore, telecomando ...................... 7
Tasti cursore, telecomando .................... 8
Tasti di comando, telecomando ............. 8
Tasti numerici, telecomando ................. 6
Telecomando ......................................... 6
Teleschermo, menu SETUP ................ 33
Tempo, menu a schermo
(On Screen) ..................................... 24
Titolo, menu a schermo (On Screen) ... 24
TOP MENU, telecomando .................... 8
Transizione, menu a schermo
(On Screen) ..................................... 24
TV, menu SETUP ................................ 33
■
U
Ultimo salvataggio, menu SETUP ...... 32
UpMix, menu SETUP ......................... 35
USB, collegamento .............................. 16
Uscita 3D, menu SETUP ..................... 33
Uscita audio, menu SETUP ................. 35
■
V
Video Process, menu SETUP .............. 34
Video, collegamento ............................ 13
Video, formati di uscita ....................... 37
■
Y
YouTube, riproduzione ........................ 21
■
Z
ZOOM, telecomando ............................. 7
45 It
Italiano
Data disc, riproduzione ........................18
DIGEST, telecomando ...........................7
DivX (R) VOD DRM, menu
SETUP .............................................32
DLNA, menu SETUP ..........................33
Downmix 2 canali, menu SETUP ........35
Downsampling, menu SETUP .............35
DRC, menu SETUP .............................35
M
MARKER, telecomando ........................6
MEDIA, menu ......................................18
Menu a schermo (On Screen) ...............24
Menu, menu SETUP ............................32
Messaggio di riproduzione in 3D,
menu SETUP ...................................31
Modalità deinterlacciamento, menu
SETUP .............................................35
Modalità video, menu SETUP .............34
Modalità/Modalità di riproduzione,
menu a schermo (On Screen) ...........24
Riduzione del rumore, menu
SETUP ............................................. 35
Riproduzione programmata ................. 26
Riproduzione, menu SETUP ............... 32
Informazioni aggiuntive
A/B, telecomando ..................................7
Aggiornamento del software ................38
Aggiornamento, menu SETUP ............31
Altri collegamenti ................................17
ANGLE, telecomando ...........................7
Angolo, menu a schermo
(On Screen) ......................................24
Archivio locale, menu SETUP .............31
Audio, collegamento ............................14
Audio, formati di uscita .......................36
Audio, menu a schermo (On Screen) ...24
Audio, menu SETUP ...........................32
AUDIO, telecomando ............................7
Auto Riproduzione disco, menu
SETUP .............................................31
HDMI Deep Color, menu SETUP .......34
HDMI, collegamento ............................12
HDMI, menu SETUP ...........................35
HOME, menu .......................................18
HOME, telecomando ..............................6
Precaución: lea las indicaciones siguientes antes de
utilizar este aparato.
1
2
3
4
5
Para asegurar el mejor rendimiento de este aparato, lea
atentamente este manual. Y luego guárdelo en un lugar
seguro para poder consultarlo en el futuro en caso de ser
necesario.
Instale esta unidad en un lugar bien ventilado, fresco, seco y
limpio, alejado de la luz directa del sol, fuentes de calor,
vibración, polvo, humedad y/o frío. Para una adecuada
ventilación, permita que el equipo tenga el siguiente espacio
libre mínimo:
Superior: 10 cm
Posterior: 10 cm
Laterales: 10 cm
Coloque este aparato lejos de otros aparatos eléctricos,
motores o transformadores, para evitar así los ruidos de
zumbido.
No exponga este aparato a cambios bruscos de temperaturas,
del frío al calor, ni lo coloque en lugares muy húmedos (una
habitación con deshumidificador, por ejemplo), para impedir
así que se forme condensación en su interior, lo que podría
causar una descarga eléctrica, un incendio, daños en el
aparato y/o lesiones a las personas.
Evite instalar este aparato en un lugar donde puedan caerle
encima objetos extraños y/o donde quede expuesto al goteo o
a la salpicadura de líquidos. Encima de este aparato no ponga:
– Otros componentes, porque pueden causar daños y/o
decoloración en la superficie de este aparato.
– Objetos con fuego (velas, por ejemplo), porque
pueden causar un incendio, daños en el aparato y/o
lesiones a las personas.
– Recipientes con líquidos, porque pueden caerse y
derramar el líquido, causando descargas eléctricas al
usuario y/o dañando el aparato.
6
7
8
9
10
11
12
13
14
15
No tape este aparato con un periódico, mantel, cortina, etc.
para no impedir el escape del calor. Si aumenta la
temperatura en el interior del aparato, esto puede causar un
incendio, daños en el aparato y/o lesiones a las personas.
No enchufe este aparato a una toma de corriente hasta
después de haber terminado todas las conexiones.
No ponga el aparato al revés. Podría recalentarse y
posiblemente causar daños.
No utilice una fuerza excesiva con los conmutadores, los
controles y/o los cables.
Cuando desconecte el cable de alimentación de la toma de
corriente, sujete la clavija y tire de ella; no tire del propio
cable.
No limpie este aparato con disolventes químicos porque
podría estropear el acabado. Utilice un paño limpio y seco
para limpiar el aparato.
Utilice solamente la tensión especificada en este aparato.
Utilizar el aparato con una tensión superior a la especificada
resulta peligroso y puede producir un incendio, daños en el
aparato y/o lesiones a las personas. Yamaha no se hará
responsable de ningún daño debido al uso de este aparato con
una tensión diferente de la especificada.
Para impedir daños debidos a relámpagos, desconecte el
cable de alimentación de la toma de corriente durante una
tormenta eléctrica.
No intente modificar ni arreglar este aparato. Póngase en
contacto con el personal de servicio Yamaha cualificado
cuando necesite realizar alguna reparación. La caja no deberá
abrirse nunca por ninguna razón.
Cuando no piense utilizar este aparato durante mucho tiempo
(cuando se ausente de casa por vacaciones, por ejemplo)
desconecte el cable de alimentación de la toma de corriente.
Precaución-i Es
16 Asegúrese de leer la sección “Resolución de problemas”
antes de dar por concluido que su aparato está averiado.
17 Antes de trasladar este aparato, pulse p para ponerlo en el
modo de espera, y luego desconecte el cable de alimentación
de CA de la toma de corriente.
18 La condensación se formará cuando cambie de repente la
temperatura ambiental. Desconecte en este caso el cable de
alimentación de la toma de corriente y no utilice el aparato.
19 El aparato se calentará cuando la utilice durante mucho
tiempo. Desconecte en este caso la alimentación y luego no
utilice el aparato para permitir que se enfríe.
20 Instale este aparato cerca de la toma de CA y donde se pueda
alcanzar fácilmente la clavija de alimentación.
21 Las baterías no deberán exponerse a un calor excesivo como,
por ejemplo, el que producen los rayos del sol, el fuego y
similares.
No utilice esta unidad a menos de 22 cm de personas
con marcapasos o implantes de desfibrilador.
Este aparato no se desconecta de la fuente de
alimentación de CA si está conectada a una toma de
corriente, aunque la propia aparato esté apagada con p.
A este estado se le llama modo de espera. En este
estado, este aparato ha sido diseñada para que consuma
un cantidad de corriente muy pequeña.
ADVERTENCIA
PARA REDUCIR EL RIESGO DE INCENDIO O
DESCARGA ELÉCTRICA, NO EXPONGA ESTE
APARATO A LA LLUVIA NI A LA HUMEDAD.
El componente láser de este producto es capaz de emitir
radiación que sobrepasa el límite establecido para la
clase 1.
Especificaciones LÁSER:
Producto LÁSER de Clase 1
Longitud de onda: 790 nm (CD)/658 nm (DVD)/405 nm (BD)
Salida de láser: máxima de 1 mW
SEGURIDAD CONTRA LA RADIACIÓN LÁSER
Este aparato utiliza rayos láser. Debido a la posibilidad de
que se produzcan daños en los ojos, la extracción de la
cubierta del aparato o las reparaciones solamente deberán
ser realizadas por un técnico cualificado.
PELIGRO
Este aparato emite radiación láser visible cuando se abre.
Evite la exposición directa a los rayos láser. Cuando se
conecte este aparato a una toma de corriente no acerque
sus ojos a la abertura de la bandeja del disco ni a otras
aberturas para mirar al interior.
Índice general
1. Introducción
1
4. Ajustes
Qué puede hacer con este reproductor ........... 2
Piezas incluidas ................................................. 2
Información sobre discos y archivos............... 3
Tipos de discos/archivos que pueden utilizarse con este
reproductor .................................................................
Para cargar un disco........................................................
Precauciones con los discos............................................
Aviso para ver imágenes de vídeo en 3D .......................
Tecnología Cinavia.........................................................
Menú SETUP ..................................................... 28
Ejemplo de funcionamiento del menú SETUP ............. 30
Configuración General .................................................. 31
Configuración de pantalla ............................................. 33
Configuración de audio................................................. 35
Sistema de Información ................................................ 35
Acerca de los formatos de salida de audio.................... 36
Acerca de los formatos de salida de vídeo.................... 37
3
4
4
4
4
Actualización de software ............................... 38
Controles y funciones ....................................... 5
Actualización del software............................................ 38
Panel delantero ............................................................... 5
Mando a distancia........................................................... 6
Introducción a las conexiones........................ 10
Panel trasero ................................................................. 10
Conexión HDMI................................................. 12
Conexión con el terminal HDMI .................................. 12
Conexión para la reproducción de discos
Blu-ray 3D................................................................ 12
Conexiones de vídeo ....................................... 13
Conexión a la toma de vídeo componente.................... 13
Conexiones de audio ....................................... 14
Conexión con el terminal/toma de audio digital........... 14
Conexión con las tomas de audio ................................. 15
Conexión de red y USB ................................... 16
Conexión con el terminal NETWORK......................... 16
Conexión con el conector USB .................................... 16
Otras conexiones ............................................. 17
Conexión a las tomas REMOTE CONTROL............... 17
Conexión del cable de alimentación............................. 17
4
5
5. Información adicional
Alimentación................................................................. 39
Funcionamiento básico ................................................. 39
Reproducción de disco .................................................. 39
Imagen........................................................................... 40
Sonido ........................................................................... 40
Red ................................................................................ 40
Mensajes en pantalla ..................................................... 41
Glosario ............................................................. 42
Especificaciones .............................................. 43
Información general ...................................................... 43
Rendimiento de audio ................................................... 43
Entrada/salida................................................................ 43
Propiedad intelectual..................................................... 44
Índice ................................................................. 45
(al final de este manual)
Information about software ....................................i
■ Acerca de este manual
3. Reproducción
Asistente inicial/Configuración Sencilla ........ 18
Configuración con el Asistente inicial/Configuración
Sencilla..................................................................... 18
Menú HOME/MEDIA ......................................... 18
Reproducción de fotos/música/vídeo............................ 18
Uso de contenidos de red.............................................. 20
21
21
22
23
Inicio de Netflix............................................................ 23
Funciones avanzadas de reproducción ......... 24
24
25
26
26
26
27
27
27
– Este manual describe cómo utilizar este reproductor
con un mando a distancia, excepto cuando no esté
disponible. También se puede acceder a algunas de
estas operaciones mediante los botones del panel
delantero.
– Las notas contienen información importante sobre
seguridad e instrucciones de funcionamiento. Las
indicaciones señalan consejos de funcionamiento.
– Este manual se ha impreso antes de la fabricación. El
diseño y las especificaciones están sujetos a cambios
en parte como resultado de mejoras, etc. En caso de
diferencias entre el manual y el producto, este último
tiene prioridad.
Iconos utilizados en este manual
Los iconos se utilizan para indicar botones/funciones
disponibles para un formato particular. Para obtener
información sobre los discos y formatos que se pueden
reproducir, consulte página 3.
BD : Vídeo BD
DVD : Vídeo DVD, DVD-VR, DVD+VR
CD : CD de audio
VIDEO : archivos de vídeo
MUSIC : archivos de audio
PHOTO : archivos de fotos
1 Es
Español
Menú en pantalla ..........................................................
Menú de estado.............................................................
Uso de Marcador ..........................................................
Programación de la reproducción .................................
Uso de la búsqueda ......................................................
Uso de BONUSVIEW™ y BD-Live™ ........................
Utilización de la función Imagen en Imagen
(reproducción de audio/vídeo secundario) ...............
Utilización de la función BD-Live™ ...........................
3
Resolución de problemas................................ 39
2. Conexiones
Uso de servicios de red ...................................
Reproducción de vídeos de YouTube™ ........
Reproducción de fotografías desde un
álbum Web de Picasa™ ...............................
Reproducción de vídeos de Netflix™.............
2
INTRODUCCIÓN
Qué puede hacer con este reproductor
Configuración sencilla de idioma, resolución y relación de aspecto
\
de la pantalla
pág. 18
Puede ajustar la configuración de idioma y TV.
Reproducción de discos Blu-ray Disc™/Blu-ray 3D™/DVD/CD
comercializados en el mercado*
\
pág. 24
\
pág. 27
\
pág. 18
\
pág. 20
\
pág. 31
\
pág. 21
Además de los discos Blu-ray, este reproductor también admite la reproducción de otros tipos de
discos.
Reproducción de BONUSVIEW™, BD-Live™, etc.*
Puede disfrutar de más películas en los discos Blu-ray más recientes.
Reproducción de archivos de Vídeo, Música, Foto de un disco/
dispositivos de memoria USB*
Con este reproductor se pueden reproducir archivos grabados en discos/dispositivos de memoria
USB.
Reproducción de archivos de Vídeo, Música, Foto de un servidor
doméstico de red* **
El contenido del PC se puede reproducir en el televisor o el receptor de A/V conectando este
reproductor a un servidor de red.
Control con el mando a distancia del televisor, receptor de A/V,
etc.
Puede conectar dispositivos con un cable HDMI y controlarlos con un único mando a distancia
utilizando la función Control HDMI.
Transferencia de contenidos de reproducción en los servicios de
red**
Puede disfrutar instantáneamente de vídeos a través de Internet con este reproductor.
* Para obtener información sobre los discos y formatos que se pueden reproducir, consulte la página 3.
** Para utilizar esta función, es necesaria la configuración de red.
Piezas incluidas
Asegúrese de que con el producto se han suministrado los siguientes accesorios.
Mando a
distancia
2 Es
Pilas (×2)
(AAA, R03, UM-4)
Cable de audio/vídeo
Cable de alimentación
1
Información sobre discos y archivos
– En este reproductor se pueden reproducir discos de
12 cm y 8 cm. No utilice un adaptador de 8 cm a
12 cm.
– Utilice discos que sean compatibles con los
estándares que se indican con la presencia de
logotipos oficiales en la etiqueta del disco. La
reproducción de discos que no cumplan con estos
estándares no está garantizada. Además, la calidad
de imagen o sonido no está garantizada aunque
puedan reproducirse estos discos.
Tipo de soporte
Formato de grabación
BD-ROM/BD-R/
BD-RE
BD-Video/archivos de datos
DVD-ROM
DVD-Video
DVD-R/DVD-R
DL/DVD-RW
DVD-Video/DVD-VR/AVCHD/archivos de
datos
DVD+R/DVD+R
DL/DVD+RW
DVD-Video/DVD+VR/AVCHD/archivos de
datos
CD-ROM
CDDA/HDCD
Ejemplos de código de región
CDDA/archivos de datos
USB*
Archivos de datos
DLNA
Archivos de datos
MP3 (.mp3)
WMA (.wma)
AAC (.aac/.m4a)
WAV (.wav)
FLAC (.flac)
Formatos de
archivo de vídeo
reproducibles
Formatos de
archivo de foto
reproducibles
VIDEO
PHOTO
DivX (.divx)
MKV con formato
DivX (.mkv)
MKV con H.264
(.mkv)
MPEG PS (.mpeg/
.mpg)
MPEG TS (.ts)
MPEG-4 (.mp4)
VOB (.vob)
AVI (.avi)
ASF (.asf)
WMV (.wmv)
Código de región “A” o “ABC”
DVD-Video
Código de región “1” o “ALL”
1
ALL
Notas
* Este reproductor es compatible con un dispositivo de
memoria USB con formato FAT 16/32 y NTFS.
MUSIC
– Los discos y los reproductores de vídeo Blu-ray
Disc/DVD tienen códigos de región, que dictan las
regiones en las que se puede reproducir un disco.
Consulte la marca de código de región que aparece
en el panel trasero de este reproductor.
– En el caso de un Blu-ray Disc, el disco puede
reproducirse en este reproductor si tiene la misma
marca de código de región o bien la marca “ABC”
de código de región.
– En el caso de un disco DVD, el disco puede
reproducirse en este reproductor si tiene la misma
marca de código de región o bien la marca “ALL” de
código de región.
BD-Video
CD-R/CD-RW
Formatos de
archivo de
audio
reproducibles
Información sobre la gestión de la
región en los vídeos Blu-ray Disc/DVD
Introducción
■ Tipos de discos/archivos que
pueden utilizarse con este
reproductor
JPEG (.jpeg/.jpg)
GIF (.gif)
PNG (.png)
Notas
Requisitos de los archivos de audio
– Frecuencia de muestreo: entre 32 - 48 kHz (MP3/
WMA), LPCM 44,1 kHz/16 bits/estéreo (WAV),
192 kHz/24 bits (FLAC)
– Bitrate: entre 8 - 320 kbps (MP3), 32 - 192 kbps
(WMA)
Requisitos de los archivos WMV
– WMV9; la resolución máxima es de 1.920 × 1.080.
3 Es
Español
– No se garantiza la reproducción de los archivos
incluidos en la tabla anterior en función del método
utilizado para la creación del archivo o del códec
empleado.
– No pueden reproducirse los archivos con protección
de los derechos de autor.
– Al utilizar DLNA, el archivo debe cumplir los
requisitos del servidor DLNA.
– Las operaciones y funciones de vídeo Blu-ray Disc/
DVD pueden ser diferentes de las explicaciones que
aparecen en este manual y algunas operaciones
pueden estar prohibidas debido a las configuraciones
del fabricante del disco.
– Si aparece una pantalla de menú o instrucciones de
funcionamiento durante la reproducción de un disco,
siga el procedimiento de funcionamiento indicado.
– Según el disco, puede que no sea posible su
reproducción.
– Finalice todos los soportes de grabación que desee
reproducir en este reproductor.
– “Finalizar” hace referencia a un procesamiento al
que se somete un disco grabado para que se pueda
reproducir en otros reproductores/grabadores, así
como en este reproductor. Solo pueden reproducirse
en el reproductor los discos que se hayan finalizado.
(Este reproductor no dispone de una función para
finalizar discos.)
– No se garantiza la reproducción de todos los archivos
de un disco, dispositivo de memoria USB y de la red.
– Un archivo con protección de los derechos de autor
no se puede reproducir a través de un dispositivo de
memoria USB o red.
Información sobre discos y archivos
■ Para cargar un disco
– Inserte el disco con la etiqueta hacia arriba.
– En el caso de un disco grabado por ambos lados,
ponga boca abajo el lado que va a reproducir.
Limpieza de la lente lectora
– No utilice nunca discos de limpieza de venta en el mercado.
La utilización de estos discos podría dañar la lente.
– Solicite la limpieza de la lente en el centro de atención al
cliente aprobado por Yamaha más cercano.
■ Aviso para ver imágenes de vídeo en 3D
Notas
– La reproducción podría iniciarse automáticamente,
dependiendo del disco y la configuración del
reproductor.
– Es posible que el menú aparezca primero, según el disco.
– El tiempo para cargar el disco puede variar
dependiendo del disco.
■ Precauciones con los discos
Tenga cuidado con los arañazos y el
polvo
– Los discos Blu-ray Disc, DVD y CD son sensibles al
polvo, a las huellas dactilares y especialmente a los
arañazos. Es posible que no se pueda reproducir un
disco con arañazos. Maneje los discos con cuidado y
guárdelos en un lugar seguro.
Almacenamiento apropiado de los
discos
Ponga el disco en el centro de la caja y
almacene la caja y el disco en posición
vertical.
Evite guardar los discos en lugares con luz
solar directa, cerca de equipos de
calefacción o en lugares con una humedad
alta.
No deje caer los discos ni los someta a
vibraciones o impactos fuertes.
Evite almacenar los discos en lugares
donde haya mucha cantidad de polvo o
humedad.
Precauciones de manipulación
– Si la superficie está sucia, límpiela con
cuidado con un paño suave humedecido
(con agua solamente). Cuando limpie los
discos, mueva siempre el paño desde el
orificio central hacia el borde exterior.
– No utilice pulverizadores de limpieza de
discos de vinilo, benceno, diluyente,
líquidos para prevenir la electricidad
estática ni otros disolventes.
– No toque la superficie.
– No pegue papel ni etiquetas adhesivas en el disco.
– Si la superficie de reproducción de un disco está
sucia o rayada, el reproductor puede decidir que el
disco es incompatible y expulsar la bandeja
portadiscos o es posible que el disco no se
reproduzca correctamente. Limpie cualquier mancha
de la superficie de reproducción con un paño suave.
4 Es
– Algunas personas pueden sufrir molestias (como
vista cansada, fatiga o náuseas) al ver imágenes de
vídeo en 3D. Se recomienda a todos los espectadores
realizar pausas periódicas durante la visualización de
imágenes de vídeo en 3D.
– Si sufre alguna molestia, deje de ver las imágenes de
vídeo en 3D hasta que ésta desaparezca. Consulte
con un médico si sufre molestias agudas.
– Lea atentamente los manuales de instrucciones (del
Blu-ray Disc y del televisor) y los mensajes de
precaución que aparecen en el televisor.
– La vista de los niños pequeños (especialmente de
menos de seis años) todavía está en proceso de
desarrollo. Consulte con su médico (como un
pediatra o un oftalmólogo) antes de permitir a niños
pequeños ver imágenes de vídeo en 3D.
– Los niños pequeños deben estar bajo la supervisión
de un adulto para garantizar que siguen las
recomendaciones descritas anteriormente.
■ Tecnología Cinavia
– La tecnología Cinavia forma parte del sistema de
protección de los contenidos incluido en este
reproductor de Blu-ray Disc.
Nota
– Es posible que aparezcan los siguientes mensajes y
que su reproductor de Blu-ray Disc detenga la
reproducción o silencie temporalmente la salida de
audio si reproduce una copia no autorizada de un
contenido protegido mediante la tecnología Cinavia.
Estos mensajes aparecen solo en inglés.
Reproducción detenida. Los contenidos que se están
reproduciendo están protegidos por Cinavia™ y su
reproducción en este dispositivo no está autorizada.
Para más información, visite http://www.cinavia.com.
Código de Mensaje 1.
Salida de audio temporalmente detenida. No ajuste el
volumen de reproducción. Los contenidos que se están
reproduciendo están protegidos por Cinavia™ y su
reproducción en este dispositivo no está autorizada.
Para más información, visite http://www.cinavia.com.
Código de Mensaje 3.
Aviso sobre Cinavia
Este producto utiliza la tecnología Cinavia para limitar el
uso de copias no autorizadas de algunas películas y vídeos
comerciales y de sus bandas sonoras. Al detectar el uso
prohibido de una copia no autorizada, aparecerá un
mensaje y se detendrá la reproducción o la copia.
Para obtener más información sobre la tecnología Cinavia,
consulte el Centro de información al consumidor de Cinavia, que
encontrará en el sitio web http://www.cinavia.com. Para solicitar
más información sobre Cinavia por correo, envíe una carta con
su dirección de correo a: Cinavia Consumer Information Center,
P.O. Box 86851, San Diego, CA, 92138, Estados Unidos
1
Controles y funciones
Introducción
■ Panel delantero
USB
1 2
3
1 p (Encendido/en espera)
Pone en marcha el reproductor/activa el modo en
espera.
Mantenga pulsado p en el panel delantero durante más
de 5 segundos y deje de pulsarlo para reiniciar el
reproductor (se reiniciará el sistema).
4
5 6 7
4 Puerta de la bandeja portadiscos
5
(Expulsar)
Abre/cierra la bandeja portadiscos.
9
0
6
(Búsqueda hacia atrás/Salto hacia
atrás):
Pulse para saltar hacia atrás y mantenga pulsado para
buscar hacia atrás.
7
(Búsqueda hacia adelante/Salto
hacia adelante):
Pulse para saltar hacia adelante y mantenga pulsado
para buscar hacia adelante.
8
(Reproducción)
Inicia la reproducción.
9
(Pausa)
Pone la reproducción en pausa.
0
(Detener)
Detiene la reproducción.
2 Conector USB (pág. 16)
3 Visor del panel delantero
Muestra distintos tipos de información sobre el estado
del dispositivo.
8
Nota
– Una película protectora colocada en la fábrica cubre el panel delantero de este reproductor. Retírela antes de empezar
a utilizar el reproductor.
Español
5 Es
Controles y funciones
■ Mando a distancia
1 Transmisor de señales infrarrojas: Emite la
señal infrarroja. Oriente esta ventana al sensor del
mando a distancia (pág. 9).
Nota
–
aparecerá en la esquina superior izquierda de la
pantalla cuando la tecla pulsada no esté disponible.
1
2
3
4
PROGRAM
MARKER
DIGEST
ZOOM
R
G
Y
B
SUBTITLE
ANGLE
5
6
7
8
9
0
AUDIO
CLEAR
SEARCH
SHUFFLE
PIP
SETUP
REPEAT
2ND
AUDIO
HOME
A B
TOP MENU
POP-UP MENU
2 MARKER DVD VIDEO : Establece un Marcador
(pág. 26) en un punto especificado de una película.
Tras definir un Marcador, para seleccionar el punto de
ajuste al que desea ir, pulse DIGEST. Puede definir
hasta 12 marcadores.
C
3
D
E
F
G
H
I
J
K
4 PROGRAM DVD CD : Establece el orden de
reproducción (pág. 26). Puede configurar hasta 15 pistas
(para discos de audio) o títulos/capítulos (DVD-Video).
L
M
: Abre/cierra la bandeja portadiscos.
5 Teclas numéricas: Permiten introducir números, o
durante la reproducción, saltar a la pista/capítulo
correspondiente al número introducido. Es posible que
estos botones no estén disponibles en función del tipo
de disco y la situación de reproducción.
6 CLEAR: Borra el número introducido o elemento establecido.
7 PIP BD : Permite encender/apagar la función Imagen
en imagen (pág. 27). Marca PIP (
) se muestra en
pantalla cuando esta función está disponible. También
puede seleccionar esta opción desde el menú en
pantalla (pág. 24).
ENTER
Nota
RETURN
ON SCREEN
– Marca PIP se muestra solo cuando la Marca PIP está
activada (pág. 32).
8 SETUP: Muestra la pantalla de menú SETUP (pág. 28).
A
B
NETFLIX
STATUS
9 2ND AUDIO BD : Selecciona el audio secundario de la
función Imagen en imagen (pág. 27) o los comentarios
de audio. Cuando esta función está disponible se
muestra en pantalla Marca Audio Secundario (
)
(pág. 35). También puede seleccionar esta opción
desde el menú en pantalla (pág. 24).
Nota
– Marca Audio Secundario se muestra solo cuando la
Marca Audio Secundario está activada (pág. 32).
0 HOME: Muestra la pantalla de menú HOME (pág. 18).
A NETFLIX: Inicia Netflix (pág. 23).
B STATUS: Muestra la información de reproducción
(pág. 25).
C DIGEST PHOTO : Muestra 12 fotografías en
miniatura. Cuando se muestran las miniaturas, puede
ir a la página siguiente o anterior con
/
.
:
Muestra
la
barra
de
selección
DVD VIDEO
Marcador (pág. 26).
D p: Enciende el reproductor o lo pone en modo de espera.
E ZOOM DVD VIDEO PHOTO : Acerca/aleja la
imagen. El tamaño de la pantalla cambiará cada vez que
pulse la tecla (ampliar/reducir zoom: 3 pasos cada uno).
F Teclas de colores BD : Utilice estas teclas según
las instrucciones en pantalla.
6 Es
Controles y funciones
1
Nota
– Es posible que esta función no se pueda realizar
dependiendo de las especificaciones del disco.
H ANGLE BD DVD : Permite cambiar el ángulo de
la cámara si el vídeo se ha grabado con varios ángulos.
Cuando esta función está disponible se muestra en
pantalla Marca de Angulo (
). También puede
seleccionar esta opción desde el menú en pantalla
(pág. 24).
Introducción
G SUBTITLE BD DVD VIDEO : Permite cambiar
el idioma de los subtítulos (pág. 43) si está disponible.
También puede seleccionar esta opción desde el menú
en pantalla (pág. 24).
Nota
– Marca de Angulo se muestra solo cuando la Marca
de Angulo está activada (pág. 32).
I AUDIO BD DVD : Permite cambiar el idioma o
formato de audio. También puede seleccionar esta
opción desde el menú en pantalla (pág. 24).
J SEARCH BD DVD CD VIDEO MUSIC :
Permite ir a un punto especificado durante la
reproducción. Para conocer los detalles sobre esta
función, consulte “Uso de la búsqueda” (pág. 26).
También puede seleccionar esta opción desde el menú
de estado (pág. 25).
K SHUFFLE DVD
CD
VIDEO
MUSIC
PHOTO : Selecciona el modo de reproducción
aleatoria (pág. 24).
L REPEAT BD
DVD
CD
VIDEO
MUSIC
PHOTO : Permite cambiar el modo de repetición. El
modo de repetición mostrado a continuación cambiará
cada vez que se pulse el botón.
: Repite el título que se está reproduciendo.
: Repite el capítulo que se está reproduciendo.
: Repite la carpeta que se está reproduciendo.
: Repite todas las pistas/archivos del disco.
: Repite la pista/archivo que se está
reproduciendo.
M A/B BD DVD CD VIDEO MUSIC : Permite
reproducir una parte específica que desee repetir.
1 Pulse A/B en la escena donde desee establecer el
punto inicial. Aparecerá “A-” en la pantalla.
Español
2 Vuelva a pulsar A/B en la escena donde desee
establecer el punto final. Aparecerá “A-B” en la
pantalla. Se inicia la reproducción de la repetición.
3 Para cancelar la reproducción de la repetición, pulse
A/B. Desaparecerá “A-B” y terminará la
reproducción de la repetición.
Continúa en la página siguiente. \
7 Es
Controles y funciones
N TOP MENU BD DVD : Muestra la pantalla de
menú principal si el disco contiene un menú.
Seleccione la opción deseada mediante 5/a/2/3 y
ENTER.
PROGRAM
MARKER
DIGEST
ZOOM
R
G
Y
B
Nota
SUBTITLE
– Las operaciones concretas pueden diferir
dependiendo del disco. Siga las instrucciones de
cada pantalla de menú.
ANGLE
AUDIO
CLEAR
SEARCH
PIP
SETUP
2ND
AUDIO
HOME
TOP MENU
REPEAT
P RETURN: Permite volver al menú o pantalla anterior,
etc.
A B
POP-UP MENU
N
R
Q Teclas de control
BD
O
P
O Teclas de cursor (5/a/2/3): Permiten mover la
selección en la pantalla de menú.
ENTER: Selecciona el menú/opción resaltado.
SHUFFLE
ENTER
RETURN
ON SCREEN
S
DVD
CD
VIDEO
MUSIC
PHOTO
: Detiene la reproducción. Para detener totalmente
la reproducción, pulse dos veces este botón.
: Pone la reproducción en pausa.
: Reproduce el contenido.
/
Q
NETFLIX
STATUS
BD DVD CD VIDEO MUSIC :
Permite buscar hacia atrás/hacia adelante. La
velocidad de búsqueda cambiará cada vez que pulse la
techa (buscar hacia atrás/adelante: 5 pasos cada una).
Pulse
para reanudar la reproducción normal.
PHOTO : Permite cambiar la velocidad de un pase de
diapositivas (más lento/más rápido: 3 pasos).
/
BD DVD CD VIDEO MUSIC :
Púlselo para realizar una búsqueda o una repetición
instantánea. La búsqueda instantánea salta
30 segundos en el contenido. La repetición instantánea
reproduce el contenido desde 10 segundos antes.
/
: Permite saltar hacia atrás/hacia adelante.
Nota
– En función del disco, el reproductor reanuda la
reproducción desde el punto en el que se paró
anteriormente el reproductor. Para reproducir desde
el principio, pulse
dos veces y después
.
R POP-UP/MENU BD DVD : Muestra el menú
emergente. Los contenidos del menú que aparecen
varían en función del disco. Encontrará más
información sobre cómo ver y controlar el menú
emergente en el manual del disco.
La pantalla del menú principal aparece a veces al
pulsar POP-UP/MENU, dependiendo del DVD.
S ON SCREEN: Muestra el menú en pantalla (pág.
24).
8 Es
Controles y funciones
Función ID
1 Configuración del mando a distancia
Para modificar el ID de ID1 a ID2, mantenga
pulsado el botón de color rojo y el botón 2 de los
botones numéricos simultáneamente durante
7 segundos. Para modificar el ID de ID2 a ID1,
mantenga pulsado el botón de color rojo y el
botón 1 de los botones numéricos simultáneamente
durante 7 segundos.
2 Configuración de la unidad principal
Mantenga pulsado
y
en el
panel delantero simultáneamente durante
2 segundos para mostrar el ID actual si:
– No hay ningún disco en el reproductor.
– La bandeja portadiscos está cerrada.
– Se detiene la reproducción.
– “NO DISC” aparece en el visor del panel
delantero.
Mantenga pulsadas las teclas durante 2 segundos
más para cambiar el ID de ID1 a ID2.
Notas
– Si el mando a distancia está sin pilas durante unos
minutos o si se dejan pilas agotadas en el mando a
distancia, el ID del mando a distancia se ajusta
automáticamente en ID1. Si desea utilizar el mando
a distancia con el ajuste ID2, coloque pilas nuevas y
vuelva a configurar el ID del mando a distancia.
– Cuando se reinicia este reproductor, su ID del mando
a distancia será ID1.
Instalación de las pilas en el mando a
distancia
1
1
Introducción
Puede modificar el ID del mando a distancia para evitar
una utilización no deseada de otro reproductor Yamaha,
como un reproductor de DVD. Si modifica el ID del
mando a distancia, seleccione el mismo ID para la unidad
principal. La configuración predeterminada es ID1.
3
2
Notas
– Cambie las dos pilas cuando note que disminuye el
alcance del mando a distancia.
– Utilice pilas AAA, R03 y UM-4.
– Asegúrese de que las polaridades son las correctas.
Consulte la ilustración que encontrará en el interior
del compartimento de las pilas.
– Extraiga las pilas si no va a utilizar el mando a
distancia durante un periodo de tiempo prolongado.
– No mezcle pilas viejas con pilas nuevas.
– No utilice juntas pilas de diferentes tipos (como pilas
alcalinas y pilas de manganeso). Lea con atención la
información del paquete, ya que diferentes tipos de
pilas pueden tener la misma forma y color.
– Si observa fugas en las pilas, deséchelas
inmediatamente. Evite tocar el material derramado y
no deje que entre en contacto con ropa, etc. Limpie
con cuidado el compartimento antes de colocar pilas
nuevas.
– No mezcle las pilas con los residuos domésticos;
deséchelas siguiendo la normativa local.
– Mantenga las pilas fuera del alcance de los niños. En
caso de que se traguen una por accidente, acuda
inmediatamente a un médico.
– Si tiene previsto no utilizar el mando a distancia
durante un periodo de tiempo prolongado, extraiga
las pilas del mando a distancia.
– No cargue ni desmonte las pilas suministradas.
Alcance aproximado de
funcionamiento del mando a distancia
Sensor del mando a distancia
USB
Español
30°
30°
6m
9 Es
CONEXIONES
Introducción a las conexiones
Encuentre el método de conexión que corresponde a su equipo de vídeo/audio. Le recomendamos que utilice el terminal
HDMI que ofrece audio y vídeo digital de alta calidad en una única conexión. Si utiliza los demás terminales/conectores,
conecte el vídeo en primer lugar. A continuación, conecte el audio.
Conecte el vídeo y audio al
receptor de A/V mediante cable
HDMI.
¿Terminal HDMI en el
receptor de A/V? *
¿Terminal HDMI en el
televisor?
Consulte el manual de
instrucciones del receptor
de A/V.
¿Terminal HDMI en el
televisor?
INICIO
Conecte el vídeo al televisor mediante cable
HDMI.
¿Utilizar receptor de A/V?
Conecte el vídeo al receptor de AV.
¿Terminal HDMI en el
televisor?
Conecte el vídeo y el audio al televisor mediante un cable HDMI.
Conecte el vídeo al televisor.
Sí
* Cuando conecte a un receptor de A/V que no pueda dar salida a la
entrada de sonido a través de su terminal HDMI, consulte el manual de
instrucciones del receptor de A/V.
No
■ Panel trasero
0
9
AC IN
VIDEO OUT
Y
PB
DIGITAL OUT
COAXIAL
HDMI
NETWORK
AUDIO OUT
L
R
OUT
IN
REMOTE CONTROL
VIDEO
PR
COMPONENT
1 2 3
10 Es
OPTICAL
4
USB
5
6
7
8
(Modelo para)
2
Conexiones
Conexión de audio y vídeo al
receptor de A/V
A HDMI (pág. 12)
Conexiones de audio para el
receptor de A/V
Conexiones para vídeo
al televisor
A’ HDMI (pág. 12)
Conecte el audio al
receptor de AV.
D COAXIAL (pág. 14)
o
al receptor de A/V
E
OPTICAL (pág. 14)
B COMPONENT (pág. 13)
o
o
F L/R (pág. 15)
C VIDEO (pág. 13)
Conexiones de vídeo y audio al televisor
A’ HDMI (pág. 12)
Conexiones de audio al televisor
Conexiones de vídeo al televisor
Conecte el audio al
televisor.
D’ COAXIAL (pág. 14)
o
B’ COMPONENT (pág. 13)
E’ OPTICAL (pág. 14)
o
o
C’ VIDEO (pág. 13)
F’ L/R (pág. 15)
6 AUDIO OUT (L/R) (pág. 15)
2 COMPONENT (pág. 13)
7 REMOTE CONTROL (OUT/IN) (pág. 17)
3 HDMI (pág. 12)
8 AC IN (pág. 17)
4 OPTICAL (pág. 14)
9 NETWORK (pág. 16)
5 USB (pág. 16)
0 COAXIAL (pág. 14)
Español
1 VIDEO (pág. 13)
11 Es
Conexión HDMI
■ Conexión con el terminal HDMI
–
–
–
–
Puede disfrutar de imagen y sonido digital de alta calidad a través del terminal HDMI.
Conecte con firmeza un cable HDMI (de venta en el mercado) a los terminales HDMI.
Consulte la página 36 para obtener información sobre los formatos de salida de audio/vídeo.
Utilice cables HIGH SPEED HDMI con el logotipo HDMI (tal como se muestra en la contraportada).
¡Precaución!
No conecte el cable de alimentación del reproductor hasta haber realizado todas las
conexiones.
Este reproductor
VIDEO OUT
Y
PB
DIGITAL OUT
COAXIAL
HDMI
NETWORK
VIDEO
PR
COMPONENT
OPTICAL
USB
Consejos
– Cuando utilice la función Control HDMI,
consulte “Control HDMI” (pág. 31).
– Para obtener más información sobre el modo
de salida del terminal HDMI, consulte
“HDMI” (pág. 35).
– Si no aparece la imagen, consulte “Resolución
de problemas” (pág. 40).
Al terminal HDMI
■ Conexión para la
reproducción de discos
Blu-ray 3D
Cable HDMI
(de venta en el mercado)
Para disfrutar de discos Blu-ray 3D en este
reproductor, necesita los equipos y conexiones
siguientes:
– Necesita un televisor y un receptor de A/V (si
es preciso) con funcionalidad 3D.
A’
– Todos los componentes deben estar
conectados con cables HDMI.
– El Blu-ray Disc debe contener imágenes 3D.
– Debe ajustar la opción Salida 3D de
Configuración de pantalla (pág. 33) en Auto.
A
Al terminal de entrada HDMI
HDMI IN
Receptor de A/V
12 Es
TV
Conexiones de vídeo
■ Conexión a la toma de vídeo componente
¡Precaución!
2
Conexiones
– Puede disfrutar de una reproducción de color precisa y de imágenes de alta calidad a través de las tomas de
componente.
– Conecte con firmeza un cable de vídeo componente (vendido en comercios) o un cable de clavijas de vídeo a la
toma COMPONENT/toma de VIDEO.
– Consulte la página 37 para obtener información sobre los formatos de salida de vídeo.
No conecte el cable de alimentación del reproductor hasta haber realizado todas las
conexiones.
Este reproductor
VIDEO OUT
Y
Este reproductor
VIDEO OUT
DIGITAL OUT
COAXIAL
Y
HDMI
PB
PB
DIGITAL OUT
COAXIAL
HDMI
NETWORK
NETWORK
PR
VIDEO
COMPONENT
(Verde)
(Azul)
(Rojo)
OPTICAL
PR
VIDEO
COMPONENT
USB
OPTICAL
A la toma
COMPONENT
USB
(Amarillo)
A la toma
VIDEO
Cable de vídeo componente
(de venta en el comercio)
B
B’
Cable de audio/vídeo
(suministrado)
C
C’
A la toma de
entrada de vídeo
A las tomas de entrada
de componente
COMPONENT IN
(Amarillo)
(Amarillo)
(Amarillo)
Y
(Verde)
PB
(Azul)
(Verde)
PR
(Rojo)
(Verde)
(Azul)
(Azul)
(Rojo)
(Rojo)
VIDEO
AV INPUT
TV
Receptor de A/V
Español
Receptor de A/V
TV
Notas
– Si reproduce la imagen mediante una videograbadora, la imagen puede deteriorarse debido a la función de
protección contra la copia.
– Para disfrutar de discos Blu-ray 3D en este reproductor, necesita conectar un receptor de A/V, un televisor y este
reproductor con cables HDMI. Consulte la página 12.
13 Es
Conexiones de audio
■ Conexión con el terminal/toma de audio digital
– Puede conectar el equipo de audio o el televisor en la toma COAXIAL o el terminal OPTICAL.
– Conecte con firmeza un cable de audio digital coaxial (de venta en el comercio) o un cable óptico (de venta en el
comercio) a la toma de audio digital coaxial o al terminal de audio digital óptico.
– Consulte la información sobre los formatos de salida de audio en la página 36.
¡Precaución!
No conecte el cable de alimentación del reproductor hasta haber realizado todas las
conexiones.
Este reproductor
Este reproductor
VIDEO OUT
Y
PB
VIDEO OUT
DIGITAL OUT
COAXIAL
Y
HDMI
PB
DIGITAL OUT
COAXIAL
HDMI
NETWORK
NETWORK
AUDIO OUT
L
R
PR
VIDEO
COMPONENT
OPTICAL
PR
VIDEO
COMPONENT
USB
OPTICAL
USB
A la toma
COAXIAL
Al terminal
OPTICAL
Cable de audio digital coaxial
(de venta en el mercado)
D
D’
A la toma de
entrada coaxial
Receptor de A/V
Cable óptico
(de venta en el mercado)
E
E’
Al terminal de
entrada óptica
COAXIAL
OPTICAL
AV INPUT
DIGITAL AUDIO IN
TV
Receptor de A/V
TV
Consejo
– Para más información sobre el modo de salida de la toma COAXIAL/terminal OPTICAL, consulte la sección
“Coaxial / Optica” (pág. 35).
14 Es
Conexiones de audio
■ Conexión con las tomas de audio
– Puede conectar el equipo de audio o el televisor en las tomas AUDIO OUT L/R.
– Conecte con firmeza un cable de audio/vídeo (suministrado) al terminal AUDIO OUT L/R.
– Consulte la información sobre los formatos de salida de audio en la página 36.
2
¡Precaución!
Este reproductor
Conexiones
No conecte el cable de alimentación del reproductor hasta haber realizado todas las
conexiones.
DIGITAL OUT
COAXIAL
DMI
NETWORK
AUDIO OUT
OUT
L
R
IN
REMOTE CONTROL
USB
(Rojo)
A la toma AUDIO
OUT L/R
(Blanco)
OPTICAL
Cable de audio/vídeo
(suministrado)
F
F’
A la toma de entrada
de audio L/R
(Blanco) (Rojo)
Receptor de A/V
R
AUDIO IN
(Rojo)
L
(Blanco)
(Rojo)
(Blanco)
AUDIO
TV
Español
15 Es
Conexión de red y USB
■ Conexión con el terminal NETWORK
– El contenido del PC se puede reproducir conectando este reproductor a la red.
– Puede disfrutar de un amplio abanico de contenidos con funciones interactivas mediante la conexión a Internet
cuando reproduzca discos compatibles BD-Live. Consulte la página 27 para obtener más información sobre las
funciones de BD-Live.
Notas
–
–
–
–
–
Conecte con firmeza un cable de red (de venta en el mercado) al terminal NETWORK.
Utilice solo un cable de red STP (par trenzado blindado).
Cuando utilice Internet, necesitará una conexión a Internet de banda ancha como se muestra más abajo.
Conecte el otro conector del cable de red al nodo/enrutador de banda ancha.
Cuando utilice una conexión a Internet de banda ancha, es necesario un contrato con un proveedor de servicios de
Internet. Para más información, póngase en contacto con su proveedor de servicios de Internet más cercano.
– Consulte el manual de instrucciones de su equipo, ya que el equipo conectado y el método de conexión pueden
variar dependiendo de su entorno de Internet.
– Emplee un cable de red/enrutador compatible con 10BASE-T/100BASE-TX.
■ Conexión con el conector USB
– Puede conectar un dispositivo de memoria USB para Almacenamiento Local al conector USB del panel posterior (o
delantero) del reproductor para guardar los datos BD-Live o para actualizar el software de este reproductor.
– Conecte con firmeza un dispositivo de memoria USB (de venta en el mercado) al conector USB.
PRECAUCIÓN:
– No desconecte el dispositivo de memoria USB
ni desenchufe el cable de alimentación mientras
se estén realizando las operaciones de BD-Live
(pág. 27) o se esté llevando a cabo la
actualización del software.
– No utilice un cable de extensión USB cuando
conecte un dispositivo de memoria USB al
conector USB del reproductor. El uso de un
cable de extensión USB puede impedir que el
reproductor funcione correctamente.
Nota
– Yamaha no puede garantizar que los
dispositivos de memoria USB de todas las
marcas funcionen con este reproductor.
Este reproductor
VIDEO OUT
Y
PB
DIGITAL OUT
COAXIAL
HDMI
NETWORK
AUDIO OUT
L
R
VIDEO
PR
COMPONENT
OPTICAL
USB
Al conector
USB
Al terminal
NETWORK
Dispositivo de memoria USB
(de venta en el mercado)
Cable de red
(de venta en el mercado)
Consejo
– Para guardar datos de
BD-Live en el
dispositivo de memoria
USB del panel frontal,
ajuste Almacenamiento
Local en USB Frontal
(pág. 31).
Al terminal
LAN
LAN
Internet
Módem
Nodo o enrutador
de banda ancha
PC
Después de la conexión
– Para configurar el parámetro de Red manualmente, consulte “Red” (pág. 32).
– Para reproducir el contenido del PC conectado a su red, consulte “Uso de contenidos de red” (pág. 20).
16 Es
Otras conexiones
■ Conexión a las tomas REMOTE
CONTROL
¡Precaución!
No conecte el cable de alimentación del
reproductor hasta haber realizado todas
las conexiones.
– Para más detalles sobre la función SCENE, consulte
el manual de instrucciones suministrado con su
receptor de A/V Yamaha.
– Puede conectar un componente Yamaha (como, por
ejemplo, un reproductor de CD) que sea compatible
con la función SCENE a la toma REMOTE
CONTROL (OUT) de este reproductor.
2
Conexiones
– Puede transmitir y recibir las señales del mando a
distancia conectando a las tomas REMOTE
CONTROL (OUT/IN).
– Conecte con firmeza cables con mini clavija mono
de 3,5 mm (de venta en el comercio) en los
terminales REMOTE CONTROL (OUT/IN).
– Si su receptor de AV es un producto Yamaha y tiene
la capacidad de transmitir señales de control
SCENE, puede controlar el reproductor con la
función SCENE.
Consejos
■ Conexión del cable de
alimentación
– Después de realizar todas las conexiones, enchufe el
cable de alimentación suministrado a la AC IN de la
parte trasera del reproductor. A continuación
enchúfelo en una toma de CA.
Este reproductor
AC IN
RK
AUDIO OUT
L
R
OUT
IN
REMOTE CONTROL
(Modelo para Europa)
A la entrada de CA
A la toma
REMOTE
CONTROL (OUT)
A la toma
REMOTE
CONTROL (IN)
A la toma de CA
Nota
Cable con mini
clavija mono de
3,5 mm
(de venta en el
mercado)
Cable con mini clavija
mono de 3,5 mm
(de venta en el mercado)
– PARA PREVENIR EL RIESGO DE DESCARGAS
ELÉCTRICAS, NO TOQUE LAS PARTES SIN
AISLAMIENTO DE NINGÚN CABLE CUANDO
EL CABLE DE ALIMENTACIÓN ESTÉ
CONECTADO.
A la toma de
entrada del mando
a distancia
A la toma de
salida del mando
a distancia
REMOTE CONTROL IN
Receptor de señales
infrarrojas o componente
Yamaha (por ejemplo, un
receptor A/V)
Español
Componente Yamaha
REMOTE CONTROL OUT
17 Es
REPRODUCCIÓN
Asistente inicial/Configuración Sencilla
■ Configuración con el Asistente inicial/Configuración Sencilla
Asistente inicial/Configuración Sencilla le permite configurar fácilmente el idioma, la resolución y la relación de aspecto
de la pantalla. La pantalla del Asistente inicial aparece la primera vez que enciende este reproductor después de
comprarlo. La misma configuración se puede realizar desde el menú SETUP = Sistema = Configuración Sencilla.
1 Cuando aparezca la pantalla Configuración Sencilla,
pulse ENTER para empezar con la Configuración
Sencilla.
2 Configure el idioma, la resolución y la relación de
aspecto de la pantalla siguiendo los mensajes que
aparecen en pantalla.
Notas
– Si no aparece la imagen tras completar Asistente
inicial/Configuración Sencilla, consulte “Resolución
de problemas” (pág. 40).
– Aparecerá un mensaje de advertencia acerca de la
reproducción de vídeo en 3D al encender este
reproductor. Pulse ENTER para descartar el
mensaje o CLEAR para desactivarlo (pág. 31).
Menú HOME/MEDIA
Los menús HOME y MEDIA le permiten examinar y reproducir archivos multimedia guardados en discos de datos,
dispositivos de memoria USB y en su red.
Nota
Iconos sobre el menú MEDIA
– Para obtener información sobre los discos y formatos
que se pueden reproducir, consulte la página 3.
: Reproduce el disco que hay en la bandeja o muestra
el contenido del disco de datos.
: Muestra el contenido del dispositivo de memoria
USB conectado al conector USB.
: Busca un servidor DLNA (pág. 20) en la red.
: Muestra el contenido del servidor DLNA conectado.
■ Reproducción de fotos/música/
vídeo
Funcionamiento básico
2/3/5/a: Mueve la selección.
2: Vuelve a la carpeta principal.
HOME: Permite entrar/salir de la pantalla de menú
HOME.
ENTER: Confirma la carpeta/archivo.
PIP
SETUP
2ND
AUDIO
HOME
TOP MENU
REPEAT
A B
POP-UP MENU
ENTER
RETURN
18 Es
ON SCREEN
Menú HOME/MEDIA
Operaciones comunes para la
reproducción de archivos en una
carpeta seleccionada
Ejemplo: Selección de un archivo de película en un
dispositivo de memoria USB
4 Seleccione la carpeta de Foto, Música, Vídeo o
AVCHD que desea reproducir y, a continuación, pulse
ENTER.
Para volver a la carpeta principal, pulse 2 o seleccione
.
Nota
3
Reproducción
– Detenga la reproducción del vídeo antes de
desplazarse a la pantalla del menú MEDIA.
1 Pulse HOME para ir a la pantalla del menú HOME.
Nota
Consejo
– La pantalla del menú HOME puede variar en función
del modelo.
2 Pulse 2/3/5/a para seleccionar MEDIA y, a
continuación, pulse ENTER.
Aparece la pantalla MEDIA.
– Tenga en cuenta que en el siguiente paso solo se
mostrarán los archivos del tipo que seleccione en
este paso. Por ejemplo, si selecciona la carpeta Foto
en este paso, solo se mostrarán archivos de fotos
después de este paso. Cuando desee reproducir un
tipo de archivo que no sea de fotos, vuelva a este
paso y seleccione de nuevo el tipo de archivo.
5 Seleccione las carpetas que contienen el archivo que
desea reproducir.
3 Seleccione el elemento que contiene el archivo que
desea reproducir y, a continuación, pulse ENTER.
Español
Continúa en la página siguiente. \
19 Es
Menú HOME/MEDIA
6 Seleccione el archivo que desea reproducir y, a
continuación, pulse ENTER.
Si selecciona un archivo de vídeo, se inicia la
reproducción.
Si selecciona un archivo de música, se muestra la
pantalla de estado y se inicia la reproducción.
Si selecciona un archivo de fotos, se inicia el pase de
diapositivas.
■ Uso de contenidos de red
Este reproductor cuenta con la certificación DLNA
(pág. 42). Puede administrar fotos, música y vídeos
almacenados en servidores DLNA de su red doméstica.
Reproducción de contenido
compartido
1 Para reproducir archivos guardados en su PC, instale
un software de servidor DLNA como, por ejemplo,
Windows Media Player 12 y comparta los archivos que
desee reproducir.
2 Encienda el PC con el software de servidor DLNA
instalado o el dispositivo DLNA conectado a su red
doméstica.
3 Pulse HOME para mostrar la pantalla del menú
HOME. Seleccione MEDIA para pasar al menú
MEDIA. Los servidores DLNA conectados a la red
aparecen en pantalla.
Consejo
– Para disfrutar del pase de diapositivas con música,
pulse HOME para volver a la pantalla del menú
HOME mientras se reproduce la música y seleccione
un archivo de fotos.
Nota
– Es posible que el archivo mostrado no se reproduzca
dependiendo del contenido.
Operaciones para la visualización de
fotos
Durante la visualización de fotos, los botones del mando a
distancia funcionan como se indica a continuación.
: Detiene el pase de diapositivas y vuelve al explorador
de archivos.
: Establece una pausa en un pase de diapositivas.
: Reproduce un pase de diapositivas.
: Pasa a la fotografía siguiente.
: Pasa a la fotografía anterior.
: Aumenta la velocidad de un pase de diapositivas en
3 pasos.
: Reduce la velocidad de un pase de diapositivas en 3
pasos.
5: Invierte una foto.
a: Muestra la foto reflejada.
2: Gira una foto en sentido contrario a las agujas del
reloj.
3: Gira una foto en el sentido de las agujas del reloj.
ZOOM: Amplía/reduce una foto (ampliar/reducir zoom: 3
pasos cada uno).
5/a/2/3: Permite desplazarse en modo de zoom
cuando la foto es mayor que la pantalla.
DIGEST: Cambia a modo de miniaturas (pág. 6). Cuando
se muestran las miniaturas, puede ir a la página siguiente o
anterior con
/
.
20 Es
Notas
– Si su servidor DLNA no aparece en la lista,
seleccione Buscar DLNA para buscarlo.
– Dependiendo del servidor DLNA, es posible que sea
necesario autorizar al reproductor desde el servidor.
– Para reproducir el archivo guardado en el servidor
DLNA, el reproductor y el servidor deben estar
conectados al mismo punto de acceso.
– Es posible que los requisitos de archivo no siempre
sean compatibles. Puede haber algunas restricciones
dependiendo de las características de los archivos y
de la capacidad del servidor DLNA.
4 Seleccione el archivo que desee reproducir.
Notas
– La calidad de funcionamiento y reproducción podría
verse afectada por las condiciones de la red
doméstica.
– Es posible que los archivos de soportes extraíbles
como dispositivos de memoria USB o unidades de
DVD del servidor de soportes no se compartan
correctamente.
Uso de servicios de red
Puede ver al instante los vídeos que ofrecen los servicios de red siguientes.
– YouTube
– Picasa (pág. 22)
– Netflix (pág. 23)
3
Notas
Reproducción
– El acceso a contenidos suministrados por terceros requiere una conexión a Internet de alta velocidad y, a veces,
también un registro de cuenta y una suscripción de pago.
– Los servicios de contenidos de terceros pueden modificarse, suspenderse, interrumpirse o dejar de proporcionarse
en cualquier momento sin previo aviso, y Yamaha no asume ninguna responsabilidad en este sentido.
– Es posible que parte de los contenidos solo estén disponibles en algunos países y que se presenten en idiomas
específicos.
– Yamaha no garantiza que los servicios de contenidos se seguirán proporcionando ni estarán disponibles durante un
periodo de tiempo concreto y rechaza cualquier garantía de este tipo, ya sea expresa o implícita.
Reproducción de vídeos de YouTube™
Puede ver películas de YouTube a través de Internet mediante este reproductor.
Los servicios pueden modificarse sin previo aviso.
1 Pulse HOME para mostrar la pantalla del menú
HOME.
Consejo
– La pantalla del menú HOME puede variar en función
del modelo.
2 Pulse 2/3/5/a para seleccionar YouTube y, a
continuación, pulse ENTER.
Consejo
– Para salir de YouTube, pulse RETURN.
Español
21 Es
Reproducción de fotografías desde un álbum Web de Picasa™
Puede ver fotografías desde un álbum Web de Picasa en Internet con este reproductor.
El servicio puede modificarse sin previo aviso.
1 Registre su nombre de usuario y contraseña en el
ordenador antes de utilizar el álbum Web de Picasa.
2 Pulse HOME para mostrar la pantalla del menú
HOME.
Pulse 2/3/5/a para seleccionar Picasa y, a
continuación, pulse ENTER.
Consejo
– La pantalla del menú HOME puede variar en función
del modelo.
3 Cuando acceda a Picasa desde este reproductor por
primera vez, seleccione el icono Nuevo usuario e
introduzca su nombre de usuario y contraseña.
Consejo
– Para salir de Picasa, pulse RETURN.
22 Es
Reproducción de vídeos de Netflix™
Puede ver películas y episodios de series de televisión al instante desde Netflix a través de Internet mediante este
reproductor. Para hacerse miembro de Netflix, vaya a www.netflix.com.
Netflix está disponible en algunos países. Se requiere suscripción ilimitada.
Consulte más información en www.netflix.com.
3
■ Inicio de Netflix
Reproducción
1 Pulse HOME para mostrar la pantalla del menú
HOME.
Pulse 2/3/5/a para seleccionar NETFLIX y, a
continuación, pulse ENTER.
También puede pulsar NETFLIX en el mando a
distancia para iniciar Netflix.
Consejos
– La pantalla del menú HOME puede variar en función
del modelo.
– Para volver a la pantalla del menú HOME, pulse
RETURN.
Notas
– Cuando se requiere una actualización de software,
aparece un aviso de actualización al seleccionar
Netflix. En este caso, lleve a cabo la actualización de
software.
– Para obtener más información sobre Netflix, vaya al
sitio web de Netflix en www.netflix.com .
– Para desactivar Netflix, consulte la sección
“Información Netflix” (pág. 32).
Español
23 Es
Funciones avanzadas de reproducción
En este capítulo se explica la reproducción de discos
Blu-ray, DVD y CD de venta en el mercado, así como
discos DVD-RW/R grabados.
Nota
– Para conocer las funciones básicas de reproducción,
consulte la página 6.
■ Menú en pantalla
DVD
–
–
–
–
–
–
–
Normal
Shuffle CH (capítulo)
Shuffle TT (título)
Shuffle All
Aleatorio CH (capítulo)
Aleatorio TT (título)
Aleatorio All
VIDEO
Para mostrar el menú en pantalla, pulse ON SCREEN. A
continuación, pulse 5/a/2/3 para seleccionar una
opción y, después, pulse ENTER para utilizar la función
deseada.
MUSIC
PHOTO
– Normal
– Shuffle F (carpeta)
– Aleatorio F (carpeta)
Audio BD DVD VIDEO : Muestra el idioma/señal de
audio del Blu-ray Disc/DVD seleccionado. Puede
seleccionar el tipo de audio deseado.
Ángulo BD DVD : Muestra el número del ángulo
seleccionado en ese momento. Si el vídeo se ha grabado
con varios ángulos, puede cambiar el ángulo.
Subtítulo BD DVD VIDEO : Muestra el idioma de
los subtítulos seleccionados actualmente si hay subtítulos.
El menú en pantalla consta de las siguientes opciones.
Título BD DVD VIDEO : Muestra el número del
título que se está reproduciendo. Puede ir al título deseado
seleccionándolo desde esta opción.
Capítulo BD DVD VIDEO : Muestra el número del
capítulo que se está reproduciendo. Puede ir al capítulo
deseado seleccionándolo desde esta opción.
Pista/Archivo CD VIDEO MUSIC PHOTO :
Muestra el número de la pista o archivo que se está
reproduciendo. Puede ir a la pista o al archivo deseado
seleccionándolo desde esta opción.
Hora BD DVD CD VIDEO MUSIC : Muestra el
tiempo de reproducción. Seleccione el tipo de
visualización entre las siguientes posibilidades:
– Tiempo de reproducción transcurrido del título,
capítulo, disco, pista o archivo
– Tiempo de reproducción restante del título, capítulo,
disco, pista o archivo
Modo/Modo de reproducción
DVD
CD
VIDEO
MUSIC
PHOTO : Muestra el
modo de reproducción actual. Puede seleccionar uno de
los modos de reproducción siguientes:
CD
– Normal: Reproducción normal.
– Shuffle: Reproducción aleatoria sin repetición.
– Aleatorio: Reproducción aleatoria con repetición.
24 Es
Estilo subtítulos BD : Muestra el estilo de los
subtítulos seleccionados. Esta función solo está disponible
para subtítulos externos de archivo de vídeo. Puede
seleccionar el estilo de texto deseado de los subtítulos.
Bitrate BD DVD CD VIDEO
bitrate de la señal de audio/vídeo.
MUSIC : Muestra el
Video secundario BD : Activa o desactiva PIP
(pág. 6).
Audio Secundario BD : Activa o desactiva el audio
secundario (pág. 6).
Búsqueda Ins
BD
DVD
CD
VIDEO
MUSIC : Salta 30 segundos.
VIDEO
MUSIC : Reproduce el
Repetición Ins
BD
DVD
CD
contenido desde 10 segundos antes.
Pase de diapositivas PHOTO :
Muestra la velocidad del pase de diapositivas. Puede
seleccionar la velocidad del pase de diapositivas entre
Lento/Medio/Rápido.
Transición PHOTO : Muestra cómo aparece la foto en
la pantalla. Puede seleccionar el tipo de transición.
Code Page VIDEO : Permite seleccionar el código de
caracteres de los subtítulos que ha agregado al vídeo DivX
(pág. 42).
Funciones avanzadas de reproducción
■ Menú de estado
Muestra varios ajustes, cómo los subtítulos, el ángulo y el
número de título/capítulo/pista reproducido. Para mostrar
el menú de estado, pulse STATUS. El menú de estado
consta de los siguientes menús.
BD
DVD
CD
MUSIC
Ejemplo: Iconos cuando se reproduce un archivo de
música
123 4
5
6
7
VIDEO
Ejemplo: Iconos cuando se reproduce un Blu-ray Disc
2
1
4
3
5
Reproducción
8 7
3
6
8
1
2
1
(Estado de reproducción)
2
(Icono de tipo de disco/archivo de vídeo)
3
(Número de título que se reproduce): Puede
saltar al título especificado con la tecla SEARCH
(pág. 7).
4
(Número de capítulo que se reproduce):
Puede saltar al capítulo especificado con la tecla
SEARCH (pág. 7).
5
(Tiempo de reproducción transcurrido):
Puede saltar al punto especificado con la tecla
SEARCH (pág. 7).
6
7
8
(Subtítulos seleccionados actualmente):
Puede cambiar el idioma de los subtítulos con la tecla
SUBTITLE.
(Audio seleccionado actualmente): Puede
cambiar el formato o idioma de audio con la tecla
AUDIO.
3
(Estado de reproducción)
(Modo repetición): Muestra el modo repetición
actual (pág. 7).
(Icono de tipo de disco/archivo de música)
4 (Gráficos) MUSIC : Muestra gráficos si están
contenidos en el archivo.
5
(Número de pista/archivo que se
reproduce): Puede saltar a la pista especificada con
la tecla SEARCH (pág. 7).
6 (Información) MUSIC : Muestra información
musical si está contenida en el archivo.
7
(Tiempo de reproducción transcurrido):
Puede saltar al punto especificado con la tecla
SEARCH (pág. 7).
8 (Barra de progreso) MUSIC : Muestra el estado de
progreso de la canción actual.
PHOTO
(Modo repetición): Muestra el modo repetición
actual (pág. 7).
(Estado de reproducción)
2
(Icono de archivo de fotos)
3
(Número del archivo mostrado)
4
(Modo repetición): Muestra el modo repetición
actual (pág. 7).
5 (Velocidad de pase de diapositivas)
25 Es
Español
1
Funciones avanzadas de reproducción
■ Uso de Marcador
DVD
VIDEO
Le permite establecer un Marcador en un punto
especificado del vídeo. Después de establecer el
Marcador, puede ir al punto elegido utilizando esta
función. Puede definir hasta 12 marcadores.
1 Pulse MARKER durante la reproducción de la película
para definir un Marcador. Se muestran el número de
Marcador y el estado.
2 Pulse ENTER para programar el orden de
reproducción.
En un disco de audio, pulse 5/a para seleccionar una
pista y, a continuación, pulse ENTER.
En un disco DVD de vídeo, seleccione un título
(indicado con TT) y un capítulo (indicado con CH) en
lugar de una pista.
Para borrar una pista configurada, seleccione la pista
que desea borrar y, a continuación, pulse CLEAR.
Pulse RETURN para cancelar la reproducción del
programa.
2 Después de establecer el Marcador, pulse DIGEST
para mostrar la barra de selección de Marcador.
3 Pulse 2/3 para seleccionar el Marcador que desee
reproducir y, a continuación, pulse ENTER.
Pulse CLEAR para eliminar el Marcador seleccionado.
Nota
– Cuando finaliza la reproducción (por ejemplo, al
expulsar el disco o al presionar
dos veces), los
marcadores se eliminan automáticamente.
■ Programación de la
reproducción DVD CD
Esta opción le permite programar el orden de
reproducción de las pistas de un disco de audio o de los
capítulos de un DVD.
Pulse PROGRAMA durante la reproducción para mostrar
la ventana PROGRAMA para programar el orden de
reproducción.
Puede programar hasta 15 pistas/capítulos.
Ejemplo: Programación del orden de reproducción de
pistas de CD
1 Pulse PROGRAMA durante la reproducción.
3 Una vez finalizada la programación, pulse
para
definir e iniciar la reproducción del programa.
4 Para cancelar la reproducción del programa, detenga la
reproducción por completo pulsando
dos veces.
■ Uso de la búsqueda
BD
DVD
CD
VIDEO
MUSIC
PHOTO
Esta opción le permite ir a un punto específico durante la
reproducción.
1 Pulse SEARCH durante la reproducción. Aparece la
barra de estado.
2 Pulse 5/a/2/3 para seleccionar una de las opciones
siguientes y, a continuación, pulse ENTER.
BD DVD :
– Número de título (indicado con
)
– Número de capítulo (indicado con
)
– Tiempo de título transcurrido (indicado con
)
– Tiempo de capítulo transcurrido (indicado con
CD :
– Número de pista (indicado con
)
– Tiempo de pista transcurrido (indicado con
)
– Tiempo de disco transcurrido (indicado con
VIDEO MUSIC :
)
– Número de archivo (indicado con
)
– Tiempo de archivo transcurrido (indicado con
PHOTO :
– Número de archivo (indicado con
)
3 Pulse 5/a o los botones numéricos para definir o
ajustar el valor de la opción seleccionada y pulse
ENTER para ir al punto especificado.
4 Para cerrar la barra de estado, pulse STATUS.
26 Es
)
)
Funciones avanzadas de reproducción
■ Uso de BONUSVIEW™ y
BD-Live™
■ Utilización de la función BD-Live™
Este reproductor admite las funciones de reproducción de
BONUSVIEW (pág. 42) (BD-ROM Perfil 1 versión 1.1) y
BD-Live (pág. 42) (BD-ROM Perfil 2).
1. Ajuste la configuración de red
(pág. 32).
Nota
■ Utilización de la función Imagen
en Imagen (reproducción de
audio/vídeo secundario)
El Vídeo BD que incluye audio y vídeo secundario
compatible con Imagen en Imagen se puede reproducir
con audio y vídeo secundario simultáneamente como un
vídeo pequeño en la esquina.
Vídeo principal
Vídeo secundario
Los datos de BD-Live se guardan en un dispositivo
de memoria USB conectado a este reproductor. Para
disfrutar de estas funciones, conecte un dispositivo
de memoria USB compatible con USB 2.0 de alta
velocidad (480 Mbit/s) al conector USB
seleccionado en Almacenamiento Local (pág. 31).
La configuración predeterminada es el conector USB
del panel trasero.
– La carpeta BUDA se crea automáticamente en el
dispositivo de memoria USB cuando es necesario.
– Si el espacio de almacenamiento es insuficiente, los
datos no se copiarán/descargarán. Elimine datos
innecesarios o utilice otro dispositivo de memoria USB.
– La carga de los datos (lectura/escritura) puede llevar
un tiempo.
3
Reproducción
– Las funciones y el método de reproducción varían
según el disco. Siga las indicaciones del disco o del
manual de usuario suministrado.
2. Conecte el dispositivo de memoria
USB al reproductor (pág. 16).
Notas
Mientras se muestra Marca PIP (
)o
Marca Audio Secundario (
), pulse
PIP para activar o desactivar la
función Imagen en imagen.
Notas
– Para escuchar audio secundario, asegúrese de que el
ajuste Salida de audio (Coaxial / Optica o HDMI) se
ha definido en PCM o Recodificar (pág. 35).
– Dependiendo del disco, para escuchar audio
secundario, es posible que tenga que activar el audio
secundario desde el menú principal del disco
(pág. 8).
– Dependiendo del contenido, el audio y el vídeo
secundario para Imagen en Imagen pueden
reproducirse y desaparecer automáticamente.
Además, puede haber restricciones con respecto a las
áreas que pueden reproducirse.
– Yamaha no puede garantizar que los dispositivos de
memoria USB de todas las marcas funcionen con
este reproductor.
– No utilice un cable de extensión USB cuando conecte
un dispositivo de memoria USB al conector USB del
reproductor. El uso de un cable de extensión USB puede
impedir que el reproductor funcione correctamente.
3. Reproduzca el disco.
4. Ejecute BD-Live siguiendo las
instrucciones del disco.
Notas
27 Es
Español
– En relación con el método de reproducción de
contenidos BD-Live, etc., lleve a cabo las
operaciones de acuerdo con las instrucciones del
manual del Blu-ray Disc.
– Para disfrutar de las funciones de BD-Live, realice la
conexión de red (pág. 16) y los ajustes de Red
(pág. 32).
– Consulte el apartado “Conexión BD-Live” (pág. 33)
para obtener información sobre la configuración para
restringir el acceso a contenidos BD-Live.
– El tiempo que se necesita para descargar los programas
ofrecidos al dispositivo de memoria USB conectado a
este reproductor depende de las velocidades de conexión
a Internet y del volumen de datos de los programas.
– Es posible que los programas BD-Live suministrados
a través de Internet no puedan mostrar la conexión
dependiendo del estado (actualización) del proveedor.
En este caso, extraiga el disco y vuelva a intentarlo.
– Si la pantalla BD-Live no aparece durante un rato
después de seleccionar la función BD-Live en el
menú del Blu-ray Disc, es posible que el dispositivo
de memoria USB no tenga suficiente espacio libre.
En este caso, expulse el disco del reproductor y, a
continuación, borre los datos del dispositivo de
memoria USB utilizando el menú “Formato” de
“Almacenamiento Local” (pág. 31).
AJUSTES
Menú SETUP
El menú SETUP permite realizar diversos ajustes y configuraciones audiovisuales en las funciones utilizando el mando a
distancia.
Menú/submenú
Sistema
Configuración
General
Idioma
Reproducción
Seguridad
Red
28 Es
Opción
Función
Página
Protector de pantalla
Activa/desactiva el protector de pantalla.
31
Reproducción
Automática Disco
Ajusta el reproductor para que inicie automáticamente la
reproducción del disco.
31
Control HDMI
Configura el reproductor para que reciba la señal de control
desde el mando a distancia de su televisor/receptor de A/V.
31
Control de Red
Activa o desactiva el control a través de Ethernet.
31
Cargar
configuracion por
defecto
Restablece todos los ajustes a los valores predeterminados,
excepto el ajuste Seguridad.
31
Actualizar
Aplica la actualización del reproductor.
31
Configuración
Sencilla
Ajusta el idioma, la resolución y la relación de aspecto de la
pantalla.
31
Almacenamiento
Local
Muestra el estado de Almacenamiento Local (pág. 31),
formatea Almacenamiento Local y selecciona el conector
USB delantero o posterior de Almacenamiento Local.
31
Mensaje
Reproducción 3D
Muestra un mensaje de advertencia acerca de la reproducción
de vídeo en 3D al encender este reproductor.
31
OSD
Selecciona el idioma del menú en pantalla.
31
Menú
Permite dar prioridad al idioma del menú del disco.
31
Audio
Permite dar prioridad al idioma del audio.
32
Subtítulo
Permite dar prioridad al idioma de los subtítulos.
32
Subtítulos
Activa o desactiva los subtítulos.
32
Marca de Angulo
Permite mostrar la Marca de Angulo cuando se reproducen
Blu-ray Disc/DVD con varios ángulos.
32
Marca PIP
Permite mostrar la Marca PIP cuando se reproducen Blu-ray
Disc/DVD con Imagen en imagen.
32
Marca Audio
Secundario
Permite mostrar la Marca Audio Secundario cuando se
reproducen Blu-ray Disc/DVD con audio secundario.
32
Memoria última
Configura este reproductor para que recuerde la última
posición de reproducción de un disco cuando se pone en
modo de espera o si se abre la bandeja portadiscos.
32
DivX (R) VOD
DRM
Muestra el código de registro del vídeo DivX(R).
Información Netflix
Desactiva este reproductor de Netflix y muestra el ESN
(Número de serie electrónico).
32
Cambiar Contraseña
Permite cambiar la contraseña de Control Paterno y Código
de país.
32
Control Paterno
Establece el Control Paterno en función del contenido del
disco.
32
32
Código de país
Establece el Código de país.
32
Conexión a Internet
Permite definir la conexión a Internet en Permitir/Desactivar.
32
Configuración de
conexión
Permite definir un método de conexión de red.
Información
Muestra la pantalla de información de red.
32
33
Prueba de conexión
Realiza la prueba de conexión de red.
33
Configuración IP
Permite definir la configuración IP en Auto/Manual.
33
Conexión BD-Live
Permite definir la conexión a BD-Live en Autorizada/
Permitida Parcialmente/Prohibido.
33
DLNA
Permite definir la conexión a DLNA en Permitir/Desactivar.
33
Configuración
Proxy
Permite definir la configuración proxy.
33
Menú SETUP
Menú/submenú
Configuración de
pantalla
Procesamiento
de Video
Salida de audio
Configuración de
audio
Opción
Función
Página
Salida 3D
Selecciona vídeos en 3D o 2D.
33
Pantalla de TV
Ajusta la relación de aspecto de la pantalla del televisor
conectado y ajusta la salida de vídeo.
33
Seleccionar Salida
de Video
Selecciona la resolución de la salida de vídeo.
Sistema de TV
Permite seleccionar el Sistema de TV entre NTSC/PAL/
Multi.
34
Color Space
Permite seleccionar Color Space entre YCbCr 4:4:4/YCbCr
4:2:2/Full RGB/RGB.
34
HDMI Deep Color
Permite seleccionar HDMI Deep Color entre 30 bits/36 bits/
48 bits/Desactivar.
34
HDMI 1080p 24Hz
Ajusta HDMI 1080p 24Hz en la configuración automática o
lo desactiva.
4
34
Sincronismo de
labios
Ajusta el retardo entre vídeo y audio, como por ejemplo
cuando el movimiento de la boca no se corresponde con la
voz.
34
Ajustes
TV
34
Modo de Vídeo
Ajusta la imagen visual.
34
Ajuste de color
Ajusta Brillo/Saturación/Tonalidad para cada color.
35
Reducción de ruido
Ajusta el nivel de Reducción de ruido.
35
Modo
desentrelazado
Ajusta cómo detectar la señal de vídeo.
Coaxial / Optica
Permite seleccionar el modo de salida de la toma COAXIAL/
terminal OPTICAL
entre Bitstream/PCM/Recodificar/Desactivar.
35
HDMI
Permite seleccionar el modo de salida del terminal HDMI
entre Bitstream/PCM/Recodificar/Desactivar.
35
Downsampling
Permite seleccionar la frecuencia de submuestreo de la señal
de audio digital entre 48K/96K/192K.
35
35
DRC
Define el valor de DRC (Compresión de gama dinámica).
Ajuste de altavoz
Mezcla descendente
2 Canales
Establece la salida de audio de la toma AUDIO OUT L/R.
Postprocesamiento
Mezcla ascendente
Convierte la señal de audio de 2 canales en multicanal.
35
35
35
Muestra la versión de software y la dirección MAC (pág. 42).
35
Sistema de
Información
Español
29 Es
Menú SETUP
■ Ejemplo de funcionamiento del
menú SETUP
Debe acceder a la pantalla del menú SETUP para realizar
ajustes en el reproductor. A continuación se explican las
operaciones básicas del menú SETUP.
SUBTITLE
ANGLE
4. Introduzca la contraseña.
Introduzca la contraseña con los botones numéricos.
– La contraseña predeterminada es 0000.
– No puede ir a la siguiente pantalla de
configuración hasta que no haya introducido la
contraseña correcta.
– Para cambiar la contraseña, consulte el apartado
“Cambiar Contraseña” (pág. 32).
AUDIO
CLEAR
PIP
SEARCH
SETUP
TOP MENU
2ND
SHUFFLE
REPEAT
POP-UP MENU
ENTER
RETURN
ON SCREEN
Ejemplo: Ajuste de Control Paterno
Nota
– Algunas opciones no se pueden ajustar durante la
reproducción. En este caso, pulse dos veces
para
detener la reproducción completamente antes de
realizar el ajuste.
5. Seleccione otra opción.
Pulse 5/a para seleccionar el nivel de Control
Paterno para Blu-ray Disc/DVD y, a continuación,
pulse ENTER.
1. Muestre la pantalla del menú
SETUP.
Pulse SETUP para mostrar la pantalla del menú
SETUP.
Pulse 2/3 para seleccionar Configuración General
y, a continuación, pulse ENTER o a.
2. Seleccione un submenú.
Pulse 5/a para seleccionar Seguridad y, a
continuación, pulse ENTER o el cursor 3.
3. Seleccione una opción del menú.
Pulse 5/a para seleccionar Control Paterno y, a
continuación, pulse ENTER o el cursor 3.
30 Es
6. Salga de la pantalla del menú.
Pulse 2 para volver al menú anterior.
Menú SETUP
■ Configuración General
Los ajustes predeterminados están marcados con “
* ”.
Sistema
Protector de pantalla
Puede activar o desactivar el protector de pantalla.
Cuando se activa, el reproductor pasará al modo de
protector de pantalla si no se utiliza durante 3 minutos.
Posteriormente, el reproductor pasará al modo de espera
cuando no se utilice durante 27 minutos.
Activar*, Desactivar
Activar*, Desactivar
Control HDMI
Puede ajustar el reproductor para que reciba una señal de
control desde un televisor/receptor de A/V compatible con la
función Control HDMI a través de un cable HDMI (pág. 12).
Activar, Desactivar*
Utilización de la función Control HDMI
Con la función Control HDMI, puede controlar de
forma interactiva este reproductor con su televisor (si es
compatible con la función Control HDMI).
Cuando se conecta el reproductor a un televisor compatible
con la función Control HDMI mediante un cable HDMI y
se activa el Control HDMI en el menú SETUP (pág. 31),
pueden realizarse las funciones indicadas a continuación.
• Función de selección de entrada automática
Cuando inicie la reproducción en este reproductor, el
selector de entrada del televisor (y de un receptor A/V
si este reproductor está conectado con el televisor
mediante un receptor A/V) pasará automáticamente a
este reproductor. La alimentación del televisor se
enciende automáticamente dependiendo del televisor.
• Función de apagado automático
Si apaga el televisor cuando este reproductor está en modo
de parada y no se visualiza la pantalla del menú SETUP,
este reproductor también se apagará automáticamente.
Activar, Desactivar*
Notas
– Cuando Control de Red está habilitado, el consumo
de energía durante el modo de espera aumenta por la
función de control de red.
– Cuando está activado en Activar, se reduce el tiempo
de inicio del sistema.
Cargar configuracion por defecto
Puede restablecer todos los ajustes de este reproductor al
ajuste predefinido, excepto el ajuste Seguridad (pág. 32).
Para obtener información sobre los ajustes
predeterminados, consulte las páginas 28–35.
Actualizar
Puede actualizar el software manualmente desde
Almacenamiento USB o Red. Para obtener información
sobre la actualización de software, consulte
“Actualización de software” (pág. 38).
Configuración Sencilla
Puede realizar la Configuración Sencilla (pág. 18).
Almacenamiento Local
Puede mostrar información de Almacenamiento Local,
formatear Almacenamiento Local y seleccionar USB
Frontal/USB Trasera para guardar los datos de BD-Live.
Para formatear (vaciar) la carpeta “BUDA” en el dispositivo
de memoria USB, seleccione Información y pulse ENTER
mientras “Formato” está seleccionado en la pantalla.
4
Ajustes
Reproducción Automática Disco
Puede activar o desactivar la Reproducción Automática
Disco. Cuando se activa, el disco se reproducirá
automáticamente después de cargarlo.
Control de Red
Puede ajustar el control a través de Ethernet en Activar/
Desactivar. Este reproductor utiliza el protocolo Yamaha
Network Control (YNC).
USB Frontal, USB Trasera*
Consejo
– Almacenamiento Local se utiliza como memoria
auxiliar cuando se reproduce un Blu-ray Disc.
Mensaje Reproducción 3D
Puede activar o desactivar la visualización de un mensaje
de advertencia acerca de la reproducción de vídeo en 3D
en el televisor al encender este reproductor.
Activar*, Desactivar
Notas
Idioma
– Es posible que la función Control HDMI no
funcione correctamente dependiendo del televisor.
– Otras funciones, aparte de las que se han
mencionado anteriormente, pueden funcionar
según el televisor o receptor A/V.
– Para poder utilizar la función Control HDMI,
configure los ajustes de la función Control HDMI en
TODOS los componentes (este reproductor, el
televisor y el receptor de A/V). Es posible que
también sean necesarias determinadas operaciones.
– Cada función se puede configurar de forma independiente
para que se active o desactive según el televisor.
– Consulte los detalles relacionados con la
configuración en los manuales de funcionamiento que
se proporcionan con el televisor y/o el receptor A/V.
– Cuando está activado, el consumo de energía durante el
modo de espera aumenta por la función Control HDMI.
OSD
Puede seleccionar el idioma de pantalla, es decir, del
menú o los mensajes mostrados en pantalla como, por
ejemplo, el menú SETUP.
English, Français , Español , Deutsch , Italiano , Svenska ,
Nederlandse ,
,
English, Français ,
, Español , Deutsch , Italiano ,
Nederlandse , Portugués, Danés, Svenska , Finlandés,
Noruego,
, Corea, Japonés, Más
31 Es
Español
Menú
Puede dar prioridad al idioma del menú del disco.
Menú SETUP
Audio
Puede dar prioridad al idioma del audio para la
reproducción de Blu-ray Disc/DVD. Para obtener
información sobre la configuración de las opciones,
consulte “Menú” (pág. 31).
Subtítulo
Puede dar prioridad al idioma de los Subtítulo.
Seguridad
Cambiar Contraseña
Puede ajustar la contraseña para cambiar el nivel de
Control Paterno y el Código de país. Consulte “Control
Paterno” (pág. 32) y “Código de país” (pág. 32).
Notas
English, Français ,
, Español , Deutsch , Italiano ,
Nederlandse , Portugués, Danés, Svenska , Finlandés,
Noruego,
, Corea, Japonés, Más, Desactivar
(Los ajustes predeterminados de [Idioma] varían en
función del modelo.)
Reproducción
Subtítulos
Puede ajustar que se visualice la audiodescripción
(pág. 43) cuando se reproducen Blu-ray Disc/DVD con
audiodescripción.
Activar*, Desactivar
Marca de Angulo
Puede ajustar la visualización de la Marca de Angulo
(
) cuando se reproducen Blu-ray Disc/DVD con
varios ángulos.
Activar*, Desactivar
Marca PIP
Puede ajustar la visualización de la Marca PIP (
)
cuando se reproducen Blu-ray Disc (pág. 27) con Imagen
en imagen.
Activar*, Desactivar
Marca Audio Secundario
Puede ajustar la visualización de la Marca Audio
Secundario (
) cuando se reproducen Blu-ray Disc con
audio secundario.
Activar*, Desactivar
Memoria última
Puede configurar este reproductor para que recuerde la
última posición de reproducción de un disco cuando se
pone en modo de espera o se abre la bandeja portadiscos.
Activar*, Desactivar
Nota
– Algunos discos no son compatibles con esta función.
DivX (R) VOD DRM
Puede mostrar el código de registro del vídeo DivX(R).
Información Netflix
Puede desactivar este reproductor de Netflix y mostrar el
ESN (Número de serie electrónico). Para volver a activar
este reproductor, consulte la sección “Reproducción de
vídeos de Netflix™” (pág. 23). El ESN (Número de serie
electrónico) es un número exclusivo que permite utilizar
el servicio Netflix.
32 Es
– La contraseña predeterminada es 0000.
– Si olvida la contraseña, consulte “Resolución de
problemas” (pág. 39) y restaure todos los ajustes
predeterminados de Seguridad.
Control Paterno
En algunos discos Blu-ray Disc/DVD, existe un nivel de
control para la visualización del disco en función de la
edad del espectador. Puede ajustar el Control Paterno
mostrado en pantalla en función del contenido del disco.
Es necesario introducir la contraseña (consulte “Cambiar
Contraseña” en pág. 32) antes de ajustar los niveles de
Control Paterno.
Después de ajustar el Control Paterno, si reproduce un
disco con un nivel más alto del nivel de Control Paterno
actual o si desea cambiar el nivel de Control Paterno,
aparecerá un cuadro de diálogo solicitando que introduzca
la contraseña.
Desactivar*, 1–8
Código de país
Puede ajustar el Código de país del estado en el que vive.
Es necesario introducir la contraseña (consulte “Cambiar
Contraseña” en pág. 32) antes de ajustar el Código de país.
Este parámetro puede utilizarse para la calificación de
Control Paterno y reproducción de discos.
Red
Conexión a Internet
Ajuste esta opción en Permitir cuando utilice BD-Live (pág.
27) o DLNA (pág. 20), actualice el software desde la red (pág.
38) o use otras funciones de red.
Permitir*, Desactivar
Configuración de conexión
Permite seleccionar un método de conexión de red.
Wired*
Se conecta a la red mediante Ethernet.
Inalámbrico
Se conecta a la red mediante una conexión LAN
inalámbrica.
Permite seleccionar la configuración para una
conexión LAN inalámbrica. Siga las instrucciones en
pantalla para llevar a cabo la operación.
Scan
Busca un punto de acceso. Permite conectarse al
punto de acceso encontrado.
Manual
Permite configurar la información manualmente para
un punto de acceso.
Menú SETUP
Información
Puede mostrar la pantalla de información de red. En esta
pantalla puede ver información de Interfaz (Ethernet),
Tipo de dirección, Dirección IP, Máscara de subred,
Default Gateway y DNS.
■ Configuración de pantalla
Prueba de conexión
Puede realizar una prueba de conexión a Internet. Si la
prueba falla, compruebe la “Configuración IP” (pág. 33) y
vuelva a realizar la prueba.
Salida 3D
Puede seleccionar la salida de vídeo en 3D o 2D desde
este reproductor.
Configuración IP
Puede configurar los ajustes de red.
Seleccione este valor para configurar
automáticamente los ajustes de red de este
reproductor con el servidor DHCP.
Manual
Seleccione este valor para configurar los ajustes de
red (Dirección IP, Máscara de subred, Default
Gateway y DNS) manualmente.
TV
Auto*
Este reproductor selecciona automáticamente vídeos
en 3D o 2D.
Desactivar
Este reproductor siempre selecciona vídeos en 2D.
4
Nota
– Aunque ajuste “Salida 3D” en “Auto” y reproduzca
un disco Blu-ray 3D, este reproductor selecciona
imágenes en 2D en función de la conexión y del
ajuste del televisor, etc. (pág. 12).
– Teclas
numéricas
Permiten introducir caracteres.
– 2/3
Permiten cambiar la opción
resaltada.
Pantalla de TV
Puede ajustar la relación de aspecto de la pantalla del
televisor conectado y configurar la salida de vídeo.
Si cambia de televisor, por ejemplo, porque ha adquirido
uno nuevo, y la relación de aspecto de la pantalla del
televisor conectado cambia, también tendrá que cambiar el
ajuste de Pantalla de TV.
– CLEAR
Permite eliminar un carácter.
16:9 Lleno
– ENTER
Permite guardar los ajustes y salir
del menú.
Selecciónelo cuando conecte el reproductor a un
televisor con pantalla 16:9. Cuando se reproduce
vídeo con una relación de aspecto 4:3, el vídeo se
muestra como aparece en la ilustración.
Conexión BD-Live
Puede definir la restricción de acceso a los contenidos de
BD-Live.
16:9 Normal* Selecciónelo cuando conecte el reproductor a un
televisor con pantalla 16:9. Cuando se reproduce
vídeo con una relación de aspecto 4:3, el vídeo se
muestra como aparece en la ilustración.
Autorizada
Permitida
Permite utilizar únicamente los discos con
Parcialmente* certificación de propietario.
4:3
Selecciónelo cuando conecte el reproductor a un
Panorámico televisor con pantalla 4:3. Cuando se reproduce
vídeo con una relación de aspecto 16:9, el vídeo se
muestra como aparece en la ilustración.
Prohibido
4:3 Buzón
Consejos
Permite que todos los discos de BD-Live se conecten
a la red.
Prohíbe que todos los discos de BD-Live se conecten
a la red.
DLNA
Puede ajustar la función DLNA (pág. 42) en Permitir/
Desactivar. Cuando no utilice la función DLNA, ajústela
en Desactivar.
Ajustes
Auto*
Los ajustes predeterminados están marcados con “ * ”.
Selecciónelo cuando conecte el reproductor a un
televisor con pantalla 4:3. Cuando se reproduce
vídeo con una relación de aspecto 16:9, el vídeo se
muestra como aparece en la ilustración.
Tamaño de
imagen
original
En un televisor 16:9 (pantalla
panorámica)
16:9 Lleno
16:9 Normal
Permitir*, Desactivar
Configuración Proxy
Puede definir Configuración Proxy. Ajuste la opción en
Desactivar para un uso normal. Seleccione Permitir para
definir la configuración del proxy.
Activa los ajustes del host y el puerto proxy.
Desactivar*
Desactiva el servidor proxy. Seleccione esta opción
cuando no utilice el servidor proxy.
Host Proxy
Define el host proxy.
Tamaño de
imagen
original
En un televisor 4:3
4:3 Panorámico
4:3 Buzón
Español
Permitir
4:3
Puerto proxy Define el puerto proxy.
16:9
33 Es
Menú SETUP
Seleccionar Salida de Video
Permite seleccionar la resolución de salida de vídeo entre
HDMI, COMPONENT y VIDEO. Para obtener más
información sobre los formatos de salida, consulte
“Acerca de los formatos de salida de vídeo” (pág. 37).
HDMI Deep Color
Si su televisor y/o receptor de A/V es compatible con
Deep Color (pág. 42), ajuste esta opción según su televisor
o receptor de A/V. Esta función está disponible cuando el
reproductor se conecta con un cable HDMI.
HDMI
30 bits, 36 bits, 48 bits, Desactivar*
Cuando se define en Auto, la resolución se ajusta a la
resolución máxima según el televisor conectado.
Si está ajustado en Disco Original, se utiliza la
resolución y frecuencia de vídeo original grabada en
el Blu-ray Disc o DVD que se reproduce. Puede
utilizar la función de conversión de vídeo de un
dispositivo externo.
Si se reproduce un disco que no sea Blu-ray Disc ni
DVD, la resolución y la frecuencia de vídeo
funcionarán como Auto.
Si se reproduce un Blu-ray Disc o DVD cuya
resolución y frecuencia de vídeo no son compatibles
con el televisor conectado, no se verá ninguna
imagen. En este caso, detenga la reproducción y
seleccione una opción que no sea Disco Original.
Auto*, Disco Original, 480i/576i, 480p/576p,
720p, 1080i, 1080p
COMPONENT Puede seleccionar solamente 480p/576p o 480i/576i.
480p/576p, 481i/576i*
VIDEO
Funciona igual que 480i/576i.
Notas
– Para emitir audio HD (Dolby TrueHD o DTS-HD
Master Audio) desde un terminal HDMI, configure
Seleccionar Salida de Video en Auto o un ajuste
superior a 720p.
– Si el televisor está conectado con un cable HDMI, el
ajuste predeterminado será HDMI.
– Si el televisor no está conectado con un cable HDMI,
el ajuste predeterminado será VIDEO.
Sistema de TV
Puede seleccionar el valor de Sistema de TV entre PAL,
NTSC y Multi. Ajuste el mismo valor de Sistema de TV
que su televisor. Para obtener más información sobre los
formatos de salida, consulte “Acerca de los formatos de
salida de vídeo” (pág. 37).
NTSC, PAL, Multi
(El ajuste predeterminado varía en función del modelo.)
Color Space
Puede seleccionar la salida Color Space (pág. 42) desde
HDMI. Esta función está disponible cuando el reproductor
se conecta con un cable HDMI.
YCbCr 4:4:4* Permite definir Color Space en YCbCr 4:4:4.
YCbCr 4:2:2
Permite definir Color Space en YCbCr 4:2:2.
Full RGB
Si ha configurado RGB y el blanco y negro de la
pantalla están demasiado difuminados, seleccione
esta opción. Esta opción se aplica si un componente
conectado admite el intervalo RGB 0–255.
RGB
Permite la salida de la señal de vídeo con el rango
normal de señal.
Nota
– Esta función solo está disponible en televisores que
admitan dicha función.
34 Es
HDMI 1080p 24Hz
Permite la salida de vídeo BD codificado con una velocidad
de fotogramas de 24 Hz en HDMI 1080p 24Hz. Con esta
función es posible que disfrute de una reproducción de
vídeo más fluida. Esta función está disponible si el receptor
de A/V o el televisor admiten esta función y el reproductor
está conectado con un cable HDMI. Para obtener más
información sobre los formatos de salida, consulte “Acerca
de los formatos de salida de vídeo” (pág. 37).
Auto*, Desactivar
Nota
– Este parámetro se desactiva cuando la resolución de
salida es diferente de 1080p.
Sincronismo de labios
Puede definir o ajustar la función Sincronismo de labios
(pág. 43).
Auto*
Este reproductor ajusta la función Sincronismo de
labios automáticamente.
Manual
Puede ajustar la función Sincronismo de labios
manualmente. Puede definir el retraso del audio para
contenido 2D y 3D de forma independiente.
2D
3D
Desactivar
Este reproductor no ajusta la función Sincronismo de
labios.
Procesamiento de Video
Modo de Vídeo
Puede seleccionar Modo de Vídeo más abajo.
Estándar*
La imagen es más natural y equilibrada. Este modo
es adecuado para usos normales.
Rico
La imagen es más viva e intensa.
Cine
La imagen es adecuada para ver películas en una
habitación a oscuras.
Particularizado Puede ajustar la imagen visual manualmente. Pulse
5/a para seleccionar al parámetro y, a continuación,
pulse 2/3 para ajustar la figura.
Brillo
Ajusta el brillo global de la imagen.
Saturación
Ajusta la riqueza de color de la imagen proyectada.
Tonalidad
Ajusta el tono de la imagen proyectada.
Contraste
Ajusta las áreas claras (niveles de blanco) de la
imagen.
Nitidez
Ajusta la nitidez de los elementos del vídeo.
CTI
Suaviza los bordes de las imágenes en color. De este
modo, las imágenes en color se distinguen más.
Los valores predeterminados son 0.
Menú SETUP
Ajuste de color
Ajusta los valores de Brillo/Saturación/Tonalidad para
cada color (Rojo/Verde/Azul/Amarillo/Cian/Magenta).
Para utilizar esta función, ajuste Modo de Vídeo en
Particularizado. Para obtener más información sobre la
configuración de opciones, consulte “Modo de Vídeo”
(pág. 34).
Downsampling
Puede seleccionar la frecuencia de submuestreo de la
señal de audio digital. Esta función está activa para la
salida de señal de audio desde la toma COAXIAL/
terminal OPTICAL.
48K*
La tasa de muestreo más alta de la salida PCM
digital es 48 kHz.
Los valores predeterminados son 0.
96K
Reducción de ruido
Puede configurar la Reducción de ruido a un nivel de entre
0 y 3. 0 equivale a desactivado y 3 es el nivel máximo.
La tasa de muestreo más alta de la salida PCM
digital es 96 kHz.
192K
La tasa de muestreo más alta de la salida PCM
digital es 192 kHz.
0, 1, 2*, 3
Auto*, Película, Vídeo
■ Configuración de audio
DRC
Puede activar, desactivar o poner en modo Auto el DRC
(Compresión de gama dinámica) (pág. 42). Al seleccionar
Auto, la DRC se activa automáticamente en una fuente
con información DRC en formato Dolby TrueHD. DRC
hace que los sonidos fuertes como los sonidos oclusivos se
escuchen menos y que las conversaciones sean más
audibles. Resulta útil cuando se ven películas de noche.
Desactivar, Activar, Auto*
Los ajustes predeterminados están marcados con “ * ”.
Ajuste de altavoz
Salida de audio
Mezcla descendente 2 Canales
Puede seleccionar 2 canales analógico como método de
mezcla descendente desde Estéreo o It/Dt.
Coaxial / Optica
Puede seleccionar el modo de salida de la toma
COAXIAL y del terminal OPTICAL. Para obtener más
información sobre los formatos de salida, consulte
“Acerca de los formatos de salida de audio” (pág. 36).
Bitstream
Permite la salida de la señal digital sin ningún
procesamiento. No se produce la salida del audio
secundario.
It/Dt
Seleccione este elemento si la unidad está conectada
a un descodificador Dolby Pro Logic. El sonido de
los altavoces posteriores se mezcla con el sonido
estéreo de 2 canales.
Estéreo*
Cambia la salida del canal a estéreo, con lo que
solamente se emite sonido desde los dos altavoces
frontales.
PCM
Emite PCM de 2 canales.
Recodificar*
Permite la salida de Bitstream con audio secundario.
Post-procesamiento
Desactivar
Silencia el sonido.
Mezcla ascendente
Permite convertir la señal de audio de 2 canales en
multicanal. Para realizar esta conversión, seleccione DTS
NEO:6 y, a continuación, seleccione el modo Cine o
Música.
HDMI
Puede seleccionar el modo de salida del terminal HDMI.
Para obtener información sobre la configuración de las
opciones, consulte “Coaxial / Optica” (pág. 35). Para
obtener más información sobre los formatos de salida,
consulte “Acerca de los formatos de salida de audio”
(pág. 36).
Bitstream*, PCM, Recodificar, Desactivar
Nota
4
Ajustes
Modo desentrelazado
Puede seleccionar cómo detectar la señal de vídeo. Ajuste
la opción en Auto para un uso normal. Cuando aparece en
la pantalla un ruido de desgarro horizontal, configure esta
opción en Película/Vídeo para eliminar el ruido.
Desactivar*, DTS NEO:6
■ Sistema de Información
Se muestran la versión del software y la dirección MAC
(pág. 42).
Español
– Para emitir audio HD (Dolby TrueHD o DTS-HD
Master Audio) desde un terminal HDMI, configure
Seleccionar Salida de Video en Auto o un ajuste
superior a 720p (pág. 34).
35 Es
Menú SETUP
■ Acerca de los formatos de salida de audio
Formato de origen
PCM 2
canales
PCM 5.1
canales
PCM 7.1
canales
Dolby Digital
con AS* o
SCB**
con AS* o
SCB**
DTS
PCM 5.1 canales
sin AS* o
SCB**
con AS* o
SCB**
sin AS* o
SCB**
con AS* o
SCB**
sin AS* o
SCB**
Dolby Digital
Bitstream
PCM 7.1 canales
PCM
PCM 2 canales
MIXED 2CH
Recodificar
–
Dolby Digital
2 canales
PCM 2 canales
Dolby Digital
PCM 2 canales
PCM 5.1 canales
sin AS* o
SCB**
con AS* o
SCB**
COAXIAL / ÓPTICA
Recodificar
PCM 2 canales
sin AS* o
SCB**
con AS* o
SCB**
PCM
PCM 2 canales
sin AS* o
SCB**
con AS* o
Dolby Digital SCB**
Plus
sin AS* o
SCB**
Dolby
TrueHD
HDMI
Bitstream
2 canales
Dolby Digital
PCM 2 canales
Dolby Digital
PCM 2 canales
PCM 7.1 canales
2 canales
2 canales
Dolby Digital
PCM 2 canales
2 canales
2 canales
PCM hasta 5.1
Dolby Digital Dolby Digital
canales
PCM 2
canales
Dolby Digital
2 canales
Dolby Digital
Dolby Digital PCM hasta 7.1
Dolby Digital
Plus
canales
Dolby Digital
Plus
PCM 2
canales
Dolby Digital
2 canales
Dolby Digital
PCM 2
canales
Dolby Digital
2 canales
DTS
PCM 2
canales
DTS
2 canales
DTS
PCM 2
canales
DTS
2 canales
DTS
PCM 2
canales
DTS
2 canales
Dolby Digital
Dolby
TrueHD
PCM hasta 7.1
canales
DTS
PCM hasta 5.1
canales
Dolby Digital
Dolby
TrueHD
DTS
con AS* o
DTS HD High SCB**
Resolution
sin AS* o
SCB**
DTS
DTS HD High PCM hasta 7.1
Resolution
canales
DTS HD High
Resolution
con AS* o
SCB**
DTS-HD
Master Audio sin AS* o
SCB**
DTS-HD
PCM hasta 7.1
Master Audio
canales
DTS
DTS-HD
Master Audio
* “AS” es audio secundario.
** “SCB” es el sonido clic del botón, el efecto de sonido de los menús emergentes, etc.
Notas
– Si Coaxial / Optica o HDMI se define en Bitstream, no se produce la salida de audio secundario. (pág. 35)
– Para emitir audio HD (Dolby TrueHD o DTS-HD Master Audio) desde un terminal HDMI, configure Seleccionar
Salida de Video en Auto o un ajuste superior a 720p (pág. 34).
36 Es
Menú SETUP
■ Acerca de los formatos de salida de vídeo
Si Sistema de TV se define en NTSC
Seleccionar Salida de Video
Índice
Terminal de
salida
HDMI
Auto
BD-Video
HDMI
con
contenido COMPONENT
1080p/24 Hz
VIDEO
BD-Video
sin contenido
1080p/24 Hz
HDMI
COMPONENT
VIDEO
DVD-Video
COMPONENT
VIDEO
HDMI
Otros
COMPONENT
VIDEO
1080p
1080i
COMPONENT
720p
*1
1080p 24 Hz/
1080p 24 Hz
1080i 60 Hz 720p 60 Hz
60 Hz *4
*2
desactivado
desactivado desactivado desactivado
*1
*3
1080p 60 Hz 1080i 60 Hz 720p 60 Hz
*2
desactivado
desactivado desactivado desactivado
*1
*3
1080p 60 Hz 1080i 60 Hz 720p 60 Hz
*2
*2
desactivado desactivado desactivado
*1
*1
1080p 60 Hz 1080i 60 Hz 720p 60 Hz
*2
*2
desactivado desactivado desactivado
VIDEO
480p/576p
480i/576i
480p/576p
480i/576i
–
480p
480i
480p
480i
480i
480i
480i
480i
480i
480i
480i
480i
480i
480i
480i
480p
480i
480p
480i
480i
480i
480i
480i
480i
480i
480i
480i
480i
480i
480i
480p
480i
480p
480i
480i
480p
480i
480p
480i
480i
480i
480i
480i
480i
480i
480p
480i
480p
480i
480i
480p
480i
480p
480i
480i
480i
480i
480i
480i
480i
4
Ajustes
HDMI
Disco
Original
Si Sistema de TV se define en PAL
Seleccionar Salida de Video
Índice
Terminal de
salida
HDMI
Auto
BD-Video
con
contenido
1080p/24 Hz
HDMI
COMPONENT
VIDEO
HDMI
BD-Video
sin contenido
1080p/24 Hz
COMPONENT
DVD-Video
COMPONENT
VIDEO
HDMI
VIDEO
HDMI
Otros
COMPONENT
VIDEO
Disco
Original
1080p
1080i
COMPONENT
720p
*1
1080p 24 Hz/
1080p 24 Hz
1080i 50 Hz 720p 50 Hz
50 Hz *4
*2
desactivado
desactivado desactivado desactivado
*1
*3
1080p 50 Hz 1080i 50 Hz 720p 50 Hz
*2
desactivado
desactivado desactivado desactivado
*1
*3
1080p 50 Hz 1080i 50 Hz 720p 50 Hz
*2
*2
desactivado desactivado desactivado
*1
*1
1080p 50 Hz 1080i 50 Hz 720p 50 Hz
*2
*2
desactivado desactivado desactivado
VIDEO
480p/576p
480i/576i
480p/576p
480i/576i
–
576p
576i
576p
576i
576i
576i
576i
576i
576i
576i
576i
576i
576i
576i
576i
576p
576i
576p
576i
576i
576i
576i
576i
576i
576i
576i
576i
576i
576i
576i
576p
576i
576p
576i
576i
576p
576i
576p
576i
576i
576i
576i
576i
576i
576i
576p
576i
576p
576i
576i
576p
576i
576p
576i
576i
576i
576i
576i
576i
576i
*1 La resolución se ajustará a la resolución máxima admitida por el televisor conectado. Por ejemplo, si la resolución
máxima admitida por el televisor conectado es de 1080p, la resolución se ajustará en 1080p.
*2 La salida HDMI tiene prioridad y en algunos casos puede impedir la emisión de vídeo.
*3 La resolución será la del disco utilizado.
*4 Si la opción Auto está seleccionada en HDMI 1080p 24Hz y el televisor conectado admite los contenidos a
1080p/24 Hz, la resolución de salida será 1080p/24 Hz en lugar de 1080p/50/60 Hz.
Si Sistema de TV se define en Multi
Si Sistema de TV está configurado como Multi, la salida de la señal de vídeo tiene la misma frecuencia que la fuente.
Consulte las tablas anteriores para obtener información sobre la configuración de frecuencia del televisor y la resolución
de la señal de vídeo de salida.
Notas
37 Es
Español
– El parámetro HDMI 1080p 24Hz se desactiva cuando la resolución de salida es diferente de 1080p.
– Cuando Sistema de TV se define en NTSC y la fuente de vídeo no es 60 Hz, la señal de salida de vídeo se
convierte a 60 Hz.
– Cuando Sistema de TV se define en PAL y la fuente de vídeo no es 50 Hz, la señal de salida de vídeo se convierte
a 50 Hz.
Actualización de software
Algunos de los discos Blu-ray que acaban de salir al mercado no se pueden reproducir a menos que actualice el software
del reproductor e instale la versión más reciente. Le recomendamos la actualización para que el reproductor funcione con
el software más actual.
Para comprobar la disponibilidad de una actualización de software, visite
http://download.yamaha.com/
Nota
– No extraiga el dispositivo de memoria USB, no ponga el reproductor en modo de espera ni desenchufe el cable de
alimentación o el cable LAN mientras se lleva a cabo la actualización de software.
■ Actualización del software
1. Prepárese para la actualización de
software.
Si actualiza el software desde Almacenamiento
USB:
1 Guarde el paquete de archivos de actualización en
la carpeta correspondiente en el dispositivo de
memoria USB. Para obtener más información,
consulte el documento de procedimientos adjunto
con el paquete de archivos de actualización.
2 Conecte el dispositivo de memoria USB.
Omita el paso 2.
2. Seleccione el método de
actualización e inicie la
actualización desde el menú
SETUP.
1 Pulse SETUP para mostrar la pantalla del menú
SETUP.
2 Seleccione Configuración General = Sistema =
Actualizar.
3 Seleccione el elemento que contiene el paquete
de archivos de actualización desde
Almacenamiento USB/Red.
Si actualiza el software desde Red:
Compruebe que el reproductor está conectado a la
red.
El sistema buscará el paquete de archivos de
actualización.
3. Actualice el software siguiendo
las indicaciones de los mensajes
que aparecen en pantalla.
La actualización se ha completado. El sistema se
reiniciará.
38 Es
INFORMACIÓN ADICIONAL
Resolución de problemas
Consulte la tabla que aparece a continuación cuando el reproductor no funcione correctamente. Si el problema que tiene
no aparece en la lista siguiente o las instrucciones no le sirven de ayuda, apague este reproductor, desenchufe el cable de
alimentación y póngase en contacto con el centro de servicio o concesionario Yamaha autorizado más cercano.
■ Alimentación
Problema
Posibles causas y soluciones
No hay alimentación.
– Conecte correctamente el cable de alimentación de CA.
– Pulse p en el panel delantero para encender la alimentación.
La alimentación del reproductor está
apagada.
– La alimentación se desconectará automáticamente pasados 30 minutos seguidos de
inactividad (sin reproducción).
5
■ Funcionamiento básico
Posibles causas y soluciones
– Utilice el mando a distancia dentro de su alcance operativo. (pág. 9)
– Cambie las pilas. (pág. 9)
– Compruebe la configuración de ID de la unidad principal y el mando a distancia. El ID
del mando a distancia de la unidad principal se puede cambiar después de reiniciar la
unidad principal. En ese caso, compruebe el ID del mando a distancia de la unidad
principal y vuelva a ajustarlo si es necesario. (pág. 9)
Los botones no funcionan.
– Mantenga pulsado p en el panel delantero durante más de 5 segundos y deje de pulsarlo
para reiniciar el reproductor.
– Para reiniciar completamente el reproductor, desenchufe el cable de alimentación de la
toma de CA durante 10 segundos o más, vuelva a enchufarlo y, a continuación,
encienda el reproductor.
He olvidado la contraseña.
– Mantenga pulsado
y
en el panel delantero simultáneamente sin ningún disco
insertado y con la reproducción parada para restaurar los valores predeterminados de
todos los ajustes, incluidos los ajustes de Seguridad (pág. 32). Una vez que la
alimentación se desconecte automáticamente, pulse p para volver a activarla.
Información adicional
Problema
El mando a distancia no funciona.
■ Reproducción de disco
Problema
Posibles causas y soluciones
El reproductor no puede reproducir un
disco.
– Extraiga el disco y límpielo. (pág. 4)
– Asegúrese de que se ha cargado correctamente el disco (alineado en la bandeja
portadiscos y con la cara de la etiqueta hacia arriba). (pág. 4)
– Utilice un disco admitido por el reproductor. (pág. 3)
– Extraiga el disco y compruebe si es un disco admitido por el reproductor o no. (pág. 3)
– Compruebe el código de región. (pág. 3)
– Compruebe si el disco es defectuoso probando con otro disco.
– Los discos CD-R/RW, DVD+R/RW/R DL y DVD-R/RW/R DL deben estar finalizados.
(pág. 3)
El vídeo se para.
– El reproductor se parará si detecta golpes o vibraciones.
El reproductor hace un sonido de
chasquido cuando comienza la
reproducción o al cargar un disco.
– Estos sonidos no son síntoma de avería sino parte del funcionamiento normal del
reproductor.
Español
39 Es
Resolución de problemas
■ Imagen
Problema
Posibles causas y soluciones
No hay imagen.
– Asegúrese de que los cables están correctamente conectados. (pág. 10)
– Asegúrese de que el televisor o receptor de A/V conectado está ajustado a la entrada
correcta. (pág. 10)
– Sin ningún disco cargado o con la reproducción parada, mantenga pulsados los botones
y
del panel delantero simultáneamente para restaurar el valor predeterminado
de la resolución del vídeo.
Si sigue sin aparecer la imagen, mantenga pulsado el botón
del panel delantero
durante unos 5 segundos para activar NTSC/PAL.
– Si está ajustado en Disco Original, se emite una señal no compatible con el televisor conectado.
Cambie el ajuste para emitir una señal compatible con el televisor conectado. (pág. 34)
La pantalla se congela y los botones de
control no funcionan.
– Pulse
y, después, reinicie la reproducción.
– Desconecte la alimentación y conéctela de nuevo.
– Mantenga pulsado p en el panel delantero durante más de 5 segundos y deje de pulsarlo
para reiniciar el reproductor.
La salida de vídeo no tiene la resolución
deseada.
– Ajuste la resolución deseada. (pág. 34)
El vídeo de pantalla ancha aparece
estirado verticalmente o aparecen
bandas negras en las partes superior e
inferior de la pantalla. O el vídeo 4:3
aparece estirado horizontalmente.
– Cambie la relación de aspecto del televisor. (pág. 33)
Aparece ruido cuadrado (mosaicos) en
la pantalla.
– Es posible que aparezcan bloques en las imágenes en escenas con movimientos rápidos
debido a las características de la tecnología de compresión de imagen digital.
La pantalla de reproducción se
perturbará si se graba vídeo DVD en una
videograbadora, o se reproduce a través
de una videograbadora.
– Este reproductor cumple con la protección contra copias analógicas. Algunos discos
contienen una señal de prohibición de copia. Si intenta reproducir tales discos a través
de una videograbadora, o grabar a una videograbadora y reproducir la señal, la
protección contra copia impedirá la reproducción normal.
No se escucha el audio o las imágenes
no se reproducen adecuadamente.
– En algunos discos en los que se ha grabado contenido protegido por derechos de autor, es
posible que no se escuche el audio o que las imágenes no se reproduzcan adecuadamente.
■ Sonido
Problema
Posibles causas y soluciones
No se escucha el sonido o está
distorsionado.
– Compruebe que el cable de audio está correctamente conectado. (pág. 10)
– Suba el volumen del televisor o del receptor de A/V.
– No se escucha sonido durante el modo de reproducción fija, avance rápido y retroceso
rápido. (pág. 8)
– Es posible que el audio no se escuche dependiendo del estado de grabación del audio, por
ejemplo, si el contenido de audio grabado no es de señal de audio o es audio no estándar. (pág. 3)
Los canales de audio izquierdo y
derecho están invertidos o el sonido
solo sale por uno de ellos.
– Compruebe la conexión de audio. (pág. 10)
No se escucha el audio o las imágenes
no se reproducen adecuadamente.
– En algunos discos en los que se ha grabado contenido protegido por derechos de autor,
es posible que no se escuche el audio o que las imágenes no se reproduzcan
adecuadamente.
No se puede escuchar el tipo de audio
que se desea y/o el número de canales.
– Consulte el ajuste Salida de audio y “Acerca de los formatos de salida de audio”.
(pág. 35, pág. 36)
No se escucha el sonido de PIP (audio
secundario).
– Ajuste Coaxial / Optica o HDMI en PCM/Recodificar. (pág. 35)
– Para escuchar el audio secundario, pulse 2ND AUDIO. (pág. 6)
– Dependiendo del disco, es posible que tenga que activar el audio secundario en el menú
principal del disco (pág. 8).
■ Red
Problema
No se puede conectar a Internet.
40 Es
Posibles causas y soluciones
– Cuando se conecte a Internet seleccionando Wired en Configuración de conexión,
conecte el cable de red correctamente. (pág. 32)
– Encienda el equipo conectado como, por ejemplo, un módem o router de banda ancha.
– Conecte correctamente el módem y/o el enrutador de banda ancha.
– Si Inalámbrico está seleccionado en Configuración de conexión, y se conecta a Internet
mediante Ethernet, seleccione Wired correctamente. (pág. 32)
– Seleccione correctamente Inalámbrico en Configuración de conexión si quiere
conectarse a Internet mediante una LAN inalámbrica. (pág. 32)
Resolución de problemas
Problema
Posibles causas y soluciones
– Verifique que este reproductor se puede conectar a Internet normalmente. Consulte
“Prueba de conexión”. (pág. 33)
– Conecte el dispositivo de memoria USB correctamente. Compruebe que el dispositivo
de memoria USB esté conectado al conector USB del reproductor. (pág. 16)
– Compruebe si el Blu-ray Disc admite BD-Live.
– Conecte el dispositivo de memoria USB con formato FAT16, FAT32 o NTFS.
– Se recomienda conectar el dispositivo de memoria USB con al menos 2 GB de espacio libre.
Si no hay suficiente espacio libre, formatee el dispositivo de memoria USB. (pág. 31)
– Consulte el manual del usuario suministrado con el disco o póngase en contacto con el
fabricante del disco.
No se puede detectar el servidor DLNA.
– Verifique que este reproductor se puede conectar a la red normalmente. Consulte
“Prueba de conexión”. (pág. 33)
– Encienda el equipo conectado como, por ejemplo un router de banda ancha o el servidor.
– Asegúrese de que el reproductor y el servidor están conectados al mismo punto de acceso.
– Dependiendo del servidor DLNA, es posible que sea necesario autorizar al reproductor
desde el servidor.
– En función del servidor DLNA, es necesario modificar el ajuste del cortafuego.
No se puede reproducir el archivo del
servidor DLNA.
– Asegúrese de que el archivo se puede reproducir. (pág. 3)
– Compruebe la configuración del servidor DLNA.
– La calidad de funcionamiento y reproducción podría verse afectada por las condiciones
de la red doméstica.
No se puede conectar a Internet a través
de la LAN inalámbrica.
– Asegúrese de que el router LAN inalámbrico está encendido.
– En función de los elementos circundantes, como el material de las paredes, el estado de
recepción de ondas de radio o los obstáculos entre el reproductor y el router LAN
inalámbrico, es posible que la distancia de comunicación se acorte. Mueva el
reproductor y el router LAN inalámbrico para acercarlos entre sí.
– Los dispositivos que funcionan en la banda de frecuencias de 2,4 GHz, como los hornos
microondas, dispositivos Bluetooth o dispositivos digitales inalámbricos, pueden llegar
a interrumpir la comunicación. Aleje el reproductor de estos dispositivos o apáguelos.
– Si la conexión a Internet a través de una LAN inalámbrica sigue sin funcionar después
de probar las dos soluciones anteriores, intente conectarse a través de Ethernet
seleccionando Wired en Configuración de conexión. (pág. 32)
La red inalámbrica no se encuentra o
está distorsionada.
– Si se lleva a cabo Scan pero la red inalámbrica no se encuentra o está distorsionada,
pulse RETURN para volver a la pantalla anterior e intente ejecutar Scan de nuevo. Si el
router inalámbrico sigue sin detectarse, pulse RETURN para seleccionar Manual.
– Asegúrese de que la red inalámbrica no se distorsiona por la presencia de hornos
microondas, teléfonos DECT u otros dispositivos Wi-Fi cercanos.
– Los hornos microondas, teléfonos DECT u otros dispositivos inalámbricos cercanos
pueden interferir en la red inalámbrica. Apague estos dispositivos.
– Asegúrese de que los firewall de la red permiten el acceso de este reproductor a la
conexión inalámbrica.
– Si la red inalámbrica no funciona correctamente en su casa, intente realizar una
conexión de red con cable.
5
Información adicional
No se pueden descargar contenidos
BD-Live.
■ Mensajes en pantalla
– Los mensajes siguientes aparecerán en la pantalla del televisor si el disco que intenta reproducir no es apropiado o
la operación no es correcta.
Mensaje de error
Posibles causas y soluciones
– El reproductor no admite el archivo. Consulte “Tipos de discos/archivos que pueden utilizarse con
este reproductor” (pág. 3).
¡Código de región erróneo!
– El disco tiene un código de región incompatible. Consulte “Información sobre la gestión de la región
en los vídeos Blu-ray Disc/DVD” (pág. 3).
La red ha fallado.
– El reproductor no se puede conectar a la red. Compruebe la conexión (pág. 16) y la configuración de la
red (pág. 32).
Red está bien, proxy ha
fallado.
– El reproductor no se puede conectar al servidor proxy. Consulte “Configuración Proxy” (pág. 33).
La conexión BD-Live está
prohibida en el menú de
SETUP.
– La conexión de BD-Live está prohibida. Consulte “Conexión BD-Live” (pág. 33).
¡La actualización ha fallado
por alguna razón!
– La actualización ha fallado. Compruebe si el archivo de actualización está dañado o es ilegible.
¡La configuración de IP no es
válida! Por favor modificar...
– La Configuración IP no es válida. Vuelva a introducir la información correcta.
Español
Fichero no compatible
41 Es
Glosario
AVCHD
AVCHD es un nuevo formato (estándar) para cámaras
de vídeo de alta definición que se puede utilizar para
grabar y reproducir imágenes de alta resolución HD.
BD-Live™
BD-Live es un estándar de Blu-ray Disc que utiliza una
conexión de red y permite al reproductor conectarse a
Internet para descargar vídeos promocionales y otros
datos.
BDMV
BDMV (película en disco Blu-ray) es uno de los
formatos de aplicación utilizados en BD-ROM, que es
una de las especificaciones de Blu-ray Disc. BDMV es
un formato de grabación equivalente a DVD-Video en la
especificación DVD.
Blu-ray 3D™
Blu-ray 3D le permite ver imágenes 3D de alta
definición completa.
BONUSVIEW™
Los discos compatibles con BONUSVIEW le permiten
disfrutar simultáneamente de subcanal de vídeo para dos
pantallas, subcanal de audio y subtítulos. Aparece una
pequeña pantalla dentro de la pantalla principal durante
la reproducción (Imagen en imagen).
Buzón (LB 4:3)
Un tamaño de pantalla con barras negras en las partes
superior e inferior de la imagen para permitir la
visualización de material en pantalla ancha (16:9) en un
televisor 4:3 conectado.
Color Space
Color Space es una gama de colores que se puede
representar. RGB es un espacio de color basado en el
modelo de color RGB (rojo, verde y azul) y se utiliza
normalmente en monitores de PC. YCbCr es un espacio
de color basado en una señal de luminancia (Y) y dos
señales de diferencia de color (Cb y Cr).
Deep Color
Deep Color hace referencia al uso de varias
profundidades de color en pantallas, a partir de
profundidades de 24 bits en versiones anteriores de la
especificación HDMI. Esta profundidad de bits
adicional permite que las pantallas HDTV y otros tipos
de pantallas pasen de millones a miles de millones de
colores y eliminen la aparición de bandas de color en
pantalla para disfrutar de unas transiciones tonales
fluidas y una gradación sutil entre colores. La mayor
relación de contraste permite representar muchos más
tonos de gris entre blanco y negro. Además, Deep Color
aumenta el número de colores disponibles dentro de los
límites definidos por el espacio de color RGB o YCbCr.
DLNA
DLNA (Digital Living Network Alliance) permite
compartir de forma sencilla contenidos digitales a través
de una red doméstica, para que pueda disfrutar de
contenidos digitales almacenados en un PC con el
software del servidor DLNA instalado u otro dispositivo
compatible con DLNA con su televisor a través de este
reproductor. Para conectar este reproductor a sus
servidores DLNA se requieren algunos ajustes del
dispositivo o del servidor DLNA. Para más detalles,
consulte el software del servidor DLNA o el dispositivo
DLNA.
Dirección Mac
La dirección Mac es un valor único asignado a un
dispositivo de red para su identificación.
DivX®
DivX® es un formato de vídeo digital creado por DivX,
LLC, una división de Rovi Corporation. Este es un
dispositivo DivX Certified® oficial capaz de reproducir
vídeo DivX. Visite divx.com para obtener más
información y herramientas de software para convertir
sus archivos en vídeos DivX.
Dolby Digital
Un sistema de sonido desarrollado por Dolby
Laboratories Inc. que da un ambiente de sala de cine a la
salida de audio cuando el producto está conectado a un
amplificador o procesador Dolby Digital.
Dolby Digital Plus
Un sistema de sonido desarrollado como una extensión
de Dolby Digital. Esta tecnología de codificación de
audio es compatible con sonido envolvente de 7.1
canales.
Dolby TrueHD
Dolby TrueHD es una tecnología de codificación sin
pérdidas que admite hasta 8 canales de sonido
envolvente multicanal para los discos ópticos de la
próxima generación. El sonido reproducido refleja
fielmente, bit a bit, la fuente original.
DRC (Control de gama dinámica)
DRC le permite ajustar la gama entre los sonidos más
alto y más bajo (gama dinámica) para reproducir los
contenidos a un volumen intermedio. Utilícela cuando
sea difícil escuchar los diálogos o durante las horas en
que la reproducción pueda molestar a los vecinos.
DTS
Un sistema de sonido digital desarrollado por DTS, Inc.
para su uso en salas de cine.
DTS-HD High Resolution Audio
DTS-HD High Resolution Audio es una nueva
tecnología desarrollada para el formato de disco óptico
de alta definición de la próxima generación.
DTS-HD Master Audio
DTS-HD Master Audio es una tecnología de
compresión de audio sin pérdidas desarrollada para el
formato de disco óptico de alta definición de la próxima
generación.
42 Es
Glosario
FLAC
Sonido PCM lineal
FLAC (Free Lossless Audio Codec, Códec libre de
comprensión de audio sin pérdida) es un formato de
audio para la compresión de datos de audio sin pérdida.
Aunque el grado de compresión es inferior al de otros
formatos de audio comprimido con pérdida,
normalmente el audio es de mayor calidad.
HDMI
HDMI (High-Definition Multimedia Interface, Interfaz
Multimedia de Alta Definición) es una interfaz que
admite vídeo y audio en una sola conexión digital. La
conexión HDMI lleva señales de vídeo (estándar y de
alta definición) y señales de audio multicanal a
componentes A/V como, por ejemplo, televisores
equipados con HDMI en forma digital y sin
degradación.
Panorámico (PS 4:3)
Sincronismo de labios
Sincronismo de labios, una abreviatura de “lip
synchronization”, o sincronización de labios, es un
término que hace referencia tanto a un problema
habitual como a la posibilidad de mantener
sincronizadas las señales de audio y vídeo durante la
posproducción y la transmisión. La latencia de audio y
vídeo requiere complejos ajustes por parte del usuario,
pero la versión HDMI incorpora una función de
sincronización automática de audio y vídeo que permite
a los dispositivos sincronizarse de forma automática y
precisa y sin la intervención del usuario.
Subtítulos
La audiodescripción es un tipo de subtítulos, la
diferencia entre los subtítulos y la audiodescripción es
que los primeros están diseñados para personas sin
problemas auditivos, mientras que los segundos lo están
para personas que no oyen. Los subtítulos no suelen
mostrar todo el audio.
La audiodescripción muestra efectos de sonido (por
ejemplo, “suena el teléfono” y “ruido de pasos”),
mientras que los subtítulos no lo hacen. Antes de
seleccionar este ajuste, asegúrese de que el disco
contiene información de audiodescripción.
Subtítulos
Son las líneas de texto que aparecen en la parte inferior
de la pantalla y que traducen o transcriben el diálogo.
Están grabadas en muchos discos DVD y Blu-ray.
x.v.Color
x.v.Color reproduce una gama de colores más amplia
que antes, mostrando casi todos los colores que puede
detectar el ojo humano.
5
Información adicional
Un tamaño de pantalla que recorta los lados de la
imagen para permitir la visualización de material de
pantalla ancha (16:9) en un televisor 4:3 conectado.
PCM lineal es un formato de grabación de señales
utilizado para CD de audio y en algunos discos DVD y
Blu-ray. El sonido de los CD de audio se graba a
44,1 kHz con 16 bits. (El sonido se graba entre 48 kHz
con 16 bits y 96 kHz con 24 bits en discos DVD y entre
48 kHz con 16 bits y 192 kHz con 24 bits en discos
Blu-ray.)
Especificaciones
■ Información general
Alimentación
[Modelos de EE. UU. y Canadá]............................ 110–240 V CA, 60 Hz
[Modelo para América Central y del Sur].........110–240 V CA, 50/60 Hz
[Modelo para Australia] .........................................110–240 V CA, 50 Hz
[Modelo para Reino Unido, Europa y Rusia]......... 110–240 V CA, 50 Hz
[Modelo para China] .............................................. 110–240 V CA, 50 Hz
[Modelo para Asia] ...........................................110–240 V CA, 50/60 Hz
Consumo (normal)................................................................................ 20 W
Consumo (en espera) .............................................................0,5 W o menos
Dimensiones (An. × Al. × Pr., incluidos salientes) ...... 435 × 86 × 257 mm
Peso ..................................................................................................... 2,8 kg
■ Rendimiento de audio
■ Entrada/salida
Salida HDMI ................................................................. Conector tipo A × 1
480i/576i/480p/576p/720p/1080i/1080p/1080p@24Hz,
Compatibilidad con Deep Color, x.v. Color
Salida de vídeo componente .....................................Y: 1 Vp-p (75 ohmios)
PB, PR: 0,7 Vp-p (75 ohmios)
Salida de vídeo. ..............................................................1 Vp-p (75 ohmios)
Salida digital.......................................................... Óptica × 1, Coaxial × 1
Salida de audio analógica ............................................ Mezcla 2 canales × 1
USB ............................................................................... Conector tipo A × 2
LAN inalámbrica............................................. Estándar: IEEE 802.11 b/g/n
Rango de frecuencias: banda de 2,4 GHz
Otros equipos................................................................ Remote IN/OUT × 1
Ethernet × 1
Las especificaciones están sujetas a cambio sin previo aviso.
43 Es
Español
Nivel de salida de audio (1 kHz, 0 dB)
Blu-ray Disc/DVD/CD-DA.........................................................2 ± 0,3 V
Relación señal/ruido
Blu-ray Disc/DVD/CD-DA............................................................ 110 dB
Rango dinámico
Blu-ray Disc/DVD ......................................................................... 105 dB
CD-DA ........................................................................................... 100 dB
Distorsión armónica (1 kHz)
Blu-ray Disc/DVD/CD-DA............................................................0,003%
Respuesta de frecuencia
Blu-ray Disc/DVD .......................De 4 Hz a 22 kHz (muestreo a 48 kHz)
De 4 Hz a 44 kHz (muestreo a 96 kHz)
CD-DA .......................................................................... De 4 Hz a 20 kHz
Especificaciones
■ Propiedad intelectual
– El material audio-visual puede consistir de productos
con propiedad intelectual que no se deben grabar sin
la autorización del poseedor de dicha propiedad
intelectual. Remítase a las leyes aplicables en su
país.
– Este producto contiene tecnología de protección de
copia que está protegida por patentes de los EE. UU.
y otros derechos de propiedad intelectual de Rovi
Corporation. Se prohíbe la ingeniería inversa o el
desarmado de la unidad.
– Fabricado con la licencia de Dolby Laboratories.
Dolby y el símbolo de la doble D son marcas
comerciales de Dolby Laboratories.
– Fabricado con licencia en aplicación de las patentes
de EE. UU.: 5,956,674; 5,974,380; 6,226,616;
6,487,535; 7,212,872; 7,333,929; 7,392,195;
7,272,567 y otras patentes de los EE. UU. e
internacionales registradas o pendientes. DTS-HD,
el símbolo y DTS-HD y el símbolo juntos son
marcas comerciales registradas, y DTS-HD Master
Audio es una marca comercial de DTS, Inc. El
producto incluye software. © DTS, Inc. Todos los
derechos reservados.
– “Blu-ray Disc™”, “Blu-ray™”, “Blu-ray 3D™”,
“BD-Live™”, “BONUSVIEW™” y los logotipos
son marcas comerciales de la Blu-ray Disc
Association.
–
es una marca comercial de DVD Format/Logo
Licensing Corporation.
– “HDMI”, el logotipo “HDMI” y “High-Definition
Multimedia Interface” son marcas comerciales o
marcas comerciales registradas de HDMI Licensing
LLC.
– “x.v.Color” y el logotipo “x.v.Color” son marcas
comerciales de Sony Corporation.
– “AVCHD” y el logotipo “AVCHD” son marcas
comerciales de Panasonic Corporation y Sony
Corporation.
– Java y todas las marcas comerciales y logotipos
basados en Java son marcas comerciales o marcas
comerciales registradas de Sun Microsystems, Inc.
en los Estados Unidos y/o otros países.
– Este producto se otorga con licencia en aplicación de
la licencia de cartera de patentes AVC y la licencia
de cartera de patentes VC-1 para su uso personal y
no comercial por parte de un consumidor para (i)
codificar vídeo que cumpla con las normas AVC y
VC-1 (“vídeo AVC/VC-1”) y/o (ii) descodificar
vídeo AVC/VC-1 codificado por un consumidor
dedicado a una actividad personal y no comercial y/o
suministrado por un proveedor de vídeo con licencia
para proporcionar vídeo AVC/VC-1. No se otorga ni
se da por supuesta licencia alguna para cualquier
otro uso. Se puede obtener información adicional de
MPEG LA, LLC.
Consulte http://www.mpegla.com.
– Windows Media Player es una marca comercial o
una marca comercial registrada de Microsoft
Corporation en Estados Unidos y/o en otros países.
– YouTube y el logotipo YouTube, Picasa y el
logotipo Picasa son marcas comerciales de Google.
Inc.
44 Es
– Netflix y el logotipo Netflix son marcas comerciales
registradas de Netflix, Inc.
– DLNA y DLNA CERTIFIED son marcas
comerciales y/o marcas de servicio de Digital Living
Network Alliance.
– Copyright 2004-2010 Verance Corporation.
Cinavia™ es una marca comercial de Verance
Corporation. Protegida por la patente estadounidense
7.369.677 y patentes internacionales registradas y
pendientes de aprobación en virtud de la licencia de
Verance Corporation. Todos los derechos
reservados.
– El logotipo Wi-Fi CERTIFIED es una marca de
certificación de Wi-Fi Alliance.
– DivX®, DivX Certified®, DivX Plus® HD y los
logotipos asociados son marcas comerciales de Rovi
Corporation o sus filiales y se utilizan con licencia.
– DivX Certified® para reproducir vídeo DivX® y
DivX Plus® HD (H.264/.MKV) hasta 1080p HD,
incluido contenido de calidad.
ACERCA DE VÍDEO DIVX: DivX® es un formato de
vídeo digital creado por DivX, LLC, una división de
Rovi Corporation. Este es un dispositivo DivX
Certified® oficial capaz de reproducir vídeo DivX.
Visite divx.com para obtener más información y
herramientas de software para convertir sus archivos en
vídeos DivX.
ACERCA DE DIVX VIDEO-ON-DEMAND: este
dispositivo DivX Certified® debe registrarse para
reproducir películas DivX Video-on-Demand (VOD)
adquiridas. Para obtener su código de registro, localice
la sección DivX VOD en el menú de configuración de su
dispositivo. Acceda a vod.divx.com para obtener más
información sobre cómo realizar el registro.
INFORMACIÓN ADICIONAL
Índice
■
Numerics
2ND AUDIO, mando a distancia ...........6
■
A
■
B
BD-Live ...............................................27
Bitrate, menú en pantalla .....................24
Botones de colores, mando a
distancia .............................................6
Botones de control, mando a
distancia .............................................8
Botones de cursor, mando a distancia ....8
Botones numéricos, mando a
distancia .............................................6
Búsqueda Ins, menú en pantalla ..........24
■
C
DIGEST, mando a distancia ...................6
Disco de datos, reproducción ...............18
DivX (R) VOD DRM, menú SETUP ...32
DLNA, menú SETUP ...........................33
Downsampling, menú SETUP .............35
DRC, menú SETUP .............................35
■
E
ENTER, mando a distancia ....................8
ESN (Número de serie electrónico) .....32
Estado, menú ........................................25
Estilo subtítulos, menú en pantalla .......24
■
F
Función Control HDMI ........................31
Función de búsqueda ............................26
Función Imagen en Imagen ..................27
Funcionamiento del menú SETUP .......30
■
H
HDMI 1080p 24Hz, menú SETUP ......34
HDMI Deep Color, menú SETUP .......34
HDMI, conexión ..................................12
HDMI, menú SETUP ...........................35
HOME, mando a distancia .....................6
HOME, menú .......................................18
Hora, menú en pantalla ........................24
■
I
Idioma, menú SETUP ..........................31
Información Netflix, menú SETUP ......32
Información, menú SETUP ..................33
■
M
Mando a distancia ..................................6
Marca Audio Secundario, menú
SETUP .............................................32
Marca de Angulo, menú SETUP ..........32
Marca PIP, menú SETUP .....................32
Marcador ..............................................26
MARKER, mando a distancia ................6
MEDIA, menú ......................................18
Memoria última, menú SETUP ............32
Mensaje Reproducción 3D, menú
SETUP .............................................31
Menú, menú SETUP ............................31
Mezcla ascendente, menú SETUP .......35
Mezcla descendente 2 Canales, menú
SETUP .............................................35
Modo de vídeo, menú SETUP .............34
Modo desentrelazado, menú SETUP ...35
Modo/Modo de reproducción, menú en
pantalla .............................................24
■
N
Netflix ..................................................23
■
O
ON SCREEN, mando a distancia ...........8
OSD, menú SETUP ..............................31
Otras conexiones ..................................17
■
P
Pantalla de TV, menú SETUP ..............33
Pantalla, menú ..................................... 24
Pase de diapositivas, menú en
pantalla ............................................ 24
PIP, mando a distancia .......................... 6
Pista/Archivo, menú en pantalla .......... 24
POP UP/MENU, mando a distancia ...... 8
Post-procesamiento, menú SETUP ..... 35
Procesamiento de Video, menú
SETUP ............................................. 34
PROGRAM, mando a distancia ............ 6
Programación de la reproducción ........ 26
Protector de pantalla, menú SETUP .... 31
Prueba de conexión, menú SETUP ..... 33
■
R
Red, conexión ...................................... 16
Red, menú SETUP ............................... 32
Reducción de ruido, menú SETUP ...... 35
REPEAT, mando a distancia ................. 7
Repetición Ins, menú en pantalla ......... 24
Reproducción Automática Disco,
menú SETUP ................................... 31
Reproducción, menú SETUP ............... 32
Requisitos de los archivos de audio ....... 3
RETURN, mando a distancia ................ 8
■
5
S
Salida 3D, menú SETUP ..................... 33
Salida de audio, menú SETUP ............ 35
SEARCH, mando a distancia ................ 7
Seguridad, menú SETUP ..................... 32
Seleccionar Salida de Video, menú
SETUP ............................................. 34
SETUP, mando a distancia .................... 6
SETUP, menú ...................................... 28
SHUFFLE, mando a distancia ............... 7
Sincronismo de labios, menú
SETUP ............................................. 34
Sistema de Información, menú
SETUP ............................................. 35
Sistema de TV, menú SETUP ............. 34
Sistema, menú SETUP ........................ 31
Software, actualización ........................ 38
STATUS, mando a distancia ................. 6
SUBTITLE, mando a distancia ............. 7
Subtítulo, menú en pantalla ................. 24
Subtítulo, menú SETUP ...................... 32
Subtítulos, menú SETUP ..................... 32
■
T
Título, menú en pantalla ...................... 24
TOP MENU, mando a distancia ............ 8
Transición, menú en pantalla ............... 24
TV, menú SETUP ................................ 33
■
U
USB, conexión ..................................... 16
■
V
Video secundario, menú en pantalla .... 24
Vídeo, conexión ................................... 13
Vídeo, formatos de salida .................... 37
■
Z
ZOOM, mando a distancia .................... 6
45 Es
Español
Cambiar Contraseña, menú SETUP .....32
Capítulo, menú en pantalla ..................24
Cargar configuración por defecto, menú
SETUP .............................................31
CLEAR, mando a distancia ...................6
Coaxial / Optica, menú SETUP ...........35
Code Page, menú en pantalla ...............24
Código de país, menú SETUP .............32
Color Space, menú SETUP ..................34
Conexión a Internet, menú SETUP ......32
Conexión BD-Live, menú SETUP .......33
Configuración de audio,
menú SETUP ...................................35
Configuración de conexión, menú
SETUP .............................................32
Configuración de pantalla, menú
SETUP .............................................33
Configuración General, menú
SETUP .............................................31
Configuración IP, menú SETUP ..........33
Configuración Proxy, menú SETUP ....33
Configuración Sencilla ........................18
Configuración Sencilla, menú
SETUP .............................................31
Contenido USB, reproducción .............18
Contenidos de YouTube,
reproducción ....................................21
Control de red, menú SETUP ..............31
Control HDMI, menú SETUP .............31
D
Información adicional
A/B, mando a distancia ..........................7
Actualización de software ....................38
Actualizar, menú SETUP .....................31
Ajuste de altavoz, menú SETUP ..........35
Ajuste de color, menú SETUP .............35
Almacenamiento Local, menú
SETUP .............................................31
ANGLE, mando a distancia ...................7
Ángulo, menú en pantalla ....................24
Asistente inicial ....................................18
Audio Secundario, menú en pantalla ...24
Audio, conexión ...................................14
Audio, formatos de salida ....................36
AUDIO, mando a distancia ....................7
Audio, menú en pantalla ......................24
Audio, menú SETUP ...........................32
Control Paterno, menú SETUP ............32
■
Let op: lees het volgende voor u dit toestel in gebruik neemt.
1
2
3
4
5
Om er zeker van te kunnen zijn dat u de optimale prestaties
uit uw toestel haalt, dient u deze handleiding zorgvuldig door
te lezen. Bewaar de handleiding op een veilige plek zodat u er
later nog eens iets in kunt opzoeken.
Installeer dit toestel op een goed geventileerde, koele, droge
en schone plek — uit de buurt van direct zonlicht,
warmtebronnen, trillingen, stof, vocht, en/of kou. Zorg, ten
behoeve van voldoende ventilatie, minimaal voor de
volgende vrije ruimte.
Boven: 10 cm
Achter: 10 cm
Zijkanten: 10 cm
Plaats dit toestel uit de buurt van andere elektrische
apparatuur, motoren of transformatoren om storend gebrom
te voorkomen.
Stel dit toestel niet bloot aan plotselinge
temperatuurswisselingen van koud naar warm en plaats het
toestel niet in een omgeving met een hoge vochtigheidsgraad
(bijv. in een ruimte met een luchtbevochtiger) om te
voorkomen dat zich binnenin het toestel condens vormt, wat
zou kunnen leiden tot elektrische schokken, brand, schade
aan dit toestel en/of persoonlijk letsel.
Vermijd plekken waar andere voorwerpen op het toestel
kunnen vallen, of waar het toestel blootstaat aan druppelende
of spattende vloeistoffen. Plaats de volgende dingen niet
bovenop dit toestel:
– Andere componenten, daar deze schade kunnen
veroorzaken en/of de afwerking van dit toestel kunnen
doen verkleuren.
– Brandende voorwerpen (bijv. kaarsen), daar deze
brand, schade aan dit toestel en/of persoonlijk letsel
kunnen veroorzaken.
– Voorwerpen met vloeistoffen, daar deze elektrische
schokken voor de gebruiker en/of schade aan dit
toestel kunnen veroorzaken wanneer de vloeistof
daaruit in het toestel terecht komt.
6
7
8
9
10
11
12
13
14
Dek het toestel niet af met een krant, tafellaken, gordijn enz.
zodat de koeling niet belemmerd wordt. Als de temperatuur
binnenin het toestel te hoog wordt, kan dit leiden tot brand,
schade aan het toestel en/of persoonlijk letsel.
Steek de stekker van dit toestel pas in het stopcontact als alle
aansluitingen gemaakt zijn.
Gebruik het toestel niet wanneer het ondersteboven is
geplaatst. Het kan hierdoor oververhit raken, wat kan leiden
tot schade.
Gebruik geen overdreven kracht op de schakelaars, knoppen
en/of snoeren.
Wanneer u de stekker uit het stopcontact haalt, moet u aan de
stekker zelf trekken, niet aan het snoer.
Maak dit toestel niet schoon met chemische oplosmiddelen;
dit kan de afwerking beschadigen. Gebruik alleen een schone,
droge doek.
Gebruik alleen het op dit toestel aangegeven voltage. Gebruik
van dit toestel bij een hoger voltage dan aangegeven is
gevaarlijk en kan leiden tot brand, schade aan het toestel en/
of persoonlijk letsel. Yamaha aanvaardt geen
aansprakelijkheid voor enige schade veroorzaakt door
gebruik van dit toestel met een ander voltage dan aangegeven
staat.
Om schade door blikseminslag te voorkomen, dient u de
stekker uit het stopcontact te halen wanneer het onweert.
Probeer niet zelf wijzigingen in dit toestel aan te brengen of
het te repareren. Neem contact op met erkend Yamaha
servicepersoneel wanneer u vermoedt dat het toestel reparatie
behoeft. Probeer in geen geval de behuizing open te maken.
LET OP-i Nl
15 Wanneer u dit toestel voor langere tijd niet zult gebruiken
(bijv. vakantie), dient u de stekker uit het stopcontact te
halen.
16 Lees het hoofdstuk "Problemen oplossen" over veel
voorkomende vergissingen bij de bediening voor u de
conclusie trekt dat het toestel een storing of defect vertoont.
17 Voor u dit toestel verplaatst, dient u op p te drukken om dit
toestel uit (standby) te schakelen en de stekker uit het
stopcontact te halen.
18 Er zal zich condens vormen wanneer de
omgevingstemperatuur plotseling verandert. Haal de stekker
uit het stopcontact en laat het toestel met rust.
19 Wanneer het toestel langere tijd achter elkaar gebruikt wordt,
kan het warm worden. Schakel de stroom uit en laat het
toestel afkoelen.
20 Installeer dit toestel in de buurt van een stopcontact op een
plek waar u de stekker gemakkelijk kunt bereiken.
21 De batterijen mogen niet worden blootgesteld aan hitte, zoals
door direct zonlicht, vuur of iets dergelijks.
Gebruik dit apparaat niet op een afstand van minder dan
22 cm van een persoon met een pacemaker of een
defibrillatorimplantaat.
De stroomvoorziening van dit toestel is niet afgesloten
zolang de stekker in het stopcontact zit, ook al is het
toestel zelf uitgeschakeld met p. Dit is de zogenaamde
standby-stand. In deze toestand is het toestel ontworpen
een zeer kleine hoeveelheid stroom te verbruiken.
WAARSCHUWING
OM DE RISICO'S VOOR BRAND OF
ELEKTRISCHE SCHOKKEN TE VERMINDEREN,
MAG U DIT TOESTEL IN GEEN GEVAL
BLOOTSTELLEN AAN VOCHT OF REGEN.
De lasercomponent in dit product is in staat stralen te
produceren die de limiet voor Klasse 1 overstijgen.
LASER specificatie:
Klasse 1 LASER product
Golflengte:
790 nm (CD's)/658 nm (DVD's)/405 nm
(BD's)
Laservermogen: max. 1 mW
VEILIGHEIDSINFORMATIE BETREFFENDE DE
LASER
Dit apparaat is voorzien van een laser. Om oogletsel te
voorkomen, mag u het verwijderen van de afdekking en
het uitvoeren van reparaties aan deze inrichting uitsluitend
door een bevoegde servicemonteur laten uitvoeren.
GEVAAR
Zichtbare laserstraling indien geopend. Voorkom
rechtstreekse blootstelling van de ogen aan de laserstraal.
Als dit toestel is aangesloten op een stopcontact, houdt u
uw ogen niet dicht bij de opening van de disclade en
andere openingen om naar binnen te kijken.
Inhoudsopgave
1. Inleiding
1
4. Instellingen
Wat kunt u doen met deze speler ..................... 2
Bijgeleverde onderdelen ................................... 2
Over schijven en bestanden ............................. 3
Schijf-/bestandstypes die u met deze speler kunt
gebruiken....................................................................
Een schijf laden ..............................................................
Voorzorgsmaatregelen voor schijven .............................
Melding voor het bekijken van 3D-videobeelden ..........
Cinavia-technologie........................................................
SETUP-menu..................................................... 28
Voorbeeld van de werking van het SETUP-menu ........ 30
Instellingen Algemeen .................................................. 31
Display Setting.............................................................. 33
Audio Setting ................................................................ 35
System Information....................................................... 35
Over de audio-uitgangsformaten................................... 36
Over de video-uitgangsformaten................................... 37
3
4
4
4
4
Software-upgrade ............................................. 38
Bediening en functies ........................................ 5
De software upgraden ................................................... 38
Voorpaneel...................................................................... 5
Afstandsbediening .......................................................... 6
Inleiding tot de aansluitingen.......................... 10
Achterpaneel................................................................. 10
HDMI-aansluiting .............................................. 12
Gebruik van de HDMI-aansluiting ............................... 12
Verbinding voor het afspelen van Blu-ray
3D-schijven .............................................................. 12
Videoaansluitingen .......................................... 13
Gebruik van de component-/videoaansluiting.............. 13
Audioaansluitingen .......................................... 14
Gebruik van de digitale audioaansluiting ..................... 14
Gebruik van de audioaansluitingen .............................. 15
Netwerk- en USB-aansluiting .......................... 16
Gebruik van de NETWORK-aansluiting...................... 16
Gebruik van de USB-poort ........................................... 16
Overige aansluitingen...................................... 17
Gebruik van de REMOTE CONTROL-aansluitingen .... 17
Aansluiten van het netsnoer.......................................... 17
4
5
5. Aanvullende informatie
Stroom........................................................................... 39
Basisbediening .............................................................. 39
Afspelen van schijven ................................................... 39
Beeld ............................................................................. 40
Geluid............................................................................ 40
Netwerk ......................................................................... 40
Meldingen op het scherm.............................................. 41
Woordenlijst...................................................... 42
Specificaties...................................................... 43
Algemeen ...................................................................... 43
Audioprestaties.............................................................. 43
Ingangen/uitgangen....................................................... 43
Auteursrechten .............................................................. 44
Index .................................................................. 45
(aan het einde van deze handleiding)
Information about software ....................................i
■ Over deze handleiding
3. Afspelen
Initiële Wizard/Snelinstelling........................... 18
Instellingen doorvoeren met Initiële Wizard/
Snelinstelling............................................................ 18
HOME/MEDIA-menu ......................................... 18
Foto/muziek/video afspelen.......................................... 18
Netwerkinhoud gebruiken ............................................ 20
21
21
22
23
Netflix starten ............................................................... 23
Geavanceerd afspelen ..................................... 24
Schermmenu .................................................................
Statusmenu....................................................................
Bookmark gebruiken ....................................................
Programma afspelen .....................................................
De zoekfunctie gebruiken ............................................
BONUSVIEW™ en BD-Live™ gebruiken .................
De beeld-in-beeldfunctie gebruiken
(afspelen van secundaire audio/video) .....................
De functie BD-Live™ gebruiken .................................
3
Problemen oplossen ........................................ 39
2. Aansluitingen
Netwerkservices gebruiken.............................
YouTube™-video's afspelen ...........................
Foto's uit een Picasa™-webalbum
weergeven.....................................................
Netflix™-video's afspelen................................
2
24
25
26
26
26
27
27
27
– Deze handleiding beschrijft hoe u de speler met een
afstandsbediening kunt bedienen, tenzij deze niet
beschikbaar is. Sommige van de handelingen kunnen
eveneens worden uitgevoerd met de knoppen op het
voorpaneel.
– Opmerkingen bevatten belangrijke informatie over
de veiligheids- en bedieningsinstructies. Tip(s)
bevatten aanwijzingen voor de bediening.
– Deze handleiding wordt voorafgaand aan de productie
gedrukt. Ontwerp en specificaties zijn onderhevig aan
wijzigingen ten gevolge van verbeteringen enz. In
geval van verschillen tussen de handleiding en het
product, heeft het product prioriteit.
Pictogrammen gebruikt in deze
handleiding
Pictogrammen worden gebruikt om te verwijzen naar
beschikbare knoppen/functies voor een bepaalde indeling.
Meer informatie over afspeelbare schijven en indelingen
vindt u op pagina 3.
Nederlands
BD : BD-Video
DVD : DVD-Video, DVD-VR, DVD+VR
CD : Audio-cd
VIDEO : videobestanden
MUSIC : audiobestanden
PHOTO : fotobestanden
1 Nl
INLEIDING
Wat kunt u doen met deze speler
Eenvoudige instelling van taal, resolutie, beeldverhouding
\
p. 18
\
p. 24
\
p. 27
\
p. 18
\
p. 20
\
p. 31
\
p. 21
U kunt taal- en tv-instellingen doorvoeren.
In de handel verkrijgbare Blu-ray Disc™/Blu-ray 3D™/DVD/
CD-schijven afspelen*
Naast Blu-ray-schijven kunt u met deze speler ook verschillende andere types schijven afspelen.
BONUSVIEW™, BD-Live™ enz. afspelen*
Op de nieuwste Blu-ray-schijven kunt u van aanvullende films genieten.
Video-, muziek-, fotobestanden op een schijf/
USB-geheugenapparaat afspelen*
Met deze speler kunt u bestanden die op schijven/USB-geheugenapparaten zijn opgenomen,
afspelen.
Video-, muziek-, fotobestanden op een thuisnetwerkserver
afspelen* **
Pc-inhoud kan met een tv- of AV-ontvanger worden afgespeeld door deze speler op een
netwerkserver aan te sluiten.
Bediening van een tv, AV-ontvanger enz. met de
afstandsbediening
Door apparaten via een HDMI-kabel aan te sluiten, kunt u deze met één afstandsbediening via de
functie HDMI Control bedienen.
Inhoud streamen via de netwerkservices**
U kunt met deze speler onmiddellijk via het internet van video's genieten.
* Meer informatie over afspeelbare schijven en indelingen vindt u op pagina 3.
** Voor deze functie moeten netwerkinstellingen worden doorgevoerd.
Bijgeleverde onderdelen
Controleer of de volgende accessoires bij het product geleverd zijn.
Afstandsbediening
2 Nl
Batterijen (×2)
(AAA, R03, UM-4)
Audio-/videokabel
Netsnoer
1
Over schijven en bestanden
– Schijven van 12 cm en 8 cm kunnen met deze speler
worden afgespeeld. Gebruik geen 8 naar 12 cm-adapter.
– Gebruik schijven waarvan de compatibiliteit
herkenbaar is aan het officiële logo op de schijf. Wij
garanderen niet dat schijven die niet aan deze normen
voldoen door deze speler kunnen worden afgespeeld.
Bovendien kunnen wij voor dergelijke schijven geen
goede beeld- en geluidskwaliteit garanderen.
Mediatype
Opnameformaat
BD-ROM/BD-R/
BD-RE
BD-Video/gegevensbestanden
DVD-ROM
DVD-Video
DVD-Video/DVD-VR/AVCHD/
gegevensbestanden
DVD+R/DVD+R
DL/DVD+RW
DVD-Video/DVD+VR/AVCHD/
gegevensbestanden
CD-ROM
CDDA/HDCD
CD-R/CD-RW
CDDA/gegevensbestanden
USB*
Gegevensbestanden
DLNA
Gegevensbestanden
MP3 (.mp3)
WMA (.wma)
AAC (.aac/.m4a)
WAV (.wav)
FLAC (.flac)
DivX (.divx)
MKV met DivXindeling (.mkv)
MKV met H.264
(.mkv)
MPEG PS (.mpeg/
.mpg)
MPEG TS (.ts)
MPEG-4 (.mp4)
VOB (.vob)
AVI (.avi)
ASF (.asf)
WMV (.wmv)
BD-Video
Regiocode "A" of "ABC"
DVD-Video
Regiocode "1" of "ALL"
1
ALL
Opmerkingen
* Deze speler is compatibel met USB-geheugenapparaten
die geformatteerd zijn met FAT 16/32 en NTFS.
Afspeelbare
videobestandsformaten
VIDEO
– Blu-ray Disc-/DVD-videospelers en schijven hebben
een regiocode die aangeeft in welke regio's de schijf
kan worden afgespeeld. Controleer de regiocode op
de achterzijde van deze speler.
– Een Blu-ray Disc die dezelfde regiocode als de
speler of de regiocode "ABC" draagt, kan afgespeeld
worden op deze speler.
– Een DVD-schijf die dezelfde regiocode als de speler
of de regiocode "ALL" draagt, kan afgespeeld
worden op deze speler.
Voorbeelden van regiocodes
DVD-R/DVD-R
DL/DVD-RW
Afspeelbare
audiobestandsformaten
MUSIC
Regiobeheerinformatie voor Blu-ray
Disc-/DVD-video's
Inleiding
■ Schijf-/bestandstypes die u met
deze speler kunt gebruiken
Afspeelbare
fotobestandsformaten
PHOTO
JPEG (.jpeg/.jpg)
GIF (.gif)
PNG (.png)
Opmerkingen
– Het afspelen van bestanden die vermeld worden in
de bovenstaande tabel kan niet gegarandeerd
worden. Dit is afhankelijk van de gebruikte
methodes voor het aanmaken van de bestanden of
van de gebruikte codecs.
– Bestanden die beschermd worden door
auteursrechten kunnen niet worden afgespeeld.
– Als u DLNA gebruikt, moeten de bestanden voldoen
aan de vereisten van de DLNA-server.
– De bediening en de beschikbare functies van Blu-ray
Disc/DVD-video's kunnen verschillen van de uitleg
in deze gebruiksaanwijzing en het kan voorkomen
dat bepaalde bedieningshandelingen niet toegestaan
zijn wegens de fabrieksinstellingen van de schijf.
– Als er tijdens het afspelen van een schijf een
menuscherm of bedieningsinstructies worden getoond,
dient u de aangegeven bedieningsprocedure te volgen.
– Afhankelijk van de schijf is het mogelijk dat
sommige schijven niet kunnen worden afgespeeld.
– Finaliseer alle opnamemedia die met deze speler
worden afgespeeld.
– "Finaliseren" verwijst naar het proces waarbij een
opgenomen schijf in een recorder wordt bewerkt zodat
de schijf in andere spelers/recorders en ook in deze
speler kan worden afgespeeld. Met deze speler kunnen
alleen gefinaliseerde schijven worden afgespeeld.
(Deze speler kan schijven niet zelf finaliseren.)
– Het wordt niet gegarandeerd dat alle bestanden op
een schijf, USB-geheugen of netwerk worden
afgespeeld.
– Een bestand dat door auteursrechten wordt
beschermd, kan niet vanaf een USB-geheugen of een
netwerk worden afgespeeld.
Vereisten voor audiobestanden
– Bemonsteringsfrequentie: tussen 32 - 48 kHz (MP3/
WMA), LPCM 44,1 kHz/16 bit/stereo (WAV),
192 kHz/24 bit (FLAC)
– Bitrate: tussen 8 - 320 kbps (MP3), 32 - 192 kbps
(WMA)
Vereisten voor WMV-bestanden
Nederlands
– WMV9, maximale resolutie van 1.920 × 1.080.
3 Nl
Over schijven en bestanden
■ Een schijf laden
– Plaats de schijf met het label naar boven.
– Bij schijven die aan beide zijden kunnen worden
afgespeeld, legt u de zijde die u wilt afspelen omlaag.
Opmerkingen
– Afhankelijk van de schijf en de instellingen van de speler
is het mogelijk dat het afspelen automatisch begint.
– Bij sommige schijven wordt eerst het menu weergegeven.
– De tijd voor het laden van de schijf varieert afhankelijk van de schijf.
■ Voorzorgsmaatregelen voor schijven
Vermijd krassen en stof
– Blu-ray Disc-, DVD- en CD-schijven zijn gevoelig voor
stof, vingerafdrukken en vooral krassen. Een schijf met
krassen kan onbruikbaar zijn voor afspelen. Wees
voorzichtig met schijven en bewaar ze op een veilige plaats.
Juiste opslag van schijven
Plaats de schijf in het midden van het
doosje en berg het doosje en de schijf
verticaal op.
Bewaar schijven niet op plaatsen in direct
zonlicht, vlakbij verwarmingsapparatuur
of in een zeer vochtige omgeving.
Laat schijven niet vallen en stel ze niet aan
sterke trillingen of schokken bloot.
Plaats schijven niet in een omgeving met
veel stof of waar snel schimmelvorming
kan optreden.
Voorzorgsmaatregelen voor het
hanteren van schijven
– Als het oppervlak vuil is geworden, kunt
u dit voorzichtig met een zachte, vochtige
(alleen water) doek afnemen. Veeg
daarmee vanaf het midden naar de rand.
– Gebruik geen sprays die bedoeld zijn
voor grammofoonplaten, wasbenzine,
verfverdunner, antistatische vloeistoffen
of andere oplosmiddelen.
– Raak het oppervlak niet met uw vingers aan.
– Plak geen papier of stickers op de schijf.
– Als de afspeelzijde van de schijf vuil of krassen bevat, kan
de speler aannemen dat de schijf niet geschikt is en de
schijflade openen of zal de speler niet in staat zijn om de
schijf op de juiste wijze af te spelen. Verwijder eventueel
vuil met een zachte doek van de afspeelzijde van de schijf.
Schoonmaken van de pick-uplens
– Gebruik nooit in de handel verkrijgbare
reinigingsschijven. Bij gebruik van deze schijven kan
de lens worden beschadigd.
– Neem contact op met het dichtstbijzijnde
servicecentrum goedgekeurd door Yamaha om de
lens te laten schoonmaken.
4 Nl
■ Melding voor het bekijken van
3D-videobeelden
– Sommige mensen ondervinden ongemak (zoals
vermoeide ogen, vermoeidheid of misselijkheid)
terwijl zij 3D-videobeelden bekijken. Wij raden aan
dat alle kijkers tijdens het bekijken van 3Dvideobeelden regelmatig pauzes nemen.
– Als u enig ongemak ondervindt, dient u te stoppen
met naar 3D-videobeelden te kijken tot het ongemak
verdwijnt. Raadpleeg een arts als u ernstige
ongemakken ondervindt.
– Lees aandachtig de gebruikershandleidingen
(Blu-ray Disc en tv) en/of de
waarschuwingsberichten die op de tv verschijnen.
– Het zicht van jonge kinderen (vooral die jonger dan
zes jaar zijn) bevindt zich nog steeds in de
ontwikkelingsfase. Raadpleeg uw arts (bijvoorbeeld
een kinderarts of oogarts) voordat u jonge kinderen
naar 3D-videobeelden laat kijken.
– Jonge kinderen moeten onder toezicht van
volwassenen zijn om te verzekeren dat zij de
hierboven beschreven aanbevelingen opvolgen.
■ Cinavia-technologie
– De Cinavia-technologie is een onderdeel van het
kopieerbeveiligingssysteem dat ingebouwd is in uw
Blu-ray Disc-speler.
Opmerking
– De volgende meldingen kunnen weergegeven
worden en het afspelen wordt mogelijk gestopt of de
audio-uitgangen kunnen tijdelijk gedempt worden
door uw Blu-ray Disc-speler als u een verboden
kopie van inhoud die beschermd is door Cinaviatechnologie probeert af te spelen.
Deze meldingen worden uitsluitend in het Engels
weergegeven.
Afspelen stopgezet. De inhoud die afgespeeld
wordt, is beschermd door Cinavia™ en mag niet
afgespeeld worden op deze apparatuur.
Voor meer informatie, zie http://www.cinavia.com.
Berichtcode 1.
Audio-uitgangen tijdelijk gedempt. Probeer niet om
het afspeelvolume te regelen. De inhoud die
afgespeeld wordt, is beschermd door Cinavia™ en
mag niet afgespeeld worden op deze apparatuur.
Voor meer informatie, zie http://www.cinavia.com.
Berichtcode 3.
Cinavia Opmerking
Dit product maakt gebruik van Cinavia-technologie om het
gebruik van verboden kopieën van bepaald commercieel
geproduceerd beeldmateriaal en de bijbehorende
soundtracks te beperken. Wanneer het gebruik van een
verboden kopie wordt geregistreerd, wordt er een melding
weergegeven en wordt het afspelen of kopiëren onderbroken.
Meer informatie over de Cinavia-technologie vindt u online in
het Cinavia Klanteninformatiecentrum op
http://www.cinavia.com. Als u meer informatie over Cinavia
per post wenst te ontvangen, stuurt u een brief met vermelding
van uw postadres naar: Cinavia Consumer Information Center,
P.O. Box 86851, San Diego, CA, 92138, Verenigde Staten.
1
Bediening en functies
Inleiding
■ Voorpaneel
USB
1 2
3
1 p (aan/stand-by)
Hiermee kunt u de speler inschakelen / de standbymodus activeren.
Houd p op het voorpaneel langer dan 5 seconden
ingedrukt en laat de knop vervolgens los om de speler
te resetten (systeemherstel).
4
5 6 7
4 Schijfladeklep
5
(uitwerpen)
Hiermee kunt u de schijflade openen/sluiten.
9
0
6
(achterwaarts zoeken/achterwaarts
overslaan):
Druk op deze knop om achterwaarts over te slaan en
houd deze ingedrukt om achterwaarts te zoeken.
7
(voorwaarts zoeken/voorwaarts
overslaan):
Druk op deze knop om voorwaarts over te slaan en
houd deze ingedrukt om voorwaarts te zoeken.
8
(afspelen)
Hiermee kunt u het afspelen starten.
9
(pauzeren)
Hiermee kunt u het afspelen pauzeren.
0
(stoppen)
Hiermee kunt u het afspelen stoppen.
2 USB-poort (p. 16)
3 Uitleesvenster op het voorpaneel
Hier wordt informatie betreffende de operationele
status weergegeven.
8
Opmerking
– In de fabriek wordt er een beschermende folie aangebracht op het voorpaneel van deze speler. Verwijder de
beschermende folie van de speler voor u deze in gebruik neemt.
Nederlands
5 Nl
Bediening en functies
■ Afstandsbediening
1 Infraroodsignaalzender: verstuurt
infraroodsignalen. Richt dit venster op de
afstandsbedieningssensor (p. 9).
Opmerking
–
wordt in de linkerbovenhoek van het scherm
weergegeven als de ingedrukte knop niet
beschikbaar is.
1
2
3
4
PROGRAM
MARKER
DIGEST
ZOOM
R
G
Y
B
SUBTITLE
ANGLE
5
6
7
8
9
0
AUDIO
CLEAR
SEARCH
SHUFFLE
PIP
SETUP
REPEAT
2ND
AUDIO
HOME
A B
TOP MENU
POP-UP MENU
2 MARKER DVD VIDEO : stelt Bookmark (p. 26) op
een specifiek punt van een film in. Wanneer Bookmark
is ingesteld en u het punt wilt selecteren waarnaar u
wilt overschakelen, drukt u op DIGEST. U kunt tot
12 Bookmarks instellen.
C
3
D
E
F
G
H
I
J
K
4 PROGRAM DVD CD : hiermee kunt u de
afspeelvolgorde instellen (p. 26). U kunt tot 15 sporen
(voor een audioschijf) of titels/hoofdstukken (DVDvideo) instellen.
L
M
: hiermee kunt u de schijflade openen/sluiten.
5 Cijfertoetsen: voor het invoeren van cijfers of om
tijdens het afspelen over te schakelen naar het spoor/
hoofdstuk dat overeenstemt met het ingevoerde cijfer.
Afhankelijk van het schijftype en de
afspeelomstandigheden zijn deze knoppen mogelijk
niet beschikbaar.
6 CLEAR: hiermee kunt u het ingevoerde cijfer /
ingestelde item wissen.
7 PIP BD : hiermee kunt u beeld-in-beeld in-/
ENTER
RETURN
ON SCREEN
uitschakelen (p. 27). PIP Mark (
) wordt
weergegeven op het scherm wanneer deze functie
beschikbaar is. U kunt dit item ook via het
schermmenu (p. 24) selecteren.
Opmerking
A
B
NETFLIX
STATUS
– PIP Mark wordt alleen weergegeven wanneer PIP
Mark is ingeschakeld (p. 32).
8 SETUP: hiermee kunt u het SETUP-menuscherm
weergeven (p. 28).
9 2ND AUDIO BD : hiermee kunt u de secundaire
audio van beeld-in-beeld (p. 27) of audiocommentaren
selecteren. Secundaire Audio Mark (
) wordt
weergegeven op het scherm wanneer deze functie
beschikbaar is (p. 35). U kunt dit item ook via het
schermmenu (p. 24) selecteren.
Opmerking
– Secundaire Audio Mark wordt alleen weergegeven
wanneer Secundaire Audio Mark is ingeschakeld
(p. 32).
0 HOME: geeft het HOME-menuscherm weer (p. 18).
A NETFLIX: hiermee kunt u Netflix starten (p. 23).
B STATUS: hiermee kunt u de afspeelinformatie
weergeven (p. 25).
6 Nl
Bediening en functies
D p: hiermee kunt u deze speler inschakelen of de
stand-bymodus activeren.
E ZOOM DVD VIDEO PHOTO : hiermee kunt u
in- en uitzoomen. Elke keer dat u de toets indrukt,
verandert het formaat van het scherm (inzoomen/
uitzoomen: elk met 3 stappen).
F Kleurtoetsen BD : gebruik deze toetsen in
overeenstemming met de instructies op het scherm.
G SUBTITLE BD DVD VIDEO : hiermee kunt u de
taal van de ondertiteling (p. 43) indien beschikbaar
wijzigen. U kunt dit item ook via het schermmenu
(p. 24) selecteren.
H ANGLE BD DVD : hiermee kunt u de camerahoek
wijzigen als de video vanuit meerdere hoeken is
opgenomen. Angle Mark (
) wordt op het scherm
weergegeven wanneer deze functie beschikbaar is. U
kunt dit item ook via het schermmenu (p. 24)
selecteren.
Opmerking
– Angle Mark wordt alleen weergegeven wanneer
Angle Mark is ingeschakeld (p. 32).
I AUDIO BD DVD : hiermee kunt u de audiotaal of
de indeling wijzigen. U kunt dit item ook via het
schermmenu (p. 24) selecteren.
L REPEAT BD
DVD
CD
VIDEO
MUSIC
1
PHOTO : hiermee kunt u de herhalingsmodus
wijzigen. Elke keer dat u de toets indrukt, wordt de
herhalingsmodus als volgt gewijzigd.
: hiermee kunt u de titel die wordt afgespeeld
herhalen.
Inleiding
C DIGEST PHOTO : hiermee kunt u 12
fotominiaturen weergeven. Wanneer er miniaturen
worden weergegeven, kunt u doorgaan naar de
volgende/vorige pagina met
/
.
DVD VIDEO : geeft de Bookmark-selectiebalk
weer (p. 26).
: hiermee kunt u het hoofdstuk dat wordt
afgespeeld herhalen.
: hiermee kunt u de map die wordt afgespeeld
herhalen.
: hiermee kunt u alle sporen/bestanden op de
schijf herhalen.
: hiermee kunt u het spoor/bestand dat wordt
afgespeeld herhalen.
M A/B BD DVD CD VIDEO MUSIC : hiermee
kunt u een bepaald deel dat u wilt herhalen opnieuw
afspelen.
1 Druk op A/B bij de scène waar u het beginpunt wilt
instellen. Op het scherm wordt "A-" weergegeven.
2 Druk op A/B bij de scène waar u het eindpunt wilt
instellen. Op het scherm wordt "A-B" weergegeven.
De herhaling start.
3 Druk op A/B om het herhaald afspelen te annuleren.
"A-B" verdwijnt en het herhaald afspelen wordt
gestopt.
Opmerking
– Afhankelijk van de specificaties van de schijf, kan
deze functie niet worden uitgevoerd.
J SEARCH BD DVD CD VIDEO MUSIC :
hiermee kunt u tijdens het afspelen overschakelen naar
een specifiek punt. Raadpleeg voor meer informatie
over deze functie "De zoekfunctie gebruiken" (p. 26).
U kunt dit item ook via het statusmenu (p. 25)
selecteren.
K SHUFFLE DVD
CD
VIDEO
MUSIC
PHOTO : hiermee kunt u de modus voor willekeurig
afspelen instellen (p. 24).
7 Nl
Nederlands
Vervolg op de volgende pagina. \
Bediening en functies
N TOP MENU BD DVD : hiermee kunt u het
hoofdmenuscherm weergeven als de schijf een menu
bevat. Selecteer het gewenste item met 5/a/2/3 en
ENTER.
PROGRAM
MARKER
DIGEST
ZOOM
R
G
Y
B
Opmerking
SUBTITLE
– Afhankelijk van de schijf kunnen specifieke
handelingen verschillend zijn. Volg de instructies op
elk menuscherm.
ANGLE
AUDIO
CLEAR
SEARCH
PIP
SETUP
2ND
AUDIO
HOME
TOP MENU
REPEAT
A B
POP-UP MENU
N
R
P RETURN: hiermee kunt u terugkeren naar het vorige
menu of scherm enz.
Q Bedieningstoetsen
BD
O
P
O Cursortoetsen (5/a/2/3): hiermee kunt u de
markering op het menuscherm verplaatsen.
ENTER: hiermee kunt u het gemarkeerde menu/item
selecteren.
SHUFFLE
ENTER
RETURN
ON SCREEN
S
DVD
CD
VIDEO
MUSIC
PHOTO
: hiermee kunt u het afspelen stoppen. Druk twee
keer op deze knop om het afspelen volledig te stoppen.
: hiermee kunt u het afspelen pauzeren.
: hiermee kunt u inhoud afspelen.
Q
/
NETFLIX
STATUS
BD DVD CD VIDEO MUSIC :
hiermee kunt u achterwaarts/voorwaarts zoeken. Elke
keer dat u de toets indrukt, verandert de zoeksnelheid
(achterwaarts/voorwaarts zoeken: elk met 5 stappen).
Druk op
om het normaal afspelen te hervatten.
PHOTO : hiermee kunt u de snelheid van een
diavoorstelling wijzigen (langzamer/sneller:
3 stappen).
/
DVD CD VIDEO MUSIC :
druk op deze knop om onmiddellijk te zoeken /
opnieuw af te spelen. Met onmiddellijk zoeken wordt
de inhoud 30 seconden overgeslagen. Met
onmiddellijk herhalen wordt de inhoud van de vorige
10 seconden herhaald.
BD
/
: hiermee kunt u voorwaarts/achterwaarts
overslaan.
Opmerking
– Afhankelijk van de schijf gaat deze speler verder met
de weergave vanaf het punt waar de speler eerder
gestopt is. Om vanaf het begin af te spelen, drukt u
twee keer op
en vervolgens op
.
R POP-UP/MENU BD DVD : hiermee kunt u het
pop-upmenu weergeven. De weergegeven menuinhoud verschilt afhankelijk van de schijf. Voor meer
informatie over het bekijken en bedienen van het popupmenu, raadpleegt u de handleiding voor de schijf.
Het hoofdmenuscherm kan worden weergegeven door,
afhankelijk van de DVD, op POP-UP/MENU te
drukken.
S ON SCREEN: hiermee kunt u het schermmenu
weergeven (p. 24).
8 Nl
Bediening en functies
ID-functie
1 Instelling afstandsbediening
Om het ID te wijzigen van ID1 naar ID2, houdt u de
rode knop en cijfertoets 2 gedurende 7 seconden
tegelijk ingedrukt. Om het ID te wijzigen van ID2
naar ID1, houdt u de rode knop en cijfertoets 1
gedurende 7 seconden tegelijk ingedrukt.
2 Instelling hoofdapparaat
Houd
en
op het voorpaneel
gedurende 2 seconden tegelijk ingedrukt om het
huidige ID weer te geven wanneer:
– geen schijf in de speler is geplaatst.
– de schijflade gesloten is.
– het afspelen gestopt is.
– "NO DISC" wordt weergegeven op het display op
het voorpaneel.
Houd de knoppen gedurende 2 seconden ingedrukt
om het ID te wijzigen tussen ID1 en ID2.
1
Inleiding
U kunt het ID van de afstandsbediening wijzigen om
ongewenste bediening te voorkomen van een andere
Yamaha-speler, zoals een DVD-speler. Als u het ID van
de afstandsbediening gewijzigd hebt, dient u ervoor te
zorgen dat u hetzelfde ID selecteert voor het
hoofdapparaat. De standaardinstelling is ID1.
– Verwijder de batterijen als u de afstandsbediening
geruime tijd niet denkt te gebruiken.
– Gebruik oude batterijen nooit samen met nieuwe
batterijen.
– Combineer geen verschillende types batterijen (bv.
alkalinebatterijen en mangaanbatterijen). Lees de
verpakking zorgvuldig; deze verschillende batterijen
kunnen immers dezelfde vorm en kleur hebben.
– Als de batterijen gelekt hebben, dient u deze
onmiddellijk te verwijderen. Raak de gelekte
vloeistof niet aan en zorg ervoor dat deze niet in
contact komt met uw kledij enz. Reinig het
batterijvak grondig voor u nieuwe batterijen plaatst.
– Gooi batterijen nooit bij het huishoudelijk afval;
verwijder deze in overeenstemming met de lokale
wetgeving.
– Houd batterijen uit de buurt van kinderen. Raadpleeg
meteen een arts als er een batterij per ongeluk wordt
ingeslikt.
– Verwijder de batterijen uit de afstandsbediening als
u deze gedurende een lange tijd niet zult gebruiken.
– Laad de bijgeleverde batterijen niet op en demonteer
deze niet.
Bedieningsbereik van de
afstandsbediening
Afstandsbedieningssensor
Opmerkingen
– Als er gedurende een paar minuten geen batterijen of
als er lege batterijen in de afstandsbediening
geplaatst zijn, wordt het ID van de afstandsbediening
automatisch ingesteld op ID1. Als u de
afstandsbediening wilt gebruiken met de instelling
ID2, moet u nieuwe batterijen plaatsen en het ID van
de afstandsbediening opnieuw instellen.
– Als u de speler reset, is het ID van de
afstandsbediening ID1.
USB
30°
30°
6m
De batterijen in de afstandsbediening
plaatsen
1
3
2
Opmerkingen
Nederlands
– Vervang beide batterijen als de bedieningsafstand
van de afstandsbediening verkleint.
– Gebruik hiervoor AAA-, R03-, UM-4-batterijen.
– Houd bij het plaatsen van de batterijen rekening met
de polariteit. Raadpleeg hiervoor de afbeelding in
het batterijvak.
9 Nl
AANSLUITINGEN
Inleiding tot de aansluitingen
Zoek de corresponderende aansluitmethode op uw video/audio-apparatuur. Wij raden aan dat u de HDMI-aansluiting
gebruikt die digitale audio en video van hoge kwaliteit biedt via één enkele aansluiting. Als u gebruik maakt van de
andere aansluitingen, sluit dan de video eerst aan. Maak daarna de audioverbindingen.
Sluit video en audio aan op de
AV-ontvanger met een HDMIkabel.
HDMI-aansluiting op
AV-ontvanger? *
HDMI-aansluiting op tv?
Raadpleeg de
gebruiksaanwijzing van de
AV-ontvanger.
HDMI-aansluiting op tv?
START
Sluit video aan op de tv met een HDMI-kabel.
U gebruikt een AVontvanger?
Sluit video aan op AV-ontvanger.
HDMI-aansluiting op tv?
Sluit video en audio aan op de tv met een HDMI-kabel.
Sluit video aan op tv.
Ja
* Wanneer u verbinding maakt met een AV-ontvanger die het geluid
ingevoerd via de HDMI-aansluiting niet kan uitvoeren, raadpleegt u de
gebruikershandleiding van uw AV-ontvanger.
Nee
■ Achterpaneel
0
9
AC IN
VIDEO OUT
Y
PB
DIGITAL OUT
COAXIAL
HDMI
NETWORK
AUDIO OUT
L
R
OUT
IN
REMOTE CONTROL
VIDEO
PR
COMPONENT
1 2 3
10 Nl
OPTICAL
4
USB
5
6
7
8
(Model voor Europa)
2
Aansluitingen
Video- en audioaansluiting op
AV-ontvanger
A HDMI (p. 12)
Audioaansluiting op AV-ontvanger
Videoaansluiting
naar tv
A’ HDMI (p. 12)
Sluit audio aan op
AV-ontvanger.
D COAXIAL (p. 14)
of
naar AV-ontvanger
E
OPTICAL (p. 14)
B COMPONENT (p. 13)
of
of
F L/R (p. 15)
C VIDEO (p. 13)
Video- en audioaansluiting op tv
A’ HDMI (p. 12)
Audioaansluiting op tv
Videoaansluiting op tv
Sluit audio aan op tv.
D’ COAXIAL (p. 14)
of
B’ COMPONENT (p. 13)
E’ OPTICAL (p. 14)
of
of
C’ VIDEO (p. 13)
F’ L/R (p. 15)
1 VIDEO (p. 13)
6 AUDIO OUT (L/R) (p. 15)
2 COMPONENT (p. 13)
7 REMOTE CONTROL (OUT/IN) (p. 17)
3 HDMI (p. 12)
8 AC IN (p. 17)
4 OPTICAL (p. 14)
9 NETWORK (p. 16)
5 USB (p. 16)
0 COAXIAL (p. 14)
Nederlands
11 Nl
HDMI-aansluiting
■ Gebruik van de HDMI-aansluiting
–
–
–
–
Via de HDMI-aansluiting kunt u genieten van digitale beelden en geluid van hoge kwaliteit.
Sluit een HDMI-kabel (los verkrijgbaar) stevig aan op de HDMI-aansluitingen.
Raadpleeg pagina 36 voor informatie over audio/video-uitgangsformaten.
Maak gebruik van HIGH SPEED HDMI-kabels waarop het HDMI-logo (zoals weergegeven op de achterflap)
wordt weergegeven.
Opgelet!
Verbind het netsnoer van deze speler pas als alle aansluitingen gemaakt zijn.
Deze speler
VIDEO OUT
Y
PB
DIGITAL OUT
COAXIAL
HDMI
NETWORK
VIDEO
PR
COMPONENT
OPTICAL
USB
Tips
– Raadpleeg HDMI Control (p. 31) als u de
"HDMI Control"-functie gebruikt.
– Raadpleeg HDMI (p. 35) voor informatie over
de uitvoermodus van de "HDMI"-aansluiting.
– Raadpleeg "Problemen oplossen" (p. 40) als
er geen beeld wordt weergegeven.
Naar de HDMI-aansluiting
■ Verbinding voor het afspelen
van Blu-ray 3D-schijven
HDMI-kabel
(los verkrijgbaar)
Om op deze speler van Blu-ray 3D-schijven te
genieten, hebt u de volgende apparatuur en
aansluitingen nodig:
– U hebt een tv en (eventueel) een AVontvanger nodig die ondersteuning bieden
voor 3D.
– Alle componenten moeten met HDMI-kabels
worden aangesloten.
A’
– De Blu-ray Disc moet 3D-beelden bevatten.
– U moet 3D Uitgang bij Display Setting (p. 33)
instellen op Auto.
A
Naar de HDMI-ingang
HDMI IN
AV-ontvanger
12 Nl
Tv
Videoaansluitingen
■ Gebruik van de component-/videoaansluiting
Opgelet!
2
Aansluitingen
– Via de componentaansluitingen kunt u genieten van een nauwkeurige kleurweergave en beelden van hoge
kwaliteit.
– Sluit een componentvideokabel (los verkrijgbaar) of een videokabel stevig aan op de COMPONENT-aansluitingen/
VIDEO-aansluiting.
– Zie pagina 37 voor informatie over de video-uitgangsformaten.
Verbind het netsnoer van deze speler pas als alle aansluitingen gemaakt zijn.
Deze speler
VIDEO OUT
Y
Deze speler
VIDEO OUT
DIGITAL OUT
COAXIAL
Y
HDMI
PB
PB
DIGITAL OUT
COAXIAL
HDMI
NETWORK
NETWORK
PR
VIDEO
COMPONENT
(Groen)
(Rood)
(Blauw)
OPTICAL
PR
VIDEO
COMPONENT
USB
OPTICAL
Naar
COMPONENTaansluitingen
Componentvideokabel
(los verkrijgbaar)
B
USB
(Geel)
Naar
VIDEOaansluiting
Audio-/videokabel
(bijgeleverd)
B’
C
C’
Naar videoingang
Naar
componentingangen
COMPONENT IN
(Geel)
(Geel)
Y
(Groen)
(Groen)
(Geel)
PB
(Blauw)
(Blauw)
PR
(Rood)
(Groen)
(Blauw)
(Rood)
(Rood)
VIDEO
AV INPUT
AV-ontvanger
Tv
AV-ontvanger
Tv
Opmerkingen
13 Nl
Nederlands
– Als u het beeld via de videorecorder weergeeft, is het mogelijk dat de beeldkwaliteit minder goed is als gevolg van
de kopieerbeveiligingsfunctie.
– Om op deze speler van Blu-ray 3D-schijven te genieten, moet u een AV-ontvanger, een tv en deze speler met
HDMI-kabels aansluiten. Zie pagina 12.
Audioaansluitingen
■ Gebruik van de digitale audioaansluiting
– U kunt audioapparatuur of de tv aansluiten op de COAXIAL-aansluiting/OPTICAL-aansluiting.
– Sluit een coaxiale digitale audiokabel (los verkrijgbaar) of een optische kabel (los verkrijgbaar) stevig aan op de
coaxiale digitale audioaansluiting of de optische digitale audioaansluiting.
– Zie pagina 36 voor informatie over audio-uitgangsformaten.
Opgelet!
Verbind het netsnoer van deze speler pas als alle aansluitingen gemaakt zijn.
Deze speler
Deze speler
VIDEO OUT
Y
PB
VIDEO OUT
DIGITAL OUT
COAXIAL
Y
HDMI
PB
DIGITAL OUT
COAXIAL
HDMI
NETWORK
NETWORK
AUDIO OUT
L
R
PR
VIDEO
COMPONENT
OPTICAL
PR
VIDEO
COMPONENT
USB
OPTICAL
USB
Naar
COAXIALaansluiting
Naar de
OPTICALaansluiting
Coaxiale digitale audiokabel
(los verkrijgbaar)
D
D’
Naar coaxiale
ingang
AV-ontvanger
Optische kabel
(los verkrijgbaar)
E
E’
Naar optische
ingang
COAXIAL
OPTICAL
AV INPUT
DIGITAL AUDIO IN
Tv
AV-ontvanger
Tv
Tip
– Voor informatie over de uitvoermodus van de COAXIAL-/OPTICAL-aansluiting, dient u de "Coaxial / Optical" (p.
35) te raadplegen.
14 Nl
Audioaansluitingen
■ Gebruik van de audioaansluitingen
– U kunt audioapparatuur of de tv op de AUDIO OUT L/R-bussen aansluiten.
– Sluit op de AUDIO OUT L/R-bus stevig een audio-/videokabel (meegeleverd) aan.
– Zie pagina 36 voor informatie over audio-uitgangsformaten.
2
Opgelet!
Aansluitingen
Verbind het netsnoer van deze speler pas als alle aansluitingen gemaakt zijn.
Deze speler
DIGITAL OUT
COAXIAL
DMI
NETWORK
AUDIO OUT
OUT
L
R
IN
REMOTE CONTROL
(Rood)
USB
(Wit)
OPTICAL
Naar AUDIO
OUT L/Raansluiting
Audio-/videokabel
(bijgeleverd)
F
F’
Naar audioL/R invoerbus
(Wit)
(Rood)
AV-ontvanger
R
AUDIO IN
(Rood)
L
(Wit)
(Rood)
(Wit)
AUDIO
Tv
Nederlands
15 Nl
Netwerk- en USB-aansluiting
■ Gebruik van de NETWORK-aansluiting
– U kunt pc-inhoud afspelen door deze speler op een netwerk aan te sluiten.
– U kunt genieten van verschillende soorten materiaal met interactieve functies door verbinding te maken met het
internet bij het afspelen van schijven die BD-Live ondersteunen. Zie pagina 27 voor meer informatie over de
BD-Live-functies.
Opmerkingen
–
–
–
–
–
Sluit een netwerkkabel (los verkrijgbaar) stevig aan op de NETWORK-aansluiting.
Gebruik hiervoor alleen een STP-netwerkkabel (Shielded Twisted Pair).
Bij gebruik van internet is een breedbandinternetverbinding vereist zoals hieronder is aangegeven.
Sluit de andere stekker van de netwerkkabel aan op de hub/breedbandrouter.
Wanneer u een breedband-internetverbinding wilt gebruiken, hebt u een contract met een internetprovider nodig.
Neem contact op met uw dichtstbijzijnde internetprovider voor verdere informatie.
– Raadpleeg tevens de handleidingen van de aangesloten apparatuur, want de aansluitmethode kan verschillen
afhankelijk van uw internetomgeving.
– Gebruik een netwerkkabel/router die 10BASE-T/100BASE-TX ondersteunt.
■ Gebruik van de USB-poort
– U kunt een USB-geheugen voor Externe opslag aansluiten op de USB-poort op het achterpaneel (of voorpaneel)
van deze speler om de BD-Live-gegevens op te slaan of de software van deze speler bij te werken.
– Sluit een USB-geheugen (los verkrijgbaar) stevig aan op de USB-poort.
OPGELET:
– Verwijder het USB-geheugen niet en maak het
netsnoer niet los terwijl de handelingen voor
BD-Live (p. 27) of de software-upgrade worden
uitgevoerd.
– Gebruik geen USB-verlengkabel bij het
aansluiten van een USB-geheugen op de USBpoort van de speler. Bij gebruik van een USBverlengkabel is het mogelijk dat de speler niet
juist functioneert.
Deze speler
VIDEO OUT
Y
DIGITAL OUT
COAXIAL
HDMI
PB
NETWORK
AUDIO OUT
L
R
VIDEO
PR
COMPONENT
OPTICAL
USB
Opmerking
– Yamaha kan niet garanderen dat de USBgeheugens van alle merken functioneren met
deze speler.
Naar de
USBpoort
Naar de
NETWORKaansluiting
USB-geheugen
(los verkrijgbaar)
Netwerkkabel
(los verkrijgbaar)
Tip
– Stel Externe opslag in op
Front USB (p. 31) om
BD-Live-gegevens op
het USB-geheugen op het
voorpaneel op te slaan.
Naar de LANaansluiting
LAN
Internet
Modem
Hub of
breedbandrouter
Na het aansluiten
– Raadpleeg "Netwerk" (p. 32) als u de Netwerk-instelling handmatig instelt.
– Raadpleeg "Netwerkinhoud gebruiken" (p. 20) om de pc-inhoud op uw netwerk af te spelen.
16 Nl
Pc
Overige aansluitingen
■ Gebruik van de REMOTE
CONTROL-aansluitingen
Opgelet!
– Raadpleeg de gebruiksaanwijzing van uw Yamaha
AV-ontvanger voor meer informatie over de
SCENE-functie.
– U kunt een Yamaha-component (zoals een CDspeler) die de SCENE-functie ondersteunt,
aansluiten op de REMOTE CONTROL (OUT)aansluiting van deze speler.
2
Aansluitingen
– U kunt de afstandsbedieningssignalen doorgeven en
ontvangen door aan te sluiten op de REMOTE
CONTROL (OUT/IN)-aansluitingen.
– Sluit monaurale 3,5 mm-ministekkerkabels (los
verkrijgbaar) stevig aan op de REMOTE CONTROL
(OUT/IN)-aansluitingen.
– Als uw AV-ontvanger een Yamaha-product is en
over de mogelijkheid beschikt om SCENEbedieningssignalen te versturen, kunt u de speler
bedienen met de SCENE-functie.
Tips
■ Aansluiten van het netsnoer
– Wanneer alle aansluitingen doorgevoerd zijn, sluit u
het bijgeleverde netsnoer aan op de AC IN-ingang
aan de achterkant van de speler. Steek daarna de
stekker in het stopcontact.
Verbind het netsnoer van deze speler pas
als alle aansluitingen gemaakt zijn.
Deze speler
RK
AC IN
AUDIO OUT
L
R
OUT
IN
REMOTE CONTROL
(Model voor Europa)
Naar AC-ingang
Naar REMOTE
CONTROL
(OUT)-aansluiting
Naar REMOTE
CONTROL
(IN)-aansluiting
Naar het AC-stopcontact
Opmerking
Monaurale
3,5mmministekkerkabel
(los verkrijgbaar)
Monaurale 3,5mmministekkerkabel
(los verkrijgbaar)
Naar de
uitgangsaansl
uiting voor de
afstandsbedie
ning
Naar de
ingangsaansluiting
voor de
afstandsbediening
REMOTE CONTROL IN
Yamaha-component
– OM BRAND OF ELEKTRISCHE SCHOKKEN TE
VOORKOMEN MAG U NIET DE NIETGEÏSOLEERDE ONDERDELEN VAN DE
KABELS AANRAKEN WANNEER HET
NETSNOER OP EEN STOPCONTACT IS
AANGESLOTEN.
REMOTE CONTROL OUT
Infraroodontvanger of
Yamaha-component
(zoals een AV-ontvanger)
Nederlands
17 Nl
AFSPELEN
Initiële Wizard/Snelinstelling
■ Instellingen doorvoeren met Initiële Wizard/Snelinstelling
Met Initiële Wizard/Snelinstelling kunt u eenvoudig de taal, resolutie en beeldverhouding instellen. Wanneer u deze
speler voor het eerst gebruikt na de aankoop, wordt het scherm Initiële Wizard weergegeven. U kunt dezelfde instelling
uitvoeren via het menu SETUP = Systeem = Snelinstelling.
1 Wanneer het scherm Snelinstelling wordt
weergegeven, drukt u op ENTER om Snelinstelling te
starten.
2 Stel de taal, resolutie en beeldverhouding in door de
instructies op het scherm te volgen.
Opmerkingen
– Wanneer er geen beeld wordt weergegeven nadat
Initiële Wizard/Snelinstelling voltooid is, raadpleegt
u "Problemen oplossen" (p. 40).
– Als deze speler wordt ingeschakeld, verschijnt een
waarschuwingsbericht betreffende het afspelen van
een 3D-video. Druk op ENTER om het bericht te
verwijderen of op CLEAR om het uit te schakelen
(p. 31).
HOME/MEDIA-menu
Met het HOME- en MEDIA-menu kunt u door multimediabestanden op gegevensschijven, USB-geheugens en uw
netwerk bladeren en deze afspelen.
Opmerking
– Meer informatie over afspeelbare schijven en
indelingen vindt u op pagina 3.
■ Foto/muziek/video afspelen
Basisbediening
2/3/5/a: hiermee kunt u de markering verplaatsen.
2: Terugkeren naar de hoofdmap.
HOME: het HOME-menuscherm openen/sluiten.
ENTER: de map/het bestand bevestigen.
PIP
SETUP
2ND
AUDIO
HOME
TOP MENU
REPEAT
A B
POP-UP MENU
ENTER
RETURN
18 Nl
ON SCREEN
Pictogrammen boven aan het MEDIAmenu
: hiermee kunt u de schijf afspelen die in de lade ligt
of de inhoud weergeven op de gegevensschijf.
: hiermee kunt u de inhoud weergeven op het USBgeheugen dat aangesloten is op de USB-poort.
: hiermee kunt u zoeken naar een DLNA-server
(p. 20) op het netwerk.
: hiermee kunt u inhoud weergeven op de aangesloten
DLNA-server.
HOME/MEDIA-menu
Basishandelingen voor het afspelen
van bestanden in een gekozen map
Voorbeeld: Een filmbestand selecteren op een USBgeheugen
4 Selecteer de Foto-, Muziek-, Video- of AVCHD-map
die u wilt afspelen en druk vervolgens op ENTER.
Druk op 2 of selecteer
om terug te keren naar de
hoofdmap.
Opmerking
– Stop het afspelen van de video voor u overschakelt
naar het MEDIA-menuscherm.
3
Afspelen
1 Druk op HOME om over te schakelen naar het HOMEmenuscherm.
Opmerking
Tip
– De HOME-menuweergave kan, afhankelijk van het
model, verschillen.
– Merk op dat alleen het type bestanden dat u in deze
stap hebt geselecteerd, wordt weergegeven in de
volgende stap. Als u bijvoorbeeld de Foto-map hebt
geselecteerd in deze stap, worden in de volgende
stap alleen fotobestanden weergegeven. Als u andere
bestanden dan foto's wilt afspelen, keert u terug naar
deze stap en selecteert u het bestandstype opnieuw.
5 Selecteer de map(pen) met het bestand dat u wilt
afspelen.
2 Druk op 2/3/5/a om MEDIA te selecteren en druk
vervolgens op ENTER.
Het MEDIA-scherm wordt weergegeven.
3 Selecteer het item dat het bestand bevat dat u wilt
afspelen en druk vervolgens op ENTER.
19 Nl
Nederlands
Vervolg op de volgende pagina. \
HOME/MEDIA-menu
6 Selecteer het bestand dat u wilt afspelen en druk
vervolgens op ENTER.
Wanneer er een videobestand geselecteerd is, wordt het
afspelen gestart.
Wanneer er een muziekbestand geselecteerd is, wordt
het statusscherm weergegeven en wordt het afspelen
gestart.
Wanneer er een fotobestand geselecteerd is, wordt er
een diavoorstelling gestart.
■ Netwerkinhoud gebruiken
Deze speler is gecertificeerd als DLNA-server (p. 42). U
kunt foto-, muziek- en video-inhoud die opgeslagen is op
een DLNA-server beheren op uw thuisnetwerk.
Gedeelde inhoud afspelen
1 Om bestanden op uw pc af te spelen, installeert u een
DLNA-serversoftware, zoals Windows Media Player
12, en deelt u de bestanden die u wilt afspelen.
2 Schakel de pc waarop DLNA-serversoftware is
geïnstalleerd of het DLNA-apparaat dat is aangesloten
op uw thuisnetwerk in.
3 Druk op HOME om het HOME-menuscherm weer te
geven. Selecteer vervolgens MEDIA om naar het
MEDIA-menu te gaan. De DLNA-servers die
verbonden zijn met het netwerk worden weergegeven
op het scherm.
Tip
– Om te genieten van een diavoorstelling met muziek,
drukt u op HOME om terug te keren naar het
HOME-menuscherm terwijl er muziek wordt
afgespeeld, en selecteert u een fotobestand.
Opmerking
– Het weergegeven bestand wordt mogelijk niet
afgespeeld, afhankelijk van de inhoud.
Opmerkingen
Handelingen bij het bekijken van
foto's
Bij het bekijken van foto's kunt u de knoppen op de
afstandsbediening als volgt gebruiken.
: hiermee kunt u een diavoorstelling stoppen en
terugkeren naar de bestandbrowser.
: hiermee kunt u een diavoorstelling pauzeren.
: hiermee kunt u een diavoorstelling afspelen.
: hiermee kunt u doorgaan naar een volgende foto.
: hiermee kunt u terugkeren naar een vorige foto.
: hiermee kunt u een diavoorstelling versnellen (3
stappen).
: hiermee kunt u een diavoorstelling vertragen (3
stappen).
5: Een foto omkeren.
a: Een foto spiegelen.
2: Een foto linksom draaien.
3: Een foto rechtsom draaien.
ZOOM: inzoomen/uitzoomen op een foto (inzoomen/
uitzoomen: elk 3 stappen).
5/a/2/3: hiermee kunt u verschuiven in de
zoommodus wanneer een foto groter is dan het
scherm.
DIGEST: overschakelen naar miniatuurmodus (p. 7).
Wanneer er miniaturen worden weergegeven, kunt u
doorgaan naar de volgende/vorige pagina met
/
.
20 Nl
– Als uw DLNA-server niet wordt weergegeven,
selecteert u DLNA Search om deze te zoeken.
– Afhankelijk van de DLNA-server, is het mogelijk
dat u deze speler moet machtigen bij de server.
– Om het bestand op de DLNA-server af te spelen,
moeten deze speler en de server aangesloten zijn op
hetzelfde toegangspunt.
– De bestandsvereisten zijn mogelijk niet altijd
compatibel. Mogelijk gelden er bepaalde
beperkingen, afhankelijk van de bestandskenmerken
en de mogelijkheden van de DLNA-server.
4 Selecteer het bestand dat u wilt afspelen.
Opmerkingen
– De afspeel- en bedieningskwaliteit kunnen beïnvloed
worden door de status van uw thuisnetwerk.
– Bestanden op verwijderbare media, zoals USBgeheugens of DVD-stations op uw mediaserver,
worden mogelijk niet goed gedeeld.
Netwerkservices gebruiken
U kunt onmiddellijk video's die worden aangeboden door de volgende netwerkservices bekijken.
– YouTube
– Picasa (p. 22)
– Netflix (p. 23)
3
Opmerkingen
Afspelen
– Toegang tot inhoud van derde partijen vereist een internetverbinding van hoge snelheid en kan ook
accountregistratie en een betaald abonnement vereisen.
– Deze inhoudsservices van derde partijen kunnen op elk moment zonder enige mededeling worden gewijzigd,
uitgesteld, onderbroken of uitgeschakeld en Yamaha kan betreffende dergelijke zaken niet aansprakelijk worden
gesteld.
– Sommige inhoud is mogelijk alleen voor specifieke landen beschikbaar en wordt mogelijk in specifieke talen
gepresenteerd.
– Yamaha verklaart of garandeert niet dat inhoudservices gedurende een bepaalde tijdsperiode geleverd of
beschikbaar zijn en op een dergelijke garantie, nadrukkelijk of geïmpliceerd, kan geen aanspraak worden gemaakt.
YouTube™-video's afspelen
U kunt met deze speler via het internet films op YouTube bekijken.
De services kunnen zonder melding worden gewijzigd.
1 Druk op HOME om het HOME-menuscherm weer te
geven.
Tip
– De HOME-menuweergave kan, afhankelijk van het
model, verschillen.
2 Druk op 2/3/5/a om YouTube te selecteren en druk
vervolgens op ENTER.
Tip
– Druk op RETURN om YouTube te sluiten.
Nederlands
21 Nl
Foto's uit een Picasa™-webalbum weergeven
U kunt met deze speler via het internet foto's in een Picasa-webalbum bekijken.
De service kan zonder melding worden gewijzigd.
1 Maak een gebruikersnaam en wachtwoord aan op de
computer voor u Picasa-webalbum gebruikt.
2 Druk op HOME om het HOME-menuscherm weer te
geven.
Druk op 2/3/5/a om Picasa te selecteren en druk
vervolgens op ENTER.
Tip
– De HOME-menuweergave kan, afhankelijk van het
model, verschillen.
3 Als u Picasa voor het eerst opent via deze speler,
selecteert u het pictogram Nieuwe gebruiker en voert u
uw gebruikersnaam en wachtwoord in.
Tip
– Druk op RETURN om Picasa te sluiten.
22 Nl
Netflix™-video's afspelen
U kunt met deze speler via het internet onmiddellijk films en tv-programma's van Netflix kijken. Ga naar
www.netflix.com om u te registreren bij Netflix.
Netflix is alleen in bepaalde landen beschikbaar. Onbeperkt lidmaatschap vereist.
Meer informatie vindt u op www.netflix.com
3
■ Netflix starten
Afspelen
1 Druk op HOME om het HOME-menuscherm weer te
geven.
Druk op 2/3/5/a om NETFLIX te selecteren en druk
vervolgens op ENTER.
U kunt ook op NETFLIX drukken op de
afstandsbediening om Netflix te starten.
Tips
– De HOME-menuweergave kan, afhankelijk van het
model, verschillen.
– Om naar het HOME-menuscherm terug te keren,
drukt u op RETURN.
Opmerkingen
– Wanneer de software geüpgraded moet worden,
wordt er bij het selecteren van Netflix een
updatemelding weergegeven. Voer in dat geval de
software-upgrade uit.
– Raadpleeg voor meer informatie over Netflix de
Netflix-website op www.netflix.com.
– Zie "Netflix Information" (p. 32) om Netflix te
deactiveren.
Nederlands
23 Nl
Geavanceerd afspelen
In dit hoofdstuk vindt u meer informatie over het afspelen
van in de handel verkrijgbare Blu-ray-schijven, DVD's,
CD's en opgenomen DVD-RW/R-schijven.
Opmerking
– Zie pagina 6 voor de basishandelingen voor het
afspelen.
■ Schermmenu
Om het schermmenu weer te geven, drukt u op ON
SCREEN. Druk daarna op 5/a/2/3 om een item te
selecteren en druk vervolgens op ENTER om de gewenste
functie te bedienen.
DVD
–
–
–
–
–
–
–
Normaal
Shuffle CH (hoofdstuk)
Shuffle TT (titel)
Shuffle All
Random CH (hoofdstuk)
Random TT (titel)
Random All
VIDEO
MUSIC
PHOTO
– Normaal
– Shuffle F (map)
– Random F (map)
Audio BD DVD VIDEO : hiermee kunt u de
audiotaal / het signaal van de geselecteerde Blu-ray Disc/
DVD weergeven. U kunt het gewenste type audio
instellen.
Hoek BD DVD : hiermee kunt u het geselecteerde
camerahoeknummer weergeven. Als de scène vanuit
meerdere camerahoeken is opgenomen, kunt u van
camerahoek wisselen.
Ondertitel BD DVD VIDEO : hiermee kunt u de
geselecteerde ondertitelingstaal weergeven als er
ondertitels beschikbaar zijn.
Het schermmenu bevat de volgende items.
Titel BD DVD VIDEO : hiermee kunt u het nummer
tonen van de titel die wordt afgespeeld. U kunt
overschakelen naar de gewenste titel door deze via dit
item te selecteren.
Hoofdstuk BD DVD VIDEO : hiermee kunt u het
nummer tonen van het hoofdstuk dat wordt afgespeeld. U
kunt overschakelen naar het gewenste hoofdstuk door het
hoofdstuk via dit item te selecteren.
Spoor/Bestand CD VIDEO MUSIC PHOTO :
hiermee kunt u het nummer tonen van het spoor/bestand
dat wordt afgespeeld. U kunt overschakelen naar het
gewenste spoor/bestand door het via dit item te selecteren.
Ondertitel Style BD : hiermee kunt u de geselecteerde
ondertitelingsstijl weergeven. Deze functie is alleen
beschikbaar voor externe ondertiteling voor
videobestanden. U kunt de gewenste tekststijl voor de
ondertiteling instellen.
Bitrate BD DVD CD VIDEO MUSIC : hiermee
kunt u de bitrate van het audio/video-signaal weergeven.
Tweede Video BD : hiermee kunt u PIP in-/
uitschakelen (p. 6).
Tweede Audio BD : hiermee kunt u de secundaire
audio in-/uitschakelen (p. 6).
Ins Zoeken
BD
DVD
CD
VIDEO
MUSIC : hiermee kunt u 30
seconden overslaan.
Tijd BD DVD CD VIDEO MUSIC : hiermee kunt u
de speelduur weergeven. Selecteer het weergavetype uit
de volgende types:
– Verstreken speelduur van de titel, het hoofdstuk, de
schijf, het spoor of het bestand
– Resterende speelduur van de titel, het hoofdstuk, de
schijf, het spoor of het bestand
Mode/Afspeelmodus
DVD CD VIDEO MUSIC PHOTO : hiermee kunt u
de huidige afspeelmodus weergeven. U kunt de
afspeelmodus selecteren uit de volgende opties:
Ins Spelen
BD DVD CD VIDEO MUSIC : hiermee kunt u de
inhoud van de voorbije 10 seconden herhalen.
Slide Show PHOTO :
Hiermee kunt u de snelheid van de diavoorstelling
weergeven. U kunt Lngz/Midden/Snel selecteren als
snelheid voor de diavoorstelling.
Overgang PHOTO : hiermee kunt u tonen hoe foto's
worden weergegeven op het scherm. U kunt het
overgangstype selecteren.
CD
– Normaal: normaal afspelen.
– Shuffle: willekeurig afspelen zonder herhaling.
– Random: willekeurig afspelen met herhaling.
24 Nl
Code Page VIDEO : hiermee kunt u de tekencode
selecteren voor de ondertiteling die u hebt toegevoegd aan
een DivX-video (p. 42).
Geavanceerd afspelen
■ Statusmenu
Hier worden verschillende instellingen weergegeven,
zoals ondertiteling, camerahoek en het nummer van de
titel/het hoofdstuk/het spoor dat wordt afgespeeld. Om het
statusmenu weer te geven, drukt u op STATUS. Het
statusmenu bevat de volgende menu's.
BD
DVD
CD
MUSIC
Voorbeeld: pictogrammen bij het afspelen van een
muziekbestand
123 4
5
6
7
VIDEO
3
2
1
3
8 7
4
Afspelen
Voorbeeld: pictogrammen bij het afspelen van een
Blu-ray Disc
5
6
8
1
2
1
(afspeelstatus)
2
(pictogram voor schijftype/videobestand)
3
(nummer van de titel die wordt afgespeeld):
u kunt overschakelen naar een bepaalde titel met de
knop SEARCH (p. 7).
4
(nummer van het hoofdstuk dat wordt
afgespeeld): u kunt overschakelen naar een bepaald
hoofdstuk met de knop SEARCH (p. 7).
3
(afspeelstatus)
(herhalingsmodus): hiermee kunt u de huidige
herhalingsmodus weergeven (p. 7).
(pictogram voor schijftype/muziekbestand)
4 (illustratie) MUSIC : geeft een illustratie weer als het
bestand hiermee is uitgerust.
5
(nummer van het spoor/bestand dat wordt
afgespeeld): u kunt overschakelen naar een bepaald
spoor met de knop SEARCH (p. 7).
6 (informatie) MUSIC : geeft muziekinformatie weer
als het bestand hierover beschikt.
5
(verstreken speelduur): u kunt overschakelen
naar een bepaald punt met de knop SEARCH (p. 7).
7
6
(geselecteerde ondertiteling): u kunt de
ondertitelingstaal wijzigen met de knop SUBTITLE.
8 (vooruitgangsbalk) MUSIC : toont de vooruitgang
van het huidige nummer.
7
(geselecteerde audio): kunt de audiotaal of de
indeling wijzigen met de knop AUDIO.
8
(verstreken speelduur): u kunt overschakelen
naar een bepaald punt met de knop SEARCH (p. 7).
PHOTO
(herhalingsmodus): hiermee kunt u de huidige
herhalingsmodus weergeven (p. 7).
1
(afspeelstatus)
2
(pictogram fotobestand)
3
(nummer van het bestand dat wordt
weergegeven)
4
(herhalingsmodus): hiermee kunt u de huidige
herhalingsmodus weergeven (p. 7).
Nederlands
5 (snelheid diavoorstelling)
25 Nl
Geavanceerd afspelen
■ Bookmark gebruiken
DVD
VIDEO
Hiermee kunt u een Bookmark invoegen op een bepaald
punt in een video. Wanneer een Bookmark ingesteld is,
kunt u met deze functie naar het ingestelde punt
overschakelen. U kunt tot 12 Bookmarks instellen.
1 Druk tijdens het afspelen van de film op MARKER om
Bookmark in te stellen. Het Bookmark-cijfer en de
status worden weergegeven.
2 Druk op ENTER om de afspeelvolgorde te
programmeren.
Druk voor een audioschijf op 5/a om een gewenst
spoor te selecteren en druk vervolgens op ENTER.
Selecteer voor een DVD-videoschijf een gewenste titel
(weergegeven als TT) en een gewenst hoofdstuk
(weergegeven als CH) in plaats van een spoor.
Om een ingesteld spoor te verwijderen, selecteert u het
spoor dat u wilt verwijderen en drukt u vervolgens op
CLEAR.
Druk op RETURN om Programma afspelen te
annuleren.
2 Nadat de Bookmark ingesteld is, drukt u op DIGEST
om de Bookmark-selectiebalk weer te geven.
3 Druk op 2/3 om de Bookmark te selecteren die u wilt
afspelen en druk vervolgens op ENTER.
Druk op CLEAR om de geselecteerde Bookmark te
verwijderen.
Opmerking
– Wanneer het afspelen wordt beëindigd (bv. wanneer
de schijf wordt uitgeworpen of u twee keer op
drukt), worden de bladwijzers automatisch
verwijderd.
■ Programma afspelen
DVD
CD
Hiermee kunt u de afspeelvolgorde van audioschijftracks
of DVD-hoofdstukken programmeren.
Druk op PROGRAM tijdens het afspelen om het venster
PROGRAMMA weer te geven voor het programmeren
van de afspeelvolgorde.
U kunt tot 15 tracks/hoofdstukken programmeren.
Voorbeeld: De afspeelvolgorde van CD-tracks
programmeren
1 Druk op PROGRAM tijdens het afspelen.
3 Druk na het programmeren op
om de instellingen
door te voeren en het geprogrammeerde afspelen te
starten.
4 Om het geprogrammeerde afspelen te annuleren, stopt u
het afspelen volledig door twee keer op
te drukken.
■ De zoekfunctie gebruiken
BD
DVD
CD
VIDEO
MUSIC
PHOTO
Hiermee kunt u tijdens het afspelen overschakelen naar
een gespecificeerd punt.
1 Druk op SEARCH tijdens het afspelen. De statusbalk
wordt weergegeven.
2 Druk op 5/a/2/3 om een van de onderstaande items
te selecteren en druk vervolgens op ENTER.
BD DVD :
– Titelnummer (weergegeven als
)
– Hoofdstuknummer (weergegeven als
)
– Verstreken tijd titel (weergegeven als
)
– Verstreken tijd hoofdstuk (weergegeven als
CD :
– Spoornummer (weergegeven als
)
)
– Verstreken tijd spoor (weergegeven als
)
– Verstreken tijd schijf (weergegeven als
VIDEO MUSIC :
– Bestandsnummer (weergegeven als
)
)
– Verstreken tijd bestand (weergegeven als
PHOTO :
)
– Bestandsnummer (weergegeven als
)
3 Druk op 5/a of een cijfertoets om de waarde van het
gemarkeerde item in te stellen / aan te passen en druk
op ENTER om over te schakelen naar het
gespecificeerde punt.
4 Druk op STATUS om de statusbalk te sluiten.
26 Nl
Geavanceerd afspelen
■ BONUSVIEW™ en BD-Live™
gebruiken
Deze speler ondersteunt afspeelfuncties voor
BONUSVIEW (p. 42) (BD-ROM Profile 1 versie 1.1) en
BD-Live (p. 42) (BD-ROM Profile 2).
Opmerking
■ De beeld-in-beeldfunctie
gebruiken (afspelen van
secundaire audio/video)
Een BD-Video die secundaire audio en video bevat die
compatibel is met beeld-in-beeld, kan gelijktijdig worden
afgespeeld met de secundaire audio en video in een klein
venster in de hoek van het beeldscherm.
Primaire video
Secundaire video
1. Voer de netwerkinstellingen door
(p. 32).
2. Sluit het USB-geheugen aan op
deze speler (p. 16).
BD-Live-gegevens worden op een USBgeheugenapparaat opgeslagen die op deze speler is
aangesloten. Om van deze functies te kunnen
genieten, sluit u een USB-geheugenapparaat dat
USB 2.0 High Speed (480 Mbit/s) ondersteunt aan
op de USB-poort die u bij Externe opslag (p. 31)
hebt geselecteerd. De standaardinstelling is de USBpoort op het achterpaneel.
– De map BUDA wordt indien nodig automatisch
aangemaakt op het USB-geheugen.
– Als er onvoldoende geheugenruimte is, zullen de
gegevens niet worden gekopieerd/gedownload. Wis
onnodige gegevens of gebruik een nieuw USB-geheugen.
– Het kan enige tijd duren voordat de gegevens zijn
geladen (lezen/schrijven).
3
Afspelen
– De functies en de afspeelmethode variëren
afhankelijk van de schijf. Raadpleeg de richtlijnen
bij de schijf of de bijgeleverde gebruiksaanwijzing.
■ De functie BD-Live™ gebruiken
Opmerkingen
– Yamaha kan niet garanderen dat de USB-geheugens
van alle merken functioneren op deze speler.
– Gebruik geen USB-verlengkabel bij het aansluiten
van een USB-geheugen op de USB-poort van de
speler. Bij gebruik van een USB-verlengkabel is het
mogelijk dat de speler niet juist functioneert.
Druk op PIP terwijl PIP Mark (
) of
Secundaire Audio Mark (
) wordt
weergegeven om de beeld-inbeeldfunctie in/uit te schakelen.
3. Speel de schijf af.
4. Gebruik BD-Live volgens de
instructies op de schijf.
Opmerkingen
– Om naar de secundaire audio te luisteren, moet
Audio Output (Coaxial / Optical of HDMI) op PCM
of Reencode (p. 35) staan.
– Afhankelijk van de schijf moet u om te kunnen
luisteren naar secundaire audio de secundaire audio
inschakelen via het hoofdmenu van de schijf (p. 8).
– De secundaire audio en video voor beeld-in-beeld
kan soms automatisch worden afgespeeld of
verdwijnen afhankelijk van de inhoud van de schijf.
Ook is het mogelijk dat er beperkingen zijn voor de
afspeelbare gedeelten.
– Voor de afspeelmethode van BD-Live-inhoud enz.
wordt u verwezen naar de instructies in de
handleiding van de Blu-ray Disc.
– Om te genieten van BD-Live-functies, voert u de
netwerkverbinding (p. 16) en de Netwerkinstellingen (p. 32) door.
– Zie "BD-Live-verbinding" (p. 33) voor het
doorvoeren van de instellingen voor het beperken
van toegang tot BD-Live-inhoud.
– De tijd die nodig is om de verstrekte programma's op
het met deze speler verbonden USB-geheugen te
downloaden naar deze speler, varieert afhankelijk
van de snelheden van de internetverbinding en het
gegevensvolume van de programma's.
– Het is mogelijk dat via internet verstrekte BD-Liveprogramma's niet in staat zijn de verbinding weer te
geven afhankelijk van de status (upgraden) van de
provider. In dergelijke gevallen haalt u de schijf eruit
en probeert u het nogmaals.
– Als het BD-Live-scherm niet even wordt
weergegeven nadat u de BD-Live-functie in het
Blu-ray Disc-menu geselecteerd hebt, is het
mogelijk dat het USB-geheugen onvoldoende vrije
ruimte heeft. In dergelijke gevallen laat u de speler
de schijf uitwerpen en wist u de gegevens op het
USB-geheugen door het "Formaat"-menu in de
"Externe opslag" (p. 31) te gebruiken.
27 Nl
Nederlands
Opmerkingen
INSTELLINGEN
SETUP-menu
Met het SETUP-menu kunt u met behulp van de afstandsbediening diverse geluids-/beeldinstellingen doorvoeren voor de
functies.
Menu/Submenu
Systeem
Instellingen
Algemeen
Item
Afspelen
Schijf Automatisch
afspelen
Instellen dat de speler schijven automatisch begint af te spelen.
HDMI Control
Stelt deze speler in om het bedieningssignaal van de
afstandsbediening van uw TV/AV-ontvanger te ontvangen.
31
Netwerk Instellingen
Voor het instellen van bediening via ethernet op aan/uit.
31
Ladingsfout
Voor het terugzetten van alle instellingen op de
standaardinstellingen, behalve de Veiligheid-instelling.
31
Bijwerken
Voor het uitvoeren van upgrades voor de speler.
31
Snelinstelling
Voor het instellen van taal, resolutie, beeldverhouding.
31
Externe opslag
Voor het weergeven van de status van Externe opslag (p. 31),
formatteren van Externe opslag en selecteren van de USBpoort vooraan/achteraan voor Externe opslag.
31
Als deze speler wordt ingeschakeld, verschijnt een
waarschuwingsbericht betreffende het afspelen van een
3D-video.
31
OSD
Voor het selecteren van de taal voor weergave op het scherm.
31
Menu
Geeft prioriteit aan de taal van het schijfmenu.
31
Audio
Geeft prioriteit aan de taal van de audio.
32
Ondertitel
Geeft prioriteit aan de taal van de ondertiteling.
32
Closed Caption
Ondertiteling voor slechthorenden in-/uitschakelen.
32
Angle Mark
Hiermee wordt de weergave van de Angle Mark ingesteld
wanneer er een Blu-ray Disc/DVD wordt afgespeeld met
meerdere camerahoeken.
32
Hiermee wordt de weergave van de PIP Mark ingesteld
wanneer er een Blu-ray Disc/DVD wordt afgespeeld met
beeld-in-beeld.
32
Secundaire Audio
Mark
Hiermee wordt de weergave van de Secundaire Audio Mark
ingesteld wanneer er een Blu-ray Disc/DVD wordt afgespeeld
met secundaire audio.
32
Last Memory
Hiermee kunt u instellen dat de speler de laatste afspeelpositie
van een schijf herinnert als de stand-bymodus geactiveerd
wordt of als de schijflade wordt geopend.
32
DivX(R) VOD DRM
Geeft de registratiecode weer voor DivX(R)-video.
32
Netflix Information
Hiermee kunt u de speler deactiveren bij Netflix en het ESN
(Electronic Serial Number) weergeven.
32
Wachtwoord wijzigen
Hiermee kunt u het wachtwoord wijzigen voor
Kinderbeveiliging en Landcode.
32
Kinderbeveiliging
Hiermee kunt u de Kinderbeveiliging instellen afhankelijk van
de schijfinhoud.
32
Landcode
Hiermee kunt u uw Landcode instellen.
32
Internetverbinding
Hiermee kunt u de internetverbinding instellen op In staat
stellen/Uitschakelen.
32
Verbindingsinstelling
Hiermee kunt u een netwerkverbindingsmethode instellen.
32
Informatie
Hiermee kunt u het netwerkinformatiescherm weergeven.
33
Verbindingstest
Hiermee kunt u de netwerkverbindingstest uitvoeren.
33
IP Setting
Hiermee kunt u de IP-instelling instellen op Auto/Handm.
33
BD-Live-verbinding
Hiermee kunt u de BD-Live-verbinding instellen op
Toegestaan/Gedeeltelijke Toegestaan/Verboden.
33
DLNA
Hiermee kunt u de DLNA instellen op In staat stellen/
Uitschakelen.
33
Proxy instellen
Hiermee kunt u de proxy-instellingen doorvoeren.
33
PIP Mark
Veiligheid
Netwerk
28 Nl
Pagina
De screensaver in-/uitschakelen.
3D Playback bericht
Taal
Functie
Screensaver
31
31
SETUP-menu
Menu/Submenu
TV
Item
Functie
Pagina
Hiermee kunt u 3D- of 2D-video's selecteren.
33
TV Scherm
Hiermee kunt u de beeldverhouding van de aangesloten tv
instellen en de video-uitgang regelen.
33
Video uit keuze
Hiermee kunt u de resolutie van de uitgevoerde video
selecteren.
34
TV-systeem
Hiermee kunt u het TV-systeem instellen op NTSC/PAL/
Multi.
34
Kleurruimte
Hiermee kunt u de Kleurruimte instellen op YCbCr 4:4:4/
YCbCr 4:2:2/Full RGB/RGB.
34
HDMI Deep Color
Hiermee kunt u HDMI Deep Color instellen op 30 bits/36 bits/
48 bits/Uit.
34
HDMI 1080p 24Hz
Hiermee kunt u HDMI 1080p 24Hz instellen op auto/uit.
34
Lip Sync
Hiermee kunt u de vertraging tussen video en audio aanpassen,
bijvoorbeeld wanneer de mondbewegingen niet synchroon
verlopen met de stem.
34
Videomodus
Hiermee kunt u het beeld aanpassen.
34
Kleur aanpassen
Hiermee kunt u de Helderh/Verzadig./Kleurtoon voor elke
kleur aanpassen.
35
Ruisonderdrukking
Hiermee kunt u het niveau van Ruisonderdrukking instellen.
35
De-interlacing Mode
Hiermee kunt u de manier instellen waarop het videosignaal
gedetecteerd wordt.
35
Coaxial / Optical
Hiermee kunt u de uitvoermodus voor de COAXIAL-/
OPTICALaansluiting instellen op Bitstream/PCM/Reencode/
Uit.
35
HDMI
Hiermee kunt u de uitvoermodus voor de HDMI-aansluiting
instellen op Bitstream/PCM/Reencode/Uit.
35
Downsampling
De neerwaartse bemonsteringsfrequentie voor het digitale
audiosignaal selecteren uit 48K/96K/192K.
35
DRC
Hiermee kunt u de DRC (Dynamic Range Compression)
instellen.
35
Luidsprekerin
stellingen
2ch Downmix
Stelt de audio-uitvoer van de AUDIO OUT L/R-bus in.
Post Process
UpMix
Zet het 2-kanaalsaudiosignaal om naar meer kanalen.
Display
Setting
Video Process
Audio Output
Audio Setting
4
Instellingen
3D Uitgang
35
35
Hiermee kunt u de softwareversie en het MAC-adres
weergeven (p. 43).
35
System
Information
Nederlands
29 Nl
SETUP-menu
■ Voorbeeld van de werking van het
SETUP-menu
U moet het SETUP-menuscherm oproepen om de
instellingen voor deze speler door te voeren. Hieronder
volgt de uitleg voor de basisbediening van het SETUPmenu.
SUBTITLE
ANGLE
4. Voer uw wachtwoord in.
Voer uw wachtwoord in met behulp van de
cijfertoetsen.
– Het standaardwachtwoord is 0000.
– U kunt pas naar het volgende instelscherm gaan
als u het juiste wachtwoord hebt ingevoerd.
– Raadpleeg "Wachtwoord wijzigen" (p. 32) om het
wachtwoord te wijzigen.
AUDIO
CLEAR
PIP
SEARCH
SETUP
TOP MENU
2ND
SHUFFLE
REPEAT
POP-UP MENU
ENTER
RETURN
ON SCREEN
Voorbeeld: Kinderbeveiliging instellen
Opmerking
– Sommige items kunnen niet worden ingesteld tijdens
het afspelen. Druk in dat geval twee keer op
om
het afspelen volledig te stoppen voor u de instelling
doorvoert.
5. Selecteer een volgend item.
Druk op 5/a om het niveau voor de
Kinderbeveiliging voor Blu-ray Disc/DVD te
selecteren en druk vervolgens op ENTER.
1. Geef het SETUP-menuscherm
weer.
Druk op SETUP om het SETUP-menuscherm weer
te geven.
Druk op 2/3 om Instellingen Algemeen te
selecteren en druk vervolgens op ENTER of a.
2. Selecteer een submenu.
Druk op 5/a om Veiligheid te selecteren en druk
vervolgens op ENTER of 3.
3. Selecteer een menu-item.
Druk op 5/a om Kinderbeveiliging te selecteren en
druk vervolgens op ENTER of 3.
30 Nl
6. Sluit het menuscherm.
Druk op 2 om terug te keren naar het vorige menu.
SETUP-menu
■ Instellingen Algemeen
De standaardinstellingen zijn aangegeven met " ".
*
Systeem
Screensaver
U kunt de screensaver in- of uitschakelen.
Wanneer u deze inschakelt, zal de speler overschakelen
naar de screensaver als er gedurende 3 minuten geen
handelingen worden uitgevoerd. Daarna schakelt de speler
over naar de stand-bymodus als er gedurende 27 minuten
geen handelingen worden uitgevoerd.
Aan*, Uit
Aan, Uit*
Opmerkingen
– Wanneer Netwerk Instellingen ingeschakeld is,
neemt het energieverbruik tijdens de stand-bystand
toe.
– Wanneer deze functie ingesteld is op Aan, gaat het
opstarten van het systeem sneller.
Aan*, Uit
Ladingsfout
U kunt alle instellingen van de speler terugzetten op de
standaardinstellingen, behalve de Veiligheid-instelling
(p. 32). Raadpleeg pagina's 28-35 voor meer informatie
over de standaardinstellingen.
HDMI Control
U kunt instellen dat de speler een bedieningssignaal
ontvangt van een TV/AV-ontvanger die compatibel is met
de functie HDMI Control via een HDMI-kabel (p. 12).
Bijwerken
U kunt de software handmatig bijwerken via USB Storage
of Netwerk. Meer informatie over het bijwerken van
software vindt u bij "Software-upgrade" (p. 38).
Aan, Uit*
Snelinstelling
U kunt Snelinstelling uitvoeren (p. 18).
Externe opslag
U kunt informatie over Externe opslag weergeven,
Externe opslag formatteren en Front USB/Rear USB
selecteren voor het opslaan van de BD-Live-gegevens.
Om de map "BUDA" op het USB-geheugen te formatteren
(ledigen), selecteert u Informatie en drukt u op ENTER
wanneer "Formaat" gemarkeerd is op het scherm.
De functie HDMI Control gebruiken
U kunt met de functie HDMI Control deze speler
interactief bedienen via uw tv (die HDMI Control
ondersteunt).
Wanneer u deze speler via een HDMI-kabel aansluit op
een tv die compatibel is met de functie HDMI Control en
HDMI Control in het SETUP-menu inschakelt (p. 31),
kunt u de onderstaande functies uitvoeren.
• Automatische ingangsselectiefunctie
Wanneer u het afspelen op deze speler start, wordt de
ingangsschakelaar van de tv (en een AV-ontvanger als
deze speler is aangesloten op de tv via de AVontvanger) automatisch ingesteld op deze speler. De
tv wordt daarbij automatisch ingeschakeld,
afhankelijk van de tv.
• Automatische uitschakelfunctie
Wanneer u de tv uitschakelt terwijl deze speler in de
stopstand staat en het SETUP-menuscherm niet wordt
weergegeven, wordt deze speler ook automatisch
uitgeschakeld.
4
Instellingen
Schijf Automatisch afspelen
U kunt Schijf Automatisch afspelen in- of uitschakelen.
Wanneer deze functie ingeschakeld is, wordt een schijf na
het laden automatisch afgespeeld.
Netwerk Instellingen
U kunt bediening via ethernet instellen op Aan/Uit. Deze
speler maakt gebruik van het protocol Yamaha Network
Control (YNC).
Front USB, Rear USB*
Tip
– Externe opslag wordt als een hulpgeheugen gebruikt
wanneer er een Blu-ray Disc wordt afgespeeld.
3D Playback bericht
U kunt een waarschuwingsbericht betreffende het afspelen
van 3D-video's die op de tv verschijnt als deze speler
wordt ingeschakeld, in- of uitschakelen.
Aan*, Uit
Opmerkingen
Taal
OSD
U kunt de schermtaal selecteren die wordt gebruikt voor
de meldingen of menu's die worden weergegeven op het
scherm, zoals het SETUP-menu.
English, Français , Español , Deutsch , Italiano , Svenska ,
Nederlandse ,
,
Menu
U kunt prioriteit geven aan de taal van het schijfmenu.
English, Français ,
, Español , Deutsch , Italiano ,
Nederlandse , Portugees, Deens, Svenska , Fins, Noors,
, Koreaans, Japans, Meer
31 Nl
Nederlands
– Het is mogelijk dat de functie HDMI Control niet
goed werkt, afhankelijk van de tv.
– Andere dan de hierboven vermelde functies
kunnen afhankelijk van de tv of AV-ontvanger
geactiveerd zijn.
– Om de functie HDMI Control beschikbaar te
maken, activeert u de functie HDMI Control op
ALLE componenten (speler, tv en AV-ontvanger).
Het is mogelijk dat er hierbij bepaalde
handelingen vereist zijn.
– Elke functie kan, afhankelijk van de tv, onafhankelijk
ingesteld worden om aan- of uitgezet te worden.
– Zie de bij de tv en/of AV-ontvanger geleverde
gebruikshandleiding voor details met betrekking
tot de instellingen.
– Wanneer de functie HDMI Control geactiveerd is,
neemt het stroomverbruik tijdens de stand-bymodus toe.
SETUP-menu
Audio
U kunt prioriteit geven aan de audiotaal voor het afspelen
van een Blu-ray Disc/DVD. Zie "Menu" (p. 31) voor meer
informatie over instelitems.
Ondertitel
U kunt prioriteit geven aan de taal voor Ondertitel.
English, Français ,
Wachtwoord wijzigen
U kunt het wachtwoord instellen voor het wijzigen van het
niveau voor Kinderbeveiliging en de Landcode.
Raadpleeg "Kinderbeveiliging" (p. 32) en "Landcode"
(p. 32).
, Español , Deutsch , Italiano ,
Nederlandse , Portugees, Deens, Svenska , Fins, Noors,
, Koreaans, Japans, Meer, Uit
(De standaardinstellingen bij [Taal] verschillen naargelang
het model.)
Afspelen
Closed Caption
U kunt instellen dat ondertiteling voor gehoorgestoorden
(p. 42) wordt weergegeven wanneer een Blu-ray Disc/
DVD met ondertiteling voor gehoorgestoorden wordt
afgespeeld.
Aan*, Uit
Angle Mark
U kunt instellen dat de Angle Mark (
) wordt
weergegeven wanneer er een Blu-ray Disc/DVD wordt
afgespeeld met meerdere camerahoeken.
Aan*, Uit
PIP Mark
U kunt instellen dat de PIP Mark (
) wordt
weergegeven wanneer er een Blu-ray Disc wordt
afgespeeld met beeld-in-beeld (p. 27).
Aan*, Uit
Secundaire Audio Mark
U kunt instellen dat de Secundaire Audio Mark (
)
wordt weergegeven wanneer er een Blu-ray Disc wordt
afgespeeld met secundaire audio.
Aan*, Uit
Last Memory
U kunt instellen dat de speler de laatste afspeelpositie van
een schijf herinnert als de stand-bymodus geactiveerd
wordt of als de schijflade wordt geopend.
Aan*, Uit
Opmerking
– Sommige schijven zijn niet compatibel met deze
functie.
DivX(R) VOD DRM
U kunt de registratiecode voor DivX(R)-video weergeven.
Netflix Information
U kunt de speler deactiveren bij Netflix en het ESN
(Electronic Serial Number) weergeven. Raadpleeg
"Netflix™-video's afspelen" (p. 23) om de speler opnieuw
te activeren. ESN (Electronic Serial Number) is een uniek
getal dat u nodig hebt om Netflix-streaming te gebruiken.
32 Nl
Veiligheid
Opmerkingen
– Het standaardwachtwoord is 0000.
– Als u het wachtwoord vergeten bent, raadpleegt u
"Problemen oplossen" (p. 39) en stelt u alle
instellingen van Veiligheid in op de
standaardinstellingen.
Kinderbeveiliging
Bij sommige Blu-ray-schijven/DVD's is er een
censuurinstelling mogelijk voor weergave van de schijf
afhankelijk van de leeftijd van de kijker. U kunt de
Kinderbeveiliging voor weergave op het scherm instellen,
afhankelijk van de inhoud van de schijf.
Het wachtwoord (zie "Wachtwoord wijzigen" op p. 32)
moet worden ingevoerd vóór het niveau voor
Kinderbeveiliging wordt ingesteld.
Wanneer u na het instellen van de Kinderbeveiliging een
schijf afspeelt met een niveau dat hoger ligt dan het
huidige niveau van de Kinderbeveiliging of wanneer u het
niveau van de Kinderbeveiliging wilt wijzigen, wordt er
een dialoogvenster weergegeven met de vraag uw
wachtwoord in te voeren.
Uit*, 1-8
Landcode
U kunt de Landcode instellen van het land waar u woont.
Het wachtwoord (zie "Wachtwoord wijzigen" op p. 32)
moet worden ingevoerd vóór de Landcode wordt
ingesteld. Deze instelling kan worden gebruikt voor het
classificeren van de Kinderbeveiliging en de
schijfweergave.
Netwerk
Internetverbinding
Stel dit item in op In staat stellen wanneer u BD-Live (p. 27),
DLNA (p. 20), software-upgrade van het netwerk (p. 38) en
de andere netwerkfuncties gebruikt.
In staat stellen*, Uitschakelen
Verbindingsinstelling
Hiermee kunt u een netwerkverbindingsmethode selecteren.
Wired*
Wireless
Hiermee maakt u via ethernet verbinding met het
netwerk.
Hiermee maakt u via een draadloos LAN verbinding
met het netwerk.
U kunt de instellingen voor verbinding via een
draadloos LAN configureren. Volg de instructies op
het scherm om verder te gaan.
Scan
Hiermee kunt u zoeken naar een toegangspunt. U
kunt verbinding maken met een gevonden
toegangspunt.
Handm.
U kunt ook handmatig informatie invoeren voor een
toegangspunt.
SETUP-menu
Informatie
U kunt het netwerkinformatiescherm weergeven. Op dit
scherm ziet u informatie over de interface (ethernet),
Adrestype, Ipadres, Subnetmasker, Standaardgateway en
DNS.
■ Display Setting
Verbindingstest
U kunt een internetverbindingstest uitvoeren. Als de test
mislukt, controleert u "IP Setting" (p. 33) en voert u de
test opnieuw uit.
3D Uitgang
U kunt voor deze speler 3D- of 2D-video-uitvoer
selecteren.
IP Setting
U kunt de netwerkinstellingen configureren.
Selecteer dit om de netwerkinstellingen van deze
speler met de DHCP-server automatisch te
configureren.
Handm.
Selecteer dit om de netwerkinstellingen (Ipadres,
Subnetmasker, Standaardgateway en DNS)
handmatig te configureren.
Tips
– Numerieke toetsen Hiermee kunt u tekens
invoeren.
– 2/3
Hiermee kunt u de
markering verplaatsen.
– CLEAR
Hiermee kunt u een teken
verwijderen.
– ENTER
Hiermee kunt u de
instellingen opslaan en het
menu afsluiten.
BD-Live-verbinding
U kunt de toegang tot BD-Live-inhoud beperken.
Toegestaan
Auto*
Deze speler selecteert automatisch 3D- of 2Dvideo's.
Uit
Deze speler selecteert altijd 2D-video's.
– Zelfs als u "3D Uitgang" op "Auto" instelt en een
Blu-ray 3D-schijf afspeelt, selecteert deze speler 2Dbeelden afhankelijk van de aansluiting en instelling
van de tv enz. (p. 12).
TV Scherm
Hier kunt u de beeldverhouding van de aangesloten tv
instellen en de video-uitgang regelen.
Als u een andere tv hebt (omdat u bijvoorbeeld een
nieuwe hebt gekocht) en de beeldverhouding van de
aangesloten tv niet meer juist is, moet u de instelling voor
het TV Scherm veranderen.
16:9 Vol
Selecteer deze instelling wanneer de speler
aangesloten is op een tv met een beeldverhouding
van 16:9. Wanneer er een video met een
beeldverhouding van 4:3 wordt afgespeeld, wordt
de video zoals hieronder weergegeven.
16:9 Normaal*
Selecteer deze instelling wanneer de speler
aangesloten is op een tv met een beeldverhouding
van 16:9. Wanneer er een video met een
beeldverhouding van 4:3 wordt afgespeeld, wordt
de video zoals hieronder weergegeven.
4:3 Pan Scan
Selecteer deze instelling wanneer de speler
aangesloten is op een tv met een beeldverhouding
van 4:3. Wanneer er een video met een
beeldverhouding van 16:9 wordt afgespeeld,
wordt de video zoals hieronder weergegeven.
4:3 Letter Box
Selecteer deze instelling wanneer de speler
aangesloten is op een tv met een beeldverhouding
van 4:3. Wanneer er een video met een
beeldverhouding van 16:9 wordt afgespeeld,
wordt de video zoals hieronder weergegeven.
Geen enkele BD-Live-schijf kan verbinding maken
met het netwerk.
DLNA
U kunt DLNA (p. 42) instellen op In staat stellen/
Uitschakelen. Stel in op Uitschakelen wanneer u de
DLNA-functie niet gebruikt.
In staat stellen*, Uitschakelen
Proxy instellen
U kunt Proxy instellen instellen. Kies Uitschakelen voor
normaal gebruik. Stel dit in op In staat stellen om de
proxy-instellingen door te voeren.
In staat
stellen
4
Opmerking
Alle BD-Live-schijven kunnen verbinding maken
met het netwerk.
Gedeeltelijke Alleen toegang tot schijven met eigenaarcertificatie.
Toegestaan*
Verboden
TV
Instellingen
Auto*
De standaardinstellingen zijn aangegeven met " * ".
Formaat
oorspronkelijk
beeld
Op 16:9-tv (breedbeeld)
16:9 Vol
16:9 Normaal
Hiermee kunt u de instellingen voor proxyhost en
proxypoort inschakelen.
Uitschakelen* Hiermee kunt u de proxyserver uitschakelen.
Selecteer dit item wanneer de proxyserver niet wordt
gebruikt.
Proxy Host
Hiermee kunt u de proxyhost instellen.
Proxypoort
Hiermee kunt u de proxypoort instellen.
4:3
Formaat
oorspronkelijk
beeld
Op 4:3-tv
4:3 Pan Scan
4:3 Letter Box
Nederlands
16:9
33 Nl
SETUP-menu
Video uit keuze
U kunt de uitgevoerde videoresolutie selecteren uit
HDMI, COMPONENT en VIDEO. Raadpleeg voor meer
informatie over uitgangsformaten "Over de videouitgangsformaten" (p. 37).
HDMI Deep Color
Wanneer uw tv en/of AV-ontvanger compatibel is met
Deep Color (p. 42), stelt u dit item in overeenstemming
met uw tv/AV-ontvanger in. Deze functie is beschikbaar
wanneer de speler aangesloten is via een HDMI-kabel.
HDMI
30 bits, 36 bits, 48 bits, Uit*
Wanneer Auto ingesteld is, wordt de resolutie
ingesteld op de maximale resolutie voor de
aangesloten tv.
Wanneer Instelling van disk ingesteld is, worden de
originele resolutie en videofrequentie gebruikt van
de Blu-ray Disc of DVD die wordt afgespeeld. U
kunt de functie voor het verbeteren van video's van
een extern apparaat gebruiken.
Wanneer u een ander medium dan een Blu-ray Disc
of DVD afspeelt, wordt Auto gebruikt voor de
resolutie en videofrequentie.
Als u een Blu-ray Disc of DVD afspeelt met een
resolutie en videofrequentie die niet worden
ondersteund door de aangesloten tv, wordt er geen
beeld weergegeven. Beëindig in dat geval het
afspelen en selecteer een andere optie dan Instelling
van disk.
Auto*, Instelling van disk, 480i/576i, 480p/
576p, 720p, 1080i, 1080p
COMPONENT Hiervoor kunt u alleen 480p/576p of 480i/576i
selecteren.
480p/576p, 481i/576i*
VIDEO
Deze resolutie heeft dezelfde werking als 480i/576i.
HDMI 1080p 24Hz
BD-Video gecodeerd met een framesnelheid van 24 Hz
wordt uitgevoerd in HDMI 1080p 24Hz. Met deze functie
kan een vloeiendere beeldweergave worden bereikt. Deze
functie is beschikbaar wanneer uw tv/AV-ontvanger deze
ondersteunt en de speler aangesloten is via een HDMIkabel. Raadpleeg voor meer informatie over
uitgangsformaten "Over de video-uitgangsformaten"
(p. 37).
Auto*, Uit
Opmerking
– Deze instelling is uitgeschakeld wanneer de
uitgevoerde resolutie niet 1080p is.
Lip Sync
U kunt de functie Lip Sync (p. 43) instellen/aanpassen.
Auto*
Handm.
Opmerkingen
– Om HD-audio (Dolby TrueHD of DTS-HD Master
Audio) uit te voeren via de HDMI-aansluiting, stelt u
Video uit keuze in op Auto of op meer dan 720p.
– Als er een tv aangesloten is via een HDMI-kabel, is
de standaardinstelling HDMI.
– Als een tv niet aangesloten is via een HDMI-kabel,
is de standaardinstelling VIDEO.
TV-systeem
U kunt het TV-systeem instellen op PAL, NTSC of Multi.
Kies hetzelfde TV-systeem als voor uw tv. Raadpleeg
voor meer informatie over uitgangsformaten "Over de
video-uitgangsformaten" (p. 37).
NTSC, PAL, Multi
(De standaardinstellingen verschillen naargelang het model.)
Kleurruimte
U kunt de Kleurruimte (p. 43) kiezen die wordt gebruikt
voor HDMI. Deze functie is beschikbaar wanneer de
speler aangesloten is via een HDMI-kabel.
YCbCr 4:4:4* Hiermee kunt u de Kleurruimte instellen op YCbCr
4:4:4.
YCbCr 4:2:2
Hiermee kunt u de Kleurruimte instellen op YCbCr
4:2:2.
Full RGB
Wanneer RGB ingesteld is en de wit- en zwarttinten
op het scherm te flets zijn, selecteert u dit item. Deze
instelling werkt als een aangesloten component het
bereik RGB 0-255 ondersteunt.
RGB
Hiermee wordt het videosignaal uitgevoerd met een
normaal signaalbereik.
Opmerking
– Deze functie is alleen beschikbaar op tv's die deze
functie ondersteunen.
34 Nl
Uit
Deze speler past de functie Lip Sync automatisch
aan.
U kunt de functie Lip Sync handmatig aanpassen. U
kunt de vertraging van de audio onafhankelijk
instellen voor 2D- en 3D-inhoud.
2D
3D
Deze speler past de functie Lip Sync niet aan.
Video Process
Videomodus
U kunt de onderstaande Videomodus selecteren.
Standaard*
Vivid
Cinema
Custom
Het beeld is natuurlijk en goed uitgebalanceerd.
Deze modus is geschikt voor normaal gebruik.
Het beeld is levendiger en scherper.
Het beeld is geschikt voor het bekijken van een film
in een donkere ruimte.
U kunt het visuele beeld handmatig aanpassen. Druk
op 5/a om de parameter te selecteren en druk
vervolgens op 2/3 om de waarde aan te passen.
Helderh
Hiermee kunt u de algemene helderheid van het
beeld aanpassen.
Verzadig.
Hiermee kunt u de rijkheid van de kleur in het
weergegeven beeld aanpassen.
Kleurtoon
Hiermee kunt u de tint van het weergegeven beeld
aanpassen.
Contr.
Hiermee kunt u de heldere delen (witniveaus) in het
beeld aanpassen.
Scherpte
Hiermee kunt u de scherpte van objecten in de video
aanpassen.
CTI
Hiermee kunt u de randen van kleurbeelden
verzachten. Kleurbeelden worden duidelijker
weergegeven.
De standaardinstellingen zijn 0.
SETUP-menu
Kleur aanpassen
U kunt de Helderh/Verzadig./Kleurtoon voor elk kleur
(Rood/Groen/Blauw/Geel/Cyaan/Magenta) aanpassen.
Om deze functie te gebruiken, stelt u Videomodus in op
Custom. Zie "Videomodus" (p. 34) voor meer informatie
over instelitems.
Downsampling
U kunt de neerwaartse bemonsteringsfrequentie voor
digitale audiosignalen selecteren. Deze functie is
beschikbaar voor het audiosignaal dat wordt uitgevoerd
via de COAXIAL-aansluiting/OPTICAL-aansluiting.
48K*
De hoogste bemonsteringsfrequentie voor digitale
PCM-uitvoer is 48 kHz.
96K
De hoogste bemonsteringsfrequentie voor digitale
PCM-uitvoer is 96 kHz.
192K
De hoogste bemonsteringsfrequentie voor digitale
PCM-uitvoer is 192 kHz.
De standaardinstellingen zijn 0.
Ruisonderdrukking
U kunt de Ruisonderdrukking instellen op een niveau van
0 tot 3. 0 is uit en 3 is het maximumniveau.
0, 1, 2*, 3
Auto*, Film, Video
■ Audio Setting
DRC
U kunt DRC (Dynamic Range Compression)
(p. 42) inschakelen/uitschakelen/instellen op Auto.
Wanneer Auto ingesteld is, wordt DRC automatisch
ingeschakeld voor een bron met DRC-informatie in Dolby
TrueHD-indeling. DRC zorgt ervoor dat lage tonen nog
dieper klinken en conversaties verstaanbaarder worden.
Dit is nuttig wanneer u 's avonds films bekijkt.
4
Instellingen
De-interlacing Mode
U kunt instellen hoe het videosignaal gedetecteerd wordt.
Kies Auto voor normaal gebruik. Wanneer er horizontale
ruis verschijnt op het scherm, stelt u deze functie in op
Film/Video om de ruis te onderdrukken.
Uit, Aan, Auto*
De standaardinstellingen zijn aangegeven met " * ".
Luidsprekerinstellingen
Audio Output
Coaxial / Optical
U kunt de uitvoermodus voor de COAXIAL-aansluiting
en de OPTICAL-aansluiting selecteren. Raadpleeg voor
meer informatie over uitgangsformaten "Over de audiouitgangsformaten" (p. 36).
Bitstream
Voert digitale signalen uit zonder verwerking.
Secundaire audio wordt niet uitgevoerd.
PCM
Voert 2-kanaals-PCM uit.
Reencode*
Voert Bitstream uit met secundaire audio.
Uit
Het geluid wordt gedempt.
HDMI
U kunt de uitvoermodus voor de HDMI-aansluiting
selecteren. Zie "Coaxial / Optical" (p. 35) voor meer
informatie over instelitems. Raadpleeg voor meer informatie
over uitgangsformaten "Over de audio-uitgangsformaten"
(p. 36).
2ch Downmix
U kunt de down-mixmethode instellen op 2-kanaals
analoog met Stereo of Lt/Rt.
Lt/Rt
Selecteer dit item als dit toestel aangesloten is op een
Dolby Pro Logic-decoder. Het geluid van de
achterluidsprekers wordt in het 2kanaalsstereogeluid gemixt.
Stereo*
Wijzigt de kanaaluitvoer naar stereo, wat betekent
dat er alleen geluid wordt uitgevoerd door de twee
voorluidsprekers.
Post Process
UpMix
U kunt het 2-kanaalsaudiosignaal omzetten naar meer
kanalen. Voor het omzetten naar meer kanalen selecteert u
DTS NEO:6 en daarna de modus Cinema of Muziek.
Uit*, DTS NEO:6
Bitstream*, PCM, Reencode, Uit
Opmerking
– Om HD-audio (Dolby TrueHD of DTS-HD Master
Audio) uit te voeren via de HDMI-aansluiting, stelt u
Video uit keuze in op Auto of op meer dan 720p
(p. 34).
■ System Information
Hiermee kunt u de softwareversie en het MAC-adres
weergeven (p. 43).
Nederlands
35 Nl
SETUP-menu
■ Over de audio-uitgangsformaten
Bronformaat
PCM 2-k
PCM 5.1-k
PCM 7.1-k
HDMI
Bitstream
met SA* of
KKG**
PCM 2-k
zonder SA* of
KKG**
COAXIAL / OPTICAL
Reencode
Bitstream
Dolby Digital
PCM 5.1-k
zonder SA* of
KKG**
PCM 7.1-k
zonder SA* of
KKG**
MIXED 2CH
Reencode
–
Dolby Digital
2-k
PCM 2-k
Dolby Digital
PCM 2-k
PCM 5.1-k
met SA* of
KKG**
PCM
PCM 2-k
PCM 2-k
met SA* of
KKG**
met SA* of
KKG**
PCM
2-k
Dolby Digital
PCM 2-k
Dolby Digital
PCM 2-k
PCM 7.1-k
2-k
2-k
Dolby Digital
PCM 2-k
2-k
2-k
Dolby Digital PCM tot 5.1-k Dolby Digital Dolby Digital
PCM 2-k
Dolby Digital
2-k
met SA* of
Dolby Digital
Dolby Digital KKG**
Dolby Digital
PCM tot 7.1-k
Dolby Digital
Plus
Plus
Dolby Digital
zonder SA* of
**
Plus
KKG
PCM 2-k
Dolby Digital
2-k
Dolby Digital
PCM 2-k
Dolby Digital
2-k
DTS
PCM 2-k
DTS
2-k
met SA* of
DTS
DTS HD High KKG**
DTS HD High
PCM tot 7.1-k
Resolution
Resolution
DTS HD High
zonder SA* of
Resolution
KKG**
DTS
PCM 2-k
DTS
2-k
met SA* of
DTS
KKG**
DTS-HD
DTS-HD
PCM tot 7.1-k
Master Audio zonder SA* of Master Audio
DTS-HD
Master Audio
KKG**
DTS
PCM 2-k
DTS
2-k
Dolby Digital
Dolby
TrueHD
DTS
zonder SA* of
KKG**
met SA* of
KKG**
zonder SA* of
KKG**
met SA* of
KKG**
zonder SA* of
KKG**
Dolby Digital
Dolby
TrueHD
PCM tot 7.1-k
DTS
PCM tot 5.1-k
Dolby
TrueHD
DTS
* "SA" staat voor secundaire audio.
** "KKG" staat voor een knopklikgeluid, het geluidseffect voor pop-upmenu's enz.
Opmerkingen
– Wanneer Coaxial / Optical of HDMI is ingesteld op Bitstream, wordt er geen secundaire audio uitgevoerd. (p. 35)
– Om HD-audio (Dolby TrueHD of DTS-HD Master Audio) uit te voeren via de HDMI-aansluiting, stelt u Video
uit keuze in op Auto of op meer dan 720p (p. 34).
36 Nl
SETUP-menu
■ Over de video-uitgangsformaten
Wanneer TV-systeem ingesteld is op NTSC
Video uit keuze
Inhoudsop
gave
HDMI
Uitgang
Auto
Instelling
van disk
*1
1080p 24Hz
*2
uit
BD-Video
zonder
1080p/24Hzinhoud
*1
*3
COMPONENT
DVD-Video
COMPONENT
HDMI
VIDEO
HDMI
VIDEO
HDMI
Overige
COMPONENT
VIDEO
*2
uit
*1
*3
*2
*2
*1
*1
*2
*2
1080i
1080p 24Hz/
1080i 60Hz
60Hz *4
uit
720p
480p/576p
480i/576i
480p/576p
480i/576i
–
720p 60Hz
480p
480i
480p
480i
480i
uit
1080p 60Hz 1080i 60Hz
uit
uit
720p 60Hz
uit
1080p 60Hz 1080i 60Hz
uit
uit
720p 60Hz
uit
1080p 60Hz 1080i 60Hz
uit
VIDEO
uit
720p 60Hz
uit
uit
480i
480i
480i
480i
480i
480i
480i
480i
480i
480i
480p
480i
480p
480i
480i
480i
480i
480i
480i
480i
480i
480i
480i
480i
480i
480p
480i
480p
480i
480i
480p
480i
480p
480i
480i
480i
480i
480i
480i
480i
480p
480i
480p
480i
480i
480p
480i
480p
480i
480i
480i
480i
480i
480i
480i
4
Instellingen
BD-Video
HDMI
met
1080p/24Hz- COMPONENT
inhoud
VIDEO
1080p
COMPONENT
Wanneer TV-systeem ingesteld is op PAL
Video uit keuze
Inhoudsop
gave
BD-Video
met
1080p/24Hzinhoud
Uitgang
HDMI
COMPONENT
VIDEO
BD-Video
zonder
1080p/24Hzinhoud
COMPONENT
DVD-Video
COMPONENT
HDMI
VIDEO
HDMI
VIDEO
HDMI
Overige
HDMI
COMPONENT
VIDEO
Auto
Instelling
van disk
*1
1080p 24Hz
*2
uit
*1
*3
*2
uit
*1
*3
*2
*2
*1
*1
*2
*2
1080p
1080p 24Hz/
1080i 50Hz
50Hz *4
uit
uit
480i/576i
480p/576p
480i/576i
–
720p 50Hz
576p
576i
576p
576i
576i
576i
576i
576i
576i
576i
576i
576i
576i
576i
576i
576p
576i
576p
576i
576i
576i
576i
576i
576i
576i
576i
576i
576i
576i
576i
576p
576i
576p
576i
576i
576p
576i
576p
576i
576i
576i
576i
576i
576i
576i
576p
576i
576p
576i
576i
576p
576i
576p
576i
576i
576i
576i
576i
576i
576i
uit
720p 50Hz
uit
720p 50Hz
uit
1080p 50Hz 1080i 50Hz
uit
480p/576p
uit
1080p 50Hz 1080i 50Hz
VIDEO
720p
uit
1080p 50Hz 1080i 50Hz
uit
COMPONENT
1080i
uit
720p 50Hz
uit
uit
*1 De resolutie wordt ingesteld op de maximale resolutie die ondersteund wordt door de aangesloten tv. Wanneer 1080p
bijvoorbeeld de maximale resolutie is die ondersteund wordt door de aangesloten tv, wordt de resolutie ingesteld op
1080p.
*2 Er worden mogelijk geen beelden uitgevoerd omdat de HDMI-uitgang prioriteit krijgt.
*3 De gebruikte resolutie is de resolutie van de brondisc.
*4 Als Auto ingesteld is voor HDMI 1080p 24Hz en de aangesloten tv 1080p 24Hz-inhoud ondersteunt, worden 1080p
24 Hz-beelden uitgevoerd in plaats van 1080p 50/60 Hz-beelden.
Wanneer TV-systeem ingesteld is op Multi
Wanneer TV-systeem ingesteld is op Multi, wordt het videosignaal uitgevoerd met dezelfde frequentie als de bron.
Raadpleeg de bovenstaande tabellen voor meer informatie over de frequentie-instelling van de tv en de resolutie van het
uitgevoerde videosignaal.
Opmerkingen
37 Nl
Nederlands
– De instelling HDMI 1080p 24Hz is uitgeschakeld wanneer de uitgevoerde resolutie niet 1080p is.
– Wanneer TV-systeem ingesteld is op NTSC en de videobron geen 60 Hz is, wordt het uitgevoerde videosignaal
omgezet naar 60 Hz.
– Wanneer TV-systeem ingesteld is op PAL en de videobron geen 50 Hz is, wordt het uitgevoerde videosignaal
omgezet naar 50 Hz.
Software-upgrade
Enkele van de nieuw uitgebrachte Blu-ray-schijven kunnen niet afgespeeld worden, tenzij u de software van deze speler
upgradet naar de nieuwste versie. Wij raden u aan de software van deze speler te upgraden via de software-upgrade zodat
deze speler bediend wordt op basis van de nieuwste software.
Om na te gaan of er een software-upgrade beschikbaar is, gaat u naar
http://download.yamaha.com/
Opmerking
– Terwijl de software-upgrade wordt uitgevoerd, mag u het USB-geheugen niet verwijderen, de speler niet in de
stand-bystand zetten en het netsnoer/de LAN-kabel niet loskoppelen.
■ De software upgraden
1. Maak de nodige voorbereidingen
voor de software-upgrade.
Wanneer u de software upgradet via USB Storage:
1 Bewaar het pakket met upgradebestanden in de
juiste map op het USB-geheugen. Raadpleeg het
proceduredocument dat bijgevoegd is bij het
pakket met upgradebestanden voor meer
informatie.
2 Sluit het USB-geheugen aan.
Sla stap 2 over.
Wanneer u de software upgradet via Netwerk:
Controleer of de speler aangesloten is op het
netwerk.
2. Selecteer de upgrademethode en
start de upgrade via het SETUPmenu.
1 Druk op SETUP om het SETUP-menuscherm
weer te geven.
2 Selecteer Instellingen Algemeen = Systeem =
Bijwerken.
3 Selecteer het item dat het pakket met
upgradebestanden bevat uit USB Storage/
Netwerk.
Het systeem gaat op zoek naar het pakket met
upgradebestanden.
38 Nl
3. Upgrade de software door de
instructies op het scherm te
volgen.
De upgrade is voltooid. Het systeem wordt gereset.
AANVULLENDE INFORMATIE
Problemen oplossen
Raadpleeg de tabel hieronder wanneer de speler niet naar behoren functioneert. Als het probleem niet hieronder vermeld
staat of als de aanwijzingen het probleem niet verhelpen, schakelt u de speler uit, haalt u de stekker uit het stopcontact en
neemt u contact op met uw dichtstbijzijnde Yamaha-dealer of -servicecentrum.
■ Stroom
Probleem
Mogelijke oorzaken en oplossingen
Geen stroom.
– Sluit het netsnoer correct aan.
– Druk op p op het voorpaneel om de speler in te schakelen.
De speler wordt vanzelf uitgeschakeld.
– De speler wordt automatisch uitgeschakeld wanneer er gedurende 30 minuten geen
activiteiten worden uitgevoerd (geen afspelen).
5
■ Basisbediening
Mogelijke oorzaken en oplossingen
– Gebruik de afstandsbediening binnen het opgegeven werkzame bereik. (p. 9)
– Vervang de batterijen. (p. 9)
– Controleer de ID-instellingen van het hoofdapparaat en de afstandsbediening. Het ID
van de afstandsbediening op het hoofdapparaat is mogelijk gewijzigd na het resetten
van het hoofdapparaat. Controleer in dat geval het ID van de afstandsbediening op het
hoofdapparaat en stel het indien nodig opnieuw in. (p. 9)
De knoppen werken niet.
– Houd p op het voorpaneel langer dan 5 seconden ingedrukt en laat de knop vervolgens
los om de speler te resetten.
– Om de speler volledig te resetten, verwijdert u gedurende 10 seconden of langer het
netsnoer uit het stopcontact, sluit u het netsnoer opnieuw aan en schakelt u vervolgens
de speler in.
Wachtwoord vergeten.
– Houd op het voorpaneel
en
gelijktijdig ingedrukt als er geen schijf is geplaatst
en het afspelen is gestopt. Zo kunt u alle instellingen, inclusief de Veiligheidinstellingen (p. 32), van deze speler op hun standaardinstellingen instellen. Nadat de
netvoeding automatisch is uitgeschakeld, drukt u op p om de netvoeding weer in te
schakelen.
Aanvullende informatie
Probleem
De afstandsbediening werkt niet.
■ Afspelen van schijven
Probleem
Mogelijke oorzaken en oplossingen
De speler kan geen schijf afspelen.
– Haal de schijf eruit en maak deze schoon. (p. 4)
– Controleer of de schijf juist geplaatst is (in de uitsparing van de schijflade en met de
labelkant naar boven). (p. 4)
– Gebruik een schijf die wordt ondersteund door de speler. (p. 3)
– Verwijder de schijf en controleer of deze wordt ondersteund door de speler. (p. 3)
– Controleer de regiocode. (p. 3)
– Controleer of de schijf defect is door een andere schijf te testen.
– Een CD-R/RW, DVD+R/RW/R DL en DVD-R/RW/R DL moet gefinaliseerd zijn.
(p. 3)
De video stopt.
– De speler stopt als deze schokken of trillingen vaststelt.
De speler maakt een klikkend geluid
wanneer deze met het afspelen begint of
bij het laden van een schijf.
– Deze geluiden duiden niet op een defect van de speler, maar zijn normale
werkingsgeluiden.
Nederlands
39 Nl
Problemen oplossen
■ Beeld
Probleem
Mogelijke oorzaken en oplossingen
Geen beeld.
– Controleer of de kabels juist zijn aangesloten. (p. 10)
– Controleer of de juiste ingang op de aangesloten tv of de AV-ontvanger is gekozen.
(p. 10)
– Houd op het voorpaneel
en
gelijktijdig ingedrukt als er geen schijf is geplaatst
of het afspelen is gestopt om de standaardwaarde in te stellen voor de videoresolutie.
Als er nog steeds geen beeld wordt weergegeven, houdt u
op het voorpaneel
gedurende ongeveer 5 seconden ingedrukt om de instelling voor NTSC/PAL te
wijzigen.
– Wanneer Instelling van disk ingesteld is, wordt er een signaal uitgevoerd dat niet
ondersteund wordt door de aangesloten tv. Wijzig de instelling zodat er een signaal
wordt uitgevoerd dat ondersteund wordt door de aangesloten tv. (p. 34)
Het beeld bevriest en de
bedieningstoetsen werken niet.
– Druk op
en start het afspelen opnieuw.
– Schakel de speler uit en dan weer in.
– Houd p op het voorpaneel langer dan 5 seconden ingedrukt en laat de knop vervolgens
los om de speler te resetten.
Video wordt niet uitgevoerd met de
gewenste resolutie.
– Stel de gewenste resolutie in. (p. 34)
Breedbeeldvideo's worden verticaal
uitgerekt of er zijn zwarte banden
zichtbaar aan de boven- en onderrand
van het tv-scherm. Of 4:3-video wordt
horizontaal uitgerekt.
– Wijzig de beeldverhouding van uw tv. (p. 33)
Het beeld bevat blokruis
(mozaïekpatroon).
– Scènes met snelle bewegingen kunnen blokruis vertonen als gevolg van de
eigenschappen van de digitale beeldcompressietechnologie.
Het weergavebeeld is vervormd als de
DVD-video op een videorecorder wordt
opgenomen of via een videorecorder
wordt weergegeven.
– Deze speler voldoet aan het kopieerbeveiligingssysteem voor analoog kopiëren.
Sommige discs bevatten een kopieerbeveiligingssignaal. Als u een dergelijke disc via
een videorecorder probeert weer te geven of op een videorecorder probeert op te nemen,
zal de kopieerbeveiliging normale weergave onmogelijk maken.
Er wordt geen geluid uitgevoerd of de
beelden worden niet juist weergegeven.
– Het is mogelijk dat er geen geluid wordt uitgevoerd of de beelden niet juist worden
weergegeven bij sommige schijven waarop kopieerbeveiligingsgegevens zijn
opgenomen.
■ Geluid
Probleem
Mogelijke oorzaken en oplossingen
Geen geluid of het geluid is vervormd.
– Controleer of de audiokabel juist is aangesloten. (p. 10)
– Draai het volume van de tv of AV-ontvanger omhoog.
– Er is geen geluid tijdens weergave van een stilstaand beeld of versnelde weergave in
voor- of achterwaartse richting. (p. 8)
– Het is mogelijk dat het geluid niet wordt uitgevoerd afhankelijk van de toestand van de
audio-opname, bijvoorbeeld wanneer er andere audio dan een audiosignaal of nietstandaardaudio is opgenomen als audiomateriaal. (p. 3)
Het linker- en rechterkanaal van het
geluidssignaal is omgekeerd of er komt
slechts van één kant geluid.
– Controleer de audioverbinding. (p. 10)
Er wordt geen geluid uitgevoerd of de
beelden worden niet juist weergegeven.
– Het is mogelijk dat er geen geluid wordt uitgevoerd of de beelden niet juist worden
weergegeven bij sommige schijven waarop kopieerbeveiligingsgegevens zijn
opgenomen.
Het gewenste type audio en/of aantal
kanalen kan niet gehoord worden.
– Raadpleeg de Audio Output-instelling en "Over de audio-uitgangsformaten". (p. 35,
p. 36)
Het geluid van PIP (secundaire audio) is
niet hoorbaar.
– Stel Coaxial / Optical of HDMI in op PCM/Reencode. (p. 35)
– Druk op 2ND AUDIO om secundaire audio te beluisteren. (p. 6)
– Afhankelijk van de schijf moet u de secundaire audio inschakelen via het hoofdmenu
van de schijf (p. 8).
■ Netwerk
Probleem
Kan geen verbinding met het internet
maken.
40 Nl
Mogelijke oorzaken en oplossingen
– Zorg ervoor dat de netwerkkabel goed aangesloten is als u verbinding maakt met het
internet door Wired bij Verbindingsinstelling te selecteren. (p. 32)
– Schakel de aangesloten apparatuur zoals een breedbandrouter of modem in.
– Sluit de breedbandrouter en/of modem juist aan.
– Als Wireless geselecteerd is bij Verbindingsinstelling en u via ethernet verbinding wilt
maken met het internet, selecteert u Wired. (p. 32)
– Selecteer Wireless bij Verbindingsinstelling als u via een draadloos LAN verbinding
wilt maken met het internet. (p. 32)
Problemen oplossen
Probleem
Mogelijke oorzaken en oplossingen
– Controleer of de internetverbinding werkt op de speler. Raadpleeg "Verbindingstest".
(p. 33)
– Sluit het USB-geheugen correct aan. Controleer of het USB-geheugen op de USB-poort
van deze speler is aangesloten. (p. 16)
– Controleer of de Blu-ray Disc BD-Live ondersteunt.
– Sluit een USB-geheugen aan dat geformatteerd is in FAT16, FAT32 of NTFS.
– Wij raden u aan om een USB-geheugen met minstens 2 GB vrije ruimte aan te sluiten.
Als er onvoldoende vrije ruimte is, formatteert u het USB-geheugen. (p. 31)
– Raadpleeg de bijgeleverde gebruikershandleiding van de schijf of raadpleeg de
schijffabrikant.
Kan de DLNA-server niet vinden.
– Controleer of de netwerkverbinding werkt op de speler. Raadpleeg "Verbindingstest".
(p. 33)
– Schakel de aangesloten apparatuur zoals een breedbandrouter of server in.
– Controleer of de speler en server aangesloten zijn op hetzelfde toegangspunt.
– Afhankelijk van de DLNA-server, is het mogelijk dat u de speler moet machtigen bij de
server.
– Afhankelijk van de DLNA-server moet er een firewallinstelling gewijzigd worden.
Kan een bestand niet afspelen op de
DLNA-server.
– Controleer of het bestand kan worden afgespeeld. (p. 3)
– Controleer de instellingen van uw DLNA-server.
– De afspeel- en bedieningskwaliteit kunnen beïnvloed worden door de status van uw
thuisnetwerk.
Kan geen verbinding met het internet
maken via draadloos LAN.
– Zorg ervoor dat de router voor draadloos LAN ingeschakeld is.
– Afhankelijk van omgevingsfactoren (bv. het materiaal van de muren, de
ontvangstomstandigheden voor radiogolven of obstakels tussen de speler en de router
voor draadloos LAN) kan de communicatieafstand korter zijn. Plaats de speler en de
router voor draadloos LAN dichter bij elkaar.
– Apparaten die gebruik maken van een frequentieband van 2,4 GHz, zoals een
magnetron, Bluetooth-apparaat of een digitaal draadloos apparaat, kunnen de
communicatie verstoren. Plaats de speler uit de buurt van dergelijke apparaten of
schakel deze uit.
– Als u na het uitvoeren van de twee bovenstaande oplossingen nog steeds geen
verbinding met het internet kunt maken via een draadloos LAN, kunt u er beter voor
kiezen verbinding te maken via ethernet door Wired te selecteren bij
Verbindingsinstelling. (p. 32)
Draadloos netwerk werd niet gevonden
of wordt gestoord.
– Als u Scan uitgevoerd hebt maar het draadloze netwerk niet gevonden wordt of gestoord
wordt, drukt u op RETURN om terug te keren naar het vorige scherm en probeert u
Scan opnieuw uit te voeren. Als de gewenste draadloze router nog steeds niet
gedetecteerd wordt, drukt u op RETURN om Handm. te selecteren.
– Zorg ervoor dat het draadloze netwerk niet gestoord wordt door magnetrons, DECTtelefoons of andere Wi-Fi-apparaten.
– Magnetrons, DECT-telefoons en andere draadloze apparaten in de nabije omgeving
kunnen het draadloze netwerk storen. Schakel deze apparaten uit.
– Zorg ervoor dat de firewalls in uw netwerk de draadloze toegang tot uw speler niet
blokkeren.
– Als het draadloze netwerk niet goed functioneert bij u thuis, kunt u beter kiezen voor
netwerkverbinding via een ethernetkabel.
5
Aanvullende informatie
Kan geen BD-Live-inhoud downloaden.
■ Meldingen op het scherm
– De volgende meldingen verschijnen op het tv-scherm wanneer de schijf die u probeert af te spelen niet geschikt is
of als de uitgevoerde bediening niet juist is.
Foutmelding
Mogelijke oorzaken en oplossingen
– Dit bestand wordt niet ondersteund door de speler. Zie "Schijf-/bestandstypes die u met deze speler
kunt gebruiken" (p. 3).
Verkeerde regiocode!
– De schijf heeft een niet-ondersteunde regiocode. Zie "Regiobeheerinformatie voor Blu-ray Disc-/
DVD-video's" (p. 3).
Netwerk is MISLUKT.
– De speler kan niet worden aangesloten op het netwerk. Controleer de verbinding (p. 16) en de
netwerkinstellingen (p. 32).
Netwerk is OK, proxy is
MISLUKT.
– De speler kan niet worden aangesloten op de proxyserver. Zie "Proxy instellen" (p. 33).
BD-live connectie is niet
ondersteund in SETUP menu
– BD-Live-verbinding is niet toegestaan. Zie "BD-Live-verbinding" (p. 33).
Upgrade is mislukt om een
aantal redenen!
– De upgrade is mislukt. Controleer of het upgradebestand corrupt of onleesbaar is.
IP-instelling is niet geldig!
Reset deze…
– De ingevoerde IP Setting is niet geldig. Voer de correcte informatie opnieuw in.
Nederlands
Niet ondersteund bestand
41 Nl
Woordenlijst
AVCHD
AVCHD is een nieuw formaat (standaard) voor HDvideocamera's dat gebruikt kan worden voor het
opnemen en afspelen van HD-beelden met een hoge
resolutie.
BD-Live™
BD-Live is een Blu-ray Disc-standaard die gebruik
maakt van een netwerkverbinding waarmee deze speler
online kan gaan en promotionele video's en andere
gegevens kan downloaden.
BDMV
BDMV (Blu-ray Disc Movie) verwijst naar een van de
toepassingsformaten die gebruikt worden voor BDROM, wat een van de Blu-ray Disc-specificaties is.
BDMV is een opnameformaat zoals DVD-Video van de
DVD-specificatie.
Blu-ray 3D™
Met Blu-ray 3D kunt u 3D-beelden volledig in HD
weergeven.
BONUSVIEW™
Bij schijven die compatibel zijn met BONUSVIEW
kunt u tegelijk van een videosubkanaal voor twee
schermen, een audiosubkanaal en ondertiteling genieten.
Een klein scherm wordt weergegeven op het
hoofdscherm tijdens het afspelen (beeld-in-beeld).
Closed Caption
"Closed Captions" zijn een soort ondertitels; het verschil
tussen gewone ondertitels en "captions" is dat
ondertitels bedoeld zijn voor mensen zonder
gehoorproblemen en "captions" voor gehoorgestoorden.
Ondertitels geven zelden alle geluiden weer.
Bijschriften tonen bijvoorbeeld ook geluidseffecten (bv.
telefoon rinkelt en voetstappen), wat niet het geval is bij
ondertitels. Voor u deze instelling selecteert, controleert
u of de disc ondertiteling voor gehoorgestoorden bevat.
Deep Color
Deep Color verwijst naar het gebruik van verschillende
kleurdieptes in schermen vanaf de 24 bitdieptes van
vorige versies van de HDMI-specificatie. Deze extra
bitdiepte zorgt ervoor dat HD-tv's en andere schermen
kunnen overschakelen van miljoenen kleuren naar
miljarden kleuren en elimineert kleurverloop op het
scherm zodat er vloeiende toonovergangen en subtiele
gradaties tussen kleuren worden bekomen. De
verhoogde contrastverhouding kan veel meer grijstinten
weergeven tussen zwart en wit. Deep Color verhoogt
eveneens het aantal beschikbare kleuren binnen de
grenzen afgebakend door de RGB- of YCbCrkleurruimte.
DivX®
DivX® is een digitale video-indeling die ontwikkeld is
door DivX, LLC, een dochteronderneming van Rovi
Corporation. Dit is een officieel DivX Certified®apparaat dat DivX-video afspeelt. Ga naar divx.com
voor meer informatie en softwareprogramma's om uw
bestanden naar DivX-video's om te zetten.
42 Nl
DLNA
Met DLNA (Digital Living Network Alliance) kunnen
digitale media eenvoudig worden gedeeld via een
thuisnetwerk en kunt u met uw tv via deze speler
genieten van digitale inhoud opgeslagen op uw pc
waarop DLNA-serversoftware is geïnstalleerd of een
ander apparaat dat DLNA ondersteunt. Om deze speler
te verbinden met uw DLNA-servers, moeten bepaalde
instellingen voor de DLNA-server of het DLNAapparaat worden doorgevoerd. Meer informatie vindt u
in uw DLNA-serversoftware of uw DLNA-apparaat.
Dolby Digital
Een geluidssysteem ontwikkeld door Dolby
Laboratories Inc. dat een geluidssignaal met de sfeer
van een bioscoopzaal genereert wanneer het apparaat op
een Dolby Digital-processor of -versterker is
aangesloten.
Dolby Digital Plus
Een geluidssysteem ontwikkeld als uitbreiding van
Dolby Digital. Deze audiocoderingstechnologie
ondersteunt 7.1-meerkanaalssurroundgeluid.
Dolby TrueHD
Dolby TrueHD is een verliesvrije coderingstechnologie
die meerkanaalssurroundgeluid bestaande uit maximaal
8 kanalen ondersteunt voor gebruik met optische
schijven van de volgende generatie. Het weergegeven
geluid is bit voor bit getrouw aan het oorspronkelijke
brongeluid.
DRC (Dynamic Range Control)
Met DRC kunt u het bereik tussen de luidste en de
zachtste geluiden (dynamisch bereik) instellen bij het
afspelen met een gemiddeld volume. Gebruik deze optie
wanneer dialogen moeilijk hoorbaar zijn of wanneer het
afspelen de buren kan storen.
DTS
Dit is een digitaal geluidssysteem ontwikkeld door DTS,
Inc. voor gebruik in bioscopen.
DTS-HD High Resolution Audio
DTS-HD High Resolution Audio is een nieuwe
technologie die ontwikkeld is voor het optische HDschijfformaat van de volgende generatie.
DTS-HD Master Audio
DTS-HD Master Audio is een verliesvrije
audiocompressietechnologie die ontwikkeld is voor het
optische HD-schijfformaat van de volgende generatie.
FLAC
FLAC (Free Lossless Audio Codec) is een open
bestandsformaat voor een verliesvrije compressie van
audiogegevens. Dit formaat heeft een lagere
compressieverhouding dan andere gecomprimeerde
audioformaten waarbij wel gegevens verloren gaan,
maar biedt vaak een betere audiokwaliteit.
Woordenlijst
HDMI
Lip Sync
HDMI (High-Definition Multimedia Interface) is een
interface die zowel video als audio ondersteunt via een
enkele digitale verbinding. De HDMI-verbinding brengt
standaard- tot hogedefinitievideosignalen en
meerkanaalsaudiosignalen in digitale vorm, dus zonder
kwaliteitsverlies, over naar AV-apparatuur zoals tv's
uitgerust met HDMI.
Kleurruimte
Kleurruimte is een kleurbereik dat kan worden
voorgesteld. RGB is een kleurruimte gebaseerd op het
RGB-kleurenmodel (rood, groen en blauw) en wordt
vooral gebruikt voor pc-schermen. YCbCr is een
kleurruimte gebaseerd op een luminantiesignaal (Y) en
twee kleurverschilsignalen (Cb en Cr).
Letter Box (LB 4:3)
Lineair PCM-geluid
Lineaire PCM is een signaalopnameformaat dat gebruikt
wordt voor Audio-CD's en voor sommige DVDschijven en Blu-ray-schijven. Het geluid op Audio-CD's
wordt opgenomen bij een bemonsteringsfrequentie van
44,1 kHz en met 16 bits. (Het geluid wordt opgenomen
tussen 48 kHz met 16 bits en 96 kHz met 24 bits op
DVD-schijven en tussen 48 kHz met 16 bits en 192 kHz
met 24 bits op Blu-ray-schijven.)
Mac-adres
Het Mac-adres is een unieke waarde die wordt
toegekend aan een netwerkapparaat voor
identificatiedoeleinden.
5
Ondertitels
Dit zijn de tekstregels die onderaan op het scherm
worden getoond en die de dialoog vertalen of
beschrijven. Ondertiteling is opgenomen op de meeste
DVD- en Blu-ray-schijven.
Pan Scan (PS 4:3)
Een beeldformaat waarbij de zijkanten van het beeld
zijn afgesneden om breedbeeldmateriaal (16:9) op een
aangesloten normale 4:3-tv te kunnen weergeven.
x.v.Color
Aanvullende informatie
Een beeldformaat met zwarte banden boven en onder
aan het scherm om breedbeeldmateriaal (16:9) op een
aangesloten normale 4:3-tv te kunnen weergeven.
Lip Sync, een afkorting voor Lip Synchronization
(lipsynchronisatie), is een technische term die zowel
betrekking heeft op een probleem als op een
mogelijkheid om audio- en videosignalen
gesynchroniseerd te houden tijdens de postproductie en
de transmissie. Normaal komen bij audio- en
videolatentie complexe aanpassingen door de
eindgebruiker kijken. HDMI bevat echter een
automatische audio- en videosynchronisatiefunctie
waarmee apparaten deze synchronisatie zonder
tussenkomst van de gebruiker automatisch en
nauwkeurig kunnen uitvoeren.
x.v.Color produceert een groter bereik aan kleuren dan
voorheen, waarbij praktisch alle kleuren kunnen worden
weergegeven die het menselijke oog kan waarnemen.
Specificaties
■ Algemeen
Stroomvoorziening
[Modellen voor V.S. en Canada].............................AC 110-240 V, 60 Hz
[Modellen voor Centraal- en Zuid-Amerika].... AC 110-240 V, 50/60 Hz
[Model voor Australië]............................................AC 110-240 V, 50 Hz
[Model voor het VK, Europa en Rusland] ..............AC 110-240 V, 50 Hz
[Model voor China].................................................AC 110-240 V, 50 Hz
[Model voor Azië]............................................. AC 110-240 V, 50/60 Hz
Stroomverbruik (normaal) .................................................................... 20 W
Stroomverbruik (stand-by) ..................................................0,5 W of minder
Afmetingen (B × H × D, inclusief uitstekende delen)
................................................... 435 × 86 × 257 mm
Gewicht ............................................................................................... 2,8 kg
■ Audioprestaties
■ Ingangen/uitgangen
HDMI-uitgang.......................................................... Type A-aansluiting × 1
480i/576i/480p/576p/720p/1080i/1080p/1080p@24Hz,
Deep Color-, x.v. Color-ondersteuning
Componentvideo-uitgang ..............................................Y: 1 Vp-p (75 ohm)
PB, PR: 0,7 Vp-p (75 ohm)
Video-uitgang......................................................................1 Vp-p (75 ohm)
Digitale uitgang.................................................... Optisch × 1, Coaxiaal × 1
Analoge audio-uitgang .................................................Gemengd 2-kan. × 1
USB .......................................................................... Type A-aansluiting × 2
Draadloos LAN ............................................. Standaard: IEEE 802.11 b/g/n
Frequentiebereik: 2,4GHz-band
Overige apparatuur....................................................... Remote IN/OUT × 1
Ethernet × 1
Wijzigingen in specificaties voorbehouden zonder voorafgaande
kennisgeving.
Nederlands
Audio-uitgangsniveau (1 kHz, 0 dB)
Blu-ray Disc/DVD/CD-DA.........................................................2 ± 0,3 V
Signaal-ruisverhouding
Blu-ray Disc/DVD/CD-DA............................................................ 110 dB
Dynamisch bereik
Blu-ray Disc/DVD ......................................................................... 105 dB
CD-DA ........................................................................................... 100 dB
Harmonische vervorming (1 kHz)
Blu-ray Disc/DVD/CD-DA............................................................0,003%
Frequentierespons
Blu-ray Disc/DVD ...................... 4 Hz tot 22 kHz (48kHz-bemonstering)
4 Hz tot 44 kHz (96kHz-bemonstering)
CD-DA ..............................................................................4 Hz tot 20 kHz
43 Nl
Specificaties
■ Auteursrechten
– Audiovisueel materiaal kan bestaan uit materiaal met
auteursrecht dat niet mag worden opgenomen zonder
toestemming van de eigenaar van het auteursrecht.
Raadpleeg de relevante wetten in uw land.
– Dit apparaat bevat technologie die de auteursrechten
beschermt die wordt beschermd door patenten in de
VS en andere wetten op intellectueel eigendom van
Rovi Corporation. Reverse-engineering en
decompilatie zijn niet toegestaan.
– Gefabriceerd onder licentie van Dolby Laboratories.
Dolby en het dubbele D-symbool zijn
handelsmerken van Dolby Laboratories.
– Vervaardigd onder licentie onder de Amerikaanse
patentnummers: 5,956,674; 5,974,380; 6,226,616;
6,487,535; 7,212,872; 7,333,929; 7,392,195;
7,272,567 en andere reeds uitgegeven en
aangevraagde patenten in de VS en de rest van de
wereld. DTS-HD, het overeenkomstige symbool en
DTS-HD gecombineerd met het overeenkomstige
symbool zijn gedeponeerde handelsmerken en DTSHD Master Audio is een handelsmerk van DTS, Inc.
Product bevat software. © DTS, Inc. Alle rechten
voorbehouden.
– "Blu-ray Disc™", "Blu-ray™", "Blu-ray 3D™",
"BD-Live™", "BONUSVIEW™" en de
overeenstemmende logo's zijn handelsmerken van
Blu-ray Disc Association.
–
is een handelsmerk van DVD Format/Logo
Licensing Corporation.
– "HDMI", het "HDMI"-logo en "High-Definition
Multimedia Interface" zijn handelsmerken of
gedeponeerde handelsmerken van HDMI Licensing
LLC.
– "x.v.Color" en het "x.v.Color"-logo zijn
handelsmerken van Sony Corporation.
– "AVCHD" en het "AVCHD"-logo zijn
handelsmerken van Panasonic Corporation en Sony
Corporation.
– Java en alle op Java gebaseerde handelsmerken en
logo's zijn handelsmerken of gedeponeerde
handelsmerken van Sun Microsystems, Inc. in de
Verenigde Staten en/of andere landen.
– Dit product is gelicentieerd onder de AVCpatentportfoliolicentie en de VC-1patentportfoliolicentie voor het persoonlijk en nietcommerciële gebruik van een consument om (i)
video te coderen in overeenstemming met de AVCnorm en VC-1-norm ("AVC/VC-1 Video") en/of (ii)
AVC/VC-1 Video te decoderen die werd gecodeerd
door een consument in het kader van een
persoonlijke en niet-commerciële activiteit en/of die
is verkregen van een videoaanbieder die
gelicentieerd is om AVC/VC-1 Video aan te bieden.
Er wordt geen licentie toegekend of impliciet
aangenomen voor enig ander gebruik. Extra
informatie kan worden verkregen van MPEG LA,
LLC. Zie http://www.mpegla.com.
– Windows Media Player is een gedeponeerd
handelsmerk of een handelsmerk van Microsoft
corporation in de Verenigde Staten en/of andere
landen.
44 Nl
– YouTube en het YouTube-logo, Picasa en het
Picasa-logo zijn handelsmerken van Google. Inc.
– Netflix en het Netflix-logo zijn gedeponeerde
handelsmerken van Netflix, Inc.
– DLNA en DLNA CERTIFIED zijn handelsmerken
en/of servicemerken van Digital Living Network
Alliance.
– Copyright 2004-2010 Verance Corporation.
Cinavia™ is een handelsmerk van Verance
Corporation. Beschermd door het Amerikaanse
patent 7,369,677 en andere reeds uitgegeven en
aangevraagde wereldwijde patenten onder licentie
van Verance Corporation. Alle rechten
voorbehouden.
– Het Wi-Fi CERTIFIED-logo is een certificaatmerk
van Wi-Fi Alliance.
– DivX®, DivX Certified®, DivX Plus® HD en
verwante logo's zijn handelsmerken van Rovi
Corporation of zijn dochterondernemingen, en
worden onder licentie gebruikt.
– DivX Certified® voor het afspelen van DivX®- en
DivX Plus® HD-video (H.264/.MKV) tot 1080p
HD, inclusief hoogwaardige inhoud.
OVER DIVX VIDEO: DivX® is een digitale videoindeling die ontwikkeld is door DivX, LLC, een
dochteronderneming van Rovi Corporation. Dit is een
officieel DivX Certified®-apparaat dat DivX-video
afspeelt. Ga naar divx.com voor meer informatie en
softwareprogramma's om uw bestanden naar DivXvideo's om te zetten.
OVER DIVX VIDEO-ON-DEMAND: dit DivX
Certified®-apparaat moet geregistreerd zijn om
gekochte DivX Video-on-Demand (VOD)-films te
kunnen afspelen. Om de registratiecode aan te maken,
gaat u naar het onderdeel DivX VOD in het
instellingenmenu van het apparaat. Ga naar
vod.divx.com voor meer informatie over hoe uw
registratie te voltooien.
AANVULLENDE INFORMATIE
Index
■
Numerics
2ch Downmix, SETUP-menu ..............35
2ND AUDIO, afstandsbediening ...........6
3D Playback bericht, SETUP-menu ....31
3D Uitgang, SETUP-menu ..................33
■
A
■
B
BD-Live ...............................................27
BD-Live-verbinding, SETUP-menu ....33
Bedieningstoetsen, afstandsbediening ...8
Beeld-in-beeldfunctie ...........................27
Bijwerken, SETUP-menu ....................31
Bitrate, schermmenu ............................24
Bookmark .............................................26
■
C
Cijfertoetsen, afstandsbediening ............6
CLEAR, afstandsbediening ...................6
Closed Caption, SETUP-menu ............32
Coaxial / Optical, SETUP-menu ..........35
Code Page, schermmenu ......................24
Cursortoetsen, afstandsbediening ..........8
■
D
De-interlacing Mode, SETUP-menu ....35
DIGEST, afstandsbediening ..................7
Display Setting, SETUP-menu ............33
DivX(R) VOD DRM, SETUP-menu ...32
DLNA, SETUP-menu ..........................33
Downsampling, SETUP-menu .............35
DRC, SETUP-menu .............................35
■
E
ENTER, afstandsbediening ....................8
ESN (Electronic Serial Number) .........32
Externe opslag, SETUP-menu .............31
■
F
Functie HDMI Control .........................31
■
H
I
Informatie, SETUP-menu ....................33
Initiële Wizard ......................................18
Ins Spelen, schermmenu .......................24
Ins Zoeken, schermmenu .....................24
Instellingen Algemeen, SETUP-menu
..........................................................31
Internetverbinding, SETUP-menu ........32
IP Setting, SETUP-menu .....................33
■
K
Kinderbeveiliging, SETUP-menu ........32
Kleur aanpassen, SETUP-menu ...........35
Kleurruimte, SETUP-menu ..................34
Kleurtoetsen, afstandsbediening ............7
■
L
Ladingsfout, SETUP-menu ..................31
Landcode, SETUP-menu ......................32
Last Memory, SETUP-menu ................32
Lip Sync, SETUP-menu .......................34
Luidsprekerinstellingen, SETUP-menu
..........................................................35
■
M
MARKER, afstandsbediening ................6
MEDIA-menu ......................................18
Menu, SETUP-menu ............................31
Mode/Afspeelmodus, schermmenu ......24
■
N
S
Schermmenu ........................................ 24
Schijf Automatisch afspelen, SETUPmenu ................................................ 31
Screensaver, SETUP-menu ................. 31
SEARCH, afstandsbediening ................ 7
Secundaire Audio Mark, SETUP-menu
......................................................... 32
SETUP, afstandsbediening .................... 6
SETUP-menu ....................................... 28
SHUFFLE, afstandsbediening ............... 7
Slide Show, schermmenu .................... 24
Snelinstelling ....................................... 18
Snelinstelling, SETUP-menu ............... 31
Software upgraden ............................... 38
Software-upgrade ................................ 38
Spoor/Bestand, schermmenu ............... 24
STATUS, afstandsbediening ................. 6
Statusmenu .......................................... 25
SUBTITLE, afstandsbediening ............. 7
Systeem, SETUP-menu ....................... 31
System Information, SETUP-menu ..... 35
■
T
Taal, SETUP-menu .............................. 31
Tijd, schermmenu ................................ 24
Titel, schermmenu ............................... 24
TOP MENU, afstandsbediening ............ 8
TV Scherm, SETUP-menu .................. 33
TV, SETUP-menu ............................... 33
TV-systeem, SETUP-menu ................. 34
Tweede Audio, schermmenu ............... 24
Tweede Video, schermmenu ............... 24
Netflix ..................................................23
Netflix Information, SETUP-menu ......32
Netwerk Instellingen, SETUP-menu ....31
Netwerk, SETUP-menu ........................32
Netwerkaansluiting ..............................16
■
■
Veiligheid, SETUP-menu .................... 32
Verbindingsinstelling, SETUP-menu
......................................................... 32
Verbindingstest, SETUP-menu ........... 33
Vereisten voor audiobestanden .............. 3
Video Process, SETUP-menu .............. 34
Video uit keuze, SETUP-menu ........... 34
Videoaansluiting .................................. 13
Videomodus, SETUP-menu ................ 34
Video-uitgangsformaten ...................... 37
O
ON SCREEN, afstandsbediening ...........8
Ondertitel Style, schermmenu ..............24
Ondertitel, schermmenu .......................24
Ondertitel, SETUP-menu .....................32
OSD, SETUP-menu .............................31
Overgang, schermmenu ........................24
Overige aansluitingen ...........................17
■
P
■
■
■
■
R
U
UpMix, SETUP-menu ......................... 35
USB-aansluiting .................................. 16
PIP Mark, SETUP-menu ......................32
PIP, afstandsbediening ...........................6
POP-UP/MENU, afstandsbediening ......8
Post Process, SETUP menu ..................35
PROGRAM, afstandsbediening .............6
Programma afspelen .............................26
Proxy instellen, SETUP-menu .............33
REPEAT, afstandsbediening ..................7
RETURN, afstandsbediening .................8
Ruisonderdrukking, SETUP-menu ......35
5
V
W
Wachtwoord wijzigen, SETUP-menu
......................................................... 32
Werking van het SETUP-menu ........... 30
■
Y
YouTube afspelen ................................ 21
Z
Zoekfunctie .......................................... 26
ZOOM, afstandsbediening .................... 7
45 Nl
Nederlands
HDMI 1080p 24Hz, SETUP-menu ......34
HDMI Control, SETUP-menu .............31
HDMI Deep Color, SETUP-menu .......34
HDMI, SETUP-menu ..........................35
HDMI-aansluiting ................................12
Hoek, schermmenu ..............................24
■
■
Aanvullende informatie
A/B, afstandsbediening ..........................7
Afspelen van een gegevensschijf .........18
Afspelen van USB-inhoud ...................18
Afspelen, SETUP-menu .......................32
Afstandsbediening .................................6
Angle Mark, SETUP-menu ..................32
ANGLE, afstandsbediening ...................7
Audio Output, SETUP-menu ...............35
Audio Setting, SETUP-menu ...............35
AUDIO, afstandsbediening ....................7
Audio, schermmenu .............................24
Audio, SETUP-menu ...........................32
Audioaansluiting ..................................14
Audio-uitgangsformaten ......................36
HOME, afstandsbediening .....................6
HOME-menu ........................................18
Hoofdstuk, schermmenu ......................24
Information about software
This product uses the following software.
For information (copyright, etc) about each software, read the original sentences stated below.
■ About Linux, Busybox, SquashFS, LIRC, U-boot,
gdb, mtd-utils
GNU GENERAL PUBLIC LICENSE
Version 2, June 1991
Copyright (C) 1989, 1991 Free Software Foundation, Inc.
51 Franklin St, Fifth Floor, Boston, MA 02110-1301 USA
Everyone is permitted to copy and distribute verbatim copies of this license document,
but changing it is not allowed.
Preamble
The licenses for most software are designed to take away your freedom to share and
change it. By contrast, the GNU General Public License is intended to guarantee your
freedom to share and change free software--to make sure the software is free for all its
users. This General Public License applies to most of the Free Software Foundation’s
software and to any other program whose authors commit to using it. (Some other Free
Software Foundation software is covered by the GNU Library General Public License
instead.) You can apply it to your programs, too.
When we speak of free software, we are referring to freedom, not price. Our General
Public Licenses are designed to make sure that you have the freedom to distribute
copies of free software (and charge for this service if you wish), that you receive source
code or can get it if you want it, that you can change the software or use pieces of it in
new free programs; and that you know you can do these things.
To protect your rights, we need to make restrictions that forbid anyone to deny you
these rights or to ask you to surrender the rights. These restrictions translate to certain
responsibilities for you if you distribute copies of the software, or if you modify it.
For example, if you distribute copies of such a program, whether gratis or for a fee, you
must give the recipients all the rights that you have. You must make sure that they, too,
receive or can get the source code. And you must show them these terms so they know
their rights.
We protect your rights with two steps: (1) copyright the software, and (2) offer you this
license which gives you legal permission to copy, distribute and/or modify the software.
Also, for each author’s protection and ours, we want to make certain that everyone
understands that there is no warranty for this free software. If the software is modified
by someone else and passed on, we want its recipients to know that what they have is
not the original, so that any problems introduced by others will not reflect on the
original authors’ reputations.
Finally, any free program is threatened constantly by software patents. We wish to
avoid the danger that redistributors of a free program will individually obtain patent
licenses, in effect making the program proprietary. To prevent this, we have made it
clear that any patent must be licensed for everyone’s free use or not licensed at all.
The precise terms and conditions for copying, distribution and modification follow.
GNU GENERAL PUBLIC LICENSE
TERMS AND CONDITIONS FOR COPYING, DISTRIBUTION AND
MODIFICATION
0. This License applies to any program or other work which contains a notice placed
by the copyright holder saying it may be distributed under the terms of this General
Public License. The “Program”, below, refers to any such program or work, and a
“work based on the Program” means either the Program or any derivative work
under copyright law: that is to say, a work containing the Program or a portion of it,
either verbatim or with modifications and/or translated into another language.
(Hereinafter, translation is included without limitation in the term “modification”.)
Each licensee is addressed as “you”.
Activities other than copying, distribution and modification are not covered by this
License; they are outside its scope. The act of running the Program is not restricted,
and the output from the Program is covered only if its contents constitute a work
based on the Program (independent of having been made by running the Program).
Whether that is true depends on what the Program does.
1. You may copy and distribute verbatim copies of the Program’s source code as you
receive it, in any medium, provided that you conspicuously and appropriately
publish on each copy an appropriate copyright notice and disclaimer of warranty;
keep intact all the notices that refer to this License and to the absence of any
warranty; and give any other recipients of the Program a copy of this License along
with the Program.
You may charge a fee for the physical act of transferring a copy, and you may at
your option offer warranty protection in exchange for a fee.
2. You may modify your copy or copies of the Program or any portion of it, thus
forming a work based on the Program, and copy and distribute such modifications
or work under the terms of Section 1 above, provided that you also meet all of these
conditions:
a) You must cause the modified files to carry prominent notices stating that you
changed the files and the date of any change.
b) You must cause any work that you distribute or publish, that in whole or in part
contains or is derived from the Program or any part thereof, to be licensed as a
whole at no charge to all third parties under the terms of this License.
i
c) If the modified program normally reads commands interactively when run, you
must cause it, when started running for such interactive use in the most
ordinary way, to print or display an announcement including an appropriate
copyright notice and a notice that there is no warranty (or else, saying that you
provide a warranty) and that users may redistribute the program under these
conditions, and telling the user how to view a copy of this License. (Exception:
if the Program itself is interactive but does not normally print such an
announcement, your work based on the Program is not required to print an
announcement.)
These requirements apply to the modified work as a whole. If identifiable sections of
that work are not derived from the Program, and can be reasonably considered
independent and separate works in themselves, then this License, and its terms, do not
apply to those sections when you distribute them as separate works. But when you
distribute the same sections as part of a whole which is a work based on the Program,
the distribution of the whole must be on the terms of this License, whose permissions
for other licensees extend to the entire whole, and thus to each and every part regardless
of who wrote it.
Thus, it is not the intent of this section to claim rights or contest your rights to work
written entirely by you; rather, the intent is to exercise the right to control the
distribution of derivative or collective works based on the Program.
In addition, mere aggregation of another work not based on the Program with the
Program (or with a work based on the Program) on a volume of a storage or distribution
medium does not bring the other work under the scope of this License.
3. You may copy and distribute the Program (or a work based on it, under Section 2)
in object code or executable form under the terms of Sections 1 and 2 above
provided that you also do one of the following:
a) Accompany it with the complete corresponding machine-readable source code,
which must be distributed under the terms of Sections 1 and 2 above on a
medium customarily used for software interchange; or,
b) Accompany it with a written offer, valid for at least three years, to give any
third party, for a charge no more than your cost of physically performing source
distribution, a complete machine-readable copy of the corresponding source
code, to be distributed under the terms of Sections 1 and 2 above on a medium
customarily used for software interchange; or,
c) Accompany it with the information you received as to the offer to distribute
corresponding source code. (This alternative is allowed only for
noncommercial distribution and only if you received the program in object
code or executable form with such an offer, in accord with Subsection b
above.)
The source code for a work means the preferred form of the work for making
modifications to it. For an executable work, complete source code means all the source
code for all modules it contains, plus any associated interface definition files, plus the
scripts used to control compilation and installation of the executable. However, as a
special exception, the source code distributed need not include anything that is
normally distributed (in either source or binary form) with the major components
(compiler, kernel, and so on) of the operating system on which the executable runs,
unless that component itself accompanies the executable.
If distribution of executable or object code is made by offering access to copy from a
designated place, then offering equivalent access to copy the source code from the same
place counts as distribution of the source code, even though third parties are not
compelled to copy the source along with the object code.
4. You may not copy, modify, sublicense, or distribute the Program except as
expressly provided under this License. Any attempt otherwise to copy, modify,
sublicense or distribute the Program is void, and will automatically terminate your
rights under this License. However, parties who have received copies, or rights,
from you under this License will not have their licenses terminated so long as such
parties remain in full compliance.
5. You are not required to accept this License, since you have not signed it. However,
nothing else grants you permission to modify or distribute the Program or its
derivative works. These actions are prohibited by law if you do not accept this
License. Therefore, by modifying or distributing the Program (or any work based
on the Program), you indicate your acceptance of this License to do so, and all its
terms and conditions for copying, distributing or modifying the Program or works
based on it.
6. Each time you redistribute the Program (or any work based on the Program), the
recipient automatically receives a license from the original licensor to copy,
distribute or modify the Program subject to these terms and conditions. You may
not impose any further restrictions on the recipients’ exercise of the rights granted
herein. You are not responsible for enforcing compliance by third parties to this
License.
7. If, as a consequence of a court judgment or allegation of patent infringement or for
any other reason (not limited to patent issues), conditions are imposed on you
(whether by court order, agreement or otherwise) that contradict the conditions of
this License, they do not excuse you from the conditions of this License. If you
cannot distribute so as to satisfy simultaneously your obligations under this License
and any other pertinent obligations, then as a consequence you may not distribute
the Program at all. For example, if a patent license would not permit royalty-free
redistribution of the Program by all those who receive copies directly or indirectly
through you, then the only way you could satisfy both it and this License would be
to refrain entirely from distribution of the Program.
If any portion of this section is held invalid or unenforceable under any particular
circumstance, the balance of the section is intended to apply and the section as a whole
is intended to apply in other circumstances.
It is not the purpose of this section to induce you to infringe any patents or other
property right claims or to contest validity of any such claims; this section has the sole
purpose of protecting the integrity of the free software distribution system, which is
implemented by public license practices. Many people have made generous
contributions to the wide range of software distributed through that system in reliance
on consistent application of that system; it is up to the author/donor to decide if he or
she is willing to distribute software through any other system and a licensee cannot
impose that choice.
This section is intended to make thoroughly clear what is believed to be a consequence
of the rest of this License.
8. If the distribution and/or use of the Program is restricted in certain countries either
by patents or by copyrighted interfaces, the original copyright holder who places
the Program under this License may add an explicit geographical distribution
limitation excluding those countries, so that distribution is permitted only in or
among countries not thus excluded. In such case, this License incorporates the
limitation as if written in the body of this License.
9. The Free Software Foundation may publish revised and/or new versions of the
General Public License from time to time. Such new versions will be similar in
spirit to the present version, but may differ in detail to address new problems or
concerns.
Each version is given a distinguishing version number. If the Program specifies a
version number of this License which applies to it and “any later version”, you have the
option of following the terms and conditions either of that version or of any later
version published by the Free Software Foundation. If the Program does not specify a
version number of this License, you may choose any version ever published by the Free
Software Foundation.
10. If you wish to incorporate parts of the Program into other free programs whose
distribution conditions are different, write to the author to ask for permission. For
software which is copyrighted by the Free Software Foundation, write to the Free
Software Foundation; we sometimes make exceptions for this. Our decision will be
guided by the two goals of preserving the free status of all derivatives of our free
software and of promoting the sharing and reuse of software generally.
NO WARRANTY
11. BECAUSE THE PROGRAM IS LICENSED FREE OF CHARGE, THERE IS NO
WARRANTY FOR THE PROGRAM, TO THE EXTENT PERMITTED BY
APPLICABLE LAW. EXCEPT WHEN OTHERWISE STATED IN WRITING
THE COPYRIGHT HOLDERS AND/OR OTHER PARTIES PROVIDE THE
PROGRAM “AS IS” WITHOUT WARRANTY OF ANY KIND, EITHER
EXPRESSED OR IMPLIED, INCLUDING, BUT NOT LIMITED TO, THE
IMPLIED WARRANTIES OF MERCHANTABILITY AND FITNESS FOR A
PARTICULAR PURPOSE. THE ENTIRE RISK AS TO THE QUALITY AND
PERFORMANCE OF THE PROGRAM IS WITH YOU. SHOULD THE
PROGRAM PROVE DEFECTIVE, YOU ASSUME THE COST OF ALL
NECESSARY SERVICING, REPAIR OR CORRECTION.
12. IN NO EVENT UNLESS REQUIRED BY APPLICABLE LAW OR AGREED
TO IN WRITING WILL ANY COPYRIGHT HOLDER, OR ANY OTHER
PARTY WHO MAY MODIFY AND/OR REDISTRIBUTE THE PROGRAM AS
PERMITTED ABOVE, BE LIABLE TO YOU FOR DAMAGES, INCLUDING
ANY GENERAL, SPECIAL, INCIDENTAL OR CONSEQUENTIAL
DAMAGES ARISING OUT OF THE USE OR INABILITY TO USE THE
PROGRAM (INCLUDING BUT NOT LIMITED TO LOSS OF DATA OR DATA
BEING RENDERED INACCURATE OR LOSSES SUSTAINED BY YOU OR
THIRD PARTIES OR A FAILURE OF THE PROGRAM TO OPERATE WITH
ANY OTHER PROGRAMS), EVEN IF SUCH HOLDER OR OTHER PARTY
HAS BEEN ADVISED OF THE POSSIBILITY OF SUCH DAMAGES.
END OF TERMS AND CONDITIONS
How to Apply These Terms to Your New Programs
If you develop a new program, and you want it to be of the greatest possible use to the
public, the best way to achieve this is to make it free software which everyone can
redistribute and change under these terms.
To do so, attach the following notices to the program. It is safest to attach them to the
start of each source file to most effectively convey the exclusion of warranty; and each
file should have at least the “copyright” line and a pointer to where the full notice is
found.
<one line to give the program’s name and a brief idea of what it does.>
Copyright (C) <year> <name of author>
This program is free software; you can redistribute it and/or modify it under the
terms of the GNU General Public License as published by the Free Software
Foundation; either version 2 of the License, or (at your option) any later version.
This program is distributed in the hope that it will be useful, but WITHOUT ANY
WARRANTY; without even the implied warranty of MERCHANTABILITY or
FITNESS FOR A PARTICULAR PURPOSE. See the GNU General Public
License for more details.
You should have received a copy of the GNU General Public License along with
this program; if not, write to the Free Software Foundation, Inc., 51 Franklin St,
Fifth Floor, Boston, MA 02110-1301 USA
Also add information on how to contact you by electronic and paper mail.
If the program is interactive, make it output a short notice like this
when it starts in an interactive mode:
Gnomovision version 69, Copyright (C) year name of author Gnomovision comes
with ABSOLUTELY NO WARRANTY; for details type ‘show w’. This is free
software, and you are welcome to redistribute it under certain conditions; type
‘show c’ for details.
The hypothetical commands ‘show w’ and ‘show c’ should show the appropriate parts
of the General Public License. Of course, the commands you use may be called
something other than ‘show w’ and ‘show c’; they could even be mouse-clicks or menu
items--whatever suits your program.
You should also get your employer (if you work as a programmer) or your school, if
any, to sign a “copyright disclaimer” for the program, if necessary. Here is a sample;
alter the names:
Yoyodyne, Inc., hereby disclaims all copyright interest in the program
‘Gnomovision’ (which makes passes at compilers) written by James Hacker.
<signature of Ty Coon>, 1 April 1989
Ty Coon, President of Vice
This General Public License does not permit incorporating your program into
proprietary programs. If your program is a subroutine library, you may consider it more
useful to permit linking proprietary applications with the library. If this is what you
want to do, use the GNU Library General
Public License instead of this License..
■ About glibc, libmtp, libusb, libusb-compat, DirectFB,
SaWMan
GNU LESSER GENERAL PUBLIC LICENSE
Version 2.1, February 1999
Copyright (C) 1991, 1999 Free Software Foundation, Inc.
59 Temple Place, Suite 330, Boston, MA 02111-1307 USA
Everyone is permitted to copy and distribute verbatim copies of this license document,
but changing it is not allowed.
[This is the first released version of the Lesser GPL. It also counts as the successor of
the GNU Library Public License, version 2, hence the version number 2.1.]
Preamble
The licenses for most software are designed to take away your freedom to share and
change it. By contrast, the GNU General Public Licenses are intended to guarantee
your freedom to share and change free software--to make sure the software is free for
all its users.
This license, the Lesser General Public License, applies to some specially designated
software packages--typically libraries--of the Free Software Foundation and other
authors who decide to use it. You can use it too, but we suggest you first think carefully
about whether this license or the ordinary General Public License is the better strategy
to use in any particular case, based on the explanations below.
When we speak of free software, we are referring to freedom of use, not price. Our
General Public Licenses are designed to make sure that you have the freedom to
distribute copies of free software (and charge for this service if you wish); that you
receive source code or can get it if you want it; that you can change the software and
use pieces of it in new free programs; and that you are informed that you can do these
things.
To protect your rights, we need to make restrictions that forbid distributors to deny you
these rights or to ask you to surrender these rights. These restrictions translate to
certain responsibilities for you if you distribute copies of the library or if you modify it.
For example, if you distribute copies of the library, whether gratis or for a fee, you must
give the recipients all the rights that we gave you. You must make sure that they, too,
receive or can get the source code. If you link other code with the library, you must
provide complete object files to the recipients, so that they can relink them with the
library after making changes to the library and recompiling it. And you must show
them these terms so they know their rights.
We protect your rights with a two-step method: (1) we copyright the library, and (2) we
offer you this license, which gives you legal permission to copy, distribute and/or
modify the library.
To protect each distributor, we want to make it very clear that there is no warranty for
the free library. Also, if the library is modified by someone else and passed on, the
recipients should know that what they have is not the original version, so that the
original author’s reputation will not be affected by problems that might be introduced
by others.
Finally, software patents pose a constant threat to the existence of any free program.
We wish to make sure that a company cannot effectively restrict the users of a free
program by obtaining a restrictive license from a patent holder. Therefore, we insist
that any patent license obtained for a version of the library must be consistent with the
full freedom of use specified in this license.
Most GNU software, including some libraries, is covered by the ordinary GNU General
Public License. This license, the GNU Lesser General Public License, applies to
certain designated libraries, and is quite different from the ordinary General Public
License. We use this license for certain libraries in order to permit linking those
libraries into non-free programs.
When a program is linked with a library, whether statically or using a shared library, the
combination of the two is legally speaking a combined work, a derivative of the original
library. The ordinary General Public License therefore permits such linking only if the
entire combination fits its criteria of freedom. The Lesser General Public License
permits more lax criteria for linking other code with the library.
We call this license the “Lesser” General Public License because it does Less to protect
the user’s freedom than the ordinary General Public License. It also provides other free
software developers Less of an advantage over competing non-free programs. These
disadvantages are the reason we use the ordinary General Public License for many
libraries. However, the Lesser license provides advantages in certain special
circumstances.
For example, on rare occasions, there may be a special need to encourage the widest
possible use of a certain library, so that it becomes a de-facto standard. To achieve this,
non-free programs must be allowed to use the library. A more frequent case is that a
free library does the same job as widely used non-free libraries. In this case, there is
little to gain by limiting the free library to free software only, so we use the Lesser
General Public License.
ii
In other cases, permission to use a particular library in non-free programs enables a
greater number of people to use a large body of free software. For example, permission
to use the GNU C Library in non-free programs enables many more people to use the
whole GNU operating system, as well as its variant, the GNU/Linux operating system.
Although the Lesser General Public License is Less protective of the users’ freedom, it
does ensure that the user of a program that is linked with the Library has the freedom
and the wherewithal to run that program using a modified version of the Library.
The precise terms and conditions for copying, distribution and modification follow.
Pay close attention to the difference between a “work based on the library” and a “work
that uses the library”. The former contains code derived from the library, whereas the
latter must be combined with the library in order to run.
GNU LESSER GENERAL PUBLIC LICENSE
TERMS AND CONDITIONS FOR COPYING, DISTRIBUTION AND
MODIFICATION
0. This License Agreement applies to any software library or other program which
contains a notice placed by the copyright holder or other authorized party saying it
may be distributed under the terms of this Lesser General Public License (also
called “this License”). Each licensee is addressed as “you”.
A “library” means a collection of software functions and/or data prepared so as to be
conveniently linked with application programs (which use some of those functions and
data) to form executables.
The “Library”, below, refers to any such software library or work which has been
distributed under these terms. A “work based on the Library” means either the Library
or any derivative work under copyright law: that is to say, a work containing the
Library or a portion of it, either verbatim or with modifications and/or translated
straightforwardly into another language. (Hereinafter, translation is included without
limitation in the term “modification”.)
“Source code” for a work means the preferred form of the work for making
modifications to it. For a library, complete source code means all the source code for
all modules it contains, plus any associated interface definition files, plus the scripts
used to control compilation and installation of the library.
Activities other than copying, distribution and modification are not covered by this
License; they are outside its scope. The act of running a program using the Library is
not restricted, and output from such a program is covered only if its contents constitute
a work based on the Library (independent of the use of the Library in a tool for writing
it). Whether that is true depends on what the Library does and what the program that
uses the Library does.
1. You may copy and distribute verbatim copies of the Library’s complete source
code as you receive it, in any medium, provided that you conspicuously and
appropriately publish on each copy an appropriate copyright notice and disclaimer
of warranty; keep intact all the notices that refer to this License and to the absence
of any warranty; and distribute a copy of this License along with the Library.
You may charge a fee for the physical act of transferring a copy, and you may at your
option offer warranty protection in exchange for a fee.
2. You may modify your copy or copies of the Library or any portion of it, thus
forming a work based on the Library, and copy and distribute such modifications or
work under the terms of Section 1 above, provided that you also meet all of these
conditions:
a) The modified work must itself be a software library.
b) You must cause the files modified to carry prominent notices stating that you
changed the files and the date of any change.
c) You must cause the whole of the work to be licensed at no charge to all third
parties under the terms of this License.
d) If a facility in the modified Library refers to a function or a table of data to be
supplied by an application program that uses the facility, other than as an
argument passed when the facility is invoked, then you must make a good faith
effort to ensure that, in the event an application does not supply such function
or table, the facility still operates, and performs whatever part of its purpose
remains meaningful.
(For example, a function in a library to compute square roots has a purpose that is
entirely well-defined independent of the application. Therefore, Subsection 2d
requires that any application-supplied function or table used by this function must
be optional: if the application does not supply it, the square root function must still
compute square roots.)
These requirements apply to the modified work as a whole. If identifiable sections of
that work are not derived from the Library, and can be reasonably considered
independent and separate works in themselves, then this License, and its terms, do not
apply to those sections when you distribute them as separate works. But when you
distribute the same sections as part of a whole which is a work based on the Library, the
distribution of the whole must be on the terms of this License, whose permissions for
other licensees extend to the entire whole, and thus to each and every part regardless of
who wrote it.
Thus, it is not the intent of this section to claim rights or contest your rights to work
written entirely by you; rather, the intent is to exercise the right to control the
distribution of derivative or collective works based on the Library.
In addition, mere aggregation of another work not based on the Library with the Library
(or with a work based on the Library) on a volume of a storage or distribution medium
does not bring the other work under the scope of this License.
3. You may opt to apply the terms of the ordinary GNU General Public License
instead of this License to a given copy of the Library. To do this, you must alter all
the notices that refer to this License, so that they refer to the ordinary GNU General
Public License, version 2, instead of to this License. (If a newer version than
version 2 of the ordinary GNU General Public License has appeared, then you can
specify that version instead if you wish.) Do not make any other change in these
notices.
iii
Once this change is made in a given copy, it is irreversible for that copy, so the ordinary
GNU General Public License applies to all subsequent copies and derivative works
made from that copy.
This option is useful when you wish to copy part of the code of the Library into a
program that is not a library.
4. You may copy and distribute the Library (or a portion or derivative of it, under
Section 2) in object code or executable form under the terms of Sections 1 and 2
above provided that you accompany it with the complete corresponding machinereadable source code, which must be distributed under the terms of Sections 1 and 2
above on a medium customarily used for software interchange.
If distribution of object code is made by offering access to copy from a designated
place, then offering equivalent access to copy the source code from the same place
satisfies the requirement to distribute the source code, even though third parties are not
compelled to copy the source along with the object code.
5. A program that contains no derivative of any portion of the Library, but is designed
to work with the Library by being compiled or linked with it, is called a “work that
uses the Library”. Such a work, in isolation, is not a derivative work of the Library,
and therefore falls outside the scope of this License.
However, linking a “work that uses the Library” with the Library creates an executable
that is a derivative of the Library (because it contains portions of the Library), rather
than a “work that uses the library”. The executable is therefore covered by this License.
Section 6 states terms for distribution of such executables.
When a “work that uses the Library” uses material from a header file that is part of the
Library, the object code for the work may be a derivative work of the Library even
though the source code is not. Whether this is true is especially significant if the work
can be linked without the Library, or if the work is itself a library. The threshold for
this to be true is not precisely defined by law.
If such an object file uses only numerical parameters, data structure layouts and
accessors, and small macros and small inline functions (ten lines or less in length), then
the use of the object file is unrestricted, regardless of whether it is legally a derivative
work. (Executables containing this object code plus portions of the Library will still
fall under Section 6.)
Otherwise, if the work is a derivative of the Library, you may distribute the object code
for the work under the terms of Section 6. Any executables containing that work also
fall under Section 6, whether or not they are linked directly with the Library itself.
6. As an exception to the Sections above, you may also combine or link a ‘work that
uses the Library” with the Library to produce a work containing portions of the
Library, and distribute that work under terms of your choice, provided that the
terms permit modification of the work for the customer’s own use and reverse
engineering for debugging such modifications.
You must give prominent notice with each copy of the work that the Library is used in
it and that the Library and its use are covered by this License. You must supply a copy
of this License. If the work during execution displays copyright notices, you must
include the copyright notice for the Library among them, as well as a reference
directing the user to the copy of this License. Also, you must do one of these things:
a) Accompany the work with the complete corresponding machine-readable
source code for the Library including whatever changes were used in the work
(which must be distributed under Sections 1 and 2 above); and, if the work is an
executable linked with the Library, with the complete machine-readable “work
that uses the Library”, as object code and/or source code, so that the user can
modify the Library and then relink to produce a modified executable containing
the modified Library. (It is understood that the user who changes the contents
of definitions files in the Library will not necessarily be able to recompile the
application to use the modified definitions.)
b) Use a suitable shared library mechanism for linking with the Library. A
suitable mechanism is one that (1) uses at run time a copy of the library already
present on the user’s computer system, rather than copying library functions
into the executable, and (2) will operate properly with a modified version of the
library, if the user installs one, as long as the modified version is interfacecompatible with the version that the work was made with.
c) Accompany the work with a written offer, valid for at least three years, to give
the same user the materials specified in Subsection 6a, above, for a charge no
more than the cost of performing this distribution.
d) If distribution of the work is made by offering access to copy from a designated
place, offer equivalent access to copy the above specified materials from the
same place.
e) Verify that the user has already received a copy of these materials or that you
have already sent this user a copy.
For an executable, the required form of the “work that uses the Library” must include
any data and utility programs needed for reproducing the executable from it. However,
as a special exception, the materials to be distributed need not include anything that is
normally distributed (in either source or binary form) with the major components
(compiler, kernel, and so on) of the operating system on which the executable runs,
unless that component itself accompanies the executable.
It may happen that this requirement contradicts the license restrictions of other
proprietary libraries that do not normally accompany the operating system. Such a
contradiction means you cannot use both them and the Library together in an executable
that you distribute.
7. You may place library facilities that are a work based on the Library side-by-side in
a single library together with other library facilities not covered by this License,
and distribute such a combined library, provided that the separate distribution of the
work based on the Library and of the other library facilities is otherwise permitted,
and provided that you do these two things:
a) Accompany the combined library with a copy of the same work based on the
Library, uncombined with any other library facilities. This must be distributed
under the terms of the Sections above.
b) Give prominent notice with the combined library of the fact that part of it is a
work based on the Library, and explaining where to find the accompanying
uncombined form of the same work.
8. You may not copy, modify, sublicense, link with, or distribute the Library except as
expressly provided under this License. Any attempt otherwise to copy, modify,
sublicense, link with, or distribute the Library is void, and will automatically
terminate your rights under this License. However, parties who have received
copies, or rights, from you under this License will not have their licenses
terminated so long as such parties remain in full compliance.
9. You are not required to accept this License, since you have not signed it. However,
nothing else grants you permission to modify or distribute the Library or its
derivative works. These actions are prohibited by law if you do not accept this
License. Therefore, by modifying or distributing the Library (or any work based on
the Library), you indicate your acceptance of this License to do so, and all its terms
and conditions for copying, distributing or modifying the Library or works based
on it.
10. Each time you redistribute the Library (or any work based on the Library), the
recipient automatically receives a license from the original licensor to copy,
distribute, link with or modify the Library subject to these terms and conditions.
You may not impose any further restrictions on the recipients’ exercise of the rights
granted herein. You are not responsible for enforcing compliance by third parties
with this License.
11. If, as a consequence of a court judgment or allegation of patent infringement or for
any other reason (not limited to patent issues), conditions are imposed on you
(whether by court order, agreement or otherwise) that contradict the conditions of
this License, they do not excuse you from the conditions of this License. If you
cannot distribute so as to satisfy simultaneously your obligations under this License
and any other pertinent obligations, then as a consequence you may not distribute
the Library at all. For example, if a patent license would not permit royalty-free
redistribution of the Library by all those who receive copies directly or indirectly
through you, then the only way you could satisfy both it and this License would be
to refrain entirely from distribution of the Library.
If any portion of this section is held invalid or unenforceable under any particular
circumstance, the balance of the section is intended to apply, and the section as a whole
is intended to apply in other circumstances.
It is not the purpose of this section to induce you to infringe any patents or other
property right claims or to contest validity of any such claims; this section has the sole
purpose of protecting the integrity of the free software distribution system which is
implemented by public license practices. Many people have made generous
contributions to the wide range of software distributed through that system in reliance
on consistent application of that system; it is up to the author/donor to decide if he or
she is willing to distribute software through any other system and a licensee cannot
impose that choice.
This section is intended to make thoroughly clear what is believed to be a consequence
of the rest of this License.
12. If the distribution and/or use of the Library is restricted in certain countries either
by patents or by copyrighted interfaces, the original copyright holder who places
the Library under this License may add an explicit geographical distribution
limitation excluding those countries, so that distribution is permitted only in or
among countries not thus excluded. In such case, this License incorporates the
limitation as if written in the body of this License.
13. The Free Software Foundation may publish revised and/or new versions of the
Lesser General Public License from time to time. Such new versions will be similar
in spirit to the present version, but may differ in detail to address new problems or
concerns.
Each version is given a distinguishing version number. If the Library specifies a
version number of this License which applies to it and “any later version”, you have the
option of following the terms and conditions either of that version or of any later
version published by the Free Software Foundation. If the Library does not specify a
license version number, you may choose any version ever published by the Free
Software Foundation.
14. If you wish to incorporate parts of the Library into other free programs whose
distribution conditions are incompatible with these, write to the author to ask for
permission. For software which is copyrighted by the Free Software Foundation,
write to the Free Software Foundation; we sometimes make exceptions for this.
Our decision will be guided by the two goals of preserving the free status of all
derivatives of our free software and of promoting the sharing and reuse of software
generally.
NO WARRANTY
15. BECAUSE THE LIBRARY IS LICENSED FREE OF CHARGE, THERE IS NO
WARRANTY FOR THE LIBRARY, TO THE EXTENT PERMITTED BY
APPLICABLE LAW. EXCEPT WHEN OTHERWISE STATED IN WRITING
THE COPYRIGHT HOLDERS AND/OR OTHER PARTIES PROVIDE THE
LIBRARY “AS IS” WITHOUT WARRANTY OF ANY KIND, EITHER
EXPRESSED OR IMPLIED, INCLUDING, BUT NOT LIMITED TO, THE
IMPLIED WARRANTIES OF MERCHANTABILITY AND FITNESS FOR A
PARTICULAR PURPOSE. THE ENTIRE RISK AS TO THE QUALITY AND
PERFORMANCE OF THE LIBRARY IS WITH YOU. SHOULD THE
LIBRARY PROVE DEFECTIVE, YOU ASSUME THE COST OF ALL
NECESSARY SERVICING, REPAIR OR CORRECTION.
16. IN NO EVENT UNLESS REQUIRED BY APPLICABLE LAW OR AGREED
TO IN WRITING WILL ANY COPYRIGHT HOLDER, OR ANY OTHER
PARTY WHO MAY MODIFY AND/OR REDISTRIBUTE THE LIBRARY AS
PERMITTED ABOVE, BE LIABLE TO YOU FOR DAMAGES, INCLUDING
ANY GENERAL, SPECIAL, INCIDENTAL OR CONSEQUENTIAL
DAMAGES ARISING OUT OF THE USE OR INABILITY TO USE THE
LIBRARY (INCLUDING BUT NOT LIMITED TO LOSS OF DATA OR DATA
BEING RENDERED INACCURATE OR LOSSES SUSTAINED BY YOU OR
THIRD PARTIES OR A FAILURE OF THE LIBRARY TO OPERATE WITH
ANY OTHER SOFTWARE), EVEN IF SUCH HOLDER OR OTHER PARTY
HAS BEEN ADVISED OF THE POSSIBILITY OF SUCH DAMAGES.
END OF TERMS AND CONDITIONS
How to Apply These Terms to Your New Libraries
If you develop a new library, and you want it to be of the greatest possible use to the
public, we recommend making it free software that everyone can redistribute and
change. You can do so by permitting redistribution under these terms (or, alternatively,
under the terms of the ordinary General Public License).
To apply these terms, attach the following notices to the library. It is safest to attach
them to the start of each source file to most effectively convey the exclusion of
warranty; and each file should have at least the “copyright” line and a pointer to where
the full notice is found.
<one line to give the library’s name and a brief idea of what it does.> Copyright (C)
<year> <name of author>
This library is free software; you can redistribute it and/or modify it under the terms
of the GNU Lesser General Public License as published by the Free Software
Foundation; either version 2 of the License, or (at your option) any later version.
This library is distributed in the hope that it will be useful, but WITHOUT ANY
WARRANTY; without even the implied warranty of MERCHANTABILITY or
FITNESS FOR A PARTICULAR PURPOSE. See the GNU Lesser General Public
License for more details.
You should have received a copy of the GNU Lesser General Public License along
with this library; if not, write to the Free Software Foundation, Inc., 59 Temple
Place, Suite 330, Boston, MA 02111-1307 USA
Also add information on how to contact you by electronic and paper mail.
You should also get your employer (if you work as a programmer) or your school, if
any, to sign a “copyright disclaimer” for the library, if necessary. Here is a sample;
alter the names:
Yoyodyne, Inc., hereby disclaims all copyright interest in the library ‘Frob’ (a
library for tweaking knobs) written by James Random Hacker.
<signature of Ty Coon>, 1 April 1990 Ty Coon, President of Vice
That’s all there is to it!
■ About Fusion
DirectFB Fusion kernel module: introduction and API
by Niels Roest
Copyright (C) 2009 Niels Roest
This documentation is free software; you can redistribute it and/or modify it under the
terms of the GNU General Public License as published by
the Free Software Foundation; either version 2 of the License, or (at your option) any
later version.
This program is distributed in the hope that it will be useful, but WITHOUT ANY
WARRANTY; without even the implied warranty of
MERCHANTABILITY or FITNESS FOR A PARTICULAR PURPOSE. See the GNU
General Public License for more details.
You should have received a copy of the GNU General Public License along with this
program; if not, write to the Free Software Foundation, Inc.,
59 Temple Place, Suite 330, Boston, MA 02111-1307 USA
For more details see the file COPYING in the source distribution of Linux.
■ About openssl
Copyright (C) 1998-2008 The OpenSSL Project. All rights reserved.
Redistribution and use in source and binary forms, with or without modification, are
permitted provided that the following conditions are met:
1. Redistributions of source code must retain the above copyright notice, this list of
conditions and the following disclaimer.
2. 2. Redistributions in binary form must reproduce the above copyright notice, this
list of conditions and the following disclaimer in the documentation and/or other
materials provided with the distribution.
3. All advertising materials mentioning features or use of this software must display
the following acknowledgment:
“This product includes software developed by the OpenSSL Project for use in the
OpenSSL Toolkit. (http://www.openssl.org/)”
4. The names “OpenSSL Toolkit” and “OpenSSL Project” must not be used to
endorse or promote products derived from this software without prior written
permission. For written permission, please contact [email protected].
5. Products derived from this software may not be called “OpenSSL” nor may
“OpenSSL” appear in their names without prior written permission of the OpenSSL
Project.
6. Redistributions of any form whatsoever must retain the following
acknowledgment:
‘This product includes software developed by the OpenSSL Project for use in the
OpenSSL Toolkit (http://www.openssl.org/)”
iv
THIS SOFTWARE IS PROVIDED BY THE OpenSSL PROJECT “AS IS” AND ANY
EXPRESSED OR IMPLIED WARRANTIES, INCLUDING, BUT NOT LIMITED
TO, THE IMPLIED WARRANTIES OF MERCHANTABILITY AND FITNESS FOR
A PARTICULAR PURPOSE ARE DISCLAIMED. IN NO EVENT SHALL THE
OpenSSL PROJECT OR ITS CONTRIBUTORS BE LIABLE FOR ANY DIRECT,
INDIRECT, INCIDENTAL, SPECIAL, EXEMPLARY, OR CONSEQUENTIAL
DAMAGES (INCLUDING, BUT NOT LIMITED TO, PROCUREMENT OF
SUBSTITUTE GOODS OR SERVICES; LOSS OF USE, DATA, OR PROFITS; OR
BUSINESS INTERRUPTION) HOWEVER CAUSED AND ON ANY THEORY OF
LIABILITY, WHETHER IN CONTRACT, STRICT LIABILITY, OR TORT
(INCLUDING NEGLIGENCE OR OTHERWISE) ARISING IN ANY WAY OUT OF
THE USE OF THIS SOFTWARE, EVEN IF ADVISED OF THE POSSIBILITY OF
SUCH DAMAGE.
This product includes cryptographic software written by Eric Young
([email protected]). This product includes software written by Tim Hudson
([email protected]).
Original SSLeay License
Copyright (C) 1995-1998 Eric Young ([email protected]) All rights reserved.
This package is an SSL implementation written by Eric Young ([email protected]).
The implementation was written so as to conform with Netscapes SSL.
This library is free for commercial and non-commercial use as long as the following
conditions are aheared to. The following conditions apply to all code found in this
distribution, be it the RC4, RSA, lhash, DES, etc., code; not just the SSL code. The
SSL documentation included with this distribution is covered by the same copyright
terms except that the holder is Tim Hudson ([email protected]).
Copyright remains Eric Young’s, and as such any Copyright notices in the code are not
to be removed. If this package is used in a product, Eric Young should be given
attribution as the author of the parts of the library used. This can be in the form of a
textual message at program startup or in documentation (online or textual) provided
with the package.
Redistribution and use in source and binary forms, with or without modification, are
permitted provided that the following conditions are met:
1. Redistributions of source code must retain the copyright notice, this list of
conditions and the following disclaimer.
2. Redistributions in binary form must reproduce the above copyright notice, this list
of conditions and the following disclaimer in the documentation and/or other
materials provided with the distribution.
3. All advertising materials mentioning features or use of this software must display
the following acknowledgement:
“This product includes cryptographic software written by Eric Young
([email protected])” The word ‘cryptographic’ can be left out if the rouines from
the library being used are not cryptographic related :-).
4. If you include any Windows specific code (or a derivative thereof) from the apps
directory (application code) you must include an acknowledgement:
“This product includes software written by Tim Hudson ([email protected])”
THIS SOFTWARE IS PROVIDED BY ERIC YOUNG “AS IS” AND ANY EXPRESS
OR IMPLIED WARRANTIES, INCLUDING, BUT NOT LIMITED TO, THE
IMPLIED WARRANTIES OF MERCHANTABILITY AND FITNESS FOR A
PARTICULAR PURPOSE ARE DISCLAIMED. IN NO EVENT SHALL THE
AUTHOR OR CONTRIBUTORS BE LIABLE FOR ANY DIRECT, INDIRECT,
INCIDENTAL, SPECIAL, EXEMPLARY, OR CONSEQUENTIAL DAMAGES
(INCLUDING, BUT NOT LIMITED TO, PROCUREMENT OF SUBSTITUTE
GOODS OR SERVICES; LOSS OF USE, DATA, OR PROFITS; OR BUSINESS
INTERRUPTION) HOWEVER CAUSED AND ON ANY THEORY OF LIABILITY,
WHETHER IN CONTRACT, STRICT LIABILITY, OR TORT (INCLUDING
NEGLIGENCE OR OTHERWISE) ARISING IN ANY WAY OUT OF THE USE OF
THIS SOFTWARE, EVEN IF ADVISED OF THE POSSIBILITY OF SUCH
DAMAGE.
The licence and distribution terms for any publically available version or derivative of
this code cannot be changed. i.e. this code cannot simply be copied and put under
another distribution licence [including the GNU Public Licence.]
■ About zlib
Copyright notice:
(C) 1995-2004 Jean-loup Gailly and Mark Adler
This software is provided ‘as-is’, without any express or implied warranty. In no event
will the authors be held liable for any damages arising from the use of this software.
Permission is granted to anyone to use this software for any purpose, including
commercial applications, and to alter it and redistribute it freely, subject to the
following restrictions:
1. The origin of this software must not be misrepresented; you must not claim that you
wrote the original software. If you use this software in a product, an
acknowledgment in the product documentation would be appreciated but is not
required.
2. Altered source versions must be plainly marked as such, and must not be
misrepresented as being the original software.
3. This notice may not be removed or altered from any source distribution.
Jean-loup Gailly
Mark Adler
[email protected]
[email protected]
If you use the zlib library in a product, we would appreciate *not* receiving lengthy
legal documents to sign. The sources are provided for free but without warranty of any
kind. The library has been entirely written by Jean-loup Gailly and Mark Adler; it does
not include third-party code.
If you redistribute modified sources, we would appreciate that you include in the file
ChangeLog history information documenting your changes. Please read the FAQ for
more information on the distribution of modified source versions.
v
■ About FreeType
The FreeType Project LICENSE
2006-Jan-27
Copyright 1996-2002, 2006 by
David Turner, Robert Wilhelm, and Werner Lemberg
Introduction
The FreeType Project is distributed in several archive packages; some of them may
contain, in addition to the FreeType font engine, various tools and contributions which
rely on, or relate to, the FreeType Project.
This license applies to all files found in such packages, and which do not fall under their
own explicit license. The license affects thus the FreeType font engine, the test
programs, documentation and makefiles, at the very least.
This license was inspired by the BSD, Artistic, and IJG (Independent JPEG Group)
licenses, which all encourage inclusion and use of free software in commercial and
freeware products alike. As a consequence, its main points are that:
o We don’t promise that this software works. However, we will be interested in any
kind of bug reports. (‘as is’ distribution)
o You can use this software for whatever you want, in parts or full form, without
having to pay us. (‘royalty-free’ usage)
o You may not pretend that you wrote this software. If you use it, or only parts of it, in
a program, you must acknowledge somewhere in your documentation that you have
used the FreeType code. (‘credits’)
We specifically permit and encourage the inclusion of this software, with or without
modifications, in commercial products. We disclaim all warranties covering The
FreeType Project and assume no liability related to The FreeType Project.
Finally, many people asked us for a preferred form for a credit/disclaimer to use in
compliance with this license. We thus encourage you to use the following text:
Portions of this software are copyright (C) <year> The FreeType Project
(www.freetype.org). All rights reserved.
Please replace <year> with the value from the FreeType version you actually use.
Legal Terms
0. Definitions
Throughout this license, the terms ‘package’, ‘FreeType Project’, and ‘FreeType
archive’ refer to the set of files originally distributed by the authors (David Turner,
Robert Wilhelm, and Werner Lemberg) as the ‘FreeType Project’, be they named as
alpha, beta or final release.
‘You’ refers to the licensee, or person using the project, where ‘using’ is a generic term
including compiling the project’s source code as well as linking it to form a ‘program’
or ‘executable’. This program is referred to as ‘a program using the FreeType engine’.
This license applies to all files distributed in the original FreeType Project, including
all source code, binaries and documentation, unless otherwise stated in the file in its
original, unmodified form as distributed in the original archive. If you are unsure
whether or not a particular file is covered by this license, you must contact us to verify
this.
The FreeType Project is copyright (C) 1996-2000 by David Turner, Robert Wilhelm,
and Werner Lemberg. All rights reserved except as specified below.
1. No Warranty
THE FREETYPE PROJECT IS PROVIDED ‘AS IS’ WITHOUT WARRANTY OF
ANY KIND, EITHER EXPRESS OR IMPLIED, INCLUDING, BUT NOT LIMITED
TO, WARRANTIES OF MERCHANTABILITY AND FITNESS FOR A
PARTICULAR PURPOSE. IN NO EVENT WILL ANY OF THE AUTHORS OR
COPYRIGHT HOLDERS BE LIABLE FOR ANY DAMAGES CAUSED BY THE
USE OR THE INABILITY TO USE, OF THE FREETYPE PROJECT.
2. Redistribution
This license grants a worldwide, royalty-free, perpetual and irrevocable right and
license to use, execute, perform, compile, display, copy, create derivative works of,
distribute and sublicense the FreeType Project (in both source and object code forms)
and derivative works thereof for any purpose; and to authorize others to exercise some
or all of the rights granted herein, subject to the following conditions:
o Redistribution of source code must retain this license file (‘FTL.TXT’) unaltered;
any additions, deletions or changes to the original files must be clearly indicated in
accompanying documentation. The copyright notices of the unaltered, original files
must be preserved in all copies of source files.
o Redistribution in binary form must provide a disclaimer that states that the software
is based in part of the work of the FreeType Team, in the distribution documentation.
We also encourage you to put an URL to the FreeType web page in your
documentation, though this isn’t mandatory.
These conditions apply to any software derived from or based on the FreeType Project,
not just the unmodified files. If you use our work, you must acknowledge us. However,
no fee need be paid to us.
3. Advertising
Neither the FreeType authors and contributors nor you shall use the name of the other
for commercial, advertising, or promotional purposes without specific prior written
permission.
We suggest, but do not require, that you use one or more of the following phrases to
refer to this software in your documentation or advertising materials: ‘FreeType
Project’, ‘FreeType Engine’, ‘FreeType library’, or ‘FreeType Distribution’.
As you have not signed this license, you are not required to accept it. However, as the
FreeType Project is copyrighted material, only this license, or another one contracted
with the authors, grants you the right to use, distribute, and modify it. Therefore, by
using, distributing, or modifying the FreeType Project, you indicate that you understand
and accept all the terms of this license.
4. Contacts
There are two mailing lists related to FreeType:
o [email protected]
Discusses general use and applications of FreeType, as well as future and wanted
additions to the library and distribution. If you are looking for support, start in this list if
you haven’t found anything to help you in the documentation.
o [email protected]
Discusses bugs, as well as engine internals, design issues, specific licenses, porting, etc.
Our home page can be found at
http://www.freetype.org
■ About Expat
Copyright (C) 1998, 1999, 2000 Thai Open Source Software Center Ltd
and Clark Cooper
Copyright (C) 2001, 2002, 2003, 2004, 2005, 2006 Expat maintainers.
Permission is hereby granted, free of charge, to any person obtaining a copy of this
software and associated documentation files (the “Software”), to deal in the Software
without restriction, including without limitation the rights to use, copy, modify, merge,
publish, distribute, sublicense, and/or sell copies of the Software, and to permit persons
to whom the Software is furnished to do so, subject to the following conditions:
The above copyright notice and this permission notice shall be included in all copies or
substantial portions of the Software.
THE SOFTWARE IS PROVIDED “AS IS”, WITHOUT WARRANTY OF ANY
KIND, EXPRESS OR IMPLIED, INCLUDING BUT NOT LIMITED TO THE
WARRANTIES OF MERCHANTABILITY, FITNESS FOR A PARTICULAR
PURPOSE AND NONINFRINGEMENT. IN NO EVENT SHALL THE AUTHORS
OR COPYRIGHT HOLDERS BE LIABLE FOR ANY CLAIM, DAMAGES OR
OTHER LIABILITY, WHETHER IN AN ACTION OF CONTRACT, TORT OR
OTHERWISE, ARISING FROM, OUT OF OR IN CONNECTION WITH THE
SOFTWARE OR THE USE OR OTHER DEALINGS IN THE SOFTWARE.
■ About cURL, libcurl
COPYRIGHT AND PERMISSION NOTICE
Copyright (C) 1996 - 2009, Daniel Stenberg, <[email protected]>.
All rights reserved.
Permission to use, copy, modify, and distribute this software for any purpose with or
without fee is hereby granted, provided that the above copyright notice and this
permission notice appear in all copies.
THE SOFTWARE IS PROVIDED “AS IS”, WITHOUT WARRANTY OF ANY
KIND, EXPRESS OR IMPLIED, INCLUDING BUT NOT LIMITED TO THE
WARRANTIES OF MERCHANTABILITY, FITNESS FOR A PARTICULAR
PURPOSE AND NONINFRINGEMENT OF THIRD PARTY RIGHTS. IN NO
EVENT SHALL THE AUTHORS OR COPYRIGHT HOLDERS BE LIABLE FOR
ANY CLAIM, DAMAGES OR OTHER LIABILITY, WHETHER IN AN ACTION
OF CONTRACT, TORT OR OTHERWISE, ARISING FROM, OUT OF OR IN
CONNECTION WITH THE SOFTWARE OR THE USE OR OTHER DEALINGS IN
THE SOFTWARE.
Except as contained in this notice, the name of a copyright holder shall not be used in
advertising or otherwise to promote the sale, use or other dealings in this Software
without prior written authorization of the copyright holder.
■ About Independent JPEG Group’s software, libjpeg
In plain English:
1. We don’t promise that this software works. (But if you find any bugs, please let us
know!)
2. You can use this software for whatever you want. You don’t have to pay us.
3. You may not pretend that you wrote this software. If you use it in a program, you
must acknowledge somewhere in your documentation that you’ve used the IJG code.
In legalese:
The authors make NO WARRANTY or representation, either express or implied, with
respect to this software, its quality, accuracy, merchantability, or fitness for a particular
purpose. This software is provided “AS IS”, and you, its user, assume the entire risk as
to its quality and accuracy.
This software is copyright (C) 1991-2009, Thomas G. Lane, Guido Vollbeding.
All Rights Reserved except as specified below.
Permission is hereby granted to use, copy, modify, and distribute this software (or
portions thereof) for any purpose, without fee, subject to these conditions:
(1) If any part of the source code for this software is distributed, then this README file
must be included, with this copyright and no-warranty notice unaltered; and any
additions, deletions, or changes to the original files must be clearly indicated in
accompanying documentation.
(2) If only executable code is distributed, then the accompanying documentation must
state that “this software is based in part on the work of the Independent JPEG Group”.
(3) Permission for use of this software is granted only if the user accepts full
responsibility for any undesirable consequences; the authors accept NO LIABILITY for
damages of any kind.
These conditions apply to any software derived from or based on the IJG code, not just
to the unmodified library. If you use our work, you ought to acknowledge us.
Permission is NOT granted for the use of any IJG author’s name or company name in
advertising or publicity relating to this software or products derived from it. This
software may be referred to only as “the Independent JPEG Group’s software”.
We specifically permit and encourage the use of this software as the basis of
commercial products, provided that all warranty or liability claims are assumed by the
product vendor.
ansi2knr.c is included in this distribution by permission of L. Peter Deutsch, sole
proprietor of its copyright holder, Aladdin Enterprises of Menlo Park, CA. ansi2knr.c is
NOT covered by the above copyright and conditions, but instead by the usual
distribution terms of the Free Software Foundation; principally, that you must include
source code if you redistribute it. (See the file ansi2knr.c for full details.) However,
since ansi2knr.c is not needed as part of any program generated from the IJG code, this
does not limit you more than the foregoing paragraphs do.
The Unix configuration script “configure” was produced with GNU Autoconf. It is
copyright by the Free Software Foundation but is freely distributable. The same holds
for its supporting scripts (config.guess, config.sub, ltmain.sh). Another support script,
install-sh, is copyright by X Consortium but is also freely distributable.
The IJG distribution formerly included code to read and write GIF files. To avoid
entanglement with the Unisys LZW patent, GIF reading support has been removed
altogether, and the GIF writer has been simplified to produce “uncompressed GIFs”.
This technique does not use the LZW algorithm; the resulting GIF files are larger than
usual, but are readable by all standard GIF decoders.
We are required to state that
“The Graphics Interchange Format(c) is the Copyright property of
CompuServe Incorporated. GIF(sm) is a Service Mark property of
CompuServe Incorporated.”
■ About International Components for Unicode
ICU License - ICU 1.8.1 and later
COPYRIGHT AND PERMISSION NOTICE
Copyright (C) 1995-2003 International Business Machines Corporation and others
All rights reserved.
Permission is hereby granted, free of charge, to any person obtaining a copy of this
software and associated documentation files (the “Software”), to deal in the Software
without restriction, including without limitation the rights to use, copy, modify, merge,
publish, distribute, and/or sell copies of the Software, and to permit persons to whom
the Software is furnished to do so, provided that the above copyright notice(s) and this
permission notice appear in all copies of the Software and that both the above copyright
notice(s) and this permission notice appear in supporting documentation.
THE SOFTWARE IS PROVIDED “AS IS”, WITHOUT WARRANTY OF ANY
KIND, EXPRESS OR IMPLIED, INCLUDING BUT NOT LIMITED TO THE
WARRANTIES OF MERCHANTABILITY, FITNESS FOR A PARTICULAR
PURPOSE AND NONINFRINGEMENT OF THIRD PARTY RIGHTS. IN NO
EVENT SHALL THE COPYRIGHT HOLDER OR HOLDERS INCLUDED IN THIS
NOTICE BE LIABLE FOR ANY CLAIM, OR ANY SPECIAL INDIRECT OR
CONSEQUENTIAL DAMAGES, OR ANY DAMAGES WHATSOEVER
RESULTING FROM LOSS OF USE, DATA OR PROFITS, WHETHER IN AN
ACTION OF CONTRACT, NEGLIGENCE OR OTHER TORTIOUS ACTION,
ARISING OUT OF OR IN CONNECTION WITH THE USE OR PERFORMANCE
OF THIS SOFTWARE.
Except as contained in this notice, the name of a copyright holder shall not be used in
advertising or otherwise to promote the sale, use or other dealings in this Software
without prior written authorization of the copyright holder.
All trademarks and registered trademarks mentioned herein are the property of their
respective owners.
■ About libpng
This copy of the libpng notices is provided for your convenience. In case of any
discrepancy between this copy and the notices in the file png.h that is included in the
libpng distribution, the latter shall prevail.
COPYRIGHT NOTICE, DISCLAIMER, and LICENSE:
If you modify libpng you may insert additional notices immediately following this
sentence. This code is released under the libpng license.
libpng versions 1.2.6, August 15, 2004, through 1.2.47, February 18, 2012, are
Copyright (C) 2004, 2006-2009 Glenn Randers-Pehrson, and are distributed according
to the same disclaimer and license as libpng-1.2.5 with the following individual added
to the list of Contributing Authors
Cosmin Truta
libpng versions 1.0.7, July 1, 2000, through 1.2.5 - October 3, 2002, are Copyright
(C) 2000-2002 Glenn Randers-Pehrson, and are distributed according to the same
disclaimer and license as libpng-1.0.6 with the following individuals added to the
list of Contributing Authors
Simon-Pierre Cadieux
Eric S. Raymond
Gilles Vollant
and with the following additions to the disclaimer:
There is no warranty against interference with your enjoyment of the library or
against infringement. There is no warranty that our efforts or the library will fulfill
any of your particular purposes or needs. This library is provided with all faults,
and the entire risk of satisfactory quality, performance, accuracy, and effort is with
the user.
libpng versions 0.97, January 1998, through 1.0.6, March 20, 2000, are Copyright (C)
1998, 1999 Glenn Randers-Pehrson, and are distributed according to the same
disclaimer and license as libpng-0.96, with the following individuals added to the list of
Contributing Authors:
Tom Lane
Glenn Randers-Pehrson
Willem van Schaik
libpng versions 0.89, June 1996, through 0.96, May 1997, are Copyright (C) 1996, 1997
Andreas Dilger Distributed according to the same disclaimer and license as libpng-0.88,
with the following individuals added to the list of Contributing Authors:
John Bowler
Kevin Bracey
Sam Bushell
Magnus Holmgren
vi
Greg Roelofs
Tom Tanner
libpng versions 0.5, May 1995, through 0.88, January 1996, are Copyright (C) 1995,
1996 Guy Eric Schalnat, Group 42, Inc.
For the purposes of this copyright and license, “Contributing Authors” is defined as the
following set of individuals:
Andreas Dilger
Dave Martindale
Guy Eric Schalnat
Paul Schmidt
Tim Wegner
The PNG Reference Library is supplied “AS IS”. The Contributing Authors and Group
42, Inc. disclaim all warranties, expressed or implied, including, without limitation, the
warranties of merchantability and of fitness for any purpose. The Contributing Authors
and Group 42, Inc. assume no liability for direct, indirect, incidental, special,
exemplary, or consequential damages, which may result from the use of the PNG
Reference Library, even if advised of the possibility of such damage.
Permission is hereby granted to use, copy, modify, and distribute this source code, or
portions hereof, for any purpose, without fee, subject to the following restrictions:
1. The origin of this source code must not be misrepresented.
2. Altered versions must be plainly marked as such and must not be misrepresented
as being the original source.
3. This Copyright notice may not be removed or altered from any source or altered
source distribution.
The Contributing Authors and Group 42, Inc. specifically permit, without fee, and
encourage the use of this source code as a component to supporting the PNG file format
in commercial products. If you use this source code in a product, acknowledgment is
not required but would be appreciated.
A “png_get_copyright” function is available, for convenient use in “about” boxes and
the like:
printf(“%s”,png_get_copyright(NULL));
Also, the PNG logo (in PNG format, of course) is supplied in the files “pngbar.png” and
“pngbar.jpg (88x31) and “pngnow.png” (98x31).
Libpng is OSI Certified Open Source Software. OSI Certified Open Source is a
certification mark of the Open Source Initiative.
Glenn Randers-Pehrson
glennrp at users.sourceforge.net
February 18, 2012
■ About gSOAP
gSOAP Public License
Version 1.3b
The gSOAP public license is derived from the Mozilla Public License (MPL1.1). The
sections that were deleted
from the original MPL1.1 text are 1.0.1, 2.1.(c),(d), 2.2.(c),(d), 8.2.(b), 10, and 11.
Section 3.8 was added. The
modified sections are 2.1.(b), 2.2.(b), 3.2 (simplified), 3.5 (deleted the last sentence),
and 3.6 (simplified).
This license applies to the gSOAP software package, with the exception of the wsdl2h
source code located in
gsoap/wsdl, all code generated by wsdl2h, the UDDI source code gsoap/uddi2, and the
Web server sample
source code samples/webserver. To use all of the software commercially, a commercial
license has to be obtained
from www.genivia.com.
1 DEFINITIONS.
1.0.1.
1.1. “Contributor” means each entity that creates or contributes to the creation of
Modifications.
1.2. “Contributor Version” means the combination of the Original Code, prior
Modifications used by a Contributor, and the Modifications made by that particular
Contributor.
1.3. “Covered Code” means the Original Code, or Modifications or the combination of
the Original Code, and Modifications, in each case including portions thereof.
1.4. “Electronic Distribution Mechanism” means a mechanism generally accepted in
the software development community for the electronic transfer of data.
1.5. “Executable” means Covered Code in any form other than Source Code.
1.6. “Initial Developer” means the individual or entity identified as the Initial
Developer in the Source Code notice required by Exhibit A.
1.7. “Larger Work” means a work which combines Covered Code or portions thereof
with code not governed by the terms of this License.
1.8. “License” means this document.
1.8.1. “Licensable” means having the right to grant, to the maximum extent possible,
whether at the time of the initial grant or subsequently acquired, any and all of the rights
conveyed herein.
1.9. “Modifications” means any addition to or deletion from the substance or structure
of either the Original Code or any previous Modifications. When Covered Code is
released as a series of files, a Modification is: A.
Any addition to or deletion from the contents of a file containing Original Code or
previous Modifications. B.
Any new file that contains any part of the Original Code, or previous Modifications.
1.10. “Original Code” means Source Code of computer software code which is
described in the Source Code notice required by Exhibit A as Original Code, and which,
at the time of its release under this License is not already Covered Code governed by
this License.
vii
1.10.1. “Patent Claims” means any patent claim(s), now owned or hereafter acquired,
including without limitation, method, process, and apparatus claims, in any patent
Licensable by grantor.
http://www.cs.fsu.edu/~engelen/license.html
1.11. “Source Code” means the preferred form of the Covered Code for making
modifications to it, including all modules it contains, plus any associated interface
definition files, scripts used to control compilation and installation of an Executable, or
source code differential comparisons against either the Original Code or another well
known, available Covered Code of the Contributor’s choice. The Source Code can be in
a compressed or archival form, provided the appropriate decompression or de-archiving
software is widely available for no charge.
1.12. “You” (or “Your”) means an individual or a legal entity exercising rights under,
and complying with all of the terms of, this License or a future version of this License
issued under Section 6.1. For legal entities, “You” includes any entity which controls, is
controlled by, or is under common control with You. For purposes of this definition,
“control” means (a) the power, direct or indirect, to cause the direction or management
of such entity, whether by contract or otherwise, or (b) ownership of more than fifty
percent (50%) of the outstanding shares or beneficial ownership of such entity.
2 SOURCE CODE LICENSE.
2.1. The Initial Developer Grant. The Initial Developer hereby grants You a worldwide, royalty-free, non-exclusive license, subject to third party intellectual property
claims:
(a)
under intellectual property rights (other than patent or trademark) Licensable by Initial
Developer to use, reproduce, modify, display, perform, sublicense and distribute the
Original Code (or portions thereof) with or without Modifications, and/or as part of a
Larger Work; and
(b)
under patents now or hereafter owned or controlled by Initial Developer, to make, have
made, use and sell (“offer to sell and import”) the Original Code, Modifications, or
portions thereof, but solely to the extent that any such patent is reasonably necessary to
enable You to utilize, alone or in combination with other software, the Original Code,
Modifications, or any combination or portions thereof.
(c)
(d)
2.2. Contributor Grant.
Subject to third party intellectual property claims, each Contributor hereby grants You a
world-wide, royalty-free, non-exclusive license
(a)
under intellectual property rights (other than patent or trademark) Licensable by
Contributor, to use, reproduce, modify, display, perform, sublicense and distribute the
Modifications created by such Contributor (or portions thereof) either on an unmodified
basis, with other Modifications, as Covered Code and/or as part of a Larger Work; and
(b)
under patents now or hereafter owned or controlled by Contributor, to make, have
made, use and sell (“offer to sell and import”) the Contributor Version (or portions
thereof), but solely to the extent that any such patent is reasonably necessary to enable
You to utilize, alone or in combination with other software, the Contributor Version (or
portions thereof).
(c)
(d)
3 DISTRIBUTION OBLIGATIONS.
3.1. Application of License.
The Modifications which You create or to which You contribute are governed by the
terms of this License, including without limitation Section 2.2. The Source Code
version of Covered Code may be distributed only under the terms of this License or a
future version of this License released under Section 6.1, and You must include a copy
of this License with every copy of the Source Code You distribute. You may not offer
or impose any terms on any Source Code version that alters or restricts the applicable
version of this License or the recipients’ rights hereunder. However, You may include
an additional document offering the additional rights described in Section 3.5.
3.2. Availability of Source Code.
Any Modification created by You will be provided to the Initial Developer in Source
Code form and are subject to the terms of the License.
3.3. Description of Modifications.
You must cause all Covered Code to which You contribute to contain a file
documenting the changes You made to create that Covered Code and the date of any
change. You must include a prominent statement that the Modification is derived,
directly or indirectly, from Original Code provided by the Initial Developer and
including the name of the Initial Developer in (a) the Source Code, and (b) in any notice
in an Executable version or related documentation in which You describe the origin or
ownership of the Covered Code.
3.4. Intellectual Property Matters.
(a) Third Party Claims.
If Contributor has knowledge that a license under a third party’s intellectual property
rights is required to exercise the rights granted by such Contributor under Sections 2.1
or 2.2, Contributor must include a text file with the Source Code distribution titled
“LEGAL” which describes the claim and the party making the claim in sufficient detail
that a recipient will know whom to contact. If Contributor obtains such knowledge after
the Modification is made available as described in Section 3.2, Contributor shall
promptly modify the LEGAL file in all copies Contributor makes available thereafter
and shall take other steps (such as notifying appropriate mailing lists or newsgroups)
reasonably calculated to inform those who received the Covered Code that new
knowledge has been obtained.
(b) Contributor APIs.
If Contributor’s Modifications include an application programming interface and
Contributor has knowledge of patent licenses which are reasonably necessary to
implement that API, Contributor must also include this information in the LEGAL file.
(c) Representations.
Contributor represents that, except as disclosed pursuant to Section 3.4(a) above,
Contributor believes that Contributor’s Modifications are Contributor’s original
creation(s) and/or Contributor has sufficient rights to grant the rights conveyed by this
License.
3.5. Required Notices.
You must duplicate the notice in Exhibit A in each file of the Source Code. If it is not
possible to put such notice in a particular Source Code file due to its structure, then You
must include such notice in a location (such as a relevant directory) where a user would
be likely to look for such a notice. If You created one or more Modification(s) You may
add your name as a Contributor to the notice described in Exhibit A. You must also
duplicate this License in any documentation for the Source Code where You describe
recipients’ rights or ownership rights relating to Covered Code. You may choose to
offer, and to charge a fee for, warranty, support, indemnity or liability obligations to
one or more recipients of Covered Code. However, You may do so only on Your own
behalf, and not on behalf of the Initial Developer or any Contributor.
3.6. Distribution of Executable Versions.
You may distribute Covered Code in Executable form only if the requirements of
Section 3.1-3.5 have been met for that Covered Code. You may distribute the
Executable version of Covered Code or ownership rights under a license of Your
choice, which may contain terms different from this License, provided that You are in
compliance with the terms of this License and that the license for the Executable
version does not attempt to limit or alter the recipient’s rights in the Source Code
version from the rights set forth in this License. If You distribute the Executable version
under a different license You must make it absolutely clear that any terms which differ
from this License are offered by You alone, not by the Initial Developer or any
Contributor. If you distribute executable versions containing Covered Code as part of a
product, you must reproduce the notice in Exhibit B in the documentation and/or other
materials provided with the product.
3.7. Larger Works.
You may create a Larger Work by combining Covered Code with other code not
governed by the terms of this License and distribute the Larger Work as a single
product. In such a case, You must make sure the requirements of this License are
fulfilled for the Covered Code.
3.8. Restrictions.
You may not remove any product identification, copyright, proprietary notices or labels
from gSOAP.
4 INABILITY TO COMPLY DUE TO STATUTE OR REGULATION.
If it is impossible for You to comply with any of the terms of this License with respect
to some or all of the Covered Code due to statute, judicial order, or regulation then You
must: (a) comply with the terms of this License to the maximum extent possible; and
(b) describe the limitations and the code they affect. Such description must be included
in the LEGAL file described in Section 3.4 and must be included with all distributions
of the Source Code. Except to the extent prohibited by statute or regulation, such
description must be sufficiently detailed for a recipient of ordinary skill to be able to
understand it.
5 APPLICATION OF THIS LICENSE.
This License applies to code to which the Initial Developer has attached the notice in
Exhibit A and to related Covered Code.
6 VERSIONS OF THE LICENSE.
6.1. New Versions.
Grantor may publish revised and/or new versions of the License from time to time.
Each version will be given a distinguishing version number.
6.2. Effect of New Versions.
Once Covered Code has been published under a particular version of the License, You
may always continue to use it under the terms of that version. You may also choose to
use such Covered Code under the terms of any subsequent version of the License.
6.3. Derivative Works.
If You create or use a modified version of this License (which you may only do in order
to apply it to code which is not already Covered Code governed by this License), You
must (a) rename Your license so that the phrase “gSOAP” or any confusingly similar
phrase do not appear in your license (except to note that your license differs from this
License) and (b) otherwise make it clear that Your version of the license contains terms
which differ from the gSOAP Public License. (Filling in the name of the Initial
Developer, Original Code or Contributor in the notice described in Exhibit A shall not
of themselves be deemed to be modifications of this License.)
7 DISCLAIMER OF WARRANTY.
COVERED CODE IS PROVIDED UNDER THIS LICENSE ON AN “AS IS” BASIS,
WITHOUT WARRANTY OF ANY KIND, WHETHER EXPRESS, IMPLIED OR
STATUTORY, INCLUDING, WITHOUT LIMITATION, THE IMPLIED
WARRANTIES OF MERCHANTABILITY, OF FITNESS FOR A PARTICULAR
PURPOSE, NONINFRINGEMENT OF THIRD PARTY INTELLECTUAL
PROPERTY RIGHTS, AND ANY WARRANTY THAT MAY ARISE BY REASON
OF TRADE USAGE, CUSTOM, OR COURSE OF DEALING. WITHOUT
LIMITING THE FOREGOING, YOU ACKNOWLEDGE THAT THE SOFTWARE
IS PROVIDED “AS IS” AND THAT THE AUTHORS DO NOT WARRANT THE
SOFTWARE WILL RUN UNINTERRUPTED OR ERROR FREE. LIMITED
LIABILITY THE ENTIRE RISK AS TO RESULTS AND PERFORMANCE OF THE
SOFTWARE IS ASSUMED BY YOU. UNDER NO CIRCUMSTANCES WILL THE
AUTHORS BE LIABLE FOR ANY SPECIAL, INDIRECT, INCIDENTAL,
EXEMPLARY OR CONSEQUENTIAL DAMAGES OF ANY KIND OR NATURE
WHATSOEVER, WHETHER BASED ON CONTRACT, WARRANTY, TORT
(INCLUDING NEGLIGENCE), STRICT LIABILITY OR OTHERWISE, ARISING
OUT OF OR IN ANY WAY RELATED TO THE SOFTWARE, EVEN IF THE
AUTHORS HAVE BEEN ADVISED ON THE POSSIBILITY OF SUCH DAMAGE
OR IF SUCH DAMAGE COULD HAVE BEEN REASONABLY FORESEEN, AND
NOTWITHSTANDING ANY FAILURE OF ESSENTIAL PURPOSE OF ANY
EXCLUSIVE REMEDY PROVIDED. SUCH LIMITATION ON DAMAGES
INCLUDES, BUT IS NOT LIMITED TO, DAMAGES FOR LOSS OF GOODWILL,
LOST PROFITS, LOSS OF DATA OR SOFTWARE, WORK STOPPAGE,
COMPUTER FAILURE OR MALFUNCTION OR IMPAIRMENT OF OTHER
GOODS. IN NO EVENT WILL THE AUTHORS BE LIABLE FOR THE COSTS OF
PROCUREMENT OF SUBSTITUTE SOFTWARE OR SERVICES. YOU
ACKNOWLEDGE THAT THIS SOFTWARE IS NOT DESIGNED FOR USE IN ONLINE EQUIPMENT IN HAZARDOUS ENVIRONMENTS SUCH AS OPERATION
OF NUCLEAR FACILITIES, AIRCRAFT NAVIGATION OR CONTROL, OR LIFECRITICAL APPLICATIONS. THE AUTHORS EXPRESSLY DISCLAIM ANY
LIABILITY RESULTING FROM USE OF THE SOFTWARE IN ANY SUCH ONLINE EQUIPMENT IN HAZARDOUS ENVIRONMENTS AND ACCEPTS NO
LIABILITY IN RESPECT OF ANY ACTIONS OR CLAIMS BASED ON THE USE
OF THE SOFTWARE IN ANY SUCH ON-LINE EQUIPMENT IN HAZARDOUS
ENVIRONMENTS BY YOU. FOR PURPOSES OF THIS PARAGRAPH, THE
TERM “LIFE- CRITICAL APPLICATION” MEANS AN APPLICATION IN
WHICH THE FUNCTIONING OR MALFUNCTIONING OF THE SOFTWARE
MAY RESULT DIRECTLY OR INDIRECTLY IN PHYSICAL INJURY OR LOSS
OF HUMAN LIFE. THIS DISCLAIMER OF WARRANTY CONSTITUTES AN
ESSENTIAL PART OF THIS LICENSE. NO USE OF ANY COVERED CODE IS
AUTHORIZED HEREUNDER EXCEPT UNDER THIS DISCLAIMER.
8 TERMINATION.
8.1.
This License and the rights granted hereunder will terminate automatically if You fail to
comply with terms herein and fail to cure such breach within 30 days of becoming
aware of the breach. All sublicenses to the Covered Code which are properly granted
shall survive any termination of this License. Provisions which, by their nature, must
remain in effect beyond the termination of this License shall survive.
8.2.
8.3.
If You assert a patent infringement claim against Participant alleging that such
Participant’s Contributor Version directly or indirectly infringes any patent where such
claim is resolved (such as by license or settlement) prior to the initiation of patent
infringement litigation, then the reasonable value of the licenses granted by such
Participant under Sections 2.1 or 2.2 shall be taken into account in determining the
amount or value of any payment or license.
8.4.
In the event of termination under Sections 8.1 or 8.2 above, all end user license
agreements (excluding distributors and resellers) which have been validly granted by
You or any distributor hereunder prior to termination shall survive termination.
9 LIMITATION OF LIABILITY.
UNDER NO CIRCUMSTANCES AND UNDER NO LEGAL THEORY, WHETHER
TORT (INCLUDING NEGLIGENCE), CONTRACT, OR OTHERWISE, SHALL
YOU, THE INITIAL DEVELOPER, ANY OTHER CONTRIBUTOR, OR ANY
DISTRIBUTOR OF COVERED CODE, OR ANY SUPPLIER OF ANY OF SUCH
PARTIES, BE LIABLE TO ANY PERSON FOR ANY INDIRECT, SPECIAL,
INCIDENTAL, OR CONSEQUENTIAL DAMAGES OF ANY CHARACTER
INCLUDING, WITHOUT LIMITATION, DAMAGES FOR LOSS OF GOODWILL,
WORK STOPPAGE, COMPUTER FAILURE OR MALFUNCTION, OR ANY AND
ALL OTHER COMMERCIAL DAMAGES OR LOSSES, EVEN IF SUCH PARTY
SHALL HAVE BEEN INFORMED OF THE POSSIBILITY OF SUCH DAMAGES.
THIS LIMITATION OF LIABILITY SHALL NOT APPLY TO LIABILITY FOR
DEATH OR PERSONAL INJURY RESULTING FROM SUCH PARTY’S
NEGLIGENCE TO THE EXTENT APPLICABLE LAW PROHIBITS SUCH
LIMITATION. SOME JURISDICTIONS DO NOT ALLOW THE EXCLUSION OR
LIMITATION OF INCIDENTAL OR CONSEQUENTIAL DAMAGES, SO THIS
EXCLUSION AND LIMITATION MAY NOT APPLY TO YOU.
10 U.S. GOVERNMENT END USERS.
11 MISCELLANEOUS.
12 RESPONSIBILITY FOR CLAIMS.
As between Initial Developer and the Contributors, each party is responsible for claims
and damages arising, directly or indirectly, out of its utilization of rights under this
License and You agree to work with Initial Developer and Contributors to distribute
such responsibility on an equitable basis. Nothing herein is intended or shall be deemed
to constitute any admission of liability.
EXHIBIT A.
“The contents of this file are subject to the gSOAP Public License Version 1.3 (the
“License”); you may not use this
file except in compliance with the License. You may obtain a copy of the License at
http://www.cs.fsu.edu/ engelen/soaplicense.html
Software distributed under the License is distributed on an “AS IS” basis, WITHOUT
WARRANTY OF ANY KIND, either express or implied. See the License for the
specific language governing rights and limitations under the License.
The Original Code of the gSOAP Software is: stdsoap.h, stdsoap2.h, stdsoap.c,
stdsoap2.c, stdsoap.cpp,
stdsoap2.cpp, soapcpp2.h, soapcpp2.c, soapcpp2_lex.l, soapcpp2_yacc.y, error2.h,
error2.c, symbol2.c, init2.c,
soapdoc2.html, and soapdoc2.pdf, httpget.h, httpget.c, stl.h, stldeque.h, stllist.h,
stlvector.h, stlset.h.
The Initial Developer of the Original Code is Robert A. van Engelen. Portions created
by Robert A. van Engelen are
Copyright (C) 2001-2004 Robert A. van Engelen, Genivia inc. All Rights Reserved.
Contributor(s):
“________________________.”
[Note: The text of this Exhibit A may differ slightly form the text of the notices in the
Source Code files of the Original code. You should use the text of this Exhibit A rather
than the text found in the Original Code Source Code for Your Modifications.]
EXHIBIT B.
“Part of the software embedded in this product is gSOAP software.
viii
Portions created by gSOAP are Copyright (C) 2001-2009 Robert A. van Engelen,
Genivia inc. All Rights Reserved. THE SOFTWARE IN THIS PRODUCT WAS IN
PART PROVIDED BY GENIVIA INC AND ANY EXPRESS OR IMPLIED
WARRANTIES, INCLUDING, BUT NOT LIMITED TO, THE IMPLIED
WARRANTIES OF MERCHANTABILITY AND FITNESS FOR A PARTICULAR
PURPOSE ARE DISCLAIMED. IN NO EVENT SHALL THE AUTHOR BE
LIABLE FOR ANY DIRECT, INDIRECT, INCIDENTAL, SPECIAL,
EXEMPLARY, OR CONSEQUENTIAL DAMAGES (INCLUDING, BUT NOT
LIMITED TO, PROCUREMENT OF SUBSTITUTE GOODS OR SERVICES; LOSS
OF USE, DATA, OR PROFITS; OR BUSINESS INTERRUPTION) HOWEVER
CAUSED AND ON ANY THEORY OF LIABILITY, WHETHER IN CONTRACT,
STRICT LIABILITY, OR TORT (INCLUDING NEGLIGENCE OR OTHERWISE)
ARISING IN ANY WAY OUT OF THE USE OF THIS SOFTWARE, EVEN IF
ADVISED OF THE POSSIBILITY OF SUCH DAMAGE.”
http://www.cs.fsu.edu/~engelen/license.html
■ About gcc libgcc, gcc libstdc++
GNU GENERAL PUBLIC LICENSE
Version 3, 29 June 2007
Copyright (C) 2007 Free Software Foundation, Inc. <http://fsf.org/>
Everyone is permitted to copy and distribute verbatim copies of this license document,
but changing it is not allowed.
Preamble
The GNU General Public License is a free, copyleft license for software and other
kinds of works.
The licenses for most software and other practical works are designed to take away
your freedom to share and change the works. By contrast, the GNU General Public
License is intended to guarantee your freedom to share and change all versions of a
program--to make sure it remains free software for all its users. We, the Free Software
Foundation, use the GNU General Public License for most of our software; it applies
also to any other work released this way by its authors. You can apply it to your
programs, too.
When we speak of free software, we are referring to freedom, not price. Our General
Public Licenses are designed to make sure that you have the freedom to distribute
copies of free software (and charge for them if you wish), that you receive source code
or can get it if you want it, that you can change the software or use pieces of it in new
free programs, and that you know you can do these things.
To protect your rights, we need to prevent others from denying you these rights or
asking you to surrender the rights. Therefore, you have certain responsibilities if you
distribute copies of the software, or if you modify it: responsibilities to respect the
freedom of others.
For example, if you distribute copies of such a program, whether gratis or for a fee,
you must pass on to the recipients the same freedoms that you received. You must
make sure that they, too, receive or can get the source code. And you must show them
these terms so they know their rights.
Developers that use the GNU GPL protect your rights with two steps:
(1) assert copyright on the software, and (2) offer you this License giving you legal
permission to copy, distribute and/or modify it.
For the developers’ and authors’ protection, the GPL clearly explains that there is no
warranty for this free software. For both users’ and authors’ sake, the GPL requires that
modified versions be marked as changed, so that their problems will not be attributed
erroneously to authors of previous versions.
Some devices are designed to deny users access to install or run modified versions of
the software inside them, although the manufacturer can do so. This is fundamentally
incompatible with the aim of protecting users’ freedom to change the software. The
systematic pattern of such abuse occurs in the area of products for individuals to use,
which is precisely where it is most unacceptable. Therefore, we have designed this
version of the GPL to prohibit the practice for those products. If such problems arise
substantially in other domains, we stand ready to extend this provision to those domains
in future versions of the GPL, as needed to protect the freedom of users.
Finally, every program is threatened constantly by software patents. States should not
allow patents to restrict development and use of software on general-purpose
computers, but in those that do, we wish to avoid the special danger that patents applied
to a free program could make it effectively proprietary. To prevent this, the GPL
assures that patents cannot be used to render the program non-free.
The precise terms and conditions for copying, distribution and modification follow.
TERMS AND CONDITIONS
0. Definitions.
“This License” refers to version 3 of the GNU General Public License.
“Copyright” also means copyright-like laws that apply to other kinds of works, such as
semiconductor masks.
“The Program” refers to any copyrightable work licensed under this License. Each
licensee is addressed as “you”. “Licensees” and “recipients” may be individuals or
organizations.
To “modify” a work means to copy from or adapt all or part of the work in a fashion
requiring copyright permission, other than the making of an exact copy. The resulting
work is called a “modified version” of the earlier work or a work “based on” the earlier
work.
A “covered work” means either the unmodified Program or a work based on the
Program.
ix
To “propagate” a work means to do anything with it that, without permission, would
make you directly or secondarily liable for infringement under applicable copyright
law, except executing it on a computer or modifying a private copy. Propagation
includes copying, distribution (with or without modification), making available to the
public, and in some countries other activities as well.
To “convey” a work means any kind of propagation that enables other parties to make
or receive copies. Mere interaction with a user through a computer network, with no
transfer of a copy, is not conveying.
An interactive user interface displays “Appropriate Legal Notices” to the extent that it
includes a convenient and prominently visible feature that (1) displays an appropriate
copyright notice, and (2) tells the user that there is no warranty for the work (except to
the extent that warranties are provided), that licensees may convey the work under this
License, and how to view a copy of this License. If the interface presents a list of user
commands or options, such as a menu, a prominent item in the list meets this criterion.
1. Source Code.
The “source code” for a work means the preferred form of the work for making
modifications to it. “Object code” means any non-source form of a work.
A “Standard Interface” means an interface that either is an official standard defined by
a recognized standards body, or, in the case of interfaces specified for a particular
programming language, one that is widely used among developers working in that
language.
The “System Libraries” of an executable work include anything, other than the work
as a whole, that (a) is included in the normal form of packaging a Major Component,
but which is not part of that Major Component, and (b) serves only to enable use of the
work with that Major Component, or to implement a Standard Interface for which an
implementation is available to the public in source code form. A “Major Component”,
in this context, means a major essential component (kernel, window system, and so on)
of the specific operating system (if any) on which the executable work runs, or a
compiler used to produce the work, or an object code interpreter used to run it.
The “Corresponding Source” for a work in object code form means all the source code
needed to generate, install, and (for an executable work) run the object code and to
modify the work, including scripts to control those activities. However, it does not
include the work’s System Libraries, or general-purpose tools or generally available
free programs which are used unmodified in performing those activities but which are
not part of the work. For example, Corresponding Source includes interface definition
files associated with source files for the work, and the source code for shared libraries
and dynamically linked subprograms that the work is specifically designed to require,
such as by intimate data communication or control flow between those subprograms
and other parts of the work.
The Corresponding Source need not include anything that users can regenerate
automatically from other parts of the Corresponding Source.
The Corresponding Source for a work in source code form is that same work.
2. Basic Permissions.
All rights granted under this License are granted for the term of copyright on the
Program, and are irrevocable provided the stated conditions are met. This License
explicitly affirms your unlimited permission to run the unmodified Program. The
output from running a covered work is covered by this License only if the output, given
its content, constitutes a covered work. This License acknowledges your rights of fair
use or other equivalent, as provided by copyright law.
You may make, run and propagate covered works that you do not convey, without
conditions so long as your license otherwise remains in force. You may convey covered
works to others for the sole purpose of having them make modifications exclusively for
you, or provide you with facilities for running those works, provided that you comply
with the terms of this License in conveying all material for which you do not control
copyright. Those thus making or running the covered works for you must do so
exclusively on your behalf, under your direction and control, on terms that prohibit
them from making any copies of your copyrighted material outside their relationship
with you.
Conveying under any other circumstances is permitted solely under the conditions
stated below. Sublicensing is not allowed; section 10 makes it unnecessary.
3. Protecting Users’ Legal Rights From Anti-Circumvention Law.
No covered work shall be deemed part of an effective technological measure under
any applicable law fulfilling obligations under article 11 of the WIPO copyright treaty
adopted on 20 December 1996, or similar laws prohibiting or restricting circumvention
of such measures.
When you convey a covered work, you waive any legal power to forbid circumvention
of technological measures to the extent such circumvention is effected by exercising
rights under this License with respect to the covered work, and you disclaim any
intention to limit operation or modification of the work as a means of enforcing, against
the work’s users, your or third parties’ legal rights to forbid circumvention of
technological measures.
4. Conveying Verbatim Copies.
You may convey verbatim copies of the Program’s source code as you receive it, in
any medium, provided that you conspicuously and appropriately publish on each copy
an appropriate copyright notice; keep intact all notices stating that this License and any
non-permissive terms added in accord with section 7 apply to the code; keep intact all
notices of the absence of any warranty; and give all recipients a copy of this License
along with the Program.
You may charge any price or no price for each copy that you convey, and you may
offer support or warranty protection for a fee.
A “User Product” is either (1) a “consumer product”, which means any tangible
personal property which is normally used for personal, family, or household purposes,
or (2) anything designed or sold for incorporation into a dwelling. In determining
whether a product is a consumer product, doubtful cases shall be resolved in favor of
coverage. For a particular product received by a particular user, “normally used” refers
to a typical or common use of that class of product, regardless of the status of the
particular user or of the way in which the particular user actually uses, or expects or is
expected to use, the product. A product is a consumer product regardless of whether the
product has substantial commercial, industrial or non-consumer uses, unless such uses
represent the only significant mode of use of the product.
5. Conveying Modified Source Versions.
You may convey a work based on the Program, or the modifications to produce it from
the Program, in the form of source code under the terms of section 4, provided that you
also meet all of these conditions:
a) The work must carry prominent notices stating that you modified it, and giving a
relevant date.
b) The work must carry prominent notices stating that it is released under this License
and any conditions added under section
7. This requirement modifies the requirement in section 4 to “keep intact all notices”.
c) You must license the entire work, as a whole, under this License to anyone who
comes into possession of a copy. This License will therefore apply, along with any
applicable section 7 additional terms, to the whole of the work, and all its parts,
regardless of how they are packaged. This License gives no permission to license the
work in any other way, but it does not invalidate such permission if you have separately
received it.
d) If the work has interactive user interfaces, each must display Appropriate Legal
Notices; however, if the Program has interactive interfaces that do not display
Appropriate Legal Notices, your work need not make them do so.
A compilation of a covered work with other separate and independent works, which
are not by their nature extensions of the covered work, and which are not combined
with it such as to form a larger program, in or on a volume of a storage or distribution
medium, is called an “aggregate” if the compilation and its resulting copyright are not
used to limit the access or legal rights of the compilation’s users beyond what the
individual works permit. Inclusion of a covered work in an aggregate does not cause
this License to apply to the other parts of the aggregate.
6. Conveying Non-Source Forms.
You may convey a covered work in object code form under the terms of sections 4 and
5, provided that you also convey the machine-readable Corresponding Source under the
terms of this License, in one of these ways:
a) Convey the object code in, or embodied in, a physical product (including a
physical distribution medium), accompanied by the Corresponding Source fixed on a
durable physical medium customarily used for software interchange.
b) Convey the object code in, or embodied in, a physical product (including a
physical distribution medium), accompanied by a written offer, valid for at least three
years and valid for as long as you offer spare parts or customer support for that product
model, to give anyone who possesses the object code either (1) a copy of the
Corresponding Source for all the software in the product that is covered by this License,
on a durable physical medium customarily used for software interchange, for a price no
more than your reasonable cost of physically performing this conveying of source, or
(2) access to copy the Corresponding Source from a network server at no charge.
c) Convey individual copies of the object code with a copy of the written offer to
provide the Corresponding Source. This alternative is allowed only occasionally and
noncommercially, and
only if you received the object code with such an offer, in accord with subsection 6b.
d) Convey the object code by offering access from a designated place (gratis or for a
charge), and offer equivalent access to the Corresponding Source in the same way
through the same place at no further charge. You need not require recipients to copy
the Corresponding Source along with the object code. If the place to copy the object
code is a network server, the Corresponding Source may be on a different server
(operated by you or a third party) that supports equivalent copying facilities, provided
you maintain clear directions next to the object code saying where to find the
Corresponding Source. Regardless of what server hosts the Corresponding Source, you
remain obligated to ensure that it is available for as long as needed to satisfy these
requirements.
e) Convey the object code using peer-to-peer transmission, provided you inform
other peers where the object code and Corresponding Source of the work are being
offered to the general public at no charge under subsection 6d.
A separable portion of the object code, whose source code is excluded from the
Corresponding Source as a System Library, need not be included in conveying the
object code work.
“Installation Information” for a User Product means any methods, procedures,
authorization keys, or other information required to install and execute modified
versions of a covered work in that User Product from a modified version of its
Corresponding Source. The information must suffice to ensure that the continued
functioning of the modified object code is in no case prevented or interfered with solely
because modification has been made.
If you convey an object code work under this section in, or with, or specifically for use
in, a User Product, and the conveying occurs as part of a transaction in which the right
of possession and use of the User Product is transferred to the recipient in perpetuity or
for a fixed term (regardless of how the transaction is characterized), the Corresponding
Source conveyed under this section must be accompanied by the Installation
Information. But this requirement does not apply if neither you nor any third party
retains the ability to install modified object code on the User Product (for example, the
work has been installed in ROM).
The requirement to provide Installation Information does not include a requirement to
continue to provide support service, warranty, or updates for a work that has been
modified or installed by the recipient, or for the User Product in which it has been
modified or installed. Access to a network may be denied when the modification itself
materially and adversely affects the operation of the network or violates the rules and
protocols for communication across the network.
Corresponding Source conveyed, and Installation Information provided, in accord
with this section must be in a format that is publicly documented (and with an
implementation available to the public in source code form), and must require no
special password or key for unpacking, reading or copying.
7. Additional Terms.
“Additional permissions” are terms that supplement the terms of thisLicense by
making exceptions from one or more of its conditions. Additional permissions that are
applicable to the entire Program shall be treated as though they were included in this
License, to the extent that they are valid under applicable law. If additional permissions
apply only to part of the Program, that part may be used separately under those
permissions, but the entire Program remains governed by this License without regard to
the additional permissions.
When you convey a copy of a covered work, you may at your option remove any
additional permissions from that copy, or from any part of it. (Additional permissions
may be written to require their own removal in certain cases when you modify the
work.) You may place additional permissions on material, added by you to a covered
work, for which you have or can give appropriate copyright permission.
Notwithstanding any other provision of this License, for material you add to a covered
work, you may (if authorized by the copyright holders of that material) supplement the
terms of this License with terms:
a) Disclaiming warranty or limiting liability differently from the terms of sections 15
and 16 of this License; or
b) Requiring preservation of specified reasonable legal notices or author attributions
in that material or in the Appropriate Legal Notices displayed by works containing it; or
c) Prohibiting misrepresentation of the origin of that material, or requiring that
modified versions of such material be marked in reasonable ways as different from the
original version; or
d) Limiting the use for publicity purposes of names of licensors or authors of the
material; or
e) Declining to grant rights under trademark law for use of some trade names,
trademarks, or service marks; or
f) Requiring indemnification of licensors and authors of that material by anyone who
conveys the material (or modified versions of it) with contractual assumptions of
liability to the recipient, for any liability that these contractual assumptions directly
impose on those licensors and authors.
All other non-permissive additional terms are considered “further restrictions” within
the meaning of section 10. If the Program as you received it, or any part of it, contains
a notice stating that it is governed by this License along with a term that is a further
restriction, you may remove that term. If a license document contains a further
restriction but permits relicensing or conveying under this License, you may add to a
covered work material governed by the terms of that license document, provided that
the further restriction does not survive such relicensing or conveying.
If you add terms to a covered work in accord with this section, you must place, in the
relevant source files, a statement of the additional terms that apply to those files, or a
notice indicating where to find the applicable terms.
x
Additional terms, permissive or non-permissive, may be stated in the form of a
separately written license, or stated as exceptions; the above requirements apply either
way.
You may not propagate or modify a covered work except as expressly provided under
this License. Any attempt otherwise to propagate or modify it is void, and will
automatically terminate your rights under this License (including any patent licenses
granted under the third
paragraph of section 11).
If you convey a covered work, knowingly relying on a patent license, and the
Corresponding Source of the work is not available for anyone to copy, free of charge
and under the terms of this License, through a publicly available network server or
other readily accessible means, then you must either (1) cause the Corresponding
Source to be so available, or (2) arrange to deprive yourself of the benefit of the patent
license for this particular work, or (3) arrange, in a manner consistent with the
requirements of this License, to extend the patent license to downstream recipients.
“Knowingly relying” means you have actual knowledge that, but for the patent license,
your conveying the covered work in a country, or your recipient’s use of the covered
work in a country, would infringe one or more identifiable patents in that country that
you have reason to believe are valid.
However, if you cease all violation of this License, then your license from a particular
copyright holder is reinstated (a) provisionally, unless and until the copyright holder
explicitly and finally terminates your license, and (b) permanently, if the copyright
holder fails to notify you of the violation by some reasonable means prior to 60 days
after the cessation.
If, pursuant to or in connection with a single transaction or arrangement, you convey,
or propagate by procuring conveyance of, a covered work, and grant a patent license to
some of the parties receiving the covered work authorizing them to use, propagate,
modify or convey a specific copy of the covered work, then the patent license you grant
is automatically extended to all recipients of the covered work and works based on it.
Moreover, your license from a particular copyright holder is reinstated permanently if
the copyright holder notifies you of the violation by some reasonable means, this is the
first time you have received notice of violation of this License (for any work) from that
copyright holder, and you cure the violation prior to 30 days after your receipt of the
notice.
A patent license is “discriminatory” if it does not include within the scope of its
coverage, prohibits the exercise of, or is conditioned on the non-exercise of one or more
of the rights that are specifically granted under this License. You may not convey a
covered work if you are a party to an arrangement with a third party that is in the
business of distributing software, under which you make payment to the third party
based on the extent of your activity of conveying the work, and under which the third
party grants, to any of the parties who would receive the covered work from you, a
discriminatory patent license (a) in connection with copies of the covered work
conveyed by you (or copies made from those copies), or (b) primarily for and in
connection with specific products or compilations that contain the covered work, unless
you entered into that arrangement, or that patent license was granted, prior to 28 March
2007.
8. Termination.
Termination of your rights under this section does not terminate the licenses of parties
who have received copies or rights from you under this License. If your rights have
been terminated and not permanently reinstated, you do not qualify to receive new
licenses for the same material under section 10.
9. Acceptance Not Required for Having Copies.
You are not required to accept this License in order to receive or run a copy of the
Program. Ancillary propagation of a covered work occurring solely as a consequence
of using peer-to-peer transmission to receive a copy likewise does not require
acceptance. However, nothing other than this License grants you permission to
propagate or modify any covered work. These actions infringe copyright if you do not
accept this License. Therefore, by modifying or propagating a covered work, you
indicate your acceptance of this License to do so.
10. Automatic Licensing of Downstream Recipients.
Each time you convey a covered work, the recipient automatically receives a license
from the original licensors, to run, modify and propagate that work, subject to this
License. You are not responsible for enforcing compliance by third parties with this
License.
An “entity transaction” is a transaction transferring control of an organization, or
substantially all assets of one, or subdividing an organization, or merging organizations.
If propagation of a covered work results from an entity transaction, each party to that
transaction who receives a copy of the work also receives whatever licenses to the work
the party’s predecessor in interest had or could give under the previous paragraph, plus
a right to possession of the Corresponding Source of the work from the predecessor in
interest, if the predecessor has it or can get it with reasonable efforts.
You may not impose any further restrictions on the exercise of the rights granted or
affirmed under this License. For example, you may not impose a license fee, royalty, or
other charge for exercise of rights granted under this License, and you may not initiate
litigation (including a cross-claim or counterclaim in a lawsuit) alleging that any patent
claim is infringed by making, using, selling, offering for sale, or importing the Program
or any portion of it.
11. Patents.
A “contributor” is a copyright holder who authorizes use under this License of the
Program or a work on which the Program is based. The work thus licensed is called the
contributor’s “contributor version”.
A contributor’s “essential patent claims” are all patent claims owned or controlled by
the contributor, whether already acquired or hereafter acquired, that would be infringed
by some manner, permitted by this License, of making, using, or selling its contributor
version, but do not include claims that would be infringed only as a consequence of
further modification of the contributor version. For purposes of this definition,
“control” includes the right to grant patent sublicenses in a manner consistent with the
requirements of this License.
Each contributor grants you a non-exclusive, worldwide, royalty-free patent license
under the contributor’s essential patent claims, to make, use, sell, offer for sale, import
and otherwise run, modify and propagate the contents of its contributor version.
In the following three paragraphs, a “patent license” is any express agreement or
commitment, however denominated, not to enforce a patent (such as an express
permission to practice a patent or covenant not to sue for patent infringement). To
“grant” such a patent license to a party means to make such an agreement or
commitment not to enforce a patent against the party.
Nothing in this License shall be construed as excluding or limiting any implied license
or other defenses to infringement that may otherwise be available to you under
applicable patent law.
12. No Surrender of Others’ Freedom.
If conditions are imposed on you (whether by court order, agreement or otherwise)
that contradict the conditions of this License, they do not excuse you from the
conditions of this License. If you cannot convey a covered work so as to satisfy
simultaneously your obligations under this License and any other pertinent obligations,
then as a consequence you may not convey it at all. For example, if you agree to terms
that obligate you to collect a royalty for further conveying from those to whom you
convey the Program, the only way you could satisfy both those terms and this License
would be to refrain entirely from conveying the Program.
13. Use with the GNU Affero General Public License.
Notwithstanding any other provision of this License, you have permission to link or
combine any covered work with a work licensed under version 3 of the GNU Affero
General Public License into a single combined work, and to convey the resulting work.
The terms of this License will continue to apply to the part which is the covered work,
but the special requirements of the GNU Affero General Public License, section 13,
concerning interaction through a network will apply to the combination as such.
14. Revised Versions of this License.
The Free Software Foundation may publish revised and/or new versions of the GNU
General Public License from time to time. Such new versions will be similar in spirit to
the present version, but may differ in detail to address new problems or concerns.
Each version is given a distinguishing version number. If the Program specifies that a
certain numbered version of the GNU General Public License “or any later version”
applies to it, you have the option of following the terms and conditions either of that
numbered version or of any later version published by the Free Software Foundation. If
the Program does not specify a version number of the GNU General Public License,
you may choose any version ever published by the Free Software Foundation.
If the Program specifies that a proxy can decide which future versions of the GNU
General Public License can be used, that proxy’s public statement of acceptance of a
version permanently authorizes you to choose that version for the Program.
Later license versions may give you additional or different permissions. However, no
additional obligations are imposed on any author or copyright holder as a result of your
choosing to follow a later version.
15. Disclaimer of Warranty.
THERE IS NO WARRANTY FOR THE PROGRAM, TO THE EXTENT
PERMITTED BY APPLICABLE LAW. EXCEPT WHEN OTHERWISE STATED
IN WRITING THE COPYRIGHT HOLDERS AND/OR OTHER PARTIES
PROVIDE THE PROGRAM “AS IS” WITHOUT WARRANTY OF ANY KIND,
EITHER EXPRESSED OR IMPLIED, INCLUDING, BUT NOT LIMITED TO, THE
IMPLIED WARRANTIES OF MERCHANTABILITY AND FITNESS FOR A
PARTICULAR PURPOSE. THE ENTIRE RISK AS TO THE QUALITY AND
PERFORMANCE OF THE PROGRAM IS WITH YOU. SHOULD THE PROGRAM
PROVE DEFECTIVE, YOU ASSUME THE COST OF ALL NECESSARY
SERVICING, REPAIR OR CORRECTION.
16. Limitation of Liability.
xi
IN NO EVENT UNLESS REQUIRED BY APPLICABLE LAW OR AGREED TO
IN WRITING WILL ANY COPYRIGHT HOLDER, OR ANY OTHER PARTY WHO
MODIFIES AND/OR CONVEYS THE PROGRAM AS PERMITTED ABOVE, BE
LIABLE TO YOU FOR DAMAGES, INCLUDING ANY GENERAL, SPECIAL,
INCIDENTAL OR CONSEQUENTIAL DAMAGES ARISING OUT OF THE USE
OR INABILITY TO USE THE PROGRAM (INCLUDING BUT NOT LIMITED TO
LOSS OF DATA OR DATA BEING RENDERED INACCURATE OR LOSSES
SUSTAINED BY YOU OR THIRD PARTIES OR A FAILURE OF THE PROGRAM
TO OPERATE WITH ANY OTHER PROGRAMS), EVEN IF SUCH HOLDER OR
OTHER PARTY HAS BEEN ADVISED OF THE POSSIBILITY OF SUCH
DAMAGES.
17. Interpretation of Sections 15 and 16.
If the disclaimer of warranty and limitation of liability provided above cannot be given
local legal effect according to their terms, reviewing courts shall apply local law that
most closely approximates an absolute waiver of all civil liability in connection with the
Program, unless a warranty or assumption of liability accompanies a copy of the
Program in return for a fee.
0. Definitions.
A file is an “Independent Module” if it either requires the Runtime Library for
execution after a Compilation Process, or makes use of an interface provided by the
Runtime Library, but is not otherwise based on the Runtime Library.
“GCC” means a version of the GNU Compiler Collection, with or without
modifications, governed by version 3 (or a specified later version) of the GNU General
Public License (GPL) with the option of using any subsequent versions published by
the FSF.
“GPL-compatible Software” is software whose conditions of propagation, modification
and use would permit combination with GCC in accord with the license of GCC.
“Target Code” refers to output from any compiler for a real or virtual target processor
architecture, in executable form or suitable for input to an assembler, loader, linker and/
or execution phase.
Notwithstanding that, Target Code does not include data in any format that is used as a
compiler intermediate representation, or used for producing a compiler intermediate
representation.
END OF TERMS AND CONDITIONS
How to Apply These Terms to Your New Programs
If you develop a new program, and you want it to be of the greatest possible use to the
public, the best way to achieve this is to make it free software which everyone can
redistribute and change under these terms.
To do so, attach the following notices to the program. It is safest to attach them to the
start of each source file to most effectively state the exclusion of warranty; and each file
should have at least the “copyright” line and a pointer to where the full notice is found.
<one line to give the program’s name and a brief idea of what it does.>
Copyright (C) <year> <name of author>
This program is free software: you can redistribute it and/or modify it under the terms
of the GNU General Public License as published by the Free Software Foundation,
either version 3 of the License, or (at your option) any later version.
This program is distributed in the hope that it will be useful, but WITHOUT ANY
WARRANTY; without even the implied warranty of MERCHANTABILITY or
FITNESS FOR A PARTICULAR PURPOSE. See the GNU General Public License for
more details.
You should have received a copy of the GNU General Public License along with this
program. If not, see <http://www.gnu.org/licenses/>.
The “Compilation Process” transforms code entirely represented in non-intermediate
languages designed for human-written code, and/or in Java Virtual Machine byte code,
into Target Code. Thus, for example, use of source code generators and preprocessors
need not be considered part of the Compilation Process, since the Compilation Process
can be understood as starting with the output of the generators or preprocessors.
A Compilation Process is “Eligible” if it is done using GCC, alone or with other GPLcompatible software, or if it is done without using any work based on GCC. For
example, using non-GPL-compatible Software to optimize any GCC intermediate
representations would not qualify as an Eligible Compilation Process.
1. Grant of Additional Permission.
You have permission to propagate a work of Target Code formed by combining the
Runtime Library with Independent Modules, even if such propagation would otherwise
violate the terms of GPLv3, provided that all Target Code was generated by Eligible
Compilation Processes.
You may then convey such a combination under terms of your choice, consistent with
the licensing of the Independent Modules.
2. No Weakening of GCC Copyleft.
The availability of this Exception does not imply any general presumption that thirdparty software is unaffected by the copyleft requirements of the license of GCC.
■ About c-ares
Also add information on how to contact you by electronic and paper mail.
Copyright 1998 by the Massachusetts Institute of Technology.
If the program does terminal interaction, make it output a short notice like this when it
starts in an interactive mode:
Permission to use, copy, modify, and distribute this software and its documentation for
any purpose and without fee is hereby granted, provided that the above copyright notice
appear in all copies and that both that copyright notice and this permission notice
appear in supporting documentation, and that the name of M.I.T. not be used in
advertising or publicity pertaining to distribution of the software without specific,
written prior permission.
M.I.T. makes no representations about the suitability of this software for any purpose. It
is provided “as is” without express or implied warranty.
<program> Copyright (C) <year> <name of author>
This program comes with ABSOLUTELY NO WARRANTY; for details type `show
w’.
This is free software, and you are welcome to redistribute it under certain conditions;
type `show c’ for details.
The hypothetical commands `show w’ and `show c’ should show the appropriate parts
of the General Public License. Of course, your program’s commands might be
different; for a GUI interface, you would use an “about box”.
You should also get your employer (if you work as a programmer) or school, if any, to
sign a “copyright disclaimer” for the program, if necessary.
For more information on this, and how to apply and follow the GNU GPL, see
<http://www.gnu.org/licenses/>.
■ About WPA Supplicant
WPA Supplicant
Copyright (c) 2003-2012, Jouni Malinen <[email protected]> and contributors
All Rights Reserved.
This program is licensed under the BSD license (the one with advertisement clause
removed).
The GNU General Public License does not permit incorporating your program into
proprietary programs. If your program is a subroutine library, you may consider it more
useful to permit linking proprietary applications with the library. If this is what you
want to do, use the GNU Lesser General Public License instead of this License. But
first, please read
<http://www.gnu.org/philosophy/why-not-lgpl.html>.
If you are submitting changes to the project, please see CONTRIBUTIONS file for
more instructions.
GCC RUNTIME LIBRARY EXCEPTION
Redistribution and use in source and binary forms, with or without modification, are
permitted provided that the following conditions are met:
Version 3.1, 31 March 2009
Copyright c 2009 Free Software Foundation, Inc. <http://fsf.org/>
Everyone is permitted to copy and distribute verbatim copies of this license document,
but changing it is not allowed.
This GCC Runtime Library Exception (“Exception”) is an additional permission under
section 7 of the GNU General Public License, version 3 (“GPLv3”). It applies to a
given file (the “Runtime Library”) that bears a notice placed by the copyright holder of
the file stating that the file is governed by GPLv3 along with this Exception.
When you use GCC to compile a program, GCC may combine portions of certain GCC
header files and runtime libraries with the compiled program. The purpose of this
Exception is to allow compilation of non-GPL (including proprietary) programs to use,
in this way, the header files and runtime libraries covered by this Exception.
License
This software may be distributed, used, and modified under the terms of BSD license:
1. Redistributions of source code must retain the above copyright notice, this list of
conditions and the following disclaimer.
2. Redistributions in binary form must reproduce the above copyright notice, this list of
conditions and the following disclaimer in the documentation and/or other materials
provided with the distribution.
3. Neither the name(s) of the above-listed copyright holder(s) nor the names of its
contributors may be used to endorse or promote products derived from this software
without specific prior written permission.
xii
THIS SOFTWARE IS PROVIDED BY THE COPYRIGHT HOLDERS AND
CONTRIBUTORS “AS IS” AND ANY EXPRESS OR IMPLIED WARRANTIES,
INCLUDING, BUT NOT LIMITED TO, THE IMPLIED WARRANTIES OF
MERCHANTABILITY AND FITNESS FOR A PARTICULAR PURPOSE ARE
DISCLAIMED. IN NO EVENT SHALL THE COPYRIGHT OWNER OR
CONTRIBUTORS BE LIABLE FOR ANY DIRECT, INDIRECT, INCIDENTAL,
SPECIAL, EXEMPLARY, OR CONSEQUENTIAL DAMAGES (INCLUDING, BUT
NOT LIMITED TO, PROCUREMENT OF SUBSTITUTE GOODS OR SERVICES;
LOSS OF USE, DATA, OR PROFITS; OR BUSINESS INTERRUPTION)
HOWEVER CAUSED AND ON ANY THEORY OF LIABILITY, WHETHER IN
CONTRACT, STRICT LIABILITY, OR TORT (INCLUDING NEGLIGENCE OR
OTHERWISE) ARISING IN ANY WAY OUT OF THE USE OF THIS SOFTWARE,
EVEN IF ADVISED OF THE POSSIBILITY OF SUCH DAMAGE.
■ About libxml2
Except where otherwise noted in the source code (e.g. the files hash.c, list.c and the trio
files, which are covered by a similar licence but with different Copyright notices) all the
files are:
Copyright (C) 1998-2003 Daniel Veillard. All Rights Reserved.
Arev Fonts Copyright
-----------------------------Copyright (c) 2006 by Tavmjong Bah. All Rights Reserved.
Permission is hereby granted, free of charge, to any person obtaining a copy of the fonts
accompanying this license (“Fonts”) and associated documentation files (the “Font
Software”), to reproduce and distribute the modifications to the Bitstream Vera Font
Software, including without limitation the rights to use, copy, merge, publish,
distribute, and/or sell copies of the Font Software, and to permit persons to whom the
Font Software is furnished to do so, subject to the following conditions:
The above copyright and trademark notices and this permission notice shall be included
in all copies of one or more of the Font Software typefaces.
The Font Software may be modified, altered, or added to, and in particular the designs
of glyphs or characters in the Fonts may be modified and additional glyphs or
characters may be added to the Fonts, only if the fonts are renamed to names not
containing either the words “Tavmjong Bah” or the word “Arev”.
Permission is hereby granted, free of charge, to any person obtaining a copy of this
software and associated documentation files (the “Software”), to deal in the Software
without restriction, including without limitation the rights to use, copy, modify, merge,
publish, distribute, sublicense, and/or sell copies of the Software, and to permit persons
to whom the Software is furnished to do so, subject to the following conditions:
This License becomes null and void to the extent applicable to Fonts or Font Software
that has been modified and is distributed under the “Tavmjong Bah Arev” names.
The above copyright notice and this permission notice shall be included in all copies or
substantial portions of the Software.
THE FONT SOFTWARE IS PROVIDED “AS IS”, WITHOUT WARRANTY OF
ANY KIND, EXPRESS OR IMPLIED, INCLUDING BUT NOT LIMITED TO ANY
WARRANTIES OF MERCHANTABILITY, FITNESS FOR A PARTICULAR
PURPOSE AND NONINFRINGEMENT OF COPYRIGHT, PATENT,
TRADEMARK, OR OTHER RIGHT. IN NO EVENT SHALL TAVMJONG BAH BE
LIABLE FOR ANY CLAIM, DAMAGES OR OTHER LIABILITY, INCLUDING
ANY GENERAL, SPECIAL, INDIRECT, INCIDENTAL, OR CONSEQUENTIAL
DAMAGES, WHETHER IN AN ACTION OF CONTRACT, TORT OR
OTHERWISE, ARISING FROM, OUT OF THE USE OR INABILITY TO USE THE
FONT SOFTWARE OR FROM OTHER DEALINGS IN THE FONT SOFTWARE.
THE SOFTWARE IS PROVIDED “AS IS”, WITHOUT WARRANTY OF ANY
KIND, EXPRESS OR IMPLIED, INCLUDING BUT NOT LIMITED TO THE
WARRANTIES OF MERCHANTABILITY, FITNESS FOR A PARTICULAR
PURPOSE AND NONINFRINGEMENT. IN NO EVENT SHALL THE DANIEL
VEILLARD BE LIABLE FOR ANY CLAIM, DAMAGES OR OTHER LIABILITY,
WHETHER IN AN ACTION OF CONTRACT, TORT OR OTHERWISE, ARISING
FROM, OUT OF OR IN CONNECTION WITH THE SOFTWARE OR THE USE OR
OTHER DEALINGS IN THE SOFTWARE.
The Font Software may be sold as part of a larger software package but no copy of one
or more of the Font Software typefaces may be sold by itself.
Except as contained in this notice, the name of Daniel Veillard shall not be used in
advertising or otherwise to promote the sale, use or other dealings in this Software
without prior written authorization from him.
Except as contained in this notice, the name of Tavmjong Bah shall not be used in
advertising or otherwise to promote the sale, use or other dealings in this Font Software
without prior written authorization from Tavmjong Bah. For further information,
contact: tavmjong @ free. fr.
■ About fonts
■ About FLAC codec library
Fonts are (c) Bitstream (see below). DejaVu changes are in public domain.
Glyphs imported from Arev fonts are (c) Tavmjong Bah (see below)
Copyright (C) 2000, 2001, 2002, 2003, 2004, 2005, 2006, 2007, 2008, 2009 Josh Coalson
Redistribution and use in source and binary forms, with or without modification, are
permitted provided that the following conditions are met:
– Redistributions of source code must retain the above copyright notice, this list of
conditions and the following disclaimer.
– Redistributions in binary form must reproduce the above copyright notice, this list of
conditions and the following disclaimer in the documentation and/or other materials
provided with the distribution.
– Neither the name of the Xiph.org Foundation nor the names of its contributors may
be used to endorse or promote products derived from this software without specific
prior written permission.
Bitstream Vera Fonts Copyright
-----------------------------Copyright (c) 2003 by Bitstream, Inc. All Rights Reserved. Bitstream Vera is a
trademark of Bitstream, Inc.
Permission is hereby granted, free of charge, to any person obtaining a copy of the fonts
accompanying this license (“Fonts”) and associated documentation files (the “Font
Software”), to reproduce and distribute the Font Software, including without limitation
the rights to use, copy, merge, publish, distribute, and/or sell copies of the Font
Software, and to permit persons to whom the Font Software is furnished to do so,
subject to the following conditions:
The above copyright and trademark notices and this permission notice shall be included
in all copies of one or more of the Font Software typefaces.
The Font Software may be modified, altered, or added to, and in particular the designs
of glyphs or characters in the Fonts may be modified and additional glyphs or
characters may be added to the Fonts, only if the fonts are renamed to names not
containing either the words “Bitstream” or the word “Vera”.
This License becomes null and void to the extent applicable to Fonts or Font Software
that has been modified and is distributed under the “Bitstream Vera” names.
The Font Software may be sold as part of a larger software package but no copy of one
or more of the Font Software typefaces may be sold by itself.
THE FONT SOFTWARE IS PROVIDED “AS IS”, WITHOUT WARRANTY OF
ANY KIND, EXPRESS OR IMPLIED, INCLUDING BUT NOT LIMITED TO ANY
WARRANTIES OF MERCHANTABILITY, FITNESS FOR A PARTICULAR
PURPOSE AND NONINFRINGEMENT OF COPYRIGHT, PATENT,
TRADEMARK, OR OTHER RIGHT. IN NO EVENT SHALL BITSTREAM OR THE
GNOME FOUNDATION BE LIABLE FOR ANY CLAIM, DAMAGES OR OTHER
LIABILITY, INCLUDING ANY GENERAL, SPECIAL, INDIRECT, INCIDENTAL,
OR CONSEQUENTIAL DAMAGES, WHETHER IN AN ACTION OF CONTRACT,
TORT OR OTHERWISE, ARISING FROM, OUT OF THE USE OR INABILITY TO
USE THE FONT SOFTWARE OR FROM OTHER DEALINGS IN THE FONT
SOFTWARE.
Except as contained in this notice, the names of Gnome, the Gnome Foundation, and
Bitstream Inc., shall not be used in advertising or otherwise to promote the sale, use or
other dealings in this Font Software without prior written authorization from the Gnome
Foundation or Bitstream Inc., respectively. For further information, contact: fonts at
gnome dot org.
xiii
THIS SOFTWARE IS PROVIDED BY THE COPYRIGHT HOLDERS AND
CONTRIBUTORS “AS IS” AND ANY EXPRESS OR IMPLIED WARRANTIES,
INCLUDING, BUT NOT LIMITED TO, THE IMPLIED WARRANTIES OF
MERCHANTABILITY AND FITNESS FOR A PARTICULAR PURPOSE ARE
DISCLAIMED. IN NO EVENT SHALL THE FOUNDATION OR CONTRIBUTORS
BE LIABLE FOR ANY DIRECT, INDIRECT, INCIDENTAL, SPECIAL,
EXEMPLARY, OR CONSEQUENTIAL DAMAGES (INCLUDING, BUT NOT
LIMITED TO, PROCUREMENT OF SUBSTITUTE GOODS OR SERVICES; LOSS
OF USE, DATA, OR PROFITS; OR BUSINESS INTERRUPTION) HOWEVER
CAUSED AND ON ANY THEORY OF LIABILITY, WHETHER IN CONTRACT,
STRICT LIABILITY, OR TORT (INCLUDING NEGLIGENCE OR OTHERWISE)
ARISING IN ANY WAY OUT OF THE USE OF THIS SOFTWARE, EVEN IF
ADVISED OF THE POSSIBILITY OF SUCH DAMAGE.
English
Information for Users on Collection and Disposal of Old Equipment
and Used Batteries
These symbols on the products, packaging, and/or accompanying documents mean that used electrical and
electronic products and batteries should not be mixed with general household waste.
For proper treatment, recovery and recycling of old products and used batteries, please take them to
applicable collection points, in accordance with your national legislation and the Directives 2002/96/EC
and 2006/66/EC.
By disposing of these products and batteries correctly, you will help to save valuable resources and prevent
any potential negative effects on human health and the environment which could otherwise arise from
inappropriate waste handling.
For more information about collection and recycling of old products and batteries, please contact your
local municipality, your waste disposal service or the point of sale where you purchased the items.
[Information on Disposal in other Countries outside the European Union]
These symbols are only valid in the European Union. If you wish to discard these items, please contact
your local authorities or dealer and ask for the correct method of disposal.
Note for the battery symbol (bottom two symbol examples):
This symbol might be used in combination with a chemical symbol. In this case it complies with the
requirement set by the Directive for the chemical involved.
Français
Information concernant la Collecte et le Traitement des piles usagées et
des déchets d’équipements électriques et électroniques
Les symboles sur les produits, l’emballage et/ou les documents joints signifient que les produits électriques
ou électroniques usagés ainsi que les piles ne doivent pas être mélangés avec les déchets domestiques
habituels.
Pour un traitement, une récupération et un recyclage appropriés des déchets d’équipements électriques et
électroniques et des piles usagées, veuillez les déposer aux points de collecte prévus à cet effet,
conformément à la réglementation nationale et aux Directives 2002/96/EC et 2006/66/EC.
En vous débarrassant correctement des déchets d’équipements électriques et électroniques et des piles
usagées, vous contribuerez à la sauvegarde de précieuses ressources et à la prévention de potentiels effets
négatifs sur la santé humaine qui pourraient advenir lors d’un traitement inapproprié des déchets.
Pour plus d’informations à propos de la collecte et du recyclage des déchets d’équipements électriques et
électroniques et des piles usagées, veuillez contacter votre municipalité, votre service de traitement des
déchets ou le point de vente où vous avez acheté les produits.
[Information sur le traitement dans d’autres pays en dehors de l’Union Européenne]
Ces symboles sont seulement valables dans l’Union Européenne. Si vous souhaitez vous débarrasser de
déchets d’équipements électriques et électroniques ou de piles usagées, veuillez contacter les autorités
locales ou votre fournisseur et demander la méthode de traitement appropriée.
Note pour le symbole “pile” (deux exemples de symbole ci-dessous):
Ce symbole peut être utilisé en combinaison avec un symbole chimique. Dans ce cas il respecte les
exigences établies par la Directive pour le produit chimique en question.
xiv
Deutsch
Verbraucherinformation zur Sammlung und Entsorgung alter
Elektrogeräte und benutzter Batterien
Befinden sich diese Symbole auf den Produkten, der Verpackung und/oder beiliegenden Unterlagen, so
sollten benutzte elektrische Geräte und Batterien nicht mit dem normalen Haushaltsabfall entsorgt werden.
In Übereinstimmung mit Ihren nationalen Bestimmungen und den Richtlinien 2002/96/EC und
2006/66/EC, bringen Sie alte Geräte und benutzte Batterien bitte zur fachgerechten Entsorgung,
Wiederaufbereitung und Wiederverwendung zu den entsprechenden Sammelstellen.
Durch die fachgerechte Entsorgung der Elektrogeräte und Batterien helfen Sie, wertvolle Ressourcen zu
schützen und verhindern mögliche negative Auswirkungen auf die menschliche Gesundheit und die
Umwelt, die andernfalls durch unsachgerechte Müllentsorgung auftreten könnten.
Für weitere Informationen zum Sammeln und Wiederaufbereiten alter Elektrogeräte und Batterien,
kontaktieren Sie bitte Ihre örtliche Stadt- oder Gemeindeverwaltung, Ihren Abfallentsorgungsdienst oder
die Verkaufsstelle der Artikel.
[Entsorgungsinformation für Länder außerhalb der Europäischen Union]
Diese Symbole gelten nur innerhalb der Europäischen Union. Wenn Sie solche Artikel ausrangieren
möchten, kontaktieren Sie bitte Ihre örtlichen Behörden oder Ihren Händler und fragen Sie nach der
sachgerechten Entsorgungsmethode.
Anmerkung zum Batteriesymbol (untere zwei Symbolbeispiele):
Dieses Symbol kann auch in Kombination mit einem chemischen Symbol verwendet werden. In diesem
Fall entspricht dies den Anforderungen der Direktive zur Verwendung chemischer Stoffe.
Svenska
Användarinformation, beträffande insamling och dumpning av gammal
utrustning och använda batterier
De symboler, som finns på produkterna, emballaget och/eller bifogade dokument talar om att de använda
elektriska och elektroniska produkterna, samt batterierna, inte ska blandas med allmänt hushållsavfall.
För rätt handhavande, återställande och återvinning av gamla produkter och gamla batterier, vänligen
medtag dessa till lämpliga insamlingsplatser, i enlighet med din nationella lagstiftning och direktiven
2002/96/EC samt 2006/66/EC.
Genom att slänga dessa produkter och batterier på rätt sätt, kommer du att hjälpa till att rädda värdefulla
resurser och förhindra möjliga negativa effekter på mänsklig hälsa och miljö, vilka i annat fall skulle kunna
uppstå, p.g.a. felaktig sophantering.
För mer information om insamling och återvinning av gamla produkter och batterier, vänligen kontakta din
lokala kommun, ditt sophanteringsföretag eller inköpsstället för dina varor.
[Information om sophantering i andra länder utanför EU]
Dessa symboler gäller endast inom EU. Om du vill slänga dessa föremål, vänligen kontakta dina lokala
myndigheter eller försäljare och fråga efter det korrekta sättet att slänga dem.
Kommentar ang. batterisymbolen (de två nedersta symbolexemplen):
Denna symbol kan komma att användas i kombination med en kemisk symbol. I detta fall överensstämmer
den med de krav, som har ställts genom direktiven för den aktuella kemikalien.
xv
Italiano
Informazioni per gli utenti sulla raccolta e lo smaltimento di vecchia
attrezzatura e batterie usate
Questi simboli sui prodotti, sull’imballaggio, e/o sui documenti che li accompagnano significano che i
prodotti e le batterie elettriche e elettroniche non dovrebbero essere mischiati con i rifiuti domestici
generici.
Per il trattamento, recupero e riciclaggio appropriati di vecchi prodotti e batterie usate, li porti, prego, ai
punti di raccolta appropriati, in accordo con la Sua legislazione nazionale e le diretti