1
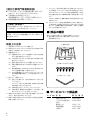
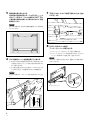
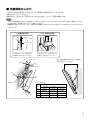
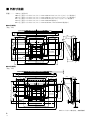
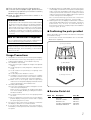
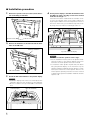
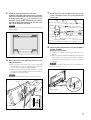
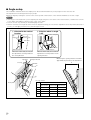
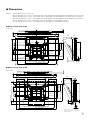
壁掛け型プラズマディスプレイ金具 HUNG ON WALL UNIT ECRAN MURAL WANDBEFESTIGUNGSEINHEIT UNITA' DA PARETE EENHEID VOOR WANDBEVESTIGING UNIDAD PARA COLGAR DE LA PARED PDK-5011 「据付工事」について ¶ 本機は十分な技術・技能を有する専門業者が据え付けを行 うことを前提に販売されているものです。据え付け・取り 付けは必ず工事専門業者または販売店にご依頼ください。 ¶ なお、据え付け、取り付けの不備、誤使用、改造、天災な どによる事故損傷については、 弊社は一切責任を負いませ ん。 取扱説明書 Operating instructions Mode d’emploi Bedienungsanleitung Istruzioni per l’uso Gebruiksaanwijzing Manual de instrucciones 〔据付工事専門業者取扱品〕 ¶ このたびは、 パイオニアの製品をお買い求めいただ きまして、まことにありがとうございます。 ¶ ご使用前に必ずお読みください。 取扱説明書に従って正しく安全にご使用ください。 ¶ 取扱説明書は必ず保管してください。 7. ディスプレイ金具内部や壁取り付け部等、目につかないと ころが破損し、 ディスプレイが落下する危険を生じること がありますので、ディスプレイ等の点検修理時や、お店の 内装工事の時等、 必ず工事専門業者に点検を依頼してくだ さい。 できれば、定期的に工事専門業者に点検を依頼することを お勧めします。 8. このディスプレイ金具を長期間使用されると、環境によっ 工事専門業者様へ 本製品の設置については、弊社発行のテクニカルマニュ アルを熟読し、その内容を必ず守ってください。 指定外の組み立て、取り付け、使い方をされた場合、およ び改造、天災などによる事故損傷については、弊社は一切 責任を負いません。 取扱上の注意 ては経年変化で強度が不足することがあります。5年を目 安として、工事専門業者に点検を依頼し、使用して問題の ないことをお確かめください。 ■ 部品の確認 組み立ての前に付属している部品を確認してください。 ※ 壁に設置するためのネジ類は付属しておりません。 別途御用意ください。 1 壁掛け金具 1. 本製品はプラズマディスプレイ専用です。 2. 指定外のプラズマディスプレイの取り付けや改造および他 の用途への使用はしないでください。 3. 設置場所について (a) 設置場所はディスプレイの重量に十分耐えうる強度 をもつ場所を選定してください。 (b) 人が容易にぶら下がったり寄り掛かれる場所には設 置しないでください。 (c) 屋外や温泉、 海辺の近くには設置しないでください。 (d) 振動や衝撃の加わるような場所には設置しないでく 2 M8 ツバ付ボルト(6 個) ださい。 (e) 壁の構造強度により取り付けできない場合がありま すので工事専門業者へご相談ください。 (f) その他設置場所についてはプラズマディスプレイ本 体の取扱説明書を熟読し、その内容を必ず守ってく ださい。 3 六角レンチ(1 個) 4. 組み立て・設置について (a) 組み立て手順を守り、指定の箇所はすべてネジ止め してください。 ディスプレイ取り付け後に破損、転倒など思わぬ事 故の原因となることがあります。 (b) 作業は安全のため、2 人以上で行ってください。 (c) 作業の際は、機器本体の主電源スイッチを切り、電 源プラグをコンセントから抜いてください。 5. 各部のネジをゆるめたりすると落下等の事故につながりま すので、絶対にゆるめないでください。 6. 異常や不具合が発見されたならば速やかに修理を工事専門 業者へ依頼してください。 2 Ja ■ サービスパーツ部品表 マーク No. 名 称 部 品 番 号 M8ツバ付ボルト プラス穴付六角座付ネジ AZB1435AZB1439- (M6) 梱包材一式 取扱説明書 六角レンチ AZH1141AZR1049AZE1122- ■ 設置手順 1 壁掛け金具下側についているネジ(2 ケ所)をはず す。 4 プラズマディスプレイとPDP側金具をM8ツバ付 ボルトで止める(6 ケ所) 。 通常は赤の「△」の表示穴を使用してください。 43型を取り付けたとき、傾斜角が18°以上になると正 面水平位置より角度調整用のネジの上部が見えることが あります。その場合は、赤の「△」の表示のない方の穴 を使用するとネジの上部を隠すことができます。 ネジ(プラス穴付 六角座付ネジ (M6) ) 2 壁側金具と PDP 側金具をはずす。 壁側金具 プラズマディスプレイの上側 ご注意 スピーカーを取り付ける場合は、この段階で取り付けて ください。 ・取り付け方はプラズマディスプレイ本体の取扱説明書 のスピーカーの取付手順またはアンダースピーカーの 取扱説明書をご覧ください。 ・特にアンダースピーカーを取り付ける際には、先にプ PDP 側金具 ラズマディスプレイにスピーカー取付金具とスピー カーコードを取り付けた状態で壁に設置し、後からア 3 プラズマディスプレイに PDP 側金具を取り付ける。 ご注意 ンダースピーカーを取り付けてください。スピーカー 取付金具とスピーカーコードの取り付けはアンダース ピーカーの取扱説明書をご覧ください。 ・ディスプレイにキズ及び破損が生じないように、シー トのようなものを敷いてください。 ・必ず平坦なテーブルなどの上で取り付けてください。 プラズマディスプレイ PDP 側金具 プラズマディスプレイの上側 3 Ja 5 壁側金具を壁に取り付ける。 左右対称の位置を固定する。 (4 ケ所) (各 の 中から 1 ケ所ずつ)。このとき使用するネジ、ボル ト類は壁の強度や材質により異なりますので、 別途 御用意ください。 7 手順1ではずしたネジで金具下側をネジ止め(左右 2 ケ所)する。 ご注意 取り付けの際には、壁や梁の強度を確認してから作業を 行ってください。 ネジ(プラス穴付六角座付ネジ (M6)) 8 【PDP-433HD-U の場合】 アンダースピーカーを取り付ける。 1 スピーカーコードをスピーカー端子に接続する。 2 スピーカーをスピーカー取付金具にのせて、下からス ピーカー付属のネジで固定する(左右 2 ケ所) 。 6 ご注意 PDP 側金具のフックを壁側金具に引っ掛ける。 スピーカーを取り付けるときは、垂直にした状態で取り 1 あらかじめ PDP 側金具の中央のネジを右に回しチル ト部分を引き起こして、引っ掛かり部分が見えるよう 付けてください。 にして取り付ける。 2 引っ掛かり部分がきちんと掛かり、プラズマディスプ レイが水平で正しい位置に取り付いたか確認する。 ご注意 取り付けの際には、スピーカー部分を持たないでくださ い。 フック 右に回す 4 Ja スピーカー 取付金具 アンダースピーカー ■ 角度設定のしかた この取り付け金具は垂直から下向き 25°まで無段階で角度を変えることができます。 作業は必ず二人で行ってください。 壁側用金具の上部中央及び下部中央のネジを左右に回すことによって角度を調整します。 ご注意 ・下部中央で角度調整する場合、角度が開いてくるとネジが回しにくくなりますので、そのときは上部中央で調整してください。 ・ネジを回す場合、壁を傷つけないよう十分注意してください。 ・調整範囲の両端にてネジがきつくなった場合、更に調整ネジを回すと過大な力が加わり、ネジが変形することがありますので、 おやめください。 A 垂直位置の目安 樹脂 プレート B 25°傾き時の目安 板金の端面 プラズマ ディスプレイの背面 スキマがなくなる 両方が一致 壁側金具 切り欠き この状態になったとき、更に閉める方 向に調整ネジを回さないでください。 開く この状態になったとき、更に開く方向 に調整ネジを回さないでください。 壁との開き量Xを測定することで角度設 定時の目安としてください。 六角レンチ X 閉じる A B 樹脂プレート チルト角の目安 角度 X 50 型通常穴 43 型通常穴 43 型上側穴 5° 133mm 130mm 133mm 10° 188mm 181mm 187mm 15° 241mm 231mm 240mm 20° 291mm 279mm 291mm 5 Ja ■ 外形寸法図 質 量 ............. 13.8 kg(金具のみ) 48.5 kg(金具+プラズマディスプレイ< PDP-433HD-S のディスプレイとスピーカー取付時>) 48.0 kg(金具+プラズマディスプレイ< PDP-433HD-U のディスプレイとスピーカー取付時>) 56.1 kg(金具+プラズマディスプレイ< PDP-503HD のディスプレイとスピーカー取付時>) 45.3 kg(金具+プラズマディスプレイ< PDP-433CMX 取付時>) 52.7 kg(金具+プラズマディスプレイ< PDP-503CMX、PDP-503PRO 取付時>) ■ 50 型使用時 98 33 (単位:mm) 655 555 455 (258) (314) 239 (143) 45 25° 573 465 545 59 35 35 6-23x10.5長穴 54 (43) 6-φ10.5 44 714 150 (44) 410 150 212 232 35 (125) (314) (239) 496 740 1218 (スピーカーなし) 1368 (スピーカー付き) ■ 43 型使用時 98 33 (単位:mm) 655 555 455 (240) (240) (165) (143) 45 25° 573 545 410 150 465 35 630 6-23x10.5長穴 12 35 6-φ10.5 2 (47) (2) 78 (アンダースピーカー) 59 150 212 232 35 ( 125 ) 25 ( 240 ) ( 165 ) 496 740 1070 (サイドスピーカーなし) 1220 (サイドスピーカー付き) (3) (18) 2001パイオニア株式会社 禁無断転載 6 Ja ¶ Thank you for purchasing this Pioneer product. ¶ To ensure safe and proper usage, please read the accompanying Operating Instructions carefully before using the product. ¶ Keep the Operating Instructions stored in an accessible place. Installation Work ÷ This product is sold on the premise that it will be installed by a professional with sufficient technique and skills. Make sure to request installation and mounting from a professional construction company or your sales agent. ÷ Pioneer shall not be liable in any way for any accidents or damage resulting from improper installation or mounting, incorrect usage, remodeling, natural disasters or the like. Note to Construction Companies Prior to installing this product, please read Pioneer's technical manual thoroughly and heed its content. 7. As damage that is not readily visible, such as to the interior of the display's metal fixtures or the parts mounted against walls, could cause the display to fall down, make sure to contact a professional construction company for related inspection when having the display inspected or repaired or when having interior finishing done. We recommend having a professional construction company make periodic inspections, when possible. 8. With long-term use, the display's metal fixtures could lose their strength, depending on the environment. To promote problem-free use, we thus recommend having a professional construction company inspect the installation every five years, as a rule. 7 Confirming the parts provided Before assembly, check to make sure that none of the parts provided are missing. * Screws to be used for wall installation are not included. Obtain them separately. 1 Hung on wall unit Pioneer shall not be liable in any way for any accidents or damage resulting from other than the specified assembly, mounting and usage, from remodeling, or from natural disasters or the like. Usage Precautions 1. This product is exclusively for use with the plasma display. 2. It should not be used for any other purpose, such as for holding a plasma display, or remodeled in any way. 3. The installation site should (a) be strong enough to support the weight of the plasma display, (b) not allow people to easily hang from or bump into the setup, (c) not be outdoors or in proximity to hot springs or the ocean, and (d) not be subjected to vibration or shock. (e) In addition, a professional construction company should be consulted in the event that the walls are not structurally sound enough to permit installation. (f) Make sure to thoroughly read the Operating Instructions for the plasma display and heed all other cautions pertaining to the installation site. 4. Assembly and Installation (a) Follow the assembly procedure and tighten screws in all of the specified places. Failure to do so could cause an unexpected accident, such as the display breaking or falling down after it has been installed. (b) For safety reasons, have two or more people perform the work. (c) Prior to starting the work, make sure to turn OFF the plasma display's main power switch and to unplug the power plug from its outlet. 5. Do not loosen any of the screws, as doing so could cause the display to fall down or a similar accident. 6. If you detect any abnormalities or poor performance, immediately contact a professional construction company for repairs. 2 Bolts M8 (6) 3 Hexagon wrench (1) 7 Service Parts List Mark No. Description Parts No. BOLT M8 SPECIAL SCREW PACKING SET INSTRUCTION MANUAL HEXAGON WRENCH AZB1435AZB1439AZH1141AZR1049AZE1122- 7 En 7 Installation procedure 1 Remove the special screws (2 locations) from the bottom of the hung on wall unit. 4 Fix the plasma display to the PDP side hardware with bolt M8 (6 locations). Usually, use the holes marked with the red triangle "%". If the 43-inch model is installed with an inclination of 18° or more, the top part of the screw used to adjust the angle may be visible from a horizontal position in front of the screen. In this case, you can hide the top of the screw by using the holes without a red triangle mark “%”. Special screws (M6) 2 Remove the hardware on the wall side and the hardware on the PDP side. Wall side hardware Top side of plasma display Warning Be sure to install the speaker at this stage. • For the installation method, refer to the speaker installation procedure in the plasma display instruction manual or the under speaker instruction manual. • To install the under speaker in particular, first attach hang the plasma display on the wall with only the speaker installation hardware and the speaker cord attached, then attach the under speaker. Refer to the under speaker operating instructions for the method of attaching the speaker installation hardware and the speaker cord. PDP side hardware 3 Attach the PDP side hardware to the plasma display. Warning • Cover the display with a sheet or similar protective material to protect it from scratches or other damage. • Be sure to attach it on top of a flat table or similar surface. Plasma display PDP side hardware Top side of plasma display 8 En 5 Attach the wall side hardware to the wall. Install the wall side hardware (4 locations) symmetrically on the left and right side (one at each location from the center of the ). Because the screws and bolts used to do this are different according to the wall strength and wall material, purchase suitable screws and bolts separately. 7 Fix the bottom of the hardware with the special screws removed at step 1 (one on the left and one on the right). Warning Check the strength of the wall and beams before installing the display. Special screw (M6) 8 6 Attach the hook on the PDP side hardware to the wall side hardware. 1 First, turn the screw right in the center of the PDP side hardware to raise the tilted part then attach the hook so that the attachment part is visible. 2 Attach the attachment part firmly, then check to make sure that the plasma display has been horizontally attached in the correct position. [When installing the PDP-S08 on the PDP-433HDE or the PDP-433HDG] Install the under speaker. 1 Connect the speaker cord to the terminal on the speaker. 2 Place the speaker installation hardware on the speaker and using the screws that come with the speaker, anchor both from the bottom (2 locations on the left and right). Warning Be sure to install the speaker with the hardware attached vertically. Warning Do not hold the speakers during the installation work. Hook Turn the screw right. Speaker installation hardware Under speaker 9 En 7 Angle setup This installation hardware allows the display to be directed downwards freely at any angle from the vertical to 25°. This adjustment must always be done by 2 people. Adjust the angle by rotating the screws at the center top and center bottom of the wall side hardware to the left or right. Warning • If the angle is increased while you are adjusting the angle using the screw at the center of the bottom, it is difficult to turn the screw. When this happens, adjust it at the center of the upper. • Turn the screws very carefully to avoid damaging the wall. • When a screw becomes tight at either end of the adjustment range, do not turn the adjustment screw any further, because if you do, you will apply excessive force, deforming the screw. B Criterion when its angle is 25° A Criterion for the vertical location End face of the plate Gap disappears Back of the plasma display Resin plate Wall side hardware Notch When it is in this state, do not turn the adjustment screw any further in the closing direction. Opening Matched in both directions When it is in this state, do not turn the adjustment screw any further in the opening direction. Measuring the opening distance X enables approximate angle values to be determined. Hexagon wrench Closing X A B Tilt Angle Criteria Resin plate X Angle Normal holes of Normal holes of Topside holes of 50-inch model 43-inch model 43-inch model 10 En 5° 133mm 130mm 133mm 10° 188mm 181mm 187mm 15° 241mm 231mm 240mm 20° 291mm 279mm 291mm 7 Dimensions Weight ..... 13.8 kg (30.4 lbs) (Hung on wall unit only) 48.5 kg (106.9 lbs) (Hung on wall unit + Plasma Display <When the PDP-433HDE or PDP-433HDG display and the PDP-S09-LR speakers are attached>) 48.0 kg (105.8 lbs) (Hung on wall unit + Plasma Display <When the PDP-433HDE or PDP-433HDG display and the PDP-S08 speakers are attached>) 56.1 kg (123.7 lbs) (Hung on wall unit + Plasma Display <When the PDP-503HDE or PDP-503HDG display and the PDP-S06-LR speakers are attached>) 45.3 kg (99.9 lbs) (Hung on wall unit + Plasma Display <When the PDP-433CMX or the PDP-433MXE are attached>) 52.7 kg (116.2 lbs) (Hung on wall unit + Plasma Display <When the PDP-503CMX or the PDP-503MXE are attached>) 7 When using 50-inch model 98 33 (Unit: mm) 655 555 455 (258) (314) 239 (143) 45 25° 573 465 545 59 35 35 6-23x10.5 54 (43) 6-φ10.5 44 714 150 (44) 410 150 212 232 35 (125) (314) (239) 496 740 1218 (Without side speaker) 1368 (With side speaker) 7 When using 43-inch model 98 33 (Unit: mm) 655 555 455 (240) (240) (165) (143) 45 25° 545 573 465 6-23x10.5 12 35 6-φ10.5 2 (47) (2) 78 (Under speaker) 150 410 630 35 59 150 212 232 35 ( 125 ) 25 ( 240 ) ( 165 ) 496 740 1070 (Without side speaker) 1220 (With side speaker) (3) (18) Published by Pioneer Corporation. Copyright © 2001 Pioneer Corporation. All rights reserved. 11 En ¶ Nous vous remercions pour l'achat de ce produit Pioneer. ¶ Pour assurer un usage approprié et sans danger, lisez attentivement ce mode d'emploi avant d'utiliser ce produit. ¶ Conservez ce mode d'emploi dans un lieu accessible à tout moment. Installation ÷ Ce produit est vendu en supposant qu'il sera installé par un professionnel ayant suffisamment d'expérience et de compétence.Veillez à confier l'installation et le montage à une entreprise professionnelle ou à votre vendeur. ÷ Pioneer décline toute responsabilité en cas d'accidents ou de dégâts causés par une installation ou un montage inadéquat, par une utilisation incorrecte, par un remodelage, ou par des catastrophes naturelles etc. Remarque destinée aux entreprises de construction Avant d'installer ce produit, lisez attentivement le manuel technique de Pioneer et respectez les consignes. Pioneer décline toute responsabilité en cas d'accidents ou de dégâts causés par un assemblage, un montage ou une utilisation non spécifiée dans le manuel, par un remodelage, ou par des catastrophes naturelles etc. Précautions d'utilisation 1. Ce produit ne peut être utilisé qu'avec l'écran plasma. 2. Il doit être utilisé uniquement comme support d’un écran au plasma, àl’exclusion de tout autre usage, et ne doit pas subir de modification. 3. Le lieu d'installation doit être (a) assez solide pour supporter le poids de l'écran plasma, (b) situé de telle façon qu'on ne s'y accroche ou s'y heurte pas facilement (c) à l'intérieur et éloigné de sources chaudes et de l'océan et (d) exempt de vibrations ou de chocs. (e) De plus, vous devez consulter une entreprise de construction professionnelle au cas où les murs ne seraient pas assez solides pour permettre l’installation. (f) Lisez attentivement le mode d'emploi de l'écran plasma et respectez toutes les consignes en rapport avec le lieu d'installation. 4. Assemblage et Installation (a) Suivez la procédure d'installation et serrez les vis dans tous les endroits indiqués. Si vous négligez ces consignes, vous risquez de provoquer des accidents, comme la fracture ou la chute de l'écran après son installation. (b) Pour des raisons de sécurité, employez deux personnes ou plus pour effectuer l'installation. (c) Avant de commencer le travail, mettez l'écran plasma HORS tension à l'aide de l'interrupteur et débranchez le cordon d'alimentation de la prise de courant. 5. Ne desserrez pas les vis sous peine de faire chuter l'écran ou de provoquer d'autres accidents. 6. Si vous détectez des anomalies ou des performances médiocres, contactez immédiatement une entreprise de construction professionnelle en vue de la réparation. 7. Des dégâts qui ne se voient pas facilement, comme ceux qui affectent l'intérieur des barres métalliques derrière l'écran ou les parties fixées aux murs, peuvent provoquer la chute de l'écran. N'oubliez donc pas de faire examiner l'installation par une entreprise professionnelle à l'occasion de l'inspection ou de la réparation de l'écran ou lors d'un l'aménagement intérieur. Nous vous conseillons de faire examiner régulièrement l'installation, si possible par une entreprise professionnelle. 8. La solidité du cadre métallique derrière l'écran peut se dégrader à l'usage, en fonction de l'environnement. Pour éviter des problèmes, nous vous conseillons de faire examiner l'installation systématiquement tous les cinq ans par une entreprise professionnelle. Publication de Pioneer Corporation. © 2001 Pioneer Corporation. Tous droits de reproduction et de traduction réservés. 12 Fr ¶ Vielen Dank für den Kauf dieses Pioneer-Produkts. ¶ Um sicheren und richtigen Gebrauch zu gewährleisten, lesen Sie bitte vor der Verwendung dieses Produkts sorgfältig die beiliegende Bedienung sanleitung. ¶ Bewahren Sie die Bedienung sanleitung leicht zugänglich auf. Installation ÷ Dieses Produkt wird unter der Voraussetzung verkauft, daß es von qualifiziertem Fachpersonal installiert wird. Stellen Sie sicher, daß die Installation und Montage von einem Fachbetrieb oder Ihrem Handelsvertreter durchgeführt wird. ÷ Pioneer schließt jegliche Haftung für Unfälle oder Schäden aus, die aus unkorrekter Installation oder Montage, unkorrektem Gebrauch, Modifikationen, Naturkatastrophen oder ähnlichem resultieren. Hinweis an Montagebetriebe Bitte lesen Sie vor der Installation dieses Produkts gründlich die technische Anleitung von Pioneer, und folgen Sie dessen Inhalt. Pioneer schließt jegliche Haftung für Unfälle oder Schäden aus, die aus anderem als der angegeben Zusammenbauprozedur, der Montage und dem angegebenen Gebrauch, aus Modifikationen, Naturkatastrophen oder ähnlichem resultieren. Sicherheitshinweise zum Gebrauch 1. Dieses Produkt darf nur zusammen mit dem PlasmaDisplay verwendet werden. 2. Das Produkt darf nicht für andere Zwecke wie beispielsweise das Halten eines Plasma-Displays eingesetzt oder in irgendeiner Weise umgebaut werden. 3. Der Installationsort (a) muß stabil genug sein, um das Plasma-Display zu tragen. (b) muß so gewählt werden, daß Personen sich nicht einfach an der Vorrichtung herunter hängen lassen können oder an ihr anstoßen. (c) darf nicht im Freien und in der Nähe von heißen Quellen oder dem Meer liegen und (d) darf keinen Vibrationen oder Stößen ausgesetzt werden. (e) Sie müssen sich an einen Fachbetrieb wenden, wenn die Wände baulich keine Installation zulassen. (f) Lesen Sie die Anweisungen für das Plasma-Display gründlich, und beachten Sie alle anderen Vorsichtsmaßnahmen, die den Installationsort betreffen. 4. Zusammenbau und Installation (a) Folgen Sie der Prozedur für den Zusammenbau, und ziehen Sie die Schrauben an den angegebenen Stellen an. Wenn dies nicht beachtet wird, kann dies nach der Installation zu unerwarteten Zwischenfällen führen, wie das Brechen oder Herunterfallen des Displays. (b) Aus Sicherheitsgründen müssen die Arbeiten von mindestens zwei Personen ausgeführt werden. (c) Vor Beginn der Arbeiten müssen Sie sicherstellen, daß der Hauptnetzschalter des Plasma-Displays ausgeschaltet und das Netzkabel abgezogen ist. 5. Lösen Sie keine Schraube, da sonst das Display herunterfallen oder ähnliches passieren könnte. 6. Falls Sie Unregelmäßigkeiten oder eine schlechte Leistung bemerken, beauftragen Sie zur Reparatur sofort einen Fachbetrieb. 7. Verdeckte Beschädigungen an der inneren DisplayMetallhalterung oder an Wandbefestigungselementen können zum Herunterfallen des Displays führen. Beauftragen Sie daher nach abgeschlossener Montage oder Displayinspektion oder -reparatur einen Fachbetrieb mit den entsprechenden Überprüfungen. Es wird empfohlen, einen Fachbetrieb mit regelmäßigen Inspektionen zu beauftragen, wenn möglich. 8. Bei Langzeiteinsatz können die Metallbefestigungen des Displays abhängig von den Umgebungsbedingungen ihre Stabilität verlieren. Um einen problemlosen Gebrauch zu gewährleisten, wird empfohlen, die Installation regelmäßig (ca. alle fünf Jahre) durch einen Fachbetrieb überprüfen zu lassen. Veröffentlicht von Pioneer Corporation. Urheberrechtlich geschützt © 2001 Pioneer Corporation. Alle Rechte vorbehalten. 13 Ge ¶ Grazie per aver acquistato questo prodotto Pioneer. ¶ Per garantire un impiego sicuro e corretto, si prega di leggere attentamente le istruzioni per l’uso allegate prima di utilizzare il prodotto. ¶ Custodire le istruzioni per l’uso in un luogo accessibile. Procedura di installazione ÷ Questo prodotto è venduto con il presupposto che sarà installato da personale specializzato in possesso della tecnica e dell’abilità necessarie. Richiedere l’installazione e l’assemblaggio da parte di una società di costruzioni specializzata o del rappresentante di vendita. ÷ Pioneer non è responsabile in alcun modo in caso di incidenti o danni dovuti ad installazione o montaggio impropri, uso scorretto, rimodellamento, disastri naturali o simili. Nota per le società di costruzioni Prima di installare questo prodotto, leggere attentamente il manuale tecnico Pioneer e prestare attenzione al suo contenuto. Pioneer non è responsabile in alcun modo di incidenti o danni provocati dall’assemblaggio, dall’installazione o dall’impiego diversi da quelli indicati oppure in caso di disastri naturali o simili. Precauzioni di impiego 1. Questo prodotto deve essere utilizzato esclusivamente con il display al plasma. 2. Deve essere utilizzato solo ed esclusivamente come sopporto di uno schermo al plasma. Non deve essere oggetto di modifiche. 3. Il sito di installazione (a) deve essere abbastanza resistente da sostenere il peso del display al plasma, (b) deve essere in posizione tale da evitare a chiunque di appendersi o di urtare l’installazione, (c) non deve essere all’aperto o in prossimità di sorgenti di acqua calda o del mare e (d) non deve essere soggetto a scosse o vibrazioni. (e) E’ inoltre necessario consultare una società specializzata nelle costruzioni nel caso in cui le pareti non siano strutturalmente abbastanza solide da permettere l’installazione. (f) Accertarsi di aver letto approfonditamente le istruzioni per l’uso del display al plasma e di osservare le altre avvertenze relative al sito di installazione. 4. Assemblaggio e installazione (a) Seguire la procedura di assemblaggio e serrare le viti in tutti i punti indicati. In caso contrario può verificarsi un incidente imprevisto, come la rottura o la caduta del display dopo l’installazione. (b) Per motivi di sicurezza è necessario che due o più persone eseguano il lavoro. (c) Prima di iniziare la procedura, assicurarsi di aver spento l’interruttore principale del display al plasma e di aver estratto la spina di alimentazione dalla relativa presa. 5. Non allentare alcuna vite, altrimenti può verificarsi la caduta del display o incidenti simili. 6. Se vengono riscontrate anomalie o prestazioni insufficienti, contattare immediatamente per le necessarie riparazioni una società di costruzioni specializzata. 7. Danni non visibili immediatamente, come i danni alle parti interne degli attrezzi di fissaggio del display o alle parti montate a parete, possono provocare la caduta del display; assicurarsi dunque di contattare una società di costruzioni specializzata per la relativa ispezione in caso di ispezione o riparazione del display o dopo l’esecuzione delle finiture interne. Se possibile, si consigliano ispezioni periodiche da parte di società di costruzioni specializzate. 8. In seguito all’uso prolungato, gli attrezzi di fissaggio in metallo del display possono perdere resistenza in base alle condizioni ambientali. Per garantire un impiego senza problemi si consiglia l’ispezione dell’installazione a intervalli di cinque anni, di regola da parte di società di costruzioni specializzate. Pubblicato da Pioneer Corporation. Copyright © 2001 Pioneer Corporation. Tutti i diritti riservati. 14 It ¶ Wij danken u voor de aankoop van dit Pioneer product. ¶ Voor een correcte en veilige toepassing raden wij u aan deze gebruiksaan wijzing vóór gebruik aandachtig door te lezen. ¶ Bewaar deze gebruiksaan wijzing op een makkelijk toegankelijke plek. Installatie ÷ Dit product wordt verkocht uitgaande van de veronderstelling dat het door een professionele technicus met voldoende ervaring en competentie wordt geïnstalleerd.Vertrouw de installatie en de montage in ieder geval toe aan een professioneel bedrijf of aan uw verkoper. ÷ Pioneer kan in geen geval verantwoordelijk worden gesteld voor ongelukken of schade die het gevolg zijn van een verkeerde installatie of montage, een onjuist gebruik, een ombouw of van natuurrampen en dergelijke. Opmerking voor bouwbedrijven Lees aandachtig de technische handleiding van Pioneer voordat u met de installatie begint en respecteer de gegeven richtlijnen. Pioneer kan in geen geval verantwoordelijk worden gesteld voor ongelukken of schade die het gevolg zijn van een assemblage, montage of gebruik die niet in de handleiding wordt aangegeven, van een ombouw of van natuurrampen en dergelijke. Voorzorgsmaatregelen i.v.m. het gebruik 1. Dit product kan alleen gebruikt worden met het plasmabeeldscherm. 2. Het mag niet worden gebruikt voor andere doeleinden, zoals het monteren van een plasmascherm, of worden gewijzigd. 3. De installatieplek moet (a) stevig genoeg zijn om het gewicht van het plasmabeeldscherm te kunnen dragen, (b) zo gelegen zijn dat men er niet makkelijk gaat aan hangen of tegen gaat stoten, (c) niet buiten gelegen zijn of vlakbij een warmwaterbron of een oceaan, (d) niet blootgesteld zijn aan trillingen of schokken. (e) B o v e n d i e n m o e t u a d v i e s v r a g e n a a n e e n professionele aannemer indien blijkt dat de muren niet voldoende stevig zijn om een degelijke installatie mogelijk te maken. (f) Lees aandachtig de gebruiksaanwijzing van het plasmabeeldscherm en neem alle voorschriften in acht die op de installatieplek betrekking hebben. 4. Assemblage en installatie (a) Volg de installatieprocedure en schroef op alle aangewezen plaatsen de moeren aan. Verzuimt u dit, dan kan dit onverwachte ongelukken veroorzaken, zoals het breken en vallen van het scherm na installatie. (b) Zet om veiligheidsredenen twee of meer personen aan het werk. (c) Zet voordat u begint eerst het plasmabeeldscherm UIT en trek de stekker uit het stopcontact. 5. Draai geen moeren los. Hierdoor kan het beeldscherm gaan vallen of kunnen er andere ongelukken gebeuren. 6. Ontdekt u iets abnormaals of werkt het apparaat slecht, neem dan onmiddellijk contact op met een professioneel bedrijf voor een reparatie. 7. De gebreken op moeilijk zichtbare plaatsen, zoals binnen in het metalen raamwerk achter het scherm of in de delen die aan de muur bevestigd zijn, kunnen de val van het scherm veroorzaken. U moet dus met een professioneel bedrijf contact opnemen voor een onderzoek. Dit kan gebeuren wanneer u het scherm laat inspecteren of repareren of wanneer u de ruimte inricht. Wij raden u aan de installatie door een professioneel bedrijf indien mogelijk regelmatig te laten onderzoeken. 8. Bij langdurig gebruik kan het metalen raamwerk achter het scherm aan stevigheid inboeten, afhankelijk van omgevingsfactoren. Om problemen te voorkomen raden wij u aan de installatie door een professioneel bedrijf systematisch om de vijf jaar te laten onderzoeken. Uitgegeven door Pioneer Corporation. Copyright © 2001 Pioneer Corporation. Alle rechten voorbehouden. 15 Du ¶ Gracias por adquirir este producto Pioneer. ¶ Para garantizar un uso correcto y seguro, lea cuidadosamente las Manual de instrucciones antes de utilizar el producto. ¶ Guarde las Manual de instrucciones en un lugar seguro y accesible. Trabajo de instalación ÷ Este producto se vende con la condición de que será instalado por un profesional experto. Solicite la instalación y el montaje a una empresa constructora profesional o a su distribuidor. ÷ Pioneer no será responsable en ningún caso de los posibles accidentes o lesiones debidos a la instalación o montaje incorrectos, el uso indebido, cambio de configuración, desastres naturales o causas similares. Nota para empresas constructoras Antes de la instalación, el manual técnico de Pioneer debe leerse en su totalidad y su contenido debe seguirse cuidadosamente. Pioneer no será responsable en ningún caso de los posibles accidentes o lesiones debidos a la instalación o el montaje incorrectos, el uso indebido, el cambio de configuración, desastres naturales o causas similares. Precauciones de utilización 1. El producto está destinado sólo al uso con la pantalla de plasma. 2. No deberá emplearse para ningún otro propósito-como, por ejemplo, para utilizar una pantalla de plasma distinta-, ni remodelarse en forma alguna. 3. El lugar de instalación debe (a) tener la suficiente resistencia para soportar el peso de la pantalla de plasma, (b) dificultar el acceso de personas para que puedan colgarse o saltar sobre el soporte, (c) estar en ubicaciones de interior y alejado de corrientes cálidas o del mar, y (d) estar alejdo de vibraciones o golpes. (e) Además, deberá consultarse a una empresa constructora en caso de que las paredes no presenten una resistencia estructural suficiente para permitir la instalación. (f) L e a d e t e n i d a m e n t e l a s I n s t r u c c i o n e s d e funcionamiento de la pantalla de plasma y siga todas las advertencias referentes al lugar de instalación. 4. Montaje e instalación (a) Siga el procedimiento de montaje y apriete los los tornillos de todos los puntos especificados. De no hacerlo así, puede provocarse un accidente, como la rotura de la pantalla o su caída después de la instalación. (b) Por motivos de seguridad, pida que le ayuden dos o más personas en esta tarea. (c) Antes de empezar a trabajar, apague (OFF) el conmutador principal de encendido y saque el enchufe de la toma de la pared. 5. No afloje ningún tornillo; si lo hace, puede provocar la caída de la pantalla o un accidente similar. 6. Si detecta alguna irregularidad o un funcionamiento deficiente, póngase en contacto inmediatamente con una empresa constructora que efectúe las reparaciones. 7. Hay algunos daños internos que no están a la vista, como los elementos metálicos interiores de la pantalla o las piezas montadas en paredes, que pueden ser causa de su caída. Por esta razón, póngase en contacto con una empresa constructora para que realice una inspección una vez instalada la pantalla o tras el acabado de interiores. Cuando sea posible, es recomendable que una empresa constructora efectúe revisiones periódicas. 8. Con el uso prolongado, los elementos metálicos de la pantalla pueden perder resistencia, según el entorno. Para lograr un funcionamiento sin problemas, se recomienda adoptar la norma de que una empresa constructora revise la instalación cada cinco años. Publicado por Pioneer Corporation. Copyright © 2001 Pioneer Corporation. Tados los derechos reservados. 2001パイオニア株式会社 禁無断転載 Published by Pioneer Corporation. Copyright © 2001 Pioneer Corporation. All rights reserved. 153-8654 東京都目黒区目黒1丁目4番1号 PIONEER CORPORATION 4-1, Meguro 1-Chome, Meguro-ku, Tokyo 153-8654, Japan PIONEER ELECTRONICS (USA) INC. P.O. BOX1540, Long Beach, California 90801-1540, U.S.A., TEL: 1-310-952-2111 PIONEER ELECTRONICS OF CANADA, INC. 300 Allstate Parkway, Markham, Ontario L3R 0P2, Canada, TEL: 1-905-479-4411 PIONEER EUROPE NV MULTIMEDIA DIVISION Pioneer House Hollybush Hill, Stoke Poges, Slough SL2 4QP, U.K., TEL: 44-1753-789-789 PIONEER ELECTRONICS AUSTRALIA PTY.LTD. 178-184 Boundary Road, Braeside, Victoria 3195, Australia, TEL: 61-39-586-6300 PIONEER ELECTRONICS ASIACENTRE PTE. LTD. 253 Alexandra Road #04-01, Singapore 159936 TEL: 65-472-1111 PIONEER HIGH FIDELTY TAIWAN CO., LTD. 13FL. No.44 Chung Shan North Road Sec.2. Taipei TAIWAN, TEL: 886-2-2521-3588 PIONEER ELECTRONICS (CHINA) LTD. Room 1704-06, 17/F World Trade Centre, 280 Gloucester Rd. Causeway Bay, Hong Kong, TEL: 852-2848-6488 PIONEER GULF FZE Lob 11-017, Jebel Ali Free Zone, P.O. BOX 61226, Jebel Ali, Dubai, United Arab Emirates, TEL: 971-4-815756 16 Sp Printed in Japan / Imprimé au Japon <AZR1049-C>