1
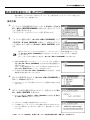
R-4 Pro 追加機能について
Timecode の Frame Rate の設定値追加
Timecode の Frame Rate が 23.976 にも対応します。
取扱説明書 P.74 の表が以下のように変更になります。
(太字の表記は、初期値です。)
メニュー
Setup
パラメーター名
Frame Rate
値
23.976, 24, 25, 29.97, 29.97D,
30, 30D
効果
映像のフレーム数を選択します。
R-4 Pro の Timecode のクロックの誤差は最大で以下のとおりです。
Frame Rate の値
24, 25, 29.97D, 30, 30D
29.97
23.976
誤差
50ppm
80ppm
120ppm
※ 1ppm は 100 万秒につき最大 1 秒の誤差が生じ得ることを表します。
外部電源消耗時の終止電圧設定機能
外部電源の消耗により電源が自動的に切れた場合でも、再度電源を入れると約 30 秒間 R-4 Pro が起動し
ます。この間に終止電圧の設定を変更することができます。
※ 電源に AC アダプターを使用する場合は、終止電圧(Ext-Power)を Adaptor に設定してください。
終止電圧の設定方法は、取扱説明書『終止電圧設定方法』(P.27)をお読みください。
*
4
0
7
8
0
0
0
1
-
0
1
*
40780001
1PD
R-4 Pro 追加機能について
プロジェクトの修復 (Repair)
録音の最中に、AC アダプターが抜けてしまったり、誤って電池を抜いてしまったりなどして再生できな
くなったプロジェクトを修復します。
操作手順
fig.finder-1.eps
1
ディスプレイに基本画面が表示されているとき、エンター/ファイン
ダー・ボタン[ENTER/FINDER]を押します。図のようにファイ
ンダー画面が表示されます。
プロジェクトは、上からアルファベット順に表示されます。
fig.finder-select.eps
2
ファインダー画面の状態で、カーソル・ボタン[CURSOR]の上下
やスク ラブ・ダイヤル[SCRUB]を操作して、修 復するプ ロジェ
クトを選択します。選択したらエンター・ボタン[ENTER]を押し
ます。
選択したプロジェクトがフォルダの場合やハードディスク(HD)や外部記憶装置 (EX) のとき
は、カーソル・ボ タン[CURSOR]の右を押す とフォルダの 中(下位フォルダ)に 移動する
ことができます。
また、上位フォルダに移動したい場合は、カーソル・ボタン[CURSOR]の左を押します。
fig.finder-ext.eps
※ 外部記憶装置を選択したいときは、ハード・ディスク(HD)を選択した
状態でカーソル・ボタン[CURSOR]の左を押すと外部記憶装置 (EX)
が表示されます。
ただし、外部記憶装置をマウントしていない場合 EX は表示されません。
取扱説明書『接続と取り外し』(P.77)をお読みください。
※ EX を選んだ後に カーソル・ボタン[CURSOR]の右を押すと、外部記
憶装置の内容を参照することができます。
fig.repair1-menu.eps
3
図のような画面が表示されたら、カーソル・ボタン[CURSOR]を
操作して 6 Repair を選びます。
※ 「6 Repair」は、R-4 Pro が壊れたプロジェクトを認識した場合にのみ表
示されます。
ig.repair-proce.eps
4
図の よう な確 認の 画面 が表示 され ます ので、確 定す るた めにエ ン
ター・ボタン[ENTER]を押します。
※ 中止し たい場合は、エンタ ー・ボタン[ENTER]を押す前にイ グジッ
ト・ボタン[EXIT]を押してください。
fig.repair-proce.eps
※ プロジェクトの修復中に電源を切らないでください。
※ この機能によって、すべてのファイルが修復できるわけではありません。
R-4 Pro の使用中に、AC アダプターを抜いたり、電池を抜いたりしない
でください。
© 2007 ローランド株式会社 本書の一部、もしくは全部を無断で複写・転載することを禁じます。
2
Operating Manual for added
functions in R-4 Pro
Added Timecode Frame Rate setting value
The Timecode Frame Rate also supports 23.976.
Page 76 in the Owner’s Manual has changed as follows. (The values in boldface are the default values.)
Menu item
Setup
Parameter
Value
23.976, 24, 25, 29.97, 29.97D, 30,
30D
Frame Rate
Function
Selects the frame rate.
The maximum clock error for the R-4 Pro Timecode is shown below.
Clock error
50ppm
80ppm
120ppm
Value of Frame Rate
24, 25, 29.97D, 30, 30D
29.97
23.976
* 1 ppm indicates a maximum error of one second per million seconds.
Feature to set final voltage when using an external
power source
When using an external power source, even when power is automatically cut off, the R-4 Pro starts within
30 seconds after power is turned back on. During this period, the final voltage settings can be changed.
* When the AC adaptor is used for power, set the final voltage (Ext-Power) to Adaptor.
See “Setting final voltage” (p. 29) in the Owner’s Manual to set the final voltage.
*
4
0
7
8
0
0
0
1
-
0
1
*
40780001
1PD
Repairing a project (Repair)
This feature allows you to repair files that cannot be played because an accident occurred during recording;
for example, an adaptor was mistakenly disconnected or the battery were removed.
Procedure
fig.finder-1.eps
1 While the Main screen is shown in the display, press the
[ENTER/FINDER] button. The Finder screen shown in
the illustration will appear.
Projects are shown in descending alphabetical order.
fig.finder-make1.eps
2
In the Finder screen, use the [CURSOR] up/down
buttons or the [SCRUB] dial to select the project that you
want to repair. Then press the [ENTER] button.
If the desired project is in a folder, the hard disk (HD), or the external memory device (EX), you
can press the [CURSOR] right button to move into the selected folder (i.e., move to a lowerlevel folder). If you want to move back to the upper-level folder, press the [CURSOR] left
button.
fig.finder-cf.eps
* If you want to select the external memory device, select the hard disk
(HD) and then press the [CURSOR] left button to show the
external memory device (EX). However, if the external memory device
is not mounted, it will not be displayed. See Owner’s Manual
Connection and removal (p. 79).
* Press the [CURSOR] right button after selecting EX to reference
the external memory device contents.
fig.finder-make2.eps
3 When the screen shown in the figure is displayed, use the
[CURSOR] buttons to select 6 Repair.
* “6 Repair” is displayed only when the R-4 Pro detects a damaged
song.
fig.finder-make3.eps
4
When the screen shown in the figure is displayed, press
the [ENTER] button to confirm the operation.
* If you decide to cancel without executing, press the [EXIT] button
before you press the [EXIT] button.
fig.finder-make4.eps
* Do not turn off the power while a project is being repaired.
* This feature cannot repair all files. Do not disconnect the adaptor or
remove the memory card while the R-4 Pro is being used.
fig.new
Copyright © 2007 ROLAND CORPORATION
All rights reserved. No part of this publication may be reproduced in any form without the written permission of ROLAND CORPORATION.