1
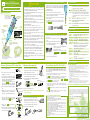
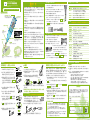
Pocket-sized pH Meter
Before use, please read this manual thoroughly. After reading it, keep it together
with the pH meter as a reference.
es
tur
Fea
• Non-glass, unbreakable silicon micro-pH meter
• Display pH and temperature • Stabilization indicator • Waterproof
• Measure samples as small as onedrop • Replaceable reference electrode
NAME AND FUNCTIONS
Power Button
The power will automatically
turn off, if no buttons are
pressed for 30 minutes
Waterproof
Gasket
Longevity Indicator
of the reference
electrode
pH sensor
Button for pH7.0
calibration
℃, pH
Symbol
Mark
Calibration
Indicator
Bubble
Probe Tip
CAL Button
C
B
Waterproof
Gasket
Battery Alarm
Low battery indicater, replace
battery.
Reference Electrode
Replaceable saturated KCI Ag/AgC1
electrode
Reference Junction
Measurement is made when the
reference junction and the pH sencor are
connected by solution
Protective Cap
Always replace the cap
after use
REPLACING THE REFERENCE ELECTRODE
! CAUTIONS
S2K922 USER'S MANUAL
•Keep the S2K922 and all accessories (protective cap, battery,
and standard solutions) out of the reach of children. Please
consult a doctor immediately if swallowed.
•Prevent the pH standardized liquid from contacting eyes or
skin, and do not drink.
•Do not incinerate or attempt to charge the button battery.
•The battery is used to operate a monitoring function, so
battery life may be shortened.
•The reference electrode's longevity may be shortened in this
pH Meter due to the monitoring function.
•DO NOT store the sensor in solution or use for long term pH
measuring applications.
•DO NOT use below 5 ℃ or above 40℃ (40 – 105℉ ).
•DO NOT leave the sensor uncapped for long periods of time.
•DO NOT allow oil, fat, food particles, starch, protein, or other
materials to remain on the pH sensor after use.
•DO NOT use a sharp metal object (needle, pin, etc.) to clean
the pH sensor surface.
•DO NOT use in an environment that will damage pH sensor or
meter: Organic solvents (acetone, toluene, thinner, oils), strong
acids (pH 0-2), strong alkalis (pH 12-14), abrasive samples,
silicon etching compounds (hydrofluoric acid).
•DO NOT press the POWER or CAL buttons with sharp objects.
•DO NOT submerge the meter. The meter has water-resistant
O-ring seals, but it is not submersible.
•D O N O T u s e i n e n v i r o n m e n t s w i t h s t a t i c e l e c t r i c i t y .
Electrostatic discharge may permanently damage the probe.
•Do not expose the pH meter to electromagnetic radiation.
•Never put into a microwave as this may cause overheating. •Never wash in an ultrasonic bath.
•Do not bend or drop the main body or reference electrode.
•NEVER disassemble, attempt to repair or alter the main body
of the pH meter.
ALARM MESSAGES
° Er3pS
1. Replace the Reference Electrode When…; 1.The bubble
in the reference electrode fills half the liquid chamber.
2.Response time slows. 3.There is difficulty in obtaining
a stable reading.
C7.01pHCalibration
2. Wipe the pH meter dry.
H.L pH
3. Pull the reference electrode out of the pH meter.
4. Check to be sure that the watertight O-ring is clean and
properly seated on the new reference.
H.L ℃
Below 5 ℃ or above 40 ℃ (40 – 105℉ )
6. Recalibrate the pH meter. Turn on the meter and be
sure Er3 °
pS disappears and the readout shows pH/
Temperature.
Er3pU
The pH sensor has been damaged.
Replace the meter
Er3℃
The Temperature sensor has been damaged.
Replace the meter
Bubble
SPECIFICATIONS
REPLACING THE BATTERY
1. Wipe the pH meter dry. Do not open the meter case if the pH
meter is wet.
2. Pull the meter case apart as shown to the
right.
3. Gently dry out the battery and replace with the
one 3v lithium CR2032 battery. The (+) side
of the battery should face up.
4. Be sure the O-ring is not damaged and is
in the correct position.
5. Reassemble the meter.
6. Recalibrate. (Press the power button.
C 7.01pH and then C 0.00pH will
display and the calibration mode will be
started.)
7. Dispose of the old battery properly.
Measure the sample pH
1.Press the power button.
1.Measure the sample's pH by placing a
single drop of solution on the probe tip or
dipping the probe into solution.
4.Rinse the probe in tap water and blot
dry.
Sample Solution
Reference Junction
Stable pH readinng
pH7.0 standard solution
Reference Junction
6.Press the CAL button once with the
tip of the clip. The C icon, pH and
temperature will flash alternately.
8.Rinse the probe in tap water and blot
dry. To measure the pH of a sample,
go to the next step.
As an enhanced feature, the meter is capable of up to 2-point calibration.
Only the standard buffers of pH 4.01, 7.01, and 9.18 are allowed on our
meter. For both alkaline and basic solutions the pH 7.0 buffer calibration
is performed the first.
3.Then the temperature disappears and the
pH is displayed.
Sample Solution
pH Sensor
7.W h e n t h e C mark disappears,
calibration is complete.
2-point calibration using pH 7.01, pH4.01, pH9.18
2.The pH and temperature will flash in turn
until a stable reading is obtained.
C
B
5.Apply one drop of 7.01 buffer to the
probe tip. Be sure to cover both the reference junction and the pH sensor.
Product
Sensor
Range
Accuracy
Stability indicator
Measuring Temperature
Operating Temp. Range
Function
Battery
Battery life
Dimensions
Weight
Accessories
Reference
S2K922
Silicon chip ISFET On chip Temp. sensor
pH2-pH12 0℃〜 50℃
± 0.02pH ± 1℃
>± 0.02 pH :"pH/temp."will flash in turn
Power ON
:"pH/temp."will flash in turn
5℃〜 40℃
1(2)point auto calibration, automatic
temperature compensation, waterproof,
automatic power off, error massages
3V lithium battery CR2032 x 1
150 hours ( approx.)
142× 28× 15mm
42g (0.1 lbs.)
Users manual, pH 7.01 standard solution,
carry case
Consumable Part No.R2K712
S2K922 WARRANTY
One-point calibration using pH7.01 standard buffer
3.The pH meter automatically enters
the measurement mode. The display
alternates pH and temperature when
the power button is pressed.
(The icon H.L pH will flash until one
drop of solution is applied to the probe
tip or the probe is dipped into solution.)
mode after Replacing Battery
pH is below pH2 or above pH12. (No pH buffer
on the pH sensor / pH sensor and reference
electrode junction are not both covered with
solution.)
5. Insert the new reference into the pH meter. ISFETCOM
Part No. R2K712.
CALIBRATION AND MEASUREMENT
2.This will be indicated on the LCD
display for one second.
The reference electrode is disconnected from
the main unit. Check the Reference Electrode or
replace the Reference Electrode.
CAL Button
C
pH Sensor
4.Press to turn the meter off.
5.When finished, always rinse the probe and replace
the protective cap.
Cleaning the Sensor
1.Gently clean the sensor with soapy
water and a toothbrush or cottontipped swab. Do not clean the sensor
with organic solvents such as
acetone, methanol, benzene, or thinner.
2.Rinse the sensor with water.
Stable pH readinng
3.Recalibrate.
1. Dip the probe into the pH7.01 buffer solution. Press the CAL button
for more than 5 seconds with the tip of the clip.
2. The C icon, pH and temperature will flash in turn until a stable reading
is obtained. The meter will automatically identify the buffer value.
3. When the first step of calibration is complete, the C icon, 4.01pH and 9.18pH will flash in turn, go to Step 4.
4. Rinse the probe in tap water and blot dry.
5. Dip the probe into the pH4.01 (or pH9.18) buffer solution. Press
the CAL button with the tip of the clip. The meter will automatically
identify the buffer value.
6. The C icon, pH and temperature will flash in turn until a stable reading
is obtained.
7. When C
icon disappears, calibration of the second point is complete,
and the pH of samples can now be measured.
Notes on Calibration and Measurement
• Soak the probe into solution (neutral) for 5 minutes if the probe is new or
has not been in regular use.
• Clean the probe regularly with soft cotton-tipped swabs.
• Keep the sensor surface clean. Be sure the surface of the sensor in the
probe is free from any deposits or film.
• STORE THE PROBE DRY with the protective cap covering the probe tip.
No electrode storage solution is required. Always place the protective cap
over the sensor tip when finished measuring.
• Be sure to use pH 7.01 buffer as a calibration standard.The use of other
solutions to calibrate may make measurements inaccurate.
• DO NOT take readings in direct sunlight. Direct sunlight may cause
unstable readings or difficulty in calibration.
• Rinse the sensor with distilled or deionized water when testing the pH of
tap water, rainwater, or clean water.
• To measure solids such as soil, make a slurry of the sample in deionized
or distilled water.
• Do not scratch the pH sensor.
• White powder or gel on the pH sensor is KCI reference solution. Clean
before using.
Warranty Stipulations
• The product shall be repaired or replaced free of charge should any trouble occur during the course
of normal use if returned within the warranty period (one year from date of purchase). In which event,
contact the dealer of purchase. Return the meter with proof of date of purchase.
• Expenses shall be incurred in the following instances within the warranty period. (Costs such as
postage shall be paid by the customer)
• Warranty does not apply in the circumstances listed below.
a) When the date of purchase and store name is not written on the warranty.
b) When trouble or damage has been incurred due to misuse, abuse, and/or improper handling.
c) When the meter has been repaired, modified or dismantled by persons other than the designated
agent or service shop.
d) In the event of changes in external appearance such as scratches or dirt caused during use or
battery fluid leakage.
e) In the event of unsuitable movement, dropping or accidents such as fire, earthquakes, floods or a
burglary.
f) When replacing consumables and accessories.
g) When cause of trouble lies not in the meter itself.
h) When this warranty is not shown or when necessary particulars have not been written in the
warranty.
Our obligation under this warranty is to repair or replace the meter free of charge in accordance with the
conditions laid down herein. Accordingly, this warranty does not limit your specific legal rights.
"
LIMITED WARRANTY
Thank you for purchasing the S2K922. The product you purchased has passed
strict quality control and inspections. Should any trouble occur during the course of
normal use, the meter will be repaired or replaced free of charge in accordance with
the stipulations laid down herein. The term of this warranty shall be for one year
from date of purchase. This warranty excludes batteries, the reference electrode,
and accessories.
Product name: Pocket pH meter S2K922 Company/Facility: Address: Phone: Date of Purchase:
Purchased from:
ISFETCOM Co., ltd.
http://global.isfet.com/
319-3 Shimokayama, Hidaka-shi, Saitama 350-1233 Japan
Copyright ISFETCOM Co,. ltd. 2009-2010 All rights reserved
ISFETCOM 防水型ポケットpH計
!
S2K922 取扱説明書
ご使用に際しては、この説明書きを必ずお読みください。
また必要なときに
読めるように大切に保管してください。
●非ガラス・堅牢なpHセンサ ●温度表示 ●安定判定
特徴 ●防水 ●すばやい応答 ●一滴測定 ●交換できる比較電極
各部の名称と機能
POWERスイッチ
電源のON状態で30分間何もしな
ければ自動的に電源が切れます。
CALスイッチ
校正を行います。
比較電極の交換のしかた
警 告
1. 交換の目安は、比較電極の先端を下向きにし右図のように
2. 本体に付いた水をよく拭き取ってから作業してください。
●p H標準液は、飲んだり、目に入れたり、身体につけたりし
ないでください。
3. 本体から比較電極を引き抜きます。
●取り外したボタン電池は火中に投げ込んだり、充電しないで
ください。
●本機にはモニター電池が付属していますが、寿命が短い場合
があります。
●本機に付属の比較電極はモニター用なので寿命が短い場合が
あります。
防水パッキング
校正マーク
℃、
pHマーク
バブル
比較電極の寿命の
目安です。
pHセンサ
C
B
防水パッキング
電池の寿命を知らせます。
点灯したら
交換してください
比較電極
●つぎのようなサンプルの pH測定は行わないでください。有
機溶媒 (シンナー、ベンジンなど )、強酸 (pH0〜 2)、強ア
ルカリ (pH12〜 14)、界面活性剤、アルコール類、油類、
接着剤、セメントなどは本機を破損する可能性があります。
●保護キャップを外したままで放置しないでください。
●洗浄中、針やピンなどの尖ったもので pHセンサ表面を傷つ
けないでください。
寿命があります。交換できます。
●強い静電気や電磁波に近づけないでください。
●電子レンジでの過熱、超音波での洗浄はしないでください。
●本体を曲げたり、落としたりしないでください。また本体は
絶対に分解・修理・改造をしないでください。
液絡芯
液絡芯とpHセンサを溶液で覆うとpH測定がで
きます。
保護キャップ
使用しないときは装着して
ください。
濡れていると内部に水が入り故障の原因になります。
4. 新しい比較電極を本体にしっかり差し込みます。このとき
防水パッキンがよじれないよう注意してください。
●暖房器具のそば、車の中、直射日光が当たり高温になるとこ
ろに保管しないでください。
えることを確認してからご使用ください。
バブル
° 未装着エラーが点滅するなら、装着状態を再度ご
( Er3pS
確認ください。)
電池交換のしかた
サンプルの pHが pH2〜 pH12の範囲外。
(サンプル液がセンサ部に付いていない場合 )
H.L ℃
サンプルの温度が 5℃〜 40℃の範囲外。
Er3pU
pHセンサの故障で、点滅後パワーオフ。
Er3℃
温度センサの故障で、点滅後パワーオフ。
仕 様
型式名称
S2K922
測定方式
シリコンチップ ISFET オンチップ温度センサ
測定範囲
pH2-pH12 0℃〜 50℃
再 現 性 ± 0.02pH ± 1℃
示
pH・温度を液晶デジタル表示
>± 0.02 pH:
「pH/温度」交互表示
温度計測
電源 ONで「pH/温度」交互表示
2. 本体ケースを図のように引き抜きます。
使用温度
5℃〜 40℃
3. ペン先などで電池を浮かせ取り外してください。
機 能 自動 1,2点校正 自動温度補償
生活防水構造 ,オートパワーオフ機能 ,各種自己診断
電 源 3V(リチウム電池 CR2032)× 1個
電池寿命
連続使用にて 150時間以上
寸 法 142× 28× 15mm
重 量 42g(電池含む )
材 質 ASA樹脂 , PA樹脂 , COP樹脂
付 属 品 標準液 pH6.86, キャリアケース ,
取扱説明書 , 保証書
消 耗 品 比較電極 (型式 R2K712)別売
4. 新しい電池を + 側を上にしてセットします。
5. 本体ケースを差し込みます。このとき防水
パッキンがよじれないようご確認ください。
6. 電池交換した場合、かならず pH6.86 校正を
おこなってからご使用ください。
7.POWER スイッチを押すと C 6.86pH が点灯・表示され pH6.9 の
校正を要請します。CAL スイッチを押すと C 0.00pH が点滅・表示
され、つづいて自動的に pH6.9 校正がおこなわれます。
S2K922pH計 品質保証書
標準液校正 2点校正 pH6.86, pH4.01, pH9.18
1.POWERスイッチを押してください。
1.センサ部をサンプル液に浸します。
本機は 1点校正で十分ですが、拡張機能で 2点校正もできます。
2点校正は、酸性領域では pH6.86と pH 4.01, アルカリ側では
pH 6.86と pH 9.18、それぞれの領域で行います。酸性、アル
カリどちらの領域でも必ず pH6.86から始まる事になっています
始まる事になっています。使用目的に合わせてご使用下さい。
2.測定値が安定するまで、温度と pHが交互
に表示されます。
C
B
3.安定値になりますと pH値だけの表示に
なりますので数値を読み取ってください。
3.自動的に測定モードに入ります。温度
と pH値が交互に表示されます。(この
ときセンサ部に溶液が無いと H.L pH
が表示されますが異常ではありませ
ん)
サンプル液
サンプル液
液絡芯
pH値安定
6.9標準液
液絡芯
5.pHセンサ部に pH6.86標準液を滴下
するか、標準液に浸します。
pHセンサ
CALスイッチ
6.CALスイッチを押して Cマークを点滅
させます。(校正時の温度と pH値が交
互に表示されます。)
C
pHセンサ
4.測定が終了しましたら、電源スイッチを押して電源を
切ります。
5.測定終了後はセンサ部を水道水などでよく洗浄し、水滴
をふき取り、保護キャップをしてください。
pHセンサの洗浄
1.綿棒のような柔らかい物に水又は中性
洗剤を含ませ pH センサ表面の汚れを
きれいに拭き取ります。シンナー、ベ
ンジンなどの有機溶剤では絶対に洗わないでください。
2.pH センサを水道水、純水でよく洗浄してください。
pH値安定
3.正常に校正ができる事を確認してご使用ください。
1.pH6.86標準液に浸し CALスイッチを 5秒以上押し、2点校
正モードに入ります。
2. C マークと pH値と温度が交互に点滅し、pH6.86の校正を
行います。
3. pH6.86の校正が終わると、C マークとともに 4.01pH と
9.18pH が交互に点滅します。
4. 先端のセンサ部を水道水などで洗浄します。
5. pH4.01(pH9.18)標準液に浸し CALスイッチを押し、2点目
の校正をおこないます。このとき標準液 pH4.01(pH9.18)
を自動判定し校正を行います。
6. 校正が終了すると、C マークが消えて pH値を測定し表示し
ます。
7. 先端のセンサ部を水道水などで洗浄し水を拭き取ります。
校正と測定上の注意
● 初めてご使用になる場合や長期間放置した場合は、測定値が不安定
になることがあります。このようなときは、センサ部を水溶液(中性)
に 5分くらい放置した後にご使用ください。
● センサ部の洗浄は綿棒のような柔らかいものを使用してください。
● 直射日光を pHセンサに当てないでください。誤差の原因になりま
す。
● pHセンサ表面は敏感で汚れていると測定できません。付着物や膜
などを常にきれいに除去してお使いください。
● イオン濃度が非常に低い水道水や雨水、その他サンプルの種類に
よっては測定値が安定しない場合があります。
保証規定
●保証期間は、お買い上げ後 1 年間です。( 但し本体のみ )
●ご使用中万一、故障が発生した場合はお買い上げ店にご連絡くだ
さい。
●ただし、下記の場合は保証期間中でも有償になります。( 郵送料等
諸掛かりもお客様のご負担となります )
1. ご使用上での取扱いの過誤により発生した故障。
2. 製品の改造、不当な修理により発生した故障。
3. 火災、地震、水害等天災地変などの不可抗力による故障及び損傷。
4. 故障の原因が本製品以外に起因する場合。
5. 使用中の外観変化、または電池の液漏れに起因する場合。
6. 消耗部品 ( 比較電極、ボタン電池 ) および付属品の交換。
7. 本保証書のご提示がない場合および必要事項の記載がない場合。
"
品質保証書
このたびは、本製品をお買い上げいただきましてありがとうございま
す。品質には万全を期しておりますが、通常のご使用において万一故
障が発生しましたときは、上記の保証規定により無償修理いたします。
本保証書は日本国内においてのみ有効です。
品 名 : ポケット pH計 S2K922 お名前 : ご住所 : TEL : お買い上げ店名 :
検査合格証
お買い上げ年月日 : 年 月 日
合格
8.先端のセンサ部を水道水などで洗浄し
水をふき取ります。
H.L pH
1. 本体に付いた水をよく拭き取ってから作業してください。濡れている
と内部に水が入り故障の原因になります。
pH測定
7.Cマークが消えると校正が終わり、pH
測定モードです。
電池交換後、pH6.86の校正を行ってください。
pH値安定判定
標準液校正 1点校正 pH6.86
4.センサ部を水道水などで洗浄し、水滴
を取り除きます。
比較電極が未装着です。点滅後パワーオフ。
C6.86pH
表
使用方法
2.約 1秒間、右図の表示がでます。これ
は動作が正常であることを示します。
° Er3pS
° が消
5. POWER スイッチを押し、未装着エラー表示 Er3pS
●本機は生活防水となっておりますが、浸漬時間は 30分以内
にしてください。pH計内に水が入り故障の原因となる場合
があります。
●40℃以上でのご使用や熱湯消毒はしないでください。
バッテリーアラーム
バブルが見える状態です。
●本体・付属品 (保護キャップ、電池、標準液 )はお子様の手の
届かないところに保管してください。万一飲み込んだ場合は
ただちに医師と相談してください。
LCD表示メッセージの説明
アイスフエトコム株式会社 埼玉県日高市下鹿山 319-3
http://www.isfet.com/company/
Copyright ISFETCOM Co,. ltd. 2009-2010 All rights reserved
![1/4 ページ WILLCOM|Advanced/W-ZERO3[es] 2007/06/07 file://C](http://vs1.manualzilla.com/store/data/006552285_2-fa8500bd334e397b7cbf34d2bf2c1809-150x150.png)