1
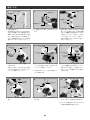
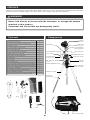
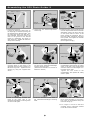
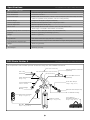
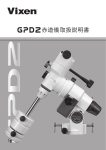
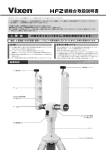
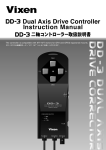
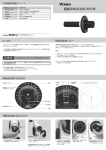
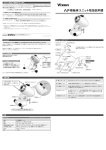
ASSEMBLY INSTRUCTIONS FOR
GP2 PHOTO GUIDER S
GP2 ガイドパックS 組立説明書
はじめに
こ の 度 は『 G P 2 ガ イ ド パ ッ ク S 』を お 買 い 上 げいただきまして誠にありがとうございます。
ご 使 用 方 法 に つ き ま し て は 別 冊 の「 天 体 望 遠鏡ガイドブック赤道儀編」、
「 星空ガイドブック」をご覧ください。
警 告
太陽を見てはいけません。失明の危険があります。
接続したカメラ、望遠鏡などで太陽を絶対に見てはいけません。失明の危険があります。
注意
お手入れ・保管について
○ G P 2 ガイドパックSが動作中は、操作する部分を除き経緯台本体に触れないようにして
・炎天下の自動車の中やヒーターなど高温の発熱体の前に製品を放置しないでください。
ください。手をはさむなどケガの原因になる場合があります。
・本体を清掃する際に、
シンナーなど有機溶剤を使用しないでください。
・製品に、
雨、
水滴、
泥、
砂などがかからないようにしてください。
○ レンズキャップを外したままで、昼間に製品を放置しないでください。
・レンズにほこりやゴミがついた場合は、
市販のカメラ用ブロアーなどで吹き飛ばしてください。
望遠鏡やファインダーなどのレンズにより、火災発生の原因となる場合があります。
・レンズ表面は手で触れないようにしてください。
指紋などでレンズが汚れた場合は、
カメラレンズと
○ 移動中や歩行中に製品を使用しないでください。衝突や転倒など、ケガの原因となる
同様な手順で清掃します。
(カメラ用ブロアー等でホコリを吹き飛ばし、
市 販のレンズクリーニン
場合があります。
グペーパーを使い、
軽く拭きとってください。
その際レンズを傷つけないようにご注意ください。
)
○ キャップ、
乾燥剤、包装用ポリ袋などを、
お子様が誤って飲みこむことのないようにしてください。
・保管する際は直射日光を避け、
風通しの良い乾燥した場所に保管してください。
内容物
各部名称
1
1
1
SXG-S71三脚
1
バランスウェイトWT1kg
1
ガイドパック用ウェイト軸
1
DD-3二軸コントローラー
1
バッテリーBOX単一8本用
1( 組 込 済 )
MT-1WTモーター
1
明視野照明装置
1
キャリングバッグ
1
付属品ケース
各1
六 角 レ ン チ 6 m m 、5 m m 、1 . 2 7 m m
4
六 角 穴 付 ボ ル ト M 6 × 1 6( ガ イ ド パ ッ ク プ レ ー ト 用 )
六 角 穴 付 ボ ル ト W 1 / 4 × 1 5( カ メ ラ 雲 台 等 取 付 用 ) 2( セ ッ ト 済 )
1
G P 2 ガ イ ド パ ッ ク S 組 立 説 明 書( 本 書 )
1
天体望遠鏡ガイドブック赤道儀編
1
DD-3二軸コントローラー取扱説明書
1
MT-1WTモーター取扱説明書
1
星空ガイドブック
1
星座早見盤
1
保証書
カメラ(市販品)
① GP2極軸ベース
② ガイドパックプレート
③
④
⑤
⑥
⑦
⑧
⑨
⑩
⑪
⑫
⑬
⑭
⑮
⑯
⑰
⑱
⑲
⑳
雲台(市販品)
明視野照明装置
(電池別売)
ガイドパックプレート
赤経クランプ(反対側)
ガイドパック用
ウェイト軸
GP2極軸ベース
ウェイト固定クランプ
極軸望遠鏡
バランスウェイトWT1 kg
M T- 1 WTモーター
高度調整ツマミ
(極軸設定用)
方位調整ツマミ
(極軸設定用)
[2ヶ所]
DD- 3 二軸コントローラー
(電池別売)
S XG- S 7 1 三脚
高さ調整ネジ
[3ヶ所]
①
③
⑨
(組立例)
②
④
⑫
⑪
⑩
⑬
(収納時)
⑤
⑥
⑦
キャリングバッグ
内容・仕様は改良のため、予告なく変更する場合がございます。
2
組立て方
①
②
SXG-S71三脚→
③
G P 2極軸ベース
方位調整ツマミ
高さ調整ネジ
方位調整ツマミ
水平支点
方位調整ツマミ
架台固定ボルト
① 三脚を設置します。
高さ調整ネジをゆるめて、好みの高さと
なるように調整します。三脚は開き切った
状態とします。また3本の脚の長さを見な
がら、上面が水平になるように調整してく
ださい。調整後はゆるまないように高さ調
整ネジをしっかりとしめてください。
④
② 方位調整ツマミ2本を十分ゆるめておき
ます。
⑤
六角レンチ
5mm
③ 写真を参考に三脚の水平支点と方位調
整ツマミの位置をあわせて三脚に搭載
します。搭載後は架台固定ボルトをしめ
て固定してください。目安として指3本
でしめられるくらいの力でしめます。そ
の後方位調整ツマミをしめます(強くし
めないでください)。
⑥
ガイドパック用
ウェイト軸
ガイドパック
プレート
ウェイト固定
クランプ
バランスウェイト
WT 1kg
ガイドパック
プレート
ウェイト脱落
防止ネジ
④ ガイドパックプレートをG P 2 極軸ベース
に取付けます。
付属のネジM 6 × 1 6 を4 本および六角レ
ンチ5 m m を使用します。ゆるまないよう
にしっかり固定してください。
⑦
⑤ ガイドパックプレートにガイドパック用
ウェイト軸を取付けます※。
ゆるまないよ
うにしっかり固定してください。
※ 六角穴付ボルト(セット済)1本を取外し
てから作業します。
⑧
⑨
カメラ雲台
(市販品)
六角レンチ
5mm
⑦ 市販のカメラ雲台など撮影機器を取付け
ます。
⑥ バランスウェイトWT1kgを取付けます。
ウェイト脱落防止ネジを取外し、ウェイト
を通します。その後ウェイト固定クランプ
をしめ、ウェイト脱落防止ネジを元通り
に取付けます。
ガイドパック
プレート
明視野照明
RA(赤経)
モーター用コード
⑧ ガイドパックプレートに明視野照明を取
付けます。
⑨ D D - 3 二 軸 コ ン ト ロ ー ラ ー の R A(赤経)
モーター用コードを取付けて完成です。
※ DD-3のご使用方法につきましてはDD-3
に付属の説明書をお読みください。
3
仕 様
仕様・外観は改良のため、予告なく変更する場合がございます。
■本体
赤経微動
ウォームホイル全周微動・歯数144山
赤経目盛環
1目盛10分(時角)
極軸望遠鏡
南北半球両用。内蔵式。6倍20mm実視界8度
2025年対応スケール内蔵。据付精度約3分。明視野照明付
極軸傾斜角範囲
0〜62度(高度目盛付:2度間隔)。
方位微動
ダブルスクリュー式、方位調整ツマミ付
高度微動
高度調整ツマミ付
モータードライブ
DD-3(二軸コントローラー)による自動追尾。モーターMT-1WT内蔵
電源:DC12V(単一アルカリ乾電池8本使用(別売)
動作電圧・消費電流
DC8〜12V 約430mA(恒星時)
・950mA(最大)
搭載可能重量
約2.5kg(バランスウェイトを含まず)
重さ
約3.1kg
■三脚
材質・形式
スチール製2段縮式(一部アルミ製)
サイズ・重さ
長さ約430〜710mm 高さ約425〜680mm 設置半径約240〜360mm 約1.8kg
■その他
約6kg
総重量
GP2ガイドパックSシステム図
仕様・外観は改良のため、予告なく変更する場合がございます。
この構成図にはGPガイドパックSに標準付属になっているパーツと
後付の別売オプションパーツが併記されています。
カメラなど(市販品)
GP用微動クラッチ
(別売)
商品番号 : 3828-04
※GP2極軸ベース(赤経)を手動微動を行う際に
使用します。
( GP微動ツマミ併用)
カメラ雲台
(市販品)
GP赤緯保護キャップ
明視野照明装置
G P2極軸ベース
商品番号 : 3864-09
※電池別売
GP微動ツマミ(別売)
商品番号 : 3822-00
ガイドパック用プレート
商品番号 : 3872-05
重 さ : 275g
極軸望遠鏡
ガイドパック用ウェイト軸
商品番号 : 3912-02
重 さ : 180g
赤経・赤緯目盛環、明視野照明装置、
GP極軸望遠鏡キャップ付
※電池別売
商品番号 : 25802-4
● シャフトφ20mm
バランスウェイト
WT1kg
商品番号 : 25801-7
GP極軸望遠鏡キャップ
G P 赤経目盛環
商品番号 : 3819-06
赤経目盛環、GP極軸望遠鏡キャップ付
DD-3
商品番号 : 37911-8
重 さ : 270g
※電池別売
赤経モーターカバー
MT-1WT
商品番号 : 3752-02
重 さ : 350g
4
SXG-S71三脚
G P ガイドパック用ケース
商品番号
長 さ
高 さ
設置半径
重 さ
材 質
形 状
商品番号 : 6188-04
重 さ : 520g
:
:
:
:
:
:
:
35503-7
430mm←→710mm
425mm←→680mm(地上高)
240mm←→360mm
1.8kg
スチール製(一部アルミ製)
二段伸縮式(ガイドパック用)
PREFACE
Thank you for your purchase of a Vixen GP2 Photo Guider S. Be sure to refer to a "Great Polaris equatorial mount telescope"
i ns truc ti on manual i nc l uded t oget her w i t h t his manual t o learn usage of t he G P2 Phot o G uider S.
WARNING!
Never look directly at the sun with the telescope, or through the camera
attached to this product.
Permanent and irreversible eye damage may result.
Contents
Components
Camera
① GP2 Equatorial body
1
② Camera/Counterweight mounting block
1
③ SXG-S71 Tripod
1
④ Counterweight 1.0kg (2.2 lbs)
1
⑤ Counterweight Shaft
1
⑥ DD-3 Dual-axis Hand Controller
1
Count erweight S haf t
⑦ Battery Box (for 8 x D-size)
1
⑧ MT-1WT R.A. Motor (Built-in)
1
Look screw
⑨ Illuminator
1
⑩ Carry Bag
1
⑪ Accessory Case
1
⑫ A set of Allen wrenches 1.27mm, 5mm & 6mm
1
⑬ M 6 - 1 6 m m B o l t (for fixing the Photo Guide Plate)
4
⑭ 1/4 inch - 15mm Bolt
2
⑮ Assembly instructions (This booklet)
1
⑯ DD-3 instruction manual
1
⑰ GP2 equatorial mount instruction manual
1
( So l d c o m m e r c i a l l y )
I lluminat or
Ball head
( So l d c o m m e r c i a l l y )
Camera Counterweight
mounting block
R. A .lock lever
G P 2 E quatorial body
Count erweight
1. 0kg ( 2 . 2 l b s )
P olar axis scope
MT-1W T R. A . Mot or
Altitude
adjustment screw
( Bu i l t - i n )
Azimuth adjustment knob
DD-3 Dual-axis
Hand Controller
S X G -S 71 Tripod
E xt ension
clamp knob
①
③
⑨
②
④
⑫
⑪
⑩
⑬
⑤
⑥
⑦
Carry Bag
5
Assembling the GP2 Photo Guider S
①
SXG-S71 Tripod→
②
③
GP2 Equatorial
body
Azimuth
adjustment screw
clamp knob
Azimuth
adjustment
screw
Peg
Azimuth
adjustment screw
Fixing bolt
① Setting up the Tripod
Loosen the extension clamp knob on
the tripod leg so that the tripod leg can
be adjusted at the desired length. Pull
the tripod legs apart until each leg is
fully extended. Stand the tripod to be
level on the ground at the desired
height by readjusting the length of
each tripod leg. Tighten the extension
clamp knobs securely.
④
Camera/counterweight
mounting block
② Loosen the two azimuth adjustment
screws fully.
⑤
③ Place the bottom of the equatorial body
over the tripod headso that the azimuth
adjustment screws are above the peg
on the tripod head as shown in the
figure. Attach the equatorial body to
the tripod head and tighten the fixing
bolt by hand. Then tighten the azimuth
adjustment screws.
(Do not tightenstrongly.)
⑥
Counterweight shaft
L o c k screw
Allen wench
Counterweight 1kg
Safety screw
④ Attach the Camera/counterweight
mounting block on the head of the
equatorial body with the supplied 4 of
M6-16mm long bolts. Tighten the bolts
securely by using the supplied Allen
wench.
⑦
⑤ Thread the counterweight shaft into
one end of the Camera/counterweight
mounting block until tight.
(Remove the attached 1/4 inch bolt in
advance to thread.)
⑧
⑨
Ball head
Camera/
counterweight
mounting block
( Sol d c om m er c i al l y )
Allen wench
⑦ Install a commercially available Ball
head on the other side of the
Camera/counterweight mounting block
as shown inthe figure.
⑥ To install the counterweight 1 kg on the
counterweight shaft,remove the safety
screw on the end of the counterweight
shaft and slide the counterweight on to
the center of the shaft.
Tighten the lock screw on the
counterweight and replace the safety
screw in place.
Illuminator
R.A motor cable
⑧ Install the illuminator on the center of
the Camera/counterweight mounting
block.
⑨ Connect the R.A motor cable of the
DD-3 hand controller to the built-in
R.A. motor on the equatorial body and
finish the setting up.
※ For usage of the DD-3 dual-axis
controller, refer to instruction manuals
for the DD-3 hand controller.
6
Specifications
The specifications are subject to change without notice.
■Equatorial Body & Bas
R.A. Slow Motion
144-tooth wheel gear whole circle movement
R.A. Graduations
10 minutes increments
Polar Axis Scope
6x20mm with illuminated reticle, usable on both hemispheres (North and South) the reticle
pattern is applicable till the year 2025, 3 arc min. setting accuracy
Altitude Range
0 degree to 62 degrees (2-degree increments)
Azimuth Adjustment
Double-screw fine adjustment, about 1-degree per rotation
Altitude Adjustment
Elevation adjustment screw (bolt)
Motor Drive
Auto tracking with DD-3 hand controller, built-in MT-1WT motor for R.A.
Power supply : DC12V(8x D-size batteries, not included)
Working Voltage・Power Consumption
DC8~12V About 430mA(at sidereal rate)・950mA(Maximum)
Payload
About 2.5kg (excluding counterweight) (5.5 lbs)
Weight
About 3.1kg (6.8 lbs)
■Tripod
Leg Material
Two-section round steel legs (Aluminum is used partly)
L e g A d j u s t a b l e L e n g t h / H e i g h t・
About 430~710mm in length or about 425~680mm in height, Setting radius:240~360mmm,
Weight
About 1.8kg (3.96 lbs)
■Other
Total Weight
About 6kg (13.2 lbs)
GP2 Photo Guider S
The specifications are subject to change without notice.
The components chart includes optional accessories along with the standard accessories.
Camera (Sold commercially)
Dec. Cap
Ball Head Camera Adapter (Sold commercially)
Illuminater
Manual Operation Clutch-G P
(Optional)
GP2 Equatorial Body
G P Slow Motion Knob
(Optional)
Photo Guider Plate
Weight : 275g
Polar Axis Scope
Counterweight Shaft
Weight : 180g (6.3 oz)
20mm in thickness
Counterweight
WT1kg
GP Polar Axis Scope Cap
R.A. Graduation Ring
DD-3 hand controller
Weight : 270g (9.5 oz)
SXG-S71 Tripod
R.A. Motor Cover
Weight : 1.8kg (3.9 lbs)
MT-1WT
Weight : 350g (12.35 oz)
7
Carry Bag for
Gp2 Photo Guider S
Weight : 520g (18.3 oz)
製品についてのお問い合わせについて
弊社ホームページのお問い合わせメールフォームにて受け付けております。
http://www.vixen.co.jp/
またお電話によるお問い合わせも受け付けております。
カスタマーサポートセンター
電話番号 :
0 4 - 2 9 6 9 - 0 2 2 2(カスタマーサポートセンター専用番号)
受付時間 : 9:00∼12:00、13:00∼17:30
(土・日・祝日、弊社夏季休業・年末年始休業など弊社休業日を除く)
※上記電話は都合によりビクセン代表電話に転送されることもあります。
※お電話によるお問い合わせは、時間帯によってつながりにくい場合もございます。
お客様のご質問にスムースに回答させていただくためにも、上記のお問い合わせ
フォームのご利用をお薦めいたします。
5-17-3 H i gash itokorozawa,Tokorozawa, Sai tama 359-0021, Japan
P h o n e +81-4-2944-4141(International)
h t t p : / / w w w. v i x e n . c o . j p F a x +81-4-2944-9722(International)
〒359-0021 埼玉県 所沢市 東所沢 5 - 1 7 - 3
[代 表]T E L : 04-2944-4000 FAX : 04-2944-4045
[ホームページ] h t t p : / / w w w . v i x e n . c o . j p
58キ-3-(80000082)-1S-76.0-(Miz)
( M)