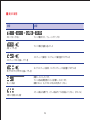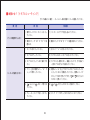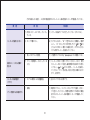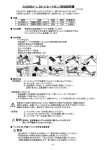
1
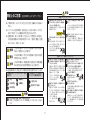
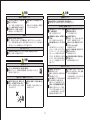
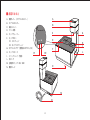
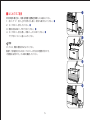
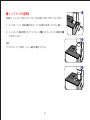
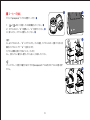
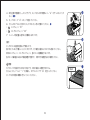
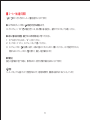
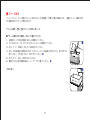
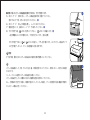
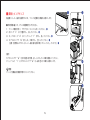
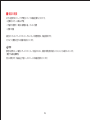
ESPRESSO
MACHINE
INSTRUCTION MANUAL
■ ご使用の前に
ご使用の前にこの取扱説明書を最後までお読みください。
■ 重要事項
本体や取外し可能な部品を絶対に水に浸けたり食器洗浄機には入れないでください。
水タンクの水は定期的に取り換えてください。
タンクが空の状態で、マシンを絶対に使用しないでください。
2ヵ月に1度は、市販のコーヒーマシン専用のスケール除去剤を使って、スケール除去を行う事をお勧めします。
(方法についてはス
ケール除去の章をご参照ください。)
本体は、一定の圧力を維持するバルブを装備しています。
そのため、抽出ユニットから少量の水がポタポタと落ちることがあります。
注記:
水の中に含まれている成分(ミネラル分等)が、製品をご使用されている間に自然に製品内部の管に付着していきます。
(付着物を
「スケール」又は水あかと呼びます。)
放置していると製品の故障の原因になりますので、スケール除去剤をご使用になり、スケール除去を行うことをお勧めします。
スケール除去剤は「カルキ除去剤」という名称でも販売されています。
目 次
■ 安全上のご注意………………………………………………… 2
■ 各部のなまえ…………………………………………………… 4
■ はじめてのご使用……………………………………………… 5
■ 電源 ON ………………………………………………………… 6
■ 電源 OFF ……………………………………………………… 7
■ 節電モード……………………………………………………… 7
■ カップスタンドの位置調節…………………………………… 8
■ コーヒーの抽出………………………………………………… 9
■ コーヒー抽出量の調節………………………………………… 11
■ スケール除去…………………………………………………… 12
■ 掃除とメンテナンス…………………………………………… 15
■ 保証の制限……………………………………………………… 16
■ 仕様/推奨……………………………………………………… 17
■ 表示の説明……………………………………………………… 18
■ 故障かな?『トラブルシューティング』 …………………… 20
■ 保証書
■ 修理・アフターサービス
1
警告
安全上のご注意 各注意事項を、必ずお守りください。
電源/コンセントについて
電源は交流100V(50/60Hz)で
「15A125V」と記されている壁面の
コンセントに直接差し込む
他の機器と併用すると、発熱による火災
の原因になります。
★ご
使用の前に、必ずこの「安全上のご注意」を最後までお読みく
ださい。
★ ここに示した注意事項は、製品を正しく安全にお使いいただき、
あなたや他の人々への損害を未然に防止するものです。
★ 注意事項は、誤った取り扱いで生じることが想定される内容を、
その危害や損害および切迫の度合いにより、「危険」
「警告」
「注意」
の3つに分け、明示しています。
危険
この表示の欄は、「死亡または重傷などを負う危険が
切迫して想定される」内容です。
警告
この表示の欄は、「死亡または重傷などを負う可能性
が想定される」内容です。
注意
この表示の欄は、「傷害を負う可能性または物的損害
のみが発生する可能性が想定される」内容です。
取り付けの悪いコンセントは絶対に使わ
ない
取り付けの悪い(ガタツキのある)コン
セントや差込み口(刃受)のゆるいコン
セントは、絶対に使用しな
いでください。感電や発熱
の恐れがあります。
:禁止 :接触禁止 :水ぬれ禁止 :分解禁止 この絵表示は、必ず実行し
ていただく「強制」内容です。
:指示を守る
電源プラグ/電源コードを破損するよう
なことはしない
電源プラグ/電源コードは、大切に扱っ
てください。無理に曲げたり、物を載せ
たり、束ねたり、傷をつけないでくださ
い。傷んだまま使用
すると、感電やショ
ート、発火などの原
因になります。
:電源プラグを抜く
:ぬれ手禁止
延長コードやテーブルタップ、ソケット
などは絶対に使わない
コンセントや電源プラグ/電源コードが
異常発熱し、発火する恐れがあります。
電源プラグ/電源コードについて
電源プラグ/電源コードが異常発熱して
いる場合は、電源を切り、電源プラグを
コンセントから抜く
使用中に、電源プラグ/電源コードが異
常に熱くなる場合は、
直ちに電源を切り、
お求めの販売店またはキーコーヒー㈱お
客様センターに、ご相談
ください。そのまま使用
すると、ショートや発火
する恐れがあります。
★ 各注意事項には、
「禁止」
または
「強制」
を促す絵表示が付いています。
この絵表示は、してはいけない「禁止」
内容です。
コンセントは本製品だけ(単独)で使用
する
コンセントの差込み口が2つある場合
は、片方の差込み口を使用せず、空けた
ままにしてください。
危険
自分で絶対に分解・修理・改造は行わない
感電・火災の原因になったり、異常作動してケガをすることがあり
ます。
2
動作中に電源プラグを抜き差ししない
感電・火災の原因になります。
電源プラグやコンセントに付着している
ホコリやゴミは、定期的に取り除く
ホコリやゴミが湿気を帯びると、ショー
トや漏電、発火などの原因になります。
ぬれた手で電源プラ
グを抜き差ししない
感電する恐れがあり
ます。
電源プラグは、根元までし
っかりと差し込む
不完全な接続は、感電や発熱による火災
の原因になります。
変形・破損している電源プラグ/電源コ
ードは絶対に使わない
感電やショート、発火する恐れがありま
す。必ず、お求めの販売店またはキーコ
ーヒー㈱お客様センターに、交換を依頼
してください。
警告
注意
使用中/使用後について
お子様だけでは使わせない。幼児の手の
届くところで使わない
ヤケド・感電・ケガの原因になります。
コーヒー抽出口や給湯ノズルから出てく
るお湯やスチーム(蒸気)に注意する
高温のため、ヤケドの原因になります。
設置場所について
使用中は給水タンク内の水量をチェック
する
極端に水が少ない状態が続くと異常発熱
し、発火する恐れがあります。
本体は不安定なところや熱に弱い場所、屋外には置かない
本体や置いた物・場所が変形・変質したり火災の原因になります。
使用中/使用後について
本体が転倒、落下したときには、使用せ
ず、点検を依頼する
感電・火災の原因になります。
長期間使用しない場合は、必ず電源プラ
グを抜く
誤って、電源が入る恐れがあります。
本体や操作部に水やジュースをこぼさな
い
本体や操作部
(コントロールパネル)
に、
水やジュース(液体)などをこぼさない
でください。万一、こぼしてしまった場
合は、ショートや感電などの恐れがあり
ますので、直ちに電源を切り、使用を中
止します。その後、お求めの販売店また
はキーコーヒー㈱お客様センターまでご
連絡ください。
使用中
異常が生じた場合は、使用を中止する
万一、異常が生じた場合は、直ちに電源を切り、電源プラグをコンセントから抜いてく
ださい。異常な状態で使い続けると、事故や故障につながります。必ず、お求めの販売
店またはキーコーヒー㈱お客様センターまでご連絡ください。
お手入れについて
本体のお手入れは電源プラグをコンセントから抜き、 各部が冷えてから行う
ヤケド・感電・ケガの原因になります。
注意
電源について
お手入れについて
ブレーカーが落ちる場合には、電力会社に連絡する
使用中にブレーカー(分電盤内の回路遮断器)が落ちる場合には、お近くの
電力会社にご相談ください。
使用後は、必ずお手入れする
故障の原因になります。
絶対に、水に浸したり、水洗いをしない
故障の原因になります。
本体と電源コード/プラグに水をかけた
り、水に浸けたり、水洗いをしない
感電やショート、
故障の原因になります。
洗剤は、必ず台所食器用洗剤を使用する
研磨剤入り洗剤やクレンザー、漂白剤、
スプレー洗剤などは使用しないでくださ
い。本体の表面が変質し、はがれ・変色・
樹脂部品の割れの原因になります。
電源プラグ/電源コードについて
電源プラグを抜くときは、電源コードを
持たず、必ず電源プラグを持って抜く
電源コードを無理に引っ張ると、破損す
る恐れがあります。
使用中および使用後しばらくはコーヒー
抽出口部分に触らない
ヤケドの原因になります。
他の用途で使用しない
本製品は、コーヒーの抽出、給湯/加熱
専用です。故障の原因になります。
使用しないときは、電源を切り、必ずプ
ラグをコンセントから抜く
故障の原因になります。
給水タンクの最大水量(MAX 表示)を
超えて水を入れない
故障の原因になります。
他製品の部品や付属品などを組み合わせ
て使用しない
故障や事故の原因になります。
使用中は、電源コードを本体に触れさせ
ない
熱で電源コードが傷み、感電やショート
の原因になります。
3
ガラス磨き、シンナー、アルコール、ワ
イヤーウール、金ブラシ、たわし、研磨
スポンジなどは使用しない
本体の表面が変質し、はがれ・変色・樹
脂部品の割れの原因になります。
■ 各部のなまえ
A
A . 開閉レバー(カプセルホルダー)
B . カプセルホルダー
B
C . 抽出ユニット
D . マシン本体
E . カップウォーマー
F . タッチボタン
F1. エスプレッソ
F2. ロングエスプレッソ
G . カプセルコンテナ(使用済みカプセル入れ)
H . カップスタンド
F1
I . ドリップトレイ(内側)
L . 水タンク
M . 主電源スイッチ ON/OFF
N . 電源コード
C
G
E
H
I
F
L
F2
D
M
N
4
In case of malfunctioning
immerse it in water, partially or fully.
If the power cord is damaged it must be replaced by the manuIn
case of malfunctioning
facturer or an authorized service center.
Do not use the appliance if the cord or plug are damaged or if
the appliance shows signs of malfunctioning or has been damDo not
use theof
appliance
if the cord or plug are damaged or if
In
case
malfunctioning
aged
in of
anydamage
way. Take
the machineturn
to the
authorized
In
malfunction,
off nearest
the
appliance
and
thecase
appliance
showsorsigns
of malfunctioning
or has
been dam■ はじめてのご使用
service
center
for
checks
or
repairs.
do
not
tamper
with
it.
For
repairs
contact
a
service
center
auaged in any way. Take the machine to the nearest authorized
Do not use
appliance
if theand
cordrequest
or plugthe
are use
damaged
or if
thorised
by the
thefor
manufacturer
of original
本体を電源に繋ぐ前に、取扱い説明書の重要安全事項をよくお読みください。
service center
checks or repairs.
the
appliance
shows
signs
malfunctioning
has been damspare
parts only.
Failure
to of
comply
with theseorinstructions
may
1 水タンク“L”を少し上げて水平に引っ張り、本体から取り外してください。❶
Ifaged
the power
isTake
damaged
it must to
be the
replaced
by the manuin any cord
way.
the machine
nearest
compromise
the safe
operation
of the machine
andauthorized
will result
facturer
or
an
authorized
service
center.
2 タンクのカバーを外してください。❷ in
center
for
or rights.
repairs.
Ifservice
the
cord
damaged
it must be replaced by the manuthepower
forfeiture
ofischecks
warranty
facturer or an authorized service center.
3 新鮮な水をMAXマークまで入れてください。❸
In
case
of damage
or malfunction,
off the appliance
and
4 タンクのカバーを元に戻し、本体にしっかりはめてください。❹
If the
power
cord is damaged
it mustturn
be replaced
by the manuImproper
use
of
the
appliance
do
not
tamper
with
it.
For
repairs
contact
a
service
center
aufacturer
or damage
an authorized
service center.
In
case of
or malfunction,
turn off the appliance and
プラグをコンセントに差しこんでください。
thorised by the manufacturer and request the use of original
do not tamper with it. For repairs contact a service center auspare parts only. Failure to comply with these instructions may
-thorised
This appliance
is intended for
useuse
only.ofAny
othby the manufacturer
andhousehold
request the
original
compromise
the safe
of the
will result
In case of damage
or operation
malfunction,
turnmachine
off the and
appliance
and
警告:
er parts
use isonly.
to beFailure
regarded
as improper
and thus
dangerous.
spare
to comply
with these
instructions
may
in
of warranty
rights.contact a service center audothe
notforfeiture
tamper with
it. For repairs
compromise
the
safe
operation
of
the
machine
and
will
result
タンクには、新鮮な飲料水のみ入れてください。
-thorised
The manufacturer
is not liable
accidents
nonby the manufacturer
andforrequest
the caused
use of by
original
in the
forfeiture of warranty
rights.
compliance
existing
legislation
electrical
grounding
熱湯や、他の液体を入れるとタンクにダメージを与える可能性が有ります。
spare
parts only.with
Failure
to comply
with on
these
instructions
may
systems. the safe
Improper
useoperation
of the
appliance
compromise
of the
machine and will result
ご使用前に必ず水が入っている事を確認してください。
of warranty
-in the
Theforfeiture
manufacturer
liable for possible damage caused
Improper
useis not
ofrights.
the appliance
by improper, incorrect or unreasonable use.
- This appliance is intended for household use only. Any other use is to be regarded as improper and thus dangerous.
- This applianceuse
is intended
for household
use only. Any othImproper
of the
appliance
appliance
used
in household
andby
similar
-Thiser
The
manufacturer
is nottoliable
for accidents
caused
nonuse
is to isbeintended
regarded
asbeimproper
and thus
dangerous.
applications
such
as:existing legislation on electrical grounding
compliance
with
-- This
The manufacturer
is
not
liable
for
accidents
caused
by
appliance is intended for household use only. Any nonothsystems.
- staff
kitchenwith
areas
in shops,
offices andelectrical
other working
encompliance
existing
legislation
grounding
er
use is to be
regarded
as
improperonand
thus dangerous.
vironments;
- systems.
The manufacturer is not liable for possible damage caused
- by
Theimproper,
manufacturer
is notorliable
for accidents
unreasonable
use.caused by nonhouses;incorrect
-- farm
The manufacturer
is not liable
for possible
damage
caused
compliance
with existing
legislation
on electrical
grounding
- hotel
in room,
motels or
and
other residential
by
improper,
incorrect
unreasonable
use. type environsystems.
ments;
This
appliance
is intended
be used
in household
and caused
similar
- The
manufacturer
is nottoliable
for possible
damage
such
as:
-applications
bed
and
breakfast
type
environments.
improper,isincorrect
use. and similar
Thisby
appliance
intended or
to unreasonable
be used in household
- staff kitchen
applications
suchareas
as: in shops, offices and other working environments;
-Thisstaff
kitchenis areas
in shops,
offices
other working
enappliance
intended
to be used
in and
household
and similar
-applications
farm
houses;
vironments;
such as:
--- staff
hotel
in room,areas
motels
and other
residential
environfarm kitchen
houses;
in shops,
offices
and othertype
working
enments;
vironments;
- hotel
in room, motels and other residential type environ-- bed
and
breakfast type environments.
ments;
farm
houses;
--
bed
breakfast
typeand
environments.
hoteland
in room,
motels
5other residential type environments;
OF
ESPRESSO
read the
safety instructionsMACHINE
given in the chapter: “important
safeguards”.
Before connecting the machine to a power supply, carefully
read
the the
safety
instructions
chapter:by“important
Remove
water
tank “L” given
from in
thethe
machine
pulling it
safeguards”.
slightly up and then out.
❶
Remove the water tank “L” from the machine by pulling it
slightly up and then out.
Remove the water tank “L” from the machine by pulling it
slightly up and then out.
Remove
the lid.
water tank “L” from the machine
❷by pulling it
Lift the tank
slightly up and then out.
Lift the tank lid.
Lift the tank lid.
❸
Fill the tank with fresh drinking water until the MAX mark is
Lift the tank lid.
reached.
CAUTION: always fill the tank with fresh, still drinking water only. Hot water or other liquids may damage the tank.
Do not use the machine without water.
Fill the tank with fresh drinking water until the
❹MAX mark is
reached.
Fill the tank with fresh drinking water until the MAX mark is
reached.
CAUTION: always fill the tank with fresh, still drinking waFill
fresh
drinking
watermay
untildamage
the MAXthe
mark
is
ter the
only.tank
Hotwith
water
or other
liquids
tank.
CAUTION:
always fill the tank with fresh, still drinking wareached.
Do not use the machine without water.
ter only. Hot water or other liquids may damage the tank.
Do not use the machine without water.
CAUTION: always fill the tank with fresh, still drinking water only. Hot water or other liquids may damage the tank.
After setting the lid back in place, insert the tank all the way
Do not use the machine without water.
into the machine.
switch on the appliance.
To turn on the machine, proceed as follows:
the main
Check the water level in the tank “L”; ifMove
necessary
addon/off
waterswitch “M” into the “I” position. The buttons
and
will light up repeatedly from left to right.
18 as previously described.
Insert the plug into the outlet. Consult the following chapter to
switch on the appliance.
■ 電源 ON
1 マ シンの電源を入れる前に、水タンクの水量を確認し、MAXマ
ークまで水を補充してください。
2 主電源スイッチを“◦”から“-”の位置に動かしてください。❶
3 ボタンと
ボタンが左から右へ繰り返し点滅します。
❶
Touch the button
❷
.
Wait until water flows out of the brew
Place a cup beneath the brew
Thegroup.
machine will automatically stop
the programmed quantity has been r
buttons on the touch screen again.
これは本体がウォームアップ状態であることを示します。❷Place a cup beneath the brew group.
Warning: make sure that the capsule compartment “B” is 18
4 と
ボタンが点灯し、ブザー音が鳴るまでお待ちくださ
Note: Only during the initial warming
will not brew coffee if the buttons
This
the machine
Move the main on/off switch “M” into the
“I”indicates
position. that
The buting. is starting to warm up.
properly
closed
before
brewing
coffee.
Never
open
it
while
Insert the plug into the outlet.
the following
chapter
to
い。これでマシンが適正な温度に達した事を示します。❸
will light
up repeatedly
from❸
left to right.
tonsConsultand
❹
coffee
is being
dispensed.
switch on
the appliance.
5 抽出ユニットの下にカップを置いてください。❹
Warning: make sure that the capsule compartment “B” is
6 湯通しをするために
ボタンを押してください。抽出ユニット
Note:
When
the machine for the first time or after
properly closed before brewing coffee.
Never
openusing
it while
it has not been used for 7 or more days, after placing a
から湯がでてくるまでお待ちください。設定量で抽出がとまりま
coffee is being dispensed.
container of suitable capacity beneath the brew group “C”,
すが、タッチスクリーンのボタンを再度押すことによっても抽出
we suggest running at least half a tank of water through
Note: When using the machine for the first time or after
を止めることができます。❺
the brew group without inserting a capsule.
Power Save
The machine has been programmed to p
Wait until the buttons
and
are steadily lit and the
save energy when it is not being used.
machine emits a beep; this indicates that the machine has
When
it has not been used for 60 m
reached the correct operating
temperature.
it has not been used for 7 or more days, after placing a
switch
automatically into the Power
container of suitable capacity beneath the brew group “C”,
Wait until the buttons
and
are Place
steadily
lit and
the the brew group.
a cup
beneath
will flash slowly.
注記:
we suggest running at least half a tank of water through
machine emits a beep; this indicates that the machine has
❺
the
brew group without inserting a capsule.
Start To switch the machine back on press
と
ボタンが点灯していないとき、もしくは点滅しているときにはお湯またはコーヒーの抽
TURNING ON/OFF
reached the correct operating temperature.
This indicates that the machine is starting to warm up.
出はされません。
To turn on the machine, proceed as follows:
Before switching off the machine, w
初めてご使用になるときや、一週間以上使用していなかった場合、カプセルを入れずに数回分湯通し
Warning:
capsule
is
Check
the make
water sure
level that
in thethe
tank
“L”; if compartment
necessary
add“B”
water
about a cupful of hot water throug
Start
TURNING ON/OFF
properly
closed
before brewing coffee. Never open it while
をしてから使用する事をお勧めします。
as previously
described.
the capsule compartment “B” emp
coffee is being dispensed.
To turn on the machine, proceed as follows:
警告: Check the water level in the tank “L”; if necessary add water
Note: When using the machine for the first time or after
as previously described.
Touch the button
.
コーヒーを抽出する前に、カプセルホルダー“B”がしっかり閉じている事を確認してください。
it has not been used for 7 or more days, after placing a
container of suitable capacity beneath the brew group “C”,
Wait
until
water
fl
ows
the brewaregroup.
コーヒーの抽出中には絶対に開けないでください。
Wait until the buttons out ofand
steadily lit and the
we suggest running at least half a tank of water through
the brew group without inserting
capsule. .
Touch thea button
The
machine
automatically
stopthat
dispensing
waterhas
when
machine
emitswill
a beep;
this indicates
the machine
the
programmed
quantity
has temperature.
been reached or you press the
reached
the correct
operating
buttons on the touch screen again.
Wait until water flows out of the brew group.
Note: Onlywater
duringwhen
the initial warming up phase, the machine
The machine will automatically stop dispensing
Start
will notorbrew
coffeethe
if the buttons
and
are off or flashTURNING ON/OFF
the programmed quantity has been reached
you press
Move the main on/off switch “M” into the “I” position. The buting.
buttons
on the touch screen again.
6
To turn onand
the machine,
proceed
as follows:from left to right.
tons
will light
up repeatedly
Note: Only during the initial warming up phase, the machine
Check the water level in the tank “L”; if necessary add water
■ 電源 OFF
1 本体の電源を切る前に、カプセルを入れずに湯通しをする事をお勧めします。
2 マシンの電源を落とすには、主電源を“-”から“◦”の位置に動かしてください。
警告:
マシンの電源が入っているままでは絶対にプラグをコンセントから抜かないでください。
■ 節電モード
本製品は、使用していない時に電気消費量を減らすようプログラム化されています。
60分間使用しないと、マシンは自動的に節電モードになり、
ボタンがゆっくり点滅します。マシンを通常の状態に戻すには、
2つのタッチボタン(F1、F2)のどちらかを押してください。
7
CUP STAND ADJUSTMENT
The machine is designed to be used with either mugs or
espresso cups.
❶
■ カップスタンドの位置調節
本製品は、コーヒーカップでもエスプレッソカップでもお使いできるようデザインされています。
To adjust the height of the cup stand “H” you must remove
O
m
O
m
1 カップスタンド“H”の位置を調節するには、“H”を右側から取り外してください。❶ it by pulling it out and then set it in the mug or espresso cup
To
adjust the height of the cup stand “H” you must remove
position.
it by pulling it out and then set it in the mug or espresso cup
2 コーヒーカップに最適な位置“ロング”エスプレッソ用❷かエスプレッソカップに最適な位置❸
position.
に合わせてください。
注記:
カップスタンド“H”の高さは、コーヒー抽出前に調整してください。
To adjust the height of the cup stand “H” you must remove
it by pulling it out and then set it in the mug ❷
or espresso cup
position.
M
Optimal position for mugs, suitable for “long” espresso.
Optimal position for mugs, suitable for “long” espresso.
❸
M
U
m
U
m
Optimal position for mugs, suitable for “long” espresso.
Optimal position for espresso size cups.
Optimal position for espresso size cups.
Note: the height of the cup stand “H” must be adjusted before
you start dispensing coffee.
Note: the height of the cup stand “H” must be adjusted before
position for
espresso size cups.
youOptimal
start dispensing
coffee.
8
Note: the height of the cup stand “H” must be adjusted before
you start dispensing coffee.
N
a
cN
at
c
t
To switch the machine off, move theposition.
main on/off switch
“M” into the “0” position; never disconnect the plug from
the power outlet when the machine is switched on.
MAKING COFFEE
Other types of capsules cannot be used, as they could dathe machine.
The machine is designed to make coffeemage
exclusively
with illy
“Iperespresso” capsules.
❶
To adjust the height of the cup stand “H” you must remove
■ コーヒーの抽出
CUP STAND ADJUSTMENT
it by pulling it out and then set it in the mug or espresso cup
❷
Y1.1は“Iperespresso”カプセル専用マシンです。❶
position.
The machine is designed to be used with
either mugs or
Make sure that the buttons
espresso cups.
1 と
and
are steadily lit.
ボタンが点灯している事を確認してください。❷
2 カプセルホルダー“B”の開閉レバー“A”を開けてください。❸
Unlock and lift the opening lever “A” of the capsule compartment “B”.
Optimal position for mugs, suitable for “long” espresso.
3 図のように、カプセルを挿入してください。❹
注記:
Other types of capsules cannot be used,
as they
daMake
sure could
that the
buttons
and
are ❸
steadily lit.
mage the machine.
もしもカプセルホルダー“B”にカプセルが入っている場合、カプセルホルダーを開けたときに自
動的にカプセルコンテナ“G”へ放出されます。
Unlock and lift the opening lever “A” of the capsule compartTo adjust the height of the cup stand “H”
you must
remove
Optimal
position
for mugs, suitable for “long” espresso.
カプセルは簡単に挿入できるようになっています。
ment “B”.
it by pulling it out and then set it in the mug or espresso cup
もし、挿入しづらい場合は一度外してから正しく入れ直してください。
position.
:
Optimal position for espresso size cups.
マシンがダメージを受ける場合がありますのでIperespressoカプセル以外のカプセルはお使い頂け
ません。
Note: the height of the cup stand “H” must be adjusted before
you start dispensing coffee.
Make sure that the buttons
and
20
Note: if a capsule is present in the compartment❹
“B”, it will be
automatically expelled when the compartment is opened. The
capsule must slide easily into the compartment; if this is not
steadily
theare
case
take itlit.out and reposition it correctly.
Optimal position for espresso size cups.
Unlock and lift the opening lever “A” of the capsule compartOptimal position for mugs, suitable for “long” espresso.
ment “B”.
Note: if a capsule is present in the compartment “B”, it will be
Note: the height of the cup stand “H” must be adjusted before
automatically expelled when the compartment is opened. The
you start dispensing coffee.
capsule
must slide
easily in
into
compartment; if this is not
Insert
the capsule
as shown
thethe
picture.
the case take it out and reposition it correctly.
9
Insert the capsule as shown in the picture.
Insert the capsule as shown in the picture.
❺
4 本体上部の可動部をしっかりと下げて、ロックされるまで開閉レバー“A”を下へおろしてくだ
さい。❺❻
5 カップスタンド“H”にカップを置いてください。
6 どちらかカプセルに合わせたタッチボタンを一秒ほど触れてください。❼
・
エスプレッソ“ F1 ”
・
ロングエスプレッソ“ F2 ”
7 コーヒーが設定量に達すると自動的に止まります。
❻
注記:
タッチボタンは温度を感知して作動します。
指が冷えていると作動しにくくなりますので、その場合は指をあたためてから触れてください。
Lower the movable part of the top of the machine completely,
本体はエスプレッソ/ロングエスプレッソ、各ボタンに初期設定があります。
and press the lever “A” until you hear it lock in place.
各ボタンの抽出量はお好みで設定調整が可能です。次章でその調整方法をご参照ください。
警告:
カプセル1つで抽出できるのは1杯分です。2杯の抽出には使用できません。
きちんとドリップトレイ“I”を清掃し、カプセルコンテナ“G”を空にしてください。
タンクの水の交換は頻繁に行うようにしてください。
Position the cup on the cup stand “H”.
Lower the movable part of the top of the machine completely,
Lower
the the
movable
partuntil
of the
of the
machine
completely,
and press
lever “A”
youtop
hear
it lock
in place.
and press the lever “A” until you hear it lock in❼
place.
Position the cup on Start
the cup stand “H”.
Position the cup on the cup stand “H”.
Start
Start
Press (one button only):
-
the
button to brew an espresso coffee.
- the
button to brew a long espresso.
Press (one button only):
Press (one button only):
- thethe coffee
button
brew anthe
espresso
coffee.level in the cup,
When
hasto
programmed
- the
button
toreached
brew an espresso
coffee.
- the willbutton
to brew a long espresso.
brewing
stop automatically.
- the
button to brew a long espresso.
10
When the coffee has reached the programmed level in the cup,
When
thewill
coffee
hasautomatically.
reached the programmed level in the cup,
brewing
stop
■ コーヒー抽出量の調節
と
ボタンそれぞれのコーヒーの量を設定することができます。
●ここではエスプレッソボタン
ロングエスプレッソ“ F2 ”
の設定の仕方のみ解説します。
の設定を行うには、同じ手順に従い設定をし、適切なサイズのカップをお使いください。
●お好みの量の抽出を調整・設定するには次の手順に従って行ってください。
1 カプセルをカプセルホルダー“B”に入れてください。
2 カップスタンド“H”に、エスプレッソカップを置いてください。
3 エスプレッソボタン
を長押しし続け、お好みの量になりましたらボタンを離してください。これで設定ができました。
次回からはエスプレッソボタン
を押すと、設定した量で抽出されます。
●手動停止
設定した量で抽出が完了する前に、再び同じボタンを押すと手動で抽出を止めることができます。
警告:
コーヒーがカップから溢れてしまう可能性があるので、最大約70秒間で、自動的に抽出が止まるようになっています。
11
able non-toxic descaling product for coffee m
The need to run the descaling cycle is indic
Use the descaling product supplied with
ming of the
and
buttons every 10 s
descale for the first time.
■ スケール除去
To descale the machine, proceed as follow
The need to run the descaling cycle is indic
Make sure that the main switch “M” is positio
コーヒーマシンは、マシン内部にスケール(水中のカルシウム残留物)が付着した場合の除去のため、一定量のコーヒーを抽出するた
ming of the
and
buttons every 10 s
Check that there are no capsules in the caps
びに自動で以下のアラームが表示されます。
“B “.
To descale the machine, proceed as follow
Remove the water tank “L” and empty the res
Make sure that the main switch “M” is positio
アラームの表示:
と
のボタンが10秒毎に暗くなる。
Fill the tank
Check that there are no capsules in the caps
fresh drinking
“B “.
●アラームが表示された場合は、次のように進めてください。
Add the de
Remove the water tank “L” and empty the res
and wait for i
1 主電源スイッチがOFFの位置にあることを確認してください。
Fill make
the tank
to
the
❶
2 カプセルホルダー“B”にカプセルが入っていないことを確認してください。
fresh
faster).drinking
3 水タンク“L”を取外し、残っている水は捨ててください。
Add the de
and wait for i
4 水タンクのMAX線まで新鮮な水を入れてください。スケール除去剤をその中に入れ、溶けるまでお
to make the
待ちください。(早く溶かすには、かきまぜてください。
)❶
faster).
5 水タンク“L”を正しく本体にはめてください。
Fit the tank “L” back in the machine until it is
6 容量が1ℓ以上ある容器を抽出ユニット“C”の下に置いてください。❷
in place.
Place a conta
Fit the tank “L” back in the❷
machine until it is
capacity of a
W
in place.
neath the bre
〈次頁に続く〉
Min.1
lit
Wer
Min.1
12
liter
Place a conta
capacity of a
neath the bre
22
●ここから、スケール除去が始まります。
1 マシンの電源を入れてください。
2 マシンの電源を入れてから15秒以内に、
のままにしてください。
スケール除去作動中約10分間、
Descaling allows to optimise cleaning and removing scale deposits from the inside.
ボタンを再度押すと、再度ブザー音がします。
ボタンは点
WARNING:
If the descaling is not performed the limescale can cause
malfunctions not covered by the warranty.
Use descaling products that are not excessively aggressive.
ボタンが交互に点滅します。
To descale the machine you can use any commercially avail-
ボタンはスケール除去が終わった後もついたままです。
able non-toxic descaling product for coffee machines.
Use the descaling product supplied with the machine to
警告:
descale for the first time.
1〜4の手順どおりに操作が行われないと、スケール除去は実行されません。
規定の操作ができなかった場合、マシンの電源を1度落とし、1から4を再度実行してください。
〈次頁に続く〉
2) Press the
15 seconds of
machine and
onds until a b
ボタンを7秒間ほど長押しし、ブザー音がするまでそ
ボタンを押してください。
これでスケール除去が始まり、マシンが水とスケール除去剤溶液を排出します。
4 再度、5秒以内に
❸ 1) Switch the
The formation of limescale is a natural consequence of using
of the machine.
ボタンが点滅し始めます。❸
3 ブザー音がしてから5秒以内に
灯したままになります。
Now you can start descaling:
DESCALING
The need to run the descaling cycle is indicated by the dimming of the
and
buttons every 10 seconds.
Start
3) The
flashing.
button again within 5 seco
4) Press the
chine will emit a beep.
5) The
button light will remaing on.
6) Press the
button within 5 seconds.
The machine will now start to dispense the w
ing solution.
WARNING:
If the operations are not performed in the
the machine will not start the descaling p
re, switch the machine off and repeat step
To descale the machine, proceed as follows:
Make sure that the main switch “M” is positioned to “0”.
Check that there are no capsules in the capsule compartment
“B “.
Remove the water tank “L” and empty the residual water.
Fill the tank with 0.7 litres of
fresh drinking water.
Add the descaling product
and wait for it to dissolve (stir
to make the product dissolve
faster).
13
button flashes alternately for about 1
The
the process.
The
remains permanently on after the w
ing solution has finished.
Now proceed with the rinsing cycle to elim
dual descaling product:
Remove the
and empty th
with descalin
Rinse it out
running wate
fresh drinking
wait
it to dissolve
Remove the water tank “L” and and
empty
theforresidual
water. (stir
to make the product dissolve
Fill the tank with 0.7 litres of
faster).
fresh drinking water.
Add the descaling product
and wait for it to dissolve (stir
to make the product dissolve
5 水タンク“L”を取り外し、スケール除去溶液の残りを捨ててください。
faster).
Fit the tank “L” back in the machine
until it is inserted correctly
●内部に残ったスケール除去溶液を排出するため、すすぎを行います。
流水でよくすすぎ、新しい水を入れてください。❹
in place.
6 水タンク“L”をもとの位置に戻し、しっかりはめてください。
7 容器を空にして、抽出ユニット“C”下に戻してください。❺
ボタンを押してください。
Place a container “W” with a
ボタンが点滅します。❻
capacity
least 1 correctly
litre beFit the tankW
“L” back in the machine
until of
it isatinserted
neath the brew group “C”.
一定の間隔をおいて水が排出され、すすぎを行ないます。
(約5分間)
in place.
8 すすぎを行う為、
Min
.1 lite
と
ボタンが点灯し、ブザー音が鳴ります。これでスケール除去サイク
r
Place a container “W” with a
capacity of at least 1 litre beルが全て終了しました。マシンを通常通りお使い頂けます。 W
すすぎが完了すると、
neath the brew group “C”.
警告:
Min.1
liter
すすぎの際、排出されたスケール除去済みの液体を再び使用しないでください。
:
スケール除去剤として、酢・アルカリ液・塩・ギ酸を使わないでください。本体にダメージを与える場合
があります。
コーヒーマシンに適切なスケール除去剤をお使いください。
スケール除去を行っている最中に出される液体を絶対に飲まないでください。
もし、手順8まで完了する前に、電源が落ちたりしてしまった場合、マシンを使用する前に最初の手順1
からスケール除去を行ってください。
Remove the
and empty th
with descaling
Now proceed with the rinsing cycle to elim
Rinse it out
dual descaling product:
running wate
the
fresh drinking
❹ Remove
and empty th
with descaling
ing solution has finished.
Rinse it out
running wate
fresh drinking
WARNING: Do not reuse the water
and des
dispensed in container “W” during the de
for the rinse phase.
Fit the tank
WARNING: Do not reuse ❺
the water and des
machine until
W
dispensed in container “W” during the de
rectly in place
for the rinse phase.
Empty the co
Min.1
place it back
liter
Fit the tank
group “C”.
machine until
W
rectly in place
The
button light is on.
Min.1
liter
❻
Empty the co
place it back
Press
the
group “C”.
the rinse cycle
The machine
cycle for abo
dispensing w
intervals.
Start
The
nately.
butt
After rinsing, the
and
buttons are pe
a beep sounds to confirm that the machine is
Do not use vinegar, lye, salt or formic ac
may damage the machine.
Use only descaling agents suitable for cof
14
The descaling solution must be disposed o
with the applicable laws and regulations.
Do not use ethyl alcohol, solvents, abrasive sponges and/or aggressive chemicals.
To clean the machine, proceed as follows:
❶
■ 掃除とメンテナンス
高品質なコーヒー抽出を維持するため、マシンの定期的な清掃をお勧めします。
●次の手順に従って、マシンの清掃を行ってください。
1 マシンの電源を切り、プラグをコンセントから外してください。❶
2 水タンク“L”とその蓋を外し、洗ってください。❷
3 カップスタンド“H”とドリップトレイ“I”を外し、洗ってください。❸
4 カプセルコンテナ“G”を引っぱって取り外し、空にしてください。❹
(注意:使用済みカプセルとコーヒー抽出後の液体の残りがトレイに入っています。
)❺
Remove
the w
(Caution:
u
Remove
the w
lid fee
andextract
wash
Remove
the w
lid
and
wash
water.
Switch the machine off and
❷ ning
lid and
wash
water.
disconnect the plug from the ning
ningNote:
water.
whe
power outlet.
place, mak
tying out t
the same t
Caution: d
Remove
the c
microwav
Remove
the “c
drip tray
❸ the
Remove
thewa
tray
“c
withdrip
warm
Remove the water tank “L” and the
the drip
traywa
“
warm
lid and wash them under run- with
with warm wa
ning water.
RECO
注記:
カプセルコンテナ“G”を元の位置に戻す際、正しくはまっている事を確認してください。
ドリップトレイ“I”とカプセルコンテナ“G”を一緒に空にする事をお勧めします。
警告:
マシンと付属品を乾燥機で乾かさないでください。
To enjoy a
-
21
CLEANING AND MAINTENANCE
The machine and its components must be cleaned at least
once a week.
Do not use the water left in the tank “L” for some days; wash
the tank and fill it daily with fresh drinking water.
Change
- If poss
the u
French
❹ Remove
Remove
tainer “G”the
byu
- “G”
Used
Remove
the
byuw
Remove the cup stand “H” and tainer
tainer
“G”
by
the drip tray “I” and wash them
with warm water.
❺ Empty out the
Remove the used capsule container “G” by pulling it out.
Do not use ethyl alcohol, solvents, abrasive sponges and/or aggressive chemicals.
To clean the machine, proceed as follows:
15
(Caution: used capsules and some liquid resid
fee extraction will be in the tray).
■ 保証の制限
以下に起因するダメージや不具合については保証対象外となります。
・定期的なスケール除去の不足
・不適切な使用や、取扱い説明書に従っていない使用
・内部の改造
認定されていないサービスセンターでおこなった修理費用は、保証対象外です。
そのような費用は全てお客様の負担となります。
警告:
修理が必要となった場合にサービスセンターへ発送のために、最初の梱包材を保有しておくことをお勧めいたします。
(最低でも保証期間内)
充分に梱包せず、輸送途上で起こったダメージは保証対象外となります。
16
■ 仕様
■ 推奨
外装:アルミニウム
上質のコーヒーをお楽しみ頂く為、次の事をお勧めします。
熱交換資材:ステンレススチール
・毎日タンクの水を取り換えてください。
水タンク:0.7ℓ
・マシン内のスケールを軽減するため、ミネラル含有量の低い水
使用済みカプセル収容量:7カプセル
ポンプ圧:19バール
本体重量:5kg
電圧:100V
電力:1250W
サイズ:240×240×2750mm
製品の外観、仕様、性能は予告なく変更することがありますので、
ご了承ください。
をお使いください。
・コーヒーカップはあらかじめ温めてからご使用ください。
17
■ 表示の説明
表示
INDICATION
INDICATION
INDICATION
INDICATION
INDICATION
INDICATION
ボタンが少しずつ点く
The buttons light up in sequence
24
24
24
状況
MACHINE
24 STATUS
MACHINE
24 STATUS
MACHINE
STATUS
24 STATUS
MACHINE
MACHINE STATUS
MACHINE
STATUS
The machine マシンの電源が入り、ウォーミングアップ中
has been turned on and is warming up.
The buttons light up in sequence
The machine has been turned on and is warming up.
The buttons light up in sequence
The machine has been turned on and is warming up.
The buttons light up in sequence
The machine has been turned on and is warming up.
+
The
machine has
reached
the right
temperature
The buttons light
The
has
turned
on and
is warmingfor
up.brewing.
+ up in sequence
The machine
machine マシンが規定の温度に達しました
has been
reached
the right
temperature
for
brewing.
+ up in sequence
The
The machine has been
turned
on and
is warmingfor
up.brewing.
reached
the right
temperature
Lit buttons light
+
点灯
Lit + ブザー音
The machine has reached the right temperature for brewing.
Lit
+
The
reachedanthe
right temperature for brewing.
The machine
machine has
is brewing
espresso.
Lit
+
is brewing
espresso.
The machine has
reachedanthe
right temperature for brewing.
Lit
+
The
machineisisbeing
brewing
an espresso.
An espresso
programmed.
+
Lit
The
machine
is
brewing
an
espresso.
An espresso isエスプレッソを抽出中/エスプレッソの抽出量をプログラム中
being programmed.
The espresso button flashes
+ flashes
The espresso button
An espresso
programmed.
The
machineisisbeing
brewing
an espresso.
エスプレッソボタン点滅
The espresso button
An espresso
isisbeing
programmed.
+ flashes + ブザー音The
machine
brewing
an
espresso.
a long
espresso.
The espresso button
fl
ashes
An
programmed.
+
Theespresso
machineisisbeing
brewing
a long espresso.
The espresso button
+ flashes
The
machine
is
brewing
a
long
espresso.
An
espresso
is being
programmed.
A
long
espresso
is
being
programmed.
+ button
The espresso
button
flashes
The
machine
is brewing
long espresso.
A long
espresso
is being aprogrammed.
long espresso
flashes
+ button flashes
The long espresso
A long
espresso
is being aprogrammed.
ロングエスプレッソ抽出中/ロングエスプレッソの抽出量をプログラム中
The
machine
is brewing
long espresso.
The long espresso
AThe
long
espresso
is being aprogrammed.
+ button flashes
machine
is
long
espresso.
ロングエスプレッソボタン点滅
+ ブザー音
The long espresso
The
machine
is brewing
inis the
Power
Save
mode. The machine switches into Power Save
A
long
espresso
being
programmed.
+ button flashes
The machine is in the Power Save mode. The machine switches into Power Save
The long espresso button flashes
after
60espresso
minutes
when
notprogrammed.
used.
Tomode.
start the
just touch
any button.
A
long
is
being
The
machine
is
in
the
Power
Save
Themachine
machineagain
switches
into Power
Save
after
60 minutes
not used.
Tomode.
start the
just touch
any button.
Slow
flashing
The long
espresso button flashes
The machine
is inwhen
the Power
Save
Themachine
machineagain
switches
into Power
Save
節電モードになっています。
Slow flashing
after
60 minutes
when
not used.
To start the
machine
again
just touch
any button.
The
is inwhen
the Power
Save
Themachine
machineagain
switches
into Power
Save
Slow flashing
aftermachine
60 minutes
not used.
Tomode.
start the
just touch
any button.
マシンは約60分間使用されないと節電モードになります。
Slow flashing
The
machine
is inwhen
the Power
Save
Themachine
machineagain
switches
into Power
Save
after
60 minutes
notdescaled.
used.
Tomode.
start the
just touch
any button.
The machine
needs
to be
ゆっくり点滅
Slow flashing
解除するには、タッチボタンF1又はF2を押してください。
The machine
needs
to be
after
60 minutes
when
notdescaled.
used. To start the machine again just touch any button.
Dimming
of illumination
The machine needs to be descaled.
Slow
flashing
Dimming of illumination
The machine needs to be descaled.
Dimming of illumination
The
machine is
needs
to be that
descaled.
Dimming of illumination
The machine
indicating
the descaling cycle has been selected. In this status
indicating
the descaling cycle has been selected. In this status
The machine is
needs
to be that
descaled.
スケール除去が必要です。スケール除去サイクルを実施してください。
(P12〜14)
Dimming of illumination
the tank
should
contain a that
descaling
solution.cycle has been selected. In this status
The
machine
is
indicating
the descaling
the
tank
should
contain
a
descaling
solution.cycle has been selected. In this status
Steadily
lit
(only
the
espresso
button)
10秒に1度暗くなる点灯
Dimming of illumination
The
machine
is
indicating
that
the
descaling
Steadily lit (only the espresso button)
the tank should contain a descaling solution.
The
machine
isis indicating
been selected.
status
Steadily lit (only the espresso button)
the
should
contain
a that
descaling
The tank
machine
indicating
thatthe
thedescaling
fisolution.
rst part cycle
of thehas
descaling
cycle isIninthis
progress.
indicating
thatthe
thedescaling
fisolution.
rst part cycle
of thehas
descaling
cycle isIninthis
progress.
Steadily lit (only+the espresso button)
The
machine
isis indicating
been selected.
status
the
tank
should
contain
a that
descaling
Descaling
solution
is being
run the
through
the
machine.
The
machine
is
indicating
that
fi
rst
part
of
the
descaling
cycle
is
in
progress.
Steadily lit (only+the espresso button)
Descaling
solution
is being
run the
through
the
should
a descaling
The tank
machine
is contain
indicating
that
fisolution.
rst the
partmachine.
of the descaling cycle is in progress.
+
Descaling
solution
is
being
run
through
the
machine.
Flash alternately
Steadily
lit (only the espresso button)
The
espresso
button
alone that
flashes
progressively.
The
machine
is
indicating
the
first the
partmachine.
of the descaling cycle is in progress.
Descaling
solution
is alone
being flrun
through
Flash alternately+
The espresso
button
ashes
progressively.
Flash alternately+
The
machine
is
indicating
that
the
first the
part of the descaling cycle is in progress.
espresso
button
alone
flrun
ashes
progressively.
Descaling
solution
is
being
through
The machine
isbutton
indicating
that
the fiprogressively.
rst part machine.
of the descaling is over.
Flash alternately+
espresso
alone
fl
ashes
Descaling
solution
is beingthat
run the
through
the machine.
The
machine
is indicating
first part
of the descaling is over.
Flash alternately
The machine
espresso
alone
flashes
The
indicating
that
thefilled
fiprogressively.
rst with
part fresh
of thedrinking
descaling
is over.
tank
mustisbutton
be
rinsed
out
and
water.
18
Steadily
lit (only the long coffee button)
Flash alternately
machine
indicating
that
thefilled
fiprogressively.
rst
part fresh
of thedrinking
descaling
is over.
espresso
alone
flashes
The tank
mustisbutton
be
rinsed
out
and
with
water.
Steadily lit (only the long coffee button)
tank mustisbe
rinsed out
and
filled
fresh
drinking
water.
The machine
indicating
that
the
fisecond
rst with
part part
of the
descaling
is over.
Steadily lit (only the long coffee button)
machine
isbe
indicating
that
the
ofdrinking
the descaling
cycle is in progThe
tank
must
rinsed
out
and
fi
lled
with
fresh
water.
The machine is indicating
rst part part
of the
is over.
indicating that
that the
thefisecond
of descaling
the descaling
cycle is in progSteadily lit (only the long coffee button)
The espresso button
+ flashes
The espresso button
+ flashes
The espresso button
+ flashes
+ flashes
The espresso button
The espresso button
+ flashes
The long espresso
+ button flashes
The long espresso
+ button flashes
The long espresso
+ button flashes
The long espresso button flashes
The
long
espresso
button flashes
Slow flashing
Slow flashing
Slow flashing
Slow
表示flashing
Slow
flashing
Dimming
of illumination
Dimming of illumination
Dimming of illumination
Dimming of illumination
Dimming
illumination
エスプレッソボタンのみ点灯
Steadily litof(only
the espresso button)
Steadily lit (only the espresso button)
Steadily lit (only the espresso button)
Steadily lit (only+the espresso button)
Steadily
lit (only+the espresso button)
Flash alternately
+
左右の点滅(エスプレッソ)
Flash alternately+
Flash alternately+
Flash alternately
Flash alternately
Steadily
lit (only the long coffee button)
Steadily lit (only the long coffee button)
ロングエスプレッソボタンのみ点灯
Steadily lit (only the long coffee button)
Steadily lit (only+the long coffee button)
Steadily
lit (only+the long coffee button)
Flash alternately
+
Flash alternately+
Flash alternately+
左右の点滅(ロングエスプレッソ)
Flash alternately+
Flash alternately+
Rapid flashing +
Rapid flashing +
Rapid flashing +
Rapid flashing
急速な点滅
Rapid flashing
The machine is brewing an espresso.
An
programmed.
Theespresso
machineisisbeing
brewing
an espresso.
An espresso
programmed.
The
machineisisbeing
brewing
an espresso.
Theespresso
machineisisbeing
brewing
a long espresso.
An
programmed.
An
programmed.
Theespresso
machineisisbeing
brewing
a long espresso.
A long
espresso
is being aprogrammed.
The
machine
is brewing
long espresso.
A long
espresso
is being aprogrammed.
The
machine
is brewing
long espresso.
A long
espresso
is being aprogrammed.
The
machine
is brewing
long espresso.
The
machine
is inis the
Power
Save mode. The machine switches into Power Save
A long
espresso
being
programmed.
A
long
espresso
is
being
programmed.
The
machine
is
in
the
Power
Save
Themachine
machineagain
switches
into Power
Save
after 60 minutes when not used.
Tomode.
start the
just touch
any button.
The
is inwhen
the Power
Save
Themachine
machineagain
switches
into Power
Save
aftermachine
60 minutes
not used.
Tomode.
start the
just touch
any button.
The
is inwhen
the Power
Save
Themachine
machineagain
switches
into Power
Save
aftermachine
60 minutes
not used.
Tomode.
start the
just touch
any button.
The machine
is inwhen
the Power
Save
Themachine
machineagain
switches
into Power
Save
after
60 minutes
not used.
Tomode.
start the
just touch
any button.
The machine
needs
to be
after
60 minutes
when
notdescaled.
used. To start the machine again just touch any button.
状況
The machine needs to be descaled.
The machine needs to be descaled.
The machine needs to be descaled.
マシンはスケール除去が選択された事を表示しています。
The machine
indicating
the descaling cycle has been selected. In this status
The
machine is
needs
to be that
descaled.
The
machine
is
indicating
the descaling
cycle has been selected. In this status
the tank
should
contain a that
descaling
solution.
この状態のときには、
タンクにスケール除去溶液が入っていることをご確認ください。
The
machine
is
indicating
that
the descaling
the tank should contain a descaling
solution.cycle has been selected. In this status
The
machine
is
indicating
that
the
descaling
been selected.
this
status
the
should
contain
a descaling
The tank
machine
indicating
thatthe
thedescaling
fisolution.
rst part cycle
of thehas
descaling
cycle isIn
progress.
The
machine
isis indicating
that
cycle
has
been selected.
Ininthis
status
the
tank
should
contain
a
descaling
solution.
The
machine
is
indicating
that
the
fi
rst
part
of
the
descaling
cycle
is
in
progress.
マシンはスケール除去の最初のステップである事を表示しておりスケール除去溶液が
Descaling
solution
is being
run through
the machine.
the
tank
should
contain
a descaling
solution.
The
machine
is
indicating
that
the
fi
rst
part
of
the
descaling
cycle
is
in
progress.
Descaling solution
is being run through the machine.
マシン内部に取り込まれています。
espresso
button
flrun
ashes
progressively.
The
machine
is
indicating
the
first the
partmachine.
of the descaling cycle is in progress.
Descaling
solution
is alone
beingthat
through
エスプレッソボタンのみが継続的に点滅します。
machine
is
indicating
the
first the
partmachine.
of the descaling cycle is in progress.
The espresso
button
flrun
ashes
progressively.
Descaling
solution
is alone
beingthat
through
espresso
flrun
ashes
The
machine
isbutton
indicating
the
fiprogressively.
rst part
of the descaling is over.
Descaling
solution
is alone
beingthat
through
the machine.
The machine
espresso isbutton
alone
fl
ashes
progressively.
indicating that the first part of the descaling is over.
The
mustマシンはスケール除去の最初のステップが終了した事を表示しています。
be
rinsed
out
and
water.
espresso
alone
flashes
The tank
machine
isbutton
indicating
that
thefilled
fiprogressively.
rst with
part fresh
of thedrinking
descaling
is over.
The machine
tank mustisbe
rinsed out
and
water.
The
indicating
that
thefilled
first with
part fresh
of thedrinking
descaling
is over.
タンクをしっかりゆすぎ、新鮮な飲料水を入れてください。
tank mustisbe
rinsed out
and
filled
fresh
water.
indicating
that
the
ofdrinking
the descaling
cycle is in progThe machine
indicating
that
the
fisecond
rst with
part part
of the
descaling
is over.
The
must
beindicating
rinsed
outthat
andthe
filled
with part
fresh
drinking
water.
machine
second
theout
descaling
cycle is in progress.tank
Water
is is
being
run through
the
machine
to of
rinse
the
circuit.
The
tank
must
be
rinsed
out
and
fi
lled
with
fresh
drinking
water.
The
indicating
that the
part
theout
descaling
cycle is in progress.machine
Water is is
being
run through
thesecond
machine
to of
rinse
the circuit.
long
espresso
button
alone
fl
ashes
progressively.
The
machine
is
indicating
that
the
second
part
of
the
descaling
cycle is in progress. Water isマシンはスケール除去の次のステップが始まった事を表示しています。
being run through the machine to rinse out the circuit.
The
machine
is
indicating
that
the
second
part
of
the
descaling
cycle is in proglong
espresso
button
alone
fl
ashes
progressively.
ress. Water isマシン内部のすすぎ行っています。
being run through the machine to rinse out the circuit.
The long
espresso
alone flTurn
ashes
progressively.
ress.
Water
is has
being
run through
the
machine
rinseonoutagain
the circuit.
The
machine
abutton
malfunction.
it off
andtoback
after 30 seconds. If
ロングエスプレッソボタンが継続的に点滅します。
The long
espresso
alone flTurn
ashes
progressively.
The
machine
has abutton
malfunction.
it off
and
back on again after 30 seconds. If
the
isespresso
signaled
again,alone
contact
a service
center.
The fault
long
flTurn
ashes
progressively.
The
machine
has abutton
malfunction.
it off
and
back on again after 30 seconds. If
the
fault
is signaled
again, contact
a service
center.
The
machine
has
a
malfunction.
Turn
it
off
and
back on again after 30 seconds. If
マシンが正常に機能していません。電源を落とし、30秒たったら電源を入れてくださ
the fault is signaled
again, contact a service center.
The
machine
has
a
malfunction.
Turn
it
off
and
back on again after 30 seconds. If
the fault is signaled
again, contact a service center.
い。もし、表示が消えないようでしたら、お求めの販売店またはキーコーヒー㈱お客
the fault is signaled again, contact a service center.
様センターへお問合せください。
19
■ 故障かな?『トラブルシューティング』
それでも直らない場合……キーコーヒー㈱お客様センターに連絡してください。
問 題
マシンの電源が入らない
コーヒーが抽出されない
原 因
解決策
1)電 気コードがコンセントにささっ
ていない。
1)コンセントにプラグを差し込んでください。
2)電 源スイッチ“M”が“O”の位
置ある。
2)電源スイッチの“M”を“I”の位置に動かしてください。
1)タンクに水が入っていない。
1)水タンク“L”に水をいれてください。
2)カプセルが入っていない。
2)カプセルホルダーにカプセルをいれてください。
3)カ プセルが入っているが抽出でき
ない。
3)カプセルを一度取り出し、湯通しをします。その後もう
一度カプセルを入れて抽出してください。
4)マ シン上部の開閉レバー“A”が
しっかり閉まっていない。
4)開閉レバー
“A”
を上げてカプセルがカプセルホルダー
“B”
に入っていることを確認してください。開閉レバー“A”
がロックするまで押し下げます。
か
のどちらか
のボタンを押してください。
5)
もしくは
ていない。
5)
ボタンが押され
6)ウ ォータータンクが正しくはまっ
ていない。
20
か
のどちらかのボタンに触れてください。
6)タンク“L”がカチッとはまるようにいれてください。
それでも直らない場合……お求めの販売店またはキーコーヒー㈱お客様センターまで連絡してください。
問 題
コーヒーが抽出されない
抽出ユニットから水滴が
落ちる
コーヒーの抽出量が
バラつく
原 因
解決策
7)内 部にスケールがたまってしまっ
ている。
7)スケール除去サイクルを行ってください(P12〜14)。
8)ポンプが動かない。
8)カプセルホルダー“B”が空であることを確認し、開閉
レバー“A”がロックするまで押し下げ、
か
の
どちらかのボタンに触れてお湯を出す。カプセルを入れ
てから再びコーヒーを抽出してください。
1)誤ったカプセルの使用。
1)ご使用のカプセルがilly“Iperespresso”かご確認ください。
2)マ シンが節電モードになっている
とき。
1)コーヒーのボタンを押してマシンをスタートさせ、両方
のコーヒーボタンが点灯し抽出準備が出来るまでお待ち
ください。
か
ボタンを押し、コーヒーを抽出し
てください。マシン内に残った水分が落ちる事がありま
すが、正常です。
1)カプセル個体による微量誤差。
1)多少のバラつきは正常です。
1)故障。
1)電源をオフにし、コンセントからプラグを抜き、水タン
クを空にしてください。修理が必要なのでお求めの販売
店またはキーコーヒー㈱お客様センターまで連絡してく
ださい。
マシン内部から水漏れする
21
22