1
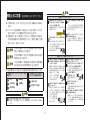
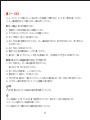
ESPRESSO
MACHINE
INSTRUCTION MANUAL
■ ご使用の前に
ご使用の前にこの取扱い説明書を最後までお読みください。
■ 重要事項
本体や取外し可能な部品を絶対に水に浸けたり食器洗浄機には入れないでください。
水タンクの水は定期的に取り換えてください。
水タンクが空の状態で、マシンを絶対に使用しないでください。
2ヵ月に1度は、市販のコーヒーマシン専用のスケール除去剤を使って、スケール除去を行う事をお勧めします。
(方法についてはス
ケール除去の章をご参照ください。)
本体は、一定の圧力を維持するバルブを装備しています。
そのため、抽出ユニットから少量の水がポタポタと落ちることもあります。
注記:
水の中に含まれている成分(ミネラル分等)が、製品をご使用されている間に自然に製品内部の管に付着していきます。
(付着物を
「スケール」又は水あかと呼びます。)
放置していると製品の故障の原因になりますので、スケール除去剤をご使用になり、スケール除去を行うことをお勧めします。
スケール除去剤は「カルキ除去剤」という名称でも販売されています。
目 次
■ 安全上のご注意………………………………………………… 2
■ 各部のなまえ…………………………………………………… 4
■ はじめてのご使用……………………………………………… 5
給水
始動とウォーミングアップ
節電モード
■ コーヒーの抽出………………………………………………… 6
■ コーヒー抽出量の設定………………………………………… 7
■ マシン内部の洗浄(空おとし) ……………………………… 8
■ 使用済カプセルの捨て方およびカプセルコンテナ清掃…… 9
■ 保管……………………………………………………………… 9
■ スケール除去…………………………………………………… 10
■ 仕様/推奨/保証の制限……………………………………… 11
■ 故障かな?『トラブルシューティング』 …………………… 12
1
警告
安全上のご注意 各注意事項を、必ずお守りください。
電源/コンセントについて
電源は交流100V(50/60Hz)で
「15A125V」と記されている壁面の
コンセントに直接差し込む
他の機器と併用すると、発熱による火災
の原因になります。
★ご
使用の前に、必ずこの「安全上のご注意」を最後までお読みく
ださい。
★ ここに示した注意事項は、製品を正しく安全にお使いいただき、
あなたや他の人々への損害を未然に防止するものです。
★ 注意事項は、誤った取り扱いで生じることが想定される内容を、
その危害や損害および切迫の度合いにより、「危険」
「警告」
「注意」
の3つに分け、明示しています。
危険
この表示の欄は、「死亡または重傷などを負う危険が
切迫して想定される」内容です。
警告
この表示の欄は、「死亡または重傷などを負う可能性
が想定される」内容です。
注意
この表示の欄は、「傷害を負う可能性または物的損害
のみが発生する可能性が想定される」内容です。
取り付けの悪いコンセントは絶対に使わ
ない
取り付けの悪い(ガタツキのある)コン
セントや差込み口(刃受)のゆるいコン
セントは、絶対に使用しな
いでください。感電や発熱
の恐れがあります。
:禁止 :接触禁止 :水ぬれ禁止 :分解禁止 この絵表示は、必ず実行し
ていただく「強制」内容です。
:指示を守る
電源プラグ/電源コードを破損するよう
なことはしない
電源プラグ/電源コードは、大切に扱っ
てください。無理に曲げたり、物を載せ
たり、束ねたり、傷をつけないでくださ
い。傷んだまま使用
すると、感電やショ
ート、発火などの原
因になります。
:電源プラグを抜く
:ぬれ手禁止
延長コードやテーブルタップ、ソケット
などは絶対に使わない
コンセントや電源プラグ/電源コードが
異常発熱し、発火する恐れがあります。
電源プラグ/電源コードについて
電源プラグ/電源コードが異常発熱して
いる場合は、電源を切り、電源プラグを
コンセントから抜く
使用中に、電源プラグ/電源コードが異
常に熱くなる場合は、
直ちに電源を切り、
お求めの販売店またはキーコーヒー㈱お
客様センターに、ご相談
ください。そのまま使用
すると、ショートや発火
する恐れがあります。
★ 各注意事項には、
「禁止」
または
「強制」
を促す絵表示が付いています。
この絵表示は、してはいけない「禁止」
内容です。
コンセントは本製品だけ(単独)で使用
する
コンセントの差込み口が2つある場合
は、片方の差込み口を使用せず、空けた
ままにしてください。
危険
自分で絶対に分解・修理・改造は行わない
感電・火災の原因になったり、異常作動してケガをすることがあり
ます。
2
動作中に電源プラグを抜き差ししない
感電・火災の原因になります。
電源プラグやコンセントに付着している
ホコリやゴミは、定期的に取り除く
ホコリやゴミが湿気を帯びると、ショー
トや漏電、発火などの原因になります。
ぬれた手で電源プラ
グを抜き差ししない
感電する恐れがあり
ます。
電源プラグは、根元までし
っかりと差し込む
不完全な接続は、感電や発熱による火災
の原因になります。
変形・破損している電源プラグ/電源コ
ードは絶対に使わない
感電やショート、発火する恐れがありま
す。必ず、お求めの販売店またはキーコ
ーヒー㈱お客様センターに、交換を依頼
してください。
警告
注意
使用中/使用後について
お子様だけでは使わせない。幼児の手の
届くところで使わない
ヤケド・感電・ケガの原因になります。
コーヒー抽出口や給湯ノズルから出てく
るお湯やスチーム(蒸気)に注意する
高温のため、ヤケドの原因になります。
設置場所について
使用中は給水タンク内の水量をチェック
する
極端に水が少ない状態が続くと異常発熱
し、発火する恐れがあります。
本体は不安定なところや熱に弱い場所、屋外には置かない
本体や置いた物・場所が変形・変質したり火災の原因になります。
使用中/使用後について
本体が転倒、落下したときには、使用せ
ず、点検を依頼する
感電・火災の原因になります。
長期間使用しない場合は、必ず電源プラ
グを抜く
誤って、電源が入る恐れがあります。
本体や操作部に水やジュース(液体)な
どをこぼさない
本体や操作部
(コントロールパネル)
に、
水やジュース(液体)などをこぼさない
でください。万一、こぼしてしまった場
合は、ショートや感電などの恐れがあり
ますので、直ちに電源を切り、使用を中
止します。その後、お求めの販売店また
はキーコーヒー㈱お客様センターまでご
連絡ください。
使用中
異常が生じた場合は、使用を中止する
万一、異常が生じた場合は、直ちに電源を切り、電源プラグをコンセントから抜いてく
ださい。異常な状態で使い続けると、事故や故障につながります。必ず、お求めの販売
店またはキーコーヒー㈱お客様センターまでご連絡ください。
お手入れについて
本体のお手入れは電源プラグをコンセントから抜き、 各部が冷えてから行う
ヤケド・感電・ケガの原因になります。
注意
電源について
お手入れについて
ブレーカーが落ちる場合には、電力会社に連絡する
使用中にブレーカー(分電盤内の回路遮断器)が落ちる場合には、お近くの
電力会社にご相談ください。
使用後は、必ずお手入れする
故障の原因になります。
絶対に、水に浸したり、水洗いをしない
故障の原因になります。
本体と電源コード/プラグに水をかけた
り、水に浸けたり、水洗いをしない
感電やショート、
故障の原因になります。
洗剤は、必ず台所食器用洗剤を使用する
研磨剤入り洗剤やクレンザー、漂白剤、
スプレー洗剤などは使用しないでくださ
い。本体の表面が変質し、はがれ・変色・
樹脂部品の割れの原因になります。
電源プラグ/電源コードについて
電源プラグを抜くときは、電源コードを
持たず、必ず電源プラグを持って抜く
電源コードを無理に引っ張ると、破損す
る恐れがあります。
使用中および使用後しばらくはコーヒー
抽出口部分に触らない
ヤケドの原因になります。
他の用途で使用しない
本製品は、コーヒーの抽出、給湯/加熱
専用です。故障の原因になります。
使用しないときは、電源を切り、必ずプ
ラグをコンセントから抜く
故障の原因になります。
給水タンクの最大水量(8分目)を超え
て水を入れない
故障の原因になります。
他製品の部品や付属品などを組み合わせ
て使用しない
故障や事故の原因になります。
使用中は、電源コードを本体に触れさせ
ない
熱で電源コードが傷み、感電やショート
の原因になります。
3
ガラス磨き、シンナー、アルコール、ワ
イヤーウール、金ブラシ、たわし、研磨
スポンジなどは使用しない
本体の表面が変質し、はがれ・変色・樹
脂部品の割れの原因になります。
■ 各部のなまえ
1. 開閉レバー(カプセルホルダー)
2. 抽出ボタン
(A. エスプレッソ B. ロングエスプレッソ)
2
7
(A)エスプレッソ
1
(B)ロングエスプレッソ
3. 抽出ユニット
4. カップスタンド
5. ドリップトレイ、
カプセルコンテナ(使用済カプセル入れ)
6. 電源コード(プラグ有)
3
7. 水タンク(取り外し可能)
8. 主電源スイッチ ON/OFF
9. カップスタンド(サポート)
8
9
6
5
4
4
OPERATING THE COFFEE MACHINE
20
IT
IT
OPERATING
THE COFFEE MACHINE
20
Filling the tank
•OPERATING
To extract the tank
(8), press
it downMACHINE
and turn it outwards at the same time
THE
COFFEE
Filling
(Fig.1) the tank
OPERATING
THE
COFFEE
MACHINE
■ はじめてのご使用
•• Fill
To extract
the
tank
it down
the tank
with
up(8),
to 1press
liter of
fresh and
cold turn
waterit outwards
(Fig.2) at the same time
Filling
the
tank
•• (Fig.1)
Reinstall
the
tank
by
slightly
tilting
and
resting
it
on the water
valve
(Fig.3)
本体を電源に繋ぐ前に、取扱い説明書の重要安全事項をよくお読みください。
To extract
the tank
tank (8), press it down and turn it outwards
at the
same
time
Filling
the
• Fill the tank
with up to 1 liter of fresh cold water (Fig.2)
〔給水〕
•• (Fig.1)
To
extractthe
thetank
tankby(8),
presstilting
it down
turn itit outwards
at the
same
time
Reinstall
slightly
andand
resting
on the water
valve
(Fig.3)
• (Fig.1)
Fill the tank with up to 1 liter
freshcoffee
cold watermachine
(Fig.2)
Starting/warming
upofthe
1.水タンク(7)を押し下げながら外側に出します。❶
Reinstall
thewith
tank
bytoslightly
andcold
resting
on the water valve (Fig.3)
•• Plug
thetank
coffee
machine
an
electrical
socket
Fill
the
up
1 into
liter tilting
of fresh
waterit (Fig.2)
Starting/warming
upbythe
coffee
machine
•• Power
turning
on the
main
switchvalve
(9) (Fig.4)
2.新鮮な水を1リットル水タンクに入れます。❷(8分目まで入れます。
)
Reinstallthe
thecoffee
tank bymachine
slightly tilting
and
resting
it on
the water
(Fig.3)
•• Plug
the (A)
coffee
into toanflash;
electrical
Buttons
andmachine
(B) will start
aftersocket
aboutmachine
a minute the lights remain
Starting/warming
upbythe
coffee
3.水バルブにはまるように少し水タンクを傾けながら水タンクをはめます。❸
• permanently
Power the coffee
machine
turning
on
the (Fig.4)
main switch (9) (Fig.4)
on
and
the
machine
is
ready
for
use
• Plug the coffee machine into
electrical socketmachine
Starting/warming
uptoanthe
• Buttons (A) and (B) will start
flash; coffee
after about a minute the lights remain
•• Plug
Power
coffee
machine
by electrical
turning on
the main switch (9) (Fig.4)
〔始動とウォーミングアップ〕
thethe
coffee
into an
permanently
on machine
and the machine
is ready socket
for use (Fig.4)
Energy
saving
function
Buttonsthe
(A)
and
(B) will
start tobyflash;
afteron
about
minute
the lights
remain
•• Power
coffee
machine
turning
the amain
switch
(9) (Fig.4)
1.コンセントにプラグ(6)を差し込んでください。
permanently
and
thestart
machine
is isready
for
use
If• the
machine
isonleft
on
not used,
after
half anthe
hour
the remain
energy
Buttons
(A) and
(B)switched
will
to and
flash;
after
about
a(Fig.4)
minute
lights
2.主電源スイッチ(8)を押し電源を入れます。❹
Energy
saving
function
saving
functionon
is activated
and the isbuttons
(B) blink every 2 seconds.
permanently
and the machine
ready (A)
for and
use (Fig.4)
3.抽出ボタン(A)と(B)が光り始めます。約1分で点灯に変わるとマシンが適正な温度に達し
IfEnergy
the machine
is
left
switched
on and is not used, after half an hour the energy
savingagain
function
To use the machine
press one of the buttons (A) or (B) and wait for it to
saving function is activated and the buttons (A) and (B) blink every 2 seconds.
たことを示します。❹
heat
when
(A) on
andand
(B)isappear
withafter
a fixed
the machine
is
Energy
saving
function
If the up;
machine
istheleftbuttons
switched
not used,
halflight
an hour
the energy
To
usefor
theuse.
machine
again press
onebuttons
of the buttons
(A)
or
(B)every
and wait
for it to
ready
saving
function
is activated
and the
(A) and
(B) half
blink
2the
seconds.
Ifheat
the up;
machine
switched
not used,
an hour
energy
when istheleftbuttons
(A) on
andand
(B)isappear
withafter
a fixed
light
the machine
is
saving
function
is activated
and the
(A) and (A)
(B) or
blink
2 seconds.
To
usefor
theuse.
machine
again press
onebuttons
of the buttons
(B)every
and wait
for it to
ready
マシンの主電源スイッチが入ったまま15分使用しないと節電モードが働き、ボタン(A)と(B)
heat
up;the
when
the buttons
(A) andone
(B)ofappear
with a(A)
fixed
thewait
machine
is
To use
machine
again press
the buttons
or light
(B) and
for it to
SAFETY
TIPS:
ready
forAND
use.ENERGY-SAVING
が2秒間おきに点滅します。
heat
up;
when
the buttons (A) and (B) appear with a fixed light the machine is
If you are going to be away from home for some time, remember to power off
ready for use.
マシンを通常の状態に戻すには、2つのボタン(A)または(B)のどちらかを押し、ヒーティング
SAFETY
ANDatENERGY-SAVING
the machine
the main switchTIPS:
(9). Do the same at night before going to bed.
IfThe
youcoffee
are going
to beheats
away up
from
home
for some
remember
machine
very
rapidly
and istime,
normally
ready to
forpower
use inoff1
が完了するまでお待ちください。ボタン(A)と(B)が点灯するとマシンが準備完了です。
SAFETY
AND
ENERGY-SAVING
TIPS:
the
machine
at the main switch (9). Do the same at night before going to bed.
minute
after power-on.
IfThe
youcoffee
areAND
going
to beheats
away up
from
home
for some
remember
machine
very
rapidly
and istime,
normally
ready to
forpower
use inoff1
SAFETY
ENERGY-SAVING
TIPS:
注記:
the
machine
attothe
main
switch
Do the
same
at night
before
going
to bed.
after
power-on.
Ifminute
you
are
going
touse
be
away
from(9).
home
forfor
some
time,
remember
toempty
power
off
plan
not
the
coffee
machine
a long
period
of time,
the
安全なご使用と節電モード
The
coffee
machine
heats
up very
readygoing
for use
in 1
the
at the
switch
(9). rapidly
Do the and
sameisatnormally
night before
to bed.
tankmachine
and unplug
themain
appliance.
minute
after
power-on.
If youcoffee
plan not
to useheats
the coffee
machine
a long
period of
time,forempty
●使用しない時は主電源スイッチ(8)をオフにしてください。
The
machine
up very
rapidlyfor
and
is normally
ready
use inthe1
tank andafter
unplug
the appliance.
minute
power-on.
●長期間マシンを使用しない場合は、水タンクを空にし、プラグを抜いて保管してください。
If you plan not to use the coffee machine for a long period of time, empty the
tank
If youand
planunplug
not tothe
useappliance.
the coffee machine for a long period of time, empty the
〔節電モード〕
警告:
tank and unplug the appliance.
水タンクには、新鮮な水のみを入れてください。
熱湯や他の液体を入れると水タンクにダメージを与える可能性があります。
ご使用前に必ず水が入っていることを確認してください。
5
❶
Fig.1
7
Fig.1
Fig.1
❷
Fig.1
Fig.2
7
Fig.2
❸
Fig.2
Fig.2
Fig.3
❹
Fig.3
Fig.3
Fig.3
8
Fig.4
Fig.4
•• short
Slowly
lift big
the
control
lever (1)
(until 10)
it stops) (Fig. 7) and introduce
according
to backwards
your
taste
(Fig.
Place (A),
the
cup(B)
underneath
the
coffee
spout
• Close
the lever
(1)slot
(Fig.
9) completely
press one of the dispensing buttons:
aSlowly
capsule
in the
provided
(Fig. 8)and (until
•NOTE
lift the
control
lever (1) backwards
it stops) (Fig. 7) and introduce
short
(A),
big
(B)(1)slot
according
to your
a capsule
in the
provided
(Fig.taste
8)and(Fig.
• Close
the lever
(Fig.
9) completely
press10)
one of the dispensing buttons:
22
The machine is equipped with a pre-infusion system: when one of the coffee
•NOTE
Close
the
lever
(1)
(Fig.
9)
completely
and
press
one ofto
themake
dispensing
short
(A),
big
(B)
according
to
your
taste
(Fig.
10)
buttons - (A) or (B) – is pressed, the machine begins
coffee,buttons:
stops,
The
machine
is
equipped
with
a
pre-infusion
system:
when
one
of the
coffee
and
automatically
restarts
until
the
programmed
volume
has
been
delivered.
short
(A),
big
(B)
according
to
your
taste
(Fig.
10)
NOTE
■ コーヒーの抽出
PREPARATION OF COFFEE buttons - (A) or (B) – is pressed, the machine begins to make coffee, stops,
NOTE
The machine
is equipped
pre-infusion
system:
when
of the
coffee
and
automatically
restartswith
untilathe
programmed
volume
hasone
been
delivered.
●Y3 は“Iperespresso”カプセル専用マシンです。
•buttons
Repeat- the
for additional
cups of begins
coffee using
a new
capsule
for
• Use only illy Iperespresso capsules
(A) steps
or
(B) above
– is pressed,
the machine
to make
stops,
The machine
is equipped
with a pre-infusion
system: when
onecoffee,
of the coffee
each
drink
automatically
restarts
until the
programmed
volume
has been
delivered.
• Place the cup underneath the coffee spoutand
buttons
(A)
or
(B)
–
is
pressed,
the
machine
begins
to
make
coffee,
stops,
Repeat
steps
above for
additional
of coffee
using awill
newautomatically
capsule for
• To
expelthe
used
capsules,
slowly
lift the cups
lever and
the capsule
and
until the programmed volume has been delivered.
• Slowly lift the control lever (1) backwards (until
itautomatically
stops)
(Fig. 7)restarts
and introduce
1.
と
ボタンが点灯していることを確認してください。
each
drink
fall
into
the used capsule tray.
a capsule in the slot provided (Fig. 8)
Repeat
steps
above for
additional
of coffee
using awill
newautomatically
capsule for
•• Repeat
To
expelifthe
used
capsules,
slowly
lift the cups
lever and
the capsule
2.抽出口の下にカップを置いてください。
unsuccessful.
drink
fall
into
the
used
capsule
• each
Repeat
above buttons:
fortray.
additional cups of coffee using a new capsule for
• Close the lever (1) (Fig. 9) completely and press
one
ofthe
thesteps
dispensing
3.ゆっくりと開閉レバー(1)を止まるまで後ろに上げ
❺、カプセル
• each
To expel
capsules,
slowly lift the lever and the capsule will automatically
drink
ifused
unsuccessful.
short (A), big (B) according to your taste (Fig.Repeat
10)into
used
capsuleslowly
tray. lift the lever and the capsule will automatically
ホルダーにカプセルを入れます。❻
WARNING:
• fall
To
expelthe
used
capsules,
Repeat
unsuccessful.
NOTE
fall into ifthe
used capsule tray.
4.完全にレバーを閉め(1)
❼ 抽出ボタンを押してください。❽
WARNING:
Before ifintroducing
capsule
Repeat
unsuccessful.
The machine is equipped with a pre-infusion system:
when
one of athe
coffee into the coffee machine, lift the control
・ エスプレッソ(A)
thecoffee,
top ofstops,
the machine slowly and fully. For proper
buttons - (A) or (B) – is pressed, the machine lever
begins(1)to on
make
WARNING:
Before
introducing
a capsule
theproduct
coffee machine,
control
hygiene,
preserve
theinto
high
quality, itlift
isthe
advisable
ロングエスプレッソ(B)
・
and automatically restarts until the programmed
volumeand
has to
been
delivered.
WARNING:
lever
(1) the
on the
top ofsoon
the machine
slowly
andbeen
fully. dispensed.
For proper
to
eject
capsule
after
the
drink
has
Before introducing a capsule into the coffee machine, lift the control
5.コーヒーが設定量に達すると自動的に止まります。
hygiene, and to preserve the high product quality, it is advisable
(1)
on the
of theformachine
slowlymachine,
and fully.
For
proper
• Repeat the steps above for additional cups oflever
coffee
newtop
capsule
Before
introducing
a capsule
into the
liftdispensed.
the control
to
ejectusing
the acapsule
soon after
thecoffee
drink has been
hygiene,
to preserve
high product
it isFor
advisable
each drink
lever (1) and
on the
top of thethe
machine
slowlyquality,
and fully.
proper
警告:
TIP:
• To expel used capsules, slowly lift the lever USEFUL
and
the
capsule
will
automatically
Fig.
7 quality,
to
eject
the
soonthe
after
drink
has been
hygiene,
andcapsule
to preserve
highthe
product
it isdispensed.
advisable
Use thick cups when preparing Espresso and heat them beforehand. This will
fall into the used capsule tray.
カプセル1つで抽出できるのは1杯分です。2杯の抽出には使用できません。
to eject
the capsule soon after the drink has been dispensed.
USEFUL
TIP:
keep your
coffee warm longer. Cups can be heated under hot running water.
Repeat if unsuccessful.
抽出後のカプセルはカプセルホルダーを開けた時に自動的にカプセルコンテナ(5)に入ります。
Use thick cups when preparing Espresso and heat them beforehand. This will
USEFUL TIP:
適時ドリップトレイ(5)を清掃し、カプセルコンテナを空にしてください。
keep your coffee warm longer. Cups can be heated under hot running water.
Use
thickTIP:
cups when preparing Espresso and heat them beforehand. This will
USEFUL
WARNING:
PROGRAMMING
THE DISPENSER BUTTONS
タンクの水の交換は頻繁に行うようにしてください。
keep
yourcups
coffeewhen
warm
longer. Cups
can and
be heated
under
hot runningThis
water.
Use thick
preparing
Espresso
heat them
beforehand.
will
マシンがダメージを受ける場合がありますので“Iperespresso”カプセル以外のカプセルはお使い頂
Big
and
holdcontrol
the button
Thebemachine
will start
water.
Before introducing a capsule into the coffee
machine,
the
PROGRAMMING
THE
DISPENSER
BUTTONS
keepcup:
yourPress
coffeelift
warm
longer.
Cups(B).can
heated
under
hotdelivering
running water.
Once the
desired
level is reached release the button (B). The machine will
lever (1) on the top of the machine slowly
and
fully.water
For proper
けません。
PROGRAMMING
DISPENSER
BUTTONS
Big cup:
Press
hold THE
the
(B). Thequantity
machine
delivering
then
stop
delivering
water
andbutton
the
desired
willwill
bestart
memorized
for water.
future
hygiene, and to preserve the high product
quality,
itand
is advisable
Once
the
desired
water
level
is reached
release theBUTTONS
button (B). The machine will
PROGRAMMING
THE
DISPENSER
dispensing.
(Fig.
10)
to eject the capsule soon after the drink
has
been
dispensed.
Big cup: Press and hold the button (B). The machine will start delivering water.
then stop
delivering
water
andthe
thebutton
desired(A).
quantity
will be memorized
for future
Fig.
8 machine
《よりコーヒーをお楽しみいただくために》
Small
cup:
Presswater
and
hold
The
willThe
start
delivering
Once
the
desired
reached
the button
(B).
machine
will
Big cup:
Press
and
holdlevel
the isbutton
(B). release
The machine
will start
delivering
water.
dispensing.
(Fig.
10)
water.
Once
the
desired
water
level
is
reached
release
the
button
(A).future
The
エスプレッソには厚いカップを使用し、使用前にカップを温めておくことをお勧めします。
then
stop
delivering
water
andis the
desired
quantity
will
be memorized
for
Once
the
desired
water
level
reached
release
the
button
(B).
The
machine
will
Small cup:
Press
anddelivering
hold thewater
button
machine
willwillstart
delivering
machine
will (Fig.
then
stop
and(A).
the The
desired
quantity
be memorized
USEFUL TIP:
dispensing.
10)water
then stop
delivering
and thelevel
desired
quantityrelease
will be memorized
for
future
water.
Once
the
desired
water
is
reached
the
button
(A).
The
future
dispensing.
10)
Use thick cups when preparing Espresso andfor
heat
them
beforehand.
This
willbutton (A). The machine will start delivering
Small
cup:
Press10)
and(Fig.
hold
the
dispensing.
machine will (Fig.
then stop
delivering water and the desired quantity will be memorized
keep your coffee warm longer. Cups can bewater.
heatedOnce
underthe
hotdesired
runningwater
water.level is reached release the button (A). The
Small
cup:
Press and(Fig.
hold10)
the button (A). The machine will start delivering
for
future
dispensing.
machine
will then
delivering
the desired
quantity
be memorized
water. Once
the stop
desired
waterwater
leveland
is reached
release
thewill
button
(A). The
for
future
dispensing.
(Fig.
10)
machine will then stop delivering water and the desired quantity will be memorized
PROGRAMMING THE DISPENSER BUTTONS
for future dispensing. (Fig. 10)
Big cup: Press and hold the button (B). The machine will start delivering water.
6
Once the desired water level is reached release the button (B). The machine will
then stop delivering water and the desired quantity will be memorized for future
❺
Fig. 7
Fig. 7
Fig. 7
Fig. 7
Fig. 8
Fig. 8
Fig. 8
Fig. 8
❼
Fig. 9
Fig. 9
Fig. 9
Fig. 9
Fig. 10
Fig. 9
❻
Fig. 10
❽
PROGRAMMING THE DISPENSER BUTTONS
■
Big cup: Press and hold the button (B). The machine will start delivering water.
Once the desired water level is reached release the button (B). The machine will
then stop delivering water and the desired quantity will be memorized for future
dispensing. (Fig. 10)
コーヒー抽出量の設定
Small cup: Press and hold the button (A). The machine will start
21 delivering
water. Once the desired water level is reached release the button (A). The
と
ボタンそれぞれのコーヒーの量を設定することができます。
machine will then stop delivering water and the desired quantity will be memorized
Rinsing
the machine/inner
circuits
for
future dispensing.
(Fig. 10)
●ここではエスプレッソボタン(A)
ロングエスプレッソ(B)
Fig. 9
❾
EN
の設定の仕方のみ解説します。
When used for the first time, or if the machine has been turned off for a prolonged
の設定を行うには、同じ手順に従い設定をし、
適切なサイズのカップをお使いください。
period, it is advisable to make at least three cups of hot water, to rinse out the
machine’s internal circuits, using the following procedure.
• Ensure that there are no capsules inside; power on the machine via the main
switch(on the back) (9)
●お好みの量の抽出を調整・設定するには次の手順に従って行ってください。
•
Place
1.カプセルをカプセルホルダーに入れてください。 a large empty cup under the coffee spout.(Fig. 5)
When the buttons (A) and (B) appear with a fixed light the machine is ready
2.カップスタンドに、エスプレッソカップを置いてください。
for use. Press a button (A) or (B); the machine dispenses water, press the
3.エスプレッソボタン
を長押しし続け、お好みの量になりましたらボタンを離してください。
button again when you have obtained the desired amount of water (Fig. 6).
これで設定ができました。
次回からはエスプレッソボタン
Fig. 10
Fig. 5
The machine has been rinsed once at least three cups of water have
been made.
を押すと、設定した量で抽出されます。
4.なお調整・設定をした後は、コーヒー抽出量を初期設定に戻すことはできません。
NOTE
To make an espresso using button (A) (small cup), place the rack (11) as in
9
Fig.6. When tall cups are needed, place the rack (11) as in Fig.5, and place
●手動停止
21
the cup directly on the rack (5) (Fig.5)
設定した量で抽出が完了する前に、再び同じボタンを押すと手動で抽出を止めることができます。
Rinsing the machine/inner circuits
警告:
When used for the first time, or if the machine has been turned off for a prolonged
コーヒーがカップから溢れてしまう可能性があるので、最大約70秒間で、
period, it is advisable to make at least three cups of hot water, to rinse out the
自動的に抽出が止まるようになっています。
EN
9
machine’s internal circuits, using the following procedure.
注記:
4
• Ensure that there are no capsules inside; power on the machine via the main
switch(on the back) (9)
●エスプレッソ抽出のときはエスプレッソボタン(A)を使用し、にあるカップスタンドサポート
• Place a large empty cup under the coffee spout.(Fig. 5)
When the buttons (A) and (B) appear with a fixed light the machine is ready
(9)を倒しカップを置いてください。大きいカップが必要なときはカップスタンドサポート(9)
for use. Press a button (A) or (B); the machine dispenses water, press the
をにあるように戻し、直接カップスタンド(4)に置いて抽出してください。
button again when you have obtained the desired amount of water (Fig. 6).
The machine has been rinsed once at least three cups of water have
been made.
7
NOTE
Fig. 6
Fig. 5
8
Rinsing the machine/inner circuits
21
EN
21
EN
When used for the first time, or if the machine has been turned off for a prolonged
Rinsing
the machine/inner circuits
■ マシン内部の洗浄(空おとし) period,
it is advisable to make at least three cups of hot water, to rinse out the
machine’s internal circuits, using the following procedure.
初めて使用もしくは長期間使用していないとき、以下の手順に従い最低3カップ分のお湯を抽出する
When used for the first time, or if the machine has been turned off for a prolonged
ことをお勧めいたします。
9
•period,
Ensure
there are
capsules
inside;
onhot
thewater,
machine
via the
it isthat
advisable
to no
make
at least
threepower
cups of
to rinse
outmain
the
switch(oninternal
the back)
(9) using the following procedure.
machine’s
circuits,
largethere
empty
theinside;
coffee power
spout.(Fig.
• Place
Ensurea that
arecup
no under
capsules
on the5)machine via the main
●カプセルが入っていないことを確認してください。
When the the
buttons
switch(on
back)(A)(9)and (B) appear with a fixed light the machine is ready
for use.
Pressempty
a button
or (B);
the machine
dispenses
1.主電源スイッチ(8)をオンにしてください。
• Place
a large
cup (A)
under
the coffee
spout.(Fig.
5) water, press the
button
again
when(A)
youand
have
the desired
amount
water (Fig.
6).
When the
buttons
(B)obtained
appear with
a fixed light
the of
machine
is ready
2.抽出口の下に大きめのカップを置いてください。
Theuse.
machine
been(A)rinsed
at least dispenses
three cupswater,
of water
for
Press ahas
button
or (B);once
the machine
presshave
the
3.抽出ボタン(A)
(B)が点灯したら、マシンの準備が完了です。
been
buttonmade.
again when you have obtained the desired amount of water (Fig. 6).
4
Fig. 5
Fig. 5
4.ボタン(A)もしくは(B)を押してください;マシンからお湯が出てきたら、適量のところで
The machine has been rinsed once at least three cups of water have
NOTE
been made.
再びボタンを押してお湯を止めてください。(なお、ボタンを押す前に設定量に達した場合、お
To make an espresso using button (A) (small cup), place the rack (11) as in
湯が自動的に止まります。)
Fig.6. When tall cups are needed, place the rack (11) as in Fig.5, and place
NOTE
the cup directly on the rack (5) (Fig.5)
●本体は少なくとも一回3カップ分のお湯で洗浄してください。
To make an espresso using button (A) (small cup), place the rack (11) as in
Fig.6. When tall cups are needed, place the rack (11) as in Fig.5, and place
the cup directly on the rack (5) (Fig.5)
警告:
●カプセルを使用していないため、多量のお湯が抽出されますので気をつけてください。
8
8
9
Fig. 6
Fig. 6
Up to 8 capsules can fit into the capsule receptacle. It is advisable to regularly
empty
the receptacle
prevent the capsules
from getting stuck inside it. To
EMPTYING
THEtoCAPSULE
RECEPTACLE
do this, you need to remove the capsule receptacle (6). (Fig. 11)
Up to 8 capsules can fit into the capsule receptacle. It is advisable to regularly
Empty the capsule receptacle and rinse. Clean off any water and coffee residues
empty the receptacle to prevent the capsules from getting stuck inside it. To
from the drip tray and grid(Fig. 12). Once clean, reintroduce the tray and the
do this, you need to remove the capsule receptacle (6). (Fig. 11)
■ 使用済カプセルの捨て方およびカプセルコンテナ清掃
capsule receptacle into the machine .
Empty the capsule receptacle and rinse. Clean off any water and coffee residues
from the drip tray and grid(Fig. 12). Once clean, reintroduce the tray and the
カプセルコンテナの容量は8個までですが、中でカプセルが詰まらないように定期的にカプセルコン
capsule receptacle into the machine .
テナ内にある使用済カプセルを捨てることをお勧め致します。
STORING THE COFFEE MACHINE AWAY
1.捨てるにはカプセルコンテナ(5)を取り出してください。
Power off and unplug the machine if it is not going to be used for a prolonged
period of time. Store the coffee machine in a dry place, away from dust and out
2.カプセルを捨てたらカプセルコンテナをすすいでください。水分やコーヒーのカスをドリップト
STORING THE COFFEE MACHINE AWAY
of the reach of children. We would advise you to store the machine in its original
レーとすのこから取り除いたら、ドリップトレーとカプセルコンテナを戻してください。
Power off and unplug the machine if it is not going to be used for a prolonged
packaging.
period of time. Store the coffee machine in a dry place, away from dust and out
Temperatures in the storage area should not be lower than 5°C, to avoid damage
of the reach of children. We would advise you to store the machine in its original
注記:
to the inner parts of the machine from water freezing inside them.
packaging.
●使用済カプセルとコーヒー抽出後の液体の残りがカプセルコンテナに入っています。
Temperatures in the storage area should not be lower than 5°C, to avoid damage
to the inner parts of the machine from water freezing inside them.
●ドリップトレイ(5)とカプセルコンテナを食器洗浄機に入れないでください。
Fig. 11
5
Fig. 11
●ドリップトレイとカプセルコンテナを清潔に保ってください。
REPAIR/MAINTENANCE
In case of malfunction, unplug the machine and contact your retailer. Only
authorized assistance centres can perform maintenance and repairs covered
REPAIR/MAINTENANCE
by warranty. In the case of services provided by an unauthorized assistance
In case we
of malfunction,
unplug the machine
andof contact
retailer.and/or
Only
■ 保管
centre,
decline any responsibility
in the event
damageyour
to persons
authorized
assistance centres can perform maintenance and repairs covered
things.
●長期間マシンを使用しないときは、電源を切り、コンセントからプラグを抜いてください。
by warranty. In the case of services provided by an unauthorized assistance
centre, we decline any responsibility in the event of damage to persons and/or
●水気のない場所で保管をし、ほこりを避け、お子様の手が届かない場所で保管をしてください。
things.
Fig. 12
Fig. 12
●マシンの外箱で保管をすることをお勧め致します。
DESCALING
注記:
The formation of lime scale is a natural consequence of using the machine. Lime scale must be removed every 1-2 months; if
the water is very hard, descale the machine more frequently. Use a non-toxic decalcifier for coffee machines of the type commonly
DESCALING
●ダメージを防ぐためにも、保管場所の温度は5℃を下回ることがないようにしてください。
available in stores. Do not use vinegar, lye, salt or formic acid because they may damage the machine.
The formation of lime scale is a natural consequence of using the machine. Lime scale must be removed every 1-2 months; if
●内部のパーツに残っている水分が凍ってしまう可能性があります。
the water is very hard, descale the machine more frequently. Use a non-toxic decalcifier for coffee machines of the type commonly
• Switch off the machine
available in stores. Do not use vinegar, lye, salt or formic acid because they may damage the machine.
• Remove the tank and empty out the water residue
• Fill the tank with the descaling solution, following the instructions on the descaler pack
• Switch off the machine
• After carrying out a second rinse cycle, fill the tank again.
• Remove the tank and empty out the water residue
• The machine is ready to use
• Fill the tank with the descaling solution, following the instructions on the descaler pack
• After carrying out a second rinse cycle, fill the tank again.
• The machine is ready to use
9
■ スケール除去
コーヒーマシンは、マシン内部にスケール(水中のカルシウム残留物)が付着するため、2〜3ヶ月に1度は取り除いてください。
コーヒーの抽出速度が遅くなった場合にはスケール除去を行なってください。
●スケール除去は、次のように進めてください。
1.主電源スイッチがOFFの位置にあることを確認してください。
2.カプセルホルダーにカプセルが入っていないことを確認してください。
3.水タンクを取外し、残っている水は捨ててください。
4.水タンクの8分目まで新鮮な水を入れてください。スケール除去剤をその中に入れ、溶けるまでお待ちください。
(早く溶かすには、
かきまぜてください。)
5.水タンクを正しく本体にはめてください。
6.容量が1ℓ以上ある容器を抽出ユニットの下に置いてください。
7.抽出ボタン((B)ロングエスプレッソ)を押してお湯を抽出します。この作業を水タンクが空になるまで続けてください。
●内部に残ったスケール除去溶液を排出するため、すすぎを行います。
1.水タンクを取り外し、スケール除去溶液の残りを捨ててください。
流水でよくすすぎ、新しい水を入れてください。
2.水タンクをもとの位置に戻し、しっかりはめてください。
3.容器を空にして、抽出ユニット下に戻してください。
4.すすぎを行う為、抽出ボタン((B)ロングエスプレッソ)を押してお湯を抽出します。水タンクが空になるまで続けてください。
5.これでスケール除去が全て終了しました。マシンを通常通りお使い頂けます。
警告:
すすぎの際、排出されたスケール除去済みの液体を再び使用しないでください。
:
スケール除去剤として、酢・アルカリ液・塩・ギ酸を使わないでください。本体にダメージを与える場合があります。
コーヒーマシンに適切なスケール除去剤をお使いください。
スケール除去を行っている最中に出される液体を絶対に飲まないでください。
10
■ 仕様
■ 保証の対象について
外装:ABS
以下に起因するダメージや不具合については保証対象外となり
熱交換資材:アルミニウム
ます。
水タンク:1.0ℓ
・定期的なスケール除去の不足
使用済みカプセル収容量:8カプセル
ポンプ圧:19バール
本体重量:3.6 kg
電圧:100V、50 - 60Hz
電力:1100W(節電機能付)
サイズ:100×310×265mm
製品の外観、仕様、性能は予告なく変更することがありますので、
ご了承ください。
・不適切な使用や、取扱い説明書に従っていない使用
・内部の改造
認定されていないサービスセンターでおこなった修理費用は、
保証対象外です。
そのような費用は全てお客様の負担となります。
※詳しくは、同封されている保証書をご確認ください。
警告:
修理が必要となった場合にサービスセンターへ発送のために、
最初の梱包材を保有しておくことをお勧め致します。
■ 推奨
(最低でも保証期間内)
充分に梱包せず、輸送途上で起こったダメージは保証対象外と
なります。
上質のコーヒーをお楽しみ頂く為、次の事をお勧めします。
・毎日水タンクの水は取り換えてください。
・マシン内のスケールを軽減するため、ミネラル含有量の低い
水(軟水)をお使いください。
・コーヒーカップはあらかじめ温めてからご使用ください。
11
■ 故障かな?『トラブルシューティング』
それでも問題が解決されない場合……キーコーヒー㈱お客様センターまで連絡してください。
問 題
電源が入らない
コーヒーが抽出されない
原 因
解決策
1)電源コードが接続されていない。
1)コンセントにプラグを差し込む。
2)主 電源スイッチが“O”の位置で
ある。
2)主電源スイッチ(8)を“I”の位置にする。
1)タンクに水が入っていない。
1)タンク(7)に水をいれてください。
2)タンクが正しく挿入されていない。
2)タンクを本体にカチッと音がするまで完全にはめてくだ
さい。
3)本 体の天面にある可動部がしっか
りと閉まっていない。
3)開閉レバー(1)を上げて、カプセルが入っているか確
認をし、レバー(1)をロックの位置まで下げる。
4)カプセルが入っていない。
4)カプセルをいれてください。
5)カ プセルが入っているが穴が完全
に開けられていない。
5)開閉レバー(1)を上げて、カプセルがきちんと入って
いるか確認をし、レバー(1)をロックの位置まで下げ
て再度抽出。それでもダメな場合は新しいカプセルでお
試しください。もしも問題が解決しなければ、お求めの
販売店もしくはキーコーヒー㈱お客様センターへ問い合
わせをしてください。
6)ポンプに水が通っていない。
6)空 おとし(P8)をします。湯量が通常通りなら問題あ
りません。湯量が少ない場合は、スケール除去(P10)
を行なってください。お湯が出ない場合はお求めの販売
店にお問い合わせをしてください。
12
それでも問題が解決されない場合……キーコーヒー㈱お客様センターまで連絡してください。
問 題
カプセルが排出されない
ポンプから大きな音がする
コーヒーがぬるい
本体がウォーミングアップ
に入っているときに抽出口
からポタポタ漏れる
コーヒーの抽出速度が遅い
コーヒーの酸味が強い
原 因
解決策
1)カ プセルが中に入ったままになっ
ている。
1)再度、レバー(1)を閉め、ゆっくりとレバーを開ける。
1)タンクに水が入っていない。
1)タンクに給水してください。
2)タンクが正しく挿入されていない。
2)タンクを正しく挿入して新しいカプセルを入れてください。
3)
カプセルに完全に穴が開いていない。 3)新しいカプセルを入れてください。もしも問題が解決し
なければ、お求めの販売店もしくはキーコーヒー㈱お客
様センターへ問い合わせをしてください。
1)ヒーティングシステムの不具合。
1)お求めの販売店もしくはキーコーヒー㈱お客様センター
へ問い合わせをしてください。
1)本 体には一定の圧力を保つために
バルブが装備されている。
1)これは故障ではありません。
1)内 部部品にスケールが形成されて
いる。
1)スケール除去の章(P10)を参照にスケール除去を行っ
てください。
1)本 体がスケール除去のあとに完全
にすすがれていない。
1)スケール除去の章(P10)を参照にもう一度すすぎを行
ってください。
2)使 用したカプセルが消費期限が切
れている。
2)新しいカプセルで抽出してください。
13
14