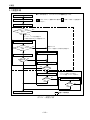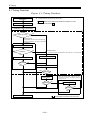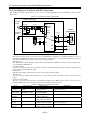
1
TM メガトルクモータ システム MECHATROLINK-Ⅲオプション スタートアップガイド TM MEGATORQUE MOTOR SYSTEM MECHATROLINK-Ⅲ Option Start-up Guide M-E099DC0C2-189 販資 C20189-01 無断転載を禁ずる 本書の内容については、技術的進歩および改良に対応するため製品の外観、仕様などは予告無しに変更する ことがあります。なお、本書の製作には正確を期するために細心の注意を払いましたが、誤記脱漏による損 害については責任を負いかねます。 All rights reserved. No part of this publication may be reproduced in any form or by any means without permission in writing from NSK Ltd. NSK Ltd. reserves the right to make changes to any products herein to improve reliability, function or design without prior notice and without any obligation. NSK Ltd. does not assume any liability arising out of the Application or use of any product described herein; neither does it convey any license under its present patent nor the rights of others. メガトルクモータを正しくお使いいただくために メガトルクモータを正しくお使いいただくために 1.安全にお使いいただくために ・ 本製品は一般工業等での使用を対象としており、人命にかかわる状況下での使用を目的として設計・製造されたもの ではありません。 ・ 本製品を原子力制御用、航空宇宙機器用、交通機器用、医療機器用、各種安全装置用の機器、あるいはシステムなど 特殊用途への適用をご検討の際には、弊社までお問合せください。 ・ 本製品は厳重な品質管理のもとに製造しておりますが、本製品の故障により重大な事故または損失が予測される設備 への適用に際しては、安全装置を設置してください。 2.ドライブユニット使用上の注意 (1)温度環境 ・ 周囲温度は 0~50[℃]になるようにしてください。50[℃]を越える高温状態ではご使用できません。制御盤内では、 ドライブユニットの上下に 100[mm]以上の十分な空間をあけてください。また、熱がドライブユニット上面に滞留 する場合は上面を熱的に開放するか(この場合は防塵対策が必要)、強制空冷する等によりできるだけ熱の逃げやすい 環境としてください。 (2)防塵・防水 ・ IP54 以上の制御盤内でご使用ください。オイルミスト、切削水、切粉、塗装ガス等の雰囲気から防護してください。 防護されない場合、ドライブユニット通気窓より異物混入による回路故障の恐れがあります。 (IP は固形異物や水の侵入に対する保護の度合いを表示するもので、IEC 規格等で定めています。) (3)配線・接地 ・ 正しく配線されているか、取扱説明書にてご確認ください。 ・ 配線、設置工事の際は、切粉等異物がドライブユニット内に混入しないようにしてください。 ・ ドライブユニット電源仕様を守ってご使用ください。 100[VAC]仕様のドライブユニットを 200[VAC]電源で使用するとドライブユニットが故障します。 200[VAC]仕様のドライブユニットを 100[VAC]電源で使用すると出力トルク特性の低下や異音が発生します。 (4)保管 ・ 雨や水滴のかかる場所、有害なガスや液体のある場所では保管しないでください。 ・ 日光の直接当たらない場所、保存温度・湿度の範囲内で保管してください。 (5)パラメータ変更回数 ・ ドライブユニットのデータは EEPROM によってバックアップされているため、データの書き換え回数には寿命があ ります。(約 10 万回) 3.モータ使用上の注意 (1)温度環境 ・ 周囲温度は 0~40[℃]になるようにしてください。40[℃]を越える状態ではご使用できません。 (2)防塵・防水 ・ PS シリーズ、PN シリーズ、ブレーキ付き PN シリーズ、PX シリーズは防塵、防水仕様にはなっていません。水、 油の雰囲気ではご使用できません。(IP30 相当) ・ 耐環境型 Z シリーズの保護等級:IP66M は、一定の条件下における製品の保護性能を示す指標であり、すべての環 境での液体・固体の侵入保護を証明するものではありません。 (3)使用条件 ・ 許容モーメント荷重、許容アキシアル荷重、許容ラジアル荷重は、モータサイズごとに異なります。お客様の使用条 件が許容荷重以内であることを再確認してください。 ・ 過大な偏荷重や負荷は、ロータの永久変形やモータ内部の軸受の異常を引き起こします。モータ自体の落下、モータ への衝撃や移動中の外部干渉による衝撃は絶対避けてください。 ・ モータの取付面の平面度は 0.02[mm]以下としてください。 (4)定期点検 ・ モータのご使用環境や条件により、モータの絶縁不良やケーブルの短絡・断線が起こる場合があります。このような 状態を放置したまま使用を続けると、モータ本来の性能がでない、ドライブユニットの損傷などのトラブルを引き起 こします。 ・ 早期発見、未然防止のため絶縁テスト等モータの良否判断の定期点検を実施してください。 安全事項 安全事項 1.安全事項の記載について 本書では、安全事項について以下の見出しを付けて記載します。 危険 :重大な人身事故につながる恐れがある事項 警告 :人身事故につながる恐れのある事項 注意 :機械や設備、ワークの故障につながる恐れがある事項 2.使用上の注意 2.1.メガトルクモータ全般の注意 システムの設置、保守、点検、およびトラブルシュートを行う際には次の点に注意してください。 注意 モータとドライブユニットはモータサイズおよび最大出力トルクが合っている組み合わせでご使用ください。 ・ ドライブユニット内に、モータのデータが保持されているためです. ・ 組み合わせは取扱説明書を参照してください。 ・ モータ、ドライブユニットのそれぞれの呼び番号に記載されている記号(モータサイズ、最大出力トルク、および位 置検出器仕様)の組み合わせが適合しているか確認してください. ・ 誤った呼び番号の組み合わせの場合は,精度低下,異音発生にとどまらず,不回転や暴走などの原因になります。 注意 ケーブルを切断して延長、短縮、中継は行わないでください。 ・ ケーブルの改造は、精度低下、異音の原因になります。 注意 モータ本体は分解しないでください。 ・ モータの分解は、剛性低下、精度低下、異音の原因になります。 危険 お客様装置側の非常停止を CN2:制御入出力コネクタの EMST 入力:非常停止に必ず接続してください。 ・ 異常時にモータを停止できるようにしてください。 注意 ドライブユニットのケースは外さないでください。 ・ ドライブユニットには大容量の電解コンデンサが内蔵されており、主電源を切った後も数分間は電圧が残っています。 注意 大きな負荷を連続運転する場合、外付けの回生抵抗が必要になる場合があります。 ・ メガトルクモータは大きな慣性モーメント負荷を減速する場合、回生電力を発生します。 ・ 回生電力はドライブユニット内部のコンデンサに蓄積しますが、大きな回生電力が連続して発生する場合には蓄積し きれず、アラーム P1:主電源過電圧でモータは停止します。この場合は運転条件(速度、加減速度、運転デューティ) を下げるか、外部に回生抵抗が必要になります。 危険 ドライブユニットには水や油は絶対にかけないでください。 ・ ドライブユニットを、水滴、油滴、金属粉等の塵挨および腐食性ガスにさらされないよう防護してください。 警告 ドライブユニットの絶縁抵抗測定は行わないでください。(内部回路が破損する恐れがあります。) 注意 運転の前に「3.調整」を参考にしてメガトルクモータの調整を必ず実施してください。 注意 許容モーメント荷重、許容アキシアル荷重、許容ラジアル荷重は、モータサイズごとに異なります。 許容客様の使用条件が許容荷重以内であることを確認してください。 ・ 各モータの許容モーメント荷重、許容アキシアル荷重、許容ラジアル荷重は取扱説明書を参照してください。 注意 過大な偏荷重や過大な負荷はロータの永久変形やモータ内部の軸受の異常を引き起こします。 モータ設置時のモータ自体の落下、モータへの衝撃や移動中の外部干渉による衝撃は絶対避けてください。 ・ モータ内部の軸受が故障しモータがメカ的にロックしてしまう場合があります。 ・ モータの取り付け面の平面度は 0.02[mm]以下としてください。 注意 45[°]の範囲内で繰り返し運転を実施する場合は、一日一回を目処としてモータを 90[°]以上回転させてください。 注意 モータに直接ハンマー等で衝撃を与えないでください。 ・ モータの側面部やモータに固定された取り付け部品に直接衝撃を加えると内部検出器の精度を劣化させる場合があ ります。 注意 モータ外部に回転支持部品(軸受・ボールねじなど)を追加する場合は芯出し(振れ 0.01[mm]以内)を行ってください。 過大な偏荷重や過大な負荷はモータ内部の軸受に異常を引き起こす場合があります。 危険 お客様の使用条件によってはモータが高温となる場合があります。十分に冷えた状態で取り扱い、やけど等に注意 してください。 危険 モータには回転部と非回転部があります。お客様で設置される部分を含め回転部に挟まれないようにしてください。 警告 下記条件を超えてダイナミックブレーキを作動させた場合にはダイナミックブレーキ回路が故障しフリーラン状態と なる可能性があります。場合によっては人身事故に繋がります。 ・ モータが回転中にアラームやサーボオフとなるワーニングが発生、または非常停止の場合、ダイナミックブレーキが 作動します。ダイナミックブレーキは非常時に回転を停止させる補助機能です。通常運転時には作動しないよう制御 による停止を行ってください。 A3:ソフトサーマル、C0:位置指令・位置フィードバック異常、C5:フィールドバスワーニング 、F5:プロ グラム異常、F8:オートチューニングエラーの場合、モータはサーボオフとなります。 ・ 搭載する負荷慣性モーメントは取扱説明書に記載の推奨負荷慣性モーメントの範囲としてください。位置決めによる 運転の場合は回転指令を 360[°]以内、また連続回転の場合は回転速度を 0.5[s-1]以下としてください。(ただし、場 合によっては使用できる場合がありますのでお問合せください。) ・ PN4180、PNZ4175 型モータをご使用の際にダイナミックブレーキを作動させて回転を停止させた場合は 20 分間の 休止状態を必ず取ってください。 安全事項 注意 大きな負荷慣性モーメントを高い回転加速度で加速し続ける場合、定格を超える出力トルクが連続的に必要となり、 アラーム(A3:ソフトサーマル)が発生する場合があります。この場合、負荷慣性モーメントを小さくする、回転加 速度を下げる等の処置をお願いします。 2.2.ブレーキ付き PN シリーズの注意 注意 ブレーキ付き PN シリーズのブレーキは無励磁にしたときにブレーキが作動(保持)する負作動形式のブレーキです。 ・ ブレーキ用 24[VDC]電源はお客様にてご用意ください。 ・ ブレーキ摺動面には鉄粉、油分等が付着しないように注意してください。 ・ ブレ-キ部周辺に鉄部材がある場合はブレーキが動作しなくなることがありますので、取り付けの際はブレーキ周辺 に最低 15[mm]の空間距離を確保してください。 ・ ブレーキは位置決め停止時の保持剛性を補う用途としてご使用頂けます。 ・ 回転動作に入る際は、必ずお客様のシーケンスでブレーキを解除した上で回転動作を行ってください。 ・ 作動回数の寿命の目安は 1,000 万回となります。 ※保証値ではありません。また、ブレーキの作動サイクルが短い場合、保証期間内に作動回数 1,000 万回に達する場 合があります。この場合での故障修理は有償となります。 ・ モータ回転中に停電やアラームが発生した場合に、モータを緊急停止させる制動目的で使用頂けますが、制動用途は あくまでも非常時の緊急停止であり、日常的に頻繁な制動の用途でご使用になることはできません。ブレーキ寿命の 目安は下記となります。(※保証値ではありません。) 表 1:モ-タ呼び番号とブレーキ寿命(制動使用時) モータ呼び番号 M-PN3045KG001 M-PN4135KG001 ブレーキ作動回数 1,500 回 1,500 回 注意 ブレーキ付き PN シリーズを調整する場合は、必ずブレーキ電源を用いて、ブレーキを解放状態にしてください。 2.3.耐環境型 Z シリーズの注意 注意 保護等級 IP66M(IEC/EN60529, IEC/EN60034-5)は、一定の条件下における製品の保護性能を示す指標であり、 すべての環境での液体・固体の浸入保護を保証するものではありません。 注意 防食(防錆)のため、モータ外表面には表面処理が施してあります。ただし、すべての環境および長期に渡る防食(防錆) 性能を保証するものではありません。また、各部表面処理は下記を使用しています。下記の表面処理が侵されるよう な環境では使用しないでください。 表 2:各部表面処理 部分 出力軸(回転部) 取付ベース モータ側面 ダストカバー コネクタスペーサ カバープレート コネクタ 出力軸部ボルト コネクタスペーサ部ボルト カバープレート部ねじ コネクタ部ねじ 表面処理 無電解ニッケルめっき フッ化低温クロムめっき アルマイト処理(黒色) 亜鉛めっき 三価クロメート処理(黒色) なし(材質:ステンレス) 亜鉛めっき 三価クロメート処理(白色) 注意 密閉部品であるオイルシール、O リング、コネクタ部のガスケットなどにはニトリルゴム(NBR)を使用しています。 ニトリルゴム(NBR)が侵されるような環境で使用しないでください。 注意 ケーブルセットの外層シース材には耐熱 PVC を使用しています。耐熱 PVC が侵されるような環境で使用しないでく ださい。 注意 使用液体の温度は 0~40[℃]としてください。 注意 オイルシール部からの液体・固体の浸入に対して安心してご使用頂くため、エアパージを実施してください。 ・ エアパージにはエアパージ用タップ穴(M5、出荷時プラグ取付)を使用してください。 ・ エアパージ圧は 0.01~0.02[MPa]としてください。 ・ 供給用エアについては異物混入のないドライエアとしてください。エアフィルタ(ろ過度:5[μm])、ミストセパレー タ(ろ過度:0.3[μm])、マイクロミストセパレータ(ろ過度:0.01[μm])を通すことを推奨いたします。 ・ モータの電源 ON/OFF に係わらず、液体・固体の付着する環境ではエアパージを実施してください。 注意 異物混入や浸水防止のため、ケーブルセットを接続する直前まで、コネクタの保護キャップを付けておいてください。 また、保守・点検時等モータとケーブルセットが接続されていない状態では、必ずコネクタの保護キャップを付けて ください。 注意 オイルシール、O リング、ガスケット、ケーブルセット等は消耗品です。モータの液体・固体の浸入による故障を防 ぐためにも、シール性の定期点検を実施してください。点検方法については、取扱説明書の簡易エアリークテストを 参照してください。 安全事項 (空ページ) 目次 目次 メガトルクモータを正しくお使いいただく為に 安全事項 1. まえがき ------------------------------------------------------------------------- 1-1 2. コマンド/パラメータの入力方法 ------------------------------------------ 2-1 2.1.動作確認------------------------------------------------------------------------------------2-1 2.2.パラメータの設定------------------------------------------------------------------------2-1 2.3.パスワードの入力------------------------------------------------------------------------2-1 2.4.工場出荷値へのリセット---------------------------------------------------------------2-2 2.5.パラメータの読み出し------------------------------------------------------------------2-2 2.6.パラメータをグループ別に読み出す------------------------------------------------2-2 2.7.工場出荷値から変更されたパラメータのみを読み出す------------------------2-3 2.8.状態のモニタ------------------------------------------------------------------------------2-3 2.9.複数の状態をモニタしながらコマンドを入力する------------------------------2-3 3. 調整 ------------------------------------------------------------------------------- 3-1 3.1.調整手順------------------------------------------------------------------------------------3-2 3.2.調整レベル 1:オートチューニング ------------------------------------------------3-3 3.3.試運転---------------------------------------------------------------------------------------3-5 3.4.調整レベル 2:サーボゲイン調整 ---------------------------------------------------3-8 4. 異常発生時の処理 ------------------------------------------------------------- 4-1 4.1.アラームが発生、故障かと思ったら------------------------------------------------4-1 4.2.電源投入時のアラーム------------------------------------------------------------------4-2 4.3.異常発生時の対処方法------------------------------------------------------------------4-3 4.4.その他---------------------------------------------------------------------------------------4-6 5. 海外安全規格 ------------------------------------------------------------------- 5-1 5.1.欧州EC指令について -------------------------------------------------------------------5-1 5.2.EMC指令への適合について ----------------------------------------------------------5-1 5.3.EC指令適合設置環境 -------------------------------------------------------------------5-2 5.4.UL規格への適合 -------------------------------------------------------------------------5-3 5.5.海外安全規格の注意事項---------------------------------------------------------------5-3 お問合せ -i- 目次 (空ページ) -ii- 1.まえがき 1. まえがき ・ 本書は、メガトルクモータシステム MECHATROLINK-Ⅲオプション単体での調整補助を目的とした スタートアップガイドです。マスターコントローラを使用した調整方法はご使用になるマスターコン トローラの取扱説明書を参照してください。 ・ メガトルクモータシステムをご使用になる前には必ずメガトルクモータシステム MECHATROLINKⅢオプション取扱説明書をよくお読みになり、操作方法や保証内容等をご理解された上で使用してく ださい。 ・ 本書と取扱説明書の内容に差異があった場合は、取扱説明書の内容が優先になります。 ・ 取扱説明書は NSK ウェブサイト(http://www.jp.nsk.com/)より PDF ファイルをダウンロードする ことができます。各取扱説明書については表 1-1、表 1-2 を参考にしてください。 ・ MECHATROLINK は MECHATROLINK 協会の登録商標です。 表 1-1:取扱説明書一覧 番号 ① ② 名称 呼び番号 メガトルクモータシステム MECHATROLINK-Ⅲオプション スタートアップガイド メガトルクモータシステム MECHATROLINK-Ⅲオプション 取扱説明書 和英:M-E099DC0C2-189 和文:M-E099DC0C2-187 英文:M-E099DC0C2-188 表 1-2:取扱説明書内容一覧 取扱説明書 ① ② 正しくお使いいただくために 安全事項 海外安全規格 ○ ○ ○ ○ ○ ○ システム構成 ‐ ○ モータ仕様 EDC 型ドライブユニット仕様 開梱・設置・配線 コマンド/パラメータの入力方法 ‐ ‐ ‐ ○ ○ ○ ○ ○ 調整 △ ○ ‐ ‐ ‐ ‐ ‐ △ ○ ○ ○ ○ ○ ○ 記載内容 運転 より高度な機能 コマンド/パラメータ 保守 アラーム/ワーニング トラブルシュート ○:記載有 △:一部記載有 -:記載無 -1-1- 1.まえがき (空ページ) -1-2- 2.コマンド/パラメータの入力方法 2. コマンド/パラメータの入力方法 ・ コマンドやパラメータの入力はハンディターミナルやメガターム等で行います。 ・ ハンディターミナルや RS-232C 通信ケーブルを接続してから電源を投入してください。 ・ コマンドやパラメータの入力はメンテナンスモードに設定してから行ってください。 (メンテナンスモ ードについては取扱説明書を参照してください。 ) 2.1.動作確認 はじめに、コマンドが入力可能であることを以下の手順で確認します。 ①画面上に" "(コロン)が表示されていることを確認します。 (" "が表示されていない場合は ENT キーを 1 度入力してください。) : : :_ ENT 2.2.パラメータの設定 例として MV:回転速度の設定値確認と設定を行います。 ①MV の現在の設定値を確認します。 +パラメータ名 を入力します。 ? ? M V :?MV MV26214 :_ ENT ②MV を 0.5[s-1] (MV13107)に設定します。 パラメータ名+数値 を入力します。 M V 1# 0? 7’ ENT 3< 1# :MV13107 :_ : " "が表示されると設定は完了です。 注意 パラメータを設定した後ドライブユニットの電源を切る場合は、" "が表示されたことを確認して から電源を切ってください。" "が表示される前に電源を切ると次回電源投入時にアラーム(E2: ROM 異常)が発生することがあります。 : : 2.3.パスワードの入力 一部のコマンドやパラメータは、パスワード入力後に設定・実行を行う必要があります。 ①/NSK ON を入力します。 / N S O N ENT K SP :/NSK ON NSK ON :_ : パスワード受領メッセージ NSK ON が表示され、" "が表示されます。続けてパラメータ設定やコマ ンド実行を行います。正しいコマンドを 1 度入力すると、パスワードの効力は失われます。 パスワード入力が必要なコマンドやパラメータは取扱説明書で確認してください。 -2-1- 2.コマンド/パラメータの入力方法 2.4.工場出荷値へのリセット 設定変更を行ったパラメータを工場出荷値にリセットすることができます。ここではパラメータ毎にリセ ットする方法を説明します。 例として MV:回転速度を工場出荷値に戻します。 ①パラメータ名+/RS を入力します。 M V / R S :MV/RS :_ ENT 2.5.パラメータの読み出し 例として VG:速度ループ比例ゲインのパラメータの読み出しを行います。 ①VG の現在の設定値を確認します。 +パラメータ名 を入力します。 ? ? V G :?VG VG1.50;_ ENT ; VG の値が表示され、行末には" " (セミコロン)表示されます。 ②行末に" "が表示された場合には、SP キーを入力することで次のパラメータが表示されます。 ; :?VG VG1.50; VGL1.50 :_ SP :"に戻ります。 パラメータ名の前方に“VG”を含むパラメータを全て読み出すと、" 読み出しを中断するには、BS キーを入力してください。 2.6.パラメータをグループ別に読み出す ドライブユニットには多数のパラメータが存在しますが、TS:設定値読出により機能グループ毎に設定値 を読み出すことができます。TS の詳細については取扱説明書を参照してください。 例として VG:速度ループ比例ゲインの設定を読み出します。 ①取扱説明書より VG は TS1 に属しているので、以下のように入力します。 T S 1# ENT :TS1 PG0.001; PG:位置ループ比例ゲインがはじめに表示されます。 ②SP キーを入力する度に TS1 に属するパラメータが表示されます。 SP キーを数回入力して VG を捜します。 SP SP … :TS1 PG0.001; PGL0.001; VG1.50;_ ③読み出しを終了させるには SP キーを入力し続け全てのパラメータを表示させるか、BS キーを入力して ください。" "が表示され読み出しが終了します。 : BS PG0.001; PGL0.001; VG1.50; :_ -2-2- 2.コマンド/パラメータの入力方法 2.7.工場出荷値から変更されたパラメータのみを読み出す パラメータを調整・設定する際に、工場出荷値から変更したパラメータだけを確認することができます。 TS0 はパラメータのグループである TS1~TS14 を全て読み出すコマンドです。 ここでは、TS:設定値読出を用いて変更されたパラメータを確認します。 TS0 で読み出されるパラメータのなかで、工場出荷値から変更されたパラメータのみを読み出します。 ただし、TS14 のパラメータの一部(BVG、BVI、BPG、BFF、BHVL、BHZ、BTUU、BTVEU)は変更 の有無に関わらず読み出します。 ①TS+番号+/MD を入力します。 T S 0? / M D ENT :TS0/MD PG0.16; VG4.13; IN100; SP キーを入力する度に TS0 に属するパラメータのなかで変更されたパラメータが表示されます。読み 出しを中断するには BS キーを入力してください。 2.8.状態のモニタ 調整過程などで、各種状態をリアルタイムでモニタしたい場合に使用します。 例として、TP:現在位置読出(パルス単位)によって現在位置をモニタします。 ①モニタ名+/RP を入力します。 T P / R P ENT :TP/RP TP 1310720 _ 現在座標が連続的に表示されます。BS キーを入力すると連続表示を中断し" :"に戻ります。 2.9.複数の状態をモニタしながらコマンドを入力する 例として、TP:現在位置読出(パルス単位)と TV:現在速度読出を同時にモニタします。このように複数の 状態をモニタする機能を「マルチモニタ」といいます。 ①モニタ TP をマルチモニタに登録します。 モニタ名+/WW を入力します。 T P / W W ENT :TP/WW TP :_ 1310720 ②モニタ TV をマルチモニタに登録します。 T V / W W ENT :TP/WW TP :TV/WW_ 1310720 以上で 2 つの状態を常時モニタすることができます。この状態でコマンドの入力も可能です。 :TV/WW TP TV :_ 1310720 0.002 マルチモニタを解除する場合には、WWC:マルチモニタ解除を入力します。 W W C ENT TP TV :WWC :_ 1310720 0.002 -2-3- 2.コマンド/パラメータの入力方法 (空ページ) -2-4- 3.調整 3. 調整 メガトルクモータの性能を十分に発揮してご使用いただく為に、サーボパ ラメータの調整が必要になります。 本書では調整レベル 1:オートチューニングおよび調整レベル 2:サーボ ゲイン調整を説明します。調整レベル 2 を行ってもモータの動作が不安定 な場合は、取扱説明書を参照して調整レベル 3:マニュアル調整を行って ください。 表 3-1:調整レベル比較 調整レベル 応答性 安定性 難易度 レベル 1:オートチューニング 低 低 低 レベル 2:サーボゲイン調整 中 中 中 レベル 3:マニュアル調整 高 高 高 危険 モータを駆動させる前に調整手順に従ってサーボパラメータの調整 を必ず行ってください。 調整を行わずにサーボオンを行うとモータがハンチングする場合が あります。 危険 モータを駆動させる前に EMST 入力:非常停止および、回転禁止 領域がある場合は OTP・OTM 入力:オーバートラベルリミットを必 ず配線し、危険な状態に陥った場合にモータが停止するようにしてく ださい。 危険 モータを駆動させる際は、1 回転しても安全上問題のない状態で行っ てください。 -3-1- 3.調整 3.1.調整手順 ●モータの取り付け、ドライブユニットの配線等を行います。 運転準備 電源投入 注意 ドライブユニット前面の LED 表示が ください。 (正常)であることを確認して サーボパラメータ初期化 オートチューニング を行う YES NO 調整レベル 1 オートチューニングの基本機能です。 この操作で動作が OK ならば調整は終了です。 オートチューニング実行 オートチューニング 成功 調整レベル 2 NO レベル 1 で調整不十分の場合の追加調整です。 YES 負荷慣性モーメント入力 試運転 動作 OK YES NO サーボゲイン微調整 YES 動作 OK NO 調整レベル 3 フィルタ調整 動作 OK レベル 1, 2 で調整できない場合は マニュアル調整(レベル 3)が必要です。 NO マニュアル調整 YES 動作 OK YES 試運転終了 本書での説明範囲 図 3-1:調整手順 -3-2- NO 3.調整 3.2.調整レベル 1:オートチューニング オートチューニング機能により、モータに固定された負荷の慣性モーメン ト値を推定し、負荷に応じてサーボ関連パラメータを自動設定します。 3.2.1.オートチューニングの実行 ①ドライブユニット前面の LED 表示が (正常)であることを確認します。 ②AT:オートチューニングを入力します。 A T ENT :AT AT READY OK? ③AT READY OK?と表示されたら、OK を入力します。 O K ENT :AT AT READY OK? ?OK TO ABORT,PUSH[BS] ENT キー入力後、モータを動かしながら調整を実行します。 ④調整終了後に初期値から変更されたパラメータが表示されます。 SP キーを入力するたびにオートチューニングにより設定されたサーボ パラメータを確認することができます。 BS キーを押した場合は表示を中断し、“:”の表示に戻ります。 SP SP … ?OK TO ABORT,PUSH[BS] LO0.003; SG6; PG0.12; VG1.29; FP480; FS480; :_ -3-3- 3.調整 3.2.2.オートチューニングの注意事項 危険 オートチューニング実行中は負荷慣性モーメントを推定するために モータが±20[°]回転します。危険防止のため回転範囲内には立ち入 らないでください。 注意 負荷の剛性が不足している場合、オートチューニング実行後モータが 振動することがあります。この場合は CN2 の EMST 入力、または MO:サーボオフを入力してモータをサーボオフしてください。再度 調整を行う場合は負荷の剛性を高くするか、取扱説明書を参考にして 調整レベル 3 を行ってください。 注意 オートチューニング中に BS キーを入力すると、負荷の慣性モーメン ト値の推定が中止され、パラメータの設定も行なわれません。 -3-4- 3.調整 3.3.試運転 サーボパラメータの調整後にはドライブユニットにあらかじめ設定され ているデモ運転プログラム、またはお客様での駆動条件で試運転を行い、 必ずモータの動作を確認してください。 3.3.1.デモ運転プログラムで試運転を行う場合 デモ運転プログラムを用いて調整の確認を行います。 ①CN2:制御入出力の EMST 入力、OTP・OTM 入力、STP 入力が 入力されていないことを確認してください。 ②CN2 の SVON 入力:サーボオンを入力します。 ③ドライブユニット前面の 7 セグメント LED 表示が (正常)であること を確認します。 ④試運転時は MV:回転速度を 0.1[s-1](MV2621)にしてください。 M V 2$ 6& 2$ 1# :MV2621 :_ ENT ⑤デモ運転プログラムのメニュー画面を表示させます。 S P / A J ENT : SP/AJ 0>ID9000;_ デモ運転プログラムが表示されます。 ⑥SP キーを入力し、デモ運転プログラムを最後まで表示します。 SP SP … 2>ID-9000; 3>TI500.0; 4>JP256; ?_ ⑦デモ運転プログラムの表示が完了すると"?"が表示されます。 この状態で ENT キーを入力すると、デモ運転プログラム開始の確認が 表示されます。 ENT 4>JP256; 5? SP/AJ Ready OK ?_ -3-5- 3.調整 ⑧OK と入力するとデモ運転が開始します。 O K 5? SP/AJ Ready OK ?OK :>_ ENT 入力後、モータが CW/CCW の往復運転を開始します。 ① CW 方向に 90[°]回転 ② 500[ms]のドゥエルタイム 2 ③ CCW 方向に 90[°]回転 ④ 500[ms]のドゥエルタイム 1 3 ⑤ ①に戻る 4 図 3-2:デモ運転プログラムの動作 往復動作を実行しないでデモ運転プログラムを抜け出すには、"?"に続 いて何も入力しないで ENT キーを入力します。"CANCELED?"と表示さ れ、通常の指令入力待ちになります。 ⑨調整の確認が終了したら MS:運転停止を入力しモータを止めます。 M S ENT :>MS :>_ 動作が正常であればこれで調整終了です。動作が不安定な場合には、調整 レベル 2、または取扱説明書の調整レベル 3 を参照してサーボパラメータ の調整を行ってください。 安定した動きになることを確認した後、お客様のご使用になる回転速度を 設定してください。 -3-6- 3.調整 3.3.2.デモ運転プログラム以外で試運転を行う場合 デモ運転プログラム以外で試運転を行う場合は、下記を参考にしてプログ ラミングを行い、SP0:プログラム実行または CN2 の RUN 入力:プログ ラム起動でプログラム運転を実行してください。 (プログラム運転の詳細は取扱説明書を参照してください。 ) :CH0 :0?ID9000 :1?TI500.0 :2?ID-9000 :3?TI500.0 :4?JP0 CW 方向に 90[°]回転 500[ms]のドゥエルタイム CCW 方向に 90[°]回転 500[ms]のドゥエルタイム チャンネル 0 の先頭にジャンプ -3-7- 3.調整 3.4.調整レベル 2:サーボゲイン調整 調整レベル 1 で動作が不安定な場合は、調整レベル 2:サーボゲイン調整 を行うことでモータの動作が安定する場合があります。 3.4.1.サーボゲイン微調整 SG:サーボゲインの数値を大きくすることで、応答性を向上させること ができます。 3.4.1.1.調整方法 SG の調整は SP/AJ:デモ運転にてモータを動作させた状態で行ってく ださい。( 「3.3.試運転」の①~⑧を実行します。) ①SG+/AJ を入力します。 下記画面表示になり+キー、-キー入力による SG 値の上下が可能にな ります。 (下記の表示では SG5 ですが、オートチューニングを行った場 合にはチューニング結果により値が異なります。) + , - キーを押したときの SG 値の変化量 S G / A J ENT :> :>SG/AJ STEP SG 1 5_ 現在の設定値 ②+キーをモータの動きに合わせて数回入力します。 SHIFT を押しながら -+ -+ … :> :>SG/AJ STEP SG 1 10 _ SG 値が大きくなり、モータの応答性が良くなってくることを確認して ください。 ③さらに+キーを入力すると、モータが小刻みに発振状態になります。 SHIFT を押しながら -+ -+ … : :SG/AJ STEP SG -3-8- 1 18 _ 3.調整 ④発振が止まるまで、-キーを数回入力して SG 値を下げます。 -+ -+ … : :SG/AJ STEP SG 1 16 _ ⑤発振状態から抜け出した SG 値の 80[%]を計算します。 例えば SG16 で発振状態から抜け出したとすると 16×0.8≒13 を SG 値 として設定してください。 : :SG/AJ STEP SG 1 13 _ ⑥ENT キー入力で調整完了となり、変更されたパラメータを表示します。 (BS キーを入力すると、調整前の値に戻ります。) :>SG/AJ STEP SG PG0.26;_ ENT 1 13 各項目に";"を付けて表示し、この状態で一時停止します。 ⑦SP キーを入力します。(BS キーを入力した場合は表示を中断します。) SP SP SG PG0.26; VG2.81; :>_ 13 サーボゲイン調整後は、必ず「3.3.試運転」を実行して動作の確認を行っ てください。動作が正常であればこれで調整終了です。 動作が不安定な場合は、取扱説明書を参照して調整レベル 3:マニュアル 調整やフィルタ調整を行ってください。 -3-9- 3.調整 3.4.2.負荷慣性モーメントの入力 負荷慣性モーメントを正確に設定することにより、摩擦等の外乱抑制効果 および指令追従性能が向上します。 オートチューニングが完了しなかった場合や行なわなかった場合は負荷 の慣性モーメントを必ず入力してください。 3.4.2.1.入力方法 負荷の慣性モーメントは LO:負荷慣性モーメントで設定します。単位は [kg・m2]です。例として LO を 0.123[kg・m2]に設定します。 また、負荷の慣性モーメントを入力した場合は SG:サーボゲイン、FP: 第 1 ローパスフィルタは自動で設定されない為,暫定的に下記の設定を行 ってください。 ①パスワードを入力します。パスワード受領メッセージが表示されます。 / N S O N ENT K :/NSK ON NSK ON :_ SP ②負荷慣性モーメントの値を入力します。 L O 0? 2$ 3< ENT .= 1# :/NSK ON NSK ON :LO0.123 : ③SG を 5 に設定します。 S G SP SP 5% : : :SG5 PG0.10;_ ENT SP キーを数回入力し、":"を表示させてください。 ④FP を 200[Hz]に設定します。 F P 2$ 0? 0? ENT : : :FP200 :_ 負荷の慣性モーメント入力後は「3.4.1.サーボゲイン微調整」を参照して 調整を行ってください。 -3-10- 3.調整 3.4.2.2.負荷の慣性モーメントの注意事項 注意 オートチューニング(調整レベル 1)によって負荷慣性モーメントが 推定出来なかった場合、または行なわなかった場合には、必ず LO を 設定してください。 注意 入力する負荷慣性モーメントの値は、事前に計算してください。 複雑な形状の為に計算することが困難な場合は、表 3-2 の値を暫定 的に入力してください。 表 3-2:負荷慣性モーメント設定の目安 モータ呼び番号 設定値[kg・m2] 小イナーシャ 中イナーシャ 大イナーシャ M-PS1004KN510 0.010 0.020 0.050 M-PS1006KN002 0.020 0.050 0.100 M-PS1012KN002 0.040 0.100 0.200 M-PS1018KN002 0.060 0.150 0.300 M-PS3015KN002 0.040 0.120 0.250 M-PS3030KN002 0.100 0.250 0.500 M-PS3060KN002 0.200 0.500 1.000 M-PS3090KN002 0.300 0.750 1.500 M-PN2012KN201 0.040 0.100 0.200 M-PN3045KN001 0.150 0.380 0.750 M-PN4135KN001 0.400 1.100 2.250 M-PN4180KN001 0.600 1.500 3.000 M-PN3045KG001 0.150 0.350 0.750 M-PN4135KG001 0.400 1.200 2.250 M-PNZ3040KN001 0.120 0.300 0.650 M-PNZ4130KN001 0.350 1.000 2.100 M-PNZ4175KN001 0.500 1.400 2.850 M-PX3050KN501 0.030 0.070 0.140 -3-11- 3.調整 (空ページ) -3-12- 4.異常発生の処理 4. 異常発生時の処理 4.1.アラームが発生、故障かと思ったら 異常と判断する前に下記の内容を確認してください。 ①アラームが発生する ・ 電源投入直後にアラームが発生する場合には、「4.2.電源投入時のアラーム」を参照してください。 ・ アラーム内容と処置方法を「4.3.異常発生時の対処方法」で確認してください。 ②電源が入らない、表示ランプが点灯しない ・ 制御電源電圧と主電源電圧をテスタでチェックし、ドライブユニットの適応範囲内か取扱説明書にて 確認してください。 ③動作しない ・ 電源オフ状態でモータを手で動かして、動作は滑らかか、引っ掛かりがないか、回転軸の上下方向に ガタはないかを確認してください。ただし、モータの分解は絶対に行わないでください。 ・ 制御入出力信号を確認してください。 IO:制御入出力読出にて SVON 入力:サーボオン、IPOS 出力:位置決め完了信号の状態を確認 してください。 オシロスコープやテスタ等の測定機にて、24[VDC]電源や入力信号の電圧が安定している事を確 認してください。 ④振動が発生する、位置がずれる、A3:ソフトサーマルがたびたび発生する ・ 「3.調整」を参考にしてサーボパラメータの調整を行ってください。 ・ 搭載負荷およびモータの取付ボルトの増し締めを行い、緩みがないことを確認してください。 ・ ドライブユニットのアース端子は必ず一点接地してください。(配線は取扱説明書を参照してくださ い。) ・ サーボロック停止時に回転方向に外力がないか確認してください。(外力が常時加わるとモータ過熱 の原因となります。 ) ⑤ブレーカのトリップがたびたび発生する ・ 電源再投入で復帰する場合は、ブレーカの定格電流が使用しているドライブユニットの電源容量に適 しているか確認してください。 -4-1- 4.異常発生の処理 4.2.電源投入時のアラーム CN2 のEMST入力:非常停止(3 番ピン) 、OTP・OTM入力:オーバートラベルリミット(5・6 番ピン) が未接続の場合には、電源投入時にアラームが発生しますが、ドライブユニット本体の故障では ありません。EMST入力、OTP・OTM入力が工場出荷時にB接点に設定されているためです。 配線処理を行うか、以下の手順で A 接点入力に変更することで、アラームを解除できます。 手順 1.アラームの確認方法 ①ドライブユニットの電源を投入します。 ②ドライブユニット前面の 7 セグメント LED を確認します。 ・ 非常停止状態の場合、LED が F→4 の順に変化します。 ・ オーバートラベルリミットオーバー状態の場合、LED が F→3 の順に変化します。 正常時 (アラーム時は 2 文字を交互に表示) 電源 LED:電源投入後,点灯します. 正常:緑色 異常:橙色 図 4-1:ドライブユニット前面パネル部 手順 2. 入力ポートの極性設定方法 ①制御入力の設定を変更するため、MO:サーボオン禁止を入力し、モータをサーボオフ状態にします。 M O :MO :_ ENT ②PI0:制御入力機能編集を入力します。 P I 0? ENT :PI0 FNEMST;_ ③FN:入力機能の表示に続き SP キーを入力する毎に NW:チャタリング防止タイマ、AB:入力極性が 表示されプロンプト"?"表示になります。 SP FNEMST; AB1; NW0.2 ?_ SP ④入力接点を A 接点に変更するために、AB0 を入力します。入力後、再度プロンプト"?"が表示されます ので ENT キーを入力します。これで EMST 入力が A 接点となります。 A B 0? ENT ?AB0 ? :_ ENT ⑤SV:サーボオン許可を入力し、モータをサーボオン許可状態に戻します。 S V ENT :SV :_ ・OTP 入力を A 接点に設定する場合は PI2 を入力し、上記と同様の手順を行ってください。 ・OTM 入力を A 接点に設定する場合は PI3 を入力し、上記と同様の手順を行ってください。 -4-2- 4.異常発生の処理 4.3.異常発生時の対処方法 ドライブユニットの7セグメント LED の表示により、アラームなどの状態を判別します。 本書では特に調整時に発生しやすい異常について記載しています。詳細内容については、取扱説明書のア ラーム、ワーニングを参照してください。 4.3.1.A3:ソフトサーマル ・ モータの発熱が規定温度を上回ったことを検出します。 ・ ワーニング発生時には、制御電源を切らないでください。制御電源を切るとモータの発熱の推定値が クリアされます。 注意 モータの発熱の推定値がクリアされた状態でモータを使用された場合、モータが破損する恐れが あります。必ず TJ:サーマル負荷が 0 になったことを確認してから、制御電源を切ってください。 表 4-1:ソフトサーマルの原因と処置 原因 処置 ① 負荷過大 ② クランプ機構との干渉 ③ 運転デューティサイクル過大 ④ サーボ関連パラメータの調整不足 ・ 「3.調整」を実施してください。 により振動発生 ・ 装置側メカ機構との干渉により、動抵抗過大となっていたり モータがロックしていないかを確認してください。 ・ 停止時間を長くしてください。 ・ 加速・減速を小さくしてください。 4.3.2.C4:フィールドバス異常 ・ ドライブユニット内部の MECHATROLINK-Ⅲ通信ユニットにおいて、通信継続が不可能な異常を検 出したことを通知します。 ・ TA/HI:アラーム履歴読出 により原因の特定が行えます。 表 4-2:フィールドバス異常の原因と処置 アラーム 履歴 原因 C4-0 通信 ASIC 初期化異常 C4-1 接続待ち監視異常 C4-2 送受信異常 C4-3 伝送周期異常 処置 ・ 電源再投入後も本アラームが発生する場合には、ド ライブユニット故障の可能性あります。ドライブユ ニットの交換を行ってください。 ・ 伝送周期を 500[μs]~64[ms]の範囲で設定してくだ さい。 -4-3- 4.異常発生の処理 4.3.3.C5:フィールドバスワーニング ・ MECHATROLINK-Ⅲ通信異常、フィールドバスの断線を検出します。 ・ コマンド TA/HI:アラーム履歴読出 により原因の特定が行えます。 表 4-3:フィールドバスワーニングの原因と処置 アラーム 履歴 原因 処置 C5-0 フレームチェックシーケンス異常 C5-1 指令データ未受信 C5-2 同期フレーム未受信 C5-3 ウォッチドッグタイマ異常 C5-4 CPU タイムアウト ・ 電源再投入後も本アラームが発生する場合には、ド ライブユニット故障の可能性あります。ドライブユ ニットの交換を行ってください。 ・ コネクタの脱落、通信ケーブルが断線していないか を確認してください。 4.3.4.F3:ハードオーバートラベル ・ モータがハードトラベルリミット領域に入った、または領域を通過したことを検出します。 表 4-4:ハードオーバートラベルの原因と処置 原因 ① OTP・OTM の極性設定間違い ② OTP・OTM が入力された ③ 配線間違い(OTP⇔OTM 等) ④ リミットセンサ故障 処置 ・ 工場出荷時 B 接点です。本入力が未接続の場合、アラームが 発生します。 「4.2.電源投入時のアラーム」を参考にして入力 ポートの極性を設定してください。 ・ 領域外へ脱出する方向の運転指令を与えてください。 ・ サーボオフし、手で領域外に回転させてください。 ・ OTP・OTM 入力からリミットセンサまでの配線確認、リミ ットセンサ自体を確認してください。 4.3.5.F4:非常停止 ・ 非常停止は、お客様がドライブユニットに対して入力する緊急停止信号です。 表 4-5:非常停止の原因と処置 原因 処置 ① EMST の極性設定間違い ・ EMST 入力は、工場出荷時 B 接点です。本入力が未接続の 場合、アラームが発生します。 「4.2.電源投入時のアラーム」 を参考にして入力ポートの極性を設定してください。 ② EMST が入力された ・ 非常停止処理後 EMST 入力を解除してください。 ③ 配線間違い ④ EMST スイッチ故障 ・ EMST 入力から非常停止スイッチまでの配線確認、非常停止 スイッチ自体を確認してください。 -4-4- 4.異常発生の処理 4.3.6.F5:プログラム異常 ・ 指定したプログラムが正常に起動・実行できなかったことを検出します。 ・ TA/HI:アラーム履歴読出により原因の特定が行えます。 表 4-6:プログラム異常の原因と処置 アラーム 履歴 原因 処置 ・ BUSY 出力が閉の間は RUN 入力を入力しないでく ださい。 ・ チャタリングやノイズの影響により RUN 入力がオ ンになっていないか確認してください。 ・ チャンネルが間違っていないか確認してください。 選択したチャンネル内に実行すべ ・ RUN 入力の 1[ms]前までに PRG0~7 の入力が確定 きコマンドが無い しているか確認してください。 現在の状況では実行できないコマ ・ 取扱説明書のコマンド解説を参照して、各コマンド ンドが含まれている の実行条件を確認してください。 F5-0 既にプログラム運転中である F5-1 F5-2 STP 入力が ON、または運転を停 ・ STP 入力がオフである事を確認してください。 止させるアラーム・ワーニングが ・ アラーム、ワーニングが発生中でないか確認してく 発生中 ださい。 F5-3 4.3.7.F8:オートチューニングエラー ・ オートチューニングが負荷慣性モーメントの推定を完了できなかったことを通知します。 ・ ターミナル上の表示により原因の特定が行えます。 表 4-7:オートチューニングエラーの原因と処置 表示 POSITION OVER? OVER WRN? INERTIA 原因 処置 ・ 外力を除去してください オ ー ト チ ュ ー ニ ン グ 中 に 約 ・ モータを水平置きにしてください。 ・ 「3.4.調整レベル 2」、または取扱説明書の調整 30[°]以上回転した レベル 3 を実行してください。 搭載イナーシャが大き過ぎる CAN’T TUNE? チューニングできない ALARM DETECTED? アラームやワーニングを検出 ・ 摺動抵抗過大や、モータをロックさせている場 合は要因の除去をしてください。 ・ 「3.4.調整レベル 2」、または取扱説明書の調整 レベル 3 を実行してください。 ・ 外力の除去、負荷の剛性を高めてください。 ・ モータを水平置きにしてください。 ・ 「3.4.調整レベル 2」、または取扱説明書の調整 レベル 3 を実行してください。 ・ 発生したアラームやワーニングに対する処置を 実施してください。 4.3.8.オートチューニング後にモータが振動 ・ 自動設定された値が適さずに振動しているものと推定されます。 ・ 取扱説明書を参考にして以下の処置を実施してください。 ①FP:第 1 ローパスフィルタ周波数の設定値を 100 程度まで下げる。 振動が収まらない時は、FP を微調整してください。 ②SG:サーボゲインを下げる。 -4-5- 4.異常発生の処理 4.3.9.アラーム/ワーニング履歴の確認 ・ 発生したアラームの細目から、トラブルシュートの為のヒントを得ることができます。 ①TA/HI:アラーム履歴読出を入力します。最新の履歴から順番に表示します。 T A SP SP / H I ENT 新しい :TA/HI **>TIME=012:04:46.0,40; 00>F5-0,000:05.18.6,35; 01>F5-2,000:10.22.4,7;_ 細目 アラーム 経過時間 電源投入回数 ②SP キーを入力すると次の行が表示されます。 ③BS キーを入力すると読み出しを中断できます。 4.3.10.アラーム/ワーニング一覧 表 4-8:アラーム/ワーニング一覧 7 セ グ LED 名称 ALM 出力 WRN 出力 アラーム履歴 - (CPU の停止) 開 開 × A0 位置検出器異常 開 - ○ A1 絶対位置異常 開 - ○ A2 モータ断線 開 - ○ A3 ソフトサーマル 開 - ○ A4 速度超過 開 - ○ A5 原点未確定 - 開 ○ A7 レゾルバ励磁アンプアラーム 開 - ○ A9 コミュテーション異常 開 - ○ C0 位置指令・位置フィードバック異常 - 開 ○ C3 CPU 異常 開 - △*1 C4 フィールドバス異常 開 - ○ C5 フィールドバスワーニング - 開 ○ E0 RAM 異常 開 - × E2 ROM 異常 開 - △*1 E7 システム異常 開 - ○ E8 インターフェース異常 開 - ○ E9 ADC 異常 開 - ○ F1 位置偏差オーバー 開 - ○ F4 非常停止 開 - × F5 プログラム異常 - 開 ○ F8 オートチューニングエラー - 開 ○ P0 オーバーヒート 開 - ○ P1 主電源過電圧 開 - ○ P2 過電流 開 - ○ P3 制御電源電圧降下 開 - × P5 主電源定電圧 開 - ○ P9 パワーモジュールアラーム 開 - ○ N0*2 原点の再設定 - - ○ *1:記録可能な履歴のみ記録します。 *2:異常ではありませんが、AZ:原点設定、または原点復帰運転によって原点が再設定された際に アラーム履歴に記録されます。 4.4.その他 ・ ・ ・ ・ ・ ・ モータとドライブユニットは指定された組み合わせでご使用ください。 パラメータは必ず控えておいてください。 ケーブルの改造は絶対に行わないでください。 コネクタのネジ部のゆるみがないことように、確実にロックしてください。 保守部品をご用意ください。(交換用モータ、ドライブユニット、ケーブル等) 清掃はシンナーを避けて、アルコールをご使用ください。 -4-6- 5.海外安全規格 5. 海外安全規格 5.1.欧州EC指令について メガトルクモータシステムは機械・装置に組み込まれて使用される部品(コンポーネント)として、組み込ま れる機械・装置の EC 指令への適合を容易にするために、低電圧指令の関連規格適合を実現しています。 5.2.EMC指令への適合について メガトルクモータシステムはドライブユニットとモータの設置距離・配線などのモデル(条件)を決定し、 4[m]の接続ケーブルモデルにて EMC 指令の関連規格に適合させています。 実際の機械・装置に組み込んだ状態においては、配線条件・設置条件などがモデルとは同一とならないこ とが考えられます。このようなことから、機械・装置での EMC 指令への適合について(特に放射ノイズ・ 伝導ノイズについて)は、メガトルクモータシステムを組み込んだ最終機械・装置での測定が必要となりま す。 表 5-1:EMC 指令適合規格 対象 モータ 適合規格 EN60034-1 低電圧指令の 関連適合規格 EN50178 モータ/ ドライブユニット EN55011* : Group1、Class A 伝導ノイズ EN55011* : Group1、Class A 放射ノイズ EN61000-6-2 : 工業環境におけるイミュニティ規格 EN61000-4-2 : 静電気放電 EN61000-4-3 : 放射電磁界 EN61000-4-4 : バースト EN61000-4-5 : 雷サージ EN61000-4-6 : 高周波伝導ノイズ EN61000-4-8 : 商用電源周波数磁界 EN61000-4-11 : 電圧低下、一時的瞬断 *ドライブユニットは室内で使用する場合、無線妨害を発生させる恐れがあります。 その場合には適切な対策が必要となります。 -5-1- EMC 指令の 関連適合規格 5.海外安全規格 5.3.EC指令適合設置環境 推奨配線例を実施することで EC 指令に適合させることができます。 制御盤 EDC 型ドライブユニット AC 電源 保護アース (PE) サーキット ブレーカ サージ アブソーバ ノイズ フィルタ フェライト コア1 (3 ターン) CN5 フェライト コア 2 (2 ターン) L N 制御電源 L N 主電源 フェライト コア 3 (1 ターン) PS 型 メガトルクモータ レゾルバ モータ CN3 フェライト コア 3 (2 ターン) N CN1 ハンディ ターミナル CN4 フェライト コア 3 (1 ターン) CN6 MECHATOROLINK-Ⅲコントローラ,等へ CN7 MECHATOROLINK-Ⅲコントローラ,等へ 図 5-1:推奨配線例 ・ 設置環境 ドライブユニットは IEC60664-1 に規定されている汚染度 2、または汚染度 1 の環境で使用してくだ さい。そのために、水・油・塵埃などが入り込まない構造(IP54)の制御盤に設置してください。 ・ 電源 IEC60664-1 で規定されている過電圧カテゴリⅢの環境下で使用してください。 ・ サーキットブレーカ 電源とドライブユニット間に IEC 規格および UL 認定のサーキットブレーカを必ず接続してください。 ・ ノイズフィルタ 電源とドライブユニットの間にノイズフィルタを設置してください。 ・ フェライトコア 電源線、モータケーブル、レゾルバケーブルに信号線用フェライトコアを設置してください。 ・ 接地 感電防止のためドライブユニットのアース端子を保護アース(PE)に必ず接続してください。 表 5-2:推奨適用周辺機器一覧 種類 サーキットブレーカ ノイズフィルタ サージアブソーバ フェライトコア 1 フェライトコア 2 フェライトコア 3 仕様 メーカー型式 メーカー 定格電流 15[A] EA32AC-15 Fuji Electric 単相 250[VAC]、 10[A] - - - - FN2070-10/07 SCHAFFNER R-A-V781BWZ-4 E04RA400270150 E04SR301334 E04SR211132 Okaya electric Seiwa Electric MFG Seiwa Electric MFG Seiwa Electric MFG -5-2- 備考 IEC 規格および UL 認定品 5.海外安全規格 5.4.UL規格への適合 表 5-3:適合 UL 規格 対象 適合規格 File No. モータ ドライブユニット ケーブルセット UL1004-1 UL508C UL 認定部品を使用しています E216970 E216221 - 下記 UL 規格認定条件を満たした設置をしてください。 ・ 設置環境 ・ ドライブユニットは IEC60664-1 に規定されている汚染度 2、または汚染度 1 の環境下で使用してく ださい。そのために、水・油・塵埃などが入り込まない構造(IP54)の制御盤に設置してください。 ・ 電源 IEC60664-1 で規定されている過電圧カテゴリⅢの環境下で使用してください。 ドライブユニットは 240[VAC]で遮断容量 5000[Arms]を超えない電源に接続してください。 ・ サーキットブレーカ ・ 電源とドライブユニットの間に UL 認定のサーキットブレーカ(定格 15[A])を必ず接続してください。 (仕様は表 5-2 を参照してください。) ・ 接地 ・ 感電防止のためドライブユニットのアース端子を保護アース(PE)に必ず接続してください。 ・ 配線 定格温度 60/75[℃]の銅線を使用してください。ただし、M-EDC-PN3、M-EDC-PN4 シリーズ のドライブユニットは定格温度 75[℃]以上の銅線を使用してください。 導線の太さは下表を参照してください。 表 5-4:適合導線径 導線径(AWG) 対象 ドライブユニット Input Output 18 19 ・ その他 ドライブユニット毎に定格の 115[%]で動作するモータ過負荷保護機能があります。 分岐線の保護は National Electrical Code および現地の規格にしたがって実施してください。 ドライブユニットは制御電源を切ると、モータ発熱の推定値がクリアされ、モータ過熱保護が検 出できなくなります。 5.5.海外安全規格の注意事項 注意 ブレーキ付き PN シリーズ、耐環境型 Z シリーズ、PX シリーズのモータ本体および PX シリーズ用 EDC 型ドライブユニットは UL 規格および CE マーキングに適合しておりません。また、モータおよ びドライブユニットを組合せたメガトルクモータシステムとしても UL 規格および CE マーキングに 適合しませんのでご注意ください。ただし、ブレーキ付き PN シリーズ、耐環境型 Z シリーズ用の EDC 型ドライブユニットは PN シリーズ用のドライブユニットと共用の為、UL 規格および CE マー キングの表示シールを貼り付けております。 注意 感電の恐れがありますので、内部コンデンサの放電に 5 分以上の時間を取ってください。 -5-3- 5.海外安全規格 (空ページ) -5-4- お問合せ お問合せ 本 社 TEL.03-3779-7111 FAX.03-3779-7431 〒141-8560 東 京 都 品 川 区 大 崎 1-6-3 日 精 ビ ル 産 業 機 械 事 業 本 部 TEL.03-3779-7227 FAX.03-3779-7644 〒141-8560 東 京 都 品 川 区 大 崎 1-6-3 日 精 ビ ル 自 動 車 事 業 産 機 営 業 統 販 売 店 営 業 統 販 売 技 術 統 東 北 支 日 立 支 本 括 括 括 部 部 部 部 TEL.03-3779-7189 TEL.03-3495-8223 TEL.03-3779-7297 TEL.03-3779-7315 FAX.03-3779-7917 FAX.03-3779-8698 FAX.03-3495-8231 FAX.03-3779-8698 〒141-8560 〒141-8560 〒141-8560 〒141-8560 東京都品川区大崎 東京都品川区大崎 東京都品川区大崎 東京都品川区大崎 1-6-3 1-6-3 1-6-3 1-6-3 日精ビル 日精ビル 日精ビル 日精ビル 社 TEL.022-261-3735 FAX.022-261-3768 〒980-0811 宮城県仙台市青葉区一番町 1-2-25 仙台 NS ビル 7F 社 TEL.029-222-5660 FAX.029-222-5661 〒310-0803 茨城県水戸市城南 1-4-7 第 5 プリンスビル 6F 北 関 東 支 社 TEL.027-321-2700 FAX.027-321-2666 〒370-0841 群馬県高崎市栄町 16-11 高崎イーストタワー2F 長 岡 営 業 所 TEL.0258-36-6360 FAX.0258-36-6390 〒940-0066 新潟県長岡市東坂之上町 2-1-1 三井生命長岡ビル 7F 東 京 支 社 札 幌 第 一 営 業 部 TEL.03-3779-7302 FAX.03-3779-7437 〒141-8560 東 京 都 品 川 区 大 崎 1-6-3 日 精 ビ ル 営 業 所 TEL.011-231-1400 FAX.011-251-2917 〒060-0032 北海道札幌市中央区北二条東 11-23 宇 都 宮 営 業 所 東 京 支 社 第 二 営 業 部 東京支社 第二営業部(八王子) 東京支社 販売店営業部 東 京 支 社 販 売 技 術 部 西 関 東 支 社 長 野 支 社 上 田 営 業 所 甲 府 営 業 所 静 岡 支 社 名 古 屋 支 社 名 古 屋 支 社 営 業 部 名古屋支社 販売店営業部 名古屋支社 販売技術部 北 陸 支 社 関 西 支 社 第 一 営 業 部 松 山 営 業 所 姫 路 営 業 所 関 西 支 社 第 二 営 業 部 京 滋 関西支社 関 西 支 社 中 営 九 山 本 〒321-0953 〒141-8560 〒192-0046 〒141-8560 〒141-8560 〒243-0018 〒392-0015 〒386-0024 〒400-0031 〒420-0852 〒460-0007 〒460-0007 〒460-0007 〒460-0007 〒920-0346 〒540-0031 〒790-0011 〒670-0962 〒540-0031 栃木県宇都宮市東宿郷 2 丁目 2-1 ビッグ・ビースクエア 7F 東 京 都 品 川 区 大 崎 1-6-3 日 精 ビ ル 東京都八王子市明神町 4-7-14 八王子 ON ビル 8F 東 京 都 品 川 区 大 崎 1-6-3 日 精 ビ ル 東 京 都 品 川 区 大 崎 1-6-3 日 精 ビ ル 神奈川県厚木市中町 2-6-10 東武太朋ビル 5F 長野県諏訪市中洲 5336-2 諏訪貿易流通会館轟ビル 4F 長 野 県 上 田 市 大 手 1-6-4 山梨県甲府市丸の内 2-14-13 ダイタビル 3F 静岡県静岡市葵区紺屋町 17-1 葵タワー22F 愛知県名古屋市中区新栄 2-1-9 雲竜フレックスビル西館 2 階 愛知県名古屋市中区新栄 2-1-9 雲竜フレックスビル西館 2 階 愛知県名古屋市中区新栄 2-1-9 雲竜フレックスビル西館 2 階 愛知県名古屋市中区新栄 2-1-9 雲竜フレックスビル西館 2 階 石 川 県 金 沢 市 藤 江 南 1-40 大阪府大阪市中央区北浜東 1-26 大阪日精ビル 6F 愛媛県松山市千舟町 4-6-1 フコク生命ビル 6F 兵庫県姫路市南駅前町 100 番 パラシオ第 2 ビル 8F 大阪府大阪市中央区北浜東 1-26 大阪日精ビル 6F 所 TEL.077-564-7551 FAX.077-564-7623 〒525-0031 滋 賀 県 草 津 市 若 竹 町 8 - 4 販 売 技 術 部 TEL.06-6945-8168 FAX.06-6945-8178 〒540-0031 大阪府大阪市中央区北浜東 1-26 大阪日精ビル 7F 社 TEL.082-285-7760 FAX.082-283-9491 〒732-0802 広島県広島市南区大洲 3-7-19 広島日精ビル 3F 支 営 州 熊 FAX.028-610-8717 FAX.03-3779-7437 FAX.042-645-7022 FAX.03-3495-8241 FAX.03-3495-8241 FAX.046-223-9910 FAX.0266-58-7817 FAX.0268-26-6813 FAX.055-224-5229 FAX.054-275-6030 FAX.052-249-5701 FAX.052-249-5826 FAX.052-249-5751 FAX.052-249-5701 FAX.076-260-1851 FAX.06-6945-8174 FAX.089-941-2538 FAX.079-289-1675 FAX.06-6945-8174 販 売 店 営 業 部 TEL.06-6945-8158 FAX.06-6945-8175 〒540-0031 大阪府大阪市中央区北浜東 1-26 大阪日精ビル 8F 国 福 業 TEL.028-610-8701 TEL.03-3779-7334 TEL.042-645-7021 TEL.03-3779-7251 TEL.03-3779-7307 TEL.046-223-9911 TEL.0266-58-8800 TEL.0268-26-6811 TEL.055-222-0711 TEL.054-253-7310 TEL.052-249-5700 TEL.052-249-5749 TEL.052-249-5750 TEL.052-249-5720 TEL.076-260-1850 TEL.06-6945-8156 TEL.089-941-2445 TEL.079-289-1521 TEL.06-6945-8248 業 営 所 TEL.084-954-6501 FAX.084-954-6502 〒721-0952 広 島 県 福 山 市 曙 町 5 - 2 9 - 1 0 社 TEL.092-451-5671 FAX.092-474-5060 〒812-0013 福岡県福岡市博多区博多駅東 2-6-1 九勧筑紫通ビル 7F 支 業 所 TEL.096-337-2771 FAX.096-348-0672 〒861-8003 熊 本 県 熊 本 市 北 区 楠 8 - 1 6 - 5 0 東 日 本 自 動 車 第 一 部 (厚 木 ) TEL.046-223-8881 FAX.046-223-8880 〒243-0018 神奈川県厚木市中町 2-6-10 東武太朋ビル 5F 東 日 本 自 動 車 第 一 部 (富 士 ) TEL.0545-57-1311 FAX.0545-57-1310 〒417-0055 静岡県富士市永田町 1-124-2 明治安田生命富士ビル 2F 東 日 本 自 動 車 第 二 部 TEL.03-3779-7361 FAX.03-3779-7439 〒141-8560 東 京 都 品 川 区 大 崎 1-6-3 日 精 ビ ル 東 日 本自動車第三部(宇都宮) TEL.028-610-9805 FAX.028-610-9806 〒321-0953 栃木県宇都宮市東宿郷 2 丁目 2-1 ビッグ・ビー スクエア 7F 東 日 本 自 動 車 第 三 部 (東 海 ) TEL.0566-71-5260 FAX.0566-71-5365 〒446-0056 愛知県安城市三河安城町 1-9-2 第 2 東祥ビル 5F 東 日 本 自 動 車 第 四 部 TEL.027-321-3434 FAX.027-321-3476 〒370-0841 群馬県高崎市栄町 16-11 高崎イーストタワー3F 中 部 日 本 自 動 車 部 ( 豊 田 ) TEL.0565-31-1920 FAX.0565-31-3929 〒471-0875 愛 知 県 豊 田 市 下 市 場 町 5 - 1 0 中 部 日 本 自 動 車 部 ( 東 海 ) TEL.0566-71-5351 FAX.0566-71-5365 〒446-0056 愛知県安城市三河安城町 1-9-2 第 2 東祥ビル 5F 中 部 日 本 浜 松 自 動 車 部 TEL.053-456-1161 FAX.053-453-6150 〒430-7719 静岡県浜松市中区板屋町 111-2 浜松アクトタワー19F 西 日 本 自 動 車 部 ( 大 阪 ) TEL.06-6945-8169 FAX.06-6945-8179 〒540-0031 大 阪 府 大 阪 市 中 央 区 北 浜 東 1-26 西 日 本 自 動 車 部 ( 広 島 ) TEL.082-284-6501 FAX.082-284-6533 〒732-0802 広 島 県 広 島 市 南 区 大 州 3 - 7 - 1 9 西 日 本 自 動 車 部 ( 姫 路 ) TEL.079-289-1530 FAX.079-289-1675 〒670-0962 兵庫県姫路市南駅前町 100 パラシオ第 2 ビル 8F ・技術手的な内容についてはコールセンターにお問い合わせください。 お客様相談室「メカトロ専用コールセンター」 :TEL.0120-446-040 お問合せ (空ページ) Notes for Proper Use of Megatorque Motor System Notes for Proper Use of Megatorque Motor System 1.Special-purpose Applications ・ This product is intended for general industrial applications and is not designed manufactured for use under dangerous conditions. ・ Contact NSK before using this product for any special-purpose applications , including nuclear power equipment and systems or aerospace , medical , and safety devices. ・ While this product is manufactured under strict quality controls, NSK recommends that an appropriate safety device be installed when used with equipment that could cause serious accidents or damage in the event of product failure. 2. Precautionary statement for the prolonged use of the Driver Unit (1)Temperature ・ Keep the ambient temperature of the Driver Unit within 0 to 50[°C]. You cannot use the Driver Unit in a high temperature atmosphere over 50[°C]. Keep a clearance of 100 [mm] in the upper and the lower side of the Driver Unit when it is installed in an enclosure. If heat is built up on the upper side of the Driver Unit, provide ventilation openings on the top surface or equip a forced air cool unit to take the heat out of the Driver Unit. (Measures against contamination are required for the ventilation openings.) (2)Dustproof and Waterproof ・ Put the Driver Unit in an enclosure with the protection code of IP54 or better. Protect the Driver Unit from oil-mist, cutting oil, metal chips and paint fume, etc. Otherwise it may result in failure of electric circuits of the Driver Unit. (The IP code is to specify the protection level of enclosures from solid contamination and water. It is specified in the IEC standard and other safety regulations.) (3)Wiring/Ground ・ Refer to the User's Manual for proper wiring. ・ When wiring and installing the Driver Unit, take appropriate measures not to contaminate it. ・ Please observe the specification of power supply voltage. (4)Storing ・ Store the Driver Unit in a place at where it is not exposed to rain, water, and harmful gas or liquid. ・ Store the Driver Unit in the place at where it is not exposed to direct sunlight. Keep the ambient temperature and the humidity as specified. (5) The limited number of times for overwriting data to EEPROM. ・ The EEPROM is used to backup all data and programs. However, the number of times for overwriting is limited to approximately 100 000 times. 3. Precautionary statement for the prolonged use of the Motor (1)Temperature ・ Keep the ambient temperature of the Driver Unit within 0 to 40[°C]. You cannot use the Driver Unit in a high temperature atmosphere over 40[°C]. (2) Dust-proof and Waterproof of the Motor ・ The PS series, the PN series the PN series with Brake and The PX series are not made for dust-proof or waterproof (IP30 equivalent). You cannot use the Motor in humid or oily atmosphere. ・ The Z series with High Environmental Resistance complies with IP66M under IEC standards certified by TÜV Rheinland Japan Ltd. But it does not guarantee full protection for all kinds of environment. (3) Use conditions ・ The allowable moment load and axial load depend on the Motor size. Double check the specified limits of the Motor meet the actual use conditions. ・ An excessive load or excessive offset load will cause permanent deflection of the rotor and the bearing abnormality. Be sure not to drop the Motor or not to give an excessive impact to it while transporting it or installing it. ・ The flatness of the Motor mounting surface shall be 0.02[mm] or less. (4) Periodic check ・ Puncture of the Motor and shorting or breakage of cable may occur depending on using and environmental conditions. If the Motor is left in such conditions, it cannot exhibit its capability 100[%] and will lead to a problem of the Driver Unit. We recommend conducting the periodic preventive measures such as an insulation resistance check of the Motor, to see its current condition. Note of Users Notes of Users 1.Notes of Safety The following notices are added to give particular emphasis on the safety precautions in this manual. Danger : A matter that might cause serious injuries. Warning : A matter that might result in injuries. Caution: A matter that might result in the breakdown of equipment into which the Motor is installed or the break down of the mechanism surrounding the Motor. 2.Precautions for Use 2.1.Precautions for Megatorque Motor System Pay special attention to the following when installing, checking and troubleshooting the Megatorque Motor System. Caution When making a combination of a Motor and a Driver Unit, confirm that their specifications for Motor size and maximum Motor torque match each other. ・ This is because the Driver Unit holds the unique parameter settings for a matching Motor. ・ Refer to "User's Manual" for the combination. ・ Make sure that the reference numbers on each identification plate of a Motor and a Driver Unit indicate the same coding for Motor size, Motor maximum torque and position sensor. ・ If the reference numbers are not matched, the Motor may lose its accuracy and emit noise, and furthermore, it may not move or lose its control. Caution Do not cut the Cable Set, or do not hook it up to other cable. ・ The modification of the Cable Set may worsen the Motor and Driver Unit performances, typically positioning accuracy and repeatability of the resolver. Caution Never disassemble the Motor because it has been precisely assembled and tuned. ・ If disassembled, it may cause abnormalities such as deterioration in rigidity and positioning accuracy, and generation of noise. Danger Be sure to connect the Emergency Stop signal circuit to the EMST port of the CN2 control I/O connector ・ Please set the System so that you can immediately stop the Motor in case of an emergency. Caution Do not remove the panel of the Driver Unit so as not to cause an electric shock. It is extremely dangerous due to high voltage present. ・ Driver Units have high capacity electrolytic capacitors in its internal circuits, and thus resulting in high residual voltage of the capacitors for few minutes after the main power is turned off. Danger Do not place other objects in the path of the Motor when the Motor power is on. An unexpected motion of the Motor may result in injury and/or damage to the System or other mechanism. Danger Always stay in a safe place away from the operating area of the Motor when the System is powered on. Danger If the Motor is fitted with an arm or similar devices, take extra care to assure that no obstacles are in or around the Motor work area. Caution Use of an optional dump resistor shall be considered for a heavy-duty operation. ・ The Megatorque Motors regenerate when they decelerate carrying heavy load inertia. ・ An internal capacitor charges the Motor regeneration. However, when high and continuous regeneration exceeding its capacity is applied, excess energy activates an alarm P1: Abnormal main power voltage and the Motor stops. In such a case, you need to decrease velocity, deceleration rate, and operation duty cycle, or you require an external high capacity dump resistor. Danger Never apply water or oil to the Driver Unit. ・ Take appropriate measures to protect the Driver Unit from water, oil, slag, dust, and corrosive gas. Warning Do not test the insulation of the Driver Unit. ・ The high voltage used in the test may destroy the internal circuits of Driver Unit. Caution In most cases, the Direct Drive Motor System cannot exhibit its full performance unless the shipping set of the parameters is altered for actual applications. ・ Refer to “8. Tuning” and be sure to set the servo parameters to actual use conditions. Caution Allowable moment load and axial load depend on Motor size. Please confirm that actual load conditions are in the limits of the Motor. ・ Refer to "User's Manuals" for the allowable moment load, axial load and radial load. Caution An excessive eccentric load or an excessive load may cause the permanent deformation of the rotor or premature failure of the bearing inside the Motor. When handling the Motor, please pay special attention not to drop it and not to give a shock to it. Protect the Motor from a collision with an obstacle. ・ Excessive load to the Motor may damage the bearing of Motor and may mechanically lock the Motor. ・ The flatness of the Motor mounting surface shall be 0.02[mm] or less. Caution For an oscillating operation less than 45 [°], turn the Motor 90 [°] or more at least once a day. Caution: Do not give a direct impact to the Motor with a hammer or the like. A direct impact to the outside of the Motor or the load fixed to the Motor may deteriorate accuracy of the built-in position sensor. Note of Users Caution When attaching a rotary machine component to the Motor such as a bearing or a ball screw, be sure to align both centers within 0.01[mm]. Excessive eccentric load or excessive load to the Motor may cause the premature failure of Motor’s bearing Warning Be sure not to activate the dynamic brake in the following conditions. Otherwise the dynamic brake circuit may break and the Motor will enter in a “free run” state, leading to possible injuries. ・ Do not activate the dynamic brake in normal operations. Stop the Motor by a control command, not by the dynamic brake. The dynamic brake is an auxiliary function to stop the Motor immediately in an emergency. In the middle of operation, an alarm, a warning or the “Emergency stop” input activates the dynamic brake. Warnings that initiate “Servo-off” state are A3 (Software thermal), C0 (Position command/Feedback error), C5 (Field bass error), F5 (Program error), and F8 (Automatic tuning error). ・ The load moment of inertia to a Motor must be 70 times or less than the Motor inertia (100 times for the PS1, PS3 and PN2 type Motors). In case of an indexing operation, a position command shall be 360 degrees or less, while the maximum speed for continual rotation must be 0.5 [s-1] or less. (However, there may be a possibility to exceed the above limits in some cases. Please consult NSK when you require a close investigation on the limits.) ・ For the PN4180 Motor, be sure to stop the Motor for 20 minutes or longer when you stop it by the dynamic brake. Caution When the Motor is continually accelerating a high inertial load with high acceleration, the system constantly outputs a high torque exceeding the rated torque, and thus likely to activate the warning A3 (Software thermal). In such a case take a remedy to decrease the load moment of inertia or to lower the speed. 2.2.Precautions for PN series with Brake Caution A negative actuation type brake that is activated in non-excitation mode. ・ A 24 [VDC] power supply for the brake must be furnished by customer. ・ Avoid the adherence of iron powder or oil to brake sliding surfaces. ・ If there are steel components close to the brake, the brake may fail to operate. During installation, keep them at least 15[mm] away from the brake. ・ Brake can be used to supplement position retention the motor stops. ・ Do not fail to release the brake before running the motor. ・ Operating life is 10 million cycles. This is not guaranteed performance. If brake operating cycles are short, operating life of 10 million cycles may be reached within the warranty period. If this occurs, warranty repair will not apply. ・ The brake can be used to bring the motor to an emergency stop if a power failure or an alarm occurs during motor operation. The brake is designed to bring the motor to an emergency stop in the event of an emergency and therefore cannot be used for braking purposes on a routine basis. Brake operating life is as follows. (Not guaranteed performance.) Table1:Motor designation numbers and brake life (used for braking) Reference Number Brake operating cycles M-PN3045KG001 1,500 cycles M-PN4135KG001 1,500 cycles Caution Never fail to use the brake power supply to place the brake in the released state before adjusting the servo parameters of the PN series with a brake. Note of Users 2.3. Precautions for Z series High Environmental Resistance Caution Dust and water resistance testing do not constitute a guarantee against malfunction or accident, or a guarantee of the product life. IP classifications specified by the IEC constitute indexes for protective performance under fixed conditions, and do not constitute a guarantee of ingress protection in all conditions and for all liquids and solids. Caution Surface treatment for antirust is applied on the motor outer surface. However it does not mean that NSK guarantees antirust performance in any type of condition/ environment. Refer to table2 for surface treatment. Please do not use it under any conditions that may affect the surface treatment of the following. Table2:Surface treatment Parts Output shaft (rotor) Mounting base Motor outer side Dust cover Connector spacer Cover plate Connector Output shaft bolts Connector spacer bolts Cover plate screws Connector screws Surface treatment Electroless nickel plating Low temperature chrome fluoride plating Alumite treatment (black) Zinc plating trivalent chromate treating (black) None (material: stainless steel) Zinc plating trivalent chromate treating (white) Caution Sealing parts, such as oil seals, O-rings and gaskets for connector parts are made of nitrile rubber (NBR). Compatibility with the specific liquid to be used must be confirmed in advance. Caution The outer layer sheath of the cable set uses heat resistant PVC, which is not resistant to all types of liquid or oil. Caution The operating temperature of the liquid should be 0 to 40 [°C]. Caution Purge the air out of the oil seal section to ensure protection from ingress of water. ・ Please use the air purge tapped hole( M5, plug is inserted at shipping). ・ The air pressure for purging must be 0.01[MPa] to 0.02[MPa]. ・ The applied air for purging must be dried and without any contamination. The uses of air filter( rated filtration: 5[μm]), mist separator( rated filtration: 0.3[μm]), micro mist separator (rated filtration: 0.01[μm]) are recommended. ・ Purge the air when the motor is used in the environment where liquids and/or solids are appeared regardless of the motor power supply condition. Caution Be sure to install the protective cap (supplied with Motor) when the cable set is not connected, such as during maintenance or inspection. Caution Oil seals, O-rings, gaskets, and cables are consumable parts. Periodic inspection of sealing performance is strongly recommended to prevent motor failure or outage due to ingress of water. Refer " Z series with High Environmental Resistance supplemental manual " for Air Leak Test. Contens Contents Note for Proper Use of Megatorque Motor System Note of Users 6. Introduction -------------------------------------------------------------------- 6-1 7. Command and Parameter Input Method ------------------------------ 7-1 7.1.Checking of Operation ---------------------------------------------------------------7-1 7.2.Setting Parameters--------------------------------------------------------------------7-1 7.3.Input the Password--------------------------------------------------------------------7-1 7.4.Reset to Shipping Set ----------------------------------------------------------------7-2 7.5.Readout the Parameter --------------------------------------------------------------7-2 7.6.Monitoring Parameters by a Group -----------------------------------------------7-2 7.7.Monitoring Parameters Altered from Shipping Set ----------------------------7-3 7.8. Monitoring the Current Status -----------------------------------------------------7-3 7.9.Inputting a Command while Monitoring Multiple Conditions ----------------7-3 8. Tuning -------------------------------------------------------------------------- 8-1 8.1.Tuning Flowchart ----------------------------------------------------------------------8-2 8.2.Tuning Level1: Automatic Tuning -------------------------------------------------8-3 8.3.Trial Running ---------------------------------------------------------------------------8-5 8.4.Tuning Level2: Servo Gain Tuning------------------------------------------------8-8 9. Troubleshooting -------------------------------------------------------------- 9-1 9.1.Quick Troubleshooting ---------------------------------------------------------------9-1 9.2.Alarm at Power Cycle ----------------------------------------------------------------9-2 9.3.Cause and Remedy-------------------------------------------------------------------9-4 9.4.Others ------------------------------------------------------------------------------------9-8 10. Conformity with the International Safety Regulations -------------10-1 10.1. Conformity with the EC Directives -------------------------------------------- 10-1 10.2. Conformity with the EMC command------------------------------------------ 10-1 10.3.Conditions to Conform with EC Directives----------------------------------- 10-2 10.4. Conformity with Underwriters Laboratories Standards ------------------ 10-3 10.5. Precautions for the International Safety Regulations -------------------- 10-4 Contacts -i- Contents (Blank Page) -ii- 6. Introduction 6. Introduction ・ This is the startup guide to support tuning process of the Megatorque Motor System with EDC driver unit MECHATROLINK-Ⅲ Option. Tuning using the master controller, please refer to the instruction manual of the master controller. ・ Before operating the Megatorque Motor System, please read User’s Manual to understand product features and terms of warranty.. ・ Description in User’s Manual must be preferred in case of any difference compared with this startup guide. ・ These User’s Manuals can be downloaded from the NSK Web site (http://www.nsk.com/). ・ Please refer table 6-1 and 6-2 for list of manuals. ・ MECHATROLINK is a registered trademark of MECHATROLINK Members Association. Table 6-1: Manual list Item Reference number MEGATORQUE MOTOR SYSTEM ① MECHATROLINK-Ⅲ Option Start-up Guide MEGATORQUE MOTOR SYSTEM ② MECHATROLINK-Ⅲ Option User's Manual JPN ENG :M-E099DC0C2-189 JPN ENG :M-E099DC0C2-187 :M-E099DC0C2-188 Table6-2: Manual list Manual ① ② Notes for Proper Use Notes for Users International Safety Regulations ○ ○ ○ ○ ○ ○ System configuration ‐ ○ Motor Specifications Driver Unit Specifications Unpacking, Installation and Wiring Command and Parameter Input Method ‐ ‐ ‐ ○ ○ ○ ○ ○ Tuning △ ○ Operation More Advanced Function Details of Command and Parameter Maintenance Alarm and Warning Troubleshooting ‐ ‐ ‐ ‐ ‐ △ ○ ○ ○ ○ ○ ○ Content ○:Described △:Partially described -:Not described -6-1- 6.Introduction (Blank Page) -6-2- 7.Command and Parameter Input Method 7. Command and Parameter Input Method ・ Use Handy terminal or Megaterm to enter commands and parameters. ・ Turn on the power for Driver unit after connecting Handy terminal or RS232C cable. ・ Enter command or parameter under Maintenance mode. ( Refer "User's manual" for more detail.) 7.1.Checking of Operation To confirm the Driver unit is ready to accept command; 1) Be sure that the colon (:) is on the display. (Press the ENT key once if the colon is not on the display.) :_ ENT 7.2.Setting Parameters This section describes the procedures to enter parameters. Following example describes how to check, and change the current setting of parameter MV (Motor velocity). 1) Check the current setting of parameter MV. Enter as +Parameter code as follows. ? ? M V :?MV MV26214 :_ ENT 2) Set the parameter MV to 0.5 [s-1] (MV13107). Enter as Parameter code+data. M V 1# 0? 7’ ENT 3< 1# :MV13107 :_ This completes the setting when the colon (:) appears on the screen. Caution Confirm that the colon (:) is on the screen when turning off the power of the Driver Unit after the setting of parameters. Otherwise the alarm E2 (ROM error) may occur when the power is on next time. 7.3.Input the Password Several parameters and commands require an entry of the password for setting and execution. 1) Enter the Password (/NSK ON). / N S O N ENT K SP :/NSK ON NSK ON :_ The acknowledgment appears on the screen, and the colon appears indicating the normal stand-by state for command entry. Then set a parameter or a command. However, the password is effective for only one entry of a parameter or a command. Refer "User’s manual" to confirm password required commands or parameters. -7-1- 7.Command and Parameter Input Method 7.4.Reset to Shipping Set You may reset a parameter, which has been altered once, to the shipping set. Though the command of initialization resets all parameters to the shipping set at once, this section describes the way to rest parameters to the shipping set one by one. The following example describes how to reset the parameter MV (Motor velocity) to the shipping set. 1)Enter as Parameter code+/RS. M V / R S ENT :MV/RS :_ 7.5.Readout the Parameter The following example describes how to read out the parameter VG (Velocity gain). 1) Check the current setting of the parameter VG. Enter as +Parameter code. ? ? V G ENT :?VG VG1.50;_ The current setting of the VG is displayed and the prompt “;” (semicolon) is on the bottom line. 2) An input of the SP key reads out the next parameter while the prompt is “;”(semicolon). :?VG VG1.50; VGL1.50 :_ SP When all parameters with the code VG have read out, the prompt changes to “:” (colon). Input the BS key to abort the readout. 7.6.Monitoring Parameters by a Group There are many parameters for the Driver Unit. The command TS (Tell settings) will read out parameter values by groups. Refer to “User's Manual” for the detail of the command TS. 1)The following example describes how to read out the setting of parameter VG for the velocity loop proportional gain (velocity gain). The parameter VG belongs to a group of TS1 as described on “User's Manual”. Thus enter as: T S 1# ENT :TS1 PG0.001; The screen will firstly show the setting of the parameter PG (position loop proportional gain). 2)Press the SP key to scroll the display until it spots the setting of the VG. SP SP … :TS1 PG0.001; PGL0.001; VG1.50;_ 3)To terminate monitoring, keep pressing the SP key until the display stops scrolling, or enter the SP key. The colon will appear on the screen to indicate the completion of readout. BS PG0.001; PGL0.001; VG1.50; :_ -7-2- 7.Command and Parameter Input Method 7.7.Monitoring Parameters Altered from Shipping Set When adjusting and setting parameters, you may read out parameter values only which have been altered from the shipping set. The command TS0 monitors all parameter values that belong to parameter groups of TS1 to TS14. Here, let’s use the command TS (Tell settings) to read out the parameters which have been altered from the shipping set.Among all parameters that can be read out by the command TS0, let’s read out only the parameters whose setting have been altered from the shipping set. However, some parameter of TS14 (BVG、BVI、BPG、BFF、BHVL、BHZ、BTUU、BTVEU) is always read out. 1)Enter as TS+number+/MD. T S 0? / M D ENT :TS0/MD PG0.16; VG4.13; IN100; Every input of the SP key identifies the parameter whose setting has been altered from the shipping set. Press the BS key to abort the readout. 7.8. Monitoring the Current Status This function is useful when you need to monitor various conditions of the System in the middle of condition adjustment. The following example describes how to monitor the current position by the Monitor TP (Read out current position [in units of pulse]). 1)Enter as Monitor code+/RP. T P / R P ENT :TP/RP TP 1310720 _ current position is read out continuously. An input of the BS key will resume the readout and the prompt changes to “:” (colon). 7.9.Inputting a Command while Monitoring Multiple Conditions The following example describes how to monitor simultaneously the monitor TP (Monitor current position in units of pulse) and the monitor TV (Monitor current velocity). The function to monitor multiple conditions simultaneously is called “Multi-monitor. 1)Input the monitor TP to the multi-monitor. Enter as Monitor code+/WW. T P / W W ENT :TP/WW TP :_ 1310720 2)And subsequently input the monitor TV. T V / W W ENT :TP/WW TP :TV/WW_ 1310720 Thus, two conditions can be monitored simultaneously. You may input the command in this state. :TV/WW TP TV :_ 1310720 0.002 Input the command WWC for cancellation of Multi-monitor. W W C ENT TP TV :WWC :_ 1310720 0.002 (Blank Page) -7-3- 7.Command and Parameter Input Method -7-4- 8.Tuning 8. Tuning The proper gain adjustment is essential to make the full use of the capability of the Megatorque Motor System. Adjustment level 1:Automatic tuning, and adjustment level 2:Servo gain tuning are described in this section. Refer "User’s Manual" for adjustment level 3:Manual tuning procedure. Table 8-1. Adjustment level Adjustment level Responsiveness Stability Di ffi cul ty Level 1: Automatic tuning Low Low Easy Level 2: Servo gain tuning Medium Medium Medium High High Hard Level 3: Manual tuning Danger Please adjust the servo parameter according to the procedure of this chapter. When a servo on is done without adjusting it, the Motor might oscillate or rotate uncontrollably. Danger Before activating the Motor, be sure to wire the following input signals so that the Motor can stop immediately in case of emergency. ・ Emergency stop (EMST) ・ Over travel limit switch (OTP and OTM) if the off limits are is set Danger Take an appropriate precaution for full turn of the motor. -8-1- 8.Tuning 8.1.Tuning Flowchart Figure. 8-1: Tuning flowchart Install the Motor and wire the Driver Unit. Preparation Caution Make sure that the LED shows the System is in the normal state ( ). Power on. Initialization of Servo Parameters Automatic tuning YES NO Tuning Level 1 This is the basic function of the automatic tuning. The tuning completes at this stage if the results are satisfactory. Automatic Tuning NO Satisfied? Tuning Level 2 This step is additional procedure when the tuning level 1 is not successful. YES Input of Load Inertia Trial Running Satisfaied? NO YES Minor Tuning of Servo Gains YES Satisfied? NO Tuning Level 3 When the tuning level 1 and 2 are not successful, it requires conventional manual tuning (Level 3). Setting Filter Satisfied? NO Manual Tuning YES Satisfied? NO YES End of Trial Runnig The procedure described in this document -8-2- 8.Tuning 8.2.Tuning Level1: Automatic Tuning The automatic tuning function implements estimation of the load inertia mounted on the motor, and set the Servo parameter setting values appropriate to the mounted load automatically. 8.2.1.Executing Automatic tuning ①Confirm that the LED on the front panel of Driver Unit indicates the System is in the normal state ( [Normally]). ②Input the command AT (Automatic tuning) A T ENT :AT AT READY OK? ③Input OK for the confirmation. The Motor servo automatically activates, and the Motor rotates for 10 to 20[°] to estimate of load inertia starts. O K ENT :AT AT READY OK? ?OK TO ABORT,PUSH[BS] ④After the LO value has appeared on the screen, press the SP key to read out the servo parameters that are set by the automatic tuning. The BS key aborts the readout and the prompt colon(:) appears for the next command. SP SP … ?OK TO ABORT,PUSH[BS] LO0.003; SG6; PG0.12; VG1.29; FP480; FS480; :_ -8-3- 8.Tuning 8.2.2. Precautions for Automatic Tuning Danger The Motor will rotate for ± 20[°] during the automatic tuning in order to estimate the Load moment of inertia. Do not enter the range of Motor rotations. Caution The Motor may vibrate at the end of automatic tuning if rigidity of the load is insufficient. In such a case turn the Motor servo off by the following way. Then increase the rigidity or perform manual tuning to continue the tuning. ・ Make the input EMST (Emergency stop) OFF ・ Make the input SVON (Servo on) OFF. ・ Turn off the power of Driver Unit. Caution If the BS key is inputted in the middle of estimating load inertia, the estimation will be interrupted, thus making unable to renew the servo parameters. -8-4- 8.Tuning 8.3.Trial Running Motor performance must be confirmed by trial running after the adjustment of Servo parameter tuning by demonstration program or customer’s own program. 8.3.1. Trial running by demonstration program. ①Be sure that the inputs of the EMST (Emergency stop), OTP/OTM (Hardware over travel limit) and STP (Stop) are not active. ②Activate the input SVON(Servo on). ③Confirm that the 7 segments LED on the front panel of Driver unit indicates the System is in the normal state( ④Lower the MV(Motor velocity) to M V 2 $ 6 & 2 $ 1 # 0.1[s-1] [Normally]) (MV2621) for trial running. :MV2621 :_ ENT ⑤Display the menu of the demonstration program on the screen. S P / A J ENT : SP/AJ 0>ID9000;_ ⑥The program for trial running appears on the screen. Input the SP key to scroll the program to the end. SP SP … 2>ID-9000; 3>TI500.0; 4>JP256; ?_ ⑦A prompt question mark(?) appears on the screen when the readout of the demonstration program completes. An input of the ENT key at this stage will make the screen to indicate that the demonstration program is ready. ENT 4>JP256; 5? SP/AJ Ready OK ?_ -8-5- 8.Tuning ⑧Input OK if you use the demonstration program as displayed. O K 5? SP/AJ Ready OK ?OK :>_ ENT The Motor starts a cyclic motion as soon as you input the OK message. (Firstly, the Motor moves in CW direction.) Figure. 8-2: Motor motion by demonstration program ① Rotate 90 degree in CW direction. ② 500 ms dwell time. 2 ③ Rotate 90 degree in CCW direction. ④ 500 ms dwell time. 1 3 ⑤ Jump to ①. 4 Press the ENT key after the prompt question mark(?) to get out from the demonstration program without moving the Motor. The screen displays as “CANCELED?” and the System gets in the normal waiting state for command entry. ⑨Stop the Motor with the Command MS(Motor stop) after confirmation of tuning results. M S ENT :>MS :>_ Complete the tuning at this stage if the Motor operates normally. If motion of the Motor is unstable, execute the next level of tuning. When the tuning is completed change the setting of the parameter MV that matches to actual use conditions. -8-6- 8.Tuning 8.3.2. Trial running by customer’s own program Refer program example in below to make your own program. The command SP0 (Program start) or the input RUN (Start program) starts the program operation. (Refer program operation in "User’s manual" for more detail.) Program example) :CH0 :0?ID9000 :1?TI500.0 :2?ID-9000 :3?TI500.0 :4?JP0 Rotate 90 degree in CW. 500 [ms] dwell time. Rotate 90 degree in CCW. 500 [ms] dwell time. Jump to line 0. -8-7- 8.Tuning 8.4.Tuning Level2: Servo Gain Tuning If the automatic tuning has not been performed or the automatic tuning has not been successful, the Servo gain tuning may improve the motor performance. 8.4.1.Minor Tuning of Servo Gains Increasing SG (Servo Gain) parameter setting value improves the responsibility of the motor. 8.4.1.1.Tuning Procedure When tuning the parameter SG, operate the Motor with the demonstration program. (Follow the procedures ① to ⑧ in “8.3.Trial Running”.) ①Input SG+/AJ. The screen changes as shown below, and you can change the setting of SG by the keys of + and -. (The example below is for setting SG5. Setting depends on the tuning result when the automatic tuning has been completed.) Increment of SG setting value for an input of + or – key S G / A J ENT :> :>SG/AJ STEP SG 1 5_ Current setting ②Input the + key several times observing the motion of the Motor. Pressing SHIFT -+ -+ … :> :>SG/AJ STEP SG 1 10 _ Observe how the motion of Motor gets crisper as the SG setting increases. -8-8- 8.Tuning ③Keep pressing the + key further until the Motor starts hunting and stops its reciprocating motion Pressing SHIFT -+ -+ … :> :>SG/AJ STEP SG 1 18 _ ④Decrease the SG setting pressing the - key several times until the Motor stops hunting and starts reciprocating motion again. -+ -+ … : :SG/AJ STEP SG 1 16 _ ⑤The Motor will operate smoothly at any position when the SG is decreased to 80[%] of the reading at where the hunting stopped. Set this value to the parameter SG. : :SG/AJ STEP SG 1 13 _ ⑥Enter the ENT key to complete the tuning and the changed parameter data will be displayed. (An input of the BS key reset to the setting before the tuning.) :>SG/AJ STEP SG PG0.26;_ ENT 1 13 Each setting is indicated with the prompt semicolon (;), and the screen pauses the indication at this stage. ⑦Input the SP key. (An input of the BS key will abort the readout.) SP SP SG PG0.26; VG2.81; :>_ 13 Implement "8.3 Trial running" after the adjustment of Servo gain. Refer "User’s manual" to adjust Servo gain and filter setting value for further improvement. -8-9- 8.Tuning 8.4.2. Input of Load moment of Inertia An accurate estimate of load inertia contributes to decrease in external disturbance such as friction, and to increase in the command follow-up capability. When the estimated of load inertia by the automatic tuning (Tuning Level 1) is not appropriate, be sure to input the load moment of inertia manually. 8.4.2.1.Input of Load moment of Inertia Input the load moment of inertia with the parameter LO(load moment of inertia) in units of [kg•m2]. The following show an example when the load moment of inertia is 0.123 [kg•m2]. When the parameter LO is manually set, the parameter SG (Servo Gain) and FP(Primary low-pass filter) are not set automatically. Set temporally the parameter SG and FP. ①Input the password. The acknowledgement appears on the screen. / N S O N ENT K :/NSK ON NSK ON :_ SP ②Input the value of load inertia. L 2 $ O 3 < 0? .= 1# :/NSK ON NSK ON :LO0.123 : ENT ③Set the SG to 5. S G SP SP 5% : : :SG5 PG0.10;_ ENT Press the SP key several times till the colon(:) appears on the bottom line. ④Set the FP to 200[Hz] F P 2$ 0? 0? ENT : : :FP200 :_ Implement "8.4.1.Minor Tuning" of Servo Gain after input of load inertia. -8-10- 8.Tuning 8.4.2.2.Precauitons for Load moment of Inertia Caution When the setting of load moment of inertia by Automatic Tuning is not appropriate, be sure to input the load moment of inertia manually. Caution When an calculation of load inertia is difficult, temporally set a value referring to the estimation of load inertia in Table 8-2 below. Table 8-2: Estimation of load moment of inertia Motor Setting of LO[kg・m2] Low inertia Medium inertia High inertia M-PS1004KN510 0.010 0.020 0.050 M-PS1006KN002 0.020 0.050 0.100 M-PS1012KN002 0.040 0.100 0.200 M-PS1018KN002 0.060 0.150 0.300 M-PS3015KN002 0.040 0.120 0.250 M-PS3030KN002 0.100 0.250 0.500 M-PS3060KN002 0.200 0.500 1.000 M-PS3090KN002 0.300 0.750 1.500 M-PN2012KN201 0.040 0.100 0.200 M-PN3045KN001 0.150 0.380 0.750 M-PN4135KN001 0.400 1.100 2.250 M-PN4180KN001 0.600 1.500 3.000 M-PN3045KG001 0.150 0.350 0.750 M-PN4135KG001 0.400 1.200 2.250 M-PNZ3040KN001 0.120 0.300 0.650 M-PNZ4130KN001 0.350 1.000 2.100 M-PNZ4175KN001 0.500 1.400 2.850 M-PX3050KN501 0.030 0.070 0.140 -8-11- 8.Tuning (Blank Page) -8-12- 9.Troubleshooting 9. Troubleshooting 9.1.Quick Troubleshooting Check the contents below to clarify the faulty of product. ① When an alarm occurs ・ Refer “9.2 Alarm at power cycle.” When Driver Unit detects alarm at power cycle. ・ Refer “9.3 Cause and remedy” for recovery. ② When the power does not turn on and the indication display does not turn on ・ Check the voltage of main and control power by a tester if the voltage is in the range of specifications that are described in the "User’s manual". ③ When the Motor does not move ・ Turn off the Motor power and check the followings. Does the Motor turn smoothly? Is there any jerky motion? Does the rotation axis have any axial play? (Never disassemble the Motor.) ・ Are the control Inputs and Outputs properly functioning? Monitor the status of SVON and IPOS signals by the I/O command through the Handy Terminal. Check if the voltage of input signal and 24[VDC] power source are stable using an oscilloscope, etc. ④ The Motor vibrates. Positioning is inaccurate. Alarm of software thermal occurs frequently. ・ Did you tune the servo parameters LO (Load inertia), SG (Servo gain), VG (Velocity loop proportional gain), PG (Position loop proportional gain), FP (Primary low-pass filter) and NP (Primary notch filter)? ・ Are the fixing bolts of the load and the Motor securely fastened? Check and fasten them tightly if necessary. ・ Connect the FG terminal of the Driver Unit to one point grounding. (Refer to "User’s Manual" for wiring.) ・ Is any external force in rotational direction when the Motor is stopping with the Servo lock state? (It leads to the Motor overheat if external force is applied.) ⑤ Breaker trip occurs frequently. ・ In case of the faulty resolved by the power cycle, confirm rated current propriety of circuit breaker installed to the power line for Driver Unit. -9-1- 9.Troubleshooting 9.2.Alarm at Power Cycle The alarm occurs when the power is turned on if input signals of EMST (Emergency stop, Pin No.3) and OTP/OTM (Over travel limits, Pin No. 5 and 6) of the connector CN2 are not wired. However, the Driver Unit is not defective. This is because the ports of EMST input and OTP/OTM inputs are set to the normally closed contact (B contact) at the factory. To cancel the alarm, wire these ports or follow the procedure below to change the polarity to the normally open contact (A contact). Step 1: identify the alarm 1) Turn on the power of the Driver Unit. 2) Check the 7 segments LED on the front panel of the Driver Unit ・ The LED changes in order of F → 4 in case of “Emergency stop.” ・ The LED changes in order of F → 3 in case of “Travel limit over” alarm. Figure.9.1: LED on Front panel Normal state (Shows two characters in abnormal state.) Power LED:Light on with power. Normal :Green Abnormal:Orange Step 2: Polarity setting of Input ports. 1) Input the command MO (Motor Off) to make the Motor servo off to set the polarity of control inputs. M O :MO :_ ENT 2) Input the command PI0 (Edit input function). P I 0? ENT :PI0 FNEMST;_ 3) Following the display of the parameter FN (Function), the parameters NW (Anti-chattering timer) AB (Input polarity) appear sequentially by a press of SP key, then the prompt “?” appears on the bottom line. SP FNEMST; AB1; NW0.2 ?_ SP 4) Input the parameter AB0 to change the polarity to the normally open contact. After the input, a prompt “?” appears again, press the ENT key when the prompt “?” appears again. Thus the input EMST is set to the normally open contact. A B 0 ? ENT ?AB0 ? :_ ENT -9-2- 9.Troubleshooting 5)Input the command SV (Servo on) to turn on the servo of the Motor. S V ENT :SV :_ ・ When setting the input OTP to the normally closed contact, input the command PI2 and follow the procedure above. ・ When setting the input OTM to the normally closed contact, input the command PI3 and follow the procedure above. -9-3- 9.Troubleshooting 9.3.Cause and Remedy The detected fault can be confirmed by the characters displayed in 7 segments display on front panel. The major alarms could be detected during tuning process are described in this document. Refer "User’s manual" for the detail of alarm and warning. 9.3.1.A3 : Software thermal ・ This alarm will be detected when the heat generation and radiation of the Motor estimated by the Driver Unit exceeds the threshold. ・ Do not turn off the control power at the occurrence of this warning to keep estimated heat generation value in the Driver Unit. Caution if the estimated heat generation value is cleared, motor damage may occur when motor operation is implemented continuously. Turn control power off after confirming parameter TJ (Thermal Load) becomes “0” Table 9-1: Cause and Remedy for Software Thermal alarm Cause Remedy ① Excessive load ② Mechanical restraint Motor such as brake. ③ Excessive motor duty cycle. ④ Vibration caused by poor adjustment of servo parameters. to the ・ Check for mechanical restraint that causes high friction resistance or locks the Motor motion. ・ Increase idle time. ・ Readjust acceleration/deceleration parameters. ・ Set the servo parameter properly. ・ Refer to “8. Tuning”. 9.3.2.C4 : Fieldbus Error ・ This alarm will be detected when the Driver Unit MECHATROLINK- Ⅲ option detects communication error. ・ The cause of fault can be identified by checking TA/HI(alarm history). Table 9-2: Cause and Remedy for Fieldbus error Alarm history Cause C4-0 Communication ASIC initialization error C4-1 Waiting for connection monitor error C4-2 Send and receive error C4-3 Transmission cycle error Remedy ・ In case of the fault continues after power cycle, replace the Driver Unit due to possibility of faulty with the Driver Unit. ・ Please reconfigure the transmission cycle. (range of 500[μs] to 64[ms] ) -9-4- 9.Troubleshooting 9.3.3.C5 : Fieldbus Warning ・ The warning reports the error in MECHATROLINK- Ⅲ communication error and the line breakage of the fieldbus board. ・ The cause of fault can be identified by checking TA/HI(alarm history). Table 9-3: Cause and Remedy for Fieldbus Warning Cause Alarm history C5-0 Frame check sequence error C5-1 Command data is not received C5-2 Sync frame is not received C5-3 Watchdog timer error C5-4 CPU time out Remedy ・ In case of the fault continues after power cycle, replace the Driver Unit due to possibility of faulty with the Driver Unit. ・ Check the comminication cable for proper connection. ・ Visually check the comminication cable for damage 9.3.4.F3 : Hardware Over Travel Limit ・ This warning reports that the Motor enters or passes through the off limits area set by the hardware travel limits. Table 9-4: Cause and Remedy for Hardware Over Travel Limit Cause ① ② ③ ④ Remedy ・ The shipping set of polarity of inputs OTP and OTM is Wrong polarity setting of OTP or normally closed (Connector B). Refer to "9.2.Alarm at OTM input port. Power Cycle". ・ Input a command to move the Motor out of the off limits area as the System accepts the move command to this OTP or OTM is inputted. direction. ・ Turn off the Motor servo then move the Motor manually out of the area. Wrong wiring ・ Check wiring of OTP and OTM. (OTP ↔ OTM, etc.) ・ Check the OT sensor. Defective limit sensor -9-5- 9.Troubleshooting 9.3.5.F4 : Emergency stop ・ This alarm will be detected when the input signal for emergency stop is activated. Table 9-5:Cause and Remedy for Emergency stop Cause Remedy ① Wrong setting of the input EMST signal port polarity. ② EMST signal is inputted. ③ Defective wiring. ④ Defective EMST switch. ・ The shipping set of the input EMST port is normally closed contact. If the port is not connected the alarm occurs. ・ Refer to "9.2.Alarm at Power Cycle". ・ Take measures against the problem, and then clear the EMST input. ・ Check wiring between the input EMST Emergency .Stop switch. ・ Check the Emergency Stop switch itself. to the 9.3.6.F5 : Program Error ・ This alarm will be detected when the execution of specified program is not implemented properly. ・ The cause of fault can be identified by checking alarm history TA/HI. Table 9-6 : Cause and Remedy for Program error Alarm history F5-0 F5-1 F5-2 F5-3 Cause Remedy ・ The input RUN (Program start) is disabled while the output BUSY (In-operation) is closed. The System is executing other ・ When a mechanical contact is used for the input RUN, check for chattering that may cause two or program. more rising signals. ・ Check if the input RUN is already ON due to noise. ・ Confirm if the selection of the program channel is right. There is no command is set in ・ Check if one of the input PRG0 to PRG7 is settled the specified channel. 1 [ms] before an input of the RUN signal. A command that cannot be carried out in the current ・ Refer to “User's Manual” for conditions to execute condition is involved in the each command. channel program. A data that is out of ・ Confirm if the Input STP (Stop) is OFF. specification is set in the ・ Confirm if an alarm or a warning is occurring. channel program. -9-6- 9.Troubleshooting 9.3.7.F8 : Automatic Tuning error ・ This alarm will be detected when the load estimation could not completed by Automatic Tuning. ・ The cause of fault can be identified by checking alarm history TA/HI. Table 9-7: Cause and Remedy for Automatic Tuning error Indication of Terminal Cause POSITION OVER? OVER WRN? Remedy ・ Remove external interference. The Motor rotated more ・ Mount the Motor so that the Moro axis is than 30[°] during automatic vertical. (Eliminate the effect of gravity.) ・ Tune the servo gains referring to “8. Tuning” tuning. or "User's Manual". ・ Remove the cause of excessive friction resistance or mechanical interference that The load moment of inertia locks the Motor. is too much. ・ Tune the servo gains referring to “8. Tuning” or "User's Manual". ・ Remove external interference. ・ Increase rigidity of the load. Cannot perform automatic ・ Mount the Motor so that the Moro axis is vertical. (Eliminate the effect of gravity.) tuning ・ Tune the servo gains referring to “8. Tuning” or "User's Manual". INERTIA CAN’T TUNE? ALARM DETECTED? An alarm or a warning is ・ Take measures against the cause of the alarm occurring. or the warning. 9.3.8.Motor vibration after Automatic Tuning ・ The estimated parameter setting values may not suitable for the application. ・ Implement procedure in below with referring "User’s Manual." ①FP: Decrease FP parameter setting value around 100[Hz]. Cut and try to figure out appropriate setting value to reduce motor vibration. ②SG: Decrease SG parameter setting value. 9.3.9.Alarm History ・ From the record of the time of occurrence, you can figure out whether an alarm occurred tight after power cycle, or it has been occurring continuously. ①Input the command TA/HI(Tell alarm status). T A SP SP / H I ENT New Alarm code :TA/HI **>TIME=012:04:46.0,40; 00>F5-0,000:05.18.6,35; 01>F5-2,000:10.22.4,7;_ Sub code Number of times for power-on Time of occurrence ②input of the SP key will monitor the next line ③Press the BS key to quit monitoring. -9-7- 9.Troubleshooting 9.3.10.List of Alarm and Warning Table 9-8: List of Alarm and Warning 7 segmens LED Name Output DRDY Output WRN Alarm history - (CPU not functioning) Open Open × A0 Disconnected sensor cable Open - ○ A1 Position data error Open - ○ A2 Disconnected Motor cable Open - ○ A3 Excess velocity - Open ○ A4 Resolver amplifier alarm Open - ○ A5 Commutation error - Open ○ A7 CPU error Open - ○ A9 Fieldbus error Open - ○ C0 RAM error - Open ○ C3 ROM error Open - △*1 C4 System error Open - ○ C5 Interface error - Open ○ E0 ADC error Open - × E2 Emergency stop Open - △*1 E7 Over heat Open - ○ E8 Excess voltage Open - ○ E9 Excess Motor current Open - ○ F1 Low control power voltage - Open ○ F4 Power module alarm Open - × F5 (CPU not functioning) - Open ○ F8 Disconnected sensor cable - Open ○ P0 Position data error Open - ○ P1 Disconnected Motor cable Open - ○ P2 Excess velocity Open - ○ P3 Resolver amplifier alarm Open - × P5 Commutation error - Open ○ P9 CPU error Open - ○ N0*2 ○ *1 : Back up only recordable history. *2 : When the home position is reset by the command AZ (Absolute ZERO position set) or the Home Return operation, the event code “N0” is recorded: However this is not abnormal. 9.4.Others Combination of the Motor and the Driver Unit shall conform to the specification. Be sure to keep the record of parameter settings. Do not modify the cable set. Lock the connectors securely and check for loose fixing screw(s). Please keep expendable parts and backup parts. (The Motor, the Driver Unit and the Cable set for replace) ・ Use alcohol for cleaning, and never apply thinner. ・ ・ ・ ・ ・ -9-8- 10. Conformity with the International Safety Regulations 10. Conformity with the International Safety Regulations The Megatorque Motor Systems conform to the EC Directives (CE Marking) and Underwriters Laboratory (UL) regulations. 10.1.Conformity with the EC Directives The Megatorque Motor System is a machine component that conforms to provisions of the EC Low Voltage Directive. This will help a user in easy conformity with the EC Directives (CE marking) of a machine into which the Megatorque Motor System is incorporated. 10.2.Conformity with the EMC command NSK defined installation models (conditions) for the Megatorque Motor PS/PN Series, including installation space and wiring between Driver Units and Motors, and set EMC command standards based on 4 [m] cable models, which have been certified by TÜV. When Megatorque Motor PS/PN Series is incorporated into machinery, real-world installation and/or wiring conditions may differ from those of established models. Therefore, it is necessary to check for EMC command compliance (especially radiation and conduction noise) in the machinery incorporating the PS/PN Series Motors. Compliance with UL Standards (PS/PN Series only). Table10-1: List of relevant standards for EMC Directive Item Motor Conformed regulation EN60034-1 Low Voltage Directive EN50178 EN55011* : Group1, Class A Conducted noise EN55011* : Group1, Class A: Radiated noise EN61000-6-2 EN61000-4-2 Motor/ Driver Unit EN61000-4-3 : Immunity standard for industrial environments : Electro static discharge : Radio-frequency electromagnetic field EN61000-4-4 : Electric fast transit burst EN61000-4-5 : Lightning surges EN61000-4-6 EN61000-4-8 Electromagnetic Compatibility Directive : Radio frequency conducted disturbance : Power frequency magnetic field EN61000-4-11 : Voltage dips and short interruption *In a domestic environment this product may cause radio interference in which case the user may be required to take adequate measures. -10-1- 10. Conformity with the International Safety Regulations 10.3.Conditions to Conform with EC Directives The wiring example shown below is one of our recommendations for the conformity with the EC Directives. Figure. 10-1: Wiring diagram (Example) Inside of control panel AC power source EDC Driver Unit Circuit breaker Ferrite core1 (3 turns) Surge absorber CN5 Noise filter Ferrite core2 (2 turns) Protective ground L N Control power L N Main power PS Series Megatorque Motor Ferrite core3 (1 turns) Resolver CN3 N Ferrite core3 (2 turns) CN1 Hndy Terminal CN4 Ferrite core3 (1 turns) Motor CN6 To MECHATROLINK-Ⅲ master controler, etc CN7 To MECHATROLINK-Ⅲ master controler, etc ・ Environmental conditions The Driver Unit must be used in the environmental condition of Pollution Degree1 or 2 as specified by IEC60664-1. The Driver Unit shall be installed into a control panel with the structure that does not allow penetration of water, oil or dust (IP54). ・ Power source The EDC Driver Unit shall be used in the environmental condition of “Over-voltage category III” as specified by IEC60664-1. ・ Circuit breaker Install a circuit breaker that conforms to IEC standard and UL safety standard between the power source and the Driver Unit. ・ Noise filter Install a noise filter between the power source and the Driver Unit. ・ Ferrite core Ferrite cores for signal cable shall be set to the power cable, the Motor cable and the resolver cable. ・ Protective Grounding Be sure to ground the protective grounding terminal of the EDC Driver Unit to the protective ground (PE) of the control panel for a measure against electrical shock. Table 10-2: List of recommended part Item Circuit breaker Noise filter Surge absober Ferrite Core 1 Ferrite Core 2 Ferrite Core 3 Specification Rated Current: 15[A] Single phase 250[VAC], 10[A] - - - - Manufacturer EA32AC-15 (Fuji Electric) FN2070-10/07 (SCHAFFNER) R-A-V781BWZ-4 (Okaya electric) E04RA400270150 (Seiwa Electric MFG) E04SR301334 (Seiwa Electric MFG) E04SR211132 (Seiwa Electric MFG) -10-2- Remarks Conforms to IEC regulations and approved by UL For the Terminal 10. Conformity with the International Safety Regulations 10.4.Conformity with Underwriters Laboratories Standards Table 10-3: List of UL Standards Subject Motor Driver Unit Cable Set Qualifies regulation UL1004-1 UL508C Use UL conformable parts File No. E216970 E216221 - Be sure to meet the following as they are the supplementary conditions for the qualification ・ Environmental conditions The Driver Unit must be used in the environmental condition of Pollution Degree1 or 2 as specified by IEC60664-1. The Driver Unit shall be installed into a control panel with the structure that does not allow penetration of water, oil or dust (IP54). ・ Power source The EDC Driver Unit shall be used in environmental condition of “Over-voltage category III” as specified by IEC60664-1. Suitable for use on a circuit capable or delivering not more than 5,000[Arms] symmetrical amperes, 240[V] maximum. ・ Circuit breaker ・ Install a circuit breaker (rated 15[A]) that conforms the UL safety standard between the power source and the Driver Unit. (Please refer to Table 10-2 above for the specifications.) ・ Protective Grounding Be sure to ground the protective grounding terminal of the EDC Driver Unit to the protective ground (PE) of the control panel for a measure against electrical shock. ・ Wiring Use 60/75 [°C] CU wire only (For models except for M-EDC-PN3 and M-EDC-PN4 Series), Use 75 [°C] CU wire only (For models M-EDC-PN3 and M-EDC-PN4 Series). Wire range for field wiring terminals are marked adjacent to the terminal, on the wiring diagram or instruction manual. Table 10-4: Acceptable lead diameter Model No. All Models Wire Range(AWG) Input Output 18 19 ・ Others Solid state Motor overload protection level of 115 [%] of FLA is provided in each model. Integral solid state short circuit protection does not provide branch circuit protection. Branch circuit protection must be provided in accordance with the National Electrical Code and any additional local codes. Motor over temperature protection is not provided by the driver. -10-3- 10. Conformity with the International Safety Regulations 10.5.Precautions for the International Safety Regulations Danger Megatorque Motor PN series with Brake unit, Megatorque Motor Z series with High environmental resistance, Megatorque Motor High speed PX series with its Driver Unit, and their system as a combination of Motor and EDC Driver Unit do not comply with UL and CE marking regulation. EDC Driver Units comply with UL Standard and CE Mark when used with a standard PN series Megatorque Motor. However, they do not comply with UL standards or CE Mark when used with Megatorque Motor PN series with Brake unit and Megatorque Motor Z series with High environmental resistance. Caution Risk of Electric Shock- Capacitor discharge time is at least 5 [min] -10-4- Contacts Contacts ☆:Head Office P:Phone F:FAX ●NSK LTD.-HEADQUARTERS, TOKYO, JAPAN INDUSTRIAL MACHINERY BUSINESS DIVISION-HEADQUARTERS Nissei Bldg., 1-6-3 Ohsaki, Shinagawa-ku, Tokyo 141-8560, Japan P: +81-3-3779-7227 F: +81-3-3779-7644 AUTOMOTIVE BUSINESS DIVISION-HEADQUARTERS Nissei Bldg., 1-6-3 Ohsaki, Shinagawa-ku, Tokyo 141-8560, Japan P: +81-3-3779-7189 F: +81-3-3779-7917 ●Africa South Africa: NSK SOUTH AFRICA (PTY) LTD. JOHANNESBURG 25 Galaxy Avenue, Linbro Business Park, Sandton, Gauteng, P.O. Box 1157,Kelvin, 2054, South Africa P: +27-11-458-3600 F: +27-11-458-3608 ●Asia and Oceania Australia: NSK AUSTRALIA PTY. LTD. MELBOURNE ☆ 11 Dalmore Drive, Scoresby, Victoria 3179, Australia P: +61-3-9765-4400 F: +61-3-9764-8304 SYDNEY 24-28 River Road West, Parramatta, New South Wales 2150, Australia P: +61-2-8843-8100 F: +61-2-9893-8406 BRISBANE 1/69 Selhurst Street, Coopers Plains, Queensland 4108, Australia P: +61-7-3347-2600 F: +61-7-3345-5376 PERTH Unit 1, 71 Tacoma Circuit, Canning Vale, Western Australia 6155, Australia P: +61-8-9256-5000 F: +61-8-9256-1044 New Zealand: NSK NEW ZEALAND LTD. AUCKLAND 3 Te Apunga Place, Mt. Wellington, Auckland, New Zealand P: +64-9-276-4992 F: +64-9-276-4082 China: NSK HONG KONG LTD. HONG KONG ☆ Suite 705, 7th Floor, South Tower, World Finance Centre, Harbour City, T.S.T, Kowloon, Hong Kong, China P: +852-2739-9933 F: +852-2739-9323 SHENZHEN Room 624-626, 6/F, Kerry Center, Renminnan Road, Shenzhen, Guangdong, China P: +86-755-25904886 F: +86-755-25904883 NSK (SHANGHAI) TRADING CO., LTD. JINGSU ☆ No.8 NSK Rd., Huaqiao Economic Development Zone, Kunshan Jiangsu, China (215332) P: +86-512-5796-3000 F: +86-512-5796-3300 NSK (CHINA) INVESTMENT CO., LTD. JINGSU ☆ No.8 NSK Rd., Huaqiao Economic Development Zone, Kunshan Jiangsu, China (215332) P: +86-512-5796-3000 F: +86-512-5796-3300 BEIJING Room 2116, Beijing Fortune Bldg., 5 Dong San Huan Bei Lu, Chao Yang District, Beijing, China (100004) P: +86-10-6590-8161 F: +86-10-6590-8166 TIAN JIN Room 06, 09F The Exchange Tower 2, No.189 NanJing Road, Heping District, Tianjin, China (300050) P: +86-22-8319-5030 F: +86-22-8319-5033 CHANGCHUN Room 1001, Building A, Zhongyin Building, 727 Xi'an Road, Changchun, Jilin, China (130061) P: +86-431-8898-8682 F: +86-431-8898-8670 SHENYANG Room 1101, China Resources Building, No.286 Qingnian Street, Heping District, Shenyang Liaoning, China (110004) P: +86-24-2334-2868 F: +86-24-2334-2058 DALIAN Room 1805 Xiwang Tower, No.136 Zhongshan Road, Zhongshan District, Dalian, Liaoning, China (116001) P: +86-411-8800-8168 F: +86-411-8800-8160 NANJING Room A1 22F, Golden Eagle International Plaza, No.89 Hanzhong Road, Nanjing, Jiangsu, China (210029) P: +86-25-8472-6671 F: +86-25-8472-6687 FUZHOU Room 1801-1811, B1#1A Class Office Building, Wanda Plaza, No.8 Aojiang Road, Fuzhou, China (350009) P: +86-591-8380-1030 F: +86-591-8380-1225 WUHAN Room 2108, New World International Trade Tower I, No.568 Jianshe Road, Wuhan, Hubei, China (430000) P: +86-27-8556-9630 F: +86-27-8556-9615 QINGDAO Room 802, Farglory International Plaza, No.26 Xianggang Zhong Road, Shinan District, Qingdao, Shandong, China (266071) P: +86-532-5568-3877 F: +86-532-5568-3876 GUANGZHOU Room 2302, TaiKoo Hui Tower 1, No. 385 Tianhe Road, Tianhe District, Guangzhou, China(510620) P: +86-20-3817-7800 F: +86-20-3786-4501 CHANGSHA Room 1048, 10/F, Zhongtian Plaza, NO.766 WuyiRoad, Changsha, Hunan, China (410005) P: +86-731-8571-3100 F: +86-731-8571-3255 LUOYANG Room 1108, Fangda Hotel, No.6 XiYuan Road, LuoYang HeNan, China (471003) P: +86-379-6069-6188 F: +86-379-6069-6180 XI'AN Room 1007, B Changan Metropolls Center, No.88 Nanguanzheng Steet, Xi'an, Shanxi, China (710068) P: +86-29-8765-1896 F: +86-29-8765-1895 CHONGQING Room 2306, Unit B, No.137, Keyuan 2nd Road, Jiulongpo District, Chonqing, China (400039) P: +86-23-6806-5310 F: +86-23-6806-5292 CHENGDU Room1117, Lippo Tower, NO.62 North Kehua Road, Chengdu, Sichuan , China (610041) P: +86-28-8528-3680 F: +86-28-8528-3690 NSK CHINA SALES CO., LTD. JINGSU No.8 NSK Rd., Huaqiao Economic Development Zone, Kunshan Jiangsu, China (215332) P: +86-512-5796-3000 F: +86-512-5796-3300 India: NSK INDIA SALES CO.PVT.LTD. CHENNAI ☆ 6th Floor, Bannari Amman Towers, No.29 Dr. Radhakrishnan Salai, Mylapore, Chennai- 600 004 Tamil Nadu, India P: +91-44-2847-9600 F: +91-44-2847-9601 Contacts GURGAON MUMBAI Unit No-202, 2nd floor, Block-A Iris Tech Park, Sector-48, Sohna Road, Gurgaon-122018, Haryana, India P: +91-124-4104-530 F: +91-124-4104-532 321, 'A' Wing, Ahura Centre, 82, Mahakali Caves Road, Andheri (East), Mumbai - 400 093, India P: +91-22-2838-7787 F: +91-22-2838-5191 Indonesia: PT. NSK INDONESIA JAKARTA Summitmas II, 6th Floor, JI. Jend Sudirman Kav. 61-62, Jakarta 12190 Indonesia P: +62-21-252-3458 F: +62-21-252-3223 Korea: NSK KOREA CO., LTD. SEOUL Posco Center (West Wing) 9F, 892, Daechi-4Dong, Kangnam-Ku, Seoul, 135-777, Korea P: +82-2-3287-0300 F: +82-2-3287-0345 Malaysia: NSK BEARINGS (MALAYSIA) SDN.BHD. SHAH ALAM ☆ No.2, Jalan Pemaju, U1/15, Seksyen U1, Hicom Glenmarie Industrial Park, 40150 Shah Alam, Selangor, Malaysia P: +60-3-7803-8859 F: +60-3-7806-5982 PRAI No.36, Jalan Kikik, Taman Inderawasih, 13600 Prai, Penang, Malaysia P: +60-4-3902275 F: +60-4-3991830 JOHOR BAHRU 88 Jalan Ros Merah 2/17, Taman Johor Jaya, 81100 Johor Bahru, Johor, Malaysia P: +60-7-3546290 F: +60-7-3546291 IPOH Gr. Floor, 89 Jalan Bendahara, 31650 Ipoh, Perak, Malaysia P: +60-5-2555000 F: +60-5-2553373 Philippines: NSK REPRESENTATIVE OFFICE MANILA 8th Floor The Salcedo Towers 169 H.V. Dela Costa St., Salcedo Villege Makati City, Philippines 1227 P: +63-2-893-9543 F: +63-2-893-9173 Singapore: NSK INTERNATIONAL (SINGAPORE) PTE LTD. SINGAPORE 238A, Thomson Road, #24-01/05, Novena Square Tower A, Singapore 307684 P: +65-6496-8000 F: +65-6250-5845 NSK SINGAPORE (PRIVATE) LTD. SINGAPORE 238A, Thomson Road, #24-01/05, Novena Square Tower A, Singapore 307684 P: +65-6496-8000 F: +65-6250-5845 Taiwan: TAIWAN NSK PRECISION CO., LTD. TAIPEI ☆ 11F., No.87, Song Jiang Rd., Jhongshan District, Taipei City 104, Taiwan R.O.C. P: +886-2-2509-3305 F: +886-2-2509-1393 TAICHUNG 107-7, Sec. 3, Wen Xing Rd., Taichung City 407, Taiwan R.O.C. P: +886-4-2311-7978 F: +886-4-2311-2627 TAINAN 5F. No.8, Daye 1st Rd.,Southern Taiwan Science Park, Tainan City 741, Taiwan R.O.C P: +886-6-505-5861 F: +886-6-505-5061 TAIWAN NSK TECHNOLOGY CO., LTD. TAIPEI ☆ 11F. No.87, Song Jiang Rd., Jhongshan District, Taipei City 104, Taiwan R.O.C. P: +886-2-2509-3305 F: +886-2-2509-1393 TAICHUNG 10F.-3, No.925, Sec.4, Taiwan Blvd., Xitun Dist., Taichung City 407, Taiwan R.O.C. P: +886-4-2358-2945 F: +886-4-2358-7682 TAINAN 5F. No.8, Daye 1st Rd., Southern Taiwan Science Park, Tainan City 741, Taiwan R.O.C. P: +886-6-505-5861 F: +886-6-505-5061 Thailand: NSK BEARINGS (THAILAND) CO., LTD. BANGKOK 26 Soi Onnuch 55/1 Pravet Subdistrict, Pravet District, Bangkok 10250, Thailand. P: +66-2320-2555 F: +66-2320-2826 Vietnam: NSK VIETNAM CO., LTD. HANOI Techno Center, Room 204-205, Thang Long Industrial Park, Dong Anh District, Hanoi, Vietnam P: +84-4-3955-0159 F: +84-4-3955-0158 NSK REPRESENTATIVE OFFICE HO CHI MINH CITY Suite 307, Metropolitan Building, 235 Dong Khoi Street, District 1, Ho Chi Minh Cuty, Vietnam P: +84-8-3822-7907 F: +84-8-3822-7910 ●Europe United Kingdom: NSK EUROPE LTD.(EUROPEAN HEADQUARTERS) MAIDENHEAD Belmont Place, Belmont Road, Maidenhead, Berkshire SL6 6TB, U.K. P: +44-1628-509-800 F: +44-1628-509-808 NSK UK LTD. NEWARK Northern Road, Newark, Nottinghamshire NG24 2JF, U.K. P: +44-1636-605-123 F: +44-1636-605-000 France: NSK FRANCE S.A.S. PARIS Quartier de l’Europe, 2 Rue Georges Guynemer, 78283 Guyancourt, France P: +33-1-30-57-39-39 F: +33-1-30-57-00-01 Germany: NSK DEUTSCHLAND GMBH DUSSELDORF ☆ Harkortstrasse 15, D-40880 Ratingen, Germany P: +49-2102-4810 F: +49-2102-4812-290 STUTTGART Liebknechtstrasse 33, D-70565 Stuttgart-Vaihingen, Germany P: +49-711-79082-0 F: +49-711-79082-289 WOLFSBURG Tischlerstrasse 3, D-38440 Wolfsburg, Germany P: +49-5361-27647-10 F: +49-5361-27647-70 Contacts Italy: NSK ITALIA S.P.A. MILANO Via Garibaldi 215, Garbagnate Milanese (Milano) 20024, Italy P: +39-299-5191 F: +39-299-025778 Netherlands: NSK EUROPEAN DISTRIBUTION CENTRE B.V. TILBURG De Kroonstraat 38, 5048 AP Tilburg, Netherlands P: +31-13-4647647 F: +31-13-4647648 Poland: NSK REPRESENTATIVE OFFICE WARSAW Ul. Migdalowa 4/73, 02-796, Warsaw, Poland P: +48-22-645-1525 F: +48-22-645-1529 Russia: NSK POLSKA SP. Z O.O. SAINT-PETERSBURG Office I 703, Bldg 29, 18th Line of Vasilievskiy Ostrov, Saint-Petersburg, Russia, 199178 P: +7-812-332-5071 F: +7-812-332-5072 Spain: NSK SPAIN S.A. BARCELONA C/Tarragona 161, 2a Planta, 08014, Barcelona, Spain P: +34-93-433-5775 F: +34-93-433-5776 Turkey: NSK RULMANLARI ORTA DOGU TIC. LTD. STI. ISTANBUL 19 Mayıs Mah. Atatürk Cad. Ulya Engin İş Mrk. No:68/3 Kat:6 34736, Kozyatağı/İstanbul, Turkey P: +90-216-477-7111 F: +90-216-477-7174 UAE: NSK BEARINGS GULF TRADING CO. DUBAI JAFZA View 19, Floor 24 Office 2/3 Jebel Ali Downtown, PO Box 262163, Dubai, UAE P: +971-4-804-8200 F: +971-4-884-7227 ●North and South America United Sates of America: NSK AMERICAS, INC.(AMERICAN HEADQUARTERS) ANN ARBOR 4200 Goss Road, Ann Arbor, Michigan 48105, U.S.A. P: +1-734-913-7500 F: +1-734-913-7511 NSK CORPORATION ANN ARBOR 4200 Goss Road, Ann Arbor, Michigan 48105, U.S.A. P: +1-734-913-7500 F: +1-734-913-7511 NSK PRECISION AMERICA, INC. FRANKLIN ☆ 3450 Bearing Drive, Franklin, Indiana 46131, U.S.A. P: +1-317-738-5000 F: +1-317-738-5050 SAN JOSE 780 Montague Expressway, Suite 508, San Jose, California 95131, U.S.A. P: +1-408-944-9400 F: +1-408-944-9405 NSK LATIN AMERICA, INC. MIAMI 2500 NW 107th Avenue, Suite 300, Miami, Florida 33172, U.S.A. P: +1-305-477-0605 F: +1-305-477-0377 Canada: NSK CANADA INC. TORONTO ☆ 5585 McAdam Road, Mississauga, Ontario, Canada L4Z 1N4 P: +1-905-890-0740 F: +1-800-800-2788 MONTREAL 2150-32E Avenue Lachine, Quebec, Canada H8T 3H7 P: +1-514-633-1220 F: +1-800-800-2788 VANCOUVER 3353 Wayburne Drive, Burnaby, British Columbia, Canada V5G 4L4 P: +1-877-994-6675 F: +1-800-800-2788 Argentina: NSK ARGENTINA SRL BUENOS AIRES Garcia del Rio 2477 Piso 7 Oficina A (1429) Buenos Aires-Argentina P: +54-11-4704-5100 F: +54-11-4704-0033 Brazil: NSK BRASIL LTDA. SAO PAULO ☆ Rua 13 de Maio, 1633-14th Andar-Bela Vista-CEP 01327-905 Sao Paulo, SP, Brazil P: +55-11-3269-4786 F: +55-11-3269-4720 BELO HORIZONTE Rua Ceara 1431-4th andar-sala 405-Funcionarios Belo Horizonte-MG, Brazil 30150-311 P: +55-31-3274-2591 F: +55-31-3273-4408 JOINVILLE Rua Blumenau, 178-sala 910-Centro Joinville-SC, Brazil 89204-250 P: +55-47-3422-5445 F: +55-47-3422-2817 PORTO ALEGRE Av. Cristovao Colombo, 1694-sala 202-Floresta Porto Alegre-RS, Brazil 90560-001 P: +55-51-3222-1324 F: +55-51-3222-2599 RECIFE Av. Conselheiro Aguiar, 2738-6th andar-conj. 604-Boa Viagem Recife-PE, Brazil 51020-020 P: +55-81-3326-3781 F: +55-81-3326-5047 Peru: NSK PERU S.A.C. LIMA Av. Caminos del Inca 670, Ofic:# 402, Santiago del Surco, Lima, Peru P: +51-1-652-3372 F: +51-1-638-0555 Mexico: NSK RODAMIENTOS MEXICANA, S.A. DE C.V. MEXICO CITY ☆ Av. Presidente Juarez No.2007 Lote 5, Col. San Jeronimo Tepetlacalco, Tlalnepantla, Estado de Mexico, Mexico, C.P.54090 P: +52-55-3682-2900 F: +52-55-3682-2937 MONTERREY Av. Ricardo Margain 575, IOS Torre C, Suite 516, Parque Corporativo Santa Engracia, San Pedro Garza Garcia, N.L. Mexico, C.P.66267 P: +52-81-8000-7300 F: +52-81-8000-7095 Contacts (Blank Page) メガトルクモータシステム MECHATROLINK-Ⅲオプション スタートアップガイド MEGATORQUE MOTOR SYSTEM MECHATROLINK-Ⅲ Option Start-up Guide Nov.15.2013 1st Edition NSK Ltd. 日本精工株式会社は、外国為替および外国貿易法等により規制されている製品・技術について は、法令に違反して輸出しないことを基本方針としております。規制に該当する当社製品を輸 出される場合は、同法に基づく輸出許可を取得されますようお願い致します。なお、当社製品 の輸出に際しては、兵器・武器関連用途に使用されることのないよう十分留意くださるよう併 せてお願い致します。 NSK Ltd. has basic policy not to export any products or technology designated as controlled item by export-related laws. When exporting the products in this brochure, the laws of the exporting country must be observed. Specifications are subjects to change without notice and without any obligation on the part of the manufacturer. Every care has been taken to ensure the accuracy of the data contained in this brochure, but no liability can be accepted any loss or damage suffered through error omissions We will gratefully acknowledge any additions corrections. ©NSK Ltd. 2013