1
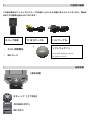
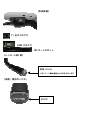
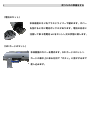
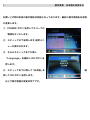
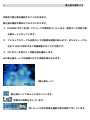
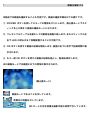
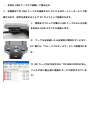
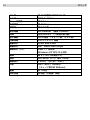
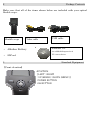
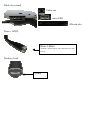
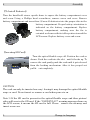
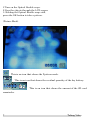
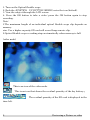
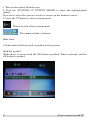
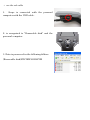
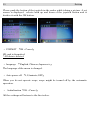
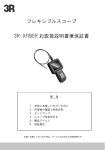
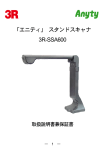
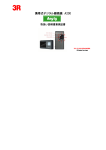
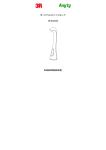
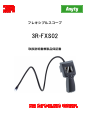
フレキシブルスコープ
3R-FXS02
取扱説明書兼製品保証書
目次
1
安全にお使いいただくために
2
内容物の確認
3
各部名称
4
使うための準備をする
5
設定変更
6
静止画を撮影する
7
動画を撮影する
8
保存データのプレビュー
9
データを PC で見る
10
設定を確認・変更する
11
付属 CD について
12
スペック
13
保証規定
14
製品保証書
日本語に変更する
安全にお使いいただくために
1
この項目は本製品を安全にお使いいただくために禁止している点や注意すべき点が記載されてい
ます。お客様の損害を防ぐために必ずお読みになった上でご利用下さい。
警告
以下は死亡や重症など重大な事故の恐れがある内容です
注意
本体を直射日光の当たる環境や高熱になる環境で保管・使用しないでください。
乾電池が膨張し破裂・爆発する恐れがあります。
製品から出る光を直視しない
光源用の LED を直視しないでください。あなたの視力に障害を及ぼす恐れがあります。
ぬれ手での使用禁止
本体がぬれた状態や、ぬれ手で使用しないでください。感電する恐れがあります。
分解禁止
製品を分解、改造しないで下さい。感電や火災の恐れがあります。
本体樹脂に有機溶剤使用禁止
本製品の清掃にアルコールやシンナーなどの有機溶剤は使用しないでください。
注意
煙や異臭などを感じた時はすぐに使用をやめてください。
注意
以下はそれ以外に注意すべき内容です。
注意
本製品のチューブ部は IPX3(防滴)相当の防滴仕様となっております。
完全な防水ではありませんので水につけたりしないで下さい。
またモニタ部は防水仕様ではありませんのでご注意下さい。
内容物の確認
2
この度は弊社のフレキシブルスコープをお買い上げいただき誠にありがとうございます。製品に
は以下の内容物が含められております。
スコープ本体
TV 出力ケーブル
USB ケーブル
,
・
テスト用乾電池
・
SD カード
ソフトウェア CD
ArcsoftMediaImpression 2
PC camera driver
各部名称
3
(本体正面)
スティック(上下左右)
POWER ボタン
OK ボタン
(本体側面)
TV 出力コネクタ
USB コネクタ
SD カードスロット
(レンズ・LED 部)
白色 LEDx2
※白いマーク●は画面の上の向きを示します
(底面・電池ボックス)
ネジ穴
使うための準備をする
4
(電池のセット)
本体底面のネジをプラスドライバーで緩めます。カバー
を空けると中に電池ボックスがあります。電池の向きに
注意して単 3 乾電池 x4 をセットし元の状態に戻します。
(SD カードのセット)
本体側面のカバーを開きます。SD カードスロットへ
カードの表が上に来る方向で「カチッ」と音がするまで
差し込みます。
設定変更
5
日本語に変更する
お買い上げ時は本体の表示言語は英語となっております。最初に表示言語を日本語
に変更します。
① POWER ボタンを押してスコープの
電源をオンにします。
② スティックの下を倒します。
設定メニ
ューが表示されます。
③ さらにスティックを下に倒し
「Language」を選択し OK ボタンを
押します。
④
スティックを下に倒して「日本語」を
択して OK ボタンを押します。
以上で表示言語の変更は完了です。
選
静止画を撮影する
6
本製品で静止画を撮影することが出来ます。
静止画の撮影手順は以下のようになります。
① POWER ボタンを押してスコープの電源をオンにします。電源オンの状態で静
止画モードとなっています。
② フレキシブルケーブルを動かして対象物を画面に映します。またスティックの
左右で LED の明るさを7段階調整することが可能です。
③ OK ボタンを押すと1枚静止画を撮影します。
また静止画モードでは画面に以下の情報が表示されます。
(静止画モード)
静止画モードであることを示しています。
乾電池の残量を示しています。
SD カードの空き容量を撮影可能な枚数で示しています。
動画を撮影する
7
本製品では動画を撮影することも可能です。動画の撮影手順は以下の通りです。
① POWER ボタンを押してスコープの電源をオンにします。静止画モードでステ
ィックを上に倒すと動画の撮影モードになります。
② フレキシブルケーブルを動かして対象物を画面に映します。またスティックの左
右で LED の明るさを7段階調整することが可能です。
③ OK ボタンを押すと動画の記録を開始します。画面の右下に赤字で記録時間が表
示されます。
④ もう一度 OK ボタンを押すと動画の記録を停止し、動画を保存します。
また動画モードでは画面に以下の情報が表示されます。
(静止画モード)
動画モードであることを示しています。
乾電池の残量を示しています。
SD カードの空き容量を撮影可能な時間で示しています。
保存データのプレビュー
8
撮影したデータは本体の液晶画面に表示させることが可能です。
プレビューの手順は以下の通りです。
① POWER ボタンを押してスコープの電源をオンにします。スティックを上に2
回倒すとプレビューモードになります。
② 「少しお待ちください」と表示がでたあとに撮影された日付順に表示されます。
スティックの左右でさらに他のファイルを参照することが可能です。
③ 動画ファイルの場合は OK ボタンで再生と停止を行うことが可能です。
プレビューモードであることを示しています。
撮影した順番の番号です。
最後のファイルまで行くと最初のファイルに戻ります。
・
スライドショー
自動的にファイルを表示するスライドショーを以下のように実行できます。
①
プレビューモード中にスティックを下に倒します。
右のようなメニューが表示されます。
② スティック上下で「スライドショー」を選択し OK
ボタンを押します。表示間隔を「3 秒、5 秒、10 秒」からスティック上下で選
択し、OK ボタンを押すとスライドショーが実行されます。
データを PC で見る
9
撮影したデータは項目 4 でセットした SD カードに保存されます。
保存データは PC などで確認することが可能です。
・
カードリーダー※を使ってカードを直接読み込む
※別売りです
①
本体の電源をオフにし、
SD カードを取り出します。
②
お持ちのカードリーダーやパソコン内蔵のカード
リーダーに SD カードをセットします。
③
SD カード内に作成された「DCIM\100DSCIM」
フォルダ内に静止画と動画のデータが保存されています。
・ 本体を USB ケーブルで接続して読み込む
※ 初期設定では USB ケーブルを接続すると PC からはカードリーダーとして認
識されます。設定を変更することで PC カメラとして認識されます。
①
電源をオフにして付属の USB ケーブルの小さな側
を本体の USB コネクタに接続します。
②
ケーブルを接続したら自動的に電源がオンとなり、
PC 側から「リムーバブルディスク」として認識されま
す。
③ SD カード内に作成された「DCIM\100DSCIM」
フォルダ内に静止画と動画のデータが保存されていま
す。
設定を確認・変更する
10
静止画モードまたは動画モード中にスティックを下に倒すと設定画面が表示されま
す。スティック上下で項目を選択し OK ボタンで決定します。
・
フォーマット
「取り消し・実行」
SD カードのフォーマットを行います。
実行するとカード内のデータは全て削除されますのでお気をつけください。
・
表示言語
「英語・中国語・日本語」
メニューなどの表示項目を以上の言語から選択することが可能です。
・
オートパワーオフ
「1 分、3 分、5 分、オフ」
一定時間操作しなかった場合に自動的に電源をオフにする機能のその長さもしくは
機能を無効にすることが可能です。
・
初期設定に戻す
「取り消し・実行」
設定画面内の各項目を工場出荷時の状態に戻します。
・
ビデオモード
「NTSC・PAL」
付属の TV 出力ケーブルを使用した際の信号の方式を選択します。
通常は NTSC から変更する必要はございません。
・ 日付設定
「オフ・設定」
ファイルの保存時間用の内蔵時計を設定することが可能です。
年月日の順番と時間をスティック上下で変更して設定したら OK ボタンを押します。
・ USB
「PC カメラ・パソコン接続」
USB ケーブルを接続した際の動作を PC カメラとカードリーダー(初期設定)から
選択することが可能です。
付属 CD について
11
付属しております CD には以下のソフトウェアが含まれています。
・ ArcsoftMediaImpression 2
画像や動画を管理したり、表示するためのソフトウェアです。スコープの記録形式
は JPEG と AVI のため Windows 標準の機能で再生可能です。
・
カメラドライバ WindowsXP のみ
ドライバをインストールしし PC カメラとして使用することが可能です。
※PC に内蔵カメラや Web カメラがある場合はインストールできないことがあります。
スペック
12
センサー
約 25 万画素 CMOS センサー
レンズ
F2.8 f=4.3mm
チューブ部径
約 9.6mm
先端部径
約 16.0mm
視野角
最大 70 度
焦点距離
20-280mm (推奨 100mm)
光源
白色 LEDx2 (7 段階切換可能)
防水機能
IPX3 相当 (チューブ部、カメラ部)
内蔵液晶
2.4 インチ TFT 液晶
画像形式
JPEG 640x480
動画形式
AVI 640x480 20fps
接続形式(PC)
USB 1.1 miniB
Windows XP SP2 以上対応
電源
単 3 アルカリ乾電池x4
保存
SD/SDHC カード 最大 16GB
映像出力
TVOUT (NTSC・PAL)
外形
95x150x1140mm
(チューブ長さ約 960mm)
重量
約 753g
対応言語
日本語、中国語、英語
13
保証規定
本保証規定はスリー・アールシステム株式会社(以下弊社)が製造した製品(以下製品)
が故障した場合の保証内容について明記したものです。弊社は弊社取り扱いの製品の故
障についてこの保証規定に基づいて修理・交換を致します。
●保証期間
製品の保証期間はお買い上げ製品の保証書、または取扱説明書を参照ください。
保証期間の開始日はご購入日からと致します。
●保証範囲
保証期間中に付属の取扱説明書に基づいた正常な環境、使用方法にて故障した場合、弊
社は無償にて製品の修理、交換を行います。
また製品は日本国内にて販売しているものであり、保証は日本国内においてのみ有効で
す。海外への保守・サポート等の対応、修理品の海外発送等は一切致しません。
保証期間内であっても以下の事項に該当する場合、保証規定の対象外となります。
1 レシート等お買い上げ日が確認できるものを弊社に提示出来ない場合。また保証書
のある製品において保証書が提示されない場合。
2 オークション等の個人間売買などを含む中古販売によって入手した製品。
3 お買い上げ後の移動、輸送時の落下や衝撃などにより生じたもの。
4 お取扱時の不注意や誤った使用方法による破損。
5 お客様にて分解、改造を行った製品、また弊社以外で修理、分解を行った事のある
製品。
6 お買い上げ製品に接続した機器やケーブルなどによる故障、また付属品・オプショ
ンなどの専用品以外の機器を使用したことによる故障。
7 取扱説明書等で示された使用環境、使用条件を満たさない状態での使用、過度の連
続使用など環境による故障。
8 取扱説明書等の注意事項、警告事項が守られない状態で起こった使用方法による故
障。
9 火災、地震、水害などの天災による故障、また戦争、騒乱などによるもの。
●免責事項
1 部品の経年劣化による故障や付属品の交換等にこの保証は適用されません。
2 製品の使用によって生じた直接的、間接的な損害などについて、弊社は製品の故障・
障害によるものかに関わらず一切の責任を負いません。
3 製品は将来発表されたハードウェア・ソフトウェアとの互換性は保証致しません。
4 通常使用時、故障時、また修理時における製品内部等に保存されたデータの消失、
破損について弊社は一切の責任を負いません。データにつきましてはお客様の責任
においてのバックアップ等をお願い致します。
5 製品の中には寿命、使用時間などが設定された部品が使用されている事があります。
これは使用頻度や使用環境などによって実際の寿命、交換時期とは前後します。場
合によっては保証期間内であっても部品交換が有償となる事があります。
●注意事項
1 弊社が日本国国内において正規に販売、取扱したものに関してのみ保証は有効です。
並行輸入品や弊社が正規に取扱いしていない商品について弊社は修理、交換は致し
ません。
2 弊社製品につきまして出張、訪問による修理やサービスは行っておりません。
3 お預かり時等、輸送時による破損・紛失等につきまして弊社は責任を負いません。
4 修理、交換が難しいと弊社が判断する場合、同等品、後継品への交換にて対応する
ことがあります。
5 修理、交換品の保証期間につきましてはお買い上げ時の保証の期限、もしくは修理、
交換品の発送日の 3 ヵ月後、いずれか長いものとなります。
6 この保証規約は予告無く変更されることがあります。
7 本規定は上記の規定に基づき修理、交換対応をするもので、お客様の法律上の権益
を制限するものではありません。
製品保証書
14
商品名 : フレキシブルスコープ
型番
: 3R-FXS02
保証期間
氏名 :
住所 : 〒
電話番号:
購入日:
販売店:
: お買い上げ日より 12 ヶ月
Flexible Scope
3R-FXS02
User's Manual
Contents
1
General Safety Information
2
Package Contents
3
Standard Equipment
4
Assembly
5
Change in language
6
Taking Picture
7
Taking Video
8
Reviewing a Picture or video
9
Scope connected with PC.
10
Setting
11
Software CD
12
Spec
13
WARRANTY
1
General Safety Information
WARNING!
Read and understand all instructions. Failure to follow all instructions listed
below may result in electric shock, fire and/or serious personal injury.
SAVE THESE INSTRUCTIONS!
Work Area Safety
1 Keep your work area clean and well lit.
Cluttered benches and dark areas may cause accidents.
2 Do not operate electrical devices or visual inspection tool in explosive
atmospheres, such as in the presence of flammable liquids, gases, or heavy
dust.Electrical devices or visual inspection tools create sparks which may ignite
the dust or fumes.
3 Do not use the visual inspection tool around corrosive chemicals.
Exposure to corrosive, oily environments can ruin the plastic covering on the
imager head and ruin the picture quality.
4 Keep bystanders, children, and visitors away while operating visual inspection
tool. Do not let visitors contact the unit
Personal Safety
1. Stay alert, watch what you are doing and use common sense.
Do not use visual inspection tool while tired or under the influence of drugs,
alcohol, or medications. A moment of inattention while operating tools may
result in serious personal injury
2. Do not overreach. Keep proper footing and balance at all times.
Proper footing and balance enables better control of the tool in unexpected
situations
3. Use safety Device.
Always wear eye protection. Dust mask, non-skid safety shoes, hard hat, or
hearing protection must be used for appropriate conditions.
4. Use proper accessories.
Do not place this product on any unstable cart or surface. The product may fall
causing serious injury to a person or serious damage to the product.
5. Prevent object and liquid entry.
Never spill liquid of any kind on the video display unit. Liquid increases the risk
of electrical shock and damage to the product.
6. Do not use this device for personal or medical use/inspection in any way.
7. The unit is not shock-resistant.
Do not use it as a hammer or drop it.
2
Package Contents
Make sure that all of the items shown below are included with your optical
flexible scope.
flexible scope
Video cable
・ Alkaline Battery
USB cable
Software CD
ArcsoftMediaImpression 2
・ SDCard
3
PC camera driver
Standard Equipment
(Front elevation)
JOYSTICK
[ LEFT : RIGHT
: UP(MODE) : DOWN (MENU)]
POWER BUTTON
OK BUTTON
(Side elevation)
Video out
mini USB
SDcard slot
(lens・LED)
White LEDx2
※White mark shows the direction on the
screen.
(battery box)
screw
4
Assembly
(To Install Batteries)
Turn the hand-held viewer upside down to expose the battery compartment cover
and screw Using a Phillips head screwdriver, remove screw and cover. Remove
battery compartment and insert four (4) new AA batteries into the proper slots in the
battery compartment. Proper battery orientation is
indicated on the battery compartment. Replace
battery compartment, making sure the fin is
oriented as shown with its taller portion toward the
LCD screen. Replace battery cover and screw.
(Inserting SD Card)
Turn the optical flexible scope off. Position the card as
shown. Push the card into the slot until it hooks up. To
remove the card gently push the card until it get released
from the hooking mechanism. After it has pooped out
pull it out completely.
CAUTION
The card can only be inserted one way; forcing it may damage the optical flexible
scope or card. Do not insert or remove a card when power is on.
Note: 1.If the SD card is present in the optical flexible scope and then picture/
video will save in the SD card. If the “CARD FULL!!!” warning message shows on
the LCD screen, it means the SD card is full. Please remove the memory and
insert a new one.
5
Change in language
The language displayed on the screen is English. You can change the displayed
language.
1
2
Flexible Scope turns on power.
Please down joy stick. A set menu is displayed. The language is selected and
the OK button is pushed.
3
6
The language that you request is selected. OK is pushed.
Taking Picture
1.Turn on the Optical flexible scope.
2.View the objects through the LCD screen.
3. Holding the Optical flexible scope still,
press the OK button to take a picture.
(Picture Mode)
This is an icon that shows the Ppicture mode.
This is an icon that shows the residual quantity of the dry battery.
This is an icon that shows the amount of the SD card
remainder.
7
Taking Video
1. Turn on the Optical flexible scope.
2. Rock the JOYSTICK UP BUTTON (MODE) enter the icon (default)
3. View the subject through the LCD screen.
4. Press the OK button to take a video; press the OK button again to stop
recording.
Note:
1.The maximum length of an individual optical flexible scope clip depends on
memory
size. Use a higher capacity SD card will record longer movie clip.
2.Optical flexible scope recording stops automatically when memory is full.
(video mode)
This is an icon of the video mode.
This is an icon that shows the residual quantity of the dry battery.。
The residual quantity of the SD card is displayed in the
time left.
8
Reviewing a Picture or video
1. Turn on the optical flexible scope
2. Rock the JOYSTICK UP BUTTON (MODE) to enter the right(playback
status).
Press the to select the picture or video to review on the monitor screen
3. Press the UP button to exit reviewing mode
This is an icon of the preview mode.
The number of data is shown.
Slide show
1 Down button of the joystick is pushed in the preview.
With the joystick
"Slide show" is selected and the OK button is pushed. Time is selected, and the
OK button is pushed.
9
Scope connected with PC
Data is preserved on the SD card. The preservation data is seen with the
personal computer.
・ use the card reader.(Option)
1. SD card is removed.
2. SD card is connected with the card reader.
3. Data is preserved in the following folders.
(Removable disk)¥DCIM¥100DSCIM
・ use the usb cable
1.
Scope is connected with the personal
computer with the USB cable.
2. is recognized to "Removable disk" and the
personal computer.
3. Data is preserved in the following folders.
(Removable disk)¥DCIM¥100DSCIM
10
Setting
Please push the button of the joystick in the under while taking a picture. A set
screen is displayed. selects with up and down of the joystick button and it
decides it with the OK button.
・ FORMAT 「OK・Cancel」
SD card is formatted.
* All data is deleted.
・ language 「"English, Chinese,Japanese~」
The language of the menu is changed.
・ Auto power off 「1,3,5minute,OFF」
When you do not operate scope, scope might be turned off by the automatic
operation.
・ Initialization「OK・Cancel」
All the settings will return to the first value.
・ Video Mode
「NTSC・PAL」
The output method of the video is changed.
・ Date「OFF・OK」
A built-in clock is corrected.
・ USB「PC CAMERA・PC」
The method of recognizing the USB cable is changed.
11
You can use softwareCD.
・ ArcsoftMediaImpression 2
This software can see the photograph.
・ CAMERA Driver
You can use Flexible scope as web camera*.
* WindowsXP
Software CD
12
Spec
Image Sensor
CMOS 510 x 492
Sensor area 1 /4"
Lens Specification
F 2.8, f =4.3 mm, View angle 63-70°,
Visual Distance Range
9.6mm
Diameter of camera
16.0mm
Viewing angle
70 degrees (max)
Visual Distance Range
Source of light
20mm-280 mm (recommend 100mm)
White LEDx2
Waterproof
IPX3(tube,camera)
LCD
Picture
2.4inch TFT
JPEG 640x480
Video
AVI 640x480 20fps
Connection
USB 1.1 miniB
Up to Windows XP SP2
Power
AA Alkaline battery x4
Card
SD/SDHC card 16GB(max)
TVOUT (NTSC・PAL)
Output
Size
95x150x1140mm
(tube 960mm)
Weight
Language
753g
(250K pixels),
English, Chinese,Japaneas
13
Warranty
WARRANTY CARD
The warranty period of this product is one year from your
purchasing.After items as follows are filled in, it is
necessary to present the receipt of the purchase shop to
receive the warranty.
Customer Name :
TEL NO:
Date
: DD/
Agent
:
MM/
YY/
(ONE YEAR)
SALES :
3R SYSTEMS CORP.JAPAN
1-5-20 KAMIMUTA HAHAKATA FUKUOKA JAPAN
TEL +81-92-4414056
FAX +81-92-4414077
www.3rrr.co.jp
www.anyty.com
[email protected]