1
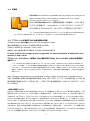
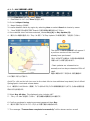
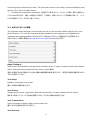
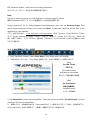
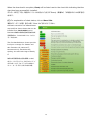
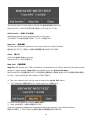
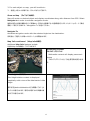
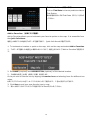
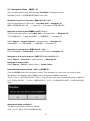
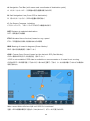
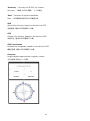
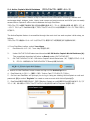
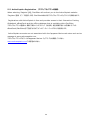
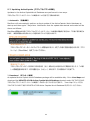
1
内容
第1章
概要 ..................................................................................................................................................... 3
1-1.Plan2Nav について .................................................................................................................................... 3
1-2. 組み込まれた機能 ..................................................................................................................................... 3
1-3. 追加機能 .................................................................................................................................................... 4
1-4. 互換性........................................................................................................................................................ 5
1-5. アプリケーションが動作するのに必要な端末の性能............................................................................... 5
第 2 章. インストール .......................................................................................................................................... 6
2-1. Plan2Nav のインストール ........................................................................................................................ 6
第 3 章. 使用してみる .......................................................................................................................................... 7
3-1. Plan2Nav を開始する ............................................................................................................................... 7
3-2. ユーザー登録............................................................................................................................................. 7
第 4 章. Jeppesen Marine Map Manager(海図マネージャー) ....................................................................... 9
4-1. C-MAP 海図の購入と更新 .................................................................................................................... 10
4-2. あなたのアカウントの管理 ..................................................................................................................... 11
第5章.特徴と機能 ........................................................................................................................................... 14
5-1. 地図操作 .................................................................................................................................................. 14
5-2. Quick Info (クイック インフォ:素早い情報).................................................................................. 15
5-3. Navigation Mode (案内モード) ......................................................................................................... 21
5-4. Active Captain World Database (アクティブキャプテン 世界データベース) .............................. 25
5-5. ActiveCaptain Registration (アクティブキャプテンの登録) ........................................................... 26
5-6. Overlay ActiveCaptain (アクティブキャプテンの表示) ................................................................ 27
5-7. Updating ActiveCaptain (アクティブキャプテンの更新)...................................................................... 28
5-8. ActiveCaptain Markers (アクティブキャプテンのマーカー:表示内容) ........................................ 29
5-9. C-Weather (C-ウェザー:気象情報) ................................................................................................. 30
5-10. Search(検索) .................................................................................................................................. 31
5-11. Track (軌跡) ................................................................................................................................... 33
5-12. Measure (計測).............................................................................................................................. 34
5-13.Route(経路) ..................................................................................................................................... 35
5-14. Settings (設定) ................................................................................................................................. 38
5-15.Anchor Drift
(走錨警報) ............................................................................................................. 39
5-16. Sharing Track and Route GPX Files (軌跡とルート GPX ファイルの共有) ............................. 39
6.Frequently Asked Question (よくある質問) ........................................................................................ 40
本資料は米国 Jeppesen 社が提供する Plan2Nav(Android 版)の英文マニュアルを和訳し、コンピューターに詳しくない
方でも理解可能なように注釈や図を追加したものです。 著作権は Jeppesen 社にあります。
2
第1章 概要
1-1.Plan2Nav について
Jeppesen Marine’s Plan2Nav is the ultimate navigation and planning tool designed for boaters
with a true passion for being on the water.
Jeppesen(イエプセンと発音するらしい) マリンのPlan2Navは、水上を行く真の情熱をもったボート愛好者の為にデ
ザインされた究極的の経路案内・計画ツールです。
Use the free background charts to start planning your journey and purchase detailed C-MAP by
Jeppesen charts to enhance your navigational experience.
フリーの簡易地図(background chart)を使いあなたの旅のプランをスタートさせ、Jeppesenの詳細なC-MAPを購
入する事であなたのナビゲーション経験をより高めてください。
1-2. 組み込まれた機能
The Plan2Nav for Android app includes several free features allowing you immediate access to
cruising and planning.
Android※1アプリ※2版のPlan2Navはすぐに航海や航路計画に使用できる幾つかの無料の機能を持っています。
※1:Android(アンドロイド)米国Google社が開発・配布するオペレーティングシステム(OS:基本ソフト)。パソコン用の
Microsoft社の Windows(ウインドウズ)より機能は少ないが、その分処理能力が小さいスマートホンやタブレット端末でも軽快に動
作でき、携帯型端末用OSとして普及している。同じような携帯端末向けOSとしてはApple Computer社のiOS(アイ オーエス)があ
り、iOS版のPlan2Navの方がAndroid版より先に発表されている。 但し、iOSの携帯端末には防水仕様の製品は無く防水ケースが
必須になる。 携帯電話の契約会社(ドコモとか)や防水性能(あくまで真水での防水性能で海水では無いので防水ケースはあった
方が良い)、電池の持ち(日本製の端末には電池の持ちの良い機種もある。遭難時を考えると電池持ちが良いものがやはり良い)等
を考慮して端末を選択するとなるとAndroid版の方が選択できる機種が多い。
※2:アプリケーションソフトウェアのこと。OS:基本ソフト上で特定の処理(Plan2Navの場合は以下の箇条書きの処理)を行うために
開発されたコンピュータプログラムのこと。
・ 簡易な世界海図
・無料のデモ地図
・立体視地図モード
・あなたのGPS(使用する端末のGPS機能)を表示することができます。
― Speed Over Ground (SOG)
-対地速度(SOG)
― Course Over Ground (COG)
-地面上のコース(COG)
― Estimated Time of Arrival (ETA)
-到着予想時間(ETA)
-Weather Chart Overlay
・天気図の表示
3
・リアルタイムなガイド表示
-up, Course-up and Chart Rotation
・ 北上、コースアップ、地図回転
・距離の測定
・アンカー流れの警告
・時計とコンパス
・ルートの作成と編集
GPS Tracks
・GPS軌跡
1-3. 追加機能
The following features are available when a detailed C-MAP by Jeppesen chart is purchased
within Plan2Nav and are always accessible even when no wireless connection is available.
以下の機能はJeppsesen chartによる詳細なC-MAP(Jeppsesenのwebストアで購入できる電子海図)が
Plan2Navに購入されると有効になり、(インターネットへの)Wireless接続が無い状態でも利用可能です。
(ナビエイド ナビを補助する機能)
(詳細な湾の海図)
-Marina Port Database (C-Marina 港のデータベース)
(動的な潮流と予測)
(写真と予定表)
th Contours and Land Elevations (深度等高線図と地形高低図)
(排他空気写真?と予定表)
4
1-4. 互換性
Plan2Nav for Android is compatible with all Android smart phones and
tablets equipped with a GPU (graphical processor unit) and running
operating system version 2.2 or higher.
Android版Plan2NavはGPU(画像処理装置)が装備され(=カラー表示
ディスプレイを装備した)、Androidオペレーティングシステムのバージョンが2.2※1
かそれ以降の全てのAndroidスマートホンとタブレットで使用することができます。
※1:2013年10月時点で最新のAndroidはバージョン4.3です。国内で2011年以降に販売された
スマートホンは2.3以降のものが多いので、ここ2年でスマートホンを買ったという人はPlan2Navが利用できるはずです。
1-5. アプリケーションが動作するのに必要な端末の性能
150MB for base Plan2Nav App with free background chart
無料の簡易地図とPlan2Navアプリを使用する場合は150MB。
50MB to 800MB for detailed C-MAP charts
詳細なC-MAPの地図を使用する場合は、50MBから800MBが必要です。
In total, 1GB of free storage space is suggested for both installation of application and
detailed C-MAP charts.
アプリケーション(Plan2Nav)と詳細なC-MAP海図の両方で合計1GB(1000MB)の空きが記憶装置に
必要です※2。
※2:Plan2Navがどこに保存されたか調べたところ、スマートホンのmicroSDカードに保存されていました。有料のC-MAPも同じです
(ドコモ F-12Cの場合。 F-12Cの本体側の記憶装置の容量は512MBと小さいですがmicroSDに保存することでPlan2Navを利用
できています。)。microSDにはカメラで撮影された画像が保存されることもあるのと、販売時に入れられているmicroSDカードは2GBの
事が多く、大抵のスマートホンでは32GBのmicroSDカードが利用できるので、ご利用の端末の取説で確認の上、大きなものを用意した方
が良いでしょう。
Note: Storage requirements vary depending on chart region and quantity of installed charts.
注意:記憶装置に必要な空き容量は海図の範囲(北米、東アジアとか)とインストールする海図の量(C-MAP 海
図は範囲毎に個別売りの為)により変化します。 (東アジアの日本・韓国近海の C-MAP は 2,200 円です:2013
年 10 月時点)
<端末の選定について>
Plan2Nav を使用可能な Android 端末等を持っておらず、i モード携帯を持っているがスマートホンに買い替えるのは困るし、2 回
線契約もしたくないという方は、スマートホンだけを買って(買増と呼ばれる)、内部の FOMA(UMI)カードを差し替えて使うという
手もあります。 数千円から 1 万円で手に入るスマートホンもあるので、そのようなものを購入して(ショップでないか聞いてみるか、
Amazon などの通販で買う)使うことができます。が、注意が必要です。近年(2011 年以降)の i モード携帯・スマートホンの
FOMA(UMI)カードは従来のものより小型な microUMI カードになっており、現在使用してる携帯電話の FOMA カードが使用で
きない場合があります。ドコモショップでカードを microUMI に交換可能ですが、アダプタ(SD カードのアダプタのようなカードサイズを
大きくするもの)を使っても以前の携帯でうまく動作しないという話があります(保証外の為)。 ドコモで言うと i モード携帯の従来
サイズの白い FOMA カード(青いのはかなり古いのでスマートホンでは使用無理)が使用できるスマートホンは 2011 年に発売され
た F-12C など数機種に限られます。ドコモショップでの入手は難しいので Amazon などで探してください。
5
第 2 章. インストール
Plan2Nav for Android can easily be downloaded for free from the Google Play Store or the
Amazon App Store.
Android版Plan2Navは“Google Play Store※1”か”Amazon App. Store※2”から無料で簡単にダウンロードでき
ます。
※1:Google Play StoreはAndroid用のアプリをユーザーに配布するためのウェブサイト(インターネット上で特定のアドレスを入力する
ことで接続でき、提供するサービスを受けられるようにしたもの)。有料・無料のアプリをダウンロード(自分のスマートホンなどの端末にコピー
を作ること。パソコン用のWindowsなどではダウンロード後、ソフトごとに異なるインストール操作を行う事が多いが、Androidの場合はダウ
ンロードと同時にインストールが行われ簡単)することができ、アプリの機能が利用できるようになる。Android OS上の“Google Play
Store”のアイコンをクリックするだけでウェブサイトに接続できる(購入した携帯端末の取説を参照)。
※2:Amazon App Storeは通販大手のAmazon.comが運営するアプリ販売の為のウェブサイト。 主にAmazonのオリジナル端末
Kindle向け。
<重要:インストールの前に>
スマートホンの契約(定額サービスの契約をしていない場合など)によっては、インストール操作で通信料金が発生します。 スマート
ホンはパソコンと同じようにWi-Fi(無線通信)でインターネットに繋ぐ機能があるので、ご家庭などインターネットへ接続する回線があ
る場所で事前にその設定を行ってから、次節からの作業を行う事をお勧めします。
また、インストールの途中でe-mailのアドレスを入力し、そのe-mail宛のメールを受け取る必要があります。 普段ご使用のパソコン
を準備されるか、スマートホンのメールを設定してそのe-mailアドレスを使用するなど準備をしてください。
Wi-Fiおよびスマートホンのメール設定方法はスマートホンの機種ごとに異なるので、ご利用のスマートホンの取扱説明書を参照してく
ださい。どうしてもわからなかったら、スマートホンを使っている家族(自宅のWi-Fi接続環境も判るので一番手っ取り早い)・友人に
聞く、取説に書かれているドコモのサポートに電話したり携帯電話の販売ショップで教えてもらったりすることも可能です。
2-1. Plan2Nav のインストール
1. Launch Google Play Store or Amazon App Store.
You will need to log in using an existing Google or Amazon account.
1.“Google Play Store“か”Amazon App Store”(ウェブサイト)に接続してください。
GoogleアカウントかAmazonアカウントが必要です(利用するためにはユーザー登録が要ります。端末の取説か端末に
アカウントの取得手順が説明されているのでそれにしたがってユーザー登録を行い、ユーザーIDとパスワードをしっかりと記
録してください)。
2. From the search field and type ‘Plan2Nav’ then select ‘Jeppesen Marine Plan2Nav’.
2.Search(検索)欄に“Plan2Nav”と入力して検索し、“Jeppesen Marine Plan2Nav”を選択してください。
3. Google PlayStore: Tap Install then Accept. Amazon AppStore: Tap Download, Next then
Install.
3.Google Play Storeでは、”Install”ボタンをタップ(一度ちょんと触れる)して続いて、”Accept”ボタンをタップし
てください。
Amazon App Storeでは“Download”をタップして続いて”Install”をタップしてください。
4. The download will start automatically. Once complete, select Open.
4.ダウンロードが自動的に開始され、直ぐに完了します。“Open”を選択してください。
6
第 3 章. 使用してみる
3-1. Plan2Nav を開始する
1. Tap on the Plan2Nav icon to open.
1.Plam2Navのアイコンを開くためにタップします。
2. The first time you use Plan2Nav, you will be prompted to ACCEPT the End User License
Agreement If you chose to DECLINE, Plan2Nav will automatically close. To continue, launch
Plan2Nav and ACCEPT the End User License Agreement.
2.初めてPlan2Navを使用する際には、使用者契約の合意事項をACCEPT(受け入れる)かの選択が求められま
す。 もしDECLINE(受け入れない)を選択するとPlan2Navは自動的に終了します。 続けるため、Plan2Navを開
始するためには使用者契約の合意でACCEPT(受け入れる)を選択してください。
The End User License Agreement can also be found in the Settings menu under Legal.
使用者契約の合意事項は(Plan2Nav の)画面下のメニューの”Setting“内でも確認できます。
3-2. ユーザー登録
To download free detailed base maps, demo charts or full detailed C-MAP by Jeppesen charts
within Plan2nav, you will first need to register the device with Jeppesen Marine Maps Manager.
From main tool bar, select Register.
無料の詳細なベースマップ、試用の海図、Jeppesenの詳細なC-MAP海図をPlan2Navにダウンロードするためには、
最初にJeppesen Marine Map Managerでご利用の端末(デバイス)を登録する必要がります。
ツールバーから“Resister”を選択してください。
1. If you already have an account, enter your User Name and Password, then select Register.
For first time users, select Create a New Account.
1.もしもアカウント(ユーザーID)を持っている場合は、ユーザーネーム(ID)とパスワードを入力し、初めての人は
“Resister(登録)”ボタンを選択し、“Create a New Account”を選択してください。
2. Enter account details including country, address, e-mail and password, then select Register.
The message “Your account has been successfully created. An e-mail has been sent with
further details.” will be displayed.
アカウントの詳細:国、住所、e-mailアドレスとパスワードを入力し、”Resister”を選択してください。“Your account
has been successfully created. An e-mail has been sent with further details.(あなたのアカウントは無
事に作成されました。より詳細な(設定)の為にe-mailが送信されました。”というメッセージが表示されます。
7
3. To complete the activation, open the e-mail from Jeppesen Marine Web Store and click on
the URL. Congratulations, “Your account has been successfully activated!”
3.アカウント登録を有効なものにする(アクティベーションと呼ばれます。1~2はあなた以外の人でも勝手に出来てし
まうので本人か否か確認することが最後に必要になります。登録したメールアドレスのメールを受け取れた人が本人という
確認方法をとります)ためには、送られてきた”Jeppesen Marine Web Store”からのメールを開き、メール内のURL
(Uniform Resource Locaterの略:ウェブサイトの場所を示すアドレス表示。日本語で言うと“統一資源位置指定
子”と呼ぶがユーアールエルとそのまま呼ぶのが一般的)をクリックしてください。 (“Your account has been
successfully activated!(アクティベーションに成功しました!)”と表示され、登録が終了します。
At this time, you can choose to add credit card details to the account. To add, select Yes. To
return to the app, select Skip.
この際に、あなたのクレジットカードの情報をアカウント内容に追加できます(C-MAP海図を購入する際の必要になる)。
追加するためには、“Yes”を選択してください。 (クレジットカードの情報を入力せずに)アプリに戻る為には”Skip”を
選択してください。
Forgot password? Go to www.jeppesen.com/lightmarine and click on Account/Login then
select ‘forgot password’. Enter your e-mail and Send. A password reset link will be sent to the
registered e-mail address.
パスワードを忘れたら? URL“www.jeppesen.com/lightmarine and click on Account/Login”へ行
き、”forget password”を選択してください。 あなたのe-mailを入力し、”Send”を選択してください。パスワードをリセ
ット(再設定)するためのページに行くリンクが書かれたe-mailが届きます。
Note: After registering the main tool bar will display
STORE and YOUR MAPS in place of ‘Register’.
注意:登録が済むとメインツールバー(Plan2Navの画面の底辺のツールバー)に“Store”と”Your Maps”が表示
されるようになります。
Plan2Nav includes a free base map, free demo charts and free access to the Active Captain World
database that can be found under YOUR MAPS once registration has been completed.
Plan2Nav は無料のベースマップ(基本図)、試用の海図、貴方が前回登録した“YOUR MAP”の領域の Active
Captain World Database”への無料アクセスを含んでいます。
8
第 4 章. Jeppesen Marine Map Manager(海図マネージャー)
Plan2Nav includes a worldwide C-MAP background chart, a free detailed base map, free demo charts
and a worldwide C-MAP charts catalog.
Plan2Nav は全世界の C-MAP バックグラウンド海図、無料詳細基本地図、無料の試用海図と全世界の C-MAP 海図のカ
タログを含んでいます。
Jeppesen Marine Maps Manager enables you to view, purchase and download detailed charts for
select regions.
Jeppesen Marine Maps Manager はあなたが選んだ領域の詳細な海図を見て、購入しダウンロードすることを可能にしま
す。
About:これについては
A. A Wi-Fi or 3G connection is necessary for downloading charts. Note: downloading via your cellular
connection could be slow and costly, as chart files can top 500 MB.
A.海図をダウンロードするためには Wi-Fi(インターネットへ接続可能な無線 LAN)か3G 回線(携帯電話のデータ通信
回線)が必要です。 注意:大きな海図は 500MB ある為、あなたの携帯電話の回線でダウンロードすると時間がかかり高
額な料金が請求されるかもしれません。
B. C-MAP charts for Plan2Nav can be purchased in-app only.
B.Plan2Nav の為の C-MAP 海図が購入可能なのはアプリ内からのみです。
C. Chart downloads can be paused and continued later.
C.海図のダウンロードは一時中断して後で再開可能です。
D. Downloads could take up to 30 minutes to complete, depending on connection speed and file size.
D.ダウンロードは回線の通信速度とファイルサイズに依存し、最長で30分で完了します。
E. During your download, a progress bar will show the remaining percentage until download is
complete.
E.ダウンロード中はダウンロードの進捗を示すバーが表示され、ダウンロードが完了するまでの割合が判ります。
F. Installed charts are accessible even when a wireless connection is not available.
F.インストールされた(ダウンロードが完了した)海図は無線接続が無い状態でも使用できます。
G. Chart purchases can be shared between three android devices.
G.購入した海図は3つの Android 端末で共有できます。
H. Purchased charts will remain accessible ON THE CLOUD for one year after purchase.
H.購入した海図は“ON THE CLOUD(Jeppesen の管理するインターネット上の保存領域)”に1年間保持されアクセ
スできます。
I. Existing chart purchases can be updated at 50% off retail.
I.(ON THE CLOUD 上に?)存在する海図の購入は販売価格の50%で更新できます。
9
4-1. C-MAP 海図の購入と更新
1. From Plan2Nav tool bar, select Store.
1.Plan2Navのツールバーから”Store”を選択します。
2. Go to theMaps Catalog.
2.Maps Catalogへ行きます。
3. Locate detailed charts by region by selecting Area or select Search to locate by name.
3.”Area”を選択するか名称で探す”Search“を選び詳細な海図を見つけてください。
4. Once desired chart has been selected, choose Buy (A) or Buy Update (B).
4.購入したい海図を選択したら、”Buy(A:買う)”か“Buy Update(B:更新を買う)”を選択してください。
The option to BUY UPDATE will appear if
a previous version of the chart has
already been purchased.
“BUY UPDATE”の操作は、以前の版の海図を既
に購入されていた際に表示されます。
Chart updates are released twice
annually and can be purchased at 50% off
retail.
海図の更新は年に二回行われ、販売価格の5
0%で購入することができます。
Quick Tip: click on the info icon next to the chart title to view additional map detail, list of official
hydrographic charts and release dates.
ヒント:海図タイトルの次のinfo(情報)アイコンをクリックするとマップの詳細情報を見ることができ、公式な水路図と配
布された日付が判ります。
5. Select Buy 4D Max. The displayed price includes VAT.
5.”Buy 4D Max”を選択してください。 表示価格は消費税込みの値段です。
6. Confirm purchase by entering account password then Buy.
6.購入する際にアカウントのパスワードを入力する事で購入が承認されます。
7. The message “Transactions completed successfully” will be shown and an e-mail
10
confirming the purchase will be sent. The purchased chart is now ready to be downloaded to the
device! Go to ‘How to install charts.’
7.“Transaction completed successfully(処理完了に成功しました)”とメッセージが現れ、購入を承認したと
いうe-mailが送られます。 購入した海図はこの時点で(ご利用の)端末へダウンロードする準備ができました。 “4-3.
C-MAP海図のインストール方法“へ進んでください。
4-2. あなたのアカウントの管理
The Jeppesen Maps Manager provides easy access to your account details directly from your
Android device. You can also manage account details at www.jeppesen.com/lightmarine.
Jeppesen Map ManagerはあなたにAndroidデバイスかあなたのアカウントへの簡単なアクセスを提供します。
あなたのアカウント詳細の管理はwww.jeppesen.com/lightmarineからも行えます。
Maps Catalogue
Search and view detailed coverage areas including a list of maps contained within the selected
chart. Once the desired area has been found, select BUY.
選択した海図に含まれる地図のリストを含む詳細な地図範囲を検索し表示します。 希望する地図の領域を見つけたら
“BUY”を選択してください。
Your Maps
Displays purchased chart areas.
購入した海図の領域を表示します。
Your Device
Display device name, registration date and number/list of maps installed on the device.
端末名、端末にインストールした地図の登録した日付、リスト中の何番目かを表示します。
Your Transactions
View purchases including date and purchase cost.
購入した日付と値段を見ることができます。
Your Account
11
Edit Payment details, credit card and change password.
クレジットカード、パスワード、支払方法の詳細を変更できます。
Help
Provide e-mail and phone for local Jeppesen customer support offices.
最寄りのJeppesenカスタマーサービスへの電話番号、e-mail送信を提供します。
Forgot password? Go to www.jeppesen.com/lightmarine and click on Account/Login then
select ‘forgot password’. Enter your e-mail and Send. A password reset link will be sent to the
registered e-mail address.
パスワードを忘れたときは? www.jeppesen.com/lightmarine へ行き、”Account /Login“をクリックしてください。
そして、”forgot password”を選択してください。 あなたの(登録した)e-mail アドレスを入力し、”Send(送
信)”を押してください。 パスワードをリセット(再設定)するためのページへのリンクのある e-mail がご登録の e-mail
アドレスに届きます。
4-3. C-MAP海図のインストール方法
1. From Plan2Nav toolbar, select Your Maps. Your Maps menu will display:
1.Plan2Navツールバーから、“Your Maps”を選択します。 あなたの地図メニューが表示されます。
(A)
On the Cloud
クラウド上
Purchased charts
available for download
ダウンロード可能な購入済海図
(B)
On the Device
あなたの端末上
Installed charts
インストール済海図
2. Tap Download to start chart installation. The chart will move under “On the Device” and the
download will start automatically.
2.海図のインストールを始めるためには、”Download“をタップ(一度短くタッチする)してください。その海図が下方
の”On the Device(あなたの端末上)“へ移動し、自動的にダウンロードが始まります。
12
When the download is complete, Ready will be listed next to the chart title indicating that the
chart has been successfully installed.
ダウンロードが完了すると、海図のインストールが成功したことを示す“Ready(準備OK)”が海図のタイトルの隣に表示
されます。
(C) For explanation of chart status, click on More Info.
海図のステータス(状態)表示の例、“More Info”をクリックしてください。
Plan2Nav includes a free detailed base
map and free demo charts that can be
installed from YOUR MAPS menu.
Plan2Navは無料の詳細な基本図と無料の試
用海図を含み、“YOUR MAP”メニューからイン
ストールできます。
The free detailed demo charts provide
local port coverage for: Boston and
San Francisco:US, Genova:IT,
Portsmouth:UK, Stockholm:Sw,
Sydney, Aus and Lake Lago di Garda,
IT
無料の試用海図は地方港を網羅しています。
ボストン:サンフランシスコ、イタリアのジェノバ、イ
ギリスのポーツマス、スエーデンのストックホルム、
シドニー、オーストラリアとイタリアのガルダ湖。
13
第5章.特徴と機能
5-1. 地図操作
Plan2Nav uses the standard pinch-zoom functionality for zooming in/out and panning on the
map.
Plan2Navは(タッチスクリーン端末で)一般的なピンチズーム機能を地図のズームイン/アウトとパニング(表示位置の
平行移動。日本語表現におけるカメラをパンさせるのPanの現在進行形Panningパニング。パンには立ち位置を変えず
に三脚の上のカメラを左右上下に振って見える位置を変えるので平行移動とは違うが、コンピューターでは表示の平行移
動もパンと表現されることが多い)に用います。
When first launched, the default view is north-up. To adjust the chart’s view, use the following
on-screen gestures:
始めて開始した際は、北が画面の上方向です。 海図の見え方を調整するためには、次に解説するジェスチャーを用いま
す。
Pan (パン:平行移動)
Pan the chart by placing one finger on the screen and dragging in the desired direction.
スクリーン上に指を置き、動かしたい方向にドラッグ(タッチしたまま滑らせる)する。
Zoom In (拡大)
Zoom in by placing two fingers on screen and pulling them apart in the area of interest.
スクリーン上に2本の指を置き、拡大したい領域を中心に指をスクリーンにタッチしたまま広げる。
Zoom Out (縮小)
Zoom out by placing two fingers on screen and pulling them together in the area of interest.
スクリーン上に2本の指を置き、拡大したい領域を中心に指をスクリーンにタッチしたまま狭める。
14
Two-Finger Rotation
2本の指を回転
Change the chart’s orientation [ROTATE] by placing two fingers
on screen and moving in a clockwise or counterclockwise
motion.
2本の指をスクリーン上で時計回りm反時計回りに滑らせると、海図の向きを変
更します。
Function is disabled when C-Weather is overlaid.
C-Weather(天気情報) が表示されているときは回転できません。
Two-Finger Tilt
Change the charts perspective [TILT] by placing two fingers on
screen and moving up or down in parallel.
2本の指をスクリーンにタッチさせて各々を上下に滑らせると海図のパース(3
D)表示の状態を変更します。
Function is disabled when C-Weather is overlaid.
C-Weather(天気情報) が表示されているときは回転できません。
Double Tap (2回タップする)
A quick double tap on the screen will return the map to the default north-up 2D view and allow
for a quick zoom-in when in the 2D/north-up mode.
スクリーンを素早く2回のタップすることで、地図を最初の北が画面上方の2D表示に戻ります。 そして2D/北が画面
上のquick Zoomだ操作可能になります。
5-2. Quick Info (クイック インフォ:素早い情報)
Plan2Nav's quick info menu will display your locations coordinates and the distance from your
GPS (when the GPS is active).
Plan2NavのQuick InfoはあなたのGPS情報(GPSが機能しているとき)から、あなたの現在位置と(目的地まで
の)距離を表示します。
Quick Info also allows you to bookmark your favorite locations and view detailed map
information, including photos, marina info, nav-aids, source data, depths, restricted areas, tidal
height and much more.
Quick Infoはあなたを ブックマークをお気に入りの場所や詳細なマップインフォメーションの表示、写真、マリーナ情報、
Nav-aide(案内補助)、源流情報、深度、制限地域、潮流の高さなど沢山の情報にアクセスすることを可能にしま
す。
15
Tap on any point on the map to access the Quick Info menu box.
Quick Infoメニューボックスを利用する為に地図上のどこかをタップしてください。
Add Favorite (お気に入りの追加)
Add bookmarks for your favorite points on the map.
マップのお気に入りの地点を登録する為に、ブックマークを追加します。
Map Info (地図情報)
Access chart detail for objects on the map within the clicked location.
地点をクリックすることで、地図上の対象の詳細情報を表示させることができます。
Close (閉じる)
Close the Quick Info menu box.
Quick Infoメニューボックスを閉じます。
Map Info (地図情報)
Map Info will display your GPS coordinates, the distance from GPS to desired object and provide
access to object details. Map Info is accessible from the Quick Info Menu.
MAP InfoはGPSによる座標を表示します。GPS位置から目標地点への距離、地点へのアクセス情報の詳細の提供を
行います。 Map InfoはQuick Info Menuよりアクセスできます。
1. Tap your desired point on the map to launch the Quick Info Menu.
1.マップ上のあなたの目標地点をタップし、Quick Infoメニューを開始します。
2. Expand map details by selectingMap Info.
2.Map Infoを選択して地図の詳細を拡大します。
Continue expanding additional cartographic detail by tapping on the desired object.
目標とする対象上で、タッピングを行い付加的な地図の詳細情報を拡大し続けます。
16
3. For each object on map, you will be able to:
3.地図上の各々の対象に対し、次のようなことができます。
Show on Map (マップ上での表示)
Map will center on desired object and display coordinates along with distance from GPS. Select
Navigate to in order to activate navigation mode.
地図は目的の対象を画面の中心に移動させ、GPSからの距離に沿った座標を表示します。ナビゲーションモード(案内
開始)に移行するためには、“Navigation To”を選んでください。
Navigate To
Activates navigation mode with the selected object as the destination.
目的地として選択した対象へのナビゲーションが開始されます。
Map Info continued (Map infoの続き)
Additional Map Info features include:
付加のMap Info機能として以下があります
Multimedia Content
マルチメディアコンテンツ
Multimedia content will display panoramic
photos
マルチメディアコンテンツとしては全景写真が表示されま
す。
Tide Height (潮汐表)
Tide Height station content is displayed
graphically with a view of the tidal station’s tide
height.
潮汐状況(stationはsituationの打ち間違いでは?)の
コンテンツが表示されます。潮流の状態における海面の高
さのグラフが表示されます。
17
Tidal Prediction (潮流の予想)
Click on Tidal Date to the set prediction date of
Tide Station.
潮の状態を知りたい日のTidal Date(日にち)をクリック
してください。
Add to Favorites (お気に入りに登録)
Add to Favorites allows you to bookmark your favorite points on the map. It is accessible from
the Quick Info Menu.
地図上のお気に入りの地点をブックマークに登録できます。 Quick Info Menuより選択できます。
1. To bookmark a location or point on the map, click on the map and select Add to Favorites.
1.ブックマークに登録したい地図上の場所やポイントに対して、地図上をクリックして“Add to Favorites”を選択しま
す。
2. Set NAME (required) and DESCRIPTION (optional) of the desired location.
2.その場所の名前(必須)と説明(任意)を設定します。
Pick a pin color of favorite icon by tapping the marker icon and selecting from five different icon
colors.
お気に入りアイコンのピンの色マーカーアイコンをタッピングして選択します。 5色から選ぶことができます。
3. Click Save to add your new favorite icon to map.
3.新しいお気に入りのアイコンをマップに追加するには“Save”をクリックしてください。
18
Note: A NAME value is required to save a favorite icon. Unless they are deleted, favorite icons are always
visible on the map view and cannot be hidden
注意:お気に入りアイコンを保存する為には名前が必要です。 名前のないものは削除されます。 お気に入りアイコンは常にマップ上に表示され、隠すことはできませ
ん。
19
Managing Favorites
Access the Favorites menu by tapping the favorite icon on the map or by going to Search >
Favorites from the main tool bar.
In addition to providing the favorite icon’s name, description, coordinates and creation date, the
favorites menu also features the following functions:
Edit
Change favorite icon name, description or
color.
Save
Save edits.
Show on map
Map will center on the favorite icon.
Navigate to
Starts navigation mode. The favorite icon is
the destination.
Delete Favorite
1. Select Search > Favorites.
2. Click on Edit next to favorite name.
3. Select Delete then OK to confirm deletion.
20
5-3. Navigation Mode (案内モード)
Set your destination using GPS through Plan2Nav’s Navigation Mode.
Plan2Navでナビゲートする目的地をGPSを使ってセットします。
Navigate to point on the map(地点へのナビゲーション):
Click the destination on the map > selectMap Info > Navigate To.
地図上の目的地をクリックします。 -> Map Info -> Navigate Toの順で選びます。
Navigate to map object(対象物へのナビゲーション):
Click on the map object > selectMap Info > choose object > Navigate To.
マップの対象をクリック -> Map Infoを選択 -> 対象を選択 -> Navigate To
Select Search > Nearby Objects > choose object > Navigate To.
Searchを選ぶ --> 近傍の対象を -> 対象を選択 -> Navigate To
Navigate to coordinates(座標へのナビゲーション):
Click on Search > Coordinates > enter coordinates > Navigate To.
Navigate to a favorite marker(お気に入りマーカーへのナビゲート):
Select Search > Favorites > select favorite > Navigate To.
Navigate to route point:
Select Search > Route > select route > Route Points.
Deactivate Navigation Mode(ナビゲートを中断する):
Click on CLOSE within the navigation menu. The message ‘Are you sure you want to stop
Navigation?’ will appear. Select YES to stop navigation or NO to continue.
ナビゲーションメニューのCLOSEをクリックしてください。“Are you sure you want to stop Navigation(本当にナビ
ゲーションを中止しますか)?”とメッセージが表示されるので、ナビゲーションを中断するにはYES、つづけるにはNOを選
びます。
Navigation Mode continued
The active navigation mode will display:
ナビゲーションモード中は、以下のものが表示されます。
21
A. Navigation Tool Bar (with name and coordinates of destination point)
A.ナビゲーションツールバー(目的地の名前と座標が表示されます)
B. Red Navigation Line (from GPS to destination)
B.赤いナビゲーションライン(GPSの位置から目的地へ)
C. On-Screen Compass, including:
C.スクリーンコンパス。 スクリーンコンパスには以下の機能があります。
DST Distance to selected destination
DST:目的地までの距離
ETA Estimated time of arrival, based on avg. speed
ETA:平均速度から計算した到着のおおよその時間
BRG Bearing of vessel in degrees (Green Marker)
BRG:船の方向角度表示(緑のマーカー)
COG* Course Over Ground, based on the device’s GPS (Red Marker)
COG*端末のGPSを元にした対地方位(赤のマーカー)
*COG is not available if GPS data is available or more accurate or if vessel is not moving.
COGはGPSデータが利用可能(でなかったり)或いはより正確で(でない)か、もしも船が進んでいないような場合は
利用できません。
Note: some fields will show N/A until GPS fix is retrieved
注意:GPSの情報が確定する迄N/A(Not/Active?)がフィールドに表示されます。
22
GPS
Plan2Nav offers four GPS modes: OFF, ON, TRACK and TRACK ROUTE. Switch modes by
tapping on GPS from the main tool bar. The GPS icon will change to display the specific GPS
mode.
Plan2Navは4つのGPSモードを提供します。 OFF,ON,TRACKとTRACK ROUTEです。 メインツールバーのGPS
をタップすることで切り替わります。 GPSアイコンは特定のモードを示すアイコンに切り替わります。
Default mode-GPS OFF
GPS ON when highlighted (North Up)
初期モード:GPSはオフ
ハイライト表示の時 GPS は ON(北が上モード)
Map will move (North Up),
Map will move (Course Up),
based on GPS location.
based on vessels heading.
マップが移動しているとき(北が上)、
マップが動いているとき(進行方向が上)
GPSの場所を基準に
船さきを基準にしている。
When the GPS is ON, the on-screen compass will display the following data fields:
GPSがオンの時は、以下のでーたフィールド(項目欄)がスクリーンコンパスに表示されます。
SOG Speed Over Ground, based on the device’s GPS
SOG 対地速度、端末のGPSを基準にした値。
COG Course Over Ground, based on the device’s GPS
COG 対地方位, 端末のGPSを基準にした値。
Compass
Click on Compass to access the following details based on the device’s GPS data:
端末のGPS情報を基にした以下の詳細情報を表示するためには、Compassをクリックしてください。
GPS Status GPSの状態
‘Fix’ – Last time of GPS update.
Fix-前回GPS情報を更新した(取得した)時刻
23
‘Accuracy’ – Accuracy of GPS fix, by meters.
Accuracy ―取得したGPSの精度。 メートル単位
‘Sats’ – Number of acquired satellites.
Sats -GPS情報を受信できたGPS衛星の数
SOG
Speed Over Ground, based on the device’s GPS.
対地速度、端末のGPSを基準にした値。
COG
Course Over Ground, based on the device’s GPS.
対地方位, 端末のGPSを基準にした値。
GPS Coordinates
Latitude and Longitude, based on the device’s GPS.
緯度と経度、端末のGPSを基準にした値。
Compass
Image displays approximate magnetic course.
大凡の磁針方向のイメージ表示
24
5-4. Active Captain World Database (アクティブキャプテン 世界データベース)
ActiveCaptain provides a wealth of up-to-date and local information including: marina and
anchorage detail, bridges, locks, inlets, boat ramps and marine stores and NOW you can easily
access Active Captain’s offline world database through Plan2Nav.
アクティブキャプテンは最新で地域性に富んだ有益な情報を提供します:マリーナ、停泊地の詳細、橋、閘門、入江、ボ
ートランプ、マリンショップ、Plan2Navを通してアクティブキャプテンのオフラインの世界規模のデータベースにアクセスすること
ができます。
The ActiveCaptain feature is accessible through the main tool bar and requires initial setup, as
follows:
アクティブキャプテン機能はメインツールバーからアクセスでき、最初に以下の初期設定をする必要があります。
1. From Plan2Nav toolbar, select Your Maps.
1.
Plan2Navのツールバーより、“Your Map”を選択します。
2.
Under ON THE CLOUD select and download AC-DB Active Captain World Database (A).
The completed download will show as Ready under ON THE DEVICE.
3.
ON THE CLOUDの下の“AC-DB Active Captain World Data base(A)”を選択しダウンロードしま
す。 ダウンロードが終わるとON THE DEVICEの下にReadyが表示されます。
4. Return to the Plan2nav home screen and tap on the ActiveCapt icon.
4.Plan2Navのホームスクリーン(画面)に戻り、”Active Capt“アイコンをタップしてください。
5.On first use Plan2Nav will prompt you to log in using an existing ActiveCaptain e-mail and
password (B) or select ‘Register’ to create a new account with ActiveCaptain(C).
5.Plan2Navを最初に使用するときに、存在するActive Captain e-mailを使用するかの表示があります、そしてパ
スワード(B)或いは新しいアクティブキャプテンのアカウントを生成するためには”Register“を選択します。
25
5-5. ActiveCaptain Registration (アクティブキャプテンの登録)
When selecting ‘Register’ (C), Plan2Nav will redirect you to the ActiveCaptain website.
“Register 登録(C)”を選択した時、Plan2Navはあなたをアクティブキャプテンのウェブサイトに接続させます。
Registration with ActiveCaptain is free and provides access to their Interactive Cruising
Guidebook, eBoatCards and the offline database that is available within Plan2Nav.
アクティブキャプテンの登録は、無料で彼らのインタラクティブ(対話的、相互情報交換)な航海ガイドブック、
eBoatCardとPlan2Nav内で可能になるオフラインのデータベースへのアクセスを提供します。
ActiveCaptain accounts are not associated with the Jeppesen Marine web store and can be
manage at www.activecaptain.com.
アクティブキャプテンのアカウントはJeppesen Marine ウェブストアとは提携していません。
www.activecaptain.comでは管理されません。
26
5-6. Overlay ActiveCaptain (アクティブキャプテンの表示)
・アクティブキャプテンのオフラインデータベースは無線接続が無い状態でも表示が残ります。
OFF and ON using the ACTIVECAPT icon located on the main
tool bar.
メインツールバー上のACTIVECAPTアイコンを使いOFFとONを簡単に切り替えられます。
-MAP by Jeppesen chart data and
are visible at scales lower than 3000 ft (1km).
・・アクティブキャプテンのマーカー(地図上の表示)はJeppesenの海図データのC-MAP詳細図の上に重ねて表示さ
れ、3000ft(1km)より低いスケールの地図で表示されます。
・・アクティブキャプテンの内容をPlan2Navから編集することはできません。
27
5-7. Updating ActiveCaptain (アクティブキャプテンの更新)
Updates to the Active CaptainWorld Database are performed in two ways.
アクティブキャプテンワールドデータベースの更新は2つの方法で行う事が出来ます。
1. Automatic (自動更新)
Plan2nav will automatically perform a silent update of the ActiveCaptain World database at
startup and then again 7 days later. Notification that the update has started and ended will be
shown as follows:
Plan2Navが開始された時にアクティブキャプテンワールドデータベースの更新が自動的に実行され、7日後に再び実行さ
れます。 更新が開始された終わったという通知が以下のように表示されます。
更新が開始されました
アクティブキャプテンデータベースのアップデートが開始されました、終了した時に説明が表示されます、アプリ
ケーション(Plan2Nav)を終了しないでください。
更新が完了しました
アクティブキャプテンのデータが2013年8月8日(木)8時40分42秒のものに更新されました、1つの新
しい情報登録があります、1件の書き込み(レビュー)があります、次の更新は7日後です。
2. Download (ダウンロード更新)
An updated Active Captain World Database package will be available daily. Go to Your Maps and
download the UPDATE AC-DB Active Captain World Database located under ON THE CLOUD.
アクティブキャプテンワールドデータベースの更新データは日々手に入れることができます。 “Your Map”メニューに行き、
“ON THE CLOUD”にある“UPDATE AC-DB Active Captain World Database”をダウンロードしてください。
28
5-8. ActiveCaptain Markers (アクティブキャプテンのマーカー:表示内容)
Easily view ActiveCaptain detail by tapping the marker icon then select Details or choose
Navigate to, to activate the navigation mode.
タッピングするマーカーアイコン(以下の一覧)からアクティブキャプテンの簡単な内容を把握して、その後”Details”(詳
細情報が表示する)か、ナビゲート(そこまで案内する)モードを有効にする為に” Navigate to”を選びます。
(RED) Marinas, yacht clubs, boat
Marine Store
yards
マリーンショップ
(赤)マリーナ、ヨットクラブ、ボート置場
(GREEN) Anchorages & free docks
Lock
(緑)停泊地、無料波止場
錠
(ORANGE) Hazards
Inlet
(オレンジ)危険
入江
(BLUE) Local Knowledge
Ferry
(青)地域情報
フェリー
Towing
Dam
引き船
ダム
Shopping
Bridge
買い物
橋
Boat Ramp
Airport
ボート斜面
空港
29
5-9. C-Weather (C-ウェザー:気象情報)
Easily download weather overlay in Plan2Nav using C-Weather.
C-Weatherを使用することでPlan2Nav上に簡単に気象情報をダウンロードし表示することができます。
C-Weather provides a three to four day forecast covering a one-by-one degree area and can be
downloaded as often as necessary. C-Weather is accessible from the main tool bar.
C-Weatherは1度ごとのエリアの3日から4日先までの予報を提供し、必要な度にダウンロードすることができます。
C-Weatherはメインツールバーよりアクセス可能です。
1. Go to a location on the map and click on C-Weather.
1. 地図上で場所を決め、C-Weatherをクリックします。
2. Select (A) Download from the C-Weather tool bar, located at top of screen. Once download
has finished, the weather forecast will overlay on map.
2.スクリーンの上端に表示されたC-Weatherツールバーの下図の(A)“Download”を選択します。 一度ダウンロ
ードが終わり、マップ上に天気予報が表示されます。
3. Switch weather types by clicking on the C-Weather drop down menu (B), located at top of
screen. Weather Types include Weather, Humidity, Temperature, Wind Data and Wave Date.
3.スクリーンの上端にあるしC-Weatherのドロップダウンメニュー(B)をクリックすることで気象情報を切り替えます。
気象情報のタイプには、気象、湿度、温度、風と波の情報があります。
4. Use the slider to change the date and time (C).
4.スライドバー(C)は日時を変更するために使います。
5. Close by selecting C-Weather again from the main tool bar.
5. メインツールバーから再びC-Weatherを選ぶことで閉じることができます。
30
Note: A connection is necessary for C-Weather downloads. Only one region can be downloaded
at a time. Tilt/Rotate is disabled when C-Weather is active.
注釈:C-Weatherをダウンロードするためには(インターネットへの)接続が必要です。一度のダウンロードで一地域の
気象情報がダウンロードできます。
5-10. Search(検索)
Quickly access map detail and saved data using Plan2Nav’s Search feature.
Plan2NavのSearch機能を使う事で、素早くマップ詳細にアクセスしデータを保存することができます。
Search is accessible from the main tool bar and provides access to the following search features:
Searchはメインツールバーからアクセス可能で以下のSearch機能にアクセスすることができます。
Coordinates (座標)
Navigate to specified coordinates.
特定の座標にナビゲート(案内)します。
Nearby Objects (近隣の対象)
Find the nearest object by category. The search radius is five KM from center of map.
カテゴリーから近隣の対象を見つけます。検索する範囲は地図の中央から半径5kmです。
Search ORA/PORT (ORA?/港の検索)
Find the nearest object by text. The search radius is 10 nautical miles (18,520 meters) from the center
of the map.
文字入力で一番近い対象を見つけます。 検索する範囲は地図の中央から半径10海里(18.520m)です。
31
ActiveCaptain Search (アクティブキャプテンの検索)
Find the nearest ActiveCaptain objects by text.
文字入力で近いアクティブキャプテンの情報を見つけます。
Favorites (お気に入り)
View on map, edit, navigate to and delete saved favorites.
保存したお気に入りをマップ表示、編集、案内、削除できます。
GPS Tracks (GPS軌跡)
View on map, edit, navigate to and delete saved tracks.
保存した軌跡を地図表示、編集、案内、削除できます。
Route (経路)
View on map, edit, navigate to and delete saved routes.
保存したルートを地図表示、編集、案内、削除できます。
32
5-11. Track (軌跡)
The track functionality in Plan2Nav allows for saving and sharing of your track files.
Plan2NavにおけるTrack(軌跡)機能は、あなたの軌跡ファイルに保存し共有することができます。
Track detail includes: Start/End Location, Time, Duration, Distance and Speed. Track
functionality is accessible from the main tool bar.
Trackの詳細は次のものを含みます:出発/到着位置、時刻、航海時間、方向とスピード。Track機能はメインツール
バーからアクセスできます。
1. Start tracking by clicking Track from the
main tool bar. When active, the track icon
will display a red dot next to the track icon.
1.メインツーツールバーからTrackをクリックして軌跡の記録をスタートし
ます。 記録をスタートした後はTrackアイコンに右図のように赤丸が表示
されます。
2. To finishing tracking, click Track again and select YES to the message “Stop Tracking?”
2.Tracking(軌跡の記録)を終了するには、Trackアイコンを再度クリックし、“Stop Tracking(軌跡の記録を
中止しますか)?”のメッセージ(以下の図)に“YES”を選択してください
3. Tracks files will be saved automatically and are viewable within the Search menu.
3.軌跡は自動的に保存され、“Search”メニューで表示できます。
Manage track files in Plan2Nav by going to Search from the main tool bar and selecting GPS
Track.
Plan2NavのTrackファイル(軌跡の記録ファイル)を管理するには、メインツールバーから“Search”に行き、”GPS
Track“を選びます。
Rename Track (Trackの名前変更)
Select track file > enter/change name > select Save.
Trackファイルを選び ->“enter/change name”―>“Save”を選びます。
33
Set Visibility of Track on Map (地図上へ軌跡の表示を設定する)
Select track file > Visibility (check ON or OFF.)
Trackファイルを選択する ->Visibility:可視性 (OnかOffをチェックする)
Display Track location on Map (軌跡場所を地図に表示)
Select track file > click Show on Map.
Trackファイルを選択 ->Show on Map:地図上に表示をクリック
Save Track File to GPX (TrackファイルをGPXに保存する)
Select track file > click Export as GPX.
Trackファイルを選択 -> Export GPX:GPXに書き出しをクリック
Delete Track (軌跡の削除)
Select track file > select Delete Track.
Trackファイルを選択 ->Delete Track:トラック削除を選択
5-12. Measure (計測)
Use Plan2Nav’s measuring feature to determine the distance and bearing from the GPS to a
specific location. Measure is accessible from main tool bar.
GPS(衛星測位システム)が示す位置(現在地)から特定の場所への距離と方角を知るためには、Plan2Navの計
測機能を使用してください。 “Measure(計測)”ボタンはメインツールバー上にあります。
1. Turn the measuring mode on by selecting Measure from main tool bar. Your GPS will be
automatically activated.
1.メインツールバーより”Measure“を選択する事で計測モードに切り替わります。 GPSによる現在地の測位が自動
的に開始されます。
2. Click on the desired location on the map. A green distance line will be placed from GPS
location to the desired location point on the map. The information in the Measure tool bar
located at top of screen will provide:
2.地図上の目的地をクリックしてください。 緑色の距離線が地図上のGPSが測定した現在位置から、目的地まで引
かれます。 スクリーン上端のMeasure(計測)ツールバーに情報が表示されます。
Coordinates Lat/Lon of selected point on map.
位置座標 選択した地図上の緯度/経度
DST Distance to your location, based on GPS data.
34
DST GPSデータを基にしたあなたの指定場所への距離
BRG Heading to your destination in degrees, based
on GPS data.
BRG GPSデータを基にした方位
3. While measure mode is active, multiple locations can be measured by clicking points on map.
3.計測モードが有効の間は、地図上のポイントをクリックする事で複数の場所について計測できます。
4. To end measuring, select Measure again.
4.計測モードを終了すには、もう一度“Measure”を選択してください。
5-13.Route(経路)
Plan2Nav’s route function lets you create, edit, save and share your favorite routes. Route is
accessible from the main tool bar.
Plan2Navのルート(経路)機能で、あなたのお気に入りの経路を設定、編集、保存、共有できます。“Route”ボタン
はメインツールバー上にあります。
Create/Edit Route: (経路の設定/編集)
1. Tap on Route from main tool bar. If a route already exists, the option to ‘Continue last route
or add new’ will appear. Select the appropriate option.
1.メインツールバーから”Rute”をタップ(一回触れる)してください。 もしも既にルートが設定されている場合は、
“Continue last route or add new:前回のルートを続けますか、新たに追加しますか”と選択するオプションが表示
35
されます。 望みのオプションを選択してください。
2. Place points along your route by tapping on the map. The route tool bar located at top of
screen allows you to:
2.あなたのルートに沿って地図をタップしていってください。 スクリーンの上端に表示されるルートツールバーで以下の事
が出来ます。
Clear Last Point – deletes last route point
最後の点を消す -経路の最後のポイントを削除します。
Clear – deletes entire route
消す - 経路全体を削除します。
Close – closes route function
閉じる ー ルート機能を終了します。
3. End the route by selecting Route from main tool bar or Close from the route tool bar.
3.メインツールバーの“Rute”ボタンか、ルートツールバーの”Close”を選択することで終了します。
4. Route files are saved automatically and are viewable within the Search menu.
4.経路情報は自動的にファイルに保存され、“Serach”メニューで表示することができます。
Individual route points can be deleted or moved by tapping on the point. The active route point
will be pinned green. Points pinned as red are inactive, until selected. (A)
個々の経路のポイントはポイントをタッピングする事で削除、移動することができます。 編集対象となっている経路のポイ
ントは緑色のピンに表示されます。
Remove points by selecting Delete Point from menu located top of screen.
Move points by dragging active point to desired location.
スクリーン上端のメニューから“Delete Point”を選びポイントを削除してください。
ポイントを希望の位置にドラッグして移動させてください。
36
Manage Routes (ルートの管理)
Manage Route files in Plan2Nav by going to Search from the main tool bar and selecting
Routes.
メインツールバーの“Search”から行くか、”Route“を選ぶことでPlan2Navのルートファイルを管理します。
*以下は各操作の為のメニューの選択順*
Rename Route (ルート名の変更)
Select route file > enter/change route name > Save.
Change On-Screen Route Visibility (ルート表示の切り替え)
Select route file > Visibility (check ON or OFF).
Set Cruising Speed (航海速度の設定)
Select route file > Cruising Speed > use drop down to select speed.
Set Fuel Consumption (燃料消費量の設定)
Select route file > Fuel Consumption > use drop down to select est. Fuel.
View Route Points (ルートポイントの表示)
Select route file > Route Points.
Go to Route (ルートに進む)
Select route file > Show On Map.
Navigate to Point on Route (ルート上のポイントへナビゲートする)
Select route file > Route Points > tap selected route point.
Export as GPX (GPXへの出力)
Select route file > Export as GPX.
Delete Route (ルートの削除)
Select route file > Delete
37
5-14. Settings (設定)
Plan2Nav’s settings menu provides access to unit settings and application details. Settings is
accessible from the main tool bar.
Plan2Navのセッティングメニューは単位の変更、アプリケーションの詳細にアクセスできます。 “Setting”メニューはメイン
ツールバーから利用できます。
Map Settings (地図設定)
Adjust map details to display as FULL or BASIC. The basic setting disables Land features (natural,
cultural, rivers, lakes and landmarks) and Tracks & Routes.
地図の詳細表示をFULLかBASICに調整します。 基本設定は地上の対象物(自然、文化、川、湖、ランドマーク)
と軌跡、経路が無効です。
ActiveCaptain Settings (アクティブキャプテンの設定)
Sign out of ActiveCaptain
アクティブキャプテンのサインアウト
Unit Settings (単位設定)
Unit Settings options include:
単位設定は以下の項目を含みます:
Depth – Meters, Feet or Fathoms
深さ - メートル、フィート、ファゾム(1ファゾム=6フィート)
Distance – Km, NM or Miles
距離 - Km、NM(1国際海里=1852m)、マイル(1マイル=1609.344m)
Coordinates – DD.dddd, DD:MM:SS or DD:MM.mmmm
座標 - 緯度経度の表示はDD.dddd, DD:MM:SS or DD:MM.mmmmから選択できる
Speed – Km/h, MPH or Knots
速度 - Km/h(km毎時), MPH(マイル/毎時) or Knots(ノット:1国際海里毎時)
Temperature – Celsius or Fahrenheit
温度 ― 摂氏(℃)、華氏(℉)
Fuel Consumption – L/H or GPH
燃料消費
― リットル/時、ガロン/時
38
Anchor Drift – 1 to 500ft
走錨警報 - 1 から500ft
Battery バッテリー
Disable GPS Tracking when battery life is less than 10% (check ON or OFF.)
バッテリー残量が10%未満の時にGPSによる経路記録を行わない(チェック ON/OFF)
Newsletter subscription
ニュースレターの購読
Subscribe to Jeppesen’s Plan2Nav newsletter by entering your e-mail and selecting ‘I
agree.’ Jeppesen will keep your detail confidential and provide correspondence on
Plan2Nav only.
“I agree 同意します”を選ぶことで、JeppesenのPlan2Navのニュースレターを入力したあなたのe-mailで購読
します。 Jeppesenはあなたの詳細を秘密にし、Plan2Navのみの通信を配信します。
About (本ソフトウェアについての情報)
View app version information .
ソフトウェアのバージョン情報を表示します。
Legal (法的な規定)
View Jeppesen’s End User License Agreement (EULA).
Jeppsenの利用ユーザーライセンスの合意内容(EULA)を表示します。
5-15.Anchor Drift
(走錨警報)
Activate or deactivate the anchor drift alarm by selecting Anchor Drift from the main tool bar.
メインツールバーから“Anchor”を選ぶことで走錨警報を有効・無効にできます。
When activated, Anchor Drift will signal an audio alarm if the vessels location has moved from
the current GPS location, based distance set under the Settings menu.
走錨警報が有効なとき、船が現状のGPSで計測した位置から移動した場合、音声アラーム信号が発せられます。
どの程度移動したら警報を発するかは“Setting”メニューで設定します。
5-16. Sharing Track and Route GPX Files (軌跡とルート GPX ファイルの共有)
Plan2Nav allows for export of TRACK and ROUTE GPX files from device to PC.
Plan2Navは軌跡と経路のGPXファイルをPlan2Navを実行する端末からパソコンへ出力することで出来ます。
1. From the main tool bar select Search.
39
1. メインツールバーから“Search”を選択します。
2. Click on GPS Tracks or Route and then select the file to be exported.
2.“GPS Track”か“Route”をクリックし、出力するファイルを選択します。
3. Click on Export as GPX. The GPX file will be saved to the devices SD card under
Plan2Nav/GPX.
3.“Export as GPX : GPXとして出力する”をクリックします。
選択したGPXファイルが端末のSDカードの
Plan2Nav/GPXフォルダに保存されます。
4. Connect device to your computer to transfer GPX files.
4.GPXファイルをコピーする為に端末をパソコンに接続してください。
GPX files can be opened and viewed in Google Earth
GPXファイルはGoogle Earthで開いて見ることができます。
6.Frequently Asked Question (よくある質問)
What is the cost of Plan2Nav?
Plan2Navを利用するのはいくらかかりますか?
The Plan2Nav application is free to download. The app includes a worldwide C-MAP by Jeppesen chart
catalog and detailed charts can be purchased in-app. Click here to view the ‘How to install charts’
video.
Plan2Navのアプリケーションは無料です。 アプリケーションは世界中のJeppesenの海図のカタログとアプリケーションで
購入できる海図の詳細が含まれます。 ここをクリックして海図のインストールの仕方のビデオを見てください。(リンクは実
際は無いのでビデオが見れません)。
How long does it take to download Plan2Nav?
Plan2Navのダウンロードにはどこくらい時間がかかりますか?
Plan2Nav application downloads in approximately 3 minutes.
Plan2Navのアプリケーションのダウンロードには3分ほどかかります。
How long does it take to download charts?
海図をダウンロードするにはどのくらい時間がかかりますか?
The average download time is 20 minutes. Actual times will vary depending on file size and connection
speed.
平均すると20分くらいダウンロードにかかります。 実際のダウンロード時間はファイルサイズと通信速度に影響されます。
Can I download purchased C-MAP charts on multiple devices?
複数の端末に購入したC-MAP海図をダウンロードできますか?
Yes, purchased charts can be shared on up to three Android devices.
はい、購入した海図は3台のアンドロイド端末で共有できます。
40
1. Install Plan2Nav on 2nd or 3rd device.
1.2台目、3台目の端末にPlan2Navをインストールします。
2. Register in-app with the same account that was used to purchase charts on the 1st device.
2.1台目のデバイスで海図を購入した同じアカウントでアプリケーション内で登録します。
3. Go to YOUR MAPS. The purchased chart(s) will be visible ON THE CLOUD, select download.
3.“YOU MAP”へ移動します。 “ON THE CLOUD”に購入した海図が表示されます。 ダウンロードを選択してくだ
さい。
Can I transfer purchased C-MAP charts made on the android to an Apple device?
Andoid端末で購入したC-MAP海図をAppleの端末で使用できますか?
No.
使用できません。
Can chart purchases be made through the Google Play or Amazon App store and then transferred
to Plan2Nav?
海図の購入はGoogle PlayやAmazon Appストアを通じて購入しPlan2Navで使用できますか?
No. Charts are purchased using Jeppesen’s proprietary mobile web store (Maps Manager) and must be
made within Plan2Nav.
できません。海図はJeppsenが運営するモバイルウェブストア(マップマネージャー)を通してのみ購入でき、Plan2Navで使用でき
ます。
What type of connection is required to download charts in Plan2Nav?
Plan2Navに海図をダウンロードするためにはとのような通信手段が必要ですか?
A Wi-Fi or 3G connection is necessary, depending on what the Android manufacturer will allow.
Wi-Fiか3G通信が必要です。 どんなAndroid端末製品が使用されるかに依存します。
Do I need wireless connection to view purchased C-MAP charts or the ActiveCaptain world
database?
購入したC-MAP海図やアクティブキャプテンの世界データベースを見るのにワイヤレス接続は必要ですか?
No. Once downloaded, detailed C-MAP by Jeppesen charts and ActiveCaptain detail stay recorded on your
device and are accessible even when a wireless connection is not available.
いいえ必要ありません。 一度ダウンロードしたら、Jeppesen海図とアクティブキャプテンの詳細はあなたの端末に記憶されており、ワイ
ヤレス通信が無効の時でも利用することができます。
41
When downloading chart data, does the device have to stay connected for the entire download?
海図データをダウンロードしているとき、ダウンロードが」完了するまで接続したままでなくてはいけないですか?
No. You can stop a download at anytime and resume at a later time/date. However, chart detail will not be
viewable onscreen until completely downloaded
いいえ、何時でもダウンロードを中断し、後日再開することができます。 しかしながら、海図の詳細はダウンロードが完了するまで表示
することはできません。
Will all screens work in portrait and landscape?
全ての表示は縦長画面でも横長画面でも使用できるでしょうか?
Yes.
はい。使用できます。
Will the “End User License’ agreement show up each time I use the application?
アプリケーションを使用するときは何時でも“使用ユーザーライセンス”合意を見ることはできますか?
No. The End User License Agreement will appear on first use only and is accessible under the Settings
menu under Legal.
いいえ、使用者ユーザーライセンス合意は最初に使用するときだけに表示されます、そして“Setting”メニューの下の“Legal”でアクセ
スできます。
Does Plan2Nav support an external GPS?
Plan2Navは外部接続のGPSに対応していますか?
Yes, depending on device compatibility. Some devices will allow for an external GPS connection via
Bluetooth.
はい、ご利用の端末が対応していることが必要です。 幾つかのデバイスはBluetoothを介したGPS接続が可能です。
Can you change the size of icons and nav-aids within Plan2Nav?
No.
Plan2Navのアイコンとナビエイドのサイズを変更することはできますか?
いいえ。できません。
Is wireless connection required for C-Weather downloads?
C-Weatherをダウンロードする為にはワイヤレス接続が必要ですか?
Yes. A wireless connection is necessary to download C-Weather.
はい必要です。C-Weatherをダウンロードするためにはワイヤレス接続が必要です。
Can I edit a previously created route?
以前作成した経路を編集できますか?
The route feature allows you to edit the last route created or add a new route.
経路機能は作成したか新たな経路を加えた最後の経路を編集することができます。
How do I turn Location Services ON?
どうしたら一サービスをONできますか?
Location Services can be turned on from your devices Settings Menu. Go To Settings > Location Service >
check ‘GPS Satellites’ to ON.
あなたの端末の設定メニューから一サービスをONにすることができます。 “Setting > 位置サービス > GPS 衛星をONにチェッ
42
クしてください。
Is Plan2Nav compatible with ALL Android Devices?
Plan2Navは全てのAndroid端末で利用できますか?
No. Plan2Nav for Android is compatible with smart phones and tablets equipped with GPU using operating
system 2.2 or higher.
いいえ。 Plan2NavはGPS機能のあるAndroidバージョン2.2以降を搭載したスマートホンとタブレットで使用できます。
Will chart purchases remain after updating Plan2Nav?
Plan2Navをアップデートした後も購入した海図は残るでしょうか?
Yes. Purchased charts will remain on the device after applying an update to the app. However, purchased
charts will need to be downloaded again if the app is removed or deleted.
はい。 購入した海図はアプリケーションのバージョンアップをした後も端末上に残ります。 しかしながら、アプリケーションを移動したり
削除した後は購入した海図を再びダウンロードする必要があります。
How often are chart updates available?
海図の更新頻度はどの程度でしょうか?
Jeppesen will release 3 catalog updates annually – Spring, Summer and Fall. C-MAP chart updates are
priced at 50% off retail.
Jeppesenは年3回の更新版を公開しています - 春、夏、秋です。 更新版のC-MAP海図は50%引きで販売されます。
43
問い合わせ先
Jeppesen
+1 (508) 477-8010
us-customersupport@jepp
esen.com
Customer
Support Contacts
USA, Canada, and South
America
Italy, Spain, Portugal,
+39 (0585) 794 800
France, Luxemburg,
eu-customersupport@jepp
esen.com
Croatia, Slovenia,
Turkey, Netherlands,
Belgium, Greece, Cyprus,
Israel, Africa, and Middle
East
UK and Ireland
+44 (0)1293 842603
Germany, Austria, and Switzerland
+49 6102 508430
Poland
+48 58 760 61 11
Norway, Denmark, Greenland, and
+47 51 46 47 00
Iceland
Finland and Sweden
Russia
+46 31 719 34 55
+7 812 327 9894
ru-customersupport@jepp
esen.com
Australasia
+61 2 98 08 6200
Technical Support
+1 (303) 328-4146
apac-customersupport@je
ppesen.com
marine.support@jeppesen.
com
44