1
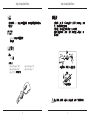
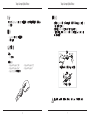
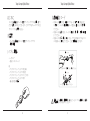
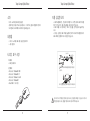
410-2312-206A / AMU95AP
3 YEARS LIMITED WARRANTY: We pride ourselves
on the quality of our products. For complete warranty details and a list of our worldwide offices, please visit www.
targus.com. Features and specifications are subject to
change without notice. Microsoft, Windows and Windows Vista are registered trademarks or trademarks of
Microsoft Corporation in the United States and/or other
countries. Mac is a trademark of Apple Inc., registered
in the U.S. and other countries. All trademarks and registered trademarks are the property of their respective
owners. ©2011 Targus Group International, Inc. All rights
reserved.
N2953
User Guide
Targus Compact Optical Mouse
Introduction
Targus Compact Optical Mouse
Retractable Cord
Thank you for your purchase of the Targus Compact Optical Mouse.
This plug and play mouse does not require a software driver.
Contents
• Targus Compact Optical Mouse
• User Guide
• To extend the USB cord, hold the mouse in one hand and the USB
connector in the other and pull both ends of the cord away from the cord
wheel at the same time.
• To retract the USB cord, extend both ends of the cord slightly and
release quickly.
• When the ideal length of USB cord is fixed, plug the mouse USB
connector into your computer’s USB port and you are ready to go.
System Requirements
Pull
Hardware
• USB interface
Operating System
• Microsoft Windows® 2000
• Microsoft Windows® XP
• Microsoft Windows Vista®
• Microsoft Windows® 7
• Mac OS® X 10.4 or later
Hold the mouse and the USB
connector and pull gently.
Pull
Do not hold the cable wheel and pull.
WARNING: WHILE THE MOUSE IS FUNCTIONING, OPTICAL LIGHT IS VISIBLE TO THE
NAKED EYE. BE CAREFUL NOT TO LOOK DIRECTLY INTO THE EMITTER HOLE WHILE THE
MOUSE IS ACTIVE.
2
3
Targus Compact Optical Mouse
介紹
Targus Compact Optical Mouse
伸縮線
感謝您購買Targus USB伸縮光學桌面型滑鼠。此款隨插即用型滑鼠無需軟件
驅動程式。
內容物
• 如要伸長USB線,用一外只手拿住滑鼠,然後用另外一隻手拿住USB連接 器,將線的兩端同時拉離線輪。
• 如要收回USB線,輕輕拉伸線的兩端,然後快速放開。
• 當固定好最佳長度的USB線時,將滑鼠USB連接器插入至電腦的USB埠,
便可使用了。
• Targus USB伸縮光學桌面型滑鼠
• 用戶指南
系統要求
拉伸
硬件
• USB介面
作業系統
•Microsoft Windows® 2000
•Microsoft Windows Vista®
•Mac OS® X 10.4或更高版本
•Microsoft Windows® XP
•Microsoft Windows® 7
拿住滑鼠和USB連接器,然後輕輕地拉伸
拉伸
切勿拿住線輪拉伸
警告:在滑鼠工作的同時,可看到發光光線。當滑鼠工作時,切勿用眼直視發射孔。
4
5
Targus Compact Optical Mouse
简介
Targus Compact Optical Mouse
伸缩线
感谢您购买Targus USB伸缩光学桌面型鼠标。此款即插即用型鼠标无需软件
驱动程序。
目录
• Targus USB伸缩光学桌面型鼠标
• 用户指南
• 如要伸长USB线,用一外只手拿住鼠标,用另一只手拿住USB连接器,将
线的两端同时拉离线轮。
• 如要收回USB线,轻轻拉伸线的两端,然后快速放开。
• 当固定好最佳长度的USB线时,将鼠标USB连接器插入至电脑的USB端
口,便可使用了。
系统要求
拉伸
硬件
• USB接口
操作系统
•Microsoft Windows® 2000 •Microsoft Windows Vista®
•Mac OS® X 10.4或更高版本
•Microsoft Windows® XP
•Microsoft Windows® 7
拿住鼠标和USB连接器,然后轻轻地拉伸
拉伸
切勿拿住线轮拉伸
警告:在鼠标工作的同时,用肉眼可观察到发光。当鼠标工作时,切勿用眼直视发射孔。
6
7
Targus Compact Optical Mouse
はじめに
Targus Compact Optical Mouse
収納可能なコード
ターガス収納可能USBケーブル付光学ラップトップマウスをお買い上げく
ださり、誠にありがとうございます。このプラグ&プレーのマウスには
ドライバソフトは必要ありません。
内容物
• ターガス収納可能USBケーブル付光学ラップトップマウス
• 取扱説明書
システム要件
• USBコードを伸ばすには、片手にマウスを、もう片方の手にUSBコネク
タを持って、コードの両端を同時にコード巻きから離れるように引っ張っ てください。
• USBコードを収納するには、コードの両端を軽く引っ張り、素早く手を離
してください。
• USBコードのお好みの長さが決まったら、マウスのUSBコネクタをパソコ
ンのUSBポートに接続してください。これで使用可能になります。
引いてください
ハードウェア
• USBインターフェース
OS
• マイクロソフト・ウィンドウズ® 2000
• マイクロソフト・ウィンドウズ® XP
• マイクロソフト・ウィンドウズ・ビスタ®
• マイクロソフト・ウィンドウズ® 7
• Mac OS® X 10.4以降
マウスとUSBコネクタを持ってやさしく引いてください
引いてください
コード巻きを持って引かないでください
注意:マウスの作動中には裸眼で見える光を発しています。マウスの作動中には発光体の
穴を直接見ないように気をつけてください。
8
9
Targus Compact Optical Mouse
ข้อมูลเบื้องต้น
Targus Compact Optical Mouse
สายแบบม้วนเก็บในตัว
ขอขอบคุณที่ท่านเลือกซื้อออปติคัลเมาส์ของ Targus แบบม้วนเก็บสายยูเอสบีในตัวสำ�หรับแลปท็อป เมาส์
แบบเสียบแล้วเล่นนี้ไม่ต้องใช้ไดรเวอร์ของซอฟต์แวร์แต่อย่างใด
สิ่งที่บรรจุอยู่ภายในกล่อง
• ออปติคัลเมาส์ของ Targus แบบม้วนเก็บสายยูเอสบีในตัวสำ�หรับเครื่องแลปท็อป
• คู่มือผู้ใช้
ข้อกำ�หนดของระบบ
• เมื่อต้องการยืดสายยูเอสบี ให้ใช้มือข้างหนึ่งจับเมาส์ไว้ และใช้มืออีกข้างหนึ่งจับที่หัวต่อยูเอ
สบี และให้ดึง
ปลายสายทั้งสองด้านออกจากล้อเก็บสายพร้อมๆ กัน
• เมื่อต้องการหดสายยูเอสบีกลับ ให้ยืดปลายทั้งสองด้านของสายออกเบาๆ แล้วปล่อยอย่าง
รวดเร็ว
• เมื่อได้ความยาวของสายยูเอสบีที่เหมาะสมแล้ว ให้เสียบหัวต่อยูเอสบีของเมาส์เข้ากับช่อง
เสียบยูเอสบีของคอมพิวเตอร์ และเมาส์ก็จะพร้อมใช้งาน
ดึง
ฮาร์ดแวร์
• ส่วนต่อประสานยูเอสบี
ระบบปฏิบัติการ
• Microsoft Windows® 2000
• Microsoft Windows® XP
• Microsoft Windows Vista®
• Microsoft Windows® 7
• Mac OS® X 10.4 หรือที่สูงกว่า
จับเมาส์และหัวต่อยูเอสบีไว้ แล้วค่อยๆ ดึงออก
ดึง
อย่าจับล้อเก็บสายแล้วดึง
คำ�เตือน: ระหว่างที่เมาส์ทำ�งานอยู่ จะสามารถมองเห็นแสงไฟได้ด้วยตาเปล่า ระวังอย่าจ้องมอง
โดยตรงที่ช่องปล่อยแสงขณะที่เมาส์ทำ�งานอยู่
10
11
Targus Compact Optical Mouse
Pengenalan
Targus Compact Optical Mouse
Kord yang dapat ditarik
Terima kasih untuk pembelian Targus USB Anda
Mouse Laptop Optik yang dapat ditarik. Mouse siap pakai ini tidak membutuhkan
driver dari software.
Isi
• Mouse Laptop Optik yang dapat ditarik USB Targus
• Petunjuk Pemakaian
• Untuk memperpanjang kord USB, tahan mouse dengan satu tangan dan penghubung USB di tangan yang lain, kemudian tarik kedua ujung kord dari roda kord pada waktu bersamaan.
• Untuk menarik kord USB, perpanjang kedua ujung kord perlahan dan kemudian lepaskan dengan cepat.
• Ketika panjang ideal kord USB telah dibenarkan, masukkan penghubung USB mouse ke dalam port USB komputer Anda dan siap dipakai
Persyaratan Sistem
Tariklah
Hardware
• Penghubung USB
Sistem Operasi
• Microsoft Windows® 2000
• Microsoft Windows® XP
• Microsoft Windows Vista®
• Microsoft Windows® 7
• Mac OS® X 10.4 dan sesudahnya
Tahan mouse dan penghubung USB lalu tarik perlahan
Tariklah
Jangan menahan dan menarik roda kabel
PERINGATAN: KETIKA MOUSE SEDANG BEKERJA, LAMPU OPTIK DAPAT TERLIHAT DENGAN MATA
TERLANJANG. BERHATI-HATILAH UNTUK TIDAK MELIHAT SECARA LANGSUNG KE LUBANG EMITER
KETIKA MOUSE SEDANG AKTIF.
12
13
Targus Compact Optical Mouse
소개
Targus Compact Optical Mouse
자동 감김형 코드
타거스 노트북용 USB 자동 감김형
광마우스를 구입해 주셔서 감사합니다. 이 마우스는 플러그앤플레이 방식이
므로 별도의 소프트웨어 드라이버가 필요 없습니다.
내용물
• USB 코드를 빼려면, 한 손에 마우스를 쥐고, 다른 손으로 USB 커넥터를
잡은 뒤 코드의 양 끝을 코드휠에서 동시에 당겨 주십시오.
• USB 코드를 다시 감으려면, 코드의 양 끝을 살짝 당겼다가 놓아주십
시오.
• 원하는 길이만큼 USB 코드를 늘렸으면 마우스 USB 커넥터를 컴퓨터의
USB 포트에 연결하여 바로 사용할 수 있습니다.
• 타거스 노트북용 USB 자동 감김형 광마우스
• 사용 설명서
시스템 요구 사양
잡아 당기기
하드웨어
• USB 인터페이스
마우스와 USB 커넥터를 잡고천천히 잡아당
깁니다.
운영체제
• Microsoft Windows® 2000
• Microsoft Windows® XP
• Microsoft Windows Vista®
• Microsoft Windows® 7
• Mac OS® X 10.4 이상
잡아 당기기
케이블 휠을 잡은 상태로 잡아당기지 마십시오.
경고: 마우스가 작동하는 동안에는 빛이 나오는 것을 맨눈으로 볼 수 있습니다. 마우스가
작동할 때 빛이 나오는 광원을 직접 바라보지 않도록 주의하십시오.
14
15
Targus Compact Optical Mouse
Warranty
Targus warrants this product to be free from defects in materials and workmanship for
three years. If your Targus accessory is found to be defective within that time, we will
promptly repair or replace it. This warranty does not cover accidental damage, wear
and tear, or consequential or incidental loss. Under no conditions is Targus liable for
loss of, or damage to devices; nor loss of, or damage to, programs, records, or data; nor
any consequential or incidental damages, even if Targus has been informed of their
possibility. This warranty does not affect your statutory rights.
Regulatory Compliance
This device complies with Part 15 of the FCC Rules. Operation is subject to the
following two conditions: (1) This device may not cause harmful interference, and (2)
This device must accept any interference received, including interference that may
cause undesired operation.
Targus Compact Optical Mouse
• Reorient or relocate the receiving antenna;
• Increase the separation between the equipment and receiver;
• Connect the equipment into an outlet on a circuit different from that to which the
receiver is connected;
• Consult the dealer or an experienced radio/TV technician for help.
Changes or modifications not authorized by the party responsible for compliance
could void the user’s authority to operate this product.
Declaration of Conformity
Hereby, Targus, declares that this device is in compliance with the essential
requirements and other relevant provisions of Directive 1999/5/EC.
FCC Statement
Tested to Comply
This equipment has been tested and found to comply with the limits of a Class
B digital device, pursuant to Part 15 of the FCC Rules. These limits are designed
to provide reasonable protection against harmful interference in a residential
installation. This equipment generates, uses, and can radiate radio frequency
energy and if not installed and used in accordance with the instructions, may cause
harmful interference to radio communications. However, there is no guarantee that
interference will not occur in a particular installation. If this equipment does cause
harmful interference to radio or television reception, which can be determined
by turning the equipment off and on, the user is encouraged to try to correct the
interference by one or more of the following measures:
16
17