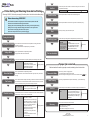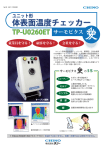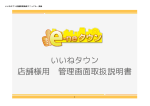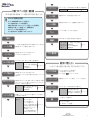
1
テストプリント 印刷までのプリンタ設定・確認事項 JV400-SUV を使用する際は、電源 ON 後、プリントを開始する前に下記を実行・確認してください。 フィード補正 テストプリントを行い、ノズル抜けや飛行曲がりがないか確認します。( 取扱説明書 2 章 ) プリント結果が異常 ヘッドクリーニングを実行 テストプリントへ 取扱説明書「2 章 メディアの送り量を設定する」を参照してください。 JV400-SUVご使用時の注意事項 ヒーターONの状態で長時間(10分以上)メディアを放置しない。 メディア幅を検出する前に、メディアの浮きを確認する。 ■ 紙詰まりが発生した場合、ただちにヘッドクリーニングを実行し、テスト作図で確認する。 ■ 乾燥性が良くない場合、フィード速度を遅くしたり、乾燥時間を設定する。 ■ キャップOFF、カバーが開いた状態で放置しないこと。 ■ インク詰まり防止のため、常に主電源スイッチはオンにしておくこと。 ■ ■ 電源 ON ヒーターを設定し、設定温度に到達するまで待ちます。設定値はメディアによって変わります。 取扱説明書「2 章 ヒーターの準備をする」を参照してください。 メディアセット 取扱説明書「2 章 メディアをセットする」を参照してください。 メディア押さえでメディアを軽く挟んでください。 メディア検出を行う テストフィードを行う 取扱説明書「2 章 双方向プリントのドット位置を調整する」を参照してください。 プリントガイドを参照し、プリントするデータを送信します。 出力された絵が、UV ランプを通過した時点で乾燥しているか確認します。 乾燥していない 同じ解像度でより多いパス数を選択する 右記を実行すると印刷速度が フィード速度を遅く (100% 以下 ) 設定する 遅くなるため、実行前にヒー ( 取扱説明書 3 章 ) ター温度を上げることができ スキャンごとの乾燥時間を設定する ないか確認する ( 取扱説明書 3 章 ) プリントへ プリント開始可能 プラテン上のメディアの浮き ( 特にメディアの両端 ) を、目視で確認します。 メディアが浮いている 吸着ファンを強くする ( 取扱説明書 3 章 ) ロールメディアの場合、巻き取り装置を使用 ( 取扱説明書 2 章 ) ヒーター温度を下げる 紙詰まりが発生したら メディアセットへ 取扱説明書「2 章 メディアをセットする」を参照してください。 メディア検出時にヘッドでメディアを擦ったり紙詰まりが発生した場合、ヘッドクリーニング を実行すること。 取扱説明書「2 章 テストフィードする」を参照し、正常にメディアが搬送できることを確認 します。プラテン-アフターヒーター間でメディアに浮きがないか、メディアがプラテンに 張りついてフィードに異常がないかを確認します。 メディア搬送に異常が ある コックリングの確認 プリント 乾燥確認 ヒーターの準備 メディアの浮きを確認 ドット位置補正 静電シートを取り付ける ( 静電シートを取り 付けると乾燥性が悪くなる ) ( 取扱説明書 1 章 ) メディアセットへ ヘッドをメディアに擦ったり紙詰まりが発生した場合、下記をすみやかに実行してください。 メディアを取り除く ヘッドクリーニング テストプリント 50cm 程度フィードし、フィードするごとにメディアの両端とクランプ-クランプ間でメディ アに浮きが発生しないか確認します。 メディアコックリングが 一度クランプアップし、メディアを再セット。 発生している 斜行していないか確認する プリヒータ設定温度を高くする ( プリントヒータ温度 +5℃~ 10℃) すべてのヒーター温度を 5℃程度ずつ下げる メディアセットへ ( 乾燥不足になる可能性があるので注意する) 加熱により変形した分のメディア (60 ~ 100cm 程度 ) をフィードする ・ヒーター ON 状態で長時間放置した場合 ・加熱でメディアが伸びきっている場合 復帰 クランプアップ後、詰まったメディアを取り除きます。 ヘッドを擦った場合、メディアを再セットします。 キャリッジを退避し、 キーでステーションへ戻します。 取扱説明書「2 章 ヘッドクリーニング」を参照して、ヘッドクリーニングを実行します。 テストプリントを行い、ノズル抜けや飛行曲がりがないか確認します。 プリント結果が異常 クリーニングを繰り返し実行してもノズル 抜けや飛行曲がりが改善しない場合、 取扱説明書「4 章 ノズル詰まりが復旧しな い場合」を参照してノズル洗浄を実行する。 ヘッド クリーニングへ ヘッドが復帰したら、以下を確認します。 ・ メディアが斜行していないか確認 ・ メディアコックリングの確認 ・ ヘッドが低すぎないか、ヘッド高さを確認 Printed in Japan D202374-10-01062012 © MIMAKI ENGINEERING CO., LTD.2012 IT Test Print Printer Setting and Checking Items before Printing When using JV400-SUV, first turn the power supply ON and then perform/ check the items below before printing. Notes when using JV400-SUV Do not leave the media for a long time (more than ten minutes) with the heater ON. Check the media float before detecting the media width. ■ If paper jam occurred, immediately perform head cleaning and check by test drawing. ■ If dryness is not enough, make the feeding speed slower or set the dryness time. ■ Do not leave it with capping OFF and the cover opened. ■ Leave the main power turned on to prevent ink clogging. Result is abnormal Feed Correction ■ ■ Turning the Power ON Preparing for the Heaters Setting a Media Check the media float Detect the Media Test Feeding Print Set the heater and wait until it reaches the set temperature. The setting value differs depending on the media. Refer to Operation Manual “Chapter2 Preparing for the Heaters” . Perform head cleaning. To Test Print Refer to Operation Manual “Chapter2 Set the media feeding amount” Refer to Operation Manual “Correct the ink drop position for bidirectional printing” . Referring to the print guide, send the data to print. Check that the output image has been dehydrated when it passes the UV lamp. If it has not been dehydrated Select more number of passes for the same resolution. When you perform the items menti- Set the FEED SPEED lower (lower than oned at the right, the printing speed 100%). (Operation Manual Chapter3) lowers. Therefore, check whether Set the DRYING TIME for each scan. you can raise the heater temperat(Operation Manual Chapter3) ure before performing them. To Test Print Print can be started Visually check the media float on the platen (especially at the both edges of the media). When the media floats Strengthen the absorption fan. (Operation Manual Chapter3) For the roll media, use the take-up device. (Operation Manual Chapter2) Lower the heater temperature. If paper jam occurred To Setting a Media If the head scratched the media or paper jam occurred, immediately perform the items below: Refer to Operation Manual “Chapter2 Setting a Media” . At the media detection, if the head scratches the media or paper jam occurs, perform head cleaning. Refer to Operation Manual “Chapter2 Test Feeding” , Check that the media can be fed normally. Check that there is no media float between the Platen and the After heater. Also, check that there is no abnormality of feeding due to the media sticking to the platen. If there an abnormality Attach the antistatic sheet. (If you attach the of the media feeding antistatic sheet, the drying performance will be lowered.) (Operation Manual Chapter1) Check of cockling Drop Position correct Checking dryness Refer to Operation Manual “Chapter2 Setting a Media” . Slightly hold the media with the media holder. Perform test print to check that there is no line that is missing and no line that is bent. (Operation Manual Chapter2) To Setting a Media Remove the Media Clamp up once and reset the media. Check that it is not skewed. Set the temperature of the pre-heater higher. (Print heater temperature +5 to 10 degrees) Lower all heater temperatures by 5 degrees each. (It may not have been dehydrated enough. Be careful about it.) Feed the media that was deformed due to heating (by about 60 to 100cm). ・When you left it for a long time with the heater ON ・When the media extended to the utmost limit due to heating To Setting a Media key. Head Cleaning By referring to Operation Manual “Chapter 2 Head Cleaning” , perform head cleaning. Test Print Perform test print and check that there is no line that is missing and no line that is bent. Feed the media by 50cm, and check that no media float occurs at the media both edges and between Clamp - Clamp every time you feed the media. If media cockling occurs After clamp up, remove the clogging media. If the head scratched the media, reset the media. Move the carriage to the waiting position, and return it to the station with the Recovery If nozzle missing occurs In case that nozzle missing and no line that is bent is not improved even though you repeat cleaning,by referring to Operation Manual “Chapter 4 When Nozzle Clogging Cannot Be Solved”, perform Washing of Head nozzle. To Head Cleaning After the head recovered, check the items below: ・ Check that the media is not skewed. ・ Check the media cockling. ・ Check that the head height (that it is not too low). Printed in Japan D202374-10-01062012 © MIMAKI ENGINEERING CO., LTD.2012 IT