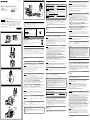
1
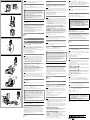
4-535-798-02(1) Montage sur un adaptateur de montage (Fig. ) English E Before operating the unit, please read this manual thoroughly and retain it for future reference. Remarque For the customers in the U.S.A. SONY LIMITED WARRANTY - Please visit http://www.sony.com/psa/warranty for important information and complete terms and conditions of Sony’s limited warranty applicable to this product. Soft Carrying Case 取扱説明書 For the customers in Canada SONY LIMITED WARRANTY - Please visit http://www.sonybiz.ca/solutions/ Support.do for important information and complete terms and conditions of Sony’s limited warranty applicable to this product. Istruzioni per l’uso Manual de instrucciones Operating Instructions Mode d’emploi Bedienungsanleitung For the customers in Europe Sony Professional Solutions Europe - Standard Warranty and Exceptions on Standard Warranty. Please visit http://www.pro.sony.eu/warranty for important information and complete terms and conditions. For the customers in Korea 7 SONY LIMITED WARRANTY - Please visit http://bpeng.sony.co.kr/handler/ BPAS-Start for important information and complete terms and conditions of Sony’s limited warranty applicable to this product. 5 Overview お買い上げいただきありがとうございます。 電気製品は、安全のための注意事項を守らないと、人身事故になるこ とがあります。 ˎ この取扱説明書には、事故を防ぐための重要な注意事項と製品の取り扱いかたを示 してあります。この取扱説明書をよくお読みのうえ、製品を安全にお使いく ださい。お読みになったあとは、いつでも見られるところに必ず保管してください。 ˎ ご使用にあたっては、URX-P03 本体および本体と組み合わせの接続機器に付属の 取扱説明書の「安全のために」と「 警告」、「 注意」をよくお読みください。 お読みになったあとは、いつでも見られるところに必ず保管してください。 LCS-URXP3 © 2014 Sony Corporation Printed in Korea 安全のために ソニー製品は安全に充分に配慮して設計されています。しかし、まちがった使い かたをすると、製品の落下などにより人身事故につながることがあり、危険です。 事故を防ぐために次のことを必ずお守りください。 ˎˎ 安全のための注意事項を守る。 ˎˎ 破損したら使わずに、ソニーのサービス窓口に相談する。 行為を禁止する記号 警告表示の意味 この取扱説明書および製品では、次のような 表示をしています。表示の内容をよく理解し てから本文をお読みください。 A この表示の注意事項を守らないと、けがをし たり周辺の物品に損害を与えたりすることが あります。 1 下記の注意を守らないと、けがをしたり周辺の 物品に損害を与えることがあります。 2 3 2 各部の名称(図) 本ケース上部の2本のバンジーコードの間からURX-P03()を入れます。 マウントアダプターに取り付ける(図) マウントアダプター SMAD-V1(別売) ()とVシュー(SMAD-V1に固定済み) ()を使用して、Vマウントに取り付けることができます。 ご注意 ベルトとファスナーを貼り合わせるときは、URX-P03を本ケースの奥までしっ かりと入れた状態で行ってください。URX-P03の電池ホルダー着脱時に、本ケー ス側面のゴム部分を挟み込んで傷つける恐れがあります。 111 本ケースのベルトをSMAD-V1の上下の穴に通す。 222 本ケースのベルトとファスナーを貼り合わせる。 333 VシューをVマウントに装着する。 カムコーダーに取り付ける(図、) ご注意 ˎˎ ベルトとファスナーを貼り合わせる際は、ベルトがゆるまないようにしっかり と引っ張りながら貼り合わせてください。 ˎˎ 本ケースをカムコーダーに取り付ける際にベルトがカムコーダーのグリップ ベルトを傷つける恐れがあります。取り付けの際は充分に注意してください。 ˎˎ ベルトとファスナーを貼り合わせるときは、URX-P03を本ケースの奥までしっ かりと入れた状態で行ってください。URX-P03の電池ホルダー着脱時に、本 ケース側面のゴム部分を挟み込んで傷つける恐れがあります。 ハンディタイプのカムコーダーに取り付ける(図) 111 本ケースのベルトをカムコーダー本体とグリップベルトの間に通す。 222 本ケースのベルトとファスナーを貼り合わせる。 ショルダータイプのカムコーダーに取り付ける(図) D Insert the URX-P03 () from between the two bungee cords at the top of the case. Mounting to a Mount Adapter (Fig. ) You can mount the case on the V mount using the SMAD-V1 mount adapter (not supplied) () and V shoe (attached to the SMAD-V1) (). Note 本ケースをカムコーダーに装着するには、マウント金具(A-8278-057-B、別売) ()を使用します。 ()とマウントアダプター SMAD-V1(別売) 111 SMAD-V1とVシューに取り付けられているネジ(3か所)をはずす。 222 マウント金具にSMAD-V1をネジ留め(4か所、+B3×5と+B4×5:各2本)す る。 333 本ケースのベルトとファスナーを貼り合わせる。 ご注意 マウント金具(A-8278-057-B、別売)にマウンティングプレート(A-1528-515-A、 別売)を取り付けることで、カムコーダーからの本ケースの取りはずしがしやす くなります。マウンティングプレートを使用する場合は、SMAD-V1にVシュー を取り付けたままで使用してください。 ケーブルを接続する 本ケースにURX-P03を入れた状態で、URX-P03の端子にケーブルを接続してく ださい。 ご注意 URX-P03の端子にコネクターを接続する際は、バンジーコードをはさみ込まない ようにしてください。 主な仕様 外形寸法 質量 付属品 68 × 98 × 40 mm(幅×高さ×奥行き) 約35 g 取扱説明書(1) 仕様および外観は、改良のため予告なく変更することがありますが、ご了承くだ さい。 ˎˎ お使いになる前に、必ず動作確認を行ってください。故障その他に伴う営業 上の機会損失等は保証期間中および保証期間経過後にかかわらず、補償はい たしかねますのでご了承ください。 ˎˎ 本製品を使用したことによるお客様、または第三者からのいかなる請求につ いても、当社は一切の責任を負いかねます。 ˎˎ 諸事情による本製品に関連するサービスの停止、中断について、一切の責任 を負いかねます。 1. Passez la bandoulière de la mallette par les orifices au sommet et à la base du SMAD-V1. 2. Attachez la bandoulière de la mallette à l’attache. 3. Montez le sabot en V sur la monture en V. Montage sur un caméscope (Fig. , ) Remarques ˎˎVeillez à tirer la bandoulière de manière à ce qu’elle soit fermement fixée et ne soit pas lâche lorsque vous attachez la bandoulière à l’attache. ˎˎLors de la fixation de cette mallette au caméscope, la bandoulière de la mallette peut érafler la bandoulière de prise du caméscope. Faites attention lorsque vous fixez la mallette. ˎˎAssurez-vous que l’URX-P03 est complètement inséré dans la mallette lorsque vous fixez la bandoulière à l’attache. Dans le cas contraire, les parties en caoutchouc sur le côté de la mallette risqueraient de se coincer et de s’endommager lors de la fixation ou du retrait du support de batterie de l’URX-P03. Montage sur un caméscope de poing (Fig. ) 1. Passez la bandoulière de la mallette dans la bandoulière de prise du caméscope. 2. Attachez la bandoulière de la mallette à l’attache. Montage sur un caméscope d’épaule(Fig. ) Remarque Fixer la plaque de montage (A-1528-515-A, non fournie) au support de montage (A-8278-057-B, non fourni) facilitera la fixation et le retrait de cette mallette du caméscope. Lors de l’utilisation d’une plaque de montage, utilisez-la avec un sabot en V fixé au SMAD-V1. Raccordement des câbles Branchez les câbles aux connecteurs de l’URX-P03 lorsqu’il est dans la mallette. Remarque Notes URX-P03をケースに入れる(図) 6 Inserting the URX-P03 into the Case (Fig. ) Mounting to a Camcorder (Fig. , ) バンジーコード ベルト ファスナー 5 Bungee cords Belt Fastener 1. Pass the case’s belt through the holes at the top and bottom of the SMAD-V1. 2. Fasten the case’s belt to the fastener. 3. Mount the V shoe onto the V mount. ソフトキャリングケースLCS-URXP3は、ポータブルダイバーシティーチュー ナー URX-P03(別売)を持ち運んだり、カムコーダーに取り付けるための専用ソ フトケースです。 ˎˎ 本ケースにURX-P03を入れたままで、ケーブル接続、スイッチ/ボタン操作、赤 外線通信、USB端子からの充電および電池交換が可能です。 ˎˎ 本ケースにURX-P03を入れたままディスプレイやランプ表示の確認が可能で す。 ˎˎ マウントアダプター SMAD-V1(別売)を使用して、本ケースをカムコーダー に取り付けることができます。 Assurez-vous que l’URX-P03 est complètement inséré dans la mallette lorsque vous fixez la bandoulière à l’attache. Dans le cas contraire, les parties en caoutchouc sur le côté de la mallette risqueraient de se coincer et de s’endommager lors de la fixation ou du retrait du support de batterie de l’URX-P03. Utilisez un support de montage (A-8278-057-B) () et l’adaptateur de montage SMAD-V1 () (non fournis) pour monter la mallette sur un caméscope. 1. Retirez les vis sur le SMAD-V1 et le sabot en V (3 vis). 2. Vissez le SMAD-V1 au support de montage (2 vis +B3×5, 2 vis +B4×5). 3. Attachez la bandoulière de la mallette à l’attache. 改造しない 改造するとキャリングケースの強度が低下し、収納している製品 が落下して、けがの原因となることがあります。 概要 C Parts Identification (Fig. ) 指定以外の機器を収納・使用しない 指定以外の機器を収納した場合、その機器が落下し、ケガの原因と なることがあります。 日本語 4 The LCS-URXP3 Soft Carrying Case is a soft carrying case specifically designed for carrying or attaching the URX-P03 Portable Diversity Tuner (not supplied) to a camcorder. ˎˎCable connections, switch and button operations, infrared transmission, charging via USB, and battery replacement can be performed while the URX-P03 is inside the case. ˎˎYou can view the URX-P03 display and indicators while it is inside the case. ˎˎThe SMAD-V1 mount adapter (not supplied) can be used to mount the case to a camcorder. Make sure the URX-P03 is fully inserted all the way into the case when attaching the belt to the fastener. Failure to do so may cause the rubber portions on the side of the case to get caught and damaged when attaching and removing the battery holder of the URX-P03. B Vous pouvez monter la mallette sur la monture en V à l’aide de l’adaptateur de montage SMAD-V1 (non fourni) () et le sabot en V (fixé au SMAD-V1) (). ˎˎBe sure to pull the belt so that it is secure and not loose when fastening the belt to the fastener. ˎˎWhen attaching this case to a camcorder, the case’s belt may scratch the grip belt on the camcorder. Be careful when attaching the case. ˎˎMake sure the URX-P03 is fully inserted all the way into the case when attaching the belt to the fastener. Failure to do so may cause the rubber portions on the side of the case to get caught and damaged when attaching and removing the battery holder of the URX-P03. Mounting to a Handheld Camcorder (Fig. ) 1. Pass the case’s belt through the grip belt on the camcorder. 2. Fasten the case’s belt to the fastener. Mounting to a Shoulder-Mount Camcorder (Fig. ) Use a mount bracket (A-8278-057-B) () and the SMAD-V1 mount adapter () (both not supplied) to mount the case to the camcorder. 1. Remove the screws on the SMAD-V1 and V shoe (3 screws). 2. Screw the SMAD-V1 onto the mount bracket (2 +B3×5 screws, 2 +B4×5 screws). 3. Fasten the case’s belt to the fastener. Note Attaching the mounting plate (A-1528-515-A, not supplied) to the mounting bracket (A-8278-057-B, not supplied) will facilitate attachment and removal of this case from the camcorder. When using a mounting plate, use it with the V shoe attached to the SMAD-V1. Connecting Cables Connect the cables to the connectors on the URX-P03 while it is inside the case. Note When connecting cables to the URX-P03 connectors, make sure that the bungee cords do not get caught. Specifications Dimensions 68 × 98 × 40 mm (2 /8 × 3 /8 × 1 /8 in.) (W × H × D) Mass Approx. 35 g (1.2 oz.) Supplied accessories Operating Instructions (1) 5 7 5 Design and specifications are subject to change without notice. Note ˎˎAlways verify that the unit is operating properly before use. SONY WILL NOT BE LIABLE FOR DAMAGES OF ANY KIND INCLUDING, BUT NOT LIMITED TO, COMPENSATION OR REIMBURSEMENT ON ACCOUNT OF THE LOSS OF PRESENT OR PROSPECTIVE PROFITS DUE TO FAILURE OF THIS UNIT, EITHER DURING THE WARRANTY PERIOD OR AFTER EXPIRATION OF THE WARRANTY, OR FOR ANY OTHER REASON WHATSOEVER. ˎˎSONY WILL NOT BE LIABLE FOR CLAIMS OF ANY KIND MADE BY USERS OF THIS UNIT OR MADE BY THIRD PARTIES. ˎˎSONY WILL NOT BE LIABLE FOR THE TERMINATION OR DISCONTINUATION OF ANY SERVICES RELATED TO THIS UNIT THAT MAY RESULT DUE TO CIRCUMSTANCES OF ANY KIND. Lors du raccordement des câbles aux connecteurs de l’URX-P03, assurez-vous que les cordons élastiques ne restent pas coincés. Spécifications Dimensions Poids Accessoires fournis 68 × 98 × 40 mm (2 5/8 × 3 7/8 × 1 5/8 po.) (L × H × P) Environ 35 g (1,2 on.) Mode d’emploi (1) La conception et les spécifications sont sujettes à modification sans préavis. Remarques ˎˎVérifiez toujours que l’appareil fonctionne correctement avant l’utilisation. Sony n’assumera pas de responsabilité pour les dommages de quelque sorte qu’ils soient, incluant mais ne se limitant pas à la compensation ou au remboursement, à cause de la perte de profits actuels ou futurs suite à la défaillance de cet appareil, que ce soit pendant la période de garantie ou après son expiration, ou pour toute autre raison quelle qu’elle soit. ˎˎSony n’assumera pas de responsabilité pour les réclamations, quelle qu’elles soient, effectuées par les utilisateurs de cet appareil ou par des tierces parties. ˎˎSony n’assumera pas de responsabilité pour la cessation ou l’interruption de tout service lié à cet appareil, résultant de quelque circonstance que ce soit. Deutsch Bitte lesen Sie dieses Handbuch vor der Benutzung des Geräts sorgfältig durch und bewahren Sie es zum späteren Nachschlagen auf. Übersicht Die Tragetasche LCS-URXP3 ist speziell zum Tragen oder Befestigen des mobilen Diversity Tuners URX-P03 (nicht im Lieferumfang enthalten) an einem Camcorder vorgesehen. ˎˎDas Anschließen von Kabeln, Bedienvorgänge mittels der Schalter und Tasten, Infrarot-Übertragungen, das Laden des Akkus über USB sowie das Ersetzen des Akkus können erfolgen, während der URX-P03 sich in der Tasche befindet. ˎˎAuch der Bildschirm und die Anzeigen des URX-P03 sind sichtbar, wenn sich dieser in der Tasche befindet. ˎˎMit dem Adapter SMAD-V1 (nicht im Lieferumfang enthalten) kann die Tasche an einem Camcorder befestigt werden. Beschreibung der Teile (Abb. ) Gummibänder Gurt Verschluss Einsetzen des URX-P03 in die Tasche (Abb. ) Legen Sie den URX-P03 () zwischen den zwei Gummibändern an der Oberseite der Tasche hindurch in die Tasche hinein. Montage an einem Adapter (Abb. ) Sie können die Tasche mit dem Adapter SMAD-V1 (nicht im Lieferumfang enthalten) () und dem V-Schuh (am SMAD-V1 angebracht) () an der V-Montagehalterung befestigen. Hinweis Achten Sie darauf, die URX-P03 so weit wie möglich in die Tasche hineinzustecken, ehe Sie den Gurt am Verschluss anbringen. Anderenfalls können die Gummiteile an der Seite der Tasche sich beim Anbringen und Entfernen des Batteriehalters URX-P03 verfangen und beschädigt werden. 1. Führen Sie den Gurt der Tasche durch die Öffnungen an der Ober- und Unterseite des SMAD-V1. Français Avant d’utiliser l’appareil, veuillez lire attentivement ce manuel et le conserver pour future référence. Pour les clients au Canada GARANTIE LIMITÉE DE SONY - Rendez-vous sur http://www.sonybiz.ca/ solutions/Support.do pour obtenir les informations importantes et l’ensemble des termes et conditions de la garantie limitée de Sony applicable à ce produit. Présentation La mallette de transport souple LCS-URXP3 est une mallette de transport spécialement conçue pour porter le tuner portable à diversité URX-P03 (non fourni) ou pour le fixer à un caméscope. ˎˎLes raccordements de câble, les opérations via interrupteurs et boutons, la transmission infrarouge, le chargement via USB et le remplacement de la batterie peuvent s’effectuer lorsque l’URX-P03 se trouve dans la mallette. ˎˎVous pouvez voir les affichages et les indicateurs de l’URX-P03 lorsqu’il se trouve dans la mallette. ˎˎL’adaptateur de montage SMAD-V1 (non fourni) peut être utilisé pour monter la mallette sur un caméscope. Identification des pièces (Fig. ) Cordons élastiques Bandoulière Attache Insertion de l’URX-P03 dans la mallette (Fig. ) Insérez l’URX-P03 () entre les deux cordons élastiques au sommet de la mallette. 2. Befestigen Sie den Gurt der Tasche am Verschluss. 3. Bringen Sie den V-Schuh an der V-Montagehalterung an. Anbringen an einem Camcorder: (Abb. , ) Hinweise ˎˎAchten Sie darauf, dass der Gurt beim Schließen des Verschlusses fest anliegt und nicht lose ist. ˎˎWenn Sie diese Tasche an einem Camcorder befestigen, kann der Gurt der Tasche an der Handschlaufe des Camcorders scheuern. Gehen Sie daher beim Anbringen der Tasche sorgfältig vor. ˎˎAchten Sie darauf, die URX-P03 so weit wie möglich in die Tasche hineinzustecken, ehe Sie den Gurt am Verschluss anbringen. Anderenfalls können die Gummiteile an der Seite der Tasche sich beim Anbringen und Entfernen des Batteriehalters URX-P03 verfangen und beschädigt werden. Anbringen an einem Handheld-Camcorder (Abb. ) 1. Führen Sie den Gurt der Tasche durch die Handschlaufe des Camcorders. 2. Befestigen Sie den Gurt der Tasche am Verschluss. Anbringen an einem Schulter-Camcorder (Abb. ) Verwenden Sie eine Halterung (A-8278-057-B) () und den Adapter SMAD-V1 () (beide nicht im Lieferumfang enthalten), um die Tasche am Camcorder zu befestigen. 1. Entfernen Sie die Schrauben am SMAD-V1 und am V-Schuh (3 Schrauben). 2. Schrauben Sie den SMAD-V1 an der Halterung fest (2 Schrauben +B3×5, 2 Schrauben +B4×5). 3. Befestigen Sie den Gurt der Tasche am Verschluss. Hinweis Sie können die Befestigungsplatte (A-1528-515-A, nicht im Lieferumfang enthalten) an der Halterung (A-8278-057-B, nicht im Lieferumfang enthalten) anbringen, um das Befestigen und Lösen der Tasche am und vom Camcorder zu erleichtern. Bei Verwendung einer Befestigungsplatte sollte der V-Schuh am Adapter SMAD-V1 angebracht werden. Anschließen der Kabel Schließen Sie die Kabel an die Anschlüsse am URX-P03 an, wenn sich dieser in der Tasche befindet. 31 케이스의 벨트를 잠금 장치에 고정시키십시오. A Inserción del URX-P03 en la bolsa (figura ) Hinweis Achten Sie beim Anschließen der Kabel an die URX-P03-Anschlüsse darauf, dass diese sich nicht mit den Gummischnüren verwickeln. Technische Daten 1 2 Abmessungen 68 × 98 × 40 mm (B × H × T) Masse ca. 35 g Mitgeliefertes Zubehör Bedienungsanleitung (1) Änderungen, die dem technischen Fortschritt dienen, bleiben vorbehalten. 3 Hinweise ˎˎBestätigen Sie vor dem Gebrauch immer, dass das Gerät richtig arbeitet. SONY KANN KEINE HAFTUNG FÜR SCHÄDEN JEDER ART, EINSCHLIESSLICH ABER NICHT BEGRENZT AUF KOMPENSATION ODER ERSTATTUNG, AUFGRUND VON VERLUST VON AKTUELLEN ODER ERWARTETEN PROFITEN DURCH FEHLFUNKTION DIESES GERÄTS ODER AUS JEGLICHEM ANDEREN GRUND, ENTWEDER WÄHREND DER GARANTIEFRIST ODER NACH ABLAUF DER GARANTIEFRIST, ÜBERNEHMEN. ˎˎSONY KANN KEINE HAFTUNG FÜR ANSPRÜCHE JEDER ART VON DEN BENUTZERN DIESES GERÄTS ODER VON DRITTER SEITE ÜBERNEHMEN. ˎˎSONY KANN KEINE HAFTUNG FÜR DIE BEENDIGUNG ODER EINSTELLUNG VON DIENSTLEISTUNGEN BEZÜGLICH DIESES GERÄTS GLEICH AUS WELCHEM GRUND ÜBERNEHMEN. 2 B Italiano Leggere attentamente questo manuale prima di utilizzare l’unità, e conservarlo per riferimenti futuri. Descrizione generale 4 La custodia di trasporto morbida LCS-URXP3 è stata specificatamente concepita per trasportare il Diversity Tuner portatile URX-P03 (disponibile separatamente) o fissarlo a un camcorder. ˎˎÈ possibile collegare i cavi, utilizzare i comandi e i pulsanti, trasmettere a infrarossi, ricaricare tramite USB e sostituire le batterie senza necessità di rimuovere il Tuner URX-P03 dalla custodia. ˎˎIl display e gli indicatori del Tuner URX-P03 sono visibili anche mentre l’apparecchio rimane nella custodia. ˎˎUtilizzando l’adattatore di montaggio SMAD-V1 (disponibile separatamente) è possibile montare la custodia su un camcorder. Identificazione delle parti (Fig. ) Elastici Cinghia Fissaggio C Inserire dall’alto il Tuner URX-P03 () nella custodia tra i due elastici. Montaggio di un adattatore di montaggio (Fig. ) È possibile montare la custodia sull’adattatore a V utilizzando l’adattatore di montaggio SMAD-V1 (disponibile separatamente) () e la slitta a V (fissata all’adattatore SMAD-V1) (). Nota 6 Es posible montar la bolsa en el soporte en V mediante con el adaptador de montaje SMAD-V1 (no suministrado) () y la zapata en V (acoplada en el SMAD-V1) (). Nota Asegúrese de que el URX-P03 está totalmente introducido en la bolsa cuando coloque la correa en el cierre. De lo contrario, las partes de goma del lateral de la bolsa podrían quedar atrapadas y sufrir daños al colocar y extraer el soporte de la batería del URX-P03. 1. Pase la correa de la bolsa a través de los orificios que se encuentran en la parte superior e inferior del SMAD-V1. 2. Fije la correa de la bolsa en el cierre. 3. Monte la zapata en V en el soporte en V. Montaje en una videocámara (figuras , ) ˎˎAsegúrese de tirar de la correa de modo que quede fija y apretada al sujetar la correa al cierre. ˎˎCuando coloque esta bolsa en una videocámara, es posible que la correa de esta arañe la correa de la empuñadura de la videocámara. Tenga cuidado cuando coloque la bolsa. ˎˎAsegúrese de que el URX-P03 está totalmente introducido en la bolsa cuando coloque la correa en el cierre. De lo contrario, las partes de goma del lateral de la bolsa podrían quedar atrapadas y sufrir daños al colocar y extraer el soporte de la batería del URX-P03. Montaje en una videocámara portátil (figura ) 1. Pase la correa de la bolsa a través de la correa de la empuñadura de la Montaje en una videocámara con soporte para hombro (figura ) Utilice un soporte de montaje (A-8278-057-B) () y el adaptador de montaje SMAD-V1 () (ambos no suministrados) para montar la bolsa en la videocámara. 1. Extraiga los tornillos del SMAD-V1 y de la zapata en V (3 tornillos). 2. Atornille el SMAD-V1 al soporte de montaje (2 +B3×5 tornillos, 2 +B4×5 tornillos). 3. Fije la correa de la bolsa en el cierre. El acoplamiento de la placa de montaje (A-1528-515-A, no suministrada) en el soporte de montaje (A-8278-057-B, no suministrado) facilita la colocación y extracción de esta bolsa de la videocámara. Cuando utilice una placa de montaje, hágalo con la zapata en V acoplada en el SMAD-V1. Conexión de los cables Conecte los cables a los conectores del URX-P03 mientras se encuentra en el interior de la bolsa. Nota Al conectar los cables a los conectores URX-P03, asegúrese de que las cuerdas de resortes no se queden atrapadas. Especificaciones El diseño y las especificaciones están sujetos a cambios sin previo aviso. ˎˎTirare sempre la cinghia per verificare che sia saldamente assicurata al fissaggio. ˎˎQuando la custodia viene montata su un camcorder, è possibile che la cinghia graffi la cinghia dell’impugnatura del camcorder. Montare la custodia con la dovuta attenzione. ˎˎNell’applicare la cinghia sul fissaggio, accertare che il Tuner URX-P03 sia completamente inserito nella custodia. In caso contrario le parti in gomma sul lato della custodia potrebbero impigliarsi e subire danni durante l’applicazione e la rimozione del comparto batterie del Tuner URX-P03. Montaggio su un camcorder a mano (Fig. ) 1. Passare la cinghia della custodia attraverso la cinghia dell’impugnatura del Montaggio su un camcorder a spalla (Fig. ) Utilizzare una staffa di montaggio (A-8278-057-B) () e l’adattatore di montaggio SMAD-V1 () (disponibili separatamente) per montare la custodia sul camcorder. 1. Rimuovere le viti da adattatore SMAD-V1 e slitta a V (3 viti). 2. Avvitare l’adattatore SMAD-V1 sulla staffa di montaggio (2 viti +B3×5, 2 viti +B4×5). 3. Fissare la cinghia della custodia al fissaggio. Nota Fissando la piastra di montaggio (A-1528-515-A, disponibile separatamente) alla staffa di montaggio (A-8278-057-B, disponibile separatamente) si facilita l’applicazione e la rimozione di questa custodia dal camcorder. Quando si utilizza una piastra di montaggio, la slitta a V deve essere collegata all’adattatore SMAD-V1. Collegamento dei cavi Collegare i cavi ai connettori del Tuner URX-P03 mentre questo si trova all’interno della custodia. Nota Durante la connessione dei cavi al Tuner URX-P03 evitare che si impiglino con le cordicelle elastiche. Caratteristiche tecniche Dimensioni Massa Accessori in dotazione 68 × 98 × 40 mm (L × A × P) Circa 35 g Istruzioni per l’uso (1) Design e caratteristiche tecniche soggetti a modifiche senza preavviso. E Note ˎˎVerificare sempre che l’apparecchio stia funzionando correttamente prima di usarlo. LA SONY NON SARÀ RESPONSABILE DI DANNI DI QUALSIASI TIPO, COMPRESI, MA SENZA LIMITAZIONE A, RISARCIMENTI O RIMBORSI A CAUSA DELLA PERDITA DI PROFITTI ATTUALI O PREVISTI DOVUTA A GUASTI DI QUESTO APPARECCHIO, SIA DURANTE IL PERIODO DI VALIDITÀ DELLA GARANZIA SIA DOPO LA SCADENZA DELLA GARANZIA, O PER QUALUNQUE ALTRA RAGIONE. ˎˎSONY NON SARÀ RESPONSABILE PER RICHIESTE O RICORSI DI NESSUN TIPO PRESENTATI DA UTENTI DI QUESTO APPARATO O DA TERZI. ˎˎSONY NON SARÀ RESPONSABILE PER LA CANCELLAZIONE O LA MANCATA CONTINUAZIONE PER QUALSIASI CAUSA O CIRCOSTANZA DI SERVIZI CORRELATI A QUESTO APPARATO. Español Antes de poner en funcionamiento la unidad, lea detenidamente este manual y consérvelo para referencias futuras. 7 5 Descripción general La bolsa de transporte blanda LCS-URXP3 está diseñada específicamente para transportar y conectar el sintonizador portátil Diversity URX-P03 (no suministrado) a la videocámara. ˎˎLas conexiones de los cables, las operaciones con los interruptores y los botones, la transmisión por infrarrojos, la carga mediante USB y la sustitución de la batería pueden llevarse a cabo con el URX-P03 dentro de la bolsa. ˎˎEs posible ver la pantalla y los indicadores del URX-P03 mientras se encuentra dentro de la bolsa. ˎˎEl adaptador de montaje SMAD-V1 (no suministrado) se puede utilizar para colocar la bolsa en una videocámara. Identificación de las piezas (figura ) Cuerdas de resortes Correa Cierre 케이블을 URX-P03 커넥터에 연결할 때 번지 코드가 끼이지 않도록 하십시오. 사양 크기 68 × 98 × 40 mm(폭/높이/깊이) 중량 약 35 g 기본 제공 액세서리 사용 설명서 1권 주의 ˎ 사용 전에는 항상 정상적으로 작동하는지 확인하십시오. SONY는 본체의 오류로 인한 현재 또는 장래 이익의 손실에 대한 손해에 대해서 보증기간 중이거나 보증기간 경과 후 또는 어떠한 이유에도 배상 또는 변상하지 않습니다. ˎ SONY는 이 장치에 의해 발생했거나 제3자가 제기한 어떠한 종류의 보상 청구에 대해서도 책임을 지지 않습니다. ˎ SONY는 어떤 상황이든 상관 없이 이 장치와 관련하여 발생할 수 있는 서비스의 해지 또는 중단에 대해 책임을 지지 않습니다. 中文 机型名称:便携式软套 使用产品前请仔细阅读本使用说明书,并请妥善保管。 概述 LCS-URXP3便携式软套是专为携带或将URX-P03无线音频接收单元(未 随附)连接至摄像机而设计的便携式软套。 ˎˎURX-P03装入软套内时,可执行如下操作:电缆连接、开关和按钮 操作、红外传输、通过USB充电、电池更换。 ˎˎURX-P03装入软套内时,可查看URX-P03的显示屏和指示灯。 ˎˎ可使用SMAD-V1安装适配器(未随附)将软套安装到摄像机上。 部件名称(图) 弹力绳 带子 扣件 将URX-P03插入软套(图) 从软套顶部的两条弹力绳之间插入URX-P03ˎ()。 安装到安装适配器上(图) 可借助SMAD-V1安装适配器(未随附)()和V形插座(连接到 SMAD-V1)()将软套安装到V形底座上。 注意 Notas ˎˎVerifique siempre que esta unidad funciona correctamente antes de utilizarlo. SONY NO SE HACE RESPONSABLE POR DAÑOS DE NINGÚN TIPO, INCLUYENDO PERO NO LIMITADO A LA COMPENSACIÓN O PAGO POR LA PÉRDIDA DE GANANCIAS PRESENTES O FUTURAS DEBIDO AL FALLO DE ESTA UNIDAD, YA SEA DURANTE LA VIGENCIA DE LA GARANTÍA O DESPUÉS DEL VENCIMIENTO DE LA GARANTÍA NI POR CUALQUIER OTRA RAZÓN. ˎˎSONY NO SE HACE RESPONSABLE POR RECLAMACIONES DE NINGÚN TIPO REALIZADAS POR USUARIOS DE ESTA UNIDAD O POR TERCEROS. ˎˎSONY NO SE HACE RESPONSABLE DE LA FINALIZACIÓN NI DE LA INTERRUPCIÓN, POR LA CIRCUNSTANCIA QUE FUERA, DE CUALQUIER SERVICIO RELACIONADO CON ESTA UNIDAD. 한국어 본 기기를 작동하기 전에 반드시 본 설명서를 숙지하고, 설명서는 나중을 위해 잘 보관하십시오. camcorder. 2. Fissare la cinghia della custodia al fissaggio. 참고 videocámara. 1. Passare la cinghia della custodia attraverso le aperture nella parte superiore e Note 케이블 연결 케이스에 넣은 상태로 케이블을 URX-P03의 커넥터에 연결하십시오. 2. Fije la correa de la bolsa en el cierre. Dimensiones 68 × 98 × 40 mm (An × Al × Pr) Peso Aprox. 35 g Accesorios suministrados Manual de instrucciones (1) Montaggio su un camcorder (Fig. , ) 장착 플레이트(A-1528-515-A, 별도 구매)를 부착 브래킷(A-8278-057-B, 별도 구매)에 부착하면 캠코더에서 이 케이스를 부착하고 제거하기가 쉽습니다. 장착 플레이트를 사용할 때는 SMAD-V1에 장착된 V 슈와 함께 사용하십시오. 디자인과 사양은 사전 통지 없이 변경될 수 있습니다. Notas Nell’applicare la cinghia sul fissaggio, accertare che il Tuner URX-P03 sia completamente inserito nella custodia. In caso contrario le parti in gomma sul lato della custodia potrebbero impigliarsi e subire danni durante l’applicazione e la rimozione del comparto batterie del Tuner URX-P03. inferiore dell’adattatore SMAD-V1. 2. Fissare la cinghia della custodia al fissaggio. 3. Montare la slitta a V sull’adattatore a V. D Montaje en un adaptador de montaje (figura ) Nota Inserimento del Tuner URX-P03 nella custodia (Fig. ) 5 Inserte el URX-P03 () por entre las dos cuerdas de resortes de la parte superior de la bolsa. 참고 개요 LCS-URXP3 소프트 운반 케이스는 URX-P03 포터블 다이버시티 튜너(별도 구매)를 운반할 때나 캠코더에 장착할 때 사용할 수 있도록 특별 제작된 부드러운 운반 케이스입니다. ˎ URX-P03을 케이스에 넣은 상태로 케이블 연결, 스위치 및 버튼 조작, 적외선 전송, USB를 통한 충전, 배터리 교체를 할 수 있습니다. ˎ URX-P03을 케이스에 넣은 상태로 디스플레이 및 표시등을 볼 수 있습니다. ˎ SMAD-V1 장착 어댑터(별도 구매)를 사용하여 케이스를 캠코더에 장착할 수 있습니다. 구성품 확인(그림 ) 번지 코드 벨트 잠금 장치 URX-P03을 케이스에 삽입(그림 ) 케이스 맨 위에 있는 2개의 번지 코드 사이에 URX-P03()을 삽입합니다. 장착 어댑터에 장착(그림 ) SMAD-V1 장착 어댑터(별도 구매)()와 V 슈(SMAD-V1에 연결됨)()를 사용하여 V 장착 어댑터에 케이스를 장착할 수 있습니다. 참고 벨트를 완전히 홀더를 손상될 잠금 장치에 부착할 때 URX-P03이 케이스에 끝까지 삽입되도록 하십시오. 그렇지 않으면 URX-P03의 배터리 부착 및 제거할 때 케이스 측면의 고무 부분이 끼여서 수 있습니다. 11 케이스의 벨트를 SMAD-V1의 위쪽과 아래쪽 구멍에 끼우십시오. 21 케이스의 벨트를 잠금 장치에 고정시키십시오. 31 V 슈를 V 마운트에 장착하십시오. 캠코더에 장착(그림 , ) 참고 ˎ 벨트를 잠금 장치에 고정할 때 풀어지지 않도록 벨트를 단단히 당기십시오. ˎ 이 케이스를 캠코더에 부착할 때 케이스의 벨트로 인해 캠코더의 그립 벨트가 긁힐 수 있습니다. 케이스를 부착할 때 주의하십시오. ˎ 벨트를 잠금 장치에 부착할 때 URX-P03을 케이스에 끝까지 삽입하십시오. 그렇지 않으면 URX-P03의 배터리 홀더를 부착 및 제거할 때 케이스 측면의 고무 부분이 끼여서 손상될 수 있습니다. 핸드헬드 캠코더에 장착(그림 ) 11 케이스의 벨트를 캠코더의 그립 벨트에 끼우십시오. 21 케이스의 벨트를 잠금 장치에 고정시키십시오. 어깨 장착 캠코더에 장착(그림 ) 부착 브래킷(A-8278-057-B)()과 SMAD-V1 장착 어댑터()(별도 구매)를 사용하여 케이스를 캠코더에 장착하십시오. 11 SMAD-V1 및 V 슈에서 나사(3개)를 제거하십시오. 21 나사를 사용하여 부착 브래킷에 SMAD-V1을 부착하십시오 (2 +B3×5개 나사, 2 +B4×5개 나사). 31 케이스의 벨트를 잠금 장치에 고정시키십시오. 참고 确保URX-P03已完全插入软套,然后再将带子连接至扣件。否则可能 导致在连接和取下URX-P03的电池架时,刮擦并损坏软套侧面的橡胶 部分。 1. 将软套的带子穿过SMAD-V1顶部和底部的孔。 2. 将软套的带子系到扣件上。 3. 将V形插座安装到V形底座上。 安装到摄像机(图、) 注意 ˎˎ将带子系到扣件上时务必用力拉扯带子,使带子牢固,没有松动。 ˎˎ将软套连接到摄像机时,软套的带子可能会刮擦摄像机上的握 带。连接软套时请务必小心。 ˎˎ确保URX-P03已完全插入软套,然后再将带子连接至扣件。否则可 能导致在连接和取下URX-P03的电池架时,刮擦并损坏软套侧面的 橡胶部分。 安装到手持式摄像机(图) 1. 将软套的带子穿过摄像机的握带。 2. 将软套的带子系到扣件上。 安装到肩托式摄像机(图) 使用安装支架(A-8278-057-B)ˎ()和SMAD-V1安装适配器()(两 者均未随附)将软套安装到摄像机上。 1. 取下SMAD-V1和V形插座上的螺钉(3颗螺钉)。 2. 使用螺钉将SMAD-V1安装到安装支架上(2颗B3×5螺钉,2颗B4×5 螺钉)。 3. 将软套的带子系到扣件上。 注意 将安装板(A-1528-515-A,未随附)连接到安装支架(A-8278057-B,未随附)可让将软套连接到摄像机的操作以及从摄像机上取 下软套的操作变得更为便利。使用安装板时,需要将V形插座连接到 SMAD-V1。 连接电缆 在URX-P03装入软套内时将电缆连接到URX-P03的接口。 注意 将电缆连接到URX-P03接口时,请确保未触碰弹力绳。 规格 尺寸ˎ 重量ˎ 随机附件ˎ 68×98×40ˎmm(宽×高×深) 约35ˎg 使用说明书(1) 设计和规格如有更改,恕不另行通知。 注意 ˎˎ在使用前请始终确认本机运行正常。ˎ 无论保修期内外或基于任何理由,SONY对任何损坏概不负责。 由于本机故障造成的利润损失等,无论是在保修期以内或者以 外,SONY均不作任何赔偿。 ˎSONY对本产品用户或第三方的任何索赔概不负责。 ˎSONY对因任何情况导致终止或停止使用本机相关服务概不负责。 出版日期:ˎ2014年11月