1
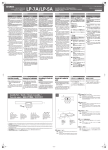
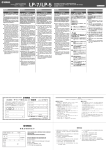
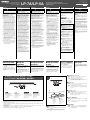
C.S.G., DMI Development Division © 2008-2014 Yamaha Corporation LP-7A/LP-5A Pedal Unit / Pedaleinheit Unité des pédales / Unidad de pedal ペダルユニット / 踏板单元 ENGLISH DEUTSCH CAUTION FRANÇAIS VORSICHT Read these precautions carefully before you assemble or use the pedal unit. Lesen Sie diese Vorsichtsmaßnahmen sorgfältig, bevor Sie die Pedaleinheit montieren oder benutzen. These precautions are to promote safe use of the pedal unit and to prevent injury and damage from occurring to you and others. By following these precautions carefully, you will be able to get long and safe usage from your pedal unit. Diese Vorsichtsmaßnahmen sollen den sicheren Gebrauch der Pedaleinheit ermöglichen und Sie und Andere vor Verletzungen und Schäden bewahren. Wenn Sie diese Vorsichtsmaßnahmen sorgfältig befolgen, wird Ihnen die Pedaleinheit über Jahre hinweg sicher und zuverlässig ihren Dienst tun. Be careful not to confuse any of the parts, and be sure to install all parts in the correct direction. Please assemble according to the sequence given below. Use only the screws provided when assembling the stand. Use of any other screws may result in an inadequate assembly that may cause damage to both the keyboard stand and the pedal unit. Always use the pedal unit properly installed on the specified keyboard stand. Also make sure to unplug the pedal cord when putting the instrument on a desk or table, since leaving it connected can damage the pedal unit. Protect the floor by placing a mat or area rug underneath the pedals. The pedals may damage the floor after an extended period of time. Make sure the stand is sturdy and safe, and all screws have been tight and firm before use. If not, the stand may overturn, the keyboard may drop, or may result in injury to the user. To disassemble, reverse the assembly sequence given below. Before using the LP-7A/LP-5A, be sure to read the “Precautions” section in the owner’s manual of your LP-7A/LP-5A compatible instrument. Achten Sie darauf, die Teile nicht zu verwechseln, und installieren Sie alle Teile in der richtigen Ausrichtung. Gehen Sie beim Zusammenbau bitte in der angegebenen Reihenfolge vor. Verwenden Sie für die Montage ausschließlich die mit dem Ständer gelieferten Schrauben. Der Gebrauch anderer Schrauben kann die Standfestigkeit beeinträchtigen und eine Beschädigung des Keyboard-Ständers und der Pedaleinheit zur Folge haben. Verwenden Sie die Pedaleinheit nur, nachdem sie ordnungsgemäß an dem angegebenen Tastaturständer angebracht wurde. Achten Sie auch darauf, das Pedalkabel abzuziehen, wenn Sie das Instrument auf ein Pult oder einen Tisch stellen, da die Pedaleinheit beschädigt werden kann, wenn es angeschlossen bleibt. Schützen Sie den Boden, indem Sie eine Matte oder einen kleinen Teppich unter die Pedale legen. Nach einem längeren Zeitraum können die Pedale den Fußboden beschädigen. Vergewissern Sie sich vor Gebrauch, daß der Ständer ordnungsgemäß zusammengebaut wurde und alle Schrauben fest angezogen sind. Ein wackeliger Ständer kann kippen oder einen Fall des Keyboards und im Extremfall sogar eine Verletzung zur Folge haben. Für die Demontage muß die angegebene Reihenfolge umgekehrt befolgt werden. Assembly Instructions / Montageanleitung Instructions pour le montage / Instrucciones de montaje 組立説明書 / 组装说明书 ATTENTION Ces précautions visent à renforcer les mesures de sécurité lors de l'utilisation des pédales afin de vous éviter de vous blesser ou de blesser votre entourage et d'endommager l'instrument. Suivez scrupuleusement ces précautions pour prolonger la durée de vie de la pédale et l'utiliser en toute sécurité. Veiller à ne pas mélanger les pièces et à les installer dans le sens correct. Veuillez assembler l'instrument dans l'ordre indiqué ci-dessous. Lors de l'assemblage du support, servez-vous exclusivement des vis fournies. L'utilisation d'autres vis pourrait produire un montage susceptible d'endommager le support du clavier et l'unité des pédales. N'utilisez l'unité des pédales que lorsqu'elle a été correctement installée sur le support de clavier spécifié. Veillez aussi à débrancher le cordon de l'unité avant de placer l'instrument sur un bureau ou une table, afin de ne pas endommager les pédales. Protégez le sol en plaçant une carpette ou un bout de tapis sous les pédales pour éviter que celles-ci n'endommagent le sol après une période d'utilisation prolongée. Assurez-vous que le support est stable et sûr et que toutes les vis sont bien serrées avant utilisation. Sinon, le support pourrait se retourner et le clavier tomber ou provoquer une blessure à l'utilisateur. Pour démonter le LP-7A/LP-5A, inverser l'ordre des instructions données cidessous. Avant d'utiliser le LP-7A/LP-5A, lisez la section relative aux précautions d'usage dans le mode d'emploi de l'instrument compatible LP-7A/LP-5A. EN DE FR ES JA ZH 日本語 ESPAÑOL Lisez attentivement les précautions suivantes avant d'assembler ou d'utiliser l'unité des pédales. Lea atentamente estas precauciones antes de montar o de emplear la unidad de pedal. Estas precauciones tienen el propósito de emplear la unidad de pedal de forma segura y evitar lesiones personales. Siguiendo con cuidado estas instrucciones la unidad de pedal le proporcionará un servicio prolongado y seguro. Observe cuidado para no confundir las piezas, y asegúrese de montar todas ellas en el sentido correcto. Proceda al montaje en el orden indicado a continuación. Emplee sólo los tornillos suministrados para montar el soporte. El empleo de otros tornillos puede dar lugar a un montaje incorrecto que cause daños en el soporte y en la unidad. Emplee la unidad después de haberla instalado correctamente en el soporte de teclado indicado. Asegúrese de desenchufar el cable del pedal cuando ponga el instrumento en una mesa, porque de lo contrario podría dañar la unidad. Have a Phillips-head (+) screwdriver of the appropriate size ready. The parts shown in the “Assembly Parts” illustration will be used. Follow the assembly instructions and select the parts as needed. 在组装或使用踏板单元前,请仔细阅读这 些注意事项。 ここに示した注意事項は、製品を安全に正しく ご使用いただき、お客様や他の方々への危害や 財産への損害を未然に防止するためのもので す。 必ずお守りください。 記号表示について この説明書に表示されている記号には、次のよ うな意味があります。 「ご注意ください」という注意喚起を示します。 ∼しないでくださいという「禁止」 を示します。 「必ず実行」してくださいという強制を示します。 注意 以下の内容を無視した取り扱いをすると、 傷害を負う可能性、または、物的損害が発 生する可能性が想定されます。 部品をまちがえたり、向きをまちがえな いように注意して、手順どおりに組み立 てる。 部品の取り付けは、必ず付属のネジを使 用する。 付属のネジ以外のネジを使用すると、他の 部品を傷つけることがあります。 这些注意事项用于确保安全使用踏板单元 以及防止您和他人受伤。 只要遵循这些注意事项,您便可长期安全使 用踏板单元。 请注意不要混淆任何部件,并务必以正确 方向安装所有部件。请根据下列顺序进行 组装。 组装支架时,请务必使用附带的螺钉。使 用任何其它螺钉可能会造成组装不完全, 从而导致键盘支架和踏板单元的损坏。 请始终使用正确安装在指定键盘支架上 的踏板单元。当将乐器放在桌子或台子上 时,请务必拔下踏板线,因为连着踏板线 可能会损坏踏板单元。 通过在踏板下放置垫子或小地毯来保护 地板。长时间使用踏板可能会损坏地板。 在使用前请确保支架稳固安全,且所有螺 钉都被拧紧。否则,支架可能会翻倒,键盘 可能会跌落,或者可能会造成使用者受 伤。 若要进行拆卸,请将上述组装步骤顺序颠 倒即可。 在使用LP-7A/LP-5A之前,请务必阅读兼 容LP-7A/LP-5A的乐器使用说明书中的 “注意事项”部分。 ペダルユニットは、指定のスタンドに組 み付けた状態で使用する。 Asegúrese de que el soporte esté bien fijado y seguro, y que todos los tornillos se hayan apretado bien antes de utilizarlo. De lo contrario, podría caerse el soporte con el teclado, o podría ocasionar daños al usuario. 楽器を机の上などに置くときは、故障の原 因になりますのでペダルユニットのコード を楽器から抜いてください。 ペダルで床やたたみを傷つけないよう注 意する。 長時間楽器(ペダル)を使用しているとペダ ルでフローリングの床やたたみを傷つける ことがあります。ペダルの下にマットを敷 くなどして、床やたたみを保護されること をおすすめします。 Para desmontar las unidades, invierta la secuencia de montaje facilitada a continuación. Antes de utilizar el LP-7A/LP-5A, lea detenidamente la sección ”Precauciones” del manual de instrucciones del instrumento compatible. 使用前に安全点検をする。 使用する前に、ネジが確実に締まっている か、必ず確認してください。ネジがゆるん でいると、スタンドが転倒してキーボード が故障したり、お客様がけがをしたりする 原因になります。 ペダルユニットを取りはずすときは、組 み立てと逆の手順で行なう。 LP-7A/LP-5Aを使用する前に、必ず LP-7A/LP-5A対応楽器に付属の取扱説 明書の「安全上のご注意」を読む。 DEUTSCH Pedal Unit Assembly 小心 組立作業、およびご使用の前に、必ずこの 「安全上のご注意」をお読みください。 Proteja el suelo con una alfombrilla debajo de los pedales, porque pueden deteriorarlo después de un tiempo. WQ29370 中文 安全上のご注意 ATENCIÓN Achten Sie darauf, den Abschnitt „Vorsichtsmaßnahmen“ in der Bedienungsanleitung Ihres LP-7A/LP5A-kompatiblen Instruments zu lesen, bevor Sie die LP-7A/LP-5A verwenden. ENGLISH Published 01/2014 改版 POAP*.*-**B0 Printed in Vietnam FRANÇAIS 日本語 ESPAÑOL 中文 Montage der Pedaleinheit Assemblage de l'unité des pédales Montaje de la unidad de pedal ペダルユニットの組み立て方 踏板单元的组装 ● ネジのサイズに合ったプラス ( + ) の ドライバーを用意します。 ● 准备一把尺寸合适的十字(+)螺丝刀。 Halten Sie einen KreuzschlitzSchraubendreher (+) der richtigen Größe bereit. Préparez un tournevis cruciforme (+) adapté à la taille des vis. Tenga preparado un destornillador con cabeza Phillips (+) del tamaño adecuado. すべての部品を取り出し、部品がすべてそ ろっているかイラストを参照して確認します。 組み立て手順に従って必要な部品を使用しま す。 Es werden die in der „Bauteile“Zeichnung abgebildeten Teile verwendet. Folgen Sie beim Zusammenbau den Anweisungen, und wählen Sie die jeweils benötigten Teile. Les éléments qui sont représentés sur la figure intitulée « Éléments à assembler » seront utilisés. Veuillez vous conformer aux instructions d'assemblage et sélectionner les éléments nécessaires. Assembly Parts / Bauteile / Éléments à assembler / Partes del conjunto / 組み立て部品 / 组装用部件 将用到 “ 组装用部件 ” 图中所示的部 件。请按照组装说明进行操作并根据需要 选择部件。 Se usarán las partes mostradas en la ilustración de ”Partes del conjunto”. Siga las instrucciones de montaje y seleccione las partes a medida que se requieran. z Bringen Sie q an w an. 1 1 q w q z-1 Schieben Sie q in w, wobei der schwarze Rand der Aussparung an q nach vorn zeigt. z-2 Führen Sie die kleinen Schrauben durch die Abstandhalter, und verbinden Sie dann vorläufig q und w von hinten mit diesen Schrauben. z Fixez q à w. z-1 Introduisez q dans w en orientant la bordure noire de la découpe présente sur q vers l'avant. z-2 Introduisez les petites vis dans les intercalaires d'appui, puis fixez temporairement q et w depuis l'arrière à l'aide de ces vis. w z Coloque q en w. 2 Small screws (2 pcs.) Spacers (2 pcs.) Cord holders (3 pcs.) Large screws (4 pcs.) Kleine Schrauben (2 St.) Abstandhalter (2 St.) Kabelbefestigungen (3 St.) Große Schrauben (4 St.) Petites vis (2 pièces) Entretoises (2 pièces) Supports de cordon (3 pièces) Grandes vis (4 pièces) Tornillos pequeños (2 uds.) Separadores (2 uds.) Soportes para cables (3 uds.) Tornillos grandes (4 uds.) 小さいネジ(×2) スペーサー (×2) コードホルダー (×3) 大きいネジ(×4) 小螺钉(2个) 定位件(2个) 踏板线固定夹(3个) 大螺钉(4个) • The illustrations as shown in this Assembly Instructions are for instructional purposes only, and may appear somewhat different from those on your unit or keyboard. • Die in dieser Montageanleitung dargestellten Abbildungen dienen nur zur Veranschaulichung und können vom tatsächlichen Aussehen Ihres Instruments oder Keyboards abweichen. • Les illustrations figurant dans ces instructions d'assemblage sont uniquement proposées à titre d'information et peuvent être différentes de celles de votre instrument ou clavier. • Las ilustraciones de estas instrucciones de montaje tienen una finalidad puramente ilustrativa, y podrían ser diferentes de las que aparezcan en la unidad o el teclado. • この組立説明書に掲載されているイラストは、手順説明のためのものです。そのため、実際の仕様と異なる場合があります。 • 本组装说明书中的插图仅用作说明之用,与实际踏板单元或键盘可能存在不同。 z-1 Coloque q en w con el borde negro de la hendidura q hacia el frente. z-2 Atornille los tornillos pequeños a través de los separadores, y sujete provisionalmente q en w con estos tornillos, desde la parte posterior. q z q を w に取り付けます。 w Spacers Small screws Abstandhalter Kleine Schrauben Entretoises Petites vis Separadores Tornillos pequeños スペーサー 小さいネジ 定位件 小螺钉 z-1 q 中央のくぼみの黒い縁を手前にして、w にはめ込み ます。 z-2 小さいネジをスペーサーに通し、このネジで q の裏側 から w を仮留めします。 z 将q装到w。 z Attach q to w. z-1 Set q onto w with the black rim of the indentation on q facing front. z-2 Thread the small screws through the spacers, then temporarily secure q and w from the rear using these screws. z-1 将q放入w中,将q上的突起部分的黑边朝着前方。 z-2 将小螺钉通过定位件拧入,然后用这些螺钉从后方 将q临时固定到w上。 x Fix the pedal unit to the keyboard stand. 2 Remove the caps on the bottom of stand part B, then attach the pedal unit there using the large screws. c Schließen Sie das Pedalkabel am 3 Keyboard an. c-1 Stecken Sie den Stecker des Pedalkabels in die Buchse [PEDAL UNIT] an der Keyboard-Rückseite. c-2 Bringen Sie die Kabelbefestigungen an der Rückwand an, und klemmen Sie dann das Kabel in die Befestigungen. The location or the angle of the [PEDAL UNIT] jack may differ depending on your keyboard. NOTE • If you have difficulty in fitting the pedal unit into the keyboard stand, lightly loosen the screws attached to stand part A. Die Position oder der Winkel der Buchse [PEDAL UNIT] kann je nach Keyboard variieren. HINWEIS L'emplacement et l'angle de la prise [PEDAL UNIT] peuvent varier selon le clavier. x Befestigen Sie die Pedaleinheit am • Informationen zur Montage des Keyboards finden Sie in der mit dem Keyboard mitgelieferten Bedienungsanleitung oder in der mit dem Keyboard-Stativ mitgelieferten Montageanleitung. La ubicación o ángulo de la clavija [PEDAL UNIT] puede variar en los distintos teclados. Keyboard-Stativ. Entfernen Sie die Kappen unten am Stativ-Teil B, und bringen Sie dann mit den großen Schrauben die Pedaleinheit dort an. [PEDAL UNIT]端子の向きや位置は楽器によって異なります。 视键盘而定,[PEDAL UNIT] 插孔的位置或角度可能会有 所不同。 HINWEIS c Connectez la fiche du cordon du pédalier au clavier. • Falls Sie Schwierigkeiten haben, die Pedaleinheit in das KeyboardStativ einzupassen, drehen Sie die an Stativ-Teil A angebrachten Schrauben wieder etwas heraus. A B c-1 Insérez la fiche du cordon du pédalier dans la prise [PEDAL UNIT] (Pédalier) située à l'arrière du clavier. c-2 Placez les supports de cordon sur le panneau arrière, puis insérez-y le cordon. B x Fixez le pédalier au pupitre du clavier. Retirez les capuchons sur le bas de la partie du pupitre B, puis fixez le pédalier à l'aide des grandes vis. 1 NOTE • Pour plus d'informations sur l'assemblage du clavier, reportez-vous au mode d'emploi fourni avec le clavier ou aux instructions d'assemblage fournies avec le pupitre du clavier. NOTE Large screws • Si vous éprouvez des difficultés à fixer le pédalier au pupitre, desserrez légèrement les vis fixées à la partie A. c Conecte el enchufe del cable del pedal al Große Schrauben Grandes vis Tornillos grandes 大きいネジ 大螺钉 teclado. x Sujete la unidad de pedal al soporte del c-1 Inserte el enchufe del cable del pedal en la toma [PEDAL UNIT] de la parte posterior del teclado. c-2 Coloque los soportes del cable en el panel posterior, después encaje el cable en los soportes. 2 teclado. Retire los tapones de la parte inferior de la parte B del soporte y después acople la unidad de pedal con los tornillos grandes. NOTA NOTA • Para información sobre el montaje del teclado, consulte el manual de instrucciones que se suministra con el teclado o las instrucciones de montaje que se facilitan con el soporte del teclado. • Si tuviera dificultades para acoplar la unidad de pedal en el soporte del teclado, afloje ligeramente los tornillos colocados en la parte A del soporte. x ペダルユニットをスタンドに固定します。 c スタンドの B 下方にあるキャップをはずして、そこにペダ ルユニットを大きいネジで取り付けます。 子に差込みます。 NOTE ・ ペダルユニットをスタンドにはめ込みにくい場合は、スタンドの A を固定してい るネジを少しゆるめてください。 c-2 コードホルダーを貼り付け、ペダルコードを固定しま す。 c Connect the pedal cord plug to the x 将踏板单元安装到键盘支架上。 从支架部件B的底部取下盖子,然后使用大螺钉将踏板单元 安装在那里。 注 • 如果您发觉将踏板单元安装到键盘支架上比较困难,请轻轻松开安装在 支架部件A 上的螺钉。 ペダルコードのプラグを楽器に接続します。 c-1 ペダルコードのプラグを楽器背面の[PEDAL UNIT]端 keyboard. c-1 Insert the pedal cord plug into the [PEDAL UNIT] jack on the rear of the keyboard. c-2 Attach the cord holders to the rear panel, then clip the cord into the holders. NOTE • For information on keyboard assembly, refer to the Owner’s Manual supplied with the keyboard, or the Assembly Instructions supplied with the keyboard stand. NOTE ・ 楽器の取り付け方法は、楽器に付属の取扱説明書、または、スタンドに付属 の組立説明書をご覧ください。 c 将踏板线插头连接到键盘上。 c-1 将踏板线插头插入键盘后部的[PEDAL UNIT] 插孔。 c-2 将踏板线固定夹安装到后面板上,然后将踏板线扣 入固定夹。 注 • 有关键盘装配的信息,请参见键盘附带的使用说明书或键盘支架附 带的组装说明书。 4 v Secure w. v Fixez la partie w. v w を固定する。 Move the instrument to the place you intend to use it, then while holding down the pedals so that w comes in firm contact with the floor, firmly tighten the screws you temporarily fastened in step z. Positionnez l'instrument à l'emplacement où vous souhaitez l'utiliser, puis maintenez les pédales enfoncées de sorte que la partie w soit bien appuyée au sol et resserrez fermement les vis que vous aviez temporairement fixées à l'étape z. 楽器を配置したい場所へ移動した後、w が床にぴったりつく ようにペダルを押さえながら、手順 z で仮留めしたネジをきつ く締め直します。 v Befestigen Sie w. Bewegen Sie das Instrument an die Stelle, an der Sie es verwenden möchten. Während Sie die Pedale nach unten drücken, so dass w in Kontakt zum Boden kommt, ziehen Sie die Schrauben, die Sie in Schritt z eingesetzt haben, fest an. q w v Asegure w. Lleve el instrumento al lugar donde prevea usarlo, después mantenga presionados los pedales de forma que w esté firmemente en contacto con el suelo y apriete bien los tornillos que colocó provisionalmente en el paso z. v 固定w。 将本乐器搬动到想要进行使用的地方,然后在踩住踏板使 w与地板紧密接触的同时,牢固拧紧在步骤z中临时固定的螺 钉。