1
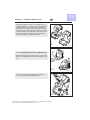
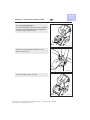
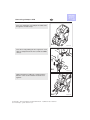
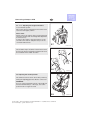
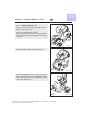
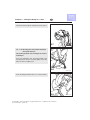
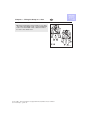
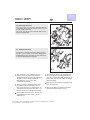
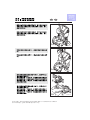
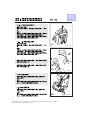
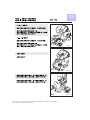
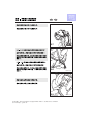
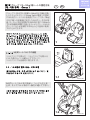
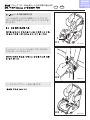
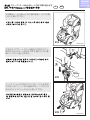
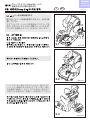
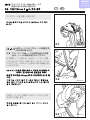
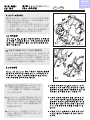
ECE 44/04
universal 9 – 36 kg
E1
04301171
Nr. .................
GB
Young Sport
Installation Instructions
Child Restraint System, Group I,II,III (9-36 kg)
These instructions must always be handed to the customer. Errors and omissions reserved. Subject to amendment.
WARNING – Keep for future reference.
TW
CN
J
取付け及び取扱説明書
チャイルドシート 適応条件:グループI、II、III(9∼36kg)
本取付け及び取扱説明書は必ず購買者にお渡し下さい。製品の外観および仕様は、改良のために予告なしに
変更する場合があります。必要な時に読めるよう、本書を大切に保管して下さい。
RECARO Child Safety GmbH & Co. KG, Guttenbergstr. 2, D-95352 Marktleugast-Mannsflur
Telefon +49/(0)9255/77-66, Fax +49/(0)9255/77-13, E-Mail: [email protected], www.recaro-cs.com
7141-4-04/1 - Version 101111
KO
Table of Contents
GB
Dear Parents,
Congratulations! In line with our motto
“Because your child is worth it" you have
chosen a high-grade quality product from
RECARO. For us, outstanding safety, best
ergonomics, state-of-the-art design, comfort
and highest quality are obligatory. For
example, at RECARO, all child seats are
treated like car seats and are tested in
accordance with the strict requirements of
the automotive industry.
The RECARO Child Safety GmbH & Co. KG
wishes you a safe journey at all times!
Contents
Chapter
Fitting the Group 1 seat
1
Fitting the seat with a 3-point safety belt
Harnessing a Group 1 child
Using the harness
Adjusting the height of the harness
Reclining the seat
Fitting the Group 2+3 seat
Before fitting
Fitting the seat and restraining the child
with the 3-point seat belt.
Handling
Removing the cover
Notes
Safety Information
General Information
Guarantee
sto7142-4-01-1 disk storchenmühle Young Sport
Inhaltsverzeichnis GB, Bilder um 33% verkleinert
erst. 27.07.2010 ps / geänd. am 09.11.11 ps
1.1 – 1.5
2
2.1 – 2.6
2.7 – 2.8
2.9
3
3.1 – 3.7
3.8 – 3.10
4
4.1
5
5.1
5.2
5.3
7142-4-01/1
Chapter 1 – Fitting the Group 1 seat
GB
7143-4-03/1
Young Sport child car seat for the age groups 1, 2
and body weight 3, 9 - 36 kg, to be secured with the
3-point harness in the car, and with a separate 5point harness to secure a Group 1 child. Checked
and approved according to ECE 44/04 for a frontal
crash at 50 km/h. The child seat can be used on all
forward-facing seats within the car, provided that
they are fitted with a 3-point belt system.
1
1673-4-04/1
1
1.1 - 1.5 Securing the seat with a 3-point harness
Open the belt buckle: Actuate the lever on the outer
side (1). The belt buckle will then automatically open
(2).
2
1.1
7023-4-02/1
Pull out the 3-point seat belt, lift up the headrest
cover and feed the belt behind the cover.
1.2
sto7143-4-03-1 disk storchenmühle Starlight Bild 1 - 1.2, Bilder um 33% verkleinert
erst. 27.07.2010 ps / geänd. am 04.08.10 ps / 09.11.11 ps
1638-4-04/1
Chapter 1 – Fitting the Group 1 seat
GB
7144-4-02/1
Close the belt buckle with an audible click. Conduct
the lap belt of the 3-point harness past the red belt
tensioners and then into the rear guides.
Klick
1.3
1639-4-05/1
2
First tighten the lap belt (1) and then the diagonal
belt (2).
1
1.4
Insert the diagonal belt buckle (3) and then close the
buckle (4) with an audible click (5). Now tension
the belt once again to ensure that the child seat is
optimally secured. For this purpose simply pull the
belt away from the belt buckle in the direction of the
car’s belt winding drum and simultaneously tighten
the lap and diagonal belts.
1640-4-05/1
4
1.5
sto7144-4-02-1 disk storchenmühle RecYoSp GB Bild 1.3 - 1.5, Bilder um 33% verkleinert
erst. 27.07.2010 ps / geänd. am 04.08.10 ps / 09.11.11 ps
3
Klick
5
7024-4-01/1
Chapter 2 – Harnessing a Group 1 child
GB
7145-4-01/1
2.1 - 2.6 Using the Harness
To increase the length of the harness press and hold
down the central adjusting button (1) and pull the
shoulder straps (2) at the bottom.
2
1
2.1
1661-4-04/1
Open the lock by turning the red button in the
direction of the arrow.
2.2
7729-4-00/1
Lay the shoulder straps to the side.
2.3
sto7145-4-01-1 disk storchenmühle YoungSport GB Bild 2.1 - 2.3, Bilder um 33% verkleinert
erst. 27.07.2010 ps / geänd. am 09.11.11 ps
1660-4-04/1
Harnessing a Group 1 child
GB
7146-4-01/1
Place your child in the seat and put the child’s arms
through the shoulder straps.
2.4
1662-4-05/1
1
Close the lock by pushing the two tongues into each
other (1) and push them into the lock with an audible
click (2).
2
Klick
2.5
7730-4-00/1
Tighten the belts by pulling the central belt in the
direction of the arrow. The belts should be close
together.
2.6
sto7146-4-01-1 disk storchenmühle YoungSport-GB Bild 2.4 - 2.6, Bilder um 33% verkleinert
erst. 27.07.2010 ps / geänd. am 09.11.11 ps
1659-4-04/1
Harnessing a Group 1 child
GB
7147-4-01/1
2.7 – 2.8 Adjusting the height of the belts:
Loosen the belt system.
Pull out the yellow locking button and set the head
rest in the next higher position.
Please note!
Please remove the reducer before raising the head
rest for the first time and check height that adjustment
is still necessary.
To remove the reducer open the fasteners on the
rear side of the reducer and pull it away from the
crotch belt and belt lock.
2.7
2273F-4-01/1
The shoulder straps should be routed in the manner
shown in the picture alongside. The belts must never
be routed below the child’s shoulder!
2.8
1643-4-00/1
2.9 Adjusting the recline position
The child seat can be set into the recline position by
turning the adjusting grip in the direction of the arrow.
WARNING!
As soon as the internal belt system of the child seat
has been dismantled (as of Group 2), the recline
position must no longer be used!
2.9
sto7147-4-01-1 disk storchenmühle YoungSport-GB Bild 2.7 - 2.8, Bilder um 33% verkleinert
erst. 27.07.2010 ps / geänd. am 09.11.11 ps
1644-4-04/1
Chapter 3 – Fitting the Group 2 + 3 Seat
GB
7148-4-01/1
3.1 – 3.7 Before fitting the seat
Please store the removed parts carefully in a safe
place for subsequent use!
3
Remove the integrated belt system.
Take off the end piece (1). Press the central adjuster
(2) downwards, hold it down and pull out the belt (3)
rearwards.
2
1
3.1
1654-4-06/1
Pull the shoulder straps out through the front.
3.2
1655-4-04/1
Raise the head support to the top position and release
the star grip. Pull the deflection roll slightly downwards
and out, and then remove the shoulder belts. Finally,
remove the deflection roll.
3.3
sto7148-4-01-1 disk storchenmühle YoungSport-GB Bild 3.1 - 3.3, Bilder um 33% verkleinert
erst. 27.07.2010 ps / geänd. am 10.11.11 ps
2274F-4-03/1
Chapter 3 – Fitting the Group 2 + 3 Seat
Partly remove the seat cover and unloop the lap belt
from the seat body.
GB
7149-4-01/1
3
1
2
3.4
1647-4-07/1
Unclip the base plate and turn it out sideways.
3.5
1645-4-05/1
Guide the metal plate out of the crotch belt and pull
the belt by the lock out of the seat area.
3.6
sto7149-4-01-1 disk storchenmühle YoungSport-GB Bild 3.4 - 3.6, Bilder um 33% verkleinert
erst. 27.07.2010 ps / geänd. am 10.11.11 ps
1666F-4-00/1
Chapter 3 – Fitting the Group 2 + 3 Seat
GB
7150-4-00/1
Turn back the base plate and clip it back into place.
3.7
1646F-4-02/1
3.8 – 3.10 Securing the seat and the child with
the 3-point harness:
The recline position must no longer be used as
of Group 2!
Place your child in the seat. Insert the lap belt of the
3-point harness into the front belt guides. Close the
belt lock with an audible click.
Klick
3.8
1651F-4-00/1
Place the diagonal belt in the hook on the headrest.
3.9
sto7150-4-00-1 disk storchenmühle YoungSport-GB Bild 3.7 - 3.9, Bilder um 33% verkleinert
erst. 27.07.2010 ps / geänd. am
1652F-4-01/1
Chapter 3 – Fitting the Group 2 + 3 Seat
GB
7151-4-00/1
Adjust the head support to the height of your child
- Proceed as described for Fig. 2.7. The optimal belt
route is over the middle of the collarbone and not
too near to the child’s neck!
3.10
sto7151-4-00-1 disk storchenmühle YoungSport-GB Bild 3.10, Bilder um 33% verkleinert
erst. 27.07.2010 ps / geänd. am
1653-4-01/1
Chapter 4 – Handling
Chapter 5 – Advice
GB
7152-4-01/1
4.1 Removing the cover:
First release the cover from the upholstery buttons
on the head, back and seat sections. The cover can
now be simply removed.
The cover can only be removed if the belt system
has been dismantled.
4.1
1648-4-07/1
5.1 Safety instructions
Irrespective of whether the seat is being used for
Group 1 or 2+3, ensure correct belt routing at the
load-bearing points. The belt lock must always be
located underneath the belt guide.
5.1
The child seat is only suitable for use in a
vehicle, where the approved vehicle is
equipped with 3-point automatic belts that
are approved according to UN-ECE
Regulation No. 16 or some other
comparable standards.
Always fasten the child seat in the car in
accordance with the installation instructions, even when it is not being used! An
unfastened seat can injure the other occupants in the event of emergency braking.
1649-4-03/1
The child seat must not be modified and
the assembly and operating instructions
must be carefully observed, otherwise it is
not possible to protect the child from danger
whilst travelling.
Belts must not be twisted or clamped in and
must be tightened.
After an accident, the child seat must be
replaced and tested in the factory.
Fix the child seat in the car so that it is not
clamped in by the front seats or by the
vehicle doors.
sto7152-4-01-1 disk storchenmühle YoungSport Bild 4.1 - 4.3, Bilder um 33% verkleinert
erst. 27.07.2010 ps / geänd. am10.11.11 ps
Chapter 5 – Advice
Ensure that items of luggage or other objects
are properly secured, especially on the
parcel shelf, since these can cause injuries
in the event of a crash.
Set a good example and use your seatbelt.
An adult who does not use a seatbelt can
be a danger to your child.
Note: Only original parts and spares must
be used!
Never leave your child without supervision.
Always place the belt around your child.
Protect the child seat from direct sunlight;
otherwise your child could suffer burns from
coming into contact with the seat. This will
also prevent bleaching of the cover.
The child seat must not be used without the
cover. Never replace the cover with a cover
that is not recommended by the
manufacturer, since this cover is an integral
part of the safety effect of the system.
GB
7153-4-01/1
5.3 Guarantee
Guarantee valid for two years after date of
purchase for production or material defects.
Claims can only be made with proof of
purchase. The guarantee is restricted to child
seats which have been treated properly and
which are returned in a clean and correct
condition.
The guarantee does not cover natural wear
and tear and damage resulting from unsuitable
use or misuse.
Textiles: All our materials meet high standards
in respect of their colour fastness. However,
materials bleach as a result of UV radiation.
This is not a material defect but normal wear
and tear, for which no guarantee can be
assumed.
Lock: Functional faults of the lock are usually
attributable to dirt for which no guarantee is
extended.
Protecting your vehicle
Weight class 1, 2 +3 ( 9 – 36 kg). Fit
facing forwards only.
We point out that the use of child seats may
cause damage to the vehicle seats. Safety
directive ECE R44 requires firm fitment.
Please take suitable precautions (e.g.
RECARO Car Seat Protector) for the seats
of your vehicle. RECARO Child Safety GmbH
& Co. KG and its dealers are not liable for
possible damage to the car seats.
Seat and belt can be washed with soap in
lukewarm water. The removed cover can be
washed according to the instructions on the
care label.
If you have any questions call us or send us
an email.
Telephone: +49 (0)9255/7766
email: [email protected]
5.2 General information
The instructions are located in a pocket
underneath the upholstery on the back. They
should always be returned after reading.
sto7153-4-01-1 disk storchenmühle YoungSport-GB Kap. 5.1, Bilder um 33% verkleinert
erst. 27.07.2010 ps / geänd. am 10.11.11 ps
TW
CN
7155-4-01/1
1
1.1 – 1.5
2
2.1 – 2.6
2.7 – 2.8
2.9
3
3.1 – 3.7
3.8 – 3.10
4
4.1
5
5.1
5.2
5.3
sto7155-4-01-1 disk storchenmühle Young Sport
Inhaltsverzeichnis TWCN, Bilder um 33% verkleinert
erst. 27.07.2010 ps / geänd. am 09.11.11 ps
TW
1
CN
7156-4-02/1
1673-4-04/1
1
2
1.1
1.2
sto7156-4-02-1 disk storchenmühle YoungSport-TWCN Bild 1 - 1.2, Bilder um 33%
verkleinert
erst. 27.07.2010 ps / geänd. am 04.08.10 ps / 09.11.11 ps
7023-4-02/1
1638-4-04/1
TW
CN
7157-4-02/1
Klick
1.3
1639-4-05/1
2
1
1.4
1640-4-05/1
4
1.5
3
Klick
sto7157-4-02-1 disk storchenmühle RecYoSp TWCN Bild 1.3 - 1.5, Bilder um 33% verkleinert
erst. 27.07.2010 ps / geänd. am 04.08.10 ps / 09.11.11 ps
5
7024-4-01/1
TW
CN
7158-4-01/1
2
1
2.1
2.2
2.3
sto7158-4-01-1 disk storchenmühle YoungSport TWCN Bild 2.1 - 2.3, Bilder um 33% verkleinert
erst. 27.07.2010 ps / geänd. am 09.11.11 ps
1661-4-04/1
7729-4-00/1
1660-4-04/1
TW
CN
7159-4-01/1
2.4
1662-4-05/1
1
2
Klick
2.5
2.6
sto7159-4-01-1 disk storchenmühle YoungSport-TWCN Bild 2.4 - 2.6, Bilder um 33% verkleinert
erst. 27.07.2010 ps / geänd. am 09.11.11 ps
7730-4-00/1
1659-4-04/1
TW
CN
2.7
2.8
2.9
sto7160-4-01-1 disk storchenmühle YoungSport-TWCN Bild 2.7 - 2.8, Bilder um 33% verkleinert
erst. 27.07.2010 ps / geänd. am 09.11.11 ps
7160-4-01/1
2273F-4-01/1
1643-4-00/1
1644-4-04/1
TW
CN
7161-4-01/1
3
2
1
3.1
3.2
3.3
sto7161-4-01-1 disk storchenmühle YoungSport-TWCN Bild 3.1 - 3.3, Bilder um 33% verkleinert
erst. 27.07.2010 ps / geänd. am 10.11.11 ps
1654-4-06/1
1655-4-04/1
2274F-4-03/1
TW
CN
7162-4-01/1
3
1
2
3.4
3.5
3.6
sto7162-4-01-1 disk storchenmühle YoungSport-TWCN Bild 3.4 - 3.6, Bilder um 33% verkleinert
erst. 27.07.2010 ps / geänd. am 10.11.11 ps
1647-4-07/1
1645-4-05/1
1666F-4-00/1
TW
CN
7163-4-00/1
3.7
1646F-4-02/1
Klick
3.8
3.9
sto7163-4-00-1 disk storchenmühle YoungSport-TWCN Bild 3.7 - 3.9, Bilder um 33% verkleinert
erst. 27.07.2010 ps / geänd. am
1651F-4-00/1
1652F-4-01/1
TW
CN
3.10
sto7164-4-00-1 disk storchenmühle YoungSport-TWCN Bild 3.10, Bilder um 33% verkleinert
erst. 27.07.2010 ps / geänd. am
7164-4-00/1
1653-4-01/1
TW
CN
4.1
5.1
sto7165-4-01-1 disk storchenmühle YoungSport-TWCN Bild 4.1 - 4.3, Bilder um 33% verkleinert
erst. 28.07.2010 ps / geänd. am
7165-4-01/1
1648-4-07/1
1649-4-03/1
TW
CN
sto7167-4-01-1 disk storchenmühle YoungSport-TWCN Hinweise, Bilder um 33% verkleinert
erst. 28.07.2010 ps / geänd. am 10.11.11 ps
7167-4-01/1
TW
CN
sto7168-4-02-1 disk storchenmühle YoungSport-TWCN Hinweise, Bilder um 33% verkleinert
erst. 28.07.2010 ps / geänd. am / 24.03.11 ps / 10.11.11 ps
7168-4-02/1
J
KO
7169-4-01/1
お客様へ
このたびは確かな品質を誇るRECARO社の製品を
ご購入いただきまして、
まことにありがとうござい
ます。弊社では「お子様を第一に」をモットーに製品
を製造しています。高い安全性と最適な人間工学、
最新のデザイン、快適性そして最高の品費を提供す
ることが弊社の義務であると自負しております。例え
ばRECARO社で製造される全てのチャイルドシート
は自動車の座席同様に、
自動車業界の厳格な基準
にもとづいて検査されています。
RECARO Child Safety事業部門は、皆さまの快適で
安全なドライブを常に願っております。
グループ1(9∼18kg)用シートの
固定方法
3点式シートベルトでの固定
グループ1(9∼18kg)用シートの
お子様の座らせ方
ハーネス類の操作方法
ハーネスの肩ベルトの高さ調節
シートの角度調節
グループ2、3(15 36kg)用シート
の固定方法とお子様の座らせ方
ハーネス類を取り外す
3点式シートベルトでのシートの
固定方法とお子様の座らせ方
カバーの取り外し
注意(必ずお読み下さい。)
安全にご使用いただくための
注意事項
一般的な注意事項
保証
1
1.1 – 1.5
2
2.1 – 2.6
2.7 – 2.8
2.9
3
3.1 – 3.7
3.8 – 3.10
4
4.1
5
5.1
5.2
5.3
グループ1(9∼18kg)用シートの固定方法
J
KO
7170-4-02/1
グループ1、2および3、体重9∼36kgのお子様を対象
としたチャイルドシートYoung Sport。車両への固定
には3点式シートベルトを使用。
グループ1(9∼18kg)
のお子様への装着用に独立した5点式ハーネスを採
用。
ヨーロッパ安全基準ECE-R44/04に基づく50km/h
での前面衝突試験に合格。当チャイルドシートは3点
式シートベルトが装備されるほとんどの座席に使用
することができます。
1
3点式シートベルトでの固定
1673-4-04/1
1
ベルトクランプの開け方:ベルトクランプを開ける
には、外側のレバーを動かして下さい(1)。
ベルトクランプは自動的に開きます(2)。
2
1.1
7023-4-02/1
1.2
1638-4-04/1
3点式シートベルトを引き出し、ヘッドレストを
上げ、そしてベルトをカバー後方に通して下さい。
グループ1(9∼18kg)用シートの固定方法
J
KO
7171-4-02/1
3点式シートベルトのバックルにタングプレートをカ
チッと音がするまで差し込み、3点式シートベルトの
腰ベルトを後部のガイドに通します。
Klick
1.3
1639-4-05/1
2
3点式シートベルトの腰ベルト
(1)、そして肩ベルト
(2)
にゆるみがないようにしっかりと引きしめるように調
節します。
1
1.4
3点式シートベルトの肩ベルトをベルトクランプ
に差し込み(3)、クランプ(4)をカチッと締め
て下さい(5)。チャイルドシート座面に体重を
かけるなどして、車の座席にチャイルドシートを
沈みこませながら3点式シートベルトの肩ベルト
をお車のリール方向へ引き、3点式シートベルト
の腰ベルトと肩ベルトのたるみを取りしっかり
固定して下さい。
1640-4-05/1
4
1.5
3
Klick
5
7024-4-01/1
グループ1(9∼18kg)用シートのお子様の座らせ方
J
KO
7172-4-01/1
ハーネス類の操作方法
ベルトを伸ばすには中央の調整スイッチ(1)を下に
押したままの状態でショルダーストラップ(2)の下部
を引きます。
2
1
2.1
1661-4-04/1
2.2
7729-4-00/1
2.3
1660-4-04/1
チャイルドシートのバックルの赤いボタンを矢印の
方向に押し、ロックを外します。
ハーネスのタングプレートを脇へ置きます。
グループ1(9∼18kg)用シートのお子様の座らせ方
J
KO
7173-4-01/1
お子様をシートに座らせ、お子様の腕をハーネスの肩
ベルトに通して下さい。
2.4
左右のタングプレートのピンを重ねて
(図2.5の(1))、
矢印の方向にカチッと音がするまで(図2.5の(2))確
実にバックルに差し込みます。
1662-4-05/1
1
2
Klick
2.5
7730-4-00/1
2.6
1659-4-04/1
シートクッションの中央のアジャスターベルトを矢印
の方向に引いて、ハーネスを締めます。ハーネスにゆ
るみがないようにしっかりと引っ張って下さい。
グループ1(9∼18kg)用シートのお子様の座らせ方
J
KO
7174-4-01/1
ハーネスの肩ベルトの高さ調節
ハーネスの肩ベルトの高さ調節をするには、背面裏
側のベルトシステムを緩めます。黄色のロックボタン
を引き、ヘッドレストの高さを調節して下さい。
2.7
2273F-4-01/1
2.8
1643-4-00/1
2.9
1644-4-04/1
ハーネスの肩ベルトの位置は、図2.8のように肩のすぐ
上を通るように調節して下さい。
シートの角度調節
チャイルドシートは調節グリップを矢印の方向に回す
ことにより倒すことができます。
注意
角度調節はグループ1(9∼18kg)のお子様のみ使用
可能な機能です。
グループ2、3(15∼36kg)用シートの
固定方法とお子様の座らせ方
J
KO
7175-4-01/1
ハーネス類を取り外す
取り外したパーツは後日使用できるよう、大切に保
管して下さい。
まずアジャスターベルトの末端部品(1)のクリップを
起こして取り外します。中央の調節スイッチ(2)を押
したまま、座面後ろのベルト
(3)を引いて外します。
3
2
1
3.1
1654-4-06/1
3.2
1655-4-04/1
3.3
2274F-4-03/1
ヘッドレストを一番上のポジションにし、図のように
ヘッドレスト裏側のネジを外して下さい。次に、背も
たれ裏側の背面バーを少し下に引き出し、図のよう
に肩ベルトを取り外し、背面バーも取り外して下さい。
グループ2、3(15∼36kg)用シートの
固定方法とお子様の座らせ方
シートカバーを取り外し、腰ベルトをシート本体から
取り外します。腰ベルトを外した後は、
シートカバー
を元通りにして下さい。
J
KO
7176-4-01/1
3
1
2
3.4
1647-4-07/1
3.5
1645-4-05/1
3.6
1666F-4-00/1
底面のベースプレートのクリップを外し、矢印の方向
へ回します。
図3.6のように、金属プレートをステップベルトから外
し、チャイルドシート座面にある5点式ハーネス用の
バックルを取り外して下さい。
グループ2、3(15∼36kg)用シートの
固定方法とお子様の座らせ方
J
KO
7177-4-00/1
ベースプレートを元通りに戻します。
3.7
1646F-4-02/1
3点式シートベルトでのシートの固定方法
とお子様の座らせ方
注意:グループ2(15kg∼)のお子様が座られる場
合は、シートの角度を倒さないで下さい。
お子様をシートに座らせ、3点式シートベルトの腰
ベルトをベルトガイドに通します。そしてバックル
にタングプレートをカチッと音がするまで確実に差
し込んで下さい。
Klick
3.8
1651F-4-00/1
3.9
1652F-4-01/1
3点式シートベルトの肩ベルトをヘッドレストにあ
るガイドに通します。
グループ2、3(15∼36kg)用シートの
固定方法とお子様の座らせ方
J
KO
7178-4-00/1
先の図2.7の説明に従い、お子様の体格に合わせてヘ
ッドレストの高さを調節します。3点式シートベルト
の肩ベルトはお子様の肩のすぐ上を通るようにしま
す。また、お子様の頭部がヘッドレストの高さより
高くならないようにして下さい。
3.10
1653-4-01/1
注意(必ずお読み下さい。)
J
KO
7179-4-01/1
腰まわりをサポートするクッションは、お子様の体格
に応じて外します。遅くともハーネスを必要としなく
なる際には取り外して下さい。
ハーネスは図3.1-3.7のように取り外します。
シートカ
バーは図4.1のように、
まずカバーが止まっているボ
タンを外し、頭部のカバー、背もたれから座面のカ
バーをそれぞれ手前に向けて取り外します。
4.1
1648-4-07/1
5.1
1649-4-03/1
安全にご使用いただくための注意事項
グループ1(9∼18kg)
または、2、3(15∼36kg)のいず
れのお子様がお使いになる場合でも、
シートベルト
がねじれたり、ゆるんだりせず正しく装着されている
か確認して下さい。
シートベルトバックルはベルトガ
イドよりも下に位置するように調節して下さい。
本製品はUN/ECE規則No.16または、それ
に同等の基準で許可された3点式シート
ベルトを装着している車両にのみ使用す
ることができます。
チャイルドシートはお子様が座っていない
場合でも、必ず取付指示に従って固定して
おいて下さい。急ブレーキの場合に、固定
されていないシートが他の乗員を傷つけ
る場合があります。
チャイルドシートは車内でフロントシート、
あるいは車のドアに挟まることがないよう
に固定して下さい。
注意(必ずお読み下さい。)
チャイルドシートは改造したり、
カバー類
やウレタンなどは取り外して使用しないで
下さい。本取付け説明書の操作と指示内容
通りにご使用下さい。以上のことをお守り
頂けなかった場合、お子様の生命に危機
または重大な傷害につながるおそれがあ
ります。
ベルトはねじれたり、あるいは折れ曲がら
ないようにし、ぴんと張るようにして下さい。
事故や落下などによって大きな衝撃を受
けたチャイルドシートは外観に損傷がな
くても使用しないで下さい。
衝突時に負傷の原因となる場合がありま
すので、荷物や物品が十分に固定されて
いることを確認して下さい。チャイルドシ
ートをお使いになる場合は、全ての同乗
する人もシートベルトを装着して下さい。
お子様を車内にひとりで放置することは
おやめ下さい。
お子様には常にシートベルトを着用させ
て下さい。
お子様が火傷を負わないよう、
またカバ
ーの色が変色しないよう、チャイルドシー
トを直射日光から保護して下さい。
チャイルドシートには必ずシートカバー
を取り付けてご使用下さい。
シートカバ
ーは安全機能の構成部品を成していま
すので、
メーカー推奨していない他のカ
バーとは交換しないで下さい。
一般的な注意事項
取扱説明書は背もたれカバーをめくった
本体に収納袋が用意されています。使用
後はいつもここに戻すようにして下さい。
J
KO
7180-4-02/1
注意(必ずお読み下さい。)
適用条件 グループ1、2、3(9∼36kg)
チャイルドシートの取り付けは車両進
行方向の向きのみ可能です。
シートカバーは取り外して、
ラベルのクリ
ーニング表示に従い洗濯することが可能
です。
また、本体樹脂部分及びベルトは、
かたく絞った布で水拭きして下さい。
正常なご使用で、製造による欠陥または
材料欠陥の発生に対してお客様の購入
日から2年間保証いたします。保証を受け
る場合は、購入日が証明できるものが必
要になります。尚、
ご返送頂いた製品に
欠陥内容が確認できない場合は保証の
対象となりません。
正常な使用でも消耗部品が自然消耗、摩
耗、劣化した場合や、過度な使用による
破損は保証の対象にはなりません。
また、
乱用や誤った使用方法による破損も保証
の対象とはなりません。
縫製部品:縫製部品の耐久性については、
高い条件を満たしております。
しかし紫外
線によって色あせする場合もございます。
これは自然劣化によるものですので、保
証の対象とはなりません。
バックル:バックルの機能障害は、多くの
場合、汚れに原因があります。
この場合も
同様に保証の対象とはなりません。
自動車座席の保護
本製品の使用によって自動車座席が損傷
を受ける可能性があります。ECE-R44安全
規定では、チャイルドシートをしっかりと
固定することを明示しています。座席(シ
ートカバー等)が破損されないよう注意し
て下さい。
RECARO Child Safety GmbH & Co.KGと
その営業所は自動車座席に生じた損傷に
対する責任を負いません。
ご不明な点がございましたら、お電話また
はE-mailで当社までお問い合わせ下さい。
レカロスタートコール:0800-919-1906
E-mai:
l [email protected]
J
KO
7181-4-02/1
NOTIZEN / NOTES
1456-4-04/1
sto1456-4-04-1 disk storchenmühle Notizen erst. 12.06.03 ps / geänd. 08.07.04 ps / 21.02.05 ps / 05.07.05 ps / 23.09.08 ps