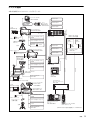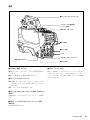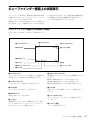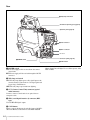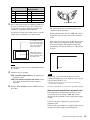
1
HD COLOR CAMERA
HDC1500 Series
電気製品は、安全のための注意事項を守らないと、
火災や人身事故になることがあります。
このオペレーションマニュアルには、事故を防ぐための重要な注意事項と
製品の取り扱いかたを示してあります。このオペレーションマニュアルを
よくお読みのうえ、製品を安全にお使いください。お読みになったあとは、
いつでも見られるところに必ず保管してください。
OPERATION MANUAL
1st Edition (Revised 1)
[Japanese/English]
日本語
安全のために
ソニー製品は安全に充分配慮して設計されています。しかし、電気製品はまちがっ
た使い方をすると、火災や感電などにより死亡や大けがなど人身事故につながるこ
とがあり、危険です。
事故を防ぐために次のことを必ずお守りください。
安全のための注意事項を守る
警告表示の意味
オペレーションマニュアルおよび
製品では、次のような表示をして
います。表示の内容をよく理解し
てから本文をお読みください。
4 ∼ 6 ページの注意事項をよくお読みください。
定期点検を実施する
長期間安全に使用していただくために、定期点検を実施することをおすすめしま
す。点検の内容や費用については、ソニーのサービス担当者または営業担当者にご
相談ください。
この表示の注意事項を守らないと、
火災や感電などにより死亡や大け
がなど人身事故につながることが
あります。
故障したら使用を中止する
ソニーのサービス担当者、または営業担当者にご連絡ください。
万一、異常が起きたら
この表示の注意事項を守らないと、
感電やその他の事故によりけがを
したり周辺の物品に損害を与えた
りすることがあります。
• 異常な音、におい、煙が出たら
• 落下させたら
注意を促す記号
m
a 電源を切る。
b 光ファイバーケーブルや DC 電源接続コードを抜く。
c ソニーのサービス担当者、または営業担当者に修理を依頼する。
炎が出たら
行為を禁止する記号
m
すぐに電源を切り、消火する。
2
安全のために
行為を指示する記号
目次
警告 .................................................................................................................................. 4
注意 .................................................................................................................................. 5
その他の安全上のご注意 ........................................................................................................ 6
概要 ......................................................................................................................................... 7
特長.............................................................................................................................. 7
システム構成 ............................................................................................................... 9
使用上のご注意 ..................................................................................................................... 10
各部の名称と働き ................................................................................................................. 11
アクセサリー関連部 .................................................................................................. 11
操作 / 端子部 ............................................................................................................. 12
準備 ....................................................................................................................................... 18
レンズの取り付け ...................................................................................................... 18
フランジバックの調整............................................................................................... 18
ビューファインダーの取り付け ................................................................................ 19
ショルダーパッドの位置調整 .................................................................................... 20
三脚への取り付け ...................................................................................................... 21
JP
記録のための調整と設定 ...................................................................................................... 22
ブラックバランス / ホワイトバランスの調整........................................................... 22
電子シャッターの設定............................................................................................... 24
ビューファインダー画面上の設定メニューの基本操作........................................................ 26
ビューファインダー画面上の状態表示 ................................................................................. 27
ビューファインダー画面上の状態表示の構成........................................................... 27
“メモリースティック”を使う ............................................................................................. 28
仕様 ....................................................................................................................................... 30
目次
3
光電気複合ケーブルやDC電源
コードを傷つけない
光電気複合ケーブルや DC 電源コードを
傷つけると、火災や感電の原因となりま
す。
• ケーブルを加工したり、傷つけたりし
ない。
• 重いものをのせたり、引っ張ったりし
ない。
• 熱器具に近づけたり、加熱したりしな
い。
• ケーブルを抜くときは、必ずプラグを
持って抜く。
万一、ケーブルが傷んだら、ソニーの
サービス担当者に交換をご依頼ください。
4
警告
回転式マルチコネクターは慎
重に扱う
回転式マルチコネクターを乱暴に扱うと、
コネクター部が回転して指を挟むことが
あります。ケーブルの接続および取り外
しは無理な力をかけずに慎重に行ってく
ださい。
ハンドルのロックを外したま
まにしない
分解しない、改造しない
分解したり、改造したりすると、感電の
原因となります。
ハンドルのロックを外した状態でカメラ
を持たないでください。ロックを外した
後は、元どおりにロックするか、大型レ
ンズアダプターのハンドル固定部にきち
んとはめ込んでください。
内部に水や異物を入れない
使用中、放熱口をふさがない
水や異物が入ると火災や感電の原因とな
ります。
万一、水や異物が入ったときは、すぐに
電源を切り、光電気複合ケーブルや接続
コードを抜いて、ソニーのサービス担当
者または営業担当者にご相談ください。
内部温度が上昇して、筐体でやけどする
おそれがあります。
油煙、湯気、湿気、ほこりの
多い場所では設置・使用しない
別売りの機器や部品の取り付け方法を誤
ると、機器が落下して怪我をすることが
あります。下記の機器や部品を取り付け
るときは、マニュアルをよく読んだうえ、
確実に取り付けてください。
• レンズ
• ビューファインダー
• 三脚アダプター
上記のような場所で設置・使用すると、
火災や感電の原因となります。
指定されたCCU(カメラコン
トロールユニット)を使用す
る
機器や部品の取り付けは正し
く行う
指定以外の CCU を使用すると、火災や
感電の原因となります。
側板をあけるときは、高温部
分に触れない
機器を使用中または使用直後に側板を開
けると、電源部が高温になっているため、
やけどすることがあります。側板を開け
て点検や調整を行うときは、電源を切っ
てから少なくとも 10 分間放置してくださ
い。
注意
5
その他の安全上のご注意
レーザー機器についてのご注意
ここに規定した以外の手順による制御および調整は、危険な
レーザー放射の被爆をもたらします。
レーザー特性
波長:
発振形態:
レーザー出力:
6
1310 ± 40 nm
パルス変調
141 +- 37
29 µW
その他の安全上のご注意
概要
HDC1500/1600 は、2/3 インチ 220 万画素 CCD 搭載のハイ
デフィニションポータブルビデオカメラです。
新開発の撮像素子、デジタル信号処理 LSI を搭載、従来の主
な機能・操作性を踏襲しながら、さらなる高画質、高安定な
映像表現を実現します。
アサイナブルスイッチを搭載
カメラの側面にアサイナブルスイッチを搭載しています。
ユーザーの好みに合わせて、電子色温度変換などの機能をあ
らかじめ設定して使用することができ、撮影時に瞬時にこれ
らの機能を働かせることができます。
ハンドル上部のスイッチもアサイナブルスイッチとして使用
できます。
メモリースティック スロット 1)
特長
メモリースティックスロットをカメラヘッドに搭載。カメラ
のセットアップデータの保存や、カメラのソフトウェアの
バージョンアップが可能です。
高画質・高性能
1) Memory Stick(“メモリースティック”)および
ニ−株式会社の商標です。
従来の FIT CCD(HDC1600 に搭載)に加え、HDC1500 に
搭載する新開発 2/3 型 220 万画素プログレッシブ IT 型の
CCD は、1080/59.94P までの駆動方式に対応し、高感度、低
スミアを実現します。また、14 ビット AD コンバーターと
独自開発の信号処理 LSI の搭載により、さらなる高画質化を
図っています。
マルチフォーマット対応
HDC1500/1600 とも、1080/50i、59.94i のインターレース、
1080/23.98PsF、24PsF、25PsF、29.97PsF のプログレッシ
ブシステムに対応します。さらに、HDC1500 では、720/
50P、59.94P システムにも対応、また、カメラヘッドから
Dual Link インターフェースにより、1080/50P、59.94P 信号
の出力が可能です。
新設計の低重心型デザインワンピース筐体
高さを低く抑えたスタイリッシュな外観構造により、ポータ
ブルカメラとしての取り扱いを改善しました。また、大型レ
ンズアダプター HDLA1500 と組み合わせて使用するときも、
ビューファインダーの位置を大幅に低くし、レンズの光軸に
ビューファインダー位置をより近づけることにより、運用効
率を改善しています。
は、ソ
多彩な色再現調整機能
ガンマテーブルの選択
複数のガンマテーブルの選択が可能で、自由度の高い画作り
に威力を発揮します。
マルチマトリックスカラーコレクション
通常の 6 軸マトリックス機能に加え、16 軸方向の色成分で
色相、彩度の調整を独立に行えるマルチマトリックス機能を
搭載。複数のカメラの色合わせに威力を発揮します。
ニーサチュレーション
ハイライト領域において発生する色相の変化や彩度の減少を
補正することができます。
強い光が顔に当たるような場合に、自然なスキントーンの再
現が可能です。
ローキーサチュレーション
ローキー領域において、色相 / 彩度の補正をすることができ
ます。マトリックスカラー補正、ニーサチュレーション機能
との組み合わせで、全領域での色再現補正を実現します。
多彩なディテールコントロール機能
スイング式ハンドル
スイング式のハンドル構造により、HDLA1500 にマウント
して運用するときに大型ビューファインダーを前方に移動す
る機構を設け、スタジオ標準カメラと同じ前後長を実現し、
スタジオ標準カメラと同じ操作性を提供します。
スキントーンディテール機能
肌色など任意の色相の色成分からディテールゲート信号を作
り出すことにより、画面内の特定色相 / 彩度エリアのみに対
してのディテール量のコントロール ( 強調 / 抑制 ) が可能で
す。同時に 3 つの色相のディテールを、独立してコントロー
ルできます。
可動式ショルダーパッド
可動式のショルダーパッドを装備しており、カメラオペレー
ターの体格、レンズの種類、撮影スタイルに応じた調整をす
ることで安定した撮影を可能にします。
ディテールブースト周波数コントロール
ブースト周波数を 20 MHz ∼ 30 MHz の範囲で調整し、被写
体に応じてディテールの太さを適切な量に設定することで、
より微妙な映像表現が得られます。
概要
7
H/V レシオコントロール
H ディテールと V ディテールの加わる比率を調整できます。
ホワイト / ブラックリミッター
ホワイト側 / ブラック側のディテールを、各々独立して抑制
( リミット ) できます。
メニューによる設定操作機能
ビューファインダー画面の表示項目、セーフティゾーンマー
カー 2)/ センターマーカー 3)、スクリーンサイズマーカーな
どに関する選択や設定を、ビューファインダー画面または外
部モニター画面に表示される設定メニューを見ながら、簡単
かつ迅速に行えます。
2) セーフティゾーンマーカー :
ビューファインダー画面上で、画面面積の 80% または 90%、92.5%、95%
の領域を示すボックス型のマーカー
3) センターマーカー :
ビューファインダー画面の中心を示す十字マーカー
充実したビューファインダー内の表示
ビューファインダー画面には、操作メッセージ、ゼブラパ
ターン 4)、セーフティゾーンマーカー、センターマーカーな
どに加え、本機の設定を表示することができます。さらに、
画面の上下には、タリーランプ、バッテリー残量警告ラン
プ、設定が標準状態ではないことを示すランプなどが配置さ
れています。したがって、本機の状態を容易に確認すること
ができます。
4) ゼブラパターン :
ビューファインダー画面上に現れる映像レベルが約 70% および 100% 以上
の部分を示すしま模様。被写体の映像レベルの確認に使用します。
光デジタル伝送
光電気複合ケーブルを用い、カメラ - カメラコントロールユ
ニット間で 1.5 ギガビット デジタル光伝送を行います。
高解像度 2 型白黒、2.7 型カラーマルチ
フォーマットビューファインダー(別売り)
マルチフォーマット対応の 2 型白黒 CRT ビューファイン
ダー HDVF-20A と、2.7 型カラー LCD ビューファインダー
HDVF-C30W により多彩なアプリケーションに対応します。
感電防止機能
接続が不完全なとき、カメラコントロールユニットからの高
電圧供給が停止します。
8
概要
システム構成
本機の関連機器およびアクセサリーを下図に示します。
ビューファインダー
HDVF-C750W
ビュー
ファインダー
HDVF-20A
HDVF-C30W
VF 回転機構
BKW-401
レンズ
(ENG/EFP 用)
HKCU1001
HKCU1003
HKCU1005
BNC (SD)
ポータブルカメラ
HDC1500/1600
光ファイバー
ケーブル
リターンビデオセレクター
CAC-6
カメラコントロールユニット
HDCU1000
HKCU1001 または
HKCU1003 が必要
メモリースティック
インターカム用ヘッドセット
映像
モニター
三脚アダプター
VCT-14
マイクホルダー
CAC-12
三脚
マイク
HKCU1001
BNC
(VBS)
HKCU1003
ポータブルカメラ
HDC1500/1600
メモリースティック
波形
モニター
BNC
(VBS)
ビデオセレクター
VCS-700
HKCU1005
ビューファインダー
HDVF-700A
HDVF-9900
BNC (SD)
カメラハンガー a)
1
POWER
CABLE
ALARM
CAM
OPEN
MAIN
SHORT
リターンビデオセレクター
CAC-6
INCOM MIC ON
OFF
PGM
PROD
PRIV
ENG
HD CAMERA CONTROL UNIT
カメラコントロールユニット
HDCU1500
PANEL STANDARD MONITOR
ACTIVE
MEMORY
STICK
5600K
AUTO
KNEE
SKIN
DETAIL
TEST
CLOSE
BARS
VTR
START/STOP
BLACK
KNEE
GAMMA SATURATION
AWB
ABB
WHITE
FUNCTION
ABS
大型レンズアダプター
HDLA1500
BLACK
MAINTE
NANCE
SCENE
AUTO
IRIS
PAINT
ALARM
IRIS/MB
ACTIVE MASTER
BLACK
CCA-5
マイク
CCA-5
インターカム用ヘッドセット
EXT
IRIS
REMOTE CONTROL UNIT
スクリプトホルダー
BKP-7911
レンズ
(スタジオカメラ用)
ビューファインダー
HDVF-700A
HDVF-9900
V ウェッジシュー
(三脚に付属)
CCA-5
1
スタジオ大型カメラ
HDC1000/1100
メモリースティック
カメラコマンド
ネットワークユニット
CNU-700
CCA-5
レンズ
(スタジオカメラ用)
リモートコントロール
ユニット
RM-B750
リターンビデオセレクター
CAC-6
インターカム用ヘッドセット
マイク
三脚
スクリプトホルダー
BKP-7911
マスターセットアップ
ユニット
MSU-900/950
リモートコントロールパネル
RCP-700 シリーズ
a)HDLA1500 に付属、部品番号:A-1128-405-A
概要
9
使用上のご注意
レーザービームについてのご注意
レーサービームは CCD に損傷を与えることがあります。
レーサービームを使用した撮影環境では、CCD 表面にレー
ザービームが照射されないように充分注意してください。
強い衝撃を与えない
内部構造や外観の変形などの損傷を受けることがあります。
使い終わったら
電源スイッチを切ってください。
使用、保管場所
水平な場所、空調のある場所に保管してください。
次のような場所での使用および保管は避けてください。
• 極端に暑い所や寒い所
• 湿気の多い所
• 激しく振動する所
• 強い磁気を発生する所
• 直射日光が長時間あたる所や暖房器具の近く
結露
本機を寒いところから暖かい場所に急に移動したり、湿度の
高い部屋で使用したりすると、空気中の水分が水滴となって
レンズやカメラ内部に付着することがあります。この現象を
結露といいます。
本機には結露を警告するランプなどは備えていません。カメ
ラの外筐やレンズに水滴が付着したときは、カメラの電源を
切り、結露が解消するまで 1 時間程度待ってから使用してく
ださい。
10
使用上のご注意
各部の名称と働き
アクセサリー関連部
a VF 端子
b ショルダーベルト取り付け金具
c ビューファインダー前後位置
固定レバーと LOCK つまみ
d ビューファインダー左右位置
固定リング
e レンズ用ケーブルクランプ
f レンズ固定レバー
g レンズマウントキャップ
h レンズマウント
k ショルダーパッド
i LENS 端子
j 三脚マウント(底面)
a VF(ビューファインダー)端子(20 ピン)
ビューファインダー(別売り)のケーブルを接続します。
b ショルダーベルト取り付け金具
ショルダーベルト(別売り)の一端をこの取り付け金具に取
り付け、もう一端を右側面のショルダーベルト取り付け金具
に取り付けます。
c ビューファインダー前後位置固定レバーと LOCK つまみ
ビューファインダーの前後位置をロックします。
位置を調整するときは、レバーとつまみをゆるめます。
d ビューファインダー左右位置固定リング
ビューファインダーの左右位置をロックします。
位置を調整するときは、このリングをゆるめます。
◆ ビューファインダーの位置の調整について詳しくは、
「ビュー
ファインダーの取り付け」(19 ページ)をご覧ください。
e レンズ用ケーブルクランプ
レンズ(別売り)のケーブルを固定します。
f レンズ固定レバー
レンズをレンズマウントに固定します。
g レンズマウントキャップ
レンズを取り付けていないときは、このキャップをはめ込ん
でおいてください。レンズ固定レバーを押し上げると、取り
外せます。
h レンズマウント
レンズを取り付けます。
各部の名称と働き
11
i LENS(レンズ)端子(12 ピン)
レンズのケーブルを接続します。この端子を介して、本機か
らレンズの機能をコントロールすることができます。
j 三脚マウント
本機を三脚に固定するとき、三脚アダプター VCT-14 を取り
付けます。
k ショルダーパッド
前後に位置を調整できます。
◆ 詳しくは「ショルダーパッドの位置調整」
(20 ページ)をご覧く
ださい。
操作 / 端子部
前部(右)
a INCOM ボタン
b RET 1 ボタン
c アサイナブルスイッチ
d 内蔵フィルター切り換えボタン
e FILTER LOCAL ボタン
g GAIN スイッチ
h OUTPUT/AUTO KNEE
スイッチ
i WHITE BAL スイッチ
f AUTO W/B BAL
スイッチ
j DISPLAY スイッチ
k CANCEL/STATUS スイッチ
l メモリースティック部
m MENU SEL つまみ /ENTER ボタン
a INCOM(インターカム 1)ボタン
押している間、インターカム 1 のマイクが ON になります。
b RET 1(リターンビデオ 1)ボタン
押している間、カメラコントロールユニットからのリターン
ビデオ 1 信号をビューファインダー画面でモニターできま
す。側面の RET 1 ボタン(14 ページ)および後面操作パネ
ルの RET 1 ボタン(16 ページ)と同じ機能です。
12
各部の名称と働き
c アサイナブルスイッチ
ビューファインダーに表示されるメニューを使って、各種の
機能を割り付けることができます。
d 内蔵フィルター切り換えボタン
FILTER LOCAL ボタンを押しながら、切り換えボタンを押
して内蔵の ND フィルターまた は CC(色温度変換)フィル
ターを切り換えます。
左のボタンを押すと ND フィルター(素通し、1/4ND、
1/8ND、1/16ND、1/64ND)が順次 切り換わります。
右のボタンを押すと CC フィルター(クロスフィルター、
ます。各メモリーに、4 個ずつ合計 8 個の調整値を記憶
3200K、4300K、6300K、8000K)が順次切り換わります。
できます。
e FILTER LOCAL(内蔵フィルター)ボタン
このボタンを押しながら、どちらかの内蔵フィルター切り換
j DISPLAY(ディスプレイ)スイッチ
以下のように機能します。
えボタンを押して内蔵の ND フィルターまたは CC フィル
ターを切り換えます。
ON:ビューファインダー画面にオペレーション時の状態を
示す文字が現れます。
f AUTO W/B BAL(ホワイトバランス / ブラックバランス
自動調整)スイッチ
カメラコントロールユニットを接続せずカメラ単体で使用す
るとき、ホワイトバランスとブラックバランスを自動調整し
OFF:ビューファインダー画面の文字表示がすべて消えま
す。
MENU:ビューファインダー画面に設定メニューが表示さ
れます。
ます。
WHT:ホワイトバランスを自動調整します。
k CANCEL/STATUS(取り消し / ステータス)スイッチ
ビューファインダーにメニューが表示されているとき、メ
BLK:ブラックバランスを自動調整します。
ニュー設定の内容を取り消したり、メニューの前画面に戻る
働きをします。
g GAIN(ゲイン)スイッチ
メニューが表示されていないときは、本機のステータス情報
を表示します。
カメラコントロールユニットを接続せずカメラ単体で使用す
るとき、撮影時の照明の状態に応じて映像アンプのマスター
ゲイン(利得)を切り換えます。
L、M、H の設定に対応するゲイン値は、出荷時に L=0 dB、
M=6 dB、H=12 dB に設定されています。
h OUTPUT/AUTO KNEE(出力信号選択 / オートニー)
スイッチ
l メモリースティック部
蓋の中に、
“メモリースティック”を挿入するスロットとア
クセスランプがあります。
スロットに挿入した“メモリースティック”にデータを書き
込んだり、メモリースティックからデータを読み出している
ときはアクセスランプが赤く点灯します。
カメラコントロールユニットを接続せずカメラ単体で使用す
るとき、本機から VTR、ビューファインダー、ビデオモニ
ご注意
ターへの出力信号(カラーバー信号、またはカメラが撮影し
ている映像)を選びます。
アクセスランプが点灯しているときは“メモリースティッ
ク”を抜き差ししないでください。
撮影している映像を出力信号として選択しているときは、
オートニー機能を使用できます。
スイッチ設定と出力信号 / オートニー機能の選択の関係は次
のとおりです。
m MENU SEL(メニュー選択)つまみ /ENTER(確定)
ボタン(ロータリーエンコーダー)
ビューファインダー画面に表示されるメニュー項目を選択
(つまみを回す)/ 確定(ボタンを押す)します。
OUTPUT
AUTO KNEE 機能
BARS
OFF
カラーバー信号が出力される。
CAM
OFF
カメラで撮影している映像が出力される。
CAM
ON
カメラで撮影している映像が出力される。
オートニー回路は機能しない。
オートニー回路が機能する。
i WHITE BAL(ホワイトバランスメモリー切り換え)ス
イッチ
ご注意
6 ∼ 9 の機能は、カメラコントロールユニットや、RCP、
MSU などのリモートコントロール機器を接続したときは、
接続した機器からのコントロールになり、カメラ本体のス
イッチは動作しません。
カメラコントロールユニットを接続せずカメラ単体で使用す
るとき、ホワイトバランスの調整方式、および調整値を記憶
させて使用することができます。
PRST(プリセットメモリー):色温度 3200K に対応するホ
ワイトバランスのプリセット値に調整されます。
A または B:メモリー A または B を選択する。AUTO W/
B BAL スイッチを WHT 側に押すと、そのときの
FILTER つまみの設定に応じてホワイトバランスが自動
調整されます。調整値は選択されたメモリーに記憶され
各部の名称と働き
13
前部(左)
a RET 1 ボタン
b MIC 1 IN 端子
e INCOM/EAR LEVEL つまみ
c MIC 電源スイッチ
f RET 2 ボタン
a RET 1(リターンビデオ 1)ボタン
押している間、カメラコントロールユニットからのリターン
ビデオ 1 信号をビューファインダー画面でモニターできま
す。ハンドル上部の RET 1 ボタン(12 ページ)および後面
操作パネルの RET 1 ボタン(16 ページ)と同じ機能です。
ON:電子シャッターを使用します。
SEL:スイッチをこの位置にすると、シャッタースピードお
よびシャッターモードの設定が切り換わります。
b MIC 1 IN(マイク入力)端子(XLR 型、3 ピン)
マイクを接続します。
後面コネクターパネルの CH1 スイッチ(18 ページ)によっ
て、AUDIO IN CH-1 端子(18 ページ)と切り替えて使用し
ます。
e INCOM/EAR LEVEL(インターカム / イヤホン音量)つ
まみ
インターカムおよびイヤホンの音声レベルを調整します。
インターカムレベルの調整は後面操作パネルの INTERCOM
1/2 LEVEL/MIC スイッチ(16 ページ)が FRONT 側に設
定されているときに有効です。
c MIC(マイク)電源スイッチ
+48V:MIC 1 IN 端子に接続したマイクに +48V の電源を
供給します。
OFF:MIC 1 IN 端子に接続したマイクに電源を供給しない
で使用します。
d SHUTTER(シャッター)スイッチ
カメラコントロールユニットを接続せずカメラ単体で使用す
るとき、電子シャッターの ON/OFF、シャッタースピード
の選択に使用します。
OFF:電子シャッターは働きません。
14
d SHUTTER スイッチ
各部の名称と働き
◆ 詳しくは「電子シャッターの設定」
(24 ページ)をご覧くださ
い。
f RET 2(リターンビデオ 2)ボタン
このボタンを押すと、ビューファインダー画面が後面操作パ
ネルの RET 2 スイッチ(16 ページ)で選択したリターンビ
デオ信号に切り換わります。
後面
b タリーランプとタリースイッチ
ショルダーベルト取付金具
(11 ページ参照)
操作パネル(16 ページ)
c CCU 端子
d SDI 1 端子
未使用
コネクターパネル(17 ページ)
a POWER スイッチ
e CALL ボタン
a POWER(電源)スイッチ
CCU:カメラコントロールユニットからの給電で電源が入
ります。
EXT:DC IN 端子からの給電で電源が入ります。
e CALL(コール)ボタン
押すと、RCP-700 シリーズのリモートコントロールパネルや
マスターセットアップユニット MSU-900/950 のレッドタ
リーランプが点灯します。RCP や MSU オペレーターを呼び
出すときに使います。
b タリーランプとタリースイッチ
ON:接続したカメラコントロールユニットへのタリー入力
や CALL ボタンなどによる呼び出し時にタリーランプが
点灯します。
OFF:タリーランプを点灯禁止にします。
c CCU(カメラコントロールユニット)端子(光マルチコ
ネクター)
光電気複合ケーブルでカメラコントロールユニットと接続し
ます。
d SDI 1(シリアルデジタルインターフェース 1)端子
(BNC 型)
HD SDI 信号を出力します。
各部の名称と働き
15
操作パネル
b RET 1 ボタン / スイッチ
a INTERCOM1、INTERCOM2 つまみ / スイッチ
c RET 2 ボタン / スイッチ
d LIGHT スイッチ
PGM 1 調整つまみ
PGM 2 調整つまみ
PGM1
LEVEL
REAR
MIC
ON
FRONT
OFF
PGM2
INCOM PROD
ENG
INTERCOM 1
PGM1
LEVEL
REAR
MIC
ON
FRONT
OFF
RET1
PGM2
2
RET2
3
1
2
3
4 LIGHT
1
4
ON
OFF
INCOM PROD
PGM1
PGM2
PGM1
PGM2
ENG
INTERCOM 2
ライン選択スイッチ
LEVEL
REAR
MIC
ON
FRONT
OFF
INCOM PROD
ENG
INTERCOM 1
INCOM 調整つまみ
LEVEL
REAR
MIC
ON
FRONT
OFF
INCOM PROD
ENG
INTERCOM 2
LEVEL/MIC スイッチ
a INTERCOM1(インターカム 1)
、INTERCOM2(イン
ターカム 2)つまみ / スイッチ
インターカムライン 1、インターカムライン 2 それぞれに対
し、PGM1 調整つまみ、PGM2 調整つまみ、ライン選択ス
イッチ、LEVEL/MIC スイッチ、および INCOM 調整つま
みが用意されています。
PGM1(プログラム 1)調整つまみ
ライン選択スイッチ
インターカムラインを選択します。
PROD:プロデューサーラインを使用します。
ENG:エンジニアラインを使用します。
b RET 1(リターンビデオ 1)ボタン / スイッチ
ボタンを押している間、スイッチで選択したリターンビデオ
信号をビューファインダー画面でモニターできます。
プログラム 1 の音声受信レベルを調整します。
PGM2(プログラム 2)調整つまみ
プログラム 2 の音声受信レベルを調整します。
LEVEL/MIC(レベル / マイクロホン)スイッチ
REAR/ON:インターカム用ヘッドセットのマイクを ON
にします。インターカム音声の受信レベルは INCOM 調
整つまみで調整します。
REAR/OFF:インターカム用ヘッドセットのマイクを OFF
にします。インターカム音声の受信レベルは INCOM 調
整つまみで調整します。
FRONT/OFF:インターカム用ヘッドセットのマイクを
OFF にします。インターカム音声の受信レベルは、カメ
ラ前面の INCOM/EAR LEVEL つまみ(14 ページ)で
調整できます。
INCOM(インターカム)調整つまみ
インターカム音声の受信レベルを調整します。
16
各部の名称と働き
c RET 2(リターンビデオ 2)ボタン / スイッチ
リターンビデオ 1 と並行して別の系統のシステムを使用して
いる場合、スイッチで選択した信号を、ボタンを押している
間ビューファインダー画面でモニターできます。
ご注意
RET 1 ボタンと RET 2 ボタンを両方とも押した場合は、
RET 1 ボタンが優先されます。
d LIGHT(ライト)スイッチ
ON にすると操作パネルの表示文字が点灯します。
コネクターパネル
g INCOM1、2 端子
a EARPHONE ジャック
RET CTRL
b RET CONT 端子
c CRANE 端子
EARPHONE
REMOTE
h REMOTE 端子
TRACKER
CRANE
RET IN
GENLOCK IN
d TRACKER 端子
PROMPTER
e DC OUT 端子
LINE
AES/EBU
FRONT MIC
MIC
+48V
OFF
DC OUT
DC IN 10.5-17V
LINE
MIC
+48V
OFF
TEST
OUT
AUDIO IN
CH1
i GENLOCK IN/RET IN/
PROMPTER OUT 端子と
切り換えスイッチ
j TEST OUT 端子
CH2
SDI 2
f DC IN 端子
k SDI 2 端子
l AUDIO IN CH1、CH2 端子 / スイッチ
a EARPHONE(イヤホン)ジャック(ステレオミニ
h REMOTE(リモート)端子(8 ピン)
ジャック)
イヤホン、ヘッドセットなどを接続し、インターカム音声を
リモートコントロールユニット RM-B150/B750、リモートコ
ントロールパネル RCP-700 シリーズ、またはマスターセッ
出力します。
トアップユニット MSU-900/950 を接続します。
b RET CONT(リターンコントロール)端子(6 ピン)
リターンビデオセレクター CAC-6 を接続します。
ご注意
c CRANE(クレーン)端子(12 ピン)
ビューファインダーや外部データなどの外部インターフェー
カメラコントロールユニットと接続して使用するときは、こ
の端子には何も接続しないでください。
ス用です。
i GENLOCK IN1)/RET IN1)/PROMPTER OUT(外部
同期信号入力 / リターン信号入力 / プロンプター信号出力)
端子(BNC 型)と切り換えスイッチ
d TRACKER(トラッカー)端子(10 ピン)
切り換えスイッチで端子の機能を選択します。1)
GENLOCK IN:カメラコントロールユニットを接続せずカ
インターカムやタリーなどの外部インターフェース用です。
e DC OUT(DC 電源出力)端子(4 ピン)
メラ単体で使用するとき、カメラを同期させる外部同期
用信号を入力します。
別売りのワイヤレスレシーバーなどに電源を供給します。
RET IN:カメラコントロールユニットを接続せずカメラ単
体で使用するとき、リターン信号を入力します(HD-
f DC IN(DC 電源入力)端子(XLR 型 4 ピン)
Y)
。
PROMPTER OUT:プロンプター信号を出力します(カメ
AC アダプター AC-DN10 などを接続し、本機に電源を供給
します。
g INCOM1、2(インターカム 1、2)端子(XLR 型 5 ピ
ン)
インターカムの音声信号を入出力します。
ラコントロールユニット接続時のみ有効)
。
1) この機能は将来対応です。
j TEST OUT(テスト出力)端子(BNC 型)
アナログ信号を出力します。
メニューの選択で、VBS 信号、VF 端子とほぼ同じ HD 信
号、HD-SYNC 信号、SD-SYNC 信号を出力することができ
ます。
各部の名称と働き
17
k SDI 2(シリアルデジタルインターフェース 2)端子
(BNC 型)
HD SDI または SD SDI 信号を出力します。
l AUDIO IN(オーディオ入力)CH1、CH2 端子(XLR
型 3 ピン)/ スイッチ
オーディオ信号を入力します。チャンネル 1、2 それぞれに
対して入力選択スイッチ、マイク電源スイッチが用意されて
います。
準備
レンズの取り付け
本機に取り付ける手順は、次のとおりです。
◆ レンズの取り扱いについては、レンズに付属の取扱説明書をご覧
ください。
CH1 オーディオ入力選択スイッチ
マイク電源スイッチ
CH2 オーディオ入力選択スイッチ
LINE
FRONT MIC
MIC
48V
OFF
LINE
AES/EBU
MIC
48V
OFF
AUDIO IN
CH 1
AUDIO IN CH1 端子
CH 2
AUDIO IN CH2 端子
CH1(チャンネル 1)オーディオ入力選択スイッチ
AUDIO IN CH1 端子に接続する機器に合わせて設定します。
LINE:ラインレベル(0 dBm)の信号を接続するとき
FRONT MIC:MIC 1 IN 端子に接続したマイクを使用する
とき
MIC:マイクを接続するとき
CH2(チャンネル 2)オーディオ入力選択スイッチ
AUDIO IN CH2 端子に接続する機器に合わせて設定します。
LINE:ラインレベル(0 dBm)の信号を接続するとき
AES/EBU:デジタル オーディオ信号を接続するとき(カ
メラ出力と同期させる必要があります。)
MIC:マイクを接続するとき
マイク電源スイッチ
対応する AUDIO IN 端子にマイクを接続したとき、マイク
に電源を供給するかどうかを設定します。
+48V:+48V の電源をマイクに供給する。
OFF:電源をマイクに供給しない。
(一番下の位置は機能しません。この位置にしてもマイクに
電源は供給されません。)
ご注意
+12V 電源を供給するためにはセットの改造が必要です。
18
準備
5 2
1
2
3
4
1,3
レンズ固定レバーを押し上げて、レンズマウントからレ
ンズマウントキャップを外す。
レンズマウント上部中央の凹部にレンズの位置決めピン
を合わせ、レンズをマウントに差し込む。
レンズを支えながら、レンズ固定レバーを押し下げてレ
ンズを固定する。
4
レンズケーブルを LENS 端子に接続する。
5
レンズケーブルをケーブルクランプに押し込む。
フランジバックの調整
次のような場合、フランジバック 1) の調整が必要です。
• レンズを初めて取り付けたとき
• レンズを交換したとき
• ズーム操作の際に、望遠・広角の両方で焦点がきちんと合
わないとき
取り付け手順
ご注意
フランジバックの調整のために操作するレンズの各部分の位
置は、レンズによって異なります。レンズに付属の取扱説明
書で確認してください。
1
ビューファインダーを図の矢印の方向にスライドさせて
取り付ける。
ストッパーが自動的に下がります。
フランジバックの調整の手順は、次のとおりです。
VF 端子
ビューファインダー
ストッパー
約3 m
1
2
絞りのモードを手動にして、絞りを開放にする。
フランジバック調整用チャートを本機から 3 m ぐらいの
所に置き、適正な映像出力レベルが得られるように、照
明を調整する。
3
Ff 2) リング固定ネジをゆるめる。
4
手動または電動で、ズームリングを望遠位置にする。
5
6
7
8
9
フランジバック調整用チャートを写し、フォーカスリン
グを回して焦点を合わせる。
MIC 1 IN 端子
2
3
4
ビューファインダーの左右位置を決め、左右位置固定リ
リングを回して締める(下記「左右方向の調整」参照)。
ビューファインダーケーブルをカメラの VF 端子に接続
する。
マイクケーブルをカメラの MIC 1 IN 端子に接続する。
ズームリングを広角位置にする。
Ff リングを回し、フランジバック調整用チャートに焦点
を合わせる。このとき、距離リングを動かさないように
注意してください。
遠望と広角の両方で焦点が合うようになるまで、手順 4
∼ 7 の操作を繰り返す。
Ff リング固定ネジをしっかり締める。
位置を調整する
位置を左右方向および前後方向に調整して、ビューファイン
ダー内を見やすくすることができます。
左右方向の調整
ビューファインダー
左右位置固定リング
1) フランジバック:レンズマウントの取り付け面から結像面までの距離
2) Ff:Flange focal length
ビューファインダーの取り付け
例:ビューファインダー HDVF-20A/
C30W を取り付ける
◆ ビューファインダーの取り扱いについて詳しくは、ビューファイ
ンダーの取扱説明書をご覧ください。
準備
19
1
2
3
ビューファインダー左右位置固定リングをゆるめる。
ビューファインダーを左右にスライドさせ、内部が見や
すい位置に調整する。
ビューファインダー左右位置固定リングを締める。
前後方向の調整
LOCK つまみ
1
2
3
ビューファインダー
前後位置固定レバー
ビューファインダー前後位置固定レバーと LOCK つまみ
をゆるめる。
ビューファインダーを前後にスライドさせ、内部が見や
すい位置に調整する。
ビューファインダー前後位置固定レバーと LOCK つまみ
を回して、ビューファインダーを固定する。
ご注意
ビューファインダーを上部に回転させる前に、ビューファイ
ンダーを少し前に引き出した位置で固定してください。
ビューファインダーの前後方向の位置が最後部になっている
と、ビューファインダー回転機構のアームが本機のハンドル
に当たります。
ビューファインダーを取り外すには
ビューファインダー左右位置固定リングをゆるめ、ストッ
パーを上げて、ビューファインダーを取り付けたときと逆の
方向にスライドさせて抜き取ります。
ビューファインダーが脚に当たらないように
するには
本機を持ち運ぶときに、ビューファインダーが脚に当たらな
いようにするには、ビューファインダー回転機構 BKW-401
(別売り)を取り付けて、ビューファインダーを上部に回転
させておきます。
20
準備
ショルダーパッドの位置調整
ショルダーパッドは、中央位置(出荷時の位置)から前方に
25mm、後方に 10mm の範囲でスライドさせることができま
す。本機を肩にのせた状態で操作しやすくなるように、ショ
ルダーパッドの位置を調整してください。
三脚アダプター
ショルダーパッドロックレバー
1,3
雲台
本体底部
2
ショルダーパッド
2
カメラを三脚アダプターにのせ、三脚アダプターの溝に
沿ってカチッと音がするまで前へスライドさせて取り付
ける。
調整するには
1
ショルダーパッドの中央のレバーを引き上げてロックを
外す。
2
前後方向にスライドさせて、適当な位置を選ぶ。
3
レバーを倒して固定する。
三脚への取り付け
三脚アダプター VCT-14 を使って、次の手順でカメラを三脚
に取り付けます。
ご注意
• カメラと三脚アダプターの重心を考慮して、三脚アダプ
ター底面の穴から適切な穴を選択してください。選択した
穴が適切でないと、カメラを取り付けたときに重心が偏
り、カメラが落下したり転倒したりして、けがの原因とな
ることがあります。
• 取り付けに選択した穴の径が、雲台のネジの径と合うこと
を確認してください。ネジの径と合わないと三脚アダプ
ターが確実に固定されず、カメラが落下したり転倒したり
して、けがの原因となることがあります。
三脚アダプターからカメラを取り外すには
赤いボタンを押しながら、レバーを矢印の方向へ動かしま
す。
取り付けるには
1
三脚アダプターを三脚に取り付け、ネジで固定する。
レバー
赤いボタン
準備
21
三脚アダプターのピンが元の位置に戻らないときは
カメラを取り外したあと、三脚アダプターのピンが元の位置
(ピン収納部)に戻らないときは、もう 1 度、赤いボタンを
押しながらレバーを矢印の方へ動かして、ピンを元の位置に
戻します。ピンが中央に残ったままだと、カメラの取り付け
ができません。
記録のための調整と設定
ブラックバランス / ホワイトバランス
の調整
本機を使用し、常に高画質の映像を得るためには、状況に応
じたブラックバランスとホワイトバランスの調整が必要で
す。
ピン収納部
ピン
ご注意
カメラコントロールユニット接続時や、RCP、MSU などの
リモートコントロール機器を接続したときは、RCP または
MSU からのコントロールになり、カメラ本体のスイッチは
動作しません。
ブラックバランスの調整
次のような場合に調整が必要です。
• 本機を初めて使用するとき
• 長時間使用しなかった後に使用するとき
• 周囲の温度が大幅に変化した状況で使用するとき
• 設定メニューでゲイン切り換え値を変更したとき
通常は、電源を再び入れた場合でも調整し直す必要はありま
せん。
ホワイトバランスの調整
照明条件が変わったときには、必ず調整し直してください。
ビューファインダー画面の表示について
ブラックバランスとホワイトバランスの調整を始めると、
ビューファインダー画面に、調整経過や結果を知らせるメッ
セージが表示されます。
ご注意
本機で自動調整される調整値や各設定値は、本機のメモリー
に記憶され、電源を切っても保持されています。
ブラックバランスを調整する
ブラックバランスの自動調整では、ブラックセット、ブラッ
クバランスの両方が調整されます。
ブラックバランスの調整手順
1
22
記録のための調整と設定
AUTO W/B BAL スイッチを BLK 側に押して、指を放
す。
ホワイトバランスの調整手順
1
WHITE BAL スイッチを A または B に設定する。
AUTO W/B BAL スイッチ
スイッチは中央に戻り、調整が実行されます。
WHITE BAL スイッチ
調整中、ビューファインダー画面上に図のようなメッ
セージが表示されます。
2
照明条件に合わせて、フィルターを切り換える。
ND フィルターを切り換えるには
FILTER LOCAL ボタンを押しながら、ND フィルター
切り換えボタンを押します。
切り換えボタンを押すたびに ND フィルター(素通し、
1/4ND、1/8ND、1/16ND、1/64ND)が順次 切り換わ
ります。
ABB:OP
CC(色温度変換)フィルターを切り換えるには
数秒で調整が終了し、「ABB:OK」のメッセージが表
示されます。調整値は自動的にメモリーに記憶されま
す。
FILTER LOCAL ボタンを押しながら、CC フィルター
切り換えボタンを押します。
切り換えボタンを押すたびに CC フィルター(クロス
フィルター、3200K、4300K、6300K、8000K)が順次切
り換わります。
ご注意
• ブラックバランス調整中、絞りは自動的に遮光状態になり
ます。
• ブラックバランス調整中、ゲイン切り換え回路が自動的に
切り換わり、また、ビューファインダー画面上にフリッ
カーが数回現れますが、故障ではありません。
ブラックバランスの自動調整ができないとき
ブラックバランスの調整が正常に終了しなかったときは、
ビューファインダー画面に約 3 秒間エラーメッセージ
「ABB:NG」が表示されます。
エラーメッセージが表示されたら、再度ブラックバランスの
調整を試みてください。
繰り返し調整を試みてもエラーメッセージが表示されるとき
は、内部点検をする必要があります。
CC フィルター切り換え
ボタン
ND フィルター切り換え
ボタン
FILTER LOCAL ボタン
ブラックバランスのメモリーについて
メモリーに記憶された値は、本機の電源を切った状態でも保
存されます。
ホワイトバランスを調整する
以下の手順でホワイトバランスを自動調整します。
ND フィルター
色温度変換フィルター
1
素通し
A
クロスフィルター
2
1/4 ND
B
3200K ( 素通し)
3
1/8 ND
C
4300K
4
1/16 ND
D
6300K
5
1/64 ND
E
8000K
記録のための調整と設定
23
3
被写体の照明光源と同じ条件のところにホワイトパター
ンを置き、ズームアップして画面に白を映す。
被写体の近くの白いもの(白布、白壁)で代用すること
もできます。
最小限必要な白の面積は、図のとおりです。
画面センターを中心とす
る長方形。
各辺の長さは、画面の高
さ、または幅の 70%。
AWB:OK
ご注意
この長方形内に、画面
面積の 10% 以上の面
積の白が必要。
自動絞り機能付きズームレンズを使用した場合、絞りがハン
チング 1) を起こすことがあります。レンズに付いている絞
りのゲインつまみ(IG、IS、S などと表示されている)を調
整してください。
1) ハンチング:オートアイリスの応答を繰り返し、映像が暗くなったり明る
くなったりすること。
4
ご注意
◆ 詳しくは、レンズの取扱説明書をご覧ください。
長方形内に高輝度スポットを入れないようにしてくださ
い。
ホワイトバランスの自動調整ができないとき
レンズの絞りを調整する。
手動調整レンズの場合:絞りを適正値に合わせる。
自動絞り調整機能付きレンズの場合:レンズ側の絞り自
動 / 手動切り換えスイッチを自動に設定する。
5
AUTO W/B BAL スイッチを WHT 側に押して、指を放
す。
ホワイトバランスの調整が正常に終了しなかったときは、
ビューファインダー画面に約 3 秒間エラーメッセージ
「AWB:NG」が表示されます。
エラーメッセージが表示されたら、再度ホワイトバランスの
調整を試みてください。
繰り返し調整を試みてもエラーメッセージが表示されるとき
は、内部点検をする必要があります。
ホワイトバランスを調整する時間がないときは
WHITE BAL スイッチを PRST にします。フィルターの設
定に従って、ホワイトバランスが自動的にとれます。
ホワイトバランスのメモリーについて
スイッチは中央に戻り、ホワイトバランスの自動調整が
実行されます。
メモリーに記憶された値は、本機の電源を切っても保存され
ます。
ホワイトバランスのメモリーは、A、B の 2 系統があり、
AUTO W/B BAL スイッチを WHT 側に押すと、そのとき
のフィルターの設定に応じてホワイトバランスが自動調整さ
れます。調整値は選択されたメモリーに記憶されます。各メ
モリーに、5 個ずつ合計 10 個の調整値を記憶できます。
調整中、ビューファインダー画面の左下に「AWB:
OP」のメッセージが表示されます。
電子シャッターの設定
AUTO W/B BAL スイッチ
約 1 秒で、図のようなメッセージが表示され、調整が完
了します。調整値は、手順 1 で選択したメモリー(A
または B)に自動的に記憶されます。
24
記録のための調整と設定
ここでは、本機の電子シャッターで使用できるシャッター
モードについて説明し、シャッターモードとシャッタース
ピードの設定手順を示します。
ビューファインダー画面の設定変更 / 調整経過メッセー
ジ表示部に、シャッターの現在の設定が約 3 秒間表示さ
れます。
例:「Shutter:1/250」
ご注意
カメラコントロールユニットや、RCP、MSU などのリモー
トコントロール機器を接続したときは、RCP または MSU か
らのコントロールになり、カメラ本体のスイッチは動作しま
せん。
2
シャッターモードについて
表示が消える前に、もう 1 度 SHUTTER スイッチを SEL
側に押す。希望のモードまたはスピードが表示されるま
で、この操作を繰り返す。
本機の電子シャッターで使用できるシャッターモードと、選
択できるシャッタースピードは次のとおりです。
すべてのモードとスピードが表示される場合は、次のよ
うな順序で表示が切り換わります。
設定できるシャッターモードとシャッタースピード
シャッター
シャッタースピード 1)
用途
1/100、1/125、1/250、
動きの早い被写体を鮮明に撮
1/500、1/1000、1/2000
影したい場合
モード
標準
(秒)
標準モード
1/100
60.0Hz ∼ 4300Hz
モニター画面を、水平方向の
クリアス
(HDC1500)または
縞模様が出ないように撮影し
キャン)
30.0Hz ∼ 4300Hz
ECS(拡張
例:60i/59.94i 時
たい場合
1/125
1/250
1/500
1/1000
1/2000
ECS モード
(HDC1600)の範囲で連
続可変
1) 表の数値は、60i/59.94i 時のものです。他のフォーマットでは設定できる値
が異なります。
ご注意
人工照明、特に蛍光灯や水銀灯などは、輝度が一定のように
見えても、電源周波数に同期して、R、G、B 各色の強さが
変化しています(これをフリッカーと言います)。このよう
な照明下でシャッターを使用すると、フリッカーがより目立
つ場合があります。特に、電源周波数が 60Hz の地域では、
カラーフリッカーとなります。なお、50Hz の地域では、
シャッタースピードを 1/100 に設定すると、フリッカーを低
減することができます。
シャッターモード / スピードを選択する
シャッターモードおよび標準モードでのシャッタースピード
は SHUTTER スイッチを切り換えて設定します。
シャッターモードおよび標準モードでのシャッタースピード
を設定するには
1
SHUTTER スイッチを、ON の位置から SEL 側に押す。
SHUTTER スイッチ
記録のための調整と設定
25
ビューファインダー画面上
の設定メニューの基本操作
DISPLAY スイッチを MENU に設定すると、ビューファイ
ンダー画面上にメニューが表示されます。表示されたメ
ニューで、各種設定値の選択や、ビューファインダー画面上
に表示させる項目とその表示方法を選択します。メニュー操
作には、下記のようなスイッチ類を使用します。
<VF DISPLAY>
EX
:c ON
ZOOM : OFF
FOCUS : OFF
ND
: ON
CC
: ON
IRIS : ON
WHITE : OFF
D5600K: ON
GAIN : ON
SHUTT : ON
4
5
1
BATT : OFF
RETURN: ON
TALK : ON
MESSAG: ALL
MENU SEL つまみ /ENTER ボタンを回して、→マーク
を設定したい項目に移動する。
MENU SEL つまみ /ENTER ボタンを押す。
→マークが ? マークに変わり、点滅します。
6
速く回すと数値が速く変化し、ゆっくり回すと微調整が
できます。
DISPLAY スイッチ
押す
変更した数値を取り消すには
MENU SEL つまみ /ENTER ボタンを押す前に
CANCEL/STATUS スイッチを CANCEL 側に押すと、
設定が元に戻ります。
CANCEL/STATUS
スイッチ
回す
MENU SEL つまみ /ENTER ボタン
1
設定を中断するには
DISPLAY スイッチを OFF にすると、メニュー表示が
消えます。
再び DISPLAY スイッチを MENU にすると、設定を再
開することができます。
DISPLAY スイッチを OFF から MENU に切り換える。
メニュー画面が表示されます。
ページ番号
<VF DISPLAY>
EX
: ON
ZOOM : OFF
FOCUS : OFF
ND
: ON
CC
: ON
IRIS : ON
WHITE : OFF
D5600K: ON
GAIN : ON
SHUTT : ON
2
3
7
?1
BATT : OFF
RETURN: ON
TALK : ON
MESSAG: ALL
MENU SEL つまみ /ENTER ボタンを回して、希望の
ページを表示させる。
MENU SEL つまみ /ENTER ボタンを押す。
MENU SEL つまみ /ENTER ボタンを回して、設定値を
変更する。
MENU SEL つまみ /ENTER ボタンを押す。
? マークが→マークに変わり、設定が確定します。
8
9
続けて同じページの設定項目を変更するには、手順 4 ∼ 7
を繰り返す。
他のページに移るには、MENU SEL つまみ /ENTER ボ
タンを何度か押して、画面右上のページスクロールバー
が表示されるところまで戻り、手順 2、3 を実行する。
選択したページの各項目の設定内容が表示され、現在の
選択項目に→マークが付きます。
メニュー操作をやめるには
DISPLAY スイッチを OFF にします。
選択したページの各項目の設定内容が表示され、現在の
選択項目に「→」マークが付きます。
26
ビューファインダー画面上の設定メニューの基本操作
ビューファインダー画面上の状態表示
ビューファインダー画面には、映像の他に本機の設定や動作
の状態を示す文字やメッセージ、センターマーカー、セーフ
ティゾーンマーカーなどが表示されます。
DISPLAY スイッチが ON に設定されているとき、画面の上
端、下端には、メニューや関連するスイッチで ON に設定さ
れた項目が表示されます。また、設定変更時や調整経過中ま
たは調整後に、設定内容や調整経過 / 結果を知らせるメッ
セージを約 3 秒間表示させることができます。
ビューファインダー画面上の状態表示の構成
表示できるすべての項目は、下の図のように配置されていま
す。
a ズームポジション
h フォーカスポジション
b レンズエクステンダー
c TALK 表示
d 5600K モード
EX Z55
TALK
56
1A W:A
F255
12.5V
0dB 1/125
i バッテリー電圧
F5.6
e フィルター
jF 値
f ホワイトバランスメモリー
k シャッター /EVS
g ゲイン値
a ズームポジション
ズームレンズのバリエーターが、広角端(0)と望遠端(99)
の間のおおよそどの位置にあるかを数値で表示します。
b レンズエクステンダー
レンズエクステンダーの使用中に EX を表示します。
c TALK 表示
インカムのマイクが ON のとき、表示されます。
d 5600K モード
5600K が ON のとき、表示されます。
e フィルター
現在選択されているフィルターの種類を表示します。数字
(1 ∼ 5)は ND フィルター、アルファベット(A、B、C、
D、E)は CC フィルターの選択を示します。
f ホワイトバランスメモリー
現在選択されているホワイトバランスの自動調整メモリーを
示します。
W:A:WHITE BAL スイッチを A に設定したとき
W:B:WHITE BAL スイッチを B に設定したとき
W:P:WHITE BAL スイッチを PRST に設定したとき
g ゲイン値
GAIN スイッチによる映像アンプのゲイン設定値(dB)を
示します。
h フォーカスポジション
ズームレンズのフォーカスポジションを数値で表示します
(0 ∼ 255(∞)
)。
i バッテリー電圧
バッテリー電圧を表示します。
ビューファインダー画面上の状態表示
27
j F値
レンズの F 値(絞り値)を表示します。
k シャッター /EVS
シャッター /EVS の状態を表示します。ただし、シャッター
および EVS 共に OFF の場合、表示されません。
“メモリースティック”を
使う
別売りの“メモリースティック”を使用すると、ファイル情
報を保存し、他のカメラでも同じファイル情報を共有するこ
とができます。
“メモリースティック”を入れるには
ラベル面を上にして、端子を奥に向けて“メモリースティッ
ク”装着部に差し込みます。カチッと音がして、赤いアクセ
スランプが点灯するまで差し込んでください。
U
EL
CANC
MEN
ラベル面
アクセスランプ
メモリースティック
アクセスランプの点灯中および点滅中は
データの読み込み、または書き込みを行っています。このと
き、本機に振動や強い衝撃を与えないでください。また、本
機の電源を切ったり、“メモリースティック”を取り出した
りしないでください。データがこわれることがあります。
“メモリースティック”とは?
“メモリースティック”は、小さくて軽く、しかもフロッ
ピーディスクより容量が大きい新世代の IC 記録メディアで
す。“メモリースティック”対応機器間でデータをやりとり
するのにお使いいただけるだけでなく、着脱可能な外部記録
メディアの 1 つとしてデータの保存にもお使いいただけま
す。“メモリースティック”には、標準サイズのものとその
小型サイズの“メモリースティックデュオ”があります。
“メモリースティックデュオ”をメモリースティックデュオ
アダプターに入れると、標準サイズの“メモリースティッ
ク”と同じサイズになり、標準サイズの“メモリースティッ
ク”対応機器でもお使いいただけます。
“メモリースティック”の種類
“メモリースティック”には、用途に応じて以下の種類があ
ります。
“メモリースティックー R”
いったん記録されたデータが上書きされない”メモリース
ティック”です。“メモリースティック− R”対応機器での
28
“メモリースティック”を使う
みデータを記録できます。著作権保護技術(マジックゲー
ト)が必要なデータは記録できません。
“メモリースティック”
著作権保護技術(マジックゲート)が必要なデータ以外の、
あらゆるデータを記録できる“メモリースティック”です。
• 以下の場合、データが破壊されることがあります。
―読み込み中、書き込み中に“メモリースティック”を取
り出したり、本機の電源を切った場合
―静電気や電気的ノイズの影響を受ける場所で使用した場
合
• 大切なデータは、バックアップを取っておくことをおすす
めします。
“マジックゲートメモリースティック”
著作権保護技術(マジックゲート)を搭載した“メモリース
ティック”です。
“メモリースティック -ROM”
あらかじめデータが記録されている、読み出し専用の“メモ
リースティック”です。データの記録や消去はできません。
“メモリースティック PRO”
“メモリースティック PRO”対応商品でのみお使いいただけ
る、著作権保護技術(マジックゲート)を搭載した“メモ
リースティック”です。
使用可能なメモリースティック
本機では、“メモリースティック”と“マジックゲートメモ
リースティック”がご使用いただけます。
ただし、マジックゲート機能は本機では動作しません。通常
の“メモリースティック”として使用してください。
ご注意
• ラベル貼り付け部には、専用ラベル以外は貼らないでくだ
さい。
• ラベルを貼るときは所定のラベル貼り付け部に貼ってくだ
さい。はみ出さないようにご注意ください。
• 持ち運びや保管の際は、付属の収納ケースに入れてくださ
い。
• 端子部には手や金属などで触れないでください。
• 強い衝撃を与えたり、曲げたり、落としたりしないでくだ
さい。
• 分解したり、改造したりしないでください。
• 水にぬらさないでください。
• 以下のような場所でのご使用や保管は避けてください。
―高温になった車の中や炎天下など気温の高い場所
―直射日光のあたる場所
―湿気の多い場所や腐食性のある場所
使用上のご注意
ご注意
“メモリースティックデュオ”はそのままではご使用になれ
ません。メモリースティックデュオアダプターと組み合わせ
てお使いください。
データ読み込み/書き込みスピードについて
お使いの“メモリースティック”と機器の組み合わせによっ
ては、データの読み込み/書き込みの速度が異なります。
マジックゲートとは?
マジックゲートは、暗号化技術を使って著作権を保護する技
術です。
• データの損失を防ぐため、データは頻繁にバックアップを
取るようにしてください。万一、データが損失した場合、
当社は一切その責任を負いかねます。
• あなたが記録したものは、個人として楽しむなどのほか
は、著作権上、権利者に無断で使用できません。著作権の
対象になっている画像やデータの記録されたメモリース
ティックは、著作権法の規定による範囲内で使用する以外
はご利用いただけませんので、ご注意ください。
• 本機のソフトウェアの仕様は、改良のため予告なく変更す
ることがありますが、ご了承ください。
• なお、実演や興行、展示物などのなかには、個人として楽
しむなどの目的であっても撮影を制限している場合があり
ますので、ご注意ください。
“メモリースティック”について
端子
誤消去防止つまみ
ラベル貼り付け部
・ Memory Stick(
“メモリースティック”
)および
は、
ソニー株式会社の商標です。
・ Memory Stick Duo(
“メモリースティックデュオ”
)および
は、ソニー株式会社の商標です。
・ Memory Stick PRO(“メモリースティック PRO”)および
は、ソニー株式会社の商標です。
・ MagicGate(
“マジックゲート”)および
は、ソニー株式会社の商標です。
• 誤消去防止ツマミを「LOCK」にすると記録や編集、消去
ができなくなります。
“メモリースティック”を使う
29
仕様
一般
電源
動作温度
保存温度
質量
光学系仕様
AC 240 V、1.4 A (max.)
DC 180 V、1.0 A (max.)
DC 12 V、7 A (max.)
− 20 ℃∼+ 45 ℃
− 20 ℃∼+ 60 ℃
約 4.5 kg ( 本体のみ)
分光系
F1.4 プリズム方式
内蔵フィルター
色温度変換フィルター
A:クロスフィルター
B:3200K(素通し)
C:4300K
D:6300K
E:8000K
ND フィルター
1:素通し
2:1/4ND
3:1/8ND
4:1/16ND
5:1/64ND
撮像素子
撮像素子
方式
有効画素数
HDC1500:2/3 型プログレッシブ転送方
式 CCD
HDC1600:2/3 型フレームインターライ
ン転送方式 CCD
RGB 3 板式
1920(水平)× 1080(垂直)
入出力端子
電気特性
CCU
光電気マルチコネクター(1)
LENS
12 ピン(1)
VF
20 ピン(1)
MIC 1 IN
XLR 型 3 ピン、凹型(1)
AUDIO IN CH1、CH2
XLR 型 3 ピン、凹型(各 1)
感度
映像 S/N
水平解像度
F10.0(2000lx、反射率 89.9%にて)
Typical 54dB
1000TV 本(画面中心)
変調度 5%以上
レジストレーション
全域 0.02%(ただしレンズによるひずみ
を除く)
幾何学ひずみ
認められず(ただしレンズによるひずみ
を除く)
INCOM 1、INCOM 2
XLR 型 5 ピン、凹型(各 1)
EARPHONE
ステレオミニジャック(1)
DC IN
XLR 型 4 ピン(1)、DC 10.5 ∼ 17 V
外形寸法 ( 単位 mm)
135
ND
CC
CALL
GAIN
OUTPUT
WHITE BAL
STATUS
DISPLAY
CANCEL
MENU
LE
NS
OFF
OFF
ON
RET2 SET
SHUTTER
WHT
BLK
AUTO B/W BAL
POWER
INTERCAM
LEVEL
348
30
仕様
197
FILTER
LOCAL
DC OUT
4 ピン(1)
、DC 10.5 ∼ 17 V、最大 1.5 A
SDI 1、SDI 2
但し、負荷条件、入力条件などにより、
制限される場合があります。
BNC 型(各 1)
TEST OUT
BNC 型(1)
PROMPTER OUT
RET CONT
BNC 型(1)
、1 Vp-p、75Ω
6 ピン(1)
REMOTE
TRACKER
8 ピン(1)
10 ピン(1)
CRANE
12 ピン(1)
付属品
オペレーションマニュアル(1)
スイッチ用表示ラベル 1、2(各 1)
別売り品
HD エレクトロニックビューファインダー
HDVF-20A(2 型、白黒)
HDVF-C30W(3 型、カラー)
HDVF-C750W(7 型、カラー)
大型レンズアダプター HDLA1500
マイクホルダー CAC-12
リターンビデオセレクター CAC-6
ビューファインダー回転機構 BKW-401
三脚アダプター VCT-14
メモリースティック
関連機器
HD カメラコントロールユニット HDCU1000/1500
マスターセットアップユニット MSU-900/950
リモートコントロールパネル RCP-700 シリーズ
ビデオセレクター VCS-700
カメラコマンドネットワークユニット CNU-700
仕様および外観は、改良のため予告なく変更することがあり
ますが、ご了承ください。
仕様
31
English
WARNING
To reduce the risk of fire or electric shock,
do not expose this apparatus to rain or
moisture.
To avoid electrical shock, do not open the
cabinet. Refer servicing to qualified
personnel only.
AVERTISSEMENT
Afin de réduire les risques d’incendie ou
d’électrocution, ne pas exposer cet
appareil à la pluie ou à l’humidité.
Afin d’écarter tout risque d’électrocution,
garder le coffret fermé. Ne confier
l’entretien de l’appareil qu’à un personnel
qualifié.
WARNUNG
Um die Gefahr von Bränden oder
elektrischen Schlägen zu verringern, darf
dieses Gerät nicht Regen oder Feuchtigkeit
ausgesetzt werden.
Um einen elektrischen Schlag zu
vermeiden, darf das Gehäuse nicht
geöffnet werden. Überlassen Sie
Wartungsarbeiten stets nur qualifiziertem
Fachpersonal.
For the customers in the USA
This equipment has been tested and found to comply with the
limits for a Class A digital device, pursuant to Part 15 of the
FCC Rules. These limits are designed to provide reasonable
protection against harmful interference when the equipment is
operated in a commercial environment. This equipment
generates, uses, and can radiate radio frequency energy and,
if not installed and used in accordance with the instruction
manual, may cause harmful interference to radio
communications. Operation of this equipment in a residential
area is likely to cause harmful interference in which case the
user will be required to correct the interference at his own
expense.
For the customers in Europe
This product with the CE marking complies with both the EMC
Directive (89/336/EEC) and the Low Voltage Directive (73/23/
EEC) issued by the Commission of the European Community.
Compliance with these directives implies conformity to the
following European standards:
• EN60950: Product Safety
• EN55103-1: Electromagnetic Interference (Emission)
• EN55103-2: Electromagnetic Susceptibility (Immunity)
This product is intended for use in the following
Electromagnetic Environment(s):
E1 (residential), E2 (commercial and light industrial),
E3 (urban outdoors) and E4 (controlled EMC environment, ex.
TV studio).
Pour les clients européens
Ce produit portant la marque CE est conforme à la fois à la
Directive sur la compatibilité électromagnétique (EMC) (89/
336/CEE) et à la Directive sur les basses tensions (73/23/
CEE) émises par la Commission de la Communauté
Européenne.
La conformité à ces directives implique la conformité aux
normes européennes suivantes:
• EN60950: Sécurité des produits
• EN55103-1: Interférences électromagnétiques (émission)
• EN55103-2: Sensibilité électromagnétique (immunité)
Ce produit est prévu pour être utilisé dans les environnements
électromagnétiques suivants:
E1 (résidentiel), E2 (commercial et industrie légère), E3
(urbain extérieur) et E4 (environnement EMC contrôlé, ex.
studio de télévision).
GB
Für Kunden in Europa
Dieses Produkt besitzt die CE-Kennzeichnung und erfüllt die
EMV-Richtlinie (89/336/EWG) sowie die
Niederspannungsrichtlinie (73/23/EWG) der EG-Kommission.
Angewandte Normen:
• EN60950: Sicherheitsbestimmungen
• EN55103-1: Elektromagnetische Verträglichkeit
(Störaussendung)
• EN55103-2: Elektromagnetische Verträglichkeit
(Störfestigkeit),
für die folgenden elektromagnetischen Umgebungen:
E1 (Wohnberelch), E2 (kommerzieller und in beschränktem
Maße industrieller Bereich), E3 (Stadtbereich im Freien) und
E4 (kontrollierter EMV-Bereich, z.B. Fernsehstudio).
You are cautioned that any changes or modifications not
expressly approved in this manual could void your authority to
operate this equipment.
The shielded interface cable recommended in this manual
must be used with this equipment in order to comply with the
limits for a digital device pursuant to Subpart B of Part 15 of
FCC Rules.
33
This HD Color Camera is classified as a CLASS 1 LASER
PRODUCT.
Laser diode properties
Wave length:
Emission duration:
Laser output power:
1310±40 nm
Pulse Modulation
141 +37
-29 µW
Daten der Laserdiode
Wellenlänge:
1310±40 nm
Emissionsdauer:
Pulsmodulation
Laser-Ausgangsleistung: 141 +37
-29 µW
Laserdiode data
Bølgelængde:
Strålingsvarighed:
Lasereffekt:
1310±40 nm
Pulse Modulation
141 +37
-29 µW
Laserdiodens egenskaper
Våglängd:
Strålningstid:
Laseruteffekt:
1310±40 nm
Pulsmodulering
+37
141 -29
µW
Laserdiodens egenskaper
Bølgelengde:
Emisjonslengde:
Laser utgangseffekt:
1310±40 nm
Pulsmodulasjon
+37
141 -29
µW
CAUTION
The use of optical instruments with this product will increase
eye hazard.
CAUTION
Use of controls or adjustments or performance of procedures
other than those specified herein may result in hazardous
radiation exposure.
34
Voor de Klanten in Nederland
• Dit apparaat bevat een vast ingebouwde batterij die niet
vervangen hoeft te worden tijdens de levensduur van het
apparaat.
• Raadpleeg uw leverancier indien de batterij toch vervangen
moet worden. De batterij mag alleen vervangen worden door
vakbekwaam servicepersoneel.
• Gooi de batterij niet weg maar lever deze in als klein
chemisch afval (KCA).
• Lever het apparaat aan het einde van de levensduur in voor
recycling, de batterij zal dan op correcte wijze verwerkt
worden.
Table of Contents
Overview................................................................................36
Features......................................................................................36
System Configuration ................................................................38
Precautions.................................................................................39
Locations and Functions of Parts.......................................40
Accessory Attachments..............................................................40
Controls and Connectors............................................................41
Preparations..........................................................................47
Attaching a Lens ........................................................................47
Adjusting the Flange Focal Length............................................47
Attaching a Viewfinder..............................................................48
Adjusting the Shoulder Pad Position .........................................49
Mounting the Camera to a Tripod..............................................50
Adjustments and Settings for Recording...........................51
Adjusting the Black Balance and White Balance ......................51
Setting the Electronic Shutter ....................................................54
Basic Operation of the Setup Menus on the Viewfinder ...55
Viewfinder Screen Status Display.......................................56
Organization of Viewfinder Screen Status Display...................56
Using a “Memory Stick”.......................................................57
Specifications .......................................................................59
Table of Contents
35
Overview
The HDC1500 is a 2/3-type high-definition portable video
camera equipped with CCD for 2,200,000 pixels. It
incorporates the latest pickup elements and digital signalprocessing LSI to yield higher picture quality and higher
stability in image creation while maintaining conventional
popular functions and operability.
Features
High picture quality and high performance
The new 2/3-type Progressive IT CCD for 2,200,000 pixels
conforms to driving formats up to 1080/59.94P, achieving
high sensitivity and low smear. In addition, the 14-bit A/D
converter and a unique signal-processing LSI provide
picture quality of optimal grade.
Multiple formats
The HDC1500 covers 1080/50i and 59.94i interlace,1080/
23.98PsF, 24PsF, 25PsF, and 29.97PsF Progressive Scan
(PsF) systems. It also covers 720/50P and 59.94P systems.
Signal output of 1080/50P and 59.94P from the camera
head is possible via the Dual Link interface.
Newly designed integrated unit with low
center of gravity
The basic design has been reworked. The stylish
appearance with low-slung design improves operability as
a portable camera and, when used in combination with the
HDLA1500 Large Lens Adaptor, it permits the viewfinder
to be mounted at a low position, making the viewfinder
position closer to the optical axis of the lens for highly
efficient operations.
Swing handle
The swinging structure of the handle enables the large
viewfinder to be shifted forward, giving it the same total
longitudinal size as a standard studio-use camera, for
operability equivalent to that of a standard studio-use
camera.
Position-adjustable shoulder pad
The position of the shoulder pad can be adjusted for stable
shooting according to the build of the camera operator, the
type of lens in use, or the shooting style.
36
Overview
Function-assignable switches
The camera has a switch to which various functions can be
assigned on the side panel. You can activate your desired
function, such as electronic color-temperature conversion,
instantly when shooting by assigning it to the switch in
advance. Another switch on the handle is also available as
a function assignable switch.
Memory Stick 1) operation
The camera is equipped with a Memory Stick port, which
enables setup data storage and software upgrading using
Memory Sticks.
1) Memory Stick and
Corporation.
are trademarks of Sony
Various color-reproduction functions
Selection of the gamma table
Multiple gamma tables are provided, enabling you to use
multiple formats and perform flexible image creation.
Multimatrix color correction
In addition the standard 6-axis matrix function, the camera
has a multimatrix function that permits you to adjust the
hue and chroma for color components in 16-axis directions
independently. This is quite useful in color matching
among multiple cameras.
Knee saturation
Change of hue and decrease in chroma that occur in
highlighted areas can be compensated.
This enables reproduction of natural skin tones under
strong lighting.
Low key saturation
Hue and saturation in low-key zones can be compensated.
Thus, compensation for color reproduction in all zones is
enabled in combination with matrix color compensation
and knee saturation functions.
Versatile detail control functions
Skin-tone detail function
This function allows control (emphasis or suppression) of
the detail level for just a certain hue or chroma area in the
image, by creating a detail gate signal from color
components of your specified hue, such as skin tones.
The detail levels of three hues can be adjusted
independently at the same time.
Detail boost-frequency control
The boost frequency can be adjusted from 20 to 30 MHz.
This allows the detail thickness to be set appropriately for
the subject, thus enabling more subtle image expression.
H/V ratio control
The ratio between horizontal and vertical detail can be
adjusted.
White/black limiter
The white and black details can be limited independently.
Easy menu-based setting
Selections and settings for viewfinder display items,
safety-zone marker 2) or center marker,3) screen size
marker, etc. can be made quickly and easily, using setup
menus displayed on the viewfinder screen or an external
monitor.
2) Safety zone marker:
A box-shaped marker displayed on the viewfinder screen which indicates
80%, 90%, 92.5%, or 95% of the total screen area
3) Center marker:
A cross-shaped marker which indicates the center of the viewfinder screen
Wide variety of viewfinder display options
Along with items such as operation messages, a zebra
pattern,4) a safety-zone marker, and a center marker,
camera settings may also be displayed on the viewfinder
screen. Furthermore, there are other indicators arranged
above and below the viewfinder, such as a tally lamp,
battery warning indicator, and an indicator to tell you that
one or more settings are other than standard. This makes it
simple to check the status of the camera.
4) Zebra pattern:
A stripe pattern displayed on the viewfinder screen which indicates the
portions where the video level is above about 70% or 100%. Used to check
the video level of the subject.
Optical digital transmission
The camera uses electro-optical coding cable for 1.5gigabit digital optical transmission between the camera
and a Camera Control Unit.
High-resolution 2-type monochrome and
2.7-type color multiformat viewfinders
(optional)
The HDVF-20A, a multiformat 2-type monochrome CRT
viewfinder, and the HDVF-C30W, a multiformat 2.7-type
color LCD viewfinder, are available as options to cover
various applications.
Prevention of electrical shock
When the power connection is unsafe, the power supply
from the connected Camera Control Unit will be shut off.
Overview
37
System Configuration
Accessories and related equipment for the HDC1500 are
shown in the figure below.
HDVF-C750W
Viewfinder
HKCU1001
HDVF-20A
HDVF-C30W
Viewfinder
BKW-401 Viewfinder
Rotation Bracket
HKCU1003
HKCU1005
HDC1500
portable camera
Optical Fiber
Cable
CAC-6
Return Video Selector
BNC (SD)
Zoom Lens
(for ENG/EFP)
HDCU1000 HD Camera
Control Unit
With HKCU1001
or HKCU1003
Memory Stick
Intercom Headset
VCT-14
Tripod Adaptor
CAC-12
Microphone
holder
Picture
Monitor
Microphone
BNC
(VBS)
HKCU1001
Tripod
HKCU1003
HDC1500
portable camera
Memory Stick
Waveform
Monitor
BNC
(VBS)
VCS-700
Video Selector
HKCU1005
HDVF-700A
HDVF-9900
Viewfinder
BNC (SD)
Camera hangers a)
1
POWER
CABLE
ALARM
CAM
OPEN
MAIN
SHORT
CAC-6
Return Video Selector
INCOM MIC ON
OFF
PGM
PROD
PRIV
ENG
HD CAMERA CONTROL UNIT
Microphone
PANEL STANDARD MONITOR
ACTIVE
MEMORY
STICK
5600K
AUTO
KNEE
SKIN
DETAIL
TEST
CLOSE
BARS
VTR
START/STOP
BLACK
KNEE
GAMMA SATURATION
AWB
ABB
WHITE
FUNCTION
ABS
BLACK
MAINTE
NANCE
HDLA1500
Large Lens Adaptor
BKP-7911 Script Holder
Zoom Lens
(for studio use)
V-wedge shoe
(supplied with
the tripod)
IRIS/MB
ACTIVE MASTER
BLACK
EXT
IRIS
REMOTE CONTROL UNIT
RM-B750
Remote Control Unit
CNU-700
Camera Command
Network Unit
CCA-5
1
HDC1000
studio camera
Memory Stick
AUTO
IRIS
PAINT
ALARM
CCA-5
Zoom Lens
(for studio use)
HDVF-700A
HDVF-9900
Viewfinder
SCENE
CCA-5
HDCU1500
HD Camera Control Unit
CCA-5
Intercom Headset
CAC-6
Return Video Selector
Intercom Headset
Microphone
MSU-900/950
Master Setup Unit
RCP-700-series
Remote Control Panel
Tripod
BKP-7911 Script Holder
38
Overview
a) supplied with the HDLA1500, Part No.: A-1128-405-A
Precautions
Note on laser beams
Laser beams may damage the CCDs. If you shoot a scene
that includes a laser beam, be careful not to let a laser beam
become directed into the lens of the camera.
Do not subject to severe shocks
Damage to the case or internal components may result.
When finished using
Turn off the power switch.
Operation and storage environment
Store in a level place with air conditioning.
Avoid use or storage in the following places:
• Extremely hot or cold places
• Places with high humidity
• Places with strong vibration
• Near strong magnetic fields
• In places where it receives much direct sunlight, or near
heating equipment
Dew condensation
If you move the camera from a very cold place to a warm
place, or use it in a damp location, dew may form on the
lens or inside the camera.
The camera has no built-in dew indicator. If you find dew
on the body or lens, switch the camera off and wait for the
dew to disappear for about one hour.
Precautions
39
Locations and Functions of Parts
Accessory Attachments
a VF connector
b Shoulder strap fitting post
c Viewfinder front-rear positioning
lever and lock knob
d Viewfinder left-right positioning
ring
e Lens cable clamp
f Lens fixing lever
g Lens mount cap
h Lens mount
k Shoulder pad
i LENS connector
j Tripod mount
a VF (viewfinder) connector (20-pin)
Connect the cable of the viewfinder (not supplied).
e Lens cable clamp
Used to secure the cable of the lens (not supplied).
b Shoulder strap fitting post
Attach one end of a shoulder strap (not supplied) to this
fitting post, and the other end to the fitting post on the other
side of the camera.
f Lens fixing lever
Used to secure the lens in the lens mount.
c Viewfinder front-rear positioning lever and LOCK
knob
Loosen the lever and knob to adjust the viewfinder position
towards the front or rear.
d Viewfinder left-right positioning ring
Loosen this ring to adjust the viewfinder position towards
the left or right.
For details on adjusting the viewfinder position, see
“Attaching a Viewfinder” on page 48.
40
Locations and Functions of Parts
g Lens mount cap
Cover the lens mount with this cap when a lens is not
attached. The cover may be removed by moving the lens
fixing lever upwards.
h Lens mount
Used to attach a lens (not supplied).
i LENS connector (12-pin)
Connect the lens cable. The camera can control the lens
functions through this cable.
j Tripod mount
Attach the VCT-14 Tripod Adaptor when mounting the
camera on a tripod.
k Shoulder pad
You can adjust the position so that you can get the best
balance for shooting with the camera on your shoulder.
For details, see “Adjusting the Shoulder Pad Position” on
page 49.
Controls and Connectors
Front right
a INCOM button
b RET 1 button
c Assignable switch
d Filter select buttons
e FILTER LOCAL button
g GAIN switch
h OUTPUT/AUTO KNEE switch
i WHITE BAL switch
f AUTO W/B BAL switch
j DISPLAY switch
k CANCEL/STATUS switch
l Memory Stick section
m MENU SEL knob/ENTER
button
a INCOM (intercom 1) button
The intercom 1 microphone is turned ON while this button
is pressed.
c Assignable switch
You can assign a function using the menu displayed on the
viewfinder screen.
b RET 1 (return video 1) button
The return video 1 signal from the camera control unit is
monitored on the viewfinder screen while this button is
pressed. It function the same as the RET 1 button on the
side (page 43) and that on the operation panel on the rear
of the camera (page 45).
d Filter select buttons
You can switch the built-in ND and CC (color temperature
conversion) filters by pressing the selectors while holding
the FILTER LOCAL button depressed.
Pressing the left button selects the available ND filters
(clear, 1/4ND, 1/8ND, 1/16ND,1/64ND) in sequence.
Pressing the right button selects the available CC filters
(cross, 3200K, 4300K, 6300K, 8000K) in sequence.
Locations and Functions of Parts
41
e FILTER LOCAL button
While holding this button depressed, press either of the
filter select button to select the ND or CC filters.
f AUTO W/B BAL (white and black balance
automatic adjustment) switch
Used to automatically adjust white and black balance when
the camera is used in stand-alone status without connecting
to the camera control unit.
WHT: Automatically adjust white balance.
BLK: Automatically adjust black balance.
g GAIN switch
Used to select the gain of the video amplifier based on
lighting conditions when the camera is used in stand-alone
status without connecting a camera control unit.
When shipped from the factory, the values set are L = 0 dB,
M = 6 dB, and H = 12 dB.
h OUTPUT (output signal selection)/AUTO KNEE
switch
Used to select the signal (color bar signal or camera’s
video signal) to be used as output to a VTR, the viewfinder
or a video monitor when the camera is used in stand-alone
status without connecting a camera control unit.
When the camera’s video signal is being used as output,
the auto knee function may be used.
The relationship between the switch setting and the output
signal and auto knee function is shown in the table below.
OUTPUT
AUTO KNEE Function
BARS
OFF
Output is a color bar signal.
CAM
OFF
Output is the camera’s video
signal. The auto knee circuit is
disabled.
CAM
ON
Output is the camera’s video
signal. The auto knee circuit is
enabled.
i WHITE BAL (white balance memory selection)
switch
Used to select the white balance adjustment method or the
memory used to store the adjusted value when the camera
is used in stand-alone status without connecting a camera
control unit.
PRST (preset): White balance is adjusted to a preset value
corresponding to a color temperature of 3200K.
A or B: Selects memory A or B. When the AUTO W/B
BAL switch is set to WHT, the white balance will be
automatically adjusted according to the setting of the
FILTER control. The adjusted value will be stored in
the selected memory. Each memory can store up to four
adjusted values, for a total of 8.
j DISPLAY switch
The functions of the DISPLAY switch are as follows:
42
Locations and Functions of Parts
ON: Characters and messages showing the camera settings
and operating status may be displayed on the
viewfinder screen.
OFF: Status messages will not appear on the viewfinder
screen.
MENU: Menus for camera settings will be displayed on
the viewfinder screen.
k CANCEL/STATUS switch
When a menu is displayed on the viewfinder screen, you
can cancel any changed settings or return the display to the
previous menu.
When no menu is displayed on the viewfinder screen, the
status information of this camera is displayed.
l Memory Stick section
A slot to accommodate a “Memory Stick” and an access
lamp are provided behind the panel. The access lamp lights
in red while writing or reading data to/from a “Memory
Stick.”
Note
Do not insert/remove the “Memory Stick” when the access
lamp lights.
m MENU SEL (menu select) knob/ENTER button
(rotary encoder)
Used to select settings from menus displayed on the
viewfinder screen (by rotating the knob) and to confirm
settings (by pushing the button).
Note
When a camera control unit or a remote control device,
such as MSU-900/950 and the RCP-700-series Remote
Control Panel, is connected, the functions of 6 to 9 are
controlled from the external control device and the
controls on the camera are disabled.
Front left
a RET 1 button
d SHUTTER switch
b MIC 1 IN connector
e INCOM/EAR LEVEL control
c MIC power switch
f RET 2 button
a RET 1 (return video 1) button
The return video 1 signal from the camera control unit is
monitored on the viewfinder screen while this button is
pressed. It function the same as the RET1 buttons on the
handle (page 41) and that on the operation panel on the rear
of the camera (page 45).
b MIC 1 IN (microphone 1 input) connector (XLR 3pin)
Connect a microphone.
This connector and the AUDIO IN CH-1 connector (page
47) on the operation panel on the rear of the camera are
alternately activated with the CH1 input select switch
(page 47).
c MIC (microphone) power switch
+48V: To supply a power of +48 V to the connected
microphone.
OFF: Not to supply a power to the connected microphone.
SEL: The shutter speed and shutter mode change each
time the switch is set to this position.
For details, see “Setting the Electronic Shutter” on page
54.
e INCOM/EAR (intercom/earphone) LEVEL control
To adjust the intercom/earphone volume level.
The intercom level adjustment is enabled when the
INTERCOM 1 and 2 LEVEL/MIC switches (page 45) on
the operation panel on the rear of the camera are set to
“FRONT.”
f RET 2 (return video 2) button
When this button is pressed, the picture on the viewfinder
changes to the return video signal selected with the RET 2
select switch (page 45) on the operation panel on the rear
of the camera.
d SHUTTER switch
Used for setting the electronic shutter functions when the
camera is used in stand-alone status without connecting a
camera control unit.
OFF: The electronic shutter does not function.
ON: The electronic shutter is activated.
Locations and Functions of Parts
43
Rear
b Tally lamp and switch
Shoulder strap fitting post (page 40)
Operation panel (page 45)
c CCU connector
d SDI 1 connector
Not used
Connector panel (page 46)
a POWER switch
e CALL button
a POWER switch
CCU: Power supply will be received from the camera
control unit.
EXT: Power supply will be received through the DC IN
connector.
b Tally lamp and switch
ON: The tally lamp lights upon a tally signal input to the
connected camera control unit or a call signal generated
by pressing a CALL button.
OFF: The tally lamp is prevented from lighting.
c CCU (Camera Control Unit) connector (optical
multi connector)
Connect a camera control unit via an optical electrocomposite cable.
d SDI 1 (serial digital interface 1) connector (BNC
type)
Used for HD SDI signal output.
e CALL button
When you press this button, the red tally lamp of the RCP700-series Remote Control Panel or the MSU-900/950
44
Locations and Functions of Parts
Master Setup Unit, will light. Use to call the operator of the
RCP or MSU.
Operation Panel
b RET 1 button and select switch
a INTERCOM1 and INTERCOM2 controls and switches
c RET 2 button and select switch
d LIGHT switch
PGM1 control
PGM2 control
PGM1
LEVEL
REAR
MIC
ON
FRONT
OFF
PGM2
INCOM PROD
ENG
PGM1
LEVEL
REAR
MIC
ON
FRONT
OFF
INTERCOM 1
RET1
PGM2
2
RET2
3
1
2
3
4 LIGHT
1
4
ON
OFF
INCOM PROD
PGM1
PGM2
PGM1
PGM2
ENG
INTERCOM 2
Line select switch
LEVEL
REAR
MIC
ON
FRONT
OFF
INCOM PROD
ENG
INTERCOM 1
INCOM level control
LEVEL
REAR
MIC
ON
FRONT
OFF
INCOM PROD
ENG
INTERCOM 2
LEVEL/MIC switch
a INTERCOM1 and INTERCOM2 controls and
switches
There are PGM1 and 2 controls incorporated with a line
select switch, a LEVEL/MIC switch, and INCOM level
control each for intercom line 1 and 2.
PGM1 (program 1) control
Adjust the audio reception level of program 1.
PGM2 (program 2) control
Adjust the audio reception level of program 2.
LEVEL/MIC switch
REAR/ON: The intercom headset microphone is turned
on. The intercom audio reception level is adjusted with
the INCOM level control.
REAR/OFF: The intercom headset microphone is turned
off. The intercom audio reception level is adjusted with
the INCOM level control.
FRONT/OFF: The intercom headset microphone is
turned off. The intercom audio reception level is
adjusted with the INCOM/EAR LEVEL control on the
front of the camera.
b RET 1 (return video 1) button and select switch
The return video signal selected with the switch is
displayed on the viewfinder screen while the button is
pressed.
c RET 2 (return video 2) button and select switch
When other return video systems are used in addition to
return video 1, you can monitor the signal selected with the
switch on the viewfinder screen while pressing the button.
Note
The RET 1 button has priority over the RET 2 button if
both buttons are pressed.
d LIGHT switch
Set to ON to illuminate the operation panel.
INCOM level control
Adjust the intercom audio reception level.
Line select switch
Select the intercom line.
PROD: Producer line
ENG: Engineer line
Locations and Functions of Parts
45
Connector panel
g INCOM1 and 2 connectors
a EARPHONE jack
RET CTRL
EARPHONE
b RET CONT connector
c CRANE connector
REMOTE
h REMOTE connector
TRACKER
CRANE
RET IN
GENLOCK IN
d TRACKER connector
PROMPTER
e DC OUT connector
LINE
AES/EBU
FRONT MIC
MIC
+48V
OFF
DC OUT
DC IN 10.5-17V
LINE
MIC
+48V
OFF
TEST
OUT
j TEST OUT connector
AUDIO IN
CH1
CH2
f DC IN connector
i GENLOCK IN/RET IN/
PROMPTER OUT
connector and switch
SDI 2
k SDI 2 connector
l AUDIO IN CH1 and CH2 connectors and switches
a EARPHONE jack (stereo minijack)
Connect an earphone or headset for output of the intercom.
b RET CONT (return control) connector (6-pin)
Used for connection to a CAC-6 Return Video Selector.
c CRANE connector (12-pin)
For external interface, such as viewfinder and external
data.
d TRACKER connector (10-pin)
For external interface, such as intercom and tally.
e DC OUT (DC power supply output) connector (4pin)
Used to supply power to devices such as a wireless receiver
(optional).
f DC IN (DC power supply input) connector (XLR 4pin)
Used for connection to the AC-DN10 AC Adaptor to
supply power to the camera.
g INCOM1 and 2 (intercom 1 and 2) connectors (XLR
5-pin)
Used for input and output of intercom audio signals.
h REMOTE connector (8-pin)
Used for connection to an RM-B150/B750 Remote
Control Unit, RCP-700-series Remote Control Panel, or
MSU-900/950 Master Setup Unit.
46
Locations and Functions of Parts
Note
When the camera is connected to a CCU, do not connect
any device to this connector.
i GENLOCK IN1)/RET IN1)/PROMPTER OUT
(external gen-lock signal input/return video signal
input/prompter signal output) connector (BNC
type) and switch
Set the switch according to the signal at the connector.1)
GENLOCK IN: Used for input of an external gen-lock
signal when the camera is used without connecting a
camera control unit
RET IN: Used for input of the return video signal (HD-Y)
when the camera is used without connecting a camera
control unit
PROMPTER OUT: Used for output of a prompter signal
(valid only when a camera control unit is connected)
1) For future use
j TEST OUT connector (BNC type)
Used to output the analog signal.
This also supplies the VBS signal, an HD signal nearly
equal to the signal output from the VF connector, an HDSYNC signal, or an SD-SYNC signal depending on which
of these you have selected on the menu.
k SDI 2 (serial digital interface 2) connector (BNC
type)
Used for HD SDI or SD SDI signal output.
l AUDIO IN CH1 and CH2 connectors (XLR 3-pin)
and switches
Connect audio signals. An input select switch and
microphone power switch are provided for each channel.
Preparations
Attaching a Lens
CH1 audio input select switch
Microphone power switches
CH2 audio input select switch
LINE
FRONT MIC
MIC
48V
OFF
LINE
AES/EBU
MIC
48V
OFF
The procedure for attaching a lens to the camera is as
follows:
For information on handling lenses, refer to the lens’
operation manual.
AUDIO IN
CH 1
AUDIO IN CH1 connector
CH 2
AUDIO IN CH2 connector
CH1 audio input select switch
Set to the appropriate position according to the equipment
connected to the AUDIO IN CH1 connector.
LINE: When a line-level (0 dBm) signal source is
connected
FRONT MIC: When using the microphone connected to
the MIC 1 IN connector
MIC: When an external microphone is connected
CH2 audio input select switch
Set to the appropriate position according to the equipment
connected to the AUDIO IN CH2 connector.
LINE: When a line-level (0 dBm) signal source is
connected
AES/EBU: When a digital audio signal is connected (The
signal must be in synchronization with the camera
output.)
MIC: When an external microphone is connected
Microphone power switches
When a microphone is connected to the corresponding
AUDIO IN connector, set whether or not to supply a power
to the microphone.
+48V: To supply a power of +48 V
OFF: Not to supply a power
(No function has been assigned to the lowermost position.
No power is supplied to the microphone.)
Note
To supply a power of +12 V, modification of the camera is
required.
5 2
4
1,3
1
Push the lens fixing lever upwards and remove the lens
mount cap from the lens mount.
2
Align the lens’ alignment pin with the notch in the
upper part of the lens mount and insert the lens into the
mount.
3
While supporting the lens, push the lens fixing lever
downwards to secure the lens.
4
Connect the lens cable to the LENS connector.
5
Secure the lens cable with the cable clamp.
Adjusting the Flange Focal Length
Adjustment of the flange focal length 1) is necessary in the
following situations.
• The first time a lens is attached
• When changing lenses
• When zooming and the focus is not sharp at both
telephoto and wide angle
Preparations
47
Attaching procedure
Note
The various parts of the lens used in adjusting the flange
focal length are in different positions on different lenses.
Refer to the lens’ operation manual.
1
Slide the viewfinder in the direction of the arrow.
The viewfinder stopper automatically pops down.
The procedure for adjusting the flange focal length is as
follows:
VF connector
Viewfinder stopper
About 3 meters
(10 ft)
1
Set the iris control to manual, and open the iris fully.
2
Place a flange focal length adjustment chart
approximately 3 meters from the camera and adjust the
lighting to get an appropriate video output level.
2
Loosen the viewfinder left-right positioning ring, slide
the viewfinder side to side to the most convenient
position and tighten the ring.
3
Loosen the Ff
4
With either manual or power zoom, set the zoom ring
to telephoto.
3
Connect the viewfinder cable to the VF connector of
the camera.
5
Aim at the flange focal length adjustment chart and
turn the focus ring to focus the image.
4
Connect the microphone cable to the MIC 1 IN
connector of the camera.
6
Set the zoom ring to wide angle.
7
Turn the Ff ring to bring the chart in focus. Take care
not to move the distance ring.
8
Repeat steps 4 through 7 until the image is focus at
both telephoto and wide angle.
9
2)
ring lock screw.
Adjusting the viewfinder position
The viewfinder position may be adjusted towards the front
and rear and to the left and right to make it easy to see into
it.
To adjust the position to the left or right
Tighten the Ff ring lock screw.
1) Flange focal length: The distance between the lens mount attachment
plane and the imaging plane
2) Ff: Abbreviation of flange focal length
Attaching a Viewfinder
Example: Attaching a HDVF-20A/C30W
Viewfinder
For details on the viewfinder, refer to the instruction
manual of the viewfinder.
48
MIC 1 IN connector
Preparations
Viewfinder left-right positioning ring
1
Loosen the viewfinder left-right positioning ring.
2
Slide the viewfinder left or right to move it into a good
viewing position.
3
Tighten the viewfinder left-right positioning ring.
To adjust the position forward or backward
LOCK knob
Viewfinder front-rear
positioning lever
1
Loosen the viewfinder front-rear positioning lever and
LOCK knob.
2
Slide the viewfinder towards the front or rear of the
camera to move it into a good viewing position.
3
Tighten the viewfinder front-rear positioning lever and
LOCK knob.
To detach the viewfinder
Loosen the viewfinder left-right positioning ring, pull the
viewfinder stopper, then pull out the viewfinder by sliding
it in the direction opposite to that when attached.
Keeping the viewfinder from hitting your
leg
To keep the viewfinder from bumping your leg when
carrying the camera, install the BKW-401 Viewfinder
Rotation Bracket (optional) and rotate the viewfinder
upwards.
Note
Lock the viewfinder in a slightly forward position before
rotating it upwards. If the viewfinder is in its rearmost
position, the arm of the viewfinder rotation bracket will
strike the grip.
Adjusting the Shoulder Pad Position
You can shift the shoulder pad from its center position
(factory setting) backward by up to 10 mm (3/8 inch) or
forward by up to 25 mm (1 inch). This adjustment helps
you get the best balance for shooting with the camcorder
on your shoulder.
Preparations
49
Tripod adaptor
Shoulder pad lock lever
1,3
Tripod
Bottom of the camera
2
Shoulder pad
2
Place the camera on the tripod adaptor, and slide
forward it along the groove of the tripod adaptor until
it clicks.
Adjusting procedure
1
Raise the lever in the center of the shoulder pad to
unlock the shoulder pad.
2
Slide the shoulder pad backward or forward until it is
in the most convenient position.
3
Bring down the lever to lock the shoulder pad in the
selected position.
Mounting the Camera to a Tripod
Mount the camera to a tripod using a VCT-14 Tripod
Adaptor.
Caution
• Select an appropriate hole from among those at the
bottom of the tripod adaptor considering the balance of
the weight of the camera and the tripod adaptor. If an
inappropriate hole is selected, the camera may fall over.
• Check that the size of the selected hole matches that of
the screw of the tripod. If they do not match, the tripod
adaptor cannot be attached to the tripod securely.
To remove the camera from the tripod adaptor
Hold down the red button and pull the lever in the direction
of the arrow.
Mounting procedure
1
Attach the tripod adaptor to the tripod and secure it
with the screw.
Lever
Red button
50
Preparations
If the pin of the tripod adaptor does not return to
its original position
After removing the camera, if the pin of the tripod adaptor
does not return to its original position, hold down the red
button and move the lever in the direction of the arrow to
return the pin to its original position. It is not possible to
mount a camera with the pin not seated.
Adjustments and
Settings for Recording
Adjusting the Black Balance and
White Balance
Original position
Pin
In order to maintain high picture quality when using the
camera, it is necessary to set the black balance and white
balance appropriately for the conditions.
Note
When a camera control unit or a remote control device,
such as MSU-900/950 and the RCP-700-series Remote
Control Panel, is connected, the black balance and white
balance are controlled from the external control device and
controls on the camera are disabled.
Black balance adjustment
The black balance needs adjustment in situations like the
following:
• The first time the camera is used
• When the camera is used after a long period of disuse
• When the surrounding temperature changes greatly
• When the gain value is changed using the setup menus
Normally, there is no need to adjust the black balance
every time the camera is turned on.
White balance adjustment
Always readjust the white balance when lighting
conditions change.
About the viewfinder screen
After the process of adjusting the black balance or white
balance begins, messages about the progress and results of
the adjustment will be displayed on the viewfinder screen.
Note
Adjusted values set through automatic adjustment, and
other settings, are stored in the camera’s memory and
preserved even when the camera power is turned off.
Adjusting the black balance
In automatic adjustment of black balance, both the black
set and black balance are adjusted.
Procedure for adjusting the black balance
1
Push the AUTO W/B BAL switch to BLK and release
the switch.
Adjustments and Settings for Recording
51
Adjusting the white balance
Automatic adjustment of white balance is performed with
the following procedure:
Procedure for adjusting the white balance
1
Set the WHITE BAL switch to A or B.
AUTO W/B BAL switch
The switch will return to the center position, and
adjustment will be performed.
During adjustment, a message like the one in the figure
below will be displayed on the viewfinder screen.
WHITE BAL switch
2
ABB:OP
After a few seconds the adjustment process will be
complete, and the message “ABB: OK” will be
displayed. The adjusted value is automatically stored
in memory.
Notes
Select the filters setting according to the lighting
conditions.
To select the ND filter
Press the ND filter select button while holding the
FILTER LOCAL button depressed.
Each press of the select button switches the available
ND filters (clear, 1/4ND, 1/8ND, 1/16ND,1/64ND) in
sequence.
To select the CC filter
Press the CC filter select button while holding the
FILTER LOCAL button depressed.
Each press of the select button switches the available
CC filters (cross, 3200K, 4300K, 6300K, 8000K) in
sequence.
• During black balance adjustment, the iris will be
automatically closed.
• During black balance adjustment, the gain switching
circuit will work automatically, and the viewfinder
screen will flicker several times. This is not a
malfunction.
When automatic black balance adjustment fails
If the automatic black balance adjustment process does not
end successfully, the error message “ABB: NG” will be
displayed on the viewfinder screen for approximately three
seconds.
If this error message is displayed, try black balance
adjustment again.
If the error message continues to be displayed after several
attempts, the camera requires internal inspection.
About black balance memory
The black balance values stored in memory will be
preserved even when the camera power is turned off.
52
Adjustments and Settings for Recording
CC filter select button
ND filter select button
FILTER LOCAL button
3
ND Filter
Color temperature
conversion filter
1
clear
A
2
1/4 ND
B
3200K (clear)
3
1/8 ND
C
4300K
4
1/16 ND
D
6300 K
5
1/64 ND
E
8000 K
cross filter
AUTO W/B BAL switch
Place a white pattern in the same lighting conditions as
the subject, and zoom in on it so that a white area is
obtained in the screen to satisfy the positional and
quantitative requirements illustrated below.
A white object (white cloth, a white wall, etc.) near the
subject may be used in place of a white pattern.
A rectangle centered in
the screen. The length of
the sides must be at least
70% of the height and
width of the screen.
The switch will return to the center position, and
adjustment will be performed.
During adjustment, the message “AWB: OP” will be
displayed in the lower left corner of the viewfinder
screen.
After about one second, a message like the one in the
figure below will be displayed, and the adjustment
process will complete. The adjusted value will be
automatically stored in the memory (A or B) selected
in step 1.
Within this rectangle,
there must be an area of
white greater than 10% of
the entire screen.
Note
Be careful not to have any spots of high illumination in
the rectangle.
4
Adjust the lens iris opening.
With a manually adjusted lens: Set the opening to an
appropriate value.
With a lens which has automatic iris control: Set the
lens’ automatic/manual iris control switch to
automatic.
5
AWB:OK
Push the AUTO W/B BAL switch to WHT and release
the switch.
Note
When using a zoom lens with automatic iris control
capability, hunting1) may occur. Adjust the lens’ iris gain
control (labeled IG, IS, S, etc.).
1) Hunting: The automatic iris responds over and over, and the image
repeatedly darkens and lightens.
For more information, refer to the lens’ operation manual.
When automatic white balance adjustment fails
If the white balance adjustment process does not end
successfully, the error message “AWB: NG” will be
displayed on the viewfinder screen for approximately three
seconds.
If this error message is displayed, try black balance
adjustment again.
If the error message continues to be displayed after several
attempts, the camera requires internal inspection.
Adjustments and Settings for Recording
53
When there is no time to adjust the white balance
Set the WHITE BAL switch to PRST. The white balance
will be set automatically according to the filter settings.
Selecting the shutter mode and speed
About white balance memory
The white balance values stored in memory will be
preserved even when the camera power is turned off.
There are two white balance memories, A and B. When the
AUTO W/B BAL switch is pushed to the WHT side, the
white balance will be adjusted automatically according to
the filter settings. The adjusted value will be stored in the
selected memory. Each memory can store up to five
adjusted values, for a total of 10.
Setting the shutter mode, and shutter speed in
standard mode
The shutter mode, and the shutter speed in standard mode,
are set using the SHUTTER switch.
1
Push the SHUTTER switch from the ON position to
the SEL position.
Setting the Electronic Shutter
This section explains the different modes which can be
used for the electronic shutter, and gives the procedures for
setting the shutter mode and shutter speed.
SHUTTER switch
Note
The current shutter setting will be displayed in the
setting change/adjustment progress message display
area of the viewfinder screen for about three seconds.
When a camera control unit or a remote control device,
such as MSU-900/950 and the RCP-700-series Remote
Control Panel, is connected, the electronic shutter is
controlled from the external control device and control on
the camera are disabled.
Example: “Shutter: 1/250”
2
About the shutter modes
The different shutter modes which can be used with the
electronic shutter of the camera, and the shutter speeds
which may be selected, are as follows:
Push the SHUTTER switch to the SEL position again
before the display disappears. Repeat this action until
the desired mode or speed is displayed.
When all modes and speeds are displayed, they will be
displayed in the following order:
Shutter modes and speeds
Example: with 60i/59.94i
Shutter
mode
Shutter speeds 1)
Standard
100, 1/125, 1/250,
Use to obtain clear
1/500, 1/1000, 1/2000 images of quickly-moving
second
subjects
ECS (Extended Continuously variable
Clear Scan)
in the range from 60.0
Hz to 4300 Hz
Usage
Use to obtain images of
computer monitors
without horizontal striping
1) The values in the table are those with 60i/59.94i. With other formats, the
available values may be different.
Note
With artificial lighting, particularly fluorescent lights and
mercury vapor lamps, the brightness appears to be
constant, but in fact the strength of the red, green, and blue
components varies at the power supply frequency. This
phenomenon is known as “flicker”. When using the
electronic shutter under these lighting conditions, there are
certain cases in which the flicker is more noticeable. In
particular, color flicker is evident when the power
frequency is 60 Hz. In areas where the power frequency is
50 Hz, setting the shutter speed to 1/100 second will
reduce the flicker.
54
Adjustments and Settings for Recording
Standard mode
1/100
1/125
1/250
1/500
ECS mode
1/1000
1/2000
Basic Operation of the
Setup Menus on the
Viewfinder
When the DISPLAY switch is set to MENU, the setup
menus will be displayed on the viewfinder screen.
The menus are used to select various setting values, and to
select items which will be displayed on the viewfinder
screen and how those items will be displayed.
The following parts are used to operate the menus.
1
<VF DISPLAY>
EX
:c ON
ZOOM : OFF
FOCUS : OFF
ND
: ON
CC
: ON
IRIS : ON
WHITE : OFF
D5600K: ON
GAIN : ON
SHUTT : ON
BATT : OFF
RETURN: ON
TALK : ON
MESSAG: ALL
4
Rotate the MENU SEL knob/ENTER button to align
the arrow marker (c) with the desired item.
5
Push the MENU SEL knob/ENTER button.
The arrow marker (c) will change to a question mark
(?) and begin flashing.
6
Rotate the MENU SEL knob/ENTER button to change
the setting value.
When the knob is rotated quickly, the values will
change quickly; when rotated slowly, the values will
change slowly.
DISPLAY switch
Push
Rotate
To reset a changed value
If you press the CANCEL/STATUS switch toward
CANCEL before pressing the MENU SEL knob/
ENTER button, the setting will be returned to its
previous value.
CANCEL/STATUS
switch
MENU SEL knob/ENTER button
1
To interrupt settings
Set the DISPLAY switch to OFF to turn off the menu
screen display.
The setting can be restarted by setting the DISPLAY
switch back to MENU.
Move the DISPLAY switch from OFF to MENU.
The menu screen will be displayed.
Page number
7
<VF DISPLAY>
EX
: ON
ZOOM : OFF
FOCUS : OFF
ND
: ON
CC
: ON
IRIS : ON
WHITE : OFF
D5600K: ON
GAIN : ON
SHUTT : ON
2
3
Push the MENU SEL knob/ENTER button.
?1
BATT : OFF
RETURN: ON
TALK : ON
MESSAG: ALL
Rotate the MENU SEL knob/ENTER button to display
the desired page.
Push the MENU SEL knob/ENTER button.
The setting items for the selected page will be
displayed, with an arrow (c) marking the currently
selected item.
The “?” mark will change back to the arrow marker
(c), and the new setting will be saved.
8
To change other setting items on the same menu page,
repeat steps 4 through 7.
9
To change to another page, press MENU SEL knob/
ENTER button several times until the page scroll bar
appears on the top right corner of the screen, then
repeat steps 2 and 3.
The setting items for the selected page will be
displayed, with the arrow marker (c) at the currently
selected item.
To end menu operations
Set the DISPLAY switch to OFF.
Basic Operation of the Setup Menus on the Viewfinder
55
Viewfinder Screen Status Display
Besides the video image, the viewfinder can display text
and messages showing the camera settings and operation
status, as well as items such as a center marker or safety
zone marker.
When the DISPLAY switch is set to ON, items set to ON
using the menu or related switches will be displayed on the
upper and lower edges of the screen. Also, messages
informing of setting values or adjustment progress and
results may be displayed for approximately three seconds
when settings are changed, or during the process of or after
adjustment.
Organization of Viewfinder Screen Status Display
All the items which may be displayed on the viewfinder
screen are located as shown in the figure below.
a Zoom position
b Lens extender
c TALK indication
d 5600K mode
h Focus position
EX Z55
TALK
56
1A W:A
F255
12.5V
0dB 1/125
i Battery voltage
F5.6
e Filter
j F value
f White balance memory
k Shutter/EVS
g Gain value
a Zoom position
Indicates the approximate position of the zoom lens
variator between wide angle (0) and telephoto (99). Shows
how close it is to the telephoto side.
b Lens extender
“EX” is displayed when a lens extender is in use.
c TALK indication
Displayed when the intercom microphone is set to ON.
d 5600K mode
Displayed when 5600K is set to ON.
e Filter
Displays the type of filter currently selected. The number
(1, 2, 3, 4, or 5) indicates the ND filter, and the letter (A, B,
C, D or E) is for the CC filter.
f White balance memory
Displays the currently selected white balance automatic
adjustment memory.
W:A: The WHITE BAL switch is set to “A”
W:B: The WHITE BAL switch is set to “B”
W:P: The WHITE BAL switch is set to “PRST”
g Gain value
Displays the video gain value (dB) set with the GAIN
switch.
h Focus position
Shows the focus position of a zoom lens as a numeric value
(0 to 255 (infinity)).
i Battery voltage
Displays the input voltage.
j F value
Indicates the lens F (iris opening) value.
56
Viewfinder Screen Status Display
k Shutter/EVS
Displays the shutter/EVS status. Nothing is displayed if
both the electronic shutter and EVS are set to OFF.
Using a “Memory Stick”
When a “Memory Stick” is inserted in the camera, the file
data can be stored on the “Memory Stick,” which enables
you to share data among cameras.
Inserting a “Memory Stick”
Insert a “Memory Stick” with the label side up into the
“Memory Stick” slot until it clicks and the access lamp
lights in red.
U
EL
CANC
MEN
Label side
Access lamp
Memory Stick
Access lamp
If the access lamp is lit or is flashing, data is being read
from or written to the “Memory Stick.” At this time, do not
shake the product or subject it to shock. Do not turn off the
power of the product or remove the “Memory Stick.” This
may damage the data.
What is “Memory Stick”?
“Memory Stick” is a new compact, portable and versatile
IC (Integrated Circuit) recording medium with a data
capacity that exceeds a floppy disk. “Memory Stick” is
specially designed for exchanging and sharing digital data
among “Memory Stick” compatible products. Because it is
removable, “Memory Stick” can also be used for external
data storage.
“Memory Stick” is available in two sizes: standard size and
compact “Memory Stick Duo” size. Once attached to a
“Memory Stick Duo” adapter, “Memory Stick Duo” turns
to the same size as standard “Memory Stick” and thus can
be used with products compliant with standard “Memory
Stick”.”
Types of “Memory Stick”
“Memory Stick” is available in the following types to meet
various requirements in functions:
“Memory Stick-R”
Stored data are not overwritten. You can write data to
“Memory Stick-R” with “Memory Stick-R” compatible
products only. Copyright protected data that requires
Using a “Memory Stick”
57
MagicGate copyright protection technology cannot be
written to “Memory Stick-R.”
“Memory Stick”
Stores any type of data except copyright-protected data
that requires the MagicGate copyright protection
technology.
“MagicGate Memory Stick”
Equipped with the MagicGate copyright protection
technology.
“Memory Stick-ROM”
Stores pre-recorded, read-only data. You cannot record on
“Memory Stick-ROM” or erase the pre-recorded data.
“Memory Stick PRO”
“Memory Stick” with MagicGate copyright protection
technology, exclusive for “Memory Stick PRO”compliant products.
Usable types of “Memory Stick”
You can use a “Memory Stick” or a “MagicGate Memory
Stick” with this product. However, the MagicGate
copyright protection is not valid with this prodoct.
Note
You cannot use a “Memory Stick Duo” without an
appropriate adaptor.
Note on data read/write speed
Data read/write speed may vary depending on the
combination of the “Memory Stick” and “Memory Stick”
compliant product you use.
What is MagicGate?
MagicGate is copyright protection technology that uses
encryption technology.
About a “Memory Stick”
Write-protect tab
Labelling position
• When you set the “Memory Stick” erasure prevention
switch to “LOCK,” data cannot be recorded, edited, or
erased.
Using a “Memory Stick”
Notes
• Do not attach anything other than the supplied label to
the “Memory Stick” labeling position.
• Attach the label so that it does not stick out beyond the
labeling position.
• Carry and store the “Memory Stick” in its case.
• Do not touch the connector of the “Memory Stick” with
anything, including your finger or metallic objects.
• Do not strike, bend, or drop the “Memory Stick”.
• Do not disassemble or modify the “Memory Stick”.
• Do not allow the “Memory Stick” to get wet.
• Do not use or store the “Memory Stick” in a location that
is:
—Extremely hot, such as in a car parked in the sun
—Under direct sunlight
—Very humid or subject to corrosive substances
Precautions
• To prevent data loss, make backups of data frequently. In
no event will Sony be liable for any loss of data.
• Unauthorized recording may be contrary to the
provisions of copyright law. When you use a “Memory
Stick” that has been pre-recorded, be sure that the
material has been recorded in accordance with copyright
and other applicable laws.
• The “Memory Stick” application software may be
modified or changed by Sony without prior notice.
• Note that there are certain restrictions on recording stage
performances and other entertainment events, even if
they are recorded for personal use only.
• “Memory Stick”,
and “MagicGate Memory
Stick” are trademarks of Sony Corporation.
• “Memory Stick Duo” and
are
trademarks of Sony Corporation.
• “Memory Stick PRO” and
are
trademarks of Sony Corporation.
• “MagicGate” and
are trademarks
of Sony Corporation.
Terminal
58
• Data may be damaged if:
—You remove the “Memory Stick” or turn off the unit
while it is reading or writing data.
—You use the “Memory Stick” in a location subject to
the effects of static electricity or electric noise.
• We recommend that you make a backup copy of
important data that you record on the “Memory Stick”.
Specifications
General
Optical system specifications
Power requirements 240 V AC, 1.4 A (max.)
180 V DC, 1.0 A (max.)
12 V DC, 7 A (max.)
Operating temperature
−20°C to +45°C (−4°F to +113°F)
Storage temperature −20°C to +60°C (−4°F to +140°F)
Mass
Approx. 4.5 kg (9 lb 15 oz) (camera
head only)
Spectral system
Built-in filters
Imager
Imager
2/3-type Progressive Scan CCD
Method
3-CCD, RGB
Effective resolution 1920 (horizontal) × 1080 (vertical)
Input/output connectors
Electrical characteristics
Sensitivity
Image S/N
Horizontal resolution
F1.4 prism
Color temperature conversion filters
A: cross filter
B: 3200K (clear)
C: 4300K
D: 6300K
E: 8000K
ND filters
1: clear
2: 1/4 ND
3: 1/8 ND
4: 1/16 ND
5: 1/64 ND
CCU
Electro-multi connector (1)
LENS
12-pin (1)
VF
20-pin (1)
MIC 1 IN
XLR 3-pin, female (1)
AUDIO IN CH1, CH2
XLR 3-pin, female (1 each)
INCOM1, INCOM2 XLR 5-pin, female (1 each)
EARPHONE
Stereo minijack (1)
DC IN
XLR 4-pin (1), 10.5 to 17 V DC
DC OUT
4-pin (1), 10.5 to 17 V DC, 1.5 A
maximum
It may be limited depending on the
load and input conditions.
SDI 1, 2
BNC type (1 each)
TEST OUT
BNC type (1)
f10.0 (at 2000 lx with 89.9%
reflectivity)
Typical 54 dB
1000 TV lines (at center of screen)
5% or higher modulation
Registration
0.02% for total area (not including
lens distortion)
Geometric distortion Negligible (not including lens
distortion)
Dimensions
Unit: mm (inches)
135 (5 3/8)
ND
CC
CALL
GAIN
OUTPUT
WHITE BAL
STATUS
DISPLAY
CANCEL
MENU
197 (7 7/8)
FILTER
LOCAL
LE
NS
OFF
OFF
ON
RET2 SET
SHUTTER
WHT
BLK
AUTO B/W BAL
POWER
INTERCAM
LEVEL
348 (13 3/4)
Specifications
59
PROMPTER OUT
RET CONT
REMOTE
TRACKER
CRANE
BNC type (1), 1 Vp-p, 75 ohms
6-pin (1)
8-pin (1)
10-pin (1)
12-pin (1)
Supplied accessories
Operation manual (1)
Switch label 1, 2 (1 each)
Optional accessories
HDVF-20A HD Electronic Viewfinder (2-type,
monochrome)
HDVF-C30W HD Electronic Viewfinder (3-type, color)
HDVF-C750W HD Electronic Viewfinder (7-type, color)
HDLA1500 Large Lens Adaptor
CAC-12 Microphone Holder
CAC-6 Return Video Selector
BKW-401 Viewfinder Rotation Bracket
VCT-14 Tripod Adaptor
Memory Stick
Related equipment
HDCU1000/1500 HD Camera Control Unit
MSU-900/950 Master Setup Unit
RCP-700-series Remote Control Panel
VCS-700 Video Selector
CNU-700 Camera Command Network Unit
Connectors for optical/electric composite cables:
• LEMO (R) PUW.3K.93C.TLCC96 (to the “CAMERA”
connector on CCU)
• LEMO (R) FUW.3K.93C.TLMC96 (to the “CCU”
connector on CAMERA)
Caution on the optical/electric composite cable:
For connection between the camera control unit and a
camera, be sure to use an optical/electric signal composite
cable with the connectors specified in this manual in order
to comply with the limit for EMC regulations.
Connecteurs pour les câbles optiques/électriques
composites:
• LEMO (R) PUW.3K.93C.TLCC96 (au connecteur
« CAMERA » de l’unité de commande de caméra)
• LEMO (R) FUW.3K.93C.TLMC96 (au connecteur
« CCU » de la caméra)
Précaution concernant le câble optique/électrique
composite:
Pour la connexion entre l’unité de commande de caméra et
une caméra, utilisez un câble optique/électrique composite
avec connecteurs spécifiés dans ce manuel pour assurer la
conformité avec la réglementation EMC.
60
Specifications
Anschlüsse für optische/elektrische FBAS-Kabel:
• LEMO (R) PUW.3K.93C.TLCC96 (an „CAMERA“Anschluss an der Kamerasteuereinheit)
• LEMO (R) FUW.3K.93C.TLMC96 (an „CCU“Anschluss an der KAMERA)
Vorsichtsmaßregeln für optische/elektrische FBASKabel:
Für Verbindung zwischen Kamerasteuereinheit und
Kamera verwenden Sie immer ein optisches/elektrisches
FBAS-Kabel mit Steckern, wie in dieser Anleitung
beschrieben, um die Grenzwerte der geltenden EMVVorschriften zu erfüllen.
Design and specifications are subject to change without
notice.
このマニュアルに記載されている事柄の著作権は当社にあ
り、説明内容は機器購入者の使用を目的としています。
従って、当社の許可なしに無断で複写したり、説明内容
(操作、保守等)と異なる目的で本マニュアルを使用する
ことを禁止します。
The material contained in this manual consists of
information that is the property of Sony Corporation
and is intended solely for use by the purchasers of the
equipment described in this manual.
Sony Corporation expressly prohibits the duplication of
any portion of this manual or the use thereof for any
purpose other than the operation or maintenance of
the equipment described in this manual without the
express written permission of Sony Corporation.
Sony Corporation
HDC1500 Series (J/UC/CE/SYL)
3-868-749-02(2)
Printed in Japan
2005.08.13
© 2005