1
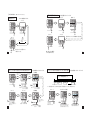
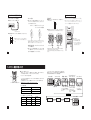
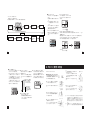
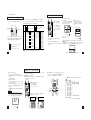
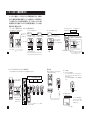
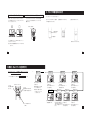
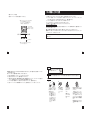
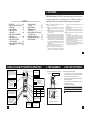
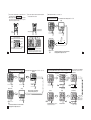
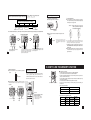
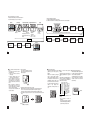
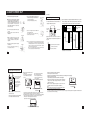
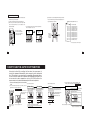
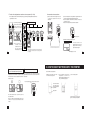
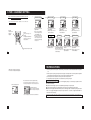
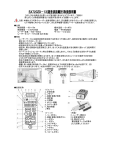
BSS149SW-0912
セイコーシステム
ストップウオッチ
S149
取扱説明書
INSTRUCTION
このたびは「セイコーシステムストップウオッチ S149」をお買い上げいただきありがとうござ
いました。
ご使用の前にこの取扱説明書をよくお読みのうえ正しくご愛用くださいますようお願い申し上
げます。なおこの取扱説明書はお手もとに保存し、必要に応じてご覧ください。
目 次
1. S149の主な特長 ……………………1
9. 時刻・カレンダーの合わせかた …27
2. 各部の名称とはたらき ………………2
3. 現在時刻の見かた ……………………3
10. お取扱い上のご注意 ………………30
11. 電池についてのお願いとご注意 …33
4. ストップウオッチの使いかた ………3
5. メモリー機能の使いかた……………11
12. 液晶パネルの交換 …………………34
13. 長くご愛用いただくために ………34
6. プリント(印字)の方法……………16
7. オートスタート機能の使いかた……21
14. 故障とお考えになる前に …………35
15. 製品仕様 ……………………………36
8. プリンタの電池の入れかた…………26
1.S149の主な特長
2.各部の名称とはたらき
セイコーシステムストップウオッチS149は、プリンタとストップウオッチをコンパクト
に一体化させ、計測と記録が一台でできる本格的なスポーツ計測機器です。さらに、
S143、グリップスイッチとの組み合わせで様々な使いかたができます。
ロールペーパーカバー
紙送りスイッチ
内部にロールペーパー
をセットします。
POWER
ON
1回押すと1行分紙送りします。
押し続けると連続して紙送りし
ます。
プリンタ電源スイッチ
SYSTEM STOPWATCH
300LAP/SPLIT MEMORY
●ロードレースやマラソンなど大勢の計測に最適です。
①プリンタとストップウオッチが一体となってい
るため計測データをただちにプリントアウトす
ることができます。
②計測開始の年・月・日・時刻も同時にプリントア
ウトされますので記録の整理や保管に便利です。
③時計機能とオートスタート機能がついています
のでマラソンのようにスタート時刻が決まって
いる場合には、あらかじめスタート時刻をセッ
トしておけば自動的に計測をスタートさせるこ
とができます。
④メモリー機能……300本までの容量を持ち、スタ
ートからストップ/リセットまでの一連のデー
タを「ブロック」として扱い、前のデータを消
さずに別ブロック(最大100ブロック)でメモリ
ーします。データの日時別管理に最適です。
⑤この他、個人別管理に役立つID設定機能、メモ
リー使用量インジケーター、最速ラップ呼出機
能など便利な機能を盛込みました。
⑥本体に抗菌材を使用しております。
※経年変化やご使用の状態によって抗菌効果は低下いた
します。
●豊富なオプション類との接続により、様々な機能
アップがはかれます。
①本機とセイコーデジタルストップウオッチS143
を接続することにより、スタート時刻を転送す
ることができ、複数のストップウオッチが同一
時刻にスタートするので計測精度もあがり、ロ
ードレース等で各地点での計測が非常に便利に
なります。
②グリップスイッチ(別売り)を接続することに
より、操作性をさらにアップさせることができ
ます。
③ペーパー拡張ホルダー(別売り)を使うことに
より、さらに大勢の人(約2,500名程度)のデー
タを一度に連続して印字することができます。
グリップスイッチ切り換えスイッチ
F
BLOCK
印字切り換えスイッチ
LAP
SPLIT
スプリット・ラップを印字
c上側
d下側
スプリットのみ印字
EXT
グリップスイッチを使用する時
▲
c上側
d下側
グリップスイッチを使用しない時
E
STOP-W. A/S SET TIME
LOCK
CLEAR
LAP/SPLIT
RESET
1/100
STOP.W A/S SET
SPLIT
START
STOP
TIME
RECALL
Aをロックします。
ロックレバー ボタン○
ストップウオッチ オートスタートセット
及び時刻・カレンダー
モードの時
モードの時
スタート/ストップ
セット
桁切り換えボタン
ボタン○
A
1/100秒計測←→1秒計測
を切り換えます。
スプリット・ラップ/リセット
メモリークリア
ボタン○
B
セレクト
リコールボタン
モード切り換えボタン
メモリーしてあるタイムを呼び
出します。
①ストップウオッチモード(トータル
タイム表示又はランニングラップ
表示)
に
②オートスタートセットモードに
③時刻、カレンダーモードに
グリップスイッチ
用ジャック
グリップスイッチを使
用する時使います。
オートスタート用ジャック
オートスタート時刻を転送
する時に使います。
1
2
3.現在時刻の見かた 4.ストップウオッチの使いかた
1モード切り換えボタン①(STOP.W)を押して
□
1モード切り換えボタン③(TIME)を押して、
□
時刻、カレンダーモード にします。
300LAP/SPLIT MEMORY
F
BLOCK
STOP
BATT.
LAP
E
RECALL
STOP-W. A/S SET TIME
LOCK
CLEAR
LAP/SPLIT
RESET
1/100
STOP.W A/S SET
START
STOP
TIME
RECALL
ボタン③
(TIME)
ブロックについて
・S149は、「ブロック」方式を採用しており、スタートからリセット
までの計測データをひとつのブロックとしてメモリーします。
・各ブロックには、スタート日時が自動的にメモリーされます。
・スタートする前にこれから計測する「ブロック」に番号が付きます。
・300データ分のメモリーを使いきるまで、計測したデータをメモリ
ーすることができます。
・ひとつのブロックでは最低3個のメモリーが必要になります。よっ
て、複数ブロックをメモリーした場合、各ブロック内のラップ/ス
プリットデータ数の合計が300になる前にメモリーが満杯になりま
す。
ストップウオッチモード にします。
2計測する単位を1/100秒までにするのか、1秒まで
□
(1/10秒桁切上げ)にするのかを決めます。
※押すたびに最下段はトータルタイム表示かランニングラ
ップ表示となります。
300LAP/SPLIT MEMORY
300LAP/SPLIT MEMORY
F
F
BLOCK
BLOCK
STOP
BATT.
LAP
STOP
BATT.
LAP
E
E
RECALL
RECALL
STOP-W. A/S SET TIME
STOP-W. A/S SET TIME
LOCK
LOCK
CLEAR
CLEAR
LAP/SPLIT
RESET
1/100
STOP.W A/S SET
LAP/SPLIT
RESET
START
STOP
1/100
TIME
STOP.W A/S SET
START
STOP
TIME
RECALL
RECALL
モード切り替えボタン① (STOP.W)
桁切り換えボタンを押して
桁を決めます。
桁切り換えボタン
時刻・カレンダーモード
ID
BLPOK
STOP
BATT.
LAP
RECALL
年
月
現在時刻
(10時8分59秒)
時刻・カレンダーモードマーク
(時刻・カレンダー表示になって
いることを表わしています。)
※現在時刻は24時制で表わされます。
3
ストップウオッチモード
(最下段トータルタイム表示の例)
日
スプリット
ラップ回数
1秒表示
SPLIT
SPLIT
BLOCK
LAP
STOP
BATT.
LAP
スプリット
タイム
ラップタイム
RECALL
トータルタイム
ストップウオッチ
モードマーク
(ストップウオッチの状態になっていることを表わしています。)
BLOCK
LAP
STOP
BATT.
LAP
RECALL
1/100秒表示
SPLIT
BLOCK
LAP
STOP
BATT.
LAP
RECALL
ボタンを押すごとに 1秒表示 ←→ 1/100秒表示 に
切り換わります。
※切り換えはリセット状態で行ないます。
※1秒表示で計測した後にリセットすると、自動的に1/100
秒表示にもどります。
4
3さあ計測の開始です。
A○
Bです。
□
(使用するボタンはボタン○
)
普通の使いかた
A→○
A→○
A…→○
A→○
B
時間計測を積算で行なうとき ボタンを押す順序○
(スタート)
A→○
A→○
B
ボタンを押す順序○
(スタート)
(ストップ)
SPLIT
(ストップ)
SPLIT
F
F
BLOCK
LAP
BLOCK
LAP
SPLIT
F
STOP
BATT.
LAP
BLOCK
LAP
STOP
BATT.
LAP
E
RECALL
E
LAP/SPLIT
RESET
RECALL
LAP/SPLIT
RESET
START
STOP
START
STOP
\
START
STOP
\
LAP/SPLIT
RESET
A
○
A
○
A
○
ゴールイン
STOP
BATT.
LAP
E
LAP/SPLIT
RESET
START
STOP
START
STOP
\
\
LAP/SPLIT
RESET
E
E
RECALL
RECALL
RECALL
START
STOP
B
○
新しい次のブロック番号で
リセット表示になります。
A→○
B→○
B…○
B→○
A→○
B
スプリット、ラップの使いかた
(最下段トータルタイム表示の場合:例マラソン) ボタンを押す順序○
(スタート)
(5km地点)
SPLIT
F
スプリット・ラップ
回数
BLOCK
LAP
E
SPLIT
ラップタイム
F
ランニングラップタイムの計測…最新の区間経過時間を
表示させながら区間経過時間を計ります。
BLOCK
LAP
STOP
BATT.
LAP
積算タイム
E
RECALL
E
RECALL
START
STOP
LAP1
\
LAP/SPLIT
RESET
A→○
B→○
B…→○
B→○
A→○
B
スプリット、ラップの使いかた
(最下段ランニングラップ表示の場合) ボタンを押す順序○
(10km地点)
F
STOP
BATT.
LAP
RECALL
6
スプリットタイム
SPLIT
BLOCK
LAP
STOP
BATT.
LAP
A
○
B
○
新しい次のブロック番号でリセッ
ト表示になります。
\
LAP/SPLIT
RESET
B\
○
A
○
LAP/SPLIT
RESET
B\
○
START
STOP
区間1 スプリットタイム 14分56秒08
ラップタイム 14分56秒08
(リセット)
途中のスタートストップは何回でもくり返せます。
F
BLOCK
LAP
STOP
BATT.
LAP
BLOCK
LAP
LAP/SPLIT
RESET
区間2 スプリットタイム 29分57秒21
ラップタイム 15分01秒13
(ストップ)
LAP2
LAP3
(40km地点)
ゴール
モード切り替えボタン①(STOP.W)を押して、最下段をランニングラップ表示にします。
(スタート)
(ラップ/スプリット計測)
SPLIT
SPLIT
F
SPLIT
F
F
BLOCK
LAP
BLOCK
B\
○
LAP/SPLIT
RESET
LAP
STOP
BATT.
LAP
E
RECALL
START
STOP
新しい次のブロック番号でリセット
表示になります。
7
LAP
STOP
BATT.
LAP
LAP/SPLIT
RESET
BLOCK
LAP
STOP
BATT.
LAP
F
BLOCK
LAP
STOP
BATT.
LAP
E
RECALL
E
RECALL
STOP
BATT.
LAP
E
RECALL
E
RECALL
START
STOP
Bを押すごとに、
ボタン○
何回でもラップタイムが
とれます。
A
\○
最終タイム 2時間11分17秒99
B\
○
LAP/SPLIT
RESET
START
STOP
区間8 スプリットタイム 2時間1分14秒12
ラップタイム 16分42秒33
LAP/SPLIT
RESET
ランニング
ラップ表示マーク
ランニングラップ
表示であることを示します。
START
STOP
\
E
F
SPLIT
F
RECALL
LAP n
スタート
START
STOP
SPLIT
BATT.
LAP
START
STOP
A
○
SPLIT
BLOCK
LAP
よ∼いどん
F
LAP/SPLIT
RESET
(ストップ)
F
00秒にもどします。
STOP
BATT.
LAP
START
STOP
A
○
SPLIT
SPLIT
E
RECALL
LAP/SPLIT
RESET
(リセット)
(リセット)
STOP
BATT.
LAP
E
RECALL
\
STOP
BATT.
LAP
STOP
BATT.
LAP
E
RECALL
\
F
BLOCK
LAP
5
F
BLOCK
LAP
\
SPLIT
(再スタート)
SPLIT
A
○
B\
○
LAP/SPLIT
RESET
START
STOP
現在計測中の区間経過時間を表示します。
Bボタンでラップ/スプリット計測を
○
行う度に0:00'00''00からカウントします。
LAP/SPLIT
RESET
START
STOP
現在測定中の区間経過時間が1時間
を超えると、時桁が表示されます。
8
グリップスイッチを使用する場合
ロックレバーの使いかた
①グリップスイッチへの切り換え
②タイムの計測
●本体とグリップスイッチを接続します。
●グリップスイッチを押すと計測がスタートし、スタートし
てからは、スイッチを押すごとにスプリットタイムとラッ
プタイムを計測していきます。
④計測の終了
(スタート)→(押すごとに、スプリットタ
●計測及びプリント(印字)が終了したら、切り換えスイッ
チにもどします。
EXT
▲
d
下側
このストップウオッチには計測をスタートした後、
誤ってストップボタンを押してしまわないよう、ロ
ックレバーがついていますのでスタートしたら、ロ
ックレバーを使用することをおすすめします。
イム、ラップタイムを計測)
SYSTEM STOPWATCH
Aでスト
●切り換えスイッチをもとにもどしてから、ボタン○
Bでリセットします。
ップウオッチをストップし、ボタン○
グリップスイッチ
300LAP/SPLIT MEMORY
F
(ストップ)
●本体の右側にあるグリップスイッチ切り換えスイッチを上にします。
(リセット)
SPLIT
EXT
▲
BLOCK
E
SPLIT
F
F
STOP-W. A/S SET TIME
BLOCK
LAP
ります。
※グリップスイッチではストップウオッチをストップさせることはできませんので、
計測を終了する時は、最終ラップまたは、最終スプリットをグリップスイッチで
計測してから④の手順にしたがってストップウオッチを止めてください。
9
LOCK
E
LAP/SPLIT
RESET
E
RECALL
1/100
LAP/SPLIT
RESET
START
STOP
ロックレバー
スタートしたら、ロック
レバーを下におろします。
CLEAR
STOP
BATT.
LAP
RECALL
LAP/SPLIT
RESET
START
STOP
STOP.W A/S SET
※ロックレバーを下におろすと、ボ
A (START、STOP)はロッ
タン○
クされ、押せなくなります。
TIME
START
STOP
RECALL
③時刻の計測(時刻・カレンダーモードでプリンタ
パワーON時のみ)
●ストップウオッチの計測と同様に、グリップスイッチを押
すと、計測がスタートし、スタートしてからはスイッチを
押すごとに経過時刻をプリントしていきます。
BLOCK
LAP
STOP
BATT.
LAP
\
※切り換えボタンを上にすると、ストップウオッチの操作はグリ
A ○
Bでは操作ができなくな
ップスイッチのみとなり、ボタン○
\
c
上側
A
○
B
○
※計測しながら印字(プリント)
する時は、プリント
(印字)
が全て終了してから、切り換えスイッ
A でストップさせて下さい。
チ
(EXTスイッチ)
をもどして、ボタン○
A を押すと、ラップスプリットが計測されてしまいますので、ご注
印字(プリント)中にボタン○
意下さい。
10
5.メモリー機能の使いかた
■メモリーの呼び出しについて
・計測し、メモリーされたデータ(最大300データ)を呼び出し、見ることができます。
・データを表示させる以外に、データをプリントすることもできます。
→「6.プリント(印字)の方法」を参照
300LAP/SPLIT MEMORY
F
BLOCK
STOP
BATT.
LAP
E
RECALL
STOP-W. A/S SET TIME
LOCK
CLEAR
B
ボタン○
LAP/SPLIT
RESET
1/100
STOP.W A/S SET
START
STOP
A
ボタン○
○ストップウオッチがリセット状態、またはストップ状態のとき:
BLOCK 1 のスタートデータから古い順にメモリ内容を表示します。
〈例:現在の表示がBLOCK 4 リセット状態の場合〉
(リセット表示)
TIME
・リコールボタンを1回押すごとにメモリーしたタイムが呼び出され、押しつづけると
連続して呼び出されます。
・タイム計測中(ストップウオッチ動作中)でもメモリーしたタイムを呼び出せます。
リコールボタン(メモリー呼び出しボタン) ・計測しながらプリントした時も、タイムはメモリーされます。
RECALL
SPLIT
STOP
BATT.
LAP
RECALL
ストップウオッチが動いているとき
新しい順にタイムを呼び出します
E
リコール
ボタン
SPLIT
F
BLOCK
LAP
STOP
BATT.
LAP
E
RECALL
SPLIT
F
BLOCK
LAP
リコール
ボタン
STOP
BATT.
LAP
F
BLOCK
LAP
E
リコール
ボタン
RECALL
スタート(時、分)
スタート年月日
リコールボタンを押すごとに
古い順にタイムを呼び出します
SPLIT
F
BLOCK
LAP
(ブロック内のラップ/
スプリットデータ) (ストップタイム)
(最速ラップ表示)
SPLIT
F
・タイムの呼び出し方向
ストップウオッチが停止しているとき
(スタートデータ)
BLOCK
LAP
STOP
BATT.
LAP
E
リコール
ボタン
RECALL
ラップ番号 Firstest LAP(最速ラップ)
このブロックの中で最も速い
ラップを番号といっしょに表
示します。
STOP
BATT.
LAP
E
RECALL
スプリットタイム
ラップ/スプリット回数
ラップ/スプリット8
スプリットタイム 2時間1分14秒12
ラップタイム 16分42秒33
ストップタイム
ストップタイム 2時間11分17秒99
ブロック1のデータ
・メモリー呼び出し(リコール)中のボタン操作
A
リコール前の状態 ボタン○
リセット
11
B
ボタン○
リコール前に戻る メモリークリア
モード切り換え
ボタン①(STOP.W)
リコール前に戻る
ストップ
リコール前に戻る リコール前に戻る リコール前に戻る
計測中
計測STOP
LAP/SPLIT計測
リコール前に戻る
リコールボタン
(リセット表示)
BLOCK2
スタートデータ
リコールボタン
BLOCK3
スタートデータ
リコールボタン
BLOCK3
ストップタイム
SPLIT
F
リコールボタン
BLOCK
LAP
STOP
BATT.
LAP
E
RECALL
12
■メモリークリアについて
・こんなときに、メモリー消去が必要にな
ります。
a)不要になった計測データを消したいと
き
b)これから計測しようと思うが、メモリ
ーの残り量が少なくオーバーしそうな
とき
・メモリーの消去とは、メモリーを全て消
すことになります。ブロック単位やデー
タ単位での消去はできません。
○ストップウオッチが計測中のとき:
新しい順にメモリー内容を表示します。
〈例:現在の表示がBLOCK4 ラップ/スプリット計測3回終了時点の場合〉
(BLOCK4最速ラップの表示)
SPLIT
F
BLOCK4
ラップ/スプリット
タイム3
ラップ/スプリット
タイム3
リコールボタン
BLOCK
LAP
リコール
ボタン STOP
BATT.
LAP
E
リコール
ボタン ラップ/スプリット
タイム2
リコールボタン
ラップ/スプリット
タイム1
RECALL
最速ラップ番号
コロンが点滅します。
ストップウオッチが計測中のときは下段に現在計測中の経過時間が表示されます。
ブロック4のデータ
BLOCK3
スタートデータ
リコールボタン
BLOCK3
最速ラップ
リコールボタン
①ストップウオッチが計測中やストップ状
態ではメモリーの消去はできません。ス
トップウオッチをリセット状態にしてく
ださい。
リコールボタン
BLOCK3
ストップタイム リコールボタン
BLOCK1
ラップ/スプリット
タイム1
リコールボタン
BLOCK4
ラップ/スプリット
タイム3
②リコールボタンを押してください。
リコール状態ならば、どのメモリーを表
示していてもメモリー消去をすることが
できます。
SPLIT
F
BLOCK
LAP
STOP
BATT.
LAP
E
RECALL
(スタートデータ)
リコールボタン
B(CLEAR)を1.5秒以上押し続けてください。
③ボタン○
B(CLEAR)を押している間このような表示と共に「ピピッピピッ・・・」とい
ボタン○
う警告音がします。
1.5秒以上押しつづけると、長い報音(ピー)とともにメモリーの消去が終了します。
すべてのデータが消去され、ブロック1のリセット状態にもどります。
Bを1.5秒以上押さない場合は、メモリーは消去されません。
※ボタン○
SPLIT
F
SPLIT
BLOCK
LAP
STOP
BATT.
LAP
F
BLOCK
LAP
SPLIT
F
BLOCK
LAP
E
STOP
BATT.
LAP
RECALL
(リセット状態)
E
RECALL
STOP
BATT.
LAP
E
RECALL
B
ボタン○
(メモリークリア操作)
(リセット)
13
14
6.プリント(印字)の方法
■メモリー使用量について
・メモリーをどのくらい使用しているのか
をインジケーターで表示します。
・各ラップまたはスプリットの他に、スタ
ート及びブロックナンバーも2個のメモ
リーとして使用しますので、1つのブロ
ックでは最低3個のメモリーが必要にな
ります。よって、複数ブロックをメモリ
ーした場合、各ブロック内のラップ(ま
たはスプリット)データの合計が300にな
る前にメモリーが満杯になります。
●インジケーターの見かた
●メモリーの呼び出し中のデータ案内
10個のバー表示でメモリーの使用量を段
メモリー呼び出し中は、呼び出している
階的に表示します。
メモリーをバーの点滅で表示します。
1個のバーが「データ30個分」に相当し、
下図では210個∼239個のデータがメモリ
下からそのメモリーの使用量を表示しま
ーされていて、現在その真中あたりのメ
す。
モリーを呼び出していることを示します。
バー表示が示すメモリー使用量
F 291∼300
SPLIT
F
E
BLOCK
LAP
STOP
BATT.
LAP
RECALL
E
270∼290
240∼269
210∼239
180∼209
150∼179
120∼149
90∼119
60∼ 89
30∼ 59
メモリーの残量が10個
以下になると点滅し、
ゼロになると点灯しま
F
●メモリーが満杯になった場合
・全てのバーが点灯します。
・301個目以降の計測は表示されますが、
メモリーされませんので後から呼び出
すことはできません。
●本機付属の感熱紙(S950)の他に2800行
まで印字可能な長手のS951もあります。
S951ご使用の際は、別売専用ペーパーホル
ダーSVAZ007が必要となります。
無理に手でロールペーパーを引き出さないでくだ
さい。
)
6
□ロールペーパーをボックス内に入れペーパ
2
□ペーパーカバーを図のように開けてくださ
ーカバーを閉じてください。
い。
E
RECALL
パワースイッチ
(上側がON)
(
ロールペーパーがつぶれている場合は、丸く形を
整えてからボックス内に入れてください。
)
3
□パワースイッチをONにしてください。この
ときモーターが約1秒間動いて電源が入っ
たことを知らせます。
4
□ロールペーパーの先端を図のようにペーパ
ー挿入口へ入れてください。
(
15
(
紙送りスイッチ
点滅
BLOCK
LAP
「30個∼59個」のデー
タがあることを示します。
バー表示がない場合は
メモリー使用量は29個
以下です。
パーを送ってください。
このときペーパーの先端がプリンタから
2∼3cm出るまで紙送りスイッチを押し
続けてください。
1
□ロールペーパーの最初の、のり付部分をま
っすぐに切って取り除いてください。
SPLIT
STOP
BATT.
LAP
5
4 の状態で紙送りスイッチを押してペー
□□
1.ロールペーパーについて
ロールペーパーを入れる方向(表・裏)に注意し
てください。裏にはプリントできません。
)
ロールペーパー
注1)ロールペーパーを逆方向(紙送りスイッチを押して送られる方向と逆の方
向)に引き抜かないでください。故障の原因になります。ロールペーパー
を全部使い終らないうちに新品と交換するときは、ボックス内のペーパー
を先に切りとり、そのあと残ったペーパーを紙送りスイッチを押して取り
除くか、正方向(紙送りスイッチによって送られる方向)に抜きとってく
ださい。
注2)必ず専用のロールペーパー(S950又はS951)を使用してください。これ
以外のロールペーパーを使用した場合は印字不良や故障の原因になりま
す。
16
2.プリント(印字)について
計測した後でプリント(印字)する場合
計測をしながらプリント(印字)する場合
1計測を始める前に、プリンタの電源スイッチもON
□
にします。スイッチが入ると紙が1行分おくられま
す。
「ブロックを選択してプリント」
3
□ストップウオッチがスタートすると、ID番号(設定時のみ)、ブロック番
POWER
ON
号、スタートした年・月・日、時刻がプリント(印字)され、それ以後、
タイムが計測されると直ちにプリント(印字)します。
(1)電源スイッチをONにして
(2)リコールボタンを押す。
g
印字切り換え
スイッチ
切ス
りイ
換ッ
えチ
POWER
ON
電源スイッチ
SYSTEM STOPWATCH
プ
リ
ン
ト
︵
印
字
︶
の
例
2プリント(印字)するデータをスプリットのみにす
□
るのかスプリットとラップの両方にするのか本体の
左側にある印字切り換えスイッチで選びます。
LAP
SPLIT
スプリットとラップをプリント(印字)
c
(印字切り換えスイッチ)
c
SPLIT
スプリットのみプリント(印字)
LAP
SPLIT
LAP
SPLIT
c
dスプリットタイムのみ
SPLIT
メモリーしてあるタイムが
プリント(印字)されます。
SYSTEM STOPWATCH
300LAP/SPLIT MEMORY
スプリットタイムと
ラップタイム
①メモリー呼び出し
プリントしたいブロックを表示させます。
そのブロック内のデータであればどのデー
タであってもかまいません。
SPLIT
F
SPLIT
BLOCK
LAP
E
RECALL
SPLIT
STOP-W. A/S SET TIME
LOCK
CLEAR
ブロック番号 BLOCK:1 ブロック番号 BLOCK:1 年・月・日 1999 10 10
年・月・日 1999 10 10
スタート時刻 START 10:19
スタート時刻 START 10:19
スプリットタイムのみ印字 SPLIT スプリット+ラップタイム SPLIT/LAP スプリットタイム 1-0:18′05 33
1位 〃 1-0:05′03 76 区間1 ラップタイム 0:18′05 33
2位 〃 2-0:05′12 33 区間2 スプリットタイム 2-0:36′37 78
ラップタイム 0:18′32 45
3-0:55′13 11
3位 〃 3-0:05′41 13 〃 3
〃
0:18′35 33
4位 〃 4-0:05′59 06
4-1:13′25 31
〃
〃 4
0:18′12 23
5位 〃 5-0:06′17 88
5-1:31′57 55
〃
〃 5
0:18′32 21
6位 〃 6-0:06′43 56
6-1:49′32 78
〃
〃 6
0:17′35 23
7位 〃 7-0:07′21 47
7-2:01′31 04
〃
8位 〃 8-0:07′36 48 〃 7
0:17′58 26
8-2:25′43 62
最終タイム /S/0:08′02 58 〃 8
〃
0:18′12 58
(または9位タイム) 最終タイム /S/2:54′02 77
LAP/SPLIT
RESET
1/100
STOP.W A/S SET
※メモリーしているタイムを全部プ
STOP
BATT.
LAP
リント(印字)するとプリンタは
止まります。
SPLIT
F
E
RECALL
START
STOP
BLOCK
LAP
(スタートデータ)
TIME
STOP
BATT.
LAP
リコールボタン
RECALL
{
{
{
{
{
{
{
{
プリントするブロック番号
BLOCK
LAP
F
STOP
BATT.
LAP
③選択したブロックのプリント
リコールボタンを押しつづけます。
ストップウオッチがプリンタのパワー
オンを確認すると、「Print」が点滅
します。
・メモリーされたデータは、何度でもプリントす
ることができます。
・プリントには「ブロックを選択してプリン
ト」/「全てのブロックをプリント」の2種類
があります。
E
RECALL
(プリント確認)
②プリンタのパワースイッチ
をONにします。
リコールボタン
・「Print」が点滅を始めて直ぐにリコールボタンを離すと、プリントは中止され、元の
画面に戻ります。
④1秒ほど押し続けてリコールボタンを離すと、選択したブロックのデータが高速に表
示された後、プリントされます。(高速表示中に最速ラップを探しています)
SPLIT
F
BLOCK
LAP
STOP
BATT.
LAP
*計測されたタイムは、
プリントと同時に300データまで自動的にメモリーされます。
*計測開始後、
プリンタのパワースイッチをONにした場合、次の計測データからプリントされます。
E
RECALL
17
そのブロックの最後のストップタイムが表示されます。
18
経過時刻をプリント(印字)する場合
「全てのブロックをプリント」
①プリンタのパワースイッチをONにします。
②メモリーを呼び出した後、リコールボタンを押しつ
づけます。
「Print」が点滅します。
③全てのブロックのプリント
・さらにリコールボタンを押しつづけると、「Print
ALL」が表示されます。
④ここでリコールボタンを離すと、ブロック1から順
に全てのブロックが高速に表示された後、プリント
されます。
(高速表示中に各ブロックの最速ラップを探してい
ます)
注意事項
※プリント中は、全てのボタンが効かなくなります。
・プリント中にプリントのキャンセルはできません。
・プリント中にプリンタのパワースイッチをOFFにした場合
にも、しばらくの間全てのボタンが効かなくなります。
SPLIT
F
・ストップウオッチ機能と同様に、スタート、途中経過時刻、ストップ時
刻をプリントすることができます。
・経過時刻は、メモリーされません。
1プリンタの電源スイッチをONにして、モード切り換えボタン③(TIME)
□
で、時刻・カレンダーモードにします。
2ボタン○
A を押すと、プリント(印字)がスタートします。ス
□
B を押す毎に、経過時刻がプリント
タートしたら、ボタン○
Aを押すと、ストップします。
(印字)され、ボタン○
ID番号が設定されているときにプリント(印字)されます。
SYSTEM STOPWATCH
POWER
ON
300LAP/SPLIT MEMORY
(1)電源スイッチをONにして
(2)モード切り換えボタン③
(TIME)を押して、時刻・
カレンダーモードにします。
SYSTEM STOPWATCH
SPLIT
F
BLOCK
LAP
STOP
BATT.
LAP
E
RECALL
STOP-W. A/S SET TIME
LOCK
300LAP/SPLIT MEMORY
CLEAR
SPLIT
F
B
ボタン○
経過時刻を
プリント(印字)
BLOCK
LAP
STOP
BATT.
LAP
E
RECALL
STOP-W. A/S SET TIME
LOCK
CLEAR
LAP/SPLIT
RESET
1/100
STOP.W A/S SET
START
STOP
TIME
※ただし、ストップウオッチがリセット状態にないと経
過時刻のプリントはできません。
RECALL
ストップウオッチ
モード
時刻・カレンダー
モード
LAP/SPLIT
RESET
1/100
STOP.W A/S SET
START
STOP
TIME
RECALL
A
ボタン○
スタート/ストップ
ID:1
1999
10 10−−−−年・月・日
ST-10:10′00−−−−スタート時刻(10時10分10秒)
1-10:10′21−−−−1回目の時刻(10時10分21秒)
2-10:10′25−−−−2 〃
3-10:10′26−−−−3 〃
4-10:10′28−−−−4 〃
5-10:10′33−−−−5 〃
6-10:10′36−−−−6 〃
7-10:10′39−−−−7 〃
8-10:10′50−−−−8 〃
9-10:10′59−−−−9 〃
10-10:11′03−−−−10 〃
/S/10:11′06−−−−ストップ時刻(10時11分06秒)
※プリント(印字)される時刻は24時間制です。
BLOCK
LAP
STOP
BATT.
LAP
SPLIT
(全ブロックプリント)
19
リコールボタン
ID
F
F
E
RECALL
BLOCK
LAP
STOP
BATT.
LAP
RECALL
BLOCK
LAP
E
STOP
BATT.
LAP
RECALL
E
20
7.オートスタート機能の使いかた
オートスタート機能とは……あらかじめスタートする時刻を記憶させておき、その時刻が
来たら、自動的に計測を開始する機能です。マラソン大会等のスタートする時刻が決まっ
ている大会などでの、タイムの計測に大変便利です。また、S143にオートスタートの時
刻を転送できるので、複数のチェックポイントで同時に計測が開始でき、マラソン大会の
運営などにもご使用いただけます。
1.オートスタート時刻の合わせかた(スタートする時刻を決めます)
2オートスタート時刻を合わせます。
□
1モード切り換えボタン②(A/S SET)を押して、
□
オートスタートセットモード にします。
オートスタートが
分合わせ
時合わせ
OFFになっている
Bを押すと、分が点滅し
Bを押すと、時が点滅し
ボタン○
ボタン○
ことを表わします。 ボタン○
Aを押すごとに1分進みます ボタン○
Aを押すごとに1時間進みます
SYSTEM STOPWATCH
300LAP/SPLIT MEMORY
SPLIT
F
BLOCK
LAP
STOP
BATT.
LAP
4セットが終了しましたら、モード切替えボタン①
□
(STOP.W)を押して ストップウオッチモード にします。
□オートスタート時刻をセットします。
3
セット
ストップウオッチモードにもどす
Bを押します
時刻を合わせ終わったら、ボタン○
点滅は消え、オートスタート時刻はセットされました。
E
最下段が現在時刻表示に変わりますのでご確認下さい。
この状態でないとオートスタート機能は有効になりません。
SYSTEM STOPWATCH
RECALL
STOP-W. A/S SET TIME
LOCK
1/100
START
STOP
STOP.W A/S SET
SPLIT
SPLIT
SPLIT
BLOCK
LAP
BLOCK
LAP
BLOCK
LAP
BLOCK
LAP
TIME
オートスタート時刻
STOP
BATT.
LAP
STOP
BATT.
LAP
RECALL
STOP
BATT.
LAP
RECALL
SPLIT
F
BLOCK
LAP
STOP
BATT.
LAP
STOP-W. A/S SET TIME
LOCK
LAP/SPLIT
RESET
RECALL
1/100
21
LAP/SPLIT
RESET
B
○
START
STOP
LAP/SPLIT
RESET
A
○
B
○
START
STOP
LAP/SPLIT
RESET
A は押し続けると早くすすみます。
※ボタン○
注意:オートスタートがON(AS ON)になると、全てのメモリーがクリアされます。
2.ストップウオッチ(S143)へのオートスタート時刻の転送
□
1転送コード
(別売り)を、オートスタート用ジャック
に指し込み、S143とつなげます。
LAP/SPLIT
RESET
例 マラソン大会等で使用する場合
1/100
START
STOP
STOP.W A/S SET
TIME
RECALL
RECALL
RECALL
LAP/SPLIT RESET
START STOP
SELECT CLEAR
SELECT CLEAR
SYSTEM
STOPWATCH
RECALL
START STOP
SYSTEM
STOPWATCH
SET
□
2スタート時刻転送
ストップウオッチ(S143)側の操作
①ストップウオッチをリセットし、メモリークリアを行ってく
ださい。メモリーがクリアされていないとオートスタートの
設定ができません。
②モードボタンを押すと自動的にオートスタート時刻が転送さ
れます。
SPLIT
F
F
BLOCK
LAP
STOP
BATT.
LAP
E
スタート地点
第1チェックポイント 第2チェックポイント
BLOCK
LAP
ゴール
RECALL
STOP-W.
300 LAP/SPLIT MEMORY
WATER RESISTANT
RECALL
STOP
BATT.
LAP
TIME
LAP/SPLIT RESET
STOP-W.
300 LAP/SPLIT MEMORY
WATER RESISTANT
TIME
SELECT CLEAR
F
POWER
ON
LAP/SPLIT RESET
RECALL
START STOP
LAP/SPLIT RESET
RECALL
F
START STOP
LAP/SPLIT RESET
STOP
BATT.
LAP
PRINTER
START STOP
SELECT CLEAR
RECALL
E
SPLIT
STOP-W. A/S SET TIME
SELECT CLEAR
LOCK
START
STOP
TIME
RECALL
SYSTEM
STOPWATCH
STOP
BATT.
LAP
SYSTEM
STOPWATCH
SET
SPLIT
START STOP
E
RECALL
SYSTEM STOPWATCH
SELECT CLEAR
F
TIME
SYSTEM
STOPWATCH
BLOCK
LAP
STOP
BATT.
LAP
E
STOP
BATT.
LAP
F
BLOCK
LAP
PRINTER
MODE
PRINTER
TIME
MODE
PRINTER
LOCK
LAP/SPLIT RESET
LAP/SPLIT
RESET
START STOP
SYSTEM
STOPWATCH
1/100
モードボタン
c
E
STOP-W. A/S SET TIME
SELECT CLEAR
TIME
MODE
PRINTER
CLEAR
(例)図のS149と3台の
S143は10時5分に同
時スタートします。
MODE
PRINTER
E
STOP-W.
300 LAP/SPLIT MEMORY
WATER RESISTANT
RECALL
RECALL
STOP.W A/S SET
START
STOP
□
3こんな場合にご注意ください。
エラー表示が出てしまった
TIME
SET
SPLIT
F
RECALL
BLOCK
LAP
SPLIT
STOP
BATT.
LAP
F
E
RECALL
STOP-W.
300 LAP/SPLIT MEMORY
WATER RESISTANT
TIME
RECALL
STOP-W.
300 LAP/SPLIT MEMORY
WATER RESISTANT
SPLIT
STOP
BATT.
LAP
c
F
TIME
MODE
STOP-W.
300 LAP/SPLIT MEMORY
WATER RESISTANT
SET
SPLIT
300LAP/SPLIT MEMORY
STOP-W.
300 LAP/SPLIT MEMORY
WATER RESISTANT
RECALL
SET
RECALL
STOP-W.
300 LAP/SPLIT MEMORY
WATER RESISTANT
E
RECALL
SYSTEM
STOPWATCH
SPLIT
BLOCK
LAP
STOP
BATT.
LAP
F
BLOCK
LAP
STOP
BATT.
LAP
SELECT CLEAR
F
BLOCK
LAP
SET
SPLIT
BLOCK
LAP
CLEAR
LAP/SPLIT RESET
E
RECALL
BLOCK
RECALL
TIME
BLOCK
LAP
MODE
PRINTER
※4台のストップウオッチが、同時刻にスタートしますので、時刻合わせ
の誤差等がなく大変便利です。
23
SET
BLOCK
LAP
MODE
RECALL
STOP.W A/S SET
SYSTEM
STOPWATCH
MODE
PRINTER
300LAP/SPLIT MEMORY
LAP/SPLIT
RESET
START STOP
E
RECALL
SPLIT
STOP
BATT.
LAP
22
SET
SPLIT
SYSTEM STOPWATCH
1/100
※オートスタート時刻になるとピッピッピッピ
ーとブザーがなり、ストップウオッチがスタ
ートします。
※オートスタートを解除するにはモード切り替え
ボタン②(A/S SET)を押してください。
LOCK
LAP/SPLIT RESET
現在時刻
STOP
BATT.
LAP
TIME
モード切り替えボタン①(STOP.W)
CLEAR
オートスタート時刻を
S143に転送して同時にス
タート
START
STOP
転送の方法
オートスタート時刻をストップウオッチS143へ転送することにより、次の様な使いかたができます。
POWER
ON
STOP.W A/S SET
RECALL
START
STOP
c
B
○
A
○
BLOCK
LAP
CLEAR
RECALL
モード切り換えボ オートスタートセットモードマー
タン②(A/S SET) ク
(オートスタートセットの状態
になっていることを表わしてい
ます。
)
オートスタート
時刻
SPLIT
E
RECALL
オートスタート時刻(10時05分)
STOP
BATT.
LAP
RECALL
300LAP/SPLIT MEMORY
オートスタートがONになっ
ていることを表わします。
SPLIT
CLEAR
LAP/SPLIT
RESET
STOP
BATT.
LAP
オートスタート時刻の転送がう
まくいかないと、エラー表示が
でます。もう一回、モードボタ
ンを押してください。
E
RECALL
エラー表示
24
8.プリンタの電池の入れかた
モードボタンを押しても、転送されない
オートスタートをやめたり、やり直したりする場合
一般に市販されている単3電池4本が必要です。
S149が、ストップウオッチモードにもどっていないと、
データは転送されません。ストップウオッチモードにも
どして、やり直してください。
○
SPLIT
F
START STOP
SYSTEM
STOPWATCH
この部分を押しな
がら外します
SET
SPLIT
BLOCK
LAP
F
BLOCK
LAP
STOP
BATT.
LAP
E
RECALL
STOP
BATT.
LAP
E
RECALL
E
STOP-W.
300 LAP/SPLIT MEMORY
WATER RESISTANT
RECALL
オートスタートモードのまま
3電池ブタを閉めてください。
□
RECALL
LAP/SPLIT RESET
SPLIT
SELECT CLEAR
STOP
BATT.
LAP
2乾電池を図のように入れます。
□
約2秒、押し続ける
F
BLOCK
LAP
□
1パワースイッチをOFFにして、裏側に
ある電池ブタを外してください。
c
×
ストップウオッチのラップ/スプリットボタンを押し続け
てください。約2秒、押し続けると、オートスタートは
解除されます。
ストップウオッチモード
TIME
電池ブタ
MODE
PRINTER
モード切り換えボタン①(STOP.W)を押して、ストッ
プウオッチモードにします。
注意! 最下段が現在時刻表示になっていることをご確
認下さい。
溝に沿ってスライドさせます。
25
26
9.時刻・カレンダーの合わせかた
注意! 時刻・カレンダー・ID(識別番号)の修正は、ストップウオッチ
がリセット状態のときのみ可能です。
1.モード切り換えボタン③(TIME)で 時刻・カレンダーモード にします。
2.
ID
BLOCK
LAP
STOP
BATT.
LAP
RECALL
ボタン○
B
修正箇所の選択に
使います。
時刻・カレンダーモード
300LAP/SPLIT MEMORY
ID
F
BLOCK
LAP
STOP
BATT.
LAP
E
RECALL
STOP-W. A/S SET TIME
LOCK
A
ボタン○
修正箇所の合わせに使います
(押し続けると早く進みます)
CLEAR
LAP/SPLIT
RESET
1/100
STOP.W A/S SET
START
STOP
分合わせ
秒合わせ
SPLIT
ID
SPLIT
ID
BLOCK
LAP
BLOCK
LAP
STOP
BATT.
LAP
年合わせ
SPLIT
ID
BLOCK
LAP
STOP
BATT.
LAP
RECALL
STOP
BATT.
LAP
RECALL
RECALL
1
B を押すと〔秒〕が
□ボタン○
1
B を押すと〔分〕が
□ボタン○
1
B を押すと〔時〕が
□ボタン○
1
B を押すと〔年〕が
□ボタン○
点滅します。
2時報と同時にボタン○
Aを押
□
すと、00秒に合います。
点滅します。
2
A を押すごとに、1
□ボタン○
分ずつ進みます。
点滅します。
2
A を押すごとに、1
□ボタン○
時間ずつ進みます。
2
A を押すごとに、1
□ボタン○
※秒表示が30∼59秒の時にボタ
A を押すと、分がくりあが
ン○
って、00秒になります。
修正の終了
IDあわせ
点滅します。
年ずつ進みます。
日合わせ
SPLIT
ID
SPLIT
ID
SPLIT
ID
BLOCK
LAP
BLOCK
LAP
BLOCK
LAP
月合わせ
SPLIT
ID
TIME
RECALL
STOP
BATT.
LAP
RECALL
モード切り換えボタン③
(TIME)
27
時合わせ
STOP
BATT.
LAP
RECALL
STOP
BATT.
LAP
RECALL
BLOCK
LAP
STOP
BATT.
LAP
RECALL
1
B を押すと点滅は消 1
Bを押すとID番号が点滅します。 1
B を押すと〔日〕が 1
B を押すと〔月〕が
□ボタン○
□ボタン○
□ボタン○
□ボタン○
2ボタン○
Aを押すごとにID番号が1つずつ
□
え修整は終わります。
点滅します。
点滅します。
進みます。OFF→01→02→…99→OFF
A を押すごとに、1 2
A を押すごとに、1
□ボタン○
□ボタン○
「OFF」は、IDが設定されていないことを 2
示します。
日ずつ進みます。
月ずつ進みます。
28
10.お取扱い上のご注意
3.液晶パネルコントラスト調整
・液晶パネルのコントラスト(濃淡)を調整することができます。
※時刻・カレンダーモードでリコールボタンを押すと、
コントラストを調整できるようになります。
コントラストは、1∼10の10段階があります。
1が最も薄く、10が最も濃くなります。
コントラスト表示
A:+1(濃く)
ボタン○
B:−1(薄く)
ボタン○
SPLIT
BLOCK
LAP
STOP
BATT.
LAP
RECALL
B
ボタン○
LAP/SPLIT
RESET
START
STOP
A
ボタン○
(1)計測中にプリンター部のパワースイッチをオンにした場合、それ以降に計測したタイムがプリントされます。
(2)プリンターの作動中に、ロールペーパーを引き抜いたり、引き戻したりしないでください。また、ロールペーパーがセットされ
ていない状態で、印字させようとする動作(空印字)は避けてください。故障の原因になります。
(3)プリンターをご使用にならないときは、必ずパワースイッチをOFF側にしてください。
(4)コードを抜くときは、コードを引っ張らず、必ずプラグを持って抜いてください。
(5)接続オプション品などを使用しないときは、必ずジャックキャップを付けてください。
ロールペーパー(感熱紙)について
本機のプリント(印字)方式は、感熱紙を加熱して発色させる感熱式ですので、インクの交換等は不要ですが、感熱紙をお使いいただ
くとき、次の点に注意してください。
●新しい感熱紙を保存する場合は、乾燥した涼しい場所で、箱等に入れて(光に当たらないように)保存してください。
●感熱紙のプリント面(プリントする面、あるいはプリントされている面)には、手の汗や油をつけないようにしてください。プリン
トができなくなったり、文字が薄くなったりします。
※感熱紙は必ず本機専用のロールペーパー(S950又はS951)をご使用ください。これ以外のロールペーパーを使用した場合は印字不良や故障の
原因になります。
リコールボタン
※時刻・カレンダー表示にもどるにはもう一度
リコールボタンを押して下さい。
29
30
注意
●本機付属の感熱紙(S950)の他に2800行まで印字可能な長手のS951もあります。S951ご使用の際は、別売専用ペーパーホルダー
SVAZ007が必要となります。
●プリント(印字)した感熱紙を保存する場合は、次の点にご注意ください。
(イ)明るい光に長時間当てないでください。プリントが薄くなることがあります。
(ロ)高温、湿気、日光はさけてください。感熱紙が変色することがあります。
(ハ)台紙等に貼って保存する場合、揮発性有機溶剤を含んだ糊、接着剤は使用しないでください。また、セロテープのご使用もさけ
てください。感熱紙が変色することがあります。澱粉系の糊、合成糊等をおすすめします。
(ニ)アンモニアを用いる複写機でコピーした直後のコピー紙には近づけないでください。感熱紙が変色します。
(ホ)塩化ビニールのフィルムなどに長時間接触させないでください。感熱紙が変色したり、プリントが薄くなったりします。
・防水時計ではありませんので、直接水に
触れるご使用はお避けください。
注意
・提げ時計やペンダント時計の場合、ひもやチェーンによって衣類や手・首などを傷つけることがありますのでご注意ください。
保管について
×
×
「−10℃∼+60℃からは
ずれた温度」下では、機
能が低下したり、停止す
る場合があります。
※この時計は常温(5℃∼
35℃の範囲内)において
安定した精度を得られる
ように調整してあります。
よって、温度によって多
少の進み遅れが生ずるこ
とがありますが、常温に
もどればもとの精度にも
どります。
31
×
・磁 気 や 静 電 気
の影響がある
ところに放置
しないでくだ
さい。
・強 い 振 動 の あ
るところに放
置 しないでく
ださい。
・極端にホコリの
多いところに放
置しないでくだ
さい。
・薬品の蒸気が発散しているところ
や薬品にふれるところに放置しな
いでください。
(薬品の例:ベンジン、シンナー
などの有機溶剤、およびそれらを
含有するもの−ガソリン、マニキ
ュア、化粧品などのスプレー液、
クリーナー剤、トイレ用洗剤、接
着剤など−水銀、ヨウ素系消毒液
など)
・温泉や防虫剤の入ったひきだしな
ど特殊な環境に放置しないでくだ
さい。
32
11.電池についてのお願いとご注意
電池について
(1)電池寿命
本機のストップウオッチ部は、新しい正常な電池を組み込んだ
場合、その後約3年間作動します。
※S149の電池寿命は、ストップウオッチ動作3時間/1日を基準と
しておりますので、それ以上使用した場合は3年に満たないうち
に容量が切れます。
●プリンタ部は新しい正常な電池を組み込んだ場合、マンガン
単3乾電池4本で約10,000行(ロールペーパー約14本分)
プリントできます。また、アルカリマンガン乾電池では、マ
ンガン乾電池の約2倍のプリントができます。(24℃で連続
してプリントした場合)
※低温では、電池の働きが弱まるため、プリントできる行数が減り
ます。低温で連続してご使用になるときは、アルカリマンガン乾
電池のご使用をおすすめします。
●次のような現象は、乾電池の消耗を示しています。
(パワースイッチがON側にある状態で)
(イ)プリント(印字)のスピードが遅くなる。
(ロ)字にムラやカケが出てくる。
(ハ)印字が薄くなる。
(ニ)紙送りしない、あるいは紙送りが不規則になる。
(ホ)プリントができない。
これらの現象が出てきましたら、「8.プリンタの電池の入れ
かた」に従って、新しい乾電池と交換してください。
(2)最初の電池
お買い上げの時計にあらかじめ組み込まれている電池は、機
能・性能をみるためのモニター用です。お買い上げ後上記の期
間に満たないうちに電池寿命が切れることが有りますのでご了
承ください。
(3)電池交換(ストップウオッチ部)
①電池交換は、必ずお買い上げ店で「純正電池」とご指定の上、
ご用命ください。
12.液晶パネルの交換
②電池寿命切れの電池をそのまま長時間放置しますと、漏液な
どで故障の原因になりますので、お早めに交換してください。
③電池交換は保証期間内でも有料となります。
④電池交換で裏ぶたを開閉しますと当初の防水性能を維持でき
なくなる場合があります。
電池交換の際には、お客様の時計の防水性能にあった防水検
査をご依頼ください。
特に10気圧以上のものは検査が必要です。
防水検査は日数を要しますので、期間をご確認のうえご依頼
ください。
(4)電池寿命切れ予告機能(ストップウオッチ部)
電池マーク「BATT」が点滅を始めたら寿命切れ間近ですので、
お早めにお買い上げ店またはセイコー取扱店で電池交換をご依
頼ください。尚、電池交換いたしますとすべてのメモリーデー
タは消去されますので、必要なデータがある場合は交換前にプ
リントアウトしてください。
警告
1.お客様は、時計から電池を取り出さないでください。
2.やむを得ずお客様が時計から電池を取り出した場合は、電池
は直ちに幼児の手が届かないところに保管してください。
3.万一飲み込んだ場合は、身体に害があるため直ちに医師とご
相談ください。
注意
1.破裂、発熱、発火などのおそれがありますので、電池を絶対
にショート、分解、加熱、火に入れるなどしないでください。
2.この時計に使用している電池は、充電式ではないので、充電
すると液漏れ、破損のおそれがあります。絶対に充電しない
でください。
3.
「常温(5℃∼35℃)からはずれた温度」下で長時間放置す
ると電池寿命が短くなることがあります。
この時計の液晶パネルは、7年を過ぎますと、コントラストが低下して数字が読みにくくなることがあります。
お買い上げ店に交換をお申しつけください。実費にて申し受けます。
13.長くご愛用いただくために
●定期点検について
・ながくご愛用いただくために、2∼3年に一度程度の点検調整
をおすすめします。定期的な点検により目に見えない部分が原
因となる損傷を未然に防ぎ、より安心してご使用いただけます。
保油状態・漏液の有無・汗や水や水分の侵入などをお買い上げ
店で点検をご依頼ください。点検の結果によっては分解掃除を
必要とする場合があります。
〔カバーガラスのお手入れ〕
●表面に特殊処理をしてありますので、柔らかい布でふいてくだ
さい。
〔ケースのお手入れ〕
●汚れがひどいときには、水で薄めた台所用洗剤(または石けん
水)に布を浸し、よく絞ってから、汚れをふき取ってください。
最後に、乾いた布で仕上げます。
●補修用性能部品について
・この時計の補修用性能部品の保有期間は通常7年間を基準として
います。
正常なご使用であれば、この期間中は原則として修理可能です。
(補修用性能部品とは、時計の機能を維持するのに不可欠な修
理用部品です。)
・修理可能な期間はご使用条件によりいちじるしく異なり、精度
が元通りにならない場合もありますので、修理ご依頼の際にお
買上げ店とよくご相談ください。
・修理のとき、代替品を使用させていただくことがありますので
ご了承ください。
●アフターサービスについて
・万一故障した場合には、お買上げ店にお持ちください。保証期
間内の場合は保証書を添えてください。
・修理期間経過後の修理およびこの時計についてのご相談はお買
上げ店でうけたまわっております。なお、ご不明の点は「セイ
コーウオッチ株式会社お客様相談室」にお問いあわせください。
・保証内容は保証書に記載したとおりですので、よくお読みいた
だき大切に保管してください。
33
34
14.故障とお考えになる前に
15.製品仕様
修理を依頼される前に、もう一度、次の表に従ってお調べください。
(ストップウオッチ部)
症 状
考えられる原因
処 置
症 状
考えられる原因
プリンタのパワースイッ
●電池が消耗していませ
●新しい電池と交換しま
スタートボタンを押した
●紙がつまっていませんか
●紙を除去します
チをON側にしてもモー
んか
す
とき印字はするが紙は送
●電池が消耗していませ
●新しい電池と交換しま ●電池の方向は正しいで
●電池を正しい方向に入
らない、あるいは紙送り
んか
す
すか
れ直します
が不規則
ターが動かない
処 置
●紙がつまっていませんか
●紙を除去します
スタートボタンを押して
●電池が消耗していませ
●新しい電池と交換しま 紙送りスイッチを押して
●電池が消耗していませ
●新しい電池と交換しま
も印字もしないし紙も送
んか
す
も紙送りしない
んか
す
らない
●電池の方向は正しいで
●電池を正しい方向に入 れ直します
●紙がつまっていませんか
●紙を除去します
すか
●ロールペーパーがつぶ
●ロールペーパーの形を
●プリンタのパワースイ
●パワースイッチをON 丸く整えます
ッチはONになってい
にしてからスタートボタン
●紙を正しく入れ直します
ますか
を押します
れていませんか
スタートボタンを押した
●紙の表裏は正しいですか
とき紙は送るが正しい印
オートスタート時刻が転
●コードはきちんとさし
●コードをきちんとさし
字をしない、あるいは印
送されない
込まれていますか
込みます
●コードの接点部に水・
●水・異物を取り除きま
異物がついていませんか
す
字をしない
※処置が困難な場合は、お買い上げ店へお持ちください
35
1.水晶振動数 ……32,768Hz(Hz=1秒間の振動数)
2.精度 ……………常温(5℃∼35℃)において±0.0006%以内
月差換算±15秒以内
3.作動温度範囲 …−10℃∼+60℃
4.表示温度範囲 …0℃∼+50℃
5.表示内容 ………〈ストップウオッチ表示〉
3段表示
時・分・秒・1/100秒、スプリット/ラップ/トータ
ルタイム又はランニングラップタイムの一括表示、
ブロック数、スプリット回数計(0∼999回まで)
、
300メモリー・リコール、BLOCK、SPLIT、LAP、
STOP、RECALL、モード表示、メモリー使用量
表示、BATTマーク
〈時刻・カレンダー表示〉
時(24時間制)
、分、秒、年、月、日、モード表示、
ID番号(OFF/01∼99)
、コントラスト調整表示
〈オートスタートセット表示〉
AS、OFF、ON、時、分、秒、1/100秒、オート
スタートセットマーク
6.表示体 …………FE型ネマチック液晶
7.使用電池 ………リチウム電池(SB-T74)1個
8.電池寿命 ………約3年(但し、ストップウオッチ動作 3時間/1
日を基準としておりますので、それ以上使用した
場合は3年に満たないうちに容量が切れます)
9.電子回路 ………C-MOS-LSI 1個
10.電池寿命切れ予告機能付き
(プリンタ部)
1.プリンタ ………型式:MTP102
印字方式:感熱式シリアルドット方式
印字方法:一方向印字(左から右)
印字スピード:約1.5行/秒(DC5.0V、25℃の時)
印字桁数:1行13桁(スペース含む)
2.記録紙 …………感熱紙:ロールペーパーS950
幅 38(+0∼−0.5mm) 全長 2,400mm 以上
(1本で約700行印字)
3.電源 ……………DC6V(単3乾電池4個使用)
4.消費電力 ………印字時:約1.5W(DC6.0V)
パワースイッチON時(印字無):約0.02W
(DC6.0V)
5.電池寿命 ………マンガン乾電池使用の場合:約10,000行印字(ロ
ールペーパー約14本分)
アルカリ乾電池使用の場合:約20,000行印字(ロ
ールペーパー約28本分)
6.作動温度範囲 …0℃∼40℃温度補正:有(温度が変化しても印字
の濃さは変わりません。
)
※上記の製品仕様は、改良のため予告なく変更することがあります。
※上記の製品仕様は改良のため予告なく、変更することがあります。
36
1.FEATURES
SEIKO Digital Stopwatch Cal. S149 is a time measuring device that can record the
measurements with the use of the built-in printer. In addition, used with the
−−−−−−−−−−−−−−−−−−−− CONTENTS −−−−−−−−−−−−−−−−−−−−−−−
stopwatch Cal. S143 or a grip switch, Cal. S149 can perform various functions.
9.TIME・CALENDAR
SETTING ………………………………65
10.PRECAUTIONS ………………………68
11.REMARKS ON THE
BATTERIES……………………………71
12.REPLACEMENT OF THE LIQUID
CRYSTAL PANEL …………………72
13.CARE OF YOUR WATCH …………72
14.TROUBLESHOOTING GUIDE ……73
15.SPECIFICATIONS …………………74
1.FEATURES ……………………………38
2.DISPLAY AND BUTTON/SWITCH
OPERATION ……………………………39
3.TIME/CALENDAR ……………………40
4.HOW TO USE THE
STOPWATCH …………………………40
5.HOW TO USE THE MEMORY
FUNCTION………………………………48
6.HOW TO PRINT OUT ………………53
7.HOW TO USE THE AUTO
START FUNCTION …………………59
8.HOW TO INSERT BATTERIES INTO
THE PRINTER …………………………64
● Cal. S149 is suitable for measuring massive time date
in a road race, marathon race, etc.
① With the use of the built-in printer, the measured
time data can be printed out as soon as they are
obtained.
② Year, month, date and time when the measurement is
started can be printed out, and therefore, it is easy to file
and keep the data.
③ An auto start function is provided. By presetting the
time when the measurement is started, the stopwatch
starts measuring automatically at the designated time.
④ Memory recall function……Up to 300 measurement
data can be stored in memory. Measurement data
obtained from the start to finish of the measurement
is recorded as a block without erasing the data in the
previous block, and up to 100 blocks of data can be
stored in memory.
This function is very useful for separately keeping
the data measured at different time and date.
⑤ Besides, the stopwatch is equipped with such
convenient functions as ID No. function useful for
keeping the data of individual users separately, and
memory capacity indicator and fastest lap time recall
functions.
⑥An antibacterial agent is applied to the case surface of
the stopwatches.
*It loses its antibacterial effect gradually over time and the
effective period differs depending on the conditions of
use.
● Used with optional devices, the stopwatch can perform
various functions.
① By connecting the stopwatch to SEIKO Digital Stopwatch
Cal. S143, more than two stopwatches can start
measuring simultaneously at a fixed time. Therefore, it is
possible to measure the time in a road race or marathon at
different checkpoints more accurately.
② Connected with a grip switch (optional accessory), the
stopwatch can be operated more easily.
③ With the use of a paper extension holder (optional
accessory), massive time data (approximately 2,500 data)
can be printed successively at a time.
38
2.DISPLAY AND BUTTON/SWITCH OPERATION
Roll paper cover:
Paper advancing switch:
With each press of the switch, one line
is advanced. The paper is advanced
continuously by keeping the switch
pressed.
POWER
ON
3.TIME/CALENDAR
1 Press mode selection button ③ (TIME) to set
□
the time to the Time/calendar mode .
Set the roll paper inside the
cover.
300LAP/SPLIT MEMORY
Power switch for printer
F
SYSTEM STOPWATCH
BLOCK
300LAP/SPLIT MEMORY
Grip switch selector
F
Print mode selection switch:
Split time and lap time are
printed out.
cUpper position
dLower position
Split time is printed out.
BLOCK
LAP
SPLIT
E
STOP-W. A/S SET TIME
LOCK
CLEAR
LAP/SPLIT
RESET
1/100
SPLIT
STOP.W A/S SET
START
STOP
STOP-W. A/S SET TIME
LOCK
CLEAR
LAP/SPLIT
RESET
1/100
STOP.W A/S SET
START
STOP
TIME
RECALL
Button ③
(TIME)
TIME
RECALL
A
Lock lever: The lever locks button ○
Readout selection button:
With each press of the button, the
measurement is displayed in 1/100
seconds and one second alternately.
Button ○
A
Start/stop
B
Button ○
Split/lap reset
Memory recall button:
Mode selection button:
39
E
RECALL
EXT
When the grip switch is used.
▲
cUpper position
dLower position
When the grip switch is not used.
Stopwatch mode
① Stopwatch mode (accumulated
elapsed time or lap time measurement in progress display)
② Auto start setting mode
③ Time/calendar mode
STOP
BATT.
LAP
With each press of the button,
the times stored in the memory
can be recalled.
Jack for grip switch:
The jack connects the
grip switch with the
stopwatch.
Jack for auto start
Auto start setting
and Time/Calendar
mode
Setting the digits
Selection of the digits
to be adjusted
Display in the time/calendar mode
ID
BLPOK
STOP
BATT.
LAP
RECALL
Year
Month
4.HOW TO USE THE STOPWATCH
Notes on the block of data in memory
・The SEIKO Stopwatch Cal. S149 features a "Block Memory"
stopwatch operation system. The data obtained from start till finish
of a race is recorded as a block and stored in memory.
・The time and date of starting the measurement of a block of data are
automatically stored in memory.
・Before the measurement is started, the block number is assigned to
the block of data to be measured.
・Up to 300 data can be stored in memory.
・A block of data includes at least three data. If more than one block is
used to store the data, the memory become full even before the
number of lap time/split time measurements in memory amounts to
300.
Date
Time (10'8''59)
Time/calendar mode mark
*Time displayed in the 24-hour indication
The jack is used for transferring
the auto start time.
40
1 Press mode selection button ① (STOP. W) to set
□
the stopwatch to the Stopwatch mode .
*With each press of button① the third line display changes
over between accumlated elapsed time and lap time
measurement in progress alternately.
2 Select the readout of the measurement between
□
3 Now measurement starts.(Use the buttons ○
A,○
B)
□
1/100 seconds and 1 second.
Standard measurement
A→○
A→○
B
Press the buttons in the following order: ○
(Start)
300LAP/SPLIT MEMORY
300LAP/SPLIT MEMORY
(Stop)
SPLIT
SPLIT
F
BLOCK
STOP
BATT.
LAP
E
STOP-W. A/S SET TIME
CLEAR
START
STOP
1/100
TIME
STOP.W A/S SET
TIME
Press the readout selection
button to select the display.
RECALL
Display in the stopwatch mode
(The third line display is accumlated elapsed time, for example)
1/100 seconds
display
SPLIT
SPLIT
BLOCK
BLOCK
LAP/SPLIT
RESET
STOP
BATT.
LAP
Lap time
STOP
BATT.
LAP
A
○
Start
SPLIT
STOP
BATT.
LAP
RECALL
With each press of the button, the display changes over between
1 second and 1/100 second alternately.
*Before selecting the readout of the measurement, be sure to reset
the digits to "00".
*If the digits are reset to "00" after the measurement is made in one
second readout the display automatically returns to 1/100 seconds.
41
Accumulated elapsed time measurement
(Start)
A→○
A→○
A…→○
A→○
B
Press the buttons in the following order: ○
(Restart)
(Stop)
SPLIT
E
RECALL
RECALL
Accumulated
elapsed time
Stopwatch mode mark
(The mark indicated the stopwatch function is activated.)
START
STOP
\
LAP/SPLIT
RESET
The new block number for the next measurement
is displayed with the digits reset to "00".
B
○
(Start)
F
SPLIT
(10 km point)
Split time
SPLIT
F
BLOCK
LAP
BLOCK
LAP
STOP
BATT.
LAP
E
RECALL
BLOCK
LAP
STOP
BATT.
LAP
E
RECALL
F
BLOCK
LAP
STOP
BATT.
LAP
STOP
BATT.
LAP
E
RECALL
START
STOP
A
○
SPLIT
SPLIT
F
F
Restart and stop of the stopwatch
A.
can be repeated by pressing ○
LAP/SPLIT
RESET
E
Section 1: Split time 14'56''08
Lap time 14'56''08
(Reset)
START
STOP
Section 2: Split time 29'57"21
Lap time 15'01"13
(40 km point)
SPLIT
F
F
BLOCK
LAP
E
LAP
RECALL
LAP/SPLIT
RESET
A
○
The new block number for the next measurement
is displayed with the digits reset to "00".
E
RECALL
START
STOP
\
\
B
○
START
STOP
LAP/SPLIT
RESET
(Stop)
BATT.
LAP
LAP/SPLIT
RESET
E
RECALL
B\
○
START
STOP
F
RECALL
STOP
BATT.
LAP
Accumulated
elapsed time
SPLIT
STOP
BATT.
LAP
STOP
BATT.
LAP
43
B\
○
BLOCK
LAP
BLOCK
LAP
F
START
STOP
A
○
A
○
(Stop)
(Reset to "00")
START
STOP
\
A
○
E
RECALL
LAP/SPLIT
RESET
LAP/SPLIT
RESET
Lap time
BLOCK
LAP
STOP
BATT.
LAP
E
\
\
LAP/SPLIT
RESET
\
START
STOP
SPLIT
BLOCK
LAP
RECALL
LAP/SPLIT
RESET
Press the buttons in the following
A→○
B→○
B…○
B→○
A→○
B
order: ○
(5km point)
No. of split / lap time
F
42
How to measure lap time/split time (When the accumlated elapsed time
display of the stopwatch mode is used, for example, in a marathon race)
SPLIT
F
Finish
BLOCK
LAP
STOP
BATT.
LAP
RECALL
START
STOP
A
○
F
Split time
BLOCK
LAP
SPLIT
START
STOP
(Reset to "00")
SPLIT
No. of split
time/lap
E
RECALL
LAP/SPLIT
RESET
Readout selection button
1 second
display
STOP
E
RECALL
START
STOP
\
LAP/SPLIT
RESET
RECALL
Button ①
(STOP. W)
STOP
BATT.
LAP
LOCK
LOCK
STOP.W A/S SET
BLOCK
LAP
\
STOP-W. A/S SET TIME
CLEAR
LAP/SPLIT
RESET
BLOCK
LAP
E
RECALL
RECALL
1/100
F
F
F
BLOCK
STOP
BATT.
LAP
B\
○
LAP/SPLIT
RESET
STOP
BATT.
LAP
STOP
BATT.
LAP
E
RECALL
START
STOP
The new block number for the next measurement
is displayed with the digits reset to "00".
LAP/SPLIT
RESET
E
RECALL
START
STOP
Finish time 2:11'17"99
A
\○
B\
○
LAP/SPLIT
RESET
The lap time can be measurB.
ed repeatedly by pressing ○
START
STOP
Section 8: Split time 2:01'14''12
Lap time 16'42''33
44
How to measure lap time/split time
(When the lap time measurement in progress mode is used)
Press the bottons in the following order:
A→○
B→○
B…→○
B→○
A→○
B
○
Lap time measurement in progress display… While a lap time is
being measured, the measurement in progress is displayed.
LAP1
LAP2
LAP3
When the grip switch is used:
① Changeover to the grip switch
② Time measurement
● Connect the grip switch to the stopwatch.
● The measurement is started by pressing the grip switch
once. Split time and lap time can be measured repeatedly
with each press of the grip switch.
(Start)→(With each press of the grip
switch, split time and lap time
are measured repeatedly.)
LAP n
Start
Finish
Grip switch
Press mode selection button ① (STOP.W) to show the lap time measurement in progress display of the stopwatch mode.
(Start)
(Lap/Split measurement)
SPLIT
SPLIT
SPLIT
F
F
BLOCK
LAP
RECALL
STOP
BATT.
LAP
E
RECALL
EXT
▲
c
Upper position
E
RECALL
*While the grip switch selector is set at the
A and ○
B will not work,
upper position, button ○
and the stopwatch is operated solely by the
grip switch.
\
B\
○
LAP/SPLIT
RESET
START
STOP
LAP/SPLIT
RESET
START
STOP
●The stopwatch can printout the time a lap time is measured
in the same manner as you press the grip switch in the
stopwatch mode.
When the lap time measurement in progress exceeds
1 hour, the hour digit appears in place of the mark for
lap time in progress mark.
The lap time measurement in progress is displayed.
B is pressed to measure the lap
Each time button ○
time/split time, the digits are reset to "00" and the
stopwatch starts counting from "00".
It indicates that the lap time measurement
in progress display is shown.
*By pressing the grip switch, split time and lap time can be measured, but the
measurement cannot be stopped. After the final split or lap time is measured,
follow the stops in ④ End of measurement" to stop the measurement.
③Printout of lapse of time (Only when in the
time/calendar mode and the power switch of the
printer is on)
START
STOP
A
○
45
BLOCK
LAP
STOP
BATT.
LAP
E
LAP/SPLIT
RESET
F
BLOCK
LAP
STOP
BATT.
LAP
● Slide up the grip switch selector located on the right side of the
stopwatch.
(10 km point)
46
5.HOW TO USE THE MEMORY FUNCTION
④End of measurement
● After the measurement is over, slide down the grip switch
selector.
EXT
▲
d
Lower position
How to use the lock lever
300LAP/SPLIT MEMORY
F
BLOCK
A (start/stop
To prevent any mistaken operation of button ○
of the stopwatch) during the measurement, it is
A be locked with the lock lever
recommended that button ○
after the measurement is started.
STOP
BATT.
LAP
E
RECALL
STOP-W. A/S SET TIME
LOCK
CLEAR
B
Button ○
LAP/SPLIT
RESET
1/100
STOP.W A/S SET
START
STOP
A
Button ○
TIME
RECALL
A to stop the
●After sliding down the selector, press button ○
B to reset the
measurement and then press button ○
stopwatch.
(Stop)
Recall button(Memory recall button)
SYSTEM STOPWATCH
300LAP/SPLIT MEMORY
(Reset to "00")
■The memory recall function
・The data obtained in the measurement can be recalled and displayed.
・Up to 100 blocks of data or 300 data can be stored and recalled.
・Besides being recalled and displayed, the data in memory can also be printed out.
(Refer to "6. HOW TO PRINT OUT")
・The stored data is recalled by pressing recall button. The data is recalled successively
if the button is kept pressed.
・The stored data can be recalled while the stopwatch is measuring.
・The data can be stored in memory even while printing out the data during the
measurement.
・Order of recalling the stored data
F
With each press of recall button
BLOCK
SPLIT
SPLIT
F
BLOCK
LAP
F
E
BLOCK
LAP
STOP-W. A/S SET TIME
STOP
BATT.
LAP
E
RECALL
STOP
BATT.
LAP
LOCK
CLEAR
E
RECALL
LAP/SPLIT
RESET
LAP/SPLIT
RESET
\
START
STOP
\
LAP/SPLIT
RESET
A
○
B
○
START
STOP
1/100
STOP.W A/S SET
START
STOP
TIME
RECALL
Lock lever
After the measurement is started,
slide down the lock lever.
*While the lock lever is slid down,
A (START/STOP) is locked
button ○
and cannot be pressed.
When the stopwatch is stopped
The data is recalled starting from the oldest one.
When the stopwatch is in use
The data is recalled starting from the newest one.
・Button operation while the stored data is recalled
A
Display before recall Button ○
Reset
Stopped
Measuring
47
Returning to the
display before recall
Returning to the
display before recall
Stopping the
measurement
B
Button ○
mode selection
button ① (STOP.W)
Clearing the data in Returning to the
memory
display before recall
Returning to the display
Returning to the
before recall
display before recall
Measuring lap/split time Returning to the
display before recall
48
When the stopwatch is reset or stopped:
The data is recalled starting from the first data in block "1".
<Ex.) When the display is reset to "00" in block "4">
(Reset)
(Start data)
SPLIT
When the stopwatch is measuring:
The data is recalled starting from the newest one.
〈ex.) When the measurement of the third lap / split time in block "4" has been completed.〉
(Fastest lap time display) (Lap/split data in block "1")
SPLIT
SPLIT
F
(Stop)
SPLIT
F
(Display of the fastest lap time in block "4")
SPLIT
F
F
F
SPLIT
F
BLOCK
LAP
BLOCK
LAP
STOP
BATT.
LAP
E
RECALL
Recall
button
BLOCK
LAP
STOP
BATT.
LAP
E
Recall
button
BLOCK
LAP
STOP
BATT.
LAP
RECALL
E
Recall
button
RECALL
BLOCK
LAP
STOP
BATT.
LAP
E
Recall
button
BLOCK4
Lap/split time 3
STOP
BATT.
LAP
RECALL
BLOCK
LAP
Recall
button
E
RECALL
Lap/split time 3
STOP
BATT.
LAP
E
Recall
button
Lap/split time 2
Recall button
Lap/split time 1
Recall button
RECALL
Start date
Start time
Fastest lap no.
Fastest LAP
The fastest lap time in this block
is displayed together with the lap
number.
split time
Lap/split no.
Lap/split no.8
split time 2:1'14"12
lap time 16'42"33
Stop time
Stop time 2:11'17"99
Fastest lap no. The colon (:) starts flashing.
When the stopwatch is mesuring, the measurement in progress is shown in the bottom row of the display.
Data in block "4"
BLOCK3
Start data
Data in block "1"
BLOCK3
Start data
Recall button
Recall button
BLOCK3
Stop time
BLOCK3
Fastest lap
Recall button
BLOCK3
Stop time
Recall button
BLOCK1
Lap/split time 1
Recall button
BLOCK4
Lap/split time 3
Recall button
(Reset)
BLOCK2
Start data
Recall button
Recall button
SPLIT
F
Recall button
BLOCK
LAP
STOP
BATT.
LAP
E
RECALL
49
50
■How to clear the stored data (All clear of
data)
・The memory clear function is useful in
the following cases.
a)When the stored data becomes
unnecessary.
b)When the residual memory is not
sufficient for a new measurement.
・Once the following steps are taken to
clear the data, all the stored data is
erased from memory. The stored data
cannot be erased one by one or block by
block.
①While the stopwatch is measuring or
when the digits are not reset after the
end of the measurement, the stored data
cannot be erased from memory.
In that case, end the measurement and
reset the stopwatch.
②Press recall button
In the memory recall display, the stored
data can be erased irrespective of which
data is displayed.
SPLIT
F
BLOCK
LAP
STOP
BATT.
LAP
E
RECALL
(Start data)
Recall button
B pressed for more than 1.5 seconds.
③Keep button ○
B is kept pressed, the display below is shown with warning beeps.
While button ○
After 1.5 seconds, the stored data is erased from memory with a long beep.
All the data is erased from memory and the initial measurement display is shown.
B is kept pressed for more than 1.5 seconds, the stored data will not be erased from
*Unless button ○
memory.
F
STOP
BATT.
LAP
SPLIT
SPLIT
F
F
BLOCK
LAP
BLOCK
LAP
E
STOP
BATT.
LAP
RECALL
(Digits reset to "00")
E
RECALL
B
Button ○
STOP
BATT.
LAP
RECALL
(Digits reset to "00")
E
●How to read the memory capacity
indicator
The number of data stored in memory is
displayed graphically with a 10-segment
bar.
Each segment of the bar corresponds to 30
data. The segments are displayed one
by one from the bottom to indicate the
number of data in memory.
F 290∼300
F
E
BLOCK
LAP
RECALL
E
●Memory data guide during recall
While the data is recalled, a segment of the
bar flashes to indicate the measurement
order of the data being recalled.
In the illustration below, 210 to 239 data is
stored in memory and the data being
recalled is between 120th and 149th
data in memory.
Number of data in memory
SPLIT
STOP
BATT.
LAP
SPLIT
BLOCK
LAP
■Notes on memory capacity
・The number of data in memory is shown
graphically by the memory capacity
indicator.
・Besides the measured lap times/split
times, the start time data and block
number are also retained in memory as
two separate data. Therefore, a block of
data includes at least three data. If more
than one block is used to store the data,
the memory become full even before the
number
of
lap
time/split
time
measurements in memory amounts to
300.
270∼290
240∼269
210∼239
180∼209
150∼179
120∼149
90∼119
60∼ 89
30∼ 59
When 10 or less data of
memory capacity is
available, the top segment
starts flashing. When the
memory is at its full
capacity, it stops flashing
and remains displayed.
30 to 59 data is stored in
memory. When no segment
is displayed, 0 to 29 data is
stored in memory.
SPLIT
F
It flashes.
BLOCK
LAP
STOP
BATT.
LAP
E
RECALL
●When the memory reaches its full
capacity:
・All the segments of the bar are
displayed.
・The 301st data and those measured
thereafter will be displayed but will not be
stored in memory for later recall.
(Memory clear procedure)
51
52
6.HOW TO PRINT OUT
2.Printout
1 Cut the first pasted position of the paper
□
straight.
2
□ Open the paper cover as shown in the
illustration.
1 Turn on the power switch for printer before starting
□
the measurement. When the switch is turned on, the
roll paper is advanced by one line.
Print mode
selection
switch
6
□ Put the roll paper into the holder and
close the paper cover.
Power switch
(
If the roll paper gets out of shape, make it round
before inserting it into the holder.
Be sure to set the paper with the right side up. It
can only be printed on one side.
)
number, starting time, date, month and year are printed out, and then the
time data are printed out successively as soon as they are measured.
SYSTEM STOPWATCH
Notes 1 Do not pull the paper in the reverse direction (opposite to the direction of
advancing the paper), as this will damage the printer. When replacing the
remaining roll paper with a new one, first cut the paper in the holder, then
remove the rest of it by pressing the paper advancing switch, or pull it out
in the direction of advancing the paper.
Notes 2 Be sure to use the roll paper S-950 for exclusive use with this model.
Otherwise, poor printing or malfunction will be caused.
Roll paper
3
□ After the measurement is started, the identification number (if it is set), block
LAP
SPLIT
LAP
SPLIT
LAP
SPLIT
SPLIT
SPLIT
Block number
BLOCK:1 Year・Month・Date 1999 10 10
Start time START 10:19
SPLIT 1-0:05′03 76
2-0:05′12 33
3-0:05′41 13
Split time
4-0:05′59 06
5-0:06′17 88
6-0:06′43 56
7-0:07′21 47
8-0:07′36 48
Finish time /S/0:08′02 58
Both split time and lap time are printed out.
c
(print mode selection switch)
SPLIT
Only split time is printed out.
split time and
c Both
lap time
d Split time only
c
(
Power switch
2 Operate print mode selection switch to select the
□
printout from "lap time only" and "both split time and
lap time".
time, the motor runs for approximately 1
second to indicate that the power is
supplied.
insertion slot.
POWER
ON
)
3
□ Slide the power switch to "ON". At this
4
□ Inset the end of the paper into the paper
Printout during the measurement
Print mode
selection
switch
●Besides the thermal paper S950 included
with this model, the thermal paper S951 is
available for printing out the stored data. It is
a long-type thermal paper that can print
out up to 2,800 lines. To use S951, the
paper holder SVAZ007 for exclusive use
with it is necessary.
Paper advancing
switch
Example of printout
5 Keep the paper advancing switch pressed
□
until the end of the paper is advanced out 2
to 3 cm from the printer.
(Do not pull out the paper by force.)
1.How to set the paper in the printer
Block number
BLOCK:1 Year・Month・Date 1999 10 10
Start time START 10:19
SPLIT/LAP 1-0:18′05 33
0:18′05 33
2-0:36′37 78
0:18′32 45
3-0:55′13 11
0:18′35 33
4-1:13′25 31
Split time
0:18′12 23
Lap time
5-1:31′57 55
0:18′32 21
6-1:49′32 78
0:17′35 23
7-2:01′31 04
0:17′58 26
8-2:25′43 62
0:18′12 58
Finish time /S/2:54′02 77
*When the power switch of the printer is turned on after the measurement is started, the data is printed
out starting from the next measurement data.
53
54
Printout after the measurement
"Printout of the desired block of data"
POWER
ON
(1)Turn on the power switch.
(2)Press memory recall
button (RECALL).
300LAP/SPLIT MEMORY
SPLIT
F
BLOCK
LAP
STOP
BATT.
LAP
The time data stored in
memory are printed out.
E
RECALL
STOP-W. A/S SET TIME
LOCK
CLEAR
LAP/SPLIT
RESET
STOP.W A/S SET
START
STOP
*When all the stored data are
printed out, the printer
automatically stops.
TIME
②Turn on the power switch of the printer.
③Keep recall button pressed.
When the stopwatch confirms the
"Power on" of the printer, flashing
"Print" is displayed.
SPLIT
F
g
SYSTEM STOPWATCH
1/100
① Memory recall
Show the memory recall display, and
select the block of data you wish to
print out.
BLOCK
LAP
Block No. for the block of data to be printed
SPLIT
F
STOP
BATT.
LAP
E
RECALL
(Start data)
E
RECALL
(Printout display for desired block of data)
RECALL
Recall button
・The stored data can be printed out as many
times as necessary.
・Printout can be selected from only the desired
block of data and all the blocks of data.
SPLIT
BLOCK
LAP
STOP
BATT.
LAP
RECALL
BLOCK
LAP
STOP
BATT.
LAP
Recall button
"To print out the data in all the blocks in memory"
①Turn on the power switch of the printer.
②Show the memory recall display, and keep recall button pressed. Flashing "Print" is displayed.
③Printout of all the blocks of data
・Keep recall button pressed further until "Print All" is displayed.
F
④Then, release recall button. The data in all the blocks is displayed
quickly one after another starting from Block "1", and will be
printed out at a stretch.
E
(While the data is displayed quickly one after another, the
(Printout of all the blocks of data)
stopwatch checks for the fastest lap time in each block.)
・If recall button is released immediately after flashing "Print" is displayed, the printout
will be canceled and the display returns to the memory recall display.
④ Keep recall button pressed for 1 second, and then release it as "Print" stops flashing and remains displayed.
The data in the selected block is displayed quickly one after another, and then printout is started.
(While the data in the block is displayed quickly one after another, the
stopwatch checks for the fastest lap time in the selected block.)
Notes:
Recall button
*While the printout is under way, none of the stopwatch buttons will work.
・Once started, the printout cannot be canceled halfway.
・Even if the power switch of the printer is turned off while the printout is in progress, the button operation of the stopwatch is nullified until entire
data to be printed is shown on the display.
F
STOP
BATT.
LAP
E
RECALL
55
The total elapsed time of the block is displayed.
56
Printout of lapse of time
・In addition to the elapsed time, the stopwatch can print out the
time when the lap time is measured.
・The time a lap time is measured is not stored in memory.
1 Turn on the power switch for printer and then press mode
□
2 Press button ○
A to start the printout. With each press of button
□
B
○, the time when the lap time is measured is printed out. To
A
stop the printout, press button ○
selection button②(TIME) to set the stopwatch to the
time/calendar mode.
*Please note that the time of measurement cannot be printed out
SYSTEM STOPWATCH
unless the stopwatch is reset to "00".
300LAP/SPLIT MEMORY
SPLIT
F
BLOCK
LAP
POWER
ON
STOP
BATT.
LAP
(1)Turn on the power switch.
(2)Press mode selection button ③
(TIME) to set the stopwatch to
the time/calendar mode.
SYSTEM STOPWATCH
Stopwatch
mode
Time/calendar
mode
SPLIT
300LAP/SPLIT MEMORY
STOP-W. A/S SET TIME
LOCK
ID
F
F
SPLIT
F
BLOCK
LAP
STOP
BATT.
LAP
BLOCK
LAP
E
BLOCK
LAP
RECALL
STOP
BATT.
LAP
STOP-W. A/S SET TIME
LOCK
CLEAR
LAP/SPLIT
RESET
1/100
E
RECALL
START
STOP
STOP.W A/S SET
E
RECALL
STOP
BATT.
LAP
B
Button ○
Printout of the
time when the
lap time is
measured.
CLEAR
LAP/SPLIT
RESET
1/100
START
STOP
STOP.W A/S SET
TIME
A
Button ○
Start/stop
RECALL
Identification number is printed when it is set
ID:1
1999
10 10−−−−Year, Month, Date
ST-10:10′00−−−−Starting time (10:10'10'')
1-10:10′21−−−−1st lap time (10:10'21'')
2-10:10′25−−−−2nd lap time (10:10'25'')
3-10:10′26−−−−3rd lap time (10:10'26'')
4-10:10′28−−−−4th lap time (10:10'28'')
5-10:10′33−−−−5th lap time (10:10'33'')
6-10:10′36−−−−6th lap time (10:10'36'')
7-10:10′39−−−−7th lap time (10:10'39'')
8-10:10′50−−−−8th lap time (10:10'50'')
9-10:10′59−−−−9th lap time (10:10'59'')
10-10:11′03−−−−10th lap time (10:11'03'')
/S/10:11′06−−−−Finish time (10:11'6'')
E
RECALL
TIME
*The time is printed out in the 24-hour indication.
RECALL
57
58
7.HOW TO USE THE AUTO START FUNCTION
Auto start function: By presetting the time when the measurement is
started, the stopwatch automatically starts measuring at the designated
time. This function is very convenient for a competition like marathon, where
the race starts at a fixed time. In addition, the designated starting time can
be transferred to other stopwatches such as Cal. S143 and thus the
measurement can be started simultaneously at different checkpoints.
1.Auto start time setting (how to set the starting
2 Set the auto start time.
□
time)
1 Press the mode selection button ② (A/S SET) to set the
□
stopwatch to the auto start setting mode .
Indicates that the
auto start function
is deactivated.
SYSTEM STOPWATCH
300LAP/SPLIT MEMORY
SPLIT
F
BLOCK
LAP
STOP
BATT.
LAP
E
RECALL
Minute setting
B, and the minute digits start flashing.
Press button ○
A to set the digits. With each press of
Press button ○
the button, one minute is advanced.
SPLIT
Hour setting
B, and the hour digits start flashing.
Press button ○
A to set the digits. With each press
Press button ○
of the button, one hour is advanced.
SPLIT
BLOCK
LAP
4
□ After the auto start time is entered in memory, press
3 Enter the auto start time.
□
Setting
Return to the stopwatch mode.
B again.
After setting the auto start time, press button ○
The digits stop flashing and the auto start time set has
been entered in memory.
Indicated that the auto start
function is activated.
SPLIT
BLOCK
LAP
BLOCK
LAP
STOP-W. A/S SET TIME
LOCK
CLEAR
LAP/SPLIT
RESET
1/100
STOP.W A/S SET
START
STOP
TIME
STOP
BATT.
LAP
SPLIT
BLOCK
LAP
Auto start time
STOP
BATT.
LAP
RECALL
Auto start time (10:05)
STOP
BATT.
LAP
RECALL
button ① (STOP. W) to return to the stopwatch mode .
SYSTEM STOPWATCH
300LAP/SPLIT MEMORY
SPLIT
F
BLOCK
LAP
STOP
BATT.
LAP
RECALL
RECALL
59
Mode selection
button ② (A/S
SET)
Auto start setting mode mark
START
STOP
LAP/SPLIT
RESET
START
STOP
LOCK
LAP/SPLIT
RESET
B
○
A
○
B
○
A
○
*The digits move quickly if the button is kept pressed.
B to start setting the auto start time,
NOTES:When you press button ○
all the stored data is cleared.
LAP/SPLIT
RESET
c
B
○
START
STOP
SPLIT
Auto start time
STOP-W. A/S SET TIME
CLEAR
RECALL
LAP/SPLIT
RESET
E
RECALL
1/100
STOP
BATT.
LAP
Be sure to confirm the third line display changes
to the current time. If not, auto start function
doesn't become effective.
STOP.W A/S SET
START
STOP
TIME
RECALL
BLOCK
LAP
STOP
BATT.
LAP
Current time
RECALL
*The stopwatch starts measuring at the
designated auto start time with three beeps.
mode selection button ① (STOP.W)
*To cancel the auto start time set in the procedure
above, press mode selection button ② (A/S SET). 60
2.Transfer of the designated auto start time to other stopwatch (Cal. S143)
How to transfer the auto start time
□
1 Inset the transfer cord into the jack for auto start
to connect the stopwatch Cal. S149 to the
stopwatches.
*The stopwatch can be used in the following way by transferring the designated auto start time to
stopwatches Cal. S143.
(EX.) Marathon race
By transferring the designated
POWER
ON
SYSTEM STOPWATCH
auto start time to stopwatches
Cal. S143, they can start the
measurement at the same
time.
SELECT CLEAR
start time can not be set.
②Press the mode button, the auto start time is transferred.
LOCK
CLEAR
LAP/SPLIT
RESET
RECALL
LAP/SPLIT RESET
□
2 Press the mode buttons of the stopwatches in stopwatch mode. The
auto start time will be automatically transferred to them.
①Reset the stopwatch, and clear all the stored data. If not the auto
(ex:S143)
START
STOP
START STOP
SYSTEM
STOPWATCH
1/100
SET
STOP.W A/S SET
TIME
RECALL
SPLIT
F
BLOCK
LAP
STOP
BATT.
LAP
E
Starting point
First checkpoint Second checkpoint
Finish
LAP/SPLIT RESET
RECALL
SELECT CLEAR
START STOP
SYSTEM
STOPWATCH
RECALL
SET
RECALL
STOP-W.
300 LAP/SPLIT MEMORY
WATER RESISTANT
LAP/SPLIT RESET
TIME
SPLIT
MODE
SELECT CLEAR
E
F
POWER
ON
LAP/SPLIT RESET
RECALL
START STOP
LAP/SPLIT RESET
RECALL
START STOP
LAP/SPLIT RESET
STOP-W.
300 LAP/SPLIT MEMORY
WATER RESISTANT
START STOP
TIME
F
STOP
BATT.
LAP
BLOCK
E
RECALL
STOP
BATT.
LAP
SELECT CLEAR
RECALL
E
RECALL
SPLIT
LAP/SPLIT RESET
STOP-W. A/S SET TIME
SELECT CLEAR
LOCK
START
STOP
STOP.W A/S SET
TIME
RECALL
SET
SELECT CLEAR
SET
SPLIT
F
BLOCK
LAP
SET
SELECT CLEAR
SYSTEM
STOPWATCH
RECALL
E
RECALL
STOP-W.
300 LAP/SPLIT MEMORY
WATER RESISTANT
TIME
F
MODE
STOP
BATT.
LAP
PRINTER
E
RECALL
STOP-W.
300 LAP/SPLIT MEMORY
WATER RESISTANT
TIME
STOP-W.
300 LAP/SPLIT MEMORY
WATER RESISTANT
SPLIT
F
MODE
BLOCK
LAP
MODE
PRINTER
MODE
STOP
BATT.
LAP
PRINTER
c
STOP-W. A/S SET TIME
LOCK
CLEAR
LAP/SPLIT
RESET
RECALL
(Ex.) The stopwatch Cal.
S149 and the three
stopwatches Cal. S143
will start measuring
simultaneously at 10:05.
c
MODE
START STOP
SYSTEM
STOPWATCH
1/100
Mode button(ex:S143)
PRINTER
E
RECALL
SELECT CLEAR
TIME
TIME
PRINTER
STOP.W A/S SET
□
3 Remarks in transferring the auto start time.
The error display is shown.
START
STOP
TIME
SET
SPLIT
F
RECALL
BLOCK
LAP
SPLIT
STOP
BATT.
LAP
F
E
RECALL
STOP-W.
300 LAP/SPLIT MEMORY
WATER RESISTANT
TIME
BLOCK
LAP
MODE
PRINTER
STOP
BATT.
LAP
*The four stopwatches automatically start measuring simultaneously at
a designated time, and therefore, there is no need to adjust the time of
each stopwatch.
61
TIME
PRINTER
300LAP/SPLIT MEMORY
STOP-W.
300 LAP/SPLIT MEMORY
WATER RESISTANT
LAP/SPLIT RESET
STOP-W.
300 LAP/SPLIT MEMORY
WATER RESISTANT
SET
SPLIT
BLOCK
LAP
STOP
BATT.
LAP
E
RECALL
SYSTEM STOPWATCH
E
F
BLOCK
LAP
STOP
BATT.
LAP
F
BLOCK
LAP
RECALL
SYSTEM
STOPWATCH
MODE
STOP
BATT.
LAP
STOP
BATT.
LAP
SYSTEM
STOPWATCH
SPLIT
START STOP
SYSTEM
STOPWATCH
SPLIT
BLOCK
LAP
CLEAR
LAP/SPLIT
RESET
1/100
SET
BLOCK
LAP
RECALL
RECALL
SYSTEM
STOPWATCH
SPLIT
STOP
BATT.
LAP
PRINTER
300LAP/SPLIT MEMORY
START STOP
F
BLOCK
LAP
If the auto start time is not
transferred properly, the error
display is shown. In that case,
press mode button again.
E
RECALL
Error display(ex:S143)
62
8.HOW TO INSERT BATTERIES INTO THE PRINTER
The auto start time cannot be transferred
even if the mode button is pressed.
The designated auto start time will not be transferred to
stopwatches if Cal. S149 remains in the auto start setting
mode. Return Cal. S149 to the stopwatch mode, and then
resume the transfer.
○
SPLIT
RECALL
LAP/SPLIT RESET
F
SELECT CLEAR
BLOCK
LAP
START STOP
SYSTEM
STOPWATCH
SET
SPLIT
BLOCK
LAP
F
BLOCK
LAP
STOP
BATT.
LAP
RECALL
Auto start setting mode
E
STOP
BATT.
LAP
□
1 Slide the power switch to "OFF" and
then remove the battery hatch.
□
2 Inset the batteries into the battery
compartment as shown in the
illustration below, checking that the (+)
and (-) terminals are properly set.
□
3 Close the battery hatch.
Keep the lap/split button pressed for approximately 2 seconds.
SPLIT
F
Use four SUM-3 (R6P) dry batteries.
Keep the lap/split button of the stopwatches pressed for
approximately 2 seconds. The auto start function will be
deactivated.
c
×
To stop and resume the auto start
STOP
BATT.
LAP
E
RECALL
Put the hatch toward
you while pushing
the portion indicated
by the arrow.
E
RECALL
STOP-W.
300 LAP/SPLIT MEMORY
WATER RESISTANT
Stopwatch mode
TIME
battery hatch
MODE
PRINTER
Press mode selection button ① (STOP. W) to return to
the stopwatch mode.
Be sure to confirm the third line display changes to the
current time. If not, auto start function doesn't become
effective.
63
(ex:S143)
Slide the battery hatch along the
grooves of the battery compartment.
64
9.TIME・CALENDAR SETTING
Caution ! Time/calendar setting and identification number setting can be
made only when the stopwatch is reset.
2.
Seconds setting
ID
1.Press mode selection button ③ (TIME) to set the time to the
Time/calendar mode.
BLOCK
LAP
STOP
BATT.
LAP
RECALL
1
B and the second
□ Press ○
digits will flash.
Button ○
B
Selection of the
digits to be
adjusted.
A in accordance
2
□ Press ○
300LAP/SPLIT MEMORY
ID
F
BLOCK
LAP
STOP
BATT.
LAP
E
RECALL
STOP-W. A/S SET TIME
LOCK
CLEAR
LAP/SPLIT
RESET
1/100
STOP.W A/S SET
START
STOP
TIME
A
Button ○
Setting the digits to be
adjusted.
(The digits can be advanced
quickly by keeping the
button pressed.)
RECALL
with a time signal to reset
the second digits to "00".
*When the second digits count
any number from "30" to "59"
A is pressed, one minute
and ○
is added and the second digits
are reset to "00".
Minutes setting
SPLIT
ID
BLOCK
LAP
SPLIT
ID
SPLIT
ID
BLOCK
LAP
STOP
BATT.
LAP
RECALL
STOP
BATT.
LAP
RECALL
RECALL
1
B and the hour
□ Press ○
1
B and the minute
□ Press ○
digits will flash.
digits will flash.
2
A, one
□ With each press of ○
hour is advanced.
Finish of time/calendar
setting
ID setting
Date setting
SPLIT
ID
SPLIT
ID
BLOCK
LAP
BLOCK
LAP
BLOCK
LAP
RECALL
2
A, one
□ With each press of ○
year is advanced.
SPLIT
ID
STOP
BATT.
LAP
1
B and the year digits
□ Press○
will flash.
2
A, one
□ With each press of ○
minute is advanced.
RECALL
65
Year setting
BLOCK
LAP
STOP
BATT.
LAP
STOP
BATT.
LAP
Mode select ion button ③ (TIME)
Hour setting
STOP
BATT.
LAP
RECALL
Month setting
SPLIT
ID
BLOCK
LAP
STOP
BATT.
LAP
RECALL
1
B and the date digits 1
B and the month
□ Press ○
□When button ○B is pressed, the 1
□ After all the adjustment are 1
□ Press ○
identification number digits start flashing.
completed, press B
○.
will flash.
digits will flash.
A , one digit is 2 With each press of ○
2With each press of button ○
□
A, one 2
A, one
□
□ With each press of ○
advanced. "OFF" means that no
day
is
advanced.
month
is
advanced.
identification number is set.
66
10.PRECAUTIONS
3.Adjustment of the contrast on the display
・The contrast of the display can be adjusted.
②Press recall button to show the contrast adjustment display.
The contrast can be adjusted for 10 levels from level "1" to "10".
The display is the lightest at level "1" and the darkest at level "10".
①Show the time/calendar mode.
ID
BLOCK
LAP
STOP
BATT.
LAP
RECALL
SPLIT
BLOCK
LAP
Contrast adjustment display
A : Increasing the level (darker)
Button ○
B : Decreasing the level (lighter)
Button ○
STOP
BATT.
LAP
RECALL
③Press recall button again to return to the time/calendar mode.
67
(1)When the power switch of the printer is turned on during the measurement, the data measured thereafter will be printed
out.
(2)While the printer is printing out, do not pull out the roll paper or do not pull it back. Also, do not operate the stopwatch
without installing the roll paper on the printer, as this will cause a malfunction of the printer.
(3)When the printer is not used, be sure to turn the power switch of the printer "OFF".
(4)The optional parts (such as grip switch) is not used, besure to put the cap on the jack.
Remarks on roll paper (thermal paper)
Since this model is a thermal printer, which prints on thermal paper by heating it, it is not necessary to replace the ink. Be
sure to observe the following.
●To preserve new thermal paper, put it in a box to avoid direct light and keep it in a dry cool place.
●Do not touch the printing surface of the thermal paper, as the sweat or oil on the palm will cause poor printing.
●Besides the thermal paper S950 included with the printer, the thermal paper S951 is available for printing out the stored
data. It is a long-type thermal paper that can print out up to 2,800 lines. To use S951, the paper holder SVAZ007 for
exclusive use with it is necessary.
*Be sure to use the roll paper S-950 or S-951 for exclusive use with this model. Otherwise, detective printing or damage of the printer will be caused.
68
●To preserve the printed thermal paper, be sure to observe the following.
[1] Do not expose thermal paper to bright light for a long time. Printed digits or letters may be faded.
[2] Keep the thermal paper away from high temperature, high humidity, or direct sunlight. The roll paper may be discolored.
[3] In case the printed paper are kept attached on a pasteboard, etc., do not use the paste or adhesives containing volatile
organic solvent. Also, do not use cellophane adhesive tape. The thermal paper may be discolored. It is recommended that
the starch or synthetic paste be used.
[4] Do not place the thermal paper near the copies reproduced by the copier using ammonia. The thermal paper may be
discolored.
[5] Do not leave the thermal paper in contact with vinyl chloride films for a long time. It may be discolored, or the printed digits
or letters may be faded.
CAUTION
・Your watch is not water-resistant, be
careful not to get it wet with water.
CAUTION
・If your watch is of the fob or pendant type, the strap or chain attached to the watch
may damage your clothes, or injure the hand, neck, or other parts of your body.
PLACES TO KEEP YOUR WATCH
×
×
・If the watch is left in a
temperature below -10℃ or
above +60℃ for a long time it
may function improperly or
stop operating.
*This watch is so adjusted that it will
maintain stable time accuracy in
normal temperatures.(5℃∼35℃)
It will lose or gain slightly, but it will
regain high time accuracy when it
returns to normal temperature.
69
11.REMARKS ON THE BATTERIES
(1)Battery life
When a new normal battery is installed, the stopwatch will
operate approximately 3 years.
*If the stopwatch is used for more than 3 hours a day, the battery life may be
less than 3 years.
●When four new and normal SUM-3 manganese dry batteries
are installed, the printer can print approximately 10,000 lines
(approx. 14 rolls of paper) if it continuously operates at 24℃.
When alkaline manganese batteries are used, it can print
approximately 20,000 lines (approx. 28 rolls).
*It the printer is used at extremely low temperatures, the battery power
becomes weak, and it cannot print as many lines as it prints at normal
temperature range. It is recommended, therefore, that alkaline manganese
batteries be used at such low temperatures.
●When the following conditions occur with the power switch
set at "ON", replace the batteries with new ones.
(1)Printing speed has reduced.
(2)Printed digits or letters are uneven or incomplete.
(3)The digits or letters are too lightly printed.
(4)The paper is not advanced at all or advanced irregularly.
(5)The printer will not print at all.
If the above conditions occur, replace the batteries with new
ones as soon as possible following the procedure in "8 How
to insert the batteries into the printer"
(2)Monitor battery
The battery in your watch may run down in less than the
specified period after the date of purchase, as it is a monitor
battery which is inserted at the factory to check the function
and performance of the watch.
(3)Battery change
①For battery replacement, be sure to have the battery
replaced with a new one at the retailer from whom the watch
was purchased, and specify a genuine battery.
②If the old battery is left in the watch for a long time, a
malfunction may be caused due to battery leakage, etc.
Have it replaced with a new one as soon as possible.
③Battery replacement is charged even if it runs down within
71 the guaranteed period.
④Once the case back is opened for battery replacement or
other purpose, the original water resistant quality designed
for the watch may deteriorate when it is closed. When you
have the battery replaced with a new one, also request the
water resistant test pertaining to the water resistant quality of
your watch. If your watch has 10-bar or higher water
resistant quality, be sure to have such test performed on the
watch every time the battery is replaced. Please note that it
takes several days to check the water resistant quality of
your watch. When requesting the checking, therefore, please
check the period required for it.
(4)Battery life indicator (stopwatch)
When the battery nears its end, flashing battery mark "BATT" is
displayed. In that case, have the battery replaced with a new
one as soon as possible by the retailer from whom your
stopwatch was purchased or an AUTHORIZED SEIKO
DEALER. When the battery is replaced with a new one, all the
stored data will be erased from memory. Before battery
replacement, therefore, print out the data you wish to keep.
WARNING
1.Do not remove the battery from the watch.
2.If it is necessary to take out the battery, keep it out of the reach of children.
3.If the child swallows it, consult a doctor immediately as it will adversely affect the
health of the child.
CAUTION
1.Never short-circuit, tamper with or heat the battery, or never expose it to fire as it
may explode, generate and intense heat or catch fire.
2.The battery in your watch is not rechargeable. Never attempt to recharge it, as
this may cause battery leakage or damage to the battery.
3.If the watch is left in a temperature below +5℃ or above +35℃ for a long time,
the battery leakage may result, causing the battery life to be shortened.
×
・Do not leave
the watch in a
place where it
is subjected to
strong magnetism or static electricity.
・Do not leave
the
watch
where there is
strong vibration.
・Do not leave
the watch in a
dusty place.
・Do not expose the watch to gases
or chemicals.
(Ex.: Organic solvents such as
benzine and thinner, gasoline, nail polish, cosmetic
spray, detergent, adhesives,
mercury, and iodine antiseptic solution.)
・Do not leave the watch in a hot
spring, or do not keep it in a
drawer having insecticides inside.
70
12.REPLACEMENT OF THE LIQUID CRYSTAL PANEL
The normal life expectancy for the luquid crystal panel of the watch is approximately 7 years. After that, it may decrease in contrast,
becoming difficult to read. Please contact the retailer from whom the watch was purchased to have the liquid crystal panel replaced with
a new one.
It will be made at cost.
13.CARE OF YOUR WATCH
●PERIODIC CHECK
・We suggest that you have your watch checked by the retailer from whom the watch was purchased every 2 or 3 years or when the battery is
replaced for oil condition, battery electtolyte leakage or damage due to water or sweat. After checking the watch adjustment and repair may be
required.
■REMARKS ON REPLACEMENT
PARTS
・SEIKO makes it policy to usually keep a stock of spare parts for its
watches for 7 years. In princlple, your watch can be reconditioned
within this period if used normally. (Replacement parts are those
which are essential to maintaining the functional integrity of the
watch.)
・The number of years that a watch is considered repairable may vary
greatly depending on the conditions under which it was used, and
normal accuracy may not be achieved in some cases. We
recommend, therefore, that you consult the retailer from whom the
watch was purchased when having them repair your watch.
・The case, dial, hands glass and bracelet, or parts there of may be
replaced with substitutes if the orginals are not available.
■REMARKS ON AFTER-SALES
SERVICING
・If the watch requires service, take it to the retailer from whom the
watch was purchased, if the trouble occurs within the guarantee
period, submit the cerificate of guarantee together with the watch.
・For repair after the guarantee period or for any other information
regarding the watch, contact the retailer from whom the watch was
purchased the "CUSTOMER SERVICE DEPARTMENT" of SEIKO
WATCH CORPORATION.
・Guarantee coverage is spelled out in certificate of guarantee. Please read
it carefully and keep the certificate for ready reference.
72
14.TROUBLESHOOTING GUIDE
15.SPECIFICATIONS
Before requesting service, please check your stopwatch following the table below.
Problem
The motor does not run
even if the power switch
of the printer is turned
"ON".
The
paper
is
not
advanced by pressing
the paper advancing
switch.
By pressing the start
button, the paper is
advanced,
but
the
printed digits or letters
are detective or the data
are not printed at all.
Possible cause
Solution
Problem
By pressing the start
button, the data are
printed out, but the paper
is not advanced irregularly.
●The paper is stuck.
●Remove the paper.
●The batteries are not
installed properly.
●Replace the batteries
with new ones.
●Install the batteries
properly.
●Weak batteries.
●Replace the batteries
with new ones.
●The paper is stuck.
●Remove the paper.
●The paper is stuck.
●Replace the batteries
with new ones.
●Remove the paper.
By pressing the start
button, no data are
printed out and the paper
is not advanced at all.
●Weak batteries.
●Weak batteries.
●The batteries are not
installed properly.
●Replace the batteries
with new ones.
●Insert the batteries
correctly.
●The roll paper gets out
of shape.
●Make the roll paper
round.
●The power switch of
the printer is not set to
"ON".
●Turn the power switch
"ON", and then press the
start button.
●The cord is not connected properly.
●Water
or
foreign
matters are sticking to
the cord plug.
●The paper is not set
properly.
●Connect
the
cord
correctly.
●Wipe off the water or
foreign matters.
●The cord is not connect ed properly.
●Connect the cord prop erly.
●Water or foreign matters
are sticking to the cord
plug.
●Wipe off water or for eign matters.
●Weak batteries.
●Inset
the
properly.
Auto start time is not
transferred.
paper
Possible cause
Solution
*For the solution of trouble other than the above, contact the retailer from whom the watch was purchased.
73
(Stopwatch)
(Printer)
1.Frequency of crystal …………………32,768Hz (Hz=Hertz…Cycles per
oscillator
second)
2.Loss/gain ………………………………Less than 15 seconds at normal
(monthly rate)
temperature range (5℃∼35℃)
3.Operational temperature ……………−10℃∼+60℃
range.
Desirable temperature ………………0℃∼+50℃
range of use
4.Display system ……………………… Stopwatch display Measures up to
10 hours. Hour, minutes, seconds,
1/100 seconds, tnree-row display of
split time/lap time/total elapsed time or
lap time in progress. No. of blocks, no.
of split times (0∼999), 300 memory
recall, BLOCK, SPLIT, LAP, STOP,
RECALL, stopwatch marks, memory
indicator, BATT.
Time/calendar display Hour (24hour
indication), minutes, seconds, year,
month, date and calendar mark, ID no.
(OFF/01∼99), contrast adjustment
display.
Auto start set display AS, OFF, ON,
hour, minutes, seconds, 1/100
seconds, auto start set mark.
5.Display medium ………………………Nematic Liquid Crystal, FEM (Field
Effect Mode)
6.Battery …………………………………Lithium battery SB-T74, 1 piece
7.Battery Life ……………………………A new normal battery will last
approximately three years.
1.Printer ……………………………Model: MTP102
Printing system: Thermal serial dot
printing system
Printing method: One-way printing
(from left to right)
Printing speed: Approx. 1.5
lines/sec. (DC 5 0V. at 25℃)
Number of digits printed: 13
digits/line (including space)
2.Recording paper …………………Roll paper S-950
38mm (width) (+ 0∼ 0.5mm),
overall length 2,400 mm or more
(approx. 700 lines can be printed
per roll.)
3.Power supply ……………………DC 6.0V (SUM-3 or AM3 dry
battery, 4 pieces)
With power switch turned "ON" (No
printing) : Approx. 0.02W (DC 6.0V)
4.Power consumption ……………During printing: Approx. 1.5W (DC
6.0V)
5.Battery life ………………………Manganese battery: Approx.
10,000 lines can be printed.
(Equivalent to approx. 14 rolls)
Alkaline manganese battery:
Approx. 20,000 lines can be
printed. (Equivalent to approx. 28
rolls)
6.Operational temperature range…0℃∼40℃ (The depth of printout
does not change even if the
temperature changes.)
*If the stopwatch is used for more than 3
hours a day, the battery life may be less
than 3 years.
8.IC (Integrated Circuit) ……………C-MOS-LSI, 1 piece
9.Battery life indicator ……………"BATT" mark start flashing when
the battery life nears its end.
*The above specifications are subject to change without prior notice, for
product improvement.
74
全国共通フリーダイヤル
0120-612-911
お客様相談室
〒 100-0005 東京都千代田区丸の内 3-1-1 国際ビル
〒 550-0013 大阪市西区新町 1-4-24 大阪四ツ橋新町ビルディング
本 社 〒105-8467 東京都港区虎ノ門2-8-10
http://www.seiko-watch.co.jp/