1
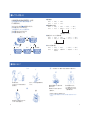
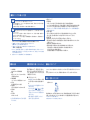
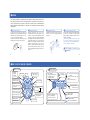
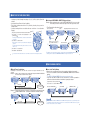
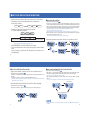
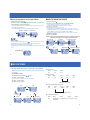
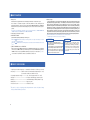
KSS322 SW-1001
セイコーデジタル
ストップウオッチ
S322
取扱説明書
INSTRUCTION
大気汚染の原因となる揮発性有機化合物の発生を減らすために、
この取扱説明書は、
「植物性大豆インキ」を使用して印刷しています。
このたびは、セイコーデジタルストップウオッチS322をお買い上げいただき
ありがとうございました。
ご使用の前にこの取扱説明書をよくお読みのうえ正しくご愛用くださいます
ようお願い申し上げます。なおこの取扱説明書はお手もとに保存いただき、必
要に応じてご覧下さい。
警告
取扱いを誤った場合に、重傷を負うなどの重大な結果になる危険性が想定されることを示します。
全国共通フリーダイヤル
0120-612-911
お客様相談室
〒100-0005 東京都千代田区丸の内 3-1-1 国際ビル
〒550-0013 大阪市西区新町 1-4-24 大阪四ッ橋新町ビルディング
注意
取扱いを誤った場合に、軽傷を負う危険性や物質的損害をこうむることが想定されることを示し
ます。
本 社 〒105-8467 東京都港区虎ノ門 2-8-10
http://www.seiko-watch.co.jp/
目次
■特長について …………………………………………………………………………………2
■ボタンと表示内容について …………………………………………………………………4
■タイマーの使いかた(シングルタイマー) ………………………………………………6
■タイムアップ告知機能について ……………………………………………………………9
■任意時間設定によるタイマーの使いかた(マルチタイマー)…………………………10
■ストップウオッチの使いかた ……………………………………………………………16
■お取扱いにあたって ………………………………………………………………………18
■電池についてのお願いとご注意 …………………………………………………………20
■製品仕様 ……………………………………………………………………………………22
■電池交換後のお願い(システムリセット)………………………………………………22
■液晶パネルについて ………………………………………………………………………23
■長くご愛用いただくために ………………………………………………………………23
■アフターサービスについて ………………………………………………………………24
■補修用性能部品について …………………………………………………………………24
■特長について
タイムキーパービブは、
ロータリースイッチによりタイマー設定時間を選択/設定できる、振動お知ら
せ機能付きデジタルタイマーです。複数のタイマー時間をお好みの回数に設定できるマルチタイマー
や通常のストップウオッチなど、
スポーツやその他の計測に便利な機能を搭載いたしました。
●シングルタイマー機能
タイマーの設定時間はロータリースイッチを希望する
目盛りに合わせるだけです。
(1、2、3、5、10、15、20、30、40、45、60分の11種類
から選択可能)
また、
オーバータイムの計測、
タイマーの減算/加算
表示の切替えも簡単に行えます。
回し ト
っと ター
くるッとス
ピ
2
●マルチタイマー機能
「シングルタイマー」は、
あらかじめ決められた11種類
から1つだけのタイマー時間をロータリースイッチで選
択できますが、
「マルチタイマー」は、任意のタイマー
時間を設定でき、
さらに、異なるタイマー時間の組合
せ設定ができます。さらにそのタイマーのリピート回
数も指定することができます。
(最大10設定、設定時間10秒∼99分59秒まで、
リ
ピート回数1回∼99回、無制限の設定も可能)
また、
オーバータイムの計測、
タイマーの減算、加算
表示への切り替えも可能です。
●ストップウオッチ機能
1/100秒単位で、99分59秒99まで計測可能です。
スプリットタイムも測れます。
イ
ヨータート
ス
●タイムアップ告知機能
タイマーで設定した時間が経過すると、電子音または振動
によりお知らせします。
タイムアップ告知(予告)は、
「電子音」
「振動」
「すべて
オフ」から選択できます。
※「電子音」設定時のみ、ボタン操作時に操作確認音が
鳴ります。
「振動」に設定してある場合は、操作確認音が
鳴りませんのでご注意ください。
●電池寿命切れ予告表示機能
「 」マ−クが点滅します。
3
■ボタンと表示内容について
●各部の名称
ストップウオッチ
・スプリット
・スプリット解除
・0秒リセット
●表示内容の説明(表示部)
タイマー
・リセット
IT
SE
T
MIN.
SEC.
リピート回数
※1∼99回、無制限設定も可能
△:加算表示(カウントアップ)
▼:減算表示(カウントダウン)
ボタン¿
ST
設定した任意のタイ
マーとして使う目盛
り位置です
AR
T・
ST
ボタン¬
減算表示(▼)
切替え
加算表示(△)
マルチタイマーの
リピート回数指定、
タイムアップ告知の
変更ができます
ストップウオッチとして
使う目盛り位置です
任意のタイマー時間を
設定できます
※使用しない時は、
「OFF」にしてください
OT:オーバータイム計測時に点滅
※タイムアップ後もオーバータイム
を計測します。
(最大100分まで)
表示部
P
PL
E
・R
O
S
タイマー時間として
使う目盛り位置です
タイマー/ストップウオッチ
・スタート、ストップ
ボタン¡
SET:タイマー時間を設定中に点灯
マルチタイマー設定数
※任意時間を最大10個まで設定が
可能です
「電子音」選択時
「振動なし・電子音なし」選択時
電池寿命切れ予告表示(点滅)
ロータリースイッチ
「振動」選択時
4
5
■タイマーの使いかた(シングルタイマー)
・タイマーは1、2、3、5、10、15、20、30、40、45、60分から選択できます。
・「減算表示」⇔「加算表示」の切替えができます。
・タイムアップ時間を、電子音または、振動によりお知らせします。
・タイマー設定した時間が経過した後も計測を続けます。
(オーバータイム表示)
〈ゴールの時の経過時間〉
¿ボタン
SEC.
ST
AR
※任意時間を設定する場合は「■任意時間設定によるタイマーの使いかた」をお読みください。
6
T・
(45分をセット)
(スタート)
(ゴールの時の残り時間)
¿
ST
P
S
MIN.
O
¤ロータリースイッチのつまみを希望する目盛り位置に合わせてく
¡ボタン
ださい。
‹ボタン¬を押して、加算表示(△)
または、減算表示(▼)
を選
ET
ES
・R
IT
択してください。
PL
※タイマースタート後でも、ボタン¬を押すことで表示切替えが
できます。
›ボタン¿を押すとタイマーがスタートします。
※ボタン¿を押すごとに、
スタート、
ストップを繰り返せます。
※設定されたタイマー終了後から、
オーバータイム計測が始まり
ます。
fiボタン¿を押すとタイマーがストップします。
flボタン¡を押すとタイマーがリセットします。
●タイマーで「減算表示」⇔「加算表示」の切替え
(例)サッカーなど「減算表示」で計測する場合で途中、
ゴールなどで経過時間をみたい場合
¬
¬ボタン
45分
¡
¿→¡と押し
( )
後半に備えます
(前半終了)
ピイー
・ピ・
ピ・ピ
20秒
14分 !
前半 ル!
ゴー
(ゴールの時の経過時間)
¿
¬
※試合開始直後は「経過時間」を、終了近くなり「残り時間」がみたい時も、
ボタンCでワンタッチ切替えができます。
7
■タイムアップ告知機能について
●タイマーでオーバータイムを測るには
●タイムアップ告知の設定方法について
設定した時間が経過した後も計測を続けますので、次のようにオーバータイムが測れます。
・タイマーで設定した時間が経過すると、電子音または振動によりお知らせします。
・タイムアップ告知は、
「電子音」
「振動」
「すべてオフ」から選択できます。
※「電子音」
「振動」を同時に選択することはできません。
・「電子音」を選択した場合にのみ、
ボタン操作時に操作確認音がなります。
(例1)
ラクビーを「加算表示」で計測、40分セットでスタート
(スタート)
ピイー
ピ・ピ・ピ・
¿
40分
¿
¤ロータリースイッチのつまみを「 」に合わせてください。
‹ボタン¿を押し、
タイムアップ告知を選択してください。
タイマー時間
ロスタイムも含め
42分30秒かかった
スタートから加算したオーバータイム表示
(アラーム音のみ)
¿
(なし)
¿
¿
(振動のみ)
(例2)30分反復学習用テキストを「減算表示」で計測、30分セットでスタート
(スタート)
ピイー
ピ・ピ・ピ・
¿
30分
¿
タイマー時間経過後の
オーバータイム
タイマー時間
予定より、1分20秒
オーバーした。
8
※「電子音」
「振動」ともタイムアップ告知は、3秒前、2秒前、1秒前に予告音または、予告振動がはじまり、タイ
ムアップ時に、電子音または、振動でタイムアップをお知らせします。
9
■任意時間設定によるタイマーの使いかた(マルチタイマー)
●任意のタイマー時間の設定方法について
・任意のタイマー時間が設定できます。
(設定時間10秒∼99分59秒まで可能)
・下図のように、複数のタイマー時間が設定できます。
(最大10個まで)
タイマー1
タイマー2
タイマー8
タイマー9
タイマー10
・設定したタイマーのリピート回数が指定できます。
(1∼99回、無制限)
タイマー1
タイマー2
タイマー3
(例)
3個のタイマーを設定する
タイマー1
タイマー2
タイマー3
¤ロータリースイッチのつまみを「 」に合わせてください。
‹ボタン¿を1回押すと1秒ごとに設定できます。ボタン¿を2∼3秒押し続けると「秒」が早送りし、ボタンを離した位置で停
止します。同様に、
ボタン¡を押すと、分の設定ができます。1回押すと1分ごとに設定でき、押し続けると「分」が早送りし、
離した位置で停止します。
※10秒未満で設定した場合は、
自動的に10秒の設定となりますのでご注意ください。
※分の設定時間は、1分∼99分まで設定できます。
※任意のタイマー設定時間は、10秒∼99分59秒まで設定できます。
›ボタン¬を押すごとに、次々と任意時間のタイマーが設定できます。‹、›の手順を繰り返し設定することができます。
※任意のタイマー設定は、同時に最大10設定まで可能です。
(例)
タイマー1に2分30秒、
タイマー2を30秒に設定する場合
¿
¡
設定した3個のタイマー時間の順序で指定した回数を繰り返します。
※最大10設定したタイマーを1セットとして、
その繰り返し回数(リピート回数)が1回∼99回と無制限
とに指定できます。
・「減算表示」⇔「加算表示」の切替えができます。
・ タイムアップ時間を、電子音または、振動によりお知らせします。
・ タイマー設定した時間が経過した後も計測を続けます。
(オーバータイム)
10
¿
¬
11
●任意の設定時間の確認・追加・変更、
リセット方法について
〈タイマー任意設定時間の確認・追加・変更方法〉
¤ロータリースイッチのつまみを「 」に合わせてください。
‹ボタン¬を押して、設定したタイマー時間の確認・追加・変更したい箇所に合わせてください。
›ボタン¿または、
ボタン¡を押すことで設定時間の追加・変更ができます。
※すでに設定した個々のタイマーを削除することはできませんので、
〈タイマー任意設定時間のリセット方法〉をご参照く
ださい。
●任意時間に設定したタイマーのリピート回数設定方法について
¤ロータリースイッチのつまみを「 」に合わせてください。
‹ボタン¡を1回押すとリピート回数が1回、押し続けると早送りをし、離した位置で停止します。
※リピート回数は、1∼99回までセットできます。
›リピート回数を、無限回設定する場合は、
ボタン¡を押して「 」に合わせてください。
※リピート回数「99回」の次に無制限設定(「 」)ができます。
¡
(3回にセット)
〈任意の設定時間のリセット方法〉
(全消去)
¤ロータリースイッチのつまみを「 」に合わせてください。
‹ボタン¿、
ボタン¡を同時に2∼3秒押し続けることによりリセットができます。
¡
¿
¡
(無制限にセット)
※この状態でボタン¿を押すと、タイムアップ告知機能の設定が変更されますので、ご注意ください。
12
13
●任意のリピート回数のリセット方法について
●任意時間の設定タイマーのスタート方法について
¤ロータリースイッチのつまみを「 」に合わせてください。
‹ボタン¿、
ボタン¡を同時に1回押してください。任意設定されたリピート回数がリセットされ「1回」を表示します。
※ボタン¿、
ボタン¡を同時に2秒以上押し続けると「全点灯表示」になりますので注意してください。
※「全点灯表示」になった場合も、
リピート回数はリセットされます。
¤ロータリースイッチのつまみを
「 」に合わせてください。
‹ボタン¬を押して、
加算表示
(△)
または、
減算表示
(▼)
を選択してください。
※タイマースタート後でも、
ボタン¬を押すことで表示切替えができます。
ここで、
表示される時間は個々のタ
イマーの経過時間と残り時間になります。
›ボタン¿を押すとタイマーがスタートします。
※ボタン¿を押すごとに、
スタート、
ストップを繰り返せます。
※点滅により、
何番目のタイマー計測中なのか、
何回目のリピート回数なのかを示します。
※タイムアップ告知機能により
「アラーム音」
「振動」選択時に各設定タイマーごとに予告、
終了をお知らせ
します。
※設定されたタイマー時間、
リピート回数終了後から、
オーバータイム計測が始まります。
fiボタン¿を押すとタイマーがストップします。
flボタン¡を押すとタイマーがリセッ
トします。
¡
¿
「ボタン¿、
ボタン¡を同時に「1回」押す」
<全点灯表示>
※「 」状態で「全点灯表示」になるのは、故障ではありません。
ボタン¿、
¡両方が同時に2秒以上押された場合にこの表示になります。
その場合は、
ボタン¿、
¡、
¬のどれか
を押し、
通常表示に戻してください。
※ボタンを押さない場合でも、60秒以上経過すると通常表示に戻ります。
(例)2分30秒ランニング後、
30秒歩くインターバルトレーニングを1セッ
トとし、
それを、
3回繰り返し行う
(1回目ランニングスタート)
(1回目インターバル)
(2回目ランニング中)
¿
¿
¡
(リセット)
(トレーニング終了)
ピイー
ピ・ピ・ピ・
(3回目ランニング中)
〈全点灯表示〉
14
15
■ストップウオッチの使いかた
・1/100秒単位で最大99分59秒99まで計測可能です。
(100分計)
※100分経過後は、00分00秒から継続し計測を開始します。
・スプリット機能があります。
●通常の使用方法
ボタン¿ → ボタン¿ → ボタン¡
スタート → ストップ → リセット
●時間計測を積算で行なう場合
ボタン¿ → ボタン¿ → ボタン¿ → ボタン¿ → ボタン¡
スタート → ストップ → 再スタート → ストップ → リセット
¤ロータリースイッチのつまみを「 」位置に合わせてください。
‹ボタン¿を押すとストップウオッチがスタートします。
※ボタン¿を押すごとに、
スタート、
ストップを繰り返せます。
›ボタン¿を押すとストップウオッチがストップします。
fiボタン¡を押すと0秒に戻ります。
(リセット)
(スタート)
¿ ¡
¡
(スプリット)
¿
(リセット)
(ストップ)
¡
(スプリット解除)
何回でも繰返すことができます。
●途中経過(スプリットタイム)を計測する場合
ボタン¿ → ボタン¡ → ボタン¡ → ボタン¿ → ボタン¡
スタート → スプリット → スプリット解除 → ストップ → リセット
何回でも繰返すことができます。
●2人のタイムを計測する場合
ボタン¿ → ボタン¡
→ ボタン¿ スタート → 1人目がゴール → 2人目がゴール 1人目のタイム → ボタン¡ → ボタン¡
→ 2人目のタイム → リセット
16
17
■お取扱いにあたって
温度
ショック
首から提げて使えます。
また、
図のようにフックにひもを通して腕に着けて
使うと便利です。
落としたり、
ぶつけたり等の過度な衝撃はお避
けください。
磁気
この時計は常温(5℃∼35℃の範囲内)の時に安定した精度が得られるように調整してあります。
直射日光が長時間あたったり、高温になる所に
置かないでください。
●表示が黒くなることがありますが、常温にもどれば
影響は残りません。
寒い所に長く置かないでください。
1)多少の進み遅れが生ずることがあります。
2)数字の変わり方が遅くなることがあります。
(精度には関係ありません)
いずれの場合も、
もとの温度にもどれば、正常な状態にもどります。
※−10℃以下、+60℃以上の温度下で長時間放置しますと止まりの原因になったり、電池が漏液したり、電池寿命が短くなることがありますの
で、
ご注意ください。
3気圧防水ですので、
雨天時や水しぶきのかかり
やすいスポーツ時でもご使用できます。
18
19
■電池についてのお願いとご注意
警告
1. お客様は、ストップウオッチから電池を取り出さないでください。
2. やむを得ずお客様がストップウオッチから電池を取り出した場合は、電池はただちに幼児の手が届か
ないところに保管してください。
3. 万一飲み込んだ場合は、身体に害があるため直ちに医師とご相談ください。
注意
1. 破裂、発熱、発火などのおそれがありますので、電池を絶対にショート、分解、加熱、火に入れるな
どしないでください。
2. このストップウオッチに使用している電池は、充電式ではないので、充電すると液漏れ、破損のおそ
れがあります。絶対に充電しないでください。
3.「常温(5℃∼35℃)からはずれた温度」下で長時間放置すると電池が漏液したり、電池寿命が短くな
ったりすることがあります。
1.ストップウオッチ電池切れ予告機能について
このストップウオッチには、
電池の交換時期を知らせる電池切れ予告機能が付いています。
※「 」マ−クが点滅したら、
電池切れが間近であることを示しています。
お早めにお買い上げ店で電池交換をご依頼ください。
※「 」マ−クが点滅すると以下の機能が使えませんが故障ではありません。
・タイムアップ告知機能「振動」
※タイムアップ告知を「振動」に選択し、
タイマー使用中に電池寿命切れ状態になった場合に、
タイムアップ
告知機能「振動」が使用できないことを「電子音」によりお知らせします。
「電子音」は、
ボタン¿、
¡、
¬
のどれかを1回押すと止まります。
使用中のタイマーは、
設定時間が終了するまで計測を継続します。
2.電池について
(1)電池寿命
このストップウオッチは新しい正常な電池を組み込んだ場合、
その後約3年間作動します。
ただし、1日あたり2時間の計測とタイムアップ告知を「振動」にし、使用5回(予告も含め20秒以内)
を基準
としていますので、
それ以上使用した場合は上記の期間に満たないうちに電池が切れる場合があります。
※特にタイマーのリピート回数を「大きな数値または無制限」を選択し、
タイムアップ告知に振動を選択した
場合は、
ご注意ください。
(2)最初の電池
お買い上げの時計にあらかじめ組み込まれている電池は、機能・性能をみるためのモニター用です。
お買い上げ後、上記の期間に満たないうちに電池が切れることがありますのでご了承ください。
(3)電池交換
A電池交換は、必ずお買い上げ店で「純正電池」とご指定の上、
ご用命ください。
B電池寿命切れの電池をそのまま長時間放置しますと、漏液などで故障の原因になりますので、
お早めに
交換してください。
C電池交換は、保証期間内でも有料となります。
D電池交換で裏ぶたを開閉しますと当初の防水性能を維持できなくなる場合があります。
電池交換の際には、
お客様の時計の防水性能にあった防水検査をご依頼ください。
特に10気圧以上のものは検査が必要です。
防水検査は日数を要しますので、期間をご確認のうえご依頼ください。
20
21
■製品仕様
■電池交換後のお願い(システムリセット)
■液晶パネルについて
1. 水晶振動数
32,
768Hz(Hz=1秒間の振動数)
2. 精度
常温(5℃∼35℃)において、±0.0012%以内
(月差換算±30秒以内)
3. 作動温度範囲
−5℃∼+50℃ ただし表示機能は0℃∼+50℃
4. 表示体
FE(電界効果)型ネマチック液晶
5. 使用電池
小型リチウム電池SB−T51(CR2032)
:1個
6. 電池寿命
約3年
7. 電子回路
C−MOS−LSI:1個
電池交換後または、万一異常な表示(読めない
表示など)になった場合、以下の操作を行ってく
ださい。時計内部のシステムがリセットされ、正常
に機能するようになります。
このストップウオッチの液晶パネルは、7年をすぎますと、
コントラストが低下したり数字が読みにくくなることがあ
ります。
お買い上げ店またはセイコーストップウオッチ取扱店に交換をお申しつけ下さい。有料にて申し受けます。
●システムリセットのしかた
■長くご愛用いただくために
※上記の製品仕様は改良のため、予告なく変更す
ることがあります。
22
ボタン¿、¡、¬の3つのボタンを同時に2∼3秒押
すと、表示が消えボタンを離した後、初期状態になり
ます。
※ロータリースイッチはどの目盛位置にあってもこの
操作は可能です。
※システムリセット後、
「 」
「 」の目盛で
合わせた「任意のタイマー設定時間」
「リピート
回数」は、
リセットされますので、
ご使用前に合わ
せ直してください。
※減算・加算表示は、
「減算表示」、
タイムアップ
告知は、
「電子音」に選択されます。
点検のおすすめ
電池交換時または2∼3年に1度の点検をおすすめします。保油状態・漏液の有無・汗や水分侵入の有無など
をお買い上げ店で点検してもらってください。点検の結果によっては、調整修理を必要とする場合があります。
※その時にパッキンの交換をご依頼ください。
※部品交換のときは「セイコー純正部品」とご指定ください。
23
■アフターサービスについて
・万一故障した場合には、お買い上げ店にお持ちください。保証期間の場合は保証書を添えてく
ださい。
・修理期間経過後の修理およびこの商品についてのご相談は、お買い上げ店でうけたまわってお
ります。
なお、ご不明の点は、「セイコーウオッチ株式会社お客様相談室」へお問い合わせください。
・保証内容は保証書に記載したとおりですので、よくお読みいただき大切に保管してください。
■補修用性能部品について
・このストップウオッチにおける補修用性能部品の保有期間は、通常7年間を基準としています。
正常なご使用であれば、この期間中は原則として修理可能です。(補修用性能部品とは、時計
の機能を維持するのに不可欠な修理用部品です。)
・修理可能な期間はご使用条件によりいちじるしく異なり、精度等が元通りにならない場合もあ
りますので、修理ご依頼の際にお買い上げ店とよくご相談ください。
・修理のとき、ケース・ガラス・バンドなどは、一部代替部品を使用させていただくことがあり
ますのでご了承ください。
24
CONTENTS
■FEATURES
………………………………………………………………………26
■HOW TO USE THE TIMER/THE STOPWATCH …………………………28
■HOW TO USE THE TIMER (SINGLE TIMER) …………………………………30
■TIME UP MESSAGE FUNCTION ………………………………………………33
■HOW TO USE THE TIMER BY SETTING ANY TIME (MULTI-TIMER) ……34
■HOW TO USE THE STOPWATCH ……………………………………………40
■CARING FOR YOUR TIMEKEEPER ……………………………………………42
■LIQUID CRYSTAL PANEL ………………………………………………………44
■TO PRESERVE THE QUALITY OF YOUR WATCH …………………………44
■INSTRUCTIONS FOR BATTERY REPLACEMENT (SYSTEM RESET) ……45
■ABOUT THE BATTERY …………………………………………………………46
■PRODUCT SPECIFICATIONS …………………………………………………48
■FEATURES
The Time Keeper ViB+ is a digital timer with a built-in vibration alarm function. The
time setting of the timer can be selected/set with a rotary switch. It also features a
range of useful functions for sports or other time counters such as a multi-timer that
allows setting the desired number of operations of several times-more than ordinary
stopwatches.
●Single-timer function
●Stopwatch function
●Multi-timer function
Set the timer’s time setting by turning and
aligning the rotary switch with the desired dial
scale division.(11 settings can be mede: 1, 2, 3, 5,
10, 15, 20, 30, 40, 45, and 60 minutes.)
Overtime count and timer count-down/count-up
display functions can also be easily selected.
y
tar sh
e ro pu rt.
n th and sta
Tur itch, ton to
sw but
the
With the Single Timer only one of the 11
predetermined time settings with the rotary
switch can be selected. The Multi-Timer allows
selecting any time setting needed and different
time settings can also be combined. Selecting the
repeat number of timer cycles is also possible. (A
maximum of 10 settings is avail-able. The time
setting can be selected from 10 sec. to 99 min.
and 59 sec. and the repeat cycle number from 1 to
99 times.) Easily selecting overtime count and
timer countdown/add-on display functions is also
an option.
●Time-Up message function
Selectable in increments of 1/100 seconds up to
99 min. 59 sec. 99. Also counting the split time
can be done.
et!
ts !
Ge tart
S
A beep sound or vibration warning indicates that
the time set on the timer is up. The Time-Up
warning settings available are: Beep Sound Vibration - No warning.
*When setting the BEEP SOUND only, the sound
is released for confirmation when pressing the
button. Note that when selecting VIBRATION, no
sound is released for confirmation.
●BATTERY RUNNING OUT Warning Function
The
mark flashes.
26
27
■HOW TO USE THE TIMER/THE STOPWATCH
Display Details
Names of Parts
Stopwatch
• Split ON
• Split OFF
• 0 sec. reset
Button
S
Used for setting the
multi-timer time.
*Place into OFF
position when not used.
28
I
ES
ET
MIN.
SEC.
ST
AR
T・
ST
: Count-up
: Count-down
Display panel
OT : Flashes when measuring
overtime
Overtime is counted also after
*time-up.
(Up to 100 minutes max.)
P
Sets multi-timer repeat
number and can be
also used for changing
the Time-up warning.
PL
R
T・
O
Dial position used as
timer time setting.
Dial position for use as
a timer randomly set
to any value.
Repeat number
repeat number from
*1Any
through 99 can be
randomly selected.
Time/Stopwatch
• Start and Stop
Button
Timer reset
Button
SET : Flashes while
timer time is set.
Count-down( )
Select
Count-up( )
Dial position for use
as a stopwatch.
Number of multi-timers set.
to 10 multi-timers
*Up
can be set to any time.
Rotary switch
BATTERY RUNNING OUT Warning Display (flashes)
When selecting
BEEP SOUND
When selecting NO VIBRATION/
NO BEEP SOUND
When selecting VIBRATION
29
■HOW TO USE THE TIMER (SINGLE TIMER)
• Selecting any of the following time settings: 1, 2, 3, 5, 10, 15, 20, 30, 40, 45, and 60
minutes.
• Selecting the Count-Down ⇔ Count-Up display.
• This function indicates that the time is up either by releasing a beep sound or
vibration alarm.
• Continue counting the time even after the time set on the timer is over (Overtime
Display).
(Time set : 45 min.)
(Start)
S
Button ¿
PL
IT
・R
ES
ET
MIN.
SEC.
ST
AR
T・
(Remaining Time When a Goal was Scored)
¿
ST
¬
P
30
(Time Elapsed when a Goal was Scored)
O
Button¡
¤Align the rotary switch knob with the desired dial division.
‹Press button ¬ to select the count-up display(△) or countdown display (▼).
*Selecting the display with the ¬ button also after the timer
has started.
›Press button ¿ to start the timer.
*Each time the ¿ button is pressed the timer start/stop is
repeated.
*Overtime will start measuring after the time set on the
timer is over.
fiPress button ¿ to stop the timer.
flPress button ¡ to reset the timer.
●Selecting the COUNT-DOWN ⇔ COUNT-UP Display on the timer
Example : When counting the time on the COUNT-DOWN DISPLAY for a soccer match
and needing to check the time that´s elapsed or the time a goal was scored.
45 min.
Button
¬
Button ¡ to go over to the
( second half of the )
match.
(End of First Half)
¡
RED
SCOlf :
AL
GO irst ha 0 sec.
F
2
.
in min
14
(Time Elapsed When Goal was Scored)
p
Bee
¿
*To set any other time desired be sure to read “How to Use the Timer for Setting Any Time.”
¬
*The display can be selected by pressing the ¬ button when to know the TIME ELAPSED immediately
after the game has started or the REMAINING TIME when the game is near the end.
31
■TIME UP WARNING FUNCTION
●Using the Timer to Count Overtime
Continuing to count time even after the set time has elapsed. Overtime can be
counted:
Example 1 : Suppose the user wants to time a rugby match using the COUNT-UP DISPLAY.
The match starts at the 40 minute setting.
(Start)
¿
40 min.
Beep
¿
●How to Set the Time-Up Warning
• When the time set on the timer is over a beep sound or vibration is generated.
• The user can select BEEP SOUND ONLY, NO WARNING, VIBRATION as the TIME-UP
warning.
*The BEEP SOUND and VIBRATION cannot be set at the same time.
• Only when the BEEP SOUND has been selected will a sound be generated to
confirm the selection that has been made when operating the button.
¤Align the knob of the rotary switch with
.
‹Press button ¿ to select the TIME-UP message.
Timer time
Overtime Display counted-up from the start.
The match took 42 min.
30 sec., including lost time.
(ACOUSTIC ALARM ONLY)
¿
(NO ALARM)
¿
(VIBRATION ONLY)
¿
Example 2 : Suppose the user wants to count the 30 minute repeat study text using the
COUND-DOWN DISPLAY. Count-down starts at the 30 minute setting.
(Start)
¿
Beep
¿
30 min.
Timer set time
32
Overtime after timer set time is over.
End of study text It took 1 min.
20 sec. longer that expected.
*Whether the BEEP SOUND or VIBRATION for the TIME-UP warning has been set, a preliminary sound
or preliminary vibration alarm will be generated 1-3 seconds beforehand. When the time is up, this
function releases either a sound or vibration.
33
■HOW TO USE THE TIMER BY SETTING ANY TIME (MULTI-TIMER)
• The timer can be set to any value. (Time can be set from 10 sec. to 99 min. 59 sec.)
• The multi-timer can be set for any desired time periods, as shown below.
Can be set up to 10 timers.
Timer 1
Timer 2
Timer 8
Timer 9
Timer 10
• The number of repeat cycles of the set timers can be specified.
(1 - 99 times, infinite number of repeats)
Timer 1
Timer 2
Timer 3
Example: Suppose you want to set 3 timers.
Timer 1
Timer 2
●How to Set Any Time on the Timer
¤Align the knob of the rotary switch with
.
‹Press button ¿ once and set in steps of 1 sec. at a time. When keeping button ¿ depressed for 2 or 3 seconds
the seconds advance rapidly and stop when the button is released. Similarly setting the minutes by pressing
button ¡ can be achived. Each time the button is pressed the time is set in 1 min. increments. Keeping this
button depressed advances the minutes rapidly, and the minute setting will stop when the button is released.
*Note that when the time set is under 10 sec. the setting will automatically become 10 sec.
*Users can set the minutes from 1 min. up to 99 min.
*When setting the timer to any desired time, the time can be set ranging from 10 sec. up to 99 min. 59 sec.
›Each time the button is pressed ¬ the time advances step by step to allow setting the timer to the needed
time. Set the time by repeating procedures ‹ and ›.
*To set the timer to any desired you can also set up to 10 timers at a time.
Timer 3
The time cycles will be repeated for the set repeat number in the order of the times set on the 3 timers.
〈Suppose the user wants to set the timer 1 to 2 min. 30 sec. and timer 2 to 30 sec.〉
*Users can select 1 - 99 times or an infinite number of times as the repeat number
¿
• COUNT-DOWN DISPLAY ⇔ COUNT-UP DISPLAY can be selected.
• This function indicates that the time is up by releasing a beep sound or vibration
alarm.
• Users can continue to count the time even after the time set on the timer is over
(Overtime Display).
¿
¡
(repeat frequency) for the maximum of 10 times as one set.
¬
34
●How to Check, Add or Alter the Time on the Timer
〈Suppose the user wants to set the timer 1 to 2 min. 30 sec. and timer 2 to 30 sec.〉
¤Align the knob of the rotary switch with
.
‹Press button ¬ and align with the location that needs checked, add or alter the time that has been set on
the timer.
›Press button ¿ or button ¡ to be able to add or alter the time that has been set.
*The timers that have already been set cannot be canceled. Be sure to refer to How to Reset the Desired
Time that has been set on the Timer.
35
●How to Set the Repeat Number of the Timer Set to Any Desired Time
¤Align the knob of the rotary switch with
.
‹When button ¡ is pressed a single time the repeat number will be 1. Keep the button depressed to
advance the repeat time rapidly. The repeat number will stop when you release the button.
*The user can set the repeat number from 1 - 99 times.
›When setting the repeat number to the infinite number of times setting, press button ¡ and align
with
.
*One can set the repeat time to the infinite number of times setting after “99 times.”
¡
〈How to Reset the Desired Time You Have Set on the Timer (Erases all settings)〉
(Set to 3 times)
¤Align the knob of the rotary switch with
.
‹Keep button ¿ and button ¡ depressed simultaneously for 2 or 3 seconds to be able to reset.
¡
¿
¡
(Set to any number of times)
*Note that when button ¿ is pressed in this condition, the setting of the TIME-UP warning function can
36
be altered.
37
●How to Reset the Repeat Number Set on the Timer to Any Desired Number
●HOW TO SET THE TIMER KNOB TO ANY DESIRED TIME
¤Align the knob of the rotary switch with
.
‹Press button ¿ and button ¡ simultaneously a single time. The repeat number set on the timer to any
desired number will be reset and 1 Time will be displayed.
*Note that when button ¿ and button ¡ are kept depressed simultaneously for 2 seconds or longer
the ALL LIGHTS ON Display will appear.
*The repeat number will be reset also when the ALL LIGHTS ON Display has appeared.
¤Align the rotary switch with
.
‹Press button ¬ and select COUNTUP DISPLAY (△) or COUNT-DOWN DISPLAY (▼).
*Select the display by pressing button ¬ also after the timer has started.
The time displayed is the elapsed time and the remaining time on each timer.
›Press button ¿ to start the timer.
*Each time button ¿ is pressed the timer starts/stops.
*The flash display indicates which timer is counting and which repeat number is in progress.
*The TIME-UP warning function gives a previous warning and shows that the time is up for each timer for
which the TIME-UP function has been set by selecting BEEP SOUND or VIBRATION.
*When the time set on the timer and the repeat number are over, the overtime count will start.
fiPress button ¿ to stop the timer.
flPress button ¡ to reset the timer.
(Press button ¿ and button ¡ once simultaneously.)
¿
¡
Example : Suppose one needs to repeat three entire courses consisting of 2 min. 30 sec.
running exercise followed by a 30 sec. walking interval training session.
ALL LIGHTS ON Display
status, this does not indicate an error. This
*When the ALL LIGHTS ON Display appear in the
display appears when ¿ and ¡ are kept depressed simultaneously for more than 2 seconds.
In
this
case,
press
¿,
¡
or
C
buttons
to
restore
the
normal
display.
*
*Even when these buttons are not pressed, the normal display will be restored after a lapse of 60 seconds
or more.
(First running start)
¿
(First interval)
(Second Running in Progress)
¿
¡
(Training finished)
(Reset)
Beep
(Third running in progress)
ALL LIGHTS ON Display
38
39
■HOW TO USE THE STOPWATCH
• Time can be counted in steps of 1/100 sec. up to 99 min. 59 sec. 99. (100 divisions)
*When 100 minutes have elapsed a consecutive new time count from 00 min. 000
sec can begin.
• The split function is available.
¤Align the knob of the rotary switch with the
position.
‹Press button ¿ to start the stopwatch.
Each
time
you
press
the
¿
button,
a
start
and
stop
cycle
is repeated.
*
›Press button ¿ to stop the stopwatch.
fiPress button ¡ to reset to 0 sec. (Reset)
(Start)
→
→
Button¡
Reset
→
→
Button¿
Restart
→
→
Button¿
Stop
→
→
Button¡
Reset
→
→
Button¡
Reset
Can be repeated as often as you wish.
●For counting the elapsed time (split time) in-between.
Button¿
→
Button¡
→
Button¡
→
Start
→
Split
→
Split Canceled →
(Split)
¿¡
●How to Use Normally
Button¿
→
Button¿
Start
→
Stop
●For time count totaling
Button¿
→ Button¿
Start
→
Stop
Button¿
Stop
Can be repeated as often as you wish.
¡
¿
(Reset)
40
(Stop)
¡
(Split canceled)
●For counting the time of two persons
Button¿ → Button¡ → Button¿ → Button¡
→ Button¡
Start → First person finished → Second person finished → Time of second person → Reset
Time of first person
41
■CARING FOR YOUR TIMEKEEPER
1. WATER RESISTANCE.
This timekeeper is water resistant and is manufactured to withsiand up to 3 atmospheres of
pressure/bar (water pressure at a 30-meter or 100-foot depth). It can be used at an athletic meet or
when playing sports where there may be accidental contact with water, such as rain or splashes.
2. WATER RESISTANCE.
Be careful not to drop the timekeeper or hit it against any hard surfaces.
3. WATER RESISTANCE.
• Extremely high temperatures
Keep the timekeeper away from direct sunligft or hot places.
*If it is used or left in such environment, the digital display may become black. But this condition
will disappear without any aftereffect when the temperature returns to normal.
• Extremely low temperatures
Do not use or leave this timekeeper in a cold place. If it is used or left in such a place for a long time :
1) A small amount of time loss/gain may occur.
2) The change of the digits may become slow. (The time keeper remains accurate.)
This timekeeper will not be affected by magnetism.
4. TEMPERATURES
The timekeeper is preadjusted to function with stable accuracy when used at a normal temperature
range (5˚C~35˚C).
The normal performance of the timekeeper, however, will return when the temperature
returns to normal.
*If
it is exposed to a temperature below -10˚C or over + 60˚C for long time, this may cause the
timekeeper to stop, the battery electrolyte to leak, or the battery life to shorten.
42
43
■LIQUID CRYSTAL PANEL
■INSTRUCTIONS FOR BATTERY REPLACEMENT (SYSTEM RESET)
When the liquid crystal panel of this timekeeper is used for more than 7 years, its contrast
may decrease and it may become difficult to read digits on the panel.
After you have replaced the battery or when an abnormal display (CAN’T READ Display)
should appear, be sure to reset the system in the clock so that it will function normally.
Request a replacement at the store from which you purchased the stopwatch or at a dealer
selling SEIKO stopwatches.
Replacement is subject to a charge.
・ How to Reset the System
■TO PRESERVE THE QUALITY OF YOUR WATCH
Press buttons ¿, ¡, and ¬ simultaneously for 2 - 3 seconds. The display will disappear. When
released this can be done the display is reset.
*You can carry out this procedure with the rotary switch in any position on the dial.
*After the system has been reset the TIME SET FOR ANY TIMER and REPEAT NUMBER aligned with
the
dial positions will be reset. Be sure to re-align before use.
*Set COUNT-DOWN/COUNT-UP DISPLAY to COUNT-DOWN DISPLAY and TIME-UP WARNING to
BEEP SOUND.
PERIODIC CHECK
It is recommended that it be checked at time of battery replacement or once every 2 to 3
years for oil condition, battery electrolyte leakage, entrance of moisture or perspiration, etc.
by the retailer from whom your timekeeper was purchased.
An adjustment or repair may be required, depending on the result of the check.
*Take this opportunity to have the gasket replaced.
*When replacing parts , be sure to specify "SEIKO parts".
44
45
■ABOUT THE BATTERY
1. Battery Life
When this timer is supplied with a new normal battery it will function for about three years.
This is based on a standard use pattern of five times (within 20 seconds, including also the
preliminary warning) of a two hour count every day with the TIME-UP MESSAGE set to VIBRATION.
When the timer is used more than this the battery may run out before the above time (3 years) is
reached.
*You need to be particularly careful when you set the repeat number to a LARGE NUMBER OR
INFINITE and the select VIBRATION as the TIME-UP WARNING.
2. Initial battery (Normally included)
3. WATER RESISTANCE.
About Preliminary Warning that Battery is Running Out
mark flashes, the battery is running out. Be sure to buy a new battery soon at the
store where you bought the timer.
*When the mark flashes the following functions cannot be used. Remember that this is not an
error.
*When the • TIME-UP WARNING function: VIBRATION
*When you have set the TIME-UP Warning function to VIBRATION and the battery runs out while the
timer is in use the BEEP SOUND lets you know that you cannot use the TIME-UP Warning Function
VIBRATION. You cancel (stop) the BEEP SOUND by pressing anyone of the buttons ¿, ¡ or ¬
once. The timer in use will then continue to count until the set time is over.
46
A For battery replacement, be sure to have the battery replaced with a new one at the retailer from whom the watch
was purchased, and specify a genuine battery. B If the old battery is left in the watch for a long time, a malfunction
may be caused due to battery leakage, etc. Have it replaced with a new one as soon as possible. C Battery
replacement is charged even if it runs down within the guaranteed period. D Once the case back is opened for battery
replacement or other purpose, the original water resistant quality designed for the watch may deteriorate when it is
closed. When you have the battery replaced with a new one, also request the water resistant test pertaining to the
water resistant quality of your watch. If your watch has 10-bar or higher water resistant quality, be sure to have such
test performed on the watch every time the battery is replaced. Please note that it takes several days to check the
water resistant quality of your watch. When requesting the checking, therefore, please check the period required for it.
*When the battery is taken out of the timekeeper, keep it out of reach of children.
If children happen to swallow it, consult a doctor immediately.
WARNING
1. Do not remove the battery from the watch.
2. If it is necessary to take out the battery, keep it out
of the reach children.
3. If a child swallows it, consult a doctor immediately
as it will adversely affect the health of the child.
4. Never short-circuit, tamper with or heat the battery, or never expose it to fire as it may explode,
generate an intense heat or catch fire.
CAUTION
・The battery is not rechargeable. Never
attempt to recharge it, as this may cause
battery leakage or damage to the battery.
・If the watch is left in a temperature below
-10°C or above +60°C for a long time, battery leakage may result to shorten the
battery life.
47
■PRODUCT SPECIFICATIONS
1. Liquid crystal oscillation frequency........32,768Hy (Hz = Number of oscillations per second)
2. Accuracy.................................Within ± 0.0012% at normal ambient temperature (5°C - 35°C)
(Converted to monthly error : Within ± 30 sec)
3. Operating temperature range.......................-5°C - +50°C. Display function: 0°C - +50°C)
4. Display............................................................FE (electric field effect) type nematic crystal
5. Battery............................................................Small lithium battery SB-T51 (CR2032 1 only)
6. Battery life......................................................Approx. 3 years
7. Electronic Circuit...........................................C-MOS-LSI (1 only)
*As
part of our policy of ongoing product improvement we reserve the right to change
these specifications without prior notice.
48
4. Battery Change