1
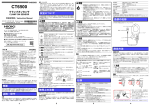
PD3129, PD3129-10 検相器 PHASE DETECTOR 取扱説明書 /Instruction Manual 2015 年 3 月 初版 Printed in Japan PD3129E980-00 15-03H ステップ 2. 活線チェック 安全について この取扱説明書には本器を安全に操作し、安全な状態に保つのに要する情報や注意事項が 記載されています。本器を使用する前に次の安全に関する事項をよくお読みください。 この機器は IEC 61010 安全規格に従って、設計され、試験し、安全な状態で 出荷されています。測定方法を間違えると人身事故や機器の故障につながる 可能性があります。取扱説明書を熟読し、十分に内容を理解してから操作し てください。万一事故があっても、弊社製品が原因である場合以外は責任を 負いかねます。 安全記号 使用者は、取扱説明書内の マークのあるところは、必ず読み注意す る必要があることを示します。 使用者は、機器上に表示されている マークのところについて、取扱 説明書の マークの該当箇所を参照し、機器の操作をしてください。 二重絶縁または強化絶縁で保護されている機器を示します。 交流(AC)を示します。 直流(DC)を示します。 取扱説明書の注意事項には、重要度に応じて次の表記がされています。 検相表示 PD3129-10 相順ランプ 電源 ON ランプ 本器がお手元に届きましたら、輸送中において異常または破損がないか点検してからご使 用ください。万一、破損あるいは仕様どおり動作しない場合は、お買上店(代理店)か最 寄りの営業所にご連絡ください。 電源 OFF スイッチ 電源 ON スイッチ 線間電圧ランプ R-S ランプ S-T ランプ 保守・サ-ビス • 本器の汚れをとるときは、柔らかい布に水か中性洗剤を少量含ませて、軽く拭いてく ださい。ベンジン、アルコール、アセトン、エーテル、ケトン、シンナー、ガソリン 系を含む洗剤は絶対に使用しないでください。変形、変色することがあります。 • 故障と思われるときは、電池の消耗を確認してから、お買上店(代理店)か最寄りの 営業所にご連絡ください。 • 輸送中に破損しないように梱包し、故障内容も書き添えてください。輸送中の破損に ついては保証しかねます。 • 本器の保護機能が破損している場合は、使用できないように廃棄するか、知らないで 動作させることのないように、表示しておいてください。 使用上の注意 本器を安全にご使用いただくために、また機能を十二分にご活用いただくために、次の注 意事項をお守りください。 概要 本器は、静電誘導式電圧クリップを用いた三相電路の相順チェック、および活線チェック が可能な検相器です。 • 被覆電線に接続できる静電誘導式電圧クリップを採用しています。 • 小型ながら CAT Ⅲ 600 V(PD3129) 、CAT Ⅳ 600 V, CAT Ⅲ 1000 V(PD3129-10)に対応し ています。 • 薄暗い場所でも判別できるよう赤色 LED を使用しています。 • LED 順次点滅による相順チェックで、簡単に相順方向を確認できます。 • 本器の背面に磁石を装着しており、配電盤の扉などに固定して使用することができます。 接続対象 操作や取り扱いを誤ると、使用者が傷害を負う場合、または機器を損傷す る可能性があることを意味します。 PD3129 点検 機能 電圧検出方式 表示 本器は PD3129:CAT Ⅲ (600 V)、PD3129-10:CAT Ⅲ (1000 V) , CAT Ⅳ (600 V) に適合 しています。 測定器を安全に使用するため、IEC61010 では測定カテゴリとして、使用する場所により 安全レベルの基準を CAT Ⅱ~ CAT Ⅳで分類しています。 コンセントに接続する電源コード付き機器(可搬形工具・家庭用電気製品など) CAT Ⅱ の一次側電路。コンセント差込口を直接測定する場合は CAT Ⅱです。 直接分電盤から電気を取り込む機器(固定設備)の一次側および分電盤からコ CAT Ⅲ ンセントまでの電路 CAT Ⅳ 建造物への引込み電路、引込み口から電力量メータおよび一次側電流保護装置 (分電盤)までの電路 使用する電圧クリップ R( 赤 ) S( 白 ) 線間電圧ランプの点灯 R-S ランプのみ R-S ランプと S-T ランプ T( 青 ) S-T ランプのみ ランプが点灯する :活線状態 ランプが点灯しない:非活線状態、または大地からの電位が AC70 V 以下 ステップ 3. 検相 線間電圧表示 電源表示 検相機能 ( 正相 , 逆相 ) 静電誘導式 絶縁電線 (PD3129: 導体公称断面積 2∼100 mm2, 仕上外径 φ2~17 mm) (PD3129-10: 導体公称断面積 14∼500 mm2, 仕上外径 φ7~40 mm) 三相 PD3129:AC70 ~ 600 V, PD3129-10:AC70 ~ 1000 V ( 正弦波 , 連続 ) 45 ~ 66 Hz 正相 : 矢印ランプ点灯、相順ランプ 4 灯 順次点滅 ( 時計回り ), ブザー断続音 逆相 : 矢印ランプ消灯、相順ランプ 4 灯 順次点滅 ( 反時計回り ), ブザー連続音 R-S ランプ , S-T ランプ 電源 ON ランプ : 電源 ON 時は点灯 , 電池消耗時は点滅 電圧センサは静電誘導式ですので、原理上、三相三線電路における接地相の 欠相は判別できません。この状態であっても、正相または逆相の判定をしま すのでご注意ください。 • 検相中は電圧クリップに触れないでください。誤動作の原因になります。 • 必ず 3 本の電圧クリップを取り付けた状態で検相してください。2 本以下では、正しく 検相できません。2 本で動作することもありますが、正しい検相ではありません。 • 三相交流回路以外では、誤動作します。 1. 被覆電線 ( ク リ ッ プ の▼マ ー ク に線 を合 わ せ て挟 んでくだ さい。 ) 一般仕様 0 ~ 40°C, 80% rh 以下 ( 結露なきこと ) -20 ~ 60°C, 80% rh 以下 ( 結露なきこと ) 屋内使用 , 高度 2000 m まで PD3129:600 V(CAT Ⅲ) 対地間最大定格電圧 PD3129-10:600 V(CAT Ⅳ ) 1000 V(CAT Ⅲ) PD3129:AC7060 Vrms、PD3129-10:AC8540 Vrms 耐電圧 定格電源電圧 DC1.5 V × 2, 単 3 形マンガン乾電池 (R6P) × 2 電源 300 mVA 最大定格電力 約 70 時間 ( 電源 ON 待機状態にて , 単 3 形マンガン乾電池 連続使用時間 * (R6P) 使用時 ) * 電池持続時間 オートパワーオフ機能 * 電源投入後約 15 分経過後 , 電源が自動的に切れます。 復帰は電源 ON スイッチによる電源再投入 * 解除できません。 磁石 4 個(背面装着) 補助機能 約 0.7 m ケーブル長 約 70W × 75H × 30D mm ( 突起物除く ) 外形寸法 PD3129:約 200 g, PD3129-10:約 240 g 質量 携帯用ケース , ストラップ *, スパイラルチューブ *, 取扱説明書 , 付属品 単 3 形マンガン乾電池 (R6P) × 2 * 必要に応じて取り付けてください。 安全性 PD3129 EN61010 汚染度 2, 測定カテゴリ (CAT Ⅲ (600V) ( 予想される過渡過電圧 6000V) 適合規格 PD3129-10 EN61010 汚染度 2, 測定カテゴリ CAT Ⅳ (600 V) CAT Ⅲ (1000 V) ( 予想される過渡過電圧 8000 V) EMC EN61326 製品保証期間 3 年間 使用温湿度範囲 保存温湿度範囲 使用場所 測定方法 感電事故を防ぐため、次のことをお守りください。 • 電圧クリップのバリア ( 障壁 ) より先端を握らないでください。 • 対地間最大定格電圧は PD3129:AC600 V(CAT Ⅲ), PD3129-10:AC1000 V(CAT Ⅲ) です。大地に対してこの電圧を超える測定はしないでくださ い。本器を破損し、人身事故になります。 • 線間電圧ランプが点灯しない場合でも、活線の可能性があります ( 大地か らの電位が AC70 V 以下の場合など ) ので、線には触れないでください。 • 使用前には、保存や輸送による故障がないか、ケーブルの被覆が破れたり、金属が露 出していないか確認してください。損傷がある場合は、感電事故になるので、お買上 店(代理店)か最寄りの営業所にご連絡ください。 • 電源ONランプが点滅している時は、 電池が消耗していますので、 早めに交換してください。 ステップ 1. 始業前の点検 ( 必須 ) 各々の電圧クリップを AC70 V 以上の単線 ( 活線 ) にクリップし、線間電圧ランプの点灯 を確認してください。なお、シールド線には使用できません。 点灯する : ご使用になれます。 点灯しない : ご使用できません。お買上店 ( 代理店 ) か最寄りの営業所にご連絡ください。 対象電線の確認 電線仕上外径 2. 点灯します。 バリア 各電線が活線の場合、 線間電圧ランプ R-S、 S-T が点灯します。 本器の電圧クリップを三相交流回路の 電線の被覆の上から取り付けます。 3. 相順ランプが矢印方向 ( 時計回り ) に順次点滅した場合、その接続相順は正相 (R-S-T) です。このときブザーは断続音となります。 < 逆相 (T-S-R) の場合 > < 正相 (R-S-T) の場合 > ピッピッピッ ブザー( 断続音 ) ピー 時計回りに順次点滅します。 ( 矢印ランプ点灯 ) ブザー( 連続音 ) 反時計回りに順次点滅します。 ( 矢印ランプ消灯 ) 電池交換 • 感電事故を避けるため、電圧クリップを被測定物から外し、電源を OFF に してから電池を交換してください。 • 交換後は、必ず電池カバーを閉め、ネジ留め後 使用してください。 • 新旧および異種の混合はしないでください。また極性+-に注意し、逆挿 入しないでください。性能劣化や液漏れの原因になります。 • 電池をショート、充電、分解または火中への投入はしないでください。破 裂する恐れがあり危険です。 • 電池は地域で定められた規則に従って処分してください。 電池交換お知らせ機能 : 電源 ON ランプが点滅している時は、 電池が消耗していますので、 早めに交換してください。 用意するもの • ドライバ、新しい単 3 形マンガン乾電池 (R6P) 2 本 ( アルカリ乾電池 (LR6) 使用可 ) 使用前の確認 感電事故を避けるため、使用前には必ず次の事項を確認してください。 • 本器をぬらしたり、ぬれた手で使用しないでください。感電事故の原因に なります。 • 本器背面の磁石を裸導線やブスバーに固定しないでください。短絡事故の 原因になります。 • 必ず被覆電線にクリップして使用してください。 • クリップを閉じたままで活線チェックはできません。 • シールド線には使用できません。 基本仕様 操作や取り扱いを誤ると、使用者が死亡または重傷につながる可能性があ ることを意味します。 各部の名称 このたびは、HIOKI PD3129, PD3129-10 検相器をご選定いただき、誠にありがとうござ います。この製品を十分にご活用いただき、末長くご使用いただくためにも、取扱説明書 はていねいに扱い、いつもお手元に置いてご使用ください。 仕様 動作保証電圧範囲 使用周波数範囲 カテゴリの数値の小さいクラスの測 定器で、数値の大きいクラスに該当す る場所を測定すると重大な事故につ ながる恐れがありますので、絶対に避 けてください。 カテゴリのない測定器で、CAT Ⅱ~ CAT Ⅳの測定カテゴリを測定すると 重大な事故につながる恐れがありま すので、絶対に避けてください。 はじめに 電池の液漏れによる腐食を防ぐため、長い間使用しないときは、電池を抜いて保管してください。 操作や取り扱いを誤ると、使用者が死亡または重傷につながる危険性が極 めて高いことを意味します。 測定カテゴリについて PD3129, PD3129-10 • 磁気カードなどに近づけないでください。保存されているデータが損なわ れる恐れがあります。 • 心臓ペースメーカなどの体内埋め込み型医療機器を装着している方は使 用しないでください。 • この機器は屋内用に設計されています。 安全性を損なわないで 0°C ~ 40°C の温度まで使用できます。 • 本器の損傷を防ぐため、運搬および取り扱いの際は振動、衝撃を避けてく ださい。特に、落下などによる衝撃に注意してください。 • 強力な電磁波を発生するもの、または帯電しているものの近くで使用しな いでください。誤動作の原因となります。 • 断線による故障を防ぐため、ケーブルの付け根を折ったり引っ張ったりし ないでください。 • ケーブルの被覆に損傷を与えないため、踏んだり挟んだりしないでください。 • 被測定導体や電線が高温の場合がありますので注意してください。 いずれか 1 本の電圧クリップを用いて、活線チェックができます。 PD3129:φ2 ~ 17 mm をご使用ください。 PD3129-10:φ7 ~ 40 mm をご使用ください。 対象となる電線と機種をご確認ください。 1. 2. 3. 4. 電源を OFF にします。 本器を裏返し、電池カバーを留めている 1 本のネジを緩めます。 新しい電池と交換します。極性を確認して取り付けてください。 電池カバーを取り付け、ネジをしっかり締めます。 1. 押す 2. 3. ゆるめる 取り付ける 4. しめる Safety Symbol PD3129,PD3129-10 PHASE DETECTOR Instruction Manual Mar. 2015 Edition 1 Printed in Japan PD3129E980-00 15-03H In the manual, the symbol indicates particularly important information that the user should read before using the instrument. The symbol printed on the instrument indicates that the user should refer to a corresponding topic in the manual (marked with the using the relevant function. Indicates a double-insulated device. symbol) before Indicates AC (Alternating Current). Indicates DC (Direct Current). The following symbols in this manual indicate the relative importance of cautions and warnings. Indicates that incorrect operation presents an extreme hazard that could result in serious injury or death to the user. Indicates that incorrect operation presents a significant hazard that could result in serious injury or death to the user. Indicates that incorrect operation presents a possibility of injury to the user or damage to the device. Specifications Basic Specifications Function Phase detection (positive/negative) Voltage detection method Static induction Performance-guarantee voltage range 3-phase Model PD3129:70 to 600 VAC (sine wave, continuous) Model PD3129-10:70 to 1000 VAC (sine wave, continuous) Operating frequency range 45 to 66 Hz Object to be connected Insulated wire Model PD3129 (nominal sectional area of the conductor: 2 to 100 mm2, finished outer diameter: up to φ2 to 17 mm) Model PD3129 -10 (nominal sectional area of the conductor: 14 to 500 mm2, finished outer diameter: up to φ7 to 40 mm) Warranty Warranty malfunctions occurring under conditions of normal use in conformity with the Instruction Manual and Product Precautionary Markings will be repaired free of charge. This warranty is valid for a period of three (3) years from the date of purchase. Please contact the distributor from which you purchased the product for further information on warranty provisions. Introduction Names of Parts Model PD3129 Line-voltage Lamp Model PD3129-10 General Specifications Operating temperature and humidity 0 to 40°C (32 to 104°F), 80% RH or less (with no condensation) Storage temperature and humidity -20 to 60°C (-4 to 140°F), 80% RH or less (with no condensation) Location for use Altitude up to 2000 m (6562 feet), indoors Maximum rated voltage to earth Model PD3129: 600 V (CAT III) Model PD3129-10: 1000 V (CAT III) Dielectric strength Model PD3129: 7060 Vrms Model PD3129-10: 8540 Vrms Power supply Rated supply voltage 1.5 VDC × 2 R6P Manganese battery (AA size) × 2 Maximum rated powers 300 mVA Continuous operating time* Approx. 70 hours (Power ON, Standby state, using R6P manganese battery) *Battery life Approx. 0.7 m (27.56”) Phase-sequence Dimensions Maintenance and Service Power ON Lamp Mass Model PD3129: Approx. 200 g (7.1 oz.) Model PD3129-10: Approx. 240 g (8.5 oz.) Options Carrying case, Strap*, Spiral tube*, Instruction manual, Two R6P Manganese batteries (AA size) *Attaching as the occasion demands. Overview The PD3129/PD3129-10 is a phase detector, designed to perform phase sequence checks and live line checks of a 3-phase circuit using a static induction voltage clip. • The static induction voltage clips are used to be able to clip on a insulated wire. • It is small with a CAT III 600 V (Model PD3129), CAT IV 600 V, CAT III 1000 V (Model PD3129-10) safety rating. • Red LED lamps are used to make the indication visible in dimly lit areas. • The direction of phase sequence can be checked easily using the LED lamps, which blink in order. Safety This manual contains information and warnings essential for safe operation of the instrument and for maintaining it in safe operating condition. Before using it, be sure to carefully read the following safety precautions. This instrument is designed to comply with IEC 61010 Safety Standards, and has been thoroughly tested for safety prior to shipment. However, mishandling during use could result in injury or death, as well as damage to the instrument. Be certain that you understand the instructions and precautions in the manual before use. We disclaim any responsibility for accidents or injuries not resulting directly from instrument defects. Auto Power Off Power ON Switch • Do not allow the instrument to get wet, and do not use it with wet hands. This may cause an electric shock. • Do not fix the magnets of the rear side of the instrument on bare conductor or busbar. It may cause short circuits. • Do not put magnet cards near the instrument. It may damage the stored data. • The instrument should not be used by anyone with a pacemaker or any other medical devices installed in his/her body. • This instrument is designed for use indoors. It can be operated at temperatures between 0 and 40°C without degrading safety. • To avoid damage to the instrument, protect it from physical shock when transporting and handling. Be especially careful to avoid physical shock from dropping. • Do not use the instrument near a source of strong electromagnetic radiation, or near a highly electrically charged object. These may cause a malfunction. • To avoid breaking the cables, do not bend or pull them. • Avoid stepping on or pinching cables, which could damage the cable insulation. • Keep in mind that, in some cases, conductors and wires to be measured may be hot. To avoid corrosion from battery leakage, remove the batteries from the instrument if it is to be stored for a long time. S-T lamp only Power indication Approx. 70W × 75H × 30D mm (2.76"W × 2.95"H × 1.18"D) (excluding projections) Follow these precautions to ensure safe operation and to obtain the full benefits of the various functions. T (blue) Since the voltage sensors are based on the static induction, it is impossible to find the missing phase of the grounding line on 3-phase 3-lead circuits in principle. In this case, the positive or negative phase sequence may be indicated. • Do not touch the clips during detection. It may cause a malfunction. • Always connect three voltage clips to the insulated wires before detecting. It can not be detected properly, if two or less clips are connected. The phase detector (Models PD3129 and PD3129-10) will operate on 2 wires, but this is not proper phase detection. • Do not detect any circuit except a 3-phase AC circuit. It causes a malfunction. Cable length Usage Notes R-S lamp and S-T lamp Power ON lamp: lights up (Power ON) blinks (Battery Low) When you receive the instrument, inspect it carefully to ensure that no damage occurred during shipping. If damage is evident, or if it fails to operate according to the specifications, contact your dealer or Hioki representative. • Pack the instrument so that it will not sustain damage during shipping, and include a description of existing damage. We cannot accept responsibility for damage incurred during shipping. • If the protective functions of the instrument are damaged, either remove it from service or mark it clearly so that others do not use it inadvertently. • The magnets on the rear side can be utilized to fix the instrument on a place like a door of power distribution box. R-S lamp only S (white) R-S lamp, S-T lamp Initial Inspection Power OFF Switch Line-voltage lamp to light up R (red) Line-voltage indication Magnet × 4 pcs (on rear side) • To clean the instrument, wipe it gently with a soft cloth moistened with water or mild detergent. Never use solvents such as benzene, alcohol, acetone, ether, ketones, thinners or gasoline, as they can deform and discolor the case. • If the instrument seems to be malfunctioning, confirm that the batteries are not discharged before contacting your dealer or Hioki representative. Voltage clip used Phase-detection indication Auxiliary function S-T Lamp • Be sure to clip on a insulated wire. • If the tip of the clip is closed, a live line check cannot be conducted. • Do not use shielding wire. Lamp lights up : The line is live. Lamp does not light up : The line is not live or the earth potential is 70 VAC or less. (This function can not be canceled.) R-S Lamp Step 2. Live Line Check A live line check can be conducted using one of the voltage clips. Positive phase sequence: The arrow lamp lights up, the four phase-sequence lamps blink in order (clockwise), and the buzzer sounds intermittently. Negative phase sequence: The arrow lamp turns off, the four phase-sequence lamps blink in order (counterclockwise), and the buzzer sounds continuously. The power will be turned off automatically if the instrument remains idle for 15 minutes after the power is turned on. To reset, turn the power on again using the Power ON switch. Thank you for purchasing the HIOKI Model PD3129/PD3129-10 PHASE DETECTOR. To obtain maximum performance from the instrument, please read this manual first, and keep it handy for future reference. Wire diameter limits Model PD3129:φ2 to 17 mm, Model PD3129-10:φ7 to 40 mm Be sure to use the correct phase detector according to your wire size. Display Measurement categories This instrument complies with CAT III 600 V (Model PD3129), CAT III 1000 V, CAT IV 600 V (Model PD3129-10) safety requirements. To ensure safe operation of measurement instruments, IEC 61010 establishes safety standards for various electrical environments, categorized as CAT II to CAT IV, and called measurement categories. CAT II : Primary electrical circuits in equipment connected to an AC electrical outlet by a power cord (portable tools, household appliances, etc.) CAT II covers directly measuring electrical outlet receptacles. CAT III : Primary electrical circuits of heavy equipment (fixed installations) connected directly to the distribution panel, and feeders from the distribution panel to outlets. CAT IV : The circuit from the service drop to the service entrance, and to the power meter and primary overcurrent protection device (distribution panel). Using a measurement instrument in an environment designated with a higher-numbered category than that for which the instrument is rated could result in a severe accident, and must be carefully avoided. Use of a measurement instrument that is not CATrated in CAT II to CAT IV measurement applications could result in a severe accident, and must be carefully avoided. Check the Size of Your Wire Before Measuring Applicable standards Safety Model PD3129: EN61010 Pollution degree 2, Measurement category CAT III (600 V) (anticipated transient overvoltage 6000 V) Model PD3129-10: EN61010 Pollution degree 2, Measurement category CAT IV(600 V), CAT III (1000 V) (anticipated transient overvoltage 8000 V) EMC EN61326 Step 3. Detection 1. Insulated wire (Place the wire at the mark on the clip.) 2. Barrier Light up Attach the voltage clips to the insulated wires of a 3-phase AC circuit. If the wires are live, the line-voltage lamps R-S and S-T will light up. 3. If the phase-sequence lamps blink in the order of the direction indicated by the arrow (clockwise), the connected circuit has a positive phase sequence (R-S-T). The buzzer will sound intermittently. <Positive phase sequence (R-S-T)> Buzzer (Intermittent sound) Blinks in order (Clockwise). The arrow lamp lights up. <Negative phase sequence (T-S-R)> Buzzer (Continuous sound) Blinks in order (Counterclockwise). The arrow lamp turns off. Replacing Battery Measurement Procedures Observe the following precautions to avoid electric shock. • Do not hold the tip of a voltage clip ahead of its barrier. • The maximum rated voltage between input terminals and ground is 600V AC (Model PD3129:CAT III), 1000V AC (Model PD3129-10:CAT III). Attempting to measure voltages exceeding these limits with respect to ground could damage the instrument and result in personal injury. • Even if the line-voltage lamps do not light up, the line may be live. (ex. When the earth potential is 70 VAC or less.) Do not touch the line. Preliminary Checks • Before using the instrument the first time, make sure that the no damage occurred during storage or shipping, that the insulation on the cables is undamaged, and that no bare conductors are improperly exposed. Using the instrument in such conditions could cause an electric shock, so contact your dealer or Hioki representative for repair. • When the Power ON lamp is blinking, the batteries are running low. Replace the batteries. Step 1. Performance Check (Indispensable) • To avoid electric shock when replacing the batteries, first disconnect the voltage clips from the object to be measured, and turn off the power. • After replacing the batteries, replace the battery cover and screws before using the instrument. • Battery may explode if mistreated. Do not short-circuit, recharge, disassemble or dispose of in fire. • Handle and dispose of batteries in accordance with local regulations. Low-battery indicator: When the Power ON lamp is blinking, the batteries are running low. Replace the batteries. Tools Screwdriver, Two new R6P manganese batteries (LR6 alkaline battery can be used also.) 1. Turn OFF the power. 2. Turn over the phase detector. Remove the screw, then remove the battery cover. 3. Replace the batteries with new ones, noting the polarity. 4. Put the battery cover back in place, and tighten the screw. Replace 3. 1. 2. 4. Be sure to check the following before use to avoid electrical shock. Connect each voltage clips to single wire (live line) 70 VAC or more, and check to see if the line-voltage lamp light up. Do not use shielding wire. Lamp lights up : It can be used. Lamp does not light up : Do not use it and contact your dealer or Hioki representative for repair. Loosen Push Tighten