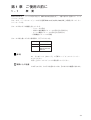
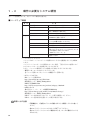
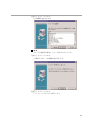
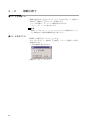
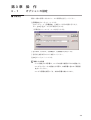
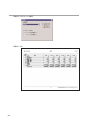
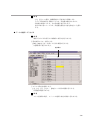
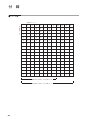
1
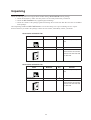
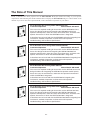
No. CP-UM-5067 SRF100/200 記録計用 スマートローダパッケージ SLP-F10/F20 取扱説明書 SRF100/200 記録計用スマートローダパッ ケージ SLP-F10/F20 をご購入いただき、 まことにありがとうございます。この取扱 説明書には、SLP-F10/F20 を正しくご使 用いただくための必要事項が記載されてお ります。 SLP-F10/F20 を使用した装置の設計や設 定、保守などを担当される方は、必ずお読 みになり、理解したうえでご使用ください。 また、この取扱説明書は、初期設定時だけ でなく、設定値の変更やトラブル時の対応 などの際にも必要です。いつもお手元にお いてご活用ください。 使用上の制限について 本製品は、一般機器での使用を前提に、開発・設計・製造されております。 とくに、下記のような安全性が必要とされる用途に使用する場合は、フェールセー フ設計、冗長設計 および 定期点検の実施など、システム・機器全体の安全に配慮 していただいた上でご使用ください。 ・人体保護を目的とした安全装置 ・輸送機器の直接制御(走行停止など) ・航空機 ・宇宙機器 ・原子力機器 など 本製品の働きが直接人命に関る用途には使用しないでください。 重要事項 ローダプラグを接続中は、強い力を加えないでください。計器を破損す る恐れがあります。 取扱い上の注意 ローダプラグに力を加えすぎると、通信ができなくなることがありま す。このときは、再度ローダプラグを接続し直してください。 お願い この取扱説明書は、本製品をお使いになる担当者のお手元に確実に届 くようお取りはからいください。 この取扱説明書の全部、または一部を無断で複写、または転載するこ とを禁じます。この取扱説明書の内容を将来予告なしに変更すること があります。 この取扱説明書の内容については、万全を期しておりますが、万一ご 不審な点や記入もれなどがありましたら、当社までお申し出ください。 お客様が運用された結果につきましては、責任を負いかねる場合がご ざいますので、ご了承ください。 1998 Yamatake Corporation ALL RIGHTS RESERVED 確認してください お買上げいただいたスマートローダパッケージ SLP-F10/F20 は、次のように構成されています。 商品の開梱時に次の点について確認してください。 1. ご注文の商品に間違いがないか、形番をチェックする 2. 商品に破損がないかどうか、外観をチェックする 3. 付属品が規定どおりあるか、チェックする 付属品は、次のとおりです。 開梱後は、付属品を紛失したり破損したりしないように、十分注意して取り扱ってください。 万一、異常や間違いがあった場合は、直ちにお買上げの販売店までご連絡ください。 SLP-F20 の場合 品名 形番 SLP-F20 システムディスク 数量 備考 SLP-F20J20 1 フロッピーディスク 3.5 型 1.44M バイト CP-UM-5067 1 本書です SLP-F10 と SLP-F20 の共通取扱説明書にな っています 1 お客様登録カードに必要事項を記入し、直 ちにご返送ください 登録をしませんと、バージョンアップのお 知らせや問い合わせに対するサポートが行 えません 専用ケーブル一式 取扱説明書 CP-UM -0123 書 取扱説明 株式会 社 山武 お客様登録カード SLP-F10 の場合 品名 形番 SLP-F10 システムディスク 数量 SLP-F10J20 専用ケーブル一式 1 備考 フロッピーディスク 3.5 型 1.44M バイト 1 取扱説明書 CP-UM -0123 CP-UM-5067 1 本書です SLP-F10 と SLP-F20 の共通取扱説明書にな っています 1 お客様登録カードに必要事項を記入し、直 ちにご返送ください 登録をしませんと、バージョンアップのお 知らせや問い合わせに対するサポートが行 えません 書 取扱説明 株式会 社 山武 お客様登録カード Ji この取扱説明書の位置づけ SRF100/200 関連の取扱説明書は全部で7冊あります。用途に応じて必要な取扱説明書をお読みください。 必要な取扱説明書がお手元にないときは当社、または販売特約店の担当者にお申し付けください。 0123 CP- UM- 取 扱説 株式会社 はじめて SRF101/102/103 をお使いになる方、SRF101/102/103 を制御盤な どに組み込むためハードウェア設計、運転操作、保守を担当される方は、 必ずお読みください。 装置に組み込むための設置、結線方法、運転操作方法、保守点検、トラブ ル時の対応、ハードウェアの仕様について説明しています。 明書 山武 0123 CP- UM- 取 扱説 株式会社 山武 0123 CP- UM- 株式会社 0123 CP- UM- 株式会社 0123 CP- UM- 株式会社 資料番号 CP-UM-1666 スマートレコーダ SRF201/202/203 設置・運転編 資料番号 CP-UM-5057 スマートレコーダ SRF206/212/224 設置・運転編 資料番号 CP-UM-5034 はじめて SRF206/212/224 をお使いになる方、SRF206/212/224 を制御盤な どに組み込むためハードウェア設計、運転操作、保守を担当される方は、 必ずお読みください。 装置に組み込むための設置、結線方法、運転操作方法、保守点検、トラブ ル時の対応、ハードウェアの仕様について説明しています。 明書 山武 取 扱説 設置・運転編 はじめて SRF201/202/203 をお使いになる方、SRF201/202/203 を制御盤な どに組み込むためハードウェア設計、運転操作、保守を担当される方は、 必ずお読みください。 装置に組み込むための設置、結線方法、運転操作方法、保守点検、トラブ ル時の対応、ハードウェアの仕様について説明しています。 明書 山武 取 扱説 スマートレコーダ SRF106 はじめて SRF106 をお使いになる方、SRF106 を制御盤などに組み込むた めハードウェア設計、運転操作、保守を担当される方は、必ずお読みくだ さい。 装置に組み込むための設置、結線方法、運転操作方法、保守点検、トラブ ル時の対応、ハードウェアの仕様について説明しています。 明書 取 扱説 スマートレコーダ SRF101/102/103 設置・運転編 資料番号 CP-UM-1667 デジトロニック CPL 通信 SRF101/102/103/106/201/202/203 編 資料番号 CP-UM-1668 明書 山武 SRF101/102/103/106/201/202/203 は RS-485、または RS-232C により他の 機器と通信を行えます。 SRF101/102/103/106/201/202/203 のもつ通信機能を使用するとき、その通 信手順とコマンドについて解説をしています。 Jii 0123 CP- UM- 取 扱説 株式会社 明書 SRF206/212/224 は RS-485、または RS-232C により他の機器と通信を行 えます。 SRF206/212/224 のもつ通信機能を使用するとき、その通信手順とコマン ドについて解説をしています。 山武 0123 CP- UM- 取 扱説 株式会社 明書 山武 デジトロニック CPL 通信 SRF206/212/224 編 資料番号 CP-UM-5035 SRF100/200 記録計用 スマートローダパッケージ SLP-F10/F20 資料番号 CP-UM-5067 本書です。 スマートローダパッケージ SLP-F10/F20 に付属します。 パソコン上で SLP-F10/F20 を動作させると、パソコンから SRF100/200 の パラメータ設定ができます。 パソコンの操作を説明しています。 本書は、SLP-F10 と SLP-F20 の共通取扱説明書になっています。 Jiii この取扱説明書の構成 この取扱説明書は、次のように構成されています。 第1章 ご使用の前に 本ローダの用途や特長、使用環境について説明しています。 第2章 インストールと基本機能 本ローダのインストール方法、起動・終了方法、機能、画面構成など基本 動作について説明しています。 第3章 操 作 形番設定、ファイル操作、印刷、本体との通信、データの設定など、設定 に関する操作方法の説明しています。 第4章 トラブルシューティング エラーメッセージ、トラブル発生時の対処方法について説明しています。 付 録 コード表を載せています。 この取扱説明書の表記について この取扱説明書の表記は、次のようにしています。 取扱い上の注意 : 取り扱い上、注意していただきたい事柄を示しています。 参考 : 知っていただくと便利な事柄を示しています。 ①②③ 操作の手順、または図などの説明のため対応する部分を示しています。 [開く]ボタン パソコン画面の選択ボタンを示しています。 [ファイル] [上書き保存] [完了] パソコン画面のメッセージ、およびメニューを示しています。 》 操作の結果、パソコンや機器に表示される内容や、操作後の機器の状 態を示します。 [TAB]キー、[↑]キー キーボードのキーを示しています。 [Ctrl]+[X]キー キーボードの[Ctrl]キーを押しながら[X]キーを押すことを示していま す。 * 各パソコン画面の図は、SLP-F20 の画面で説明しています。 Jiv 目 次 確認してください この取扱説明書の位置づけ この取扱説明書の構成 この取扱説明書の表記について 第 1 章 ご使用の前に 1-1 概 要・・・・・・・・・・・・・・・・・・・・・・・・・・・・・・・・・・・・・・・・・・・・・・J1 1-2 動作に必要なシステム環境 ・・・・・・・・・・・・・・・・・・・・・・・・・・・・・・・・・J2 ■ ハードウェア機器 ・・・・・・・・・・・・・・・・・・・・・・・・・・・・・・・・・・・・J2 ■ ハードウェア構成 ・・・・・・・・・・・・・・・・・・・・・・・・・・・・・・・・・・・・J3 ■ 動作確認に使用した機器 ・・・・・・・・・・・・・・・・・・・・・・・・・・・・・・・・J3 第 2 章 インストールと基本機能 2-1 インストール ・・・・・・・・・・・・・・・・・・・・・・・・・・・・・・・・・・・・・・・・・J4 2-2 起動と終了 ・・・・・・・・・・・・・・・・・・・・・・・・・・・・・・・・・・・・・・・・・・・J6 ■ ローダを起動する ・・・・・・・・・・・・・・・・・・・・・・・・・・・・・・・・・・・・J6 ■ ローダを終了する ・・・・・・・・・・・・・・・・・・・・・・・・・・・・・・・・・・・・J6 2-3 機能説明 ・・・・・・・・・・・・・・・・・・・・・・・・・・・・・・・・・・・・・・・・・・・・J7 ■ ローダの機能 ・・・・・・・・・・・・・・・・・・・・・・・・・・・・・・・・・・・・・・・J7 2-4 画面構成 ・・・・・・・・・・・・・・・・・・・・・・・・・・・・・・・・・・・・・・・・・・・・J8 ■ ローダの画面構成 ・・・・・・・・・・・・・・・・・・・・・・・・・・・・・・・・・・・・J8 第 3 章 操 作 3-1 オプションの設定 ・・・・・・・・・・・・・・・・・・・・・・・・・・・・・・・・・・・・・・J9 ■ 形番設定 ・・・・・・・・・・・・・・・・・・・・・・・・・・・・・・・・・・・・・・・・・・J9 ■ 環境設定 ・・・・・・・・・・・・・・・・・・・・・・・・・・・・・・・・・・・・・・・・・J10 3-2 ファイルの操作 ・・・・・・・・・・・・・・・・・・・・・・・・・・・・・・・・・・・・・・・J11 ■ 新規ファイルを作成する ・・・・・・・・・・・・・・・・・・・・・・・・・・・・・・・J11 ■ 既存のファイルを開く ・・・・・・・・・・・・・・・・・・・・・・・・・・・・・・・・J11 ■ ファイルを上書きする ・・・・・・・・・・・・・・・・・・・・・・・・・・・・・・・・J11 ■ ファイルに名前を付けて保存する ・・・・・・・・・・・・・・・・・・・・・・・・・J12 ■ CSV 形式ファイルを出力する ・・・・・・・・・・・・・・・・・・・・・・・・・・・・J12 3-3 印 刷 ・・・・・・・・・・・・・・・・・・・・・・・・・・・・・・・・・・・・・・・・・・・・・J13 ■ パラメータの印刷 ・・・・・・・・・・・・・・・・・・・・・・・・・・・・・・・・・・・J13 3-4 本体との通信 ・・・・・・・・・・・・・・・・・・・・・・・・・・・・・・・・・・・・・・・・J15 ■ 本体からローダへ通信する(ローダへ読み出す) ・・・・・・・・・・・・・・・・・J15 ■ ローダから本体へ通信する(ローダから書き込む) ・・・・・・・・・・・・・・・・J15 ■ 日付/時刻を本体に設定する。・・・・・・・・・・・・・・・・・・・・・・・・・・・・J15 3-5 データの設定 ・・・・・・・・・・・・・・・・・・・・・・・・・・・・・・・・・・・・・・・・J16 ■ 設定項目を選択する ・・・・・・・・・・・・・・・・・・・・・・・・・・・・・・・・・・J16 ■ 数値データを入力する ・・・・・・・・・・・・・・・・・・・・・・・・・・・・・・・・J16 ■ 文字データを入力する ・・・・・・・・・・・・・・・・・・・・・・・・・・・・・・・・J18 Jv 第 4 章 トラブルシューティング 4-1 エラーメッセージ ・・・・・・・・・・・・・・・・・・・・・・・・・・・・・・・・・・・・・・J19 ■ 通信エラーメッセージ ・・・・・・・・・・・・・・・・・・・・・・・・・・・・・・・・J19 ■ ファイルエラーメッセージ ・・・・・・・・・・・・・・・・・・・・・・・・・・・・・J19 ■ 印刷エラーメッセージ ・・・・・・・・・・・・・・・・・・・・・・・・・・・・・・・・J19 ■ 起動エラーメッセージ ・・・・・・・・・・・・・・・・・・・・・・・・・・・・・・・・J19 付録 ■ コード表 ・・・・・・・・・・・・・・・・・・・・・・・・・・・・・・・・・・・・・・・・・J20 Jvi 第 1 章 ご使用の前に 1 - 1 概 要 SLP-F10/F20(以下、ローダと呼びます)は、SRF100/200 記録計(以下、本体と呼びます)用のエンジニア リングツールです。 本ローダは、パーソナルコンピュータの日本語版Windows95/98/Me/2000/XP上で動作するソフトウェ アパッケージです。 本ローダは次のような機能を持っています。 ・ パラメータの設定 ・ 本体との通信機能(パラメータの書き込み/読み出し) ・ ファイル機能(パラメータの書き込み/読み出し) ・ 印刷機能(パラメータの印刷) 本ローダで取り扱いできる本体形番は、以下のとおりです。 形 番 本体形番 SLP-F20 SRF206/212/224 SLP-F10 SRF101/102/103 SRF201/202/203 SRF106 参考 2-1 インストール (J4 ページ) の手順でハードディスクにインストー ルしてください。 お買い上げのシステムディスクは保存用としてください。 取扱い上の注意 このディスクは、システムを含まないため、そのままでは使用できません。 J1 1 - 2 動作に必要なシステム環境 本ローダを使用するには、次のシステム環境が必要です。 ■ ハードウェア機器 項 目 パソコン 周辺機器 内 容 対象機種 Pentium 以上の CPU を搭載している PC/AT 互換機 メモリ 24M バイト以上 オペレーティングシステム 日本語版 Windows95/98/Me/2000/XP (以下、Windows と呼びます) 日本語入力システム Windows に対応した日本語入力システム ディスプレイ コンピュータ本体に接続可能または内蔵されてい て Windows に対応したもの プリンタ Windows に対応したプリンタドライバを持つ プリンタ(A4 横に対応していること) シリアルポート * 9 ピンシリアルポート 1ch 以上 ハードディスクドライブ 空き容量が 40M バイト以上あるハードディスク フロッピーディスクドライブ 1 ドライブ以上 お買い上げいただいたパッケージのフロッピーデ ィスクを読みとれるタイプのもの (1.44M バイトフォーマット) ポインティングデバイス マウス、またはマウス相当のデバイスで Windows に対応したもの * : シリアルポートについて パソコンは9ピンシリアルポートが内蔵されているものを使用することをお勧め します。 パソコンにシリアルポートが内蔵されていない場合、下記のどれかの拡張アダプ タによりローダケーブルを接続することができます。 ただし、パソコンの環境などにより動作が不安定になることがあります。 ・専用インターフェイス(ポートリプリケータ) 各パソコン専用アダプタ(パソコンの機種ごとに専用です) ・CF カードアダプタ IBSジャパン社製CF232 http://www.ibsjapan.com/CF232.htm 動作確認パソコンIBM社Thinkpad A31 RATOC社製REX-CF60 http://www.ratocsystems.com/products/subpage/cf60.html ・USB アダプタ 株式会社アイ・オー・データ機器製USB-RSAQ3 http://www.iodata.jp/prod/mobile/serial/2004/usb-rsaq3/ 動作確認パソコンIBM社Thinkpad A31 USBケーブルを接続するときには、ポート番号を確認してください。 USBケーブルを接続する位置によって番号が変わります。 取扱い上の注意 ・印刷機能は、ご使用のプリンタが動作することを確認してからお使いく ださい。 ・他のアプリケーションソフトはすべて終了してください。 他のアプリケーションソフトが動作中のとき、ローダが動作しないこと があります。 J2 ■ ハードウェア構成 SLP-F10/F20 データ用ディスク SRF100/200 プリンタ 読み込み/保存 送信/受信 専用ケーブル(付属品) ■ 動作確認に使用した機器 項 目 パソコン プリンタ メーカー 内 容 Dell Optiplex Gxi5200 Dell Optiplex GX5166 富士通 FMV-5166T3 Canon LBP-720 Canon BJC-620JW EPSON LP-1000 J3 第 2 章 インストールと基本機能 2 - 1 インストール ここでは、ローダをパソコンにインストールする方法を説明します。 取扱い上の注意 他のアプリケーションソフトが動作している場合、インストールプログラ ムが正常に動作しないことがあります。 他のアプリケーションソフトの常駐を解除してからインストールプログラ ムを起動してください。 また他のアプリケーション、ドライバなどの組み合わせにより本製品が動 作しないことがあります。 また Windows、パソコンの設定に関しては、Windows、パソコンに付属の 取扱説明書をご覧ください。 ● ローダをインストールする ① 画面下部の[スタート]ボタンをクリック後 [ファイル名を指定して実行 R] を選択します。 ② [A:¥SETUP] をキーボードから入力します。 ③ 本ソフトウエアのディスクをディスクドライブにセットし、[OK]ボタン をクリックします。 》インストールプログラムが起動されます。 参考 インストール先ディレクトリを変更するには ます。 J4 [参照] をクリックし ④ [次へ] をクリックします。 》次の画面が表示されます。 参考 グループを変更する場合は、グループ名を入力してください。 ⑤ [次へ] をクリックします。 》正常終了すると、次の画面が表示されます。 ⑥ [完了] をクリックします。 》インストールプログラムが終了します。 J5 2 - 2 起動と終了 ■ ローダを起動する ① 画面下部の[スタート]ボタンをクリックし [プログラム] SLP-F □□(SRF □□□)のアイコンを選択します。 》ローダが起動し、オープニング画面が表示されます。 》メニューウインドウが表示されます。 の [SLP] の 参考 使用しているオペレーティングシステムやマウスの使用方法について は、Windowsに付属の取扱説明書をご覧ください。 ■ ローダを終了する ① 画面右上の[終了]ボタンをクリックします。 また、[ファイル] の [SLP-F □□の終了] コマンドを選択しても同じ 処理が行えます。 》下記の画面が表示されます。 ② [OK]ボタンをクリックします。 J6 2 - 3 機能説明 ■ ローダの機能 ローダは本体の機能を構築するのに必要な ・パラメータ編集機能 ・ファイル管理機能 ・データの通信機能 ・印刷機能 ・形番設定機能 を持っています。 機能の一覧は次のとおりです。 機 能 パラメータ編集機能 ・各パラメータを作成/編集する ファイル管理機能 ・作成したデータをフロッピーディスクやハードディスクに ファイルとして保存する ・保存したファイルの読み出し、再編集する データ通信機能 ・作成したデータを本体へ書き込みする ・本体からローダへ読み出しする 印刷機能 ・作成した各パラメータの印刷をする 形番設定機能 ・ローダと接続する本体形番を設定する 参考 1ファイルとは本体1台分のデータのことです。 1ファイル=各パラメータ設定+形番情報 J7 2 - 4 画面構成 ■ ローダの画面構成 ・ローダの基本画面です。 メニューバー ボタンバー 選択ウインドウ 設定項目 メッセージウインドウ ・[ヘルプ] の 表示です。 J8 スクロールバー [バージョン情報] を選択したときのダイアログボックス 第 3 章 操 作 3 - 1 オプションの設定 ■ 形番設定 最初に本体の形番にあわせてローダの形番設定を行ってください。 ① [形番設定]ボタンをクリックします。 [オプション] の [形番設定] を選択しても同じ処理が行えます。 また、[Ctrl]+[T]キーでも同じ処理が行えます。 》形番設定ダイアログボックスが表示されます。 ② 基本形番、出力形式、付加機能1、付加機能2を設定します。 ③ 各設定を選択項目の中から選択してください。 ④ [OK]ボタンをクリックします。 取扱い上の注意 ・ここで設定される形番は、ローダの内部で使用するための設定です。 ・ローダでパラメータの設定をする際は、本体形番に合わせて形番設 定をしてください。 ・ローダで形番を変更しても、本体の形番は変わりません。 J9 ■ 環境設定 パソコンの通信ポートやフォントを設定します。 ① [環境設定]ボタンをクリックします。 [オプション] の [環境設定] を選択しても同じ処理が行えます。 また、[Ctrl]+[E]キーでも同じ処理が行えます。 》環境設定ダイアログボックスが表示されます。 ② 通信ポートを設定します。 各設定を選択してください。 ③ フォントの大きさを設定します。 各設定を選択してください。 ④ [OK]ボタンをクリックします。 取扱い上の注意 ・通常は「COM1」を使用してください。 選択可能な場合でも通信ポートの形状により使用できない場合があ ります。 ・編集画面のフォントは専用フォントを使用するため変更できません。 J10 3 - 2 ファイルの操作 ■ 新規ファイルを作成する ① [新規作成]ボタンをクリックします。 [ファイル] の [新規作成] を選択しても同じ処理が行えます。 また、[Ctrl]+[N]キーでも同じ処理が行えます。 》新規作成ダイアログボックスが表示されます。 ② [OK]ボタンをクリックします。 》新規のファイルが開かれます。 ■ 既存ファイルを作成する ① [開く]ボタンをクリックします。 [ファイル] の [開く] を選択しても同じ処理が行えます。 また、[Ctrl]+[O]キーでも同じ処理が行えます。 》ファイルを開くダイアログボックスが表示されます。 ② [ファイルの場所] でフォルダ名を選択します。 ③ ファイル名をクリック(選択)します。 ④ [開く]ボタンをクリックします。 》設定したファイル名のファイルが開きます。 ■ ファイルを上書き保存する ① [上書き保存]ボタンをクリックします。 [ファイル] の [上書き保存] を選択しても同じ処理が行えます。 また、[Ctrl]+[S]キーでも同じ処理が行えます。 》ファイルが上書き保存されます。 J11 ■ ファイルに名前を付けて保存する ① [ファイル] の [ファイルに名前を付けて保存] を選択してください。 また、[Ctrl]+[A]キーでも同じ処理が行えます。 》名前を付けて保存ダイアログボックスが表示されます。 ② [保存する場所] でフォルダ名を選択してください。 ③ [ファイル名] にファイル名を入力します。 ④ [保存]ボタンをクリックします。 》設定したファイル名でファイルが保存されます。 参考 [ファイル名]ウインドウでファイル名をクリック(選択)したときは、 上書き保存となります。 ■ CSV 形式ファイルを出力する ① [ファイル] の [CSV 出力] を選択してください。 また、[Ctrl]+[X]キーでも同じ処理が行えます。 》CSV出力ダイアログボックスが表示されます。 ② [保存する場所] でフォルダ名を選択します。 ③ [ファイル名] にファイル名を入力します。 ④ [保存]ボタンをクリックします。 》設定したファイル名でファイルが出力されます。 参考 ファイル名ウインドウでファイル名をクリック(選択)したときは、上 書き保存となります。 CSV形式はカンマで区切られたテキストファイルです。 市販の表計算ソフトMicrosoft Excelなどで利用可能です。 J12 3 - 3 印 刷 ■ パラメータの印刷 ● 全項目を印刷する ① [印刷]ボタンをクリックします。 [ファイル] の [印刷] を選択しても同じ処理が行えます。 また、[Ctrl]+[P]キーでも同じ処理が行えます。 》印刷実行ダイアログボックスが表示されます。 ② 印刷実行ダイアログボックスの中から [全項目] を選択します。 ③ [OK]ボタンをクリックします。 》全パラメータが印刷されます。 ● 選択パラメータの全チャンネルを印刷する ① [印刷]ボタンをクリックします。 [ファイル] の [印刷] を選択しても同じ処理が行えます。 また、[Ctrl]+[P]キーでも同じ処理が行えます。 》印刷実行ダイアログボックスが表示されます。 ② 印刷実行ダイアログボックスの中から印刷したい項目を選択します。 ③ 印刷実行ダイアログボックスの中から全チャンネルを選択します。 ④ [OK]ボタンをクリックします。 》選択したパラメータが印刷されます。 ● 選択パラメータのチャンネルを選択して印刷する ① [印刷]ボタンをクリックします。 [ファイル] の [印刷] を選択しても同じ処理が行えます。 また、[Ctrl]+[P]キーでも同じ処理が行えます。 》印刷実行ダイアログボックスが表示されます。 ② 印刷実行ダイアログボックスの中から印刷したい項目を選択します。 ③ 印刷実行ダイアログボックスの中から印刷したいチャンネルを選択します。 ④ [OK]ボタンをクリックします。 》選択したパラメータが印刷されます。 取扱い上の注意 SLP-F10 では、チャンネルを指定した印刷はできません。 J13 ・ 印刷ダイアログボックス表示 ・ 印刷サンプル J14 3 - 4 本体との通信 ■ 本体からローダへ通信する(ローダへ読み出す) ① [読出し(SRF → SLP)]ボタンをクリックします。 [通信] の [読出し(SRF → SLP)] を選択しても同じ処理が行えます。 また、[Ctrl]+[R]キーでも同じ処理が行えます。 》確認ダイアログボックスが表示されます。 ② [OK]ボタンをクリックします。 》ローダへの読み出しを開始します。 ■ ローダから本体へ通信する(ローダから書き込む) ① [書込み(SLP → SRF)]ボタンをクリックします。 [通信] の [書込み(SLP → SRF)] を選択しても同じ処理が行えます。 また、[Ctrl]+[W]キーでも同じ処理が行えます。 》確認ダイアログボックスが表示されます。 ② [OK]ボタンをクリックします。 》本体への書き込みを開始します。 取扱い上の注意 本体とローダで設定した形番があっていない場合は、形番が異なって いることを表示します。 ■ 日付/時刻を本体に設定する ① [通信] の [日付/時刻書込み] を選択します。 また、[Ctrl]+[D]キーでも同じ処理が行えます。 》日付/時刻書き込みダイアログボックスが表示されます。 ② [OK]ボタンをクリックします。 》ローダへの日付/時刻書き込みを開始します。 取扱い上の注意 パソコンの時刻はあらかじめ設定しておいてください。 J15 3 - 5 データの設定 ■ 設定項目を選択する ● キーボードで反転表示を移動する ① [→]、[←]、[↑]、[↓]キーを押すと表の中で反転表示が移動します。 ● マウスで反転表示を移動する ① 移動したい部分でクリックします。 ② スクロールバーをクリックします。 》画面がスクロールします。最上段、最下段が表示されているときはそ れ以上スクロールしません。 ● 操作するウインドウを変更する ① [Tab]キーを押します。 》操作対象のウインドウを移動します。 参考 設定できる部分を順番に移動します。 ■ 数値データを入力する ● 数値の入力方法 数値の入力方法は次のとおりです。 ・数値を入力したいときはキーボードの[0]∼[9]キーを押します。 ・16進数を入力したいときはキーボードの[0]∼[9]キー、[A]∼[F]キーを押 します。 ・小数点を入力したいときは希望の位置で[ . ]キーを押します。 ・マイナス値を入力したいときは[ー]キーを押します。 ・入力を間違えて、1文字消したいときは[Back Space]キーを押します。 》表示されている値が1文字消えます。 ・入力中の数値をキャンセルしたいときは[Esc]キーを押します。 》元の設定値が表示されます。 ● 設定項目への入力 設定項目への入力は[0]∼[9]キーを使用します。 ① 設定項目を選択(反転表示)します。 ② 希望の設定値を[0]∼[9]キーにより入力します。 ③ [Ent]キーを押します。また、[↑]、[↓]キーでも同じ処理が行えます。 》設定値が確定されます。 J16 参考 ・[↑]、[↓]キーの場合、数値確定後に反転表示が移動します。 マウスで設定項目を移動したときは、設定値は確定されません。 ・設定値が無効なときは、元の設定値が表示されます。 途中で取り消したいときは、設定値を確定する前に[Esc]キーを押し ます。 ● データを選択して入力する 参考 選択入力ができる項目では自動的に項目が表示されます。 ① 設定項目のボタンを押します。 [Tab]、[Alt]+[↓]キーを押しても同じ処理が行えます。 》選択項目が表示されます。 選択項目 ② マウスで設定を選択します。 [→]、[←]、[↑]、[↓]キー、[Ent]キーでも同じ処理が行えます。 》設定値が確定されます。 参考 マウスを使用の場合、クリックで選択と決定が同時に行われます。 J17 ■ 文字データを入力する ● 文字データの入力方法 文字データの入力方法は次のとおりです。 ・入力を間違えて、1文字消したいときは[Delete]キーを押します。 》表示されている値が1文字消えます。 ・すべて削除したいときは[Home]キーを押します。 ・入力中にキャンセルしたいときは、設定値を確定する前に[Esc]キーを押 します。 》元の設定値が表示されます。 ● 文字データを選択して入力する ① 設定項目を選択(反転表示)します。 ② [Enter]キーを押します。 また、 [編集] の [文字入力一覧] を選択しても同じ処理が行えます。 》文字一覧入力が表示されます。 ③ [Home]キーを押して現在の入力をクリアします。 ④ [→]、[←]キーで文字グループを選択します。 また、[文字グループ(→)]ボタン、[文字グループ(←)]ボタンを選択して も同じ処理が行えます。 ⑤ [↑]、[↓]キーで文字を選択します。 また、マウスでクリックしても同じ処理が行えます。 ⑥ [Insert]キーで文字を追加します。 また、マウスでダブルクリックしても同じ処理が行えます。 ⑦ ④から⑥を必要な回数繰り返します。 ⑧ [Enter]キーを押して確定します。 また、[OK]ボタンでも同じ処理が行えます。 》設定値が確定されます。 取扱い上の注意 文字データの直接入力はできません。 日付タイプが JP 以外のときは、カタカナのコードは選択できません。 (SRF206/212/224 と SLP-F20 の組み合わせに限ります) J18 第 4 章 トラブルシューティング 4 - 1 エラーメッセージ ■ 通信エラーメッセージ 分 類 メッセージ 通信エラー タイムアウト 内 容 対処方法 タイムアウト時間内に電文を受 ケーブルの接続、接触を確認し 信できなかった てください 通信ポートをオープンできま 通信ポートをオープンできなか 他の通信ポートを使用している せん った ソフトと同時に使用しないでく ださい 通信エラーが発生しました システムのエラーが発生した ローダを終了させ、 Windows を再起動してください 本体 接続中の計器を確認してくだ 接続されている計器が SRF100/ SRF100/200 に接続して使用 状態エラー さい 200 以外のものである してください SRF100/200 が接続されて いない 接続中の SRF100/SRF200 を サポートできません 使用しているローダと本体の バージョンが対応していない 当社支店、営業所、および販売 店にご相談ください ■ ファイルエラーメッセージ 分 類 メッセージ ファイル名 このファイル名は無効です エラー 内 容 無効なファイル名を入れた このファイル名が見つかり 存在しないファイル名を入力 ません した パスとファイル名を確認して ください 対処方法 正しいファイル名を入力してく ださい 存在するファイル名を正しく入 力してください このファイル名はデバイス名 デバイス名として予約されてい 正しいファイル名を入力してく として予約されています るファイル名を入力した ださい 別の名前を指定してください ディスク エラー パス名 エラー ディスクの空き容量が不足で ディスクの空き容量が不足して ディスクの空き容量を十分に確 す いる 保してください デバイスの準備ができていま ディスクが準備できていない せん ディスクを準備したあと、再度 操作を行ってください ファイルを作成できません ファイルが作成できなかった 別の場所に保存してください ファイル名が長すぎます ファイル名が長すぎた ファイル名を 255 文字以下に してください パス名が存在しません パス名を確認してください 不正なパス名を入力した 正しいパス名を入力し、再度操 作を行ってください ファイルが壊れている 壊れたファイルは使用できません ファイル情報 ファイルサイズが不正です エラー ファイル情報が不正です 再度、作成してください ■ 印刷エラーメッセージ 分 類 メッセージ 印刷エラー Unable to begin printing 内 容 プリンタ設定を間違えている 対処方法 プリンタ設定を修正した後、再 度操作を行ってください ■ 起動エラーメッセージ 分 類 ローダ システム エラー メッセージ 内 容 一度に複数の SLP-F10/F20 を ローダを多重起動した 起動することはできません 対処方法 [OK]ボタンを押してください J19 付 録 ■ コード表 上位 4 ビット → 2 下 位 4 ビ ッ ト ↓ 0 3 4 5 6 7 8 0 @ P ` p 3 B C D ー タ ミ ア チ ム イ ツ メ 」 ウ テ モ 1 ! 1 A Q a q ° 2 ” 2 B R b r ° 3 # 3 C S c s . 4 $ 4 D T d t 、 エ ト ヤ 5 % 5 E U e u . オ ナ ユ 6 & 6 F V f v ヲ カ ニ ヨ 7 ’ 7 G W g w ァ キ ヌ ラ 8 ( 8 H X h x ィ ク ネ リ 9 ) 9 I Y i y ゥ ケ ノ ル A * : J Z j z ェ コ ハ レ B + ; K [ k Ω ォ サ ヒ ロ C , < L ¥ l ャ シ フ ワ D - = M ] m µ ュ ス ヘ ン E . > N ^ n 2 ョ セ ホ ゛ F / ? O _ o ッ ソ マ ° 2 SLP-F10 でサポートできるコード SLP-F20 でサポートできるコード J20 A 。 「 改訂履歴 印刷年月 資料番号 種 類 98-04 99-12 CP-UM-5067 初 版 第2版 00-12 03-01 06-04 改訂ページ 第 3 版 全体 表2 J18 J20 第 4 版 見返し 第 5 版 全体 見返し J2 J4 改訂内容 SLP-F10(SRF100)の追加 ローダ取説文統一と製作ツール変更による 全面改訂 和文/英文合本化により、全ページに"J"を追加 重要事項(ローダプラグについて) 追加 取扱い上の注意へ説明文追加 付録 コード表整備 使用上の制限について 変更 動作環境 Windows95→Windows95/98/Me/2000/XPとする ローダプラグに関する注意のイラストを変更 シリアルポートについての説明を追加 インストールの方法①∼③の説明変更 コピーしてお使いください。 FAX.送信先 FAX.0466-27-2669 株式会社 山武 藤沢工場 テクニカルマニュアル製作担当行 取扱説明書に関するご意見 この用紙は、取扱説明書の記載内容についてのご意見にだけにご使用ください。 機器の使用方法やトラブルの対策などについてのお問い合わせは、購入された販売店、または当 社販売員にお問い合わせください。 本書を使いやすくするために、皆さまからの貴重なご意見(説明不足・誤字・脱字・ご要望など)を お待ちしております。ぜひ、ご協力をお願いします。 ご記入くださいましたら、ご面倒でも FAX にて当社までご送付願います。 ご 芳 名 電話番号 貴 社 名 FAX 番号 所属部署 E-mailアドレス 所 在 地 名 称 SRF100/200 記録計用 スマートローダパッケージ SLP-F10/F20 CP-UM-5067 ページ 行 第5版 内容へのご指摘 / ご要望 山武記入欄 記 事 受付年月日 受付 No. 受付担当 SRF100/200 記録計用 スマートローダパッケージ SLP-F10/F20 取扱説明書 CP-UM-5067 初 版 第 5 版 編 集 発 行 1998 年 4 月 発行 2006 年 4 月 改訂 株式会社 山武 アドバンスオートメーションカンパニー 株式会社 山武 アドバンスオートメーションカンパニー 〒100-6419 東京都千代田区丸の内2-7-3 東京ビル (W) 〔ご注意〕この資料の記載内容は、お断りなく変更する場合も ありますのでご了承ください。 アドバンスオートメーションカンパニー 本社 〒 100-6419 北海道支店 東北支店 北関東支店 東京支社 東京都千代田区丸の内 2-7-3 (011)781-5396 (022)292-2004 (048)653-8733 (03)6810-1200 中 関 中 九 部 西 国 州 支 支 支 支 社 社 店 社 お問い合わせは、下記または当社事業所へお願いいたします。 東京ビル (052)238-3037 (06)6881-3383 ∼ 4 (082)222-3982 (093)953-0631 製品のお問い合わせ、計装のご相談は… コールセンター: 0466-20-2143 〈COMPO CLUB アドレス〉http://www.compoclub.com/ 〈山武ホームページアドレス〉http://jp.yamatake.com/ この資料は再生紙を使用しています。 (11) 1998 年 4 月 初版発行 2006 年 4 月 改訂 5 版 No. CP-UM-5067E SLP-F10/F20 Smart Loader Package for SRF100/SRF200 Smart Recorder User's Manual Thank you for purchasing the SLPF10/F20 Smart Loader Package for SRF100/200 Smart Recorder. This manual contains information for ensuring correct use of the SLPF10/F20. It also provides necessary information for installation, maintenance, and trouble-shooting. This manual should be read by those who design and maintain devices that use the SLP-F10/F20. Be sure to keep this manual nearby for handy reference. RESTRICTIONS ON USE This product has been designed, developed and manufactured for general-purpose application in machinery and equipment. Accordingly, when used in applications outlined below, special care should be taken to implement a fail-safe and/or redundant design concept as well as a periodic maintenance program. • Safety devices for plant worker protection • Start/stop control devices for transportation and material handling machines • Aeronautical/aerospace machines • Control devices for nuclear reactors Never use this product in applications where human safety may be put at risk. IMPORTANT Do not apply a strong force while connecting a loader plug. Failure to do so might damage the recorder. Handling Precautions Application of excessive force to the loader plug might cause communication failure. If such failure happens, reconnect the loader plug correctly. NOTICE Be sure that the user receives this manual before the product is used. Copying or duplicating this user’s manual in part or in whole is forbidden. The information and specifications in this manual are subject to change without notice. Considerable effort has been made to ensure that this manual is free from inaccuracies and omissions. If you should find an error or omission, please contact Yamatake Corporation. In no event is Yamatake Corporation liable to anyone for any indirect, special or consequential damages as a result of using this product. ©1999 Yamatake Corporation ALL RIGHTS RESERVED Unpacking Check the following when removing the Smart Loader Package SLP-F10/F20 from its package. 1. Check the model No. to make sure that you have received the product that you ordered. 2. Check the SLP-F10/F20 for any apparent physical damage. 3. Check the contents of the package against the Package List to make sure that all accessories are included in the package. After unpacking, handle the SLP-F10/F20 and its accessories taking care to prevent damage or loss of parts. If an inconsistency is found or the package contents are not in order, immediately contact your dealer. Accessories of the SLP-F20 Name Model No. SLP-F20 System Disk SLP-F20J20 Q’ty 1 Remarks 3.5 inch disk (1.44 MB) x 1 disk 1 Special Cable User’s Manual CP-UM-5067E -XXXX No. CP-UM 1 This manual. This manual is the common manual of the SLP-F10 and the SLP-F20. Q’ty Remarks E X XXXX XX XXXX anua ser's X XXXX XXXX XXXXX XXXXX XX XXXXX XXXXX XX XXXXX XXXXX XX XXXXX XXXXX XX XXXXX XXXXX XX XXXXX XXXXX XXXX XXXX XXXX XXXX XXXX Accessories of the SLP-F10 Name Model No. SLP-F10 System Disk SLP-F10J20 1 3.5 inch disk (1.44 MB) x 1 disk 1 Special Cable User’s Manual CP-UM-5067E -XXXX No. CP-UM E X XXXX XX XXXX anua ser's X XXXX XXXX XXXXX XXXXX XX XXXXX XXXXX XX XXXXX XXXXX XX XXXXX XXXXX XX XXXXX XXXXX XX XXXXX XXXXX XXXX XXXX XXXX XXXX XXXX Ei 1 This manual. This manual is the common manual of the SLP-F10 and the SLP-F20. The Role of This Manual In all, 7 manuals have been prepared for the SRF100/200. Read the manual according to your specific requirements. The following lists all the manuals that accompany the SRF100/200 and gives a brief outline of the manual: If you do not have the required manual, contact Yamatake Corporation or your dealer. No. CP-U E M-XXXX X XXXX XX XXXX ua an ser's X XXXX XX XXXXXX XXX XXX XXXX XXXXXX XXX XXX XXXX XXXXXX XXX XXX XXXX XXXXXX XXX XXX XXXX XXXXXX XXX XXX XXXX XXX XXX XXX XXX Smart Recorder Dot Printing Model SRF206/212/224 Installation/Operation Manual No.CP-SP-1027E This manual is required reading for those who use the SRF206/212/224, those who design hardware for integrating the SRF206/212/224 into operator control panels, those who carry out maintenance, and those who operate instruments in which the SRF206/212/224 is integrated. It describes how to install and wire the SRF206/212/224 for integrating into instruments, method of operation, maintenance and inspection, troubleshooting, and hardware specifications. No. CP-U E M-XXXX X XXXX XX XXXX ua an ser's X XXXX XX XXXXXX XXX XXX XXXX XXXXXX XXX XXX XXXX XXXXXX XXX XXX XXXX XXXXXX XXX XXX XXXX XXXXXX XXX XXX XXXX XXXXXX XXX XXX Smart Recorder Pen Printing Model SRF201/202/203 Installation/Operation Manual No.CP-SP-1037E This manual is required reading for those who use the SRF201/202/203, those who design hardware for integrating the SRF201/202/203 into operator control panels, those who carry out maintenance, and those who operate instruments in which the SRF201/202/203 is integrated. It describes how to install and wire the SRF201/202/203 for integrating into instruments, method of operation, maintenance and inspection, troubleshooting, and hardware specifications. No. CP-U E M-XXXX X XXXX XX XXXX ua an ser's X XXXX XX XXXXXX XXX XXX XXXX XXXXXX XXX XXX XXXX XXXXXX XXX XXX XXXX XXXXXX XXX XXX XXXX XXXXXX XXX XXX XXXX XXXXXX XXX XXX Smart Recorder Dot Printing Model SRF106 Installation/Operation Manual No.CP-UM-1666E This manual is required reading for those who use the SRF106, those who design hardware for integrating the SRF106 into operator control panels, those who carry out maintenance, and those who operate instruments in which the SRF106 is integrated. It describes how to install and wire the SRF106 for integrating into instruments, method of operation, maintenance and inspection, troubleshooting, and hardware specifications. No. CP-U E M-XXXX X XXXX XX XXXX ua an ser's X XX XX XX XXXXXX XXX XXX XXXX XXXXXX XXX XXX XXXX XXXXXX XXX XXX XXXX XXXXXX XXX XXX XXXX XXXXXX XXX XXX XXXX XXXXXX XXX XXX Smart Recorder Pen Printing Model SRF101/102/103 Installation/Operation Manual No.CP-UM-1667E This manual is required reading for those who use the SRF101/102/103, those who design hardware for integrating the SRF101/102/103 into operator control panels, those who carry out maintenance, and those who operate instruments in which the SRF101/102/103 is integrated. It describes how to install and wire the SRF101/102/103 for integrating into instruments, method of operation, maintenance and inspection, troubleshooting, and hardware specifications. Eii No. CP-U E M-XXXX X XXXX XX XXXX ua an ser's X XXXX XX XXXXXX XXX XXX XXXX XXXXXX XXX XXX XXXX XXXXXX XXX XXX XXXX XXXXXX XXX XXX XXXX XXXXXX XXX XXX XXXX XXXXXX XXX XXX No. CP-U E M-XXXX X XXXX XX XXXX ua an ser's X XXXX XX XXXXXX XXX XXX XXXX XXXXXX XXX XXX XXXX XXXXXX XXX XXX XXXX XXXXXX XXX XXX XXXX XXXXXX XXX XXX XXXX XXXXXX XXX XXX No. CP-U E M-XXXX X XXXX XX XXXX ua an ser's X XXXX XX XXXXXX XXX XXX XXXX XXXXXX XXX XXX XXXX XXXXXX XXX XXX XXXX XXXXXX XXX XXX XXXX XXXXXX XXX XXX XXXX XXXXXX XXX XXX DigitroniK CPL Communications Manual SRF206/212/224 Dot Printing Model Version Manual No.CP-SP-1208E The SRF206/212/224 can communicate with other equipment via the RS485 or RS-232C interfaces. This manual is required reading for those who use the CPL communication functions of the SRF206/212/224. It briefly describes CPL communications, how to wire the SRF206/212/224, communication procedures, communication data for the SRF206/212/224, troubleshooting and communication specifications. DigitroniK CPL Communications Manual SRF101/102/103/106/201/202/203 Manual No.CP-UM-1668E The SRF101/102/103/106/201/202/203 can communicate with other equipment via the RS-485 or RS-232C interfaces. This manual is required reading for those who use the CPL communication functions of the SRF101/102/103/106/201/202/203. It briefly describes CPL communications, how to wire the SRF101/102/103/106/201/202/203, communication procedures, communication data for the SRF101/102/103/106/201/202/203, troubleshooting and communication specifications. SLP-F10/F20 Smart Loader Package for SRF100/200 Smart Recorder Manual No.CP-UM-5067E This Manual. This manual is packaged with the SLP-F10/F20. Running the SLP-F10/F20 package on a personal computer enables you to set up SRF100/200 parameters on the personal computer. This manual describes operations on the personal computer. This manual is the common manual of the SLP-F10 and the SLP-F20. Eiii Organization of This User’s Manual This manual is organized as follows: Chapter 1. INTRODUCTION This chapter describes SLP applications and features, and operating environment. Chapter 2. INSTALLATION & BASIC FUNCTIONS This chapter describes how to install, start up and quit the SLP, its functions, screen configurations and basic operations. Chapter 3. OPERATION This chapter describes how to set the type, file operations, printing, communications with the SRF and operations relating to data setup. Chapter 4. TROUBLESHOOTING This chapter describes error messages that are displayed when trouble occurs, and how to remedy trouble. Appendix This chapter gives a code table. Conventions Used in This Manual The following conventions are used in this manual: Handling Precautions : Handling Precautions indicate items that the user should pay attention to when handling the SLP-F10 or the SLP-F20. Note : Notes indicate useful information that the user might benefit by knowing. (1), (2), (3) : The numbers with the parenthesis indicate steps in a sequence or indicate corresponding parts in an explanation. <OK> : Indicates a selection button in screens displayed on the personal computer. [File] : [Over Write] Indicates messages and menus displayed on the personal computer. >> : Indicates the result of an operation, details displayed on the personal computer or devices, or the state of a device after an operation. TAB Key, ↑ Ctrl Key : Key+ X Key : Indicates keys on the keyboard. Indicates the operation of pressing the X Key while the on the keyboard. Ctrl Key is pressed * Each dialog box explanation of the personal computer is being done by using the dialog box of the SLP-F20 in this user's manual. Eiv Contents Unpacking The Role of This Manual Organization of This User’s Manual Conventions Used in This Manual Chapter 1. INTRODUCTION 1-1 Outline of the SLP . . . . . . . . . . . . . . . . . . . . . . . . . . . . . . . . . . . . . . . . . . . . . . . E1 1-2 System Operating Environment . . . . . . . . . . . . . . . . . . . . . . . . . . . . . . . . . . . . E2 ■ Hardware . . . . . . . . . . . . . . . . . . . . . . . . . . . . . . . . . . . . . . . . . . . . . . . . . . . E2 ■ Hardware Configuration . . . . . . . . . . . . . . . . . . . . . . . . . . . . . . . . . . . . . . . E3 ■ Compatible Equipment . . . . . . . . . . . . . . . . . . . . . . . . . . . . . . . . . . . . . . . . E3 Chapter 2. INSTALLATION & BASIC FUNCTIONS 2-1 Installing SLP . . . . . . . . . . . . . . . . . . . . . . . . . . . . . . . . . . . . . . . . . . . . . . . . . . . E4 2-2 Starting Up and Quitting SLP . . . . . . . . . . . . . . . . . . . . . . . . . . . . . . . . . . . . . . E6 ■ Starting Up SLP . . . . . . . . . . . . . . . . . . . . . . . . . . . . . . . . . . . . . . . . . . . . . . E6 ■ Quitting SLP. . . . . . . . . . . . . . . . . . . . . . . . . . . . . . . . . . . . . . . . . . . . . . . . . E6 2-3 Description of Functions . . . . . . . . . . . . . . . . . . . . . . . . . . . . . . . . . . . . . . . . . E7 ■ SLP Functions . . . . . . . . . . . . . . . . . . . . . . . . . . . . . . . . . . . . . . . . . . . . . . . E7 2-4 Screen Configuration . . . . . . . . . . . . . . . . . . . . . . . . . . . . . . . . . . . . . . . . . . . . E8 ■ SLP Screen Configuration . . . . . . . . . . . . . . . . . . . . . . . . . . . . . . . . . . . . . E8 Chapter 3. OPERATION 3-1 Setting Up Options . . . . . . . . . . . . . . . . . . . . . . . . . . . . . . . . . . . . . . . . . . . . . . E9 ■ Setting the Type. . . . . . . . . . . . . . . . . . . . . . . . . . . . . . . . . . . . . . . . . . . . . . E9 ■ Setting the Environment . . . . . . . . . . . . . . . . . . . . . . . . . . . . . . . . . . . . . . E10 3-2 File Operations . . . . . . . . . . . . . . . . . . . . . . . . . . . . . . . . . . . . . . . . . . . . . . . . E11 ■ Making New Files. . . . . . . . . . . . . . . . . . . . . . . . . . . . . . . . . . . . . . . . . . . . E11 ■ Opening Existing Files . . . . . . . . . . . . . . . . . . . . . . . . . . . . . . . . . . . . . . . E11 ■ Overwriting and Saving Files . . . . . . . . . . . . . . . . . . . . . . . . . . . . . . . . . . E11 ■ Saving Files With a New Name. . . . . . . . . . . . . . . . . . . . . . . . . . . . . . . . . E12 ■ Outputting CSV Format Files . . . . . . . . . . . . . . . . . . . . . . . . . . . . . . . . . . E12 3-3 Printing . . . . . . . . . . . . . . . . . . . . . . . . . . . . . . . . . . . . . . . . . . . . . . . . . . . . . . . E13 ■ Printing Parameters . . . . . . . . . . . . . . . . . . . . . . . . . . . . . . . . . . . . . . . . . E13 3-4 Communications with the SRF. . . . . . . . . . . . . . . . . . . . . . . . . . . . . . . . . . . . E15 ■ Communicating to the SLP from the SRF (reading to SLP) . . . . . . . . . . . . . . E15 ■ Communicating to the SRF from the SLP (writing from SLP) . . . . . . . . . . . . . . E15 ■ Setting the Date and Time on the SRF . . . . . . . . . . . . . . . . . . . . . . . . . . E15 3-5 Setting Up Data . . . . . . . . . . . . . . . . . . . . . . . . . . . . . . . . . . . . . . . . . . . . . . . . E16 ■ Selecting Setup Items . . . . . . . . . . . . . . . . . . . . . . . . . . . . . . . . . . . . . . . . E16 ■ Entering Numerical Data. . . . . . . . . . . . . . . . . . . . . . . . . . . . . . . . . . . . . . E16 ■ Entering Text Data. . . . . . . . . . . . . . . . . . . . . . . . . . . . . . . . . . . . . . . . . . . E18 Ev Chapter 4. TROUBLESHOOTING 4-1 Error Messages . . . . . . . . . . . . . . . . . . . . . . . . . . . . . . . . . . . . . . . . . . . . . . . . E20 ■ Communications Error Messages . . . . . . . . . . . . . . . . . . . . . . . . . . . . . . E20 ■ File Error Messages . . . . . . . . . . . . . . . . . . . . . . . . . . . . . . . . . . . . . . . . . E20 ■ Printing Error Messages . . . . . . . . . . . . . . . . . . . . . . . . . . . . . . . . . . . . . . E20 ■ Startup Error Messages . . . . . . . . . . . . . . . . . . . . . . . . . . . . . . . . . . . . . . E20 Appendix ■ Code Table . . . . . . . . . . . . . . . . . . . . . . . . . . . . . . . . . . . . . . . . . . . . . . . . . E21 Evi Chapter 1. 1-1 INTRODUCTION Outline of the SLP The SLP-F10/F20 (simply called “SLP” from here on) is an engineering tool for the Smart Recorder SRF100/200 (simply called “SRF” from here on). The SLP software package runs on Windows95/98/Me/2000/XP on a personal computer. The SLP has the following functions: • Parameter setup • Communications with SRF (reading/writing of parameters) • File operations (reading/writing of parameters) • Printing (printing of parameters) The SRF which can be set up with each SLP is as the follwing. Model No. of SLP Model No. of SRF SLP-F20 SRF206/212/224 SLP-F10 SRF101/102/103 SRF201/202/203 SRF106 Note Install SLP on the hard disk following the procedure in “2-1 Installing SLP”. Use the system disk that you have purchased as the backup system. Handling Precautions These disks do not contain the system, and cannot be used as they are. E1 Chapter 1 INTRODUCTION 1-2 System Operating Environment The following system environment is required for using the SLP: ■ Hardware Item Personal Computer Description Target model PC/AT compatibles with a Pentium chip or higher Memory 24MB or more Operating system Windows95/98/Me/2000/XP (simply called “Windows” from here on) Peripheral Devices Display Windows compatible display connectable to or built-into computer body Printer Windows compatible printer having a windows compatible printer driver capable of printing A4 landscape Serial port * At least 1 serial port (9pin D-Sub) Hard disk drive Hard disk with at least 40MB of free space Floppy disk drive At least 1 drive capable of reading the floppy disk in the product package (1.44MB format) Pointing device Windows compatible mouse or equivalent device *: Serial port It is recommended to use a personal computer with 9-pin serial port built-in. If your personal computer does not have any serial port, you may use any of the extension adaptors listed below to connect the loader cable. However, note that the operation may become unstable depending on the personal computer environment. • Special interface (port replicater) Adaptor specially designed for each personal computer (special adaptor for each personal computer model) • CF card adaptor CF232 manufactured by Elan Digital systems URL: http://www.elandigitalsystems.com/interface/cf232.php Operation confirmed personal computer, IBM's Thinkpad A31 REX-CF60 manufacture by RATOC. URL: http://www.ratocsystems.com/products/subpage/cf60.html(Japanese) • USB adaptor USB-RSAQ3 manufactured by I•O DATA DEVCE, INC. URL: http://www.iodata.jp/prod/mobile/serial/2004/usb-rsaq3/(Japanese) Operation confirmed personal computer, IBM's Thinkpad A31 When connecting the USB cable, check the port No. The port No. may vary depending on the USB cable connection position. Handling Precautions • Before using the print function, make sure that your printer can be operated. • Before starting up SLP, quit all other applications. If you start up SLP while another application is running, SLP may malfunction. E2 Chapter 1. INTRODUCTION ■ Hardware Configuration SLP-F10/F20 Data disk SRF100/200 Printer Reading/Saving Communications Special cable (provided) ■ Compatible Equipment Operation of SLP has been confirmed on the equipment in the following table: PC Printer Manufacturer Dell Dell Fujitsu Canon Canon EPSON Model No. Optiplex Gxi5200 Optiplex GX5166 FMV-5166T3 LBP-720 BJC-620JW LP-1000 E3 Chapter 2. 2-1 INSTALLATION & BASIC FUNCTIONS Installing SLP This section describes how to install the SLP on a personal computer. Handling Precautions If you start up the Installer while another application is running, the Installer may malfunction. Remove other resident applications from their directories before starting up the Installer. The SLP sometimes cannot be started up depending on the combination of other applications and drivers. For details on Windows and personal computer settings, refer to the User’s Manuals provided with Windows and the personal computer. ● Installating SLP (1) Click the [Start] button at the bottom of the screen, and then click [Run...]. (2) [A:\SETUP] inputs from keyboard. (3) Insert the disk provided with the software package into the disk drive, click <OK>. >>The Installer is started. (4) Click [Next>]. Note To change the installation destination directory, click [Browse...]. E4 Chapter 2. INSTALLATION & BASIC FUNCTIONS (5) Click [Next>]. >>The following screen appears: Note To change the program folder, enter the new folder name. (6) Click [Next>]. (7) Click [Next>]. >>When installation ends normally, the following screen appears: (8) Click [Finish]. >>The installer is finished. E5 Chapter 2. INSTALLATION & BASIC FUNCTIONS 2-2 Starting Up and Quitting SLP ■ Starting Up SLP (1) Click [Start] at the bottom of the screen, and click the SLP-F✽✽ (SRF✽✽✽) under [Programs]-[SLP]. >>The SLP is started up, and the opening screen appears. >>The menu window is displayed. Note For details on the operating system and the mouse you are using, refer to the User’s Manual provided with Windows95. ■ Quitting SLP (1) Click <close> at the top right of the screen. The operation is the same by selecting the [File]-[Quit SLP-F✽✽] command. >>The following screen appears: (2) Click <OK>. E6 Chapter 2. INSTALLATION & BASIC FUNCTIONS 2-3 Description of Functions ■ SLP Functions The SLP is provided with the following functions for configuring SRF functions: • • • • • Parameter Editing Function File Management Function Data Communications Function Print Function Model Setting Function The figure below shows operations available by these functions. Functions Parameter Editing Function • Creates and edits parameters. File Management Function • Saves created data to a file on floppy disk or hard disk. • Reads saved files for re-editing. Data Communications Function Print Function Model Setting Function • Writes created data to the SRF. • Reads from the SRF to the SLP. • Prints created parameters. • Sets the SRF model for connection to the SLP. Note “One file” refers to data for one SRF. Each file comprises the various parameter settings and the model number information. E7 Chapter 2. INSTALLATION & BASIC FUNCTIONS 2-4 Screen Configuration ■ SLP Screen Configuration ● Basic SLP screen Menu bar Button bar Jump button Scroll bar Selection window Setup items Message window Scroll bar ● Dialog box displayed when [Help]-[Version] is selected E8 Chapter 3. 3-1 OPERATION Setting Up Options ■ Setting the Type First, set the SLP type matched to the SRF model No. (1) Click <Type Setting>. The operation is the same by selecting the [Option]-[Type Setting] command or the Ctrl + T keys. >>The Type Setting dialog box appears. (2) Set the basic model No., output format, and additional functions 1 and 2. (3) Select the desired setting from each of the selection items. (4) Click <OK>. Handling Precautions • The model No. you set here is for internal use by the SLP. • Set up the Model No. and options of the SRF which it tries to set up on the Type Setting screen of the SLP before you set up parameters of the SRF. • The model No. of the SRF does not change even if the type is changed on the SLP. E9 Chapter 3. OPERATION ■ Setting the Environment Set the communications port and font on the personal computer. (1) Click <Environment Setup>. The operation is the same by selecting the [Option]-[Environment Setup] command or the Ctrl + E keys. >>The Environment Setup dialog box appears. (2) Set the communications port. Select the various settings. (3) Set the font size. Select the various settings. (4) Click <OK>. Handling Precautions • Normally, use “COM1”. Even if another communications port can be selected, it sometimes cannot be used depending on its shape of connector. • Special fonts are used for editing screens, and cannot be changed. E10 Chapter 3. OPERATION 3-2 File Operations ■ Making New Files (1) Click <New>. The operation is the same by selecting the [File]-[New] command or the Ctrl + N keys. >>The New dialog box appears. (2) Click <OK>. >>A new file opens. ■ Opening Existing Files (1) Click <Open>. The operation is the same by selecting the [File]-[Open] command or the + O keys. >>The [Open] dialog box appears. Ctrl (2) Select the folder name in [Look in...]. (3) Click (select) the file name. (4) Click <Open>. >>The file having the name that you set opens. ■ Overwriting and Saving Files (1) Click (select) <Save>. The operation is the same by selecting the [File]-[Save] command or the Ctrl + S keys. >>The file is overwritten and saved. E11 Chapter 3. OPERATION ■ Saving Files With a New Name (1) Select the [File]-[Save As] command. The operation is the same by selecting the Ctrl + A keys. >>The [Save As] dialog box appears. (2) Select the folder name under [Save in]. (3) Enter the file name to [File name]. (4) Click <Save>. >>The file is saved under the file name that you set. Note The file is overwritten and saved when you click (select) the file name at the [File name] window. ■ Outputting CSV Format Files (1) Select the [File]-[CSV Out] command. The operation is the same by selecting the Ctrl + X keys. >>The [CSV Output] dialog box appears. (2) Select the folder name under [Save in]. (3) Enter the file name to [File name]. (4) Click <Save>. >>The file is output under the file name that you set. Note The file is overwritten and saved when you click (select) the file name at the [File name] window. A CSV format file is a text file delimited by commas, and can be used in Microsoft Excel or other off-the-shelf spreadsheet applications. E12 Chapter 3. OPERATION 3-3 Printing ■ Printing Parameters ● Printing all items (1) Click <Print>. The operation is the same by selecting the [File]-[Print] command or the Ctrl + P keys. >>The Print Execution dialog box appears. (2) Select [ALL] from the Print Execution dialog box. (3) Click <OK>. >>All parameters are printed. ● Printing all channels of selected parameters (1) Click <Print>. The operation is the same by selecting the [File]-[Print] command or the Ctrl + P keys. >>The Print Execution dialog box appears. (2) Select the item to print from the Print Execution dialog box. (3) Select [All Channels] from the Print Execution dialog box. (4) Click <OK>. >>The selected parameters are printed. ● Selecting and printing a specific channel of selected parameters. (1) Click <Print>. The operation is the same by selecting the [File]-[Print] command or the Ctrl + P keys. >>The Print Execution dialog box appears. (2) Select the item to print from the Print Execution dialog box. (3) Select the channel to print from the Print Execution dialog box. (4) Click <OK>. >>The selected parameters are printed. Handling Precautions The SLP can not print the parameters of the specific channels. E13 Chapter 3. OPERATION ● Print Execution dialog box ● Sample printout E14 Chapter 3. OPERATION 3-4 Communications with the SRF ■ Communicating to the SLP from the SRF (reading to SLP) (1) Click <Read (SRF→SLP)>. The operation is the same by selecting the [Communications][Read(SRF→SLP)] command or the Ctrl + R keys. >>The Confirm dialog box appears. (2) Click <OK>. >>Reading to the SLP starts. ■ Communicating to the SRF from the SLP (writing from SLP) (1) Click <Write (SLP→SRF)>. The operation is the same by selecting the [Communications][Write(SLP→SRF)] command or the Ctrl + W keys. >>The Confirm dialog box appears. (2) Click <OK>. >>Writing to the SRF starts. Handling Precautions If the type set on the SLP does not match the SRF model No., the Warnning dialog box appears on the screen. ■ Setting the Date and Time on the SRF (1) Select the [Communications]-[Date/Time Write] command The operation is the same by selecting the Ctrl + D keys. >>The Date/Time dialog box appears. (2) Click <OK>. >>Writing of the date and time to the SRF starts. Handling Precautions The time must be set beforehand on the personal computer. E15 Chapter 3. OPERATION 3-5 Setting Up Data ■ Selecting Setup Items ● Moving the highlight section on the display by operating the keyboard (1) Press the ↑ ↓ ← or → key to move the highlighted section on screen. ● Moving the highlight section on the display by operating the mouse (2) Click the section you want to move. (3) Click the scroll bar to scroll the screen. >>The screen cannot be scrolled beyond the topmost or bottommost rows on screen. ● Changing operation windows (1) Press the TAB key. >>The screen moves to the target operation window. Note Setup items are moved to in order on screen. ■ Entering Numerical Data ● Entering numerical values • To enter a numerical value Press the 0 to 9 keys on the keyboard. • To enter a hexadecinal value Press the 0 to 9 keys and the A to F on the keyboard. • To enter a decimal point Press the . key at the desired decimal point position. • To enter a minus value Press the — key. • To cancel a wrong entry Press the BackSpace key. >>The currently displayed value is deleted. • To cancel the currently entered numerical value Press the Esc key. >>Original set value is redisplayed. ● Select the setup item Entering numerical data by the 0 to 9 keys to select the setup item. (1) Select the setup item to highlight it. (2) Enter the desired set value by the 0 to 9 keys. (3) Press the Enter key. The operation is the same by pressing the ↑ or ↓ key. >>The set value is fixed. E16 Chapter 3. OPERATION Note • After you have fixed the numerical value by pressing the ↑ or ↓ key, the highlight section moves on screen. When you have moved a setup item using the mouse, the set value is not fixed. • When a set value is invalid, the original set value is redisplayed. To cancel a set value midway during entry, press the Esc key before you fix the set value. ● Selecting and entering data Note Items that can be selected and entered are automatically displayed. (1) Press a setup item button. The operation is the same by selecting the TAB or ALT + ↓ keys. >>[Selection Item] is displayed. Selection item (2) Select the setup item by the mouse. The operation is the same by selecting the ↑ ↓ ← or → key, or the Enter key. >>The set value is fixed. Note When you use the mouse, the set value is fixed at the same time that you select it with the mouse. E17 Chapter 3. OPERATION ■ Entering Text Data ● Entering Text Data The method to entering a text data is as the following. • To delete a character Press the Delete key. >>The currently displayed text data is deleted. • To delete all characters Press the HOME key. • To cancel en entry midway Press the Esc key befoer you fix the text data. >>Original set value is redisplayed. ● Selecting and entering text data (1) Select the setup item to highlight it. (2) Press the Enter key. The operation is the same by selecting the <List input> [Edit]-[List input] command. >>The [List input] dialog box appears. (3) Press the HOME key to clear the current entry. (4) Select the text group by the → or ← key. The operation is the same by selecting <Group (→)> or <Group (←)>. (5) Select the text by the ↑ or ↓ key. The operation is the same by clicking with the mouse. (6) Add text by the Insert key. The operation is the same by double-clicking with the mouse. (7) If necessary, repeat steps (4) to (6). (8) Press the Enter key to fix the entry. The operation is the same by pressing <OK>. >>The set value is fixed. E18 Chapter 3. OPERATION Handling Precautions • You cannot directly enter text data. • Katakana codes cannot be normally treated with the SLP-F20's English version. E19 Chapter 4. 4-1 TROUBLESHOOTING Error Messages ■ Communications Error Messages Category Communications error Message “Time out” “Cannot open communications port” “Communications error has occurred” “Check currently connected instruments.” SRF status error Description Could not receive message during time out preset time. Could not open communications port. A system error occurred. Remedy Check cable connections and contacts. Do not use the communications port at the same time as software that is using other communications ports. Quit SLP, and reboot Windows. Currently connected instrument is not an SRF100/200. Or, SRF100/200 is not connected. Versions of SLP and SRF in use are not supported. Connect the SRF100/200 before use. Message “This filename is not valid.” “This file cannot be found. Make sure that the correct path and filename are given.” “This filename is a reserved device name. Use a different filename.” “Not enough free space on disk” “The device is not ready.” “Cannot make file” “File name too long” Description An invalid file name has been entered. A non-existent file name has been entered. Remedy Enter the correct file name. A file name reserved as a device name has been entered. Enter the correct file name. There is not enough free space on disk. The disk is not prepared. “The path does not exist. Make sure that the correct path is given.” “Illegal file size” “Illegal file information” An illegal path name has been entered. Secure enough free space on disk. Prepare a disk, and repeat the operation. Save to a different destination. Limit file names to 255 or less characters. Enter the correct path name, and repeat the operation. “Cannot support currently connected SRF100/200” Contact your dealer. ■ File Error Messages Category File name error Disk error Path name error File information error The file could not be made. The file name is too long. Correctly enter the name of an existent file. File is damaged. Damaged files cannot be used. Make a new file. Description Printer setup is wrong. Remedy Correct the printer setup, and repeat the operation. Description An attempt was made to start up two or more SLP at once. Remedy Press the <OK> button. ■ Printing Error Messages Category Printing error Message “Unable to begin printing” ■ Startup Error Messages Category SLP system error E20 Message “Cannot start up two or more SLP at once.” Appendix ■ Code Table Upper 4 bits → 2 ← Lower 4 bits 0 3 4 5 6 7 8 0 @ P ` p 3 1 ! 1 A Q a q ° 2 ” 2 B R b r ° 3 # 3 C S c s . 4 $ 4 D T d t 5 % 5 E U e u 6 & 6 F V f v 7 ’ 7 G W g w 8 ( 8 H X h x 9 ) 9 I Y i y A * : J Z j z B + ; K [ k Ω C , < L ¥ l D - = M ] m µ E . > N ^ n 2 F / ? O _ o 2 Handling Precautions Katakana codes cannot be normally treated with the SLP-F20's English version. E21 Revision History Printed date Manual Number Edition Revised pages Description Feb. 1999 CP-UM-5067E 1st Edition Dec. 2000 Jan. 2003 2nd Edition 3rd Edition iv overall Apr. 2006 4th Edition Cover, Eiii Inside of cover E2 E4 Overall revision RESTRICTIONS ON USE changed Conventions Used in This Manual changed Circle numbers changed to the numbers with the parenthesis in explanation of method Operating Environment, Windows95 changed to Windows95/98/Me/2000/XP. Manual name changed. The illustration of IMPORTANT changed. Description of Serial port added. Installating SLP, (1) to (3) of description changed. Specifications are subject to change without notice. Advanced Automation Company 1-12-2 Kawana Fujisawa Kanagawa 251-8522 Japan URL: http://www.yamatake.com Printed on recycled paper. (05) Printed in Japan. 1st Edition: Issued in Feb. 1999 (W) 4th Edition: Issued in Apr. 2006 (W)