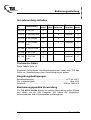
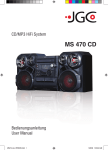
1
M 100 Range
Bedienungsanleitung
Operation manual
Mode d'emploi
Manual de instrucciones
Istruzioni per l'uso
Käyttöohje
TLS Communication GmbH
Marie-Curie-Straße 20
D – 40721 Hilden
Tel.: +49 (0) 2103 50 06 - 0
Fax: +49 (0) 2103 50 06 - 90
e-mail: [email protected]
D
........................................................................................... 3
GB
......................................................................................... 20
F
......................................................................................... 36
E
......................................................................................... 54
I
......................................................................................... 71
SF
......................................................................................... 89
Bedienungsanleitung
D
Identifizierung
Hersteller: .................................................... TLS Communication GmbH
Marie-Curie-Straße 20
D-40721 Hilden
Tel: +49 (0) 2103 5006 0
Fax: +49 (0) 2103 5006 90
Produkt: ................................................................................ M 100 Serie
Ursprungsland: ................................................... Tschechische Republik
Bedienungsanleitung: ........................................................... Stand 11/03
Ausgabedatei:................................................................ M100Range.doc
Diese Bedienungsanleitung gehört zu diesem Produkt. Sie enthält
wichtige Hinweise zur Handhabung des Gerätes. Achten Sie hierauf,
auch wenn Sie das Gerät an Dritte weitergeben. Bewahren Sie diese
Bedienungsanleitung zum Nachlesen auf.
Inhaltsverzeichnis
Identifizierung ........................................................................................ 3
Inhaltsverzeichnis .................................................................................. 3
Im Lieferumfang enthalten ..................................................................... 4
Technische Daten.................................................................................. 4
Umgebungsbedingungen ...................................................................... 4
Bestimmungsgemäße Verwendung ...................................................... 4
Garantie ................................................................................................. 5
Sicherheit............................................................................................... 5
Inbetriebnahme...................................................................................... 6
Das Kassettenlaufwerk .......................................................................... 6
Der CD-Player ....................................................................................... 8
Das Mischpult ...................................................................................... 13
Externe Anschlüsse ............................................................................. 14
Verwendung von Funk-Mikrofonen...................................................... 15
Pflegehinweise..................................................................................... 16
Umweltschutz ...................................................................................... 16
Im Falle einer Transportbeschädigung ................................................ 17
Support ................................................................................................ 17
Betriebsprobleme................................................................................. 18
Tabelle Technische Daten ................................................................... 19
Stand 11/03
3
Bedienungsanleitung
Im Lieferumfang enthalten
Ident.Nr.
Bezeichnung
Netz- LS
Fernbed.+ Mikrofon+ Bed.kabel Kabel Batterien Batterien anleit.
804 010 M 100 CD
X
X
810 010 M 100 CD Funk
X
X
801 010 M 100 Combi
X
X
801 020 M 100 Combi
Funk
X
X
801 050 M 100 LS Plus
X
801 030 M 100 Talk
X
801 040 M 100 Talk
Funk
X
X
optional
X
X
optional
X
X
X
X
optional
X
Technische Daten
Siehe Tabelle Seite 19
Zugunsten fortlaufender Produktverbesserungen behält sich TLS das
Recht vor, Spezifikationen ohne Vorankündigung zu ändern.
Umgebungsbedingungen
Betriebstemperatur: ........................................................ +5°C bis +60°C
Rel. Luftfeuchtigkeit: ................................................................ Max. 85%
Luftdruck: .....................................................................600 bis 1000 hPA
Bestimmungsgemäße Verwendung
Die TLS M 100 Geräte dienen zur mobilen Beschallung großer Räume
und Hallen bis ca. 400 Personen. Sie haben die Möglichkeit,
unterschiedliche Audio-Signalquellen wiederzugeben.
4
Stand 11/03
Bedienungsanleitung
Garantie
Die TLS-Werksgarantie für die TLS M 100 Geräte beträgt 24 Monate.
Schäden, die durch eine unsachgemäße Bedienung oder durch
Gewaltanwendung
entstanden
sind,
unterliegen
nicht
der
Garantieleistung. Die Garantie erlischt, wenn nichtautorisierte
Personen das Gerät öffnen.
Sicherheit
Diese Bedienungsanleitung enthält grundlegende Hinweise, die Sie bei
der Bedienung der TLS M 100 Geräte beachten müssen. Halten Sie
sich genau an die Anweisungen, um Fehler zu vermeiden. Lesen Sie
diese Bedienungsanleitung deshalb unbedingt, bevor Sie mit den TLS
M 100 Geräten arbeiten.
Die in dieser Anleitung enthaltenen Sicherheitshinweise, deren
Nichtbeachtung Gefahren für Personen hervorrufen können, sind mit
dem
Sicherheitskennzeichen nach DIN 4844-W8 und dem Wort Gefahr gekennzeichnet.
Lebensgefahr
Elektrische Schläge aus den Netzteilen können zum Tode oder zu
schweren gesundheitlichen Schäden führen. Öffnen Sie niemals das
Gehäuse der TLS M 100 Geräte! Mit dem Öffnen endet sofort jeglicher
Garantieanspruch!
Gefahr
Dieses Produkt erzeugt Laserstrahlung. Eine Durchführung anderer
Vorgänge, als hier angegeben, kann zu gefährlicher Strahlung führen.
Setzen Sie sich auf keinem Falle dem Strahl aus.
Gefahr
Steckverbindungen und Kabel können zerstört werden. Verbinden Sie
Stecker und Buchsen ohne Gewalt.
Stand 11/03
5
Bedienungsanleitung
Gefahr
Eine Verwendung ist in geschlossenen Räumen vorgesehen. Das
Gerät darf nicht Tropf- oder Spritzwasser ausgesetzt werden und es
dürfen keine mit Flüssigkeit gefüllten Gegenstände auf das Gerät
gestellt werden.
Inbetriebnahme
Drehen Sie den TONE-Regler in die Mittelstellung.
Drehen Sie den VOLUME-Regler (MIC, CD oder TAPE) in die
Stellung min.
Stecken Sie das beiliegende Netzkabel in die seitliche Netzanschlussbuchse.
Verbinden Sie den Netzstecker mit dem 230 V/50 Hz Stromnetz.
Schalten Sie die TLS M 100 Geräte mit dem Schalter POWER
unterhalb des Netzkabeleingangs ein bzw. nach Gebrauch wieder
aus.
Das Kassettenlaufwerk
Kassetten-Stereolaufwerk ED500
REC
0
50
100
FULL AUTO STOP
PITCH
REC
PLAY
REW/REV
F.F/CUE STOP/EJECT PAUSE
Bild 1
6
Stand 11/03
Bedienungsanleitung
Wiedergabe
Öffnen Sie das Kassettenfach mit der Taste ST/EJ (siehe Bild 1).
Setzen Sie eine Kassette, freiliegende Tonbandfläche nach unten
und gewünschte Tonbandseite (Seite 1 oder A bzw. 2 oder B) nach
vorn gerichtet, in das Kassettenfach ein.
Schließen Sie das Kassettenfach.
Drücken Sie die Taste PLAY.
Hinweis:
Wenn Sie den Kassettenbetrieb beenden wollen, drücken
Sie auf die Taste ST/EJ (Stop/Eject). Drücken Sie diese
Taste ein zweites Mal, damit sich das Kassettenfach
öffnet. Nun können Sie die Kassette wieder entnehmen.
Aufnahme
Hinweis:
Wie mit allen anderen Kassettenrekordern können Sie
auch mit diesem Gerät nur auf Kassetten aufnehmen,
deren Löschschutzlaschen noch vorhanden und intakt
sind.
Legen Sie die Kassette für die Aufnahme in das Kassettenfach.
Drücken Sie die Taste PAUSE.
Drücken Sie die Taste REC.
Die rote Leuchtdiode REC leuchtet (siehe Bild 1).
Lösen Sie die Taste PAUSE, die Aufnahme beginnt.
Hinweis:
Um die Aufnahme kurz zu unterbrechen, drücken Sie die
Taste PAUSE. Um die Aufnahme zu beenden, drücken Sie
die Taste ST/EJ.
Auffinden einer bestimmten Bandstelle
Stellen Sie vor Beginn von Aufnahme oder Wiedergabe mit der
Taste RESET das Zählwerk COUNTER auf 000 (siehe Bild 2).
Merken Sie sich bestimmte Positionen anhand des Zählwerkstandes.
Diese Positionen können Sie dann mit dem schnellen Vorlauf (Taste
F.FWD) oder Rücklauf (Taste REW) einfach wiederfinden.
Stand 11/03
7
Bedienungsanleitung
COUNTER
RESET
000
Zählwerk
Zählwerkrücksteller
Bild 2
Schnelle Wiedergabe
Bei dem Stereokassettenlaufwerk haben Sie zusätzlich die Möglichkeit
der schnellen Wiedergabe. Hierbei erfolgt die Wiedergabe schneller,
aber weiterhin hörbar.
Drücken Sie die Taste F.F/CUE oder REW/REV während die Taste
PLAY gedrückt ist (in dieser Funktion rasten die Tasten nicht ein).
Lassen Sie die entsprechende F.F/CUE oder REW/REV Taste
wieder los, um in den normalen Wiedergabebetrieb zu gelangen.
Regelung der Bandgeschwindigkeit (PITCH)
Manchmal ist es wünschenswert, die Bandgeschwindigkeit und damit
die Wiedergabe von Musik oder Sprache zu verlangsamen oder zu
beschleunigen z.B. in Tanzschulen oder während eines Sprachunterrichts. Diese Möglichkeiten bietet Ihnen der Regler PITCH.
Drehen Sie den Regler PITCH nach links, um die Bandgeschwindigkeit zu verringern.
Drehen Sie den Regler PITCH nach rechts, um die Bandgeschwindigkeit zu erhöhen.
Drehen Sie den Regler PITCH in die Stellung 0, damit das Band mit
Standardgeschwindigkeit läuft.
Der CD-Player
CD-Player EC300
C O M P A C T
D IG I T A L
IR
A U D IO
REPEAT
REPEAT 1 ALL A↔ B RANDOM PROGRAM
1
2
3
4
INTRO
5
6
7
8
9
10
11
12
13
14
15
REMAIN
15
72:15
A-B
PROG REMAIN
STOP
SEARCH
PLAY/PAUSE
REPEAT
SKIP
Bild 3
8
Stand 11/03
Bedienungsanleitung
OPEN/CLOSE (Öffnen und Schließen des CD-Faches)
Drücken Sie die Taste OPEN/CLOSE, um das CD-Fach zu öffnen.
Legen Sie die CD mit der Beschriftung nach oben in das CD-Fach.
Drücken Sie noch einmal die OPEN/CLOSE-Taste, um das CD-Fach
zu schließen. Die CD beginnt sich automatisch zu drehen. Sobald die
Gesamtzahl der Stücke angezeigt werden, ist der CD-Player betriebsbereit. Wenn Sie beim Einlegen der CD auf PLAY statt auf
OPEN/CLOSE drücken, wird der Einschub automatisch geschlossen
und die Wiedergabe beginnt beim ersten Stück.
PLAY/PAUSE (Wiedergabe/Pause)
Drücken Sie die Taste PLAY/PAUSE, wenn Sie eine CD von Anfang
an abspielen möchten. Die CD-Wiedergabe beginnt beim ersten Stück.
Der Wiedergabebetrieb wird durch die Anzeige PLAY (bzw. durch das
Symbol X) im Display des CD-Players angezeigt.
Drücken Sie während der Wiedergabe der CD die Taste
PLAY/PAUSE, gelangen Sie in den Pause-Betrieb. Ein erneutes
Drücken auf die Taste PLAY/PAUSE deaktiviert die Pause-Funktion
und die CD-Wiedergabe startet.
STOP
Bei der Betätigung der STOP-Taste stoppt die Wiedergabe der CD.
SKIP (Titelsuchlauf)
Während des Wiedergabe-Betriebes können Sie zum jeweils vorigen
oder nächsten Titel der CD wechseln, sofern Sie die Taste nur sehr
kurz antippen.
Drücken Sie die Taste SKIP |<<, um zu den vorherigen Titel zu
gelangen. Bei laufender Wiedergabe springt der CD-Player bei
einmaligen Drücken an den Anfang des Titels zurück.
Drücken Sie die SKIP >>|, um zu den nächsten Titel zu gelangen.
SEARCH (Suchlauf)
Um in einem Titel zu suchen, halten Sie die entsprechende SEARCHTaste gedrückt.
Drücken Sie die Taste SEARCH für schnellen Vor- und Rücklauf,
um eine bestimmte Stelle eines Titels zu finden.
Stand 11/03
9
Bedienungsanleitung
REPEAT (Wiederholung)
Drücken Sie die Taste REPEAT. Der zur Zeit wiedergegebene Titel
wird wiederholt und im Display leuchtet die Wiederholungskennung
(REPEAT und 1).
Drücken Sie die Taste REPEAT ein zweites Mal. Die gesamte CD
oder die von Ihnen programmierten Titel werden bis zum erneuten
Drücken der Taste REPEAT wiederholt. Die Wiederholungskennung (REPEAT und ALL) leuchtet im Display auf.
Drücken Sie die Taste REPEAT ein drittes Mal. Die Wiederholungsfunktion wird aufgehoben.
PROG (Titelprogrammierung)
Drücken Sie die Taste PROGRAM, um die Funktion Titelprogrammierung zu starten.
Drücken Sie die Tasten zur Auswahl des vorigen oder nächsten
Titels UP und DOWN, bis der von Ihnen gewünschte Titel im LCDAnzeigenfeld blinkt.
Drücken Sie die Taste PROGRAM, um die Programmierung des
Titels zu bestätigen.
Wiederholen Sie die Schritte 2. und 3. bzw. für weitere Titel.
Drücken Sie die Taste PLAY, um die Wiedergabe in der
Reihenfolge Ihrer Programmierung zu starten. Es sind maximal 21
Titel programmierbar.
REMAIN (Verbleibende Zeit)
Das Display zeigt bei Wiedergabe die bereits gespielte Zeit eines Titels
an. Mit der Taste REMAIN können zwei andere Zeitfunktionen
aufgerufen werden.
Drücken Sie die REMAIN-Taste, um die verbleibende Spielzeit des
Titels anzeigen zu lassen.
Drücken Sie die REMAIN-Taste ein zweites Mal, um sich die
verbleibende Gesamtspielzeit der CD anzeigen zu lassen.
Diese Funktion ist beim Abspielen einer Titelprogrammierung, bei
Auswahl durch Zufallsgenerators und bei Wiederholung nicht
auswählbar.
10
Stand 11/03
Bedienungsanleitung
A ⇔B
⇔ (Programmierbare Wiederholung)
Mit dieser Funktion können Sie einen Teil eines Titels beliebig oft
wiederholen.
Drücken Sie die A ⇔B-Taste am Anfang des gewünschten
Abschnitts.
Drücken Sie die A ⇔B-Taste am Ende des gewünschten
Abschnitts. Der CD-Player läuft jetzt in einer Wiederholungsschleife
zwischen den von Ihnen gesetzten Grenzen.
Drücken Sie die A ⇔B-Taste erneut, um die Wiederholung des von
Ihnen gewünschten Abschnitts zu beenden.
A-B
SPACE
<< SEARCH >>
>>|
|<<
REPEAT
REMAIN
SKIP
INTRO
+10
10
RANDOM
8
7
9
PROGRAM
5
4
6
STOP
3
2
1
OPEN/CLOSE
PAUSE
PLAY
Infrarot-Fernbedienung
Mit der Infrarot-Fernbedienung können Sie den CD-Player des TLS
Gerätes in allen Funktionen bedienen (siehe Bild 4). Die Funktionen
der Tasten auf der Fernbedienung entsprechen denen der Tasten auf
dem Bedienfeld des CD-Players. Zusätzlich bietet die Fernbedienung
einige weitere Funktionen.
Bild 4
RANDOM (Zufallsgenerator)
Der Zufallsgenerator wählt einen Titel der CD aus und startet die
Wiedergabe. Nach Ende dieses Titels wird ein neues Stück zufällig
ausgewählt und wiedergegeben. Diese Prozedur wird fortgesetzt bis
alle Titel der CD gespielt sind oder Sie die Wiedergabe unterbrechen.
Drücken Sie die RANDOM-Taste, um den Zufallsgenerator zu
starten. Die Zufallsgeneratorkennung (RANDOM) leuchtet im
Display auf.
Drücken Sie die RANDOM-Taste erneut, um die Funktion zu
beenden.
Diese Funktion ist beim Abspielen einer Titelprogrammierung nicht
auswählbar.
Stand 11/03
11
Bedienungsanleitung
INTRO (Automatisches Anspielen aller Titel)
Diese Funktion hilft Ihnen z. B. ein Musikstück zu finden, dessen Titel
Ihnen entfallen ist. Jeder Titel der CD wird für 10 Sekunden angespielt.
Drücken Sie die INTRO-Taste, um alle Titel für nur 10 Sekunden
anzuspielen. Die Anspielkennung (SPACE) leuchtet im Display auf.
Drücken Sie die INTRO-Taste ein zweites Mal, um die
Anspielfunktion zu verlassen.
Die Anspielfunktion ist nur nach Unterbrechung der Wiedergabe durch
die Taste STOP möglich.
SPACE (Wiedergabeverzögerung)
Zwischen der Wiedergabe der einzelnen Titel legt der CD-Player
automatisch Pausen von fünf Sekunden. Das kann z. B. für Aufnahmen
sinnvoll sein. Auf der von CD aufgenommenen Kassette sind
Titelanfänge so leichter zu finden.
Drücken Sie die SPACE-Taste, um zwischen den einzelnen Titel
ein Pause von fünf Sekunden zu erhalten.
Drücken Sie die SPACE-Taste ein
Wiedergabeverzögerung zu verlassen.
zweites
Mal, um
die
Regelung der CD-Geschwindigkeit (PITCH)
Manchmal ist es wünschenswert, die CD-Geschwindigkeit und damit
die Wiedergabe von Musik oder Sprache zu verlangsamen oder zu
beschleunigen – z. B. in Tanzschulen oder beim Sprachunterricht.
Diese Möglichkeit bietet Ihnen der Regler PITCH.
Drehen Sie den Regler PITCH nach links, um die CDGeschwindigkeit zu verringern.
Drehen Sie den Regler PITCH nach rechts, um die CDGeschwindigkeit zu erhöhen.
Drehen Sie den Regler PITCH in Mittelstellung, damit die CD mit
Standardgeschwindigkeit läuft.
Inbetriebnahme der Fernbedienung (Batteriewechsel)
Die Infrarot-Fernbedienung wird mit zwei Batterien des Typs 1,5 V AAA
R03 betrieben. Öffnen Sie den Batteriefachdeckel auf der Rückseite
der Fernbedienung. Nehmen Sie vorhandene Batterien aus dem
Batteriefach heraus und legen Sie die beiden frischen Batterien den
Angaben im Gehäuse entsprechend ein. Stellen Sie sicher, dass die
Batterien mit richtiger Polarität (+ Zeichen bzw. – Zeichen müssen der
vorgegebenen Polung entsprechen) in der Fernbedienung eingelegt
12
Stand 11/03
Bedienungsanleitung
sind. Schließen Sie das Batteriefach.
Hinweis:
Der IR-Sensor befindet sich auf der Bedien-/Lautsprecherseite des Gerätes.
Hinweis:
Wenn das Gerät lange Zeit nicht verwendet wird, nehmen
Sie die Batterien heraus, um ein mögliches Austreten der
Batterieflüssigkeit in der Fernbedienung zu vermeiden.
Das Mischpult
0
45
6
7
8
9
A
ED
CB
0
0
1
0
23
F
-
+
-
+
L
TREBLE
BASS
R
BALANCE
LS-OUT
-
+
MIC1
I
-
+
MIC2
I
-
+
TAPE
CD
IN
OUT
Bild 5
Lautstärkeregelung
Mit dem Regler TAPE/CD steuern Sie die Lautstärke des
Kassettenlaufwerks, des CD-Laufwerks und der externen Geräte.
Drehen Sie den Lautstärkeregler nach rechts, um die maximale
Lautstärke einzustellen und entsprechend links herum, um die
Lautstärke zu reduzieren.
Mit dem Lautstärkeregler MIC 1 und MIC 2 können Sie die Lautstärke
des Mikrofons steuern. Drehen Sie den Lautstärkeregler nach rechts,
um die maximale Lautstärke einzustellen und entsprechend links
herum, um die Lautstärke zu reduzieren.
Der Kanalregler BALANCE dient zur Regelung der Balance zwischen
dem rechten und linken Kanal für einen optimalen Stereoeffekt. Durch
Rechtsdrehung wird die Lautstärke des linken Kanals vermindert und
umgekehrt. Lassen Sie den Regler normalerweise in Mittelstellung
stehen.
Stand 11/03
13
Bedienungsanleitung
Klangwaage
Die Klangregler BASS und TREBLE erlauben eine Absenkung oder
Anhebung der tiefen bzw. hohen Töne.
Stellen Sie den Klang der TLS Geräte entsprechend der Akustik des
Hörraumes oder nach Ihrem Geschmack ein. Sobald Sie mittels der
Regler TAPE/CD die Maximalwerte erreichen, kann es zu Verzerrungen bei der Wiedergabe kommen, die das Lautsprechersystem
beschädigen können.
Hinweis:
Bei verzerrter Wiedergabe können die Lautsprecher
geschädigt werden. Betreiben Sie das Gerät nie dauerhaft
mit Verzerrungen. Verringern Sie die Gesamtlautstärke,
damit die Verzerrungen aufhören.
Externe Anschlüsse
MIC 1 und MIC 2
Über die Anschlüsse MIC 1 und MIC 2 können Sie drahtgebundene
Mikrofone mit einem 6,3 mm Klinkenstecker an das Gerät anschließen.
LS-OUT
Über den Anschluss LS-OUT kann die aktive TLS Verstärkerbox M 100
LS Plus angeschlossen werden. Der Anschluss LS-OUT bietet die
Möglichkeit zum Stereobetrieb. Dazu verbinden Sie bitte zuerst beide
Geräte, bevor Sie sie einschalten.
Audio IN
Über den Anschluss Audio IN kann eine externe Audioquelle
angeschlossen werden, um diese z.B. auf Kassette aufzunehmen.
Audio OUT
Über den Ausgang Audio OUT kann z.B. eine Stereoanlage
angeschlossen werden.
Kopfhörer
Für das Anhören von Kassetten oder CD's über Kopfhörer verfügen die
Geräte über einen Kopfhöreranschluss mit 6,3 mm Klinke. Wenn Sie
den Klinkenstecker Ihres Kopfhörers in die Buchse mit dem
durchgestrichenen Lautsprechersymbol stecken, wird der eingebaute
Lautsprecher stumm geschaltet.
14
Stand 11/03
Bedienungsanleitung
Verwendung von Funk-Mikrofonen
Das Funkmikrofon überträgt Signale an den eingebauten Empfänger
ohne Kabel und Drähte. Die hochfrequenten Funksignale, die auch je
nach Beschaffenheit Türen, Wände und Fenster durchdringen können,
gewährleisten dabei einen klaren und deutlichen Empfang. Die TLS
Sendekanaleinstellung ist werksseitig auf Kanal F eingestellt.
Schalten Sie das Mikrofon ein (ON). Die Inbetrieb-Anzeige leuchtet
auf.
Schalten Sie das Mikrofon nach Gebrauch wieder aus (OFF).
Die Betrieb- (ON) und Batterieanzeige beginnt zu blinken, wenn die
Batterieleistung geschwächt ist. Daraufhin sollten Sie die Batterien
wechseln. Legen Sie eine 9 Volt-Batterie in das Batteriefach des
Mikrofons, wobei eine korrekte Polung (der + Pol der Batterie muss
mit dem + Kennung am Mikrofon übereinstimmen) zu beachten ist.
Hinweis:
Sollte das Mikrofon nicht funktionieren, prüfen Sie zuerst,
ob das TLS Gerät an die Netzsteckdose angeschlossen
bzw. das Mikrofon eingeschaltet ist. Stellen Sie sicher,
dass die Batterie im Mikrofon nicht geschwächt ist.
Desweiteren überprüfen Sie bitte, ob die Kanalwahl am
Handsender mit dem Kanal am TLS Gerät übereinstimmt.
Bei einer Verzerrung überprüfen Sie bitte, ob die
Lautstärke der Audioquelle nicht auf einen zu hohen Pegel
eingestellt ist. Gegebenenfalls verringern Sie bitte die
Lautstärke. Achten Sie auch darauf, dass das Gerät bzw.
das Mikrofon nicht in der Nähe von Leuchtstofflampen
positioniert ist.
Übertragungsstörungen während des Funkmikrofon-Betriebes
Treten während des Mikrofonbetriebes Störungen auf, können Sie den
Sendekanal am Kanalschalter wechseln.
Hinweis:
Beachten Sie bei der Kanaleinstellung die nationalen
Bestimmungen der örtlichen Regulierungsbehörden.
Weitere Informationen zum Mikrofon entnehmen Sie bitte der
beigefügten separaten Bedienungsanleitung.
Stand 11/03
15
Bedienungsanleitung
Pflegehinweise
Hinweis:
Verwenden Sie niemals starke Lösungsmittel wie Alkohol,
Benzin oder Farbverdünner. Eindringende Feuchtigkeit
kann Elektronik und Elektrik beschädigen. Sorgen Sie
dafür, dass keine Feuchtigkeit in das Geräte-Innere dringt.
Reinigung des Kassettenlaufwerks
Reinigen Sie regelmäßig den Lösch-, Aufnahme- und Wiedergabekopf
sowie die Andruckrolle, um eine optimale Klangqualität zu erreichen.
Verwenden Sie zur Reinigung ein Wattestäbchen, das leicht mit
Tonkopf-Reinigungsflüssigkeit oder Isoprophyl-Alkohol befeuchtet
wurde.
Reinigung des CD-Players
Säubern Sie den CD-Player ausschließlich mit einem Foto-Pinsel.
Es darf auf keinen Fall Feuchtigkeit in den CD-Player dringen.
Reinigung des TLS M 100 Gerätes
Die Seitenteile des Gerätes sind mit abwaschbarem Material
beschichtet.
Benutzen Sie in hartnäckigen Fällen einen leicht angefeuchteten
weichen Lappen.
Umweltschutz
Gerät, Zubehör und Verpackung sollten einer umweltgerechten
Wiederverwertung zugeführt werden. Defekte Batterien müssen gemäß
Richtlinie 91/157/EWG recycelt werden. Werfen Sie verbrauchte
Batterien nicht in den Hausmüll, ins Feuer oder ins Wasser. Jedes
technische Gerät hat irgendwann ausgedient. Die TLS Communication
GmbH nimmt aus diesen Grund alle Komponenten der TLS M 100
Geräte zurück und führt sie dem Recycling zu.
16
Stand 11/03
Bedienungsanleitung
Im Falle einer Transportbeschädigung
Sollte es zu einem Transportschaden kommen, bitten wir Sie folgende
Punkte zu beachten:
Lassen Sie auf jeden Fall die Ware und Verpackung unverändert.
Lassen Sie sich den Schaden vom Überbringer quittieren.
Benutzen Sie das beschädigte Gerät nicht.
Bei Anlieferung durch Spedition oder Paketdienst melden Sie uns
bitte den Schaden innerhalb von 7 Kalendertagen telefonisch oder
schriftlich.
Zur schnellen Schadensregulierung senden Sie uns bitte mit der
Rücksendung eine Kopie des Lieferscheins.
Beachten Sie bitte, dass wir zurückgeschickte Ware nur annehmen,
wenn die Rücksendung vorher mit uns vereinbart wurde.
Support
Mit Fragen, die im Rahmen der Bedienung oder während des
laufenden Betriebes auftreten, wenden Sie sich bitte an Ihren
ortsansässigen TLS Händler oder direkt an TLS:
TLS Communication GmbH
Marie-Curie-Straße 20
D-40721 Hilden
Tel.: +49 (0) 2103 5006-0
Fax: +49 (0) 2103 5006-90
e-mail: [email protected]
www.tls-gmbh.com
Stand 11/03
17
Bedienungsanleitung
Betriebsprobleme
Problem
Gerät lässt sich nicht einschalten
Mögliche Ursache
Maßnahme
•
Netzstecker nicht richtig
angeschlossen
•
Stecker fest in die Steckdose
schieben
•
Sicherung defekt
•
- Netzkabel aus Gerät ziehen
- Sicherungshalter mit Sicherung
aus dem Kaltgeräteeinbaustecker
ziehen (seitlich am Gehäuse)
- Sicherungshalter mit neuer
Sicherung wieder in Kaltgeräteeinbaustecker stecken
•
Falsche CD-Seite oben
•
Mit Etikettseite nach oben einlegen
•
Papp-CD mit Infoaufdruck nicht
entfernt
•
Papp-CD mit Infoaufdruck entfernen
•
Disc verschmutzt
•
Disk säubern
•
Selbstgebrannte CD verwendet
•
Aufgrund der Übertragungsfehler bei
unterschiedlichen CD-Brennern
kann es vorkommen, dass einige
gebrannte CD's nicht abspielbar sind
•
Optik beschlagen
- Unmittelbar nach dem ein Heizkörper eingeschalten wurde
- In einem dampfhaltigen und sehr
feuchtem Raum
- Wenn dieses Gerät plötzlich von
einem sehr kalten Standort an
einen warmen gebracht wird
•
Ca. 1 Stunde akklimatisieren lassen
•
Disc verschmutzt
•
Disc säubern
•
Disc verkratzt
•
Einwandfreie Disc verwenden
•
Störung durch Trittschall
•
Auf eine stabile Unterlage stellen
•
Gerät auf Wiedergabe geschaltet
•
Auf Stop schalten (bei laufender
Wiedergabe keine Eingabe möglich)
•
Auf CD nicht vorhandene Titelnummer
•
Keine höheren Nummern als die des
letzten CD-Titels wählen
•
Batterien leer
•
Wechseln der Batterien der Fernbedienung
•
Kein Empfang
•
Fernbedienung in Richtung Lautsprecherverkleidung/Frontplatte
halten
•
Kassette ist gegen versehentliches
Löschen geschützt
•
Wenn Kassette gelöscht werden
darf, Öffnungen an der Kassettenhinterseite mit Tesafilm abkleben
Kassette/CD läuft zu schnell / zu lang- •
sam (nur bei Geräten mit Pitch-Regler)
Pitch-Regler nicht zentriert
•
Pitch-Regler in Mittelstellung stellen
Keine Wiedergabe über das Funkmikrofon
•
Batterien leer
•
Wechseln der Batterien der Fernbedienung
•
Kanaleinstellung stimmt nicht
überein
•
Stellen Sie den gleichen Kanal am
Gerät und am Mikrofon ein
•
Kassettenband locker
•
Kassettenband mit einen Bleistift
oder ähnlichen Gegenstand straffen
•
Kassettenlaufwerk ist verschmutzt
•
Im Kassettenlaufwerk Löschkopf,
Tonkopf-Andruckrolle und Tonwelle
mit Wattestäbchen und Alkohol
säubern
Disc eingesetzt, aber keine Wiedergabe möglich
Wiedergabesprünge bzw.
ungewöhnlich langsamer Titelzugriff
Kein Vorprogrammieren möglich
CD-Spieler lässt sich nicht fern
bedienen
Die Aufnahmetaste des Kassettenfachs lässt sich nicht betätigen
Die Box klingt bei Kassettenwiedergabe dumpf oder es treten Gleichlauffehler auf
18
Stand 11/03
Stand 11/03
19
Dimensions/Weight/etc.
W x H x D mm
Weight kg (packed)
Customs consignment No
Wireless Microphone
Carrier frequency
Operating distance
Operating time
Sensitivity
330 x 510 x 290
15.5 kg (18.0 kg)
852 033 19
330 x 510 x 290
15.8 kg (18.4 kg)
852 790 98
863-864 MHz
max. 120 m
10 h
20-20.000 Hz
< 0.05 %
> 80 dB at 1 kHz
> 60 dB at 1 kHz
Yes
Infrared
330 x 510 x 290
16.4 kg (18.6 kg)
852 033 19
20-20.000 Hz
< 0.05 %
> 80 dB at 1 kHz
> 60 dB at 1 kHz
Yes
Infrared
20-20.000 Hz
< 0.05 %
> 80 dB at 1 kHz
> 60 dB at 1 kHz
Yes
Infrared
6.3 mm jack Ster.
CD Player
Frequency range
Total harmonic distortion
Signal/Noise ratio
Channel Separation
Controllable pitch
Remote control
6.3 mm jack Ster.
6.3 mm jack Ster.
2 x 6.3 mm jack
6.3 mm jack
2 x Phono Stereo
2 x Phono Stereo
70 W
20-20.000 Hz
92 dB
0.5 %
8Ω
230 V / 50 Hz
140 Watt
1.6 A delayed
Active box
Two way system
801 010
M 100 Combi
1/4 Track, Stereo
4.75 cm/sec.
Yes
< 0.3 %
50-14.000 Hz
3 digit
2 x 6.3 mm jack
6.3 mm jack
2 x Phono Stereo
2 x Phono Stereo
70 W
20-20.000 Hz
92 dB
0.5 %
8Ω
230 V / 50 Hz
140 Watt
1.6 A delayed
Active box
Two way system
2 x 6.3 mm jack
6.3 mm jack
2 x Phono Stereo
2 x Phono Stereo
70 W
20-20.000 Hz
92 dB
0.5 %
8Ω
230 V / 50 Hz
140 Watt
1.6 A delayed
Active box
Two way system
804 010
M 100 CD
Wireless
810 010
Cassette Recorder
Track System
Tape speed
Controllable pitch
Wow & Flutter
Frequency range
Counter
Input/Output
Microphone Mono
Headphones Stereo
External sources IN
External sources OUT
External speakers IN
External OUT
Amplifier
Power rating ms
Frequency range
Dynamic range
Total harmonic distortion
Impedance
Mains voltage
Power consumption
Fuse
Design
Product No.
M 100 CD
330 x 510 x 290
16.7 kg (19.0 kg)
852 790 98
863-864 MHz
max. 120 m
10 h
20-20.000 Hz
< 0.05 %
> 80 dB at 1 kHz
> 60 dB at 1 kHz
Yes
Infrared
1/4 Track, Stereo
4.75 cm/sec.
Yes
< 0.3 %
50-14.000 Hz
3 digit
6.3 mm jack Ster.
2 x 6.3 mm jack
6.3 mm jack
2 x Phono Stereo
2 x Phono Stereo
70 W
20-20.000 Hz
92 dB
0.5 %
8Ω
230 V / 50 Hz
140 Watt
1.6 A delayed
Ster. active box
Two way system
M 100 Combi
Wireless
801 020
330 x 510 x 290
13.8 kg (17.6 kg)
851 821 190
6.3 mm jack Ster.
2 x 6.3 mm jack
6.3 mm jack
2 x Phono Stereo
2 x Phono Stereo
70 W
20-20.000 Hz
92 dB
0.5 %
8Ω
230 V / 50 Hz
140 Watt
1.6 A delayed
Active box
Two way system
801 030
M 100 Talk
330 x 510 x 290
14.1 kg (18.0 kg)
851 821 90
863-864 MHz
max. 120 m
10 h
6.3 mm jack Ster.
2 x 6.3 mm jack
6.3 mm jack
2 x Phono Stereo
2 x Phono Stereo
70 W
20-20.000 Hz
92 dB
0.5 %
8Ω
230 V / 50 Hz
140 Watt
1.6 A delayed
Active box
Two way system
M 100 Talk
Wireless
801 040
330 x 510 x 290
13.2 kg (16.4 kg)
851 999 18
6.3 mm jack Ster.
2 x Phono Stereo
70 W
20-20.000 Hz
92 dB
0.5 %
8Ω
230 V / 50 Hz
140 Watt
1.6 A delayed
Active box
Two way system
801 050
M 100 LS Plus
Bedienungsanleitung
Tabelle Technische Daten
Operation manual
GB
Identification
Manufacturer:............................................... TLS Communication GmbH
Marie-Curie-Straße 20
D-40721 Hilden
Tel: +49 (0) 2103 5006 0
Fax: +49 (0) 2103 5006 90
Product:...............................................................................M 100 Range
Country of origin:............................................................. Czech Republic
Operation manual: ............................................................... Status 11/03
Output file:......................................................................M100Range.doc
This operation manual belongs to this product. They contain important
information on handling the device. Please pay attention to this, even if
you are passing the device on to third parties. Keep these instructions
for use for future reference.
Table of Contents
Identification......................................................................................... 20
Table of Contents................................................................................. 20
Included in Delivery.............................................................................. 21
Technical Data ..................................................................................... 21
Environmental Conditions .................................................................... 21
Appropriate Use ................................................................................... 21
Warranty .............................................................................................. 22
Safety................................................................................................... 22
Initial Operation.................................................................................... 23
The Cassette Drive .............................................................................. 23
The CD Player ..................................................................................... 25
The Mixer Console............................................................................... 29
External Connections........................................................................... 30
Use Radio Microphones ...................................................................... 31
Care of the Device ............................................................................... 32
Environmental Issues .......................................................................... 32
Transport Damage ............................................................................... 33
Support ................................................................................................ 33
Operational Problems .......................................................................... 34
Table of Technical Data ....................................................................... 35
20
Status 11/03
Operation manual
Included in Delivery
IdentNo.
Description
Power LS
RC +
Mic. +
Operation
Cable Cable Batteries Batteries Manual
804 010
M 100 CD
X
X
810 010
M 100 CD
Wireless
X
X
801 010
M 100 Combi
X
X
801 020
M 100 Combi
Wireless
X
X
801 050
M 100 LS
Plus
X
801 030
M 100 Talk
X
801 040
M 100 Talk
Wireless
X
X
optional
X
X
optional
X
X
X
X
optional
X
Technical Data
See table on page 35
In the interest of continuing product improvements TLS reserves the
right to change specifications without prior notice.
Environmental Conditions
Operating temperature: .................................................... +5°C to +40°C
Rel. humidity: ........................................................................... Max. 85%
Air pressure: ..................................................................600 to 1000 hPA
Appropriate Use
The TLS M 100 devices are portable sounds systems for use in large
rooms and halls of up to approx. 400 people. A variety of audio signal
sources can be played back.
Status 11/03
21
Operation Manual
Warranty
The TLS factory warranty for the TLS M 100 devices lasts for 24
months. Damage caused by improper operation or excessive force is
not covered by the warranty. The warranty becomes invalid if
unauthorised persons open the device.
Safety
These instructions for use contain fundamental instructions that you
must observe when operating the TLS M 100 devices. Follow the
instructions precisely to avoid errors. You must therefore read these
instructions for use before working with the TLS M 100 devices.
The safety information in these instructions, non-observance of which
may cause danger to humans, are marked with the
safety symbol as per DIN 4844-W8 and the word "Danger".
Danger to Life
Electric shocks from the electrical parts can cause death or serious
damage to health. Never open the housing of the TLS M 100 devices!
Opening these parts will invalidate the warranty!
Danger
This product contains laser beams. If any other procedures than
described here are carried out, dangerous levels of laser rays could be
produced. Exposure to laser rays should be avoided at all costs.
Danger
Plugs and cables can be damaged. Connect the plugs and sockets
with extreme care.
22
Status 11/03
Operation manual
Danger
The device can only be used in enclosed rooms. It should not be
exposed to dripping water or water spray, and containers of liquid
should not be placed on top of the device.
Initial Operation
Turn the TONE control to the middle setting.
Turn the VOLUME control (MIC, CD or TAPE) to the min. setting.
Plug the power cable included in delivery into the power socket on
the side of the device.
Connect the power plug with the 230 V/50 Hz power supply.
Switch on the TLS M 100 devices with the POWER switch
underneath the power cable input, and off again after use.
The Cassette Drive
Stereo cassette drive ED500
REC
0
50
100
FULL AUTO STOP
PITCH
REC
PLAY
REW/REV
F.F/CUE STOP/EJECT PAUSE
Figure 1
Status 11/03
23
Operation Manual
Playback
Open the cassette deck with the ST/EJ button (see Figure 1).
Put a cassette into the deck with the open side of the cassette
facing down and the required cassette side facing the front (side 1
or A; side 2 or B).
Close the cassette deck.
Press the PLAY button.
Note:
To stop the cassette, press the ST/EJ button (Stop/Eject).
Press this button again to open the cassette deck. Now
remove the cassette.
Recording
Note:
As with all other cassette recorders, this device will only
record onto cassettes with intact delete-protection tabs.
Put the recording cassette into the cassette deck.
Press the PAUSE button.
Press the REC button.
The red REC light comes on (see Figure 1)
Release the PAUSE button to start the recording.
Note:
The recording can be interrupted briefly by pressing the
PAUSE button. To stop the recording, press the ST/EJ
button.
Finding a particular place on the tape
Before recording or playback, press the RESET button to set the
COUNTER to 000 (see Figure 2).
Make a note of particular places on the tape by using the counter.
These positions can easily be found again by using fast forward
(F.FWD button) or rewind (REW button).
COUNTER
RESET
000
Figure 2
24
Status 11/03
Operation manual
Fast playback
The stereo cassette drive also has a fast playback facility. The
playback is faster than normal, but still clearly audible.
Press the F.F/CUE or the REW/REV button while the PLAY button
is down (the buttons cannot be pressed right down in this function).
Release the F.F/CUE or REW/REV button again to allow the
normal playback operation to continue.
Regulating the tape speed (PITCH)
Sometimes it is necessary to slow down or accelerate the tape speed
i.e. the playback of music or language on the tape. e.g. in dance
classes or during language training. This can be done with the PITCH
control.
Turn the PITCH control to the left to slow down the tape speed.
Turn the PITCH control to the right to accelerate the tape speed.
Turn the PITCH control to 0 to set the tape to normal speed.
The CD Player
CD Player EC300
C O M P A C T
D IG I T A L
IR
A U D IO
REPEAT
REPEAT 1 ALL A↔ B RANDOM PROGRAM
1
INTRO
5
6
7
8
72:15
9
10
11
12
13
14
15
REMAIN
15
2
3
A-B
STOP
PLAY/PAUSE
REPEAT
4
PROG REMAIN
SEARCH
SKIP
Figure 3
OPEN/CLOSE (Opening and closing the CD drive)
Press the OPEN/CLOSE button to open the CD drive. Put the CD into
the CD drive with the print side up. Press the OPEN/CLOSE button
again to close the CD drive. The CD starts to turn automatically. As
soon as the total number of tracks on the CD is displayed, the CD
player is ready. If the PLAY button is pressed instead of the
OPEN/CLOSE when the CD is put into the machine, the CD drive is
automatically closed and the playback starts with the first track.
Status 11/03
25
Operation Manual
PLAY/PAUSE (Playback/Pause)
Press the PLAY/PAUSE button to play a CD from the beginning. The
first track on the CD starts playing. The playback operation is displayed
on PLAY (or on the X symbol) on the CD player display.
While the CD is playing, press the PLAY/PAUSE button to pause the
playback. Press the PLAY/PAUSE button again to deactivate the
pause function and restart the CD playback.
STOP
Press the STOP button to stop the CD.
SKIP (Track search)
During playback it is possible to skip forward or back to another CD
track by pressing the button very quickly.
Press the SKIP |<< button to go back to the previous track. Press
the button once and while playback is running, the CD player will
jump back to the beginning of the track.
Press the SKIP >>| button to go onto the next track.
SEARCH
To find a particular point in a track, press the SEARCH button.
Press the SEARCH button to fast forward and back to find a
particular place in a track.
REPEAT
Press the REPEAT button. The track which is being played at that
moment is repeated and REPEAT flashes on the display. (REPEAT
and 1).
Press the REPEAT button again. The whole CD or the
preprogrammed track is repeated until the REPEAT button is
pressed again. REPEAT flashes up on the display (REPEAT and
ALL).
Press the REPEAT button a third time and the repeat function is
stopped.
26
Status 11/03
Operation manual
PROG (Track programming)
Press the PROGRAM button to start the track programme function.
Press the UP and DOWN buttons to select a previous or next track
until the selected track is displayed in the LCD.
Press the PROGRAM button to confirm the track programming.
Repeat steps 2 and 3 to programme any further tracks. Press the
PLAY button to start the playback in the selected programme order.
A maximum of 21 tracks can be programmed.
REMAIN (Remaining time)
The display shows the elapsed playback time of a track. Press the
REMAIN button to access two more time functions.
Press the REMAIN button to view the remaining playing time of the
track.
Press the REMAIN button again to view the total remaining
playback time on the CD.
This function is not available during track programming, random
selection or repeat.
A ⇔B
⇔ (Programmed repeat function)
This function repeats a part of a track as often as required.
Press the A ⇔B button at the beginning of the required extract.
Press the A ⇔B button at the end of the required extract. The CD
player now runs in a repeat loop between the selected points.
Press the A ⇔B button again to end the selected repeat section.
Infrared remote control
Use the infrared remote control to operate all the CD player functions
on the TLS device (see Figure 4). The functions on the remote control
buttons correspond to those on the operation buttons of the CD player.
The remote control has a few additional functions.
Status 11/03
27
UP/FF
8
INTRO
VOL+
7
10
VOL-
DOWN/REW
REMAIN
5
4
+10
RANDOM
9
PROG
6
3
2
1
MUTE
STOP
REPEAT
Operation Manual
Figure 4
RANDOM
Random selects a CD track and starts the playback. At the end of this
track a new one is selected at random and played back. This process
continues until all the CD tracks have been played or the playback is
interrupted.
Press the RANDOM button to activate the random mode. The
random function (RANDOM) lights up on the display.
Press the RANDOM button again to end the function.
This function is not available during track programming.
INTRO (Automatic playing of all the tracks)
This function can help find a piece of music when the name of the track
cannot be retrieved. Each CD track is played for 10 seconds.
Press the INTRO button to play all the tracks for just 10 seconds.
SPACE flashes on the display.
Press the INTRO button again to release this function.
This function can only be interrupted by pressing the STOP button.
SPACE (Playback hesitation)
Between each track the CD player automatically leaves gaps of five
seconds. This is useful, for example, during the recording process. It is
easier to find the start of each track on a cassette recording from a CD.
Press the SPACE button to keep a five-second gap between the
individual tracks.
Press the SPACE button again to release the playback hesitation.
28
Status 11/03
Operation manual
Controlling the CD speed (PITCH)
Sometimes it is necessary to slow down or accelerate the tape speed
i.e. the playback of music or language e.g. in dance classes or during
language training. This can be done with the PITCH control.
Turn the PITCH control to the left to slow down the CD speed.
Turn the PITCH control to the right to accelerate the CD speed..
Turn the PITCH control to the middle setting to set the CD to
normal speed.
Starting the operation (Changing the batteries)
The infrared remote control runs off two batteries 1.5 V AAA R03.
Open the battery cover on the back of the remote control. Remove the
old batteries and place the two new batteries in the appropriate slot.
Make sure that the batteries are placed in the remote control with the
correct polarity (+ symbol or – symbol for the appropriate polarity
marked on the battery). Close the battery cover.
Note:
The IR sensor is on the operational/loudspeaker side of
the device.
Note:
If the device is not going to be used for a while, remove the
batteries to avoid any battery fluid leaking into the remote
control.
The Mixer Console
0
0
45
6
7
8
9
A
ED
CB
0
1
0
23
F
-
+
-
+
L
TREBLE
BASS
R
BALANCE
LS-OUT
-
+
MIC1
I
-
+
MIC2
I
-
+
TAPE
CD
IN
OUT
Figure 5
Status 11/03
29
Operation Manual
Volume control
Control the volume of the cassette drive, the CD drive and external
devices with the TAPE/CD button. Turn the volume control to the right
to set the maximum volume and in the same way to the left to turn the
volume down.
The mic volume controls MIC 1 and MIC 2 regulate the microphone
volume. Turn the volume control to the right to set the maximum
volume and in the same way to the left to turn the volume down.
The channel control BALANCE controls the balance between the left
and right channels for an optimal stereo effect. Turning this to the right
lowers the volume of the left channel and vice versa. Under normal
circumstances, leave the control on the middle setting.
Tone balance
The tone controls BASS and TREBLE allow a lowering or raising of the
low and high tones.
Set the tone on the TLS devices according to the acoustics in the
room, or as required. As soon as the maximum value has been
reached using the control TAPE/CD, playback distortions can occur
which could damage the loudspeaker system.
Note:
Playback distortions can damage the loudpeaker. Do not
operate the device for any length of time when distortions
occur. Lower the total volume and stop the distortion.
External Connections
MIC 1 and MIC 2
Via the MIC 1 and MIC 2 connections wired microphones can be
connected to the device with a 6.3 mm jack plug.
LS-OUT
The active TLS amplifier M 100 LS PLus can be connected via the LSOUT connection. The LS-OUT connection enables stereo operation.
Connect both devices before switching them on.
Audio IN
An external audio source can be connected via the Audio IN
connection to record this onto a cassette, for example.
30
Status 11/03
Operation Manual
Audio OUT
A stereo system can be connected via the output Audio OUT.
Headphones
To listen to cassettes or CDs via headphones, the devices have a
headphone connection with a 6.3 mm jack plug. Put the jack plug on
the headphones into the socket with the crossed out loudspeaker
symbol to switch the integrated loudspeaker to mute.
Using Radio Microphones
The radio microphone transmits signals to the built-in receiver without
cables and wires. Depending on how they are made up, the high
frequency radio signals can also go through doors, walls and windows,
delivering clear and pure reception. The TLS transmission channel is
factory-set to channel F.
Switch the microphone on (ON). The operation display lights up.
Switch the microphone off after use (OFF).
The operation (ON) and battery display starts to flash when the
batteries start running down. At this point the batteries need
changing. Put a 9 volt battery into the battery holder on the
microphone using correct polarity (the + pole on the battery must
agree with the + symbol on the microphone).
Note:
If the microphone is not working, check first whether the
TLS device is connected to the mains or whether the
microphone is switched on. Make sure that the battery in
the microphone is not running low. In addition please
check if the selected channel on the hand transmitter is the
same as the channel on the TLS device. If there is
distortion, check whether the volume on the audio source
is not set at too high a level. If so, turn the volume down.
Also make sure that the device or the microphone is not
positioned too close to fluorescent lamps.
Transmission errors during operation of the radio microphone
If any errors occur during operation of the microphone, the
transmission channel can be changed on the channel switch.
Status 11/03
31
Operation Manual
Note:
When setting the channel please ensure that the national
rules and regulations of the corresponding authorising
body are adhered to.
Further information on the microphone can be found in the separate
accompanying operation manual.
Care of the Device
Note:
Never use aggressive chemical products such as alcohol,
petrol or paint thinner. Moisture can damage electronic and
electrical parts. Do not allow moisture to penetrate the
inside of the device.
Cleaning the cassette drive
To ensure optimal sound quality, clean the erase, recording and
playback heads regularly, as well as the tension roller.
Clean with a cotton wool bud that has been lightly moistened with
head cleaning liquid or isoprophyl alcohol.
Cleaning the CD player
Only clean the CD player with a lens brush. Moisture should not be
allowed to penetrate the CD player.
Cleaning the TLS M 100 device
The sides of the device are covered in a washable material.
In stubborn cases, use a soft damp cloth.
Environmental Issues
The device, accessories and packaging should be recycled. Faulty
batteries must be recycled according to paragraph 91/157/EWG. Do
not put used batteries into household rubbish, onto a fire or into water.
All technical devices have a life span. For this reason, TLS
Communication GmbH will take back all the components of the TLS M
100 devices and have them recycled.
32
Status 11/03
Operation Manual
Transport Damage
If damage is caused in transit, please note the following points:
Leave the product and packaging intact.
Obtain proof of damage from the carrier.
Do not use the damaged device.
If the product was delivered by carrier or parcel post, report the
damage to us within 7 calendar days by telephone or in writing.
The administrative process will be quicker if you send us a copy of
the delivery note.
Please note that we will only accept returned goods if the situation
has been cleared with us beforehand.
Support
Queries regarding the operation of the device should be directed to
your local TLS dealer or direct to TLS:
TLS Communication GmbH
Marie-Curie-Straße 20
D-40721 Hilden
Tel.: +49 (0) 2103 5006-0
Fax: +49 (0) 2103 5006-90
e-mail: [email protected]
www.tls-gmbh.com
Status 11/03
33
Operation Manual
Operational Problems
Problem
Device won’t switch on
Possible reason
Solution
•
Not plugged in properly
•
Push the plug in properly
•
Faulty fuse
•
-Pull the power cable out of the
device
- Pull the fuse holder and fuse out of
the built-in device plug (on the side
of the housing)
- Insert the fuse holder with the new
fuse back into the built-in device
plug
•
CD in the wrong way up
•
CD with label side upwards
•
Printed cardboard CD protector has
not been removed
•
Remove printed cardboard CD
•
Disc dirty
•
Clean disc
•
CD-RW
•
Due to possible faults in the writing
process of various types of CDburners, it may be the case that
some CD RWs won’t play
•
Optics misted up
- immediately after a radiator is
switched on
- In a damp room
- When the device is brought
suddenly from a very cold place
into a warm room
•
Let the device acclimatise for ca. 1
hour
•
Dirty disc
•
Clean disc
•
Scratched disc
•
Use undamaged disc
•
Disturbance caused by heavy steps
•
Place on a stable surface
•
Device on playback
•
Press stop (no input is possible
during playback)
•
Track number not available on the
CD
•
Don’t select a higher number that of
the last CD track
•
Dead batteries
•
Change the batteries in the remote
control
•
No reception
•
Hold the remote control in the
direction of the loudspeaker/front
panel
Recording button on the cassette drive •
won’t work
Cassette is protected against
erroneous deletion
•
If the cassette can be erased,
sellotape over the openings on the
rear side of the cassettes
Cassette/CD runs too quickly / too
slowly (only on devices with pitch
control)
•
Pitch control is not centred
•
Centre pitch control
No playback via the radio microphone
•
Empty batteries
•
Change the batteries in the remote
control
•
Channel settings are not identical
•
Set the same channel on the device
and the microphone
•
Loose cassette tape
•
Tighten the cassette tape with a
pencil or similar
•
Dirty cassette drive
•
Clean the erase head, head tension
roller and head in the cassette drive
with a cotton bud and alcohol
Disc in, but no playback possible
Jumping during playback or unusually
slow track access
Preprogramming not available
Remote control not working with CD
player
The device sounds muffled during
cassette playback or speed and pitch
variations occur
34
Status 11/03
Status 11/03
35
Dimensions/Weight/etc.
W x H x D mm
Weight kg (packed)
Customs consignment No
Wireless Microphone
Carrier frequency
Operating distance
Operating time
Sensitivity
330 x 510 x 290
15.5 kg (18.0 kg)
852 033 19
330 x 510 x 290
15.8 kg (18.4 kg)
852 790 98
863-864 MHz
max. 120 m
10 h
20-20.000 Hz
< 0.05 %
> 80 dB at 1 kHz
> 60 dB at 1 kHz
Yes
Infrared
330 x 510 x 290
16.4 kg (18.6 kg)
852 033 19
20-20.000 Hz
< 0.05 %
> 80 dB at 1 kHz
> 60 dB at 1 kHz
Yes
Infrared
20-20.000 Hz
< 0.05 %
> 80 dB at 1 kHz
> 60 dB at 1 kHz
Yes
Infrared
6.3 mm jack Ster.
CD Player
Frequency range
Total harmonic distortion
Signal/Noise ratio
Channel Separation
Controllable pitch
Remote control
6.3 mm jack Ster.
6.3 mm jack Ster.
2 x 6.3 mm jack
6.3 mm jack
2 x Phono Stereo
2 x Phono Stereo
70 W
20-20.000 Hz
92 dB
0.5 %
8Ω
230 V / 50 Hz
140 Watt
1.6 A delayed
Active box
Two way system
801 010
M 100 Combi
1/4 Track, Stereo
4.75 cm/sec.
Yes
< 0.3 %
50-14.000 Hz
3 digit
2 x 6.3 mm jack
6.3 mm jack
2 x Phono Stereo
2 x Phono Stereo
70 W
20-20.000 Hz
92 dB
0.5 %
8Ω
230 V / 50 Hz
140 Watt
1.6 A delayed
Active box
Two way system
2 x 6.3 mm jack
6.3 mm jack
2 x Phono Stereo
2 x Phono Stereo
70 W
20-20.000 Hz
92 dB
0.5 %
8Ω
230 V / 50 Hz
140 Watt
1.6 A delayed
Active box
Two way system
804 010
M 100 CD
Wireless
810 010
Cassette Recorder
Track System
Tape speed
Controllable pitch
Wow & Flutter
Frequency range
Counter
Input/Output
Microphone Mono
Headphones Stereo
External sources IN
External sources OUT
External speakers IN
External OUT
Amplifier
Power rating ms
Frequency range
Dynamic range
Total harmonic distortion
Impedance
Mains voltage
Power consumption
Fuse
Design
Product No.
M 100 CD
330 x 510 x 290
16.7 kg (19.0 kg)
852 790 98
863-864 MHz
max. 120 m
10 h
20-20.000 Hz
< 0.05 %
> 80 dB at 1 kHz
> 60 dB at 1 kHz
Yes
Infrared
1/4 Track, Stereo
4.75 cm/sec.
Yes
< 0.3 %
50-14.000 Hz
3 digit
6.3 mm jack Ster.
2 x 6.3 mm jack
6.3 mm jack
2 x Phono Stereo
2 x Phono Stereo
70 W
20-20.000 Hz
92 dB
0.5 %
8Ω
230 V / 50 Hz
140 Watt
1.6 A delayed
Ster. active box
Two way system
M 100 Combi
Wireless
801 020
330 x 510 x 290
13.8 kg (17.6 kg)
851 821 190
6.3 mm jack Ster.
2 x 6.3 mm jack
6.3 mm jack
2 x Phono Stereo
2 x Phono Stereo
70 W
20-20.000 Hz
92 dB
0.5 %
8Ω
230 V / 50 Hz
140 Watt
1.6 A delayed
Active box
Two way system
801 030
M 100 Talk
330 x 510 x 290
14.1 kg (18.0 kg)
851 821 90
863-864 MHz
max. 120 m
10 h
6.3 mm jack Ster.
2 x 6.3 mm jack
6.3 mm jack
2 x Phono Stereo
2 x Phono Stereo
70 W
20-20.000 Hz
92 dB
0.5 %
8Ω
230 V / 50 Hz
140 Watt
1.6 A delayed
Active box
Two way system
M 100 Talk
Wireless
801 040
330 x 510 x 290
13.2 kg (16.4 kg)
851 999 18
6.3 mm jack Ster.
2 x Phono Stereo
70 W
20-20.000 Hz
92 dB
0.5 %
8Ω
230 V / 50 Hz
140 Watt
1.6 A delayed
Active box
Two way system
801 050
M 100 LS Plus
Operation Manual
Table of Technical Data
Mode d'emploi
Identification
F
Fabricant: ..................................................... TLS Communication GmbH
Marie-Curie-Straße 20
D-40721 Hilden
Tel: +49 (0) 2103 5006 0
Fax: +49 (0) 2103 5006 90
Produit:..................................................................................Série M 100
Pays d’origine: ......................................................... République tchèque
Mode d’emploi:.................................................................... Edition 11/03
Fichier-sortie: .................................................................M100Range.doc
Ce mode d’emploi est partie constituante de ce produit. Il contient des
informations importantes relatives à la manipulation de l’appareil. En
tenir compte si vous remettez l’appareil à une tierce personne.
Conserver ce mode d’emploi pour pouvoir le consulter ultérieurement.
Table des matières
Identification......................................................................................... 36
Table des matières .............................................................................. 36
Compris dans la fourniture................................................................... 37
Caractéristiques techniques ................................................................ 37
Conditions ambiantes .......................................................................... 37
Emploi conforme à la finalité................................................................ 37
Garantie ............................................................................................... 38
Consignes de sécurité ......................................................................... 38
Mise en service .................................................................................... 39
Le lecteur cassettes ............................................................................. 39
Le lecteur CD ....................................................................................... 42
La table de mixage .............................................................................. 46
Prises externes .................................................................................... 47
Utilisation de radiomicrophones........................................................... 48
Instructions d’entretien......................................................................... 49
Protection de l’environnement ............................................................. 50
En cas de dommages dus au transport ............................................... 50
Assistance............................................................................................ 51
Problèmes de fonctionnement ............................................................. 52
Tableau Caractéristiques techniques .................................................. 53
36
Edition 11/03
Mode d'emploi
Compris dans la fourniture
N°
ident.
Désignation
Télécom- MicroCâble Câble
mande+ phone+
secteur LS
piles
piles
804 010 M 100 CD
X
X
810 010 M 100 CD
Wireless
X
X
801 010 M 100 Combi
X
X
801 020 M 100 Combi
Wireless
X
X
801 050 M 100 LS
Plus
X
801 030 M 100 Talk
X
801 040 M 100 Talk
Wireless
X
Mode
d’emploi
X
en option
X
X
en option
X
X
X
X
en option
X
Caractéristiques techniques
Voir le tableau page 53
Pour favoriser l’amélioration continue des produits, TLS se réserve le
droit de modifier les spécifications sans préavis.
Conditions ambiantes
Température de service:............................................... de +5°C à +60°C
Humidité d’air relative: ............................................................. Max. 85%
Pression atmosphérique: ...........................................de 600 à 1000 hPA
Emploi conforme à la finalité
Les appareils M 100 TLS servent à la sonorisation mobile de grandes
salles et de halles pouvant contenir approximativement jusqu’à 400
personnes. Vous avez la possibilité de reproduire différentes sources
de signaux audio.
Edition 11/03
37
Mode d'emploi
Garantie
La garantie usine TLS pour les appareils M 100 TLS est valable 24
mois. Les dommages découlant de manipulation non conforme,
d’usage de force ou d’utilisation dangereuse ne sont pas couverts par
la garantie. La garantie perd toute validité en cas d’ouverture de
l’appareil par des personnes non agréées.
Consignes de sécurité
Ce mode d’emploi contient des informations fondamentales devant
impérativement être respectées lors de l’utilisation de l’appareil M 100
TLS. Suivre strictement ces instructions pour éviter toute erreur. Par
conséquent, lire impérativement ce mode d’emploi avant de faire
fonctionner les appareils M 100 TLS.
Les consignes de sécurité figurant dans ce mode d’emploi et dont le
non-respect risque d’être à l’origine de dangers pour les personnes
sont signalées par le
symbole de sécurité selon DIN 4844-W8 et par le mot Danger.
Danger de mort
Tout choc électrique transmis par les blocs d’alimentation risque
d’entraîner la mort ou de graves blessures corporelles. Ne jamais
ouvrir le boîtier des appareils M 100 TLS! La garantie perd toute
validité en cas d’ouverture du boîtier !
Danger
Ce produit est source de rayonnement laser. Toute exécution
d’opération autre que celle indiquée ici risque d’entraîner un
rayonnement dangereux. Ne jamais s’exposer au faisceau.
Danger
Les connexions par fiches et les câbles risquent de se détériorer.
Relier les connecteurs et les prises sans forcer.
38
Edition 11/03
Mode d'emploi
Danger
L’utilisation de l’appareil est prévue dans des locaux clos. Il est interdit
d’exposer l’appareil aux gouttes d’eau ou aux éclaboussures. Ne
jamais poser des récipients ou objets remplis de liquide sur l’appareil.
Mise en service
Tournez le bouton de réglage TONE sur la position centrale.
Tournez le bouton de réglage VOLUME (MIC, CD ou TAPE) sur la
position min.
Branchez le câble secteur fourni avec l’appareil dans la prise reliée
à la masse située sur le côté.
Branchez la fiche secteur sur le réseau électrique de 230 V/50 Hz.
Selon la nécessité, connectez voire coupez les appareils M 100
TLS par le biais de l’interrupteur POWER situé en dessous de
l’entrée du câble secteur.
Le lecteur cassettes
Lecteur cassettes mono ED500
REC
0
50
100
FULL AUTO STOP
PITCH
REC
PLAY
REW/REV
F.F/CUE STOP/EJECT PAUSE
Illustration 1
Edition 11/03
39
Mode d'emploi
Lecture
Ouvrez le compartiment cassette par pression sur la touche ST/EJ
(voir Illustration 1).
Introduire une cassette dans le compartiment avec la surface libre
de la bande magnétique orientée vers le bas et la face de bande
voulue placée vers l’avant (côté 1 ou A ou 2 ou B).
Refermer le compartiment cassette.
Appuyer sur la touche PLAY.
Nota:
Pour arrêter le fonctionnement du lecteur cassettes,
pressez la touche ST/EJ (Stop/Eject). Pressez une
seconde fois cette touche pour ouvrir le compartiment
cassette. Vous pouvez maintenant sortir la cassette.
Enregistrement
Nota:
Comme avec tous les autres magnétophones, pour
enregistrer avec cet appareil il ne faut utiliser que des
cassettes dont les ergots de protection ne sont ni
supprimés, ni détériorés.
Pour enregistrer, introduire la cassette dans le compartiment.
Pressez la touche PAUSE.
Pressez la touche REC.
Le témoin lumineux rouge REC est allumé (voir Illustration 1).
Relâchez la touche PAUSE pour que l’enregistrement commence.
Nota:
Pour une interruption de courte durée de l’enregistrement,
pressez la touche PAUSE. Pour arrêter l’enregistrement
pressez la touche ST/EJ.
Recherche d’une position précise sur la bande
Avant de commencer l’enregistrement ou la lecture, réglez le
compteur COUNTER sur 000 par le biais de la touche RESET (voir
Illustration 2).
Repérez les positions précises en consultant l’indication de
référence du compteur.
Vous pouvez ensuite facilement retrouver ces positions en utilisant la
touche de bobinage à vitesse rapide avant (touche F.FWD) ou de
rembobinage rapide (touche REW).
40
Edition 11/03
Mode d'emploi
COUNTER
RESET
000
Illustration 2
Lecture rapide
Le lecteur cassettes stéréo offre en plus la possibilité de lecture rapide.
La lecture s’effectue en l’occurrence plus rapidement tout en étant
audible.
Pressez la touche F.F/CUE ou REW/REV pendant que la touche
PLAY est enfoncée (les touches ne s’encliquètent pas durant cette
fonction).
Relâcher soit la touche F.F/CUE, soit la touche REW/REV selon le
besoin pour repasser au mode d’enregistrement normal.
Réglage de la vitesse de bande (PITCH)
Il s’avère parfois souhaitable de ralentir ou d’accélérer la vitesse de
défilement de la bande et par conséquent celle de la lecture d’un
morceau musical ou de texte, comme par exemple dans les écoles de
danse ou pendant un cours de langue. La molette de réglage PITCH
vous offre ces possibilités.
Tournez la molette de réglage PITCH dans le sens antihoraire pour
ralentir la vitesse de la bande.
Tournez la molette de réglage PITCH dans le sens horaire pour
accélérer la vitesse de la bande.
Tournez la molette de réglage PITCH sur 0 pour que la bande
défile à vitesse standard.
Edition 11/03
41
Mode d'emploi
Le lecteur CD
CD Player EC300
C O M P A C T
D IG I T A L
IR
A U D IO
REPEAT
REPEAT 1 ALL A↔ B RANDOM PROGRAM
1
2
3
4
INTRO
5
6
7
8
9
10
11
12
13
14
15
REMAIN
15
72:15
A-B
PROG REMAIN
STOP
SEARCH
PLAY/PAUSE
REPEAT
SKIP
Illustration 3
OPEN/CLOSE (ouverture et fermeture du tiroir du CD)
Appuyez sur la touche OPEN/CLOSE pour ouvrir le tiroir du CD.
Centrez le CD dans le tiroir avec la face imprimée tournée vers le haut.
Appuyez une nouvelle fois sur la touche OPEN/CLOSE pour fermer le
tiroir du CD. Le CD commence à tourner automatiquement. Le lecteur
CD est en état de fonctionnement dès que le nombre de plages total
est affiché. Si au lieu d’appuyer sur OPEN/CLOSE vous appuyez sur
PLAY lors de l’introduction du CD, le tiroir se referme automatiquement
et la lecture commence à la première plage.
PLAY/PAUSE (lecture/arrêt momentané)
Appuyez sur la touche PLAY/PAUSE si vous désirez lire un disque
depuis le début. La lecture du CD commence à la première plage. Le
mode de lecture est signalé par la visualisation de PLAY (voire du
symbole X) sur l’afficheur du lecteur CD.
Si vous appuyez sur la touche PLAY/PAUSE pendant la lecture du
disque, vous activez alors le mode d’arrêt momentané. Un nouvel
appui sur la touche PLAY/PAUSE désactive la fonction d’arrêt
momentané et la lecture du CD commence.
STOP
L’actionnement de la touche STOP engendre l’arrêt de la lecture du
CD.
SKIP (recherche de titres)
Pendant la lecture du disque, vous pouvez passer au titre précédent ou
au titre suivant du CD, en n’appuyant que très brièvement sur la
touche.
42
Edition 11/03
Mode d'emploi
Appuyez sur la touche SKIP |<< pour accéder au titre précédent.
En cours de lecture et en cas d’un seul appui, le lecteur CD
retourne au début du titre.
Appuyez sur la touche SKIP >>| pour accéder au titre suivant.
SEARCH (recherche)
Pour rechercher dans un titre, maintenez la touche SEARCH
appropriée enfoncée.
Pour rechercher un point précis d’un titre, appuyez sur la touche
SEARCH de bobinage en avant et de rembobinage rapides.
REPEAT (répétition)
Appuyez sur la touche REPEAT. Le titre lu à ce moment-là est
répété et l’indicatif caractéristique de la fonction répétition
(REPEAT et 1) est allumé sur l’afficheur.
Appuyez une seconde fois sur la touche REPEAT. L’ensemble des
plages du CD ou celles que vous avez programmées sont répétées
jusqu’à ce que vous appuyiez une nouvelle fois sur la touche
REPEAT. L’indicatif caractéristique de la fonction répétition
(REPEAT et ALL) s’allume sur l’afficheur.
Appuyez une troisième fois sur la touche REPEAT. La fonction
répétition est annulée.
PROG (programmation de titres)
Appuyez sur la touche PROGRAM pour démarrer la fonction
programmation des titres.
Appuyez sur les touches UP et DOWN permettant de sélectionner
le titre précédent ou le titre suivant jusqu’à ce que le titre voulu
clignote sur le champ d’affichage à cristaux liquides.
Appuyez sur la touche PROGRAM pour valider la programmation
du titre.
Répétez les étapes 2 et 3 pour rechercher un autre titre. Appuyez
sur la touche PLAY pour que la lecture commence dans l’ordre de
votre programmation. Le nombre de titres programmables est de
21.
REMAIN (temps d’écoute restant)
Pendant la lecture du disque, l’afficheur indique le temps déjà écoulé
pour un titre. La touche REMAIN permet aussi d’activer deux autres
fonctions de temps.
Edition 11/03
43
Mode d'emploi
Appuyez sur la touche REMAIN pour afficher le temps d’écoute
restant d’un titre.
Appuyez une seconde fois sur la touche REMAIN pour afficher le
total du temps d’écoute restant du CD.
Cette fonction ne peut être activée ni pour la lecture d’une
programmation de titres, ni pour la sélection par le générateur de
lecture de titres en ordre aléatoire, et ni pour la répétition.
A ⇔B
⇔ (répétition programmable)
Cette fonction vous permet de répéter une partie du titre aussi souvent
que vous le désirez.
Appuyez sur la touche A ⇔B au début de la section voulue.
Appuyez sur la touche A ⇔B à la fin de la section voulue. Le lecteur
CD fonctionne maintenant en boucle entre les limites que vous
avez définies.
Appuyez une nouvelle fois sur la touche A ⇔B pour mettre fin à la
répétition de la section choisie.
UP/FF
8
INTRO
VOL+
7
10
VOL-
DOWN/REW
REMAIN
5
4
+10
RANDOM
9
PROG
6
3
2
1
MUTE
STOP
REPEAT
Télécommande infrarouge
La télécommande infrarouge vous permet d’utiliser toutes les fonctions
du lecteur CD de l’appareil TLS (voie Illustration 4). Les fonctions des
touches de la télécommande correspondent à celles des touches du
panneau de commande du lecteur CD. La télécommande offre en plus
un certain nombre d’autres fonctions.
Illustration 4
RANDOM (générateur de lecture de plages en ordre aléatoire)
Le générateur de lecture de plages en ordre aléatoire sélectionne un
titre du CD et en active la lecture. A la fin de ce titre, un nouveau titre
est choisi selon le principe du hasard avant d’être lu. Cette procédure
se poursuit jusqu’à ce que tous les titres du CD aient été lus ou jusqu’à
ce que vous interrompiez la lecture.
44
Edition 11/03
Mode d'emploi
Appuyez sur la touche RANDOM pour démarrer le générateur de
lecture de plages en ordre aléatoire. L’indicatif caractéristique du
générateur de lecture de plages en ordre aléatoire (RANDOM)
s’allume sur l’afficheur.
Appuyez une nouvelle fois sur la touche RANDOM pour désactiver
la fonction.
Cette fonction ne peut pas être activée pour la lecture d’une
programmation de titres.
INTRO (lecture automatique de l’intro de tous les titres)
Cette fonction vous aide à trouver par ex. un morceau musical dont le
titre vous échappe. Chaque intro des titres du CD est lu pendant les 10
premières secondes.
Appuyez sur la touche INTRO pour activer la lecture des 10
premières secondes de tous les titres. La caractéristique de cette
fonction (SPACE) s’allume sur l’afficheur.
Appuyez une seconde fois sur la touche INTRO pour quitter la
fonction de lecture des intros.
La fonction de lecture des intros n’est possible qu’après l’interruption
de la lecture par le biais de la touche STOP.
SPACE (lecture retardée)
Le lecteur CD insère automatiquement des arrêts momentanés de cinq
secondes entre la lecture de chacun des titres. Cette fonction peut
s’avérer judicieuse par ex. pour les enregistrements. Les débuts de
titres enregistrés sur cassette depuis le CD sont de cette manière plus
facilement trouvables.
Appuyez sur la touche SPACE pour obtenir un arrêt momentané de
cinq secondes entre chacun des titres.
Appuyez une seconde fois sur la touche SPACE pour quitter la
fonction lecture retardée.
Réglage de la vitesse du CD (PITCH)
Il s’avère parfois souhaitable de ralentir ou d’accélérer la vitesse du CD
et par conséquent celle de la lecture d’un morceau musical ou de texte,
comme par exemple dans les écoles de danse ou pendant un cours de
langue. La molette de réglage PITCH vous offre ces possibilités.
Tournez la molette de réglage PITCH dans le sens antihoraire pour
ralentir la vitesse du CD.
Edition 11/03
45
Mode d'emploi
Tournez la molette de réglage PITCH dans le sens horaire pour
accélérer la vitesse du CD.
Tournez la molette de réglage PITCH sur la position centrale pour
que le CD tourne à vitesse standard.
Mise en service (échange de piles)
La télécommande infrarouge fonctionne au moyen de deux piles de
type 1,5 V AAA R03. Ouvrez le couvercle du compartiment à piles situé
au dos de la télécommande. Enlevez les piles qui s’y trouvent et
introduisez les deux piles neuves en suivant les instructions figurant
dans le boîtier. Assurez-vous que les piles de la télécommande ont été
correctement introduites dans leur compartiment (les signes de polarité
+ voire – doivent correspondre aux repères des pôles prescrits).
Refermer le couvercle du compartiment à piles.
Nota:
Le capteur IR se trouve sur le côté commande/hautparleur de l’appareil.
Nota:
En cas de non-utilisation prolongée de l’appareil, enlevez
les piles pour éviter tout écoulement éventuel du liquide
des piles dans la télécommande.
La table de mixage
0
0
45
6
7
8
9
A
ED
CB
0
1
0
23
F
-
+
-
+
L
TREBLE
BASS
R
BALANCE
LS-OUT
-
+
MIC1
I
-
+
MIC2
I
-
+
TAPE
CD
IN
OUT
Illustration 5
46
Edition 11/03
Mode d'emploi
Régulation de niveau sonore
Le régleur TAPE/CD permet d’ajuster le niveau sonore du lecteur
cassettes, du lecteur CD et des appareils externes. Pour régler le
niveau sonore maximal, tourner le régleur de niveau sonore dans le
sens horaire et le tourner dans le sens antihoraire pour baisser le
niveau sonore.
La molette de réglage MIC 1 et MIC 2 vous permet de régler le niveau
sonore du microphone. Pour régler le niveau sonore maximal, tourner
la molette de réglage de niveau sonore dans le sens horaire et la
tourner dans le sens antihoraire pour réduire le niveau sonore.
La molette de réglage des canaux BALANCE sert à la régulation de la
balance entre le canal de droite et le canal de gauche pour obtenir un
effet stéréo optimal. Le niveau sonore du canal de gauche se réduit en
tournant la molette dans le sens horaire et vice versa. En ordre
général, laissez la molette tournée sur la position centrale.
Balance de tonalité
Les régleurs de tonalité BASS et TREBLE permettent de baisser ou
d’amplifier les graves ou les aiguës.
Réglez la tonalité des appareils TLS en fonction de l’acoustique du
milieu d’écoute ou selon votre choix. L’atteinte des valeurs maximales
par le biais des régleurs TAPE/CD et VOL+ / VOL- risque de
provoquer des distorsions lors de la lecture et par conséquent
d’endommager les systèmes des haut-parleurs.
Nota:
Les haut-parleurs risquent d’être endommagés en cas de
lecture déformée. Ne jamais laisser l’appareil fonctionner
en permanence avec des distorsions. Réduire le niveau
sonore total au moyen de la touche VOL- pour mettre fin à
ces distorsions.
Prises externes
MIC 1 et MIC 2
Les prises MIC 1 et MIC 2 permettent de brancher un microphone relié
par fil sur l’appareil au moyen d’une prise jack de 6,3 mm.
Edition 11/03
47
Mode d'emploi
LS-OUT
La prise LS-OUT permet de brancher l’enceinte d’amplificateur active
M 100 LS Plus TLS. La prise LS-OUT offre la possibilité de
fonctionnement en stéréo. Pour cela, veuillez tout d’abord relier les
deux appareils avant de les mettre en service.
Audio IN
La prise Audio IN permet de brancher une source audio externe, pour
par exemple enregistrer cette dernière sur une cassette.
Audio OUT
Par le biais de la sortie Audio OUT il est possible de brancher par
exemple une chaîne Hi-Fi.
Casque d’écoute
Pour pouvoir écouter des cassettes ou des disques compacts par le
biais d’un casque d’écoute, les appareils sont dotés d’une prise pour
casque avec jack de 6,3 mm. Lorsque vous branchez la prise jack de
votre casque d’écoute dans la prise dotée du symbole des hautparleurs barré, vous rendez le haut-parleur incorporé muet.
Utilisation de radiomicrophones
Le radiomicrophone transmet des signaux au récepteur incorporé sans
câbles ni fils. Les signaux radio très fréquents qui peuvent s’infiltrer en
fonction de la qualité des portes, murs et fenêtres, assurent une
réception claire et nette. Le réglage du canal d’émission TLS a été
réglé en usine sur le canal F.
Mettre le microphone en service (ON). L’indicateur de mise en
service s’allume.
Après l’utilisation, mettre le microphone hors circuit (OFF).
L’indicateur de service (ON) et de piles commence à clignoter
lorsque la puissance des piles s’affaiblit. Lors de ce signal, il est
conseillé de changer les piles. Placer une pile de 9 volts dans le
compartiment à piles du microphone en veillant à respecter les
indications de polarité correctes (le pôle + de la pile doit concorder
avec le repère + du microphone).
48
Edition 11/03
Mode d'emploi
Nota:
En cas de non-fonctionnement du microphone, vérifiez
tout d’abord si l’appareil TLS est branché sur la prise
secteur ou si le microphone est allumé. Assurez-vous que
la pile qui se trouve dans le microphone n’est pas épuisée.
En outre, veuillez vérifier si la sélection du canal sur
l’émetteur manuel concorde avec le canal sur l’appareil
TLS. En cas de distorsion, veuillez vérifier si le niveau
sonore de la source audio n’est pas réglé à un haut
niveau. Le cas échéant, veuillez réduire le niveau sonore.
Veuillez aussi veiller à ce que l’appareil ou le microphone
ne soit pas positionné à proximité de tubes fluorescents.
Interférences de transmission pendant le fonctionnement du
radiomicrophone
En cas d’apparition de parasites pendant le fonctionnement du
radiomicrophone, vous pouvez changer le canal d’émission au
commutateur de canal.
Nota:
Lors du réglage du canal, veillez à respecter les
prescriptions nationales des autorités de régulation
locales.
Pour de plus informations concernant le microphone, veuillez consulter
le mode d’emploi fourni séparément.
Instructions d’entretien
Nota:
Ne jamais utiliser des solvants puissants tels qu’alcool,
white-spirit ou des diluants. Toute infiltration d’humidité
risque de détériorer les systèmes électronique et
électrique. Veillez impérativement à ce qu’aucune humidité
ne pénètre à l’intérieur de l’appareil.
Nettoyage du lecteur cassettes
Nettoyez régulièrement la tête d’effacement, d’enregistrement et de
lecture, ainsi que le galet de pression de contact pour obtenir un son
de qualité optimale.
Pour le nettoyage, utiliser un coton-tige légèrement humecté avec
un liquide nettoyant ou avec un alcool isopropylique.
Edition 11/03
49
Mode d'emploi
Nettoyage du lecteur CD
Nettoyer exclusivement le lecteur CD avec une «brosse à photos».
Veillez`impérativement à éviter toute infiltration d’humidité dans le
lecteur CD.
Nettoyage de l’appareil M 100 TLS
Les parties latérales de l’appareil sont recouvertes d’un matériau
lavable.
En cas de salissures résistantes, utilisez un chiffon doux
légèrement humide.
Protection de l’environnement
Lors de leur élimination, il est préconisé de diriger l’appareil, les
accessoires et l’emballage vers un recyclage répondant aux critères de
l’environnement. Les piles défectueuses doivent être recyclées selon la
directive 91/157/CEE. Ne pas jeter les piles usées dans les ordures
ménagères, dans le feu ou dans l’eau. Les appareils techniques ne
sont pas éternels. De ce fait, TLS Communication GmbH reprend
toutes les composantes des appareils M 100 TLS pour les gérer vers
le recyclage.
En cas de dommages dus au transport
En cas de dommage découlant du transport, veuillez respecter les
points suivants:
Quel que soit le cas, toujours laisser la marchandise et l’emballage
tels quels.
Se laisser confirmer le dommage par le chargé de livraison.
Ne pas utiliser l’appareil endommagé.
En cas de livraison par une entreprise de transport ou un service
des colis, veuillez, par téléphone ou par courrier, nous signaler tout
dommage dans les 7 jours qui suivent la livraison.
Pour un règlement rapide du dommage, veuillez nous retourner le
produit auquel vous joindrez une copie du bordereau de livraison.
Nous vous prions de tenir compte du fait que nous n’acceptons les
produits retournés que lorsqu’il en a été auparavant convenu avec
nous.
50
Edition 11/03
Mode d'emploi
Assistance
Pour toutes questions pouvant se poser au cours du maniement ou
pendant le fonctionnement, veuillez vous adresser à votre revendeur
TLS local ou directement à TLS:
TLS Communication GmbH
Marie-Curie-Straße 20
D-40721 Hilden
Tel.: +49 (0) 2103 5006-0
Fax: +49 (0) 2103 5006-90
e-mail: [email protected]
www.tls-gmbh.com
Edition 11/03
51
Mode d'emploi
Problèmes de fonctionnement
Problème
L’appareil ne se laisse pas mettre en
marche
Cause possible
Remède
•
Prise secteur incorrectement
branchée
•
Introduire fermement la prise mâle dans
la prise femelle
•
Fusible défectueux
•
- Débrancher le câble secteur de
l’appareil
- Retirer le porte-fusible, fusible compris, de la prise mâle intégrée dans
l’appareil (situé sur le côté du boîtier)
- Emboîter à nouveau le porte-fusible,
fusible neuf compris, dans la prise
mâle intégrée dans l’appareil
•
Le disque est à l’envers
•
Introduire le disque l’étiquette tournée
vers le haut
•
Pochette CD carton avec
surimpression infos non enlevée
•
Enlever la pochette CD carton avec
surimpression infos
•
Disque encrassé
•
Nettoyer le disque
•
Utilisation d’un propre CD gravé
•
En raison des défauts de transmission
pour les différents graveurs de CD, il
peut arriver que certains disques gravés
ne soient pas lisibles
•
Objectif embué
- dès qu’un radiateur est allumé
- dans un milieu à teneur de
vapeur et très humide
- lorsque cet appareil passe
d’un endroit très froid à un
endroit chaud
•
Laisser l’appareil s’acclimater env.
pendant une heure
•
Disque encrassé
•
Nettoyer le disque
•
Disque rayé
•
Utiliser un disque impeccable
•
Anomalie due au bruit de chocs
•
Poser l’appareil sur un support stable
•
Appareil commuté sur Lecture
•
Commuter sur Stop (si la lecture est en
cours, aucune saisie possible)
•
Numéro de titre non existant sur
le CD
•
Ne pas sélectionner de numéros
supérieurs à celui du dernier titre du CD
•
Piles vides
•
Changer les piles de la télécommande
•
Aucune réception
•
Pointer la télécommande en direction de
l’enceinte du haut-parleur/du panneau
frontal
La touche d’enregistrement du
•
compartiment cassettes ne se laisse pas
actionner
Cassette protégée contre tout
effacement incontrôlé
•
S’il est permis d’effacer la cassette,
obturer les ouvertures à l’arrière de la
cassette au moyen d’un ruban adhésif
La cassette/le CD défile trop vite/trop
lentement (uniquement pour les
appareils avec molette de réglage Pitch)
•
Molette de réglage Pitch non
centré
•
Tourner la molette de réglage Pitch sur
la position centrale
Aucune lecture par le biais du
radiomicrophone
•
Piles déchargées
•
Remplacer les piles de la
télécommande
•
Le réglage du canal ne concorde •
pas
Le disque est en place, toutefois la
lecture est impossible
Sauts de lecture ou accès au titre
anormalement lent
Pas de préprogrammation possible
Télécommande du lecteur CD
impossible
L’enceinte sonne sourd lors de la lecture •
de cassette ou des défauts de
synchronisme apparaissent
•
52
Régler le même canal sur l’appareil et
sur le microphone
Bande de cassette lâche
•
Tendre la bande de la cassette au
moyen d’un crayon ou de tout autre
objet similaire
Lecteur cassettes encrassé
•
Dans le lecteur cassettes, nettoyer la
tête d’effacement, le galet de pression
de contact, la tête de lecture et le cabestan à l’aide de coton-tiges et d’alcool
Edition 11/03
Edition 11/03
53
Dimensions/Weight/etc.
W x H x D mm
Weight kg (packed)
Customs consignment No
Wireless Microphone
Carrier frequency
Operating distance
Operating time
Sensitivity
330 x 510 x 290
15.5 kg (18.0 kg)
852 033 19
330 x 510 x 290
15.8 kg (18.4 kg)
852 790 98
863-864 MHz
max. 120 m
10 h
20-20.000 Hz
< 0.05 %
> 80 dB at 1 kHz
> 60 dB at 1 kHz
Yes
Infrared
330 x 510 x 290
16.4 kg (18.6 kg)
852 033 19
20-20.000 Hz
< 0.05 %
> 80 dB at 1 kHz
> 60 dB at 1 kHz
Yes
Infrared
20-20.000 Hz
< 0.05 %
> 80 dB at 1 kHz
> 60 dB at 1 kHz
Yes
Infrared
6.3 mm jack Ster.
CD Player
Frequency range
Total harmonic distortion
Signal/Noise ratio
Channel Separation
Controllable pitch
Remote control
6.3 mm jack Ster.
6.3 mm jack Ster.
2 x 6.3 mm jack
6.3 mm jack
2 x Phono Stereo
2 x Phono Stereo
70 W
20-20.000 Hz
92 dB
0.5 %
8Ω
230 V / 50 Hz
140 Watt
1.6 A delayed
Active box
Two way system
801 010
M 100 Combi
1/4 Track, Stereo
4.75 cm/sec.
Yes
< 0.3 %
50-14.000 Hz
3 digit
2 x 6.3 mm jack
6.3 mm jack
2 x Phono Stereo
2 x Phono Stereo
70 W
20-20.000 Hz
92 dB
0.5 %
8Ω
230 V / 50 Hz
140 Watt
1.6 A delayed
Active box
Two way system
2 x 6.3 mm jack
6.3 mm jack
2 x Phono Stereo
2 x Phono Stereo
70 W
20-20.000 Hz
92 dB
0.5 %
8Ω
230 V / 50 Hz
140 Watt
1.6 A delayed
Active box
Two way system
804 010
M 100 CD
Wireless
810 010
Cassette Recorder
Track System
Tape speed
Controllable pitch
Wow & Flutter
Frequency range
Counter
Input/Output
Microphone Mono
Headphones Stereo
External sources IN
External sources OUT
External speakers IN
External OUT
Amplifier
Power rating ms
Frequency range
Dynamic range
Total harmonic distortion
Impedance
Mains voltage
Power consumption
Fuse
Design
Product No.
M 100 CD
330 x 510 x 290
16.7 kg (19.0 kg)
852 790 98
863-864 MHz
max. 120 m
10 h
20-20.000 Hz
< 0.05 %
> 80 dB at 1 kHz
> 60 dB at 1 kHz
Yes
Infrared
1/4 Track, Stereo
4.75 cm/sec.
Yes
< 0.3 %
50-14.000 Hz
3 digit
6.3 mm jack Ster.
2 x 6.3 mm jack
6.3 mm jack
2 x Phono Stereo
2 x Phono Stereo
70 W
20-20.000 Hz
92 dB
0.5 %
8Ω
230 V / 50 Hz
140 Watt
1.6 A delayed
Ster. active box
Two way system
M 100 Combi
Wireless
801 020
330 x 510 x 290
13.8 kg (17.6 kg)
851 821 190
6.3 mm jack Ster.
2 x 6.3 mm jack
6.3 mm jack
2 x Phono Stereo
2 x Phono Stereo
70 W
20-20.000 Hz
92 dB
0.5 %
8Ω
230 V / 50 Hz
140 Watt
1.6 A delayed
Active box
Two way system
801 030
M 100 Talk
330 x 510 x 290
14.1 kg (18.0 kg)
851 821 90
863-864 MHz
max. 120 m
10 h
6.3 mm jack Ster.
2 x 6.3 mm jack
6.3 mm jack
2 x Phono Stereo
2 x Phono Stereo
70 W
20-20.000 Hz
92 dB
0.5 %
8Ω
230 V / 50 Hz
140 Watt
1.6 A delayed
Active box
Two way system
M 100 Talk
Wireless
801 040
330 x 510 x 290
13.2 kg (16.4 kg)
851 999 18
6.3 mm jack Ster.
2 x Phono Stereo
70 W
20-20.000 Hz
92 dB
0.5 %
8Ω
230 V / 50 Hz
140 Watt
1.6 A delayed
Active box
Two way system
801 050
M 100 LS Plus
Mode d'emploi
Tableau Caractéristiques techniques
Manual de instrucciones
Identificación
E
Fabricante: ................................................... TLS Communication GmbH
Marie-Curie-Straße 20
D-40721 Hilden
Tel: +49 (0) 2103 5006 0
Fax: +49 (0) 2103 5006 90
Producto:...............................................................................M 100 Serie
País de origen:..............................................................República Checa
Manual de instrucciones: .................................................... Estado 11/03
Archivo de salida:...........................................................M100Range.doc
Estas instrucciones para el manejo pertenecen a este producto. Las
mismas contienen instrucciones importantes para el manejo del
aparato. Ponga aquí atención en las mismas, también cuando pase el
aparato a terceros. Guarde estas instrucciones para el manejo y así
consultarlas en caso de necesidad.
Índice de materias
Identificación ........................................................................................ 54
Índice de materias................................................................................ 54
Contenido en el volumen de suministro............................................... 55
Datos técnicos ..................................................................................... 55
Condiciones ambiente ......................................................................... 55
Utilización según los fines determinados............................................. 55
Garantía ............................................................................................... 56
Seguridad............................................................................................. 56
Puesta en marcha................................................................................ 57
El compartimiento de casetes.............................................................. 57
El reproductor de discos compactos ................................................... 59
El pupitre de mezclas .......................................................................... 64
Conexiones externas ........................................................................... 65
Utilización de radiomicrófonos............................................................. 66
Instrucciones para el cuidado .............................................................. 67
Protección del medio ambiente ........................................................... 67
En el caso de un daño de transporte................................................... 68
Support ................................................................................................ 68
Problemas de funcionamiento ............................................................. 69
Tabla de datos técnicos ....................................................................... 70
54
Estado 11/03
Manual de instrucciones
Contenido en el volumen de suministro
No. de
identif.
Instrucc.
Mando a
Cable
Micrófono+
Cable
Denominación de
de
distancia
pilas
LS
manejo.
+ pilas
red
804 010
M 100 CD
X
X
810 010
M 100 CD
Wireless
X
X
801 010
M 100 Combi
X
X
801 020
M 100 Combi
Wireless
X
X
801 050
M 100 LS Plus
X
801 030
M 100 Talk
X
801 040
M 100 Talk
Wireless
X
X
opcional
X
X
opcional
X
X
X
X
opcional
X
Datos técnicos
Véase tabla de página 70
A favor de mejora continua de productos, TLS se reserva el derecho
de modificaciones de especificaciones sin aviso previo.
Condiciones ambiente
Temperatura de funcionamiento:................................ +5°C hasta +60°C
Humedad del aire relativa:....................................................... máx. 85%
Presión del aire:.......................................................600 hasta 1000 hPA
Utilización según los fines determinados
Los aparatos TLS M 100 sirven para la sonorización móvil de locales
grandes y pabellones de hasta unas 400 personas. Usted tendrá la
posibilidad de reproducir diferentes fuentes de audioseñales.
Estado 11/03
55
Manual de instrucciones
Garantía
La garantía de empresa TLS para los aparatos TLS M 100 comprende
24 meses. Los daños que se produzcan por un manejo inadecuado o
por untilizaión de violencia, no estarán sometidos a los rendimientos
de garantia. La garantia caducará si el aparato se abre por personas
no autorizadas.
Seguridad
Estas instrucciones para el manejo contienen avisos fundamentales
que usted deberá tener en cuenta en el manejo de los aparatos TLS
M 100. Cumpla las instrucciones con exactitud, para así evitar fallos.
Por consiguiente, lea imprescindiblemente estas instrucciones para el
manejo, antes de trabajar con los aparatos TLS M 100.
Las insrucciones para la seguridad contenidas en estas intrucciones,
cuya no observación pueden provocar peligros para personas, están
caracterizadas con el
signo de identificación según DIN 4844-W8 y con la palabra peligro.
Peligro de vida
Golpes eléctricos de las fuentes de alimentación pueden inducir a la
muerte o a daños graves de la salud. ¡No abra nunca la carcasa de los
aparatos TLS M 100! ¡Al abrir finaliza inmediatamente todo derecho
de garantía!
Peligro
Este producto genera irradiación de láser. Una ejecución de otros
procesos diferentes a los indicados aquí, podrá inducir a una
irradiación peligrosa. No se exponga en ninguno de los casos a la
irradiación.
Peligro
Las conexiones de enchufe y cable pueden destruirse. Empalme los
conectores y las cajas de enchufe sin violencia.
56
Estado 11/03
Manual de instrucciones
Peligro
Está prevista una utilización en locales cerrados. El aparato no deberá
ser sometido a agua de goteo o salpicadura y sobre el aparato no
deberán colocarse objetos rellenos con líquido.
Puesta en marche
Gire el regulador de tono TONE a la posición central.
Gire el regulador VOLUME (MIC, CD o TAPE) a la posición min.
Introduzca el cable de alimentación adjunto en la conexión lateral
de red.
Conecte el cable de alimentación con la red de corriente de 230
V/50 Hz.
Encienda los aparatos TLS M 100 conectar, si bien, desconectar
después del uso, con el interruptor POWER debajo de la entrada
de cable de alimentación de la red.
El compartimiento de casetes
Mecanismo de arrastre para casetes estéreo ED500
REC
0
50
100
FULL AUTO STOP
PITCH
REC
PLAY
REW/REV
F.F/CUE STOP/EJECT PAUSE
Illustración 1
Estado 11/03
57
Manual de instrucciones
Reproducción
Abra el compartimiento de casete con la tecla ST/EJ (véase
Illustración 1).
Coloque un casete, superficie libre de cinta magnetofónica libre
hacia abajo y lado de cinta magnetofónica (lado 1 ó A, si bien, 2 ó
B), dirigida hacia adelante, en el compartimiento de casete.
Cierre el compartimiento de casete.
Presione la tecla PLAY.
Aviso:
Cuando desee que termine el funcionamiento de la
casete, presione la tecla ST/EJ (Stop/Eject). Presiones
esta tecla por segunda vez para que se abra el
compartimiento de la casete. Ahora usted puede sacar
nuevamente la casete.
Grabación
Aviso:
Como con todas las grabadoras de casetes, usted puede
también con este aparato grabar solamente en casetes,
cuyas lengüetas protectoras todavía existan y se
conserven.
Ponga el casete para la grabación en el compartimiento de casete.
Presione la tecla PAUSE.
Presione la tecla REC.
El diodo luminoso REC se enciende (véase Illustración 1).
Desconecte la tecla PAUSE, comienza la grabación.
Aviso:
Para interrumpir por corto tiempo la grabación presione la
tecla PAUSE. Para terminar la grabación, presione la tecla
ST/EJ.
Localización de un punto de cinta determinado
Regule a 000 (véase Illustración 2) el contador COUNTER antes
de comenzar con la grabación o la reproducción, usando la tecla
RESET.
Recuerde las determinadas posiciones mediante el estado del
contador.
Usted puede volver a encontrar fácilmente estas posiciones con el
avance rápido (tecla F.FWD) o inversión (tecla REW/REV).
58
Estado 11/03
Manual de instrucciones
COUNTER
RESET
000
Illustración 2
Reproducción rápida
En el mecanismo de arrastre para casetes estéreo usted tiene
adicionalmente la posibilidad de la reproducción rápida. Aquí se
efectúa la reproducción más rápidamente, pero continúa siendo udible.
Presione la tecla F.F/CUE o REW/REV mientras que la tecla PLAY
está pulsada (en esta función las teclas no enclavan).
Suelte de nuevo la tecla correspondiente F.F/CUE o REW/REV,
para así llegar al funcionamiento de reproducción normal.
Regulación de la velocidad de cinta (PITCH)
A veces es deseable reducir la velocidad de cinta para de esta manera
reducir o acelerar la reproducción de música o idioma, por ejemplo, en
escuelas de baile o durante un curso de idiomas. Estas posibilidades
se lo ofrece el regulador PITCH.
Gire el regulador PITCH hacia la izquierda, para así reducir la
velocidad de la cinta.
Gire el regulador PITCH hacia la derecha, para así aumentar la
velocidad de la cinta.
Gire el regulador PITCH a la posición 0, de tal manera que la cinta
funcione a la velocidad standard.
El reproductor de discos compactos
El reproductor de discos compactos EC300
C O M P A C T
D IG I T A L
IR
A U D IO
REPEAT
REPEAT 1 ALL A↔ B RANDOM PROGRAM
1
2
3
4
INTRO
5
6
7
8
9
10
11
12
13
14
15
REMAIN
15
72:15
A-B
PROG REMAIN
STOP
SEARCH
PLAY/PAUSE
REPEAT
SKIP
Illustración 3
Estado 11/03
59
Manual de instrucciones
OPEN/CLOSE (abrir y cerrar el compartimiento de discos
compactos)
Presione la tecla OPEN/CLOSE para abrir el compartimiento de discos
compactos. Ponga el CD con la etiqueta hacia arriba en el
compartimiento de discos compactos. Presione una vez más la tecla
OPEN/CLOSE, para cerrar el compartimiento de discos compactos. El
disco compacto comienza a girar automáticamente. Tan pronto como
se muestran el número total de piezas y la duración total, el
reproductor de discos compactos estará listo para el funcionamiento.
Si al poner el disco compacto presiona en PLAY en lugar de
OPEN/CLOSE, la bandeja se cierra automáticamente y la
reproducción comenzará automáticamente con el primer título.
PLAY/PAUSE (reproducción/pausa)
Presione la tecla PLAY/PAUSE, si usted desea escuchar un disco
desde el principio. La reproducción del disco comenzará en el primer
título. El funcionamiento de reproducción se mostrará por la indicación
PLAY (si bien, por el símbolo X) en el visuaizador del mecanismo de
reproducción de discos compactos.
Si durante la reproducción del disco compacto presiona la tecla
PLAY/PAUSE, llegará usted al servicio de pausa. Volver a presionar la
tecla PLAY/PAUSE desactiva la función de pausa y la reproducción
del disco compacto arranca.
STOP
Al pulsar la tecla STOP, se para la reproducción del disco compacto.
SKIP (búsqueda de título)
Durante el funcionamiento de reproducción usted podrá cambiar al
título anterior o siguiente del disco compacto respectivamente, en tanto
como usted presione la tecla sólo de forma breve.
Presione la tecla SKIP |<<, para así llegar al título anterior. Con la
reproducción en funcionamiento el reproductor de discos
compactos salta de regreso al principio del título al pulsar una sola
vez.
Presione la SKIP >>|, para llegar al próximo título.
SEARCH (función de búsqueda)
Para buscar en un título mantenga pulsada la tecla correspondiente
SEARCH.
Presione la tecla SEARCH para una marcha rápida de avance y de
retroceso, para así encontrar un punto determinado de un título.
60
Estado 11/03
Manual de instrucciones
REPEAT (repetición)
Presione la tecla REPEAT. El título reproducido en la actualidad se
repite y en el visualizador se enciende el indicativo de repetición
(REPEAT y 1).
Presione la tecla REPEAT por segunda vez. Todo el disco
compacto o el título programado por usted se repiten hasta volver a
presionar la tecla REPEAT. El indicativo de repetición (REPEAT y
ALL) se enciende en el visualizador.
Pulse la tecla REPEAT por tercera vez. La función de repetición es
cancelada.
PROG (programación de título)
Presione la tecla PROGRAM, para arrancar la función de
programación de título.
Presione las teclas UP y DOWN para la elección del título anterior
o siguiente, hasta que el título deseado por usted haga
intermitencia en el campo visualizador LCD.
Presione la teclas PROGRAM, para confirmar la progrmación del
título.
Repita los pasos 2° y 3°, si bien, para otros títulos .Presione la
tecla PLAY, para arrancar la reproducción en la sucesión de su
programación. Son programables como máximo 21 títulos.
REMAIN (tiempo restante)
El display muestra en la reproducción el tiempo ya reproducido de un
título. Con la tecla REMAIN pueden consultarse otras dos funciones de
tiempo.
Presione la tecla REMAIN, para dejar mostrar el tiempo de
reproducción restante del título.
Presione la tecla REMAIN por segunda vez, para dejarse mostrar
el tiempo de reproducción restante del disco compacto.
Esta función no es seleccionable en la reproducción de una
programación de título, en la elección por generador casual y en la
repetición.
Estado 11/03
61
Manual de instrucciones
A ⇔B
⇔ (repetición programable)
Con esta función usted podrá repetir cuantas veces quiera una parte
de un título.
Presione la tecla A ⇔B al principio del pasaje deseado.
Pulse la tecla A ⇔B al final del pasaje deseado. El reproductor de
discos compactos se mueve ahora en una vuelta de repetición
entre los límites fijados por usted.
Presione de nuevo la tecla A ⇔B, para terminarla repetición del
pasaje deseado por usted.
UP/FF
8
INTRO
VOL+
7
10
VOL-
DOWN/REW
REMAIN
5
4
+10
RANDOM
9
PROG
6
3
2
1
MUTE
STOP
REPEAT
Mando a distancia infrarrojo
Con el mando a distancia infrarrojo usted podrá manejar todas las
funciones del reproductor de discos compactos del aparato TLS en
todas las funciones (véase Illustración 4). Las funciones de las teclas
en el mando a distancia corresponden a las teclas en el campo de
mando del reproductor de discos compactos. El mando a distancia
ofrece adicionalmente algunas funciones más.
Illustración 4
RANDOM (generador casual)
El generador casual selecciona un título en el disco compacto y
arranca la reproducción. Después de terminar este título se selecciona
de forma casual otro título y se reproduce. Este proceso continúa,
hasta que todos los títulos del disco compacto han sido reproducidos o
usted interrumpe la reproducción.
Presione la tecla RANDOM, para arrancar el generador casual. El
indicativo de generador casual (RANDOM) se enciende en el
visualizador.
Presione de nuevo la tecla RANDOM, para finalizar la función.
Esta función no es seleccionable al reproducir una programación de
título.
62
Estado 11/03
Manual de instrucciones
INTRO (reproducción automática de todos los títulos)
Esta función le ayudará, por ejemplo, a encontrar una pieza de música,
cuyo título se le había olvidado. Todo título del disco compacto se
reproduce por 10 segundos.
Presione la tecla INTRO, para reproducir solamente por 10
segundos. La identificación de reproducción (SPACE) se enciende
en el display.
Presione la tecla INTRO por segunda vez, para abandonar la
función de reproducción.
La función de reproducción es posible solamente después de la
interrupción de la reproducción mediante la tecla STOP.
SPACE (retardo en la reproducción)
Entre la reproducción de los títulos individuales el reproductor de
discos compactos hace automáticamente pausas de cinco segundos.
Esto puede ser de sentido, por ejemplo, para grabaciones. En el
casete grabado de CD se pueden encontrar así los inicios de títulos
más fácilmente.
Presione la tecla SPACE, para percibir una pausa de cinco
segundos entra cada título individual.
Presione la tecla SPACE por segunda vez para abandonar el
retardo de la reproducción.
Regulación de la velocidad del disco compacto (PITCH)
A veces es deseable acelerar la velocidad del disco compacto y con
ello reducir o acelerar la reproducción de música o idioma, por
ejemplo, en escuelas de baile o en clases de idiomas. Esta posibilidad
se la ofrece el regulador PITCH.
Gire el regulador PITCH hacia la izquierda para reducir la velocidad
del disco compacto.
Gire el regulador PITCH hacia la derecha, para aumentar la
velocidad del disco compacto.
Gire el regulador PITCH a la posición central, para que el disco
compacto funcione a la velocidad standard.
Estado 11/03
63
Manual de instrucciones
Puesta en marcha (cambio de pilas)
El mando a distancia infrarrojo funciona con dos pilas del tipo 1,5 V
AAA R03. Abra la tapa del compartimiento de pilas en la parte trasera
del mando a distancia. Saque las pilas existentes del compartimiento
de las mismas y ponga las dos pilas nuevas siguiendo las
instrucciones que aparecen en la cubierta. Asegúrese de que las pilas
estén puestas con la polaridad correcta (el signo +, si bien, el signo –
tienen que corresponder a la polaridad correspondiente preindicada)
en el mando a distancia. Cierre el compartimiento para pilas.
Aviso:
El sensor receptor se encuentra al lado de mando/altavoz
del aparato.
Aviso:
Cuando el aparato no se utiliza por largo tiempo, saque las
pilas para de esta manera evitar un posible escape del
líquido de pilas en el mando a distancia.
El pupitre de mezclas
0
45
6
7
8
9
A
ED
B
C
0
0
1
0
23
F
-
+
-
+
L
TREBLE
BASS
R
BALANCE
LS-OUT
-
+
MIC1
I
-
+
MIC2
I
-
+
TAPE
CD
IN
OUT
Illustración 5
Con el regulador TAPE/CD usted dirigirá el volumen del mecanismo de
arrastre para casetes, del reproductor de discos compactos y de los
aparatos externos. Gire el regulador de volumen hacia la derecha para
conseguir el volumen más elevado y correspondientemente hacia la
izquierda para reducir volumen.
64
Estado 11/03
Manual de instrucciones
Con el regulador de volumen MIC 1 y MIC 2 usted podrá dirigir el
volumen de micrófono. Gire el regulador de volumen hacia la derecha,
para así regular el volumen máximo y correspondientemente hacia la
izquierda, para así reducir el volumen.
El regulador de canal BALANCE sirve para la regulación del balance
entre el canal derecho y el izquierdo, para un efecto estéreo óptimo.
Girando hacia la derecha se reduce el volumen del canal izquierdo y
viceversa. Deje el regulador normalmente en la posición central.
Balanza de sonido
El regulador de sonido BASS y TREBLE permiten una reducción o
elevación de lostonos bajos y altos.
Regule el sonido de los aparatos TLS correspondiendo a la acústca
del local de escucha o según su propio gusto. En tanto como usted
consiga los valores máximos mediante el regulador TAPE/CD y
VOL+ / VOL-, podrán producirse distorsiones en la reproducción, que
podrán dañar el sistema de altavoces.
Aviso:
En reproducción distorsionada pueden dañarse los
altavoces.
No
haga
funcionar
los
altavoces
permanentemente con distorsiones. Reduzca el volumen
total mediante la tecla VOL-, de tal manera que cesen las
distorsiones.
Conexiones externas
MIC 1 y MIC 2
Por las conexiones MIC 1 y MIC 2 usted podrá conectar al aparato
micrófonos unidos por cable con un enchufe de clavija de 6,3 mm.
LS-OUT
Por la conexión LS-OUT puede conectarse el TLS activo de caja
amplificador M 100 LS Plus. La conexión LS-OUT ofrece la posibilidad
del funcionamiento en estéreo. Para ello empalme, por favor, ambos
aparatos antes de conectarlos.
Audio IN
Por la conexión Audio IN puede conectarse una fuente audioexterna,
para, por ejemplo, grabar la misma en casete.
Audio OUT
Por la salida Audio OUT puede conectarse, por ejemplo, un equipo de
música estéreo.
Estado 11/03
65
Manual de instrucciones
Auricular
Para la audición de casetes o discos compactos mediante auriculares,
los aparatos disponen de una conexión para auricular con clavija de
6,3 mm. Su introduce el conector de clavija de su auricular en el
enchufe con el símbolo de altavoz tachado, el altavoz instalado se
conecta sin sonido.
Utilización de radiomicrófonos
El radiomicrófono transmite señales al receptor instalado sin cable e
hilos. Las radioseñales de alta frecuencia que, dependiendo de su
calidad, también pueden penetrar por puertas paredes y ventanas,
garantizan aquí una recepción clara y comprensible. La regulación de
canal de emisión TLS está ya regulada por la empresa en canal F.
Conecte el micrófono (ON). La indicación de puesta en marcha se
enciende.
Vuelva a desconectar el micrófono después de su uso (OFF).
La indicación de funcionamiento (ON) y pila comienza a hacer
intermitencia, cuando la pila comienza a estar gastada.
Seguidamente debería cambiar la pila. Ponga una pila de 9 voltios
en el compartimiento de pilas del micrófono, debiendo tener los
polos correctamente (el polo + de la pila tiene que coincidir con el
indicativo + del micrófono).
Aviso:
Para el caso que el micrófono no funcionase, controle
primero si el aparato TLS está conectado a la caja de la
red, si bien, el micrófono está conectado. Asegúrese de
que la pila en el micrófono no esté gastada. Además,
controle, por favor, si la elección de canal concuerda en el
emisor manual con el canal en el aparato TLS. En caso
de una distorsión controle, por favor, si el volumen de la
audiofuente no está regulada a un nivel demasiado alto.
Dado el caso reduzca, por favor, el volumen. Ponga
atención también en que el aparato, si bien, el micrófono
no esté posicionado en las cercanías de lámpara
fluorescentes.
Fallos en la transmisión durante el funcionamiento del micrófono
Si durante el funcionamiento del micrófono se producen fallos, usted
podrá cambiar el canal de emisión en el selector de canales.
66
Estado 11/03
Manual de instrucciones
Aviso:
En la regulación del canal tenga en cuenta las
disposiciones nacionales de las autoridades de regulación
locales.
Más informaciones sobre el micrófono las podrá tomar, por favor, del
manual de instrucciones adjuntado separadamente.
Instrucciones para el cuidado
Aviso:
No utilice nunca diluyentes agresivos como alcohol,
bencina disolventes. La penetración de humedad podrá
dañar la parte electrónica y eléctrica. Ponga atención en
que no penetre humedad en el interior del aparato.
Limpieza del mecanismo de arrastre para casetes
Limpie con regularidad el cabezal de borrado, grabación y
reproducción, así como el rodillo de presión, para así conseguir una
calidad de sonido óptima.
Para la limpieza utilice un palillo de algodón, que haya sido
suavemente humectado con líquido limpiador para cabezas de
sonido o alcohol isopropílico.
Limpieza del reproductor de discos compactos
Limpie el reproductor de discos compactos exclusivamente con un
fotopincel. en ninguno de los casos deberá penetrar líquido en el
reproductor de discos compactos.
Limpeza del aparato TLS M 100
Los elementos laterales del aparato están recubiertos con material
lavable.
Utilice en casos
humectado.
obstinados
un
trapo
suave
ligeramente
Protección del medio ambiente
El aparato, los accesorios y el embalaje deberían llevarse a un
reciclaje afable al medio ambiente. Las pilas defectuosas deberán
reciclarse según la directriz 91/157/CEE. No tire las pilas gastadas a la
basura doméstica común, al fuego o al agua. Todo aparato técnico
llega algún día a su fin. La casa TLS Communication GmbH, por este
motivo, recoge de vuelta todos los componentes de los aparatos TLS
M 100 y los lleva al reciclaje.
Estado 11/03
67
Manual de instrucciones
En el caso de un daño por transporte
Si se produjese un daño por transporte, rogamos se tengan en cuenta
los siguientes puntos:
En todo caso deje la mercancía y el embalaje sin modificar.
Deje confirmarse el daño por el transportista.
No utilice el aparado dañado.
En caso de suministro por una compañía de transportes o por un
servicio de paquetes, comuníquenos, por favor, por teléfono o por
escrito sobre el daño en el plazo de 7 días de calendario.
Para la regulación rápida del daño, por favor, mándenos con el
envío de devolución una copia del talón de entrega.
Por favor, tenga en cuenta, que nosotros recibimos la mercancía
devuelta solamente si la devolución ha sido anteriormente
acordada con nosotros.
Support
Con cuestiones que se produzcan dentro del marco del manejo o
durante el funcionamiento, diríjase, por favor, a su comerciante TLS de
su localidad o directamente a TLS:
TLS Communication GmbH
Marie-Curie-Straße 20
D-40721 Hilden
Tel.: +49 (0) 2103 5006-0
Fax: +49 (0) 2103 5006-90
e-mail: [email protected]
www.tls-gmbh.com
68
Estado 11/03
Manual de instrucciones
Problemas de funcionamiento
Problema
El aparato no se logra encender
Causa posible
Solución
•
El enchufe de la red no está
correctamente conectado
•
Presione fuertemente la clavija en el
enchufe
•
Fusible defectuoso
•
- Sacar el cable de alimentación del
aparato
- Sacar el sujetador de fusibles del
enchufe empotrado de la toma en
frío (en el costado de la cubierta)
- Volver a introducir el sostenedor de
fusibles en el enchufe empotrado en
frío con un fusible nuevo
•
Disco compacto falso – lado hacia
arriba
•
Ponerlo con la etiqueta hacia arriba
•
Cartón del disco con impresión
informativa no se ha quitado
•
Quitar cartón del disco compacto con
impresión informativa
•
Disco sucio
•
Limpiar disco
•
Se ha utilizado disco compacto
autoquermado
•
Por motivo del fallo de transmisión en
quemadores diferentes de disco
compacto, puede suceder que en
algunos de los discos compactos
quemados no sea posible una
reproducción
•
Objetivo empañado
- Directamente después de haberse
conectado un elemento térmico
- En un local con contenido de
vapor y muy húmedo
- Cuando se lleva este aparato de un
lugar muy frío a uno caliente
•
Dejar aclimatizarse durante
aproximadamente 1 hora
•
Disco sucio
•
Limpiar disco
•
Disco rayado
•
Utilizar disco en estado intachable
•
Fallo por ruido de impactos
•
ponerlo sobre una base estable
•
Aparato conectado a reproducción
•
Conectar a stop (parada) (no es
posible una entrada en caso de estar
funcionando la reproducción)
•
Número de título no existe en el disco
compacto
•
No utilizar números más altos que el
del último título en el disco compacto
El reproductor de discos compactos
no se puede usar con el mando a
distancia
•
Pilas vacías
•
Cambiar las pilas del mando a
distancia
•
No hay recepción
•
Mantener el mando en dirección a la
cubierta del altavoz/placa frontal
No es posible usar la tecla de
grabación del compartimiento de
casetes
•
El casete está protegido contra un
borrado por descuido
•
Si el casete puede ser borrado, pegar
una cinta adhesiva en los orificios de
la parte posterior del casete
El casete/disco compacto corre muy
rápido / muy lento (solamente en
aparatos con regulación Pitch)
•
El regulador Pitsch no está centrado
•
Poner el regulador Pitch en la posición
central
Ninguna reproducción por el
radiomicrófono
•
Pilas vacías
•
Cambiar pilas del mando a distancia
•
Regula el mismo canal en el aparato y
en el micrófono
Está puesto el disco pero no es
posible la reproducción
Saltos en la reproducción, si bien,
acceso al título demasiado lento
No es posible una programación
previa
La caja suena en la reproducción de
casetes de forma bronca o se
producen fallos de marcha uniforme
Estado 11/03
•
Regulación de canal no concuerda
•
Cinta de casete floja
•
Tensar la cinta del casete con un
lapicero o con un objeto similar
•
mecanismo de arrastre para casetes
está sucio
•
Limpiar en el mecanismo de arrastre
para casetes el cabezal de borrado,
grabación y reproducción, así como el
rodillo de presión con un palillo de
algodón alcohol
69
70
Dimensions/Weight/etc.
W x H x D mm
Weight kg (packed)
Customs consignment No
Wireless Microphone
Carrier frequency
Operating distance
Operating time
Sensitivity
330 x 510 x 290
15.5 kg (18.0 kg)
852 033 19
330 x 510 x 290
15.8 kg (18.4 kg)
852 790 98
863-864 MHz
max. 120 m
10 h
20-20.000 Hz
< 0.05 %
> 80 dB at 1 kHz
> 60 dB at 1 kHz
Yes
Infrared
330 x 510 x 290
16.4 kg (18.6 kg)
852 033 19
20-20.000 Hz
< 0.05 %
> 80 dB at 1 kHz
> 60 dB at 1 kHz
Yes
Infrared
20-20.000 Hz
< 0.05 %
> 80 dB at 1 kHz
> 60 dB at 1 kHz
Yes
Infrared
6.3 mm jack Ster.
CD Player
Frequency range
Total harmonic distortion
Signal/Noise ratio
Channel Separation
Controllable pitch
Remote control
6.3 mm jack Ster.
6.3 mm jack Ster.
2 x 6.3 mm jack
6.3 mm jack
2 x Phono Stereo
2 x Phono Stereo
70 W
20-20.000 Hz
92 dB
0.5 %
8Ω
230 V / 50 Hz
140 Watt
1.6 A delayed
Active box
Two way system
801 010
M 100 Combi
1/4 Track, Stereo
4.75 cm/sec.
Yes
< 0.3 %
50-14.000 Hz
3 digit
2 x 6.3 mm jack
6.3 mm jack
2 x Phono Stereo
2 x Phono Stereo
70 W
20-20.000 Hz
92 dB
0.5 %
8Ω
230 V / 50 Hz
140 Watt
1.6 A delayed
Active box
Two way system
2 x 6.3 mm jack
6.3 mm jack
2 x Phono Stereo
2 x Phono Stereo
70 W
20-20.000 Hz
92 dB
0.5 %
8Ω
230 V / 50 Hz
140 Watt
1.6 A delayed
Active box
Two way system
804 010
M 100 CD
Wireless
810 010
Cassette Recorder
Track System
Tape speed
Controllable pitch
Wow & Flutter
Frequency range
Counter
Input/Output
Microphone Mono
Headphones Stereo
External sources IN
External sources OUT
External speakers IN
External OUT
Amplifier
Power rating ms
Frequency range
Dynamic range
Total harmonic distortion
Impedance
Mains voltage
Power consumption
Fuse
Design
Product No.
M 100 CD
330 x 510 x 290
16.7 kg (19.0 kg)
852 790 98
863-864 MHz
max. 120 m
10 h
20-20.000 Hz
< 0.05 %
> 80 dB at 1 kHz
> 60 dB at 1 kHz
Yes
Infrared
1/4 Track, Stereo
4.75 cm/sec.
Yes
< 0.3 %
50-14.000 Hz
3 digit
6.3 mm jack Ster.
2 x 6.3 mm jack
6.3 mm jack
2 x Phono Stereo
2 x Phono Stereo
70 W
20-20.000 Hz
92 dB
0.5 %
8Ω
230 V / 50 Hz
140 Watt
1.6 A delayed
Ster. active box
Two way system
M 100 Combi
Wireless
801 020
330 x 510 x 290
13.8 kg (17.6 kg)
851 821 190
6.3 mm jack Ster.
2 x 6.3 mm jack
6.3 mm jack
2 x Phono Stereo
2 x Phono Stereo
70 W
20-20.000 Hz
92 dB
0.5 %
8Ω
230 V / 50 Hz
140 Watt
1.6 A delayed
Active box
Two way system
801 030
M 100 Talk
330 x 510 x 290
14.1 kg (18.0 kg)
851 821 90
863-864 MHz
max. 120 m
10 h
6.3 mm jack Ster.
2 x 6.3 mm jack
6.3 mm jack
2 x Phono Stereo
2 x Phono Stereo
70 W
20-20.000 Hz
92 dB
0.5 %
8Ω
230 V / 50 Hz
140 Watt
1.6 A delayed
Active box
Two way system
M 100 Talk
Wireless
801 040
330 x 510 x 290
13.2 kg (16.4 kg)
851 999 18
6.3 mm jack Ster.
2 x Phono Stereo
70 W
20-20.000 Hz
92 dB
0.5 %
8Ω
230 V / 50 Hz
140 Watt
1.6 A delayed
Active box
Two way system
801 050
M 100 LS Plus
Manual de instrucciones
Tabla de datos técnico
Estado 11/03
Istruzioni per l'uso
I
Identificazione
Costruttore: .................................................. TLS Communication GmbH
Marie-Curie-Straße 20
D-40721 Hilden
Tel: +49 (0) 2103 5006 0
Fax: +49 (0) 2103 5006 90
Prodotto: ............................................................................... M 100 Serie
Paese d'origine: ............................................................ Repubblica Ceca
Istruzioni per l'uso:............................................................Edizione 11/03
File d'uscita: ................................................................... M100Range.doc
Il presente manuale d'istruzione fa parte del prodotto. Esso contiene
importanti informazioni riguardanti l'uso dell'apparecchio. Si prega di
tenerne conto anche nel caso in cui inoltriate l'apparecchio a terzi.
Conservare sempre il presente manuale d'istruzione per consultarlo
eventualmente un secondo momento.
Sommario
Identificazione...................................................................................... 71
Sommario ............................................................................................ 71
Mole di dotazione................................................................................. 72
Dati tecnici ........................................................................................... 72
Condizioni ambientali .......................................................................... 72
Impiego conforme allo scopo previsto ................................................. 72
Garanzia .............................................................................................. 73
Sicurezza ............................................................................................. 73
Messa in funzione................................................................................ 74
L'unità cassette .................................................................................... 75
Il CD-Player ......................................................................................... 77
Il quadro di missaggio.......................................................................... 82
Collegamenti esterni ............................................................................ 83
Uso di radiomicrofoni ........................................................................... 83
Note sulla manutenzione ..................................................................... 85
Tutela ambientale ................................................................................ 85
Nel caso di un danno di trasporto........................................................ 86
Supporto .............................................................................................. 86
Problemi di funzionamento .................................................................. 87
Tabella dei dati tecnici ......................................................................... 88
Edizione11/03
71
Istruzioni per l'uso
Mole di dotazione
No.
identif.
Denominazione
TelecoCavo
Microfono Istruzioni
Cavo
mando +
d'alimen+ batterie per l'uso
LS
batterie
tazione
804 010 M 100 CD
X
X
810 010 M 100 CD
Wireless
X
X
801 010 M 100 Combi
X
X
801 020 M 100 Combi
Wireless
X
X
801 050 M 100 LS
Plus
X
801 030 M 100 Talk
X
801 040 M 100 Talk
Wireless
X
X
optional
X
X
optional
X
X
X
X
optional
X
Dati tecnici
Si veda la tabella a pagina 88
La TLS si riserva il diritto di modificare le specificazioni senza alcun
preavviso per scopi di progressive migliorie.
Condizioni ambientali
Temperatura di servizio: ................................................ +5°C fino +60°C
Relativa umidità d'aria:............................................................. max. 85%
Pressione dell'aria:......................................................600 fino 1000 hPA
Impiego conforme allo scopo previsto
Gli Apparecchi TLS M 100 sono concepiti per la diffusione sonora in
grandi locali e sale fino a ca. 400 persone. Essi offrono la possibilità di
riprodurre diverse sorgenti di segnali audio.
72
Edizione 11/03
Istruzioni per l'uso
Garanzia
La garanzia di fabbrica TLS concessa per gli apparecchi TLS M 100
corrisponde a 24 mesi. I danni attribuibili ad un impiego non
appropriato o all'applicazione di forza, non sono coperti dalla garanzia.
La garanzia verrà comunque declinata nei casi in cui all'apparecchio
venisse aperto da parte di persone non autorizzate.
Sicurezza
Le presenti istruzioni per l'uso contengono informazioni fondamentali
che devono essere osservate durante l'uso degli apparecchi TLS M
100. Si raccomanda di attenersi esattamente alle istruzioni, per
prevenire degli errori. Pertanto, si prega di leggere attentamente le
presenti istruzioni per l'uso, prima di utilizzare gli apparecchi TLS M
100.
Le informazioni di sicurezza riportate nelle presenti istruzioni per l'uso,
che nella mancata osservanza possono costituire imminenti pericoli per
le persone, vengono contrassegnate con il simbolo di pericolo generale
evidenziato con la parola "Pericolo" conformemente alla norma DIN
4844-W8.
Pericolo di morte
Le scosse elettriche dagli alimentatori di rete possono avere
conseguenze mortali o di gravi danni alla salute. Pertanto, si
raccomanda di non aprire mai l'alloggiamento degli Apparecchi TLS M
100! Inoltre, in seguito all'apertura verrà immediatamente declinata
qualsiasi richiesta di garanzia!
Pericolo
Questo prodotto genera raggi laser. L'esecuzione di procedimenti
diversi da quelli qui descritti può comportare pericolose radiazioni. Si
raccomandami non esporsi mai a questi raggi.
Edizione 11/03
73
Istruzioni per l'uso
Pericolo
I collegamenti ad innesto e i cavi possono essere distrutti. Non
collegare mai i connettori e le spine con violenza.
Pericolo
L'impiego di questi apparecchi è previsto in ambienti chiusi. Gli
apparecchi non devono essere mai esposti a gocce o spruzzi d'acqua
e all'interno non devono penetrare alcuni liquidi o corpi estranei.
Messa in funzione
Girare i regolatori TONE in posizione centrale.
Girare il regolatore del VOLUME (MIC, CD o TAPE) verso la
posizione min.
Collegare il presente cavo d'alimentazione nella boccola di rete
laterale.
Collegare la spina di rete ad una presa di corrente da 230 V/50 Hz.
Accensione degli Apparecchi TLS M 100, con l'interruttore
POWER situato al di sotto dell'ingresso del cavo l'alimentazione si
può accendere ovvero spegnere l'apparecchio.
74
Edizione 11/03
Istruzioni per l'uso
L'unità cassette
Unità cassette stereo ED500
REC
0
50
100
FULL AUTO STOP
PITCH
REC
PLAY
REW/REV
F.F/CUE STOP/EJECT PAUSE
Figura 1
Riproduzione
Aprire il vano delle cassette con il tasto ST/EJ (si veda Figura 1).
introdurre nel vano una cassetta con la parte del nastro aperta
rivolta verso un basso e con la parte del nastro audio desiderata
(parte 1 oppure A risp. 2 oppure B) rivolta in avanti.
Chiudere il vano cassetta.
Premere il tasto PLAY.
Nota:
Se desiderate terminare il funzionamento a cassetta,
occorre premere sul tasto ST/EJ (Stop/Eject). Premere
una seconda volta il tasto, per aprire il vano cassette. A
questo punto potete prelevare la cassetta.
Registrazione
Nota:
Come in tutti gli altri registratori a cassetta, anche con
questo apparecchio potete registrare delle cassette,
purché siano ancora previste della linguetta di protezione
intatta.
Edizione 11/03
75
Istruzioni per l'uso
Introdurre la cassetta nel vano per la registrazione.
Premere il tasto PAUSE.
Premere il tasto REC.
Il diodo luminoso REC si accende (si veda Figura 1).
Rilasciare tasto PAUSE, per iniziare la registrazione.
Nota:
Per interrompere brevemente la registrazione, premere il
tasto PAUSE. Per terminare la registrazione, premere il
tasto ST/EJ.
Ricerca di un determinato brano sul nastro
Prima di iniziare la registrazione o la riproduzione si consiglia di
azzerare il contatore COUNTER attraverso il tasto RESET (si veda
Figura 2).
In tal modo si possono annotare determinate posizioni secondo lo
stato del contatore.
Dopodiché queste posizioni possono essere ritrovate facilmente
attraverso la funzione di avanzamento rapido (tasto F.FWD) oppure
ritorno (tasto REW).
COUNTER
RESET
000
Figura 2
Produzione rapida
Nell'unità cassette stereo viene inoltre offerta la possibilità della
riproduzione rapida. Qui la riproduzione avviene più rapidamente, ma è
ancora ascoltabile.
Premere il tasto F.F/CUE o REW/REV mentre è premuto il tasto
PLAY (in questa funzione i tasti non scattano in posizione).
Rilasciare nuovamente il rispettivo tasto F.F/CUE o REW/REV, per
ritornare di nuovo al modo di riproduzione normale.
Regolazione di velocità del nastro (PITCH)
In alcuni casi può essere auspicabile rallentare oppure accelerare la
velocità del nastro, per adattare rispettivamente la riproduzione di brani
musicali o di discorsi – per esempio in scuole da ballo o durante lezioni
di lingua. Questa possibilità viene offerta dal regolatore PITCH.
76
Edizione 11/03
Istruzioni per l'uso
Girare in senso antiorario il regolatore PITCH, per ridurre la velocità
del nastro.
Girare in senso orario il regolatore PITCH, per aumentare la
velocità del nastro.
Girare il regolatore PITCH in posizione 0, per regolare il nastro alla
velocità standard.
Il CD-Player
CD-Player EC300
C O M P A C T
D IG I T A L
IR
A U D IO
REPEAT
REPEAT 1 ALL A↔ B RANDOM PROGRAM
1
2
3
4
INTRO
5
6
7
8
9
10
11
12
13
14
15
REMAIN
15
72:15
A-B
PROG REMAIN
STOP
SEARCH
PLAY/PAUSE
REPEAT
SKIP
Figura 3
OPEN/CLOSE (apertura e chiusura del vano CD)
Premere il tasto OPEN/CLOSE, per aprire il vano CD. Inserire il CD
con le diciture rivolte verso l'alto nel vano CD. Premere ancora una
volta il tasto OPEN/CLOSE, per chiudere il vano CD. Il CD incomincia
a girare automaticamente. Non appena viene visualizzato il numero
totale dei brani, il CD-Player è pronto per il funzionamento. Se
all'inserimento del CD premette sul tasto PLAY anziché sul tasto
OPEN/CLOSE, viene automaticamente chiusa l'inserzione e la
rivoluzione inizia dal primo brano.
PLAY/PAUSE (riproduzione/pausa)
Premere il tasto PLAY/PAUSE, se desiderate riprodurre un CD sin
dall'inizio. La riproduzione del CD inizia dal primo brano. Il modo di
riproduzione viene indicato tramite l'indicazione PLAY (risp. per mezzo
del simbolo X) nel display del CD-Player.
Premere durante la riproduzione del CD il tasto PLAY/PAUSE, per
commutare al modo di pausa. Premendo nuovamente sul tasto
PLAY/PAUSE viene disattiva la funzione di pausa e la riproduzione del
CD prosegue.
Edizione 11/03
77
Istruzioni per l'uso
STOP
Premendo il tasto STOP viene fermata la riproduzione del CD.
SKIP (ricerca automatica dei titoli)
Durante il modo di riproduzione si può passare rispettivamente al titolo
precedente o successivo del CD, sfiorando solo brevemente il tasto.
Premere il tasto SKIP |<<, per ritornare indietro al titolo precedente.
Premendo una volta il tasto durante la riproduzione, il CD-Player
ritorna indietro all'inizio del titolo.
Premere il tasto SKIP >>|, per passare avanti al prossimo titolo.
SEARCH (ricerca automatica)
Per ricercare un brano all'interno di un titolo, occorre mantenere
premuto il rispettivo tasto SEARCH.
Premere il tasto SEARCH per la ricerca rapida in avanti oppure
indietro, per trovare un determinato brano all'interno di un titolo.
REPEAT (ripetizione)
Premere il tasto REPEAT. Il titolo attualmente in fase di
riproduzione viene ripetuto e nel display si illumina il rispettivo
simbolo di ripetizione (REPEAT e 1).
Premere una seconda volta il tasto REPEAT. L'intero CD oppure i
titoli programmati vengono ripetuti finché non si preme di nuovo il
tasto REPEAT. Nel display si illumina il simbolo di ripetizione
(REPEAT e ALL).
Premere una terza volta il tasto REPEAT. La funzione di ripetizione
viene annullata.
PROG (programmazione dei titoli)
Premere il tasto PROGRAM,
programmazione dei titoli.
per
avviare
la
funzione
di
Premere tasti per la selezione del titolo precedente o successivo
UP e DOWN, finché sul visualizzatore a LCD non viene indicato il
titolo desiderato.
Premere il tasto PROGRAM, per confermare la programmazione
del titolo selezionato.
Ripetere i passi 2. e 3. risp. per ulteriori titoli. Premere il tasto
PLAY, per avviare la riproduzione nell'ordine programmato. Si
possono programmare al massimo 21 titoli.
78
Edizione 11/03
Istruzioni per l'uso
REMAIN (tempo rimanente)
Durante la riproduzione nel display viene indicato il tempo di
riproduzione attuale di un titolo. Attraverso il tasto REMAIN si possono
richiamare due altre funzioni di tempo.
Premere il tasto REMAIN, per visualizzare il tempo di riproduzione
rimanente del titolo.
Premere una seconda volta il tasto REMAIN, per visualizzare il
tempo totale di riproduzione rimanente del CD.
Questa funzione non può essere tuttavia selezionata durante la
riproduzione di titoli programmati, nella selezione del generatore
casuale e nella funzione di ripetizione.
A ⇔B
⇔ (ripetizione programmabile)
Tramite questa funzione si può ripetere a piacere un determinato brano
di un titolo.
Premere il tasto A ⇔B all'inizio del brano desiderato.
Premere il tasto A ⇔B alla fine del brano desiderato. Il CD-Player
adesso funziona in un ciclo di ripetizione tra i limiti impostati.
Premere nuovamente il tasto A ⇔B, per terminare la ripetizione del
brano desiderato.
UP/FF
8
INTRO
VOL+
7
10
VOL-
DOWN/REW
REMAIN
5
4
+10
RANDOM
9
PROG
6
3
2
1
MUTE
STOP
REPEAT
Telecomando a raggi infrarossi
Attraverso il telecomando a raggi infrarossi si possono comandare tutte
le funzioni del CD-Player integrato nell'apparecchio TLS (si veda
Fehler! Verweisquelle konnte nicht gefunden werden.). Le funzioni
dei tasti del telecomando corrispondono a quelle dei tasti sul quadro di
comando del CD-Player. Inoltre, il telecomando offre alcune altre
funzioni.
Figura 4
Edizione 11/03
79
Istruzioni per l'uso
RANDOM (generatore casuale)
Il generatore casuale seleziona un titolo del CD e ne avvia quindi la
riproduzione. Al termine di questo titolo viene selezionato a caso un
nuovo brano, che viene quindi altrettanto riprodotto. Questo
procedimento prosegue finché non sono stati riprodotti tutti i titoli del
CD o finché non viene interrotta la riproduzione.
Premere il tasto RANDOM, per avviare il generatore casuale. Nel
display si illumina il simbolo del generatore casuale (RANDOM).
Premere nuovamente il tasto RANDOM, per terminare la funzione.
Questa funzione non può essere tuttavia selezionata durante la
riproduzione di titoli programmati.
INTRO (riproduzione automatica di tutti i titoli)
Questa funzione aiuta per esempio a ritrovare un brano musicale del
quale non si ricorda più il titolo. Ogni titolo del CD viene riprodotto per
la durata di 10 secondi.
Premere il tasto INTRO, per riprodurre per 10 secondi tutti titoli. Nel
display si illumina il simbolo d'allusione (SPACE).
Premere una seconda volta il tasto INTRO, per uscire dalla
funzione di allusione.
Dopo l'interruzione della riproduzione, la funzione d'allusione può
essere attivata attraverso un tasto STOP.
SPACE (ritardo di riproduzione)
Tra la riproduzione dei singoli brani il CD-Player introduce
automaticamente delle pause di 5 secondi. Ciò può essere per
esempio utile durante le registrazioni. In tal modo sulla cassetta
registrata da un CD si possono ritrovare più facilmente gli inizi dei
brani.
Premere il tasto SPACE, per inserire tra i singoli brani una pausa di
cinque secondi.
Premere una seconda volta il tasto SPACE, per uscire dal ritardo di
produzione.
80
Edizione 11/03
Istruzioni per l'uso
Regolazione di velocità del CD (PITCH)
In alcuni casi può essere auspicabile rallentare oppure accelerare la
velocità del CD, per adattare rispettivamente la riproduzione di brani
musicali o di discorsi – per esempio in scuole da ballo o durante lezioni
di lingua. Questa possibilità viene offerta dal regolatore PITCH.
Girare in senso antiorario il regolatore PITCH, per ridurre la velocità
del CD.
Girare in senso orario il regolatore PITCH, per aumentare la
velocità del CD.
Girare il regolatore PITCH in posizione centrale, per regolare il CD
alla velocità standard.
Messa in funzione (cambio delle batterie)
Il telecomando a raggi infrarossi viene alimentato con due batterie del
tipo 1,5 V AAA R03. Aprire il coperchio dello scomparto delle batterie
nella parte posteriore del telecomando. Estrarre le batterie situate nello
scomparto ed inserire due batterie nuove nell'alloggiamento secondo le
indicazioni ivi riportate. Accertarsi che le batterie siano inserite con la
corretta polarità (il simbolo + risp. – devono corrispondere alla polarità
indicata) nel telecomando. Chiudere infine lo scompartimento della
batteria.
Nota:
Il sensore a raggi infrarossi si trova sulla parte di comando
/ dell'altoparlante dell'apparecchio.
Nota:
Quando l'apparecchio non viene più utilizzato per un
periodo prolungato, si raccomanda di rimuovere batterie,
per prevenire una possibile fuoriuscita di acido dalle
batterie nel telecomando.
Edizione 11/03
81
Istruzioni per l'uso
Il quadro di missaggio
0
0
0
1
0
23
F
ED
-
+
-
+
L
TREBLE
BASS
45
6
7
8
9
A
CB
R
BALANCE
LS-OUT
-
+
MIC1
I
-
+
MIC2
I
-
+
TAPE
CD
IN
OUT
Figura 5
Regolazione del volume
Tramite il regolatore TAPE/CD viene controllato il volume dell'unità
cassette, del drive CD e degli apparecchi esterni. Girare in senso
orario il regolatore del volume, per regolare il volume massimo e
rispettivamente in senso antiorario, per ridurre il volume.
Attraverso il regolatore del volume MIC 1 e MIC 2 si può regolare il
volume del microfono. Girare in senso orario il regolatore del volume,
per regolare il volume massimo e rispettivamente in senso antiorario,
per ridurre il volume.
Il regolatore dei canali BALANCE serve per regolare il bilanciamento
tra il canale destro e quello sinistro, per ottenere un effetto stereofonico
ottimale. Girando il regolatore in senso orario, viene ridotto il volume
del canale sinistro e viceversa. Normalmente si raccomanda di lasciare
il regolatore sulla posizione centrale.
Regolatore del tono
I regolatori del tono BASS e TREBLE consentono una riduzione
ovvero aumento dei toni bassi oppure alti.
Regolare il tono degli apparecchi TLS in corrispondenza dell'acustica
della sala d'ascolto o secondo il gusto individuale. Non appena si
raggiungono i valori massimi attraverso il regolatore TAPE/CD e
VOL+/VOL-, possono verificarsi delle distorsioni durante la
riproduzione, che potrebbero danneggiare i diffusori acustici.
82
Edizione 11/03
Istruzioni per l'uso
Nota:
In una riproduzione distorta non sono da escludere dei
danni ai diffusori acustici. Non utilizzare mai in
continuazione l'apparecchio con distorsioni. Ridurre il
volume totale attraverso il tasto VOL-, per sopprimere così
le distorsioni.
Collegamenti esterni
MIC 1 e MIC 2
Attraverso i collegamenti MIC 1 e MIC 2 si possono collegare
all'apparecchio microfoni legati a conduttori con una spina a jack da 6,3
mm.
LS-OUT
Attraverso il collegamento LS-OUT si può collegare il box amplificatore
attivo TLS M 100 LS Plus. Il collegamento LS-OUT offre la possibilità
di stereofonia. A tal fine occorre collegare prima ambedue gli
apparecchi, prima di accenderli.
Audio IN
Attraverso il collegamento Audio IN si può collegare una sorgente
audio esterna, per registrarla ad esempio su cassetta.
Audio OUT
Attraverso l'uscita Audio OUT si può per esempio collegare un impianto
stereo.
Cuffia
Per ascoltare cassette oppure CD attraverso una cuffia, gli apparecchi
dispongono di una boccola di collegamento per cuffie a jack da 6,3
mm. Se inserite la spina a jack della vostra cuffia nella boccola
evidenziata con il simbolo dell'altoparlante, l'altoparlante integrato verrà
disinserito.
Uso di radiomicrofoni
Il radiomicrofono trasmette segnali al ricevitore integrato senza cavi o
conduttori. I segnali ad alta frequenza, che, a seconda delle loro
proprietà, possono anche penetrare attraverso porte, pareti e finestre,
garantiscono una ricezione chiara e distinta. La regolazione del canale
di trasmissione TLS in fabbrica è impostata sul canale F.
Edizione 11/03
83
Istruzioni per l'uso
Inserire il microfono (ON). A questo punto si accende la spia di
funzionamento.
Disinserire nuovamente il microfono dopo l'uso (OFF).
La spia di funzionamento (ON) e delle batterie incomincia a
lampeggiare, non appena viene registrata una capacità insufficiente
le batterie. Dopodiché occorre cambiare batterie. Introdurre una
batteria da 9 Volt nello scomparto del microfono, rispettando la
corretta polarità (il polo + della batteria deve corrispondere col polo
+ evidenziato nel microfono).
Nota:
Nel caso il microfono non dovesse funzionare, controllare
dapprima se l'apparecchio TLS è collegato alla presa di
corrente o se il microfono è inserito. Accertarsi che la
batteria del microfono non si sia esaurita. In caso di una
distorsione, accertarsi che il volume della sorgente audio
non sia stato regolato al livello massimo. Ridurre
necessariamente il volume. Accertarsi inoltre che
l'apparecchio oppure il microfono non sia piazzato in
prossimità di lampade fluorescenti.
Disturbi di trasmissione durante il funzionamento nel modo a
radiomicrofono
Nel caso durante il funzionamento del microfono dovessero verificarsi
dei disturbi, si può anche cambiare il canale di trasmissione nel
selettore canali.
Nota:
nella regolazione del canale si prega di osservare le
prescrizioni nazionali delle autorità locali.
Le ulteriori informazioni riguardanti il microfono sono da apprendere nel
manuale d'istruzione separato.
84
Edizione 11/03
Istruzioni per l'uso
Note sulla manutenzione
Nota:
Non utilizzare mai forti solventi, quali ad esempio alcol,
benzina oppure diluenti per vernici. La penetrazione di
liquidi può danneggiare gli equipaggiamenti elettronici ed
elettrici. Provvedere affinché all'interno degli apparecchi
non possano penetrare alcuni liquidi.
Pulizia dell'unità cassette
Pulire periodicamente la testina di cancellazione, registrazione e
riproduzione nonché il rullo di compressione, per garantire
costantemente una qualità sonora ottimale.
Per la polizia si raccomanda di utilizzare dei bastoncini di ovatta,
leggermente imbevuti con un detergente fluido per testine audio
oppure con alcol isopropilico.
Pulizia del CD-Player
Pulire il CD-Player esclusivamente con un pennello per materiali
fotografici. All'interno del CD-Player non deve in nessun caso
penetrare umidità.
Pulizia dell'apparecchio TLS M 100
Le parti laterali dell'apparecchio sono rivestite con materiale lavabile.
Per la sporcizia ostinata si raccomanda di impiegare un panno
morbido leggermente inumidito.
Tutela ambientale
L'apparecchio, gli accessori e l'imballaggio dovrebbero essere recati ad
un centro di riciclaggio per la protezione dell'ambiente. Le batterie
difettose ossia scariche devono essere riciclate conformemente alla
direttiva 91/157/CEE. Non gettare mai le batterie scariche nei rifiuti
urbani, nel fuoco e nell'acqua. Ogni apparecchio tecnico prima o poi
non serve più. Per questo motivo, la TLS Communication GmbH ritira
tutti i componenti degli apparecchi TLS M 100 per recarli
successivamente al centro di riciclaggio.
Edizione 11/03
85
Istruzioni per l'uso
Nel caso di un danno di trasporto
Qualora dovesse verificarsi un danno di trasporto, si prega di
osservare i punti seguenti:
non modificare in nessun caso la merce oppure l'imballaggio.
fare consegnare comunque il danno dal corriere.
non utilizzare in nessun caso l'apparecchio danneggiato.
dopo la consegna dello spedizioniere o del corriere si prega di
segnalarci il danno entro 7 giorni per telefono o per iscritto.
per regolare rapidamente il danno, si prega di inviarci una copia
della bolla di consegna insieme alla rispedizione.
inoltre, si prega di osservare che possiamo accettare la merce
rispedita solamente se la rispedizione è stata previamente
concordata.
Supporto
In caso di domande riguardanti l'uso o il funzionamento, si prega di
rivolgersi al commerciante TLS locale oppure direttamente alla TLS:
TLS Communication GmbH
Marie-Curie-Straße 20
D-40721 Hilden
Tel.: +49 (0) 2103 5006-0
Fax: +49 (0) 2103 5006-90
e-mail: [email protected]
www.tls-gmbh.com
86
Edizione 11/03
Istruzioni per l'uso
Problemi di funzionamento
Problema
l'apparecchio non può essere
acceso
Probabile problema
•
Rimedio
•
•
spina non correttamente collegata alla
presa di corrente
fusibile guasto
•
CD introdotto all'inverso
•
•
dicitura informativa non rimossa dal CD
•
•
•
disco sporco
utilizzare un CD di masterizzazione
propria
•
•
•
•
superficie ottica appannata
- in seguito all'immediata accen sione di
un corpo riscaldante
- uso all'interno di un locale con molto
vapore e molto umido
- quando questo apparecchio viene
improvvisamente trasportato da un
luogo molto freddo in un luogo caldo
salti durante la riproduzione
oppure accesso ai titoli
insolitamente lento
•
•
•
disco sporco
disco graffiato
disturbi per calpestio
•
•
•
pulire il disco
utilizzare un disco in stato perfetto
posizionarlo su un piano stabile
nessuna preprogrammazione
possibile
•
apparecchio commutato al modo di
riproduzione
•
•
numero del titolo non presente sul CD
•
commutare su stop (durante la
riproduzione non è possibile alcun
inserimento)
non selezionare nessun numero
maggiore rispetto a quello dell'ultimo
titolo del CD
•
batterie scariche
•
nessuna ricezione
•
•
cambiare le batterie del telecomando
dirigere il telecomando in direzione dei
rivestimenti degli altoparlanti / del
pannello frontale
nessuna riproduzione possibile,
nonostante sia stato inserito il
disco
il CD-Player non può essere
telecomandato
•
spingere con forza la spina nella presa
di corrente
- staccare il cavo d'alimentazione
dall'apparecchio
- staccare il portafusibili con il fusibile
stesso dalla spina dell'apparecchio
dopo che si è raffreddato (situata al
lato dell'alloggiamento)
- inserire un nuovo portafusibili con un
fusibile nuovo nella spia dell'apparecchio
introdurre il CD con la parte
dell'etichetta rivolta verso l'alto
rimuovere la dicitura informativa dal
CD
pulire il disco
a causa di errori di trasmissione in
diversi masterizzatori, può capitare
che alcuni CD masterizzati non
possono essere più riprodotti
lasciare acclimatizzare per circa un'ora
non è possibile premere il tasto di •
registrazione del vano cassette
la cassetta è protetta contro una
cancellazione involontaria
•
se la cassetta può essere cancellata,
coprire le aperture nella parte
posteriore della cassetta con del
nastro adesivo
velocità troppo alta / troppo bassa •
del CD / della cassetta (solo in
apparecchi con regolatore Pitch)
regolatore Pitch non centrato
•
portare il regolatore Pitch in posizione
centrale
nessuna riproduzione attraverso il •
radiomicrofono
•
batterie scariche
regolazione del canale non corretta
•
•
cambiare le batterie del telecomando
regolare lo stesso canale sia
nell'apparecchio che nel microfono
il diffusore acustico a un suono
•
cupo durante la riproduzione di
cassette oppure si verificano degli •
errori di sincronismo
nastro della cassetta allentato
•
unità cassette sporca
•
tendere il nastro della cassetta con
una matita oppure simili oggetti
pulire accuratamente la testina di cancellazione, la testina audio e il rullo di
compressione nonché l'albero del tono
all'interno dell'unità cassette con un
bastoncino di ovatta imbevuto di alcol
Edizione 11/03
87
88
Dimensions/Weight/etc.
W x H x D mm
Weight kg (packed)
Customs consignment No
Wireless Microphone
Carrier frequency
Operating distance
Operating time
Sensitivity
330 x 510 x 290
15.5 kg (18.0 kg)
852 033 19
330 x 510 x 290
15.8 kg (18.4 kg)
852 790 98
863-864 MHz
max. 120 m
10 h
20-20.000 Hz
< 0.05 %
> 80 dB at 1 kHz
> 60 dB at 1 kHz
Yes
Infrared
330 x 510 x 290
16.4 kg (18.6 kg)
852 033 19
20-20.000 Hz
< 0.05 %
> 80 dB at 1 kHz
> 60 dB at 1 kHz
Yes
Infrared
20-20.000 Hz
< 0.05 %
> 80 dB at 1 kHz
> 60 dB at 1 kHz
Yes
Infrared
6.3 mm jack Ster.
CD Player
Frequency range
Total harmonic distortion
Signal/Noise ratio
Channel Separation
Controllable pitch
Remote control
6.3 mm jack Ster.
6.3 mm jack Ster.
2 x 6.3 mm jack
6.3 mm jack
2 x Phono Stereo
2 x Phono Stereo
70 W
20-20.000 Hz
92 dB
0.5 %
8Ω
230 V / 50 Hz
140 Watt
1.6 A delayed
Active box
Two way system
801 010
M 100 Combi
1/4 Track, Stereo
4.75 cm/sec.
Yes
< 0.3 %
50-14.000 Hz
3 digit
2 x 6.3 mm jack
6.3 mm jack
2 x Phono Stereo
2 x Phono Stereo
70 W
20-20.000 Hz
92 dB
0.5 %
8Ω
230 V / 50 Hz
140 Watt
1.6 A delayed
Active box
Two way system
2 x 6.3 mm jack
6.3 mm jack
2 x Phono Stereo
2 x Phono Stereo
70 W
20-20.000 Hz
92 dB
0.5 %
8Ω
230 V / 50 Hz
140 Watt
1.6 A delayed
Active box
Two way system
804 010
M 100 CD
Wireless
810 010
Cassette Recorder
Track System
Tape speed
Controllable pitch
Wow & Flutter
Frequency range
Counter
Input/Output
Microphone Mono
Headphones Stereo
External sources IN
External sources OUT
External speakers IN
External OUT
Amplifier
Power rating ms
Frequency range
Dynamic range
Total harmonic distortion
Impedance
Mains voltage
Power consumption
Fuse
Design
Product No.
M 100 CD
330 x 510 x 290
16.7 kg (19.0 kg)
852 790 98
863-864 MHz
max. 120 m
10 h
20-20.000 Hz
< 0.05 %
> 80 dB at 1 kHz
> 60 dB at 1 kHz
Yes
Infrared
1/4 Track, Stereo
4.75 cm/sec.
Yes
< 0.3 %
50-14.000 Hz
3 digit
6.3 mm jack Ster.
2 x 6.3 mm jack
6.3 mm jack
2 x Phono Stereo
2 x Phono Stereo
70 W
20-20.000 Hz
92 dB
0.5 %
8Ω
230 V / 50 Hz
140 Watt
1.6 A delayed
Ster. active box
Two way system
M 100 Combi
Wireless
801 020
330 x 510 x 290
13.8 kg (17.6 kg)
851 821 190
6.3 mm jack Ster.
2 x 6.3 mm jack
6.3 mm jack
2 x Phono Stereo
2 x Phono Stereo
70 W
20-20.000 Hz
92 dB
0.5 %
8Ω
230 V / 50 Hz
140 Watt
1.6 A delayed
Active box
Two way system
801 030
M 100 Talk
330 x 510 x 290
14.1 kg (18.0 kg)
851 821 90
863-864 MHz
max. 120 m
10 h
6.3 mm jack Ster.
2 x 6.3 mm jack
6.3 mm jack
2 x Phono Stereo
2 x Phono Stereo
70 W
20-20.000 Hz
92 dB
0.5 %
8Ω
230 V / 50 Hz
140 Watt
1.6 A delayed
Active box
Two way system
M 100 Talk
Wireless
801 040
330 x 510 x 290
13.2 kg (16.4 kg)
851 999 18
6.3 mm jack Ster.
2 x Phono Stereo
70 W
20-20.000 Hz
92 dB
0.5 %
8Ω
230 V / 50 Hz
140 Watt
1.6 A delayed
Active box
Two way system
801 050
M 100 LS Plus
Istruzioni per l'uso
Tabella dei dati tecnici
Edizione 11/03
Käyttöohje
SF
Tunnistetiedot
Valmistaja: ................................................... TLS Communication GmbH
Marie-Curie-Straße 20
D-40721 Hilden
Tel: +49 (0) 2103 5006 0
Fax: +49 (0) 2103 5006 90
Tuote:..................................................................................M 100 Range
Valmistusmaa: ............................................................... Tsekin tasavalta
Käyttöohje:........................................................................... Versio 11/03
Tulostustiedosto:............................................................ M100Range.doc
Tämä käyttöohje kuuluu tähän tuotteeseen ja sisältää tärkeää tietoa
laitteen käytöstä. Huomioi ohjeet, vaikka välittäisit laitteita eteenpäin.
Säilytä käyttöohje tulevaa käyttöä varten.
Sisällys
Tunnistustiedot .................................................................................... 89
Sisällys................................................................................................. 89
Toimituksen sisältö .............................................................................. 90
Tekniset tiedot ..................................................................................... 90
Käyttöympäristö ................................................................................... 90
Käyttötarkoitus ..................................................................................... 90
Takuu................................................................................................... 91
Turvallisuusohjeet................................................................................ 91
Käyttöönotto......................................................................................... 92
Kasettisoitin ......................................................................................... 92
CD-soitin .............................................................................................. 94
Mikserikonsoli ...................................................................................... 98
Ulkoiset liitännät................................................................................... 99
Langattoman mikrofonin käyttö ......................................................... 100
Laitteen puhdistus.............................................................................. 101
Ympäristökysymykset ........................................................................ 101
Kuljetusvauriot ................................................................................... 101
Käyttötuki ........................................................................................... 102
Käyttöongelmat.................................................................................. 103
Tekniset tiedot-taulukko..................................................................... 104
Versio 11/03
89
Käyttöohje
Toimituksen sisältö
Tunniste
Kuvaus
No.
Virtajohto
LS
johto
RC +
paristot
804 010
M 100 CD
X
X
810 010
M 100 CD
Wireless
X
X
801 010
M 100 Combi
X
X
801 020
M 100 Combi
Wireless
X
X
801 050
M 100 LS
Plus
X
801 030
M 100 Talk
X
801 040
M 100 Talk
Wireless
X
Mic. +
Käyttöparistot ohje
X
optio
X
X
optio
X
X
X
X
optio
X
Tekniset tiedot
Katso taulukko, sivu 104
Jatkuvan tuotekehittelyn takaamiseksi
muutoksiin ilman aikaisempaa ilmoitusta.
TLS
pidettää
oikeudet
Käyttöympäristö
Käyttölämpötila: ..................................................................+5°C - +40°C
Suht. kosteus: .......................................................................... Max. 85%
Ilmanpaine: ..................................................................... 600 - 1000 hPA
Käyttötarkoitus
TLS M 100 -laitteet ovat kannettavia äänentoistolaitteita käytettäväksi
suurissa huoneissa sekä enintään n. 400 henkilölle tarkoitetuissa
tiloissa. Laitteilla voidaan soittaa useita eri audiolähteitä.
90
Versio 11/03
Käyttöohje
Takuu
TLS M 100 laitteiden tehdastakuu on voimassa 24 kuukautta.. Takuu
ei korvaa vahinkoa, jos laitetta on käytetty väärin tai liian suurella
voimalla. Takuun voimassaolo lakkaa, jos laitteen avaa valtuuttamaton
henkilö.
Turvallisuusohjeet
Tämä käyttöohje sisältää perusturvallisuusohjeet, joita on nuodatettava
TLS M 100 laitteita käytttäessä. Nuodata ohjeita tarkasti virheiden
välttämiseksi. Lue käyttöohje huolellisesti läpi ennen TLS M 100
laitteiden käyttöä.
Käyttöohjeen turvallisuustiedot, joiden
huomioimatta jättäminen
saattaa aihauttaa vahinkoa ihmisille, on merkitty seuraavalla symbolilla:
Turvallisuus symboli DIN 4844-W8 ja sana “Vaara".
Hengenvaara
Sähköisistä osista saadut sähköiskut voivat aiheuttaa kuoleman tai
vakavaa vahinkoa terveydelle. Älä koskaan avaa TLS M 100 laitteiden
koteloa! Näiden osien avaaminen johtaa takuun raukeamiseen.
Vaara
Tämä laite tuottaa lasersäteitä. Vaarallisia määriä lasersäteitä sattaa
syntyä, jos laitetta käytetään muuhun kuin mainittuihin toimintoihin.
Lasersäteille altistumista tulee ehdottomasti välttää!
Vaara
Pistokkeet ja johdot voivat vaurioitua. Yhdistä pistokkeet pistorasiaan
erittäin varoivaisesti.
Vaara
Laitetta voidaan käyttää ainoastaan sisätiloissa. Sitä ei saa altistaa
tippuvalle vedelle tai vesisuihkulle, eikä nestesäiliöitä tule pitää laitteen
päällä.
Status 11/03
91
Käyttöohje
Käyttöönotto
Käännä TONE -säädin keskiasentoon.
Käännä VOLUME -säädin (MIC, CD tai TAPE) min-asentoon.
Liitä toimituksessa mukana tullut virtajohto laitteen sivulla olevaan
laitteen virtapistorasiaan.
Liitä virtajohto 230 V/50 Hz päävirtaan.
Kytke TLS M 100 laitteet päälle POWER -vivusta, joka sijaitsee
virtajohdon pistorasian alapuolella. Virta kytketään pois tästä
vivusta käytön jälkeen.
Kasettisoitin
Stereo kasettisoitin ED500
REC
0
50
100
FULL AUTO STOP
PITCH
REC
PLAY
REW/REV
F.F/CUE STOP/EJECT PAUSE
Kuvio 1
Soitto
Avaa kasettipesä painamalla ST/EJ painiketta (kts. Kuvio 1).
Aseta kasetti pesään avoin osa alaspäin ja kuunneltava puoli
etupuolelle (puoli 1 tai A; puoli 2 tai B).
Sulje kasettipesä.
Paina PLAY painiketta.
92
Versio 11/03
Käyttöohje
Huom:
Pysäytä kasetti painamalla ST/EJ painiketta (Stop/Eject).
Paina painiketta uudelleen kasettipesän avaamiseksi. Nyt
voit poistaa kasetin.
Äänitys
Huom:
Kuten kaikki kasettisoittimet, myös tämä
ainoastaan kasetille, jonka turvatapit ovat tallella.
äänittää
Aseta kasetti kasettipesään.
Paina PAUSE painike alas.
Paina REC painiketta.
Punainen REC valo syttyy (kts. Kuvio 1)
Vapauta PAUSE painike äänityksen aloittamiseksi.
Huom:
Äänitys voidaan pysäyttää hetkeksi painamalla PAUSE
painiketta. Kun haluat lopettaa äänityksen, paina ST/EJ
painiketta.
Tarkan kohdan löytäminen nauhalta
Ennen soittoa tai äänitystä, paina RESET painiketta laskimen
nollaamiseksi (COUNTER 000, kts. Kuvio 2).
Merkitse haluamasi kohdat ylös käyttämällä laskinta.
Nämä kohdat voidaan löytää nopeasti uudetaan kelaamalla eteen(F.FWD painike) tai taaksepäin (REW painike).
COUNTER
RESET
000
Kuvio 2
Nopea soitto
Kasettisoittimessa on myös nopean soiton mahdollisuus. Soitto on
tavallista nopeampaa, mutta yhä selvästi ymmärrettävää.
Paina F.F/CUE tai REW/REV painiketta PLAY painikkeen olessa
alhaalla (Painikkeita ei voida painaa alas suoraan tätä toimintoa
varten).
Vapauta F.F/CUE
jatkamiseksi.
Status 11/03
tai
REW/REV
painike
normaalin
soiton
93
Käyttöohje
Nauhan nopeuden säätö (PITCH)
Joskus on tarpeellista nopeuttaa tai hidastaa nauhan nopeutta esim.
musiikkia soittettaessa tai kielikasetteja kuunneltaessa esim.
tanssitunnilla tai kielten opetuksessa. Tämä voidaan tehdä PITCH
säätimen avulla.
Käännä PITCH
hidastamiseksi.
säädin
Käännä PITCH
kiihdyttämiseksi .
vasemmalle
säädin
oikealle
nauhan
nauhan
soittonopeuden
soittonopeuden
Palauta normaali soittonopeus kääntämällä PITCH säädin 0 asentoon.
CD-soitin
CD-soitin EC300
C O M P A C T
D IG I T A L
IR
A U D IO
REPEAT
REPEAT 1 ALL A↔ B RANDOM PROGRAM
1
2
3
4
INTRO
5
6
7
8
9
10
11
12
13
14
15
REMAIN
15
72:15
A-B
PROG REMAIN
STOP
SEARCH
PLAY/PAUSE
REPEAT
SKIP
Kuvio 3
OPEN/CLOSE (CD-aseman avaaminen ja sulkeminen)
Paina OPEN/CLOSE painiketta CD-aseman avaamiseksi. Aseta CDlevy asemaan tekstipuoli ylöspäin. Paina OPEN/CLOSE painiketta
uudestaan CD-aseman sulkemiseksi. CD alkaa pyöriä automaattisesti.
Kun näytöllä näkyy CD:llä oleva kappalemäärä, CD-soitin on valmis.
Jos painat PLAY painiketta OPEN/CLOSE painikkeen sijaan laitettuasi
CD:n soittimeen, CD-asema sulkeutuu automaattisesti ja alkaa soittaa
ensimmäistä kappaletta.
94
Versio 11/03
Käyttöohje
PLAY/PAUSE (Soitto/Tauko)
Paina PLAY/PAUSE painiketta soittaaksesi CD:n alusta alkaen.
Ensimmäinen kappale CD:llä alkaa soida. Näytöllä näkyy PLAY (tai X
symboli).
CD:n soidessa paina PLAY/PAUSE painiketta soiton keskeyttämiseksi.
Paina PLAY/PAUSE painiketta uudelleen tauon lopettamiseksi ja CD:n
soiton jatkamiseksi.
STOP
Paina STOP painiketta CD:n soiton pysäyttämiseksi.
SKIP (Kappalehaku)
Soiton aikana on mahdollista siirtyä kappaleesta toiseen eteen- tai
taaksepäin painamalla painiketta hyvin nopeasti.
Paina SKIP |<< painiketta, kun haluat palata edelliseen
kappaleeseen. CD-soitin hyppää takaisin kappaleen alkuun, kun
painat painiketta kerran soiton aikana.
Paina SKIP >>|
kappaleeseen.
painiketta,
kun haluat siirtyä seuraavaan
SEARCH (Tarkan kohdan löytäminen)
Tarkan kohdan löytämiseksi kappaleesta, paina SEARCH painiketta.
Paina SEARCH painiketta eteen- tai taaksepäin tarkan kohdan
löytämiseksi.
REPEAT (Kertaus)
Paina REPEAT painiketta. Parhaillaan soitettava kappale soitetaan
uudelleen. REPEAT vilkkuu näytöllä (REPEAT ja 1).
Paina REPEAT painiketta uudelleen. Koko CD tai ennalta
ohjelmoitu kappale soitetaan yhä uudestaan kunnes REPEAT
painiketta painetaan uudelleen. REPEAT vilkkuu näytöllä (REPEAT
ja ALL).
Paina REPEAT
lopettamiseksi.
Status 11/03
painiketta
kolmannen
kerran
kertauksen
95
Käyttöohje
PROG (Ohjelmoitu soitto)
Paina PROGRAM painiketta ohjelmoinnin aloittamiseksi.
Paina UP ja DOWN painikkeita valitaksesi edellisen tai seuraavan
kappaleen kunnes haluttu kappale näkyy LCD:ssä.
Paina PROGRAM painiketta kappaleohjelmoinnin vahvistamiseksi.
Toista kohdat 2 ja 3 useiden kappaleiden valitsemiseksi. Paina
PLAY painiketta, kun haluat aloittaa valitun ohjelmoinnin soiton.
Enintään 21 kappaletta voidaan ohjelmoida.
REMAIN (Jäljellä oleva aika)
Näytöllä näkyy kappaleen soitettu aika. Paina REMAIN painiketta
kahden muun aikatoiminnon mahdollistamiseksi.
Paina REMAIN painiketta kappaleen jäljellä olevan soittoajan
tarkistamiseksi.
Paina REMAIN painiketta uudelleen koko CD:n jäljellä olevan
soittoajan tarkistamiseksi.
Tämä toiminto ei ole käytössä kertauksen, satunnaissoiton tai
ohjelmoidun soiton aikana.
A ⇔B
⇔ (Ohjelmoitu kertaus)
Tämä toiminto soittaa uudelleen osan kappaleesta niin monta kertaa
kuin halutaan.
Paina A ⇔B painiketta halutun osuuden alussa.
Paina A ⇔B painiketta halutun osuuden lopussa. CD-soitin soittaa
valittujen kohtien välisen osan yhä uudelleen.
Paina A ⇔B painiketta toiminnon lopettamiseksi.
Infrapunakaukosäädin
Käytä infrapunakaukosäädintä kaikkien TLS laitteen CD-soittimen
toimintojen ohjaamiseen (kts. Kuvio 4). Kaukosäätimen näppäimet
vastaavat
CD-soittimen
painikkeita.
Kaukosäädin
antaa
mahdollisuuden myös muutamaan lisätoimintoon.
96
Versio 11/03
UP/FF
8
INTRO
VOL+
7
10
VOL-
DOWN/REW
REMAIN
5
4
+10
RANDOM
9
PROG
6
3
2
1
MUTE
STOP
REPEAT
Käyttöohje
Kuvio 4
RANDOM (Satunnaissoitto)
Satunnaissoitto valitsee kappaleen ja alkaa soittaa. Kappaleen loputtua
uusi kappale valitaan sattumanvaraisesti ja soitetaan. Tämä jatkuu
kunnes kaikki CD:llä olevat kappaleet on soitettu tai soitto
keskeytetään.
Paina RANDOM painiketta satunnaissoiton
Satunnaissoitto (RANDOM) syttyy näytölle.
aloittamiseksi.
Paina RANDOM painiketta uudelleen toiminnon lopettamiseksi.
Tämä toiminto ei ole käytössä ohjelmoidun soiton aikana.
INTRO (Kaikkien kappaleiden automaattinen soitto)
Tämä toiminto voi auttaa kappaleen löytämistä, kun kappaleen nimeä
ei tiedetä. Jokaista kappaletta soitetaan 10 sekunnin ajan.
Paina INTRO painiketta soittaaksesi jokaista kappaletta 10
sekunttia. SPACE vilkkuu näytöllä.
Paina INTRO painiketta uudelleen toiminnon lopettamiseksi.
Tämä toiminto voidaan keskeyttää hetkeksi ainoastaan painamalla
STOP painiketta.
SPACE (Soiton viivytys)
CD-soitin jättää jokaisen kappaleen väliin automaatisesti 5 sekunnin
tauon. Tämä on käytännöllistä, esim. äänityksen aikana. Näin on
helpompi löytää jokaisen kappaleen alku kasetilta.
Paina SPACE painiketta 5 sekunnin tauon pitämiseksi kappaleiden
välissä.
Paina SPACE painiketta uudelleen toiminnon lopettamiseksi.
Status 11/03
97
Käyttöohje
CD:n soittonopeuden säätö (PITCH)
Joskus on tarpeellista nopeuttaa tai hidastaa soittonopeutta esim.
musiikkia soittettaessa tai kielikasetteja kuunneltaessa esim.
tanssitunnilla tai kielten opetuksessa. Tämä voidaan tehdä PITCH
säätimen avulla.
Käännä PITCH
hidastamiseksi.
Käännä
PITCH
kiihdyttämiseksi .
säädin
vasemmalle
säädin
CD:n
oikealle
CD:n
soittonopeuden
soittonopeuden
Palauta normaali soittonopeus kääntämällä PITCH säädin 0 asentoon.
Käytön aloittaminen (Paristojen vaihto)
Infrapunakaukosäädin toimii kahdella 1.5 V AAA R03 paristolla. Avaa
paristojen luukku kaukosäätimen takaosassa. Poista vanhat paristot ja
aseta kaksi uutta paristoa oikealle paikalleen. Varmista, että paristot on
asetettu oikein päin (+ symboli tai – symboli vastaavaa pariston
merkkiä kohti). Sulje paristojen luukku.
Huom:
Infrapunasensori sijaitsee laitteen toiminta/kaiutinpuolella.
Huom:
Jos laitetta ei tulla käyttämään vähään aikaan, poista
paristot, jottei kaukosäätimeen valuisi nestettä paristoista.
Mikserikonsoli
0
0
45
6
7
8
9
A
ED
CB
0
1
0
23
F
-
+
-
+
L
TREBLE
BASS
R
BALANCE
LS-OUT
-
+
MIC1
I
-
+
MIC2
I
-
+
TAPE
CD
IN
OUT
Kuvio 5
98
Versio 11/03
Käyttöohje
Äänenvoimakkuuden sääto
Säädä kasettisoittimen, CD-soittimen ja ulkoisten laitteiden
äänenvoimakkuutta
TAPE/CD
säätimellä.
Käännä
äänenvoimakkuussäädin oikealle äänenvoimakuuden lisäämiseksi ja
vasemmalle vähentämiseksi.
MIC 1 ja MIC 2 säätimet säätävät mikrofonin äänenvoimakkuutta.
Käännä
äänenvoimakkuussäädin
oikealle
äänenvoimakuuden
lisäämiseksi ja vasemmalle vähentämiseksi.
Kanva säädin BALANCE säätää tasapainoa oikean ja vasemman
kanavan välillä parhaan stereovaikutelman saavuttamiseksi. Käännä
säädintä
oikealle
vasemman
kanavan
äänenvoimakkuuden
vähentämiseksi ja päinvaistoin. Normaalitilanteessa jätä säädin
keskiasentoon.
Äänensävyn säätö
Äänenkorkeuden säätimet BASS ja TREBLE madaltavat tai nostavat
matalia ja korkeita ääniä. Säädä TLS laitteiden äänensävy huoneen
akustiikan tai vaatimusten mukaan. Heti kun korkein äänenvoimakkuus
on saavutettu TAPE/CD säädintä käyttämällä, soittohäiriöitä saattaa
esiintyä, mikä voi vahingoittaa kaiutinjärjestelmää.
Huom:
Soittohäiriöt voivat vahingoittaa kaiutinjärjestelmää. Älä
jatka laitteen käyttöä soittohäiriöiden esiintyessä.
Vaimenna äänenvoimakkuutta häiriöiden lopettamiseksi.
Ulkoiset liitännät
MIC 1 ja MIC 2
MIC 1 ja MIC 2 pistokeliintäntöjen kautta johdollinen mikrofoni voidaan
yhdistää laitteeseen 6.3 mm jack pistokkeella.
LS-OUT
TLS M 100 LS PLus äänenvahvistin voidaan liittää laitteeseen LSOUT:n kautta. LS-OUT pistokeliitäntä mahdollistaa stereotoiminnan.
Liitä molemmat laitteet ennen virran kytkemistä.
Audio IN (Audio sisään)
Ulkoinen audiolähde voidaan yhdistää laitteeseen
pistokeliitännän kautta esim. kasetille äänitystä varten.
Status 11/03
Audio
IN
99
Käyttöohje
Audio OUT (Audio ulos)
Stereojärjestelmä voidaan yhdistää Audio OUT pistokeliitännän kautta.
Kuulokeet
CD:n tai kasetin kuuntelemiseksi kuulokkeilla laitteissa on kuuloke
liitäntä (6.3 mm jack). Sisäisen kaiutinjärjestelmän vaimentamiseksi
laita kuulokkeiden pistoke laitteessa olevaan pistorasiaan, jossa on
yliviivattu kaiuttimen kuva.
Langattoman mikrofonin käyttö
Langaton
mikrofoni
lähettää
signaaleja
sisäänrakennettuun
vastaanottimeen ilman kaapelia tai johtoja. Mikrofonin rakenteesta
riippuen korkeataajuiset radiosignaalit voivat läpäistä ovia, seiniä ja
ikkunoita lähettäen selvää ja puhdasta signaalia. TLS lähetyskanava
on tehdasasetettu F kanavaan.
Kytke mikrofoni päälle (ON). Toimintonäyttö syttyy.
Kytke mikrofoni pois päältä käytön jälkeen (OFF).
Käyttö- (ON) ja paristonäyttö alkaa vilkkua, kun paristot alkavat
heiketä. Tässä vaiheessa paristot tulee vaihtaa. Aseta yksi 9 voltin
paristo oikein päin mikrofonin paristoluukkuun (+ symboli tai –
symboli vastaavaa pariston merkiä kohti).
Huom:
Jos mikrofoni ei toimi, tarkista, että TLS laite on kytketty
päävirtaan ja mikrofoni on päällä. Varmista, että mikrofonin
paristot toimivat. Lisäksi tarkista, että mikrofonissa ja TLS
laitteessa on valittuna sama kanava. Jos häiriöitä esiintyy,
tarkista, että äänenvoimakkuus ei ole asetettu liian
voimakkaaksi.
Siinä
tapauksessa
vähennä
äänenvoimakkuutta. Varmista myös, ettei laite tai mikrofoni
sijaitse liian lähellä loistelamppua.
Lähetyshäiriöt langatonta mikrofonia käytettäessä
Jos mikforonin käytön aikana ilmestyy ongelma, lähetyskavana
voidaan vaihtaa kavanasäätimellä.
Huom:
Kun asetat kanavaa muista noudattaa kansallisia sääntöjä
sekä vastaavien auktoriteettien säännöksiä.
Mikrofonista löytyy
käyttöohjeesta.
100
enemmän
tietoa
mukanatulleesta
erillisestä
Versio 11/03
Käyttöohje
Laitteen puhdistus
Huom:
Älä koskaan käytä voimakkaita kemikaaleja, kuten
alkoholia, bensiiniä tai liuottimia. Kosteus saattaa
vahingoittaa elektronisia ja sähköisiä osia. Älä päästä
kosteutta laitteen sisäosiin.
Kasettisoittimen puhdistus
Äänipäät, vetoakselit ja painerullat tulee puhdistaa säännöllisesti
parhaan äänilaadun takaamiseksi.
Puhdista
kasetti
äänipääpuhdistusaineeseen
isopropyylialkoholiin kevyesti kosteutetulla vanulla.
tai
CD-soittimen puhdistus
Käytä CD-aseman puhdistamiseen ainoastaan siihen tarkoitettua
harjaa. CD-soittimen sisään ei tule päästää kosteutta.
TLS M 100 laitteen puhdistus
Laitteen kotelo on pestävää materiaalia
Vaikeissa tapauksissa käytä kosteahkoa pyyhettä.
Ympäristökysymykset
Laite, lisälaitteet ja pakkaus tulee kierrättää. Käytetyt paristot tulee
kierrättää 91/157/EWG -asetuksen mukaan. Älä heitä käytettyjä
paristoja kotitalousjätteisiin, tuleen tai veteen. Kaikilla teknisillä
tuotteilla on elinikä. Siksi TLS Communication GmbH ottaa takaisin
kaikki TLS M 100 laitteiden komponentit ja kierrättää ne.
Kuljetusvauriot
Jos tuote vaurioituu kuljetuksen aikana, huomioi seuraavat asiat:
Älä koske tuotteeseen tai pakkaukseen.
Pyydä kuljetuspalvelulta todiste vauriosta.
Älä käytä vaurioitunutta laitetta.
Jos lähetti- tai postipalvelu kuljetti tuotteen, ilmoita meille vauriosta
puhelimitse tai postitse 7 kalenteripäivän kuluessa..
Hallinnollinen
prosessi
saapumisilmoituksesta.
nopeutuu,
jos
toimitat
kopion
Huomioi, että hyväksymme palautuksia ainoastaan, jos tilanteesta
on ilmoitettu meille etukäteen.
Versio 11/03
101
Käyttöohje
Käyttötuki
Laitteen käyttöä koskevat kysymykset tulee esittää paikalliselle TLS:n
edustajalle tai suoraan TLS:lle:
TLS Communication GmbH
Marie-Curie-Straße 20
D-40721 Hilden
Tel.: +49 (0) 2103 5006-0
Fax: +49 (0) 2103 5006-90
e-mail: [email protected]
www.tls-gmbh.com
102
Versio 11/03
Käyttöohje
Käyttöongelmat
Ongelma
Laite ei kytkeydy päälle
Mahdollinen syy
Ratkaisu
•
Virtajohto kytketty huonosti
•
Kytke virtajoto kunnolla
•
Viallinen sulake
•
- Irroita virtajohto laitteesta
- Vedä sulakepidike ja sulake ulos
laitteen sivussa olevasta
sisäisestä pistorasiasta
- Laita uusi sulake
sulakepidikkeessä takaisin
sisäiseen laitepistorasiaan
•
CD asetettu ylösalaisin
•
CD tekstipuoli ylöspäin
•
Pahvista CD-suojakoteloa ei ole •
poistettu
•
Likainen levy
•
Puhdista levy
•
CD-RW-levy
•
Mahdollisten CD-polttimen
kirjoitusvikojen takia, jotkut CD-RWlevyt eivät soi
•
•
Sumuinen lukupää
- välittömästi laitteen päälle
kytkemisen jälkeen
- kosteassa huoneessa
- kun laite tuodaan äkkiä hyvin
kylmästä lämpimään huoneeseen
Anna laitteen tottua huoneilmaan n.
tunnin ajan
Kappaleen hyppiminen tai
poikkeuksellisen hidas kappaleen
tunnistus
•
Likainen levy
•
Puhdista levy
•
Naarmuunut levy
•
Käytä vahingoittumatonta levyä
•
Raskaista askelista johtuvat häiriö
•
Aseta vakaalle tasolle
Ohjelmointi ei toimi
•
Laite soittaa parhaillaan
•
Paina stop (ohjelmointi mahdotonta
soiton aikana)
•
CD ei sisällä kappelenumeroa
•
Älä valitse suurempaa numeroa kuin
CD:n viimeinen kappalenumero
•
Huonot paristot
•
Vaihda kaukosäätimen paristot
•
Ei signaalin vastaanottoa
•
Suuntaa kaukosäädin kohti
kaiutin/painikepuolta
Levy on sisällä, mutta ei soi
Kaukosäädin ei ohjaa CD-asemaa.
Poista pahvinen CD –suojakotelo
Kasettisoittimen äänityspainike ei toimi •
Kasetti on suojattu äänitystä vastaan •
Jos kasetille on mahdollista äänittää,
peitä esim. teipillä reiät kasetin
takapuolella
Kasetti/CD soi liian nopeasti tai hitaasti •
(vain laitteissa, joissa PITCH säädin)
PITCH säädin ei ole keskiasennossa •
Aseta PITCH säädin keskiasentoon
Langaton mikrofoni ei kuulu
•
Tyhjät paristot
•
Vaihda kaukosäätimen paristot
•
Kanava-asetukset eivät täsmää
•
Aseta laitteeseen ja mikrofoniin
sama kanava
•
Löysä kasettinauha
•
Kiristä kasettinauha lyijykynällä tai
vastaavalla
•
Likainen kasettisoitin
•
Puhdista äänipäät, vetoakselit ja
painerullat kasettipesässä vanulla ja
alkoholilla
Soitto kuulostaa vaimealta kasettia
soitettaessa tai äänennopeus
vaihtelee
Versio 11/03
103
104
Dimensions/Weight/etc.
W x H x D mm
Weight kg (packed)
Customs consignment No
Wireless Microphone
Carrier frequency
Operating distance
Operating time
Sensitivity
330 x 510 x 290
15.5 kg (18.0 kg)
852 033 19
330 x 510 x 290
15.8 kg (18.4 kg)
852 790 98
863-864 MHz
max. 120 m
10 h
20-20.000 Hz
< 0.05 %
> 80 dB at 1 kHz
> 60 dB at 1 kHz
Yes
Infrared
330 x 510 x 290
16.4 kg (18.6 kg)
852 033 19
20-20.000 Hz
< 0.05 %
> 80 dB at 1 kHz
> 60 dB at 1 kHz
Yes
Infrared
20-20.000 Hz
< 0.05 %
> 80 dB at 1 kHz
> 60 dB at 1 kHz
Yes
Infrared
6.3 mm jack Ster.
CD Player
Frequency range
Total harmonic distortion
Signal/Noise ratio
Channel Separation
Controllable pitch
Remote control
6.3 mm jack Ster.
6.3 mm jack Ster.
2 x 6.3 mm jack
6.3 mm jack
2 x Phono Stereo
2 x Phono Stereo
70 W
20-20.000 Hz
92 dB
0.5 %
8Ω
230 V / 50 Hz
140 Watt
1.6 A delayed
Active box
Two way system
801 010
M 100 Combi
1/4 Track, Stereo
4.75 cm/sec.
Yes
< 0.3 %
50-14.000 Hz
3 digit
2 x 6.3 mm jack
6.3 mm jack
2 x Phono Stereo
2 x Phono Stereo
70 W
20-20.000 Hz
92 dB
0.5 %
8Ω
230 V / 50 Hz
140 Watt
1.6 A delayed
Active box
Two way system
2 x 6.3 mm jack
6.3 mm jack
2 x Phono Stereo
2 x Phono Stereo
70 W
20-20.000 Hz
92 dB
0.5 %
8Ω
230 V / 50 Hz
140 Watt
1.6 A delayed
Active box
Two way system
804 010
M 100 CD
Wireless
810 010
Cassette Recorder
Track System
Tape speed
Controllable pitch
Wow & Flutter
Frequency range
Counter
Input/Output
Microphone Mono
Headphones Stereo
External sources IN
External sources OUT
External speakers IN
External OUT
Amplifier
Power rating ms
Frequency range
Dynamic range
Total harmonic distortion
Impedance
Mains voltage
Power consumption
Fuse
Design
Product No.
M 100 CD
330 x 510 x 290
16.7 kg (19.0 kg)
852 790 98
863-864 MHz
max. 120 m
10 h
20-20.000 Hz
< 0.05 %
> 80 dB at 1 kHz
> 60 dB at 1 kHz
Yes
Infrared
1/4 Track, Stereo
4.75 cm/sec.
Yes
< 0.3 %
50-14.000 Hz
3 digit
6.3 mm jack Ster.
2 x 6.3 mm jack
6.3 mm jack
2 x Phono Stereo
2 x Phono Stereo
70 W
20-20.000 Hz
92 dB
0.5 %
8Ω
230 V / 50 Hz
140 Watt
1.6 A delayed
Ster. active box
Two way system
M 100 Combi
Wireless
801 020
330 x 510 x 290
13.8 kg (17.6 kg)
851 821 190
6.3 mm jack Ster.
2 x 6.3 mm jack
6.3 mm jack
2 x Phono Stereo
2 x Phono Stereo
70 W
20-20.000 Hz
92 dB
0.5 %
8Ω
230 V / 50 Hz
140 Watt
1.6 A delayed
Active box
Two way system
801 030
M 100 Talk
330 x 510 x 290
14.1 kg (18.0 kg)
851 821 90
863-864 MHz
max. 120 m
10 h
6.3 mm jack Ster.
2 x 6.3 mm jack
6.3 mm jack
2 x Phono Stereo
2 x Phono Stereo
70 W
20-20.000 Hz
92 dB
0.5 %
8Ω
230 V / 50 Hz
140 Watt
1.6 A delayed
Active box
Two way system
M 100 Talk
Wireless
801 040
330 x 510 x 290
13.2 kg (16.4 kg)
851 999 18
6.3 mm jack Ster.
2 x Phono Stereo
70 W
20-20.000 Hz
92 dB
0.5 %
8Ω
230 V / 50 Hz
140 Watt
1.6 A delayed
Active box
Two way system
801 050
M 100 LS Plus
Käyttöohje
Tekniset tiedot -taulukko
Versio 11/03
TLS Produktprogramm
•
•
•
•
•
Mobile Beschallungsanlagen
Computer-Trainings-Systeme
Sprachtrainingssysteme
Übertragungstechnik
Spezialkabel
TLS Product range
•
•
•
•
•
Portable Sound Systems
Computer Training Systems
Language Training Systems
Transmission Technology
Special Cables
Besuchen Sie uns im Internet / Visit our Website:
www.tls-gmbh.com