1
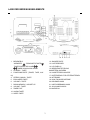
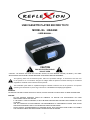
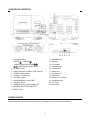
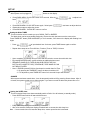
HRA 4060
Stereo-Digital-Radio mit Weckfunktion,
Kassettenlaufwerk. Mit Encoding-Funktion via PC.
BEDIENUNGSANLEITUNG
Bitte lesen Sie sich diese Anleitung gut durch, bevor Sie das Produkt benutzen. Heben Sie diese für den
weiteren Gebrauch gut auf.
1
SICHERHEITSHINWEISE
Das Ausrufezeichen im Dreieck weist den Benutzer auf wichtige Bedienungs- und
Wartungsanweisungen (Service) in diesem Handbuch hin, die unbedingt zu befolgen
sind.
Das Blitzsymbol im Dreieck weist den Benutzer auf "gefährliche Spannungen" an
einigen freiliegenden Bauteilen im Inneren des Gerätes hin.
Um die Gefahr elektrischer Schläge auszuschließen, Gehäuse auf keinen Fall öffnen.
Im Innern des Gerätes befinden sich keine vom Benutzer selbst instandsetzbaren
Teile. Reparaturen dürfen nur von einer autorisierten Fachwerkstatt durchgeführt
werden.
Dieses Gerät ist für 230V~50Hz Netzspannung ausgelegt. Bei längerer
Nichtbenutzung des Geräts ziehen Sie bitte den Stecker aus der Steckdose.
Setzen Sie das Gerät weder Feuchtigkeit noch Regen aus.
Der EIN-Schalter dieses Geräts ist an den Sekundärschaltkreis angeschlossen.
Seine Abschaltung unterbricht die Hauptstromzufuhr des Geräts nicht.
Schalten Sie das System erst dann ein, wenn Sie alle Verbindungen genau geprüft
haben.
Stellen Sie das Gerät so auf, dass immer eine ungestörte Frischluftzufuhr
sichergestellt ist. Stellen Sie das Gerät keinesfalls auf Teppiche und in die Nähe von
Gardinen und bauen Sie es nicht in Bücherregale ein.
Setzen Sie das Gerät weder direkter Sonneneinstrahlung noch Wärmequellen aus.
Beim Einlegen von Batterien achten Sie auf die richtige Polarität.
Bei längerer Nichtbenutzung des Gerätes (mehr als einen Monat) entfernen Sie die
Batterie, um Auslaufen von Säure zu vermeiden.
2
LAGE DER BEDIENUNGSELEMENTE
1. BEDIENFELD:
VORWÄRTS-
12. SNOOZE-TASTE
13. LAUTSPRECHER
14. LCD-DISPLAY
15. BEDIENTASTE FÜR DAS
KASSETTENLAUFWERK
16. KASSETTENFACHKLAPPE
17. BATTERIEFACH FÜR STÜTZBATTERIEN
18. NETZKABEL
19. UKW (FM) WURFANTENNE
20. USB-ANSCHLUSS
21. KOPFHÖRERANSCHLUSS
22. AUX-IN ANSCHLUSS
23. MIKROFON
, RÜCKWÄRTS-TASTE
TUNER SCAN/CLOCK ALARM
TUNER SCAN/CLOCK ALARM
2. STANDBY - TASTE
3. FUNKTIONS-TASTE (TUNER, TAPE, AUX
IN)
4. STEREO / MONO - TASTE
5. EQUILAIZER-TASTE
6. VOLUME + TASTE
7. RADIO MEMORY / UHR-SET UP
8. VOLUME - TASTE
9. TIMER-TAST
10. ALARM-TASTE
11. SLEEP-TASTE
3
HINWEIS:
UM SICH MIT DEM RADIO VERTRAUT ZU MACHEN, LESEN SIE SICH BITTE AUFMERKSAM DIESE
BEDIENUNGSANLEITUNG DURCH, BEVOR SIE DAS GERÄT ZUM ERSTEN MAL IN BETRIEB NEHMEN. PRODUKT
UND FUNKTIONSKENNTNISSE VOR DER INSTALLATION UND NUTZUNG DES GERÄTES HELFEN, PANNEN UND
SCHÄDEN ZU VERMEIDEN.
BEWAHREN SIE DIE BEDIENUNGSANLEITUNG AUF; UM SPÄTER JEDERZEIT NACHSCHLAGEN ZU KÖNNEN.
WARNUNG:
ZUR VERMEIDUNG VON FEUER UND STROMSCHLÄGEN SETZEN SIE DAS GERÄT NIEMALS DIREKTER
FEUCHTIGKEIT ODER REGEN AUS.
GEHÄUSE NICHT ÖFFNEN, ES BEFINDEN SICH KEINE BAUTEILE IM GERÄT, DIE DURCH DEN VERBRAUCHER
INSTANDGESETZT WERDEN KÖNNEN. WENDEN SIE SICH BEI NÖTIGEN REPARATUREN STETS AN EINEN
AUTORISIERTEN KUNDENDIENST.
VORSICHT! STROMSCHLAGGEFAHR! GERÄT NICHT ÖFFNEN!
NUTZUNGSHINWEISE
PACKEN SIE ALLE TEILE VORSICHTIG AUS UND ENTFERNEN SIE DAS SCHUTZMATERIAL.
•
VERBINDEN SIE DAS GERÄT ERST MIT DER STROMVERSORGUNG, NACHDEM SIE DIE NETZSPANNUNG
GEPRÜFT UND ALLE ANSCHLÜSSE HERGESTELLT HABEN.
• BEDECKEN SIE KEINE LÜFTUNGSSCHLITZE UND VERGEWISSERN SIE SICH, DASS UM DAS GERÄT HERUM
EINIGE ZENTIMETER PLATZ FÜR DIE BELÜFTUNG BESTEHEN.
LIEFERUMFANG
-STEREO-DIGITAL-RADIO HRA 4060
-BEDIENUNGSANLEITUNG
ANSCHLUSS
1. STECKEN SIE DEN STECKER DES NETZKABELS (18) IN EINE GEEIGNETE STECKDOSE. STROMVERSORGUNG:
AC 230 V / 50 HZ – NUR WECHSELSTROM
2. DRÜCKEN SIE DIE STANDBY-TASTE (2). ERHÄLT DAS GERÄT STROM ERSCHEINT AUF DEM DISPLAY DER
SCHRIFTZUG “HELLO“. SIE KÖNNEN NUN MIT DER FUNKTIONSWAHL-TASTE (3) DEN GEWÜNSCHTEN MODUS
AUSWÄHLEN UND DAS GERÄT GEMÄSS DER BEDIENUNGSANLEITUNG NUTZEN.
HINWEIS:
IST DAS NETZKABEL BESCHÄDIGT, TRENNEN SIE DAS GERÄT UMGEHEND VON DER STROMVERSORGUNG!
SOLLTE ES ZU STÖRUNGEN AM GERÄT KOMMEN, SO TRENNEN SIE BITTE DAS GERÄT FÜR 30 SEKUNDEN VON
DER STROMVERSORGUNG!
ANTENNE AUSRICHTEN
1.
2.
UKW (FM): FÜR DEN UKW-EMPFANG BEFINDET SICH AUF DER RÜCKSEITE DES GERÄTES EINE UKWWURFANTENNE (19). WICKELN SIE DIE ANTENNE KOMPLETT AB UND BEWEGEN SIE DIESE HIN UND HER, BIS
DER BESTE EMPFANG ERREICHT WIRD.
MW (AM): FÜR DEN MW-EMPFANG WERDEN DIE SIGNALE ÜBER EINE EINGEBAUTE FERRITANTENNE
EMPFANGEN. SIE BRAUCHEN DAS GERÄT NUR AUSZURICHTEN, BIS DER BESTE EMPFANG ERREICHT WIRD.
EINLEGEN DER STÜTZBATTERIEN
1.
2.
ÖFFNEN SIE AUF DER UNTERSEITE DES GERÄTES DAS BATTERIEFACH (17) FÜR DIE STÜTZBATTERIEN.
LEGEN SIE 2 BATTERIEN DES TYPS “AAA“ EIN. ACHTEN SIE HIERBEI AUF DIE RICHTIGE POLUNG. SCHLIESSEN
SIE DAS BATTERIEFACH WIEDER.
HINWEIS:
BITTE ÜBERPRÜFEN SIE VON ZEIT ZU ZEIT DEN ZUSTAND DER BATTERIEN. NACH EINER GEWISSEN ZEIT SIND
DIESE BATTERIEN, OHNE DASS DAS GERÄT VOM NETZ GETRENNT WURDE, VERBRAUCHT.
4
EINSTELLEN DER UHRZEIT
VERSETZEN SIE DAS GERÄT IN DEN STANBY-MODUS. IM DISPLAY BLINKT DIE ANZEIGE “-- -- : -- --“.
1. DRÜCKEN SIE DIE RADIO-MEMORY-TASTE (7) FÜR CA. 3 SEKUNDEN UM IN DEN UHRZEIT-MODUS ZU
GELANGEN. AUF DEM DISPLAY (14) BLINKT DIE ANZEIGE FÜR DAS 12/24 STUNDEN-FORMAT. NUTZEN SIE DIE
TUNER SCAN/CLOCK/ALARM-TASTE AUF DEM BEDIENFELD (1), UM DIE ZEITANZEIGE AUF 12H ODER 24H
EINZUSTELLEN. DRÜCKEN SIE DIE RADIO-MEMORY-TASTE (7) UM DIE EINGABE ZU SPEICHERN.
2. DIE STUNDENANZEIGE “00“ BEGINNT ZU BLINKEN. NUTZEN SIE DIE TUNER SCAN/CLOCK/ALARM-TASTE AUF
DEM BEDIENFELD (1) ZUM EINSTELLEN DER STUNDEN. DRÜCKEN SIE DIE RADIO-MEMORY-TASTE (7) ZUR
SPEICHERUNG.
3. NUN BLINKT DIE MINUTENANZEIGE “00”. BENUTZEN SIE EBENFALLS DIE TUNER SCAN/CLOCK/ALARM-TASTE
AUF DEM BEDIENFELD (1) UM DIE MINUTEN EINZUSTELLEN. DRÜCKEN SIE DIE RADIO-MEMORY-TASTE (7)
ERNEUT, UM DIE EINGESTELLTE UHRZEIT ZU SPEICHERN.
HINWEIS:
WENN SIE DAS GERÄT VOM STROM TRENNEN, OHNE DASS SIE VORHER STÜTZBATTERIEN EINGELEGT HABEN,
MÜSSEN SIE ALLE EINSTELLUNGEN (UHRZEIT, WECKZEIT, ETC.) ERNEUT VORNEHMEN
EINSTELLEN DER ALARM-/WECKZEIT
SIE KÖNNEN DIESES GERÄT ALS WECKER BENUTZEN. HIERBEI KÖNNEN SIE WÄHLEN OB SIE SICH PER RADIO /
KASSETTE ODER SUMMER WECKEN LASSEN WOLLEN.
HINWEIS:
BITTE STELLEN SIE VORHER DIE KORREKTE UHRZEIT EIN!
1.
2.
3.
4.
5.
6.
7.
8.
9.
VERSETZEN SIE DAS GERÄT IN DEN STANBY-MODUS. IM DISPLAY ERSCHEINT DIE UHRZEIT.
DRÜCKEN SIE DIE TIMER-TASTE (9) FÜR CA. 3 SEKUNDEN UM IN DEN WECKZEIT-MODUS ZU GELANGEN. AUF
DEM DISPLAY (14) BLINKT DIE STUNDENANZEIGE “00”. IM OBEREN BEREICH ERSCHEINT DIE ANZEIGE “ON“.
NUTZEN SIE DIE TUNER SCAN/ CLOCK/ALARM-TASTE AUF DEM BEDIENFELD (1), UM DIE STUNDEN
EINZUSTELLEN. DRÜCKEN SIE DIE TIMER-TASTE (9) UM DIE EINGABE ZU SPEICHERN.
NUN BLINKT DIE MINUTENANZEIGE “00”. BENUTZEN SIE EBENFALLS DIE TUNER SCAN/CLOCK ALARM
RÜCKWÄRTS- ODER VORWÄRTS-TASTEN AUF DEM BEDIENFELD (1) UM DIE MINUTEN EINZUSTELLEN.
DRÜCKEN SIE DIE TIMER-TASTE (9) ERNEUT, UM DIE EINGESTELLTE UHRZEIT ZU SPEICHERN.
AUF DEM DISPLAY (14) BLINKT NUN ERNEUT DIE STUNDENANZEIGE “00”. IM OBEREN BEREICH ERSCHEINT
DIE ANZEIGE “OFF“. SIE KÖNNEN NUN DIE DAUER DER WECKSEQUENZ EINSTELLEN. NUTZEN SIE DIE TUNER
SCAN/CLOCK ALARM RÜCKWÄRTS- ODER VORWÄRTS-TASTEN AUF DEM BEDIENFELD (1), UM DIE STUNDEN
EINZUSTELLEN. DRÜCKEN SIE DIE TIMER-TASTE (9) UM DIE EINGABE ZU SPEICHERN.
NUN BLINKT DIE MINUTENANZEIGE “00”. BENUTZEN SIE EBENFALLS DIE TUNING/SKIP/SEARCH RÜCKWÄRTSODER VORWÄRTS-TASTEN AUF DEM BEDIENFELD (1) UM DIE MINUTEN EINZUSTELLEN. DRÜCKEN SIE DIE
TIMER-TASTE (9) ERNEUT, UM DIE EINGESTELLTE ZEIT ZU SPEICHERN.
AUF DEM DISPLAY ERSCHEINT NUN DIE ANZEIGE “TUNER“. SIE KÖNNEN NUN MIT DER TUNER SCAN/CLOCK
ALARM RÜCKWÄRTS- ODER VORWÄRTS-TASTE AUF DEM BEDIENFELD (1) EINSTELLEN, OB SIE PER RADIO,
KASSETTE ODER SUMMER GEWECKT WERDEN MÖCHTEN. DRÜCKEN SIE ZUR SPEICHERUNG DIE TIMERTASTE (9).
STELLEN SIE NUN NOCH MIT HILFE DER TUNER SCAN/CLOCK ALARM RÜCKWÄRTS- ODER VORWÄRTSTASTEN AUF DEM BEDIENFELD (1) DIE LAUTSTÄRKE EIN UND DRÜCKEN SIE DIE TIMER-TASTE (9) UM DEN
VORGANG ZU SPEICHERN. DAS GERÄT DURCHLÄUFT NUN NOCH EINMAL DIE GESPEICHERTEN EINGABEN.
WENN SIE SICH NICHT MIT MUSIK WECKEN LASSEN WOLLEN, SO DRÜCKEN SIE DIE ALARM-TASTE (10) UM
AUF DEN SUMMER UMZUSCHALTEN.
DRÜCKEN SIE DIE TIMER-TASTE (9) EINMAL KURZ UM DEN ALARM EIN- BZW. AUSZUSCHALTEN.
HINWEIS:
SOLLTE DIE AUSSCHALTZEIT GLEICH DER EINSCHALTZEIT SEIN, SO ERSCHEINT EINE FEHLERMELDUNG.
GEBEN SIE DANN BITTE ERNEUT DIE AUSSCHALTZEIT EIN!
SNOOZE-FUNKTION
1.
WURDE DER WECKER AKTIVIERT, SO KÖNNEN SIE MIT DER SNOOZE-TASTE (12) DEN ALARM
5
VORÜBERGEHEND AUSSCHALTEN. NACH 10 MINUTEN SCHALTET SICH DER ALARM WIEDER EIN. UM DEN
ALARM-MODUS ZU BEENDEN, DRÜCKEN SIE DIE TIMER-TASTE (9).
SLEEP-TIMER-FUNKTION
1. DRÜCKEN SIE DIE SLEEP-TASTE (11). AUF DEM DISPLAY (14) ERSCHEINT DIE “SLEEP”-ANZEIGE.
2. DRÜCKEN SIE DIE SLEEP-TASTE (11) MEHRFACH, UM DIE EINSCHLAFZEIT VON 90 > 80 >70….10 MINUTEN
EINZUSTELLEN.
3. NACHDEM DIE EINGESTELLTE ZEIT ABGELAUFEN IST, SCHALTET SICH DAS GERÄT AUTOMATISCH IN DEN
STANDBY-BETRIEB.
4. UM DIE SLEEP-FUNKTION ZU DEAKTIVIEREN, DRÜCKEN SIE DIE SLEEP-TASTE (11) ERNEUT BIS DIE “SLEEP”ANZEIGE AUF DEM DISPLAY (14) ERLISCHT.
WECKALARM AUSSCHALTEN
DRÜCKEN SIE DIE TIMER-TASTE (9) NOCHEINMAL UM DEN ALARM AUSZUSCHALTEN. DAS
WECKALARM-SYMBOL
ERLISCHT.
FUNKTIONSAUSWAHL
MIT DER FUNKTIONS-TASTE KOMMEN SIE ZWISCHEN RADIO, KASSETTE ODER AUX AUSWÄHLEN
RADIOBETRIEB
1. SCHALTEN SIE DAS GERÄT MIT DER STANDBY-TASTE (2) EIN UND WÄHLEN SIE MIT DER
FUNKTIONSWAHL-TASTE (3) “TUNER” AUS.
2. MIT DER TUNER SCAN/CLOCK ALARM RÜCKWÄRTS- ODER VORWÄRTSTASTE WÄHLEN SIE DIE
GEWÜNSCHTE FREQUENZ AUS.
3. MIT DEN LAUTSTÄRKE-TASTEN (6/8) KÖNNEN SIE DIE GEWÜNSCHTE LAUTSTÄRKE EINSTELLEN.
4. WENN SIE DAS UKW (FM) SIGNAL IN STEREO-QUALITÄT EMPFANGEN, ERSCHEINT DAS
STEREOSYMPOL
IM DISPLAY.
SPEICHERN VON RADIOSENDERN
SIE KÖNNEN BIS ZU 30 RADIOSENDER SPEICHERN
1.
2.
3.
4.
5.
FÜHREN SIE WIE OBEN BESCHRIEBEN EINEN SENDERSUCHLAUF DURCH.
WURDE EIN SENDER, DEN SIE SPEICHERN WOLLEN, GEFUNDEN SO DRÜCKEN SIE EINMAL DIE RADIOMEMORY-TASTE (7). AUF DEM DISPLAY ERSCHEINT DIE ANZEIGE “MEMORY“, DARÜBER BLINKT DIE
PROGRAMMPLATZNUMMER.
MIT DEN
RÜCKWÄRTSODER VORWÄRTS-TASTEN IM BEDIENFELD(1) WÄHLEN SIE DEN
PROGRAMMPLATZ AUS.
DRÜCKEN SIE DIE RADIO-MEMORY-TASTE (7) ERNEUT, UM DIE PROGRAMMIERUNG ZU SPEICHERN.
WIEDERHOLEN SIE DIE SCHRITTE 1 BIS 4 UM WEITERE SENDER ZU SPEICHERN.
6
HINWEIS:
WENN SIE DAS GERÄT VOM STROM TRENNEN, OHNE DASS SIE VORHER STÜTZBATTERIEN EINGELEGT HABEN,
MÜSSEN SIE DIE SENDEREINSTELLUNGEN ERNEUT VORNEHMEN.
SIE KÖNNEN JEDERZEIT DIE GESPEICHERTEN SENDER LÖSCHEN ODER DURCH ANDERE ERSETZEN.
EQUILIZER
SIE KÖNNEN ZWISCHEN 5 KLANGOPTIONEN WÄHLEN
KOPFHÖRER-ANSCHLUSS
DAS GERÄT VERFÜGT ÜBER EINE 3,5 MM KLINKEN-KOPFHÖRERBUCHSE (21) AUF DER RÜCKSEITE. VERBINDEN
SIE DEN KOPFHÖRER (8-32 OHM) MIT DEM GERÄT UND REGELN SIE DIE LAUTSTÄRKE ÜBER DIE LAUTSTÄRKETASTEN (6/8). SIND KOPFHÖRER ANGESCHLOSSEN WERDEN DIE LAUTSPRECHER (13) DES GERÄTES
AUTOMATISCH STUMM GESCHALTET.
AUX-IN-ANSCHLUSS
SIE KÖNNEN ANDERE AUDIOGERÄTE AN DAS RADIO ANSCHLIESSEN. NUTZEN SIE HIERFÜR EIN GEEIGNETES
CINCHKABEL (NICHT IM LIEFERUMFANG ENTHALTEN) UND VERBINDEN ES MIT DEM AUX-IN-ANSCHLUSS (22).
BEDIENUNG DES KASSETTENLAUFWERKS
ALLGEMEINE FUNKTIONEN
1.
SCHALTEN SIE DAS GERÄT MIT DER STANDBY-TASTE (2) EIN UND WÄHLEN SIE MIT DER FUNKTIONSWAHLTASTE (3) “TAPE” AUS. NUTZEN SIE DIE BEDIENTASTEN FÜR DAS KASSENLAUFWERK (15) UND GEHEN SIE
ANSCHLIESSEND WIE FOLGT VOR:
EINLEGEN UND HERAUSNEHMEN EINER KASSETTE
1.
2.
3.
4.
DRÜCKEN SIE DIE STOP/AUSWURF-TASTE UM DAS KASSETTENFACH ZU ÖFFNEN.
LEGEN SIE EINE KASSETTE EIN.
SCHLIESSEN SIE DIE KASSETTENFACHKLAPPE (16) VOLLSTÄNDIG, BEVOR SIE DIE WIEDERGABE BEGINNEN.
AM ENDE DER WIEDERGABE DRÜCKEN SIE DIE STOP/AUSWURF-TASTE, UM DAS KASSETTENFACH ZU
ÖFFNEN UND DIE KASSETTE HERAUSZUNEHMEN.
WIEDERGABE EINER KASSETTE
1.
2.
3.
4.
5.
LEGEN SIE IHRE KASSETTE EIN UND SCHLIESSEN SIE DIE KASSETTENFACHKLAPPE (16).
DRÜCKEN SIE DIE PLAY-TASTE, UM DIE WIEDERGABE ZU AKTIVIEREN.
NUTZEN SIE DIE PAUSE-TASTE, UM DIE WIEDERGABE ZU UNTERBRECHEN.
MIT DER RÜCKSPUL- ODER VORSPUL-TASTE, KÖNNEN SIE ZU EINZELNEN TITELN AUF DER KASSETTE
ZURÜCK- ODER VORSPULEN.
MIT DER STOP/AUSWURF-TASTE BEENDEN SIE DIE WIEDERGABE.
AUFNAHME AUF EINE KASSETTE
1.
SCHALTEN SIE DAS GERÄT MIT DER STANDBY-TASTE (2) EIN UND WÄHLEN SIE MIT DER FUNKTIONSWAHLTASTE (3) DIE GEWÜNSCHTE AUFNAHMEQUELLE (TUNER, AUX ODER TAPE).
HINWEIS:
IST ALS AUFNAHMEQUELLE “TAPE“ GEWÄHLT, SO ERFOLGT DIE AUFNAHME ÜBER DAS EINGEBAUTE
MIKROFON.
2. WÄHLEN SIE DEN GEWÜNSCHTEN SENDER ODER DEN/DIE GEWÜNSCHTEN TITEL AUS.
3. LEGEN SIE EINE KASSETTE EIN UND SCHLIESSEN SIE DIE KASSETTENFACHKLAPPE (16).
4. DRÜCKEN SIE GLEICHZEITIG DIE RECORD- UND DIE PLAY-TASTE. DIE AUFNAHME BEGINNT.
5. UM DIE AUFNAHME ZU BEENDEN, DRÜCKEN SIE DIE STOP-TASTE.
HINWEIS:
WÄHREND DES VORSPULENS DER KASSETTE, IST KEINE WIEDERGABE MÖGLICH UND ES KÖNNEN
LAUFGERÄUSCHE DURCH DAS SPULEN ZU HÖREN SEIN.
7
-
ES WIRD EMPFOHLEN, DIE KASSETTE NACH JEDER NUTZUNG UND INSBESONDERE BEI LÄNGERER
NICHTBENUTZUNG DES KASSETTENLAUFWERKS, ZU ENTNEHMEN UND NICHT IM GERÄT ZU LASSEN.
BEDIENTASTEN DES KASSETTENDECKS
1. RECORD : AUFNAHME-TASTE
2. PLAY : WIEDERGABE-TASTE
3. REWIND : RÜCKSPUL-TASTE
4. F.FWD : VORSPUL-TASTE
5. STOP/ EJECT: STOP/AUSWURF-TASTE
6. PAUSE : PAUSE-TASTE
8
Kurzanleitung AUDACITY (hier als
Installation unter Windows dargestellt.)
Installation der AUDACITY Software
Installieren Sie die AUDACITY Software auf
Ihrem Computer (nutzen Sie die beiliegende
CD):
- Legen Sie die CD in Ihr CD- bzw DVDLaufwerk ein.
- Öffnen Sie auf dem Desktop den “Arbeitsplatz”.
- Öffnen Sie mit einem Doppelklick auf das
Laufwerk den Inhalt der CD.
- Mit einem weiteren Doppelklick öffnen Sie
“Audacity Set Up”. Folgen Sie nun den
Anweisungen zur Installation des Programms.
HINWEIS: AUDACITY ist eine FreewareSoftware! Beachten Sie bitte die Bestimmungen
der GNU GPL unter
www.Audacity.sourceforge.net. Hier finden Sie
auch Updates oder Neuerungen!
Installation der USB Treiber (falls nötig)
- Vergewissern Sie sich, dass die Software CD
im Laufwerk eingelegt ist.
- Nutzen Sie das beiliegende USB-Kabel und
schliessen Sie das Gerät an Ihrem Computer
an.
- Folgen Sie den Anweisungen zur Installation
der USB-Treiber.
AUDACITY starten
1. Starten Sie mit einem Doppelklick auf das
AUDACITY-Icon auf dem Desktop das
Programm. Folgende Benutzeroberfläche (Bild 1)
wird auf dem Bildschirm angezeigt:
Einstellungen
(Bild 2)
AUDACITY Einstellungen
(Bild 3)
4. Regeln Sie die Lautstärke für Ein- und
Ausgabe
(Bild 4)
(Bild 1)
2. Mit den Bedienbutton, Wiedergabe,
Aufnahme, Pause und Stop im oberen Bereich
des Bildschirms steuern Sie Ihre
Aufzeichnungen. Zur Speicherung, Exportierung
und Bearbeitung der Musiktitel nutzen Sie die
Menüpunkte.
3. Wählen Sie den Menüpunkt “Bearbeiten” und
öffnen Sie den Unterpunkt “Einstellungen” (Bild
2). Nehmen Sie hier die nötigen Einstellungen
vor, um die Software zu nutzen. WICHTIG:
Stellen Sie im Unterpunkt “Audio E/A“ das
richtige Eingabe- und Ausgabegerät ein! (Bild 3)
Eventuell ist ein Neustart erforderlich.
5. Starten Sie die Wiedergabe auf dem
angeschlossenen Gerät. Drücken Sie den
Aufnahme-Button ( ). In der Anzeige wird nun
die Aufnahme für den rechten und linken Kanal
dargestellt.(Bild 5)
(Bild 5)
9
Werden während der Aufnahme keine
flukturierenden Wellen in der Anzeige dargestellt,
regeln und erhöhen Sie bitte die
Eingangslautstärke Ihres Computers wie folgt:
Audioeigenschaften (Bild 9)
5.1. Klicken Sie unten links in der Taskleiste auf
“Start”. Wählen Sie “Programme”, “Zubehör”,
“Unterhaltungsmedien” , “Audiorecorder” (Bild 6).
(Bild 6)
5.2. Öffnen Sie den “Sound-Audiorecorder“
(Bild 7)
(Bild 7)
5.3. Wählen Sie “Bearbeiten“ und den
Unterpunkt “Audioeigenschaften“ (Bild 8):
(Bild 9)
5.4. Wählen Sie unter dem Punkt
“Soundaufnahme“,“Lautstärke” aus.
Regeln Sie nun die Eingangslautstärke, bis die
Anzeige (Bild 5) als flukturierende Welle
dargestellt wird.
6. Bedienbutton (Bild 10):
6.1. Nutzen Sie den -Button um
zurückzuspulen;
6.2. Nutzen Sie den -Button um vorzuspulen;
6.3. Nutzen Sie den -Button zur Wiedergabe;
6.4. Nutzen Sie den -Button um die Aufnahme
zu unterbrechen;
6.5. Nutzen Sie den -Button um die Aufnahme
zu beenden.
(Bild 10)
(Bild 8)
7. Exportieren und Speichern der Aufnahme als
WAV-, MP3- oder Ogg vorbis-Datei:
7.1. Haben Sie die Aufnahme beendet, sollten
Sie die Datei speichern.
7.2. Öffnen Sie den Menüpunkt “Datei“ und
wählen Sie aus, ob Sie die Datei in das WAV-,
MP3- oder OGG-Format exportieren möchten.
7.3. Geben Sie nun den Dateinamen an und
wählen Sie einen Speicherort aus.
HINWEIS: AUDACITY ist nicht in der Lage MP3Dateien direkt zu erstellen. Sie benötigen hierfür
einen MP3 Encoder. Empfohlen wird der LAME
MP3 Encoder. Dieser ist ebenfalls als Freeware
im Internet erhältlich.
10
TECHNISCHE DATEN
STROMVERSORGUNG:
NETZBETRIEB (AC)
STROMVERBRAUCH
STANDBY
STÜTZBATTERIE
230V ~ 50Hz
25 W
ca. 1.8 W
2 x AAA (UM-2) 1.5V (NICHT IM LIEFERUMFANG)
FREQUENZBEREICH:
UKW (FM):
MUSIKLEISTUNG:
87.5 – 108 MHz
2 x 1.5 W
ABMESSUNGEN
GEWICHT
(B) x (T) x (H) 250 x 205 x 95MM
1,6 KG
AUF GRUND STÄNDIGER VERBESSERUNGEN BLEIBT DIE ÄNDERUNG DER TECHNISCHEN DATEN UND DES
DESIGNS OHNE VORANKÜNDIGUNG VORBEHALTEN.
! ACHTUNG !
Gefahr eines elektrischen Schlags
! GERÄT NICHT ÖFFNEN !
ACHTUNG:
UM DIE GEFAHR EINES ELEKTRISCHEN SCHLAGS AUSZUSCHLIEßEN, ÖFFNEN
SIE NIEMALS DAS GEHÄUSE. ES BEFINDEN SICH KEINE BEDIENELEMENTE IM
INNEREN DES GERÄTES. ÜBERLASSEN SIE WARTUNGS- UND
REPARATURARBEITEN IMMER QUALIFIZIERTEM FACHPERSONAL.
ENTSORGUNG ELEKTRISCHER UND ELEKTRONISCHER GERÄTE
DIESES PRODUKT MUSS AM ENDE SEINER GEBRAUCHSFÄHIGKEIT ORDNUNGSGEMÄß ENTSORGT WERDEN,
EINE ENTSORGUNG MIT DEM HAUSMÜLL IST NICHT STATTHAFT.
DIESES PRODUKT MUSS BEI DEN ENTSPRECHENDEN RECYCLING-SAMMELSTELLEN ODER DEM
FACHHÄNDLER ABGEGEBEN WERDEN, VON DEM EIN GLEICHARTIGES PRODUKT ERNEUT
ERWORBEN WIRD. DAS SYMBOL BESTÄTIGT, DASS DIESES PRODUKT DEN BESTIMMUNGEN DER
UMWELT-RICHTLINIEN (2002/95/EC, 2002/96/EC, 2003/108/EC) ENTSPRICHT UND ENTSPRECHEND
ORDNUNGSGEMÄß ENTSORGT WERDEN MUSS. NÄHERE EINZELHEITEN ZU DEN RECYCLINGSAMMELSTELLEN ERFAHREN SIE VON IHREN ÖRTLICHEN BEHÖRDEN. ZUWIDERHANDLUNGEN
WERDEN ENTSPRECHEND VERFOLGT.
BATTERIE-ENTSORGUNGSHINWEIS:
BATTERIEN UND AKKUS DÜRFEN NICHT IN DEN HAUSMÜLL!
JEDER VERBRAUCHER IST GESETZLICH VERPFLICHTET, ALLE BATTERIEN UND AKKUS, EGAL OB
SIE SCHADSTOFFE* ENTHALTEN ODER NICHT, BEI EINER SAMMELSTELLE SEINER
GEMEINDE/SEINES STADTTEILS ODER IM HANDEL ABZUGEBEN, DAMIT SIE EINER
UMWELTSCHONENDEN ENTSORGUNG ZUGEFÜHRT WERDEN KÖNNEN.
BATTERIEN UND AKKUS BITTE NUR IM
ENTLADENEN ZUSTAND ABGEBEN!
*) GEKENNZEICHNET MIT :
CD = CADMIUM,
HG = QUECKSILBER,
PB = BLEI
11
HRA 4060
GARANTIE
Die Firma
UltraMedia GmbH & Co. Handels KG
Steinstr. 5
D-21357 Bardowick
Tel.: +49/ (0) 4131/9239-20, Fax:+49/ (0) 4131/9239-55
(Mo.-Do.: 08:00-17:00, Fr.: 08:00-14:00)
www.ultramedia.de
[email protected]
übernimmt für dieses Produkt eine Garantie für die Dauer von 24 Monaten ab Kaufdatum.
Ausgeschlossen von der Garantie sind Verschleissteile, ästhetische Teile, Produkte mit
beschädigtem Garantiesiegel oder nicht lesbarer Seriennummer, sowie die Schäden durch
unsachgemässe Bedienung und/oder unsachgemässer Gebrauch, durch den Gebrauch von nicht
originalen Ersatzteilen, ungeeigneter Verpackung oder aus irgendeinem Grund verursacht
werden, die den “Reflexion“ Produkten nicht zuzuschreiben sind.
Beachten Sie unbedingt die Warnhinweise in der Bedienungsanleitung.
Im Garantiefall senden Sie das System in der Originalverpackung, mit komplettem Zubehör und
mit Kopie Ihres Kaufbeleges frei Haus (Absender übernimmt Fracht) an oben angegebene
Adresse. Für Transportschäden von Geräten, die nicht in der Originalverpackung verschickt
werden, übernimmt UltraMedia keine Haftung ! UltraMedia sendet frei Haus zurück. Vor einem
eventuellen Versand des Systems setzen Sie sich bitte mit uns unter der oben angegebenen
Adresse, Tel.-, Faxnummer oder Mailadresse in Verbindung.
Für Rückfragen stehen wir gerne zur Verfügung !
12
USB CASSETTE PLAYER RECORD TO PC
MODEL NO. : HRA4060
- USER MANUAL -
CAUTION
RISK OF ELECTRIC SHOCK
DO NOT OPEN
CAUTION : TO REDUCE THE RISK OF ELECTRIC SHOCK, DO NOT REMOVE COVER ( OR BACK ). NO USER
SERVICEABLE PARTS INSIDE. REFER SERVICING TO QUALIFIED SERVICE PERSONNEL.
The lightning flash with arrowhead symbol, within an equilateral triangle, is intended to alert the user
to the presence of un-insulated “dangerous voltage” within the product’s enclosure that may be of sufficient
magnitude to constitute a risk of electric shock to persons.
The exclamation point within an equilateral triangle is intended to alert the user to the presence of important
operating and maintenance (servicing) instructions in the literature accompanying the appliance.
WARNING:
TO REDUCE THE RISK OF FIRE OR ELECTIC SHOCK, DO NOT EXPOSE THIS APPLIANCE TO RAIN OR MOISTURE.
CAUTION
DO NOT REMOVE EXTERNAL CASES OR CABINETS TO EXPOSE THE ELECTRONICS. NO USER
SERVICEABLE PARTS ARE WITHIN!
IF THE SUPPLY CORD IS DAMAGED, IT MUST BE REPLACED BEFORE FURTHER USE IN ORDER TO AVOID
A HAZARD.
USE OF CONTROLS OR ADJUSTMENTS OR PERFORMANCE OF PROCEDURES OTHER THAN THOSE
SPECIFIED HEREIN MAY RESULT IN HAZARDOUS RADIATION EXPOSURE.
DO NOT INSTALL THIS EQUIPMENT IN A CONFINED SPACE, SUCH AS A BOOK CASE OR BUILT IN CABINET.
THE APPARATUS MUST NOT BE EXPOSED TO DRIPPING OR SPLASHING.
1
LOCATION OF CONTROLS
12. SNOOZE button
13. Speakers
14. LCD display
15. Cassette knobs
16. Cassette door
17. Battery door
18. AC power cord
19. FM antenna
20. USB port (to computer)
21. Headphones jack
22. Aux in jack
23. Microphone
1. Control Pad button:
PRESET
, PRESET
2.
3.
4.
5.
6.
7.
8.
9.
10.
11.
TUNER SCAN/CLOCK ALARM
TUNER SCAN/CLOCK ALARM
STANDBY button
FUNCTION button (TUNER, TAPE, AUX IN)
STEREO / MONO button
EQ button – Equalizer set
VOLUME + button
RADIO MEMORY / CLOCK SET
VOLUME - button
TIMER SET button (FOR ALARM SET)
BUZZER button (FOR ALARM SET)
SLEEP button
POWER SOURCE
This Unit is designed to operate on normal 230V ~ 50Hz household power source. Do not attempt to operate the
system using other power sources. This may result in damage to the unit and void your warranty.
2
SET UP
☆ Setting the Time
When power cord is plugged in,
flashes on the display.
•
Press RADIO MEM./ CLOCK SET button for 3 seconds, follow by
format (12 or 24 hours)
•
•
•
Press RADIO MEM./ CLOCK SET button again , follow by
Repeat above steps to adjust the minute.
Press RADIO MEM./ CLOCK SET button to confirm.
to adjust hour
button to adjust the hour
☆ Setting the Wake TIMER
This unit includes a timer to wake you up to RADIO, TAPE or BUZZER.
The Wake timer can be set at standby mode only. Ensure the clock has been set to the correct time.
Press TIMER SET button (FOR ALARM SET) on for 3 seconds, “ON” show on the display with flashing hour
digits
*
Press
*
Repeat above steps to set Timer Off-time, Function (Tuner or TAPE) & Volume.
*
*
*
Upon completion, all settings will cyclic once and then switch to current time with clock icon.
By pressing BUZZER button, system switches to traditional alarm sound.
REMARKS: WAKE UP BY TAPE (SHOULD BE PRESS THE PALY
BUTTON OF CASSETTE TAPE), OTHERWISE, TAPE WAKE UP CAN
NOT BE ACTIVATED.
Note:1. ERROR reported if Off-time found equal or smaller than On-Time.
2. By pressing the TIMER SET button, the alarm is switched off.
3. For adjustment, press TIMER SET button for 3 seconds & input new selection.
*
to input desired hour & minutes, press TIMER button again to confirm.
SNOOZE
When system activates at wake timer, it can be temporarily switched off by pressing Snooze button. After 10
minutes, the system reminds you to wake up again. If you want to cancel the alarm set please refer to P.4
☆ Setting the SLEEP timer
This unit includes Sleep timer that automatically switch off after 10 to 90 minutes (to standby mode).
* Press SLEEP button which will start with 90 minutes.
* Every additional pressing reduces timer by 10 minutes.
* After a few seconds, Sleep time display will switch back to current time with sleep icon
Note: If current music source is less than Sleep time, ensure repeat function is activated.
3
Cancel Alarm set
z Press TIMER SET button (FOR ALARM SET) again can be cancel Alarm setting (
icon disappear).
Battery Backup
When there is power failure, all settings will be lost. To safeguard, this system has a battery backup (2xAAA
batteries excluded). Suggest check function regularly by unplugging the power cord.
BASIC OPERATION
☆ FUNCTION selector (TUNER, TAPE, AUX)
To select desired sound source.
☆ RADIO OPERATION
* Press function selector to “TUNER”
*
* Press
key to choose desired tuning station.
*
* Adjust Volume to obtain desired listening level.
* When selected FM station is received in stereo quality, stereo indication (
*
*
) lights up on the display
30 preset stations available: To store a station, press RADIO MEM./ CLOCK SET button, MEMORY lights
up & memory no. flashes, press [RADIO MEM./ CLOCK SET ] button again to confirm.
Listen to stored station, press [PRESET
] or [PRESET
] button.
NOTE: To achieve best reception, always extend fully FM antenna wire (on rear panel).
☆ EQ button
5 options of Equalizer: Classic, Rock, Pop, Jazz & Bass.
☆ HEADPHONE JACK
Be sure that your headphones have a 3.5mm stereo plug with an impedance of 8-32 Ohms. When
headphones are connected, the speakers will automatically mute.
☆ AUX INPUT JACK
Press function selector to “ AUX”
z
This system includes an AUX IN jack and allows sound emission of external audio equipments.
z
Connect audio output or headphones jack of external audio equipments to AUX IN jack on rear panel
of this system.
4
CASSETTE DECK BASIC OPERATION
Before operation, make sure Function Selector is in the Tape mode.
☆ PLAYBACK
• Set Function Selector to Tape mode.
• Press Eject button to open the cassette door.
• Place the cassette tape into Deck, with the side to be played facing the window.
• Close cassette door and Press Play button to start playback.
• Playback stops when the tape reaches the end.
• Press Stop button if you want to stop playback before the end of the tape.
☆ PLAY DECK CONTROLS
1. RECORD : to start recording to cassette tape.
2. PLAY : to start cassette playback.
3. REWIND : to fast rewind the cassette tape
4. F.FWD : to fast forward the cassette tape
5. STOP/ EJECT: to stop or eject cassette tape
6. PAUSE : to interrupt recording or playback
☆ ENCODING (VIA USB CABLE TO COMPUTER)
Running the Software
1. Double-click the Audacity software showing red
and orange “balls” wearing blue headphone, and
go to the following interface:
Installing Audacity Software
Install the Audacity software in your Computer
(supplied disc matches with the device):
- Insert the Audacity disc into CD drive of your
computer.
- Click “My Computer” on the desktop.
- Double-click “CD drive” to view contents of the
Audacity disc.
- Double-click “Audacity Set Up” & follow the
instruction to install the software.
Install USB Driver
- Make sure the Audacity disc remains in your
CD drive.
- Use supplied USB cable to connect the device
to your computer.
- Follow screen instruction to install the USB
driver.
2. Use the attribute controls button at top of the
screen, go to beginning, Play, Record, Pause,
Stop and go to end. Use the File, Edit, View,
Project, Generate, Effect and Analyze menu to
Save, Export and edit the music.
3. Select preference at bottom of the menu which
will open up Audacity Preference. You can set
the Audio I/O, Quality, File Formats,
Spectrograms, Directories, Interface, Keyboard
and Mouse in the Audacity preference Interface.
5
“Entertainment” , “Sound Recorder” and go
into the sound record interface.
Audacity Preference
(ii) Sound Recorder Interface
4. Adjust output and input volume.
(iii) Select Edit and click “Audio Properties” in
bottom of the menu to go to “Audio
Properties” interface:
5.
) to record the disc, left
Select record button (
and right tracks will show on the interface;
If no fluctuant wave on the interface during
recording, please adjust the line in volume as
follows:
(i)
Click “start” in left corner of the computer,
Select “Programs” , “Accessories”,
6
Audio properties Interface
6. Click the (
) button to skip to start;
7. Click the (
) button to skip to end;
8. Click the (
) button to play;
9. Click the (
) button to pause the record play;
10. Click the (
) button to stop the Record.
11. Export music files to WAV, MP3, Ogg format.
-
(iv) Select sound recording volume and go to
“Recording Control” interface:
-
Adjust the line in volume to most or middle, the
fluctuant wave will show on the interface when
recording.
SPECIFICATION
Power Supply
Power Consumption
Radio Section
: AC 230V ~ 50Hz
: 25W
: FM 87.5 – 108 MHz (FM ONLY)
7
Once you finished the record, you should save
your music to the computer.
Click File menu and move down to Export as
WAV format, MP3 format or Ogg format.
Click anyone format to save the music, and you
will ask for the file name of the music recorded.
Note: Audacity does not export MP3 files directly,
you should download the LAME MP3 encoder,
which named lame_enc.dll.