1
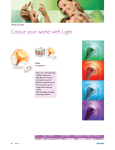
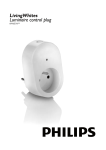
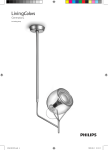
LivingColors
Generation2
Led Lamp
MA0
000
015
Last update: 08/07/09
AA
A
A
AA
A
AA
b
0
c
l
a
A
Content
EN................ 2
ES............... 18
HU............. 34
SL............... 51
FR................. 4
PT............... 20
LV............... 36
MK............. 53
DU............... 6
IT................ 22
LT............... 38
BG.............. 56
NL................ 8
EL............... 24
ET............... 40
HR.............. 58
NO............ 10
TR.............. 26
RU.............. 42
SR............... 60
DA.............. 12
PL............... 28
UK.............. 45
AR..............62
SV............... 14
CS.............. 30
KK.............. 47
FI................ 16
SK............... 32
RO.............. 49
1
0
B
e
f
l
d
g
5sec
60min
7
EN
Problem
Instruction for Use
LivingColors is not providing light
Thank you for buying Philips LivingColors!
LivingColors has been especially designed to create your own ambiance
at home, through colour and light.
If using LivingColors for the first time, please read these instructions
carefully and save them for future reference. By following our guidelines,
you will enjoy the full functionality of Philips LivingColors.
Important:
-Carefully remove the parts from the packaging.
-Check whether all parts are available.
Getting started:
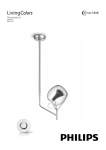
1. Open the battery compartment of the remote control by sliding
the button at the back. Insert 3 AAA batteries (+ and – as
indicated) (drawing a).
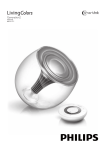
2. Place LivingColors at a selected location on a flat and stable surface.
Direct LivingColors towards the wall (the optimal distance is
50 cm), insert the connection plug into the lamp (drawing b), and
then plug it into the wall socket. LivingColors will show a short
introduction to the colour possibilities.
3. Switch on LivingColors by briefly pressing the "I" (on) on the on/off
button placed on the remote control (drawing c).
4. Create your own ambiance by:
-Touching the desired colour on the colour wheel.You can move
your finger over the colour wheel to refine the colour (drawing d)
-Changing the colour saturation (adding more white to the current
colour). Press on ( ) for a deep colour or on ( ) for a more
pastel colour (drawing e). Ultimately you will reach the white
colour.
-Dimming. Increase ( ) or decrease ( ) the light intensity via the
dimming buttons (drawing f).
5. Switch off LivingColors by pressing the "0" (off) button briefly.
LivingColors will remember your last colour setting for your next
usage (drawing c).
Do more with LivingColors:
1.Automatic colour-changing mode
Sweep your finger around the colour wheel (one full circle) and
briefly press on "I" ("On"); LivingColors will then turn into the
automatic colour-changing mode: the lamp will start changing
colours automatically.
You can adjust the speed with which colours change. Speed can
be adjusted clockwise, from fast (dark blue colour on the colour
wheel) to slow (purple) (drawing g).You can tap anywhere on the
colour wheel. While in the automatic colour changing mode, you
can also adjust the saturation and brightness of the colours.
the Philips logo on the top of the lamp and press on "I" ("On").
LivingColors will flash 3 times, and then quickly flash green.You can
release the button now. The linked lamps will turn to the last setting
of the remote control.
- Repeat this operation for each LivingColors lamp that you want to
link with the others.
- To use the LivingColors separately again, link it to another remote
control in the same way as described above.
Remote control is not working
See the following section
Remote control is not working
Check the batteries in the remote control. The batteries should
be correctly placed (+ and -) and should be charged. If the
remote control is still not working, try replacing the batteries.
Remote control is not linked to
the lamp
Link the remote to the LivingColors lamp by following the
procedure under “2. Linking LivingColors lamps”
Heavy traffic on a wireless data
network (e.g. wireless router)
Move LivingColors away from the wireless access point
“I” button wasn’t pressed long
enough
Redo the procedure under “2. Linking LivingColors lamps”. If
it was linked successfully, the lamp will give 1 green flash; if the
linking was unsuccessful it will revert to its previous settings
immediately without flashing green.
The LivingColors lamps belong to
different versions
Check if the lamps you cannot link both have a “G2” sign on the
back of the remote control and at the bottom of the lamp itself.
If one of the lamps does not have it, it cannot be linked with
another lamp that does (but it can still be linked with other
lamps that do not have the G2 sign).
I cannot start the automatic colour
changing mode
The sweep movement was not
correct
If the colour changes to another (static) colour, but no colour
loop starts, then your sweep movement was not correct; please
try again
LivingColors is still not working to
the correct standards
Other problem
Contact the Philips Lighting Contact centre (see Warranty and
Service)
I cannot link multiple LivingColors
lamps
3.Compatibility with timers
You can use LivingColors with a timer (not included). When
switched on with a timer, the LivingColors will show your last
setting (static colour or automatic colour-changing mode)
Cleaning and maintenance:
Remove the plug from the wall socket.
To avoid scratching, the LivingColors lamp, remote control and
adapter should only be cleaned with a soft dry cloth.
Do not use cleaning agents.
Plug specification:
Safety instructions:
Keep the plug and LivingColors away from liquids and humidity.
-LivingColors is for indoor use only. Do not use in wet locations, e.g.
bathrooms or outdoors.
-LivingColors is not a toy designed to be played with by children.
-Do not place on hot surfaces
-For safety reasons and under the terms of the warranty, the
LivingColors and plug must not be opened.
-Only use the adapter supplied: using a different adapter can damage
your LivingColors.
Environment:
If you need to discard the appliance, dispose of it in accordance with
instructions from the local authority. Remove the batteries when you
discard the remote control. Do not throw the batteries away with
normal household waste. They must be handed in at an official collection
point or at a Philips Dealer, both of which will dispose of the batteries in
an environmentally friendly way.
To switch back to static colour mode, sweep around the
colour wheel again, then press "0". Alternatively, you can switch
LivingColors off "0" and on "I" again. (drawing c)
AC adapter
Model: Input:
Output:
EADP-10EB C (EU type)
EADP-10EB D (UK type + Singapore)
EADP-10EB E (Australia type)
220 - 240 V – 0.3A
50 Hz
18.5 V 0.83 A
Remote Control:
Batteries:
Powerlife Alkaline AAA LR03, 1.5 V.
3 x Philips
Wireless specification:
Wireless RF mode frequency band:
2405–2475 MHz
Wireless communications protocol:
IEEE 802.15.4)
Operating channels:
channels 11,
15, 20 or 25
Environmental specification:
Temperature (operation):
0...40 °C
Temperature (Storage):
Relative humidity:
condensing
1.You can operate multiple LivingColors with one remote control.
The LivingColors lamps will then project the same colour (or
will change colours simultaneously). In order to link several
LivingColors to one remote control, bring the remote close to
Check that the plug is correctly placed in the wall socket
Make sure that all LivingColors connected to this remote are
on; otherwise they will not respond after this action.
Press simultaneously on “0” and ( ) for at least 5 seconds
to switch to another channel (all LivingColors will flash green
to confirm).You can repeat this procedure up to 3 times,
preferably from another position.
Disposal of your old product
Power consumption of the luminaire: up to 15.4 W
2.Linking LivingColors lamps
Solution
Check the connections of the cord to the lamp
LivingColors does not respond to
the remote control
2. It is also possible to control one LivingColors lamp with several
remote controls. In order to do so, first reset one of the remotes
by pressing and holding the "0" and the ( ) buttons simultaneously
for 5 seconds. Then hold two remote controls close to each other
and press the "I" button on both for 7 seconds.You can now link
the new remote control to the LivingColors in the same way as
described above.
- LivingColors that are linked to two (or more) remote controls can
be controlled by either remote control.
- To unlink a remote control from a LivingColors, hold the remote
control close to the LivingColors and press "0" for three seconds.
The LivingColors will flash 3 times. Hold the "0" button a little
longer and it will slowly fade to off. The remote control and the
LivingColors are now unlinked.
Possible cause
The lamp is not plugged in
correctly
-25...60 °C
5...95 % non
Your product is designed and manufactured with high
quality materials and components, which can be recycled
and reused. When this crossed-out wheeled bin symbol is
attached to a product it means the product is covered by
the European Directive 2002/96/EC
Please inform yourself about the local separate collection
system for electrical and electronic products. Please act
according to your local rules and do not dispose of your old
products with your normal household waste. The correct
disposal of your old product will help prevent potential
negative consequences for the environment and human
health.
Warranty:
Philips' two-year warranty is valid if the product is used in accordance
with the instructions and for its intended purpose. Claims will only be
accepted on submission of the original proof of purchase (invoice, sales
slip or receipt) stating the purchase date, the name of the dealer and a
description of the product.
The Philips warranty lapses if:
- Anything has been changed, crossed out, deleted or rendered
illegible on the purchase docket or product description.
- Failures caused by damage, faulty connections or abuse.
- A defect is caused by extreme circumstances not inherent to the
LivingColors, for example, lightning, flooding, fire, incorrect use or
negligence.
- The LivingColors has been opened or disassembled.
Warranty and service:
For your information and in case of any problems, please visit the Philips
website at www.philips.com/livingcolors or contact Philips Lighting
Contact Centre free of charge in U.S.: 00800-PHILIPSL or
00800-74454775
2
3
FR
Merci d'avoir acheté le LivingColors Philips.
LivingColors a été spécialement conçu pour vous permettre de créer,
chez vous, une ambiance de lumière et de couleurs.
Avant la première utilisation de LivingColors, veuillez lire ces
instructions attentivement et les conserver pour une consultation
ultérieure. Suivez les instructions pour profiter au maximum des
fonctionnalités du LivingColors de Philips.
Important :
-Retirez avec précaution les éléments de leur emballage.
-Assurez-vous que tous les éléments sont bien présents.
Mise en route :
1.Ouvrez le compartiment à piles de la télécommande en faisant
glisser le bouton situé à l'arrière. Insérez 3 piles AAA (en respectant
la polarité + et - comme indiqué) (figure a).
2.Placez LivingColors sur une surface plane et stable.
Orientez LivingColors vers le mur (distance optimale : 50 cm),
insérez le connecteur dans la lampe (figure b), puis branchez
LivingColors dans la prise secteur. LivingColors procède à une
brève démonstration des possibilités de couleurs.
3.Appuyez brièvement sur « I » (marche) sur le bouton marche/arrêt
de la télécommande pour allumer LivingColors (figure c).
4.Créez votre propre ambiance de la manière suivante :
-Sélectionnez la couleur désirée d'un simple contact avec la roue des
couleurs. Déplacez votre doigt sur la roue pour affiner la couleur
(figure d).
-Modifiez la saturation des couleurs (ajoutez plus de blanc à la
couleur actuelle). Appuyez sur ( ) pour obtenir des couleurs
intenses ou sur ( ) pour des couleurs pastel (figure e).Vous finirez
par atteindre la couleur blanche.
-Créez des gradations. Augmentez ( ) ou diminuez ( ) l'intensité
de la lumière à l'aide des boutons de gradation (figure f).
5.Appuyez brièvement sur « 0 » (arrêt) pour éteindre LivingColors.
LivingColors gardera en mémoire le dernier réglage de couleur
sélectionné pour la prochaine utilisation. (figure c).
Encore plus de possibilités avec LivingColors :
1.Mode de changement de couleur automatique
Déplacez votre doigt autour de la roue des couleurs (effectuez
un tour complet) et appuyez brièvement sur « I » (marche).
LivingColors passe alors en mode de changement de
couleur automatique : la lampe se met à changer de couleur
automatiquement.
Vous pouvez régler la vitesse de changement des couleurs.Vous
pouvez régler la vitesse dans le sens des aiguilles d'une montre, de
la plus rapide (bleu foncé sur la roue des couleurs) à la plus lente
(violet) (figure g).Vous pouvez appuyer n'importe où sur la roue des
couleurs. En mode de changement de couleur automatique, vous
pouvez également régler la saturation et la luminosité des couleurs.
Pour revenir au mode de couleur statique, sélectionnez une couleur
sur la roue, puis appuyez sur « 0 ».Vous pouvez également éteindre
« 0 » et rallumer « I » LivingColors (figure c).
2.
Problème
Instructions d’utilisation de LivingColors
Connexion des lampes LivingColors
LivingColors ne s’allume pas.
1.Vous pouvez contrôler plusieurs LivingColors avec une seule
télécommande. Les lampes LivingColors diffuseront alors la
même couleur (ou changeront de couleur simultanément). Pour
connecter plusieurs LivingColors à une seule télécommande, placez
la télécommande à proximité du logo Philips situé au-dessus de la
lampe et appuyez sur « I » (marche). LivingColors clignote 3 fois,
puis se met à clignoter en vert.Vous pouvez maintenant relâcher le
bouton. Les lampes, à présent connectées entre elles, appliqueront le
dernier réglage sélectionné à l'aide de la télécommande.
- Répétez cette procédure pour toutes les lampes LivingColors que
vous voulez connecter ensemble.
- Pour utiliser de nouveau les lampes LivingColors séparément,
connectez une lampe LivingColors à une autre télécommande en
suivant les instructions décrites précédemment.
La télécommande ne
fonctionne pas.
La télécommande ne
fonctionne pas.
Voir la section suivante.
La télécommande n’est
pas connectée à la lampe.
Connectez la télécommande à la lampe LivingColors en suivant la procédure
décrite à la section « 2. Connexion des lampes LivingColors ».
Fort trafic sur un réseau
de données sans fil (un
routeur sans fil par
exemple).
Éloignez LivingColors du point d’accès sans fil.
Vous n’avez pas maintenu
le bouton « I » assez
longtemps.
Recommencez la procédure décrite à la section « 2. Connexion des lampes
LivingColors ». Si la connexion est réussie, la lampe clignote une fois en vert.
Si la connexion a échoué, elle reviendra immédiatement au réglage précédent
sans clignoter en vert.
Les versions des lampes
LivingColors sont
différentes.
Vérifiez que le signe « G2 » est inscrit au bas des lampes que vous n’arrivez
pas à connecter, et derrière leur télécommande respective. Si l’une des
lampes ne présente pas ce signe, vous ne pouvez pas la connecter avec
l’autre.Vous pouvez néanmoins la connecter avec les autres lampes qui ne
présentent pas le signe G2.
Je n’arrive pas à lancer le mode
de changement de couleur
automatique.
Vous n’avez pas effectué
le bon mouvement sur la
roue des couleurs.
Si la couleur passe à une autre couleur (statique) mais que le cycle de
changement de couleurs ne se lance pas, cela signifie que vous n’avez pas
effectué le bon mouvement sur la roue des couleurs.Veuillez réessayer.
LivingColors n’atteint pas le niveau
de performances requis.
Autre problème.
Contactez le service client de Philips Lighting (voir Garantie et service).
Je n’arrive pas à connecter
plusieurs lampes LivingColors
ensemble.
3.Compatibilité avec une minuterie
Vous pouvez utiliser LivingColors avec une minuterie (non fournie).
Lorsque LivingColors est connecté à une minuterie, il applique
le dernier réglage sélectionné (couleur statique ou mode de
changement de couleur automatique).
Solution
Vérifiez les connexions du câble avec la lampe.
LivingColors ne répond pas à la
télécommande.
2.Vous pouvez également contrôler une lampe LivingColors avec
plusieurs télécommandes. Pour ce faire, commencez par réinitialiser
l'une des télécommandes en maintenant enfoncés les boutons «
0 » et ( ) simultanément pendant 5 secondes. Puis, appuyez sur
le bouton « I » de deux télécommandes pendant 7 secondes en
s'assurant qu'elles sont à proximité l'une de l'autre.Vous pouvez
maintenant connecter la nouvelle télécommande à LivingColors en
suivant les instructions décrites précédemment.
- Une lampe LivingColors connectée à deux télécommandes (ou
plus) peut être contrôlée par chacune des télécommandes.
- Pour déconnecter une télécommande de LivingColors, placez
la télécommande à proximité de la lampe et appuyez sur « 0
» pendant 3 secondes. LivingColors clignote 3 fois. Maintenez
enfoncé le bouton « 0 » plus longtemps et la lampe s'éteindra
progressivement. La télécommande et LivingColors sont à présent
déconnectés.
Cause possible
La lampe n’est pas
branchée correctement.
Vérifiez que le cordon d’alimentation est correctement inséré dans la prise
secteur.
Vérifiez les piles de la télécommande. Les piles doivent être positionnées en
respectant la polarité (+ et -) et doivent être chargées. Si la télécommande
ne fonctionne toujours pas, remplacez les piles.
Vérifiez que toutes les lampes LivingColors connectées à cette
télécommande sont allumées. Dans le cas contraire, elles ne répondront pas
après cette action.
Appuyez simultanément sur « 0 » et ( ) pendant au moins 5 secondes
pour passer sur un autre canal (toutes les lampes LivingColors se mettent
à clignoter en vert pour indiquer qu’elles sont connectées).Vous pouvez
répéter cette procédure jusqu’à 3 fois, de préférence à des endroits
différents.
signifie que ce dernier répond aux exigences de la directive européenne
2002/96/EC.
Caractéristiques de la prise :
Adaptateur CA
Modèle : Entrée :
Sortie :
Nettoyage et entretien :
Retirez l’adaptateur de la prise murale.
Pour éviter de rayer la lampe LivingColors, la télécommande et
l'adaptateur, nettoyez-les exclusivement à l'aide d'un chiffon doux
et sec.
N'utilisez pas de produits de nettoyage.
Instructions de sécurité :
EADP-10EB C (type UE)
EADP-10EB D (type Royaume-Uni + Singapour)
EADP-10EB E (type Australie)
220 - 240 V ~ 0,3 A 50 Hz
18,5 V 0,83 A
Consommation d'énergie du luminaire : jusqu'à 15,4 W
Conservez le cordon d'alimentation et LivingColors à l'abri de
l'humidité et de tout liquide.
-LivingColors est conçu pour une utilisation en intérieur uniquement.
Évitez d'utiliser LivingColors dans des pièces humides telles que la
salle de bain ou à l'extérieur.
-LivingColors n'est pas un jouet et doit être conservé hors de
portée des enfants.
-Évitez tout contact avec des surfaces chaudes.
-Pour des raisons de sécurité et conformément aux termes de la
garantie, LivingColors et le cordon d'alimentation ne doivent pas
être ouverts.
-Utilisez uniquement l'adaptateur fourni : l'utilisation d'un autre
adaptateur risque d'endommager votre LivingColors.
Environnement :
Si vous souhaitez mettre au rebut l'appareil usagé à la fin de sa durée
de vie, respectez les instructions des autorités locales. Retirez les piles
lorsque vous mettez la télécommande au rebut. Ne jetez pas les piles
avec les déchets ménagers normaux. Déposez-les dans un point de
collecte officiel ou auprès de votre revendeur Philips. Les piles seront
alors mises au rebut dans le respect de l'environnement.
Télécommande :
Piles :
Powerlife LR03 ; 1,5 V.
Caractéristiques sans fil :
Bande de fréquence RF sans fil :
Protocole de communication sans fil :
Canaux disponibles :
3 piles alcalines AAA Philips
2 405~2 475 MHz
IEEE 802.15.4)
canaux 11, 15, 20 ou 25
Caractéristiques de l'environnement :
Température de fonctionnement :
Température de stockage :
Humidité relative :
condensée
0...40 °C
-25...60 °C
5...95 % non-
Mise au rebut des produits en fin de vie
Ce produit a été conçu et fabriqué avec des matériaux et
composants recyclables de haute qualité.
Le symbole d'une poubelle barrée apposé sur un produit
4
5
Informez-vous auprès des instances locales sur le système de collecte
des produits électriques et électroniques en fin de vie.
Conformez-vous à la législation en vigueur et ne jetez pas vos produits
avec les déchets ménagers. Seule une mise au rebut adéquate des
produits peut empêcher la contamination de l'environnement et ses
effets nocifs sur la santé.
Garantie :
La garantie de deux ans de Philips est valable si le produit est utilisé
conformément aux instructions et uniquement dans le but pour lequel
il a été créé. Les réclamations sont acceptées sur présentation de la
preuve d'achat d'origine (facture, ticket de caisse ou reçu) indiquant la
date de l'achat, le nom du revendeur et une description du produit.
La garantie Philips n'est pas valable si :
- des informations de la preuve d'achat ou de la description du
produit ont été modifiées, rayées, effacées ou rendues illisibles ;
- l'appareil a été endommagé, n'a pas été correctement connecté ou
a été utilisé de manière abusive ;
- un défaut non inhérent à LivingColors a été causé dans des
circonstances extrêmes (éclairage, inondation, incendie, utilisation
inappropriée ou négligence, par exemple) ;
- LivingColors a été ouvert ou désassemblé.
Garantie et service :
Pour plus d'informations, en cas de problème, veuillez consulter le site
Philips à l'adresse : www.philips.com/livingcolors ou contactez le service
clientèle de Philips Lighting au numéro : 00800-PHILIPSL ou
00800-74454775 (numéros gratuits)
DU
Bedienungsanleitung
Vielen Dank, dass Sie sich für den Kauf von Philips LivingColors
entschieden haben!
LivingColors wurde speziell entwickelt, damit Sie sich durch Licht und
Farbe ein angenehmes Ambiente schaffen können.
Wenn Sie LivingColors zum ersten Mal verwenden, lesen Sie die
Bedienungsanleitung sorgfältig durch, und bewahren Sie diese für spätere
Verwendungen auf. Wenn Sie diese Anweisungen befolgen, können Sie
die Funktionen von Philips LivingColors optimal nutzen.
Wichtig:
-Nehmen Sie die einzelnen Teile vorsichtig aus der Verpackung.
-Prüfen Sie, ob alle Teile vorhanden sind.
Erste Schritte:
1.Öffnen Sie das Batteriefach der Fernbedienung, indem Sie die
Abdeckung auf der Rückseite zurückschieben. Legen Sie 3 AAABatterien ein (+ und – wie angezeigt) (Abbildung a).
2.Stellen Sie LivingColors auf einen geraden und stabilen Untergrund.
Richten Sie LivingColors zur Wand aus (optimale Entfernung beträgt
50 cm), stecken Sie den Anschlussstecker in die Leuchte (Abbildung
b) und den Netzstecker in die Wandsteckdose. LivingColors
leuchtet kurz in allen Farben auf.
3.Schalten Sie LivingColors ein, indem Sie kurz "I" (Ein) auf der Einbzw. Ausschalttaste der Fernbedienung drücken (Abbildung c).
4.Erzeugen Sie Ihr eigenes Ambiente:
-Berühren Sie die gewünschte Farbe auf dem Farbrad. Bewegen
Sie Ihre Finger über das Farbrad, um die Farbe genau einzustellen
(Abbildung d).
-Ändern Sie die Farbsättigung (Hinzufügen von mehr Weiß zur
aktuellen Farbe). Drücken Sie auf ( ) für einen intensiveren
Farbton oder auf ( ) für einen dezenteren (pastellfarbenen)
Ton (Abbildung e). Schließlich werden Sie einen weißen Farbton
erreichen.
-Verringern Sie die Farbhelligkeit Erhöhen ( ) oder verringern ( )
Sie die Lichtintensität über die Dimmertasten (Abbildung f).
5.Schalten Sie die LivingColors aus, indem Sie kurz auf "0" (Aus)
drücken. Die LivingColors speichert die letzte Einstellung für die
nächste Verwendung (Abbildung c).
Weitere Funktionen der LivingColors:
1.Automatischer Farbänderungsmodus
Bewegen Sie einmal den Finger ganz über das Farbrad (ein
vollständiger Kreis), und drücken Sie kurz auf "I" (Ein).
Dadurch wechselt die LivingColors in den automatischen
Farbänderungsmodus: Die Leuchte ändert automatisch die Farbe.
Sie können festlegen, in welcher Geschwindigkeit die Farbe
geändert werden soll. Die Geschwindigkeit kann im Uhrzeigersinn
angepasst werden, von schnell (dunkelblau auf dem Farbrad) bis
langsam (lila) (Abbildung g). Sie können das Farbrad an einer
beliebigen Stelle berühren. Im automatischen Farbänderungsmodus
können Sie auch die Sättigung und Helligkeit der Farben anpassen.
2.LivingColors-Leuchten miteinander verbinden
1. Sie können mehrere LivingColors über eine Fernbedienung steuern.
Die Leuchte projizieren dieselbe Farbe bzw. ändern ihre Farbe
gleichzeitig. Um mehrere LivingColors mit einer Fernbedienung
zu verbinden, halten Sie die Fernbedienung nahe neben das
Philips Logo oben auf der Leuchte, und drücken Sie "I" (Ein). Die
LivingColors blinkt dreimal und anschließend kurz grün. Lassen Sie
die Taste wieder los. Die verbundenen Leuchten kehren zur letzten
Einstellung der Fernbedienung zurück.
- Wiederholen Sie diesen Vorgang für jede LivingColors-Leuchte, die
Sie mit anderen LivingColors Leuchten verbinden möchten.
- Um die LivingColors wieder einzeln zu verwenden, verbinden Sie sie
mit anderen Fernbedienungen, wie oben beschrieben.
2. Es ist auch möglich, eine LivingColors-Leuchte über mehrere
Fernbedienungen zu steuern. Dafür müssen Sie zuerst eine der
Fernbedienungen zurücksetzen, indem Sie die Taste "0" und die
Taste ( ) gleichzeitig 5 Sekunden lang gedrückt halten. Halten
Sie anschließend zwei Fernbedienungen eng nebeneinander,
und drücken Sie auf beiden 7 Sekunden lang die Taste "I". Nun
können Sie die neue Fernbedienung mit der LivingColors Leuchte
verbinden, wie oben beschrieben.
- LivingColors, die mit zwei (oder mehr) Fernbedienungen
verbunden sind, können von allen verbundenen Fernbedienungen
gesteuert werden.
- Um die Verbindung einer der Fernbedienungen von LivingColors
zu trennen, halten Sie die Fernbedienung eng neben die Lampe,
und drücken Sie drei Sekunden lang auf "0". Die LivingColors blinkt
dreimal. Halten Sie die Taste "0" weiter gedrückt, bis das Licht
verblasst. Die Fernbedienung und die LivingColors sind nun nicht
mehr verbunden.
Problem
Die LivingColors spendet kein
Licht.
Mögliche Ursache
Die Leuchte ist nicht
ordnungsgemäß eingeschaltet.
Lösung
Überprüfen Sie die Kabelverbindung der Leuchte.
Die Fernbedienung funktioniert
nicht.
Die Fernbedienung funktioniert
nicht.
Siehe folgender Abschnitt.
Die LivingColors reagiert nicht auf
die Fernbedienung.
Die Fernbedienung ist nicht mit der
Leuchte verbunden.
Verbinden Sie die Fernbedienung mit LivingColors, indem Sie
die Schritte unter “2. Die LivingColors-Leuchte miteinander
verbinden” befolgen.
Es tritt viel Datenverkehr im
drahtlosen Netzwerk auf (z. B.
Wireless-Router).
Entfernen Sie die LivingColors aus der Nähe des drahtlosen
Zugriffspunkts.
Die Taste “I” wurde nicht lang genug
gedrückt.
Wiederholen Sie die Schritte unter “2. LivingColors-Leuchten
miteinander verbinden”. Wenn die Verbindung erfolgreich war,
blinkt die Leuchte einmal grün. Wenn sie nicht erfolgreich war,
kehrt die Leuchte sofort zu ihren ursprünglichen Einstellungen
zurück, ohne grün zu blinken.
Die LivingColors-Leuchte gibt es in
verschiedenen Ausführungen.
Überprüfen Sie, ob die Leuchten, die Sie nicht verbinden können,
beide auf der Rückseite der Fernbedienung und an der Unterseite
der Leuchte selbst das Zeichen “G2” aufweisen. Wenn dies auf
einer der Leuchten nicht vorhanden ist, kann diese nicht mit den
Leuchten mit dem entsprechenden Zeichen verbunden werden.
(Sie kann jedoch mit anderen Leuchten verbunden werden, die
das Zeichen “G2” ebenfalls nicht haben.)
Ich kann den automatischen
Farbänderungsmodus nicht
starten.
Die Bewegung war nicht richtig.
Wenn eine Farbe zu einer anderen (statischen) Farbe wechselt,
aber keine Farbschleife beginnt, war Ihre Bewegung nicht richtig.
Versuchen Sie es erneut.
Die LivingColors funktioniert
immer noch nicht normal.
Weitere Probleme
Wenden Sie sich an das Philips Lighting Contact Center (siehe
“Service und Garantie”).
Ich kann nicht mehrere
LivingColors-Leuchten verbinden.
3.Kompatibilität mit Timern
Sie können LivingColors mit einem Timer verwenden (nicht im
Lieferumfang enthalten). Wenn die LivingColors mit einem Timer
eingeschaltet wird, wird Ihre letzte Einstellung wiedergegeben
(statische Farbe oder automatischer Farbänderungsmodus).
Sicherheitshinweise:
Schützen Sie den Stecker und LivingColors vor Flüssigkeiten und
Feuchtigkeit.
Stecker – Technische Daten:
-Die LivingColors ist nur für den Gebrauch in Innenräumen
vorgesehen.Verwenden Sie das Gerät nicht in einer feuchten
Umgebung, z. B. im Badezimmer oder im Außenbereich.
-Die LivingColors ist kein Spielzeug und daher nicht für Kinder
geeignet.
-Stellen Sie die LivingColors Mini nicht auf heiße Flächen.
-Aus Sicherheits- und Garantiegründen dürfen LivingColors und der
zugehörige Stecker nicht geöffnet werden.
-Es darf nur das mitgelieferte Netzteil verwendet werden. Die
Nutzung eines anderen Netzteils kann zu Schäden an der
LivingColors führen.
Netzteil
Modell: Eingangsleistung:
Ausgangsleistung:
EADP-10EB C (Europäischer Typ)
EADP-10EB D (UK-Typ + Singapur)
EADP-10EB E (Australischer Typ)
220 - 240 V ~ 0,3 A 50 Hz
18,5 V 0,83 A
Philips Powerlife Alkaline AAA LR03, 1,5 V.
Funksendefrequenz der Fernbedienung: 2,4GHz
Umwelt:
Wenn Sie das Gerät am Ende seiner Lebensdauer entsorgen, achten
Sie auf die Vorschriften Ihrer lokalen Behörde. Entfernen Sie die
Batterien, bevor Sie die Fernbedienung entsorgen. Entsorgen Sie die
Batterien nicht über den normalen Hausmüll. Geben Sie die Batterien
an einer Sammelstelle oder bei einem Philips Händler ab, wo sie auf
umweltfreundliche Weise entsorgt werden.
Wireless-Spezifikation:
Frequenzband des drahtlosen RF-Modus: 2405 ~ 2475 MHz
Wireless-Kommunikationsprotokoll:
IEEE 802.15.4
Betriebskanäle:
Kanäle 11,
15, 20 oder 25
Um zurück zum statischen Farbmodus zu wechseln, bewegen Sie
Ihren Finger erneut kreisförmig auf dem Farbrad, und drücken Sie
"0". Sie können stattdessen die LivingColors auch aus- ("0") und
wieder einschalten ("I") (Abbildung c).
Umgebungsbedingungen:
Temperatur (Betrieb):
0 - 40 °C
Temperatur (Lagerung):
-25 - 60 °C
Relative Luftfeuchtigkeit:
5 - 95 %, nicht kondensierend
6
7
Überprüfen Sie die Batterien in der Fernbedienung. Die Batterien
müssen richtig eingesetzt (+ und -) und aufgeladen sein. Wenn
die Fernbedienung noch immer nicht funktioniert, ersetzen Sie
die Batterien.
Stellen Sie sicher, dass alle LivingColors, die mit dieser
Fernbedienung verbunden sind, eingeschaltet sind; andernfalls
können diese nach dieser Aktion nicht reagieren.
Drücken Sie mindestens 5 Sekunden gleichzeitig auf “0” und ( ),
um in einen anderen Kanal zu wechseln (alle LivingColors blinken
zur Bestätigung grün). Sie können diesen Vorgang bis zu dreimal
wiederholen, idealerweise immer von einer anderen Position.
Entsorgung Ihres alten Geräts
Stromverbrauch der Leuchte: bis zu 15,4 W
Fernbedienung:
Batterien:
Überprüfen Sie, ob der Stecker richtig in die Steckdose
eingesteckt ist.
Ihr Gerät wurde unter Verwendung hochwertiger
Materialien und Komponenten entwickelt und hergestellt, die
recycelt und wieder verwendet werden können.
Befindet sich dieses Symbol (durchgestrichene Abfalltonne
auf Rädern) auf dem Gerät, bedeutet dies, dass für dieses
Gerät die Europäischen Richtlinie 2002/96/EG gilt.
Informieren Sie sich über die geltenden Bestimmungen zur getrennten
Sammlung von Elektro- und Elektronik-Altgeräten in Ihrem Land.
Richten Sie sich bitte nach den geltenden Bestimmungen in Ihrem Land,
und entsorgen Sie Altgeräte nicht über Ihren Haushaltsabfall. Durch die
korrekte Entsorgung Ihrer Altgeräte werden Umwelt und Menschen vor
möglichen negativen Folgen geschützt.
Garantie:
Die zweijährige Garantie von Philips gilt nur, wenn das Gerät gemäß
den Anweisungen und für den vorgesehenen Zweck verwendet wird.
Reklamationen werden nur mit einem Original-Kaufbeleg (Rechnung,
Kassenbon oder Quittung) akzeptiert. Auf diesem Kaufbeleg müssen
sowohl das Kaufdatum als auch der Name des Händlers und eine
Beschreibung des Produkts aufgeführt sein.