1
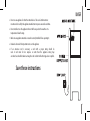
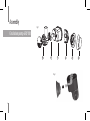
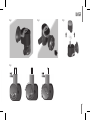
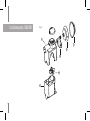
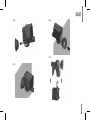
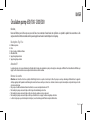
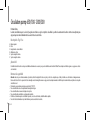
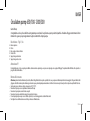
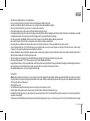
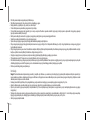
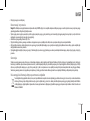
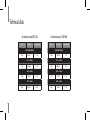
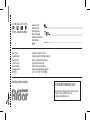
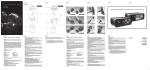
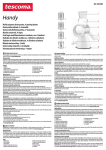
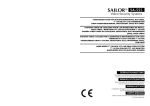
Circulation pump
650/180
1200/ 300
User’s Guide
Italiano 1
Important safety instructions
WARNING - To guard against injury, basic safety precautions should be observed, including the following: read and follow all safety instructions
DANGER - To avoid possible electric shock, special care should be taken in the use of aquarium equipment. For each of the following situations, do not
attempt repairs yourself; return the appliance to an authorized service facility for service or discard the appliance.
1. A)
If
the appliance shows any sign of abnormal water leakage, immediately unplug from the power source
B) Carefully examine the appliance after installation. It should not be plugged in if there is water on parts not intended to be wet.
C) Do not operate any appliance if it has a damaged cord or plug, or if it is malfunctioning or if it is dropped or damaged in any
manner. Inspect power cord insulation to be sure there are no cuts or exposed wire. If so, discard and order a new replacement.
D) To avoid the possibility of the appliance plug or receptacle getting wet, position aquarium stand and tank to one side of a wall mounted receptacle
to prevent water from dripping onto the receptacle or plug. A “drip loop”, shown in the Figure at right, should be arranged by the user for each cord connecting an aquarium appliance to a receptacle. The “drip loop” is that part of the cord below the level of the receptacle or the connector if
an extension cord is used, to prevent water traveling along the cord and coming in contact with the receptacle. If the plug or receptacle does get wet, DON’T unplug the cord. Disconnect the fuse or circuit breaker that supplies power to the appliance. Then unplug and examine for presence of
water in the receptacle.
2. Close supervision is necessary when any appliance is used by or near children.
3. To avoid injury, do not contact moving parts or hot parts such as heaters, reflectors, lamp bulbs, etc.
4. Always unplug an appliance from an outlet when not in use, before putting on or taking off parts, and before cleaning. Never yank cord to pull plug
from outlet. Grasp the plug and pull to disconnect.
2
5. Do not use an appliance for other than intended use. The use of attachments not recommended or sold by the appliance manufacturer may cause an unsafe condition.
6. Do not install or store the appliance where it will be exposed to the weather or to temperatures below freezing.
7. Make sure an appliance mounted on a tank is securely installed before operating it.
8. Read and observe all the important notices on the appliance.
9. If
an extension cord is necessary, a cord with a proper rating should be
used. A cord rated for less amperes or watts than the appliance rating may
over heat. Care should be taken to arrange the cord so that it will not be tripped over or pulled.
Save these instructions
3
Assembly
fig 1
Circulation pump 650/180
A
B
C
fig 2
4
D
E
F
fig 3
fig 4
fig 5
fig 6
5
Circulation pump 1200/300
fig 1a
A
F
E
D
B
C
6
fig 2a
fig 4a
fig 5a
fig 3a
7
Contents
English
Deutsch
Française
Español
Italiano
Nederlandse
Polska
Руссо
日本
8
pag 9
pag 12
pag 15
pag 18
pag 21
pag 24
pag 27
pag 30
pag 33
Circulation pump 650/180-1200/300
Dear Hobbyist,
we thank You for choosing Hydor. Please read the following instructions very carefully for best understanding of the characteristics of this new, unique and innovative
product.
Description - Fig. 1/1a A. Upper chamber
B. Impeller
C. Pump body + Lower chamber
D. Spere joint
E. Internal suction cup+magnet support
F. External suction cup+magnet support
Attention!!!
Pumps are specially designed for use in aquariums and tanks for water movement. It is not a filtration pump. Please refer to your dealer for any other application.
Safety information
•
•
•
•
•
•
•
Attention:please verify that all components of the pump are undamaged before putting it into function. Before any kind of intervention, ALWAYS disconnect electrical supply of the pump and
any other appliance placed in the water. Be sure that the voltage of the mains supply corresponds to the voltage shown on the unit’s label.
The pump is intended for indoor use only in fluid with a temperature of max. 35° C (95° F).
Do not connect to electrical supply if pump is not completely immersed in water.
Do not connect to electrical supply if pump is missing parts.
Do not connect to electrical supply if pump is not positioned using the supplied suction-cup + magnet support.
The cord of this pump cannot be replaced or repaired; in case of damage the entire unit must be substituted.
Do not cut or pull on the electrical cord.
Always disconnect from mains gently and make sure hands are dry.
English 9
•
•
•
•
•
•
•
•
•
•
•
When in function, make sure that the pump surface is not blocked.
When in function, make sure that the pump does not take in sand, as this could seriously damage the unit and void the guarantee (read carefully the maintenance paragraph).
Due to the high attraction level between the magnets in the support, keep out of reach of children.
Avoid attaching the magnets directly to one-another.
Make sure you hold the magnets from the sides and avoid placing hands, fingers in between.
At a distance up to 5 cm (1,97 inches) the magnets attracts metal objects and other magnets with a high force: to prevent injuries, avoid closeness with blades, sharp objects or other magnets.
The magnet can cause permanent damage to electrical devices or articles that are affected by a magnetic field such as pacemakers, credit cards, or keys: always maintain them at a minimum
distance of 30 cm (12 inches).
When not in use, always place the carton separator between magnets.
If exposed to temperature higher than 50° C (122° F) the magnets can lose part or all the attracting power.
Always clean the aquarium side before placing the suctions cup+ magnet support: any dirt on the surface might prevent the suction cup from attaching properly and the pump might slip on the
bottom of the aquarium causing damage to things and itself.
Please keep these instruction in a safe and dry place.
Installation
•
•
•
•
•
•
•
Attention: please verify that all components of the pump are undamaged before putting it into function. Before any kind of intervention, ALWAYS disconnect electrical supply of the pump and
any other appliance placed in the water. Be sure that the voltage of the mains supply corresponds to the voltage shown on the unit’s label. In order to prevent noise and disturbance caused by
vibration we suggest to position the pump avoiding lateral contact with the aquarium glass or in an upward position on the bottom.
Unwind the electric cable.
Insert the rotation sphere of the base in the proper slot on the suction cup-magnet support. - Fig. 2/2a Immerse the pump completely and turn it in a vertical position in order to allow any air to come out of the impeller chamber.
Attach the pump with the internal part of the suction cup + magnet support to the aquarium side as desired - Fig. 3/3a - (remember to clean the surface before attaching the support).
Holding with one hand the pump attached inside the aquarium, place the external part of the magnetic support on the outside of the aquarium at a distance of approx. 10 cm (3.93 inches)
from the centre of the internal support. Slowly move the external support until you feel the attraction between the magnets and place them so that the centres are on the same axis. - Fig. 4/4a Direct the water flow as desired.
Connect to electrical supply.
Regulation
The flow is regulated through the control knob, built in the rotor chamber, where the water suction is also located. -fig. 6-.
10
English
Maintaneance
•
•
•
•
•
•
Attention: before any kind of intervention, ALWAYS disconnect electrical supply of the pump and any other appliance placed in the water.
Regular cleaning and maintenance will guarantee the pump better and longer performance.
With one hand hold the pump assembly, with other hand remove the external magnet to release. (use the appendix on the outside of the suction cup to help you in this operation).
Disassemble as shown. - Fig. 5/5a Clean the impeller assembly removing deposits with a soft brush. Do not use detergents or solvents.
Reassemble everything in reverse order, make sure the notches on the pump chambers correspond and that the shaft is placed correctly.
In case of abnormal noise and /or reduced performance caused by sudden changes in electricity supply, it is sufficient to restart the pump.
Guarrantee
The device is guaranteed for a period of 24 months from the date of purchase, against defects in material and/or workmanship. Our guarantee does not apply to claims the cause of which is due
to installation and operation faults, lack of maintenance, misuse of the device, effects of frost, furring and lime deposits or amateur repair attempts. The consumable materials and parts subject
to wear and tear, that must be periodically replaced for normal maintenance of the device, are not included in our guarantee. The certificate of guarantee must be completed by the retailer and
is to be sent with the device in case of return, together with the purchase receipt recording the date of purchase.
European union disposal information
This symbol means that according to local laws and regulations your product should be disposed of separately from household waste. When this product reaches its end of life, take it to
a collection point designated by local authorities. Some collection points accept products for free. The separate collection and recycling of your product at the time of disposal will help
conserve natural resources and ensure that it is recycled in a manner that protects human health and the environment.
English 11
Circulation pump 650/180-1200/300
Sehr geehrter Kunde,
Wir beglückwünschen Sie zu Ihrer Wahl! Damit Sie die Eigenschaften dieses Qualitätsprodukts optimal ausnützen können, bitten wir Sie folgende Hinweise aufmerksam
zu lesen.
Beschreibung - abb. 1/1a -
A. Untere Pumpenkammer
B. Laufrad
C. Pumpenkörper + Obere Pumpenkammer
D. Kugelgelenk
E. Interner Magnet-Saugnapfhalter(mit Kugelgelenk)
F. Externer Magnet-Saugnapfhalter
Achtung!!!
Die Pumpenreihe ist für die ausschließliche Anwendung im Aquaristikbereich konzipiert, kann jedoch nicht als Filterpumpe eingesetzt werden. Bevor Sie diese Pumpe für andere Zwecke verwenden,
lassen Sie sich bitte von Ihrem Fachhändler beraten.
Sicherheitshinweise
•
•
•
•
•
•
12
Achtung: Vor Anschluss des Geräts, vergewissern Sie sich der Unversehrtheit des Produkts. Insbesondere dürfen das Kabel und die Pumpe keinerlei Beschädigungen aufweisen. Ziehen Sie
unbedingt die Netzstecker aller eingetauchten Elektrogeräte ab, bevor Sie mit den Händen ins Wasser greifen und grundsätzlich vor jeder Wartung. Kontrollieren Sie, dass die auf dem Gerät
angegebene Netzspannung, der Ihres Stromnetzes entspricht.
Diese Pumpe darf nur in geschlossenen Räumen und bei einer Wassertemperatur bis zu Max. 35° C betrieben werden.
Vor dem Anschluss der Pumpe ist sicherzustellen, dass sie vollständig eingetaucht ist.
Die Pumpe darf bei fehlenden Bestandteilen nicht angeschlossen werden.
Ohne den im Lieferumfang enthaltenen Magnet-Saugnapfhalter darf die Pumpe ebenfalls nicht angeschlossen werden.
Das Kabel dieser Pumpe kann weder ausgewechselt noch repariert werden; bei Beschädigung muss das komplette Gerät ersetzt werden.
Das Kabel ist weder durchzuschneiden noch ist daran zu ziehen um die Stromspeisung zu unterbrechen.
Deutsch
•
•
•
•
•
•
•
•
•
•
•
•
•
•
•
Ziehen Sie den Netzstecker mit angebrachter Vorsicht aus der Steckdose.
Vergewissern Sie sich, dass Ihre Hände trocken sind, bevor Sie den Netzstecker abziehen.
Um Unfälle vorzubeugen achten Sie immer darauf, dass die Stromanschlüsse trocken sind.
Stellen Sie sicher, dass die Steckdose sauber ist und keine Feuchtigkeit oder Salzablagerungen aufweist.
Wenn sich die Pumpe in Betrieb befindet, ist sicher-zustellen, dass die Ansaugfläche nicht verstopft ist.
Wenn sich die Pumpe in Betrieb befindet, ist außerdem sicherzustellen, dass sie keinen Sand ansaugt, der die Innenteile ernsthaft beschädigen und folglich zum Ausschluss des Produkts von der
Garantie führen kann (lesen Sie hierzu auch den Abschnitt Wartung).
Aufgrund der hohen magnetischen Zugkraft des zweigeteilten Halters ist er außer Rechweite von Kindern zu halten.
Vermeiden Sie, dass die beiden Teile des Magnethalters direkt aneinander liegen.
Achten Sie darauf, dass Sie die beiden Teile immer seitlich halten und somit verhindern, dass Ihre Finger oder die Hand dazwischen gelangen.
Bei einem Abstand unter 5 cm zieht der Magnet metallische Gegenstände oder andere Magnete mit großer Kraft an: vermeiden Sie deshalb die Nähe zu Klingen, anderen Schneidobjekten oder
Magneten um Verletzungen vorzubeugen.
Der Magnet kann bei elektronischen und anderen Geräten, die auf Magnetfelder empfindlich sind, wie z.B. Herzschrittmacher, Kreditkarten und Schlüssel, permanente Schäden verursachen: Halten
Sie ihn deshalb immer auf einer Distanz von mindestens 30 cm.
Wenn der Magnethalter nicht im Einsatz ist, legen Sie immer die mitgelieferte Plastiktrennscheibe dazwischen.
Bei einem Temperatureinsatzbereich von 50° C könnte der Magnet seine Zugkraft teilweise, wenn nicht sogar ganz, verlieren.
Reinigen Sie die betroffene Stelle, bevor Sie den Magnethalter an der Aquariumscheibe befestigen: eine schmutzige Oberfläche könnte den Halt des Saugnapfs beinträchtigen und den Absturz der
Pumpe auf den Bodengrund zur Folge haben. Dies kann wiederum zu Folgeschäden an der Pumpe selbst oder an anderen, in der Nähe stehenden, Objekten führen.
Bewahren Sie die vorliegende Bedienungsanleitung an einem sicheren und trockenen Ort auf.
Installation
•
•
•
•
Achtung: Bevor Sie das Gerät in Betrieb nehmen, vergewissern Sie sich der Unversehrtheit des Produkts. Ziehen Sie die Netzstecker aller eingetauchten Elektrogeräte ab und überprüfen Sie, ob die
auf dem Gerät angegebene Netzspannung, der Ihres Stromnetzes entspricht. Um Resonanzen oder Vibrationen zu vermeiden empfehlen wir die Pumpe so einzubauen, dass kein seitlicher Kontakt
mit der Aquariumscheibe zustande kommt auch dann nicht, wenn sie senkrecht auf dem Boden steht. Wickeln Sie das elektrische Kabel aus.
Führen Sie das Kugelgelenk der Halterung in dem eigens dazu bestimmten Loch am internen Magnet-Saugnapfhalter ein. -Abb. 2/2aTauchen Sie die Pumpe vollständig ins Was-ser ein und lassen Sie die, in der Pumpenkammer enthaltene, Luft entweichen indem Sie die Pumpe in senkrechter Position halten.
Befestigen Sie nun die Pumpe mit dem internen Magnet-Saugnapfhalter an der gewünschten Stelle auf der Aquariumscheibe -Abb. 3/3a-. Vergessen Sie aber nicht die betroffene Stelle zu reinigen,
bevor Sie den Magnet-Halter aufsetzen.
Mit einer Hand halten Sie nun die Pumpe mit dem internen Magnet-Saugnapfhalter, währenddem Sie den externen Magnet-Saugnapfhalter an der Außenseite des Aquariums auf einer Distanz
von ca. 10 cm vom Zentrum des internen Magnet-Saugnapfhalters aufsetzen. Verschieben Sie vorsichtig den externen Magnet-Saugnapfhalter bis Sie deutlich die Zugkraft des gegenüberliegenden
Deutsch 13
Magnets spüren und positionieren Sie den externen Magnet-Saugnapfhalter so, dass die Zentren beider Magnethalter übereinstimmen und somit auf gleicher Achse liegen.-Abb. 4/4a-
• Drehen Sie die Pumpe in die gewünschte Richtung.
• Schließen Sie den Netzstecker an.
Einstellung
Der Wasserdurchlauf wird über den Wassereinlass in der Rotorkammer geregelt.-s. Abbild. 6-
Wartung
Achtung: Vor jeder Wartung oder bevor Sie mit den Händen ins Wasser greifen, ziehen Sie IMMER und unbedingt die Netzstecker aller eingetauchten Elektrogeräte ab.
• Regelmäßiges reinigen und warten sind unumgängliche Voraussetzungen für einen einwandfreien Betrieb und die Langlebigkeit der Pumpe.
• Um die Pumpe von der magnetischen Zugkraft zu befreien, ist mit einer Hand der interne Magnet-Saugnapfhalter inklusive Pumpe zu halten und mit der anderen, der externe Magnet-
Saugnapfhalter wegzuschieben (nehmen Sie sich gegebenenfalls den Fortsatz auf der Aussenseite des Magnet-Saugnapfhalters zu Hilfe).
• Die Pumpe gemäss Zeichnung -Abb. 5/5a- zerlegen.
• Das Laufrad und seinen Sitz mit einer weichen Bürste von allfälligen Kalkrückständen befreien ohne jedoch auf Reinigungsmittel oder Lösungsmittel zurückzugreifen.
• Die verschiedenen Bestandteile wieder in umgekehrter Reihenfolge zusammenbauen. Achten Sie beim Zusammenschrauben der unteren und oberen Pumpenkammer insbesondere darauf, dass
die Kerben auf beiden Teilen übereinstimmen und außerdem, dass sich die Welle in ihrem Sitz befindeta
• Sollte ein ungewöhnlicher Lärm hörbar und/oder ein auffälliger Nachlass der Leistungsstärke bemerkbar werden, die auf einen allfälligen Spannungssprung zurückzuführen sind, genügt es die
Pumpe neu zu starten.
Garantiebedingungen
Wir garantieren für 24 Monate ab Kaufdatum für fehlerhaftes Material und Fabrikationsfehler. Von der Garantie ausgeschlossen sind Schäden, die auf Montage- oder Behandlungsfehler, fehlende
Wartung, Frostschäden, Kalkablagerungen oder unsachgemässe Reparationen zurückzuführen sind sowie Verbrauchs- und Verschleissmaterial, das zur ordungsgemässen Wartung und Reinigung
in regelmässigen Abständen ausgetauscht werden muss. Im Garantiefall schicken Sie bitte das reklamierte Gerät mit der vom Händler ausgefüllten Garantiekarte und der datierten Kaufquittung
oder Rechnung ein.
Europäische union information zur entsorgung
Dieses Symbol weist darauf hin, dass dieses Produkt entsprechend den geltenden gesetzlichen Vorschriften und getrennt vom Hausmüll entsorgt werden muss. Geben Sie dieses Produkt zur
Entsorgung bei einer offiziellen Sammelstelle ab. Bei einigen Sammelstellen können Produkte zur Entsorgung unentgeltlich abgegeben werden. Durch getrenntes Sammeln und Recycling
werden die Rohstoff-Reserven geschont, und es ist sichergestellt, dass beim Recycling des Produkts alle Bestimmungen zum Schutz von Gesundheit und Umwelt eingehalten werden.
14
Deutsch
Circulation pump 650/180-1200/300
Cher client,
Nous vous félicitons pour le choix que vous venez de faire et vous remercions d’avoir donné votre préférence à ce produit de qualité. Nous vous invitons à lire
soigneusement les instructions suivantes afin de pouvoir apprécier au mieux les caractéristiques de cette pompe.
Description -Fig. 1/1aA. Chambre supérieure
B. Rotor
C. Corps de pompe + Chambre inférieure
D. Articulation à bille
E. Support magnétique intérieur
F. Support magnétique extérieur
Attention!!!
La gamme de pompe a été conçue exclusivement pour l’emploi dans le domaine des aquariums et ne peut pas être employée comme pompe de filtration. Pour toutes utilisations différentes par
rapport à celle ci-dessus mentionnée nous vous prions de bien vouloir consulter le revendeur.
Normes de securite
•
•
•
•
•
Attention: avant de mettre en fonction ce produit, vérifiez l’intégrité de toutes ses parties et surtout que le câble et la pompe ne soient pas endommagés. Débranchez tous les appareils
électriques appliqués dans l’aquarium avant d’immerger les mains dans l’eau ou avant de procéder avec tous entretiens. Assurez-vous que la tension indiquée sur le produit correspond à celle
de votre réseau électrique.
Cette pompe est à utiliser exclusivement dans un lieu fermé et en eau avec une température max. de 35° C.
Ne branchez pas la pompe au réseau électrique si elle n’est pas entièrement immergée dans l’eau.
Ne branchez pas la pompe au réseau électrique si elle est en absence de quelques-uns de ses composants.
Ne branchez pas la pompe au réseau électrique si elle n’a pas été installée avec son support à ventouse magnétique en dotation.
Le câble de cette pompe ne peut ni être remplacé ni être réparé; en cas d’endommagement il faut donc remplacer l’unité entière.
Française 15
•
•
•
•
•
•
•
•
•
•
•
•
•
•
•
•
Il ne faut pas couper le câble d’alimentation et non plus le tirer pour couper l’alimentation.
Sortez avec prudence la fiche de la prise de courant.
Assurez-vous d’avoir les mains sèches avant que vous débranchiez l’appareil du circuit électrique.
Pour réduire les risques de chocs accidentels, maintenez toutes les connexions sèches.
Vérifiez que la prise de courant soit propre et sans résidus d’humidité ou dépôts de sel.
Quand en fonction, vérifiez que la surface de la pompe ne soit pas obstruée.
Quand en fonction, contrôlez que la pompe n’aspire pas du sable: ce dernier pourrait en effet endommager gravement les parties à contact direct et pourrait conduire à l’exclusion du produit de
la garantie (lire attentivement la section “entretien”).
A cause de la force de traction magnétique élevée des deux parties du support, il faut tenir ce dernier hors de la portée des enfants.
Evitez de mettre en contact direct les deux parties du support magnétique.
Tenez les deux parties du support magnétique par leur bord en évitant de mettre vos mains ou vos doigts entre eux.
A une distance inférieure de 5 cm le support magnétique attire les objets métalliques et autres aimants avec une force élevée: évitez de vous approcher à des lames et autres objets coupants ou
à autres aimants pour éviter des blessures accidentelles.
Le support magnétique peut provoquer des dommages permanents aux appareils électroniques et à autres dispositifs sensibles au champ magnétique comme par exemple les stimulateurs
cardiaques, les cartes de crédit et les clefs: maintenez toujours une distance d’au moins 30 cm.
Quand le support magnétique n’est pas utilisé, interposez toujours la plaque de séparation en plastique comprise dans la fourniture.
A une température supérieure de 50° C l’aimant pourrait perdre partie ou la totalité de sa force de traction.
Nettoyez la surface de l’aquarium avant d’y appliquer le support magnétique: une surface sale pourrait empêcher l’adhésion correcte du support à ventouse magnétique et faire ainsi tomber la
pompe sur le fond, causant des dommages à elle-même ou à autres objets dans ses environs.
Conservez ce manuel d’instructions dans un lieu sec et sûr.
Installation
•
•
•
•
16
Attention: Avant de mettre en fonction le produit, vérifiez l’intégrité de toutes ses parties. Débranchez du réseau tous appareils électriques et vérifiez que la tension indiquée sur le produit
correspond à celle de votre réseau électrique. Pour prévenir des résonances ou des vibrations l’on recommande d’éviter le positionnement de la pompe à contact avec les cotés de l’aquarium, cela
même si l’on la positionne de façon verticale sur le fond de la cuve. Déroulez le câble électrique.
Insérez le joint à rotule de la base dans le trou prévu à cet effet sur le support magnétique intérieur. -Fig. 2/2aImmergez la pompe complètement dans l’eau en la tournant en position verticale pour faire sortir l’air de la chambre du rotor.
Appuyez l’ensemble avec le support intérieur à une paroi de l’aquarium -Fig. 3/3a- dans la position désirée (n’oubliez pas de nettoyer la partie de la paroi concernée avant d’y appliquer la surface
du support magnétique).
En tenant avec une main l’ensemble de pompe avec support intérieur, appuyez le support magnétique extérieur à la paroi de l’aquarium à une distance de 10 cm environ du centre du support
Française
•
intérieur. Traînez le support extérieur jusqu’à ce que vous percevez le force magnétique opposé et positionnez les centres des deux supports sur le même axe.-Fig. 4/4aOrientez la pompe vers la direction souhaitée.
Reglage
Le flux est contrôlé au moyen d’un robinet incorporé dans la chambre de la turbine dans la quel l’aspiration de l’eau est insérée. -fig. 6-.
Entretien
•
•
•
•
•
•
Attention: Avant que vous effectuiez des interventions d’entretien ou avant que vous immergiez les mains dans l’eau, il faut TOUJOURS et impérativement débrancher de l’alimentation tous
appareils électriques qu’y sont immergés.
Le nettoyage et l’entretien régulier de la pompe garantissent son fonctionnement correct et son longue duré.
Tenir l’ensemble de pompe et support intérieur et éloigner le support extérieur en le traînant afin de libérer la pompe de la force de traction (servez-vous éventuellement de l’appendice prévu
sur le côté extérieur du support magnétique).
Démontez la pompe en suivant le schéma -Fig. 5/5a-.
Nettoyez le rotor et son siège en enlevant des éventuels dépôts de calcaire un utilisant une brosse souple, tout en évitant l’emploi de détergents ou de solvants.
Remontez tous composants en ordre inverse, en prêtant de l’attention à faire coïncider les crans présents sur la chambre supérieure avec ceux de la chambre inférieure mais surtout en vous
assurant que l’arbre soit inséré dans son siège.
Dans le cas où des bruits inhabituels devraient se produire et/ou vous deviez noter des diminutions évidentes de portée, dus à des sauts de tension anormaux, il suffira faire redémarrer la pompe.
Garantie
Cet appareil est garanti pendant une période de 24 mois à partir de la date d’achat contre les défauts de matériel et de fabrication. Les réclamations dont les causes sont dues à des erreurs de
montage, de manœuvre et de manque d’entretien, à l’action du gel, à des dépôts de calcaire ou à des tentatives de réparation non appropriées ne sont pas comprises dans la couverture de notre
garantie. Les matériaux à usure normale et tous les éléments également sujets à usure qui doivent être remplacés périodiquement lors d’un entretien ordinaire ainsi que lors du nettoyage de
l’appareil ne sont pas couverts par la garantie. Le certificat de garantie doit toujours être rempli par le revendeur et devra toujours accompagner l’appareil s’il est restitué avec le ticket de caisse
ou la facture prouvant la date d’achat.
Union européenne informations sur l’élimination:
Ce symbole signifie que vous devez vous débarrasser de votre produit sans le mélanger avec les ordures ménagères, selon les normes et la législation de votre pays. Lorsque ce produit
n’est plus utilisable, portez-le dans un centre de traitement des déchets agréé par les autorités locales. Certains centres acceptent les produits gratuitement. Le traitement et le recyclage
séparé de votre produit lors de son élimination aideront à préserver les ressources naturelles et à protéger l’environnement et la santé des êtres humains.
Française 17
Circulation pump 650/180-1200/300
Estimado Cliente,
Le damos la enhorabuena por su elección y le agradecemos haber escogido este producto de calidad. Le pedimos lea atentamente las breves instrucciones adjuntas para
que pueda apreciar más detalladamente las características de esta bomba.
Descripción -Fig. 1/1a-
A. Cámara superior
B. Rotor
C. Cuerpo bomba + cámara inferior
D. Articulación a esfera
E. Soporte magnético interno
F. Soporte magnético externo
¡Atención!
La familia de bombas ha sido creada para ser utilizada exclusivamente en acuarios y no puede ser utilizada como bomba de filtrado. Para cualquier uso diferente rogamos se pongan en contacto
con el vendedor.
Normas de seguridad
•
•
•
•
•
•
18
Atención: antes de poner en funcionamiento el producto, verificar la integridad de todas sus partes y sobre todo comprobar que el cable y la bomba no estén dañados de ninguna manera.
Desconectar de la red todos los aparatos eléctricos sumergidos antes de inmergir las manos en agua y antes de cualquier manutención. Verificar que la tensión indicada en el producto corresponda
a la de Vuestra red.
Esta bomba es para exclusivo uso interno en agua hasta 35° C (95° F).
No accionar la bomba si no está completamente sumergida en el agua.
No accionar la bomba en ausencia de algunas de sus partes.
No accionar la bomba sin el relativo soporte magnético incluido.
El cable de esta bomba no puede ser sustituido o reparado; en caso de estar dañado, sustituir la unidad completa.
No cortar el cable de alimentación y no tirar del mismo para desconectarlo de la corriente.
Español
•
•
•
•
•
•
•
•
•
•
•
•
•
•
•
Extraer con precaución la clavija de la toma de corriente.
Cerciorarse de tener las manos secas antes de desconectar el aparato del circuito eléctrico.
Para reducir los riesgos de shock accidentales, mantener secas todas las conexiones.
Verificar que la toma de corriente esté limpia y sin humedad ni incrustaciones de sales.
Cuando ya esté funcionando, verificar que la superficie de la bomba no esté obstruida.
Cuando ya esté funcionando, verificar que la bomba no aspire arena: ésta última, de hecho, podría dañar notablemente las partes en contacto directo e podría invalidar la garantía del producto (lean
con atención la sección “Manutención”).
A causa de la elevada tracción magnética de las dos partes del soporte, mantenerlo lejos del alcance de los niños.
Evitar poner en contacto directo las dos partes del soporte magnético.
Al tener el soporte en las manos, tocar sólo los lados del mismo, sin interponer las manos o los dedos entre las dos superficies de polaridad opuesta.
A una distancia inferior a 5 cm (1,97 pulgadas) el imán atrae objetos metálicos y otros imanes con una fuerza elevada: evitar acercarse con cuchillas u otros objetos cortantes, o con otros imanes
para evitar heridas accidentales.
El imán puede provocar daños permanentes a aparatos electrónicos y a otros objetos sensibles al campo magnético, como marcapasos cardiacos, tarjetas de crédito y llaves: mantener siempre una
distancia de al menos 30 cm (12 pulgadas).
Cuando se transporta el soporte magnético, interponer siempre el cartoncito divisorio incluido.
A una temperatura superior a 50° C (122° F) el imán podría perder parcial o totalmente su energía de tracción.
Limpiar la superficie del acuario antes de posicionar el soporte magnético: una superficie sucia podría aflojar la fuerza de agarre del caucho y hacer precipitar la bomba en el fondo causando daños
a la misma o a otros objetos cercanos.
Guardar el presente manual de instrucciones en un lugar seco y seguro.
Instalación
•
•
•
•
•
Atención: antes de poner en funcionamiento el producto, verificar la integridad de todas sus partes. Desconectar de la red todos los aparatos eléctricos y verificar que la tensión indicada en el
producto corresponda a la de su red. Para evitar resonancias o vibraciones, recomendamos evitar posicionar la bomba en contacto con las superficies laterales adyacentes a la misma o de pie en
el fondo del acuario.
Introducir la esfera de rotación en el correspondiente agujero del soporte magnético interno. -Fig. 2/2aSumergir completamente la bomba en el agua y girarla en posición vertical para que salga el aire de la cámara rotor.
Apoyar el conjunto con el soporte interno a una pared del acuario -Fig. 3/3a- en la posición deseada (limpiar la parte del cristal interesada antes de apoyar la superficie del soporte magnético).
Cogiendo con una mano el conjunto de la bomba y del soporte interno, apoyar el soporte magnético externo al cristal del acuario a una distancia de unos circa 10 cm (3.93 pulgadas) del centro del
soporte interno, arrastrarlo hasta notar su fuerza magnética opuesta y posicionar el centro de los dos soportes en el mismo eje. -Fig. 4/4aOrientar la bomba hacia la dirección deseada.
Español 19
• Conectar a la red eléctrica.
Regulación:
El flujo se controla mediante una llave ubicada en la aspiración del agua, incorporada en la cámara del rotor. -fig. 6-.
Manutención
Atención: antes de cualquier intervención de manutención o antes de inmergir las manos en el agua, desconectar siempre de la alimentación todos los aparatos eléctricos sumergidos en el agua.
• bomba garantizan su correcto funcionamiento y su larga duración.
• Sostener el conjunto de bomba y soporte interno y arrastrar lejos el soporte externo para liberar la bomba de la fuerza de tracción (si es necesario utilizar el apéndice presente sobre la superficie de
la ventosa).
• Descomponer la bomba siguiendo el esquema. -Fig. 5/5a• Limpiar el rotor y su alojamiento de eventuales incrustaciones calcáreas utilizando una brochita suave y evitando utilizar detergentes o disolventes.
• Volver a ensamblar todos los componentes en orden inverso: hacer coincidir las muescas presentes en la cámara superior con las de la cámara inferior y girar hasta que las partes encajen
completamente, sin forzar demasiado. Verificar que el eje esté insertado en su alojamiento.
• En caso de ruido inusual y/o disminuciones evidentes de prestaciones imputables a anormales saltos de tensión, es suficiente volver a poner en funcionamiento la bomba.
Garantía
Este aparato está garantizado por un periodo de 24 meses desde la fecha de compra, contra defectos de materiales y de fabricación. No están cubiertas por nuestra garantía aquellas reclamaciones
cuyas causas se deban a errores de montaje, de maniobra y de falta de manutención, a la acción del frío intenso, a incrustaciones calcáreas o a intentos no correctos de reparación. No están cubiertos
por la garantía tampoco los materiales de consumo y todos los componentes sujetos a desgaste, que tienen que ser sustituidos periódicamente para la manutención ordinaria y la limpieza del
aparato. El certificado de garantía tiene que ser rellenado por el vendedor y tendrá que acompañar el aparato, en caso sea devuelto, junto con el ticket o recibo fiscal comprobante la fecha de compra.
Unión europea información sobre el desecho de residuos
Este símbolo indica que, de acuerdo con la legislación local, la eliminación de este producto debe realizarse de forma separada de la de los residuos domésticos. Cuando este producto ya
no pueda utilizarse, llévelo a uno de los puntos de recogida especificados por las autoridades locales. Algunos de estos puntos de recogida prestan el servicio gratuitamente. La recogida
selectiva y el reciclaje de su producto en el momento de desecharlo contribuirán a la conservación de los recursos naturales y garantizarán un procesamiento de los residuos respetuoso con
la salud de las personas y con el medio ambiente.
20
Español
Circulation pump 650/180-1200/300
Gentile Cliente,
ci congratuliamo con Lei per la scelta fatta e La ringraziamo per aver dato la Sua preferenza a questo prodotto di qualità. Le chiediamo di leggere attentamente le brevi
istruzioni che seguono per poter apprezzare al meglio le caratteristiche di questa pompa.
Descrizione - Fig. 1/1a A. Camera superiore
B. Rotore
C. Corpo pompa + Camera inferiore
D. Snodo a sfera
E. Supporto magnetico interno
F. Supporto magnetico esterno
Attenzione!!!
La famiglia di pompe è stata concepita per un utilizzo esclusivamente in acquariologia e non può essere impiegata come pompa di filtraggio. Per qualsiasi utilizzo differente dal sopraccitato si
prega di contattare il rivenditore.
Norme di sicurezza
•
•
•
•
•
•
Attenzione: prima di mettere in funzione il prodotto, verificare l’integrità di tutte le sue parti e soprattutto che cavo e pompa non risultino in qualche modo danneggiati. Scollegare dalla rete tutti
gli apparecchi elettrici sommersi prima di immergere le mani in acqua e prima di qualunque manutenzione. Verificare che la tensione riportata sul prodotto corrisponda a quella della Vostra rete.
Questa pompa è per esclusivo uso interno in acqua sino a 35° C (95° F).
Non azionare la pompa se non completamente immersa nell’acqua.
Non azionare la pompa in assenza di alcune sue parti.
Non azionare la pompa senza il relativo supporto magnetico in dotazione.
Il cavo di questa pompa non può essere sostituito o riparato; in caso di danneggiamento sostituire l’intera unità.
Non tagliare il cavo di alimentazione e non tirarlo per rimuovere l’alimentazione.
Italiano 21
•
•
•
•
•
•
•
•
•
•
•
•
•
•
•
Estrarre con cautela la spina dalla presa di corrente.
Accertarsi di avere le mani asciutte prima di scollegare l’apparecchio dal circuito elettrico.
Per ridurre i rischi di shock accidentali, mantenere tutte le connessioni asciutte.
Verificare che la presa di corrente sia pu-lita e priva di umidità o depositi di sale.
Quando in funzione, verificare che la superficie della pompa non sia ostruita.
Quando in funzione, verificare che la pompa non aspiri sabbia: quest’ultima infatti potrebbe danneggiare considerevolmente le parti a diretto contatto e potrebbe condurre all’esclusione dalla
garanzia del prodotto (leggere con attenzione la sezione “Manutenzione”).
A causa dell’elevata trazione magnetica delle due parti del supporto, tenere quest’ultimo lontano dalla portata dei bambini.
Evitare di porre a diretto contatto le due parti del supporto magnetico.
Tenere il supporto in mano solo tramite i lati di esso senza interporre le mani o le dita tra le due superfici di polarità opposta.
A una distanza inferiore ai 5 cm (1,97 inches) il magnete attrae oggetti metallici e altri magneti con una forza elevata: evitare di avvicinarsi a lame o ad oggetti taglienti, o ad altri magneti per
evitare ferite accidentali
Il magnete può provocare danni permanenti a apparecchi elettronici e ad altri oggetti sensibili al campo magnetico, come pacemakers cardiaci, carte di credito e chiavi: mantenere sempre una
distanza di almeno 30 cm (12 inches).
Quando si trasporta il supporto magnetico, interporre sempre il divisorio di cartone fornito con esso.
Ad una temperatura superiore a 50°C (122° F) il magnete potrebbe perdere parte o tutta la sua energia di trazione.
Pulire la superficie della vasca prima di posizionare il supporto magnetico: una superficie sporca potrebbe allentare l’attrito della ventosa in gomma e far precipitare la pompa sul fondo causando
dei danni a se stessa o ad oggetti nelle vicinanze.
Conservare il presente libretto di istruzioni in un luogo asciutto e sicuro.
Installazione
•
•
•
•
•
22
Attenzione: prima di mettere in funzione il prodotto, verificare l’integrità di tutte le sue parti. Scollegare dalla rete tutti gli apparecchi elettrici e verificare che la tensione riportata sul prodotto
corrisponda a quella della Vostra rete. Per evitare risonanze o vibrazioni si raccomanda di evitare di posizionare la pompa a contatto con le superfici laterali adiacenti ad essa o in piedi sul fondo
della vasca.
Svolgere il cavo elettrico.
Inserire la sfera di rotazione della basetta nell’apposito foro del supporto magnetico interno. -Fig. 2/2aImmergere completamente la pompa in acqua e girarla in posizione verticale per far fuoriuscire l’aria dalla camera rotore.
Appoggiare l’assieme con il supporto interno ad una parete della vasca -Fig. 3/3a- nella posizione desiderata (pulire la parte del vetro interessata prima di appoggiare la superficie del supporto
magnetico).
Reggendo con una mano l’assieme pompa con supporto interno, appoggiare il supporto magnetico esterno al vetro dell’acquario ad una distanza di circa 10 cm (3.93 inches) dal centro del
Italiano
•
•
supporto interno, trascinarlo fino a percepirne la forza magnetica opposta e posizionare i centri dei due supporti sullo stesso asse.
Orientare la pompa nella direzione desiderata. -Fig. 4/4aCollegare alla rete elettrica.
Regolazione
Il flusso viene controllato mediante un rubinetto, nel quale è inserita l’aspirazione dell’acqua, incorporato nella camera rotore. -fig. 6-.
Manutenzione
•
•
•
•
•
•
Attenzione: prima di qualunque intervento di manutenzione o prima di immergere le mani in acqua scollegare sempre dall’alimentazione tutti gli apparecchi elettrici immersi in essa.
La regolare pulizia e manutenzione della pompa ne garantiscono il corretto funzionamento ed una lunga durata.
Reggere l’assieme pompa e supporto interno e trascinare lontano il supporto esterno per liberare la pompa dalla forza di trazione.(eventualmente servirsi dell’appendice presente sulla superficie
della ventosa).
Scomporre la pompa seguendo lo schema. -Fig. 5/5aPulire il rotore e la sua sede da eventuali depositi calcarei utilizzando uno spazzolino morbido ed evitando l’uso di detergenti o solventi.
Riassemblare tutte le componenti in ordine inverso: far coincidere la tacca presente nella camera superiore con quella della camera inferiore. Verificare che l’alberino sia inserito nella sua sede.
In caso di rumorosità inconsuete e/o cali evidenti di prestazioni imputabili ad anomali sbalzi di tensione, è sufficiente riavviare la pompa.
Garanzia
Questo apparecchio è garantito per un periodo di 24 mesi dalla data di acquisto, da difetti di materiale e di fabbricazione. Non rientrano nella copertura della nostra garanzia i reclami le cui cause
sono dovute ad errori di montaggio, di manovra e di mancanza di manutenzione, all’azione del gelo, a depositi calcarei o a tentativi non appropriati di riparazione. Non rientrano nella copertura
della garanzia anche i materiali di consumo e tutti i componenti soggetti ad usura che devono essere sostituiti periodicamente per l’ordinaria manutenzione e pulizia dell’apparecchio. Il certificato
di garanzia deve essere compilato a cura del rivenditore e dovrà accompagnare l’apparecchio, nel caso venga restituito, assieme allo scontrino o ricevuta fiscale comprovante la data di acquisto.
Unione europea informazioni per l’eliminazione
Questo simbolo significa che, in base alle leggi e alle norme locali, il prodotto dovrebbe essere eliminato separatamente dai rifiuti casalinghi. Quando il prodotto diventa inutilizzabile,
portalo nel punto di raccolta stabilito dalle autorità locali. Alcuni punti di raccolta accettano i prodotti gratuitamente.
La raccolta separata e il riciclaggio del prodotto al momento dell’eliminazione aiutano a conservare le risorse naturali e assicurano che venga riciclato in maniera tale da salvaguardare
la salute umana e l’ambiente.
Italiano 23
Circulation pump 650/180-1200/300
Beste klant,
Wij willen u graag feliciteren met de door u gemaakte keuze en wij danken u hartelijk dat u de voorkeur aan dit kwaliteitsproduct gegeven heeft. Wij verzoeken u
vriendelijk om de korte aanwijzingen die hieronder volgen aandachtig te lezen zodat u de kenmerken van deze pomp beter kunt waarderen.
Beschrijving -Afb. 1/1a-
A. Bovenste kamer
B. RotorOnderste kamer
C. Pomplichaam + Onderste kamer
D. Kogelgewricht
E. Inwendige magnetische steun
F. Uitwendige magnetische steun
Attentie!!!
De familie pompen is uitsluitend ontwikkeld voor het gebruik in aquaria en mag niet als filterpomp gebruikt worden. Voor elk gebruik dat afwijkt van het bovenstaande verzoeken wij u zich
tot de verkoper te wenden.
Veiligheidsvoorschriften
•
•
•
•
•
•
24
Attentie: Alvorens het product aan te zetten moet eerst gecontroleerd worden of alle onderdelen intact zijn en vooral of het snoer en de pomp niet op de een of andere manier beschadigd zijn.
Alvorens uw handen in het water te steken en vóór elk onderhoud moeten alle ondergedompelde elektrische apparaten eerst van het lichtnet afgekoppeld worden. Controleer of de spanning
die op het product staat overeenstemt met de spanning van uw lichtnet.
Deze pomp is uitsluitend bestemd voor gebruik binnen-shuis in water met een temperatuur van max. 35° C (95° F).
De pomp mag niet in werking gesteld worden als hij niet volledig in het water ondergedompeld is.
De pomp mag niet in werking gesteld worden als er enkele onderdelen van ontbreken.
De pomp mag niet zonder de bijbehorende meegeleverde magnetische steun in werking gesteld worden.
Het snoer van de pomp kan niet vervangen of gerepareerd worden; in geval van beschadiging moet het hele blok vervangen worden.
Het snoer mag niet doorgeknipt worden en er mag niet aan getrokken worden om het uit het stopcontact te halen.
Nederlandse
•
•
•
•
•
•
•
•
•
•
•
•
•
•
•
De stekker moet voorzichtig uit het stopcontact gehaald worden.
Er moet gecontroleerd worden of u droge handen heeft alvorens het apparaat van het lichtnet af te koppelen.
Om het risico van elektrische schokken te verminderen moet er voor gezorgd worden dat alle verbindingen droog blijven.
Er moet gecontroleerd worden of het stopcontact schoon is en vrij van vocht of zoutaanslag.
Als de pomp in werking is moet gecontroleerd worden of het oppervlak van de pomp niet verstopt is.
Als de pomp in werking is moet gecontroleerd worden of de pomp geen zand aanzuigt: Hierdoor kan het namelijk gebeuren dat de delen die hier rechtstreeks mee in aanraking komen aanzienlijk
beschadigd worden en hierdoor kan de garantie op het product ongeldig worden (lees de paragraaf “Onderhoud”aandachtig).
Door de hoge magnetische aantrekkingskracht van de twee delen van de steun moet de steun buiten het bereik van kinderen gehouden worden.
Er moet vermeden worden dat de twee delen van de magnetische steun rechtstreeks met elkaar in aanraking komen.
De steun mag alleen aan de zijkanten in de hand gehouden worden zonder de handen of de vingers tussen de twee oppervlakken van de tegenpolen te steken.
Op een afstand van minder dan 5 cm (1,97 inch) trekt de magneet op hoge kracht metalen voorwerpen en andere magneten aan: Er mag niet in de buurt van messen of andere scherpe
voorwerpen of andere magneten gekomen worden om verwondingen te voorkomen.
De magneet kan blijvende schade aan elektronische apparatuur en andere voorwerpen die gevoelig zijn voor magnetische velden veroorzaken, zoals pacemakers, creditcards en sleutels: Er moet
altijd een afstand van minimaal 30 cm (12 inch) aangehouden worden.
Tijdens het verplaatsen van de magnetische steun moet altijd het kartonnen scheidingsschot dat erbij geleverd wordt ertussen gedaan worden.
Bij een hogere temperatuur dan 50° C (112° F) kan de magneet een deel of al zijn aantrekkingskracht verliezen.
Het oppervlak van de bak moet eerst schoongemaakt worden voordat de magnetische steun aangebracht wordt: Als het oppervlak vuil is kan de wrijving van de rubber zuignap verminderen en
kan de pomp hierdoor op de bodem vallen waardoor er schade aan de pomp zelf of aan voorwerpen in de buurt ervan kan ontstaan.
Deze gebruiksaanwijzing moet op een droge en veilige plaats bewaard worden.
Installatie
•
•
•
•
•
Attentie: Alvorens het product aan te zetten moet eerst gecontroleerd worden of alle onderdelen intact zijn. Koppel alle elektrische apparatuur van het lichtnet af en controleer of de spanning
die op het product staat overeenstemt met de spanning van uw lichtnet. Om resonantie of trillingen te vermijden wordt geadviseerd om de pomp niet tegen de zijvlakken in de buurt ervan aan
of rechtop op de bodem van de bak te plaatsen.
Rol het elektrische snoer uit.
Steek de cilinder van de draaibol van de inwendige steun in het speciale gat van de onderste kamer. -afb. 2/2aDompel de pomp volledig onder in het water en draai de pomp in de verticale stand om de lucht uit de rotorkamer te laten gaan.
Houd het blok met de inwendige steun op de gewenste plaats tegen een wand van de bak aan -afb. 3/3a- (maak het betreffende gedeelte van het glas schoon voordat u het oppervlak van de
magnetische steun aanbrengt).
Ondersteun met één hand het blok pomp met inwendige steun en houd de uitwendige magnetische steun op een afstand van ongeveer 10 cm (3,93 inch) van het midden van de inwendige
Nederlandse 25
•
•
steun tegen het glas van het aquarium aan, totdat u de tegengestelde magnetische kracht ervan voelt en plaats het midden van de twee steunen op dezelfde aslijn. -afb. 4/4aDraai de pomp in de gewenste richting.
Sluit hem op het lichtnet aan.
Afstelling
De stroming wordt geregeld door middel van een kraan, waar de aanzuiging van het water in geplaatst is, die in de rotorkamer ingebouwd is. Door de kraan naar beneden te draaien wordt de
maximum doorstroomhoeveelheid verkregen; om de doorstroomhoeveelheid te verminderen moet u de kraan iets met de klok mee (rechtsom) draaien -afb. fig. 6-.
Onderhoud
Attentie: Alvorens onderhoudswerkzaamheden uit te voeren of voordat u uw handen in het water steekt moet u altijd eerst alle ondergedompelde elektrische apparaten van het lichtnet
afkoppelen. Regelmatige reiniging en onderhoud van de pomp waarborgt de goede werking ervan en garandeert een lange levensduur.
Ondersteun het blok pomp en inwendige steun en schuif de uitwendige steun uit de buurt om de pomp van de aantrekkingskracht te ontdoen.
Haal de pomp uit elkaar en houd daarbij het schema aan. -afb. 5/5aMaak de rotor en de betreffende behuizing schoon en verwijder eventuele kalkaanslag waarbij u een zacht borsteltje moet gebruiken; gebruik geen schoonmaakproducten of oplosmiddelen.
Zet alle onderdelen in de omgekeerde volgorde weer in elkaar: Zorg ervoor dat de inkepingen in de bovenste kamper samenvallen met de inkepingen in de onderste kamer en draai totdat de
delen volledig vastgeklemd zijn zonder te forceren. Controleer of de as op de daarvoor bestemde plaats erin gegaan is.
• In geval van ongewone geluiden en/of duidelijke achteruitgang van de prestaties wat toe te schrijven is aan abnormale spanningsschommelingen is het voldoende om de pomp opnieuw te
starten.
•
•
•
•
Garantie
Op dit product wordt vanaf de aankoopdatum 24 maanden garantie verleend voor materiaal- en fabrieksfouten. De klachten waarvan de oorzaken te wijten zijn aan een verkeerde montage,
verkeerde manoeuvres of geen onderhoud, bevriezing, kalkaanslag of onjuiste reparatiepogingen vallen niet onder de dekking van de door ons verleende garantie. De verbruiksmaterialen en
alle onderdelen die onderhevig zijn aan slijtage die regelmatig vervangen moeten worden tijdens het gewone onderhoud en de reiniging van het apparaat vallen ook niet onder de dekking
van de garantie. Het garantiebewijs moet door de verkoper ingevuld worden en moet samen met de bon of de kwitantie waaruit de aankoopdatum blijkt bij het apparaat gevoegd worden als
het apparaat teruggezonden wordt.
Europese unie gescheiden inzameling
Dit symbool geeft aan dat dit product volgens de lokale regelgeving niet samen met huishoudelijk afval mag worden weggegooid. Wanneer dit product niet meer bruikbaar is, brengt u het
naar een hiertoe door de lokale autoriteiten aangewezen inzamelingspunt. Sommige inzamelingspunten vragen hiervoor geen vergoeding. Het apart inzamelen en recyclen van uw product
betekent dat natuurlijke hulpbronnen niet onnodig worden aangesproken en dat het product zodanig wordt gerecycled dat het milieu en de gezondheid van de mens worden beschermd.
26
Nederlandse
Circulation pump 650/180-1200/300
Drogi kliencie,
Gratulujemy dobrego wyboru i dziękujemy za zakup tego produktu o wysokiej jakości. Prosimy uważnie przeczytać instrukcję jego obsługi, która pozwoli się Państwu
zapoznać się bliżej z parametrami tego nowatorskiego urządzenia.
Opis - Rys. 1/1a -
A. Komora górna
B. Wirnik
C. Korpus pompy + komora dolna (z przegubem kulowym)
D. Podpora magnetyczna wewn.
E. Podpora magnetyczna zewn.
Uwaga!!!
Gama pomp została zaprojektowana wyłącznie do zastosowania w akwariach i nie może być używana jako pompa filtracyjna. W razie zastosowań innych niż wskazane powyżej należy
skontaktować się ze sprzedawcą.
Zachowanie zasad bezpieczeństwa
•
•
•
•
•
•
Uwaga! Przed uruchomieniem urządzenia należy sprawdzić, czy wszystkie części składowe są na swoim miejscu, oraz czy przewody i pompa nie są uszkodzone. Przed zanurzeniem rąk w
wodzie lub przed przystąpieniem do konserwacji akwarium, należy wyłączyć z prądu wszystkie urządzenia elektryczne. Należy także sprawdzić, czy napięcie wskazane na etykiecie odpowiada
wartości napięcia w Państwa sieci.
Urządzenie może być używane jedynie w pomieszczeniu zamkniętym, w którym temperatura wody nie przekracza 35°C.
Nie wolno podłączać pompy do sieci elektrycznej, jeśli brakuje jej jakichś elementów składowych.
Nie wolno podłączać pompy do sieci elektrycznej, jeśli nie została ona zainstalowana na podpórce z przyssawką magnetyczną.
Przewód zasilający nie może być naprawiany, lub zamieniany. W razie jakiejkolwiek awarii należy wymienić całą jednostkę.
Nie wolno przecinać przewodu zasilającego pompę, ani ciągnąć go w celu odłączenia z sieci.
Ostrożnie wyjmować wtyczkę z gniazdka.
Polska 27
•
•
•
•
•
•
•
•
•
•
•
•
•
•
Przed odłączeniem urządzenia z prądu wysuszyć dokładnie ręce.
Wszystkie połączenia muszą być suche, aby nie doszło do przypadkowego spięcia.
Należy sprawdzić, czy wtyczka jest czysta, sucha, bez osadów solnych.
W czasie funkcjonowania powierzchnia pompy nie może być zasłonięta.
W czasie funkcjonowania pompy należy sprawdzić, czy nie zasysa ona piasku. Piasek może poważnie uszkodzić części pompy i taka sytuacja może doprowadzić do wygaśnięcia gwarancji
(przeczytać uważnie rozdział„Konserwacja”).
Dwóch powodu dużej siły ssania dwóch części podpory magnetycznej, należy trzymać ją w miejscu niedostępnym dla dzieci.
Unikać bezpośredniego kontaktu dwóch części podpory magnetycznej.
Trzymać dwie części podpory magnetycznej za brzegi, unikać wkładania pomiędzy nie rąk lub palców.
Podpora magnetyczna przyciąga z dużą siłą przedmioty metalowe i inne magnesy z odległości 5 cm. Należy unikać zbliżania jej do ostrych i tnących przedmiotów, oraz magnesów, gdyż grozi
to przypadkowym zranieniem.
Podpora magnetyczna może spowodować stałe uszkodzenia urządzeń elektrycznych, lub innych urządzeń wrażliwych na działanie pola magnetycznego, jak na przykład rozruszniki serca, karty
kredytowe czy klucze. Nie należy zbliżać tych obiektów na odległość mniejszą niż 30 cm.
Jeśli podpora magnetyczna nie jest używana, należy zawsze nakryć ją plastikową płytką oddzielającą, znajdującą się w zestawie.
W temperaturze powyżej 50 °C magnes może częściowo lub całkowicie stracić swoją siłę przyciągania.
Przed zainstalowaniem podpory magnetycznej należy dokładnie wyczyścić powierzchnię akwarium. Zanieczyszczenia mogłyby sprawić, że podpora z przyssawką magnetyczną nie będzie
dokładnie przylegała do powierzchni. Pompa może spaść na dno akwarium niszcząc się, lub uszkadzając przedmioty znajdujące się w pobliżu.
Przechowywać instrukcję obsługi w suchym miejscu.
Instalacja
•
•
•
•
•
28
Uwaga! Przed uruchomieniem urządzenia należy sprawdzić, czy wszystkie części składowe są na swoim miejscu. Należy wyłączyć z prądu wszystkie urządzenia elektryczne i sprawdzić, czy
napięcie wskazane na etykiecie odpowiada wartości napięcia w Państwa sieci. Aby zapobiec rezonansowi lub wibracjom, zaleca się nie instalować pompy w taki sposób, by dotykała ona ścianek
akwarium, ani nie stała pionowo na dnie zbiornika.
Rozwinąć przewód elektryczny. Wsunąć bolec przegubu kulowego w odpowiedni otwór znajdujący się na wewnętrznej podporze magnetycznej -Rys. 2/2a-.
Zanurzyć całkowicie pompę w wodzie, przekręcając ją do pozycji pionowej, aby pozbyć się powietrza znajdującego się w komorze wirnika.
Przycisnąć całość razem z podporą wewnętrzną do ściany akwarium -Rys. 3/3a- w wybranym miejscu (nie zapomnieć o wyczyszczeniu tej części ścianki przed przyłożeniem do niej podpory
magnetycznej).
Trzymając jedną ręką pompę razem z podporą wewnętrzną, przycisnąć podporę magnetyczną zewnętrzną do ścianek akwarium z odległości około 10 cm od środka podpory wewnętrznej.
Ciągnąć podporę zewnętrzną aż do chwili, gdy będzie odczuwalny opór siły magnetycznej i ustawić środki tych dwóch podpór na jednej osi -Rys. 4/4a-.
Obrócić pompę w żądanym kierunku.
Polska
•
Podłączyć pompę do sieci elektrycznej.
Konserwacja / czyszczenie
•
•
•
•
•
Uwaga! Przed każdą konserwacją lub zanurzeniem rąk w wodzie należy ZAWSZE odłączyć z sieci wszystkie urządzenia elektryczne pracujące w wodzie. Częsta konserwacja i czyszczenie pompy
gwarantują prawidłowe i długotrwałe jej funkcjonowanie.
Trzymać pompę razem z podporą wewnętrzną i oddalać podporę zewnętrzną ciągnąc ją, aby znalazła się poza obszarem siły przyciągania pompy (można posłużyć się w tym celu bolcem
znajdującym się na zewnętrznej stronie podpory magnetycznej).
Zdemontować pompę według schematu -Rys. 5/5a-.
Wyczyścić wirnik i jego obudowę, usuwając ewentualne osady wapniowe za pomocą miękkiej szczoteczki; nie zaleca się używania detergentów, ani rozpuszczalników.
Złożyć wszystkie elementy w odwrotnej kolejności, zwracając uwagę, aby wszystkie ząbki znajdujące się na górnej komorze przylegały do ząbków na komorze dolnej, a przede wszystkim, aby
wał był prawidłowo umieszczony w tunelu.
W przypadku gdyby zwiększył się hałas pracy pompy i / lub zmniejszył się znacznie zasięg jej działania, spowodowany anormalnymi skokami napięcia, należy wyłączyć pompę i załączyć ją
ponownie.
Gwarancja
Urządzenie posiada gwarancję ważną 24 miesiące od dnia zakupu, obejmującą skazy materiału i wady fabryczne. Reklamacje, których podstawą jest nieprawidłowy montaż, obsługa czy
konserwacja, uszkodzenia spowodowane wystawieniem na mróz, osadami wapiennymi lub próby samodzielnej naprawy, nie zostaną uwzględnione. Materiały eksploatacyjne, z których
zrobione są wszystkie szybko zużywające się części, które powinny być co jakiś czas wymieniane w czasie zwykłej konserwacji lub czyszczenia urządzenia także nie podlegają reklamacji.
Świadectwo gwarancji powinno zostać wypełnione przez sprzedawcę, i trzeba go przedstawić w razie reklamacji, razem z bonem sprzedaży lub fakturą, na której widnieje data sprzedaży.
Unia europejska informacje dotyczące sortowania odpadów
Ten znak (przekreślony pojemnik na śmieci) oznacza, że w/w produktu nie można wyrzucać razem z odpadami gospodarstwa domowego, lecz stosować się do norm i ustawodawstwa
właściwego dla danego kraju. Kiedy produkt nie nadaje się już do użytku należy go odnieść do centrum przeróbki odpadów posiadającego legalizację lokalnych władz. Niektóre
ośrodki przyjmują te odpady bezpłatnie. Odpowiednie sortowanie, przetwarzanie i recykling waszych produktów pomagają zachowywać zasoby naturalne i chronić środowisko oraz
zdrowie istot ludzkich.
Polska 29
Circulation pump 650/180-1200/300
Уважаемый аквариумист-любитель,
благодарим Вас за выбор помпы. Для наилучшего понимания характеристик этого нового, уникального и инновационного изделия, пожалуйста,
внимательно прочтите приведенные ниже инструкции.
Описание -Рис. 1/1a-
A. Верхняя камера
B. Крыльчатка
C. Корпус помпы + Нижняя камера (с вращающимся шаровым соединением)
D. Внутренняя присоска + магнитный держатель
E. Внешняя присоска + магнитный держатель
Внимание!!!
Помпы специально разработаны для использования в аквариумах в целях создания циркуляции воды. Это не фильтрационный насос. За более подробной информацией
обращайтесь к своему поставщику или продавцу.
Информация по технике безопасности
•
•
•
•
•
•
•
30
Внимание: перед эксплуатацией убедитесь, что все компоненты помпы в работоспособном состоянии. Перед любым вмешательством необходимо отсоединить помпу, а также
любое другое погруженное в воду электрооборудование от источника электропитания. Убедитесь, что напряжение сети электропитания соответствует значению номинального
напряжения, указанному на ярлыке устройства.
Данная помпа предназначена для использования внутри помещений только в жидкостях с максимальной температурой 35°C (95 °F).
Если помпа полностью не погружена в воду, запрещено подключать её к источнику электропитания.
Если в помпе не достает каких-либо деталей, запрещено подключать её к источнику электропитания.
Если помпа не прикреплена с помощью имеющегося в комплекте магнитного крепления (присоска + магнит), запрещено подключать её к источнику электропитания.
Шнур помпы не подлежит замене или ремонту; в случае его повреждения необходимо заменить все устройство целиком.
Запрещено резать или тянуть за шнур электропитания.
Вынимать штепсель из сетевой розетки следует осторожно и обязательно сухими руками.
Руссо
•
•
•
•
•
•
•
•
•
•
•
В процессе работы следите, чтобы поверхность помпы не закупоривалась.
В процессе работы следите, чтобы внутрь помпы не засасывался песок, поскольку это может привести к серьезному повреждению устройства. Гарантия на такое повреждение не
распространяется (внимательно прочтите раздел, касающийся технического обслуживания).
Беречь от детей из-за высокой силы притяжения между магнитами крепления.
Избегать непосредственного соприкосновения магнитов между собой.
Брать магниты можно только за грани. Избегайте попадания рук и пальцев между магнитами.
Магниты с силой притягивают металлические предметы и другие магниты на расстоянии 5 см (1,97 дюймов): во избежание травмирования следите, чтобы радом с магнитами не
было лезвий, острых предметов и других магнитов.
Данный магнит может стать причиной неустраняемого повреждения электроприборов или устройств, которые могут выйти из строя под воздействием магнитного поля
(например, электронные стимуляторы сердца, кредитные карты или ключи). Держите их от магнита на расстоянии минимум 30 см (12 дюймов).
В случае прекращения эксплуатации обязательно поместите между магнитами картонную прокладку.
При повышении температуры выше 50 °C (122 °F) магниты могут частично или полностью потерять притягивающую мощность.
Перед прикреплением помпы с помощью крепления присоска+магнит стенку аквариума надо обязательно очистить: любое загрязнение поверхности может помешать
надлежащему креплению присоски и, как следствие, привести к падению помпы на дно аквариума и повреждению самой помпы и другого оборудования.
Храните данные инструкции в сухом и безопасном месте.
Установка
•
•
•
•
•
Внимание: перед началом использования убедитесь, что все компоненты помпы в работоспособном состоянии. Перед любым вмешательством надо ОБЯЗАТЕЛЬНО отсоединить
помпу, а также любое другое погруженное в воду электрооборудование от источника электропитания. Убедитесь, что напряжение сети электропитания соответствует значению
номинального напряжения, указанному на ярлыке устройства. Для предотвращения возникновения шума по причине вибраций мы рекомендуем располагать помпу так, чтобы
её корпус не касался стенок аквариума. Можно крепить помпу ко дну, чтобы она была направлена вверх.
Размотайте шнур электропитания.
Вставьте шаровое соединение в соответствующую выемку основания крепления присоска-магнит -Рис. 2/2a-.
Полностью погрузите помпу в воду и установите её в вертикальное положение, чтобы выпустить остатки воздуха из камеры крыльчатки.
Прислоните помпу к аквариумному стеклу внутренней частью крепления присоска + магнит в нужном месте, как показано на -Рис. 3/3a- (не забудьте предварительно очистить
поверхность стекла в месте прикрепления).
Удерживая одной рукой помпу прижатой к внутренней стенке аквариума, прислоните внешнюю часть магнитного крепления к стеклу с внешней его стороны на расстоянии
приблизительно 10 см (3,93 дюйма) от центра внутреннего крепления помпы. Медленно передвиньте внешнюю часть крепления в направлении внутренней части, пока не
почувствуете силу притяжения между магнитами. Разместите их так, чтобы центры магнитов располагались на одной оси. -Рис. 4/4aНаправьте поток воды в нужную сторону.
Руссо 31
•
Подключите помпу к источнику электропитания.
Регулировка
Поток воды регулируется ручкой регулировки, встроенной в камеру ротора, где также находится всасывающая трубка. Опустите ручку регулировки до конца вниз для установки
максимальной скорости потока, для уменьшения скорости потока осторожно поворачивайте ручку по часовой стрелке -рис.6-.
Техническое обслуживание
•
•
•
•
•
•
Внимание: Перед любым вмешательством надо ОБЯЗАТЕЛЬНО отсоединить помпу, а также любое другое погруженное в воду электрооборудование от источника электропитания.
Регулярное выполнение очистки и технического обслуживания гарантирует бесперебойную и продолжительную работу помпы.
Удерживая одной рукой помпу прижатой к внутренней стенке аквариума, другой рукой отведите внешний магнит в сторону (для этого используйте выступ на внешней
поверхности присоски)
Разберите, как показано на -Рис. 5/5a-.
С помощью мягкой щетки очистите крыльчатку от известкового налета. Не используйте растворители или моющие средства.
Снова соберите все детали в обратном порядке. Следите, чтобы совпали два паза камер помпы, а также убедитесь в правильном расположении вала.
При возникновении необычного шума и/или снижения производительности из-за скачков напряжения в сети электропитания, достаточно перезапустить помпу.
Гарантия
Данный прибор имеет гарантию на 24 месяца с даты покупки, которая распространяется на дефекты материалов и на производственный брак. Гарантия не
покрывает рекламации из-за ошибок при монтаже, при эксплуатации и из-за отсутствия технического обслуживания, в результате обледенения, образования
известкового налета или поломок, не подлежащих ремонту. Кроме того, гарантия не покрывает расходные материалы и детали, подвергающиеся износу, которые
должны заменяться периодически в ходе планового технического обслуживания и чистки прибора. Гарантийный сертификат заполняется продавцом и в случае
замены должен быть приложен к прибору вместе с квитанцией об оплате или чеком, подтверждающими дату покупки. При отсутствии чека о покупке, срок
гарантии исчисляется с момента производства изделия.
Европейский союз информация по утилизации
Этот символ означает, что согласно с местными законами и нормативами, изделие должно быть выброшено отдельно от обычного, бытового мусора,
Когда изделие становится непригодным, избавиться от него через Ваш коммунальный пункт приема вторсырья. Некоторые пункты приема вторсырья
принимают бесплатно. Правильно утилизированные или сданные в переработку изделия, помогают экономить природные ресурсы и гарантируют, что
правильно выполненная утилизация, оберегает человеческое здоровье и природу
32
Руссо
Circulation pump 650/180-1200/300
お客様へ
本製品をご購入いただき誠にありがとうございます。製品の構造を理解していただくために、説明書をよくお
読みください。
各部名称 -図.1-
A.A チャンバー上部
B.B インペラー
C. C ポンプ本体
D. D 回転球付きジョイント
E. E サクションカップ付マグネットサポート内側
F. F サクションカップ付マグネットサポート外側
注意
本製品は水槽内の水流を作るためのポンプとして特別に設計されており、濾過用ポンプではありません。不明な点がございましたら、
ハイドール商品販売
店もしくは国内輸入総代理店である弊社までお問い合わせ下さい。
安全に関する注意事項
•
•
•
•
•
注意
使用前に全てのパーツに傷が付いていないことをご確認下さい。作業を行なう前に、水中のポンプ、
その他の水中電子機器の電源が切れていることを必
ず確かめて下さい。製品のラベルに表記された電圧とご使用になる地域の周波数が対応していることをご確認下さい。
ポンプは35℃以下の屋内における水中使用専用です。
ポンプが完全に水に浸っていない状態で、電源を入れないで下さい。
ポンプのパーツが不足している場合、電源を入れないで下さい。
ポンプが
「サクションカップ付マグネットサポート」
で固定されていない場合、電源を入れないで下さい。
電源コードの差し替え、修理は行なわないで下さい。万が一破損が見られたらポンプ本体一式を交換して下さい。
日本
33
•
•
•
•
•
•
•
•
•
•
•
•
•
電源コードを切断したり、
引っ張ったりしないで下さい。
電源は必ず丁寧に外し、
その際手が乾いていることをご確認下さい。
作動中、
ポンプの吸水口と吐出口がふさがっていないことをご確認下さい。
作動中、
ポンプに砂が巻き込まれていないかご確認下さい。
これによりポンプは深刻なダメージを受ける可能性があります。
またこの場合は保証の対象外
となります。
(詳しくはメンテナンスの欄をご覧下さい。)
サポート内のマグネットは強力な磁力を持っているため、
お子様の手の届かない所に置いて下さい。
マグネット同士を直接接着することを避けて下さい。
必ずマグネットを横から持ち、
マグネットの間に手や指を挟まないようにご注意下さい。
マグネットは強力な磁場により、5cm以内にある金属類や他の磁石を引き付けます。怪我を避けるために、刃物や尖った物、他の磁石を近くに置くことを
避けて下さい。
マグネットは、磁力の影響を受けるペースメーカーをはじめとする電子装置や、
クレジットカード、
カギ等の電子物に常にダメージを与える恐れがありま
す。
マグネットは必ずそれらの物から最低30cm以上離して下さい。
使用しない時は、必ずマグネットの間にダンボール紙を挟んで下さい。
気温が50℃を超える場所では、
マグネットの持つ強力な磁力は失われます。
サクションカップ付マグネットサポート」
を取り付ける際、水槽面を必ずきれいにして下さい。水槽表面が汚れている場合サクションカップの性能が低下し
ます。
ポンプが水槽底面に滑り落ちると水槽内の物や、
ポンプ本体にダメージを与える結果になります。
この取扱説明書は大切に保管して下さい。
組み立て
注意
組み立て前にポンプの全てのパーツに傷が付いていないことをご確認下さい。作業を行なう前に、水中のポンプ、
その他の水中電子機器の電源が切れて
いることを必ず確かめて下さい。製品のラベルに表記された電圧とご使用になる地域の周波数が対応していることをご確認下さい。振動によって引き起こ
されるノイズや振動を避けるため、設置の際はポンプ側面と水槽面が触れないように、
またポンプを水槽底面に取り付けないことをお勧めします。
• 電源コードをほどきます。
•「回転球付きジョイント」
に付いている回転球を、
「サクションカップ付マグネットサポート内側」
の差し込み口に挿入します。-図.2参照• インペラー室の空気を逃がすため、
ポンプ全体を水中に沈めて垂直方向に向けます。
•「サクションカップ付マグネットサポート内側」
を用いてポンプを水槽側面に取り付けます。-図.3参照-(サポートを取り付ける前に水槽面をきれいにして
下さい。)
• 取り付けたポンプを片手で持ち、
「サクションカップ付マグネットサポート内側」
の中心点から約10cm離れた水槽外面に
「サクションカップ付マグネット
サポート外側」
を押し当てます。
サポート内側とサポート外側の磁石が接着するまでゆっくりとサポート外側を動かし、
それぞれの中心点を合わせます。34 日本
図.4参照• 水流の向きを調整します。
• 電源コードをコンセントにつなぎます。
調整方法
流量はポンプ本体に組み込まれたコントロールノブを使って調整することができます。
コントロールノブを上方に固定すると流量は最大になり、反時計周
りに回すと流量が弱まります。-図.A参照-
•
•
•
•
•
メンテナンス
注意
作業を行なう前に、水中のポンプ、
その他の電子機器の電源が切れていることを必ず確かめて下さい。
定期的にポンプの清掃やメンテナンスを行なうことで、
より効率的かつ長期的なパフォーマンスを維持することができます。
片手でポンプを持ち、
もう片方の手で
「サクションカップ付マグネットサポート外側」
を取り外します。
チャンバー上部、
インペラーを取り外します。-図.5参照柔らかいブラシを使ってゴミを取り除きインペラーを清掃します。
この時、洗剤や溶液を使わないで下さい。
反対の手順で部品を組み立てます。
ポンプ室の二つの切込みが対応しているか、
シャフトが正しい位置にきているか確認して下さい。
突然の電力供給の変化により起こる異音や流量の低下は、
ポンプの再起動で解決することができます。
保証
本製品には機器の材料もしくは製造上の欠陥に対してご購入日より12ヶ月の保証がついています。間違った組み立てや操作での故障、手入れの不備、機
器の誤使用、
凍結、
コケ、
石灰沈着物によるもの、
お客様自身の修理による故障などは保証対象外となります。
またインペラー等の消耗材、
消耗の対象とな
る部品は普段の手入れと装置の清掃で定期的に交換されるものであり、
それらに対しても保証は致しかねます。保証書は販売店によって記入されたもの
で、返還の場合、機器と共にレシート、
あるいは購入日を証明するレシートを持参して下さい。
また、本製品の使用による生体の死亡等には、一切の保証を
行いません。
日本
35
Technical data
Circulation pump 650/180
model
flow rate
power absorbed
Circulation pump 1200/300
model
230/240V~50Hz
650
650 l/h
4,5 W
1200
115 V ~60Hz
180
180 gph
600 l/h
4W
300
36
600 l/h
1200 l/h
7W
300 gph
8W
100 V ~50Hz
3,2 W
950
100 V ~60Hz
600
power absorbed
115 V ~60Hz
100 V ~50Hz
600
flow rate
230/240V~50Hz
950 l/h
5,4 W
100 V ~60Hz
2,8 W
950
950 l/h
7,4 W
SPARES ERSATZTEILE RECHANGES RECAMBIOS RICAMBI WISSEKSTUKKEN
mod.
650
EU
xp1601
xp1614
xp1616
xa0119
USA
xp1606
xp1615
xp1617
xa0120
EU
xp1417
xp1421
xp1423
xp1941
USA
xp1420
xp1422
xp1424
xp1943
mod.
1200
37
c i r c u l at i o n
p u m p
for aquariums
Date of sale
Verkaufsdatum
Date de vente
Fecha de venta
Data di vendita
Verkoopsdatum
販売日
A quality product made by
Guarantee Card
Garantieschein
Bon de Garantie
Bono de Garantia
Certificato di Garanzia
Waar Borgbon
保証
Stamp and signature of seller
Stempel und unterschrift des händlers
Cachet et signature du revendeur
Sello y firma del vendedor
Timbro e firma del rivenditore
Stempel en handtekening verdeller
スタンプと売り手の署名
FOR NORTH AMERICA ONLY
For questions, missing parts or warranty issues:
Please e-mail customer service at
[email protected]
Hydor
Via Voiron, 27 - 36061
Bassano del Grappa (VI) ITALY
www.hydor.com
HYDOR USA Inc.
Phone (916)920-5222
[email protected]
www.hydor.com
235504-02/01-2013