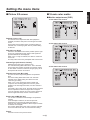
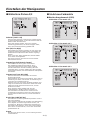
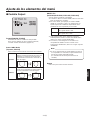
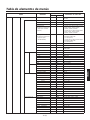
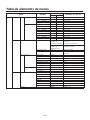
1
ENGLISH Operating Instructions HD Communication Camera ESPAÑOL ITALIANO FRANÇAIS GP-VD150E РУССКИЙ Model No. DEUTSCH <Operations and Settings> ENGLISH VERSION Contents Before use ...........................................................................2 Setting the menu items ....................................................18 Overview ..........................................................................2 Setting the menu items ..................................................18 Concerning HD Visual Communications System .............2 Top Menu .......................................................................18 Concerning the wireless remote controller (optional accessory) ....................................................2 Camera screen (when FullAuto is selected) ..................19 Trademarks and registered trademarks ...........................2 Contrast screen ..............................................................20 Camera screen (when Manual1 to 3 is selected) ...........19 About copyright and licence .............................................2 Picture 1/2 screen ..........................................................21 Disclaimer of warranty......................................................2 Picture 2/2 screen ..........................................................22 Unit operations ...................................................................3 16-axis color matrix ........................................................22 How to turn the power on and off .....................................4 System screen ...............................................................23 Output screen ................................................................24 Tur ning the power on .......................................................4 Other 1/2 screen ............................................................26 Tur ning the power off .......................................................5 Other 2/2 screen ............................................................27 Concerning simultaneous mode transition linkup ............5 Maintenance screen.......................................................28 Selecting the units..............................................................6 Firmware Version screen ...............................................28 Selecting the shooting modes (scene files).....................6 Menu item table ................................................................30 Types of shooting modes .................................................6 How to select the shooting mode .....................................7 Shooting ..............................................................................8 What to do when encountering problems in the basic shooting operations..................................9 More advanced operations ..............................................10 Manual shooting ...............................................................11 Manually adjusting the focus ..........................................11 Manually adjusting the iris..............................................11 Manually adjusting the shutter speed ............................12 Manually adjusting the gain ...........................................12 Preset memories...............................................................13 White balance adjustment ...............................................14 White balance adjustment..............................................14 Basic setting menu operations .......................................16 1 (E) wwOverview wwAbout copyright and licence pw This unit is a full HD camera integrated with a pan-tilt head and featuring a 1/3-type full HD MOS sensor and digital signal processor (DSP). Distributing, copying, disassembling, reverse compiling, reverse engineering, and also exporting in violation of export laws of the software provided with this unit are expressly prohibited. pw In addition to its optical 12 zoom lens, the unit comes with a 10 digital zoom to achieve high-quality shooting that overflows with ambiance. wwDisclaimer of warranty pw This unit is designed to be used exclusively with Panasonic HD visual communications system. Compatible HD visual communication units: KX-VC300CX, KX-VC300EX, KX-VC600CX, KX-VC600EX IN NO EVENT SHALL Panasonic Corporation BE LIABLE TO ANY PARTY OR ANY PERSON, EXCEPT FOR REPLACEMENT OR REASONABLE MAINTENANCE OF THE PRODUCT, FOR THE CASES, INCLUDING BUT NOT LIMITED TO BELOW: 1 ANY DAMAGE AND LOSS, INCLUDING WITHOUT LIMITATION, DIRECT OR INDIRECT, SPECIAL, CONSEQUENTIAL OR EXEMPLARY, ARISING OUT OF OR RELATING TO THE PRODUCT; wwConcerning HD Visual Communications System 2 PERSONAL INJURY OR ANY DAMAGE CAUSED BY INAPPROPRIATE USE OR NEGLIGENT OPERATION OF THE USER; pw For descriptions of the panning, tilting, zooming, preset and other camera operations using an HD visual communication unit, refer to the operating instructions of the unit which is supported. 3 UNAUTHORIZED DISASSEMBLE, REPAIR OR MODIFICATION OF THE PRODUCT BY THE USER; 4 INCONVENIENCE OR ANY LOSS ARISING WHEN IMAGES ARE NOT DISPLAYED, DUE TO ANY REASON OR CAUSE INCLUDING ANY FAILURE OR PROBLEM OF THE PRODUCT; wwConcerning the wireless remote controller (optional accessory) 5 ANY PROBLEM, CONSEQUENTIAL INCONVENIENCE, OR LOSS OR DAMAGE, ARISING OUT OF THE SYSTEM COMBINED BY THE DEVICES OF THIRD PARTY; pw This unit can be operated remotely using a wireless remote controller (model AW-RM50G) available as an optional accessory. It cannot be operated directly using the wireless remote controller of an HD visual communication unit. To purchase a wireless remote controller, contact your dealer. 6 LOSS OF REGISTERED DATA CAUSED BY ANY FAILURE. wwTrademarks and registered trademarks pw HDMI, the HDMI Logo and High-Definition Multimedia Interface are trademarks or registered trademarks of HDMI Licensing LLC in the United States and other countries. pw Adobe, Acrobat Reader, and Reader are either registered trademarks or trademarks of Adobe Systems Incorporated in the United States and/or other countries. How the model’s Operating Instructions manuals are configured pw The manual of this HD communication camera (hereafter, “the unit”) is divided into two manuals: one is the <Operations and Settings> (this manual in the PDF file), and the other is the <Basics>. Before installing the unit, be sure to read the <Basics> to ensure that the unit is installed correctly. 2 (E) ENGLISH Before use Unit operations All the operations of the unit can be performed using a wireless remote controller (model AW-RM50G) available as an optional accessory. The operation procedures detailed in this manual are operations performed from the wireless remote controller. Note pw The unit cannot be operated directly using the wireless remote controller of an HD visual communication unit. 3 (E) wwTurning the power on When turning on the supply of power to the unit from the STANDBY mode When supplying power to turn on the unit 1 Set all the power switches of the units and 1 Check that the unit is in the STANDBY mode. devices connected in the system to ON. pw Check that the STANDBY mode has been established (the status display lamp is lit in orange). 2 Supply power to the unit. pw This unit does not have a power switch. When power is supplied to it, the status display lamp will light up orange. What happens next is that the initial operations are performed, and when they have been completed, the POWER ON mode is established, images are output and control becomes possible. When the POWER ON mode is established, the status display lamp will light up green. 2 Press one of the [CAM1] to [CAM4] buttons on the wireless remote controller to select the unit. 3 Press the [ON/STANDBY] button on the wireless remote controller for at least 2 seconds. The POWER ON mode is established, images are output, and control can be exercised. pw The unit’s status display lamp now lights up green. Notes pw It takes about 30 seconds per unit for the initial settings operation to be completed. During this period, the unit cannot be operated. (Status display lamp: light up orange) pw When operation is transferred to the STANDBY mode: The current pan-tilt position is stored in the memory (as a POWER ON preset), and the camera moves so that it points toward the back. pw When operation is transferred to the POWER ON mode: The camera moves to the position which was stored in the memory (as a POWER ON preset) when operation was transferred to the STANDBY mode. Note pw When operation is transferred to the POWER ON mode: The camera moves to the position which was stored in the memory (as a POWER ON preset) when operation was transferred to the STANDBY mode. 4 If a multiple number of units are going to be used, repeat steps 2 and 3 as required. The unit’s status display lamp blinks green when a signal matched by the remote control ID has been received, and it blinks orange when a signal that is not matched by the remote control ID has been received. 4 (E) ENGLISH How to turn the power on and off How to turn the power on and off wwConcerning simultaneous mode transition linkup wwTurning the power off 1 Turn off the supply of power to the unit. pw The unit’s power can be turned off no matter which mode (STANDBY mode or POWER ON mode) is established. As soon as the HD visual communication unit connected to the unit is set to the screen standby mode, the unit transfers to the STANDBY mode. Similarly, as soon as the device is released from the screen standby mode, the unit transfers to the POWER ON mode. 5 (E) Selecting the units button. The unit’s status display lamp blinks green when a signal matched by the remote control ID has been received, and it blinks orange when a signal that is not matched by the remote control ID has been received. Selecting the shooting modes (scene files) wwTypes of shooting modes This unit has four preset shooting modes, each of which corresponds to a set of circumstances in which the subject will be shot. Select the mode that satisfies the shooting conditions and suits your preferences. The settings can be changed by menu operations. FullAuto: Factory setting The shutter speed and lens iris setting are adjusted automatically. Manual1 The settings of your preferences can be established in line with the shooting scene, lighting and other conditions. pw When using this unit while connected to a Panasonic HD visual communication unit, use the “FullAuto” shooting mode. pw The results of the white balance and other adjustments are stored in the memory separately by shooting mode. Be absolutely sure to select the shooting mode before making any adjustments. Manual2 The settings of your preferences can be established in line with the shooting scene, lighting and other conditions. Manual3 The settings of your preferences can be established in line with the shooting scene, lighting and other conditions. Note pw If “FullAuto” has been selected as the setting for Scene on the camera menu, for example, all the auto settings will be turned on, and manual operations will no longer be possible for some of the items. 6 (E) ENGLISH 1 Press the [CAM1], [CAM2], [CAM3] or [CAM4] Up to four units can be operated using one wireless remote controller. Select the unit (or units) to be operated from the wireless remote controller. Even when using only one unit, it must still be selected. Selecting the shooting modes (scene files) wwHow to select the shooting mode 4 Press the [] button. The “Camera” sub-menu is displayed on the monitor. 2, 8 1 Camera Scene Contrast Level FullAuto 0 3, 5, 7 4, 6, 7 Return 1 Press the [CAM1], [CAM2], [CAM3] or [CAM4] 5 Press the [] or [] button to bring the cursor button to select the unit. to “Scene”. 2 Press the [MENU] button for at least 6 Press the [] button. 2 seconds. The shooting mode blinks. The Top Menu is displayed. Top Menu 7 Press the [] or [] button to select the Camera Scene: FullAuto System Mainte nance shooting mode (FullAuto, Manual1, Manual2 or Manual3) to be used, and press the [] button to enter the selection. For details, refer to page 19. 8 Press the [MENU] button for at least 2 seconds. The menu display is exited. 3 Press the [] or [] button to bring the cursor to “Camera”. 7 (E) qwSwitching the direction or zoom speed qwChanging the camera’s direction Moving the camera toward the left or right (panning): Press the [] or [] button. Changing the direction or zoom at high speed: Press the [FAST] button. Moving the camera up or down (tilting): Press the [] or [] button. Changing the direction or zoom at low speed: Press the [SLOW] button. Moving the camera diagonally: Press the [] or [] button and [] or [] button at the same time. The lens focus control speed is also changed at the same time. Returning the camera to the reference position: Press the [HOME] button for at least 2 seconds. qwUsing the zoom function Zooming in (the subject becomes magnified in size): Press the [T] button of [ZOOM]. Zooming out (the subject becomes reduced in size): Press the [W] button of [ZOOM]. 8 (E) ENGLISH Shooting What to do when encountering problems in the basic shooting operations The menu screen is displayed. If the trouble is not resolved by taking the action suggested below, refer to “Troubleshooting” (in the <Basics>). Press the [MENU] button for at least 2 seconds to exit the menu. The unit does not move. The lens focus is not adjusted automatically. pw Press the [CAM1], [CAM2], [CAM3] or [CAM4] button to select the unit which is to be operated. If only one unit is being used, it is normally selected using the [CAM1] button. pw If the unit’s status display lamp is off or lights up orange, it means that the unit’s power is not on. Refer to “How to turn the power on and off” (page 4), and turn on the power. pw If the unit’s status display lamp does not blink even when the wireless remote controller is operated near the unit’s wireless remote controller signal light-sensing area, it means that the wireless remote controller’s batteries have run down. Replace the batteries. Press the [A/FOCUS] button to switch to auto focusing. (Auto focusing does not work during panning or tilting operations.) The camera picture is too light or too dark. 1. Press the [A/IRIS] button to switch automatically to the lens iris adjustment. 2. Press the [AUTO] button of [GAIN] to switch automatically to the gain adjustment. Something is wrong with the colouring of the camera pictures. Refer to “Auto tracking white adjustment (ATW)” (page 15), and switch to “ATW”. 9 (E) White balance adjustment (see pages 14 to 15) Manual shooting (see pages 11 to 12) pw pw pw pw Manual adjustment of focus Manual adjustment of iris Manual adjustment of shutter speed Manual adjustment of gain pw This adjustment is performed to express the white accurately. Its setting also has an effect on the colour tones of the entire screen. pw It must be performed when using the unit for the first time or when the unit has not been used for a prolonged period. pw It must be performed when the lighting conditions or brightness has changed. pw Once the white balance has been attained, no further adjustment is required provided that the unit is going to be used under the same conditions. Preset memories (see page 13) pw Up to 12 settings for the camera direction (panning and tilting), zoom, focus, iris, gain up and white balance can be registered in the preset memories, and called. pw The number of settings which can be registered and called is 12, which is the number of settings for the wireless remote controller (model AW-RM50G), which is sold separately. 10 (E) ENGLISH More advanced operations Manual shooting wwManually adjusting the focus wwManually adjusting the iris The lens focus can be adjusted manually. The lens iris can be adjusted manually. 1 Press the [M/FOCUS] button to switch the 1 Press the [M/IRIS] button to switch the iris to manual adjustment. focus to manual adjustment. 2 Press the [F] or [N] button of [FOCUS], and 2 Adjust the iris using the [IRIS +] or [IRIS –] adjust the focus. button. When the [F] button is pressed, the focus moves further away (far); conversely, when the [N] button is pressed, it moves nearer (near). The speed of focusing and other adjustments can be switched to fast or slow by pressing the [FAST] or [SLOW] button, respectively. Press the [IRIS +] button to adjust the lens iris in the opening direction; conversely, press the [IRIS –] button to adjust the lens iris in the closing direction. 3 If necessary, press the [A/IRIS] button to return 3 If necessary, press the [A/FOCUS] button to the iris to the automatic adjustment. return the focus to the automatic adjustment. Note pw When the focus is set to manual, the subject may go out of focus during panning, tilting and zooming. Therefore, the unit comes with a function which compensates for this. (Focus compensation during zooming function: Focus ADJ With PTZ.) This function was set to ON at the factory. If the function has been set to OFF, either adjust the focus, as required, after zooming or set the focus to auto. (See page 26.) 11 (E) wwManually adjusting the gain wwManually adjusting the shutter speed The gain is adjusted using the wireless remote controller. For further details, refer to the [Gain] item on page 20. The shutter speed adjustment can be set using one of the two camera menu procedures. One is a method that specifies the time (where a time such as 1/250 sec. is designated), and the other is a method that specifies the frequency (where synchro scan, 50.20 Hz, etc. is designated). When shooting a TV screen or PC monitor screen, the horizontal noise generated when the screen is shot can be minimized by adjusting the frequency to the screen frequency using synchro scan. Note pw When adjusting the gain, the light quantity may change suddenly (causing the image output to be subjected to a shock). 1 Press the [OFF], [LOW] or [HI] button. These buttons enable the gain increase to be selected in three steps. [LOW] is used to select 9 dB; [HI] is used to select 18 dB. Perform the adjustments on the Camera menu. For further details, refer to the [Shutter Mode] and [Step/Synchro] items on page 20. 2 If necessary, press the [AUTO] button in order to return the gain to the automatic adjustment (AGC). The maximum gain of the automatic adjustment can be set by the menu. For further details, refer to the [AGC Max Gain] item on page 20. 12 (E) ENGLISH Manual shooting Preset memories Twelve settings (preset No.1 to No.12) can be registered and called using the wireless remote controller. The [1] to [12] buttons correspond to the unit’s preset memories No.1 to No.12. This unit enables up to 12 settings for the camera direction (panning and tilting), zoom, focus, iris, gain and white balance to be registered in its preset memories, and called. pw The operating mode (manual or auto setting) is not registered for the focus and iris settings. The current focus and iris values are registered. pw The focus and iris values can be recalled only when the manual settings are applicable. pw AWB A, AWB B or ATW is registered as the white balance setting. The values selected when AWB was established are recalled as the adjustment values of AWB A or AWB B. qw Registering the settings in the preset memories 1 Display the picture to be shot on the monitor. Operate the pan, tilt or zoom buttons to determine the camera angle. Adjust the focus, iris, gain and white balance if they need to be adjusted. Notes 2 While holding down the [PRESET] button, pw When there is a large difference in the environmental temperature between the time of registration and the time the setting is called, displacement of the preset position may occur. pw If displacement occurs, perform registration again. pw While preset settings are being called, it is not possible to perform manual operations such as panning, tilting, zooming or iris adjustments. pw If, when one set of preset settings has been called, another set of preset settings is then called, the first set of preset settings which have been called will take precedence. press the button corresponding to the preset memory number. pw If a preset memory number with an already registered setting has been selected, the existing setting will be erased and replaced with the new one. qw Calling the settings of the preset memories 1 Press the button in which the preset memory setting has been registered. 13 (E) White balance adjustment ENGLISH wwWhite balance adjustment qwAutomatic adjustment (AWB: AWB A or AWB B) In order for the white to be reproduced accurately, the ratio between the three primary colours (RGB) is adjusted. If the white balance has shifted out of adjustment, not only will the white be reproduced poorly but the colour tones of the entire screen will also be degraded. 1 Shoot a white subject (such as a white wall or handkerchief) so that it fills the screen. pw This adjustment must be performed when using the unit for the first time or when the unit has not been used for a prolonged period. pw It must be performed when the lighting conditions or brightness has changed. pw Do not shoot shiny or very bright objects. pw Steps 2 through 8 represent the procedure for selecting the “AWB A” or “AWB B” memory. They need not be taken if a selection has already been made. When the [SET] button on the wireless remote controller has been pressed, either the AWB (automatic white balance) adjustment which is performed automatically or the ATW (automatic tracking white) adjustment which is constantly and continuously adjusted can be selected. 2 Select Manual1, Manual2 or Manual3 as the shooting mode by following the procedure in “Selecting the shooting modes (scene files)” (page 7). The results of the AWB adjustment can be stored in two memories, A and B, when “AWB A” or “AWB B” has been selected for the white balance. Camera pw Once the white balance has been adjusted when the unit is used with the same settings and under the same conditions, its setting is completed simply by selecting a menu setting. There is no need to set it again. pw Once a new setting is entered, the previous setting will be erased. Scene Contrast Picture Color Matrix Manual1 Return Use the two memories to store settings corresponding to different shooting conditions. 3 Press the [] or [] button to bring the cursor to “Picture”. 4 Press the [] button. The “Picture 1/2” sub-menu is displayed. Picture 1/2 Chroma Level AWB Mode R Gain B Gain Detail Flesh Tone Mode DNR Return 14 (E) -1 AWB A 0 0 Low Off High White balance adjustment Notes 5 Press the [] or [] button to bring the cursor pw ON must be selected as the OSD Status setting in order for messages to be displayed. [Top Menu]>[System]>[OSD Status] on [Other 2/2] pw White balance may not be correctly set if the lighting of the object is too weak. pw Since the unit has a built-in memory, the set white balance will remain in the memory even if power is turned off. Therefore, it is not necessary to reset the white balance if the colour temperature of those objects remains unchanged. However, it must be reset if the colour temperature changes, such as when you move from indoors to outside, or vice versa. to “AWB Mode”. 6 Press the [] button. “AWB Mode” starts blinking. 7 Press the [] or [] button to change the AWB mode to be used to “AWB A” or “AWB B”, and press the [] button to enter the selection. 8 Press the [MENU] button for at least 2 seconds. qwAuto tracking white adjustment (ATW) The menu display is exited. When the white balance adjustment is set to “ATW”, the white balance continues to be adjusted automatically all the time, and it is automatically corrected even when the light source or colour temperature has changed to produce completely natural pictures. 9 Press the [SET] button for at least 2 seconds. The auto white balance adjustment (AWB) is performed, and the white balance setting is entered. pw When the white balance adjustment is completed successfully, “AWB OK” appears in the centre of the screen. This function works when “ATW” is selected instead of “AWB A” or “AWB B” by following the steps for “Automatic adjustment” in “White balance adjustment” (page 14). Notes pw ATW might not function properly when high brightness light (ex. fluorescent lamp) beams into a screen. pw White balance may not be accurately set if there is no white object in the scene being shot. pw The white balance may shift out of adjustment when a different kind of light source such as sunlight or fluorescent lighting applies. AWB OK pw When the adjustment has failed, an error message such as “OUT RANGE NG”, “HIGH LIGHT NG”, “LOW LIGHT NG” or “ATW NG” is displayed. 15 (E) Table of operations Menus are displayed on the monitor when the unit’s settings are to be selected. The monitor is connected to the video signal output connector. The basic menu operations involve displaying sub-menus from the Top Menu items, and selecting settings on the sub-menus. Some sub-menus have menu items for performing more detailed settings. Menu operation The menu operations are conducted using the wireless remote controller. The following are the basic operations for changing the menu item settings using the wireless remote controller. Wireless remote controller Selecting the unit to be operated Press the [CAM1], [CAM2], [CAM3] or [CAM4] button. Displaying the Top Menu Press the [MENU] button for at least 2 seconds. Selecting the items Press the [] or [] ([] or []) button. Displaying the sub-menus Press the [] button. Returning to the previous menu With the cursor at the [Return] position, press the [] button. Changing the settings With the cursor at the item to be changed, press the [] button to start the item’s value blinking. Use the [], [], [] and [] buttons to change the value, and press the [] button to enter the change. Canceling the setting change While the setting is blinking, press the [MENU] button quickly (for less than 2 seconds). Exiting the menu operations Press the [MENU] button for at least 2 seconds. Note pw Perform the menu operations and exit from the menus using the wireless remote controller which displayed the Top Menu. 16 (E) ENGLISH Basic setting menu operations Basic setting menu operations 1 Press the [CAM1], [CAM2], [CAM3] or [CAM4] 9 After the setting has been completed, press button to select the unit which is to be operated. the [MENU] button for at least 2 seconds. The menu display is exited. 2 Press the [MENU] button for at least 2 seconds. The Top Menu is displayed. 3 Press the [] or [] button to bring the cursor to the item to be selected. Each time the [] or [] button is pressed, the cursor moves. The cursor can be moved in the same way using the [] and [] buttons. 4 Press the [] button. The sub-menu of the selected item is displayed. (Some sub-menu items have a sub-menu of their own.) 5 Press the [] or [] button to bring the cursor to the item to be set. Each time the [] or [] button is pressed, the cursor moves. The cursor can be moved in the same way using the [] and [] buttons. With the cursor at the “Return” position, press the [] button to return to the previous menu. 6 Press the [] button. The value of the item to be set starts blinking. 7 Press the [] or [] button to change the setting. The setting can be changed in the same way using the [] and [] buttons. 8 Press the [] button. The value of the item to be set is entered, and it stops blinking. 17 (E) wwTop Menu wwSetting the menu items When the unit’s settings are to be selected, the menus are displayed on the monitor. The monitor is connected to the video signal output connector. The basic menu operations involve displaying sub-menus from the Top Menu items, and selecting settings on the sub-menus. Some sub-menus have menu items for performing more detailed settings. For details on the basic operations to display the menus and change the items using the wireless remote controller, refer to pages 16 to 17. Top Menu Camera Scene: FullAuto System Maintenance The “ ” and “ ” marks in the menu titles indicate the hierarchical level of the menu currently displayed. For instance, “ ” indicates the first hierarchical level whereas “ ” and “ ” indicate that the second hierarchical level is now displayed. Menu items accompanied by a “ ” mark indicate data which is stored on a scene by scene basis; menu items accompanied by a “ ” mark indicate data which is stored together for one camera regardless of the scenes. Camera Select this to open the camera menu relating to the camera images. System Select this to open the system menu relating to the camera’s output image settings, etc. Maintenance Select this to display the Maintenance menu used to check the camera’s firmware version or initialize its settings. Note pw The Top Menu does not have a “Return” setting. To close the menu screen, use the wireless remote controller to perform the operation to close the menu screen. For details, refer to pages 16 to 17. 18 (E) ENGLISH Setting the menu items Setting the menu items wwCamera screen (when Manual1 to 3 is selected) wwCamera screen (when FullAuto is selected) This menu is used for the camera image settings. Camera Cam era Scene Contr ast Level Scene Contrast Picture Color Matrix FullAuto 0 Manual1 Return Return Scene [FullAuto, Manual1, Manual2, Manual3] Scene [FullAuto, Manual1, Manual2, Manual3] Refer to section on Scene in the column on the left. Selected here is the shooting mode that matches the shooting situation. Select the mode which best suits the prevailing shooting conditions and the user’s preferences. FullAuto: Contrast Select this to display the Contrast screen to adjust the brightness. In this mode, the optimum settings and adjustments for the shooting conditions at hand are automatically established. When “FullAuto” has been selected, the detailed setting and adjustment menus are not displayed. Picture Select this to display the Picture screen to adjust the image quality. Two screens (Picture 1/2 and Picture 2/2) are provided for the image quality adjustment menu. Manual1 to 3: In these modes, the detailed settings and adjustments are established manually to match the prevailing shooting conditions and the user’s preferences. When the Manual1, Manual2 or Manual3 mode has been selected, the detailed setting and adjustment menu for the mode concerned is displayed. Color Matrix Select this to load the color matrix data which has been preset and compensate the saturation and hue. Return Use this to return to the previous menu. Contrast Level [–5 to +5] Use the contrast level to adjust the image brightness. Return Use this to return to the previous menu. 19 (E) wwContrast screen Frame Mix [Auto, Off, 6dB, 12dB, 18dB] Co ntrast Select for frame addition (gain-up using sensor storage) amount. This item can be set when “Off” is selected as the “Shutter Mode” item setting. When frame addition is performed, it will appear as if the images are missing some frames. Contra st Mode Auto Contr ast Level 0 Shutt er Mode ---Step /Synchro ---Fram e Mix ---Auto F.Mix Max Gain 0dB Gain Auto AGC Ma x Gain 18dB Return AutoF. Mix Max Gain [0dB, 6dB, 12dB, 18dB] When “Auto” for the “Contrast Mode” or “Auto” for the “Frame Mix” is selected, the maximum frame addition amount can be set. If frame addition is performed at the Auto setting, it will appear as if the images are missing some frames. Contrast Mode [Auto, Manual] This item is used to select whether the image brightness (contrast) is to be controlled automatically or manually. Auto: Gain [Auto, 0dB, 3dB, 6dB, 9dB, 12dB, 15dB, 18dB] The iris, shutter speed and frame addition are controlled and the camera brightness is adjusted automatically. The image gain is adjusted here. In locations which are too dark, adjust the gain upward; conversely, in locations which are too bright, adjust it downward. When “Auto” is set, the light quantity is adjusted automatically. The noise increases when the gain is increased. Switching the gain is also possible by pressing the [OFF], [LOW], [HI] and [AUTO] buttons for [GAIN] on the wireless remote controller. Manual: Operations are performed using the manually set values. Switching between the contrast modes is also possible by pressing the [A/IRIS] and [M/IRIS] buttons on the wireless remote controller. Contrast Level [–5 to +5] Set here is the contrast level when the image brightness is adjusted. This item can be set when “Auto” has been selected as the “Contrast Mode” setting. AGC Max Gain [6dB, 12dB, 18dB] When “Auto” is selected as the “Gain” setting, the maximum gain-up amount can be set. Return Shutter Mode [Off, Step, Synchro] Use this to return to the previous menu. Select for camera shutter speed. This item can be set when “Manual” has been selected as the “Contrast Mode” setting. Off: The shutter is set to OFF (so that it cannot be tripped). Step: The step shutter is set (the steps can be changed). Synchro: The synchro shutter is set (the setting can be changed continuously). Step/Synchro This is used to adjust the shutter speed in the mode which was selected as the “Shutter Mode” setting. When a higher shutter speed is selected, fast-moving subjects do not become blurred easily but the images will be darker. The shutter speeds that can be set are listed below. When “Step” is selected as the “Shutter Mode” When “Synchro” is selected as the “Shutter Mode” 1/120, 1/250, 1/500, 1/1000, 1/2000, 1/4000, 1/10000 50.20 Hz to max. 538.51 Hz (255 steps) 20 (E) ENGLISH Setting the menu items Setting the menu items wwPicture 1/2 screen DNR [Off, Low, High] Pi cture 1/2 Chroma Level AWB Mo de R Gai n B Gai n Detail Flesh Tone Mode DNR Set here is the level of the digital noise reduction effect so that light, noise-free and clear images will be output even at night and in other low-brightness environments. When “Low” or “High” is selected, even more noise can be eliminated. However, there is an increased possibility that afterimages may occur. -1 AWB A 0 0 Low Off High Return Return Use this to return to the previous menu. Chroma Level [–3 to +3] Set here is the colour intensity (chroma level) of the images. Notes pw When the automatic white balance (AWB) adjustment is performed, the R Gain and B Gain values return to “0”. pw When “AWB A” or “AWB B” has been selected as the AWB Mode setting, the R Gain and B Gain adjustment values can be stored in the two memories (A and B). pw When new values are set, the previous data is deleted. Use one memory for one set of shooting conditions and the other memory for another set of shooting conditions. pw In registering data in the preset memories, the R Gain and B Gain settings (-30 to +30) are not stored, but the white balance (color) statuses that are established after adjustments have been made using R Gain and B Gain can be stored. pw If Mode A has been selected as the Preset Scope setting, the R Gain and B Gain settings will return to “0” when the data in the preset memories is recalled. pw When ATW has been selected as the AWB Mode setting, R Gain and B Gain cannot be adjusted. AWB Mode [ATW, AWB A, AWB B] The white balance mode is selected here. Select the mode when the colouring is not natural because of the nature of the light source or other factors. If the white colour serving as the reference can be recognized, subjects can be shot with natural colouring. ATW: In this mode, the white balance is compensated for automatically, even if changes occur in the light source or colour temperature, by a process of continuous and automatic adjustment. AWB A, AWB B: When AWB A or AWB B is selected and the white balance is executed, the adjustment results obtained are stored in the memory selected. When AWB A or AWB B is then selected, the white balance stored in the selected memory can be recalled. R Gain, B Gain [–30 to +30] When “AWB A” or “AWB B” has been selected as the AWB Mode setting, the white balance can be finely adjusted upon completion of the automatic white balance (AWB) adjustment. Detail [Off, Low, High] The image detail (image sharpness) is adjusted here. When “Low” or “High” is selected, the detail is enhanced. Flesh Tone Mode [Off, Low, High] Set here is the flesh tone mode for displaying the subjects’ skin so that it appears more smoothly and eye-pleasingly. When “Low” or “High” is selected, the effect is enhanced even more. 21 (E) ww16-axis color matrix wwPicture 2/2 screen qwMonitor output menu (OSD) Pi cture 2/2 Pedest al DRS Gamma Type Gamm a Level Back L ight COMP. <Color matrix 1/3 screen> -5 Low ------Off Color Matrix 1/3 Matrix Select USER [Saturation] [Phase] Axis01 +50 0 Axis02 0 0 Axis03 0 0 Axis04 +35 +5 Axis05 0 0 Axis06 0 0 Return Return Pedestal [–10 to +10] This item is used to adjust the black level (adjust the pedestal) so that the dark parts of the images are easier to see. These parts become darker when a negative setting is selected and, conversely, lighter when a positive setting is selected. <Color matrix 2/3 screen> Color Matrix 2/3 DRS [Off, Low, High] Set here is the DRS function which provides just the right amount of compensation when images with significant light/dark differences are displayed. When “Low” or “High” is selected, the effect is enhanced even more. This may make noise more perceptible with some scenes. Matrix Select USER [Saturation] [Phase] Axis07 +30 0 Axis08 -20 +10 Axis09 0 -30 Axis10 0 0 Axis11 +10 +50 Axis12 0 0 Return Gamma Type [Off, Normal, Cinema] Selected here is the type of gamma curve. The selected setting takes effect when “Off” is selected as the “DRS” item setting. Normally, the “Normal” setting is used. When “Cinema” is selected, images giving off an atmosphere like movies can be shot. <Color matrix 3/3 screen> Color Matrix 3/3 Matrix Select USER [Saturation] [Phase] Axis13 0 0 Axis14 +35 +10 Axis15 0 0 Axis16 0 0 Gamma Level [Low, Mid, High] This item is used to adjust the gamma compensation level. The item’s setting takes effect when “Off” has been selected as the “DRS” setting and “Normal” as the “Gamma Type” setting. When “Low” is set, the images appear sedate and composed. The resulting gamma curve has a gentle gradient in the low-brightness areas, and the contrast is sharper. Conversely, when “High” is set, the tonal range in the dark area is expanded so that the images take on a lighter tone. The resulting gamma curve has a sharp gradient in the low-brightness areas, and the contrast is softer. Return Back Light COMP. [Off, On] “On” or “Off” is set here for the backlight compensation function. Under backlight conditions, the function prevents darkening as a result of light striking the backs of subjects, and makes it possible to shoot images in shade or shadow more brightly. The function takes effect when “Auto” has been selected as the Contrast Mode, Gain or Frame Mix item setting. Return Use this to return to the previous menu. 22 (E) ENGLISH Setting the menu items Setting the menu items wwSystem screen qwColor Matrix 1/3 to 3/3 screens: Matrix Select [Normal, EBU, NTSC, USER] This menu has items that relate to the camera’s output image settings. This loads the color matrix data which has been preset, and compensates the saturation and hue. When “USER” is selected, the saturation and hue can be finely adjusted using the 16-axis color matrix (Axis01 to Axis16). System Output Other qwColor Matrix 1/3 to 3/3 screens: Axis01 to Axis16:Saturation [–127 to +127] Return qwUser Color Matrix Setup screen: Axis01 to Axis16:Saturation [–127 to +127] Output This enables the saturation of Axis01 to Axis16 to be finely adjusted. This displays the Output screen on which to select the camera’s output image settings. Other qwColor Matrix 1/3 to 3/3 screens: This displays the Other screen on which to select the settings for the installation status of the camera’s pan-tilt head unit and operating speed as well as the settings relating to the other functions. Axis01 to Axis16:Phase [–127 to +127] qwUser Color Matrix Setup screen: Return Axis01 to Axis16:Phase [–127 to +127] Use this to return to the previous menu. This enables the hue of Axis01 to Axis16 to be finely adjusted. 23 (E) wwOutput screen HDMI Color [RGB-NOR, RGB-ENH, YCbCr422, YCbCr444] Set here is the HDMI colour output. p When an HDMI monitor is used, use “YCbCr422” under normal circumstances. p In cases where, for instance, HDMI (RGB) signals are converted and output to a DVI monitor, the settings required will differ depending on the colour gradation supported by the monitor. Ou tput Format Down C ONV. Mode HDMI C olor 1080/50i Squeeze YCbCr422 RGB-NOR The RGB output signals are output in the 16 to 235 range. RGB-ENH The RGB output signals are output in the 0 to 255 range. Return p If the black parts of the images appear overexposed when “RGB-NOR” has been selected, use the “RGBENH” setting instead. p Conversely, if the images are displayed with a loss of dark detail when “RGB-ENH” has been selected, use the “RGB-NOR” setting instead. Format [1080/50i, 576/50p] The video format is changed on this screen. For details on how to change the format, refer to “Changing the format” (page 25). Note Down CONV. Mode [Squeeze, SideCut] pw If an HDMI Color setting which is not supported by the monitor has been specified, the HDMI Color setting may be changed automatically. (The menu display will remain unchanged.) The down-conversion mode is selected here. When the 4:3 aspect ratio has been set for the monitor screen, the images Squeeze are squeezed horizontally and extended vertically changing the view of the angle. Return Use this to return to the previous menu. SideCut With the vertical height serving as the reference, the parts which extend beyond this at the two sides are cropped changing the view of the angle. 24 (E) ENGLISH Setting the menu items Setting the menu items qwChanging the format Format unchanged screen When the format is changed on the Output screen from its current setting, the Format change check screen appears. Format change check screen Format FO RMAT unchanged Do you want to set Format ( 1080/50i)? CANCEL O.K. p The format (1080/50i, 576/50p) to be set is displayed within the parentheses on the screen. p When the cursor is moved to “O.K.” on the format change check screen and the setting is entered, the Format Set screen appears for a few seconds, and the format is changed. After the format has been changed, the display returns to the Output screen. With some types of monitors, the Format Set screen may not be displayed. Format Set screen Format ( 1080/50i) Set p The format (1080/50i, 576/50p) to be set is displayed within the parentheses on the screen. p When the cursor is moved to “CANCEL” on the format change check screen and the setting is entered, the Format unchanged screen appears for 5 seconds, the format is left unchanged, and the display returns to the Output screen. Note pw Do not make any changes when connecting to an HD visual communications system. 25 (E) wwOther 1/2 screen Digital Zoom [Disable, Enable] “Enable” or “Disable” is set here for the digital zoom function. If zooming is performed toward the Tele end beyond the maximum position when “Enable” has been selected, the digital zoom can be operated continuously. Zooming will stop temporarily at the position where the optical zoom and digital zoom are switched so after it has stopped at this position, proceed with zooming again. When the setting is changed to “Disable” while already in the digital zoom region, the zoom will automatically move to the maximum position of the optical zoom. Ot her 1/2 Instal l Position Desktop Preset Speed 10 Preset Scope Mode A Digita l Zoom Disable Speed With Zoom POS. On Focus Mode Auto Focus ADJ With PTZ. ---Return Speed With Zoom POS. [Off, On] “On” or “Off” is set here for the function used to adjust the camera direction’s adjustment speed in conjunction with the zoom magnification. When “On” is set, the panning and tilting operations will become slower in the zoom status. This function has no effect during preset operations. Install Position [Desktop] Stand-alone is the only installation option available for the unit. Desktop: Stand-alone installation Preset Speed [1 to 30] Focus Mode [Auto, Manual] There are 30 preset pan-tilt operation speeds when regenerating the camera direction and other information which are registered in the preset memory. “Auto” or “Manual” is set here for the focusing function. Auto: The subjects are always brought into focus automatically. Manual: The focus is operated manually. Switching between the focus modes is also possible by pressing the [A/FOCUS] and [M/FOCUS] buttons on the wireless remote controller. Note pw If a high value is selected for the Preset Speed setting, the image on the screen may shake when operation stops. Focus ADJ With PTZ. [Off, On] Preset Scope [Mode A, Mode B, Mode C] “On” or “Off” is set here for the function which compensates for out-of-focusing when it occurs during panning, tilting or zooming operations at the manual focus setting. When “Off” is set, adjust the focus as required after zooming or set the focus to the auto mode. This item can be selected only when “Manual” has been selected as the “Focus Mode” setting. Selected here are the setting items to be recalled when the contents of the preset memory are regenerated. Mode A: Pan, Tilt, Zoom (including digital zoom), Focus, Iris, Gain, White-BAL Mode B: Pan, Tilt, Zoom (including digital zoom), Focus, Iris Mode C: Pan, Tilt, Zoom (including digital zoom), Focus Return Use this to return to the previous menu. 26 (E) ENGLISH Setting the menu items Setting the menu items wwOther 2/2 screen Note pw When menu operations cannot be performed: 1. Tur n off the power of the units and devices that are connected. 2. Disconnect the unit’s power cable, and plug it back in. 3. Perform the operation for turning on the unit’s power from the wireless remote controller. 4. After changing this item, turn off the unit’s power and turn it back on. Ot her 2/2 Tally Enable Enable OSD Of f With Tally Off OSD St atus Off Return Tally Enable [Disable, Enable] Selecting this item has no effect since this is an expansion function. OSD Off With Tally [Off, On] Selecting this item has no effect since this is an expansion function. OSD Status [Off, On] “On” or “Off” is set here for the status display which appears during AWB operations. Return Use this to return to the previous menu. 27 (E) wwFirmware Version screen wwMaintenance screen Firmware Version Model GP-VD150 CPU Software Camera Main V01.00 Pan/Tilt V01.00 Network V--.-- Mai ntenance Firmwa re Version Initia lize PLD Camera Output Return Return V01.00 V01.00 Model Firmware Version This displays the model name. This is selected to display the Firmware Version screen on which to check the version of the firmware used. CPU Software Camera Main Initialize This displays the software version of the camera unit. This is selected to display the Initialize screen on which to initialize the camera’s settings. For details on operation, refer to “Concerning initialization” on page 29. CPU Software Pan/Tilt This displays the software version of the pan-tilt unit. CPU Software Network Return This displays “V--.--”. Use this to return to the previous menu. PLD Camera This displays the PLD version of the camera unit. PLD Output This displays the PLD version of the output unit. Return Use this to return to the previous menu. 28 (E) ENGLISH Setting the menu items Setting the menu items qwConcerning initialization Menu settings unchanged screen When “Initialize” is selected on the Maintenance screen, the Initialize screen appears. Initialize screen Menu settings In itialize unchanged Do you want to initialize Menu s ettings? CANCEL O.K. Return p When the cursor is moved to “O.K.” on the Initialize screen and the setting is entered, the Menu settings initialize screen is displayed for 5 seconds, and the camera settings are restored to the settings which were established when the camera was purchased. However, the Format settings (see page 24) are not initialized. When the initialization operation is completed, the Initialize screen is restored to the display. Menu settings initialized screen Menu s ettings initia lized p When the cursor is moved to “CANCEL” on the Initialize screen and the setting is entered, the Menu settings unchanged screen is displayed for 5 seconds, the initialization operation is not performed, and the Initialize screen returns to the display. 29 (E) Menu item table Top Menu Camera Item Scene Contrast Scene FullAuto Manual1 FullAuto, Manual1, Manual2, Manual3 Contrast Mode Auto Auto Auto, Manual Contrast Level 0 0 –5 to +5 Shutter Mode ---- ---- Off, Step, Synchro Step/Synchro (When “Step” is selected as the “Shutter Mode”) ---- ---- pw When 59.94 Hz is selected: 1/100, 1/250, 1/500, 1/1000, 1/2000, 1/4000, 1/10000 pw When 50 Hz is selected: 1/120, 1/250, 1/500, 1/1000, 1/2000, 1/4000, 1/10000 Step/Synchro (When “Synchro” is selected as the “Shutter Mode”) ---- ---- pw When 59.94 Hz is selected: 60.24Hz to 646.21Hz (1 to 255 steps) pw When 50 Hz is selected: 50.20Hz to 538.51Hz (1 to 255 steps) Frame Mix ---- ---- Auto, Off, 6dB, 12dB, 18dB AutoF.Mix Max Gain ---- 0dB 0dB, 6dB, 12dB, 18dB Gain ---- Auto Auto, 0dB, 3dB, 6dB, 9dB, 12dB, 15dB, 18dB AGC Max Gain ---- 18dB 6dB, 12dB, 18dB ---- –1 –3 to +3 AWB Mode ---- AWB A ATW, AWB A, AWB B R Gain ---- 0 –30 to +30 B Gain ---- 0 –30 to +30 Detail ---- Low Off, Low, High Flesh Tone Mode ---- Off Off, Low, High DNR ---- High Off, Low, High ---- –5 –10 to +10 DRS ---- Low Off, Low, High Gamma Type ---- ---- Off, Normal, Cinema Gamma Level ---- ---- Low, Mid, High Back Light COMP. ---- Off Off, On Matrix Select ---- USER Normal, EBU, NTSC, USER Axis01 Saturation ---- +50 –127 to +127 Phase ---- 0 –127 to +127 Saturation ---- 0 –127 to +127 Phase ---- 0 –127 to +127 Saturation ---- 0 –127 to +127 Phase ---- 0 –127 to +127 Saturation ---- +35 –127 to +127 Phase ---- +5 –127 to +127 Saturation ---- 0 –127 to +127 Phase ---- 0 –127 to +127 Saturation ---- 0 –127 to +127 Phase ---- 0 –127 to +127 Matrix Select ---- USER Normal, EBU, NTSC, USER Axis07 Saturation ---- +30 –127 to +127 Phase ---- 0 –127 to +127 Saturation ---- –20 –127 to +127 Phase ---- +10 –127 to +127 Saturation ---- 0 –127 to +127 Phase ---- –30 –127 to +127 Saturation ---- 0 –127 to +127 Phase ---- 0 –127 to +127 Picture Picture 1/2 Chroma Level Picture 2/2 Pedestal Color Matrix 1/3 Axis02 Axis03 Axis04 Axis05 Axis06 Color Matrix 2/3 Selection items Manual1 to 3 FullAuto Axis08 Axis09 Axis10 30 (E) ENGLISH Factory setting Menu Menu item table Factory setting Menu Top Menu Camera Item Scene Color Matrix 2/3 Axis11 Saturation ---- +10 –127 to +127 Phase ---- +50 –127 to +127 Saturation ---- 0 –127 to +127 Phase ---- 0 –127 to +127 Matrix Select ---- USER Normal, EBU, NTSC, USER Axis13 Saturation ---- 0 –127 to +127 Phase ---- 0 –127 to +127 Saturation ---- +35 –127 to +127 Phase ---- +10 –127 to +127 Saturation ---- 0 –127 to +127 Phase ---- 0 –127 to +127 Saturation ---- 0 –127 to +127 Phase ---- 0 –127 to +127 Axis12 Color Matrix 3/3 Axis14 Axis15 Axis16 System Output Other Format Other 1/2 Other 2/2 Maintenance Firmware Version Selection items Manual1 to 3 FullAuto 1080/59.94i (When 59.94 Hz is selected) pw When 59.94 Hz is selected: 1080/59.94i, 480/59.94p 1080/50i (When 50 Hz is selected) pw When 50 Hz is selected: 1080/50i, 576/50p Down CONV. Mode Squeeze Squeeze, SideCut HDMI Color YCbCr422 RGB-NOR, RGB-ENH, YCbCr422, YCbCr444 Install Position Desktop ---- Preset Speed 10 1 to 30 Preset Scope Mode A Mode A, Mode B, Mode C Digital Zoom Disable Disable, Enable Speed With Zoom POS. On Off, On Focus Mode Auto Auto, Manual Focus ADJ With PTZ. ---- Off, On Tally Enable Enable Disable, Enable OSD Off With Tally Off Off, On OSD Status Off Off, On Model GP-VD150 ---- Camera Main Version shipped ---- Pan/Tilt Version shipped ---- Network ---- ---- Camera Version shipped ---- Output Version shipped ---- ---- CANCEL CANCEL, OK CPU Software PLD Initialize 31 (E) 32 (E) ENGLISH DEUTSCHE AUSGABE (GERMAN VERSION) Inhalt Vor dem Gebrauch ..............................................................2 Einstellen der Menüposten ..............................................18 Übersicht ..........................................................................2 Einstellen der Menüposten ............................................18 Info zu HD-Sichtkommunikationssystem ..........................2 Hauptmenü (Top Menu) .................................................18 Info zur drahtlosen Fernbedienung (Sonderzubehör) ......2 Bildschirm Camera (bei Wahl von FullAuto) ...................19 Warenzeichen und eingetragene Warenzeichen..............2 Bildschirm Camera (bei Wahl von Manual1 bis 3) .........19 Copyright und Lizenz .......................................................2 Bildschirm Contrast ........................................................20 Haftungsausschluss .........................................................2 Bildschirm Picture 1/2 ....................................................21 Funktionen des Gerätes.....................................................3 Bildschirm Picture 2/2 ....................................................22 Ein- und Ausschaltverfahren .............................................4 16-Achsen-Farbmatrix....................................................22 Bildschirm System .........................................................23 Einschalten ......................................................................4 Bildschirm Output...........................................................24 Ausschalten......................................................................5 Bildschirm Other 1/2 ......................................................26 Info zu simultaner Modusübergangskopplung .................5 Bildschirm Other 2/2 ......................................................27 Auswählen der Geräte ........................................................6 Bildschirm Maintenance .................................................28 Auswählen des Aufnahmemodus (Szenendatei) .............6 Bildschirm Firmware Version..........................................28 Aufnahmemodustypen .....................................................6 Tabelle der Menüposten ...................................................30 Wahl des Aufnahmemodus ..............................................7 Aufnahme ............................................................................8 Maßnahmen bei Störungen des grundlegenden Aufnahmebetriebs..........................................................9 Fortgeschrittene Bedienung............................................10 Manuelle A ufnahme ..........................................................11 ManuelleF okuseinstellung.............................................11 Manuelle Blendeneinstellung .........................................11 Manuelle Einstellung der Verschlusszeit ........................12 Manuelle Einstellung der Verstärkung ............................12 Vorwahlspeicher ...............................................................13 Weißabgleich-Einstellung ................................................14 Weißabgleich-Einstellung...............................................14 GrundlegendeEinst ellungsmenüoperationen...............16 1 (G) wwÜbersicht wwCopyright und Lizenz pw Dieses Gerät ist eine Full-HD-Kamera mit integriertem Schwenk-Neigekopf. Es ist mit einem 1/3-Zoll-FullHD-MOS-Sensor und Digitalsignalprozessor (DSP) ausgestattet. Verteilen, Kopieren, Zerlegen, Nacherstellen und Nachbauen der mit dem Gerät gelieferten Software, sowie auch deren Export unter Verletzung der Exportgesetze ist ausdrücklich verboten. pw Zusätzlich zum optischen 12-Zoom seines Objektivs verfügt das Gerät über einen 10-Digitalzoom, um hochwertige und stimmungsvolle Aufnahmen zu erzielen. wwHaftungsausschluss pw Dieses Gerät ist für den ausschließlichen Einsatz mit Panasonic HD-Video-Konferenzsystemen ausgelegt. Kompatible HD-Video-Konferenzsysteme: KX-VC300CX, KX-VC300EX, KX-VC600CX, KX-VC600EX Panasonic Corporation IST UNTER ANDEREM IN KEINEM DER UNTEN AUFGEFÜHRTEN FÄLLE GEGENÜBER JURISTISCHEN PERSONEN ODER PERSONEN HAFTBAR, ES SEI DENN ES HANDELT SICH UM DEN ERSATZ ODER DIE ZUMUTBARE WARTUNG DES PRODUKTS: 1 SCHADENSANSPRÜCHE JEGLICHER ART, EINSCHLIESSLICH UND OHNE EINSCHRÄNKUNGEN UNMITTELBARER, MITTELBARER, ZUSÄTZLICHER, FOLGEODER ÜBER DEN VERURSACHTEN SCHADEN HINAUSGEHENDER SCHADENSANSPRÜCHE; wwInfo zu HD-Sichtkommunikationssystem pw Beschreibungen der Vorgänge Schwenken, Neigen, Zoomen, Vorwahl und anderer Kameraoperationen mithilfe eines HD-Video-Konferenzsystems entnehmen Sie bitte der Bedienungsanleitung des unterstützten Gerätes. 2 KÖRPERVERLETZUNGEN ODER SONSTIGE SCHÄDEN, DIE AUF DEN UNSACHGEMÄSSEN GEBRAUCH ODER DEN FAHRLÄSSIGEN BETRIEB DURCH DEN BENUTZER ZURÜCKZUFÜHREN SIND; wwInfo zur drahtlosen Fernbedienung (Sonderzubehör) 3 UNZULÄSSIGES ZERLEGEN, REPARIEREN ODER VERÄNDERN DES PRODUKTS DURCH DEN BENUTZER; pw Dieses Gerät kann ferngesteuert werden. Dazu benötigen Sie eine drahtlose Fernbedienung (Modell AW-RM50G), die als Sonderzubehör erhältlich ist. Die Kamera kann nicht direkt mit der drahtlosen Fernbedienung eines HD-Video-Konferenzsystemens bedient werden. Wenden Sie sich zum Kauf einer drahtlosen Fernbedienung an Ihren Händler. 4 UNANNEHMLICHKEITEN ODER VERLUSTE, WENN BILDER AUS IRGENDWELCHEN GRÜNDEN ODER URSACHEN NICHT ANGEZEIGT WERDEN, EINSCHLIESSLICH EINES AUSFALLS ODER PROBLEMS DES GERÄTS; 5 JEGLICHE STÖRUNGEN, MITTELBARE UNANNEHMLICHKEITEN, ODER VERLUSTE ODER SCHÄDEN, DIE SICH AUS DEM ZUSAMMENSCHALTEN DES SYSTEMS MIT GERÄTEN VON FREMDHERSTELLERN ERGEBEN; wwWarenzeichen und eingetragene Warenzeichen 6 VERLUST AUFGEZEICHNETER DATEN AUFGRUND EINES AUSFALLS. pw HDMI, das HDMI-Logo und High-Definition Multimedia Interface sind Markenzeichen oder eingetragene Markenzeichen von HDMI Licensing LLC, in den Vereinigten Staaten und in anderen Ländern. pw Adobe, Acrobat Reader und Reader sind eingetragene Markenzeichen bzw. Markenzeichen von Adobe Systems Incorporated in den Vereinigten Staaten und/oder in anderen Ländern. Konfigurationsweise der Bedienungsanleitungen des Modells pw Die Anleitung dieser HD-Kommunikationskamera (im Folgenden “Gerät” genannt) ist in zwei Teile unterteilt: den Teil <Bedienungsverfahren und Einstellungen> (diese Anleitung in der PDF-Datei) und den Teil <Grundlagen>. Bitte lesen Sie vor der Installation des Gerätes den Teil <Grundlagen> durch, um korrekte Installation des Gerätes zu gewährleisten. 2 (G) DEUTSCH Vor dem Gebrauch Funktionen des Gerätes Mithilfe einer drahtlosen Fernbedienung (Modell AW-RM50G), die als Sonderzubehör erhältlich ist, können alle Funktionen des Gerätes ferngesteuert werden. Die in dieser Anleitung beschriebenen Bedienungsverfahren werden über die drahtlose Fernbedienung durchgeführt. Hinweis pw Die Kamera kann nicht direkt mit der drahtlosen Fernbedienung eines HD-VideoKonferenzsystemens bedient werden. 3 (G) Ein- und Ausschaltverfahren wwEinschalten Stromzufuhr des Gerätes vom Bereitschaftsmodus (STANDBY) aus Stromzufuhr zum Einschalten des Gerätes 1 Stellen Sie alle Ein-Aus-Schalter der an 1 Prüfen Sie, ob sich das Gerät im das System angeschlossenen Geräte und Vorrichtungen auf “ON”. pw Prüfen Sie, ob der Bereitschaftsmodus (STANDBY) hergestellt worden ist (die Statusanzeigelampe leuchtet in Orange). 2 Versorgen Sie das Gerät mit Strom. pw Dieses Gerät besitzt keinen Ein-Aus-Schalter. Wenn Strom zugeführt wird, leuchtet die Statusanzeigelampe in Orange auf. Als Nächstes werden die Initialisierungsvorgänge durchgeführt, und danach wird der Betriebsmodus (POWER ON) hergestellt, worauf Bilder ausgegeben werden und die Steuerung möglich wird. Wenn der Betriebsmodus (POWER ON) hergestellt wird, leuchtet die Statusanzeigelampe grün auf. 2 Drücken Sie eine der Tasten [CAM1] bis [CAM4] an der drahtlosen Fernbedienung, um das gewünschte Gerät auszuwählen. 3 Drücken Sie die Taste [ON/STANDBY] an der drahtlosen Fernbedienung für mindestens 2 Sekunden. Hinweise Der Modus “POWER ON” wird hergestellt, Bilder werden ausgegeben, und die Steuerung kann ausgeübt werden. pw Die Statusanzeigelampe des Gerätes leuchtet nun in Grün. pw Die Durchführung der Anfangseinstellungen dauert etwa 30 Sekunden pro Gerät. Während dieser Zeitspanne kann das Gerät nicht bedient werden. (Statusanzeigelampe: leuchtet in Orange auf) pw Wenn der Betrieb auf Bereitschaftsmodus umgeschaltet wird: Die aktuelle SchwenkNeige-Position wird gespeichert (als EinschaltVoreinstellung), und die Kamera bewegt sich so, dass sie nach hinten zeigt. pw Wenn der Betrieb auf Einschaltmodus umgeschaltet wird: Die Kamera bewegt sich zu der Position, die bei Umschaltung des Betriebs auf Bereitschaftsmodus (als Einschalt-Voreinstellung) gespeichert wurde. Hinweis pw Wenn der Betrieb auf Einschaltmodus umgeschaltet wird: Die Kamera bewegt sich zu der Position, die bei Umschaltung des Betriebs auf Bereitschaftsmodus (als Einschalt-Voreinstellung) gespeichert wurde. 4 Wenn mehrere Geräte verwendet werden sollen, wiederholen Sie die Schritte 2 und 3 je nach Bedarf. Die Statusanzeigelampe des Gerätes blinkt in Grün, wenn ein Signal empfangen wird, das mit der Fernbedienungskennung übereinstimmt, und in Orange, wenn ein Signal empfangen wird, das nicht mit der Fernbedienungskennung übereinstimmt. 4 (G) DEUTSCH Bereitschaftsmodus (STANDBY) befindet. Ein- und Ausschaltverfahren wwInfo zu simultaner Modusübergangskopplung wwAusschalten 1 Schalten Sie die Stromversorgung des Gerätes aus. Sobald das an die Kamera angeschlossene HD-Video-Konferenzsystems auf den BildschirmBereitschaftsmodus umgeschaltet wird, wird die Kamera in den Bereitschaftsmodus (STANDBY) versetzt. Gleichermaßen wird die Kamera in den Betriebsmodus (POWER ON) versetzt, sobald das Sichtgerät aus dem Bildschirm-Bereitschaftsmodus herausgeholt wird. pw Das Gerät kann ohne Rücksicht auf den herrschenden Modus (STANDBY oder POWER ON) ausgeschaltet werden. 5 (G) Auswählen der Geräte 1 Drücken Sie die Taste [CAM1], [CAM2], [CAM3] Bis zu vier Geräte können mit der drahtlosen Fernbedienung gesteuert werden. Wählen Sie das Gerät (bzw. die Geräte) aus, das (die) mit der drahtlosen Fernbedienung gesteuert werden soll (sollen). Selbst wenn nur ein Gerät verwendet wird, muss es dennoch ausgewählt werden. oder [CAM4]. DEUTSCH Die Statusanzeigelampe des Gerätes blinkt in Grün, wenn ein Signal empfangen wird, das mit der Fernbedienungskennung übereinstimmt, und in Orange, wenn ein Signal empfangen wird, das nicht mit der Fernbedienungskennung übereinstimmt. Auswählen des Aufnahmemodus (Szenendatei) wwAufnahmemodustypen Dieses Gerät besitzt vier vorprogrammierte Aufnahmemodi, von denen jeder einem bestimmten Satz an Bedingungen entspricht, unter denen das Motiv aufgenommen wird. Wählen Sie den Modus aus, der die Aufnahmebedingungen erfüllt und Ihrer Bevorzugung entspricht. Die Einstellungen können durch Menüoperationen geändert werden. FullAuto: Werksein-stellung Verschlusszeit und Objektivblende werden automatisch eingestellt. Manual1 Sie können die Einstellungen Ihrer Bevorzugung im Einklang mit der Aufnahmeszene, der Beleuchtung und anderen Bedingungen herstellen. pw Wenn Sie dieses Gerät benutzen, während es an ein HD-Video-Konferenzsystem von Panasonic angeschlossen ist, verwenden Sie den Aufnahmemodus “FullAuto”. pw Die Ergebnisse des Weißabgleichs und anderer Einstellungen werden nach Aufnahmemodus getrennt gespeichert. Wählen Sie unbedingt den Aufnahmemodus, bevor Sie irgendwelche Einstellungen vornehmen. Manual2 Sie können die Einstellungen Ihrer Bevorzugung im Einklang mit der Aufnahmeszene, der Beleuchtung und anderen Bedingungen herstellen. Manual3 Sie können die Einstellungen Ihrer Bevorzugung im Einklang mit der Aufnahmeszene, der Beleuchtung und anderen Bedingungen herstellen. Hinweis pw Wenn “FullAuto” als Einstellung für “Scene” im Kameramenü gewählt worden ist, werden beispielsweise alle automatischen Einstellungen eingeschaltet, und manuelle Operationen sind für manche Posten nicht mehr möglich. 6 (G) Auswählen des Aufnahmemodus (Szenendatei) wwWahl des Aufnahmemodus 4 Drücken Sie die Taste []. 2, 8 1 Das Untermenü “Camera” wird auf dem Monitor angezeigt. Camera Scene Contrast Level 3, 5, 7 FullAuto 0 4, 6, 7 Return 1 Drücken Sie die Taste [CAM1], [CAM2], [CAM3] oder [CAM4], um das gewünschte Gerät auszuwählen. 5 Drücken Sie die Taste [] oder [], um den Cursor auf “Scene” zu stellen. 2 Drücken Sie die Taste [MENU] für mindestens 2 6 Drücken Sie die Taste []. Sekunden. Der Aufnahmemodus blinkt. Das Hauptmenü (Top Menu) wird angezeigt. Top Menu 7 Drücken Sie die Taste [] oder [], um den Camera Scene: FullAuto System Mainte nance zu verwendenden Aufnahmemodus (FullAuto, Manual1, Manual2 oder Manual3) zu wählen, und drücken Sie die Taste [], um die Auswahl einzugeben. Für Einzelheiten siehe die Seite 19. 8 Drücken Sie die Taste [MENU] für mindestens 2 Sekunden. Die Menüanzeige wird beendet. 3 Drücken Sie die Taste [] oder [], um den Cursor auf “Camera” zu stellen. 7 (G) Aufnahme qwUmschalten der Richtung oder Zoomgeschwindigkeit qwÄndern der Kamerarichtung Bewegen der Kamera nach links oder rechts (Schwenken): Drücken Sie die Taste [] oder []. Umschalten auf hohe Bewegungs- oder Zoomgeschwindigkeit: Drücken Sie die Taste [FAST]. Bewegen der Kamera nach oben oder unten (Neigen): Drücken Sie die Taste [] oder []. Diagonales Bewegen der Kamera: Drücken Sie die Taste [] oder [] und die Taste [] oder [] gleichzeitig. Gleichzeitig wird auch die Fokussiergeschwindigkeit des Objektivs umgeschaltet. Zurückstellen der Kamera auf die Bezugsposition: Drücken Sie die Taste [HOME] für mindestens 2 Sekunden. qwVerwendung der Zoomfunktion Einzoomen (das Motiv wird vergrößert): Drücken Sie die Taste [T] der [ZOOM]. Auszoomen (das Motiv wird verkleinert): Drücken Sie die Taste [W] der [ZOOM]. 8 (G) DEUTSCH Umschalten auf niedrige Bewegungs- oder Zoomgeschwindigkeit: Drücken Sie die Taste [SLOW]. Maßnahmen bei Störungen des grundlegenden Aufnahmebetriebs Der Menübildschirm wird angezeigt. Falls sich die Störung nicht durch Ausführen der unten vorgeschlagenen Maßnahmen beheben lässt, schlagen Sie unter “Fehlersuche” nach (in <Grundlagen>). Drücken Sie die Taste [MENU] für mindestens 2 Sekunden, um das Menü zu verlassen. Der Objektivfokus wird nicht automatisch eingestellt. Das Gerät bewegt sich nicht. pw Drücken Sie die Taste [CAM1], [CAM2], [CAM3] oder [CAM4], um das zu bedienende Gerät auszuwählen. Wenn nur ein Gerät verwendet wird, erfolgt die Wahl normalerweise mit der Taste [CAM1]. pw Falls die Statusanzeigelampe des Gerätes erloschen ist oder in Orange leuchtet, bedeutet dies, dass das Gerät nicht eingeschaltet ist. Schalten Sie das Gerät gemäß “Ein- und Ausschaltverfahren” (Seite 4) ein. pw Falls die Statusanzeigelampe des Gerätes nicht blinkt, selbst wenn die drahtlose Fernbedienung nahe am Lichtsensorfeld des Gerätes betätigt wird, bedeutet dies, dass die Batterien der drahtlosen Fernbedienung erschöpft sind. Wechseln Sie die Batterien aus. Drücken Sie die Taste [A/FOCUS], um auf automatische Fokussierung umzuschalten. (Der Autofokus funktioniert während Schwenk- oder Neigevorgängen nicht.) Das Kamerabild ist zu hell oder zu dunkel. 1. Drücken Sie die Taste [A/IRIS], um auf automatische Steuerung der Objektivblende umzuschalten. 2. Drücken Sie die Taste [AUTO] von [GAIN], um auf automatische Verstärkungseinstellung umzuschalten. Die Färbung der Kamerabilder stimmt nicht. Schlagen Sie unter “Weißabgleich-Nachregelautomatik (ATW)” (Seite 15) nach, und schalten Sie auf “ATW” um. 9 (G) Manuelle Aufnahme (Siehe die Seiten 11 bis 12) Weißabgleich-Einstellung (Siehe die Seiten 14 bis 15) pw pw pw pw pw Diese Einstellung wird durchgeführt, um eine genaue Reproduktion von Weiß zu erhalten. Sie hat auch einen Einfluss auf die Farbtöne des gesamten Bildschirms. pw Sie muss durchgeführt werden, wenn das Gerät zum ersten Mal benutzt wird oder längere Zeit nicht benutzt worden ist. pw Sie muss auch durchgeführt werden, wenn sich die Beleuchtungsverhältnisse oder die Helligkeit geändert haben. pw Wenn der Weißabgleich einmal eingestellt worden ist, braucht er nicht wieder eingestellt zu werden, sofern die Kamera unter denselben Bedingungen benutzt werden soll. Manuelle Fokuseinstellung Manuelle Blendeneinstellung Manuelle Einstellung der Verschlusszeit Manuelle Einstellung der Verstärkung Vorwahlspeicher (Siehe die Seite 13) pw Bis zu 12 Einstellungen für Kamerarichtung (Schwenken und Neigen), Zoom, Fokus, Blende, Verstärkungserhöhung und Weißabgleich können in den Vorwahlspeicherplätzen registriert und abgerufen werden. pw Die Anzahl der Einstellungen, die registriert und abgerufen werden können, ist 12. Dies ist die Anzahl der Einstellungen für die getrennt erhältliche drahtlose Fernbedienung (Modell AW-RM50G). 10 (G) DEUTSCH Fortgeschrittene Bedienung Manuelle Aufnahme wwManuelle Fokuseinstellung wwManuelle Blendeneinstellung Der Objektivfokus kann manuell eingestellt werden. Die Objektivblende kann manuell eingestellt werden. 1 Drücken Sie die Taste [M/FOCUS], um auf 1 Drücken Sie die Taste [M/IRIS], um auf manuelle Blendeneinstellung umzuschalten. manuelle Fokussierung umzuschalten. 2 Drücken Sie die Taste [F] oder [N] von 2 Stellen Sie die Blende mit der Taste [IRIS +] [FOCUS], und stellen Sie den Fokus ein. oder [IRIS –] ein. Durch Drücken der Taste [F] wird der Fokus weiter entfernt (fern), während er durch Drücken der Taste [N] näher herangeholt wird (nah). Die Geschwindigkeit der Fokussierung und anderer Bewegungen kann durch Drücken der Taste [FAST] oder [SLOW] erhöht bzw. erniedrigt werden. Durch Drücken der Taste [IRIS +] wird die Objektivblende weiter geöffnet, während sie durch Drücken der Taste [IRIS –] weiter geschlossen wird. 3 Drücken Sie erforderlichenfalls die Taste 3 Drücken Sie erforderlichenfalls die Taste [A/IRIS], um wieder auf automatische Blendeneinstellung zurückzuschalten. [A/FOCUS], um wieder auf automatische Fokuseinstellung zurückzuschalten. Hinweis pw Wenn die manuelle Fokussierung aktiviert wird, kann das Motiv während des Schwenk-, Neige- und Zoombetriebs unscharf werden. Daher besitzt das Gerät eine Funktion, die diesen Mangel ausgleicht. (Fokuskompensation während der Zoomfunktion: Focus ADJ With PTZ.) Diese Funktion wurde werksseitig aktiviert. Falls die Funktion deaktiviert worden ist, stellen Sie entweder den Fokus bei Bedarf nach dem Zoomen ein, oder aktivieren Sie die automatische Fokussierung. (Siehe Seite 26.) 11 (G) Manuelle Aufnahme wwManuelle Einstellung der Verschlusszeit wwManuelle Einstellung der Verstärkung Die Verschlusszeit kann mithilfe von einem der beiden Kameramenüverfahren eingestellt werden. Bei der einen Methode wird die Zeit angegeben (wobei eine Zeit, wie z. B. 1/250 s, angegeben wird), und bei der anderen Methode wird die Frequenz angegeben (wobei Synchro Scan, 50,20 Hz usw., angegeben wird). Beim Aufnehmen eines Fernsehschirms oder PCMonitorbildschirms können horizontale Störstreifen, die beim Aufnehmen des Bildschirms erzeugt werden, minimiert werden, indem die Frequenz mittels Synchro Scan der Bildschirmfrequenz angeglichen wird. Die Verstärkung wird mithilfe der drahtlosen Fernbedienung eingestellt. Weitere Einzelheiten dazu finden Sie unter dem Posten [Gain] auf Seite 20. pw Bei der Einstellung der Verstärkung kann sich die Lichtmenge plötzlich ändern (so dass das ausgegebene Bild einem Schock ausgesetzt wird). 1 Drücken Sie die Taste [OFF], [LOW] oder [HI]. Führen Sie die Einstellungen im Menü “Camera” durch. Für weitere Einzelheiten siehe die Posten [Shutter Mode] und [Step/Synchro] auf Seite 20. Diese Tasten ermöglichen die Wahl der Verstärkungsanhebung in drei Stufen. [LOW] dient zur Wahl von 9 dB; [HI] zur Wahl von 18 dB. 2 Drücken Sie erforderlichenfalls die Taste [AUTO], um die Verstärkung wieder auf automatische Einstellung (AGC) zurückzustellen. Die maximale Verstärkung der automatischen Einstellung kann mit dem Menü festgelegt werden. Weitere Einzelheiten dazu finden Sie unter dem Posten [AGC Max Gain] auf Seite 20. 12 (G) DEUTSCH Hinweis Vorwahlspeicher Zwölf Einstellungen (Vorwahlspeicher Nr. 1 bis Nr. 12) können mit der drahtlosen Fernbedienung registriert und abgerufen werden. Die Tasten [1] bis [12] entsprechen den Vorwahlspeicherplätzen Nr. 1 bis Nr. 12 des Gerätes. Mit diesem Gerät können bis zu 12 Einstellungen für Kamerarichtung (Schwenken und Neigen), Zoom, Fokus, Blende, Verstärkung und Weißabgleich in den Vorwahlspeicherplätzen registriert und abgerufen werden. pw Der Betriebsmodus (Einstellung für manuellen oder automatischen Betrieb) wird nicht für die Fokus- und Blendeneinstellungen registriert. Die aktuellen Fokus- und Blendenwerte werden registriert. pw Die Fokus- und Blendenwerte können nur dann abgerufen werden, wenn die manuellen Einstellungen anwendbar sind. pw AWB A, AWB B oder ATW wird als WeißabgleichEinstellung registriert. Die Werte, die bei der Einrichtung von AWB gewählt wurden, werden als Einstellwerte von AWB A oder AWB B abgerufen. qw Registrieren der Einstellungen auf den Vorwahlspeicherplätzen 1 Zeigen Sie das aufzunehmende Bild auf dem Monitor an. Betätigen Sie die Schwenk-, Neige- oder Zoomtasten, um den Kamerawinkel festzulegen. Stellen Sie Fokus, Blende, Verstärkung und Weißabgleich bei Bedarf ein. Hinweise 2 Während Sie die Taste [PRESET] gedrückt pw Wenn ein großer Unterschied in der Umgebungstemperatur zwischen dem Zeitpunkt der Registrierung und dem Zeitpunkt des Aufrufs der Einstellung besteht, kann eine Verlagerung der Vorwahlposition auftreten. pw Falls eine Verlagerung auftritt, führen Sie die Registrierung erneut durch. pw Während Vorwahleinstellungen aufgerufen werden, können keine manuellen Vorgänge wie Schwenken, Neigen, Zoomen oder Blendeneinstellungen durchgeführt werden. pw Wird nach dem Abruf eines Voreinstellungssatzes ein weiterer Voreinstellungssatz abgerufen, hat der zuerst abgerufene Voreinstellungssatz Vorrang. halten, drücken Sie die Taste, die der Vorwahlspeichernummer entspricht. pw Wenn eine Vorwahlspeichernummer mit einer bereits registrierten Einstellung gewählt wird, wird die vorhandene Einstellung gelöscht und durch die neue ersetzt. qw Abrufen der Einstellungen von den Vorwahlspeicherplätzen 1 Drücken Sie die Taste, unter der die Vorwahlspeicher-Einstellung registriert worden ist. 13 (G) Weißabgleich-Einstellung wwWeißabgleich-Einstellung qwAutomatische Einstellung (AWB: AWB A oder AWB B) Um Weiß genau zu reproduzieren, wird das Verhältnis zwischen den drei Primärfarben (RGB) eingestellt. Falls sich der Weißabgleich verschoben hat, wird nicht nur Weiß schlecht reproduziert, sondern auch die Farbtöne des gesamten Bilds verschlechtern sich. 1 Nehmen Sie ein weißes Objekt (z. B. eine weiße pw Nehmen Sie keine glänzenden oder sehr hellen Objekte auf. Wenn die Taste [SET] an der drahtlosen Fernbedienung gedrückt worden ist, kann entweder die automatisch durchgeführte AWB-Einstellung (automatischer Weißabgleich) oder die ATW-Einstellung (Automatic Tracking White), die konstant und kontinuierlich durchgeführt wird, gewählt werden. pw Die Schritte 2 bis 8 repräsentieren das Verfahren für die Wahl des Speicherplatzes “AWB A” oder “AWB B”. Sie erübrigen sich, wenn bereits eine Wahl getroffen worden ist. 2 Wählen Sie “Manual1”, “Manual2” oder Die Ergebnisse der AWB-Einstellung können auf zwei Speicherplätzen, A und B, gespeichert werden, wenn “AWB A” oder “AWB B” für den Weißabgleich gewählt worden ist. “Manual3” als Aufnahmemodus nach dem folgenden Verfahren unter “Auswählen des Aufnahmemodus (Szenendatei)” (Seite 7). Camera pw Nachdem der Weißabgleich eingestellt worden ist, wenn das Gerät mit denselben Einstellungen und unter denselben Bedingungen eingesetzt wird, kann die Einstellung durch einfaches Auswählen einer Menüeinstellung durchgeführt werden. Eine erneute Einstellung erübrigt sich. pw Sobald eine neue Einstellung eingegeben wird, wird die vorherige Einstellung gelöscht. Scene Contrast Picture Color Matrix Manual1 Return Benutzen Sie die zwei Speicherplätze, um Einstellungen für unterschiedliche Aufnahmebedingungen zu speichern. 3 Drücken Sie die Taste [] oder [], um den Cursor auf “Picture” zu stellen. 4 Drücken Sie die Taste []. Das Untermenü “Picture 1/2” wird angezeigt. Picture 1/2 Chroma Level AWB Mode R Gain B Gain Detail Flesh Tone Mode DNR Return 14 (G) -1 AWB A 0 0 Low Off High DEUTSCH Wand oder ein Handtuch) bildschirmfüllend auf. pw Diese Einstellung muss durchgeführt werden, wenn das Gerät zum ersten Mal benutzt wird oder längere Zeit nicht benutzt worden ist. pw Sie muss auch durchgeführt werden, wenn sich die Beleuchtungsverhältnisse oder die Helligkeit geändert haben. Weißabgleich-Einstellung 5 Drücken Sie die Taste [] oder [], um den Hinweise Cursor auf “AWB Mode” zu stellen. pw “OSD Status” muss auf “ON” gesetzt werden, damit Meldungen angezeigt werden. [Top Menu]>[System]>[OSD Status] unter [Other 2/2] pw Der Weißabgleich wird eventuell nicht korrekt eingestellt, falls die Beleuchtung des Objekts zu schwach ist. pw Da die Kamera einen internen Speicher besitzt, bleibt der eingestellte Weißabgleich auch nach dem Ausschalten der Kamera gespeichert. Daher erübrigt sich eine Neueinstellung des Weißabgleichs, wenn die Farbtemperatur dieser Objekte unverändert bleibt. Der Weißabgleich muss jedoch neu eingestellt werden, wenn sich die Farbtemperatur ändert, z. B. bei einem Standortwechsel von drinnen nach draußen und umgekehrt. 6 Drücken Sie die Taste []. “AWB Mode” beginnt zu blinken. 7 Drücken Sie die Taste [] oder [], um den zu verwendenden AWB-Modus auf “AWB A” oder “AWB B” zu ändern, und drücken Sie dann die Taste [], um die Auswahl einzugeben. 8 Drücken Sie die Taste [MENU] für mindestens 2 Sekunden. Die Menüanzeige wird beendet. qwWeißabgleich-Nachregelautomatik (ATW) 9 Drücken Sie die Taste [SET] für mindestens 2 Sekunden. Wenn die Weißabgleich-Einstellung auf “ATW” gesetzt wird, erfolgt eine ständige automatische WeißabgleichNachregelung, wodurch der Weißabgleich automatisch korrigiert wird, selbst wenn die Lichtquelle oder die Farbtemperatur sich geändert hat, um vollkommen natürliche Bilder zu erzeugen. Der automatische Weißabgleich (AWB) wird durchgeführt, und die Weißabgleich-Einstellung wird eingegeben. pw Wenn die Weißabgleich-Einstellung erfolgreich abgeschlossen wird, erscheint “AWB OK” in der Mitte des Bildschirms. Diese Funktion ist wirksam, wenn “ATW” anstelle von “AWB A” oder “AWB B” nach den Schritten für “Automatische Einstellung” unter “Weißabgleich-Einstellung” (Seite 14) gewählt wird. Hinweise AWB OK pw ATW funktioniert eventuell nicht richtig, wenn ein sehr helles Licht (z. B. Leuchtstofflampe) auf einen Bildschirm scheint. pw Der Weißabgleich wird eventuell nicht genau eingestellt, wenn die aufzunehmende Szene kein weißes Objekt enthält. pw Der Weißabgleich kann sich verschieben, wenn eine andere Lichtquelle, wie z. B. Tageslicht oder Leuchtstofflampenlicht verwendet wird. pw Wenn die Einstellung fehlgeschlagen ist, wird eine Fehlermeldung wie “OUT RANGE NG”, “HIGH LIGHT NG”, “LOW LIGHT NG” oder “ATW NG” angezeigt. 15 (G) Grundlegende Einstellungsmenüoperationen Tabelle der Bedienungsvorgänge Menüoperation Die Menüoperationen werden mithilfe der drahtlosen Fernbedienung durchgeführt. Im Folgenden werden die grundlegenden Bedienungsverfahren zum Ändern der Einstellungen der Menüposten mithilfe der drahtlosen Fernbedienung beschrieben. Drahtlose Fernbedienung Auswählen des zu bedienenden Gerätes Drücken Sie die Taste [CAM1], [CAM2], [CAM3] oder [CAM4]. Anzeigen des Hauptmenüs Drücken Sie die Taste [MENU] für mindestens 2 Sekunden. Auswählen der Posten Drücken Sie die Taste [] oder [] ([] oder []). Anzeigen der Untermenüs Drücken Sie die Taste []. Zurückkehren zum vorherigen Menü Während der Cursor auf der Position [Return] steht, drücken Sie die Taste []. Ändern der Einstellungen Während der Cursor auf dem zu ändernden Posten steht, drücken Sie die Taste [], um den Wert des Postens zum Blinken zu bringen. Ändern Sie den Wert mit den Tasten [], [], [] und [], und drücken Sie die Taste [], um die Änderung einzugeben. Aufheben der Einstellungsänderung Während die Einstellung blinkt, drücken Sie die Taste [MENU] kurz (für weniger als 2 Sekunden). Beenden der Menüoperationen Drücken Sie die Taste [MENU] für mindestens 2 Sekunden. Hinweis pw Führen Sie die Menüoperationen durch, und verlassen Sie die Menüs mithilfe der drahtlosen Fernbedienung, die das Hauptmenü angezeigt hat. 16 (G) DEUTSCH Menüs werden auf dem Monitor angezeigt, wenn die Einstellungen des Gerätes ausgewählt werden sollen. Der Monitor wird an die Videosignal-Ausgangsbuchse angeschlossen. Die grundlegenden Menüoperationen beinhalten die Anzeige von Untermenüs der Hauptmenüposten und die Auswahl von Einstellungen in den Untermenüs. Manche Untermenüs enthalten Menüposten zur Durchführung von noch detaillierteren Einstellungen. Grundlegende Einstellungsmenüoperationen 1 Drücken Sie die Taste [CAM1], [CAM2], [CAM3] 9 Nachdem die Einstellung durchgeführt oder [CAM4], um das zu bedienende Gerät auszuwählen. worden ist, drücken Sie die Taste [MENU] für mindestens 2 Sekunden. Die Menüanzeige wird beendet. 2 Drücken Sie die Taste [MENU] für mindestens 2 Sekunden. Das Hauptmenü (Top Menu) wird angezeigt. 3 Drücken Sie die Taste [] oder [], um den Cursor auf den auszuwählenden Posten zu stellen. Bei jedem Drücken der Taste [] oder [] bewegt sich der Cursor. Mit den Tasten [] und [] kann der Cursor auf die gleiche Weise bewegt werden. 4 Drücken Sie die Taste []. Das Untermenü des ausgewählten Postens wird angezeigt. (Einige Untermenüposten weisen eigene Untermenüs auf.) 5 Drücken Sie die Taste [] oder [], um den Cursor auf den einzustellenden Posten zu stellen. Bei jedem Drücken der Taste [] oder [] bewegt sich der Cursor. Mit den Tasten [] und [] kann der Cursor auf die gleiche Weise bewegt werden. Während der Cursor auf der Position “Return” steht, drücken Sie die Taste [], um zum vorherigen Menü zurückzukehren. 6 Drücken Sie die Taste []. Der Wert des einzustellenden Postens beginnt zu blinken. 7 Drücken Sie die Taste [] oder [], um die Einstellung zu ändern. Mit den Tasten [] und [] kann die Einstellung auf die gleiche Weise geändert werden. 8 Drücken Sie die Taste []. Der Wert des einzustellenden Postens wird eingegeben, und das Blinken hört auf. 17 (G) Einstellen der Menüposten wwHauptmenü (Top Menu) wwEinstellen der Menüposten Menüs werden auf dem Monitor angezeigt, wenn die Einstellungen des Gerätes ausgewählt werden sollen. Der Monitor wird an die Videosignal-Ausgangsbuchse angeschlossen. Die grundlegenden Menüoperationen beinhalten die Anzeige von Untermenüs der Hauptmenüposten und die Auswahl von Einstellungen in den Untermenüs. Manche Untermenüs enthalten Menüposten zur Durchführung von noch detaillierteren Einstellungen. Einzelheiten über die grundlegenden Bedienungsverfahren zum Anzeigen der Menüs und Ändern der Posten mit der mitgelieferten drahtlosen Fernbedienung finden Sie auf den Seiten 16 bis 17. Top Menu DEUTSCH Camera Scene: FullAuto System Maintenance Camera Die Zeichen “ ” und “ ” in den Menütiteln zeigen die hierarchische Ebene des gegenwärtig angezeigten Menüs an. So kennzeichnet “ ” beispielsweise die erste hierarchische Ebene, während “ ” und “ ” anzeigen, dass die zweite hierarchische Ebene nun angezeigt wird. Mit dem Zeichen “ ” versehene Menüposten kennzeichnen Daten, die auf Szenenbasis gespeichert werden; mit dem Zeichen “ ” versehene Menüposten kennzeichnen Daten, die ohne Rücksicht auf die Szenen für eine Kamera zusammen gespeichert werden. Wählen Sie diesen Posten, um das auf die Kamerabilder bezogene Kameramenü zu öffnen. System Wählen Sie diesen Posten, um das Systemmenü in Bezug auf die Bildausgabe-Einstellungen der Kamera usw. zu öffnen. Maintenance Wählen Sie diesen Posten, um das Wartungsmenü anzuzeigen, das zur Überprüfung der Firmware-Version der Kamera oder zur Initialisierung ihrer Einstellungen verwendet wird. Hinweis pw Das Hauptmenü weist keinen Eintrag “Return” auf. Um den Menübildschirm zu schließen, führen Sie mit der drahtlosen Fernbedienung den Vorgang zum Schließen des Menübildschirms durch. Für Einzelheiten siehe die Seiten 16 bis 17. 18 (G) Einstellen der Menüposten wwBildschirm Camera (bei Wahl von Manual1 bis 3) wwBildschirm Camera (bei Wahl von FullAuto) Dieses Menü wird für die Kamerabild-Einstellungen verwendet. Camera Scene Contrast Picture Color Matrix Cam era Scene Contr ast Level FullAuto 0 Manual1 Return Return Scene [FullAuto, Manual1, Manual2, Manual3] Scene [FullAuto, Manual1, Manual2, Manual3] Siehe den Abschnitt “Scene” in der linken Spalte. Hier wird der für die jeweilige Aufnahmesituation geeignete Aufnahmemodus gewählt. Wählen Sie den Modus, der für die vorherrschenden Aufnahmebedingungen und die Benutzerbevorzugungen am besten geeignet ist. FullAuto: Contrast Wählen Sie diesen Posten, um den Bildschirm Contrast anzuzeigen und die Helligkeit einzustellen. In diesem Modus werden die optimalen Einstellungen und Justierungen für die vorliegenden Aufnahmebedingungen automatisch hergestellt. Wenn “FullAuto” gewählt worden ist, werden die Menüs für detaillierte Einstellungen und Justierungen nicht angezeigt. Picture Wählen Sie diesen Posten, um den Bildschirm Picture anzuzeigen und die Bildqualität einzustellen. Zwei Bildschirme (“Picture 1/2” und “Picture 2/2”) sind für das Bildqualitäts-Einstellungsmenü vorhanden. Manual1 bis 3: In diesen Modi werden die detaillierten Einstellungen und Justierungen zur Anpassung an die vorherrschenden Aufnahmebedingungen und Benutzerbevorzugungen manuell hergestellt. Wenn der Modus “Manual1”, “Manual2” oder “Manual3” gewählt worden ist, wird das Menü für die detaillierten Einstellungen und Justierungen für den betreffenden Modus angezeigt. Color Matrix Wählen Sie diesen Posten, um die voreingestellten Farbmatrixdaten zu laden und Farbsättigung sowie Farbton zu kompensieren. Return Benutzen Sie diesen Posten, um zum vorherigen Menü zurückzukehren. Contrast Level [–5 bis +5] Stellen Sie die Bildhelligkeit mithilfe der Kontraststufe ein. Return Benutzen Sie diesen Posten, um zum vorherigen Menü zurückzukehren. 19 (G) Einstellen der Menüposten wwBildschirm Contrast Wählen Sie diesen Posten für den FrameHinzufügungsbetrag (Verstärkungserhöhung mit Sensorspeicherung). Dieser Posten kann eingestellt werden, wenn “Off” als Einstellung des Postens “Shutter Mode” gewählt wird. Wenn Frame-Hinzufügung durchgeführt wird, hat es den Anschein, als würden einige Vollbilder im Bild fehlen. Contra st Mode Auto Contr ast Level 0 Shutt er Mode ---Step /Synchro ---Fram e Mix ---Auto F.Mix Max Gain 0dB Gain Auto AGC Ma x Gain 18dB Return AutoF. Mix Max Gain [0dB, 6dB, 12dB, 18dB] Contrast Mode [Auto, Manual] Mit diesem Posten wählen Sie, ob die Bildhelligkeit (Kontrast) automatisch oder manuell geregelt werden soll. Auto: Blende, Verschlusszeit und Frame-Hinzufügung werden gesteuert, und die Kamera-Helligkeit wird automatisch justiert. Gain [Auto, 0dB, 3dB, 6dB, 9dB, 12dB, 15dB, 18dB] Damit wird die Bildverstärkung justiert. Erhöhen Sie die Verstärkung an Orten, die zu dunkel sind; erniedrigen Sie dagegen die Verstärkung an Orten, die zu hell sind. Wenn “Auto” eingestellt wird, wird die Lichtmenge automatisch justiert. Rauschen nimmt zu, wenn die Verstärkung erhöht wird. Die Umschaltung der Verstärkung ist auch durch Drücken der Tasten [OFF], [LOW], [HI] und [AUTO] für [GAIN] an der drahtlosen Fernbedienung möglich. Manual: Operationen werden unter Verwendung der manuell festgelegten Werte durchgeführt. Die Umschaltung zwischen den Kontrastmodi ist auch durch Drücken der Tasten [A/IRIS] und [M/IRIS] an der drahtlosen Fernbedienung möglich. Contrast Level [–5 bis +5] Damit wird die Kontraststufe zur Justierung der Bildhelligkeit eingestellt. Dieser Posten kann eingestellt werden, wenn “Auto” als Einstellung von “Contrast Mode” gewählt worden ist. AGC Max Gain [6dB, 12dB, 18dB] Wenn “Auto” als Einstellung von “Gain” gewählt wird, kann der maximale Verstärkungserhöhungsbetrag festgelegt werden. Shutter Mode [Off, Step, Synchro] Wählen Sie diesen Posten für die Kamera-Verschlusszeit. Dieser Posten kann eingestellt werden, wenn “Manual” als Einstellung von “Contrast Mode” gewählt worden ist. Off: Der Verschluss wird auf OFF eingestellt (so dass er nicht ausgelöst werden kann). Step: Der Stufen-Verschluss wird festgelegt (die Stufen können geändert werden). Return Benutzen Sie diesen Posten, um zum vorherigen Menü zurückzukehren. Synchro: Der Synchro-Verschluss wird festgelegt (die Einstellung kann fortlaufend geändert werden). Step/Synchro Dieser Posten dient der Einstellung der Verschlusszeit in dem Modus, der als Einstellung von “Shutter Mode” gewählt wurde. Wenn eine kürzere Verschlusszeit gewählt wird, werden sich schnell bewegende Objekte nicht so leicht unscharf, aber die Bilder werden dunkler. Die einstellbaren Verschlusszeiten sind unten aufgelistet. Wenn “Step” für “Shutter Mode” gewählt wird Wenn “Synchro” für “Shutter Mode” gewählt wird 1/120, 1/250, 1/500, 1/1000, 1/2000, 1/4000, 1/10000 50,20 Hz bis max. 538,51 Hz (255 Stufen) Wenn “Auto” für “Contrast Mode” oder “Auto” für “Frame Mix” gewählt wird, kann der maximale FrameHinzufügungsbetrag eingestellt werden. Wenn Frame-Hinzufügung bei der Einstellung Auto durchgeführt wird, hat es den Anschein, als würden einige Vollbilder im Bild fehlen. 20 (G) DEUTSCH Frame Mix [Auto, Off, 6dB, 12dB, 18dB] Co ntrast Einstellen der Menüposten wwBildschirm Picture 1/2 DNR [Off, Low, High] Pi cture 1/2 Chroma Level AWB Mo de R Gai n B Gai n Detail Flesh Tone Mode DNR Damit stellen Sie den Pegel des digitalen Rauschunterdrückungseffekts so ein, dass helle, rauschfreie und klare Bilder selbst bei Nacht und in anderen lichtschwachen Umgebungen ausgegeben werden. Wenn “Low” oder “High” gewählt wird, kann Rauschen noch stärker unterdrückt werden. Es besteht jedoch eine zunehmende Möglichkeit, dass Nachbilder auftreten. -1 AWB A 0 0 Low Off High Return Return Benutzen Sie diesen Posten, um zum vorherigen Menü zurückzukehren. Chroma Level [–3 bis +3] Damit stellen Sie die Farbintensität (Chromapegel) der Bilder ein. Hinweise AWB Mode [ATW, AWB A, AWB B] pw Wenn die automatische Weißabgleich-Einstellung (AWB) durchgeführt wird, werden die Werte für “R Gain” und “B Gain” auf “0” zurückgesetzt. pw Wenn “AWB A” oder “AWB B” als Einstellung von “AWB Mode” gewählt worden ist, können die Einstellwerte für “R Gain” und “B Gain” in den zwei Speichern (A und B) gespeichert werden. pw Wenn neue Werte eingestellt werden, werden die vorherigen Daten gelöscht. Benutzen Sie den einen Speicher für einen Satz von Aufnahmebedingungen und den anderen Speicher für einen weiteren Satz von Aufnahmebedingungen. pw Bei der Registrierung von Daten in den Vorwahlspeichern werden die Einstellungen für “R Gain” und “B Gain” (–30 bis +30) nicht gespeichert, aber die Weißabgleichstatusse (Farbe), die hergestellt werden, nachdem Einstellungen unter Verwendung von “R Gain” und “B Gain” durchgeführt worden sind, können gespeichert werden. pw Wenn “Mode A” als Einstellung von “Preset Scope” gewählt worden ist, werden die Einstellungen für “R Gain” und “B Gain” auf “0” zurückgesetzt, sobald Daten in den Vorwahlspeichern abgerufen werden. pw Wenn “ATW” als Einstellung von “AWB Mode” gewählt worden ist, können “R Gain” und “B Gain” nicht eingestellt werden. Damit wählen Sie den Weißabgleichmodus. Wählen Sie den Modus, wenn der Farbton wegen der Art der Lichtquelle oder aufgrund anderer Faktoren unnatürlich ist. Wenn die als Referenz dienende weiße Farbe erkannt werden kann, können Objekte mit natürlichem Farbton aufgenommen werden. ATW: In diesem Modus erfolgt eine automatische Kompensation des Weißabgleichs durch einen fortlaufenden und automatischen Korrekturprozess, selbst wenn Änderungen in der Lichtquelle oder Farbtemperatur auftreten. AWB A, AWB B: Wenn AWB A oder AWB B gewählt wurde und der Weißabgleich ausgeführt wird, werden die erhaltenen Justierungsergebnisse im gewählten Speicherplatz gespeichert. Wenn AWB A oder AWB B dann gewählt wird, kann der im ausgewählten Speicherplatz gespeicherte Weißabgleich abgerufen werden. R Gain, B Gain [–30 bis +30] Wenn “AWB A” oder “AWB B” als Einstellung von “AWB Mode” gewählt worden ist, kann eine Feineinstellung des Weißabgleichs nach Abschluss der automatischen Weißabgleich-Einstellung (AWB) durchgeführt werden. Detail [Off, Low, High] Damit justieren Sie das Bilddetail (Bildschärfe). Wenn “Low” oder “High” gewählt wird, erfolgt eine Detailanhebung. Flesh Tone Mode [Off, Low, High] Damit stellen Sie den Hauttonmodus ein, um die Haut von Personen so anzuzeigen, dass sie weicher und angenehmer für das Auge erscheint. Wenn “Low” oder “High” gewählt wird, wird der Effekt noch stärker hervorgehoben. 21 (G) Einstellen der Menüposten ww16-Achsen-Farbmatrix wwBildschirm Picture 2/2 qwMonitor-Ausgabemenü (OSD) Pi cture 2/2 <Bildschirm “Color matrix 1/3”> -5 Low ------Off Color Matrix 1/3 Matrix Select USER [Saturation] [Phase] Axis01 +50 0 Axis02 0 0 Axis03 0 0 Axis04 +35 +5 Axis05 0 0 Axis06 0 0 Return Return Pedestal [–10 bis +10] Dieser Posten dient der Justierung des Schwarzpegels (Schwarzwerteinstellung), so dass die dunklen Teile der Bilder leichter erkennbar sind. Diese Teile werden dunkler, wenn eine negative Einstellung gewählt wird; sie werden dagegen heller, wenn eine positive Einstellung gewählt wird. <Bildschirm “Color matrix 2/3”> Color Matrix 2/3 Matrix Select USER [Saturation] [Phase] Axis07 +30 0 Axis08 -20 +10 Axis09 0 -30 Axis10 0 0 Axis11 +10 +50 Axis12 0 0 Return DRS [Off, Low, High] Damit stellen Sie die DRS-Funktion ein, die genau den richtigen Kompensationsbetrag liefert, wenn Bilder mit beträchtlichen Hell/Dunkel-Unterschieden angezeigt werden. Wenn “Low” oder “High” gewählt wird, wird der Effekt noch stärker hervorgehoben. Dies kann Rauschen bei manchen Szenen stärker wahrnehmbar machen. Gamma Type [Off, Normal, Cinema] Damit wählen Sie den Typ der Gammakurve. Die gewählte Einstellung wird wirksam, wenn “Off” als Einstellung des Postens “DRS” gewählt wird. Normalerweise wird die Einstellung “Normal” verwendet. Wenn “Cinema” gewählt wird, können Bilder aufgenommen werden, die eine filmähnliche Atmosphäre ausstrahlen. <Bildschirm “Color matrix 3/3”> Color Matrix 3/3 Matrix Select USER [Saturation] [Phase] Axis13 0 0 Axis14 +35 +10 Axis15 0 0 Axis16 0 0 Gamma Level [Low, Mid, High] Dieser Posten dient zum Einstellen der GammaKompensationsstufe. Die Einstellung des Postens wird wirksam, wenn “Off” als Einstellung von “DRS” und “Normal” als Einstellung von “Gamma Type” gewählt worden ist. Bei Wahl von “Low” erscheinen die Bilder gediegen und ruhig. Die resultierende Gammakurve weist eine sanfte Steigung in lichtschwachen Bereichen auf, und der Kontrast ist schärfer. Wenn dagegen “High” gewählt wird, wird der Farbtonbereich in dunklen Flächen erweitert, so dass die Bilder einen helleren Ton annehmen. Die resultierende Gammakurve weist eine steile Steigung in lichtschwachen Bereichen auf, und der Kontrast ist weicher. Return Back Light COMP. [Off, On] Damit können Sie die Gegenlichtkompensation auf “On” oder “Off” einstellen. Bei Gegenlicht verhindert die Funktion eine Abdunkelung, wenn Objekte von hinten angeleuchtet werden, und ermöglicht es, Bilder im Schatten heller aufzunehmen. Die Funktion wird wirksam, wenn “Auto” als Einstellung des Postens “Contrast Mode”, “Gain” oder “Frame Mix” gewählt worden ist. Return Benutzen Sie diesen Posten, um zum vorherigen Menü zurückzukehren. 22 (G) DEUTSCH Pedest al DRS Gamma Type Gamm a Level Back L ight COMP. Einstellen der Menüposten qwBildschirme “Color Matrix 1/3 bis 3/3”: wwBildschirm System Matrix Select [Normal, EBU, NTSC, USER] Dieses Menü weist Posten auf, die sich auf die BildausgabeEinstellungen der Kamera beziehen. Damit werden die voreingestellten Farbmatrixdaten geladen und die Farbsättigung sowie der Farbton kompensiert. Wenn “USER” gewählt wird, können Feineinstellungen von Farbsättigung und Farbton mithilfe der 16-AchsenFarbmatrix (Axis01 bis Axis16) durchgeführt werden. System Output Other qwBildschirme “Color Matrix 1/3 bis 3/3”: Axis01 bis Axis16:Saturation [–127 bis +127] Return qwBildschirm “User Color Matrix Setup”: Axis01 bis Axis16:Saturation [–127 bis +127] Output Damit zeigen Sie den Bildschirm Output an, auf dem die Einstellungen für das Ausgabebild der Kamera gewählt werden. Ermöglicht eine Feineinstellung der Farbsättigung von Axis01 bis Axis16. Other qwBildschirme “Color Matrix 1/3 bis 3/3”: Damit zeigen Sie den Bildschirm Other an, auf dem die Einstellungen für den Installationsstatus der Schwenk-Neigekopfeinheit der Kamera und die Betriebsgeschwindigkeit sowie die auf die anderen Funktionen bezogenen Einstellungen ausgewählt werden. Axis01 bis Axis16:Phase [–127 bis +127] qwBildschirm “User Color Matrix Setup”: Axis01 bis Axis16:Phase [–127 bis +127] Return Benutzen Sie diesen Posten, um zum vorherigen Menü zurückzukehren. Ermöglicht eine Feineinstellung des Farbtons von Axis01 bis Axis16. 23 (G) Einstellen der Menüposten Damit legen Sie die HDMI-Farbausgabe fest. p Wenn ein HDMI-Monitor verwendet wird, benutzen Sie “YCbCr422” unter normalen Umständen. p In Fällen, in denen beispielsweise HDMI-(RGB)Signale umgewandelt und an einen DVI-Monitor ausgegeben werden, sind die erforderlichen Einstellungen je nach der vom Monitor unterstützten Farbabstufung unterschiedlich. Ou tput Format Down C ONV. Mode HDMI C olor 1080/50i Squeeze YCbCr422 RGB-NOR Die RGB-Ausgangssignale werden im Bereich von 16 bis 235 ausgegeben. RGB-ENH Die RGB-Ausgangssignale werden im Bereich von 0 bis 255 ausgegeben. Return Format [1080/50i, 576/50p] p Falls die schwarzen Teile der Bilder bei Wahl von “RGB-NOR” überbelichtet erscheinen, verwenden Sie statt dessen die Einstellung “RGB-ENH”. p Falls dagegen die Bilder bei Wahl von “RGB-ENH” mit Dunkeldetailverlust angezeigt werden, verwenden Sie statt dessen die Einstellung “RGB-NOR”. Auf diesem Bildschirm wird das Videoformat geändert. Einzelheiten über das Verfahren zum Ändern des Formats finden Sie unter “Ändern des Formats” (Seite 25). Down CONV. Mode [Squeeze, SideCut] Hinweis Damit wählen Sie den Abwärts-Konvertierungsmodus. pw Wenn eine HDMI-Farbeinstellung angegeben worden ist, die nicht vom Monitor unterstützt wird, kann die HDMI-Farbeinstellung automatisch geändert werden. (Die Menüanzeige bleibt unverändert.) Wenn das Seitenverhältnis 4:3 für den Monitorbildschirm eingestellt worden ist, Squeeze werden die Bilder horizontal gestaucht und vertikal gedehnt, und der Blickwinkel wird verändert. Return SideCut Benutzen Sie diesen Posten, um zum vorherigen Menü zurückzukehren. Unter Verwendung der vertikalen Höhe als Referenz werden die auf beiden Seiten überstehenden Teile abgeschnitten, und der Blickwinkel wird verändert. 24 (G) DEUTSCH HDMI Color [RGB-NOR, RGB-ENH, YCbCr422, YCbCr444] Bildschirm Output Einstellen der Menüposten qwÄndern des Formats Bildschirm Format unchanged Wenn die aktuelle Einstellung des Formats auf dem Bildschirm Output geändert wird, erscheint der Formatänderungs-Bestätigungsbildschirm. Formatänderungs-Bestätigungsbildschirm Format FO RMAT unchanged Do you want to set Format ( 1080/59.94i)? CANCEL O.K. p Das einzustellende Format (1080/50i, 576/50p) wird in Klammern auf dem Bildschirm angezeigt. p Wenn der Cursor auf “O.K.” auf dem Formatänderungs-Bestätigungsbildschirm gestellt wird und die Einstellung eingegeben wird, erscheint der Bildschirm Format Set für einige Sekunden, und das Format wird geändert. Nachdem das Format geändert worden ist, schaltet das Display auf den Bildschirm Output zurück. Bei manchen Monitortypen wird der Bildschirm Format Set eventuell nicht angezeigt. Bildschirm Format Set Format ( 1080/59.94i) Set p Das einzustellende Format (1080/50i, 576/50p) wird in Klammern auf dem Bildschirm angezeigt. p Wenn der Cursor auf “CANCEL” auf dem Formatänderungs-Bestätigungsbildschirm gestellt wird und die Einstellung eingegeben wird, erscheint der Bildschirm Format unchanged für 5 Sekunden, worauf das Format unverändert bleibt und das Display auf den Bildschirm Output zurück schaltet. Hinweis pw Nehmen Sie keine Änderungen vor, wenn die Kamera an ein HD-Videokommunikationssystem angeschlossen wird. 25 (G) Einstellen der Menüposten Damit wählen Sie “Enable” oder “Disable” für die Digitalzoomfunktion. Falls Zoomen in Richtung Tele-Anschlag über die Maximalposition hinaus durchgeführt wird, wenn “Enable” gewählt worden ist, kann der Digitalzoom kontinuierlich betätigt werden. Der Zoombetrieb stoppt vorübergehend an der Umschaltposition zwischen optischem und digitalem Zoom, kann aber danach fortgesetzt werden. Wenn die Einstellung auf “Disable” geändert wird, während sich die Kamera bereits im Digitalzoombereich befindet, fährt der Zoom automatisch zur Maximalposition des optischen Zooms. Ot her 1/2 Instal l Position Desktop Preset Speed 10 Preset Scope Mode A Digita l Zoom Disable Speed With Zoom POS. On Focus Mode Auto Focus ADJ With PTZ. ---Return Speed With Zoom POS. [Off, On] Install Position [Desktop] Damit wählen Sie “On” oder “Off” für die Funktion, die zur Justierung der Kamerarichtungs-Einstellgeschwindigkeit in Verbindung mit der Zoomvergrößerung verwendet wird. Wenn “On” gewählt wird, werden die Schwenk- und Neigevorgänge im Zoomzustand langsamer. Diese Funktion hat keinen Einfluss während der Vorwahlvorgänge. Freistehende Installation ist die einzige für das Gerät verfügbare Installationsoption. Desktop: Freistehende Installation Preset Speed [1 bis 30] Es stehen 30 voreingestellte Schwenk-NeigeBetriebsgeschwindigkeiten zur Verfügung, wenn die Kamerarichtung und andere Informationen, die im Vorwahlspeicher registriert sind, regeneriert werden. Focus Mode [Auto, Manual] Damit wählen Sie “Auto” oder “Manual” für die Fokussierfunktion. Auto: Die Motive werden immer automatisch scharfgestellt. Manual: Der Fokus wird manuell betätigt. Hinweis pw Falls ein hoher Wert für “Preset Speed” gewählt wird, kann das Schirmbild beim Anhalten des Vorgangs zittern. Die Umschaltung zwischen den Fokusmodi ist auch durch Drücken der Tasten [A/FOCUS] und [M/FOCUS] an der drahtlosen Fernbedienung möglich. Preset Scope [Mode A, Mode B, Mode C] Damit wählen Sie die Einstellungsposten, die abgerufen werden, wenn der Inhalt des Vorwahlspeichers regeneriert wird. Mode A: Pan, Tilt, Zoom (inklusive Digitalzoom), Focus, Iris, Gain, White-BAL Mode B: Pan, Tilt, Zoom (inklusive Digitalzoom), Focus, Iris Mode C: Pan, Tilt, Zoom (inklusive Digitalzoom), Focus Focus ADJ With PTZ. [Off, On] Damit wählen Sie “On” oder “Off” für die Funktion, die Unschärfe ausgleicht, wenn sie bei manueller Fokussierung während der Schwenk-, Neige- oder Zoomvorgänge auftreten. Wenn “Off” gewählt wird, stellen Sie den Fokus bei Bedarf nach dem Zoomen ein, oder schalten Sie auf den automatischen Modus um. Dieser Posten kann nur gewählt werden, wenn “Manual” als Einstellung von “Focus Mode” gewählt worden ist. Return Benutzen Sie diesen Posten, um zum vorherigen Menü zurückzukehren. 26 (G) DEUTSCH Digital Zoom [Disable, Enable] wwBildschirm Other 1/2 Einstellen der Menüposten wwBildschirm Other 2/2 Hinweis pw Wenn keine Menüoperationen durchgeführt werden können: 1. Schalten Sie die angeschlossenen Geräte und Vorrichtungen aus. 2. Ziehen Sie das Netzkabel des Gerätes ab, und schließen Sie es wieder an. 3. Führen Sie den Vorgang zum Einschalten der Stromversorgung des Gerätes über die drahtlose Fernbedienung durch. 4. Nachdem Sie diesen Posten geändert haben, schalten Sie das Gerät aus und wieder ein. Ot her 2/2 Tally Enable Enable OSD Of f With Tally Off OSD St atus Off Return Tally Enable [Disable, Enable] Die Wahl dieses Postens ist wirkungslos, da dies eine Erweiterungsfunktion ist. OSD Off With Tally [Off, On] Die Wahl dieses Postens ist wirkungslos, da dies eine Erweiterungsfunktion ist. OSD Status [Off, On] Damit wählen Sie “On” oder “Off” für die Statusanzeige, die während der AWB-Vorgänge erscheint. Return Benutzen Sie diesen Posten, um zum vorherigen Menü zurückzukehren. 27 (G) Einstellen der Menüposten wwBildschirm Firmware Version wwBildschirm Maintenance Firmwa re Version Initia lize PLD Camera Output Return Return V01.00 V01.00 Model Firmware Version Dieser Posten dient der Anzeige der Modellbezeichnung. Dieser Posten dient der Anzeige des Bildschirms “Firmware Version”, auf dem die Version der verwendeten Firmware überprüft werden kann. CPU Software Camera Main Dieser Posten dient der Anzeige der Software-Version des Kamerateils. Initialize Dieser Posten dient der Anzeige des Bildschirms “Initialize”, auf dem die Kamera-Einstellungen initialisiert werden. Für Einzelheiten zur Bedienung siehe “Info zur Initialisierung” auf Seite 29. CPU Software Pan/Tilt Dieser Posten dient der Anzeige der Software-Version des Schwenk-Neigeteils. CPU Software Network Return Dieser Posten dient der Anzeige von “V--.--”. Benutzen Sie diesen Posten, um zum vorherigen Menü zurückzukehren. PLD Camera Dieser Posten dient der Anzeige der PLD-Version des Kamerateils. PLD Output Dieser Posten dient der Anzeige der PLD-Version des Ausgabeteils. Return Benutzen Sie diesen Posten, um zum vorherigen Menü zurückzukehren. 28 (G) DEUTSCH Firmware Version Model GP-VD150 CPU Software Camera Main V01.00 Pan/Tilt V01.00 Network V--.-- Mai ntenance Einstellen der Menüposten qwInfo zur Initialisierung Bildschirm Menu settings unchanged Wenn “Initialize” auf dem Bildschirm Maintenance gewählt wird, erscheint der Bildschirm Initialize. Bildschirm Initialize Menu settings In itialize unchanged Do you want to initialize Menu s ettings? CANCEL O.K. Return p Wenn der Cursor auf “O.K.” auf dem Bildschirm Initialize gestellt und die Einstellung eingegeben wird, wird der Bildschirm Menu settings initialize für 5 Sekunden angezeigt, und die Kamera-Einstellungen werden auf die beim Kauf der Kamera gültigen Einstellungen wiederhergestellt. Die Format-Einstellungen (siehe die Seite 24) werden jedoch nicht initialisiert. Wenn der Initialisierungsvorgang beendet ist, erscheint der Bildschirm Initialize wieder auf dem Display. Bildschirm Menu settings initialized Menu s ettings initia lized p Wenn der Cursor auf “CANCEL” auf dem Bildschirm Initialize gestellt und die Einstellung eingegeben wird, wird der Bildschirm Menu settings unchanged für 5 Sekunden angezeigt, der Initialisierungsvorgang wird nicht durchgeführt, und das Display wird wieder auf den Bildschirm Initialize zurückgeschaltet. 29 (G) Tabelle der Menüposten Top Menu Camera Werksein-stellung Manual1 bis 3 Posten Scene Contrast Scene FullAuto Manual1 FullAuto, Manual1, Manual2, Manual3 Contrast Mode Auto Auto Auto, Manual Contrast Level 0 0 –5 bis +5 Shutter Mode ---- ---- Off, Step, Synchro Step/Synchro (Wenn “Step” für “Shutter Mode” gewählt wird) ---- ---- pw Bei Wahl von 59.94 Hz: 1/100, 1/250, 1/500, 1/1000, 1/2000, 1/4000, 1/10000 pw Bei Wahl von 50 Hz: 1/120, 1/250, 1/500, 1/1000, 1/2000, 1/4000, 1/10000 Step/Synchro (Wenn “Synchro” für “Shutter Mode” gewählt wird) ---- ---- pw Bei Wahl von 59.94 Hz: 60.24Hz bis 646.21Hz (1 bis 255 Stufen) pw Bei Wahl von 50 Hz: 50.20Hz bis 538.51Hz (1 bis 255 Stufen) Frame Mix ---- ---- Auto, Off, 6dB, 12dB, 18dB AutoF.Mix Max Gain ---- 0dB 0dB, 6dB, 12dB, 18dB Gain ---- Auto Auto, 0dB, 3dB, 6dB, 9dB, 12dB, 15dB, 18dB AGC Max Gain ---- 18dB 6dB, 12dB, 18dB ---- –1 –3 bis +3 AWB Mode ---- AWB A ATW, AWB A, AWB B R Gain ---- 0 –30 bis +30 B Gain ---- 0 –30 bis +30 Detail ---- Low Off, Low, High Flesh Tone Mode ---- Off Off, Low, High DNR ---- High Off, Low, High ---- –5 –10 bis +10 DRS ---- Low Off, Low, High Gamma Type ---- ---- Off, Normal, Cinema ---- ---- Low, Mid, High Back Light COMP. ---- Off Off, On Matrix Select ---- USER Normal, EBU, NTSC, USER Axis01 Saturation ---- +50 –127 bis +127 Phase ---- 0 –127 bis +127 Saturation ---- 0 –127 bis +127 Phase ---- 0 –127 bis +127 Saturation ---- 0 –127 bis +127 Phase ---- 0 –127 bis +127 Saturation ---- +35 –127 bis +127 Phase ---- +5 –127 bis +127 Saturation ---- 0 –127 bis +127 Phase ---- 0 –127 bis +127 Saturation ---- 0 –127 bis +127 Phase ---- 0 –127 bis +127 Matrix Select ---- USER Normal, EBU, NTSC, USER Axis07 Saturation ---- +30 –127 bis +127 Phase ---- 0 –127 bis +127 Saturation ---- –20 –127 bis +127 Phase ---- +10 –127 bis +127 Saturation ---- 0 –127 bis +127 Phase ---- –30 –127 bis +127 Saturation ---- 0 –127 bis +127 Phase ---- 0 –127 bis +127 Picture Picture 1/2 Chroma Level Picture 2/2 Pedestal Gamma Level Color Matrix 1/3 Axis02 Axis03 Axis04 Axis05 Axis06 Color Matrix 2/3 Auswahlposten FullAuto Axis08 Axis09 Axis10 30 (G) DEUTSCH Menü Tabelle der Menüposten Menü Top Menu Camera Posten Scene Color Matrix 2/3 Axis11 ---- +10 –127 bis +127 Phase ---- +50 –127 bis +127 Saturation ---- 0 –127 bis +127 Phase ---- 0 –127 bis +127 Matrix Select ---- USER Normal, EBU, NTSC, USER Axis13 Saturation ---- 0 –127 bis +127 Phase ---- 0 –127 bis +127 Saturation ---- +35 –127 bis +127 Phase ---- +10 –127 bis +127 Saturation ---- 0 –127 bis +127 Phase ---- 0 –127 bis +127 Saturation ---- 0 –127 bis +127 Phase ---- 0 –127 bis +127 Axis14 Axis15 Axis16 System Output Other 1080/59.94i (Bei Wahl von 59.94 Hz) pw Bei Wahl von 59.94 Hz: 1080/59.94i, 480/59.94p 1080/50i (Bei Wahl von 50 Hz) pw Bei Wahl von 50 Hz: 1080/50i, 576/50p Down CONV. Mode Squeeze Squeeze, SideCut HDMI Color YCbCr422 RGB-NOR, RGB-ENH, YCbCr422, YCbCr444 Install Position Desktop ---- Preset Speed 10 1 bis 30 Preset Scope Mode A Mode A, Mode B, Mode C Digital Zoom Disable Disable, Enable Format Other 1/2 Other 2/2 Maintenance Firmware Version Auswahlposten Saturation Axis12 Color Matrix 3/3 Werksein-stellung Manual1 bis 3 FullAuto Speed With Zoom POS. On Off, On Focus Mode Auto Auto, Manual Focus ADJ With PTZ. ---- Off, On Tally Enable Enable Disable, Enable OSD Off With Tally Off Off, On OSD Status Off Off, On Model GP-VD150 ---- Camera Main Versand-Version ---- Pan/Tilt Versand-Version ---- Network ---- ---- Camera Versand-Version ---- Output Versand-Version ---- ---- CANCEL CANCEL, OK CPU Software PLD Initialize 31 (G) 32 (G) DEUTSCH VERSION FRANÇAISE (FRENCH VERSION) Table des matières Avant utilisation ..................................................................2 Réglage des options des menus.....................................18 Vue géné rale ....................................................................2 Réglage des options des menus ....................................18 Au sujet des systèmes de communication vidéo HD .......2 Top Menu .......................................................................18 Au sujet de la télécommande sans fil (accessoire optionnel) .............................................2 Écran Camera (quand FullAuto est sélectionné) ...........19 Marques commerciales et marques commerciales déposées .........................................2 Écran Contrast ...............................................................20 Écran Camera (quand Manual1 à 3 est sélectionné) .....19 Écran Picture 1/2 ...........................................................21 Au sujet du droit d’auteur et de la licence ........................2 Écran Picture 2/2 ...........................................................22 Déni de la garantie ...........................................................2 Matrice couleur 16 axes .................................................22 Opérations de l’appareil.....................................................3 Écran System .................................................................23 Mise sous et hors tension .................................................4 Écran Output ..................................................................24 Mise sous tension ............................................................4 Écran Other 1/2 ..............................................................26 Mise hors tension .............................................................5 Écran Other 2/2 ..............................................................27 Au sujet du lien de transition simultanée de mode...........5 Écran Maintenance ........................................................28 Sélection des appareils......................................................6 Écran Firmware Version .................................................28 Sélection des modes de prise de vues (fichiers scèn es) .............................................................6 Tableau des options des menus .....................................30 Types de modes de prise de vues ...................................6 Comment sélectionner le mode de prise de vues ............7 Prise de vues ......................................................................8 Que faire en cas de problèmes pendant la prise de vues de base................................................9 Opérations plus avancées ...............................................10 Prise de vues manuelle ....................................................11 Réglage manuel de la mise au point ..............................11 Réglage manuel du diaphragme ....................................11 Réglage manuel de la vitesse d’obturation ....................12 Réglage manuel du gain ................................................12 Mémoires de préréglage ..................................................13 Réglage de la balance des blancs ..................................14 Réglage de la balance des blancs .................................14 Opérations de base des menus ......................................16 1 (F) Avant utilisation wwAu sujet du droit d’auteur et de la licence wwVue générale pw Cette caméra Full HD intégrée avec une tête panoramique est dotée d’un capteur MOS Full HD de type 1/3 et d’un processeur de signal numérique (DSP). La distribution, la copie, le démontage, l’inversion en conformité, l’inversion d’ingénierie et également l’exportation en violation aux lois de l’exportation du logiciel fourni avec cet appareil sont formellement interdits. pw En plus de son zoom optique 12, l’appareil est muni d’un zoom numérique 10 permettant des prises de vues d’excellente qualité avec des ambiances exceptionnelles. wwDéni de la garantie pw Cet appareil est conçu pour être utilisé exclusivement avec le système de communication vidéo HD Panasonic. Compatible avec les unités de communication vidéo HD : KX-VC300CX, KX-VC300EX, KX-VC600CX, KX-VC600EX wwAu sujet des systèmes de communication vidéo HD 1 TOUT DÉGÂT ET PERTE, Y COMPRIS SANS LIMITATION, DIRECT OU INDIRECT, SPÉCIAL, IMPORTANT OU EXEMPLAIRE, SURVENANT OU CONCERNANT LE PRODUIT; pw Pour obtenir une description des opérations de panoramique horizontal, panoramique vertical, zooming, préréglage et autres opérations de la caméra à l’aide d’une unité de communication vidéo HD, se reporter au mode d’emploi de l’unité compatible. 2 BLESSURE PERSONNELLE OU TOUT DÉGÂT CAUSÉS PAR UN USAGE NON APPROPRIÉ OU UNE UTILISATION NÉGLIGENTE DE L’UTILISATEUR; 3 DÉMONTAGE, RÉPARATION OU MODIFICATION NON AUTORISÉS DU PRODUIT EFFECTUÉS PAR L’UTILISATEUR; wwAu sujet de la télécommande sans fil (accessoire optionnel) 4 INCOMMODITÉ OU TOUTE PERTE SURVENANT LORSQUE LES IMAGES NE SONT PAS AFFICHÉES DÛ À TOUTE RAISON OU CAUSE Y COMPRIS TOUTE PANNE OU PROBLÈME DU PRODUIT; pw Cet appareil peut être piloté à distance par une télécommande sans fil (modèle AW-RM50G) disponible en option. Il ne peut pas être exploité directement par la télécommande sans fil d’une unité de communication vidéo HD. Pour acheter une télécommande sans fil, veuillez contacter votre revendeur. 5 TOUT PROBLÈME, INCOMMODITÉ IMPORTANTE OU PERTE OU ENDOMMAGEMENT, SURVENANT DU SYSTÈME COMBINÉ PAR LES APPAREILS DE TIERS; wwMarques commerciales et marques commerciales déposées 6 PERTES DE DONNÉES ENREGISTRÉES PROVOQUÉES PAR UNE PANNE. pw HDMI, le logo HDMI et High-Definition Multimedia Interface sont des marques commerciales ou des marques commerciales déposées de la firme HDMI Licensing LLC aux États-Unis d’Amérique et dans d’autres pays. pw Adobe, Acrobat Reader et Reader sont des marques déposées ou des marques de fabrique d’Adobe Systems Incorporated aux États-Unis et/ou dans d’autres pays. Organisation des modes d’emploi de ce modèle pw La documentation de cette caméra de communication HD (ci-après dénommée “l’appareil”) est divisée en deux manuels : la partie intitulée <Utilisation et réglages> (ce manuel dans le fichier PDF) et la partie intitulée <Les bases>. Avant d’installer l’appareil, prendre soin de lire <Les bases> pour assurer une installation correcte de l’appareil. 2 (F) FRANÇAIS EN AUCUN CAS Panasonic Corporation NE SERA TENU POUR RESPONSABLE POUR TOUTE PARTIE OU TOUTE PERSONNE, À L’EXCEPTION DU REMPLACEMENT OU D’UNE MAINTENANCE RAISONNABLE DE CE PRODUIT POUR LES CAS CITÉS, INCLUS MAIS NON LIMITÉS À CE QUI SUIT : Opérations de l’appareil Toutes les opérations de l’appareil peuvent être pilotées depuis une télécommande sans fil (modèle AW-RM50G) disponible en option. Les opérations détaillées dans ce manuel sont des opérations qui peuvent être exécutées depuis la télécommande sans fil. Remarque pw L’appareil ne peut pas être piloté directement depuis la télécommande sans fil d’une unité de communication vidéo HD. 3 (F) Mise sous et hors tension wwMise sous tension Alimentation de l’appareil à partir du mode STANDBY Alimentation de l’appareil pour le mettre sous tension 1 Vérifier que l’appareil est en mode STANDBY. 1 Positionner tous les interrupteurs d’alimentation des appareils et dispositifs raccordés au système sur ON. pw Vérifier que le mode STANDBY est établi (le voyant d’affichage d’état est allumé en orange). 2 Appuyer sur une des touches [CAM1] à [CAM4] 2 Allumer l’alimentation électrique vers de la télécommande sans fil pour sélectionner l’appareil. l’appareil. pw Cet appareil ne possède pas d’interrupteur d’alimentation. Quand il reçoit un courant électrique, le voyant d’affichage d’état s’allume en orange. Ensuite, les opérations initiales sont exécutées, et quand elles sont terminées, l’appareil passe en mode POWER ON, des images sont sorties, et la commande devient possible. Quand l’appareil passe en mode POWER ON, le voyant d’affichage d’état s’allume en vert. 3 Appuyer sur la touche [ON/STANDBY] de la L’appareil se met alors sous tension, des images sont produites et l’appareil peut être commandé. pw Le voyant d’affichage d’état de l’appareil s’allume maintenant en vert. Remarque Remarques pw Quand le fonctionnement est commuté vers le mode de mise sous tension : La caméra revient à la position qui a été sauvegardée dans la mémoire (en tant que préréglage de mise sous tension) au moment où le fonctionnement a été commuté vers le mode de veille. pw Il faut compter environ 30 secondes par appareil jusqu’à la fin des réglages initiaux. Pendant cette période, l’appareil ne peut pas être utilisé. (Voyant d’affichage d’état : s’allume en orange) pw Quand le fonctionnement est commuté vers le mode de veille : La position actuelle de panoramique horizontal/vertical est sauvegardée dans la mémoire (en tant que préréglage de mise sous tension), et la caméra bouge de manière à pointer vers l’arrière. pw Quand le fonctionnement est commuté vers le mode de mise sous tension : La caméra revient à la position qui a été sauvegardée dans la mémoire (en tant que préréglage de mise sous tension) au moment où le fonctionnement a été commuté vers le mode de veille. 4 Si plusieurs appareils doivent être utilisés, répéter les étapes 2 et 3 autant de fois que nécessaire. Le voyant d’affichage d’état de l’appareil clignote en vert quand un signal correspondant à l’identification de la télécommande est reçu, et il clignote en orange quand un signal ne correspondant pas à l’identification de la télécommande est reçu. 4 (F) FRANÇAIS télécommande sans fil pendant au moins 2 secondes. Mise sous et hors tension wwAu sujet du lien de transition simultanée de mode wwMise hors tension 1 Couper l’alimentation électrique vers l’appareil. Dès que l’unité de communication vidéo HD raccordée à l’appareil est mise en mode de veille d’écran, l’appareil passe en mode STANDBY. De la même manière, dès que l’unité sort du mode de veille d’écran, l’appareil passe en mode POWER ON. pw L’alimentation de l’appareil peut être interrompue, quel que soit le mode (mode STANDBY ou POWER ON) établi. 5 (F) Sélection des appareils 1 Appuyer sur la touche [CAM1], [CAM2], [CAM3] Il est possible d’exploiter jusqu’à quatre appareils depuis la télécommande sans fil. Sélectionner l’appareil (ou les appareils) à exploiter à partir de la télécommande sans fil. Même si un seul appareil est utilisé, il doit être sélectionné. ou [CAM4]. FRANÇAIS Le voyant d’affichage d’état de l’appareil clignote en vert quand un signal correspondant à l’identification de la télécommande est reçu, et il clignote en orange quand un signal ne correspondant pas à l’identification de la télécommande est reçu. Sélection des modes de prise de vues (fichiers scènes) wwTypes de modes de prise de vues L’appareil offre quatre modes de prise de vues préréglés, chacun correspondant à un ensemble de conditions dans lesquelles le sujet sera filmé. Sélectionner le mode répondant aux conditions de prise de vues et aux préférences personnelles. Les réglages peuvent être modifiés sur le menu. FullAuto : Réglage usine La vitesse d’obturation et l’ouverture du diaphragme sont réglées automatiquement. Manual1 Les paramètres de votre choix peuvent être établis en fonction de la scène à filmer, de l’éclairage et d’autres conditions. pw Si cet appareil est utilisé pendant qu’il est raccordé à une unité de communication vidéo HD, utiliser le mode de prise de vues “FullAuto”. pw Les résultats de la balance des blancs et d’autres réglages sont préservés en mémoire séparément par mode de prise de vues. S’assurer d’avoir bien sélectionné le mode de prise de vues avant d’effectuer un réglage quel qu’il soit. Manual2 Les paramètres de votre choix peuvent être établis en fonction de la scène à filmer, de l’éclairage et d’autres conditions. Manual3 Les paramètres de votre choix peuvent être établis en fonction de la scène à filmer, de l’éclairage et d’autres conditions. Remarque pw Si “FullAuto” a été sélectionné à l’option Scene sur le menu de caméra, par exemple, tous les réglages automatiques sont activés, et le fonctionnement manuel n’est plus possible pour certaines options. 6 (F) Sélection des modes de prise de vues (fichiers scènes) wwComment sélectionner le mode de prise de vues 4 Appuyer surwla touche []. Le menu secondaire “Camera” s’affiche sur le moniteur. 2, 8 1 Camera Scene Contrast Level 3, 5, 7 FullAuto 0 4, 6, 7 Return 1 Appuyer sur la touche [CAM1], [CAM2], [CAM3] 5 Appuyer sur la touche [] ou [] pour amener ou [CAM4] pour sélectionner l’appareil. le curseur devant “Scene”. 2 Appuyer sur la touche [MENU] pendant au 6 Appuyer sur la touche []. moins 2 secondes. Le mode de prise de vues clignote. Le Top Menu apparaît. Top Menu 7 Appuyer sur la touche [] ou [] pour Camera Scene: FullAuto System Mainte nance sélectionner le mode de prise de vues (FullAuto, Manual1, Manual2 ou Manual3) à utiliser, puis appuyer sur la touche [] pour entrer la sélection. Pour en savoir plus, se reporter à la page 19. 8 Appuyer sur la touche [MENU] pendant au moins 2 secondes. L’affichage du menu disparaît. 3 Appuyer sur la touche [] ou [] pour amener le curseur devant “Camera”. 7 (F) Prise de vues qwModification de la vitesse de changement de direction ou de zooming qwModification de la direction de la caméra Pour faire tourner la caméra vers la gauche ou la droite (panoramique horizontal) : Appuyer sur la touche [] ou []. Pour accélérer la vitesse de changement de direction ou de zooming : Appuyer sur la touche [FAST]. Pour lever ou baisser la caméra (panoramique vertical) : Appuyer sur la touche [] ou []. Pour ralentir la vitesse de changement de direction ou de zooming : Appuyer sur la touche [SLOW]. Pour déplacer la caméra en diagonale : Appuyer sur la touche [] ou [] et [] ou [] en même temps. La vitesse de réglage de la mise au point change aussi en même temps. FRANÇAIS Pour ramener la caméra à la position de référence : Appuyer sur la touche [HOME] pendant au moins 2 econdes. s qwUtilisation de la fonction zoom Pour faire un zoom avant (le sujet devient plus gros) : Appuyer sur la touche [T] de [ZOOM]. Pour faire un zoom arrière (le sujet devient plus petit) : Appuyer sur la touche [W] de [ZOOM]. 8 (F) Que faire en cas de problèmes pendant la prise de vues de base L’écran du menu est affiché. Si le problème n’est pas résolu par les actions suggérées cidessous, se reporter à “Diagnostic de panne” (dans <Les bases>). Appuyer sur la touche [MENU] pendant au moins 2 secondes pour sortir du menu. La mise au point de l’objectif ne se règle pas automatiquement. L’appareil ne bouge pas. pw Appuyer sur la touche [CAM1], [CAM2], [CAM3] ou [CAM4] pour sélectionner l’appareil devant être exploité. Si un seul appareil est utilisé, il est normalement sélectionné par la touche [CAM1]. pw Si le voyant d’affichage d’état de l’appareil est éteint ou allumé en orange, cela signifie sur l’appareil n’est pas sous tension. Se reporter à “Mise sous et hors tension” (page 4), et mettre l’appareil sous tension. pw Si le voyant d’affichage d’état de l’appareil ne clignote pas, même quand la télécommande sans fil est actionnée près du capteur optique du signal de télécommande sans fil, cela signifie que les piles de la télécommande sans fil sont épuisées. Remplacer les piles. Appuyer sur la touche [A/FOCUS] pour passer à la mise au point automatique. (La mise au point automatique est inopérante pendant les opérations de panoramique horizontal ou vertical.) L’image de la caméra est trop lumineuse ou trop sombre. 1. Appuyer sur la touche [A/IRIS] pour passer au réglage automatique du diaphragme. 2. Appuyer sur la touche [AUTO] de [GAIN] pour passer au réglage automatique du gain. Il y a un défaut dans les couleurs des images prises par la caméra. Se reporter à “Suivi automatique de la balance des blancs (ATW)” (page 15), et passer au mode ATW. 9 (F) Opérations plus avancées Réglage de la balance des blancs (voir pages 14 à 15) Prise de vues manuelle (voir pages 11 à 12) pw pw pw pw pw Ce réglage sert à rendre le blanc avec précision. Sa valeur affecte les teintes de couleur de tout l’écran. pw Il doit être effectué quand l’appareil est utilisé pour la première fois ou si l’appareil n’a pas été utilisé pendant longtemps. pw Il doit être effectué si les conditions d’éclairage ou la luminosité changent. pw Une fois que la balance des blancs est réalisée, ce réglage n’est plus à faire tant que l’appareil est utilisé dans les mêmes conditions. Réglage manuel de la mise au point Réglage manuel du diaphragme Réglage manuel de la vitesse d’obturation Réglage manuel du gain Mémoires de préréglage (voir page 13) FRANÇAIS pw Jusqu’à 12 paramètres de direction de caméra (panoramique horizontal et vertical), de zoom, de mise au point, de diaphragme, d’augmentation de gain et de balance des blancs peuvent être enregistrés dans les mémoires de préréglage, et rappelés. pw Le nombre de réglages pouvant être enregistrés et rappelés est 12, qui est le nombre de réglages pour la télécommande sans fil (modèle AW-RM50G), vendue séparément. 10 (F) Prise de vues manuelle wwRéglage manuel de la mise au point wwRéglage manuel du diaphragme La mise au point de l’objectif peut être réglée manuellement. 1 Appuyer sur la touche [M/IRIS] pour passer au Le diaphragme de l’objectif peut être réglé manuellement. 1 Appuyer sur la touche [M/FOCUS] pour passer réglage manuel du diaphragme. au réglage manuel de la mise au point. 2 Régler le diaphragme à l’aide de la touche 2 Appuyer sur la touche [F] ou [N] de [FOCUS], [IRIS +] ou [IRIS –]. puis faire la mise au point. Appuyer sur la touche [IRIS +] pour ouvrir le diaphragme; inversement, appuyer sur la touche [IRIS –] pour fermer le diaphragme. Quand la touche [F] est actionnée, la mise au point est effectuée sur un point plus éloigné (far) ; inversement, quand la touche [N] est actionnée, la mise au point est effectuée sur un point plus rapproché (near). La vitesse de la mise au point et d’autres réglages peut être accélérée ou ralentie par une pression sur [FAST] ou [SLOW], respectivement. 3 Si nécessaire, appuyer sur la touche [A/IRIS] pour rétablir le réglage automatique du diaphragme. 3 Si nécessaire, appuyer sur la touche [A/FOCUS] pour rétablir la mise au point automatique. Remarque pw Quand la mise au point est en mode manuel, le sujet risque de devenir flou pendant un panoramique horizontal, un panoramique vertical ou un zooming. L’appareil est doté d’une fonction qui compense ce problème. (Compensation de mise au point pendant le zooming : Focus ADJ With PTZ.) Cette fonction est réglée sur ON en usine. Si cette fonction est réglée sur OFF, refaire la mise au point, si nécessaire, après le zooming, ou utiliser la mise au point automatique. (Voir page 26.) 11 (F) Prise de vues manuelle wwRéglage manuel de la vitesse d’obturation wwRéglage manuel du gain Le gain est réglé à partir de la télécommande sans fil. Pour en savoir plus, se reporter à l’option [Gain] à la page 20. Le réglage de la vitesse d’obturation peut être réalisé à partir de deux opérations du menu de la caméra, au choix. La première consiste à spécifier un temps (tel que 1/250 s), et la seconde consiste à spécifier la fréquence (synchrobalayage, tel que 50,20 Hz). Lors de la prise de vues d’un écran de télévision ou d’ordinateur, le bruit horizontal généré pendant la prise de vues de l’écran peut être minimisé si la fréquence est réglée sur la fréquence de l’écran à l’aide de Synchro Scan (synchrobalayage). Remarque pw Pendant que le réglage du gain est effectué, la quantité de lumière risque de varier brusquement (ce qui peut provoquer un sursaut de l’image produite). Ces touches permettent de sélectionner l’augmentation de gain sur trois incréments. [LOW] sert à sélectionner 9 dB; [HI] sert à sélectionner 18 dB. 2 Si nécessaire, appuyer sur la touche [AUTO] pour rétablir le réglage de gain automatique (AGC). Le gain maximum pour le réglage automatique peut être réglé sur le menu. Pour en savoir plus, se reporter à l’option [AGC Max Gain] à la page 20. 12 (F) FRANÇAIS 1 Appuyer sur la touche [OFF], [LOW] ou [HI]. Effectuer les réglages sur le menu de la caméra. Pour en savoir plus, se reporter aux options [Shutter Mode] et [Step/Synchro] à la page 20. Mémoires de préréglage Il est possible d’enregistrer et rappeler jusqu’à douze réglages (préréglages N° 1 à 12) depuis la télécommande sans fil. Les touches [1] à [12] correspondent aux mémoires de préréglage N° 1 à 12 de l’appareil. Cet appareil permet d’enregistrer jusqu’à 12 paramètres de direction de caméra (panoramique horizontal et vertical), de zoom, de mise au point, de diaphragme, d’augmentation de gain et de balance des blancs dans les mémoires de préréglage, et de les rappeler. pw Le mode de fonctionnement (réglages manuels ou automatiques) n’est pas enregistré pour la mise au point et le réglage du diaphragme. Les valeurs actuelles de mise au point et de diaphragme sont enregistrées. pw Les valeurs de mise au point et de diaphragme ne peuvent être rappelées que si les réglages manuels sont applicables. pw Les réglages de balance des blancs pouvant être enregistrés sont AWB A, AWB B ou ATW. Les valeurs sélectionnées quand le réglage AWB a été établi sont rappelées en tant que valeurs de réglage de AWB A ou AWB B. qw Enregistrement des réglages dans les mémoires de préréglage 1 Afficher l’image à filmer sur le moniteur. Agir sur les touches de panoramique horizontal ou vertical ou de zoom pour déterminer l’angle de la caméra. Régler la mise au point, le diaphragme, le gain et la balance des blancs si besoin est. 2 Tout en tenant la touche [PRESET] enfoncée, Remarques appuyer sur la touche correspondant au numéro de la mémoire de préréglage. pw S’il y a une grande différence de température ambiante entre le moment de l’enregistrement et le moment où le réglage est rappelé, le réglage risque de se déplacer. pw Si un déplacement s’est produit, l’enregistrement doit être refait. pw Pendant que les paramètres préréglés sont appelés, il n’est pas possible d’effectuer des opérations manuelles, comme le panoramique horizontal, le panoramique vertical, le zooming ou le réglage du diaphragme. pw Si un ensemble de paramètres préréglés est appelé alors qu’un autre ensemble de paramètres préréglés avait déjà été appelé, le premier jeu de paramètres préréglés appelés a priorité. pw Si un numéro de mémoire de préréglage contenant déjà un réglage est sélectionné, le réglage existant est effacé et remplacé par le nouveau. qw Rappel des réglages des mémoires de préréglage 1 Appuyer sur la touche sur laquelle le réglage a été enregistré. 13 (F) Réglage de la balance des blancs wwRéglage de la balance des blancs qwRéglage automatique (AWB : AWB A ou AWB B) Pour pouvoir reproduire le blanc avec précision, le rapport entre les trois couleurs primaires (RGB) doit être réglé. Si la balance des blancs se dérègle, non seulement le blanc sera mal reproduit, mais les teintes de couleur de tout l’écran seront également affectées. 1 Filmer un sujet blanc (comme un mur ou un mouchoir blanc) de manière qu’il remplisse l’écran. pw Ce réglage doit être effectué quand l’appareil est utilisé pour la première fois ou si l’appareil n’a pas été utilisé pendant longtemps. pw Il doit être effectué si les conditions d’éclairage ou la luminosité changent. pw Ne pas filmer d’objet très brillant ou lumineux. 2 Sélectionner le mode de prise de vues Manual1, Manual2 ou Manual3 en suivant les instructions données dans “Sélection des modes de prise de vues (fichiers scènes)” (page 7). Les résultats du réglage AWB peuvent être sauvegardés dans deux mémoires, A et B, si “AWB A” ou “AWB B” a été sélectionné pour la balance des blancs. pw Une fois que la balance des blancs a été réglée et que l’appareil est utilisé avec les mêmes réglages et dans les mêmes conditions, ce réglage est achevé par la sélection d’un réglage du menu. Il n’y a pas besoin de refaire ce réglage. pw Si un nouveau réglage est entré, le réglage précédent est effacé. Camera Scene Contrast Picture Color Matrix Utiliser les deux mémoires pour préserver des réglages correspondant à des conditions de mise au point différentes. Manual1 Return 3 Appuyer sur la touche [] ou [] pour amener le curseur devant “Picture”. 4 Appuyer surwla touche []. Le menu secondaire “Picture 1/2” apparaît. Picture 1/2 Chroma Level AWB Mode R Gain B Gain Detail Flesh Tone Mode DNR Return 14 (F) -1 AWB A 0 0 Low Off High FRANÇAIS pw Les étapes 2 à 8 représentent la marche à suivre pour sélectionner la mémoire “AWB A” ou “AWB B”. Elles n’ont pas besoin d’être suivies si une mémoire est déjà sélectionnée. Si la touche [SET] de la télécommande sans fil a été enfoncée, le réglage AWB (automatic white balance : balance des blancs automatique) qui est effectué automatiquement, ou le réglage ATW (automatic tracking white : suivi automatique de la balance des blancs) qui est un réglage constant et continu, peut être sélectionné. Réglage de la balance des blancs 5 Appuyer sur la touche [] ou [] pour amener Remarques le curseur devant “AWB Mode”. pw ON doit être sélectionné au réglage OSD Status pour que les messages puissent être affichés. [Top Menu]>[System]>[OSD Status] sur [Other 2/2] pw La balance des blancs risque de ne pas être réglée correctement si l’éclairage de l’objet est trop faible. pw Étant donné que la caméra présente une mémoire intégrée, la balance des blancs réglée reste en mémoire même si la caméra est mise hors tension. En conséquence, il n’est pas nécessaire de refaire le réglage de la balance des blancs si la température de couleur de ces objets ne change pas. Cependant, il doit être refait si la température de couleur change, comme quand on passe de l’intérieur à l’extérieur, ou vice versa. 6 Appuyer surwla touche []. “AWB Mode” se met à clignoter. 7 Appuyer sur la touche [] ou [] pour changer le mode AWB à utiliser en “AWB A” ou “AWB B”, puis appuyer sur la touche [] pour entrer la sélection. 8 Appuyer sur la touche [MENU] pendant au moins 2 secondes. L’affichage du menu disparaît. qwSuivi automatique de la balance des blancs (ATW) 9 Appuyer sur la touche [SET] pendant au moins Quand le réglage de la balance des blancs est réglé sur “ATW”, la balance des blancs continue d’être ajustée automatiquement et constamment. Elle est automatiquement corrigée même si la source de lumière ou la température de couleur changent, afin de produire des images parfaitement naturelles. 2 secondes. Le réglage automatique de la balance des blancs (AWB) est effectué, et le paramètre de la balance des blancs est entré. pw Si le réglage de balance des blancs aboutit, “AWB OK” apparaît au centre de l’écran. Cette fonction est activée quand “ATW” est sélectionné à la place de “AWB A” ou “AWB B” en suivant la marche à suivre de “Réglage automatique” dans “Réglage de la balance des blancs” (page 14). AWB OK Remarques pw L’ATW risque de ne pas fonctionner correctement si des faisceaux de lumière vive (ex : éclairage fluorescent) pénètrent dans un écran. pw La balance des blancs risque de ne pas être réglée correctement si la scène filmée ne contient aucun objet blanc. pw La balance des blancs risque de se dérégler si une source de lumière différente, comme la lumière du soleil ou un éclairage fluorescent, est appliquée. pw Si le réglage échoue, un message d’erreur tel que “OUT RANGE NG”, “HIGH LIGHT NG”, “LOW LIGHT NG” ou “ATW NG” s’affiche. 15 (F) Opérations de base des menus Tableau des opérations Utilisation du menu Les menus sont utilisés depuis la télécommande sans fil. Ce qui suit porte sur les opérations de base pour modifier les réglages d’une option de menu depuis la télécommande sans fil. Télécommande sans fil Sélection de l’appareil à exploiter Appuyer sur la touche [CAM1], [CAM2], [CAM3] ou [CAM4]. Affichage du Top Menu Appuyer sur la touche [MENU] pendant au moins 2 secondes. Sélection des options Appuyer sur la touche [] ou [] ([] ou []). Affichage des menus secondaires Appuyer surwla touche []. Retour au menu précédent Amener le curseur sur la position [Return], puis appuyer sur la touche []. Modification des réglages Amener le curseur devant l’option à changer, puis appuyer sur la touche [] pour faire clignoter la valeur de l’option. Utiliser les touches [], [], [] et [] pour changer la valeur, puis appuyer sur la touche [] pour entrer la nouvelle valeur. Annulation du changement de paramètre Pendant que le paramètre clignote, appuyer brièvement (pendant moins de 2 secondes) sur la touche [MENU]. Fin de l’utilisation du menu Appuyer sur la touche [MENU] pendant au moins 2 secondes. Remarque pw Utiliser les menus et sortir des menus à l’aide de la télécommande sans fil qui affiche le Top Menu. 16 (F) FRANÇAIS Les menus sont affichés sur le moniteur quand des réglages de l’appareil doivent être sélectionnés. Le moniteur est raccordé au connecteur de sortie de signal vidéo. Les opérations de base des menus consistent à afficher des menus secondaires à partir des options du Top Menu, et à sélectionner des paramètres sur les menus secondaires. Certains menus secondaires présentent des options permettant d’effectuer des réglages plus détaillés. Opérations de base des menus 1 Appuyer sur la touche [CAM1], [CAM2], [CAM3] 9 Quand le réglage est terminé, appuyer sur la ou [CAM4] pour sélectionner l’appareil devant être utilisé. touche [MENU] pendant au moins 2 secondes. L’affichage du menu disparaît. 2 Appuyer sur la touche [MENU] pendant au moins 2 secondes. Le Top Menu apparaît. 3 Appuyer sur la touche [] ou [] pour amener le curseur devant l’option à sélectionner. Chaque pression sur la touche [] ou [] déplace le curseur. Le curseur peut être déplacé de la même manière à l’aide des touches [] et []. 4 Appuyer surwla touche []. Le menu secondaire de l’option sélectionnée est affiché. (Certaines options des menus secondaires ont leur propre menu secondaire.) 5 Appuyer sur la touche [] ou [] pour amener le curseur devant l’option à régler. Chaque pression sur la touche [] ou [] déplace le curseur. Le curseur peut être déplacé de la même manière à l’aide des touches [] et []. Quand le curseur est sur la position “Return”, appuyer sur la touche [] pour revenir au menu précédent. 6 Appuyer surwla touche []. La valeur de l’option devant être réglée se met à clignoter. 7 Appuyer sur la touche [] ou [] pour changer le paramètre. Le paramètre peut être changé de la même manière à l’aide des touches [] et []. 8 Appuyer surwla touche []. La valeur de l’option à régler est entrée, et elle cesse de clignoter. 17 (F) Réglage des options des menus wwTop Menu wwRéglage des options des menus Quand des réglages de l’appareil doivent être sélectionnés, les menus sont affichés sur le moniteur. Le moniteur est raccordé au connecteur de sortie de signal vidéo. Les opérations de base des menus consistent à afficher des menus secondaires depuis le Top Menu, et à sélectionner des paramètres sur les menus secondaires. Certains menus secondaires ont des options permettant d’effectuer des réglages plus détaillés. Pour en savoir plus sur les opérations de base pour afficher les menus et changer les options depuis la télécommande sans fil fournie, se reporter aux pages 16 à 17. Top Menu Camera Scene: FullAuto System Maintenance Les symboles “ ” et “ ” dans les titres des menus indiquent le niveau hiérarchique du menu actuellement affiché. Par exemple, “ ” indique le premier niveau hiérarchique, tandis que “ ” et “ ” indiquent que le second niveau hiérarchique est affiché. Les options de menu accompagnées d’un astérisque “ ” indiquent que les données sont mémorisées scène par scène; les options de menu accompagnées d’un dièse “ ” indiquent que les données sont mémorisées ensemble pour une caméra quelle que soit la scène. Camera System Sélectionner ceci pour ouvrir le menu de système qui porte, entre autres, sur les réglages d’image de sortie de la caméra. Maintenance Sélectionner ceci pour afficher le menu Maintenance qui sert à vérifier la version du micrologiciel de la caméra ou à initialiser ses paramètres. Remarque pw Le Top Menu ne comporte pas d’option “Return”. Pour fermer l’écran du menu, utiliser la télécommande sans fil et exécuter l’opération qui ferme l’écran du menu. Pour en savoir plus, se reporter aux pages 16 à 17. 18 (F) FRANÇAIS Sélectionner ceci pour ouvrir le menu de caméra correspondant aux images de la caméra. Réglage des options des menus wwÉcran Camera (quand Manual1 à 3 est sélectionné) wwÉcran Camera (quand FullAuto est sélectionné) Ce menu sert à régler l’image de la caméra. Camera Cam era Scene Contr ast Level Scene Contrast Picture Color Matrix FullAuto 0 Manual1 Return Return Scene [FullAuto, Manual1, Manual2, Manual3] Scene [FullAuto, Manual1, Manual2, Manual3] Se reporter à la section Scene dans la colonne de gauche. Sélectionner le mode de prise de vues correspondant à la situation de tournage. Sélectionner le mode qui convient le mieux aux conditions de tournage en cours et aux préférences de l’utilisateur. FullAuto : Contrast Sélectionner ceci pour afficher l’écran Contrast et régler la luminosité. Dans ce mode, les réglages et ajustements optimaux pour les conditions de tournage actuelles sont effectués automatiquement. Quand “FullAuto” est sélectionné, les menus de réglage et d’ajustement détaillés ne sont pas affichés. Picture Sélectionner ceci pour afficher l’écran Picture pour régler la qualité de l’image. Le menu de réglage de la qualité de l’image est partagé en deux écrans (Picture 1/2 et Picture 2/2). Manual1 à 3 : Dans ces modes, les réglages et ajustements détaillés sont établis manuellement en fonction des conditions de tournage actuelles et des préférences de l’utilisateur. Quand le mode Manual1, Manual2 ou Manual3 est sélectionné, le menu de réglage et d’ajustement détaillé pour le mode concerné est affiché. Color Matrix Sélectionner ceci pour charger les données de matrice couleur qui ont été préréglées et compenser la saturation et la teinte. Return Cette position sert à revenir au menu précédent. Contrast Level [–5 à +5] Le niveau de contraste sert à régler la luminosité de l’image. Return Cette position sert à revenir au menu précédent. 19 (F) Réglage des options des menus wwÉcran Contrast Frame Mix [Auto, Off, 6dB, 12dB, 18dB] Co ntrast Sélectionner la quantité d’adjonction d’images (augmentation du gain grâce à la mémoire de capteur). Cette option peut être réglée si “Off” est sélectionné au paramètre “Shutter Mode”. Quand l’adjonction d’images est réalisée, le film apparaît comme s’il manquait quelques images. Contra st Mode Auto Contr ast Level 0 Shutt er Mode ---Step /Synchro ---Fram e Mix ---Auto F.Mix Max Gain 0dB Gain Auto AGC Ma x Gain 18dB Return AutoF. Mix Max Gain [0dB, 6dB, 12dB, 18dB] Si “Auto” est sélectionné à “Contrast Mode” ou à “Frame Mix”, l’adjonction d’images maximum peut être réglée. Si l’adjonction d’images est réalisée au paramètre Auto, le film apparaît comme s’il manquait quelques images. Contrast Mode [Auto, Manual] Cette option sert à choisir si la luminosité de l’image (contraste) doit être réglée automatiquement ou manuellement. Le gain d’image est ajusté ici. Dans les endroits trop obscurs, régler le gain vers le haut; inversement, dans les endroits trop lumineux, régler le gain vers le bas. Si “Auto” est choisi, la quantité de lumière est réglée automatiquement. Le bruit augmente quand le gain est augmenté. Il est également possible de commuter le gain en appuyant sur les touches [OFF], [LOW], [HI] et [AUTO] pour [GAIN] sur la télécommande sans fil. Le diaphragme, la vitesse d’obturation, l’adjonction d’image et la luminosité de la caméra sont réglés automatiquement. Manual : Les valeurs réglées manuellement sont prises en compte. Il est également possible de commuter entre les deux modes de contraste en appuyant sur les touches [A/IRIS] et [M/IRIS] sur la télécommande sans fil. AGC Max Gain [6dB, 12dB, 18dB] Contrast Level [–5 à +5] Si “Auto” est sélectionné au paramètre “Gain”, la quantité maximum d’augmentation de gain peut être définie. Cette option permet de définir le niveau de contraste quand la luminosité de l’image est ajustée. Elle est accessible si “Auto” est sélectionné au paramètre “Contrast Mode”. Return Cette position sert à revenir au menu précédent. Shutter Mode [Off, Step, Synchro] Sélectionner la vitesse d’obturation de la caméra. Cette option est accessible si “Manual” est sélectionné au paramètre “Contrast Mode”. Off : L’obturateur est réglé sur OFF (pour qu’il ne puisse pas être déclenché). Step : L’obturateur incrémental est sélectionné (les incréments peuvent être modifiés). Synchro : L’obturateur synchro est sélectionné (le réglage peut être modifié en continu). Step/Synchro Cette option sert à ajuster la vitesse d’obturation dans le mode sélectionné au paramètre “Shutter Mode”. Quand une vitesse d’obturation plus élevée est sélectionnée, les sujets rapides sont moins flous, mais les images deviennent plus sombres. La vitesse d’obturation peut être choisie dans la liste ci-dessous. Quand “Step” est sélectionné à “Shutter Mode” Quand “Synchro” est sélectionné à “Shutter Mode” 1/120, 1/250, 1/500, 1/1000, 1/2000, 1/4000, 1/10000 De 50,20 Hz à 538,51 Hz maxi. (255 incréments) 20 (F) FRANÇAIS Auto : Gain [Auto, 0dB, 3dB, 6dB, 9dB, 12dB, 15dB, 18dB] Réglage des options des menus wwÉcran Picture 1/2 DNR [Off, Low, High] Pi cture 1/2 Chroma Level AWB Mo de R Gai n B Gai n Detail Flesh Tone Mode DNR Régler ici le niveau de l’effet de réduction de bruit numérique de manière à produire des images lumineuses, claires et sans bruit, même la nuit et dans d’autres environnements obscurs. Si “Low” ou “High” est sélectionné, encore plus de bruit peut être éliminé. Il y a cependant un risque accru de persistance. -1 AWB A 0 0 Low Off High Return Return Cette position sert à revenir au menu précédent. Chroma Level [–3 à +3] Remarques C’est ici que l’on règle l’intensité de couleur (niveau de chroma) des images. pw Quand le réglage automatique de balance des blancs (AWB) est exécuté, les valeurs de réglage R Gain et B Gain reviennent à “0”. pw Si “AWB A” ou “AWB B” est sélectionné au réglage AWB Mode, les valeurs de réglage R Gain et B Gain peuvent être sauvegardées dans les deux mémoires (A et B). pw Quand de nouvelles valeurs sont réglées, les données précédentes sont effacées. Utiliser une mémoire pour un ensemble de conditions de prise de vues, et l’autre mémoire pour un autre ensemble de conditions de prise de vues. pw Quand des données sont enregistrées dans les mémoires préréglées, les réglages R Gain et B Gain (-30 à +30) ne sont pas enregistrés, mais les états de balance des blancs (couleur) qui ont été établis après que les réglages R Gain et B Gain ont été réalisés peuvent être enregistrés. pw Si Mode A est sélectionné au réglage Preset Scope, les réglages R Gain et B Gain reviennent à “0” quand les données des mémoires préréglées sont rappelées. pw Si ATW est sélectionné au réglage AWB Mode, R Gain et B Gain ne peuvent pas être réglés. AWB Mode [ATW, AWB A, AWB B] Le mode de balance des blancs est sélectionné ici. Sélectionner le mode quand la nature de la source lumineuse ou d’autres facteurs produisent des couleurs pas naturelles. Si la couleur blanche servant de référence peut être reconnue, les sujets peuvent être filmés dans des couleurs naturelles. ATW : Dans ce mode, la balance des blancs est compensée automatiquement, même si la source de lumière ou la température de couleur changent, grâce à un système de réglage automatique continu. AWB A, AWB B : Si AWB A ou AWB B est sélectionné et que la balance des blancs est exécutée, le réglage obtenu est conservé dans la mémoire sélectionnée. Si AWB A ou AWB B est ensuite sélectionné, le réglage de balance des blancs conservé dans la mémoire sélectionnée peut être rappelé. R Gain, B Gain [–30 à +30] Si “AWB A” ou “AWB B” est sélectionné au réglage AWB Mode, la balance des blancs peut être réglée finement une fois que le réglage automatique de balance des blancs (AWB) est terminé. Detail [Off, Low, High] Le détail d’image (netteté de l’image) est réglé ici. Quand “Low” ou “High” est sélectionné, le détail est amélioré. Flesh Tone Mode [Off, Low, High] C’est ici que l’on règle le mode de ton chair permettant de faire apparaître la peau des sujets plus lisse et agréable à l’œil. Si “Low” ou “High” est sélectionné, l’effet est encore plus prononcé. 21 (F) Réglage des options des menus wwMatrice couleur 16 axes wwÉcran Picture 2/2 qwMenu de sortie moniteur (OSD) Pi cture 2/2 <Écran Color Matrix 1/3> -5 Low ------Off Color Matrix 1/3 Matrix Select USER [Saturation] [Phase] Axis01 +50 0 Axis02 0 0 Axis03 0 0 Axis04 +35 +5 Axis05 0 0 Axis06 0 0 Return Return Pedestal [–10 à +10] Cette option sert à régler le niveau du noir (le pedestal) de manière que les parties sombres des images soient mieux visibles. Ces parties deviennent plus sombres si un paramètre négatif est sélectionné, et inversement, elles deviennent plus claires si un paramètre positif est sélectionné. <Écran Color Matrix 2/3> Color Matrix 2/3 Matrix Select USER [Saturation] [Phase] Axis07 +30 0 Axis08 -20 +10 Axis09 0 -30 Axis10 0 0 Axis11 +10 +50 Axis12 0 0 Return DRS [Off, Low, High] Régler ici la fonction DRS qui procure la quantité correct de correction quand des images avec des différences prononcées entre les parties lumineuses et sombres sont affichées. Si “Low” ou “High” est sélectionné, l’effet est encore plus prononcé. Ce réglage peut rendre le bruit plus perceptible dans certaines scènes. Gamma Type [Off, Normal, Cinema] Sélectionner ici le type de courbe gamma. Le paramètre sélectionné prend effet quand “Off” est sélectionné à l’option “DRS”. Normalement, le paramètre “Normal” est utilisé. Quand “Cinema” est sélectionné, les images peuvent être filmées avec une atmosphère cinématographique. <Écran Color Matrix 3/3> Color Matrix 3/3 Matrix Select USER [Saturation] [Phase] Axis13 0 0 Axis14 +35 +10 Axis15 0 0 Axis16 0 0 Gamma Level [Low, Mid, High] Cette option sert à régler le niveau de correction gamma. Le réglage de l’option prend effet si “Off” a été sélectionné à l’option “DRS”, et “Normal” à l’option “Gamma Type”. Si “Low” est sélectionné, les images apparaissent calmes et posées. La courbe gamma résultante présente une pente douce dans les zones à faible luminosité, et le contraste est plus prononcé. Inversement, si “High” est sélectionné, la gamme de tons dans les parties sombres est allongée de manière que les images soient plus lumineuses. La courbe gamma obtenue présente une pente raide dans les zones à faible luminosité, et le contraste est plus doux. Return Back Light COMP. [Off, On] Sélectionner “On” ou “Off” pour la fonction de correction de contrejour. Quand il y a un contrejour, la fonction empêche que la lumière située derrière le sujet assombrisse ce dernier, et permet de prendre des images plus lumineuses à l’ombre. La fonction prend effet quand “Auto” est sélectionné à l’option de réglage Contrast Mode, Gain ou Frame Mix. Return Cette position sert à revenir au menu précédent. 22 (F) FRANÇAIS Pedest al DRS Gamma Type Gamm a Level Back L ight COMP. Réglage des options des menus qwÉcrans Color Matrix 1/3 à 3/3 : wwÉcran System Matrix Select [Normal, EBU, NTSC, USER] Ce menu présente des options portant sur les réglages de l’image de sortie de la caméra. Ceci charge les données de matrice couleur qui ont été préréglées, et compense la saturation et la teinte. Quand “USER” est sélectionné, la saturation et la teinte peuvent être réglées finement à l’aide de la matrice couleur 16 axes (Axis01 à Axis16). System Output Other qwÉcrans Color Matrix 1/3 à 3/3 : Axis01 à Axis16:Saturation [–127 à +127] Return qwÉcran User Color Matrix Setup : Axis01 à Axis16:Saturation [–127 à +127] Output Cette option permet de régler finement la saturation de Axis01 à Axis16. Cette option affiche l’écran Output sur lequel sont sélectionnés les paramètres de l’image de sortie de la caméra. qwÉcrans Color Matrix 1/3 à 3/3 : Other Axis01 à Axis16:Phase [–127 à +127] Cette option affiche l’écran Other (autres) qui permet de sélectionner les paramètres pour l’état d’installation et la vitesse de fonctionnement de la tête panoramique de la caméra ainsi que les paramètres relatifs aux autres fonctions. qwÉcran User Color Matrix Setup : Axis01 à Axis16:Phase [–127 à +127] Return Cette position sert à revenir au menu précédent. Cette option permet de régler finement la teinte de Axis01 à Axis16. 23 (F) Réglage des options des menus HDMI Color [RGB-NOR, RGB-ENH, YCbCr422, YCbCr444] wwÉcran Output La sortie de couleur HDMI est réglée ici. p Si un moniteur HDMI est utilisé, utiliser “YCbCr422” dans des circonstances normales. p Dans des cas où les signaux HDMI (RGB) sont convertis et sortis vers un moniteur DVI, par exemple, les paramètres nécessaires diffèrent en fonction de la gradation des couleurs acceptée par le moniteur. Ou tput 1080/50i Squeeze YCbCr422 RGB-NOR Les signaux de sortie RGB sont émis dans la plage 16 à 235. RGB-ENH Les signaux de sortie RGB sont émis dans la plage 0 à 255. Return p Si les parties noires des images apparaissent surexposées quand “RGB-NOR” est sélectionné, utiliser le paramètre “RGB-ENH” à la place. p A l’inverse, si les images affichées présentent une perte de détails dans les parties sombres quand “RGB-ENH” est sélectionné, utiliser le paramètre “RGB-NOR” à la place. Format [1080/50i, 576/50p] Le format vidéo est changé sur cet écran. Pour en savoir plus sur la manière de changer le format, se reporter à “Changement du format” (page 25). Down CONV. Mode [Squeeze, SideCut] Remarque Le mode de conversion vers le bas est sélectionné ici. pw Si un paramètre HDMI Color qui n’est pas accepté par le moniteur est spécifié, le paramètre HDMI Color risque de changer automatiquement. (L’affichage du menu reste inchangé.) Si le rapport d’image 4:3 a été réglé pour l’écran du moniteur, les images sont Squeeze compressées horizontalement et allongées verticalement, ce qui change l’angle de vue. Return SideCut Cette position sert à revenir au menu précédent. La hauteur verticale servant de référence, les parties dépassant une certaine limite de part et d’autre sont rognées, ce qui change l’angle de vue. 24 (F) FRANÇAIS Format Down C ONV. Mode HDMI C olor Réglage des options des menus qwChangement du format Écran Format unchanged Quand le format est modifié sur l’écran Output par rapport à son réglage actuel, l’écran de vérification de changement de format apparaît. Écran de vérification de changement de format Format FO RMAT unchanged Do you want to set Format ( 1080/50i)? CANCEL O.K. p Le format choisi (1080/50i, 576/50p) est indiqué entre parenthèses sur l’écran. p Si le curseur est amené devant “O.K.” sur l’écran de vérification de changement de format et que le paramètre est entré, l’écran Format Set apparaît pendant quelques secondes et le format est changé. Après que le format a été changé, l’affichage de l’écran Output est rétabli. L’écran Format Set peut ne pas s’afficher sur certains types de moniteurs. Écran Format Set Format ( 1080/50i) Set p Le format choisi (1080/50i, 576/50p) est indiqué entre parenthèses sur l’écran. p Si le curseur est amené devant “CANCEL” sur l’écran de vérification de changement de format et que le paramètre est entré, l’écran Format unchanged apparaît pendant 5 secondes, le format est laissé inchangé, et l’écran Output est de nouveau affiché. Remarque pw Aucun changement ne doit être effectué lors du raccordement d’un système de communication vidéo HD. 25 (F) Réglage des options des menus Digital Zoom [Disable, Enable] wwÉcran Other 1/2 La fonction de zoom numérique est réglée ici sur “Enable” (actif) ou “Disable” (inactif). Quand “Enable” est sélectionné, si un zooming est effectué au-delà de la position Tele maximum, le zoom numérique peut être utilisé en continu. Le zooming s’interrompt temporairement à l’endroit où le zoom optique et le zoom numérique sont commutés ; il convient donc de reprendre le zooming après un arrêt sur cette position. Si le paramètre est changé en “Disable” alors que le zoom est déjà en position numérique, il revient automatiquement à la position du zoom optique maximum. Ot her 1/2 Instal l Position Desktop Preset Speed 10 Preset Scope Mode A Digita l Zoom Disable Speed With Zoom POS. On Focus Mode Auto Focus ADJ With PTZ. ---Return Install Position [Desktop] La fonction servant à régler la vitesse de réglage de direction de caméra en parallèle avec le grossissement du zoom est réglée ici sur “On” ou “Off”. Si “On” est choisi, les opérations de panoramique horizontal et vertical deviennent plus lentes quand le zoom est utilisé. Cette fonction n’a aucun effet pendant le fonctionnement préréglé. Preset Speed [1 à 30] Il y a 30 vitesses de fonctionnement préréglées de panoramique horizontal/vertical quand la direction de la caméra et d’autres informations enregistrées dans les mémoires préréglées sont régénérées. Focus Mode [Auto, Manual] Remarque La fonction de mise au point est réglée ici sur “Auto” ou “Manual”. Auto : La mise au point est toujours réalisée automatiquement sur les sujets. Manual : La mise au point est effectuée manuellement. Il est également possible de commuter entre les deux modes de mise au point en appuyant sur les touches [A/FOCUS] et [M/FOCUS] sur la télécommande sans fil. pw Si une valeur élevée est sélectionnée pour le paramètre Preset Speed, l’image à l’écran risque de trembler quand l’opération s’arrête. Preset Scope [Mode A, Mode B, Mode C] Sélectionner ici les options de réglage à rappeler quand le contenu des mémoires préréglées est régénéré. Mode A : Pan, Tilt, Zoom (y compris zoom numérique), Focus, Iris, Gain, White-BAL Mode B : Pan, Tilt, Zoom (y compris zoom numérique), Focus, Iris Mode C : Pan, Tilt, Zoom (y compris zoom numérique), Focus Focus ADJ With PTZ. [Off, On] Choisir ici “On” ou “Off” pour la fonction qui corrige les erreurs de mise au point pendant les opérations de panoramique horizontal/vertical ou de zooming quand la mise au point est effectuée manuellement. Si “Off” est choisi, régler la mise au point après le zooming si nécessaire, ou passer la mise au point en mode automatique. Cette option ne peut être sélectionnée que si “Manual” est sélectionné au réglage “Focus Mode”. Return Cette position sert à revenir au menu précédent. 26 (F) FRANÇAIS Speed With Zoom POS. [Off, On] L’installation autonome est la seule option d’installation possible pour l’appareil. Desktop : Installation autonom e Réglage des options des menus wwÉcran Other 2/2 Remarque pw Si les menus ne peuvent pas être utilisés : 1. Mettre les appareils et dispositifs raccordés hors tension. 2. Débrancher le câble d’alimentation de l’appareil, puis le rebrancher. 3. Mettre l’appareil sous tension depuis la télécommande sans fil. 4. Après avoir changé cette option, mettre l’appareil hors tension et à nouveau sous tension. Ot her 2/2 Tally Enable Enable OSD Of f With Tally Off OSD St atus Off Return Tally Enable [Disable, Enable] La sélection de cette option n’a aucun effet, puisqu’il s’agit d’une fonction d’extension. OSD Off With Tally [Off, On] La sélection de cette option n’a aucun effet, puisqu’il s’agit d’une fonction d’extension. OSD Status [Off, On] L’affichage d’état qui apparaît pendant les opérations AWB est réglé ici sur “On” ou “Off”. Return Cette position sert à revenir au menu précédent. 27 (F) Réglage des options des menus wwÉcran Firmware Version wwÉcran Maintenance Firmware Version Model GP-VD150 CPU Software Camera Main V01.00 Pan/Tilt V01.00 Network V--.-- Mai ntenance Firmwa re Version Initia lize PLD Camera Output Return Return V01.00 V01.00 Model Firmware Version CPU Software Camera Main Cette option affiche la version du logiciel de la caméra. Initialize CPU Software Pan/Tilt Sélectionner cette option pour afficher l’écran Initialize qui permet d’initialiser les réglages de la caméra. Pour en savoir plus, se reporter à “En ce qui concerne l’initialisation” à la page 29. Cette option affiche la version du logiciel de la tête panoramique. CPU Software Network Return Cette option affiche “V--.--”. Cette position sert à revenir au menu précédent. PLD Camera Cette option affiche la version du circuit logique programmable de la caméra. PLD Output Cette option affiche la version du circuit logique programmable du dispositif de sortie. Return Cette position sert à revenir au menu précédent. 28 (F) FRANÇAIS Cette option affiche le nom du modèle. Choisir cette option pour afficher l’écran Firmware Version sur laquelle est indiquée la version du micrologiciel utilisé. Réglage des options des menus qwEn ce qui concerne l’initialisation Écran “Menu settings unchanged” Quand “Initialize” est sélectionné sur l’écran Maintenance, l’écran Initialize apparaît. Écran Initialize Menu settings In itialize unchanged Do you want to initialize Menu s ettings? CANCEL O.K. Return p Si le curseur est amené devant “O.K.” sur l’écran Initialize et que le paramètre est entré, l’écran “Menu settings initialized” s’affiche pendant 5 secondes, et les réglages de la caméra sont ramenés à ceux qui étaient en vigueur au moment de l’achat de l’appareil. Cependant, les réglages de Format (voir page 24) ne sont pas initialisés. Quand l’opération d’initialisation est terminée, l’écran “Initialize” est à nouveau affiché. Écran “Menu settings initialized” Menu s ettings initia lized p Si le curseur est amené devant “CANCEL” sur l’écran Initialize et que le réglage est entré, l’écran “Menu settings unchanged” s’affiche pendant 5 secondes, et l’opération d’initialisation n’est pas exécutée. L’écran “Initialize” est à nouveau affiché. 29 (F) Tableau des options des menus Scene Contrast FullAuto Manual1 FullAuto, Manual1, Manual2, Manual3 Contrast Mode Auto Auto Auto, Manual Contrast Level 0 0 –5 à +5 Shutter Mode ---- ---- Off, Step, Synchro Step/Synchro ---(Quand “Step” est sélectionné à “Shutter Mode”) ---- pw Quand 59.94 Hz est sélectionné : 1/100, 1/250, 1/500, 1/1000, 1/2000, 1/4000, 1/10000 pw Quand 50 Hz est sélectionné : 1/120, 1/250, 1/500, 1/1000, 1/2000, 1/4000, 1/10000 Step/Synchro ---(Quand “Synchro” est sélectionné à “Shutter Mode”) ---- pw Quand 59.94 Hz est sélectionné : 60.24Hz à 646.21Hz (1 à 255 incréments) pw Quand 50 Hz est sélectionné : 50.20Hz à 538.51Hz (1 à 255 incréments) Frame Mix ---- ---- Auto, Off, 6dB, 12dB, 18dB AutoF.Mix Max Gain ---- 0dB 0dB, 6dB, 12dB, 18dB Gain ---- Auto Auto, 0dB, 3dB, 6dB, 9dB, 12dB, 15dB, 18dB AGC Max Gain ---- 18dB 6dB, 12dB, 18dB ---- –1 –3 à +3 AWB Mode ---- AWB A ATW, AWB A, AWB B R Gain ---- 0 –30 à +30 B Gain ---- 0 –30 à +30 Detail ---- Low Off, Low, High Flesh Tone Mode ---- Off Off, Low, High DNR ---- High Off, Low, High ---- –5 –10 à +10 DRS ---- Low Off, Low, High Gamma Type ---- ---- Off, Normal, Cinema ---- ---- Low, Mid, High Back Light COMP. ---- Off Off, On Matrix Select ---- USER Normal, EBU, NTSC, USER Axis01 Saturation ---- +50 –127 à +127 Phase ---- 0 –127 à +127 Saturation ---- 0 –127 à +127 Phase ---- 0 –127 à +127 Saturation ---- 0 –127 à +127 Phase ---- 0 –127 à +127 Saturation ---- +35 –127 à +127 Phase ---- +5 –127 à +127 Saturation ---- 0 –127 à +127 Phase ---- 0 –127 à +127 Saturation ---- 0 –127 à +127 Phase ---- 0 –127 à +127 Matrix Select ---- USER Normal, EBU, NTSC, USER Axis07 Saturation ---- +30 –127 à +127 Phase ---- 0 –127 à +127 Saturation ---- –20 –127 à +127 Phase ---- +10 –127 à +127 Saturation ---- 0 –127 à +127 Phase ---- –30 –127 à +127 Saturation ---- 0 –127 à +127 Phase ---- 0 –127 à +127 Picture 2/2 Pedestal Gamma Level Axis02 Axis03 Axis04 Axis05 Axis06 Color Matrix 2/3 Réglages possibles Scene Picture Picture 1/2 Chroma Level Color Matrix 1/3 FullAuto Axis08 Axis09 Axis10 30 (F) FRANÇAIS Top Menu Camera Réglage usine Manual1 à 3 Option Menu Tableau des options des menus Option Menu Top Menu Camera Scene Color Matrix 2/3 Axis11 ---- +10 –127 à +127 Phase ---- +50 –127 à +127 Saturation ---- 0 –127 à +127 Phase ---- 0 –127 à +127 Matrix Select ---- USER Normal, EBU, NTSC, USER Axis13 Saturation ---- 0 –127 à +127 Phase ---- 0 –127 à +127 Saturation ---- +35 –127 à +127 Phase ---- +10 –127 à +127 Saturation ---- 0 –127 à +127 Phase ---- 0 –127 à +127 Saturation ---- 0 –127 à +127 Phase ---- 0 Axis14 Axis15 Axis16 System Output Other Other 2/2 Maintenance Firmware Version –127 à +127 1080/59.94i (Quand 59.94 Hz est sélectionné) pw Quand 59.94 Hz est sélectionné : 1080/59.94i, 480/59.94p 1080/50i (Quand 50 Hz est sélectionné) pw Quand 50 Hz est sélectionné : 1080/50i, 576/50p Down CONV. Mode Squeeze Squeeze, SideCut HDMI Color YCbCr422 RGB-NOR, RGB-ENH, YCbCr422, YCbCr444 Install Position Desktop ---- Preset Speed 10 1 à 30 Preset Scope Mode A Mode A, Mode B, Mode C Digital Zoom Disable Disable, Enable Format Other 1/2 Réglages possibles Saturation Axis12 Color Matrix 3/3 Réglage usine Manual1 à 3 FullAuto Speed With Zoom POS. On Off, On Focus Mode Auto Auto, Manual Focus ADJ With PTZ. ---- Off, On Tally Enable Enable Disable, Enable OSD Off With Tally Off Off, On OSD Status Off Off, On Model GP-VD150 ---- Camera Main Version usine ---- Pan/Tilt Version usine ---- Network ---- ---- Camera Version usine ---- Output Version usine ---- ---- CANCEL CANCEL, OK CPU Software PLD Initialize 31 (F) 32 (F) FRANÇAIS VERSIONE ITALIANA (ITALIAN VERSION) Sommario Prima dell’uso .....................................................................2 Impostazione delle voci di menu.....................................18 Descrizione generale .......................................................2 Impostazione delle voci di menu ....................................18 Informazioni sui sistemi di comunicazione video HD .......2 Menu superiore (Top Menu) ...........................................18 Informazioni sul telecomando wireless (accessorio opzionale) ............................................2 Schermata Camera (se è selezionato FullAuto) ............19 Marchi di fabbrica e marchi di fabbrica registrati ..............2 Schermata Camera (se è selezionato da Manual1 a 3) ..........................19 Riguardo a copyright e licenza .........................................2 Schermata Contrast .......................................................20 Esonero dalla garanzia ....................................................2 Schermata Picture 1/2 ...................................................21 Operazioni dell’unità ..........................................................3 Schermata Picture 2/2 ...................................................22 Matrice colore a 16 assi .................................................22 Accensione e spegnimento dell’unità ..............................4 Schermata System.........................................................23 Accensione dell’unità .......................................................4 Schermata Output ..........................................................24 Spegnimentodell’unità .....................................................5 Schermata Other 1/2......................................................26 Informazioni sul collegamento simultaneo di transizione delle modalità ..........................................................5 Schermata Other 2/2......................................................27 Schermata Maintenance ................................................28 Selezione delle unità ..........................................................6 Schermata Firmware Version .........................................28 Selezione delle modalità di ripresa (file di scena) ...........6 Tabella delle voci di menu ...............................................30 Tipi di modalità di ripresa .................................................6 Selezione della modalità di ripresa ..................................7 Ripresa ................................................................................8 Risoluzione dei problemi per le operazioni di ripresa basilari ...........................................................9 Altre operazioni avanzate ................................................10 Ripresa man uale ...............................................................11 Regolazione manuale della messa a fuoco ...................11 Regolazione manuale del diaframma.............................11 Regolazione manuale della velocità otturatore ..............12 Regolazione manuale del guadagno .............................12 Memorie per sonalizzate ...................................................13 Regolazione del bilanciamento del bianco ....................14 Regolazione del bilanciamento del bianco.....................14 Operazioni dei menu - Impostazioni basilari .................16 1(I) Prima dell’uso wwDescrizione generale wwRiguardo a copyright e licenza pw La presente unità è una videocamera full HD integrata da una testa di panoramica orizzontale/verticale, dotata di un sensore MOS full HD di tipo 1/3 e di un processore di segnale digitale (DSP). Sono espressamente proibiti la distribuzione, la riproduzione, il disassemblaggio, la decompilazione, la retroingegnerizzazione ed anche l’esportazione in violazione delle leggi sull’esportazione del software fornito con questa unità. pw Oltre che di un obiettivo con zoom ottico 12, l’unità è dotata di uno zoom digitale 10 per ottenere riprese di alta qualità e cariche di atmosfera. wwEsonero dalla garanzia pw L’unità può essere utilizzata esclusivamente con sistemi di comunicazione video HD Panasonic. Unità di comunicazione video HD compatibili: KX-VC300CX, KX-VC300EX, KX-VC600CX, KX-VC600EX wwInformazioni sui sistemi di comunicazione video HD 1 QUALSIASI DANNO E PERDITA, INCLUSI SENZA LIMITAZIONE, QUELLI DIRETTI O INDIRETTI, SPECIALI, CONSEGUENTI O ESEMPLARI, DERIVATI O RELATIVI AL PRODOTTO; pw Per la descrizione delle operazioni di panoramica orizzontale, panoramica verticale, zoom, preimpostazione e altre operazioni della videocamera con un’unità di comunicazione video HD, vedere le istruzioni per l’uso dell’unità supportata. 2 LESIONI PERSONALI O QUALSIASI DANNO CAUSATO DALL’UTILIZZO SCORRETTO O DALL’ESECUZIONE NEGLIGENTE DI OPERAZIONI DA PARTE DELL’UTENTE; 3 SMONTAGGIO, RIPARAZIONE O MODIFICA NON AUTORIZZATI DEL PRODOTTO DA PARTE DELL’UTENTE; wwInformazioni sul telecomando wireless (accessorio opzionale) 4 INCONVENIENTI O QUALSIASI PERDITA DERIVATI DALLA MANCATA VISUALIZZAZIONE DELLE IMMAGINI, DOVUTI A QUALSIASI MOTIVO O CAUSA INCLUSI QUALSIASI GUASTO O PROBLEMA DEL PRODOTTO; pw L’unità può essere comandata a distanza utilizzando un telecomando wireless (modello AW-RM50G) disponibile come accessorio opzionale. Non può essere comandata direttamente con il telecomando wireless di un’unità di comunicazione video HD. Per acquistare un telecomando wireless, contattare il rivenditore. 5 QUALSIASI PROBLEMA, CONSEGUENTE INCONVENIENTE, PERDITA O DANNO DERIVATO DAL SISTEMA COMBINATO CON DISPOSITIVI DI TERZI; 6 PERDITA DI DATI REGISTRATI CAUSATA DA QUALSIASI GUASTO. wwMarchi di fabbrica e marchi di fabbrica registrati pw HDMI, il logo HDMI e High-Definition Multimedia Interface sono marchi o marchi registrati di HDMI Licensing LLC negli Stati Uniti e in altri Paesi. pw Adobe, Acrobat Reader e Reader sono marchi registrati o marchi di Adobe Systems Incorporated negli Stati Uniti e/o in altri paesi. Suddivisione dei manuali di istruzioni per l’uso di questo modello pw Il manuale di questa videocamera di comunicazione HD integrata (di seguito, “l’unità”) è suddiviso in due manuali: il primo è <Operazioni e impostazioni> (il presente manuale su file PDF), il secondo è <Nozioni di base>. Prima di installare l’unità, leggere le <Nozioni di base> in modo da installare l’unità correttamente. 2(I) ITALIANO IN NESSUN CASO Panasonic Corporation DOVRÀ ESSERE RITENUTA RESPONSABILE NEI CONFRONTI DI ALCUNA PARTE O PERSONA, FATTA ECCEZIONE PER LA SOSTITUZIONE O LA MANUTENZIONE RAGIONEVOLE DEL PRODOTTO, NEI CASI, INCLUSI MA NON LIMITATI AI SEGUENTI: Operazioni dell’unità Tutte le operazioni dell’unità possono essere eseguite utilizzando un telecomando wireless (modello AW-RM50G) disponibile come accessorio opzionale. Le procedure operative descritte nel presente manuale vengono eseguite con il telecomando wireless. Nota pw L’unità non può essere comandata direttamente con il telecomando wireless di un’unità di comunicazione video HD. 3(I) Accensione e spegnimento dell’unità wwAccensione dell’unità Alla riaccensione dell’unità dalla modalità STANDBY Quando si alimenta e si accende l’unità 1 Controllare che l’unità sia in modalità 1 Impostare tutti gli interruttori di accensione STANDBY. delle unità e dei dispositivi collegati al sistema su ON. pw Controllare che la modalità STANDBY sia stata attivata (la spia del display di stato è accesa di colore arancio). 2 Alimentare l’unità. pw Questa unità non dispone di interruttore di accensione. Se l’unità è alimentata, la spia del display di stato si accende di colore arancio. Vengono quindi eseguite le operazioni iniziali. Al loro completamento, viene attivata la modalità POWER ON, vengono trasmesse le immagini ed è possibile eseguire il controllo. All’attivazione della modalità POWER ON, la spia del display di stato si accende in verde. 2 Premere uno dei tasti da [CAM1] a [CAM4] sul telecomando wireless per selezionare l’unità. 3 Premere il tasto [ON/STANDBY] sul telecomando wireless per almeno 2 secondi. Viene attivata la modalità di accensione (POWER ON), le immagini vengono trasmesse ed è possibile esercitare il controllo. pw La spia del display di stato dell’unità si accende di colore verde. Note pw Il caricamento delle impostazioni iniziali impiega circa 30 secondi. Durante questa fase, l’unità non può essere utilizzata. (Spia del display di stato: si accende di colore arancio) pw Quando viene attivata la modalità STANDBY: La posizione di panoramica orizzontale/verticale corrente viene salvata in memoria (come impostazione personalizzata per POWER ON) e la videocamera si sposta in modo da puntare all’indietro. pw Quando viene attivata la modalità POWER ON: La videocamera si sposta nella posizione salvata in memoria (come impostazione personalizzata per POWER ON) quando è stata attivata la modalità STANDBY. pw Quando viene attivata la modalità POWER ON: La videocamera si sposta nella posizione salvata in memoria (come impostazione personalizzata per POWER ON) quando è stata attivata la modalità STANDBY. 4 Se si utilizzano più unità, ripetere i passaggi 2 e 3 secondo necessità. La spia del display di stato dell’unità lampeggia di colore verde se viene ricevuto un segnale corrispondente all’ID del telecomando e lampeggia di colore arancio se il segnale ricevuto non corrisponde all’ID del telecomando. 4(I) ITALIANO Nota Accensione e spegnimento dell’unità wwInformazioni sul collegamento simultaneo di transizione delle modalità wwSpegnimento dell’unità 1 Spegnere l’unità. pw L’unità può essere spenta indipendentemente dalla modalità attivata (modalità STANDBY o modalità POWER ON). Appena l’unità di comunicazione video HD collegata all’unità viene impostata in modalità di standby dello schermo, l’unità passa alla modalità STANDBY. Allo stesso modo, appena sul dispositivo viene disattivata la modalità di standby dello schermo, l’unità passa alla modalità POWER ON. 5(I) Selezione delle unità 1 Premere il tasto [CAM1], [CAM2], [CAM3] o Con il telecomando wireless è possibile comandare fino a quattro unità. Selezionare le unità (o le unità) da comandare tramite il telecomando wireless. Anche se si utilizza una sola unità, questa deve essere selezionata. [CAM4]. La spia del display di stato dell’unità lampeggia di colore verde se viene ricevuto un segnale corrispondente all’ID del telecomando e lampeggia di colore arancio se il segnale ricevuto non corrisponde all’ID del telecomando. wwTipi di modalità di ripresa L’unità è dotata di quattro modalità di ripresa preimpostate, ognuna delle quali corrisponde a una serie di condizioni di ripresa del soggetto. Selezionare la modalità più idonea alle condizioni di ripresa e alle proprie preferenze. Le impostazioni possono essere modificate con le operazioni dei menu. FullAuto: Impostazione di fabbrica La velocità otturatore e il diaframma obiettivo vengono regolati automaticamente. Manual1 È possibile applicare le impostazioni preferite a seconda della scena, dell’illuminazione e delle altre condizioni di ripresa. pw Quando si utilizza la presente unità mentre è collegata a un'unità di comunicazione video HD Panasonic, utilizzare la modalità di ripresa “FullAuto”. pw I risultati della regolazione del bilanciamento del bianco e di altre regolazioni vengono salvati in memoria separatamente dalla modalità di ripresa. È sempre necessario selezionare la modalità di ripresa prima di effettuare qualsiasi regolazione. Manual2 È possibile applicare le impostazioni preferite a seconda della scena, dell’illuminazione e delle altre condizioni di ripresa. Manual3 È possibile applicare le impostazioni preferite a seconda della scena, dell’illuminazione e delle altre condizioni di ripresa. Nota pw Se per esempio “FullAuto” è stato selezionato come impostazione di Scene nel menu della videocamera, tutte le impostazioni automatiche vengono attivate e le operazioni manuali non saranno più consentite per alcune voci. 6(I) ITALIANO Selezione delle modalità di ripresa (file di scena) Selezione delle modalità di ripresa (file di scena) wwSelezione della modalità di ripresa 4 Premere il tasto []. Sul monitor viene visualizzato il sottomenu “Camera”. 2, 8 1 Camera Scene Contrast Level 3, 5, 7 FullAuto 0 4, 6, 7 Return 1 Premere il tasto [CAM1], [CAM2], [CAM3] o 5 Premere il tasto [] o [] per portare il [CAM4] per selezionare l’unità. cursore su “Scene”. 2 Premere il tasto [MENU] per almeno 2 secondi. 6 Premere il tasto []. Viene visualizzato il menu superiore (Top Menu). La modalità di ripresa lampeggia. Top Menu 7 Premere il tasto [] o [] per selezionare Camera Scene: FullAuto System Mainte nance la modalità di ripresa (FullAuto, Manual1, Manual2 o Manual3) da utilizzare, quindi premere il tasto [] per confermare la selezione. Per maggiori informazioni, vedere la pag. 19. 8 Premere il tasto [MENU] per almeno 2 secondi. Si esce dal display del menu. 3 Premere il tasto [] o [] per portare il cursore su “Camera”. 7(I) Ripresa qwCommutazione della direzione o della velocità di zoom qwModifica della direzione della videocamera Movimento della videocamera a destra o sinistra (panoramica orizzontale): Premere il tasto [] o []. Variazione della direzione o dello zoom ad alta velocità: Premere il tasto [FAST]. Movimento della videocamera verso l’alto o il basso (panoramica verticale): Premere il tasto [] o []. Variazione della direzione o dello zoom a bassa velocità: Premere il tasto [SLOW]. Movimento della videocamera in diagonale: Premere contemporaneamente i tasti [] o [] e [] o []. Contemporaneamente, viene variata anche la velocità di controllo della messa a fuoco dell’obiettivo. Ritorno della videocamera nella posizione di riferimento: Premere il tasto [HOME] per almeno 2 secondi. qwUso della funzione zoom Zoom in avanti (il soggetto viene ingrandito): Premere il tasto [T] di [ZOOM]. ITALIANO Zoom all’indietro (il soggetto viene rimpicciolito): Premere il tasto [W] di [ZOOM]. 8(I) Risoluzione dei problemi per le operazioni di ripresa basilari Se il problema non viene risolto con i passaggi suggeriti di seguito, vedere “Risoluzione dei problemi” (in <Nozioni di base>). Viene visualizzata la schermata di menu. L’unità non si muove. La messa a fuoco dell’obiettivo non viene regolata automaticamente. Premere il tasto [MENU] per almeno 2 secondi per uscire dal menu. pw Premere il tasto [CAM1], [CAM2], [CAM3] o [CAM4] per selezionare l’unità da comandare. Se si utilizza una sola unità, questa viene normalmente selezionata con il tasto [CAM1]. pw Se la spia del display di stato dell’unità è spenta o accesa di colore arancio, l’unità è spenta. Vedere “Accensione e spegnimento dell’unità” (pag. 4) e accendere l’unità. pw Se la spia del display di stato dell’unità non lampeggia neanche se il telecomando wireless viene utilizzato vicino all’area di rilevamento del segnale, le batterie del telecomando wireless sono esaurite. Sostituire le batterie. Premere il tasto [A/FOCUS] per passare alla messa a fuoco automatica. (La messa a fuoco automatica non funziona durante le operazioni di panoramica orizzontale o verticale.) L’immagine della videocamera è troppo chiara o scura. 1. Premere il tasto [A/IRIS] per passare alla regolazione automatica del diaframma. 2. Premere il tasto [AUTO] di [GAIN] per passare alla regolazione automatica del guadagno. Problemi con i colori delle immagini della videocamera. Vedere “Regolazione automatica costante del bianco (ATW)” (pag. 15) e passare ad “ATW”. 9(I) Altre operazioni avanzate Regolazione del bilanciamento del bianco (vedere alle pagg. 14 a 15) Ripresa manuale (vedere alle pagg. 11 a 12) pw pw pw pw Regolazione manuale della messa a fuoco Regolazione manuale del diaframma Regolazione manuale della velocità otturatore Regolazione manuale del guadagno Memorie personalizzate (vedere alle pag. 13) ITALIANO pw Le memorie personalizzate consentono di salvare e richiamare fino a 12 impostazioni per la direzione della videocamera (panoramica orizzontale e verticale), lo zoom, la messa a fuoco, il diaframma, l’aumento di guadagno e il bilanciamento del bianco. pw Il numero di impostazioni che possono essere registrate e richiamate è 12 e corrisponde al numero di impostazioni del telecomando wireless (modello AW-RM50G) venduto separatamente. pw Questa regolazione viene eseguita per riprodurre il bianco in modo preciso. L’impostazione ha effetti sulle tonalità di colore dell’intero schermo. pw La regolazione deve essere effettuata se l’unità viene utilizzata per la prima volta o se è rimasta inutilizzata a lungo. pw Inoltre, deve essere effettuata se l’illuminazione o la luminosità sono cambiate. pw Regolato il bilanciamento del bianco, non sarà più necessario effettuare la regolazione purché l’unità venga utilizzata alle stesse condizioni. 10 ( I ) Ripresa manuale wwRegolazione manuale della messa a fuoco wwRegolazione manuale del diaframma È possibile regolare manualmente la messa a fuoco dell’obiettivo. È possibile regolare manualmente il diaframma obiettivo. 1 Premere il tasto [M/FOCUS] per passare alla 1 Premere il tasto [M/IRIS] per passare alla regolazione manuale del diaframma. regolazione manuale della messa a fuoco. 2 Premere il tasto [F] o [N] di [FOCUS], quindi regolare la messa a fuoco. Premendo il tasto [F], la messa a fuoco si allontana dal soggetto (lontano). Viceversa, premendo il tasto [N], si avvicina al soggetto (vicino). La velocità di messa a fuoco e delle altre regolazioni può essere aumentata o diminuita premendo i tasti [FAST] o [SLOW] rispettivamente. 3 Se necessario, premere il tasto [A/FOCUS] 2 Regolare il diaframma con i tasti [IRIS +] e [IRIS –]. Premere il tasto [IRIS +] per regolare il diaframma obiettivo nella direzione di apertura. Viceversa, premere il tasto [IRIS –] per regolare il diaframma obiettivo nella direzione di chiusura. 3 Se necessario, premere il tasto [A/IRIS] per tornare alla regolazione automatica del diaframma. per tornare alla regolazione automatica della messa a fuoco. Nota pw Se la messa a fuoco è in modalità manuale, il soggetto potrebbe sfocarsi durante lo zoom, la panoramica orizzontale e la panoramica verticale. L’unità è tuttavia dotata di una funzione che aiuta a compensare questo fenomeno. (Compensazione della messa a fuoco durante la funzione zoom: Focus ADJ With PTZ.) Come impostazione di fabbrica, questa funzione è impostata su ON. Se la funzione viene impostata su OFF, regolare la messa a fuoco secondo necessità dopo lo zoom o impostare la messa a fuoco automatica. (Vedere pag. 26.) 11 ( I ) Ripresa manuale wwRegolazione manuale della velocità otturatore wwRegolazione manuale del guadagno La regolazione della velocità otturatore può essere impostata con uno dei due metodi operativi mediante i menu della videocamera. Il primo consiste nello specificare il tempo (per esempio, 1/250 sec.), il secondo nello specificare la frequenza (per esempio, scansione sincrona di 50,20 Hz, ecc.). Se si riprende uno schermo televisivo o il monitor di un PC, è possibile ridurre al minimo le bande orizzontali generate dalla ripresa dello schermo adattando la frequenza a quella dello schermo mediante la scansione sincrona. Il guadagno viene regolato con il telecomando wireless. Per maggiori informazioni, vedere la voce [Gain] a pag. 20. Nota pw Regolando il guadagno, la quantità di luce potrebbe variare improvvisamente (causando uno shock sull’immagine in uscita). 1 Premere il tasto [OFF], [LOW] o [HI]. Questi tasti permettono di aumentare il guadagno con tre incrementi. [LOW] è utilizzato per selezionare 9 dB; [HI] è utilizzato per selezionare 18 dB. Eseguire le regolazioni nel menu Camera. Per maggiori informazioni, vedere le voci [Shutter Mode] e [Step/Synchro] a pag. 20. 2 Se necessario, premere il tasto [AUTO] per Il guadagno massimo per la regolazione automatica può essere impostato dal menu. Per maggiori informazioni, vedere la voce [AGC Max Gain] a pag. 20. 12 ( I ) ITALIANO tornare alla regolazione automatica del guadagno (AGC). Memorie personalizzate Con le memorie personalizzate, l’unità permette di salvare e richiamare fino a 12 impostazioni per la direzione della videocamera (panoramica orizzontale e verticale), lo zoom, la messa a fuoco, il diaframma, il guadagno e il bilanciamento del bianco. pw La modalità operativa (impostazione manuale o automatica) non viene registrata per le impostazioni di messa a fuoco e diaframma. Vengono registrati solo i valori correnti di messa a fuoco e diaframma. pw I valori di messa a fuoco e diaframma possono essere richiamati solo se sono applicabili le impostazioni manuali. pw AWB A, AWB B o ATW viene registrato come impostazione di bilanciamento del bianco. I valori selezionati quando è stato applicato AWB vengono richiamati come valori di regolazione di AWB A o AWB B. Con il telecomando wireless è possibile registrare e richiamare dodici impostazioni (memorie personalizzate da n.1 a n.12). I tasti da [1] a [12] corrispondono alle memorie personalizzate da n.1 a n.12 dell’unità. qw Registrazione delle impostazioni nelle memorie personalizzate 1 Visualizzare l’immagine da riprendere sul monitor. Premere i tasti di panoramica orizzontale, panoramica verticale o zoom per determinare l’angolazione della videocamera. Regolare la messa a fuoco, il diaframma, il guadagno e il bilanciamento del bianco se necessitano di regolazione. Note pw Se vi è una grande differenza di temperatura ambientale tra il momento della registrazione e il momento in cui l’impostazione viene richiamata, può verificarsi uno spostamento della posizione di memoria. pw In caso di spostamento, eseguire nuovamente la registrazione. pw Mentre vengono richiamate le impostazioni personalizzate, non è possibile eseguire operazioni manuali come la panoramica orizzontale, la panoramica verticale e le regolazioni di zoom o diaframma. pw Se dopo aver richiamato una serie di impostazioni personalizzate viene richiamata un’altra serie di impostazioni personalizzate, la prima serie di impostazioni personalizzate richiamata ha la precedenza. 2 Tenendo premuto il tasto [PRESET], premere il tasto corrispondente al numero di memoria personalizzata. pw Se si seleziona un numero di memoria personalizzata su cui è già stata registrata un impostazione, l’impostazione esistente viene cancellata e sostituita con quella nuova. qw Richiamo delle impostazioni delle memorie personalizzate 1 Premere il tasto su cui è stata registrata l’impostazione di memoria personalizzata. 13 ( I ) Regolazione del bilanciamento del bianco wwRegolazione del bilanciamento del bianco qwRegolazione automatica (AWB: AWB A o AWB B) 1 Riprendere un soggetto bianco (es. parete bianca o fazzoletto) a tutto schermo. pw La regolazione deve essere effettuata se l’unità viene utilizzata per la prima volta o se è rimasta inutilizzata a lungo. pw Inoltre, deve essere effettuata se l’illuminazione o la luminosità sono cambiate. Premendo il tasto [SET] sul telecomando wireless, è possibile selezionare la regolazione AWB (bilanciamento del bianco automatico), che viene eseguita automaticamente, o la regolazione ATW (bilanciamento del bianco con tracciamento automatico), che viene eseguita in modo costante e continuo. pw Non riprendere oggetti brillanti o molto luminosi. pw I passaggi da 2 a 8 illustrano la procedura di selezione delle memorie “AWB A” o “AWB B”. Questa procedura non deve essere eseguita se è già stata effettuata una selezione. 2 Selezionare Manual1, Manual2 o Manual3 come modalità di ripresa seguendo la procedura descritta in “Selezione delle modalità di ripresa (file di scena)” (pag. 7). I risultati della regolazione AWB possono essere salvati in due memorie, A e B, selezionando “AWB A” o “AWB B” per il bilanciamento del bianco. Camera pw Dopo aver regolato il bilanciamento del bianco, e se l’unità viene utilizzata con le stesse impostazioni e alle stesse condizioni, l’impostazione viene completata selezionando semplicemente un’impostazione di menu. Non è necessario impostarlo nuovamente. pw Dopo aver inserito una nuova impostazione, l’impostazione precedente viene cancellata. Scene Contrast Picture Color Matrix Utilizzare le due memorie per salvare le impostazioni corrispondenti a condizioni di ripresa diverse. Manual1 ITALIANO Per riprodurre il bianco in modo preciso, viene regolato il rapporto fra i tre colori primari (RGB). Se il bilanciamento del bianco non è regolato correttamente, non solo si avrà una cattiva riproduzione del bianco, ma anche le tonalità di colore dell’intero schermo risulteranno degradate. Return 3 Premere il tasto [] o [] per portare il cursore su “Picture”. 4 Premere il tasto []. Viene visualizzato il sottomenu “Picture 1/2”. Picture 1/2 Chroma Level AWB Mode R Gain B Gain Detail Flesh Tone Mode DNR Return 14 ( I ) -1 AWB A 0 0 Low Off High Regolazione del bilanciamento del bianco 5 Premere il tasto [] o [] per portare il Note cursore su “AWB Mode”. pw Affinché i messaggi vengano visualizzati, è necessario selezionare ON come impostazione di OSD Status. [Top Menu]>[System]>[OSD Status] in [Other 2/2] pw Se l’illuminazione del soggetto è troppo debole, il bilanciamento del bianco potrebbe non essere impostato correttamente. pw Poiché la videocamera dispone di memoria integrata, il bilanciamento del bianco impostato rimane in memoria anche dopo aver spento l’unità. Pertanto, non è necessario reimpostare il bilanciamento del bianco se la temperatura del colore dei soggetti rimane invariata. Al contrario, deve essere reimpostato se la temperatura del colore varia, per esempio passando da interni ad esterni o viceversa. 6 Premere il tasto []. “AWB Mode” inizia a lampeggiare. 7 Premere il tasto [] o [] bper impostare la modalità AWB su “AWB A” o “AWB B”, quindi premere il tasto [] per confermare la selezione. 8 Premere il tasto [MENU] per almeno 2 secondi. Si esce dal display del menu. 9 Premere il tasto [SET] per almeno 2 secondi. Viene eseguita la regolazione automatica del bilanciamento del bianco (AWB) e viene applicata l’impostazione del bilanciamento del bianco. pw Quando la regolazione del bilanciamento del bianco viene completata con successo, viene visualizzato “AWB OK” al centro dello schermo. qwRegolazione automatica costante del bianco (ATW) Se la regolazione del bilanciamento del bianco è impostata su “ATW”, il bilanciamento del bianco viene regolato e corretto automaticamente anche in caso di variazioni della sorgente luminosa o della temperatura del colore, in modo da ottenere immagini assolutamente naturali. Questa funzione è operativa se si seleziona “ATW” al posto di “AWB A” o “AWB B”, come descritto in “Regolazione automatica” alla sezione “Regolazione del bilanciamento del bianco” (pag. 14). AWB OK Note pw La funzione ATW potrebbe non funzionare correttamente se una sorgente molto luminosa (es. lampada fluorescente) influisce sullo schermo. pw Se nella ripresa non vi sono oggetti bianchi, il bilanciamento del bianco potrebbe non essere impostato correttamente. pw Se si alternano sorgenti luminose diverse (es. luce solare e luce fluorescente), il bilanciamento del bianco potrebbe perdere la regolazione corretta. pw Quando la regolazione non va a buon fine, viene visualizzato un messaggio di errore come “OUT RANGE NG”, “HIGH LIGHT NG”, “LOW LIGHT NG” o “ATW NG”. 15 ( I ) Operazioni dei menu - Impostazioni basilari Tabella delle operazioni Le operazioni dei menu vengono configurate con il telecomando wireless. Di seguito vengono descritte le operazioni basilari per modificare le impostazioni delle voci dei menu con il telecomando wireless. Operazione del menu Telecomando wireless Selezione dell’unità da comandare Premere il tasto [CAM1], [CAM2], [CAM3] o [CAM4]. Visualizzazione del menu superiore (Top Menu) Premere il tasto [MENU] per almeno 2 secondi. Selezione delle voci Premere il tasto [] o [] ([] o []). Visualizzazione dei sottomenu Premere il tasto []. Ritorno al menu precedente Con il cursore in posizione [Return], premere il tasto []. Modifica delle impostazioni Con il cursore sulla voce da modificare, premere il tasto [O] per far lampeggiare il valore della voce. Utilizzare i tasti [], [], [] e [] per modificare il valore e premere il tasto [] per confermare la modifica. Annullamento della modifica dell’impostazione Mentre l’impostazione lampeggia, premere brevemente il tasto [MENU] (per meno di 2 secondi). Uscita dalle operazioni dei menu Premere il tasto [MENU] per almeno 2 secondi. Nota pw Eseguire le operazioni dei menu e uscire dai menu utilizzando il telecomando wireless che ha visualizzato il menu superiore (Top Menu). 16 ( I ) ITALIANO I menu vengono visualizzati sul monitor per selezionare le impostazioni dell’unità. Il monitor è collegato al connettore di uscita segnale video. Le operazioni basilari dei menu prevedono la visualizzazione di sottomenu a partire dalle voci del menu superiore (Top Menu) e la selezione delle impostazioni dei sottomenu. Alcuni sottomenu contengono voci di menu per configurare le impostazioni in modo più dettagliato. Operazioni dei menu - Impostazioni basilari 1 Premere il tasto [CAM1], [CAM2], [CAM3] o [CAM4] per selezionare l’unità da comandare. 9 Dopo aver terminato l’impostazione, premere il tasto [MENU] per almeno 2 secondi. Si esce dal display del menu. 2 Premere il tasto [MENU] per almeno 2 secondi. Viene visualizzato il menu superiore (Top Menu). 3 Premere il tasto [] o [] per portare il cursore sulla voce da selezionare. A ogni pressione del tasto [] o [], il cursore si sposta. Il cursore può essere spostato allo stesso modo utilizzando i tasti [] e []. 4 Premere il tasto []. Viene visualizzato il sottomenu della voce selezionata. (Alcuni sottomenu hanno a loro volta un sottomenu.) 5 Premere il tasto [] o [] per portare il cursore sulla voce da impostare. A ogni pressione del tasto [] o [], il cursore si sposta. Il cursore può essere spostato allo stesso modo utilizzando i tasti [] e []. Con il cursore in posizione “Return”, premere il tasto [] per tornare al menu precedente. 6 Premere il tasto []. Il valore della voce da impostare inizia a lampeggiare. 7 Premere il tasto [] o [] per modificare l’impostazione. La voce può essere modificata allo stesso modo utilizzando i tasti [] e []. 8 Premere il tasto []. Il valore della voce da impostare viene confermato e smette di lampeggiare. 17 ( I ) Impostazione delle voci di menu wwMenu superiore (Top Menu) wwImpostazione delle voci di menu Top Menu Per selezionare le impostazioni dell’unità, vengono visualizzati i menu sul monitor. Il monitor è collegato al connettore di uscita segnale video. Le operazioni basilari dei menu prevedono la visualizzazione di sottomenu a partire dalle voci del menu superiore (Top Menu) e la selezione delle impostazioni dei sottomenu. Alcuni sottomenu contengono voci di menu per configurare le impostazioni in modo più dettagliato. Per informazioni dettagliate sulle operazioni basilari per la visualizzazione dei menu e la modifica delle voci con il telecomando wireless, vedere da pag. 16 a 17. Camera Selezionare per aprire il menu della videocamera relativo alle immagini della videocamera. System Selezionare per aprire il menu di sistema, relativo alle impostazioni di uscita delle immagini della videocamera, ecc. Maintenance Selezionare per visualizzare il menu Maintenance, che consente di controllare la versione firmware della videocamera o inizializzare le impostazioni. Nota pw Il menu superiore (Top Menu) non dispone di un’impostazione “Return”. Per chiudere la schermata di menu, chiudere la schermata eseguendo l’apposita operazione con il telecomando wireless. Per maggiori informazioni, vedere le pagine 16 a 17. 18 ( I ) ITALIANO I simboli “ ” e “ ” nei titoli dei menu indicano il livello gerarchico del menu correntemente visualizzato. Per esempio, “ ” indica il primo livello gerarchico, mentre “ ”e “ ” indicano che è visualizzato il secondo livello gerarchico. Le voci di menu affiancate dal simbolo “ ” indicano i dati memorizzati a seconda delle varie scene; le voci di menu affiancate dal simbolo “ ” indicano i dati memorizzati insieme su una videocamera, indipendentemente dalle scene. Camera Scene: FullAuto System Maintenance Impostazione delle voci di menu wwSchermata Camera (se è selezionato FullAuto) wwSchermata Camera (se è selezionato da Manual1 a 3) Questo menu è utilizzato per le impostazioni dell’immagine della videocamera. Camera Scene Contrast Picture Color Matrix Cam era Scene Contr ast Level FullAuto 0 Manual1 Return Return Scene [FullAuto, Manual1, Manual2, Manual3] Queste opzioni consentono di selezionare la modalità di ripresa più adatta alle condizioni di ripresa. Selezionare la modalità più idonea alle condizioni di ripresa prevalenti e alle preferenze dell’utente. FullAuto: In questa modalità, vengono applicate le impostazioni e le regolazioni ottimali per le condizioni di ripresa disponibili. Selezionando “FullAuto”, i menu delle impostazioni e delle regolazioni dettagliate non vengono visualizzati. Manual1 a 3: In queste modalità, le impostazioni e le regolazioni dettagliate vengono applicate manualmente per adattarsi alle condizioni di ripresa prevalenti e alle preferenze dell’utente. Selezionando Manual1, Manual2 o Manual3, vengono visualizzati i menu delle impostazioni e delle regolazioni dettagliate per la modalità pertinente. Scene [FullAuto, Manual1, Manual2, Manual3] Vedere la sezione Scene nella colonna a sinistra. Contrast Selezionare per visualizzare la schermata Contrast e regolare la luminosità. Picture Selezionare per visualizzare la schermata Picture e regolare la qualità di immagine. Il menu di regolazione della qualità di immagine è formato da due schermate (Picture 1/2 e Picture 2/2). Color Matrix Selezionare per caricare i dati della matrice colore preimpostati e compensare la saturazione e la tonalità. Return Utilizzare per tornare al menu precedente. Contrast Level [da –5 a +5] Utilizzare il livello di contrasto per regolare la luminosità dell’immagine. Return Utilizzare per tornare al menu precedente. 19 ( I ) Impostazione delle voci di menu wwSchermata Contrast Frame Mix [Auto, Off, 6dB, 12dB, 18dB] Contra st Mode Auto Contr ast Level 0 Shutt er Mode ---Step /Synchro ---Fram e Mix ---Auto F.Mix Max Gain 0dB Gain Auto AGC Ma x Gain 18dB Return Selezionare il valore desiderato per l’aggiunta di quadri (aumento di guadagno con memoria del sensore). Questa voce può essere impostata se come impostazione di “Shutter Mode” viene selezionato “Off”. Quando viene eseguita l’aggiunta di quadri, sembrerà che alle immagini manchino alcuni quadri. AutoF. Mix Max Gain [0dB, 6dB, 12dB, 18dB] Se si seleziona “Auto” per “Contrast Mode” o “Auto” per “Frame Mix”, è possibile impostare l’aggiunta massima di quadri. Quando viene eseguita l’aggiunta di quadri con l’impostazione Auto, sembrerà che alle immagini manchino alcuni quadri. Contrast Mode [Auto, Manual] Questa voce viene utilizzata per scegliere se controllare la luminosità dell’immagine (contrast) automaticamente o manualmente. Auto: Il diaframma, la velocità otturatore l’aggiunta di quadri vengono controllati e la luminosità della videocamera viene regolata automaticamente. Gain [Auto, 0dB, 3dB, 6dB, 9dB, 12dB, 15dB, 18dB] Consente di regolare il guadagno dell’immagine. Nei luoghi più scuri, aumentare regolare il guadagno; viceversa, nei luoghi troppo luminosi, diminuirlo. Impostando “Auto”, la quantità di luce viene regolata automaticamente. Aumentando il guadagno, aumentano i disturbi. È possibile commutare il guadagno anche premendo i tasti [OFF], [LOW], [HI] e [AUTO] per [GAIN] sul telecomando wireless. Manual: Le operazioni vengono eseguite utilizzando i valori impostati manualmente. È possibile commutare le modalità di contrasto anche premendo i tasti [A/IRIS] e [M/IRIS] sul telecomando wireless. Contrast Level [da –5 a +5] Consente di impostare il livello di contrasto per regolare la luminosità dell’immagine. Questa voce può essere impostata se come impostazione di “Contrast Mode” è stato selezionato “Auto”. Shutter Mode [Off, Step, Synchro] AGC Max Gain [6dB, 12dB, 18dB] Selezionando “Auto” come impostazione di “Gain”, è possibile impostare l’aumento di guadagno massimo. Return Utilizzare per tornare al menu precedente. Selezionare la velocità otturatore della videocamera. Questa voce può essere impostata se come impostazione di “Contrast Mode” è stato selezionato “Manual”. Off: L’otturatore è impostato su OFF (non può essere attivato). Step: Viene impostato l’otturatore a incrementi (è possibile modificare gli incrementi). Synchro: Viene impostato l’otturatore sincronizzato (è possibile modificare l’impostazione in modo continuo). Step/Synchro Viene utilizzato per regolare la velocità otturatore nella modalità selezionata per “Shutter Mode”. Selezionando una velocità otturatore più alta, i soggetti che si muovono velocemente non risulteranno sfocati, ma le immagini risulteranno più scure. Di seguito vengono elencate le velocità otturatore selezionabili. Selezionando “Step” per “Shutter Mode” Selezionando “Synchro” per “Shutter Mode” 1/120, 1/250, 1/500, 1/1000, 1/2000, 1/4000, 1/10000 Da 50,20 Hz a max. 538,51 Hz (255 incrementi) 20 ( I ) ITALIANO Co ntrast Impostazione delle voci di menu wwSchermata Picture 1/2 DNR [Off, Low, High] Pi cture 1/2 Chroma Level AWB Mo de R Gai n B Gai n Detail Flesh Tone Mode DNR Consente di impostare il livello dell’effetto digitale di riduzione dei disturbi, in modo da trasmettete immagini chiare, prive di disturbi e nitide anche di notte o in ambienti poco luminosi. Selezionando “Low” o “High”, è possibile ridurre ulteriormente i disturbi. Tuttavia, la possibilità di una persistenza di immagine potrebbe aumentare. -1 AWB A 0 0 Low Off High Return Return Utilizzare per tornare al menu precedente. Chroma Level [da –3 a +3] Consente di impostare l’intensità di colore (livello croma) delle immagini. Note pw Eseguendo la regolazione automatica del bilanciamento del bianco (AWB), i valori di R Gain e B Gain tornano a “0”. pw Se si seleziona “AWB A” o “AWB B” come impostazione di AWB Mode, è possibile registrare i valori di regolazione di R Gain e B Gain in due memorie (A e B). pw Impostando i nuovi valori, i dati precedenti vengono eliminati. Utilizzare una memoria per una serie di condizioni di ripresa e l’altra memoria per un’altra serie di condizioni di ripresa. pw Registrando i dati nelle memorie personalizzate, le impostazioni di R Gain e B Gain (da -30 a +30) non vengono memorizzate, ma è possibile memorizzare gli stati del bilanciamento del bianco (colore) impostati dopo aver eseguito le regolazioni con R Gain e B Gain. pw Se si seleziona Mode A come impostazione di Preset Scope, le impostazioni di R Gain e B Gain tornano a “0” quando vengono richiamati i dati delle memorie personalizzate. pw Se si seleziona ATW come impostazione di AWB Mode, non è possibile regolare R Gain e B Gain. AWB Mode [ATW, AWB A, AWB B] Consente di selezionare la modalità bilanciamento del bianco. Selezionare la modalità quando i colori non risultano naturali a causa della sorgente luminosa o di altri fattori. Se non è possibile riconoscere il colore bianco di riferimento, i soggetti possono essere ripresi con un colore naturale. ATW: In questa modalità, il bilanciamento del bianco viene compensato automaticamente, anche in caso di variazioni della sorgente luminosa o della temperatura colore, grazie a una regolazione continua e automatica. AWB A, AWB B: Se si seleziona AWB A o AWB B e viene eseguito il bilanciamento del bianco, i risultati della regolazione vengono salvati nella memoria selezionata. Selezionando successivamente AWB A o AWB B, viene richiamato il bilanciamento del bianco salvato nella memoria selezionata. R Gain, B Gain [da –30 a +30] Se si seleziona “AWB A” o “AWB B” come impostazione di AWB Mode, è possibile regolare con precisione il bilanciamento del bianco al termine della regolazione automatica del bilanciamento del bianco (AWB). Detail [Off, Low, High] Consente di regolare il dettaglio dell’immagine (nitidezza dell’immagine). Selezionando “Low” o “High”, il dettaglio viene esaltato di conseguenza. Flesh Tone Mode [Off, Low, High] Consente di regolare la modalità tono carnagione per visualizzare la pelle del soggetto in modo più uniforme ed esteticamente piacevole. Selezionando “Low” o “High”, l’effetto viene esaltato ulteriormente. 21 ( I ) Impostazione delle voci di menu wwMatrice colore a 16 assi wwSchermata Picture 2/2 qwMenu di uscita sul monitor (OSD) Pedest al DRS Gamma Type Gamm a Level Back L ight COMP. <Schermata Color matrix 1/3> -5 Low ------Off Color Matrix 1/3 Matrix Select USER [Saturation] [Phase] Axis01 +50 0 Axis02 0 0 Axis03 0 0 Axis04 +35 +5 Axis05 0 0 Axis06 0 0 Return Return Pedestal [da –10 a +10] Questa voce viene utilizzata per regolare il livello del nero (regolare il livello di spegnimento) in modo che le parti scure delle immagini siano più facilmente visibili. Queste parti risultano più scure selezionando un valore negativo. Viceversa, risultano più chiare selezionando un valore positivo. <Schermata Color matrix 2/3> Color Matrix 2/3 Matrix Select USER [Saturation] [Phase] Axis07 +30 0 Axis08 -20 +10 Axis09 0 -30 Axis10 0 0 Axis11 +10 +50 Axis12 0 0 Return DRS [Off, Low, High] Consente di impostare la funzione DRS, che applica il giusto livello di compensazione quando si visualizzano immagini con differenze chiaro/scuro rilevanti. Selezionando “Low” o “High”, l’effetto viene esaltato ulteriormente. Con alcune scene, questa opzione potrebbe rendere più percepibili i disturbi. Gamma Type [Off, Normal, Cinema] Consente di selezionare il tipo di curva di gamma. L’impostazione selezionata ha effetto selezionando l’impostazione “Off” alla voce “DRS”. Normalmente si utilizza l’impostazione “Normal”. Selezionando “Cinema”, è possibile riprendere immagini ricreando un’atmosfera simile a un film. <Schermata Color matrix 3/3> Color Matrix 3/3 Matrix Select USER [Saturation] [Phase] Axis13 0 0 Axis14 +35 +10 Axis15 0 0 Axis16 0 0 Gamma Level [Low, Mid, High] Questa voce viene utilizzata per regolare il livello di compensazione gamma. L’impostazione di questa voce ha effetto quando si seleziona “Off” come impostazione di “DRS” e “Normal” come impostazione di “Gamma Type”. Selezionando “Low”, le immagini risultano più equilibrate e composte. La curva di gamma risultante ha un gradiente lieve nelle aree a bassa luminosità e il contrasto è più netto. Viceversa, se si imposta “High”, la gamma tonale nelle aree più scure viene espansa, in modo che le immagini acquisiscano una tonalità più chiara. La curva di gamma risultante ha un gradiente netto nelle aree a bassa luminosità e il contrasto è più morbido. Return Back Light COMP. [Off, On] Consente di impostare “On” o “Off” per la funzione di compensazione controluce. In caso di controluce, la funzione previene l’oscuramento causato dalla luce sul retro dei soggetti e permette di riprendere le immagini in ombra o oscurate in modo più brillante. La funzione ha effetto se come impostazione della voce Contrast Mode, Gain o Frame Mix è stato selezionato “Auto”. Return Utilizzare per tornare al menu precedente. 22 ( I ) ITALIANO Pi cture 2/2 Impostazione delle voci di menu qwSchermate Color Matrix da 1/3 a 3/3: Matrix Select [Normal, EBU, NTSC, USER] Carica i dati della matrice colore preimpostati e compensa la saturazione e la tonalità. Selezionando “USER”, è possibile regolare con precisione la saturazione e la tonalità mediante la matrice colore a 16 assi (da Axis01 a Axis16). wwSchermata System Questo menu contiene voci relative alle impostazioni dell’immagine di uscita della videocamera. System Output Other qwSchermate Color Matrix da 1/3 a 3/3: Axis01 a Axis16:Saturation [da –127 a +127] Return qwSchermata User Color Matrix Setup: Axis01 a Axis16:Saturation [da –127 a +127] Consente di regolare con precisione la saturazione da Axis01 a Axis16. qwSchermate Color Matrix da 1/3 a 3/3: Axis01 a Axis16:Phase [da –127 a +127] Output Visualizza la schermata Output, che consente di selezionare le impostazioni dell’immagine di uscita della videocamera. Other Visualizza la schermata Other, che consente di selezionare le impostazioni dello stato di installazione dell’unità testa di panoramica orizzontale/verticale della videocamera e la velocità operativa, oltre alle impostazioni relative alle altre funzioni. qwSchermata User Color Matrix Setup: Axis01 a Axis16:Phase [da –127 a +127] Return Utilizzare per tornare al menu precedente. Consente di regolare con precisione la tonalità da Axis01 a Axis16. 23 ( I ) Impostazione delle voci di menu wwSchermata Output HDMI Color [RGB-NOR, RGB-ENH, YCbCr422, YCbCr444] Consente di impostare l’uscita colore HDMI. p Se si utilizza un monitor HDMI, utilizzare “YCbCr422” in circostanze normali. p Nei casi in cui, per esempio, i segnali HDMI (RGB) vengono convertiti e trasmessi a un monitor DVI, le impostazioni necessarie differiranno a seconda della gradazione di colori supportata dal monitor. Ou tput 1080/50i Squeeze YCbCr422 RGB-NOR I segnali di uscita RGB vengono trasmessi nell’intervallo da 16 a 235. RGB-ENH I segnali di uscita RGB vengono trasmessi nell’intervallo da 0 a 255. Return p Se le parti nere dell’immagine appaiono sovraesposte quando è stato selezionato “RGB-NOR”, utilizzare l’impostazione “RGB-ENH”. p Viceversa, se le immagini evidenziano una perdita di dettagli scuri quando è stato selezionato “RGB-ENH”, utilizzare l’impostazione “RGB-NOR”. Format [1080/50i, 576/50p] In questa schermata è possibile modificare il formato video. Per informazioni sulla modifica del formato, vedere “Modifica del formato” (pag. 25). Nota Down CONV. Mode [Squeeze, SideCut] pw Se viene specificata un’impostazione di HDMI Color non supportata dal monitor, l’impostazione di HDMI Color può essere modificata automaticamente. (Il display del menu resta invariato.) Consente di selezionare la modalità Down converter. Quando per lo schermo del monitor è stato impostato l’aspect ratio 4:3, Squeeze le immagini vengono compresse orizzontalmente e allungate verticalmente, modificando la visuale dell’angolo. Return Utilizzare per tornare al menu precedente. SideCut Utilizzando come riferimento l’altezza verticale, le parti che sporgono oltre questo limite sui due lati vengono tagliate, modificando la visuale dell’angolo. 24 ( I ) ITALIANO Format Down C ONV. Mode HDMI C olor Impostazione delle voci di menu qwModifica del formato Quando si modifica il formato nella schermata Output a partire dall’impostazione corrente, viene visualizzata la schermata di controllo del cambio formato. Schermata Format unchanged Schermata di controllo del cambio formato Format FO RMAT unchanged Do you want to set Format ( 1080/50i)? CANCEL O.K. p Il formato (1080/50i, 576/50p) da impostare viene visualizzato tra parentesi nella schermata. p Spostando il cursore su “O.K.” nella schermata di controllo del cambio formato, e confermando l’impostazione, la schermata Format Set viene visualizzata per alcuni secondi e il formato viene cambiato. Dopo il cambio di formato, il display torna alla schermata Output. Con alcuni tipi di monitor, la schermata Format Set potrebbe non essere visualizzata. Schermata Format Set Format ( 1080/50i) Set p Il formato (1080/50i, 576/50p) da impostare viene visualizzato tra parentesi nella schermata. p Spostando il cursore su “CANCEL” nella schermata di controllo del cambio formato e confermando l’impostazione, la schermata Format unchanged viene visualizzata per 5 secondi, il formato non viene cambiato e il display torna alla schermata Output. Nota pw Non eseguire modifiche se si collega l’unità a un sistema di comunicazione video HD. 25 ( I ) Impostazione delle voci di menu Digital Zoom [Disable, Enable] Consente di impostare “Enable” o “Disable” per la funzione di zoom digitale. Se si esegue lo zoom verso il lato Tele e si supera la posizione massima quando è stato selezionato “Enable”, è possibile utilizzare lo zoom digitale in modo continuo. Lo zoom si interromperà temporaneamente nella posizione di commutazione tra zoom ottico e zoom digitale. Dopo l’arresto in questa posizione, è possibile procedere nuovamente con lo zoom. Cambiando l’impostazione su “Disable” mentre lo zoom si trova già nell’area digitale, lo zoom si sposta automaticamente alla posizione massima dello zoom ottico. Ot her 1/2 Instal l Position Desktop Preset Speed 10 Preset Scope Mode A Digita l Zoom Disable Speed With Zoom POS. On Focus Mode Auto Focus ADJ With PTZ. ---Return Install Position [Desktop] L’installazione indipendente è l’unica opzione disponibile per l’unità. Desktop: Installazione indipendente Speed With Zoom POS. [Off, On] Consente di impostare “On” o “Off” per la funzione che consente di modificare la velocità di regolazione della direzione della videocamera insieme all’ingrandimento zoom. Impostando “On”, le operazioni di panoramica orizzontale e panoramica verticale rallentano quando lo zoom è attivo. Questa funzione non ha effetto durante le operazioni personalizzate. Preset Speed [da 1 a 30] Sono disponibili 30 velocità operative personalizzate di panoramica orizzontale-verticale per riprodurre la direzione della videocamera e altre informazioni registrate nella memoria personalizzata. Nota pw Se per l’impostazione Preset Speed si seleziona un valore alto, l’immagine a schermo potrebbe tremare al termine dell’operazione. Focus Mode [Auto, Manual] Consente di impostare “Auto” o “Manual” per la funzione di messa a fuoco. Auto: I soggetti vengono sempre messi a fuoco automaticamente. Manual: La messa a fuoco viene regolata manualmente. È possibile commutare le modalità di messa a fuoco anche premendo i tasti [A/FOCUS] e [M/FOCUS] sul telecomando wireless. Preset Scope [Mode A, Mode B, Mode C] Consente di selezionare le voci di impostazione da richiamare per riprodurre i contenuti della memoria personalizzata. Mode A: Pan, Tilt, Zoom (compreso zoom digitale), Focus, Iris, Gain, White-BAL Mode B: Pan, Tilt, Zoom (compreso zoom digitale), Focus, Iris Mode C: Pan, Tilt, Zoom (compreso zoom digitale), Focus Focus ADJ With PTZ. [Off, On] Consente di impostare “On” o “Off” per la funzione che compensa la sfocatura che si verifica durante le operazioni di panoramica orizzontale, panoramica verticale o zoom quando è impostata la messa a fuoco manuale. Quando è impostato “Off”, regolare la messa a fuoco secondo necessità dopo lo zoom o impostare la messa a fuoco automatica. Questa voce può essere impostata solo se come impostazione di “Focus Mode” è stato selezionato “Manual”. Return Utilizzare per tornare al menu precedente. 26 ( I ) ITALIANO wwSchermata Other 1/2 Impostazione delle voci di menu wwSchermata Other 2/2 Nota pw Se non è possibile eseguire le operazioni dei menu: 1. Spegnere tutte le unità e i dispositivi collegati. 2. Scollegare il cavo di alimentazione, quindi ricollegarlo. 3. Eseguire l’operazione di accensione dell’unità dal telecomando wireless. 4. Dopo aver modificato questa voce, spegnere l’unità e riaccenderla. Ot her 2/2 Tally Enable Enable OSD Of f With Tally Off OSD St atus Off Return Tally Enable [Disable, Enable] La selezione di questa voce non ha effetto poiché si tratta di una funzione di espansione. OSD Off With Tally [Off, On] La selezione di questa voce non ha effetto poiché si tratta di una funzione di espansione. OSD Status [Off, On] Consente di impostare “On” o “Off” per il display di stato visualizzato durante le operazioni AWB. Return Utilizzare per tornare al menu precedente. 27 ( I ) Impostazione delle voci di menu wwSchermata Firmware Version Firmware Version Model GP-VD150 CPU Software Camera Main V01.00 Pan/Tilt V01.00 Network V--.-- Mai ntenance Firmwa re Version Initia lize PLD Camera Output Return Return Firmware Version Viene selezionata per visualizzare la schermata Firmware Version, che consente di controllare la versione del firmware in uso. Model Viene visualizzato il nome del modello. CPU Software Camera Main Viene visualizzato la versione software dell’unità videocamera. Initialize Viene selezionato per visualizzare la schermata Initialize, che consente di inizializzare le impostazioni della videocamera. Per maggiori informazioni sull’operazione, vedere “Informazioni sull’inizializzazione” a pag. 29. Return V01.00 V01.00 CPU Software Pan/Tilt Viene visualizzato la versione software dell’unità di panoramica orizzontale/verticale. CPU Software Network Viene visualizzato “V--.--”. Utilizzare per tornare al menu precedente. PLD Camera Viene visualizzato la versione PLD dell’unità videocamera. PLD Output Viene visualizzato la versione PLD dell’unità di uscita. Return Utilizzare per tornare al menu precedente. 28 ( I ) ITALIANO wwSchermata Maintenance Impostazione delle voci di menu qwInformazioni sull’inizializzazione Schermata Menu settings unchanged Selezionando “Initialize” nella schermata Maintenance, viene visualizzata la schermata Initialize. Schermata Initialize Menu settings unchanged In itialize Do you want to initialize Menu s ettings? CANCEL O.K. Return p Spostando il cursore su “O.K.” nella schermata Initialize e confermando l’impostazione, la schermata Menu settings initialized viene visualizzata per 5 secondi e le impostazioni della videocamera vengono riportate ai valori predefiniti all’acquisto. Tuttavia, le impostazioni di Format (vedere pag. 24) non vengono inizializzate. Terminata l’operazione di inizializzazione, sul display viene ripristinata la schermata Initialize. Schermata Menu settings initialized Menu s ettings initia lized p Spostando il cursore su “CANCEL” nella schermata Initialize e confermando l’impostazione, la schermata Menu settings unchanged viene visualizzata per 5 secondi, l’operazione di inizializzazione non viene eseguita e la schermata Initialize torna al display. 29 ( I ) Tabella delle voci di menu Top Menu Camera Scene Contrast FullAuto Manual1 FullAuto, Manual1, Manual2, Manual3 Contrast Mode Auto Auto Auto, Manual Contrast Level 0 0 da –5 a +5 Shutter Mode ---- ---- Off, Step, Synchro Step/Synchro (Selezionando “Step” per “Shutter Mode”) ---- ---- pw Se è selezionato 59.94 Hz: 1/100, 1/250, 1/500, 1/1000, 1/2000, 1/4000, 1/10000 pw Se è selezionato 50 Hz: 1/120, 1/250, 1/500, 1/1000, 1/2000, 1/4000, 1/10000 Step/Synchro (Selezionando “Synchro” per “Shutter Mode”) ---- ---- pw Se è selezionato 59.94 Hz: 60.24Hz a 646.21Hz (da 1 a 255 incrementi) pw Se è selezionato 50 Hz: 50.20Hz a 538.51Hz (da 1 a 255 incrementi) Frame Mix ---- ---- Auto, Off, 6dB, 12dB, 18dB AutoF.Mix Max Gain ---- 0dB 0dB, 6dB, 12dB, 18dB Gain ---- Auto Auto, 0dB, 3dB, 6dB, 9dB, 12dB, 15dB, 18dB AGC Max Gain ---- 18dB 6dB, 12dB, 18dB ---- –1 da –3 a +3 AWB Mode ---- AWB A ATW, AWB A, AWB B R Gain ---- 0 da –30 a +30 B Gain ---- 0 da –30 a +30 Detail ---- Low Off, Low, High Flesh Tone Mode ---- Off Off, Low, High DNR ---- High Off, Low, High ---- –5 da –10 a +10 DRS ---- Low Off, Low, High Gamma Type ---- ---- Off, Normal, Cinema ---- ---- Low, Mid, High Back Light COMP. ---- Off Off, On Matrix Select ---- USER Normal, EBU, NTSC, USER Axis01 Saturation ---- +50 da –127 a +127 Phase ---- 0 da –127 a +127 Saturation ---- 0 da –127 a +127 Phase ---- 0 da –127 a +127 Saturation ---- 0 da –127 a +127 Phase ---- 0 da –127 a +127 Saturation ---- +35 da –127 a +127 Phase ---- +5 da –127 a +127 Saturation ---- 0 da –127 a +127 Phase ---- 0 da –127 a +127 Saturation ---- 0 da –127 a +127 Phase ---- 0 da –127 a +127 Matrix Select ---- USER Normal, EBU, NTSC, USER Axis07 Saturation ---- +30 da –127 a +127 Phase ---- 0 da –127 a +127 Saturation ---- –20 da –127 a +127 Phase ---- +10 da –127 a +127 Saturation ---- 0 da –127 a +127 Phase ---- –30 da –127 a +127 Saturation ---- 0 da –127 a +127 Phase ---- 0 da –127 a +127 Picture 2/2 Pedestal Gamma Level Axis02 Axis03 Axis04 Axis05 Axis06 Color Matrix 2/3 Voci di selezione Scene Picture Picture 1/2 Chroma Level Color Matrix 1/3 Impostazione di fabbrica FullAuto Manual1 - 3 Axis08 Axis09 Axis10 30 ( I ) ITALIANO Voce Menu Tabella delle voci di menu Voce Impostazione di fabbrica FullAuto Manual1 - 3 Saturation ---- +10 da –127 a +127 Phase ---- +50 da –127 a +127 Saturation ---- 0 da –127 a +127 Phase ---- 0 da –127 a +127 Matrix Select ---- USER Normal, EBU, NTSC, USER Axis13 Saturation ---- 0 da –127 a +127 Phase ---- 0 da –127 a +127 Saturation ---- +35 da –127 a +127 Phase ---- +10 da –127 a +127 Saturation ---- 0 da –127 a +127 Phase ---- 0 da –127 a +127 Saturation ---- 0 da –127 a +127 Phase ---- 0 da –127 a +127 Menu Top Menu Camera Scene Color Matrix 2/3 Axis11 Axis12 Color Matrix 3/3 Axis14 Axis15 Axis16 System Output Other Format Other 1/2 Other 2/2 Maintenance Firmware Version Voci di selezione 1080/59.94i pw Se è selezionato 59.94 Hz: (Se è selezionato 59.94 Hz) 1080/59.94i, 480/59.94p 1080/50i (Se è selezionato 50 Hz) pw Se è selezionato 50 Hz: 1080/50i, 576/50p Down CONV. Mode Squeeze Squeeze, SideCut HDMI Color YCbCr422 RGB-NOR, RGB-ENH, YCbCr422, YCbCr444 Install Position Desktop ---- Preset Speed 10 da 1 a 30 Preset Scope Mode A Mode A, Mode B, Mode C Digital Zoom Disable Disable, Enable Speed With Zoom POS. On Off, On Focus Mode Auto Auto, Manual Focus ADJ With PTZ. ---- Off, On Tally Enable Enable Disable, Enable OSD Off With Tally Off Off, On OSD Status Off Off, On Model GP-VD150 ---- Camera Main Versione di fabbrica ---- Pan/Tilt Versione di fabbrica ---- Network ---- ---- Camera Versione di fabbrica ---- Output Versione di fabbrica ---- ---- CANCEL CANCEL, OK CPU Software PLD Initialize 31 ( I ) ITALIANO 32 ( I ) VERSIÓN ESPAÑOLA (SPANISH VERSION) Índice Antes del uso ......................................................................2 Ajuste de los elementos del menú..................................18 Perspectiva general..........................................................2 Ajuste de los elementos del menú .................................18 Acerca de un sistema de comunicaciones visuales HD ...............................................................2 Top Menu .......................................................................18 Pantalla Camera (cuando se ha seleccionado Full Auto) ...................19 Acerca del mando a distancia inalámbrico (accesorio opcional) ..................................................2 Marcas comerciales y marcas comerciales registradas .....2 Pantalla Camera (cuando se ha seleccionado el modo Manual 1 a 3) .....19 Acerca de los derechos de autor y de la licencia.............2 Pantalla Contrast............................................................20 Renuncia de la garantía ...................................................2 Pantalla Picture 1/2 ........................................................21 Operaciones de la unidad ..................................................3 Pantalla Picture 2/2 ........................................................22 Matriz de colores de 16 ejes ..........................................22 Conexión y desconexión de la alimentación ...................4 Pantalla System .............................................................23 Conexión de la alimentación ............................................4 Pantalla Output ..............................................................24 Desconexión de la alimentación ......................................5 Pantalla Other 1/2 ..........................................................26 Acerca de la vinculación de transición de modo simultáneo .................................................................5 Pantalla Other 2/2 ..........................................................27 Pantalla Maintenance.....................................................28 Selección de las unidades .................................................6 Pantalla Firmware Version .............................................28 Selección de los modos de filmación (archivos de escenas)....................................................6 Tabla de elementos de menús .........................................30 Tipos de modos de filmación ...........................................6 Cómo seleccionar el modo de filmación ..........................7 Filmación .............................................................................8 Qué hacer cuando se encuentran problemas en las operaciones de filmación básicas ....................9 Operaciones más avanzadas ..........................................10 Filmación manual .............................................................11 Ajuste manual del enfoque.............................................11 Ajuste manual del iris .....................................................11 Ajuste manual de la velocidad del obturador .................12 Ajuste manual de la ganancia ........................................12 Memorias de preajustes...................................................13 Ajuste del balance del blanco .........................................14 Ajuste del balance del blanco ........................................14 Operaciones básicas con menús de ajuste ...................16 1 (S) Antes del uso wwPerspectiva general wwAcerca de los derechos de autor y de la licencia pw Esta unidad es una cámara full HD integrada con un cabezal de panorámica-inclinación, e incluye un sensor MOS Full HD del tipo de 1/3 y un procesador de señal digital (DSP). La distribución, copiado, desensamblaje, contraposición de la compilación, contraposición de ingeniería, así como la exportación violando las leyes de exportación del software suministrado con esta unidad, quedan expresamente prohibidos. pw Además de su objetivo zoom óptico de 12, la unidad incluye un zoom digital de 10 para lograr una filmación de alta calidad que rebosa buen ambiente. pw Esta unidad ha sido diseñada para ser utilizada exclusivamente con un sistema de comunicación visual HD de Panasonic. Unidades de comunicación visual HD compatibles: KX-VC300CX, KX-VC300EX, KX-VC600CX, KX-VC600EX wwRenuncia de la garantía Panasonic Corporation NO ACEPTA NINGÚN TIPO DE RESPONSABILIDAD CON PERSONAS LEGALES O FÍSICAS, A EXCEPCIÓN DEL REEMPLAZO O MANTENIMIENTO RAZONABLE DEL PRODUCTO, PARA LOS CASOS INCLUIDOS A CONTINUACIÓN, PERO SIN LIMITARSE A ELLOS: wwAcerca de un sistema de comunicaciones visuales HD 1 NINGÚN DAÑO O PÉRDIDA, INCLUYENDO PERO SIN LIMITARSE POR ELLO, LOS DIRECTOS O INDIRECTOS, ESPECIALES, CONSECUENTES O PUNITIVOS, QUE PUEDAN SURGIR O ESTAR RELACIONADOS CON EL PRODUCTO; pw Para conocer descripciones de la panorámica, la inclinación, el zoom, los preajustes y otras operaciones de la cámara utilizando una unidad de comunicación visual HD, consulte las instrucciones de funcionamiento de la unidad compatible. 2 HERIDAS PERSONALES NI NINGÚN TIPO DE DAÑO CAUSADO POR EL EMPLEO INADECUADO O LA OPERACIÓN NEGLIGENTE DEL USUARIO; wwAcerca del mando a distancia inalámbrico (accesorio opcional) 3 DESMONTAJE, REPARACIÓN O MODIFICACIÓN NO AUTORIZADOS DEL PRODUCTO POR EL USUARIO; 5 NINGÚN PROBLEMA, INCONVENIENCIA CONSECUENTE, PÉRDIDAS NI DAÑOS QUE PUEDAN SURGIR POR HABER COMBINADO EL SISTEMA CON DISPOSITIVOS DE OTRAS MARCAS; wwMarcas comerciales y marcas comerciales registradas 6 PÉRDIDA DE DATOS REGISTRADOS CAUSADOS POR UNA FALLA. pw HDMI, el logotipo HDMI y High-Definition Multimedia Interface son marcas de fábrica o marcas registradas de HDMI Licensing LLC en los Estados Unidos y en otros países. pw Adobe, Acrobat Reader y Reader son marcas registradas o marcas comerciales de Adobe Systems Incorporated en los Estados Unidos y/o en otros países. Cómo están configurados los manuales de instrucciones de operación del modelo pw El manual de esta cámara de comunicación HD (a partir de ahora “la unidad”) se divide en dos manuales: uno es <Operaciones y ajustes> (este manual en el archivo PDF) y el otro es <Lo básico>. Antes de instalar la unidad, asegúrese de leer <Lo básico> para asegurarse de que la unidad esté instalada correctamente. 2 (S) ESPAÑOL 4 INCONVENIENCIAS O CUALQUIER TIPO DE PÉRDIDA DEBIDO A QUE NO SE VISUALIZAN LAS IMÁGENES, DEBIDO A CUALQUIER MOTIVO O CAUSA, INCLUYENDO CUALQUIER FALLA O PROBLEMA DEL PRODUCTO; pw Esta unidad se puede controlar a distancia utilizando un mando a distancia inalámbrico (modelo AW-RM50G) disponible como accesorio opcional. La unidad no se puede controlar directamente utilizando el mando a distancia inalámbrico de una unidad de comunicación visual HD. Para adquirir un mando a distancia inalámbrico, póngase en contacto con su concesionario. Operaciones de la unidad Todas las operaciones de la unidad se pueden controlar utilizando un mando a distancia inalámbrico (modelo AW-RM50G) disponible como accesorio opcional. Los procedimientos de operación detallados en este manual son las operaciones realizadas desde el mando a distancia inalámbrico. Nota pw La unidad no puede funcionar directamente utilizando el mando a distancia inalámbrico de una unidad de comunicación visual HD. 3 (S) Conexión y desconexión de la alimentación wwConexión de la alimentación Cuando se conecta el suministro de alimentación a la unidad desde el modo STANDBY Cuando se suministra alimentación para encender la unidad 1 Compruebe que la unidad esté en el modo 1 Ponga todos los interruptores de la STANDBY. alimentación de las unidades y dispositivos conectados al sistema en la posición ON. pw Compruebe que el modo STANDBY haya sido establecido (la luz indicadora de estado se enciende en naranja). 2 Suministro de alimentación a la unidad. pw Esta unidad no tiene interruptor de la alimentación. Cuando se suministre alimentación a esta unidad, la luz indicadora de estado se encenderá en color anaranjado. Lo que pasa a continuación es que las operaciones iniciales ser realizan, y cuando éstas han terminado, el modo POWER ON se establece, las imágenes se emiten y el control es entonces posible. Cuando se establece el modo POWER ON, la luz indicadora de estado se enciende en verde. 2 Pulse uno de los botones [CAM1] a [CAM4] del mando a distancia inalámbrico para seleccionar la unidad. 3 Pulse el botón [ON/STANDBY] del mando a distancia inalámbrico durante al menos 2 segundos. Se establece el modo POWER ON, las imágenes se reproducen y se puede realizar el control. pw La luz indicadora de estado de la unidad se enciende ahora en color verde. Notas pw La operación de ajuste inicial de cada unidad tarda unos 30 segundos en realizarse. Durante este periodo, la unidad no puede ser utilizada. (Luz indicadora de estado: encendida en color naranja) pw Cuando la operación se transfiere al modo de espera: La posición de panorámica-inclinación actual se guarda en la memoria (como un preajuste de POWER ON), y la cámara se mueve de forma que apunta hacia atrás. pw Cuando la operación se transfiere al modo POWER ON: La cámara se mueve a la posición que fue guardada en la memoria (como un preajuste de POWER ON) cuando la operación se transfirió al modo STANDBY. Nota 4 Si van a utilizarse múltiples unidades, repita los pasos 2 y 3 según sea necesario. La luz indicadora de estado de la unidad parpadea en color verde cuando se recibe una señal que concuerda con la identificación del mando a distancia, y parpadea en color anaranjado cuando se recibe una señal que no concuerda con la identificación del mando a distancia. 4 (S) ESPAÑOL pw Cuando la operación se transfiere al modo POWER ON: La cámara se mueve a la posición que fue guardada en la memoria (como un preajuste de POWER ON) cuando la operación se transfirió al modo STANDBY. Conexión y desconexión de la alimentación wwAcerca de la vinculación de transición de modo simultáneo wwDesconexión de la alimentación 1 Desconecte el suministro de alimentación a la unidad. Tan pronto como la unidad de comunicación visual HD conectada a la unidad se pone en el modo de espera de la pantalla, la unidad cambia al modo STANDBY. De forma similar, tan pronto como el aparato deja el modo de espera de la pantalla, la unidad cambia al modo POWER ON. pw La alimentación de la unidad se puede desconectar sin importar el modo (modo STANDBY o modo POWER ON) que ha sido establecido. 5 (S) Selección de las unidades 1 Pulse el botón [CAM1], [CAM2], [CAM3] o Utilizando un mando a distancia inalámbrico se puede controlar un máximo de cuatro unidades. Seleccione la unidad (o unidades) desde el mando a distancia inalámbrico. Aunque solo se utilice una unidad, ésta deberá ser seleccionada. [CAM4]. La luz indicadora de estado de la unidad parpadea en color verde cuando se recibe una señal que concuerda con la identificación del mando a distancia, y parpadea en color anaranjado cuando se recibe una señal que no concuerda con la identificación del mando a distancia. Selección de los modos de filmación (archivos de escenas) wwTipos de modos de filmación Esta unidad tiene cuatro modos de filmación preajustados, cada uno de los cuales corresponde a una serie de circunstancias en las que se filmará el motivo. Seleccione el modo que cumpla las condiciones de la filmación y sea satisfaga sus preferencias. Los ajustes se pueden cambiar empleando menús. FullAuto: Ajuste de fábrica La velocidad del obturador y el iris del objetivo se ajustan automáticamente. Manual1 Los ajustes que usted prefiera se podrán establecer de acuerdo con la escena, la iluminación y otras condiciones de la filmación. pw Cuando se use esta unidad estando conectada a una unidad de comunicación visual HD de Panasonic, utilice el modo de filmación “FullAuto”. pw Los resultados del balance del blanco y otros ajustes se guardan en la memoria por separado para cada uno de los modos de filmación. Asegúrese absolutamente de seleccionar el modo de filmación antes de hacer cualquier ajuste. Los ajustes que usted prefiera se podrán establecer de acuerdo con la escena, la iluminación y otras condiciones de la filmación. Manual3 Los ajustes que usted prefiera se podrán establecer de acuerdo con la escena, la iluminación y otras condiciones de la filmación. Nota pw Si se ha seleccionado “FullAuto” para Scene en el menú de cámara, por ejemplo, todos los ajustes automáticos se activarán, y las operaciones manuales no se podrán realizar para algunos de los elementos. 6 (S) ESPAÑOL Manual2 Selección de los modos de filmación (archivos de escenas) wwCómo seleccionar el modo de filmación 4 Pulse el botón []. El menú secundario “Camera” se visualiza en el monitor. 2, 8 1 Camera Scene Contrast Level 3, 5, 7 FullAuto 0 4, 6, 7 Return 1 Pulse el botón [CAM1], [CAM2], [CAM3] o [CAM4] para seleccionar la unidad. 5 Pulse el botón [] o [] para poner el cursor en “Scene”. 2 Pulse el botón [MENU] durante al menos 2 segundos. 6 Pulse el botón []. Se visualiza Top Menu. El modo de filmación parpadea. Top Menu 7 Pulse el botón [] o [] para seleccionar Camera Scene: FullAuto System Mainte nance el modo de filmación (FullAuto, Manual1, Manual2 o Manual3) que va a utilizarse y luego pulse el botón [] para establecer la selección. Para conocer detalles, consulte la página 19. 8 Pulse el botón [MENU] durante al menos 2 segundos. Se sale de la visualización del menú. 3 Pulse el botón [] o [] para poner el cursor en “Camera”. 7 (S) Filmación qwCambio de dirección o de velocidad del zoom qwCambio de dirección de la cámara Movimiento de la cámara hacia la derecha o hacia la izquierda (panorámica): Pulse el botón [] o []. Cambio de la dirección o del zoom a alta velocidad: Pulse el botón [FAST]. Movimiento de la cámara hacia arriba o hacia abajo (inclinación): Pulse el botón [] o []. Cambio de la dirección o del zoom a baja velocidad: Pulse el botón [SLOW]. La velocidad de control del enfoque del objetivo cambia también al mismo tiempo. Movimiento de la cámara en diagonal: Pulse al mismo tiempo el botón [] o [] y el botón [] o []. Retorno de la cámara a la posición de referencia: Pulse el botón [HOME] durante al menos 2 segundos. qwUtilización de la función del zoom Acercamiento con zoom (el tamaño del motivo aumenta): Pulse el botón [T] de [ZOOM]. ESPAÑOL Alejamiento con zoom (el tamaño del motivo se reduce): Pulse el botón [W] de [ZOOM]. 8 (S) Qué hacer cuando se encuentran problemas en las operaciones de filmación básicas La pantalla del menú se visualiza. Si no se resuelve el problema tomando la medida sugerida más abajo, consulte “Solución de problemas” (en <Lo básico>). Pulse el botón [MENU] durante al menos 2 segundos para salir del menú. El enfoque del objetivo no se ajusta automáticamente. La unidad no se mueve. pw Pulse el botón [CAM1], [CAM2], [CAM3] o [CAM4] para seleccionar la unidad que va a ser utilizada. Si sólo se va a utilizar una unidad, ésta se seleccionará normalmente utilizando el botón [CAM1]. pw Si la luz indicadora de estado de la unidad se apaga o se enciende en color anaranjado, esto significa que la alimentación de la unidad no está conectada. Consulte “Conexión y desconexión de la alimentación” (página 4) y conecte la alimentación. pw Si la luz indicadora de estado de la unidad no parpadea aunque el mando a distancia inalámbrico se utilice cerca del área sensora de señales del mando a distancia inalámbrico, esto significa que las pilas del mando a distancia inalámbrico se han agotado. Sustituya las pilas. Pulse el botón [A/FOCUS] para cambiar al enfoque automático. (El enfoque automático no funciona durante las operaciones de panorámica o inclinación.) La imagen de la cámara es demasiado clara o demasiado oscura. 1. Pulse el botón [A/IRIS] para cambiar automáticamente al ajuste del iris del objetivo. 2. Pulse el botón [AUTO] de [GAIN] para cambiar automáticamente al ajuste de ganancia. Algo no va bien con el color de las imágenes de la cámara. Consulte “Ajuste del balance del blanco con seguimiento automático (ATW)” (página 15) y cambie a “ATW”. 9 (S) Operaciones más avanzadas Ajuste del balance del blanco (consulte las páginas 14 a 15) Filmación manual (consulte las páginas 11 a 12) pw pw pw pw pw Este ajuste se realiza para expresar con mayor precisión el color blanco. Su ajuste también influye en los tonos de los colores de toda la pantalla. pw Este ajuste debe realizarse cuando se utilice la unidad por primera vez o cuando la unidad no se haya utilizado durante mucho tiempo. pw Este ajuste debe realizarse cuando hayan cambiados las condiciones de la iluminación o el brillo. pw Una vez logrado el balance del blanco no será necesario realizar más ajustes siempre que la unidad vaya a utilizarse bajo las mismas condiciones. Ajuste manual del enfoque Ajuste manual del iris Ajuste manual de la velocidad del obturador Ajuste manual de la ganancia Memorias de preajustes (consulte las página 13) ESPAÑOL pw En las memorias de preajustes se puede registrar, y luego llamar, un máximo de 12 ajustes para el sentido de movimiento de la cámara (panorámica e inclinación), el zoom, el enfoque, el iris, la ganancia y el balance del blanco. pw El número de ajustes que puede ser registrado y recuperado es 12, que es el número de ajustes para el mando a distancia inalámbrico (modelo AW-RM50G) vendido por separado. 10 (S) Filmación manual wwAjuste manual del enfoque wwAjuste manual del iris El enfoque del objetivo se puede ajustar manualmente. El iris del objetivo se puede ajustar manualmente. 1 Pulse el botón [M/FOCUS] para cambiar el 1 Pulse el botón [M/IRIS] para cambiar el iris al ajuste manual. enfoque a ajuste manual. 2 Pulse el botón [F] o [N] de [FOCUS] y ajuste el 2 Ajuste el iris utilizando el botón [IRIS +] o enfoque. [IRIS –]. Cuando se pulse el botón [F], el enfoque se alejará (lejos); y a la inversa, cuando se pulse el botón [N], el enfoque se acercará (cerca). La velocidad del enfoque y de otros ajustes podrá cambiarse a rápida o lenta pulsando respectivamente el botón [FAST] o el botón [SLOW]. Pulse el botón [IRIS +] para ajustar el iris del objetivo en la dirección de abertura; y a la inversa, pulse el botón [IRIS –] para ajustar el iris del objetivo en la dirección de cierre. 3 Si es necesario, pulse el botón [A/IRIS] para 3 Si es necesario, pulse el botón [A/FOCUS] volver a poner el iris en el ajuste automático. para volver a poner el enfoque en ajuste automático. Nota pw Cuando el enfoque se pone en manual, el motivo puede que se desenfoque durante el empleo del zoom, panorámica y inclinación. Por lo tanto, la unidad incluye una función que compensa este inconveniente. (Compensación de enfoque durante el empleo del zoom: Focus ADJ With PTZ.) Esta función sale activada (ON) de la fábrica. Si se desactiva esta función (OFF), ajuste el enfoque, según sea necesario, después de emplear el zoom o ponga el enfoque en automático. (Consulte la página 26.) 11 (S) Filmación manual wwAjuste manual de la ganancia wwAjuste manual de la velocidad del obturador La ganancia se ajusta utilizando el mando a distancia inalámbrico. Para conocer más detalles, consulte el elemento [Gain] en las página 20 . El ajuste de la velocidad del obturador se puede establecer utilizando uno de los dos procedimientos del menú de la cámara. Uno de ellos especifica el tiempo (donde se designa un tiempo como, por ejemplo, de 1/250 de segundo), y el otro especifica la frecuencia (donde se designa una exploración sincronizada, 50,20 Hz, etc.). Cuando se filma una pantalla de TV o una pantalla de monitor de PC, el ruido horizontal generado cuando se filma la pantalla puede minimizarse ajustando la frecuencia a la frecuencia de la pantalla utilizando la exploración sincronizada. Nota pw Cuando se ajusta la ganancia, la cantidad de luz puede cambiar repentinamente (haciendo que la salida de imagen sea sometida a una sacudida). 1 Pulse el botón [OFF], [LOW] o [HI]. Estos botones permiten seleccionar el aumento de la ganancia en tres pasos. [LOW] se utiliza para seleccionar 9 dB; [HI] se utiliza para seleccionar 18 dB. Haga los ajustes en el menú de la cámara. Para conocer detalles, consulte los elementos [Shutter Mode] y [Step/Synchro] en la página 20. 2 Si es necesario, pulse el botón [AUTO] para volver a poner la ganancia en el modo de ajuste automático (AGC). ESPAÑOL La ganancia máxima del ajuste automático se puede establecer mediante el menú. Para conocer más detalles, consulte el elemento [AGC Max Gain] en las página 20. 12 (S) Memorias de preajustes Utilizando el mando a distancia inalámbrico se pueden registrar y recuperar doce ajustes (preajustes número 1 a número 12). Los botones [1] a [12] corresponden a las memorias de preajustes número 1 a número 12 de la unidad. Esta unidad permite registrar en sus memorias de preajustes, y luego recuperar de las mismas, hasta 12 ajustes para la dirección de la cámara (panorámica e inclinación), zoom, enfoque, iris, ganancia y balance del blanco. pw El modo de funcionamiento (ajuste manual o automático) no se registra para los ajustes de enfoque y del iris. Los valores actuales del enfoque y del iris se registran. pw Los valores del enfoque y del iris sólo pueden recuperarse cuando son aplicables los ajustes manuales. pw AWB A, AWB B o ATW están registrados como ajustes del balance del blanco. Los valores seleccionados cuando se estableció AWB se recuperan como los valores de ajuste de AWB A o AWB B. qw Registro de ajustes en las memorias de preajustes 1 Visualice en el monitor la imagen que va a ser filmada. Utilice los botones de panorámica, inclinación o zoom para determinar el ángulo de la cámara. Ajuste el enfoque, el iris, la ganancia y el balance del blanco si éstos necesitan ser ajustados. Notas pw Cuando existe una diferencia grande en la temperatura ambiental entre el momento del registro y el momento en que se llama al ajuste, puede que se produzca un desplazamiento de la posición preajustada. pw Si se produce un desplazamiento, vuelva a realizar el registro. pw Mientras se recuperan ajustes preajustados no es posible realizar operaciones manuales tales como ajustes de panorámica, inclinación, zoom e iris. pw Si, cuando se ha recuperado un grupo de ajustes preajustados, se llama a otro grupo de ajustes preajustados, el primero de los grupos de ajustes preajustados tendrá preferencia. 2 Mientras mantiene pulsado el botón [PRESET], pulse el botón correspondiente al número de la memoria de preajuste. pw Si se ha seleccionado un número de memoria de preajuste con un ajuste ya registrado, el ajuste existente será borrado y reemplazado por el ajuste nuevo. qw Recuperación de ajustes de la memoria de preajustes 1 Pulse el botón en el que ha sido registrado el ajuste de la memoria de preajuste. 13 (S) Ajuste del balance del blanco wwAjuste del balance del blanco qwAjuste automático (AWB: AWB A o AWB B) Para que el color blanco se pueda reproducir con exactitud se ajusta la relación entre los tres colores primarios (RGB). Si el balance del blanco se ha desajustado, el blanco no sólo se reproducirá mal, sino que los tonos de los colores de toda la pantalla también se degradarán. 1 Enfoque un objeto blanco (una pared o un pañuelo blanco) de forma que ocupe toda la pantalla. pw Este ajuste deberá realizarse cuando se utilice la unidad por primera vez o cuando la unidad no se haya utilizado durante mucho tiempo. pw Este ajuste deberá hacerse cuando las condiciones de iluminación o el brillo hayan cambiado. pw No enfoque objetos lustrosos o muy brillantes. Cuando se haya pulsado el botón [SET] del mando a distancia inalámbrico podrá seleccionarse el ajuste AWB (balance automático del blanco) que se realiza automáticamente o el ajuste ATW (seguimiento automático del blanco) que se ajusta constante y continuamente. pw Los pasos 2 a 8 representan el procedimiento para seleccionar la memoria “AWB A” o “AWB B”. No necesitan seguirse si ya se ha hecho una selección. 2 Seleccione Manual1, Manual2 o Manual3 como Los resultados del ajuste AWB se pueden guardar en dos memorias, la A y la B, cuando se ha seleccionado “AWA A” o “AWB B” para el balance del blanco. modo de filmación siguiendo el procedimiento de “Selección de los modos de filmación (archivos de escenas)” (página 7). pw Una vez ajustado el balance del blanco cuando la unidad se usa con los mismos ajustes y bajo las mismas condiciones, su ajuste se completa simplemente seleccionando un ajuste de menú. No será necesario tener que volver a ajustar el balance del blanco otra vez. pw Una vez introducido un ajuste nuevo, el ajuste anterior se borrará. Camera Scene Contrast Picture Color Matrix Utilice las dos memorias para guardar los ajustes correspondientes a condiciones de filmación diferentes. Manual1 3 Pulse el botón [] o [] para poner el cursor en “Picture”. 4 Pulse el botón []. El menú secundario “Picture 1/2” se visualiza. Picture 1/2 Chroma Level AWB Mode R Gain B Gain Detail Flesh Tone Mode DNR Return 14 (S) -1 AWB A 0 0 Low Off High ESPAÑOL Return Ajuste del balance del blanco 5 Pulse el botón [] o [] para poner el cursor Notas en “AWB Mode”. pw Para poder visualizar el mensaje deberá seleccionarse ON para el ajuste OSD Status. [Top Menu]>[System]>[OSD Status] en [Other 2/2] pw El balance del blanco puede no ajustarse correctamente si la iluminación del objeto es demasiado débil. pw Como la cámara tiene una memoria incorporada, el ajuste del balance del blanco permanecerá en la memoria aunque se desconecte la alimentación. Por lo tanto, no será necesario restablecer el balance del blanco si la temperatura del color de esos objetos permanece sin cambiar. Sin embargo, el balance del blanco tendrá que restablecerse si cambia la temperatura del color, como es el caso en el que usted pasa de interiores a exteriores o viceversa. 6 Pulse el botón []. “AWB Mode” empieza a parpadear. 7 Pulse el botón [] o [] para cambiar el modo AWB que se va a usar a “AWB A” o “AWB B”, y pulse el botón [] para establecer la selección. 8 Pulse el botón [MENU] durante al menos 2 segundos. Se sale de la visualización del menú. 9 Pulse el botón [SET] durante al menos qwAjuste del balance del blanco con seguimiento automático (ATW) 2 segundos. El ajuste automático del balance del blanco (AWB) se realiza y se establece. pw Cuando el ajuste del balance del blanco se realiza satisfactoriamente, “AWB OK” aparece en el centro de la pantalla. Cuando el ajuste del balance del blanco se pone en “ATW”, el balance del blanco continua ajustándose automáticamente en todo momento, y éste se corrige automáticamente aunque la fuente de luz o la temperatura del color haya cambiado para producir imágenes completamente naturales. Esta función se activa cuando se selecciona “ATW” en lugar de “AWB A” o “AWB B” siguiendo los pasos de “Ajuste automático” en “Ajuste del balance del blanco” (página 14). AWB OK Notas pw ATW puede no funcionar correctamente cuando una luz brillante (la de lámparas fluorescentes por ejemplo) ilumina la pantalla. pw El balance del blanco puede no ajustarse con exactitud si no hay objetos blancos en la escena que se filma. pw El balance del blanco se puede desajustar cuando se emplean fuentes de luz diferentes como, por ejemplo, la luz del sol o la luz de lámparas fluorescentes. pw Cuando el ajuste ha fallado se visualiza un mensaje de error tal como “OUT RANGE NG”, “HIGH LIGHT NG”, “LOW LIGHT NG” o “ATW NG”. 15 (S) Operaciones básicas con menús de ajuste Tabla de operaciones Cuando se van a seleccionar ajustes de la unidad se visualizan menús en el monitor. El monitor se conecta al conector de salida de señal de vídeo. Las operaciones básicas con menús implican la visualización de menús secundarios desde elementos de Top Menu, y también seleccionar ajustes en los menús secundarios. Algunos menús secundarios tienen elementos de menú para realizar ajustes más detallados. Operación con menú Las operaciones con menús se realizan utilizando el mando a distancia inalámbrico. Las siguientes son operaciones básicas para cambiar ajustes de elementos de menús utilizando el mando a distancia inalámbrico. Mando a distancia inalámbrico Selección de la unidad que va a ser utilizada Pulse el botón [CAM1], [CAM2], [CAM3] o [CAM4]. Visualización de Top Menu Pulse el botón [MENU] durante al menos 2 segundos. Selección de los elementos Pulse el botón [] o [] ([] o []). Visualización de los menús secundarios Pulse el botón []. Vuelta al menú anterior Con el cursor en la posición [Return], pulse el botón []. Cambio de los ajustes Con el cursor en el elemento que se va a cambiar, pulse el botón [] para que empiece a parpadear el valor del elemento. Utilice los botones [], [], [] y [] para cambiar el valor y pulse el botón [O] para establecer el cambio. Cancelación del cambio del ajuste Mientras está parpadeando el ajuste, pulse rápidamente el botón [MENU] (durante menos de 2 segundos). Salida de las operaciones Pulse el botón [MENU] durante al con menús menos 2 segundos. Nota ESPAÑOL pw Haga las operaciones con menú y salga de los menús utilizando el mando a distancia inalámbrico que visualiza Top Menu. 16 (S) Operaciones básicas con menús de ajuste 1 Pulse el botón [CAM1], [CAM2], [CAM3] o 9 Pulse el botón [MENU] durante al menos [CAM4] para seleccionar la unidad que quiera utilizar. 2 segundos después de terminar el ajuste. Se sale de la visualización del menú. 2 Pulse el botón [MENU] durante al menos 2 segundos. Se visualiza Top Menu. 3 Pulse el botón [] o [] para poner el cursor en el elemento que quiera seleccionar. El cursor se mueve cada vez que se pulsa el botón [] o []. El cursor se puede mover de la misma forma utilizando los botones [] y []. 4 Pulse el botón []. El menú secundario del elemento seleccionado se visualiza. (Algunos elementos de menú secundario tienen su propio menú secundario.) 5 Pulse el botón [] o [] para poner el cursor en el elemento que quiera establecer. El cursor se mueve cada vez que se pulsa el botón [] o []. El cursor se puede mover de la misma forma utilizando los botones [] y []. Con el cursor en la posición “Return”, pulse el botón [] para volver al menú anterior. 6 Pulse el botón []. El valor del elemento que va a establecer empieza a parpadear. 7 Pulse el botón [] o [] para cambiar el ajuste. El ajuste se puede cambiar de la misma forma utilizando los botones [] y []. 8 Pulse el botón []. El valor del elemento que va a ajustarse se establece y éste deja de parpadear. 17 (S) Ajuste de los elementos del menú wwTop Menu wwAjuste de los elementos del menú Top Menu Cuando se vayan a seleccionar los ajustes de la unidad, los menús se visualizarán en el monitor. El monitor se conecta al conector de salida de señales de vídeo. Las operaciones básicas con menús implican la visualización de menús secundarios desde elementos de Top Menu, y también seleccionar ajustes en los menús secundarios. Algunos menús secundarios tienen elementos de menús para realizar ajustes más detallados. Para conocer detalles de las operaciones básicas para visualizar los menús y cambiar los elementos utilizando el mando a distancia inalámbrico, consulte las páginas 16 a 17. Camera Scene: FullAuto System Maintenance Camera Seleccione esto para abrir el menú de cámara relacionado con las imágenes de la cámara. Las marcas “ ” y “ ” de los títulos de menús indican el nivel jerárquico del menú que está visualizándose actualmente. Por ejemplo, “ ” indica el primer nivel jerárquico, mientras que “ ”y “ ” indica que ahora se visualiza el segundo nivel jerárquico. Los elementos de menú acompañados por la marca “ ” indican datos que fueron guardados en base a escena por escena; los elementos de menú acompañados por la marca “ ” indican datos que fueron guardados juntos para una cámara independientemente de las escenas. System Seleccione esto para abrir el menú del sistema relacionado con los ajustes de la imagen de salida de la cámara, etc. Maintenance Seleccione esto para visualizar el menú Maintenance utilizado para verificar la versión del firmware de la cámara o para inicializar sus ajustes. Nota ESPAÑOL pw Top Menu no tiene un ajuste “Return”. Para cerrar la pantalla del menú, utilice el mando a distancia inalámbrico para realizar la operación de cierre de la pantalla de menú. Para conocer detalles, consulte las páginas 16 a 17. 18 (S) Ajuste de los elementos del menú wwPantalla Camera (cuando se ha seleccionado el modo Manual1 a 3) wwPantalla Camera (cuando se ha seleccionado FullAuto) Este menú se utiliza para los ajustes de imagen de la cámara. Camera Scene Contrast Picture Color Matrix Cam era Scene Contr ast Level FullAuto 0 Manual1 Return Return Scene [FullAuto, Manual1, Manual2, Manual3] Scene [FullAuto, Manual1, Manual2, Manual3] Consulte la sección Scene en la columna de la izquierda. Aquí se selecciona el modo de filmación que concuerda con la situación de la filmación. Seleccione el modo que mejor se adapte a las condiciones de filmación prevalecientes y a las preferencias del usuario. FullAuto: Contrast Seleccione esto para visualizar la pantalla Contrast para ajustar el brillo. En este modo, los ajustes óptimos y los ajustes para las condiciones de filmación existentes se establecen automáticamente. Cuando se selecciona “FullAuto”, el ajuste detallado y los menús de ajuste no se visualizan. Picture Seleccione esto para visualizar la pantalla Picture para ajustar la calidad de la imagen. Para el menú de ajuste de la calidad de la imagen se proveen dos pantallas (Picture 1/2 y Picture 2/2). Manual1 a 3: En estos modos, los ajustes detallados y los demás ajustes se establecen manualmente para que concuerden con las condiciones de filmación prevalecientes y a las preferencias del usuario. Cuando se ha seleccionado el modo Manual1, Manual2 o Manual3, el ajuste detallado y el menú de ajuste para el modo pertinente se visualizan. Color Matrix Seleccione esto para cargar los datos de la matriz de colores que han sido preestablecidos y para compensar la saturación y el matiz. Return Utilice esto para volver al menú anterior. Contrast Level [–5 a +5] Utilice el nivel de contraste para ajustar el brillo de la imagen. Return Utilice esto para volver al menú anterior. 19 (S) Ajuste de los elementos del menú wwPantalla Contrast Frame Mix [Auto, Off, 6dB, 12dB, 18dB] Co ntrast Seleccione la cantidad de adición de cuadro (ganancia utilizando el almacenamiento de sensor). Este elemento se puede ajustar cuando se selecciona “Off” para el elemento “Shutter Mode”. Cuando se realiza la adición de cuadros, ésta aparecerá como si en las imágenes faltasen algunos cuadros. Contra st Mode Auto Contr ast Level 0 Shutt er Mode ---Step /Synchro ---Fram e Mix ---Auto F.Mix Max Gain 0dB Gain Auto AGC Ma x Gain 18dB Return AutoF. Mix Max Gain [0dB, 6dB, 12dB, 18dB] Cuando se selecciona “Auto” para “Contrast Mode” o para “Frame Mix”, se puede establecer la cantidad de adición de cuadro máxima. Si la adición de cuadros se realiza en el modo de ajuste automático, ésta aparecerá como si en las imágenes faltasen algunos cuadros. Contrast Mode [Auto, Manual] Este elemento se utiliza para seleccionar si el brillo de la imagen (contraste) se va a controlar automática o manualmente. Gain [Auto, 0dB, 3dB, 6dB, 9dB, 12dB, 15dB, 18dB] Se controlan el iris, la velocidad del obturador y la adición de cuadros, y el brillo de la cámara se ajusta automáticamente. La ganancia de imagen se ajusta aquí. El lugares demasiado oscuros, ajuste la ganancia en sentido ascendente; y a la inversa, en lugares demasiado brillantes, ajústela en sentido descendente. Cuando se establece “Auto”, la cantidad de luz se ajusta automáticamente. Cuando aumenta la ganancia aumenta el ruido. Cambiar la ganancia también es posible pulsando los botones [OFF], [LOW], [HI] y [AUTO] para [GAIN] en el controlador remoto inalámbrico. Manual: Las operaciones se realizan utilizando los valores ajustados manualmente. Cambiar entre los modos de contraste también es posible pulsando los botones [A/IRIS] y [M/IRIS] en el controlador remoto inalámbrico. Contrast Level [–5 a +5] Aquí se ajusta el nivel de contraste cuando se ajusta el brillo de la imagen. Este elemento se puede ajustar cuando se ha seleccionado “Auto” para “Contrast Mode”. AGC Max Gain [6dB, 12dB, 18dB] Cuando se selecciona “Auto” para “Gain” se puede ajustar la cantidad de ganancia máxima. Shutter Mode [Off, Step, Synchro] Return Seleccione la velocidad del obturador de la cámara. Este elemento se puede ajustar cuando se ha seleccionado “Manual” para “Contrast Mode”. Off: El obturador se desactiva (para que no pueda ser activado). Step: El obturador por pasos se ajusta (los pasos no se pueden cambiar). Utilice esto para volver al menú anterior. Synchro: El obturador sincronizado se ajusta (el ajuste se puede cambiar continuamente). Step/Synchro Esto se utiliza para ajustar la velocidad del obturador en el modo que fue seleccionado para “Shutter Mode”. Cuando se selecciona una velocidad del obturador alta, los motivos en movimiento rápido no quedarán borrosos fácilmente, pero las imágenes serán más oscuras. Las velocidades del obturador que se pueden ajustar son las siguientes. Cuando se selecciona “Step” para “Shutter Mode” Cuando se selecciona “Synchro” para “Shutter Mode” 1/120, 1/250, 1/500, 1/1000, 1/2000, 1/4000, 1/10000 50,20 Hz a un máximo de 538,51 Hz (255 pasos) 20 (S) ESPAÑOL Auto: Ajuste de los elementos del menú wwPantalla Picture 1/2 DNR [Off, Low, High] Pi cture 1/2 Chroma Level AWB Mo de R Gai n B Gai n Detail Flesh Tone Mode DNR Aquí se ajusta el nivel del efecto de reducción de ruido digital, para que puedan reproducir imágenes brillantes, sin ruido y nítidas, incluso durante la noche y en otros ambientes de poco brillo. Cuando se selecciona “Low” o “High” se puede eliminar más ruido todavía. Sin embargo, aumenta la posibilidad de que se produzca imágenes secundarias. -1 AWB A 0 0 Low Off High Return Return Utilice esto para volver al menú anterior. Chroma Level [–3 a +3] Aquí se ajusta la intensidad del color (nivel de croma) de las imágenes. Notas pw Cuando se realiza el ajuste del balance automático del blanco (AWB), los valores de R Gain y B Gain vuelven a “0”. pw Cuando se ha seleccionado “AWB A” o “AWB B” como ajuste de AWB Mode, los valores de ajuste de R Gain y B Gain pueden guardarse en las dos memorias (A y B). pw Cuando se establecen valores nuevos, los datos anteriores se eliminan. Utilice una memoria para un juego de condiciones de filmación y la otra memoria para otro juego de condiciones de filmación. pw Al registrar datos en las memorias de preajustes, los ajustes de R Gain y B Gain (-30 a +30) no se guardan, pero los estados del balance del blanco (color) que se establecen después de haber hecho los ajustes utilizando R Gain y B Gain se pueden guardar. pw Si Mode A ha sido seleccionado como ajuste de Preset Scope, los ajustes de R Gain y B Gain volverán a “0” cuando se recuperen los datos de las memorias de preajustes. pw Cuando se ha seleccionado ATW como ajuste de AWB Mode, R Gain y B Gain no se podrán ajustar. AWB Mode [ATW, AWB A, AWB B] El modo del balance del blanco se selecciona aquí. Seleccione el modo cuando el color no sea natural debido a la naturaleza de la fuente de luz o a otros factores. Si se puede reconocer el color blanco que sirve como referencia, los motivos se pueden filmar con un color natural. ATW: En este modo, el balance del blanco se compensa automáticamente, aunque se produzcan cambios en la fuente de luz o en la temperatura del color, mediante un proceso de ajuste continuo y automático. AWB A, AWB B: Cuando se selecciona AWB A o AWB B y se ejecuta el balance del blanco, los resultados obtenidos de los ajustes se guardan en la memoria seleccionada. Cuando se selecciona AWB A o AWB B, el balance del blanco guardado en la memoria seleccionada se puede recuperar. R Gain, B Gain [–30 a +30] Cuando se ha seleccionado “AWB A” o “AWB B” como ajuste para AWB Mode, el balance del blanco podrá ajustarse con precisión al completarse el ajuste del balance automático del blanco (AWB). Detail [Off, Low, High] El detalles de la imagen (nitidez de imagen) se ajusta aquí. Cuando se selecciona “Low” o “High”, el detalle mejora. Flesh Tone Mode [Off, Low, High] Aquí se ajusta el modo del tono de la piel, para visualizar la piel de las personas de forma que ésta aparezca más suave y agradable a la vista. Cuando se selecciona “Low” o “High”, el efecto mejora aún más. 21 (S) Ajuste de los elementos del menú wwMatriz de colores de 16 ejes wwPantalla Picture 2/2 qwMenú de salida del monitor (OSD) Pi cture 2/2 Pedest al DRS Gamma Type Gamm a Level Back L ight COMP. <Pantalla Color Matrix 1/3> -5 Low ------Off Color Matrix 1/3 Matrix Select USER [Saturation] [Phase] Axis01 +50 0 Axis02 0 0 Axis03 0 0 Axis04 +35 +5 Axis05 0 0 Axis06 0 0 Return Return Pedestal [–10 a +10] Este elemento se utiliza para ajustar el nivel del negro (ajuste de pedestal), para que las partes oscuras de las imágenes se puedan ver fácilmente. Estas partes se oscurecen cuando se selecciona un ajuste negativo, y se aclaran cuando se selecciona un ajuste positivo. <Pantalla Color Matrix 2/3> Color Matrix 2/3 Matrix Select USER [Saturation] [Phase] Axis07 +30 0 Axis08 -20 +10 Axis09 0 -30 Axis10 0 0 Axis11 +10 +50 Axis12 0 0 Return DRS [Off, Low, High] Aquí se ajusta la función DRS que proporciona la cantidad de compensación justa cuando se visualizan imágenes con diferencias claras/oscuras considerables. Cuando se selecciona “Low” o “High”, el efecto mejora aún más. Esto puede hacer ruidos más perceptible con algunas escenas. Gamma Type [Off, Normal, Cinema] Aquí se selecciona el tipo de curva de gamma. El ajuste seleccionado se activa cuando se selecciona “Off” para el elemento “DRS”. Normalmente se utiliza el ajuste “Normal”. Cuando se selecciona “Cinema” se pueden filmar imágenes con una atmósfera similar a la de las películas. <Pantalla Color Matrix 3/3> Matrix Select USER [Saturation] [Phase] Axis13 0 0 Axis14 +35 +10 Axis15 0 0 Axis16 0 0 Gamma Level [Low, Mid, High] Este elemento se utiliza para ajustar el nivel de compensación de gamma. El ajuste del elemento se activa cuando se ha seleccionado “Off” para el elemento “DRS” y “Normal” para el elemento “Gamma Type”. Cuando se selecciona “Low”, las imágenes aparecen reposadas y compuestas. La curva de gamma resultante tiene un gradiente suave en las áreas de poco brillo, y el contraste es más nítido. Por otra parte, cuando se establece “High”, la gama tonal en el área oscura se expande para que las imágenes adquieran un tono más claro. La curva de gamma resultante tiene un gradiente agudo en las áreas de poco brillo, y el contraste es más suave. Return Back Light COMP. [Off, On] “On” u “Off” se establecen aquí para la función de compensación de luz de fondo. Bajo condiciones de luz de fondo, la función impide el oscurecimiento debido a la luz que incide sobre las partes posteriores de los motivos, permitiendo filmar imágenes en la sombra con más brillo. La función se activa cuando se ha seleccionado “Auto” para el elemento Contrast Mode, Gain o Frame Mix. Return Utilice esto para volver al menú anterior. 22 (S) ESPAÑOL Color Matrix 3/3 Ajuste de los elementos del menú qwPantallas Color Matrix 1/3 a 3/3: wwPantalla System Matrix Select [Normal, EBU, NTSC, USER] Este menú tiene elementos relacionados con los ajustes de imagen de salida de la cámara. Esto carga los datos de matriz de colores que ha sido preajustada y compensa la saturación y el matiz. Cuando se selecciona “USER”, la saturación y el matiz se pueden ajustar con precisión utilizando la matriz de colores de 16 ejes (Axis01 a Axis16). System Output Other qwPantallas Color Matrix 1/3 a 3/3: Axis01 a Axis16:Saturation [–127 a +127] Return qwPantalla User Color Matrix Setup: Axis01 a Axis16:Saturation [–127 a +127] Output Esto permite ajustar con precisión la saturación de Axis01 a Axis16. Esto visualiza la pantalla Output en la que se seleccionan los ajustes de la imagen de salida de la cámara. Other qwPantallas Color Matrix 1/3 a 3/3: Esto visualiza la pantalla Other en la que se seleccionan los ajustes para el estado de instalación y para la velocidad de operación del cabezal de panorámicainclinación de la cámara, así como también los ajustes relacionados con otras funciones. Axis01 a Axis16:Phase [–127 a +127] qwPantalla User Color Matrix Setup: Axis01 a Axis16:Phase [–127 a +127] Return Utilice esto para volver al menú anterior. Esto permite ajustar con precisión el matiz de Axis01 a Axis16. 23 (S) Ajuste de los elementos del menú HDMI Color [RGB-NOR, RGB-ENH, YCbCr422, YCbCr444] wwPantalla Output Aquí se ajusta la salida de color HDMI. p Cuando se utiliza un monitor HDMI, utilice “YCbCr422” bajo circunstancias normales. p En casos donde, por ejemplo, las señales HDMI (RGB) se convierten y salen a un monitor DVI, los ajustes requeridos cambiarán dependiendo de la gradación de color soportada por el monitor. Ou tput Format Down C ONV. Mode HDMI C olor 1080/50i Squeeze YCbCr422 RGB-NOR Las señales de salida RGB salen dentro de la gama de 16 a 235. RGB-ENH Las señales de salida RGB salen dentro de la gama de 0 a 255. Return p Si las partes negras de las imágenes aparecen sobreexpuestas cuando se selecciona “RGB-NOR”, utilice en su lugar el ajuste “RGB-ENH”. p A la inversa, si las imágenes se visualizan con una pérdida de detalles oscuros cuando se ha seleccionado “RGB-ENH”, utilice en su lugar el ajuste “RGB-NOR”. Format [1080/50i, 576/50p] El formato de vídeo se cambia en esta pantalla. Para conocer detalles de cómo cambiar el formato, consulte “Cambio del formato” (página 25). Down CONV. Mode [Squeeze, SideCut] Nota pw Si se ha especificado un ajuste HDMI Color que no es compatible con el monitor, el ajuste HDMI Color puede que cambie automáticamente. (La visualización del menú permanecerá sin cambiar.) Aquí se selecciona el modo de conversión descendente. Cuando se ha establecido la relación de aspecto 4:3 para la pantalla de monitor, las Squeeze imágenes se comprimen horizontalmente y se extienden verticalmente cambiando la vista del ángulo. Return Utilice esto para volver al menú anterior. ESPAÑOL Con la altura sirviendo como referencia, las partes que se extienden por ambos lados se recortan cambiando la vista del ángulo. SideCut 24 (S) Ajuste de los elementos del menú qwCambio del formato Pantalla Format unchanged Cuando se cambie el formato en la pantalla Output aparecerá la pantalla de verificación de cambio Format. Pantalla de verificación de cambio Format Format FO RMAT unchanged Do you want to set Format ( 1080/50i)? CANCEL O.K. p El formato (1080/50i, 576/50p) que va a ser establecido se visualiza entre paréntesis en la pantalla. p Cuando el cursor se mueve a “O.K.” en la pantalla de verificación de cambio Format y se establece el ajuste, la pantalla Format Set se muestra durante unos pocos segundos y el formato cambia. Después de cambiar el formato, la visualización vuelve a la pantalla Output. Con algunos tipos de monitores, la pantalla Format Set puede que no se visualice. Pantalla Format Set Format ( 1080/50i) Set p El formato (1080/50i, 576/50p) que va a ser establecido se visualiza entre paréntesis en la pantalla. p Cuando el cursor se mueve a “CANCEL” en la pantalla de verificación de cambio Format y se establece el ajuste, la pantalla Format unchanged se muestra durante 5 segundos y el formato no cambia, y la visualización vuelve a la pantalla Output. Nota pw No haga ningún cambio cuando conecte a un sistema de comunicaciones visuales HD. 25 (S) Ajuste de los elementos del menú Digital Zoom [Disable, Enable] wwPantalla Other 1/2 Aquí se establece “Enable” o “Disable” para la función del zoom digital. Si el zoom se emplea hacia el extremo de Tele más allá de la posición máxima cuando se ha seleccionado “Enable”, el zoom digital podrá utilizarse continuamente. El zoom se detendrá temporalmente en la posición donde el zoom óptico y el zoom digital se conmutan, así que después de detenerse en esta posición, siga de nuevo empleando el zoom. Cuando el ajuste se cambia a “Disable” estando ya en la región de zoom digital, el zoom se moverá automáticamente a la posición máxima del zoom óptico. Ot her 1/2 Instal l Position Desktop Preset Speed 10 Preset Scope Mode A Digita l Zoom Disable Speed With Zoom POS. On Focus Mode Auto Focus ADJ With PTZ. ---Return Speed With Zoom POS. [Off, On] Install Position [Desktop] Aquí se establece “On” u “Off” para la función utilizada para ajustar la velocidad de ajuste de dirección de la cámara en conjunción con el aumento de zoom. Cuando se establece “On”, las operaciones de panorámica e inclinación serán más lentas en el estado del zoom. Esta función no tiene ningún efecto durante las operaciones de preajuste. La instalación independiente es la única opción de instalación disponible para la unidad. Desktop: Instalación independiente Preset Speed [1 a 30] Hay 30 velocidades de operación de panorámicainclinación preajustadas cuando se regenera la dirección de la cámara y otra información que está registrada en la memoria de preajustes. Focus Mode [Auto, Manual] Nota pw Si se selecciona un valor alto para el ajuste de Preset Speed, la imagen de la pantalla puede que vibre cuando se detenga la operación. Preset Scope [Mode A, Mode B, Mode C] Aquí se seleccionan los elementos de ajuste que van a ser recuperados cuando se regenere el contenido de la memoria de preajustes. Mode A: Pan, Tilt, Zoom (incluyendo zoom digital), Focus, Iris, Gain, White-BAL Mode B: Pan, Tilt, Zoom (incluyendo zoom digital), Focus, Iris Mode C: Pan, Tilt, Zoom (incluyendo zoom digital), Focus Focus ADJ With PTZ. [Off, On] Aquí se establece “On” u “Off” para la función que compensa el desenfoque durante las operaciones de panorámica, inclinación o zoom con el ajuste de enfoque manual. Cuando se establece “Off”, ajuste el enfoque según se requiera después de emplear el zoom o ponga el enfoque en el modo automático. Este elemento sólo se puede seleccionar cuando se ha seleccionado “Manual” para “Focus Mode”. Return Utilice esto para volver al menú anterior. 26 (S) ESPAÑOL Aquí se establece “Auto” o “Manual” para la función de enfoque. Auto: Los motivos siempre son enfocados automáticamente. Manual: El enfoque se controla manualmente. Cambiar entre los modos de enfoque también es posible pulsando los botones [A/FOCUS] y [M/FOCUS] en el controlador remoto inalámbrico. Ajuste de los elementos del menú wwPantalla Other 2/2 Nota pw Cuando las operaciones con menús no se puedan realizar: 1. Desconecte la alimentación de las unidades y dispositivos que están conectados. 2. Desconecte el cable de alimentación de la unidad y vuelva a conectarlo. 3. Realice la operación para conectar la alimentación de la unidad desde el mando a distancia inalámbrico. 4. Después de cambiar este elemento, desconecte la alimentación de la unidad y vuelva a conectarla. Ot her 2/2 Tally Enable Enable OSD Of f With Tally Off OSD St atus Off Return Tally Enable [Disable, Enable] La selección de este elemento no tiene ningún efecto porque ésta es una función de expansión. OSD Off With Tally [Off, On] La selección de este elemento no tiene ningún efecto porque ésta es una función de expansión. OSD Status [Off, On] Aquí se establece “On” u “Off” para la visualización de estado que aparece durante las operaciones AWB. Return Utilice esto para volver al menú anterior. 27 (S) Ajuste de los elementos del menú wwPantalla Firmware Version wwPantalla Maintenance Firmware Version Model GP-VD150 CPU Software Camera Main V01.00 Pan/Tilt V01.00 Network V--.-- Mai ntenance Firmwa re Version Initia lize PLD Camera Output Return Return V01.00 V01.00 Model Firmware Version Esto visualiza el nombre del modelo. Esto se selecciona para visualizar la pantalla Firmware Version en la que se va a verificar la versión del firmware utilizado. CPU Software Camera Main Esto visualiza la versión del software de la unidad de cámara. Initialize Esto se selecciona para visualizar la pantalla Initialize en la que se van a inicializar los ajustes de la cámara. Para conocer detalles de la operación, consulte “Acerca de la inicialización” en la página 29. CPU Software Pan/Tilt Esto visualiza visualizar la versión del software de la unidad de panorámica e inclinación. Return CPU Software Network Utilice esto para volver al menú anterior. Esto visualiza “V--.-”. PLD Camera Esto visualiza la versión PLD de la unidad de cámara. PLD Output Return Utilice esto para volver al menú anterior. 28 (S) ESPAÑOL Esto visualiza la versión PLD de la unidad de salida. Ajuste de los elementos del menú Pantalla Menu settings unchanged qwAcerca de la inicialización Cuando se selecciona “Initialize” en la pantalla Maintenance aparece la pantalla de Initialize. Menu settings Pantalla Initialize unchanged In itialize Do you want to initialize Menu s ettings? CANCEL O.K. Return p Cuando el cursor se mueve a “O.K.” en la pantalla Initialize y se introduce el ajuste, la pantalla Menu settings initialize se visualiza durante 5 segundos, y los ajustes de la cámara se restablecen a los ajustes que estaban establecidos cuando se adquirió la cámara. Sin embargo, los ajustes Format (consulte la página 24) no se inicializan. Cuando termina la operación de inicialización, la pantalla Initialize se restablece para visualizar. Pantalla Menu settings initialized Menu s ettings initia lized p Cuando el cursor se mueve a “CANCEL” en la pantalla Initialize y se introduce el ajuste, la pantalla Menu settings unchanged se visualiza durante 5 segundos, la operación de visualización no se realiza y la pantalla Initalize vuelve a la visualización. 29 (S) Tabla de elementos de menús Top Menu Camera Elemento Scene Contrast FullAuto Manual1 FullAuto, Manual1, Manual2, Manual3 Contrast Mode Auto Auto Auto, Manual Contrast Level 0 0 –5 a +5 Shutter Mode ---- ---- Off, Step, Synchro Step/Synchro ---(Cuando se selecciona “Step” para “Shutter Mode”) ---- pw Cuando se ha seleccionado 59.94 Hz: 1/100, 1/250, 1/500, 1/1000, 1/2000, 1/4000, 1/10000 pw Cuando se ha seleccionado 50 Hz: 1/120, 1/250, 1/500, 1/1000, 1/2000, 1/4000, 1/10000 Step/Synchro ---(Cuando se selecciona “Synchro” para “Shutter Mode”) ---- pw Cuando se ha seleccionado 59.94 Hz: 60.24Hz a 646.21Hz (1 a 255 pasos) pw Cuando se ha seleccionado 50 Hz: 50.20Hz a 538.51Hz (1 a 255 pasos) Frame Mix ---- ---- Auto, Off, 6dB, 12dB, 18dB AutoF.Mix Max Gain ---- 0dB 0dB, 6dB, 12dB, 18dB Gain ---- Auto Auto, 0dB, 3dB, 6dB, 9dB, 12dB, 15dB, 18dB AGC Max Gain ---- 18dB 6dB, 12dB, 18dB ---- –1 –3 a +3 AWB Mode ---- AWB A ATW, AWB A, AWB B R Gain ---- 0 –30 a +30 B Gain ---- 0 –30 a +30 Detail ---- Low Off, Low, High Flesh Tone Mode ---- Off Off, Low, High DNR ---- High Off, Low, High ---- –5 –10 a +10 DRS ---- Low Off, Low, High Gamma Type ---- ---- Off, Normal, Cinema ---- ---- Low, Mid, High Back Light COMP. ---- Off Off, On Matrix Select ---- USER Normal, EBU, NTSC, USER Axis01 Saturation ---- +50 –127 a +127 Phase ---- 0 –127 a +127 Saturation ---- 0 –127 a +127 Phase ---- 0 –127 a +127 Saturation ---- 0 –127 a +127 Phase ---- 0 –127 a +127 Saturation ---- +35 –127 a +127 Phase ---- +5 –127 a +127 Saturation ---- 0 –127 a +127 Phase ---- 0 –127 a +127 Saturation ---- 0 –127 a +127 Phase ---- 0 –127 a +127 Matrix Select ---- USER Normal, EBU, NTSC, USER Axis07 Saturation ---- +30 –127 a +127 Phase ---- 0 –127 a +127 Saturation ---- –20 –127 a +127 Phase ---- +10 –127 a +127 Saturation ---- 0 –127 a +127 Phase ---- –30 –127 a +127 Saturation ---- 0 –127 a +127 Phase ---- 0 –127 a +127 Picture 2/2 Pedestal Gamma Level Axis02 Axis03 Axis04 Axis05 Axis06 Color Matrix 2/3 Elementos de selección Scene Picture Picture 1/2 Chroma Level Color Matrix 1/3 Ajuste de fábrica FullAuto Manual1 a 3 Axis08 Axis09 Axis10 30 (S) ESPAÑOL Menú Tabla de elementos de menús Menú Top Menu Camera Elemento Scene Color Matrix 2/3 Axis11 ---- +10 –127 a +127 Phase ---- +50 –127 a +127 Saturation ---- 0 –127 a +127 Phase ---- 0 –127 a +127 Matrix Select ---- USER Normal, EBU, NTSC, USER Axis13 Saturation ---- 0 –127 a +127 Phase ---- 0 –127 a +127 Saturation ---- +35 –127 a +127 Phase ---- +10 –127 a +127 Saturation ---- 0 –127 a +127 Phase ---- 0 –127 a +127 Saturation ---- 0 –127 a +127 Phase ---- 0 Axis14 Axis15 Axis16 System Output Other Other 2/2 Maintenance Firmware Version –127 a +127 1080/59.94i (Cuando se ha seleccionado 59.94 Hz) pw Cuando se ha seleccionado 59.94 Hz: 1080/59.94i, 480/59.94p 1080/50i (Cuando se ha seleccionado 50 Hz) pw Cuando se ha seleccionado 50 Hz: 1080/50i, 576/50p Down CONV. Mode Squeeze Squeeze, SideCut HDMI Color YCbCr422 RGB-NOR, RGB-ENH, YCbCr422, YCbCr444 Install Position Desktop ---- Preset Speed 10 1 a 30 Preset Scope Mode A Mode A, Mode B, Mode C Digital Zoom Disable Disable, Enable Format Other 1/2 Elementos de selección Saturation Axis12 Color Matrix 3/3 Ajuste de fábrica FullAuto Manual1 a 3 Speed With Zoom POS. On Off, On Focus Mode Auto Auto, Manual Focus ADJ With PTZ. ---- Off, On Tally Enable Enable Disable, Enable OSD Off With Tally Off Off, On OSD Status Off Off, On Model GP-VD150 ---- Camera Main Versión entregada ---- Pan/Tilt Versión entregada ---- Network ---- ---- Camera Versión entregada ---- Output Versión entregada ---- ---- CANCEL CANCEL, OK CPU Software PLD Initialize 31 (S) 32 (S) ESPAÑOL РУССКАЯ ВЕРСИЯ (RUSSIAN VERSION) Содержание Перед использованием ....................................................................2 Установка пунктов меню ................................................................18 Общие сведения .............................................................................2 Установка пунктов меню ..............................................................18 Информация о системах HD видео конференц-связи ................2 Top Menu .......................................................................................18 Информация о пульте дистанционного управления (дополнительный аксессуар) ..............................................2 Экран Camera (при выборе значения FullAuto) ..........................19 Торговые знаки и зарегистрированные торговые знаки ..............2 Экран Camera (при выборе значения от Manual1 до Manual3) ...............19 Об авторском праве и лицензии ...................................................2 Экран Contrast ..............................................................................20 Отказ от гарантии ...........................................................................2 Экран Picture 1/2 ...........................................................................21 Управление устройством .................................................................3 Экран Picture 2/2 ...........................................................................22 16-осевая цветовая матрица .......................................................22 Как включить и выключить электропитание ...............................4 Экран System ................................................................................23 Включение электропитания ...........................................................4 Экран Output .................................................................................24 Выключение электропитания ........................................................5 Экран Other 1/2 .............................................................................26 Информация об одновременной смене режимов соединенных устройств ..............................................................................5 Экран Other 2/2 .............................................................................27 Экран Maintenance .......................................................................28 Выбор устройств ...............................................................................6 Экран Firmware Version ................................................................28 Выбор режимов съемки (сюжетные файлы) ...............................6 Таблица пунктов меню ...................................................................30 Типы режимов съемки ....................................................................6 Как выбрать режим съемки............................................................7 Съемка .................................................................................................8 Что следует делать при возникновении проблем с базовыми операциями съемки ..............................9 Дополнительные операции ...........................................................10 Ручная съемка .................................................................................. 11 Ручная регулировка фокуса ........................................................ 11 Ручная регулировка диафрагмы ................................................. 11 Регулировка скорости затвора вручную .....................................12 Регулировка усиления вручную...................................................12 Предустановленные шаблоны памяти ........................................13 Регулировка баланса белого .........................................................14 Регулировка баланса белого .......................................................14 Базовые операции установки меню ............................................16 1 (R) Перед использованием wwОбщие сведения wwОб авторском праве и лицензии pw Данное устройство является интегрированной камерой высокого разрешения full HD с панорамно-наклонной головкой, в котором впервые использован 1/3-дюймовый МОП-датчик full HD и цифровой сигнальный процессор (DSP). Распространение, копирование, дизассемблирование, декомпиляция, реинжиниринг, а также экспорт в нарушение законов об экспорте программного обеспечения, поставляемого с данным устройством, категорически запрещено. pw В дополнение к оптическому объективу с увеличением 12 в устройстве предусмотрено цифровое масштабирование 10 для достижения высокого качества съемки, передающей все детали окружающей среды. wwОтказ от гарантии НИ В КАКИХ СЛУЧАЯХ, КРОМЕ ЗАМЕНЫ ИЛИ ОБОСНОВАННОГО ТЕХОБСЛУЖИВАНИЯ ПРОДУКТА, Panasonic Corporation НЕ НЕСЕТ ОТВЕТСТВЕННОСТИ ПЕРЕД ЛЮБОЙ СТОРОНОЙ ИЛИ ЛИЦОМ ЗА СЛУЧАИ, ВКЛЮЧАЯ, НО НЕ ОГРАНИВАЯСЬ ЭТИМ: pw Данное устройство разработано для использования исключительно с системой HD видео конференц-связи Panasonic. Совместимые устройства HD видео конференц-связи: KX-VC300CX, KX-VC300EX, KX-VC600CX, KX-VC600EX 1 ВСЯКОЕ ПОВРЕЖДЕНИЕ И ПОТЕРИ, ВКЛЮЧАЮЩИЕ БЕЗ ОГРАНИЧЕНИЯ, НЕПОСРЕДСТВЕННЫЕ ИЛИ КОСВЕННЫЕ, СПЕЦИАЛЬНЫЕ, ПОБОЧНЫЕ ИЛИ ТИПОВЫЕ, ВОЗНИКАЮЩИЕ ИЗ ИЛИ ОТНОСЯЩИЕСЯ К ДАННОМУ ИЗДЕЛИЮ; wwИнформация о системах HD видео конференц-связи 2 ТРАВМЫ ИЛИ ЛЮБОЕ ПОВРЕЖДЕНИЕ, ВЫЗЫВАЕМЫЕ НЕСООТВЕТСТВУЮЩИМ ПРИМЕНЕНИЕМ ИЛИ НЕБРЕЖНЫМ УПРАВЛЕНИЕМ ПОЛЬЗОВАТЕЛЯ; pw Для получения описаний операций поворота, наклона, трансфокации, выполнения предварительных установок и других операций камеры с помощью системы HD видео конференц-связи обратитесь к инструкции по эксплуатации поддерживаемого устройства. 3 НЕОБОСНОВАННУЮ РАЗБОРКУ, РЕМОНТ ИЛИ МОДИФИКАЦИЮ ИЗДЕЛИЯ ПОЛЬЗОВАТЕЛЕМ; 4 НЕУДОБСТВО ИЛИ ЛЮБЫЕ ПОТЕРИ, ВОЗНИКАЮЩИЕ ПРИ НЕПРЕДСТАВЛЕНИИ ИЗОБРАЖЕНИЙ ПО ЛЮБОЙ ПРИЧИНЕ, ВКЛЮЧАЮЩЕЙ ОТКАЗ ИЛИ НЕИСПРАВНОСТЬ ИЗДЕЛИЯ; wwИнформация о пульте дистанционного управления (дополнительный аксессуар) 5 ЛЮБУЮ НЕИСПРАВНОСТЬ, КОСВЕННОЕ НЕУДОБСТВО ИЛИ ПОТЕРЮ ИЛИ ПОВРЕЖДЕНИЕ, ВОЗНИКАЮЩИЕ ИЗ СИСТЕМЫ, КОМБИНИРОВАННОЙ С УСТРОЙСТВАМИ ТРЕТЬЕЙ СТОРОНЫ; pw Управлять данным устройством можно дистанционно с помощью пульта дистанционного управления (модель AW-RM50G), который доступен в качестве дополнительного аксессуара. Управлять устройством непосредственно с помощью пульта дистанционного управления для системы HD видео конференцсвязи невозможно. Для приобретения пульта дистанционного управления обратитесь к дилеру. 6 ПОТЕРИ ЗАРЕГИСТРИРОВАННЫХ ДАННЫХ ИЗ-ЗА КАКОГО-ЛИБО СБОЯ. wwТорговые знаки и зарегистрированные торговые знаки РУССКИЙ pw HDMI, логотип HDMI и High-Definition Multimedia Interface являются товарными знаками или зарегистрированными товарными знаками HDMI Licensing LLC в Соединенных Штатах Америки и других странах. pw Adobe, Acrobat Reader и Reader являются зарегистрированными товарными знаками или товарными знаками Adobe Systems Incorporated в Соединенных Штатах Америки и/или других странах. Как составлены инструкции по эксплуатации данной модели pw Руководство по данной камере высокого разрешения для конференц-связи (в дальнейшем “устройство”) подразделяется на две инструкции: <Операции и установки> (данное руководство в PDF-файле) и <Основные положения>. Перед установкой устройства обязательно прочтите <Основные положения> для обеспечения правильности установки. 2 (R) Управление устройством Все управление данным устройством может осуществляться с помощью пульта дистанционного управления (модель AW-RM50G), который доступен в качестве дополнительного аксессуара. Процедуры управления, описание которых приведено в данном руководстве, осуществляются с помощью пульта дистанционного управления. Примечаниe pw Управлять устройством непосредственно с помощью пульта дистанционного управления для системы HD видео конференц-связи невозможно. 3 (R) Как включить и выключить электропитание wwВключение электропитания При включении подачи электропитания на устройство, которое находится в режиме STANDBY При подаче электропитания для включения устройства 1 Установите выключатели электропитания 1 Убедитесь в том, что устройство находится в устройств и приборов, подключенных в системе, в положение ON. режиме STANDBY. pw Убедитесь в том, что включен режим STANDBY (индикаторная лампа состояния горит оранжевым цветом). 2 Подайте электропитание на устройство. pw Данное устройство не имеет выключателя электропитания. Когда на него подается электропитание, индикаторная лампа состояния будет гореть оранжевым цветом. Далее выполняются начальные операции, по завершении которых включается режим POWER ON, начинают выводиться изображения и становится возможным управление устройством. При включении режима POWER ON индикаторная лампа состояния загорается зеленым цветом. 2 Нажмите одну из кнопок [CAM1] - [CAM4] на пульте дистанционного управления для выбора устройства. 3 Нажмите кнопку [ON/STANDBY] на пульте дистанционного управления в течение как минимум 2 секунд. Устройство перейдет в режим POWER ON, начнут выводиться изображения, и можно начинать управлением устройством. pw Индикаторная лампа состояния теперь загорится зеленым цветом. Примечания pw На завершение операции начальных установок требуется примерно 30 секунд для каждого устройства. В этот период устройство не может эксплуатироваться. (Индикаторная лампа состояния: загорается оранжевым цветом) pw При переключении управления в режим ожидания: Текущее положение поворота-наклона сохраняется в памяти (в качестве предустановленного шаблона POWER ON), при этом камера перемещается таким образом, чтобы она была направлена назад. pw При переключении управления в режим POWER ON: Камера перемещается в положение, которое было сохранено в камере (в качестве предустановленного шаблона POWER ON) при переключении управления в режим STANDBY. Примечаниe pw При переключении управления в режим POWER ON: Камера перемещается в положение, которое было сохранено в камере (в качестве предустановленного шаблона POWER ON) при переключении управления в режим STANDBY. 4 Если предполагается использовать несколько Индикаторная лампа состояния устройства мигнет зеленым цветом при приеме сигнала, совпадающего с идентификатором дистанционного управления, и мигнет оранжевым цветом при приеме сигнала, не совпадающего с идентификатором дистанционного управления. 4 (R) РУССКИЙ устройств, повторите при необходимости действия пунктов 2 и 3. Как включить и выключить электропитание wwИнформация об одновременной смене режимов соединенных устройств wwВыключение электропитания 1 Отключите подачу электропитания на устройство. pw Питание устройства можно отключить независимо от включенного режима (режим STANDBY или режим POWER ON). Как только система HD видео конференц-связи, подсоединенная к данному устройству, будет переключена в экранный режим ожидания, данное устройство будет переключено в режим STANDBY. Аналогично, как только в системе будет отключен экранный режим ожидания, данное устройство будет переключено в режим POWER ON. 5 (R) Выбор устройств 1 Нажмите кнопку [CAM1], [CAM2], [CAM3] или [CAM4]. С помощью одного беспроводного пульта дистанционного управления может управляться до четырех устройств. Выберите устройство (или устройства) для управления с пульта дистанционного управления. Даже если используется только одно устройство, оно тем не менее должно быть выбрано. Индикаторная лампа состояния устройства мигнет зеленым цветом при приеме сигнала, совпадающего с идентификатором дистанционного управления, и мигнет оранжевым цветом при приеме сигнала, не совпадающего с идентификатором дистанционного управления. Выбор режимов съемки (сюжетные файлы) wwТипы режимов съемки Данное устройство имеет четыре предустановленных режима съемки, каждый из которых соответствует определенному набору условий, в которых будет производиться съемка объекта. Выберите режим, удовлетворяющий условиям съемки и Вашим предпочтениям. Установки могут быть изменены с помощью операций меню. FullAuto: Заводская установка Установки скорости затвора и диафрагмы объектива регулируются автоматически. Manual1 Установки можно выполнить по своему усмотрению в соответствии с местом съемки, освещением и другими условиями. pw При использовании данного устройства, подключенного к устройству HD видео конференц-связи Panasonic, используйте режим съемки “FullAuto”. pw Результаты регулировки баланса белого и других регулировок хранятся в памяти отдельно по режимам съемки. Обязательно выберите режим съемки перед выполнением каких-либо регулировок. Manual2 Установки можно выполнить по своему усмотрению в соответствии с местом съемки, освещением и другими условиями. Установки можно выполнить по своему усмотрению в соответствии с местом съемки, освещением и другими условиями. Примечание pw При выборе, например, значения “FullAuto” в качестве установки для пункта Scene в меню камеры, будут включены все автоматические установки, а для некоторых пунктов ручное управление станет невозможным. 6 (R) РУССКИЙ Manual3 Выбор режимов съемки (сюжетные файлы) wwКак выбрать режим съемки 4 Нажмите кнопку []. На мониторе отобразится подменю “Camera”. 2, 8 1 Camera Scene Contrast Level 3, 5, 7 FullAuto 0 4, 6, 7 Return 1 Нажмите кнопку [CAM1], [CAM2], [CAM3] или [CAM4] 5 Воспользуйтесь кнопкой [] или [] для для выбора устройства. перемещения курсора к пункту “Scene”. 2 Нажмите кнопку [MENU] в течение как минимум 6 Нажмите кнопку []. 2 секунд. Режим съемки начнет мигать. Отобразится меню Top Menu. Top Menu 7 Воспользуйтесь кнопкой [] или [] для выбора Camera Scene: FullAuto System Mainte nance необходимого режима съемки (FullAuto, Manual1, Manual2 или Manual3) и нажмите кнопку [] для ввода выбранного значения. Для получения дополнительной информации обратитесь к стр. 19. 8 Нажмите кнопку [MENU] в течение как минимум 2 секунд. Отображение меню завершится. 3 Воспользуйтесь кнопкой [] или [] для перемещения курсора к пункту “Camera”. 7 (R) Съемка qwПереключение скорости направления или трансфокации qwИзменение направления камеры Движение камеры в левую или в правую сторону (поворот): Нажмите кнопку [] или []. Изменение направления или трансфокации с высокой скоростью: Нажмите кнопку [FAST]. Движение камеры вверх или вниз (наклон): Нажмите кнопку [] или []. Изменение направления или трансфокации с низкой скоростью: Нажмите кнопку [SLOW]. Движение камеры по диагонали: Нажмите кнопку [] или [] и [] или [] одновременно. Скорость управления фокусом объектива также изменяется в это же время. Возвращение камеры в исходное положение: Нажмите кнопку [HOME] в течение как минимум 2 секунд. qwИспользование функции трансфокации Увеличение масштаба изображения (величина объекта увеличивается): Нажмите кнопку [T] переключателя [ZOOM]. РУССКИЙ Уменьшение масштаба изображения (величина объекта уменьшается): Нажмите кнопку [W] переключателя [ZOOM]. 8 (R) Что следует делать при возникновении проблем с базовыми операциями съемки Отображается экран меню. Если после выполнения указанных ниже действий проблема не будет решена, обратитесь к разделу “Поиск и устранение неисправностей” (в документе <Основные положения>). Нажмите кнопку [MENU] в течение как минимум 2 секунд для выхода из меню. Фокус объектива не регулируется автоматически. Устройство не перемещается. Нажмите кнопку [A/FOCUS] для переключения на автоматическую фокусировку. (Автоматическая фокусировка не работает во время выполнения операций поворота или наклона.) pw Нажмите кнопку [CAM1], [CAM2], [CAM3] или [CAM4] для выбора управляемого устройства. Если используется только одно устройство, оно обычно выбирается с помощью кнопки [CAM1]. pw Если индикаторная лампа состояния устройства выключена или горит оранжевым цветом, это означает, что питание устройства не включено. Обратитесь к разделу “Как включить и выключить электропитание” (стр. 4) и включите питание. pw Если индикаторная лампа состояния устройства не мигает даже если операции пультом дистанционного управления выполняются вблизи светочувствительной области сигнала пульта дистанционного управления устройства, это означает, что разрядились батарейки пульта дистанционного управления. Замените батарейки. Изображение камеры слишком светлое или слишком темное. 1. Нажмите кнопку [A/IRIS] для переключения на автоматическую регулировку диафрагмы. 2. Нажмите кнопку [AUTO] переключателя [GAIN] для переключения на автоматическую регулировку усиления. Наблюдается искажение цвета в изображениях камеры. Обратитесь к разделу “Автоматическое слежение за балансом белого (ATW)” (стр. 15) и переключитесь на “ATW”. 9 (R) Дополнительные операции Регулировка баланса белого (см. стр. с 14 до 15) Ручная съемка (см. стр. с 11 до 12) pw pw pw pw Ручная регулировка фокуса Ручная регулировка диафрагмы Ручная регулировка скорости затвора Ручная регулировка усиления pw Эта регулировка выполняется для точного изображения белого цвета. Эта установка также влияет на цветовые тона всего экрана. pw Ее следует выполнять, если устройство используется в первый раз или если устройство не использовалось в течение длительного периода времени. pw Эту регулировку следует выполнять при изменении условий освещения или яркости. pw По достижении баланса белого в дальнейшем регулировка не требуется, при условии, что устройство будет использоваться в тех же условиях. Предустановленные шаблоны памяти (см. стр. 13) РУССКИЙ pw В предустановленных шаблонах памяти можно сохранить и вызвать из них до 12 установок для направления камеры (поворот и наклон), трансфокации, фокуса, диафрагмы, усиления и баланса белого. pw Количество установок, которые можно сохранить и вызвать, составляет 12, что соответствует количеству установок для пульта дистанционного управления (модель AW-RM50G), который продается отдельно. 10 (R) Ручная съемка wwРучная регулировка фокуса wwРучная регулировка диафрагмы Фокус объектива можно отрегулировать вручную. Диафрагму объектива можно отрегулировать вручную. 1 Нажмите кнопку [M/FOCUS] для переключения на 1 Нажмите кнопку [M/IRIS] для переключения на ручную регулировку фокуса. ручную регулировку диафрагмы. 2 Нажмите кнопку [F] или [N] переключателя [FOCUS] и отрегулируйте фокус. 2 Отрегулируйте диафрагму с помощью кнопки При нажатии кнопки [F] фокус перемещается дальше (дальний); и наоборот, при нажатии кнопки [N] он перемещается ближе (ближний). Скорость фокусировки и других регулировок можно переключать на быструю или медленную путем нажатия кнопки [FAST] или [SLOW] соответственно. [IRIS +] или [IRIS –]. Нажимайте кнопку [IRIS +] для регулировки диафрагмы объектива в направлении открывания, и наоборот, нажимайте кнопку [IRIS –] регулировки диафрагмы объектива в направлении закрывания. 3 При необходимости нажмите кнопку [A/FOCUS] для 3 При необходимости нажмите кнопку [A/IRIS] возврата к автоматической регулировке фокуса. для возврата к автоматической регулировке диафрагмы. Примечание pw При ручной установке фокуса во время поворота, наклона и трансфокации объект может выйти из фокуса. Поэтому устройство поставляется с функцией, компенсирующей это. (Функция компенсации фокуса во время трансфокации: Focus ADJ With PTZ.) Эта функция изначально установлена в положение ON. Если функция установлена в положение OFF, следует либо отрегулировать фокус, как требуется, после трансфокации, либо установить автоматический фокус. (См. стр. 26.) 11 (R) Ручная съемка wwРегулировка скорости затвора вручную wwРегулировка усиления вручную Усиление регулируется с помощью пульта дистанционного управления. Для получения дополнительной информации обратитесь к пункту [Gain] на стр. 20. Регулировку скорости затвора можно выполнить с помощью одной из двух процедур в меню камеры. Один – это способ, при котором задается время (с указанием такого времени, как, например, 1/250 сек.), и другой – способ, при котором задается частота (с указанием синхронного сканирования, 50,20 Hz и т.п.). При съемке экрана телевизора или экрана монитора ПК можно минимизировать генерируемый при этом горизонтальный шум путем регулировки частоты в соответствии с частотой экрана с помощью синхронного сканирования. Примечание pw При регулировке усиления освещенность может неожиданно изменяться (в результате чего выходной сигнал изображения подвергается ударному воздействию). 1 Нажмите кнопку [OFF], [LOW] или [HI]. Выполните регулировки в меню камеры. Для получения дополнительной информации обратитесь к пунктам [Shutter Mode] и [Step/Synchro] на стр. 20. Эти кнопки позволяют за три шага выбрать увеличение усиления. Кнопка [LOW] используется для выбора значения 9 dB, а кнопка [HI] используется для выбора значения 18 dB. 2 При необходимости нажмите кнопку [AUTO] для возврата к автоматической регулировке усиления (AGC). РУССКИЙ Максимальное усиление автоматической регулировки можно установить с помощью меню. Для получения дополнительной информации обратитесь к пункту [AGC Max Gain] на стр. 20. 12 (R) Предустановленные шаблоны памяти С помощью пульта дистанционного управления можно сохранить и вызвать двенадцать установок (предустановленные шаблоны от №1 до №12). Кнопки от [1] до [12] соответствуют предустановленным шаблонам памяти устройства от №1 до №12. Данное устройство позволяет сохранять в предустановленных шаблонах памяти и вызывать из них до 12 установок для направления камеры (поворот и наклон), трансфокации, фокуса, диафрагмы, усиления и баланса белого. pw Зарегистрировать режим работы (ручные или автоматические установки) для установок фокуса и диафрагмы невозможно. Сохраняются значения фокуса и диафрагмы в данный момент времени. pw Значения фокуса и диафрагмы могут быть повторно вызваны, только когда применяются ручные установки. pw В качестве установки баланса белого можно сохранить шаблоны AWB A, AWB B или ATW. Значения, выбранные при установке AWB, вызываются в качестве значений регулировок для AWB A или AWB B. qw Сохранение установок в предустановленных шаблонах памяти 1 Отобразите на мониторе изображение для съемки. Нажимайте кнопки поворота, наклона или трансфокации для задания угла камеры. Отрегулируйте настройки фокуса, диафрагмы, усиления и баланса белого, если это необходимо. Примечания 2 Удерживая нажатой кнопку [PRESET], pw В случае большой разницы в температуре окружающей среды между временем регистрации и временем вызова установки, возможен сдвиг предустановленной позиции. pw Если произойдет сдвиг, выполните регистрацию снова. pw При вызове предустановленных установок выполнять операции в ручном режиме, например поворот, наклон, трансфокацию или регулировку диафрагмы, невозможно. pw Если был вызван один набор предустановленных установок, затем вызвать другой набор предустановленных установок, первый набор вызванных предустановленных установок будет иметь приоритет. нажмите кнопку, соответствующую номеру предустановленного шаблона памяти. pw Если будет выбран номер предустановленного шаблона памяти с уже сохраненной установкой, существующая установка будет стерта и заменена новой. qw Вызов установок предустановленных шаблонов памяти 1 Нажмите кнопку, в которой была сохранена установка предустановленного шаблона памяти. 13 (R) Регулировка баланса белого wwРегулировка баланса белого qwАвтоматическая регулировка (AWB: AWB A или AWB B) Для точного воспроизведения белого цвета регулируется соотношение между тремя основными цветами (RGB). Если нарушится регулировка баланса белого, не только белый цвет будет воспроизводиться неправильно, но также ухудшатся цветовые тона всего экрана. 1 Выполните съемку белого объекта (такого, как белая стена или носовой платок) так, чтобы он заполнил экран. pw Эту регулировку следует выполнять, если устройство используется в первый раз или если устройство не использовалось в течение длительного периода времени. pw Эту регулировку следует выполнять при изменении условий освещения или яркости. pw Не снимайте сверкающие или очень яркие объекты. pw В пунктах со 2 по 8 приведена процедура выбора памяти “AWB A” или “AWB B”. Их не нужно выполнять, если выбор уже произведен. При нажатии кнопки [SET] на пульте дистанционного управления можно выбрать регулировку AWB (автоматический баланс белого), которая выполняется автоматически, или регулировку ATW (автоматическое отслеживание белого), которая постоянно регулируется. 2 Выберите Manual1, Manual2 или Manual3 для режима съемки, выполнив процедуру, приведенную в разделе “Выбор режимов съемки (сюжетные файлы)” (стр. 7). Результаты регулировки AWB можно сохранить в двух запоминающих устройствах A и B, если для баланса белого выбран шаблон “AWB A” или “AWB B”. Camera pw Как только баланс белого отрегулирован, если устройство используется с такими же установками и в таких же условиях, его установка завершается простым выбором установки меню. Нет необходимости устанавливать его снова. pw Как только вводится новая установка, предыдущая установка будет стерта. Scene Contrast Picture Color Matrix Используйте два запоминающих устройства для хранения установок, соответствующих различным условиям съемки. Manual1 Return 3 Воспользуйтесь кнопкой [] или [] для перемещения курсора к пункту “Picture”. 4 Нажмите кнопку []. Picture 1/2 Chroma Level AWB Mode R Gain B Gain Detail Flesh Tone Mode DNR Return 14 (R) -1 AWB A 0 0 Low Off High РУССКИЙ Отобразится подменю “Picture 1/2”. Регулировка баланса белого 5 Воспользуйтесь кнопкой [] или [] для Примечания перемещения курсора к пункту “AWB Mode”. pw Чтобы отображались сообщения, необходимо выбрать значение ON для установки OSD Status. [Top Menu]>[System]>[OSD Status] в разделе [Other 2/2] pw Баланс белого может быть установлен неправильно, если освещение объекта слишком слабое. pw Так как камера оснащена встроенной памятью, установка баланса белого останется в памяти даже при отключении питания. Поэтому нет необходимости повторно устанавливать баланс белого, если цветовая температура снимаемых объектов осталась неизменной. Однако его следует повторно установить, если цветовая температура изменилась, например, если Вы переместились из помещения наружу и т.п. 6 Нажмите кнопку []. Начнет мигать пункт “AWB Mode”. 7 Воспользуйтесь кнопкой [] или [] для изменения необходимого режима AWB на “AWB A” или “AWB B”, а затем нажмите кнопку [] для ввода выбранного значения. 8 Нажмите кнопку [MENU] в течение как минимум 2 секунд. qwАвтоматическое слежение за балансом белого (ATW) Отображение меню завершится. Когда установлена опция “ATW” регулировки баланса белого, баланс белого продолжает все время автоматически регулироваться, и автоматически корректируется даже при перемене источника света или цветовой температуры для создания полностью натуральных изображений. 9 Нажмите кнопку [SET] в течение как минимум 2 секунд. Будет выполнена автоматическая регулировка баланса белого (AWB), а также будет введена установка баланса белого. pw Когда вся процедура регулировки баланса белого будет успешно завершена, в центре экрана появится индикация “AWB OK”. Эта функция работает, если выбрана опция “ATW” вместо “AWB A” или “AWB B” при выполнении действий пунктов “Автоматическая регулировка” в разделе “Регулировка баланса белого” (стр. 14). Примечания pw Функция ATW может не работать корректно, если на экране отображается объект, являющийся источником высокой яркости (такой, как флуоресцентная лампа). pw Баланс белого может быть установлен неточно, если на экране, подлежащем съемке, отсутствуют белые объекты. pw Регулировка баланса белого может нарушиться при съемке в условиях другого типа источника света, как, например, солнечный свет или флуоресцентное освещение. AWB OK pw Если не удалось выполнить регулировку, будет отображено сообщение об ошибке “OUT RANGE NG”, “HIGH LIGHT NG”, “LOW LIGHT NG” или “ATW NG”. 15 (R) Базовые операции установки меню Таблица операций Меню отображаются на мониторе при выборе установок устройства. Монитор подключается к выходному разъему видеосигнала. Базовые операции меню включают вызов подменю из пунктов меню Top Menu и выбор установок в подменю. Некоторые подменю имеют пункты меню для выполнения более детальных установок. Операция меню Операции меню выполняются с помощью беспроводного пульта дистанционного управления. Ниже приведены базовые операции для изменения установок пунктов меню с помощью пульта дистанционного управления. Пульт дистанционного управления Выбор устройства для управления Нажмите кнопку [CAM1], [CAM2], [CAM3] или [CAM4]. Отображение меню Top Menu Нажмите кнопку [MENU] в течение как минимум 2 секунд. Выбор пунктов Нажмите кнопку [] или [] ([] или []). Вызов подменю Нажмите кнопку []. Возврат к предыдущему меню Когда курсор находится в положении [Return], нажмите кнопку []. Изменение установок Когда курсор находится на необходимом параметре, нажмите кнопку [], чтобы значение параметра начало мигать. Воспользуйтесь кнопками [], [], [] и [] для изменения значения и нажмите кнопку [] для ввода измененного значения. Отмена изменения установки Пока установка мигает, быстро нажмите кнопку [MENU] (в течение менее 2 секунд). Выход из операций меню Нажмите кнопку [MENU] в течение как минимум 2 секунд. Примечаниe РУССКИЙ pw Выполняйте операции меню и выходите из меню с помощью пульта дистанционного управления, с помощью которого отображается меню Top Menu. 16 (R) Базовые операции установки меню 9 После завершения установки нажмите кнопку 1 Нажмите кнопку [CAM1], [CAM2], [CAM3] или [CAM4] [MENU] в течение как минимум 2 секунд. для выбора управляемого устройства. Отображение меню завершится. 2 Нажмите кнопку [MENU] в течение как минимум 2 секунд. Отобразится меню Top Menu. 3 Воспользуйтесь кнопкой [] или [] для перемещения курсора к необходимому пункту. Каждый раз при нажатии кнопки [] или [] курсор перемещается. Курсор можно перемещать аналогичным образом с помощью кнопок [] и []. 4 Нажмите кнопку []. Отобразится подменю выбранного пункта. (Некоторые пункты подменю имеют собственные подменю.) 5 Воспользуйтесь кнопкой [] или [] для перемещения курсора к необходимому пункту. Каждый раз при нажатии кнопки [] или [] курсор перемещается. Курсор можно перемещать аналогичным образом с помощью кнопок [] и []. Когда курсор находится в положении “Return”, нажмите кнопку [] для возврата к предыдущему меню. 6 Нажмите кнопку []. Значение устанавливаемого параметра начнет мигать. 7 Воспользуйтесь кнопкой [] или [] для изменения установки. Установку можно изменить аналогичным образом с помощью кнопок [] и []. 8 Нажмите кнопку []. Значение для устанавливаемого параметра будет введено и оно перестанет мигать. 17 (R) Установка пунктов меню wwTop Menu wwУстановка пунктов меню При выборе установок устройства на мониторе отображаются меню. Монитор подключается к выходному разъему видеосигнала. Базовые операции меню включают вызов подменю из пунктов меню Top Menu и выбор установок в подменю. Некоторые подменю имеют пункты меню для выполнения более детальных установок. Для получения дополнительной информации о базовых операциях по отображению меню и изменению пунктов с помощью беспроводного пульта дистанционного управления, обратитесь к стр. с 16 до 17. Top Menu Camera Scene: FullAuto System Maintenance Метки “ ” и “ ” в названиях меню указывают на уровень иерархии текущего отображаемого меню. Например, индикация “ ” означает первый уровень иерархии, в то время как индикации “ ”и“ ” указывают на то, что сейчас отображается второй уровень иерархии. Пункты меню, отмеченные меткой “ ”, означают данные, которые хранятся в зависимости от сюжетов; а пункты меню, отмеченные меткой “ ”, означают данные, которые хранятся вместе для одной камеры независимо от сюжетов. Camera Выберите данный пункт для открытия меню камеры, касающееся изображений камеры. System Выберите данный пункт, чтобы открыть системное меню, в котором отображены установки выходного изображения камеры и т.п. Maintenance Выберите данный пункт для отображения меню Maintenance, которое используется для проверки версии встроенного программного обеспечения камеры или для инициализации его установок. Примечание РУССКИЙ pw В меню Top Menu нет установки “Return”. Чтобы закрыть экран меню, используйте пульт дистанционного управления для выполнения операции закрытия экрана меню. Для получения дополнительной информации обратитесь к стр. с 16 до 17. 18 (R) Установка пунктов меню wwЭкран Camera (при выборе значения от Manual1 до Manual3) wwЭкран Camera (при выборе значения FullAuto) Данное меню используется для изменения установок изображения камеры. Camera Cam era Scene Contr ast Level Scene Contrast Picture Color Matrix FullAuto 0 Return Return Scene [FullAuto, Manual1, Manual2, Manual3] Scene [FullAuto, Manual1, Manual2, Manual3] Обратитесь к разделу Scene в колонке слева. В данном подменю можно выбрать режим съемки, который соответствует ситуации съемки. Выберите режим, который больше всего подходит для превалирующих условий съемки и для установок пользователя. FullAuto: Manual1 - 3: Manual1 Contrast Выберите данный пункт для отображения экрана Contrast для регулировки яркости. При выборе данного режима автоматически выбираются установки и регулировки, оптимальные для конкретных условий съемки. При выборе режима “FullAuto” меню детализированных установок и регулировок не отображаются. Picture Выберите данный пункт для отображения экрана Picture для регулировки качества изображения. Для меню регулировки качества изображения предусмотрены два экрана (Picture 1/2 и Picture 2/2). При выборе данных режимов детализированные установки и регулировки выбираются вручную для соответствия конкретным условиям съемки и установкам пользователя. При выборе режима Manual1, Manual2 или Manual3 отображается меню детализированных установок и регулировок для соответствующего режима. Color Matrix Выберите данный пункт для загрузки данных цветовой матрицы, которые были предварительно сохранены, и выполните компенсацию насыщенности и оттенка. Return Contrast Level [от –5 до +5] Используйте данный пункт для возврата к предыдущему меню. Используйте уровень контрастности для регулировки яркости изображения. Return Используйте данный пункт для возврата к предыдущему меню. 19 (R) Установка пунктов меню wwЭкран Contrast Frame Mix [Auto, Off, 6dB, 12dB, 18dB] Co ntrast Выберите данный пункт для изменения степени добавления кадров (усиление с помощью буфера датчика). Изменять значение данного пункта можно, если в качестве установки пункта “Shutter Mode” было выбрано значение “Off”. При выполнении добавления кадров кажется, как будто в изображениях не хватает кадров. Contra st Mode Auto Contr ast Level 0 Shutt er Mode ---Step /Synchro ---Fram e Mix ---Auto F.Mix Max Gain 0dB Gain Auto AGC Ma x Gain 18dB Return AutoF. Mix Max Gain [0dB, 6dB, 12dB, 18dB] При выборе значения “Auto” для параметра “Contrast Mode” или значения “Auto” для параметра “Frame Mix” можно установить максимальную степень добавления кадров. При выполнении добавления кадров при установке Auto кажется, как будто в изображениях не хватает кадров. Contrast Mode [Auto, Manual] Данный пункт используется для выбора автоматического или ручного контроля яркости изображения (контрастность). Auto: Manual: Выполняется контроль установок диафрагмы, скорости затвора и добавления кадра, а яркость камеры регулируется автоматически. Gain [Auto, 0dB, 3dB, 6dB, 9dB, 12dB, 15dB, 18dB] В данном пункте можно регулировать усиление изображения. В слишком темных местах отрегулируйте усиление по возрастанию; и наоборот, в слишком ярких местах отрегулируйте усиление по убыванию. При установке значения “Auto” количество света регулируется автоматически. При увеличении усиления также увеличивается и уровень шума. Переключение усиления также возможно путем нажатия кнопок [OFF], [LOW], [HI] и [AUTO] в пункте [GAIN] на пульте дистанционного управления. Операции выполняются с использованием установленных вручную значений. Переключение между режимами контрастности также возможно путем нажатия кнопок [A/IRIS] и [M/IRIS] на пульте дистанционного управления. Contrast Level [от –5 до +5] В данном пункте устанавливается уровень контрастности, когда отрегулирована яркость изображения. Изменять значение данного пункта можно, если в качестве установки “Contrast Mode” было выбрано значение “Auto”. AGC Max Gain [6dB, 12dB, 18dB] При выборе значения “Auto” для установки “Gain” можно установить максимальное значение усиления. Shutter Mode [Off, Step, Synchro] Выберите данный пункт для регулировки скорости затвора камеры. Изменять значение данного пункта можно, если в качестве установки “Contrast Mode” было выбрано значение “Manual”. Затвор установлен в положение OFF (таким образом, выключить затвор невозможно). Step: Установлен шаговый затвор (интервал шага можно изменять). Synchro: Установлен синхронный затвор (установку можно изменять постоянно). Используйте данный пункт для возврата к предыдущему меню. РУССКИЙ Off: Return Step/Synchro Данный пункт используется для регулировки скорости затвора в режиме, который был выбран для установки “Shutter Mode”. При выборе большей скорости затвора быстро движущиеся предметы не становятся размытыми, но при этом изображения будут темнее. Ниже перечислены значения скорости затвора, которые можно установить. При выборе значения “Step” для параметра “Shutter Mode” При выборе значения “Synchro” для параметра “Shutter Mode” 1/120, 1/250, 1/500, 1/1000, 1/2000, 1/4000, 1/10000 От 50,20 Hz до макс. 538,51 Hz (255 шагов) 20 (R) Установка пунктов меню wwЭкран Picture 1/2 DNR [Off, Low, High] Pi cture 1/2 Chroma Level AWB Mo de R Gai n B Gai n Detail Flesh Tone Mode DNR В данном пункте можно установить уровень эффекта цифрового подавления шума таким образом, чтобы даже ночью или в другой плохо освещенной обстановке выводились светлые, четкие изображения с низким уровнем шума. При выборе значения “Low” или “High” можно устранить еще больше шума. Однако, при этом увеличивается вероятность появления остаточных изображений. -1 AWB A 0 0 Low Off High Return Return Используйте данный пункт для возврата к предыдущему меню. Chroma Level [от –3 до +3] В данном пункте устанавливается интенсивность цвета (уровень цветности) изображений. Примечания pw После выполнения автоматической регулировки баланса белого (AWB) значения R Gain и B Gain будут возвращены к “0”. pw При выборе значения “AWB A” или “AWB B” для установки AWB Mode значения регулировки R Gain и B Gain можно хранить в двух памятях (A и B). pw При установке новых значений предыдущие данные будут удалены. Используйте одну память для одного набора условий съемки и другую память для другого набора условий съемки. pw При регистрации значений в предустановленных шаблонах памяти установки R Gain и B Gain (от -30 до +30) не сохраняются, но состояния баланса белого (цвета), которые применяются после регулировок, выполненных с помощью R Gain и B Gain, можно сохранить. pw При вызове данных из предустановленных шаблонов памяти, когда выбрано значение Mode A для установки Preset Scope, установки R Gain и B Gain будут возвращены к значению “0”. pw При выборе значения ATW для установки AWB Mode регулировать R Gain и B Gain невозможно. AWB Mode [ATW, AWB A, AWB B] В данном пункте можно выбрать режим баланса белого. Выберите необходимый режим, если цветопередача кажется неестественной из-за природы источника света или других факторов. Если можно определить белый цвет, который используется в качестве эталона, предметы можно снимать с естественной цветопередачей. ATW: В данном режиме баланс белого компенсируется автоматически посредством непрерывной и автоматической регулировки, даже если источник света или цветовая температура изменяются. AWB A, AWB B: При выборе опций AWB A или AWB B и выполнении регулировки баланса белого полученные результаты регулировки сохраняются в выбранной памяти. При последующем выборе AWB A или AWB B можно вызвать установки баланса белого, хранящиеся в выбранной памяти. R Gain, B Gain [От –30 до +30] При выборе значения “AWB A” или “AWB B”для установки AWB Mode можно выполнять точную регулировку баланса белого после завершения автоматической регулировки баланса белого (AWB). Detail [Off, Low, High] В данном пункте можно регулировать детализацию изображения (резкость изображения). При выборе значения “Low” или “High” детализация улучшается. Flesh Tone Mode [Off, Low, High] В данном пункте можно установить режим телесного цвета для отображения кожи человека таким образом, что она выглядит более гладкой и приятной для глаз. При выборе значения “Low” или “High” эффект усиливается еще больше. 21 (R) Установка пунктов меню ww16-осевая цветовая матрица wwЭкран Picture 2/2 qwМеню выходных данных монитора (OSD) Pi cture 2/2 Pedest al DRS Gamma Type Gamm a Level Back L ight COMP. <Экран Color matrix 1/3> -5 Low ------Off Color Matrix 1/3 Matrix Select USER [Saturation] [Phase] Axis01 +50 0 Axis02 0 0 Axis03 0 0 Axis04 +35 +5 Axis05 0 0 Axis06 0 0 Return Return Pedestal [от –10 до +10] Данный пункт используется для регулировки уровня черного (регулировка баланса) таким образом, чтобы было лучше видно темные части изображения. Такие части темнеют при выборе отрицательного значения, и наоборот, светлеют при выборе положительного значения. <Экран Color matrix 2/3> Color Matrix 2/3 DRS [Off, Low, High] Matrix Select USER [Saturation] [Phase] Axis07 +30 0 Axis08 -20 +10 Axis09 0 -30 Axis10 0 0 Axis11 +10 +50 Axis12 0 0 Return В данном пункте можно установить функцию DRS, которая обеспечивает необходимое значение компенсации, когда отображаются изображения со значительной разницей светлых/ темных тонов. При выборе значения “Low” или “High” эффект усиливается еще больше. При этом в некоторых сценах шум может стать более заметным. Gamma Type [Off, Normal, Cinema] В данном пункте можно выбрать тип кривой гамма-распределения. Выбранная установка будет применена при выборе значения “Off” для установки пункта “DRS”. Обычно используется установка “Normal”. При выборе значения “Cinema” можно снимать изображения, передающие атмосферу кинофильмов. <Экран Color matrix 3/3> Color Matrix 3/3 Gamma Level [Low, Mid, High] Matrix Select USER [Saturation] [Phase] Axis13 0 0 Axis14 +35 +10 Axis15 0 0 Axis16 0 0 В данном пункте можно отрегулировать уровень гаммакоррекции. Установка пункта будет применена при выборе значения “Off” в качестве установки “DRS” и при выборе значения “Normal” в качестве установки “Gamma Type”. При установке значения “Low” изображения кажутся спокойными и уравновешенными. Полученная в результате кривая гаммараспределения имеет плавный градиент в областях низкой яркости, а контрастность становится более резкой. И наоборот, при установке значения “High” тональный диапазон в темной области расширяется таким образом, чтобы изображения приобретали более светлый тон. Полученная в результате кривая гамма-распределения имеет резкий градиент в областях низкой яркости, а контрастность становится более мягкой. РУССКИЙ Return Back Light COMP. [Off, On] В данном пункте можно установить значения “On” или “Off” для функции компенсации тылового освещения. В условиях тылового освещения данная функция предотвращает затемнение в результате падения света на обратные стороны объектов, также она позволяет снимать затемненные или затененные изображения в более ярких тонах. Функция будет применена при выборе значения “Auto” в качестве установки пункта Contrast Mode, Gain или Frame Mix. Return Используйте данный пункт для возврата к предыдущему меню. 22 (R) Установка пунктов меню wwЭкран System qwЭкраны от Color Matrix 1/3 до 3/3: Matrix Select [Normal, EBU, NTSC, USER] Данное меню включает пункты, которые относятся к установкам выходного изображения камеры. С помощью данного пункта можно загрузить данные цветовой матрицы, которые были предварительно сохранены, и выполнить компенсацию насыщенности и оттенка. При выборе значения “USER” насыщенность и оттенок можно точно отрегулировать с помощью 16-осевой цветовой матрицы (от Axis01 до Axis16). System Output Other qwЭкраны от Color Matrix 1/3 до 3/3: Axis01 до Axis16:Saturation [–127 до +127] Return qwЭкран User Color Matrix Setup: Axis01 до Axis16:Saturation [–127 до +127] Output Данный пункт служит для отображения экрана Output, на котором осуществляется выбор установок выходного изображения камеры. С помощью данного пункта можно произвести точную регулировку насыщенности от Axis01 до Axis16. qwЭкраны от Color Matrix 1/3 до 3/3: Other Axis01 до Axis16:Phase [–127 до +127] Данный пункт служит для отображения экрана Other, на котором осуществляется выбор установок для состояния установки панорамно-наклонной головки камеры и рабочей скорости, а также установок, касающихся других функций. qwЭкран User Color Matrix Setup: Axis01 до Axis16:Phase [–127 до +127] Return Используйте данный пункт для возврата к предыдущему меню. С помощью данного пункта можно произвести точную регулировку оттенка от Axis01 до Axis16. 23 (R) Установка пунктов меню HDMI Color [RGB-NOR, RGB-ENH, YCbCr422, YCbCr444] wwЭкран Output В данном пункте устанавливается выходной цветовой сигнал HDMI. p При использовании монитора HDMI используйте значение “YCbCr422” в обычных условиях. p Если, например, сигналы HDMI (RGB) конвертируются и выводятся на монитор DVI, требуемые установки будут отличаться в зависимости от поддерживаемой монитором градации цветов. Ou tput Format Down C ONV. Mode HDMI C olor 1080/50i Squeeze YCbCr422 RGB-NOR Return RGB-ENH p Если при выборе установки “RGB-NOR” черные части изображений кажутся передержанными, используйте вместо нее установку “RGB-ENH”. p И наоборот, если при выборе установки “RGB-ENH” изображения воспроизводятся с потерей черных деталей, используйте вместо нее установку “RGB-NOR”. Format [1080/50i, 576/50p] На этом экране выполняется изменение видеоформата. Для получения детальной информации об изменении формата обратитесь к разделу “Изменение формата” (стр. 25). Down CONV. Mode [Squeeze, SideCut] Примечание В данном пункте можно выбрать режим понижающего преобразования. pw Если была указана установка HDMI Color, которая не поддерживается монитором, установка HDMI Color может быть изменена автоматически. (При этом отображение меню не изменится.) При установке для экрана монитора формата кадра 4:3 изображения сжимаются Squeeze Выходные сигналы RGB выводятся в диапазоне от 16 до 235. Выходные сигналы RGB выводятся в диапазоне от 0 до 255. по горизонтали и растягиваются по вертикали, изменяя вид ракурса. Return Используйте данный пункт для возврата к предыдущему меню. РУССКИЙ SideCut Высота по вертикали служит в качестве шаблона, а части, которые выходят за пределы данного шаблона по обеим сторонам, обрезаются, изменяя вид ракурса. 24 (R) Установка пунктов меню qwИзменение формата Экран Format unchanged При изменении текущей установки формата на экране Output появляется экран подтверждения изменения формата. Экран подтверждения изменения формата Format FO RMAT unchanged Do you want to set Format ( 1080/50i)? CANCEL O.K. p Необходимый формат (1080/50i, 576/50p) отображается на экране в круглых скобках. p Если навести курсор на индикацию “O.K.” на экране подтверждения изменения формата и ввести установку, на несколько секунд появится экран Format Set, и при этом формат будет изменен. После изменения формата на дисплее снова будет отображен экран Output. На некоторых типах мониторов экран Format Set может не отображаться. Экран Format Set Format ( 1080/50i) Set p Необходимый формат (1080/50i, 576/50p) отображается на экране в круглых скобках. p Если навести курсор на индикацию “CANCEL” на экране подтверждения изменения формата и ввести установку, на 5 секунд появится экран Format unchanged, при этом формат не будет изменен, а на дисплее снова будет отображен экран Output. Примечаниe pw Не выполняйте какие-либо изменения при подключении к системе HD видео конференц-связи. 25 (R) Установка пунктов меню Digital Zoom [Disable, Enable] wwЭкран Other 1/2 В данном пункте можно установить значения “Enable” или “Disable” для функции цифровой трансфокации. Если выбрана установка “Enable”, при выполнении трансфокации в направлении Tele за пределами максимального положения, можно продолжать операцию цифровой трансфокации. Трансфокация будет временно приостановлена в положении, где оптическая трансфокация переключается на цифровую трансфокацию, поэтому после такой паузы необходимо продолжить трансфокацию. Когда камера уже находится в зоне цифровой трансфокации, при изменении установки на “Disable” трансфокация автоматически будет переведена в положение максимальной оптической трансфокации. Ot her 1/2 Instal l Position Desktop Preset Speed 10 Preset Scope Mode A Digita l Zoom Disable Speed With Zoom POS. On Focus Mode Auto Focus ADJ With PTZ. ---Return Install Position [Desktop] Speed With Zoom POS. [Off, On] Единственным вариантом, доступным для данного устройства, является автономная установка. Desktop: Автономная установка В данном пункте можно установить значение “On” или “Off” для функции, используемой для изменения скорости регулировки направления камеры вместе с увеличением значения трансфокации. При установке значения “On” операции поворота и наклона будут выполняться медленнее при выполнении трансфокации. Данная функция не применяется при выполнении предустановленных операций. Preset Speed [от 1 до 30] При восстановлении установок направления камеры и другой информации, сохраненной в предустановленном шаблоне памяти, можно использовать 30 значений для предустановленной скорости операций поворота-наклона. Focus Mode [Auto, Manual] Примечаниe В данном пункте можно установить значения “Auto” или “Manual” для функции фокусировки. Auto: Объекты всегда попадают в фокус автоматически. Manual: Производится ручное управление фокусом. pw Если для установки Preset Speed выбрано высокое значение, изображение на экране при остановке операции может дрожать. Переключение между режимами фокуса также возможно путем нажатия кнопок [A/FOCUS] и [M/FOCUS] на пульте дистанционного управления. Preset Scope [Mode A, Mode B, Mode C] В данном пункте можно выбрать значения установок, которые вызываются при восстановлении содержимого предустановленного шаблона памяти. Mode A: Pan, Tilt, Zoom (включая цифровую трансфокацию), Focus, Iris, Gain, White-BAL Mode B: Pan, Tilt, Zoom (включая цифровую трансфокацию), Focus, Iris Mode C: Pan, Tilt, Zoom (включая цифровую трансфокацию), Focus В данном пункте можно установить значение “On” или “Off” для функции, которая компенсирует потерю фокусировки, если она происходит во время операций поворота, наклона или трансфокации при ручной установке фокуса. При установке значения “Off” проведите необходимую корректировку фокуса после выполнения трансфокации или переключите фокус в автоматический режим. Выбрать данный пункт можно только в том случае, если в качестве установки “Focus Mode” выбрано значение “Manual”. Return Используйте данный пункт для возврата к предыдущему меню. 26 (R) РУССКИЙ Focus ADJ With PTZ. [Off, On] Установка пунктов меню wwЭкран Other 2/2 Примечаниe pw Когда выполнять операции меню невозможно: 1. Выключите питание подключенных устройств и приборов. 2. Отсоедините кабель электропитания устройства и вставьте его обратно. 3. Выполните операцию включения питания устройства с помощью беспроводного пульта дистанционного управления. 4. После изменения данного пункта выключите питание устройства и включите его снова. Ot her 2/2 Tally Enable Enable OSD Of f With Tally Off OSD St atus Off Return Tally Enable [Disable, Enable] Выбор данного пункта не приведет к каким-либо изменениям, поскольку он является функцией для дополнительного оборудования. OSD Off With Tally [Off, On] Выбор данного пункта не приведет к каким-либо изменениям, поскольку он является функцией для дополнительного оборудования. OSD Status [Off, On] В данном пункте можно установить значение “On” или “Off” для индикации состояния, которая появляется во время операций AWB. Return Используйте данный пункт для возврата к предыдущему меню. 27 (R) Установка пунктов меню wwЭкран Firmware Version wwЭкран Maintenance Firmware Version Model GP-VD150 CPU Software Camera Main V01.00 Pan/Tilt V01.00 Network V--.-- Mai ntenance Firmwa re Version Initia lize PLD Camera Output Return Return V01.00 V01.00 Model Firmware Version Данный пункт служит для отображения названия модели. Выберите данный пункт для отображения экрана Firmware Version, на котором можно проверить версию используемого программного обеспечения. CPU Software Camera Main Данный пункт служит для отображения версии программного обеспечения блока камеры. Initialize Выберите данный пункт для отображения экрана Initialize, на котором можно выполнить инициализацию установок камеры. Для получения подробных сведений об этой операции обратитесь к разделу “Об инициализации” на стр. 29. CPU Software Pan/Tilt Данный пункт служит для отображения версии программного обеспечения панорамно-наклонной головки. Return CPU Software Network Используйте данный пункт для возврата к предыдущему меню. Данный пункт служит для отображения “V--.--”. PLD Camera Данный пункт служит для отображения версии ППУ блока камеры. PLD Output Данный пункт служит для отображения версии ППУ выходного блока. Return РУССКИЙ Используйте данный пункт для возврата к предыдущему меню. 28 (R) Установка пунктов меню qwОб инициализации Экран Menu settings unchanged При выборе пункта “Initialize” на экране Maintenance, появляется экран Initialize. Экран Initialize Menu settings In itialize unchanged Do you want to initialize Menu s ettings? CANCEL O.K. Return p Если навести курсор на индикацию “O.K.” на экране Initialize и ввести установку, на 5 секунд появится экран Menu settings initialized, и при этом установки камеры будут возвращены к значениям, установленным на момент покупки камеры. Однако, установки пункта Format (см. стр. 24) не будут инициализированы. По завершении операции инициализации на дисплее снова будет отображен экран Initialize. Экран Menu settings initialized Menu s ettings initia lized p Если навести курсор на индикацию “CANCEL” на экране Initialize и ввести установку, на 5 секунд появится экран Menu settings unchanged, операция инициализации не будет выполнена, и на экране снова будет отображен экран Initialize. 29 (R) Таблица пунктов меню Top Menu Camera Пункт Scene Contrast FullAuto Manual1 FullAuto, Manual1, Manual2, Manual3 Contrast Mode Auto Auto Auto, Manual Contrast Level 0 0 От –5 до +5 Shutter Mode ---- ---- Off, Step, Synchro Step/Synchro (При выборе значения “Step” для параметра “Shutter Mode”) ---- ---- pw При выборе 59.94 Hz: 1/100, 1/250, 1/500, 1/1000, 1/2000, 1/4000, 1/10000 pw При выборе 50 Hz: 1/120, 1/250, 1/500, 1/1000, 1/2000, 1/4000, 1/10000 ---Step/Synchro (При выборе значения “Synchro” для параметра “Shutter Mode”) ---- pw При выборе 59.94 Hz: 60.24Hz до 646.21Hz (От 1 до 255 шагов) pw При выборе 50 Hz: 50.20Hz до 538.51Hz (От 1 до 255 шагов) Frame Mix ---- ---- Auto, Off, 6dB, 12dB, 18dB AutoF.Mix Max Gain ---- 0dB 0dB, 6dB, 12dB, 18dB Gain ---- Auto Auto, 0dB, 3dB, 6dB, 9dB, 12dB, 15dB, 18dB AGC Max Gain ---- 18dB 6dB, 12dB, 18dB ---- –1 От –3 до +3 AWB Mode ---- AWB A ATW, AWB A, AWB B R Gain ---- 0 От –30 до +30 B Gain ---- 0 От –30 до +30 Detail ---- Low Off, Low, High Flesh Tone Mode ---- Off Off, Low, High DNR ---- High Off, Low, High ---- –5 От –10 до +10 DRS ---- Low Off, Low, High Gamma Type ---- ---- Off, Normal, Cinema ---- ---- Low, Mid, High Back Light COMP. ---- Off Off, On Matrix Select ---- USER Normal, EBU, NTSC, USER Axis01 Saturation ---- +50 От –127 до +127 Phase ---- 0 От –127 до +127 Saturation ---- 0 От –127 до +127 Phase ---- 0 От –127 до +127 Saturation ---- 0 От –127 до +127 Phase ---- 0 От –127 до +127 Saturation ---- +35 От –127 до +127 Phase ---- +5 От –127 до +127 Saturation ---- 0 От –127 до +127 Phase ---- 0 От –127 до +127 Saturation ---- 0 От –127 до +127 Phase ---- 0 От –127 до +127 Matrix Select ---- USER Normal, EBU, NTSC, USER Axis07 ---- +30 От –127 до +127 Phase ---- 0 От –127 до +127 Saturation ---- –20 От –127 до +127 Phase ---- +10 От –127 до +127 Saturation ---- 0 От –127 до +127 Phase ---- –30 От –127 до +127 Saturation ---- 0 От –127 до +127 Phase ---- 0 От –127 до +127 Picture 2/2 Pedestal Gamma Level Axis02 Axis03 Axis04 Axis05 Axis06 Color Matrix 2/3 Пункты для выбора Scene Picture Picture 1/2 Chroma Level Color Matrix 1/3 Заводская установка FullAuto Manual1 до 3 Axis08 Axis09 Axis10 Saturation 30 (R) РУССКИЙ Меню Таблица пунктов меню Меню Top Menu Camera Пункт Scene Color Matrix 2/3 ---- +10 От –127 до +127 Phase ---- +50 От –127 до +127 Saturation ---- 0 От –127 до +127 Phase ---- 0 От –127 до +127 Matrix Select ---- USER Normal, EBU, NTSC, USER Axis13 Saturation ---- 0 От –127 до +127 Phase ---- 0 От –127 до +127 Saturation ---- +35 От –127 до +127 Phase ---- +10 От –127 до +127 Saturation ---- 0 От –127 до +127 Phase ---- 0 От –127 до +127 Saturation ---- 0 От –127 до +127 Phase ---- 0 Axis14 Axis15 Axis16 System Output Other Other 2/2 Maintenance Firmware Version От –127 до +127 1080/59.94i (При выборе 59.94 Hz) pw При выборе 59.94 Hz: 1080/59.94i, 480/59.94p 1080/50i (При выборе 50 Hz) pw При выборе 50 Hz: 1080/50i, 576/50p Down CONV. Mode Squeeze Squeeze, SideCut HDMI Color YCbCr422 RGB-NOR, RGB-ENH, YCbCr422, YCbCr444 Install Position Desktop ---- Preset Speed 10 От 1 до 30 Preset Scope Mode A Mode A, Mode B, Mode C Digital Zoom Disable Disable, Enable Format Other 1/2 Пункты для выбора Saturation Axis11 Axis12 Color Matrix 3/3 Заводская установка FullAuto Manual1 до 3 Speed With Zoom POS. On Off, On Focus Mode Auto Auto, Manual Focus ADJ With PTZ. ---- Off, On Tally Enable Enable Disable, Enable OSD Off With Tally Off Off, On OSD Status Off Off, On Model GP-VD150 ---- Camera Main Поставляемая версия ---- Pan/Tilt Поставляемая версия ---- Network ---- ---- Camera Поставляемая версия ---- Output Поставляемая версия ---- ---- CANCEL CANCEL, OK CPU Software PLD Initialize 31 (R) 32 (R) РУССКИЙ © Panasonic System Networks Co., Ltd. 2012 F0912-0 PGQP1395ZA