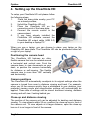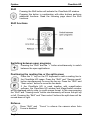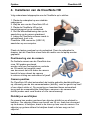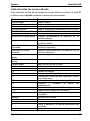
1
Optelec ClearNote HD Index 1. Introduction ......................................................................................9 About this manual ........................................................................9 2. What’s in the box? .........................................................................10 3. Installing the ClearNote HD software ............................................10 4. Setting up the ClearNote HD .........................................................11 Positioning the camera head ......................................................11 Camera positions .......................................................................11 Close-up and distance viewing ...................................................11 5. The ClearNote HD Toolbar, commands and functions ................12 Starting the software ..................................................................12 The Toolbar ................................................................................12 Auto Focus on / off Button ..........................................................13 Touch screen gestures ...............................................................13 Using the mouse ........................................................................13 List of commands .......................................................................13 Adjusting the magnification ........................................................15 Viewing modes ...........................................................................15 Semi-colors ................................................................................15 Text thickness ............................................................................16 Auto Contrast .............................................................................16 Resizing and moving the ClearNote HD window ........................16 Activating and sizing line markers ..............................................16 Save and open images...............................................................16 Mirror / flip the image..................................................................17 Auto Focus on / off .....................................................................17 6. Using the remote control ...............................................................18 Basic functions ............................................................................... 18 Adjusting the magnification ........................................................18 Viewing modes ...........................................................................18 Semi-colors ................................................................................18 Autofocus ...................................................................................18 Shift ............................................................................................19 Shift functions ................................................................................. 19 Switching between open programs ............................................19 Positioning the reading line or the split-screen ...........................19 Refocus ......................................................................................19 7. ClearNote HD and magnification software ...................................20 Appendix A: Safety ...............................................................................21 Appendix B: Technical Information .....................................................22 Appendix C: Compliances ....................................................................23 Optelec Offices Worldwide ...................................................................91 3 Optelec ClearNote HD Inhoudsopgave 1. Algemeen ........................................................................................25 Over deze handleiding ...............................................................25 2. Inhoud van de verpakking .............................................................26 3. ClearNote HD software installatie .................................................26 4. Installeren van de ClearNote HD ...................................................27 Positionering van de camera ......................................................27 Camera posities .........................................................................27 Dichtbij en veraf kijken ...............................................................27 5. De ClearNote HD knoppenbalk, commando’s en functies ..........28 De software starten ....................................................................28 De knoppenbalk .........................................................................28 Automatische scherpstelling aan / uit knop ................................29 Aanraakscherm gebaren ............................................................29 Gebruik van de muis ..................................................................29 Overzicht commando’s ...............................................................30 Aanpassen vergroting ................................................................31 Leesstanden ..............................................................................31 Kleurstanden ..............................................................................32 Tekst dikte..................................................................................32 Automatisch Contrast .................................................................32 Grootte en positie ClearNote HD venster aanpassen .................32 Activeren en aanpassen hulplijnen .............................................32 Opslaan en openen plaatjes .......................................................32 Spiegel/keer het plaatje om ........................................................33 Automatische scherpstelling AAN/UIT ........................................33 6. Gebruik van de afstandbediening .................................................34 Basisfuncties .................................................................................. 34 De vergroting instellen................................................................34 Een leesstand selecteren ...........................................................34 Voor- en achtergrondkleuren selecteren ....................................34 Autofocus uitschakelen ..............................................................34 Shift ............................................................................................35 Shift functies ................................................................................... 36 Schakelen tussen open programma’s ........................................36 Leeslijn of Split-Screen op het scherm positioneren ...................36 Opnieuw scherpstellen ...............................................................36 7. ClearNote HD and vergrotingssoftware ........................................37 Bijlage A: Belangrijke informatie .........................................................38 Bijlage B: Technische Informatie .........................................................39 Bijlage C: Conformiteitverklaring ........................................................40 Optelec Kantoren ..................................................................................91 4 Optelec ClearNote HD Table des matières 1. Introduction ....................................................................................42 À propos du manuel ...................................................................42 2. Le contenu de la boîte ...................................................................43 3. Installation du logiciel ClearNote HD ............................................43 4. Installation du ClearNote HD .........................................................44 Positionner la tête de caméra .....................................................44 Positions de caméra ...................................................................44 Visualisation de près et de loin ...................................................44 5. La barre d’outils, les commandes et les fonctions du ClearNote HD .45 Démarrer le logiciel ....................................................................45 La barre d’outils..........................................................................45 Activer et désactiver la mise au point automatique .....................46 Utilisation de l’écran tactile .........................................................46 Utilisation de la souris ................................................................46 Liste des commandes ................................................................47 Ajuster le grossissement ............................................................48 Modes de visualisation ...............................................................49 Demi-couleurs ............................................................................49 Épaisseur du texte .....................................................................49 Contraste automatique ...............................................................49 Déplacer et changer les dimensions d’une fenêtre .....................49 Activer et calibrer les marqueurs de ligne ...................................50 Enregistrer et ouvrir des images.................................................50 Refléter/renverser l’image ..........................................................50 Activer/désactiver la mise au point automatique.........................50 6. Utilisation de la télécommande .....................................................51 Fonctions de base .......................................................................... 51 Ajuster le grossissement ............................................................51 Modes de visualisation ...............................................................51 Demi-couleurs ............................................................................51 Mise au point automatique .........................................................51 Utilisation de la touche Maj (Shift) ..............................................51 Fonctions avec la touche Maj (Shift) ............................................... 52 Passer d’une application à une autre .........................................52 Positionnement de la ligne de lecture ou de l’écran partagé.......52 Refaire la mise au point..............................................................52 7. ClearNote HD et logiciel de grossissement d’écran ....................53 Annexe A: Sécurité ...............................................................................54 Annexe B: Renseignements techniques .............................................55 Annexe C: Conformité ..........................................................................56 Les Bureaux Internationaux d’Optelec ................................................91 5 Optelec ClearNote HD Índice 1. Introducción ...................................................................................58 Acerca de este manual...............................................................58 2. ¿Qué contiene la caja? ..................................................................59 3. Instalación del programa ClearNote HD .......................................59 4. Montaje del ClearNote HD..............................................................60 Posicionar el cabezal de la cámara ............................................60 Posiciones de la cámara ............................................................60 Visualización de cerca y a distancia ...........................................60 5. Barra de herramientas, comandos y funciones del ClearNote HD .....61 Iniciar el programa ClearNote HD ..............................................61 Barra de herramientas................................................................61 Botón Auto-foco .........................................................................62 Gestos en pantalla táctil .............................................................62 Uso del ratón ..............................................................................62 Lista de teclas de acceso directo ...............................................63 Ajustar la amplificación...............................................................65 Modos de visualización ..............................................................65 Colores de alto contraste ...........................................................65 Grosor del texto..........................................................................65 Contraste automático .................................................................65 Redimensionar y desplazar la ventana ClearNote HD................65 Activar y dimensionar los marcadores de línea ..........................66 Guardar y abrir imágenes ...........................................................66 Voltear y reflejar las imágenes ...................................................66 Activar y desactivar el auto-foco.................................................66 6. Uso del telemando .........................................................................68 6.1. Funciones básicas ................................................................... 68 Ajustar la amplificación...............................................................68 Modos de visualización ..............................................................68 Colores de alto contraste ...........................................................68 Auto-foco....................................................................................68 Mayúscula ..................................................................................68 6.2. Funciones con la mayúscula.................................................... 69 Alternar entre los programas abiertos ........................................69 Posicionar la línea de lectura y pantalla dividida ........................69 Reenfocar ..................................................................................69 7. El ClearNote HD con los programas de amplificación ................70 Apéndice A: Seguridad .........................................................................71 Apéndice B: Características técnicas .................................................72 Apéndice C: Conformidad ....................................................................73 Optelec en el Mundo .............................................................................91 6 Optelec ClearNote HD Inhalt 1. Einleitung ........................................................................................75 Über dieses Handbuch ...............................................................75 2. Was ist im Lieferumfang enthalten? .............................................76 3. Installation der ClearNote HD Software ........................................76 4. Lernen Sie das ClearNote HD kennen...........................................77 Kamera positionieren .................................................................77 Kamera Positionen .....................................................................77 Nah- und Fernbetrachtung .........................................................77 5. Die ClearNoteHD Werkzeugleiste und Tastenkurzbefehle .........78 Die Software starten ...................................................................78 Die Werkzeugleiste ....................................................................78 Autofokus An / Aus Taste ...........................................................79 Touchscreen Gesten ..................................................................79 Steuerung per Maus ...................................................................79 Liste Hotkeys..............................................................................80 Einstellen der Vergrößerung.......................................................81 Anzeige Modi .............................................................................81 Lesefarben wechseln .................................................................81 Text Stärke.................................................................................81 Automatische Kontrasterhöhung ................................................82 Änderung der ClearNote HD Fenstergröße ................................82 Aktivieren und Verschieben der Leselinie ...................................82 Speichern und Öffnen eines Fotos .............................................82 Bilder drehen oder spiegeln .......................................................83 Autofocus Ein- / Ausschalten......................................................83 6. Verwendung der Fernbedienung...................................................84 Grundfunktionen ............................................................................. 84 Einstellung der Vergrößerung.....................................................84 Anzeigemodus ...........................................................................84 Lesefarbenmodus ......................................................................84 Autofokus ...................................................................................85 Umschalttaste (Shift) ..................................................................85 Funktionen mit der Umschalttaste (Shift) ........................................ 85 Zwischen geöffneten Windows-Anwendungen wechseln ...........85 Positionieren der Leselinie oder des Bildteilungsfensters ...........86 Manuell Refokussieren ...............................................................86 7. ClearNote HD und Vergrößerungssoftware ..................................87 Anhang A: Sicherheit und Pflege.........................................................88 Anhang B: Technische Informationen .................................................89 Anhang C: Erklärungen .......................................................................90 Optelec Weltweit ...................................................................................91 7 Optelec ClearNote HD User manual version 1.1 © 2015 Optelec, the Netherlands. All rights reserved Optelec P.O. Box 399 2990 AJ Barendrecht The Netherlands Telephone: +31 (0)88 6783 444. Fax +31 (0)88 6783 400 E-mail: [email protected] Internet: www.optelec.com 8 English Optelec ClearNote HD 1. Introduction Congratulations on choosing the ClearNote HD, a portable and foldable video magnifier designed by Optelec. The ClearNote HD is a PC connected auto-focus video magnifier to magnify text, photos the blackboard and more, all on your PC screen. The ClearNote HD magnifier can be folded into a compact package so you can easily take it with you. The ClearNote HD offers an enhanced ergonomic design that allows simple operation. The ergonomics are designed for optimal efficiency when working with a PC. The ClearNote HD can be operated using the PC’s touch screen, mouse, keyboard or via the remote control. The ClearNote HD software is compatible with Windows 8 and higher. The unit should be connected via a USB 3.0 port. If you have any questions or suggestions concerning the use of this product, please contact your distributor or the Optelec headquarters using the contact information at the last page of this manual. Your feedback is greatly appreciated. We hope you enjoy working with your ClearNote HD. About this manual At Optelec, we are constantly improving our products and their functionalities. Therefore, it is possible that this manual is not the latest version. Please download the most up-to-date manual on www.optelec.com at the Support section. This manual will familiarize you with the features and operation of the ClearNote HD and ClearNote HD software with a PC. Please read this manual carefully before using your device. Keep this manual in a safe place for future reference. English 9 Optelec ClearNote HD 2. What’s in the box? The ClearNote HD packaging contains the following: Carrying bag ClearNote HD video magnifier Base plate Remote control ClearNote HD software and documentation User manual Hotkey lists If any of these items are missing from your package, please contact your local distributor. 3. Installing the ClearNote HD software Important: Install the ClearNote HD software before connecting your unit to a PC. To use the ClearNote HD with your PC you will need to install the included software. To install the software: 1. Run the setup; 2. Follow the onscreen setup instructions; 3. Now connect the ClearNote HD USB cable to a USB 3.0 port on your PC and wait until Windows has completed the driver setup; 4. Start the Software by clicking the ClearNote HD 7 icon on your desktop or in the Windows Start Menu. 10 English Optelec ClearNote HD 4. Setting up the ClearNote HD To setup your ClearNote HD unit please follow the following steps: 1. Place the base plate nearby your PC on a steady surface; 2. Unfold the ClearNote HD unit; 3. Place the ClearNote HD on the connection point of the base plate; 4. Connect the remote control to the camera stand; 5. If you have already installed the ClearNote HD software connect the ClearNote HD output cable (USB 3.0) to your desktop or laptop PC. When you use a laptop, you can choose to place your laptop on the ClearNote HD base plate. The ClearNote HD can be positioned either left or right of your laptop. Positioning the camera head The ClearNote HD features an ultraflexible camera that can be rotated around a horizontal and vertical axis. Point the camera down to view documents on your desk, or position the camera horizontally for distance or self-viewing. The flexible camera view is more than 180º vertically and horizontally. Camera positions The ClearNote HD automatically re-adjusts to its original settings when the camera is turned from near to distance viewing and back. For example, when you tilt the camera quickly from a whiteboard to your desktop, your preferred viewing mode and magnification settings will automatically be applied. Three sets of settings can be stored: document viewing, distance viewing and self view / looking behind you. Close-up and distance viewing The position of the camera unit can be adjusted for desktop and distance viewing. To view objects within 25 cm, position the close-up lens in front of the camera unit. To view objects at a larger distance, open the close-up lens so it is no longer in front of the camera. English 11 Optelec ClearNote HD 5. The ClearNote HD Toolbar, commands and functions Starting the software Start the ClearNote HD application by clicking either the ClearNote HD icon on your PC’s desktop or via the Windows Start Menu. You can close the ClearNote HD application as any other Windows program using “Alt+F4” or by clicking the close (x) button on the ClearNote HD Toolbar. The Toolbar The toolbar contains the following buttons: Button Description Zoom out Zoom in Toggle High Contrast / Full Color Photo Mode Decrease Window Size Increase Window Size Open Options Menu Open Settings Menu Close ClearNote HD Application 12 English Optelec ClearNote HD Auto Focus on / off Button Besides the Toolbar buttons, a button with a pencil is being displayed in the bottom left corner of the ClearNote window. Clicking on this icon will enable or disable the Auto Focus of the camera. Touch screen gestures You can control the ClearNote HD with touch screen gestures. Please note that touch screen gestures may conflict with your magnifier software depending on the magnifier used and the version of the magnifier software. The following touch screen gestures are supported: Gesture Description Tap Left mouse click Double Tap in Window Toggle Full Screen ON / OFF Double Tap on Toolbar Open Context Menu Drag Window Move Window Pinch Close Zoom out Pinch Open Zoom in Two Finger Swipe left / Right Change semi-color combination Two Finger Swipe up / down Toggle between photo mode and false color mode Using the mouse The following mouse actions are supported: Mouse Action Description Mouse Wheel Resize Window Alt+Mouse Wheel Adjust Line Position Shift+Mouse Weel Adjust Text Thickness in High Contrast Mode Ctrl+Mouse Wheel Zoom in / out Left Double Click Full screen ON / OFF Right Click Context Menu Right Click on pressed Focus icon Refocus when Auto Focus is off Ctrl+Left Click on pressed Focus Refocus when Auto Focus is off icon List of commands The list with hotkeys can be accessed pressing “F1” or by opening the help menu in the Toolbar. English 13 Optelec Hotkey Arrow Down Arrow Up Arrow Left Arrow Right Ctrl+Arrow Left Ctrl+Arrow Right Shift+Arrow Down Shift+Arrow Up Shift+Arrow Left Shift+Arrow Right Ctrl+Shift+Arrow Down Ctrl+Shift+Arrow Up Page Down Page Up F1 F2 F3 F5 F6 F9 F10 F11 Enter Escape Space Alt+Space C F G I L Ctrl+M Shift+M P R Ctrl+R S T V W Shift+Q Shift+Ctrl+Q 14 ClearNote HD Description Zoom out Zoom in Previous color combination Next color combination Decrease window size Enlarge video window size Change window position vertically (down) Change window position vertically (up) Change window position horizontally (left) Change window position horizontally (right) Decrease Text thickness IncreaseText thickness Line position > Down Line position > Up Help Save image Open image folder Toggle Semi-color / Full color Photo mode Smooth text ON/OFF Hide/Show toolbar Save image configuration Video device selection Full screen ON/OFF Minimize window Menu Settings Menu Auto Contrast Adjustment ON / OFF Toggle Auto Focus ON / OFF Refocus when Auto Focus is off Open Saved Image Folder Toggle Line ON / OFF Horizontal flip ON / OFF Vertical flip ON / OFF Cycle Window Position Rotation Left / Right / OFF Camera Reset Sharpen ON / OFF Toggle Toolbar Position Always On Top ON/OFF Toggle inverse Toolbar ON / OFF Save Image 1 Open Image 1 English Optelec Shift+W Shift+Ctrl+w Shift+E Shift+Ctrl+E Shift+R Shift+Ctrl+R Shift+T Shift+Ctrl+T Shift+Y Shift+Ctrl+Y Shift+U Shift+Ctrl+U Shift+I Shift+Ctrl+I Shift+O Shift+Ctrl+O Shift+P Shift+Ctrl+P A+Q X Ctrl+ Win+Space Win+F2 ClearNote HD Save Image 2 Open Image 2 Save Image 3 Open Image 3 Save Image 4 Open Image 4 Save Image 5 Open Image 5 Save Image 6 Open Image 6 Save Image 7 Open Image 7 Save Image 8 Open Image 8 Save Image 9 Open Image 9 Save Image 10 Open Image 10 Show Application Settings View Zoom Area Application Window On Top Full screen mode ON / OFF Adjusting the magnification Click on the “-“ button to decrease the magnification. Click on the “+” button to increase the magnification. Pressing the “Arrow down” button will decrease the magnification. Pressing the “Arrow up” button will increase the magnification. Use the pinch commands to increase and decrease the magnification. Viewing modes You may choose to display text in a pair of selectable colors when more contrast is needed or when high contrast color combinations provide better visibility. Click on the “Mode” button or press the “F5” button on the keyboard to toggle between Full color photo mode and high contrast semi color reading mode. Alternatively, use the touch screen gesture swipe up or down with 2 fingers. Semi-colors You may choose to display text using a range of high-contrast semi-color combinations. These can be activated by clicking on the “Mode” button or English 15 Optelec ClearNote HD pressing “F5” to switch to High Contrast mode. To cycle through each of the different foreground and background colors use the left and right arrow keys or a swipe left or right with two fingers on the touch screen. Text thickness To improve the readability of the text in high contrast mode, the text thickness can be adjusted using Control+Shift+Arrow Up and Down. Auto Contrast When enabled, the Auto Contrast function will attempt to eliminate shadows and light spots in the ClearNote HD image. This function can be helpful in full color mode and in poor light conditions. When one of the semi color modes are enabled, and in normal light conditions, it is highly recommended to leave this function off. The hotkey to toggle Auto Contrast on or off is “c”. By default, Auto Contrast is on in full color mode and off in semi color mode. Resizing and moving the ClearNote HD window The size of the ClearNote HD window can be adjusted by clicking on the two window resizing buttons on the Toolbar. Press “Enter” or “Win+F2” to restore the ClearNote HD window, or to switch to full screen mode. “Escape” will minimize the ClearNote HD window. The ClearNote HD “Ctrl+Win+Space”. window can be repositioned by pressing Activating and sizing line markers The reading line can be used for better orientation or as a reference when using the ClearNote HD. Press “L” to activate the reading line. Press “Page up” or “Page down” to move the line up or down. Save and open images To save an image press “F2”. To open the folder with saved images press “F3” or “i”. Images are named using a prefix and number in a numerical order. The folder to which the images are saved as well as the used prefix can be set in the “Save Frame Dialog”. To open the “Saved Frame Dialog”, click on the Settings button (Alt+Space) in the Toolbar and select “Frame Saving Configuration” from the menu. Here you can set: - The destination folder - The Image File format 16 English Optelec ClearNote HD - The File prefix - Number format for existing files Mirror / flip the image Pressing “Shift+M” allows you to horizontally mirror / flip the video image. To mirror the image vertically, press “Ctrl+M”. You may choose this function when you have tilted the camera for self-viewing, because selfviewing results in an image that is upside down. Alternatively you can rotate the image by pressing “R”. Auto Focus on / off The ClearNote HD features automatic focusing. This produces a clear image at any time. Turning Auto Focus off, stops the ClearNote HD from continuously focusing. This is useful for tasks such as writing, painting or enjoying craftwork. To toggle Auto Focus on or off, select the Pencil icon located in the bottom left corner of the ClearNote HD window. Alternatively, press the pencil button on the Remote Control or F on the keyboard. If the Auto Focus is off, you can manually refocus the camera by pressing G, Control + left mouse click, right click, or pressing Shift + Focus on the Remote Control. English 17 Optelec ClearNote HD 6. Using the remote control Basic functions Decreasing the magnification Viewing modes Semi-colors Auto-focus Adjusting the magnification Pressing the two trapezium shaped buttons allows you to change the magnification. Pressing the “-” button will decrease the magnification. Pressing the “+“ button will increase the magnification. Viewing modes Pressing this button will toggle semi color mode on / off. Semi-colors When high contras semi color mode is enabled, Pressing this button cycles you through 16 different foreground and background color combinations. Autofocus Press this button to disable or enable Auto Focus. Autofocus on 18 Autofocus off English Optelec Shift ClearNote HD Pressing the Shift button will activate the ClearNote HD window. Pressing this button in combination with other buttons performs additional functions. Read the following page about the Shift functions. Shift functions Switching between open programs Pressing the “Shift” and the “+” button simultaneously to switch between the open applications. Positioning the reading line or the split-screen Press the “L” key on the PC keyboard to add a reading line to the ClearNote HD image. Press the “Shift” and “Viewing mode” button simultaneously to move the line up. Press the “Shift” and “Semi-colors” button to move the line down. If the ClearNote HD is used together with magnification software, the ClearNote HD window and Magnification window will be displayed side by side, in a split-screen format. In this case pressing the “Shift” and “Viewing mode” button simultaneously will move the split up or left. Pressing the “Shift” and “Semi-colors” buttons the split down will be moved down or right. Refocus Press “Shift” and Focus is disabled. English “Focus” to refocus the camera when Auto 19 Optelec ClearNote HD 7. ClearNote HD and magnification software The ClearNote HD can be used simultaneously with magnification software programs such as SuperNova and ZoomText. The ClearNote HD image appears adjacent to the magnified Window, in a split-screen. The ClearNote HD image can be re-sized and positioned anywhere on your screen. The split screen will be automatically adjusted. The ClearNote HD software will detect Zoomtext or Supernova automatically. Start your magnification software first, followed by the ClearNote HD application. When closing your magnifier, make sure to close the ClearNote HD application first. In the About window, the detected magnification software is being displayed. To open the about screen, select Settings (Alt + Space) in the Toolbar. Support for magnifiers is limited to Dolphin Supernova version 14.04 or higher and ZoomText version 10.1 or higher. 20 English Optelec ClearNote HD Appendix A: Safety Only use the ClearNote HD indoors. Do not expose the ClearNote HD to extreme or rapid changes in temperature or humidity. These conditions may damage the unit’s electronics or optics. Do not place the unit on an unstable surface. It may fall, causing serious damage to the unit or injuries to the user. To avoid injuries, always assemble, disassemble and handle the unit with good care as the unit contains movable and rotatable parts. Do not expose the ClearNote HD to excessive heat or direct sunlight to avoid the risk of fire. Do not remove any parts of the ClearNote HD. Contact your Optelec distributor to service the ClearNote HD if necessary. Do not open your unit as this will void the warranty. The unit contains no userserviceable parts. To avoid risk of electrical damage, keep your ClearNote HD away from fluids and chemicals Handle the ClearNote HD with care. Rough handling will damage the internal components Do not use the ClearNote HD near inadequately shielded medical devices. Always unplug the unit before cleaning. Use a soft damp cloth to clean the exterior. Do not use cleaning agents or abrasive materials as they will damage the unit. Do not use the unit under 0° or above +40° Celsius. Use of the ClearNote HD other than described in this manual will exclude it from warranty conditions. English 21 Optelec ClearNote HD Appendix B: Technical Information - Camera Viewing modes : : - Semi-colors : - Magnification Focus Weight PC requirements Connections : : : : : 12x optical zoom Full color photo mode High contrast black-on-white High contrast white-on-black 16 foreground / background color combinations 1.3 to 40 times on a 15“ monitor Autofocus with focus lock 1,4 kg Windows 8 or higher USB 3.0 Important: USB 3.0 ports using the Renesas µPD720200A chipset are not supported. Operating conditions Humidity Temperature : : < 75%, no condensation 0 – 40 °C Storage & transport conditions Humidity : < 75%, no condensation Temperature : -20 – 60 °C WARNING: The use of accessories, transducers and cables other than those specified, with the exception of transducers and cables sold by the manufacturer of the ClearNote HD as replacement parts for internal components, may result in increased emissions or decreased immunity of the ClearNote HD. Optelec nor its partners do not take any responsibility when using the product and its accessories other than those specified in this manual. For additional questions on the ClearNote HD regarding service, installation or operation, do not hesitate to contact your local distributor or closest Optelec office. See the last pages of this manual for a complete list of Optelec addresses. 22 English Optelec ClearNote HD Appendix C: Compliances This product complies with the safety and EMC requirements of the directives: EN60601-1 : 2006 EN60601-1-2 : 2007 Optelec Breslau 4 2993 LT Barendrecht The Netherlands EU – Declaration of conformity 2014, Barendrecht, the Netherlands The manufacturer declares that the: Video magnifier ClearNote HD complies to the safety guidelines and directives of the European Community. This EU – declaration of conformity is based on tests according to the directives: EN 60601-1:2006 and EN 60601-1-2:2007 by an independent Notified body. This device bears the CE approval mark English 23 Optelec ClearNote HD ClearNote HD gebruikershandleiding versie 1.1 © 2015 Optelec, Nederland. Alle rechten voorbehouden Optelec P.O. Box 399 2990 AJ Barendrecht The Netherlands Telephone: +31 (0)88 6783 444. Fax +31 (0)88 6783 400 E-mail: [email protected] Internet: www.optelec.com 24 Nederlands Optelec ClearNote HD 1. Algemeen Gefeliciteerd met de aanschaf van uw ClearNote HD, een hoogwaardige opklapbare en meeneembare elektronische loep van Optelec. ClearNote HD is een automatisch scherpstellende beeldschermloep, ontwikkeld om slechtzienden te ondersteunen bij lezen, schrijven, het bekijken van foto’s, het uitvoeren van hobby’s etc. De ClearNote HD beeldschermloep is opklapbaar waardoor het mogelijk is deze makkelijk en comfortabel mee te nemen. De ClearNote HD heeft een doordacht ergonomisch ontwerp. Hierdoor wordt het gebruik en bediening van de beeldschermloep met een computer eenvoudiger en efficiënter. De ClearNote HD kan direct worden bediend via het toetsenbord van een computer of via de bijgeleverde afstandsbediening. De meegeleverde ClearNote software is compatible met Windows 8 en hoger. De vereiste aansluiting is USB 3.0. Mocht u vragen of suggesties hebben betreffende het gebruik van dit product, neem dan contact op met uw leverancier of direct met het Optelec hoofdkantoor (zie gegevens op de laatste pagina van deze handleiding). Wij hopen dat u met veel plezier gebruik zult maken van de ClearNote HD. Over deze handleiding Optelec verbetert continue haar producten en de functionaliteit ervan. Het kan daarom voorkomen dat deze handleiding niet de meest recente versie is. Kijk daarom op onze website www.optelec.com onder Support om te zien of er een recentere versie beschikbaar is. Deze handleiding geeft u een overzicht van de mogelijkheden en het gebruik van de ClearNote HD beeldschermloep en ClearNote HD software met een computer. Wij raden u aan deze handleiding aandachtig te lezen alvorens u het product gaat gebruiken. Bewaar deze handleiding voor toekomstige raadpleging. Nederlands 25 Optelec ClearNote HD 2. Inhoud van de verpakking De ClearNote verpakking bevat de volgende items: - Een beschermhoes - De opvouwbare ClearNote HD beeldschermloep - Een onderplaat ter ondersteuning van de ClearNote HD - Een Afstandsbediening - De ClearNote HD software en handleidingen - Deze handleiding - Een lijst met sneltoetscombinaties voor de PC Mochten één of meerdere onderdelen ontbreken, neem dan contact op met uw leverancier. 3. ClearNote HD software installatie NB: Installeer de software voordat u de ClearNote aansluit op een computer. Alvorens u de ClearNote in combinatie met uw PC kunt gebruiken, dient u de meegeleverde ClearNote software op uw computer te installeren. Volg onderstaand stappenplan om de ClearNote HD software op uw computer te installeren: 1. Start de ‘setup’; 2. Doorloop de installatie instructies op het scherm; 3. Sluit de ClearNote HD USB kabel aan op een USB 3 poort op uw pc en wacht tot Windows de driver installatie heeft voltooid; 4. Start de software met het icon ClearNote HD 7 dat op de desktop staat of in het Windows Start Menu. 26 Nederlands Optelec ClearNote HD 4. Installeren van de ClearNote HD Volg onderstaand stappenplan om de ClearNote op te stellen: 1. Plaats de onderplaat op een stabiele ondergrond. 2. Klap de arm van de ClearNote HD uit. 3. Plaats de ClearNote HD op het bevestigingspunt op de onderplaat. 4. Sluit de afstandbediening aan op de aansluiting op de camera standaard. 5. Indien de ClearNote software reeds is geïnstalleerd, kunt u de ClearNote USB connector (USB 3.0) aansluiten op uw computer. Plaats de laptop eventueel op de onderplaat. Door de onderplaat te draaien, kan de ClearNote zowel links als rechts van de laptop worden geplaatst. Positionering van de camera De flexibele camera van de ClearNote kan circa 180 graden geroteerd worden rond een horizontale en verticale as. Dit maakt het mogelijk zowel een document dat zich onder de camera bevindt te lezen alsook de camera te roteren richting een schoolbord of jezelf. Camera posities De ClearNote HD slaat automatisch de laatste gebruikte beeldinstellingen op, afkomstig van de drie camerastanden (dichtbij, veraf en gericht op uzelf of een object achter u). De vergroting en leesstand keren automatisch terug naar de oorspronkelijke instellingen, wanneer u de camera van dichtbij modus naar veraf modus of vice versa beweegt. Dichtbij en veraf kijken De camera kan worden geroteerd om objecten dichtbij en op afstand te bekijken. Om objecten binnen een bereik van 25 cm, zoals een document op uw bureau, te bekijken, draait u de close-up lens voor de camera. Om objecten op grotere afstand te bekijken draait u de lens weg van het objectief. Nederlands 27 Optelec ClearNote HD 5. De ClearNote HD knoppenbalk, commando’s en functies De software starten Start de ClearNote HD door op de ClearNote HD icoon te klikken of deze via het Windows Start Menu te activeren. De ClearNote HD software kan zoals elk Windows programma met “Alt+F4” worden gesloten of met de Sluiten (x) knop van de knoppenbalk. De knoppenbalk De knoppenbalk heeft de volgende knoppen: Knop Beschrijving Uitzoomen Inzoomen Schakel tussen Hoogcontrast en Kleurinstelling Verklein het venster Vergroot het venster Open Opties Menu Open Instellingen Menu Sluit ClearNote HD programma 28 Nederlands Optelec ClearNote HD Automatische scherpstelling aan / uit knop Naast de knoppenbalk wordt er links onderin het ClearNote scherm een potlood getoond. Met deze knop wordt de automatische scherpstelling uit en aan gezet. Aanraakscherm gebaren De ClearNote HD kan met aanraakscherm gebaren worden bediend. Deze gebaren kunnen mogelijk conflicteren met de toegankelijkheidssoftware. De volgende aanraakscherm gebaren zijn mogelijk: Gebaar Beschrijving Enkele tik Linker muis klik Dubbel tik venster Volledig scherm AAN/UIT Dubbel tik op knoppenblak Open het Context Menu Sleep venster Venster wordt verplaatst Twee vingers naar elkaar toe Uitzoomen (verkleinen) bewegen Twee vingers van elkaar af Inzoomen (vergroten) bewegen Twee vinger van links naar rechts Wijzig de Hoogcontrast kleur (of andersom) vegen combinatie Twee vinger van boven naar Schakelen tussen kleurenstand en beneden (of andersom) vegen hoogcontrast kleuren Gebruik van de muis De volgende muis acties worden ondersteund: Muis actie Beschrijving Muiswiel Venster grootte aanpassen Alt + Muiswiel Aanpassen regel positie Shift + Muiswiel Aanpassen tekst dikte in Hoogcontrast stand Ctrl + Muiswiel Zoom in / uit Linker dubbel klik Volledig scherm AAN/UIT Rechter klik Context Menu Rechter klik op ingedrukte Handmatig focussen wanneer de Automatische scherpstelling knop automatische focus uit staat Nederlands 29 Optelec ClearNote HD Overzicht commando’s Het overzicht van de sneltoetsen kan met F1 opgevraagd worden of via het help menu in de knoppenbalk. Commando Pijl omlaag Pijl omhoog Pijl links Pijl rechts Ctrl+ Pijl links Ctrl+ Pijl rechts Shift+ Pijl omlaag Shift+ Pijl omhoog Shift+Pijl links Shift+Pijl rechts Ctrl+Shift+Pijl omlaag Ctrl+Shift+Pijl omhoog PageDown PageUp F1 F2 F3 F5 F6 F9 F10 F11 Enter Escape Spatie Alt+Spatie C F G I L Ctrl+M Shift+M P R Ctrl+R 30 Beschrijving Uitzoomen Inzoomen Vorige kleurcombinatie Volgende kleurcombinatie Verklein venster Vergroot venster Wijzig venster positie verticaal (beneden) Wijzig venster positie verticaal (omhoog) Wijzig venster positie horizontaal (links) Wijzig venster positie horizontaal (rechts) Tekst dikte > Verklein Tekst dikte > Vergroot Regel positie > Omlaag positie > Omhoog Help Bewaar plaatje Open plaatjes map Schakel tussen hoogcontrast en kleurenstand Afgeronde tekst AAN/UIT Verberg/toon knoppenbalk Bewaar instellingen plaatje Videoapparaat keuze Volledig scherm AAN/UIT Minimaliseer Venster Menu Instellingen Menu Automatische Contrast aanpassing AAN/UIT Zet Automatische scherpstelling AAN/UIT Handmatig scherpstelling wanneer Automatische scherpstelling UIT staat Open Opgeslagen plaatjes map Schakel tussen regel AAN / UIT Horizontaal klappen AAN / UIT Verticaal klappen AAN / UIT Schakel tussen Venster posities Roteer Links / Rechts / UIT Camera Reset Nederlands Optelec S T V W Shift+Q Shift+Ctrl+Q Shift+W Shift+Ctrl+w Shift+E Shift+Ctrl+E Shift+R Shift+Ctrl+R Shift+T Shift+Ctrl+T Shift+Y Shift+Ctrl+Y Shift+U Shift+Ctrl+U Shift+I Shift+Ctrl+I Shift+O Shift+Ctrl+O Shift+P Shift+Ctrl+P A+Q X Ctrl+ Win+Spatie Win+F2 ClearNote HD Scherpstellen AAN / UIT Schakel tussen knoppenbalk posities Altijd over andere vensters AAN/UIT Schakel tussen omgekeerde kleuren knoppenbalk AAN / UIT Bewaar plaatje 1 Open plaatje 1 Bewaar plaatje 2 Open plaatje 2 Bewaar plaatje 3 Open plaatje 3 Bewaar plaatje 4 Open plaatje 4 Bewaar plaatje 5 Open plaatje 5 Bewaar plaatje 6 Open plaatje 6 Bewaar plaatje 7 Open plaatje 7 Bewaar plaatje 8 Open plaatje 8 Bewaar plaatje 9 Open plaatje 9 Bewaar plaatje 10 Open plaatje 10 Toon applicatie instellingen Bekijk zoom gebied Applicatie venster boven Volledige scherm modus AAN / UIT Aanpassen vergroting Klik op de “-“ knop om de vergroting te verlagen. Klik op de “+“ knop om de vergroting te verhogen. Gebruik “pijl omlaag“ om de vergroting te verlagen. Gebruik “pijl omhoog“ knop om de vergroting te verhogen. Of gebruik de aanraakscherm gebaren om de vergroting aan te passen. Leesstanden Het kan prettig zijn om de tekst in hoogcontrast kleuren te bekijken. Druk op de leesstanden knop of druk op “F5” om te schakelen tussen de Nederlands 31 Optelec ClearNote HD hoogcontrast standen en de fotostand. Of gebruik het aanraakscherm gebaar 2 vingers omhoog of omlaag bewegen. Kleurstanden Tekst kan in een aantal hoogcontrast combinaties worden getoond. Deze kunnen met de leesstanden knop of F5 worden geactiveerd. Met de linker en rechter pijl kan door de verschillende kleuren worden gelopen. Of gebruik het aanraakscherm gebaar 2 vingers naar links of rechts bewegen. Tekst dikte Om de leesbaarheid van de tekst in hoogcontrast stand te verbeteren kan de dikte van de tekst worden aangepast met Control+Shift+Pijl Omhoog en Omlaag. Automatisch Contrast Wanneer geactiveerd, zal de Automatische contrast functie proberen schaduwen en lichtvlekken in het beeld te verwijderen. Deze functie kan handig zijn in de kleurenstand en in situaties met slechte lichtomstandigheden. Bij normale lichtomstandigheden wordt geadviseerd deze functie niet aan te hebben staan. De sneltoets combinatie om Automatisch Contrast AAN/UIT te zetten is “c”. Standaard staat de functie aan in de kleurenstand en uit in de hoogcontrast stand. Grootte en positie ClearNote HD venster aanpassen De grootte van het ClearNote HD venster kan aangepast worden met de twee knoppen om de grootte van het venster aan te passen. Druk op “Enter” of “Win+F2” om het ClearNote HD venster te herstellen of om te schakelen naar volledig scherm. “Escape” zorgt dat het ClearNote HD venster wordt geminimaliseerd. Het ClearNote HD venster kan worden verschoven met “Ctrl+Win+Spatie”. Activeren en aanpassen hulplijnen De lees hulplijn kan worden gebruikt voor betere oriëntatie of als referentie. Druk op “L” om de hulplijn te activeren. Gebruik de “Pagina omhoog” and “Pagina omlaag” om de lijn naar boven of beneden te verplaatsen. Opslaan en openen plaatjes Om een plaatje te bewaren, druk op “F2”. Om de map met opgeslagen plaatjes te openen, druk op “F3” of “i”. Plaatjes worden in numerieke volgorde opgeslagen. In de instellingen kan bepaald worden waar en onder welke naam de plaatjes worden bewaard. 32 Nederlands Optelec ClearNote HD Deze instellingen zijn te bereiken via de (Alt+Spatie) en kies “Frame Saving Configuration” vanuit het menu. Mogelijke instellingen: - De doelmap. - Het bestand type - De naamgeving van het bestand - Nummer opmaak voor bestaande bestanden Spiegel/keer het plaatje om Druk op “Shift+M” om horizontaal te spiegelen. Om verticaal te spiegelen druk op “Ctrl+M”. Gebruik deze functie als het camerabeeld omgekeerd staat of om naar jezelf te kijken. Er kan ook worden geroteerd door op “R” te drukken. Automatische scherpstelling AAN/UIT De Automatische scherpstelling functie zorgt voor een optimale beeldweergave. Als deze functie uit staat wordt er niet meer continue scherpgesteld. Dit is handig bij schrijven, schilderen en andere hobby’s. Om de Automatische scherpstelling AAN of UIT te zetten, druk op de potlood icoon links onderin het scherm. Of druk op de potlood icoon op de afstandbediening of F op het toetsenbord. Als de Automatische scherpstelling UIT staat kan er handmatig scherpgesteld worden met G, Control + linker muis klik, rechter muis klik of druk op Shift + Scherpstellen op de afstandbediening. Nederlands 33 Optelec ClearNote HD 6. Gebruik van de afstandbediening Basisfuncties De vergroting instellen ClearNote vergroot tekst en afbeelding van circa 1,25 tot 40 maal de originele vergroting. Door middel van het indrukken van de “+” en “–” toetsen op de afstandsbediening kunt u de vergroting respectievelijk verhogen of verlagen. Een leesstand selecteren Druk de toets, onder de vergrotingstoetsen, in om de hoogcontrast kleuren aan of uit te zetten. Voor- en achtergrondkleuren selecteren Door deze toets, onder de leesstandentoets, in te drukken, kunt u achtereenvolgens 16 verschillende voor- en achtergrond kleurencombinaties selecteren. Deze toets is enkel actief in de hoog contrast tekststanden (zwart/wit en wit/zwart). Autofocus uitschakelen De ClearNote HD stelt automatisch scherp op het object dat zich onder of voor de camera bevindt. Door middel van het indrukken van de ‘Autofocus’ toets, linksonder op de afstandsbediening, zal de ClearNote HD de automatische 34 Nederlands Optelec ClearNote HD scherpstelling “bevriezen” en niet langer continue blijven focusseren. Het uitschakelen van de autofocus wordt met name aangeraden tijdens het schrijven, schilderen of uitvoeren van hobby’s. Autofocus aan Autofocus uit Shift Met de Shift toets, rechtsonder op de afstandsbediening, kunt u het ClearNote venster activeren. Door deze toets, in combinatie met andere toetsen op de afstandbediening, te gebruiken, kunt u extra functionaliteit activeren. Hieronder vindt u een opsomming van de functies die met behulp van de Shift toets uitgevoerd kunnen worden: Nederlands 35 Optelec ClearNote HD Shift functies Schakelen tussen open programma’s Druk tegelijk de Shift en + knop om tussen de open programma’s te schakelen. Leeslijn of Split-Screen op het scherm positioneren Druk de “L” toets op toetsenbord van uw computer in om een leeslijn op het scherm te activeren. Druk vervolgens op de afstandbediening tegelijkertijd de “Shift” en “Leesstanden” toetsen in om de leeslijn omhoog te verplaatsen. Druk op de afstandbediening tegelijkertijd de “Shift” en “Voor- en achtergrondkleuren” toetsen in om de leeslijn omlaag te verplaatsen. Wanneer u de ClearNote in combinatie met vergrotingssoftware gebruikt, wordt het beeld van de ClearNote in splitscreen weergegeven. U kunt het split-screen beeld respectievelijk omhoog of omlaag verplaatsen door de toetsen “Shift” en “Leesstanden” omhoog en met “Shift” en “Vooren achtergrondkleuren” omlaag in te drukken. Opnieuw scherpstellen Druk de “Shift” en “Autofocus” toets tegelijkertijd in om opnieuw scherp te stellen als de automatische scherpstelling uit staat. 36 Nederlands Optelec ClearNote HD 7. ClearNote HD en vergrotingssoftware ClearNote kan in de toekomst tegelijk gebruikt worden met vergrotingsprogramma’s als SuperNova en ZoomText. Naast een vergrote Windows applicatie, kunt u tevens het ClearNote beeld in een gedeeld scherm bekijken (split-screen). Het ClearNote beeld kan op iedere gewenste plaats in het scherm worden gepositioneerd en kan op iedere gewenste vergroting worden aangepast. Belangrijk: Start eerst de vergrotingssoftware voordat u de ClearNote software opstart. Bij afsluiten dient u eerst de ClearNote software en vervolgens de vergrotingsapplicatie af te sluiten. In het ‘Over’ venster wordt de gedetecteerde vergrotingssoftware weergegeven. Om het ‘Over’ venster te openen, klik op Instellingen in de knoppenbalk of op Alt + Spatie. Ondersteuning voor vergrotingsprogramma’s zal beperkt zijn tot Supernova 14.04 of hoger en ZoomText versie 10.1 of hoger) Nederlands 37 Optelec ClearNote HD Bijlage A: Belangrijke informatie • Gebruik de ClearNote alleen binnen. • Stel het apparaat niet bloot aan extreme of snel veranderende temperaturen of vochtigheid. Deze omstandigheden kunnen onherstelbare schade aan uw apparaat toebrengen. • Plaats de ClearNote niet op een instabiele ondergrond. Het apparaat kan vallen en dit kan ernstige schade toebrengen. • Monteer en demonteer de ClearNote voorzichtig om schade en letsel te voorkomen. De ClearNote bevat scharende en draaiende onderdelen. • Plaats de ClearNote niet direct naast een warmtebron of in direct zonlicht. Gebruik de ClearNote ook niet in vochtige ruimtes. • Neem contact op met uw leverancier voor iedere vorm van service aan de ClearNote. Maak het apparaat niet open, hierdoor vervalt de garantie. • Ga voorzichtig met de ClearNote om. Ruw behandelen zal de interne • componenten beschadigen. • Gebruik de ClearNote niet dichtbij ondeugdelijk afgeschermde (medische) apparatuur. • Plaats geen apparaten in de nabijheid van de ClearNote die storingen kunnen veroorzaken. • Gebruik alleen een licht vochtige doek om de buitenzijde schoon te maken. Gebruik geen schoonmaakmiddelen of andere agressieve middelen. • Gebruik de ClearNote bij temperaturen tussen de +0° en +40° Celsius. Bij gebruik van de ClearNote anders dan omschreven in deze handleiding vervalt het recht op garantie. 38 Nederlands Optelec ClearNote HD Bijlage B: Technische Informatie - Camera Leesstanden : : - Hoogcontrast Vergroting : : - Focus : - Gewicht PC specificaties USB poort : : : 10x optische zoom Kleurenweegave Hoog contrast zwart/wit Hoog contrast wit/zwart 16 voor- en achtergrondkleuren 1,3 tot 40 maal vergroting op een 15“ monitor Autofocus met mogelijkheid de focus te bevriezen 1,4 kg Windows 8 of hoger USB 3.0 Belangrijk: USB 3.0 poorten die een Renesas µPD720200A chipset gebruiken werken niet met de ClearNote HD. Gebruikersomstandigheden Vochtigheid : Temperatuur : < 75%, geen condensatie 0 – 40 °C Opslag- en transportomstandigheden Vochtigheid : < 75%, geen condensatie Temperatuur : -20 – 60 °C WAARSCHUWING: Het gebruik van accessoires en kabels, met uitzondering van de door de leverancier van de ClearNote verkregen kabels, kan resulteren in verhoogde emissie of verminderde afscherming van de ClearNote Optelec neemt geen verantwoordelijkheid voor gebruik van de ClearNote of de accessoires, anders dan beschreven in deze handleiding. Wanneer u vragen heeft over bediening, gebruik of installatie van uw ClearNote, neem dan contact op met uw leverancier of een Optelec kantoor. Op de laatste pagina van deze handleiding is een adresoverzicht van alle Optelec vestigingen te vinden. Nederlands 39 Optelec ClearNote HD Bijlage C: Conformiteitverklaring Dit product is in overeenstemming met de veiligheidsrichtlijn en de richtlijn voor EMC: EN60601-1 : 2006 EN60601-1-2 : 2007 Optelec Breslau 4 2993 LT Barendrecht Nederland EU – Conformiteitverklaring Barendrecht, Nederland Oktober 2008 De fabrikant verklaart dat de: Draagbare video loep ClearNote HD overeenstemt met de veiligheidsrichtlijn en de richtlijn voor EMC van de Europese Unie. Deze EU – conformiteitsverklaring is gebaseerd op testen volgens de richtlijnen: EN 60601-1:2006 en EN 60601-1-2:2007 door een onafhankelijk meetinstituut. Dit apparaat voldoet aan de CE richtlijnen. 40 Nederlands Optelec ClearNote HD Manuel d’utilisation version 1.1 © 2015 Optelec, Pays-Bas Tous droits réservés Optelec P.O. Box 399 2990 AJ Barendrecht Pays-Bas Téléphone: +31 (0)88 6783 444. Fax +31 (0)88 6783 400 E-mail: [email protected] Internet: www.optelec.com Français 41 Optelec ClearNote HD 1. Introduction Nous vous félicitons d’avoir choisi le ClearNote HD, un téléagrandisseur portable et pliable conçu par Optelec. Le ClearNote HD est un téléagrandisseur à mise au point automatique se connectant à votre ordinateur pour grossir des textes, des photos ou un tableau noir sur votre écran d’ordinateur. Le ClearNote HD est pliable pour être facilement rangé et transporté où que vous alliez. Le ClearNote HD est doté d’un design ergonomique amélioré pour rendre son utilisation facile et agréable. Son ergonomie est spécifiquement conçue pour qu’il soit utilisé avec un ordinateur. Vous pouvez l’opérer à partir de l’écran tactile de votre ordinateur, de votre souris, du clavier ou de sa télécommande. Le logiciel ClearNote HD est compatible avec Windows 8 et les versions ultérieures de Windows. L’unité doit être connectée dans un port USB 3.0. Si vous avez des questions ou des suggestions concernant l’utilisation de ce produit, veuillez contacter votre distributeur ou le siège social d’Optelec. Les coordonnées peuvent être trouvées à la dernière page de ce manuel. Vos commentaires sont toujours appréciés! Nous espérons que vous aimerez travailler avec le ClearNote HD. À propos du manuel Optelec améliore constamment ses produits ainsi que leurs fonctions. Il est donc possible que ce manuel ne soit la dernière version disponible. Veuillez vous rendre à la section Support de notre site Internet www.optelec.com pour télécharger la dernière version de ce manuel. Ce manuel vous familiarisera avec les fonctions d’opération du ClearNote HD et du logiciel ClearNote HD. Veuillez lire ce manuel attentivement avant d’utiliser votre appareil et conservez-le dans un endroit sûr pour pouvoir vous y référer ultérieurement. 42 Français Optelec ClearNote HD 2. Le contenu de la boîte La boîte du ClearNote HD comprend les éléments suivants : Une pochette de transport Le téléagrandisseur ClearNote HD Un plateau de support Une télécommande Le logiciel ClearNote HD et de la documentation Le manuel d’utilisation La liste des raccourcis clavier Si l’un ou plusieurs de ces éléments est manquant, veuillez contacter votre distributeur. 3. Installation du logiciel ClearNote HD Important: Installez le logiciel ClearNote HD avant de connecter votre unité à votre ordinateur. Pour utiliser le ClearNote HD avec votre ordinateur, vous devez d’abord installer le logiciel inclus. Voici la procédure à suivre : 1. Démarrez l’installation; 2. Suivez les instructions d’installation affichées à l’écran; 3. Connectez le câble USB du ClearNote HD dans un port USB 3.0 de votre ordinateur et attendez que Windows ait terminé l’installation; 4. Démarrez le logiciel en cliquant sur l’icône ClearNote HD 7 sur votre bureau ou dans le menu Démarrer de Windows. Français 43 Optelec ClearNote HD 4. Installation du ClearNote HD Veuillez suivre ces étapes pour installer votre ClearNote HD: 1. Placez le plateau de support sur une surface stable près de votre ordinateur; 2. Dépliez le ClearNote HD; 3. Placez le ClearNote HD sur le point de connexion du plateau de support; 4. Connectez la télécommande au support de caméra; 5. Si vous avez déjà complété l’installation du logiciel ClearNote HD, connectez le câble USB 3.0 du ClearNote HD à votre ordinateur. Lorsque vous utilisez un ordinateur portable, vous pouvez choisir de placer votre portable sur le plateau de support du ClearNote HD. Le ClearNote HD peut être placé à gauche ou à droite de votre portable. Positionner la tête de caméra Le ClearNote HD est équipé d’une caméra ultra-flexible pouvant être pivotée sur un axe horizontal ou vertical. Dirigez la caméra vers le bas pour visualiser un document sur votre bureau ou tournez la caméra en position horizontale pour voir plus au loin ou pour faire de l’auto-visualisation. Le champ de vision de la caméra flexible est de plus de 180º verticalement et horizontalement. Positions de caméra Le ClearNote HD reprend automatiquement ses réglages d’origine quand la caméra est tournée d’une position de visionnement à distance à une position pour visionnement de près ou l’inverse. Si, par exemple, vous faites pivoter la caméra rapidement d’un tableau à votre bureau, votre mode de visualisation et vos réglages de grossissement favoris seront appliqués automatiquement. Trois ensembles de réglages peuvent être enregistrés : visualisation de document, visualisation à distance et autovisualisation / voir derrière soi. Visualisation de près et de loin La position de la caméra peut être ajustée pour une visualisation de près ou de loin. Pour visualiser des objets à moins de 25 cm, placer la bonnette devant la caméra. Pour visualiser des objets à une plus grande distance, ouvrez la bonnette pour la dégager de la caméra. 44 Français Optelec ClearNote HD 5. La barre d’outils, les commandes et les fonctions du ClearNote HD Démarrer le logiciel Démarrez l’application ClearNote HD, soit en cliquant l’icône ClearNote HD sur le bureau de votre ordinateur, soit à partir du menu Démarrer de Windows. Vous pouvez fermer l’application ClearNote HD comme n’importe quel autre programme Windows, soit en appuyant sur “Alt+F4” ou en cliquant le bouton fermer (x) de la barre d’outils ClearNote HD. La barre d’outils La barre d’outils comprend les boutons suivants : Bouton Description Zoom arrière Zoom avant Basculer entre Contraste élevé / Mode photo couleur Réduire les dimensions de la fenêtre Augmenter les dimensions de la fenêtre Ouvrir le Menu Options Ouvrir le Menu Réglages Fermer l’application ClearNote HD Français 45 Optelec ClearNote HD Activer et désactiver la mise au point automatique À côté des boutons de la barre d’outils, l’icône d’un crayon est affichée dans le coin inférieur gauche de la fenêtre ClearNote. Cliquer sur cette icône pour activer ou désactiver la fonction de Mise au point automatique de la caméra. Utilisation de l’écran tactile Vous pouvez signifier des commandes à votre ClearNote HD à l’aide de gestes sur l’écran tactile. Veuillez noter qu’il est possible que les gestes sur écran tactile entrent en conflit avec votre logiciel de grossissement. Cela dépend du logiciel et de la version que vous utilisez. Liste des gestes d’écran tactile supportés : Geste Description Toucher une fois Clic gauche de souris Toucher deux fois sur fenêtre Activer/Désactiver le plein écran Toucher deux fois sur barre Ouvrir Menu Local d’outils Glissement sur fenêtre Déplacer la fenêtre Pincement vers l’intérieur Zoom vers l’extérieur (-) Pincement vers l’extérieur Zoom vers l’intérieur (+) Glissement 2 doigts de gauche à Changer combinaison de demidroite couleurs Glissement 2 doigts du haut vers Passer du mode Photo au mode le bas Fausses couleurs et vice-versa Utilisation de la souris Liste des actions de la souris supportées : Action de la souris Description Roue de la souris Changer les dimensions de la fenêtre Alt+Roue de souris Ajustement de la position de la ligne Maj+Roue de souris Ajuster l’épaisseur du texte en mode contraste élevé Ctrl+Roue de souris Zoom intérieur / extérieur Double clic gauche Activer/Désactiver le plein écran Clic droit Menu Local Clic droit sur l’icône appuyé de Refaire la mise au point Mise au point automatique automatique lorsque celle-ci est désactivée Ctrl+Clic gauche sur l’icône Refaire la mise au point 46 Français Optelec appuyé de automatique ClearNote HD Mise au point automatique lorsque celle-ci est désactivée Liste des commandes La liste des raccourcis est accessible en appuyant sur “F1” ou par le menu Aide de la barre d’outils. Touche-raccourci Flèche vers le bas Flèche vers le haut Flèche vers la gauche Flèche vers la droite Ctrl+Flèche gauche Ctrl+Flèche droite Maj+Flèche bas Maj+Flèche haut Maj+Flèche gauche Maj+Flèche droite Ctrl+Maj+Flèche Bas Ctrl+Maj+Flèche haut Bas de Page Haut de page F1 F2 F3 F5 F6 F9 F10 F11 Retour Échappe Barre d’espacement Alt+Barre d’espacement C F G I Français Description Zoom extérieur Zoom intérieur Combinaison de couleurs précédente Combinaison de couleurs suivante Rapetisser la fenêtre Agrandir la fenêtre Changer position de la fenêtre à la verticale Changer position de la fenêtre à la verticale Changer position de la fenêtre à l’horizontale Changer position de la fenêtre à l’horizontale Diminuer épaisseur de texte Augmenter épaisseur de texte Position de la ligne vers le bas Position de la ligne vers le haut Aide Enregistrer image Ouvrir fichier image Bascule Demi-couleurs / Mode photo couleur Affiner texte ON/OFF Masquer/Afficher la barre d’outils Enregistrer configuration d’image Sélection d’appareil vidéo Plein écran ON/OFF Réduire fenêtre Menu Menu Réglages Ajustement du Contraste automatique ON/OFF Bascule Mise au point automatique ON/OFF Refaire la mise au point Ouvrir fichier image enregistré 47 Optelec L Ctrl+M Maj+M P R Ctrl+R S T V W Maj+Q Maj+Ctrl+Q Maj+W Maj+Ctrl+W Maj+E Maj+Ctrl+E Maj+R Maj+Ctrl+R Maj+T Maj+Ctrl+T Maj+Y Maj+Ctrl+Y Maj+U Maj+Ctrl+U Maj+I Maj+Ctrl+I Maj+O Maj+Ctrl+O Maj+P Maj+Ctrl+P A+Q X Ctrl+ Win+Barre d’échappement Win+F2 ClearNote HD Bascule ligne ON / OFF Renversement horizontal ON / OFF Renversement vertical ON / OFF Changer position de la fenêtre Rotation Gauche / Droite / OFF Réinitialisation de la caméra Affiner ON / OFF Bascule position barre d’outils Toujours en haut ON/OFF Bascule inversée barre d’outils ON / OFF Enregistrer Image 1 Ouvrir Image 1 Enregistrer Image 2 Ouvrir Image 2 Enregistrer Image 3 Ouvrir Image 3 Enregistrer Image 4 Ouvrir Image 4 Enregistrer Image 5 Ouvrir Image 5 Enregistrer Image 6 Ouvrir Image 6 Enregistrer Image 7 Ouvrir Image 7 Enregistrer Image 8 Ouvrir Image 8 Enregistrer Image 9 Ouvrir Image 9 Enregistrer Image 10 Ouvrir Image 10 Montrer réglages de l’application Visualiser partie en zoom Fenêtre de l’application en haut Mode plein écran ON / OFF Ajuster le grossissement Cliquez sur le bouton “-“ pour réduire le grossissement. Cliquez sur le bouton “+” pour augmenter le grossissement. Le bouton “Flèche Bas” peut être utilisé pour diminuer le grossissement et le bouton “Flèche Haut” pour l’augmenter. 48 Français Optelec ClearNote HD Le grossissement peut être également être diminué ou augmenté à l’aide de la commande d’écran tactile de pincement des doigts vers l’intérieur ou vers l’extérieur. Modes de visualisation Vous pouvez choisir d’afficher le texte en deux couleurs sélectionnables lorsque plus de contraste est nécessaire ou lorsque les combinaisons de couleurs à contraste élevé procurent une meilleure visibilité. Cliquez sur le bouton “Mode” ou sur le bouton “F5” du clavier pour basculer entre les modes Photo Couleur et Mode de lecture à contraste élevé demi-couleurs. Vous pouvez également utiliser la commande d’écran tactile de glissement de deux doigts vers le bas ou vers le haut. Demi-couleurs Vous pouvez choisir d’afficher le texte dans une variété de combinaisons de demi-couleurs à contraste élevé. Celles-ci peuvent être activées en cliquant sur le bouton “Mode” ou “F5” afin de passer au mode Contraste élevé. Pour visualiser les différentes combinaisons de couleurs d’avant et d’arrière plan, utilisez les touches Flèche gauche et Flèche droite ou la commande d’écran tactile de glissement de deux doigts vers la gauche ou la droite. Épaisseur du texte Vous pouvez ajuster l’épaisseur du texte en mode Contraste élevé pour faciliter votre lecture en appuyant sur Ctrl+Maj+Flèche Haut et Bas. Contraste automatique Lorsqu’activée, la fonction Contraste automatique tentera d’éliminer les ombres et taches lumineuses dans l’image. Cette fonction est très pratique en mode Photo couleur et lorsque les conditions d’éclairage ne sont pas idéales. Il est cependant recommandé de désactiver cette fonction lorsque l’une des modes demi-couleurs est activée et que l’éclairage est suffisant. Le raccourci pour activer ou désactiver la fonction Contraste automatique est la touche “C”. Par défaut, le contraste automatique est activé lorsque en mode Phot couleur et désactivé en mode demi-couleurs. Déplacer et changer les dimensions d’une fenêtre Les dimensions d’une fenêtre ClearNote HD peuvent être ajustées en cliquant sur les deux boutons de redimensionnement de la barre d’outils. Appuyez sur “Retour” ou “Win+F2” pour revenir aux dimensions originales ou pour passer en mode plein écran. Appuyer sur “Échappe” réduira la fenêtre. Français 49 Optelec ClearNote HD La fenêtre ClearNote HD peut être déplacée en appuyant sur “Ctrl+Win+Barre d’espacement”. Activer et calibrer les marqueurs de ligne La ligne de lecture est utilisée pour aider à l’orientation ou pour servir de référence. Appuyez sur “L” pour activer la ligne de lecture. Utilisez les touches “Page Haut” et “Page Bas” pour déplacer la ligne. Enregistrer et ouvrir des images Appuyez sur “F2” pour enregistrer une image. Appuyez sur “F3” ou “i” pour ouvrir le dossier d’images enregistrées. Les noms des images sont composés d’un préfixe et d’un nombre en ordre numérique. Le nom du dossier contenant ces images ainsi que le préfixe utilisé peuvent être définis dans l’option “Dialogue cadre enregistré”. Pour ouvrir “Dialogue cadre enregistré”, cliquez sur le bouton Réglages (Alt+Barre d’espacement) de la barre d’outils et sélectionnez “Configuration enregistrement cadre” dans le menu. Vous pourrez y définir: - Le dossier de destination - Le format du fichier d’image - Le préfixe du fichier - Le format du nombre pour les fichiers existants Refléter/renverser l’image Appuyez sur “Maj+M” pour refléter horizontalement ou renverser une image vidéo. Pour refléter l’image verticalement, appuyez sur “Ctrl+M”. Cette option est utile pour l’auto-visualisation ou lorsqu’une image se trouve inversée après que vous ayez inclinée la caméra. L’image peut également être tournée en appuyant sur la touche “R”. Activer/désactiver la mise au point automatique Le ClearNote HD est équipé d’une mise au point automatique, produisant ainsi une image claire en tout temps. Il vous est possible de désactiver la fonction de mise au point automatique. Il peut être utile de le faire pour l’écriture et la pratique d’artisanat. Pour activer ou désactiver la mise au point automatique, sélectionner l’icône de crayon dans le coin inférieur gauche de la fenêtre du ClearNote HD. Vous pouvez également appuyez sur le bouton crayon de la télécommande ou sur la touche F du clavier. Si la mise au point automatique est désactivée, vous pouvez faire la mise au point manuellement en appuyant sur G, Ctrl+clic gauche de souris, clic droit, ou en appuyant sur Shift + Focus sur la télécommande. 50 Français Optelec ClearNote HD 6. Utilisation de la télécommande Fonctions de base Ajuster le grossissement Servez-vous des deux boutons en forme de trapèze pour ajuster le grossissement. Appuyez sur le bouton “-” pour réduire le grossissement et sur le bouton “+“ pour l’augmenter. Modes de visualisation Appuyez sur ce bouton pour faire activer ou désactiver le mode demi-couleurs. Demi-couleurs Lorsque le mode contraste élevé demi-couleurs est activé, appuyez sur ce bouton pour faire défiler les 16 combinaisons de couleurs avant / arrière plan. Mise au point automatique Appuyez sur ce bouton pour activer ou désactiver la fonction de mise au point automatique. Activée Désactivée Utilisation de la touche Maj (Shift) Appuyez sur la touche Maj pour activer la fenêtre ClearNote HD. Ce bouton peut être utilisé en combinaison avec d’autres boutons de la télécommande pour d’autres fonctions. La page suivante vous informera sur les fonctions pratiquées avec la touche Maj. Français 51 Optelec ClearNote HD Fonctions avec la touche Maj (Shift) Passer d’une application à une autre Appuyez sur la touche Maj et le bouton ‘’+’’ simultanément pour passer à une autre application ouverte. Positionnement de la ligne de lecture ou de l’écran partagé Appuyez sur la touche “L” de votre clavier d’ordinateur pour ajouter une ligne de lecture à l’image du ClearNote HD. Appuyez sur “Maj” simultanément avec le bouton “Mode de visualisation” pour déplacer la ligne vers le haut ou sur “Maj” et “Demicouleurs” pour faire descendre la ligne. Si le ClearNote HD est utilisé avec un logiciel de grossissement d’écran, la fenêtre du ClearNote HD sera affichée côte à côte avec la fenêtre du grossissement d’écran, en écran partagé. Dans ce cas, vous pouvez appuyer simultanément sur “Maj” et “Mode de visualisation” pour déplacer la ligne de division d’écran vers le haut ou vers la gauche. À l’inverse, appuyer simultanément sur “Maj” et “Demi-couleurs” déplacera la ligne de division d’écran vers le bas ou vers la droite. Refaire la mise au point Appuyez sur “Maj” et le bouton “Mise au point automatique” simultanément pour faire la mise au point lorsque la mise au point automatique est désactivée. 52 Français Optelec ClearNote HD 7. ClearNote HD et logiciel de grossissement d’écran Le ClearNote HD peut être utilisé simultanément avec un logiciel de grossissement d’écran tel que SuperNova et ZoomText. L’image du ClearNote HD apparaîtra adjacente à la fenêtre agrandie, dans un écran partagé. L’image du ClearNote HD peut être agrandie ou rapetissée et placée n’importe où dans l’écran. L’écran partagé sera ajusté automatiquement. Le logiciel du ClearNote HD détecte automatiquement ZoomText ou Supernova. Démarrez d’abord votre logiciel de grossissement et ensuite l’application du ClearNote HD. Lorsque vous éteignez votre ordinateur, fermez d’abord l’application du ClearNote HD. La fenêtre À propos affichera le logiciel de grossissement d’écran détecté. Pour ouvrir la fenêtre À propos, rendez vous sur la barre d’outils, dans l’onglet Réglages (Alt+barre d’espacement) et cliquez À propos. Le support pour les logiciels de grossissement d’écran est limité à Dolphin Supernova version 14.04 ou supérieure et ZoomText version 10.01 ou supérieure. Français 53 Optelec ClearNote HD Annexe A: Sécurité Utilisez votre ClearNote HD à l’intérieur seulement. N’exposez pas votre ClearNote HD à des changements de température ou d’humidité extrême ou subits. Ces conditions peuvent endommager les pièces électroniques ou optiques de l’unité. Ne placez pas votre unité sur une surface instable. Elle risquerait de tomber et de s’endommager ou de causer des blessures à son utilisateur. Faites preuve de délicatesse lorsque vous assemblez, désassemblez et manipulez l’unité. Celle-ci contient des pièces pouvant se déplacer. Afin de prévenir les risques d’incendie, n’exposez pas votre ClearNote HD à une chaleur excessive ou à la lumière directe du soleil. N’enlevez pas de pièces du ClearNote HD. Contactez votre distributeur Optelec si votre unité nécessite un entretien. N’ouvrez pas votre unité puisque ceci annulerait la garantie. Le ClearNote HD ne contient aucune pièce dont l’entretien peut être fait par l’utilisateur. Afin de prévenir les risques de dommages électriques, maintenez votre ClearNote HD loin des liquides et produits chimiques. Manipulez votre ClearNote HD avec soin. Une manipulation brutale peut endommager ses composants internes. N’utilisez pas votre ClearNote HD près d’équipement médical inadéquatement protégé. Veuillez toujours débrancher votre unité avant de procéder à son nettoyage. Utilisez un chiffon doux et humide pour en nettoyer l’extérieur. N’utilisez pas de produits nettoyants ni de matériaux abrasifs puisque ceux-ci peuvent endommager l’unité. N’utilisez pas votre ClearNote HD à une température inférieure à 0° ou supérieure à +40° Celsius. Une utilisation du ClearNote HD différente que celle décrite dans ce manuel annulera la garantie. 54 Français Optelec ClearNote HD Annexe B: Renseignements techniques - Caméra : Modes de visualisation : - Demi-couleurs : - Grossissement Mise au point Poids Exigences PC Connexions : : : : : zoom optique 12x Mode Photo couleur Contraste élevé noir sur blanc Contraste élevé blanc sur noir 16 combinaisons de couleurs avant / arrière plan 1.3 à 40 fois sur un moniteur de 15“ Automatique avec verrouillage 1,4 kg Windows 8 ou version supérieure USB 3.0 Important: les ports USB 3.0 qui utilisent les composants Renesas µPD720200A ne sont pas supportés. Conditions d’opération : Humidité Température : : < 75%, sans condensation 0 – 40 °C Conditions de transport et d’entreposage : Humidité : < 75%, sans condensation Température : -20 – 60 °C AVERTISSEMENT: L’utilisation d’accessoires, de transducteurs et de câbles autres que ceux spécifiés, à l’exception des transducteurs et câbles vendues par le manufacturier du ClearNote HD comme pièces de remplacement, peut provoquer une augmentation des émissions ou une diminution de l’immunité du ClearNote HD. Optelec et ses partenaires déclinent toute responsabilité sur l’utilisation du produit et de ses accessoires si cette utilisation n’est pas telle que spécifiée dans ce manuel. Si vous avez d’autres questions sur le ClearNote HD, sur son entretien, son installation ou son opération, n’hésitez pas à contacter votre distributeur ou le bureau Optelec de votre région. Référez-vous aux dernières pages de ce manuel pour une liste complète des adresses d’Optelec. Français 55 Optelec ClearNote HD Annexe C: Conformité Ce produit est conforme aux exigences EMC et de sécurité des directives : EN60601-1 : 2006 EN60601-1-2 : 2007 Optelec Breslau 4 2993 LT Barendrecht Pays-Bas EU – Déclaration de conformité 2014, Barendrecht, Pays-Bas La manufacturier déclare que : Le téléagrandisseur ClearNote HD est conforme aux directives sur la sécurité de la Communauté Européenne. Cette déclaration de conformité - EU – est appuyée par des tests, selon les directives: EN 60601-1:2006 et EN 60601-1-2:2007 par un organisme notifié indépendant. Cet appareil porte le sceau d’approbation CE 56 Français Optelec ClearNote HD Manual del usuario Versión 1.1 © 2015 Optelec, los Países Bajos. Reservados todos los derechos Optelec C.P. 399 2990 AJ Barendrecht Los Países Bajos Teléfono: +31 (0)88 6783 444. Fax +31 (0)88 6783 400 Correo-E: [email protected] Internet: www.optelec.com Español 57 Optelec ClearNote HD 1. Introducción ¡Felicitaciones por la compra de su ClearNote HD, el sistema de amplificación portátil y desplegable, desarrollado por Optelec! El ClearNote HD es un sistema de amplificación con auto-foco que se conecta al ordenador. Se usa el ClearNote HD para ampliar texto, ver fotografías, el pizarrón y mucho más en la pantalla del monitor de su ordenador. También, el ClearNote HD puede ser plegado hasta un tamaño compacto para transportarlo con facilidad. El ClearNote HD ha sido desarrollado para proporcionar una mayor comodidad de uso gracias a su ergonomía cuyo diseño garantiza un rendimiento óptimo cuando se lo usa junto con el ordenador. El ClearNote HD puede ser utilizado con la pantalla táctil del ordenador, el ratón, el teclado del ordenador o el telemando. El programa ClearNote HD es compatible con Windows 8 o superior. La unidad debe ser conectada a un puerto USB 3.0. Si tiene preguntas o sugerencias con respecto al uso de este producto, por favor contacte a su proveedor o a la oficina central de Optelec, utilizando la información de contacto que aparece al final de este manual. Sus opiniones serán altamente apreciadas. ¡Esperamos que disfruten trabajar con su ClearNote HD! Acerca de este manual Debido a que estámos constantemente mejorando nuestros productos y sus funcionalidades, es posible que no sea la versión más reciente de este manual. Por favor, descargue la última versión de este manual en la página de www.optelec.com. El siguiente manual le permitirá familiarizarse con las características y el funcionamiento del ClearNote HD y el programa ClearNote HD en el ordenador. Por favor, lea atentamente este manual antes de usar su unidad. Conserve este manual en un lugar seguro para eventual referencia futura. 58 Español Optelec ClearNote HD 2. ¿Qué contiene la caja? El empaque del ClearNote HD contiene los elementos siguientes: Un estuche de transporte El sistema de amplificación ClearNote HD Una placa de base Un telemando El programa ClearNote HD y documentos Este manual del usuario Listas de las teclas de acceso directo En caso de notar que dentro del empaque falta alguno de los elementos arriba mencionados, por favor, póngase en contacto con su proveedor. 3. Instalación del programa ClearNote HD Importante: Instale el programa ClearNote HD antes de conectar la unidad al ordenador. Para usar el ClearNote HD junto con el ordenador, es necesario instalar el programa proporcionado con la unidad. Para instalar el programa: 1. Ejecute el programa de instalación; 2. Siga las instrucciones que se indican en pantalla. 3. Ahora conecte el cable USB del ClearNote HD al ordenador mediante un puerto USB 3.0, y espere hasta que Windows termine la instalación del controlador; 4. Inicie el programa haciendo clic en el icono del ClearNote HD 7 que se encuentra en el escritorio o el menú de inicio de Windows. Español 59 Optelec ClearNote HD 4. Montaje del ClearNote HD Para montar el ClearNote HD, siga los pasos a continuación: 1. Coloque la placa de base cerca del ordenador sobre una superficie estable. 2. Despliegue la unidad del ClearNote HD. 3. Coloque el ClearNote HD en el punto de conexión en la placa de base. 4. Conecte el telemando al soporte de la cámara. 5. Si ha instalado el programa ClearNote HD, conecte el cable del ClearNote HD (USB 3.0) al ordenador. Si utiliza un ordenador portátil, se puede colocarlo sobre la placa de base del ClearNote HD. Puede posicionar el ClearNote HD a la izquierda o a la derecha del ordenador portátil. Posicionar el cabezal de la cámara El ClearNote HD cuenta con una cámara flexible que se puede girar a un eje horizontal o vertical. Dirija el enfoque de la cámara hacia abajo para ver un documento de cerca. Posicione la cámara horizontalmente para ver un objeto a distancia o para mirarse a uno mismo. La cámara flexible ofrece una vista de más de 180 grados horizontalmente y verticalmente. Posiciones de la cámara El ClearNote HD vuelve automáticamente a su configuración predeterminada cuando la cámara pasa del modo de visualización de cerca al modo de visualización a distancia o viceversa. Por ejemplo, al inclinar rápidamente la cámara desde un pizarrón hacia su escritorio, sus preferencias de modo de visualización y de amplificación se aplicarán automáticamente. El ClearNote HD ofrece tres modos de visualización: Visualización de documentos, visualización a distancia y autovisualización/visualización hacia atrás. Visualización de cerca y a distancia Se puede ajustar la posición de la cámara para ver objetos de cerca o a distancia. Para ver objetos puestos a una distancia dentro de 25 cm, posicione la lente de acercamiento delante de la cámara. Para ver objetos puestos más lejos, abra la lente de acercamiento para alejarla de la cámara. 60 Español Optelec ClearNote HD 5. Barra de herramientas, comandos y funciones del ClearNote HD Iniciar el programa ClearNote HD Inicie el programa ClearNote HD haciendo clic en el icono ClearNote HD que se encuentra en el escritorio o selecciónelo en el menú de inicio de Windows. Como cualquier otro programa, el programa ClearNote HD puede cerrarse presionando las teclas Alt+F4 o haciendo clic en el botón x ubicado en la barra de herramientas del ClearNote HD. Barra de herramientas La barra de herramientas contiene los siguientes botones: Botón Descripción Alejar el zoom Acercar el zoom Alternar entre Modo de alto Contraste/Modo foto a todo color Reducir el tamaño de la ventana Aumentar el tamaño de la ventana Abrir el menú Opciones Abrir el menú Configuraciones Cerrar el programa ClearNote HD Español 61 Optelec ClearNote HD Botón Auto-foco Aparte de los botones de la barra de herramientas, un icono con un dibujo de bolígrafo aparece en la esquina inferior izquierda de la ventana ClearNote HD. Al hacer un clic en el icono activará o desactivará el Auto-Foco. Gestos en pantalla táctil El ClearNote HD puede ser controlado haciendo gestos con los dedos en la pantalla. Tenga en cuenta que los gestos en pantalla pueden provocar conflictos con los programas de amplificación, dependiente del tipo de programa o de la versión utilizada. Se permiten los siguientes gestos en pantalla táctil: Gesto Descripción Tocar una vez Clic de ratón izquierdo Tocar la ventana dos veces Activa y desactiva el modo de pantalla completa Tocar la barra de herramientas Abre el menú contextual dos veces Arrastrar la ventana Desplaza la ventana Pellizcar para cerrar Aleja el zoom Pellizcar para abrir Acerca el zoom Deslizar por izquierda/derecha Cambia la combinación de colores con dos dedos Deslizar por arriba/abajo con dos Alterna entre el modo foto y el dedos modo color falso Uso del ratón Se permiten las siguientes acciones de ratón: Acción de ratón Descripción Rueda del ratón Redimensiona la ventana Alt+Rueda del ratón Ajusta la Posición de la línea Mayúscula+Rueda del ratón Ajusta el grosor del Texto en modo de alto contraste Ctrl+Rueda del ratón Acerca y aleja el zoom Doble clic con el botón izquierdo Active y desactiva el modo de pantalla completa Un clic con el botón derecho Activa el menú contextual Un clic con el botón derecho en el Ajusta el enfoque cuando el autoicono Enfocar presionado foco está desactivado Ctrl+Un clic con el botón izquierdo Ajusta el enfoque cuando el autoen el icono Enfocar presionado foco está desactivado 62 Español Optelec ClearNote HD Lista de teclas de acceso directo Para consultar la lista de las teclas de acceso directo, presione la tecla F1 o abra el menú Ayuda mediante la barra de herramientas. Tecla de acceso directo Flecha abajo Flecha arriba Flecha izquierda Flecha derecha Ctrl+Flecha izquierda Ctrl+Flecha derecha Mayúscula+Flecha abajo Descripción Aleja el zoom Acerca el zoom Vuelve a la combinación de colores anterior Pasa a la siguiente combinación de colores Reduce el tamaño de la ventana Aumenta el tamaño de la ventana Cambia verticalmente la posición de la ventana (abajo) Mayúscula+Flecha arriba Cambia verticalmente la posición de la ventana (arriba) Mayúscula+Flecha Cambia horizontalmente la posición de la izquierda ventana (izquierdo) Mayúscula+Flecha Cambia horizontalmente la posición de la derecha ventana (derecho) Ctrl+Mayúscula+Flecha Reduce el grosor del texto abajo Ctrl+Mayúscula+Flecha Aumenta el grosor del texto arriba Página abajo Baja la posición de la línea Página arriba Sube la posición de la línea F1 Ayuda F2 Guarda la imagen F3 Abre la carpeta de imágenes F5 Alterna entre Modo de alto contraste / Modo foto a todo color F6 Activa y desactiva el suavizado del texto F9 Esconde y muestra la barra de herramientas F10 Guarda la configuración de la imagen F11 Selecciona el dispositivo de video Intro Activa y desactiva el modo de pantalla completa Escape Minimiza la ventana Espacio Abre el menú Alt+Espacio Abre el menú Configuraciones C Activa y desactiva el ajuste automático del contraste F Activa y desactiva el auto-foco Español 63 Optelec G I L Ctrl+M Mayúscula+M P R Ctrl+R S T V W Mayúscula+Q Mayúscula+Ctrl+Q Mayúscula+W Mayúscula+Ctrl+w Mayúscula+E Mayúscula+Ctrl+E Mayúscula+R Mayúscula+Ctrl+R Mayúscula+T Mayúscula+Ctrl+T Mayúscula+Y Mayúscula+Ctrl+Y Mayúscula+U Mayúscula+Ctrl+U Mayúscula+I Mayúscula+Ctrl+I Mayúscula+O Mayúscula+Ctrl+O Mayúscula+P Mayúscula+Ctrl+P A+Q X Ctrl+Win+Espacio Win+F2 64 ClearNote HD Ajusta el enfoque cuando el auto-foco está desactivado Abre la carpeta de imágenes guardadas Activa y desactiva la línea Activa y desactiva el volteo horizontal Activa y desactiva el volteo vertical Recorre las posiciones de ventana Activa y desactiva la rotación izquierda/derecha Restablece la cámara Activa y desactiva la función de Nitidez Recorre las posiciones de la barra de herramientas Activa y desactiva la posición “Siempre por encima” Activa y desactiva la barra de herramientas invertida Guarda Imagen 1 Abre Imagen 1 Guarda Imagen 2 Abre Imagen 2 Guarda Imagen 3 Abre Imagen 3 Guarda Imagen 4 Abre Imagen 4 Guarda Imagen 5 Abre Imagen 5 Guarda Imagen 6 Abre Imagen 6 Guarda Imagen 7 Abre Imagen 7 Guarda Imagen 8 Abre Imagen 8 Guarda Imagen 9 Abre Imagen 9 Guarda Imagen 10 Abre Imagen 10 Muestra las Configuraciones de la aplicación Muestra la área del zoom Desplaza la ventana de la aplicación por encima Activa y desactiva el modo de pantalla completa Español Optelec ClearNote HD Ajustar la amplificación Haga clic en el botón – para reducir la amplificación. Haga clic en el botón + para aumentar la amplificación. Al presionar el botón Flecha abajo reducirá la amplificación. Al presionar el botón Flecha arriba aumentará la amplificación. También, puede hacer los gestos de pellizcar para aumentar o reducir la amplificación. Modos de visualización El ClearNote HD le permite desplegar texto en varias combinaciones de colores cuando es necesario revelar el contraste o mejorar la visualización. Haga clic en el botón Modo (Mode) o presione la tecla F5 para alternar entre el modo foto a todo color y el modo de lectura en alto contraste. También, puede hacer los gestos de deslizar hacia arriba o abajo con dos dedos. Colores de alto contraste Se puede cambiar los colores del texto y fondo gracias a las varias combinaciones de colores de alto contraste. Haga clic en el botón Modo (Mode) o presione la tecla F5 para activar el modo de alto contraste. Para recorrer las combinaciones de colores de texto y fondo, utilice las teclas de flechas izquierda o derecha, o deslice dos dedos hacia la izquierda o derecha en la pantalla táctil. Grosor del texto Para mejorar la legibilidad de un texto en modo de alto contraste, ajuste el grosor del texto presionando las teclas Control+Mayúscula+Flecha arriba o Control+Mayúscula+Flecha abajo. Contraste automático Cuando está activada, la función Contraste automático intentará eliminar sombras y claroscuros en la imagen ClearNote HD. Esta función puede ser útil cuando las condiciones de luz no sean óptimas. Cuando uno de los modos de alto contraste está activado, y las condiciones de luz son óptimas, se recomienda desactivar esta función. La tecla de acceso directo para activar o desactivar el modo de Contraste automático es c. Por defecto, el contraste automático está activado en el modo a todo color y desactivado en el modo de alto contraste. Redimensionar y desplazar la ventana ClearNote HD Para ajustar el tamaño de la ventana ClearNote HD, haga clic en los dos botones de redimensión ubicados en la barra de herramientas. Español 65 Optelec ClearNote HD Presione la tecla Intro o las teclas Win+F2 para restablecer la ventana ClearNote HD o para pasar al modo de pantalla completa. Al presionar la tecla Escape minimizará la ventana ClearNote HD. Se puede desplazar la ventana ClearNote HD presionando las teclas Ctrl+Win+Espacio. Activar y dimensionar los marcadores de línea Los marcadores de línea se utilizan para que la orientación resulte más fácil y también sirven de guía de lectura cuando utiliza el ClearNote HD. Presione la tecla L para activar los marcadores de línea. Utilice las teclas Página arriba o Página abajo para desplazar los marcadores de línea por arriba o abajo. Guardar y abrir imágenes Para guardar una imagen, presione la tecla F2. Para abrir la carpeta de imágenes guardadas, presione la tecla F3 o la tecla I. Las imágenes se nombran usando prefijos y se clasifican en orden numérico. Es posible de configurar la carpeta en donde se guarden las imágenes con sus prefijos mediante la herramienta “Save Frame Dialog”. Para activar esta herramienta en la barra de herramientas, haga clic en el botón Configuraciones o presione las teclas Alt+Espacio. Seleccione la opción “Frame Saving Configuration” para configurar: - La carpeta de destinación - El formado de los archivos de imagen - El prefijo de los archivos - El formado numérico de los archivos existentes Voltear y reflejar las imágenes Al presionar las teclas Mayúscula+M le permitirá voltear o reflejar horizontalmente la imagen. Para reflejar la imagen verticalmente, presione las teclas Ctrl+M. Se puede seleccionar esta función cuando la inclinación de la cámara para mirarse a uno mismo, porque la auto-visualización produce una imagen invertida. También puede voltear la imagen presionando la tecla R. Activar y desactivar el auto-foco El ClearNote HD cuenta con la función de auto-foco que se usa para ajustar la nitidez de la imagen en pantalla. Al presionar el botón Auto-foco (Autofocus) hará que el 66 Español Optelec ClearNote HD ClearNote HD deje de enfocar continuamente. Se usa este modo especialmente para tareas tales como escribir, pintar o hacer manualidades. Para activar o desactivar el auto-foco, haga un clic en el icono con el dibujo de bolígrafo que se encuentra en la esquina inferior izquierda de la ventana ClearNote HD. También, puede presionar el botón con un dibujo de bolígrafo en el telemando o la tecla F en el teclado del ordenador. Si el Auto Foco esta desactivado, puede reenfocar la cámara manualmente. Presione la tecla G, CRTL+ Clic del ratón izquierdo, Clic del ratón derecho, o pulse el botón Mayúscula junto con el botón Enfocar En el telemando. Español 67 Optelec ClearNote HD 6. Uso del telemando 6.1. Funciones básicas Ajustar la amplificación Para ajustar la amplificación, presione los dos botones de forma trapezoidal. Al presionar el botón - reducirá la amplificación. Al presionar el botón + aumentará la amplificación. Modos de visualización Al presionar este botón le permitirá activar o desactivar el modo de alto contraste. Colores de alto contraste Cuando el modo de alto contraste está activado, al presionar este botón le permitirá recorrer 16 combinaciones de colores de texto y fondo. Auto-foco Presione este botón hará activar o desactivar la función del autofoco. Activar auto-foco Desactivar auto-foco Mayúscula Al utilizar este botón junto con otros botones del telemando le permitirá acceder demás opciones de funcionamiento. Lea la siguiente página para familiarizarse con las funciones del botón Mayúscula (Shift). 68 Español Optelec ClearNote HD 6.2. Funciones con la mayúscula Alternar entre los programas abiertos Presione simultáneamente el botón Mayúscula (Shift) y el botón + para alternar entre los programas abiertos. Posicionar la línea de lectura y pantalla dividida Presione la tecla L en el teclado del ordenador para añadir una línea de lectura a la imagen ClearNote HD. Para desplazar la línea de lectura por arriba, presione simultáneamente el botón Mayúscula (Shift) y el botón Modo de visualización (Viewing Mode). Para desplazar la línea de lectura por abajo, presione simultáneamente el botón Mayúscula (Shift) y el botón Alto contraste (Semi-Colors). Si usa el ClearNote Hd junto con un programa de amplificación, la pantalla se dividirá desplegando las ventanas del ClearNote HD y del programa de amplificación, una al lado de la otra. En esto caso, presione simultáneamente el botón Mayúscula (Shift) y botón Modo de visualización (Viewing Mode). Para desplazar la ventana dividida por arriba o izquierda. Presione simultáneamente el botón Mayúscula (Shift) y el botón Alto contraste (Semi-Colors) Para desplazar la ventana dividida por abajo o derecha. Reenfocar Presione el botón Mayúscula (Shift) junto con el botón Enfocar (Focus) para reenfocar la cámara cuando el auto-foco está desactivado. Español 69 Optelec ClearNote HD 7. El ClearNote HD con los programas de amplificación El ClearNote HD puede ser utilizado junto con los programas de amplificación tales como SuperNova y ZoomText. Las ventanas del ClearNote HD y del programa de amplificación se desplegarán una al lado de la otra dividiendo la pantalla. Se puede redimensionar y desplazar la ventana ClearNote HD en cualquier parte de la pantalla y se ajustará automáticamente. El programa ClearNote HD detectará automáticamente los programas ZoomText o Supernova. Inicie su programa de amplificación en primero, luego el programa ClearNote HD. Cuando quiere cerrar el programa de amplificación, asegúrese de cerrar el programa ClearNote HD en primero. La ventana Acerca de (About) indicará el programa de amplificación detectado. Para abrir esta ventana, haga clic en el botón Configuraciones ubicado en la barra de herramientas. Suporte para los programas de amplificación se limita a Dolphin Supernova versión 14.04 o superior y ZoomText versión 10.1 o superior. 70 Español Optelec ClearNote HD Apéndice A: Seguridad Utilice el ClearNote HD únicamente adentro. No exponga el ClearNote HD a cambios repentinos o extremos de temperatura o de humedad, ya que esto puede dañar sus circuitos eléctricos u ópticos. No coloque la unidad sobre una superficie inestable, ya que esto puede causar la caída del ClearNote HD lo que podría provocar serios daños a la unidad o lesiones al usuario. Para prevenir lesiones, siempre monte, desmonte y manipule la unidad con cuidado, ya que la unidad contiene piezas móviles y giratorias. No exponga el ClearNote HD a cambios extremos de temperatura o a la luz solar directa para evitar riesgos de incendios. No intente retirar ningún compuesto del ClearNote HD. Póngase en contacto con su proveedor Optelec cuando sea necesario una reparación o mantenimiento. No abra la unidad, ya que ello invalidaría la garantía. La unidad no contiene ninguna pieza cuyo mantenimiento esté a cargo del usuario. Para evitar daños eléctricos, conserve su ClearNote HD alejado de líquidos y substancias químicas. Manipule el ClearNote HD con cuidado. Una manipulación brusca dañaría los compuestos internos. No utilice el ClearNote HD cerca de dispositivos médicos con protección deficiente. Desenchufe siempre la unidad antes de limpiarla. Use un paño suave y húmedo para limpiar la parte exterior. No use agentes de limpieza o materiales abrasivos ya que dañarían la unidad. No utilice la unidad por debajo de los 0°C o por encima de 40°C. Cualquier uso del ClearNote HD distinto a lo señalado por el presente manual del usuario es causa de invalidar la garantía. Español 71 Optelec ClearNote HD Apéndice B: Características técnicas - Cámara : Modos de visualización : - Colores : - Amplificación Foco Peso Exigencias de sistema Conexiones : : : : : Zoom óptico de 12x Modo de foto a todo color Alto contraste, negro sobre blanco Alto contraste, blanco sobre negro 16 combinaciones de colores de texto y fondo 1.3 a 40 veces en un monitor de 15“ Auto-foco con bloqueo 1.4 kg Windows 8 o superior USB 3.0 Importante: Los puertos USB 3.0 que usan el chip Renesas µPD720200A no son suportados. Condiciones de funcionamiento Humedad : < 75%, no condensación Temperatura : 0 – 40 °C Condiciones de almacenamiento y de transporte Humedad : < 75%, no condensación Temperatura : -20 – 60 °C ADVERTENCIA: El uso de accesorios, transductores y cables que no sean las piezas originales de recambio de componentes internos vendidas por el fabricante del ClearNote HD pueden ocasionar un aumento en las emisiones o una disminución de la inmunidad del ClearNote HD. Bajo ningunas circunstancias, ni Optelec ni sus distribuidores asume responsabilidad alguna por el uso de este equipo o sus compuestos de manera diferente o con otros objetivos de lo descrito en este manual. Si tiene preguntas sobre como iniciar, instalar o reparar el ClearNote HD, por favor contacte a su proveedor o a la oficina central de Optelec, utilizando la información de contacto que aparece al final de este Manual. 72 Español Optelec ClearNote HD Apéndice C: Conformidad Este producto está en conformidad con las exigencias de seguridad de las siguientes normativas de la CEM: EN60601-1 : 2006 EN60601-1-2 : 2007 Optelec Breslau 4 2993 LT Barendrecht Los Países Bajos Declaración de conformidad con la UE 2014, Barendrecht, los Países Bajos El fabricante declara que: El sistema de amplificación ClearNote HD satisface todas las exigencias de las directrices y normativas establecidas con la Comunidad Europea. Esta declaración de conformidad de la UE se basa en las pruebas que se han realizado según las normativas: EN 60601-1:2006 y EN 60601-1-2:2007 por un centro independiente designado. Este dispositivo lleva el indicador de probación CE. Español 73 Optelec ClearNote HD Bedienungsanleitung Version 1.1 Copyright 2015 Optelec Alle Rechte gesichert Optelec P.O. Box 399 2990 AJ Barendrecht The Netherlands Telefon: +31 (0)88 6783 444. Fax +31 (0)88 6783 400 E-mail: [email protected] Internet: www.optelec.com 74 Deutsch Optelec ClearNote HD 1. Einleitung Herzlichen Glückwunsch zum Erwerb Ihres ClearNote HD, einem hochwertigen, tragbaren und klappbaren Bildschirmlesegerät aus dem Hause Optelec. Das ClearNote HD ist ein an den PC angeschlossenes Bildschirmlesegerät, mit dem Sie Text, Fotos oder die Tafel und vieles mehr vergrößert oder kontrastreicher betrachten können. Damit das ClearNote HD auch mobil einsetzbar ist, kann man es sehr klein zusammenklappen. Das ClearNote HD bietet ein verbessertes ergonomisches Design, das eine einfache Bedienung ermöglicht. Es kann mit der Tastatur, dem PC Touchscreen, der Maus oder einer Fernbedienung gesteuert werden. Die ClearNote HD Software ist mit Windows 8 und neuer kompatibel. Das ClearNote HD sollte über einen USB 3.0 Anschluss mit dem PC verbunden werden. Wenn Sie Fragen oder Anregungen zu Ihrem ClearNote HD haben, wenden Sie sich bitte an die Optelec Zentrale oder Ihren Händler. Die Kontaktinformationen finden Sie auf der letzten Seite dieses Handbuches. Ihr Feedback wird sehr geschätzt. Über dieses Handbuch Optelec arbeitet kontinuierlich daran seine Produkte und deren Funktionen zu verbessern, daher kann es sein, dass dieses Handbuch nicht die aktuellste Version ist. Bitte laden Sie sich die aktuellste Version dieses Handbuches auf unserer Internetseite www.optelec.com im Bereich Support herunter. Diese Bedienungsanleitung enthält Informationen über Aufbau, Bedienung und Pflege des Gerätes. Bitte lesen Sie vor Gebrauch sorgfältig alle Hinweise. Bewahren Sie diese Anleitung bitte zum Nachschlagen gut auf. Wenn Sie noch weitere Fragen haben, wenden Sie sich bitte an Ihren Händler. Deutsch 75 Optelec ClearNote HD 2. Was ist im Lieferumfang enthalten? Das ClearNote HD Paket beinhaltet folgendes: ClearNote HD Basisplatte Fernbedienung ClearNote HD Software und Dokumentation Benutzerhandbuch Liste der Tastenkombinationen Transporttasche mit Schaumstoffeinlage Sollte eines dieser Teile fehlen, wenden Sie sich bitte an Ihren Optelec Händler. 3. Installation der ClearNote HD Software Wichtig: Installieren Sie die ClearNote HD Software, bevor Sie das Gerät mit dem PC verbinden. Um das ClearNote HD verwenden zu können, müssen Sie vorher die Software wie folgt installieren: 1. Starten Sie die Setup Anwendung und folgen Sie den Anweisungen auf Ihrem Bildschirm. 2. Schließen Sie jetzt bitte das USB Kabel Ihrer ClearNote HD an einem USB 3.0 Port Ihres PCs an und warten Sie bis Windows die Treiberinstallation abgeschlossen hat. 3. Starten Sie die ClearNote HD Software, indem Sie auf das Symbol auf dem Desktop klicken oder Sie das Programm im Startmenü ausführen. 76 Deutsch Optelec ClearNote HD 4. Lernen Sie das ClearNote HD kennen Um das ClearNote HD verwenden zu können, befolgen sie bitte folgende Schritte: 1. Stellen Sie die Basisplatte in der Nähe Ihres PCs auf eine gerade Oberfläche. 2. Klappen Sie das ClearNote HD aus. 3. Platzieren Sie das ClearNote HD auf der dafür vorgesehenen Stelle auf der Basisplatte. 4. Schließen Sie die Fernbedienung am Kameraarm an. 5. Falls Sie die ClearNote HD Software schon installiert haben, können Sie nun das USBKabel des ClearNote HD mit einem USB 3.x Anschluss Ihres PC verbinden. Wenn Sie einen Laptop verwenden, können Sie diesen auf die Basisplatte Ihres ClearNote HD stellen. Das ClearNote HD kann entweder links oder rechts Ihres Laptops aufgestellt werden. Kamera positionieren Das ClearNote HD bietet Ihnen eine extrem flexible Kamera, die um eine horizontale als auch vertikale Achse gedreht werden kann. Sie können die Kamera zur Dokumentenbetrachtung auf ein Dokument oder horizontal zur Selbstoder Distanzbetrachtung ausrichten. Die Kamera kann 180° sowohl vertikal als auch horizontal geschwenkt werden. Kamera Positionen Das ClearNote HD kann für drei Kamerapositionen (Fernansicht, Nahansicht und Selbstansicht) die Einstellungen für Zoom, Kontrast und Farbschema speichern. Diese werden beim zurückkehren zur jeweiligen Position automatisch geladen. Wenn Sie beispielsweise von der Fern- in die Nahbetrachtung wechseln, werden automatisch wieder die dafür gespeicherten Werte für Zoom, Farbschema und Kontrast eingestellt. Nah- und Fernbetrachtung Die Kamera kann auf Nah- und Fernbetrachtung eingestellt werden. Bei Nahbetrachtungen bis zu 25 cm Abstand von der Kamera, klappen Sie bitte die Linse vor die Kamera. Bei Fernbetrachtungen ab 25 cm klappen Sie die Linse einfach wieder weg. Deutsch 77 Optelec ClearNote HD 5. Die ClearNoteHD Werkzeugleiste und Tastenkurzbefehle Die Software starten Starten Sie die ClearNote HD Anwendung, indem Sie das Symbol auf dem Desktop oder ClearNote HD im Startmenü ausführen. Sie können das Programm wie jedes andere Windows Programm über ”Alt+F4” oder über das “X” in der Werkzeugleiste schließen. Die Werkzeugleiste Die Werkzeugleiste beinhaltet folgende Symbole Symbol Beschreibung Vergrößerung reduzieren (Zoom-) Vergrößerung erhöhen (Zoom+) Wechseln zwischen Echt- und Lesefarben ClearNote HD Fenster verkleinern ClearNote HD Fenster vergrößern Öffnet das Menü “Optionen” Öffnet das Menü “Einstellungen” Schließen der Clear Note HD Anwendung 78 Deutsch Optelec ClearNote HD Autofokus An / Aus Taste In der unteren linken Ecke des ClearNote Fensters befindet sich das Toolbar Symbol (in Form eines Stiftes). Durch das Anklicken dieser Schaltfläche wird der Autofokus der Kamera Ein- und Ausgeschaltet. Touchscreen Gesten Sie können das ClearNote HD auch mit Touchscreen Gesten steuern. Bitte beachten Sie, dass abhängig von Ihrer Vergrößerungssoftware Probleme mit der Touchscreensteuerung auftreten können. Folgende Touchscreen Gesten werden unterstützt: Gesten Beschreibung Tippen Linker Mausklick Zweimal im Fenster tippen Vollbild ein- oder ausschalten Zweimal auf die Werkzeugleiste Kontextmenü öffnen tippen Fenster ziehen Fenster bewegen Zusammenziehen Zoom reduzieren Auseinanderziehen Zoom erhöhen Mit zwei Fingern nach links oder Lesefarbenkombination ändern rechts wischen Mit zwei Fingern nach oben oder Wechsel zwischen Echtfarben- und unten wischen Lesefarbenmodus Steuerung per Maus Folgende Mausgesten werden unterstützt Gesten Beschreibung Mausrad drehen Fenstergröße ändern Alt + Mausrad drehen Leselinienpostion einstellen Shift + Mausrad drehen Textstärke im Kontrastmodus einstellen Strg + Mausrad Vergrößerung reduzieren/erhöhen Doppelklick links Vollbild ein/aus Rechts Klick Kontextmenü Rechts Klick auf das Refokussieren wenn der Autofokus ausgeschaltete Fokus Symbol ausgeschaltet ist Strg+Links Klick auf das Refokussieren wenn der Autofokus ausgeschaltete Fokus Symbol ausgeschaltet ist Deutsch 79 Optelec ClearNote HD Liste Hotkeys Die Liste der Hotkeys bekommen Sie durch drücken der “F1” Taste oder über die Auswahl in der Werkzeugliste angezeigt. Hotkey STRG + STRG + Shift + Shift + Shift + Shift + STRG + Shift + STRG + Shift + Bild Bild F1 F2 F3 oder I F5 F6 F9 F10 F11 Enter oder Win + F2 Esc Leertaste Alt + Leertaste C F G L STRG + M Shift + M P 80 Funktion Vergrößerung reduzieren/ZoomVergrößerung erhöhen /Zoom+ Lesefarbe vorherige Lesefarbe nächste Videofenster kleiner Videofenster größer Videofenster aufwärts Videofenster abwärts Videofenster nach links Videofenster nach rechts Buchstaben dünner (Nur bei Lesefarben) Buchstaben fetter (Nur bei Lesefarben) Leselinie abwärts Leselinie aufwärts Hilfe Bild speichern Öffne Bilderablage Lesefarbe/Echtfarbe Kantenglättung Ein/Aus Menüleiste Ein/Aus Ordner der Bilderablage konfigurieren Videoquelle wählen Videofenster Vollbild Ein/Aus Minimiere Videofenster Funktionsmenü Ein/Aus Einstellmenü Ein/Aus Automatischer Kontrast Autofokus Kamera Ein/Aus Refocussieren wenn der Autofocus ausgeschaltet ist Hilfslinie Ein/Aus Spiegeln Drehen 180 Grad Videofensterposition Deutsch Optelec S T V W Shift + Q-P STRG + Shift + Q-P ClearNote HD Bildschärfe Ein/Aus Werkzeugleiste verschieben Videobild immer im Vordergrund Ein/Aus Menüleiste Positiv/Negativ Bild Schnellspeicher 1-10 Lade Bild Schnellspeicher 1-10 Einstellen der Vergrößerung Klicken Sie auf das “-“ Symbol, um die Vergrößerung zu reduzieren oder auf das “+” Symbol um die Vergrößerung zu erhöhen. Drücken Sie die “Pfeil nach unten” Taste um die Vergrößerung zu reduzieren. Drücken Sie die “Pfeil nach oben” Taste, um die Vergrößerung zu erhöhen. Bei einem Touch-Bildschirm können Sie zusätzlich durch das auseinanderbzw. zusammenziehen zweier Finger im ClearNote Fenster vergrößern und verkleinern (Zoomen). Anzeige Modi Sie können aus einer Reihe von kontrastreichen Lesefarbenkombinationen wählen, um die Textkonturen besser erkennen zu können. Klicken Sie auf das “Mode” Symbol oder drücken Sie die “F5” Taste um zwischen Echtund Lesefarbenansicht zu wechseln. Alternativ hierzu können die TouchBildschirm Geste „mit zwei Fingern nach oben oder unten wischen“ verwenden. Lesefarben wechseln Sie können aus einer Reihe von Farbkombinationen wählen. Dazu müssen Sie zuerst in die Lesefarbenansicht wechseln, indem Sie auf das “Modus” Symbol klicken oder die Taste “F5” drücken. Danach können Sie mit den Pfeiltasten links oder rechts bzw. bei einem Touchbildschirm mit zwei Fingern nach links oder rechts wischen um zwischen den einzelnen Farbschemen zu wechseln. Text Stärke Um das Lesen von Texten zu erleichtern, kann die Stärke des Textes im Lesefarbenmodus angepasst werden, indem man die Tastenkombination “Strg + Shift + Pfeil hoch oder runter” drückt. Deutsch 81 Optelec ClearNote HD Automatische Kontrasterhöhung Ist die automatische Kontrasterhöhung aktiviert, wird diese versuchen, Schatten und Lichtpunkte auf dem zu lesenden Dokument zu entfernen. Diese Funktion kann bei schlechten Lichtverhältnissen und im Vollfarbenmodus hilfreich sein. Bei guten Lichtverhältnissen und auch wenn der Lesefarbenmodus aktiviert ist, wird empfohlen diese Funktion zu deaktivieren. Das Tastenkürzel zum Ein- und Ausschalten ist “C”. Standartmäßig ist der Autokontrast im Vollfarbenmodus eingeschaltet und im Lesefarbenmodus ausgeschaltet. Änderung der ClearNote HD Fenstergröße Die Größe des ClearNote HD Fensters kann verändert werden, indem Sie auf das “Fenster verkleinern” oder “Fenster vergrößern” Symbol klicken. Drücken Sie die “Eingabetaste“ (Enter) oder “Win + F2” um die Standardeinstellung der Fenstergröße wiederherzustellen oder um in den Vollbildmodus zu wechseln. Durch Drücken der “Escape” (ESC) Taste wird sich das Fenster minimieren. Das ClearNote HD Fenster kann bewegt werden, indem man “Strg + Win + Leertaste” drückt. Aktivieren und Verschieben der Leselinie Die Leselinie kann zur besseren Orientierung und als Referenz benutzt werden. Um die Leselinie zu aktivieren, drücken Sie die “L” Taste. Um die Linie nach oben oder unten zu bewegen, drücken Sie die “Seite auf” oder “Seite ab” Taste. Speichern und Öffnen eines Fotos Drücken Sie die “F2” Taste, um ein Foto zu speichern. Den Ordner mit den gesicherten Fotos können Sie mit “F3” oder “I” öffnen. Die Bilder werden mit einem Vorsatz und einer Zahl in numerischer Reihenfolge benannt. Der Vorsatz und der Zielordner können im Speichern-Dialog gewählt werden. Um den Speichern-Dialog zu öffnen, klicken Sie auf das Symbol “Einstellungen” oder “Alt + Leertaste” und wählen Sie “Bild speichern Konfiguration” aus dem Menü. Hier können Sie folgendes einstellen: - den Zielordner. - das Datei Format - den Datei Vorsatz - das Zahlenformat für vorhandene Dateien 82 Deutsch Optelec ClearNote HD Bilder drehen oder spiegeln Mit “Shift + M” können Sie das Kamerabild horizontal spiegeln. Vertikal können Sie das Bild spiegeln, indem Sie “Strg + M” drücken. Diese Option können Sie wählen, wenn durch das Neigen der Kamera das Bild auf dem Kopf steht oder verdreht ist. Autofocus Ein- / Ausschalten Das ClearNote HD hat eine automatische Fokussierungsfunktion, wodurch Sie jederzeit ein scharfes Bild angezeigt bekommen. Wenn Sie diese Funktion abschalten, beendet das ClearNote HD die automatische Fokussierung und behält die aktuelle Fokussierung bei. Die Abschaltung ist sinnvoll wenn Sie auf dem Dokument schreiben oder zeichnen möchten oder unter der Kamera mit den Händen arbeiten. Um die Autofokusfunktion Ein und Aus zu schalten, klicken Sie mit der linken Maustaste auf das Symbol mit dem Stift in der linken unteren Ecke des ClearNote HD Fensters. Alternativ können Sie die Taste mit dem Stift auf der Fernbedienung oder die Taste “F“ auf der Tastatur drücken. Ist der Autofokus abgeschaltet können Sie manuell Fokussieren lassen, indem Sie • die Taste G auf der Tastatur drücken, • die Strg-Taste drücken + linke Maustaste auf das Fokus Symbol klicken • die rechte Maustaste drücken • oder die Tasten Shift + Focus auf der Fernbedienung drücken. Deutsch 83 Optelec ClearNote HD 6. Verwendung der Fernbedienung Grundfunktionen Einstellung der Vergrößerung Um die Vergrößerung einzustellen benutzen Sie bitte die beiden oberen trapezförmigen Tasten. Mit der Taste “-” wird Ihr Vergrößerungsfaktor reduziert. Mit der Taste “+” wird Ihr Vergrößerungsfaktor erhöht. Ist eine andere Zoombegrenzung gewünscht, so kann man in der ClearNote_startup.ini im Verzeichnis: C:\useres\optelec\appdata\local\optelec\clearnotehd den Wert “DigitalZoomLimit“ erhöhen. Anzeigemodus Wenn Sie diese Taste drücken wird der Lesefarbenmodus Einund Ausgeschaltet. Lesefarbenmodus Diese Funktion kann nur im Lesefarbenmodus benutzt werden. Wenn Sie diese Taste drücken können Sie zwischen 16 Vordergrund/Hintergrundfarben wechseln. So können Sie die für Sie beste Farbkombination auswählen. 84 Deutsch Optelec ClearNote HD Autofokus Durch Anklicken dieser Symbole wird der Autofokus Ein- oder Ausgeschaltet Autofokus ein Autofokus aus Umschalttaste (Shift) Wenn Sie die Umschalttaste drücken, wird die ClearNote HD Software sofort in den Vordergrund kommen, egal in welcher Windowsanwendung Sie sich befinden. Funktionen mit der Umschalttaste (Shift) In Verbindung mit anderen Tasten der Fernbedienung, kann mit der Shifttaste der Funktionsumfang der Fernbedienung erweitert werden. Lesen Sie im Folgenden die Shiftfunktionen. Zwischen geöffneten Windows-Anwendungen wechseln Wenn Sie die “Umschalttaste” und die “+” Taste gleichzeitig drücken, können sie zwischen offenen Windows-Anwendungen wechseln. Deutsch 85 Optelec ClearNote HD Positionieren der Leselinie oder des Bildteilungsfensters Wenn Sie die Taste “L” gedrückt haben, zeigt Ihnen die ClearNote HD Software eine Leselinie an. Die Position der Leselinie können Sie verändern, indem Sie die “Umschalt” Taste drücken und halten und gleichzeitig die Taste “Anzeige Modi” oder “Lesefarben Modus” drücken. Wenn Sie die ClearNote HD Software gleichzeitig mit einer Vergrößerungssoftware benutzen, können Sie eine Bildteilung einstellen. Hierbei verändern Sie die Größenanteile ebenfalls mit der “Umschalttaste” gefolgt von der “Anzeigen Modi” Taste um die Teilung nach oben oder links zu bewegen, oder “Semi Farben Modus” Taste um die Teilung nach unten oder rechts zu bewegen. In diesem Fall wird nicht mehr die Leselinie verschoben. Manuell Refokussieren Drücken Sie die “Umschalttaste” und die “Fokus” Taste gleichzeitig, um die Kamera zu refokussieren wenn der Autofokus ausgeschaltet ist. 86 Deutsch Optelec ClearNote HD 7. ClearNote HD und Vergrößerungssoftware Die ClearNote HD Software kann gleichzeitig mit Vergrößerungssoftware wie SuperNova oder ZoomText genutzt werden. Das Bild des ClearNote HD wird auf Ihrem Bildschirm in einem Teilungsfenster neben dem Fenster der Vergrößerungssoftware angezeigt. Die Fenstergröße der ClearNote HD Software können Sie verändern. Das Fenster kann auch beliebig positioniert werden. Die Bildschirmteilung wird automatisch konfiguriert. Die ClearNote HD Software erkennt Ihre Vergrößerungssoftware automatisch. Starten Sie Ihre Vergrößerungssoftware, bevor Sie ClearNote HD starten. Beim Ausschalten achten Sie bitte darauf, dass Sie erst die ClearNote HD Software schliessen und dann die Vergrößerungssoftware. Im Informationsfenster wird Ihnen angezeigt, welche Vergrößerungssoftware gefunden wurde. Um das Informationsfenster zu öffnen, klicken Sie in der Werkzeugleiste auf “Einstellungen” oder drücken Sie “Alt + Leertaste”. Klicken Sie dann bitte auf Informationen. Als Vergrößerungssoftware werden Dolphin SuperNova ab Version 14.04 und neuer oder ZoomText ab Version 10.1 und neuer unterstützt. Deutsch 87 Optelec ClearNote HD Anhang A: Sicherheit und Pflege Benutzen Sie das ClearNote HD nur in geschlossenen Räumen. Setzen Sie den ClearNote HD keiner Feuchtigkeit oder schnell wechselnden Temperaturen aus. Platzieren Sie den ClearNote HD nicht in der Nähe einer Heizung oder eines Heizgebläses und setzen Sie ihn nicht direkter Sonneneinstrahlung aus. Diese Bedingungen könnten der Elektronik oder der Optik des ClearNote HD schaden. Benutzen Sie den ClearNote HD nicht in der Nähe von abgeschirmten medizinischen Geräten. Er könnte elektromagnetische Inter-ferenzen verursachen. Stellen Sie den ClearNote HD nicht auf einen wackligen Untergrund. Er könnte herunter fallen und schweren Schaden nehmen oder Personen verletzen. Behandeln Sie den ClearNote HD vorsichtig. Grobe Behandlung kann Schäden im Inneren des Gerätes verursachen. Wenn Sie den ClearNote HD an einen anderen Ort bringen möchten, trennen Sie es vorher vom Computer. Der ClearNote HD besteht aus beweglichen und abnehmbaren Teilen. Bitte seien Sie vorsichtig, wenn Sie diese Teile entfernen oder ausrichten. Es besteht Verletzungsgefahr falls ein Finger oder Kleidung eingeklemmt werden. Wenn Sie Schwierigkeiten im Umgang mit dem ClearNote HD haben, wenden Sie sich an Ihren Händler. Entfernen Sie keine Teile des ClearNote HD. Wenden Sie sich an eine Optelec-Niederlassung in Ihrer Nähe. Öffnen Sie keine Komponente des ClearNote HD. Sie würden die Garantie verletzen. Jede Komponente enthält Teile, die nur von Optelec-Fachpersonal repariert werden sollten. Schalten Sie das Gerät immer aus wenn Sie es nicht benutzen. Reinigen Sie das Gerät niemals wenn es an den Strom angeschlossen oder eingeschaltet ist. Benutzen Sie ein weiches feuchtes Tuch um es von außen zu reinigen. Benutzen Sie keine Reinigungsmittel oder aggressive Materialien die das Gerät beschädigen könnten. Benutzen Sie den ClearNote HD nicht bei Temperaturen unter ±0°C oder über +40°C. Benutzen Sie den ClearNote HD anders als in dieser Anleitung beschrieben, erlischt die Garantie. 88 Deutsch Optelec ClearNote HD Anhang B: Technische Informationen - Kamera Anzeige Modi : : - Semi-Farben : - Vergrößerung Fokus Gewicht SW Voraussetzungen PC / Notebook Voraussetzungen : : : : : - Anschluss : 12x Optischer Zoom HD-Kamera Echtfarben FotoModus Hoch Kontrast Schwarz-Weiß-Modus Hoch Kontrast Weiß-Schwarz-Modus 16 Vordergrund/Hintergrund Farbkombinationen 1,3 bis 4fach mit 15“ Bildschirm Autofokus mit festem Fokus 1,4 kg Windows 8 oder höher Intel Pentium IV 1.6GHz oder höher (empfohlen) 32 MB Video RAM Minimum (64 MB empfohlen) USB 3.0 Wichtig: USB 3.0 Anschlüsse mit Renesas µPD720200A Chipsätzen werden nicht unterstützt. Arbeitsbedingungen Relative Luftfeuchte Temperatur : : <75%, keine Kondensierung 0 – 40 °C Lager & Transportbedingungen Luftfeuchte : <75%, keine Kondensierung Temperatur : -20 – 60 °C WARNUNG: Benutzen Sie nur alle von Optelec mitgelieferten Zubehörteile. Eine Nutzung anderer Kabel, Kabelverlängerungen, Netzteile, Akkus oder nicht geprüften PCs, Notebooks oder Monitore kann die EU-Richtlinien gemäß des EMV- und Sicherheitsgesetzes verletzen. Die Optelec übernimmt in diesem Falle keine Verantwortung für Fehler und verursachte Schäden. Bei Bedienungs-, Service oder Installationsfragen zu Ihrem ClearNote HD wenden Sie sich bitte an Ihren lokalen Händler oder Ihre nächstgelegene Optelec Verkaufsstelle. Der letzten Seite dieser Anleitung entnehmen Sie bitte eine Liste der Kontaktadressen. Deutsch 89 Optelec ClearNote HD Anhang C: Erklärungen Optelec GmbH Fritzlarer Str. 25 34613 Schwalmstadt ____________________________________ (Name und Adresse des Inverkehrbringers) Schwalmstadt, 01.01. 2014 ____________________________________ (Ort, Datum) EU - Konformitätserklärung (gemäß den Richtlinien des Rates der Europäischen Gemeinschaft) Hiermit erklären wir in eigener Verantwortung, dass das Produkt __________Bildschirmlesegerät ClearNote HD______________ (Gerät, Typ, Bezeichnung) mit den Chargen-Produktionsseriennummern von NH 1X01 D 0001 bis NH 1X53 D 9999 auf das sich diese Erklärung bezieht, in der EU gefertigt und eingestuft in die Produktklasse 1, mit den grundlegenden Anforderungen nach Anhang I, den Konformitätsbewertungsverfahren nach Anhang VII und den Klassifizierungskriterien nach Anhang IX, gemäß den Bestimmungen der Richtlinie des Rates der Europäischen Gemeinschaft 93/42/EWG vom 14.Juni 1993 über Medizinprodukte, novelliert durch die Richtlinie 2007/47/EG vom 05. September 2007, übereinstimmt. Diese Konformitätserklärung basiert auf den Prüfungen durch unabhängige Prüfinstitute mit den nachfolgend aufgeführten Normen: EN 60601-1 : 2006 EN 60601-1-2 : 2007 (EN 55011, EN61000-4-2, EN61000-4-3, EN61000-4-4, EN61000-4-6,EN61000-4-8) (Firmenstempel) _______________________________ (Rechtsverbindliche Unterschrift des Inverkehrbringers) Werner Schwegler Dieses Gerät besitzt das gültige CE-Etikett. 90 Deutsch Optelec ClearNote HD Optelec Offices Worldwide | Optelec Kantoren | Les Bureaux Internationaux d’Optelec | Optelec en el Mundo | Optelec Weltweit Optelec Headquarters: Optelec BV Breslau 4 2993 LT Barendrecht, The Netherlands T: +31 (0)88 6783 444 www.optelec.eu Optelec Offices: Optelec NV Baron Ruzettelaan 29 8310 Bruges Belgium T: +32 (0)50 35 7555 www.optelec.be Optelec Nederland BV Breslau 4 2993 LT Barendrecht The Netherlands T: +31 (0)88 6783 555 www.optelec.nl Optelec Canada 1832, Boulevard Marie-Victorin Longueuil, QC J4G 1Y9 Canada T: +1 (0)450 677-1171 www.optelec.ca Optelec UK 2 Millfield House, Woodshots Meadow, Watford WD18 8YX United Kingdom T: +44 (1923) 23 13 13 www.optelec.co.uk Optelec GmbH Fritzlarer Strasse 25 34613 Schwalmstadt, Germany T: +49 (0)6691 96170 www.optelec.de Optelec US Ltd 3030 Enterprise Court Suite C, Vista, CA 92081 U.S.A. T: +1 (800) 826 4200 www.optelec.com Deutsch 91 Optelec Page | Pagina | Pàgina | Seite 92 ClearNote HD