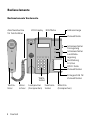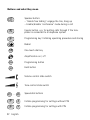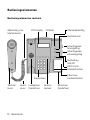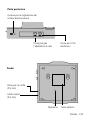
1
HUMANTECHNIK
flashtel
comfort II
D
Bedienungsanleitung
Spezialtelefon
Seite 2
GB
Operating Instructions
Special telephone
Page 26
F
Mode d’emploi
Téléphone spécial
Page 50
NL
Gebruiksaanwijzing
Speciale telefoon
Pagina 74
I
Istruzioni per l’uso
Telefono speciale
Pagina 98
E
Instrucciones de servicio
Teléfono especial
Página 122
Sicherheitshinweise
Damit Sie Ihr Telefon schnell in Betrieb nehmen und sicher
nutzten können, lesen Sie bitte unbedingt die nachfolgenden
Sicherheitshinweise und das Kapitel „Inbetriebnahme“.
•
Stellen Sie das Gerät auf eine rutschfeste Unterlage.
•
Verlegen Sie die Anschlusskabel unfallsicher.
•
Setzen Sie das Telefon nie folgenden Einflüssen aus:
− Wärmequellen
− direkter Sonneneinstrahlung
− Feuchtigkeit
− anderen elektrischen Geräten
•
Schützen Sie Ihr Telefon vor Nässe, Staub, aggressiven
Flüssigkeiten und Dämpfen.
•
Schließen Sie die Anschlusskabel nur an den vorgesehenen
Dosen/Buchsen an.
•
Schließen Sie nur zugelassenes Zubehör an.
•
Niemals
– das Telefon selbst öffnen!
– das Telefon an den Anschlusskabeln tragen!
– telefonieren bei Gewitter!
2 Deutsch
Sicherheitshinweise
Inbetriebnahme
Verpackungsinhalt
Anschluss des Telefons
Bedienelemente
Bedienelemente Vorderseite
Bedienelemente Rückseite/Unterseite
Tasten und ihre Bedeutung
Telefonieren
Anrufen
Anruf annehmen
Gerätelautsprecher bei einem Gespräch nutzen
Wahlwiederholung der zuletzt gewählten Telefonnummer
Wahlwiederholung der letzten 5 gewählten Telefonnummern
Löschen der letzten gewählten Telefonnummern
Löschen aller gewählten Telefonnummen
Einstellung der Hörerlautstärke/Hoch- und Tieftonregelung
Stummschaltung (HOLD)
Wahlpause einfügen (PABX)
Rückfragetaste (HOOK/FLASH)
Zielwahltasten
Zielwahltasten mit Rufnummern belegen
Mit Zielwahltasten wählen
Zielwahltasten löschen
Alle Zielwahltasten löschen
Telefonbuch
Benutzen des Telefonbuchs
Name/Nummer speichern
Anruf mit dem Telefonbuch
Telefonbucheintrag löschen
Alle Telefonbucheinträge löschen
Rufnummernanzeige
Funktionsweise
Einträge ablesen und anrufen
Einträge löschen
Alle Einträge löschen
Seite 2
5
5
6
7
8
9
9
9
9
10
10
10
11
11
11
11
12
12
13
13
14
14
15
15
15
16
16
17
17
Deutsch 3
Einstellungen - Rufsignalisierung
Blitzlicht ein-/ausschalten
Rufsignal ein-/ausschalten
Lautstärke des Rufsignals einstellen
Tonart des Rufsignals
Einstellungen - Ton-/Pulswahl - Hook/Flash - PABX - PIN
Ton-/Pulswahl
Hook/Flash
Wahlpause - PABX
PIN (Persönlicher Code)
Zusätzliche Anschlüsse
Headset-Anschluss
Kopfhöreranschluss
Reset
Stromausfall-Überbrückung
Wenn das Telefon nicht funktioniert
Allgemein
Wenn es klingelt wird keine Nummer angezeigt
Das Telefon funktioniert nicht
Anhang
Wartung und Pflege
Garantie
CE-Zeichen
Entsorgung
Technische Daten
4 Deutsch
18
18
19
19
20
20
21
21
22
22
22
23
23
23
24
24
24
25
25
25
Inbetriebnahme
Verpackungsinhalt
Folgende Teile sind im Lieferumfang enthalten:
•
•
•
•
•
•
•
•
Telefongrundgerät
Telefonhörer
Hörerschnur
Telefonkabel
Garantiekarte
Bedienungsanleitung
Einlegeschild Zielwahl
Steckernetzteil
Anschluss des Telefons
1.
2.
3.
Stecker der Hörerschnur (Spiralkabel) in die Buchse mit dem
Hörersymbol an der linken Seite des Gerätes und in den
Telefonhörer einstecken.
Kleineren Stecker des Telefonkabels in die Buchse „LINE“ stecken
(Geräterückseite). Den größeren Stecker in die Anschlussdose
Ihres Telefonanschlusses einstecken.
Steckernetzteilkabel in die Buchse „AC 9 V“ einstecken.
Das Steckernetzteil in eine 230 V-Netzsteckdose einstecken.
Achtung!
Platzieren Sie das Telefon nicht in der Nähe von z.B. Fernsehern,
Bildschirmen, Lüftern usw., um das Störungsrisiko so klein wie möglich
zu halten. Stellen Sie das Telefon nicht direkt in die Sonne oder nahe
an eine Wärmequelle.
Verwenden Sie nur das Original-Telefonkabel oder ein vergleichbares
mit internationaler Belegung.
Deutsch 5
Bedienelemente
Bedienelemente Vorderseite
Anschlussbuchse
für Telefonhörer
LCD-Display
Blitzfläche
Statusanzeige
Zielwahltaste
Schiebeschalter
Tonregelung
Schiebeschalter
Lautstärkeregelung
Verstärkung
Ein/Aus
HOLD-Taste
Zielwahltasten
Wähltasten
Telefonhörer
6 Deutsch
Hörerschnur
Lautsprecher
(Freisprechen)
Funktionstasten
Einlegeschild für
Zielwahltasten
Mikrofon
(Freisprechen)
Bedienelemente Rückseite
Schiebeschalter für
Rufton-Klingelstärke
Anschlussbuchse
Steckernetzteil
Anschlussbuchse
Telefonkabel
Bedienelemente Unterseite
Headset-Anschluss
(2,5 mm)
Audio-Ausgang
(3,5 mm)
Reset
Batteriefach
Deutsch 7
Tasten und ihre Bedeutung
Lautsprecher-Taste:
– »Freisprechen«: Leitung belegen, Leitung trennen
– »Mithören« ein-/ausschalten während eines Gespräches
R
Rückfrage-Taste z.B. zum Vermitteln von Gesprächen bei
Anschluss des Telefons an eine Telefonanlage
P
Programm-Taste: Bedienprozedur einleiten und abspeichern
Wahlwiederholung
M♥
Zielwahltaste
Verstärkung Ein / Aus
Store
Programmier-Taste
Hold
Hold-Taste
Schiebeschalter Lautstärkeeinstellung
Schiebeschalter Tonregelung
M1 .... M6
Zielwahltasten
P
#
Programmierung für Einstellungen ohne PIN einleiten
P
*
Programmierung für Einstellungen mit PIN einleiten
8 Deutsch
Telefonieren
Anrufen
1. Heben Sie den Telefonhörer ab oder drücken Sie die Taste
.
2. Geben Sie die Telefonnummer ein.
3. Um das Telefonat zu beenden, legen Sie den Telefonhörer auf bzw.
drücken erneut die Taste
.
Anruf annehmen
1. Das Telefon klingelt.
2. Heben Sie den Telefonhörer ab oder drücken Sie die Taste
.
3. Um das Telefonat zu beenden, legen Sie den Telefonhörer auf bzw.
drücken erneut die Taste
.
Gerätelautsprecher bei einem Gespräch nutzen
1. Drücken Sie die Taste
um während eines Gespräches den
Gerätelautsprecher einzuschalten. Der Lautsprecher des Hörers bleibt
dabei eingeschaltet.
2. Sie können nun den Hörer auflegen und das Telefongespräch über den
Gerätelautsprecher und das eingebaute Mikrofon weiterführen.
3. Um den Gerätelautsprecher wieder auszuschalten, drücken Sie die
Taste
.
Anmerkung:
Ein Gespräch wird beendet, wenn Sie die Taste
der Hörer aufgelegt ist.
drücken, während
Wahlwiederholung der zuletzt gewählten Telefonnummer
1. Heben Sie den Telefonhörer ab.
2. Durch Drücken der Taste
wird die zuletzt gewählte Rufnummer
angewählt.
Deutsch 9
Wahlwiederholung der letzten 5 gewählten Telefonnummern
Die letzten 5 gewählten Telefonnummern werden automatisch im Telefon
abgespeichert.
1. Drücken Sie die Taste
.
2. Blättern Sie mit den beiden Tasten
*
und
#
zwischen den Einträgen.
3. Wird die gewünschte Telefonnummer im Display angezeigt, heben Sie den
Telefonhörer ab.
Die ausgewählte Rufnummer wird angewählt.
Anmerkung:
Die Auswahl der Telefonnummern muss bei aufgelegtem Telefonhörer durchgeführt werden.
Löschen der letzten gewählten Telefonnummern
1. Drücken Sie die Taste
.
2. Blättern Sie mit den beiden Tasten
*
und
#
zwischen den Einträgen.
3. Drücken Sie die Taste R , um den gewählten Eintrag zu löschen.
Im Display des Telefons wird „OK ?“ angezeigt. Drücken Sie die
Taste P zur Bestätigung.
Löschen aller gewählten Telefonnummern
1. Drücken Sie die Taste
.
2. Halten Sie die Taste R
für 2 Sekunden gedrückt. Im Display des
Telefons wird „OK ?“ angezeigt. Drücken Sie die Taste
P zur
Bestätigung.
10 Deutsch
Einstellung der Hörerlautstärke/Hoch-/Tieftonregelung
Die Hörerlautstärke kann während eines Telefonats mit dem sich auf der
rechten Seite des Telefons befindlichen „Volume“-Schiebeschalter eingestellt werden.
Mit der Taste
kann eine zusätzliche Verstärkung eingeschaltet werden.
Bei aktivierter zusätzlicher Verstärkung wird eine Lautstärke des Telefonhörers von bis zu 30 dB erreicht. Wenn die Verstärkung eingeschaltet ist,
leuchtet die Statusanzeige und zusätzlich das Symbol
im Display des
Telefons. Die Verstärkung bleibt auch bei aufgelegtem Hörer eingeschaltet.
Durch erneutes Drücken der Taste
wird die Zusatzverstärkung ausgeschaltet.
Mit der Tonkontrolle (Schiebeschalter auf der rechten Gehäuseseite) können
Sie zusätzlich hohe bzw. tiefe Töne um zusätzlich 10 dB erhöhen.
Stummschaltung (HOLD)
Diese Funktion ermöglicht Ihnen eine vorübergehende Unterbrechung des
Gesprächs, ohne das Telefonat zu beenden.
Durch Drücken der Taste Hold wird das Gespräch vorübergehend
unterbrochen.
Wahlpause einfügen (PABX)
Durch Drücken auf die Taste
unterbrochen.
wird der Wählvorgang für 1-6 Sekunden
Rückfragetaste (Hook/Flash)
Diese Funktion wird benötigt, um bestimmte T-Net Leistungsmerkmale zu
aktivieren.
Durch Druck auf die Taste R wird die Telefonleitung für eine bestimmte
Zeit unterbrochen. Im Auslieferungszustand des Telefons ist der Wert von
260 ms eingestellt.
Deutsch 11
Zielwahltasten
Zielwahltasten mit Rufnummern belegen
Die 6 Zielwahltasten und die VIP-Taste
Telefonnummern belegt werden.
M♥ können mit beliebigen
1. Drücken Sie die Taste P und danach die Taste # .
2. Geben Sie den Code „01“ und die gewünschte „Telefonnummer“ ein.
Die Telefonnummer wird der Taste M1 zugeordnet.
3. Geben Sie den Code „02“ und die gewünschte „Telefonnummer“ ein.
Die Telefonnummer wird der Taste M2 zugeordnet.
4. Geben Sie den Code „03“ und die gewünschte „Telefonnummer“ ein.
Die Telefonnummer wird der Taste M3 zugeordnet.
5. Geben Sie den Code „04“ und die gewünschte „Telefonnummer“ ein.
Die Telefonnummer wird der Taste M4 zugeordnet.
6. Geben Sie den Code „05“ und die gewünschte „Telefonnummer“ ein.
Die Telefonnummer wird der Taste M5 zugeordnet.
7. Geben Sie den Code „06“ und die gewünschte „Telefonnummer“ ein.
Die Telefonnummer wird der Taste M6 zugeordnet.
8. Geben Sie den Code „07“ und die gewünschte „Telefonnummer“ ein.
Die Telefonnummer wird der Taste M♥ zugeordnet.
9. Drücken Sie die Taste P , um die Änderungen zu speichern.
Geben Sie erneut einen Code ein oder drücken Sie die Taste P , um das
Menü Einstellungen zu verlassen.
Mit Zielwahltasten wählen
Heben Sie dazu den Telefonhörer ab oder drücken Sie die Taste
.
Durch Druck auf eine der Tasten M1 .... M6 oder M♥ wird die gespeicherte
Telefonnummer gewählt.
12 Deutsch
Zielwahltasten löschen
1.
2.
Durch Druck auf eine der Tasten M1 .... M6 oder M♥ wird die
gespeicherte Telefonnummer im Display angezeigt.
Drücken sie die Taste R , um den gewählten Eintrag zu löschen.
Im Display des Telefons wird „OK ?“ angezeigt.
Drücken sie die Taste P
zur Bestätigung.
Alle Zielwahltasten löschen
1.
2.
Durch Druck auf eine der Tasten M1 .... M6 oder M♥ wird die
gespeicherte Telefonnummer im Display angezeigt.
Drücken sie die Taste R für 2 Sekunden, um alle Zielwahltasten
zu löschen. Im Display des Telefons wird „OK ?“ angezeigt.
Drücken sie die Taste P
zur Bestätigung.
Deutsch 13
Telefonbuch
Benutzen des Telefonbuchs
Im Telefonbuch können Namen und Telefonnummern gespeichert werden.
Wenn eine Telefonnummer gespeichert ist, kann der Anruf mit wenigen
Tastendrücken erfolgen.
Es können 30 Telefonnummern im Telefonbuch gespeichert werden.
Jede Telefonnummer kann bis zu 20 Zahlen enthalten.
Name / Nummer speichern
Um neue Einträge in das Telefonbuch einzutragen, gehen Sie wie folgt vor:
1. Drücken Sie die Taste P und danach die Taste # .
2. Geben Sie den Code „80“ für einen neuen Eintrag ein.
3. Geben Sie die gewünschte Telefonnummer mittels der Zifferntasten ein.
Mit der Taste R können Sie jeweils die letzte Ziffer wieder löschen.
4. Drücken Sie die Taste P , um die Telefonnummer zu speichern und
um mit dem Namenseintrag zu beginnen.
5. Durch mehrmaliges Drücken einer Taste können Sie den gewünschten
Buchstaben auswählen (siehe untenstehende Tabelle). Mit der Taste R
können Sie jeweils den letzten Buchstaben wieder löschen.
6. Drücken Sie die Taste P , um die Programmierung abzuschließen.
Taste
1
2
3
4
5
6
7
8
9
0
Buchstaben/Zeichen
1
A
B
D
E
G
H
J
K
M
N
P
Q
T
U
W
X
_
0
14 Deutsch
C
F
I
L
O
R
V
Y
2
3
4
5
6
S
8
Z
7
9
Anruf mit dem Telefonbuch
1.
2.
3.
4.
Drücken Sie die Taste P und danach die Taste # .
Geben Sie den Code „81“ ein, um das Telefonbuch zu öffnen.
Blättern Sie mit den beiden Tasten
und # zwischen den Einträgen.
Heben Sie den Telefonhörer ab oder drücken Sie die Taste
, um die
ausgewählte Rufnummer anzuwählen.
*
Telefonbucheintrag löschen
1. Blättern Sie wie unter Punkt „Anruf mit dem Telefonbuch“ beschrieben
bis zum gewünschten Eintrag.
2. Drücken Sie die Taste R , um den gewählten Eintrag zu löschen.
Im Display des Telefons wird „OK ?“ angezeigt.
Drücken Sie die Taste P zur Bestätigung.
Alle Telefonbucheinträge löschen
1. Öffnen Sie wie unter Punkt „Anruf mit dem Telefonbuch“ beschrieben
das Telefonbuch.
2. Halten Sie die Taste R für 2 Sekunden gedrückt. Im Display des
Telefons wird „OK ?“ angezeigt.
Drücken Sie die Taste P zur Bestätigung.
Deutsch 15
Rufnummernanzeige
Funktionsweise
Die Rufnummer des Anrufers wird im Display des Telefons angezeigt.
Das Telefon unterstützt beide gängigen Systeme (DTMF/ FSK).
Ihr Telefon speichert die letzten 5 eingegangenen Rufnummern automatisch.
Ist der Speicher voll, wird der älteste Eintrag gelöscht.
Achtung!
Die Rufnummernanzeige funktioniert nur, wenn dieser Dienst
von Ihrer Telefongesellschaft unterstützt wird.
Bitte fragen Sie bei Ihrer Telefongesellschaft nach.
Einträge ablesen und anrufen
Die letzten 5 erkannten Telefonnummern werden automatisch im Telefon
abgespeichert.
1. Drücken Sie die Taste R .
2. Blättern Sie mit den beiden Tasten
und # zwischen den Einträgen.
(Es werden nur die ersten 10 Ziffern der Telefonnummer angezeigt.
Mit der Taste
können Sie den Rest der Telefonnummer einsehen.
Durch weiteres Drücken der Taste
können Sie Datum und Uhrzeit
des Anrufes abrufen).
3. Wird die gewünschte Telefonnummer im Display angezeigt, heben Sie
den Telefonhörer ab oder drücken Sie die Taste
.
Die ausgewählte Rufnummer wird angewählt.
*
Anmerkung:
Die Auswahl der Telefonnummern muss bei aufgelegtem Telefonhörer
durchgeführt werden.
16 Deutsch
Einträge löschen
1. Blättern Sie wie unter Punkt „Einträge ablesen und anrufen“ beschrieben
bis zum gewünschten Eintrag.
2. Drücken Sie die Taste R , um den gewählten Eintrag zu löschen.
Im Display des Telefons wird „OK ?“ angezeigt.
Drücken Sie die Taste P zur Bestätigung.
Alle Einträge löschen
1. Öffnen Sie wie unter Punkt „Einträge ablesen und anrufen“ beschrieben
das Telefonbuch.
2. Halten Sie die Taste R für 2 Sekunden gedrückt. Im Display des
Telefons wird „OK ?“ angezeigt.
Drücken Sie die Taste P zur Bestätigung.
Deutsch 17
Einstellungen - Rufsignalisierung
Blitzlicht ein-/ausschalten
Sie können sich ankommende Telefonanrufe zusätzlich über ein Blitzlicht
anzeigen lassen. Das Blitzlicht wird auf der Rückseite des Telefons abgestrahlt.
1. Drücken Sie die Taste P und danach die Taste # .
2. Geben Sie nun einen der beiden folgenden Codes ein:
a. Code „40“ schaltet das Blitzlicht aus.
b. Code „41“ schaltet das Blitzlicht ein, dabei leuchtet das Blitz-Symbol
im Display des Telefons.
3. Drücken Sie die Taste P , um die Einstellungen zu speichern.
4. Geben Sie erneut einen Code ein oder drücken Sie die Taste P ,
um das Menü Einstellungen zu verlassen.
Anmerkung:
Im Falle eines Stromausfalles funktioniert das Blitzlicht nicht!
Rufsignal ein/ausschalten
1. Drücken Sie die Taste P und danach die Taste # .
2. Geben Sie nun einen der beiden folgenden Codes ein:
a. Code „20“ schaltet das Rufsignal aus.
b. Code „21“ schaltet das Rufsignal ein.
3. Drücken Sie die Taste P , um die Einstellungen zu speichern.
4. Geben Sie erneut einen Code ein oder drücken Sie die Taste P
um das Menü Einstellungen zu verlassen.
18 Deutsch
,
Lautstärke des Rufsignals einstellen
Die Klingellautstärke des Telefons kann mit einem Schiebeschalter auf der
Rückseite des Telefons eingestellt werden.
Tonart des Rufsignals
Sie können zwischen 7 unterschiedlichen akustischen Rufsignalen wählen.
1. Drücken Sie die Taste P und danach die Taste # .
2. Geben Sie den Code „23“ ein. Im Display wird die letzte
Signaleinstellung angezeigt.
3. Mit den Zifferntasten 1-8 können Sie das Rufsignal verändern.
4. Drücken Sie die Taste P , um die Einstellungen zu speichern.
5. Geben Sie erneut einen Code ein oder drücken Sie die Taste P ,
um das Menü Einstellungen zu verlassen.
Deutsch 19
Einstellungen - Ton/Pulswahl - Hook/Flash - PABX - PIN
Ton/Pulswahl
1. Drücken Sie die Taste P und danach die Taste # .
2. Geben Sie nun einen der drei folgenden Codes ein:
a. Code „10“ für Tonwahl
b. Code „11“ für Pulswahl (33% M/B)
c. Code „12“ für Pulswahl (40% M/B)
3. Drücken Sie die Taste P , um die Einstellungen zu speichern.
4. Geben Sie erneut einen Code ein oder drücken Sie die Taste P ,
um das Menü Einstellungen zu verlassen.
Anmerkung:
Die meisten Telefonanschlüsse arbeiten heutzutage mit dem
Tonwahlverfahren.
Hook/Flash
Sie können die Rückfragetaste auf unterschiedlich lange Flashzeiten einstellen.
Die Flasheinstellung ist ggf. nur dann zu ändern, wenn Sie das Telefon an einer
Telefonanlage betreiben (siehe Bedienungsanleitung der Telefonanlage).
1. Drücken Sie die Taste P und danach die Taste * .
2. Geben Sie den vierstelligen Geräte-PIN „XXXX“ ein
(PIN-Code im Auslieferungszustand des Telefons „0000“).
3. Sie können nun einen der folgenden Codes eingeben:
a. Code „700“ stellt die Flashzeit auf „90 ms“,
b. Code „701“ stellt die Flashzeit auf „110 ms“,
c. Code „702“ stellt die Flashzeit auf „130 ms“,
d. Code „703“ stellt die Flashzeit auf „260 ms“ oder
e. Code „704“ stellt die Flashzeit auf „600 ms“ ein.
4. Drücken Sie die Taste P , um die Änderungen zu speichern.
5. Geben Sie erneut einen Code ein oder drücken Sie die Taste P ,
um das Menü Einstellungen zu verlassen.
20 Deutsch
Wahlpause - PABX
Sie können die Wahlpause unterschiedlich lang einstellen (1-6 Sekunden).
Die Wahlpause ist ggf. nur dann zu ändern, wenn Sie das Telefon an einer
Telefonanlage betreiben (siehe Bedienungsanleitung der Telefonanlage).
1. Drücken Sie die Taste P und danach die Taste * .
2. Geben Sie den vierstelligen Geräte-PIN „XXXX“ ein
(PIN-Code im Auslieferungszustand des Telefons „0000“).
3. Geben Sie den Code „720“ ein.
4. Geben Sie die Wahlpause mit den Zifferntasten 1-6 ein.
5. Drücken Sie die Taste P , um die Änderungen zu speichern.
6. Geben Sie erneut einen Code ein oder drücken Sie die Taste P ,
um das Menü Einstellungen zu verlassen.
PIN (Persönlicher Code)
Einige Funktionen Ihres Telefons sind über einen PIN geschützt.
Der PIN ist im Auslieferungszustand des Telefons auf „0000“ eingestellt.
Wenn Sie den PIN ändern, merken Sie sich die Nummer gut.
1. Drücken Sie die Taste P und danach die Taste * .
2. Geben Sie den vierstelligen Geräte-PIN „XXXX“ ein
(PIN-Code im Auslieferungszustand des Telefons „0000“).
3. Geben Sie den Code „600“ ein.
4. Geben Sie den neuen vierstelligen PIN „XXXX“ ein.
5. Zur Bestätigung geben Sie den vierstelligen PIN „XXXX“ erneut ein.
6. Nach Eingabe der letzten Zahl wird der PIN automatisch gespeichert.
7. Geben Sie erneut einen Code ein oder drücken Sie die Taste P ,
um das Menü Einstellungen zu verlassen.
Deutsch 21
Zusätzliche Anschlüsse
Headset-Anschluss
Standard-Headset-Anschluss mit einer 2,5 mm-Klinkenbuchse.
(z.B. Anschluss eines PL-100/PL-200)
Kopfhöreranschluss
Kopfhörerausgang zum Anschluss eines Kopfhörers, Teleschlinge oder
ähnlichem.
Reset
Mittels eines Tasters auf der Geräteunterseite können Sie das Telefon auf
den werkseitigen Auslieferungszustand zurücksetzten. Halten Sie hierzu
diese Taste für 2 Sekunden gedrückt.
Dies kann vor allem dann sinnvoll sein, wenn Sie den Geräte-PIN des
Telefons vergessen haben.
Auslieferungszustand:
Lichtblitz:
Zielwahltasten:
VIP-Taste:
Speicher Wahlwiederholung:
Speicher Rufnummernanzeige (CLIP):
Telefonbuch:
Hook/Flash:
Wahlpause:
Klingelton:
Ton/Pulswahl:
PIN-Code:
22 Deutsch
EIN
leer
leer
leer
leer
leer
260 ms
3s
1
Tonwahl
0000
Stromausfallüberbrückung
Während eines Stromausfalles können Sie weiterhin Telefonate führen.
Lediglich der Lichtblitz hat keine Funktion.
Soll die Displayanzeige auch während eines Stromausfalles betriebsbereit
sein, können Sie 5 Batterien (Micro oder AAA) in das Telefon einsetzen.
Anmerkung:
Während eines Stromausfalles hat der Lichtblitz des Telefons auch bei
eingesetzten Batterien keine Funktion.
Bei leeren Batterien bzw. bei nicht eingesetzten Batterien wird im Display
das Batterie-Leer-Symbol
angezeigt.
Wenn das Telefon nicht funktioniert
Allgemein
Vergewissern Sie sich, dass das Telefonkabel unbeschädigt und korrekt eingesteckt ist. Entfernen Sie eventuelle Zusatzausrüstung, Verlängerungskabel
und andere Telefone. Wenn das Telefon danach funktioniert, wird der Fehler
durch ein anderes Gerät verursacht.
Versuchen Sie das Telefon z.B. bei einem Nachbarn anzuschließen. Wenn
das Gerät dort funktioniert, ist Ihr Telefonanschluss eventuell gestört. Rufen
Sie die Störungsstelle an.
Wenn es klingelt, wird keine Nummer angezeigt
•
•
•
Die Rufnummernanzeige muss von Ihrem Netzbetreiber unterstützt
werden.
Wenn keine Rufnummer im Display angezeigt wird, bedeutet dies, dass
keine Rufnummerninformation vorhanden ist, oder der Anrufer eine
geheime Telefonnummer besitzt. Es kann sich aber auch um eine
Vermittlungsstelle handeln.
Bei Anschluss an einer Nebenstelle funktioniert die Rufnummernanzeige normalerweise nicht.
Deutsch 23
Das Telefon funktioniert nicht
•
•
•
•
Vergewissern Sie sich, dass das Netzteil korrekt im Telefon und in der
Steckdose eingesteckt ist.
Vergewissern Sie sich, dass das Telefonkabel korrekt im Telefon und in
der Telefonsteckdose eingesteckt ist.
Schließen Sie ein anders Telefon an Ihren Telefonanschluss an.
Wenn dieses Telefon funktioniert, ist Ihr Telefon vermutlich fehlerhaft.
Verwenden Sie nur das Originalkabel oder ein Telefonkabel mit internationaler Belegung.
Anhang
Wartung und Pflege
Das Telefon ist wartungsfrei. Bei Verschmutzung sollten Sie das Gerät gelegentlich mit einem weichen, angefeuchteten Tuch reinigen. Verwenden Sie
niemals Alkohol, Verdünner oder andere organische Lösungsmittel.
Das Telefon sollte nicht über längere Zeit direkter Sonneneinstrahlung ausgesetzt werden und darüber hinaus vor großer Hitze, Feuchtigkeit oder starker mechanischer Erschütterung geschützt werden.
Garantie
Das Telefon weist eine hohe Betriebssicherheit auf. Sollten trotz sachgerechter Montage und Bedienung Störungen auftreten, setzen Sie sich bitte
mit ihrem Fachhändler in Verbindung oder wenden Sie sich direkt an den
Hersteller.
Die Garantieleistung umfasst die kostenlose Reparatur sowie den kostenlosen Rückversand. Vorraussetzung dafür ist das Einschicken in der Originalverpackung, werfen Sie diese also nicht weg. Die Garantie verfällt bei
Schäden, die durch unsachgemäße Behandlung oder Reparaturversuchen
von nicht autorisierten Personen (Zerstörung des Gerätesiegels) herbeigeführt wurden. Garantiereparaturen werden nur bei Einsendung der ausgefüllten Garantiekarte des Fachhändlers bzw. des Originalgarantiescheins bei
Direktbezug durchgeführt. Die Gerätenummer muss in jedem Fall mit angegeben werden.
24 Deutsch
CE-Zeichen
Dieses Gerät erfüllt die Anforderungen der EU-Richtlinie: 1999/5/EG
Richtlinie über Funkanlagen und Telekommunikationsendeinrichtungen und
die gegenseitige Anerkennung ihrer Konformität. Die Konformität mit der
o. a. Richtlinie wird durch das CE-Zeichen auf dem Gerät bestätigt.
Entsorgung
Entsorgung von gebrauchten elektrischen und elektronischen Geräten (anzuwenden in den Ländern der Europäischen Union und anderen europäischen
Ländern mit einem separaten Sammelsystem für diese Geräte).
Das Symbol auf dem Produkt oder seiner Verpackung weist darauf hin, dass
dieses Produkt nicht als normaler Haushaltsabfall zu behandeln ist, sondern
an einer Annahmestelle für das Recycling von elektrischen und elektronischen Geräten abgegeben werden muss. Durch Ihren Beitrag zum korrekten
Entsorgen dieses Produkts schützen Sie die Umwelt und die Gesundheit
Ihrer Mitmenschen. Umwelt und Gesundheit werden durch falsches Entsorgen gefährdet. Materialrecycling hilft, den Verbrauch von Rohstoffen zu
verringern. Weitere Informationen über das Recycling dieses Produkts erhalten Sie von Ihrer Gemeinde, den kommunalen Entsorgungsbetrieben oder
dem Geschäft, in dem Sie das Produkt gekauft haben.
Technische Daten
Energieversorgung:
Netzteil: Primär 220/230 V 50 Hz / 1000 mA sekundär 9 V AC / 1000 mA
Abmessungen (LxBxH): 210 mm x 227 mm x 70 mm
Gewicht:
860 g
Deutsch 25
Safety instructions
To enable you to get your telephone working quickly and to use it
safely, it is essential that you read the following safety instructions
and the section on "Getting started".
•
Place the telephone on a non-slip surface.
•
Lay the connecting cable safely in order to avoid the risk of
accidents.
•
Never expose the telephone to any of the following influencing
factors:
- sources of heat
- direct sunlight
- moisture
- other electrical appliances
•
Protect your telephone from damp, dust, aggressive liquids and
steam.
•
Only insert the connecting cable to the designated sockets/jacks.
•
Only connect approved accessories to it.
•
Never
- open the telephone casing yourself!
- carry the telephone by the connecting cables!
- using the telephone during electrical storms!
26 English
Safety instructions
Getting started
Pack content
Telephone connection
Controls
Controls on the front
Controls on the back / undersite
Buttons and what they mean
Using the telephone
Making calls
Answering calls
Using the telephone speaker during a call
Last number redial
Redial for the last 5 telephone numbers dialed
Deleting the last telephone numbers dialed
Deleting all telephone numbers dialed
Receiver volume / treble / bass control settings
HOLD
Inserting a dialing pause (PABX)
Inquiry button (HOOK/FLASH)
One-touch dial keys
Allocating telephone numbers to one-touch dial keys
Using the one-touch dial keys
Deleting the one-touch dial keys
Deleting the one-touch dial keys
Telephone book
Using the telephone book
Storing Name / Number
Placing telephone calls from the telephone book
Deleting a telephone book entry
Deleting all telephone book entries
Calling number display
How it works
Reading and calling entries
Deleting an entry
Deleting all entries
page 26
29
29
30
31
32
33
33
33
33
34
34
34
35
35
35
35
36
36
37
37
38
38
39
39
39
40
40
41
41
English 27
Settings - Call signaling
Switching Flash on/off
Switching call signal on/off
Setting call signal volume
Call signal tone
Settings - Tone/Pulse dialing - Hook/Flash - PABX - PIN
Tone / Pulse dialing
Hook / Flash
Pause - PABX
PIN (personal identification code)
Additional ports
Headset port
Headphone port
Reset
Power failure operation
If your telephone doesn’t work
General information
No number appears when the phone rings
The telephone doesn’t work
Appendix
Maintenance and care
Guarantee
CE-symbol
Disposal
Technical data
28 English
42
42
43
43
44
44
45
45
46
46
46
47
47
47
48
48
48
49
49
49
Getting started
Pack content
The telephone comes with the following parts:
•
•
•
•
•
•
•
•
Telephone base unit
Telephone receiver
Receiver cord
Telephone cable
Guarantee card
Operating instructions
Speed-dial inlay card
Mains adapter
Telephone connection
1.
2.
3.
Insert the receiver cord (spiral-shaped cable) into the jack marked
with a receiver symbol on the left side of the base unit and into
the receiver.
Insert the smaller plug for the telephone cable into the "LINE"
jack (back of the base unit). Insert the larger plug into the socket
for your telephone line.
Insert the plug-in mains adapter cable into the "AC 9 V" jack.
Plug the mains adapter into a 230 V mains socket.
Warning!
Don't place the telephone close to televisions, VDUs, fans, etc. so as
to minimize the risk of interference. Don't place the telephone in
direct sunlight or close to a source of heat.
Only use the original telephone cable or a comparable cable with an
international configuration.
English 29
Controls
Controls on the front
Receiver jack
LCD display
Flashing area
Status display
Speed-dial button
Tone control slide
switch
Volume control
slide switch
Amplification
on/off
HOLD button
Speed-dial buttons
Dialing
buttons
Receiver
30 English
Receiver Speaker
cord
(hands
free)
Function
keys
Speed-dial inlay
card
Microphone
(hands free)
Controls on the back
Ringer volume
slide switch
Plug-in mains
adapter jack
Telephone cable
socket
Controls on the underside
Headset port
(2,5 mm)
Audio-output
(3,5 mm)
Reset
Battery
compartment
English 31
Buttons and what they mean
Speaker button:
– "Hands-free talking": engage the line, hang up
– Enable/disable "conference" mode during a call
R
Inquiry button, e.g. for putting calls through if the telephone is connected to a telephone system
P
Programming key: Initiating operating procedure and storing
Redial
M♥
One-touch dial key
Amplification on / off
Store
Programming button
Hold
Hold button
Volume control slide switch
Tone control slide switch
M1 .... M6
Speed-dial buttons
P
#
Initiate programming for settings without PIN
P
*
Initiate programming for settings with PIN
32 English
Using the telephone
Making calls
1. Lift up the receiver or press the
button.
2. Dial the telephone number.
3. In order to end the call, replace the receiver or press the
button again.
Answering calls
1. The telephone rings.
2. Lift up the receiver or press the
button.
3. In order to end the call, replace the receiver or press the
button again.
Using the telephone speaker during a call
1. Press the
button to activate the telephone speaker during
a call. The receiver speaker remains activated.
2. You can now replace the receiver and continue the call over the
telephone speaker and integrated microphone.
3. Press the
button to deactivate the telephone speaker again.
Note:
A call is ended if you press the
on the cradle.
Last number redial
1. Lift up the receiver.
2. If you press the
button while the receiver is
button, the last number called is redialed.
English 33
Redial for the last 5 telephone numbers dialed
The last 5 telephone numbers dialed will be stored in the telephone
automatically.
1. Press
and # to page between the entries.
*
3. Once the number you are looking for appears in the display,
2. Use
lift the receiver.
The number you have selected will be dialed automatically.
Note:
The receiver must be on the cradle while you are selecting the telephone
number you want to redial.
Deleting the last telephone numbers dialed
1. Press
2. Use
*
and
#
to page between the entries.
3. Press R to delete the entry currently selected. “OK ?” will appear
in the telephone display.
Press P to confirm your selection.
Deleting all the telephone numbers dialed
1. Press
2. Press and hold R for 2 seconds. “OK ?” will appear in the
telephone display.
Press P to confirm your selection.
34 English
Receiver volume/treble/bass control settings
The receiver volume can be adjusted during a call with the "Volume" slide
switch on the right side of the telephone.
Additional amplification can be switched on by pressing the
button.
When additional amplification is activated, the receiver volume can be
raised to up to 30 dB. If the amplification is switched on, the status display
will light up along with the symbol
in the telephone display.
The amplification also remains on when the receiver is placed back on its
cradle. The additional amplification is deactivated by pressing the
button again.
You can also increase treble or bass tones by an additional 10 dB using the
tone control (slide switch on the right side of the base unit).
HOLD
This function enables you to interrupt a conversation temporarily without
ending the call. Press the Hold button to interrupt the conversation
temporarily.
Inserting a dialing pause (PABX)
Press the
button to interrupt dialing for 1-6 seconds.
Inquiry button (Hook/Flash)
This function is required in order to activate certain T-Net features.
If you press the R button, the telephone line is interrupted for a certain
length of time.
Fixed setting standard 260 ms.
English 35
One-touch dial keys
Allocating telephone numbers to one-touch dial keys
The 6 speed-dial keys and the M♥ VIP key can be programmed with any
telephone number.
1. Press P and then #
2. Enter the code “01” and the desired “telephone number”.
The telephone number will be allocated to the M1 key.
3. Enter the code “02” and the desired “telephone number”.
The telephone number will be allocated to the M2 key.
4. Enter the code “03” and the desired telephone number.
The telephone number will be allocated to the M3 key.
5. Enter the code “04” and the desired “telephone number”.
The telephone number will be allocated to the M4 key.
6. Enter the code “05” and the desired “telephone number”.
The telephone number will be allocated to the M5 key.
7. Enter the code “06” and the desired “telephone number”.
The telephone number will be allocated to the M6 key.
8. Enter the code “07” and the desired “telephone number”.
The telephone number will be allocated to the M♥ key.
9. Press P to store the changes.
Enter another code or press P to quit the settings menu.
Using the one-touch dial keys
Take the receiver from the cradle or press the key
If you press one of the keys marked M1 .... M6 or M♥ the telephone number
stored for that key will be dialed automatically.
36 English
Deleting the one-touch dial keys
1.
2.
If you press any of the M1 ... M6 or M♥ buttons, the telephone
number which is stored there is dialed.
Press R to delete the entry selected. “OK ?” will appear in the
telephone display.
Press P to confirm your selection.
Deleting of all one-touch dial keys
1.
2.
If you press any of the M1 ... M6 or M♥ buttons, the telephone
number which is stored there is dialed.
Press the key marked R for 2 seconds to delete all the speed-dial
entries. “OK ?” will appear in the telephone display.
Press the key marked P to confirm your selection.
English 37
Telephone book
Using the telephone book
Names and numbers can be stored in the telephone book. Once a telephone number is stored, you can call that number by pressing a minimum
number of keys.
Up to 30 telephone numbers can be stored in the telephone book. Each
telephone number can contain up to 20 digits.
Storing name/number
To make new entries in the telephone book, proceed as follows:
1. Press P and then #
2. Enter the code “80” for a new entry.
3. Enter the desired telephone number on the keypad. Press R to delete
the last digit entered.
4. Press P to store the telephone number and to begin to enter the
name.
5. Press the corresponding key as frequently as necessary to select the
desired letter (see table below). Press R to delete the last letter
entered.
6. Press P to complete the programming process.
Key
1
2
3
4
5
6
7
8
9
0
38 English
Letter / character
1
A
B
D
E
G
H
J
K
M
N
P
Q
T
U
W
X
_
0
C
F
I
L
O
R
V
Y
2
3
4
5
6
S
8
Z
7
9
Placing a call with the telephone book
1.
2.
3.
4.
Press P and then #
Enter the code “81” to access the telephone book.
Press
and # to page between the entries.
Lift the receiver or press the key
to dial the number you have
selected.
*
Deleting an entry in the telephone book
1. Page to the desired entry as described in “Placing a call with the
telephone book”.
2. Press R to delete the entry selected. “OK ?” will appear in the
telephone display.
Press P to confirm your selection.
Deleting all the entries in the telephone book
1. Access the telephone book as described in “Placing a call using the
telephone book”.
2. Press and hold R for 2 seconds. “OK ?” will appear in the
telephone display.
Press P to confirm your selection.
English 39
Calling number display
How it works
The number of the person calling you will appear in the telephone display.
The telephone supports both of the current systems (DTMF/ FSK).
Your telephone will store the last 5 calling numbers automatically.
If the memory is full, the oldest entry will be deleted.
Important!
Calling number display will only work if this service is
supported by your telecom supplier. Please inquire with
your telephone company.
Reading and calling entries
The last 5 telephone numbers recognized will be automatically stored in
the telephone.
1. Press R
2. Use
and # to page between the entries. (Only the first 10 digits
of the telephone number will appear in the display.
Press
to see the rest of the telephone number. Press the key
again to see the date and time the call was received).
3. Once the desired telephone number appears in the display, lift the
receiver or press the
The number you have selected will be dialed.
*
Note:
The receiver must be resting on the cradle when you select the telephone
number.
40 English
Deleting an entry
1. Page to the desired entry as described in “Reading and calling entries”.
2. Press R to delete the entry selected. “OK ?” will appear in the
telephone display.
Press P to confirm your selection.
Deleting all entries
1. Access the telephone book as described in “Reading and calling entries”.
2. Press and hold R for 2 seconds. “OK ?” will appear in the
telephone display.
Press P to confirm your selection.
English 41
Settings – Call signaling
Switching the flash on/off
You can also have incoming calls signaled by a flashing light. The flashing
light appears on the back of the telephone.
1. Press P and then #
2. Then enter one of the two following codes:
a. Code “40” to switch the flash off.
b. Code “41” to switch the flash on;
the flash symbol will appear in the telephone display.
3. Press P to store the settings.
4. Enter another code or press P to quit the settings menu.
Note:
The flash will not work during a power failure!
Switching the call signal on/off
1. Press P and then #
2. Enter one of the following two codes:
a. Code “20” switches the call signal off.
b. Code “21” switches the call signal on.
3. Press P to store the settings.
4. Enter another code or press P to quit the settings menu.
42 English
Setting the volume of the call signal
The volume of the call signal can be adjusted by moving the sliding switch
on the back of the telephone.
Call signal tone
You can select from between 7 different acoustic call signals.
1.
2.
3.
4.
5.
Press P and then #
Enter code “23”. The current signal setting will appear in the display.
Press number keys 1-8 to alter the call signal.
Press P to store the settings.
Enter another code or press P to quit the settings menu.
English 43
Settings - Tone/pulse dialing - Hook/Flash - PABX - PIN
Tone/pulse dialing
1. Press P and then #
2. Enter one of the following three codes:
a. Code “10” for tone dialing
b. Code “11” for pulse dialing (33% M/B)
c. Code “12” for pulse dialing (40% M/B)
3. Press P to store the settings.
4. Enter another code or press P to quit the settings menu.
Note:
Nowadays, most telephone connections use tone dialing.
Hook/Flash
You can set the flash key to different flash times. The flash setting usually does
not have to be altered when the telephone is connected to a larger telephone
system (see the operating manual for the telephone system).
1. Press P and then
2. Enter the four-digit unit PIN “XXXX” (the default PIN code for the
telephone is “0000”).
3. You can now enter one of the following codes:
a. Code “700” sets the flash time to “90 ms”,
b. Code “701” sets the flash time to “110 ms”,
c. Code “702” sets the flash time to “130 ms”,
d. Code “703” sets the flash time to “260 ms” or
e. Code “704” sets the flash time to “600 ms”.
4. Press P to store the settings.
5. Enter another code or press P to quit the settings menu.
*
44 English
Pause - PABX
You can alter the length of the dialing pause (1-6 seconds). The pause usually does not have to be altered when the telephone is connected to a larger
telephone system (see the operating manual for the telephone system).
1. Press P and then
2. Enter the four-digit unit PIN “XXXX”.
(The default PIN code for the telephone is “0000”).
3. Enter code „720“.
4. Enter the dialing pause with the number keys 1-6.
5. Press P to store the settings.
6. Enter another code or press P to quit the settings menu.
*
PIN (Personal Identification Code)
Some of your telephone’s functions are protected by a PIN.
The default PIN for your telephone is “0000”.
1. Press P and then
2. Enter the four-digit unit PIN “XXXX”.
(The default PIN code for the telephone is “0000”).
3. Enter code „600“.
4. Now enter the new four-digit PIN “XXXX”.
5. To confirm the entry of your new PIN, enter it once again.
6. The PIN will be stored automatically once you have entered the last digit.
7. Enter another code or press P to quit the settings menu.
*
English 45
Additional ports
Headset port
Standard headset port with a 2.5 mm jack (for connecting a PL-100/ PL-200,
for example).
Headphone port
Output for connecting headphones, an induction loop or such like.
Reset
You can press a button on the back of the telephone to reset all the telephone settings to the default settings. Press and hold this button for 2 seconds.
This function is useful if you have forgotten the telephone’s PIN.
Default settings:
Flashing light:
One-touch dial keys:
VIP key:
Redial memory:
Calling number display memory (CLIP):
Telephone book:
Hook/Flash:
Pause:
Ring tone:
Tone/pulse dialing:
PIN code:
46 English
ON
None
None
Empty
Empty
Empty
260 ms
3s
1
Tone dialing
0000
Power failure operation
Should there be a power failure, you can still use your telephone. However,
the flashing light will not work.
If you would like to use the display function during a power failure, you can
put 5 batteries (micro or AAA) into the telephone.
Note:
During a power failure, the telephone’s flashing light will not work even if
you can put in batteries.
The dead-battery symbol
will appear in the display if the
batteries are dead or not inserted into the device.
If your telephone doesn't work...
General information
Make sure that the telephone cable isn't damaged and is correctly inserted.
Disconnect any additional equipment, extension cables and other telephones. If the telephone works then, this indicates that the fault is caused by
another piece of equipment.
Try to connect your telephone to a neighbor's line, for example. If it works
there, this indicates that there may be a fault on your telephone line. Call
the service provider to report the fault.
No number appears when the phone rings
• Calling number display is a function that has to be supported by your
service provider.
• If no calling number appears in the display, this means that no calling
number information is available or that the caller has an unlisted number.
This can also happen when a call is received from a telephone exchange.
• If the telephone is connected to an extension, the calling number display
function will not usually work.
English 47
The telephone doesn't work
•
•
•
•
Make sure that the mains adapter is correctly inserted into the
telephone and into the mains socket.
Make sure that the telephone cable is correctly inserted into the
telephone and into the telephone socket.
Connect another telephone to your telephone line. If it works,
it indicates that your telephone is probably faulty.
Only use the original cable or a telephone cable with an international
configuration.
Appendix
Maintenance and care
The telephone is maintenance-free. If the telephone becomes dirty, wipe it
occasionally with a soft, damp cloth. Never use alcohol, thinner or other
organic solvents.
The telephone should never be exposed to sunlight for a long time and
should also be protected from intense heat, moisture or strong mechanical
vibrations.
Guarantee
The telephone works very reliably. However, if faults occur despite being
installed and operated properly, contact your specialist dealer or contact the
manufacturer directly.
The guarantee covers free repair and return, provided it is returned in its
original packaging. Therefore, do not throw this away. The guarantee will
become void in the case of damage resulting from improper handling or
repairs attempted by unauthorized persons (damaging the telephone's seal).
Repairs will only be carried out under guarantee upon presentation of the
completed guarantee card from the dealer or the original guarantee certificate in the case of telephones bought directly from us. In any event, the
serial number of the telephone must also be indicated.
48 English
CE symbol
This telephone conforms to the requirements of EU Directive 1999/5/EC
on radio equipment and telecommunications terminal equipment and the
mutual recognition of their conformity.
Conformity with the afore-mentioned directive is confirmed by the
CE symbol on the telephone.
Disposal
Disposal of used electrical and electronic equipment (to be observed in the
countries in the European Union and other European countries with a separate collection system for this equipment)
The symbol on the product or its packaging indicates that this product is not
to be disposed of in the regular household waste but has to be brought to a
collection center for the recycling of electrical and electronic equipment.
By disposing of this equipment correctly, you make an important contribution to protecting the environment and your health. Disposing of this equipment incorrectly poses a threat to the environment and your health.
Material recycling helps to reduce the amount of raw materials we use.
For further information on the recycling of this product, please contact your
local authorities, your city council or the store where you purchased the
product.
Technical data
Energy supply:
Primary 220/230 V 50 Hz / 1000 mA secondary 9 V AC / 1000 mA
Dimensions (LxWxH): 210 mm x 227 mm x 70 mm
Weight:
860 g
English 49
Consignes de sécurité
Afin de mettre le téléphone rapidement en service et de l'utiliser en
toute sécurité, lire impérativement les instructions de sécurité suivantes ainsi que le chapitre "Mise en service".
•
Placer l'appareil sur une surface antidérapante.
•
Poser le câble de raccordement de façon à prévenir tout accident.
•
Ne pas placer ou exposer le téléphone :
− près d'une source de chaleur
− aux rayons du soleil
− à l'humidité
− près d'autres appareils électriques
•
Protéger le téléphone de l'humidité, de la poussière, des liquides
corrosifs et des vapeurs.
•
Ne raccorder le câble de raccordement qu'aux prises/fiches
prévues à cet effet.
•
Ne raccorder que des accessoires homologués.
•
Ne jamais
– ouvrir soi-même le téléphone.
– tirer le téléphone par le câble de raccordement.
– utilisation du téléphone durant les orages.
50 Français
Instructions de sécurité
page 50
Mise en service
Déballage
53
Raccordement du téléphone
53
Eléments de commande
Eléments de commande sur la face avant
54
Eléments de commande au dos / au dessous
55
Les touches et leur signification
56
Utilisation
Emission d'un appel
57
Réception d'un appel
57
Utilisation du le haut-parleur lors d'une conversation
57
Répétition du dernier appel
57
Rappel des 5 derniers numéros composés
58
Effacement des derniers numéros composés
58
Effacement de tous les numéros composés
58
Réglage du volume de l'écouteur / réglage des aigus / des graves 59
Silencieux (HOLD)
59
Pause lors de la composition d'un numéro (PABX)
59
Touche de transmission (HOOK/FLASH)
59
Touches de sélection directe
Attribution de numéros de téléphone aux touches de sélection directe 60
Composition à l´aide des touches de sélection directe
60
Effacement des numéros de sélection directe
61
Effacement de tous les numéros de sélection directe
61
Répertoire téléphonique
Utilisation du répertoire téléphonique
62
Enregistrement du Nom/Numéro
62
Appel depuis le répertoire téléphonique
63
Effacement d’une entrée du répertoire téléphonique
63
Effacement de toutes les entrées du répertoire téléphonique
63
Affichage du numéro de l’appelant
Comment ça marche
64
Lecture et appel des entrées
64
Effacement d’une entrée
65
Effacement de toutes les entrées
65
Français 51
Réglages - Signal d’appel
Activation/désactivation des flashs lumineux
Activation/désactivation du signal d’appel
Réglage du volume du signal d’appel
Tonalité du signal d’appel
Réglages - Mode de composition du numéro Décrochage/Clignotement - Autocommutateur - PIN
Numérotation par fréquence acoustique/Impulsions
Décrochage/Clignotement Hook/Flash
Pause - Autocommutateur PABX
PIN (code d’identification personnel)
Raccordements supplémentaires
Raccord micro-casque
Raccord écouteur
Reset - Réinitialisation
Fonctionnement en cas de panne de courant
Si le téléphone ne fonctionne pas
Généralités
Aucun numéro ne s’affiche lorsque le téléphone sonne
Le téléphone ne fonctionne pas
Annexe
Maintenance et entretien
Garantie
Marquage CE
Gestion des déchets
Caractéristiques techniques
52 Français
66
66
67
67
68
68
69
69
70
70
70
71
71
71
72
72
72
73
73
73
Mise en service
Déballage
Les pièces suivantes font partie de la livraison :
•
•
•
•
•
•
•
•
Téléphone
Combiné
Cordon du combiné
Câble du téléphone
Certificat de garantie
Mode d’emploi
Carte-mémento pour la sélection directe de numéros
Bloc-secteur
Raccordement du téléphone
1.
2.
3.
Brancher la fiche du cordon du combiné (cordon spiralé) à la
prise femelle (voir symbole) sur le côté gauche de l'appareil et
au combiné.
Raccorder la plus petite fiche du câble de téléphone à la prise
"LINE" (au dos de l'appareil) et la plus grande à la prise téléphonique.
Raccorder le câble du bloc-secteur à la prise femelle
"AC 9 V". Brancher le bloc-secteur sur une prise
d'alimentation de 230 V.
Attention !
Ne pas placer le téléphone à proximité de postes de télévision,
d'écrans, de ventilateurs ou d'appareils similaires afin de réduire
au minimum le risque de perturbations. Ne pas exposer le téléphone
au rayonnement direct du soleil et ne pas le placer à proximité
d'une source de chaleur.
N'utiliser que le câble d'origine du téléphone ou un câble téléphonique
avec un câblage international.
Français 53
Eléments de commande
Eléments de commande sur la face avant
Prise de raccordement du
combiné
Affichage LCD Flash
Témoin de
l'amplification
Touche de
sélection directe
VIP
Bouton de réglage
de la tonalité
Bouton de réglage
du volume
Touches
chiffrées
Combiné
Cordon du Haut-parleur Touches
combiné
(mains libres) de
fonction
54 Français
Amplificateur
marche/arrêt
Touche HOLD
Touches de sélection directe
Carte-mémento
pour les touches
de sélection
directe
Microphone
(mains libres)
Eléments de commande au dos
Bouton de réglage du volume
de la sonnerie
Prise de raccordement
du bloc-secteur
Prise de raccordement du câble du
téléphone
Eléments de commande au dessous
Raccord micro-casque
(2,5 mm)
Sortie audio
(3,5 mm)
Reset
Réinitialisation
Logement des piles
Français 55
Les touches et leur signification
Touche haut-parleur :
– Mains libres : garder en ligne, raccrocher
– Ecouter : activer/désactiver pendant une conversation
R
Touche de transmission, par exemple pour passer un
correspondant sur une autre ligne lorsque le téléphone
est raccordé à un standard téléphonique
P
Touche de programmation : Initialisation de la procédure de
fonctionnement et enregistrement
Bis
M♥
Composition à touche unique
Amplification, marche/arrêt
Store
Touche de programmation
Hold
Touche HOLD
Bouton de réglage du volume
Bouton de réglage de la tonalité
M1 .... M6
Touches de sélection directe
P
#
Programmation des réglages sans le code PIN
P
*
Programmation des réglages avec le code PIN
56 Français
Utilisation
Emission d'un appel
1. Décrocher le combiné ou appuyer sur la touche
2. Composer le numéro.
3. Pour mettre fin à la communication téléphonique, raccrocher le combiné
ou appuyer à nouveau sur
Réception d'un appel
1. Le téléphone sonne.
2. Décrocher le combiné ou appuyer sur la touche
3. Pour mettre fin à la communication téléphonique, raccrocher le combiné
ou appuyer à nouveau sur
Utilisation du haut-parleur lors d'une conversation
1. Appuyer sur la touche
pour activer le haut-parleur pendant une
conversation téléphonique. L'écouteur du combiné reste activé.
2. Il est possible de raccrocher le combiné et de poursuivre la conversation téléphonique avec le haut-parleur et le microphone intégré.
3. Pour désactiver le haut-parleur, appuyer sur la touche
Remarque :
La ligne est coupée lorsque la touche
combiné a été raccroché.
est activée quand le
Répétition du dernier appel
1. Décrocher le combiné.
2. Appuyer sur la touche
pour recomposer le dernier numéro appelé.
Français 57
Rappel des 5 derniers numéros composés
Les 5 derniers numéros appelés sont enregistrés automatiquement dans le
téléphone.
1. Appuyer sur la touche
et # pour avancer d’une entrée à une autre.
*
3. Lorsque le numéro recherché s’affiche à l’écran, décrochez le combiné.
2. Utiliser les touches
Le numéro que vous avez sélectionné sera composé automatiquement.
Remarque :
Le combiné doit impérativement être sur la base lorsque vous sélectionnez le
numéro de téléphone que vous souhaitez rappeler.
Effacement des derniers numéros composés
1. Appuyer sur la touche
2. Utiliser les touches
*
et
#
pour avancer d’une entrée à une autre.
3. Appuyer sur R pour effacer l’entrée que vous venez de sélectionner.
„OK ?“ s’affiche à l’écran du téléphone.
Appuyer sur la touche P pour confirmer l’effacement.
Effacement de tous les numéros composés
1. Appuyer sur la touche
2. Maintenir enfoncée la touche
R pendant 2 secondes.
„OK ?“ s’affiche à l’écran du téléphone.
Appuyer sur la touche P pour confirmer l’effacement.
58 Français
Réglage du volume de l'écouteur / réglage des aigus / des graves
Le volume de l'écouteur se règle pendant une conversation téléphonique
à l'aide du bouton de réglage du volume situé à droite de l'appareil.
La touche
permet d'amplifier encore l'écouteur. Avec cette amplification
supplémentaire, l'écouteur atteint un volume maximal de 30 dB.
Si l’amplification est activée, l’affichage du statut s’allume en même temps
que le symbole
à l’écran du téléphone. L'amplification reste activée
une fois l'écouteur raccroché.
Il faut appuyer sur la touche
pour la désactiver.
Le réglage de la tonalité (bouton sur le côté droit du boîtier) permet en
outre d'augmenter les aigus ou les graves de 10 dB.
Silencieux (HOLD)
Cette fonction permet d'interrompre une conversation momentanément
sans couper la ligne. Il suffit de maintenir la touche Hold enfoncée.
Pause lors de la composition d'un numéro (PABX)
Cette touche P interrompt la composition d'un numéro pendant
1-6 secondes.
Touche de transmission (HOOK/FLASH)
Cette touche sert à activer certaines fonctions de T-Net.
La touche R coupe la ligne pendant une durée donnée (260 ms, valeur
prescrite).
Français 59
Touches de sélection directe
Attribution de numéros de téléphone aux touches de sélection directe
Les six touches de sélection directe et la touche M♥ VIP peuvent être
programmées pour n’importe quel numéro de téléphone.
1. Appuyer sur P puis sur #
2. Saisir le code “01”, puis le “numéro de téléphone” souhaité.
Le numéro de téléphone sera attribué à la touche M1.
3. Saisir le code “02”, puis le “numéro de téléphone” souhaité.
Le numéro de téléphone sera attribué à la touche M2.
4. Saisir le code “03”, puis le “numéro de téléphone” souhaité.
Le numéro de téléphone sera attribué à la touche M3.
5. Saisir le code “04”, puis le “numéro de téléphone” souhaité.
Le numéro de téléphone sera attribué à la touche M4.
6. Saisir le code “05”, puis le “numéro de téléphone” souhaité.
Le numéro de téléphone sera attribué à la touche M5.
7. Saisir le code “06”, puis le “numéro de téléphone” souhaité.
Le numéro de téléphone sera attribué à la touche M6.
8. Saisir le code “07”, puis le “numéro de téléphone” souhaité.
Le numéro de téléphone sera attribué à la touche M♥
9. Appuyer sur P pour enregistrer les changements.
Saisir un nouveau code ou appuyez sur P pour quitter le menu.
Composition à l’aide des touches de sélection directe
Décrocher le combiné ou appuyer sur la touche
Si vous appuyez sur l’une des touches marquées M1 .... M6 ou M♥ ,
le numéro de téléphone enregistré pour chaque touche sera composé automatiquement.
60 Français
Effacement des numéros de sélection directe
1.
2.
Les numéros de téléphone enregistrés pour les touches M1 …. M6
ou M♥ sont affichés en appuyant sur ces touches.
Pour effacer le numéro enregistré, appuyer sur la touche R
« OK ? » s´affiche à l´écran du téléphone.
Appuyer sur P pour confirmer l´effacement.
Effacement de tous les numéros de sélection directe
1.
2.
Les numéros de téléphone enregistrés pour les touches M1 …. M6
ou M♥ sont affichés en appuyant sur ces touches.
Pour effacer tous les numéros enregistrés, appuyer pendant 2 secondes
sur la touche R
« OK ? » s´affiche à l´écran du téléphone.
Appuyer sur P pour confirmer l´effacement.
Français 61
Répertoire téléphonique
Utilisation du répertoire téléphonique
Les noms et numéros de téléphone peuvent être enregistrés dans le
répertoire. Après avoir enregistré un numéro de téléphone, vous pouvez
l’appeler en composant un numéro abrégé. Vous pouvez enregistrer
jusqu’à 30 numéros de téléphone dans le répertoire téléphonique.
Chaque numéro de téléphone peut contenir jusqu’à 20 chiffres.
Enregistrement du nom/numéro
Pour créer des entrées dans le répertoire téléphonique, procéder comme suit :
1. Appuyer sur P , puis sur #
2. Saisir le code “80” pour une nouvelle entrée.
3. Saisir le numéro de téléphone souhaité sur la touche de clavier.
Appuyer sur R pour effacer le dernier numéro enregistré.
4. Appuyer sur P pour enregistrer le numéro de téléphone et
commencer à saisir le nom.
5. Appuyer sur la touche correspondante autant de fois que nécessaire pour
sélectionner la lettre souhaitée (voir tableau ci-dessous).
Appuyer sur R pour effacer la dernière lettre saisie.
6. Appuyer sur P pour terminer la procédure de programmation.
Touche
1
2
3
4
5
6
7
8
9
0
Lettre/Caractère
1
A
B
D
E
G
H
J
K
M
N
P
Q
T
U
W
X
_
0
62 Français
C
F
I
L
O
R
V
Y
2
3
4
5
6
S
8
Z
7
9
Appel depuis le répertoire téléphonique
1.
2.
3.
4.
Appuyer sur P , puis sur #
Saisir le code “81” pour accéder au répertoire téléphonique.
Appuyer sur
et # pour avancer d’une entrée à une autre.
Décrocher le récepteur ou appuyer sur la touche
pour composer
le numéro que vous avez sélectionné.
*
Effacement d’une entrée du répertoire téléphonique
1. Aller à l’entrée souhaitée comme décrit dans «Appel depuis le répertoire
téléphonique».
2. Appuyer sur R pour supprimer l’entrée sélectionnée.
„OK ?“ s’affiche à l’écran du téléphone.
Appuyer sur P pour confirmer votre sélection.
Effacement de toutes les entrées du répertoire téléphonique
1. Accéder au répertoire téléphonique comme décrit dans «Appel depuis
le répertoire téléphonique».
2. Maintenir enfoncée la touche R pendant 2 secondes.
„OK ?“ s’affiche à l’écran du téléphone.
Appuyer sur P pour confirmer votre sélection.
Français 63
Affichage du numéro de l’appelant
Comment ça marche
Le numéro de l’appelant s’affiche à l’écran du téléphone. Le téléphone
prend en charge les deux systèmes actuels (DTMF/ FSK). Votre téléphone
enregistre automatiquement les 5 derniers numéros appelés. Lorsque la
mémoire est pleine, l’entrée la plus ancienne est effacée.
Important !
L’affichage du numéro de l’appelant fonctionne uniquement si
vous avez souscrit cette option auprès de votre opérateur téléphonique. Veuillez vous renseigner auprès de votre opérateur
téléphonique.
Lecture et appel des entrées
Les 5 derniers numéros reconnus sont enregistrés automatiquement dans
le téléphone.
1. Appuyer sur R
2. Appuyer sur
et # pour avancer d’une entrée à une autre.
(Seuls les 10 premiers chiffres du numéro de téléphone s’affichent à
l’écran. Appuyer sur
pour visualiser le reste du numéro de téléphone.
Appuyer sur la touche
une nouvelle fois pour voir la date et
l’heure de réception de l’appel).
3. Lorsque le numéro souhaité s’affiche à l’écran, décrocher le combiné ou
appuyer sur
Le numéro que vous avez sélectionné est composé.
*
Remarque :
Le combiné doit impérativement être sur sa base lorsque vous
sélectionnez le numéro de téléphone souhaité.
64 Français
Effacement d’une entrée
1. Aller à l’entrée souhaitée comme décrit dans «Lecture et appel des
entrées».
2. Appuyer sur R pour supprimer l’entrée sélectionnée.
„OK ?“ s’affiche à l’écran du téléphone.
Appuyer sur P pour confirmer votre sélection.
Effacement de toutes les entrées
1. Accéder au répertoire téléphonique comme décrit dans «Lecture et appel
des entrées ».
2. Maintenir enfoncée la touche R pendant 2 secondes.
„OK ?“ s’affiche à l’écran du téléphone.
Appuyer sur P pour confirmer votre sélection.
Français 65
Réglages – Signal d’appel
Activation/désactivation des flashs lumineux
Vous pouvez également signaler les appels entrants par des flashs
lumineux. Le clignotement lumineux apparaît à l’arrière du téléphone.
1. Appuyer sur P , puis sur #
2. Saisir l’un des deux codes suivants :
a. Code “40” pour désactiver le clignotement lumineux.
b. Code “41” pour activer le clignotement lumineux.
Le symbole correspondant s’affiche à l’écran du téléphone.
3. Appuyer sur P pour enregistrer votre sélection.
4. Saisir un nouveau code ou appuyer sur P pour quitter le menu.
Remarque :
La clignotement lumineux ne fonctionne pas pendant une coupure de
courant.
Activation/désactivation du signal d’appel
1. Appuyer sur P , puis sur #
2. Saisir l’un des deux codes suivants :
a. Code “20” pour désactiver le clignotement lumineux.
b. Code “21” pour activer le clignotement lumineux.
Le symbole correspondant s’affiche à l’écran du téléphone.
3. Appuyer sur P pour enregistrer votre sélection.
4. Saisir un nouveau code ou appuyer sur P pour quitter le menu.
66 Français
Réglage du volume du signal d’appel
Vous pouvez régler le volume du signal d’appel en déplaçant le curseur à
l’arrière du téléphone.
Tonalité du signal d’appel
Vous pouvez sélectionner parmi 7 tonalités de signal d’appel.
1. Appuyer sur P , puis sur #
2. Saisir le code “23”. Le réglage actuel du signal d’appel s’affiche
à l’écran.
3. Appuyer sur les touches numériques 1 à 8 pour modifier la tonalité du
signal d’appel.
4. Appuyer sur P pour enregistrer les réglages.
5. Saisir un nouveau code ou appuyer sur
P pour quitter le menu.
Français 67
Réglages - Mode de composition du numéro Décrochage/Clignotement - Autocommutateur - Code PIN
Mode de composition à fréquence acoustique/à impulsions
1. Appuyer sur P , puis sur #
2. Saisir l’un des trois codes suivants :
a. Code “10” pour la numérotation par fréquence acoustique
b. Code “11” pour la numérotation par impulsions (33 % M/B)
c. Code “12” pour la numérotation par impulsions (40 % M/B)
3. Appuyer sur P pour enregistrer les réglages.
4. Saisir un nouveau code ou appuyer sur P pour quitter le menu.
Remarque :
Actuellement, la plupart des téléphones utilisent la numérotation par
tonalité.
Hook/Flash - Décrochage/clignotement
Vous pouvez régler la fréquence du clignotement lumineux. Le réglage du clignotement ne doit généralement pas être modifié lorsque le téléphone est relié
à un standard t´léphonique (voir le manuel d’utilisation du standard téléphonique).
1. Appuyer sur P , puis sur *
2. Saisir le code PIN à quatre chiffres “XXXX” (le code PIN par défaut du
téléphone est “0000”).
3. Vous pouvez maintenant saisir l’un des codes suivants :
a. Le code “700” règle la fréquence du clignotement à “90 ms”,
b. Le code “701” règle la fréquence du clignotement à “110 ms”,
c. Le code “702” règle la fréquence du clignotement à “130 ms”,
d. Le code “703” règle la fréquence du clignotement à “260 ms” ou
e. Le code “704” règle la fréquence du clignotement à “600 ms”.
4. Appuyer sur P pour enregistrer les changements.
5. Saisir un nouveau code ou appuyer sur P pour quitter le menu.
68 Français
Pause - Autocommutateur - PABX
Vous pouvez modifier la durée de la pause de numérotation (1 à 6 secondes). Le réglage de la pause de numérotation ne doit généralement pas être
modifié lorsque le téléphone est relié à un standard téléphonique (voir le
manuel d’utilisation du standard téléphonique).
1. Appuyer sur P , puis sur *
2. Saisir le code PIN à quatre chiffres XXXX”.
(le code PIN par défaut du téléphone est 0000”).
3. Saisir le code “720”.
4. Saisir la pause de numérotation souhaitée avec les touches
numériques 1 à 6.
5. Appuyer sur P pour enregistrer les changements.
6. Saisir un nouveau code ou appuyer sur P pour quitter le menu.
PIN (code d’identification personnel)
Certaines fonctions de votre téléphone sont protégées par un code PIN.
Le code PIN par défaut du téléphone est “0000”. Lorsque vous modifiez le
code PIN, veillez à noter le numéro que vous avez saisi.
1. Appuyer sur P , puis sur *
2. Saisir le code PIN à quatre chiffres “XXXX” (le code PIN par défaut
du téléphone est “0000”).
3. Saisir le code “600”.
4. Saisir maintenant le nouveau code PIN à quatre chiffres “XXXX”.
5. Pour confirmer votre nouveau code PIN, saisissez-le à nouveau.
6. Le code PIN est enregistré automatiquement après que vous avez saisi
le dernier chiffre.
7. Saisir un nouveau code ou appuyer sur P pour quitter le menu.
Français 69
Raccordements supplémentaires
Raccord micro-casque
Raccord micro-casque standard avec un connecteur jack de 2,5 mm.
(par ex. le raccord d'un PL-100/ PL-200)
Raccord écouteur
Sortie d'écouteur pour raccorder un écouteur, une boucle magnétique, etc.
(prise jack de 3,5 mm).
Reset - Réinitialisation
Vous pouvez appuyer sur une touche située à l’arrière du téléphone pour
restaurer tous les réglages par défaut. Maintenir enfoncée cette touche
pendant 2 secondes.
Cette fonction est utile si vous avez oublié le code PIN du téléphone.
Réglages par défaut :
Clignotement lumineux :
Composition à touche unique :
Touche VIP :
Rappel :
Mémorisation du numéro d’appel entrant :
Répertoire téléphonique :
Décrochage/Clignotement
Pause:
Sonnerie :
Numérotation par fréquence acoustique/impulsions :
Code PIN :
70 Français
ON
Aucun
Aucun
Vide
Vide
Vide
260 ms
3s
1
Numérotation par
fréquence acoustique
0000
Fonctionnement en cas de panne de courant
Votre téléphone fonctionne en cas de panne de courant.
Seul le clignotement lumineux ne fonctionne pas.
Si vous souhaitez utiliser l’affichage durant une panne de courant,
insérez 5 piles (micro ou AAA) dans le téléphone.
Remarque :
Durant une panne de courant, le clignotement lumineux du téléphone ne
peut pas fonctionner, même si vous insérez des piles.
1. Le symbole « Piles vides »
apparaît à l’écran si elles sont
vides ou si les piles ne sont pas mises en place.
Si le téléphone ne fonctionne pas
Généralités
S'assurer que le câble du téléphone est intact et correctement raccordé. Oter
le cas échéant les équipements en option, les rallonges de câble et les autres
téléphones. Si ensuite le téléphone fonctionne, c'est que le dérangement est
occasionné par un autre appareil.
Essayer par exemple de brancher le téléphone chez un voisin. Si l'appareil
fonctionne chez le voisin, c'est la prise téléphonique qui est sans doute
défectueuse. Contacter le service des dérangements.
Aucun numéro ne s’affiche lorsque le téléphone sonne.
• L’affichage du numéro de l’appelant fonctionne uniquement si ce service
est fourni par votre opérateur téléphonique.
• Lorsqu’aucun numéro ne s’affiche à l’écran, cela signifie qu’aucune information sur ce numéro n’est disponible ou que l’appelant n’est pas enregistré dans votre répertoire. Cette situation peut également se produire
lorsqu’un appel est reçu d’un central téléphonique.
• Lorsque le téléphone est relié à un standard téléphonique, la fonction
d’affichage du numéro de l’appelant ne fonctionne généralement pas.
Français 71
Le téléphone ne fonctionne pas
• S'assurer que le bloc-secteur est correctement enfiché dans le téléphone et correctement raccordé au secteur.
• S'assurer que le câble du téléphone est correctement enfiché dans le
téléphone et sur la prise de raccordement du téléphone.
• Brancher un autre téléphone sur la prise téléphonique. Si ce téléphone
fonctionne, l'appareil est vraisemblablement défectueux.
• Utiliser uniquement le câble d'origine ou un câble analogue avec une
prise internationale.
Annexe
Maintenance et entretien
Ce téléphone ne demande pas d'entretien. S'il est sale, le nettoyer à
l'aide d'un chiffon doux et humide. Ne pas utiliser d'alcool, de diluant ni
de solvant organique.
Il est préférable de ne pas exposer trop longtemps le téléphone aux
rayons du soleil et de le protéger des grandes chaleurs, de l'humidité
et des vibrations mécaniques importantes.
Garantie
Ce téléphone est très fiable. Si, malgré un montage et une manipulation
corrects, des dysfonctionnements apparaissent, prendre contact avec le
revendeur ou s'adresser directement au fabricant.
La prestation de garantie englobe la réparation gratuite ainsi que le renvoi
franco de port à condition que l'envoi se fasse dans l'emballage d'origine ;
il faut donc conserver l'emballage. La garantie expire en cas de dommages
dus à une manipulation incorrecte ou à des essais de réparation effectués
par des personnes non autorisées (destruction du scellé de garantie).
Les réparations sous garantie ne sont exécutées qu'après réception du
certificat de garantie dûment rempli. Le numéro de série de l'appareil doit
être impérativement inscrit sur le certificat de garantie.
72 Français
Marquage CE
Cet appareil répond aux exigences de la directive européenne 1999/5/CE
sur les équipements hertziens et les équipements terminaux de télécommunications et la reconnaissance mutuelle de leur conformité. Le label CE
apposé sur l'appareil atteste la conformité de l'appareil à la directive citée
plus haut.
Gestion des déchets
Gestion des déchets électriques et électroniques (dans les pays de l’Union
européenne et dans les autres pays européens disposant d’un système de
collecte distinct pour cette classe de déchets).
Le symbole sur le produit ou l’emballage indique que ce produit ne doit pas
être jeté comme les déchets ménagers ordinaires, mais apporté à un point
de collecte pour le recyclage des déchets électriques et électroniques.
En respectant ces règles pour votre équipement usagé, vous apportez une
contribution importante à la protection de l’environnement et de votre
santé. Le non-respect de ces règles pour votre équipement usagé constitue
une atteinte à l’environnement et une menace pour votre santé.
Le recyclage des matériaux contribue à réduire la quantité de matières
premières utilisées. Pour en savoir plus sur le recyclage de ce produit,
veuillez contacter les autorités locales compétentes, votre mairie ou le
magasin où vous avez effectué votre achat.
Caractéristiques techniques
Bloc d’alimentation :
Dimensions (L x l x H) :
Poids :
Primaire 220/230 V 50 Hz / 1000 mA secondaire 9 V AC / 1000 mA
210 mm x 227 mm x 70 mm
860 g
Français 73
Veiligheidsinstructies
Lees absoluut de volgende veiligheidsinstructies en het hoofdstuk
"In gebruik nemen" door, zodat u uw telefoon snel en veilig kunt
gebruiken.
•
Plaats het toestel op een slipvaste ondergrond.
•
Plaats het aansluitsnoer zo dat niemand erover kan struikelen.
•
Stel de telefoon niet bloot aan de volgende invloeden:
− warmtebronnen
− directe zonnestralen
− vocht
− andere elektrische apparaten
•
Bescherm uw telefoon tegen vocht, stof, agressieve vloeistoffen
en dampen.
•
Sluit de kabels alleen aan op de passende contactdozen/
aansluitingen.
•
Sluit alleen goedgekeurde accessoires aan.
•
Nooit
– De telefoon zelf openen!
– De telefoon dragen aan het netsnoer!
– Telefoneren bij onweer!
74 Nederlands
Veiligheidsinstructies
In gebruik nemen
Inhoud van de verpakking
Teleoon aansluiten
Bedieningselementen
Bedieningselementen voorkant
Bedieningselementen achterkant/onderkant
Toetsen en hun betekenis
Telefoneren
Opbellen
Oproep aannemen
Luidspreker gebruiken tijdens een gesprek
Herhaling van het laatstgekozen nummer
Herhaling van de laatse 5 gekozentelefoonnummers
Laatstgekozen telefoonnummers wissen
Alle gekozen telefoonnummers wissen
Instelling hoornvolume/hoge- en lage-tonenregeling
Mute-functie (HOLD)
Kiespauze inlassen (PABX)
Ruggespraaktoets (HOOK/FLASH)
Snelkiestoetsen
Nummers programmeren op snelkiestoetsen
Kiezen met snelkiestoetsen
Telefoonboek
Gebruik van het telefoonboek
Naam/nummer opslaan
Opbellen uit het telefoonboek
Telefoonboekingave wissen
Alle telefoonboekingaven wissen
Nummerpresentatie
Werking
Ingaven aflezen en opbellen
Ingaven wissen
Alle ingaven wissen
Pagina 74
77
77
78
79
80
81
81
81
81
82
82
82
83
83
83
83
84
84
86
86
87
87
87
88
88
89
89
Nederlands 75
Instellingen - Oproepsignalering
Flitslicht in-/uitschakelen
Oproepsignaal in-/uitschakelen
Volume van het oproepsignaal instellen
Toonaard van het oproepsignaal
Instellingen - Toon-/Impulskiezen - Hook/Flash - PABX - PIN
Toon-/impulskiezen
Hook/Flash
Kiespauze - PABX
PIN (persoonlijke code)
Bijkomende aansluitingen
Headset-aansluiting
Hoofdtelefoonaansluiting
Reset
Stroomuitvaloverbrugging
Als de telefoon niet werkt
Allgemeen
De telefoon rinkelt en er verschijnt geen nummer
De telefoon werkt niet
Bijlage
Onderhoud en verzorging
Garantie
CE-teken
Verwijdering
Technische gegevens
76 Nederlands
Pagina
90
90
91
91
92
92
93
93
94
94
94
95
95
95
96
96
96
97
97
97
In gebruik nemen
Inhoud van de verpakking
De volgende delen bevinden zich in de verpakking:
•
•
•
•
•
•
•
telefoontoestel
hoorn
hoornsnoer
telefoonsnoer
garantiekaart
handleiding
label snelkiestoetsen
Telefoon aansluiten
1.
2.
3.
Steek de stekker van het hoornsnoer (spiraalkabel) in de
aansluiting met het hoornsymbool aan de linkerkant van het
toestel en in de hoorn.
De kleinere stekker van het telefoonsnoer steekt u in de
aansluiting „LINE“ (achterkant van het toestel), de grote stekker
in de contactdoos van uw telefoonaansluiting.
De stekker van de netadapter steekt u in de aansluiting „AC 9 V“.
De netadapter steekt u in een 230-V-stopcontact.
Opgelet!
Plaats de telefoon bijv. niet in de buurt van televisietoestellen,
monitors, ventilators etc. om het storingsrisico zo klein mogelijk
te houden. Plaats de telefoon niet direct in de zon of in de buurt
van een warmtebron.
Gebruik alleen het originele telefoonsnoer of een vergelijkbaar snoer
met internationale configuratie.
Nederlands 77
Bedieningselementen
Bedieningselementen voorkant
Aansluiting voor
telefoonhoorn
Flitsvlak
LCD-Display
Statusaanduiding
Snelkiestoets
Schuifregelaar
toonregeling
Schuifregelaar
volumeregeling
Versterking
Aan/Uit
HOLD-toets
Snelkiestoetsen
Kiestoetsen
Telefoonhoorn
Hoorn- Luidspreker
snoer (handsfree)
78 Nederlands
Functietoetsen
Label voor
snelkiestoetsen
Microfoon
(handsfree)
Bedieningselementen achterkant
Schuifregelaar voor
beltoonvolume
Aansluiting
netadapter
Aansluiting
telefoonsnoer
Bedieningselementen onderkant
Headset-aansluiting
(2,5 mm)
Audio-uitgang
(3,5 mm)
Reset
Batterijvak
Nederlands 79
Toetsen en hun betekenis
Luidsprekertoets:
– »Handsfree«: leiding innemen, leiding scheiden
– »Meeluisteren« in-/uitschakelen tijdens een gesprek
R
Ruggespraaktoets, bijv. om gesprekken door te verbinden
als de telefoon aangesloten is op een telefooncentrale
P
Programmatoets: bedieningsprocedure starten en opslaan
Kiesherhaling
M♥
Verkort-kiestoets
Versterking Aan / Uit
Store
Programmeertoets
Hold
Hold-toets
Schuifregelaar volumeregeling
Schuifregelaar toonregeling
M1 .... M6
Snelkiestoetsen
P
#
Programmering voor instellingen zonder PIN starten
P
*
Programmering voor instellingen met PIN starten
80 Nederlands
Telefoneren
Opbellen
1. Neem de hoorn op of druk op de toets
2. Kies het telefoonnummer.
3. Om het gesprek te beëindigen, legt u de hoorn neer resp. drukt u
opnieuw op de toets
Oproep aannemen
1. De telefoon rinkelt.
2. Neem de hoorn op of druk op de toets
3. Om het gesprek te beëindigen, legt u de hoorn neer resp. drukt u
opnieuw op de toets
Luidspreker gebruiken bij een gesprek
1. Druk op de toets
om tijdens een gesprek de luidspreker in te
schakelen. De luidspreker van de hoorn blijft daarbij ingeschakeld.
2. U kunt nu de hoorn neerleggen en het telefoongesprek voortzetten via
de luidspreker van het toestel en de ingebouwde microfoon.
3. Om de luidspreker van het toestel opnieuw uit te schakelen, drukt u
op de toets
Opmerking:
Een gesprek wordt beëindigd als u op de toets
hoorn neergelegd is.
drukt terwijl de
Kiesherhaling van het laatstgekozen telefoonnummer
1. Neem de hoorn op.
2. Als u op de toets
drukt, wordt het laatstgekozen nummer
opnieuw gekozen.
Nederlands 81
Kiesherhaling van de laatste 5 gekozen nummers
De laatste 5 gekozen telefoonnummers worden automatisch opgeslagen in de
telefoon.
1. Druk op de toets
2. Blader met de beide toetsen
*
en
#
tussen de nummers.
3. Zodra het gewenste telefoonnummer op de display verschijnt, neemt u de
telefoonhoorn op.
Het gekozen telefoonnummer wordt opgebeld.
Opmerking:
De telefoonnummers moeten met opgelegde hoorn worden gekozen.
Laatstgekozen telefoonnummers wissen
1. Druk op de toets
2. Blader met de beide toetsen
*
en
#
tussen de nummers.
3. Druk op de toets R om het gekozen nummer te wissen.
Op de display van de telefoon verschijnt „OK ?“.
Druk op de toets P om te bevestigen.
Alle gekozen telefoonnummers wissen
1. Druk op de toets
2. Houd de toets R gedurende 2 seconden ingedrukt.
Op de display van de telefoon verschijnt „OK ?“.
Druk op de toets P om te bevestigen.
82 Nederlands
Instelling hoornvolume/hoge- en lage-tonenregeling
Het hoornvolume kan tijdens een telefoongesprek worden ingesteld met de
schuifregelaar "Volume" aan de rechterkant van de telefoon.
Met de toets
kan een bijkomende versterking worden ingeschakeld.
Als de versterking geactiveerd is, wordt in de hoorn een volume van maximaal 30 dB bereikt. Als de versterking ingeschakeld is, verschijnt de statusaanduiding en daarnaast ook het symbool
op de display van de telefoon. De versterking blijft ook ingeschakeld als de hoorn neergelegd is.
Door nogmaals op de toets
te drukken, wordt de bijkomende versterking uitgeschakeld.
Met de toonregeling (schuifregelaar aan de rechterkant) kunt u de hoge
resp. lage tonen extra 10 dB verhogen.
Mute-functie (HOLD)
Met deze functie kan het gesprek tijdelijk onderbroken worden zonder de
verbinding te verbreken. Als u op de toets Hold drukt, wordt het gesprek
tijdelijk onderbroken.
Kiespauze inlassen (PABX)
Als u op de toets P drukt, wordt de kiesprocedure gedurende
1-6 seconden onderbroken.
Ruggespraaktoets (Hook/Flash)
Deze functie is vereist om bepaalde functies in het telefoonnet te activeren.
Als u op deze toets R drukt, wordt de telefoonleiding gedurende een
bepaalde tijd onderbroken. In de leveringstoestand is in de telefoon de
waarde 260 ms ingesteld.
Nederlands 83
Verkort-kiestoetsen
Nummers programmeren op verkort-kiestoetsen
Op de 6 verkort-kiestoetsen en de VIP-toets M♥ kunnen willekeurige telefoonnummers worden geprogrammeerd.
1. Druk op de toets P en dan op de toets #
2. Voer de code „01“ en het gewenste „Telefoonnummer“ in.
Het telefoonnummer wordt geprogrammeerd op de toets M1.
3. Voer de code „02“ en het gewenste „Telefoonnummer“ in.
Het telefoonnummer wordt geprogrammeerd op de toets M2.
4. Voer de code „03“ en het gewenste „Telefoonnummer“ in.
Het telefoonnummer wordt geprogrammeerd op de toets M3.
5. Voer de code „04“ en het gewenste „Telefoonnummer“ in.
Het telefoonnummer wordt geprogrammeerd op de toets M4.
6. Voer de code „05“ en het gewenste „Telefoonnummer“ in.
Het telefoonnummer wordt geprogrammeerd op de toets M5.
7. Voer de code „06“ en het gewenste „Telefoonnummer“ in.
Het telefoonnummer wordt geprogrammeerd op de toets M6
8. Voer de code „07“ en het gewenste „Telefoonnummer“ in.
Het telefoonnummer wordt geprogrammeerd op de toets M♥
9. Druk op de toets P om de wijzigingen op te slaan.
Voer opnieuw een code in of druk op de toets P om het menu Instellingen
te verlaten.
Kiezen met verkort-kiestoetsen
Neem de telefoonhoorn op of druk op de toets
Als u op één van de toetsen M1 .... M6 of M♥ drukt, wordt het opgeslagen
telefoonnummer gekozen.
84 Nederlands
Verkort-kiestoetsen wissen
1.
2.
Als u op één van de toetsen M1 .... M6 of M♥ drukt, wordt het
opgeslagen telefoonnummer gekozen.
Druk op de toets R om de gekozen ingave te wissen.
Op de display van de telefoon verschijnt „OK ?“
Druk op de toets P om te bevestigen.
Alle verkort-kiestoetsen wissen
1.
2.
Als u op één van de toetsen M1 .... M6 of M♥ drukt, wordt het
opgeslagen telefoonnummer gekozen.
Druk 2 seconden op de toets R om alle ingevoerde snelkeuzetoetsen te wissen. Op het display van de telefoon verschijnt “OK ?”.
Druk op de toets P om uw keuze te bevestigen.
Nederlands 85
Telefoonboek
Gebruik van het telefoonboek
In het telefoonboek kunnen namen en telefoonnummers worden opgeslagen. Als een telefoonnummer opgeslagen is, kan het met weinige toetsen
snel worden opgeroepen.
U kunt maximaal 30 telefoonnummers opslaan in het telefoonboek. Elke
telefoonnummer kan uit maximaal 20 cijfers bestaan.
Naam/Nummer opslaan
Om nieuwe ingaven op te slaan in het telefoonboek, gaat u als volgt te werk:
P en daarna op de toets #
1. Druk op de toets
2. Voer de code „80“ voor een nieuwe ingave in.
3. Voer het gewenste telefoonnummer in met de cijfertoetsen.
Met de toets R kunt u telkens het laatste cijfer wissen.
4. Druk op de toets P om het telefoonnummer op te slaan en de naam
in te voeren.
5. Door meermaals op een toets te drukken, kunt u de gewenste letters
invoeren (zie onderstaande tabel). Met de toets R kunt u telkens de
laatste letter wissen.
6. Druk op de toets P om de programmering af te sluiten.
Toets
1
2
3
4
5
6
7
8
9
0
Letters/Tekens
1
A
B
D
E
G
H
J
K
M
N
P
Q
T
U
W
X
_
0
86 Nederlands
C
F
I
L
O
R
V
Y
2
3
4
5
6
S
8
Z
7
9
Opbellen uit het telefoonboek
1.
2.
3.
4.
Druk op de toets P en daarna op de toets #
Voer de Code „81“ in om het telefoonboek te openen.
Blader met de beide toetsen
en # in de ingaven.
Neem de telefoonhoorn op of druk op de toets
om een verbinding
met het gekozen nummer op te bouwen.
*
Telefoonboekingave wissen
1. Blader zoals beschreven onder het punt „Opbellen uit het telefoonboek“
naar de gewenste ingave.
2. Druk op de toets R om de gekozen ingave te wissen.
Op de display van de telefoon verschijnt „OK ?“
Druk op de toets P om te bevestigen.
Alle telefoonboekingaven wissen
1. Open het telefoonboek zoals beschreven onder het punt „Opbellen uit het
telefoonboek“.
2. Houd de toets R gedurende 2 seconden ingedrukt.
Op de display van de telefoon verschijnt „OK ?“
Druk op de toets P om te bevestigen.
Nederlands 87
Nummerpresentatie
Werking
Het telefoonnummer van de oproeper verschijnt op de display van de telefoon. De telefoon ondersteunt de beide gebruikelijke systemen (DTMF/ FSK).
Uw telefoon slaat de laatste 5 binnengekomen nummers automatisch op.
Als het geheugen vol is, wordt het oudste nummer gewist.
Opgelet!
De nummerpresentatie werkt alleen als deze dienst door uw
telefoonmaatschappij wordt ondersteund. Uw telefoonmaatschappij kan u meer informatie geven.
Ingaven aflezen en opbellen
De laatste 5 herkende telefoonnummers worden automatisch opgeslagen in
de telefoon.
1. Druk op de toets R
2. Blader met de beide toetsen
en # tussen de ingaven.
(Alleen de eerste 10 van het telefoonnummer worden aangegeven.
Met de toets
kunt u de rest van het telefoonnummer oproepen.
Als u nogmaals op de toets
drukt, kunt u ook de datum en de tijd
van de oproep zien).
3. Als het gewenste telefoonnummer op de display verschijnt, neemt u de
hoorn op of drukt u op de toets
Het gekozen telefoonnummer wordt opgebeld.
*
Opmerking:
De telefoonnummers moeten met opgelegde hoorn worden gekozen.
88 Nederlands
Ingaven wissen
1. Blader zoals beschreven onder het punt „Ingaven aflezen en opbellen“
naar de gewenste ingave.
2. Druk op de toets R om de gekozen ingave te wissen.
Op de display van de telefoon verschijnt „OK ?“
Druk op de toets P om te bevestigen.
Alle ingaven wissen
1. Open het telefoonboek zoals beschreven onder het punt „Ingaven aflezen
en opbellen“.
2. Houd de toets R gedurende 2 seconden ingedrukt.
Op de display van de telefoon verschijnt „OK ?“
Druk op de toets P om te bevestigen.
Nederlands 89
Instellingen – Oproepsignalering
Flitslicht in-/uitschakelen
U kunt aankomende oproepen ook met een bijkomend flitslicht laten
signaleren. Het flitslicht straalt aan de achterkant van de telefoon.
1. Druk op de toets P en daarna op de toets #
2. Voer nu één van de beide volgende codes in:
a. Code „40“ schakelt het flitslicht uit.
b. Code „41“ schakelt het flitslicht in, daarbij brandt het flitssymbool
op de display van de telefoon.
3. Druk op de toets P om de instellingen op te slaan.
4. Voer opnieuw een code in of druk op de toets P om het menu
Instellingen te verlaten.
Opmerking:
Als de stroom uitvalt, werkt het flitslicht niet!
Oproepsignaal in-/uitschakelen
1. Druk op de toets P en daarna op de toets #
2. Voer nu één van de beide volgende codes in:
a. Code „20“ schakelt het oproepsignaal uit.
b. Code „21“ schakelt het oproepsignaal in.
3. Druk op de toets P om de instellingen op te slaan.
4. Voer opnieuw een code in of druk op de toets P om het menu
instellingen te verlaten.
90 Nederlands
Volume van het oproepsignaal instellen
Het belvolume van de telefoon kan d.m.v. een schuifregelaar aan de
achterkant van de telefoon worden ingesteld.
Toonaard van het oproepsignaal
U hebt de keuze tussen 7 verschillende akoestische beltonen.
1. Druk op de toets P en daarna op de toets #
2. Voer de Code „23“ in. Op de display verschijnt de laatste signaalinstelling.
3. Met de cijfertoetsen 1-8 kunt u het oproepsignaal veranderen.
4. Druk op de toets P om de instellingen op te slaan.
5. Voer opnieuw een code in of druk op de toets P om het menu
instellingen te verlaten.
Nederlands 91
Instellingen - Toon-/Impulskiezen - Hook/Flash - PABX - PIN
Toon-/Impulskiezen
1. Druk op de toets P en daarna op de toets #
2. Voer nu één van de drie volgende codes in:
a. Code „10“ voor toonkiezen
b. Code „11“ voor impulskiezen (33% M/B)
c. Code „12“ voor impulskiezen (40% M/B)
3. Druk op de toets P om de instellingen op te slaan.
4. Voer opnieuw een code in of druk op de toets P om het menu
instellingen te verlaten.
Opmerking:
De meeste telefoonaansluitingen werken vandaag volgens het
toonkiesprocédé.
Hook/Flash
U kunt de ruggespraaktoets instellen op verschillende flashtijden. De flashinstelling hoeft evt. alleen te worden gewijzigd als u de telefoon gebruikt in
combinatie met een telefooncentrale (zie handleiding van de telefooncentrale).
1. Druk op de toets P en daarna op de toets *
2. Voer de toestel-PIN met vier cijfers „XXXX“ in
(PIN-code in leveringstoestand „0000“).
3. Dan kunt u één van de volgende codes invoeren:
a. Code „700“ stelt de flashtijd in op „90 ms“,
b. Code „701“ stelt de flashtijd in op „110 ms“,
c. Code „702“ stelt de flashtijd in op „130 ms“,
d. Code „703“ stelt de flashtijd in op „260 ms“ of
e. Code „704“ stelt de flashtijd in op „600 ms“.
4. Druk op de toets P om de wijzigingen op te slaan.
5. Voer opnieuw een code in of druk op de toets P om het menu
instellingen te verlaten.
92 Nederlands
Kiespauze - PABX
U kunt de kiespauze instellen tussen 1en 6 seconden. De Kiespauze hoeft
evt. alleen te worden gewijzigd als u de telefoon gebruikt in combinatie met
een telefooncentrale (zie handleiding van de telefooncentrale).
1. Druk op de toets P en daarna op de toets *
2. Voer de toestel-PIN met vier cijfers „XXXX“ in (PIN-code in
leveringstoestand „0000“).
3. Voer de code „720“ in.
4. Voer de kiespauze in met de cijfertoetsen 1-6.
5. Druk op de toets P om de wijzigingen op te slaan.
6. Voer opnieuw een code in of druk op de toets P om het menu
Instellingen te verlaten.
PIN (persoonlijke code)
Enkele functies van uw telefoon zijn beschermd met een PIN.
De PIN is in de leveringstoestand van de telefoon ingesteld op „0000“.
Als u de PIN wijzigt, moet u het nieuwe nummer onthouden.
1. Druk op de toets P en daarna op de toets *
2. Voer de toestel-PIN met vier cijfers „XXXX“ in (PIN-code in
leveringstoestand „0000“).
3. Voer de code „600“ in.
4. Voer nu de nieuwe PIN „XXXX“ met vier cijfers in..
5. Om de nieuwe PIN te bevestigen, voert u de vier cijfers „XXXX“
nogmaals in.
6. Nadat het laatste cijfer is ingevoerd, wordt de PIN automatisch
opgeslagen.
7. Voer opnieuw een code in of druk op de toets P om het menu
Instellingen te verlaten.
Nederlands 93
Bijkomende aansluitingen
Headset-aansluiting
Standaard 2,5 mm-aansluiting voor headset.
(bijv. voor een PL-100/ PL-200)
Hoofdtelefoonaansluiting
Hoofdtelefoonuitgang voor het aansluiten van een hoofdtelefoon, een
hoorapparaat o.i.d.
Reset
Met een knop aan de onderkant van het apparaat kunt u opnieuw de
standaardinstellingen van de telefoon instellen. Daarvoor houdt u deze knop
2 seconden ingedrukt.
Deze functie is zinvol als u de PIN van de telefoon vergeten bent.
Leveringstoestand:
Lichtflits:
Verkort-kiestoetsen:
VIP-toets:
Geheugen kiesherhaling:
Geheugen nummerpresentatie (CLIP):
Telefoonboek:
Hook/Flash:
Kiespauze:
Beltoon:
Toon-/impulskiezen:
PIN-code:
94 Nederlands
AAN
leeg
leeg
leeg
leeg
leeg
260 ms
3s
1
Toonkiezen
0000
Stroomuitvaloverbrugging
Tijdens een stroomuitval kunt u nog steeds telefoneren. Alleen de lichtflits
werkt niet meer.
Als de displayaanduiding ook tijdens een stroomuitval bruikbaar moet zijn,
kunt u 5 batterijen (micro of AAA) in de telefoon plaatsen.
Opmerking:
Tijdens een stroomuitval werkt de lichtflits ook niet als er batterijen in de
telefoon zitten.
Het symbool 'batterij leeg' verschijnt op de display wanneer de batterij leeg
is of niet in het apparaat is geplaatst.
Als de telefoon niet werkt
Algemeen
Controleer of het telefoonsnoer onbeschadigd en correct aangesloten is.
Verwijder eventuele accessoires, verlengsnoeren en andere telefoons.
Als de telefoon daarna werkt, wordt de fout veroorzaakt door een ander
apparaat.
Probeer de telefoon bijv. bij de buren aan te sluiten. Als het toestel daar
werkt, is uw telefoonaansluiting eventueel gestoord. Neem contact op met
de storingsdienst.
De telefoon rinkelt en er verschijnt geen nummer
• De nummerpresentatie moet ondersteund worden door uw telefoonmaatschappij.
• Als er geen nummer op de display verschijnt, is er geen nummerinformatie beschikbaar of beschikt de beller over een geheim telefoonnummer.
Eventueel is het echter ook een centrale die opbelt.
• Als de telefoon aangesloten is op een nevenaansluiting, werkt de
nummerpresentatie in de regel niet.
Nederlands 95
De telefoon werkt niet
•
•
•
•
Controleer of de netadapter correct aangesloten is op de telefoon en
het stopcontact.
Controleer of het telefoonsnoer correct aangesloten is op de telefoon
en de contactdoos van de telefoonaansluiting.
Sluit een andere telefoon aan op uw telefoonaansluiting. Als deze
telefoon werkt, is uw telefoon vermoedelijk defect.
Gebruik alleen het originele snoer of een telefoonsnoer met internationale configuratie.
Bijlage
Onderhoud
De telefoon is onderhoudsvrij. Reinig het apparaat af en toe met een
zachte, vochtige doek. Gebruik nooit alcohol, verdunner of andere
organische oplosmiddelen.
De telefoon mag niet gedurende langere tijd worden blootgesteld aan
directe zonnestraling en moet bovendien worden beschermd tegen grote
hitte, vochtigheid of sterke mechanische schokken.
Garantie
De telefoon is zeer betrouwbaar. Mochten ondanks deskundige montage
en bediening storingen optreden, dan kunt u contact opnemen met uw
vakhandelaar of direct met de fabrikant.
De garantie omvat kostenloze reparatie en terugzending. Een voorwaarde
hiervoor is dat het toestel in de originele verpakking wordt ingestuurd.
Werp deze dus niet weg.
De garantie vervalt bij schade veroorzaakt door ondeskundige behandeling
of reparatiepogingen door niet-bevoegde personen (verbreking van het
toestelzegel).
Reparaties op garantie worden alleen uitgevoerd bij inzending van de
ingevulde garantiekaart van de vakhandelaar resp. het originele garantiebewijs bij directaankoop. Het toestelnummer moet altijd worden aangegeven.
96 Nederlands
CE-teken
Dit toestel voldoet aan de eisen van de EU-richtlijn: 1999/5/EG Richtlijn
betreffende radioapparatuur en telecommuncatie-eindapparatuur en de
wederzijdse erkenning van hun conformiteit. De conformiteit met de voornoemde richtlijn wordt bevestigd door het CE-teken op het apparaat.
Verwijdering
Verwijdering van gebruikte elektrische en elektronische apparatuur (toe te
passen in de landen van de Europese Unie en andere Europese landen met
een eigen inzamelsysteem voor zulke apparaten)
Het symbool op het product en de verpakking wijst erop dat dit product niet
als normaal huisafval mag worden behandeld maar op een verzamelpunt
voor de recyclage van elektrisch en elektronisch moet worden afgegeven.
Door uw bijdrage tot de correcte verwijdering van dit product, beschermt u
de het milieu en de gezondheid van uw medemensen. Milieu en gezondheid
worden door foute verwijdering in gevaar gebracht. Materiaalrecyclage
helpt het verbruik van grondstoffen te reduceren. Meer informatie over de
recyclage van dit product krijgt u bij uw gemeente, de communale afvalverwijderingsbedrijven of in de zaak waar u dit product heeft gekocht.
Technische gegevens
Voeding:
Afmetingen (L x B x H):
Gewicht:
netadapter: 220/230 V 50 Hz / 1000 mA
secundair 9 V AC / 1000 mA
210 mm x 227 mm x 70 mm
860 g
Nederlands 97
Istruzioni per la sicurezza
Per rendere operativo e sicuro il telefono, è importante attenersi alle
istruzioni per la sicurezza e alle indicazioni contenute nella sezione
"Operazioni preliminari".
•
Appoggiare il telefono su una superficie non sdrucciolevole.
•
Posare il filo di collegamento in modo da evitare il rischio di
incidenti.
•
Non esporre mai il telefono a:
− fonti di calore
− luce diretta del sole
− umidità
− vicinanza di altre apparecchiature elettriche
•
Proteggere il telefono da umidità, vapore, polvere e liquidi
aggressivi.
•
Inserire il filo di collegamento solo nell’ apposita presa/jack.
•
Collegare solo accessori omologati.
•
Evitare di:
− aprire l’involucro del telefono!
− trasportare il telefono appeso ai fili di collegamento
– utilizzo del telefono durante i temporali
98 Italiano
Istruzioni per la sicurezza
pagina 98
Operazioni preliminari
Contenuto della confezione
101
Collegamento del telefono
101
Controlli
Parte anteriore
102
Parte posteriore / fondo
103
Funzioni dei pulsanti
104
Utilizzo del telefono
Fare una chiamata
105
Rispondere a una chiamata
105
Utilizzo dell’altoparlante durante una chiamata
105
Ricomposizione dell’ultimo numero
105
Ricomposizione degli ultimi 5 numeri chiamati
106
Eliminazione degli ultimi numeri chiamati
106
Eliminazione di tutti i numeri chiamati
106
Regolazione del volume e del tono
107
Sospensione (HOLD)
107
Inserimento di una pausa durante la composizione (PABX)
107
Pulsante di richiesta (HOOK/FLASH)
107
Pulsanti per la composizione veloce
Assegnazione dei numeri ai pulsanti per la composizione veloce
108
Chiamare con i pulsanti per la composizione veloce
108
Eliminazione dei tasti di composizione rapida
109
Eliminazione di tutti dei tasti di composizione rapida
109
Rubrica telefonica
Utilizzo della rubrica telefonica
110
Memorizzazione del nome/numero
110
Chiamate dirette dalla rubrica telefonica
111
Eliminazione di una voce della rubrica telefonica
111
Eliminazione di tutte le voci della rubrica telefonica
111
Visualizzazione del numero del chiamante
Come funziona
112
Lettura e chiamata delle voci
112
Eliminazione delle voci
113
Eliminazione di tutte le voci
113
Italiano 99
Impostazioni - Segnalazione di chiamata
pagina
Attivazione/disattivazione del lampeggiamento
114
Attivazione/disattivazione del segnale di chiamata
114
Regolazione del volume del segnale di chiamata
115
Tono del segnale di chiamata
115
Impostazioni - Composizione in multifrequenza/A impulsi Pulsante di richiesta (hook/flash) Inserimento di una pausa durante la composizione (PABX) - PIN
Composizione in multifrequenza/A impulsi
116
Pulsante di richiesta (hook/flash)
116
Inserimento di una pausa durante la composizione (PABX)
117
Codice di identificazione personale (PIN)
117
Prese/uscite addizionali
Presa per cuffia
118
Uscita audio
118
Ripristino
118
Funzionamento in caso di interruzione dell’energia elettrica
119
Se il telefono non funziona
Informazioni di carattere generale
119
Non appaiono numeri quando il telefono squilla
119
Il telefono non funziona
120
Appendice
Manutenzione e pulizia
120
Garanzia
120
Marchio CE
121
Smaltimento
121
Dati tecnici
121
100 Italiano
Operazioni preliminar
Contenuto della confezione
La confezione contiene le seguenti parti:
•
•
•
•
•
•
•
Base di appoggio
Cornetta
Filo di collegamento della cornetta
Filo di collegamento del telefono
Scheda di garanzia
Istruzioni di funzionamento
Scheda a inserimento per la composizione veloce
Collegamento del telefono
1.
2.
3.
Inserire il filo della cornetta (spiralato) nella presa jack contrassegnata dal simbolo della cornetta, sul lato sinistro della base,
e nella cornetta stesso.
Inserire la spina piccola del filo telefonico nella presa jack contrassegnata dall’indicazione "LINE" (sul retro della base).
Inserire la spina grande nella presa della linea telefonica.
Inserire il cavo dell’adattatore di rete nella presa jack "AC 9 V".
Inserire la spina dell’adattatore di rete nella presa di corrente a
muro (230 V).
Avvertenza!
Per ridurre il rischio di interferenze, non collocare l’apparecchio in
prossimità di televisori, monitor, ventilatori o apparecchiature simili.
Non esporre il telefono alla luce diretta del sole né ad altre fonti di
calore. Utilizzare solo il filo originale in dotazione o fili omologati con
configurazione internazionale.
Italiano 101
Controlli
Parte anteriore
Presa jack della
cornetta
Display LCD Area di lampeggiamento
Pulsanti di
composizione
Cornetta Filo della Altoparlante
cornetta (mani libere)
102 Italiano
Pulsanti
funzione Microfono
(mani libere)
Indicatore visivo
di stato
Pulsante per la composizione veloce
Cursore per la regolazione del tono
Cursore per la regolazione del volume
Inserimento/disinserimento dell’amplificazione
Pulsante HOLD
Pulsanti per la composizione veloce
Scheda a inserimento con i numeri
per la composizione
veloce
Parte posteriore
Cursore per la regolazione del
volume della suoneria
Presa jack per
l’adattatore di rete
Presa per il filo
telefonico
Fondo
Presa per la cuffia
(2,5 mm)
Uscita audio
(3,5 mm)
Ripristino
Vano batterie
Italiano 103
Funzioni dei pulsanti
Pulsante altoparlante:
– "Conversazione a vivavore": impegna la linea e interrompe
la comunicazione
– Abilita/disabilita la modalità "conferenza" durante una
chiamata
R
Pulsante di richiesta, per passare la chiamata se
l'apparecchio è collegato a un sistema telefonico
P
Programmazione del tasto: inizio della procedura operativa
e memorizzazione
Ricomposizione
M♥
Tasto di composizione rapida
Inserimento/disinserimento dell'amplificazione
Store
Pulsante di programmazione
Hold
Pulsante di sospensione
Cursore per il controllo del volume
Cursore per il controllo del tono
M1 .... M6
Pulsanti per la composizione veloce
P
#
Iniziare la programmazione delle impostazioni senza il PIN
P
*
Iniziare la programmazione delle impostazioni con il PIN
104 Italiano
Utilizzo del telefono
Fare una chiamata
1. Sollevare la cornetta o premere il pulsante
2. Comporre il numero di telefono.
3. A conclusione della chiamata riporre la cornetta sulla base o premere
novamente il pulsante
Rispondere a una chiamata
1. Il telefono squilla.
2. Sollevare la cornetta o premere il pulsante
3. Per terminare la chiamata, riporre la cornetta sulla base o premere
novamente il pulsante
Utilizzo dell'altoparlante durante una chiamata
1. Premere il pulsante
per attivare l'altoparlante durante una
chiamata. L'altoparlante del ricevitore rimane attivo.
2. È possibile continuare la conversazione utilizzando l'altoparlante del
telefono e il microfono integrato.
3. Premere il pulsante
per disattivare l'altoparlante del telefono.
Nota:
se si preme il pulsante
la chiamata si interrompe.
quando la cornetta e riposta sulla base,
Ricomposizione dell'ultimo numero
1. Sollevare la cornetta.
2. Premere il pulsante
per ricomporre immediatamente l'ultimo
numero chiamato.
Italiano 105
Ricomposizione degli ultimi 5 numeri chiamati
Il telefono memorizza automaticamente gli ultimi 5 numeri chiamati.
1. Premere il pulsante
e il tasto # per passare da una voce all'altra.
*
3. Quando il numero desiderato appare sul display, sollevare il ricevitore.
2. Utilizzare il tasto
Il numero verrà composto automaticamente.
Nota:
il ricevitore deve rimanere appoggiato sulla base durante la selezione del
numero.
Eliminazione degli ultimi numeri chiamati
1. Premere il pulsante
2. Utilizzare il tasto
*
e il tasto
#
per passare da una voce all'altra.
3. Premere il pulsante R per eliminare la voce selezionata.
Sul display comparirà „OK ?“
Premere P per confermare la selezione.
Eliminazione di tutti i numeri chiamati
1. Premere il pulsante
2. Premere e mantenere premuto per 2 secondi il tasto
Sul display comparirà „OK ?“
Premere P per confermare la selezione.
106 Italiano
R
Regolazione del volume e del tono della cornetta
Il volume della cornetta può essere regolato durante una chiamata agendo
sul cursore "Volume", sul lato destro del telefono.
Per attivare l'amplificazione supplementare, premere il pulsante
Con l'amplificazione supplementare il volume della cornetta può raggiungere
la potenza di 30 dB. Se l'amplificazione è attiva, l'indicatore di stato e il
relativo simbolo
si illumineranno sul display del telefono.
L'amplificazione rimane attivo anche se la cornetta viene riposta sulla base.
Per disattivare l'amplificazione supplementare premere nuovamente il pulsante
È possibile aumentare i toni bassi o acuti di un ulteriore 10 dB agendo sul
controllo del tono (cursore sul lato destro della base).
HOLD (SOSPENSIONE)
Questa funzione permette di sospendere temporaneamente una conversazione senza interromperla definitivamente. Premere il pulsante Hold per
sospendere la chiamata.
Inserimento di una pausa durante la composizione (PABX)
Premere il pulsante P per interrompere la composizione per
1-6 secondi.
Pulsante di richiesta (Hook/Flash)
Questo pulsante permette di attivare alcune funzioni T-Net.
Premendo il pulsante R la linea telefonica viene interrotta per un certo
periodo di tempo (l'impostazione predefinita è 260 ms).
Italiano 107
Tasto di composizione rapida
Abbinamento dei numeri di telefono ai tasti di composizione rapida
I 6 tasti di composizione rapida e il tasto M♥ VIP possono essere associati a
qualunque numero di telefono.
1. Premere il pulsante P seguito da #
2. Immettere il codice “01” e il numero di telefono desiderato.
Il numero verrà abbinato al tasto M1.
3. Immettere il codice “02” e il numero di telefono desiderato.
Il numero verrà abbinato al tasto M2.
4. Immettere il codice “03” e il numero di telefono desiderato.
Il numero verrà abbinato al tasto M3.
5. Immettere il codice “04” e il numero di telefono desiderato.
Il numero verrà abbinato al tasto M4.
6. Immettere il codice “05” e il numero di telefono desiderato.
Il numero verrà abbinato al tasto M5.
7. Immettere il codice “06” e il numero di telefono desiderato.
Il numero verrà abbinato al tasto M6.
8. Immettere il codice “07” e il numero di telefono desiderato.
Il numero verrà abbinato al tasto M♥
9. Premere il pulsante P per memorizzare le modifiche.
Immettere un altro codice o premere P per uscire dal menu di impostazione.
Utilizzo dei tasti di composizione rapida
Sollevare il ricevitore dalla base o premere il tasto
Premendo uno dei tasti contrassegnati M1 …. M6 o il tasto M♥ verrà composto automaticamente il numero di telefono associato.
108 Italiano
Eliminazione dei tasti di composizione rapida
1.
2.
Premendo uno dei tasti contrassegnati M1 …. M6 o il tasto M♥ verrà
composto automaticamente il numero di telefono associato.
Premere il pulsante R per eliminare la voce selezionata.
Sul display comparirà „OK ?“
Premere P per confermare la selezione.
Eliminazione di tutti dei tasti di composizione rapida
1.
2.
Premendo uno dei tasti contrassegnati M1 …. M6 o il tasto M♥ verrà
composto automaticamente il numero di telefono associato.
Premere e mantenere premuto per 2 secondi il tasto R
Sul display comparirà „OK ?“
Premere P per confermare la selezione.
Italiano 109
Rubrica telefonica
Utilizzo della rubrica telefonica
La rubrica telefonica pemette di memorizzare nomi e numeri. I numeri
memorizzati possono essere composti premendo un numero minimo di
tasti.
La capacità della rubrica telefonica è di 30 numeri. Ogni numero può essere formato da un massimo di 20 cifre.
Memorizzazione del nome/numero
Per immettere nuove voci nella rubrica telefonica procedere come segue:
1. Premere il pulsante P seguito da #
2. Immettere il codice “80” se si tratta di una nuova voce.
3. Digitare il numero di telefono sul tastierino Premere R per cancellare
l'ultima cifra immessa.
4. Premere P per memorizzare il numero di telefono e iniziare a
immettere il nome.
5. Premere il tasto corrispondente per il numero di volte necessario per
selezionare la lettera desiderata (vedere tabella). Premere R per
cancellare l'ultima lettera immessa.
P al termine dell’operazione.
6. Premere
Tasto
1
2
3
4
5
6
7
8
9
0
Lettera/carattere
1
A
B
D
E
G
H
J
K
M
N
P
Q
T
U
W
X
_
0
110 Italiano
C
F
I
L
O
R
V
Y
2
3
4
5
6
S
8
Z
7
9
Esecuzione di una chiamata dalla rubrica telefonica
1.
2.
3.
4.
Premere il pulsante P seguito da #
Immettere il codice “81” per accedere alla rubrica telefonica.
Premere il tasto
e il tasto # per passare da una voce all'altra.
Sollevare il ricevitore o premere il tasto
per comporre il numero
selezionato.
*
Eliminazione di una voce della rubrica telefonica
1. Visualizzare la voce desiderata come descritto in "Esecuzione di una
chiamata dalla rubrica telefonica".
2. Premere il pulsante R per eliminare la voce selezionata.
Sul display comparirà „OK ?“
Premere P per confermare la selezione.
Eliminazione di tutte le voci della rubrica telefonica
1. Accedere alla rubrica telefonica come descritto in "Esecuzione di una
chiamata dalla rubrica telefonica".
2. Premere e mantenere premuto per 2 secondi il tasto R
Sul display comparirà „OK ?“.
Premere P per confermare la selezione.
Italiano 111
Visualizzazione del numero del chiamante
Come funziona
Il numero del chiamante comparirà sul display.
Il telefono supporta i sistemi DTMF e FSK.
L'aspparecchio è in grado memorizzare automaticamente fino a 5 numeri.
Se la memoria è piena, verranno eliminate le voci più vecchie.
Importante!
La visualizzazione del numero del chiamante è possibile solo
se il servizio è supportato dall'operatore telefonico. Per
informazioni rivolgersi direttamente all'operatore telefonico.
Lettura e chiamata delle voci
Gli ultimi 5 numeri di telefono riconosciuti verranno memorizzati automaticamente nel telefono.
1. Premere il pulsante R
2. Utilizzare il tasto
e il tasto # per passare da una voce all'altra.
(appariranno solo le prime 10 cifre del numero di telefono.
Premere
per visualizzare le cifre rimanenti. Premere nuovamente il
tasto
per visualizzare la data e l'ora della chiamata).
3. Quando il numero di telefono desiderato compare sul display, sollevare
il ricevitore e premere
Il numero verrà composto automaticamente.
*
Nota:
il ricevitore deve essere appoggiato sulla base quando si seleziona il
numero di telefono.
112 Italiano
Eliminazione di una voce
1. Visualizzare la voce desiderata come descritto in "Lettura e chiamata
delle voci".
2. Premere R per eliminare la voce selezionata.
Sul display comparirà „OK ?“
Premere P per confermare la selezione.
Eliminazione di tutte le voci
1. Accedere alla rubrica telefonica come descritto in "Lettura e chiamata
delle voci".
2. Premere R per eliminare la voce selezionata.
Sul display comparirà „OK ?“
Premere P per confermare la selezione.
Italiano 113
Impostazioni - Segnalazione di chiamata
Attivazione/disattivazione del lampeggiamento
È possibile fare in modo che le chiamate in arrivo siano segnalate da una
luce lampeggiante. La luce lampeggiante si trova nella parte posteriore del
telefono.
1. Premere il pulsante P seguito da #
2. Immettere uno dei due codici:
a. Codice “40” per disattivare la luce lampeggiante.
b. Codice “41” per attivare la luce lampeggiante: sul display comparirà il
simbolo del lampeggiamento.
3. Premere P per memorizzare le impostazioni.
4. Immettere un altro codice o premere
P per uscire dal menu di
impostazione.
Nota:
il lampeggiamento non funzionerà in caso di interruzione dell'energia elettrica!
Attivazione e disattivazione del segnale di chiamata
1. Premere il pulsante P seguito da #
2. Immettere uno dei due codici:
a. Codice “20” per attivare il segnale di chiamata.
b. Codice “21” per disattivare il segnale di chiamata.
3. Premere P per memorizzare le impostazioni.
4. Immettere un altro codice o premere P per uscire dal menu di
impostazione.
114 Italiano
Impostazione del volume del segnale di chiamata
Per regolare il volume del segnale di chiamata agire sul cursore che si trova
sul retro del telefono.
Tono del segnale di chiamata
È possibile scegliere tra 7 diversi segnali acustici.
1. Premere il pulsante P seguito da #
2. Immettere il codice “23”.
Verrà visualizzato il segnale corrente.
3. Premere un tasto numerico da 1 a 8 per cambiare il segnale di chiamata.
4. Premere P per memorizzare le impostazioni.
5. Immettere un altro codice o premere P per uscire dal menu di
impostazione.
Italiano 115
Impostazioni - Composizione in multifrequenza/a impulsi Pulsante di richiesta (HOOK/FLASH) - inserimento di una
pausa durante la composizione (PABX) - PIN
Ton/Pulswahl
1. Premere il pulsante P seguito da #
2. Immettere uno dei tre codici:
a. Codice “10” per la composizione in multifrequenza
b. Codice “11” per la composizione a impulsi (33% M/B)
c. Codice “12” per la composizione a impulsi (40% M/B)
3. Premere P per memorizzare le impostazioni.
4. Immettere un altro codice o premere P per uscire dal menu di
impostazione.
Nota:
la maggior parte delle connessioni telefoniche avviene ormai tramite
composizione in muti frequenza.
Hook/Flash
È possibile selezionare diverse frequenze di lampeggiamento. Se l'apparecchio
fa parte di un sistema telefonico è consigliabile non modificare l'impostazione
di lampeggiamento (vedere il manuale operativo del sistema telefonico).
1. Premere il pulsante P seguito da *
2. Immettere il PIN di quattro cifre “XXXX” (il codice PIN predefinito del
telefono è “0000”).
3. Immettere quindi uno dei seguenti codici:
a. Codice “700” per impostare la frequenza di lampeggiamento a “90 ms”,
b. Codice “701” per impostare la frequenza di lampeggiamento a “110 ms”,
c. Codice “702” per impostare la frequenza di lampeggiamento a “130 ms”,
d. Codice “703” per impostare la frequenza di lampeggiamento a “260 ms” o
e. Codice “704” per impostare la frequenza di lampeggiamento a “600 ms”.
4. Premere P per memorizzare le impostazioni.
116 Italiano
5. Immettere un altro codice o premere
impostazione.
P
per uscire dal menu di
Pausa - PABX
È possibile modificare la lunghezza della pausa di composizione (da 1 a 6
secondi). Se l'apparecchio fa parte di un sistema telefonico è consigliabile
non modificare l'impostazione della pausa (vedere il manuale operativo del
sistema telefonico).
1. Premere il pulsante P seguito da *
2. Immettere il PIN di quattro cifre “XXXX”.
(il codice PIN predefinito del telefono è “0000”).
3. Immettere il codice „720“.
4. Immettere la pausa di composizione con i tasti numerici da 1 a 6.
5. Premere P per memorizzare le impostazioni.
6. Immettere un altro codice o premere P per uscire dal menu di
impostazione.
PIN (Codice personale di identificazione)
Alcune funzioni del telefono sono protette dal PIN. il codice PIN predefinito
del telefono è “0000”.
Se si modifica il PIN occorre annotare il nuovo codice per non dimenticarselo.
1. Premere il pulsante P seguito da *
2. Immettere il PIN di quattro cifre “XXXX” (il codice PIN predefinito del
telefono è “0000”).
3. Immettere il codice „600“.
4. Immettere il nuovo PIN a quattro cifre “XXXX”.
5. Per confermare il nuovo PIN immettere nuovamente le quattro cifre.
6. Il PIN verrà memorizzato automaticamente dopo l'immissione dell'ultima
cifra.
7. Immettere un altro codice o premere P per uscire dal menu di
impostazione.
Italiano 117
Prese/uscite addizionali
Presa per cuffia
Presa jack per cuffia standard da 2,5 mm (ad esempio per il collegamento di
PL-100/ PL-200).
Uscita audio
Uscita per il collegamento di auricolari, amplificatore sonoro o altro
dispositivo simile.
Reset (Ripristino)
Premendo il pulsante di ripristino che si trova sul retro del telefono è possibile ritornare alle impostazioni predefinite. Premere e mantenere premuto il
pulsante per 2 secondi.
Questa funzione è utile qualora si sia dimenticato il PIN del telefono.
Impostazioni predefinite:
Luce lampeggiante
Tasti di composizione rapida:
Tasto VIP:
Memoria di ricomposizione:
Memoria di visualizzazione numero chiamante (CLIP)
Rubrica telefonica:
Hook/Flash:
Pausa:
Suoneria
Composizione in multifrequenza/a impulsi:
Codice PIN:
118 Italiano
ATTIVA
Nessuno
Nessuno
Vuota
Vuota
Vuota
260 ms
3s
1
In multifrequenza
0000
Funzionamento in caso di interruzione dell'energia
elettrica
Il telefono continua a funzionare anche in caso di interruzione dell'energia
elettrica. Solo la luce lampeggiante non funzionerà.Se si desidera poter continuare a utilizzare il display anche durante un'eventuale interruzione dell'
energia elettrica, inserire 5 batterie mini-stilo nel telefono.
Nota:
in caso di interruzione dell'energia elettrica la luce lampeggiante del telefono non funziona, anche se sono state inserite le batterie nel telefono.
Se le batterie sono scariche o non inserite nel dispositivo, sul display apparirà il simbolo
di batteria scarica.
Se il telefono non funziona...
Informazioni di carattere generale
Accertarsi che il filo del telefono non sia danneggiato e sia inserito correttamente, scollegare eventuali dispositivi supplementari, prolunghe o altri
telefoni. Se il telefono riprende a funzionare, significa che il problema non
è dovuto al telefono.
Provare, , ad esempio, a collegare il telefono sulla linea di un vicino di casa.
Se funziona, significa che il problema riguarda la linea telefonica. Chiamare
l'assistenza clienti del fornitore di servizi telefonici per riferire del guasto.
Non appaiono numeri quando il telefono squilla
• La visualizzazione del numero del chiamante è possibile solo se il servizio
è supportato dall'operatore telefonico.
• Se il numero del chiamante non appare significa che non ci sono informazioni disponibili su tale numero o che si tratta di un numero privato. Può
succedere anche quando la chiamata è smistata da un centralino.
• Solitamente la visualizzazione del numero del chiamante non funziona
quando il telefono ha una derivazione.
Italiano 119
Il telefono non funziona
•
•
•
•
Accertarsi che l'adattatore di rete sia inserito correttamente, sia nel
telefono sia nella presa di corrente a muro.
Accertarsi che il filo del telefono sia inserito correttamente nella presa
telefonica.
Collegare un secondo apparecchio alla linea telefonica. Se funziona,
significa che il primo telefono è guasto.
Utilizzare solo il filo originale o un filo con configurazione internazionale.
Appendice
Manutenzione e pulizia
Il telefono non richiede manutenzione. Pulire l'apparecchio con un panno
morbido e leggermente umido. Non utilizzare alcol, diluenti o solventi
organici. Non esporre il telefono alla luce diretta del sole per lunghi periodi
di tempo. Tenere il telefono al riparo da fonti di calore intenso, umidità o
forti vibrazioni meccaniche.
Garanzia
Questo telefono è una apparecchio estremamente affidabile. Tuttavia, a
dispetto di un’installazione e un utilizzo incorretto, potrebbe guastarsi,
in tal caso sarà necessario contattare il rivenditore presso il quale è stato
acquistato o rivolgersi direttamente al produttore.
La garanzia copre le spese di riparazione e di spedizione, a condizione che
l'apparecchio venga restituito nella confezione originale, che si raccomanda
pertanto di non gettare.
La garanzia è nulla se i danni sono dovuti a uso improprio o a riparazioni
effettuate da personale non autorizzato (sigillo spezzato).
Le riparazioni in garanzia potranno essere effettuate solo previa presentazione del modulo di garanzia debitamente compilato (se l’acquisto è stato
effettuato presso un rivenditore), o del certificato di garanzia originale debitamente compilato (se l’acquisto è stato effettuato direttamente presso di
noi). In entrambi i casi occorre indicare il numero di serie del telefono.
120 Italiano
Marchio CE
Questo telefono è conforme ai requisiti della direttiva europea 1999/5/EC
sulle apparecchiature radio e di telecomunicazione e al mutuo riconoscimento delle loro conformità. La conformità alla direttiva sopra citata è confermata dalla presenza del marchio CE sui telefono.
Smaltimento
Smaltimento delle apparecchiature elettriche ed elettroniche (norme da
osservare nei paesi dell'Unione Europea e in altri paesi europei nei quali sia
prevista la raccolta separata di questo tipo di apparecchiature)
Il simbolo riportato sul prodotto o sulla confezione indica che il telefono non
deve essere smaltito attraverso i normali canali di smaltimento dei rifiuti
domestici ma portato a un centro di raccolta per il riciclo delle apparecchiature elettriche ed elettroniche. Il corretto smaltimento dell'apparecchio telefonico rappresenta un contributo attivo alla protezione dell'ambiente e della
salute dei cittadini. Al contrario, uno smaltimento non corretto costituisce
un pericolo per l'ambiente e la salute dei cittadini. Il riciclaggio dei materiali contribuisce a ridurre l'utilizzo delle materie prime. Per ulteriori informazioni sul riciclaggio di questo prodotto rivolgersi alle autorità locali, al
Comune o al negozio presso il quale è stato effettuato l'acquisto.
Dati tecnici
Alimentatore:
Dimensioni (L x P x A):
Peso:
Primario 220/230 V 50 Hz / 1000 mA secondario 9 V c.a. / 1000 mA
210 x 227 x 70 mm
860 g
Italiano 121
Instrucciones de seguridad
Con el fin de que pueda instalar y utilizar su teléfono lo antes
posible y de manera segura, es imperativo que lea las instrucciones
de seguridad que se indican a continuación, así como la sección
denominada "Información preliminar".
•
Coloque el teléfono sobre una superficie que no resbale.
•
Tienda el cable de conexión de manera segura para evitar el
riesgo de accidentes.
•
Nunca exponga el teléfono a cualquiera de las siguientes
condiciones adversas:
− fuente de calor
− rayos del sol
− humedad
− otros aparatos eléctricos
•
Proteja su teléfono contra la humedad, el polvo, líquidos
agresivos y vapor.
•
Inserte únicamente el cable de conexión en las tomas o
entradas indicadas.
•
Conecte únicamente al aparato aquellos accesorios que hayan
sido aprobados.
•
Nunca haga lo siguiente:
– abrir la carcasa del teléfono
– sostener el teléfono por los cables de conexión
– uso del teléfono durante una tormenta eléctrica
122 Español
Instrucciones de seguridad
pagina 122
Información preliminar
Contenido del embalaje
125
Conexión del teléfono
125
Controles e indicadores
Parte frontal
126
Parte trasera / Parte inferior
127
Botones y sus funciones
128
Utilización del teléfono
Cómo hacer una llamada
129
Cómo contestar una llamada
129
Cómo utilizar la función altavoz del teléfono durante una llamada 129
Último número marcado
129
Rellamada de los últimos 5 números de teléfono marcados
130
Borrado de los últimos números de teléfono marcados
130
Borrado de todos los números de teléfono marcados
130
Ajuste de los controles de volumen, agudos y graves del auricular 131
Puesta en espera
131
Cómo insertar una pausa de marcación (centralita PABX)
131
Botón de localización (rellamada de registro)
131
Botones de marcación rápida
Cómo asignar números a los botones de marcación rápida
132
Cómo efectuar una llamada utilizando los botones de marcación rápida 132
Borrado de una teclas de marcado con un solo toque
133
Borrado de todas teclas de marcado con un solo toque
133
Agenda telefónica
Uso de la agenda telefónica
134
Guardar NOMBRE/NÚMERO
134
Realizar llamadas telefónicas desde la agenda telefónica
135
Borrado de una entrada de la agenda telefónica
135
Borrado de todas las entradas de la agenda telefónica
135
Visualización del número de la llamada
Cómo funciona
136
Leer las entradas y llamar
136
Borrado de entradas
137
Borrado de todas las entradas
137
Español 123
Configuración - sondidos de llamada
pagina
Encendido y apagado de la luz intermitente
138
Encendido y apagado de la sEÑAL de llamada
138
Ajuste del volumen de la señal de llamada
139
Tono de la señal de llamada
139
Configuración - marcación por tonos/pulsos - interrupción
hook/flash - PABX (centralita telefónica automática privada) - PIN
Marcación por tonos/pulsos
140
interrupción hook/flash
140
PABX (centralita telefónica automática privada)
141
PIN (código de identificación personal)
141
Puertos de salida complementarios
Salida para audífonos
142
Salida para auriculares
142
Reconfiguración
142
Funcionamiento durante un corte del suministro eléctrico
143
Pasos a seguir en caso de que su teléfono no funcione
Información general
143
No aparecerá ningún número cuando suene el teléfono
143
Si el teléfono no funciona haga lo siguiente
144
Anexo
Cuidado y mantenimiento
144
Garantía
144
Marcado CE
145
Eliminación
145
Especificaciones técnicas
145
124 Español
Información preliminar
Contenido del embalaje
Este teléfono se suministra con los accesorios siguientes:
•
•
•
•
•
•
•
estación base del teléfono
auricular
cable de conexión del auricular
cable de línea telefónica
tarjeta de garantía
instrucciones de funcionamiento
tarjeta para números de marcación rápida
Conexión del teléfono
1.
2.
3.
Inserte el cable de conexión del auricular (cable espiral) en la
entrada marcada con el símbolo de un teléfono y que está situada
en el lado izquierdo de la estación base. Conecte el otro extremo
del cable al auricular.
Conecte el conector más pequeño del cable de línea telefónica a
la entrada marcada con la palabra "LINE", situada en la parte
posterior de la estación base. Inserte el conector de mayor
tamaño en el cajetín de su línea telefónica.
Inserte el conector del cable del adaptador de corriente en la
entrada marcada "AC 9 V" de la estación base. Enchufe el adaptador de corriente a un tomacorriente eléctrico de 230 V.
¡Advertencia!
No coloque el teléfono cerca de aparatos de televisión, pantallas de
visualización de datos (VDU), ventiladores, etc. para mantener al mínimo el riesgo de interferencias. No coloque el teléfono donde pueda
quedar expuesto a luz directa del sol o cerca de una fuente de calor.
Utilice solamente el cable de teléfono suministrado o un cable equivalente homologado internacionalmente.
Español 125
Controles e indicadores
Parte frontal
Entrada para el
auricular
LCD-Display
Zona del avisador luminoso
Interruptor deslizante de control de tono
Interruptor deslizan-te de control
de volumen
Activación/desactivación del amplificador
Botón de puesta en espera
Botones de
marcación rápida
Tarjeta para números de marcación
rápida
Botones de
marcación
Auricular Cable de
conexión
del
auricular
126 Español
Altavoz
(manos
libres)
Botones de
selección de
funciones
Pantalla de indicación de funciones
Botone de
marcación rápida
Micrófono
(manos
libres)
Parte trasera
Interruptor deslizante de control de
volumen del tono de llamada
Entrada para
el adaptador de
corriente
Salida para el
cable de línea
telefónica
Parte inferior
Salida para audífonos
(2,5 mm)
Salida de audio
(3,5 mm)
Reconfiguración
Compartimiento
para las pilas
Español 127
Botones y sus funciones
Botón del altavoz:
– permite utilizar el teléfono en modo de "manos libres":
mantiene la línea ocupada y cuelga
– activa o desactiva el modo de "multiconferencia" durante
una llamada.
R
Botón de localización, p.ej.: para transferir llamadas cuando
el teléfono está conectado a una red telefónica
P
Tecla de programación: Inicio del proceso de funcionamiento y almacenamiento
Rellamada
Tecla de marcación con un solo toque
M♥
Activación /desactivación del amplificador
Store
Botón de programación
Hold
Botón de puesta en espera
Interruptor deslizante de control de volumen
Interruptor deslizante de control de tono
M1 .... M6
Botones de marcación rápida
P
#
Iniciar la programación de la configuración sin PIN
P
*
Iniciar la programación de la configuración con PIN
128 Español
Utilización del teléfono
Cómo hacer una llamada
1. Descuelgue el auricular o pulse el botón
2. Marque el número deseado.
3. Para finalizar la llamada, cuelgue el auricular o pulse el botón
Cómo contestar una llamada
1. El teléfono suena.
2. Descuelgue el auricular o pulse el botón
3. Para finalizar la llamada, cuelgue el auricular o pulse el botón
Cómo utilizar la función altavoz del teléfono durante una llamada
1. Pulse el botón
para activar la función altavoz del teléfono
durante una llamada El altavoz del auricular seguirá funcionando.
2. Tendrá la opción de colgar el auricular y continuar la llamada utilizando
el altavoz y micrófono incorporado en la estación base.
3. Pulse el botón
para desactivar la función altavoz del teléfono.
Nota:
Podrá finalizar la llamada si pulsa el botón
auricular está colgado en su receptáculo.
mientras que el
Último número marcado
1. Descuelgue el auricular.
2. Si pulsa el botón
se marcará el número de la última llamada
realizada.
Español 129
Rellamada de los últimos 5 números de teléfono marcados
Los últimos 5 números de teléfono marcados se guardarán en el teléfono automáticamente.
1. Pulse
y # para avanzar de una entrada a otra.
*
3. Una vez aparezca en la pantalla el número que está buscando, levante el
2. Pulse
receptor.
El número seleccionado se marcará automáticamente.
Nota:
El receptor deberá estar en la base mientas selecciona el número de teléfono
al que desea volver a llamar.
Borrado de los últimos números de teléfono marcados
1. Pulse
2. Pulse
*
y
#
para avanzar de una entrada a otra.
3. Pulse R para borrar la entrada actualmente seleccionada.
En la pantalla del teléfono aparecerá el mensaje „OK ?“.
Pulse P
para confirmar su selección.
Borrado de todos los números de teléfono marcados
1. Pulse
2. Pulse R
y mantenga esta tecla pulsada durante 2 segundos.
En la pantalla del teléfono aparecerá el mensaje „OK ?“.
Pulse P para confirmar su selección.
130 Español
Ajuste de los controles de volumen, agudos y graves del auricular
El volumen del auricular puede ajustarse durante una llamada utilizando
el interruptor deslizante de "volumen" situado en el lado derecho de la
estación base.
Puede activar el amplificador complementario pulsando el botón
Cuando se activa el amplificador complementario, el volumen del auricular
puede subirse hasta unos 30 dB. Si está conectada la amplificación, la pantalla de estado se encenderá junto con el símbolo
de la pantalla del
teléfono. El amplificador permanecerá activado cuando cuelgue el auricular
en su receptáculo. Para desactivar el amplificador complementario, pulse
de nuevo el botón
También podrá aumentar unos 10 dB más los tonos agudos o graves utilizando el control del tono (interruptor deslizante situado en la parte derecha
de la estación base).
Puesta en espera (HOLD)
Esta función le permite interrumpir provisionalmente una conversación, sin
finalizar la llamada. Pulse el botón Hold para interrumpir provisionalmente
la conversación.
Cómo insertar una pausa de marcación (centralita PABX)
Pulse el botón P para interrumpir la marcación durante 1-6 segundos.
Botón de localización (rellamada de registro)
Esta función es necesaria para activar ciertas características del sistema
T-Net.
Si pulsa el botón R la línea telefónica se interrumpirá durante un
cierto intervalo de tiempo (configuración no modificable de 260 mseg.).
Español 131
Teclas de marcación con un solo toque
Asignación de números de teléfono a las teclas de marcación con un
sólo toque
Se pueden programar con cualquier número de teléfono las 6 teclas de
marcación rápida y la tecla M♥ VIP.
1. Pulse P y después #
2. Introduzca el código “01” y el “número de teléfono” deseado.
El número de teléfono se asignará a la tecla M1.
3. Introduzca el código “02” y el “número de teléfono” deseado.
El número de teléfono se asignará a la tecla M2.
4. Introduzca el código “03” y el “número de teléfono” deseado.
El número de teléfono se asignará a la tecla M3.
5. Introduzca el código “04” y el “número de teléfono” deseado.
El número de teléfono se asignará a la tecla M4.
6. Introduzca el código “05” y el “número de teléfono” deseado.
El número de teléfono se asignará a la tecla M5.
7. Introduzca el código “06” y el “número de teléfono” deseado.
El número de teléfono se asignará a la tecla M6.
8. Introduzca el código “07” y el “número de teléfono” deseado.
El número de teléfono se asignará a la teclaM♥
9. Pulse P para guardar los cambios. Introduzca otro código o pulse
para salir del menú de configuración.
P
Uso de las teclas de marcado con un solo toque
Extraiga el teléfono de la base o pulse la tecla
Si pulsa una de las teclas M1 .... M6 o la tecla M♥ se marcará automáticamente el número de teléfono guardado en dicha tecla.
132 Español
Borrado de una teclas de marcado con un solo toque
1.
2.
Si pulsa una de las teclas M1 .... M6 o la tecla M♥ se marcará
automáticamente el número de teléfono guardado en dicha tecla.
Pulse R para borrar la entrada actualmente seleccionada.
En la pantalla del teléfono aparecerá el mensaje „OK ?“.
Pulse P para confirmar su selección.
Borrado de todas teclas de marcado con un solo toque
1.
2.
Si pulsa una de las teclas M1 .... M6 o la tecla M♥ se marcará
automáticamente el número de teléfono guardado en dicha tecla.
Pulse R y mantenga esta tecla pulsada durante 2 segundos.
En la pantalla del teléfono aparecerá el mensaje „OK ?“.
Pulse
P para confirmar su selección.
Español 133
Agenda telefónica
Uso de la agenda telefónica
Se pueden guardar en la agenda telefónica nombres y números. Una vez
guardado un número de teléfono, puede llamar a dicho número pulsando
muy pocas teclas.
Se pueden guardar en la agenda hasta 30 números de teléfono. Cada
número de teléfono puede contener hasta 20 dígitos.
Guardar nombre/número
Para crear nuevas entradas en la agenda telefónica, siga estos pasos:
1. Pulse P y después #
2. Introduzca el código “80” para una nueva entrada.
3. Introduzca con el teclado el número de teléfono deseado. Pulse R
para borrar el último dígito introducido.
4. Pulse P para guardar el número de teléfono y empezar a introducir
el nombre.
5. Pulse la tecla correspondiente tantas veces como sea necesario para
seleccionar la letra deseada (véase la siguiente tabla). Pulse R para
borrar la última letra introducida.
6. Pulse P para completar el proceso de programación. .
Tecla
1
2
3
4
5
6
7
8
9
0
Letra/carácter
1
A
B
D
E
G
H
J
K
M
N
P
Q
T
U
W
X
_
0
134 Español
C
F
I
L
O
R
V
Y
2
3
4
5
6
S
8
Z
7
9
Realizar llamadas telefónicas desde la agenda telefónica
1.
2.
3.
4.
Pulse P y después #
Introduzca el código “81” para acceder a la agenda telefónica.
Pulse
y # para pasar de página entre entradas.
Levante el receptor o pulse la tecla
para marcar el número
seleccionado.
*
Borrado de una entrada de la agenda telefónica
1. Avance hasta la entrada deseada tal y como se describe en el apartado
“Realizar llamadas telefónicas desde la agenda telefónica”.
2. Pulse R para borrar la entrada seleccionada.
En la pantalla del teléfono aparecerá el mensaje „OK ?“.
Pulse P para confirmar su selección.
Borrado de todas las entradas de la agenda telefónica
1. Acceda a la agenda telefónica tal y como se describe en el apartado
“Realizar llamadas telefónicas desde la agenda telefónica”.
2. Pulse R y mantenga esta tecla pulsada durante 2 segundos.
En la pantalla del teléfono aparecerá el mensaje „OK ?“.
Pulse P para confirmar su selección.
Español 135
Visualización del número de la llamada
Cómo funciona
El número de la persona que le está llamando aparecerá en la pantalla del
teléfono. El teléfono es compatible con ambos sistemas actuales (DTMF/
FSK). Su teléfono guardará automáticamente los 5 últimos números de
llamadas recibidas. Si la memoria está llena, se borrará la entrada más
antigua.
¡Importante!
La visualización del número que llama sólo funcionará si
este servicio es proporcionado por su compañía telefónica.
Pregunte a su compañía telefónica.
Leer las entradas y llamar
Los últimos 5 números de teléfono reconocidos se guardarán automáticamente en el teléfono.
1. Pulse R
2. Pulse
y # para avanzar de una entrada a otra.
(Sólo aparecerán en la pantalla los 10 primeros dígitos del número de
teléfono. Pulse
para ver el resto del número de teléfono.
Pulse esta tecla
de nuevo para ver la fecha y la hora en que se
recibió la llamada).
3. Una vez aparezca en la pantalla el número de teléfono deseado, levante
el receptor o pulse
Se marcará el número seleccionado.
*
Nota:
El receptor debe estar apoyado en la base cuando seleccione el número de
teléfono.
136 Español
Borrado de una entrada
1. Avance hasta la entrada deseada tal y como se describe en el apartado
“Leer las entradas y llamar”.
2. Pulse R para borrar la entrada seleccionada.
En la pantalla del teléfono aparecerá el mensaje „OK ?“.
Pulse P para confirmar su selección.
Borrado de todas las entradas
1. Acceda a la agenda telefónica tal y como se describe en el apartado
“Leer las entradas y llamar”.
2. Pulse R y mantenga esta tecla pulsada durante 2 segundos.
En la pantalla del teléfono aparecerá el mensaje „OK ?“.
Pulse P para confirmar su selección.
Español 137
Configuración – Sonidos de llamada
Encendido y apagado de la luz intermitente
También puede indicar las llamadas entrantes con una luz intermitente.
La luz intermitente aparece en la parte posterior del teléfono.
1. Pulse P y después #
2. A continuación, introduzca uno de los dos códigos siguientes:
a. Código “40” para apagar la luz intermitente.
b. Código “41” para encender la luz intermitente; el símbolo luminoso
aparecerá en la pantalla del teléfono.
3. Pulse P para guardar la configuración.
4. Introduzca otro código o pulse P para salir del menú de
configuración.
Nota:
La luz no funcionará en el caso de un corte del suministro eléctrico.
Encendido y apagado de la señal de llamada
1. Pulse P y después #
2. Introduzca uno de los dos códigos siguientes:
a. Código “20” para apagar la señal de llamada.
b. Código “21” para encender la señal de llamada.
3. Pulse P para guardar la configuración.
4. Introduzca otro código o pulse P para salir del menú de
configuración.
138 Español
Ajuste del volumen de la señal de llamada
Se puede ajustar el volumen de la señal de llamada moviendo el interruptor
deslizante situado en la parte posterior del teléfono.
Tono de la señal de llamada
Puede seleccionarlo entre 7 señales acústicas diferentes de llamada.
1. Pulse P y después #
2. Introduzca el código “23”. La configuración actual de la señal aparecerá
en la pantalla.
3. Pulse las teclas numéricas 1-7 para modificar la señal de llamada.
4. Pulse P para guardar la configuración.
5. Introduzca otro código o pulse
P para salir del menú de
configuración.
Español 139
Configuración - Marcación por tonos/pulsos –
Interrupción “Hook/Flash” – PABX (Centralita Telefónica
Automática Privada) – PIN
Marcación por tonos/pulsos
1. Pulse P y después #
2. Introduzca uno de los tres códigos siguientes:
a. Código “10” para la marcación por tonos
b. Código “11” para la marcación por pulsos (33% M/B)
c. Código “12” para la marcación por pulsos (40% M/B)
3. Pulse P para guardar la configuración.
4. Introduzca otro código o pulse P para salir del menú de
configuración.
Nota:
Hoy en día, la mayor parte de las conexiones telefónicas utilizan la
marcación por tonos.
Interrupción Hook/Flash
Puede configurar la tecla de la interrupción Flash a diferentes tiempos de interrupción. Esta configuración normalmente no tiene por qué ser alterada cuando
el teléfono se conecta a un sistema telefónico superior (véase el manual de
funcionamiento del sistema telefónico).
1. Pulse P y después *
2. Introduzca el PIN de cuatro dígitos “XXXX” (el código PIN predefinido del
teléfono es “0000”).
3. Ahora puede introducir uno de los siguientes códigos:
a. El código “700” establece el tiempo de la interrupción Flash en “90 ms”,
b. El código “701” establece el tiempo de la interrupción Flash en “110 ms”,
c. El código “702” establece el tiempo de la interrupción Flash en “130 ms”,
d. El código “703” establece el tiempo de la interrupción Flash en “260 ms”o
e. El código “704” establece el tiempo de la interrupción Flash en “600 ms”.
140 Español
4. Pulse P para guardar los cambios.
5. Introduzca otro código o pulse P para salir del menú de configuración.
Pausa – PABX (Centralita Telefónica Automática Privada)
Puede modificar la duración de la pausa de marcación (1-6 segundos). La
pausa normalmente no tiene por qué ser alterada cuando el teléfono se
conecta a un sistema telefónico superior (véase el manual de funcionamiento del sistema telefónico).
1. Pulse P y después *
2. Introduzca el PIN de cuatro dígitos de la unidad “XXXX”.
(El código PIN predefinido del teléfono es “0000”).
3. Introduzca el código “720”.
4. Introduzca la pausa de marcación con las teclas numéricas 1-6.
5. Pulse P para guardar los cambios.
6. Introduzca otro código o pulse P para salir del menú de
configuración.
PIN (Código de identificación personal)
Algunas de las funciones de su teléfono están protegidas por un código PIN.
El código PIN predefinido del teléfono es “0000”. Si modifica el PIN, asegúrese de anotar en algún sitio el número introducido.
1. Pulse P y después *
2. Introduzca el PIN de cuatro dígitos ”XXXX” (el código PIN predefinido del
teléfono es “0000”).
3. Introduzca el código “600”.
4. A continuación, introduzca el nuevo código PIN de cuatro dígitos “XXXX”.
5. Para confirmar la introducción de su nuevo PIN, tecléelo de nuevo.
6. El código PIN se guardará automáticamente una vez introducido el último
dígito.
7. Introduzca otro código o pulse P para salir del menú de configuración.
Español 141
Puertos de salida complementarios
Salida para audífonos
Puerto estándar para audífonos con conector de 2,5 mm (para conectar
audífonos PL-100 o PL-200, por ejemplo).
Salida para auriculares
Para conectar auriculares, sistemas de inducción magnética o similares.
Reset (Reconfiguración)
Puede pulsar un botón de la parte posterior del teléfono para restablecer
todas las configuraciones del teléfono a las configuraciones predefinidas.
Pulse este botón y manténgalo pulsado durante 2 segundos.
Esta función resulta útil si ha olvidado el código PIN del teléfono.
Configuraciones predefinidas:
Luz intermitente:
Teclas de marcación con un sólo toque:
Tecla VIP:
Memoria de rellamada:
Memoria de visualización del número de llamada (CLIP):
Agenda telefónica:
Interrupción Hook/Flash:
Pausa:
Tono de llamada:
Marcación por tonos/pulsos:
Código PIN:
142 Español
ACTIVADA
Ninguna
Ninguno
Vacía
Vacía
Vacía
260 ms
3s
1
Marcación por
tonos
0000
Funcionamiento durante un corte del suministro eléctrico
En el caso de un corte del suministro eléctrico, podrá seguir utilizando el teléfono. Sin embargo, la luz intermitente no funcionará.
Si desea utilizar la función de visualización durante un corte del suministro
eléctrico, puede introducir 5 pilas (micro o AAA) en el teléfono.
Nota:
Durante un corte del suministro eléctrico, no funcionará la luz intermitente del
teléfono incluso si introduce pilas.
El símbolo de batería agotada aparecerá en la pantalla si las baterías están
agotadas o si no están introducidas en el dispositivo.
Pasos a seguir en caso de que su teléfono no funcione
Información general
Asegúrese de que el cable del teléfono no presenta daños y está conectado
correctamente en su sitio. Desconecte cualquier equipo complementario,
prolongadores de cable y otros teléfonos. Si tras esta acción el teléfono
funciona, será indicativo de que la avería procede de dicho equipo complementario. Intente conectar su teléfono a otra línea telefónica, por ejemplo a
la de un vecino. Si el teléfono funciona en esa línea, es posible que el problema esté en su línea telefónica. Llame a su compañía telefónica para
notificar la avería.
No aparecerá ningún número cuando suene el teléfono
• La visualización del número de llamada es una función que debe proporcionar su proveedor del servicio.
• Si no aparece en la pantalla el número de llamada, significará que la
información del número de llamada no está disponible o que el número
de la persona que llama no está registrado. Esto también puede ocurrir
cuando se recibe una llamada desde una centralita telefónica.
• Si el teléfono está conectado a una centralita, normalmente no funcionará la función de visualización del número de llamada.
Español 143
Si el teléfono no funciona haga lo siguiente:
• asegúrese de que el adaptador de corriente está insertado correctamente en la estación base y en el tomacorrientes.
• asegúrese de que el cable de línea está insertado correctamente en la
estación base y en el cajetín de la línea telefónica.
• conecte otro teléfono a su línea telefónica. Si funciona, será indicativo
de que su teléfono está averiado.
• Utilice únicamente el cable de teléfono suministrado o un cable equivalente homologado internacionalmente.
Anexo
Cuidado y mantenimiento
Este teléfono es un aparato libre de mantenimiento. Si llegara a ensuciarse,
pásele de vez en cuando un paño suave humedecido. Nunca alcohol, aguarrás u otros disolventes orgánicos.
No deje el teléfono expuesto al sol durante largos períodos de tiempo y
protéjalo también contra altas temperaturas, humedad o altos niveles de
vibración mecánica.
Garantía
Este teléfono es un aparato muy fiable. Sin embargo, si se produjese alguna
avería a pesar de estar instalado correctamente y de haber sido utilizado de
la manera adecuada, póngase en contacto con su distribuidor especializado
o directamente con el fabricante. La garantía cubre la reparación y gastos
de envío siempre que el aparato se devuelva en su embalaje original. Por lo
tanto, no deseche el embalaje. La garantía quedará anulada en caso de que
la avería resulte de una utilización incorrecta o de reparaciones inadecuadas efectuadas por personas no autorizadas (que hayan dañado el precinto
de garantía del teléfono). Las reparaciones en garantía se efectuarán únicamente si se presenta la tarjeta de garantía debidamente completada por el
distribuidor, o el certificado original de garantía en caso de que el teléfono
haya sido adquirido directamente a través de nosotros. En cualquier caso,
se deberá indicar también el número de serie del teléfono.
144 Español
Marcado CE
Este teléfono cumple los requisitos para los equipos terminales de radio y
telecomunicación establecidos en la Directiva europea 1999/5/CE y ha sido
homologado conforme a dicha Directiva.
Su conformidad con la Directiva mencionada está confirmada por el marcado CE estampado en el teléfono.
Eliminación
Eliminación de equipos eléctricos y electrónicos usados (a respetar en los
países de la Unión Europea y otros países europeos con un sistema de recogida independiente de este tipo de equipos)
El símbolo que aparece en el producto o en su embalaje indica que este producto no debe eliminar junto con el resto de desechos, sino que debe llevarse a un centro de recogida de residuos para el reciclado de equipos eléctricos y electrónicos. Desechando estos equipos correctamente contribuye de
manera importante a la protección del medio ambiente y a su salud.
Desechar estos equipos incorrectamente pone en peligro el medio ambiente
y su salud. El reciclaje del material ayuda a reducir la cantidad de materias
primas utilizadas. Para más información sobre el reciclaje de este producto,
póngase en contacto con las autoridades locales, su ayuntamiento o la tienda en la que compró el producto.
Especificaciones técnicas
Fuente de alimentación:
Dimensiones (Largo x Ancho x Alto):
Peso:
Primaria 220/230 V 50 Hz / 1000 mA secundaria 9 V AC / 1000 mA
210 mm x 227 mm x 70 mm
860 g
Español 145
Humantechnik Service-Partner
D
Germany
CH
Switzerland
A
Austria
Eastern Europe
F/B
France
Belgium
For other service-partners
in Europe please contact:
Humantechnik Germany
Tel.: ++ 49 - 76 21- 9 56 89 - 0
Fax.: ++ 49 - 76 21- 9 56 89 - 70
Internet: www.humantechnik.com
e-mail: [email protected]
Humantechnik GmbH
Im Wörth 25
D-79576 Weil am Rhein
Tel.: 0 76 21 / 9 56 89 - 0
Fax.: 0 76 21 / 9 56 89 - 70
Humantechnik GHL AG
Rastatterstrasse 9
CH-4057 Basel
Tel.: 0 61 / 6 93 22 60
Fax.: 0 61 / 6 93 22 61
Humantechnik Austria
Sicklinger & Partner KEG
Wagnitzer Strasse 29
A-8401 Kalsdorf b. Graz
Tel./Fax.: ++43 3135 / 5 62 87
SMS
Audio Electronique S.à.r.l.
138, Grand’ Rue
F-68170 Rixheim
Tel.: ++33 - 3 89 44 14 00
Fax.: ++33 - 3 89 44 62 13
HUMANTECHNIK
RM453200 · 0106