1
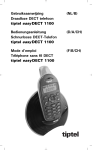
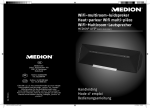
Schnurlostelefon
Téléphone sans fil
Telefono senza fili
Cordless telephone
Draadloze telefoon
DF73X
Bedienungsanleitung
Mode d’emploi
Istruzioni per l’uso
Operating Instructions
Gebruiksaanwijzing
2
Bedienungsanleitung . . . . . . . . 3
Mode d’emploi . . . . . . . . . . . . 43
Istruzioni per l’uso . . . . . . . . . . 83
Operating Instructions . . . . . . . 125
Gebruiksaanwijzing . . . . . . . . . 167
Declaration of Conformity . . . . . 208
2
1
1
2
3
4
5
6
7
8
9
10
11
12
13
14
15
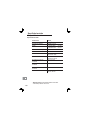
Inhaltsverzeichnis
Sicherheitshinweise . . . . . . . . . . . .
4
Telefon in Betrieb nehmen . . . . . . . .
6
Bedienelemente . . . . . . . . . . . . . . .
9
Wie bediene ich mein Telefon? . . . . . 11
Telefonieren . . . . . . . . . . . . . . . . . . 14
Nebenstellenanlagen / Zusatzdienste 20
Menüstruktur . . . . . . . . . . . . . . . . . 22
Telefonbuch . . . . . . . . . . . . . . . . . . 28
Rufnummernanzeige / Anrufliste . . . . 30
Besondere Funktionen . . . . . . . . . . . 33
Erweitern des Telefonsystems . . . . . 34
Falls es Probleme gibt . . . . . . . . . . . 36
Technische Eigenschaften . . . . . . . . 38
Pflegehinweise / Garantie . . . . . . . . 40
Stichwortverzeichnis . . . . . . . . . . . . 41
3
Sicherheitshinweise
1 Sicherheitshinweise
Lesen Sie diese Bedienungsanleitung sorgfältig durch.
Bestimmungsgemäße Verwendung
Dieses Telefon ist geeignet für das Telefonieren innerhalb eines Telefonnetzes. Jede andere Verwendung gilt als nicht bestimmungsgemäß. Eigenmächtige Veränderungen oder Umbauten sind nicht
zulässig. Öffnen Sie das Gerät in keinem Fall selbst und führen Sie
keine eigenen Reparaturversuche durch.
Aufstellungsort
Vermeiden Sie Belastungen durch Rauch, Staub, Erschütterungen,
Chemikalien, Feuchtigkeit, Hitze oder direkte Sonneneinstrahlung.
Verwenden Sie das Mobilteil nicht in explosionsgefährdeten Bereichen.
Netzteil
Achtung: Verwenden Sie nur das mitgelieferte Steckernetzteil, da andere Netzteile das Telefon beschädigen
können. Sie dürfen den Zugang zum Steckernetzteil nicht
durch Möbel oder andere Gegenstände versperren.
Aufladbare Akkus
Achtung: Werfen Sie Akkus nicht ins Feuer. Verwenden
Sie nur Akkus des gleichen Typs! Achten Sie auf die richtige Polung! Bei unsachgemäßer Verwendung von Akkus
besteht Explosionsgefahr.
Stromausfall
Bei Stromausfall kann mit dem Telefon nicht telefoniert werden. Halten Sie für Notfälle ein schnurgebundenes Telefon bereit, welches
ohne externe Stromversorgung arbeitet.
4
Sicherheitshinweise
Medizinische Geräte
Achtung: Benutzen Sie das Telefon nicht in der Nähe von
medizinischen Geräten. Eine Beeinflussung kann nicht
völlig ausgeschlossen werden.
Halten Sie mindestens 1 m Abstand.
DECT1−Telefone können in Hörgeräten einen unangenehmen
Brummton verursachen.
Entsorgung
Hat Ihr Gerät ausgedient, bringen Sie das Altgerät zur
Sammelstelle Ihres kommunalen Entsorgungsträgers (z.
B. Wertstoffhof). Das nebenstehende Symbol bedeutet,
dass das Altgerät getrennt vom Hausmüll zu entsorgen
ist. Nach dem Elektro− und Elektronikgerätegesetz sind
Besitzer von Altgeräten gesetzlich gehalten, alte Elektro− und Elektronikgeräte einer getrennten Abfallerfassung zuzuführen.
Akkus entsorgen Sie beim batterievertreibenden Handel sowie bei zuständigen Sammelstellen, die entsprechende Behälter bereitstellen.
Verpackungsmaterialien entsorgen Sie entsprechend
den lokalen Vorschriften.
1
DECT: Digital Enhanced Cordless Telecommunication
= Standard für kabellose Telefone.
5
Telefon in Betrieb nehmen
2 Telefon in Betrieb nehmen
Sicherheitshinweise
Achtung: Lesen Sie vor der Inbetriebnahme unbedingt
die Sicherheitshinweise in Kapitel 1.
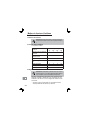
Verpackungsinhalt 2
Zum Lieferumfang gehören:
Inhalt
DF73X−Modell
73
732*
733*
734*
Basisstation(en) mit Netzteil
1
1
1
1
Ladestation(en) mit Netzteil
−
1
2
3
Mobilteil(e)
1
2
3
4
Telefonanschlusskabel
1
1
1
1
Akkus
3
6
9
12
Gürtelclip(s)
1
2
3
4
Bedienungsanleitung
1
1
1
1
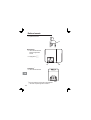
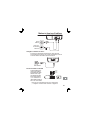
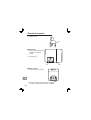
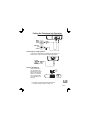
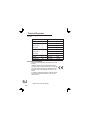
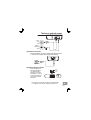
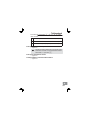
Basisstation anschließen
Achtung: Stellen Sie die Basisstation mit einem Mindestabstand von 1 m zu anderen elektronischen Geräten auf,
da es sonst zu gegenseitigen Störungen kommen kann.
Schließen Sie die Basisstation wie auf der Skizze abgebildet an.
Verwenden Sie aus Sicherheitsgründen nur das mitgelieferte Netzteil sowie das beigefügte Telefonanschlusskabel.
*
6
Unter www.switel.com erfahren Sie, ob dieses Telefonset bereits erhältlich ist.
Telefon in Betrieb nehmen
Netz−
steckdose
Telefonanschluss−
dose
Ladestation anschließen1
Schließen Sie die Ladestation wie auf der Skizze abgebildet an.
Verwenden Sie aus Sicherheitsgründen nur das mitgelieferte Netzteil.
Netzsteckdose
Akkus einlegen
Legen Sie die Akkus in
das geöffnete Akkufach
ein. Verwenden Sie nur
Akkus des Typs AAA
Ni−MH 1,2 V. Achten
Sie auf die richtige Polung! Schließen Sie
das Akkufach.
1
− AAA +
+ AAA −
− AAA +
Gilt nur für Modelle mit mindestens zwei Mobilteilen.
Abschnitt Verpackungsinhalt" auf Seite 6
7
Telefon in Betrieb nehmen
Akkus aufladen 3
Stellen Sie das Mobilteil bei der ersten Inbetriebnahme für mindestens 15 Stunden in die Basisstation / Ladestation. Haben Sie das
Mobilteil richtig in die Basisstation / Ladestation gestellt, leuchtet die
Ladekontrollleuchte. Das Mobilteil erwärmt sich beim Laden. Dies
ist normal und ungefährlich.
Laden Sie das Mobilteil nicht mit fremden Aufladegeräten.
Der aktuelle Akkuladezustand wird im Display angezeigt:
Voll
Schwach
Gürtelclip anbringen
Drehen Sie das Mobilteil so, dass die Rückseite nach oben zeigt
und drücken Sie den Gürtelclip in die dafür vorgesehenen zwei
Aussparungen im oberen seitlichen Bereich des Mobilteils.
Spracheinstellung
Auf Seite 22 erfahren Sie, wie Sie bei der ersten Inbetriebnahme Ihres Telefons die Displaysprache einstellen.
Uhrzeit einstellen
Auf Seite 24 erfahren Sie, wie Sie bei der ersten Inbetriebnahme
die Uhrzeit Ihres Mobilteils einstellen.
Nebenstellenanlagen
In Kapitel 6 erhalten Sie weitere Informationen, falls Sie Ihr Telefon
an einer Nebenstellenanlage anschließen möchten.
8
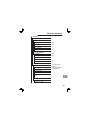
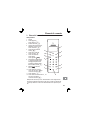
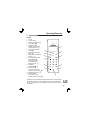
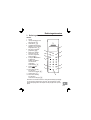
Bedienelemente
3 Bedienelemente
Mobilteil
1
2
Display
Auflegen−Taste,
Standby−Taste 3 Telefonbuch 4 Groß−/Kleinschreibung,
AM/PM (im 12 Stunden Format)
Konferenz−Taste 5 INT−Taste (für interne
Gespräche) 6 Menü−Taste, OK−Taste,
Mikrofon−Taste 7 Löschtaste, Zurücktaste,
R−Signaltaste clear
8 Einfügen von Satzzeichen
bei der Texteingabe,
Kurzfristiges Umschalten
zum Ton−Wahlverfahren,
Manuelle Tastensperre 9 Wahlwiederholung,
Pause redial
10 Auswahltaste: Abwärts
durch das Menü, Hörer−
lautstärke verringern 11 Gesprächstaste 12 Auswahltaste: Aufwärts
durch das Menü, Hörer−
lautstärke erhöhen 1
12
2
11
3
10
9
8
4
7
5
6
Die Tasten Ihres Telefons werden in dieser Bedienungsanleitung nachfolgend mit vereinheitlichten Symbolen dargestellt (s. o.). Leichte Abweichungen der Tastensymbole Ihres Telefons gegenüber den hier verwendeten Tastensymbolen sind daher möglich.
9
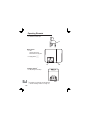
Bedienelemente
13 Kopfhöreranschluss
13
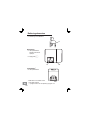
Basisstation
14 LED Ladekontrollleuchte,
blinkt bei eingehenden
Anrufen
15 Paging−Taste 15
14
Ladestation1
16 LED Ladekontrollleuchte
1
10
Gilt nur für Modelle mit mindestens zwei Mobilteilen.
Abschnitt Verpackungsinhalt" auf Seite 6
16
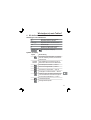
Wie bediene ich mein Telefon?
4 Wie bediene ich mein Telefon?
Darstellungen und Schreibweisen
3 sec STUMM oder
Nummern oder Buchstaben eingeben
Abgebildete Taste kurz drücken
Abgebildete Taste 3 Sekunden drücken
Mobilteil klingelt
Mobilteil aus der Basisstation nehmen
Mobilteil in die Basisstation stellen
Text oder Symbole im Display
Symbole im Display
Symbol
Beschreibung
Die Verbindung zur Basisstation ist vorhanden.
Wird die Verbindung schlecht, ertönt der Reichweitenwarnton.
AUSSER
REICHW.
Das Mobilteil hat keine Verbindung mehr zur
Basisstation. Nähern Sie sich der Basisstation.
Die Tastensperre ist aktiviert. Seite 18
Der Tonruf ist ausgeschaltet. Seite 18
Der Weckruf ist eingeschaltet. Seite 33
Texteingabe von Kleinbuchstaben Seite 28
Hinweis auf eine neue Sprachnachricht bei aktivem Anrufbeantworter im Telefonnetz (optionaler Dienst Ihres Netzbetreibers) Seite 21
Volle Batteriekapazität.
Niedrige Batteriekapazität.
11
Wie bediene ich mein Telefon?
BATTERIE
LEER
Zusätzlich ertönt der Akkuwarnton.
Bitte laden Sie Ihr Telefon.
Durchlaufende Segmente:
Die Akkus werden geladen. Seite 8
MT−NAME
Name des Mobilteils Seite 26
OO:OO
Anzeige der Uhrzeit Seite 24
LTSPR
Das Freisprechen ist aktiviert. Seite 18
STUMM
Das Mikrofon ist stumm geschaltet. Seite 18
SPR
Ein normales Telefonat wird geführt.
Standby−Modus 4
Die nachfolgenden Bedienungsanweisungen gehen davon aus,
dass sich das Mobilteil im Standby−Modus befindet.
Im Standby−Modus sind die Tasten und das Display beleuchtet.
Außerdem zeigt das Display die Meldung BEREIT an.
Den Standby−Modus erreichen Sie durch Drücken der Taste .
Energiesparmodus
Nach einiger Zeit im Standby−Modus wechselt das Mobilteil in einen
Energiesparmodus. Tasten und Display sind nun nicht mehr beleuchtet. Im Display wird die Uhrzeit angezeigt.
Drücken Sie eine beliebige Taste, um den Standby−Modus zu aktivieren.
12
Wie bediene ich mein Telefon?
Navigation im Menü
Alle Funktionen sind über unterschiedliche Menüs zu erreichen.
Den Weg zur gewünschten Funktion entnehmen Sie der Menüstruktur. Kapitel 7
Hauptmenü öffnen
oder Gewünschtes Untermenü auswählen
Untermenü öffnen
oder Gewünschte Funktion auswählen
Funktion öffnen
oder Gewünschte Einstellung auswählen
Nummern oder Buchstaben eingeben
Eingaben bestätigen
clear
eine Ebene zurück
in den Standby−Modus zurückkehren
Jeder Vorgang wird automatisch abgebrochen, wenn innerhalb von 20 Sekunden keine Eingabe erfolgt.
Telefonbucheinträge erstellen − Beispiel
Wie Sie in den Menüs navigieren und Eingaben vornehmen, ist hier
anhand des Beispiels Telefonbucheinträge erstellen, erklärt. Verfahren Sie bei allen Einstellungen wie bei diesem Beispiel.
Telefonbuch öffnen
Menü öffnen
oder Funktion auswählen und bestätigen
, Namen eingeben und bestätigen
, Rufnummer eingeben und bestätigen
Sensortasten
Bei den Sensortasten handelt es sich um berührungssensitive Tastenfelder auf der Oberfläche des Mobilteils.
Die Sensortasten werden gedrückt", indem die Tastenfelder mit
den Fingern berührt werden. Es ist nicht notwendig, besonders fest
zu drücken.
13
Telefonieren
5 Telefonieren
Anruf annehmen 5
Geht an Ihrem Telefon ein Anruf ein, hören Sie einen Rufton, sofern
Sie diesen nicht ausgeschaltet haben. Zusätzlich blinken an der Basisstation die LED sowie am Mobilteil die Beleuchtung von Display
und Tasten.
, oder
Anruf annehmen
Wenn Sie die Automatische Gesprächsannahme aktiviert haben, brauchen Sie nur das Mobilteil aus der Basisstation nehmen, um einen Anruf anzunehmen.
Seite 25
Gespräch beenden
oder Gespräch beenden
Anrufen
Rufnummer eingeben
Bei Falscheingabe
letzte Ziffer löschen
Rufnummer wählen
clear
Sie können auch zuerst die Gesprächstaste drücken und
erhalten damit das Freizeichen. Die eingegebenen Ziffern
Ihrer gewünschten Rufnummer werden sofort gewählt.
Eine Korrektur einzelner Ziffern der Rufnummer ist bei
dieser Form des Gesprächaufbaus nicht möglich.
Wahlwiederholung
Ihr Telefon speichert die 20 zuletzt gewählten Rufnummern in einer
Wahlwiederholungsliste.
Freizeichen abwarten
redial
wählt automatisch die
zuletzt gewählte Rufnummer
oder:
redial
14
Wahlwiederholungsliste öffnen
Telefonieren
oder , Eintrag auswählen und
Verbindung herstellen
Entgangene Anrufe zurückrufen 6
Ihr Telefon speichert 40 eingegangene Anrufe in einer Anrufliste.
Seite 30
2x oder Anrufliste öffnen
oder Eintrag auswählen
Verbindung herstellen
Rufnummern aus dem Telefonbuch wählen 7
Sie müssen Rufnummern im Telefonbuch gespeichert haben.
Seite 27 und 28
Das Telefon verfügt über eine alphabetische Namensuche. Geben Sie den Anfangsbuchstaben des gesuchten Namen ein. Z. B.:
Für den Namen Henry" drücken Sie die 4". Die erste gefundene
Übereinstimmung zu Ihrer Suche wird angezeigt.
Telefonbuch öffnen
oder , Eintrag auswählen und
Verbindung herstellen
Direktruf 8
Wenn Sie die Direktruf−Funktion (Baby Call) aktiviert haben, wird
eine einprogrammierte Rufnummer gewählt, sobald eine beliebige
Taste auf dem Mobilteil gedrückt wird (mit Ausnahme der Menü−Taste). Geben Sie die gewünschte Rufnummer ein, nachdem Sie die
Funktion eingeschaltet haben. Seite 25
Wollen Sie eine andere Rufnummer wählen, müssen Sie
zuerst die Direktruf−Funktion ausschalten.
Intern telefonieren 9
Interne Gespräche führen
Sie müssen zwei oder mehr Mobilteile (MT1, MT2, ...) vom Typ
DF73X an einer Basisstation angemeldet haben, um kostenlose interne Gespräche führen zu können.
15
Telefonieren
MT1: , o. Internes Telefonat einleiten,
gewünschtes Mobilteil wählen
Alternativ zum Auf− und Abwärtsblättern können Sie das
gewünschte andere Mobilteil auch direkt mit seiner 1−stelligen Nummer anwählen.
MT2: Internes Gespräch am anderen
Mobilteil annehmen
MT1 / MT2: Internes Gespräch beenden
Externe Gespräche intern weiterleiten
Während eines Telefonats von MT1 mit einem externen Gesprächs−
partner:
MT1: , o. Internes Telefonat einleiten,
gewünschtes Mobilteil wählen
MT2: Internes Gespräch am anderen
Mobilteil annehmen
MT1: Gespräch weiterleiten
Sollte sich das gerufene Mobilteil nicht melden, können
Sie sich das externe Gespräch durch Drücken der Taste
wieder zurückholen.
Rücksprache / Makeln
Das Makeln ist ein optionaler Dienst Ihres Netzbetreibers.
Fragen Sie diesen nach weiteren Informationen.
Kapitel 6
Während eines externen Gesprächs können Sie ein anderes internes Mobilteil anwählen, um Rücksprache zu halten. Der externe
Gesprächspartner wird gehalten, während Sie mit dem internen
Gesprächspartner sprechen. Sie können den Gesprächspartner beliebig oft wechseln.
MT1: , o. Während eines externen
Gesprächs ein internes
Telefonat einleiten,
gewünschtes Mobilteil wählen
16
Telefonieren
MT2: MT1 : Internes Gespräch am anderen
Mobilteil annehmen
Gesprächspartner wechseln
Konferenzgespräche führen
Die Dreier−Konferenz ist ein optionaler Dienst Ihres Netzbetreibers. Fragen Sie diesen nach weiteren Informationen. Kapitel 6
Ein externes Gespräch kann mit einem weiteren internen Ge−
sprächspartner zum Konferenzgespräch geschaltet werden.
MT1: , o. Während eines externen
Gesprächs ein internes
Telefonat einleiten,
gewünschtes Mobilteil wählen
MT2: Internes Gespräch am anderen
Mobilteil annehmen
MT1: Konferenz starten
MT1 / MT2: Durch Auflegen eines internen
Gesprächspartners wird die
Konferenz beendet.
Anklopfen
Das Anklopfen ist ein optionaler Dienst Ihres Netzbetreibers. Fragen Sie diesen nach weiteren Informationen.
Kapitel 6
Hören Sie während eines Telefonats einen Signalton, versucht ein
anderer Gesprächspartner Sie zu erreichen.
clear Nimmt den neuen Anruf an und
hält das erste Gespräch.
clear
Schaltet zwischen den zwei
Anrufern hin− und her.
Anzeige der Gesprächsdauer
Während eines Gesprächs wird die Gesprächsdauer in Minuten
und Sekunden angezeigt.
17
Telefonieren
Tonrufmelodie und −lautstärke 10
Sie haben die Wahl zwischen 14 verschiedenen Ruftonmelodien
sowie zwischen 4 verschiedenen Ruftonlautstärken und der Einstellung AUS. Seite 23
Hörerlautstärke
Sie können während eines Gesprächs die Hörerlautstärke anpassen.
oder Gewünschte Lautstärke
einstellen
Mikrofon im Mobilteil stummschalten 11
Sie können während eines Telefongesprächs das Mikrofon des Mobilteils aus− und einschalten. Ihr Gesprächspartner kann Sie dann
nicht mehr hören.
Verfahren Sie während eines Gesprächs folgendermaßen:
Mikrofon ausschalten,
im Display erscheint
STUMM .
Mikrofon einschalten
Freisprechen 12
Nutzen Sie diese Funktion, um den Gesprächspartner über den
Lautsprecher zu hören.
Verfahren Sie während eines Gesprächs folgendermaßen:
Freisprechen einschalten,
im Display erscheint LTSPR .
Freisprechen ausschalten
Displaykontrast 13
Sie können den Kontrast des Displays Ihren Bedürfnissen entsprechend einstellen. Seite 24
Automatische Tastensperre 14
Die Intelligente Tastensperre verhindert, dass Sie während eines
Telefonats versehentlich die Sensortasten betätigen.
18
Telefonieren
Ist die Intelligente Tastensperre eingeschaltet, können die Tasten
nicht mehr gedrückt werden, sobald Sie eine Rufnummer gewählt
haben und das Mobilteil an Ihrem Ohr anliegt.
Die intelligente Tastensperre schaltet sich automatisch aus, sobald
Sie das Mobilteil vom Ohr entfernen. Seite 25
ManuelleTastensperre 15
Die Manuelle Tastensperre verhindert, dass Sie durch unachtsame
Bedienung versehentlich einen Anruf tätigen.
Im Standby Mode: , Tastensperre einschalten
Bei aktivierter Tastensperre:
, Tastensperre ausschalten
Eingehende Anrufe können Sie trotz aktivierter Tastensperre wie gewohnt annehmen. Nach Beendigung des
Gesprächs befindet sich Ihr Telefon weiterhin in gesperrtem Zustand.
Ist die Tastatur gesperrt, können Sie nur noch die Menü−
Taste bedienen und die einprogrammierte Notrufnummer
wählen.
Notrufnummer wählen
Ihr Telefon ist werkseitig so eingestellt, dass die zwei Notrufnummern 117 und 118 auch bei eingeschalteter Tastensperre gewählt
werden können.
Notrufnummer tippen und
Verbindung herstellen
oder:
Notrufnummer tippen und
Verbindung herstellen
Mobilteil suchen (Paging)
Wenn Sie Ihr Mobilteil verlegt haben, können Sie es über einen
Suchton leicht wiederfinden.
{«}
Suchton starten
oder ©
Suchton beenden
19
Nebenstellenanlagen / Zusatzdienste
6 Nebenstellenanlagen / Zusatzdienste
Nebenstellenanlagen 16
Zugangscode (Amtskennziffer)
Bei Nebenstellenanlagen ist es erforderlich, eine Amtskennziffer
(z. B. 9" oder 0) vorzuwählen, um ein Freizeichen zu bekommen.
Wahlpause
Bei Nebenstellenanlagen ist es erforderlich, eine Amtskennzahl vorzuwählen, um ein Freizeichen für eine Amtsleitung zu bekommen.
Bei wenigen, älteren Nebenstellenanlagen dauert es einige Zeit, bis
das Freizeichen zu hören ist. Für diese Nebenstellenanlagen kann
nach der Amtskennzahl eine Wahlpause eingefügt werden, um direkt weiter wählen zu können, ohne das Freizeichen abzuwarten.
redial
Wahlpause einfügen
Im Display erscheint die Anzeige P". Nach der Amtsholung wartet
Ihr Telefon für einige Sekunden mit dem Wählen der eigentlichen
Rufnummer.
Die Pause kann auch bei der Eingabe von Rufnummern
in das Telefonbuch eingegeben werden.
R−Taste an Nebenstellenanlagen
Ist Ihr Telefon an einer Nebenstellenanlage angeschlossen, können
Sie über die R−Taste clear Anrufe weiterleiten und den automatischen Rückruf nutzen. Lesen Sie bitte in der Bedienungsanleitung
Ihrer Nebenstellenanlage, welche Flash−Zeit Sie zur Nutzung dieser
Funktionen einstellen müssen. Ob Ihr Telefon an Ihrer Nebenstellenanlage einwandfrei funktioniert, erfahren Sie bei dem Händler,
bei dem die Anlage gekauft wurde. Flash−Zeit Seite 25
Flash−Zeit
Um Ihr Telefon an einer Nebenstellenanlage zu betreiben, stellen
Sie eine Flash−Zeit von 100 ms ein. Seite 25
Zusatzdienste
Rufnummernanzeige (CLIP1)
Steht diese Funktion an Ihrer Telefonleitung zur Verfügung, wird Ih-
20
Nebenstellenanlagen / Zusatzdienste
nen die Rufnummer des Anrufers angezeigt, sobald das Telefon
klingelt. Kapitel 9
Hat ein Anrufer das Übertragen seiner Rufnummer unterdrückt, wird
eine entsprechende Meldung angezeigt. In diesem Fall kann die
Rufnummer nicht angezeigt und somit auch nicht in der Anrufliste
gespeichert werden.
Die Rufnummernanzeige ist ein optionaler Service Ihres
Netzbetreibers. Fragen Sie diesen nach weiteren Informationen.
Anrufbeantworter im Telefonnetz 17
Der Anrufbeantworter im Telefonnetz ist ein Angebot vieler Netzbetreiber. Wenn Ihr Netzbetreiber einen Anrufbeantworter im Telefonnetz für Sie bereitstellt, werden Sie mit einem Briefsymbol über
neue Nachrichten informiert (VMWI2). Über diese Funktion können
Sie nur dann verfügen, wenn Ihr Netzbetreiber diesen Service anbietet. Bitte fragen Sie Ihren Netzbetreiber nach weiteren Informationen.
Zum Entfernen des Briefsymbols aus dem Display wählen Sie aus
dem Menü die Funktion NACHR−SIGNAL AUS. Seite 26
R−Taste und Zusatzdienste
Ihr Telefon unterstützt Zusatzdienste Ihres Netzbetreibers, wie
z. B. Makeln, Anklopfen und Konferenz. Über die R−Taste können
Sie diese Zusatzdienste nutzen. Bitte fragen Sie Ihren Netzbetreiber, welche Flash−Zeit Sie zur Nutzung von Zusatzdiensten einstellen müssen. Zur Freischaltung von Zusatzdiensten wenden Sie sich
bitte an Ihren Netzbetreiber. Einstellen der Flash−Zeit Seite 25
1
2
CLIP: Calling Line Identification Presentation
VMWI: Visual Message Waiting Indication
21
Menüstruktur
7 Menüstruktur
Hauptmenü
In das Hauptmenü gelangen Sie durch Drücken der Taste .
Mit den Tasten und können Sie sich durch das Menü
bewegen und eine Funktion auswählen.
Alternativ zum Scrollen können Sie viele Funktionen und
Einstellungen auch direkt über die Ziffern anwählen, die
den Funktionen in der nachstehenden Übersicht voranstellt sind (s. u.).
Bestätigen Sie jede Auswahl oder Eingabe mit der Taste .
Um eine Ebene zurück zu gehen, drücken Sie Taste clear .
Durch Drücken der Taste gelangen Sie in den Standby Modus. Seite 12
[1] SPRACHE
[1] ENGLISH
[2] FRANÇAIS
[3] ESPAÑOL
[4] PORTUGUÊS
[5] NEDERLANDS
[6] DEUTSCH
[7] ITALIANO
[8] SVENSK
[9] SUOMI
[0] DANSK
NORSK
18
22
Menüstruktur
19
[2] RUFTONEINST.
[1] RUFTONLAUTST.
[1] EXTERNER ANRUF
[0] AUS
stumm
[1] 4 Pfeile
leise
[2] 8 Pfeile
[3] 12 Pfeile
[4] 16 Pfeile
laut
[2] INTERNER ANRUF
[0] AUS
stumm
[1] 4 Pfeile
leise
[2] 8 Pfeile
[3] 12 Pfeile
[4] 16 Pfeile
[2] RUFTON
[1] EXTERNER ANRUF
[1] RingTone 1
laut
Es stehen
10 polyphone und
4 Standardklingeltöne zur Verfügung.
[2] RingTone 2
[3] RingTone 3
[4] RingTone 4
ab [5]: 10 polyphone Melodien
[2] INTERNER ANRUF
[1] Intercom Tone 1
[2] Intercom Tone 2
23
Menüstruktur
[3] Intercom Tone 3
[4] Intercom Tone 4
ab [5]: 10 polyphone Melodien
[3] ZEITEINSTELL.
[1] UHREINSTELLUNG
Uhrzeit 4−stellig eingeben
[2] WECKRUF
AN
AUS
Weckzeit 4−stellig eingeben
[3] ANZEIGEFORMAT
24 Hr
MM / DD
DD / MM
12 Hr
MM / DD
DD / MM
Mit der Taste können Sie
bei der Eingabe von Uhr− und
Weckzeit zwischen AM und PM
wechseln.
[4] TELEFON−SETUP
[1] KONTRAST EINST.
[2] TASTENTON
[0] AUS
[1] 1
[2] 2
[3] 3
[4] 4
20
24
16 Stufen Seite 18
21
Menüstruktur
[3] AUTO−TASTENSP.
AN
AUS
Intelligente Tastensperre
Seite 18
[4] AUTOM. ANTWORT
AN
AUS
Automatische
Gesprächsannahme
Seite 14
[5] DIREKTRUF
AN
AUS
Seite 15
Rufnummer eingeben
[6] WÄHLMODUS
TON
IWV
Ändern Sie das Wahlverfahren
nur, wenn Ihr Netzbetreiber
dies empfiehlt.
[7] RÜCKRUFZEIT
100 ms
270 ms
300 ms
600 ms
Ändern Sie die Flashzeit
(Rückrufzeit) nur, wenn Ihr
Netzbetreiber dies empfiehlt.
[8] MT−NAME
Mobilteil−Namen eintippen
[9] ZEIT HNTGRNDBL.
60 s
50 s
40 s
30 s
20 s
Dauer Hintergrundbeleuchtung
für Display und Tasten
25
Menüstruktur
22
[5] SICHERHTSEINST.
[1] REGIST.−MODUS
1
2
3
4
Mobilteil an Basis anmelden
PIN−Code1
PIN−Code1
PIN−Code1
PIN−Code1
[2] ABMELDUNG
MOBILTEIL 1
MOBILTEIL 2
MOBILTEIL 3
MOBILTEIL 4
Mobilteil von Basis abmelden
Werkseitige Namen der Mobilteile
[3] NACHR−SIGN AUS
NEIN
JA
Visual Message Waiting Indication2 ausschalten: Entfernt das
Briefsymbol aus dem Display.
[4] BASIS AUSWÄHLEN
1
AUTO
[6] WERKSEINSTELL.
NEIN
JA
1
2
26
PIN−Code: 0000 Seite 39
Seite 21
Autom. Wahl von Basisstationen
Menüstruktur
Telefonbuch 23
In das Telefonbuch gelangen Sie, wenn Sie aus dem Standby Modus heraus die Taste drücken. Das Telefonbuch−Menü öffnen
Sie, wenn Sie anschließend die Taste drücken.
Bestätigen Sie jede Auswahl oder Eingabe mit der Taste .
[1] EINTR.HINZUFÜG.
Namen eingeben1
Nummer eingeben
[2] EINTR.BEARBEIT.
Namen ändern1
Nummer ändern
[3] EINTRAG LÖSCHEN
[4] ALLES LÖSCHEN
Die Funktionen [2] und [3] beziehen sich immer auf den
Telefonbucheintrag, der nach dem Öffnen des Telefonbuchs ausgewählt wurde.
Anrufliste 24
In die Anrufliste gelangen Sie, wenn Sie aus dem Standby Modus
heraus 2 x die Taste oder drücken. Das Anrufliste−
Menü öffnen Sie, wenn Sie anschließend die Taste drücken.
Bestätigen Sie jede Auswahl oder Eingabe mit der Taste .
[1] EINTR.HINZUFÜG.
Namen eingeben1
[2] Z. WÄHL. BEARB.
Nummer ändern
zum Telefonbuch hinzufügen
Nummer eingeben bzw. bestätigen
Nummer zum Wählen bearbeiten
weiter mit EINTR.HINZUFÜG. (s. o.)
[3] EINTRAG LÖSCHEN
[4] ALLES LÖSCHEN
Die Funktionen [1], [2] und [3] beziehen sich immer auf
den Eintrag, der ausgewählt wurde.
1
Abschnitt Texteingabe" auf Seite 28
27
Telefonbuch
8 Telefonbuch
In das Telefonbuch können 60 Rufnummern mit Namen gespeichert
werden. Jede Rufnummer darf maximal 24 Stellen umfassen.
Für jeden Namen stehen maximal 16 Stellen zur Verfügung.
Telefonbucheinträge speichern 25
Seite 27
Geben Sie bei allen Rufnummern immer die Vorwahl ein,
damit das Telefon auch eingehende Ortsgespräche einem Telefonbucheintrag zuordnen kann.
Texteingabe 26
Die Zifferntasten sind zusätzlich mit Buchstaben beschriftet. Durch
mehrmaliges Drücken der entsprechenden Taste können Buchstaben sowie Zahlen eingegeben werden.
Beispiel: Sie möchten den Namen "Peter" eingeben. Drücken Sie
1 x Taste , 2 x Taste , 1 x Taste , 2 x Taste und 3 x Taste .
Weitere Hinweise für die Eingabe von Text:
Um den gleichen Buchstaben zweimal einzugeben, tippen Sie den
entsprechenden Buchstaben ein und warten dann, bis der Cursor
nicht mehr blinkt. Jetzt können Sie den Buchstaben erneut eingeben.
Außerdem haben Sie diese Möglichkeiten:
clear
löscht letztes Zeichen
schaltet um zwischen
Groß− und Kleinbuchstaben
redial
28
fügt bei der Eingabe von
Rufnummern eine Pause ein
Telefonbuch
Durch mehrmaliges Drücken der Tasten , und stehen Ihnen zudem weitere Zeichen zur Verfügung:
1
1
_
−
+
=
^
.
,
;
:
*
*
#
?
!
$
&
%
/
\
|
~
0
0
’
(
)
[
]
<
>
{
}
Telefonbucheinträge ändern
Seite 27
Um einen Eintrag direkt auszuwählen, drücken Sie die Taste, die dem Anfangsbuchstaben des Eintrages entspricht. Um beispielsweise Peter" direkt anzuwählen,
drücken Sie 1x Taste .
Telefonbucheinträge löschen
Seite 27
Rufnummern aus dem Telefonbuch wählen
Seite 15
29
Rufnummernanzeige / Anrufliste
9 Rufnummernanzeige / Anrufliste
Steht Ihrer Telefonanlage die CLIP−Funktion zur Verfügung (CLIP =
Calling Line Identification Presentation), zeigt das Display bei eingehendem Anruf die Rufnummer des Anrufers an. Haben Sie diese
Rufnummer in Ihrem Telefonbuch gespeichert, wird gleich der gespeicherte Name angezeigt.
Hat der Anrufer das Übertragen seiner Rufnummer unterdrückt,
wird die Rufnummer nicht angezeigt; stattdessen erscheint im
Display die Meldung NUMMER UNTERDR. .
Zeigt das Display die Meldung NICHT VERFÜGBAR , ist
keine Information zum Anrufer vorhanden; in diesem Fall
könnte es sich auch um ein internationales Gespräch handeln.
Die Rufnummernanzeige (CLIP) sowie die Anzeige von
Datum und Uhrzeit sind optionale Dienste Ihres Netzbetreibers. Bitte fragen Sie diesen nach detaillierten Informationen.
Anrufliste 27
Insgesamt können bis zu 40 Rufnummern in der Anrufliste gespeichert werden. Nach Belegung aller Plätze wird jeweils die älteste
Rufnummer überschrieben.
Wurden während Ihrer Abwesenheit neue Rufnummern in der Anrufliste gespeichert, erscheint im Display ein Hinweis auf neue Eingänge.
Angezeigt wird die Anzahl aller eingegangenen Anrufe;
wiederholte Anrufe gleicher Anrufer inklusive!
Rufnummern aus der Anrufliste anzeigen
Übersicht anzeigen
oder Anrufliste öffnen
Zwei unterschiedliche Anzeigen informieren Sie, wie viele Einträge
sich insgesamt in der Anrufliste befinden und wie viele Einträge davon neu eingegangen sind, seitdem die Liste das letzte Mal angeschaut wurde.
30
Rufnummernanzeige / Anrufliste
In dieser Übersicht wird nur die Anzahl verschiedener Anrufer erfasst; wiederholte Anrufe gleicher Anrufer werden
hier nicht berücksichtigt!
Display
Beschreibung
ALLE
Anzahl aller Einträge
NEU
Anzahl neuer Einträge
Einzelne Einträge ansehen
oder Einträge ansehen
Jeder Eintrag erhält eine 2−stellige CALL#−Nummer, die rechts oben
im Display angezeigt wird. Außerdem wird die Rufnummer des Anrufers angezeigt, sofern dieser der Rufnummernübermittlung (CLIP)
zugestimmt hat (s. o.). Ist die Rufnummer im Telefonbuch gespeichert, wird im Display außerdem noch der gespeicherte Name des
Anrufers mit angezeigt.
Hat ein Anrufer mehrfach versucht, Sie zu erreichen, sehen Sie beim allerersten Betrachten neuer Einträge unterhalb der CALL#−Nummer den Hinweis REPT.
Haben Sie alle Einträge durchgeschaut, erscheint im Display der
Hinweis LISTENENDE .
Rufnummer aus der Anrufliste im Telefonbuch speichern
Eine Rufnummer kann direkt aus der Anrufliste im Telefonbuch gespeichert werden. Wählen Sie hierfür die Funktion EINTR.HINZUFÜG. Seite 27
Rufnummer aus der Anrufliste zurückrufen
Seite 15
Rufnummer aus der Anrufliste ändern
Sie können eine Rufnummer aus der Anrufliste ändern. Wählen Sie
dazu die Funktion Z. WÄHL. BEARB.. Seite 27
Um die geänderte Nummer anschließend direkt anzurufen, drücken
Sie einfach die Gesprächstaste .
Um die geänderte Rufnummer im Telefonbuch abzuspeichern, bestätigen Sie Ihre Änderung mit der Taste und fahren Sie mit
31
Rufnummernanzeige / Anrufliste
dem Speichervorgang fort.
Rufnummern aus der Anrufliste löschen
Einzelne Rufnummer löschen
Seite 27
Alle Rufnummern löschen
Um die Anrufliste komplett zu leeren, löschen Sie über die Funktion
ALLES LÖSCHEN alle Rufnummern. Seite 27
32
Besondere Funktionen
10 Besondere Funktionen
Automatische Gesprächsannahme
Haben Sie die Funktion aktiviert, wird ein Anruf automatisch beim
Herausnehmen des Mobilteils aus der Basis− oder Ladestation angenommen.
Seiten 14, 25
Wecker 28
Mit dieser Funktion können Sie sich zu einer bestimmten Zeit von
Ihrem Mobilteil wecken lassen. Seite 24
Baby Call (Direktruf)
Mit der Funktion haben Sie die Möglichkeit, eine bestimmte Rufnummer zu speichern, die bei Betätigen einer beliebigen Taste (außer ) automatisch angerufen wird. Seite 25
Kopfhöreranschluss
Auf der rechten Seite des Mobilteils finden Sie eine Anschlussmöglichkeit für einen Kopfhörer / ein Headset, passend für einen 2,5
mm Stereoklinkenstecker.
Eine Funktionsgarantie kann nicht übernommen werden.
Wahlverfahren
Sie können Ihr Telefon sowohl an den analogen Vermittlungsstellen
(Impuls−Wahlverfahren) als auch an den neuen digitalen Vermittlungsstellen (Ton−Wahlverfahren) betreiben. Seite 25
Temporäre Tonwahl
Können Sie Ihr Telefon nur mit dem Impuls−Wahlverfahren betreiben, brauchen Sie nicht auf die Vorteile des Ton−Wahlverfahrens
(z. B. für die Abfrage eines Anrufbeantworters im Telefonnetz) zu
verzichten. Während einer bestehenden Verbindung können Sie
vorübergehend zum Ton−Wahlverfahren wechseln.
Während des Gesprächs
drücken
Nach Gesprächsende wird wieder automatisch auf das Impuls−
Wahlverfahren zurückgeschaltet.
33
Erweitern des Telefonsystems
11 Erweitern des Telefonsystems
Sie können an Ihrer Basisstation bis zu 3 weitere Mobilteile des
gleichen Modells anmelden. Jedes Mobilteil kann an vier Basisstationen angemeldet sein.
Mehrere Mobilteile
Sie können insgesamt 4 Mobilteile vom Typ DF73X an Ihrer Basisstation anmelden.
Anmelden von Mobilteilen an eine bestimmte Basisstation
Bevor Sie das Mobilteil anmelden, setzen Sie die Basisstation in
den Registriermodus:
3 sec Registriermodus starten
Die LED an der Basisstation blinkt solange sich diese im
Registriermodus befindet.
Zum Anmelden eines Mobilteils an einer Basisstation gehen Sie im
Menü auf die Funktion REGIST.−MODUS. Wählen Sie einen der 4
Speicherplätze für die Basis aus. Seite 26
Bereits belegte Speicherplätze sind mit einem Haken hinter dem
Speicherplatz gekennzeichnet. Durch einen neuen Speichervorgang können diese überschrieben werden.
Nach erfolgreicher Registrierung meldet das Display ERFOLG .
Dem Mobilteil wurde außerdem eine interne Rufnummer zugewiesen, die im Display angezeigt wird. Diese ist wichtig zum Führen interner Telefonate und für weitere Ab− und Anmeldevorgänge.
Ist die Registrierung fehlgeschlagen, sehen Sie
WIEDERHOLEN? auf dem Display. Führen Sie die Registrierung erneut durch.
Um zu testen, ob das Mobilteil wirklich an der Basis registriert wurde, drücken Sie die Paging−Taste. Das Mobilteil
sollte klingeln. Um das Klingeln zu beenden, drücken Sie
nochmals auf die Taste.
34
Erweitern des Telefonsystems
Abmelden von Mobilteilen von einer Basisstation
Sie können ein Mobilteil von einer Basisstation nur durch
ein weiteres an dieser Basisstation angemeldetes Mobilteil abmelden.
Zum Abmelden eines bestimmten Mobilteils von einer Basisstation
wählen Sie aus dem Menü die Funktion ABMELDUNG und wählen
Sie den Namen bzw. die Nummer des Mobilteils aus, welches Sie
abmelden möchten. Seite 26
Nach erfolgreicher Abmeldung zeigt das Display ERFOLG .
Ist die Abmeldung fehlgeschlagen, sehen Sie WIEDERHOLEN?
auf dem Display. Führen Sie den Vorgang erneut durch.
Mehrere Basisstationen
Ihre Mobilteile können gleichzeitig an 4 verschiedenen Basisstationen angemeldet sein. Jede Basisstation benötigt eine eigene Telefonsteckdose. Es können Anschlüsse mit der selben und auch mit
unterschiedlichen Rufnummern sein.
Seite 26
Laufende Gespräche können nicht von einer zur anderen
Basisstation übertragen werden.
Erhöhung der Reichweite
Platzieren Sie die Basisstationen so, dass sich die Reichweite der
einzelnen Basisstationen überschneidet. Testen Sie die Reichweite
Ihrer Mobilteile, da Hindernisse in Gebäuden die Reichweite einschränken.
Melden Sie jedes Mobilteil an allen Basisstationen an. Schalten Sie
die Funktion AUTO (Automatische Wahl von Basisstationen) ein.
Seite 26
An welchem Standort Sie sich auch befinden, das Mobilteil sucht
sich automatisch die nächstgelegene Basisstation mit der besten
Verbindung.
35
Falls es Probleme gibt
12 Falls es Probleme gibt
Service Hotline
Haben Sie Probleme mit Ihrem Telefon, kontrollieren Sie zuerst die
folgenden Hinweise. Bei technischen Problemen können Sie sich
an unsere Service−Hotline unter Tel. 0900 00 16 75 (nur für Anrufe
innerhalb der Schweiz gültig − Kosten bei Drucklegung: CHF 2.00 /
Min) wenden. Bei Garantieansprüchen wenden Sie sich an Ihren
Fachhändler. Die Garantiezeit beträgt 2 Jahre.
Fragen und Antworten
36
Fragen
Antworten
Keine Verbindung zur Basisstation möglich
− Prüfen Sie, ob Sie sich mit dem richtigen
PIN−Code an der Basisstation angemeldet
haben. Seite 39
Kein Telefongespräch
möglich
− Das Telefon ist nicht korrekt angeschlossen
oder gestört. Verwenden Sie nur das mitgelieferte Telefonanschlusskabel.
− Testen Sie mit einem anderen Telefon, ob
Ihr Telefonanschluss in Ordnung ist.
− Das Netzteil ist nicht eingesteckt
oder es liegt ein totaler Stromausfall vor.
− Die aufladbaren Akkus sind leer oder
defekt.
− Sie haben sich zu weit von der Basisstation
entfernt.
− Wahlverfahren falsch eingestellt.
Seite 25
Verbindung
abgehackt,
fällt aus
− Sie haben sich zu weit von der Basisstation
entfernt.
− Falscher Aufstellungsort der Basisstation.
Falls es Probleme gibt
Das System
reagiert nicht
mehr
− Setzen Sie alle Funktionen in den Werkszustand zurück. Seite 26
− Ziehen Sie kurzzeitig das Netzteil aus der
Steckdose.
Die Akkus sind − Die Akkus sind leer oder defekt.
in kürzester Zeit − Stellen Sie das Mobilteil richtig auf die Baleer
sisstation. Reinigen Sie die Kontaktflächen
am Mobilteil und an der Basisstation mit einem weichen, trockenen Tuch.
− Stellen Sie das Mobilteil für 15 Stunden in
die Basisstation.
Die Rufnummernanzeige
(CLIP1)
funktioniert
nicht
1
− Die Rufnummernanzeige ist ein optionaler
Service Ihres Netzbetreibers. Bitte fragen
Sie Ihren Netzbetreiber nach weiteren Informationen.
− Der Anrufer hat das Übertragen seiner Rufnummer unterdrückt.
CLIP: Calling Line Identification Presentation
37
Technische Eigenschaften
13 Technische Eigenschaften
Technische Daten
Merkmal
Wert
Standard
DECT1
Stromversorgung
230/240 V, 50 Hz
Reichweite
Außen: ca. 300 m
Innen: ca. 50 m
Standby
bis zu 120 h
Max. Gesprächsdauer
bis zu 5 h
Aufladbare Akkus
3 x 750 mAh NiMH,
Größe: AAA
Wahlverfahren
Ton−Wahlverfahren
Impuls−Wahlverfahren
Zulässige
Betriebstemperatur
0°C bis 45°C
Zulässige
Umgebungstemperatur
−20°C bis 60°C
Zulässige
relative Luftfeuchtigkeit
20% bis 75%
Flash−Funktion
100 ms, 270 ms,
300 ms, 600 ms
1
38
DECT: Digital Enhanced Cordless Telecommunication
= Standard für kabellose Telefone.
Technische Eigenschaften
Werkseinstellungen 29
Mobilteil 30
Sprache:
Deutsch
Name Mobilteil:
MOBILTEIL1
Hörerlautstärke
VOL2
PIN1:
0000
Wahlverfahren:
TON
Ruftonlautstärke:
3
Anzeige Uhr:
24 h
Rufton:
3
Anzeige Datum:
MM / DD
Weckruf:
AUS
00:00
Externer Anruf
Interner Anruf
Ruftonlautstärke:
3
Weckzeit:
Rufton:
3
Int.Tastensperre: AN
Tastentöne:
1
Autom. Antwort:
EIN
Kontrast:
8
Direktruf:
AUS
Zeit Beleuchtung:
20 s
Flash−Zeit:
100 ms
Konformitätserklärung
Dieses Gerät erfüllt die Anforderungen der EU−Richtlinie:
1999/5/EG Richtlinie über Funkanlagen und Telekommunikationsendeinrichtungen und die gegenseitige Anerkennung ihrer Konformität. Die Konformität mit der o. a.
Richtlinie wird durch das CE−Zeichen auf dem Gerät bestätigt.
Für die komplette Konformitätserklärung nutzen Sie bitte
den kostenlosen Download von unserer Website
www.switel.com.
1
Der PIN−Code ist unveränderbar.
39
Pflegehinweise / Garantie
14 Pflegehinweise / Garantie
Pflegehinweise
Reinigen Sie die Gehäuseoberflächen nur mit einem weichen und
fusselfreien Tuch − ohne Reinigungs− oder Lösungsmittel!
Garantie
SWITEL − Geräte werden nach den modernsten Produktionsverfahren hergestellt und geprüft. Ausgesuchte Materialien und hoch entwickelte Technologien sorgen für einwandfreie Funktion und lange
Lebensdauer. Ein Garantiefall liegt nicht vor, wenn die Ursache einer Fehlfunktion des Gerätes bei dem Telefonnetzbetreiber oder einer eventuell zwischengeschalteten Nebenstellenanlage liegt. Die
Garantie gilt nicht für die in den Produkten verwendeten Batterien,
Akkus oder Akkupacks. Die Garantiezeit beträgt 24 Monate, gerechnet vom Tage des Kaufs.
Innerhalb der Garantiezeit werden alle Mängel, die auf Material−
oder Herstellungsfehler zurückzuführen sind, kostenlos beseitigt.
Der Garantieanspruch erlischt bei Eingriffen durch den Käufer oder
durch Dritte. Schäden, die durch unsachgemäße Behandlung oder
Bedienung, durch falsches Aufstellen oder Aufbewahren, durch unsachgemäßen Anschluss oder Installation sowie durch höhere Gewalt oder sonstige äußere Einflüsse entstehen, fallen nicht unter die
Garantieleistung. Wir behalten uns vor, bei Reklamationen die defekten Teile auszubessern, zu ersetzen oder das Gerät auszutauschen. Ausgetauschte Teile oder ausgetauschte Geräte gehen in
unser Eigentum über. Schadenersatzansprüche sind ausgeschlossen, soweit sie nicht auf Vorsatz oder grober Fahrlässigkeit des
Herstellers beruhen.
Sollte Ihr Gerät dennoch einen Defekt innerhalb der Garantiezeit
aufweisen, wenden Sie sich bitte unter Vorlage Ihrer Kaufquittung
ausschließlich an das Geschäft, in dem Sie Ihr SWITEL − Gerät gekauft haben. Alle Gewährleistungsansprüche nach diesen Bestimmungen sind ausschließlich gegenüber Ihrem Fachhändler geltend
zu machen. Nach Ablauf von zwei Jahren nach Kauf und Übergabe
unserer Produkte können Gewährleistungsrechte nicht mehr geltend gemacht werden.
40
Stichwortverzeichnis
15 Stichwortverzeichnis
A
Abmelden von Mobilteilen
von einer Basisstation,
35
Akkuladezustand, 8
Akkus, 4, 5
Akkus aufladen, 8
Akkus einlegen, 7
Akkuwarnton, 12
AM/PM , 9
Amtskennziffer, 20
Anklopfen, 17, 21
Anmelden von Mobilteilen
an eine bestimmte Basisstation, 34
Anruf annehmen, 14
Anrufbeantworter im Telefonnetz, 21
Anrufen, 14
Anrufliste, 30
Anrufliste: Alle Rufnummern löschen, 32
Anrufliste: Einzelne Einträge ansehen, 31
Anrufliste: Einzelne Rufnummer löschen, 32
Anrufliste: Übersicht anzeigen, 30
Auflegen−Taste, 9
Aufstellungsort, 4
Auswahltaste: Abwärts, 9
Auswahltaste: Aufwärts, 9
Automatische Gesprächsannahme, 33
Automatische Wahl, 35
B
Baby Call, 15, 33
Basisstation, 10
Basisstation anschließen, 6
Basisstationen, mehrere,
35
Bedienelemente, 9
Besondere Funktionen, 33
Bestimmungsgemäße Verwendung, 4
D
Darstellungen, 11
Direktruf, 15, 33
Displaykontrast, 18
Dreier−Konferenz, 17, 21
E
Energiesparmodus, 12
Entgangene Anrufe zurückrufen, 15
Entsorgung, 5
Erhöhung der Reichweite,
35
Erweitern des Telefonsystems, 34
Externe Gespräche intern
weiterleiten, 16
F
Falls es Probleme gibt, 36
Fehlerbehebung, 36
Flash−Zeit an Nebenstellenanlagen, 20
Flashzeit, 25, 39
Fragen und Antworten, 36
Freisprechen, 18
G
Garantie, 40
Gespräch beenden, 14
Gesprächsdauer, 17
Gesprächstaste, 9
Groß−/Kleinschreibung, 9
Gürtelclip, 8
H
Hauptmenü, 22
Headset, 33
Hörerlautstärke, 18
Hörerlautstärke erhöhen, 9
Hörerlautstärke verringern,
9
I
Impuls−Wahlverfahren, 33
INT−Taste, 9
Intern Telefonieren, 15
Interne Gesprache führen,
15
K
Konferenz−Taste, 9
Konferenzgespräche führen, 17
Konformitätserklärung, 39
Kopfhöreranschluss, 10, 33
L
Ladestation, 10
Ladestation anschließen, 7
LED Ladekontrollleuchte,
Basisstation, 10
LED Ladekontrollleuchte,
Ladestation, 10
Löschtaste, 9
41
Stichwortverzeichnis
M
Makeln, 16, 21
Medizinische Geräte, 5
Mehrere Mobilteile, 34
Menü−Taste, 9
Menüstruktur, 22
Mikrofon stummschalten,
18
Mikrofon−Taste, 9
Mobilteil suchen, 19
N
Navigation im Menü, 13
Nebenstellenanlagen, 20
Netzteil, 4
Notrufnummer wählen, 19
O
OK−Taste, 9
P
Paging, 19
Paging−Taste, 10
Pause, 9
Pflegehinweise, 40
R
R−Signaltaste, 9
R−Taste an Nebenstellenanlagen, 20
R−Taste und Zusatzdienste,
21
Reichweitenwarnton, 11
Rückrufzeit, 25
Rücksprache, 16
Rufnummer aus der Anrufliste ändern, 31
Rufnummer aus der Anrufliste im Telefonbuch speichern, 31
Rufnummer aus der Anrufliste zurückrufen, 31
Rufnummern aus dem Telefonbuch wählen, 15, 29
Rufnummern aus der Anrufliste anzeigen, 30
Rufnummern aus der Anru-
42
fliste löschen, 32
Rufnummernanzeige, 20
S
Satzzeichen, 9
Schreibweisen, 11
Sensortasten, 13
Service Hotline, 36
Sicherheitshinweise, 4
Spracheinstellung, 8
Standby−Modus, 12
Standby−Taste, 9
Stromausfall, 4
Symbole im Display, 11
T
Tastensperre, automatisch,
18
Tastensperre, manuelle, 9,
19
Technische Daten, 38
Telefon in Betrieb nehmen,
6
Telefonbuch, 9, 27, 28
Telefonbucheinträge ändern, 29
Telefonbucheinträge erstellen, 13
Telefonbucheinträge löschen, 29
Telefonbucheinträge speichern, 28
Telefonieren, 14
Temporäre Tonwahl, 33
Texteingabe, 28
Ton−Wahlverfahren, 33
Tonrufmelodie, 18
U
Uhrzeit einstellen, 8
V
Verpackungsinhalt, 6
Verpackungsmaterialien, 5
VMWI, 21
W
Wahlpause, 20
Wahlverfahren, 25, 33
Wahlwiederholung, 9, 14
Wecker, 33
Weiterleiten, 16
Werkseinstellungen, 39
Wie bediene ich mein Telefon?, 11
Z
Zurücktaste, 9
Zusatzdienste, 20
31
Table des matières
1
2
3
4
5
6
7
8
9
10
11
12
13
14
15
Consignes de sécurité . . . . . . . . . . .
Mettre le téléphone en service . . . . .
Eléments de manipulation . . . . . . . .
Comment me servir du téléphone . . .
Téléphoner . . . . . . . . . . . . . . . . . . .
Installations à postes sup. et
services sup. . . . . . . . . . . . . . . . . .
Structure du menu . . . . . . . . . . . . . .
Répertoire . . . . . . . . . . . . . . . . . . .
Affichage du numéro d’appel / Liste
d’appels . . . . . . . . . . . . . . . . . . . . .
Fonctions spéciales . . . . . . . . . . . . .
Élargissement du système
téléphonique . . . . . . . . . . . . . . . . . .
En cas de problèmes . . . . . . . . . . . .
Caractéristiques techniques . . . . . . .
Remarques d’entretien / Garantie . . .
Index . . . . . . . . . . . . . . . . . . . . . . .
44
46
49
51
54
60
62
68
70
73
74
76
78
80
81
43
Consignes de sécurité
1 Consignes de sécurité
Lisez très attentivement ce mode d’emploi.
Utilisation conforme aux prescriptions
Ce téléphone convient pour téléphoner à l’intérieur d’un réseau téléphonique. Toute autre utilisation est considérée comme non
conforme à l’usage. Des modifications ou changements effectués
d’un propre gré ne sont pas autorisés. N’ouvrez en aucun cas l’appareil et n’effectuez aucun essai de réparation vous−même.
Lieu d’installation
Evitez toute nuisance par la fumée, la poussière, les tremblements,
les produits chimiques, l’humidité, la grande chaleur ou l’ensoleillement direct.
N’utilisez pas le combiné dans des zones exposées aux explosions.
Bloc d’alimentation
Attention : N’utilisez que le bloc d’alimentation fourni
avec l’appareil, d’autres pouvant détruire votre téléphone.
Vous ne devez pas bloquer son accès par des meubles ou
autres objets.
Piles rechargeables
Attention : Ne jetez jamais les piles rechargeables dans
le feu. N’utilisez que des piles rechargeables du même
type ! Observez une polarisation correcte ! Une utilisation
incorrecte des piles rechargeables est accompagnée
d’un risque d’explosion.
Panne de courant
En cas de panne de courant, vous ne pouvez pas téléphoner avec
cet appareil. Pour les cas d’urgence, ayez à votre disposition un téléphone à fil fonctionnant sans alimentation externe en courant.
44
Consignes de sécurité
Appareils médicaux
Attention : N’utilisez pas le téléphone à proximité d’appareils médicaux. Une influence ne peut pas être totalement
exclue.
Respectez au moins une distance d’ 1 m.
DECT1− Les téléphones DECT peuvent causer un bourdonnement
désagréable dans les prothèses auditives.
Élimination
Si votre appareil ne sert plus, veuillez l’apporter au centre de collecte de l’organisme d’élimination des déchets
de votre commune (par ex. centre de recyclage). Le
symbole ci−après signifie que l’appareil usagé ne doit
pas être éliminé avec les ordures ménagères, mais séparément. D’après la loi relative aux appareils électriques et électroniques, les propriétaires d’appareils usagés sont tenus de mettre tous les appareils électriques
et électroniques usagés dans un collecteur séparé.
Éliminez les piles auprès d’un revendeur spécialisé
ainsi que dans des centres de collecte qui tiennent à votre disposition les collecteurs appropriés correspondants.
les fournitures d’emballage conformément au règlement local.
1
DECT: Digitally Enhanced Cordless Telecommunication
= Standard pour téléphones sans fil.
45
Mettre le téléphone en service
2 Mettre le téléphone en service
Remarques concernant la sécurité
Attention : Avant de mettre votre appareil en service, lisez impérativement les consignes de sécurité mentionnées au chapitre 1.
Contenu de l’emballage 32
Les éléments suivants font partie de la livraison :
Contenu
Modèle DF73X
73
732*
733*
734*
Base(s) avec bloc d’alimentation
1
1
1
1
Chargeur(s) avec bloc d’alimentation
−
1
2
3
Combiné(s)
1
2
3
4
Câble de raccordement
téléphonique
1
1
1
1
Piles rechargeables
3
6
9
12
Clip(s) de ceinture
1
2
3
4
Mode d’emploi
1
1
1
1
Raccordement de la base
Attention : Posez la base à une distance minimum d’un
mètre par rapport aux autres appareils électroniques pour
éviter d’éventuelles interactions.
Raccordez la base tel que décrit sur le croquis. Pour des raisons de
sécurité, n’utilisez que le bloc d’alimentation fourni avec l’appareil
ainsi que le câble de raccordement téléphonique ci−joint.
*
46
Le site www.switel.com vous renseignera si cet ensemble
téléphonique est disponible.
Mettre le téléphone en service
Prise de
courant
réseau
Boîte de
raccordement
téléphonique
Raccorder le chargeur1
Raccordez le chargeur tel que représenté sur le croquis. Pour des raisons
de sécurité, n’utilisez que le bloc d’alimentation fourni avec l’appareil.
Prise réseau
Pose des piles rechargeables
Introduisez les piles
dans le compartiment
prévu à cet effet. N’utilisez que des piles rechargeables de type
AAA Ni−MH 1,2 V. Observez une polarisation
correcte ! Fermez le
compartiment à piles.
1
− AAA +
+ AAA −
− AAA +
N’est valable que pour les modèles possédant au moins deux
combinés.
Section Contenu de l’emballage" à la page 46
47
Mettre le téléphone en service
Chargement des piles rechargeables 33
Lors de la première mise en service, placez le combiné pendant au
moins 15 heures sur sa base / chargeur. Si vous avez posé correctement le combiné sur la base / le chargeur, le voyant de charge
s’allume. Le combiné chauffe lors du chargement. C’est normal et
inoffensif.
Ne chargez pas le combiné avec des chargeurs d’un autre fabricant.
Le niveau actuel de chargement des piles est affiché sur l’écran :
Plein
Faible
Poser le clip de ceinture
Tournez le combiné de telle façon que le côté arrière montre vers le
haut et pressez le clip de ceinture dans les encoches prévues à cet
effet dans la partie supérieur latérale.
Réglage de la langue
La page 62 vous expliquera comment régler la langue visible sur
l’écran de votre téléphone lors de la première mise en service de
celui−ci.
Réglage de l’heure
La page 64 vous expliquera comment régler l’heure de votre combiné lors de sa première mise en service.
Installations à postes supplémentaires
Le chapitre 6 vous donnera de plus amples informations au cas où
vous désireriez raccorder votre téléphone à une installation à postes supplémentaires.
48
Eléments de manipulation
3 Eléments de manipulation
Combiné
1
2
Ecran
Touche Raccrocher,
Touche veille 3 Répertoire 4 Écriture majuscule−/minuscule,
AM/PM (en format de 12 heures)
Touche conférence 5 Touche INT (pour com12
munications internes) 6 Touche menu, touche OK,
11
touche microphone 7 Touche suppression, touche
10
retour, touche de
signalisation R clear
9
8 Introduction de signes de
ponctuation à l’introduction du
texte, communication brève
sur numérotation par tonalité,
8
Verrouillage manuel du
clavier 9 Touche BIS,
7
Pause redial
10 Touche de sélection: vers le
bas dans le menu, diminuer le
volume de l’écouteur 11 Touche de communication 6
12 Touche de sélection: vers le haut
dans le menu, augmenter le volume de l’écouteur 1
2
3
4
5
Dans ce mode d’emploi, les touches de votre téléphone seront
représentées par la suite par des icônes standardisés (v. p.h). Aussi des
différences entre les icônes des touches de votre téléphone par rapport à
ceux utilisés ici sont−ils possibles.
49
Eléments de manipulation
13 Raccord de casque
13
Base
14 DEL voyant de contrôle de
charge, clignote si appels
entrants
15 Touche de paging 15
14
Ladestation1
16 DEL voyant de contrôle de charge
1
50
N’est valable que pour les modèles possédant au
moins deux combinés.
Section Contenu de l’emballage" à la page 46
16
Comment me servir du téléphone
4 Comment me servir du téléphone
Représentations et notations
3 sec MUET ou
Saisir des chiffres ou des lettres
Appuyer brièvement sur la touche représentée
Appuyer 3 secondes sur la touche représentée
Le combiné sonne
Retirer le combiné de la base
Poser le combiné sur la base
Texte ou icônes sur l’écran
Symboles à l’écran
Symbole
Description
La liaison avec la base existe.
Si la liaison est mauvaise, le signal sonore d’avertissement de la portée retentit.
HORS DE
PORTEE
Le combiné n’est plus relié avec la base. Rapprochez−vous de celle−ci.
Le verrouillage du clavier est activé. page 58
La sonnerie d’appel est désactivée. page 58
La sonnerie de réveil est branchée. page 73
Introduction de texte en minuscules page 68
Indication d’un nouveau message vocal si
répondeur actif dans le réseau téléphonique
(service optionnel de votre opérateur) page
61
Capacité des piles pleine.
Capacité des piles faible.
51
Comment me servir du téléphone
BATTERIE
FAIBLE
De plus retentit le signal d’avertissement du
niveau de chargement des piles.
Veuillez charger votre téléphone.
Segments continus :
Les piles rechargeables sont en train d’être
chargées. page 48
COMBINE
OO:OO
Nom du combiné page 65
Affichage de l’heure page 64
HPRL
Le mode mains−libres est activé. page 58
MUET
Le microphone est branché sur muet. page
58
PARLE
Une communication normale est effectuée.
Mode de veille 34
Les modes d’emploi suivantes partent du fait que votre combiné se
trouve en mode de veille.
En mode de veille les touches et l’écran sont éclairés.
En outre l’écran affiche le message PRÊT .
Vous obtenez le mode d’attente en appuyant sur la touche .
Mode économie d’énergie
Après avoir été quelque temps en mode de veille, le combiné passe
au mode économie d’énergie. Touches et écran ne sont plus éclairés. L’heure est affichée sur l’écran.
Appuyez sur une touche quelconque pour activer le mode de veille.
52
Comment me servir du téléphone
Navigation dans le menu
Vous pouvez accéder à toutes les fonctions via différents menus. La
structure du menu vous indique le chemin à prendre jusqu’à la
fonction désirée. Chapitre 7
Ouvrir le menu principal
ou Sélectionner le sous−menu désiré
Ouvrir le sous−menu
ou Sélectionner la fonction désirée
Ouvrir la fonction
ou Sélectionner le réglage désiré
Saisir des chiffres ou des lettres via le pavé
numérique.
Confirmer les entrées
Retour au niveau précédent
Retourner au mode de veille
clear
Chaque opération est automatiquement interrompue si
vous n’effectuez pas de saisie dans les 20 secondes.
Créer des enregistrements dans le répertoire− Exemple
L’exemple Créer des enregistrements dans le répertoire vous
explique comment naviguer dans les menus et effectuer des entrées. Pour tous les réglages, procédez comme dans cet exemple.
Ouvrir le répertoire
Ouvrir le menu
ou Sélectionner la fonction et confirmer
, Entrer le nom et confirmer
, Entrer le numéro d’appel et confirmer
Touche à effleurement
Les touches à effleurement sont des claviers tactiles situés à la surface de votre combiné.
Les touches à effleurement sont appuyées" lorsque l’on touche le
clavier avec les doigts. Il n’est pas nécessaire d’appuyer fortement.
53
Téléphoner
5 Téléphoner
Prendre l’appel 35
Si un appel vous parvient, vous entendez une sonnerie dans la mesure où vous ne l’avez pas désactivée. De plus, la DEL clignote sur
la base et sur le combiné l’éclairage de l’écran et des touches.
, ou Prendre l’appel
Si vous avez activé la prise d’appel automatique, vous
n’avez besoin que de prendre le combiné de la base pour
prendre l’appel.
page 64
Terminer la communication
ou Terminer la communication
Appeler
clear
Saisir le numéro d’appel
Si la saisie est erronée, effacer
le dernier chiffre
Composer le numéro
Vous pouvez également appuyer tout d’abord sur la touche de communication, vous obtenez ainsi la tonalité. Les
chiffres saisis de votre numéro d’appel seront immédiatement composés. La correction individuelle des chiffres du
numéro d’appel n’est pas possible quand la communication est établie de cette manière.
Touche de répétition automatique des derniers numéros
Votre téléphone enregistre les 20 derniers numéros composés dans
une liste de répétition automatique des derniers numéros.
Attendre la tonalité
redial
Ou :
54
Compose automatiquement le
numéro composé en dernier
Téléphoner
redial
ou , Ouvrir la liste de répétition
automatique des derniers
numéros
Sélectionner l’enregistrement et
confirmer
Rappeler les appels manqués 36
Votre téléphone enregistre les 40 appels manqués dans une liste
d’appels.
page 70
2x ou Ouvrir la liste d’appels
ou Sélectionner l’enregistrement
Établir la connexion
Composition de numéros du répertoire 37
Vous devez avoir enregistré des numéros d’appel dans le répertoire.
page 67 et 68
Votre téléphone dispose d’une recherche de nom alphabétique.
Entrez l’initiale du nom recherché. Par ex. pour le nom Henry" appuyez sur le 4". La première concordance trouvée avec votre recherche est affichée.
Ouvrir le répertoire
ou , Sélectionner l’enregistrement et
confirmer
Appel direct 38
Si vous avez activé la fonction appel direct (Appel bébé), un numéro
programmé est composé dès que vous appuyez sur une touche quelconque de votre combiné (à l’exception de la touche de menu). Entrez
le numéro désiré après avoir activé la fonction. page 64
Si vous désirez composer un autre numéro, vous devez
tout d’abord désactiver la fonction appel direct.
Téléphoner en interne 39
Téléphoner en interne
Vous devez avoir déclaré deux combinés ou plus (MT1, MT2, ...) de
55
Téléphoner
type DF73X sur une base pour pouvoir passer des communications
en interne gratuites.
MT1: , o. Introduire une communication
interne, choisir le combiné désiré
Comme alternative au déroulement vers le haut ou vers le
bas, vous pouvez choisir l’autre combiné désiré également directement avec son numéro à 1 chiffre.
MT2: Prendre la communication en
interne sur l’autre combiné
MT1 / MT2: Terminer la communication
interne
Transférer des communications externes à des internes
Pendant une communication de MT1 avec un correspondant externe:
MT1: , o. Introduire une communication
interne, choisir le combiné désiré
MT2: Prendre la communication en
interne sur l’autre combiné
MT1: Transférer la communication
Si le combiné appelé ne réagit pas, vous pouvez reprendre la communication externe en appuyant sur la touche
.
Intercommunication / Va−et−vient
Le va−et−vient est un service optionnel de votre opérateur.
Veuillez lui demander de plus amples informations.
Chapitre 6
Vous pouvez, pendant une communication externe, sélectionner un
autre combiné interne pour intercommuniquer. Le correspondant
externe est maintenu en ligne pendant que vous parlez avec le correspondant interne. Vous pouvez changer de correspondant autant
de fois que vous le désirez.
MT1: , o. Introduire une communication
interne pendant une
56
Téléphoner
MT2: MT1: communication externe,
sélectionner le combiné désiré
Prendre la communication en
interne sur l’autre combiné
Changer de correspondant
Mener des conférences téléphoniques
La conférence à trois est un service optionnel de votre
opérateur. Veuillez lui demander de plus amples informations. Chapitre 6
Une communication externe peut être branchée sur un autre correspondant interne dans le but de mener une conférence.
MT1: , o. Introduire une communication
interne pendant une
communication externe,
sélectionner le combiné désiré
MT2: Prendre la communication en
interne sur l’autre combiné
MT1: Démarrer la conférence
MT1 / MT2: La conférence se termine quand un
correspondant interne raccroche
Signalisation d’appel en instance
La signalisation d’appel en instance est un service optionnel de votre opérateur. Veuillez lui demander de plus amples informations. Chapitre 6
Si vous entendez un signal sonore pendant que vous téléphonez,
cela signifie qu’un autre correspondant essaie de vous joindre.
clear Prend le nouvel appel et maintient la première communication.
clear Passe d’un correspondant à un
autre.
Affichage de la durée de la communication
La durée d’une communication est affichée en minutes et secondes.
57
Téléphoner
Mélodie et volume de la sonnerie d’appel 40
Vous avez le choix entre 14 mélodies d’appel différentes ainsi qu’entre
4 volumes différents que vous pouvez régler. ARRÊT. page 63
Volume sonore de l’écouteur
Pendant une communication, vous pouvez régler le volume sonore
de l’écouteur.
ou Régler le volume désiré
Débranchement du microphone du combiné 41
Pendant une communication, vous pouvez activer et désactiver le
microphone du combiné. Votre correspondant ne peut alors plus
vous entendre.
Pendant une communication, veuillez procéder comme suit:
Désactiver le microphone,
il apparaît à l’écran MUET .
Activer le microphone
Mode mains−libres 42
Utilisez cette fonction pour entendre le correspondant par l’intermédiaire du haut−parleur.
Pendant une communication, veuillez procéder comme suit:
Activer le mode mains−libres,
il apparaît à l’écran HPRL .
Débrancher le mode mains−libres
Contraste de l’écran 43
Vous pouvez régler le contraste de l’écran selon vos besoins.
page 64
Verrouillage du clavier automatique 44
Le verrouillage intelligent du clavier évite que vous actionniez les
touches à effleurement par inadvertance.
Si vous avez activé le verrouillage intelligent du clavier, vous ne
pouvez plus appuyer sur les touches dès que vous avez composé
un numéro et que vous avez le combiné à votre oreille.
58
Téléphoner
Le verrouillage interlligent du clavier se désactive automatiquement
dès que vous écartez le combiné de votre oreille. page 64
Verrouillage manuel du clavier 45
Le verrouillage manuel du clavier évite que vous appeliez
quelqu’un par inadvertance par une manoeuvre non voulue.
Activer le verrouillage du clavier , en mode de veille
Désactiver le verrouillage du clavier activé , quand verrouillage activé
Lorsque le verrouillage du clavier est activé, vous pouvez
continuer à réceptionner des appels entrants. À la fin de
la communication, votre téléphone se trouve toujours en
mode verrouillé.
Si le clavier est verrouillé, vous ne pouvez que commander la touche menu et composer le numéro d’appel d’urgence programmé.
Composer le numéro d’appel d’urgence
Votre téléphone est paramétré en usine de telle façon que vous
puissiez composer les deux numéros 117 et 118, même si le verrouillage est activé.
Taper le numéro d’appel d’urgence et établir la communication
Ou :
Taper le numéro d’appel d’urgence et établir la communication
Chercher le combiné (Paging)
Si vous avez perdu votre combiné, vous pouvez le retrouver facilement grâce à un son de recherche.
{«}
Démarrer le son de recherche
ou ©
Terminer le son de recherche
59
Installations à postes sup. et services sup.
6 Installations à postes sup. et services sup.
Installations à postes supplémentaires 46
Code d’accès (chiffre de la ligne principale)
Dans le cas d’installations à postes supplémentaires, il est nécessaire de précomposer auparavant un chiffre de la ligne principale
(p. ex. 9" ou 0) pour obtenir la tonalité.
Pause de numérotation
Il est nécessaire, avec les installations à postes supplémentaires,
de précomposerun code réseau pour obtenir une tonalité à la ligne
principale. Sur les quelques installations à postes supplémentaires
plus anciennes, cela dure quelques instants jusqu’à ce que vous
entendiez la tonalité. Pour ces installations à postes supplémentaires, une pause de numérotation peut être insérée après le code
réseau afin de pouvoir continuer à numéroter directement sans attendre la tonalité.
redial
Introduire une pause de
numérotation
L’affichage P" apparaît sur l’écran. Après la prise de ligne, votre
téléphone attend quelques secondes pour composer le numéro
d’appel propre.
La pause peut également être enregistrée dans le répertoire lors de la saisie de numéros d’appel.
Touche R sur les installations à postes supplémentaires
Si votre téléphone est raccordé par l’intermédiaire d’une installation
à postes supplémentaires, vous pouvez via la Touche R clear
transférer des appels et utiliser le rappel automatique. Veuillez lire
dans le mode d’emploi de votre installation à postes supplémentaires quel temps de flash vous devez régler pour l’utilisation de ces
fonctions. Votre revendeur, auprès duquel vous avez acheté l’installation, vous informera si votre téléphone fonctionne parfaitement
sur ce genre d’installation. Temps de flash page 64
Temps de flash
Afin de pouvoir exploiter votre téléphone sur une installation à po-
60
Installations à postes sup. et services sup.
stes supplémentaires, réglez un temps de flash de 100 ms.
Page 64
Services supplémentaires
Affichage du numéro d’appel (CLIP1)
Si cette fonction est à votre disposition sur votre ligne téléphonique,
le numéro du correspondant vous sera affiché dès que le téléphone
sonne. Chapitre 9
Si votre correspondant a bloqué la transmission de son numéro, un
message correspondant sera affiché. Ce numéro ne peut pas être
affiché et donc ne peut être enregistré dans la liste d’appels.
L’affichage du numéro d’appel est un service optionnel de
votre exploitant de réseau. Veuillez lui demander de plus
amples informations.
Répondeur dans le réseau téléphonique 47
Le répondeur dans le réseau téléphonique est un service offert par
beaucoup d’opérateurs. Si votre opérateur tient un répondeur à votre disposition dans le réseau téléphonique, un icône sous forme de
lettre vous informe de nouveaux messages (VMWI2). Vous ne pouvez disposer de cette fonction que si votre opérateur offre ce service. Veuillez lui demander de plus amples informations.
Pour supprimer l’icône de la lettre de l’écran, sélectionnez la fonction ANNUL ATTENTE M dans le menu page 65
Touche R et services supplémentaires
Votre téléphone supporte des services supplémentaires de votre
opérateur, comme par ex. le va−et−vient, la signalisation d’appel en
instance et la conférence. Vous pouvez utiliser ces services
supplémentaires par l’intermédiaire de la touche R. Demandez à
votre opérateur quel temps de flash vous devez régler pour utiliser
ces services supplémentaires. Contactez votre opérateur pour
déconnecter les services supplémentaires. Réglage du temps de
flash page 64
1
2
CLIP : Calling Line Identification Presentation
VMWI: Visual Message Waiting Indication
61
Structure du menu
7 Structure du menu
Menu principal
Vous accédez au menu principal en appuyant sur la touche .
Les touches et vous permettent de vous déplacer dans
le menu et de sélectionner une fonction.
Comme alternative au défilement, vous pouvez sélectionner de nombreuses fonctions et réglages directement
également via les chiffres qui sont placés avant les fonctions dans le tableau suivant (v. p.b.)
Confirmez toute sélection ou entrée avec la touche .
Pour reculer d’un niveau, appuyez sur la touche clear .
En appuyant sur la touche vous accédez au mode de veille.
page 52
[1] LANGUE
[1] ENGLISH
[2] FRANÇAIS
[3] ESPAÑOL
[4] PORTUGUÊS
[5] NEDERLANDS
[6] DEUTSCH
[7] ITALIANO
[8] SVENSK
[9] SUOMI
[0] DANSK
NORSK
48
62
Structure du menu
49
[2] SONNERIE
[1] VOL DE SONNERIE
[1] APPEL EXTERNE
[0] ARRÊT
[1] 4 flèches
[2] 8 flèches
[3] 12 flèches
[4] 16 flèches
[2] APPEL INTERNE
[0] ARRÊT
[1] 4 flèches
[2] 8 flèches
[3] 12 flèches
[4] 16 flèches
[2] SONNERIE
[1] APPEL EXTERNE
[1] RingTone 1
[2] RingTone 2
[3] RingTone 3
[4] RingTone 4
à p.de [5]: 10 mélodies polyphones
Muet
bas
fort
Muet
bas
fort
10 sonneries polyphones et
4 sonneries standard
sont disponibles.
[2] APPEL INTERNE
[1] Intercom Tone 1
[2] Intercom Tone 2
63
Structure du menu
[3] Intercom Tone 3
[4] Intercom Tone 4
à p. de [5]: 10 mélodies spolyphones
[3] RÉGLER HEURE
[1] HEURE / DATE
[2] ALARME
ACTIVÉ
Entrer l’heure à 4 chiffres
Entrer l’heure de réveil à 4 chiffres
ARRÊT
[3] AFFICHAGE
24 Hr
MM / DD
DD / MM
12 Hr
MM / DD
DD / MM
[4] TÉLÉPHONE RÉGL.
[1] CONTRASTE LCD
[2] Effets
[0] ARRÊT
[1] 1
[2] 2
50
51
64
[3] 3
[4] 4
La touche vous permet
de passer de AM à PM à
l’entrée de l’heure et de l’heure
de réveil.
16 sensibilités page 58
Structure du menu
[3] VERROUIL. SMART
ACTIVÉ
ARRÊT
Verrouillage intelligent du clavier
page 58
[4] REPONSE AUTO
ACTIVÉ
ARRÊT
Prise de communication
automatique
page 54
[5] APPEL BEBE
ACTIVÉ
Page 55
Entrer le numéro d’appel
ARRÊT
[6] NUMEROTATION
TONALITE
IMPULSION
Ne modifiez le système de
numérotation que si votre
opérateur vous le recommande.
[7] DUREE RAPPEL
100 ms
270 ms
300 ms
600 ms
Ne modifiez le temps de flash
(temps de rappel) que si votre
opérateur vous le recommande.
[8] COMBINE
Entrer le nom du combiné
[9] TPS R.ECLAIRAGE
60 s
50 s
40 s
Durée de léclairage de fond
pour écran et touches
30 s
20 s
52
65
Structure du menu
[5] SECURITE
[1] MODE ENREGIST.
1
2
3
4
Déclarer le combiné sur la base
PIN−Code1
PIN−Code1
PIN−Code1
PIN−Code1
[2] DESINSCRIPTION
COMBINÉ 1
COMBINÉ 2
COMBINÉ 3
COMBINÉ 4
Annuler le combiné de la base
Noms des combinés attribués en
usine
[3] ANNUL ATTENTE M
NON
OUI
Désactiver Visual Message Waiting Indication2: Supprime l’icône
de la lettre de l’écran.
[4] SÉLECT BASE
1
AUTO
[6] RÉGLAGES
NON
OUI
1
2
66
Code PIN: 0000 page 79
page 21
Sélection automatique des bases
Structure du menu
Répertoire 53
Vous accédez au répertoire si vous appuyez sur la touche depuis le mode de veille. Vous ouvrez le menu répertoire si vous
appuyez ensuite sur la touche .
Confirmez toute sélection ou entrée avec la touche .
[1] AJOUT. ADRESSES
Entrer le nom1
Entrer le numéro
[2] EDITER ADRESSES
Modifier le nom1
Modifier le numéro
[3] EFF. DONNÉE
[4] EFF. TOUT
Les fonctions [2] et [3] se réfèrent toujours à l’enregistrement du répertoire qui a été sélectionné après l’ouverture
de celui−ci.
Liste d’appels 54
Vous accédez à la liste d’appels si vous appuyez 2 x sur la touche
ou depuis le mode de veille. Vous ouvrez le menu liste
d’appels si vous appuyez ensuite sur la touche .
Confirmez toute sélection ou entrée avec la touche .
[1] AJOUT. ADRESSES
Entrer le nom1
Ajouter au répertoire
Entrer le numéro ou confirmer
[2] EDITER PO.COMP.
Modifier le numéro
Traiter le numéro pour composer
Contin. avec AJOUT. ADRESSES
(v.h.)
[3] EFF. DONNÉE
[4] EFF. TOUT
Les fonctions [1], [2] et [3] se réfèrent toujours à l’enregistrement qui a été sélectionné.
1 Section Introduction du texte" à la page 68
67
Répertoire
8 Répertoire
Vous pouvez enregistrer 60 numéros avec nom dans le répertoire.
Chaque numéro doit comprendre 24 chiffres maximum.
16 lettres sont disponibles au maximum pour chaque nom.
Enregistrer des enregistrements du répertoire 55
Page 67
Saisissez toujours les numéros d’appel avec l’indicatif afin
que le téléphone puisse aussi attribuer les communications locales à un enregistrement du répertoire.
Introduction du texte 56
Les touches chiffrées contiennent également des lettres. En appuyant plusieurs fois sur la touche correspondante, on peut saisir
des lettres ainsi que des chiffres.
Exemple : Vous désirez saisir le nom "Peter". Appuyez
1 x sur la touche , 2 x sur la touche , 1 x sur la touche
, 2 x sur la touche et 3 x sur la touche .
Remarques supplémentaires pour introduire le texte :
Pour taper deux fois la même lettre, tapez la lettre correspondante
et attendez que le curseur ne clignote plus. Maintenant, vous pouvez entrer la lettre une nouvelle fois.
En outre vous avez ces possibilités:
clear
efface le dernier caractère
commute entre
majuscules et minuscules
redial
68
introduit une pause à la saisie
des numéros
Répertoire
En appuyant plusieurs fois sur les touches , et d’autres caractères sont disponibles:
1
1
_
−
+
=
^
.
,
;
:
*
*
#
?
!
$
&
%
/
\
|
~
0
0
’
(
)
[
]
<
>
{
}
Modifier des enregistrements du répertoire
Page 67
Pour sélectionner directement un enregistrement, appuyez sur la touche qui correspond à la première lettre de
l’enregistrement. Par exemple, pour sélectionner directement Peter" appuyez 1x sur la touche .
Effacer des enregistrements du répertoire
Page 67
Composer de numéros du répertoire
Page 55
69
Affichage du numéro d’appel / Liste d’appels
9 Affichage du numéro d’appel / Liste d’appels
Si la fonction CLIP est disponible sur votre installation téléphonique
(CLIP = Calling Line Identification Presentation), l’écran affiche le
numéro du correspondant lorsque celui−ci appelle. Si vous avez enregistré ce numéro dans votre repertoire, le nom enregistré est
alors affiché.
Si le correspondant a bloqué la transmission de son numéro,
celui−ci n’est pas affiché ; le message suivant s’affiche à sa
place : N° DIFFERE .
Si l’écran affiche le message INDISPONIBLE , c’est qu’il
n’existe pas d’information relative au correspondant ; dans ce
cas, il pourrait s’agir également d’une communication
internationale.
L’affichage du numéro d’appel (CLIP) ainsi que l’affichage
de la date et de l’heure sont des services optionnels de votre opérateur. Veuillez lui demander de plus amples informations.
Liste d’appels 57
Dans la liste d’appels, vous pouvez enregistrer 40 numéros au
maximum. Lorsque toutes les places sont occupées, c’est le numéro le plus ancien qui est écrasé.
Si de nouveaux numéros ont été enregistrés dans la liste d’appels
pendant votre absence, une indication sur l’écran vous en informera.
Le nombre des appels entrés est affiché ; y compris les appels de correspondants identiques!
Afficher des numéros de la liste d’appels
Afficher la vue d’ensemble
ou Ouvrir la liste d’appels
Deux affichages différents vous informent combien d’enregistrements se trouvent au total dans la liste et combien sont nouvellement arrivés depuis que vous avez consulté celle−ci la dernière fois.
70
Affichage du numéro d’appel / Liste d’appels
Dans cette vue d’ensemble, seul le nombre de différents
correspondants est saisi ; Les appels répétés de correspondants identiques ne sont pas pris ici en considération!
Ecran
Description
TOUT
Nombre de tous les enregistrements
NOUVEAU
Nombre des nouveaux enregistrements
Consulter les différents enregistrements
ou Consulter les enregistrements
Chaque enregistrement reçoit un numéro CALL# à 2 chiffres affiché
en haut à droite de l’écran. Par ailleurs, le numéro d’appel du correspondant est affiché dans la mesure où ce dernier a donné son
accord pour la transmission du numéro d’appel (CLIP) (v. h.). Si ce
numéro est enregistré dans le répertoire, le nom du correspondant
enregistré apparaîtra en outre sur l’écran.
Si un correspondant a essayé plusieurs fois de vous appeler, vous apercevez en regardant pour la première fois vos
nouveaux enregistrements l’information REPT sous le
numéro CALL#.
Quand vous avez terminé de regarder tous vos enregistrements,
apparaît sur l’écran l’information suivante: FIN DE LISTE .
Enregistrez ce numéro dans le répertoire
Vous pouvez enregistrer un numéro directement de la liste d’appels
dans le répertoire. Sélectionnez pour cela la fonction AJOUT.
ADRESSES page 67
Rappeler des numéros de la liste d’appels
Page 55
Modifier des numéros de la liste d’appels
Vous pouvez modifier un numéro de la liste d’appels. Pour cela, sélectionnez la fonction EDITER PO.COMP.. page 67
Afin d’appeler ensuite directement le numéro modifié, il vous suffit
d’appuyer sur la touche de communication .
71
Affichage du numéro d’appel / Liste d’appels
Pour enregistrer le numéro modifié dans le répertoire, confirmez votre modification avec la touche et continuez l’enregistrement.
Effacer des numéros de la liste d’appels
Effacer des numéros individuels
Page 67
Effacer tous les numéros
Pour vider toute la liste d’appels, effacez tous les numéros via la
fonction EFF. TOUT. page 67
72
Fonctions spéciales
10 Fonctions spéciales
Mise en communication automatique
Si vous activez cette fonction, un appel est automatiquement mis en
communication lorsque le combiné est retiré de la base ou du chargeur.
Pages 54, 64
Réveil 58
Avec cette fonction, votre combiné peut vous réveiller à une certaine heure. page 64
Appel bébé (Appel direct)
Cette fonction vous permet d’enregistrer un numéro déterminé qui
est automatiquement appelé en appuyant sur une touche quelconque ( sauf ). page 64
Raccord de casque
Vous trouvez sur le côté droit du combiné une possibilité de raccordement d’un casque / d’un kit d’oreilles convenant pour une fiche à
jack stéréo de 2,5 mm.
Nous ne pouvons pas garantir un fonctionnement parfait.
Système de numérotation
Vous pouvez faire fonctionner votre téléphone aussi bien sur les
raccordements analogiques (numérotation par impulsions/DC)
que sur les nouveaux raccordements numériques (numérotation
par tonalité/FV) page 64
Numérotation temporaire par tonalité
Si vous ne pouvez utiliser votre téléphone qu’avec la numérotation
par impulsions, vous n’avez pas besoin de renoncer aux avantages
de la numérotation par tonalité (par ex. : consultation d’un répondeur dans le réseau téléphonique). Vous pouvez passer à la numérotation par tonalité pendant que vous passez une communication.
Appuyer dessus pendant la
communication
Quand la communication est terminée, la numérotation par impulsions est automatiquement rétablie.
73
Élargissement du système téléphonique
11 Élargissement du système téléphonique
Sur votre base, vous pouvez déclarer 3 autres combinés au maximum du même modèle. Chaque combiné peut être déclaré sur quatre bases.
Plusieurs combinés
Vous pouvez déclarer au total 4 combinés de type DF73X sur votre
base.
Déclarer des combinés sur une base déterminée
Avant de déclarer un combiné, vous devez placer la base en mode
d’enregistrement.
3 sec Démarrer le mode
d’enregistrement
La DEL de la base clignote tant que celle−ci se trouve en
mode d’enregistrement.
Pour déclarer un combiné sur une base, allez dans le menu sur la
fonction MODE ENREGIST.. Sélectionnez l’une des 4 places de
mémoire de la base. page 65
Les places de mémoire déjà occupées sont cochées derrière celles−ci. Vous pouvez les écraser par un nouvel enregistrement.
Si l’enregistrement a réussi, l’écran signale SUCCÈS . Par ailleurs, un numéro d’appel interne, affiché sur l’écran, a été affecté au
combiné. Ceci est important pour téléphoner en interne et pour des
déclarations et annulations.
Si l’enregistrement a échoué, vous voyez ENCORE? sur
l’écran. Effectuez l’enregistrement une nouvelle fois.
Pour tester si le combiné a bien été enregistré sur la base,
appuyez sur la touche de paging. Il devrait sonner. Pour
terminer la sonnerie, appuyez encore une fois sur cette
touche.
74
Élargissement du système téléphonique
Annuler des combinés d’une base
Vous ne pouvez annuler un combiné d’une base que par
un autre qui est déclaré sur cette base.
Pour annuler un certain combiné d’une base, sélectionnez à partir
du menu la fonction DESINSCRIPTION et le nom ou le numéro du
combiné que vous désirez annuler. page 65
Si l’annulation a réussie, l’écran affiche SUCCÈS .
Si l’annulation a échoué, vous voyez ENCORE? sur l’écran. Recommencez l’opération.
Plusieurs bases
Vous pouvez déclarer simultanément vos combinés sur 4 bases différentes. Chaque base a besoin d’une prise téléphonique individuelle. Ces raccordements peuvent porter le même numéro d’appel
ou bien des numéros différents.
Page 65
Les communications en cours ne peuvent pas être
transférées d’une base à l’autre.
Augmentation de la portée
Placez vos bases de telle sorte que la portée de chacune se recoupe. Testez la portée de vos combinés, des obstacles dans les
bâtiments pouvant la restreindre.
Déclarez chaque combiné à toutes les bases. Activez la fonction
AUTO (Numérotation automatique de bases).
page 65
L’endroit où vous vous trouvez est indifférent, le combiné cherche
automatiquement la base la plus proche ayant la meilleure liaison.
75
En cas de problèmes
12 En cas de problèmes
Service Hotline
Si vous avez des problèmes avec votre téléphone, contrôlez
d’abord les remarques suivantes. En cas de problèmes techniques,
vous pouvez vous adresser à notre service−hotline au numéro de
tél. 0900 00 16 75 (uniquement valable pour des appels en provenance de Suisse − coûts si impression : CHF 2.00 / Min). Si vous
avez des droits de garantie, adressez−vous à votre revendeur. La
durée de la garantie est de 2 ans.
Questions et réponses
Questions
Réponses
Pas de connexion possible
avec la base
− Contrôlez si vous vous êtes bien identifié
sur la base par le code PIN correct.
page 79
Pas de commu- − Le téléphone n’est pas raccordé correctenication
ment ou en dérangement. N’utilisez que le
téléphonique
câble de raccordement téléphonique fourni
possible
avec l’appareil.
− Testez avec un autre téléphone si votre raccordement téléphonique fonctionne.
− Le bloc d’alimentation n’est pas branché ou
il y a une panne totale de courant.
− Les piles rechargeables sont vides ou
défectueuses.
− Vous vous êtes trop éloigné de la base.
− Erreur de réglage du système de numérotation.
page 64
La liaison est
− Vous vous êtes trop éloigné de la base.
hachée, coupée − Mauvais lieu d’installation de la base.
76
En cas de problèmes
Le système ne
réagit plus
− Remettez toutes les fonctions en configuration usine. page 65
− Retirez le bloc d’alimentation de la prise de
courant pendant un court instant.
Les piles rechargeables
sont vides au
bout de peu de
temps
− La pile rechargeable est vide ou défectueuse.
− Placez le combiné correctement sur sa
base. Nettoyez les surfaces de contact du
combiné et de la base avec un chiffon doux
et non pelucheux.
− Posez le combiné sur la base et laissez−le
pendant 15 heures.
L’affichage du
numéro d’appel
(CLIP1)
ne fonctionne
pas
− L’affichage du numéro d’appel est un service optionnel de votre exploitant de réseau.
Veuillez lui demander de plus amples informations.
− Le correspondant a bloqué la transmission
de son numéro d’appel.
1
CLIP : Calling Line Identification Presentation
77
Caractéristiques techniques
13 Caractéristiques techniques
Données techniques
Caractéristique
Valeur
Standard
DECT1
Alimentation en courant
230/240 V, 50 Hz
Portée
A l’extérieur : env. 300 m
A l’intérieur : env. 50 m
Etat de veille
Jusqu’à 120 h
Durée max. de communication
Jusqu’à 5 h
Piles rechargeables
3 x 750 mAh NiMH, Taille: AAA
Numérotation
Numérotation par tonalité
Numérotation par impulsions
Température de service
admissible
0°C à 45°C
Température ambiante
autorisée
−20°C à 60°C
Humidité atmosphérique relative autorisée
20% à 75%
Fonction de flash
100 ms, 270 ms,
300 ms, 600 ms
1
78
DECT: Digitally Enhanced Cordless Telecommunication
= Standard pour téléphones sans fil.
Caractéristiques techniques
Réglages usine 59
Combiné 60
Langue:
Nom du combiné:
COMBINÉ 1
PIN1:
0000
Appel externe
Numérotation:
TONALITE
Volume de la sonnerie:
Affichage horloge:
3
Sonnerie d’appel:
3
Volume sonore de
l’écouteur
allemand
VOL2
Appel interne
24 h
Affichage date:
MM / DD
Sonnerie réveil:
ARRÊT
Heure de réveil:
00:00
Volume de la sonnerie:
3
Sonnerie d’appel:
3
Verrouillage du clavier interne:
ACTIVÉ
Son des touches:
1
Réponse autom.:
Contraste:
8
Appel direct:
ARRÊT
Temps d’éclairage:
20 s
Temps de flash:
100 ms
activé
Déclaration de conformité
Cet appareil répond aux exigences des directives de
l’union européenne (UE) :
1999/5/CE Directive sur les installations de radio et de télécommunication et la reconnaissance réciproque de leur
conformité. La conformité avec la directive mentionnée ci−
dessus est confirmée sur l’appareil par la marque CE.
Pour obtenir la déclaration intégrale de conformité, veuillez vous servir du téléchargement gratuit sur notre site
Internet www.switel.com.
1
Le code PIN n’est pas modifiable.
79
Remarques d’entretien / Garantie
14 Remarques d’entretien / Garantie
Remarques d’entretien
Nettoyez les surfaces du boîtier uniquement avec un chiffon doux et
non pelucheux − sans lessive ou dissolvant!
Garantie
Les appareils SWITEL sont fabriqués selon les procédes les plus
modernes et sont contrôlés. Des matériels sélectionnés et des technologies de pointe ont pour effet un fonctionnement irréprochable et
une longue durée de vie. La garantie ne rentre pas en jeu si l’exploitant du réseau téléphonique ou une installation à postes supplémentaires éventuellement intercalée est responsable du dysfonctionnement de l’appareil. La garantie n’est pas valable pour les
piles, piles rechargeables ou packs de piles utilisés dans le produits. La durée de la garantie est de 24 mois, à partir de la date
d’achat.
Pendant la durée de la garantie, tous les défauts, dus à des vices
de matériel ou de fabrication, seront éliminés gratuitement. Le droit
à la garantie expire en cas d’intervention de l’acheteur ou de tiers.
Les dommages provenant d’un maniement ou d’une manipulation
incorrects, d’une mauvaise mise en place ou d’une mauvaise
conservation de l’appareil, d’un raccordement non conforme ainsi
que d’un cas de force majeure ou autres influences extérieures,
sont exclus de la garantie. Nous nous reservons le droit, en cas de
réclamations, de réparer ou de remplacer les composants défectueux ou d’échanger l’appareil. Les composants remplacés ou les
appareils échangés deviennent notre propriété. Les demandes de
dommages et intérêts sont exclues tant qu’elles ne reposent pas
sur l’intention ou une négligence grossière du fabricant.
Si votre appareil devait malgré tout présenter une défectuosité pendant la période de garantie, veuillez vous adressez, muni de la quittance d’achat, exclusivement au magasin où vous avez acheté votre appareil SWITEL. Vous ne pouvez faire valoir vos droits à la
garantie selon ces dispositions qu’auprès de votre revendeur exclusivement. Deux ans après l’achat et la remise de nos produits, il
n’est plus possible de faire valoir les droits à la garantie.
80
Index
15 Index
A
Affichage du numéro d’appel, 61
Afficher des numéros de la
liste d’appels, 70
Akkus, 45
AM/PM , 49
Annuler des combinés
d’une base, 75
Appareils médicaux, 45
Appel bébé, 55, 73
Appel direct, 55, 73
Appeler, 54
Augmentation de la portée,
75
Augmenter le volume de
l’écouteur, 49
B
Base, 50
Bases, plusieurs, 75
Bloc d’alimentation, 44
C
Chargement des piles rechargeables, 48
Chargeur, 50
Chercher le combiné, 59
Chiffre de la ligne principale, 60
Comment me servir du téléphone, 51
Compose de numéros du
répertoire, 69
Composer le numéro d’appel d’urgence, 59
Composition de numéros
du répertoire, 55
Conférence à trois, 57, 61
Consignes de sécurité, 44
Contenu de l’emballage, 46
Contraste de l’écran, 58
Créer des enregistrements
dans le répertoire, 53
D
Débranchement du microphone, 58
Déclaration de conformité,
79
Déclarer des combinés sur
une base déterminée,
74
DEL voyant de contrôle de
charge, base, 50
DEL voyant de contrôle de
charge, chargeur, 50
Diminuer le volume de
l’écouteur, 49
Données techniques, 78
Durée de la communication,
57
E
Écriture majuscule−/minuscule, 49
Effacer des enregistrements du répertoire, 69
Effacer des numéros de la
liste d’appels, 72
Élargissement du système
téléphonique, 74
Eléments de manipulation,
49
Élimination, 45
Éliminez les fournitures
d’emballage, 45
En cas de problèmes, 76
Enregistrer des enregistrements du répertoire, 68
Enregistrez ce numéro
dans le répertoire, 71
F
Fonctions spéciales, 73
G
Garantie, 80
I
Installations à postes supplémentaires, 60
Intercommunication, 56
Introduction du texte, 68
L
Lieu d’installation, 44
Liste d’appels, 70
Liste d’appels: Afficher la
vue d’ensemble, 70
Liste d’appels: Consulter
les différents enregistrements, 71
Liste d’appels: Effacer des
numéros individuels, 72
Liste d’appels: Effacer tous
les numéros, 72
Lit d’oreilles, 73
M
Mélodie de sonnerie d’appel, 58
Mener des conférences téléphoniques, 57
Menu principal, 62
Mettre le téléphone en service, 46
Mise en communication automatique, 73
Mode de veille, 52
Mode économie d’énergie,
52
Mode mains−libres, 58
Modifier des enregistrements du répertoire, 69
Modifier des numéros de la
liste d’appels, 71
N
Navigation dans le menu,
53
Niveau de chargement des
piles rechargeables, 48
Notations, 51
81
Index
Numérotation automatique ,
75
Numérotation par impulsions, 73
Numérotation par tonalité,
73
Numérotation temporaire
par tonalité, 73
P
Paging, 59
Panne de courant, 44
Pause, 49
Pause de numérotation, 60
Piles rechargeables, 44
Plusieurs combinés, 74
Pose des piles rechargeables, 47
Poser le clip de ceinture, 48
Prendre l’appel, 54
Q
Questions et réponses, 76
R
Raccord de casque, 50, 73
Raccordement de la base,
46
Raccorder le chargeur , 47
Rappeler des numéros de
la liste d’appels, 71
Rappeler les appels manqués, 55
Réglage de l’heure, 48
Réglage de la langue, 48
Réglages usine, 79
Remarques d’entretien, 80
Répertoire, 49, 67, 68
Répondeur dans le réseau
téléphonique, 61
Représentations, 51
Réveil, 73
S
Service Hotline, 76
Services supplémentaires,
60, 61
82
Signal d’avertissement du
niveau de chargement
des piles, 52
Signal sonore d’avertissement de la portée, 51
Signalisation d’appel en instance, 57, 61
Signes de ponctuation, 49
Structure du menu, 62
Suppression des anomalies, 76
Symboles à l’écran, 51
Système de numérotation,
65, 73
T
Téléphoner, 54
Téléphoner en interne, 55
Temps de flash, 65, 79
Temps de flash sur les installations à postes supplémentaires, 61
Temps de rappel, 65
Terminer la communication,
54
Touche BIS, 49
Touche conférence, 49
Touche de communication,
49
Touche de paging, 50
Touche de répétition automatique des derniers
numéros, 54
Touche de sélection: vers le
bas, 49
Touche de sélection: vers le
haut, 49
Touche de signalisation R,
49
Touche INT, 49
Touche menu, 49
Touche microphone, 49
Touche OK, 49
Touche R et services supplémentaires, 61
Touche R sur les installa-
tions à postes supplémentaires, 60
Touche Raccrocher, 49
Touche retour, 49
Touche suppression, 49
Touche veille, 49
Touches à effleurement, 53
Transférer des communications externes à des internes, 56
U
Utilisation conforme aux
prescriptions, 44
V
Va−et−vient, 56, 61
Verrouillage du clavier, automatique, 58
Verrouillage du clavier, manuel, 49, 59
VMWI, 61
Volume sonore de l’écouteur, 58
61
1
2
3
4
5
6
7
8
9
10
11
12
13
14
15
Contenuto
Indicazioni di sicurezza . . . . . . . . . . 84
Mettere in funzione il telefono . . . . . . 86
Elementi di comando . . . . . . . . . . . . 89
Come funziona il mio telefono? . . . . . 91
Compiere telefonate . . . . . . . . . . . . 94
Impianti telefonici interni/servizi
addizionali . . . . . . . . . . . . . . . . . . . 101
Struttura di menu . . . . . . . . . . . . . . 104
Rubrica telefonica . . . . . . . . . . . . . . 110
Visualizzazione del numero / Elenco
chiamate . . . . . . . . . . . . . . . . . . . . 112
Funzioni speciali . . . . . . . . . . . . . . . 115
Ampliare il sistema telefonico . . . . . . 116
In presenza di problemi . . . . . . . . . . 118
Specifiche tecniche . . . . . . . . . . . . . 120
Consigli per la cura / Garanzia . . . . . 122
Indice alfabetico . . . . . . . . . . . . . . . 123
83
Indicazioni di sicurezza
1 Indicazioni di sicurezza
Leggere attentamente le presenti istruzioni per l’uso.
Impiego conforme agli usi previsti
Il presente apparecchio consente di compiere telefonate all’interno
di una rete di telecomunicazione. Qualsiasi altro impiego è considerato come non conforme agli usi previsti. Non sono consentite modifiche o trasformazioni non autorizzate. Non aprire per nessuna ragione l’apparecchio autonomamente e svolgere riparazioni di
propria iniziativa.
Luogo di installazione
Evitare un’esposizione a fumo, polvere, vibrazioni, sostanze chimiche, umidità, calore e raggi solari diretti.
Non utilizzare l’unità portatile in aree esposte al rischio di deflagrazione.
Alimentatore di rete
Attenzione: Utilizzare solo l’alimentatore a spina fornito
in dotazione visto che altri alimentatori di rete potrebbero
addirittura danneggiare il telefono. Non ostacolare il libero
accesso all’alimentatore a spina con mobili o altri oggetti
simili.
Batterie ricaricabili
Attenzione: Non gettare le batterie nel fuoco. Utilizzare
solo batterie dello stesso tipo! Osservare la corretta polarità! Pericolo di esplosione in caso di impiego non conforme delle batterie ricaricabili.
Caduta di tensione
In caso di caduta di tensione non è possibile impiegare l’unità per
telefonare. Si consiglia di ricorrere in caso di emergenza ad un telefono con filo in grado di funzionare anche senza alimentazione elettrica esterna.
84
Indicazioni di sicurezza
Apparecchiature mediche
Attenzione: Evitare di utilizzare il telefono nelle vicinanze
di apparecchiature mediche. Non è possibile escludere
completamente il rischio di eventuali interferenze.
Osservare una distanza minima di 1 m.
Telefoni DECT1 possono causare un fastidioso ronzio in apparecchi
acustici.
Smaltimento
Alla fine della vita utile dell’apparecchio si ricorda che è
necessario consegnare l’apparecchio vecchio presso
uno dei punti di raccolta istituiti dalla propria società di
smaltimento rifiuti comunale (per es. centro di riclico materiali). Il simbolo qui raffigurato indica il divieto di smaltire l’apparecchio vecchio assieme ai rifiuti domestici.
Secondo quanto previsto dalla legge sugli apparecchi
elettrici ed elettronici i proprietari di apparecchi vecchi
sono per legge tenuti alla consegna di tutti gli apparecchi elettrici ed elettronici presso un centro di rilievo rifiuti in raccolta differenziata.
Consegnare le batterie ricaricabili per lo smaltimento
presso rivenditori al dettaglio di batterie o centri di raccolta che mettono a disposizione appositi contenitori.
Smaltire confezioni ed imballaggi in base a quanto indicato dalle norme in vigore a livello locale.
1
DECT: Digital Enhanced Cordless Telecommunication
= Standard per telefoni senza cavo.
85
Mettere in funzione il telefono
2 Mettere in funzione il telefono
Indicazioni di sicurezza
Attenzione: Prima della messa in funzione, leggere attentamente le indicazioni di sicurezza riportate al capitolo
1.
Contenuto della confezione 62
La confezione contiene:
Contenuto
73
Modello DF73X
732* 733* 734*
Stazione(i) base con alimentatore di rete
1
1
1
1
Stazione(i) di carica con alimentatore di rete
−
1
2
3
Unità portatile(i)
1
2
3
4
Cavo di collegamento telefonico
1
1
1
1
Batterie ricaricabili
3
6
9
12
Ganci(o) per cintura
1
2
3
4
Istruzioni per l’uso
1
1
1
1
Collegare la stazione base
Attenzione: Posizionare la stazione base con una distanza minima di 1 m da altre apparecchiature elettroniche considerato il rischio di interferenze reciproche.
Procedere al collegamento della stazione base seguendo quanto
raffigurato sul disegno. Utilizzare per motivi di sicurezza solo l’alimentatore di rete oltre che il cavo di collegamento telefonico forniti
in dotazione.
*
86
Visitando il nostro sito www.switel.com è possibile informarsi
sulla disponibilità del set telefonico qui descritto.
Mettere in funzione il telefono
Presa
elettrica
Presa di allacciamento
telefonico
Collegare la stazione di carica 1
Procedere al collegamento della stazione di carica seguendo
quanto raffigurato sul disegno. Si consiglia di utilizzare per motivi di
sicurezza soltanto l’alimentatore fornito in dotazione.
Presa elettrica
Inserire le batterie ricaricabili
Inserire le batterie ricari− AAA +
cabili nel vano batterie
+ AAA −
− AAA +
precedentemente aperto.
Utilizzare a tale scopo
solo batterie ricaricabili
del tipo AAA Ni−MH da
1,2 V. Osservare la corretta polarità! Chiudere infine il vano accumulatore.
1 Vale solo per modelli dotati di minimo due unità portatili.
Paragrafo Contenuto della confezione" a pagina 86
87
Mettere in funzione il telefono
Caricare le batterie 63
Riporre l’unità portatile in sede di prima messa in funzione per minimo 15 ore nella stazione base / stazione di carica. Avendo posizionato l’unità portatile nella stazione base / stazione di carica in
maniera corretta, la spia di controllo dello stato di carica è accesa.
L’unità portatile si surriscalda durante il processo di carica. Questo
è un fenomeno normale e non pericoloso.
Evitare di caricare l’unità portatile con dispositivi di carica differenti
o estranei.
Lo stato di carica attuale è visualizzato sul display:
Carico
Debole
Montare il gancio per cintura
Girare l’unità portatile in modo che il retro sia rivolto verso sopra e
spingere il gancio per cintura nelle due apposite rientranze presenti
sul lato superiore dell’unità portatile.
Impostare la lingua
A pagina 104 sono riportate indicazioni su come impostare la lingua
del display del proprio telefono in sede di prima messa in funzione.
Impostare l’ora
A pagina 106 sono riportate indicazioni su come impostare l’ora
dell’unità portatile in sede di prima messa in funzione.
Impianti telefonici interni
Il capitolo 6 contiene ulteriori informazioni qualora si desiderasse
integrare il telefono in un impianto telefonico interno.
88
Elementi di comando
3 Elementi di comando
Unità portatile
1
2
Display
Tasto riaggancio,
Tasto stand−by 3 Rubrica telefonica 4 Lettere maiuscole/minuscole,
AM/PM (in formato 12 ore)
Tasto conferenza 5 Tasto INT (per chiamate
12
interne) 6 Tasto menu, Tasto OK,
11
Tasto microfono 7 Tasto cancellazione,
10
Tasto indietro,
Tasto segnale R clear
9
8 Inserire segni di interpunzione
in sede di immissione di testo,
Passaggio temporaneo alla
procedura di selezione a toni,
Blocco tastiera manuale 8
9 Ripetizione di selezione,
7
Pausa redial
10 Tasto selezione: Scorrere
verso sotto nel menu, Ridurre
volume del ricevitore 11 Tasto chiamata 12 Tasto selezione: Scorrere verso sopra
nel menu, Aumentare
volume del ricevitore 1
2
3
4
5
6
Nelle presenti istruzioni per l’uso i tasti del telefono sono raffigurati utilizzando simboli graficamente uniformi (vedi sopra). Leggeri scostamenti tra
i simboli qui utilizzati e i simboli sui tasti del telefono sono pertanto possibili.
89
Elementi di comando
13 Presa per cuffia
13
Stazione base
14 LED di controllo stato di carica,
lampeggia con chiamata
in arrivo
15 Tasto paging 15
Stazione di carica 1
16 LED di controllo stato di carica
1
90
Vale solo per modelli dotati di minimo due unità portatili. 16
Paragrafo Contenuto della confezione" a pagina 86
14
Come funziona il mio telefono?
4 Come funziona il mio telefono?
Rappresentazioni e modi di scrittura
3 sec MUTO o
Inserire numeri o lettere
Premere brevemente il tasto raffigurato
Premere il tasto raffigurato per 3 secondi
Unità portatile squilla
Estrarre l’unità portatile dalla stazione base
Riporre l’unità portatile nella stazione base
Testo o simboli sul display
Simboli sul display
Simbolo
Descrizione
Il collegamento alla stazione base è instaurato.
Non appena la qualità del collegamento peggiora, il telefono emette un segnale di avviso
portata.
FUORI
CAMPO
Il collegamento tra unità portatile e stazione
base è interrotto. Avvicinarsi alla stazione base.
Il blocco tastiera è attivato. Pagina 99.
La segnalazione acustica di chiamata è disattivata. Pagina 98.
La sveglia è attivata. Pagina 115.
Immissione di testo con lettere minuscole.
Pagina 110
Indica la presenza di un nuovo messaggio nella
mailbox di rete con segreteria telefonica inserita
(servizio opzionale del proprio gestore di rete
telefonica) Pagina 102
Batterie con piena capacità.
91
Come funziona il mio telefono?
Batterie con bassa capacità.
BATTERIE!
In più si avverte un segnale di avviso batteria.
A questo punto si rende necessario caricare il
telefono.
Segmenti che scorrono:
Processo di carica delle batterie in corso.
Pagina 88.
NOME PORTATILE
Nome dell’unità portatile. Pagina 108
OO:OO
Visualizzazione dell’ora. Pagina 106
VVCE
La funzione vivavoce è attivata. Pagina 99.
MUTO
Il microfono è disattivato. Pagina 98.
CONV
Normale conversazione telefonica in corso.
Modalità di stand−by 64
Nelle seguenti istruzioni per l’uso si presume che l’unità portatile sia
in modalità di stand−by.
In modalità di stand−by i tasti ed il display sono illuminati.
Sul display è inoltre visualizzata la dicitura PRONTO.
La modalità di stand−by è selezionata premendo il tasto .
Modalità di risparmio energetico
Dopo un determinato intervallo di tempo in modalità di stand−by, l’unità
portatile passa alla modalità di risparmio energetico. A questo punto, tasti e display non risultano più illuminati. Sul display appare l’ora.
Premere un tasto qualsiasi per attivare di nuovo la modalità di stand−by.
Navigare nel menu
I differenti menu consentono di raggiungere tutte le funzioni del telefono. Il percorso da seguire per giungere alla funzione desiderata
è indicato dalla struttura di menu. Capitolo 7
92
Come funziona il mio telefono?
o
o
o
clear
Aprire il menu principale
Selezionare il sottomenu desiderato
Aprire il sottomenu
Selezionare la funzione desiderata
Aprire la funzione
Selezionare l’impostazione desiderata
Inserire numeri e lettere
attraverso la tastiera
Confermare le immissioni
Tornare indietro di un livello
Passare di nuovo alla modalità di stand−by
Ogni singolo processo si interrompe automaticamente se
entro 20 secondi non si procede con una immissione.
Creare voci nella rubrica telefonica − Esempio
Come navigare nei menu e compiere immissioni è indicato
dall’esempio Creare voci nella rubrica telefonica. Si consiglia di
seguire l’esempio riportato per tutte le altre impostazioni che si desiderano compiere.
Aprire la rubrica telefonica
Aprire il menu
o Selezionare una funzione e confermare
, Inserire un nome e confermare
, Inserire un numero di chiamata e
confermare
Tasti sensore
I tasti sensore sono dei tasti sensibili allo sfioramento presenti sulla
superficie dell’unità portatile.
I tasti sensore sono premuti" mediante sfioramento con le dita. Il
loro azionamento non richiede l’esercizio di una forte pressione.
93
Compiere telefonate
5 Compiere telefonate
Ricevere una chiamata 65
Con chiamata in arrivo il telefono emette, nel caso in cui la funzione
non sia stata precedentemente disattivata, una segnalazione acustica di chiamata. In più, sulla stazione base lampeggia il LED mentre sull’unità portatile si illuminano display e tasti.
, o Ricevere una chiamata
Nel caso di attivazione della Ricezione automatica di
chiamate è sufficiente estrarre l’unità portatile dalla stazione base per accettare la chiamata. pagina 107.
Concludere una chiamata
o
Concludere una chiamata
Telefonare
Inserire il numero di chiamata
In caso di immissione errata
cancellare l’ultima cifra
Selezionare un numero di chiamata
clear
È altresì possibile premere prima il tasto di chiamata e ricevere il segnale di linea libera. Le cifre immesse per la
composizione del numero di chiamata desiderato sono
immediatamente selezionate. Nel corso di una simile
chiamata non è possibile eseguire una correzione di singole cifre che compongono il numero di chiamata.
Ripetizione di selezione
Il telefono memorizza i 20 numeri di chiamata selezionati per ultimo
in un elenco di ripetizione di chiamata.
Attendere il segnale di linea libera
redial
94
Seleziona automaticamente il No.
telefonico chiamato per ultimo
Compiere telefonate
Oppure:
redial
o , Aprire l’elenco di ripetizione di
chiamata
Scegliere la voce e instaurare
un collegamento
Richiamare chiamate mancate 66
Il telefono memorizza 40 chiamate ricevute in un apposito elenco
chiamate. pagina 112.
2x o Aprire l’elenco chiamate
o
Selezionare una voce
Selezionare un collegamento
Selezionare numeri dalla rubrica telefonica 67
Per fare questo è necessario aver memorizzato i numeri di chiamata nella rubrica telefonica. pagina 109 e 110
Il telefono dispone di una funzione di ricerca nome automatica.
Inserire la lettera iniziale del nome cercato. Per es.: Per cercare il
nome Henry" premere la cifra 4". Sul display è indicato il primo
nome che corrisponde al criterio di ricerca.
Aprire la rubrica telefonica
o , Scegliere la voce e instaurare
un collegamento
Chiamata diretta 68
Avendo attivato questa funzione di chiamata diretta (chiamata
bebè), il numero di chiamata programmato è selezionato non appena è premuto un tasto qualsiasi sull’unità portatile (ad eccezione
del tasto menu). Inserire il numero di chiamata desiderato dopo
aver attivato la funzione. pagina 107.
Nel caso in cui si desiderasse selezionare un numero di
chiamata differente, disattivare prima la funzione di chiamata diretta.
95
Compiere telefonate
Compiere chiamate interne 69
Condurre chiamate interne
Prima di poter compiere telefonate interne gratuite è necessario
aver registrato due o più unità portatili (UP1, UP2, ...) del tipo
DF73X ad una stazione base.
UP1: , o Avviare la chiamata interna, selezionare l’unità portatile desiderata
Anziché scorrere verso sopra e verso sotto, l’unità portatile desiderata è selezionabile anche direttamente in seguito a immissione del rispettivo numero composto da 1
cifra.
UP2: Ricevere la chiamata interna
presso l’altra unità portatile
UP1 / UP2: Concludere la chiamata interna
Inoltro interno di chiamate esterne
Durante la conduzione di una telefonata con un interlocutore
esterno da UP1:
UP1: , o Avviare la chiamata interna, selezionare l’unità portatile desiderata
UP2: Ricevere la chiamata interna
presso l’altra unità portatile
UP1: Trasferire la chiamata
Se l’unità portatile selezionata non dovesse rispondere, la
chiamata esterna potrà essere nuovamente ripresa con il
tasto .
Riscontro / Chiamata in attesa
La funzione di chiamata in attesa è un servizio opzionale
offerto dal proprio gestore di rete telefonica. Rivolgersi al
proprio provider per ricevere ulteriori informazioni. Capitolo 6
Durante lo svolgimento di una telefonata esterna è possibile chiamare
un’altra unità portatile interna a scopo di consultazione. Mentre è in
96
Compiere telefonate
corso la conversazione con l’interlocutore interno, la chiamata esterna è
trattenuta. Il numero di passaggi tra i partner di chiamata è illimitato.
UP1: , o Avviare con chiamata esterna in
corso una telefonata interna
selezionando l’unità portatile
desiderata
UP2: Ricevere la chiamata interna
presso l’altra unità portatile
UP1: Cambiare il partner di chiamata
Condurre chiamate a conferenza
La conferenza a tre è un servizio opzionale offerto dal proprio gestore di rete telefonica. Rivolgersi al proprio provider per ricevere ulteriori informazioni. Capitolo 6
Tra una chiamata esterna ed un altro interlocutore interno è possibile instaurare una chiamata a conferenza.
UP1: , o Avviare con chiamata esterna in
corso una telefonata interna
selezionando l’unità portatile
desiderata
UP2: Ricevere la chiamata interna
presso l’altra unità portatile
UP1: Dare inizio alla conferenza
UP1 / UP2: Il riaggancio da parte di uno
degli interlocutori interni
conclude la chiamata a
conferenza.
97
Compiere telefonate
Avviso di chiamata
La funzione di avviso di chiamata è un servizio opzionale
offerto dal proprio gestore di rete telefonica. Rivolgersi al
proprio provider per ricevere ulteriori informazioni. Capitolo 6
Un segnale acustico avvertito durante lo svolgimento di una telefonata
indica che un altro interlocutore telefonico sta provando a chiamare.
clear Accettare la nuova telefonata
trattenendo la prima chiamata.
clear
Passare da un chiamante
all’altro.
Visualizzazione della durata di conversazione
Durante lo svolgimento di una chiamata, la durata della telefonata è
visualizzata in minuti e secondi sul display.
Melodia e volume di suoneria 70
È possibile scegliere tra 14 differenti melodie di suoneria e 4 livelli di
volume della suoneria oltre all’impostazione SPENTO. pagina 105
Volume del ricevitore
Con chiamata in corso è possibile regolare il volume del ricevitore.
o
Impostare il volume desiderato
Silenziamento del microfono nell’unità portatile 71
È possibile attivare e disattivare il microfono dell’unità portatile con
chiamata telefonica in corso. L’interlocutore all’altro capo della linea
non è più in grado di sentire nulla.
Procedere con chiamata in corso come segue:
Disattivare il microfono,
sul display appare MUTO .
Attivare il microfono
98
Compiere telefonate
Funzione vivavoce 72
Utilizzare questa funzione per ascoltare il partner di chiamata attraverso l’altoparlante. Procedere con chiamata in corso come segue:
Attivare il dispositivo di vivavoce,
sul display appare VVCE .
Disattivare la funzione vivavoce
Contrasto di display 73
Il contrasto del display è regolabile in base alle proprie esigenze.
pagina 106
Blocco tastiera automatico 74
Il blocco tastiera intelligente impedisce con telefonata in corso
l’azionamento accidentale dei tasti sensore.
Se il blocco tastiera intelligente è inserito, non appena è stato selezionato un numero di chiamata e l’unità portatile è stata avvicinata
all’orecchio i tasti non potranno più essere azionati.
Il blocco tastiera intelligente si disinserisce automaticamente non
appena l’unità portatile è allontanata dall’orecchio. pagina 107
Blocco tastiera manuale 75
Il blocco tastiera manuale impedisce la selezione di un numero e la conseguente instaurazione di collegamento non intenzionali in caso di esercizio.
In modalità di stand−by , attivare il blocco tastiera
Con blocco tastiera inserito , disattivare il blocco tastiera
Chiamate in arrivo sono ricevute come di consueto, anche
con blocco tastiera attivato. A conclusione della chiamata
il telefono continua comunque ad essere bloccato.
Con tastiera bloccata è solo possibile comandare i tasti
menu e selezionare il numero di chiamata d’emergenza
precedentemente programmato.
99
Compiere telefonate
Selezionare un numero d’emergenza
Il telefono è impostato in fabbrica in modo da consentire ad ogni
modo la selezione dei due numeri d’emergenza 117 e 118 anche
con blocco tastiera attivato.
Digitare il numero di chiamata
d’emergenza e instaurare un
collegamento
Oppure:
Digitare il numero di chiamata
d’emergenza e instaurare un
collegamento
Ricerca dell’unità portatile (funzione di paging)
Avendo perso d’occhio la propria unità portatile è possibile ritrovarla
facilmente grazie all’emissione di un tono di ricerca.
{«}
Avviare il tono di ricerca
o©
Interrompere il tono di ricerca
100
Impianti telefonici interni/servizi addizionali
6 Impianti telefonici interni/servizi addizionali
Impianti telefonici interni 76
Codice di accesso (cifra per il segnale dalla centrale)
Nell’ambito di impianti telefonici interni è necessario preselezionare
una cifra per il segnale dalla centrale
(per es. 9" o 0) per ricevere un segnale di libero.
Pausa di selezione
In presenza di impianti telefonici interni è necessario preselezionare un numero di accesso alla rete esterna per ottenere un segnale di linea libera prima di poter compiere una telefonata. Alcuni
impianti telefonici interni di vecchia data richiedono un intervallo di
tempo di poco superiore prima di trasmettere un segnale di libero.
In particolare, proprio per questi impianti telefonici interni è possibile prevedere, dopo aver inserito il numero di accesso alla rete
esterna, una pausa di selezione che consente di comporre il numero di chiamata desiderato senza dover necessariamente attendere il segnale di libero.
redial
Impostare una pausa di
selezione
Sul display viene visualizzato P". Dopo aver ottenuto la linea libera, il telefono attende alcuni secondi prima di procedere alla selezione del numero di chiamata vero e proprio.
La pausa è anche programmabile in sede di immissione
dei numeri di chiamata nella rubrica telefonica.
Tasto R in impianti telefonici interni
Con telefono collegato ad un impianto telefonico interno, il tasto R
consente di inoltrare clear chiamate e usufruire della funzione di richiamata automatica. Si prega di consultare le istruzioni per l’uso del
proprio impianto telefonico interno per individuare il tempo flash da impostare al fine di poter usufruire di queste funzioni. Il rivenditore specializzato è in grado di indicare se il telefono acquistato funzionerà
senza alcun problema nel proprio impianto telefonico interno. Tempo
flash Pagina 107
101
Impianti telefonici interni/servizi addizionali
Tempo flash
Per poter adoperare il proprio telefono all’interno di un impianto telefonico interno è necessario impostare un tempo flash di 100 ms. pagina 107
Servizi addizionali
Visualizzazione del numero di chiamata (CLIP1)
A condizione che il collegamento telefonico disponga di questa funzione, l’apparecchio visualizza il numero telefonico del chiamante
non appena il telefono squilla. Capitolo 9
Nel caso in cui un chiamante abbia soppresso la trasmissione del
proprio numero di chiamata, appare un’apposita indicazione. Visto
che il numero di chiamata non è in tal caso visualizzabile, questo
non sarà memorizzato nell’elenco chiamate.
La visualizzazione del numero di chiamata è un servizio
opzionale offerto dal proprio gestore di rete telefonica. Rivolgersi al proprio provider per ricevere ulteriori informazioni.
Segreteria telefonica integrata nella rete telefonica 77
La segreteria telefonica integrata nella rete telefonica è un servizio
offerto da numerosi gestori di rete telefonica. Nel caso in cui il gestore di rete telefonica metta a disposizione dei propri utenti una segreteria telefonica nell’ambito della rete telefonica, il simbolo indicante una letterina informa sulla presenza di nuovi messaggi
(VMWI2). Tali funzioni saranno peraltro solo accessibili nel caso in
cui il gestore di rete telefonica offra i servizi descritti. Per maggiori
dettagli a riguardo, rivolgersi al proprio gestore di rete telefonica.
Per rimuovere il simbolo della letterina, selezionare sul display nel
rispettivo menu la voce CANC. MSG. ATT.. Pagina 108
1
2
102
CLIP: Calling Line Identification Presentation
VMWI: Visual Message Waiting Indication
Impianti telefonici interni/servizi addizionali
Tasto R e servizi addizionali
Il telefono supporta servizi addizionali messi a disposizione dal proprio gestore di rete telefonica come per es. le funzioni di chiamata
in attesa, avviso di chiamata e chiamata a conferenza. Con il tasto
R è possibile accedere a questi servizi addizionali. Si prega di consultare il proprio gestore di rete telefonica per ottenere informazioni
sul tempo flash necessario per l’utilizzo dei servizi addizionali. Rivolgersi al proprio gestore di rete telefonica per ottenere l’abilitazione ai servizi addizionali. Impostare il tempo flash Pagina 107
103
Struttura di menu
7 Struttura di menu
Menu principale
Nel menu principale si giunge premendo il tasto .
Con i tasti e è possibile scorrere nel menu e selezionare una funzione.
Anziché scorrere è possibile selezionare numerose funzioni e impostazioni anche direttamente attraverso le cifre
anteposte alle funzioni nella seguente vista riassuntiva
(vedi sotto).
Confermare ogni selezione o immissione con il tasto .
Per andare indietro di un livello, premere il tasto clear .
Premendo il tasto si passa alla modalità di stand−by.
Pagina 92
[1] LINGUA
[1] ENGLISH
[2] FRANÇAIS
[3] ESPAÑOL
[4] PORTUGUÊS
[5] NEDERLANDS
[6] DEUTSCH
[7] ITALIANO
[8] SVENSK
[9] SUOMI
[0] DANSK
NORSK
78
104
Struttura di menu
79
[2] SUONERIA
[1] VOLUME SUONERIA
[1] CHIAM. ESTERNA
[0] SPENTO
MUTO
[1] 4 frecce
Volume basso
[2] 8 frecce
[3] 12 frecce
[4] 16 frecce
Volume alto
[2] CHIAM. INTERNA
[0] SPENTO
MUTO
[1] 4 frecce
Volume basso
[2] 8 frecce
[3] 12 frecce
[4] 16 frecce
[2] TONI SUONERIA
[1] CHIAM. ESTERNA
[1] RingTone 1
Volume alto
Sono disponibili 10
suonerie polifoniche e
4 suonerie standard.
[2] RingTone 2
[3] RingTone 3
[4] RingTone 4
da [5] in poi: 10 melodie polifoniche
[2] CHIAM. INTERNA
[1] Intercom Tone 1
[2] Intercom Tone 2
105
Struttura di menu
[3] Intercom Tone 3
[4] Intercom Tone 4
da [5] in poi: 10 melodie polifoniche
[3] IMPOSTA ORA
[1] ORA
Impostare ora a 4 cifre
[2] SVEGLIA
ACCESO
SPENTO
Impostare ora di sveglia a 4 cifre
[3] FORMATO DISPLAY
24 Hr
MM / DD
DD / MM
12 Hr
MM / DD
DD / MM
Con il tasto è possibile
passare da AM a PM e viceversa in sede di immissione di
ora e sveglia.
[4] IMPOSTA TEL.
[1] CONTRASTO
[2] TONI TASTIERA
[0] SPENTO
[1] 1
[2] 2
[3] 3
[4] 4
80
106
16 livelli Pagina 99
81
Struttura di menu
[3] BLOC TASTOSMART
ACCESO
SPENTO
Blocco tastiera intelligente
Pagina 99
[4] RISP. AUTOMAT.
ACCESO
SPENTO
Ricezione automatica di chiamate
Pagina 94
[5] SELEZ. RAPIDA
ACCESO
SPENTO
Pagina 95
Inserire un numero di chiamata
[6] MODI CHIAMATA
TONO
IMPULSO
Modificare la procedura di selezione solo dietro suggerimento
del gestore di rete telefonica.
[7] TEMPO RICHIAM.
100 ms
270 ms
300 ms
600 ms
Modifica del tempo flash (intervallo di richiamata) solo su consiglio del proprio gestore di rete
telefonica.
[8] NOME PORTATILE
Inserire il nome dell’unità portatile
[9] DURATA RETROIL.
60 s
50 s
40 s
30 s
20 s
Durata della retroilluminazione
per display e tasti
107
Struttura di menu
82
[5] SICUREZZA
[1] MODALITÀ REGIST.
1
2
3
4
Registrare l’unità portatile presso
la base
PIN−Code1
PIN−Code1
PIN−Code1
PIN−Code1
[2] CANCELLAZIONE
PORTATILE 1
PORTATILE 2
PORTATILE 3
PORTATILE 4
Deregistrare l’unità portatile dalla base
Nomi delle unità portatili assegnati
in fabbrica
[3] CANC. MSG. ATT.
NO
SÌ
Disattivare la Visual Message Waiting Indication2: Rimuove il simbolo
della letterina dal display.
[4] SELEZION. BASE
1
AUTO
Selezione automatica di stazioni base
[6] IMPOSTA DEFAULT
NO
SÌ
1
2
108
PIN−Code: 0000 Pagina 121
Pagina 21
Struttura di menu
Rubrica telefonica 83
Per passare alla rubrica telefonica, premere il tasto in modalità di stand−by. Il menu della rubrica telefonica si apre premendo infine il tasto .
Confermare ogni selezione o immissione con il tasto .
[1] AGGIUNGI REC
Inserire il nome1
Inserire il numero
[2] EDITA REGISTRA.
Modificare il nome1
Modificare il numero
[3] CANCELLA DATO
[4] ELIMINA TUTTI
Le funzioni [2] e [3] si riferiscono sempre alla voce dell’elenco telefonico selezionata dopo aver aperto la rubrica
telefonica.
Elenco chiamate 84
Nell’elenco chiamate si giunge premendo in modalità di stand−by 2
x il tasto o . Il menu elenco chiamate si apre premendo
infine il tasto .
Confermare ogni selezione o immissione con il tasto .
[1] AGGIUNGI REC
Inserire il nome1
Per aggiungere alla rubrica telefonica
Inserire il numero e confermare
[2] MOD. PER CHIAM.
Modificare il numero prima di chiamare
Modificare il numero
cont. con AGGIUNGI REC (vedi sopra)
[3] CANCELLA DATO
[4] ELIMINA TUTTI
Le funzioni [1], [2] e [3] si riferiscono sempre alla voce selezionata.
1
Paragrafo Immissione di testo" a Pagina 110
109
Rubrica telefonica
8 Rubrica telefonica
Nella rubrica telefonica è possibile memorizzare 60 numeri di chiamata. Ogni numero di chiamata può essere composto da un massimo di 24 cifre.
Per ogni nome sono disponibili al massimo 16 caratteri.
Salvare voci nella rubrica telefonica 85
Pagina 109
I numeri di chiamata dovranno essere immessi sempre
con il rispettivo prefisso, cosa che consente di assegnare
anche a chiamate urbane in arrivo una delle voci dalla rubrica telefonica.
Immissione di testo 86
I tasti con le cifre presentano in più delle lettere. Premendo ripetutamente il corrispondente tasto si ha modo di selezionare anche lettere e cifre.
Esempio: Per immettere per es. il nome "Peter", procedere come
segue. Premere
1 x tasto , 2 x tasto , 1 x tasto , 2 x tasto e 3 x
tasto .
Ulteriori indicazioni sull’immissione di testo:
Per immettere la stessa lettera una seconda volta, digitare la prima
lettera e attendere fino a quando il cursore non lampeggia più. A
questo punto è possibile ripetere l’immissione della lettera.
Sono inoltre possibili le seguenti operazioni:
clear
Per cancellare l’ultimo carattere
Per passare da lettere
maiuscole a lettere minuscole
redial
Per aggiungere una pausa
prima di immettere il numero di
chiamata
110
Rubrica telefonica
Premendo ripetutamente i tasti , e è inoltre possibile scegliere tra i seguenti segni:
1
1
_
−
+
=
^
.
,
;
:
*
*
#
?
!
$
&
%
/
\
|
~
0
0
’
(
)
[
]
<
>
{
}
Modificare voci nella rubrica telefonica
Pagina 109
Per selezionare la voce direttamente, premere il tasto che
corrisponde alla lettera iniziale della voce desiderata. Per
selezionare per esempio direttamente il numero di Peter", premere 1 x il tasto .
Cancellare voci dalla rubrica telefonica
Pagina 109
Selezionare numeri dalla rubrica telefonica
Pagina 95
111
Visualizzazione del numero / Elenco chiamate
9 Visualizzazione del numero / Elenco chiamate
Nel caso in cui il proprio impianto telefonico interno fosse abilitato
alla funzione CLIP (CLIP = Calling Line Identification Presentation),
sul display è visualizzato il numero del chiamante con telefonata in
arrivo. Con numero di chiamata memorizzato nella propria rubrica
telefonica, il nome assegnato alla voce appare sul display.
Se il chiamante ha invece soppresso la trasmissione del
proprio numero telefonico, il numero non è visualizzato; sul
display appare allora l’indicazione NUMERO RISERVATO .
Se il display visualizza l’indicazione NON DISPONIBILE ,
significa che non è disponibile alcuna informazione riguardo il
chiamante. In tal caso si potrebbe altresì trattare di una
chiamata dall’estero.
La visualizzazione del numero di chiamata (CLIP) oltre
che l’indicazione di data e ora sono servizi opzionali del
proprio gestore di rete telefonica. Rivolgersi pertanto al
provider per ricevere informazioni più dettagliate.
Elenco chiamate 87
L’elenco chiamate consente di memorizzare complessivamente fino
a 40 numeri di chiamata. Una volta occupate tutte le posizioni di
memoria, l’apparecchio procede a sovrascrivere il numero di chiamata più remoto.
In caso di memorizzazione di nuove chiamate nell’elenco durante la
propria assenza, sul display è indicata la presenza di nuove chiamate.
Visualizzazione del numero di chiamate ricevute; incluse
le chiamate eseguite dallo stesso partner di chiamata!
Visualizzare numeri di chiamata dall’elenco chiamate
Visualizzare la panoramica
o
Aprire l’elenco chiamate
Due differenti indicazioni informano sul numero complessivo di
chiamate salvate e sul numero di chiamate salvate dall’ultima consultazione dell’elenco chiamate.
112
Visualizzazione del numero / Elenco chiamate
La voce indica soltanto il numero di differenti partner di
chiamata; chiamate ripetute compiute dallo stesso partner
di chiamata non sono tenute in considerazione!
Display
Descrizione
TUTTI
Numero di tutte le voci
NUOVO
Numero di voci nuove
Visualizzare singole voci
o
Visualizzare voci
Ad ogni voce è assegnato un numero CALL# a due cifre visualizzato sul display in alto a destra. In più è visualizzato il numero telefonico del chiamante qualora questi abbia attivato la visualizzazione del numero di chiamata (CLIP) (vedi sopra). Se il numero di
chiamata è memorizzato nella rubrica telefonica, sul display è inoltre indicato il nome del chiamante rispettivamente assegnato.
Se il chiamante ha chiamato ripetutamente, scorrendo per
la prima volte le nuove chiamate salvate nell’elenco sul
display appare al di sotto del numero CALL# l’indicazione
REPT.
Dopo aver consultato tutte le voci, sul display è visualizzata l’indicazione FINE ELENCO .
Memorizzare il numero di chiamata dall’elenco chiamate nella
rubrica telefonica
È possibile memorizzare un numero di chiamata direttamente
dall’elenco chiamate nella rubrica telefonica. Selezionare la funzione AGGIUNGI REC Pagina 109
Richiamare il numero di chiamata dall’elenco chiamate
Pagina 95
Modificare il numero di chiamata dall’elenco chiamate
Il numero di chiamata è modificabile dall’elenco chiamate. Selezionare a tale scopo la funzione MOD. PER CHIAM. Pagina 109.
Per selezionare a questo punto direttamente il numero modificato,
premere semplicemente il tasto di chiamata .
113
Visualizzazione del numero / Elenco chiamate
Per salvare invece il numero modificato nella rubrica telefonica,
confermare la modifica con il tasto e proseguire con l’operazione di memorizzazione.
Cancellare numeri di chiamata dall’elenco chiamate
Cancellare singoli numeri di chiamata
Pagina 109
Cancellare tutti i numeri di chiamata
Per cancellare l’intero elenco, selezionare la funzione ELIMINA
TUTTI per eliminare tutti i numeri di chiamata. Pagina 109
114
Funzioni speciali
10 Funzioni speciali
Ricezione automatica di chiamate
Avendo attivato la funzione, la chiamata è accettata automaticamente non appena si estrae l’unità portatile dalla stazione base o di
carica.
Pagine 94, 107
Sveglia 88
Con la funzione è possibile farsi svegliare dalla propria unità portatile all’orario precedentemente impostato. Pagina 106
Chiamata bebè (Chiamata diretta)
La funzione consente di memorizzare un numero di chiamata selezionato in seguito automaticamente premendo un determinato tasto
(tranne ). Pagina 107
Presa per cuffia
Sul lato destro dell’unità portatile è prevista una presa per il collegamento di una cuffia / un auricolare con spinotto da 2,5 mm.
Non si assume alcuna garanzia riguardo il rispettivo funzionamento.
Procedura di selezione
Il telefono è in grado di operare sia con impianti di commutazione
interni analogici (selezione a impulsi) sia con impianti telefonici digitali (selezione a toni). Pagina 107
Selezione a toni temporanea
Pur dovendo adoperare il proprio telefono con procedura di selezione a impulsi non è necessario rinunciare ai vantaggi della procedura di selezione a toni (per es. per l’interrogazione a distanza di
una segreteria telefonica all’interno della rete telefonica). Con chiamata in corso è infatti possibile passare temporaneamente alla
procedura di selezione a toni.
Premere con chiamata in corso
Alla fine della telefonata il telefono passa di nuovo automaticamente alla procedura di selezione a impulsi.
115
Ampliare il sistema telefonico
11 Ampliare il sistema telefonico
La stazione base consente il collegamento di fino a 3 ulteriori unità
portatili dello stesso modello. Ogni unità portatile può risultare registrata a quattro stazioni base differenti.
Maggior numero di unità portatili
È possibile registrare complessivamente fino a 4 unità portatili del
tipo DF73X presso la stazione base.
Registrare unità portatili ad una determinata stazione base
Prima di registrare un’unità portatile è necessario selezionare
presso la stazione base la modalità di registrazione:
3 sec Avviare la modalità di
registrazione
Il LED presente sulla stazione base lampeggia per la durata in cui l’apparecchio si trova in modalità di registrazione.
Per registrare un’unità portatile ad una stazione base, passare
all’interno del menu alla voce MODALITÀ REGIST. Scegliere quindi
una delle 4 posizioni di memoria per la base. Pagina 108
Posizioni di memoria già occupate sono indicate con una crocetta
dietro alla posizione di memoria. Lo svolgimento di una nuova memorizzazione consente di sovrascrivere l’impostazione.
In seguito a registrazione svolta con esito positivo, il display indica
OK . All’unità portatile è assegnato un numero di chiamata interno visualizzato a sua volta sul display. Questo numero è importante nel caso in cui si volessero condurre delle chiamate interne e
per le operazioni di registrazione e cancellazione.
Se la registrazione non è svolta con successo, sul display appare
RIPROVARE? . Ripetere in tal caso la registrazione.
Per provare se l’unità portatile è stata davvero registrata
presso la stazione base, premere il tasto di paging. L’unità
portatile dovrebbe squillare. Per interrompere l’emissione
del segnale acustico, premere di nuovo il tasto.
116
Ampliare il sistema telefonico
Cancellare unità portatili da una stazione base
La cancellazione di un’unità portatile da una stazione
base è possibile solo con un’altra unità portatile registrata
presso la stessa stazione base.
Per cancellare una determinata unità portatile dalla stazione base,
scegliere nel rispettivo menu la voce CANCELLAZIONE ed indicare
il nome ovvero il numero dell’unità portatile che si desidera deselezionare. Pagina 108
In seguito a cancellazione eseguita con esito positivo, il display visualizza OK .
Se la cancellazione non è svolta con successo, sul display appare
RIPROVARE? . Ripetere in tal caso la procedura.
Maggior numero di stazioni base
È possibile registrare unità portatili contemporaneamente presso 4
stazioni base differenti. Ogni stazione base necessita di una propria
presa telefonica. Si può trattare di allacciamenti con lo stesso numero o con un numero di chiamata differente.
Pagina 108
Per chiamate in corso non è invece possibile compiere un
trasferimento da una stazione base all’altra.
Aumento della portata
Posizionare le stazioni base in modo da ottenere un’intersecazione
della portata delle singole stazioni base. Provare la portata
dell’unità portatile visto che eventuali ostacoli presenti negli edifici
possono limitare la portata.
Registrare ogni unità portatile a tutte le stazioni base in funzione.
Attivare la funzione AUTO (Selezione automatica di stazioni
base).
Pagina 108
Indipendentemente dal punto in cui ci si trova, l’unità portatile individua automaticamente la stazione base più vicina con il miglior collegamento.
117
In presenza di problemi
12 In presenza di problemi
Hotline di assistenza
In presenza di problemi con il telefono, seguire le indicazioni riportate qui di seguito. In caso di problemi tecnici è possibile rivolgersi
alla nostra hotline di assistenza tecnica chiamando al numero telefonico 0900 00 16 75 (valida solo per chiamate nell’ambito della
Svizzera − Spese alla data di stampa: CHF 2.00 / min). In caso di reclami entro il periodo di garanzia, rivolgersi al rivenditore autorizzato. Il periodo di garanzia ricopre 2 anni.
Domande e risposte
118
Domande
Risposte
Non è possibile
collegarsi alla
stazione base.
− Verificare se la registrazione alla stazione
base è stata eseguita con il codice PIN corretto Pagina 121
Non è possibile
condurre
una chiamata
telefonica.
− Il telefono non è collegato correttamente
oppure presenta un guasto. Utilizzare esclusivamente il cavo di collegamento telefonico
fornito.
− Provare con un altro telefono se l’allacciamento telefonico in questione è funzionante.
− L’alimentatore di rete non è inserito oppure
si è in presenza di una caduta di tensione
totale.
− Le batterie ricaricabili sono
scariche o difettose.
− La distanza dalla stazione base è troppo
grande.
− Impostazione errata della procedura di selezione
Pagina 107
In presenza di problemi
Il collegamento
è disturbato,
è interrotto.
− La distanza dalla stazione base è troppo
grande.
− Luogo di installazione della stazione base
errato.
Il sistema non
reagisce più.
− Ripristinare le impostazioni di default per
tutte le funzioni Pagina 108
− Estrarre brevemente l’alimentatore di rete
dalla presa di corrente.
Le batterie ricaricabili si scaricano piuttosto
subito.
− Le batterie sono scariche o difettose.
− Riporre l’unità portatile correttamente nella
stazione base. Pulire le superfici di contatto
di unità portatile e stazione base con un
panno morbido e asciutto.
− Posizionare l’unità portatile per la durata di
15 ore nella stazione base.
La visualizzazione del numero di chiamata (CLIP1)
non funziona.
− La visualizzazione del numero di chiamata
è un servizio opzionale offerto dal proprio
gestore di rete telefonica. Per maggiori dettagli a riguardo, rivolgersi al proprio gestore
di rete telefonica.
− Il chiamante ha disattivato la trasmissione
del proprio numero di chiamata.
1
CLIP: Calling Line Identification Presentation
119
Specifiche tecniche
13 Specifiche tecniche
Specifiche tecniche
Caratteristica
Valore
Standard
DECT1
Alimentazione elettrica
230/240 V, 50 Hz
Portata
in campo aperto:
in ambienti chiusi:
Autonomia di stand−by
fino a 120 ore
Autonomia di chiamata
fino a 5 ore
Batterie ricaricabili
3 x 750 mAh NiMH,
Dimensione: AAA
Procedura di selezione
Selezione a toni
Selezione a impulsi
Temperatura d’esercizio
consentita
da 0°C a 45°C
Temperatura ambiente
consentita
da −20°C a 60°C
Umidità relativa
consentita
da 20% a 75%
Funzione flash
100 ms, 270 ms,
300 ms, 600 ms
1
120
ca. 300 m
ca. 50 m
DECT: Digital Enhanced Cordless Telecommunication
= Standard per telefoni senza cavo.
Specifiche tecniche
Impostazioni di default 89
Unità portatile 90
Lingua:
Tedesco
Nome unità portatile:
PORTATILE1
Volume del ricevitore VOL2
Chiamata esterna
PIN1:
Procedura di selezione:
0000
Volume della suoneria chiamata:
Segnale di chiamata:
TONO
3
Indicazione
dell’ora:
24 h
3
Indicazione della
data:
MM / DD
Sveglia:
Ora di sveglia:
SPENTO
00:00
Blocco tastiera int.:
Risposta autom.:
Chiamata diretta:
Tempo flash:
ACCESO
ON
SPENTO
100 ms
Chiamata interna
Volume della suoneria chiamata:
3
Segnale di chiamata:
Suono tasti:
Contrasto:
Durata illuminazione:
3
1
8
20 s
Dichiarazione di conformità
Quest’apparecchio risponde a quanto disposto dalla Direttiva UE:
1999/5/CE Direttiva concernente le apparecchiature radio, le apparecchiature terminali di telecomunicazioni e il
reciproco riconoscimento della loro conformità. La conformità con la Direttiva di cui sopra viene confermata dal
marchio CE applicato sull’apparecchio.
Per la dichiarazione di conformità completa si prega di voler usufruire del
servizio gratuito di download dal nostro sito Internet www.switel.com.
1
Il codice PIN non è modificabile.
121
Consigli per la cura / Garanzia
14 Consigli per la cura / Garanzia
Consigli per la cura
Pulire la superficie della custodia con un panno morbido e antipilling evitando l’uso di detergente o solvente!
Garanzia
Gli apparecchi SWITEL sono costruiti e collaudati in osservanza dei
processi di produzione più moderni. L’impiego di materiali selezionati e tecnologie altamente sviluppate sono garanti di una perfetta
funzionalità e lunga durata in vita. La garanzia non viene considerata esecutiva qualora la causa del malfunzionamento dell’apparecchio è dovuta al gestore della rete telefonica oppure se questa è da
attribuirsi ad un impianto telefonico interno interposto. La garanzia
non si estende a batterie, accumulatori o batterie ricaricabili utilizzati all’interno degli apparecchi. Il periodo di garanzia è di 24 mesi
a partire dalla data di acquisto.
Entro il periodo di garanzia si procederà all’eliminazione gratuita di
tutti i guasti dovuti a difetti di materiale o produzione. Il diritto di garanzia cessa in caso di interventi da parte dell’acquirente o di terzi.
La presente garanzia non ricopre danni dovuti all’uso o all’esercizio
non conformi a quanto previsto, a montaggio o conservazione errati, a collegamento o installazione impropri così come a forza maggiore o a qualsiasi altro influsso esterno. In qualità di produttore ci
riserviamo il diritto, in caso di reclami, di riparare o sostituire le parti
difettose o di rimpiazzare l’apparecchio. Parti sostituite o apparecchi rimpiazzati divengono di nostra proprietà. Sono esclusi diritti di
risarcimento per danni qualora non siano dovuti a intenzione o
colpa grave del costruttore.
Nel caso in cui il presente apparecchio dovesse ciò nonostante presentare un difetto durante il periodo di garanzia, si prega di rivolgersi esclusivamente al negozio di rivendita dell’apparecchio SWITEL assieme al relativo scontrino di acquisto. In base a quanto
riportato nelle presenti disposizioni, tutti i diritti di garanzia dovranno
essere rivendicati nei confronti del rivenditore autorizzato. Decorso
il termine di due anni dalla data di acquisto e consegna dei nostri
prodotti non sarà più possibile fare valere alcun diritto di garanzia.
122
Indice alfabetico
15 Indice alfabetico
A
Alimentatore di rete, 85
AM/PM , 90
Ampliare il sistema telefonico, 117
Apparecchiature mediche,
86
Aumentare volume del ricevitore, 90
Aumento della portata, 118
Auricolare, 116
Avviso di chiamata, 99, 104
B
Batterie, 85
Batterie ricaricabili, 86
Blocco tastiera, automatico,
100
Blocco tastiera, manuale,
90, 100
C
Caduta di tensione, 85
Cancellare numeri di chiamata dall’elenco chiamate, 115
Cancellare unità portatili da
una stazione base, 118
Cancellare voci dalla rubrica telefonica, 112
Caricare le batterie, 89
Chiamata bebè, 96, 116
Chiamata diretta, 96, 116
Chiamata in attesa, 97, 104
Cifra per il segnale dalla
centrale, 102
Collegare la stazione base,
87
Collegare la stazione di carica, 88
Come funziona il mio telefono?, 92
Compiere chiamate interne,
97
Compiere telefonate, 95
Concludere una chiamata,
95
Condurre chiamate interne,
97
Condurre una chiamata a
conferenza, 98
Conferenza a tre, 98, 104
Confezioni ed imballaggi,
86
Consigli per la cura, 123
Contenuto della confezione,
87
Contrasto di display, 100
Correzione di errori, 119
Creare voci nella rubrica telefonica, 94
D
Dichiarazione di conformità,
122
Domande e risposte, 119
Durata di conversazione, 99
E
Elementi di comando, 90
Elenco chiamate, 113
Elenco chiamate: Cancellare singoli numeri di
chiamata, 115
Elenco chiamate: Cancellare tutti i numeri di chiamata, 115
Elenco chiamate: Visualizzare la panoramica, 113
Elenco chiamate: Visualizzare singole voci, 114
F
Funzione vivavoce, 100
Funzioni speciali, 116
G
Gancio per cintura, 89
Garanzia, 123
H
Hotline di assistenza, 119
I
Immissione di testo, 111
Impianti telefonici interni,
102
Impiego conforme agli usi
previsti, 85
Impostare l’ora, 89
Impostare la lingua, 89
Impostazioni di default, 122
In presenza di problemi,
119
Indicazioni di sicurezza, 85
Inoltrare chiamate, 97
Inoltro interno di chiamate
esterne, 97
Inserire le batterie ricaricabili, 88
Intervallo di richiamata, 108
L
LED di controllo stato di carica, stazione base, 91
LED di controllo stato di carica, stazione di carica,
91
Lettere maiuscole/minuscole, 90
Luogo di installazione, 85
M
Maggior numero di unità
portatili, 117
Melodia di suoneria, 99
Memorizzare il numero di
chiamata dall’elenco
chiamate nella rubrica
telefonica, 114
Menu principale, 105
Mettere in funzione il telefono, 87
Modalità di risparmio energetico, 93
123
Indice alfabetico
Modalità di stand−by, 93
Modi di scrittura, 92
Modificare il numero di
chiamata dall’elenco
chiamate, 114
Modificare voci nella rubrica
telefonica, 112
N
Navigare nel menu, 93
P
Paging, 101
Pausa, 90
Pausa di selezione, 102
Presa per cuffia, 91, 116
Procedura di selezione, 116
procedura di selezione, 108
Procedura di selezione a
impulsi, 116
Procedura di selezione a
toni, 116
R
Rappresentazioni, 92
Registrare unità portatili ad
una determinata stazione base, 117
Ricerca dell’unità portatile,
101
Ricevere una chiamata, 95
Ricezione automatica di
chiamate, 116
Richiamare chiamate mancate, 96
Richiamare il numero di
chiamata dall’elenco
chiamate, 114
Ridurre volume del ricevitore, 90
Ripetizione di selezione, 90,
95
Riscontro, 97
Rubrica telefonica, 90, 110,
111
S
Salvare voci nella rubrica
124
telefonica, 111
Segnale di avviso batteria,
93
Segnale di avviso portata,
92
Segni di interpunzione, 90
Segreteria telefonica integrata nella rete telefonica, 103
Selezionare numeri dalla rubrica telefonica, 96, 112
Selezionare un numero
d’emergenza, 101
Selezione a toni temporanea, 116
Selezione automatica, 118
Servizi addizionali, 102, 103
Silenziamento del microfono, 99
Simboli sul display, 92
Smaltimento, 86
Specifiche tecniche, 121
Stato di carica delle batterie, 89
Stazione base, 91
Stazione di carica, 91
Stazioni base, maggior numero, 118
Struttura di menu, 105
Sveglia, 116
T
Tasti sensore, 94
Tasto cancellazione, 90
Tasto chiamata, 90
Tasto conferenza, 90
Tasto indietro, 90
Tasto INT, 90
Tasto menu, 90
Tasto microfono, 90
Tasto OK, 90
Tasto paging, 91
Tasto R e servizi addizionali, 104
Tasto R in impianti telefonici
interni, 102
Tasto riaggancio, 90
Tasto segnale R, 90
Tasto selezione: Verso sopra, 90
Tasto selezione: Verso
sotto, 90
Tasto stand−by, 90
Telefonare, 95
Tempo flash, 108, 122
Tempo flash in impianti telefonici interni, 103
V
Visualizzare numeri di chiamata dall’elenco chiamate, 113
Visualizzazione del numero
di chiamata, 103
VMWI, 103
Volume del ricevitore, 99
91
1
2
3
4
5
6
7
8
9
10
11
12
13
14
15
Contents
Safety Information . . . . . . . . . . . . . . 126
Putting the Telephone into Operation . 128
Operating Elements . . . . . . . . . . . . . 131
Operating the Telephone . . . . . . . . . 133
Telephoning . . . . . . . . . . . . . . . . . . 136
PABX / Supplementary Services . . . . 142
Menu Structure . . . . . . . . . . . . . . . . 145
Phone Book . . . . . . . . . . . . . . . . . . 151
Caller Number Display (CLIP) /
Calls Log . . . . . . . . . . . . . . . . . . . . 153
Special Functions . . . . . . . . . . . . . . 156
Expanding the Telephone System . . . 157
In the Case of Problems . . . . . . . . . 159
Technical Properties . . . . . . . . . . . . 161
Maintenance / Guarantee . . . . . . . . . 163
Index . . . . . . . . . . . . . . . . . . . . . . . 164
125
Safety Information
1 Safety Information
Please read this operating instruction manual thoroughly.
Intended use
The telephone is suitable for telephoning within a public telephone
network system. Any other use is considered unintended use.
Unauthorised modification or reconstruction is not permitted. Under
no circumstances open the device or complete any repair work
yourself.
Installation location
Prevent excessive exposure to smoke, dust, vibration, chemicals,
moisture, heat and direct sunlight.
Do not use the handset in potentially explosive areas.
Power adapter plug
Attention: Only use the power adapter plug supplied because other power supplies could damage the telephone.
Ensure access to the power adapter plug is not obstructed
by furniture or such.
Rechargeable batteries
Attention: Never throw batteries into a fire. Only use batteries of the same type. Pay attention to correct polarity.
There is a risk of explosion if batteries are improperly
used.
Power failure
The telephone cannot be used to make calls in the event of a power
failure. Always keep a cord connected telephone which operates
without an external power supply available in case of emergency
situations.
126
Safety Information
Medical equipment
Attention: Never use the telephone in the vicinity of
medical equipment. Effects on such equipment cannot
be fully ruled out.
Maintain a clearance of at least 1 m.
DECT1 telephones can cause an unpleasant humming sound in
hearing aids.
Disposal
If your device has come to the end of its service life,
bring it to a collection point provided by your local public
waste authorities (e.g. recycling center). The adjacent
symbol indicates that the old device must be disposed of
separate from domestic waste. According to laws on the
disposal of electronic and electrical devices, owners are
obliged to dispose of old electronic and electrical devices in a separate waste container.
Batteries must be disposed of at the point of sale or at
appropriate collection points provided by the public
waste authorities.
Packing materials must be disposed of according to
local regulations.
1
DECT: Digital Enhanced Cordless Telecommunication
= Standard for cordless telephones.
127
Putting the Telephone into Operation
2 Putting the Telephone into Operation
Safety information
Attention: It is essential to read the Safety Information in
Chapter 1 before starting up.
Package contents
92
The package contains:
Content
DF73X model
73
732*
733*
734*
Base station(s)
with power adapter plug
1
1
1
1
Charging station(s)
with power adapter plug
−
1
2
3
Handset(s)
1
2
3
4
Telephone connection cable
1
1
1
1
Batteries
3
6
9
12
Belt clip(s)
1
2
3
4
Operating manual
1
1
1
1
Connecting the base station
Attention: Position the base station at least 1 m away
from other electronic devices, otherwise there is a risk of
mutual disturbance.
Connect the base station as illustrated in the diagram. For reasons
of safety, only use the power adapter plug and telephone connection line supplied.
*
128
Refer to www.switel.com to see if this telephone set is already
available.
Putting the Telephone into Operation
Mains
power
outlet
Telephone
line
socket
Connecting the charging station1
Connect the charging station as illustrated in the diagram. For
safety reasons, only use the power adapter plug supplied.
Mains power outlet
Inserting the batteries
Insert the batteries in
the open battery compartment. Only use batteries of the type AAA
NiMH 1.2 V. Pay attention to correct polarity.
Close the battery compartment.
1
− AAA +
+ AAA −
− AAA +
Only applies to models with at least two handsets.
Section Package contents" on Page 128
129
Putting the Telephone into Operation
Charging the batteries
93
Before the handset is used for the first time, insert it in the base station/charging station for at least 15 hours. When the handset is correctly inserted in the base station / charging station, the charge control lamp lights up. The handset warms up during the charging
process. This is normal and does not represent a risk.
Do not charge the handset with charging units from other manufacturers.
The current battery charge status is indicated on the display:
Full
Low
Attaching the belt clip
Turn the handset so that the rear side faces up and press the belt
clip into the two recesses provided at the top of the handset on the
sides.
Selecting the language
The information on Page 145 explains how to set the display language when putting it into operation for the first time.
Setting the time
The information on Page 147 explains how to set the time on the
handset when putting it into operation for the first time.
Private branch exchanges
The information in Chapter 6 explains how to install your telephone
in a private branch exchange.
130
Operating Elements
3 Operating Elements
Handset
1
2
Display
On−hook button,
Standby mode button 3 Phone book 4 Upper/Lower case,
AM/PM (12−hour format)
Conference button 5 INT button (for internal
calls) 6 Menu button, OK button,
Mute 7 Delete button, Back button,
R button clear
8 Insert special characters
when entering text,
Temporary switch to
tone dialling mode,
Manual key lock 9 Redialling,
Dialling pause redial
10 Selection button:
scroll down in the menu,
Reduce receiver volume 11 Speakerphone button 12 Selection button:
scroll up in the menu,
Increase receiver volume 1
12
2
11
3
10
9
8
4
7
5
6
The buttons on your telephone are depicted with uniform icons throughout
this operating manual (see above). Slight deviations in the appearance of
the icons on the buttons on your telephone and those used in this manual
are possible.
131
Operating Elements
13 Headset connection port
13
Base station
14 LED:
Charge control lamp,
flashes with incoming calls
15 Paging button 15
14
Charging station1
16 LED, charge control lamp
1
132
Only applies to models with at multi−handsets.
Section Package contents" on Page 128
16
Operating the Telephone
4 Operating the Telephone
Display and explanation of operation sequences
3 sec MUTE
or
Enter digits or letters
Press the button depicted briefly
Press the button depicted for 3 seconds
Handset rings
Remove handset from the base station
Place handset in the base station
Text or icon in the display
Icons in the display
Icon
Description
A connection to the base station is available.
If the connection deteriorates, you will hear the
acoustic Out Of Range warning signal.
OUT OF
RANGE
The handset no longer has a connection to the
base station. Move towards the base station.
The key lock is activated. Page 140
The ringing tone has been switched off.
Page 139
The alarm clock is activated. Page 156
Entering text in small letters. Page 151
Indicates a new voice message has been recorded when the answering machine in the telephone network is activated (optional service
offered by your telephone network provider)
Page 143
Full battery charge capacity.
133
Operating the Telephone
Low battery charge capacity.
LOW BATTERY
You will also hear the battery warning signal.
Please charge the telephone.
Run−through segments: The batteries are being
charged. Page 130
HANDSET
NAME
Name of the telephone. Page 149
OO:OO
Display of the time. Page 147
SPKR
Handsfree mode (speaker) has been activated.
Page 140
MUTE
The microphone is switched off. Page 140
TALK
A normal telephone call is taking place.
Standby mode 94
The following operating instructions assume that the handset is in
Standby mode.
The buttons and the display light up when Standby mode is active.
In addition, the message READY appears in the display.
The handset is in Standby mode after pressing the button.
Energy−save mode
After a certain time in Standby mode, the handset switches to an
Energy−save mode. The buttons and display are no longer lit up.
The time appears in the display.
Press any button to return to Standby mode.
Navigating in the menu
All the functions can be accessed via the various menus. Refer to
the menu structure to find how to access the respective functions.
Chapter 7
134
Operating the Telephone
or or or Open the main menu
Select the required submenu
Open the submenu
Select the required function
Open the function
Select the required setting
Enter digits or letters using the
relevant digit keys
Confirm the input
Move one level back
Return to Standby mode
clear
Every process is automatically cancelled if there is no
input within 20 seconds.
Creating phone book entries − example
The way in which to navigate through the menus and enter data is
explained by means of the example Creating phone book entries.
Proceed as in this example for all the settings.
Open the phone book
Open the menu
or Select the function and confirm
, Enter the name and confirm it
, Enter the phone number and confirm it
Touch−sensitive buttons
The so called touch−sensitive buttons relate to the buttons on the
surface of the handset which react when touched.
The touch−sensitive buttons must be pressed" lightly with your
finger. It is not necessary to press hard.
135
Telephoning
5 Telephoning
Taking a call 95
When a call is received, the telephone rings as long as you have
not deactivated the ringing function. In addition, the LED on the
base station lights up and the display and buttons light up on the
handset.
, or Take the call
If the Auto Answer function is activated, you only need to
take the handset from the base station to take the call.
Page 148
Ending a call
or End the call
Making a call
Enter the phone number
Delete the last digit if incorrect
Dial the phone number
clear
It is also possible to press the Call button first to obtain the
dialling tone. The digits in the phone number then entered
are dialled immediately. It is not possible to correct wrong
digits individually using this dialling procedure.
Redialling
The telephone stores the last 20 records dialled in a redialling list.
Wait for the dialling tone
redial
The last number dialled is
automatically redialled
or:
redial
or , 136
Open the redialling list
Select an entry and dial the
number
Telephoning
Missed calls 96
The telephone stores the numbers of the last 40 calls received in a
calls log. Page 153
2x or Open the calls log
or Select the entry required
Dial the number
Dialling phone numbers from the phone book 97
There must be phone numbers stored in the phone book.
Pages 150 and 151
There is a alphabetical telephone name search to jump directly. For
example, if the telephone name is "Henry", just directly press "4" in
phonebook record, then will jump to the phonebook name with the
first record name with letter of "H". Then use <down> key to scroll
the record.
Open the phone book
or , Select an entry and dial the
number
Baby call 98
If you have activated the Baby Call function, a programmed phone
number is dialled when any button on the handset is pressed (except the Menu button). Enter the required phone number after having activated the function. Page 148
If you want to dial another number, you must deactivate the
Baby Call function first.
Internal calls 99
Making internal calls
In order to be able to make free internal calls, two or more handsets
(HS1, HS2, ...) of the type DF73X must be registered on the respective base station.
HS1: , or Initiate the internal call, dial the
handset required
137
Telephoning
Alternatively to scrolling up and down, you can call the
other handset directly by simply dialling the 1−digit phone
number.
HS2: Take the internal call on the
other handset
HS1/HS2: End the internal call
Transferring external calls internally
A call is taking place between HS1 and an external caller:
HS1: , or Initiate the internal call, dial the
handset required
HS2: Take the internal call on the
other handset
HS1: Transfer the call
If the handset called does not answer, take the external
call back by pressing the button.
Holding a call / Brokering
Brokering is an optional service offered by your telephone
network provider. Contact your provider for further information. Chapter 6
While an external call is in progress, it is possible to dial another internal handset in order to consult with someone. The external caller
is put on hold while you converse with the second, internal person
called. You can switch between the callers as often as necessary.
HS1: , or While an external call is in
progress, initiate an internal call
with the required handset
HS2: Take the internal call on the
other handset
HS1: Switch callers
138
Telephoning
Making conference calls
The three−way conference is an optional service offered
by your telephone network provider. Contact your provider
for further information. Chapter 6
An external call can be transferred to another internal handset for a
conference call.
HS1: , or While an external call is in
progress, initiate an internal call
with the required handset
HS2: Take the internal call on the
other handset
HS1: Start the conference
HS1/HS2: The conference is terminated by
one of the internal handset
users ending the call
Call waiting
Call waiting is an optional service offered by your telephone network provider. Contact your provider for further
information. Chapter 6
If another call is received while you are actually making a call, you
hear an acoustic signal.
clear Take the new call and put the
first caller on hold
clear
Switch between the two callers.
Talk time display
The duration of a call is displayed in minutes and seconds during
the call.
Ringing melody and volume 100
There are 14 different ringing melodies and 4 different ring volumes
available as well as the OFF" setting. Page 146
139
Telephoning
Receiver volume
The volume can be adjusted during a call.
or Set the required volume
Muting the microphone in the handset 101
The microphone in the handset can be activated and deactivated
during a telephone conversation. When deactivated, the caller can
no longer hear you.
Proceed as follows during a call:
Deactivate the microphone,
MUTE appears in the
display.
Activate the microphone
Handsfree 102
Use this function to listen to the caller via the loudspeaker.
Proceed as follows during a call:
Activate handsfree mode,
SPKR appears in the
display.
Deactivate handsfree mode
Display contrast 103
The contrast of the display can be adjusted to suit current needs.
Page 147
Smart KeylockTM 104
The Smart KeylockTM function prevents functions assigned to buttons being inadvertently activated during a call.
When the Smart KeylockTM function is on, the buttons are automatically disabled when you have dialled a number and placed the
handset to your ear.
The Smart KeylockTM function is automatically deactivated when
you move the handset away from your ear. Page 148
140
Telephoning
Manual key lock 105
The manual key lock function prevents operations being activated
inadvertently.
During Standby mode , Activate the key lock function
During Keylock is activated , Deactivate the key lock function
Incoming calls can still be taken in the normal way even
with the key lock activated. When the call is ended, the telephone key lock function remains activated.
When the key lock function is activated, only the Menu button can be operated and the programmed emergency
numbers dialled.
Dialling emergency numbers
By default, the telephone is set up so that two emergency numbers,
117 and 118, can be dialled even if the key lock function is activated.
Enter the emergency number
and dial the number
or:
Enter the emergency number
and dial the number
Searching for the handset (Paging)
If you have mislaid your handset, you can locate it with the aid of a
search tone.
{«}
Start the search tone
or ©
End the search tone
141
PABX / Supplementary Services
6 PABX / Supplementary Services
Private branch exchanges
106
Access code (number for an outside line)
In the case of private branch exchanges, it is necessary to dial a
specific number (e.g. 9" or 0") in order to obtain the dialling tone
for an outside line.
Dialling pause
In the case of private branch exchanges, it is necessary to dial a
specific number in order to obtain the dialling tone for an outside
line. When using some older private branch exchanges, it takes a
little time before the dialling tone becomes audible. Particularly in
the case of such private branch exchanges, it is possible to insert a
dialling pause after the number for the outside line so that the
number can be dialled in a continuous process without having to
wait for the dialling tone.
redial
Insert a dialling pause
P" appears in the display. After dialling the number for the outside
line, the telephone then waits a few seconds before dialling the
actual phone number.
The pause can also be entered with the phone numbers
in the phone book.
R button on private branch exchanges
If your telephone is connected to a private branch exchange, it is
possible to use the transfer calls and automatic call back functions
via the R button clear . Please refer to the operating manual supplied with your private branch exchange to determine which Flash
time must be set in order to use these functions. The dealer where
you purchased the exchange can provide information as to whether
the telephone will work properly with the exchange. Flash (Recall)
time Page 148
Flash time (recall time)
To operate the telephone in a private branch exchange, set the
Flash time to 100 ms. Page 148
142
PABX / Supplementary Services
Supplementary services
Call number display (CLIP1)
If this feature is available on your telephone line, the phone number
of the caller appears when the telephone rings. Chapter 9
If the caller has suppressed transmission of his phone number, a
corresponding message appears in the display. In this case, the
phone number is not displayed and, as a result, is not stored in the
calls log.
The CLIP (caller number display) function is an optional
service offered by telephone network providers. Contact
your provider for further information.
Answering machine in the telephone network 107
If your telephone network provider has an answering machine available for you in the telephone network, an envelope icon (VMWI2)
indicates new messages have been recorded for you. The answering machine in the telephone network is an optional service offered
by your telephone network provider. Contact your network provider
for further information.
To remove the envelope icon from the display, select the CLEAR
MSG WAIT option from the menu. Page 149
1
2
CLIP: Calling Line Identification Presentation
VMWI: Visual Message Waiting Indication
143
PABX / Supplementary Services
R button and supplementary services
Telephone network providers offer various supplementary services
e.g. brokering, call waiting and three−way conference for specific fees.
The supplementary services can be used in conjunction with the R
button. Contact your telephone network provider with regard to enabling supplementary services. Please also ask your telephone network provider which Flash time (recall time) must be set in order to
use the supplementary services. Setting the Flash time Page
148
144
Menu Structure
7 Menu Structure
Main menu
Access the main menu by pressing the button.
Use the and buttons to scroll through the menu and
select functions.
As an alternative to scrolling, several functions and settings can be selected directly by pressing the digit key
which precede the respective function and are listed in the
following table (see below).
Confirm every selection or input by pressing the button.
To move one level back, press the clear button.
Activate Standby mode by pressing the button. Page 134
[1] LANGUAGE
[1] ENGLISH
[2] FRANÇAIS
[3] ESPAÑOL
[4] PORTUGUÊS
[5] NEDERLANDS
[6] DEUTSCH
[7] ITALIANO
[8] SVENSK
[9] SUOMI
[0] DANSK
NORSK
108
145
Menu Structure
109
[2] RING SETTING
[1] RINGER VOLUME
[1] EXTERNAL CALL
[0] OFF
mute
[1] 4 arrows
quiet
[2] 8 arrows
[3] 12 arrows
[4] 16 arrows
loud
[2] INTERNAL CALL
[0] OFF
mute
[1] 4 arrows
quiet
[2] 8 arrows
[3] 12 arrows
[4] 16 arrows
[2] RINGER TONE
[1] EXTERNAL CALL
[1] RingTone 1
[2] RingTone 2
[3] RingTone 3
[4] RingTone 4
from [5]: 10 polyphonic melodies
[2] INTERNAL CALL
[1] Intercom Tone 1
[2] Intercom Tone 2
146
loud
10 polyphonic and
4 standard ring tones
are available.
Menu Structure
[3] Intercom Tone 3
[4] Intercom Tone 4
from [5]: 10 polyphonic melodies
[3] SET TIME
[1] CLOCK SETTING
Enter time as 4 digits
[2] ALARM
ON
OFF
Enter alarm time as 4 digits
[3] DISPLAY FORMAT
24 Hr
MM / DD
DD / MM
12 Hr
MM / DD
DD / MM
Use the button to switch
between AM and PM when entering the time and alarm clock
time.
[4] PHONE SETUP
[1] SET CONTRAST
16 levels Page 140
[2] KEY TONE
[0] OFF
[1] 1
[2] 2
[3] 3
[4] 4
110
147
Menu Structure
111
[3] SMART KEY LOCK
ON
OFF
148
Page 140
[4] AUTO ANSWER
ON
OFF
Automatic answering
Page 136
[5] BABY CALL
ON
OFF
Page 137
Enter the phone number
[6] DIAL MODE
TONE
PULSE
Only change the dialling mode
when recommended to by the
telephone network provider.
[7] RECALL TIME
100 ms
270 ms
300 ms
600 ms
Only change the Flash time
(Recall time) when recommended to by the telephone network provider.
[8] HANDSET NAME
Enter the handset name
[9] BACKLIGHT TIME
60 s
50 s
40 s
30 s
20 s
Duration of the backlighting for
display and buttons
Menu Structure
112
[5] SECURITY SET
[1] REGISTRATION
1
2
3
4
Register handset on base station
PIN−Code1
PIN−Code1
PIN−Code1
PIN−Code1
[2] DEREGISTRATION
Deregister handset
from base station
HANDSET 1
HANDSET 2
HANDSET 3
HANDSET 4
[3] CLEAR MSG WAIT
NO
YES
[4] SELECT BASE
1
AUTO
Default names of handsets
Deactivate Visual Message Waiting Indication2: Removes the envelope icon from display.
Automatic selection of base station
[6] SET DEFAULT
NO
YES
1
2
PIN−Code: 0000 Page 162
Page 143
149
Menu Structure
Phone book 113
Open the phone book by pressing the button when in
Standby mode. The phone book menu can be opened by pressing
the button directly after.
Confirm every selection or input by pressing the button.
[1] ADD RECORD
Enter the name1
Enter the number
[2] EDIT RECORD
Change the name1
Change the number
[3] DELETE RECORD
[4] DELETE ALL
The functions [2] and [3] always relate to the phone book
entry selected after the phone book was opened.
Calls log 114
Open the calls log from Standby mode by pressing the or
button twice. The call log menu is opened by pressing the
button directly after.
Confirm every selection or input by pressing the button.
[1] ADD RECORD
Enter the name1
[2] EDIT TO DIAL
Change the number
Add to the phone book
Enter or confirm the number
Edit the number to dial
Continue with ADD RECORD
(see above)
[3] DELETE RECORD
[4] DELETE ALL
The functions [2] and [3] always relate to the entry
selected.
1 Section Text input" on Page 151
150
Phone Book
8 Phone Book
The phone book can store a maximum of 60 phone numbers together with the associated names. A phone number may have a
maximum of 24 digits.
A name may have a maximum of 16 characters.
Saving phone book entries 115
Page 150
Always enter the area access code with the phone numbers so that the telephone can also assign incoming local
calls to a phone book entry.
Text input 116
Letters are also imprinted on the digit keys. Pressing the respective
key the necessary number of times enables letters and digits to be
entered.
Example: You want to enter the name Peter". Press
1 x button , 2 x button , 1 x button , 2 x button
and 3 x button .
Further information on entering text:
To enter the same letter twice, press the relevant button until the
letter appears then wait till the cursor automatically skips one position forward. You can then enter the same letter again.
The following options are also available:
clear
Delete the last entry
Switch between upper
and lower case
redial
Insert a dialling pause when
entering phone numbers
151
Phone Book
Even more characters are available by pressing the , and buttons several times:
1
1
_
−
+
=
^
.
,
;
:
*
*
#
?
!
$
&
%
/
\
|
~
0
0
’
(
)
[
]
<
>
{
}
Editing phone book entries
Page 150
To select an entry directly, press the first letters of the name
of the entry you require. For example, to select Peter"
directly, press the button once.
Deleting phone book entries
Page 150
Dialling phone numbers from the phone book
Page 137
152
Caller Number Display (CLIP) / Calls Log
9 Caller Number Display (CLIP) / Calls Log
If the CLIP function is enabled for your telephone system (CLIP =
Calling Line Identification Presentation), the phone number of the
caller appears in the display when a call is received. If the caller’s
number is stored in the phone book, the name stored with the
phone number appears.
If the caller has suppressed transmission of his phone number,
the number is not displayed. The WITHHELD NUMBER
message appears in the display instead.
If the message UNAVAILABLE appears, no information is
available on the caller; this could also indicate an international
call.
Caller number display (CLIP) and display of date and time
are optional services offered by your telephone network
provider. Contact your provider for further details.
Calls log 117
Up to 40 phone numbers can be stored in the calls log. When the
list is full, the oldest phone number is deleted.
If new phone numbers have been stored in the calls log during your
absence, this is indicated in the display.
The total number of all the incoming calls is displayed, including several calls from the same caller.
Display phone numbers in the calls log
Display overview
or Open the calls log
Two different indicators show how many entries are in the calls log
as a total and how many of them have been received since the calls
log was last viewed.
This list only displays the number of different calls; several
calls from the same caller are not taken into account !
153
Caller Number Display (CLIP) / Calls Log
Display
Description
ALL
Total number of entries
NEW
Number of new entries
Viewing individual entries
or View entries
Each entry is assigned a 2−digit CALL# number which appears at
the top right of the display. In addition, the caller’s phone number is
displayed as long as the information was transmitted with the phone
number (CLIP) (see above). If the phone number received is stored
in the phone book, the name of the caller also appears in the display.
If the caller has made several attempts to contact you, the
message REPT appears under the CALL# number when
the new number is viewed for the first time.
After viewing all the numbers in the log, the message
END OF LIST appears in the display.
Storing numbers from calls log in the phone book
A phone number in the calls log can be transferred directly to the
phone book and stored. To do this, select the ADD RECORD function. Page 150
Dialling phone numbers from the calls log
Page 137
Editing phone numbers in the calls log
It is possible to edit a phone number stored in the calls log. To do
this, select the EDIT TO DIAL function. Page 150
To dial the edited number directly, simply press the Call button
.
To save the edited number in the phone book, confirm the changes
by pressing the button and proceed with the saving procedure.
154
Caller Number Display (CLIP) / Calls Log
Deleting phone numbers from the calls log
Deleting individual phone numbers
Page 150
Deleting all phone numbers
To delete all the phone numbers in the calls log, use the DELETE
ALL option. Page 150
155
Special Functions
10 Special Functions
Automatic answering
If the automatic answering" function has been activated, a call is
taken automatically on removing the handset from the base or
charging station.
Pages 136, 148
Alarm clock 118
The alarm clock" function can be used so that you are woken up by
the handset at a specific time. Page 147
Baby call (direct dialling)
The Baby Call" function enables a specific phone number to be
saved which can then dialled automatically by pressing any button
(except the ) button). Page 148
Headset connection port
The handset has a connection port, suitable for a 2.5 mm stereo
jack, on the right−hand side with which to connect earphones /
headsets.
There is no guarantee the headset will function properly.
Dialling mode
The telephone can be operated in new, digital exchanges (TONE)
as well as analogue exchanges (PULSE). Page 148
Temporary tone dialling
If you only operate the telephone using the PULSE dialling mode,
you can still make use of the advantages of TONE dialling mode
(e.g.: for remote access of the answering machine in the conventional telephone network). You can temporarily switch to Tone dialling when a connection has already been made.
Press the button during the call
When the call is ended, the equipment automatically switches back
to Pulse dialling.
156
Expanding the Telephone System
11 Expanding the Telephone System
You can extend your SWITEL DF73X telephone system to up to 4
handsets and 4 base stations of the same type.
Multiple handsets
You can register a total of 4 handsets of the type DF73X on your
base station.
Registering handsets on a specific base station
Before starting with the registration process for a handset, switch
the base station to Registration mode.
3 sec Activate Registration mode
The LED on the base station flashes as long as it remains
in Registration mode.
To register a handset on a base station, open the menu and select
the REGISTRATION function. Select one of the 4 memory locations
for the base station. Page 149
Memory locations already assigned are identified by a tick following
the memory location. These can be overwritten through a new registration process.
When registration is completed, the message SUCCESS appears in the display. The handset is also assigned an internal call
number which also appears in the display. This is important in order
for making internal calls and performing other registration/deregistration processes.
If the registration process has failed, the message RETRY? appears in the display. Complete the registration process again.
To test whether the handset really is registered on the
base station, press the Paging button. The handset should
ring. Press the button again to stop the ringing.
Deregistering handsets from a base station
A handset registered on a base station can only be deregistered from it by another handset registered to the same
base station.
157
Expanding the Telephone System
To deregister a specific handset from a base station, open the
menu, select the DEREGISTRATION function and then select the
name or number of the handset to be deregistered. Page 149
When deregistration is completed properly, the message
SUCCESS appears in the display.
If the deregistration process has failed, the message RETRY?
appears in the display. Complete the deregistration process again.
Multiple base stations
Your handsets can be simultaneously registered on up to 4 different
base stations. Each base station requires its own telephone line
socket. Connections can be used with the same call number or with
different ones.
Page 149
Calls in progress, however, cannot be transferred from
one base station to another.
Increasing the range
Position the base stations so that the ranges of the individual base
stations overlap. Test the range of your handsets because obstructions in building restrict the range.
Register all the handsets on all the base stations. Activate the
AUTO function (automatic selection of base stations).
Page 149
Regardless of where you are, the handset automatically attempts to
connect to the next base station with the best connection.
158
In the Case of Problems
12 In the Case of Problems
Service hotline
Should problems arise with the telephone, please refer to the following information first. In the case of technical problems, please
contact our hotline under tel. 0900 00 16 75 (only valid for calls
within Switzerland − costs at time of going to print: CHF 2.00 / min.).
In the case of claims under the terms of guarantee, contact your
sales outlet. There is a 2 year period of guarantee.
Problems and solutions
Problems
Solutions
No connection
to base station
possible
− Check that the handset has been registered
on the base station with the correct PIN
code. Page 162
No telephone
calls possible
− The telephone line is not connected properly or is defective. Only use the telephone
connection cable supplied.
− Test whether the telephone connection is in
order by using another telephone.
− The power adaptor plug is not plugged in or
there is a complete power failure.
− The rechargeable batteries are empty or
defective.
− The handset is too far from the base station.
− Dialling mode is set incorrectly. Page
148
Connection is
disturbed or cut
off
− The handset is too far from the base station.
− The base station is in an unsuitable
location.
The system no
longer responds
− Reset all the functions to their default settings. Page 149
− Disconnect the power adapter plug briefly
from the power socket.
159
In the Case of Problems
The batteries
are empty in a
short time
− Batteries are empty or defective.
− Place the handset in the base station properly. Clean the contact surfaces on the
handset and base station with a soft, dry
cloth.
− Place the handset in the base station for
15 hours.
The CLIP1
function does
not work
− The caller number display function is an optional service offered by telephone network
providers. Contact your network provider for
further information.
− The caller has suppressed the transmission
of their phone number.
1
160
CLIP: Calling Line Identification Presentation
Technical Properties
13 Technical Properties
Technical data
Feature
Value
Standard
DECT1
Power supply
230/240 V, 50 Hz
Range
Outdoors: Approx. 300 m
Indoors: Approx. 50 m
Standby
Up to 120 hours
Max. talk time
Up to 5 hours
Rechargeable batteries
3 x 750 mAh NiMH,
size: AAA
Dialling mode
Tone dialling mode
Pulse dialling mode
Permissible
operating temperature
0°C to 45°C
Permissible ambient temperature
−20°C to 60°C
Permissible relative humidity
20% to 75%
Flash function (recall)
100 ms, 270 ms,
300 ms, 600 ms
1
DECT: Digital Enhanced Cordless Telecommunication
= Standard for cordless telephones.
161
Technical Properties
Default settings 119
Handset 120
Language:
Receiver volume
Deutsch
Handset name:
HANDSET1
VOL2
PIN1:
0000
Dialling method:
TONE
External call
Ringing volume:
3
Clock display:
24−hour
Ringing tone:
3
Date display:
MM / DD
Alarm clock:
OFF
Internal call
Ringing volume:
3
Alarm time:
00:00
Ringing tone:
3
Smart Keylock:
ON
Key tone:
1
Auto answer:
ON
Contrast:
8
Baby call:
OFF
Backlight time:
20 s
Flash time:
100 ms
Declaration of Conformity
This device fulfils the requirements stipulated in the EU
directive:
1999/5/EU directive on radio equipment and telecommunications terminal equipment and the mutual recognition of their conformity. Conformity with the above mentioned directive is confirmed by the CE symbol on the
device.
To view the complete Declaration of Conformity, please
refer to the free download available on our web site
www.switel.com.
1
162
The PIN code cannot be changed.
Maintenance / Guarantee
14 Maintenance / Guarantee
Maintenance
Clean the surface of the housing with a soft, lint−free cloth and do
not use cleaning agents or solvents.
Guarantee
SWITEL equipment is produced and tested according to the latest
production methods. The implementation of carefully chosen materials and highly developed technologies ensure trouble−free functioning and a long service life. The terms of guarantee do not apply
where the cause of equipment malfunction is the fault of the telephone network operator or any interposed private branch extension
system. The terms of guarantee do not apply to the batteries or
power packs used in the products. The period of guarantee is 24
months from the date of purchase.
All deficiencies resulting from material or production faults which
occur during the period of guarantee will be eliminated free of
charge. Rights to claims under the terms of guarantee are annulled
following intervention by the purchaser or third parties. Damage
caused as a result of improper handling or operation, incorrect positioning or storing, improper connection or installation, Acts of God
or other external influence are not covered by the terms of guarantee. In the case of complaints, we reserve the right to repair or replace defect parts or provide a replacement device. Replacement
parts or devices become our property. Rights to compensation in
the case of damage are excluded where there is no evidence of intent or gross negligence by the manufacturer.
If your device shows signs of defect during the period of guarantee,
please return it to the sales outlet in which you purchased the SWITEL device together with the purchase receipt. All rights to claims
under the terms of guarantee in accordance with this agreement
must be asserted exclusively with regard to your sales outlet. Two
years after the purchase and transfer of our products, claims under
the terms of guarantee can no longer be asserted.
163
Index
15 Index
A
Alarm clock, 156
AM/PM , 131
Answering machine in the
telephone network, 143
Automatic answering, 156
B
Baby Call, 137
Baby call, 156
Back button, 131
Base station, 132
Batteries, 126
Batteries , 127
Battery charge status, 130
Battery warning signal, 134
Belt clip, 130
Brokering, 138, 143
C
Call number display, 143
Call waiting, 139, 143
Calls log, 153
Calls log: deleting all phone
numbers, 155
Calls log: deleting individual
phone numbers, 155
Calls log: overview, 153
Calls log: viewing individual
entries, 154
Charging station, 132
Charging the batteries, 130
Conference button, 131
Conference calls, 139
Connecting the base station, 128
Connecting the charging
station, 129
Creating phone book
entries, 135
D
Declaration of Conformity,
162
Default settings, 162
Delete button, 131
Deleting phone book
entries, 152
Deleting phone numbers
from the calls log, 155
Deregistering handsets
from a base station, 157
Dialling emergency
numbers, 141
Dialling mode, 148, 156
Dialling numbers from the
calls log, 154
Dialling pause, 142
Dialling phone numbers
from the phone book,
137, 152
Direct call, 137
Direct dialling, 156
Display, 133
Display contrast, 140
Display phone numbers in
the calls log, 153
Disposal, 127
E
Editing phone book entries,
152
Editing phone numbers in
the calls log, 154
Ending a call, 136
Energy−save mode, 134
Expanding the telephone
system, 157
Explanations, 133
F
Flash time, 148, 162
G
Guarantee, 163
164
H
Handsfree, 140
Headset, 156
Headset connection port,
132, 156
Holding a call, 138
I
Icons in the display, 133
In the case of problems,
159
Increase receiver volume,
131
Increasing the range, 158
Inserting batteries, 129
Installation location, 126
INT button, 131
Intended use, 126
Internal calls, 137
K
Key lock, manual, 131, 141
L
Language selection, 130
LED, charge control lamp,
base station, 132
LED, charge control lamp,
charging station, 132
M
Main menu, 145
Maintenance, 163
Making a call, 136
Making internal calls, 137
Medical equipment, 127
Menu button, 131
Menu structure, 145
Microphone button, 131
Missed calls, 137
Multiple base stations, 158
Multiple handsets , 157
Mute, 131
Muting the microphone, 140
Index
N
Navigating in the menu, 134
Number for an outside line,
142
O
OK button, 131
On−hook key, 131
Operating elements, 131
Operating the telephone,
133
P
Package contents, 128
Packing materials, 127
Paging, 141
Paging button, 132
Pause, 131
Phone book, 131, 150, 151
Power adapter plug, 126
Power failure, 126
Private branch exchanges,
142
Problems and solutions,
159
Pulse dialling mode, 156
Putting the telephone into
operation, 128
R
R button, 131
R button on private branch
exchanges, 142
R−button and supplementary services, 143
Range warning signal, 133
Recall time, 148
Flash time for T−Net, 144
Flash time on PABX, 142
Receiver volume, 140
Redialling, 131, 136
Reduce receiver volume,
131
Registering handsets on a
specific base station,
157
Ringing melody, 139
S
Safety information , 126
Saving phone book entries,
151
Searching for the handset,
141
Select base, 158
Selection button: Down,
131
Selection button: Up, 131
Service hotline, 159
Setting the time, 130
Smart key lock, 140
Special characters, 131
Special functions, 156
Standby button, 131
Standby mode, 134
Storing number from calls
log in phone book, 154
Supplementary services,
142, 143
T
Taking a call, 136
Talk time, 139
Technical data, 161
Telephoning, 136
Temporary tone dialling,
156
Text input, 151
Three−way conference,
139, 143
Tone dialling mode, 156
Touch−sensitive buttons,
135
Transferring, 138
Transferring external calls
internally, 138
Troubleshooting, 159
U
Upper/Lower case, 131
V
VMWI, 143
165
166
121
1
2
3
4
5
6
7
8
9
10
11
12
13
14
15
Inhoudsopgave
Veiligheidsinstructies . . . . . . . . . . . . 168
Telefoon in gebruik nemen . . . . . . . . 170
Bedieningselementen . . . . . . . . . . . 173
Hoe bedien ik mijn telefoon? . . . . . . 175
Telefoneren . . . . . . . . . . . . . . . . . . 178
Huiscentrales / aanvullende diensten 184
Menustructuur . . . . . . . . . . . . . . . . . 186
Telefoonboek . . . . . . . . . . . . . . . . . 192
Nummerweergave / oproepenlijst . . . 194
Speciale functies . . . . . . . . . . . . . . . 197
Uitbreiden van het telefoonsysteem . 198
Als er problemen zijn . . . . . . . . . . . . 200
Technische eigenschappen . . . . . . . 202
Instructies voor de verzorging
/ garantie . . . . . . . . . . . . . . . . . . . . 204
Trefwoordenlijst . . . . . . . . . . . . . . . 205
122
167
Veiligheidsinstructies
1 Veiligheidsinstructies
Lees deze gebruiksaanwijzing aandachtig door.
Bedoeld gebruik
Deze telefoon is geschikt voor telefoneren binnen een telefoonnet.
Alle overige toepassingen zijn niet−bedoeld. Eigenmachtige wijzigingen of ombouw zijn niet toegestaan. Maak het apparaat in geen
geval zelf open en probeer het niet zelf te repareren.
Standplaats
Voorkom buitensporige belasting door rook, stof, schokken, chemicaliën, vocht, hitte of directe zonnestraling.
Gebruik de handset niet op plaatsen waar ontploffingsgevaar kan
heersen.
Netadapter
Let op: Gebruik alleen de bijgeleverde netadapter omdat
andere netadapters de telefoon kunnen beschadigen. U
mag de toegang tot de netadapter niet versperren door
meubels of andere voorwerpen.
Oplaadbare batterijen
Let op: Gooi oplaadbare batterijen nooit in het vuur. Gebruik alleen oplaadbare batterijen van hetzelfde type! Let
op de juiste aansluiting van de polen! Bij verkeerd gebruik
van oplaadbare batterijen bestaat explosiegevaar.
Stroomuitval
Bij stroomuitval kunt u niet langer met de telefoon telefoneren.
Houd voor noodgevallen een telefoon met snoer achter de hand,
die zonder externe stroomvoorziening werkt.
168
Veiligheidsinstructies
Medische apparaten
Let op: Gebruik de telefoon niet in de buurt van medische
apparaten. Beïnvloeding kan niet volledig worden uitgesloten.
Houd minimaal 1 m afstand.
DECT1−telefoons kunnen in gehoorapparaten een onaangename
bromtoon veroorzaken.
Afdanken en afvoeren
Als u het toestel wilt afdanken dan breng u het naar een
inzamelingspunt (bijv. milieustraat). Het nevenstaande
pictogram betekent dat het oude toestel gescheiden van
het huisvuil moet worden afgevoerd. Volgens de wet op
elektrische en elektronische apparaten zijn eigenaars
van oude apparaten verplicht om oude elektrische en
elektronische apparaten naar een gescheiden afvalinzameling te brengen.
Oplaadbare batterijen brengt u naar verkooppunten of
naar hiervoor aangewezen inzamelingspunten, waar
speciale bakken klaar staan.
Verpakkingsmaterialen voert u volgens de lokale voorschriften af.
1
DECT: Digital Enhanced Cordless Telecommunication
= standaard voor draadloze telefoons.
169
Telefoon in gebruik nemen
2 Telefoon in gebruik nemen
Veiligheidsinstructies
Let op: Lees vóór de ingebruikneming beslist de veiligheidsinstructies in hoofdstuk 1.
Inhoud van de verpakking 123
In de verpakking treft u het volgende aan:
DF73X−model
Inhoud
73
732*
733*
734*
Basisstation(s) met netadapter
1
1
1
1
Oplaadstation(s) met netadapter
−
1
2
3
Handset(s)
1
2
3
4
Toestelaansluitsnoer
1
1
1
1
Oplaadbare batterijen
3
6
9
12
Riemclip(s)
1
2
3
4
Gebruiksaanwijzing
1
1
1
1
Basisstation aansluiten
Let op: Plaats het basisstation altijd minimaal 1 meter uit
de buurt van andere elektronische apparaten, omdat anders storingen kunnen ontstaan.
Sluit het basisstation aan zoals in de tekening weergegeven. Gebruik voor de veiligheid alleen de bijgeleverde netadapter en het
bijgevoegde toestelaansluitsnoer.
*
170
Op www.switel.com leest u of deze telefoon al leverbaar is.
Telefoon in gebruik nemen
Stopcontact
Telefoonaansluitdoos
Oplaadstation aansluiten1
Sluit het oplaadstation aan zoals in de tekening weergegeven. Gebruik
in verband met de veiligheid alleen de bijgeleverde netadapter.
Stopcontact
Oplaadbare batterijen plaatsen
Plaats de batterijen in
het geopende batterijvak. Gebruik alleen
batterijen van het type
AAA Ni−MH 1,2 volt. Let
op de juiste aansluiting
van de polen! Sluit het
batterijvak.
1
− AAA +
+ AAA −
− AAA +
Geldt alleen voor modellen met ten minste twee handsets.
paragraaf ’Inhoud van de verpakking’ op pagina 170
171
Telefoon in gebruik nemen
Oplaadbare batterijen opladen 124
Laat de handset bij de eerste ingebruikneming minimaal 15uur in
het basisstation / oplaadstation staan. Als u de handset goed in het
basisstation / oplaadstation hebt gezet dan licht de laadindicator op.
De handset wordt warm bij het opladen. Dit is normaal en ongevaarlijk.
Laad de handset nooit op met opladers van andere fabrikanten.
De actuele batterijstatus wordt weergegeven op het display:
Vol
Zwak
Riemclip bevestigen
Draai de handset zodanig dat de achterkant naar boven wijst en
druk de riemclip in de twee hiervoor bestemde uitsparingen bovenaan in de zijkant van de handset.
Taal instellen
Op pagina 186 leest u hoe u bij de eerste ingebruikneming van de
telefoon de displaytaal instelt.
Tijd instellen
Op pagina 188 leest u hoe u bij de eerste ingebruikneming de tijd
van de handset instelt.
Huiscentrales
In hoofdstuk 6 leest u hoe u de telefoon op een huiscentrale kunt
aansluiten.
172
Bedieningselementen
3 Bedieningselementen
Handset
1
2
Display
’Oproep beëindigen’−toets,
Stand−bytoets 3 Telefoonboek 4 Hoofdletters/kleine letters,
AM/PM (in 12 uurs−notatie)
Driegesprek−toets 5 INT−toets (voor interne
gesprekken) 6 Menu−toets, OK−toets,
Microfoon−toets 7 Wis−toets, Terug−toets,
Flash−toets clear
8 Invoegen van leestekens
bij tekstinvoer,
Tijdelijk omschakelen
naar toonkiezen,
Handmatige
toetsblokkering 9 Nummer herhalen,
Pauze redial
10 Keuze−toets: Omlaag
door het menu,
Hoornvolume verlagen 11 Gesprek−toets 12 Keuze−toets: Omhoog
door het menu,
Hoornvolume verhogen 1
12
2
11
3
10
9
8
4
7
5
6
De toetsen van de telefoon worden in deze gebruiksaanwijzing weergegeven met uniforme pictogrammen (zie boven). De pictogrammen in deze
gebruiksaanwijzing kunnen iets afwijken van de pictogrammen op het apparaat.
173
Bedieningselementen
13 Aansluiting voor hoofdtelefoon
13
Basisstation
14 LED oplaadindicator,
knippert bij inkomende
oproepen
15 Paging−toets 15
Oplaadstation1
16 LED oplaadindicator
1
174
Geldt alleen voor modellen met ten
16
minste twee handsets.
paragraaf ’Inhoud van de verpakking’ op pagina 170
14
Hoe bedien ik mijn telefoon?
4 Hoe bedien ik mijn telefoon?
Weergaven en conventies
3 sec MUTE
of
Nummers of letters invoeren
Weergegeven toets kort indrukken
Weergegeven toets 3 seconden indrukken
Handset gaat over
Handset uit het basisstation nemen
Handset in het basisstation plaatsen
Tekst of pictogrammen op het display
Pictogrammen op het display
Pictogram
Beschrijving
De verbinding met het basisstation is opgebouwd.
Als de verbinding slecht wordt, hoort u het bereikalarm.
BUITEN
BEREIK
De handset heeft geen verbinding meer met het
basisstation. Ga naar het basisstation toe.
De toetsblokkering is ingeschakeld. pagina
182
De beltoon is uitgeschakeld. pagina 182
De wekker is ingeschakeld. pagina 197
Invoer van kleine letters pagina 192
Melding van een nieuw spraakbericht als de
voicemailbox in het telefoonnet is ingeschakeld
(aanvullende dienst van uw netwerkaanbieder)
pagina 185
Maximale batterijcapaciteit.
175
Hoe bedien ik mijn telefoon?
Lage batterijcapaciteit.
LEGE
BATTERIJ
Tevens hoort u het batterijalarm.
Laad de telefoon op.
Lopende segmenten:
De batterijen worden opgeladen. pagina 172
HANDSET
Naam van de handset pagina 190
OO:OO
Weergave van de tijd pagina 188
LSPK
Handenvrij telefoneren is ingeschakeld. pagina 182
MUTE
De microfoon is uitgeschakeld. pagina 182
SPRE
Een normaal gesprek wordt gevoerd.
Stand−bymodus 125
De volgende bedieningsinstructies gaan ervan uit dat de handset
zich in de stand−bymodus bevindt.
In de stand−bymodus zijn de toetsen en het display verlicht.
Bovendien wordt op het display de melding GEREED weergegeven.
De stand−bymodus roept u op met de toets .
Energiezuinige modus
Na enige tijd in de stand−bymodus schakelt de handset naar de
energiezuinige modus. Toetsen en display zijn niet langer verlicht.
Op het display wordt de tijd weergegeven.
Druk op een willekeurige toets om de stand−bymodus in te schakelen.
176
Hoe bedien ik mijn telefoon?
Navigatie in het menu
Alle functies zijn bereikbaar via verschillende menu’s. De route naar
de gewenste functie vindt u in de menustructuur. hoofdstuk 7
Hoofdmenu openen
of Gewenst submenu kiezen
Submenu openen
of Gewenste functie kiezen
Functie openen
of Gewenste instelling kiezen
Nummers of letters invoeren
Invoer bevestigen
clear
Een niveau terug
Naar de stand−bymodus terugkeren
Elke procedure wordt automatisch afgebroken als binnen
20 seconden geen invoer plaatsvindt.
Nummers in het telefoonboek opnemen – voorbeeld
Hoe u in de menu’s navigeert en nummers invoert is hier beschreven aan de hand van het voorbeeld Nummers in het telefoonboek opnemen. Ga bij alle overige invoerhandelingen op dezelfde
wijze te werk als in dit voorbeeld.
Telefoonboek openen
Menu openen
of Functie kiezen en bevestigen
, Naam intoetsen en bevestigen
, Telefoonnummer intoetsen en bevestigen
Sensortoetsen
De sensortoetsen zijn aanraakgevoelige toetsen op het oppervlak
van de handset.
De sensortoetsen worden ’bediend’ door aanraking van de toetsen
met de vingers. Het is niet nodig om bijzonder hard te drukken.
177
Telefoneren
5 Telefoneren
Oproep beantwoorden 126
Als u wordt gebeld dan hoort u een beltoon, tenzij u deze hebt uitgeschakeld. Bovendien knipperen op het basisstation de LED en op
de handset de verlichting van display en toetsen.
, of Oproep beantwoorden
Als u de functie Oproep automatisch beantwoorden ingeschakeld hebt, hoeft u de handset alleen uit het basisstation te tillen om de oproep te beantwoorden.
pagina 189
Gesprek beëindigen
of Gesprek beëindigen
Telefoonnummer intoetsen
Bellen
Bij foutieve invoer laatste cijfer
wissen
Telefoonnummer kiezen
clear
U kunt ook eerst de Gesprek−toets indrukken en op de kiestoon wachten. Het ingetoetste telefoonnummer worden
direct gekozen. Correctie van afzonderlijke cijfers van het
telefoonnummer is bij deze vorm van bellen niet mogelijk.
Nummer herhalen
De telefoon slaat de laatste 20 gekozen telefoonnummers op in een
nummergeheugen.
Op kiestoon wachten
redial
Kiest automatisch het
laatstgekozen telefoonnummer
Of:
redial
178
Nummerherhalingslijst openen
Telefoneren
of , Item kiezen en verbinding
opbouwen
Gemiste oproepen terugbellen 127
De telefoon slaat 40 ingekomen oproepen op in een oproepenlijst.
pagina 194
2× of Oproepenlijst openen
of Item kiezen
Verbinding opbouwen
Telefoonnummers uit het telefoonboek kiezen 128
Er moeten telefoonnummers in het telefoonboek staan.
pagina 191 en 192
Met de telefoon kunnen namen alfabetisch worden gezocht. Toets
de eerste letter van de gezochte naam in. Bijvoorbeeld: Voor de
naam ’Henry’ drukt u op ’4’. De eerste overeenstemming wordt
weergegeven.
Telefoonboek openen
of , Item kiezen en verbinding
opbouwen
Directe oproep 129
Als u de functie Directe oproep (Baby Call) hebt ingeschakeld,
wordt een ingeprogrammeerd telefoonnummer gekozen zodra u
een willekeurige toets op de handset indrukt (behalve de menutoets). Toets het gewenste telefoonnummer in, nadat u de functie
hebt ingeschakeld. pagina 189
Als u een ander nummer wilt bellen, moet u eerst de functie Directe oproep uitschakelen.
Intern telefoneren 130
Interne gesprekken voeren
U moet twee of meer handsets (HS1, HS2, ...) van het type DF73X
op het basisstation hebben aangemeld om kosteloze interne gesprekken te kunnen voeren.
179
Telefoneren
HS1: , of Intern telefoongesprek starten,
gewenste handset kiezen
Als alternatief voor het omhoog en omlaag bladeren kunt
u de andere handset ook direct met zijn 1−cijferig nummer
kiezen.
HS2: Intern gesprek met de andere
handset beantwoorden
HS1 / HS2: Intern gesprek beëindigen
Externe gesprekken intern doorsturen
Tijdens een gesprek van HS1 met een externe gesprekspartner:
HS1: , of Intern telefoongesprek starten,
gewenste handset kiezen
HS2: Intern gesprek met de andere
handset beantwoorden
HS1: Gesprek doorsturen
Als de opgeroepen handset zich niet meldt dan kunt u het
externe gesprek met de toets weer terughalen.
Ruggespraak / makelen
Makelen is een aanvullende dienst van uw netwerkaanbieder. Vraag uw netwerkaanbieder om meer informatie.
hoofdstuk 6
Tijdens een extern gesprek kunt u een andere handset kiezen voor
ruggespraak. De eerste gesprekspartner wordt in de wacht gezet
terwijl u met de interne gesprekspartner spreekt. U kunt zo vaak u
wilt wisselen tussen de gesprekspartners.
HS1: , of Tijdens een extern gesprek een
intern gesprek starten,
gewenste handset kiezen
HS2: Intern gesprek met de andere
handset beantwoorden
HS1 : Gesprekspartner wisselen
180
Telefoneren
Driegesprekken voeren
Het driegesprek is een aanvullende dienst van uw netwerkaanbieder. Vraag uw netwerkaanbieder om meer informatie. hoofdstuk 6
Een externe gesprekspartner kan worden betrokken bij een driegesprek met een andere interne gesprekspartner.
HS1: , of Tijdens een extern gesprek een
intern gesprek starten,
gewenste handset kiezen
HS2: Intern gesprek met de andere
handset beantwoorden
HS1: Driegesprek starten
HS1 / HS2: Als een van de
gesprekspartners de verbinding
verbreekt, wordt het driegesprek
beëindigd.
Aankloppen
Aankloppen is een aanvullende dienst van uw netwerkaanbieder. Vraag uw netwerkaanbieder om meer informatie. hoofdstuk 6
Als u tijdens een gesprek een kloptoon hoort, probeert iemand anders u te bereiken.
clear Beantwoordt de nieuwe oproep
en zet het eerste gesprek in de
wacht.
clear
Schakelt tussen de twee
gesprekken heen en weer.
Weergave van de gespreksduur
Tijdens een gesprek wordt de gespreksduur weergegeven in uren,
minuten en seconden.
181
Telefoneren
Beltoon en −volume 131
U kunt kiezen uit 14 verschillende beltonen en uit 4 verschillende
belvolumes en de instelling ’UIT’. pagina 187
Hoornvolume
U kunt tijdens een gesprek het hoornvolume aanpassen.
of Gewenst volume instellen
Microfoon in de handset uitschakelen 132
Tijdens een telefoongesprek kunt u de microfoon van de handset
uit− en inschakelen. Uw gesprekspartner kan u dan niet meer horen.
Ga tijdens een gesprek als volgt te werk:
Microfoon uitschakelen,
op het display verschijnt
MUTE .
Microfoon inschakelen
Handenvrij telefoneren 133
Gebruik deze functie om de gesprekspartner via de luidspreker te
horen.
Ga tijdens een gesprek als volgt te werk:
Handenvrij telefoneren
inschakelen,
op het display verschijnt
LSPK .
Handenvrij telefoneren
uitschakelen
Displaycontrast 134
U kunt het contrast van het display naar wens instellen. pagina 188
Automatische toetsblokkering 135
De intelligente toetsblokkering voorkomt dat u tijdens een gesprek
per ongeluk een sensortoets bedient.
Als de intelligente toetsblokkering is ingeschakeld, kunnen de toetsen niet meer worden bediend, zodra u een telefoonnummer hebt
gekozen en u de handset aan uw oor houdt.
182
Telefoneren
De intelligente toetsblokkering schakelt zichzelf automatisch uit, zodra u de handset van uw oor neemt. pagina 189
Handmatige toetsblokkering 136
De handmatige toetsblokkering voorkomt dat u per ongeluk een
oproep start.
In de stand−bymodus: , Toetsblokkering inschakelen
Als de toetsblokkering ingeschakeld is:
, Toetsblokkering uitschakelen
Inkomende oproepen kunt u zoals gebruikelijk beantwoorden, ook al is de toetsblokkering ingeschakeld. Na
beëindiging van het gesprek is de toetsblokkering weer ingeschakeld.
Als de toetsblokkering is ingeschakeld, kunt u alleen nog
de menutoets bedienen en het ingeprogrammeerde
alarmnummer kiezen.
Handset zoeken (paging)
Als u de handset uit het oog hebt verloren dan kunt u hem via een
zoektoon gemakkelijk terugvinden.
{«}
Zoektoon starten
of ©
Zoektoon beëindigen
183
Huiscentrales / aanvullende diensten
6 Huiscentrales / aanvullende diensten
Huiscentrales 137
Toegangscode (nummer voor een buitenlijn)
Als de telefoon is aangesloten op een huiscentrale dan moet u een
nummer (bijv. ’9’ of ’0’) kiezen om een kiestoon te krijgen.
Kiespauze
Als de telefoon is aangesloten op een huiscentrale dan moet u een
bepaald nummer kiezen om een kiestoon voor een buitenlijn te krijgen. Bij enkele oudere huiscentrales duurt het enige tijd voordat u
de kiestoon hoort. Voor deze huiscentrales kan na het kiezen van
een buitenlijn een kiespauze worden ingevoegd, om direct verder te
kunnen kiezen zonder de kiestoon af te wachten.
redial
Kiespauze invoegen
Op het display verschijnt een ’P’. Na het kiezen van de buitenlijn
wacht de telefoon enkele seconden met het kiezen van het eigenlijke telefoonnummer.
De pauze kan tevens bij de invoer van telefoonnummers
in het telefoonboek worden ingevoegd.
Flashtoets bij huiscentrales
Als de telefoon is aangesloten op een huiscentrale dan kunt u met de
R−toets clear oproepen doorschakelen of de functie Automatisch
terugbellen inschakelen. Lees in de gebruiksaanwijzing voor de huiscentrale, welke flashtijden u voor het gebruik van deze functies moet instellen. De leverancier van uw telefoon kan u vertellen of u deze met
uw huiscentrale kunt gebruiken. Flashtijd pagina 189
Flashtijd
Om de telefoon bij een huiscentrale te gebruiken stelt u een flashtijd van 100 ms in. pagina 189
Aanvullende diensten
Nummerweergave (CLIP)1)
Als uw netwerkaanbieder deze functie ondersteunt, wordt het tele1
184
CLIP: Calling Line Identification Presentation
Huiscentrales / aanvullende diensten
foonnummer van degene die u belt weergegeven zodra de telefoon
overgaat. hoofdstuk 9
Als de beller de weergave van zijn telefoonnummer heeft onderdrukt dan verschijnt een desbetreffende melding. In dit geval kan
het telefoonnummer niet worden weergegeven en dus ook niet in
de oproepenlijst worden opgeslagen.
De nummerweergave is een aanvullende dienst van uw
netwerkaanbieder. Vraag uw netwerkaanbieder om meer
informatie.
Voicemailbox in het telefoonnet 138
De voicemailbox in het telefoonnet is een aanvullende dienst van
uw netwerkaanbieder. Als uw netwerkaanbieder een voicemailbox
in het telefoonnet ondersteunt, worden nieuwe berichten met een
enveloppictogram gemeld (VMWI2). U kunt deze functie alleen gebruiken als de netwerkaanbieder deze service aanbiedt. Vraag uw
netwerkaanbieder om meer informatie.
Kies in het menu de functie VOICEMAIL UIT om het enveloppictogram van het display te verwijderen. pagina 190
Flashtoets en aanvullende diensten
De telefoon ondersteunt aanvullende diensten van uw netwerkaanbieder, zoals makelen, aankloppen en driegesprek. Via de flashtoets kunt u deze aanvullende diensten gebruiken. Vraag aan uw
netwerkaanbieder, welke flashtijden u moet instellen voor het gebruik van aanvullende diensten. Voor het vrijschakelen van aanvullende diensten neemt u contact op met uw netwerkaanbieder. Instellen van de flashtijd pagina 189.
2
VMWI: Visual Message Waiting Indication
185
Menustructuur
7 Menustructuur
Hoofdmenu
Het hoofdmenu opent u met de toets .
Met de toetsen en kunt u door het menu navigeren en
een functie kiezen.
Als alternatief voor het scrollen kunt u vele functies en instellingen ook direct kiezen via de cijfers die in het onderstaande overzicht ervoor staan.
Bevestig elke instelling of invoer met de toets .
Druk op de toets clear om een niveau terug te gaan.
Druk op de toets om de stand−bymodus op te roepen. pagina 176
[1] TAAL
[1] ENGLISH
[2] FRANÇAIS
[3] ESPAÑOL
[4] PORTUGUÊS
[5] NEDERLANDS
[6] DEUTSCH
[7] ITALIANO
[8] SVENSKA
[9] SUOMI
[0] DANSK
NORSK
139
186
Menustructuur
140
[2] RING INSTELLEN
[1] BEL VOLUME
[1] EXTERN GESPREK
[0] UIT
stil
[1] 4 pijlen
stil
[2] 8 pijlen
[3] 12 pijlen
[4] 16 pijlen
hard
[2] INTERN GESPREK
[0] UIT
stil
[1] 4 pijlen
stil
[2] 8 pijlen
[3] 12 pijlen
[4] 16 pijlen
[2] BEL SIGNAAL
[1] EXTERN GESPREK
[1] RingTone 1
hard
U kunt kiezen uit
10 polyfone en
4 standaardbeltonen.
[2] RingTone 2
[3] RingTone 3
[4] RingTone 4
vanaf [5]: 10 polyfone beltonen
[2] INTERN GESPREK
[1] Intercom Tone 1
[2] Intercom Tone 2
187
Menustructuur
[3] Intercom Tone 3
[4] Intercom Tone 4
vanaf [5]: 10 polyfone beltonen
[3] INSTELLEN TIJD
[1] KLOK INSTELLEN
Tijd 4−cijferig intoetsen
[2] ALARM
AAN
UIT
Wektijd 4−cijferig intoetsen
[3] WEERG FORMAAT
24 Hr
MM / DD
DD / MM
12 Hr
MM / DD
DD / MM
Druk op de toets om bij
het invoeren van de (wek)tijd
tussen AM en PM om te schakelen.
[4] TELEFOON SETUP
[1] CONTRAST
[2] TOETSGELUID
[0] UIT
[1] 1
[2] 2
[3] 3
[4] 4
141
188
16 niveaus pagina 182
142
Menustructuur
[3] SMART KEY SLOT
AAN
UIT
Intelligente toetsblokkering
pagina 182
[4] AUTO−BEANTW
AAN
UIT
Oproep automatisch
beantwoorden
pagina 178
[5] BABYOPROEP
AAN
UIT
pagina 179
Telefoonnummer intoetsen
[6] BELMODUS
TOON
PULS
Verander de kiesmodus alleen
als uw netwerkaanbieder dit
adviseert.
[7] FLASHTIJD
100 ms
270 ms
300 ms
600 ms
Verander de flashtijd (terugbeltijd) alleen als uw netwerkaanbieder dit adviseert.
[8] HANDSET
Handsetnaam intoetsen
[9] BACKLIGHT TIJD
60 s
50 s
40 s
30 s
20 s
Duur achtergrondverlichting
voor display en toetsen
189
Menustructuur
143
[5] VEILIGH INST
[1] REGIST. MODUS
1
2
3
4
Handset op basisstation aanmelden
PIN−code1
PIN−code1
PIN−code1
PIN−code1
[2] DEREGISTRATIE
HANDSETNAAM 1
HANDSETNAAM 2
HANDSETNAAM 3
HANDSETNAAM 4
Handset op basisstation afmelden
In de fabriek ingestelde namen van
de handsets
[3] WIS VOICEMAIL
NEE
JA
Visual Message Waiting Indication2 uitschakelen: Verwijdert het
enveloppictogram van het display.
[4] SELECTEER BASIS
1
AUTO
Automatisch selectie van basisstations
[6] FABRIEKS INST
NEE
JA
1
2
190
PIN−code: 0000 pagina 203
pagina 185
Menustructuur
Telefoonboek 144
Druk in de stand−bymodus op de toets om het telefoonboek
te openen. Druk vervolgens op de toets om het Telefoonboek−menu te openen.
Bevestig elke instelling of invoer met de toets .
[1] TOEVOEGEN BEST
Naam intoetsen1
Nummer intoetsen
[2] WIJZ BESTAND
Naam bewerken1
Nummer bewerken
[3] WIS BESTAND
[4] ALLES WISSEN
De functies [2] en [3] hebben altijd betrekking op het item
dat na het openen van het telefoonboek werd gekozen.
Oproepenlijst 145
Druk in de stand−bymodus 2× op de toets of om de
oproepenlijst te openen. Druk vervolgens op de toets om het
Telefoonboek−menu te openen.
Bevestig elke instelling of invoer met de toets .
[1] TOEVOEGEN BEST
In het telefoonboek opnemen
Naam intoetsen1
Nummer intoetsen of bevestigen
[2] BEWERK EN BEL
Nummer voor kiezen bewerken
Nummer bewerken
Verder met TOEVOEGEN BEST (zie
boven)
[3] WIS BESTAND
[4] ALLES WISSEN
De functies [1], [2] en [3] hebben altijd betrekking op het
item dat werd gekozen.
1 Paragraaf ’Tekstinvoer’ op pagina 192
191
Telefoonboek
8 Telefoonboek
In het telefoonboek kunnen 60 telefoonnummers met naam worden
opgeslagen. Elk telefoonnummer mag maximaal 24 tekens tellen.
Voor elke naam staan maximaal 16 tekens ter beschikking.
Nummers in het telefoonboek opslaan 146
pagina 191
Voer bij alle telefoonnummers altijd ook het netnummer in,
zodat de telefoon aan inkomende lokale gesprekken een
naam uit het telefoonboek kan toewijzen.
Tekstinvoer 147
Op de cijfertoetsen staan ook letters. Door meermaals drukken op
een toets kunnen letters en cijfers worden ingevoerd.
Bijvoorbeeld: U wilt de naam ’Peter’ intoetsen. Druk
1× op toets , 2× op toets , 1× op toets , 2× op
toets en 3× op toets .
Meer informatie over het invoeren van tekst:
Om dezelfde letter tweemaal in te voeren drukt u op de betreffende
toets. Wacht totdat de cursor niet meer knippert. U kunt de letter nu
nogmaals intoetsen.
Daarnaast hebt u de volgende mogelijkheden:
clear
Wist het laatste teken
Schakelt om tussen
hoofd− en kleine letters
redial
Voegt bij het invoeren van
telefoonnummers een pauze in
192
Telefoonboek
Druk meermaals op de toetsen , en om andere
tekens te kiezen:
1
1
_
−
+
=
^
.
,
;
:
*
*
#
?
!
$
&
%
/
\
|
~
0
0
’
’
(
)
[
]
<
>
{
}
Items in het telefoonboek aanpassen
pagina 191
Om een item direct te kiezen drukt u op de toets met de
eerste letter van het item. Om bijvoorbeeld ’Peter’ direct te
kiezen drukt u 1× op de toets .
Items uit het telefoonboek wissen
pagina 191
Telefoonnummers uit het telefoonboek kiezen
pagina 179
193
Nummerweergave / oproepenlijst
9 Nummerweergave / oproepenlijst
Als de huiscentrale de CLIP−dienst (CLIP = Calling Line Identification Presentation ondersteunt dan wordt bij een inkomende oproep
het nummer van de beller weergegeven. Als u dit telefoonnummer
in het telefoonboek hebt opgeslagen dan wordt tevens de naam
weergegeven.
Als de beller de weergave van zijn telefoonnummer onderdrukt,
wordt het telefoonnummer niet weergegeven; in plaats hiervan
verschijnt op het display de melding
NUMMER ONBEKEND .
Als het display de melding NIET BESCH. weergeeft dan is
geen informatie over de beller beschikbaar. In dit geval kan het
ook om een internationaal gesprek gaan.
Nummerweergave (CLIP) is evenals de weergave van datum en tijd een aanvullende dienst van uw netwerkaanbieder. Vraag hem om extra informatie.
Oproepenlijst 148
In totaal kunnen maximaal 40 telefoonnummers in de oproepenlijst
worden opgeslagen. Als alle plaatsen bezet zijn dan wordt het oudste telefoonnummer overschreven.
Als tijdens uw afwezigheid nieuwe telefoonnummers in de oproepenlijst zijn opgeslagen dan wordt dit op het display gemeld.
Alle ingekomen oproepen worden weergegeven: herhaalde oproepen van dezelfde beller worden elk weergegeven!
Telefoonnummers uit de oproepenlijst weergeven
Overzicht weergeven
of Oproepenlijst openen
Twee verschillende tellers tonen hoeveel nummers er in totaal in de
oproepenlijst staan en hoeveel daarvan nieuw zijn ingekomen sinds
de lijst voor het laatst werd bekeken.
194
Nummerweergave / oproepenlijst
In dit overzicht wordt alleen het aantal verschillende
oproepen geteld; herhaalde oproepen van dezelfde bellers worden niet geteld!
Display
Beschrijving
ALLES
Totaal aantal items
NIEUW
Aantal nieuwe items
Afzonderlijke items bekijken
of Items bekijken
Elk item krijgt een 2−cijferig CALL#−nummer, dat rechtsboven op het
display verschijnt. Bovendien wordt het telefoonnummer van de beller weergegeven, tenzij deze zijn nummer heeft onderdrukt (zie boven). Als het telefoonnummer in uw telefoonboek staat, verschijnt
op het display ook de naam van de beller.
Als een beller meermaals heeft geprobeerd om u te bereiken dan staat de eerste keer dat u de oproepenlijst bekijkt
onder het CALL#−nummer de aanduiding REPT (repeated/meermaals).
Als u alle items hebt bekeken, verschijnt op het display de melding
EINDE LIJST .
Telefoonnummer uit de oproepenlijst in het telefoonboek
opslaan
Een telefoonnummer kan direct uit de oproepenlijst in het telefoonboek worden opgeslagen. Kies hiervoor de functie TOEVOEGEN
BEST pagina 191
Telefoonnummer uit de oproepenlijst terugbellen
pagina 179
Telefoonnummer uit de oproepenlijst bewerken
U kunt een telefoonnummer uit de oproepenlijst bewerken. Kies
hiervoor de functie BEWERK EN BEL. pagina 191
Om het bewerkte nummer vervolgens direct te bellen drukt u op de
Gesprek−toets .
195
Nummerweergave / oproepenlijst
Om het bewerkte telefoonnummer in het telefoonboek op te slaan,
bevestigt u met de toets en gaat u verder met opslaan.
Telefoonnummers uit de oproepenlijst wissen
Afzonderlijke telefoonnummers wissen
pagina 191
Alle telefoonnummers wissen
Kies de functie ALLES WISSEN om de oproepenlijst helemaal leeg
te maken. pagina 191
196
Speciale functies
10 Speciale functies
Oproep automatisch beantwoorden
Als u deze functie hebt ingeschakeld dan wordt een oproep automatisch beantwoord zodra u de handset uit het basis− of oplaadstation neemt.
pagina’s 178, 189
Wekker 149
Met deze functie kunt u zich door een handset laten wekken. pagina 188
Baby Call (directe oproep)
Met deze functie kunt u een bepaald telefoonnummer opslaan, dat
bij gebruik van een willekeurige toets (behalve ) automatisch
worden gekozen. pagina 189
Aansluiting voor hoofdtelefoon
Aan de rechterzijde van de handset vindt u een 2,5 mm stereoconnector voor een hoofdtelefoon / headset.
De juiste werking van een aangesloten hoofdtelefoon / headset
wordt niet gegarandeerd.
Kiesmodus
U kunt de telefoon zowel op analoge centrales (pulskiezen) aansluiten als op digitale centrales van recenter datum (toonkiezen). pagina 189
Tijdelijk toonkiezen
Zelfs als u de telefoon alleen met pulskiezen kunt gebruiken dan
kunt u toch gebruik maken van toonkiezen (bijv. voor het uitluisteren
van een voicemailbox in het vaste net). Tijdens een verbinding kunt
u toonkiezen tijdelijk inschakelen.
Tijdens het gesprek indrukken
Na beëindiging van het gesprek wordt automatisch weer teruggeschakeld naar pulskiezen.
197
Uitbreiden van het telefoonsysteem
11 Uitbreiden van het telefoonsysteem
U kunt maximaal 3 andere handsets van hetzelfde model op het basisstation aanmelden. Elke handset kan tegelijkertijd op vier basisstations aangemeld zijn.
Meerdere handsets
U kunt in totaal 4 handsets van het type DF73X op het basisstation
aanmelden.
Aanmelden van handsets op een bepaald basisstation
Voordat u de handset aanmeldt, zet u het basisstation in de registreermodus:
3 sec Registreermodus starten
De LED op het basisstation knippert zolang u zich deze in
de registreermodus bevindt.
Voor het aanmelden van een handset op een basisstation kiest u in
het menu de functie DEREGISTRATIE. Kies een van de 4 geheugenplaatsen voor het basisstation. pagina 190
Gebruikte geheugenplaatsen zijn gemarkeerd met een haakje.
Desgewenst kunnen ze worden overschreven.
Na een geslaagde registratie meldt het display SUCCESVOL .
De handset heeft bovendien een intern telefoonnummer gekregen
dat op het display wordt weergegeven. Dit is belangrijk voor het
voeren van interne telefoongesprekken en voor het aan− en afmelden van toestellen.
Als de registratie mislukt is, ziet u NOGMAALS? op het display.
Voer de registratie nogmaals uit.
Druk op de Paging−toets om te testen of de handset werkelijk op het basisstation geregistreerd is. De handset
moet overgaan. Druk nogmaals op de toets om de beltoon
uit te schakelen.
198
Uitbreiden van het telefoonsysteem
Afmelden van handsets bij een basisstation
U kunt een handset alleen bij een basisstation afmelden
met een andere handset die op dit basisstation is aangemeld.
Voor het afmelden van een handset bij een basisstation kiest u in
het menu de functie DEREGISTRATIE. Kies vervolgens de naam of
het nummer van de handset die u wilt afmelden. pagina 190
Na een geslaagde afmelding toont het display SUCCESVOL .
Als de afmelding mislukt is, ziet u NOGMAALS? op het display.
Voer de procedure nogmaals uit.
Meerdere basisstations
Uw handsets kunnen tegelijkertijd op 4 verschillende basisstations
worden aangemeld. Elk basisstation heeft een eigen telefoonaansluitdoos nodig. Dit kunnen aansluitingen met dezelfde of verschillende telefoonnummers zijn.
pagina 190
Beantwoorde oproepen kunnen niet van het ene basisstation naar het andere worden doorgeschakeld.
Vergroting van het bereik
Plaats de basisstations zodanig dat het bereik van elk basisstation
het bereik van het dichtstbijzijnde basisstation overlapt. Test het bereik van de handsets, omdat obstakels in gebouwen het bereik beperken.
Meld elke handset op alle basisstations aan. Schakel de functie
AUTO (Automatische selectie van basisstations) in.
pagina 190
Waar u zich ook bevindt, de handset zoekt automatisch het dichtstbijzijnde basisstation met de beste verbinding.
199
Als er problemen zijn
12 Als er problemen zijn
Service Hotline
Controleer eerst de volgende zaken als u problemen hebt met uw
telefoon. Neem voor garantie contact op met de leverancier van de
telefoon. De garantieperiode bedraagt 2 jaar.
Vragen en antwoorden
Vragen
Antwoorden
Geen verbinding met het
basisstation
mogelijk
− Controleer of u zich met de juiste PIN−code
op het basisstation hebt aangemeld.
pagina 203
Geen telefoongesprek mogelijk
− De telefoon is niet goed aangesloten of
heeft een storing. Gebruik alleen het bijgeleverde toestelaansluitsnoer.
− Test met een andere telefoon of de telefoonaansluiting in orde is.
− De netadapter zit niet goed in het stopcontact of de stroom is uitgevallen.
− De oplaadbare batterijen zijn leeg of defect.
− U bent te ver verwijderd van het basisstation.
− Foutieve kiesmodus ingesteld.
pagina 189
Verbinding verbroken, gesprek valt weg.
− U bent te ver verwijderd van het basisstation.
− Basisstation staat op een verkeerde plaats.
Het systeem re- − Zet alle functies terug naar de toestand bij
ageert niet
aflevering. pagina 190
meer.
− Trek de netadapter even uit het stopcontact.
200
Als er problemen zijn
− De batterijen zijn leeg of defect.
De batterijen
− Zet de handset goed op het basisstation.
zijn binnen de
Reinig de contactpunten van de handset en
kortste tijd leeg.
van het basisstation met een zachte, droge
doek.
− Laat de handset minimaal 15 uur op het basisstation staan.
De nummerweergave
(CLIP1) functioneert niet
1
− De nummerweergave is een aanvullende
dienst van uw netwerkaanbieder. Vraag uw
netwerkaanbieder om meer informatie.
− De beller heeft de weergave van zijn telefoonnummer onderdrukt.
CLIP: Calling Line Identification Presentation
201
Technische eigenschappen
13 Technische eigenschappen
Technische gegevens
Kenmerk
Waarde
Standaard
DECT1
Stroomvoorziening
230/240 V, 50 Hz
Bereik
Buiten: ongeveer 300 m
Binnen: ongeveer 50 m
Stand−by
Maximaal 120 uur
Gespreksduur
Maximaal 5 uur
Oplaadbare batterijen
3× 750 mAh NiMH,
Formaat: AAA
Kiesmodus
Toonkiezen
Pulskiezen
Toelaatbare
bedrijfstemperatuur
0 °C tot 45 °C
Toelaatbare
omgevingstemperatuur
−20 °C tot 60 °C
Toelaatbare
relatieve luchtvochtigheid
20% tot 75%
Flashfunctie
100 ms, 270 ms,
300 ms, 600 ms
1
202
DECT: Digital Enhanced Cordless Telecommunication
= standaard voor draadloze telefoons.
Technische eigenschappen
Standaardinstellingen 150
Handset 151
Taal:
Duits
Naam handset:
Hoornvolume
VOL2
PIN1:
0000
Kiesmodus:
TOON
Beltoonvolume:
3
Weergave tijd:
24 h
Beltoon:
3
Weergave datum:
MM / DD
Wektoon:
UIT
HANDSETNAAM1
Externe oproep
Interne oproep
Beltoonvolume:
3
Wektijd:
00:00
Beltoon:
3
Intelligente
toetsblokkering:
AAN
Toetstonen:
1
Automatisch beantwoorden:
AAN
Contrast:
8
Directe oproep:
UIT
Tijd verlichting:
20 s
Flashtijd:
100 ms
Verklaring van overeenstemming
Dit apparaat voldoet aan de eisen van de EU−richtlijn:
Richtlijn 1999/5/EG betreffende radioapparatuur en telecommunicatie−eindapparatuur en de wederzijdse erkenning van hun conformiteit. De overeenstemming met de
bovengenoemde richtlijn wordt bevestigd door het CE−
merk op het apparaat.
Een volledige versie van de Verklaring van overeenstemming kunt u kosteloos downloaden op onze website:
www.switel.com.
1
De PIN−code kan niet worden gewijzigd.
203
Instructies voor de verzorging / garantie
14 Instructies voor de verzorging / garantie
Instructies voor de verzorging
Reinig de oppervlakken van de behuizing alleen met een zachte,
niet−pluizende doek – zonder reinigings− of oplosmiddelen!
Garantie
SWITEL apparaten worden gefabriceerd en gecontroleerd volgens
de modernste fabricagemethoden. Zorgvuldig gekozen materialen
en geavanceerde technologieën zorgen voor een onberispelijke
werking en lange levensduur. De garantie is niet van toepassing als
de oorzaak van het falen van het apparaat is gelegen bij de netwerkaanbieder of een eventuele huiscentrale. De garantie geldt niet
voor de batterijen of accupacks die in de producten worden gebruikt. De garantieperiode bedraagt 24 maanden, gerekend vanaf
de datum van aankoop.
Binnen de garantieperiode worden alle gebreken die het gevolg zijn
van materiaal− of fabricagefouten, kosteloos verholpen. De aanspraak op garantie vervalt bij ingrepen door de koper of derden.
Schade die het gevolg is van onjuiste behandeling of bediening,
verkeerde plaatsing of verkeerd opbergen, van foutieve aansluiting
of installatie valt evenals schade door overmacht of overige externe
invloeden niet onder de garantie. Wij behouden ons het recht voor
om bij reclamaties de defecte onderdelen te repareren of te vervangen dan wel het complete apparaat te vervangen. Vervangen onderdelen en vervangen apparaten worden ons eigendom. Schadeclaims zijn uitgesloten, tenzij sprake is van opzet of grove
nalatigheid van de fabrikant.
Als het SWITEL apparaat binnen de garantieperiode een defect
vertoont, breng het dan terug naar de leverancier en neem de aankoopbon mee. De leverancier is verplicht om u garantie te geven
volgens de hier genoemde bepalingen. Na afloop van twee jaar na
aankoop en overgave van onze producten kan geen aanspraak
meer worden gemaakt op garantie.
204
Trefwoordenlijst
15 Trefwoordenlijst
A
Aankloppen, 181, 185
Aanmelden van handsets
op een bepaald basisstation, 198
Aansluiting voor hoofdtelefoon, 174, 197
Aanvullende diensten, 184
Afdanken en afvoeren, 169
Afmelden van handsets bij
een basisstation, 199
Als er problemen zijn, 200
AM/PM , 173
Automatische selectie, 199
B
Baby Call, 179, 197
Basisstation, 174
Basisstation aansluiten, 170
Basisstations, meerdere,
199
Batterijalarm, 176
Batterijstatus, 172
Bedieningselementen, 173
Bedoeld gebruik, 168
Bellen, 178
Beltoon, 182
Bereikalarm, 175
C
Conventies, 175
D
Directe oproep, 179, 197
Displaycontrast, 182
Doorsturen, 180
Driegesprek, 181, 185
Driegesprek−toets, 173
Driegesprekken voeren,
181
E
Energiezuinige modus, 176
Externe gesprekken intern
doorsturen, 180
F
Flash−toets, 173
Flashtijd, 189, 203
Flashtijd bij huiscentrales,
184
Flashtoets bij huiscentrales,
184
Flashtoets en aanvullende
diensten, 185
Fouten verhelpen, 200
G
Garantie, 204
Gemiste oproepen terugbellen, 179
Gesprek beëindigen, 178
Gesprek−toets, 173
Gespreksduur, 181
H
Handenvrij telefoneren, 182
Handset zoeken, 183
Headset, 197
Hoe bedien ik mijn telefoon?, 175
Hoofdletters/kleine letters,
173
Hoofdmenu, 186
Hoornvolume, 182
Hoornvolume verhogen,
173
Hoornvolume verlagen, 173
Huiscentrales, 184
I
Inhoud van de verpakking,
170
Instructies voor de verzorging, 204
INT−toets, 173
Intern telefoneren, 179
Interne gesprekken voeren,
179
Items in het telefoonboek
aanpassen, 193
Items uit het telefoonboek
wissen, 193
K
Keuze−toets: Omhoog, 173
Keuze−toets: Omlaag, 173
Kiesmodus, 189, 197
Kiespauze, 184
L
LED oplaadindicator, basisstation, 174
LED oplaadindicator,
oplaadstation, 174
Leestekens, 173
M
Makelen, 180, 185
Medische apparaten, 169
Meerdere handsets, 198
Menu−toets, 173
Menustructuur, 186
Microfoon uitschakelen, 182
Microfoon−toets, 173
N
Navigatie in het menu, 177
Netadapter, 168
Nummer herhalen, 173, 178
Nummer voor een buitenlijn, 184
Nummers in het telefoonboek opnemen, 177
Nummers in het telefoonboek opslaan, 192
Nummerweergave, 184
O
OK−toets, 173
Oplaadbare batterijen, 168,
169
Oplaadbare batterijen opladen, 172
205
Trefwoordenlijst
Oplaadbare batterijen plaatsen, 171
Oplaadstation, 174
Oplaadstation aansluiten,
171
Oproep automatisch beantwoorden, 197
Oproep beantwoorden, 178
Oproepenlijst, 194
Oproepenlijst: Afzonderlijke
items bekijken, 195
Oproepenlijst: Afzonderlijke
telefoonnummers wissen, 196
Oproepenlijst: Alle telefoonnummers wissen, 196
Oproepenlijst: Overzicht
weergeven, 194
P
Paging, 183
Paging−toets, 174
Pauze, 173
Pictogrammen op het display, 175
Pulskiezen, 197
R
Riemclip, 172
Ruggespraak, 180
S
Sensortoetsen, 177
Service Hotline, 200
Speciale functies, 197
Stand−bymodus, 176
Stand−bytoets, 173
Standaardinstellingen, 203
Standplaats, 168
Stroomuitval, 168
T
Taal instellen, 172
Technische gegevens, 202
Tekstinvoer, 192
Telefoneren, 178
Telefoon in gebruik nemen,
206
170
Telefoonboek, 173, 191,
192
Telefoonnummer uit de
oproepenlijst bewerken,
195
Telefoonnummer uit de
oproepenlijst in het telefoonboek opslaan, 195
Telefoonnummer uit de
oproepenlijst terugbellen, 195
Telefoonnummers uit de
oproepenlijst weergeven, 194
Telefoonnummers uit de
oproepenlijst wissen,
196
Telefoonnummers uit het telefoonboek kiezen, 179,
193
Terug−toets, 173
Terugbeltijd, 189
Tijd instellen, 172
Tijdelijk toonkiezen, 197
Toetsblokkering, automatisch, 182
Toetsblokkering, handmatige, 173, 183
Toonkiezen, 197
U
Uitbreiden van het telefoonsysteem, 198
V
Veiligheidsinstructies, 168
Vergroting van het bereik,
199
Verklaring van overeenstemming, 203
Verpakkingsmaterialen, 169
VMWI, 185
Voicemailbox in het telefoonnet, 185
Vragen en antwoorden, 200
W
Weergaven, 175
Wekker, 197
Wis−toets, 173
207
Declaration of conformity 152
WE
OF
TELGO AG
Route d’Englisberg 11
CH−1763 Granges−Paccot
Declare under our own responsibility that the product
MODEL:
DF73X
DESCRIPTION:
Cordless DECT telephone
Is in conformity with directives: R&TTE Directive (1999/5/EC)
COMPLIANCE IS ACHIEVED BY CONFORMITY TO THE FOLLOWING:
EN 60950−1:2001, EN 301 489−6 V1.2.1 (2002−08), EN 301 489−1 V1.4.1
(2002−08), EN 301 406 V1.5.1 (2003−07), EN 301 406 V1.5.1 (2003−07),
ETSI TS 103 021−1 V1.1.1 (2003−08), ETSI TS 103 021−2 V1.1.2
(2003−09), ETSI TS 103 021−3 V1.1.2 (2003−09), TBR38:1998
AUTHORISED BY:
________________________
Signed:
Name (printed):
Selim Dusi
Position in company:
Managing Director
Date of issue:
20.01.2006
Copies of this document will be held on file for a period of 10 years after
the last production.
Supplier:
TELGO AG, Route d’Englisberg 11
CH−1763 Granges−Paccot
Product:
DF73X
This product is intended for connection to analogue PSTN lines within
Switzerland. However, due to differences between the individual PSTNs
provided in the different countries, the approval does not, of itself, give an
unconditional assurance of successful operation on every PSTN network
termination point.