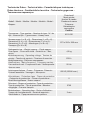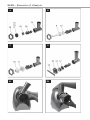
1
Bedienungsanleitung
Elements of Lifestyle
User Manual
Mode d'emploi
Manual de instrucciones
Istruzioni per l’uso
Gebruiksaanwijzing
Руководство по эксплуатации
Panther
Fleischwolf
Meat grinder
Hachoir à viande
Picadora de carne
Tritacarne
Gehaktmolen
мясорубка
Technische Daten - Technical data - Caractéristiques techniques Datos técnicos - Caratteristiche tecniche - Technische gegevens Технические параметры
Modell - Model - Modèle - Modelo - Modello - Model Модель
Fleischwolf
Meat grinder
Hachoir à viande
Picadora de carne
Tritacarne
Gehaktmolen
мясорубка
Panther
Typnummer - Type number - Numéro de type - N.º de
tipo - Numero tipo - Typenummer - Номер типа
M 12.001
Abmessungen (L x B x H) - Dimensions (L x W x H) Dimensions (L x l x H) - Dimensiones (F x A x A) Dimensioni (L x P x A) - Afmetingen (L x B x H) Размеры (Д х Ш х В)
275 x 200 x 380 mm
Nettogewicht ca. - Weight, approx. - Poids approx. Peso aprox. - Peso netto circa - Gewicht ca. - Вес,
около
Betriebsspannung - Operating voltage - Tension de
service - Tensión de servicio - Tensione di esercizio Bedrijfsspanning - Рабочее напряжение
Netzfrequenz - Mains frequency - Fréquence secteur Frecuencia de red - Frequenza di rete - Netfrequentie Частота сети
Leistungsaufnahme - Power - Puissance -Potencia Potenza assorbita - Vermogen - Мощность
Schutzklasse - Protection class - Classe de protection
- Categoría de protección - Classe di protezione Beschermingsklasse - Класс защиты
Schutzart - Degree of protection- Type de protection Tipo de protección - Tipo di protezione - Beschermingstype - Степень защиты
Betriebsdauer - Operating time - Durée d'utilisation Tiempo de funcionamiento - Durata di esercizio Gebruiksduur - Продолжительность работы
4,2 kg
230V~
50 Hz
600 W (850W max.)
II
IPX0
3 min
BEEM - Elements of Lifestyle
DE
Urheberrecht
Dieses Dokument ist urheberrechtlich
geschützt. Jede Vervielfältigung bzw.
jeder Nachdruck, auch auszugsweise,
sowie die Wiedergabe der Abbildungen,
auch im veränderten Zustand, ist nur mit
schriftlicher Zustimmung des Herstellers
gestattet.
EN
Copyright
This document is copyrighted. Any duplication or reprinting, in whole or in part,
and the reproduction of the illustrations,
even in modified form, is only permitted
with the written approval of the manufacturer.
FR
Droits d’auteur
Ce document est soumis à la protection
des droits d’auteur. Toute reproduction
ou impression ultérieure, même partielle,
ainsi que la retranscription d’illustrations,
même modifiée, est seulement possible
sur autorisation écrite du fabricant.
ES
Derechos de autor
Este documento está protegido por las
leyes de derechos de autor. Queda prohibida la reproducción y reimpresión total
o parcial del manual, así como la copia
de sus ilustraciones, con o sin modificaciones, sin la autorización por escrito del
fabricante.
IT
Diritti d’autore
Il presente documento è protetto da diritti
di autore. Ogni copia o ristampa, anche
parziale, e la riproduzione delle illustrazioni, anche se modificate, è permessa
esclusivamente previa autorizzazione
scritta del costruttore.
NL
Auteursrecht
Dit document is auteursrechtelijk beschermd. Iedere vermenigvuldiging resp.
iedere herdruk, ook gedeeltelijk, alsmede
de weergave van de afbeeldingen, ook in
gewijzigde vorm, is uitsluitend met schriftelijke toestemming van de fabrikant toegestaan.
Авторское право
Настоящий
документ
защищен
авторским правом. Тиражирование или
перепечатка, в том числе частичная,
а также воспроизведение рисунков,
в том числе в измененном виде,
допускаются только с письменного
согласия изготовителя.
DEPanther
Inhalt
Sicherheitshinweise . . . . . . . . . . . . . . . . 1
Inbetriebnahme . . . . . . . . . . . . . . . . . . . . 4
Gerätebeschreibung. . . . . . . . . . . . . . . . 5
Vorbereitungen . . . . . . . . . . . . . . . . . . . . 5
Bedienung und Betrieb. . . . . . . . . . . . . . 5
Gerät demontieren. . . . . . . . . . . . . . . . . 7
Rezeptvorschläge . . . . . . . . . . . . . . . . . . 7
Reinigung und Pflege. . . . . . . . . . . . . . . 9
Lagerung . . . . . . . . . . . . . . . . . . . . . . . . . 9
Allgemeine Hinweise. . . . . . . . . . . . . . . . 9
Sehr geehrter Kunde,
lesen Sie vor Verwendung des Gerätes
die in dieser Bedienungsanleitung enthaltenen Hinweise zu Inbetriebnahme,
Sicherheit, bestimmungsgemäßem Gebrauch sowie Reinigung und Pflege.
Schlagen Sie die Ausklappseiten am Anfang und am Ende der Bedienungsanleitung heraus, um die Abbildungen während des Lesens sehen zu können.
Bewahren Sie diese Bedienungsanleitung
für den späteren Gebrauch auf und geben
Sie diese mit dem Gerät an Nachbesitzer
weiter.
Sicherheitshinweise
►►Setzen Sie das Gerät nur für die
beschriebene Verwendung ein.
Setzen Sie das Gerät auf keinen
Fall für andere, möglicherweise
naheliegende Zwecke ein.
►►Dieses Gerät darf nicht von Kindern benutzt werden.
►►Das Gerät und seine Anschlussleitung sind von Kindern fernzuhalten.
BEEM - Elements of Lifestyle
►►Kinder dürfen nicht mit dem Gerät
spielen.
►►Lagern Sie das Gerät und die Zubehörteile außer Reichweite von
Kindern unter 8 Jahren.
►►Kontrollieren Sie das Gerät vor der
Verwendung auf äußere sichtbare
Schäden. Nehmen Sie ein beschädigtes Gerät nicht in Betrieb.
►►Lassen Sie das Gerät während des
Betriebes nicht unbeaufsichtigt.
►►Verwenden Sie nur Zubehörteile
des Herstellers oder solche, die
vom Hersteller ausdrücklich empfohlen werden. Ansonsten besteht
kein Gewährleistungs- oder Garantieanspruch mehr.
►►Verwenden Sie dieses Gerät nicht
zusammen mit einer externen Zeitschaltuhr oder einem separaten
Fernwirksystem.
►►Lassen Sie Reparaturen am Gerät
nur von einem vom Hersteller autorisierten Kundendienst durchführen, da sonst bei Beschädigungen
und nachfolgenden Störungen
kein Gewährleistungs- oder Garantieanspruch mehr besteht. Dies
gilt insbesondere auch für den
Austausch einer beschädigten Anschlussleitung. Durch unsachgemäße Reparaturen können erhebliche Gefahren für den Benutzer
entstehen.
►►Tauschen Sie defekte Bauteile nur
gegen Original-Ersatzteile aus. Nur
bei diesen Teilen ist gewährleistet,
dass die Sicherheitsanforderungen
erfüllt werden.
1
PantherDE
►►Eine Reparatur des Gerätes wäh-
rend der Gewährleistungs- bzw.
Garantiezeit darf nur von einem
vom Hersteller autorisierten Kundendienst vorgenommen werden,
sonst besteht bei Beschädigungen
und nachfolgenden Störungen kein
Gewährleistungs- bzw. Garantieanspruch mehr.
GEFAHR
Gefahr durch elektrischen Strom!
►► Benutzen Sie das Gerät nicht,
wenn die Netzleitung oder der
Netzstecker beschädigt sind.
►► Öffnen Sie auf keinen Fall das
Gehäuse des Gerätes. Werden
spannungsführende Anschlüsse
berührt und der elektrische und
mechanische Aufbau verändert,
besteht Stromschlaggefahr.
►► Tauchen Sie den Motorblock
oder den Netzstecker niemals in
Wasser oder andere Flüssigkeiten.
►► Ziehen Sie den Netzstecker in
folgenden Situationen aus der
Steckdose:
–– vor der Montage/Demontage
der Aufsätze,
–– während das Gerät nicht benutzt wird
–– bei Störung des Geräts während des Betriebes.
►► Ziehen Sie die Anschlussleitung
immer am Netzstecker aus der
Steckdose, nicht an der Netzleitung selbst.
2
►► Tragen, heben oder bewegen Sie
das Gerät niemals am Netzkabel.
Erstickungsgefahr durch Verpackungsmaterialien!
►► Stellen Sie sicher, dass keine
Kinder mit dem Verpackungsmaterial spielen.
WARNUNG
Gefahr durch bewegliche Bauteile!
►► Ziehen Sie immer den Netzstecker vor dem Zusammensetzen,
Auseinandernehmen, Reinigen
oder vor der Lagerung des Gerätes.
►► Betreiben Sie das Gerät nur mit
montiertem Vorsatz.
Verletzungsgefahr durch scharfe
Messer!
►► Berühren Sie nicht die Klingen
des Kreuzmessers.
►► Stecken Sie keinesfalls Ihre
Finger oder Gegenstände in
den Zuführschacht. Führen Sie
die Lebensmittel immer mit dem
Stopfer nach, niemals mit den
Fingern oder anderen Gegenständen.
►► Betreiben Sie das Gerät nur mit
montiertem Vorsatz.
ACHTUNG
►► Lassen Sie das Gerät bei längeren
Verarbeitungszeiten zwischendurch
abkühlen, um eine Überhitzung zu
vermeiden.
BEEM - Elements of Lifestyle
DEPanther
►► Betätigen Sie den Rückwärtstaster
(7) nur max. 10 Sekunden (siehe
Kapitel Blockierungen beseitigen
(S. 6), da sonst der Motor beschädigt werden könnte.
►► Betätigen Sie den Rückwärtstaster
erst nach vollständigem Stillstand
des Antriebsmotors.
Überlastschutz
Der Motor ist durch einen Thermoschutzschalter gegen Überlastung gesichert. Er
schaltet sich bei Überlastung automatisch
ab. In diesem Fall schalten Sie das Gerät
aus und lassen es ca. 60 Minuten abkühlen.
ACHTUNG
►► Lassen Sie das Gerät bei längeren
Verarbeitungszeiten zwischendurch
abkühlen, um eine Überhitzung zu
vermeiden.
Sicherer Aufstellort
Für einen sicheren und fehlerfreien Betrieb des Gerätes muss der Aufstellort folgende Voraussetzungen erfüllen:
►►Die Unterlage des Geräts muss fest,
trocken, eben, wasserfest und hitzebeständig sein.
►►Die Umgebung des Geräts darf nicht
heiß, nass oder sehr feucht sein.
►►Die Steckdose muss leicht zugänglich sein, so dass die Netzverbindung
schnell getrennt werden kann.
►►Die Oberflächen von Möbeln enthalten
möglicherweise Bestandteile, die die
Stellfüße des Gerätes angreifen und
aufweichen können. Legen Sie gegebenenfalls eine Unterlage unter die
Stellfüße des Gerätes.
BEEM - Elements of Lifestyle
Bestimmungsgemäße
Verwendung
Dieses Gerät ist zur Zerkleinerung von
Lebensmitteln sowie zur Herstellung von
Wurst, Kebbe und Spritzgebäck für die
Verwendung im Haushalt oder ähnlichen,
nicht gewerblichen Bereichen bestimmt,
wie zum Beispiel
–– Personalküchen von Läden, Cafés,
Büros oder von einem anderen beruflichen
Umfeld
–– Landwirtschaftlichen Anwesen
–– Nutzung durch Gäste in Hotels, Motels
oder anderen Wohnanlagen
–– Bed and Breakfast-Gasthäusern
Eine andere oder darüber hinausgehende
Benutzung gilt als nicht bestimmungsgemäß.
Ansprüche jeglicher Art wegen Schäden
aus nicht bestimmungsgemäßer Verwendung sind ausgeschlossen. Das Risiko
trägt allein der Betreiber.
Verwendete Symbole
GEFAHR
Wird verwendet für eine unmittelbar drohende Gefahr, die zu schweren Körperverletzungen oder zum Tod führt.
►► Zur Vermeidung der Gefahr die hier
aufgeführten Anweisungen befolgen.
WARNUNG
Wird verwendet für eine möglicherweise
gefährliche Situation, die zu schweren
Körperverletzungen oder zum Tod führen könnte.
►► Zur Vermeidung der Gefahr die hier
aufgeführten Anweisungen befolgen.
3
PantherDE
VORSICHT
Wird verwendet für eine möglicherweise
gefährliche Situation, die zu leichten
Verletzungen oder zu Sachschäden
führen kann.
►► Zur Vermeidung der Gefahr die hier
aufgeführten Anweisungen befolgen.
ACHTUNG
Wird verwendet für eine Situation, die zu
Sachschäden führen kann.
►► Zur Vermeidung der Gefahr die hier
aufgeführten Anweisungen befolgen.
Inbetriebnahme
Auspacken
So gehen Sie vor:
1. Entnehmen Sie das Gerät, alle Zubehörteile und die Bedienungsanleitung
aus dem Karton.
2. Entfernen Sie vor dem Erstgebrauch
alle Verpackungsmaterialien und
Schutzfolien vom Gerät und den Zubehörteilen. Entfernen Sie niemals
das Typenschild und eventuelle Warnhinweise.
3. Bewahren Sie die Originalverpackung
während der Gewährleistungs- bzw.
Garantiezeit des Gerätes auf, um das
Gerät im Garantiefall ordnungsgemäß
verpackt verschicken zu können.
Transportschäden führen zum Erlöschen des Gewährleistungs- oder
Garantieanspruchs.
4. Prüfen Sie den Inhalt, auch im Stopfer, auf Vollständigkeit und auf sichtbare Schäden. Nehmen Sie ein beschädigtes Gerät nicht in Betrieb.
Anschließen
Für einen sicheren und fehlerfreien Betrieb
des Gerätes sind beim elektrischen Anschluss folgende Hinweise zu beachten:
4
►►Stellen Sie sicher, dass das Gerät
an ein vorschriftsmäßig installiertes
Schutzleitersystem angeschlossen
werden kann. Der Betrieb an einer
Steckdose ohne Schutzleiter ist verboten. Lassen Sie im Zweifelsfall die
Hausinstallation durch eine ElektroFachkraft überprüfen. Der Hersteller
übernimmt keine Verantwortung für
Schäden, die durch einen fehlenden
oder unterbrochenen Schutzleiter verursacht werden.
►►Vergleichen Sie vor dem Anschließen des Gerätes die Anschlussdaten
(Spannung und Frequenz) auf dem
Typenschild mit denen Ihres Elektronetzes. Diese Daten müssen übereinstimmen, damit keine Schäden am
Gerät auftreten. Im Zweifelsfall fragen
Sie Ihren Elektrofachhändler.
►►Die Steckdose muss mindestens über
eine 16A-Sicherung abgesichert ist.
►►Stellen Sie sicher, dass die Anschlussleitung unbeschädigt ist. Verlegen Sie
die Anschlussleitung so, dass keine
Stolpergefahr besteht. Die Anschlussleitung darf nicht über scharfe Kanten
verlegt, straff gespannt, geknickt, gequetscht oder verknotet werden. Die
Anschlussleitung darf nicht in Kontakt
mit heißen Oberflächen kommen.
Vor dem ersten Gebrauch
1. Reinigen Sie das Gerät und das Zubehör, auch die Teile im Stopfer, wie
im Kapitel Reinigung und Pflege
(S. 9) beschrieben.
HINWEIS
►► Bei der ersten Inbetriebnahme
können durch produktionsbedingte
Zusätze, wie z. B. Fette, Geruch
oder leichter Rauch entstehen. Dies
ist völlig normal! Sorgen Sie daher
für ausreichende Belüftung.
BEEM - Elements of Lifestyle
DEPanther
Gerätebeschreibung
11 Former
12 Wurstfüllscheibe
(Abbildungen siehe linke Ausklappseite)
13 Spritzgebäckaufsatz
1
Stopfer mit Deckel
14 Schieber
2
Einfülltrichter
15 Kleine Lochscheibe (Ø 3 mm)
3
Aufnahme für Vorsatz
16 Mittlere Lochscheibe (Ø 4,5 mm)
4
Entriegelungsknopf für Vorsatz
17 Große Lochscheibe (Ø 8 mm)
5
Motorblock
18 Feststellring
6
Ein-/Ausschalter
19 Kreuzmesser
7
Rückwärtstaster
20 Schnecke
8
Betriebskontrollleuchte
21 Vorsatz
9
Wurstfüllrohr
22 Antriebsritzel
23 Bedienungsanleitung
(ohne Abbildung)
10 Tülle
Bedienelemente
Entriegelungsknopf (4)
Funktion
Entriegelt den Vorsatz für die Demontage.
Ein-/Ausschalter (6)
Schaltet das Gerät Ein oder Aus.
Rückwärtstaster (7)
Dreht den Motor rückwärts.
Wenn sich nach dem Betrieb der Vorsatz nicht mehr vom
Gehäuse trennen lässt, Rückwärtstaster für 2-3 Sekunden drücken, um festsitzende Lebensmittel zu lösen.
Betriebskontrollleuchte (8)
Zeigt den Betrieb des Gerätes an.
Vorbereitungen
Je nach Verwendungszweck muss das
Gerät mit unterschiedlichen Aufsätzen
ausgerüstet werden.
1. Montieren Sie zunächst das Antriebsritzel (22) auf die Schnecke (20), wie
in der Abbildung auf der linken Ausklappseite dargestellt.
ACHTUNG
Das Gerät kann zu heiß werden, wenn
der Feststellring zu fest angedreht wird.
►► Drehen Sie den Feststellring stets
bis zum Anschlag und dann etwa um
eine Vierteldrehung wieder zurück.
BEEM - Elements of Lifestyle
Bedienung und Betrieb
ACHTUNG
►► Lassen Sie das Gerät bei längeren
Verarbeitungszeiten zwischendurch
abkühlen, um eine Überhitzung zu
vermeiden.
Verwendung als Fleischwolf
(Bild A)
1. Ziehen Sie den Netzstecker aus der
Steckdose.
2. Stecken Sie die Schnecke (20) in den
Vorsatz (21).
3. Stecken Sie das Kreuzmesser (19)
mit den Schneiden nach außen auf
den Vierkant der Schnecke.
5
PantherDE
4. Stecken Sie die gewünschte Lochscheibe (15, 16 oder 17) auf die
Schnecke. Die Kerbe der Lochscheibe
muss dabei über der Führungsnase
des Vorsatzes liegen.
5. Schrauben Sie den Feststellring (18)
auf den Vorsatz.
6. Stecken Sie den vormontierten Vorsatz in die Aufnahme (3).
7. Drehen Sie den Vorsatz gegen den
Uhrzeigersinn, bis er hörbar einrastet
(Bild E1).
8. Stecken Sie den Einfülltrichter (2) auf
den Vorsatz.
4. Stecken Sie das Wurstfüllrohr (9)
durch den Feststellring (18).
5. Schrauben Sie den Feststellring (18)
auf den Vorsatz.
HINWEIS
►► Wenn Sie ganz feines Hackfleisch
herstellen möchten, können Sie
das Fleisch mehrmals durchlaufen
lassen. Wählen Sie dazu zuerst eine
Lochscheibe mit großem Lochdurchmesser, dann eine Lochscheibe mit
kleinerem Lochdurchmesser.
►► Sie können weitere Zutaten
(z.B.Zwiebel) zusammen mit dem
Hackfleisch zerkleinern.
So gehen Sie vor:
1. Ziehen Sie den Netzstecker aus der
Steckdose.
2. Stecken Sie die Schnecke (20) in den
Vorsatz (21).
3. Stecken Sie den Former (11) auf die
Schnecke. Die Kerbe im Former muss
dabei über der Führungsnase des
Vorsatzes liegen.
4. Stecken Sie die Tülle (10) auf den
Former.
5. Schrauben Sie den Feststellring (18)
auf den Vorsatz.
6. Stecken Sie den vormontierten Vorsatz in die Aufnahme (3).
7. Drehen Sie den Vorsatz gegen den
Uhrzeigersinn, bis er hörbar einrastet
(Bild E1).
8. Stecken Sie den Einfülltrichter (2) auf
den Vorsatz.
Blockierungen beseitigen
So gehen Sie vor:
1. Schalten sie das Gerät aus.
2. Betätigen Sie den Rückwärtstaster für
ca. 2-3 Sekunden. Die Schnecke kann
sich so befreien und Sie können den
Vorsatz leicht abnehmen.
Herstellung von Wurst (Bild B)
So gehen Sie vor:
1. Ziehen Sie den Netzstecker aus der
Steckdose.
2. Stecken Sie die Schnecke (20) in den
Vorsatz (21).
3. Stecken Sie die Wurstfüllscheibe (12)
auf die Schnecke. Die Kerbe in der
Wurstfüllscheibe muss dabei über der
Führungsnase des Vorsatzes liegen.
6
6. Stecken Sie den vormontierten Vorsatz in die Aufnahme (3).
7. Drehen Sie den Vorsatz gegen den
Uhrzeigersinn, bis er hörbar einrastet
(Bild E1).
8. Stecken Sie den Einfülltrichter (2) auf
den Vorsatz.
Herstellung von Kebbe (Bild C)
Herstellung von Spritzgebäck
(Bild D)
So gehen Sie vor:
1. Ziehen Sie den Netzstecker aus der
Steckdose.
2. Stecken Sie die Schnecke (20) in den
Vorsatz (21).
3. Stecken Sie die große Lochscheibe
(17) auf die Schnecke. Die Kerbe der
Lochscheibe muss dabei über der
Führungsnase des Vorsatzes liegen.
BEEM - Elements of Lifestyle
DEPanther
4. Stecken Sie den Spritzgebäckaufsatz
(13) ohne den Schieber (14) auf die
Lochscheibe.
4. Halten Sie den Entriegelungsknopf (4)
gedrückt.
5. Schrauben Sie den Feststellring (18)
auf den Vorsatz.
5. Drehen Sie den Vorsatz im Uhrzeigersinn und ziehen Sie ihn von der
Aufnahme (3) ab (Bild E2).
6. Stecken Sie den Schieber auf den
Spritzgebäckaufsatz.
6. Schrauben Sie den Feststellring (18)
ab.
7. Stecken Sie den vormontierten Vorsatz in die Aufnahme (3).
7. Entnehmen Sie alle Teile aus dem
Vorsatz.
8. Drehen Sie den Vorsatz gegen den
Uhrzeigersinn, bis er hörbar einrastet
(Bild E1).
9. Stecken Sie den Einfülltrichter (2) aufden Vorsatz.
Nach dem Gebrauch
So gehen Sie vor:
1. Schalten sie das Gerät aus.
2. Ziehen Sie den Netzstecker aus der
Steckdose.
3. Demontieren Sie den Vorsatz, wie
im Abschnitt Gerät demontieren
(S. 7) beschrieben.
HINWEIS
►► Wenn sich der Vorsatz nicht mehr
vom Gehäuse trennen lässt, beseitigen Sie die Blockierung, wie im
Kapitel Blockierungen beseitigen
(S. 6) beschrieben.
4. Reinigen Sie das Gerät und die verwendeten Zubehörteile wie im Kapitel
Reinigung und Pflege (S. 9) beschrieben.
Gerät demontieren
So gehen Sie vor:
1. Schalten Sie das Gerät aus.
2. Ziehen Sie den Netzstecker aus der
Steckdose.
3. Ziehen Sie den Einfülltrichter (2) ausdem Vorsatz (21).
BEEM - Elements of Lifestyle
Rezeptvorschläge
Rostbratwurst
Verwenden Sie für ca. 20 Stück die folgenden Zutaten:
●● 1,5 kg Schweinefleisch
●● 500 g roher Speck
●● 2 Eier aus dem Kühlschrank
●● 100 ml kalte Milch
●● 1 große Zwiebel
●● 1 Zehe Knoblauch
●● Gewürze: Salz, Pfeffer, Majoran
So gehen Sie vor:
1. Schweinefleisch und Speck im
Fleischwolf zerkleinern.
2. Geben Sie die Milch, Eier, fein gehackte Zwiebel, gepresste Knoblauchzehe und die Gewürze hinzu und
vermischen Sie alles.
3. Wursthülle auf das Wurstfüllrohr (9)
aufziehen und das Ende verknoten.
4. Wurstmasse in den Einfülltrichter geben und langsam einfüllen. Nach etwa
20 cm die Wurst drehen und gleichmäßig weiter füllen.
Tipps:
1. Am besten schmecken die Würste,
wenn sie gleich gegrillt werden.
2. Sie können die Würste aber auch für
etwa 3 Wochen einfrieren.
7
PantherDE
Fleischhülle für Kebbe
Verwenden Sie für ca. 20 Stück die folgenden Zutaten:
●● 250 g Bulgurweizen
●● 500 g mageres Rind-, Hammel- oder
Kalbfleisch
●● 2 Eier aus dem Kühlschrank
●● 1 fein gehackte Zwiebel
●● Salz
●● Pfeffer
So gehen Sie vor:
1. Aus den Zutaten wird ein geschmeidiger Teig hergestellt.
2. Weichen Sie den Bulgur in Wasser ein
und schütten Sie nach etwa 20 min
überschüssiges Wasser weg.
3. Zerkleinern Sie das Fleisch mehrmals
hintereinander im Fleischwolf.
4. Vermengen Sie das Fleisch, den Bulgur und die fein gehackte Zwiebel zu
einem geschmeidigen Teig und würzen Sie es mit Pfeffer und Salz.
5. Füllen Sie das gewürzte Hackfleisch
in den Einfülltrichter.
6. Drücken Sie mit dem Stopfer das
Hackfleisch nach unten, bis der Zuführschacht leer ist.
7. Schneiden Sie die hohle Fleischrolle
auf die gewünschte Länge.
Tipps:
1. Statt Bulgurweizen können Sie auch
Mehl (etwa 200-250 g) verwenden.
2. Frieren Sie die fertigen Fleischhüllen
kurz an, damit das Einfüllen einfacher
gelingt.
Klassische Kebbe-Füllung
Verwenden Sie für ca. 20 Stück die folgenden Zutaten:
●● 500 g Hammelfleisch (oder z. B. Rindfleisch)
8
●●
●●
●●
●●
●●
●●
2 Esslöffel Pinienkerne
1 gehackte Zwiebel
etwas Olivenöl
Salz
Pfeffer
Frittierfett
So gehen Sie vor:
1. Zerkleinern Sie das Fleisch dreimal
hintereinander im Fleischwolf.
2. Zwiebel in Olivenöl dünsten. Pinienkerne zugeben und goldbraun anbraten.
3. Fleisch zufügen, mit Salz und Pfeffer
würzen und so lange anbraten, bis
das Fleisch eine knusprige Farbe annimmt.
4. Füllen Sie nun das Hackfleisch in
die Fleischhülle und drücken Sie die
Enden mit feuchten Händen zusammen, um sie zu verschließen. Für
die typische Form werden die Enden
der eiförmigen Klößchen zu Spitzen
geformt.
5. Frittieren Sie die Kebbe-Stücke goldbraun in auf ca. 160-170° C erhitztem
Frittierfett.
6. Nehmen Sie die fertigen Stücke aus
dem Fett, lassen Sie sie auf einem
Küchenpapier abtropfen und servieren
Sie sie anschließend heiß.
Tipps:
1. Dazu schmecken z. B. Salate, Dips
und Fladenbrot.
Spritzgebäck
Verwenden Sie die folgenden Zutaten:
●● 200 g Butter
●● 200 g Zucker
●● 1 Päckchen Vanillezucker
●● 200 g gemahlene Mandeln
●● 2 Eier
●● 400 g Mehl
●● 100 g Speisestärke
BEEM - Elements of Lifestyle
DEPanther
So gehen Sie vor:
1. Rühren Sie Butter, Zucker, Vanillezucker schaumig und geben Sie nach
und nach die Eier hinzu.
3. Reinigen Sie die Aufsätze und das
Zubehör in warmer Spülmittellösung.
Verwenden Sie keinen Metall-/Scheuerschwamm zur Reinigung.
2. Geben Sie Mandeln, Mehl und Speisestärke zur Buttermasse und vermengen Sie alles gut miteinander.
4. Trocknen Sie alle Geräteteile nach
der Reinigung gut ab, bevor Sie sie in
das Gerät einsetzen.
3. Wickeln Sie den Teig in Frischhaltefolie und lassen Sie ihn vor der Weiterverarbeitung 30 min ruhen.
HINWEIS
►► Alle Zubehörteile aus Kunststoff
sind spülmaschinengeeignet. Alle
Zubehörteile aus Metall sind nicht
spülmaschinengeeignet.
4. Montieren Sie zunächst den Spritzgebäckaufsatz. Füllen Sie den Teig in
den Einfülltrichter und lassen Sie ihn
durch den Spritzgebäckaufsatz laufen.
5. Schneiden Sie das Spritzgebäck auf
die gewünschte Länge und setzen
Sie die Stücke auf ein mit Backpapier
ausgelegtes Backblech.
6. Backen Sie die Plätzchen bei Mittelhitze (ca. 175 °C) ca. 10 min.
Reinigung und Pflege
WARNUNG
Gefahr durch elektrischen Strom!
►► Tauchen Sie das Gerät oder den
Netzstecker niemals in Wasser oder
andere Flüssigkeiten.
►► Halten Sie das Gerät nie unter fließendes Wasser.
ACHTUNG
Beschädigung der Oberflächen.
►► Verwenden Sie zum Reinigen der
Oberflächen keine scharfen Gegenstände oder scheuernde Reinigungsmittel.
So gehen Sie vor:
1. Ziehen Sie den Netzstecker aus der
Steckdose.
2. Wischen Sie den Motorblock (5) mit
einem leicht feuchten Tuch ab.
BEEM - Elements of Lifestyle
Lagerung
Sollten Sie das Gerät längere Zeit nicht
benötigen, reinigen Sie es, wie im Kapitel
Reinigung und Pflege (S. 9) beschrieben.
Bewahren Sie das Gerät und alle Zubehörteile an einem trocknen, sauberen und
frostfreien Ort auf, an dem es vor direktem
Sonnenlicht geschützt ist.
Allgemeine Hinweise
Hinweise zum Umweltschutz
Die verwendeten Verpackungsmaterialien sind recyclebar. Entsorgen Sie
nicht mehr benötigte Verpackungsmaterialien gemäß den örtlich geltenden Vorschriften.
Dieses Produkt darf innerhalb der
Europäischen Union nicht im normalen Hausmüll entsorgt werden. Entsorgen Sie das Gerät über die kommunalen Sammelstellen.
Gewährleistung/Garantie
Neben der gesetzlichen Gewährleistungspflicht übernimmt BEEM bei einigen
Produkten zusätzlich eine erweiterte Herstellergarantie.
9
PantherDE
Sofern diese gewährt ist, finden Sie entsprechende Angaben entweder auf der
produktspezifischen Verpackung, den
Werbematerialien oder auf der BEEM
Webseite beim jeweiligen Produkt.
Bei einer gewerblichen oder gleichzustellenden Nutzung, z.B. in Hotels, Pensionen oder Gemeinschaftsanlagen, oder
wenn der Kunde kein Verbraucher im
Sinne des Bürgerlichen Gesetzbuchs ist,
beträgt die Garantiezeit 6 Monate. Der
Gewährleistungsausschluss bleibt hiervon unberührt.
Konformitätserklärung
Hiermit erklärt die Firma BEEM, dass sich
dieses Gerät in Übereinstimmung mit den
grundlegenden Anforderungen und den
übrigen einschlägigen Bestimmungen der
Richtlinien 2006/95/EG, 2004/108/EG und
2009/125/EG befindet.
Auf unserer Webseite www.beem.de finden Sie die ausführlichen Garantiebedingungen, erhältliches Zubehör und Ersatzteile sowie Bedienungsanleitungen in
verschiedenen Sprachen.
Für Garantiebedingungen, Zubehörbestellungen oder Fragen zur Serviceabwicklung außerhalb Deutschlands kontaktieren Sie Ihren Händler.
Haftungsbeschränkungen
Wir übernehmen keine Haftung für Schäden oder Folgeschäden bei:
■■ Nichtbeachtung der Bedienungsanleitung,
■■ nicht bestimmungsgemäßer Verwendung,
■■ unsachgemäßer oder ungeeigneter
Behandlung,
■■ nicht sachgemäß durchgeführten Reparaturen,
■■ unerlaubten Veränderungen,
■■ Verwendung von fremden Teilen bzw.
Ersatzteilen,
■■ Verwendung von ungeeigneten Ergänzungs- oder Zubehörteilen.
10
BEEM - Elements of Lifestyle
ENPanther
Contents
Safety. . . . . . . . . . . . . . . . . . . . . . . . . . . 11
Getting started. . . . . . . . . . . . . . . . . . . . 13
Appliance description. . . . . . . . . . . . . . 14
Preparations. . . . . . . . . . . . . . . . . . . . . 15
Operation and controls. . . . . . . . . . . . . 15
Disassembling the appliance. . . . . . . . 17
Recipe suggestions. . . . . . . . . . . . . . . 17
Cleaning and care. . . . . . . . . . . . . . . . . 18
Storage. . . . . . . . . . . . . . . . . . . . . . . . . . 19
General information . . . . . . . . . . . . . . . 19
Dear customer,
Before using the appliance, please read
the information contained in this user manual regarding setup, safety and intended
use as well as cleaning and care.
Open the fold-out pages at the beginning
and end of the user manual so that you
can view the illustrations while reading.
Keep this user manual for later use and
give it to any future owner along with the
appliance.
Safety
►►Only use the appliance for the use
described. Do not use the appliance for other, possibly similar,
uses under any circumstances.
►►This appliance must not be used
by children.
►►The appliance and its power cable
must be kept out of the reach of
children.
►►Children must not play with the appliance.
BEEM - Elements of Lifestyle
►►Store the appliance and the acces-
sory parts out of the reach of children under 8 years of age.
►►Inspect the appliance before use
for visible, external damage. Do
not operate a damaged appliance.
►►Do not leave the appliance unattended during operation.
►►Only use accessory parts of the
manufacturer or those which are
expressly recommended by the
manufacturer. Otherwise all warranty or guarantee rights are void.
►►Do not use this appliance in combination with an external timer or a
separate remote control system.
►►Only have repairs to the appliance
performed by a customer service
representative authorised by the
manufacturer because otherwise,
in the event of damage or subsequent malfunctions, there is no
longer any guarantee or warranty
coverage. This also applies specifically to the replacement of a
damaged power supply cord. Considerable hazards for the user can
result from improper repairs.
►►Only replace defective components with original spare parts.
Only these parts ensure that the
safety requirements are fulfilled.
►►During the warranty and guarantee period, repair of the appliance must only be performed by
a customer service representative
authorised by the manufacturer,
otherwise, in the event of any damage or subsequent malfunction,
the warranty will be void.
11
PantherEN
DANGER
Hazard due to electrical current!
►► Do not use the appliance if the
mains cord or plug are damaged.
►► Do not open the housing of the
appliance under any circumstances. If energised connections are touched or the electrical
or mechanical configuration is
changed, there is a risk of electrical shock.
►► Never immerse the motor block
or the mains plug in water or
other liquids.
►► Unplug the mains plug from the
socket in the following situations:
–– before mounting/removing the
attachments
–– before cleaning the appliance
–– When the appliance is not in
use
–– When there is a malfunction of
the appliance during operation.
►► Always pull the power supply
cord out of the mains socket by
the plug and not by the mains
cord itself.
►► Never carry, lift or move the appliance by the mains cord.
Risk of suffocation due to packaging
material!
►► Ensure that no children play with
the packaging material.
WARNING
Hazard due to moving components!
►► Always pull the mains plug
before assembling, dismantling,
cleaning or storing the appliance.
12
►► Only operate the appliance when
the attachment body is mounted
and locked in place.
Risk of injury due to sharp blades!
►► Do not touch the blades of the
mincing knife.
►► Never put your fingers or any
other object into the feeding
chute. Only use the pusher to
add foods. Never use your fingers or other objects.
►► Only operate the appliance with
the attachment body mounted.
CAUTION
►► Allow the appliance to cool now and
then when processing for longer
periods of time to avoid overheating.
►► Only operate the reversing button (7)
for a maximum of 10 seconds (see
the chapter Clearing blockages
(page 15) because otherwise the
motor could be damaged.
►► Only operate the reversing button
after the drive motor has come to a
complete standstill.
Overload protection
The motor is protected against overloading by a thermal circuit breaker. It shuts off
automatically in the event of overloading.
In this case, switch the appliance off and
allow it to cool for about 60 minutes.
ATTENTION
►► Allow the appliance to cool now and
then when processing for longer
periods of time to avoid overheating.
Safe operation site
The operation site must meet the following
requirements to ensure safe and troublefree operation of the appliance:
BEEM - Elements of Lifestyle
ENPanther
►►The operating surface of the appliance
must be solid, dry, level and both water
and heat resistant.
►►The immediate surroundings of the
appliance must not be hot, wet or very
damp.
►►The socket must be easily accessible
so that the mains connection can be
disconnected quickly.
►►Furniture surfaces may possibly contain substances which could affect the
feet of the appliance, causing them to
soften. Place another material under
the feet of the appliance if needed.
Designated use
This appliance is intended for mincing
foods as well as for the preparation of
sausage, Kebbe and spritz biscuits for use
in household or similar non-commercial
areas, such as:
–– Staff kitchens in shops, cafés, offices
or other employment environments
–– Agricultural estates
–– Use by guests in hotels, motels or
other forms of accommodation
–– Bed and breakfast establishments
Any other use, or a use which goes beyond these, constitutes improper use.
All claims whatsoever for damage arising from improper use are excluded. The
owner bears the sole risk.
Symbols used
DANGER
This is used for a hazard which is an immediate threat leading to severe bodily
injury or to death.
►► To avoid the hazard, follow the
instructions given here.
BEEM - Elements of Lifestyle
WARNING
This is used for a possibly hazardous
situation which could lead to severe
bodily injury or to death.
►► To avoid the hazard, follow the
instructions given here.
CAUTION
This is used for a possibly hazardous
situation which could lead to minor
injuries.
►► To avoid the hazard, follow the
instructions given here.
ATTENTION
►► A note contains additional information to simplify the use of the appliance.
Getting started
Unpacking
Proceed as follows:
1. Take the appliance, all accessories
and the user manual out of the box.
2. Remove all packaging material and
protective films from the appliance
and the accessories before using
them for the first time. Never remove
the type plate or any warning notices.
3. Keep the original packaging for the
duration of the appliance’s warranty
or guarantee period so that the appliance can be packaged properly for
shipping in the event of a warranty
claim. Shipping damage voids the
guarantee or warranty.
4. Check the contents, including in the
pusher, for completeness and visible
damage. Do not operate a damaged
appliance.
13
PantherEN
Power connection
The following regulations for the electrical
supply must be observed to ensure safe
and trouble-free operation of the appliance:
►►Be certain that the appliance can be
connected to a properly installed protective conductor electrical system. Operation using a socket without an earth
conductor is not permitted. If in doubt,
have the house mains network inspected by an electrician. The manufacturer
assumes no responsibility for damage
resulting from the absence or interruption of a protective earth conductor.
►►Before connecting the appliance, compare the electrical data (voltage and
frequency) on the type plate with that
of your electrical mains network. These
data must match to avoid damage to
the appliance. If in doubt, ask your electrical appliance retailer.
►►Be certain that the socket is protected
by at least a 16 A fuse.
►►Be certain that the power supply cord is
not damaged. Route the power supply
cord in such a way that it poses no risk
of stumbling. The power supply cord
must not be routed over sharp edges,
be pulled taut kinked, crushed or knotted. The power supply cord must not
come into contact with hot surfaces.
Before first use
1. Clean the appliance and the accessories, including parts in the pusher,
as described in the chapter Cleaning
and care (page 18).
14
NOTE
►► When using for the first time, it is
possible that production-related
additives such as grease could
cause slight odour or smoke. This is
completely normal! Ensure sufficient
ventilation.
Appliance description
(For illustrations, see the fold out page at
the left.)
1
Tamper with cover
2
Hopper
3
Holding fixture for attachment body
4
Catch for attachment body
5
Motor block
6
On/off switch
7
Reversing button
8
Indicator lamp
9
Sausage filling tube
10 Spout
11 Shaper
12 Sausage filling screen
13 Spritz biscuit attachment
14 Slider
15 Fine screen (Ø 3 mm)
16 Medium screen (Ø 4.5 mm)
17 Coarse screen (Ø 8 mm)
18 Ring nut
19 mincing knife
20 Screw
21 Attachment body
22 Drive sprocket
23 User manual (not shown)
BEEM - Elements of Lifestyle
ENPanther
Controls
Function
Catch (4)
Releases the attachment body for dismantling.
On/off switch (6)
Reversing button (7)
Indicator lamp (8)
Switches the appliance on or off.
Reverses the direction of the motor.
If the attachment body cannot be separated from the
housing after operation, press the reversing button for
2-3 seconds to loosen stuck foods.
Indicates that the appliance is operating.
Preparations
The appliance must be equipped with
different attachments depending on the
intended application.
1. First mount the drive sprocket (22) on
the screw (20) as shown in the illustration on the fold out page at the left.
ATTENTION
The appliance can become too hot if the
ring nut is screwed on too tightly.
►► Always screw the ring nut fully to the
stop and then loosen it again by one
quarter turn.
4. Place the desired screen (15, 16 or
17) onto the screw. The notch in the
screen must be positioned over the
guide lug of the attachment body.
5. Screw the ring nut (18) onto the attachment body.
6. Place the assembled attachment body
into the holding fixture (3).
7. Turn the attachment body anti- clockwise until it can be heard as it clicks
into place (Figure E1).
8. Place the hopper (2) onto the attachment body.
ATTENTION
►► Allow the appliance to cool now and
then when processing for longer
periods of time to avoid overheating.
NOTE
►► If you wish to make very fine minced
meat, you may put the meat through
the appliance several times. To
do this, first select a screen with a
coarse or large holes, then a screen
with smaller holes.
►► You can also mince other ingredients
(e.g. onions) along with the meat.
Use as a meat grinder (Figure A)
Clearing blockages
Operation and controls
1. Unplug the mains plug from the socket.
2. Place the screw (20) into the attachment body (21).
3. Place the mincing knife (19) onto the
square drive of the screw with the
blades facing outwards.
BEEM - Elements of Lifestyle
Proceed as follows:
1. Switch the appliance off.
2. Operate the reversing button for about
2-3 seconds. This enables the screw
to free itself and you can easily remove the attachment body.
15
PantherEN
Making sausage (Figure B)
Proceed as follows:
1. Unplug the mains plug from the
socket.
2. Place the screw (20) into the attachment body (21).
3. Place the sausage filling screen (12)
onto the screw. The notch in the sausage filling screen must be positioned
over the guide lug of the attachment
body.
4. Push the sausage filling tube (9)
through the ring nut (18).
5. Screw the ring nut (18) onto the attachment body.
6. Place the assembled attachment body
into the holding fixture (3).
7. Turn the attachment body anti-clockwise until it can be heard as it clicks
into place (Figure E1).
8. Place the hopper (2) onto the attachment body.
Making Kebbe (Figure C)
Proceed as follows:
1. Unplug the mains plug from the
socket.
2. Place the screw (20) into the attachment body (21).
3. Place the shaper (11) onto the screw.
The notch in the shaper must be positioned over the guide lug of the attachment body.
4. Place the spout (10) onto the shaper.
5. Screw the ring nut (18) onto the attachment body.
6. Place the assembled attachment body
into the holding fixture (3).
7. Turn the attachment body anti- clockwise until it can be heard as it clicks
into place (Figure E1).
8. Place the hopper (2) onto the attachment body.
16
Making spritz biscuits (Figure D)
Proceed as follows:
1. Unplug the mains plug from the
socket.
2. Place the screw (20) into the attachment body (21).
3. Place the coarse screen (17) onto the
screw. The notch in the screen must
be positioned over the guide lug of the
attachment body.
4. Place the spritz biscuits attachment (13)
onto the screen without the slider (14).
5. Screw the ring nut (18) onto the attachment body.
6. Place the slider onto the spritz biscuits
attachment.
7. Place the assembled attachment body
into the holding fixture (3).
8. Turn the attachment body anti- clockwise until it can be heard as it clicks
into place (Figure E1).
9. Place the hopper (2) onto the attachment body.
After use
Proceed as follows:
1. Switch the appliance off.
2. Unplug the mains plug from the
socket.
3. Disassemble the attachment body as
described in the section Disassembling the appliance (page 17).
NOTE
►► If the attachment body cannot
be separated from the housing,
clear the blockage as described in
the section Clearing blockages
(page 15).
BEEM - Elements of Lifestyle
ENPanther
4. Clean the appliance and the accessories used as described in the section
Cleaning and care (page 18).
Disassembling the appliance
Proceed as follows:
1. Switch the appliance off.
2. Unplug the mains plug from the
socket.
3. Pull the hopper (2) out of the attachment body (21).
4. Keep down the catch (4).
5. Turn the attachment body clockwise
and pull it off of the holding fixture (3)
(Figure E2).
6. Unscrew the ring nut (18).
7. Remove all parts from the attachment
body.
Recipe suggestions
Bratwurst
Use the following ingredients for a
quantity of about 20:
●● 1.5 kg pork
●● 500 g raw bacon
●● 2 eggs from the refrigerator
●● 100 ml cold milk
●● 1 large onion
●● 1 clove garlic
●● Salt, pepper marjoran
Proceed as follows:
1. Mince the pork and bacon in the meat
grinder.
2. Add the milk, eggs, finely chopped onion, pressed garlic clove and seasonings and mix well.
3. Push the sausage skin over the sausage filling tube (9) and knot the end.
4. Put the mixed sausage meat into the
hopper and slowly fill. After about 20 cm,
BEEM - Elements of Lifestyle
twist the sausage and the continue filling
evenly.
Tips:
1. The sausages taste best if they are
grilled right away.
2. You can freeze the sausages for
about 3 weeks.
Meat for the Kebbe shell
Use the following ingredients for a
quantity of about 20:
●● 250 g bulgur wheat
●● 500 g lean beef, mutton or veal
●● 2 eggs from the refrigerator
●● 1 finely chopped onion
●● Salt
●● Pepper
Proceed as follows:
1. The ingredients are mixed until a
smooth texture is obtained.
2. Allow the bulgur to soak in water for
about 20 minutes and then pour off
excess water.
3. Mince the meat repeatedly by putting
it through the meat grinder several
times.
4. Mix the meat, the bulgur and the finely
chopped onion until it has a smooth
texture and season it with salt and
pepper.
5. Load the seasoned minced meat into
the hopper.
6. Press the minced meat downwards
with the pusher until the feeding chute
is empty.
7. Cut the hollow meat roll to the desired
length.
Tips:
1. Flour (about 200-250 g) can also be
used instead of bulgur wheat.
17
PantherEN
2. Allow the meat shells to freeze slightly
to make filling easier.
Classic Kebbe filling
Use the following ingredients for a
quantity of about 20:
●● 500 g mutton (or beef)
●● 2 Tbls. pine nuts
●● 1 chopped onion
●● Some olive oil
●● Salt
●● Pepper
●● Deep-frying fat
Proceed as follows:
1. Mince the meat repeatedly by putting it
through the meat grinder three times.
2. Sauté the onion in olive oil, add the
pine nuts and allow to become golden
brown.
3. Add the meat, season with salt and
pepper and continue sautéing until the
meat takes on a crispy colour.
4. Now fill the meat shells with the
minced meat and press the ends together with moistened hands so they
are well closed. To obtain the typical
form, the ends of the egg-shaped
balls are drawn to a point.
5. Deep-fry the Kebbe pieces until golden brown in deep-frying fat heated to
about 160-170° C
6. Remove the pieces from the fat when
done and allow them to drip off on
some paper towel and then serve
them hot.
Tips:
1. They are tasty when served with salads, dips or pita bread.
18
Spritz biscuits
Use the following ingredients:
●● 200 g butter
●● 200 g sugar
●● 1 package vanilla sugar
●● 200 g ground almonds
●● 2 eggs
●● 400 g flour
●● 100 g starch
Proceed as follows:
1. Stir the butter, sugar and vanilla sugar
until creamy and then add the eggs
gradually.
2. Add the almonds, flour and starch to
the butter mass and mix further until
well distributed.
3. Wrap the dough in plastic foil and allow it to rest for 30 minutes before
continuing.
4. Mount the spritz biscuits attachment.
Put the dough into the hopper and allow it to run through the spritz biscuits
attachment.
5. Cut the spritz biscuits to the desired
length and place the pieces onto a
baking sheet lined with baking paper.
6. Bake the biscuits at medium heat
(about 175 °C) for about 10 minutes.
Cleaning and care
DANGER
Hazard due to electrical current!
►► Never immerse the appliance or the
mains plug in water or other liquids.
►► Never hold the appliance under running water.
BEEM - Elements of Lifestyle
ENPanther
ATTENTION
Damage to the surfaces.
►► Do not use any sharp instruments
or abrasive cleaning agents to clean
the surfaces.
Proceed as follows:
1. Unplug the mains plug from the socket.
2. Wipe off the motor block (5) with a
slightly damp cloth.
3. Clean the attachments and the accessories in warm washing-up water. Do
not use a metal scourer or an abrasive sponge for cleaning.
4. Thoroughly dry all parts after cleaning
and before placing them back into the
appliance.
NOTE
►► All accessories made of plastic are
dishwasher safe. All accessories
made of metal are not dishwasher
safe.
Storage
If you do not need the appliance for a
longer period of time, clean it as described in the chapter Cleaning and care
(page 18).
Store the appliance and all accessories
in a clean, dry and frost-free location protected from direct sunlight.
General information
A note about environmental
protection
The packaging materials used can
be recycled. Dispose of packaging
materials which are no longer needed in
accordance with local regulations.
This product may not be disposed of
as normal household waste within
the European Union. Dispose of the
BEEM - Elements of Lifestyle
appliance via municipal collection points.
Warranty/guarantee
In addition to the statutory warranty obligation, BEEM also offers an extended manufacturer’s guarantee on certain products.
If offered, you will find the appropriate details either on the product-specific packaging, promotional materials or on the BEEM
website for the particular product.
In the case of commercial or equivalent
use, for example in hotels, guest houses
or communal facilities, or if the customer
is not a consumer in the sense of the Civil
Code, the warranty period is 6 months.
This has no effect on the warranty exclusion.
The full warranty conditions, accessories
available and spare parts as well as user
manuals in various languages can be
found on our website at www.beem.de.
Contact your dealer for the warranty conditions, for ordering accessories or with
any questions regarding servicing outside
of Germany.
Limitation of liability
We assume no liability for damage or consequential damage caused by:
■■ failing to observe the operating instructions,
■■ use for any other than the designated
purpose,
■■ improper or inappropriate handling,
■■ inexpert repairs,
■■ unauthorised modifications,
■■ use of third-party parts and spare
parts,
■■ use of unsuitable add-ons or accessories.
19
PantherEN
Declaration of Conformity
BEEM hereby declares that this appliance complies with the fundamental requirements and other relevant provisions
of 2006/95/EC and 2004/108/EC and
2009/125/EC directives.
20
BEEM - Elements of Lifestyle
FRPanther
Table des matières
Sécurité . . . . . . . . . . . . . . . . . . . . . . . . . 21
Mise en service . . . . . . . . . . . . . . . . . . . 24
Description de l'appareil. . . . . . . . . . . . 25
Préparations. . . . . . . . . . . . . . . . . . . . . 25
Utilisation et fonctionnement. . . . . . . . 25
Démontage de l’appareil. . . . . . . . . . . . 27
Suggestions de recettes. . . . . . . . . . . . 27
Nettoyage et entretien. . . . . . . . . . . . . . 29
Rangement. . . . . . . . . . . . . . . . . . . . . . . 29
Informations générales. . . . . . . . . . . . . 29
Cher client,
Avant d‘utiliser l‘appareil, nous vous
recommandons de lire les consignes
détaillées dans la présente notice d‘utilisation concernant la mise en service, la
sécurité, l‘utilisation conforme à la destination de l‘appareil ainsi que le nettoyage et
l‘entretien de ce dernier.
Dépliez les rabats au début et à la fin de
la notice d‘utilisation pour vous permettre
de voir les images tout en lisant le texte de
la notice.
Conservez cette notice d‘utilisation pour
une consultation ultérieure et transmettezla avec l‘appareil à son prochain propriétaire.
Sécurité
►►N’utilisez l’appareil que pour l’usa-
ge décrit. N’utilisez en aucun cas
l’appareil pour une autre finalité
éventuellement proche.
►►Cet appareil ne doit pas être utilisé
par les enfants.
►►Tenir l’appareil et son câble de
branchement hors de portée des
enfants.
BEEM - Elements of Lifestyle
►►Ne pas laisser les enfants jouer
avec l’appareil.
►►Rangez l’appareil et ses accessoires hors de portée des enfants de
moins de 8 ans.
►►Avant d’utiliser l’appareil, contrôlez-le pour vérifier qu’il ne présente
aucun dommage apparent. Ne
mettez pas en service un appareil
endommagé.
►►Pendant l’utilisation de l’appareil,
ne le laissez pas sans surveillance.
►►Utilisez uniquement des accessoires fournis par le fabricant ou
explicitement recommandés par ce
dernier. A défaut, vous ne pourrez
pas vous prévaloir de la responsabilité ou de la garantie.
►►N’utilisez pas cet appareil combiné
à une minuterie externe ou un système à télécommande séparé.
►►Toute réparation de l’appareil doit
uniquement être réalisée par un
service clientèle autorisé par le fabricant, afin d’éviter l’annulation de
la responsabilité et de la garantie
en cas de dommages et de dysfonctionnements consécutifs. Cette
obligation s’applique en particulier
pour le remplacement d’un câble
de branchement endommagé. Les
réparations inappropriées sont
sources de dangers importants
pour l’utilisateur.
►►Les composants défectueux doivent uniquement être remplacés
par des pièces de rechange d’origine. L’utilisation de ces pièces est
une condition préalable au respect
des exigences de sécurité.
21
PantherFR
►►Les réparations de l’appareil pen-
dant la période de garantie légale
ou de garantie contractuelle doivent obligatoirement être réalisées
par un service après-vente autorisé par le constructeur afin d’éviter
la déchéance du droit à garantie
légale ou contractuelle dans le cas
où l’appareil serait endommagé et
cesserait de fonctionner correctement par la suite.
VUE D’ENSEMBLE DES RISQUES
Danger dû au courant électrique !
►► N‘utilisez pas l‘appareil lorsque
le câble ou la fiche électrique est
endommagé.
►► N‘ouvrez jamais le boîtier de
l‘appareil. Risque d‘électrocution en cas de contact avec des
connexions sous tension et de
modification des caractéristiques
électriques et mécaniques.
►► Ne plongez jamais le bloc moteur
ou la fiche secteur dans l‘eau ou
d‘autres liquides.
►► Débranchez la fiche secteur
dans les situations suivantes :
–– avant le montage/démontage
des adaptateurs
–– avant de nettoyer l’appareil
–– pendant que l’appareil n’est
pas utilisé
–– en cas de panne de l’appareil
en cours d’utilisation.
►► Retirez toujours le câble de branchement de la prise électrique en
le saisissant au niveau de la fiche
électrique, sans tirer sur le câble
électrique lui-même.
22
►► Ne portez et ne levez jamais
l‘appareil à l‘aide du câble électrique.
Risque d‘étouffement avec les emballages !
►► Assurez-vous qu‘aucun enfant
ne joue avec l‘emballage.
AVERTISSEMENT
Danger résultant des pièces mobiles !
►► Débranchez la fiche électrique
avant le montage, le démontage,
le nettoyage ou le rangement de
l‘appareil.
►► N‘utilisez l‘appareil qu‘avec
l‘adapteur monté et verrouillé..
Risque de blessures dues aux lames coupantes !
►► Ne touchez pas les lames du
couteau en croix
►► Ne mettez jamais les doigts ou
d‘objet dans l‘ouverture d‘entrée.
Introduisez toujours le produit à
l‘aide du poussoir, mais jamais
avec les doigts ou un autre objet.
►► Ne faire fonctionner l‘appareil
qu‘avec l‘adaptateur mis en
place.
ATTENTION
►► Laissez l‘appareil refroidir pendant
les temps de préparation longs afin
d‘éviter toute surchauffe.
►► Actionnez pendant 10 secondes
maximum sur le bouton marche
arrière (7) (voir chapitre Eliminer les
blocages (page 26) afin d‘éviter
d‘endommager le moteur.
►► Actionnez le bouton marche arrière
une fois le moteur d‘entraînement
complètement arrêté.
BEEM - Elements of Lifestyle
FRPanther
Protection contre les surtensions
Le moteur est protégé contre les surtensions par un disjoncteur thermique. Celuici coupe le moteur en cas de surcharge.
Vous devez alors éteindre l’appareil et le
laisser refroidir pendant 60 minutes environ.
ATTENTION
►► Laissez l‘appareil refroidir pendant
les temps de préparation longs afin
d‘éviter toute surchauffe.
Sécurité de l’emplacement
L’emplacement choisi pour l’installation
doit répondre aux exigences ci-après, en
vue d’assurer la bonne marche et la sécurité de l’appareil :
►►L’appareil doit être posé sur un support
stable, sec, plan, imperméable et résistant à la chaleur.
►►L’appareil ne doit pas être situé dans
un environnement chaud, mouillé ou
humide.
►►La prise électrique doit être aisément
accessible afin de pouvoir débrancher
rapidement l’appareil.
►►La surface des meubles peut contenir
des composants agressifs pour les
pieds de l’appareil et risquant de les
ramollir. Placez si besoin un support
sous les pieds de l’appareil.
Utilisation conforme à la
destination prévue
Cet appareil sert uniquement pour émincer des aliments et la préparation de
saucisson, kebbé et petits fours à utiliser
à domicile ou autre, à l’exclusion de toute
utilisation commerciale telle que
–– les cuisines du personnel dans les
boutiques, cafés, bureaux ou dans tout
autre environnement professionnel
–– utilisation par les clients dans des hôtels, les motels ou autres logements
–– bed and breakfast
Toute utilisation autre ou allant au-delà de
l‘utilisation indiquée est non conforme à la
destination prévue.
Toute réclamation pour des dommages
résultant d‘une utilisation non conforme
à la destination prévue est exclue. L‘utilisateur est seul responsable des risques
encourus.
Symboles utilisés
DANGER
Est utilisé pour un risque imminent entraînant de graves blessures corporelles
ou la mort.
►► Suivre les instructions données ici
pour éviter ce risque.
AVERTISSEMENT
Est utilisé pour une situation potentiellement dangereuse susceptible d’entraîner de graves blessures corporelles ou
la mort.
►► Suivre les instructions données ici
pour éviter ce risque.
PRUDENCE
Est utilisé pour une situation potentiellement dangereuse susceptible d’entraîner des blessures légères.
►► Suivre les instructions données ici
pour éviter ce risque.
ATTENTION
Est utilisé pour une situation susceptible
d’entraîner des dommages matériels.
►► Suivre les instructions données ici
pour éviter ce risque.
–– locaux agricoles
BEEM - Elements of Lifestyle
23
PantherFR
Mise en service
Déballage
La procédure est la suivante :
1. Retirez l’appareil, tous les accessoires
et la notice d’utilisation du carton.
2. Avant la première utilisation, enlevez tous les emballages et films de
protection de l’appareil et des accessoires. Ne retirez jamais la plaque
signalétique et les avertissements
éventuels.
3. Conservez l’emballage d’origine pendant toute la période de responsabilité
et de garantie de l’appareil de manière à pouvoir l’emballer correctement
dans le cas où vous devriez faire
jouer la garantie. Les dommages dus
au transport annulent la responsabilité
et la garantie.
4. Assurez-vous que toutes les pièces,
y compris celles contenues dans le
poussoir, sont fournies et ne présentent aucun dommage apparent. Ne
mettez pas en service un appareil
endommagé.
Raccordement
Il convient de respecter les consignes ciaprès concernant le raccordement électrique, en vue d’assurer la bonne marche et
la sécurité de l’appareil :
►►Assurez-vous que l’appareil puisse être
raccordé à un système à conducteur
de terre installé dans les règles de l’art
et le respect de la réglementation. Il est
interdit d’utiliser l’appareil sur une prise
électrique sans conducteur de terre. En
cas de doute, faites vérifier votre installation domestique par un électricien.
Le fabricant décline toute responsabilité
en cas de dommages résultant d’un
conducteur de terre absent ou interrompu.
24
►►Avant de raccorder l’appareil, vérifiez
les données de raccordement (tension
et fréquence) inscrites sur la plaque
signalétique avec celle de votre réseau
électrique. Ces données doivent être
identiques afin d’éviter d’endommager
l’appareil. En cas de doute, renseignezvous auprès de votre revendeur de
produits électroménagers.
►►Assurez-vous que la prise électrique
est protégée au moins par un fusible
de 16A.
►►Vérifiez que le câble de branchement
est en parfait état. Disposez le câble de
branchement afin d’éviter tout risque
qu’une personne trébuche dessus.
Le câble de branchement ne doit pas
passer sur des arêtes coupantes, être
tendu, plié ou noué. Le câble de branchement ne doit pas être en contact
avec des surfaces brûlantes.
Avant la première utilisation
1. Nettoyez l’appareil et les accessoires,
y compris les pièces contenues
dans le poussoir, comme indiqué
au chapitre Nettoyage et entretien
(page 29).
REMARQUE
►► Lors de la première mise en service,
une légère fumée ou une odeur
peuvent se produire du fait d’additifs
requis pour la production, comme
par ex. des graisses. Ceci est tout
à fait normal! Veiller alors à aérer
suffisamment.
BEEM - Elements of Lifestyle
FRPanther
Description de l'appareil
11 Forme
12 Disque de remplissage des saucisses
(Images sur le rabat gauche)
13 Adaptateur à biscuits
1
Poussoir avec couvercle
14 Glissière
2
Trémie
15 Grille à petits trous (Ø 3 mm)
3
Logement pour adaptateur
16 Grille à trous moyens (Ø 4,5 mm)
4
Tête de déverrouillage pour adaptateur
17 Grille à grands trous (Ø 8 mm)
5
Bloc moteur
18 Bague de serrage
6
Bouton marche/arrêt
19 Couteau en croix
7
Bouton marche arrière
20 Vis
8
Diode marche
21 Adaptateur
9
Tuyau de remplissage des saucisses
22 Roue dentée d’entraînement
23 Notice d’utilisation (non représentée)
10 Embout
Eléments de
commande
Tête de déverrouillage (4)
Bouton marche/arrêt (6)
Bouton marche arrière (7)
Diode marche (8)
Fonction
Déverrouille l‘adaptateur pour le démontage.
Mise en marche et arrêt de l‘appareil.
Rotation du moteur en marche arrière.
Dans le cas où l‘adaptateur ne se sépare plus du boîtier
après utilisation, appuyez pendant 2-3 secondes sur le
bouton marche arrière pour enlever les produits qui sont
restés collés.
Témoin de fonctionnement de l‘appareil.
Préparations
L’appareil doit être équipé de différents
adaptateurs en fonction de son utilisation.
1. Montez tout d’abord la roue dentée
d’entraînement (22) sur la vis sans fin
(20) comme indiqué sur la figure présente sur le rabat gauche.
ATTENTION
L’appareil peut devenir brûlant si la bague de fixation est serrée trop fortement.
►► Tournez la bague de fixation jusqu’à
la butée puis tournez d’un quart de
tour dans le sens opposé.
BEEM - Elements of Lifestyle
Utilisation et fonctionnement
ATTENTION
►► Laissez l’appareil refroidir pendant
les temps de préparation longs afin
d’éviter toute surchauffe.
Utilisation comme hachoir à
viande (figure A)
1. Débranchez la fiche secteur de la
prise électrique.
2. Introduisez la vis (20) dans l’adaptateur (21).
3. Placez le couteau en croix (19) avec
les lames à l’extérieur sur le carré de
la vis.
25
PantherFR
4. Mettez en place la grille choisie (15,
16 ou 17) sur la vis. L’encoche de la
grille doit être située sur l’ergot de guidage de l’adaptateur.
5. Vissez la bague de serrage (18) sur
l’adaptateur.
6. Mettez en place l’adaptateur prémonté sur le logement (3).
7. Tournez l’adaptateur dans le sens antihoraire jusqu’à ce qu’il s’encliquète
de manière audible (figure E1).
8. Introduisez la trémie (2) sur l’adaptateur.
REMARQUE
►► Pour préparer de la viande finement
hachée, vous pouvez passer la
viande plusieurs fois dans le hachoir.
Choisissez à cet effet une grille à
grands trous, puis une grille à petits
trous.
►► Vous pouvez hacher finement
d’autres ingrédients (par ex. des
oignons) avec la viande hachée.
Eliminer les blocages
La procédure est la suivante :
1. Eteignez l’appareil.
2. Appuyez pendant 2-3 secondes sur
le bouton marche arrière. La vis peut
ainsi se libérer et vous pouvez retirer
facillement l’adaptateur.
Elaboration de saucisses
(figure B)
La procédure est la suivante :
1. Débranchez la fiche secteur de la
prise électrique.
2. Introduisez la vis (20) dans l’adaptateur (21).
3. Placez le disque de remplissage des
saucisses (12) sur la vis. L’encoche
du disque de remplissage des saucisses doit être située sur l’ergot de
guidage de l’adaptateur.
26
4. Introduisez le tuyau de remplissage
des saucisses (9) dans la bague de
serrage (18).
5. Vissez la bague de serrage (18) sur
l’adaptateur.
6. Mettez en place l’adaptateur prémonté sur le logement (3).
7. Tournez l’adaptateur dans le sens antihoraire jusqu’à ce qu’il s’encliquète
de manière audible (figure E1).
8. Introduisez la trémie (2) sur l’adaptateur.
Elaboration de kebbé (figure C)
La procédure est la suivante :
1. Débranchez la fiche secteur de la
prise électrique.
2. Introduisez la vis (20) dans l’adaptateur (21).
3. Introduisez la forme (11) sur la vis.
L’encoche dans la forme doit se trouver au-dessus de l’ergot de guidage
de l’adaptateur.
4. Introduisez l’embout (10) sur la forme.
5. Vissez la bague de serrage (18) sur
l’adaptateur.
6. Mettez en place l’adaptateur prémonté sur le logement (3).
7. Tournez l’adaptateur dans le sens antihoraire jusqu’à ce qu’il s’encliquète
de manière audible (figure E1).
8. Introduisez la trémie (2) sur l’adaptateur.
Elaboration de biscuits
(figure D)
La procédure est la suivante :
1. Débranchez la fiche secteur de la
prise électrique.
2. Introduisez la vis (20) dans l’adaptateur (21).
3. Placez la grande grille (17) sur la vis.
L’encoche de la grille doit être située
sur l’ergot de guidage de l’adaptateur.
BEEM - Elements of Lifestyle
FRPanther
4. Introduisez l’adaptateur à biscuits (13)
sans la glissière (14) sur la grille.
5. Vissez la bague de serrage (18) sur
l’adaptateur.
6. Introduisez la glissière sur l’adaptateur à biscuits.
7. Mettez en place l’adaptateur prémonté sur le logement (3).
8. Tournez l’adaptateur dans le sens antihoraire jusqu’à ce qu’il s’encliquète
de manière audible (figure E1).
9. Introduisez la trémie (2) sur l’adaptateur.
Après utilisation
La procédure est la suivante :
1. Eteignez l’appareil.
2. Débranchez la fiche secteur de la
prise électrique.
3. Démontez l’adaptateur comme
indiqué à la section Démontage de
l’appareil (page 27).
REMARQUE
►► Si l’adaptateur ne se détache pas du
capot, comme indiqué au chapitre
Eliminer les blocages (page 26).
4. Nettoyez l’appareil et les accessoires
utilisés, comme indiqué au chapitre
Nettoyage et entretien (page 29).
Démontage de l’appareil
La procédure est la suivante :
1. Eteignez l’appareil.
2. Débranchez la fiche secteur de la
prise électrique.
6. Dévissez la bague de serrage (18).
7. Retirez toutes les pièces de l’adaptateur.
Suggestions de recettes
Saucisse à griller
Pour une vingtaine d‘unités, utilisez les
ingrédients suivants :
●● 1,5 kg de porc
●● 500 g de lardons crus
●● 2 oeufs sortis du frigo
●● 100 ml de lait froid
●● 1 grand oignon
●● 1 gousse d’ail
●● sel, poivre, marjolaine
La procédure est la suivante :
1. Hachez le porc et les lardons dans le
hachoir à viande.
2. Incorporez le lait, les oeufs, l’oignon
finement haché, la gousse d’ail pressé
et les épices et mélangez le tout.
3. Tirez le boyau sur le tuyau de remplissage des saucisses (9) et nouez
l’extrémité.
4. Introduisez la pâte à saucisse dans
la trémie en remplissant lentement.
Tournez la saucisse après 20 minutes
environ et continuez à remplir régulièrement.
Conseils :
1. Les saucisses ont meilleur goût
lorsqu’elles sont grillées aussitôt.
2. Vous pouvez congeler les saucisses
pendant 3 semaines environ.
3. Retirez la trémie (2) de l’adaptateur (21).
Boyau de viande pour kebbé
4. Maintenez le bouton de déverrouillage
(4) enfoncé.
Pour une vingtaine d‘unités, utilisez les
ingrédients suivants :
●● 250 g de boulgour
●● 500 g de boeuf, mouton ou agneau
maigre
5. Tournez l’adaptateur dans le sens horaire et retirez-le de son logement (3)
(figure E2).
BEEM - Elements of Lifestyle
27
PantherFR
●● 2 oeufs sortis du frigo
●● 1 oignon finement haché
●● sel
●● poivre
La procédure est la suivante :
1. Préparez une pâte souple avec les
ingrédients.
2. Laissez gonfler le boulgour dans l’eau
pendant 20 minutes puis retirez l’excédent d’eau.
3. Hachez la viande en la passant plusieurs fois au hachoir.
4. Mélangez la viande, le boulgour et
les oignons finement hachés jusqu’à
obtenir une pâte souple. Salez et poivrez.
5. Versez ensuite la viande hachée assaisonnée dans la trémie.
6. Appuyez avec le poussoir sur la viande hachée jusqu’à ce que l’ouverture
d’entrée soit vide.
7. Découpez le rouleau de viande évidée
à la longueur souhaitée.
Conseils :
1. Vous pouvez remplacer le boulgour
par de la farine (200-250 g environ).
2. Mettez au réfrigérateur brièvement
les boyaux de viande pour faciliter le
remplissage.
Kebbé classique
Pour une vingtaine d‘unités, utilisez les
ingrédients suivants :
●● 500 g de viande d’agneau (ou de
boeuf)
●● 2 cuillères à soupe de pignons de pin
●● 1 oignon haché
●● un peu d’huile d’olive
●● sel
●● poivre
●● Graisse à friture
28
La procédure est la suivante :
1. Hachez trois fois de suite la viande
dans le hachoir à viande.
2. Faites revenir les oignons dans l’huile
d’olive, ajoutez les pignons de pin et
faites-les dorer.
3. Ajoutez la viande, salez et poivrez et
faites dorer la viande.
4. Mettez la viande hachée dans le boyau
et appuyez les extrémités avec les
mains humides pour le refermer. Faites
des boulettes aux extrémités pointues
pour obtenir une forme typique.
5. Faites frire les kebbés dans l’huile de
friture à 160-170° C jusqu’à ce qu’ils
soient bien dorés.
6. Retirez les kebbés de la friture, égouttez sur un papier absorbant et servez
chaud.
Conseils :
1. Accompagnez d’une salade, de sauces et de pain oriental.
Biscuits
Utilisez les ingrédients suivants :
●● 200 g de beurre
●● 200 g de sucre
●● 1 sachet de sucre vanillé
●● 200 g d’amandes moulues
●● 2 oeufs
●● 400 g de farine
●● 100 g de fécule de maïs
La procédure est la suivante :
1. Battez en neige le beurre, le sucre, le
sucre vanille et incorporez progressivement les oeufs.
2. Ajoutez les amandes, la farine et la
fécule de maïs au beurre et mélangez
bien le tout.
3. Enroulez la pâte dans le film fraîcheur
puis laissez reposer pendant 30 min
avant de reprendre.
BEEM - Elements of Lifestyle
FRPanther
4. Montez l’adaptateur à biscuits. Versez
la pâte dans la trémie en la laissant
s’écouler dans l’adaptateur à biscuits.
5. Découpez les biscuits à la longueur
souhaitée et disposez les pièces sur
une tôle recouverte de papier de cuisson.
6. Cuisez les biscuits à chaleur moyenne
(env. 175 °C) pendant 10 min. environ.
Nettoyage et entretien
Rangement
Dans le cas où vous n’avez pas besoin
d’utiliser l’appareil pendant un certain
temps, nettoyez ce dernier comme indiqué au chapitre Nettoyage et entretien
(page 29).
Conservez l’appareil et tous ses accessoires à un endroit sec, propre et à l’abri du
gel, dans lequel il n’est pas exposé directement au soleil.
DANGER
GDanger dû au courant électrique !
►► Ne plongez jamais l’appareil ou la fiche électrique dans l’eau ou d’autres
liquides.
►► Ne maintenez jamais l’appareil sous
un jet d’eau.
ATTENTION
Surfaces endommagées.
►► N’utilisez pas d’objets pointus ou de
produits de nettoyage récurants pour
nettoyer les surfaces.
La procédure est la suivante :
1. Débranchez la fiche secteur de la
prise électrique.
2. Essuyez l’unité moteur (5) à l’aide
d’un chiffon légèrement humecté.
3. Nettoyez les adaptateurs et les accessoires dans une solution de liquide
vaisselle chaude. N’utilisez jamais
d’éponge métallique/à récurer pour le
nettoyage.
4. Séchez toutes les pièces de l’appareil
après le nettoyage avant de les remettre en place dans l’appareil.
REMARQUE
►► Tous les accessoires en plastique
se lavent au lave-vaisselle. Tous les
accessoires en métal ne se lavent
pas au lave-vaisselle.
BEEM - Elements of Lifestyle
Informations générales
Informations relatives à la
protection de l’environnement
Les emballages utilisés sont recyclables. Mettez au rebut les emballages
dont vous n’avez plus besoin conformément à la réglementation en vigueur.
Ce produit ne doit pas être mis au
rebut avec les ordures ménagères
normales, au sein de l’Union européenne. Mettez l’appareil au rebut dans
un point de collecte mis à votre disposition
par votre commune.
Responsabilité/Garantie
BEEM offre pour certains produits une garantie constructeur supplémentaire venant
en complément de l’obligation de responsabilité prévue par la législation.
Dans les cas où elle s’applique, les informations correspondantes sont consultables soit
sur l’emballage du produit, soit sur la documentation commerciale soit sur le site Web
Beem, à la page du produit concerné.
La période de garantie est de 6 mois dans
le cas d’une utilisation commerciale ou équivalente, par exemple dans des hôtels, des
pensions ou des établissements communautaires, ou lorsque le client n’est pas un client
aux termes du Code civil allemand.
29
PantherFR
Cette disposition est applicable sans préjudice de l’exclusion de garantie.
Vous trouverez sur notre site Web www.
beem.de les conditions de garantie complètes, les accessoires et les pièces de
rechange disponibles ainsi que les notices
d’utilisation dans différentes langues.
Veuillez contacter votre revendeur pour
toute question relative aux conditions de
garantie, à la commande d’accessoires
ou au service après-vente dans les autres
pays que l’Allemagne.
Limitations de responsabilité
Nous déclinons toute responsabilité en
cas de dommages ou de dommages
consécutifs en cas de :
■■ non respect des consignes de la notice
d’utilisation,
■■ utilisation non conforme à la destination prévue,
■■ manipulation inappropriée ou incorrecte,
■■ réparations non effectuées dans les
règles de l’art,
■■ modifications non autorisées,
■■ utilisation de pièces ou des pièces de
rechanges ne provenant pas du fabricant,
■■ utilisation de pièces complémentaires
ou d’accessoires inappropriés.
Déclaration de conformité
Par la présente, la société BEEM déclare
que cet appareil est conforme aux exigences fondamentales et aux autres dispositions applicables des directives 2004/108/
CE, 2006/95/CE et 2009/125/CE.
30
BEEM - Elements of Lifestyle
ES
Panther
Indice
Seguridad. . . . . . . . . . . . . . . . . . . . . . . . 31
Puesta en funcionamiento. . . . . . . . . . 34
Descripción del aparato. . . . . . . . . . . . 35
Preparación . . . . . . . . . . . . . . . . . . . . . . 35
Manejo y funcionamiento. . . . . . . . . . . 35
Desmontar el aparato . . . . . . . . . . . . . . 37
Propuestas de recetas . . . . . . . . . . . . . 37
Limpieza y conservación . . . . . . . . . . . 39
Almacenamiento . . . . . . . . . . . . . . . . . . 40
Indicaciones generales. . . . . . . . . . . . . 40
Estimado cliente:
Lea las indicaciones que se exponen en
el presente manual de instrucciones referentes a la puesta en funcionamiento, a la
seguridad, a la utilización según finalidad
prevista así como a la limpieza y la conservación antes de utilizar el aparato.
Abra las páginas desplegables al principio y al final del manual de instrucciones
para poder ver las ilustraciones durante la
lectura.
Conserve el manual de instrucciones para
su uso posterior y entrégueselo con el
aparato al siguiente propietario.
Seguridad
►►Use el aparato sólo para la utiliza-
ción descrita. En ningún caso debe
utilizar el aparato para finalidades
distintas aunque puedan ser similares.
►►Está prohibido que los niños utilicen este aparato.
►►El aparato y su cable de conexión
tienen que mantenerse fuera del
alcance de los niños.
BEEM - Elements of Lifestyle
►►Está prohibido que los niños jue-
guen con el aparato.
►►Guarde el aparato y sus accesorios fuera del alcance de los niños
menores de 8 años.
►►Antes de utilizar el aparato tiene
que controlar si presenta deterioros visibles por fuera. No ponga en
funcionamiento un aparato defectuoso.
►►No deje el aparato funcionando sin
vigilancia.
►►Utilice sólo los accesorios del
fabricante o aquellos que el fabricante recomiende expresamente.
En caso contrario se pierden todos
los derechos de saneamiento por
vicios o de garantía.
►►No utilice este aparato con un temporizador externo ni con un sistema de telecontrol separado.
►►Encargue las reparaciones del
aparato sólo al servicio posventa
autorizado por el fabricante ya que
en caso contrario se pierden todos
los derechos de saneamiento por
vicios o de garantía por los daños
y defectos siguientes. Ello es especialmente de aplicación también
al cambio de un cable de conexión
deteriorado. Las reparaciones
inadecuadas pueden causar considerables peligros para el usuario.
►►Sustituya los componentes defectuosos sólo por piezas de repuesto
originales. Sólo con estas piezas
queda garantizado el cumplimiento
de los requisitos de seguridad.
31
PantherES
►►La reparación del aparato durante
el periodo de saneamiento por vicios o de garantía queda reservada exclusivamente al servicio posventa autorizado por el fabricante
ya que en caso contrario se pierden todos los derechos de saneamiento por vicios o de garantía por
los daños y defectos siguientes.
PELIGRO
Peligro por corriente eléctrica!
►► No utilice el aparato si el cable
de conexión o el enchufe están
deteriorados.
►► No abra en ningún caso la carcasa del aparato. Existe peligro
de electrocución si se tocan las
conexiones bajo tensión y si se
cambia la estructura eléctrica y
mecánica.
►► No introduzca jamás el bloque
del motor ni el enchufe en el
agua ni en otros líquidos.
►► Saque el enchufe en las siguientes situaciones:
–– antes de montar o desmontar
los elementos
–– antes de limpiar el aparato
–– mientras no se esté utilizando
el aparato
–– en caso de mal funcionamiento
del aparato.
►► Desconecte siempre la línea de
alimentación quitando el enchufe
de la caja de la red y no el propio
cable de conexión.
►► No utilice jamás el cable de la
red para llevar, izar o mover el
aparato.
32
Peligro de asfixia con los materiales
del embalaje!
►► Asegúrese de que ningún niño juegue con el material del embalaje.
ADVERTENCIA
Peligro por componentes móviles!
►► Quite siempre el enchufe de la
red antes de montar, desmontar,
limpiar y almacenar el aparato.
►► Ponga el aparato en marcha
sólo si el cuerpo está montado y
enclavado.
Peligro de sufrir heridas con la cuchilla cortante!
►► No toque las hojas de la cuchilla
en cruz.
►► No introduzca los dedos ni otros
objetos en la boca de entrada.
Empuje siempre los alimentos
usando el empujador. Jamás con
los dedos ni con otros objetos.
►► Utilice el aparato sólo con el
revestimiento montado.
ATENCIÓN
►► Deje que se enfríe el aparato de vez
en cuando si se utiliza durante un
tiempo prolongado para evitar su
sobrecalentamiento.
►► Active el pulsador de marcha atrás
(7) durante 10 segundos como máx.
(véase el capítulo Eliminar los
bloqueos (página 36)) ya que,
en caso contrario, podría dañarse el
motor.
►► No active el pulsador de marcha
atrás hasta que el motor de accionamiento esté completamente parado.
BEEM - Elements of Lifestyle
ES
Panther
Protección contra sobrecarga
El motor tiene un disyuntor térmico que le
protege contra sobrecarga. Se desconecta
automáticamente en caso de sobrecarga.
Desconecte en dicho caso el aparato y deje
que se enfríe durante unos 60 minutos.
ATENCIÓN
►► Deje que se enfríe el aparato de vez
en cuando si se utiliza durante un
tiempo prolongado para evitar su
sobrecalentamiento.
Lugar de colocación seguro
El lugar de colocación tiene que cumplir
los siguientes requisitos para que el aparato pueda funcionar con seguridad y sin
fallos:
►►La base donde se apoya el aparato
tiene que ser sólida, estar seca, llana y
ser resistente al agua y al calor.
►►El entorno donde se use el aparato no
debe ser caliente, estar mojado ni muy
húmedo.
►►El enchufe tiene que tener siempre
una fácil accesibilidad para poder cortar rápidamente la conexión con la red.
►►Las superficies de los muebles pueden
tener componentes que ataquen y
ablanden las patas del aparato. Ponga
si es necesario una base de apoyo
debajo de las patas del aparato.
Utilización según finalidad
prevista
Este aparato está concebido para la trituración de alimentos así como para la
elaboración de embutidos, “kebbe” y pastas extrusionadas en el hogar o similares,
pero no para uso industrial, como por
ejemplo:
–– Cocinas para personal en tiendas,
cafeterías, oficinas y otros entornos profesionales
BEEM - Elements of Lifestyle
–– Fincas agrícolas
–– Uso de clientes en hoteles, moteles u
otros complejos residenciales
–– Alojamientos que ofrecen cama y desayuno
Cualquier otra utilización distinta o que
vaya más allá de la expuesta se considera
como no conforme a la finalidad prevista.
Queda excluida toda pretensión de cualquier tipo por daños debido a una utilización no conforme a la finalidad prevista.
El usuario es el responsable exclusivo del
riesgo.
Símbolos utilizados
PELIGRO
Se utiliza para un peligro inminente que
puede causar graves lesiones corporales o incluso la muerte.
►► Síganse las instrucciones aquí expuestas para evitar el peligro.
ADVERTENCIA
Se utiliza para una situación posiblemente peligrosa que puede causar
graves lesiones corporales o incluso la
muerte.
►► Síganse las instrucciones aquí expuestas para evitar el peligro.
CUIDADO
Se utiliza para una situación posiblemente peligrosa que puede causar leves
lesiones.
►► Síganse las instrucciones aquí expuestas para evitar el peligro..
ATENCIÓN
Se utiliza para una situación que puede
generar un daño material.
►► Síganse las instrucciones aquí expuestas para evitar el peligro.
33
PantherES
Puesta en funcionamiento
Desembalaje
Proceda de la siguiente manera:
1. Saque de la caja el aparato, todos los
accesorios y el manual de instrucciones.
2. Quite todos los materiales del embalaje y láminas de protección del
aparato y de sus accesorios antes de
su primera utilización. No quite nunca
la placa de características ni las eventuales indicaciones de advertencia.
3. Guarde el embalaje original durante
el periodo de saneamiento por vicios
o de garantía del aparato para poder
enviarlo embalado correctamente en
caso de tener que hacer uso del derecho de garantía. Los daños causados
en el trasporte hacen que se pierda el
derecho de saneamiento por vicios o
de garantía.
4. Compruebe si el contenido está completo, también en el llenador, y si hay
daños visibles. No ponga en funcionamiento un aparato defectuoso.
Conexión
Hay que tener en cuenta las siguientes
normas sobre la conexión eléctrica para
que el aparato pueda funcionar con seguridad y sin fallos:
►►2.Compare antes de conectar el aparato los datos de conexión (tensión y
frecuencia) expuestos en la placa de
características con los de la red eléctrica. Estos datos tienen que coincidir
para que el aparato no sufra daños.
Consulte en caso de dudas a su comerciante de artículos eléctricos.
►►Asegúrese de que el enchufe esté asegurado al menos con un fusible de 16A.
►►Asegúrese de que el cable de conexión
no está deteriorado. Coloque el cable
de conexión de forma que no haya
riesgo de tropezar. Está prohibido colocar el cable de conexión sobre bordes
cortantes, colocarlo tenso, doblado,
aplastado o anudado. El cable de conexión no debe entrar en contacto con
superficies calientes.
Antes del primer uso
1. Limpie el aparato y los accesorios,
también las piezas del llenador, como
se describe en el capítulo Limpieza y
conservación (página 39) .
INDICACIÓN
►► Durante la primera puesta en
servicio pueden surgir olores o un
ligero humo debido a los aditivos
necesarios para la producción como,
por ejemplo, grasa. ¡Ello es absolutamente normal! Encárguese de que
haya suficiente ventilación.
►►Asegúrese de que el aparato puede conectarse en un sistema con conductor
protector instalado reglamentariamente.
Está prohibido el funcionamiento utilizando un enchufe sin conductor protector. Encargue en caso de dudas a un
electricista que compruebe la instalación doméstica. El fabricante no asume
ningún tipo de responsabilidad por
daños debidos a la falta de conductor
protector o a la interrupción de éste.
34
BEEM - Elements of Lifestyle
ES
Panther
Descripción del aparato
(Véanse las ilustraciones en la página
desplegable izquierda)
1
2
3
4
Llenador con tapa
Embudo de relleno
Alojamiento para el cuerpo del aparato
Botón de desenclavamiento del cuerpo
del aparato
5
Bloque de motor
6
Interruptor
7
Pulsador de marcha atrás
8
Lámpara de control de funcionamiento
9
Tubo para embutir
Elementos de mando
10
Boquilla
11
Moldeador
12
Disco para embutir
13
Pieza para pastas extrusionadas
14
Corredera
15
Disco de agujeros pequeños (Ø 3 mm)
16
Disco de agujeros medianos (Ø 4,5 mm)
17
Disco de agujeros grandes (Ø 8 mm)
18
Anillo de apriete
19
Cuchilla en cruz
20
Tornillo sin in
21
Cuerpo del aparato
22
Piñón de accionamiento
23
Manual de instrucciones (sin ilustración)
Función
Botón de desenclavamiento (4) Desenclava el cuerpo del aparato para desmontarlo.
Interruptor (6)
Pulsador de marcha atrás (7)
Lámpara de control de
funcionamiento (8)
Conecta y desconecta el aparato.
Hace que el motor gire hacia atrás.
En el caso de que después del funcionamiento no
pueda quitarse el cuerpo del aparato de la carcasa,
active el pulsador de marcha atrás durante 2 o 3 segundos para que se suelten los alimentos atascados.
Indica el funcionamiento del aparato.
Preparación
Manejo y funcionamiento
Hay que equipar al aparato con diferentes
elementos dependiendo de la finalidad de
uso.
ATENCIÓN
►► Deje que se enfríe el aparato de vez
en cuando si se utiliza durante un tiempo prolongado para evitar su sobrecalentamiento.
1. Monte primero el piñón de accionamiento (22) en el tornillo sin fin (20)
como se muestra en la página desplegable izquierda.
ATENCIÓN
Apretar el anillo de apriete demasiado
fuerte puede hacer que el aparato se
caliente demasiado.
►► Gire siempre el anillo de apriete hasta el tope y aflójelo luego aproximadamente un cuarto de vuelta.
BEEM - Elements of Lifestyle
Utilización como picadora de
carne (imagen A)
1. Desconecte el enchufe de la caja del
enchufe.
2. Introduzca el tornillo sin fin (20) en el
cuerpo del aparato (21).
3. Encaje la cuchilla en cruz (19) con el filo
hacia fuera en el cuadrado del tornillo
sin fin.
35
PantherES
4. Encaje el disco perforado deseado
(15, 16 o 17) en el tornillo sin fin. La
muesca del disco perforado tiene
que quedar sobre el talón de guía del
cuerpo del aparato.
5. Enrosque el anillo de apriete (18) en
el cuerpo del aparato.
6. Encaje el cuerpo del aparato ya montado previamente en el alojamiento (3).
7. Gire el cuerpo del aparato en el sentido opuesto al de las agujas del reloj
hasta que se oiga que se enclava
(imagen E1).
8. Encaje el embudo de relleno (2) en el
cuerpo del aparato.
INDICACIÓN
►► Puede pasar la carne varias veces
si quiere obtener carne picada muy
fina. Utilice primero un disco perforado con agujeros grandes y luego un
disco perforado con agujeros más
pequeños.
►► También puede picar otros ingredientes (por ejemplo, cebolla) junto
con la carne picada.
Eliminar los bloqueos
Proceda de la siguiente manera:
1. Desconecte el aparato.
2. Active el pulsador de marcha atrás
durante 2 o 3 segundos. El tornillo sin
fin se libera así y usted puede quitar
fácilmente el cuerpo del aparato.
Producción de embutidos
(imagen B)
Proceda de la siguiente manera:
1. Desconecte el enchufe de la caja del
enchufe.
2. Introduzca el tornillo sin fin (20) en el
cuerpo del aparato (21).
3. Encaje el disco para embutir (12) en
el tornillo sin fin. La muesca del disco
para embutir tiene que quedar sobre el
talón de guía del cuerpo del aparato.
36
4. Introduzca el tubo para embutir (9)
por el anillo de apriete (18).
5. Enrosque el anillo de apriete (18) en
el cuerpo del aparato.
6. Encaje el cuerpo del aparato ya montado previamente en el alojamiento
(3).
7. Gire el cuerpo del aparato en el sentido opuesto al de las agujas del reloj
hasta que se oiga que se enclava
(imagen E1).
8. Encaje el embudo de relleno (2) en el
cuerpo del aparato.
Producción de “kebbe”
(imagen C)
Proceda de la siguiente manera:
1. Desconecte el enchufe de la caja del
enchufe.
2. Introduzca el tornillo sin fin (20) en el
cuerpo del aparato (21).
3. Encaje el moldeador (11) en el tornillo
sin fin. La muesca del moldeador tiene que quedar sobre el talón de guía
del cuerpo del aparato.
4. Encaje la boquilla (10) en el moldeador.
5. Enrosque el anillo de apriete (18) en
el cuerpo del aparato.
6. Encaje el cuerpo del aparato ya montado previamente en el alojamiento (3).
7. Gire el cuerpo del aparato en el sentido opuesto al de las agujas del reloj
hasta que se oiga que se enclava
(imagen E1).
8. Encaje el embudo de relleno (2) en el
cuerpo del aparato.
Producción de pastas
extrusionadas (imagen D)
Proceda de la siguiente manera:
1. Desconecte el enchufe de la caja del
enchufe.
2. Introduzca el tornillo sin fin (20) en el
cuerpo del aparato (21).
BEEM - Elements of Lifestyle
ES
Panther
3. Encaje el disco de agujeros grandes
(17) en el tornillo sin fin. La muesca
del disco perforado tiene que quedar
sobre el talón de guía del cuerpo del
aparato.
4. Encaje la pieza para pastas extrusionadas (13) sin corredera (14) en el
disco perforado.
5. Enrosque el anillo de apriete (18) en
el cuerpo del aparato.
6. Encaje la corredera en la pieza para
pastas extrusionadas.
7. Encaje el cuerpo del aparato ya montado previamente en el alojamiento (3).
8. Gire el cuerpo del aparato en el sentido opuesto al de las agujas del reloj
hasta que se oiga que se enclava
(imagen E1).
9. Encaje el embudo de relleno (2) en el
cuerpo del aparato.
Después del uso
Proceda de la siguiente manera:
1. Desconecte el aparato.
2. Desconecte el enchufe de la caja del
enchufe.
3. Desmonte el cuerpo del aparato como
se describe en el apartado Desmontar el aparato (página 37).
INDICACIÓN
►► En el caso de que después del
funcionamiento no pueda quitarse
el cuerpo del aparato de la carcasa
elimine el bloqueo como se describe
en el capítulo Eliminar los bloqueos (página 36).
4. Limpie el aparato y los accesorios
utilizados como se describe en el
capítulo Limpieza y conservación
(página 39).
BEEM - Elements of Lifestyle
Desmontar el aparato
Proceda de la siguiente manera:
1. Desconecte el aparato.
2. Desconecte el enchufe de la caja del
enchufe.
3. Quite el embudo de relleno (2) del
cuerpo del aparato (21).
4. Mantenga pulsado el botón de desenclavamiento (4).
5. Gire el cuerpo del aparato en el sentido de las agujas del reloj y sáquelo
del alojamiento (3) (imagen E2).
6. Desenrosque el anillo de apriete (18).
7. Quite todas las piezas del cuerpo del
aparato.
Propuestas de recetas
Salchicha asada a la parrilla
Utilice los siguientes ingredientes para
unas 20 unidades:
●● 1,5 Kg. de carne de cerdo
●● 500 g de panza cruda
●● 2 huevos del frigorífico
●● 100 ml de leche fría
●● 1 cebolla grande
●● 1 diente de ajo
●● Sal, pimienta, mayorana
Proceda de la siguiente manera:
1. Picar la carne de cerdo y la panza en
la picadora.
2. Añada la leche, los huevos, la cebolla
picada fina, el diente de ajo prensado
y las especias y mézclelo todo.
3. Introduzca la tripa para embutidos
en el tubo para embutir (9) y haga un
nudo en el extremo.
37
PantherES
4. Eche la masa para el embutido en el
embudo de relleno y vaya llenado la
tripa poco a poco. Aproximadamente
a los 20 cm girar el embutido y seguir
llenado homogéneamente.
Recomendaciones:
1. Los embutidos saben mejor si se
asan inmediatamente.
2. También puede congelar los embutidos durante unas 3 semanas.
Cubierta de carne para “kebbe”
Utilice los siguientes ingredientes para
unas 20 unidades:
●● 250 g bulgur de trigo
●● 500 g de carne magra de vacuno, de
carnero o de ternera
●● 2 huevos del frigorífico
●● 1 cebolla picada fina
●● Sal
●● Pimienta
Proceda de la siguiente manera:
1. Con los ingredientes se hace una
masa blanda.
2. Ablande el bulgur en agua y transcurridos unos 20 minutos tire el agua
excedente.
3. Pique varias veces sucesivamente la
carne en la picadora.
4. Mezcle la carne con el bulgur y la
cebolla picada fina hasta obtener una
masa blanda y sazone con pimienta
y sal.
5. Eche la carne picada condimentada
en el embudo de relleno.
6. Empuje la carne picada con el llenador hacia abajo hasta que la boca de
entrada se vacíe.
7. Corte el rollo de carne hueco a la longitud deseada.
38
Recomendaciones:
1. En lugar de bulgur de trigo también
puede utilizar harina (aproximadamente 200-250 g).
2. Congele las cubiertas de carne terminadas para que el relleno resulte más
fácil.
Relleno clásico de “kebbe”
Utilice los siguientes ingredientes para
unas 20 unidades:
●● 500 g de carne de carnero (o de vacuno)
●● 2 cucharadas de piñones
●● 1 cebolla picada
●● un poco de aceite de oliva
●● Sal
●● Pimienta
●● Grasa para freír
Proceda de la siguiente manera:
1. Pique tres veces sucesivamente la
carne en la picadora.
2. Rehogue la cebolla en aceite de oliva, añada los piñones y deje que se
doren.
3. Añada la carne, sazone con sal y pimienta y fríala hasta que se vea por el
color que la carne está crujiente.
4. Eche ahora la carne picada en la funda de carne y presione los extremos
con las manos húmedas para cerrarlos. Para obtener la forma típica se
moldean los extremos dejándolos en
punta.
5. Fría las piezas de “kebbe” en grasa
para freír a aprox. 160-170°C hasta
que queden doradas.
6. Saque las piezas terminadas de la
grasa, déjelas escurrir sobre papel de
cocina y sírvalas luego calientes.
BEEM - Elements of Lifestyle
ES
Panther
Recomendaciones:
1. Con ello saben bien, por ejemplo, ensaladas, salsas y pan plano.
Pastas extrusionadas
Utilice los siguientes ingredientes:
●● 200 g de mantequilla
●● 200 g de azúcar
●● 1 sobre de vainilla azucarada
●● 200 g de almendras molidas
●● 2 huevos
●● 400 g de harina
●● 100 g de fécula
Proceda de la siguiente manera:
1. Batir la mantequilla con el azúcar y la
vainilla azucarada hasta que quede todo
espumoso y echar los huevos poco a
poco.
2. Añada las almendras, la harina y la
fécula a la masa de mantequilla y mézclelo todo bien.
3. Enrolle la masa en celofán y déjela
reposar durante 30 minutos antes de
proseguir la elaboración.
4. Monte la pieza para pastas extrusionadas. Eche la masa en el embudo de
relleno y hágala pasar por la pieza para
pastas extrusionadas.
5. Corte las pastas extrusionadas a la
longitud deseada y coloque las piezas
sobre papel de estraza en una bandeja
de horno.
6. Hornee las pastas durante unos 10
min. a temperatura media (aprox.
175°C).
BEEM - Elements of Lifestyle
Limpieza y conservación
PELIGRO
Peligro por corriente eléctrica!
►► No introduzca jamás el aparato ni
el enchufe en el agua ni en otros
líquidos.
►► No ponga nunca el aparato bajo el
agua corriente.
ATENCIÓN
Deterioro de las superficies.
►► No utilice objetos cortantes ni productos de limpieza abrasivos para
limpiar las superficies.
Proceda de la siguiente manera:
1. Desconecte el enchufe de la caja del
enchufe.
2. Limpie el bloque de motor (5) con un
paño ligeramente húmedo.
3. Limpie los elementos y los accesorios
con una solución de lavavajillas caliente. No utilice esponjas de metal ni
abrasivas para la limpieza.
4. Seque bien todas las partes del aparato después de fregarlas antes ponerlas en el aparato.
INDICACIÓN
►► Todos los accesorios de plástico son
aptos para el lavavajillas. Ninguno
de los accesorios metálicos es apto
para el lavavajillas.
39
PantherES
Almacenamiento
Limpie el aparato y los accesorios como
se describe en el capítulo Limpieza y
conservación (página 39).
Guarde el aparato y todos sus accesorios
en un lugar seco, limpio y a prueba de heladas protegido contra la luz solar directa.
Indicaciones generales
Indicaciones sobre la protección
medioambiental
Los materiales utilizados en el embalaje son reciclables. Deseche los materiales del embalaje que ya no necesite
respetando las normas locales vigentes.
Está prohibido desechar este producto con la basura doméstica normal dentro de la Unión Europea.
Deseche el aparato entregándolo en los
puntos de recogida municipales.
Saneamiento por vicios / Garantía
En nuestra página web www.beem.de
puede ver las condiciones detalladas de
garantía, los accesorios disponibles y las
piezas de repuesto así como los manuales de instrucciones en diferentes idiomas.
Póngase en contacto con su comerciante
para informarse sobre las condiciones de
garantía, para pedir accesorios o si tiene
preguntas sobre la tramitación del servicio
postventa fuera de Alemania.
Limitaciones de responsabilidad
No asumimos ningún tipo de responsabilidad por daños o daños consecuenciales
debidos a:
■■ no observancia del manual de instrucciones,
■■ utilización distinta a la finalidad prevista,
■■ tratamiento inadecuado o inapropiado,
■■ reparaciones realizadas inadecuadamente,
■■ modificaciones no autorizadas,
Además de la obligación legal de saneamiento por vicios, BEEM ofrece adicionalmente una garantía ampliada del fabricante para algunos productos.
■■ utilización de piezas ―o piezas de repuesto― ajenas,
En el caso de que ésta se conceda encontrará las indicaciones correspondientes o
bien en el embalaje específico del producto, en los materiales de publicidad o en la
página web de BEEM bajo el producto en
cuestión.
Declaración de conformidad
El período de garantía es de 6 meses en
caso de utilización industrial o de un uso
equiparable como, por ejemplo, en hoteles, pensiones o instalaciones comunes
así como en el caso de que el cliente no
sea un consumidor en el sentido del Código Civil. Ello no afecta a la exclusión de la
garantía de saneamiento.
40
■■ utilización de piezas complementarias
o accesorios inapropiados.
Mediante la presente, BEEM declara que
este aparato cumple con los requisitos
básicos y las demás disposiciones relevantes de las directivas 2006/95/CE,
2004/108/CE y 2009/125/CE.
BEEM - Elements of Lifestyle
ITPanther
Indice
Istruzioni di sicurezza. . . . . . . . . . . . . . 41
Messa in servizio. . . . . . . . . . . . . . . . . . 44
Descrizione apparecchio . . . . . . . . . . . 45
Preparazione . . . . . . . . . . . . . . . . . . . . . 45
Comando e funzionamento . . . . . . . . . 45
Smontaggio dell’apparecchio . . . . . . . 47
Proposte di ricette. . . . . . . . . . . . . . . . . 47
Pulizia e manutenzione. . . . . . . . . . . . . 49
Deposito. . . . . . . . . . . . . . . . . . . . . . . . . 49
Avvertenze generali. . . . . . . . . . . . . . . . 49
Gentili clienti,
prima di impiegare l’apparecchio leggete
tutte le indicazioni riportate nelle presenti
istruzioni per l’uso concernenti la messa in
servizio, la sicurezza, l’uso previsto, nonché la pulizia e la cura.
Aprite la pagina piegata dietro alla copertina all’inizio e alla fine delle presenti istruzioni per l’uso in modo da poter vedere le
immagini durante la lettura.
Conservate le presenti istruzioni per l’uso
per un uso successivo e consegnatele con
l’apparecchio in caso di vendita a un altro
utente.
Istruzioni di sicurezza
►►Impiegare l’apparecchio solo per
l’uso descritto. Non impiegare assolutamente l’apparecchio per altri
possibili usi, neanche se simili.
►►Non è consentito l’uso del presente
apparecchio da parte di bambini.
►►L’apparecchio e il suo cavo di alimentazione devono essere tenuti
fuori dalla portata dei bambini.
BEEM - Elements of Lifestyle
►►Non è consentito che i bambini
giochino con l’apparecchio.
►►Conservare l’apparecchio e gli accessori fuori dalla portata di bambini di età inferiore agli 8 anni.
►►Prima dell’uso controllare l’assenza di danni visibili sull’apparecchio.
Non mettere in funzione un apparecchio danneggiato.
►►Durante il funzionamento non lasciare l’apparecchio incustodito.
►►Impiegare esclusivamente pezzi
di ricambio originali o consigliati
esplicitamente dal produttore. In
caso contrario decade il diritto di
avvalersi della garanzia.
►►Non impiegare il presente apparecchio con un timer esterno o
con un sistema di azionamento a
distanza separato.
►►Fare eseguire le riparazioni sull’apparecchio esclusivamente da un
servizio di assistenza clienti autorizzato dal produttore, poiché
altrimenti in caso di danni e conseguenti malfunzionamenti decade il
diritto di avvalersi della garanzia.
Ciò vale in particolare anche per la
sostituzione di un cavo di alimentazione danneggiato. Da riparazioni
non a regola d’arte possono derivare notevoli pericoli per l’utilizzatore.
►►Sostituire i componenti difettosi
esclusivamente con pezzi di ricambio originali. Solo per tali pezzi è
garantito che vengano soddisfatti i
requisiti di sicurezza.
41
PantherIT
►►Una riparazione dell’apparecchio
durante il periodo di validità della
garanzia deve avvenire esclusivamente da parte di un centro di
assistenza clienti autorizzato dal
produttore, poiché altrimenti per
i danni e i conseguenti malfunzionamenti non vale più nessuna
garanzia.
PERICOLO
Tensione elettrica pericolosa!
►► Non utilizzare l’apparecchio in
caso di cavo di alimentazione o
spina danneggiati.
►► Non aprire mai l’involucro
dell’apparecchio. Pericolo di
folgorazione in caso di contatto
con i collegamenti elettrici e di
modifiche della struttura elettrica
e/o meccanica.
►► Non immergere mai il blocco
motore o la spina di rete in acqua
o in altri fluidi.
►► Nelle situazioni sotto elencate
estrarre la spina dalla presa di
corrente:
–– prima di montaggio/smontaggio
di componenti
–– mentre l’apparecchio non viene
utilizzato
–– in caso di guasto dell’apparecchio durante il funzionamento.
►► Togliere sempre il collegamento
del cavo di alimentazione estraendo la spina dalla presa e mai
tirando il cavo.
42
►► Non trasportare, sollevare o
spostare mai l’apparecchio per
mezzo del cavo di alimentazione.
Pericolo di soffocamento dovuto ai
materiali d’imballaggio!
►► Assicurarsi che i bambini piccoli
non giochino con il materiale
d’imballaggio.
AVVERTENZA
Pericolo dovuto a componenti mobili!
►► Estrarre sempre la spina di
alimentazione prima di unire o
staccare dei pezzi e prima della
pulizia o del deposito dell’apparecchio.
►► Far funzionare l’apparecchio
esclusivamente a parte frontale
montata.
Pericolo di ferite dovuto a lame
affilate!
►► Non toccare la lama a croce.
►► Non mettere in nessun caso dita
o oggetti nel collo di alimentazione. Spingere gli alimenti sempre
con il pestello e mai con le dita o
altri oggetti.
►► Far funzionare l’apparecchio
esclusivamente a parte frontale
montata.
ATTENZIONE
►► In caso di lunghi tempi di lavorazione
far raffreddare ogni tanto l’apparecchio per evitare un surriscaldamento.
BEEM - Elements of Lifestyle
ITPanther
►► Azionare il pulsante d’inversione
rotazione (7) per solo 10 secondi al
massimo (vedi Eliminazione bloccaggi (pag. 46) per evitare danni
al motore di azionamento.
►► Premere il pulsante d’inversione
rotazione solo dopo che il motore si
è arrestato completamente.
Salvamotore
Uso previsto
Il presente apparecchio è destinato alla
triturazione di alimenti nonché alla realizzazione di salsicce, kibbeh e biscotti per
l’uso domestico o simile - non destinato
all’uso commerciale - come per esempio:
–– cucine del personale di negozi, bar, uffici o locali di altri ambienti professionali
–– tenute agricole
Il motore è protetto da un interruttore magnetotermico che scatta automaticamente
in caso di sovraccarico. In tal caso spegnere l’apparecchio e farlo raffreddare per
circa 60 minuti.
–– uso da parte di ospiti di alberghi, motel
o residence
ATTENZIONE
►► In caso di lunghi tempi di lavorazione
far raffreddare ogni tanto l’apparecchio per evitare un surriscaldamento.
Sono escluse pretese di qualsiasi tipo a
causa di danni dovuti a un uso non regolare. Delle conseguenze che derivano da un
uso non regolare risponde esclusivamente
l’utente.
Luogo di installazione sicuro
Per un esercizio sicuro e corretto dell’apparecchio il luogo d’installazione deve
soddisfare i seguenti requisiti
►►La superficie di appoggio dell’apparecchio deve essere solida, asciutta, piana, resistente all’acqua e al calore.
►►L’ambiente di uso dell’apparecchio non
deve essere caldo, né bagnato, né
molto umido.
►►La presa deve essere facilmente accessibile in modo tale che il collegamento elettrico si possa interrompere
rapidamente in caso di necessità.
►►Le superfici dei mobili potrebbero contenere componenti che danneggiano
i piedini in gomma dell’apparecchio;
appoggiare eventualmente una base
di appoggio sotto i piedini dell’apparecchio.
BEEM - Elements of Lifestyle
–– bed and breakfast
Un uso diverso o più esteso vale come
non regolare.
Pittogrammi impiegati
PERICOLO
Viene impiegato per un pericolo imminente che provoca ferite gravi o la
morte.
►► Per evitare il pericolo seguire le
istruzioni qui riportate.
AVVERTENZA
Viene impiegato per una situazione
potenzialmente pericolosa che potrebbe
provocare gravi ferite o la morte.
►► Per evitare il pericolo seguire le
istruzioni qui riportate.
43
PantherIT
CAUTELA
Viene impiegato per una situazione
potenzialmente pericolosa che potrebbe
provocare lievi ferite o danni materiali.
►► Per evitare il pericolo seguire le
istruzioni qui riportate.
ATTENZIONE
Viene impiegato per una situazione
potenzialmente pericolosa che potrebbe
provocare danni materiali.
►► Per evitare il pericolo seguire le
istruzioni qui riportate.
Messa in servizio
Disimballaggio
Procedere come di seguito descritto
1. Togliere dal cartone l’apparecchio,
tutti i pezzi di ricambio e le istruzioni
per l’uso.
2. Precedentemente al primo uso togliere dall’apparecchio e dagli accessori
tutti i materiali d’imballaggio e le pellicole di protezione. Non rimuovere
mai la targhetta ed eventuali cartelli di
avvertimento.
3. Conservare la confezione originale
per il periodo di garanzia dell’apparecchio, così da poter spedire l’apparecchio imballato in modo regolare
nei casi coperti da garanzia. I danni di
trasporto comportano la decadenza
della validità della garanzia.
4. Verificare la completezza della fornitura e l’assenza di danni visibili. Non
mettere in funzione un apparecchio
danneggiato.
Collegamento
Per un funzionamento sicuro e corretto
dell’apparecchio nel collegamento elettrico
occorre seguire le seguenti istruzioni.
44
►►Assicurarsi che l’apparecchio possa
essere collegato a un sistema di messa a terra installato a norma. È vietato
far funzionare l’apparecchio su una
presa senza conduttore di terra. In
caso di dubbio far controllare il proprio
impianto elettrico casalingo da parte di
un elettricista specializzato. Il costruttore non si assume alcuna responsabilità per danni provocati da un conduttore di terra mancante o difettoso.
►►Prima del collegamento dell’apparecchio confrontare i dati di collegamento
(tensione e frequenza) sulla targhetta
con quelli della propria rete elettrica.
Tali dati devono coincidere per evitare
danni all’apparecchio. In caso di dubbio domandare al proprio rivenditore.
►►La presa deve essere almeno protetta
da un fusibile da 16 A.
►►Assicurarsi che il cavo di alimentazione non presenti danni. Posare il cavo
di alimentazione in modo tale che non
ci si possa inciampare. Il cavo di alimentazione non deve essere posato
su spigoli acuti, teso, piegato, schiacciato o annodato. Il cavo di alimentazione non deve entrare in contatto con
superfici calde.
Precedentemente al primo uso
1. Pulire l’apparecchio, gli accessori
e anche i pezzi nel pestello, come
descritto nel capitolo Pulizia e manutenzione (pag. 49).
NOTA
►► Alla prima messa in funzione può
svilupparsi un odore o un leggero
fumo dovuto a sostanze aggiunte
per motivi di produzione, come
per esempio grassi. Ciò è del tutto
normale! Provvedere perciò a una
sufficiente ventilazione.
BEEM - Elements of Lifestyle
ITPanther
Descrizione apparecchio
11 Inserto per kibbeh
12 Disco per insaccare salsicce
(per le figure aprire la pagina piegata sinistra)
13 Accessorio per biscotti
1
Pestello con coperchio
15 Trafila a fori piccoli (Ø 3 mm)
2
Tramoggia
16 Trafila a fori medi (Ø 4,5 mm)
3
Attacco per parte frontale
17 Trafila a fori grandi (Ø 8 mm)
4
Pulsante di sblocco per parte frontale
18 Ghiera filettata
5
Blocco motore
19 Lama a croce
6
Interruttore
20 Elica
7
Pulsante d’inversione rotazione
21 Parte frontale
8
Spia di accensione
22 Pignone
9
Beccuccio per insaccare salsicce
23 Istruzioni per l’uso (non illustrate)
14 Inserto scorrevole
10 Beccuccio per kibbeh
Elementi di comando
Funzione
Pulsante di sblocco (4)
Sblocca la parte frontale per lo smontaggio.
Interruttore (6)
Pulsante d’inversione rotazione (7)
Spia di accensione (8)
Accende o spegne l’apparecchio.
Fa girare il motore al contrario.
Se dopo il funzionamento la parte frontale non si riesce
più a separare dal corpo principale, premere il pulsante
d’inversione per 2 - 3 secondi per far staccare gli alimenti
bloccati.
Mostra il funzionamento dell’apparecchio.
Preparazione
Comando e funzionamento
A seconda dell’uso l’apparecchio deve essere montato con componenti diversi.
ATTENZIONE
►► In caso di lunghi tempi di lavorazione
far raffreddare ogni tanto l’apparecchio per evitare un surriscaldamento.
1. Montare per prima cosa il pignone
(22) sull’elica (20), come rappresentato nella figura sulla pagina richiudibile
sinistra.
ATTENZIONE
L’apparecchio può diventare troppo caldo se si stringe troppo la ghiera filettata.
►► Girare sempre la ghiera fino alla fine
e poi riaprire di un quarto di giro.
BEEM - Elements of Lifestyle
Impiego come tritacarne
(fig. A)
1. Estrarre la spina dalla presa.
2. Inserire l’elica (20) nella parte frontale
(21).
3. Inserire la lama a croce (19) con il
tagliente verso l’esterno sull’asse
dell’elica.
45
PantherIT
4. Inserire la trafila desiderata (15, 16
o 17) sull’elica. L’intaglio della trafila
deve trovarsi sulla sporgenza di guida
della parte frontale.
5. Avvitare la ghiera filettata (18) sulla
parte frontale.
6. Inserire la parte frontale premontata
sull’attacco (3).
7. Girare la parte frontale in senso antiorario fino a quando si sente scattare
(figura E1).
8. Inserire la tramoggia (2) sulla parte
frontale.
NOTA
►► Se si vuole ottenere carne tritata
molto fine, la si può ripassare diverse volte. A tal scopo scegliere prima
la trafila a fori grandi e quindi una
trafila a fori più piccoli.
►► È possibile tritare insieme alla carne
altri ingredienti (per es. cipolle).
Eliminazione bloccaggi
Procedere come di seguito descritto
1. Spegnere l’apparecchio.
2. Premere il pulsante d’inversione rotazione per circa 2 - 3 secondi. L’elica si
può così liberare ed è possibile togliere facilmente la parte frontale.
Realizzazione di salsicce (figura B)
Procedere come di seguito descritto
1. Estrarre la spina dalla presa.
2. Inserire l’elica (20) nella parte frontale
(21).
3. Inserire sull’elica il disco per insaccare salsicce (12). L’intaglio del disco
per insaccare salsicce deve trovarsi
sulla sporgenza di guida della parte
frontale.
4. Inserire il beccuccio per insaccare salsicce (9) attraverso la ghiera filettata
(18).
46
5. Avvitare la ghiera filettata (18) sulla
parte frontale.
6. Inserire la parte frontale premontata
sull’attacco (3).
7. Girare la parte frontale in senso antiorario fino a quando si sente scattare
(figura E1).
8. Inserire la tramoggia (2) sulla parte
frontale.
Realizzazione di kibbeh
(polpette ripiene libanesi)
(figura C)
Procedere come di seguito descritto
1. Estrarre la spina dalla presa.
2. Inserire l’elica (20) nella parte frontale
(21).
3. Inserire sull’elica l’inserto per kibbeh
(11). L’intaglio dell’inserto deve trovarsi sulla sporgenza di guida della parte
frontale.
4. Inserire il beccuccio per kibbeh (10)
sull’inserto per kibbeh.
5. Avvitare la ghiera filettata (18) sulla
parte frontale.
6. Inserire la parte frontale premontata
sull’attacco (3).
7. Girare la parte frontale in senso antiorario fino a quando si sente scattare
(figura E1).
8. Inserire la tramoggia (2) sulla parte
frontale.
Realizzazione di biscotti (figura D)
Procedere come di seguito descritto
1. Estrarre la spina dalla presa.
2. Inserire l’elica (20) nella parte
frontale (21).
3. Inserire sull’elica la trafila a fori grandi
(17). L’intaglio della trafila deve trovarsi sulla sporgenza di guida della parte
frontale.
4. Inserire sulla trafila l’accessorio per biscotti (13) senza l’inserto scorrevole (14).
BEEM - Elements of Lifestyle
ITPanther
5. Avvitare la ghiera filettata (18) sulla
parte frontale.
Proposte di ricette
6. Inserire l’inserto scorrevole sull’accessorio per biscotti.
Salsicce alla griglia
7. Inserire la parte frontale premontata
sull’attacco (3).
8. Girare la parte frontale in senso antiorario fino a quando si sente scattare
(figura E1).
9. Inserire la tramoggia (2) sulla parte
frontale.
Dopo l’impiego
Procedere come di seguito descritto
1. Spegnere l’apparecchio.
2. Estrarre la spina dalla presa.
3. Smontare la parte frontale come
descritto nel paragrafo Smontaggio
dell’apparecchio (pag. 47).
NOTA
►► Se la parte frontale non si riesce
più a separare dal corpo principale, procedere come descritto nel
capitolo Eliminazione bloccaggi
(pag. 46).
4. Pulire l’apparecchio e gli accessori
utilizzati come descritto nella sezione
Pulizia e manutenzione (pag. 49).
Smontaggio dell’apparecchio
Procedere come di seguito descritto
1. Spegnere l’apparecchio.
2. Estrarre la spina dalla presa.
3. Estrarre la tramoggia (2) dalla parte
frontale (21).
4. Tenere premuto il pulsante di sblocco
(4).
5. Girare la parte frontale in senso orario
ed estrarla dall’attacco(3) (figura E2).
6. Svitare la ghiera filettata (18).
7. Togliere tutti i pezzi dalla parte frontale.
BEEM - Elements of Lifestyle
Impiegare i seguenti ingredienti per circa
20 pezzi:
●● 1,5 kg di carne di maiale
●● 500 g di pancetta
●● 2 uova dal frigorifero
●● 100 ml di latte freddo
●● 1 cipolla grande
●● 1 spicchio d’aglio
●● Spezie: sale, pepe, maggiorana
Procedere come di seguito descritto
1. Tritare la carne di maiale e la pancetta
nel tritacarne.
2. Aggiungere latte, uova, cipolla tritata
fine, aglio in pezzettini e le spezie e
mescolare.
3. Mettere il budello sul beccuccio per
insaccare salsicce (9) e annodare
l’estremità.
4. Inserire il contenuto della salsiccia
nella tramoggia e riempire lentamente.
Dopo circa 20 cm girare la salsiccia e
continuare a riempire lentamente.
Suggerimenti
1. Le salsicce sono buonissime se cotte
subito alla griglia.
2. Le salsicce si possono però anche
congelare per circa 3 settimane.
Involucro di carne per le kibbeh
Impiegare i seguenti ingredienti per circa
20 pezzi:
●● 250 g di bulgur
●● 500 g di carne magra di manzo, montone o vitello
●● 2 uova dal frigorifero
●● 1 cipolla tritata fine
●● sale
●● pepe
47
PantherIT
Procedere come di seguito descritto
1. Con gli ingredienti viene realizzato un
impasto morbido.
2. Mettere a bagno il bulgur in acqua e
dopo 20 minuti eliminare l’acqua non
assorbita.
3. Tritare la carne facendola passare diverse volte di seguito nel tritacarne.
4. Amalgamare la carne, il bulgur, la cipolla tritata fine in un impasto morbido
e insaporirlo con pepe e sale.
5. Inserire la carne tritata insaporita nella
tramoggia.
6. Premere con il pestello la carne tritata
verso il basso fino al collo di alimentazione.
7. Tagliare i cilindri cavi alla lunghezza
desiderata.
Suggerimenti
1. Invece del bulgur si può anche usare
della farina (circa 200-250 g).
2. Congelare brevemente gli involucri
pronti in modo da facilitarne l’infarcitura.
Farcitura classica delle kibbeh
Impiegare i seguenti ingredienti per circa 20 pezzi:
●● 500 g di carne di montone (o per es.
carne di vitello)
●● 2 cucchiai di pinoli
●● 1 cipolla tritata
●● un po’ di olio di oliva
●● sale
●● pepe
●● grasso per friggere
Procedere come di seguito descritto
1. Tritare la carne facendola passare tre
volte di seguito nel tritacarne.
48
2. Soffriggere le cipolle nell’olio di oliva.
Aggiungere i pinoli e dorarli.
3. Aggiungere la carne, insaporire con
sale e pepe e cuocere fino a quando
la carne assume un colore dorato.
4. Riempire ora l’involucro di carne con
la carne tritata e premere insieme
le estremità con le mani umide per
chiuderle. Per la forma tipica a uovo le
estremità vengono schiacchiate sulle
punte.
5. Friggere le kibbeh in olio per frittura
riscaldato a 160-170° C.
6. Estrarre i pezzi pronti dall’olio, farli
sgocciolare su una carta da cucina e
servirli caldi.
Suggerimenti
1. Si possono mangiare per es. con insalate, salse e pane arabo.
Biscotti
Impiegare i seguenti ingredienti:
●● 200 g di burro
●● 200 g di zucchero
●● 1 bustina di zucchero vanigliato
●● 200 g di mandorle macinate
●● 2 uova
●● 400 g di farina
●● 100 g di fecola
Procedere come di seguito descritto
1. Mescolare burro, zucchero, zucchero
vanigliato fino a ottenere un impasto
schiumoso e aggiungere piano piano
le uova.
2. Aggiungere le mandorle, farina e fecola al composto così ottenuto e amalgamare bene tutti gli ingredienti.
3. Avvolgere l’impasto nella pellicola
trasparente e farlo riposare per 30
minuti.
BEEM - Elements of Lifestyle
ITPanther
4. Montare l’accessorio per i biscotti. Inserire l’impasto nella tramoggia e farlo
passare nell’accessorio per i biscotti.
5. Tagliare i biscotti della lunghezza
desiderata e appoggiarli su una teglia
ricoperta con carta da forno.
6. Cuocere i biscotti a media temperatura (175 °C) per circa 10 min.
Pulizia e manutenzione
AVVERTENZA
Tensione elettrica pericolosa!
►► Non immergere mai l’apparecchio
o la spina di rete in acqua o in altri
fluidi.
►► Non tenere mai l’apparecchio sotto
acqua corrente.
ATTENZIONE
Danno delle superfici.
►► Per la pulizia delle superfici non
impiegare oggetti appuntiti né detergenti aggressivi.
Procedere come di seguito descritto
1. Estrarre la spina dalla presa.
2. Pulire con un panno leggermente umido il blocco motore (5).
3. Pulire i componenti e gli accessori in
soluzione detergente calda. Per la pulizia non impiegare spugne metalliche/
abrasive.
4. Dopo la pulizia prima di utilizzare
l’apparecchio asciugarne bene tutti i
pezzi.
NOTA
►► Tutti gli accessori in plastica sono
adatti al lavaggio in lavastoviglie.
Tutti gli accessori in metallo non
sono adatti al lavaggio in lavastoviglie.
BEEM - Elements of Lifestyle
Deposito
Se non si usa l’apparecchio per un certo
tempo pulirlo come descritto nella sezione
Pulizia e manutenzione (pag. 49).
Conservare l’apparecchio e tutti gli accessori in un luogo asciutto, pulito, non
soggetto alla formazione di ghiaccio e in
un punto non esposto alla luce diretta del
sole.
Avvertenze generali
Avvertenze sulla protezione
dell’ambiente
I materiali d’imballaggio impiegati
sono riciclabili. Smaltire i materiali
d’imballaggio non più necessari conformemente alle prescrizioni valide localmente.
All’interno dell’Unione Europea questo prodotto non può essere smaltito
insieme ai normali rifiuti domestici.
Per lo smaltimento consegnare l’apparecchio a un punto di raccolta comunale a ciò
preposto.
Garanzia/garanzia estesa
Oltre alla garanzia obbligatoria BEEM accorda per alcuni prodotti addizionalmente
una garanzia del produttore estesa.
Nel caso in cui venga accordata tale garanzia si trovano relativi dati sulla confezione specifica del prodotto, nel materiale
pubblicitario o sul sito web BEEM relativamente al corrispondente prodotto.
In caso di impiego commerciale o equiparabile per es. in alberghi, pensioni o locali
pubblici o se il cliente non è un utilizzatore
nel senso del codice civile il periodo di
garanzia è di 6 mesi. L’esclusione dalla
garanzia rimane in tal caso immutata.
Sul nostro sito www.beem.de si trovano le
condizioni di garanzia dettagliate, accessori e pezzi di ricambio disponibili, nonché
istruzioni per l’uso nelle diverse lingue.
49
PantherIT
Per condizioni di garanzia, ordini di pezzi
o domande riguardo allo svolgimento del
servizio di assistenza all’esterno della
Germania contattare il proprio rivenditore.
Limitazioni della responsabilità
Non ci assumiamo alcuna responsabilità
per danni, diretti o conseguenti, in caso di:
■■ mancata osservanza delle istruzioni
per l’uso,
■■ uso non conforme alla destinazione,
■■ trattamento irregolare o inadeguato,
■■ riparazioni non eseguite a regola d’arte,
■■ modifiche non autorizzate,
■■ impiego di componenti o pezzi di ricambio di terzi,
■■ impiego di componenti o accessori non
adatti.
Dichiarazione di conformità
Con la presente la ditta BEEM dichiara
che il presente apparecchio è conforme ai
requisiti fondamentali e alle altre disposizioni rilevanti delle direttive 2006/95/CE,
2004/108/CE e 2009/125/CE.
50
BEEM - Elements of Lifestyle
NLPanther
Inhoud
Veiligheid . . . . . . . . . . . . . . . . . . . . . . . . 51
In bedrijfname . . . . . . . . . . . . . . . . . . . . 54
Beschrijving apparaat. . . . . . . . . . . . . . 55
Voorbereidingen . . . . . . . . . . . . . . . . . . 55
Bediening en gebruik . . . . . . . . . . . . . . 55
Apparaat demonteren. . . . . . . . . . . . . . 57
Receptsuggesties . . . . . . . . . . . . . . . . . 57
Reiniging en onderhoud. . . . . . . . . . . . 59
Opslag . . . . . . . . . . . . . . . . . . . . . . . . . . 59
Algemene opmerkingen. . . . . . . . . . . . 59
Geachte klant,
Lees voor gebruik van het apparaat de in
deze handleiding opgenomen aanwijzingen in verband met de in bedrijfname, de
veiligheid, het bestemmingsconform gebruik, en de reiniging en het onderhoud.
Sla de uitklappagina’s aan het begin en
het einde van de handleiding open, om de
afbeeldingen tijdens het lezen te kunnen
bekijken.
Bewaar deze handleiding voor later gebruik, en en geef ze samen met het apparaat door aan een volgende eigenaar.
Veiligheid
►►Gebruik het apparaat alleen voor
het beschreven doel. Gebruik het
apparaat in geen geval voor andere, mogelijk gelijkaardige doelen.
►►Dit apparaat mag niet door kinderen gebruikt worden.
►►Het apparaat en zijn aansluitleiding
moeten uit de buurt van kinderen
worden gehouden.
►►Kinderen mogen niet met het apparaat spelen.
BEEM - Elements of Lifestyle
►►Bewaar het apparaat en de acces-
soires buiten bereik van kinderen
jonger dan 8 jaar.
►►Controleer het apparaat voor
het gebruik op uiterlijk zichtbare
schade. Neem een beschadigd apparaat niet in gebruik.
►►Laat het apparaat tijdens het gebruik niet zonder toezicht achter.
►►Gebruik alleen accessoires van de
fabrikant of accessoires die door
de fabrikant uitdrukkelijk aanbevolen worden. Anders kan er geen
aanspraak worden gemaakt op
waarborg en garantie.
►►Gebruik dit apparaat niet in combinatie met een externe tijdschakelaar of een apart op afstand
bediend systeem.
►►Laat reparaties aan het apparaat
alleen uitvoeren door een door de
fabrikant erkende klantendienst,
omdat er anders bij beschadigingen en daaruit volgende storingen
geen aanspraak meer kan worden
gemaakt op garantie of waarborg.
Dit geldt met name ook voor het
vervangen van een beschadigde
aansluitkabel. Door onoordeelkundige reparaties kan er wezenlijk
gevaar voor de gebruiker ontstaan.
►►Vervang defecte onderdelen alleen
door originele vervangonderdelen.
Alleen bij deze onderdelen wordt
gegarandeerd, dat aan de veiligheidseisen wordt voldaan.
51
PantherNL
►►Een reparatie van het apparaat
tijdens de waarborg- resp. garantieperiode mag alleen door een
door de fabrikant geautoriseerde
klantendienst uitgevoerd worden.
Anders vervalt bij beschadigingen
en de daaruit volgende storingen
de waarborg- resp. garantie-aansprakelijkheid.
GEVAAR
Gevaar door elektrische stroom!
►► Gebruik het apparaat niet, indien
de netkabel of de stekker beschadigd zijn.
►► Open in geen geval de behuizing
van het apparaat. Indien onder
spanning staande aansluitingen
aangeraakt worden, en de elektrische en mechanische opbouw
gewijzigd wordt, bestaat er gevaar voor elektrische schokken.
►► Dompel het motorblok of de
stekker nooit onder in water of
andere vloeistoffen.
►► Trek de stekker in volgende situaties uit het stopcontact:
–– voor het monteren/demonteren
van de opzetstukken
–– voor het reinigen van het apparaat
–– als het apparaat niet gebruikt
wordt
–– bij storing van het apparaat tijdens het gebruik.
►► Trek de aansluitkabel altijd met
de stekker uit het stopcontact,
nooit met de netkabel zelf.
►► Draag, til of verplaats het apparaat nooit met de netkabel.
52
Verstikkingsgevaar door verpakkingsmaterialen!
►► Zorg er voor dat er geen kinderen met het verpakkingsmateriaal
spelen.
WAARSCHUWING
Gevaar door bewegende delen!
►► Trek steeds de netstekker voor
het in elkaar zetten, het uit elkaar
nemen, het reinigen of het opbergen van het apparaat uit het
stopcontact.
►► Gebruik het apparaat alleen, als
het voorzetstuk gemonteerd en
vergrendeld is.
Verwondingsgevaar door scherpe
messen!
►► Raak de mesbladen van het
kruismes niet aan.
►► Steek in geen geval uw vingers
of voorwerpen in de toevoerschacht. Druk de levensmiddelen
altijd aan met de stamper. Gebruik daarvoor nooit de vingers
of andere voorwerpen.
►► Gebruik het apparaat enkel met
gemonteerd voorzetstuk.
LET OP
►► Laat het apparaat tijdens langere gebruiksperiodes tussendoor afkoelen,
om oververhitting te vermijden.
►► Gebruik de achteruit schakelaar
(7) slechts max. 10 seconden (zie
hoofdstuk Blokkeringen verhelpen (zijde 56)), omdat de motor
anders beschadigd kan raken.
►► Bedien de achteruit schakelaar pas
na volledige stilstand van de aandrijfmotor.
BEEM - Elements of Lifestyle
NLPanther
Beveiliging tegen overbelasting
De motor is met een thermische beveiligingsschakelaar beveiligd tegen overbelasting. Deze schakelt bij overbelasting
automatisch uit. Schakel in dit geval het
apparaat uit, en laat het ca. 60 minuten
afkoelen.
LET OP
►► Laat het apparaat tijdens langere gebruiksperiodes tussendoor afkoelen,
om oververhitting te vermijden.
Veilige plaats van installatie
Voor een veilig en storingsvrij gebruik van
het apparaat moet de plaats van installatie
aan de volgende voorwaarden voldoen:
►►De ondergrond van het apparaat moet
stevig, droog, vlak, water- en hittebestendig zijn.
►►De omgeving van het apparaat mag
niet heet, nat of zeer vochtig zijn.
►►Het stopcontact moet gemakkelijk toegankelijk zijn, zodat de verbinding met
het net snel losgekoppeld kan worden.
►►Het oppervlak van meubelen bevat
mogelijk bestanddelen, die de stelvoeten van het apparaat kunnen aantasten en week maken. Leg eventueel
een onderlegger onder de stelvoeten
van het apparaat.
Bestemmingsconform gebruik
Dit apparaat is enkel bestemd voor het
verkleinen van levensmiddelen en de bereiding van worst, kebbe en spritsgebak
voor thuisgebruik of gelijkaardige, niet
professionele sectoren, zoals bijvoorbeeld:
–– Personeelskeukens van winkels, cafés, kantoren of een andere beroepsmatige omgeving
–– Landbouw bedrijven
of andere wooninrichtingen
–– Bed and breakfast-pensions
Een ander of verder gaand gebruik geldt
als niet bestemmingsconform.
Schadeclaims van welke aard dan ook als
gevolg van schade vanwege niet bestemmingsconform gebruik zijn uitgesloten. Dit
risico rust volledig bij de gebruiker.
Gebruikte symbolen
GEVAAR
Wordt gebruikt voor een acuut dreigend
gevaar, dat tot zware lichaamsverwondingen of tot de dood voert.
►► Ter vermijding van het gevaar de
hierna opgesomde aanwijzingen
volgen.
WAARSCHUWING
Wordt gebruikt voor een mogelijk
gevaarlijke situatie, die tot zware
lichaamsverwondingen of tot de dood
kan voeren.
►► Ter vermijding van het gevaar de
hierna opgesomde aanwijzingen
volgen.
VOORZICHTIG
Wordt gebruikt voor een mogelijk gevaarlijke situatie, die kan leiden tot lichte
verwondingen.
►► Ter vermijding van het gevaar de
hierna opgesomde aanwijzingen
volgen.
LET OP
Wordt gebruikt voor een situatie, die kan
leiden tot materiële schade.
►► Ter vermijding van het gevaar de
hierna opgesomde aanwijzingen
volgen.
–– Gebruik door gasten in hotels, motels
BEEM - Elements of Lifestyle
53
PantherNL
In bedrijfname
Uitpakken
Ga als volgt tewerk:
1. Neem het apparaat, alle accessoires
en de gebruikshandleiding uit de verpakking.
2. Verwijder voor het eerste gebruik alle
verpakkingsmaterialen en beschermfolies van het apparaat en de accessoires. Verwijder het typeplaatje en
eventuele waarschuwingen nooit.
3. Bewaar tijdens de waarborg- resp. garantieperiode de originele verpakking,
om het apparaat bij een garantieclaim
correct verpakt te kunnen verzenden.
Transportschade leidt tot het vervallen van de garantie- of waarborgaanspraak.
4. Controleer de inhoud, ook in de
stamper, op volledigheid en zichtbare
schade. Neem een beschadigd apparaat niet in gebruik.
Aansluiten
Voor een veilig en storingsvrij gebruik van
het apparaat moeten bij de elektrische aansluiting de volgende voorschriften in acht
worden genomen:
met die van elektriciteitsnet. Deze
gegevens moeten met elkaar overeen
komen, zodat er geen schade aan het
apparaat optreedt. Vraag in twijfelgevallen advies aan uw elektrohandelaar.
►►Controleer of het stopcontact beveiligd
is met een zekering van minstens 16A.
►►Controleer of de aansluitleiding onbeschadigd is. Leg de aansluitleiding zo,
dat er geen struikelgevaar bestaat. De
aansluitleiding mag niet over scherpe
randen gelegd, strak gespannen, geknikt, gekwetst of geknoopt worden.
De aansluitleiding mag niet in contact
komen met hete oppervlakken.
Voor het eerste gebruik
1. Reinig het apparaat en de accessoires, ook de delen in de stamper, zoals
beschreven in het hoofdstuk Reiniging en onderhoud (zijde 59) .
OPMERKING
►► Bij de eerste inbedrijfstelling kunnen
door bij de productie gebruikte stoffen, zoals bijv. vetten, geur- en lichte
rookvorming optreden. Dat is heel
normaal! Zorg daarom voor voldoende ventilatie.
►►Controleer of het apparaat kan worden
aangesloten op een correct geïnstalleerd stopcontact met beschermgeleider. Het gebruik op een stopcontact
zonder beschermgeleider is niet
toegestaan. Laat in twijfelgevallen de
elektrische installatie nakijken voor een
elektromonteur. De fabrikant aanvaardt
geen verantwoordelijkheid voor schade,
die wordt veroorzaakt door een ontbrekende of onderbroken beschermingsgeleider.
►►Vergelijk voor het aansluiten van het
apparaat de aansluitgegevens (spanning en frequentie) op het typeplaatje
54
BEEM - Elements of Lifestyle
NLPanther
Beschrijving apparaat
(afbeeldingen zie linker uitklappagina)
1
2
3
4
5
6
7
8
9
10
Stamper met deksel
Vultrechter
Opening voor het voorzetstuk
Ontgrendelknop voorzetstuk
Motorblok
Aan/uit-schakelaar
Achteruit schakelaar
Controlelampje
Worst vulbuis
Tule
Bedieningselementen
Ontgrendelknop (4)
11
12
13
14
15
16
17
18
19
20
21
22
23
Kneder
Worst vulplaat
Opzet spritsen
Schuiver
Kleine gaten-schijf (Ø 3 mm)
Middelgrote gaten-schijf (Ø 4,5 mm)
Grote gaten-schijf (Ø 8 mm)
Klemring
Kruismes
Transportschroef
Voorzetstuk
Aandrijfrondsel
Gebruikshandleiding (niet afgebeeld)
Functie
Ontgrendelt het opzetzet voor het demonteren.
Aan/uit schakelaar (6)
In- en uitschakelen van het apparaat.
Achteruit drukknop (7)
Doet de motor in omgekeerde zin draaien.
Indien het voorzetstuk na gebruik niet meer van de behuizing kan worden losgemaakt, de achteruit-druktoets
2-3 seconden indrukken, om vast zittende levensmiddelen los te maken.
Controlelampje (8)
Geeft de bedrijfstoestand van het apparaat aan.
Voorbereidingen
Naargelang het gebruiksdoel moet het
apparaat van verschillende opzetstukken
worden voorzien.
1. Monteer eerst het aandrijfdrondsel (22 )
op de transportschroef (20), zoals afgebeeld op de linker uitklappagina.
LET OP
Het apparaat kan te heet worden, als de
klemring te vast wordt aangedraaid.
►► Draai de klemring steeds tot tegen
de aanslag en daarna een kwartslag
terug.
BEEM - Elements of Lifestyle
Bediening en gebruik
LET OP
►► Laat het apparaat tijdens langere gebruiksperiodes tussendoor afkoelen,
om oververhitting te vermijden.
Gebruik als vleesmolen (afb. A)
1. Haal de stekker uit het stopcontact.
2. Steek de transportschroef (20) in het
voorzetstuk (21).
3. Steek het kruismes (19) met de snijdkanten naar buiten op het vierkant van
de transportschroef.
4. Steek de gewenste gatenschijf (15,
16 of 17) op de transportschroef. De
inkeping van de gatenschijf moet
daarbij over de geleidingsnok van het
voorzetstuk liggen.
55
PantherNL
5. Schroef de klemring (18) op het voorzetstuk.
6. Steek het voorgemonteerde voorzetstuk in de opening (3).
7. Draai het voorzetstuk tegende klok in,
tot het hoorbaar vastklikt (afb. E1).
8. Steek de vultrechter (2) op het voorzetstuk.
OPMERKING
►► Om bijzonder fijngemalen vlees te
maken, kunt u het vlees meerdere
keren malen. Kies eerst een gatenschijf met een grotere gatendiameter, en daarna een gatenschijf met
kleinere gaten.
►► U kunt andere ingrediënten (bijv.
uien) samen met het vlees verwerken.
Blokkeringen verhelpen
Ga als volgt tewerk:
1. Schakel het apparaat uit.
2. Druk gedurende ca. 2-3 seconden op
de achteruit-druktoets. Op die manier
kan de transportschroef vrij worden
gemaakt, en kunt u het voorzetstuk
gemakkelijk afnemen.
Maken van worst (afb. B)
Ga als volgt tewerk:
1. Trek de stekker uit het stopcontact.
2. Steek de transportschroef (20) in het
voorzetstuk (21).
3. Steek de worstvulschijf (12) op de
transportschroef. De inkeping van de
worstvulschijf moet daarbij over de
geleidingsnok van het voorzetstuk liggen.
4. Steek de worstvulbuis (9) door de
klemring (18).
5. Schroef de klemring (18) op het voorzetstuk.
6. Steek het voorgemonteerde voorzetstuk in de opening (3).
56
7. Draai het voorzetstuk in tegenuurwerkwijzerzin, tot het hoorbaar vastklikt (afb. E1).
8. Steek de beide vultrechters (2) op het
voorzetstuk.
Het maken van kebbe (afb. C)
Ga als volgt tewerk:
1. Trek de stekker uit het stopcontact.
2. Steek de transportschroef (20) in het
voorzetstuk (21).
3. Steek de vorm (11) op de transportschroef. De inkeping van de vorm
moet daarbij over de geleidingsnok
van het voorzetstuk liggen.
4. Steek de tule (10) op de vorm.
5. Schroef de klemring (18) op het voorzetstuk.
6. Steek het voorgemonteerde voorzetstuk in de opening (3).
7. Draai het voorzetstuk in tegenuurwerkwijzerzin, tot het hoorbaar vastklikt (afb. E1).
8. Steek de beide vultrechters (2) op het
voorzetstuk.
Het maken van spritsen (afb. D)
Ga als volgt tewerk:
1. Trek de stekker uit het stopcontact.
2. Steek de transportschroef (20) in het
voorzetstuk (21).
3. Steek de grote gatenschijf (17) op de
transportschroef. De inkeping van de
gatenschijf moet daarbij over de geleidingsnok van het voorzetstuk liggen.
4. Steek de spritsbakopzet (13) zonder
de schuiver (14) op de gatenschijf.
5. Schroef de klemring (18) op het voorzetstuk.
6. Steek de schuiver op de spritsopzet.
7. Steek het voorgemonteerde voorzetstuk in de opening (3).
BEEM - Elements of Lifestyle
NLPanther
8. Draai het voorzetstuk in tegenuurwerkwijzerzin, tot het hoorbaar vastklikt (afb. E1).
9. Steek de beide vultrechters (2) op het
voorzetstuk.
Na het gebruik
Ga als volgt tewerk:
1. Schakel het apparaat uit.
2. Haal de stekker uit het stopcontact.
3. Demonteer het voorzetstuk, zoals
beschreven in het deel Apparaat demonteren (zijde 57).
OPMERKING
►► Indien het voorzetstuk niet van de
behuizing kan worden losgemaakt,
de blokkade verwijderen, zoals
beschreven in het hoofdstuk Blokkeringen verhelpen (zijde 56).
4. R
einig het apparaat en de gebruikte
accessoires, zoals beschreven in het
hoofdstuk Reiniging en onderhoud
(zijde 59).
Apparaat demonteren
Ga als volgt tewerk:
1. Schakel het apparaat uit.
2. Trek de stekker uit het stopcontact.
3. Neem de vultrechter (2) uit het voorzetstuk (21).
4. Hou de ontgrendelingsknop (4) ingedrukt.
5. Draai het voorzetstuk in uurwerkwijzerzin en trek hem van de opening (3)
af (afb. E2).
6. Schroef de klemring (18) af.
7. Neem alle delen uit het voorzetstuk.
BEEM - Elements of Lifestyle
Receptsuggesties
Braadworst
Gebruik voor ca. 20 stuks de volgende
ingrediënten:
●● 1,5 kg varkensvlees
●● 500 g spek
●● 2 eieren uit de koelkast
●● 100 ml koude melk
●● 1 grote ui
●● 1 teentje knoflook
●● zout, peper, marjolein
Ga als volgt tewerk:
1. Maal het varkensvlees en het spek in
de vleesmolen.
2. Voeg de melk, de eieren, de fijngehakte ui, het geperst teentje koflook n
de kruiden toe, en meng.
3. Plaats de worstomhulling op de worstvulbuis (9), en maak een knoop in het
uiteinden.
4. Breng de worstmassa in de vultrechter en vul langzaam. Draai na zowat
20 cm de worst, en vul gelijkmatig
verder.
Tips:
1. Deze worsten zijn het lekkerst, als ze
meteen geroosterd worden.
2. U kunt de worsten ook voor zowat 3
weken invriezen.
Vleesomhulling voor kebbe
Verwenden Sie für ca. 20 Stück die folgenden Zutaten:
●● 250 g bulgur tarwe
●● 500 g mager runds-, schapen- of kalfsvlees
●● 2 eieren uit de koelkast
●● 1 fijn gehakte ui
●● zout
●● peper
57
PantherNL
Ga als volgt tewerk:
1. Maak met de ingrediënten een smeuig
deeg.
2. Week de bulgur in water, en giet na
20 min het overtollige water weg.
3. Maal het vlees meerdere keren na
elkaar in de vleesmolen.
4. Meng het vlees, de bulgur en de fijngehakte ui tot een smeuig deeg, en
kruid met peper en zout.
5. Breng de stukken vlees in de vultrechter.
6. Druk met de stamper de stukken
vlees naar onder, tot de toevoerschacht leeg is.
7. Snij de holle vleesrolletjes op de gewenste lengte.
Tips:
1. In de plaats van bulgur tarwe kunt u
ook meel (ongeveer 200-250 g) gebruiken.
2. Vries de afgewerkte vleesbuisjes kort
in, zodat het vullen eenvoudiger gaat.
Klassieke kebbe-vulling
Gebruik voor ca. 20 stuks de volgende
ingrediënten:
●● 500 g schapenvlees (of runds)
●● 2 el pijnboompitten
●● 1 gehakte ui
●● een beetje olijfolie
●● zout
●● peper
●● frituurvet
Ga als volgt tewerk:
1. Maal het vlees drie maal na elkaar in
de vleesmolen.
2. Stoof de ui aan in de olijfolie, voeg de
pijnboompitten toe, en braad ze goudbruin aan.
58
3. Het vlees toevoegen, kruiden met peper en zout en zo lang aanbraden, tot
het vlees een knapperige kleur krijgt.
4. Breng nu het gehakt in de vleesomhulling en druk de uiteinden met vochtige handen samen, om ze te sluiten.
Voor de typische vorm worden de
uiteinden van de eivormige balletjes
puntvormig gemaakt.
5. Frituur de kebbe goudbruin in frituurvet van ong. 160-170° C.
6. Neem de kebbe uit het vet, laat ze uitlekken op een stuk keukenpapier, en
serveer ze aansluitend heet.
Tips:
1. Hierbij smaken bijv. salades, dips en
groot rond plat brood.
Spritsen
Gebruik de volgende ingrediënten:
●● 200 g boter
●● 200 g suiker
●● 1 pakje vanillesuiker
●● 200 g gemalen amandelen
●● 2 eieren
●● 400 g bloem
●● 100 g zetmeel
Ga als volgt tewerk:
1. Roer de boter, de suiker en de vanillesuiker schuimig, en voeg de eireen een
voor een toe.
2. Voe de amandelen en de bloem aan de
botermassa toe, en meng alles goed
door elkaar.
3. Wikkel het deeg in vershoudfolie en laat
het 30 minuten rusten voor u het verder
verwerkt.
4. Monteer de spritsopzet. Breng het deeg
in de vultrechter, en laat het door het
spritsopzet lopen.
5. Snijd de spritsen op de gewenste lengte,
en leg de stukken op een met bakpapier
bekleed bakblik.
BEEM - Elements of Lifestyle
NLPanther
6. Bak de koekjes in een middelhete oven
(ca. 175 °C) gedurende ca. 10 min.
Algemene opmerkingen
Reiniging en onderhoud
Opmerkingen in verband met het
milieu
GEVAAR
Gevaar door elektrische stroom!
►► Dompel het apparaat nooit onder in
water of andere vloeistoffen.
►► Hou het apparaat nooit onder stromend water.
LET OP
Beschadiging van de oppervlakken.
►► Gebruik voor het reinigen van de
oppervlakken geen scherpe voorwerpen of schurende reinigingsmiddelen.
Ga als volgt tewerk:
1. Haal de stekker uit het stopcontact.
2. Veeg het motorblok (5) met een licht
vochtige doek af.
3. Reinig de opzetstukken en de accessoires met een warme afwasmiddelsopje. Gebruik geen metaal- of
schuursponsjes voor het reinigen.
4. Droog alle delen van het apparaat na
het reinigen goed af, voor u ze in het
apparaat zet.
OPMERKING
►► Alle accessoires uit kunststof zijn
geschikt voor de vaatwasser. De
accessoires uit metaal zijn niet
geschikt voor de vaatwasser.
Opslag
Indien u het apparaat gedurende langere
tijd niet nodig heeft, reinig het dan, zoals
in het hoofdstuk Reiniging en onderhoud
(zijde 59) beschreven.
Bewaar het apparaat en alle accessoires
op een droge, zuivere en vorstvrije plaats,
beschermd tegen rechtstreeks zonlicht.
BEEM - Elements of Lifestyle
De gebruikte verpakkingsmaterialen
zijn recycleerbaar. Voer verpakkingsmateriaal dat u niet meer nodig heeft af
conform de plaatselijk geldende voorschriften.
Dit product mag binnen de Europese Unie niet via het normale huisvuil
worden afgevoerd. Voer het apparaat af via de gemeentelijke inzamelpunten.
Waarborg/Garantie
Naast de wettelijke garantieverplichting
neemt BEEM bij enkele producten een uitgebreide fabrieksgarantie op zich.
Voor zover deze aangeboden wordt, vindt
u daarbij behorende informatie op de productspecifieke verpakking, op de reclamematerialen, of op de website van BEEM bij
het desbetreffende product.
Bij een professioneel of daarmee gelijk te
stellen gebruik, bijv. in hotels, pensions of
gemeenschappelijke installaties, of indien
de klant geen consument is in de zin van
het Burgerlijk Wetboek, bedraagt de garantieperiode 6 maanden.
De garantie-uitsluiting blijft hierdoor onaangetast.
Op onze website www.beem.de vindt u uitvoerige garantievoorwaarden, beschikbare
accessoires en vervangonderdelen en de
bedieningshandleidingen in verschillende
talen.
Neem voor de garantievoorwaarden, het
bestellen van accessoires of vragen in
verband met de servicedienstverlening
buiten Duitsland contact op met uw handelaar.
59
PantherNL
Aansprakelijkheidsbeperkingen
Wij aanvaarden geen aansprakelijkheid bij
schade of vervolgschade bij:
■■ het niet naleven van de bedieningshandleiding,
■■ het niet bestemmingsconform gebruik,
■■ onoordeelkundig of onaangepast gebruik,
■■ niet oordeelkundig doorgevoerde herstellingen,
■■ niet toegelaten wijzigingen,
■■ gebruik van vreemde onderdelen resp.
vervangonderdelen,
■■ gebruik van ongeschikte uitbreidingsof accessoire-inderdelen.
Conformiteitsverklaring
Bij deze verklaart BEEM dat dit apparaat
aan de principiële eisen en de overige
van toepassing zijnde bepalingen van de
richtlijnen 2004/108/EG, 2006/95/EG en
2009/125/EG voldoet.
60
BEEM - Elements of Lifestyle
RUPanther
Cодержание
Безопасность. . . . . . . . . . . . . . . . . . . . 61
Начало использования. . . . . . . . . . . . 64
Описание прибора. . . . . . . . . . . . . . . . 65
Подготовка . . . . . . . . . . . . . . . . . . . . . . 65
Использование и управление. . . . . . 66
Разборка прибора . . . . . . . . . . . . . . . . 67
Предлагаемые рецепты. . . . . . . . . . . 67
Чистка и уход. . . . . . . . . . . . . . . . . . . . 69
Хранение. . . . . . . . . . . . . . . . . . . . . . . . 69
Общие указания. . . . . . . . . . . . . . . . . . 69
Уважаемый покупатель!
Перед использованием прибора прочтите содержащиеся в данном руководстве
указания по первому использованию,
безопасности, использованию по назначению, а также чистке и уходу.
Разложите сложенные страницы в начале и в конце руководства по эксплуатации, чтобы во время чтения можно
было видеть рисунки.
Сохраняйте данное руководство для
дальнейшего использования и прилагайте его в случае передачи прибора
следующему владельцу.
Безопасность
►►Используйте прибор только в
целях, описанных в этом руководстве. Ни в коем случае не используйте прибор в иных, даже
сходных целях.
►►Данный прибор не разрешается
использовать детям.
►►Оберегать детей от доступа к
прибору и соединительному проводу.
BEEM - Elements of Lifestyle
►►Следите за тем, чтобы дети не
играли с прибором.
►►Храните прибор и принадлежности к нему в месте, не доступном
для детей младше 8 лет.
►►Перед использованием проверяйте прибор на наличие
внешних видимых повреждений.
Не используйте поврежденный
прибор.
►►Не оставляйте работающий прибор без присмотра.
►►Используйте только оригинальные принадлежности или
принадлежности, однозначно
рекомендуемые изготовителем.
В противном случае гарантия не
предоставляется.
►►Не используйте этот прибор с
внешним таймером или отдельной системой дистанционного
управления.
►►Ремонт прибора должен производиться только авторизованной
изготовителем сервисной службой, так как в противном случае
при повреждениях и последующих неисправностях больше не
предоставляется гарантия. Это,
в частности, касается и замены
поврежденного шнура электропитания. Неквалифицированно
произведенный ремонт может
представлять серьезную опасность для пользователя.
►►Неисправные части следует заменять только оригинальными
запасными частями. Только использование таких частей гарантирует соответствие требованиям безопасности.
61
PantherRU
►►Ремонт прибора в течение гаран-
тийного срока должен производиться только авторизованной
изготовителем сервисной службой, так как в противном случае
при повреждениях и последующих неисправностях гарантия
больше не предоставляется.
ОПАСНОСТЬ!
Опасность электрического тока!
►► Не используйте прибор при
повреждениях шнура электропитания или сетевой вилки.
►► Ни в коем случае не вскрывайте корпус прибора. При
прикосновении к токопроводящим контактам и внесении
изменений в электрическую и
механическую части прибора
существует опасность удара
электротоком.
►► Никогда не погружайте корпус
с двигателем или сетевую вилку в воду или другие жидкости.
►► В следующих ситуациях вынимайте сетевую вилку из
розетки:
–– перед монтажом/демонтажом
насадок;
–– перед очисткой прибора;
–– если не используете прибор;
–– при возникновении неисправности во время работы прибора.
►► При выключении из розетки
всегда беритесь за сетевую
вилку, а не за сам шнур электропитания.
62
►► Никогда не переносите, не
поднимайте и не передвигайте
прибор за шнур электропитания.
Опасность удушья, исходящая
от упаковочных материалов!
►► Следите за тем, чтобы дети не
играли с упаковочными материалами.
ПРЕДУПРЕЖДЕНИЕ!
Опасность, исходящая от подвижных частей!
►► Всегда вынимайте сетевую
вилку из розетки перед сборкой, разборкой, чисткой или
перед хранением прибора.
►► Эксплуатируйте прибор только
со смонтированным и зафиксированным мясоприемником.
Опасность травмирования
острыми ножами!
►► Не прикасайтесь к лезвиям
крестовидного ножа.
►► Ни в коем случае не вставляйте в мясоприемник пальцы или
какие-либо предметы. Всегда
подавайте продукты питания
толкателем. Никогда не делайте этого пальцами или другими
предметами.
►► Эксплуатируйте прибор только
со смонтированным мясоприемником.
ВНИМАНИЕ
►► При длительной переработке продуктов давайте прибору время от
времени остывать во избежание
перегрева.
BEEM - Elements of Lifestyle
RUPanther
►► Нажимайте кнопку реверса (7)
не более чем на 10 секунд (см.
раздел Устранение блокировок
(cmp. 66), так как иначе может
быть поврежден двигатель.
►► Нажимайте кнопку реверса только
после полной остановки приводного двигателя.
Защита от перегрузки
Двигатель предохранен от перегрузки
термозащитным реле. При перегрузке
оно автоматически отключает двигатель.
В этом случае выключите прибор и дайте ему остыть в течение прибл. 60 минут.
ВНИМАНИЕ
►► При длительной переработке продуктов давайте прибору время от
времени остывать во избежание
перегрева.
Безопасное место установки
Для безопасной и исправной работы
прибора место его установки должно
отвечать следующим требованиям:
►►Поверхность для установки прибора
должна быть прочной, сухой, ровной, водостойкой и жаропрочной.
►►Окружающая прибор среда не должна быть жаркой, влажной или очень
сырой.
►►Розетка должна находиться в легкодоступном месте, чтобы электропитание можно было быстро отключить.
►►Поверхности предметов мебели могут содержать компоненты, способные разъедать и размягчать ножки
прибора. При необходимости подкладывайте под ножки какой-либо
защитный материал.
BEEM - Elements of Lifestyle
Использование по назначению
Этот прибор предназначен для измельчения продуктов питания, а также для
изготовления колбас, кеббе и печенья в
домашних условиях или аналогичного
некоммерческого использования, например:
–– на кухнях для персонала магазинов,
кафе, офисов или другой профессиональной сферы;
–– работниками сельского хозяйства;
–– жильцами в отелях, мотелях или
других жилых заведениях;
–– в небольших гостиницах, предоставляющих ночлег и завтрак;
Использование в иных целях или целях,
выходящих за рамки указанных, считается использованием не по назначению.
Любые претензии, связанные с ущербом вследствие использования прибора
не по назначению, исключаются. Все
риски несет только пользователь.
Используемые символы
ОПАСНОСТЬ!
Указывает на непосредственную
опасность, которая может привести к тяжелым травмам или
смерти.
►► Во избежание опасности, соблюдайте приведенные здесь указания.
ПРЕДУПРЕЖДЕНИЕ!
Указывает на возможную опасную
ситуацию, которая может привести
к тяжелым травмам или смерти.
►► Во избежание опасности, соблюдайте приведенные здесь указания.
63
PantherRU
ОСТОРОЖНО
Указывает на возможную опасную
ситуацию, которая может привести
к легким травмам.
►► Во избежание опасности, соблюдайте приведенные здесь указания.
ВНИМАНИЕ
Указывает на ситуацию, которая
может привести к повреждениям
имущества.
►► Во избежание опасности, соблюдайте приведенные здесь указания.
Начало использования
Распаковка
Действуйте следующим образом:
1. Извлеките прибор, все принадлежности и руководство по эксплуатации из коробки.
2. Перед первым использованием
удалите с прибора и принадлежностей все упаковочные материалы
и защитные пленки. Никогда не
удаляйте фирменную табличку и
имеющиеся предупредительные
надписи.
3. Сохраняйте оригинальную упаковку
в течение срока действия гарантии,
чтобы в гарантийном случае прибор
можно было надлежащим образом
упаковать для отправки. При повреждениях, возникающих во время транспортировки, гарантия не
предоставляется.
4. Проверьте содержимое, в том числе
в толкателе, на комплектность и отсутствие видимых повреждений. Не
используйте поврежденный прибор.
64
Подключение
Для безопасной и исправной работы
прибора при его подключении к электросети следует соблюдать следующие
правила:
►►Убедитесь в том, что подключаете
прибор к правильно установленной розетке с защитным проводом.
Подключение прибора к розетке
без защитного провода запрещено. При сомнениях обратитесь к
специалисту-электрику для проверки
домашней электропроводки. Изготовитель не несет ответственность
за ущерб, возникающий вследствие
отсутствия или неисправности защитного провода.
►►Перед подключением прибора
сравните параметры (напряжение и
частоту), указанные на фирменной
табличке, с параметрами вашей
электросети. Они должны совпадать,
что позволит избежать повреждения
прибора. При сомнениях обратитесь
к специалисту-электрику.
►►Убедитесь в том, что розетка предохранена, как минимум, предохранителем на 16 A.
►►Убедитесь в том, что шнур электропитания не поврежден. Располагайте
шнур так, чтобы о него нельзя было
зацепиться при ходьбе. Он не должен быть проложен через острые
углы, быть сильно натянут, переломлен, пережат или спутан. Провод
электропитания не должен соприкасаться с горячими поверхностями.
Перед первым использованием
1. Очистите прибор и его принадлежности, в том числе части в толкателе, как описано в разделе Чистка
и уход (cmp. 69).
BEEM - Elements of Lifestyle
RUPanther
УКАЗАНИЕ
►► При первом включении прибора
из-за наличия добавок, используемых на производстве (например,
жиров) может появиться запах или
легкий дымок. Это считается нормальным явлением! Позаботьтесь
о достаточном проветривании.
Описание прибора
(См. рисунки на левой разложенной
странице)
1
Толкатель с крышкой
2
Загрузочный лоток
3
Крепление для мясоприемника
4
Кнопка фиксатора мясоприемника
5
Корпус с двигателем
6
Вкл-/выключатель
Элементы управления
7
Кнопка реверса
8
Лампа-индикатор работы
9
Насадка (трубка) для колбас
10 Наконечник
11 Формовочный диск
12 Диск для колбас
13 Насадка для печенья
14 Шибер
15 Мелкая решетка (Ø 3 мм)
16 Средняя решетка (Ø 4,5 мм)
17 Крупная решетка (Ø 8 мм)
18 Стопорное кольцо
19 Крестовидный нож
20 Шнек
21 Мясоприемник
22 Приводная шестерня
23 Руководство по эксплуатации (без
изображения)
Функция
Кнопка фиксатора (4)
Освобождает мясоприемник для демонтажа.
Вкл-/выключатель (6)
Включает или выключает прибор.
Кнопка реверса (7)
Включает обратное вращение двигателя.
Если после работы мясоприемник не отделяется от
корпуса, нажмите на 2-3 секунды кнопку реверса,
чтобы высвободить застрявшие продукты питания.
Лампа-индикатор работы (8) Сигнализирует о работе прибора.
Подготовка
В зависимости от цели использования,
прибор должен оснащаться различными насадками.
1. Сначала установите приводную
шестерню (22) на шнек (20), как показано на рисунке на левой раскладываемой странице.
BEEM - Elements of Lifestyle
ВНИМАНИЕ
Прибор может перегреваться, если
слишком сильно затянуто стопорное кольцо.
►► Всегда навинчивайте кольцо до
упора, а затем отпускайте его приблизительно на четверть оборота.
65
PantherRU
Использование и управление
ВНИМАНИЕ
►► При длительной переработке продуктов давайте прибору время от
времени остывать во избежание
перегрева.
Использование в качестве
мясорубки (рисунок A)
1. Выньте сетевую вилку из розетки.
2. Вставьте шнек (20) в мясоприемник
(21).
3. Наденьте на четырехгранник шнека
крестовидный нож (19) лезвиями
наружу.
4. Наденьте на шнек необходимую
решетку (15, 16 или 17). При этом
выемка на решетке должна попасть
на выступ на мясоприемнике.
5. Навинтите на мясоприемник стопорное кольцо (18).
6. Вставьте собранный мясоприемник
в крепление (3).
7. Поверните мясоприемник против
часовой стрелки до щелчка фиксации (рисунок E1).
8. Наденьте на мясоприемник загрузочный лоток (2).
УКАЗАНИЕ
►► Для изготовления очень тонкого
фарша мясо можно пропустить через мясорубку неоднократно. При
этом сначала выбирайте решетку
с большим, а затем - с меньшим
диаметром отверстий.
►► Вместе с мясом можно измельчать
и другие ингредиенты (например,
лук).
Устранение блокировок
Действуйте следующим образом:
1. Выключите прибор.
66
2. На 2-3 секунды нажмите кнопку
реверса. Это позволяет освободить
шнек и легко отделить мясоприемник.
Изготовление колбас
(рисунок B)
Действуйте следующим образом:
1. Выньте сетевую вилку из розетки.
2. Вставьте шнек (20) в мясоприемник (21).
3. Наденьте на шнек диск для колбас
(12). При этом выемка на диске
должна попасть на выступ на мясоприемнике.
4. Проденьте насадку для колбас (9)
сквозь стопорное кольцо (18).
5. Навинтите на мясоприемник стопорное кольцо (18).
6. Вставьте собранный мясоприемник
в крепление (3).
7. Поверните мясоприемник против
часовой стрелки до щелчка фиксации (рисунок E1).
8. Наденьте на мясоприемник загрузочный лоток (2).
Изготовление кеббе (рисунок C)
Действуйте следующим образом:
1. Выньте сетевую вилку из розетки.
2. Вставьте шнек (20) в мясоприемник
(21).
3. Наденьте на шнек формовочный
диск (11). При этом выемка на диске
должна попасть на выступ на мясоприемнике.
4. Наденьте на формовочный диск наконечник (10).
5. Навинтите на мясоприемник стопорное кольцо (18).
6. Вставьте собранный мясоприемник
в крепление (3).
7. Поверните мясоприемник против
часовой стрелки до щелчка фиксации (рисунок E1).
BEEM - Elements of Lifestyle
RUPanther
8. Наденьте на мясоприемник загрузочный лоток (2).
Изготовление печенья
(рисунок D)
Действуйте следующим образом:
1. Выньте сетевую вилку из розетки.
2. Вставьте шнек (20) в мясоприемник (21).
3. Наденьте на шнек решетку с крупными отверстиями (17). При этом
выемка на решетке должна попасть
на выступ на мясоприемнике.
4. Наденьте поверх решетки насадку
для печенья (13) без шибера (14).
5. Навинтите на мясоприемник стопорное кольцо (18).
6. Установите на насадку для печенья
шибер.
7. Вставьте собранный мясоприемник
в крепление (3).
8. Поверните мясоприемник против
часовой стрелки до щелчка фиксации (рисунок E1).
9. Наденьте на мясоприемник загрузочный лоток (2).
После использования
Действуйте следующим образом:
1. Выключите прибор.
2. Выньте сетевую вилку из розетки.
3. Разберите мясоприемник, как описано в разделе Разборка прибора
(cmp. 67).
УКАЗАНИЕ
►► Если мясоприемник не отделяется
от корпуса, устраните блокировку,
как описано в разделе Устранение блокировок (cmp. 66).
4. Очистите прибор и используемые
принадлежности, как описано в разделе Чистка и уход (cmp. 69).
BEEM - Elements of Lifestyle
Разборка прибора
Действуйте следующим образом:
1. Выключите прибор.
2. Выньте сетевую вилку из розетки.
3. Отделите загрузочный лоток (2) от
мясоприемника (21).
4. Нажмите и удерживайте кнопку
фиксатора (4).
5. Поверните мясоприемник по часовой стрелке и извлеките его из крепления (3) (рисунок E2).
6. Отвинтите стопорное кольцо (18).
7. Извлеките из мясоприемника все
части.
Предлагаемые рецепты
Колбаски для жарки
Используйте следующие ингредиенты
приблизительно для 20 шт.:
●● 1,5 кг свинины;
●● 500 г сырого сала;
●● 2 яйца из холодильника;
●● 100 мл холодного молока;
●● 1 большая луковица;
●● 1 зубчик чеснока;
●● соль, перец, майоран.
Действуйте следующим образом:
1. Измельчите свинину и сало в мясорубке.
2. Добавьте молоко, яйца, мелко порубленный лук, выдавленный зубчик
чеснока и специи и все перемешайте.
3. Наденьте колбасную оболочку на
насадку (9) и завяжите не ее конце
узел.
67
PantherRU
4. Подавайте колбасный фарш в загрузочный лоток и медленно наполняйте оболочку. Приблизительно
через 20 см поворачивайте колбасу
и равномерно продолжайте наполнение.
Рекомендации:
1. У колбасок лучший вкус, если их
сразу же поджарить на гриле.
2. Их также можно заморозить приблизительно на 3 недели.
Мясная оболочка для кеббе
Используйте следующие ингредиенты
приблизительно для 20 шт.:
●● 250 г булгура;
●● 500 г постной говядины, баранины
или телятины;
●● 2 яйца из холодильника;
●● 1 мелко порубленная луковица;
●● соль;
●● перец
Действуйте следующим образом:
1. Из ингредиентов готовится пластичное тесто.
2. Замочите булгур в воде и приблизительно через 20 мин. слейте лишнюю воду.
3. Несколько раз пропустите мясо через мясорубку.
4. Вымесите из мяса, булгура и мелко порубленного лука пластичное
тесто и приправьте его солью и
перцем.
5. Подавайте приправленный фарш в
загрузочный лоток.
6. Используя толкатель, проталкивайте фарш вниз до опустошения канала мясоприемника.
7. Нарезайте полую мясную трубочку
по длине.
68
Рекомендации:
1. Вместо булгура можно также использовать муку (около 200-250 г).
2. Слегка заморозьте готовые мясные
оболочки, чтобы их было проще начинять.
Классическая начинка для кеббе
Используйте следующие ингредиенты
приблизительно для 20 шт:
●● 500 г баранины (или говядины);
●● 2 ст. л. пиниевых орешков;
●● 1 порубленная луковица;
●● немного оливкового масла;
●● соль;
●● перец
●● масло для фритюра.
Действуйте следующим образом:
1. Трижды пропустите мясо через мясорубку.
2. Потушите лук в оливковом масле,
добавьте пиниевые орешки и поджарьте их до золотисто- коричневого цвета.
3. Добавьте мясо, приправьте солью
и перцем и жарьте до тех пор, пока
оно не станет хрустящим.
4. Начиняйте мясные оболочки фаршем и сжимайте влажными руками
их концы, чтобы закрыть. Для придания традиционной формы концы
яйцевидных клецок заостряются.
5. Жарьте шарики кеббе до золотисто- коричневого цвета в масле для
фритюра, разогретом до 160-170°C.
6. Вынимайте готовые шарики из масла, обсушивайте их на бумажном
кухонном полотенце, после чего подавайте горячими.
Рекомендации:
1. Могут подаваться с салатами, дипсоусами и лепешками.
BEEM - Elements of Lifestyle
RUPanther
Выдавливаемое печенье
Используйте следующие ингредиенты:
●● 200 г сливочного масла;
●● 200 г сахара;
●● 1 пакетик ванильного сахара;
●● 200 г молотого миндаля;
●● 2 яйца;
●● 400 г муки;
●● 100 г пищевого крахмала.
ВНИМАНИЕ
Повреждение поверхностей.
►► Не используйте для чистки поверхностей острые предметы или
абразивные чистящие средства.
Действуйте следующим образом:
1. Выньте сетевую вилку из розетки.
2. Протрите корпус с двигателем (5)
слегка влажной тканью.
1. Смешайте сливочное масло, сахар
и ванильный сахар до образования
пены, постепенно добавляя яйца.
3. Промойте насадки и принадлежности в теплом растворе моющего
средства. Не используйте для
чистки металлическую/абразивную
губку.
2. Добавьте к масляной массе миндаль, муку и крахмал и все хорошо
перемешайте друг с другом.
4. После мойки хорошо обсушите все
части, прежде чем устанавливать
их в прибор.
3. Заверните тесто в пищевую пленку и дайте ему 30 мин. отдохнуть
перед дальнейшей переработкой.
УКАЗАНИЕ
►► Все принадлежности из пластмассы можно мыть в посудомоечной
машине. Все принадлежности из
металла запрещено мыть в посудомоечной машине.
Действуйте следующим образом:
4. Установите насадку для печенья.
Подавайте тесто в загрузочный лоток и пропускайте его через насадку
для печенья.
5. Нарезайте печенье по длине и укладывайте его на противень, застеленный бумагой для выпечки.
6. Выпекайте печенье при средней
температуре (прибл. 175 °C) около
10 мин.
Чистка и уход
ПРЕДУПРЕЖДЕНИЕ!
Опасность электрического тока!
►► Никогда не погружайте прибор
или его сетевую вилку в воду или
другие жидкости.
►► Никогда не подставляйте прибор
под струю воды.
BEEM - Elements of Lifestyle
Хранение
Если прибор не используется в течение долгого времени, очистите его,
как описано в разделе Чистка и уход
(cmp. 69).
Храните прибор и все принадлежности
в сухом, чистом, не подверженном заморозкам месте, защищенном от прямых солнечных лучей.
Общие указания
Охрана окружающей среды
Использованные упаковочные материалы могут быть переработаны. Утилизируйте ненужные упаковочные материалы в соответствии с
местными нормами и правилами.
69
PantherRU
На территории Европейского Союза это изделие запрещено утилизировать вместе с обычным бытовым мусором. Сдайте прибор в
муниципальный пункт утилизации.
Гарантия
Наряду с законодательно установленной обязанностью по предоставлению
гарантии, на некоторые изделия фирма
BEEM дополнительно дает расширенную гарантию изготовителя.
Если это имеет место, соответствующую информацию можно найти либо
на упаковке изделия и в рекламных
материалах, либо на веб-сайте фирмы
BEEM в описании того или иного изделия.
В случае использования прибора в
промышленных или подобных целях,
например в гостиницах, пансионатах
или в коллективных установках, либо
в случае, если покупатель не является
пользователем согласно положений
Гражданского кодекса, гарантийный
срок составляет 6 месяцев. Исключения
из гарантийных условий при этом не изменяются.
На нашем веб-сайте www.beem.de вы
найдете подробные условия гарантии,
имеющиеся принадлежности и запасные части, а также руководства по эксплуатации на разных языках.
Ограничение ответственности
Изготовитель не несет ответственность
за прямой или косвенный ущерб в случаях:
■■ несоблюдения руководства по эксплуатации,
■■ использования не по назначению,
■■ неправильного или неподходящего
обращения,
■■ неквалифицированно произведенного ремонта,
■■ внесения неразрешенных изменений,
■■ использования деталей и запасных
частей других производителей,
■■ использования неподходящих дополнительных деталей или принадлежностей.
Декларация о соответствии
нормам ЕС
Настоящим фирма BEEM заявляет, что
настоящий прибор полностью соответствует основополагающим требованиям
и другим действующим положениям
Директив 2006/95/EС, 2004/108/EС
2009/125/EС.
Для получения информации о гарантийных условиях, заказа дополнительных
принадлежностей или по вопросам
сервисного обслуживания за пределами
Германии свяжитесь с Вашим продавцом.
70
BEEM - Elements of Lifestyle
Ersatzteile und Zubehör - Spare parts and accessories - Pièces de
rechange et accessoires - Piezas de repuesto y accesorios - Pezzi di
ricambio ed accessori - Reserveonderdelen en accessoires - Запасные
части и принадлежности
Ersatzteile und Zubehör erhalten Sie über unsere Homepage oder auf Anfrage
bei unserem Kundenservice.
Spare parts and accessories are available on our homepage or on request from
our customer service.
Vous pouvez obtenir les accessoires et les pièces de rechange via notre site
Web ou sur demande auprès de notre service après-vente.
Los repuestos y accesorios los puede adquirir en nuestra página web a petición
en nuestro servicio técnico autorizado.
Per l’ordine di pezzi di ricambio e accessori usare il nostro sito oppure fare
richiesta al nostro servizio di assistenza clienti.
Onderdelen en toebehoren zijn verkrijgbaar via onze homepage of op aanvraag
bij onze klantenservice.
Запасные части и принадлежности можно приобрести на нашем сайте в
Интернете или по запросу в нашей сервисной службе.
BEEM - Elements of Lifestyle
A
B
C
D
E1
E2
Kundenservice:
Customer service:
Bureaux de service après-vente:
Centros de atención al cliente:
Centro di assistenza clienti:
Klantenservice:
Сервисная служба:
Elements of Lifestyle
BEEM
Blitz-Elektro-Erzeugnisse Manufaktur Handels-GmbH
Abt. Kundenservice
Dieselstraße 19-21
61191 Rosbach v.d.H.
Germany
Fon +49 (0)60 03 / 91 13 88 88
Fax +49 (0)60 03 / 91 13 99 99
(Kosten laut Konditionen des Vertragspartners für Festnetzanschlüsse oder
Mobilfunkanschlüsse)
E-Mail: [email protected]
Homepage: www.beem.de
Technische Änderungen vorbehalten.
Subject to technical modifications.
Sous réserve de modifications techniques.
Salvo modificaciones técnicas.
Con riserva di modifiche tecniche.
Technische wijzigingen voorbehouden.
Право на технические изменения сохраняется.
Für Kundenservicestellen in anderen Ländern kontaktieren Sie bitte Ihren Händler.
For service in other countries contact your local dealer.
Pour les bureaux de service après-vente dans d‘autres pays, veuillez contacter votre vendeur.
Para obtener información sobre los centros de atención al cliente en otros países, póngase en
contacto con su distribuidor
Per i centri di assistenza clienti al di fuori della Germania contattare il proprio rivenditore.
Neem voor klantenservice in andere landen contact op met uw handelaar.
Обратитесь к Вашему продавцу, чтобы узнать о пунктах сервисной службы в других
странах.
BA_M12.001_2015-05-04_A2
© 2015 by BEEM GmbH
Druckfehler vorbehalten.
Subject to printing errors.
Sous réserve d'erreurs d'impression.
Queda reservado el derecho por errores de impresión.
Con riserva di errori di stampa.
Drukfouten voorbehouden.
Право на опечатки сохраняется.