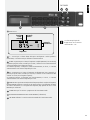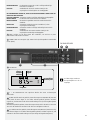
1
OWNER MANUAL
MS 1033
CD / MP3 PLAYER
(ON CD, USB FLASH DRIVES,
SD CARDS) FM TUNER
INDEX - ENGLISH
SAFETY PRECAUTIONS
PRODUCT INFORMATIONS
FRONT PANEL REAR PANEL
REMOTE CONTROL
CD / MP3 SEARCH AND PLAY
INSTALLATION
SPECIFICATIONS
page 4
page 6
page 6
page 9
page 9
page 11
page 13
page 14
INDICE - ITALIANO
AVVERTENZE PER LA SICUREZZA
DESCRIZIONE GENERALE
PANNELLO FRONTALE
PANNELLO POSTERIORE
TELECOMANDO
RICERCA E RIPRODUZIONE DI UN BRANO (CD AUDIO / MP3)
INSTALLAZIONE SPECIFICHE TECNICHE
pagina 15
pagina 17
pagina 17
pagina 20
pagina 21
pagina 23
pagina 25
pagina 26
INHALTSVERZEICHNIS - DEUTSCH
WICHTIGE HINWEISE
BESCHREIBUNG
GERÄTEVORDERSEITE
GERÄTERÜCKSEITE
FERNBEDIENUNG
SUCHEN UND ABSPIELEN EINES TRACKS (CD/ MP3)
INSTALLATION
Seite 27
Seite 29
Seite 29
Seite 32
Seite 33
Seite 35
Seite 37
ENGLISH
SAFETY
PRECAUTIONS
Before connecting and using this product, please read this instruction manual carefully and
keep it on hand for future reference. The manual is to be considered an integral part of
this product and must accompany it when it changes ownership as a reference for correct
installation and use as well as for the safety precautions.
RCF S.p.A. will not assume any responsibility for the incorrect installation and / or use of
this product.
IMPORTANT NOTES
WARNING: To prevent the risk of fire or electric shock, never expose this product to rain
or humidity.
WARNING
SAFETY PRECAUTIONS
1. All the precautions, in particular the safety ones, must be read with special attention, as
they provide important information.
2. POWER SUPPLY FROM MAINS (direct connection)
a. The mains voltage is sufficiently high to involve a risk of electrocution; therefore, never
install or connect this product when its power cable is plugged in.
b. Before powering up, make sure that all the connections have been made correctly and
the voltage of your mains corresponds to the voltage shown on the rating plate on the
unit, if not, please contact your RCF dealer.
c. The metallic parts of the unit are earthed by means of the power cable.
d. An apparatus with CLASS I construction shall be connected to a mains socket outlet
with a protective earthing connection.
e. Protect the power cable from damage.
f. Make sure it is positioned in a way that it cannot be stepped on or crushed by
objects.
g. To prevent the risk of electric shock, never open the product: there are no parts inside
that the user needs to access.
3. Make sure that no objects or liquids can get into this product, as this may cause a short
circuit. This apparatus shall not be exposed to dripping or splashing. No objects filled with
liquid, such as vases, shall be placed on this apparatus. No naked sources (such as lighted
candles) should be placed on this apparatus.
4. Never attempt to carry out any operations, modifications or repairs that are not expressly
described in this manual.
Contact your authorized service centre or qualified personnel should any of the following
occur:
-- The product does not function (or functions in an anomalous way).
-- The power supply cable has been damaged.
-- Objects or liquids have got in the unit.
-- The product has been subject to a heavy impact.
5. If this product is not used for a long period, disconnect the power cable.
6. If this product begins emitting any strange odours or smoke, switch it off immediately
and disconnect the power supply cable.
7. Do not connect this product to any equipment or accessories not foreseen.
For suspended installation, only use the dedicated anchoring points and do not try to hang
this product by using elements that are unsuitable or not specific for this purpose.
Also check the suitability of the support surface to which the product is anchored (wall,
ceiling, structure, etc.), and the components used for attachment (screw anchors, screws,
brackets not supplied by RCF etc.), which must guarantee the security of the system /
installation over time, also considering, for example, the mechanical vibrations normally
generated by transducers.
To prevent the risk of falling equipment, do not stack multiple units of this product unless
this possibility is specified in the user manual.
4
ENGLISH
8. RCF S.p.A. strongly recommends this product is only installed by professional
qualified installers (or specialised firms) who can ensure correct installation
and certify it according to the regulations in force.
The entire audio system must comply with the current standards and regulations
regarding electrical systems.
9. Supports and trolleys
The equipment should be only used on trolleys or supports, where necessary, that are
recommended by the manufacturer. The equipment / support / trolley assembly must be
moved with extreme caution. Sudden stops, excessive pushing force and uneven floors may
cause the assembly to overturn.
10. There are numerous mechanical and electrical factors to be considered when installing
a professional audio system (in addition to those which are strictly acoustic, such as sound
pressure, angles of coverage, frequency response, etc.).
11. Hearing loss
Exposure to high sound levels can cause permanent hearing loss. The acoustic pressure
level that leads to hearing loss is different from person to person and depends on the
duration of exposure. To prevent potentially dangerous exposure to high levels of acoustic
pressure, anyone who is exposed to these levels should use adequate protection devices.
When a transducer capable of producing high sound levels is being used, it is therefore
necessary to wear ear plugs or protective earphones.
See the technical specifications in loudspeaker instruction manuals to know their maximum
sound pressure levels.
12. To prevent the occurrence of noise, use screened cables only and avoid putting them
close to:
-- equipment that produces high-intensity electromagnetic fields (for example, high power
transformers).
-- Mains cables.
-- Loudspeaker lines.
13. Situate this product far from any heat sources.
14. Never force the control elements (keys, knobs, etc…).
15. Do not use solvents, alcohol, benzene or other volatile substances for cleaning the
external parts of this product.
-- Use 12 cm audio CD, CD-R and CD-RW only. Never insert 8 cm compact discs!
-- Do not use damaged compact discs (or having an irregular shape).
-- Keep compact discs clean and hold them always on their edges (without touching their
unlabeled surface).
-- Wipe a dirty CD from the centre outward with a clean soft and dry cleaning cloth. Do
not use alcohol or solvents.
-- Do not attach adhesive labels on compact discs (and do not use discs having adhesive
labels).
-- Put compact discs in their cases when not used.
-- Do not leave compact discs close to heat sources, exposed to high temperatures or the
direct sunlight (for instance, inside a car).
-- Some CD-R (recordable) / CD-RW (rewritable) types may not be read correctly.
---------
NOTES ABOUT
COMPACT DISCS
CLASS 1
LASER PRODUCT
NOTES ABOUT MP3 FILES
MP3: means MPEG Audio Layer 3 and refers to an audio compression type.
This player reads MP3 files on CD-ROM, CD-R or CD-RW discs, USB flash drives and SD cards.
If available, track titles, artists and albums are displayed (ID3 TAG).
CD-R – CD-RW discs formatted as ‘packet write’ mode are not supported.
The file extension must be .mp3.
The max. directory (/ folder) level is 8, including the ‘root’.
Max. 2000 MP3 files per source.
It is advisable to use MP3 files having a sampling frequency of 44.1 kHz and a fixed
bit-rate of at least 128 kbps (if higher, for instance 192 kbps, the sound quality will be
better).
5
ENGLISH
PRODUCT
INFORMATIONS
RCF S.p.A. would like to thank you for having purchased this product, which
has been designed to guarantee reliability and high performance.
MS 1033 has 2 separated and independent sections that can be used at the same time:
-- CD player with anti-shock mechanic and electronics. It plays both audio tracks and MP3 files on compact discs (CD, CD-R, CD-R/W).
It plays MP3 files (only) on USB flash drives and ‘Secure Digital’ (SD) cards (this port is
also compatible for ‘MultiMedia Cards’) .
-- Tuner (FM: 87.5 ÷ 108 MHz) with 60 memories (10 accessed directly and 50 through
the remote control) to store and recall preferred stations quickly.
FRONT PANEL
CD – MP3
1
RADIO
CD - MP3 PLAYER
1 MAIN SWITCH (O = OFF, I = ON).
2
3
4
6
77
88
99
10
10
11
12
12
13
13
14
14
15
15
16
16
17
17
5
2 USB PORT. Do not use it if a USB flash drive is connected to the other port 28 the
rear panel.
3 CD SLOT LOAD. Use 12 cm diameter discs only.
4 CD LED indicating that the CD - MP3 player is selected by the remote control.
5 LCD.
6 PROG. Programming mode (a sequence made of max. 64 tracks / files; see the manual
section ‘Tracks / MP3 files sequence programming’).
6
18
ENGLISH
7 SKIP REV.
-- In stop mode: press to select the previous track / MP3 file (from the first, it skips to the last).
-- When programming the track sequence: it selects the previous folder / track.
-- In play mode: if pressed once (only) for a while, the track begins again; press it twice
quickly to select the previous track (press more times to select other tracks); press and
hold for fast reversing.
8 SKIP CUE.
-- In stop mode: press to select the next track / MP3 file (from the last, it skips to the first).
-- When programming the track sequence: it selects the next folder / track.
-- In play mode: press once (only) for a while to select the next track (press more times to
select other tracks); press and hold for fast forwarding.
9 STOP. It stops the track / file play and completely clears the sequence when
programming.
10
PLAY / PAUSE. It switches play / pause of the selected tracks / files.
11
EJECT. Compact disc ejection.
POWER. Press to switch the CD - MP3 player on / off.
12
Press and hold (for at least 3 seconds) to switch off.
13
FOLDER
(active on MP3 files only). Press to select the previous folder (note: from
the first, it skips to the last).
14
FOLDER
(active on MP3 files only). Press to select the next folder (note: from the
last, it skips to the first).
15 FIND. MP3 file search. Press once to enter the file search menu, select the MP3 file
through the SKIP REV 8 and SKIP CUE 7 keys, according to its name initial letter. Press
for the second time to start the folder search.
Press again (no selection) or confirm the selection through the PLAY/PAUSE 10 key to quit
manually.
After 15 seconds since the last key pressure, it automatically quits from the file search
menu.
16 REPEAT. Press (once or more times) to change the play mode.
WHEN USING AN AUDIO CD:
PLAY ALL RANDOM it plays a random sequence of all tracks once
REPEAT TRACK
it continuously repeats the same track
REPEAT ALL it continuously repeats the entire compact disc
RANDOM REPEAT it continuously repeats the entire compact disc following a
random track sequence
PLAY ALL
default mode: it plays all track once (respecting the original CD sequence)
WHEN USING A CD, AN USB FLASH DRIVE OR A SD CARD WITH MP3 FILES:
PLAY ALL RANDOM it plays a random sequence of all files once
REPEAT TRACK
it continuously repeats the same file
REPEAT FOLDER
it continuously repeats all files in the selected folder (only)
REPEAT ALL
it continuously repeats all files (in their original sequence)
RANDOM REPEAT it continuously repeats all files following a random sequence
PLAY ALL
default mode: it plays all files once (in their original sequence)
17 FUNC. Press (once or more) to select among CD, USB flash drive or SD card (CARD).
18 SD MMC CARD. ‘Secure Digital’ (SD) card port (also compatible for ‘MultiMedia’
cards).
7
ENGLISH
FM TUNER
25
25
19
26
26
21
22
23
24
20
19 LCD.
stereo
signal
“sleep”
function
enabled
FM
SLEEP
«ST»
«CH»
MHz
selected
preset
frequency
20 1 ÷ 10. Numeric keys to recall / store the first 10 preferred stations.
21 DOWN. If pressed for a while, the frequency decreases of 0.05 MHz (manual search).
If pressed for more than half a second and then released, the previous station is automatically
searched (to lower frequencies).
If pressed and held, the frequency continuously decreases; when released, the tuner will
automatically tune itself to the first found station.
22 UP. If pressed for a while, la frequency increases of 0.05 MHz (manual search).
If pressed for more than half a second and then released, the next station is automatically
searched (to higher frequencies).
If pressed and held, the frequency continuously increases; when released, the tuner will
automatically tune itself to the first found station.
23 MEMORY. This key can be used to store the preferred stations. Select the frequency,
press the MEMORY key and (within 5 seconds) one of the 10 numeric keys (the first 10
presets), which that frequency has to be assigned to; then, press the MEMORY key again
to confirm.
24 POWER. Press to switch the tuner on / off.
25 REMOTE CONTROL infrared receiver (note: the remote control is included).
26 LED TUNER indicating that the tuner is selected by the remote control.
8
The display can show
the selected preset
from1 to 18 only.
ENGLISH
REAR
PANEL
27
27
28
28
29
29
30
30
31
31
32
32
33
33
34
34
35
35
36
36
37
37
27 FM ANTENNA. Aerial terminal (75 Ω, unbalanced).
28 USB PORT. (note: do NOT use it if an USB flash drive is connected to the front panel
port 2 ).
29 TUNER VOL. TUNER OUT 32 volume control.
30 PRIORITY VOL. PRIORITY 33 out (tuner or CD – MP3 player) volume control.
31 CD VOL. CD OUT 34 volume control.
32 TUNER OUT. FM tuner stereo audio output.
33 PRIORITY. Stereo audio output common for both the FM tuner and the CD / MP3
player. The CD/MP3 player signal has priority (when playing).
34 CD OUT CD / MP3 player stereo audio output.
35 EARTH. Terminal.
36 POWER CABLE TERMINAL (with fuse; fuse type is specified on the rear panel).
37 MAINS VOLTAGE SELECTOR: 230 V / 115 V.
Note: before turning the device on, make sure this selection corresponds to the mains
voltage.
REMOTE
CONTROL
The remote controls (included) controls either the CD / MP3 or the tuner.
Most of its functions correspond to the ones of the relevant MS 1033 front panel keys. The
red writings identify the key second function to control the tuner. It is necessary to aim the
remote control to the MS 1033 front panel from a distance not longer than 4 / 5 metres
(the working range depends on the battery state).
Note: The CD/TUNER key switches the control from the CD – MP3 player to the tuner
and vice-versa. The controlled section is indicated by the 2 respective LEDs: CD 4 and
TUNER 26 .
9
ENGLISH
POWER. Press to switch the CD - MP3 player on / off. Press and hold (for at least 3 seconds
to switch off.
CD - MP3 PLAYER MODE
1 ÷ 10/0. Numeric keys to select either the audio track or the MP3 file.
PLAY / PAUSE. It switches play / pause of the selected tracks / files.
STOP. It stops the track / file play and completely clears the sequence when programming.
PROG. Programming mode (a sequence made of max. 64 tracks / files; see the paragraph
‘Tracks / MP3 files sequence programming’).
FIND. MP3 file search (see 15 ).
ESP. Enable / disable the CD “anti-shock” function.
FOLDER
(active on MP3 files only). Press to select the previous folder (note: from the
first, it skips to the last).
FOLDER
(active on MP3 files only). Press to select the next folder (note: from the last,
it skips to the first).
SKIP REV.
-- In stop mode: press to select the previous track / MP3 file (from the first, it skips to the
last. When programming the track sequence: it selects the previous folder / track.
-- In play mode: if pressed once (only) for a while, the track begins again; press it twice
quickly to select the previous track (press more times to select other tracks); press and
hold for fast reversing.
SKIP CUE.
-- In stop mode: press to select the next track / MP3 file (from the last, it skips to the first).
-- When programming the track sequence: it selects the next folder / track.
-- In play mode: press once (only) for a while to select the next track (press more times to
select other tracks); press and hold for fast forwarding.
REPEAT. Press (once or more times) to change the play mode (see 16 ).
DISPLAY. When playing MP3 files, it changes information displayed on LCD.
FUNC. Press (once or more) to select among CD, USB flash drive or SD card (CARD).
EJECT. Compact disc ejection.
MUTE. Press once to mute the CD player. Press again to reset the normal volume level.
CD/TUNER. It switches the control from the CD - MP3 player to the tuner and vice-versa.
POWER. Press to switch the tuner on / off.
1 ÷ 10. Numeric keys to recall / store the first 10 preferred stations.
DIRECT. Direct frequency selection: press DIRECT, then (within 5 seconds) choose the desired
frequency by using the numeric keys and press DIRECT again to confirm. For instance, to
select the frequency 96.4 MHz, press DIRECT, 9, 6, 4, DIRECT sequentially.
+10. Increase of 10 positions the current stored selected station (up to no. 60).
MEM. This key can be used to store the preferred stations. Select the frequency, press the MEMORY
key and (within 5 seconds) one of the 10 numeric keys (the first 10 presets), which that frequency
has to be assigned to; then, press the MEMORY key again to confirm. To select store stations from
memories 11 to 60, it is necessary to use the M-UP (+1), M-DOWN (–1), +10 keys.
ASM. Press and hold (at least 2 seconds) to start the automatic search and store of the
found stations.
10
TUNER MODE
ENGLISH
MO/ST. It switches the tuner signal mono / stereo.
M-DOWN. Press to select the previous stored station.
M-UP. Press to select the next stored station.
DOWN. If pressed for a while, the frequency decreases of 0.05 MHz (manual search).
If pressed for more than half a second and then released, the previous station is automatically
searched (to lower frequencies). If pressed and held, the frequency continuously decreases;
when released, the tuner will automatically tune itself to the first found station.
UP. If pressed for a while, la frequency increases of 0.05 MHz (manual search).
If pressed for more than half a second and then released, the next station is automatically
searched (to higher frequencies). If pressed and held, the frequency continuously increases;
when released, the tuner will automatically tune itself to the first found station.
SLEEP. Press to enable the SLEEP function (the tuner is automatically turned off after the
set time). The time (that is shown for 5 seconds) is initially 90 minutes, but it can be
reduced in 10 minute steps by pressing the SLEEP key more times. After setting the value
10 (minutes), another key pressure disables the SLEEP function. The SLEEP function (when
on) is displayed on LCD. This key also disables the SLEEP function (when enabled) and turn
the tuner on when this has been automatically turned off.
CD / MP3
COMPACT DISC AUDIO
If no compact disc is loaded, the writing “NO DISC” is displayed.
NO DISC
After inserting a compact disc, the track search begins.
READING
DISC
Then, the found track number and the total time are displayed (example: 16 tracks; 72
minutes and 50 seconds).
The displayed ESP indicates that the anti-shock mode is enabled.
Select a track by using the SKIP CUE 8 and SKIP REV 7 , then press the PLAY key 10 to
start the play mode.
When a compact disc has been loaded (and the file search is over), the found folder
(directory) and file total numbers are displayed (example: 7 folders and 81 MP3 files).
The player manages up to 2000 MP3 files.
It is possible to search a folder (by using the FOLDER
file (by using the SKIP CUE 8 and SKIP REV 7 ).
14 , FOLDER
13 keys) or a
Press the PLAY key 10 to start the play mode. Information (if available) about the played
file is displayed.
CD
TR16 72 : 50 ESP
CD
TR01 00 : 01 ESP
CD WITH MP3 FILES
CD
07
0081
Artist - XYZ
TR0001 00:01 MP3
11
ENGLISH
Connect a USB flash drive (only 1 !) into one of the 2 available ports (one on the front
panel 2 , one on the rear panel 28 ), then press the FUNC 17 key to select USB.
After the file search, the found folder (directory) and file total numbers are displayed
(example: 2 folders and 40 MP3 files).
The player manages up to 2000 MP3 files.
Press the PLAY key 10 to start the play mode. Information (if available) about the played
file is displayed.
USB FLASH DRIVE (MP3 FILES)
USB
02
0040
Artist - XYZ
TR0001 00:01 MP3
If no file is found, the writing “NO FILE” will be displayed.
NO FILE
Insert a SD card into the SD port 18 , then press the FUNC 17 key to select CARD.
After the file search, the found folder (directory) and file total numbers are displayed
(example: 2 folders and 40 MP3 files). The player manages up to 2000 MP3 files.
Press the PLAY key 10 to start the play mode. Information (if available) about the played
file is displayed.
SD CARD (MP3 FILES)
CARD
02
0040
Artist - XYZ
TR0001 00:01 MP3
If no file is found, the writing “NO FILE” will be displayed.
NO FILE
Notes:
-- It is possible to programme a sequence made of max. 64 tracks / files.
-- If pressed when programming, the STOP key will completely clear the sequence.
-- After 15 seconds since the last key pressure, the programming mode is automatically quit.
TRACK / MP3 FILE SEQUENCE
PROGRAMMING
AUDIO CD
Press the PROG key 6 to enter the programming mode.
Choose the first track (within 15 seconds) by using the SKIP CUE 8 and SKIP REV 7 keys
(i.e. track no. 4).
C D
PROGRAM
P-01
00
C D
PROGRAM
P-01
04
C D
PROGRAM
P-02
00
Press the PROG key 6 to confirm and proceed with the choice of the second track.
When the sequence is completed, press the PLAY key to start the play mode according the
programmed selection.
MEM
TR 04
00:01
ESP
MP3 FILE
Press the PROG key 6 to enter the programming mode.
Choose a folder (within 15 seconds) by using the SKIP CUE 8 and SKIP REV 7 keys (i.e.
folder no. 3).
Press the PROG key 6 to confirm, then choose the file (example: no.7) belonging to the
selected folder by using the SKIP CUE 8 and SKIP REV 7 keys.
Press the PROG key to confirm and proceed with the choice (folder and file) for the second
memory location.
When the sequence is completed, press the PLAY key to start the play mode according the
programmed selection.
Information (if available) about the played file is displayed.
12
P-01
PROGRAM
000
0000
P-01
PROGRAM
003
0000
P-01
PROGRAM
003
0007
P-02
PROGRAM
000
0000
MEM A r t i s t A
TR0007 00:01 MP3
SEARCH AND STORE RADIO
STATIONS AS PRESETS (TUNER)
ENGLISH
Use the UP 22 (/ DOWN 21 ) key in 3 possible ways:
-- If pressed for a while, the frequency increases (/ decreases) of 0.05 MHz (manual search).
-- If pressed for more than half a second and then released, the next (/ previous) station
is automatically searched.
-- If pressed and held, the frequency continuously increases (/ decreases).
After finding your favourite station, this can be directly stored to 1 of the first 10 presets:
press MEMORY 23 and (within 5 seconds) 1 of the 10 numeric keys (if possible, choose an
empty preset, not already assigned to another station), then press the MEMORY key again
to confirm.
Use the remote control to recall and store presets 11 to 60 (see the respective manual
section).
INSTALLATION
This device can be either installed into a 19” rack cabinet (1 unit) thanks to its rack ears or
put on a desk (after taking its rack ears off by removing the 4 screws on each side).
INSERT / REMOVE / CHANGE THE
REMOTE CONTROL BATTERIES
The battery compartment is on the bottom of the remote control rear side.
Push (slightly) the lever and pull the battery compartment cover to remove it (picture 1).
Remove old batteries (if present), by raising them from their positive pole.
The right polarity is indicated in the battery compartment (picture 2).
Insert 2 new AAA type (1.5 V) non-rechargeable batteries, better if alkaline. Assure the
polarity is correct when inserting. Battery insertion: first push its negative pole against the
compartment spring, then push down its positive pole (to fix the battery; picture 3).
picture 1
picture 2
- AAA 1,5 +
Use 2 new AAA (1.5 V) non-rechargeable batteries, better if alkaline.
Do NOT use old and new batteries at the same time.
Do NOT put together different models of batteries.
Do NOT attempt to charge non rechargeable batteries.
Verify the polarity of batteries is correct (inserted properly, following the indication on
the relevant compartment).
-- Remove batteries when empty or in the case the device will not be used for a long time.
-- Do NOT short-circuit batteries (i.e. connecting the 2 opposite poles together with
metallic wires).
-- Throw empty batteries into dedicated garbage cans, according to your country laws
about ecology and environment protection.
+ AAA 1,5 -
------
picture 3
13
SPECIFICATIONS
CD / MP3 PLAYER SPECIFICATIONS
Audio output level (1 kHz, 0 dB)
Output level difference between channels (1 kHz, 0 dB)
Frequency response (± 3 dB)
Stereo separation (1 kHz, 0 dB)
Total harmonic distortion (1 kHz, 0 dB)
Signal / noise ratio
< 2 dB
20 Hz ÷ 20 kHz
> 60 dB
< 0.1 %
> 80 dB
TUNER SPECIFICATIONS
Tuning frequency range
87.5 ÷ 108 MHz (FM)
Intermediate frequency
10.7 MHz
Sensitivity
Stereo separation (1 kHz)
Frequency response
6 µV e.m.f.
≥ 40 dB
100 Hz ÷ 12 kHz
Total harmonic distortion
≤ 0.1 %
Signal / noise ratio
≥ 50 dB
Automatic tuning sensitivity
≤ 50 µV
DEVICE
Power supply (ac)
Dimensions (w x h x d)
Net weight
14
1.2 V (±2 dBu)
230 - 115 V (50 / 60 Hz), 50 VA
482 x 44 x 250 mm (one 19” rack unit)
3.6 kg
µ
±
÷
ITALIANO
AVVERTENZE PER
LA SICUREZZA
Prima di collegare ed utilizzare questo prodotto, leggere attentamente le istruzioni
contenute in questo manuale, il quale è da conservare per riferimenti futuri. Il presente
manuale costituisce parte integrante del prodotto e deve accompagnare quest’ultimo anche
nei passaggi di proprietà, per permettere al nuovo proprietario di conoscere le modalità
d’installazione e d’utilizzo e le avvertenze per la sicurezza.
L’installazione e l’utilizzo errati del prodotto esimono la RCF S.p.A. da ogni responsabilità.
IMPORTANTE
ATTENZIONE: Per prevenire i rischi di fiamme o scosse elettriche, non esporre mai questo
prodotto alla pioggia o all’umidità.
ATTENZIONE
AVVERTENZE PER LA SICUREZZA
1. Tutte le avvertenze, in particolare quelle relative alla sicurezza, devono essere lette con
particolare attenzione, in quanto contengono importanti informazioni.
2. ALIMENTAZIONE DIRETTA DA RETE
a. La tensione di alimentazione dell’apparecchio ha un valore sufficientemente alto da
costituire un rischio di folgorazione per le persone: non procedere mai all’installazione
o connessione dell’apparecchio con il cavo d’alimentazione collegato alla rete.
b. Prima di alimentare questo prodotto, assicurarsi che tutte le connessioni siano corrette
e che la tensione della vostra rete di alimentazione corrisponda quella di targa
dell’apparecchio, in caso contrario rivolgetevi ad un rivenditore RCF.
c. Le parti metalliche dell’apparecchio sono collegate a terra tramite il cavo di
alimentazione. Un apparecchio avente costruzione di CLASSE I deve essere connesso
alla presa di rete con un collegamento alla terra di protezione.
d. Accertarsi che il cavo di alimentazione dell’apparecchio non possa essere calpestato o
schiacciato da oggetti, al fine di salvaguardarne la perfetta integrità.
e. Per evitare il rischio di shock elettrici, non aprire mai l’apparecchio: all’interno non vi
sono parti che possono essere utilizzate dall’utente.
3. Impedire che oggetti o liquidi entrino all’interno del prodotto, perché potrebbero causare
un corto circuito. L’apparecchio non deve essere esposto a stillicidio o a spruzzi d’acqua;
nessun oggetto pieno di liquido, quali vasi, deve essere posto sull’apparecchio.
Nessuna sorgente di fiamma nuda (es. candele accese) deve essere posta sull’apparecchio.
4. Non eseguire sul prodotto interventi / modifiche / riparazioni se non quelle espressamente
descritte sul manuale istruzioni.
-- Contattare centri di assistenza autorizzati o personale altamente qualificato quando:
-- l’apparecchio non funziona (o funziona in modo anomalo);
-- il cavo di alimentazione ha subito gravi danni;
-- oggetti o liquidi sono entrati nell’apparecchio;
-- l’apparecchio ha subito forti urti.
5. Qualora questo prodotto non sia utilizzato per lunghi periodi, scollegare il cavo
d’alimentazione.
6. Nel caso che dal prodotto provengano odori anomali o fumo, spegnerlo immediatamente
e scollegare il cavo d’alimentazione.
7. Non collegare a questo prodotto altri apparecchi e accessori non previsti.
Quando è prevista l’installazione sospesa, utilizzare solamente gli appositi punti di ancoraggio
e non cercare di appendere questo prodotto tramite elementi non idonei o previsti allo scopo.
Verificare inoltre l’idoneità del supporto (parete, soffitto, struttura ecc., al quale è ancorato
il prodotto) e dei componenti utilizzati per il fissaggio (tasselli, viti, staffe non fornite da
RCF ecc.) che devono garantire la sicurezza dell’impianto / installazione nel tempo, anche
considerando, ad esempio, vibrazioni meccaniche normalmente generate da un trasduttore.
Per evitare il pericolo di cadute, non sovrapporre fra loro più unità di questo prodotto, quando
questa possibilità non è espressamente contemplata dal manuale istruzioni.
8. La RCF S.p.A. raccomanda vivamente che l’installazione di questo prodotto
sia eseguita solamente da installatori professionali qualificati (oppure da ditte
15
ITALIANO
specializzate) in grado di farla correttamente e certificarla in accordo con le
normative vigenti. Tutto il sistema audio dovrà essere in conformità con le
norme e le leggi vigenti in materia di impianti elettrici.
9. Sostegni e Carrelli
Se previsto, il prodotto va utilizzato solo su carrelli o sostegni consigliati dal produttore.
L’insieme apparecchio-sostegno / carrello va mosso con estrema cura. Arresti improvvisi, spinte
eccessive e superfici irregolari o inclinate possono provocare il ribaltamento dell’assieme.
10. Vi sono numerosi fattori meccanici ed elettrici da considerare quando si installa un
sistema audio professionale (oltre a quelli prettamente acustici, come la pressione sonora,
gli angoli di copertura, la risposta in frequenza, ecc.).
11. Perdita dell’udito
L’esposizione ad elevati livelli sonori può provocare la perdita permanente dell’udito. Il livello di
pressione acustica pericolosa per l’udito varia sensibilmente da persona a persona e dipende
dalla durata dell’esposizione. Per evitare un’esposizione potenzialmente pericolosa ad elevati
livelli di pressione acustica, è necessario che chiunque sia sottoposto a tali livelli utilizzi delle
adeguate protezioni; quando si fa funzionare un trasduttore in grado di produrre elevati livelli
sonori è necessario indossare dei tappi per orecchie o delle cuffie protettive.
Consultare i dati tecnici contenuti nei manuali istruzioni per conoscere le massime pressioni
sonore che i diffusori acustici sono in grado di produrre.
12. Per evitare fenomeni di rumorosità indotta sui cavi che trasportano segnali audio, usare
solo cavi schermati ed evitare di posarli nelle vicinanze di:
-- apparecchiature che producono campi elettromagnetici di forte intensità (per esempio
trasformatori di grande di potenza);
-- cavi di rete;
-- linee che alimentano altoparlanti.
13. Collocare il prodotto lontano da fonti di calore.
14. Non forzare mai gli organi di comando (tasti, manopole ecc.).
15. Non usare solventi, alcool, benzina o altre sostanze volatili per la pulitura delle parti
esterne dell’unità.
---------
Usare solo CD audio, CD-R e CD-RW da 12 cm; quelli da 8 cm non possono essere utilizzati.
Non usare CD danneggiati o con forma irregolare.
Tenere i CD puliti ed afferrarli sempre dal bordo (senza toccarne la superficie con le dita).
Per pulire i CD, utilizzare un panno pulito, morbido ed asciutto, iniziando dal centro e
procedendo verso l’esterno. Non usare alcool, sostanze solventi o detergenti.
Non mettere etichette adesive sui CD e non utilizzare CD sui quali sono già stati
apposti adesivi.
Riporre i CD nella loro custodia quando non sono utilizzati.
Non lasciare i CD vicino a fonti di calore o comunque esposti a temperature elevate
oppure alla luce diretta del sole (es. su cruscotti di automobili).
Alcuni tipi di CD registrabili (CD-R) o riscrivibili (CD-RW) potrebbero non essere letti
correttamente.
-- MP3 sta per MPEG Audio Layer 3 ed è uno standard di compressione audio.
-- Questo prodotto permette la riproduzione di file MP3 su CD-ROM, CD-R, CD-RW, chiavi USB e
memorie SD; sono visualizzati (se disponibili) il titolo del brano, l’artista e l’album (ID3 TAG).
-- Non è supportata la lettura di CD-R – CD-RW scritti con la modalità a pacchetti (“packet
write”).
-- L’estensione dei file deve essere .mp3.
-- Il livello massimo di directory (o “cartelle”/“folder”) in un supporto è 8, inclusa la radice
(”root”).
-- Il numero max. di file MP3 presenti su un supporto non deve essere maggiore di 2000.
-- Consigliamo di utilizzare file MP3 con frequenza di campionamento (sampling frequency)
di 44.1 kHz ed un “bit rate” fisso di almeno 128 kbps (se più alto, es. 192 kbps, si
ottiene una qualità migliore).bit-rate of at least 128 kbps (if higher, for instance 192
kbps, the sound quality will be better).
16
NOTE SUI COMPACT DISC
CLASS 1
LASER PRODUCT
NOTE SUI FILE MP3
ITALIANO
DESCRIZIONE
GENERALE
RCF S.p.A. Vi ringrazia per l’acquisto di questo prodotto, realizzato in modo
da garantirne l’affidabilità e prestazioni elevate.
MS 1033 si compone di 2 sezioni separate ed indipendenti utilizzabili contemporaneamente:
-- Lettore CD dotato di meccanica ed elettronica “anti-shock”.
Riproduce tracce audio e file MP3 da compact disc (CD, CD-R, CD-R/W).
Riproduce soli file MP3 da chiave USB (memoria “Flash”) oppure schede di memoria
“SD” (“Secure Digital”; la porta è compatibile anche per le schede “MultiMedia Card”).
-- Sintonizzatore radio (FM: 87,5 ÷ 108 MHz) con 60 locazioni di memoria (10 con accesso
diretto più 50 tramite telecomando) per la selezione rapida delle frequenze preferite.
PANNELLO
FRONTALE
CD – MP3
1
RADIO
CD – MP3 PLAYER
1 INTERRUTTORE PRINCIPALE (O = spento; I = acceso).
2
3
4
6
77
88
99
10
10
11
12
12
13
13
14
14
15
15
16
16
17
17
5
18
2 PORTA PER CHIAVE USB. Da NON utilizzarsi nel caso che sia già stata inserita una
chiave USB nella porta
posta sul pannello posteriore.
28
3 FESSURA PER L’INSERIMENTO SERVOASSISTITO DEL CD; usare solo CD con diametro
12 cm.
4 LED CD indicante il controllo tramite telecomando del lettore CD - MP3.
5 DISPLAY LCD.
6 PROG. Modalità di programmazione (sequenza di max. 64 tracce / file; vedere la
sezione “programmazione sequenza delle tracce o dei file MP3”).
7 SKIP REV.
-- Durante lo stop: premere per selezionare la traccia (/ file MP3) precedente (nota: dalla
prima si salta ciclicamente all’ultima).
17
ITALIANO
-- Durante la programmazione della sequenza delle tracce: seleziona la traccia o la cartella
precedente.
-- Durante la riproduzione: se premuto una sola volta per un istante, la traccia ricomincia da
capo; premendolo due volte in rapida successione, si accede alla traccia precedente (premere
più volte per selezionare); tenendolo premuto, si scorre velocemente la traccia all’indietro.
8 SKIP CUE.
-- Durante lo stop: premere per selezionare (in avanti) la traccia da riprodurre.
-- Durante la programmazione della sequenza delle tracce: seleziona la traccia o la cartella
successiva.
-- Durante la riproduzione: premere una sola volta per un istante per accedere alla traccia
successiva (premere più volte per selezionare); tenendolo premuto, si scorre velocemente
la traccia in avanti.
9 STOP. Ferma la riproduzione e cancella completamente la sequenza durante la modalità
di programmazione delle tracce.
10
PLAY / PAUSE. Attiva la riproduzione (della traccia selezionata) oppure la mette in
pausa nel caso che questa fosse già stata attivata.
EJECT. Espulsione del compact disc.
11
POWER. Tasto per l’accensione / spegnimento del lettore CD – MP3.
12
Per spegnere: tenere premuto per almeno 3 secondi.
FOLDER
(attivo solo sui file MP3). Premere per selezionare la cartella precedente
13
(nota: dalla prima si salta ciclicamente all’ultima).
14
FOLDER
(attivo solo sui file MP3). Premere per selezionare la cartella successiva
(nota: dall’ultima si salta ciclicamente alla prima).
15 FIND. Ricerca file MP3. Premuto una prima volta, si attiva la ricerca di un file, tramite
i tasti SKIP REV 7 e SKIP CUE 8 , in base alla lettera iniziale del suo nome. Alla seconda
pressione, si attiva la ricerca per cartella.
Ad una successiva pressione (o dopo aver effettuato la selezione tramite il tasto PLAY/
PAUSE 10 ) si esce manualmente dalla modalità di ricerca.
Trascorsi circa 15 secondi dall’ultima selezione, l’uscita dalla modalità di ricerca è automatica.
16 REPEAT. Seleziona il modo di riproduzione delle tracce; premere una o più volte per
scegliere l’opzione desiderata.
SE SI UTILIZZA UN CD AUDIO:
PLAY ALL RANDOM riproduce una sola volta una sequenza casuale di tutte le tracce
REPEAT TRACK
ripete continuamente la stessa traccia
REPEAT ALL ripete continuamente tutto il compact disc
RANDOM REPEAT ripete continuamente tutto il compact disc con una sequenza casuale delle tracce
PLAY ALL
modalità standard: riproduce una sola volta tutte le tracce
(nella loro sequenza originale)
SE SI UTILIZZA UN CD, UNA CHIAVE USB O UNA “SD CARD” CON FILE MP3:
PLAY ALL RANDOM riproduce una sola volta una sequenza casuale di tutti i file
REPEAT TRACK
ripete continuamente lo stesso file
REPEAT FOLDER
ripete continuamente solo i file contenuti nella cartella scelta
REPEAT ALL
ripete continuamente tutti i file (mantenendo la loro sequenza)
RANDOM REPEAT ripete continuamente tutti i file con una sequenza casuale
PLAY ALL
modalità standard: riproduce una sola volta tutti i file (nella loro sequenza originale)
17 FUNC. Seleziona il supporto per la riproduzione tra compact disc (CD), chiave USB e SD card (CARD).
18 SD MMC CARD. Porta per le schede “Secure Digital” (compatibile anche per le schede
“MultiMedia Card”).
18
25
25
19
ITALIANO
FM TUNER
26
26
21
22
23
24
20
19 DISPLAY LCD
funzione
“sleep”
attivata
SLEEP
segnale
stereo
«ST»
«CH»
MHz
memoria
selezionata
La schermata principale del
display mostra solo le memorie
selezionate da 1 a 18.
frequenza
20 1 ÷ 10. Tasti per il richiamo diretto delle prime 10 frequenze / stazioni preferite e
memorizzate; si utilizzano anche per effettuare la memorizzazione.
21 DOWN. Se premuto per un istante, la frequenza scende di 0,05 MHz (ricerca manuale);
se premuto per più di mezzo secondo e poi rilasciato, si effettua la ricerca automatica della
stazione precedente (verso frequenze inferiori).
Se mantenuto premuto, la frequenza scende ininterrottamente; al rilascio, si sintonizza
automaticamente sulla stazione disponibile più vicina.
22 UP. Se premuto per un istante, la frequenza sale di 0,05 MHz (ricerca manuale); se
premuto per più di mezzo secondo e poi rilasciato, si effettua la ricerca automatica della
stazione successiva (verso frequenze superiori).
Se mantenuto premuto, la frequenza sale ininterrottamente; al rilascio, si sintonizza
automaticamente sulla stazione disponibile più vicina.
23 MEMORY. Tasto per la memorizzazione delle frequenze preferite. Scegliere la frequenza,
premere MEMORY ed (entro 5 secondi) uno dei 10 tasti numerici (corrispondenti alle prime
10 locazioni di memoria) a cui assegnare tale frequenza; dopo premere di nuovo il tasto
MEMORY per confermare.
24 POWER. Tasto per l’accensione / spegnimento del sintonizzatore radio.
25 RICEVITORE AD INFRAROSSI PER IL TELECOMANDO (in dotazione).
26 LED TUNER indicante il controllo tramite telecomando del sintonizzatore radio.
19
ITALIANO
PANNELLO
POSTERIORE
27
27
28
28
29
29
30
30
31
31
32
32
33
33
34
34
27 FM ANTENNA. Morsetti per il collegamento dell’antenna (75 Ω, s. sbilanciato).
28 PORTA USB (da non utilizzarsi nel caso che sia già stata inserita una chiave USB nella
porta 2 alternativa posta sul pannello frontale).
29 TUNER VOL. Controllo di volume dell’uscita TUNER OUT 32 (sintonizzatore radio).
30 PRIORITY VOL. Controllo di volume dell’uscita PRIORITY 33 (sintonizzatore radio o
lettore CD / MP3).
31 CD VOL. Controllo di volume dell’uscita CD OUT 34 (lettore CD / MP3).
32 TUNER OUT. FM tuner stereo audio output.
33 PRIORITY. Uscita audio stereo comune ad entrambe le sorgenti musicali (sintonizzatore
radio e lettore CD / MP3); il segnale del lettore CD/MP3 (durante la riproduzione) è
prioritario.
34 CD OUT. Uscita audio stereo del (solo) lettore CD / MP3.
35 EARTH. Morsetto per la messa a terra dell’apparecchio.
36 CONNETTORE PER IL CAVO D’ALIMENTAZIONE DA RETE (con fusibile di protezione;
leggere i dati di targa).
37 SELETTORE DELLA TENSIONE DI RETE: 230 V – 115 V.
Nota: prima di accendere l’apparecchio, accertarsi che la tensione selezionata corrisponda
a quella di rete.
20
35
35
36
36
37
37
37
ITALIANO
TELECOMANDO
Il telecomando (in dotazione) agisce sia sul lettore CD / MP3 sia sul sintonizzatore radio.
Molte delle sue funzioni di controllo corrispondono a quelle dei rispettivi tasti posti sul
pannello frontale dell’apparecchio; le scritte in rosso identificano la seconda funzione del
tasto specifica per il sintonizzatore radio. Occorre che il telecomando sia puntato verso il
pannello frontale dell’apparecchio da una distanza non superiore ai 4 / 5 metri (il raggio
d’azione è influenzato dallo stato di carica delle pile).
Nota: il tasto CD/TUNER commuta il controllo del telecomando dal lettore CD – MP3 al
sintonizzatore radio e viceversa. La sezione controllata dell’apparecchio è evidenziata dai
2 LED, CD 4 e TUNER 26 .
POWER. Tasto per l’accensione / spegnimento del lettore CD – MP3.
Per spegnere: tenere premuto per almeno 3 secondi.
CD - MP3 PLAYER MODE
1 ÷ 10/0. Tasti per la selezione numerica della traccia audio o del file MP3.
PLAY / PAUSE. Attiva la riproduzione (della traccia selezionata) oppure la mette in pausa nel
caso che questa fosse già stata attivata.
STOP. Ferma la riproduzione e cancella completamente la sequenza durante la modalità di
programmazione delle tracce.
PROG. Modalità di programmazione (sequenza di max. 64 tracce / file; vedere la sezione
“programmazione sequenza delle tracce o dei file MP3”).
FIND. Ricerca file MP3 (vedere 15 ).
ESP. Attiva / disattiva la modalità “anti-shock” dei CD audio.
FOLDER
(attivo solo sui file MP3). Premere per selezionare la cartella precedente (nota:
dalla prima si salta ciclicamente all’ultima).
FOLDER
(attivo solo sui file MP3). Premere per selezionare la cartella successiva (nota:
dall’ultima si salta ciclicamente alla prima).
SKIP REV.
-- Durante lo stop: premere per selezionare la traccia (/ file MP3) precedente (nota: dalla
prima si salta ciclicamente all’ultima).
-- Durante la programmazione della sequenza delle tracce: seleziona la traccia o la cartella
precedente.
-- Durante la riproduzione: se premuto una sola volta per un istante, la traccia ricomincia da
capo; premendolo due volte in rapida successione, si accede alla traccia precedente (premere
più volte per selezionare); tenendolo premuto, si scorre velocemente la traccia all’indietro.
SKIP CUE.
-- Durante lo stop: premere per selezionare (in avanti) la traccia da riprodurre.
-- Durante la programmazione della sequenza delle tracce: seleziona la traccia o la cartella
successiva.
-- Durante la riproduzione: premere una sola volta per un istante per accedere alla traccia
successiva (premere più volte per selezionare); tenendolo premuto, si scorre velocemente
la traccia in avanti.
21
ITALIANO
REPEAT. Seleziona il modo di riproduzione delle tracce; premere una o più volte per scegliere
l’opzione desiderata (vedere 16 ).
DISPLAY. Durante la riproduzione di file MP3, cambia (in sequenza) le informazioni mostrate
sul display.
FUNC. Seleziona il supporto per la riproduzione tra compact disc (CD), chiave USB e SD
card (CARD).
EJECT. Espulsione del compact disc.
MUTE. Premere una volta per mettere in stato di “mute” (volume a zero) il lettore CD MP3; premere di nuovo per togliere la funzione “mute” e ripristinare il volume normale.
CD/TUNER. Commuta il controllo del telecomando dal lettore CD - MP3 al sintonizzatore radio.
POWER. Tasto per l’accensione / spegnimento del sintonizzatore radio.
1 ÷ 10. Tasti per il richiamo diretto delle prime 10 stazioni preferite e memorizzate; si
utilizzano anche per effettuare la memorizzazione e la selezione diretta della frequenza.
DIRECT. Selezione diretta della frequenza: premere DIRECT , poi (entro 5 secondi) digitare
la frequenza desiderata usando i tasti numerici e premere di nuovo DIRECT per confermare.
Esempio: per selezionare la frequenza 96,4 MHz, premere in sequenza DIRECT, 9, 6, 4,
DIRECT.
+10. Incrementa di 10 posizioni la locazione di memoria selezionata (fino alla nr. 60).
MEM. Tasto per la memorizzazione delle frequenze preferite. Scegliere la frequenza,
premere MEM ed (entro 5 secondi) uno dei 10 tasti numerici (corrispondenti alle prime 10
locazioni di memoria) a cui assegnare tale frequenza; dopo premere di nuovo il tasto MEM
per confermare. Per selezionare le memorie da 11 a 60, occorre utilizzare i tasti M-UP (+1),
M-DOWN (–1), +10.
ASM. Tenere premuto (almeno 2 secondi) per attivare la ricerca e memorizzazione
automatica delle stazioni radio trovate.
MO/ST. Commutazione mono / stereo del segnale radio.
M-DOWN. Selezione della locazione di memoria precedente.
M-UP. Selezione della locazione di memoria successiva.
DOWN. Se premuto per un istante, la frequenza scende di 0,05 MHz (ricerca manuale); se
premuto per più di mezzo secondo e poi rilasciato, si effettua la ricerca automatica della
stazione precedente (verso frequenze inferiori).
Se mantenuto premuto, la frequenza scende ininterrottamente; al rilascio, si sintonizza
automaticamente sulla stazione disponibile più vicina.
UP. Se premuto per un istante, la frequenza sale di 0,05 MHz (ricerca manuale); se premuto
per più di mezzo secondo e poi rilasciato, si effettua la ricerca automatica della stazione
successiva (verso frequenze superiori).
Se mantenuto premuto, la frequenza sale ininterrottamente; al rilascio, si sintonizza
automaticamente sulla stazione disponibile più vicina.
SLEEP. Quando premuto, la funzione “sleep” (spegnimento automatico del solo
sintonizzatore radio dopo un tempo prefissato) si attiva e viene mostrato per 5 secondi il
tempo selezionato (in minuti), che inizialmente è 90, ma può essere ridotto in passi da 10
minuti premendo il tasto SLEEP più volte; dopo il valore 10, premendo ancora si disattiva la
funzione. L’attivazione della funzione “sleep” è segnalata sul display LCD.
Il tasto SLEEP, inoltre, disattiva la funzione “sleep” se questa era stata attivata in precedenza
o riaccende il sintonizzatore radio quando questo si è spento automaticamente.
22
TUNER MODE
ITALIANO
CD AUDIO
MP3
COMPACT DISC AUDIO
Se nel lettore CD non è stato inserito alcun compact disc, sul display appare la scritta “NO DISC”.
NO DISC
Dopo aver inserito un compact disc, inizia la ricerca delle tracce.
READING
DISC
Successivamente, sono indicati il numero di tracce presenti ed il tempo complessivo
(esempio: 16 tracce; 72 minuti e 50 secondi).
La scritta ESP sul display indica l’attivazione della modalità “anti-shock”.
Selezionare la traccia desiderata utilizzando i tasti SKIP CUE 8 e SKIP REV 7 , poi
premere il tasto PLAY 10 per iniziare la riproduzione.
Dopo aver inserito un compact disc e terminata la ricerca, sul display appare il numero delle
cartelle ed il numero complessivo di file MP3 presenti (esempio: 7 cartelle e 81 file MP3).
L’unità gestisce fino a 2000 file MP3.
Sono possibili due tipi di ricerca: per cartella (utilizzando i tasti FOLDER
13 ) oppure per file (tramite i tasti SKIP CUE 8 e SKIP REV 7 ).
CD
TR16 72 : 50 ESP
CD
TR01 00 : 01 ESP
COMPACT DISC CON FILE MP3
14 , FOLDER
Premere il tasto PLAY 10 per iniziare la riproduzione; sul display sono mostrate le
informazioni (se disponibili) relative al file riprodotto.
Inserire una sola chiave USB (memoria “flash”) in una delle 2 porte disponibili (una sul
pannello frontale 2 , una sul pannello posteriore 28 ), poi premere il tasto FUNC 17 fino
a selezionare USB.
Terminata la ricerca, sul display appare il numero delle cartelle (“directory”) ed il numero
complessivo di file MP3 presenti (esempio: 2 cartelle e 40 file MP3).
L’unità gestisce fino a 2000 file MP3.
Premere il tasto PLAY 10 per iniziare la riproduzione; sul display sono mostrate le
informazioni (se disponibili) relative al file riprodotto.
CD
07
0081
Artist - XYZ
TR0001 00:01 MP3
CHIAVE USB (FILE MP3)
USB
02
0040
Artist - XYZ
TR0001 00:01 MP3
Nel caso non sia stato trovato alcun file, sul display appare la scritta “NO FILE”.
NO FILE
Inserire una memoria “SD” nella relativa porta 18 , poi premere il tasto FUNC 17 fino a
selezionare CARD.
Terminata la ricerca, sul display appare il numero delle cartelle (“directory”) ed il numero
complessivo di file MP3 presenti (esempio: 2 cartelle e 40 file MP3).
L’unità gestisce fino a 2000 file MP3.
Premere il tasto PLAY 10 per iniziare la riproduzione; sul display sono mostrate le
informazioni (se disponibili) relative al file riprodotto.
MEMORIA “SD” (FILE MP3)
CARD
02
0040
Artist - XYZ
TR0001 00:01 MP3
Nel caso non sia stato trovato alcun file, sul display appare la scritta “NO FILE”.
NO FILE
23
ITALIANO
Note:
-- è possibile programmare una sequenza di max. 64 tracce / file;
-- se premuto durante la programmazione, il tasto STOP cancella completamente la
sequenza;
-- dopo circa 15 secondi dall’ultima pressione di un tasto, si esce dal modo di programmazione.
PROGRAMMAZIONE SEQUENZA
DELLE TRACCE O DEI FILE MP3
CD AUDIO
Premere il tasto PROG 6 per entrare nel modo di programmazione.
Scegliere la prima traccia (entro 15 secondi) utilizzando i tasti SKIP CUE 8 e SKIP
REV 7 (es. la numero 4).
Premere il tasto PROG 6
traccia.
C D
PROGRAM
P-01
00
C D
PROGRAM
P-01
04
C D
PROGRAM
P-02
00
per confermare e proseguire con la scelta della seconda
Alla fine della programmazione, premere il tasto PLAY per avviare la riproduzione secondo
la sequenza memorizzata.
MEM
TR 04
FILE MP3
Premere il tasto PROG 6 per entrare nel modo di programmazione.
Scegliere la cartella (entro 15 secondi) utilizzando i tasti utilizzando i tasti SKIP CUE 8 e
SKIP REV 7 (es. la numero 3).
Premere il tasto PROG 6 per confermare ed effettuare la scelta del file (esempio: il nr. 7)
presente all’interno della cartella selezionata tramite i tasti SKIP CUE 8 e SKIP REV 7 .
Premere il tasto PROG per confermare e proseguire con la scelta (cartella e file) per la
seconda locazione di memoria.
Alla fine della programmazione, premere il tasto PLAY per avviare la riproduzione secondo
la sequenza memorizzata.
Sul display sono mostrate le informazioni (se disponibili) relative al file riprodotto.
Per effettuare la ricerca di una stazione, utilizzare il tasto UP 22 (o DOWN 21 ) in una delle
tre possibili modalità:
-- se premuto per un istante, la frequenza sale (/ scende) di 0,05 MHz (ricerca manuale);
-- se premuto per più di mezzo secondo e poi rilasciato, si effettua la ricerca automatica della
stazione successiva (/ precedente);
-- se mantenuto premuto, la frequenza sale (/ scende) ininterrottamente.
Dopo aver trovato la stazione, questa può essere memorizzata in una delle 10 locazioni
di memoria dirette disponibili: occorre premere MEMORY 23 ed (entro 5 secondi) uno dei
10 tasti numerici (possibilmente una locazione di memoria non ancora utilizzata, facendo
quindi attenzione a non cancellare una stazione memorizzata in precedenza), poi premere
di nuovo il tasto MEMORY per confermare.
Per memorizzare (e richiamare) una stazione nelle locazioni da 11 a 60, occorre usare il
telecomando (vedere la relativa sezione del manuale).
24
00:01
ESP
P-01
PROGRAM
000
0000
P-01
PROGRAM
003
0000
P-01
PROGRAM
003
0007
P-02
PROGRAM
000
0000
MEM A r t i s t A
TR0007 00:01 MP3
SINTONIZZATORE RADIO:
RICERCA E MEMORIZZAZIONE
DELLE STAZIONI PREFERITE
ITALIANO
INSTALLAZIONE
INSTALLAZIONE
L’apparecchio può essere installato in un armadio rack da 19” (1 unità) tramite le alette
laterali o posizionato su un tavolo (rimuovendo le alette svitando le 4 viti per parte).
------
picture 1
picture 2
- AAA 1,5 +
Il vano delle pile si trova nella parte bassa del retro del telecomando.
Premere verso il basso la leva del coperchio per rimuoverlo (figura 1).
Rimuovere (se presenti) le vecchie pile, sollevandole dal polo positivo.
Nel vano è indicata la polarità corretta delle batterie (figura 2).
Inserire 2 pile nuove di tipo AAA (1,5 V) non ricaricabili e possibilmente alcaline (facendo
attenzione alla polarità). L’inserimento si effettua ponendo prima il polo negativo contro
la molla del vano, poi spingendo verso il basso il polo positivo in modo da fissare la pila
(figura 3).
INSERIMENTO / RIMOZIONE /
SOSTITUZIONE DELLE PILE
DEL TELECOMANDO
+ AAA 1,5 -
Utilizzare 2 pile nuove di tipo AAA (1,5 V) non ricaricabili, possibilmente alcaline.
Non utilizzare contemporaneamente pile vecchie e nuove.
Non utilizzare contemporaneamente tipi diversi di batterie.
Non tentare di ricaricare batterie non ricaricabili.
Verificare che sia rispettata la polarità delle batterie, seguendo le indicazioni riportate sul
relativo vano.
-- Togliere le batterie una volta esaurite o nel caso l’apparecchiatura non sia utilizzata per
un lungo periodo.
-- Non cortocircuitare le pile (ad esempio collegando i 2 poli opposti con un filo di metallo).
-- Smaltire le batterie esaurite negli appositi contenitori, facendo riferimento alle norme di
legge vigenti (nel paese di utilizzo) in materia di ecologia e protezione dell’ambiente.
picture 3
25
ITALIANO
SPECIFICHE
TECNICHE
DATI TECNICI LETTORE CD / MP3
Livello uscita audio (1 kHz, 0 dB
Differenza livello uscita audio tra canali (1 kHz, 0 dB)
Risposta in frequenza (± 3 dB)
Separazione stereo (1 kHz, 0 dB)
Distorsione armonica totale (1 kHz, 0 dB)
Rapporto segnale / rumore
DATI TECNICI SINTONIZZATORE RADIO
Gamma di sintonia
Frequenza intermedia
Sensibilità
Separazione stereo (1 kHz)
Risposta in frequenza
< 2 dB
20 Hz ÷ 20 kHz
> 60 dB
< 0.1 %
> 80 dB
87.5 ÷ 108 MHz (FM)
10.7 MHz
6 µV f.e.m.
≥ 40 dB
100 Hz ÷ 12 kHz
Distorsione armonica totale
≤ 0.1 %
Rapporto segnale / rumore
≥ 50 dB
Sensibilità sintonia automatica
≤ 50 µV
CARATTERISTICHE GENERALI
Alimentazione (c.a.)
Dimensioni (l x h x p)
Peso (senza imballo
26
1.2 V (±2 dBu)
230 -115 V (50 / 60 Hz), 50 VA
482 x 44 x 250 mm (1 unità rack 19”)
3,6 kg
µ
±
÷
DEUTSCH
WICHTIGER
HINWEISE
Bevor Sie dieses Gerät in Betrieb nehmen, lesen Sie die Bedienungsanleitung bitte sorgfältig
durch und halten Sie diese zur weiteren Einsichtnahme bereit. Die Bedienungsanleitung
sollte als wesentlicher Bestandteil dieses Produkts verstanden werden und sollte
diesem entsprechend immer beiliegen (auch wenn das Gerät den Besitzer wechselt), um
eine korrekte Installation und Benutzung zu gewährleisten sowie um als Referenz für
Sicherheitsvorkehrungen zu dienen.
R.C.F S.p.A. übernimmt keine Haftung im Falle einer unsachgemäßen Installation und/ oder
Benutzung dieses Produkts.
WICHTIGER HINWEIS
WARNUNG: Um die Gefahr eines Brandes oder eines Stromschlags auszuschließen, setzen
Sie dieses Produkt niemals Regen oder sonstiger Feuchtigkeit aus.
WARNUNG
SICHERHEITSHINWEISE
1. Alle Anweisungen, im Besonderen die sicherheitsrelevanten, sollten mit besonderer
Aufmerksamkeit gelesen werden, da sie entscheidende Informationen enthalten.
2. HAUPTSTROMVERSORGUNG
a. Die Netzspannung ist ausreichend hoch, um einen tödlichen Stromschlag zu
verursachen. Installieren oder verbinden Sie das Gerät deshalb nicht bei eingeschalteter
Stromversorgung.
b. Stellen Sie vor dem Einschalten sicher, dass alle Anschlüsse korrekt vorgenommen
wurden und dass die Netzspannung mit der auf dem Typenschild des Gerätes
angegeben Spannung übereinstimmt, anderenfalls nehmen Sie bitte Kontakt zu Ihrem
RCF-Händler auf.
c. Die Metallteile des Gerätes sind über das Netzanschlusskabel geerdet. Ein Gerät
in CLASS 1 Bauweise sollte immer über ein Schutzkontaktkabel mit geerdetem
Schutzleiter an eine Netzsteckdose angeschlossen werden.
d. Schützen Sie das Netzkabel vor Beschädigungen. Stellen Sie sicher, dass dieses so
positioniert wird, dass nicht darauf getreten oder von Gegenständen eingedrückt
werden kann.
e. Um vor der Gefahr eines Stromschlags zu schützen, öffnen Sie niemals das Gehäuse des
Gerätes. Im Inneren des Gerätes befinden sich keine für die Bedienung notwendigen
Bauteile.
Stellen Sie sicher, dass keine Gegenstände oder Flüssigkeiten ins Innere des Gerätes
gelangen können, da dies zu einem Kurzschluss führen kann. Schützen Sie das Gerät vor
Tropf- und Spritzwasser. Stellen Sie keine mit Flüssigkeit gefüllten Behälter (z.B. Vasen) oder
offene Brandquellen (z.B. Kerzen) auf das Gerät.
4. Versuchen Sie niemals Funktionen, Modifikationen oder Reparaturen am Gerät
durchzuführen, die nicht ausdrücklich in dieser Bedienungsanleitung beschrieben werden.
Kontaktieren Sie Ihr autorisiertes Service-Center oder qualifiziertes Fachpersonal, sollte
eines der folgenden Ereignisse auftreten:
-- Das Gerät funktioniert nicht (oder funktioniert nicht korrekt)
-- Das Netzkabel wurde beschädigt
-- Gegenstände oder Flüssigkeiten sind ins Innere des Gerätes gelangt
-- Das Produkt war einer hohen Belastung/ einem heftigen Stoß ausgesetzt.
5. Sollten Sie das Gerät längere Zeit nicht in Betrieb nehmen, trennen Sie das
Stromanschlusskabel vom Netz.
6. Sollte von dem Gerät ein ungewohnter Geruch oder Rauch ausgehen, schalten Sie dieses
unverzüglich aus und ziehen Sie das Netzanschlusskabel.
7. Verbinden Sie das Produkt nur mit dafür vorgesehenen Geräten und Zubehörteilen.
Nutzen Sie für eine hängende Installation ausschließlich die vorgesehenen Verankerungspunkte
und versuchen Sie nicht, das Produkt mit für diesen Zweck ungeeigneten Bauteilen zu
27
DEUTSCH
montieren. Prüfen Sie zudem die Eignung der Stützfläche (Wand, Decke, Struktur etc.) und des
Befestigungsmaterials (Dübel, Schrauben, Winkel etc., nicht im Lieferumfang von RCF), um
eine langfristige Sicherheit des Systems/ der Installation zu gewährleisten. Berücksichtigen
Sie dabei beispielsweise auch die mechanischen Vibrationen, die gewöhnlich von einem
akustischen Strahler ausgehen. Um die Gefahr von herunterfallenden Geräten zu verhindern,
stapeln Sie nicht mehrere Einheiten dieses Produkts aufeinander, wenn diese Möglichkeit
nicht explizit in der Bedienungsanleitung beschrieben wird.
8. RCF S.p.A. empfiehlt nachdrücklich, die Installation des Gerätes ausschließlich
von qualifiziertem Fachpersonal (oder spezialisierten Firmen) durchführen
zu lassen, die eine korrekte Installierung sicherstellen und diese gemäß der
geltenden Bestimmungen zertifizieren können.
Das gesamte Audio-System muss die aktuellen Standards sowie die Vorschriften
für elektrische Anlagen einhalten.
9. Halterungen und Gerätewagen
Das Gerät sollte, falls erforderlich, nur mit vom Hersteller empfohlenen Halterungen oder
Gerätewagen genutzt werden. Der Gesamtaufbau von Gerät/ Halterung/ Gerätewagen
sollte mit extremer Vorsicht bewegt werden. Plötzliches Stoppen, zu starkes Anschieben
und unebene Böden könnten zum Umkippen des Aufbaus führen.
10. Bei der Installation eines professionellen Audiosystems sollten neben rein akustischen
Parametern (wie etwa Schalldruck, Abdeckungswinkel, Frequenzgang etc.) einige
mechanische und elektrische Faktoren beachtet werden.
11. Gehörschädigung
Die Einwirkung hoher Lautstärkepegel kann zu dauerhaften Gehörschädigungen führen. Der
Schalldruckpegel, der zu einer Schädigung des Gehörs führt, unterscheidet sich von Person zu
Person und ist von der Dauer der Einwirkung abhängig. Um potentielle Gefahren durch hohe
Schalldruckpegel zu vermeiden, sollte jeder, der diesen Pegeln ausgesetzt ist, einen geeigneten
Gehörschutz verwenden. Beim Einsatz eines leistungsfähigen Schallerzeugers, der hohe
Lautstärkepegel erzeugt, ist es erforderlich Gehörschutzstöpsel oder Ohrenschützer zu tragen.
Lesen Sie hierzu die Angaben des maximal zulässigen Schalldruckpegels in der
Betriebsanleitung der Lautsprecher.
12. Um das Auftreten von Rauschen durch Mikrofon- oder Linesignalleitungen zu
vermeiden, verwenden Sie ausschließlich abgeschirmte Verbindungskabel und platzieren
Sie diese nicht in der Nähe von:
-- Geräten, die starke elektromagnetische Felder erzeugen (z.B. Hochleistungstransformatoren).
-- Netzstromkabeln.
-- Lautsprecherleitungen.
13. Stellen Sie das Gerät nicht in der Nähe von Wärmequellen auf.
14. Forcieren Sie niemals die Bedienelemente (Tasten, Kontrollvorrichtungen, usw.).
15. Verwenden Sie für die Reinigung der Außenteile keine Lösungsmittel, Alkohol, Benzin
oder andere flüchtige Substanzen.
-- Verwenden Sie ausschließlich Audio-CDs, CD-Rs und CD-RWs mit einem Durchmesser
von 12 cm. Legen Sie niemals 8cm-CDs ein!
-- Verwenden Sie keine beschädigten (oder außergewöhnlich geformten) CDs.
-- Behandeln Sie CDs pfleglich und halten Sie diese stets an den Rändern, berühren Sie
nicht die unbedruckte Oberfläche.
-- Reinigen Sie eine verschmutzte CD indem Sie diese mit einem weichen und trockenen
Reinigungstuch von innen nach außen abwischen. Verwenden Sie keinen Alkohol oder
sonstige Lösungsmittel.
-- Bringen Sie keine Klebeetiketten auf den CDs an (und verwenden Sie keine mit Etiketten
beklebten CDs).
-- Geben Sie nicht benutzte CDs in die zugehörigen Hüllen.
-- Setzen Sie die CDs keinen direkten Wärmequellen, hohen Temperaturen oder direktem
Sonnenlicht aus (so z.B. im Autoinnenraum).
-- Manche Typen von CD-Rs und CD-RWs (beschreibbare und wiederbeschreibbare CDs)
werden möglicherweise nicht korrekt ausgelesen.
28
HINWEISE ZU
COMPACT DISCS (CDS)
CLASS 1
LASER PRODUCT
HINWEISE ZU MP3-DATEIEN
DEUTSCH
-- »MP3« steht für MPEG Audio Layer 3 und beschreibt ein Verfahren zur AudioDatenkompression.
-- Dieses Abspielgerät liest MP3-Dateien auf CD-ROM, CD-R oder CD-RW sowie auf USBFlashlaufwerken. Tracktitel, Interpret und Album werden, falls verfügbar (ID3 Tag), angezeigt.
-- CD-R und CD-RW-Discs, die mit dem »Packet Writing«-Verfahren erstellt wurden,
werden nicht unterstützt.
-- Die Dateiendung muss ».mp3« lauten.
-- Die Verzeichnistiefe (Ordner/ »folder«) ist auf 8 Ebenen beschränkt (inklusive RootVerzeichnis).
-- Maximal 2000 MP3-Dateien je Quelle
-- Es wird empfohlen, MP3-Dateien mit einer Abtastrate von 44,1 kHz und einer konstanten
Bitrate von mindestens 128 kBit/s (bei einer höheren Bitrate von z.B. 192 kBit/s wird die
Wiedergabequalität verbessert) zu verwenden.
BESCHREIBUNG
R.C.F S.p.A. dankt Ihnen für den Kauf dieses Produkts, das auf höchste
Zuverlässigkeit und Leistungsfähigkeit ausgelegt ist.
Der MS 1033 verfügt über zwei getrennte und unabhängige Sektionen, die parallel genutzt
werden können:
-- CD-Player mit Anti-Shock-Mechanismus und Elektronik.
Spielt sowohl Audio-Tracks und MP3-Dateien auf Compact Discs (CD, CD-R, CD-RW).
Spielt (ausschließlich) MP3-Dateien auf USB-Flashlaufwerken und »Secure Digital« (SD)Speicherkarten (dieser Port ist auch kompatibel zu »MultiMedia Cards«).
-- Radiotuner (UKW 87,5 - 108 MHz) mit 60 Senderspeichern (10 über direkten Zugriff
und 50 über die Fernbedienung) zum Speichern und Abrufen bevorzugter Sender.
GERÄTEVORDERSEITE
CD – MP3
1
RADIO
CD-/MP3-PLAYER
1 HAUPTSCHALTER (O = AUS, I = EIN).
2
3
5
4
6
77
88
99
10
10
11
12
12
13
13
14
14
15
15
16
16
17
17
18
29
DEUTSCH
2 USB-SCHNITTSTELLE.
Verwenden Sie diese nicht, wenn ein USB-Flash-Laufwerk an der USB-Schnittstelle 28 auf
der Geräterückseite angeschlossen ist.
3 CD-EINZUGSSCHACHT. Verwenden Sie ausschließlich Discs mit einem Durchmesser
von 12 cm.
4 CD LED Zeigt an, dass der CD-/MP3-Player über die Fernbedienung ausgewählt wurde.
5 LCD-ANZEIGE.
6 PROG. Programmmodus (für eine Abfolge von max. 64 Tracks/ Dateien; Lesen Sie hierzu
den Abschnitt »Track/ MP3-Datei Ablaufprogrammierung« in der Bedienungsanleitung).
7 SKIP REV.
-- Im Stop-Modus: Drücken Sie die Taste, um den/ die vorherige(n) Track/ MP3-Datei
auszuwählen (auf den ersten Track folgt wieder der letzte).
-- Bei der Programmierung der Track-Sequenz: Wählt den vorherigen Ordner/ Track aus.
-- Im Wiedergabe-Modus: Drücken Sie die Taste einmal, um an den Anfang des aktuellen
Tracks zu springen. Drücken Sie zweimal schnell hintereinander, um zum vorherigen
Track zu springen. Halten Sie die Taste gedrückt, um den Track schnell zurücklaufen zu
lassen.
8 SKIP CUE.
-- Im Stop-Modus: Drücken Sie die Taste, um den/ die nächste(n) Track/ MP3-Datei
auszuwählen (auf den letzten Track folgt der erste).
-- Bei der Programmierung der Track-Sequenz: Wählt den nächsten Ordner/ Track aus.
-- Im Wiedergabe-Modus: Drücken Sie die Taste einmal, um zum nächsten Track zu springen
(drücken Sie die Taste mehrfach, um andere Tracks auszuwählen). Halten Sie die Taste
gedrückt, um den Track schnell vorlaufen zu lassen.
9 STOP. Stoppt die Wiedergabe des Tracks/ der Datei und löscht im Programmmodus die
gesamte Sequenz.
10
PLAY / PAUSE. Aktiviert die Wiedergabe/ Pause der ausgewählten Tracks/ Dateien.
11
EJECT. Auswurf der Compact Disc.
12
POWER. Schaltet den CD-/MP3-Player ein/ aus. Halten Sie die Taste 3 Sekunden
gedrückt, um das Gerät auszuschalten.
13
FOLDER
(Funktion nur bei MP3-Dateien).
Auswahl des vorherigen Ordners (Hinweis: auf den ersten Ordner folgt wieder der letzte).
14
FOLDER
(Funktion nur bei MP3-Dateien).
Auswahl des nächsten Ordners (Hinweis: auf den letzten Ordner folgt der erste).
15 FIND. MP3-Dateisuche.
Drücken Sie die Taste einmal, um in das Datei-Suchmenü zu gelangen. Wählen Sie die MP3Datei nach dem Anfangsbuchstaben des Dateiamen aus, indem Sie die SKIP REV 7 und
SKIP CUE 8 - Tasten betätigen. Drücken Sie die Taste ein zweites Mal, um die Ordnersuche
zu starten.
Bestätigen Sie die Auswahl durch Drücken der PLAY/ PAUSE 10 - Taste oder drücken Sie
erneut die FIND-Taste (für keine Auswahl), um die Suche manuell zu beenden.
Nach 15 Sekunden seit dem letzten Tastendruck wird der Datei-Suchmodus automatisch
beendet.
16 REPEAT. Drücken Sie die Taste einmal bzw. wiederholt, um den Wiedergabemodus zu
ändern.
BEI VERWENDUNG EINER AUDIO-CD:
PLAY ALL RANDOM Alle Tracks werden in zufälliger Reihenfolge wiedergegeben.
REPEAT TRACK
Der aktuelle Track wird kontinuierlich wiederholt.
REPEAT ALL Die komplette Compact Disc wird kontinuierlich wiederholt.
30
Die komplette Compact Disc wird in zufälliger Reihenfolge kontinuierlich wiederholt.
Standardmodus: Alle Tracks werden einmalig in der ursprünglichen Reihenfolge der CD wiedergegeben.
DEUTSCH
RANDOM REPEAT
PLAY ALL
BEI VERWENDUNG EINER CD, EINES USB-FLASHLAUFWERKS ODER EINER SDKARTE MIT MP3-DATEIEN:
PLAY ALL RANDOM Alle Dateien werden in zufälliger Reihenfolge wiedergegeben.
REPEAT TRACK
Die aktuelle Datei wird kontinuierlich wiederholt.
REPEAT FOLDER
Alle Dateien im gewählten Verzeichnis werden kontinuierlich wiederholt.
REPEAT ALL
Alle Dateien werden kontinuierlich wiederholt (in ihrer ursprünglichen Reihenfolge).
RANDOM REPEAT Alle Dateien werden in zufälliger Reihenfolge kontinuierlich wiederholt.
PLAY ALL
Standardmodus: Alle Dateien werden einmalig in der ursprünglichen Reihenfolge wiedergegeben.
17 FUNC. Drücken Sie die Taste einmal bzw. wiederholt, um zwischen CD, USBFlashlaufwerk oder SD-Karte zu wählen.
18 SD MMC CARD. »Secure Digital« (SD) -Kartenschacht (auch kompatibel zu »MultiMedia
Cards« (MMC).
FM RADIOTUNER
25
25
19
26
26
21
22
23
24
20
19 LCD-DISPLAY
»Sleep«Funktion
aktiviert
SLEEP
Stereo
Signal
«ST»
«CH»
MHz
ausgewählter
Speicherplatz
Auf dem Display werden nur
die Speicherplätze von 1 bis 18
angezeigt.
Frequenz
20 1 ÷ 10. Nummerntasten zum Speichern/ Abrufen der ersten 10 bevorzugten
Radiosender.
21 DOWN. Wird die Taste kurz gedrückt, nimmt die Frequenz um 0,05 MHz ab (manuelle
Suche). Wird die Taste länger als eine halbe Sekunde gedrückt gehalten und dann
losgelassen, wird automatisch der nächste Radiosender gesucht (in Richtung absteigender
Frequenzen).
Wird die Taste gedrückt gehalten, nimmt die Frequenz kontinuierlich ab. Nach Loslassen der
Taste stellt der Radiotuner automatisch den nächsten verfügbaren Sender ein.
22 UP. Wird die Taste kurz gedrückt, nimmt die Frequenz um 0,05 MHz zu (manuelle Suche).
Wird die Taste länger als eine halbe Sekunde gedrückt gehalten und dann losgelassen, wird
automatisch der nächste Radiosender gesucht (in Richtung aufsteigender Frequenzen).
31
DEUTSCH
Wird die Taste gedrückt gehalten, nimmt die Frequenz kontinuierlich zu. Nach Loslassen der
Taste stellt der Radiotuner automatisch den nächsten verfügbaren Sender ein.
23 MEMORY. Diese Taste kann verwendet werden, um bevorzugte Radiosender
abzuspeichern. Wählen Sie die entsprechende Frequenz aus, drücken Sie die MEMORYTaste und anschließend (innerhalb von 5 Sekunden) eine der 10 Nummerntasten (die 10
ersten Senderspeicher), der diese Sendefrequenz zugewiesen werden soll. Drücken Sie
anschließend nochmals die MEMORY-Taste, um den Vorgang zu bestätigen.
24 POWER. Schaltet den Radiotuner ein/ aus.
25 INFRAROT-EMPFÄNGER FÜR DIE FERNBEDIENUNG (Hinweis: Die Fernbedienung ist
Teil des Lieferumfangs).
26 LED TUNER zeigt an, dass der Radiotuner über die Fernbedienung ausgewählt wurde.
GERÄTERÜCKSEITE
27
27
28
28
29
29
30
30
31
31
32
32
33
33
34
34
27 FM ANTENNA. Anschlussklemme für die UKW-Antenne (75 Ω, unsymmetrisch).
28 USB-Schnittstelle. (Hinweis: Verwenden Sie diese nicht, wenn ein USB-Flash-Laufwerk
an der USB-Schnittstelle 2 auf der Vorderseite angeschlossen ist.)
29 TUNER VOL. Lautstärkeregler für den Tunerausgang TUNER OUT 32 .
30 PRIORITY VOL. Lautstärkeregler für den Prioritätsausgangs (CD-/MP3-Player oder
Radiotuner) PRIORITY 33 .
31 CD VOL. Lautstärkeregler für den Ausgang des CD-Players CD OUT 34 .
32 TUNER OUT. Stereo-Audioausgang des UKW-Radiotuners.
33 PRIORITY. Gemeinsamer Stereo-Audioausgang für den UKW-Radiotuner und den CD-/
MP3-Player. Der CD-/MP3-Player hat Priorität, wenn dieser ein Audiosignal sendet.
34 CD OUT. Stereo-Audioausgang des CD-/MP3-Players.
35 EARTH. Erdungsklemme.
36 NETZANSCHLUSS MIT SICHERUNG (Der Typ der Netzsicherung ist auf der
Geräterückseite angegeben).
37 NETZSPANNUNGSWAHLSCHALTER: 230 V / 115 V .
Stellen Sie vor dem Einschalten des Gerätes sicher, dass diese Einstellung der Netzspannung
entspricht.
32
35
35
36
36
37
37
DEUTSCH
FERNBEDIENUNG
Die Fernbedienung (im Lieferumfang enthalten) steuert den CD-/MP3-Player oder den
Radiotuner. Die meisten seiner Funktionen entsprechen den Tasten auf der Vorderseite des
MS 1033. Die rote Beschriftung kennzeichnet die zweite Funktion der jeweiligen Taste, die
zur Steuerung des Radiotuners dient.
Richten Sie die Fernbedienung auf die Gerätevorderseite des MS 1033 und überschreiten
Sie nicht eine Entfernung von mehr als 4-5 Metern. (Die Reichweite hängt vom Zustand
der Batterien ab).
Hinweis: die CD-/TUNER-Taste schaltet die Steuerung vom CD-/MP3-Player zum
Radiotuner um (und umgekehrt). Die steuerbare Sektion wird von der entsprechenden LED
auf der Gerätevorderseite angezeigt, der CD-LED 4 oder der Tuner-LED 26 .
POWER. Schaltet den CD-/MP3-Player ein/ aus. Halten Sie die Taste (mindestens 3 Sekunden
lang) gedrückt, um das Gerät auszuschalten.
CD-/MP3-PLAYER-MODUS
1 ÷ 10/0. Nummerntasten, um den entsprechenden Audiotrack oder die MP3-Datei
auszuwählen.
PLAY / PAUSE. Aktiviert die Wiedergabe/ Pause der ausgewählten Tracks/ Dateien.
STOP. Stoppt die Wiedergabe des Tracks/ der Datei und löscht im Programmmodus die
gesamte Sequenz.
PROG. Programmmodus (für eine Abfolge von max. 64 Tracks/ Dateien; Lesen Sie hierzu
den Abschnitt »Track/ MP3-Datei Ablaufprogrammierung« der Bedienungsanleitung).
FIND. MP3-Dateisuche (Siehe 15 ).
ESP. Aktiviert/ deaktiviert die »Anti-Shock«-Funktion des Players.
FOLDER
(Funktion nur bei MP3-Dateien) Auswahl des vorherigen Ordners (Hinweis:
auf den ersten Ordner folgt wieder der letzte).
FOLDER
(Funktion nur bei MP3-Dateien) Auswahl des nächsten Ordners (Hinweis: auf
den letzten Ordner folgt der erste).
SKIP REV.
-- Im Stop-Modus: Drücken Sie die Taste, um den/ die vorherige(n) Track/ MP3-Datei
auszuwählen (auf den ersten Track folgt wieder der letzte).
-- Bei der Programmierung der Track-Sequenz: Wählt den vorherigen Ordner/ Track aus.
-- Im Wiedergabe-Modus: Drücken Sie die Taste einmal, um an den Anfang des aktuellen
Tracks zu springen. Drücken Sie zweimal schnell hintereinander, um zum vorherigen Track
zu springen. Halten Sie die Taste gedrückt, um den Track schnell zurücklaufen zu lassen.
SKIP CUE.
-- Im Stop-Modus: Drücken Sie die Taste, um den/ die nächste(n) Track/ MP3-Datei
auszuwählen (auf den letzten Track folgt der erste).
-- Bei der Programmierung der Track-Sequenz: Wählt den nächsten Ordner/ Track aus.
-- Im Wiedergabe-Modus: Drücken Sie die Taste einmal, um zum nächsten Track zu springen
(drücken Sie die Taste mehrfach, um andere Tracks auszuwählen). Halten Sie die Taste
gedrückt, um den Track schnell vorlaufen zu lassen.
33
DEUTSCH
REPEAT. Drücken Sie die Taste einmal bzw. wiederholt, um den Wiedergabemodus zu ändern.
DISPLAY. Bei der Wiedergabe von MP3-Dateien lassen sich die im Display angezeigten
Informationen durchschalten.
FUNC. Drücken Sie die Taste einmal bzw. wiederholt, um zwischen CD, USB-Flashlaufwerk
oder SD-Karte zu wählen.
EJECT. Auswurf der Compact Disc.
MUTE. Drücken Sie die Taste, um den CD-Player stumm zu schalten. Drücken Sie die Taste
erneut, um zur normalen Lautstärke zurückzukehren.
CD/TUNER. Schaltet die Steuerung vom CD-/MP3-Player zum Radiotuner um (und
umgekehrt).
POWER. Schaltet den Radiotuner ein/ aus.
1 ÷ 10. Nummerntasten zum Aufrufen/ Abspeichern der 10 ersten bevorzugten
Radiosender.
DIRECT. Direkte Frequenzauswahl: Drücken Sie DIRECT und wählen Sie dann (innerhalb
von 5 Sekunden) die gewünschte Frequenz mit den Nummerntasten aus. Bestätigen Sie
ihre Wahl mit der DIRECT-Taste. Um beispielsweise die Frequenz 96,4 MHz auszuwählen,
drücken Sie nacheinander DIRECT, 9, 6, 4, DIRECT.
+10. Erhöht den aktuell ausgewählten, gespeicherten Sender um 10 Positionen (bis zur Nr. 60).
MEM. Diese Taste kann verwendet werden, um bevorzugte Radiosender abzuspeichern.
Wählen Sie die entsprechende Frequenz aus, drücken Sie die MEMORY-Taste und anschließend
(innerhalb von 5 Sekunden) eine der 10 Nummerntasten (die 10 ersten Senderspeicher),
der diese Sendefrequenz zugewiesen werden soll. Drücken Sie anschließend nochmals
die MEMORY-Taste, um den Vorgang zu bestätigen. Um die Speicherplätze von 11 bis 60
auszuwählen, verwenden Sie die M-UP (+1), M-DOWN (-1) und +10 -Tasten.
ASM. Halten Sie die Taste (mindestens 2 Sekunden lang) gedrückt, um den automatischen
Sendersuchlauf und die Senderspeicherung zu starten.
MO/ST. Schaltet das Tunersignal zwischen Mono und Stereo um.
M-DOWN. Drücken Sie die Taste, um den vorherigen Senderspeicher auszuwählen.
M-UP. Drücken Sie die Taste, um den vorherigen Senderspeicher auszuwählen.
DOWN. Wird die Taste kurz gedrückt, nimmt die Frequenz um 0,05 MHz ab (manuelle Suche).
Wird die Taste länger als eine halbe Sekunde gedrückt gehalten und dann losgelassen, wird
automatisch der nächste Radiosender gesucht (in Richtung absteigender Frequenzen). Wird
die Taste gedrückt gehalten, nimmt die Frequenz kontinuierlich ab. Nach Loslassen der
Taste stellt der Radiotuner automatisch den nächsten verfügbaren Sender ein.
UP. Wird die Taste kurz gedrückt, nimmt die Frequenz um 0,05 MHz zu (manuelle Suche).
Wird die Taste länger als eine halbe Sekunde gedrückt gehalten und dann losgelassen, wird
automatisch der nächste Radiosender gesucht (in Richtung aufsteigender Frequenzen).
Wird die Taste gedrückt gehalten, nimmt die Frequenz kontinuierlich zu. Nach Loslassen der
Taste stellt der Radiotuner automatisch den nächsten verfügbaren Sender ein.
SLEEP. Drücken Sie die Taste, um die SLEEP-Funktion zu aktivieren (Der Tuner wird automatisch
nach einer eingestellten Zeit ausgeschaltet). Die Zeit beträgt anfangs 90 Minuten (wird 5
Sekunden lang im Display angezeigt) und kann durch mehrmaliges Drücken der SLEEPTaste in 10-Minuten-Schritten reduziert werden. Nachdem der Wert auf 10 (Minuten)
gesetzt wurde, wird bei nochmaligem Drücken der Taste die SLEEP-Funktion deaktiviert. Ist
die Funktion aktiviert, wird »SLEEP« im Display angezeigt. Die Taste deaktiviert ebenfalls
die SLEEP-Funktion (wenn aktiv) und schaltet den Radiotuner wieder ein, wenn dieser
automatisch ausgeschaltet wurde.
34
RADIOTUNER-MODUS
07
Wurde keine Compact Disc (CD) eingelegt, wird »NO DISC« im Display angezeigt.
DEUTSCH
CD MP3
CD/
0081
COMPACT DISC AUDIO
NO DISC
Nachdem eine CD eingelegt wurde, beginnt unverzüglich der Track Scan.
READING
DISC
Die Trackanzahl und gesamte Spieldauer der CD werden angezeigt. (Beispiel: 16 Tracks, 72
Minuten und 50 Sekunden).
Das »ESP« im Display zeigt an, dass der »Anti-Shock«-Modus aktiviert ist.
Wählen Sie einen Track mit den SKIP CUE 8 und SKIP REV 7 -Tasten aus und drücken
Sie die PLAY-Taste 10 , um den Wiedergabemodus zu starten.
Nach Einlegen einer CD (und dem Ende des Disc-Scans), werden die Anzahl der enthaltenen
Ordner (Verzeichnisse) und die Gesamtanzahl der MP3-Dateien angezeigt (zum Beispiel: 7
Ordner und 81 MP3-Dateien). Das Gerät verarbeitet bis zu 2000 MP3-Dateien.
14 und, FOLDER
Wählen Sie einen Ordner (mit den FOLDER
eine Datei (mit SKIP CUE 8 und SKIP REV 7 ) aus.
CD
TR16 72 : 50 ESP
CD
TR01 00 : 01 ESP
COMPACT DISC MIT
MP3-DATEIEN
15 -Tasten) oder
Drücken Sie die PLAY-Taste 10 , um den Wiedergabemodus zu starten.
Informationen zum abgespielten Track (falls verfügbar) werden angezeigt.
Schließen Sie ein (einzelnes!) USB-Flashlaufwerk an einer der beiden USB-Schnittstellen
an (eine befindet sich auf der Gerätevorderseite 2 , eine weitere auf der Rückseite 28 ).
Drücken Sie anschließend die FUNC-Taste 17 um »USB« auszuwählen.
Nach dem Scan der Dateien des Laufwerks werden die Anzahl der Ordner (Verzeichnisse)
und die Anzahl enthaltener Dateien angezeigt (z.B. 2 Ordner und 40 MP3-Dateien). Das
Gerät verarbeitet bis zu 2000 MP3-Dateien.
Drücken Sie die PLAY-Taste 10 , um den Wiedergabemodus zu starten. Informationen zur
abgespielten Datei werden (falls verfügbar) angezeigt.
CD
07
0081
Artist - XYZ
TR0001 00:01 MP3
USB-FLASHLAUFWERK
(MP3-DATEIEN)
USB
02
0040
Artist - XYZ
TR0001 00:01 MP3
Kann keine Datei auf dem Laufwerk gefunden werden, erscheint »NO FILE« im Display.
NO FILE
Führen Sie eine SD-Speicherkarte in den SD-Schacht 18 ein, drücken Sie anschließend die
FUNC-Taste 17 , um »SD« auszuwählen.
Nach dem Scan der Dateien der Speicherkarte werden die Anzahl der Ordner (Verzeichnisse)
und die Anzahl enthaltener Dateien angezeigt (z.B. 2 Ordner und 40 MP3-Dateien). Das
Gerät verarbeitet bis zu 2000 MP3-Dateien.
Drücken Sie die PLAY-Taste 10 , um den Wiedergabemodus zu starten. Informationen zur
abgespielten Datei werden (falls verfügbar) angezeigt.
Kann keine Datei auf der Speicherkarte gefunden werden, erscheint »NO FILE« im
Display.
SD-SPEICHERKARTE
(MP3-DATEIEN)
CARD
02
0040
Artist - XYZ
TR0001 00:01 MP3
NO FILE
35
DEUTSCH
Hinweise:
-- Es kann eine Ablaufprogrammierung für maximal 64 Tracks/ Dateien erstellt werden.
-- Drücken Sie die STOP-Taste 9 im Programmmodus, um die Ablaufprogrammierung
komplett zu löschen.
-- 15 Sekunden nach dem letzten Tastendruck wird der Programmmodus automatisch
beendet.
TRACK/ MP3-DATEI
ABLAUFPROGRAMMIERUNG
CD AUDIO
Drücken Sie die PROG-Taste 6 , um in den Programmmodus zu gelangen.
Wählen Sie (innerhalb von 15 Sekunden) mit den SKIP CUE 8 und SKIP REV 7 -Tasten
den ersten Track aus (z.B. Track Nr. 4).
Drücken Sie die PROG-Taste 6
Auswahl des zweiten Tracks fort.
C D
PROGRAM
P-01
00
C D
PROGRAM
P-01
04
C D
PROGRAM
P-02
00
, um ihre Wahl zu bestätigen und fahren Sie mit der
Wenn Sie die Ablaufprogrammierung abgeschlossen haben, drücken Sie die PLAY-Taste 10 ,
um die Wiedergabe ihrer programmierten Auswahl zu starten.
MEM
TR 04
MP3-DATEI
Drücken Sie die PROG-Taste 6 , um in den Programmmodus zu gelangen.
ESP
Wählen Sie (innerhalb von 15 Sekunden) mit den SKIP CUE 8 und SKIP REV 7 -Tasten
ein Verzeichnis aus (z.B. Ordner Nr. 3).
P-01
PROGRAM
000
0000
Drücken Sie die PROG-Taste 6 , um ihre Wahl zu bestätigen, wählen Sie dann mit den SKIP
CUE 8 und SKIP REV 7 -Tasten eine enthaltene Datei aus (z.B. Nr. 7).
P-01
PROGRAM
003
0000
Drücken Sie die PROG-Taste 6 , um ihre Wahl zu bestätigen und fahren Sie mit der
Auswahl (Ordner und Datei) des zweiten Speicherplatzes fort.
P-01
PROGRAM
003
0007
Wenn Sie die Ablaufprogrammierung abgeschlossen haben, drücken Sie die PLAYTaste 10 , um die Wiedergabe Ihrer programmierten Auswahl zu starten. Informationen zur
abgespielten Datei werden (falls verfügbar) angezeigt.
P-02
PROGRAM
000
0000
Verwenden Sie die UP 22 und DOWN 21 -Tasten zur Suche eines Senders auf drei Arten:
-- Wird die Taste kurz gedrückt, nimmt die Frequenz um 0,05 MHz zu bzw. ab (manuelle
Suche).
-- Wird die Taste länger als eine halbe Sekunde gedrückt gehalten und dann losgelassen,
wird automatisch der nächste bzw. vorherige Radiosender gesucht (in Richtung
absteigender Frequenzen).
-- Wird die Taste gedrückt gehalten, nimmt die Frequenz kontinuierlich zu bzw. ab.
Nachdem Sie ihren bevorzugten Sender gefunden haben, können Sie diesen direkt
einem der Speicherplätze 1 bis 10 zuweisen: Drücken Sie MEMORY 23 und (innerhalb
von 5 Sekunden) eine der 10 Nummerntasten. (Wählen Sie, wenn möglich, einen
freien Speicherplatz, dem noch kein anderer Sender zugewiesen wurde.) Drücken Sie
anschließend die MEMORY-Taste, um ihre Wahl zu bestätigen.
Verwenden Sie die Fernbedienung, um die Speicherplätze 11 bis 60 zu belegen und
aufzurufen (lesen Sie hierzu den entsprechenden Abschnitt der Bedienungsanleitung).
36
00:01
MEM A r t i s t A
TR0007 00:01 MP3
SUCHEN UND SPEICHERN
VON RADIOSENDERN
DEUTSCH
INSTALLATION
Dieses Gerät kann dank seiner Rackwinkel entweder in ein 19-Zoll-Rack (1 HE) eingebaut
oder (nach Abnehmen der Befestigungswinkel durch Lösen der 4 Schrauben auf jeder Seite)
auf einen Tisch gestellt werden.
picture 1
picture 2
- AAA 1,5 +
Das Batteriefach befindet sich auf der Unterseite der Fernbedienung. Drücken Sie den
Verriegelungshebel und nehmen Sie die Abdeckung des Batteriefachs ab (Abbildung 1).
Entfernen Sie die alten Batterien (falls vorhanden), indem Sie ihren positiven Pol anheben.
Die korrekte Polarität ist im Batteriefach angegeben (Abbildung 2). Setzen Sie 2 neue AAA
(1,5 V) nicht wiederaufladbare Batterien (vorzugsweise Alkali-Mangan-Batterien) ein.
Stellen Sie beim Einsetzen sicher, dass die Polarität der Batterien korrekt ist.
Einsetzen der Batterie: Drücken Sie den negativen Pol der Batterie zunächst gegen die
Feder im Fach, setzen Sie dann den positiven Pol in das Fach ein (um die Batterie zu fixieren;
Abbildung 3).
EINSETZEN/ ENTNEHMEN/
AUSTAUSCHEN DER BATTERIEN
DER FERNBEDIENUNG
+ AAA 1,5 -
-- Verwenden Sie 2 neue AAA (Micro, 1,5 V) nicht wiederaufladbare Batterien, vorzugsweise
Alkali-Mangan-Batterien (Alkalin).
-- Verwenden Sie keine gebrauchten und neuen Batterien gleichzeitig.
-- Verwenden Sie keine unterschiedlichen Batterietypen gleichzeitig.
-- Versuchen Sie niemals, nicht wiederaufladbare Batterien aufzuladen.
-- Stellen Sie sicher, dass die Polarität der Batterien korrekt ist (richtig eingesetzt, wie auf
dem Batteriefach angegeben).
-- Entnehmen Sie die Batterien, wenn diese leer sind oder das Gerät längere Zeit nicht
genutzt wird.
-- Schließen Sie die Batterien niemals kurz (d.h. verbinden Sie ihre beiden Pole nicht mit
einem Metalldraht).
-- Entsorgen Sie Altbatterien an dafür vorgesehene Sammelstellen (gemäß der gültigen
Vorschriften des Gesetzgebers).
picture 3
37
DEUTSCH
TECHNISCHE
DATEN
TECHNISCHE DATEN DES CD-/MP3-PLAYERS
Audioausgangspegel (1 kHz, 0 dB)
1.2 V (±2 dBu)
Ausgangspegeldifferenz zwischen den Kanälen (1 kHz, 0 dB)
Frequenzgang (± 3dB)
Stereo-Kanaltrennung (1 kHz, 0dB)
Klirrfaktor (THD) (1kHz, 0 dB)
Störabstand (SNR)
TECHNISCHE DATEN DES RADIOTUNERS
FM Bandbreite
20 Hz ÷ 20 kHz
> 60 dB
< 0.1 %
> 80 dB
87.5 ÷ 108 MHz (FM)
Zwischenfrequenz
10.7 MHz
Empfindlichkeit
6 µV EMK
Stereo-Kanaltrennung (1kHz)
Frequenzgang
≥ 40 dB
100 Hz ÷ 12 kHz
Klirrfaktor (THD)
≤ 0.1 %
Störabstand (SNR)
≥ 50 dB
Empfindlichkeit des Sendersuchlaufs
≤ 50 µV
GERÄTEDATEN
Stromversorgung (Wechselspannung)
230 – 115 V (50 / 60 Hz), 50 VA
Leistungsaufnahme
Abmessung (B x H x T)
Gewicht (netto)
38
< 2 dB
350 W
482 x 44 x 250 mm (1 HE)
3.6 kg
µ
±
÷
www.rcf.it
HEADQUARTERS:
RCF S.p.A. Italy
tel. +39 0522 274 411
e-mail: [email protected]
RCF UK
tel. 0844 745 1234
Int. +44 870 626 3142
e-mail: [email protected]
RCF France
tel. +33 1 49 01 02 31
e-mail: [email protected]
RCF Germany
tel. +49 2203 925370
e-mail: [email protected]
RCF Belgium
tel. +32 (0) 3 - 3268104
e-mail: [email protected]
RCF USA Inc.
tel. +1 (603) 926-4604
e-mail: [email protected]
10307146 RevF
RCF Spain
tel. +34 91 817 42 66
e-mail: [email protected]