1
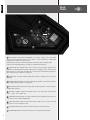
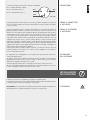
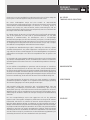
OWNER MANUAL
NX 10-SMA
NX 12-SMA
NX 15-SMA
PROFESSIONAL ACTIVE
SPEAKER SYSTEMS
LANGUAGE
ENGLISH
ITALIANO
deutsch
2
3
9
15
ENGLISH
SAFETY
PRECAUTIONS
1. All the precautions, in particular the safety ones, must be read with special attention, as
they provide important information.
WARNING: to prevent the risk of fire or electric shock, never expose this product to rain
or humidity.
WARNING
2. POWER SUPPLY FROM MAINS
a. The mains voltage is sufficiently high to involve a risk of electrocution; install and
connect this product before plugging it in.
b. Before powering up, make sure that all the connections have been made correctly and
the voltage of your mains corresponds to the voltage shown on the rating plate on the
unit, if not, please contact your RCF dealer.
c. This unit is CLASS I construction, so it must be connected to a MAIN socket outlet with
a protective earthing connection.
d. Protect the power cable from damage; make sure it is positioned in a way that it
cannot be stepped on or crushed by objects.
e. To prevent the risk of electric shock, never open this product: there are no parts inside
that the user needs to access.
3. Make sure that no objects or liquids can get into this product, as this may cause a short
circuit.
This apparatus shall not be exposed to dripping or splashing. No objects filled with liquid,
such as vases, shall be placed on this apparatus. No naked sources (such as lighted candles)
should be placed on this apparatus.
4. Never attempt to carry out any operations, modifications or repairs that are not expressly
described in this manual.
Contact your authorized service centre or qualified personnel should any of the following
occur:
-- The product does not function (or functions in an anomalous way).
-- The power cable has been damaged.
-- Objects or liquids have got in the unit.
-- The product has been subject to a heavy impact.
5. If this product is not used for a long period, disconnect the power cable.
6. If this product begins emitting any strange odours or smoke, switch it off immediately
and disconnect the power cable.
7. Do not connect this product to any equipment or accessories not foreseen.
For suspended installation, only use the dedicated anchoring points and do not try to hang
this product by using elements that are unsuitable or not specific for this purpose. Also
check the suitability of the support surface to which the product is anchored (wall, ceiling,
structure, etc.), and the components used for attachment (screw anchors, screws, brackets
not supplied by RCF etc.), which must guarantee the security of the system / installation
over time, also considering, for example, the mechanical vibrations normally generated by
transducers.
To prevent the risk of falling equipment, do not stack multiple units of this product unless
this possibility is specified in the user manual.
8. RCF S.p.A. strongly recommends this product is only installed by professional
qualified installers (or specialised firms) who can ensure correct installation
and certify it according to the regulations in force.
The entire audio system must comply with the current standards and regulations
regarding electrical systems.
IMPORTANT
3
ENGLISH
9. Supports and trolleys
The equipment should be only used on trolleys or supports, where necessary, that are
recommended by the manufacturer. The equipment / support / trolley assembly must be
moved with extreme caution. Sudden stops, excessive pushing force and uneven floors may
cause the assembly to overturn.
10. There are numerous mechanical and electrical factors to be considered when installing
a professional audio system (in addition to those which are strictly acoustic, such as sound
pressure, angles of coverage, frequency response, etc.).
11. Hearing loss
Exposure to high sound levels can cause permanent hearing loss. The acoustic pressure level
that leads to hearing loss is different from person to person and depends on the duration
of exposure. To prevent potentially dangerous exposure to high levels of acoustic pressure,
anyone who is exposed to these levels should use adequate protection devices. When a
transducer capable of producing high sound levels is being used, it is therefore necessary
to wear ear plugs or protective earphones. See the manual technical specifications to know
the maximum sound pressure level.
IMPORTANT NOTES
To prevent the occurrence of noise on line signal cables, use screened cables only and avoid
putting them close to:
-- Equipment that produces high-intensity electromagnetic fields.
-- Power cables.
-- Loudspeaker lines.
IMPORTANT NOTES
OPERATING
PRECAUTIONS
-- Place this product far from any heat sources and always ensure an adequate air
circulation around it.
-- Do not overload this product for a long time.
-- Never force the control elements (keys, knobs, etc. ).
-- Do not use solvents, alcohol, benzene or other volatile substances for cleaning the
external parts of this product.
IMPORTANT NOTES
Before connecting and using this product, please read this instruction manual carefully and
keep it on hand for future reference. The manual is to be considered an integral part of
this product and must accompany it when it changes ownership as a reference for correct
installation and use as well as for the safety precautions. RCF S.p.A. will not assume any
responsibility for the incorrect installation and / or use of this product.
4
IMPORTANT NOTES
ENGLISH
PRODUCT
INFORMATIONS
The NX Series - a new line of active loudspeakers specifically designed to be the everyday
tool for rental companies and professional musicians. With its ultra compact design and
choice of formats, together with high output levels, NX Series is the answer to a wide
variety of production requirements.
The NX is reliable, easy to use and versatile: for every rental company, musician, venue and
audio/visual provider, this high-performance self-powered speaker system offers a degree
of simplicity unmatched by traditional amp and speaker PA systems.
NX SERIES TOURING AUDIO SOLUTIONS
NX Series is a practical solution for high intelligibility speech and audio applications, covering
infill or delay, production studios, presentations and high power music sound reinforcement
with or without subwoofers. A key requirement for everyday audio systems, delivering
simple ‘plug and play’ solutions, without compromising performance and portability.
Legendary RCF transducer technology coupled with state of the art digital amplification
topology resulting in a perfectly optimised loudspeaker series. The NX Series provides
high end audio coverage even at extreme sound pressure levels, unmatched reliability and
acoustic compatibility across the whole series.
The NX Series offers a wide range of practical mounting hardware, to cover all aspects of
system integration, which assist in the overall simple and effortless system set-up, redefining
the high performance portable PA.
The NX Series monitoring systems feature light weight coaxial neodymium transducers
in order to guarantee a better performance and make for easier transportation.
The coaxial design guarantee the maximum vocal integrity and feedback rejection.
All Compression drivers and woofers are precision built taking advantage of RCF’s superior
moulding, assembly technologies and a wealth of professional knowledge and experience
dedicated to achieving extremely high standards.
COMPONENTS
All NX Series two-way speakers are equipped with a new generation Digital Amplifiers.
The result of this is very high output, extremely low distortion and an incredible natural
sound.
AMPLIFIERS
Each amplifier presents both XLR and jack inputs, XLR output link, volume, EQ Mode (FREEFIELD,
FLOOR), MIC/LINE sensitivity switch, Neutrik Powercon input and link connector.
The amplifier features a solid mechanical aluminium structure which not only stabilize
the amplifier during transportation but also assist in the heat dissipation.
The new loudspeaker design looks aggressive whilst retaining familiar ergonomics and is
the result of extensive combined functional and acoustic research.
The NX coaxial system cabinets are manufactured in Baltic birch plywood and are
designed to dampen down vibrations even at maximum volume settings. The reflex porting
has been designed to offer a the efficiency in the bass vocal range.
The models are equipped with a side aluminium handle with rubber handgrip for greater
portability; a special side design of the cabinet helps the precise repositioning of the
monitor on the stage.
A rugged steel pole mount has been installed on a side; in combination with the FREEFIELD
equalisation gives the possibility of using the monitor in a pole stand configuration.
CABINETS
5
ENGLISH
REAR
PANEL
5
1
8
6
4
9
7
3
2
10
1 Jack/female XLR inputs (bal/unbal). The system accepts jack or XLR input
connectors.These balanced inputs can be used to connect balanced or unbalanced
microphones or audio sources at line level.
The balanced connector is connected in parallel and can be used to send the audio
signal to other amplified speakers, recorders or supplementary amplifiers.
2 Limiter led. The amplifier has a built in limiter circuit to prevent clipping of the
amplifiers or overdriving the transducers. When the soft clipping circuit is active the LED
blinks orange. It is okay if the limit LED blinks occasionally. If the LED blinks frequently or
lights continuously, turn down the signal level.
3 Signal led. The signal indicator lights green if there is signal present on the main
XLR input.
4 Power status led. This green led is ON when the speaker is connected to the main
power supply and the ON/OFF is in ON position.
5 Male XLR signal output. The output XLR connector provides a loop through for
speakers daisy chaining.
6 Volume control. Adjust the amplifier volume. This control does not affect the
“Link” - “Input - Link” output level.
7 Freefield/floor switch. Set a specific equalisation for stage monitor position or in
case of pole mount or free field application.
8 Input sensitivity switch. Position the switch in LINE to use a line level source (0
dB) or MIC to use a microphone source.
9 Neutrik powercon AC IN-OUT socket. IN-OUT AC Powercon Sockets.
10 Power main switch. The power switch turns the AC power ON and OFF.
6
ENGLISH
CONNECTIONS
The XLR connectors use the following AES standard:
PIN 1 = GROUND (SHIELD)
PIN 2 = HOT (+)
HOT
GND
PIN 3 = COLD (-)
COLD
BAL. XLR
On the back panel you will find all the controls, the signal and current inputs. In case
is necessary to change the voltage please call your vendor or authorized RCF SERVICE
CENTRE. This operation require the substitution of the fuse value and is reserved to an RCF
SERVICE CENTRE.
BEFORE CONNECTING
THE SPEAKER
At this point you can connect the power supply cable and the signal cable, but before
turning on the speaker make sure that the volume control is at the minimum level (even
on the mixer output). It is important that the mixer is already ON before turning on the
speaker. This will avoid damage to the speakers and noisy “bumps” due to turning on parts
on the audio chain. It is a good practice to always turn on speakers at last and turn them
off immediately after the show.
Now you can turn ON the speaker and adjust the volume control to a proper level.
BEFORE TURNING ON
THE SPEAKER
The amplifiers are equipped with a microprocessor to control the DSP and the amplifier. The
correct switch on of the amplifier is ensured by an initialisation procedure; during this test
stage the LEDS (Limiter, Signal and Power Status), located on the amplifier module, remain
off for approx. 2 sec. At the end of the switch on procedure on the amplifier module the
Ready green LED only remains steadily on.
In case of severe failure of the speaker, the LED on the front panel flashes several times and
on the amplifier module, the Limiter red LED flashes. The speaker switches to “mute”.
TURNING ON
THE SPEAKER
INSTALLATION
A 35 MM socket for mounting the loudspeaker on a speaker stand is provided in the
bottom of the cabinet.
PowerCon plug is used to disconnect device from MAIN power. This device shall remain
readily accessible after the installation.
WARNING: Never suspend NX speakers by there handles. Handles are intended for
transportation, not for rigging.
WARNING
FAILURE INDICATION
AND SAFETY
!
The microprocessor is able to signal three different kinds of failure by flashing the “Limiter”
red LED on the amplifier panel before the lighting up of the “Power status” green LED.
The three types of failure are:
1) WARNING: a non severe error or auto-restart malfunction is detected and the
performance of the speaker is not limited.
2) LIMITATION: an error is detected and the performance of the speaker is limited (the
sound level is reduced by 3dB).
This does not affect the operation of the speaker since it continues to operate.
However, it is necessary to call the service centre to solve the issue.
7
ENGLISH
3) FAILURE: a severe malfunction is detected. The speaker switches to “mute”.
Flashing Indication
1 or 2 Warning
3 or 4 Limitation
from 5 to 8 Failure
In case of failure, the “Ready” green LED remains off.
COOLING
Thermal control is provided by the internal microprocessor which, by means of two sensors,
controls the temperature of the amplifier and of the power supply, avoiding overheating by
limiting the overall volume.
In case of overheating ( > 80 degrees) the volume decreases proportionally to the
temperature increase, making the change unnoticeable.
The correct volume and all the functions are automatically restored when standard operating
temperatures are reached.
8
ITALIANO
AVVERTENZE PER
LA SICUREZZA
1. Tutte le avvertenze, in particolare quelle relative alla sicurezza, devono essere lette
con particolare attenzione, in quanto contengono importanti informazioni.
ATTENZIONE: per prevenire i rischi di fiamme o scosse elettriche, non esporre mai questo
prodotto alla pioggia o all’umidità.
ATTENZIONE
2. ALIMENTAZIONE DIRETTA DA RETE
a. La tensione di alimentazione dell’apparecchio ha un valore sufficientemente alto da
costituire un rischio di folgorazione per le persone: non procedere mai all’installazione
o connessione dell’apparecchio con l’alimentazione inserita.
b. Prima di alimentare questo prodotto, assicurarsi che tutte le connessioni siano corrette
e che la tensione della vostra rete di alimentazione corrisponda a quella di targa
dell’apparecchio, in caso contrario rivolgetevi ad un rivenditore RCF.
c. Questo è un apparecchio CLASSE I e deve essere connesso alla presa di rete con un
collegamento alla terra di protezione.
d. Accertarsi che il cavo di alimentazione dell’apparecchio non possa essere calpestato o
schiacciato da oggetti, al fine di salvaguardarne la perfetta integrità.
e. Per evitare il rischio di shock elettrici, non aprire mai l’apparecchio: all’interno non vi
sono parti che possono essere utilizzate dall’utente.
3. Impedire che oggetti o liquidi entrino all’interno del prodotto, perché potrebbero causare
un corto circuito. L’apparecchio non deve essere esposto a stillicidio o a spruzzi d’acqua;
nessun oggetto pieno di liquido, quali vasi, deve essere posto sull’apparecchio.
Nessuna sorgente di fiamma nuda (es. candele accese) deve essere posta
sull’apparecchio.
4. Non eseguire sul prodotto interventi / modifiche / riparazioni se non quelle espressamente
descritte sul manuale istruzioni.
Contattare centri di assistenza autorizzati o personale altamente qualificato quando:
-- l’apparecchio non funziona (o funziona in modo anomalo);
-- il cavo di alimentazione è danneggiato;
-- oggetti o liquidi sono entrati nell’apparecchio;
-- l’apparecchio ha subito forti urti.
5. Qualora questo prodotto non sia utilizzato per lunghi periodi, scollegare il cavo
d’alimentazione.
6. Nel caso che dal prodotto provengano odori anomali o fumo, spegnerlo immediatamente
e scollegare il cavo d’alimentazione.
7. Non collegare a questo prodotto altri apparecchi e accessori non previsti.
Quando è prevista l’installazione sospesa, utilizzare solamente gli appositi punti di
ancoraggio e non cercare di appendere questo prodotto tramite elementi non idonei o
previsti allo scopo.
Verificare inoltre l’idoneità del supporto (parete, soffitto, struttura ecc.), al quale è ancorato
il prodotto e dei componenti utilizzati per il fissaggio (tasselli, viti, staffe non fornite
da RCF ecc.) che devono garantire la sicurezza dell’impianto / installazione nel tempo,
anche considerando, ad esempio, vibrazioni meccaniche normalmente generate da un
trasduttore.
Per evitare il pericolo di cadute, non sovrapporre fra loro più unità di questo prodotto,
quando questa possibilità non è espressamente contemplata dal manuale istruzioni.
8. La RCF S.p.A. raccomanda vivamente che l’installazione di questo prodotto
sia eseguita solamente da installatori professionali qualificati (oppure da ditte
specializzate) in grado di farla correttamente e certificarla in accordo con le
normative vigenti. Tutto il sistema audio dovrà essere in conformità con le
norme e le leggi vigenti in materia di impianti elettrici.
IMPORTANTE
9
ITALIANO
9. Sostegni e Carrelli. Se previsto, il prodotto va utilizzato solo su carrelli o sostegni
consigliati dal produttore. L’insieme apparecchio-sostegno / carrello va mosso con estrema
cura. Arresti improvvisi, spinte eccessive e superfici irregolari o inclinate possono provocare
il ribaltamento dell’assieme.
10. Vi sono numerosi fattori meccanici ed elettrici da considerare quando si installa un
sistema audio professionale (oltre a quelli prettamente acustici, come la pressione sonora,
gli angoli di copertura, la risposta in frequenza, ecc.).
11. Perdita dell’udito
L’esposizione ad elevati livelli sonori può provocare la perdita permanente dell’udito. Il
livello di pressione acustica pericolosa per l’udito varia sensibilmente da persona a
persona e dipende dalla durata dell’esposizione. Per evitare un’esposizione potenzialmente
pericolosa ad elevati livelli di pressione acustica, è necessario che chiunque sia sottoposto a
tali livelli utilizzi delle adeguate protezioni; quando si fa funzionare un trasduttore in grado
di produrre elevati livelli sonori è necessario indossare dei tappi per orecchie o delle cuffie
protettive. Consultare i dati tecnici del manuale d’uso per conoscere le massime pressioni
sonore che i monitor da studio sono in grado di produrre.
NOTE IMPORTANTI
Per evitare fenomeni di rumorosità indotta sui cavi che trasportano segnali dai microfoni
o di linea (per esempio 0dB), usare solo cavi schermati ed evitare di posarli nelle
vicinanze di:
-- Apparecchiature che producono campi elettromagnetici di forte intensità.
-- Cavi di rete.
-- Linee che alimentano altoparlanti.
NOTE IMPORTANTI
PRECAUZIONI
D’USO
-- Collocare il prodotto lontano da fonti di calore e lasciare dello spazio libero intorno per
garantire la circolazione dell’aria.
-- Non sovraccaricare questo prodotto per lunghi periodi.
-- Non forzare mai gli organi di comando (tasti, manopole ecc.).
-- Non usare solventi, alcool, benzina o altre sostanze volatili per la pulitura delle parti
esterne.
NOTE IMPORTANTI
Prima di collegare ed utilizzare questo prodotto, leggere attentamente le istruzioni
contenute in questo manuale, il quale è da conservare per riferimenti futuri.
Il presente manuale costituisce parte integrante del prodotto e deve accompagnare
quest’ultimo anche nei passaggi di proprietà, per permettere al nuovo proprietario di
conoscere le modalità d’installazione e d’utilizzo e le avvertenze per la sicurezza.
L’installazione e l’utilizzo errati del prodotto esimono la RCF S.p.A. da ogni responsabilità.
10
NOTE IMPORTANTI
ITALIANO
DESCRIZIONE
GENERALE
La serie NX è una nuova serie di diffusori acustici attivi disegnati per essere lo strumento
di ogni giorno di service, aziende rental e musicisti professionali. Con un design ultra
compatto ed una scelta di diversi formati ed alti livelli di potenza, la serie NX è la risposta
ad una vasta varietà di richieste di produzione.
NX SERIES TOURING AUDIO SOLUTIONS
I modelli 2 vie della serie NX sono una soluzione pratica per applicazioni audio di ogni
tipo e per il rinforzo vocale ad alta intelligibilità. Sono strumenti ideali per lo studio di
produzione, per il sound reinforcement ad alto livello, sono perfetti in applicazioni come il
monitorino, il delay, l’in-fill.
La leggendaria tecnologia dei trasduttori RCF unita ad una amplificazione allo stato
dell’arte permettono alla serie NX una riproduzione ad alta fedeltà anche ai massimi livelli
di pressione sonora.
Tutti i monitor da palco della Serie NX sono dotati di trasduttori coassiali neodimio per
una perfetta performance e per offrire il minimo peso e rendere più facile il trasporto.
La riproduzione coassiale del suono garantisce la massima integrità vocale e la massima
reiezione al larsen dal microfono.
Tutti i driver a compressione sono costruiti con la massima precisione grazie alle superiori
tecnologie RCF di stampaggio, lavorazione ed assemblaggio. Risultati di eccellenza sono
ottenuti grazie all’esperienza, il know how distribuito e standard produttivi estremamente
elevati.
COMPONENTI
I diffusori coassiali NX sono equipaggiati con un amplificatore digitale di nuova
generazione. Il risultato sono una pressione acustica elevatissima, distorsioni bassissime
ed un suono incredibilmente naturale.
AMPLIFICATORI
Ogni amplificatore presenta ingessi bilanciati XLR e jack, link di uscita XLR, controllo di
volume, tasto di selezione dell’equalizzazione (FREEFIELD/FLOOR), commutazione della
sensibilità di ingresso mic./linea, connettori di alimentazione e di link dell’alimentazione
Neutrik Powercon.
L’amplificatore è dotato di una robusta struttura di alluminio che non solo lo rende
robusto durante il trasporto e gli urti ma assiste la dissipazione termica.
I diffusori coassiali della Serie NX sono costruiti in multistrato di betulla del Baltico e
sono progettati in modo da smorzare le vibrazioni della struttura anche ai massimi volumi.
I condotti reflex sono stati progettati per offrire la massima efficienza sulla gamma bassa
della voce.
Il diffusori sono dotati di una maniglia laterale in alluminio con inserto in gomma per una
perfetta trasportabilità.
Inserto a tazza in acciaio, unitamente alla selezione FREEFIELD, permette l’utilizzo del
diffusore su supporto stand o comunque in campo libero. La forma dei nuovi cabinet
consente infatti per tutti i modelli l’uso in configurazione standard o in posizione stage
monitor.
MOBILI
11
ITALIANO
PANNELLO
POSTERIORE
5
1
8
6
4
9
7
3
2
10
1 Ingresso JACK/XLR (sbilanciato/bilanciato). Il sistema accetta connettori di
ingresso Jack o XLR che essere utilizzati come ingressi bilanciati per il collegamento di
microfoni bilanciati o sbilanciati o di sorgenti audio a livello linea.
2 Led di inserimanto del limiter. L’amplificatore è dotato di un circuito di limiter in
modo da prevenire il clipping dell’amplificatore o di sovraccaricare gli altoparlanti. Quando
il circuito di soft clipping è attivo il LED lampeggia con colore ROSSO. È accettabile che
il LED lampeggi occasionalmente. Se il LED lampeggia frequentemente o si accende di
continuo ridurre il segnale in ingresso.
3 LED di presenza del segnale. Il LED di segnale si accende con colore VERDE se è
presente segnale audio all’ingresso XLR.
4 LED di power status. Il LED verde è acceso quando il diffusore è alimentato e il
commutatore di accensione è nella posizione ON.
5 Uscita segnale XLR maschio. Il connettore XLR di loop del segnale permette la
connessione a catena di più diffusori.
6 Controllo di livello. Varia il volume del diffusore.
7 Freefield/floor switch. Imposta una speciale equalizzazioni nel caso di utilizzo in
posizione stage monitor o nel caso di utilizzo su stand da pavimento.
8 MIC/LINE. Posizionare il selettore in LINE per l’utilizzo di una sorgente a livello linea
(0dB) o MIC per l’utilizzo di un microfono.
9 Prese dei connettori di alimentazione. Prese ingresso-uscita per cavo di
alimentazione con connettori Neutrik powercon.
10 Interruttore generale. L’interruttore generale permette l’accensione e
lo spegnimento dell’apparecchio una volta che questo sia collegato alla rete di
alimentazione.
12
ITALIANO
CONNESSIONI
Il connettore di ingresso XLR segue il seguente standard AES:
PIN 1 = TERRA (GROUND ; SHIELD)
PIN 2 = LATO CALDO (HOT ; +)
HOT
GND
PIN 3 = LATO FREDDO (COLD ; -)
COLD
BAL. XLR
Sul pannello posteriore trovano posto tutti i controlli, gli ingressi di segnale e di corrente. In
caso sia necessario cambiare la tensione di alimentazione rivolgersi al proprio rivenditore
o centro assistenza.
PRIMA DI CONNETTERE
IL DIFFUSORE
A questo punto potete inserire il connettore di alimentazione e il connettore di segnale, ma
prima di accendere il diffusore assicuratevi che il controllo di volume sia al minimo sia sul
diffusore che sulla sorgente sonora collegata al diffusore (che generalmente sarà un mixer);
è importante anche che il mixer sia già acceso al momento in cui viene acceso il diffusore
a lui collegato. Queste due precauzioni vi eviteranno innanzitutto di accendere i diffusori
in presenza di forti segnali in ingresso (evitando di causare danni al diffusore stesso ma
soprattutto alle persone che vi si possono trovare davanti) e inoltre di far arrivare agli
altoparlanti e al pubblico i fastidiosi “bump” causati dall’accensione delle apparecchiature
audio a monte dei diffusori. Infatti è buona regola che i diffusori amplificati e gli amplificatori
in genere siano sempre le ultime apparecchiature ad essere accese dopo il montaggio e le
prime ad essere spente alla fine dello spettacolo.
A questo punto potete accendere il diffusore e alzare il controllo di livello fino alla linea
marcatrice presente sulla scala tra “0” e “MAX”, per poi correggere successivamente il
livello a seconda delle necessità.
PRIMA DI ACCENDERE
IL DIFFUSORE
Gli amplificatori sono equipaggiati con un microprocessore per la gestione del DSP ed il
controllo dell’amplificatore.
La regolare accensione del diffusore è garantita da una procedura di inizializzazione;
durante questa fase di test i LED (”Limiter”, “Signal” e “Power status”), posti sul modulo
amplificatore rimangono spenti per circa 2 secondi.
Al termine della procedura di avvio il LED verde “Power status” rimane acceso fisso.
Nel caso di un malfunzionamento grave del diffusore sul modulo amplificatore il LED rosso
“Limiter” lampeggia. Il diffusore viene posto in stato “mute”.
ACCENSIONE
DEL DIFFUSORE
INSTALLAZIONE
DEL DIFFUSORE
Il diffusore è provvisto di un adattatore per supporto a stand di 35 MM.
Il connettore PowerCon viene usato per disconnettere l’apparato dall’alimentazione di rete.
Il connettore deve rimanere accessibile dopo l’installazione.
ATTENZIONE: Non sospendere mai il diffusore per mezzo delle maniglie. Le maniglie sono
state progettate per il trasporto del diffusore, non per la sua sospensione.
ATTENZIONE
13
ITALIANO
PROTEZIONI ED
INDICAZIONI DI GUASTO
Il microprocessore è in grado di segnalare tre diversi tipi di guasti tramite il lampeggio del
LED rosso “Limiter” sul pannello amplificatore prima dell’accensione del LED verde “Power
status” I tre tipi di guasto sono:
1) ATTENZIONE: viene rilevato una errore o un malfunzionamento autoripristinante non
grave e le prestazioni del diffusore non vengono limitate.
2) LIMITAZIONE: viene rilevato un errore e vengono limitate le prestazioni del diffusore (il
livello sonoro viene ridotto di 3dB). Questo però non influisce sul funzionamento generale
del diffusore. È comunque necessario contattare il centro assistenza per risolvere il guasto.
3) GUASTO: viene rilevato un malfunzionamento grave. Il diffusore viene posto nello stato
di “mute”.
Indicazioni
1 o 2 Attenzione
3 o 4 Limitazione
Da 5 a 8 Guasto
Nel caso di guasto, il LED verde “Power status” rimane spento.
RAFFREDDAMENTO
Il controllo termico è gestito dal microprocessore interno, che grazie a due sensori
controlla la temperatura dell’amplificatore e dell’alimentatore evitando il surriscaldamento
limitandone il volume generale.
In caso di surriscaldamento ( > 80 gradi) il volume decresce in funzione dell’aumento della
temperatura rendendo impercettibile la variazione.
Il corretto volume e tutte le funzioni verranno riprese automaticamente al raggiungimento
delle normali temperature di esercizio.
14
!
DEUTSCH
SICHERHEITSVORKEHRUNGEN
SICHERHEITSHINWEISE
1. Alle Anweisungen, im Besonderen die sicherheitsrelevanten, sollten mit besonderer
Aufmerksamkeit gelesen werden, da sie entscheidende Informationen enthalten.
2. Hauptstromversorgung
a. Die Netzspannung ist ausreichend hoch, um einen tödlichen Stromschlag zu
verursachen. Installieren oder verbinden Sie das Gerät deshalb nicht bei eingeschalteter
Stromversorgung.
b. Stellen Sie vor dem Einschalten sicher, dass alle Anschlüsse korrekt vorgenommen
wurden und dass die Netzspannung mit der auf dem Typenschild des Gerätes
angegeben Spannung übereinstimmt, anderenfalls nehmen Sie bitte Kontakt zu Ihrem
RCF-Händler auf.
c. Die Metallteile des Gerätes sind über das Netzanschlusskabel geerdet. Ein Gerät
in CLASS 1 Bauweise sollte immer über ein Schutzkontaktkabel mit geerdetem
Schutzleiter an eine Netzsteckdose angeschlossen werden.
d. Schützen Sie das Netzkabel vor Beschädigungen. Stellen Sie sicher, dass dieses so
positioniert wird, dass nicht darauf getreten oder von Gegenständen eingedrückt
werden kann.
e. Um vor der Gefahr eines Stromschlags zu schützen, öffnen Sie niemals das Gehäuse des
Gerätes. Im Inneren des Gerätes befinden sich keine für die Bedienung notwendigen
Bauteile.
3. Stellen Sie sicher, dass keine Gegenstände oder Flüssigkeiten ins Innere des Gerätes
gelangen können, da dies zu einem Kurzschluss führen kann. Schützen Sie das Gerät vor
Tropf- und Spritzwasser. Stellen Sie keine mit Flüssigkeit gefüllten Behälter (z.B. Vasen) oder
offene Brandquellen (z.B. Kerzen) auf das Gerät.
4. Versuchen Sie niemals Funktionen, Modifikationen oder Reparaturen am Gerät
durchzuführen, die nicht ausdrücklich in dieser Bedienungsanleitung beschrieben werden.
Kontaktieren Sie Ihr autorisiertes Service-Center oder qualifiziertes Fachpersonal, sollte
eines der folgenden Ereignisse auftreten:
-- Das Gerät funktioniert nicht (oder funktioniert nicht korrekt)
-- Das Netzkabel wurde beschädigt
-- Gegenstände oder Flüssigkeiten sind ins Innere des Gerätes gelangt
-- Das Produkt war einer hohen Belastung/ einem heftigen Stoß ausgesetzt.
5. Sollten Sie das Gerät längere Zeit nicht in Betrieb nehmen, trennen Sie das
Stromanschlusskabel vom Netz.
6. Sollte von dem Gerät ein ungewohnter Geruch oder Rauch ausgehen, schalten Sie dieses
unverzüglich aus und ziehen Sie das Netzanschlusskabel.
7. Verbinden Sie das Produkt nur mit dafür vorgesehenen Geräten und Zubehörteilen. Nutzen
Sie für eine hängende Installation ausschließlich die vorgesehenen Verankerungspunkte
und versuchen Sie nicht, das Produkt mit für diesen Zweck ungeeigneten Bauteilen zu
montieren. Prüfen Sie zudem die Eignung der Stützfläche (Wand, Decke, Struktur etc.)
und des Befestigungsmaterials (Dübel, Schrauben, Winkel etc., nicht im Lieferumfang
von RCF), um eine langfristige Sicherheit des Systems/ der Installation zu gewährleisten.
Berücksichtigen Sie dabei beispielsweise auch die mechanischen Vibrationen, die gewöhnlich
von einem akustischen Strahler ausgehen. Um die Gefahr von herunterfallenden Geräten
zu verhindern, stapeln Sie nicht mehrere Einheiten dieses Produkts aufeinander, wenn diese
Möglichkeit nicht explizit in der Bedienungsanleitung beschrieben wird.
8. RCF S.p.A. empfiehlt nachdrücklich, die Installation des Gerätes ausschließlich
von qualifiziertem Fachpersonal (oder spezialisierten Firmen) durchführen
zu lassen, die eine korrekte Installierung sicherstellen und diese gemäß der
geltenden Bestimmungen zertifizieren können. Das gesamte Audio-System
muss die aktuellen Standards sowie die Vorschriften für elektrische Anlagen
einhalten.
WICHTIG
15
DEUTSCH
9. Halterungen und Gerätewagen
Das Gerät sollte, falls erforderlich, nur mit vom Hersteller empfohlenen Halterungen
oder Gerätewagen genutzt werden. Der Gesamtaufbau von Gerät/ Halterung/
Gerätewagen sollte mit extremer Vorsicht bewegt werden. Plötzliches Stoppen, zu
starkes Anschieben und unebene Böden könnten zum Umkippen des Aufbaus
führen.
10. Bei der Installation eines professionellen Audiosystems sollten neben rein
akustischen Parametern (wie etwa Schalldruck, Abdeckungswinkel, Frequenzgang
etc.) einige mechanische und elektrische Faktoren beachtet werden.
11. Gehörschädigung
Die Einwirkung hoher Lautstärkepegel kann zu dauerhaften Gehörschädigungen führen. Der
Schalldruckpegel, der zu einer Schädigung des Gehörs führt, unterscheidet sich von Person
zu Person und ist von der Dauer der Einwirkung abhängig. Um potentielle Gefahren durch
hohe Schalldruckpegel zu vermeiden, sollte jeder, der diesen Pegeln ausgesetzt ist, einen
geeigneten Gehörschutz verwenden. Beim Einsatz eines leistungsfähigen Schallerzeugers,
der hohe Lautstärkepegel erzeugt, ist es erforderlich Gehörschutzstöpsel oder Ohrenschützer
zu tragen. Lesen Sie hierzu die Angaben des maximal zulässigen Schalldruckpegels in der
Betriebsanleitung der Lautsprecher.
WICHTIGE HINWEISE
Um das Auftreten von Rauschen durch Mikrofon- oder Linesignalleitungen zu vermeiden,
verwenden Sie ausschließlich abgeschirmte Verbindungskabel und platzieren Sie diese
nicht in der Nähe von:
-- Geräten, die starke elektromagnetische Felder erzeugen (z.B. Hochleistungstransformatoren).
-- Netzstromkabeln.
-- Lautsprecherleitungen.
WICHTIGE HINWEISE
SicherheitsmaSSnahmen
für den Betrieb
-- Stellen Sie das Gerät nicht in der Nähe von Wärmequellen auf und sorgen Sie stets für
eine ausreichende Luftzirkulation am Lüftungsgitter.
-- Überlasten Sie das Gerät nicht über einen längeren Zeitraum.
-- Betätigen Sie die Bedienelemente (Tasten, Kontrollvorrichtungen, usw.) niemals mit
übermäßiger Kraft.
-- Verwenden Sie für die Reinigung der Außenteile keine Lösungsmittel, Alkohol, Benzin
oder andere flüchtige Substanzen.
Wichtige Hinweise
Bevor Sie dieses Gerät in Betrieb nehmen, lesen Sie die Bedienungsanleitung bitte sorgfältig
durch und halten Sie diese zur weiteren Einsichtnahme bereit. Die Bedienungsanleitung
sollte als wesentlicher Bestandteil dieses Produkts verstanden werden und sollte
diesem entsprechend immer beiliegen (auch wenn das Gerät den Besitzer wechselt), um
eine korrekte Installation und Benutzung zu gewährleisten sowie um als Referenz für
Sicherheitsvorkehrungen zu dienen.
RCF S.p.A. übernimmt keine Haftung im Falle einer unsachgemäßen Installation und/ oder
Benutzung dieses Produkts.
16
WICHTIGE HINWEISE
DEUTSCH
Produkt
informationen
Die NX-Serie ist eine neue Produktreihe von Aktivlautsprechern, die sich für den alltäglichen
Einsatz speziell an Beschallungsfirmen und professionelle Musiker richtet.
NX SERIES TOURING AUDIO SOLUTIONS
Mit seinem ultrakompakten Design und einer Auswahl an unterschiedlichen
Dimensionierungen und Ausgangsleistungen ist die NX-Serie die Antwort auf eine Vielzahl
unterschiedlicher Produktionsanforderungen. Die NX-Serie ist zuverlässig, einfach zu
bedienen und vielseitig: Für jeden PA-Verleiher, Musiker, Veranstaltungsort oder AVDienstleister bietet dieses aktive Hochleistungs-Lautsprechersystem ein von herkömmlichen
PA-Anlagen unerreichtes Maß an Einfachheit.
Die 2-Wege-Systeme der NX-Serie sind eine praktische Lösung für Audio-Anwendungen
aller Art und garantieren ein hohes Maß an Sprachverständlichkeit. Sie sind ideale
Werkzeuge in Produktionsstudios, bei Präsentationen sowie in leistungsfähigen
Musikbeschallungsanlagen (mit oder ohne Subwoofer) und eignen sich zudem perfekt für
Anwendungen wie Monitoring oder FOH (Delay/In-Fill). Als wesentliche Voraussetzung für
ein alltagstaugliches Audiosystem bietet die NX-Serie einfache »Plug & Play«-Lösungen,
ohne dabei die Leistungsfähigkeit und Portabilität zu beeinträchtigen.
Die legendäre RCF Wandlertechnologie ergibt in Verbindung mit modernster, digitaler
Verstärkerschaltungstechnik eine perfekt abgestimmte Lautsprecherserie. Die NX-Serie
sorgt selbst bei extremen Schalldruckpegeln für höchste Wiedergabetreue und garantiert
unübertroffene Zuverlässigkeit sowie akustische Kompatibilität über die gesamte Serie
hinweg.
Um alle Aspekte der Systemintegration abzudecken, bietet die NX-Serie eine breite Palette
an praktischer Montagehardware, die den Gesamtablauf der einfachen und mühelosen
Systemkonfiguration unterstützt. Die NX-Serie - eine Neudefinition portabler HochleistungsPA-Systeme.
Um eine erhöhte Leistungsfähigkeit zu garantieren und den Transport zu vereinfachen,
verfügen die Monitoringsysteme der NX-Serie über leichte, koaxiale Neodym-Wandler.
Das koaxiale Design garantiert höchste klangliche Integrität und Rückkopplungssicherheit.
Alle Kompressionstreiber und Tieftöner (Woofer) sind mit höchster Präzision gefertigt und
profitieren von RCFs überlegener Formgebung, den Montagetechnologien und einer Fülle an
Fachwissen und Erfahrung, die das Erreichen der extrem hohen Standards ermöglichen.
Komponenten
Alle 2-Wege-Lautsprecher der NX-Serie sind mit einer neuen Generation von digitalen
Verstärkern ausgestattet. Das Ergebnis ist ein unglaublich natürlicher Klang bei gleichzeitig
sehr hohem Ausgangspegel sowie extrem geringen Verzerrungen.
Verstärker
Jeder Verstärker verfügt über symmetrische XLR- und Klinken-Eingänge, einen XLR
Link-Ausgang, Lautstärkeregler, EQ-Modusschalter (Freefield/Floor), Input Sensitivity
-Wahlschalter (Mic/Line) sowie Neutrik PowerCon-Stromversorgungsbuchse und PowerWeiterführung (AC-Link). Der Verstärker besitzt einen robusten Aluminiumrahmen, der zur
Stabilisierung des Verstärkers während des Transports beiträgt und die Wärmeableitung
unterstützt.
Das neue Lautsprecherdesign vereint einen aggressiven Look mit der gewohnten
Ergonomie und ist das Ergebnis umfangreicher, kombinierter Forschung auf den Gebieten
Funktionalität und Akustik. Die Gehäuse der NX-Series Koaxial-Lautsprecher sind aus
baltischem Birken-Mulitplex gefertigt, um Vibrationen auch bei maximaler Lautstärke zu
dämpfen. Der Bassreflex-Port sorgt für einen hohen Wirkungsgrad in den tiefen Stimmlagen.
Für perfekte Portabilität verfügen die NX-Modelle seitlich über einen gummiummantelten
Tragegriff aus Aluminium. Die spezielle Formgebung des Gehäuses erlaubt eine genaue
Ausrichtung des Monitors auf der Bühne. Ein robuster Hochständerflansch aus Stahl auf der
Seite des Gehäuses ermöglicht, in Kombination mit der Freifeldentzerrung (FREEFIELD), die
Verwendung des Monitors auf einem Standard-Hochstativ (FOH-Einsatz).
Gehäuse
17
DEUTSCH
GERÄTERÜCKSEITE
5
1
8
6
4
9
7
3
2
10
1 Eingänge Stereoklinken- / XLR-Buchse, weiblich (symm./unsymm.). Zum
Anschluss von Klinken- oder XLR-Steckern. Die symmetrischen Eingänge können verwendet
werden, um symmetrische oder unsymmetrische Mikrofonsignale oder Audioquellen mit
Linepegel anzuschließen.
Die symmetrischen Anschlussbuchsen sind parallel geschaltet und können somit verwendet
werden, um das Signal an weitere Aktivlautsprecher, Aufnahmegeräte oder zusätzliche
Verstärker zu senden.
2 Limiter-LED. Der Verstärker verfügt über eine eingebaute Limiterschaltung zur
Vermeidung einer Übersteuerung von Verstärker und Lautsprecher. Ist diese Schaltung zur
weichen Signalbegrenzung (Soft Clipping) aktiv, leuchtet die LED rot auf. Dabei ist ein
gelegentliches Aufleuchten dieser LED unproblematisch. Leuchtet die LED häufig auf oder
leuchtet diese permanent, verringern Sie den Signalpegel.
3 Signal-LED. Die Signalindikator-LED leuchtet grün, wenn ein Signal am XLR-Eingang
anliegt.
4 Power-Status-LED. Diese LED leuchtet grün, wenn das Gerät ans Stromnetz
angeschlossen ist und sich der Netzschalter (10) in der Position »ON« befindet.
5 XLR-Signalausgangsbuchse, männlich (LINK). Die LINK-Buchse dient dem
Durchschleifen des Eingangsignals für eine Hintereinanderschaltung (Reihenschaltung) von
Lautsprechern.
6 Lautstärkeregler. Stellen Sie hiermit die Lautstärke des Verstärkers ein. Der Regler
hat keinen Einfluss auf den Signalpegel des LINK-Ausgangs.
7 Freefield/Floor-Wahlschalter. Stellen Sie die entsprechende Entzerrung für den
Einsatz als Bühnenmonitor (Floor) oder bei Freifeldanwendungen auf einem Hochständer
(Freefield) ein.
18
DEUTSCH
8 Input-Sensivity-Schalter. Wählen Sie die Position »LINE« für Signalquellen mit
Line-Pegel (0 dB) oder die Position »MIC« für Mikrofonquellen.
9 Neutrik PowerCon AC IN (blau) und AC LINK-Buchse (grau). Ein-und
Ausgangsbuchse für die Netzstromversorgung über Neutrik PowerCon-Anschlüsse
10 Hauptnetzschalter. Der Hauptnetzschalter schaltet die Netzstromversorgung ein
und aus.
Anschlüsse
Die Pins der XLR-Anschlüsse sind nach folgendem AES-Standard belegt:
HOT
COLD
PIN 1 = Masse (ABSCHRIMUNG)
PIN 2 = Positive Signalader (HOT +)
PIN 3 = Negative Signalader (invertiert, COLD -)
GND
BAL. XLR
Auf der Geräterückseite finden Sie alle Bedienelemente sowie Signal- und Netzanschlüsse.
Sollte es notwendig sein, die Spannungseinstellung zu ändern, kontaktieren Sie bitte Ihren
Händler oder ein autorisiertes RCF Service-Center. Dieser Vorgang erfordert den Austausch
der Sicherung und ist einer RCF Service-Werkstatt vorbehalten.
Vor dem AnschlieSSen
des Lautsprechers
Schließen Sie nun das Netzkabel und die Signalleitungen an, stellen Sie jedoch vor
dem Einschalten des Lautsprechers sicher, dass der Lautstärkeregler (ggf. auch der des
Mischpultausgangs) in Minimalstellung steht. Es ist wichtig, dass das Mischpult bereits
vor dem Einschalten des Lautsprechers eingeschaltet wurde. Dies vermeidet sowohl eine
Beschädigung des Lautsprechers als auch laute Einschaltgeräusche (lautes Knacken) von
anderen Gliedern der Signalkette. Generell wird empfohlen, die Lautsprecher immer zuletzt
einzuschalten und sie unmittelbar nach dem Gebrauch auszuschalten.
Nun können Sie den Lautsprecher einschalten und mit dem Lautstärkeregler einen
geeigneten Pegel einstellen.
Vor dem Einschalten
des Lautsprechers
Die Verstärker der Serie sind mit einem Mikroprozessor ausgestattet, der für die Steuerung
des digitalen Signalprozessors (DSP) sowie der Verstärkereinheit zuständig ist.
Das ordnungsgemäße Einschalten des Verstärkers wird durch einen Initialisierungsvorgang
sichergestellt. Während dieses Selbsttests des Systems bleiben die LEDs (Limiter-,
Signal- und Power-Status-LED), die sich auf dem Verstärkermodul befinden, für ca. 2
Sekunden ausgeschaltet. Am Ende des Initialisierungsvorgangs bleibt die grüne PowerStatus-LED dauerhaft erleuchtet. Im Falle einer schwerwiegenden Funktionsstörung des
Lautsprechersystems leuchtet die Status-LED mehrfach auf. Gleichzeitig blinkt die rote
Limiter-LED auf dem Verstärkermodul. Der Lautsprecher wird automatisch stummgeschaltet
(Status »Mute«).
Einschalten
des Lautsprechers
19
DEUTSCH
Installation
Der Hochständerflansch (zur Verwendung auf einen Standard-Hochstativ) befindet sich auf
der (Unter-)Seite des Gehäuses und weist einen Normdurchmesser von 35 mm auf.
Achtung: Hängen Sie Lautsprecher der NX-Serie niemals an ihren Griffen auf. Die
Tragegriffe sind ausschließlich für den Transport vorgesehen, nicht jedoch für die Montage.
Achtung
Störungsanzeige und
Schutzvorrichtungen
Der Mikroprozessor ist in der Lage, drei verschiedene Arten von Störungen durch das Blinken
der roten Limiter-LED vor dem Aufleuchten der grünen Power-Status-LED auf dem Bedienfeld
des Verstärkers anzuzeigen. Bei den drei Störungsarten handelt es sich um:
1) ACHTUNG: Es wurde ein leichter Fehler oder eine Funktionsstörung mit automatischem
System-Neustart festgestellt. Die Leistung des Lautsprechers wird nicht eingeschränkt.
2) BEGRENZUNG: Es wurde eine Störung festgestellt und die Leistung des Lautsprechers
wird begrenzt (der Schallpegel wird um 3 dB gesenkt).
Dies hat keinen Einfluss auf die Funktionstüchtigkeit des Lautsprechers, dieser kann weiter
betrieben werden. Jedoch ist es in diesem Fall notwendig, den Kundendienst zu verständigen,
um das Problem zu beheben.
3) DEFEKT: Es wurde eine schwere Funktionsstörung festgestellt. Der Lautsprecher wird
stummgeschaltet (Status »Mute«).
Störungsanzeige
Aufleuchten
Indikation
1 oder 2 Achtung
3 oder 4
Begrenzung
Von 5 bis 8 Defekt
Im Falle eines Defekts bleibt die grüne Power-Status-LED aus.
20
!
DEUTSCH
Kühlung
Die Temperaturkontrolle wird durch den integrierten Mikroprozessor gesteuert, der
mittels zweier Sensoren die Temperatur des Verstärkers sowie des Netzteils prüft und eine
Überhitzung durch Begrenzung der Lautstärke verhindert.
Im Falle einer Überhitzung (>80° C) verringert sich die Lautstärke in Abhängigkeit des
Temperaturanstiegs, wodurch die Veränderung nicht wahrnehmbar ist.
Die vorherige Lautstärke und alle Funktionen werden nach Erreichen der normalen
Betriebstemperaturen automatisch wiederhergestellt.
21
SPECIFICATIONS
NX 10-SMA
NX 12-SMA
NX 15-SMA
60 - 20 kHz
50 - 20 kHz
50 - 20 kHz
127 dB
129 dB
130 dB
Horizontal Coverage
60°
60°
60°
Vertical Coverage
60°
60°
60°
1.700
1.700
1.600
µ
±
÷
ACOUSTICAL
Frequency response
Max SPL
Crossover point
COAXIAL TRANSDUCERS
Low frequency
10” neo, 2.5” voice coil
12” neo, 2.5” voice coil
15” neo, 2.5” voice coil
High frequency
1” neo, 1.7” voice coil
1” neo, 1.7” voice coil
1” neo, 1.7” voice coil
Total power
400 Watt
700 Watt
700 Watt
Low section
300 Watt
500 Watt
500 Watt
High section
100 Watt
200 Watt
200 Watt
Signal input/output
Jack-XLR male / XLR female
Jack-XLR male / XLR female
Jack-XLR male / XLR female
Power input/output
Powercon Input / Output
connectors
2 way equalisation, crossover
filtering
Fast limiter
RMS limiter
Powercon Input / Output
connectors
2 way equalisation, crossover
filtering
Fast limiter
RMS limiter
Powercon Input / Output
connectors
2 way equalisation, crossover
filtering
Fast limiter
RMS limiter
AMPLIFIER
CONNECTIONS
Digital input
PHYSICAL SPECIFICATIONS
Dimensions (w, h, d)
Net Weight
Colour
22
450 mm, 324 mm, 417 mm 550 mm, 324 mm, 417 mm
14.5 Kg
16.5 Kg
645 mm, 360 mm, 490 mm
Black
Black
Black
19.5 Kg
www.rcf.it
HEADQUARTERS:
RCF S.p.A. Italy
tel. +39 0522 274 411
e-mail: [email protected]
RCF UK
tel. 0844 745 1234
Int. +44 870 626 3142
e-mail: [email protected]
RCF France
tel. +33 1 49 01 02 31
e-mail: [email protected]
RCF Germany
tel. +49 2203 925370
e-mail: [email protected]
RCF Belgium
tel. +32 (0) 3 - 3268104
e-mail: [email protected]
RCF USA Inc.
tel. +1 (603) 926-4604
e-mail: [email protected]
10307254 RevD
RCF Spain
tel. +34 91 817 42 66
e-mail: [email protected]