1
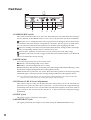
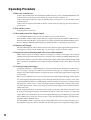
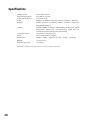
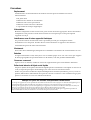
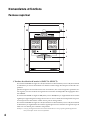
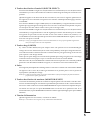
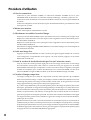
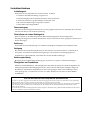
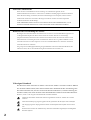
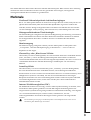
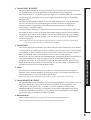
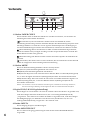
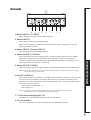
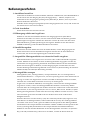
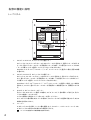
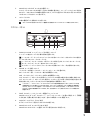
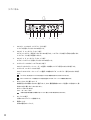
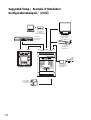
OWNER’S MANUAL MANUEL D’UTILISATION BEDIENUNGSANLEITUNG Precautions Location Using the unit in the following locations can result in a malfunction. • In direct sunlight • Locations of extreme temperature or humidity • Excessively dusty or dirty locations • Locations of excessive vibration • Close to magnetic fields Power supply Please connect the designated AC adapter to an AC outlet of the correct voltage. Do not connect it to an AC outlet of voltage other than that for which your unit is intended. Interference with other electrical devices Radios and televisions placed nearby may experience reception interference. Operate this unit at a suitable distance from radios and televisions. Handling To avoid breakage, do not apply excessive force to the switches or controls. Care If the exterior becomes dirty, wipe it with a clean, dry cloth. Do not use liquid cleaners such as benzene or thinner, or cleaning compounds or flammable polishes. Keep this manual After reading this manual, please keep it for later reference. Keeping foreign matter out of your equipment Never set any container with liquid in it near this equipment. If liquid gets into the equipment, it could cause a breakdown, fire, or electrical shock. Be careful not to let metal objects get into the equipment. If something does slip into the equipment, unplug the AC adapter from the wall outlet. Then contact your nearest Korg dealer or the store where the equipment was purchased. THE FCC REGULATION WARNING (for U.S.A.) This equipment has been tested and found to comply with the limits for a Class B digital device, pursuant to Part 15 of the FCC Rules. These limits are designed to provide reasonable protection against harmful interference in a residential installation. This equipment generates, uses, and can radiate radio frequency energy and, if not installed and used in accordance with the instructions, may cause harmful interference to radio communications. However, there is no guarantee that interference will not occur in a particular installation. If this equipment does cause harmful interference to radio or television reception, which can be determined by turning the equipment off and on, the user is encouraged to try to correct the interference by one or more of the following measures: • Reorient or relocate the receiving antenna. • Increase the separation between the equipment and receiver. • Connect the equipment into an outlet on a circuit different from that to which the receiver is connected. • Consult the dealer or an experienced radio/TV technician for help. Unauthorized changes or modification to this system can void the user’s authority to operate this equipment. CE mark for European Harmonized Standards CE mark which is attached to our company’s products of AC mains operated apparatus until December 31, 1996 means it conforms to EMC Directive (89/336/EEC) and CE mark Directive (93/68/EEC). And, CE mark which is attached after January 1, 1997 means it conforms to EMC Directive (89/336/EEC), CE mark Directive (93/68/EEC) and Low Voltage Directive (73/23/EEC). Also, CE mark which is attached to our company’s products of Battery operated apparatus means it conforms to EMC Directive (89/336/EEC) and CE mark Directive (93/68/EEC). COPYRIGHT WARNING This professional device is intended only for use with works for which you yourself own the copyright, for which you have received permission from the copyright holder to publicly perform, record, broadcast, sell, and duplicate, or in connection with activities which constitute Ågfair useÅh under copyright law. If you are not the copyright holder, have not received permission from the copyright holder, or have not engaged in fair use of the works, you may be violating copyright law, and may be liable for damages and penalties. If you are unsure about your rights to a work, please consult a copyright attorney. KORG TAKES NO RESPONSIBILITY FOR ANY INFRINGEMENT COMMITTED THROUGH USE OF KORG PRODUCTS. A note about using this video device Some people subjected to stimulation by intense light or rapidly flashing images may experience symptoms of temporary muscle spasms or loss of consciousness. If you experience any such symptoms, stop using this device immediately and seek medical attention. In particular when using this device in a public place or other location where there are large numbers of people, you must take into account people other than the operator, and avoid creating and displaying continuous successions of images that might produce this type of intense stimulation. Korg Corporation accepts no responsibility for any health problem or personal or property damage that may occur to the operator or observers from use of this device in violation of this warning. Video Signal Standard The krossfour can operate in either NTSC or PAL mode. Use the NTSC/PAL switch to select the correct video standard for your equipment or area. Note that the unit will not operate correctly if the NTSC/PAL switch setting does not match the video standards of your other equipment. Note: “NTSC” is the standard used in Japan and North America. Do not change the NTSC/PAL switch setting while the power is ON. Turn the power off first. The krossfour will not operate correctly with non-interlaced signals. The output signal from copy-protected DVD and video sources may be discolored and noisy. Noise may occur with certain devices or media, depending on their individual characteristics and capabilities. 2 Features Two-channel video mixer with four source inputs Up to four video sources can be connected to the krossfour, and any of the four sources may be individually assigned to each of the two mixer channels. Simple, intuitive design makes it easy to carry out switching and mixing for a wide variety of applications: video jockeying, video performance, video editing, and more. Backlit Crossfader Owner’s Manual Thank you for purchasing the krossfour 4-channel video mixer & switcher. To enjoy long and trouble-free use of this product, please read this manual carefully and operate this unit only as directed. The crossfader control lets you dynamically adjust the mix between the two video channels in realtime. By selecting different fader curves, you can change the characteristics of the fader and access different types of mixing techniques. Monitor Output The Monitor output allows you to preview or “audition” any of the video sources, without affecting the mixer output - sort of like headphones for the eyes. Chroma-key or “Blue-Screen” effects Chroma-key is a type of compositing effect that removes (or “keys-out”) a specific color from a video image, allowing a background video source to show through. Spaceships whizzing past planets, superheroes flying through the air, or the local forecaster standing in front of a changing weather map are examples of Chroma-key effects. Luma-key effects Like Chroma-key, Luminance-key (or “Luma-key”) is also a compositing effect that removes a specific part of a video image, allowing a background video image to show through. Lumakey uses a brightness value (Black or White) to specify the keyed-out area, instead of a particular color value. For example, white titles prepared on a black background can be made to float on top of any video image by using Luma-key to remove the black areas from the title shot. Internal Time Base Corrector (TBC) Time Base Correction is needed to provide stable synchronization when working with multiple video sources. TBC digital processing provides excellent synchronization and ensures stable imaging when mixing or switching signals from various DVD players, VCR, video cameras, PCs with video output capability, and other such devices. The switching of input and monitor sources is not image synchronized. This type of switching may cause disturbances in the image. 3 Switches and Connectors Top Panel 6 5 1 2 3 4 1. INPUT A SELECT keys These keys select the input source for Channel A. When you press a key, it will light up solid to indicate that the source is selected. If the MODE switch is set to C-K (Chroma-key) or L-K (Luma-key), the selected source will be used as the background image for a compositing effect. Press the same key a second time and it will begin blinking. When the key is blinking, the input source will be ignored, and the output of the channel will depend on the MODE setting. If the MODE switch is set to BK (Black) or WH (White), the blinking key indicates that the unit is ignoring the source image and outputting the specified background color instead. These solid backgrounds can then be used as a source for video mixing. If the MODE switch is set to C-K (Chroma-key) or L-K (Luma-key), the blinking key indicates that the input source will be ignored and a black background will be used for the compositing effect. Note: If there is no device connected to the selected input (or there is no signal from the connected unit), the krossfour will output a blue background screen. 4 These keys select the input source for Channel B. When you press a key, it will light up solid to indicate that the source is selected. If the MODE switch is set to C-K (Chroma-key) or L-K (Luma-key), the selected source will be used as the foreground image for a compositing effect. Press the same key a second time and it will begin blinking. When the key is blinking, the input source will be ignored, and the output of the channel will depend on the MODE setting. If the MODE switch is set to BK (Black) or WH (White), the blinking key indicates that the unit is ignoring the source image and outputting the specified background color instead. These solid backgrounds can then be used as a source for video mixing. If the MODE switch is set to C-K (Chroma-key) or L-K (Luma-key), the blinking key indicates that the input selected for Channel B will be ignored and only Channel A will be output. In the C-K Mode, however, if the HOLD key is pressed while any INPUT B SELECT key is blinking, a black screen will be output for Channel B instead. Owner’s Manual 2. INPUT B SELECT keys Note: If there is no device connected to the selected input (or there is no signal from the connected unit), the krossfour will output a blue background screen. 3. HOLD keys There are two HOLD keys; one for each channel. Pressing the HOLD key freezes the image from the selected source (on that channel), so that the image appears as a still. The key acts as a toggle: press it once to freeze the image, and again to return to a moving image. Note that you can change the input source while the image is frozen, but the frozen image will continue to be output until the HOLD key is released. In the C-K mode, the Channel B HOLD key has a special function. When any of the INPUT B SELECT keys are blinking, pressing the Channel B HOLD key will cause Channel B to output a full black screen. 4. Fader Dynamically adjusts the mix between Channel A and Channel B. If the MODE switch is set to C-K or L-K, the fader operates only on the foreground or overlay (Channel B) portions of the image. 5. MONITOR SELECT keys The MONITOR feature allows you to view any input source before it is assigned to a mixer channel. This provides you with the ability to preview, audition or “cue-up” a video source. Use the MONITOR SELECT keys to select which of the four inputs will be sent to the MONITOR OUT jack on the front panel. If you select OUT, the MONITOR OUT provides the same (mixed) signal as the VIDEO OUTPUT jack. 6. Power Indicator Lights up to indicate that the power is on. Note: If this lamp starts blinking, please turn off the power immediately. 5 Front Panel 1 2 3 4 5 1. FADER CURVE switch This switch selects the fader curve. The curve determines how the fader affects the mixing of the two channels. If the MODE switch is set to C-K or L-K, the fader only affects Channel B. (Normal curve) : Sliding the fader causes a gradual, linear change in the mix between the two channels. The center position corresponds to a 50:50 mix. This is a typical crossfade operation; movement in either direction attenuates one channel while amplifying the other. (No mix) : Sliding toward the center attenuates both channels; sliding to either end amplifies the corresponding channel. The two channels never mix. (Center mix) : Channels are mixed only over the central span of the fader range, (Switcher) : The fader acts like a toggle switch that selects either Channel A or Channel B. There is no attenuation and no mixing. 2. MODE switch Selects the background color or the overlay mode. BK (Black): Sets the background color to black. WH (White): Sets the background color to white. C-K (Chroma key): The unit cuts out the blue parts of the (foreground) Channel B image, so that the Channel A signal (background) shows through the cutouts. L-K (Luminance key): The unit cuts out the black and white portions from the (foreground) Channel B signal, so that the Channel A image (background) shows through the cutouts. Note: For C-K and L-K modes, Channel A serves as the background and Channel B is the overlay. Note that when signals are being mixed in these ways, the fader affects only the Channel B image. 3. FINE knob (C-K/L-K Level Adjustment) This control is effective only in C-K and L-K modes. If the mode is set to C-K, this knob will adjust the color of the area that will be “keyed-out” or removed from the foreground image (Channel B). If the mode is set to L-K, this knob will adjust the brightness level (from white to gray to black) of the area that will be “keyed-out” or removed from the foreground image (Channel B). 4. INPUT 4 jack This input accepts a composite video signal. 5. MONITOR OUT jack The signal provided by this output is selected by using the MONITOR SELECT keys. 6 Owner’s Manual Rear Panel 8 7 6 5 1. INPUT 1 S-VIDEO connector 4 3 2 1 This input accepts an S-VIDEO connector. 2. INPUT 1 jack This input accepts a composite video signal. If you connect both the S-VIDEO connector and the INPUT 1 jack, only the S-VIDEO input will be effective. 3. INPUT 2 jack, INPUT 3 jack These inputs accept composite video signals. 4. OUTPUT S-VIDEO connector This output provides the output from the krossfour’s mixer as an S-VIDEO signal. Specifically, this signal will be the signals from Channel A and Channel B (as selected by the INPUT SELECT keys), after they have been mixed and processed by the fader. 5. OUTPUT jack This output provides the output from the krossfour’s mixer as a composite video signal Note: The OUTPUT S-VIDEO connector and the OUTPUT jack both provide the same content. Both outputs can be used at the same time. 6. NTSC/PAL switch This switch is used to select the video standard you are using. Turn the krossfour off to change the setting on this switch. The krossfour reads the setting of this switch when power is first turned on, and the setting cannot be changed until you turn the power off. NTSC: Japan, North America, etc. PAL: Europe, etc. Note: Be sure this switch is set to match the standard of your input signals, or the output signal will be garbled. 7. DC 7V IN Connect the AC adaptor (included) to this jack. 8. Power switch Switches the power between ON and STANDBY. 7 Operating Procedure 1. Make the connections. Connect the OUTPUT jack, the OUTPUT S-VIDEO connector, and/or the MONITOR OUT jack of the krossfour to the input of the display device(s) - monitor, projector, etc. Connect the output of the source devices (DVD players, cameras, PCs, etc.) to the INPUT jacks of the krossfour. Connect the AC adapter (included) to the DC 7V IN connector, and plug the other end into a power outlet. 2. Turn on the power. Turn the power switch ON. 3. Select and control the image output. Use the INPUT SELECT keys to select an input source for each channel. Slide the fader to the A side to output the source signal selected by the INPUT A SELECT keys. Slide the fader to the B side to output the source signal selected by the INPUT B SELECT keys. Select a different FADER CURVE setting to change the fader’s operating characteristics. 4. Output a still image. Press the HOLD key for either channel to freeze the channel’s input signal and output this frozen image as a still. Press the HOLD key a second time to return to normal output. 5. Output the selected background color from either channel. Either channel can be set to output a black screen image or a white screen image. Choose which Channel will output the background color, and press the currently lit INPUT SELECT key for that channel. The key will start to blink, and the input signal will be replaced by the background color selected by the MODE switch, either black (if the MODE switch is set to BK) or white (if WH). 6. Creating Composite Images Composite images (or “compositing effects”) are special effects that combine two video sources into one image - placing a toy dinosaur in downtown Chicago, for example. Generally, one image is set as the background plate, and portions of the second image appear in the foreground as an overlay. There are two different ways to specify which portions of the foreground image will be keyedout, allowing the background image to show through. Chroma-key effects remove areas of the foreground based on their color. Traditionally, the blue portions are removed, so a subject standing in front of a “blue screen” can be superimposed on any background. Luma-key effects rely on removing the black, white or specific gray portions of the image based on their brilliance, rather than color. When using the krossfour in the Chroma-key (CK) or Luma-key (LK) modes, Channel A will be used as the background plate, and Channel B will be used as the overlay, or foreground image. Here’s how. Select the source for the background image by pressing the appropriate INPUT A SELECT key. Select the source for the overlay (foreground) image by pressing the appropriate INPUT B SELECT key. Use the MODE switch to select the type of compositing effect; either C-K (Chroma-key) or LK (Luminance-key). If you have selected C-K, the blue parts of the foreground image (Chan- 8 Owner’s Manual nel B) will be removed. If you have selected L-K, the black or white portions of the foreground image (Channel B) will be removed. In each case, the Channel A image will be visible through the areas that have been removed by the “key” effect. You can adjust the extent of the cut-out area by using the FINE dial. Sliding the fader to the B side will make it easier to adjust the FINE dial setting. 9 Specifications Video Formats: Video Sampling Rate: Frame Synchronizers: Inputs: Outputs: Switches: Composite Effects: Power: Dimensions: Weight: Included Accessory: NTSC/PAL ITU601 13.5 MHz, 4:2:2, 8-bit A and B (1 each) INPUT 1 (S-VIDEO/composite), INPUT 2, INPUT 3, INPUT 4 VIDEO OUTPUT (S-VIDEO), VIDEO OUTPUT (composite), MONITOR OUTPUT FADER CURVE (4 settings); MODE (Black background, White background, Chroma-key, Luminance-key); FINE dial (for Chroma-key and Luminance-key adjustment) Chroma-key, Luminance-key DC7V (dedicated AC adapter) 185(W) _ 249(D) _ 75(H) mm [7.3 (W) _ 9.8 (D) _ 3.0 (H) in.] 1.5 kg [3.3 lb.] AC adapter Appearance and specifications of this product are subject to change without notice. 10 Précautions Emplacement L’utilisation de cet instrument dans les endroits suivants peut en entraîner le mauvais fonctionnement. • En plein soleil • Endroits très chauds ou très humides • Endroits sales ou fort poussiéreux • Endroits soumis à de fortes vibrations • A proximité de champs magnétiques Alimentation Branchez l’adaptateur secteur fourni à une prise secteur de tension appropriée. Evitez de brancher l’adaptateur à une prise de courant dont la tension ne correspond pas à celle pour laquelle l’appareil est conçu. Interférences avec d’autres appareils électriques Les postes de radio et de télévision situés à proximité peuvent par conséquent souffrir d’interférences à la réception. Veuillez dès lors faire fonctionner cet appareil à une distance raisonnable de postes de radio et de télévision. Maniement Pour éviter de les endommager, manipulez les commandes et les boutons de cet instrument avec soin. Entretien Lorsque l’instrument se salit, nettoyez-le avec un chiffon propre et sec. Ne vous servez pas d’agents de nettoyage liquides tels que du benzène ou du diluant, voire des produits inflammables. Conservez ce manuel Après avoir lu ce manuel, veuillez le conserver soigneusement pour toute référence ultérieure. Evitez toute intrusion d’objets ou de liquide Ne placez jamais de récipient contenant du liquide près de l’instrument. Si le liquide se renverse ou coule, il risque de provoquer des dommages, un court-circuit ou une électrocution. Veillez à ne pas laisser tomber des objets métalliques dans le boîtier (trombones, par ex.). Si cela se produit, débranchez l’alimentation de la prise de courant et contactez votre revendeur korg le plus proche ou la surface où vous avez acheté l’instrument. Marque CE pour les normes européennes harmonisées La marque CE apposée sur tous les produits de notre firme fonctionnant sur secteur jusqu’au 31 décembre 1996 signifie que ces appareils répondent à la Directive EMC (89/336/CEE) et à la Directive concernant la marque CE (93/68/CEE). La marque CE apposée après le 1 janvier 1997 signifie que ces appareils sont conformes à la Directive EMC (89/336/CEE), à la Directive concernant la marque CE (93/68/CEE) ainsi qu’à la Directive Basse Tension (73/23/CEE). La marque CE apposée sur tous les produits de notre firme fonctionnant sur piles signifie que ces appareils répondent à la Directive EMC (89/336/CEE) et à la Directive concernant la marque CE (93/68/CEE). AVERTISSEMENT AU SUJET DU DROIT D’AUTEUR Cet appareil professionnel a été conçu pour la manipulation de matériel audio dont vous détenez les droits d’auteur ou dont le détenteur de ces droits vous a donné la permission de jouer, d’enregistrer, de diffuser, de vendre et de copier le matériel, ou dans le cadre d’activités ne ne constituant pas une infraction à la législation régissant le droit d’auteur. Sachez que l’utilisation de matériel audio protégé sans l’autorisation de l’ayant droit constitue une infraction à la législation concernant le droit d’auteur et est dès lors susceptible d’être sanctionnée. En cas de doute, veuillez adresser vos questions à une personne compétente en matière de droit. KORG DECLINE TOUTE RESPONSABILITE POUR TOUTE INFRACTION COMMISE AVEC LES PRODUITS KORG. Une remarque à propos de l’utilisation de cet appareil vidéo Certaines personnes stimulées par une lumière intense ou des images changeant rapidement peuvent présenter des symptômes comme des spasmes temporaires ou une perte de conscience. Si vous ressentez un de ces symptômes, arrêtez immédiatement d’utiliser ce dispositif et consultez un médecin. En particulier lorsque vous utilisez ce dispositif dans un lieu public ou tout autre endroit où se trouvent réunis un grand nombre de personnes, vous devez prendre en considération les personnes autres que l’utilisateur de l’appareil et éviter de créer ou présenter des successions d’images qui pourraient produire ce type de stimulation intense. Korg Corporation rejette toute responsabilité pour tout problème de santé ou dommage personnel ou matériel quel qu’il soit dont pourraient être victimes l’utilisateur ou les observateurs, suite à l’utilisation de ce dispositif en violation du présent avertissement. Standard du signal vidéo Le krossfour peut fonctionner en mode NTSC ou PAL. Utiliser le commutateur NTSC/PAL pour sélectionner le standard vidéo correct pour votre matériel ou région. Noter que l’appareil ne fonctionnera pas correctement si le réglage du commutateur NTSC/PAL ne correspond pas au standard vidéo du matériel avec lequel il est utilisé. Remarque: “NTSC” est le standard utilisé au Japon et en Amérique du Nord. Ne pas changer le réglage du commutateur NTSC/PAL quand l’appareil est sous tension. Mettre d’abord l’appareil hors tension. Le krossfour ne fonctionnera pas correctement avec des signaux non-entrelacés. Le signal de sortie de DVD et de sources vidéo protégés contre la copie peut présenter des défauts de couleur et du bruit. Avec certains appareils ou supports, selon leurs caractéristiques et capacités individuelles, du bruit peut apparaître. 2 Merci d’avoir choisi le mélangeur & commutateur vidéo à 4 entrées krossfour. Pour assurer un fonctionnement sans problème, prière de lire ce manuel attentivement et d’utiliser cet appareil de la manière indiquée. Caractéristiques Mélangeur vidéo à deux canaux avec quatre entrées de source Jusqu’à quatre sources vidéo peuvent être connectées au krossfour, et n’importe quelle des quatre sources peut être individuellement affectée à chacun des deux canaux du mélangeur. La conception simple et intuitive permet d’effectuer facilement la commutation et le mixage pour une grande variété d’applications: jockeying vidéo (VJ), performance vidéo, montage vidéo, etc. La commande par crossfader permet de régler dynamiquement le mélange entre les deux canaux vidéo en temps réel. En sélectionnant différentes courbes de fader, on peut changer les caractéristiques du fader et accéder à différents types de techniques de mixage. Sortie moniteur La sortie moniteur permet de prévisualiser n’importe quelle des sources vidéo, sans affecter la sortie du mélangeur—comme un casque permet d’écouter le son d’un mélangeur audio. Effets d’incrustation en chrominance “Chroma Key” ou “Ecran Bleu” L’incrustation en chrominance est un type d’effet de composition qui enlève (ou “découpe”) une couleur particulière d’une image vidéo, permettant à une source vidéo de fond d’y apparaître. Les vaisseaux spatiaux passant à toute allure devant des planètes, les héros volants, ou le présentateur de télévision devant une carte météo changeante sont des exemples d’effets d’incrustation en chrominance. Manuel d’utilisation Crossfader rétroéclairé Effets d’incrustation en luminance “Luminance Key” Comme l’incrustation en chrominance, l’incrustation en luminance (ou “Luminance Key”) est aussi un effet de composition qui enlève une partie particulière d’une image vidéo, permettant à une image vidéo de fond d’y apparaître. L’incrustation en luminance utilise une valeur de luminosité (Noir ou Blanc) pour spécifier la zone découpée, au lieu d’une valeur de couleur particulière. Sur n’importe quelle image vidéo on peut par exemple faire flotter des titres blancs préparés sur un fond noir en utilisant l’incrustation en luminance pour enlever les zones noires à la place desquelles ils apparaîtront. Correcteur de base de temps (TBC) interne La correction de base de temps est nécessaire pour donner une synchronisation stable lorsqu’on travaille avec plusieurs sources vidéo. Le traitement numérique du TBC donne une excellente synchronisation et assure des images stables lors du mélange ou de la commutation de signaux provenant de lecteurs de DVD, magnétoscopes, caméras vidéo, PC avec capacité de sortie vidéo, et autres appareils similaires. La commutation de sources d’entrée et de sorties moniteur ne présente pas de synchronisation d’image. Ce type de commutation peut donner lieu à des perturbations dans l’image. 3 Nomenclature et fonctions Panneau supérieur 6 5 1 2 3 4 1. Touches de sélection d’entrée A (INPUT A SELECT) Si le sélecteur MODE est réglé sur C-K (Incrustation en chrominance) ou sur L-K (Incrustation en luminance), la source sélectionnée sera utilisée comme image de fond pour un effet de composition. Quand on appuie sur la même touche une seconde fois, elle se met à clignoter. Quand la touche clignote, la source d’entrée sera ignorée et la sortie du canal dépendra du réglage du sélecteur MODE. Si le sélecteur MODE est réglé sur BK (Noir) ou sur WH (Blanc), le clignotement de la touche signifie que l’appareil ignore l’image de la source et sort la couleur de fond spécifiée à la place. Ce fond peut alors être utilisé comme source pour le mixage vidéo. Si le sélecteur MODE est réglé sur C-K (Incrustation en chrominance) ou sur L-K (Incrustation en luminance), le clignotement de la touche signifie que la source d’entrée sera ignorée et qu’un fond noir sera utilisé pour l’effet de composition. Remarque: S’il n’y a pas d’appareil connecté à une entrée sélectionnée (ou s’il n’y a pas de signal de l’appareil connecté), le krossfour sortira un écran de fond bleu. 4 Si le sélecteur MODE est réglé sur C-K (Incrustation en chrominance) ou sur L-K (Incrustation en luminance), la source sélectionnée sera utilisée comme image de fond pour un effet de composition. Quand on appuie sur la même touche une seconde fois, elle se met à clignoter. Quand la touche clignote, la source d’entrée sera ignorée et la sortie du canal dépendra du réglage du sélecteur MODE. Si le sélecteur MODE est réglé sur BK (Noir) ou sur WH (Blanc), le clignotement de la touche signifie que l’appareil ignore l’image de la source et sort la couleur de fond spécifiée à la place. Ce fond peut alors être utilisé comme source pour le mixage vidéo. Si le sélecteur MODE est réglé sur C-K (Incrustation en chrominance) ou sur L-K (Incrustation en luminance), le clignotement de la touche signifie que l’entrée sélectionnée pour le canal B sera ignorée et que seule la sortie du canal A sera active. Dans le mode C-K, toutefois, si la touche HOLD est actionnée pendant qu’une des touches INPUT B SELECT clignote, un écran noir sera sorti pour le canal B. Remarque: S’il n’y a pas d’appareil connecté à une entrée sélectionnée (ou s’il n’y a pas de signal de l’appareil connecté), le krossfour sortira un écran de fond bleu. 3. Touches de gel (HOLD) Il y a deux touches HOLD; une pour chaque canal. Une pression sur la touche HOLD gèle l’image de la source sélectionnée (sur le canal correspondant), si bien que l’image devient fixe. La touche fonctionne comme une bascule: l’actionner une fois pour geler l’image, et de nouveau pour repasser à une image animée. Noter que l’on peut changer la source d’entrée pendant que l’image est gelée, mais cette image continuera d’être sortie jusqu’à ce qu’on actionne de nouveau la touche HOLD. Dans le mode C-K, la touche HOLD du canal B a une fonction spéciale. Si on l’actionne pendant qu’une des touches INPUT B SELECT clignote, le canal B sort un écran totalement noir. Manuel d’utilisation 2. Touches de sélection d’entrée B (INPUT B SELECT) 4. Fader Sert à régler dynamiquement le mélange entre le canal A et le canal B. Si le commutateur MODE est réglé sur C-K ou sur L-K, le fader agit seulement sur le premier plan ou sur les parties de superposition (canal B) de l’image. Remarque: Le fader est considéré comme un produit consommable et ne fait par conséquent pas partie des éléments qui peuvent être réparés gratuitement. 5. Touches de sélection de moniteur (MONITOR SELECT) La fonction de moniteur permet de visualiser n’importe quelle source d’entrée avant de l’affecter à un canal du mélangeur. Ceci donne la possibilité de prévisualiser ou de “mettre en attente” une source vidéo. Utiliser les touches MONITOR SELECT pour sélectionner laquelle des quatre entrées sera envoyée à la prise MONITOR OUT se trouvant sur le panneau avant. Si on sélectionne OUT, la prise MONITOR OUT donne le même signal (mélangé) que la prise VIDEO OUTPUT. 6. Témoin d’alimentation Quand l’appareil est sous tension, ce témoin est allumé. Remarque: Si le témoin se met à clignoter, couper l’alimentation immédiatement. 5 Panneau avant 1 2 3 4 5 1. Sélecteur de courbe de fader (FADER CURVE) Permet de sélectionner la courbe du fader. Cette courbe détermine comment le fader affecte le mélange des deux canaux. (Courbe normale): Le déplacement donne un changement progressif et linéaire du mélange entre les deux canaux. La position centrale correspond à un mélange 50:50. Opération typique d’un cross fader; le déplacement dans un sens ou dans l’autre atténue un canal tout en amplifiant l’autre. (Pas de mélange): Le déplacement vers le centre atténue les deux canaux; le déplacement vers un côté ou l’autre amplifie le canal correspondant. Les deux canaux ne sont jamais mélangés. (Mélange au centre): Les canaux sont mélangés seulement sur la partie centrale de la plage du fader. (Commutateur): Le fader agit comme un interrupteur à bascule qui sélectionne soit le canal A soit le canal B. Il n’y a pas d’atténuation ni de mélange. 2. Sélecteur de mode (MODE) Permet de sélectionner la couleur de fond ou le mode de superposition. BK (Noir): Sélectionne le noir comme couleur de fond. WH (Blanc): Sélectionne le blanc comme couleur de fond. C-K (Incrustation en chrominance): L’appareil découpe les parties bleues de l’image du canal B (premier plan), si bien que le signal du canal A (fond) apparaît par les découpes. L-K (Incrustation en luminance): L’appareil découpe les parties blanches et noires du signal du canal B (premier plan), si bien que l’image du canal A (fond) apparaît par les découpes. Remarque: Pour les modes C-K et L-K, le canal A sert de fond et le canal B est la superposition. Noter que lorsque les signaux sont ainsi mélangés, le fader n’affecte que l’image du canal B. 3. Bouton de réglage fin (FINE) (Réglage de niveau C-K/L-K) Cette commande ne sert que dans les modes C-K et L-K. En mode C-K, ce bouton sert à régler la couleur de la zone qui sera “découpée” ou enlevée de l’image du premier plan (canal B). En mode L-K, ce bouton sert à régler le niveau de luminosité (du blanc au noir en passant par le gris) de la zone qui sera “découpée” ou enlevée de l’image du premier plan (canal B). 4. Prise d’entrée 4 (INPUT 4) Cette prise permet d’entrer un signal vidéo composite. 5. Prise de sortie moniteur (MONITOR OUT) Le signal vidéo sélectionné à l’aide des touches MONITOR SELECT est sorti par cette prise. 6 Panneau arrière 7 6 5 4 3 2 1 1. Connecteur d’entrée 1 S-Vidéo (INPUT 1 S-VIDEO) Ce connecteur permet d’entrer un signal S-Vidéo. 2. Prise d’entrée 1 (INPUT 1) Cette prise permet d’entrer un signal vidéo composite. Si on essaie d’utiliser le connecteur S-VIDEO et la prise INPUT 1 en même temps, l’entrée SVIDEO est prioritaire. 3. Prise d’entrée 2, prise d’entrée 3 (INPUT 2, INPUT 3) Chacune de ces prises permet d’entrer un signal vidéo composite. 4. Connecteur de sortie S-Vidéo (OUTPUT S-VIDEO) Manuel d’utilisation 8 Ce connecteur donne la sortie du mélangeur krossfour sous forme de signal S-Vidéo. Explicitement, ce signal sera celui résultant du mélange et du traitement des signaux du canal A et du canal B (sélectionnés par les touches INPUT SELECT) par le fader. 5. Prise de sortie vidéo (OUTPUT VIDEO) Cette prise donne la sortie du mélangeur krossfour sous forme de signal vidéo composite. Remarque: Le connecteur OUTPUT S-VIDEO et la prise OUTPUT VIDEO donnent la même image. Ces deux sorties peuvent être utilisées en même temps. 6. Commutateur NTSC/PAL Ce commutateur sert à sélectionner le standard vidéo à utiliser. Avant de changer le réglage de ce commutateur, mettre le krossfour hors tension. Le krossfour mémorise le réglage de ce commutateur lors de la mise sous tension, et ce réglage ne peut donc pas être changé sans mettre le krossfour hors tension. NTSC: Japon, Amérique du Nord, etc. PAL: Europe, etc. Remarque: Veiller à ce que le réglage de ce commutateur corresponde au standard des signaux d’entrée, sinon le signal de sortie présentera des perturbations. 7. Prise d’alimentation (DC7V) Connecter l’adaptateur secteur (fourni) à cette prise. 8. Interrupteur d’alimentation Permet de mettre l’appareil sous tension (ON) ou hors tension (STANDBY). 7 Procédure d’utilisation 1. Faire les connexions. Connecter la prise OUTPUT VIDEO, le connecteur OUTPUT S-VIDEO et/ou la prise MONITOR OUT du krossfour à l’entrée du matériel d’affichage—moniteur, projecteur, etc. Connecter la sortie du matériel source (lecteurs de DVD, caméra, PC, etc.) aux prises INPUT du krossfour. Connecter l’adaptateur secteur (fourni) à la prise d’alimentation DC7V, puis brancher la fiche à une prise de courant. 2. Mettre sous tension. Mettre l’interrupteur d’alimentation sur ON. 3. Sélectionner et contrôler la sortie d’image. Utiliser les touches INPUT SELECT pour sélectionner une source d’entrée pour chaque canal. Déplacer le curseur du fader vers le côté A pour sortir le signal de la source sélectionnée par les touches INPUT A SELECT. Déplacer le curseur du fader vers le côté B pour sortir le signal de la source sélectionnée par les touches INPUT B SELECT. Sélectionner un réglage FADER CURVE différent si on souhaite changer les caractéristiques de fonctionnement du fader. 4. Sortir une image fixe. Appuyer sur la touche HOLD d’un canal ou l’autre pour geler le signal d’entrée de ce canal et sortir l’image fixe correspondante. Pour repasser à la sortie normale, appuyer sur la touche HOLD une seconde fois. 5. Sortir la couleur de fond sélectionnée par l’un ou l’autre des canaux. L’un ou l’autre des canaux peut être réglé pour sortir une image d’écran noire ou une image d’écran blanche. Choisir quel canal sortira la couleur de fond, puis appuyer sur la touche INPUT SELECT allumée qui correspond à ce canal. La touche se mettra à clignoter, et le signal d’entrée sera remplacé par la couleur de fond choisie avec le sélecteur MODE, soit noir (si le sélecteur MODE est réglé sur BK) soit blanc (si le sélecteur MODE est réglé sur WH). 6. Création d’images composites Les images composites (ou “effets de composition”) sont des effets spéciaux qui combinent deux sources dans une image - comme, par exemple, la mise d’un dinosaure miniature au centre de Chicago. En général, une image est sélectionnée comme fond, et des parties de la seconde image apparaissent au premier plan comme une superposition. Il y a deux façons différentes pour spécifier quelles parties de l’image du premier plan seront découpées, permettant à l’image de fond d’apparaître par les découpes. Les effets d’incrustation en chrominance enlèvent les parties du premier plan en fonction de leur couleur. Habituellement, les parties bleues sont enlevées, si bien qu’un sujet se tenant devant un “écran bleu” peut être superposé sur n’importe quel fond. Les effets d’incrustation en luminance font appel à la suppression des parties noires, blanches ou grises de l’image sur la base de leur brillance, plutôt que de la couleur. Quand on utilise le krossfour en mode incrustation en chrominance (CK) ou incrustation en luminance (LK), le canal A est utilisé pour le fond, et le canal B pour la superposition, ou image de premier plan. Sélectionner la source pour l’image du fond en appuyant sur la touche INPUT A SELECT appropriée. Sélectionner la source pour l’image de la superposition (premier plan) en appuyant sur la touche INPUT B SELECT appropriée. 8 Manuel d’utilisation Utiliser le sélecteur MODE pour sélectionner le type d’effet de composition; C-K (incrustation en chrominance) ou L-K (incrustation en luminance). Si on a sélectionné C-K, les parties bleues de l’image du premier plan (canal B) seront enlevées. Si on a sélectionné L-K, les parties noires ou blanches de l’image du premier plan (canal B) seront enlevées. Dans chaque cas, l’image du canal A sera visible par les zones qui ont été enlevées par l’effet de “découpe”. On peut ajuster l’étendue de la zone découpée en utilisant le bouton FINE. La mise du curseur du fader sur le côté B facilitera le réglage à l’aide du bouton FINE. 9 Spécifications Formats vidéo: Fréquence d’échantillonnage vidéo: Synchroniseurs d’image: Entrées: Sorties: Sélecteurs: Effets de composition: Alimentation: Dimensions: Poids: Accessoire inclus: NTSC/PAL ITU601 13,5 MHz, 4:2:2, 8 bits A et B (1 par canal) INPUT 1 (S-VIDEO / composite), INPUT 2, INPUT 3, INPUT 4 VIDEO OUTPUT (S-VIDEO), VIDEO OUTPUT (composite), MONITOR OUT FADER CURVE (4 réglages), MODE (fond noir, fond blanc, incrustation en chrominance, incrustation en luminance), bouton FINE (pour réglage d’incrustation en chrominance et d’incrustation en luminance) Incrustation en chrominance, incrustation en luminance) CC 7V (adaptateur secteur dédié) 185 (L) × 249 (P) × 75 (H) mm 1,5 kg Adaptateur secteur L’aspect et les spécifications de ce produit sont sujets à modifications sans avis préalable. 10 Vorsichtsmaßnahmen Aufstellungsort Vermeiden Sie das Aufstellen des Geräts an Orten, an denen • es direkter Sonneneinstrahlung ausgesetzt ist; • hohe Feuchtigkeit oder Extremtemperaturen auftreten können; • Staub oder Schmutz in großen Mengen vorhanden sind; • das Gerät Erschütterungen ausgesetzt sein kann. • in der Nähe eines Magnetfeldes. Stromversorgung Schließen Sie das beiliegende Netzteil nur an eine geeignete Steckdose an. Verbinden Sie es niemals mit einer Steckdose einer anderen Spannung. Störeinflüsse auf andere Elektrogeräte Dieser kann bei in der Nähe aufgestellten Rund-funkempfängern oder Fernsehgeräten Empfangsstörungen hervorrufen. Betreiben Sie solche Geräte nur in einem geeigneten Abstand von diesem Erzeugnis. Bedienung Vermeiden Sie bei der Bedienung von Schaltern und Reglern unangemessenen Kraftaufwand. Reinigung Bei auftretender Verschmutzung können Sie das Gehäuse mit einem trockenen, sauberen Tuch abwischen. Verwenden Sie keinerlei Flüssigreiniger wie beispielsweise Reinigungsbenzin, Verdünnungs- oder Spülmittel. Verwenden Sie niemals brennbare Reiniger. Bedienungsanleitung Bewahren Sie diese Bedienungsanleitung gut auf, falls Sie sie später noch einmal benötigen. Flüssigkeiten und Fremdkörper Stellen Sie niemals Behältnisse mit Flüssigkeiten in der Nähe des Geräts auf. Wenn Flüssigkeit in das Gerät gelangt, können Beschädigung des Geräts, Feuer oder ein elek-trischer Schlag die Folge sein. Beachten Sie, daß keinerlei Fremdkörper in das Gerät gelangen. Sollte ein Fremdkörper in das Gerät gelangt sein, so trennen Sie es sofort vom Netz. Wenden Sie sich dann an Ihren KORGFachhändler. Das CE-Zeichen für die Europäische Gemeinschaft Vor dem 31.12.1996 vergebene CE-Zeichen auf unseren netzgespeisten Geräten zeigen an, daß diese Geräte gemäß der EMC-Richtlinie (89/336/EWG) und der CE-Richtlinie (93/68/EWG) der EU arbeiten. Nach dem 01.01.1997 vergebene CE-Zeichen auf unseren netzgespeisten Geräten zeigen an, daß diese Geräte gemäß der EMC-Richtlinie (89/336/EWG), der CE-Richtlinie (93/68/EWG) und der Niederspannungsstromrichtlinie (73/23/ EWG) der EU arbeiten. Die CE-Zeichen auf unseren batteriegespeisten Geräten zeigen an, daß diese Geräte gemäß der EMC-Richtlinie (89/336/EWG) und der CE-Richtlinie (93/68/EWG) der EU arbeiten. Über das Urheberrecht Dieses Gerät ist ausschließlich für die Verwendung von Audiomaterial gedacht, dessen Urheberrechtsinhaber Sie sind bzw. wofür Sie eine schriftliche Genehmigung des Inhabers bekommen haben. Bei Verwendung von Material, das diesen Anforderungen nicht entspricht, verletzen Sie das Urheberrecht und machen sich strafbar. Bei Fragen wenden Sie sich bitte an einen kompetenten Fachmann und Kenner der Rechtslage. KORG ÜBERNIMMT KEINE HAFTUNG FÜR VERLETZUNGEN DES URHEBERRECHTS, AUCH WENN DAFÜR KORG-PRODUKTE IN GLEICH WELCHER WEISE VERWENDET WURDEN. Hinweise zur Verwendung des Geräts Bei einigen Personen können Reize durch intensives Licht oder rasch wechselnde Bilder Symptome wie vorübergehende Krämpfen oder Bewusstseinsverlust hervorrufen. Wenn Sie an sich derartige Symptome feststellen, unterbrechen Sie sofort die Arbeit mit dem Gerät und suchen Sie einen Arzt auf. Insbesondere bei Verwendung des Geräts auf öffentlichen Plätzen oder vor großem Publikum ist auch auf andere Personen zu achten. Sequenzen von rasch wechselnden Bildern bzw. intensiven Lichtreizen sind in diesem Fall zu vermeiden. Korg Corporation schließt jegliche Haftung für gesundheitliche oder Sachschäden beim Bediener oder anderen Personen, die aus der Nichtbeachtung dieses Warnhinweises entstehen, aus. Videosignal-Standard Das Krossfour kann entweder im NTSC- oder im PAL-Modus verwendet werden. Wählen Sie mit dem Schalter NTSC/PAL den korrekten Video-Standard für Ihre Ausrüstung oder Ihr Gebiet. Beachten Sie, dass das Gerät nicht korrekt funktioniert, wenn die Stellung des Schalters NTSC/PAL nicht mit dem Video-Standard Ihrer anderen Geräte übereinstimmt. Hinweis: „NTSC“ ist der in Japan und Nordamerika verwendete Standard. Schalten Sie den Schalter NTSC/PAL nicht bei eingeschaltetem Gerät um. Schalten Sie zuerst das Gerät aus. Wenn Nicht-Zeilensprung-Signale zugeführt werden, funktioniert das Krossfour nicht einwandfrei. Das Ausgangssignal von kopiergeschützten DVD- und Videoquellen kann verfärbt und verrauscht sein. Bei bestimmten Geräten oder Medien kann je nach ihren individuellen Eigenschaften und Fähigkeiten Rauschen auftreten. 2 Wir danken Ihnen für den Kauf des Krossfour 4-Kanal-Videomischpults. Bitte lesen Sie diese Anleitung aufmerksam durch und betreiben Sie das Gerät nur gemäß den Anweisungen, um langen und störungsfreien Betrieb dieses Produkts zu gewährleisten. Merkmale Zweikanal-Videomischpult mit vier$Auelleneingängen Bis zu vier Videoquellen können an das Krossfour angeschlossen werden, und jede der vier Quellen kann individuell jedem der beiden Mischpultkanäle zugewiesen werden. Das schlichte, intuitive Design ermöglicht leichtes Umschalten und Mischen für eine Vielzahl von Anwendungen: Video Jockeying, Video Performance, Video Editing und vieles mehr. Hintergrundbeleuchteter Überblendregler Der Überblendregler ermöglicht eine dynamische Regulierung der Mischung zwischen den beiden Videokanälen in Echtzeit. Durch die Wahl unterschiedlicher Faderkurven können Sie die Eigenschaften des Faders verändern und auf verschiedene Mischtechniken zugreifen. Monitorausgang Der Monitorausgang ermöglicht es Ihnen, jede der Videoquellen zu überprüfen oder „vorzuspielen“, ohne den Mischpultausgang zu beeinflussen — etwa wie eine Art Kopfhörer für die Augen. Chroma-Key ist eine Art Montageeffekt, der eine bestimmte Farbe eines Videobilds entfernt (oder „ausstanzt“), so dass die Hintergrund-Videoquelle durchscheint. An Planeten vorbeisausende Raumschiffe, durch die Luft fliegende Superhelden, oder der vor einer sich verändernden Wetterkarte stehende Wetteransager sind Beispiele von Chroma-KeyEffekten. Luma-Key-Effekt Wie Chroma-Key so ist auch Luminanz-Key (oder „Luma-Key“) eine Art Montageeffekt, der einen bestimmten Teil eines Videobilds entfernt, um ein Hintergrund-Videobild durchscheinen zu lassen. Anstelle eines bestimmten Farbwertes verwendet Luma-Key einen Helligkeitswert (Schwarz oder Weiß), um den auszustanzenden Bereich festzulegen. Beispielsweise können auf schwarzem Hintergrund erstellte weiße Titel in jedes Videobild schwebend eingeblendet werden, indem mit Luma-Key die schwarzen Bereiche der Titelaufnahme entfernt werden. Interner Zeitfehlerausgleicher (TBC) Bedienungsanleitung Chroma-Key- oder „Blue-Screen“-Effekte Die Zeitfehlerkorrektur ist notwendig, um eine stabile Synchronisierung zu erhalten, wenn mit mehreren Videoquellen gearbeitet wird. Die TBC-Digitalverarbeitung liefert eine ausgezeichnete Synchronisierung und gewährleistet stabile Bildverarbeitung, wenn Signale von verschiedenen DVD-Playern, Videorecordern, Videokameras, PCs mit Videoausgabefunktion und anderen derartigen Geräten gemischt oder umgeschaltet werden. Die Umschaltung von Eingangs- und Monitorquellen ist nicht bildsynchronisiert. Diese Art von Umschaltung kann Bildstörungen verursachen. 3 Bedienungselemente und Anschlüsse Oberseite 6 5 1 2 3 4 1. Tasten INPUT A SELECT Wird der Schalter MODE auf C-K (Chroma-Key) oder L-K (Luma-Key) gestellt, dann wird die gewählte Quelle als Hintergrundbild für einen Montageeffekt ausgegeben. Wird dieselbe Taste ein zweites Mal gedrückt, beginnt sie zu blinken. Wenn die Taste blinkt, wird die Eingangsquelle ignoriert, und die Ausgabe des Kanals hängt von der MODEEinstellung ab. Wird der Schalter MODE auf BK (Schwarz) oder WH (Weiß) gestellt, zeigt die blinkende Taste an, dass das Gerät das Quellenbild ignoriert und statt dessen die angegebene Hintergrundfarbe ausgibt. Diese festen Hintergründe können dann als Quelle für Videomischen verwendet werden. Wird der Schalter MODE auf C-K (Chroma-Key) oder L-K (Luma-Key) gestellt, dann zeigt die blinkende Taste an, dass die Eingangsquelle ignoriert und ein schwarzer Hintergrund für den Montageeffekt verwendet wird. Hinweis: Wenn kein Gerät an den gewählten Eingang angeschlossen ist (oder kein Signal vom angeschlossenen Gerät vorliegt), gibt das Krossfour ein blaues Hintergrundbild aus. 4 2. Tasten INPUT B SELECT Wird der Schalter MODE auf C-K (Chroma-Key) oder L-K (Luma-Key) gestellt, dann wird die gewählte Quelle als Vordergrundbild für einen Montageeffekt ausgegeben. Wird dieselbe Taste ein zweites Mal gedrückt, beginnt sie zu blinken. Wenn die Taste blinkt, wird die Eingangsquelle ignoriert, und die Ausgabe des Kanals hängt von der MODEEinstellung ab. Wird der Schalter MODE auf BK (Schwarz) oder WH (Weiß) gestellt, zeigt die blinkende Taste an, dass das Gerät das Quellenbild ignoriert und statt dessen die angegebene Hintergrundfarbe ausgibt. Diese festen Hintergründe können dann als Quelle für Videomischen verwendet werden. Wird der Schalter MODE auf C-K (Chroma-Key) oder L-K (Luma-Key) gestellt, dann zeigt die blinkende Taste an, dass der für Kanal B gewählte Eingang ignoriert und nur Kanal A ausgegeben wird. Wenn jedoch im Modus C-K die Taste HOLD gedrückt wird, während eine der Tasten INPUT B SELECT blinkt, wird statt dessen ein schwarzer Bildschirm für Kanal B ausgegeben. Hinweis: Wenn kein Gerät an den gewählten Eingang angeschlossen ist (oder kein Signal vom angeschlossenen Gerät vorliegt), gibt das Krossfour ein blaues Hintergrundbild aus. Zwei Tasten HOLD sind vorhanden, für jeden Kanal eine. Durch Drücken der Taste HOLD wird das Bild der gewählten Quelle (des betreffenden Kanals) eingefroren, so dass das Bild als Standbild erscheint. Die Taste fungiert als Umschalter: Beim ersten Drücken wird das Bild zum Standbild, beim zweiten Drücken wird es wieder zum Bewegtbild. Beachten Sie, dass Sie während der Standbildausgabe die Eingangsquelle wechseln können, aber das Standbild wird solange ausgegeben, bis die Taste HOLD ausgerastet wird. Im Modus C-K besitzt die Taste HOLD von Kanal B eine Sonderfunktion. Wenn eine der Tasten INPUT B SELECT blinkt, bewirkt das Drücken der Taste HOLD von Kanal B, dass Kanal B einen völlig schwarzen Bildschirm ausgibt. 4. Fader Damit können Sie die Mischung zwischen Kanal A und Kanal B dynamisch regulieren. Befindet sich der Schalter MODE in der Stellung C-K oder L-K, beeinflusst der Fader nur den Vordergrund- bzw. Overlayteil (Kanal B) des Bilds. Hinweis: Der Fader ist ein Verschleißteil und gehört nicht zu den Teilen, die kostenlos repariert werden. 5. Tasten MONITOR SELECT Die MONITOR-Funktion ermöglicht es Ihnen, jede Eingangsquelle zu überprüfen, bevor sie einem Mischpultkanal zugewiesen wird. Dadurch erhalten Sie die Möglichkeit, eine Videoquelle zu überprüfen oder „vorlaufen“ zu lassen. Wählen Sie mit den Tasten MONITOR SELECT, welcher der vier Eingänge mit der Buchse MONITOR OUT an der Frontplatte verbunden wird. Wenn Sie OUT wählen, liefert MONITOR OUT das gleiche (gemischte) Signal wie die Buchse VIDEO OUTPUT. Bedienungsanleitung 3. Tasten HOLD 6. Betriebslampe Diese Lampe leuchtet auf, um anzuzeigen, dass das Gerät eingeschaltet ist. Hinweis: Falls diese Lampe zu blinken beginnt, schalten Sie das Gerät bitte sofort aus. 5 Vorderseite 1 2 3 4 5 1. Schalter FADER CURVE Dieser Schalter dient zur Wahl der Faderkurve. Die Kurve bestimmt, wie der Fader die Mischung der beiden Kanäle beeinflusst. (Normale Kurve): Das Verschieben des Faders bewirkt eine allmähliche, lineare Veränderung der Mischung zwischen den beiden Kanälen. Die Mittenstellung entspricht einem Mischungsverhältnis von 50:50. Dies ist eine typische Überblendoperation: Die Bewegung in eine der beiden Richtungen schwächt den einen Kanal ab, während sie den anderen verstärkt. (Keine Mischung): Durch Verschieben zur Mitte werden beide Kanäle abgeschwächt; durch Verschieben zum jeweiligen Anschlag wird der entsprechende Kanal verstärkt. Die beiden Kanäle werden nicht gemischt. (Mittenmischung): Die Kanäle werden nur über die mittlere Spanne des Faderbereichs gemischt. (Umschalter): Der Fader wirkt wie ein Umschalter, der entweder Kanal A oder Kanal B wählt. Es erfolgt keine Abschwächung und keine Mischung. 2. Schalter MODE Dient zur Wahl der Hintergrundfarbe oder des Overlaymodus. BK (Schwarz): Stellt die Hintergrundfarbe auf Schwarz ein. WH (Weiß): Stellt die Hintergrundfarbe auf Weiß ein. C-K (Chroma-Key): Das Gerät stanzt die blauen Teile des Bilds von Kanal B (Vordergrund) aus, so dass das Signal des Kanals A (Hintergrund) durch die Ausschnitte durchscheint. L-K (Luminanz-Key): Das Gerät stanzt die schwarzen und weißen Anteile des Signals von Kanal B (Vordergrund) aus, so dass das Bild des Kanals A (Hintergrund) durch die Ausschnitte durchscheint. Hinweis: Für den Modus C-K und L-K dient Kanal A als Hintergrund, und Kanal B ist das Overlay. Beachten Sie, dass bei einer derartigen Mischung von Zoomsignalen der Fader nur das Bild des Kanals B beeinflusst. 3. Regler FINE (C-K/L-K-Pegeleinstellung) Dieser Regler ist nur im Modus C-K und L-K wirksam. Wenn der Modus C-K gewählt wird, stellt dieser Regler die Farbe des Bereichs ein, der vom Vordergrundbild (Kanal B) „ausgestanzt“ oder entfernt wird. Wenn der Modus L-K gewählt wird, stellt dieser Regler den Helligkeitspegel (von Weiß über Grau bis Schwarz) des Bereichs ein, der vom Vordergrundbild (Kanal B) „ausgestanzt“ oder entfernt wird. 4. Buchse INPUT 4 Dieser Eingang akzeptiert ein FBAS-Signal. 5. Buchse MONITOR OUT 6 Das von diesem Ausgang gelieferte Signal wird mit den Tasten MONITOR SELECT ausgewählt. Rückseite 8 7 6 1. Buchse INPUT 1 S-VIDEO 5 4 3 2 1 Dieser Eingang akzeptiert einen S-VIDEO-Stecker. 2. Buchse INPUT 1 Dieser Eingang akzeptiert ein FBAS-Signal. Wenn sowohl die Buchse S-VIDEO als auch die Buchse INPUT 1 belegt ist, ist nur der Eingang S-VIDEO wirksam. 3. Buchse INPUT 2, Buchse INPUT 3 Diese Eingänge akzeptieren FBAS-Signale. Dieser Ausgang liefert das Ausgangssignal vom Mischpult des Krossfour als S-VIDEOSignal. Dieses Signal setzt sich speziell aus den Signalen von Kanal A und Kanal B zusammen (entsprechend der Wahl durch die Tasten INPUT SELECT), nachdem sie vom Fader gemischt und verarbeitet worden sind. 5. Buchse OUTPUT VIDEO Dieser Ausgang liefert das Ausgangssignal vom Mischpult des Krossfour als FBAS-Signal. Hinweis: Die Buchsen OUTPUT S-VIDEO und OUTPUT VIDEO liefern den gleichen Inhalt. Beide Ausgänge können gleichzeitig verwendet werden. 6. Schalter NTSC/PAL Dieser Schalter dient zur Wahl des verwendeten Videostandards. Schalten Sie das Krossfour aus, bevor Sie diesen Schalter umschalten. Das Krossfour erfasst die Einstellung dieses Schalters beim ersten Einschalten, und diese Einstellung kann erst nach dem Ausschalten des Gerätes geändert werden. NTSC: Japan, Nordamerika u.a. PAL: Europa u.a. Bedienungsanleitung 4. Buchse OUTPUT S-VIDEO Hinweis: Vergewissern Sie sich, dass die Schalterstellung mit dem Standard Ihrer Eingangssignale übereinstimmt, weil anderenfalls das Ausgangssignal gestört ist. 7. 7-V-Gleichstrom-Eingang (DC 7V) Schließen Sie das Netzgerät (mitgeliefert) an diese Buchse an. 8. Ein-Aus-Schalter Dient zum Umschalten zwischen ON (Ein) und STANDBY (Bereitschaft). 7 Bedienungsverfahren 1. Anschlüsse herstellen. Verbinden Sie die Buchse OUTPUT VIDEO, OUTPUT S-VIDEO und/oder MONITOR OUT des Krossfour mit dem Eingang des (der) Anzeigegeräte(s) — Monitor, Projektor usw. Verbinden Sie den Ausgang des Quellengerätes (DVD-Player, Kamera, PC usw.) mit den Buchsen INPUT des Krossfour. Schließen Sie das Netzgerät (mitgeliefert) an die Eingangsbuchse DC 7V an, und stecken Sie den Netzstecker in eine Netzsteckdose. 2. Gerät einschalten. Stellen Sie den Ein-Aus-Schalter auf ON. 3. Bildausgang wählen und regulieren. Wählen Sie mit den Tasten INPUT SELECT eine Eingangsquelle für jeden Kanal. Schieben Sie den Fader zur Seite A, um das mit den Tasten INPUT A SELECT gewählte Quellensignal auszugeben. Schieben Sie den Fader zur Seite B, um das mit den Tasten INPUT B SELECT gewählte Quellensignal auszugeben. Wählen Sie mit dem Schalter FADER CURVE die gewünschte Betriebsfunktion des Faders. 4. Standbild ausgeben. Drücken Sie die Taste HOLD für einen der beiden Kanäle, um das Eingangssignal des Kanals einzufrieren und als Standbild auszugeben. Drücken Sie die Taste HOLD ein zweites Mal, um die normale Signalausgabe wiederherzustellen. 5. Ausgewählte Hintergrundfarbe von einem der Kanäle ausgeben. Beide Kanäle können auf Ausgabe eines schwarzen oder weißen Schirmbilds eingestellt werden. Wählen Sie den Kanal, auf dem die Hintergrundfarbe ausgegeben werden soll, und drücken Sie die gegenwärtig leuchtende Taste INPUT SELECT für den betreffenden Kanal. Die Taste beginnt zu blinken, und das Eingangssignal wird durch die mit dem Schalter MODE gewählte Hintergrundfarbe ersetzt: Schwarz (bei Einstellung des Schalters MODE auf BK) oder Weiß (bei Einstellung auf WH). 6. Montagebilder erzeugen Montagebilder (oder „Montageeffekte“) sind Spezialeffekte, die zwei Videoquellen zu einem Bild kombinieren — beispielsweise, um einen Spielzeugsaurier in die Innenstadt von Chicago zu stellen. Im Allgemeinen wird das erste Bild als Hintergrundtafel verwendet, und Teile des zweiten Bilds erscheinen als Overlay im Vordergrund. Es gibt zwei verschiedene Methoden, um anzugeben, welche Teile des Vordergrundbilds ausgestanzt werden, so dass das Hintergrundbild durchscheint. Chroma-Key-Effekte entfernen Teile des Vordergrunds auf der Basis ihrer Farbe. Traditionell werden die blauen Teile entfernt, so dass ein Gegenstand, der sich vor einem „Blue Screen“ befindet, in jeden Hintergrund eingeblendet werden kann. Bei Luma-Key-Effekten werden schwarze, weiße oder bestimmte graue Teile des Bilds nicht auf der Basis ihrer Farbe sondern ihrer Helligkeit entfernt. Wenn das Krossfour im Chroma-Key- (CK) oder Luma-Key-Modus (LK) eingesetzt wird, dient Kanal A als Hintergrundtafel, während Kanal B als Overlay oder Vordergrundbild verwendet wird. Und so wird’s gemacht. Wählen Sie die Quelle für das Hintergrundbild durch Drücken der entsprechenden Taste INPUT A SELECT. Wählen Sie die Quelle für das Overlay (Vordergrund) durch Drücken der entsprechenden Taste INPUT B SELECT. Wählen Sie mit dem Schalter MODE die Art des Montageeffekts: entweder C-K (ChromaKey) oder LK (Luminanz-Key). Wenn Sie C-K wählen, werden die blauen Teile des 8 Bedienungsanleitung Vordergrundbilds (Kanal B) entfernt. Wenn Sie L-K wählen, werden die schwarzen oder weißen Teile des Vordergrundbilds (Kanal B) entfernt. In beiden Fällen ist das Bild des Kanals A durch die mit dem „Key“-Effekt ausgestanzten Löcher sichtbar. Mit Hilfe des Reglers FINE können Sie das Ausmaß der Ausstanzfläche einstellen. Schieben Sie den Fader zur Seite B, um die Einstellung des Reglers FINE zu erleichtern. 9 Spezifikationen Videoformate: Video-Abtastrate: Bildsynchronizer: Eingänge: Ausgänge: Schalter: Montageeffekte: Stromversorgung: Abmessungen: Gewicht: Mitgeliefertes Zubehör: NTSC/PAL ITU601 13,5 MHz, 4:2:2, 8-Bit A und B (je 1) INPUT 1 (S-VIDEO/FBAS), INPUT 2, INPUT 3, INPUT 4 VIDEO OUTPUT (S-VIDEO), VIDEO OUTPUT (FBAS), MONITOR OUTPUT FADER CURVE (4 Positionen); MODE (schwarzer Hintergrund, weißer Hintergrund, Chroma-Key, LuminanzKey); Regler FINE (für Chroma-Key- und Luminanz-KeyEinstellung) Chroma-Key, Luminanz-Key 7 V Gleichstrom (dediziertes Netzgerät) 185 (B) × 249 (T) × 75 (H) mm 1,5 kg Netzgerät Änderungen der äußeren Aufmachung und Spezifikationen dieses Produkts vorbehalten. 10 Owner’s Manual 6 5 1 2 3 4 1 2 3 4 5 Owner’s Manual 8 7 6 5 4 3 2 1 Owner’s Manual Owner’s Manual Suggested Setup / Exemple d’installation Konfigurationsbeispiel / SCAN CONVERTER PC CONVERTISSEUR DE BALAYAGE ABTAASTRATENWANDLER TV MONITOR ECRAN MONITEUR TV-MONITOR DVD PLAYER LECTEUR DE DVD DVD-PLAYER INPUT OUTPUT INPUT1 INPUT2 INPUT3 DC7V PROJECTOR PROJECTEUR PROJEKTOR OUTPUT AC Secteur Netzsteckdose AC ADAPTER ADAPTER SECTEUR NETZGERÄT INPUT4 CAMCORDER CAMESCOPE CAMCORDER WARNING! This Product is only suitable for sale in Japan. Properly qualified service is not available for this product if purchased elsewhere. Any unauthorised modification or removal of original serial number will disqualify this product from warranty protection. IMPORTANT NOTICE TO CONSUMERS This product has been manufactured according to strict specifications and voltage requirements that are applicable in the country in which it is intended that this product should be used. If you have purchased this product via the internet, through mail order, and/or via a telephone sale, you must verify that this product is intended to be used in the country in which you reside. WARNING: Use of this product in any country other than that for which it is intended could be dangerous and could invalidate the manufacturer's or distributor's warranty. Please also retain your receipt as proof of purchase otherwise your product may be disqualified from the manufacturer's or distributor's warranty. REMARQUE IMPORTANTE POUR LES CLIENTS Ce produit a été fabriqué suivant des spécifications sévères et des besoins en tension applicables dans le pays où ce produit doit être utilisé. Si vous avez acheté ce produit via l’internet, par vente par correspondance ou/et vente par téléphone, vous devez vérifier que ce produit est bien utilisable dans le pays où vous résidez. ATTENTION: L’utilisation de ce produit dans un pays autre que celui pour lequel il a été conçu peut être dangereuse et annulera la garantie du fabricant ou du distributeur. Conservez bien votre récépissé qui est la preuve de votre achat, faute de quoi votre produit ne risque de ne plus être couvert par la garantie du fabricant ou du distributeur. WICHTIGER HINWEIS FÜR KUNDEN Dieses Produkt wurde unter strenger Beachtung von Spezifikationen und Spannungsanforderungen hergestellt, die im Bestimmungsland gelten. Wenn Sie dieses Produkt über das Internet, per Postversand und/oder mit telefonischer Bestellung gekauft haben, müssen Sie bestätigen, dass dieses Produkt für Ihr Wohngebiet ausgelegt ist. WARNUNG: Verwendung dieses Produkts in einem anderen Land als dem, für das es bestimmt ist, verwendet wird, kann gefährlich sein und die Garantie des Herstellers oder Importeurs hinfällig lassen werden. Bitte bewahren Sie diese Quittung als Kaufbeleg auf, da andernfalls das Produkt von der Garantie des Herstellers oder Importeurs ausgeschlossen werden kann. 15-12, Shimotakaido 1-chome, Suginami-ku, Tokyo, Japan 2004 KORG INC. URL: http://www.korg.co.jp/ 1606 CTH Printed in Japan