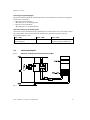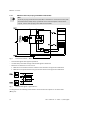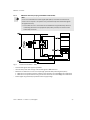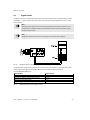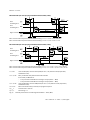
1
Druckaufbau- und Entlüftungsventil
Soft-start/quick exhaust valve
MS6-SV-...-E-10V24
de
Bedienungsanleitung
en
Operating
instructions
8028460
1310b
[8028461]
MS6-SV-...-E-10V24
Symbole/Symbols:
Warnung
Warning
Vorsicht
Caution
Einbau und Inbetriebnahme darf nur durch Fachpersonal mit entsprechender Qualifikation gemäß
dieser Bedienungsanleitung durchgeführt
werden.
Installation and commissioning may only be performed in accordance with these instructions by
technicians with appropriate qualifications.
Hinweis
Note
Umwelt
Environment
Zubehör
Accessories
Deutsch – Originalbetriebsanleitung . . . . . . . . . . . . . . . . . . . . . . . . . . . . . . . . . . . . . . . . . . . . . . . . . .
3
English – Translation of the original instructions . . . . . . . . . . . . . . . . . . . . . . . . . . . . . . . . . . . . . . . . .
40
2
Festo – MS6-SV-...-E-10V24 – 1310b
MS6-SV-...-E-10V24
Deutsch – Druckaufbau- und Entlüftungsventil
MS6-SV-...-E-10V24
Inhaltsverzeichnis
1
Sicherheit . . . . . . . . . . . . . . . . . . . . . . . . . . . . . . . . . . . . . . . . . . . . . . . . . . . . . . . . . . . . . . .
5
1.1
1.2
1.3
1.4
Allgemeine Sicherheitshinweise . . . . . . . . . . . . . . . . . . . . . . . . . . . . . . . . . . . . . . . . . . . . . .
Bestimmungsgemäße Verwendung . . . . . . . . . . . . . . . . . . . . . . . . . . . . . . . . . . . . . . . . . . .
Vorhersehbare Fehlanwendung . . . . . . . . . . . . . . . . . . . . . . . . . . . . . . . . . . . . . . . . . . . . . .
Sicherheitsfunktion nach EN ISO 13849 . . . . . . . . . . . . . . . . . . . . . . . . . . . . . . . . . . . . . . .
5
5
6
6
2
Voraussetzungen für den Produkteinsatz . . . . . . . . . . . . . . . . . . . . . . . . . . . . . . . . . . . . . .
7
2.1
2.2
2.3
2.4
2.5
Technische Voraussetzungen . . . . . . . . . . . . . . . . . . . . . . . . . . . . . . . . . . . . . . . . . . . . . . . .
Qualifikation des Fachpersonals . . . . . . . . . . . . . . . . . . . . . . . . . . . . . . . . . . . . . . . . . . . . . .
Ausfälle aufgrund gemeinsamer Ursache (Common Cause Failure – CCF) . . . . . . . . . . . . . .
Einsatzbereich und Zulassungen . . . . . . . . . . . . . . . . . . . . . . . . . . . . . . . . . . . . . . . . . . . . .
Service . . . . . . . . . . . . . . . . . . . . . . . . . . . . . . . . . . . . . . . . . . . . . . . . . . . . . . . . . . . . . . . . .
7
7
8
8
8
3
Bedienteile und Anschlüsse . . . . . . . . . . . . . . . . . . . . . . . . . . . . . . . . . . . . . . . . . . . . . . . .
9
4
Funktion und Anwendung . . . . . . . . . . . . . . . . . . . . . . . . . . . . . . . . . . . . . . . . . . . . . . . . . .
10
4.1
4.2
4.3
4.4
4.5
Betriebsarten Automatischer Start/Überwachter Start . . . . . . . . . . . . . . . . . . . . . . . . . . .
Funktionsprinzip der Multipol-Steckdosen NECA-…-MP1, -MP3 und -MP5 . . . . . . . . . . . . .
Anschlussbeispiele . . . . . . . . . . . . . . . . . . . . . . . . . . . . . . . . . . . . . . . . . . . . . . . . . . . . . . . .
4.3.1
MS6-SV-E mit Multipol-Steckdose NECA-S1G9-P9-MP1 . . . . . . . . . . . . . . . . . . .
4.3.2
MS6-SV-E mit Multipol-Steckdose NECA-S1G9-P9-MP3 . . . . . . . . . . . . . . . . . . .
4.3.3
MS6-SV-E mit Multipol-Steckdose NECA-S1G9-P9-MP5 . . . . . . . . . . . . . . . . . . .
Meldekontakt . . . . . . . . . . . . . . . . . . . . . . . . . . . . . . . . . . . . . . . . . . . . . . . . . . . . . . . . . . . .
Durchschaltdruck/Befüllzeit . . . . . . . . . . . . . . . . . . . . . . . . . . . . . . . . . . . . . . . . . . . . . . . . .
10
12
13
13
15
16
18
19
5
Einbau mechanisch/pneumatisch . . . . . . . . . . . . . . . . . . . . . . . . . . . . . . . . . . . . . . . . . . . .
20
5.1
5.2
Mechanischer Einbau . . . . . . . . . . . . . . . . . . . . . . . . . . . . . . . . . . . . . . . . . . . . . . . . . . . . . .
Pneumatischer Einbau . . . . . . . . . . . . . . . . . . . . . . . . . . . . . . . . . . . . . . . . . . . . . . . . . . . . .
5.2.1
Pneumatisch – Anschluss 1 und 2 . . . . . . . . . . . . . . . . . . . . . . . . . . . . . . . . . . . .
5.2.2
Pneumatisch – Anschluss 3 . . . . . . . . . . . . . . . . . . . . . . . . . . . . . . . . . . . . . . . . .
20
22
22
22
Festo – MS6-SV-...-E-10V24 – 1310b Deutsch
3
MS6-SV-...-E-10V24
6
Elektrischer Anschluss . . . . . . . . . . . . . . . . . . . . . . . . . . . . . . . . . . . . . . . . . . . . . . . . . . . .
23
6.1
6.2
6.3
Erdungsband anschließen . . . . . . . . . . . . . . . . . . . . . . . . . . . . . . . . . . . . . . . . . . . . . . . . . .
Multipol-Steckdose NECA-… anschließen . . . . . . . . . . . . . . . . . . . . . . . . . . . . . . . . . . . . . .
Eingänge und Ausgänge . . . . . . . . . . . . . . . . . . . . . . . . . . . . . . . . . . . . . . . . . . . . . . . . . . . .
24
25
26
7
Inbetriebnahme . . . . . . . . . . . . . . . . . . . . . . . . . . . . . . . . . . . . . . . . . . . . . . . . . . . . . . . . . .
26
8
Betrieb . . . . . . . . . . . . . . . . . . . . . . . . . . . . . . . . . . . . . . . . . . . . . . . . . . . . . . . . . . . . . . . . .
27
9
Wartung und Pflege . . . . . . . . . . . . . . . . . . . . . . . . . . . . . . . . . . . . . . . . . . . . . . . . . . . . . . .
27
10
Ausbau . . . . . . . . . . . . . . . . . . . . . . . . . . . . . . . . . . . . . . . . . . . . . . . . . . . . . . . . . . . . . . . . .
28
11
Außerbetriebnahme und Entsorgung . . . . . . . . . . . . . . . . . . . . . . . . . . . . . . . . . . . . . . . . .
28
12
Zubehör . . . . . . . . . . . . . . . . . . . . . . . . . . . . . . . . . . . . . . . . . . . . . . . . . . . . . . . . . . . . . . . . .
28
13
Diagnose und Fehlerbehandlung . . . . . . . . . . . . . . . . . . . . . . . . . . . . . . . . . . . . . . . . . . . .
29
13.1 LED-Anzeige . . . . . . . . . . . . . . . . . . . . . . . . . . . . . . . . . . . . . . . . . . . . . . . . . . . . . . . . . . . . .
13.2 Anzeige der Fehlercodes . . . . . . . . . . . . . . . . . . . . . . . . . . . . . . . . . . . . . . . . . . . . . . . . . . . .
13.3 Störungsbeseitigung bei auftretendem Fehlercode: . . . . . . . . . . . . . . . . . . . . . . . . . . . . . .
29
29
30
14
Technische Daten . . . . . . . . . . . . . . . . . . . . . . . . . . . . . . . . . . . . . . . . . . . . . . . . . . . . . . . . .
31
14.1
14.2
14.3
14.4
14.5
Sicherheitstechnische Kenngrößen . . . . . . . . . . . . . . . . . . . . . . . . . . . . . . . . . . . . . . . . . . .
Allgemeine Daten . . . . . . . . . . . . . . . . . . . . . . . . . . . . . . . . . . . . . . . . . . . . . . . . . . . . . . . . .
Befüllungsdurchfluss . . . . . . . . . . . . . . . . . . . . . . . . . . . . . . . . . . . . . . . . . . . . . . . . . . . . . .
Entlüftungsszeit . . . . . . . . . . . . . . . . . . . . . . . . . . . . . . . . . . . . . . . . . . . . . . . . . . . . . . . . . .
Schaltverhalten der Multipol-Steckdosen NECA-…-MP1, -MP3 und -MP5 . . . . . . . . . . . . . .
14.5.1
Schaltverhalten für Multipol-Steckdose NECA-S1G9-P9-MP1 . . . . . . . . . . . . . .
14.5.2
Schaltverhalten für Multipol-Steckdose NECA-S1G9-P9-MP3/-MP5 . . . . . . . . .
31
31
34
35
36
36
38
4
Festo – MS6-SV-...-E-10V24 – 1310b Deutsch
MS6-SV-...-E-10V24
1
Sicherheit
1.1
Allgemeine Sicherheitshinweise
Hinweis
Verlust der Sicherheitsfunktion
Wenn Maßnahmen zur Beherrschung der “Ausfälle aufgrund gemeinsamer Ursache”
(CCF) nicht eingehalten werden, kann die Sicherheitsfunktion des Druckaufbau- und
Entlüftungsventils beeinträchtigt werden.
• Stellen Sie sicher, dass die beschriebenen Maßnahmen zur Beherrschung der
“Ausfälle aufgrund gemeinsamer Ursache” (CCF) eingehalten werden ( Kap. 2.3
und Kap. 14.1 ).
Hinweis
Verlust der Sicherheitsfunktion
Nicht-Einhalten der Technischen Daten kann zum Verlust der Sicherheitsfunktion führen.
• Halten Sie die Technischen Daten ein.
1.2
Bestimmungsgemäße Verwendung
Das elektropneumatische Druckaufbau- und Entlüftungsventil dient bestimmungsgemäß ausschließlich
dem schnellen und sicheren Entlüften und dem sanften Druckaufbau in pneumatischen Leitungssystemen und Endgeräten der Industrie.
Bei dem Produkt handelt es sich um ein sicheres, redundantes mechatronisches System nach den
Forderungen der EN ISO 13849-1+2, bei dem die pneumatische Sicherheitsfunktion “sicheres
Entlüften” auch bei einem Fehler im Ventil (z. B. durch Verschleiß, Verschmutzung) gewährleistet ist.
Über den elektrischen Anschluss (Multipol-Steckdose NECA-… Sub-D, 9-polig) erhält das
MS6-SV-...E-10V24-… die sicheren Enable-Signale (EN1/EN2) von handelsüblichen elektronischen oder
elektromechanischen Sicherheitsschaltgeräten, die die Schutzeinrichtungen der Maschine (z. B. NotHalt, Lichtgitter, elektrische Türschalter der Schutzeinhausung etc.) überwachen.
Das Produkt ist zum Einbau in Maschinen bzw. automatisierungstechnische Anlagen bestimmt und
ausschließlich folgendermaßen einzusetzen:
– im Industriebereich
– innerhalb der durch die technischen Daten definierten Grenzen des Produkts
( Kap. 14 Technische Daten)
– im Originalzustand ohne eigenmächtige Veränderungen
– in technisch einwandfreiem Zustand
– im Standardbetrieb, zu dem auch Stillstand, Einricht- und Servicebetrieb sowie Notfallbetrieb
zählen
Festo – MS6-SV-...-E-10V24 – 1310b Deutsch
5
MS6-SV-...-E-10V24
1.3
Vorhersehbare Fehlanwendung
Zur nicht bestimmungsgemäßen Verwendung gehören folgende vorhersehbare Fehlanwendungen:
– der Einsatz im Außenbereich
– der Einsatz als Pressensicherheitsventil
– das Umgehen der Sicherheitsfunktion
– der Einsatz im reversiblen Betrieb (Umkehrung von Zu- und Abluft)
– Vakuumbetrieb
Hinweis
Bei Schäden, die aufgrund von unbefugten Eingriffen oder nicht bestimmungsgemäßem
Gebrauch entstehen, erlischt der Gewährleistungs- und Haftungsanspruch gegenüber
dem Hersteller.
1.4
Sicherheitsfunktion nach EN ISO 13849
Für die Sicherheitsfunktionen weist das elektropneumatische Druckaufbau- und Entlüftungsventil
steuerungstechnische Eigenschaften auf, mit denen ein Performance Level e erreicht werden kann.
Das Produkt wurde nach den grundlegenden und bewährten Sicherheitsprinzipien der EN ISO 13849-2
entwickelt und gefertigt.
Folgende Anforderungen gelten für den Betreiber:
– Die Angaben zur Montage und den Betriebsbedingungen in dieser Bedienungsanleitung sind einzuhalten.
– Für einen Einsatz in höheren Kategorien (2 bis 4) sind die Anforderungen der EN ISO 13849 (z. B.
CCF) zu berücksichtigen.
– Das Produkt muss mindestens einmal pro Monat ausgeschaltet werden, um die Sicherheitsfunktion
sicherzustellen.
– Die grundlegenden und bewährten Sicherheitsprinzipien der EN ISO 13849-2 zur Implementierung
und zum Betrieb des Bauteils sind zu erfüllen.
– Beim Einsatz dieses Produkts in Maschinen oder Anlagen, für die spezifische C-Normen gelten, sind
die dort genannten Anforderungen zu beachten.
– Vor dem Einsatz des Produkts ist eine Risikobeurteilung entsprechend EN ISO 12100 nach
Maschinenrichtlinie 2006/42/EG, Anhang I, Absatz 1 und 1.1.2 notwendig.
– Der Anwender ist dafür verantwortlich, alle geltenden Sicherheitsvorschriften und -regeln mit der
für ihn zuständigen Behörde in eigener Verantwortung abzustimmen und einzuhalten.
6
Festo – MS6-SV-...-E-10V24 – 1310b Deutsch
MS6-SV-...-E-10V24
2
Voraussetzungen für den Produkteinsatz
• Stellen Sie diese Bedienungsanleitung dem Konstrukteur und Monteur der Maschine oder Anlage,
an der dieses Produkt zum Einsatz kommt, zur Verfügung.
• Bewahren Sie diese Bedienungsanleitung während des gesamten Produktlebenszyklus auf.
• Berücksichtigen Sie die für den Bestimmungsort geltenden gesetzlichen Regelungen sowie:
– Vorschriften und Normen,
– Regelungen der Prüforganisationen und Versicherungen,
– nationale Bestimmungen.
2.1
Technische Voraussetzungen
Allgemeine, stets zu beachtende Hinweise für den ordnungsgemäßen und sicheren Einsatz des Produkts:
• Halten Sie die angegebenen Grenzwerte ein (z. B. für Drücke, Temperaturen und elektrische
Spannungen).
• Sorgen Sie für Druckluft mit ordnungsgemäßer Aufbereitung gemäß den Angaben zum Medium.
• Entfernen Sie Partikel in den Zuleitungen vor der Montage durch geeignete Maßnahmen. Sie
schützen das Produkt so vor frühzeitigem Ausfall und höherem Verschleiß.
• Belüften Sie Ihre gesamte Anlage langsam. Damit können schlagartige Bewegungen vermieden
werden.
• Beachten Sie die Warnungen und Hinweise in dieser Bedienungsanleitung.
• Verwenden Sie das Produkt im Originalzustand mit zugehöriger Multipol-Steckdose NECA-… ohne
eigenmächtige Veränderung.
2.2
Qualifikation des Fachpersonals
Einbau, Installation, Inbetriebnahme, Wartung, Reparatur und Außerbetriebnahme dürfen nur von
qualifiziertem Fachpersonal mit Kenntnissen und Erfahrungen im Umgang mit elektrischer und pneumatischer Steuerungstechnik vorgenommen werden.
Festo – MS6-SV-...-E-10V24 – 1310b Deutsch
7
MS6-SV-...-E-10V24
2.3
Ausfälle aufgrund gemeinsamer Ursache (Common Cause Failure –
CCF)
Ausfälle aufgrund gemeinsamer Ursache bewirken den Verlust der Sicherheitsfunktion, da in diesem
Fall beide Kanäle in einem zweikanaligen System gleichzeitig ausfallen.
Durch folgende Maßnahmen stellen Sie sicher, dass Ausfälle aufgrund gemeinsamer Ursache vermieden werden:
– Einhaltung der zulässigen Werte für Schwing- und Schockbelastung
– Einhaltung des Temperaturbereichs
– Einhaltung der Druckluftqualität entsprechend den technischen Daten, insbesondere Vermeidung
von Flugroststaub (z. B. hervorgerufen durch Service-Arbeiten) sowie Einhaltung des Restölgehalts
von max. 0,1 mg/m3 bei Verwendung von esterhaltigen Ölen (die z. B. im Kompressoröl enthalten
sein können)
– Einhaltung des maximalen Betriebsdrucks ggf. durch den Einsatz eines Druckbegrenzungsventils
– Ein Zusetzen des Schalldämpfers muss vermieden werden ( Abschnitt 5.2.2)
Beachten Sie hierzu die technischen Daten im Kapitel 14.
Hinweis
Verlust der Sicherheitsfunktion
Nicht-Einhalten der Technischen Daten kann zum Verlust der Sicherheitsfunktion führen.
• Halten Sie die Technischen Daten ein.
2.4
Einsatzbereich und Zulassungen
Das Produkt ist ein Sicherheitsbauteil nach Maschinenrichtlinie 2006/42/EG und mit dem CE-Kennzeichen versehen.
Sicherheitsgerichtete Normen und Prüfwerte, die das Produkt einhält und erfüllt, finden Sie im Abschnitt Technische Daten. Die produktrelevanten EG-Richtlinien und Normen entnehmen Sie bitte der
Konformitätserklärung.
Zertifikate und die Konformitätserklärung zu diesem Produkt finden Sie auf:
www.festo.com/sp
2.5
Service
Es dürfen nur Reparaturen mit im Ersatzteilkatalog gelisteten Teilen durchgeführt werden. Das Öffnen
des Gehäuses ist untersagt. Bitte wenden Sie sich bei technischen Problemen an Ihren lokalen Service
von Festo.
8
Festo – MS6-SV-...-E-10V24 – 1310b Deutsch
MS6-SV-...-E-10V24
3
Bedienteile und Anschlüsse
Das elektropneumatische Druckaufbau- und Entlüftungsventil MS6-SV-...-E-10V24-..., im folgendem
MS6-SV-E genannt, entspricht der Kategorie 4 mit einem maximal erreichbarer Performance Level e
nach DIN EN ISO 13849-1.
1
2
3
9
4
5
6
8
7
1
2
3
4
5
LED Anzeige (LED Power und LED Error)
Drosselschraube für Softstartfunktion
Pneumatischer Anschluss 1 (Eingang
Druckluft)
Elektronikblock
Ventilblock
Fig. 1
6
7
8
9
Multipol-Steckdose NECA-… (Zubehör)
Pneumatischer Anschluss 3 (Entlüftung)
Vormontiertes Erdungsband
Pneumatischer Anschluss 2 (Ausgang
Druckluft)
Bedienteile und Anschlüsse
Festo – MS6-SV-...-E-10V24 – 1310b Deutsch
9
MS6-SV-...-E-10V24
4
Funktion und Anwendung
4.1
Betriebsarten Automatischer Start/Überwachter Start
Die folgenden zwei Betriebsarten sind möglich:
– “Automatischer Start” (automatic reset)
– “Überwachter Start” (monitored reset)
In beiden Betriebsarten kann das MS6-SV-E abhängig von der verwendeten Multipol-Steckdose
NECA-… entweder mit statischen oder dynamischen Enable-Signalen (EN1/EN2) elektrisch angesteuert
werden.
Funktionsweise der Betriebsarten ( Fig. 2):
– Die Betriebsart “Automatischer Start” (automatic reset) ist durch eine Brücke von Klemme 5 auf 6
in der Multipol-Steckdose NECA-… voreingestellt (Auslieferungszustand).
– Die Betriebsart “Überwachter Start” (monitored reset) ist aus Sicht des Gesamtsystems als unterlagerter Start anzusehen. Führend ist immer das Freigabesignal des Sicherheitsrelais oder der Steuerung.
Hinweis
Der durch den Starttaster generierte Impuls muss in einem Zeitfenster zwischen 0,1 s
und 2 s liegen.
Wenn der Starttaster zu lange gedrückt wird oder einrastet, wird ein Querschluss
erkannt und das Gerät geht in den Fehlermodus.
Hinweis
Das Startsignal auf S34 darf erst 1 s nach dem Anlegen der Enable-Signale EN1/EN2
erzeugt werden.
Wenn das Startsignal vor oder zeitgleich mit den Enable-Signalen liegt, wird dieses nicht
erkannt und muss erneut gesetzt werden.
10
Festo – MS6-SV-...-E-10V24 – 1310b Deutsch
MS6-SV-...-E-10V24
Automatischer Start
(Auslieferungszustand)
Fig. 2
Überwachter Start
Betriebsarten
Festo – MS6-SV-...-E-10V24 – 1310b Deutsch
11
MS6-SV-...-E-10V24
4.2
Funktionsprinzip der Multipol-Steckdosen NECA-…-MP1, -MP3 und
-MP5
Zustand von
EN1
Zustand von
EN2
Zustand Ventil
mit NECA-…-MP1
Zustand Ventil
mit NECA-…-MP3
Zustand Ventil mit
NECA-…-MP5
0V
0V
Unbelüftet
Ventil geht in den
Fehlermodus
0V
24 V
Belüftet
24 V
24 V
Ventil geht in den
Fehlermodus
Belüftet
Ventil geht nicht in den
Fehlermodus, bleibt aber
im sicheren, unbelüfteten
Zustand
Hinweis:
Querschlusserkennung
und Fehlererkennung/
Auswertung über externe
Steuerung notwendig
Belüftet
24 V
0V
Ventil geht in den
Fehlermodus
Unbelüftet
Tab. 1
12
Ventil geht in den
Fehlermodus
Ventil geht nicht in den
Fehlermodus, bleibt aber
im sicheren, unbelüfteten
Zustand
Hinweis:
Querschlusserkennung
und Fehlererkennung/
Auswertung über externe
Steuerung notwendig
Unbelüftet
Funktionsprinzip der Multipol-Steckdosen NECA-…
Festo – MS6-SV-...-E-10V24 – 1310b Deutsch
MS6-SV-...-E-10V24
Erkennung von Signalübergängen
Werden Sicherheitsausgänge mit Testimpulsen benutzt, um das MS6-SV-E anzusteuern, ist folgendes
Zeitverhalten zu beachten:
• MS6-SV-E Zustand Entlüftung
Testimpulse < 3 ms werden ignoriert
• MS6-SV-E Zustand Belüftung
Testimpulse < 12 ms werden ignoriert
Querschlusserkennung der Enable-Signale
Generell ist eine Querschlußerkennung zu gewährleisten, um Performance Level e zu erreichen. Abhängig vom gewählten Stecker erkennt entweder das MS6-SV-E selbst den Querschluss oder das
Sicherheitsschaltgerät/-SPS.
NECA-…-MP1
NECA-…-MP3
NECA-…-MP5
durch Sicherheitsschaltgerät/-SPS
(taktende Signale)
durch MS6-SV-E
durch Sicherheitsschaltgerät/-SPS
(Überwachung Potentialdifferenz)
Tab. 2
Querschlusserkennung
4.3
Anschlussbeispiele
4.3.1
MS6-SV-E mit Multipol-Steckdose NECA-S1G9-P9-MP1
Fig. 3
Anschluss NECA-...-MP1
Festo – MS6-SV-...-E-10V24 – 1310b Deutsch
13
MS6-SV-...-E-10V24
Die Multipol-Steckdose NECA-…-MP1 ist für statische und taktende Sicherheitsausgänge einsetzbar:
– Statische Enable-Signale (EN1/EN2 = 24 V)
Fig. 4
Statische Enable-Signale - Signalabstand
– Taktende Enable-Signale (EN1/EN2 = 24 V) zur Querschlusserkennung.
Die Querschlusserkennung mittels Taktsignalen wird grundsätzlich durch das verwendete Sicherheitsschaltgerät/Sicherheits-SPS durchgeführt.
Fig. 5
Enable-Signale – Querschlusskennung
Die Diagramme für das Schaltverhalten finden Sie im Kapitel 14 “Technische Daten” ( Fig. 20).
Hinweis
Da die Taktausgänge diverser Steuerungshersteller nicht genormt sind, ist die Verwendbarkeit jeweils zu überprüfen. Liegt der Takt außerhalb der beschriebenen Grenzen wird
das vom MS6-SV-E als Fehler erkannt und eine sichere Abschaltung herbeigeführt.
14
Festo – MS6-SV-...-E-10V24 – 1310b Deutsch
MS6-SV-...-E-10V24
4.3.2
MS6-SV-E mit Multipol-Steckdose NECA-S1G9-P9-MP3
Hinweis
Die Multipol-Steckdose NECA-S1G9-P9-MP3 ist für die konventionelle Beschaltung mit
elektromechanischen Sicherheitsrelais vorgesehen. Kommt es bei der Verwendung mit
bipolaren Halbleiterausgängen zu Problemen, verwenden Sie in diesem Fall die Multipol-Steckdose NECA-S1G9-P9-MP5
Fig. 6
Anschluss mit NECA-...-MP3
– statische Enable-Signale mit entgegengesetzten Potentialen
– Verzögerungszeit der Pegelwechsel der Enable-Signale werden überwacht
– Verhalten bei der Erkennung eines Querschlusses:
• MS6-SV-E im entlüfteten Zustand: bleibt im sicheren Zustand und geht in Störung
• MS6-SV-E im belüfteten Zustand: geht in den sicheren Zustand und geht in Störung
Fig. 7
Statische Enable-Signale - Signalabstand
Die Diagramme für das Schaltverhalten finden Sie im Kapitel 14 “Technische Daten” ( Fig. 22).
Festo – MS6-SV-...-E-10V24 – 1310b Deutsch
15
MS6-SV-...-E-10V24
4.3.3
MS6-SV-E mit Multipol-Steckdose NECA-S1G9-P9-MP5
Hinweis
Ein Querschluss zwischen den Enable-Signalen EN1/EN2 wird nicht erkannt und führt zu
keiner Fehlerreaktion. Erst wenn die Enable-Signale korrekt anliegen, wird die Anlage
belüftet.
• Sicherstellen, dass die Querschlusserkennung durch entsprechende Maßnahmen in
der Peripherie (SPS/Sicherheitssteuerung) im Sinne der gültigen Sicherheitsstandards hergestellt und gewährleistet werden.
Fig. 8
Anschluss mit NECA-...-MP5
– statische Enable-Signale mit entgegengesetzten Potentialen
– Verzögerungszeit der Pegelwechsel der Enable-Signale werden nicht überwacht
– Verhalten bei der Erkennung eines Querschlusses (durch vorgeschaltetes
Sicherheitsschaltgerät/-SPS):
• MS6-SV-E im entlüfteten Zustand: bleibt im sicheren Zustand und geht nicht in Störung
• MS6-SV-E im belüfteten Zustand: geht in den sicheren Zustand und geht nicht in Störung
– Enable-Signale sind galvanisch von der Versorgungsspannung getrennt
16
Festo – MS6-SV-...-E-10V24 – 1310b Deutsch
MS6-SV-...-E-10V24
Fig. 9
Statische Enable-Signale - Signalabstand
Die Diagramme für das Schaltverhalten finden Sie im Kapitel 14 “Technische Daten” ( Fig. 22).
Schaltzustände
Hinweis
Die Verzögerungszeit t2 zwischen EN1 und EN2 muss selbstständig festgelegt werden.
Die zeitliche Dauer der Verzögerung wird nicht ausgewertet. Die Multipol-Steckdose
NECA-MP5 erlaubt keine Querschlusserkennung durch das MS6-SV-E..
Festo – MS6-SV-...-E-10V24 – 1310b Deutsch
17
MS6-SV-...-E-10V24
4.4
Meldekontakt
Der Meldekontakt ist ein potentialfreier Schließerkontakt eines Halbleiterrelais. Über die Klemmen 3
und 4 der Multipol-Steckdose NECA-… kann der Kontakt bei Bedarf in den Rückführkreis (feedback
circuit) einer Sicherheitssteuerung aufgenommen werden.
Hinweis
Ein Betrieb des Meldekontakts außerhalb der zulässigen technischen Daten führt zu
dessen irreparablen Ausfall. Die Einhaltung der Spezifikation ist durch eine geeignete
Schutzbeschaltung sicherzustellen.
Hinweis
Die Belegung dieser Kontakte ist für das Erreichen des Sicherheitskategorie nicht
erforderlich.
Fig. 10
Anschluss Feedbacksignal
Die Diagramme für das Schaltverhalten finden Sie im Kapitel 14 “Technische Daten” (mit MultipolSteckdose NECA-S1G9-P9-MP1 Fig. 20; mit Multipol-Steckdose NECA-S1G9-P9-MP3/MP5
Fig. 22).
Zustand Ventil
Meldekontakt
Ansteuerung zur Belüftung durch EN1 und EN2
Ansteuerung zur Entlüftung durch EN1 und EN2
Störung (rote LED blinkt)
Versorgungsspannung liegt nicht an
offen
geschlossen
offen
offen
Tab. 3
18
Schaltzustände des Meldekontakts
Festo – MS6-SV-...-E-10V24 – 1310b Deutsch
MS6-SV-...-E-10V24
4.5
Durchschaltdruck/Befüllzeit
Mit der im Deckel befindlichen Drosselschraube wird ein langsamer Druckaufbau des Ausgangsdrucks
p2 erzeugt. Durch Drehen der Drosselschraube kann der Druckanstieg eingestellt werden. Hat der Ausgangsdruck p2 ca. 50 % des Betriebsdrucks p1 erreicht, öffnet das Ventil und die maximale Druchflussleistung wird freigegeben.
1
2
1
Verhältnis p2 zu p1 [%]
Fig. 11
2
Zeitachse t
Toleranzfeld Durchschaltdruck
Beispiel:
Bei einem Betriebsdruck von p1 = 4 bar, ist unter Beachtung der zulässigen Toleranz von ±20 % ein
Durchschaltdruck von 1,2 bis 2,8 bar zulässig.
1
3
4
2
1
2
Ausgangsdruck p2 [bar]
Zeitachse t
Fig. 12
3
4
Drosselschraube +
Drosselschraube -
Toleranzfeld Befüllzeit
Festo – MS6-SV-...-E-10V24 – 1310b Deutsch
19
MS6-SV-...-E-10V24
5
Einbau mechanisch/pneumatisch
5.1
Mechanischer Einbau
Hinweis
Um die elektromagnetische Verträglichkeit laut EMV-Richtlinie sicherstellen zu können,
beachten Sie Folgendes:
• Wandabstand von 32 mm einhalten (z. B. mit dem Befestigungswinkel MS6-WPB).
• Keine Kabel zwischen Wand und MS6-SV-E verlegen.
Hinweis
Verlust der Sicherheitsfunktion
Wenn der minimale Abstand von 15 mm zwischen Schalldämpfer und Boden nicht
eingehalten wird, kann es zum Verlust der Sicherheitsfunktion kommen.
• Minimalen Abstand von 15 mm unterhalb des Schalldämpfers einhalten ( Fig. 13).
Der Freiraum sorgt für ein störungsfreies Entlüften.
Informationen zur Montage von Modulverbinder, Anschlussplatte und Befestigungswinkel
finden Sie in der Bedienungsanleitung, die dem Zubehör beigefügt ist.
• Platzieren Sie das MS6-SV-E so nahe wie möglich am
Einsatzort.
• Die Einbaulage ist beliebig.
Fig. 13
20
Einbau
Festo – MS6-SV-...-E-10V24 – 1310b Deutsch
MS6-SV-...-E-10V24
• Beachten Sie die Durchflussrichtung von 1 nach 2. Als
Orientierung dienen die Ziffern 1 und 2 auf dem
Produktgehäuse ( Fig. 14).
1
Fig. 14
Durchflussrichtung
Zusammenbau mit Wartungsgeräten der MS-Baureihe
Hinweis
Verlust der Sicherheitsfunktion
Der falsche Einbau in die Wartungskombination kann zum Verlust der Sicherheitsfunktion führen.
• Nach dem MS6-SV-E dürfen nur Geräte platziert werden, die die pneumatische
Schutzmaßnahme “sicheres Entlüften” nicht beeinträchtigen.
Beim Zusammenbau mit einem oder mehreren bereits vorhandenen Wartungsgeräten der gleichen
Baureihe ( Fig. 15):
1. Demontieren Sie, falls vorhanden, die Abdeckkappe MS6-END 1 auf der Zusammenbauseite (nach oben schieben).
2. Platzieren Sie die Modulverbinder MS6-MV 2
in den Nuten der Einzelgeräte. Dabei ist zwischen den Einzelgeräten eine Dichtung (im
Lieferumfang Modulverbinder MS6-MV bzw.
Befestigungswinkel MS6-WPB) erforderlich.
3. Befestigen Sie die Modulverbinder MS6-MV
mit 2 Schrauben.
1
2
max. 1,2 Nm
Fig. 15
Festo – MS6-SV-...-E-10V24 – 1310b Deutsch
Zusammenbau
21
MS6-SV-...-E-10V24
5.2
Pneumatischer Einbau
5.2.1
Pneumatisch – Anschluss 1 und 2
Bei Verwendung von Anschlussverschraubungen mit Schlüsselweite größer SW24:
• Entfernen Sie die Abdeckkappe MS6-END (nach oben schieben), falls vorhanden.
Bei Verwendung von Anschlussverschraubungen:
• Beachten Sie die zulässige Einschraubtiefe von 10 mm der Anschlussgewinde.
Für größere Einschraubtiefen müssen die Anschlussplatten MS6-AG…/AQ… von Festo verwendet
werden.
• Achten Sie auf korrekten Anschluss der Druckluftleitungen.
• Drehen Sie die Verschraubungen unter Verwendung von geeignetem Dichtmaterial in die pneumatischen Anschlüsse.
5.2.2
Pneumatisch – Anschluss 3
Bei der Entlüftung einer Anlage über das MS6-SV-E entstehen hohe Schalldruckpegel. Daher ist der
Einsatz eines Schalldämpfers zu empfehlen.
Hinweis
Warnung
Verlust der Sicherheitsfunktion
Durch ein Zusetzen des Dämpferkörpers eines handelsüblichen Schalldämpfers kann es
zu einer reduzierten Entlüftungsleistung (Staudruck) kommen, die bis zu einem vollständigem Verlust der Sicherheitsfunktion führen kann.
• Verwenden Sie die zum Gerät zugehörigen Sicherheitsschalldämpfer UOS-…
( Kapitel 12 “Zubehör”).
• Verwenden Sie einen handelsüblichen Schalldämpfer nur dann, wenn dieser in
Verbindung mit einer Staudrucküberwachung eingesetzt wird. Zusätzlich muss der
Schalldämpfer regelmäßig durch Servicepersonal überprüft und ggf. ausgetauscht
werden.
• Drehen Sie den Schalldämpfer in den pneumatischen Anschluss 3.
• Achten Sie auf eine ungehinderte Entlüftung. Der Schalldämpfer oder der Anschluss 3 dürfen nicht
versperrt werden.
22
Festo – MS6-SV-...-E-10V24 – 1310b Deutsch
MS6-SV-...-E-10V24
6
Elektrischer Anschluss
Vorsicht
Verletzungsgefahr durch elektrischen Schlag
• Der elektrische Anschluss darf nur in spannungslosem Zustand und nur durch
Fachpersonal hergestellt werden.
Vorsicht
Verwenden Sie ausschließlich Stromquellen, die eine sichere elektrische Trennung der
Betriebsspannung nach IEC/DIN EN 60204-1 gewährleisten. Berücksichtigen Sie zusätzlich die allgemeinen Anforderungen an PELV-Stromkreise gemäß IEC/DIN EN 60204-1.
Hinweis
Lange Signalleitungen reduzieren die Störfestigkeit.
• Stellen Sie sicher, dass die Signalleitungen stets kürzer sind als 20 m.
• Die Signalleitungen müssen getrennt von Leitungen, die Störungen aussenden,
gemäß EN 60204-1 verlegt werden.
Festo – MS6-SV-...-E-10V24 – 1310b Deutsch
23
MS6-SV-...-E-10V24
6.1
Erdungsband anschließen
• Verbinden Sie den vormontierten Erdungsanschluss
niederohmig (kurze Leitung mit großem Querschnitt)
mit dem Erdpotential.
Sie vermeiden damit Störungen durch elektromagnetische Einflüsse und stellen die elektromagnetische
Verträglichkeit gemäß den EMV-Richtlinien sicher.
Fig. 16
24
Anschluss Erdungskabel
Festo – MS6-SV-...-E-10V24 – 1310b Deutsch
MS6-SV-...-E-10V24
6.2
Multipol-Steckdose NECA-… anschließen
Hinweis
Das MS6-SV-E darf nur mit den dafür zugelassenen Multipol-Steckdosen NECA-…
verwendet werden ( Fig. 17). Informationen zur Klemmenbelegung finden Sie in der
beigefügten Montageanleitung der jeweiligen Multipol-Steckdose NECA-….
Hinweis
Achten Sie beim Montieren der Multipol-Steckdosen NECA-… mit beigefügter Dichtung
auf die richtige Orientierung des Steckers in Bezug auf das Ventil. Das Sichtfenster der
Multipol-Steckdose NECA-… muss nach vorne zeigen.
• Schließen Sie die Multipol-Steckdose
NECA-… in der richtigen Orientierung an. Das
Fenster zeigt zum Schalldämpfer.
Achten Sie darauf, das die Schrauben fest
angezogen sind, damit Schutzart IP65
gewährleistet ist. Das Anziehdrehmoment
beträgt max. 0,4 ± 0,1 Nm.
NECA-S1G9-P9-MP5
NECA-S1G9-P9-MP3
NECA-S1G9-P9-MP1
Fig. 17
Festo – MS6-SV-...-E-10V24 – 1310b Deutsch
Elektrischer Anschluss
25
MS6-SV-...-E-10V24
6.3
Eingänge und Ausgänge
Klemme in
MultipolSteckdose NECA-…
E/A
Belegung
1
EN1
2
EN2
3
13
Enable-Signal 1 (statisch
oder dynamisch)
Enable-Signal 2 (statisch
oder dynamisch)
Meldekontakt, NO
4
14
5
A5
6
S34
7
8
9
Tab. 4
7
–
+L1
M
Kontakt für Betriebsart
“Automatischer Start”
Kontakt für Betriebsart
“Automatischer Start”
oder “Überwachter
Start”
–
Betriebsspannung
GND
Eingang 0 V/24 V
(EN 61131-2 Typ 2)
Eingang 0 V/24 V
(EN 61131-2 Typ 2)
potentialfreier
Kontakt (Halbleiterrelais),
max. 120 mA
max. 60 V DC
Abschnitt 4.3
“Anschlussbeispiele”
Abschnitt 4.4
“Meldekontakt”
–
Eingang 0 V/24 V
(EN 61131-2 Typ 2)
Abschnitt 4.1 und
4.3
+24 V DC ±10%
Klemmenbelegung
Inbetriebnahme
Hinweis
Zur einfacheren Inbetriebnahme empfiehlt es sich, einen Resetknopf (Öffner) im Spannungsversorgungskreis vorzusehen. Das Rücksetzen im Fehlerfall wird dadurch vereinfacht.
Die folgende Beschreibung der Inbetriebnahme wird grafisch unterstützt durch die Diagramme auf den
nächsten Seiten (mit Multipol-Steckdose NECA-S1G9-P9-MP1 Fig. 20; mit Multipol-Steckdose NECAS1G9-P9-MP3/MP5 Fig. 22). Die Diagramme zeigen das Schaltverhalten der Ein- und Ausgänge im
Normalbetrieb (bei eingestellter Betriebsart “Automatischer Start”). Aktionen des Bedieners werden im
Diagramm durch einen Pfeil symbolisiert.
Für die Inbetriebnahme gehen Sie wie folgt vor:
1. Betriebsdruck p1 anlegen.
2. Betriebsspannung einschalten. Das MS6-SV-E testet sich selbstständig auf Fehler.
• LED Power (grün)
26
Festo – MS6-SV-...-E-10V24 – 1310b Deutsch
MS6-SV-...-E-10V24
– leuchtet beim Selbsttest für etwa 6 s
– blinkt grün nach erfolgreichem Selbsttest,
• LED Error (rot)
– leuchtet beim Selbsttest für etwa 6 s
– erlischt nach erfolgreichem Selbsttest,
Während des Selbsttests erfolgt ein kurzes Abblasen der Druckluft an den Ausgängen 2 und 3.
Hinweis
Solange sich das Produkt in diesem Zustand befindet, wird das Ventil durch einen
Selbsttest einmal pro Stunde pneumatisch getestet. Der Betriebsdruck p1 muss dabei
vorhanden sein, sonst geht das Ventil auf Störung.
Das MS6-SV-E kann ist jetzt betriebsbereit und kann belüftet werden.
3. Enable-Signale EN1/EN2 anlegen (bei Betriebsart “Überwachter Start” ist zusätzlich ein Startsignal
auf S34 erforderlich Fig. 2).
LED Power (grün) leuchtet.
Der Ausgangsdruck p2 wird langsam aufgebaut.
Die Dauer “t” des Druckaufbaus wird über die am Deckel angebrachte Drosselschraube eingestellt. Entsprechend der eingestellten Drosselstellung steigt der Ausgangsdruck an ( Fig. 19).
Bei Erreichen des Durchschaltdrucks (ca. 50 % vom Betriebsdruck p1) öffnet der Hauptsitz des
Ventils ( Fig. 11). Das MS6-SV-E belüftet die Anlage jetzt mit dem vollen Durchfluss.
Es sind keine weiteren Einstellungen erforderlich.
8
Betrieb
Hinweis
Im belüfteten Zustand wird das mechanische System des MS6-SV-E nicht getestet.
• Führen Sie monatlich mindestens eine Zwangsabschaltung durch, wenn die prozessbedingte Schalthäufigkeit geringer ist.
Hinweis
Die Pausendauer nach dem Entlüften beträgt 1 s. Diese Zeitdauer ist zwingend
einzuhalten. Erst dann darf ein erneuter Belüftungsvorgang folgen.
9
Wartung und Pflege
• Schalten Sie zur äußeren Reinigung folgende Energiequellen ab:
– Betriebsspannung
– Druckluft.
• Reinigen Sie bei Bedarf das MS6-SV-E von außen.
Zulässige Reinigungsmedien sind Seifenlauge (max. +50 °C), Waschbenzin und alle werkstoffschonenden Medien.
Festo – MS6-SV-...-E-10V24 – 1310b Deutsch
27
MS6-SV-...-E-10V24
10
Ausbau
1. Schalten Sie zum Ausbau folgende Energiequellen ab:
– Betriebsspannung
– Druckluft.
2. Trennen Sie die jeweiligen Anschlüsse vom MS6-SV-E.
11
Außerbetriebnahme und Entsorgung
Das Produkt kann in Abstimmung mit dem Entsorger komplett dem Metallrecycling zugeführt werden (z. B. EAK 17 04 02). Gegebenenfalls ist der Elektronikblock zu demontieren,
der keine gefährlichen Bauteile enthält und separat dem Elektronikschrottrecycling zuzuführen ist (EAK 16 02 16).
12
Zubehör
Bezeichnung
Typ
Multipol-Steckdose
NECA-S1G9-P9-MP1
NECA-S1G9-P9-MP3
NECA-S1G9-P9-MP5
UOS-1
UOS-1-LF
Schalldämpfer
Tab. 5
Zubehör
Das Zubehör von Festo finden Sie unter: www.festo.com/catalogue
28
Festo – MS6-SV-...-E-10V24 – 1310b Deutsch
MS6-SV-...-E-10V24
13
Diagnose und Fehlerbehandlung
13.1
LED-Anzeige
Betriebszustände und Fehler werden durch Blinken der Leuchtdioden angezeigt.
LED Power (grün)
LED Error (rot)
Bedeutung
aus
leuchtet nach dem Einschalten ca. 6 s
blinkt im Sekundentakt
leuchtet dauerhaft
aus
leuchtet nach dem Einschalten
ca. 6 s
aus
aus
Betriebsspannung fehlt
MS6-SV-E durchläuft alle Tests beim
Anlauf
MS6-SV-E ist im entlüfteten Zustand
MS6-SV-E ist im belüfteten Zustand
MS6-SV-E wartet auf das Signal
(S34) bei überwachtem Start.
4x kurz
blinkt im Sekundentakt
Fehlercode
Tab. 6
LED-Anzeige
13.2
Anzeige der Fehlercodes
Die Anzeige des Fehlercodes wird durch 4 kurze Blinkimpulse der LED Power (grün) angekündigt. Anschließend gibt die LED Error (rot) den Fehlercode aus (Anzahl der Blinkimpulse = Fehlercode).
Die Blinkimpulse der beiden LED wiederholen sich fortlaufend. Erst wenn die Betriebsspannung zur
Fehlerbehebung ausgeschaltet wird, endet das LED-Blinken.
Übersicht der Fehlercodes:
1
Fig. 18
2
1
Beispiel Fehlercode
Nach 4 kurzen Blinkimpulsen der LED Power 1 folgen 6 lange Blinkimpulse der LED Error 2. Damit
wird Fehlercode 6, ein pneumatischer Fehler, signalisiert. Ein pneumatischer Fehler tritt auf, wenn z. B.
der Betriebsdruck unter dem erforderlichen Mindestdruck oder überhaupt nicht anliegt.
Festo – MS6-SV-...-E-10V24 – 1310b Deutsch
29
MS6-SV-...-E-10V24
13.3
–
–
–
–
–
Störungsbeseitigung bei auftretendem Fehlercode:
Überprüfen Sie die Druckluftversorgung
Überprüfen Sie die Spannungsversorgung
Überprüfen Sie die Installation der Signalleitungen
Nehmen Sie das Gerät in Betrieb ( Kapitel 7 “Inbetriebnahme”)
Tritt der Fehler erneut auf, kontaktieren Sie den Service von Festo.
Störung/
Fehlercode
Mögliche Ursache
Abhilfe
2
Prellen auf den Enable-Signalen
5
Spannungsversorgung ist unzureichend
6
Versorgungsnetzteil ist nicht richtig
dimensioniert, Spannung bricht
zusammen
Druckversorgung wurde unterbrochen
• Sicherstellen, dass nur entprellte
Kontakte verwenden werden (z. B. bei
Schutzgittern oder -türen).
• Sicherstellen, dass die Spannungsversorgung ausreichend ist.
• Sicherstellen, dass das Versorgungsnetzteil ausreichend groß
dimensioniert ist.
• Druckluftversorgung
wiederherstellen
• Spezifikation einhalten ( Kapitel 7)
8
Enable-Signale außerhalb der
Spezifikation
Multipol-Steckdose NECA-… bzw.
Verkabelung ist defekt
Weitere
Fehlercodes
SPS gibt zeitlich versetzte Testimpulse
auf den Enable-Signalen aus
Störung durch elektrische oder
elektromagnetische Effekte
(EMV-Hinweise nicht eingehalten)
Druck p1
bricht kurzzeitig bei
jedem Schaltvorgang ein
Druckversorgung des MS6-SV-E weist zu
kleinen Querschnitt auf
Tab. 7
30
Drossel ist zu weit geöffnet
• Multipol-Steckdose NECA-… bzw.
Verkabelung überprüfen und ggf.
austauschen
• Testimpulse abschalten
• MP5-Stecker verwenden
• Max. Länge der Signalleitungen
einhalten
• Erdung richtig anschließen
• Min. Wandabstand einhalten
• keine Kabel hinter dem MS6-SV-E
verlegen
• Drosselschraube zudrehen
• Volumen vor p1 Eingang anbringen
• Druckluftversorgung anpassen, z. B.
Querschnitt der Versorgungleitung
vergrößern
Störungsbeseitigung
Festo – MS6-SV-...-E-10V24 – 1310b Deutsch
MS6-SV-...-E-10V24
14
Technische Daten
14.1
Sicherheitstechnische Kenngrößen
Typ
MS6-SV-E
Entspricht Norm
EN ISO 13849-1
EN ISO 13849-2
sicheres Entlüften und Schutz von unerwartetem Belüften
Entlüften: Kategorie 4, PL e
Entlüften: SIL 3
0,9 Mio. Schaltspiele
Sicherheitsfunktion
Performance Level (PL)
Safety Integrity Level (SIL)
Lebensdauerkennwert B10
Wahrscheinlichkeit eines gefahrbringenden Ausfalls pro Stunde (PFHd)
– PFHd für den elektronischen Teil des
Produkts
– PFHd für das Gesamtgerät 1)
CCF Maßnahmen
Hinweis zur Zwangsdynamisierung
CE-Zeichen ( Konformitätserklärung)
Baumusterprüfung
Zertifikat ausstellende Stelle
– Bescheinigung Nr.
1)
4,08 E-9 h-1
8,11 E-9 h-1
Betriebsdruckgrenzen einhalten
Temperaturbereich einhalten
Einhaltung Schwing Schock
Druckluftqualität einhalten
Schaltfrequenz mindestens 1/Monat
nach EU-Maschinen-Richtlinie 2006/42/EG
nach EU-EMV-Richtlinie 2004/108/EG
Die funktionale Sicherheitstechnik des Produktes wurde
von einer unabhängigen Prüfstelle zertifiziert
EG-Baumusterprüfbescheinigung (www.festo.com)
IFA Europäisch notifizierte Stelle - Kenn-Nummer 0121
IFA 1001180
Dieser Berechnung liegt eine Betätigungsrate von durchschnittlich einmal pro Stunde bei 365 Tage und 24 Stunden zugrunde. Bei
dieser Berechnung wird vom ungünstigsten Fall ausgegangen.
Tab. 8
14.2
Sicherheitstechnische Kenngrößen
Allgemeine Daten
Typ
MS6-SV-E
Pneumatischer Anschluss 1, 2
Pneumatischer Anschluss 3
Befestigungsart
G½ (ISO 228)
G1 (ISO 228)
Leitungseinbau
mit Zubehör
Kolben-Sitz nicht überschneidungsfrei
Konstruktiver Aufbau
Festo – MS6-SV-...-E-10V24 – 1310b Deutsch
31
MS6-SV-...-E-10V24
Typ
Betätigungsart
Steuerluftversorgung
Abluftfunktion
Positionserkennungsprinzip
Handhilfsbetätigung
Rückstellart
Steuerart
Ventilfunktion
Einbaulage
Betriebsmedium
Hinweis Betriebsmedium
Umgebungstemperatur
Mediumstemperatur
Lagertemperatur
Schockfestigkeit
Schwingfestigkeit
Betriebsdruck
C-Wert
b-Wert
Normalnenndurchfluss 1 > 2
Normalnenndurchfluss 2 > 3
Min. Normalnenndurchfluss
2 > 3 im kritischsten Fehlerfall
Restdruck im Normalbetrieb
Max. Restdruck im Fehlerfall
(worst case)
Durchschaltpunkt
Befüllungsdurchfluss
Nennbetriebsspannung DC
Zulässige Spannungsschwankung
Max. Schaltfrequenz
Schaltzeit aus
Schaltzeit ein
Einschaltdauer
32
MS6-SV-E
elektrisch
intern
nicht drosselbar
Magnetkolben-Prinzip
keine
mechanische Feder
vorgesteuert
3/2-Wegeventil, monostabil geschlossen
Druckaufbaufunktion
beliebig
Druckluft nach ISO 8573-1:2010 [7:4:4]
geölter Betrieb möglich (im weiteren Betrieb erforderlich)
[°C]
–10 … +50 (0 … +50 mit Drucksensor)
[°C]
–10 … +50 (0 … +50 mit Drucksensor)
[°C]
–10 … +50 (0 … +50 mit Drucksensor)
Schockprüfung mit Schärfegrad 2 nach FN 942017-5
und EN 60068-2-27
Transporteinsatzprüfung mit Schärfegrad 2 nach
FN 942017-4 und EN 60068-2-6
[bar]
3,5 … 10
[l/(s bar)] 19,3
0,21
[l/min]
4 300 (bei p1 = 6 bar, p2 = 5 bar)
[l/min]
9 000 (bei p1 = 6 bar)
[l/min]
6 000 (bei p1 = 6 bar)
[bar]
[bar]
0 (restdruckfrei)
0,4 (bei p1 = 10 bar und voll geöffneter Drossel)
[V]
[%]
ca. 50 % von p1 Fig. 11
über Drossel einstellbar Fig. 19
24
±10
[Hz]
[ms]
[ms]
[%]
0,5
40
130
100
Festo – MS6-SV-...-E-10V24 – 1310b Deutsch
MS6-SV-...-E-10V24
Typ
MS6-SV-E
Elektrischer Anschluss
Sub-D, 9-polig (das Produkt darf nur mit den zugehörigen Multipol-Steckdosen NECA-S1G9-P9-MP… betrieben werden)
IP65 mit Multipol-Steckdose NECA-…
75 mit Schalldämpfer UOS-1
Alu-Druckguss
NBR
0,12 1)
durch PELV-Netzteil
Schutzart
Schalldruckpegel
[dB(A)]
Werkstoff-Info Gehäuse
Werkstoff-Info Dichtung
Max. Stromaufnahme
[A]
Schutz gegen elektrischen Schlag (Schutz
gegen direktes und indirektes Berühren
nach EN 60204-1/IEC 204)
Schaltstellungsanzeige
Halbleiterrelais (Meldekontakt)
– Max. Spannung
[V]
– Max. kontinuierlicher Strom [A]
– Max. Widerstand im eingeschalteten Zustand
[Ω]
– Max. Leckagestrom im ausgeschalteten Zustand
[μA]
Min. Pausenzeit nach einer
[s]
Entlüftung
Schutzklasse
Brandklasse nach UL94
2)
LED und potenzialfreier Kontakt
60
0,12
25 (typ. 18)
1
1
III
V0-V2
Beim Einschalten kommt es kurzfristig zu einem erhöhtem Einschaltstrom.
Tab. 9
Allgemeine Daten
Festo – MS6-SV-...-E-10V24 – 1310b Deutsch
33
MS6-SV-...-E-10V24
14.3
Befüllungsdurchfluss
Durchfluss qn in Abhängigkeit von der Anzahl Umdrehungen n der Drosselschraube
p1: 4 bar
p1: 6 bar
p1: 8 bar
p1: 10 bar
Fig. 19
34
Durchflussdiagramm
Festo – MS6-SV-...-E-10V24 – 1310b Deutsch
MS6-SV-...-E-10V24
14.4
Entlüftungsszeit
Die nachfolgende Tabelle zeigt die Entlüftungszeit im Normalbetrieb (N) und im Fehlerfall (F) bei verschiedenen Volumina und Betriebsdrücken.
Hinweis
Für den Fehlerfall (F) wird der schwerstmögliche Fehler im Ventilinneren angenommen
(worst case).
Normalbetrieb: N
Im Fehlerfall: F
Betriebsdruck 3,5 bar
Entlüftungszeit [s]
auf
auf
1,0 bar
0,5 bar
Betriebsdruck 6 bar
Entlüftungszeit [s]
auf
auf
1,0 bar
0,5 bar
Betriebsdruck 10 bar
Entlüftungszeit [s]
auf
auf
1,0 bar
0,5 bar
Volumen [l]
0,1
(0,16)
0,3
(0,4)
0,5
(0,8)
1,2
(1,7)
3,2
(4,8)
0,24
(0,28)
0,55
(0,8)
1,0
(1,5)
2,2
(3,4)
6,0
(9,8)
0,3
(0,36)
0,7
(1,2)
1,4
(2,4)
3,0
(5,1)
11,0
(16,2)
Tab. 10
2
N
(F)
10 N
(F)
20 N
(F)
40 N
(F)
150 N
(F)
0,2
(0,22)
0,45
(0,6)
0,85
(1,25)
1,9
(2,8)
5,0
(8,2)
0,3
(0,35)
0,7
(1,1)
1,3
(2,2)
3,0
(5,3)
8,2
(15,4)
0,4
(0,52)
0,9
(1,9)
1,7
(3,9)
3,9
(8,1)
12,8
(29,0)
Entlüftungszeit
Festo – MS6-SV-...-E-10V24 – 1310b Deutsch
35
MS6-SV-...-E-10V24
14.5
Schaltverhalten der Multipol-Steckdosen NECA-…-MP1, -MP3 und
-MP5
14.5.1
Schaltverhalten für Multipol-Steckdose NECA-S1G9-P9-MP1
Betriebsdruck p1
Ausgangsdruck p2
+L1: Betriebsspannung
EN1: Enable-Signal 1
EN2: Enable-Signal 2
Meldekontakte
LED Power (grün)
LED Error (rot)
Fig. 20
Schaltverhalten Ein- und Ausgänge im Normalbetrieb (bei eingestellter Betriebsart “Automatischer Start”) für Multipol-Steckdose NECA-S1G9-P9-MP1
Hinweis
• Impulse an den Eingängen EN1 und EN2 von 0 auf 24 V, von Dauer ≤ 3 ms führen zu
keiner Fehlermeldung am Sicherheitsventil MS6-SV-E.
• Impulse an den Eingängen EN1 und EN2 von 24 auf 0 V, von Dauer ≤ 12 ms führen zu
keiner Fehlermeldung am Sicherheitsventil MS6-SV-E.
Die Diagramme auf der nächsten Seite zeigen das genaue Schaltverhalten der Enable-Signale EN1 und
EN2 mit zeitlichem Versatz. Aus der Verzögerungzeit zwischen den beiden Signalen lässt sich die maximale Reaktionszeit ableiten.
36
Festo – MS6-SV-...-E-10V24 – 1310b Deutsch
MS6-SV-...-E-10V24
EN2 vor EN1 (für Multipol-Steckdose NECA-S1G9-P9-MP1)
EN2:
Enable-Signal 2
EN1:
Enable-Signal 1
Meldekontakte
Max. Reaktionszeit von der Entlüftung bis Belüftung: t2 + t1 = 75 ms + 5 ms = 80 ms
Max. Reaktionszeit von der Belüftung bis Entlüftung: t3 + t4 = 15 ms + 2 ms = 17 ms
EN1 vor EN2 (für Multipol-Steckdose NECA-S1G9-P9-MP1)
EN2:
Enable-Signal 2
EN1:
Enable-Signal 1
Meldekontakte
Max. Reaktionszeit von der Entlüftung bis Belüftung: t2 + t1 + t4 = 75 ms + 5 ms + 2 ms = 82 ms
Max. Reaktionszeit von der Belüftung bis Entlüftung: t2 + t3 + t4 = 75 ms + 15 ms + 2 ms = 92 ms
t1 > 5 ms:
t2 <= 75 ms:
t3 >= 15 ms:
t4 = 2 ms:
tp1 } 2:
tp2 } 3:
Fig. 21
Pegel von EN2/EN1 muss min. 5 ms HIGH sein (Entprellzeit/Eingangsfilter/Stabilisierungszeit).
Max. zulässige Verzögerungszeit zwischen EN1 und EN2. Bei Überschreiten wird das
MS6-SV-E nicht belüftet und eine Fehlermeldung ausgegeben.
Pegel von EN2/EN1 muss min. 15 ms LOW sein (Entprellzeit/Eingangsfilter/Stabilisierungszeit).
Max. interne Verzögerungszeit bedingt durch den Programmablauf.
Belüftung > 300 ms
Entlüftung > 1 s
Zeitverhalten Enable-Signale mit NECA-...-MP1
Festo – MS6-SV-...-E-10V24 – 1310b Deutsch
37
MS6-SV-...-E-10V24
14.5.2
Schaltverhalten für Multipol-Steckdose NECA-S1G9-P9-MP3/-MP5
Betriebsdruck p1
Ausgangsdruck p2
+L1: Betriebsspannung
EN1: Enable-Signal 1
EN2: Enable-Signal 2
Meldekontakte
LED Power (grün)
LED Error (rot)
Fig. 22
Schaltverhalten Ein- und Ausgänge im Normalbetrieb (bei eingestellter Betriebsart “Automatischer Start”) für Multipol-Steckdose NECA-S1G9-P9-MP3/-MP5
Beim NECA-...-MP3 kommt es zur Entlüftung und Ausgabe einer Fehlermeldung, wenn:
• EN1 und EN2 = 0 V (LOW)
• EN1 und EN2 = 24 V (HIGH)
Beim NECA-...-MP5 kommt es zur Entlüftung und Ausgabe keiner Fehlermeldung, wenn:
• EN1 und EN2 = 0 V (LOW)
• EN1 und EN2 = 24 V (HIGH)
Die Diagramme auf der nächsten Seite zeigen das genaue Schaltverhalten der Enable-Signale EN1 und
EN2 mit zeitlichem Versatz. Aus der Verzögerungzeit zwischen den beiden Signalen lässt sich die maximale Reaktionszeit ableiten.
38
Festo – MS6-SV-...-E-10V24 – 1310b Deutsch
MS6-SV-...-E-10V24
EN2 vor EN1 (für Multipol-Steckdose NECA-S1G9-P9-MP3/-MP5)
EN2:
Enable-Signal 2
EN1:
Enable-Signal 1
Meldekontakte
Max. Reaktionszeit von der Entlüftung bis Belüftung: t2 + t1 = 75 ms + 5 ms = 80 ms
Max. Reaktionszeit von der Belüftung bis Entlüftung: t3 + t4 = 15 ms + 2 ms = 17 ms
EN1 vor EN2 (für Multipol-Steckdose NECA-S1G9-P9-MP3/-MP5)
EN2:
Enable-Signal 2
EN1:
Enable-Signal 1
Meldekontakte
Max. Reaktionszeit von der Entlüftung bis Belüftung: t2 + t1 + t4 = 75 ms + 5 ms + 2 ms = 82 ms
Max. Reaktionszeit von der Belüftung bis Entlüftung: t2 + t3 + t4 = 75 ms + 15 ms + 2 ms = 92 ms
t1 > 5 ms:
t2 <= 75 ms:
t3 >= 15 ms:
t4 = 2 ms:
tp1 } 2:
tp2 } 3:
Fig. 23
Pegel von EN2 (EN1) muss min. 5 ms HIGH (LOW) sein (Entprellzeit/Eingangsfilter/Stabilisierungszeit).
Max. zulässige Verzögerungszeit zwischen EN1 und EN2.
Bei Überschreiten wird das MS6-SV-E:
– nicht belüftet und eine Fehlermeldung ausgegeben (NECA-...-MP3)
– nicht belüftet und keine Fehlermeldung ausgegeben (NECA-...-MP5)
Pegel von EN2 (EN1) muss min. 15 ms LOW (HIGH) sein (Entprellzeit/Eingangsfilter/
Stabilisierungszeit).
Max. interne Verzögerungszeit bedingt durch den Programmablauf.
Belüftung > 300 ms
Entlüftung > 1 s
Zeitverhalten Enable-Signale mit NECA-...-MP3/-MP5
Festo – MS6-SV-...-E-10V24 – 1310b Deutsch
39
MS6-SV-...-E-10V24
English – Soft-start/quick exhaust valve
MS6-SV-...-E-10V24
Table of contents
1
Safety . . . . . . . . . . . . . . . . . . . . . . . . . . . . . . . . . . . . . . . . . . . . . . . . . . . . . . . . . . . . . . . . . .
42
1.1
1.2
1.3
1.4
General safety instructions . . . . . . . . . . . . . . . . . . . . . . . . . . . . . . . . . . . . . . . . . . . . . . . . . .
Intended use . . . . . . . . . . . . . . . . . . . . . . . . . . . . . . . . . . . . . . . . . . . . . . . . . . . . . . . . . . . . .
Foreseeable misuse . . . . . . . . . . . . . . . . . . . . . . . . . . . . . . . . . . . . . . . . . . . . . . . . . . . . . . .
Safety function according to EN ISO 13849 . . . . . . . . . . . . . . . . . . . . . . . . . . . . . . . . . . . . .
42
42
43
43
2
Requirements for product use . . . . . . . . . . . . . . . . . . . . . . . . . . . . . . . . . . . . . . . . . . . . . . .
44
2.1
2.2
2.3
2.4
2.5
Technical requirements . . . . . . . . . . . . . . . . . . . . . . . . . . . . . . . . . . . . . . . . . . . . . . . . . . . . .
Qualification of trained personnel . . . . . . . . . . . . . . . . . . . . . . . . . . . . . . . . . . . . . . . . . . . .
Failures due to common cause (common cause failure – CCF) . . . . . . . . . . . . . . . . . . . . . .
Range of application and certifications . . . . . . . . . . . . . . . . . . . . . . . . . . . . . . . . . . . . . . . .
Service . . . . . . . . . . . . . . . . . . . . . . . . . . . . . . . . . . . . . . . . . . . . . . . . . . . . . . . . . . . . . . . . .
44
44
45
45
45
3
Control sections and connections . . . . . . . . . . . . . . . . . . . . . . . . . . . . . . . . . . . . . . . . . . . .
46
4
Function and application . . . . . . . . . . . . . . . . . . . . . . . . . . . . . . . . . . . . . . . . . . . . . . . . . . .
47
4.1
4.2
4.3
4.4
4.5
Automatic start/monitored start operating modes . . . . . . . . . . . . . . . . . . . . . . . . . . . . . . .
Operational principle of the multi-pin plug socket NECA-…-MP1, -MP3 and -MP5 . . . . . . .
Connection examples . . . . . . . . . . . . . . . . . . . . . . . . . . . . . . . . . . . . . . . . . . . . . . . . . . . . . .
4.3.1
MS6-SV-E with multi-pin plug socket NECA-S1G9-P9-MP1 . . . . . . . . . . . . . . . . .
4.3.2
MS6-SV-E with multi-pin plug socket NECA-S1G9-P9-MP3 . . . . . . . . . . . . . . . . .
4.3.3
MS6-SV-E with multi-pin plug socket NECA-S1G9-P9-MP5 . . . . . . . . . . . . . . . . .
Signal contact . . . . . . . . . . . . . . . . . . . . . . . . . . . . . . . . . . . . . . . . . . . . . . . . . . . . . . . . . . . .
Switch-through pressure/filling time . . . . . . . . . . . . . . . . . . . . . . . . . . . . . . . . . . . . . . . . . .
47
49
50
50
52
53
55
56
5
Mechanical/pneumatic installation . . . . . . . . . . . . . . . . . . . . . . . . . . . . . . . . . . . . . . . . . .
57
5.1
5.2
Mechanical installation . . . . . . . . . . . . . . . . . . . . . . . . . . . . . . . . . . . . . . . . . . . . . . . . . . . . .
Pneumatic installation . . . . . . . . . . . . . . . . . . . . . . . . . . . . . . . . . . . . . . . . . . . . . . . . . . . . .
5.2.1
Pneumatic ports 1 and 2 . . . . . . . . . . . . . . . . . . . . . . . . . . . . . . . . . . . . . . . . . . .
5.2.2
Pneumatic port 3 . . . . . . . . . . . . . . . . . . . . . . . . . . . . . . . . . . . . . . . . . . . . . . . . .
57
59
59
59
40
Festo – MS6-SV-...-E-10V24 – 1310b English
MS6-SV-...-E-10V24
6
Electrical connection . . . . . . . . . . . . . . . . . . . . . . . . . . . . . . . . . . . . . . . . . . . . . . . . . . . . . .
60
6.1
6.2
6.3
Connecting earthing strap . . . . . . . . . . . . . . . . . . . . . . . . . . . . . . . . . . . . . . . . . . . . . . . . . .
Connect multi-pin plug socket NECA-... . . . . . . . . . . . . . . . . . . . . . . . . . . . . . . . . . . . . . . . .
Inputs and outputs . . . . . . . . . . . . . . . . . . . . . . . . . . . . . . . . . . . . . . . . . . . . . . . . . . . . . . . .
61
62
63
7
Commissioning . . . . . . . . . . . . . . . . . . . . . . . . . . . . . . . . . . . . . . . . . . . . . . . . . . . . . . . . . . .
63
8
Operation . . . . . . . . . . . . . . . . . . . . . . . . . . . . . . . . . . . . . . . . . . . . . . . . . . . . . . . . . . . . . . .
64
9
Maintenance and care . . . . . . . . . . . . . . . . . . . . . . . . . . . . . . . . . . . . . . . . . . . . . . . . . . . . .
64
10
Disassembly . . . . . . . . . . . . . . . . . . . . . . . . . . . . . . . . . . . . . . . . . . . . . . . . . . . . . . . . . . . . .
65
11
De-commissioning and disposal . . . . . . . . . . . . . . . . . . . . . . . . . . . . . . . . . . . . . . . . . . . . .
65
12
Accessories . . . . . . . . . . . . . . . . . . . . . . . . . . . . . . . . . . . . . . . . . . . . . . . . . . . . . . . . . . . . . .
65
13
Diagnostics and error handling . . . . . . . . . . . . . . . . . . . . . . . . . . . . . . . . . . . . . . . . . . . . . .
66
13.1 LED indicator . . . . . . . . . . . . . . . . . . . . . . . . . . . . . . . . . . . . . . . . . . . . . . . . . . . . . . . . . . . . .
13.2 Display of the error codes . . . . . . . . . . . . . . . . . . . . . . . . . . . . . . . . . . . . . . . . . . . . . . . . . . .
13.3 Fault correction when error code appears: . . . . . . . . . . . . . . . . . . . . . . . . . . . . . . . . . . . . . .
66
66
67
14
Technical data . . . . . . . . . . . . . . . . . . . . . . . . . . . . . . . . . . . . . . . . . . . . . . . . . . . . . . . . . . . .
68
14.1
14.2
14.3
14.4
14.5
Safety characteristics . . . . . . . . . . . . . . . . . . . . . . . . . . . . . . . . . . . . . . . . . . . . . . . . . . . . . .
General data . . . . . . . . . . . . . . . . . . . . . . . . . . . . . . . . . . . . . . . . . . . . . . . . . . . . . . . . . . . . .
Filling flow . . . . . . . . . . . . . . . . . . . . . . . . . . . . . . . . . . . . . . . . . . . . . . . . . . . . . . . . . . . . . . .
Exhaust time . . . . . . . . . . . . . . . . . . . . . . . . . . . . . . . . . . . . . . . . . . . . . . . . . . . . . . . . . . . . .
Switching characteristics of the multi-pin plug sockets NECA-…-MP1, -MP3 and -MP5 . . .
14.5.1
Switching characteristics for multi-pin plug socket NECA-S1G9-P9-MP1 . . . . . .
14.5.2
Switching characteristics for multi-pin plug socket NECA-S1G9-P9-MP3/-MP5
68
69
71
72
73
73
75
Festo – MS6-SV-...-E-10V24 – 1310b English
41
MS6-SV-...-E-10V24
1
Safety
1.1
General safety instructions
Note
Loss of the safety function
If measures to handle “common cause failures” (CCF) are not complied with, the safety
function of the soft-start/quick exhaust valve can be impaired.
• Make sure that the described measures for handling “common cause failures” (CCF)
are complied with ( chap. 2.3 and chap. 14.1).
Note
Loss of the safety function
Non-compliance with the technical data can lead to loss of the safety function.
• Comply with the technical data.
1.2
Intended use
The electro-pneumatic soft-start/quick exhaust valve is intended solely for reducing pressure quickly
and safely and for building up pressure gently in pneumatic piping systems and terminal equipment in
industry.
The product is a safe, redundant mechatronic system in accordance with the requirements set out in
EN ISO 13849-1+2, in which the pneumatic safety function, safe venting, is guaranteed even in the
event of an error in the valve (e.g. due to wear or contamination).
The MS6-SV-...E-10V24- receives secure enable signals (EN1/EN2) from commercially-available electronic or electromechanical safety switching devices via its electrical connection (NECA multi-pin plug
socket Sub-D, 9-pin). These safety switching devices monitor the machine's protective devices (e.g.
emergency stop, light curtain, electrical door switch on the protective housing, etc.).
The product is intended for installation in a machine or automated system and must be used exclusively
as follows:
– in an industrial environment
– within the limits of the product defined by the technical data ( Chap. 14 Technical data)
– in original status, without unauthorised modifications
– in excellent technical condition
– in standard operation, which also includes rest, set-up and service operation, as well as emergency
operation
42
Festo – MS6-SV-...-E-10V24 – 1310b English
MS6-SV-...-E-10V24
1.3
Foreseeable misuse
The following foreseeable misuses are among those not approved as intended use:
– use outdoors
– use as a press safety valve
– bypassing of the safety function
– use in reversible operation (reversal of supply and exhaust air)
– vacuum operation
Note
In the event of damage caused by unauthorised manipulation or use other than that
intended, the guarantee is invalidated and the manufacturer is not liable for damages.
1.4
Safety function according to EN ISO 13849
The electro-pneumatic soft-start/quick exhaust valve has control technology features with which a
performance level e can be reached for the safety functions.
The product has been developed and produced in accordance with the fundamental and reliable safety
principles of EN ISO 13849-2.
The following requirements apply for the operator:
– Specifications on mounting and operating conditions in these operating instructions must be observed.
– For use in higher categories (2 to 4), the requirements of EN ISO 13849 (e.g. CCF) must be considered.
– The product must be switched off at least once per month to ensure the safety function.
– The basic and proven safety principles of EN ISO 13849-2 relating to implementation and operation
of the component must be satisfied.
– When using this product in machines or systems subject to specific C standards, the requirements
specified in these standards must be observed.
– Before using the product, a risk evaluation corresponding to EN ISO 12100 in accordance with Machinery Directive 2006/42/EC, appendix I, paragraph 1 and 1.1.2 is necessary.
– The user is responsible for coordinating all applicable safety regulations and rules with the responsible authority and for complying with them.
Festo – MS6-SV-...-E-10V24 – 1310b English
43
MS6-SV-...-E-10V24
2
Requirements for product use
• Make these operating instructions available to the design engineer and installer of the machine or
system in which this product will be used.
• Keep these operating instructions during the entire product life cycle.
• Take into consideration the legal regulations applicable for the destination as well as:
– regulations and standards,
– regulations of the testing organizations and insurers,
– national specifications.
2.1
Technical requirements
General conditions for the correct and safe use of the product, which must be observed at all times:
• Maintain the specified limits (e.g. for pressures, temperatures and electric voltages).
• Make sure there is a supply of correctly prepared compressed air in accordance with the specifications on the medium.
• Before mounting, remove particles in the supply lines through appropriate measures. In this way,
you protect the product from premature failure and higher wear.
• Pressurize your entire system slowly. This allows avoidance of abrupt movements.
• Observe the warnings and instructions in these operating instructions.
• Use the product in its original status with the related multi-pin plug socket NECA-... without unauthorised modifications.
2.2
Qualification of trained personnel
Installation, mounting, commissioning, maintenance, repair and removal from operation may only be
performed by qualified personnel with knowledge and experience with electrical and pneumatic control
technology.
44
Festo – MS6-SV-...-E-10V24 – 1310b English
MS6-SV-...-E-10V24
2.3
Failures due to common cause (common cause failure – CCF)
Common cause failures cause the loss of the safety function, since in this case both channels in a twochannel system fail simultaneously.
Through the following measures, you ensure that common cause failures are avoided:
– Compliance with the permissible values for vibration and shock stress
– Compliance with the temperature range
– Compliance with compressed air quality conforming to the technical data, in particular avoidance of
flash rust particles (for example, caused by servicing work) as well as compliance with the residual
oil content of max. 0.1 mg/m3 when using ester-containing oils (which may, for example, be contained in the compressor oil)
– Compliance with the maximum operating pressure, if necessary through use of a pressure-relief
valve
– Clogging of the silencer must be avoided ( section 5.2.2)
Observe the technical data in chapter 14.
Note
Loss of the safety function
Non-compliance with the technical data can lead to loss of the safety function.
• Comply with the technical data.
2.4
Range of application and certifications
The product is a safety component as defined in the Machinery Directive 2006/42/EC and carries the CE
marking.
Safety-oriented standards and test values, which the product must comply with and fulfil, can be found
in the section “Technical data”. The product-relevant EC directives and standards can be found in the
declaration of conformity.
Certificates and the declaration of conformity for this product can be found at:
www.festo.com/sp
2.5
Service
Repairs may only be conducted with the parts listed in the replacement parts catalogue. Opening the
housing is prohibited. Please consult your local Festo repair service if you have any technical problems.
Festo – MS6-SV-...-E-10V24 – 1310b English
45
MS6-SV-...-E-10V24
3
Control sections and connections
The electro-pneumatic soft-start/quick exhaust valve MS6-SV-...-E-10V24-..., hereafter called
MS6-SV-E, conforms to category 4 with a maximum achievable performance level e in accordance with
DIN EN ISO 13849-1.
1
2
3
9
4
5
6
8
7
1
2
3
4
5
LED display (Power LED and Error LED)
Flow control screw for soft start function
Pneumatic port 1 (compressed air inlet)
Electronic insert
Monoblock valve
Fig. 1
46
6
7
8
9
Multi-pin plug socket NECA-... (accessories)
Pneumatic port 3 (exhaust)
Pre-assembled earthing strap
Pneumatic port 2 (compressed air outlet
port)
Control sections and connections
Festo – MS6-SV-...-E-10V24 – 1310b English
MS6-SV-...-E-10V24
4
Function and application
4.1
Automatic start/monitored start operating modes
The following two operating modes are possible:
– “Automatic start” (automatic reset)
– “Monitored start” (monitored reset)
In both operating modes, the MS6-SV-E can be electrically triggered using either static or dynamic enable signals (EN1/EN2), dependent on the multi-pin plug socket NECA-... used.
Mode of operation of the operating modes ( Fig. 2):
– The “Automatic start” (automatic reset) operating mode is preset with a current bridge from terminal 5 to terminal 6 in the multi-pin plug socket NECA-... (delivery status).
– The “Monitored start” (monitored reset) operating mode should be seen as a subordinate start
from the perspective of the entire system. The enable signal from the safety relay or the control
system always has priority.
Note
The impulse generated by the start button has to be within a time-frame of 0.1 s and
2 s.
If the start button is held down for too long or locked down, the system identifies a
cross circuit and the device is placed in fault mode.
Note
The start signal for S34 must not be generated until 1 s after the Enable signals
EN1/EN2 are created.
If the start signal is made before or simultaneously with the enable signals, it will not be
recognised and will have to be made again.
Festo – MS6-SV-...-E-10V24 – 1310b English
47
MS6-SV-...-E-10V24
Automatic start
(delivery status)
Fig. 2
48
Monitored start
Operating modes
Festo – MS6-SV-...-E-10V24 – 1310b English
MS6-SV-...-E-10V24
4.2
Operational principle of the multi-pin plug socket NECA-…-MP1,
-MP3 and -MP5
Status of EN1
Status of EN2
Status of valve
Status of valve
Status of valve with
with NECA-…-MP1 with NECA-…-MP3 NECA-…-MP5
0V
0V
Unpressurized
Valve goes into
the fault mode
0V
24 V
Pressurized
24 V
24 V
Valve goes into
the fault mode
Pressurized
24 V
0V
Valve goes into
the fault mode
Unpressurized
Tab. 1
Valve goes into
the fault mode
Valve does not go into the
fault mode, but remains in
the safe, unpressurized
status
Note:
Cross-circuit detection
and error detection/
evaluation via external
controller necessary
Pressurized
Valve does not go into the
fault mode, but remains in
the safe, unpressurized
status
Note:
Cross-circuit detection
and error detection/
evaluation via external
controller necessary
Unpressurized
Operational principle of the multi-pin plug socket, NECA-...
Festo – MS6-SV-...-E-10V24 – 1310b English
49
MS6-SV-...-E-10V24
Identification of signal transitions
If safety outputs with test pulses are used to control the MS6-SV-E, the following runtime performance
must be observed:
• MS6-SV-E Exhaust status
Test pulses < 3 ms are ignored
• MS6-SV-E Pressurisation status
Test pulses < 12 ms are ignored
Cross-circuit detection of the enable signals
Generally, a cross-circuit detection must be ensured to achieve performance level e. Dependent on the
selected plug, either the MS6-SV-E detects the cross circuit itself or the safety switching device/PLC.
NECA-…-MP1
NECA-…-MP3
through safety switching device/PLC through MS6-SV-E
(clocked signals)
Tab. 2
NECA-…-MP5
through safety switching device/PLC
(potential difference monitoring)
Cross-circuit detection
4.3
Connection examples
4.3.1
MS6-SV-E with multi-pin plug socket NECA-S1G9-P9-MP1
Fig. 3
50
Connection NECA-...-MP1
Festo – MS6-SV-...-E-10V24 – 1310b English
MS6-SV-...-E-10V24
The multi-pin plug socket NECA-…-MP1 can be used for static and clocked safety outputs:
– Static enable signals (EN1/EN2 = 24 V)
Fig. 4
Static enable signals - signal distance
– Clocked enable signals (EN1/EN2 = 24 V) for cross-circuit detection.
Cross-circuit detection by means of clock signals is carried out through the safety switching device/
safety PLC.
Fig. 5
Enable signals – cross circuit detection
The diagrams for the switching characteristics can be found in the chapter 14 “Technical data”
( Fig. 20).
Note
Since the clock outputs from different controller manufacturers are not standardised,
their usability must be checked in each case. If the clock pulse is outside of the described limits, this is recognised by the MS6-SV-E as an error and a safe switch-off is
performed.
Festo – MS6-SV-...-E-10V24 – 1310b English
51
MS6-SV-...-E-10V24
4.3.2
MS6-SV-E with multi-pin plug socket NECA-S1G9-P9-MP3
Note
The multi-pin plug socket NECA-S1G9-P9-MP3 is intended for conventional circuitry with
electromechanical safety relays. If problems arise in use with bipolar semiconductor
outputs, use the multi-pin plug socket NECA-S1G9-P9-MP5
Fig. 6
Connection to NECA-...-MP3
– Static enable signals with opposite potentials
– The time delay of the level change of the enable signals is monitored
– Behaviour on detection of a cross circuit:
• MS6-SV-E in the exhausted status: remains in the safe status and goes into malfunction
• MS6-SV-E in the pressurized status: goes into the safe status and goes into malfunction
Fig. 7
Static enable signals - signal distance
The diagrams for the switching characteristics can be found in the chapter 14 “Technical data”
( Fig. 22).
52
Festo – MS6-SV-...-E-10V24 – 1310b English
MS6-SV-...-E-10V24
4.3.3
MS6-SV-E with multi-pin plug socket NECA-S1G9-P9-MP5
Note
A cross circuit between the enable signals (EN1/EN2) is not detected and does not
cause an error response. The system can is pressurized only when the enable signals
are applied correctly.
• Ensure that the cross-circuit detection is established and guaranteed by means of
conforming measures in the peripherals (PLC/safety control) in accordance with
valid safety standards.
Fig. 8
Connection with NECA-...-MP5
– Static enable signals with opposite potentials
– The time delay of the level change of the enable signals is not monitored
– Behaviour on detection of a cross circuit (through upstream safety switching device/PLC):
• MS6-SV-E in the exhausted status: remains in the safe status and does not go into malfunction
• MS6-SV-E in the pressurized status: goes into the safe status and does not go into malfunction
– Enable signal are galvanically separated from the supply voltage
Festo – MS6-SV-...-E-10V24 – 1310b English
53
MS6-SV-...-E-10V24
Fig. 9
Static enable signals - signal distance
The diagrams for the switching characteristics can be found in the chapter 14 “Technical data”
( Fig. 22).
Switching statuses
Note
The time delay t2 between EN1 and EN2 must be automatically determined. The duration of the delay is not evaluated. The multi-pin plug socket NECA-MP5 does not allow
any cross-circuit detection through the MS6-SV-E.
54
Festo – MS6-SV-...-E-10V24 – 1310b English
MS6-SV-...-E-10V24
4.4
Signal contact
The signal contact is a potential-free N/O contact of a semiconductor relay. Through terminals 3 and 4
of the NECA-... multi-pin plug socket, the contact can be picked up in the feedback circuit of a safety
control system.
Note
Operation of the signal contact outside the permitted technical data results in its irreparable failure. Compliance with the specification must be ensured through an appropriate protective circuit.
Note
Assignment of these contacts is not required to achieve the safety category.
Fig. 10
Feedback signal connection
The diagrams for the switching characteristics can be found in the chapter 14 “Technical data” (with
multi-pin plug socket NECA-S1G9-P9-MP1 Fig. 20; with multi-pin plug socket NECAS1G9-P9-MP3/MP5 Fig. 22).
Status of valve
Signal contact
Activation for pressurisation through EN1 and EN2
Activation for exhaust through EN1 and EN2
Malfunction (red LED flashing)
Supply voltage is not connected
Open
Closed
Open
Open
Tab. 3
Switching statuses of the signal contact
Festo – MS6-SV-...-E-10V24 – 1310b English
55
MS6-SV-...-E-10V24
4.5
Switch-through pressure/filling time
The flow control screw in the cover generates a gradual pressure build-up of output pressure p2. The
pressure rise can be adjusted by turning the flow control screw. If the output pressure p2 reached has
about 50 % of the output pressure p1, the valve opens and the maximum flow rate is enabled.
1
2
1
Ratio of p2 to p1 [%]
Fig. 11
2
Time axis t
Switch-through pressure tolerance field
Example:
If operating pressure p1 = 4 bar, a switch-through pressure of 1.2 to 2.8 bar is permissible, given the
maximum permitted tolerance of ±20 %.
1
3
4
2
1
2
Output pressure p2 [bar]
Time axis t
Fig. 12
56
3
4
Flow control screw +
Flow control screw -
Tolerance field filling time
Festo – MS6-SV-...-E-10V24 – 1310b English
MS6-SV-...-E-10V24
5
Mechanical/pneumatic installation
5.1
Mechanical installation
Note
In order to ensure electromagnetic compatibility in accordance with the EMC directive,
observe the following:
• Observe wall distance of 32 mm (e.g. with the mounting bracket MS6-WPB).
• Do not install a cable between wall and MS6-SV-E.
Note
Loss of the safety function
If the minimum distance of 15 mm between the silencer and base is not maintained, loss
of the safety function can result.
• Observe distance of 15 mm below the silencer ( Fig. 13). The free space ensures
trouble free venting.
Information about mounting of the module connector, sub-base and mounting bracket
can be found in the operating instructions enclosed with the relevant accessories.
• Place the MS6-SV-E as close as possible to the
location of use.
• The mounting position is any desired.
Fig. 13
Festo – MS6-SV-...-E-10V24 – 1310b English
Installation
57
MS6-SV-...-E-10V24
• Observe the flow direction from 1 to 2. The numerals
1 and 2 on the product housing serve as an
orientation ( Fig. 14).
1
Fig. 14
Flow direction
Assembly with service units of the MS series
Note
Loss of the safety function
Incorrect installation in the service unit combination can result in loss of the safety function.
• Only devices that do not impair the pneumatic protective measure “safe venting”
may be placed downstream of the MS6-SV-E.
For assemble one or several already present service units of the same series ( Fig. 15):
1. If present, remove the cover cap MS6-END 1
from the assembly side (push upwards).
2. Place the module connectors MS6-MV 2 in
the grooves of the individual devices. A seal is
required between the individual units (included in the scope of delivery, module connector MS6-MV or mounting bracket
MS6-WPB).
3. Fasten the module connectors MS6-MV with 2
screws.
1
2
max. 1.2 Nm
Fig. 15
58
Assembly
Festo – MS6-SV-...-E-10V24 – 1310b English
MS6-SV-...-E-10V24
5.2
Pneumatic installation
5.2.1
Pneumatic ports 1 and 2
If using fittings with spanner size larger than SW24:
• Remove the cover cap MS6-END (push upwards), if available.
If using fittings:
• Observe the permissible screw-in depth of the connecting thread of 10 mm.
For larger screw-in depths, the sub-bases MS6-AG…/AQ from Festo must be used.
• Make sure that the compressed air line is connected correctly.
• Screw the fittings into the pneumatic ports using appropriate sealing material.
5.2.2
Pneumatic port 3
When exhausting a system through the MS6-SV-E, high sound pressure levels are generated. We therefore recommend that you use a silencer.
Note
Warning
Loss of the safety function
If a commercially-available silencer is used, the body of the silencer may become
clogged, which can result in reduced exhaust performance (back pressure), which can
lead to a complete loss of the safety function.
• Use the safety silencer designed for the device UOS-… ( chapter 12 “Accessories”).
• Only use a commercially available silencer if it will be employed in combination with
a back pressure monitoring system. In addition, the silencer must be checked regularly by service staff and replaced, if necessary.
• Screw the silencer into the pneumatic port 3.
• Make sure that there is unrestricted air venting. Neither the silencer nor port 3 may be blocked.
Festo – MS6-SV-...-E-10V24 – 1310b English
59
MS6-SV-...-E-10V24
6
Electrical connection
Caution
Danger of injury from electric shock
• The electrical connection may only be created in a voltage-free status and only by
qualified personnel.
Caution
Use only power sources which guarantee reliable electrical disconnection of the operating voltage in accordance with IEC/DIN EN 60204-1. Observe also the general requirements for PELV power circuits in accordance with IEC/DIN EN 60204-1.
Note
Long signal lines reduce the resistance to interference.
• Make sure that the signal lines are not longer than 20 m.
• The signal lines must be separated from lines that emit interference, in accordance
with EN 60204-1.
60
Festo – MS6-SV-...-E-10V24 – 1310b English
MS6-SV-...-E-10V24
6.1
Connecting earthing strap
• Connect the pre-assembled earth terminal with low
impedance (short cable with large cross section) to
the earth potential.
This prevents interference from electromagnetic
sources and ensures electromagnetic compatibility in
accordance with EMC directives.
Fig. 16
Festo – MS6-SV-...-E-10V24 – 1310b English
Earth cable connection
61
MS6-SV-...-E-10V24
6.2
Connect multi-pin plug socket NECA-...
Note
The MS6-SV-E may only be used with the approved NECA-... multi-pin plug sockets
( Fig. 17). Information on terminal connections can be found in the assembly instructions enclosed with each multi-pin plug socket NECA-....
Note
When mounting the multi-pin plug sockets NECA-… with enclosed seal, pay attention to
the correct orientation of the plug with regard to the valve. The inspection window of
the multi-pin plug socket NECA-… must point forward.
• Connect the multi-pin plug socket NECA-…
with the correct orientation. The window
points to the silencer.
Make sure that the screws are fastened
tightly in order to guarantee protection class
IP65. The maximum tightening torque is
0.4 ± 0.1 Nm.
NECA-S1G9-P9-MP5
NECA-S1G9-P9-MP3
NECA-S1G9-P9-MP1
Fig. 17
62
Electrical connection
Festo – MS6-SV-...-E-10V24 – 1310b English
MS6-SV-...-E-10V24
6.3
Inputs and outputs
Terminal in
multi-pin plug
socket NECA-...
I/O
Allocation
1
EN1
2
EN2
3
13
Enable signal 1 (static or
dynamic)
Enable signal 2 (static or
dynamic)
Signal contact, NO
4
14
5
A5
6
S34
7
8
9
–
+L1
M
Tab. 4
7
Contact for “Automatic
start” operating mode
Contact for “Automatic
start” or “Monitored
start” operating mode
–
Operating voltage
GND
Input 0 V/24 V
(EN 61131-2 type 2)
Input 0 V/24 V
(EN 61131-2 type 2)
Potential-free
contact
(semiconductor
relay),
Max. 120 mA
Max. 60 V DC
–
Input 0 V/24 V
(EN 61131-2 type 2)
Section 4.3
“Connection
examples”
Section 4.4
“Signal contact”
Section 4.1 and
4.3
+24 V DC ±10 %
Terminal assignment
Commissioning
Note
For easier commissioning, we recommend planning a reset button (normally closed) in
the power supply circuit. This simplifies resetting in case of error.
The following description of commissioning is graphically supported by the diagrams on the next pages
(with multi-pin plug socket NECA-S1G9-P9-MP1 Fig. 20; with multi-pin plug socket NECAS1G9-P9-MP3/MP5 Fig. 22). The diagrams show the switching characteristics of the inputs and
outputs in normal operation (if the “Automatic start” operating mode has been set). The operator’s
actions are marked in the diagram by an arrow.
To commission the device, proceed as follows:
1. Apply operating pressure p1.
2. Switch on the operating voltage. The MS6-SV-E automatically tests itself for errors.
• Power LED (green)
– illuminates during self test for around 6 s
– flashes green after successful self test,
Festo – MS6-SV-...-E-10V24 – 1310b English
63
MS6-SV-...-E-10V24
• Error LED (red)
– illuminates during self test for around 6 s
– goes out after successful self test,
During the self test, there is a brief ejection of compressed air at the ports 2 und 3.
Note
The valve is tested pneumatically in a self-test once an hour for as long as the product
remains in this status. The operating pressure p1 must be present; otherwise, the valve
switches over to malfunction.
The MS6-SV-E is now ready for operation and can be pressurized.
3. Create EN1/EN2 enable signals (in “Monitored start” operating mode, a start signal at S34 is also
required Fig. 2).
Power LED (green) lights up.
Output pressure p2 is built up slowly.
The duration “t” of the pressure build-up is adjusted using the flow control screw attached to
the cover. The output pressure rises corresponding to the set throttle point ( Fig. 19 ). When
the switch-through pressure is reached (approx. 50 % of operating pressure p1), the valve’s
main seat opens ( Fig. 11). The MS6-SV-E now pressurizes the system at full flow.
No further settings are required.
8
Operation
Note
In the pressurized status, the mechanical system of the MS6-SV-E is not tested.
• At least once a month, perform a forced switch-off if the process-related switching
frequency is lower.
Note
The pause period after venting is 1s. This period must be complied with. Only then may
a new pressurization procedure take place.
9
Maintenance and care
• Switch off the following energy sources before cleaning the exterior of the device:
– Operating voltage
– Compressed air.
• If needed, clean the MS6-SV-E from outside.
Soap suds (max. +50 °C), petroleum ether and all non-abrasive cleaning agents may be used.
64
Festo – MS6-SV-...-E-10V24 – 1310b English
MS6-SV-...-E-10V24
10
Disassembly
1. Switch off the following energy sources before disassembly:
– Operating voltage
– Compressed air.
2. Separate the respective connections from the MS6-SV-E.
11
De-commissioning and disposal
In coordination with the waste management company, the product can be completely
disposed of through metal recycling (e.g. EAK 17 04 02). If necessary, the electronic insert, which contains no dangerous components, is removed and sent separately for electronic scrap recycling (EAK 16 02 16).
12
Accessories
Designation
Type
Multi-pin plug socket
NECA-S1G9-P9-MP1
NECA-S1G9-P9-MP3
NECA-S1G9-P9-MP5
UOS-1
UOS-1-LF
Silencers
Tab. 5
Accessories
Festo accessories can be found at: www.festo.com/catalogue
Festo – MS6-SV-...-E-10V24 – 1310b English
65
MS6-SV-...-E-10V24
13
Diagnostics and error handling
13.1
LED indicator
Operating statuses and errors are indicated by flashing LEDs.
Power LED (green)
Error LED (red)
Significance
Off
Lights up for approx. 6 s
after switch on
Flashes in seconds
pulse
Is permanently
illuminated
Off
Lights up for approx. 6 s after
switch on
Off
Operating voltage not applied
MS6-SV-E runs through all tests
during start-up
MS6-SV-E is in an exhausted status
Off
MS6-SV-E is in the pressurized
status
MS6-SV-E is waiting for the signal
(S34) with monitored start.
4x briefly
Flashes in seconds pulse
Error code
Tab. 6
LED indicator
13.2
Display of the error codes
The error code is displayed by 4 short flash pulses of the Power LED (green). Then the Error LED (red)
displays the error code (number of flash pulses = error code).
The flash pulses for both LEDs repeat continuously. The LEDs only stop flashing when the operating
voltage is switched off in order to eliminate the error.
Overview of the error codes:
1
Fig. 18
2
1
Example for error code
After 4 short flash pulses of the Power LED 1, there are 6 long flash pulses of the Error LED 2. This
indicates error code 6, a pneumatic fault. A pneumatic fault occurs, for example, if the operating pressure is below the required minimum pressure or there is no pressure at all.
66
Festo – MS6-SV-...-E-10V24 – 1310b English
MS6-SV-...-E-10V24
13.3
–
–
–
–
–
Fault correction when error code appears:
Check the compressed air supply
Check the voltage supply
Check the installation of the signal lines
Place the device in operation ( chapter 7 “Commissioning”)
If the error occurs again, contact Festo Service.
Malfunction/
error code
Possible cause
2
Bouncing on the enable signals
Remedy
• Make sure that only debounced
contacts are used (e.g. for protective
guards or doors).
5
Voltage supply is insufficient
• Ensure that the voltage supply is
sufficient.
Power unit is not correctly dimensioned; • Ensure that the power unit is
voltage collapses
sufficiently large.
6
Pressure supply was interrupted
• Re-establish compressed air supply
8
Enable signals outside the specifications • Comply with specification
( chapter 7)
Multi-pin plug socket NECA-… or cable is • Check multi-pin plug socket NECA-…
defective
or cable and replace if defective
Additional er- PLC emits test pulses that are off-set to
• Switch off test pulses
ror codes
the enable signals
• Use MP5 plug
Malfunction due to electrical or electro• Comply with max. length of the signal
magnetic effects (EMC information not
lines
complied with)
• Connect earthing correctly
• Observe min. wall distance
• Do not install a cable behind
theMS6-SV-E
Pressure p1
Pressure supply of the MS6-SV-E has too • Tighten flow control screw
collapses
little cross section
• Attach reservoir in front of p1 inlet
briefly at every
• Adapt compressed air supply,
switching ope.g. increase cross section of the
Throttle is opened too wide
eration
supply line
Tab. 7
Trouble-shooting
Festo – MS6-SV-...-E-10V24 – 1310b English
67
MS6-SV-...-E-10V24
14
Technical data
14.1
Safety characteristics
Type
MS6-SV-E
Conforms to standard
EN ISO 13849-1
EN ISO 13849-2
Reliable venting and protection against unexpected
pressurization
Venting: category 4, PL e
Venting: SIL 3
0.9 million switching cycles
Safety function
Performance level (PL)
Safety integrity level (SIL)
Service life characteristic B10
Probability of an endangering failure per
hour (PFHd)
– PFHd for the electronic part of the
product
– PFHd for the entire device 1)
CCF measures
Note on forced dynamisation
CE marking ( declaration of
conformity)
Type test
Certificate issuing authority
– Certificate no.
1)
4.08 E-9 h-1
8.11 E-9 h-1
Comply with operating pressure limits
Comply with temperature range
Comply with vibration/shock limits
Comply with compressed air quality
Switching frequency at least 1/month
According to EC Machinery Directive 2006/42/EC
According to EU EMC directive 2004/108/EC
The functional safety of the product has been certified by
an independent testing office
EC-type examination certificate (www.festo.com)
IFA Europe notified position - characteristics number 0121
IFA 1001180
This calculation is based on an actuation rate averaging once per hour for 365 days and 24 hours. The least favourable case is
assumed for this calculation.
Tab. 8
68
Safety characteristics
Festo – MS6-SV-...-E-10V24 – 1310b English
MS6-SV-...-E-10V24
14.2
General data
Type
Pneumatic connection 1, 2
Pneumatic port 3
Type of mounting
Design
Actuation type
Pilot air supply
Exhaust function
Position sensing principle
Manual override
Reset method
Type of control
Valve function
Mounting position
Operating medium
Note on operating medium
Ambient temperature
Temperature of medium
Storage temperature
Shock resistance
Vibration resistance
Operating pressure
C value
b value
Standard nominal flow rate
1>2
Standard nominal flow rate
2>3
Min. standard nominal flow rate
2 > 3 in the most critical error
case
Residual pressure in normal
operation
Max. residual pressure in event
of error (worst case)
MS6-SV-E
G½ (ISO 228)
G1 (ISO 228)
In-line installation
With accessories
Piston seat not free of overlap
Electric
Internal
Without flow control
Solenoid piston principle
None
Mechanical spring
Piloted
3/2-way valve, monostable, closed
Pressure build-up function
Any
Compressed air in accordance with ISO 8573-1:2010
[7:4:4]
Lubricated operation possible (in which case lubricated
operation will always be required)
[°C]
–10 … +50 (0 … +50 with pressure sensor)
[°C]
–10 … +50 (0 … +50 with pressure sensor)
[°C]
–10 … +50 (0 … +50 with pressure sensor)
Shock test with severity level 2 according to
FN 942017-5 and EN 60068-2-27
Transport application test with severity level 2
according to FN 942017-4 and EN 60068-2-6
[bar]
3.5 … 10
[l/(s bar)] 19.3
0.21
[l/min]
4 300 (if p1 = 6 bar, p2 = 5 bar)
[l/min]
9 000 (at p1 = 6 bar)
[l/min]
6 000 (if p1 = 6 bar)
[bar]
0 (no residual pressure)
[bar]
0.4 (if p1 = 10 bar and flow control valve is fully open)
Festo – MS6-SV-...-E-10V24 – 1310b English
69
MS6-SV-...-E-10V24
Type
MS6-SV-E
Switching point
Filling flow
Nominal operating voltage DC
Permissible voltage fluctuation
Max. switching frequency
Switching time off
Switching time on
Duty cycle
Electrical connection
Approx. 50 % of p1 Fig. 11
Adjustable through flow control valve Fig. 19
24
±10
0.5
40
130
100
Sub-D, 9-pin (the product may only be operated with
the related multi-pin plug sockets NECA-S1G9-P9-MP…)
IP65 with multi-pin plug socket NECA-...
75 with silencer UOS-1
Die-cast aluminium
NBR
0.12 1)
By means of PELV power supply unit
[V]
[%]
[Hz]
[ms]
[ms]
[%]
Protection class
Noise level
[dB(A)]
Information on material, housing
Information on material, seal
Max. current consumption
[A]
Protection against electric shock
(protection against direct and indirect
contact as per EN 60204-1/IEC 204)
Switching position display
Semiconductor relay (signal contact)
– Max. voltage
[V]
– Max. continuous current
[A]
– Max. resistance in the
switched-on status
[Ω]
– Max. leakage current in the
switched-off status
[μA]
Min. pause after exhausting
[s]
Protection class
Fire protection classification to UL94
1)
60
0.12
25 (typ. 18)
1
1
III
V0-V2
During the switch on process, an increased starting current takes place short-term.
Tab. 9
70
LED and potential-free contact
General data
Festo – MS6-SV-...-E-10V24 – 1310b English
MS6-SV-...-E-10V24
14.3
Filling flow
Flow rate qn dependent on the number of rotations n of the flow control screw
p1: 4 bar
p1: 6 bar
p1: 8 bar
p1: 10 bar
Fig. 19
Flow diagram
Festo – MS6-SV-...-E-10V24 – 1310b English
71
MS6-SV-...-E-10V24
14.4
Exhaust time
The following table shows the exhaust time in normal operation (N) and in the event of a fault (F) for
different volumes and operating pressures.
Note
The fault case (F) assumes the worst possible error in the valve’s interior (worst case).
Normal operation: N
Fault case: F
Operating pressure
3.5 bar
Venting time [s]
at 1.0 bar at 0.5 bar
Operating pressure
6 bar
Venting time [s]
at 1.0 bar at 0.5 bar
Operating pressure
10 bar
Venting time [s]
at 1.0 bar at 0.5 bar
Volume [l]
0.1
(0.16)
0.3
(0.4)
0.5
(0.8)
1.2
(1.7)
3.2
(4.8)
0.24
(0.28)
0.55
(0.8)
1.0
(1.5)
2.2
(3.4)
6.0
(9.8)
0.3
(0.36)
0.7
(1.2)
1.4
(2.4)
3.0
(5.1)
11.0
(16.2)
Tab. 10
72
2
N
(F)
10 N
(F)
20 N
(F)
40 N
(F)
150 N
(F)
0.2
(0.22)
0.45
(0.6)
0.85
(1.25)
1.9
(2.8)
5.0
(8.2)
0.3
(0.35)
0.7
(1.1)
1.3
(2.2)
3.0
(5.3)
8.2
(15.4)
0.4
(0.52)
0.9
(1.9)
1.7
(3.9)
3.9
(8.1)
12.8
(29.0)
Venting time
Festo – MS6-SV-...-E-10V24 – 1310b English
MS6-SV-...-E-10V24
14.5
Switching characteristics of the multi-pin plug sockets NECA-…-MP1,
-MP3 and -MP5
14.5.1
Switching characteristics for multi-pin plug socket NECA-S1G9-P9-MP1
Operating pressure p1
Output pressure p2
+L1: operating voltage
EN1: enable signal 1
EN2: enable signal 2
Signal contacts
Power LED (green)
Error LED (red)
Fig. 20
Input and output switching characteristics in normal operation (when the “Automatic start”
operating mode is set) for multi-pin plug socket NECA-S1G9-P9-MP1
Note
• Pulses at the inputs EN1 and EN2 from 0 to 24 V of ≤ 3 ms duration do not result in
an error message at the safety valve MS6-SV-E.
• Pulses at the inputs EN1 and EN2 from 24 to 0 V of ≤ 12 ms duration do not result in
an error message at the safety valve MS6-SV-E.
The diagrams on the next page show the precise switching characteristics of the Enable signals EN1
and EN2 with a time offset. The maximum reaction time can be derived from the delay between the two
signals.
Festo – MS6-SV-...-E-10V24 – 1310b English
73
MS6-SV-...-E-10V24
EN2 before EN1 (for multi-pin plug socket NECA-S1G9-P9-MP1)
EN2:
enable signal 2
EN1:
enable signal 1
Signal contacts
Max. reaction time from pressurisation until exhausting: t2 + t1 = 75 ms + 5 ms = 80 ms
Max. reaction time from pressurisation until exhausting: t3 + t4 = 15 ms + 2 ms = 17 ms
EN1 before EN2 (for multi-pin plug socket NECA-S1G9-P9-MP1)
EN2:
enable signal 2
EN1:
enable signal 1
Signal contacts
Max. reaction time from exhausting until pressurisation: t2 + t1 + t4 = 75 ms + 5 ms + 2 ms = 82 ms
Max. reaction time from pressurisation until exhausting: t2 + t3 + t4 = 75 ms + 15 ms + 2 ms = 92 ms
t1 > 5 ms:
t2 <= 75 ms:
t3 >= 15 ms:
t4 = 2 ms:
tp1 } 2:
tp2 } 3:
Fig. 21
74
Level of EN2/EN1 must be HIGH for min. 5 ms (debounce time/input filter/stabilisation
time).
Max. permissible delay time between EN1 and EN2. If exceeded, the MS6-SV-E is not
pressurized and an error message is output.
Level of EN2/EN1 must be LOW for min. 15 ms (debounce time/input filter/stabilisation
time).
Max. internal time delay caused by the program sequence.
Pressurisation > 300 ms
Exhausting > 1 s
Runtime performance of enable signals with NECA-...-MP1
Festo – MS6-SV-...-E-10V24 – 1310b English
MS6-SV-...-E-10V24
14.5.2
Switching characteristics for multi-pin plug socket NECA-S1G9-P9-MP3/-MP5
Operating
pressure p1
Output pressure p2
+L1: operating voltage
EN1: enable signal 1
EN2: enable signal 2
Signal contacts
Power LED (green)
Error LED (red)
Fig. 22
Input and output switching characteristics in normal operation (when the “Automatic start”
operating mode is set) for multi-pin plug socket NECA-S1G9-P9-MP3/-MP5
For NECA-...-MP3, exhausting and output of an error message occurs when:
• EN1 and EN2 = 0 V (LOW)
• EN1 and EN2 = 24 V (HIGH)
For NECA-...-MP5, exhausting and output of no error message occurs when:
• EN1 and EN2 = 0 V (LOW)
• EN1 and EN2 = 24 V (HIGH)
The diagrams on the next page show the precise switching characteristics of the Enable signals EN1
and EN2 with a time offset. The maximum reaction time can be derived from the delay between the two
signals.
Festo – MS6-SV-...-E-10V24 – 1310b English
75
MS6-SV-...-E-10V24
EN2 before EN1 (for multi-pin plug socket NECA-S1G9-P9-MP3/-MP5)
EN2:
enable signal 2
EN1:
enable signal 1
Signal contacts
Max. reaction time from pressurisation until exhausting: t2 + t1 = 75 ms + 5 ms = 80 ms
Max. reaction time from pressurisation until exhausting: t3 + t4 = 15 ms + 2 ms = 17 ms
EN1 before EN2 (for multi-pin plug socket NECA-S1G9-P9-MP3/-MP5)
EN2:
enable signal 2
EN1:
enable signal 1
Signal contacts
Max. reaction time from exhausting until pressurisation: t2 + t1 + t4 = 75 ms + 5 ms + 2 ms = 82 ms
Max. reaction time from pressurisation until exhausting: t2 + t3 + t4 = 75 ms + 15 ms + 2 ms = 92 ms
t1 > 5 ms:
t2 <= 75 ms:
t3 >= 15 ms:
t4 = 2 ms:
tp1 } 2:
tp2 } 3:
Fig. 23
76
Level of EN2 (EN1) must be HIGH (LOW) for min. 5 ms (debounce time/input filter/
stabilisation time).
Max. permissible delay time between EN1 and EN2.
If exceeded, the MS6-SV-E:
– is not pressurized and an error message is output (NECA-...-MP3)
– is not pressurized and no error message is output (NECA-...-MP5)
Level of EN2 (EN1) must be LOW (HIGH) for min. 15 ms (debounce time/input filter/
stabilisation time).
Max. internal time delay caused by the program sequence.
Pressurisation > 300 ms
Exhausting > 1 s
Runtime performance of enable signals with NECA-...-MP3/-MP5
Festo – MS6-SV-...-E-10V24 – 1310b English
Copyright:
Festo AG & Co. KG
Postfach
73726 Esslingen
Deutschland
Phone:
+49 711 347-0
Weitergabe sowie Vervielfältigung dieses Dokuments, Verwertung
und Mitteilung seines Inhalts sind verboten, soweit nicht ausdrücklich gestattet. Zuwiderhandlungen verpflichten zu Schadenersatz. Alle Rechte sind für den Fall der Patent-, Gebrauchsmusteroder Geschmacksmustereintragung vorbehalten.
Reproduction, distribution or sale of this document or communication of its contents to others without express authorization is
prohibited. Offenders will be liable for damages. All rights reserved in the event that a patent, utility model or design patent is
registered.
Fax:
+49 711 347-2144
e-mail:
[email protected]
Internet:
www.festo.com
Original: de