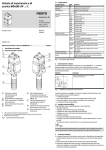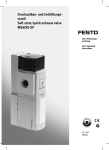
1
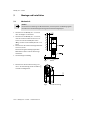
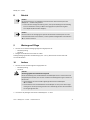
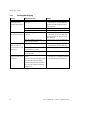
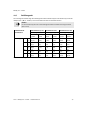
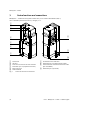
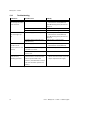
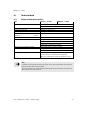
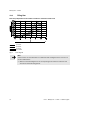
Druckaufbau- und Entlüftungsventil
Soft-start/quick exhaust valve
MS6(N)-SV-...-E-ASIS
de
Bedienungsanleitung
en
Operating
instructions
8004463
1205NH
MS6(N)-SV-...-E-ASIS
Symbole/Symbols:
Warnung
Warning
Vorsicht
Caution
Einbau und Inbetriebnahme darf nur durch Fachpersonal mit entsprechender Qualifikation gemäß
dieser Bedienungsanleitung durchgeführt
werden.
Installation and commissioning may only be performed in accordance with these instructions by
technicians with appropriate qualifications.
Hinweis
Note
Umwelt
Environment
Zubehör
Accessories
Deutsch – Druckaufbau- und Entlüftungsventil (Originalbetriebsanleitung) . . . . . . . . . . . . . . . . . . .
3
English – Soft-start/quick exhaust valve (Translation of the original instructions) . . . . . . . . . . . . . .
31
2
Festo – MS6(N)-SV-...-E-ASIS – 1205NH
MS6(N)-SV-...-E-ASIS
Deutsch – Druckaufbau- und Entlüftungsventil
MS6(N)-SV-...-E-ASIS
Inhaltsverzeichnis
1
Sicherheit . . . . . . . . . . . . . . . . . . . . . . . . . . . . . . . . . . . . . . . . . . . . . . . . . . . . . . . . . . . . . . .
5
1.1
1.2
1.3
1.4
Allgemeine Sicherheitshinweise . . . . . . . . . . . . . . . . . . . . . . . . . . . . . . . . . . . . . . . . . . . . . .
Bestimmungsgemäße Verwendung . . . . . . . . . . . . . . . . . . . . . . . . . . . . . . . . . . . . . . . . . . .
Vorhersehbare Fehlanwendung . . . . . . . . . . . . . . . . . . . . . . . . . . . . . . . . . . . . . . . . . . . . . .
Sicherheitsfunktion nach EN ISO 13849 . . . . . . . . . . . . . . . . . . . . . . . . . . . . . . . . . . . . . . .
5
5
6
6
2
Voraussetzungen für den Produkteinsatz . . . . . . . . . . . . . . . . . . . . . . . . . . . . . . . . . . . . . .
7
2.1
2.2
2.3
2.4
2.5
2.6
Technische Voraussetzungen . . . . . . . . . . . . . . . . . . . . . . . . . . . . . . . . . . . . . . . . . . . . . . . .
Qualifikation des Fachpersonals . . . . . . . . . . . . . . . . . . . . . . . . . . . . . . . . . . . . . . . . . . . . . .
Ausfälle aufgrund gemeinsamer Ursache (Common Cause Failure – CCF) . . . . . . . . . . . . . .
Einsatzbereich und Zulassungen . . . . . . . . . . . . . . . . . . . . . . . . . . . . . . . . . . . . . . . . . . . . .
Normen . . . . . . . . . . . . . . . . . . . . . . . . . . . . . . . . . . . . . . . . . . . . . . . . . . . . . . . . . . . . . . . . .
Service . . . . . . . . . . . . . . . . . . . . . . . . . . . . . . . . . . . . . . . . . . . . . . . . . . . . . . . . . . . . . . . . .
7
7
8
8
9
9
3
Bedienteile und Anschlüsse . . . . . . . . . . . . . . . . . . . . . . . . . . . . . . . . . . . . . . . . . . . . . . . .
10
4
Funktion und Anwendung . . . . . . . . . . . . . . . . . . . . . . . . . . . . . . . . . . . . . . . . . . . . . . . . . .
11
4.1
4.2
Begriffsdefinitionen AS-interface . . . . . . . . . . . . . . . . . . . . . . . . . . . . . . . . . . . . . . . . . . . . .
Kurzbeschreibung AS-i . . . . . . . . . . . . . . . . . . . . . . . . . . . . . . . . . . . . . . . . . . . . . . . . . . . . .
11
11
5
Montage und Installation . . . . . . . . . . . . . . . . . . . . . . . . . . . . . . . . . . . . . . . . . . . . . . . . . .
13
5.1
5.2
Mechanisch . . . . . . . . . . . . . . . . . . . . . . . . . . . . . . . . . . . . . . . . . . . . . . . . . . . . . . . . . . . . . .
Pneumatisch . . . . . . . . . . . . . . . . . . . . . . . . . . . . . . . . . . . . . . . . . . . . . . . . . . . . . . . . . . . . .
5.2.1
Anschluss 1 und 2 (Gewindegröße G½ oder NPT½-14) . . . . . . . . . . . . . . . . . . .
5.2.2
Anschluss 3 (Gewindegröße G1 oder NPT1) . . . . . . . . . . . . . . . . . . . . . . . . . . . .
13
14
14
15
6
Elektrischer Anschluss . . . . . . . . . . . . . . . . . . . . . . . . . . . . . . . . . . . . . . . . . . . . . . . . . . . .
15
6.1
6.2
Erdungskabel anschließen . . . . . . . . . . . . . . . . . . . . . . . . . . . . . . . . . . . . . . . . . . . . . . . . . .
AS-i-Bus anschließen . . . . . . . . . . . . . . . . . . . . . . . . . . . . . . . . . . . . . . . . . . . . . . . . . . . . . .
6.2.1
Anschluss an M12-Stecker . . . . . . . . . . . . . . . . . . . . . . . . . . . . . . . . . . . . . . . . . .
6.2.2
AS-Interface-Adressen . . . . . . . . . . . . . . . . . . . . . . . . . . . . . . . . . . . . . . . . . . . . .
16
16
16
17
Festo – MS6(N)-SV-...-E-ASIS – 1205NH Deutsch
3
MS6(N)-SV-...-E-ASIS
7
Inbetriebnahme . . . . . . . . . . . . . . . . . . . . . . . . . . . . . . . . . . . . . . . . . . . . . . . . . . . . . . . . . .
20
8
Betrieb . . . . . . . . . . . . . . . . . . . . . . . . . . . . . . . . . . . . . . . . . . . . . . . . . . . . . . . . . . . . . . . . .
21
9
Wartung und Pflege . . . . . . . . . . . . . . . . . . . . . . . . . . . . . . . . . . . . . . . . . . . . . . . . . . . . . . .
21
10
Ausbau . . . . . . . . . . . . . . . . . . . . . . . . . . . . . . . . . . . . . . . . . . . . . . . . . . . . . . . . . . . . . . . . .
21
11
Außerbetriebnahme und Entsorgung . . . . . . . . . . . . . . . . . . . . . . . . . . . . . . . . . . . . . . . . .
22
12
Zubehör . . . . . . . . . . . . . . . . . . . . . . . . . . . . . . . . . . . . . . . . . . . . . . . . . . . . . . . . . . . . . . . . .
22
13
Diagnose und Fehlerbehandlung . . . . . . . . . . . . . . . . . . . . . . . . . . . . . . . . . . . . . . . . . . . .
23
13.1 LED-Anzeige . . . . . . . . . . . . . . . . . . . . . . . . . . . . . . . . . . . . . . . . . . . . . . . . . . . . . . . . . . . . .
13.2 Störungsbeseitigung . . . . . . . . . . . . . . . . . . . . . . . . . . . . . . . . . . . . . . . . . . . . . . . . . . . . . . .
23
24
14
Technische Daten . . . . . . . . . . . . . . . . . . . . . . . . . . . . . . . . . . . . . . . . . . . . . . . . . . . . . . . . .
25
14.1
14.2
14.3
14.4
14.5
Sicherheitstechnische Kenngrößen . . . . . . . . . . . . . . . . . . . . . . . . . . . . . . . . . . . . . . . . . . .
Allgemeine Daten . . . . . . . . . . . . . . . . . . . . . . . . . . . . . . . . . . . . . . . . . . . . . . . . . . . . . . . . .
Durchschaltdruck / Befüllzeit . . . . . . . . . . . . . . . . . . . . . . . . . . . . . . . . . . . . . . . . . . . . . . . .
Befüllungsdurchfluss . . . . . . . . . . . . . . . . . . . . . . . . . . . . . . . . . . . . . . . . . . . . . . . . . . . . . .
Entlüftungszeit . . . . . . . . . . . . . . . . . . . . . . . . . . . . . . . . . . . . . . . . . . . . . . . . . . . . . . . . . . .
25
26
27
28
29
4
Festo – MS6(N)-SV-...-E-ASIS – 1205NH Deutsch
MS6(N)-SV-...-E-ASIS
1
Sicherheit
1.1
Allgemeine Sicherheitshinweise
Hinweis
Verlust der Sicherheitsfunktion
Wenn Maßnahmen zur Beherrschung der “Ausfälle gemeinsamer Ursache” (CCF) nicht
eingehalten werden, kann die Sicherheitsfunktion des Druckaufbau- und Entlüftungsventils beeinträchtigt werden.
• Stellen Sie sicher, dass die beschriebenen Maßnahmen zur Beherrschung der “Ausfälle gemeinsamer Ursache” (CCF) eingehalten werden ( Kap. 2 und Kap. 14).
Hinweis
Verlust der Sicherheitsfunktion
Nicht-Einhalten der Technischen Daten kann zum Verlust der Sicherheitsfunktion führen.
• Halten Sie die Technischen Daten ein.
1.2
Bestimmungsgemäße Verwendung
Das elektropneumatische Druckaufbau- und Entlüftungsventil MS6(N)-SV-...-E-ASIS dient bestimmungsgemäß ausschließlich dem schnellen und sicheren Druckabbau und dem sanften Druckaufbau in
pneumatischen Leitungssystemen und Endgeräten der Industrie.
Bei dem Produkt handelt es sich um ein selbsttestendes, redundantes mechatronisches System nach
den Forderungen der EN ISO 13849-1+2, bei dem die pneumatische Sicherheitsfunktion, sicheres
Entlüften, auch bei einem Fehler im Ventil (z. B. durch Verschleiß, Verschmutzung) gewährleistet ist.
Eine weitere umgesetzte Sicherheitsfunktion ist der Schutz vor unerwartetem Anlauf nach EN 1037.
Das Produkt ist ausschließlich für den Einsatz in Bussystemen gemäß der AS-Interface-Spezifikation
(SPEC 3.0, Profil 7.5.5) geeignet.
Das Produkt ist zum Einbau in Maschinen bzw. automatisierungstechnischen Anlagen bestimmt und
ausschließlich folgendermaßen einzusetzen:
– im Industriebereich
– innerhalb der durch die technischen Daten definierten Grenzen des Produkts
( Kap. 14 Technische Daten)
– im Originalzustand ohne eigenmächtige Veränderungen
– in technisch einwandfreiem Zustand
– im Standardbetrieb, zu dem auch Stillstand, Einricht- und Servicebetrieb sowie Notfallbetrieb
zählen
Festo – MS6(N)-SV-...-E-ASIS – 1205NH Deutsch
5
MS6(N)-SV-...-E-ASIS
1.3
Vorhersehbare Fehlanwendung
Zu den vorhersehbaren Fehlanwendungen gehören:
– der Einsatz im Außenbereich
– der Einsatz als Pressensicherheitsventil
– der Einsatz im nicht-industriellen Bereich/Wohnbereich
– der Einsatz außerhalb der durch die technischen Daten definierten Grenzen des Produkts
– eigenmächtige Veränderungen
– das Umgehen der Sicherheitsfunktion
– der Einsatz im reversiblen Betrieb (Umkehrung von Zu- und Abluft)
– Vakuumbetrieb
Hinweis
Bei Schäden, die aus unbefugten Eingriffen oder nicht bestimmungsgemäßem Gebrauch entstehen, erlischt der Gewährleistungs- und Haftungsanspruch gegenüber dem
Hersteller.
1.4
Sicherheitsfunktion nach EN ISO 13849
Für die Sicherheitsfunktionen weist das Druckaufbau- und Entlüftungsventil MS6(N)-SV-...-E-ASIS
steuerungstechnische Eigenschaften auf, mit denen ein Performance Level e erreicht werden kann.
Das Produkt wurde nach den grundlegenden und bewährten Sicherheitsprinzipien der EN ISO 13849-2
entwickelt und gefertigt.
Folgende Anforderungen gelten für den Betreiber:
– Die Angaben zur Montage und den Betriebsbedingungen in dieser Bedienungsanleitung sind einzuhalten.
– Für einen Einsatz in höheren Kategorien (2 bis 4) sind die Anforderungen der EN ISO 13849 (z. B.
CCF) zu berücksichtigen.
– Das Produkt muss mindestens einmal pro Monat ausgeschaltet werden, um die bestimmungsgemäße Verwendung sicherzustellen.
– Die grundlegenden Sicherheitsprinzipien der EN ISO 13849-2 zur Implementierung und zum Betrieb
des Bauteils sind zu erfüllen. Für Kategorie 2 bis 4 sind die bewährten Sicherheitsprinzipien nach
EN ISO 13849-2 für die Implementierung und den Betrieb des Bauteils zu erfüllen.
– Beim Einsatz dieses Produkts in Maschinen oder Anlagen, für die spezifische C-Normen gelten, sind
die dort genannten Anforderungen zu beachten.
– Vor dem Einsatz des Produkts ist eine Risikobeurteilung nach Maschinenrichtlinie 2006/42/EG,
Anhang I, Absatz 1 und 1.1.2 notwendig.
– Der Anwender ist dafür verantwortlich, alle geltenden Sicherheitsvorschriften und -regeln mit der
für ihn zuständigen Behörde in eigener Verantwortung abzustimmen und einzuhalten.
6
Festo – MS6(N)-SV-...-E-ASIS – 1205NH Deutsch
MS6(N)-SV-...-E-ASIS
2
Voraussetzungen für den Produkteinsatz
• Stellen Sie diese Bedienungsanleitung dem Konstrukteur und Monteur der Maschine oder Anlage,
an der dieses Produkt zum Einsatz kommt, zur Verfügung.
• Bewahren Sie diese Bedienungsanleitung während des gesamten Produktlebenszyklus auf.
• Berücksichtigen Sie die für den Bestimmungsort geltenden gesetzlichen Regelungen sowie:
– Vorschriften und Normen,
– Regelungen der Prüforganisationen und Versicherungen,
– nationale Bestimmungen.
2.1
Technische Voraussetzungen
Allgemeine, stets zu beachtende Hinweise für den ordnungsgemäßen und sicheren Einsatz des Produkts:
• Halten Sie die angegebenen Grenzwerte ein (z. B. für Drücke, Temperaturen und elektrische
Spannungen).
• Sorgen Sie für Druckluft mit ordnungsgemäßer Aufbereitung gemäß den Angaben zum Medium.
• Entfernen Sie Partikel in den Zuleitungen vor der Montage durch geeignete Maßnahmen. Sie
schützen das Produkt so vor frühzeitigem Ausfall und höherem Verschleiß.
• Belüften Sie Ihre gesamte Anlage langsam. Damit können schlagartige Bewegungen vermieden
werden.
• Beachten Sie die Warnungen und Hinweise in dieser Bedienungsanleitung.
• Verwenden Sie das Produkt im Originalzustand ohne jegliche eigenmächtige Veränderung.
2.2
Qualifikation des Fachpersonals
Einbau, Installation, Inbetriebnahme, Wartung, Reparatur und Außerbetriebnahme dürfen nur von
qualifiziertem Fachpersonal mit Kenntnissen und Erfahrungen im Umgang mit elektrischer und pneumatischer Steuerungstechnik vorgenommen werden.
AS-Interface-Bussysteme dürfen nur von hierfür geschultem Fachpersonal installiert werden. Angaben
zur Konzeption und Adressierung Ihres Bussystems finden Sie in der Beschreibung Ihres AS-i-Masters.
Festo – MS6(N)-SV-...-E-ASIS – 1205NH Deutsch
7
MS6(N)-SV-...-E-ASIS
2.3
Ausfälle aufgrund gemeinsamer Ursache (Common Cause Failure –
CCF)
Ausfälle aufgrund gemeinsamer Ursache bewirken den Verlust der Sicherheitsfunktion, da in diesem
Fall beide Kanäle in einem zweikanaligen System gleichzeitig ausfallen.
Durch folgende Maßnahmen stellen Sie sicher, dass Ausfälle aufgrund gemeinsamer Ursache vermieden werden:
– Einhaltung der zulässigen Werte für Schwing- und Schockbelastung
– Einhaltung des Temperaturbereichs
– Einhaltung der Druckluftqualität entsprechend den technischen Daten, insbesondere Vermeidung
von Flugroststaub (z. B. hervorgerufen durch Service-Arbeiten) sowie Einhaltung des Restölgehalts
von max. 0,1 mg/m3 bei Verwendung von esterhaltigen Ölen (die z. B. im Kompressoröl enthalten
sein können)
– Einhaltung des maximalen Betriebsdrucks ggf. durch den Einsatz eines Druckbegrenzungsventils
Beachten Sie hierzu die technischen Daten im Kapitel 14.
Hinweis
Verlust der Sicherheitsfunktion
Nicht-Einhalten der Technischen Daten kann zum Verlust der Sicherheitsfunktion führen.
• Halten Sie die Technischen Daten ein.
2.4
Einsatzbereich und Zulassungen
Das Produkt ist ein Sicherheitsbauteil nach Maschinenrichtlinie 2006/42/EG und mit dem CE-Kennzeichen versehen.
Normen und Prüfwerte, die das Produkt einhält und erfüllt, finden Sie im Abschnitt Technische Daten.
Die produktrelevanten EG-Richtlinien entnehmen Sie bitte der Konformitätserklärung.
8
Festo – MS6(N)-SV-...-E-ASIS – 1205NH Deutsch
MS6(N)-SV-...-E-ASIS
2.5
Normen
Norm
Titel
EN ISO 13849-1:2008-06
Sicherheit von Maschinen - Sicherheitsbezogene Teile von Steuerungen
Teil 1: Allgemeine Gestaltungsleitsätze
Sicherheit von Maschinen - Sicherheitsbezogene Teile von Steuerungen
Teil 2: Validierung
Niederspannungschaltgeräte, Steuerungs- und Geräteinterface; Aktuator Sensor Interface (AS-interface)
Sicherheit von Maschinen - Elektrische Ausrüstung von Maschinen
Teil 1: Allgemeine Anforderungen
Funktionale Sicherheit sicherheitsbezogener elektrischer/
elektronischer/programmierbarer elektronischer Systeme
Teil 3: Anforderungen an Software
Niederspannungsschaltgeräte - Steuerung-Geräte-Netzwerke (CDIs)
Teil2: Aktuator Sensor Interface (AS-i)
Fluidtechnik - Allgemeine Regeln und sicherheitstechnische Anforderungen an Pneumatikanlagen und deren Bauteile
EN ISO 13849-2:2008-06
EN 50295:1999-10
EN 60204-1:2006-06
EN 61508-3:2010-05
IEC 62026-2:2008-01
EN ISO 4414:2010-11
Tab. 1
2.6
Normen
Service
Reparaturen, insbesondere das Öffnen des Gehäuses, dürfen nur vom Hersteller vorgenommen
werden. Bitte wenden Sie sich bei technischen Problemen an Ihren lokalen Service von Festo.
Festo – MS6(N)-SV-...-E-ASIS – 1205NH Deutsch
9
MS6(N)-SV-...-E-ASIS
3
Bedienteile und Anschlüsse
Druckaufbau- und Entlüftungsventil MS6(N)-SV-...-E-ASIS nach EN ISO 13849-1,
max. erreichbarer Performance Level e, Kategorie 3 + 4.
1
2
3
8
4
5
6
9
7
aJ
1
2
3
4
5
6
LED Status
LED AS-i
Drosselschraube für Softstartfunktion
Pneumatischer Anschluss 1 (Eingang Druckluft)
Elektronikblock
Ventilblock
Fig. 1
10
7
8
9
aJ
Anschluss AS-Interface-Bus
Pneumatischer Anschluss 2 (Ausgang Druckluft)
Anschluss Funktionserde mit Erdungskabel
(vormontiert)
Pneumatischer Anschluss 3 (Entlüftung)
Bedienteile und Anschlüsse
Festo – MS6(N)-SV-...-E-ASIS – 1205NH Deutsch
MS6(N)-SV-...-E-ASIS
4
Funktion und Anwendung
Über den sicherheitsgerichteten elektrischen Anschluss wird das MS6(N)-SV-...-E-ASIS ohne weitere
zusätzlichen Geräte direkt als Slave an die AS-i Safety at Work Umgebung angeschlossen.
4.1
Begriffsdefinitionen AS-interface
Begriff
Beschreibung
Master
Komponente zur Datenübertragung, die das logische und zeitliche Verhalten auf der AS-i-Leitung steuert.
Komponente, die die sicherheitsgerichteten Slaves und die korrekte
Funktion des Netzes überwacht. Die Konfiguration und Inbetriebnahme des
AS-i-Sicherheitsmonitors erfolgt über einen PC/Notebook mit der Konfigurationssoftware ASiMon.
Komponente zur Datenübertragung, die vom Master zyklisch über ihre
Adresse angesprochen wird und nur dann eine Antwort generiert.
Konfigurationssoftware für das AS-i-Netzwerk
Sicherheitsmonitor
Slave
ASiMon
Tab. 2
Begriffsdefinitionen AS-interface
Hinweis
Angaben zur Konzeption und Adressierung Ihres Bussystems finden Sie in der
Beschreibung Ihres AS-Interface-Masters und AS-i-Sicherheitsmonitors.
Eine detaillierte Beschreibung aller Funktionen finden Sie im Benutzerhandbuch der
Konfigurationssoftware ASiMon.
4.2
Kurzbeschreibung AS-i
Das Aktuator-Sensor-Interface (AS-i) ist ein System zur Vernetzung von Sensoren und Aktuatoren auf
der untersten Ebene der Automatisierungshierarchie. Es ist ein herstellerunabhängiges, offenes Bussystem und ermöglicht die Daten- und Energieübertragung auf nur einer Leitung. Diese einfache Handhabung ermöglicht einen wirtschaftlichen Aufbau bei gleichzeitig zuverlässigem Betriebsverhalten. Die
Netzwerktopologie des AS-i-Systems ist beliebig und problemlos erweiterbar.
Ein AS-i-Netzwerk besteht aus einer Kontrolleinheit, einem sogenannten Master und den dazugehörigen Sensor- und Aktuatorkomponenten, den Slaves. Der Master pollt zyklisch alle projektierten Slaves
und tauscht mit ihnen die Ein- und Ausgangsdaten aus. Ein Telegramm besteht dabei aus 4-Bit Nutzdaten. Der Master kommuniziert mit einem seriellen Übertragungsprotokoll mit den Teilnehmern.
Festo – MS6(N)-SV-...-E-ASIS – 1205NH Deutsch
11
MS6(N)-SV-...-E-ASIS
Mit AS-i Safety at Work wurde ein zertifizierter Standard entwickelt, der den Einsatz von sicherheitsgerichteten Komponenten (z. B. MS6(N)-SV-...-E-ASIS) im AS-i-System ermöglicht. Das sichere AS-iSystem ist für Sicherheitsanwendungen bis Kategorie 4 nach EN ISO 13849-1 PL e vorgesehen.
Ein Mischbetrieb von Standardkomponenten und sicherheitsgerichteten Komponenten ist möglich. Der
AS-i-Master betrachtet die sicherheitsgerichteten Slaves wie alle übrigen Slaves und bindet sie in das
Netz ein. Das Übertragungsprotokoll und die Leitungen des AS-i-Systems sind so ausgelegt, dass sie
auch sicherheitsorientierte Telegramme übertragen können.
Der AS-i-Sicherheitsmonitor ist das zentrale sichere Element und überwacht innerhalb eines AS-i-Systems die ihm zugeordneten sicherheitsgerichteten Slaves. Die Sicherheitsfunktion wird durch die zusätzliche Signalübertragung zwischen den sicherheitsgerichteten Slaves und dem AS-i-Sicherheitsmonitor erreicht. Diese Übertragung geschieht mit einem speziellen Sicherheitsprotokoll.
Im Fall einer Stopp-Anforderung oder eines Defektes schaltet der AS-i-Sicherheitsmonitor im Schutzbetrieb das System mit einer Reaktionszeit von maximal 40 ms sicher ab.
Fig. 2
12
Beispiel AS-i Safety at Work
Festo – MS6(N)-SV-...-E-ASIS – 1205NH Deutsch
MS6(N)-SV-...-E-ASIS
5
Montage und Installation
5.1
Mechanisch
Hinweis
Informationen zur Montage von Modulverbinder, Anschlussplatte und Befestigungswinkel finden Sie in der Bedienungsanleitung, die dem Zubehör beigefügt ist.
• Platzieren Sie das MS6(N)-SV-...-E-ASIS so
nahe wie möglich am Einsatzort.
• Platzieren Sie das MS6(N)-SV-...-E-ASIS so,
dass Sie ausreichend Platz für den AS-i-Anschluss und den Schalldämpfers haben
Fig. 3 Einbau mit Schalldämpfer UOS-1 von
Festo.
• Beachten Sie den minimal zulässigen Wandabstand von 32 mm.
Bei Verwendung des Befestigungswinkels
MS6-WPB von Festo ist dieser Abstand gewährleistet.
• Die Einbaulage ist beliebig.
Fig. 3
Einbau
• Beachten Sie die Durchflussrichtung von 1
nach 2. Als Orientierung dienen die Ziffern 1
auf dem Produktgehäuse.
1
Fig. 4
Festo – MS6(N)-SV-...-E-ASIS – 1205NH Deutsch
Durchflussrichtung
13
MS6(N)-SV-...-E-ASIS
Zusammenbau mit Wartungsgeräten der Baureihe MS
Warnung
Der falsche Einbau in die Wartungskombination kann die Sicherheitsfunktion des
MS6(N)-SV-...-E-ASIS beeinträchtigen.
• Nach dem MS6(N)-SV-...-E-ASIS dürfen nur Geräte platziert werden, die die pneumatische Sicherheitsfunktion – sicheres Entlüften – nicht beeinträchtigen.
Beim Zusammenbau mit einem oder mehreren bereits vorhandenen Wartungsgeräten der gleichen
Baureihe Fig. 5 Zusammenbau.
1. Demontieren Sie, falls vorhanden, die Abdeckkappe MS6-END 1 auf der Zusammenbauseite (nach oben schieben).
2. Platzieren Sie die Modulverbinder MS6-MV 2
in den Nuten der Einzelgeräte. Dabei ist zwischen den Einzelgeräten eine Dichtung (im
Lieferumfang Modulverbinder MS6-MV bzw.
Befestigungswinkel MS6-WPB) erforderlich.
3. Befestigen Sie die Modulverbinder MS6-MV
mit 2 Schrauben.
1
2
max. 1,2 Nm
Fig. 5
5.2
Zusammenbau
Pneumatisch
5.2.1
Anschluss 1 und 2 (Gewindegröße G½ oder NPT½-14)
Bei Verwendung von Anschlussverschraubungen mit Schlüsselweite größer SW24:
• Entfernen Sie die Abdeckkappe MS6-END (nach oben schieben), falls vorhanden.
Bei Verwendung von Anschlussverschraubungen:
• Beachten Sie die zulässige Einschraubtiefe der Anschlussgewinde:
ISO 228
NPT
10,0 mm
10,0 mm
Tab. 3
14
Max. Einschraubtiefe
Festo – MS6(N)-SV-...-E-ASIS – 1205NH Deutsch
MS6(N)-SV-...-E-ASIS
Für größere Einschraubtiefen müssen die Anschlussplatten MS6-AG.../AQ... von Festo verwendet
werden.
• Achten Sie auf korrekten Anschluss der Druckluftleitungen.
• Drehen Sie die Verschraubungen unter Verwendung von geeignetem Dichtmaterial in die pneumatischen Anschlüsse.
5.2.2
Anschluss 3 (Gewindegröße G1 oder NPT1)
Bei der Entlüftung einer Anlage über das MS6(N)-SV-...-E-ASIS entstehen hohe Schalldruckpegel. Daher ist der Einsatz eines Schalldämpfers zu empfehlen.
Vorsicht
Verletzungsgefahr durch Restdruck im System
Bei der Verwendung eines handelsüblichen Schalldämpfers kann es zum Zusetzen des
Dämpferkörpers kommen, was zu einer reduzierten Entlüftungsleistung und Staudruck
führen kann.
• Verwenden Sie den zum Produkt zugehörigen Sicherheitsschalldämpfer
12 Zubehör.
• Verwenden Sie einen handelsüblichen Schalldämpfer nur dann, wenn dieser regelmässig durch Servicepersonal gewartet und in Verbindung mit einer Staudrucküberwachung eingesetzt wird.
• Drehen Sie den Schalldämpfer in den pneumatischen Anschluss 3.
Hinweis
Beim MS6N-SV-...-E-ASIS muss zusätzlich ein Adapter (von Gewindegröße NPT1 auf G1)
zwischen Schalldämpfer und Produkt montiert werden.
• Achten Sie auf eine ungehinderte Entlüftung. Der Schalldämpfer oder der Anschluss 3 dürfen nicht
versperrt werden.
6
Elektrischer Anschluss
Vorsicht
Verletzungsgefahr durch elektrischen Schlag
• Stellen Sie den elektrischen Anschluss nur in spannungslosem Zustand und nur
durch Fachpersonal her.
Vorsicht
Verwenden Sie ausschließlich AS-Interface Netzteile, die eine sichere elektrische
Trennung der Betriebsspannung nach IEC/DIN EN 60204-1 gewährleisten. Berücksichtigen Sie zusätzlich die allgemeinen Anforderungen an PELV-Stromkreise gemäß
IEC/DIN EN 60204-1.
Festo – MS6(N)-SV-...-E-ASIS – 1205NH Deutsch
15
MS6(N)-SV-...-E-ASIS
6.1
Erdungskabel anschließen
• Verbinden Sie den Erdungsanschluss niederohmig (kurze Leitung mit großem Querschnitt)
mit dem Erdpotential.
Sie vermeiden damit Störungen durch
elektromagnetische Einflüsse und stellen die
elektromagnetische Verträglichkeit gemäß der
EMV-Richtlinie sicher.
Fig. 6
6.2
Anschluss Erdungskabel
AS-i-Bus anschließen
Beachten Sie bei Stichleitungen:
– die maximale Gesamtlänge des AS-i-Bus (100 m ohne Repeater/Extender)
– die Leitungslänge des Lastspannungsanschlusses (abhängig von der Stromaufnahme und den
Schwankungen der Lastspannung).
6.2.1
Anschluss an M12-Stecker
M12-Stecker, 4-polig (In)
M12-Buchse, 4-polig (Out)
Pin 1:
Pin 2:
Pin 3:
Pin 4:
Pin 1:
Pin 2:
Pin 3:
Pin 4:
Tab. 4
AS-i +
n. c.
AS-i –
n. c.
AS-i +
Adressierkontakt –
AS-i –
Adressierkontakt +
Anschluss AS-Interface-Bus
• Verschließen Sie nicht genutzte Anschlüsse mit Schutzkappen ISK M12 oder UIFB1-02-1/4.
Hinweis
Das Zubehör von Festo finden Sie unter: www.festo.com/catalogue
16
Festo – MS6(N)-SV-...-E-ASIS – 1205NH Deutsch
MS6(N)-SV-...-E-ASIS
6.2.2
AS-Interface-Adressen
Vor der Inbetriebnahme weisen Sie dem MS6(N)-SV-...-E-ASIS eine nicht sicherheitsgerichtete SlaveAdresse und eine Adresse eines sicherheitsgerichteten Slave zu.
Die Module bzw. Slaves, die adressiert worden sind, sollten unbedingt sorgfältig beschriftet werden.
Adresszuordnung
Die Zuordnung der Datenbits zu den Ein- und Ausgängen zeigen folgende Tabellen:
Zyklische Digitaldaten
Eingänge
n. c. n. c.
Tab. 5
Beschreibung
DI1
DI0
0
0
1
1
0
1
0
1
Eingänge zyklische Digitaldaten
Ausgänge
DO3 DO2 n. c.
x
Tab. 6
pneumatischer Zustand entlüften
pneumatischer Zustand belüften
weicher Fehler; pneumatische Grenzen über-/unterschritten
schwerer Fehler; defekt in der Hard-/Software aufgedeckt
Beschreibung
n. c.
x
nicht verwendet
Ausgänge zyklische Digitaldaten
Zyklische Analogwerte
A15 … A0
Beschreibung
xxxxxxxxxxxxxxxx
Druck p1
Tab. 7
Ausgänge zyklische Analogwerte
A15 … A0
Beschreibung
xxxxxxxxxxxxxxxx
Druck p2
Tab. 8
Ausgänge zyklische Analogwerte
Festo – MS6(N)-SV-...-E-ASIS – 1205NH Deutsch
17
MS6(N)-SV-...-E-ASIS
Azyklische Werte
Datenformat Diagnose AS-i-Objekt 00 (17 Byte)
16 15 14 13 12 11 10 9
8
7
Bedeutung:
0
Vendor ID (high Byte)
1
Vendor ID (low Byte)
2
Device ID (high Byte)
3
Device ID (low Byte)
4
Spezifikation der analogen Ein-/Ausgänge
5 … 20
Product Key
21
Schaltspielzähler Ventil (low Byte)
22
Schaltspielzähler Ventil
23
Schaltspielzähler Ventil
24
Schaltspielzähler Ventil (high Byte)
25
Monatszähler
Tab. 9
6
5
4
3
2
1
0
Wert 01hex
Wert 4Dhex
Wert 03hex
Wert A6hex
Wert 03hex
Wert xxhex
Wert xxhex
Wert xxhex
Wert xxhex
Wert xxhex
Wert xxhex
Datenformat Diagnose AS-i-Objekt 00
Datenformat Diagnose AS-i-Objekt 01 (16 Bit)
15
14
Bedeutung:
0
1
2
3
4
5
6
7 … 12
13 … 15
Tab. 10
18
13
12
11
10
9
8
7
6
5
4
3
2
1
0
Pneumatischer Fehler: Unterschreitung minimaler Betriebsdruck (p1 < p1min. 3,5 bar)
Pneumatischer Fehler: Überschreitung maximaler Betriebsdruck (p1 > p1max. 10 bar)
Selbsttest:
0 = Nicht betriebsbereit
1 = Betriebsbereit
Interner Fehler, führt zum Abschalten und Sperren
Überschreitung tmin (1/Monat)
Status AUX1, z. B. AS-i-Kommunikationsfehler
Status AUX2
frei
Interne Ventildiagnose
Datenformat Diagnose AS-i-Objekt 01
Festo – MS6(N)-SV-...-E-ASIS – 1205NH Deutsch
MS6(N)-SV-...-E-ASIS
Zuweisen der AS-i-Adresse
Empfehlung: Verwenden Sie das Adressiergerät ASI-PRG-ADR mit Adapterkabel KASI-ADR von Festo.
Das Adressiergerät scannt den am Adressiergerät angeschlossenen Slave.
Adressierung für sicherheitsgerichteten Slave:
1. Stecken Sie den AS-i-Konfigurationsstecker CACC-CP-AS auf die M12-Buchse.
Der “Mode Switch” wechselt von “run” zu “prog”.
2. Weisen Sie dem Slave die gewünschte Adresse mit einem Adressiergerät oder mit dem AS-i-Master
zu (zulässiger Adressbereich 1 … 31, Werkseinstellung: Adresse #0).
3. Prüfen Sie die Adresse mit dem Adressiergerät oder AS-i Master.
4. Prüfen Sie den ID-Code. Dieser muss Fhex sein.
5. Prüfen Sie den ID1-Code. Dieser muss die 10er-Stelle der safety Adresse beinhalten.
6. Prüfen Sie den ID2-Code. Dieser muss die 1er-Stelle der safety Adresse beinhalten.
7. Prüfen Sie den IO Code. Dieser muss “7” sein.
8. Wiederholen Sie den Vorgang ab Schritt 1, wenn die Prüfung der Codes fehlerhaft war.
9. Ziehen Sie den AS-i-Konfigurationsstecker CACC-CP-AS ab.
Der “Mode Switch” wechselt von “prog” zu “run”.
Adressierung für nicht sicherheitsgerichteten Slave:
1. Weisen Sie jedem Slave eine noch nicht belegte Adresse zu.
2. Schließen Sie den Slave an den AS-Interface-Bus an.
Hinweis
Durch den Einsatz des AS-i-Konfigurationssteckers CACC-CP-AS werden Pin 1 – Pin 4 und
Pin 2 – Pin 3 am AS-i-Anschlussstecker verbunden. In diesem Zustand geht das Ventil in
den Adressiermodus für die sichere Adresse. Die Adresse kann nun mittels AS-i-Master
oder einem Adressiergerät nach SPEC V2.1 eingestellt werden. Bei der Verwendung des
Adressiergerätes ASI-PRG-ADR ist das Ventil zwingend mit einer externen Spannungsquelle zu versorgen. Die Adressierleitung KASI-ADR ist zu verwenden.
Hinweis
Wird die sichere Adresse über den AS-i-Master eingestellt, kann es zu einem Adressenkonflikt zwischen Slave und Monitor im Master kommen.
Die sichere Adresse des Slave wird erst am Bus angemeldet, wenn der AS-i Konfigurationsstecker eingesteckt wird. Ist der Monitor bereits mit der gleichen Adresse am Bus
angemeldet kommt es zum Adressenkonflikt.
Festo – MS6(N)-SV-...-E-ASIS – 1205NH Deutsch
19
MS6(N)-SV-...-E-ASIS
7
Inbetriebnahme
Voraussetzung für die folgende Inbetriebnahme des MS6(N)-SV-...-E-ASIS ist die Zuweisung einer nicht
sicherheitsgerichtete Slave-Adresse und einer Adresse eines sicherheitsgerichteten Slave.
Hinweis
Beachten Sie die Reihenfolge für eine fehlerfreie Inbetriebnahme.
1. Betriebsdruck p1 anlegen.
2. AS-i Betriebsspannung einschalten. Das MS6(N)-SV-...-E-ASIS testet sich selbstständig auf Fehler.
• LED AS-i leuchtet grün.
• LED Status
– blinkt grün nach erfolgreichem Selbsttest,
– blinkt rot, Betriebsdruck p1 fehlt oder liegt außerhalb des zulässigen Bereichs
( 14.2 Allgemeine Daten)
– leuchtet dauerhaft rot bei fehlerhaftem Selbsttest ( 13.2 Störungsbeseitigung).
War der Selbsttest erfolgreich, wird am Schalldämpfer kurz Druckluft abgeblasen.
Das MS6(N)-SV-…-E-ASIS kann belüftet werden.
Hinweis
Solange sich das Produkt in diesem Zustand befindet, wird das Ventil durch einen
Selbsttest einmal pro Stunde pneumatisch getestet.
3. Sicherheitsgerichtetes AS-i-Telegramm durch den AS-i-Sicherheitsmonitor generieren.
Das MS6(N)-SV-…-E-ASIS wechselt in den belüfteten Zustand.
Die LED Status leuchtet dauerhaft grün.
Der Ausgangsdruck p2 wird langsam aufgebaut.
Die Dauer “t” des Druckaufbaus wird über die am Deckel angebrachte Drosselschraube eingestellt. Entsprechend der eingestellten Drosselstellung steigt der Ausgangsdruck an
( 14.4 Befüllungsdurchfluss ). Bei Erreichen des Durchschaltdrucks (ca. 50% vom Betriebsdruck p1) öffnet der Hauptsitz des Ventils ( 14.3 Durchschaltdruck / Befüllzeit ). Das
MS6(N)-SV-...-E-ASIS ist betriebsbereit (Sicherheitsfunktion sicheres Entlüften).
Es sind keine weiteren Einstellungen erforderlich.
20
Festo – MS6(N)-SV-...-E-ASIS – 1205NH Deutsch
MS6(N)-SV-...-E-ASIS
8
Betrieb
Hinweis
Im prozesssicheren (d. h. belüfteten) Zustand wird das mechanische System des
MS6(N)-SV-...-E-ASIS nicht getestet.
• Führen Sie eine Zwangsabschaltung durch, wenn prozessbedingt die Schalthäufigkeit von mindestens einmal pro Monat nicht gegeben ist (Überwachung über
AS-i-Objekt 00/Monatszähler möglich).
Hinweis
Beachten Sie bei der Auslegung des Systems die maximale Schaltfrequenz und den
Lebensdauerkennwert des Produktes, um eine optimale Verfügbarkeit sicherzustellen
14 Technische Daten.
9
Wartung und Pflege
• Schalten Sie zur äußeren Reinigung folgende Energiequellen ab:
– Betriebsspannung
– Druckluft
• Reinigen Sie bei Bedarf das Produkt von außen.
Zulässige Reinigungsmedien sind Seifenlauge (max. +50 °C), Waschbenzin und alle werkstoffschonenden Medien.
10
Ausbau
1. Schalten Sie zum Ausbau folgende Energiequellen ab:
– Betriebsspannung
– Druckluft
Vorsicht
Verletzungsgefahr durch Restdruck im System
Bei der Verwendung eines handelsüblichen Schalldämpfers kann es zum Zusetzen des
Dämpferkörpers kommen, was zu einer reduzierten Entlüftungsleistung und Staudruck
führen kann.
• Verwenden Sie den zum Produkt zugehörigen Sicherheitsschalldämpfer
12 Zubehör.
• Verwenden Sie einen handelsüblichen Schalldämpfer nur dann, wenn dieser regelmässig durch Servicepersonal gewartet und in Verbindung mit einer Staudrucküberwachung eingesetzt wird.
2. Trennen Sie die jeweiligen Anschlüsse vom MS6(N)-SV-…-E-ASIS.
Festo – MS6(N)-SV-...-E-ASIS – 1205NH Deutsch
21
MS6(N)-SV-...-E-ASIS
11
Außerbetriebnahme und Entsorgung
Das Produkt kann in Abstimmung mit dem Entsorger komplett dem Metallrecycling zugeführt werden (z. B. EAK 17 04 02). Gegebenenfalls ist der Elektronikblock zu demontieren,
der keine gefährlichen Bauteile enthält, und separat dem Elektronikschrottrecycling zuzuführen ist (EAK 16 02 16).
12
Zubehör
Bezeichnung
Typ
AS-i-Konfigurationsstecker
Schalldämpfer
Adressiergerät
Adressierleitung
CACC-CP-AS
UOS-1
ASI-PRG-ADR
KASI-ADR
Tab. 11
Zubehör
Hinweis
Das Zubehör von Festo finden Sie unter: www.festo.com/catalogue
22
Festo – MS6(N)-SV-...-E-ASIS – 1205NH Deutsch
MS6(N)-SV-...-E-ASIS
13
Diagnose und Fehlerbehandlung
13.1
LED-Anzeige
LED AS-i
Diagnose
aus
leuchtet grün
leuchtet rot
leuchtet rot
blinkt grün/rot
keine AS-i-Spannung vorhanden
AS-i-Spannung vorhanden, kein Fehler
AS-i-Adresse nicht eingestellt (gleich 0)
Ausfall der Buskommunikation (z. B. Watchdog abgelaufen)
Fehler im Entlüftungsventil, siehe detailliertere Fehlerdarstellung
im AS-i-Objekt
Tab. 12
Diagnose LED AS-i
LED Status
Diagnose
blinkt grün
leuchtet grün
blinkt rot
entlüfteter Zustand
belüfteter Zustand
Betriebsdruck p1 über-/unterschritten, siehe detailliertere Fehlerdarstellung im AS-i-Objekt
schwerer Fehler
Im Safety-Adressierungszustand; AS-i-Konfigurationsstecker ist
gesteckt
AUX1 keine Buskommunikation oder falsche Adresse;
Fehlerentriegelung notwendig
AUX2 Fehler, AS-i-Bus nicht richtig konfiguriert
leuchtet rot
blinkt rot/grün
blinkt gelb
leuchtet gelb
Tab. 13
Diagnose LED Status
Hinweis
AS-Interface hat eine integrierte Watchdog-Funktion, welche die Ausgänge bei Ausfall
der Bus-Kommunikation zurücksetzt.
Festo – MS6(N)-SV-...-E-ASIS – 1205NH Deutsch
23
MS6(N)-SV-...-E-ASIS
13.2
Störungsbeseitigung
Störung
Mögliche Ursache
Abhilfe
Ausgang 2 entlüftet,
obwohl der Sicherheitskreis geschlossen
ist.
Druckversorgung wurde unterbrochen
• Druckversorgung wiederherstellen
• Reset des AS-i-Slaves (MS6-SV)
Hinweis: Überwachung des Drucks
über Objekt 01
schwerer Fehler (interner Fehler)
AS-i-Kommunikationsfehler
schwerer Fehler
Druckversorgung wurde unterLED-Status leuchtet rot brochen
Zustand 1 – Betriebsbereit wird nicht erreicht (Selbsttest nicht
bestanden)
Hardwaredefekt (mechanisch
oder/und elektronisch)
fehlender Versorgungsdruck
Ventil erneuern / Festo kontaktieren
Versorgungsdruck außerhalb der
Druckgrenzen 3,5-10bar
Hardwaredefekt, Störung
schwerer Fehler
Druck p1 bricht kurznicht überschneidungsfreies Sitzzeitig bei jedem Schalt- ventil.
vorgang ein.
(Das Verhalten wird verstärkt, wenn
das Ventil mit kleinen Volumen /
Schlauchdurchmessern betrieben
wird, und die Softstartdrossel voll
geöffnet ist.)
Tab. 14
24
Ventil erneuern / Festo kontaktieren
AS-i-Bus Konfiguration überprüfen
• Druckversorgung wiederherstellen
• Reset des AS-i-Slaves (MS6-SV)
Hinweis: Überwachung des Drucks
über Objekt 01
• Druckversorgung wiederherstellen
• Reset des AS-i-Slaves (MS6-SV)
Druckversorgung überprüfen
Ventil erneuern / Festo kontaktieren
• Drosselschraube zudrehen
• Volumen vor p1 Eingang anbringen
• Druckluftversorgung anpassen.
Störungsbeseitigung
Festo – MS6(N)-SV-...-E-ASIS – 1205NH Deutsch
MS6(N)-SV-...-E-ASIS
14
Technische Daten
14.1
Sicherheitstechnische Kenngrößen
Typ
MS6-SV-…-E-ASIS
Entspricht Norm
EN ISO 13849-1:2008-06
EN ISO 13849-2:2008-06
Entlüften
Entlüften: Kategorie 4, PL e
Entlüften: SIL 3
0,25
4,51 10E–9
Betriebsdruckgrenzen einhalten
Temperaturbereich einhalten
Einhaltung Schwing Schock
Druckluftqualität einhalten
Schaltfrequenz mindestens 1/Monat
nach EU-Maschinen-Richtlinie
nach EU-EMV-Richtlinie
Die funktionale Sicherheitstechnik des Produktes wurde
von einer uanbhägigen Prüfstelle zertifiziert
EG-Baumusterprüfbescheinigung (www.festo.com)
Sicherheitsfunktion
Performance-Level (PL)
Safety Integrity Level (SIL)
Lebensdauerkennwert B10
PFH
CCF Maßnahmen
[Mio SP]
Hinweis zur Zwangsdynamisierung
CE-Zeichen ( Konformitätserklärung)
Baumusterprüfung
Tab. 15
MS6N-SV-…-E-ASIS
Sicherheitstechnische Kenngrößen
Hinweis
Zusätzlich zur Systemreaktionszeit von max. 40 ms müssen die Reaktionszeiten des
sicheren AS-Interface-Sensor-Slaves addiert werden.
Die zu addierenden Reaktionszeiten sind den technischen Daten der Slaves sowie
Sensoren und Aktuatoren zu entnehmen.
Festo – MS6(N)-SV-...-E-ASIS – 1205NH Deutsch
25
MS6(N)-SV-...-E-ASIS
14.2
Allgemeine Daten
Typ
Pneumatischer Anschluss 1, 2
Pneumatischer Anschluss 3
Befestigungsart
Konstruktiver Aufbau
Betätigungsart
Steuerluftversorgung
Abluftfunktion
Positionserkennungsprinzip
Handhilfsbetätigung
Rückstellart
Steuerart
Ventilfunktion
Einbaulage
Betriebsmedium
Hinweis Betriebsmedium
Umgebungstemperatur
Mediumstemperatur
Lagertemperatur
Schockfestigkeit
Schwingfestigkeit
Betriebsdruck
C-Wert
b-Wert
Normalnenndurchfluss 1 > 2
Normalnenndurchfluss 2 > 3
Min. Normalnenndurchfluss
2 > 3 im kritischsten Fehlerfall
Restdruck im Normalbetrieb
Max. Restdruck im Fehlerfall
(worst case)
Durchschaltpunkt
Befüllungsdurchfluss
Betriebsspannungsbereich DC
AS-Interface
Maximale Schaltfrequenz
26
MS6-SV-…-E-ASIS
MS6N-SV-…-E-ASIS
G½ (ISO 228)
NPT½-14
G1 (ISO 228)
NPT1
Leitungseinbau
mit Zubehör
Kolben-Sitz nicht überschneidungsfrei
elektrisch
intern
nicht drosselbar
Magnetkolben-Prinzip
keine
mechanische Feder
vorgesteuert
3/2-Wegeventil, geschlossen monostabil
Druckaufbaufunktion
beliebig
Druckluft nach ISO 8573-1:2010 [7:4:4]
geölter Betrieb möglich (im weiteren Betrieb erforderlich)
[°C]
–10 … +50 (0 … +50 mit Drucksensor)
[°C]
–10 … +50 (0 … +50 mit Drucksensor)
[°C]
–10 … +50 (0 … +50 mit Drucksensor)
Schockprüfung mit Schärfegrad 2 nach FN 942017-5
und EN 60068-2-27
Transporteinsatzprüfung mit Schärfegrad 2 nach
FN 942017-4 und EN 60068-2-6
[bar]
3,5 … 10
[l/(s*bar)] 19,3
0,21
[l/min]
4 300 (bei p1 = 6 bar, p2 = 5 bar)
[l/min]
9 000 (bei p1 = 6 bar)
[l/min]
6 000 (bei p1 = 6 bar)
[bar]
[bar]
0 (restdruckfrei)
0,4 (bei p1 = 10 bar und voll geöffneter Drossel)
[V]
Ca. 50 % von p1 Fig. 7
über Drossel einstellbar Fig. 8
22,0 … 31,6
[Hz]
0,5
Festo – MS6(N)-SV-...-E-ASIS – 1205NH Deutsch
MS6(N)-SV-...-E-ASIS
Typ
MS6-SV-…-E-ASIS
Schaltzeit aus
Schaltzeit ein
Einschaltdauer
Elektrischer Anschluss
Schutzart
Schalldruckpegel
Werkstoff-Info Gehäuse
Werkstoff-Info Dichtung
Tab. 16
14.3
[ms]
[ms]
[%]
[dB(A)]
MS6N-SV-…-E-ASIS
40
130
100
M12-Stecker
M12-Buchse
IP65 mit Steckdose
75 mit Schalldämpfer UOS-1
Alu-Druckguss
NBR
Allgemeine Daten
Durchschaltdruck / Befüllzeit
Mit der im Deckel befindlichen Drosselschraube wird ein gedrosselter Druckaufbau vom Ausgangsdruck p2 erzeugt. Durch Drehen der Drosselschraube kann der Druckanstieg eingestellt werden. Hat
der Ausgangsdruck p2 ca. 50% vom Betriebsdruck p1 erreicht, öffnet das Ventil und am Ausgang liegt
der volle Betriebsdruck p1 an.
100%
70%
p
Toleranzbereich
50%
Durchschaltpunkt
30%
Befüllzeit über Drossel
einstellbar
t
Fig. 7
Durchschaltdruck
Beispiel:
Ist der Betriebsdruck p1 = 4 bar, so ist unter Beachtung der zulässigen Toleranz von ±20% ein Durchschaltdruck von 1,2 … 2,8 bar möglich.
Festo – MS6(N)-SV-...-E-ASIS – 1205NH Deutsch
27
MS6(N)-SV-...-E-ASIS
14.4
Befüllungsdurchfluss
Durchfluss qn in Abhängigkeit von der Anzahl Umdrehungen n der Drosselschraube
p1: 4 bar
p1: 6 bar
p1: 8 bar
p1: 10 bar
Fig. 8
Durchflussdiagramm
Hinweis
Kleine Volumen und Schlauchdurchmesser können in Verbindung mit einem zu hohen
Befüllungsdurchfluss zu Störungen führen.
• Achten Sie darauf, das der Befüllungsduchfluss entsprechend der gewählten Anschlussgröße und dem Volumen der nachgeschalteten Anlage eingestellt wird.
28
Festo – MS6(N)-SV-...-E-ASIS – 1205NH Deutsch
MS6(N)-SV-...-E-ASIS
14.5
Entlüftungszeit
Die nachfolgende Tabelle zeigt die Entlüftungszeit im Normalbetrieb (N) und im Fehlerfall (F) mit Schalldämpfer UOS-1, 12 Zubehör, bei verschiedenen Volumina und Betriebsdrücken.
Hinweis
Für den Fehlerfall (F) wird der schwerstmögliche Fehler im Ventilinneren angenommen
(worst case).
Normalbetrieb: N
Im Fehlerfall: F
Betriebsdruck 3,5 bar
Entlüftungszeit [s]
auf
auf
1,0 bar
0,5 bar
Betriebsdruck 6 bar
Entlüftungszeit [s]
auf
auf
1,0 bar
0,5 bar
Betriebsdruck 10 bar
Entlüftungszeit [s]
auf
auf
1,0 bar
0,5 bar
Volumen [l]
0,1
(0,16)
0,3
(0,4)
0,5
(0,8)
1,2
(1,7)
3,2
(4,8)
0,24
(0,28)
0,55
(0,8)
1,0
(1,5)
2,2
(3,4)
6,0
(9,8)
0,3
(0,36)
0,7
(1,2)
1,4
(2,4)
3,0
(5,1)
11,0
(16,2)
Tab. 17
2
N
(F)
10 N
(F)
20 N
(F)
40 N
(F)
150 N
(F)
0,2
(0,22)
0,45
(0,6)
0,85
(1,25)
1,9
(2,8)
5,0
(8,2)
0,3
(0,35)
0,7
(1,1)
1,3
(2,2)
3,0
(5,3)
8,2
(15,4)
0,4
(0,52)
0,9
(1,9)
1,7
(3,9)
3,9
(8,1)
12,8
(29,0)
Entlüftungszeit
Festo – MS6(N)-SV-...-E-ASIS – 1205NH Deutsch
29
MS6(N)-SV-...-E-ASIS
30
Festo – MS6(N)-SV-...-E-ASIS – 1205NH Deutsch
MS6(N)-SV-...-E-ASIS
English – Soft-start/quick exhaust valve
MS6(N)-SV-...-E-ASIS
Table of contents
1
Safety . . . . . . . . . . . . . . . . . . . . . . . . . . . . . . . . . . . . . . . . . . . . . . . . . . . . . . . . . . . . . . . . . .
33
1.1
1.2
1.3
1.4
General safety instructions . . . . . . . . . . . . . . . . . . . . . . . . . . . . . . . . . . . . . . . . . . . . . . . . . .
Intended use . . . . . . . . . . . . . . . . . . . . . . . . . . . . . . . . . . . . . . . . . . . . . . . . . . . . . . . . . . . . .
Foreseeable misuse . . . . . . . . . . . . . . . . . . . . . . . . . . . . . . . . . . . . . . . . . . . . . . . . . . . . . . .
Safety function according to EN ISO 13849 . . . . . . . . . . . . . . . . . . . . . . . . . . . . . . . . . . . . .
33
33
34
34
2
Requirements for product use . . . . . . . . . . . . . . . . . . . . . . . . . . . . . . . . . . . . . . . . . . . . . . .
35
2.1
2.2
2.3
2.4
2.5
2.6
Technical requirements . . . . . . . . . . . . . . . . . . . . . . . . . . . . . . . . . . . . . . . . . . . . . . . . . . . . .
Qualification of trained personnel . . . . . . . . . . . . . . . . . . . . . . . . . . . . . . . . . . . . . . . . . . . .
Common cause failures (CCF) . . . . . . . . . . . . . . . . . . . . . . . . . . . . . . . . . . . . . . . . . . . . . . . .
Range of application and certifications . . . . . . . . . . . . . . . . . . . . . . . . . . . . . . . . . . . . . . . .
Standards . . . . . . . . . . . . . . . . . . . . . . . . . . . . . . . . . . . . . . . . . . . . . . . . . . . . . . . . . . . . . . .
Service . . . . . . . . . . . . . . . . . . . . . . . . . . . . . . . . . . . . . . . . . . . . . . . . . . . . . . . . . . . . . . . . .
35
35
36
36
37
37
3
Control sections and connections . . . . . . . . . . . . . . . . . . . . . . . . . . . . . . . . . . . . . . . . . . . .
38
4
Function and application . . . . . . . . . . . . . . . . . . . . . . . . . . . . . . . . . . . . . . . . . . . . . . . . . . .
39
4.1
4.2
Definition of terms, AS-interface . . . . . . . . . . . . . . . . . . . . . . . . . . . . . . . . . . . . . . . . . . . . .
Brief description AS-i . . . . . . . . . . . . . . . . . . . . . . . . . . . . . . . . . . . . . . . . . . . . . . . . . . . . . .
39
39
5
Mounting and installation . . . . . . . . . . . . . . . . . . . . . . . . . . . . . . . . . . . . . . . . . . . . . . . . . .
41
5.1
5.2
Mechanical . . . . . . . . . . . . . . . . . . . . . . . . . . . . . . . . . . . . . . . . . . . . . . . . . . . . . . . . . . . . . .
Pneumatic . . . . . . . . . . . . . . . . . . . . . . . . . . . . . . . . . . . . . . . . . . . . . . . . . . . . . . . . . . . . . . .
5.2.1
Port 1 and 2 (thread size G½ or NPT½-14) . . . . . . . . . . . . . . . . . . . . . . . . . . . . .
5.2.2
Port 3 (thread size G1 or NPT1) . . . . . . . . . . . . . . . . . . . . . . . . . . . . . . . . . . . . . .
41
42
42
43
6
Electrical connection . . . . . . . . . . . . . . . . . . . . . . . . . . . . . . . . . . . . . . . . . . . . . . . . . . . . . .
43
6.1
6.2
Connect the earth cable . . . . . . . . . . . . . . . . . . . . . . . . . . . . . . . . . . . . . . . . . . . . . . . . . . . .
Connect AS-i bus . . . . . . . . . . . . . . . . . . . . . . . . . . . . . . . . . . . . . . . . . . . . . . . . . . . . . . . . . .
6.2.1
Connection to M12 plug . . . . . . . . . . . . . . . . . . . . . . . . . . . . . . . . . . . . . . . . . . . .
6.2.2
AS-Interface addresses . . . . . . . . . . . . . . . . . . . . . . . . . . . . . . . . . . . . . . . . . . . .
44
44
44
45
Festo – MS6(N)-SV-...-E-ASIS – 1205NH English
31
MS6(N)-SV-...-E-ASIS
7
Commissioning . . . . . . . . . . . . . . . . . . . . . . . . . . . . . . . . . . . . . . . . . . . . . . . . . . . . . . . . . . .
48
8
Operation . . . . . . . . . . . . . . . . . . . . . . . . . . . . . . . . . . . . . . . . . . . . . . . . . . . . . . . . . . . . . . .
49
9
Maintenance and care . . . . . . . . . . . . . . . . . . . . . . . . . . . . . . . . . . . . . . . . . . . . . . . . . . . . .
49
10
Disassembly . . . . . . . . . . . . . . . . . . . . . . . . . . . . . . . . . . . . . . . . . . . . . . . . . . . . . . . . . . . . .
49
11
De-commissioning and waste management . . . . . . . . . . . . . . . . . . . . . . . . . . . . . . . . . . . .
50
12
Accessories . . . . . . . . . . . . . . . . . . . . . . . . . . . . . . . . . . . . . . . . . . . . . . . . . . . . . . . . . . . . . .
50
13
Diagnostics and error handling . . . . . . . . . . . . . . . . . . . . . . . . . . . . . . . . . . . . . . . . . . . . . .
51
13.1 LED display . . . . . . . . . . . . . . . . . . . . . . . . . . . . . . . . . . . . . . . . . . . . . . . . . . . . . . . . . . . . . .
13.2 Troubleshooting . . . . . . . . . . . . . . . . . . . . . . . . . . . . . . . . . . . . . . . . . . . . . . . . . . . . . . . . . .
51
52
14
Technical data . . . . . . . . . . . . . . . . . . . . . . . . . . . . . . . . . . . . . . . . . . . . . . . . . . . . . . . . . . . .
53
14.1
14.2
14.3
14.4
14.5
Safety-related characteristics . . . . . . . . . . . . . . . . . . . . . . . . . . . . . . . . . . . . . . . . . . . . . . .
General data . . . . . . . . . . . . . . . . . . . . . . . . . . . . . . . . . . . . . . . . . . . . . . . . . . . . . . . . . . . . .
Switch-through pressure / filling time . . . . . . . . . . . . . . . . . . . . . . . . . . . . . . . . . . . . . . . . .
Filling flow . . . . . . . . . . . . . . . . . . . . . . . . . . . . . . . . . . . . . . . . . . . . . . . . . . . . . . . . . . . . . . .
Venting time . . . . . . . . . . . . . . . . . . . . . . . . . . . . . . . . . . . . . . . . . . . . . . . . . . . . . . . . . . . . .
53
54
55
56
57
32
Festo – MS6(N)-SV-...-E-ASIS – 1205NH English
MS6(N)-SV-...-E-ASIS
1
Safety
1.1
General safety instructions
Note
Loss of the safety function
If measures to handle “common cause failures” (CCF) are not complied with, the safety
function of the soft-start/quick exhaust valve can be impaired.
• Make sure that the described measures for handling “common cause failures” (CCF)
are complied with ( chap. 2 and chap. 14).
Note
Loss of the safety function
Non-compliance with the technical data can lead to loss of the safety function.
• Comply with the technical data.
1.2
Intended use
The MS6(N)-SV-...-E-ASIS electro-pneumatic soft start/quick exhaust valve is intended solely for reducing pressure quickly and safely and for building up pressure gently in pneumatic piping systems and
terminal equipment in industry.
The product is a self-testing, redundant mechatronic system in accordance with the requirements set
out in EN ISO 13849-1+2, in which the pneumatic safety function, safe venting, is guaranteed guaranteed even in the event of an error in the valve (e.g. due to wear or contamination).
An additional implemented safety function is protection from unexpected starting-up in accordance
with EN 1037.
The product is only appropriate for use in bus systems in accordance with the AS interface specification
(SPEC 3.0, profile 7.5.5).
The product is intended for installation in machines or automation technology systems and may be
used only in the following ways:
– in an industrial environment
– within the limits of the product defined by the technical data ( Chap. 14 Technical data)
– in its original status, without unauthorised modifications
– in excellent technical condition
– in standard operation, which also includes rest, set-up and service operation as well as emergency
operation
Festo – MS6(N)-SV-...-E-ASIS – 1205NH English
33
MS6(N)-SV-...-E-ASIS
1.3
Foreseeable misuse
Foreseeable misuse includes:
– use outdoors
– use as a press safety valve
– use in the non-industrial area/residential area
– use outside the limits of the product defined in the technical data
– unauthorised modifications
– bypassing of the safety function
– use in reversible operation (reversal of supply and exhaust air)
– vacuum operation
Note
In the event of damage caused by unauthorised manipulation or use other than that
intended, the guarantee is invalidated and the manufacturer is not liable for damages.
1.4
Safety function according to EN ISO 13849
The soft-start/quick exhaust valve MS6(N)-SV-...-E-ASIS has control technology features with which a
performance level e can be reached for the safety functions.
The product has been developed and produced in accordance with the fundamental and reliable safety
principles of EN ISO 13849-2.
The following requirements apply for the operator:
– Specifications on mounting and operating conditions in these operating instructions must be observed.
– For use in higher categories (2 to 4), the requirements of EN ISO 13849 (e.g. CCF) must be considered.
– The product must be switched off at least once per week to ensure its intended use.
– The fundamental safety principles of EN ISO 13849-2 relating to implementation and operation of
the component must be satisfied. For category 2 to 4, the proven safety principles in accordance
with EN ISO 13849-2 for implementation and operation of the component must be satisfied.
– When using this product in machines or systems subject to specific C standards, the requirements
specified in these standards must be observed.
– Before using the product, a risk evaluation in accordance with EC machinery directive 2006/42/EC,
appendix I, paragraph 1 and 1.1.2 is necessary.
– The user is responsible for coordinating all applicable safety regulations and rules with the responsible authority and for complying with them.
34
Festo – MS6(N)-SV-...-E-ASIS – 1205NH English
MS6(N)-SV-...-E-ASIS
2
Requirements for product use
• Make these operating instructions available to the design engineer and installer of the machine or
system in which this product will be used.
• Keep these operating instructions during the entire product life cycle.
• Take into consideration the regulations applicable for the destination, as well as:
– regulations and standards,
– regulations of the testing organizations and insurers,
– national specifications.
2.1
Technical requirements
General conditions for the correct and safe use of the product, which must be observed at all times:
• Maintain the specified limits (e.g. for pressures, temperatures and electric voltages).
• Make sure there is a supply of correctly prepared compressed air in accordance with the specifications on the medium.
• Before mounting, remove particles in the supply lines through appropriate measures. In this way,
you protect the product from premature failure and higher wear.
• Pressurize your entire system slowly. This allows avoidance of abrupt movements.
• Observe the warnings and instructions in these operating instructions.
• Use the product in its original status, without any unauthorised changes.
2.2
Qualification of trained personnel
Installation, mounting, commissioning, maintenance, repair and removal from operation may only be
performed by qualified personnel with knowledge and experience with electrical and pneumatic control
technology.
AS-Interface bus systems may only be installed by personnel especially trained for this purpose. Specifications on the design and addressing of your bus system can be found in the description of your AS-i
master.
Festo – MS6(N)-SV-...-E-ASIS – 1205NH English
35
MS6(N)-SV-...-E-ASIS
2.3
Common cause failures (CCF)
Common cause failures cause the loss of the safety function, since in this case both channels in a twochannel system fail simultaneously.
Through the following measures, you ensure that common cause failures are avoided:
– Compliance with the permissible values for vibration and shock stress
– Compliance with the temperature range
– Compliance with compressed air quality conforming to the technical data, in particular avoidance of
flash rust particles (for example, caused by servicing work) as well as compliance with the residual
oil content of max. 0.1 mg/m3 when using ester-containing oils (which may, for example, be contained in the compressor oil)
– Compliance with the maximum operating pressure, if necessary through use of a pressure-relief
valve
Observe the technical data in chapter 14.
Note
Loss of the safety function
Non-compliance with the technical data can lead to loss of the safety function.
• Comply with the technical data.
2.4
Range of application and certifications
The product is a safety component as defined in the Machinery Directive 2006/42/EC and carries the CE
marking.
Standards and test values which the product complies with and fulfils can be found in the section
“Technical data”. The product-relevant EC directives can be found in the declaration of conformity.
36
Festo – MS6(N)-SV-...-E-ASIS – 1205NH English
MS6(N)-SV-...-E-ASIS
2.5
Standards
Standard
Title
EN ISO 13849-1:2008-06
Safety of machinery - safety-related parts of control systems
Part 1: General principles for design
Safety of machinery - safety-related parts of control systems
Part 2: Validation
Low voltage switchgear, control and device interface; actuator sensor
interface (AS-interface)
Safety of machinery - electrical equipment of machines
Part 1: General requirements
Functional safety of safety-related electrical/electronic/programmable
electronic systems
Part 3: Software requirements
Low voltage switchgear - controller device interfaces (CDIs)
Part 2: Actuator sensor interface (AS-i)
Fluid engineering - general rules and safety-related requirements for
pneumatic systems and their components
EN ISO 13849-2:2008-06
EN 50295:1999-10
EN 60204-1:2006-06
EN 61508-3:2010-05
IEC 62026-2:2008-01
EN ISO 4414:2010-11
Tab. 1
2.6
Standards
Service
Repairs, in particular opening of the housing, may only be performed by the manufacturer. Please consult your local Festo repair service if you have any technical problems.
Festo – MS6(N)-SV-...-E-ASIS – 1205NH English
37
MS6(N)-SV-...-E-ASIS
3
Control sections and connections
MS6(N)-SV-...-E-ASIS soft start/quick exhaust valve, in accordance with EN ISO 13849-1,
max. achievable performance level “e”, category 3 + 4.
1
2
3
8
4
5
6
9
7
aJ
1
2
3
4
5
6
Status LED
LED AS-i
Flow control screw for soft start function
Pneumatic port 1 (compressed air inlet)
Electronic insert
Valve manifold
Fig. 1
38
7
8
9
aJ
AS-interface bus connection
Pneumatic port 2 (compressed air outlet)
Functional earth connection with earth cable
(pre-assembled)
Pneumatic port 3 (exhaust)
Control sections and connections
Festo – MS6(N)-SV-...-E-ASIS – 1205NH English
MS6(N)-SV-...-E-ASIS
4
Function and application
Through the safety-oriented electrical connection, the MS6(N)-SV-...-E-ASIS is connected without additional devices directly as slave to the AS-i Safety at Work environment.
4.1
Definition of terms, AS-interface
Term
Description
Master
Component for data transmission that controls the logical and temporal
behaviour on the AS-i line.
Component that monitors the safety-oriented slaves and correct
functioning of the network. Configuration and commissioning of the AS-i
safety monitor take place via a PC/notebook with the configuration
software ASiMon.
Component for data transmission that is addressed by the master cyclically
via its address and only then generates an answer.
Configuration software for the AS-i network
Safety monitor
Slave
ASiMon
Tab. 2
Definition of terms, AS-interface
Note
Specifications on the design and addressing of your bus system can be found in the
manual for the AS-Interface master and AS-i safety monitor.
A detailed description of all functions can be found in the user manual of the configuration software ASiMon.
4.2
Brief description AS-i
The actuator sensor interface (AS-i) is a system for networking sensors and actuators on the lowest
level of the automation hierarchy. It is a non-proprietary open bus system and enables transfer of data
and energy on just one line. This simple handling permits an efficient configuration with simultaneously
reliable performance. The network topology of the AS-i system can be expanded as desired without
trouble.
An AS-i network consists of a control unit, a so-called master and the associated sensor and actuator
components, namely the slaves. The master cyclically polls all configured slaves and exchanges input
and output data with them. A telegram consists of 4-bit user data. The master communicates with the
stations with a serial transmission protocol.
Festo – MS6(N)-SV-...-E-ASIS – 1205NH English
39
MS6(N)-SV-...-E-ASIS
With AS-i Safety at Work, a certified standard has been developed that permits the use of safety-oriented components (e.g. MS6(N)-SV-...-E-ASIS) in the AS-i system. The safe AS-i system is intended for
safety applications up to category 4 in accordance with EN ISO 13849-1 PL e.
Mixed operation of standard components and safety-oriented components is possible. The AS-interface
master considers the safety-oriented slaves just like all other slaves and incorporates them into the
network. The transmission protocol and cables in the AS-i system are laid out so that they are also
capable of transmitting safety-oriented telegrams.
The AS-i safety monitor is the central safe component and monitors the safety-oriented slaves assigned
to it within an AS-i system. The safety function is ensured via additional signal transmission between
the safety-oriented slaves and the AS-i safety monitor. This transmission takes place with a special
safety protocol.
In the case of a stop request or a defect, the AS-i safety monitor in protection mode reliably switches
the system off with a reaction time of maximum 40 ms.
Fig. 2
40
Example AS-i Safety at Work
Festo – MS6(N)-SV-...-E-ASIS – 1205NH English
MS6(N)-SV-...-E-ASIS
5
Mounting and installation
5.1
Mechanical
Note
Information about mounting of module connectors, sub-bases and mounting brackets
can be found in the operating instructions enclosed with the relevant accessories.
• Place the MS6(N)-SV-...-E-ASIS as close as
possible to the location where it will be used.
• Place the MS6(N)-SV-...-E-ASIS so that you
will have sufficient space for the AS-i connection and the silencer Fig. 3 Installation with
silencer UOS-1 from Festo.
• Observe the minimum permissible distance
from the wall of 32 mm.
If using the mounting bracket MS6-WPB from
Festo, this minimum distance is guaranteed.
• The mounting orientation is any desired.
Fig. 3
Installation
• Observe the flow direction from 1 to 2. Serving
as orientation are the numerals 1 on the
product housing.
1
Fig. 4
Festo – MS6(N)-SV-...-E-ASIS – 1205NH English
Flow direction
41
MS6(N)-SV-...-E-ASIS
Combination with service units of the MS series
Warning
Incorrectly installing the device in the service unit combination can impair the
MS6(N)-SV-...-E-ASIS safety function.
• Only devices that do not impair the pneumatic safety function – safe venting – may
be placed downstream of the MS6(N)-SV-...-E-ASIS.
If fitted together with one or several already present service units of the same series
Fig. 5 Assembly.
1. Remove the cover cap MS6-END 1, if on
hand, from the side to be combined (push upwards).
2. Place the module connectors MS6-MV 2 in
the grooves of the individual devices. A seal is
required between the individual units (included in the scope of delivery, module connector MS6-MV or mounting bracket
MS6-WPB).
3. Fasten the module connectors MS6-MV with
2 screws.
1
2
max. 1.2 Nm
Fig. 5
5.2
Assembly
Pneumatic
5.2.1
Port 1 and 2 (thread size G½ or NPT½-14)
If using screw connectors with spanner size larger than SW24:
• Remove the cover cap MS6-END (push upwards), if on hand.
If using fittings:
• Observe the maximum screw-in depth of the connecting threads:
ISO 228
NPT
10.0 mm
10.0 mm
Tab. 3
42
Max. screw-in depth
Festo – MS6(N)-SV-...-E-ASIS – 1205NH English
MS6(N)-SV-...-E-ASIS
For larger screw-in depths, the sub-bases MS6-AG.../AQ... from Festo must be used.
• Make sure that the compressed air lines are connected correctly.
• Screw the connectors into the pneumatic ports using appropriate sealing material.
5.2.2
Port 3 (thread size G1 or NPT1)
Exhausting a system through the MS6(N)-SV-...-E-ASIS creates high noise levels. We therefore recommend that you use a silencer.
Caution
Danger of injury due to residual pressure in the system
If a commercially-available silencer is used, the body of the silencer may become
clogged, which can result in reduced exhaust performance and back pressure.
• Use the safety silencer designed for the product 12 Accessories.
• Only use a commercially-available silencer if it will be maintained at regular intervals
by service staff and only in combination with a back pressure monitoring system.
• Screw the silencer into the pneumatic port 3.
Note
For MS6N-SV-...-E-ASIS an adapter (from thread size NPT1 to G1) must also be mounted
between silencer and product.
• Make sure that there is unrestricted exhausting. Neither the silencer nor port 3 may be blocked.
6
Electrical connection
Caution
Danger of injury from electric shock
• Create the electrical connection only in a voltage-free status and only by qualified
personnel.
Caution
Only use AS-interface power sources that guarantee reliable electrical disconnection of
the operating voltage in accordance with IEC/DIN EN 60204-1. Observe also the general
requirements for PELV power circuits as per IEC/DIN EN 60204-1.
Festo – MS6(N)-SV-...-E-ASIS – 1205NH English
43
MS6(N)-SV-...-E-ASIS
6.1
Connect the earth cable
• Connect the earth terminal with low impedance (short cable with large cross-sectional
area) to the earth potential.
This prevents interference from electromagnetic sources and ensures electromagnetic
compatibility in accordance with EMC directives.
Fig. 6
6.2
Earth cable connection
Connect AS-i bus
Observe with branch lines:
– The maximum overall length of the AS-i bus (100 m without repeater/extender)
– Cable length for the load voltage connection (dependent on the current consumption and
fluctuations in the load voltage).
6.2.1
Connection to M12 plug
M12 plug, 4-pin (In)
M12 socket, 4-pin (Out)
Pin 1:
Pin 2:
Pin 3:
Pin 4:
Pin 1:
Pin 2:
Pin 3:
Pin 4:
Tab. 4
AS-i +
n.c.
AS-i –
n.c.
AS-i +
Addressing contact –
AS-i –
Addressing contact +
AS-interface bus connection
• Seal unused connections with protective caps of type ISK M12 or UIFB1-02-1/4.
Note
Festo accessories can be found at: www.festo.com/catalogue
44
Festo – MS6(N)-SV-...-E-ASIS – 1205NH English
MS6(N)-SV-...-E-ASIS
6.2.2
AS-Interface addresses
Prior to commissioning, assign the MS6(N)-SV-...-E-ASIS a slave address that is not safety-oriented and
an address of a safety-oriented slave.
The modules or slaves that have been addressed should always be carefully labelled.
Address assignment
The following tables show the assignment of the data bits to the inputs and outputs.
Cyclical digital data
Inputs
n.c. n.c.
Tab. 5
Description
DI1
DI0
0
0
1
1
0
1
0
1
Cyclic digital data inputs
Outputs
DO3 DO2 n.c.
x
Tab. 6
Pneumatic status exhaust
Pneumatic status pressurize
Minor error; pneumatic limits exceeded or fallen below
Major error; defect uncovered in the hardware/software
Description
n.c.
x
Not used
Cyclical digital data outputs
Cyclical analogue values
O15 … O0
Description
xxxxxxxxxxxxxxxx
Pressure p1
Tab. 7
Cyclical analogue values outputs
O15 … O0
Description
xxxxxxxxxxxxxxxx
Pressure p2
Tab. 8
Cyclical analogue values outputs
Festo – MS6(N)-SV-...-E-ASIS – 1205NH English
45
MS6(N)-SV-...-E-ASIS
Acyclic values
Data format diagnostics AS-i object 00 (17 bytes)
16 15 14 13 12 11 10 9
8
7
Significance:
0
Vendor ID (high byte)
1
Vendor ID (low Byte)
2
Device ID (high byte)
3
Device ID (low byte)
4
Specification of the analogue inputs/outputs
5 … 20
Product key
21
Switching cycle counter valve (low byte)
22
Switching cycle counter valve
23
Switching cycle counter valve
24
Switching cycle counter valve (high byte)
25
Month counter
1
0
15
14
13
12
11
10
9
8
7
6
5
4
3
2
1
Significance:
0
Pneumatic error: minimum operating pressure fallen below (p1 < p1min. 3.5 bar)
1
Pneumatic error: minimum operating pressure exceeded (p1 > p1max. 10 bar)
2
Self test:
0 = not ready for operation
1 = ready for operation
3
Internal error, results in switch-off and disabling
4
Exceeding tmin (1/month)
5
Status AUX1, e.g. AS-i communication error
6
Status AUX2
7 … 12
free
13 … 15
Internal valve diagnostics
0
Tab. 9
6
5
4
3
2
Value 01hex
Value 4Dhex
Value 03hex
Value A6hex
Value 03hex
Value xxhex
Value xxhex
Value xxhex
Value xxhex
Value xxhex
Value xxhex
Data format diagnostics AS-i object 00
Data format diagnostics AS-i object 01 (16 bit)
Tab. 10
46
Data format diagnostics AS-i object 01
Festo – MS6(N)-SV-...-E-ASIS – 1205NH English
MS6(N)-SV-...-E-ASIS
Assigning the AS-i address
Recommendation: Use the addressing device ASI-PRG-ADR with adapter cable KASI-ADR from Festo.
The addressing device scans the slave connected to the addressing device.
Addressing for safety-oriented slave:
1. Plug the AS-i configuration plug CACC-CP-AS onto the M12 socket.
The “mode switch” changes from “run” to “prog”.
2. Assign the slave the desired address with an addressing device or the AS-i master(permissible
address range 1 … 31, factory setting: address #0).
3. Check the address with the addressing device or AS-i master.
4. Check the ID code. It must be Fhex.
5. Check the ID1 code. It must contain the 10s position of the safety address.
6. Check the ID2 code. It must contain the 1s position of the safety address.
7. Check the I/O code. It must be “7”.
8. Repeat the procedure starting with step 1 if the check of the code was faulty.
9. Unplug the AS-i configuration plug CACC-CP-AS.
The “Mode Switch” changes from “prog” to “run”.
Addressing for non-safety-oriented slave:
1. Assign a still unassigned address to each slave.
2. Connect the slave to the AS interface bus.
Note
Through use of the AS-i configuration plug CACC-CP-AS, pin 1 – pin 4 and pin 2 – pin 3
are connected to the AS-i connection plug. In this status, the valve goes into the addressing mode for the safe address. The address can now be set with the AS-i master or
an addressing device in accordance with SPEC V2.1. If the addressing device
ASI-PRG-ADR is used, the valve must be supplied from an external voltage source. The
addressing cable KASI-ADR must be used.
Note
If the safe address is set via the AS-i master, an address conflict between slave and
monitor can occur in the master.
The safe address of the slave is only logged in to the bus when the AS-i configuration
plug is plugged in. If the monitor is already logged in to the bus with the same address,
the result is an address conflict.
Festo – MS6(N)-SV-...-E-ASIS – 1205NH English
47
MS6(N)-SV-...-E-ASIS
7
Commissioning
A requirement for the following commissioning of the MS6(N)-SV-...-E-ASIS is assignment of a slave
address that is not safety-oriented and an address of a safety-oriented slave.
Note
Observe the sequence for error-free commissioning.
1. Apply operating pressure p1.
2. Switch on AS-i operating voltage. The MS6(N)-SV-...-E-ASIS automatically tests itself for errors.
• LED AS-i lights up green.
• Status LED
– flashes green after successful self test.
– flashes red, operating pressure p1 lacking or lies outside the permissible range
( 14.2 General data)
– permanently lit red in case of a faulty self test ( 13.2 Troubleshooting).
If the self test was successful, compressed air is briefly vented at the silencer.
The MS6(N)-SV-…-E-ASIS can be pressurized.
Note
The valve is tested pneumatically in a self-test once an hour for as long as the product
remains in this status.
3. Generate safety-oriented AS-i telegram through the AS-i safety monitor.
The MS6(N)-SV-…-E-ASIS switches into the pressurized status.
The LED status is permanently lit green.
Output pressure p2 is built up slowly.
The duration “t” of the pressure build-up is adjusted using the flow control screw attached to
the cap. The output pressure rises corresponding to the set throttle point ( 14.4 Filling flow ).
When the switch-through pressure is reached (approx. 50 % of operating pressure p1), the
valve’s main seat opens ( 14.3 Switch-through pressure / filling time ). Das
MS6(N)-SV-...-E-ASIS is ready for operation (safety function safe venting).
No further settings are required.
48
Festo – MS6(N)-SV-...-E-ASIS – 1205NH English
MS6(N)-SV-...-E-ASIS
8
Operation
Note
In its process-reliable (i.e. pressurised) state, the mechanical system of the
MS6(N)-SV-...-E-ASIS is not tested.
• Perform a forced switch-off if the process does not ensure the switching frequency
of at least once per month (monitoring via AS-i object 00/month counter possible).
Note
When designing the system, observe the maximum switching frequency and service life
characteristic of the product to ensure an optimal availability 14 Technical data.
9
Maintenance and care
• Switch off the following energy sources before cleaning the exterior of the device:
– Operating voltage
– Compressed air
• If needed, clean the product from outside.
Soap suds (max. +50 °C), petroleum ether and all non-abrasive cleaning agents may be used.
10
Disassembly
1. Switch off the following sources of energy before disassembly:
– Operating voltage
– Compressed air
Caution
Danger of injury due to residual pressure in the system
If a commercially-available silencer is used, the body of the silencer may become
clogged, which can result in reduced exhaust performance and back pressure.
• Use the safety silencer designed for the product 12 Accessories.
• Only use a commercially-available silencer if it will be maintained at regular intervals
by service staff and only in combination with a back pressure monitoring system.
2. Disconnect the relevant connections from the MS6(N)-SV-…-E-ASIS.
Festo – MS6(N)-SV-...-E-ASIS – 1205NH English
49
MS6(N)-SV-...-E-ASIS
11
De-commissioning and waste management
In coordination with the waste management company, the product can be completely
disposed of through metal recycling (e.g. EAK 17 04 02). If necessary, the electronic insert, which contains no dangerous components, is removed and sent separately for electronic scrap recycling (EAK 16 02 16).
12
Accessories
Designation
Type
AS-i configuration plug
Silencer
Addressing device
Addressing cable
CACC-CP-AS
UOS-1
ASI-PRG-ADR
KASI-ADR
Tab. 11
Accessories
Note
Festo accessories can be found under: www.festo.com/catalogue
50
Festo – MS6(N)-SV-...-E-ASIS – 1205NH English
MS6(N)-SV-...-E-ASIS
13
Diagnostics and error handling
13.1
LED display
LED AS-i
Diagnostics
Off
Lights up green
Lights up red
Lights up red
Flashes green/red
AS-i voltage not applied
AS-i interface voltage applied, no error
AS-i address not set (equals 0)
Bus communication failed (e.g. watchdog expired)
Error in the exhaust valve, see detailed error representation in the
AS-i object
Tab. 12
LED AS-i diagnostics
Status LED
Diagnostics
Flashes green
Lights up green
Flashes red
Exhausted status
Pressurized status
Operating pressure p1 exceeded/fallen below, see detailed error
representation in the AS-i object
Serious error
In the safety addressing status; AS-i configuration plug is plugged in
AUX1 no bus communication or incorrect address; error unlock
necessary
AUX2 error, AS-i bus not correctly configured
Lights up red
Flashes red/green
Flashes yellow
Lights up yellow
Tab. 13
LED status diagnostics
Note
The AS-interface has an integrated watchdog function which resets the outputs if the
bus communication fails.
Festo – MS6(N)-SV-...-E-ASIS – 1205NH English
51
MS6(N)-SV-...-E-ASIS
13.2
Troubleshooting
Malfunction
Possible cause
Remedy
Output 2 exhausted,
even though the safety
circuit is closed.
Pressure supply was interrupted
• Restore pressure supply
• Reset the AS-i slave (MS6-SV)
Note: Monitoring of the pressure via
object 01
Serious error (internal error)
AS-i communication error
Pressure supply was interrupted
Replace valve / contact Festo
Check AS-i bus configuration
• Restore pressure supply
• Reset the AS-i slave (MS6-SV)
Note: Monitoring of the pressure via
object 01
Hardware defect (mechanical or/
and electronic)
Lack of supply pressure
Replace valve / contact Festo
Serious error
LED status lights up
red
Status 1 – ready for
operation is not
achieved (self test not
passed)
Pressure p1 collapses
briefly at every
switching operation.
Tab. 14
52
Supply pressure outside the pressure limits 3.5-10 bar
Hardware defect, malfunction,
serious error
Poppet valve not without overlap.
(The behaviour is reinforced if the
valve is operated with small
volumes / hose diameters and the
soft-start throttle is opened completely.)
• Restore pressure supply
• Reset the AS-i slave (MS6-SV)
Check the compressed air supply
Replace valve / contact Festo
• Tighten flow control screw
• Attach reservoir in front of p1 inlet
• Adapt compressed air supply.
Troubleshooting
Festo – MS6(N)-SV-...-E-ASIS – 1205NH English
MS6(N)-SV-...-E-ASIS
14
Technical data
14.1
Safety-related characteristics
Type
MS6-SV-…-E-ASIS
Conforms to standard
EN ISO 13849-1:2008-06
EN ISO 13849-2:2008-06
Venting
Venting: category 4, PL e
Venting: SIL 3
0.25
Safety function
Performance Level (PL)
Safety Integrity Level (SIL)
Characteristic service life
value B10
PFH
CCF measures
[Million
cycles]
Note on forced checking procedure
CE marking ( declaration of conformity)
Product type testing
Tab. 15
MS6N-SV-…-E-ASIS
4.51 10E–9
Comply with operating pressure limits
Comply with temperature range
Comply with vibration/shock limits
Comply with compressed air quality
Switching frequency at least 1/month
In accordance with EC Machinery Directive
In accordance with EU EMC Directive
The functional safety engineering of the product has
been certified by an independent testing body
EC-type examination certificate (www.festo.com)
Safety-related characteristics
Note
In addition to the system reaction time of max. 40 ms, the reaction times of the safe AS
interface sensor slaves must be added.
The reaction times to be added should be taken from the technical data of the slaves as
well as the sensors and actuators.
Festo – MS6(N)-SV-...-E-ASIS – 1205NH English
53
MS6(N)-SV-...-E-ASIS
14.2
General data
Type
Pneumatic connection 1, 2
Pneumatic connection 3
Type of mounting
Design
Actuation type
Pilot air supply
Exhaust function
Position sensing principle
Manual override
Reset method
Type of control
Valve function
Mounting position
Operating medium
Note on operating medium
Ambient temperature
Temperature of medium
Storage temperature
Shock resistance
Vibration resistance
Operating pressure
C value
b value
Standard nominal flow rate
1>2
Standard nominal flow rate
2>3
Min. standard nominal flow rate
2 > 3 in the most critical error
case
Residual pressure in normal operation
Max. residual pressure in event
of error (worst case)
54
MS6-SV-…-E-ASIS
MS6N-SV-…-E-ASIS
G½ (ISO 228)
NPT½-14
G1 (ISO 228)
NPT1
In-line installation
With accessories
Piston seat not free of overlap
Electric
Internal
Without flow control
Solenoid piston principle
None
Mechanical spring
Piloted
3/2-way valve, closed, monostable
Pressure build-up function
Any
Compressed air in accordance with
ISO 8573-1:2010 [7:4:4]
Operation with lubricated medium possible (required
for further operation)
[°C]
–10 … +50 (0 … +50 with pressure sensor)
[°C]
–10 … +50 (0 … +50 with pressure sensor)
[°C]
–10 … +50 (0 … +50 with pressure sensor)
Shock test with severity level 2 according to
FN 942017-5 and EN 60068-2-27
Transport application test with severity level 2 in accordance with FN 942017-4 and EN 60068-2-6
[bar]
3.5 … 10
[l/(s*bar)] 19.3
0.21
[l/min]
4 300 (if p1 = 6 bar, p2 = 5 bar)
[l/min]
9 000 (if p1 = 6 bar)
[l/min]
6 000 (if p1 = 6 bar)
[bar]
0 (no residual pressure)
[bar]
0.4 (if p1 = 10bar and flow control valve is fully open)
Festo – MS6(N)-SV-...-E-ASIS – 1205NH English
MS6(N)-SV-...-E-ASIS
Type
MS6-SV-…-E-ASIS
Switch-through point
Filling flow
Operating voltage range DC for
AS-interface
Maximum switching frequency
Switching time off
Switching time on
Duty cycle
Electrical connection
Approx. 50 % of p1 Fig. 7
adjustable through flow control valve Fig. 8
22.0 … 31.6
Protection class
Sound pressure level
Housing materials information
Seal material information
Tab. 16
14.3
[V]
[Hz]
[ms]
[ms]
[%]
[dB(A)]
MS6N-SV-…-E-ASIS
0.5
40
130
100
M12 plug
M12 socket
IP65 with plug socket
75 with silencer UOS-1
Die-cast aluminium
NBR
General data
Switch-through pressure / filling time
With the flow control screw in the cover, a gradual pressure build-up of output pressure p2 is generated. The pressure rise can be adjusted by turning the flow control screw. Once output pressure p2
reaches approximately 50 % of operating pressure p1, the valve opens and the full operating pressure
p1 is reached at the output.
100
%
70 %
p
Tolerance range
50 %
Switch-through point
30 %
Filling time can be adjusted
via a flow control valve
t
Fig. 7
Switch-through pressure
Example:
If operating pressure p1 = 4 bar, a switch-through pressure of 1.2 … 2.8 bar is permissible, given the
maximum permissible tolerance of ±20 %.
Festo – MS6(N)-SV-...-E-ASIS – 1205NH English
55
MS6(N)-SV-...-E-ASIS
14.4
Filling flow
Flow rate qn dependent on the number of rotations n of the flow control screw
p1: 4 bar
p1: 6 bar
p1: 8 bar
p1: 10 bar
Fig. 8
Flow diagram
Note
Small volumes and hose diameters in combination with a filling flow that is too fast can
result in malfunctions.
• Make sure that the filling flow is set corresponding to the selected connection size
and volume of the following system.
56
Festo – MS6(N)-SV-...-E-ASIS – 1205NH English
MS6(N)-SV-...-E-ASIS
14.5
Venting time
The following table shows the venting time in normal operation (N) and in the event of a fault (F) with
silencer UOS-1 , 12 Accessories, at various volumes and operating pressures.
Note
The fault case (F) assumes the worst possible error in the valve’s interior (worst case).
Normal operation: N
Fault case: F
Operating pressure
3.5 bar
Venting time [s]
at 1.0 bar at 0.5 bar
Operating pressure
6 bar
Venting time [s]
at 1.0 bar at 0.5 bar
Operating pressure
10 bar
Venting time [s]
at 1.0 bar at 0.5 bar
Volume [l]
0.1
(0.16)
0.3
(0.4)
0.5
(0.8)
1.2
(1.7)
3.2
(4.8)
0.24
(0.28)
0.55
(0.8)
1.0
(1.5)
2.2
(3.4)
6.0
(9.8)
0.3
(0.36)
0.7
(1.2)
1.4
(2.4)
3.0
(5.1)
11.0
(16.2)
Tab. 17
2
N
(F)
10 N
(F)
20 N
(F)
40 N
(F)
150 N
(F)
0.2
(0.22)
0.45
(0.6)
0.85
(1.25)
1.9
(2.8)
5.0
(8.2)
0.3
(0.35)
0.7
(1.1)
1.3
(2.2)
3.0
(5.3)
8.2
(15.4)
0.4
(0.52)
0.9
(1.9)
1.7
(3.9)
3.9
(8.1)
12.8
(29.0)
Venting time
Festo – MS6(N)-SV-...-E-ASIS – 1205NH English
57
MS6(N)-SV-...-E-ASIS
58
Festo – MS6(N)-SV-...-E-ASIS – 1205NH English
Copyright:
Festo AG & Co. KG
Postfach
D-73726 Esslingen
Phone:
+49 711 347 0
Weitergabe sowie Vervielfältigung dieses Dokuments, Verwertung
und Mitteilung seines Inhalts sind verboten, soweit nicht ausdrücklich gestattet. Zuwiderhandlungen verpflichten zu Schadenersatz. Alle Rechte sind für den Fall der Patent-, Gebrauchsmusteroder Geschmacksmustereintragung vorbehalten.
Fax:
+49 711 347 2144
Reproduction, distribution or sale of this document or communication of its contents to others without express authorization is
prohibited. Offenders will be liable for damages. All rights reserved in the event that a patent, utility model or design patent is
registered.
Internet:
www.festo.com
e-mail:
[email protected]
Original: de
Version: 1205NH