1
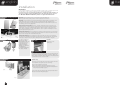
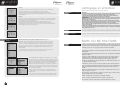
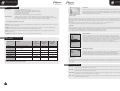
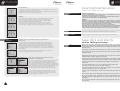
operating instructions
Foster European Operations
Blast Chillers and Freezers
France
Foster Refrigerator France SA
Tel: (33) 01 34 30 22 22 Fax: (33) 01 30 37 68 74 Email: [email protected]
Germany
Foster Refrigerator Germany
Tel: (0781) 96 93 00 Fax: (0781) 96 93 019 Email: [email protected]
BC11, BCF 11, BC 21, BCF 21, BC36, BCF 36, BC 51, BCF
51, BCCF RI 1, BCCF 1, Modular Blast Chillers & Freezers
operating instructions
Foster Refrigerator
Oldmedow Road, King’s Lynn,
Norfolk, PE30 4JU
England
Tel: 01553 691122
Fax: 01553 691447
Website: www.fosterrefrigerator.co.uk
Email: [email protected]
a Division of ITW (UK) Ltd.
BC/BCCF/MBC/OP/0504
15261584
GB
Operating instructions
D
Bedienungsanleitung
F
Notice d'installation
et d’utilisation
english
GB
F
français
installation
IMPORTANT:
To the installer: Installation of these units should be carried out by a competent person and
the appropriate codes of practice adhered to, thus ensuring safe installation.
Pass to the user: Do not discard this document: it contains important guidelines on
Operation, Loading, Cleaning and Maintenance and should be kept for reference.
For Modular BC/BCF installation please see separate instructions.
positioning/unpacking Important: Ensure a minimum clearance of 150mm above unit and ventilation for
1
efficient operation. Where possible, ensure the unit is not adjacent to a heat source.
Cabinet
Unpacking: The unit is delivered on a pallet and shrink-wrapped. Documentation is inserted into a clear
pocket located inside the unit. Carefully remove the protective plastic film and cardboard from the
unit exterior and from the door opening surround making sure that any sharp instrument used does not
cause damage, plus remove any quality labels.
Cabinet removal from the pallet: Remove the package containing the castors or legs. Remove the
retaining bolts which secures the unit to the pallet. Move the unit over the front of the pallet and fit the
lockable castors or legs in the mounting holes if required. To fit the rear castors or legs, lock the front
castors, tilt the unit forwards, remove the pallet and fit the castors or legs in the mounting holes. Ensure
that all are tightened firmly into position.
Cabinets fitted with castors - Remove fittings from inside the unit and ensure the door is locked before
removal from the pallet. Cut the heavy duty cable ties that hold the front castors to the pallet. Unlock the
castors and then carefully roll the unit forward off the pallet.
Cabinets fitted with legs - Remove fittings from inside the unit and ensure the door is locked before
removal from the pallet. Remove the fixing blocks located in front of the legs at the front of the unit and
cut the straps securing the unit to the pallet. Carefully manoeuvre the unit forward, off the pallet.
castors
legs
2
Castors/legs/feet
All models are normally fitted
with swivel castors. Ensure
during installation the unit is level
if not the door may not close
correctly. Adjust castors by
inserting spacers under the
appropriate castor and the base
of the unit until level.
As an alternative adjustable legs
can be fitted to all models.
3
Ramp
BCCF RI 1
Fit the ramp into the
retaining slots.
4
Vapouriser Tray
BCCF 1 and BCCF RI 1
Fit electrically operated condensate vapouriser tray to the external rear wall
of the BCCF RI 1 using the screws provided. For the BCCF 1 slide the tray
into the retainers beneath the cabinet. Alternatively connect drain pipe direct
to a main drain via the use of a bolt on tundish.
Doors
5
BCCF RI 1 only
Narrow site access may require door removal. It is necessary to remove the
unit compartment cover to gain access to the door hinge.
a) Remove unit compartment cover. (fig. 4).
b) Remove the locknut from the bottom hinge bracket (see fig. 5).
c) Remove the M5 hex screw from the top hinge bracket and push down
on the spring loaded cartridge top (fig. 6).
Fig 5.
The door is then free to be pulled clear of the top hinge bracket and then
lifted clear of the bottom hinge bracket (fig. 6).
Fig 6.
2
23
F
français
8
Cleaning/Maintenance
14
Diagnostic
GB
défauts
Les vérifications doivent être effectuées par du personnel autorisé.
Avant d'appeler votre revendeur agréé, prière de contrôler les points suivants:
Défaut d'alimentation électrique (disjoncteur)
Défaut affiché sur le régulateur (voir chapitre alarmes et avertissements)
Prise de courant endommagée
En cas de besoin d'assistance technique préciser:
Le numéro de série de l'appareil
Le type de l'appareil. Ces informations se trouvent sur une plaque à l'intérieur de l'armoire.
Lorsqu'un code de défaut ou 'APPEL SERVICE' s'affiche sur le régulateur, mentionner ces indications lors de
votre appel téléphonique.
english
Operating Instructions
6
Standard Operation
When mains electrical power is first applied to the controller it will carry out a self-test function, for
approximately 3 seconds. During this period the display will show.
On completion of the self test, the controller will revert to the last chill program that was run
(Pre-chill, Soft Chill, Hard Chill, Hard Chill Max, Shock Freeze, Professional 1, Professional 2, or
Professional 3). The availability of these is dependent on how the controller has been configured.
The example shows the controller in Hard Chill mode with the previous and next programs indicated
at the top of the display. To change the program rotate the dial, either clockwise or
anticlockwise to select the type of program you require. (for guidelines refer to page 6)
To initiate the program just press and release the dial for the program to start.
The program starts with the screen at the top being displayed for 2 minutes. After which the
intelligent probe determines if the cycle is controlled by time, displayed by the screen in the
middle, or by temperature as displayed by the screen at the bottom.
On completion of the program the controller will cause the blast chiller to enter the Hold Mode, as
displayed on the left. An alarm will sound, press and release the dial to cancel the alarm, if the alarm
is not cancelled the blast chiller will still enter the Hold Mode with the periodical sounding of the
alarm. To cancel press and release the dial.
To stop the blast chiller during operation, press and hold the dial for 2 seconds, the display
returns to the program selection screen.
At any time when the blast chiller is operational the dial can be rotated to give information on the
status of the particular mode of operation.
The display will remain for 10 seconds and then revert to the normal operating screen
automatically.
22
3
GB
english
F
nettoyage et entretien
Pre Chill
This program is used to Pre Chill the cabinet prior to the first cycle. This is done with the
Blast Chiller empty and is a short time based program of about 20 minutes.
It is generally recognised as the correct method of preparing for a blast chill cycle.
The program is selected by rotating the dial until the display shows, press and release the dial to
start the program.
Nota: Eteindre l'appareil avant le nettoyage intérieur
Instructions de nettoyage
IMPORTANT
En en prenant soin, le revêtement inox a la propriété de résister à la corrosion pendant de longues années.
Pour conserver ces propriétés, nous recommandons le nettoyage hebdomadaire suivant:
a - Extérieur: utiliser un produit spécifique au nettoyage de l'inox (selon instruction du fabricant)
b - Intérieur: laver à l'eau savonneuse, rincer et sécher avec un chiffon doux.
AVERTISSEMENT
Les agents détergents à base de solution alcaline, d'eau de javel, de chlore ou d'acide sont formellement
interdites pour le nettoyage des inox. Des traces de corrosion ou de piquage peuvent résulter de leur
application déibérée ou involontaire.
Au cas où l'un de ces produits entrerait en contact avec une meuble réfrigéré pendant un nettoyage
général de la cuisine, rincer immédiatement les parties attaquées avec de l'eau propre et sécher en frottant.
Ne jamais utiliser de tampon ou de poudre abrasive sur les surface en inox ou en aluminium.
Après le nettoyage, attendre que l'appareil ait atteint sa température de fonctionnement avant de le
recharger avec les aliments.
En cas de salissures pendant l'utilisation, essuyer immédiatement en prenant soin de ne pas mettre la peau
en contact avec les parois internes des meubles à température négative ou de maintien en température
(risque de brûlures dans les 2 cas).
11
Joints de porte
Ceux-ci doivent régulièrement être inspectés et remplacés en cas de détérioration. Nettoyer avec un chiffon
imbibé d’eau chaude et savonneuse. Rincer avec un chiffon humide et sécher avant de refermer les portes.
12
Condenseur
Le nettoyage du filtre condenseur doit être effectué au moins une fois par an par du personnel qualifié.
10
8
Defrost
Defrosting is not normally required but if there is an ice build up on the coil inside the cabinet a
manual defrost can be selected. Rotate the dial until the Defrost screen, top left, is displayed.
Press and release the dial to start the defrost.
During defrost the screens will alternate between the middle and bottom screens.
Defrost will last 20 minutes and when completed the alarm will sound. Press the dial to
acknowledged or if not wait until it comes to the end of the alarm period, the alarm will stop
and the display will revert to the previous screen.
Further Operational
Features
7
Chill time adjustment. (All programs excluding Professional 1, 2 or 3)
Whilst in the pre-programmed selection screen press and hold the dial for 2 seconds, the
information screen will be displayed, top left. Press and release the dial to move to the
time set, see bottom left. Rotate the dial clockwise to increase the time, anticlockwise to
decrease. Once the time has been selected, press and release the dial and ‘CHILL TEMP’
will be highlighted. On completion of the program the time changes will revert to the
default settings.
FAIRE OU NE PAS FAIRE
Les denrées ont toutes leurs propres qualités thermiques et certains facteurs doivent être
considérés pour déterminer les temps de refroidissement et choisir le programme adéquate.
Un rôti de 10 Kgs ne refroidira pas dans les mêmes conditions que 10 kgs de pâtisseries.
13
8
>
La densité, la teneur en eau et en graisse affectent les temps de traitement.
>
La fragilité de la structure et de la surface du produit doit être pris en compte dans le choix
du programme.
>
Le chargement de l'appareil ne doit pas être excessif. Foster recommande un maximum de
4Kgs par bac GN 1/1
>
Les pièces de viande importantes ne font pas parties des bases de calcul des temps de
refroidissement. Les recommandations sanitaires sont de trancher la viande avant le
refroidissement ou de s'assurer d'un refroidissement dans le temps le plus court.
Professional 1, 2 and 3, if configured, are programs that can be used to
tailor the chill time and temperature to suit specific product requirements.
Adjust the 'CHILL TIME' as above. With the 'CHILL TEMP' highlighted, left
(display b.), press and release the dial to move to the temp set, left
(display c.). Rotate the dial clockwise to increase the time, anticlockwise to
decrease. Once the time has been selected, press and release the dial and
'HOLD TEMP' will be highlighted. Follow the procedure for changing chill
temp to change the hold temp.
>
Le temps de refroidissement de denrées introduites à une température supérieures à 63˚C
sera proportionnellement allongé.
>
L'utilisation de couvercles, de film ou de bacs profonds accroît les temps de traitement.
>
Laisser un passage d'air suffisant entre chaque niveau. Le processus de refroidissement
rapide nécessite impérativement un flux d'air très important sur toutes les surfaces à
refroidir.
On completion press and hold the dial for 2 seconds to return to the
program selection screen, to continue press and release the dial for the
program to start.
>
Relever les températures à l'aide de la sonde à piquer à chaque début et fin de cycle et
garder une trace de ces relevés.
>
Ne pas surcharger les bacs. Répartir les denrées de façon homogène sur toute la surface.
(épaisseur maximum de 40 mm - Guide LERPAC)
>
Nettoyer et désinfecter la sonde à piquer avant chaque utilisation
>
Faire un cycle de pré-refroidissement avant de commercer un traitement
>
En cas de doute, contrôler la température à l'aide d'un thermomètre extérieur
On completion press and hold the dial for 2 seconds to return to the program selection
screen, to continue press and release the dial for the program to start.
Chill / Hold temperature adjustments. (Professional 1, 2 or 3 only)
Display a)
Display b)
4
Display d)
Display c)
français
The chill time and chill / hold temperature adjusted settings are retained
for Professional 1, 2 and 3 programs and will not revert to the default.
21
F
8
français
GB
Alarmes et avertissements
Information
Pressost HP:
Les raisons de cette alarme peuvent être:
La température d'introduction des produits est supèrieure à 90˚C.
La quantité de produit est supérieure aux spécifications de l'appareil.
Le soufflage d'air est bloqué ou réduit
Le filtre du condenseur est encrassé.
Après vérification, si l'alarme persiste, appeler votre revendeur Foster.
Défaut tension:
Un défaut de tension inférieur à 5 minutes niaffecte pas le fonctionnement. Le programme poursuit
automatiquement le programme en cours. Au delà de 5 minutes, le régulateur se mettra en mode stockage.
Pour contrôler le déroulement du cycle, aller au menu information pour vérifier l'historique.
Whilst in the program selection screen press and hold the dial for 2 seconds, the information screen
will be displayed. Rotate the dial until 'INFORMATION' is highlighted. Press and release the dial to
display the screen showing the last run cycle. The information relates to date, program run, start
time, start temperature and end temperature.
HACCP settings
Whilst in the program selection screen press and hold the dial for 2 seconds, the information screen will be displayed. Rotate the dial
until 'HACCP SETTINGS' is highlighted. Press and release the dial to access the HACCP option screen. Press and release the dial to
move to the selection screen for long or short reports, rotate the dial to select which option, once selected press and release the dial
to confirm.
Press and release the dial to move to the selection screen for the print sample, select 3 or 5 minute selection rate.
On completion press and hold the dial for 2 seconds to return to the program selection screen.
Les 4 programmes principaux et utiles sont:
Délicats: Pour éviter la cristallisation de surface des produits délicats tels, les pâtisseries ou les produits à haute teneur en eau comme
les légumes verts, le riz ou les pâtes.
Print Data
Standard: Cas général díun grand nombre d'aliments incluant les pâtés en croûte, les lasagnes ou les portions individuelles qui
nécessitent un ralentissement du froid en fin de cycle pour éviter la cristallisation de surface.
Whilst in the program selection screen press and hold the dial for 2 seconds, the information screen will be displayed. Rotate the dial
until 'PRINT DATA' is highlighted. If using a hand held printer switch the printer on now. Point the printer at the infra red download
sensor (optional), located in display area, press and release the dial to download the print data.
On completion press and hold the dial for 2 seconds to return to the program selection screen.
Epaisse: Recommandé pour les produits à haute densité ou forte densité en graisse tels les rotis, les ragoûts ou les aliments en
barquettes operculées.
Set time and date
Congélation: Congélation des produits de +63˚C à -18˚C à cœur en moins de 240 minutes.
9
Whilst in the program selection screen press and hold the dial for 2 seconds, the information
screen will be displayed, top left. Rotate the dial until 'SET TIME/DATE' is highlighted. Press and
release the dial to access the service screen, below left. Press and release the dial to move to the
displayed time in hours and minutes, rotate the dial to alter the time, once the correct time has
been achieved press and release the dial to move to 'DAY'. If it is necessary to change the day,
month and year change the settings using the same procedure for setting the time.
On completion press and hold the dial for 2 seconds to return to the program selection screen.
Guide des temps de refroidissement
Type de denrées
Type de denrées
Exemple
Viandes
Programme
de
Refroidissement
Temps estimé en
refroidissement
(minutes)
Temps estimé
en congélation
(minutes)
Bœuf, porc, mouton, volailles
Standard
40 - 90
60 - 240
Poissons
Frit ou court bouillon
Saumon, haddock
Délicats
30 - 90
60 - 240
Plats préparés
Ragoûts, lasagne, Risotto
Standard
50 - 90
90 - 240
Légumes
Vapeur ou frits, riz
Délicats
30 - 90
60 - 240
Fruits
Délicats
60 - 90
60 - 240
Pâtisseries
Standard
30 - 90
70 - 240
Délicats
30 - 90
70 - 240
Desserts
A base de fruits, flans
english
Changing Text Language
Whilst in the program selection screen press and hold the dial for 2 seconds, the information screen will
be displayed continue pressing the dial for a further 2 seconds to display the 'SERVICE MENU'.
LANGUAGE will be highlighted, press and release the dial, 'ENG' (English) will be highlighted. Rotate the
dial to change the language. Select the preferred language, press and release the dial to confirm.
Screen Saver
The screen saver screen is displayed if the machine is not used for 20 minutes, providing power is connected to it. It shows a series of
'Z' indicating sleep mode. Pressing and releasing the dial or opening the door will awaken the unit, the program selection screen will
be displayed.
Note: les temps annoncés ne sont donnés qu'à titre indicatif et sont dépendants des types de
produits, du conditionnement et des quantités.
8
Alarms and Warnings
Air Probe:
If this alarm occurs it will remain in the program selected until it is completed, however no further operation will be
possible. Call your Foster Authorised Service Company.
Air Probe:
If this alarm occurs it will remain in the program selected until it is completed, however no further operation will be
possible. Call your Foster Authorised Service Company.
Food Probe: If this alarm occurs it will automatically change to a timed program until it is completed, however no further operation
will be possible. Call your Foster Authorised Service Company.
Door Open: The display will continue to show the alarm message until the door is closed. If this does not cancel the alarm call your
Foster Authorised Service Company.
20
5
GB
8
english
F
français
Alarms & Warnings Contd.
Informations
High Temperature:
This alarm will only occur in the hold mode only. Probe the product to determine it is at the correct
temperature. If it is at the correct temperature place in a storage refrigerator or freezer and call your Foster
Authorised Service Company. If the product temperature is above the guidelines check the chill time selected or
the weight of product being chilled does not exceed the specification for the Cabinet.
Sur l'écran de sélection des programmes, maintenir pressé le bouton pendant 2 secondes et l'écran
d'information apparaît. Tourner jusqu'à surligner la ligne 'INFORMATION'. Appuyer et relâcher le
bouton pour faire apparaître les informations sur le dernier cycle. Sont affichés, la date, le type du
programme utilisé, l'heure de départ, la température de départ et la température de fin de cycle.
HP Switch:
Causes for this alarm could be:
Does the product temperature exceed 90˚c. Has too much product been placed in the cabinet. Is the airflow
restricted. Does the condenser filter require cleaning. If the problem persists call your Foster Authorised
Service Company.
Paramètres HACCP
Sur l'écran de sélection des programmes, maintenir pressé le bouton pendant 2 secondes et l'écran d'information apparaît. Tourner
jusqu'à surligner la ligne 'HACCP'. Appuyer et relâcher le bouton pour accéder au menu HACCP. Appuyer et relâcher le bouton pour
accéder à la sélection entre un rapport complet ou succinct. Le choix se fait en tournant le bouton sur l'option choisie.
Appuyer et relâcher le bouton pour confirmer.
Appuyer et relâcher le bouton pour revenir à l'écran précédent et choisir entre 3 et 5 minutes l'incrémentation des relevés de
température. Ce choix effectué, maintenir pressé le bouton pendant 2 secondes pour revenir à l'écran de base.
There are four main programmes that you will need to use your Blast Chiller or Freezer.
Soft Chill - for the safe chilling of delicate products such as gateaux and patisserie items, and high water content items such as
vegetables, rice and pasta.
Impression des données
Hard Chill- For general purpose chilling. The Hard Chill cycle is ideal for chilling 'standard products' such as meat pies, lasagne,
individually portioned meals etc. Providing surface protection for the later part of the program.
Sur l'écran de sélection des programmes, maintenir pressé le bouton pendant 2 secondes et l'écran d'information apparaît. Tourner
jusqu'à surligner la ligne 'IMPRESSION'. Mettre en marche l'imprimante portative. Pointer l'imprimante en face de l'œil infra rouge
(option) situé dans le tableau de commande. Appuyer et relâcher le bouton pour télécharger les données à imprimer.
Une fois effectué, maintenir pressé le bouton pendant 2 secondes pour revenir à l'écran de base.
Hard Chill Max- For high density and high fat content products such as meat joints, stews and sous vide.
Shock Freeze- Products to be frozen can be shock frozen to below -18˚c within 240 minutes.
Réglage de l'heure et de la date
9
Guide for Blast Chilling
& Freezing
Blast Chill
Programme
required
Time required
to Blast Chill
(Minutes)
Food Type
Includes
Meat
Beef, pork, lamb, poultry & mince
Hard
40 - 90
60 - 240
Fish
Fried, poached or baked - haddock,
plaice, salmon, cod fillets etc
Soft
30 - 90
60 - 240
Prepared Dishes
Stews & casseroles, lasagne, risotto,
shepherds pie
Hard
50 - 90
90 - 240
Vegetables &
Pulses
Steamed or roasted veg, rice and
potatoes etc.
Soft
30 - 90
60 - 240
Fruit
Stewed and cooked fruits.
Soft
60 - 90
60 - 240
Bakery
Cakes
Hard
30 - 90
70 - 240
Bakery
Pastries
Hard
60 - 90
50 - 240
Ecran de veille
Desserts
Fruit Based desserts & egg based flans.
Soft
30 - 90
70 - 240
Desserts
Sponge puddings and dense desserts
such as cheesecake.
Hard
30 - 90
70 - 240
Raccordé au secteur, l'écran de veille est activé après 20 minutes de non fonctionnement. L'affichage indique une série de 'Z' pour
indiquer le mode veille. En pressant et relâchant le bouton ou en ouvrant la porte, le mode veille s'efface et l'écran principal de
sélection de programme est réactivé.
NOTE: All times listed should be used as a guide only, and will depend on type, size and quantity.
6
Sur l'écran de sélection des programmes, maintenir pressé le bouton pendant 2 secondes et
l'écran d'information apparaît (A gauche ci-dessous). Tourner jusqu'à surligner la ligne
'TEMPS/DATE'. Appuyer et relâcher pour accéder à l'écran service (A droite ci-dessous). Appuyer
et relâcher pour accéder à l'affichage du temps en heures et minutes. Tourner le bouton pour
effectuer le réglage. Une fois réglé, appuyer et relâcher pour valider et accéder à la date. En cas
de nécessité, poursuivre le même procédé pour modifier le mois et l'année.
Les valeurs réglées, maintenir pressé le bouton pendant 2 secondes pour revenir à l'écran de base.
Time Required to
Shock Freeze.
(Minutes)
Choix du langage
Sur l'écran de sélection des programmes, maintenir pressé le bouton pendant 2 secondes et l'écran
d'information apparaît. Maintenir appuyé 2 autres secondes pour accéder au menu 'SERVICE'. 'LANGUES'
surlignées, en appuyant et relâchant de nouveau le bouton 'ENG' apparaît.
Tourner le bouton pour modifier le paramètre jusqu'à ce que 'FRAN' pour le français soit surligné.
Pour confirmer appuyer et relâcher le bouton.
8
Alarmes et avertissements
Sonde d'air:
Au cas où cette alarme apparaît, elle reste affichée jusqu'à la fin du cycle en cours. Cependant, plus aucune autre
action ne sera possible. Appeler votre revendeur Foster
Sonde à piquer:
Au cas où cette alarme apparaît, le cycle passera automatiquement en mode Temps jusqu'à la fin du cycle en
cours. Cependant, plus aucune autre action ne sera possible. Appeler votre revendeur Foster.
Porte ouverte:
L'écran maintient ce message affiché jusqu'à la fermeture de la porte. Au cas où cette action n'efface pas ce
message, appeler votre revendeur Foster.
Haute Temp:
Cet avertissement ne peut intervenir qu'en mode stockage. Contrôler la température réelle des produits. Si la
température relevée est inférieure à 10˚C (en refroidissement) ou -18˚C en congélation, placer les aliments dans
une enceinte de stockage appropriée et appeler votre revendeur Foster. Au cas où la température est au dessus
des normes, vérifier le temps programmé ou le poids des produits introduits. Il est probable quíil soit supérieur
aux spécifications de l'appareil.
19
F
français
GB
cleaning/maintenance
Pré-refroidissement
Ce programme doit être utilisé à vide pour mettre la cellule en température avant le premier cycle
de refroidissement. Sa durée est d'environ 20 minutes.
Ce programme est sélectionné en tournant le bouton jusqu'à l'affichage de cette fonction. Appuyer
et relâcher pour démarrer le cycle de pré-refroidissement.
Dégivrage
N.B. Before internal cleaning, switch off unit.
10
Important Cleaning Instructions
Cared for correctly, stainless steel has the ability to resist corrosion and pitting for many years.
The following weekly cleaning regime is recommended:
a. Exterior: Use a proprietary stainless steel cleaner following the manufacturers instructions.
b. Interior: Wash with soapy water, rinse and dry thoroughly.
Cleaning Instructions
8
Cette fonction n'est pas obligatoire. Toutefois, si une accumulation de glace se produit à
l'intérieur de l'enceinte, il peut être nécessaire d'enclencher un dégivrage manuel.
Tourner le bouton jusqu'à l'affichage de la fonction (exemple ci-dessous à gauche).
Appuyer et relâcher pour enclencher le dégivrage manuel.
Pendant cette période, les affichages alternent (ci-dessous au centre et à droite).
A la fin du cycle de 20 minutes une alarme s'enclenche. Presser pour acquitter. Sans
intervention, l'alarme s'éteint après un instant et l'affichage retourne à l'écran précédent.
7
Autres
instructions
écran b)
18
11
Door Gaskets
These should be inspected on a regular basis and replaced if damaged. To clean, wipe with a warm damp
soapy cloth followed by a clean damp cloth and finally thoroughly dry before closing the door.
12
Condenser
Cleaning the condenser should be carried out by a Foster approved service technician annually.
basic do’s and don’ts
écran d)
écran c)
of Blast Chilling & Freezing
Different foods give up their heat at different rates and therefore there are certain factors
that need to be considered when determining chill or freeze time, and which programme
should be used. A 10kg meat joint will not have the same chilling requirements as a 10kg of
patisseries product.
13
8
>
Density, water content, and fat content all affect the time required to achieve temperature.
>
Delicacy of the foods’ structure and surface must be taken into account when selecting the
programme required.
>
Weight loadings and the thickness of product should not be exceeded. Foster recommends a
maximum loading of 3.75kg per gastronorm 1/1 container.
Ajustement des températures de refroidissement/stockage
(Programmes 1,2 et 3 uniquement)
>
Large joints of meat will not chill within the standard guidelines. In this situation, guidelines
recommend that joints are either portioned before chilling or chilled as quickly as possible.
Prog 1, 2 et 3 (si configurés) sont des programmes qui peuvent être utilisés
pour affiner les temps/températures de certains produits particuliers.
Régler le temps comme ci-dessus. Lorsque la température est surlignée
(2ème photo) Appuyer et relâcher le bouton pour autoriser les modifications
( 3ème photo). Tourner vers la droite pour augmenter la température ou vers
la gauche pour la réduire. Une fois la température réglée, appuyer et relâcher
le bouton pour surligner la température de stockage. Suivre la mÍme
procédure que précédemment pour ajuster la température de stockage.
>
Product that is hotter than the recommended starting temperature will obviously take
longer to chill.
>
It is recommended that foods are not covered or lidded, as this will extend the time
required. Use of deep containers will also extend the chilling time.
>
It is essential that good airflow passes over the product to facilitate even and consistent
chilling. Foil should not be used to cover food if possible.
Une fois ces réglages effectués, maintenir appuyé pendant 2 secondes
pour revenir à l'écran de base. Appuyer et relâcher pour commencer le
cycle. Ces modifications sont enregistrées et remplaceront les anciennes
valeurs par défauts pour les Programmes 1, 2 et 3.
>
Always check the food product before and after with a hand held temperature probe and
record it.
>
Do not overfill containers (recommended depth is 25mm) and keep food evenly spread.
>
Allow food to rest after cooking - especially meat to ensure the quality and texture of the
end product. Guidelines recommend that food is rested and cooled for 30 minutes before
blast chilling.
>
Do not overload the Blast Chiller as this will mean the required temperature will not be
achieved in time.
Une fois ces réglages effectués, maintenir appuyé pendant 2 secondes pour revenir à
l'écran de base. Appuyer et relâcher pour commencer le cycle.
écran a)
WARNING:
High alkaline cleaning agent or those containing bleaches, acids and chlorines are very harmful to
stainless steel. Corrosion and pitting may result from their accidental or deliberate application.
If any of these liquids should come into contact with the unit during general kitchen cleaning,
wipe down the affected area immediately with clean water and rub dry.
Never use wire wool or scouring powders on stainless steel or aluminium surfaces.
After cleaning allow the unit to reach its normal operating temperature before reloading with
product. During usage all spills should be wiped clean immediately but care should be taken not
to touch the interior of freezer units as warm skin can ‘freeze’ to metal or heated cabinets.
Ajustement des temps de refroidissement (Tous les programmes sauf
Prog 1,2 et 3)
Sur l'écran de sélection des programmes pré-enregistrés, maintenir appuyé pendant 2
secondes le bouton. Un écran d'informations s'affiche (schéma ci-dessous à gauche).
Appuyer et relâcher le bouton pour autoriser les modifications de temps. Tourner vers la
droite pour augmenter le temps ou vers la gauche pour le réduire. Une fois le temps
choisi, appuyer et relâcher. Le temps de refroidissement sera surligné. Les modifications ne
sont apportées que pour le cycle en cours. A la fin de ce cycle, les paramètres par défauts
seront appliqués.
english
7
GB
english
F
français
Contd.
13
8
>
Always clean and sanitise the fitted core probe before use.
>
Decant hot liquids into manageable size gastronorm containers.
>
Pre-chilling the unit is recommended to improve the cooling time.
>
If in doubt, use the probe to ensure safe temperatures are achieved.
Utilisation des cellules en
refroidissement et congélation
6
Opérations de base
Lors du raccordement au secteur, le régulateur enclenche un 'auto-test' pendant 3 secondes
environ. Pendant cette période l'afficheur indique:
operation failure
Problem Diagnosis
14
Checks must be carried out by a competent person.
Before calling a Foster Authorised Service Company check the following:
a) Power failure (may be off at source)
b) Fault conditions as described in User Operational Guidelines - Alarms and Warnings.
c) Damaged mains lead plug.
When requesting service assistance always quote the following:
a) unit serial number (E..........)
b) the model number from the serial number plate located inside the unit.
c) If a “Fault Code ” appears quote the “Fault Code Reference” to the Foster Authorised Service Company.
L'autotest terminé, le régulateur revient automatiquement au dernier programme effectué (Prérefroidissement, produits délicats, produits standards, pièces épaisses, congélation, Prog.1, Prog 2,
Prog 3). La disponibilité de ces programmes est fonction du paramétrage du régulateur.
L'exemple montre l'écran réglé sur le programme 'produits standards' avec líindication en haut des
programmes précédent et suivant. Pour changer la programmation, tourner le bouton dans un sens
ou dans l'autre et s'arrêter sur celle désirée. (Voir page 20 pour des conseils)
Pour enclencher un cycle, appuyer et relâcher le bouton
Le programme démarre pendant 2 minutes (exemple de gauche). Après cette période, selon la
température relevée par la sonde à piquer, le régulateur détermine de façon 'intelligente' si le cycle
est contrôlé par le temps (exemple au milieu) ou par la température (exemple de droite).
En fin de cycle, la cellule se met automatiquement en mode stockage (exemple de gauche). Une
alarme retentit. Appuyer et relâcher le bouton pour acquitter l'alarme. En cas de non acquittement,
la cellule passe en mode stockage et l'alarme sonne périodiquement. Pour annuler, presser et
relâcher le bouton.
Pour arrêter un cycle en cours, maintenir appuyé le bouton pendant 2 secondes.
L'affichage retourne à la liste des programmes.
A tout moment en cours de cycle, le bouton peut être tourné et l'écran indique des informations
sur le programme en fonction. L'affichage dure 10 secondes puis retourne automatiquement à
l'écran du cycle.
8
17
français
F
D
installation
Auspacken/Inbetriebnahme
IMPORTANT:
WICHTIG
Dieses Gerät muss gemäß der nachstehenden Anleitung unter Berücksichtigung aller
Sicherheitsrichtlinien aufgestellt werden.
Bitte diese Bedienungsanleitung sicher aufbewahren: sie enthält wichtige
Informationen über die Bedienung des Gerätes sowie Hinweise über Pflege,
Reinigung und Wartung.
Pour l'installation: L'installation de ces produits doit être assurée par un personnel qualifié
selon les usages de la profession et les normes en vigueur.
Pour l'utilisation: Conserver ce document. Il contient des informations essentielles
quant au fonctionnement, l'entretien et le nettoyage de votre matériel.
Mise en place/déballage
1
Armoires
IMPORTANT: Pour assurer une ventilation correcte de l'appareil, il est nécessaire de prévoir un espace de 150mm
entre le dessus du groupe frigorifique et le plafond du bâtiment. Dans la mesure du possible, ne pas positionner
l'appareil prés d'une source de chaleur.
Positionierung/Auspacken
1
Schrank
Déballage
Le meuble est livré sur palette avec un emballage recouvert d'un film thermorétractable. Les documents se
trouvent dans une pochette à l'intérieur du meuble. Retirer le film de protection recouvrant le meuble en prenant
soin de ne pas endommager l'appareil avec un outil pointu ou tranchant. Oter les étiquettes de contröle.
Entfernen der Palette (Schränke): Nehmen Sie die Schrankfüße bzw. -rollen aus dem Gerät. Lösen Sie die
Befestigungsbolzen aus der Unterseite der Palette. Ziehen Sie den Schrank vorsichtig nach vorne auf der
Palette und schrauben Sie die vorderen Füße bzw. die feststellbaren Rollen in die dafür vorgesehenen Löcher
in der Schrankunterseite ein. Kippen Sie den Schrank nach vorne (vordere Rollen vorher feststellen) und
schrauben Sie die hinteren Füße bzw. Rollen fest.
Dépalettisation des meubles bas
Comptoirs livrés sur roulettesEnlever les accessoires fournis à l'intérieur des appareils et s'assurer que les portes et tiroirs soient refermés à clé.
Couper les fixations plastiques qui retiennent les roulettes avant sur la palette. Libérer les roulettes de leur frein et
avec précaution, faire rouler le meuble pour le sortir de la palette.
Pieds
Comptoirs livrés sur piedsEnlever les accessoires fournis à l'intérieur des appareils et s'assurer que les portes et tiroirs soient refermés à clé.
Enlever les cales de bois qui bloquent les pieds sur l'avant et couper les fixations plastiques pour libérer le meuble.
Avec précaution, manoeuvrer le meuble pour le sortir de la palette.
Roulettes et piétements
2
Portes
5
Tout modèle: La fourniture
standard est de 4 roulettes pivotantes
de 100mm. Lors de l'installation
s'assurer que l'armoire est de niveau
pour garantir la fermeture correcte
de(s) porte(s). En cas de sol non plan,
insérer des rondelles entre le socle de
l'armoire et la/les roulette(s) jusqu'à la
mise à niveau. Des pieds réglables de
150mm sont également disponibles
sur demande pour tous les modèles.
Pour les appareils avec le groupe logé
en partie basse des vérins réglables
sont également disponibles sur
demande. (la méthode de fixation
reste identique)
3
Rampe
Schränke mit Rollen: Nehmen Sie das Zubehör aus dem Schrank und schließen Sie die Tür ab. Schneiden
Sie die Kabelhalterung von den vorderen Rollen ab. Lösen Sie die Bremsen bei den vorderen Rollen und
fahren Sie das Gërat vorsichtig von der Palette herunter.
Rollen
Schränke mit Füßen: Nehmen Sie das Zubehör aus dem Schrank und schließen Sie die Tür ab. Entfernen
Sie die Klötze vor den Füßen und die Befestigungsbänder. Ziehen Sie das Gerät vorsichtig von der Palette
herunter.
Füße
Alle Schränke werden mit
Füßen oder auf Wunsch mit
Rollen geliefert. Überprüfen Sie,
ob der Schrank im Waage
steht, ansonsten ist es möglich,
dass die Tür nicht richtig
schließt. Die Füße sind
höhenverstellbar.
Gegebenenfalls legen Sie
Unterlegscheiben
zwischen Rollen und
Schrankboden ein.
Füße/Rollen
2
BCCF RI 1
Mettre la rampe en place
dans les encoches
prévues.
4
4 Bac de ré-évaporation
5
Türen
Fig 5.
Rampe
BCCF RI 1
Montieren Sie die Rampe
in die dafür
vorgesehenen
Befestigungslöcher.
4
Verdunsterschale
Nur BCCF RI 1
Wenn zum Einstransport nicht genügend Platz vorhanden ist, kann die
Tür ausgebaut werden.Die Maschinenraumblende muss entfernt werden
um an die Türscharniere zu kommen.
Pour démonter la porte, il est nécessaire de:
a) retirer le cache-groupe (Fig. 4).
b) enlever l'écrou de la charnière inférieure (Fig. 5).
c) dévisser l'écrou 6 pan creux de la charnière supérieure et enfoncer le
cylindre (Fig. 6).
d) La porte se libère de la partie supérieure, et une fois légèrement
inclinée, soulever pour la libérer de la charnière inférieure. (Fig. 6).
3
BCCF 1 and BCCF RI 1
Das Tauwasser kann entweder über einen Abfluss abgeführt werden oder
durch die mitgelieferte beheizte Verdunsterschale verdunstet werden. Beim
BCCF RI 1 wird die Schale mit Hilfe der mitgelieferten Schrauben hinten
montiert, beim BCCF 1 wird die Schale in die vorgesehenen
Befestigungsschienen unter dem Schrank eingeführt.
BCCF RI 1
Fixer le bac de récupération des eaux de dégivrage sur l'arrière de
l'appareil à extérieur à l'aide des vis fournies.
BCCF1
Glisser le bac dans les glissières sous l'appareil
Les écoulements peuvent, alternativement, être reliés directement au
réseau d'eaux usées
BCCF RI 1 uniquement
Wichtig (nur Schränke): stellen Sie einen Deckenabstand von 150mm sowie eine ausreichende Belüftung
über dem Schrank sicher, um die einwandfreie Funktion des Gerätes zu gewährleisten. Stellen Sie das Gerät
nicht neben einer Wärmequelle auf.
Auspacken: der Schrank ist auf einer Palette montiert und in einer Schrumpffolie verpackt. Technische
Unterlagen finden Sie in einer Folientasche an der Tür oder im Schrank. Entfernen Sie die Schrumpffolie
vorsichtig, um eine Beschädigung des Gerätes zu vermeiden. Entfernen Sie die Schutzfolie vom
Schrankgehäuse und die Prüfaufkleber.
Dépalettisation
Retirer la clayette supportant le carton avec les pieds ou les roulettes. Dévisser les boulons qui maintiennent le
meuble sur sa palette et faire glisser de moitié l'appareil vers l'avant. Fixer les roulettes avec frein ou les pieds dans
les mêmes filetages que les fixations sur la palette. Pour mettre en place les piétements arriêre, mettre les freins aux
roulettes avant et basculer l'appareil pour enlever la palette et accéder aux fixations. S'assurer que tous les
piétements sont fermement serrés.
Roulettes
deutsch
a) Ziehen Sie die Maschinenraumblende ab
b) Entfernen Sie die Mutter vom unteren Scharnierhalter (Abb. 5).
c) Entfernen Sie die Bolzen vom oberen Scharnierhalter und drücken Sie
die Feder nach hinten (Abb 6).
Abb. 5.
Nun kann die Tür entfernt werden. Dazu ziehen Sie die Tür oben leicht
nach vorne und heben Sie sie dann aus dem unteren Scharnierhalter
(Abb 6).
Fig 6.
16
Abb. 6.
9
D
deutsch
D
Bedienung der Steuerung
6
Normalbetrieb
Nach dem Einschalten des Gerätes wird ein Selbsttest von ca. 3 Sekunden durchgeführt. Während
dieses Selbsttests wird das Bild links im Display der Steuerung angezeigt.
deutsch
Störung
14
Fehlerdiagnose
Reparaturen dürfen nur von einem Fachmann durchgeführt werden.
Kontrollieren Sie folgendes, bevor Sie den Kundendienst anrufen:
● Stromausfall
● Störmeldung wie vorher beschrieben
● Stecker nicht richtig eingesteckt
Wenn ein Serviceeinsatz notwendig ist, bitte Modell- und Serien-Nummer (Typenschild befindet sich im
Gerät) gegebenenfalls auch Fehlercode, angeben.
Nach Beendigung des Selbsttests, stellt sich der Schockkühler automatisch auf das zuletzt gestartete
Programm ein (Vorkühlen, Soft Chill, Hard Chill, Hard Chill Max, Schockfrosten, Programm 1,
Programm 2, Programm 3). Die Verfügbarkeit dieser Funktionen ist vom Modell abhängig. Das
Beispiel zeigt die Steuerung im Hard Chill Modus, das vorige Programm wird links oben, das folgende
Programm wird rechts oben im Display angezeigt. Wechseln des Programms durch Drehen des Knopfs
nach links oder rechts, um zu dem gewünschten Programm zu gelangen (Übersicht s. Seite 13)
Zum Starten des Programms Knopf drücken und loslassen
Nach dem Programmstart erscheint im Display das Bild links. In dieser Zeit überprüft der
„intelligente” Kerntemperaturfühler die Temperatur im Schrank und legt nach ca. 2 Minuten fest,
ob ein zeitgesteuertes Programm (Bild Mitte) oder ein temperaturgesteuertes Programm (Bild
unten) gefahren werden soll.
Nach dem Programmablauf schaltet das Gerät automatisch auf Lagerung um (Bild links) und eine
Warnmeldung ertönt. Diese kann durch Knopfdruck gelöscht werden. Sonst wird die Warnmeldung
regelmäßig wiederholt, bis sie gelöscht wird.
Die Schockkühlphase kann jederzeit durch 2-sekundiges Drücken und Festhaltens des
Knopfes beendet werden, danach wird das Programmauswahlfenster angezeigt.
Durch Drehen des Knopfs ist es jederzeit möglich, den aktuellen Status des Programms anzuzeigen.
Nach 10 Sekunden wird wieder das normale Programmdisplay angezeigt.
10
15
D
10
deutsch
12
deutsch
Reinigung/Wartung
Vorkühlen
Achtung: Gerät vor der Reinigung ausschalten.
Vor dem Beladen muss das Gerät auf Betriebstemperatur heruntergekühlt werden (ca. 20 Minuten).
Zum Starten den Knopf drehen, bis Vorkühlen angezeigt wird, dann wieder loslassen.
WICHTIG: damit das Gerät sein ansprechendes Äußeres behält, empfehlen wir eine wöchentliche
Reinigung mit:
a) einem Sprühreiniger, speziell für Edelstahloberflächen oder
b) heißer Seifenlauge und einem nicht kratzenden Lappen
Reinigen Sie immer in Schliffrichtung des Bleches.
WARNUNG
Hochalkalische Reinigungsmittel oder solche, die Bleichmittel oder Säuren enthalten, sind ebenso wie
chlorhaltige nicht zur Reinigung von Edelstahloberflächen geeignet. Diese Reinigungsmittel greifen die
Edelstahloberflächen an. Sollte ein Gerät aus Versehen mit solchen Reinigungsmitteln in Kontakt
gekommen sein, reinigen Sie die Stelle SOFORT mit einer milden Seifenlauge und reiben Sie die Stelle
trocken. Benutzen Sie niemals Scheuerpulver oder Stahlwolle.
Für die Zeit der Reinigung müssen alle Lebensmittel in einem anderen Kühl- oder Tiefkühlschrank gelagert
werden. Lassen Sie das Gerät vor dem Beschicken wieder auf Betriebstemperatur kommen. Verschüttetes
sofort entfernen.
Berühren Sie die Innenwände nicht mit nassen Händen - die Haut könnte festfrieren.
Reinigungshinweise
8
11
D
Abtauung
Alle Geräte haben automatische Abtauung. Es ist jedoch auch möglich, bei Bedarf eine
manuelle Abtauung wie folgt einzuleiten: Knopf drehen, bis „Abtauung” (Bild links oben)
angezeigt wird, dann den Knopf drücken und wieder loslassen.
Während der Abtauung werden abwechselnd die Bilder Mitte und unten angezeigt. Das Ende
der Abtauung (nach ca. 20 Minuten) wird durch eine akustische Warnmeldung angezeigt. Diese
kann durch Knopfdruck ausgeschaltet werden. Im Display erscheint das letzte Bild vor der
manuellen Abtauung.
Reinigen Sie die Türdichtung(en) wöchentlich mit einer Seifenlauge. Gründlich trocknen. Wenn eine Dichtung
beschädigt ist, muss sie ausgetauscht werden.
Türdichtungen
Verflüßiger (nur Schränke) Der Verflüßiger (befindet sich hinter der Maschinenraumblende) muss regelmäßig, am besten monatlich, mit
einem Staubsauger oder einer weichen Bürste gründlich gereinigt werden. Ein verschmutzter Verflüßiger
reduziert die Kälteleistung des Gerätes und kann zum Kompressorausfall führen.
Die grundsätzlichen Regeln
beim Schockkühlen und Schockfrosten
7
Zusätzliche
Funktionen
Den Knopf 2 Sekunden gedrückt halten, Informationsdisplay oben links erscheint. Den
Knopf erneut drücken und loslassen, bis die Zeit wie unten links markiert wird. Die
gewünschte Zeit wird durch Drehen nach links oder rechts eingestellt und durch
Knopfdruck bestätigt. „Schockkühltemp.” wird im Display markiert. Programmstart
automatisch nach ca. 20 Sekunden. Die eingegebene Zeit wird nicht gespeichert.
Die Wärmeabgabe der verschiedenen Speisen vollzieht sich in unterschiedlichem Maße:
demzufolge gibt es erhebliche Variationen je nach Produktart und -menge in der Abkühlzeit.
Die benötigte Abkühlzeit für ein 10 kg großes Fleischstück ist anders als für 10 kg
Konditoreiware.
13
8
14
>
Es ist unbedingt erforderlich, dass die kalte Luft direkt über das Produkt geführt wird, um
ein schnelles und gleich bleibendes Abkühlen zu bewerkstelligen
>
Die Produktdichte sowie das Wasser- und Fettgehalt des Produktes beeinflussen die
benötigte Abkühlzeit
>
Bei der Auswahl eines Schockkühlprogramms müssen die Empfindlichkeit und die Struktur
des Produktes berücksichtigt werden
>
Foster empfiehlt ein maximales Produktgewicht von 3,75 kg pro 1/1 Gastronorm-Behälter
>
Größere Fleischstücke benötigen eine längere Abkühlzeit. Wenn möglich, das Fleisch vor dem
Schockkühlen portionieren
>
Deckel oder Folien sollten zum Abdecken der Speisen nicht verwendet werden. Der Einsatz
von zu tiefen Gastronorm-Behältern verlängert ebenfalls die Abkühlzeit
>
Das Gerät nicht überladen. Foster empfiehlt eine Produkthöhe von max. 25 mm. Das Produkt
gleichmäßig im Schrank verteilen
>
Geben Sie dem Produkt wenn möglich eine kleine Pause (besonders bei Fleisch)
>
Achten Sie auf die Hygiene! Reinigen sie den Kerntemperaturfühler gründlich nach jedem
Schockkühlvorgang, um Kreuzkontamination zu vermeiden
>
Heiße Flüssigkeiten vor dem Schockkühlen am besten in flache Gastronorm-Behälter
umlagern
>
Lassen Sie das Gerät vor dem Beladen auf Temperatur herunterkühlen
>
Überprüfen Sie die Produkttemperatur vor und nach dem Schockkühlen.
Einstellen der Schockkühlzeit (außer bei Programm 1, 2 oder 3)
Nach dem Einstellen der Zeit- und Temperaturdaten den Knopf 2 Sekunden gedrückt
halten, die Programmauswahl erschient im Display. Programmstart durch Drücken und
Loslassen des Knopfs.
Einstellen der Schockkühl- und Lagertemperatur
(nur Programm 1, 2 oder 3)
Display a)
Display d)
Display b)
Display c)
Die Programme 1, 2 oder 3 (Display a) links) können bei Bedarf aktiviert
werden, um die Funktion des Gerätes individuell nach Produktart oder
Produktmenge zu programmieren.
Die Schockkühlzeit wird wie oben eingestellt. Danach wird
„Schockkühltemp.” im Display markiert (Display b) links). Knopf drücken
und loslassen, Temperatur wird markiert (Display d) links). Die gewünschte
Temperatur wird durch Drehen nach links oder rechts eingestellt und
durch Knopfdruck bestätigt. Jetzt wird „Lagertemperatur” markiert
(Display c) links). Die Lagertemperatur wird wie die Schockkühltemperatur
eingestellt und bestätigt.
Nach dem Einstellen der Zeit- und Temperaturdaten den Knopf 2
Sekunden gedrückt halten, die Programmauswahl erschient im Display.
Programmstart durch Drücken und Loslassen des Knopfs.
Alle im Programm 1, 2 oder 3 eingegebenen Werte werden gespeichert.
11
D
deutsch
deutsch
D
Information
8
In der Programmauswahl den Knopf 2 Sekunden gedrückt halten. Informationsdisplay erscheint.
Den Knopf drehen und „Information” markieren. Durch Knopfdruck erscheinen alle Daten aus dem
letzten Schockkühlvorgang (Datum, Programmart, Programmstart und -ende, Start- und
Endtemperatur, u.s.w.).
Alarm- und Warnmeldungen
Hochdruck
Der Alarmzustand wird ausgelöst durch u. a.
● Produkttemperatur über +90˚C
● Gerät überladen
● Luftführung blockiert
● Verflüßiger oder Verflüßigerfilter verschmutzt
Kundendienst benachrichtigen, wenn der Hochdruckalarm wiederholt ausgelöst wird.
Stromausfall
Das Gerät startet wieder, wenn der Strom nicht länger als 5 Minuten ausfällt. Nach einem Stromausfall von
mehr als 5 Minuten automatische Umschaltung auf Lagern. Das durch den Stromausfall unterbrochene
Programm kann über „Information” überprüft werden (s. oben).
HACCP Optionen
In der Programmauswahl den Knopf 2 Sekunden gedrückt halten. Informationsdisplay erscheint. Den Knopf drehen und „HACCPWerte” markieren. Die gewünschte Form des HACCP-Berichtes kann durch Drücken und Loslassen des Knopfes und durch
Knopfdrehen bestimmt werden. Bestätigung durch erneuten Knopfdruck. Knopf drücken und loslassen und die Häufigkeit der
Datenmessungen auswählen (alle 3 oder alle 5 Minuten). Speicherung der Daten durch erneuten Knopfdruck.
Es stehen 4 verschiedene Abkühlmethoden zur Auswahl:
Soft Chill: für empfindliche Ware wie Konditoreiprodukte und Produkte mit Sahne, sowie Produkte mit hohem Wassergehalt, Fisch,
Reis, Pasta, einige Gemüsesorten.
Daten ausdrucken
Hard Chill: Standardmethode für die meisten Produkte, inkl. portionierte Speisen, Fleisch, Gemüse, Auflaufe, u. s. w.
Warenschutzfunktion im letzten Drittel des Programms.
In der Programmauswahl den Knopf 2 Sekunden gedrückt halten. Informationsdisplay erscheint. Den Knopf drehen und „Daten
drucken” markieren. Bei Datendruck über Handdrucker diesen jetzt einschalten und auf den Infrarotsender im Displaybereich richten
(Infrarotsender wird auf Wunsch und in Kombination mit dem Handdrucker geliefert). Den Knopf drücken und loslassen, um ein
Download der Daten zu starten.
Hard Max: für dichte Produkte oder Produkte mit hohem Fettgehalt, größere Fleischstücke oder „Sous Vide”-Gerichte.
Schockfrost (nur BCF und MBCF-Modelle): Abkühlung auf -18˚C in max. 240 Minuten.
Datum und Uhrzeit einstellen
In der Programmauswahl den Knopf 2 Sekunden gedrückt halten. Informationsdisplay erscheint.
Den Knopf drehen und „Datum/Uhrzeit” markieren. Nach erneutem Knopfdruck erscheint das
Bild unten links. Die Uhrzeit (Stunden, Minuten) sowie das Datum (Tag, Monat, Jahr).werden
durch Drücken und Drehen des Knopfes eingestellt. Speicherung der Daten durch erneuten
Knopfdruck.
9
Programmempfehlungen
Produkt
Beispiel
Fleisch
Fisch
Sprache ändern
In der Programmauswahl den Knopf 2 Sekunden gedrückt halten. Informationsdisplay erscheint. Den
Knopf erneut 2 Sekunden gedrückt hallten. „Service” erscheint, Sprache wird markiert. Die gewünschte
Sprache (Deutsch, Englisch. Französisch oder Dänisch) wird durch Drücken und Drehen des Knopfes
eingestellt. Speicherung der Sprache durch erneuten Knopfdruck.
Bildschirmschoner
Der Bildschirmschoner (mehrfach der Buchstabe Z - „Schlafmodus”) erscheint nach 20 Minuten und wird durch einen Knopfdruck
oder durch Öffnen der Tür ausgeschaltet.
Erforderliches
Schockkühlprogramm
Schockkühlzeit
(Minuten)
Schockfrostzeit
(Minuten)
Rind, Schwein, Lamm, Geflügel, Hackfleisch
Hard
40 - 90
60 - 240
Gebraten, gedunstet, gebacken,
mit oder ohne Sauce
Soft
30 - 90
60 - 240
Fertiggerichte
Lasagne, Auflauf, Gulasch, Risotto
Hard
50 - 90
90 - 240
Gemüse
Gedunstet oder gebraten,
Reis, Kartoffeln
Soft
30 - 90
60 - 240
Obst
Gedunstet oder gebraten
Soft
60 - 90
60 - 240
Backwaren
Pasteten, Blätterteigware, Kuchen
Hard
30 - 90
50 - 240
Desserts
Obstdesserts, Sahne, Pudding
Soft
30 - 90
70 - 240
Desserts
Verschiedene Kuchensorten
Hard
30 - 90
70 - 240
ACHTUNG: alle o. a. Zeiten sind nur Richtwerte. Die benötigte Zeit ist stets von der Produktart und -stärke
sowie von der Gesamtmenge abhängig.
8
Alarm- und Warnmeldungen
Lufttemp.-fühler
Lufttemperaturfühler defekt. Das Gerät funktioniert nur bis zum Programmende. Kundendienst benachrichtigen.
Verdampferfühler Verdampferfühler defekt. Das Gerät funktioniert nur bis zum Programmende. Kundendienst benachrichtigen.
Einstechfühler
Kerntemperaturfühler defekt. Das Gerät schaltet automatisch auf ein zeitgesteuertes Programm um und
funktioniert nur bis zum Programmende. Kundendienst benachrichtigen.
Tür offen
Alarm wird durch Schließen der Tür gelöscht, sonst Kundendienst benachrichtigen.
Zu warm
Alarmzustand bei „Lagern”. Prüfen Sie die Temperatur des Produktes mit dem Kerntemperaturfühler. Wenn diese
innerhalb der Temperaturrichtlinien liegt, kann die Ware in einem Kühl- oder Tiefkühlschrank gelagert werden.
Kundendienst benachrichtigen. Bei einer zu hohen Produkttemperatur prüfen Sie, ob das Produktgewicht zu hoch
oder die Schockkühlzeit zu kurz für die Größe des Gerätes sind.
12
13