1
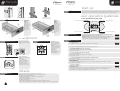
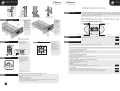
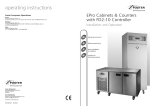
operating instructions
gastro pro range
Foster European Operations
France
Foster Refrigerator France SA
Tel: (33) 01 34 30 22 22 Fax: (33) 01 30 37 68 74 Email: [email protected]
cabinet & counter installation
and operating instructions
Germany
Foster Refrigerator Germany
Tel: (0781) 96 93 00 Fax: (0781) 96 93 019 Email: [email protected]
Foster Refrigerator
Oldmedow Road, King’s Lynn,
Norfolk, PE30 4JU
England
Tel: 01553 691122
Fax: 01553 691447
Website: www.fosterrefrigerator.co.uk
Email: [email protected]
a Division of ITW (UK) Ltd.
PROCAB0305
GB
Operating instructions
D
Bedienungsanleitung
F
Notice d'installation
et d'utilisation
GB
english
F
installation
français
IMPORTANT:
To the installer: Installation of these units should be carried out by a competent person and
the appropriate codes of practice adhered to, thus ensuring safe installation.
Pass to the user: Do not discard this document: it contains important guidelines on
Operation, Loading, Cleaning and Maintenance and should be kept for reference.
DISPOSAL REQUIREMENTS
If not disposed of properly all refrigerators have components that can be
harmful to the environment. All old refrigerators must be disposed of by
appropriately registered and licensed waste contractors, and in accordance
with National laws and regulations.
Positioning/unpacking
1
Cabinet
Counter
castors
legs
2
Castors/legs/feet
Please refer to label on back
and base of unit for correct
fitting of castors
Fitting Shelves
4
Cabinet
All models are normally fitted
with swivel castors. Ensure
during installation the unit is level
if not the door(s) may not close
correctly. Adjust castors by
inserting spacers under the
appropriate castor and the base
of the unit until level.
As an alternative adjustable legs
can be fitted to all models.
As an alternative 8mm threaded
adjustable levelling feet are
available for ‘U’ mount cabinet
models, for all other models
12mm threaded adjustable
levelling feet are available .
(Fitting method as castors or legs).
3
Shelf/Tray Supports
To adjust the position of the
trayslides insert the ends into
the vertical support with the
‘hooks’ pointing downwards
and ‘slot downwards’ into
position. Ensure the
trayslides are parallel and
level after fitting.
Shelves must be inserted
into the unit so that they
sit at the back of the unit.
5
Vaporiser Tray
This is only fitted to the Pro
300/300 cabinet models.
Slide the vaporiser tray onto
its runners on the underside
of the cabinet and insert the
electrical plug into the socket
provided. If the runners are
tight loosen slightly and
re-tighten after inserting the
tray. Ensure tray covers drain
outlet.
Counter
Marine Units
6
Important (Cabinets only): Ensure a minimum clearance of 150mm above unit and ventilation for
efficient operation. Where possible, ensure the unit is not adjacent to a heat source.
Unpacking: The unit is delivered on a pallet and shrink-wrapped. Documentation is inserted into a clear
pocket located inside the unit. Carefully remove the protective plastic film and cardboard from the
unit exterior and from the door opening surround making sure that any sharp instrument used does not cause
damage, plus remove any quality labels.
Cabinet removal from the pallet: Remove the shelf holding the package containing the castors or legs.
Remove the retaining bolts which secures the unit to the pallet. Move the unit over the front of the pallet and
fit the lockable castors or legs in the mounting holes. To fit the rear castors or legs, lock the front castors, tilt
the unit forwards, remove the pallet and fit the castors or legs in the mounting holes. Ensure that all are
tightened firmly into position.
On double door top mount cabinets, ensure 3 castors are fitted at the front.
N.B. Gastro Pro 250/250, 300/300 and all Fish cabinets and counters only. Take care not to damage the drain outlet
under the base. All cabinets & counters are heavy and care should be taken when handling.
Counter removal from the pallet:
Counters fitted with castors - Remove fittings from inside the unit and ensure all drawers and doors are
locked before removal from the pallet. Cut the heavy duty cable ties that hold the front castors to the pallet.
Unlock the castors and then carefully roll the unit forward off the pallet.
Counters fitted with legs - Remove fittings from inside the unit and ensure all drawers and doors are
locked before removal from the pallet. Remove the fixing blocks located in front of the legs at the front of the
unit and cut the straps securing the unit to the pallet. Carefully manoeuvre the unit forward, off the pallet.
Units for marine
applications are provided
with special marine legs
and bulkhead fixings.
These units must be
installed by specialist
marine installation
companies.
Counter Bulkhead Fixings
Cabinet Bulkhead
Fixings
2
Marine Leg
19
F
français
english
GB
start up
7
Supports standard
Démontage crémaillère
Démontage des tiroirs
17
Variante armoire á poissons
Switching On
user operation guidelines
Variante armoire de
maintien en température
Tiroir neutre
(option)
Ce tiroir est
retenu sur ses
glissières par des
clips plastiques
(A). Ces clips
doivent être
enfoncés pour
libérer le tiroir.
Foster Standard Controller (FSC)
Tiroirs
réfrigérés
(option)
Pour enlever ces
tiroirs, les ouvrir
à fond et lever
pour que les
roulements (B)
des glissières
passent dans les
encoches
prévues à cet
effet.
Stand-by / On Button
Button 1
Mute / Increase Button
Button 4
Initial Start Up
Chargement
Circulation de l'air
Une fois l'armoire chargée,
contrôler que l'air peut circuler
librement autour des produits
stockés.
19
Répartition de la charge La charge de 40 kg
40Kg
20
Aliments
maximum par clayettes
dolt être uniformément
répartie avec un
maximum de 160kg par
section de 600 litres pour
les armoires et de 80 kg
par porte pour les
meubles bas.
Ne pas stocker de
produits directement sur
le fond des appareils.
Couvrir les aliments en
séparant les produits crus des
produits cuits.
Dans les armoires de
maintien en température,
couvrir les bacs pour éviter
tout dessèchement et
remplir le bac humidificateur
en partie basse avec de l'eau.
Défauts
21
Diagnostic
18
Button 2
Temperature Button
Button 3
Defrost / Decrease Button
by
8
18
If the unit has been laid on its back at any time DO NOT switch on immediately but leave in the upright
position for at least 60 minutes. (Not applicable to heated cabinets). To switch on the unit see ‘User Operation
Guidelines’. Allow the unit to reach its normal operating temperature before loading with product.
9
Your new Foster Cabinet / Counter will be delivered ready to run. Plug into the mains
supply and the unit will operate in the following way.
Start Up & Self Test: These indications are only displayed during the first three seconds
following mains electrical power being applied to the unit. During this period the
controller performs a self-check. (Refer to point 6 - Set Unit to Standby).
followed by
---
Operator Instructions
1. To Start the Unit
Press button 1. Controller will start and air temperature will be displayed.
-20
2. To Check Storage Temperature Setting
Press button 2. Display temporarily shows current Temperature Set Point.
3. To Increase Storage Temperature (if required)
a. Press and hold button 2.
b. Press button 4 until required temperature is displayed.
c. Release both buttons.
4. To Lower Storage Temperature (if required)
a. Press and hold button 2.
b. Press button 3 until required temperature is displayed.
c. Release both buttons.
5. To Initiate a Manual Defrost (Not applicable to Heated Cabinets)
a. Press and hold button 3.
b. Press button 1. A timed/temperature defrost will then follow.
c. Release both buttons.
Defrost Indication
This indication is displayed during the defrost cycle. On completion the display will revert back to showing
the internal air temperature.
6. Set Unit to Standby
Press button 1. display shows:
Standby Indication
This indication is displayed while the unit is not operating but with mains power still applied to the unit. This
mode may be used for internal cleaning regimes and short periods when the unit is not required. For
extended periods of inactivity the mains supply should be isolated.
888
---
Les vérifications doivent être effectuées par du personnel autorisé.
Avant d'appeler votre revendeur agréé, prière de contrôler les points suivants:
Défaut d'alimentation électrique (disjoncteur)
Défaut affiché sur le régulateur (voir chapitre alarmes et avertissements)
Prise de courant endommagée
En cas de besoin d'assistance technique préciser:
Le numéro de série de l'appareil
Le type de l'appareil. Ces informations se trouvent sur une plaque à l'intérieur de l'armoire.
Lorsqu'un code de défaut s'affiche sur le régulateur, mentionner ces indications lors de votre appel téléphonique.
3
GB
english
F
français
Nettoyage et entretien
Nota: Eteindre l'appareil avant le nettoyage intérieur
13
Alarms and Warnings
10
Instructions de nettoyage Important
En en prenant soin, le revêtement inox à la propriété de résister à la corrosion pendant de longues
années.
Pour conserver ces propriétés, nous recommandons le nettoyage hebdomadaire suivant:
a - Extérieur: utiliser un produit spécifique au nettoyage de l'inox (selon instruction du fabricant)
b - Intérieur: laver à l'eau savonneuse, rincer et sécher avec un chiffon doux.
AVERTISSEMENT
Les agents détergents à base de solution alcaline, d'eau de javel, de chlore ou d'acide sont
formellement interdites pour le nettoyage des inox. Des traces de corrosion ou de piquage
peuvent résulter de leur application délibérée ou involontaire.
Au cas où l'un de ces produits entrerait en contact avec une meuble réfrigérée pendant un
nettoyage général de la cuisine, rincer immédiatement les parties attaquées avec de l'eau propre
et sécher en frottant.
Ne jamais utiliser de tampon ou de poudre abrasive sur les surface en inox ou en aluminium.
Après le nettoyage, attendre que l'appareil et atteint sa température de fonctionnement avant de
le recharger avec les aliments.
En cas de salissures pendant l'utilisation, essuyer immédiatement en prenant soin de ne pas
mettre la peau en contact avec les parois internes des meubles à température négative ou de
maintien en température (risque de brûlures dans les 2 cas).
Door Open Alarm.
The display will alternately show
and the internal air temperature. The controller alarm sounds, but can be
stopped by pressing button 4. The display will continue to show the alarm message until cancelled by shutting the door. If
the alarm cannot be cancelled by doing this call your Foster Authorised Service Company.
000
High Temperature Alarm.
Display shows internal air temperature and
000
alternately.
The alarm will sound, but can be switched off for one hour by pressing button 4
000
Display will continue to show
and the alarm will resound after one hour. The alarm can again be silenced, and
the unit will continue to operate. The alarm will automatically be cancelled by the unit returning to normal operating
temperatures. If this does not occur after 4 hours, call your Foster Authorised Service Company. On a heated cabinet,
switch off and call your Foster Authorised Service Company.
Low Temperature Alarm.
Display shows internal air temperature and
000
alternately.
000
Display will continue to show
and the alarm will resound after one hour. The alarm can again be silenced, and
the unit will continue to operate. The alarm will automatically be cancelled by the unit
returning to normal operating temperatures. If this does not occur after 4 hours, call your Foster Authorised Service
Company. On a heated cabinet, close the door as soon as possible. The audible alarm can be switched off by pressing
button 4. If the alarm continues longer than 4 hours call your Foster Authorised Service Company.
Air Temperature Probe Failure.
Display shows probe failure indication.
Ceux ci doivent être régulièrement inspectés et remplacés en cas de détérioration. Nettoyer avec un chiffon
humecté à l'eau chaude et savonneuse, rincer avec un chiffon humide et sécher avant de refermer les portes.
14
Joints de porte
15
Nettoyage condenseur Nettoyer le condenseur (situé dans le compartiment compresseur, au dessus de l’appareil) dès que clignote le
The alarm will sound, but can be switched off for one hour by pressing button 4
symbole
ccc
sur l’afficheur. (voir chapitre Alarmes et Avertissements).
Eteindre l’appareil. Brosser les ailettes à l’aide d’une brosse à poils durs (non métalliques).
Nettoyer avec un chiffon humecté à l’eau chaude et savonneuse, rincer avec un chiffon humide et sécher
avant de refermer les portes.
PFi
Armoire
1
Meubles
bas
3
The alarm will sound, but can be switched off by pressing button 4
Groupe
logé en
haut
2
Groupe logé en bas
There is no further action that can be taken by the user in this instance; therefore call your Foster Authorised Service
Company as soon as possible. During this period the unit will continue to operate, but may have a reduced performance.
Evaporator Temperature Probe Failure. (Automatic Defrost Cabinets Only)
Display shows probe failure indication
alternating with the internal air temperature.
PF2
The alarm will sound, but can be switched off by pressing button 4
Again, there is no further action that can be taken by the user in this instance; therefore call your Foster Authorised
Service Company as soon as possible. During this period the unit will continue to operate
satisfactorily, but this failure will have an effect on defrost and therefore efficiency if allowed to continue.
Condenser Clean Warning.
The condenser must be checked and cleaned at regular intervals the frequency being determined by site conditions.
However the controller automatically displays a warning message
alternating at one-second intervals with the
Sur les meubles bas, enlever
les 2 vis situées en dessous de
la tùle cache groupe.
Nettoyer avec une brosse
douce et non métallique.
ccc
air temperature when the maximum time limit for cleaning the condenser has been exceeded. The alarm sound can be switched
off by pressing button 4. The controller will continue to alternate between
and the internal air temperature.
ccc
Switch off the unit by pressing button 1 and clean the condenser (see cleaning instructions).
To reset the unit and reset the condenser clean warning press button 1.
Failure to carry out this action may invalidate the warranty of the condensing unit.
11
Door Lock
To lock the door, insert the key and turn through 90˚.
12
Light with Glass Door
Cabinets
The ‘push button’
on/off internal light
switch is located under
the bottom edge of the
stainless steel top
control panel housing.
4
Cabinets
Counters
The ‘push button’ on/off
internal light switch is
located on the fan housing
(left) on left hand unit
configurations or (b) on the
fan housing (right) on right
hand unit configurations.
Counters
16
Clayettes et supports
Pour enlever les clayettes et les glissières, se reporter aux instructions d'installation. Pour démonter les
crémaillères, soulever et tirer. Les vis de fixation restent en place sur les parois. Au remontage, s'assurer que
les trous oblongs à l'arrière des embouts plastiques s'engagent correctement sur les vis de fixation. Les
clayettes et les glissières peuvent être nettoyer en machine. Laver les supports verticaux (crémaillères) à l'eau
chaude et savonneuse, rincer avec et sécher avant de les remettre en place.
Crémaillères pour armoire à poisson et armoire de maintien en température.
Pour le démontage, desserrer les écrous de fixation et lever la crémaillère au travers des trous oblongs.
Casier à vins.
Pour le démontage, dévisser l'écrou moleté retenant le casier sur l'arrière.
17
F
français
GB
english
cleaning/maintenance
N.B. Before internal cleaning, switch off unit.
10
Alarmes et avertissements
13
Cleaning Instructions
000
Alarme porte ouverte
L'afficheur indique en alternance
et la température intérieurede l'air. L'alarme sonore du régulateur s'enclenche et
peut être arrêtée en pressant la touche 4. L'afficheur continuera d'indiquer le message d'alarme tant que la porte ne sera pas
correctement fermée. Au cas où l'alarme ne se dés-active pas en fermant la porte, faire appel à votre service de maintenance.
Alarme haute température.
Le régulateur affichera alternativement
000
WARNING:
High alkaline cleaning agent or those containing bleaches, acids and chlorines are very harmful to
stainless steel. Corrosion and pitting may result from their accidental or deliberate application.
If any of these liquids should come into contact with the unit during general kitchen cleaning,
wipe down the affected area immediately with clean water and rub dry.
Never use wire wool or scouring powders on stainless steel or aluminium surfaces.
After cleaning allow the unit to reach its normal operating temperature before reloading with
product. During usage all spills should be wiped clean immediately but care should be taken not
to touch the interior of freezer units as warm skin can ‘freeze’ to metal or heated cabinets.
et la température de l'air.
L'alarme sonore s'enclenchera et pourra être arrêtée pendant une heure en appuyant sur la touche 4.
000
Il continuera de s'afficher
et l'alarme sonore reprendra après une heure d'interruption.
Elle pourra de nouveau être stoppée sans modifier le régime de l'appareil. L'alarme s'annulera
automatiquement dès le retour de l'appareil dans les plages de températures pré-définies.
Au cas où l'alarme persisterait plus de 4 heures, veuillez faire appel à votre revendeur agréé.
Sur les appareils de maintien en température (+85˚C) débrancher l'armoire et faire appel à votre revendeur agréé.
Alarme basse température.
Le régulateur affichera alternativement
000
14
Door Gaskets
15
Condenser
et la température de l'air.
L'alarme sonore s'enclenchera et pourra être arrêtée pendant une heure en appuyant sur la touche 4.
000
Important Cleaning Instructions
Cared for correctly, stainless steel has the ability to resist corrosion and pitting for many years.
The following weekly cleaning regime is recommended:
a. Exterior: Use a proprietary stainless steel cleaner following the manufacturers instructions.
b. Interior: Wash with soapy water, rinse and dry thoroughly.
Clean the condenser, located in the unit compartment, when it becomes dirty (see Alarms and Warnings in
the User Operation Guidelines). Switch off the unit. (Remove the unit cover on bottom mounts and counters
as below.)
Clean the condenser using a soft brush or vacuum cleaner. NOTE: if there are any stubborn grease deposits
etc left on or through the condenser call your local service company to carry out a full service.
Once the condenser has been cleaned, switch on the unit by pressing button 1 this action will also reset the
condenser clean warning.
Failure to carry out this action may invalidate the warranty of the condensing unit.
Il continuera de s'afficher
et l'alarme sonore reprendra après une heure d'interruption.
Elle pourra de nouveau être stoppée sans modifier le régime de l'appareil.
L'alarme s'annulera automatiquement dès le retour de l'appareil dans les plages de températures
pré-définies.
Au cas où l'alarme persisterait plus de 4 heures, veuillez faire appel à votre revendeur agréé.
Défaut de sonde d'air
En cas de défaut de la sonde d'air, l'afficheur indiquera:
L'alarme sonore s'enclenchera et pourra être arrêtée en appuyant sur la touche 4
Dans ce cas, il est nécessaire de faire appel dans les meilleurs délais à votre revendeur agréé pour le
remplacement de cette sonde. L'appareil continuera de fonctionner en régime minimum avec des
performances réduites.
These should be inspected on a regular basis and replaced if damaged. To clean, wipe with a warm damp
soapy cloth followed by a clean damp cloth and finally thoroughly dry before closing the door.
PFi
Cabinets
1
Counters
3
Top Mount
2
Bottom Mount
Défaut de sonde d'évaporateur (Sur modèle avec dégivrage automatique)
En cas de défaut de la sonde d'évaporateur, l'afficheur indiquera:
PF2
L'alarme sonore s'enclenchera et pourra être arrêtée en appuyant sur la touche 4
Dans ce cas, il est nécessaire de faire appel dans les meilleurs délais à votre revendeur agréé pour le
remplacement de cette sonde. L'appareil continuera de fonctionner en régime normal sans la fonction dégivrage. Sans
remplacement rapide de la sonde, l'efficacité de l'appareil sera réduite. (Prise en glace)
Avertissement encrassement du condenseur.
Le condenseur doit être nettoyé régulièrement. L'afficheur indique automatiquement cet entretien préventif. En alternance toutes
les secondes avec la température interne, il s'affichera:
ccc
L'alarme sonore s'enclenchera et pourra être arrêtée en appuyant sur la touche 4
L'avertissement visuel continuera de clignoter.
Eteindre l'appareil en pressant la touche 1 et nettoyer le condenseur (voir instructions de nettoyage)
Pour remettre en route l'appareil et remettre à zéro la minuterie de l'avertissement du nettoyage condenseur, appuyer de
nouveau sur la touche 1
11
Serrure
Pour fermer la porte à clé, insérer la clé dans la serrure et tourner de 90˚.
12
Eclairage
( Optionnel)
Armoires
Le bouton poussoir
Marche/arrêt
commandant l'éclairage
est situé sous le bandeau
supérieur inox de
l'armoire.
Armoires
16
Meubles bas
Le bouton poussoir
marche/arrêt commandant
l'éclairage est situé à
l’intérieur du meuble sur le
caisson ventilation à
gauche ou à droite selon
l’emplacement du groupe
froid.
Meubles bas
16
Shelf Supports,
Trayslides & Shelves
On counter units, remove
the two screws located at
the base of the condenser
compartment unit cover (a)
for access to condenser.
Brush with a stiff (not wire)
brush.
Remove the shelves and trayslides (see Installation Instructions). To remove the support uprights lift vertically
and pull away. The retaining studs remain attached to the internal wall. To replace, ensure the “keyhole”
slots in the rear of the plastic moulding engages the retaining stud. The shelves and trayslides are dishwasher
safe. Wash the vertical supports with warm soapy water, rinse and thoroughly dry before replacing.
Shelf Supports
To remove, loosen the locating screw and lift from the ‘keyhole’ fixing.
Wine Racks
To remove, unscrew the thumb screw holding the rack to the rear of the unit and carefully lift out.
5
GB
english
F
mise en marche
Shelf Supports (continued)
16
français
7
Au cas où l'appareil aurait été couché, NE PAS METTRE EN MARCHE avant une période de 60 minutes (sauf pour
les armoires chaudes). Pour mettre en marche, se reporter aux instructions d'utilisation. Laisser l'appareil atteindre
sa température de fonctionnement avant d'introduire des aliments.
Branchement
Instructions d'utilisation
Régulateur FOSTER 'Pro' (FSC)'
Standard Trayslide
Drawer Removal
17
Ladderack Removal
Fish Racking Variation
Heated Shelf Variation
Refrigerated
Drawers
To remove these
drawers pull out
to full extent and
lift the drawer so
that the rollers B
pass through
the slots in the
drawer runners.
Chef’s knife
Drawer
(if fitted)
These drawers are
secured to their
runners by
locking clips A.
These must be
depressed to
release the
drawer.
Airflow
18
When loaded, ensure
that air can circulate
around / through
stored products.
9
19
Load Distribution
40Kg
Evenly distribute the
load.
Food
6
Touche 3
Dégivrage / Diminution
8- Première mise en
marche
Votre nouvelle armoire Foster est livrée prête à fonctionner. Raccorder l'appareil à la source
d'énergie adéquate et le régulateur fonctionnera de la façon suivante:
Mise en route et auto-test: ces indications restent affichées pendant les
3 premières secondes uniquement après le raccordement électrique de
Suivie de
l'appareil. Pendant cette période, le régulateur procède à un auto-test.
(Se reporter au point 6 des instructions utilisateurs - Mise en veille)
3. Augmentation du point de consigne (si nécessaire)
a. Appuyer et maintenir enfoncer la touche 2.
b. Appuyer sur la touche 4 jusqu'à ce que la température désirée soit affichée.
c. Relâcher les 2 touches.
Cover all foods and
separate raw and cooked
foods.
Checks must be carried out by a competent person.
Before calling a Foster Authorised Service Company check the following:
a) Power failure (may be off at source)
b) Fault conditions as described in User Operational Guidelines - Alarms and Warnings.
c) Damaged mains lead plug.
When requesting service assistance always quote the following:
a) unit serial number (E..........)
b) the model number from the serial number plate located inside the unit.
c) If a “Fault Code ” appears quote the “Fault Code Reference” to the Foster Authorised Service Company.
---
Instructions utilisateurs
1. Mise en marche
Appuyer sur la touche 1 . Le régulateur affichera la température de l'air.
For Counters 40kg max
per shelf or 80kg per
door section.
operation failure
Problem Diagnosis
Touche 4
Température
2. Vérification des réglages des températures
Appuyer sur la touche 2 - Le point de consigne s'affichera temporairement.
In heated cabinets cover
food to prevent
dehydration and fill the
high humidity container in
the base with water.
21
Arrêt alarme / Augmentation
Touche 2
For Cabinets 40kg max
per shelf or 160kg per
full door section.
Do not stack product on
the base of the unit.
20
Touche 1
by
8
loading
Mise en veille /
Mise en marche
-20
4. Diminution du point de consigne (si nécessaire)
a. Appuyer et maintenir enfoncer la touche 2.
b. Appuyer sur la touche 3 jusqu'à ce que la température désirée soit affichée.
c. Relâcher les 2 touches
5. Dégivrage manuel (sauf armoire de maintien en température +85˚C)
a. Appuyer et maintenir enfoncer la touche 3.
b. Appuyer sur la touche 1. Le dégivrage programmé (temps/température) commencera.
c. Relâcher les 2 touches.
Affichage pendant le dégivrage
Pendant cette période, le régulateur affichera:
En fin de cycle, l'affichage reviendra automatiquement à la température de l'air.
6. Mise en veille
Appuyer sur la touche 1, il s'affichera:
Cet affichage indique que l'appareil est sous tension mais qu'il ne fonctionne pas.
Cette fonction peut être utilisée pour de courte période telle le nettoyage.
Pour de longues durées sans utilisation, il est recommandé de débrancher l'appareil.
888
-----
15
F
français
GB
installation
english
IMPORTANT:
Pour l'installation
L'installation de ces produits doit être assurée par un personnel qualifié selon les usages de la
profession et les normes en vigueur.
Pour l'utilisation
Conserver ce document. Il contient des informations essentielles quant au fonctionnement,
l'entretien et le nettoyage de votre matériel.
MODALITES DE MISE AU REBUT
Certains composants des réfrigérateurs peuvent présenter un danger pour
l'environnement. Aussi est-il indispensable que ces produits soient mis au
rebut dans une décharge habilitée à ces fins selon la législation en vigueur.
Mise en place/déballage IMPORTANT: Pour assurer une ventilation correcte de l'appareil, il est nécessaire de prévoir un espace de
1
Armoires
Meubles bas
castors
2
legs
Roulettes et piétements Tout modèle: La fourniture standard
Pour un montage correct des
roulettes, se référer aux instructions
collées à l'arrière de l'appareil
4
est de 4 roulettes pivotantes de
100mm. Lors de l'installation s'assurer
que l'armoire est de niveau pour
garantir la fermeture correcte de(s)
porte(s). En cas de sol non plan,
insérer des rondelles entre le socle de
l'armoire et la/les roulette(s) jusqu'à la
mise à niveau. Des pieds réglables de
150mm sont également disponibles
sur demande pour tous les modèles.
Des vérins réglables sont également
disponibles sur demande. (la méthode
de fixation reste identique)
Les clayettes doivent être
insérées afin que le
décroché permette la
circulation de l'air sur
l'arrière des appareils.
Clayette
Armoires
6
150mm entre le dessus du groupe frigorifique et le plafond du bâtiment. Dans la mesure du possible, ne pas
positionner l'appareil près d'une source de chaleur.
Déballage
Le meuble est livré sur palette avec un emballage recouvert d'un film thermorétractable. Les documents se
trouvent dans une pochette à l'intérieur du meuble. Retirer le film de protection recouvrant le meuble en prenant
soin de ne pas endommager l'appareil avec un outil pointu ou tranchant. Oter les étiquettes de contrôle.
Dépalettisation
Retirer la clayette supportant le carton avec les pieds ou les roulettes.
Dévisser les boulons qui maintiennent le meuble sur sa palette et faire glisser de moitié l'appareil vers l'avant.
Fixer les roulettes avec frein ou les pieds dans les mêmes filetages que les fixations sur la palette.
Pour mettre en place les piétements arrière, mettre les freins aux roulettes avant et basculer l'appareil pour enlever
la palette et accéder aux fixations. S'assurer que tous les piétements sont fermement serrés.
Dépalettisation des meubles bas
Comptoirs livrés sur roulettesEnlever les accessoires fournis à l'intérieur des appareils et s'assurer que les portes et tiroirs soient refermés à clé.
Couper les fixations plastiques qui retiennent les roulettes avant sur la palette. Libérer les roulettes de leur frein et
avec précaution, faire rouler le meuble pour le sortir de la palette. Remettre le meuble dans sa position dès cette
opération terminée.
Comptoirs livrés sur piedsEnlever les accessoires fournis à l'intérieur des appareils et s'assurer que les portes et tiroirs soient refermés à clé.
Enlever les cales de bois qui bloquent les pieds sur l'avant et couper les fixations plastiques pour libérer le meuble.
Avec précaution, manoeuvrer le meuble pour le sortir de la palette.
NB: Modèles PRO 300/300 H, PRO 250/250 H et armoires à poisson uniquement: Prendre soin de ne pas
endommager la sortie d'écoulement située sous l'armoire. Toutes les armoires et meubles bas sont lourds et
volumineux. Ils doivent être manipulés avec précaution. Sur les armoires doubles portes, veillez à mettre 3
roulettes à l'avant de l'appareil.
3
Clayettes et supports
Pour ajuster les niveaux de
clayettes, insérer les
extrémités des supports dans
les montants verticaux en
pointant les encoches vers le
bas, puis relever pour mettre
en position. S'assurer que les
supports sont parallèles et
de niveau.
5
Bac de réévaporation
Modèles PRO 300/300 H et
PRO 250/250 H uniquement:
Insérer le bac dans les
glissières sous l'armoire et
raccorder la prise électrique à
l'embase située sous
l'appareil. En cas de glissières
trop serrées, desserrer
légèrement pour glisser le
bac et resserrer une fois mis
en place.
Meubles bas
Kit 'marine'
Ces appareils sont fournis
avec des piétements
spéciaux et des accroches
particulières. Ils doivent être
installés par du personnel
spécialisé dans ce domaine.
Fixations particulières
meubles bas Kit marine
Fixation
Pieds marine
14
7
D
deutsch
D
deutsch
Aufstellung
WICHTIG
Dieses Gerät muss gemäß der nachstehenden Anleitung unter Berücksichtigung aller
Sicherheits-Richtlinien aufgestellt werden.
Bitte diese Bedienungsanleitung sicher aufbewahren: sie enthält wichtige Informationen
über die Bedienung des Gerätes sowie Hinweise über Pflege, Reinigung und Wartung.
Entsorgung
Alle Kühlgeräte und deren Teile müssen fachgerecht entsorgt werden.
1
Positionierung/Auspacken Wichtig (nur Schränke): stellen Sie einen Deckenabstand von 150mm sowie eine ausreichende Belüftung
Schranke
Tisch
Rollen
über dem Schrank sicher, um die einwandfreie Funktion des Gerätes zu gewährleisten. Stellen Sie das Gerät
nicht neben einer Wärmequelle auf.
Auspacken: der Schrank ist auf einer Palette montiert und in einer Schrumpffolie verpackt. Technische
Unterlagen finden Sie in einer Folientasche an der Tür oder im Schrank. Entfernen Sie die Schrumpffolie
vorsichtig, um eine Beschädigung des Gerätes zu vermeiden. Entfernen Sie die Schutzfolie vom
Schrankgehäuse und die Prüfaufkleber.
Entfernen der Palette (Schränke): Nehmen Sie den Karton mit den Schrankfüßen bzw. -rollen aus dem
Gerät. Lösen Sie die Befestigungsbolzen aus der Unterseite der Palette. Ziehen Sie den Schrank vorsichtig nach
vorne auf der Palette und schrauben Sie die vorderen Füße bzw. die feststellbaren Rollen in die dafür vorgesehenen Löcher in der Schrankunterseite ein. Kippen Sie den Schrank nach vorne (vordere Rollen vorher feststellen) und schrauben Sie die hinteren Füße bzw. Rollen fest.
Bei Schränken mit zwei Türen nebeneinander müssen stets 3 Füße bzw. 3 Rollen vorne montiert werden.
Achtung (nur bei PRO 250/250, PRO 300/300 und bei Fischkühlschränken: Sorgen Sie dafür, dass der
Tauwasserabfluss unter dem Gerät nicht beschädigt wird.
Entfernen der Palette (Tische): Tische mit Rollen: Nehmen Sie das Zubehör aus dem Tisch und schließen
Sie die Türen und Schubladen ab. Schneiden Sie die Kabelhalterung von den vorderen Rollen ab. Lösen Sie die
Bremsen bei den vorderen Rollen und fahren Sie das Gërat vorsichtig von der Palette herunter.
Tische mit Füßen: Nehmen Sie das Zubehör aus dem Tisch und schließen Sie die Türen und Schubladen ab.
Entfernen Sie die Klötze vor den Füßen und die Befestigungsbänder. Ziehen Sie das Gerät vorsichtig von der
Palette herunter.
Füße
Füße/Rollen
2
Vor dem Anbringen von Rollen lesen
Sie bitte das Hinweisschild auf der
Rückseite des Gerätes.
Schränke und Tische
werden mit verstellbaren
Füßen oder auf Wunsch mit
Rollen geliefert. Überprüfen
Sie, ob der Schrank im Waage
steht, ansonsten ist es
möglich, dass die Türen nicht
richtig schlieflen. Die Füße
sind höhenverstellbar.
Gegebenenfalls legen Sie
Unterlegscheiben zwischen
Rollen und Schrankboden ein.
Roste
4
3
5
Auflageschienen
Tauwasserverdunsterschale Achtung: nur bei PRO G 300/300
und PRO S 250/250. Die
Verdunsterschale wird unter dem
Schrank in Führungsschienen
montiert. Stecken Sie den
Stecker der Verdunsterheizung in
die dafür vorgesehene Steckdose
in der Schrankunterseite. Wenn
nötig, lockern Sie die
Führungsschienen und befestigen Sie sie nach Montage der
Verdunsterschale wieder neu.
Tisch
Schiffskühlschränke
6
Befestigen Sie die
Auflageschienen wie
abgebildet. Achten Sie
darauf, dass die Schienen
waagerecht und parallel
montiert werden.
Schränke und Tische in
Schiffsausführung werden
mit Befestigungswinkeln
und Marine-Füßen geliefert.
Diese Geräte müssen von
einem Fachmann installiert
werden.
Schiffskühltisch mit
Befestigungswinkeln
Befestigungswinkel
8
Marine-Fuß
13
deutsch
D
D
deutsch
Inbetriebnahme
7
Auflageschienen
Herausnehmen der
Schubladen
17
Herausnehmen der Stellleisten
Auflageschienen bei
Fischkühlschränken
Wenn der Schrank während der Montage der Füße/Rollen gelegen hat, muss nach dem Aufrichten mindestens
eine Stunde gewartet werden, bis das Gerät in Betrieb genommen wird (gilt nicht bei Warmhalteschränken).
Schalten Sie das Gerät ein (s. unten: „Bedienung der Steuerung”). Lassen Sie den Schrank auf Betriebtemperatur
kommen, bevor Sie ihn mit Lebensmitteln beschicken.
Einschalten
Auflageschienen bei
Warmhalteschränken
Besteckschublade
(wenn
vorhanden).
Diese werden durch
Clipsen (A) befestigt. Drücken Sie
diese, um die
Besteckschublade
herauszunehmen.
Bedienung der Steuerung
Foster Standard Controller (FSC)
Herausnehmen
der gekühlten
Schubladen.
Ziehen sie die
Schublade so
weit wie möglich
heraus, bis die
Rollen (B) durch
die Schlitze in
den
Teleskopschienen
gelangen.
Ein/Aus
Taste 1
Wärmer/Hupe aus
Taste 4
Taste 2
Temperatur
Taste 3
Kälter/Abtauuen
by
8
Betrieb
18
Umluft
Den Schrank nicht überladen. Den Luftstrom
nicht blockieren.
Lagerung
19
Roste und Schubladen Die Ladung gleichmäflig
verteilen.
Höchstbelastung der
Roste 40 kg.
Der Boden des Gerätes
sollte nicht als Ablage
benutzt werden.
(max. Belastbarkeit der
Roste oder Schubladen
40 kg)
Rohe und gekochte Speisen
getrennt lagern. Keine offenen Behälter verwenden.
Bei Warmhalteschränken
Befeuchtungswanne mit
Wasser füllen.
Störung
21
Fehlerdiagnose
danach
---
40Kg
20
Inbetriebnahme
Das Gerät ist betriebsfertig. Start und Selbstprüfung: erlischt nach ca. 3 Sekunden, wenn die
Selbstprüfung zu Ende ist.
9
Bedienungsanleitung
1. Einschalten
Taste 1 drücken. Die Lufttemperatur im Schrank wird angezeigt. Das Gerät läuft.
-20
2. Soll-Wert prüfen
Taste 2 drücken. Im Display erscheint die eingestellte Soll-Temperatur. Automatischer Rückgang auf Anzeige der Lufttemperatur im Schrank.
3. Wärmer einstellen (wenn notwendig)
a. Taste 2 drücken und festhalten.
b. Taste 4 drücken, bis die gewünschte Temperatur erreicht wird.
c. Beide Tasten loslassen
4. Kälter einstellen (wenn notwendig)
a. Taste 2 drücken und festhalten.
b. Taste 3 drücken, bis die gewünschte Temperatur erreicht wird.
c. Beide Tasten loslassen
5. Manuelle Abtauung einleiten (nicht bei Warmhalteschränken)
a. Taste 3 drücken und festhalten
b. Taste 1 drücken. Abtauung wird eingeleitet.
c. Beide Tasten loslassen
Anzeige
Während der Abtauung erscheint im Display
Nach der Abtauung wird wieder die Lufttemperatur im Schrank angezeigt.
6. Ausschalten
Taste 1 drücken. Das Gerät läuft nicht mehr. Im Display erscheint
In diesem Zustand kann das Gerät innen gereinigt werden, es steht jedoch noch unter Strom.
Den Netzstecker aus der Steckdose ziehen, wenn das Gerät länger ausgeschaltet bleiben soll.
888
-----
Reparaturen dürfen nur von einem Fachmann durchgeführt werden.
Kontrollieren Sie folgendes, bevor Sie den Kundendienst anrufen:
Stromausfall
Störmeldung wie vorher beschrieben
Stecker nicht richtig eingesteckt
Wenn ein Serviceeinsatz notwendig ist, bitte Modell- und Serien-Nummer (Typenschild befindet sich im
Gerät), gegebenenfalls auch Fehlermeldung, angeben.
12
9
D
deutsch
D
deutsch
Reinigung/Wartung
Achtung: Gerät vor der Reinigung ausschalten.
10
Warnmeldungen und
Alarmzustand
13
Reinigungshinweise
WICHTIG: damit das Gerät sein ansprechendes Äußeres behält, empfehlen wir eine wöchentliche
Reinigung mit einem Sprühreiniger, speziell für Edelstahloberflächen oder heifler Seifenlauge und
einem nicht kratzenden Lappen. Reinigen Sie immer in Schliffrichtung des Bleches.
WARNUNG
Hochalkalische Reínigungsmittel oder solche, die Bleichmittel oder Säuren enthalten, sind ebenso
wie chlorhaltige nicht zur Reinigung von Edelstahloberflächen geeignet. Diese Reinigungsmittel
greifen die Edelstahloberflächen an. Sollte ein Schrank aus Versehen mit solchen
Reinigungsmitteln in Kontakt gekommen sein, reinigen Sie die Stelle SOFORT mit einer milden
Seifenlauge und reiben Sie die Stelle trocken. Benutzen Sie niemals Scheuerpulver oder
Stahlwolle.
Für die Zeit der Reinigung müssen alle Lebensmittel in einem anderen Kühl- oder Tiefkühlschrank
gelagert werden. Lassen Sie das Gerät vor dem Beschicken wieder auf Betriebstemperatur
kommen. Verschüttetes sofort entfernen.
Berühren Sie die Innenwände nicht mit nassen Händen - die Haut könnte festfrieren.
Vorsicht bei Warmhalteschränken!
14
Türdichtungen
Reinigen Sie die Türdichtung(en) wöchentlich mit einer Seifenlauge. Gründlich trocknen. Wenn eine Dichtung
beschädigt ist, muss sie ausgetauscht werden.
15
Verflüssiger
000
"Tür auf"-alarm
Wenn die Tür zu lange geöffnet bleibt, erscheinen im Display abwechselnd
und die Lufttemperatur im Schrank. Die
Hupe ertönt, kann jedoch durch Drücken der Taste 4 ausgeschaltet werden. Die Alarmmeldung im Display erlischt erst nach
Schließen der Tür. Den Kundendienst rufen, wenn die Alarmmeldung trotz Schließen der Tür bestehen bleibt.
„Zu warm”
Im Display erscheinen abwechselnd die Innentemperatur und
000
Die Hupe kann durch Drücken der Taste 4 ausgeschaltet werden.
000
Die Fehlermeldung
bleibt im Display bestehen. Die Hupe ertönt wieder nach einer Stunde und kann durch
erneutes Drücken der Taste 4 wieder ausgeschaltet werden. Der Alarmzustand wird bei Wiedererreichen der Soll-Temperatur
beendet. Den Kundendienst anrufen, wenn der Alarmzustand nach 4 Stunden noch besteht. Warmhalteschränke ausschalten.
„Zu kalt”
Im Display erscheinen abwechselnd die Innentemperatur und
000
Die Hupe kann durch Drücken der Taste 4 ausgeschaltet werden.
000
Die Fehlermeldung
bleibt im Display bestehen. Die Hupe ertönt wieder nach einer Stunde und kann durch
erneutes Drücken der Taste 4 wieder ausgeschaltet werden. Der Alarmzustand wird bei Wiedererreichen der Soll-Temperatur
beendet. Den Kundendienst anrufen, wenn der Alarmzustand nach 4 Stunden noch besteht.
„Fehler bei Lufttemperaturfühler”
Lufttemperaturfühler defekt oder nicht mehr richtig angeschlossen. Im Display erscheint
Schalten Sie das Gerät aus und reinigen Sie den Verfüssiger mit einem Staubsauger oder einer weichen
Bürste, wenn die Meldung
im Display erscheint (s. „Alarmzustand und Warnmeldungen”).
ccc
PFi
Schrank
1
Tisch
3
Die Hupe kann durch Drücken der Taste 4 ausgeschaltet werden.
Maschine
oben
2
Maschine unten
In diesem Falle ist es erforderlich, den Kundendienst zu benachrichtigen. Das Gerät läuft weiter, ggfls. bei reduzierter Leistung.
„Fehler bei Verdampferfühler” (nur bei Fleischkühlschränken und Tiefkühlschränken)
Verdampferfühler defekt oder nicht mehr richtig angeschlossen. Im Display erscheinen abwechselnd
und die Innentempertur.
PF2
Die Hupe kann durch Drücken der Taste 4 ausgeschaltet werden.
In diesem Falle ist es erforderlich, den Kundendienst zu benachrichtigen. Das Gerät läuft weiter, die fehlende Abtaufunktion
wird jedoch zu anderen Problemen (z.B. Eisbildung am Verdampfer) führen.
„Verflüssiger reinigen”
Ein verstaubter Verflüssiger erhöht den Stromverbrauch und kann zu Ausfällen führen. Wenn es notwendig ist, den Verflüssiger
zu reinigen, erscheinen im Display abwechselnd
und die
ccc
Innentemperatur. Die Hupe kann durch Drücken der Taste 4 ausgeschaltet werden. Schalten Sie das Gerät durch Drücken der
Taste 1 aus und reinigen Sie den Verflüssiger (s. „Reinigungshinweise”).
Bei Tischen müssen 2
Schrauben an der Unterseite
der Maschinenraumblende
gelöst werden. Reinigen Sie
den Verflüssiger mit einem
Staubsauger oder einer
weichen Bürste (keine
Drahtbürste).
Nach der Reinigung Taste 1 drücken, um den Alarmzustand zu beenden.
11
12
Drehen Sie den Schlüssel um 90˚, um die Tür abzuschließen.
Türschloss
Innenbeleuchtung bei
Glastüren
12
Schränke
Der Ein-/Aus-Schalter
für die Beleuchtung
befindet sich an der
Unterseite der
Maschinenraumblende.
Tische
Der Ein-/Aus-Schalter für
die Beleuchtung befindet
sich in Gerät in einem
wasserdichten Gehäuse.
16
Stellleisten,
Auflageschienen und Roste
Die Inneneinrichtung kann ohne Werkzeug entfernt werden. Die Stellleisten werden nach oben gezogen.
Die Roste und Auflageschienen sind spülmaschinenfest. Reinigen Sie die Stellleisten mit warmer Seifenlauge,
gründlich trocknen.
Feste Auflagen (nur bei Fischkühlschränken und Warmhalteschränken): lösen Sie die
Befestigungsschrauben und heben Sie die senkrechten Leisten.
Weingestell: dieses wird mit Schrauben an der Rückwand befestigt.
Schränke
10
Tische
11