1
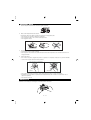
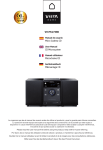
STEREO-MIKRO-HIFIANLAGE
MICROCHAINE STEREO
MINI IMPIANTO STEREO
HIFI MICRO SYSTEM
BEDIENUNGSANLEITUNG
MANUEL D'INSTRUCTIONS
MANUALE DI ISTRUZIONI
INSTRUCTION MANUAL
1
1
1
1
2
4
3
23
24
5
6
7
8
9
10
11
12
13
14
25
26
33
27
34
28
29
30
32
35
31
15
22
16
18 20
17 19 21
36
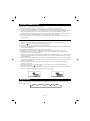
VORSICHT
LASERGERÄT DER KLASSE 1
Eigenmächtige Modifikationen oder eine unsachgemäße Einstellung von Bedienelementen können
zur Emission gefährlicher Strahlungspegel führen.
LASERSTRAHLUNG
Das Gerät emittiert Laserstrahlung und darf nur von Fachpersonal repariert werden.
GEFAHR: Wenn Sie die Sicherheitssperren umgehen oder beschädigen und das Gerät öffnen, tritt
unsichtbare Laserstrahlung aus. Augenkontakt vermeiden!
VORSICHT: Bei geöffnetem Gerät und beschädigten Sicherheitssperren tritt gefährliche
Laserstrahlung aus.
Reinigung: Gerät vor dem Reinigen immer von der Stromversorgung trennen. Reinigen Sie das Gerät
mit einem weichen, leicht mit Seifenwasser getränktem Tuch. Keine Reinigungs- oder
Scheuermittel verwenden.
Sicherheitshinweise
Das Gerät erfüllt die europäischen Sicherheitsvorschriften. Dennoch sollten Sie die nachstehenden
Hinweise beachten, um eine maximale Betriebsdauer zu gewährleisten und sich zu schützen.
Bitte lesen Sie vor der Inbetriebnahme die nachstehenden Hinweise.
Überprüfen Sie, ob alle Stromanschlüsse (Steckdosen, Verlängerungskabel und die Signalkabel
zwischen Geräten) entsprechend Herstellervorgaben vorgenommen wurden.
Wenden Sie sich im Zweifelsfall an Ihren Fachhändler oder einen Elektriker.
Sollte ein Gerät nicht ordnungsgemäß funktionieren oder beschädigt sein, schalten Sie das Gerät aus,
trennen es von der Stromversorgung und wenden sich an Ihren Fachhändler.
Entfernen Sie auf keinen Fall die Gehäuseabdeckungen, da im Inneren der Geräte gefährliche
Spannungen anliegen können.
Lassen Sie eingeschaltete Geräte nicht unbeaufsichtigt, wenn diese Geräte nicht im Standby-Modus
betrieben werden können oder wenn der Hersteller nicht ausdrücklich darauf hingewiesen hat, dass
ein unbeaufsichtigter Betrieb zulässig ist. Schalten Sie das Gerät immer mit dem Betriebsschalter aus.
Für gebrechliche oder behinderte Menschen sind eventuell besondere Vorsichtsmaßnahmen
erforderlich.
Das Hören mit Kopfhörern bzw. Ohrhörern bei hoher Lautstärke und über einen längeren Zeitraum
kann zu Hörschäden führen und sollte vermieden werden.
Die Lüftungsöffnungen des Geräts dürfen nicht zugedeckt werden (z.B. mit Gardinen oder Textilien),
da sich bei zu starker Erwärmung des Geräts die Lebensdauer verkürzt oder das Gerät beschädigt
werden kann.
Elektrische Geräte dürfen nicht Regen oder Feuchtigkeit ausgesetzt werden.
Wichtig:
- Niemals Gegenstände in das Gerät stecken – Gefahr von Stromschlägen! Weisen Sie Ihre Kinder
auf diese Gefahr hin.
- Niemals mit elektrischen Geräte experimentieren!
- Achten Sie immer auf Ihre Sicherheit.
WARNUNG: DAS GERÄT DARF WEDER REGEN NOCH FEUCHTIGKEIT AUSGESETZT WERDEN, DA
SONST DIE GEFAHR VON STROMSCHLÄGEN ODER BRANDBILDUNG BESTEHT. IM
GERÄT TRETEN GEFÄHRLICH HOHE SPANNUNGEN AUF. VERSUCHEN SIE NICHT,
DAS GERÄT AUSEINANDER ZU NEHMEN. REPARATURARBEITEN DÜRFEN NUR VON
FACHPERSONAL AUSGEFÜHRT WERDEN.
DE – 1
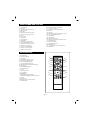
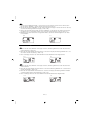
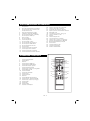
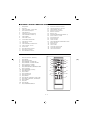
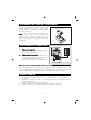
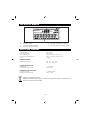
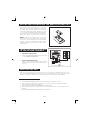
FUNKTIONEN UND TASTEN
1. Lautsprecher
2. CD-Fach
3. CD-Fach öffnen/schliessen
4. Batteriefach
5. Standby
6. Betriebs-/Standby-Anzeige
7. Voreinstellungen/Ordner +
8. Timer
9. Suche/ESP
10. Equalizer
11. Stereo/Mono
12. Bandwahl
13. Voreinstellungen/Ordner 14. CD: Wiedergabe/Pause
15. Kopfhöreranschlussbuchse
16. Kassette: Aufnahme
17. Kassette: Wiedergabe
18. Kassette: Rückspulen
19. Kassette: Vorspulen
20. Kassette: Stopp/Auswerfen
21. Kassette: Pause
22. Kassette: Tastenabdeckung
23. Sensor
24. Display
25. Überspringen/Suche/Sendersuche +
26. Titel-/Programmspeicher
27. Lautstärke
28. CD: Stopp
29. Kassettenrekorder
30. Überspringen/Suche/Sendersuche 31. Kassettenfach
32. Betriebsschalter
33. UKW(FM)-Antenne
34. MW-Antenne
35. Lautsprecheranschlussklemmen
36. Netzkabel
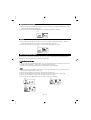
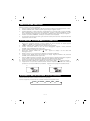
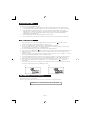
Fernbedienung
1. Ein/Standby
2. Stummschaltung
3. Lautstärke 4. Voreinstellungen/Ordner +
5. Voreinstellungen/Ordner 6. CD: Wiedergabe/Pause
7. Titel-/Programmspeicher
8. Überspringen/Suche/Sendersuche 9. CD: Stopp
10. Zufallsfwiedergabe
11. Wiederholung
12. Intro
13. Funktionswahl
14. Lautstärke +
15. Bandwahl
16. Mono/Stereo/Suche/ESP
17. Überspringen/Suche/Sendersuche +
18. Timer
19. Equalizer
20. Zeitgesteuerte Abschaltung
21. Zifferntasten
1
3
5
6
2
4
13
14
15
16
7
17
8
10
11
9
19
18
20
12
21
DE - 2
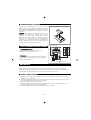
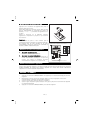
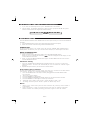
BATTERIEN EINSETZEN
Öffnen Sie das Batteriefach und setzen Sie zwei
Batterien des Typs AAA (UM4 bzw. R03) ein. Achten Sie
dabei auf die richtige Polarität. Setzen Sie anschließend
die Abdeckung des Batteriefachs wieder ein (sie muss
einrasten).
HINWEIS: Bei längerem Nichtgebrauch müssen die
Batterien herausgenommen werden, da sie sonst
auslaufen und das Gerät beschädigen können.
Verwenden Sie keine Akkus und setzen Sie nie zwei
Batterien mit unterschiedlichem Herstellungsdatum
gleichzeitig ein. Sobald die Batterien erschöpft sind,
reagiert das Gerät nicht mehr auf die Fernbedienung
und Sie müssen die Batterien austauschen.
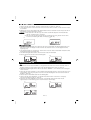
LAUTSPRECHER ANSCHLIESSEN
**Batterien werden nicht mitgeliefert**
Betriebsschalter
1. Lautsprecheranschluss
Schliessen Sie die Lautsprecherkabel an die
Lautsprecheranschlussklemmen an.
L
R
2. Netzkabel
Vor dem Einschalten des Geräts muss das Netzkabel
mit einer Steckdose verbunden werden. Schalten Sie
das Gerät anschließend ein.
Netzkabel
BEDIENUNG
Wenn Sie das Gerät zum ersten Mal an eine Steckdose anschließen, schaltet die Minianlage
automatisch in den Standby-Modus. Mit dem Betriebsschalter schalten Sie das Gerät ein bzw. aus.
Um das Gerät vollständig abzuschalten, müssen Sie den Netzstecker ziehen.
BETRIEBSSCHALTER
1. Schalten Sie das Gerät mit dem Betriebsschalter ein (er ist sowohl am Gerät als auch auf der
Fernbedienung vorhanden).
2. Wählen Sie mit der Taste FUNCTION eine Eingangsquelle aus (CD, Kassette, Aux, Tuner). Die
aktuelle Eingangsquelle wird im Display angezeigt.
3. Stellen Sie die gewünschte Lautstärke ein.
4. Wählen Sie mit der Taste EQ das gewünschte Klangbild aus (Klassik, Rock, Pop, Jazz). In der
Einstellung PASS ist der Equalizer ausgeschaltet.
5. Mit dem Betriebsschalter können Sie das Gerät wieder ausschalten.
DE - 3
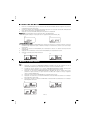
UHRZEIT EINSTELLEN
Die Uhrzeit wird im Standby-Modus eingestellt.
1. Halten Sie die Taste MEMORY / C-ADJ gedrückt, bis die Uhrzeit im Display blinkt.
2. Drücken Sie die Taste TUNING, bis das Gerät auf das 24-Stunden-Zeitformat eingestellt ist.
3. Drücken Sie die Taste MEMORY / C-ADJ. Daraufhin blinkt die Stundenanzeige und Sie können mit
der Taste TUNING die Stunde einstellen. Drücken Sie erneut die Taste MEMORY/ C-ADJ.
Daraufhin blinkt die Minutenanzeige und Sie können mit der Taste TUNING die Minuten einstellen.
4. Drücken Sie die Taste MEMORY/C-ADJ, um die Zeiteinstellung zu bestätigen.
5. Wenn Sie innerhalb von zehn Sekunden keine Eingabe vornehmen, wird die Einstellung wieder
zurückgesetzt.
TIMER EINSTELLEN
1. Halten Sie die Taste TIMER einige Sekunden gedrückt. Daraufhin erscheint im Display die
Meldung
ON und die Zeitanzeige blinkt (s. Abb. F1).
2. Passen Sie die Stundenanzeige mit der Taste TUNING an.
3. Drücken Sie erneut die Taste TIMER. Daraufhin blinkt die Minutenanzeige, die Sie ebenfalls mit der
Taste TUNING anpassen.
4. Bestätigen Sie die Startzeit des Timers mit der Taste TIMER.
5. Im Display erscheint die Meldung
OFF und die Stundenanzeige blinkt (s. Abb. F2).
6. Wiederholen Sie die Schritte 2 und 3 und drücken Sie anschließend die Taste TIMER, um die
Ausschaltzeit des Timers zu bestätigen.
7. Jetzt blinkt im Display entweder die Meldung TUNER oder die Meldung CD (d.h. der Timer schaltet
entweder das Radio oder den CD-Player ein). Wählen Sie die gewünschte Einstellungen mit der
Taste TUNING aus.
8. Drücken Sie die Taste TIMER. Daraufhin blinkt im Display die Meldung VOL (das ist die Lautstärke,
mit der der Timer entweder das Radio oder die CD startet). Stellen Sie die gewünschte Lautstärke
mit der Taste TUNING ein.
9. Wenn Sie innerhalb von zehn Sekunden keine Eingabe vornehmen, werden die Einstellungen
wieder zurückgesetzt.
10. Nachdem Sie den Timer eingestellt haben, drücken Sie erneut die Taste TIMER. Daraufhin
erscheint die Meldung
im Display.
11. Das Gerät schaltet sich nun automatisch ein, sobald die Startzeit des Timers erreicht wird. Nach
Erreichen der Abschaltzeit wird das Gerät wieder ausgeschaltet.
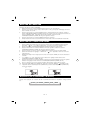
F1
F2
EQUALIZER
Mit der Taste EQ wählen Sie das gewünschte Klangbild aus. Sie können zwischen den folgenden
Einstellungen wählen:
PA SS
CLASSIC
ROCK
DE - 4
POP
JAZZ
SLEEP (AUTOMATISCHES AUSSCHALTEN)
1. Wenn Sie die Taste SLEEP betätigen, wird das Gerät nach einer bestimmten Zeit automatisch
abgeschaltet.
2. Sie können festlegen, wann die automatische Abschaltung erfolgt (Einstellbereich: 10 bis 90
Minuten).
RADIO
Schalten Sie das Gerät mit der Taste FUNCTION in die Betriebsart TUNER.
1. Drücken Sie die Taste BAND. Daraufhin wird das aktuelle Frequenzband angezeigt.
2. Mit der Taste BAND können Sie zu einem anderen Frequenzband umschalten.
FREQUENZBAND
Mit der Taste TUNING können Sie die Empfangsfrequenz einstellen. Halten Sie die Taste solange
gedrückt, bis der Empfang optimal ist.
MONO/ STEREO
Der Stereoempfang ist nur im UKW-Modus möglich.
1. Mit der Taste MONO/STEREO schalten Sie zwischen Mono- und Stereoempfang um. Bei Empfang
eines UKW-Senders erscheint das Symbol
im Display.
2. Wenn Sie die Taste MONO/STEREO erneut drücken, schaltet das Gerät in die Betriebsart „Mono“.
AUTOMATISCHE SENDERWAHL
1. Halten Sie die Taste TUNING mindestens eine Sekunde gedrückt. Das Gerät sucht nun
automatisch das Frequenzband ab und stellt sich auf den jeweils nächsten Sender ein, sofern
das Sendersignal ausreichend stark ist.
2. Wiederholen Sie den Vorgang, um zu einem anderen Sender zu wechseln.
SENDER SPEICHERN
Sie können bis zu 10 MW- und 10 UKW-Sender speichern. Gehen Sie dazu folgendermaßen vor:
1. Wählen Sie mit der Taste BAND das gewünschte Empfangsband aus (AM/MW oder FM/UKW).
2. Stellen Sie den gewünschten Sender ein.
3. Drücken Sie die Taste MEMORY / C-ADJ.
4. Legen Sie mit den Tasten PRESET +/- den gewünschten Speicherplatz fest.
5. Bestätigen Sie die Einstellung mit der Taste MEMORY / C-ADJ.
6. Wiederholen Sie die Schritte 2 bis 5, wenn Sie weitere Sender speichern möchten.
7. Sie können einen gespeicherten Sender jederzeit durch einen neuen Sender überschreiben.
Hinweise:
1. Wenn Sie einen Sender auf einem bereits vergebenen Senderplatz speichern, wird die alte
Einstellung gelöscht und der neue Sender auf dem alten Senderplatz gespeichert.
2. Bei Stromausfall oder Ziehen des Netzsteckers werden alle Senderplätze gelöscht und Sie müssen
die Einstellungen wiederholen.
DE - 5
VOREINGESTELLTE SENDER AUSWÄHLEN
1. Wählen Sie mit dem Bandwahlschalter das gewünschte Frequenzband aus (AM/MW oder
FM/UKW).
2. Wählen Sie mit den Tasten PRESET +/- den gewünschten Senderplatz aus.
3. Der Senderplatz wird zusammen mit der Senderfrequenz im Display angezeigt.
UKW-Antenne
Sie können eine UKW-Antenne an das Gerät anschließen, um den UKW-Empfang zu verbessern.
KASSETTENREKORDER
WIEDERGABE
Öffnen Sie die Abdeckung des Kassettenteils. Achten Sie darauf, dass das Band keine Schlaufen
bildet. Ziehen Sie das Band ggf. mit einem Kugelschreiber, Bleistift o.ä. fest, indem Sie den Stift in
eine der Öffnungen stecken und in die richtige Richtung drehen. Öffnen Sie das Kassettenfach mit
der Taste STOP / EJECT.
Legen Sie die Kassette ein und schließen Sie das Kassettenfach. Die offene Seite der Kassette muss
nach unten zeigen und die volle Bandrolle muss sich auf der linken Seite befinden. Berühren Sie
nicht das Band. Wählen Sie mit der Taste FUNCTION die Einstellung TAPE aus und drücken Sie die
Taste PLAY. Um die Wiedergabe zu beenden, drücken Sie die Taste STOP / EJECT. Drücken Sie
erneut die Taste STOP / EJECT, um das Kassettenfach zu öffnen.
AUFNAHME VOM INTERNEN RADIO
Wählen Sie mit der Taste FUNCTION die Betriebsart TUNER aus und stellen Sie mit der Taste BAND
das gewünschte Frequenzband ein (MW oder UKW). Stellen Sie anschließend den gewünschten
Sender ein (s. Abschnitt „Radio“). Legen Sie eine unbespielte Kassette ein, und drücken Sie die
Taste RECORD, um die Aufnahme zu starten.
Mit der Taste STOP / EJECT beenden Sie die Aufnahme. Mit der Taste PAUSE können Sie die
Aufnahme anhalten, um sie später wieder fortzusetzen. Drücken Sie die Taste F.FWD, um
vorzuspulen bzw. die Taste REWIND, um zurückzuspulen.
AUFNAHME VON CD
Wählen Sie mit der Taste FUNCTION die Betriebsart CD aus. Wählen Sie die CD-Tracks aus, die Sie
aufnehmen möchten. Legen Sie eine unbespielte Kassette ein und drücken Sie die Taste RECORD,
um die Aufnahme zu starten.
Mit der Taste STOP / EJECT beenden Sie die Aufnahme.
Auto-Stopp
Sobald das Bandende erreicht wird, hält die Aufnahme bzw. Wiedergabe automatisch an und die
Tasten PLAY und RECORD werden freigegeben. Die Wiedergabe der CD bzw. des Radios wird
dabei jedoch fortgesetzt.
Kassettenformate
Verwenden Sie für Aufnahmen ausschließlich Kassetten des Typs 1 (Ferrit). Das Gerät kann auch
andere Kassetten abspielen, erzielt dabei aber keine optimale Aufnahmequalität. Kassetten des Typs
C120 sollten nicht verwendet werden.
DE – 6
Überspielschutz
Wenn Sie eine bereits bespielte Kassette erneut bespielen, wird die alte Aufnahme gelöscht. Sie
können bespielte Kassetten jedoch gegen versehentliches Überspielen schützen, indem Sie die
Plättchen an der Oberseite der Kassette herausbrechen.
Bei vorbespielten Kaufkassetten fehlen diese Plättchen grundsätzlich, sodass die Aufnahmen
geschützt sind. Bei solchen Kassetten ist es nicht möglich, die Taste RECORD zu betätigen.
Versuchen Sie nicht, diese Taste mit Gewalt zu drücken, da sonst das Gerät beschädigt werden
kann. Überprüfen Sie stattdessen, ob Sie wirklich eine Kassette eingelegt haben und ob die
Plättchen eventuell bereits entfernt wurden. Wenn Sie eine geschützte Kassette löschen bzw. mit
einer neuen Aufnahme überspielen wollen, kleben Sie einfach Klebeband über die Öffnungen, in
denen sich normalerweise die Plättchen befinden würden.
Pflege des Kassettenteils
Nach jeweils zehn Betriebsstunden sollten Kombikopf, Laufrolle und Andruckrolle vorsichtig gereinigt
werden. Entsprechende Reinigungsmittel sind im Fachhandel erhältlich.
Laufrolle
Andruckrolle
Kombikopf
Löschkopf
Löschkopf, Kombikopf und Andruckrolle sind hochempfindlich. Sie dürfen nicht mit Metallteilen wie
Schraubenzieher o.ä. in Berührung kommen. Die Reinigung wird erleichtert, wenn Sie die Taste
PLAY drücken, da Sie dann den Kombikopf und die Andruckrolle sehen können. Vergessen Sie nicht,
nach der Reinigung die Taste STOP zu drücken.
Wenn Sie vergessen, die Taste STOP zu drücken und das Gerät ausschalten, kann die Andruckrolle
beschädigt werden. Das Gerät ist selbstschmierend und darf nicht geölt oder geschmiert werden.
WARNUNG
Ziehen Sie bei längerem Nichtgebrauch den Netzstecker. Setzen Sie das Gerät weder Regen noch
Feuchtigkeit aus.
DE - 7
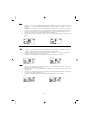
CD-WIEDERGABE
1. Drücken Sie die Taste OPEN / CLOSE, um das CD-Fach zu öffnen (s. Abb. F3).
2. Legen Sie eine CD ein und drücken Sie erneut die Taste OPEN / CLOSE, um das CD-Fach wieder
zu schließen.
3. Wählen Sie mit der Taste FUNCTION die Betriebsart CD aus. Daraufhin liest der Player die CD ein.
MP3-Dateien werden automatisch erkannt.
HINWEIS: (1) Das Gerät kann CDs des Typs CD, CD-R und CD-RW abspielen. Die Dateiformate
CD-DA und MP3 werden unterstützt.
(2) Falls keine CD eingelegt wurde oder die eingelegte CD nicht gelesen werden kann,
erscheint die Meldung NO DISC im Display (s. Abb. F4).
F4
F3
CD komplett abspielen
1. Starten Sie die Wiedergabe durch Drücken der Taste PLAY/PAUSE. Die Wiedergabe beginnt mit
dem ersten Track. Im Display wird die Nummer des aktuellen Tracks und die abgelaufene Zeit
angezeigt (F5).
2. Um die Wiedergabe zu unterbrechen, drücken Sie erneut die Taste PLAY/PAUSE. Daraufhin blinkt
die abgelaufene Zeit im Display (F6).
3. Um die Wiedergabe fortzusetzen, drücken Sie die Taste PLAY/PAUSE.
4. Mit der Taste STOP beenden Sie die Wiedergabe.
F5
F6
Track auswählen
- CD
1. Wählen Sie mit den Tasten TUNING +/- den gewünschten Track aus. Die Tracknummer wird im
Display angezeigt und der Player beginnt mit der Wiedergabe des Tracks (s. Abb. F7).
2. Während der Wiedergabe können Sie mit den Tasten TUNING +/- zum nächsten bzw. vorherigen
Track wechseln.
3. Wenn Sie die Tasten TUNING +/- bei angehaltener Wiedergabe drücken, wechselt der Player zum
ausgewählten Track, beginnt jedoch noch nicht mit der Wiedergabe. Die Tracknummer blinkt im
Display (s. Abb. F8).
4. Mit der Taste PLAY/PAUSE starten Sie die Wiedergabe.
5. Drücken Sie die Taste FIND/ESP, um die ESP-Antischockfunktion zu aktivieren. Im Display
erscheint die Meldung „ESP“ (s. Abb. F9).
6. Wenn Sie die Taste FIND/ESP erneut drücken, wird die ESP-Antischockfunktion wieder
abgeschaltet und die Meldung „ESP“ verschwindet aus dem Display.
F7
F8
F9
DE - 8
- MP3
1. Mit den Tasten PRESET/FOLDER +/- können Sie zu einem anderen Ordner auf der CD wechseln.
Mit den Tasten TUNING +/- wählen Sie den gewünschten Track aus.
2. Drücken Sie die Taste FIND/ESP, um den Titel im Display anzuzeigen. Falls die CD keinen Titel hat,
erscheint die Meldung NONE im Display (s. Abb. F10).
3. Drücken Sie zweimal hintereinander die Taste FIND/ESP, um den Namen des Albums anzuzeigen.
Der Name kann nur angezeigt werden, wenn er auf der CD gespeichert wurde (s. Abb. F11).
4. Sobald Sie den gewünschten Track ausgewählt haben, starten Sie die Wiedergabe mit der Taste
PLAY/PAUSE.
F10
F11
Wiederholung
- CD
1. Drücken Sie die Taste REPEAT. Im Display erscheint die Meldung REPEAT und der aktuelle Track
wird wiederholt (s. Abb. F12).
2. Wenn Sie die Taste REPEAT zweimal drücken, erscheint im Display die Meldung REPEAT ALL und
alle Tracks werden wiederholt (s. Abb. F13).
3. Durch dreimaliges Drücken der Taste REPEAT wird die Wiederholfunktion abgeschaltet.
F13
F12
- MP3
1. Drücken Sie die Taste REPEAT. Im Display erscheint die Meldung REPEAT und der aktuelle Track
wird wiederholt.
2. Wenn Sie die Taste REPEAT zweimal drücken, erscheint die Meldung REPEAT ALL und alle Tracks
werden wiederholt (s. Abb. F14).
3. Wenn Sie die Taste REPEAT dreimal drücken, erscheint im Display die Meldung REPEAT ALBUM
und das gesamte Album wird wiederholt (s. Abb. F15).
4. Durch viermaliges Drücken der Taste REPEAT wird die Wiederholfunktion abgeschaltet.
F14
F15
DE - 9
Zufallswiedergabe
1. Drücken Sie die Taste RANDOM. Daraufhin erscheint im Display die Meldung RANDOM (s. Abb.
F16) und die Zufallswiedergabe beginnt.
2. Drücken Sie erneut die Taste RANDOM, um die Zufallswiedergabe zu beenden.
F16
Intro
1. Drücken Sie die Taste INTRO. Daraufhin erscheint im Display die Meldung INTRO (s. Abb. F17)
und der Player spielt die jeweils ersten zehn Sekunden aller Tracks ab.
2. Drücken Sie zweimal die Taste INTRO, um die normale Wiedergabe zu starten.
F17
PROGRAMMIERUNG
Sie können bis zu 64 Tracks auswählen, die in der von Ihnen festgelegten Reihenfolge abgespielt
werden. Die Trackprogrammierung erfolgt im Stoppmodus.
1. Trackreihenfolge festlegen
- CD
1. Drücken Sie die Taste MEMORY/C-ADJ, um in den Programmmodus zu wechseln (s. Abb. F18).
2. Mit den Tasten TUNING +/- wählen Sie den gewünschten Track aus.
3. Drücken Sie die Taste MEMORY/C-ADJ, um die Einstellung zu bestätigen.
- MP3
1. Drücken Sie die Taste MEMORY/C-ADJ, um in den Programmmodus zu wechseln. Die Nummer
des aktuellen Albums blinkt (s. Abb. F19).
2. Mit den Tasten TUNING +/- wählen Sie das gewünschte Album aus.
3. Drücken Sie die MEMORY/C-ADJ Taste. Daraufhin blinkt die Tracknummer (s. Abb. F20).
4. Mit den Tasten TUNING +/- wählen Sie den gewünschten Track aus.
5. Drücken Sie die Taste MEMORY/C-ADJ, um die Einstellung zu bestätigen.
F18
F19
F20
DE - 10
2. Programmierte Wiedergabe
Nachdem Sie die Programmierung abgeschlossen haben, drücken Sie die Taste PLAY/PAUSE, um
die programmierte Wiedergabe zu starten.
3. Programmierte Wiedergabe abbrechen
1. Drücken Sie die Taste STOP.
2. Öffnen Sie das CD-Fach.
3. Drücken Sie erneut die Taste STOP.
STUMMSCHALTUNG
1. Mit der Taste MUTE schalten Sie den Ton aus. Im Display wird die aktuelle Lautstärke angezeigt (s.
Abb. F21).
2. Wenn Sie die Taste MUTE erneut betätigen, wird der Ton wieder mit der angezeigten Lautstärke
eingeschaltet.
F21
KOPFHÖRER
Das Gerät verfügt über einen Kopfhöreranschluss. Schließen Sie den Kopfhörer (nicht im
Lieferumfang enthalten) an den 3,5-mm-Anschluss mit der Beschriftung PHONES an der Vorderseite
der Minianlage an. Sobald Sie einen Kopfhörer anschließen, werden die Lautsprecher abgeschaltet.
BATTERIEN
Das Gerät benötigt drei 1,5-V-Batterien des Typs AA (UM-3), um die Einstellungen auch bei
Stromausfall oder Ziehen des Netzsteckers speichern zu können.
DE - 11
UMGANG MIT CDs
1. Verwenden Sie stets Compact Discs mit diesem Zeichen:
2. Hinweise zum Umgang mit CDs.
* Berühren Sie nicht die verspiegelte Wiedergabeseite.
* Kleben Sie keine Etiketten auf CDs und beschreiben Sie die Wiedergabeseite nicht.
* Verbiegen Sie die CDs nicht.
3. Aufbewahrung
* Bewahren Sie CDs in der Hülle auf.
* Setzen Sie CDs nicht direktem Sonnenlicht, hohen Temperaturen, hoher Luftfeuchtigkeit oder Staub
aus.
4. Reinigen einer CD.
* Falls die CD verschmutzt ist, wischen Sie Staub, Schmutz oder Fingerabdrücke mit einem weichen
Tuch ab.
* Die CD sollte von innen nach außen gereinigt werden.
Von innen nach außen
Richtig
Falsch
* Verwenden Sie keine benzinhaltigen Reinigungsmittel, Verdünner, Schallplattenreiniger oder
Antistatik-Sprays.
* Schließen Sie das CD-Fach, damit die Linse nicht durch Staub verschmutzt wird.
* Berühren Sie nicht die Linse des Lasersystems.
DE - 12
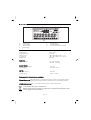
DISPLAY
B
A
C
ALBUM SLEEP
MEMORY
REPEAT ALL ALBUM
D
RANDOM
ESP
INTRO
E
kHz
MHz
VOL
F
G
A.
B.
C.
D.
Suchanzeige
Timer-Anzeige
Albumnummer
ESP-Anzeige
E.
F.
G.
Stereoanzeige
Lautstärkeanzeige
Track-/Nummern-/Zeit-Anzeige
TECHNISCHE DATEN
Netzanschluss:
Ausgangsleistung:
Abmessungen:
Lautsprecher:
Nettogewicht:
230 V~ 50 Hz
2 x 4,5 W
160 x 230 x 260 mm (B x L x H)
145 x 186 x 259.5 mm (L x B x H)
6.25 Kg
RADIOTEIL
Frequenzbereich:
FM : 87,5 -108 MHz
MW: 522 - 1620 KHz
KASSETTENTEIL
Bandlaufgeschwindigkeit:
Frequenzgang:
4,75 cm/s
125 Hz bis 8 KHz
CD-TEIL
Optisches System:
Frequenzgang:
Dreistrahl
100 Hz - 16 kHz
Änderungen ohne Vorankündigung vorbehalten.
Flüssigkeitswarnung: Das Gerät darf nicht in Flüssigkeiten getaucht oder mit Flüssigkeiten benetzt
werden. Keine mit Flüssigkeit gefüllte Gegenstände (z.B. Blumenvasen) auf dem Gerät abstellen.
Luftzirkulationswarnung: Die Luftzirkulation des Geräts darf nicht behindert werden.
Leisten Sie Ihren Beitrag zum Umweltschutz !
Befolgen Sie die örtlichen Vorschriften und geben Sie Ihr ausgedientes Elektrogerät an einer
hierfür vorgesehenen Sammelstelle ab.
DE - 13
Pour profiter au mieux de la performance de cet appareil, vous familiariser à ses caractéristiques et
vous assurer des années d’écoute et de fonctionnement fidèle et sans panne, veillez lire
attentivement ce manuel avant la mise en service de l’appareil.
Remarques importantes
x
x
x
x
x
Conservez les instructions de sécurité et de fonctionnement pour pouvoir vous y reporter
ultérieurement.
Évitez d’installer l’appareil à des endroits ou il serait exposée à la lumière directe du soleil ou à
proximité d’appareils de chauffage, tels que radiateurs électriques, au-dessus d’autres
équipements stéréo qui émettent une chaleur trop intense, dans des endroits poussiéreux, peu
aérés, humides ou soumis à des vibrations constantes.
Veillez à ne pas obstruer les orifices de ventilation. Faites fonctionner les commandes et
interrupteurs comme le décrit le manuel.
Avant d’alimenter pour la première fois l’appareil, vérifiez que le cordon d’alimentation est
correctement installé.
Conservez vos cassettes et CD en des endroits frais pour éviter que la chaleur ne les
endommage.
Pour des raisons de sécurité, ne retirez aucun couvercle et n’essayez pas d’atteindre les éléments
internes de l’appareil. Confiez tout travail d’entretien à un personnel qualifié.
N’essayez pas de retirer les vis ni d’ouvrir le coffret de l’appareil. Aucune pièce interne ne peut être
réparée par l’utilisateur. Confiez tout travail d’entretien à un personnel qualifié.
ATTENTION
Risque de choc
électrique ne pas ouvrir
ATTENTION : Pour réduire le risque de choc électrique, ne pas enlever le couvercle (ou le fond) de
L’appareil. Aucune pièce interne n’est utile à l’utilisateur. Confier tout travail d’entretien
à un personnel qualifié.
TENSION DANGEREUSE
Indique la présence, dans le coffret de cet appareil, d’une tension conductrice
dangereuse pouvant être d’une magnitude suffisante pour constituer un risque de choc
électrique aux personnes
IMPORTANT
LE MANUEL DE L’UTILISATEUR CONTIENT D’IMPORTANTES INSTRUCTIONS DE SECURITE CONCERNANT
LE FONCTIONNEMENT ET L’ENTRETIENT DE L’APPAREIL. IL CONVIENT DE SE REFERER A CE MANUEL
AVERTISSEMENT : POUR
EVITER TOUT RISQUE D’INCENDIE OU DE CHOC ELECTRIQUE, NE PAS EXPOSER CET
APPAREIL A LA PLUIE OU A L’HUMIDITE
REMARQUE :
CET APPAREIL PEUT DEVENIR CHAUD EN CAS D’UTILISATION PROLONGEE. CE PHENOMENE EST NORMAL ET
N’INDIQUE NULLEMENT UNE DEFECTUOSITE DE L’UNITE.
LE LECTEUR CD COMPREND DES MICROPROCESSEURS POUVANT CONNAITRE UN DYSFONCTIONNEMENT EN CAS DE
BRUIT OU D’INTERFERENCE ELECTRIQUE EXTERNE. SI LE LECTEUR CD NE FONCTIONNE PAS CORRECTEMENT,
DEBRANCHEZ LA SOURCE D’ALIMENTATION ET REBRANCHEZ-LA
FR - 1
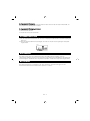
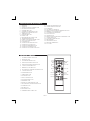
CARACTERISTIQUES ET REGLAGES
1.
2.
3.
4.
5.
6.
7.
8.
9.
10.
11.
12.
13.
14.
15.
16.
17.
18.
19.
Haut-parleur
Porte du compartiment à cassettes
Touche d’ouverture / fermeture du
compartiment à CD
Porte du compartiment à pile
Indicateur de Pause (Standby)
Touche d’alimentation / Standby
Touche preset/ folder up
Touche Timer
Touche Find/Esp
Touche Equaliseur
Touche stéréo / mono
Touche bande de fréquence
Touche preset/ folder down
Touche Play/Pause du CD
Prise casque
Touche record de la cassette
Touche play de la cassette
Touche rewind de la cassette
Touche fast forward de la cassette
20.
21.
22.
23.
24.
25.
26.
27.
28.
29.
30.
31.
32.
33.
34.
35.
36.
Touche stop /eject de la cassette
Touche pause de la cassette
Protection des touches cassette
Capteur pour la commande à distance
Affichage LCD
Touche skip / search / tuning up
Touche mémoire /C-AD
Volume
Touche Stop du CD
Touche de lecteur cassette
Touche skip / search / tuning down
Porte du compartiment à cassettes
Bouton d’alimentation principal
Antenne FM
Terminal antenne AM
Terminal haut-parleur
Cordon d’alimentation
COMMANDE A DISTANCE
1
1.
Touche d’alimentation
2.
Touche Mute
3.
Volume –
4.
Touche preset /folder up
5.
Touche preset /folder down
6.
Touche de lecture / pause
7.
Touche mémoire /C-AD
8.
Touche skip / search / tuning down
9.
Touche Stop du CD
10. Touche random
11. Touche de répétition
12. Touche intro
13. Touche fonction
14. Volume +
15. Touche Bande de fréquence
16. Touche mono / stéréo/ find/ ESP
17. Touche skip / search / tuning up
18. Touche timer
19. Touche Eq
20. Touche sleep
21. Touches numériques
3
5
6
2
4
13
14
15
16
7
17
8
10
11
9
19
18
20
12
21
FR - 2
MISE EN PLACE DES PILES
**PILES NON FOURNIES**
Appuyez sur le couvercle du logement des piles et
faites-le glisser pour l’ouvrir.
Placez deux piles (non fournies) de type UM3, AA, R6
dans la télécommande en respectant les signes de
polarité (« + » et « - « ) à l’intérieur du logement et sur
les piles.
Placez le couvercle sur le logement, appuyez
légèrement et repoussez le jusqu’à ce qu’il se ferme
d’un bruit sec.
Remarque
Veillez à ôter les piles si vous n’utilisez pas la
commande à distance pendant une période prolongée.
Ne mélanger pas les piles normales et les piles
rechargeables. Lorsque le signal de la commande à
distance s’affaiblit, remplacez les piles.
INTERRUPTEUR D'ALIMENTAITION ELECTRIQUE
L
Connexion des haut-parleurs
R
1.
Connexion des haut-parleurs
Etendez les câbles et connectez-les.
2.
Connexion du cordon d’alimentation
Avant de vous servir de l'appareil, branchez le
cordon d'alimentation électrique à une prise de
courant, puis mettez le contacteur principal
d'alimentation de l'appareil sur la position ON.
CORDON D'ALIMENTATION ELECTRIQUE
Faire fonctionner l’appareil
Lorsque vous branchez l’appareil, il se mettra en mode de veille. Vous pouvez appuyer sur la touche
POWER /STANDBY de l’appareil pour allumer l’appareil ou le mettre hors tension. Débranchez
l’appareil si vous voulez l’éteindre complètement.
POWER / STANDBY
1.
2.
3.
4.
5.
Appuyer sur le bouton POWER/STANDBY de l’appareil (ou sur la télécommande) pour allumer
l’appareil.
Sélectionner la source de son (CD, Cassette, AUX ou Tuner) en appuyant sur la touche
correspondante. L’affichage correspondant s’allumera.
Ajuster le volume avec la touche volume ( up & down )
Ajuster le type d’équaliseur (pass,classique, rock ,pop ou jazz) avec la touche EQ de l’appareil
ou de la télécommande.
Appuyer sur le bouton POWER/STANDBY pour éteindre l’appareil.
FR - 3
REGLAGE DE L’HORLOGE
L’appareil doit être en position STANDBY
1.
Maintenez enfoncer la touche MEMO/C-ADJ jusqu’à ce que 12H s’affiche.
2.
Appuyez sur la touche Tuning / Skip / search ( Rev. ou FF. ) pour ajuster l’affichage de l’heure
sous le format 12h ou 24h.
3.
Appuyez à nouveau sur la touche MEMO/C-ADJ , l’affichage des heures clignote, utilisez la
touche TUNING/SKIP/SEARCH (DOWN OU UP) pour régler les heures. Appuyez à nouveau sur
la touche MEMO/C-ADJ , l’affichage des minutes clignote, utilisez la touche
TUNING/SKIP/SEARCH (DOWN OU UP) pour régler les minutes.
4.
Appuyez à nouveau sur la touche MEMO/C-ADJ pour confirmer.
5.
Chaque état décrit ci-dessus est annulé dans les 10 secondes si aucune modification n’a été faite.
REGLAGE DE LA FONCTION REVEIL
1.
2.
3.
4.
5.
6.
7.
8.
9.
Après réglage de l’horloge, appuyez et tenez enfoncer la touche TIMER pendant quelques
secondes, « ON » et « 0 :00 » apparaissent à l’écran et les heures clignotent. ( F1)
Utilisez les touches TUNING/SKIP/SEARCH (DOWN OU UP) pour régler l’heure.
Appuyez à nouveau sur la touche TIMER, les minutes clignotent, utilisez les touches
TUNING/SKIP/SEARCH (DOWN OU UP) pour régler les minutes.
Appuyez encore une fois sur la touche TIMER pour confirmer et lancer le mode TIMER.
Après avoir effectué les réglages, « TIMER ON » «
OFF » apparaît à l’écran et les heures
clignotent (F2)
Répétez les étapes 2 et 3 et appuyez à nouveau sur la touche TIMER pour activer /désactiver
ce mode.
Le « TUNER » ou « CD » clignote à l’écran, effectuez le réglage à l’aide de la touche
TUNING/SKIP/SEARCH (DOWN OU UP).
Appuyez à nouveau sur la touche TIMER, l’indicateur de volume apparaît à l’écran et clignote,
effectuez le réglage à l’aide de la touche TUNING/SKIP/SEARCH (DOWN OU UP).
Si vous n ‘appuyez sur aucune touche pendant 10 secondes, chaque état est annulé.
10.
Après avoir réglé TIMER ON et TIMER OFF, appuyez sur la touche TIMER et
11.
L’appareil s’allume automatiquement (TIMER ON ) et s’éteint automatiquement (TIMER OFF)
aux heures réglées.
F1
apparaît à l’écran.
F2
Equaliseur (sur la commande à distance)
Lorsque vous appuyez sur la touche EQ de la commande à distance, l’équaliseur change comme
suit :
PASS
CLASSIC
ROCK
FR - 4
POP
JAZZ
REGLAGE DE LA FONCTION SOMMEIL ( SLEEP )
1.
2.
Si vous voulez vous endormir en musique, enfoncez la touche SLEEP sur la télécommande.
Vous pouvez ajuster la radio ou le lecteur CD afin qu’il joue la musique durant 90, 80,70 … ou
10 minutes avant que l’appareil ne s’éteigne automatiquement.
NORMAL
UTILISATION DE LA RADIO
Appuyer sur la touche FUNCTION de l’appareil ou de la télécommande afin de sélectionner le mode
RADIO.
1.
Appuyer sur le bouton BAND, pour sélectionner la bande de fréquence qui apparaît à l’écran
2.
Sélectionnez la fréquence désirée avec le bouton BAND.
Sélection de la bande de fréquences.
Pour régler les stations faibles, utilisez le réglage manuel à l’aide des touches
TUNING/SKIP/SEARCH (DOWN OU UP) jusqu’à ce que vous atteigniez la fréquence voulue.
Sélection mono/Stéréo
Sélectionnez le mode FM,
1.
Si vous voulez sélectionner une station FM stéréo, appuyez sur la touche MONO/STEREO
Lorsque vous captez une station FM stéréo, l’indicateur «
» s’affiche à l’écran.
2.
Si vous appuyez à nouveau sur la touche MONO/STEREO, l’indicateur FM stéréo s’éteint et
l’appareil passe en mode MONO.
Recherche automatique des stations
1.
Appuyez sur la touche TUNING/SKIP/SEARCH (DOWN OU UP) pendant au moins une seconde,
puis relâchez la touche. L’appareil s’arrêtera automatiquement à la première station émettant un
signal assez puissant.
2.
Répétez la procédure ci-dessus pour sélectionner une autre station.
Mise en mémoire des stations
Vous pouvez également mettre en mémoire des stations de votre choix et enregistrer jusqu'à 10
stations AM et 10 FM. Pour enregistrer vos stations de radiodiffusion choisies :
1.
Appuyez sur le bouton BAND de l’appareil (ou la télécommande) pour basculer entre AM et
FM pour faire votre sélection.
2.
Recherchez la station désirée
3.
Appuyez sur la touche MEMORY / C-ADJ
4.
Appuyez sur la touche PRESET/FOLDER (UP ou DOWN) pour choisir le numéro de mise en
mémoire de la station.
5.
Appuyer à nouveau sur la touche MEMORY / C-ADJ pour confirmer votre sélection.
6.
Pour programmer plusieurs stations dans la mémoire, répétez les étapes 2 à 5.
7.
Pour changer une station préréglée, répétez les étapes 2 à 5.
Remarques :
1.
En enregistrant une nouvelle station, cela effacera la station précédemment enregistrée à cet
emplacement.
2.
Ma mise hors tension ou le disfonctionnement du cordon d’alimentation peut effacer la mémoire
de l’ensemble des stations préréglées.
Exécutez à nouveau les procédures d’enregistrement des stations.
FR - 5
Sélectionner les stations préréglées
1.
Appuyez sur la touche BAND afin de sélectionner la bande de fréquences.
2.
Appuyez sur la touche PRESET/FOLDER (UP ou DOWN) afin de sélectionner le numéro de la
station préréglée.
3.
L'emplacement numérique de cette station est affiché avec la fréquence correspondante.
Antenne FM
Câble d'antenne FM pour une meilleure réception FM.
FONCTIONNEMENT DU LECTEUR DE CASSETTE :
Lecture d’une cassette
Sur l’appareil, ouvrez le couvercle de protection des touches du lecteur cassettes.
Assurez-vous de que la bande de lecture est bien tendue avant d’utiliser la cassette. Sinon, utilisez
soit un crayon ou un stylo à bille, en l’insérant au centre de la bobine et en tournant le crayon ou le
stylo à bille jusqu’à ce que la bande de lecture se tende. Enfoncez le bouton CASS.STOP / EJECT
afin d’ouvrir le compartiment cassette.
Insérez la cassette dans le compartiment avec la face ouverte vers le bas et la bobine pleine vers la
gauche. Refermez ensuite le compartiment cassette. Assurez-vous de ne pas toucher la surface de
la bande.
Sélectionnez la fonction TAPE et appuyez sur le bouton PLAY. Pour arrêter la lecture, appuyez une
seule fois sur le bouton STOP/EJECT. Pour sortir la cassette, appuyez une fois de plus sur le bouton
CASS.STO/EJECT.
Enregistrement à partir de la radio
Sélectionnez la fonction RADIO et sélectionnez ensuite le mode FM ou AM ainsi qu’une station de
radio (référez-vous à la section fonctionnement de la radio). Insérez ensuite une cassette dans le
compartiment cassette et appuyez sur le bouton RECORD. Appuyez sur le bouton CASS.STOP /
EJECT pour arrêter l’enregistrement. Le bouton CASS. PAUSE peut être utilisé pour arrêter
l’enregistrement momentanément durant de courts intervalles.
Enregistrement à partir d’un CD
Sélectionnez la fonction CD. Sélectionnez ensuite la plage que vous voulez enregistrer. Insérez une
cassette dans le compartiment cassette et appuyez sur le bouton RECORD. . Appuyez sur le bouton
CASS.STOP / EJECT pour arrêter l’enregistrement.
Auto Stop
Lorsque la cassette arrive en fin de lecture ou d’enregistrement, la fonction Auto Stop fait que la
lecture ou l’enregistrement s’arrête et libère le bouton PLAY ou RECORD. Le système AUTO STOP
fonctionne aussi lors de l’enregistrement d’une cassette au moyen de la radio ou d’un CD. Seule la
cassette s’arrête automatiquement, la radio ou le cd continue à jouer.
Type de cassette :
Il est recommandé d’utiliser des cassettes de bonne qualité (IEC TYPE 1) pour faire des
enregistrements. Il est possible d’utiliser d’autres types de cassette mais sans garantir la qualité de
l’enregistrement. L’utilisation des cassettes de type C120 n’est pas recommandée pour cet appareil.
Protection des enregistrements
Normalement, n’importe quel enregistrement réalisé sur une cassette est automatiquement effacé
lorsqu’un nouvel enregistrement est réalisé. Il est possible de protéger vos enregistrements en
enlevant la languette située à l’arrière de la cassette.
FR - 6
Lorsque vous tenez la cassette avec la bande face à vous, la languette de protection se trouve à
l’arrière gauche de la cassette.
Toutes cassettes préenregistrées sont protégées afin d’éviter tout effacement accidentel
d’enregistrement commercial. Les cassettes "protégées" empêcheront le bouton record d'être
actionné. Si à un moment ou un autre, lors d’un enregistrement, le bouton ne veut pas s’enfoncer, ne
forcez pas le mécanisme ou alors il est possible que ce dernier soit peut-être endommagé. Vérifier
que la cassette a bien été insérée et que la languette n’ai pas été retirée.
Enregistrer sur une cassette alors que la languette a été retirée peut être fait en recouvrant le trou où
était la languette au moyen d’un morceau de papier adhésif.
Entretien du mécanisme de la cassette
Nettoyez doucement les assemblages de tête et de pince-roue/cabestan de bande toutes les 10
heures d'utilisation jusqu'à ce que toutes les traces de gisement d'oxyde aient été retirées.
Un assortiment de produits de nettoyage est disponible dans le commerce.
La tête d'effacement et la tête d’enregistrement et de lecture ainsi que la surface du rouleau de
pincement sont sensibles et ne doivent pas être touchées avec des objets en métal tels que des
tournevis. Pour avoir plus facile à nettoyer le mécanisme, vous pouvez appuyer sur le bouton PLAY
afin de rendre ce dernier plus accessible. Assurez-vous ensuite d’appuyer sur le bouton CASS.
STOP après avoir nettoyer le mécanisme.
TETE
D'ENREGISTREMENT/LECTURE
TETE D'EFFACEMENT
CABESTAN
GALET PRESSEUR
Les dommages au pinchwheel (pince- roue) peuvent se produire si l’appareil est resté en mode
PLAY avec le courant coupé. N’appliquez en aucun cas un lubrifiant sur d’autres parties de l’appareil.
ATTENTION :
Il est conseillé de débranchez l’appareil lorsque vous ne l’utilisez pas. Ne pas exposer l’appareil à la
pluie ou à l’humidité.
FR - 7
ECOUTER UN CD / MP3
1.
Pour lire un CD/MP3, appuyez sur la touche CD DOOR OPEN/CLOSE de l’appareil, la porte du
compartiment à CD s’ouvre (F3).
2.
Insérez un disque CD / MP3 dans l’appareil, appuyez sur la touche CD DOOR OPEN/CLOSE
pour refermer la porte du compartiment à CD.
3.
Appuyez sur la touche FUNCTION pour sélectionner le mode CD.
Remarque : (1) Cet appareil peut lire des CD, CD-R, CD-RW et MP3
(2) Si le disque ne peut pas être lu, l’appareil affiche NO DISC ( F4)
F4
F3
Lecture d’un disque entier
1.
Appuyer sur la touche PLAY/PAUSE pour commencer la lecture, le témoin s’allume. La lecture
commence par la première piste. L’afficheur indique le numéro de la piste en cours et le temps
écoulé.(F5)
2.
Appuyez sur la touche PLAY/PAUSE pour interrompre la lecture. Le témoin du temps écoulé
clignote.(F6)
3.
Appuyer une nouvelle fois sur la touche PLAY/PAUSE pour reprendre la lecture .
4.
Appuyez sur STOP pour arrêter la lecture.
F5
F6
Ecouter la piste choisie
-CD
1.
2.
3.
4.
5.
6.
Appuyez sur la touche TUNING/SKIP/SEARCH (DOWN OU UP) de l’appareil ou de la
commande à distance pour sélectionner la piste. La lecture commence.(F7)
Pendant la lecture appuyez sur la touche TUNING/SKIP/SEARCH (DOWN OU UP) pour
passer à la piste suivante ( ou pour retourner au début de la piste en cours).
Appuyez sur la touche TUNING/SKIP/SEARCH (DOWN OU UP) en mode pause pour
passer à la piste suivante ( ou pour retourner au début de la piste en cours). L’appareil
reste en mode PAUSE. (F8)
Appuyez sur la touche PLAY/PAUSE pour commencer la lecture.
Appuyez une seule fois sur la touche FIND-ESP, la fonction ESP est activée et l ‘indicateur
ESP s’affiche à l’écran (F9)
Appuyez à nouveau sur la touche FIND-ESP, la fonction ESP est désactivée et l ‘indicateur
ESP disparaît de l’écran
F8
F7
F9
FR - 8
-MP3
1.
2.
3.
4.
Appuyez sur la touche PRESET/FOLDER (UP ou DOWN), le numéro de l’album change.
Appuyez sur la touche SKIP/SEARCH/TUNING (UP ou DOWN), le numéro de la piste
change.
Appuyez une seule fois sur la touche FIND-ESP, l’indication du titre s’affiche à l’écran et
clignote ( s’il n’y a pas de nom de titre enregistré sur le disque, NOTHING s’affiche)(F10)
Appuyez à deux reprises sur la touche FIND /ESP, le nom de l’album s’affiche (s’il n’y a
pas de nom d’album sur le disque, UN-KNOWN s’affiche)(F11)
Lorsque la piste choisie s’affiche, appuyez sur la touche PLAY/PAUSE pour commencer la
lecture.
F10
F11
Lecture répétée ( commande à distance)
- CD
1.
2.
3.
Appuyez une seule fois sur la touche REPEAT de la commande à distance, REPEAT
s’affiche. L’appareil lit la piste affichée de manière répétitive (F12)
Appuyez à deux reprises sur la touche REPEAT, REPEAT ALL s’affiche. L’appareil lit
toutes les pistes de manière répétitive.(F13)
Appuyez une troisième fois sur la touche REPEAT pour désactiver la fonction.
F13
F12
- MP3
1.
2.
3.
4.
Appuyez une seule fois sur la touche REPEAT de la commande à distance, le CD lit la
piste en cours de manière répétitive.
Appuyez deux fois sur la touche REPEAT, REPEAT ALL s’affiche et le CD complet est
répété (F14)
Appuyez une troisième fois sur la touche REPEAT, REPEAT ALBUM s’affiche. L’album en
cours est lu de manière répétitive. (F15)
Appuyez une quatrième fois sur la touche REPEAT pour désactiver la fonction.
F15
F14
FR – 9
LECTURE ALEATOIRE (télécommande)
1.
2.
Appuyez une fois sur le bouton RANDOM de la télécommande et RANDOM s’affiche. (F16)
Appuyez à nouveau sur le bouton RANDOM et la lecture reprend normalement.
F16
Lecture aléatoire ( commande à distance)
1.
2.
Appuyez sur la touche INTRO de la commande à distance, INTRO s’affiche. L’appareil lit
les 10 premières secondes de chaque piste (F17)
Appuyez une deuxième fois sur la touche INTRO pour annuler la fonction et reprendre la
lecture normale.
F17
Mode de programmation
Vous pouvez programmer jusqu’à 64 pistes.
I.
Comment programmer
CD
1.
Appuyez sur la touche MEMORY/C-ADJ pour passer en mode de programmation(F18)
2.
Appuyez sur la touche SKIP/SEARCH/TUNING (UP ou DOWN) pour changer le numéro
de piste.
3.
Appuyez sur la touche MEMORY/C-ADJ pour confirmer.
MP3
1.
Appuyez sur la touche MEMORY/C-ADJ pour passer en mode de programmation. Le
numéro de l’album clignote (F19)
2.
Appuyez sur la touche SKIP/SEARCH/TUNING (UP ou DOWN) pour changer le numéro
d’album.
3.
Appuyez sur la touche MEMORY/C-ADJ, le numéro de piste clignote (F20)
4.
Appuyez sur la touche SKIP/SEARCH/TUNING pour changer le numéro de la piste.
5.
Appuyez sur la touche MEMORY/C-AD pour confirmer le numéro de piste.
F19
F18
F20
FR - 10
II.
Lecture programmée.
Après avoir programmer toutes les pistes, appuyez sur la touche PLAY/PAUSE pour
commencer la lecture programmée.
III.
Annuler la programmation
1.
Pendant la lecture, appuyez sur la touche STOP
2.
Ouvrez la porte du compartiment à CD
3.
Appuyez sur la touche STOP pendant la programmation.
LE MODE MUTE
1.
2.
Appuyez sur la touche MUTE le niveau du volume s’affiche et le son est coupé temporairement
(F21)
Appuyez à nouveau sur la touche MUTE pour retourner en mode normal.
F21
Utilisation d’un casque /écouteurs
L’appareil dispose d’une prise casque. Lorsque vous connectez des écouteurs /casque, le son des
heu-parleurs est coupé automatiquement.
MEMORY BACK-UP (SAUVEGARDE MÉMOIRE)
Insérer 3 piles R6 dans le compartiment à piles de l• appareil. Elle permettra de garder en mémoire
les données.
FR - 11
A PROPOS DES DISQUES COMPACTS
1. Utilisez toujours les disques compacts portant le label ci-dessous.
2. Remarques sur la manipulation des disques
Pour retirer le disque de son logement et le charger
x
Évitez de toucher la face réfléchissante enregistrée
x
Ne collez pas d’étiquette et n’écrivez pas sur la surface
x
Ne pliez pas les disques
3. Conservation du disque
x
Replacez les disques dans leur boîtier
x
N’exposez pas les disques à la lumière directe du soleil, à des températures élevées,
à une humidité excessive ou à la poussière
4. Nettoyage des disques
x
Si les disques sont sales, essuyez-les avec un chiffon doux afin de retirer la poussière,
la saleté et les traces de doigt
x
Pour ce faire, essuyez-les du centre vers les bords
Du centre vers les bords
Correct
x
x
Incorrect
N’utilisez jamais de benzène, de diluant pour peinture, de nettoyant liquide pour
disques ou de vaporisateur antistatique
Veillez à refermer le compartiment du CD pour ne pas que la poussière s’accumule sur
la lentille. Ne touchez pas la lentille.
FR - 12
Ecran LCD
B
A
C
ALBUM SLEEP
MEMORY
REPEAT ALL ALBUM
D
RANDOM
ESP
INTRO
E
kHz
MHz
VOL
F
G
A.
B.
C.
D.
Indicateur FIND
Indicateur TIMER
Indicateur de numéro d’album
Indicateur ESP
E.
F.
G.
Indicateur STEREO
Indicateur du niveau de volume
Indicateur du numéro de piste/temps
Caractéristiques
ALIMENTATION :
PUISSANCE DE SORTIE :
DIMENSION DE L’APPAREIL :
DIMENSION DES ENCEINTES :
POIDS NET :
SECTION RADIO
GAMME DE FREQUENCE :
SECTION CASSETTE
VITESSE :
FREQUENCE DE REPONSE :
SECTION CD
CAPTEUR OPTIQUE :
REPONSE EN FREQUENCE :
230V-50HZ
4.5 WATTS RMS x 2
160 x 230 x 260 mm
145 x 186 x 259.5 mm
6.25 KG
FM 87.5 – 108 MHz
MW 522 – 1620 KHz
4.75 cm/sec
125 Hz – 8 kHz
laser 3 faisceaux
100 Hz – 16 KHz
Les caractéristiques peuvent changer sans avis préalable.
Attention : N’exposez pas cet appareil aux éclaboussures. Ne placez pas d’objets remplis de liquide
sur l’appareil.
Ventilation : N’empêchez pas la ventilation normale de l’appareil.
Aidez-nous à protéger l’environnement !
Respectez les réglementations locales en vigueur : déposez votre appareil électrique hors
d’usage dans un centre de collecte approprié.
FR - 13
Per fruire al meglio delle possibilità dell'apparecchio, leggere attentamente il manuale prima di
procedere all'uso, in modo da familiarizzandosi con le varie funzionalità. L'utente potrà così fruire per
anni di un piacevole ascolto e di un funzionamento efficiente.
Note Importanti
* Conservare le istruzioni: le istruzioni di sicurezza e le istruzioni per l'uso devono essere conservate per
eventuali consultazioni future.
* Evitare di installare l'apparecchio nei seguenti punti:
- Luoghi esposti alla luce solare diretta o in prossimità di apparecchi di riscaldamento, come stufe elettriche.
- Sopra impianti stereofonici che emanano troppo calore.
- In luoghi scarsamente ventilati, o polverosi.
- In luoghi soggetti a vibrazioni costanti.
- In luoghi umidi o bagnati.
* Non ostruire le aperture di ventilazione.
* Azionare i comandi e i commutatori come descritto nel manuale.
* Prima di inserire l'alimentazione per la prima volta, verificare che il cavo di alimentazione sia installato
adeguatamente.
* Conservare i CD in un locale fresco, per evitare danni provocati dal calore.
Per ragioni di sicurezza, non smontare alcun coperchio né tentare di accedere all'interno dell'apparecchio.
Affidare qualsiasi riparazione a personale qualificato.
Non tentare di smontare nessuna vite, né di aprire l'involucro dell'apparecchio. All'interno dell'apparecchio
non vi sono componenti che possano essere riparati dall'utente. Affidare qualsiasi riparazione a personale
qualificato.
ATTENZIONE
RISCHIO DI SCOSSA ELETTRICA
NON APRIRE
AVVERTENZA: PER RIDURRE IL RISCHIO DI ELETTROCUZIONE, NON SMONTARE IL COPERCHIO (O IL
PANNELLO POSTERIORE). ALL'INTERNO NON VI SONO COMPONENTI CHE POSSANO
ESSERE RIPARATI DALL'UTENTE. AFFIDARE LE RIPARAZIONI A PERSONALE
QUALIFICATO.
TENSIONE PERICOLOSA
All'interno dell'apparecchio vi sono conduttori sotto tensione pericolosa, di entità
sufficiente a costituire un rischio di elettrocuzione per le persone.
ATTENZIONE
Il manuale per l'uso contiene importanti istruzioni per l'uso e la manutenzione. Per la
sicurezza dell'utente è necessario consultare il manuale.
AVVERTENZA: PER EVITARE IL RISCHIO DI INCENDIO E DI ELETTROCUZIONE, NON ESPORRE
L'APPARECCHIO ALLA PIOGGIA O ALL'UMIDITÀ.
Nota:
L'uso prolungato dell'apparecchio ne provoca il riscaldamento. Il fenomeno è normale e non indica nessuna
irregolarità di funzionamento dell'apparecchio. Il lettore di CD contiene un microprocessore che può
funzionare in modo anomalo in seguito a interferenze elettriche esterne. Se il lettore di CD non funziona in
modo adeguato, staccare l'alimentazione e collegarla di nuovo.
IT - 1
CARATTERISTICHE E CONTROLLI
1.
2.
3.
4.
5.
6.
7.
8.
9.
Altoparlante
Vano CD
Tasto CD OPEN / CD CLOSE
Vano batteria tampone
Tasto Stand-by
Indicatore acceso/stand-by
Tasto PRESET/FOLDER up
Tasto TIMER
Tasto FIND / ESP
10. Tasto EQUALIZZATORE
11. Tasto Stereo / Mono
12. Tasto band
13. Tasto PRESET/FOLDER down
14. Tasto CD Play / Pause
15. Presa cuffia
16. Tasto RECORD cassetta
17. Tasto PLAY cassetta
18. Tasto REWIND cassetta
19.
20.
21.
22.
23.
24.
25.
26.
27.
28.
29.
30.
31.
32.
33.
34.
35.
36.
Tasto Fast Forward cassetta
Tasto STOP/EJECT cassetta
Tasto PAUSE cassetta
Copertura tasti cassetta
Sensore infrarossi
Display LCD
Tasto SKIP/SEARCH/SINTONIA up
Tasto memoria / C-ADJ
Controllo Volume
Tasto CD STOP
Tasto cassetta
Tasto SKIP/SEARCH/SINTONIA down
Vano cassetta
Selettore AC
Antenna FM
Terminale antenna AM
Terminali altoparlanti
Cavo alimentazione
TELECOMANDO
1.
Tasto accensione / Stand-by
2.
Tasto MUTE
3.
Tasto Volume down
4.
Tasto PRESET / FOLDER UP
5.
Tasto PRESET / FOLDER DOWN
6.
Tasto CD PLAY / PAUSE
7.
Tasto MEMORY / C-ADJ
8.
Tasto SKIP/SEARCH/TUNING DOWN
9.
Tasto CD STOP
10. Tasto RANDOM (casuale)
11. Tasto REPEAT
12. Tasto INTRO
13. Tasto FUNCTION
14. Tasto Volume UP
15. Tasto BAND
16. Tasto MONO / STEREO / FIND / ESP
17. Tasto SKIP / SEARCH / TUNING UP
18. Tasto TIMER
19. Tasto EQ
20. Tasto SLEEP
21. Tasto NUMBER SEARCH
1
3
5
6
2
4
13
14
15
16
7
17
8
10
11
9
19
18
20
12
21
IT - 2
INSERIMENTO BATTERIE DEL TELECOMANDO
Premere il coperchio del vano batterie del telecomando
e aprirlo facendolo scorrere. Inserire 2 batterie (AAA)
facendo attenzione a rispettare le corrette polarità.
Richiudere il vano batterie.
Batterie non incluse
Nota: se non si intende utilizzare il telecomando per un
lungo periodo di tempo, rimuovere le batterie. Non
mischiare batterie vecchie con batterie nuove, non
mischiare batterie ricaricabili e batterie normali. Se le
batterie sono scariche, il telecomando non funziona
correttamente.
COLLEGAMENTO ALTOPARLANTI
1.
Collegamento altoparlanti
Estendere i cavi altoparlanti e collegarli ai terminali
posti sul retro dell’apparecchio.
2.
Collegamento alla rete elettrica
Prima di utilizzare l'apparecchio, collegare il cavo
di alimentazione elettrica ad una presa di corrente
e quindi portare il contattore principale di
alimentazione dell'apparecchio in posizione ON.
INTERRUTTORE DI ALIMENTAZIONE ELETTRICA
L
R
Presa rete elettrica
FUNZIONAMENTO DELL’APPARECCHIO
Quando si collega l’apparecchio alla rete elettrica, l’apparecchio sarà in modalità Stand-by. Premere
il tasto POWER/STAND-BY sull’apparecchio o sul telecomando per accendere o spegnere. Per
spegnere completamente l’apparecchio togliere il cavo di alimentazione dalla rete elettrica.
POWER STAND-BY
1.
2.
3.
4.
5.
Per accendere l•apparecchio premere il tasto POWER/STAND-BY sull• apparecchio o sul
telecomando.
Selezionare la sorgente (CD, TAPE, AUX o TUNER) premendo il tasto FUNCTION. Il display
corrispondente si illumina.
Regolare il volume a proprio piacimento (VOLUME + o -)
Regolare l• equalizzatore a proprio piacimento (Pass, Classic, Rock, Pop, Jazz)
Premere nuovamente il tasto POWER / STAND BY per spegnere l• apparecchio
IT - 3
IMPOSTAZIONE OROLOGIO
Selettore funzioni in posizione STAND-BY.
1.
Premere e tenere premuto MEMORY/C-ADJ fino a quando sul display non lampeggia orario a 12 cifre.
2.
3.
Premere TUNING / SKIP / SEARCH (Down oppure UP) per regolare l’orario.
Premere MEMORY / C-ADJ nuovamente, lampeggeranno le cifre delle ORE , premere TUNING /
SKIP / SEARCH (Down oppure UP) per regolare l’ora. Premere nuovamente MEMORY / C-ADJ,
le cifre dei MINUTI lampeggeranno, premere SKIP / SEARCH (Down oppure UP) per regolare.
Premere nuovamente MEMORY / C-ADJ per confermare orario impostato.
Per procedere all’inserimento orario, ogni tasto deve essere premuto entro 10 secondi altrimenti
l’operazione viene annullata.
4.
5.
ACCENSIONE E SPEGNIMENTO AUTOMATICO
1.
2.
3.
4.
5.
6.
7.
8.
Dopo avere impostato l’orologio, premere TIMER per alcuni secondi, sul display appare
“
ON ” e “00:00” e le cifre delle ore lampeggiano (F. 1).
Premere TUNING / SKIP / SEARCH (Down oppure UP) per regolare.
Premere nuovamente TIMER, le cifre dei minuti lampeggiano, regolare I minuti premendo
TUNING / SKIP / SEARCH (Down oppure UP).
Premere TIMER nuovamente per confermare TIMER ON.
Dopo avere regolato “TIMER ON”, “
OFF “ appare sul display e le cifre delle ORE
lampeggiano (F. 2).
Ripetere i passi 2 e 3, quindi premere TIMER per confermare TIMER OFF.
A questo punto TUNER oppure CD appaiono sul display. Regolare TUNER o CD premendo
TUNING / SKIP / SEARCH (Down oppure UP).
Premere TIMER nuovamente, l’indicatore “VOL” del timer appare sul display lampeggiando, regolare il
volume del timer a piacimento premendo TUNING / SKIP / SEARCH (Down oppure UP).
9.
Premere ogni tasto entro 10 secondi,a altrimenti l’operazione viene annullata.
10.
Dopo avere regolato il TIMER ON e il TIMER OFF, premere il tasto TIMER, “
“ appare sul display.
11. L’apparecchio si accenderà automaticamente all’orario impostato da TIMER ON, inizierà la
riproduzione e all’orario TIMER OFF prestabilito , l’apparecchio si spegnerà automaticamente.
F1
F2
CONTROLLO EQUALIZZATORE (sul telecomando)
L’EQUALIZZATORE mostra la tonalità di suono pre-impostato.
Premere il tasto EQ sul telecomando, la tonalità cambierà nel seguente ordine:
PASS
CLASSIC
ROCK
IT - 4
POP
JAZZ
IMPOSTAZIONE FUNZIONE SLEEP (telecomando)
1.
2.
Se si desidera addormentarsi ascoltando la musica, premere il tasto SLEEP sul telecomando.
E’ possibile regolare la funzione Sleep della RADIO o del CD, scegliendo la durata della
riproduzione da 90, 80. 70 fino a 10 minuti di ascolto prima che l’apparecchio si spegna
automaticamente.
NORMAL
OPERAZIONI RADIO
Premere il tasto FUNCTION per portarsi in modalità TUNER e impostare le operazioni RADIO.
Premere il tasto BAND per selezionare la banda, che apparirà sul display.
SELETTORE BANDA
Per sintonizzarsi su stazioni radio deboli, utilizzare la sintonizzazione manuale premendo TUNING /
SKIP / SEARCH (UP oppure DOWN) continuamente fino a che si legge la corretta frequenza oppure
la ricezione è al meglio.
SELEZIONE MONO / STEREO
E’ possibile utilizzare solo la modalità FM.
1.
Quando si desidera selezionare una stazione FM Stereo, premere il tasto MONO / STEREO.
Quando si riceve una stazione FM Stereo, l’indicatore appare sul display ”
“.
2.
Quando si preme nuovamente il tasto MONO / STEREO, l’indicatore FM STEREO si spegne e
lìapparecchio si porta in modalità MONO FM.
SINTONIZZAZIONE AUTOMATICA
1.
Premere il tasto TUNING / SKIP / SEARCH (UP oppure DOWN) per circa un secondo, quindi
rilasciare il tasto. La ricerca si interrompe alla prima stazione radio con sufficiente segnale che
si incontra.
2.
Ripetere la procedura per sintonizzarsi su un’altra stazione radio.
PROGRAMMAZIONE STAZIONI
E’ possibile anche memorizzare fino a 10 stazioni AM e 10 stazioni FM.
1.
Premere il tasto BAND per scegliere fra AM e FM.
2.
Sintonizzarsi sulla stazione radio preferita.
3.
Premere il tasto MEMORY / C-ADJ
4.
Premere il tasto PRESET / FOLDER (UP oppure DOWN) per il numero della stazione preferito.
5.
Premere MEMORY / C-ADJ per confermare la selezione.
6.
Per procedere alla memorizzazione di altre stazioni radio, ripetere i punti da 2 a 5.
7.
Per cambiare le stazioni in memoria, ripetere i punti da 2 a 5.
Nota:
1.
memorizzare una nuova stazione radio in una posizione precedentemente memorizzata,
annullerà la stazione radio precedente.
2.
Scollegare il cavo alimentazione dalla rete elettrica o problemi di alimentazione annulleranno le
stazioni memorizzate. Sarà necessario memorizzare nuovamente tutte le stazioni.
IT - 5
SELEZIONE DELLE STAZIONI RADIO IN MEMORIA
1.
Premere il tasto BAND per selezionare la banda desiderata.
2.
Premere il tasto PRESET / FOLDER (UP oppure DOWN) per selezionare il numero della stazione
radio in memoria desiderata.
3.
Il numero della stazione radio scelta apparirà sul display con la relativa frequenza.
ANTENNA FM
Estendere il cavo antenna FM per una migliore ricezione in FM.
OPERAZIONE CASSETTA
Riproduzione delle cassette
Aprire la copertura dei tasti cassetta.
Prima dell’utilizzo assicurarsi che il nastro della cassetta sia ben riavvolto.
Aprire il vano cassetta premendo il tasto CASS STOP / EJECT.
Inserire la cassetta con il nastro rivolto verso il basso.
Selezionare TAPE con il tasto FUNCTION e premere il tasto PLAY. Per fermare la riproduzione
premere CASS STOP / EJECT una volta. Per espellere la cassetta premere nuovamente CASS STOP /
EJECT.
Registrazione dalla radio
Selezionare TUNER premendo il tasto FUNCTION , scegliere AM oppure FM e premere la stazione
radio desiderata. Inserire un nastro vergine nel vano cassetta e premere il tasto RECORD. Premere il
tasto CASS STOP / EJECT per interrompere la registrazione. Premere il tasto CASS PAUSE per
interrompere la registrazione momentaneamente. Premere CASSETTE F.FWD per fare avanzare
velocemente il nastro, premere CASSETTE REWIND per riavvolgere il nastro velocemente.
Registrazione da CD
Selezionare CD premendo il tasto FUNCTION, selezionare il brano da registrare. Inserire un nastro
vergine nel vano cassetta e premere il tasto RECORD. Premere il tasto CASS STOP / EJECT per
interrompere la registrazione.
Auto Stop
Quando il nastro raggiunge il termine del suo corso in PLAY oppure in RECORD, la funzione AUTO
STOP rilascia automaticamente i tasti PLAY o RECORD. Questa funzione è operativa durante la
registrazione da RADIO oppure da CD. Solo la cassetta verrà interrotta, il CD o la RADIO
continueranno la loro riproduzione.
Tipi di cassetta
Utilizzare solamente cassette di qualità (IEC TYPE 1) per le registrazioni. NON si consiglia l’uso di
cassette C120.
IT – 6
Protezione della registrazione
E’ possibile proteggere le vostre registrazioni sui nastri audio rimuovendo le linguette di protezione
poste sul retro delle cassette.
Tutte le cassette pre-registrate vengono protette in questo modo per evitare registrazioni accidentali.
MANUTENZIONE DEL MECCANISMO DELLA CASSETTA
Pulire la testina e il pinch / capstan dopo circa 10 ore di utilizzo.
TESTINA DI
TESTINA DI
CAPSTAN
RULLO PRESSORE
ATTENZIONE :
prima di procedere alla pulizia, staccare l’apparecchio dalla rete elettrica.
IT – 7
ASCOLTO DI COMPACT DISC (CD / MP3)
1.
Premere il tasto CD DOOR OPEN / CLOSE sull’apparecchio, il vano CD si aprirà
automaticamente (F. 3).
2.
Inserire il CD/MP3 nel vano CD, premere il tasto CD DOOR OPEN / CLOSE nuovamente per chiudere.
3.
Premere il tasto FUNCTION per selezionare la modalità CD.
NOTA:
x
questo apparecchio riproduce CD, CD-R, CD-RW e MP3.
x
Se viene inserito un disco impossibile da leggere oppure senza disco inserito, sul display
appare “NO DISC” (F. 4)
F4
F3
Riproduzione intero CD/MP3
1.
La riproduzione ha inizio premendo il tasto PLAY/PAUSE, l’indicatore appare. La riproduzione inizia dal
primo brano. Sul display appare il numero del brano in riproduzione e il tempo trascorso. (F. 5)
2.
Per interrompere momentaneamente la riproduzione premere il tasto PLAY/PAUSE. Il tempo
trascorso lampeggia. (F. 6)
Per riprendere la riproduzione, premere nuovamente PLAY/PAUSE.
Per fermare la riproduzione premere STOP.
3.
4.
F5
F6
ASCOLTO DEI BRANI DESIDERATI
- CD
1.
Premere il tasto SKIP / SEARCH / TUNING (UP oppure DOWN), il brano desiderato appare sul
display e inizia la sua riproduzione. (F7)
2.
Durante la riproduzione premere SKIP / SEARCH / TUNING (UP oppure DOWN), passare al
brano successivo (oppure all’inizio del brano corrente).
3.
Premere il tasto SKIP / SEARCH / TUNING (UP oppure DOWN), durante la funzione di PAUSE,
poi passare al brano successivo (oppure inizio del brano corrente) e mantenere la pausa, il
display lampeggia. (F8)
4.
Premere PLAY / PAUSE per iniziare la riproduzione.
5.
Premere FIND / ESP una volta, la funzione ESP (FUNZIONE ANTI-SHOCK) viene attivata e
l’indicatore ESP appare sul display. (F9)
6.
Premere nuovamente FIND / ESP, la funzione ESP viene disattivata e l’indicatore ESP scompare
dal display.
F7
F8
F9
IT – 8
- MP3
1.
Premere il tasto PRESET / FOLDER (UP oppure DOWN) il numero dell’album cambierà. Premere
SKIP / SEARCH / TUNING (UP oppure DOWN), il numero del brano cambierà.
2.
Premere una volta il tasto FIND / ESP, l’indicatore TITLE appare sul display lampeggiando (se
non c’è nome nel disco, NOTHING appare). (F10)
3.
Premere il tasto FIND / ESP per 2 volte, IL NOME album appare (se non c’è il nome dell’album
nel disco, UN-KNOWN appare). (F11)
4.
Quando il brano desiderato appare sul display, premere PLAY/PAUSE per iniziare la
riproduzione.
F10
F11
FUNZIONE REPEAT (sul telecomando)
- CD
1.
Premere il tasto REPEAT una volta sul telecomando, REPEAT appare sul display. Il brano CD
attuale verrà riprodotto ripetutamente. (F12)
2.
Premere il tasto REPEAT 2 volte sul telecomando, REPEAT ALL appare sul display. L’intero CD
verrà riprodotto ripetutamente. (F13)
3.
Premere il tasto REPEAT una terza volta sul telecomando, la funzione REPEAT verrà annullata.
F13
F12
- MP3
1.
Premere il tasto REPEAT una volta sul telecomando, REPEAT appare sul display. Il brano CD
attuale verrà riprodotto ripetutamente.
2.
Premere il tasto REPEAT 2 volte sul telecomando, REPEAT ALL appare sul display. L’intero CD
verrà riprodotto ripetutamente. (F14)
3.
Premere il tasto REPEAT una terza volta sul telecomando, REPEAT ALBUM appare sul display.
L’attuale album verrà riprodotto continuamente. (F15)
4.
Premere il tasto REPEAT una quarta volta sul telecomando, la funzione REPEAT verrà annullata.
F14
F15
IT – 9
RIPRODUZIONE RANDOM (Riproduzione in ordine CASUALE)
1.
2.
Premere RANDOM sul telecomando, RANDOM appare sul display. (F16)
Premere nuovamente RANDOM, la riproduzione continuerà normalmente.
F16
RIPRODUZIONE INTRO
1.
2.
Premere INTRO sul telecomando, INTRO appare sul display. La funzione INTRO permette di
riprodurre i primi 10 secondi di ogni brano. (F17)
Premere INTRO due volte per riprendere la normale riproduzione.
F17
PROGRAMMAZIONE
E’ possibile programmare fino a 64 brani preferiti. La modalità di programmazione viene attivata in
modalità STOP.
1) COME PROGRAMMARE
- CD
1.
Premere il tasto MEMORY / C-ADJ, portarsi in modalità PROGRAM. (F18)
2.
Premere SKIP / SEARCH / TUNING (UP oppure DOWN), il numero del brano verrà cambiato.
3.
Premere MEMORY / C-ADJ per confermare il numero del brano.
- MP3
1.
Premere il tasto MEMORY / C-ADJ, portarsi in modalità PROGRAM. Il numero album lampeggia. (F19)
2.
3.
4.
5.
Premere SKIP / SEARCH / TUNING (UP oppure DOWN), il numero album verrà cambiato.
Premere MEMORY / C-ADJ il numero del brano lampeggia. (F20)
Premere SKIP / SEARCH / TUNING (UP oppure DOWN), il numero del brano verrà cambiato.
Premere MEMORY / C-ADJ per confermare il numero del brano.
F18
F19
F20
IT – 10
2) RIPRODUZIONE PROGRAMMAZIONE
Dopo la programmazione delle canzoni, premere il tasto PLAY/PAUSE e la riproduzione seguirà la
lista canzoni da voi programmata.
3) CANCELLAZIONE PROGRAMMAZIONE
1.
Durante la riproduzione premere STOP.
2.
Aprire il vano CD.
3.
Premere il tasto STOP durante la fase di programmazione
IMPOSTAZIONE MUTE (dal telecomando)
1.
2.
Premere il tasto MUTE una volta sul telecomando, il livello volume si illumina e l’audio verrà
escluso temporaneamente. (F21)
Premere nuovamente MUTE, il livello volume si spegne e l’audio riprende normalmente.
F21
ASCOLTO TRAMITE CUFFIA
L’apparecchio è dotato di una presa cuffia per un ascolto privato. Inserire lo spinotto 3.5mm di una
cuffia stereo (non fornita) nell’apposita presa cuffia PHONES sul pannello frontale. Gli altoparlanti
esterni vengono automaticamente disconnessi quando la cuffia è collegata.
BATTERIA TAMPONE
Inserire 1.5v X 3, UM-3, AA oppure equivalenti nel vano batterie dell• apparecchio. La batteria
tampone mantiene le memorie del CPU in caso di back-out corrente elettrica.
IT - 11
COMPACT DISC
1. Usare sempre compact disc recanti la sigla seguente.
2. Note sulla manipolazione dei dischi
Estrazione del disco dalla custodia e inserimento nell'apparecchio.
* Non toccare la superficie riflettente registrata.
* Non incollare carta e non scrivere sulla superficie.
* Non piegare il disco.
3. Conservazione
* Conservare i dischi nella custodia.
* Non esporre i dischi alla luce solare diretta né alle alte temperature, all'umidità eccessiva o in
luoghi polverosi.
4. Pulizia dei dischi
* Se un disco è sporco, togliere la povere, lo sporco e le impronte di dita con un panno morbido.
* I dischi vanno puliti dal centro alla periferia.
DAL CENTRO ALLA PERIFERIA
GIUSTO
SBAGLIATO
* Non usare mai benzene, diluenti, fluido detergente per dischi o spray antistatico.
* Si abbia cura di chiudere lo sportello del compartimento CD in modo che sulla lente non si
depositi la polvere.
* Non toccare la lente.
CASSETTE
Utilizzare una matita per riavvolgere eventuali porzioni di nastro.
IT - 12
LCD DISPLAY WINDOW
B
A
C
D
ALBUM SLEEP
MEMORY
REPEAT ALL ALBUM
RANDOM
ESP
INTRO
E
kHz
MHz
VOL
F
G
a)
b)
c)
d)
Indicatore FIND
Indicatore TIMER
Indicatore NUMERO ALBUM
Indicatore ESP (ANTI-SHOCK)
e)
f)
g)
Indicatore STEREO
Indicatore VOLUME ALTO/BASSO
Indicatore BRANO / NUMERO / TIME
SPECIFICHE TECNICHE
POWER SUPPLY :
OUTPUT POWER :
UNIT DIMENSION :
SPEAKER BOX DIMENSION :
N. W. :
RADIO SECTION
FREQUENCY RANGE :
230V~50Hz
4.5 Watts x 2
160(W) x 230 (L) x 260 (H) mm
145 (L) x 186 (W) x 259.5 (H) mm
6.25 kg
FM 87.5 - 108 MHz
MW 522 - 1620 kHz
CASSETTE SECTION
TAPE SPEED :
FREQUENCY RESPONSE :
4.75 CM/SEC
125Hz-8KHz
COMPACT DISC SECTION
OPTICAL PICKUP :
FREQUENCY RESPONSE :
3 - BEAM LASER
100Hz - 16kHz
Aiutateci a proteggere l'ambiente!
Rispettate le normative locali in vigore: portare il vostro apparecchio elettrico in disuso presso un
apposito centro di raccolta autorizzato.
IT – 13
To achieve the utmost in enjoyment and performance, please read this manual carefully before
attempting to operate the unit in order to became familiar with its features, and assure you years of
faithful, trouble free performance and listening pleasure.
Important Notes
*
*
*
*
*
Keep instructions the safety and operating instructions should be retained for future reference.
Avoid installing the unit in locations described below:
Places exposed to direct sunlight or close to heat radiating appliances such as electric heaters.
On top of other stereo equipment that radiate too much heat.
Places lacking ventilation or dusty places.
Places subject to constant vibration.
Humid or moist places.
Make sure not to obstruct the ventilation openings.
Operate turning controls and switches as instructed in the manual.
Before turning on the power for the first time, make certain the power cord is properly installed.
Store your tapes or CD in a cool area to avoid damage from heat.
For safety reasons, do not remove any covers or attempt to gain access to the inside of the product.
Refer any servicing to qualified personnel.
Do not attempt to remove any screws, or open the casing of the unit; there are no user serviceable
parts inside, refer all servicing to qualified service personnel.
CAUTION : TO REDUCE THE RISK OF ELECTRIC SHOCK DO NOT REMOVE COVER ( OR BACK ) ,
NO USER SERVICEABLE PARTS INSIDE, REFER SERVICING TO QUALIFIED SERVICE
PERSONNEL.
DANGEROUS VOLTAGE
Conductor dangerous voltage, that may be of sufficient magnitude to constitute a risk
of electric shock to persons is present within this products enclosure.
ATTENTION
The owners manual contains important operating and maintenance instructions, for
your safety, it is necessary to refer to the manual.
WARNING : TO PREVENT FIRE OR SHOCK HAZARD, DO NOT EXPOSE THIS APPLIANCE TO
DRIPPING OR SPLASHING.
Note:
This unit will become warm when used for a long period of time. This is normal and does not indicate
a problem with the unit.
The CD player includes micro-processors which may malfunction as a result of external electrical
interference or noise. If the CD player is not working properly, disconnect the power source and
then reconnect it.
UK-1
FEATURES AND CONTROLS
1. SPEAKER
2. CD DOOR
3. CD DOOR OPEN/CLOSE BUTTON
4. BACKUP BATTERY DOOR
5. STANDBY BUTTON
6. STANDBY/POWER INDICATOR
7. PRESET/FOLDER UP BUTTON
8. TIMER BUTTON
9. FIND/ESP BUTTON
10. EQ BUTTON
11. FM MODE MONO/ST BUTTON
12. TUNER/BAND BUTTON
13. PRESET/FOLDER DOWN BUTTON
14. CD/PLAY/PAUSE BUTTON
15. PHONES JACK
16. CASSETTE RECORD BUTTON
17. CASSETTE PLAY BUTTON
18. CASSETTE REWIND BUTTON
19. CASSETTE F.FWD BUTTON
20. CASSETTE STOP/EJECT BUTTON
21. CASSETTE PAUSE BUTTON
22. CASSETTE BUTTON DOOR
23. IR SENSOR
24. LCD DISPLAY WINDOW
25. SEARCH/SKIP/TUNING FORWARD BUTTON
26. MEMORY/CLK-ADJ BUTTON
27. VOLUME UP/DOWN KNOB
28. STOP BUTTON
29. TAPE BUTTON
30. SEARCH/SKIP/TUNING BACKWARD BUTTON
31. CASSETTE DOOR
32. AC MAIN POWER SWITCH
33. FM ANTENNA
34. AM ANTENNA JACK
35. SPEAKER TERMINALS
36. AC CORD
REMOTE CONTROL
1. POWER/STANDBY BUTTON
2. MUTE BUTTON
1
3. VOLUME DOWN BUTTON
3
4. PRESET/FOLDER UP BUTTON
5
6
5. PRESET/FOLDER DOWN BUTTON
6. CD PLAY/PAUSE BUTTON
7. MEMORY/C-ADJ BUTTON
2
4
13
14
15
16
7
17
8
8. SKIP/SEARCH/TUNING DOWN BUTTON
9. CD STOP BUTTON
10. RANDOM BUTTON
10
11. REPEAT BUTTON
11
12. INTRO BUTTON
12
13. FUNCTION BUTTON
9
19
18
20
21
14. VOLUME UP BUTTON
15. BAND BUTTON
16. MONO/ST./FIND/ESP BUTTON
17. SKIP/SEARCH/TUNING UP BUTTON
18. TIMER BUTTON
19. EQ BUTTON
20. SLEEP BUTTON
21. NUMBER SEARCH BUTTON
UK-2
PUTTING THE BATTERIES INTO THE REMOTE CONTROL UNIT
Press down of the compartment cover, and slide
the cover off to open the compartment. Place the
two (UM4), (AAA), (R03) batteries in the remote
control according to the polarity markings ("+" and
" - ") inside the compartment and on the batteries.
Place the cover over the compartment, press down
lightly, and push it upward until it snaps on.
**BATTERIES NOT INCLUDED**
NOTE : Remove the batteries from the remote
control if not in use for long period of the time.
Do not mix normal batteries with rechargeable
batteries, when the batteries become weak,
remote control will not function and replace with
new batteries.
INSTALLING THE SPEAKER WIRE
TO THE SPEAKER TERMINALS
AC MAIN POWER SWITCH
L
1.
2.
Speakers Connection
Extend the SPEAKER WIRES and connect them
to the SPEAKER TERMINALS.
R
Power Cord Connection
Before using , connect the AC Power Cord to
the AC outlet ,then turn on the main switch of
the unit.
AC CORD
OPERATING THE UNIT
When you first plug the unit into the AC outlet , the unit will be in standby mode , You can
press the POWER/STANDBY button on the unit ( or on the remote control ) to switch the unit ON
and OFF. Pull the AC plug out of the wall socket if you want to switch off completely.
POWER/STANDBY
1.
2.
3.
4.
5.
Press POWER/STANDBY button on the unit (or remote) to switch the unit on.
Select the sound source (CD , Tape , Aux, or Tuner) by pressing FUNCTION button.
The corresponding display will light up.
Adjust the volume with the VOLUME (UP or DOWN) button.
Set the present equalizer ( pass, classic , rock , pop, or jazz) with the EQ button on the
Remote.
Press POWER/STANDBY button again to turn off the unit.
UK-3
CLOCK SETTING
Function switch on STANDBY position
1.
Press & hold MEMORY / C-ADJ. button until the time will display 12-hour digit flashing.
2.
Press TUNING / SKIP / SEARCH (DOWN or UP) button to adjust 12-hour or 24-hour digit.
3.
Press MEMORY / C-ADJ. button again , the time display HOUR digit flashing , press
TUNING / SKIP / SEARCH (DOWN or UP) button to adjust HOUR digit; Press MEMORY/
C-ADJ button once more, the MINUTE digit flashing, adjust it by the SKIP/SEARCH/
TUNING (UP or DOWN)button.
4.
Press the MEMORY/C-ADJ button again to confirm the time.
5.
Each enable state as shown above will be cleared if the key is not pushed in 10 seconds.
TIMER SETTING
1.
After adjusting clock, press the TIMER button for a few seconds, "
ON" and "00:00"
appears on the display and the HOUR digit flashing.(F1)
2. Press the TUNING / SKIP / SEARCH (UP or DOWN) Button to adjust it.
3. Press the TIMER button again, the MINUTE digit will start flashing, adjust it by pressing
the TUNING / SKIP / SEARCH (UP or DOWN) button.
4. Press the TIMER button once more to confirm/order TIMER ON time.
5. After adjusting "TIMER ON", "
OFF" appears on the display and the HOUR digit flashing.(F2)
6. Repeat the above steps 2 to 3, then press the TIMER button once more to confirm/order
TIMER OFF time.
7. Now the "TUNER" or "CD" appears on the display and the flashing , adjust "TUNER" or "CD" by
pressing the TUNING/SKIP/SERCH (UP or DOWN) button.
8. Press the TIMER button again, the timer "VOL" indicator appears on the display and flashing,
adjust the timer volume high or low by the TUNING/SKIP/SEARCH *(UP or DOWN) button.
9. Each enable state as shown above will be cleared if the button is not pushed in 10 seconds.
10. After adjusting "TIMER ON" and "TIMER OFF" ,press the TIMER button, "
" appears on
the display.
11. The unit will be switched on automatically at "TIMER ON" order and start playing & the unitl will
be switched off automatically at "TIMER OFF" order.
F1
F2
EQ CONTROL (on the remote)
EQ shows the present sound tone.
When you press the EQ button on the remote, the sound tone changes as below:
PASS
CLASSIC
ROCK
UK-4
POP
JAZZ
TO SET SLEEP FUNCTION (for remote handset)
1.
2.
If you want to fall asleep to music, press SLEEP button on the remote.
You may adjust the Radio or CD player's sleep function to play from 90, 80, 70 up to 10
minutes of music before shutting itself off automatically.
NORMAL
RADIO OPERATION
Press the FUNCTION button to the TUNER mode on the unit (or remote),you can selected the Radio
operation.
1. Press the BAND button to select wave band range appearing on the display.
2. Select the desired wave band range with the BAND button.
BAND SELECT
To tune for weak stations, use manual tuning by pressing TUNING / SKIP / SEARCH (UP or
DOWN) button continuously until you read the correct frequency or the reception at its best.
MONO/ STEREO SELECT
You can use only FM mode.
1. When you want to select FM stereo station, press the MONO/STEREO button .
When you receive a FM stereo station the "
" indicator will appear on the display, you can
receive FM stereo tramission .
2. When you press the MONO/STEREO button again , the FM STEREO indicator will turn off &
switch to MONO FM stuatus.
Automatic Tuning
1.
2.
Press the TUNING / SKIP / SEARCH (UP or DOWN) button for a second or more, then
release the button. The tuner will automatically for the first station of sufficient signal
strength.
Repeat above procedure if you wish to select another station.
Programming preset stations
You can also preset stations of your choice and store up to 10 AM and 10 FM stations
in its memory. To store your selected broadcasting stations:
1.
Press the BAND button on the unit(or remote) to toggle between AM and FM to make
your selection.
2.
Tune to the required station.
3.
Press the MEMORY / C-ADJ button.
4.
Press the PRESET/FOLDER(UP or DOWN) button for your desired station number.
5.
Press the MEMORY / C-ADJ again to confirm your selection.
6.
To program more stations into memory, repeat the above steps 2 to 5.
7.
To change the stored preset stations, repeat the above steps 2 to 5.
Notes:
1.
2.
Storing a new station into a preset location will erase the previously stored station in
that location.
Power off / failure or power cord disconnection will clear the memory of all preset
stations. Perform the stations presetting procedures again to store the stations.
UK-5
Selecting the Preset Stations
1.
2.
3.
Press the BAND button to select the desired band.
Press PRESET/FOLDER(UP or DOWN) button to select the desired preset station number.
The numeric location of that preset station is displayed along with the corresponding
frequency.
FM Antenna
FM antenna wire for better FM reception.
CASSETTE OPERATION
Playing Of Cassette
When playing of cassette, open the cover of the CASSETTE BUTTON DOOR first.
Be sure to tighten any slack tape in the cassette before use. Using either a pencil or a ball-point
pen, simply insert the pen or pencil into the centre of the spool and rotate to remove slackness.
Depress the CASS. STOP / EJECT button to open the cassette door.
Insert the cassette into the compartment with the open end facing downwards and full reel on the
left hand side, push the cassette well down and close the door. Be sure not to touch the tape
surface. Select "TAPE" on the FUNCTION button and press the PLAY button. To stop playback,
press the CASS. STOP / EJECT button once. To release the cassette, press the CASS. STOP /
EJECT button again.
Recording From Radio
Set the FUNCTION button to TUNER select AM or FM on BAND button and press to the desired
broadcast (refer to radio operation section). Insert a cassette into the deck and press the
RECORD button.
Press the CASS. STOP / EJECT button to stop recording. The CASS. PAUSE button can be used to
stop recording for short intervals. Press the CASSETTE F.FWD to fast forword the tape, press the
CASSETTE REWIND button to fast rewind the tape.
Recording From CD
Set the FUNCTION to CD. Select the required tracks to be recorded. Insert a cassette into the
cassette deck and press the CASS. RECORD button.
Press the CASS. STOP / EJECT button to stop recording.
Auto Stop
When the tape reaches the end in PLAY or RECORD, the built-in AUTO STOP system functions
to release the depressed PLAY, RECORD keys. The AUTO STOP system operates while recording
from the built-in RADIO or CD player. Only the cassette function is brought automatically to a
stop , the RADIO or CD PLAYER will continue to play.
Type Of Cassettes
Use only good quality cassettes (IEC TYPE1) for making recordings. May be used to replay other
types of cassette but is unable to make proper recordings on these more specialized tapes. The
use of C120 cassettes is not recommended in this machine.
UK-6
Protecting Recordings
Normally, anything recorded on the tape is automatically erased when new recording is made.
It is possible to protect your recordings from accidental erasure by removing the tabs found on
the rear of the cassette.
When the cassette is held with the recorded side upper-most and exposed tape facing the front,
the protective tab will be found on the left rear of the cassette.
All pre-recorded cassette are protected in this way to prevent accidental erasure of the
commercial recordings. "Protected" cassettes will prevent the record button from being operated.
If at any time you attempt to record and find that this button will not depress, never force the
mechanism or it may be damaged. Check that a cassette has been loaded and that tab has not
been removed. Recording on a cassette from which the tabs have been removed can be done by
covering the tab openings with a piece of adhesive tape.
Care Of Cassette Mechanism
Gently clean the tape head and pinch-wheel / capstan assemblies after every 10 hours of use
until all traces of oxide deposit have been removed. A range of cassette care products are
available.
RECORD/PLAY HEAD
ERASE HEAD
CAPSTAN
PINCH ROLLER
The erase head and record/play head and the surface of the pinch roller are delicate and must
not be touched with metal objects such as screwdrivers. You may find it easier to clean the
assembly by pressing the PLAY button to bring head and pinch roller into view. Be sure to press
the CASS. STOP button after cleaning the mechanism.
Damage to the pinch wheel can occur if the unit is left in PLAY mode with the power switched off.
Under no circumstances should you attempt to lubricate any part of the machine.
WARNING
Disconnect from the mains at the wall socket when not in use. Do not expose the set to rain or
moisture.
UK-7
LISTENING TO WATCH COMPACT DISC (CD/MP3)
1.
When CD / Mp3 is playing , press the CD DOOR OPEN / CLOSE button on the unit first, then
the CD door will open automatically.(F3)
2. Insert the CD/MP3 disc into the CD compartment, press the CD DOOR OPEN / CLOSE button
again, then the CD door will close automatically.
3. Press the FUNCTION button on the unit to select the CD mode, This unit begin selecting and
shifting to the CD / MP3 mode automatically .
NOTE: (1) This unit can play CD, CD-R, CD-RW and MP3 discs.
(2) If no disc or can`t read TOC, NO DISC will be displayed.(F4)
F4
F3
Playing The Entire CD/MP3
1.
2.
3.
4.
Playback will be start by pressing PLAY/PAUSE ,the indicator then appears. Playback starts
with the first track , The display shows the current track number and its elapsed time.(F5)
To interrupt playback , press PLAY/PAUSE button . The time elapsed indicator will flash.(F6)
To resume playback, press the PLAY/PAUSE again.
To stop playback, press the STOP button.
F5
F6
LISTEN TO THE DESIRED TRACK
- CD
1.
2.
3.
4.
5.
6.
Press the SKIP/SEARCH/TUNING ( UP or DOWN ) button on the unit (or remote), the
required track number appears on the display, then start playing.(F7)
During play, press the SKIP/SEARCH/TUNING (UP or DOWN) button, skip to the next track(or
head of the current track ).
Press the SKIP/SEARCH/TUNING (UP or DOWN) button during pause condition, then skips to
the next track(or the head of the current track) and keep pausing , and the display is
flashing.(F8)
Press the PLAY/PAUSE button to start playing.
Press the FIND/ESP button once, the ESP function will turn on & the ESP indicator appears on
the display.(F9)
Press the FIND/ESP button again, the ESP function will turn off & the ESP indicator disappears
on the display.
F7
F8
F9
UK-8
- MP3
1.
2.
3.
4.
Press the PRESET/FOLDER ( UP or DOWN ) button, the album number will be changed;
press the SKIP/SEARCH/TUNING (UP or DOWN) button, the track number will be changed.
Press the FIND/ESP button once, TITLE indicator is displayed and flashing.(In that case if no
name in the disc, NOTHING is displayed.) (F10)
Press the FIND/ESP button twice, ALBUM name is displayed,(In that case if no name in the disc.
UN-KNOWN is displayed.) (F11)
When the desired track is displayed press the PLAY/PAUSE button to start playing the track.
F10
F11
REPEAT PLAY (on the remote)
- CD
1.
2.
3.
Press the REPEAT button once on the remote, REPEAT is displayed. CD will play the current
track repeatedly.(F12)
Press the REPEAT button twice, REPEAT ALL is displayed. CD will play all tracks
repeatedly.(F13)
Press the REPEAT button third, REPEAT function will be off.
F13
F12
- MP3
1.
2.
3.
4.
Press the REPEAT button once on the remote, then REPEAT is displayed. CD will play the
current track repeatedly.
Press the REPEAT button twice, REPEAT ALL is displayed. CD plays all tracks repeatedly.(F14)
Press the REPEAT button third, then REPEAT ALBUM is displayed. Repeat the current play
album.(F15)
Press the REPEAT button four times, then REPEAT function will be off.
F14
F15
UK-9
RANDOM PLAY(on the remote)
1.
2.
Press the RANDOM button on the remote, then RANDOM is displayed.(F16)
Press the RANDOM button again, then resume to normally play.
F16
INTRO PLAY (on the remote)
1.
2.
Press the INTRO button on the remote, then INTRO is displayed. INTRO will play the first
10 seconds of each track.(F17)
Press the INTRO button twice, then resume to normally play.
F17
PROGRAM MODE
Used to listen to the songs selected. User can program up to 64 favorite songs. Program mode is
activated while in stop mode.
1. How to program
- CD
1) Press the MEMORY/C-ADJ button, shift to PROGRAM mode.(F18)
2) Press the SKIP/SEARCH/TUNING (UP or DOWN) button, the track number will be
changed.
3) Press the MEMORY/C-ADJ button to confirm the track number.
- Mp3
1) Press the MEMORY/C-ADJ button, shift to PROGRAM mode. The album number is
flashing. (F19)
2) Press the SKIP/SEARCH/ TUNING button, the album number will be changed.
3) Press the MEMORY/C-ADJ button , the track number is flashing.(F20)
4) Press the SKIP/SEARCH/TUNING button, the track number will be changed.
5) Press the MEMORY/C-ADJ button to confirm the track number.
F18
F19
F20
UK-10
2.
PROGRAM PLAY
After programming songs, press the PLAY/PAUSE button and it will play the songs as you
programmed.
3.
CANCEL PROGRAM
1)
2)
3)
While playing, press the STOP button.
Open the door.
Press the STOP button, during program memory
MUTE SETTING(on the remote)
1.
2.
When you press the MUTE button once on the remote, the volume level will light on & the
audio output will be temporary terminate.(F21)
Press MUTE button again, the volume level will light off & the audio output will return
to normal.
F21
LISTEN TO THE MUSIC BY USING HEADPHONE
A stereo headphone jack is provided for private listening . To listen to the unit with headphones
(not included ) insert the 3.5mm mini-stereo plug from the headphones into the PHONES
jack on the front panel. The external speakers are automatically disconnected when
headphones are using.
MEMORY BACK-UP
To insert 1.5V x 3, UM-3, AA or equivalent batteries in the battery compartment of the unit. It is
used to back-up the memory of the main CPU.
UK-11
COMPACT DISC
1.
Always use a compact discs bearing the mark as shown.
2.
Notes on handling discs
Removing the disc from its storage case and loading it.
* Do not touch the reflective recorded surface.
* Do not stick paper or write anything on the surface.
* Do not bend the disc.
3.
Storage
* Store the disc in its case.
* Do not expose discs to direct sunlight or high temperatures, high humidity or dusty
places.
4.
Cleaning a disc
* Should the disc become soiled, wipe off dust, dirt and fingerprints with a soft cloth.
* The disc should be cleaned from the centre to the edge.
FROM THE CENTRE TO THE EDGE
CORRECT
INCORRECT
* Never use benzene, thinners, record cleaner fluid or anti static spray.
* Be sure to close the CD door so the lens is not contaminated by dust.
* Do not touch the lens.
UK-12
LCD DISPLAY WINDOW
B
A
C
D
ALBUM SLEEP
MEMORY
REPEAT ALL ALBUM
RANDOM
ESP
INTRO
E
kHz
MHz
VOL
F
G
A.
B.
C.
D.
FIND INDICATOR
TIMER INDICATOR
ALBUM NUMBER INDICATOR
ESP INDICATOR
E. STEREO INDICATOR
F. VOLUME HIGH/LOW INDICATOR
G. TRACK/NUMBER/TIME INDICATOR
SPECIFICATION
POWER SUPPLY :
OUTPUT POWER :
UNIT DIMENSION :
SPEAKER BOX DIMENSION :
N. W. :
RADIO SECTION
FREQUENCY RANGE :
230V~50Hz
4.5 Watts x 2
160(W) x 230 (L) x 260 (H) mm
145 (L) x 186 (W) x 259.5 (H) mm
6.25 kg
FM 87.5 - 108 MHz
MW 522 - 1620 kHz
CASSETTE SECTION
TAPE SPEED :
FREQUENCY RESPONSE :
4.75 CM/SEC
125Hz-8KHz
COMPACT DISC SECTION
OPTICAL PICKUP :
FREQUENCY RESPONSE :
3 - BEAM LASER
100Hz - 16kHz
SPECIFICATION SUBJECT TO CHANGE WITHOUT FURTHER NOTICE.
Dripping warning :
" The product shall not be exposed to dripping or splashing and that no
objects filled with liquids, such as vases, shall be placed on the product."
Ventilation warning : " The normal ventilation of the product shall not be impeded for intended use. "
You can help protect the environment!
Please remember to respect the local regulations: hand in the non-working electrical equipments
to an appropriate waste disposal center.
UK-13