1
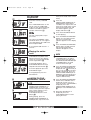
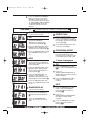
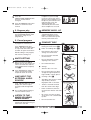
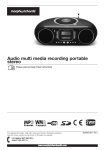
29118 rev2
8/8/06
13:05
Page 1
Wall hanging USB & SD Micro system
with MP3 playback
Please read and keep these instructions
For replacement parts, help with using your Morphy Richards, problems
and lots more, contact us by phone or through our website.
UK Helpline: 0870 060 2614
Ireland 1800 409119
www.morphyrichardsaudio.com
29118 Rev2
29118 rev2
8/8/06
13:05
Page 2
IMPORTANT
SAFETY
INSTRUCTIONS
To achieve the utmost in
enjoyment and
performance, please read
this manual carefully before
attempting to operate the
unit in order to become
familiar with its features,
and assure you years of
faithful, trouble free
performance and listing
pleasure.
Important Notes
•
Keep instructions the
safety and operating
instructions should be
retained for future
reference.
•
Avoid installing the unit in
locations described below:
•
Place exposed to direct
sunlight or close to heat
radiating appliances such
as electric heaters.
•
On top of other stereo
equipment that radiate too
much heat. Places lacking
ventilation or dusty places.
Places subject to constant
vibration. Humid or moist
places.
•
Make sure not to obstruct
the ventilation openings.
•
Before turning on the
power for the first time,
make certain the power
cord is properly installed.
•
To be completely
disconnect the power
input, the mains plug of
apparatus shall be
disconnected from the
mains.
•
•
When the stand-by LED
gives no colour, the
apparatus is completely
disconnected from mains.
When the stand-by LED
gives no colour, the
apparatus is completely
disconnected from mains.
•
Minimum distances around
the apparatus for is 10cm
sufficient ventilation.
•
Attention should be drawn
to the environment aspects
of battery disposal.
•
The use of apparatus in
moderate climates.
•
The mains plug should not
be obstructed OR should
be easily accessed during
intended use.
•
The ventilation should not
be impeded by covering
the ventilation openings
such as a newspaper, table
cloths, curtains etc.
•
No naked flame sources
such as lighted candles
should be placed on the
apparatus.
For safety reasons, do not
remove any covers or
attempt to gain access to
the inside of the product.
Refer any servicing to
qualified personnel.
Do not attempt to remove
any screws, or open the
casing unit; there are no
user serviceable parts
inside, refer all servicing to
qualified service personnel.
WARNING: To reduce
the risk of electric
shock do not remove
cover (or back), No user
serviceable parts
inside, refer servicing
to qualified service
personnel.
ATTENTION:
The owners manual
contains important
operating and
maintenance
instructions, for your
safety, it is necessary
to refer to the manual.
WARNING: To prevent
fire or shock hazard, do
not expose this
appliance o dripping or
splashing.
Note:This unit will become
warm when used for a long
period of time. This is
normal and does not
indicate a problem with the
unit.
The CD player includes
micro-processors which
may malfunction as a result
of external electrical
interference or noise. If the
CD player is not working
properly, disconnect the
power source and then
reconnect it.
ELECTRICAL
REQUIREMENTS
Check that the voltage on
the rating plate of your
appliance corresponds with
your house electricity
supply which must be A.C.
(Alternating current).
WARNING : The plug
removed from the
mains lead, if severed,
must be destroyed as a
plug with a bared
flexible cord is
hazardous if engaged
into a live socket
outlet.
DANGEROUS VOLTAGE
Conductor dangerous
voltage, that may be of
sufficient magnitude to
constitute a risk of
electric shock to
persons is present
within this products
enclosure.
UK Helpline 0870 060 2614
Should the fuse in the 13
amp plug require changing
a 3 amp BS1362 fuse must
be fitted.
WARNING: This
appliance must be
earthed.
Ireland Helpline 1800 409119
29118 rev2
8/8/06
13:05
Page 3
INDEX
Important safety instructions
1
Index
2
Assembly drawing of unit
3
Features and controls
3
4-5
LCD display window
5
Remote control
6
Putting the batteries into the remote control unit
6
Operate the unit
6
Standby
7
Clock setting
7
Timer setting
7
EQ control
8
To see sleep function
8
Function select
8
Radio operation
8
CD/MP3 operation
9
Listen to the desired track
10
Repeat play
11
Random play
11
Intro play
11
Program mode
11
Mute setting
12
Line-input for external audio source
12
Listen to the music by using headphone
12
Memory back-up
12
Compact disc
12
Specification
13
Guarantee
14
www.morphyrichardsaudio.com
2
29118 rev2
8/8/06
13:05
Page 4
ASSEMBLY DRAWING OF UNIT
1
2
Fixing of the base for the table mounting
Fixing the board for wall mounting
N.B Please ensure the wall you are mounting the main unit and speakers onto is strong
enough for their weight.
3
3
Speakers connection
4
Assembly finished
UK Helpline 0870 060 2614
Ireland Helpline 1800 409119
4
29118 rev2
8/8/06
13:05
Page 5
FEATURES AND CONTROLS
5
www.morphyrichardsaudio.com
4
29118 rev2
8/8/06
13:05
Page 6
FEATURES AND
CONTROLS
33 From main jack
34 Volume knob
1
‘NXT’ speaker
2
Speaker stand
3
FM antenna
4
AUX jack ‘R’
5
AUX jack ‘L’
6
Standby button
7
CD door open/close button
8
LCD display window
D ESP indicator (Electronic Shock
Protection)
9
CD door
E
Stereo indicator
10 Search/skip/tuning down button
F
Volume high/low indicator
11 Search/skip/tuning up button
G Track/number/time indicator
35 AC input
LCD DISPLAY
WINDOW A
A
Find indicator
B
Timer indicator
C Album number indicator
12 CD stop button
A
13 CD play/pause button
14 Sub woofer socket
15 Phone socket
16 Memory card indicator
17 Memory card socket
18 USB in socket
19 USB in indicator
20 Volume down button
21 Volume up button
22 Preset/folder down button
23 Preset/folder up button
24 Memory/clk.-ADJ button
25 Function button
26 Band button
27 Mounting hole
28 Back-up battery door
29 Main unit stand
30 Standby indicator
31 Power button
32 Speaker output socket
5
UK Helpline 0870 060 2614
Ireland Helpline 1800 409119
6
29118 rev2
B
8/8/06
13:05
Page 7
REMOTE CONTROL
1
Standby button
2
Mute button
3
Preset/folder up button
4
Preset/folder down button
5
Random button
6
Skip/search/tuning down button
7
Info button
8
Volume down button
9
Function button
Do not mix normal batteries
with rechargeable batteries,
when the batteries become
weak, remote control will not
function and replace with new
batteries.
OPERATING THE
UNIT
10 Band button
11 Mono/ST./find/ESP button
12 Repeat button
When you first plug the unit into
the AC outlet, then press the
power button on the woofer, the
unit will be in standby mode, the
POWER/STANDBY indicator is
red. You can now press the
POWER/STANDBY button on
the unit (or on the remote
control) to switch the unit ON.
The POWER/STANDBY
indicator charges
to green. Pull the B
AC plug out of the
wall socket if you
want to switch off
completely.
13 Cd player/pause button
14 EQ button
15 Skip/search/tuning up button
16 Stop button
17 Mem/C-ADJ button
18 Timer button
19 Sleep button
20 Number search button
21 Volume button
Putting the
batteries into the
remote control C
Press down the compartment
cover, and slide the cover off to
open the compartment. Place
the two (UM4), (AAA), (R03)
batteries in the remote control
according to the polarity
markings (“+” and “-”) inside the
compartment and on the
batteries. Place the cover over
the compartment, press down
lightly, and push it upwards until
it snaps on.
C
Note: Remove the batteries
from the remote control if not in
use fo a long period of the time.
7
UK Helpline 0870 060 2614
Repwlw
acwe.meonrpt hPyarrictsha0r8d7s0au1d5i7o.6c6o4m5
Ireland Helpline 1800 409119
6
29118 rev2
1
8/8/06
13:05
Page 8
STANDBY
TIMER SETTING
Press the power button on the
woofer cabinet, unit is in
standby mode.
(on the remote)
1
After adjusting clock, press the
TIMER button for a few
seconds,
‘ON and 00:00’
appears on the display and the
HOUR digit flashes. D.
2
Press STANDBY button on the
CD unit (or remote) to switch the
unit on.
3
Select the sound source (CD,
AUX, CARD-USB or TUNER) by
pressing FUNCTION button.
2
Press the
SEARCH/SKIP/TUNING (UP or
DOWN) button to adjust it.
The corresponding display will
light up.
3
Press the TIMER button again,
the MINUTE digit will start
flashing, adjust it by pressing
SEARCH/SKIP/TUNING (UP or
DOWN) button.
4
Press the TIMER button once
more to confirm/order TIMER
ON time.
5
After adjusting ‘TIMER ON’, ‘
OFF’ appears on the display and
the HOUR digit flashes. E
6
Repeat the above steps 2 to 3,
then press the TIMER button
once more to confirm/order
TIMER OFF time.
7
Now the TUNER or CD appears
on the display with flashing,
adjust ‘TUNING’ or ‘CD’ by
pressing the
SEARCH/SKIP/TUNING (UP or
DOWN) button.
8
Press the TIMER button again,
the timer ‘VOL 15’ indicator
appears on the display and
flashes, adjust the timer volume
high or low by the
SEARCH/SKIP/TUNING (UP or
DOWN) button.
9
Each enable state as shown
above will be cleared if the
button is not pushed in 10
seconds.
4
Adjust the VOLUME with the
volume (UP or DOWN) button
5
Set the preset equaliser (PASS,
CLASSIC, ROCK, POP, OR
JAZZ) with the EQ button on the
remote.
6
Press STANDBY button again on
the CD to turn off the unit.
CLOCK SETTING
In the standby mode.
1
Press and hold MEMORY/CLKADJ. button until the time
displays 24-hour digit flashing.
2
Press SEARCH/SKIP/TUNING
(DOWN or UP) button to adjust
12 hour or 24 hour digit.
3
Press MEMORY/CLK-ADJ.
button again, the time display
HOUR digit flashes, press
SEARCH/SKIP/TUNING (DOWN
or UP) button to adjust HOUR
digit; Press MEMORY/CLK-ADJ
button once more, the MINUTE
digit flashes, adjust it by the
SEARCH/SKIP/TUNING (UP or
DOWN) button.
4
5
6
7
Press the MEMORY/CLK-ADJ
button again to confirm the
time.
Each enable state as shown
above will be cleared if the key
is not pushed in 10 seconds.
In the CD or TUNER mode.
Press and hold the
MEMORY/CLK-ADJ button a
few seconds. To check the
current time.
D
E
10 After adjusting ‘TIMER ON” and
‘TIMER OFF’, press the TIMER
button. ‘
‘ appears on the
display.
11 The unit will be switched on
automatically at ‘TIMER ON’ and
start playing and the unit will be
switched off automatically at
‘TIMER OFF’.
Note: N.B Not available with
USB or SD.
UK Helpline 0870 060 2614
Ireland Helpline 1800 409119
29118 rev2
8/8/06
13:05
Page 9
EQ CONTROL
2
(on the remote) F
EQ shows the present sound
tone.
F
Select the desired wave band
range with the
SEARCH/SKIP/TUNING (UP or
DOWN) button.
When you press the EQ button
on the remote, the sound tone
changes.
G
TO SET SLEEP
FUNCTION
1
2
(for remote handset) G
If you want to fall asleep to
music, press SLEEP button on
the remote.
H
You may adjust the Radio or CD
player sleep function to play
from 90, 80, 70, up to 10
minutes of music before shutting
itself off automatically.
Band select
To tune for a weak stations, use
manual tuning by pressing
SEARCH/SKIP/TUNING (UP or
DOWN) button continuously until
you read the correct frequency
or the reception at its best.
FUNCTION SELECT
H
Pressing this button alters the
audio play out source. Display
changes as below.
Mono/Stereo select
ESP Function
Only in FM mode.
This is the electronic shock
protection function prevents the
CD’ skipping’ if the system is
accidentally knocked during
play.
1
In CD mode 40 sec.
2
In MP3 mode 100 sec.
1
When you want to select FM
stereo station, press
MONO/ST./FIND/ESP button.
When you receive a FM stereo
station the “
” indicator
will appear on the display, you
can receive FM stereo
tramission.
2
When you press the
MONO/ST./FIND/ESP button
again, the FM STEREO indicator
will turn off and switch to
MONO FM status.
HINT: Please deselect the ESP
function if the disc play has an
poor effect on ESP condition.
RADIO OPERATION
Automatic tuning
Press the FUNCTION button to
the TUNER mode on the unit (or
remote control), you can select
the radio operation.
1
9
1
Press the
SEARCH/SKIP/TUNING (UP or
DOWN) button for a second of
more, then release the button.
The tuner will automatically
search the first station of
sufficient signal strength.
2
Repeat above procedure if you
wish to select another station.
Press the BAND button to select
wave band range appearing on
the display.
wwww
.m.m
oroprhpyhryicrihcahradrsdasu.cdoiom.com
9
8
29118 rev2
8/8/06
13:05
Page 10
Programming
preset stations
FM Antenna
Make sure the FM lead wire
antenna is unwound and
extended to its full length. It
may be necessary to vary the
direction of this wire antenna
unit you find the position that
provides the best reception for
your favourite FM stations.
You can also preset stations of
your choice and store up to 10
MW and 30 FM stations in its
memory. To store your selected
broadcasting stations:
1
Press the BAND button on the
unit (or remote) to toggle
between MW and FM to make
your selection.
CD/MP3 OPERATION
Listening to compact
disc CD/MP3
2
Tune to the required station.
3
Press the MEMORY/CLK-ADJ
button.
1
Press FUNCTION until display
shows CD.
4
Press the PRESET/FOLDER (UP
or DOWN) button for your
desired station number.
2
5
Press the MEMORY/CLK-ADJ
again to confirm your selection.
IF you want to enjoy CD/MP3,
press the CD DOOR
OPEN/CLOSE button on the
unit first, then the CD door will
open automatically I.
3
6
To program more stations into
memory, repeat the above steps
2 to 5.
Insert the CD/MP3 disc into the
CD compartment, press the CD
DOOR OPEN/CLOSE button
again, then the CD door will
close automatically.
7
To change the stored preset
stations, repeat the above steps
2 to 5.
NOTE:
1
This unit can play CD, CD-R,
CD-RW and MP3 discs.
2
If no disc or can’t read TOC, NO
DISC will be displayed J.
NOTES:
1
Storing a new station into a
preset location will erase the
previously stored station in that
location.
2
Power off/failure or power cord
disconnection will clear the
memory of all preset stations.
Perform the stations presetting
procedures again to store the
stations.
Selecting the preset
stations
1
2
3
9
I
J
Playing the entire
CD/MP3
1
Playback will start by pressing K
PLAY/PAUSE. Playback starts
with the first track. The display
shows the current track number
and its elapsed time K.
2
To interrupt playback, press
PLAY/PAUSE button. The time
elapsed indicator will flash. L.
Press the BAND button to
select the desired band.
3
To resume playback, press the
PLAY/PAUSE button again.
Press PRESET/FOLDER (UP or
DOWN) button to select the
desired preset station number.
4
To stop playback, press the
STOP button.
L
The numeric location of that
preset stations displayed along
with the corresponding
frequency.
UK Helpline 0870 060 2610
Ireland Helpline 1800 409119
29118 rev2
8/8/06
13:05
Page 11
Card-USB
operation
M
3
Press the
SEARCH/SKIP/TUNING (UP or
DOWN) button during pause
condition, then skips to the next
track (or the head of the current
track) and keep pausing, and
the ‘00:00’ appears on the
display and flashes Q.
NOTE:
4
Press the PLAY/PAUSE button
to start playing.
The unit can play MP3 only in
this mode.
5
Press the MONO/ST./FIND/ESP
button once, the ESP function
will turn on and the ESP
indicator appears on the display
R.
6
Press the MONO/ST./FIND/ESP
button again, the ESP function
will turn off and the ESP
indicator disappears on the
display.
1
Insert the memory card/USB
card.
2
Press FUNCTION button on the
unit to select the CARD-USB
mode, the unit will automatically
read the total folders and the
number of the tracks M.
N
1
O
2
The volume of SD/MMC card is
unlimited. But it can not support
some brand flash disc USB hard
disk and ipod 40GB
3
It can support USB version 1.1
and 2.0.
P
track (or the head of the current
track).
Playing the entire
card
Q
1
2
R
Playback will start by pressing
PLAY/PAUSE. Playback starts
with the first track. The display
shows the current track number
and its elapsed time N.
To interrupt playback, press
PLAY/PAUSE button. The time
elapsed indicator will flash O.
3
To resume playback press the
PLAY/PAUSE again.
4
To stop playback, press the
STOP button.
LISTEN TO THE
DESIRED TRACK
S
MP3
1
Press the PRESET/FOLDER (UP
or DOWN) button, the album
number will be changed; press
the SEARCH/SKIP/TUNING (UP
or DOWN) button, the track
number will be changed.
2
Press the MONO/ST./FIND/ESP
button once, TITLE indicator is
displayed and “
” flashed. (In
the case of no name in the disc,
NONE is displayed). Press the
SEARCH/SKIP/TUNING (UP or
DOWN) to select the TITLE A to
Z and 0-9 S (USB -MEMORY
card w/o this function).
3
Press the MONO/ST./FIND/ESP
button twice, ALBUM name is
displayed, (in that case if no
name in the disc. UN-KNOWN is
displayed). Press the
SEARCH/SKIP/TUNING (UP or
DOWN) to select ALBUM name
T.
4
When the desired track is
displayed, press the
PLAY/PAUSE button to start
playing the track.
CD
1
Q
2
Press the
SEARCH/SKIP/TUNING (UP or
DOWN) button on the unit (or
remote control) until the required
track number appears on the
display, then press the
PLAY/PAUSE button to start
playing P.
During playing, press the
SEARCH/SKIP/TUNING(UP or
DOWN) button, skip to the next
www.morphyrichardsaudio.com
10
29118 rev2
8/8/06
13:05
5
Page 12
Press the MONO/ST./FIND/ESP
button more than 1 sec, if the
MP3 file is written with ‘ID3’ it
will automatically up to 64 letters
of ‘TITLE NAME’ ‘ARTIST NAME’
or ‘ALBUM NAME’ which will
scroll from right to left on the
display.
REPEAT PLAY
U
INTRO PLAY
(on the remote control)
(on the remote control)
CD
1
Press REPEAT button once on
the remote, REPEAT is
displayed, CD will play the
current track repeatedly U.
2
Press the REPEAT button twice,
REPEAT ALL is displayed. CD
will play all tracks repeatedly V.
3
Press the REPEAT button a third
time, REPEAT function will be
off.
V
W
X
Z
Press the INTRO button on the
remote, then INTRO is displayed.
Into will play the first 10 seconds
of each track Z.
2
Press INTRO button twice, then
resume to normal play.
PROGRAM MODE
Listen to the songs selected.
User can program up to 64
favourite songs. Program mode
is activated while in stop mode.
MP3
1
Y
1
2
3
4
A1
1. How to program
Press the REPEAT button once
on the remote, then REPEAT is
displayed. It will play the current
track repeatedly.
CD
1
Press the REPEAT button twice,
REPEAT ALL is displayed will
plays all tracks repeatedly the
current album W.
Press the MEMORY/CLK-ADJ
button, shift to PROGRAM mode
A1.
2
Press the REPEAT button the
third time , then REPEAT
ALBUM is displayed. It will play
repeatedly the current album X.
Press the
SEARCH/SKIP/TUNING (UP or
DOWN) button, the track number
will be changed.
3
Press the MEMORY/CLK-ADJ
button, to confirm the track
number.
Press the REPEAT button four
times, then REPEAT function will
be off.
RANDOM PLAY
MP3
1
Press the MEMORY/CLK-ADJ
button, shift to PROGRAM
mode. The album number is
flashing. A2
2
Press the
SEARCH/SKIP/TUNING button,
the album number will be
charged.
3
Press the MEMORY/CLK-ADJ
button, the track number is
flashing A3.
(on the remote control)
A2
A3
11
1
2
Press the RANDOM button on
the remote, then RANDOM is
displayed it will play randomly
Y.
Press the RANDOM button
again, then resume to normal
play.
UK Helpline 0870 060 2614
Ireland Helpline 1800 409119
29118 rev2
8/8/06
13:05
Page 13
4
Press the
SEARCH/SKIP/TUNING button,
the track number will be
changed.
5
Press the MEMORY/CLK -ADJ
button to confirm the track
number.
headphones (not included)
insert the 3.5mm mini-stereo
plug from the headphones into
the phone jack located on the
right side of the unit. The
external speakers are
automatically disconnected
when headphones are used.
2. Program play
MEMORY BACK -UP
After programming songs, press
the PLAY/PAUSE button and it
will play the songs as you
programmed.
To insert 1.5V, UM-4, AAA or
equivalent batteries in the
battery compartment of the
unit. It is used to back-up the
memory of the main CPU.
3. Cancel program
COMPACT DISC
A program is erased if you:
Press MEMORY/CLK-ADJ
button, then press STOP button
in stop mode. OR switch the
unit OFF. Or open the CD door.
MUTE SETTING
(on the remote control)
2
When you press the MUTE
button once on the remote, the
volume level will flash and the
audio output will be temporary
stop A4.
Press MUTE button again, the
volume level and the audio
output will return to normal.
LINE-INPUT FOR
EXTERNAL AUDIO
SOURCE
1
2
Press FUNCTION button until
‘AUX’ indicator lights up on the
display. This unit can input
analogue audio through AUX
jacks.
Always use compact discs
bearing the mark shown A5.
2
Notes on handling discs A6
•
Removing the disc from its
storage case and load it.
•
Do not touch the reflective
record surface.
•
Do not stick paper or write
anything on the surface.
•
Do not bend the disc.
3
Storage
•
Store the disc in its case.
•
Do not expose discs to direct
sunlight or high temperatures,
high humidity or dusty places.
4
Cleaning a disc A7
•
Should the disc become soiled,
wipe off dust, dirt and
A7
fingerprints with a soft cloth.
•
The disc should be cleaned
from the centre to the edge.
•
Never use benzene, thinners,
record cleaner fluid or anti static
spray.
•
Be sure to close the CD door
so the lens is not contaminated
by dust.
•
Do not touch the lens.
Use a cable with RCA plug to
connect external source.
LISTEN TO THE
MUSIC BY USING
HEADPHONES
A5
1
NOTE: Setting a new program,
will clear the existing one.
1
A4
A6
Stereo headphone jack is
provided for private listening. To
listen to the unit with
www.morphyrichardsaudio.com
12
29118 rev2
8/8/06
13:05
Page 14
SPECIFICATION
Power supply:
230V-50Hz
Output power:
5 Watts x 2 + 20 Watts
Unit dimension:
210 (W) x165 (D) x 220.5 (H) mm
Speaker box dimension:
139 (W) x 119 (D) x 220.5 (H) mm
Subwoofer dimension:
160 (W) x 347 (D) x 260 (H) mm
Net.Weight.:
7.2kg
Radio Section
Frequency range:
FM 87.5-108 MHz
MW 522-1620 kHz
Compact disc section
Optical pickup:
3-Beam laser
Frequency response:
100 Hz-16 KHz
Specification subject to change without further
notice.
Dripping warning:
Trademark of New
Transducers Limited Ventilation warning:
13
‘The product shall not be exposed to dripping or
splashing and that no objects filled with liquids,
such as vases, shall be placed on the product.’
“The normal ventilation of the product shall not
be impeded for intended use.’
www.morphyrichardsaudio.com
29118 rev2
8/8/06
13:05
Page 15
GUARANTEE
Morphy Richards products are
manufactured to internationally
accepted quality standards. In
addition to your statutory rights.
Morphy Richards guarantee your
product to be free from
manufacturing and component
defects for a period of TWO
YEARS from date of purchase.
If your product proves to be
defective within 28 days of
purchase, your Morphy Richards
dealer from who the product
was purchased will be pleased
to replace it free of charge.
Should your product develop a
defect within the guarantee
period but after the replacement
period, please return the
product to the following
address, together with the proof
of purchase, brief details of the
symptoms and your own name
and address
Your post office will provide a
certificate of posting. The
product will be repaired and
returned you promptly.
For electrical products
sold within the European
Community. At the end of
the electrical products
useful life it should not be
disposed of with
household waste.
Please recycle where
facilities exist. Check with
your Local Authority or
retailer for recycling advice
in your country.
UK Helpline 0870 060 2614
Ireland Helpline 1800 409119
14
29118 rev2
8/8/06
13:05
Page 16
The After Sales Division
Morphy Richards Ltd
Mexborough, South Yorkshire,
England, S64 8AJ
Morphy Richards products are intended for household use only.
Morphy Richards has a policy of continuous improvement in product quality and
design. The company, therefore reserves the right to change the specification of its
models at any time.
Helpline (office hours)
UK 0870 060 2614
Republic of Ireland 1800 409119
29118 Rev 2 08/06
For details of other products in the Morphy Richards range please see our website . . .
15
www.morphyrichardsaudio.com