1
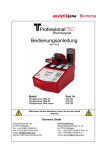
Mastercycler / Mastercycler gradient
Bedienungsanleitung
Operating Manual
Mode d'emploi
Istruzioni d'impiego
Manual de Instrucciones
Certificate
Authorized Thermal Cycler
This instrument, Serial No. 5331
, is an Authorized Thermal Cycler.
This instrument, Serial No. 5333
, is an Authorized Thermal Cycler.
Its purchase price includes the up-front fee component of a license under United States Patent
Nos. 4,683,195, 4,683,202 and 4,965,188, owned by Roche Molecular Systems, Inc., and under
corresponding claims in patents outside the United States, owned by F. Hoffmann-La Roche Ltd.,
covering the Polymerase Chain Reaction ("PCR") process, to practice the PCR process for
internal research and development using this instrument. The running royalty component of that
license may be purchased from Applied Biosystems or obtained by purchasing Authorized
Reagents. This instrument is also an Authorized Thermal Cycler for use with applications licenses
available from Applied Biosystems. Its use with Authorized Reagents also provides a limited PCR
license in accordance with the label rights accompanying such reagents. Purchase of this product
does not itself convey to the purchaser a complete license or right to perform the PCR process.
Further information on purchasing licenses to practice the PCR process may be obtained by
contacting the Director of Licensing at Applied Biosystems, 850 Lincoln Centre Drive, Foster City,
California, 94404, USA.
No rights are conveyed expressly, by implication or estoppel to any patents on real-time methods,
including but not limited to 5' nuclease assays, or to any patent claiming a reagent or kit.
Applied Biosystems does not guarantee the performance of this instrument.
B 5331 900.062-04/0602
Bedienungsanleitung . . . . . . . . . . . . . . . . . . . . . . . . . . . . . . . . . . . . . . . . . . . . . . . . . . . . . . . . . . . . . . . . . . 1
Operating Manual. . . . . . . . . . . . . . . . . . . . . . . . . . . . . . . . . . . . . . . . . . . . . . . . . . . . . . . . . . . . . . . . . . . . . 61
Mode d’emploi . . . . . . . . . . . . . . . . . . . . . . . . . . . . . . . . . . . . . . . . . . . . . . . . . . . . . . . . . . . . . . . . . . . . . . 123
Istruzioni d'impiego . . . . . . . . . . . . . . . . . . . . . . . . . . . . . . . . . . . . . . . . . . . . . . . . . . . . . . . . . . . . . . . . . . 185
Manual de Instrucciones . . . . . . . . . . . . . . . . . . . . . . . . . . . . . . . . . . . . . . . . . . . . . . . . . . . . . . . . . . . . . . 191
EG-Konformitätserklärung . . . . . . . . . . . . . . . . . . . . . . . . . . . . . . . . . . . . . . . . . . . . . . . . . . . . . . . . . . . . 196
EC Conformity Declaration
Déclaration de conformité
Dichiarazione di conformità CE
Declaración de conformidad CEE
Nachdruck und Vervielfältigung – auch auszugsweise – nur mit Genehmigung.
No part of this publication may be reproduced without the prior permission of the copyright owner.
Toute reproduction, complète ou partielle et quel que soit le proèdè est interdiete,
sauf autorisation expresse de notre part.
Ristampa e riproduzione – anche di estratti – solo con autorizzazione.
Reimpresión y copia – incluso parciales – sólo con autorización.
Copyright 2002 by Eppendorf AG, Hamburg
Mastercycler is a registered trademark – US Reg. No. 2,273,536 – Canadian Reg. No. TMA510572
Mastercycler® gradient is protected by US-Patent No. 6,210,958
Inhaltverzeichnis
1
Einführung . . . . . . . . . . . . . . . . . . . . . . . . . . . . . . . . . . . . . . . . . . . . . . . . . . . . . . . . . . . . . . . . . . . 3
2
Sicherheitshinweise . . . . . . . . . . . . . . . . . . . . . . . . . . . . . . . . . . . . . . . . . . . . . . . . . . . . . . . . . . . . 4
3
3.1
3.2
3.3
Installation. . . . . . . . . . . . . . . . . . . . . . . . . . . . . . . . . . . . . . . . . . . . . . . . . . . . . . . . . . . . . . . . . . . .
Lieferumfang. . . . . . . . . . . . . . . . . . . . . . . . . . . . . . . . . . . . . . . . . . . . . . . . . . . . . . . . . . . . . . . . . . .
Aufstellung . . . . . . . . . . . . . . . . . . . . . . . . . . . . . . . . . . . . . . . . . . . . . . . . . . . . . . . . . . . . . . . . . . . .
Inbetriebnahme. . . . . . . . . . . . . . . . . . . . . . . . . . . . . . . . . . . . . . . . . . . . . . . . . . . . . . . . . . . . . . . . .
5
5
5
5
4
4.1
4.2
4.3
Technische Beschreibung . . . . . . . . . . . . . . . . . . . . . . . . . . . . . . . . . . . . . . . . . . . . . . . . . . . . . . .
Geräteaufbau . . . . . . . . . . . . . . . . . . . . . . . . . . . . . . . . . . . . . . . . . . . . . . . . . . . . . . . . . . . . . . . . . .
Tastenbeschreibung . . . . . . . . . . . . . . . . . . . . . . . . . . . . . . . . . . . . . . . . . . . . . . . . . . . . . . . . . . . . .
Anzeige. . . . . . . . . . . . . . . . . . . . . . . . . . . . . . . . . . . . . . . . . . . . . . . . . . . . . . . . . . . . . . . . . . . . . . .
6
6
7
8
5
5.1
5.2
5.3
5.3.1
5.3.2
5.3.3
5.3.4
5.3.5
5.4
5.4.1
5.4.2
5.4.3
5.4.4
5.5
5.6
Beschreibung der Menüs. . . . . . . . . . . . . . . . . . . . . . . . . . . . . . . . . . . . . . . . . . . . . . . . . . . . . . . . 9
Main-Menu . . . . . . . . . . . . . . . . . . . . . . . . . . . . . . . . . . . . . . . . . . . . . . . . . . . . . . . . . . . . . . . . . . . . 9
Start . . . . . . . . . . . . . . . . . . . . . . . . . . . . . . . . . . . . . . . . . . . . . . . . . . . . . . . . . . . . . . . . . . . . . . . . 10
FILES . . . . . . . . . . . . . . . . . . . . . . . . . . . . . . . . . . . . . . . . . . . . . . . . . . . . . . . . . . . . . . . . . . . . . . . 10
Edit . . . . . . . . . . . . . . . . . . . . . . . . . . . . . . . . . . . . . . . . . . . . . . . . . . . . . . . . . . . . . . . . . . . . . . . . . 10
Load . . . . . . . . . . . . . . . . . . . . . . . . . . . . . . . . . . . . . . . . . . . . . . . . . . . . . . . . . . . . . . . . . . . . . . . . 11
Standard . . . . . . . . . . . . . . . . . . . . . . . . . . . . . . . . . . . . . . . . . . . . . . . . . . . . . . . . . . . . . . . . . . . . . 11
New. . . . . . . . . . . . . . . . . . . . . . . . . . . . . . . . . . . . . . . . . . . . . . . . . . . . . . . . . . . . . . . . . . . . . . . . . 11
Delete . . . . . . . . . . . . . . . . . . . . . . . . . . . . . . . . . . . . . . . . . . . . . . . . . . . . . . . . . . . . . . . . . . . . . . . 11
OPTIONS . . . . . . . . . . . . . . . . . . . . . . . . . . . . . . . . . . . . . . . . . . . . . . . . . . . . . . . . . . . . . . . . . . . . 12
Editor . . . . . . . . . . . . . . . . . . . . . . . . . . . . . . . . . . . . . . . . . . . . . . . . . . . . . . . . . . . . . . . . . . . . . . . 12
Printer . . . . . . . . . . . . . . . . . . . . . . . . . . . . . . . . . . . . . . . . . . . . . . . . . . . . . . . . . . . . . . . . . . . . . . 13
Gradient . . . . . . . . . . . . . . . . . . . . . . . . . . . . . . . . . . . . . . . . . . . . . . . . . . . . . . . . . . . . . . . . . . . . . 14
GENERAL . . . . . . . . . . . . . . . . . . . . . . . . . . . . . . . . . . . . . . . . . . . . . . . . . . . . . . . . . . . . . . . . . . . 15
Lid . . . . . . . . . . . . . . . . . . . . . . . . . . . . . . . . . . . . . . . . . . . . . . . . . . . . . . . . . . . . . . . . . . . . . . . . . . 17
Incubate . . . . . . . . . . . . . . . . . . . . . . . . . . . . . . . . . . . . . . . . . . . . . . . . . . . . . . . . . . . . . . . . . . . . . 18
6
6.1
6.1.1
6.1.2
6.1.3
6.1.4
6.2
6.3
6.4
6.5
6.6
6.7
6.8
Bedienung . . . . . . . . . . . . . . . . . . . . . . . . . . . . . . . . . . . . . . . . . . . . . . . . . . . . . . . . . . . . . . . . . . .
Vorbereitungen . . . . . . . . . . . . . . . . . . . . . . . . . . . . . . . . . . . . . . . . . . . . . . . . . . . . . . . . . . . . . . . .
Probenbestückung . . . . . . . . . . . . . . . . . . . . . . . . . . . . . . . . . . . . . . . . . . . . . . . . . . . . . . . . . . . . .
Probenmenge . . . . . . . . . . . . . . . . . . . . . . . . . . . . . . . . . . . . . . . . . . . . . . . . . . . . . . . . . . . . . . . . .
Heizdeckel . . . . . . . . . . . . . . . . . . . . . . . . . . . . . . . . . . . . . . . . . . . . . . . . . . . . . . . . . . . . . . . . . . .
Blocktemperierung . . . . . . . . . . . . . . . . . . . . . . . . . . . . . . . . . . . . . . . . . . . . . . . . . . . . . . . . . . . . .
Gerät einschalten . . . . . . . . . . . . . . . . . . . . . . . . . . . . . . . . . . . . . . . . . . . . . . . . . . . . . . . . . . . . . .
Programm starten. . . . . . . . . . . . . . . . . . . . . . . . . . . . . . . . . . . . . . . . . . . . . . . . . . . . . . . . . . . . . .
Programmlaufzeit anzeigen . . . . . . . . . . . . . . . . . . . . . . . . . . . . . . . . . . . . . . . . . . . . . . . . . . . . . .
Programm unterbrechen. . . . . . . . . . . . . . . . . . . . . . . . . . . . . . . . . . . . . . . . . . . . . . . . . . . . . . . . .
Unterbrochenes Programm fortsetzen . . . . . . . . . . . . . . . . . . . . . . . . . . . . . . . . . . . . . . . . . . . . . .
Programm abbrechen . . . . . . . . . . . . . . . . . . . . . . . . . . . . . . . . . . . . . . . . . . . . . . . . . . . . . . . . . . .
Außer Betrieb nehmen . . . . . . . . . . . . . . . . . . . . . . . . . . . . . . . . . . . . . . . . . . . . . . . . . . . . . . . . . .
19
19
19
20
20
20
21
21
23
23
24
24
24
7
7.1
7.1.1
7.1.2
7.1.3
7.1.4
7.1.5
7.1.6
7.1.7
7.1.8
7.1.9
Programmierung. . . . . . . . . . . . . . . . . . . . . . . . . . . . . . . . . . . . . . . . . . . . . . . . . . . . . . . . . . . . . .
Beschreibung der Befehle . . . . . . . . . . . . . . . . . . . . . . . . . . . . . . . . . . . . . . . . . . . . . . . . . . . . . . .
CNTRL . . . . . . . . . . . . . . . . . . . . . . . . . . . . . . . . . . . . . . . . . . . . . . . . . . . . . . . . . . . . . . . . . . . . . .
Lid . . . . . . . . . . . . . . . . . . . . . . . . . . . . . . . . . . . . . . . . . . . . . . . . . . . . . . . . . . . . . . . . . . . . . . . . . .
T
Anwahl auch mit 1. . . . . . . . . . . . . . . . . . . . . . . . . . . . . . . . . . . . . . . . . . . . . . . . . . . . .
HOLD
Anwahl auch mit 2 . . . . . . . . . . . . . . . . . . . . . . . . . . . . . . . . . . . . . . . . . . . . . . . . . . . .
PAUSE
Anwahl auch mit 3 . . . . . . . . . . . . . . . . . . . . . . . . . . . . . . . . . . . . . . . . . . . . . . . . . . . .
GOTO
Anwahl auch mit 4 . . . . . . . . . . . . . . . . . . . . . . . . . . . . . . . . . . . . . . . . . . . . . . . . . . . .
SOUND Anwahl auch mit 5 . . . . . . . . . . . . . . . . . . . . . . . . . . . . . . . . . . . . . . . . . . . . . . . . . . . .
LINK
Anwahl auch mit 6 . . . . . . . . . . . . . . . . . . . . . . . . . . . . . . . . . . . . . . . . . . . . . . . . . . . .
END . . . . . . . . . . . . . . . . . . . . . . . . . . . . . . . . . . . . . . . . . . . . . . . . . . . . . . . . . . . . . . . . . . . . . . . .
25
25
25
26
26
28
28
28
28
28
29
1
Inhaltverzeichnis
2
7.2
7.2.1
7.2.2
7.3
7.4
7.5
7.6
7.6.1
7.6.2
7.6.3
7.6.4
7.6.5
7.6.6
Neues Programm erstellen . . . . . . . . . . . . . . . . . . . . . . . . . . . . . . . . . . . . . . . . . . . . . . . . . . . . . .
Programmieren . . . . . . . . . . . . . . . . . . . . . . . . . . . . . . . . . . . . . . . . . . . . . . . . . . . . . . . . . . . . . . .
Programm sichern . . . . . . . . . . . . . . . . . . . . . . . . . . . . . . . . . . . . . . . . . . . . . . . . . . . . . . . . . . . . .
Programm ändern . . . . . . . . . . . . . . . . . . . . . . . . . . . . . . . . . . . . . . . . . . . . . . . . . . . . . . . . . . . . . .
Programm mit Programmvorlage erstellen . . . . . . . . . . . . . . . . . . . . . . . . . . . . . . . . . . . . . . . . . .
Programm löschen . . . . . . . . . . . . . . . . . . . . . . . . . . . . . . . . . . . . . . . . . . . . . . . . . . . . . . . . . . . . .
Programmierbeispiele . . . . . . . . . . . . . . . . . . . . . . . . . . . . . . . . . . . . . . . . . . . . . . . . . . . . . . . . . .
Gradienten PCR (nur für Mastercycler gradient) . . . . . . . . . . . . . . . . . . . . . . . . . . . . . . . . . . . .
Verwendung der Befehle "Pause" und "Hold" (Beispiel: Hot Start PCR) . . . . . . . . . . . . . . . . . . . .
Das Temperaturinkrement (Beispiel: Touch Down PCR) . . . . . . . . . . . . . . . . . . . . . . . . . . . . . . . .
Das Zeitinkrement (Beispiel: Long PCR) . . . . . . . . . . . . . . . . . . . . . . . . . . . . . . . . . . . . . . . . . . . .
Regulierung der Temperiergeschwindigkeit (Beispiel: RAPD-PCR) . . . . . . . . . . . . . . . . . . . . . . .
Probenkühlung und angeschlossene PCR . . . . . . . . . . . . . . . . . . . . . . . . . . . . . . . . . . . . . . . . . .
29
30
32
33
35
35
36
36
37
38
38
39
40
8
Kurzanleitung . . . . . . . . . . . . . . . . . . . . . . . . . . . . . . . . . . . . . . . . . . . . . . . . . . . . . . . . . . . . . . . . 41
9
9.1
9.2
9.3
Personal card . . . . . . . . . . . . . . . . . . . . . . . . . . . . . . . . . . . . . . . . . . . . . . . . . . . . . . . . . . . . . . . .
Sicherheitshinweise . . . . . . . . . . . . . . . . . . . . . . . . . . . . . . . . . . . . . . . . . . . . . . . . . . . . . . . . . . . .
Bedienung. . . . . . . . . . . . . . . . . . . . . . . . . . . . . . . . . . . . . . . . . . . . . . . . . . . . . . . . . . . . . . . . . . . .
Programme bearbeiten . . . . . . . . . . . . . . . . . . . . . . . . . . . . . . . . . . . . . . . . . . . . . . . . . . . . . . . . . .
10
10.1
10.2
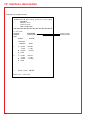
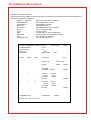
Schnittstellenbeschreibung. . . . . . . . . . . . . . . . . . . . . . . . . . . . . . . . . . . . . . . . . . . . . . . . . . . . . 45
Drucker- / PC-Anschluss. . . . . . . . . . . . . . . . . . . . . . . . . . . . . . . . . . . . . . . . . . . . . . . . . . . . . . . . . 45
Programmübertragung . . . . . . . . . . . . . . . . . . . . . . . . . . . . . . . . . . . . . . . . . . . . . . . . . . . . . . . . . . 48
11
Wartung . . . . . . . . . . . . . . . . . . . . . . . . . . . . . . . . . . . . . . . . . . . . . . . . . . . . . . . . . . . . . . . . . . . . . 49
12
12.1
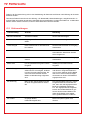
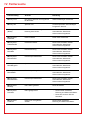
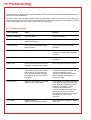
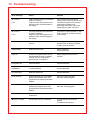
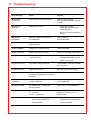
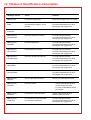
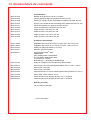
Fehlersuche . . . . . . . . . . . . . . . . . . . . . . . . . . . . . . . . . . . . . . . . . . . . . . . . . . . . . . . . . . . . . . . . . 50
Fehlermeldungen . . . . . . . . . . . . . . . . . . . . . . . . . . . . . . . . . . . . . . . . . . . . . . . . . . . . . . . . . . . . . . 50
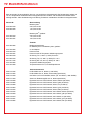
13
Technische Daten . . . . . . . . . . . . . . . . . . . . . . . . . . . . . . . . . . . . . . . . . . . . . . . . . . . . . . . . . . . . 55
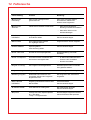
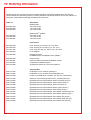
14
Bestellinformationen . . . . . . . . . . . . . . . . . . . . . . . . . . . . . . . . . . . . . . . . . . . . . . . . . . . . . . . . . . 56
15
Stichwortverzeichnis . . . . . . . . . . . . . . . . . . . . . . . . . . . . . . . . . . . . . . . . . . . . . . . . . . . . . . . . . . 58
43
43
43
44
1 Einführung
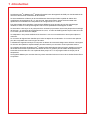
Die Eppendorf Mastercycler und Mastercycler gradient sind PCR-Geräte für molekularbiologische und biochemische Forschungslabore.
Die Temperierung erfolgt mit Peltierelementen, die sehr schnelle Temperaturänderungen von bis zu 3 °C pro
Sekunde ermöglichen. Dadurch können auch die Proben sehr schnell im Bereich von 4 °C bis 99 °C temperiert werden.
Für die Temperierung von Proben in unterschiedlichen Gefäßen mit verschiedenen Füllvolumina wurde ein
spezieller "tube control"-Modus entwickelt.
Der Thermoblock ist als Universalblock konstruiert, in den, ohne den Block austauschen zu müssen, Mikrotiterplatten im Format 8 x 12, 96 0,2 ml Eppendorf PCR-Gefäße, 77 dünnwandige 0,5 ml Eppendorf PCRGefäße oder weitere geeignete Gefäße einsetzbar sind.
Mit Hilfe des in situ Adapters können in situ Reaktionen auf bis zu 4 Objektträgern durchgeführt werden.
Zur Verhinderung von Kondensation ist das Gerät mit einem beheizbaren Deckel ausgerüstet, der für alle
Gefäße optimal angepasst ist.
Die Bedienung ist einfach und wird an einem integrierten, achtzeiligen Anzeigenfeld dargestellt. Der Versuchsablauf kann an einem angeschlossenen Drucker dokumentiert werden.
Als besonderen Vorteil besitzt der Mastercycler gradient eine Gradientenfunktion, der die Optimierung von
PCR-Versuchen wesentlich erleichtert. Der Gradient ermöglicht es, die Temperatur über den gesamten Thermoblock in einer Bandbreite von bis zu 20 °C zu variieren; er kann bei jedem Temperaturschritt programmiert
werden.
Die Mastercycler sind autorisierte Cycler mit Lizenz der Perkin-Elmer Corporation.
3
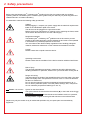
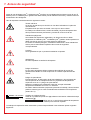
2 Sicherheitshinweise
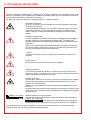
Vor Gebrauch des Mastercycler bzw. Mastercycler gradient lesen Sie bitte die Bedienungsanleitung vollständig durch. Der Mastercycler bzw. Mastercycler gradient darf nur zur Durchführung der PCR und verwandter Methoden im Forschungslabor eingesetzt werden.
Die folgenden Bestimmungen sind unbedingt zu beachten:
Elektrische Spannung:
Die Netzspannung muss mit den Angaben auf dem Typenschild übereinstimmen.
Das Gerät muss an eine geerdete Steckdose angeschlossen werden.
Bei Wartungsarbeiten, Sicherungswechsel und Reinigung muss das Gerät vorher ausgeschaltet und der Netzstecker gezogen werden.
Gefährliche Stoffe:
Explosive, brennbare und heftig reagierende Stoffe dürfen nicht im Mastercycler bzw. Mastercycler gradient temperiert werden. Das Gerät darf nicht in
explosionsgefährdeten Räumen betrieben werden.
Beim Umgang mit pathogenem Material, radioaktiven Stoffen oder anderen
gesundheitsgefährdenden Stoffen sind die entsprechenden Sicherheitsvorschriften zu beachten.
Flüssigkeiten:
Es ist sicherzustellen, dass keine Flüssigkeit in das Gerät eindringt.
Umgebung:
Die Lüftung des Geräts darf nicht behindert werden.
Verletzungsgefahr:
Die allgemein gültigen Vorsichtsmaßnahmen sind bei der Handhabung des
Geräts zu beachten. Beim Verschließen des Deckels ist besonders auf die
Hände zu achten.
Verbrennungsgefahr:
Thermoblock, Heizdeckelinnenseite und Reaktionsgefäße / Mikrotiterplatten
erreichen sehr schnell Temperaturen oberhalb 50 °C. Es besteht Verbrennungsgefahr!
Heizdeckel geschlossen halten, bis Temperaturen um 30 °C erreicht sind.
Keine Materialien (Gefäße, Mikrotiterplatten, Verschlüsse, Folien, Matten) verwenden, die nicht ausreichend temperaturbeständig (bis 120 °C) sind.
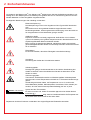
Caution: Hot Surface
Symbol auf dem Thermoblock:
Es warnt vor einem evtl. heißen Thermoblock (▼) oder einer heißen Deckelinnenseite (▲).
zeigt, dass bei Gradientenbetrieb die Temperatur auf
der rechten Seite heißer ist als auf der linken Seite.
Reparaturen sind dem Fachmann vorbehalten. Nur Original-Eppendorf-Ersatzteile verwenden.
4
3 Installation
3.1 Lieferumfang
Zum Lieferumfang gehören folgende Teile:
1 Mastercycler oder Mastercycler gradient
1 Netzkabel
1 Bedienungsanleitung
1 Personal card
1 Beutel PCR-Gefäße 0,2 ml (100 Stück)
1 Beutel PCR-Gefäße 0,5 ml (100 Stück)
3.2 Aufstellung
Es muss so viel Platz vorhanden sein, dass die seitlichen Lüftungsschlitze nicht verdeckt werden und Luft zur
Kühlung unter das Gerät gelangen kann. Es ist darauf zu achten, dass nichts unter dem Gerät liegt.
Für den Transport des Geräts ist kein spezielles Hilfsmittel erforderlich. Es kann auf beiden Seiten angehoben
und so getragen werden.
Platzbedarf:
Breite:
Tiefe:
Höhe:
26 cm
41 cm
27 cm
Netzanschluss: 1 Schutzkontaktsteckdose für den Mastercycler bzw. Mastercycler gradient.
Soll ein Drucker angeschlossen werden, wird ein zweiter Netzanschluss benötigt.
Der Lieferkarton sollte aufbewahrt werden, um bei einem eventuellen Reparaturfall das Gerät sicher verschikken zu können.
3.3 Inbetriebnahme
Der Klebestreifen über dem Heizdeckel wird entfernt und die unter dem Heizdeckel liegende Luftpolster-Folie
herausgenommen.
Der Mastercycler bzw. der Mastercycler gradient wird mit dem Netzkabel an das Netz angeschlossen.
Vor dem Einschalten muss sichergestellt werden, dass die korrekte Netzspannung für das Gerät vorhanden
ist. Dazu bitte die Angaben auf dem Typenschild (Kap. 4.1, Abb. 3) vergleichen.
Der Anschluss und die Inbetriebnahme eines Druckers sind in Kap. 10.1 beschrieben.
5
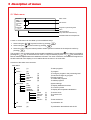
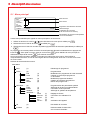
4 Technische Beschreibung
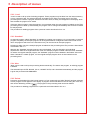
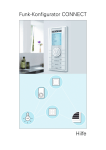
4.1 Geräteaufbau
1
2
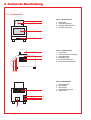
Abb. 1: Vorderansicht
1
2
3
4
Heizdeckel
Verriegelungsknopf
Anzeige und Bedienfeld
Personal card-Leser
3
4
1
2
3
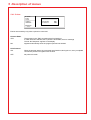
Abb. 2: Seitenansicht
1
2
3
4
5
6
Heizdeckel
Thermoblock (nicht sichtbar)
Lüftungsschlitze
Helligkeitsregler
PC-Anschlussbuchse
Druckeranschlussbuchse
6 54
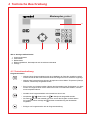
Abb. 3: Rückansicht
1
2
3
4
5
6
1
2
3
4
5
Lüftungsschlitze
Netzschalter
Sicherungen
Netzanschlussbuchse
Typenschild
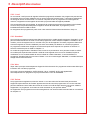
4 Technische Beschreibung
Mastercycler gradient
5
1
2
3
4
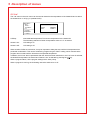
Abb. 4: Anzeige und Bedienfeld
1
2
3
4
5
Programmiertasten
Cursortasten
Bedientasten
Zifferneingabeblock, Dezimalpunkt und Vorzeichenumkehrtaste
Anzeige
4.2 Tastenbeschreibung
Programmiertasten
– Während eines Programmablaufs wird durch Betätigen der Taste die ungefähre Laufzeit
und die Uhrzeit für das voraussichtliche Ende des Programms für 5 Sekunden angezeigt.
– Während der Programmierung können die Optionen zu dem Befehl "Temperatur" (Rampe,
Gradient, Inkremente) ausgewählt werden.
– Zum Löschen von Programmzeilen, Zahlen oder Buchstaben oder Zurücksetzen von Parametern. Ein längerer Druck auf die Taste löscht nicht nur einzelne Buchstaben, sondern
einen kompletten Namen.
– Auswahl eines Programmbefehls oder Auswahl aus einer Liste.
– Anstelle der
/
-Tasten kann mit
ein Menüpunkt ausgewählt werden.
– Die Taste
wird für die Auswahl aus Listen und für die Eingabe von Buchstaben
für Programmnamen benötigt. Mit
wird die Auswahlrichtung der Buchstaben
umgekehrt.
– Einfügen von Programmzeilen bei der Programmerstellung.
7
4 Technische Beschreibung
Cursortasten
Der Cursor wird in der Anzeige als dunkles Feld dargestellt.
– Soll ein Menü aufgerufen werden, muss der Cursor auf das Menü bewegt und die Wahl
anschließend mit
bestätigt werden.
– Der Cursor wird auch benutzt, um in Eingabefelder zu springen oder zwischen
Eingabefeldern zu wechseln. Eingaben müssen nicht zusätzlich mit
bestätigt
werden, sie sind sofort gespeichert.
Bedientasten
– Zum Verlassen eines Menüs oder Rückkehr in die nächsthöhere Menüebene.
– Nach dem Start eines Programms kann die Darstellung des Programmablaufs verlassen werden, um z. B. in der Programmierebene zu arbeiten.
– Ein mit dem Cursor ausgewähltes Menü wird aufgerufen.
– Eine Eingabe wird abgeschlossen.
– Zum Schnellstart für ein Programm aus der Bearbeitungsebene (Menü "FILES/Edit").
Soll ein anderes Programm gestartet werden, muss das Menü "Start" benutzt werden.
– Zum Abbrechen oder Unterbrechen eines Programms.
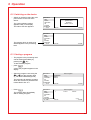
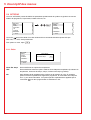
4.3 Anzeige
Netzschalter auf der Geräterückseite (Kapitel 4.1, Abb. 3.2) einschalten. In der Anzeige erscheinen kurz der
Gerätename und die installierte Softwareversion.
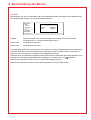
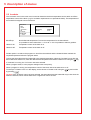
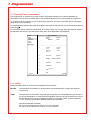
Danach wird das Main-Menu angezeigt:
Main-Menu
Start
FILES . .
OPTIONS . .
Lid
Incubate
STANDARD
– –/25.0°
Menüfeld
❋❋❋
MASTERCYCLER ❋❋❋
gradient 5331
eppendorf
Version ❋.❋❋.❋❋
Lid:105°
10:22:06
Programmierfeld
Die achtzeilige Anzeige ist in zwei Bereiche aufgeteilt. Im Menüfeld links werden zur Auswahl stehende Programme angezeigt. In dem Programmierfeld werden die Programmierungen vorgenommen und die Geräteparameter eingestellt.
8
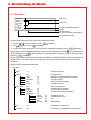
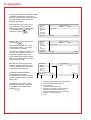
5 Beschreibung der Menüs
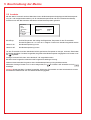
5.1 Main-Menu
Menüname
Main-Menu
Start
FILES . .
OPTIONS . .
Lid
Incubate
STANDARD
– –/25.0°
Untermenüs
Lid:105°
10:22:06
Programm in Bearbeitungsebene
Uhrzeit
Deckeltemperatur
(nur wenn der Deckel eingeschaltet ist)
Soll-/Ist-Blocktemperatur
Ein Menü oder Untermenü kann auf drei Arten aufgerufen werden:
1. Mit den
2. Mit
/
-Tasten auswählen und mit
auswählen und mit
bestätigen.
bestätigen.
3. Mit interner Positionsnummer (im Text in Klammern dargestellt) auswählen und mit
bestätigen.
Das Programm, das in der Bearbeitungsebene steht, kann durch Drücken der Taste
sofort gestartet werden. Ein Menü wird mit
wieder verlassen. Um das Main-Menu zu erreichen, kann es erforderlich sein,
mehrfach
zu betätigen.
Menüs, die in Großbuchstaben geschrieben sind, sind Menüs mit weiteren Untermenüs. Zur Orientierung wird
der Menüname in der linken Hälfte der Anzeige oder als Überschrift über dem Menü oder als Untermenü
angezeigt.
Übersicht über die gesamte Menüstruktur:
Main-Menu
Start
(1)
FILES . .
(2)
Edit
Load
Standard
New
Delete
OPTIONS . .
(3)
Editor
Printer
Gradient
GENERAL . .
Programme starten
Programmieren
Programm in Bearbeitungsebene ändern
Beliebiges Programm laden und ändern
Programmvorlage
Neue Programme erstellen
Programme löschen
(1)
(2)
(3)
(4)
(5)
(1)
(2)
(3)
(4)
Clock
Remote
Sound
Etc
VALID . .
Systemeinstellungen
Zusatzfunktionen anzeigen
Anschluss eines Druckers
Anzeige der Temperaturverteilung
(1)
(2)
(3)
(4)
(5)
Einstellung der Uhr
Anschluss eines PC’s
Ton
Geräteprüfung
Lid
(4)
Heizdeckel vortemperieren
Incubate
(5)
Thermoblock und Heizdeckel vortemperieren
9
5 Beschreibung der Menüs
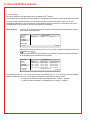
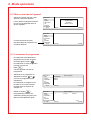
5.2 Start
Aus dem "Start"-Menü heraus können nur Programme gestartet werden.
Das in der Bearbeitungsebene angezeigte Programm kann direkt durch Drücken von
werden (1).
Soll ein abgespeichertes Programm gestartet werden, wird es nach Drücken von
aus der angezeigten Liste angewählt (2) und mit
bestätigt.
gestartet
mit den Cursortasten
Das "Start"-Menü hat keine Unterprogramme.
Main-Menu
Start
FILES . .
OPTIONS . .
Lid
Incubate
STANDARD
– –/25.0°
Bearbeitungsebene
(1)
(2)
Main-Menu
Start
FILES . .
OPTIONS . .
Lid
Incubate
STANDARD
– –/25.0°
STANDARD
TEST1
TEST2
Main-Menu
Start
FILES . .
OPTIONS . .
Lid
Incubate
Running/STANDARD
95.0/94.7°
Main-Menu
Start
FILES . .
OPTIONS . .
Lid
Incubate
Running/TEST2
– –/25.0°
5.3 FILES
Im Menü "FILES" werden Programme geändert, geladen, neu erstellt oder gelöscht.
Main-Menu
Start
FILES . .
OPTIONS . .
Lid
Incubate
STANDARD
– –/25.0°
FILES . .
Edit
Load
Standard
New
Delete
STANDARD
– –/25.0°
5.3.1 Edit
Mit dem Menü "Edit" werden bereits vorhandene Programme geändert. Das zu ändernde Programm kann
entweder schon in der "Bearbeitungsebene" stehen oder es wird mit dem Menü "Load" geladen und steht
dann in der Bearbeitungsebene. Dabei spielt es keine Rolle, ob das Programm aus dem internen Gerätespeicher oder von einer Personal card kommt.
Das geänderte Programm kann durch Drücken der Taste
überprüft werden, nachdem es unter einem
Programmnamen gespeichert wurde. Mit dem Speichern wird die Bearbeitungsebene nicht gelöscht. Die Programmdaten bleiben auch nach Ausschalten des Gerätes erhalten und werden nur durch Aufrufen der Untermenüs "New" oder "Standard" überschrieben.
Hinweis: Wird das geänderte Programm (ohne Speicherung unter einem anderen Namen) gestartet, gibt es
2 verschiedene Programme unter gleichem Namen (einmal im internen Speicher und einmal in der Bearbeitungsebene).
10
5 Beschreibung der Menüs
5.3.2 Load
Mit "Load" wird eine Liste der bestehenden Programme aufgerufen. Es können Programme aus dem internen
Speicher oder von der Personal card sein. Das ausgewählte Programm wird in die Bearbeitungsebene "Edit"
geladen. Befindet sich darin noch ein nicht gespeichertes Programm, erscheint eine Sicherheitsabfrage, die
ermöglicht, das Programm noch zu speichern.
Ist das nicht gewünscht, wird das Programm beim Laden des neuen Programms überschrieben. Da hierbei
automatisch die Bearbeitungsebene "Edit" aufgerufen wird, kann das Programm sofort geändert und zum
Prüfen gestartet werden.
Das Laden von Programmen von einer Personal card ist in Kapitel 9.3 beschrieben.
5.3.3 Standard
Zum Erstellen von neuen Programmen gibt es eine Programmvorlage mit dem Namen "Standard". Ein Programm muss nicht komplett neu geschrieben werden, sondern die Vorlage wird ergänzt oder geändert und
unter neuem Namen gespeichert. Auch jedes andere Programm, das sich im internen Speicher befindet,
kann als Programmvorlage benutzt werden.
Die Programmvorlage wird nach einer Sicherheitsabfrage in die Bearbeitungsebene geladen. Der Aufbau ist
in Kapitel 7.4 genauer beschrieben.
Die Programmvorlage "Standard" bleibt immer erhalten und kann nicht gelöscht werden. Sie kann jedoch individuell verändert werden. Dazu muss sie nach den Änderungen unter dem Namen "Standard" gespeichert
werden. Soll die ursprüngliche Programmvorlage wiederhergestellt werden, muss im Untermenü "Delete" das
Programm "Standard" gelöscht werden. Anschließend wird beim Aufrufen von "Standard" wieder die
ursprüngliche Vorlage in die Bearbeitungsebene geladen.
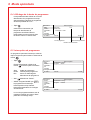
5.3.4 New
Mit "New" wird automatisch die Bearbeitungsebene aufgerufen. Ein vorhandenes Programm wird für die
Erstellung eines neuen Programms gelöscht.
Die unbedingt benötigten Eingaben CNTRL BLOCK, Lid =0°, NOWAIT AUTO, end werden automatisch vorgespielt und das Programm erhält den vorläufigen Namen UNNAMED.
5.3.5 Delete
Aus dem Gerätespeicher oder von der Personal card können Programme gelöscht werden. Nach Anwahl von
"Delete" wird eine Liste von Programmnamen angezeigt, aus der mit der Cursortaste ein Programm ausgewählt und mit
gelöscht wird. Das Programm in der Bearbeitungsebene kann nicht gelöscht werden.
Das Löschen von Programmen von einer Personal card ist in Kapitel 9.3 beschrieben.
11
5 Beschreibung der Menüs
5.4 OPTIONS
Im Menü "OPTIONS" werden generelle Systemeinstellungen für Programmeditor, Drucker, Datum/Uhrzeit
usw. definiert.
Main-Menu
Start
FILES . .
OPTIONS . .
Lid
Incubate
STANDARD
– –/25.0°
OPTIONS . .
Editor
Printer
Gradient
GENERAL . .
STANDARD
– –/25.0°
Mit der Taste
kann z. B. eine Auswahl zwischen YES/NO, ON/OFF und anderen Einstellungen durchgeführt werden.
Das Menü wird mit
verlassen.
5.4.1 Editor
OPTIONS . .
Editor
Printer
Gradient
GENERAL . .
Editor Mode
Show Ext. Steps:
YES
STANDARD
– –/22.0°
12
Show Ext. Steps
Zum Anzeigen der Temperaturoptionen.
YES
Zu jedem Temperaturschritt werden alle Optionen (Temperaturinkrement, Zeitinkrement,
Rampe, Rampeninkrement, Gradient) angezeigt.
NO
Es werden nur Solltemperatur und Zykluszeit angezeigt. Sind Optionen definiert, wird bei
Aufruf des Programms der Befehl mit einem "*" als Information gekennzeichnet. Die
Optionen können trotzdem mit
aufgerufen und eingegeben bzw. angezeigt werden.
5 Beschreibung der Menüs
5.4.2 Printer
OPTIONS . .
Editor
Printer
Gradient
GENERAL . .
Printer Mode
Printout Editor:
Print Protocol:
NO
OFF
STANDARD
– –/22.0°
Eingaben hierzu sind nur erforderlich, wenn ein Drucker angeschlossen ist.
Printout Editor
YES:
NO:
Print Protocol
ON:
OFF:
Das in der Bearbeitungsebene "Edit" stehende Programm wird ausgedruckt.
Ist "YES" angewählt, aber kein Drucker vorhanden, erfolgt die Fehlermeldung
"Printer: No Response".
Wird automatisch eingestellt, wenn der Programmausdruck beendet ist.
Bei Start eines Programms werden die Befehle ausgedruckt,
während des Laufs wird jeder abgearbeitete Befehl mit Uhrzeit gedruckt.
Es wird nichts gedruckt.
13
5 Beschreibung der Menüs
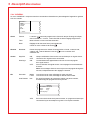
5.4.3 Gradient
Die Gradientenfunktion kann nur bei dem Mastercycler gradient angewählt werden.
Mit Hilfe der Gradientenfunktion lässt sich die Temperaturverteilung über dem Thermoblock variieren.
In jedem Temperaturschritt kann der Thermoblock so programmiert werden, dass in jeder Spalte eine andere
Temperatur herrscht. Die Temperatur liegt in den Vertiefungen auf der linken Seite am niedrigsten und steigt
an, bis sie auf der rechten Seite am höchsten ist.
Show Gradient
Mit Hilfe des Menüs "Show Gradient" kann angesehen werden, welche Temperatur in
welcher Spalte herrscht:
OPTIONS
Editor
Printer
Gradient
GENERAL . .
Tube: 0.2 ml
STANDARD
– –/22.0°
Show Gradient
T=60.0
G=7.0 °C
10:22:06
Mit der Taste
wird der Gefäßtyp "0,2 ml, 0,5 ml, 0,5 ml thin, plate" ausgewählt und mit
bestätigt.
Nach Eingabe einer Temperatur und des Gradienten wird die Temperaturverteilung über
den Block angezeigt:
OPTIONS
Editor
Printer
Gradient
GENERAL . .
STANDARD
– –/22.0°
Settings:
Pos. 1: 52.9C
Pos. 2: 53.2C
Pos. 3: 54.0C
Pos. 4: 55.2C
Show Gradient
Tube: 0.2 ml
T=60.0C G= 7.0C
Pos. 5: 56.9C
Pos. 9: 64.3C
Pos. 6: 58.7C
Pos:10: 65.8C
Pos. 7: 60.6C
Pos.11: 66.9C
Pos. 8: 62.5C
Pos.12: 67.5C
Print Results <OPT>
10:22:06
Der Gradient kann maximal ± 10 °C mit einer Auflösung von 0,1 °C sein, so dass die gesamte Temperaturspanne 20 °C beträgt. Die gewählte Temperatur liegt in der Mitte des Blocks,
die linke Seite wird auf Solltemperatur – Gradient
die rechte Seite auf
Solltemperatur + Gradient temperiert.
14
5 Beschreibung der Menüs
5.4.4 GENERAL
Zur Eingabe allgemeingültiger Einstellungen und der Geräteprüfung.
GENERAL . .
Clock
Remote
Sound
Etc
VALID . .
– –/22.0°
Clock
Format:
Mit Taste
kann die Uhrzeit im 24 h- oder 12 h-Format
(Wahl zwischen PM und AM) ausgewählt werden.
Time:
Eingabe der aktuellen Uhrzeit in Stunden:Minuten:Sekunden.
Date:
Eingabe des aktuellen Datums in Tag/Monat/Jahr.
Auswahl eines Monats mit Taste
durchführen.
Remote
Baudrate:
Auswahl der Übertragungsrate 19 200, 9 600, 4 800, 2 400 oder 1 200 mit
Taste
für einen PC-Anschluss.
Sound
KeyClick:
ON:
OFF:
Jeder Tastendruck wird mit einem Signalton bestätigt.
Der Signalton für den Tastendruck ist ausgeschaltet.
Warnings:
ON:
OFF:
Bei Warnungen ertönt ein Signalton zusätzlich zum Warntext.
Kein Signalton bei Warnungen.
Hinweis: Bei Fehlern ertönt unabhängig von dieser Einstellung
immer ein Signalton.
Etc
Start with:
MAIN:
LAST:
Nach dem Einschalten wird das Main-Menu angezeigt.
Nach dem Einschalten wird das zuletzt benutzte Menü angezeigt.
Auto Restart:
NO:
Ein durch Netzausfall unterbrochenes Programm wird nicht fortgesetzt.
Attention!
PROGRAM interrupted
Uhrzeit
Dauer
Step:x
Cyc:y
Press any key!
15
5 Beschreibung der Menüs
YES:
In Abhängigkeit von der Dauer des Netzausfalls läuft ein unterbrochenes Programm automatisch weiter oder kann manuell fortgesetzt bzw.
abgebrochen werden.
Netzausfall < 3 min:
Ein laufendes Programm wird automatisch weiter abgearbeitet, wenn
innerhalb von 3 Minuten nach Netzausfall die Stromversorgung wiederhergestellt ist. Zur Information wird angezeigt, wann, wie lange und bei
welchem Schritt das Programm unterbrochen wurde:
AutoRestart!
PROGRAM restarted
Uhrzeit
Dauer
Step:x
Cyc:y
Press any key!
Nach Drücken einer beliebigen Taste springt die Anzeige in die
Programmansicht zurück. Soll das Programm abgebrochen werden,
muss die Taste
gedrückt und mit
bestätigt werden.
Netzausfall > 3 min:
Im Falle eines längeren Netzausfalls ertönt ein Warnsignal, sobald
die Stromversorgung wiederhergestellt ist, und das Programm kann
manuell fortgesetzt oder abgebrochen werden.
PROGRAM
Uhrzeit
Step:x
Restart:
Decide!
interrupted
Dauer
Cyc:y
YES/NO
Soll das unterbrochene Programm fortgesetzt werden "YES" mit
wählen und mit
bestätigen. Nach Drücken einer beliebigen
Taste wird die Programmansicht wieder angezeigt.
Soll das Programm abgebrochen werden, "NO" mit
wählen und mit
bestätigen.
VALID . .
Mit diesen Programmen kann das Gerät überprüft werden. Zur Dokumentation der Messungen
kann ein Drucker angeschlossen werden.
Für die Menüs "Validate" und "Calibrate" wird das Temperatur-Validierungssystem
(Bestell-Nr. 5331 222.005) benötigt. Es besteht aus einem Temperaturmessgerät, einem
speziellen Temperatursensor und einer Personal card mit einer dafür entwickelten Software.
Die genaue Bedienung für die Programme "Validate" und "Calibrate" ist in der Bedienungsanleitung des Temperatur-Validierungssystems beschrieben.
Validate:
Zur Überprüfung der Gerätetemperatur mit Hilfe eines Temperaturmessgeräts.
Das Messgerät ist Bestandteil des Temperatur-Validierungssystems und wird
über die serielle Schnittstelle des Mastercyclers angeschlossen.
Calibrate:
16
Zum Abgleich der Gerätetemperatur mit Hilfe eines Temperaturmessgeräts.
Das Messgerät ist Bestandteil des Temperatur-Validierungssystems und wird
über die serielle Schnittstelle des Mastercyclers angeschlossen.
5 Beschreibung der Menüs
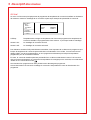
5.5 Lid
Mit dem Menü "Lid" aus dem Main-Menu kann die Heizdeckeltemperatur festgelegt und der Heizdeckel einoder ausgeschaltet werden (z .B. zum Vorheizen des Deckels).
Main-Menu
Start
FILES . .
OPTIONS . .
Lid
Incubate
STANDARD
– –/22.0°
Lid Temp
LidTemp:
Heater
105/55°C
is Off
LidTemp:
Soll/Ist Temperatur. Hier erfolgt die Eingabe der Temperatur für den Heizdeckel.
Die Eingabe von 0 °C schaltet die Deckelheizung ab.
Heater is On:
Die Deckelheizung ist ein.
Heater is Off:
Die Deckelheizung ist aus.
Für empfindliche PCRs kann es wichtig sein, erst zu starten, wenn die Deckeltemperatur eine Kondensation
verhindert. Dafür kann bei der Programmierung die Einstellung "WAIT" gewählt werden, bei der das Programm erst nach Erreichen der vorgegebenen Deckeltemperatur startet.
Außerdem kann der Heizdeckel vorgeheizt werden. Dazu wird nach Einschalten des Geräts das Menü "Lid"
angewählt, die gewünschte Deckeltemperatur eingegeben und "Heater is On" mit
angewählt.
Bei Start eines Programms haben dann die Programmeinstellungen Vorrang.
Während eines laufenden Programms kann die Deckelheizung nicht geschaltet werden.
17
5 Beschreibung der Menüs
5.6 Incubate
Mit dem Menü "Incubate" aus dem Main-Menu kann die Blocktemperatur festgelegt und die Blocktemperierung ein- oder ausgeschaltet werden (z. B. für Inkubationsexperimente oder zum Vorheizen des Blocks).
Zusammen mit dem Block wird der Heizdeckel auf die Blocktemperatur gebracht.
Main-Menu
Start
FILES . .
OPTIONS . .
Lid
Incubate
STANDARD
– –/22.0°
Block Temp
BlockTemp:
Heater
37/22°C
is Off
BlockTemp:
Soll-/Ist-Temperatur. Hier erfolgt die Eingabe der Temperatur für den Thermoblock.
Es sind Eingaben von +4 °C bis 99 °C möglich. Es kann kein Gradient angewählt werden.
Heater is On:
Die Blocktemperierung ist ein.
Heater is Off:
Die Blocktemperierung ist aus.
Um den Thermoblock und den Heizdeckel auf die gewünschte Temperatur zu bringen, wird nach Einschalten
des Geräts das Menü "Incubate" angewählt, die gewünschte Blocktemperatur eingegeben und "Heater is On"
mit
angewählt.
Solange "Incubate" läuft, kann nicht das Menü "Lid" angewählt werden.
Bei Start eines Programms haben dann die Programmeinstellungen Vorrang.
Während eines laufenden Programms kann die Blocktemperierung nicht geschaltet werden.
Abbrechen: Solange "Heater is On" in der Anzeige steht, mit
bestätigen.
auf "Heater is Off" einstellen und mit
Achtung: Wurde das Menü "Incubate" angewählt, können der Thermoblock und der Heizdeckel schon beim
Einsetzen der Gefäße heiß sein. Es besteht Verbrennungsgefahr.
18
6 Bedienung
6.1 Vorbereitungen
6.1.1 Probenbestückung
Der Thermoblock kann mit drei verschiedenen Gefäßtypen bestückt werden, ohne dass dafür Umrüstungen
nötig sind. Verwendet werden können 96 Stück 0,2 ml PCR-Gefäße oder 77 dünnwandige 0,5 ml PCRGefäße (speziell von Eppendorf) oder 1 Mikrotiterplatte (8x12).
Um einen optimalen Temperaturübergang zu erreichen, sollten nur Probengefäße und Mikrotiterplatten verwendet werden, die einen V-förmigen Boden haben (siehe Bestellinformationen). Dabei ist darauf zu achten,
dass die Gefäße einen guten Sitz im Thermoblock haben und nicht wackeln. Gefäße, die nicht ausreichend
temperaturbeständig sind (ca. bis 120 °C), sollten nicht verwendet werden.
Dieses gilt generell auch für Folien, mit denen Mikrotiterplatten verschlossen werden. Durch die regelbare
Deckelheizung ist es auch noch möglich, Folien einzusetzen, die über 100 °C schmelzen. Die Deckelheizung
kann dann auf z. B. 95 °C eingestellt werden.
Der Thermoblock besitzt 96 enge Positionen für 0,2 ml Gefäße und Mikrotiterplatten und 77 weite Positionen
für 0,5 ml Gefäße. Um die maximale Anzahl von 0,5 ml Gefäßen in den Thermoblock stecken zu können,
müssen die Gefäße reihenweise ausgerichtet werden. Um einen gleichmäßigen Andruck des Heizdeckels zu
gewährleisten, wird empfohlen, in jede Ecke des Thermoblocks ein Gefäß zu positionieren. Die Bestückung ist
wie folgt vorgesehen:
96 x 0,2 ml PCR-Gefäße
oder
Mikrotiterplatten (8x12)
(PCR Plate 96)
77 x 0,5 ml PCR-Gefäße, dünnwandig
(speziell von Eppendorf)
39 x 0,5 ml Eppendorf Safe-Lock Reaktionsgefäße
0,5 ml Gefäße mit breitem Verschlussdeckel,
wie z. B. 0,5 ml Eppendorf Reaktionsgefäße,
aus Platzgründen versetzt bestücken
Für in situ Reaktionen wird der in situ Adapter benötigt. Der Metallträger für maximal 4 Objektträger wird mit
den "Zapfen" der Unterseite in die 0,5 ml Positionen des Thermoblocks gesteckt.
19
6 Bedienung
6.1.2 Probenmenge
Die Temperierung kann entweder auf den Thermoblock oder auf die Probe eingestellt werden.
Mit dem Befehl "CNTRL /TUBE" kann eine Anpassung auf die tatsächliche Probenmenge und Gefäßtypen
durchgeführt werden.
Die Probenmengen sollten dann bei
0,2 ml Gefäßen oder "plate" nicht größer als 50 µl,
0,5 ml oder 0,5 ml thin Gefäßen nicht größer als 100 µl sein.
Bei der Anwahl "in situ" wird keine Probenmenge berücksichtigt.
6.1.3 Heizdeckel
Der Heizdeckel wird nach der Probenbestückung über den Thermoblock geklappt und mit dem Verriegelungshebel verschlossen. Dazu wird der Verriegelungshebel nach rechts gedreht, bis die entsprechende Gefäßhöhe erreicht ist. Die Symbole kennzeichnen die Verschlussposition für Gefäße oder Platten entsprechend
der Höhe von 0,5 ml, 0,2 ml bzw. 0,1 ml Fassungsvermögen. Bei der Bestückung mit Platten ist demnach die
Position "0,2 ml Gefäß" oder "Platte" anzuwählen.
Da der Heizdeckel die Kondensation der Flüssigkeit im oberen Teil der Probengefäße verhindert, ist eine
Ölüberschichtung der Probe nicht erforderlich.
Hinweis: Verschiedene Gefäßtypen sollten nicht gemeinsam verwendet werden, da sie dann nicht korrekt
vom Heizdeckel verschlossen werden.
Müssen doch verschiedene Gefäßtypen gleichzeitig im Thermoblock bearbeitet werden, ist eine Ölüberschichtung erforderlich.
Die Deckeltemperatur (bis 110 °C) wird vom Programm automatisch gesteuert. Der Anwender kann
bestimmen, ob sein Programm sofort (NOWAIT) oder erst nach Erreichen einer voreingestellten Deckeltemperatur starten soll (WAIT). Soll das Programm schnell starten, kann mit dem Menü "Lid" der Heizdeckel
vortemperiert werden.
Alle Gefäße sind auch während des Temperiervorgangs leicht zugänglich, da der Deckel jederzeit geöffnet
werden kann.
Achtung: Wird der Deckel bei laufendem Programm geöffnet, besteht Verbrennungsgefahr (110 °C) beim
Berühren der Deckelinnenfläche und des Thermoblocks.
Auch Gefäße oder Mikrotiterplatten können je nach Bearbeitungstemperatur sehr heiß werden.
Bei in situ Reaktionen wird der Heizdeckel nicht temperiert und bleibt immer geöffnet.
6.1.4 Blocktemperierung
Für Inkubationsexperimente oder um den Start von Methoden zu beschleunigen, kann der Thermoblock mit
dem Heizdeckel temperiert werden. Dazu wird im Main-Menu das Menü "Incubate" angewählt, eine Blocktemperatur eingegeben und "Heater" auf "On" gestellt.
Achtung: Der Thermoblock und der Heizdeckel können sehr heiß werden, so dass beim Einsetzen von Gefäßen oder einer Mikrotiterplatte Verbrennungsgefahr besteht.
20
6 Bedienung
6.2 Gerät einschalten
– Netzschalter auf der Geräterückseite
einschalten.
Die aktuelle Softwareversion wird
kurz angezeigt, danach erscheint
das Main-Menu.
In der Bearbeitungsebene wird das
startbereite Programm angezeigt.
Main-Menu
Start
FILES . .
OPTIONS . .
Lid
Incubate
STANDARD
– –/25.0°
Lid:105°
10:22:06
Main-Menu
Start
FILES . .
OPTIONS . .
Lid
Incubate
STANDARD
– –/25.0°
Lid:105°
10:22:06
❋❋❋
MASTERCYCLER ❋❋❋
gradient 5331
eppendorf
Version ❋.❋❋.❋❋
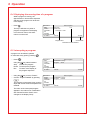
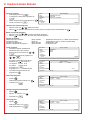
6.3 Programm starten
– Durch Drücken von
kann das
in der Bearbeitungsebene stehende
Programm sofort gestartet werden.
Zum Starten eines anderen
Programms
–
drücken.
Es wird eine Liste der Programme
angezeigt.
– Programmnamen mit Taste
oder
auswählen (Programmname
wird mit dunklem Feld hinterlegt).
Das Starten von Programmen, die
auf einer Personal card gespeichert
sind, ist im Kap. 9.3 beschrieben.
–
drücken.
Das Programm startet nach einer
Prüfung ("Testing Program") sofort.
Main-Menu
Start
FILES . .
OPTIONS . .
Lid
Incubate
STANDARD
– –/25.0°
Run a Program:
STANDARD
TEST1
TEST2
Lid:105°
Main-Menu
Start
1
FILES . .
OPTIONS . .
Lid
Incubate
Running/STANDARD
95.0/94.7°
Lid:105°
10:22:06
Run a Program:
T=95.0°
0:00:05
Cyc:4
10:22:06
21
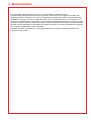
6 Bedienung
Enthält das Programm den "CNTRL/TUBE"
Befehl (Temperaturregelung auf die Probe),
sind nach dem Start des Programms
Eingaben über Gefäßtyp und Füllvolumen
nötig.
– Mit Taste
den Gefäßtyp Tube:
0,2 ml, 0,5 ml (z. B. Safe-Lock),
0,5 ml thin (dünnwandige Gefäße),
plate (Mikrotiterplatte) oder in situ
auswählen und mit
bestätigen.
Main-Menu
Start
FILES . .
OPTIONS . .
Lid
Incubate
Enter Tube
22.0/25.0°
– Das Füllvolumen eingeben und mit
bestätigen.
Main-Menu
Start
FILES . .
OPTIONS . .
Lid
Incubate
STANDARD
22.0/25.0°
Gefäßtyp 0,2 ml/plate: 5 bis 50 µl
Gefäßtyp 0,5 ml/thin: 5 bis 100 µl
Bei in situ ist keine Eingabe nötig.
Werden Eingaben für "Tube" und
"Fill.Vol." nicht eingetragen, kann
das Programm nicht abgearbeitet
werden.
Im Main-Menu erscheint anstelle des
Programmnamens "Enter Tube" und
es ertönt solange ein akustisches
Signal, bis die Eingabe gemacht
wurde.
Nach dem Start und während der
Abarbeitung wird der Name des
gestarteten Programms im MainMenu im Wechsel mit "Running"
angezeigt.
Eine blinkende Temperaturanzeige
weist darauf hin, dass die Solltemperatur noch nicht erreicht ist und
momentan geheizt bzw. gekühlt
wird.
– Die Anzeige eines Programms kann
jederzeit mit
verlassen werden, um z. B. in der Bearbeitungsebene "Edit" zu programmieren.
22
Run a Program:
CNTRL
TUBE
Tube: 0.2 ml
Lid:105°
10:22:06
Run a Program:
CNTRL
TUBE
Fill.Vol.: 20 µl
Lid:105°
10:22:06
Main-Menu
Start
1
FILES . .
OPTIONS . .
Lid
Incubate
Running/STANDARD
95.0/97.0°
Lid:105°
1
2
3
Run a Program:
T=95.0°
0:00:05
Cyc:4
10:22:06
4
1 Programm blinkt abwechselnd mit "Running"
2 Soll-/Ist-Blocktemperatur
3 Deckeltemperatur
(nur wenn Deckel eingeschaltet ist)
4 Programmzeilennummer, Programmbefehl
im Beispiel: Temperaturbefehl (T)
mit Solltemperatur und Zykluslänge
5 Anzahl der durchgeführten Zyklen
6 Uhrzeit
5
6
6 Bedienung
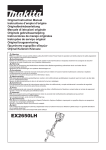
6.4 Programmlaufzeit anzeigen
Während der Abarbeitung eines Programms können die ungefähre Laufzeit
und die Uhrzeit für das voraussichtliche
Ende eines Programms angezeigt werden.
–
drücken.
Die Taste ist nur wirksam, wenn die
Darstellung eines Programmablaufs
angezeigt wird, nicht im Main-Menu,
bei anderen Menüs oder Untermenüs.
Main-Menu
Run a Program:
Start
Run Time:
1:03
FILES . .
Finish Time:
OPTIONS . .
17/Jun/1997 15:06
Lid
Incubate
Running/STANDARD
22.0/25.0°
Lid:105°
Programmende
14:02:30
aktuelle Uhrzeit
Laufzeit in Stunden:Minuten
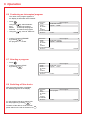
6.5 Programm unterbrechen
Mit
kann ein Programm an beliebiger
Stelle angehalten, abgebrochen oder
fortgesetzt werden.
–
drücken.
Mit Taste
Stop
Pause
Run
– Mit
auswählen zwischen
Programm beenden
Programm unterbrechen
Zurück zur Anzeige des
Programmablaufs
auf "Pause".
– "Program:PAUSE" mit
bestätigen,
das Programm wird angehalten,
die Zeit läuft nicht weiter,
die letzte Solltemperatur wird beibehalten.
Main-Menu
Run a Program:
Start
STANDARD running...
FILES . .
Program:
STOP
OPTIONS . .
Lid
Incubate
Running/STANDARD
95.0/94.5°
Lid:105°
10:22:06
Main-Menu
Run a Program:
STOP !
STANDARD running...
FILES . .
Program:
PAUSE
OPTIONS . .
Lid
Incubate
Paused/STANDARD
95.0/94.5°
Lid:105°
10:22:06
Der Name des unterbrochenen Programms wird abwechselnd mit "Paused"
angezeigt und das Menu "Start" wechselt
in die Anzeige "Stop".
23
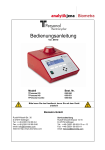
6 Bedienung
6.6 Unterbrochenes Programm fortsetzen
Der Name des Programms wird im
Wechsel mit "Paused" angezeigt.
–
drücken.
Mit Taste
auswählen zwischen
Stop
Programm beenden
Pause Programm unterbrechen
Resume Programm weitermachen
– Mit
auf "Resume".
– "Program:RESUME" mit
bestätigen, das Programm wird
fortgesetzt.
Main-Menu
Run a Program:
STOP !
STANDARD PAUSED
FILES . .
Program:
PAUSE
OPTIONS . .
Lid
Incubate
Paused/STANDARD
95.0/94.5°
Lid:105°
10:22:06
Main-Menu
Run a Program:
STOP !
STANDARD PAUSED
FILES . .
Program:
RESUME
OPTIONS . .
Lid
Incubate
Paused/STANDARD
95.0/94.5°
Lid:105°
10:22:06
Main-Menu
Run a Program:
STOP !
STANDARD running...
FILES . .
Program:
STOP
OPTIONS . .
Lid
Incubate
Paused/STANDARD
95.0/94.5°
Lid:105°
10:22:06
Main-Menu
Start
FILES . .
OPTIONS . .
Lid
Incubate
STANDARD
22.0/25.0°
14:02:30
6.7 Programm abbrechen
–
drücken.
– "Program:STOP" mit
bestätigen.
6.8 Außer Betrieb nehmen
Nach Abarbeitung des Programms
erscheint die Anzeige:
Soll ein neues Programm gestartet
werden, Programm mit
verlassen.
Soll das Gerät ausgeschaltet werden,
Netzschalter auf der Geräterückseite auf
stellen.
24
>0<
Run a Program:
End of program
Lid:105°
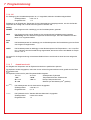
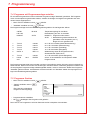
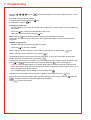
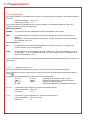
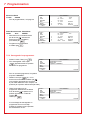
7 Programmierung
7.1 Beschreibung der Befehle
Zur Programmierung stehen je 2 grundsätzliche Befehle zur Temperierung von Thermoblock und Heizdeckel
und 6 verschiedene Befehle zum Ablauf des Programms zur Verfügung.
Ein Programm kann bis zu 40 Programmzeilen enthalten, wobei die Befehle beliebig oft wiederholt werden
können.
Eingegeben werden können entweder Ziffern oder Buchstaben oder es wird mit Taste
getroffen.
eine Auswahl
Bei Eingaben von Ziffern erscheint bei Über- oder Unterschreitung der Wertebereiche die Meldung "Value out
of range" und es wird automatisch der noch mögliche Grenzwert eingetragen.
FILES...
Edit
Load
Standard
New
Delete
UNNAMED
Edit UNNAMED
CNTRL
BLOCK
LID=0°
NOWAIT
AUTO
- - - - - - - - - - - - -- - - - - - - - - - - - - - - - - - - - - - - - - - - - - - - - - - - 1
T=❋❋❋❋°
+0.0°
R=3.0°/s
G=0.0°
❋❋:❋❋:❋❋
+0:00
+0.0°/s
2
Hold ❋❋❋❋°
ENTER
3
PAUSE
4
GOTO❋❋❋
5
SOUND❋❋
6
LINK❋❋❋❋❋❋❋❋
PRESS ENTER
REP❋❋❋
end
– –/22.0°
10:22:06
7.1.1 CNTRL
Mit diesem Befehl wird die Art der Blocktemperierung festgelegt.
BLOCK
Es wird die Temperatur am Thermoblock gemessen und danach die Solltemperatur eingestellt.
TUBE
Die Temperatur des Thermoblocks wird von der Software auf die Temperatur der Gefäße und
Probenmenge angepasst. Daher müssen unmittelbar nach dem Start eines Programms der
Gefäßtyp und das Füllvolumen eingegeben werden. Bei der Anwahl von in situ ist keine weitere
Eingabe erforderlich.
Gefäßtyp 0,2 ml oder plate:
5 bis 50 µl Füllvolumen
0,5 ml oder 0,5 ml thin: 5 bis 100 µl Füllvolumen
25
7 Programmierung
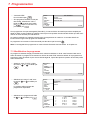
7.1.2 Lid
Zur Festlegung der Heizdeckeltemperatur. Ist 0 °C angewählt, bleibt der Heizdeckel abgeschaltet.
Zulässige Werte
Eingabeschritte
0 bis 110 °C
1 °C
Zusätzlich zu der Eingabe der Temperatur für den Heizdeckel kann festgelegt werden, wie sich die Deckeltemperatur am Anfang und am Ende eines Programms verhalten soll:
Anfang
NOWAIT
Das Programm wird unabhängig von der Deckeltemperatur gestartet.
WAIT
Das Programm wird erst bei Erreichen der programmierten Deckeltemperatur gestartet.
Anmerkung: Um den Start des Programms zu beschleunigen, kann der Heizdeckel mit dem
Menü "Lid" vorgeheizt werden.
Ende
FIX
Die Deckeltemperatur ist unabhängig von der Blocktemperatur. Die Deckelheizung wird am Ende
des Programms abgeschaltet.
AUTO
Die Deckeltemperatur ist abhängig von der Blocktemperatur. Bei Temperaturen < 22 °C und Zeiten > 5 Minuten wird die Deckelheizung abgeschaltet; ebenso bei einem Hold-Befehl mit Temperaturen < 22 °C.
Die sechs für die Programmierung vorbereiteten Befehle können auch direkt mit einer Nummer aufgerufen
werden.
7.1.3 T
Anwahl auch mit 1
Zur Eingabe der Temperatur und der Zykluszeit sowie deren spezifischen Optionen.
Die Optionen werden eingegeben, indem der Cursor auf der Programmzeilennummer gestellt und die Taste
gedrückt wird.
Die Optionen lassen sich für jeden Temperaturbefehl eingeben.
T = ❋❋❋❋°
+ 0.0 °
R = 3 °/s
G = 0.0
T = ❋❋❋❋°
: :
❋❋ ❋❋ ❋❋
26
❋❋:❋❋:❋❋
+ 0:00
+ 0.0 °/s
Solltemperatur, Zykluszeit
Temperaturinkrement, Zeitinkrement
Rampe, Rampeninkrement
Gradient (nur bei Mastercycler gradient)
Die Solltemperatur wird in Grad Celsius eingegeben.
Zulässige Werte
4 bis 99,0 °C
Eingabeschritte
0,1 °C
Die Zykluszeit wird in "Stunden:Minuten:Sekunden" eingegeben.
Zulässige Werte
0:00:01 bis 9:59:59
Eingabeschritte
1s
7 Programmierung
± 0.0 °
Temperaturinkrement (± °C): Bei jedem Zyklus wird die Temperatur um den hier eingegebenen
Betrag erhöht oder erniedrigt.
Zu beachten ist, dass die Temperatur nicht größer als 99 °C werden kann, so dass z. B. bei
einem Temperaturinkrement von +0,1 °C und 25 Zyklen die Anfangstemperatur nicht größer als
96,5 °C sein darf. Zuerst den Zahlenwert und dann das Vorzeichen eingeben.
Zulässige Werte
0,0 bis 10,0 °C
Eingabeschritte
0,1 °C
Eingabe für Temperaturerhöhung
"+"
Eingabe für Temperaturerniedrigung
"–"
± 0:00
Zeitinkrement (± s): Bei jedem Zyklus wird die Zeit um den hier eingegebenen Betrag (maximal
1 Minute) verlängert oder verkürzt.
Eingabe für Zeitverlängerung
"+"
Eingabe für Zeitverkürzung
"–"
Zulässige Werte
0:00 bis 1:00
Eingabeschritte
1s
R = 3 °/s
Rampe (K/s): Die Rampe gibt die Geschwindigkeit an, mit der der Cycler aufheizt oder kühlt. Je
größer der Wert ist, desto schneller erfolgt die Aufheizung oder Kühlung. Für die meisten Reaktionen ist eine möglichst schnelle Heiz-/Kühlrate gewünscht, d. h. ein großer Wert. Für Verfahren,
bei denen langsam aufgeheizt oder gekühlt werden soll, können für die Rampe unterschiedliche
Werte eingegeben werden.
Zulässige Werte
0,3 bis 3 K/s
Eingabeschritte
0,1 K/s
± 0.0 °/s
Rampeninkrement (± s): Bei jedem Zyklus wird die Rampe um den hier eingegebenen Betrag
erhöht oder erniedrigt.
Zu beachten ist, dass die Rampe nicht größer als 3 K/s werden kann, d. h. bei der Anfangseingabe einer Rampe von 0,3 und einem Rampeninkrement von 0,1 sind max. 27 Zyklen möglich.
Zuerst den Zahlenwert und dann das Vorzeichen eingeben.
Zulässige Werte
0,0 bis 1,0 K/s
Eingabeschritte
0,1 K/s
Eingabe für Rampengeschwindigkeits-Erhöhung
"+"
Eingabe für Rampengeschwindigkeits-Erniedrigung "–"
G = 0.0°
Nur bei Mastercycler gradient möglich.
Gradient: Wird hier eine Eingabe gemacht, wird jede Spalte des Blocks auf eine andere
Temperatur eingestellt. Die bei "T" eingestellte Solltemperatur liegt in der Mitte des Blocks. Die
niedrigste Temperatur liegt auf der linken Seite und steigt bis zur höchsten Temperatur auf der
rechten Seite an. So können bis zu 20 °C Temperaturunterschied innerhalb des Blocks erzeugt
werden (siehe Kap. 5.4.3). Die Temperaturverteilung kann im Programm OPTIONEN/Gradient
angesehen werden. Bei Verwendung von 0,2 ml Gefäßen können max. 12, bei 0,5 ml Gefäßen
nur 11 verschiedene Temperaturen eingestellt werden.
Zu beachten ist, dass die Temperatur nicht größer als 99 °C werden kann, d. h. soll ein Gradient
von +10 °C gefahren werden, darf die Solltemperatur nicht größer als 89 °C sein.
Zulässige Werte
± 0,0 bis ± 10,0 °C
Eingabeschritte
0,1 °C
Beim Gefäßtyp "in situ" wird kein Gradient wirksam.
27
7 Programmierung
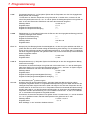
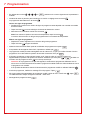
7.1.4 HOLD
Anwahl auch mit 2
Das Programm hält die Temperatur auf dem eingegebenen Wert. Nach Drücken von
gramm fortgesetzt oder beendet.
wird das Pro-
Hinweis: Ein Programm sollte nicht mit einem HOLD-Befehl mit einer Temperatur < 22 °C beginnen, da sonst
die Deckeltemperierung nicht anspringt. Werden z. B. 4 °C zu Beginn eines Programms benötigt, sollte HOLD
mit einem Link-Befehl mit dem Hauptprogramm verbunden werden. Siehe Programmierbeispiel Kapitel 7.6.
HOLD xx ENTER
Zulässige Werte
Eingabeschritte
7.1.5 PAUSE
4 bis 99 °C
0,1 °C
Anwahl auch mit 3
Das Programm wird angehalten und die Temperatur bleibt auf dem Wert des letzten Temperaturbefehls. Nach
Drücken von
wird das Programm fortgesetzt.
Anstelle des voreingestellten Textes "PRESS ENTER" kann ein individueller Text eingegeben werden.
PAUSE PRESS ENTER
Textlänge
7.1.6 GOTO
0 bis 11 Zeichen
Anwahl auch mit 4
Hier erfolgt die Eingabe für zyklische Wiederholungen. Es wird zu einer anderen Programmzeilennummer
(GOTO) verzweigt, an der das Programm fortgesetzt wird. Außerdem wird angegeben, wie häufig (REP) dieses durchgeführt werden soll.
GOTO xxx REP xxx
Zulässige Werte
Programmzeilennummer
Wiederholungen
7.1.7 SOUND
1 bis 40
1 bis 99
Anwahl auch mit 5
Es ist die Ausgabe eines akustischen Signals möglich; z. B. für die Anzeige einer einprogrammierten Pause
oder bei Beendigung des Programms.
SOUND ❋❋
Zulässige Wiederholungen
7.1.8 LINK
1 bis 10 Töne
Anwahl auch mit 6
Es erfolgt eine Verknüpfung mit einem anderen Programm im internen Speicher. Mit dem LINK-Befehl wird
das aktuelle Programm beendet und das angewählte Programm begonnen. Durch Verwendung von LINKBefehlen können max. 5 Programme nacheinander abgearbeitet werden. Dabei bleiben die im Programmkopf
stehenden Befehle CNTRL, Lid, NOWAIT/WAIT, AUTO/FIX bei den nachfolgenden Programmen unberücksichtigt.
Mit einem LINK-Befehl kann nicht zu Programmen in der Bearbeitungsebene ("Edit") oder auf der Personal
card verzweigt werden (von der Personal card zu Programmen im internen Speicher ist dieses möglich).
LINK ❋❋❋❋❋❋❋❋
Zulässige Anzahl Programme
5
Eingetragen werden muss der Name (Buchstaben mit Taste
auswählen) des Programms, das zur Abarbeitung aufgerufen werden soll. Wird der eigene Name des Programms eingetragen, wird das Programm
ständig wiederholt und kann nur durch "Stop" abgebrochen werden.
28
7 Programmierung
7.1.9 END
END erscheint automatisch als letzte Zeile eines Programms. Er schaltet die Block- und Deckeltemperierung
ab und beendet das Programm.
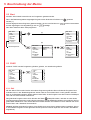
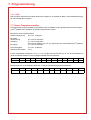
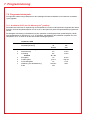
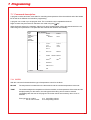
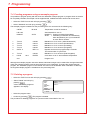
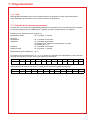
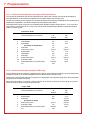
7.2 Neues Programm erstellen
Die Eingabe der Programmbefehle ist für Mastercycler und Mastercycler gradient identisch. Beim Mastercycler gradient kann zusätzlich ein Gradient programmiert werden.
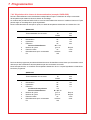
Beispiel für einen Programmablauf:
Initiale Denaturierung
95 °C für 2 Minuten
20 Zyklen:
Denaturierung
Annealing
Elongation
95 °C für 45 Sekunden
61 °C für 45 Sekunden
hier wird ein Gradient von ±10 °C programmiert (nur beim Mastercycler gradient)
72 °C für 45 Sekunden
Finale Elongation
72 °C für 2 Minuten
Abkühlung der Proben
22 °C
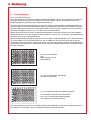
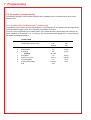
Für den eingestellten Gradienten von 61 °C ± 10 °C ergibt sich beim Einsatz von 12 0,2 ml PCR Gefäßen folgende Temperaturverteilung in den jeweiligen Spalten des Thermoblocks:
Gefäßreihe
1
2
3
4
5
6
7
8
9
10
11
12
Temperatur
51,0
51,3
52,5
54,2
56,5
59,1
61,8
64,5
67,0
69,1
70,6
71,5
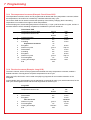
Beim Einsatz von 0,5 ml Gefäßen haben die 11 Reihen des Blocks folgende Temperaturen:
Gefäßreihe
1
2
3
4
5
6
7
8
9
10
11
Temperatur
51,1
51,9
53,3
55,4
57,8
60,5
63,2
65,8
68,1
69,9
71,1
29
7 Programmierung
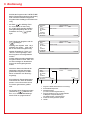
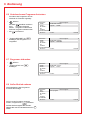
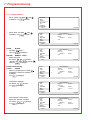
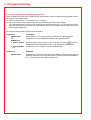
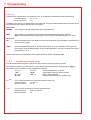
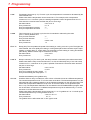
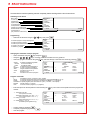
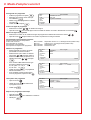
7.2.1 Programmieren
– Menü "FILES" mit Taste
oder
anwählen, mit
aufrufen.
Main-Menu
Start
FILES . .
OPTIONS . .
Lid
Incubate
STANDARD
– –/22.0°
– Menü "New" mit Taste
oder
anwählen, mit
aufrufen.
CNTRL
BLOCK
– Mit Taste
ändern
oder mit
bestätigen.
LID=105° NOWAIT AUTO
– Werte eintragen,
die Tasten 1 , >0< , 5 drücken.
"Nowait" und "Auto" ändern (Taste
oder mit
bestätigen.
Initiale Denaturierung
T=95.0°
0:02:00
– Befehl T (Temperatur) mit Taste
auswählen, Taste evtl. mehrfach
betätigen,
mit
bestätigen.
– Temperatur eintragen,
die Tasten 9 , 5 drücken,
mit
bestätigen.
– Zeit eintragen, Reihenfolge:
Sekunden, Minuten, Stunden
Die Tasten >0< , >0< , 2 drücken,
mit
bestätigen.
30
10:22:06
FILES . .
Edit
Load
Standard
New
Delete
UNNAMED
– –/22.0°
Edit UNNAMED
CNTRL
BLOCK
LID=0°
NOWAIT
AUTO
end
FILES . .
Edit
Load
Standard
New
Delete
UNNAMED
– –/22.0°
Edit UNNAMED
CNTRL
BLOCK
LID=105°
NOWAIT
AUTO
end
FILES . .
Edit
Load
Standard
New
Delete
UNNAMED
– –/22.0°
Edit UNNAMED
CNTRL
BLOCK
LID=105°
NOWAIT
AUTO
T=❋❋❋❋°
❋❋:❋❋:❋❋
end
10:22:06
10:22:06
)
FILES . .
Edit
Load
Standard
New
Delete
UNNAMED
– –/22.0°
FILES . .
Edit
Load
Standard
New
Delete
UNNAMED
– –/22.0°
1
10:22:06
1
Edit UNNAMED
CNTRL
BLOCK
LID=105°
NOWAIT
AUTO
T=95.0°
❋❋:❋❋:❋❋
end
10:22:06
1
Edit UNNAMED
CNTRL
BLOCK
LID=105°
NOWAIT
AUTO
T=95.0°
00:02:00
end
10:22:06
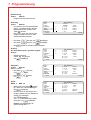
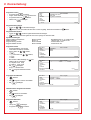
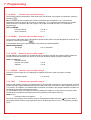
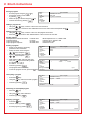
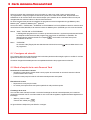
7 Programmierung
Denaturierung
T=95.0°
0:00:45
Programmierung siehe Seite 30
Annealing
T=61.0°
0:00:45
– Für Optionen zum Temperaturbefehl
(Temp.- und Zeitinkrement, Rampe,
Rampeninkrement, Gradient) die
Taste
drücken.
Der Cursor muss sich dazu auf der
Programmzeilennummer vor dem
Temperaturbefehl befinden.
– Die Tasten
6
– Die Tasten
4
– Mit
,
1
5
FILES . .
Edit
Load
Standard
New
Delete
UNNAMED
– –/22.0°
drücken, mit
bestätigen.
drücken, mit
bestätigen.
1
2
3
Edit UNNAMED
Lid 105°
NOWAIT
AUTO
T= 95.0°
0:02:00
T= 95.0°
0:00:45
T= 61.0°
0:00:45
+ 0.0
+0:00
10:22:06
weiter bis Gradient oder Elongation.
Gradient
Nur beim Mastercycler gradient möglich.
G=10.0°
– Gradient eintragen
Tasten 1 , >0< drücken,
mit
bestätigen.
Elongation
T=72.0°
0:00:45
Befehl T wählen
– Die Tasten 7 , 2 drücken,
mit
bestätigen.
5
– Die Tasten 4
drücken,
mit
bestätigen.
Zyklus
GOTO 2
REP 19
– Befehl GOTO mit Taste
auswählen, Taste evtl. mehrfach betätigen.
Mit
bestätigen.
– Zeilennummer für den Beginn des
Programmabschnitts, der wiederholt
werden soll, eintragen,
mit
bestätigen.
Anzahl der Wiederholungen (REP)
eintragen, mit
bestätigen.
FILES . .
Edit
Load
Standard
New
Delete
UNNAMED
– –/22.0°
FILES . .
Edit
Load
Standard
New
Delete
UNNAMED
– –/22.0°
FILES . .
Edit
Load
Standard
New
Delete
UNNAMED
– –/22.0°
1
2
3
T=
T=
T=
+
R=
G=
Edit UNNAMED
95.0°
0:02:00
95.0°
0:00:45
61.0°
0:00:45
0.0
+0:00
3.0°/s
+0:0°/s
10.0°
10:22:06
2
3
4
T=
T=
+
R=
G=
T=
Edit UNNAMED
95.0°
0:00:45
61.0°
0:00:45
0.0
+0:00
3.0°/s
+0:0
10.0°
72.0°
00:00:45
10:22:06
3
4
5
Edit UNNAMED
T= 61.0°
0:00:45
+ 0.0
+0:00
R= 3.0°/s
+0:0
G= 10.0°
T= 72.0°
00:00:45
REP❋❋❋
GOTO❋❋❋
10:22:06
Hinweis: Die Gesamtzahl der
Zyklen beträgt REP + 1.
31
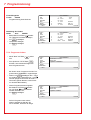
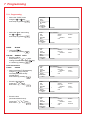
7 Programmierung
Finale Elongation
T=72.0°
0:02:00
Programmierung siehe Seite 30
Abkühlung der Proben
HOLD
22.0°
ENTER
– Befehl HOLD mit Taste
auswählen, Taste evtl. mehrfach betätigen,
mit
bestätigen.
– Temperatur eintragen,
mit
bestätigen.
FILES . .
Edit
Load
Standard
New
Delete
UNNAMED
– –/22.0°
FILES . .
Edit
Load
Standard
New
Delete
UNNAMED
– –/22.0°
4
5
6
Edit UNNAMED
+ 0.0
+0:00
R= 3.0°/s
+0:0
G= 10.0°
T= 72.0°
00:00:45
GOTO 2
REP 19
T= 72.0°
00:02:00
10:22:06
4
5
6
7
Edit UNNAMED
R= 3.0°/s
+0:0
G= 10.0°
T= 72.0°
00:00:45
GOTO 2
REP 19
T= 72.0°
00:02:00
Hold
22.0°
ENTER
10:22:06
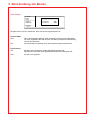
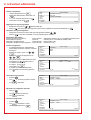
7.2.2 Programm sichern
– Menü "New" mit Taste
sen.
verlas-
– Zum Speichern "YES" Taste
drücken, es erscheint die Frage nach
dem Programmnamen.
FILES . .
Edit
Load
Standard
New
Delete
UNNAMED
– –/22.0°
Edit UNNAMED
UNNAMED not saved
SAVE: YES
ProgName: UNNAMED
FILES . .
Edit
Load
Standard
New
Delete
UNNAMED
– –/22.0°
Edit UNNAMED
UNNAMED not saved
SAVE: YES
ProgName: Gradient
10:22:06
Bei einem neuen Programm wird der Programmname "UNNAMED" vorgeschlagen.
– Namen mit
bestätigen oder – wenn
ein anderer Name gewünscht ist – mit
löschen (längeren Druck auf die Taste
löscht den ganzen Namen, kurzer Druck
nur einzelne Buchstaben).
– Neuen Programmnamen eingeben.
Buchstaben mit Taste
auswählen, mit Taste
auf die nächste
Position wechseln etc.,
mit
bestätigen.
Soll ein Programm unter einem
Namen gespeichert werden, der
schon existiert, erscheint die Frage:
32
10:22:06
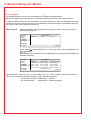
7 Programmierung
– "Overwrite:YES". Zum Überschreiben mit Taste
bestätigen.
Soll das existierende Programm
nicht überschrieben werden, mit
"NO" auswählen und nach Drücken
von
einen neuen Namen
eingeben, mit
bestätigen.
FILES . .
Edit
Load
Standard
New
Delete
UNNAMED
– –/22.0°
Edit UNNAMED
Testing...
Gradient exists
Overwrite: YES
10:22:06
Wird ein Programm nicht gesichert ("Save:NO"), bleibt es in der Bearbeitungsebene und kann durch Aufrufen
von "Edit" ergänzt oder geändert werden. Sicherheitsabfragen bei Aufruf anderer Untermenüs verhindern,
dass ein nicht gespeichertes Programm versehentlich überschrieben wird.
Im internen Speicher können maximal 99 Programme gespeichert werden. Die Anzahl ist abhängig von den
Programmlängen.
Das Programm in der Bearbeitungsebene kann mit der Taste
gestartet werden.
Hinweis: Sichern von Programmen auf einer Personal card ist in Kapitel 9.3 beschrieben.
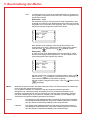
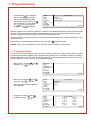
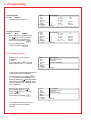
7.3 Programm ändern
Ein bereits vorhandenes Programm aus dem internen Speicher oder von der Personal card wird zum Ändern
in die Bearbeitungsebene geladen. Das in der Bearbeitungsebene "Edit" vorhandene Programm wird damit
gelöscht. Befindet sich ein noch nicht gesichertes Programm in der Bearbeitungsebene, kann es nach einer
Sicherheitsabfrage vor dem Löschen noch gespeichert werden.
– Menü "FILES" mit Taste
oder
anwählen, mit
aufrufen.
– Menü "Load" mit Taste
oder
anwählen, mit
aufrufen.
Eine Liste vorhandener Programme
wird angezeigt.
– Programm mit Taste
auswählen und mit
oder
laden.
Main-Menu
Start
FILES . .
OPTIONS...
Lid
Incubate
STANDARD
– –/22.0°
FILES . .
Edit
Load
Standard
New
Delete
STANDARD
– –/22.0°
FILES...
Edit
Load
Standard
New
Delete
STANDARD
– –/22.0°
10:22:06
Load to Editor
STANDARD
TEST1
TEST2
10:22:06
1
2
3
4
5
6
Edit STANDARD
T= 94.0°
0:02:00
T= 94.0°
0:00:15
T= 44.0°
0:00:15
T= 72.0°
0:00:30
GOTO 2
REP 24
T= 72.0°
0:00:30
10:22:06
33
7 Programmierung
– Blinkenden Cursor mit den
dert werden soll.
,
,
,
-Tasten oder
auf den Parameter bewegen, der geän-
– Eingaben mit Ziffernblock durchführen
oder mit
zwischen Einstellungen wählen
oder mit
Buchstaben eingeben.
Programmzeile einfügen
– Blinkenden Cursor auf die Nummer der Programmzeile bewegen, vor die ein neuer Befehl eingefügt
werden soll.
–
drücken; eine neue Zeile wird über dem Cursor eingefügt.
– Gewünschten Befehl mit
auswählen.
Hinweis: Für die Eingabe von Optionen zum Temperaturbefehl die Taste
drücken.
Der Cursor muss sich dazu auf der Programmzeilennummer vor dem Temperaturbefehl befinden.
Programmzeile löschen
– Blinkenden Cursor auf die Programmzeilennummer bewegen.
– Taste
drücken; Zeile wird gelöscht.
– Nach einer Programmänderung die Bearbeitungsebene "Edit" mit
– Die Abfrage "Save:YES" zum Speichern mit
verlassen.
bestätigen.
– Das geänderte Programm kann unter dem gleichen Namen gespeichert werden, wobei das alte Programm überschrieben wird. Dazu die Abfrage "Overwrite:YES" mit
bestätigen.
Soll das alte Programm nicht überschrieben werden, sondern ein neues zusätzliches Programm entstehen, die Abfrage "Overwrite:" mit "NO" beantworten (mit
und
) und einen neuen
Programmnamen mit
bzw. dem Zahlenfeld eingeben.
Achtung: Wenn das geänderte Programm nicht gespeichert wird, gibt es zwei verschiedene
Programme mit gleichem Namen. In der Bearbeitungsebene steht das geänderte
Programm, im Gerätespeicher steht das ungeänderte Programm.
Das geänderte Programm in der Bearbeitungsebene kann mit
– Nach Ende des Programms steht in der Anzeige "End of Program".
– Soll das geänderte Programm jetzt gespeichert werden, mit
In der Anzeige steht "Program not saved – Save YES"
– Programm mit
34
speichern.
gestartet werden.
drücken.
Menü "Load" wählen,
drücken.
7 Programmierung
7.4 Programm mit Programmvorlage erstellen
Ein schnelles Programmieren kann mit Hilfe der Programmvorlage "Standard" geschehen. Ein Programm
muss nicht komplett neu geschrieben werden, sondern die Vorlage wird ergänzt und geändert und unter
neuem Namen abgespeichert.
– Menü "FILES" anwählen und mit
aufrufen.
– "Standard" anwählen und mit
aufrufen.
Die Programmvorlage wird in die Bearbeitungsebene geladen. Sie hat folgenden Aufbau:
CNTRL
LID=105°
NOWAIT
1
2
3
4
5
T=94.0°
T=94.0°
T=44.0°
T=72.0°
GOTO 2
6
7
T=72.0°
HOLD
end
BLOCK
AUTO
0:02:00
0:00:15
0:00:15
0:00:30
REP 24
22.0°
0:00:30
ENTER
Temperaturregelung für den Block
Deckelheizung auf 105 °C einstellen
NOWAIT = Programm sofort starten
AUTO
= Deckelheizung wird automatisch abgeschaltet, wenn Temperatur (22 °C)
länger als 5 min gehalten wird.
94 °C für 2 min halten (Initiale Denaturierung)
94 °C für 15 s halten (Denaturierung)
44 °C für 15 s halten (Annealing)
72 °C für 30 s halten (Elongation)
Wiederholung 24mal ab Programmschritt 2,
Gesamtzahl der Zyklen ist 25
72 °C für 30 s halten (Finale Elongation)
auf 22 °C herunterkühlen und Temperatur halten
Programmende
Die Programmvorlage bleibt immer erhalten und kann nicht gelöscht werden. Sie kann jedoch individuell verändert werden. Dazu muss sie nach den Änderungen unter dem Namen "Standard" gespeichert werden. Soll
die ursprüngliche Programmvorlage wiederhergestellt werden, muss im Untermenü "Delete" das Programm
"Standard" gelöscht werden. Anschließend wird beim Aufrufen von "Standard" wieder die ursprüngliche Vorlage in die Bearbeitungsebene geladen.
7.5 Programm löschen
– Menü "FILES" anwählen und mit
– "Delete" anwählen und mit
aufrufen.
Eine Liste der vorhandenen
Programme wird angezeigt.
aufrufen.
FILES . .
Edit
Load
Standard
New
Delete
STANDARD
– –/22.0°
Delete Program
TEST 1
TEST 2
10:22:06
– Programmnamen auswählen.
– Mit
bestätigen. Das Programm wird gelöscht.
Das Löschen von Programmen auf einer Personal card ist in Kapitel 9.3 beschrieben.
35
7 Programmierung
7.6 Programmierbeispiele
Im Folgenden werden einige Beispiele für den vielseitigen Einsatz der Befehle und Funktionen der Mastercycler gegeben.
7.6.1 Gradienten PCR (nur für Mastercycler gradient)
Die Gradienten PCR wird zur Optimierung der Temperaturen in einem PCR Experiment eingesetzt. Der Gradient kann mit einer Temperaturspanne von bis zu 20 °C als Option mit jedem Temperaturbefehl programmiert
werden.
Die häufigste Anwendung ist die Bestimmung der optimalen Annealingtemperatur (siehe Beispiel). Hierfür
wird beispielsweise ein Gradient von ± 10 °C aufgebaut. Als Mittelwert des Gradienten empfiehlt sich eine
Temperatur, die 5 °C höher ist als die berechnete Annealingtemperatur.
Gradienten PCR
Gefäßtemperierung
Deckeltemperierung
1
2
3
4
5
6
7
36
Initiale Denaturierung
Denaturierung
Annealing
Gradient
Elongation
Anzahl Zyklen
Finale Elongation
Abkühlung und Aufbewahrung
Ende
Control
lid
Nowait
94°
94°
60°
G = 10°
72°
go to 2
72°
Hold 20°
end
tube
105°
auto
2 min
15 sec
15 sec
30 sec
Rep 29
2 min
enter
7 Programmierung
7.6.2 Verwendung der Befehle "Pause" und "Hold" (Beispiel: Hot Start PCR)
Mit dem Befehl "Pause" wird das Programm unterbrochen, wobei die zuletzt eingegebene Temperatur gehalten wird. Zur Definition des Zwecks der Pause kann ein Text eingegeben werden. Nach Bestätigung mit
wird das Programm fortgesetzt.
Der Befehl "Hold" ermöglicht es, eine beliebige Temperatur solange zu halten, bis nach Betätigung von
das Programm fortgesetzt werden soll.
Im aufgeführten Beispiel einer Hot Start PCR wird das Programm nach der initialen Denaturierung angehalten, um eine Reaktionskomponente zuzusetzen. Nach der finalen Elongation wird der Block auf Raumtemperatur abgekühlt.
Hot Start PCR
Gefäßtemperierung
Deckeltemperierung
1
2
3
4
5
6
7
8
Initiale Denaturierung
Anhalten zur Zugabe
Denaturierung
Annealing
Elongation
Anzahl Zyklen
Finale Elongation
Abkühlung und Aufbewahrung
Ende
Control
lid
Nowait
94°
Pause
94°
55°
72°
go to 3
72°
Hold 20°
end
tube
105°
auto
2 min
Zugabe
15 sec
15 sec
30 sec
Rep 29
2 min
enter
37
7 Programmierung
7.6.3 Das Temperaturinkrement (Beispiel: Touch Down PCR)
Das Temperaturinkrement, das als Option mit jedem Temperaturbefehl programmiert werden kann, ermöglicht
eine Erniedrigung oder Erhöhung der Temperatur um einen definierten Wert mit jedem Zyklus.
Mit der Touch Down PCR kann eine erhöhte Spezifität der PCR erreicht werden, indem die Annealingtemperatur sukzessiv von höheren zu niedrigeren Temperaturen verändert wird.
Im vorliegenden Beispiel wird die Annealingtemperatur in den ersten 16 Zyklen jeweils um 1 °C reduziert, bis
50 °C erreicht sind. Mit dieser Annealingtemperatur schließen sich weitere 14 Zyklen an.
Touch Down PCR
Gefäßtemperierung
Deckeltemperierung
1
2
3
4
5
6
7
8
9
10
11
Initiale Denaturierung
Denaturierung
Annealing
Temperaturinkrement
Elongation
Anzahl Zyklen
Denaturierung
Annealing
Elongation
Anzahl Zyklen
Finale Elongation
Abkühlung und Aufbewahrung
Ende
Control
lid
Nowait
94°
94°
65°
–1°
72°
go to 2
94°
50°
72°
go to 6
72°
Hold 20°
end
tube
105°
auto
2 min
15 sec
15 sec
30 sec
Rep 15
15 sec
15 sec
30 sec
Rep 13
2 min
enter
7.6.4 Das Zeitinkrement (Beispiel: Long PCR)
Das Zeitinkrement, das als Option mit jedem Temperaturbefehl programmiert werden kann, ermöglicht eine
Verlängerung der Verweildauer bei einer bestimmten Temperatur, um einen definierten Wert mit jedem Zyklus.
Diese Funktion kann bei der Long PCR zur Amplifizierung langer Fragmente für eine sukzessive Verlängerung des Elongationsschritts genutzt werden.
Im vorliegenden Beispiel wird die Elongationszeit mit jedem Zyklus um 10 Sekunden verlängert, so dass im
30. Zyklus die Elongationszeit 290 Sekunden länger gehalten wird als im ersten Zyklus.
Long PCR
Gefäßtemperierung
Deckeltemperierung
1
2
3
4
5
6
38
Initiale Denaturierung
Denaturierung
Elongation
Zeitinkrement
Anzahl Zyklen
Finale Elongation
Abkühlung und Aufbewahrung
Ende
Control
lid
Nowait
94°
94°
68°
go to 2
72°
Hold 20°
end
tube
105°
auto
2 min
15 sec
10 min
+0:10 sec
Rep 29
15 min
enter
7 Programmierung
7.6.5 Regulierung der Temperiergeschwindigkeit (Beispiel: RAPD-PCR)
Variable Heiz- bzw. Kühlraten, die als Option mit jedem Temperaturbefehl programmiert werden können,
erlauben, die Temperiergeschwindigkeit zu regulieren.
Beim Verfahren der RAPD-PCR oder bei der PCR mit A/T-reichen Primer/Template-Hybriden kann beispielsweise eine vorsichtige Erhitzung nach dem Annealing erforderlich sein.
Im vorliegenden Beispiel wird die Elongationstemperatur mit einer Geschwindigkeit von 1 K/s erreicht.
RAPD-PCR
Gefäßtemperierung
Deckeltemperierung
1
2
3
4
5
6
7
Initiale Denaturierung
Denaturierung
Annealing
Elongation
Heizrate
Anzahl Zyklen
Finale Elongation
Abkühlung und Aufbewahrung
Ende
Control
lid
Nowait
94°
94°
55°
72°
R = 1 °/s
go to 2
72°
Hold 20°
end
tube
105°
auto
2 min
15 sec
15 sec
30 sec
Rep 29
2 min
enter
Beliebig langsame Temperiergeschwindigkeiten können durch Programmschleifen erreicht werden, die eine
sukzessive Temperaturänderung über Temperaturinkremente erzielen.
Im folgenden Bespiel wird nach dem Annealing mit Hilfe einer Programmschleife auf eine Elongationstemperatur von 72 °C erhitzt.
RAPD-PCR
Gefäßtemperierung
Deckeltemperierung
1
2
3
4
5
6
7
8
Initiale Denaturierung
Denaturierung
Annealing
Elongation
Temperaturinkrement
Heizrate
Anzahl Zyklen
Anzahl Zyklen
Finale Elongation
Abkühlung und Aufbewahrung
Ende
Control
lid
Nowait
94°
94°
55°
56°
+1°
R = 0,3 °/s
go to 4
go to 2
72°
Hold 20°
end
tube
105°
auto
2 min
15 sec
15 sec
7 sec
Rep 16
Rep 29
2 min
enter
39
7 Programmierung
7.6.6 Probenkühlung und angeschlossene PCR
Sollen empfindliche Proben bis zur PCR ständig gekühlt werden, kann der Thermoblock vorgekühlt werden.
Dazu gibt es zwei Möglichkeiten:
1. Menü "Incubate" auf 4 °C und "Heater is On" einstellen.
2. Durch Vorschalten eines ersten Programms und Verküpfung mit einem "LINK"-Befehl.
Der Thermoblock wird mit einem ersten Programm auf eine Temperatur von 4 °C temperiert. Nach dem
Einsetzen der Proben in den kalten Thermoblock wird über einen Link-Befehl das 2. Programm mit dem
PCR-Protokoll aufgerufen.
Die Programmierung sollte folgendermaßen aussehen:
Programm 1
CNTRL TUBE
Lid
NOWAIT FIX
Die Eingaben im 1. Programm gelten auch für die mit LINK angefügten
Programme. Es muss die Deckeleinstellung "Fix" gewählt werden.
1 Hold 4 °C Enter
Der Thermoblock kühlt solange, bis durch Drücken der Taste
über den
Link-Befehl das Bearbeitungsprogramm (z. B. PCRPROT) gestartet wird.
2 Link PCRPROT
end
Verknüpfung zum 2. Programm mit dem PCR-Protokoll.
Programm 2
CNTRL TUBE
40
z. B. KUEHL
PCRPROT
Enthält das Programm auch den tube control Befehl, werden keine Eingaben für
Gefäßtyp und Fill.Volumen mehr erforderlich, sondern es gelten die Eingaben
des 1. Programms für alle weiteren Programme.
8 Kurzanleitung
Arbeiten Sie mit der Kurzanleitung nur, nachdem Sie sich mit der ausführlichen Bedienungsanleitung vertraut
gemacht haben.
Gerät einschalten
Main-Menu
Start
FILES . .
OPTIONS . .
Lid
Incubate
STANDARD
– –/25.0°
Menüname
Starten eines beliebigen Programms
Programmieren
Systemeinstellungen
Heizdeckel vortemperieren
Block- und Heizdeckel temperieren
Programm in Bearbeitungsebene
Soll-/Ist Blocktemperatur
Deckeltemperatur
(nur wenn Deckel eingeschaltet ist)
Lid:105°
10:22:06
Uhrzeit
Programmierung
– Menü FILES mit
/
wählen,
.
FILES . .
Edit
Load
Standard
New
Delete
STANDARD
– –/22.0°
Programm in Bearbeitungsebene bearbeiten
Beliebiges Programm laden und bearbeiten
Programmvorlage laden und bearbeiten
Neues Programm erstellen
Beliebiges Programm löschen
10:22:06
Programmvorlage "Standard" ändern
– "Standard" mit
wählen,
.
– Mit
,
,
,
den Cursor zu den oder zwischen den Eingabepositionen bewegen.
– Mit
Programmbefehle auswählen, Einstellungen oder Texte eingeben; mit
bestätigen.
CNTRL
BLOCK
TUBE
Lid
NOWAIT
WAIT
AUTO
FIX
Temperaturregelung definieren
Für den Thermoblock
Für unterschiedliche Gefäße
Deckeltemperatur festlegen
Programm startet sofort
Programm wartet auf Deckeltemperatur
Deckel schaltet bei T <22 °C
und Zeit >5 min. ab
Deckel schaltet bei Programmende ab
FILES . .
Edit
Load
Standard
New
Delete
STANDARD
– –/22.0°
1
2
3
Edit STANDARD
CNTRL
BLOCK
LID=105°
NOWAIT
AUTO
T=94.0°
0:02:00
T=94.0°
0:00:15
T=44.0°
0:00:15
10:22:06
Programmbefehle
T
HOLD
PAUSE
GOTO/REP
SOUND
LINK
Temperaturen, Zeiten, Inkremente, Rampe, Gradient
Eingegebene Temperatur halten, bis mit Enter fortgesetzt wird (4–99 °C)
Unterbrechen bis mit Enter fortgesetzt wird (0–11 Zeichen)
Programmteile wiederholen und Anzahl Zyklen (1–40 Zeilen, 1–99 Wiederholungen)
Akustisches Signal (1–10 Töne)
Verzweigen zu anderen Programmen (1–5 Programme)
– Optionen des Temperaturbefehls mit
eingeben. Der Cursor muss auf der Zeilennummer stehen.
T
Temperatur (0–99°)
Zeit (0:00:01–9.59:59)
Temperaturinkrement (0,0 –10,0°, + oder –)
Zeitinkrement (0:00–1:00, + oder –)
R Rampe (0,3–3 K/s)
Rampeninkrement (0,0–1,0 °/s, + oder –)
G Gradient (±0,0 – ±10 °C)
(nur bei Mastercycler gradient)
FILES . .
Edit
Load
Standard
New
Delete
STANDARD
– –/22.0°
3
4
5
STANDARD
T=44.0°
T=72.0°
+0.0°
R= 3.0°/s
G=0.0°
GOTO 2
0:00:15
0:00:30
+0:00
+0.0°/s
REP 24
10:22:06
– Eingaben mit
bestätigen.
– Programmierung mit
abschließen.
– Programm speichern.
41
8 Kurzanleitung
Programm sichern
– Programm mit
verlassen.
– Frage: "Save: YES" mit
beantworten.
– Programmnamen mit
– Namen mit
definieren.
bestätigen.
FILES . .
Edit
Load
Standard
New
Delete
STANDARD
– –/22.0°
Edit STANDARD
STANDARD not saved
SAVE: YES
ProgName: STANDARD
10:22:06
Programmzeile einfügen
– Cursor mit
vor die Zeile bewegen.
/
–
drücken, eine neue Zeile wird über dem Cursor eingefügt. Gewünschten Befehl mit
wählen.
Programmzeile löschen
– Cursor mit
auf die Programmzeilennummer bewegen.
/
–
drücken. Die Zeile wird gelöscht. Der Cursor springt zur nächsten Zeile.
Systemeinstellungen
Deckel und Block temperieren
Deckel vorheizen
Programmierung drucken
Programmablauf drucken
Menü Incubate
Menü Lid
Menü OPTION
Menü OPTION
Programm starten
– Gerät einschalten, evtl. Deckel
oder Deckel und Block vorheizen.
– Menü "Start" mit
wählen,
/
.
– Programmnamen mit
wählen,
/
.
– Bei CNTRL TUBE Gefäßtyp mit
wählen. Fill.Vol. eingeben.
0,2 ml/plate: 5 bis 50 µl
0,5 ml/thin: 5 bis 100 µl
– Mit
bestätigen.
Programm startet sofort.
– Mit
aus-
Programmlaufzeit ansehen.
Programm unterbrechen
–
– Mit
drücken.
Programm "Pause" auswählen.
– Mit
bestätigen.
Main-Menu
Start
FILES . .
OPTIONS . .
Lid
Incubate
STANDARD
– –/25.0°
Blocktemperatur 37 °C, Heater is ON
LidTemp 105 °C, Heater is ON
Printout Editor: YES
PrintProtocol: ON
Run a Program:
STANDARD
TEST1
TEST2
10:22:06
Main-Menu
Start
1
FILES . .
OPTIONS . .
Lid
Incubate
Running/STANDARD
95.0/94.5°
Lid:105°
Run a Program:
T=95.0°
0:00:05
Cyc:4
10:22:06
Main-Menu
Run a Program:
Start
STANDARD running . . .
Program:
PAUSE
FILES . .
OPTIONS . .
Lid
Incubate
Paused/STANDARD
95.0/94.5°
Lid:105°
10:22:06
Main-Menu
Start
FILES . .
OPTIONS . .
Lid
Incubate
STANDARD
95.0/94.5°
10:22:06
Unterbrochenes Programm fortsetzen
–
– Mit
drücken.
"Resume" auswählen.
– Mit
bestätigen.
Programm abbrechen
–
drücken.
– "Stop" mit
– Programm mit
42
bestätigen.
verlassen.
Run a Program:
STANDARD running . .
Program:
STOP
Lid:105°
9 Personal card
Auf einer Personal card können abhängig von der Programmlänge max. 10 Programme gespeichert werden.
Beim Starten eines Programms von einer Personal card wird das Programm für die Dauer der Programmabarbeitung in einen temporären Speicher, jedoch nicht in den internen Speicher oder in die Bearbeitungsebene, geladen.
Mit der Speicherkarte können Programme zu weiteren Geräten des Typs Mastercycler, Mastercycler
gradient und Mastercycler personal übertragen werden.
Nur wenn die Personal card eingeschoben ist, wird in den Menüs "Start", "FILES/Load", "FILES/Edit" und
"FILES/Delete" unterschieden zwischen dem Speicher der Personal card 〈MCARD〉 und dem internen
Speicher der Mastercycler 〈INTERN〉.
Menüs "Start", "FILES/Load" und "FILES/Delete"
Angezeigt werden immer nur Programme eines Speichers. Der momentan geschlossene Speicher
wird am Kopf der Programmliste als 〈INTERN〉 oder 〈MCARD〉 angezeigt. Durch Anwählen des
geschlossenen Speichers und Bestätigen mit
wird der Speicher geöffnet und der vorherige
Speicher geschlossen.
Menü
"FILES/Edit"
Mit der Taste
festgelegt wird.
muss das Speicherziel (Target) ausgewählt werden, bevor der Programmname
9.1 Sicherheitshinweise
Die goldene Kontaktfläche auf der Personal card darf nicht beschädigt, zerkratzt oder verschmutzt werden.
Berührungen mit den Fingern sollten vermieden werden.
Elektrostatische Ladungen können gespeicherte Programme zerstören.
9.2 Bedienung
Karte einlegen
– Karte in Pfeilrichtung (goldene Kontaktfläche nach oben) in den Schlitz unter dem Bedienfeld einstecken.
– Karte bis zum Anschlag einschieben, sie rastet automatisch ein.
Karte entnehmen
– Karte bis zum Anschlag einschieben.
– Durch Federdruck wird die Karte herausgedrückt und kann entnommen werden.
Karte formatieren
Eine neue Karte muss formatiert werden. Die Aufforderung zum Formatieren wird – nur wenn es notwendig
ist – automatisch vom Gerät angezeigt. Bei einer fehlerhaft beschriebenen Karte wird ebenfalls zum
Formatieren aufgefordert.
– "Memory card not valid".
"Format: Yes" mit
bestätigen.
In der untersten Zeile werden die Ist/Soll Steps angezeigt.
43
9 Personal card
9.3 Programme bearbeiten
Programm von einer Karte starten
– Menüpunkt "Start" anwählen, mit
aufrufen
– 〈MCARD〉 anwählen, mit
aufrufen.
Wird am Kopf der Liste anstelle von 〈MCARD〉 der Speichername 〈INTERN〉 angezeigt, ist der Programmspeicher der Personal card bereits geöffnet.
– Ein Programm anwählen, mit
aufrufen
Hinweis: Programme werden zum Starten nicht in den internen Speicher oder die Bearbeitungsebene "Edit"
geladen. Nach Beenden des Programms ist das von der Karte gestartete Programm nicht mehr auf dem
Gerät vorhanden.
Programm von einer Karte löschen
– Menü "FILES/Delete" anwählen, mit
aufrufen
– 〈MCARD〉 anwählen, mit
aufrufen.
Wird am Kopf der Liste anstelle von 〈MCARD〉 der Speichername 〈INTERN〉 angezeigt, ist der Programmspeicher der Personal card bereits geöffnet.
– Ein Programm anwählen, mit
löschen
Programm von einer Karte in die Bearbeitungsebene laden
– Menü "FILES/Load" anwählen, mit
aufrufen
– 〈MCARD〉 anwählen, mit
aufrufen.
Wird am Kopf der Liste anstelle von 〈MCARD〉 der Speichername 〈INTERN〉 angezeigt, ist der Programmspeicher der Personal card bereits geöffnet.
– Ein Programm anwählen, mit
laden
Programm auf eine Karte sichern
– Nach dem Erstellen oder Ändern eines Programms die Bearbeitungsebene mit Taste
– Die Abfrage "Save: YES" mit
verlassen
bestätigen
– Bei der Abfrage "Target:INTERN" mit der Taste
– Programmnamen (max 8 Zeichen) eingeben, mit
〈MCARD〉 auswählen, mit
bestätigen
bestätigen
Hinweis: Es kann der gleiche Name verwendet werden, unter dem das Programm auch im internen Speicher
des Mastercyclers gesichert ist.
Programme mit LINK-Befehlen
Ein Programm kann nicht von einer Personal card gestartet werden, wenn es Programmverzweigungen
– LINK-Befehle – zu anderen Programmen auf der Personal card enthält. Ein Start ist möglich, wenn eine
Verzweigung zu einem Programm im internen Speicher der Geräte vorhanden ist.
Ein Programm aus dem internen Speicher kann mit einem LINK-Befehl kein Programm von der Personal card
aufrufen.
44
10 Schnittstellenbeschreibung
10.1 Drucker- / PC-Anschluss
Druckeranschluss
Die Anschlussbuchse (25-polig, Centronics parallele Schnittstelle, PC-kompatibel) für einen Drucker befindet
sich an der rechten Geräteseite unterhalb der PC-Anschlussbuchse (siehe Kap. 4.1, Abb. 2.6).
Mastercycler oder Mastercycler gradient und Drucker mit einem handelsüblichen PC-Druckerkabel
verbinden. Bei der Installation müssen Cycler und Drucker ausgeschaltet sein. Wird ein Drucker selten
benutzt, sollte das Druckerkabel aus der Cycler-Anschlussbuchse herausgezogen und nur bei Bedarf
installiert werden.
Im Menü "OPTIONS/Printer" werden die Parameter für den Drucker eingestellt.
Programmierung drucken
Printout Editor: NO
Das Drucken ist ausgeschaltet.
Printout Editor: YES
Das im Menü "Edit" vorhandene Programm wird ausgedruckt.
Dazu "YES" mit Taste
anwählen und mit
bestätigen.
Nach dem Ausdruck wird automatisch auf "Printout Editor: NO" umgeschaltet.
Programmprotokoll drucken
Print Protocol: OFF
Der Programmablauf soll nicht protokolliert werden.
Print Protocol: ON
Der Programmablauf wird mit dem Drucker protokolliert.
45
10 Schnittstellenbeschreibung
Beispiel für einen Programmausdruck:
✼ ✼ M A ST E R CY C L E R g r a d i e n t 5 3 3 1 ✼ ✼
eppendorf
Version x.xx.xx
Time: 13:41:02
Date: 14/Apr/1999
✼✼✼✼✼✼✼✼✼✼✼✼✼✼✼✼✼✼✼✼✼✼✼✼✼✼
LISTING
Program:
Created:
Step:
CNTRL
LID=105C
NOWAIT
STANDARD
13/Apr/1999
BLOCK
AUTO
1
T = 94.0C
+0.0C
R = 3.0C/s
G = 0.0C
0:02:00
+ 0:00
+0.0C/s
2
T = 44.0C
+0.0C
R = 3.0C/s
G = 0.0C
0:00:15
+ 0:00
+0.0C/s
.
.
.
.
.
.
7
HOLD 22.0C ENTER
END OF LISTING
46
11:46
Programmname
Datum der letzten Speicherung
10 Schnittstellenbeschreibung
Beispiel für ein Programmprotokoll:
Vor dem Start wird das Programm (siehe Seite 46) ausgedruckt und während des Programmablaufs werden
alle Temperaturen und Zeiten protokolliert.
Program ... started at
Initial Blocktemp
Initial Lidtemp
Run Time
Finish Time
Count
Cycle
Step
Command
Time
Completion Time
–
–
–
–
–
–
–
–
–
–
_
Datum und Uhrzeit des Programmstarts
Blocktemperatur beim Start
Heizdeckeltemperatur beim Start
geschätzte Laufzeit
geschätzte Uhrzeit bei Programmende
Zählung der Programmschritte
Zykluszählung
Programmschrittnummer aus der Programmierung
Befehltyp und programmierte Werte
Uhrzeit nach Abarbeitung eines Befehls
Uhrzeit bei Programmende
Program STANDARD started at Date:
15/Apr/1999
Initial Blocktemp:
24.7 C
Initial Lidtemp:
25 C
Run Time:
1:26
Finish Time:
15/Apr/1999
9:22
7:56:12
Count
Time
Cycle
Step
Command
Tube:0.2 ml
Fill.Vol.:20 µl
CNTRL
TUBE
LID=105C
NOWAIT
1
2
1
1
1
2
AUTO
T=94.0C
+0.0C
R=3.0C/s
G=0.0C
0:02:00
+ 0:00
+0.0C/s
T=94.0C
+0.0C
R=3.0C/s
G=0.0C
0:00:15
+ 0:00
+0.0C/s
7:56:21
7:56:22
7:59:05
7:59:21
.
.
Completion Time:
15/Apr/1999
9:24:55
END OF PROTOCOL
47
10 Schnittstellenbeschreibung
PC-Anschluss
Die 9-polige PC-Anschlussbuchse (serielle Schnittstelle RS 232) befindet sich an der rechten Geräteseite
oberhalb der Druckeranschlussbuchse (siehe Kap. 4.1, Abb. 2.5).
Im Menü "OPTIONS/GENERAL/Remote" werden die Parameter für den Rechner eingestellt.
Auswahl der Übertragungsrate: Baudrate 19 200, 9 600, 4 800, 2 400 oder 1 200
Nähere Auskünfte über den PC-Anschluss und das notwendige Verbindungskabel erhalten Sie auf Anfrage.
Der anzuschließende PC muss den EN 60 950- und UL 1950-Bestimmungen entsprechen.
Für die serielle Kommunikation gibt es eine spezielle Bedienungsanleitung. Nähere Angaben dazu erhalten
Sie auf Anfrage.
10.2 Programmübertragung
Werden Programme auf einer Personal card gespeichert, können sie durch die Karte auf andere Geräte des
Typs Mastercycler, Mastercycler gradient und Mastercycler personal übertragen werden. Es können auch
Programme, die auf einem Mastercycler personal erstellt wurden, auf einen Mastercycler gradient
übertragen werden. Der Mastercycler gradient besitzt eine zusätzliche Funktion. Der Temperaturbefehl ist
um eine Gradientenfunktion erweitert, d. h. es kann ein Temperaturgefälle im Thermoblock erzeugt werden.
Diese Funktion entfällt bei der Programmübertragung zum Mastercycler und Mastercycler personal.
48
11 Wartung
Verschmutzungen können mit Wasser oder mildem Laborreiniger entfernt werden.
Das Gerät sollte vor organischen Lösungsmitteln und aggressiven Chemikalien geschützt werden. Es darf
keine Flüssigkeit in das Gerät laufen. Aus Sicherheitsgründen muss bei einer Reinigung das Gerät stets
ausgeschaltet und der Netzstecker gezogen werden.
Die elektrischen Schmelzsicherungen befinden sich zwischen Netzschalter und Netzstecker auf der
Geräterückseite. Durch Aufwärtsschieben einer Sperrklinke können sie entnommen und gewechselt werden.
Bevor die Sicherungen gewechselt werden, muss das Gerät ausgeschaltet und der Netzstecker gezogen
werden. Es dürfen nur Sicherungen mit korrekten Spannungswerten verwendet werden (ein Schild mit
Angaben über den Sicherungstyp befindet sich auf der Geräterückseite).
Das Gerät darf nur von einem qualifizierten Fachmann geöffnet werden. Die Gerätegarantie erlischt mit einem
unautorisierten Eingriff in das Gerät.
49
12 Fehlersuche
Fehler in der Programmierung oder in der Handhabung der Personal card können nach Klärung der Ursache
behoben werden.
Technische Fehler können durch eine Störung, z. B. Netzausfall, Netzschwankungen, ausgelöst werden. In
einigen Fällen ist es daher ausreichend, das Gerät kurz auszuschalten. Vor dem Einschalten ca. 10 Sekunden
warten. Tritt der Fehler erneut auf, muss ein Servicetechniker informiert werden.
12.1 Fehlermeldungen
50
Fehlermeldung
Ursache
Behebung
BLOCK ChkSumErr
Technischer Defekt.
Service benachrichtigen.
BLOCK TOO HOT!
Regelung oder Elektronik
defekt.
Service benachrichtigen.
Card changed
Karte wurde direkt vor dem Beschreiben entfernt.
Karte korrekt einstecken und Vorgang
wiederholen.
Card content not o.k.
Karteninhalt ist fehlerhaft.
Karte muss formatiert werden.
Automatischer Ablauf beim Sichern
eines Programms.
Card not in slot
Karte wurde während des Sicherns
entfernt.
Karte korrekt einstecken und Vorgang
wiederholen.
Enter Tube
Für ein gestartetes Programm fehlen
Eingaben.
Gefäßtyp und Probenvolumen
eingeben.
Err GOTO (1)
Verzweigung zu einer Programmzeilennummer nicht möglich, da diese
in einem Programmbereich liegt, der
schon mit einem anderen GOTOBefehl zur Wiederholung aufgerufen
wird.
GOTO-Befehle prüfen, ggf. ändern
oder löschen. Programmzeilennummer für einen weiteren GOTO-Befehl
darf nicht in einem Abschnitt liegen,
der bereits von einem GOTO-Befehl
angesprochen wird.
Err GOTO (2)
Mehr als drei GOTO-Befehle wurden
für einen Programmbereich verwendet.
Drei GOTO-Befehle können in einem
Programmabschnitt verwendet werden, wenn sich die angesprochenen
Bereiche vollständig überlagern.
D. h. der angesprochene Programmbereich des zweiten Befehls ist größer als der des ersten Befehls. Der
dritte GOTO-Befehl muss wieder
einen größeren Bereich umfassen.
Err Invalid
Ungültiger Befehl,
Parametereingabe fehlt.
Befehl komplett eingeben oder
löschen.
12 Fehlersuche
Fehlermeldung
Ursache
Behebung
Err Link (1)
...
Line ..
LINK-Befehl kann nicht durchgeführt
werden.
Programm wird nicht gefunden.
Programmname und -zeile des fehlerhaften LINK-Befehls werden angezeigt.
Es können nur Programme aus dem
internen Speicher vom LINK-Befehl
aufgerufen werden, nicht Programme
von der Personal card oder das Programm aus der Bearbeitungsebene
("Edit").
Err Link (2)
...
Line ..
Zu viele Programme werden durch
LINK-Befehle verbunden.
Programmname und -zeile des fehlerhaften LINK-Befehls werden angezeigt.
Maximal 5 Programme, d. h. 4 LINKBefehle, können nacheinander bearbeitet werden.
Err No Program
Kein ausführbares Programm im
Speicher vorhanden.
Ein Programm aus dem Speicher
oder von Personal card laden oder im
Menü "Edit" ein Programm definieren
und dann erneut starten.
FAN ERROR!
Interner Lüfter defekt.
Gerät ausschalten.
Service benachrichtigen.
FAT Full
Anzahl der verwaltbaren Programme
überschritten.
Interner Speicher: 99 Programme
Personal card: 10 Programme
Nicht benötigte Programme löschen.
Internal EE-Err
Technischer Defekt.
Service benachrichtigen.
LEFT BLOCK
DEFEKTIV!
Regelung oder Elektronik des linken
Blocks defekt.
Gerät ausschalten.
Service benachrichtigen.
LID TOO HOT!
Elektronik defekt.
Service benachrichtigen
Link not found
Programmverzweigung nicht möglich,
da das Programm, das aufgerufen
werden sollte, gelöscht wurde.
LINK-Befehl prüfen;
Fehlendes Programm eingeben.
Link Error
Programmverzweigung nicht möglich,
da das Programm, das aufgerufen
werden sollte, gelöscht wurde.
LINK-Befehl prüfen;
Fehlendes Programm eingeben.
MCard Error
Der Speicher der Personal card ist
fehlerhaft.
Weitere Meldungen auswerten.
Memory corrupted
Der interne Speicher ist fehlerhaft.
Der interne Speicher muss gelöscht
werden.
Damit sind alle Programme gelöscht.
51
12 Fehlersuche
Fehlermeldung
Ursache
Behebung
Memory Error
Der interne Speicher für Programme
ist fehlerhaft.
Weitere Meldungen auswerten.
Memory full!
Speicher voll.
Vor dem Speichern nicht benötigte
Programme löschen.
MemoryCard
(Blank)
Karte hat eine falsche logische
Kennung bzw. ist leer.
Karte muss formatiert werden.
Automatischer Ablauf beim
Sichern eines Programms.
MemoryCard
Defective!
Karte ist defekt.
Neue Karte verwenden.
MemoryCard
HdChksumErr
Prüfsummenfehler.
Karte muss formatiert werden.
Automatischer Ablauf beim
Sichern eines Programms.
MemoryCard
ManIDErr
Falsche Kennung.
Karte muss formatiert werden.
Automatischer Ablauf beim
Sichern eines Programms.
MemoryCard
MemOverErr!
Falsche Speicheradresse.
Karte muss formatiert werden.
Automatischer Ablauf beim
Sichern eines Programms.
MemoryCard
MemRangeErr
Speicherbereichsfehler.
Karte muss formatiert werden.
Automatischer Ablauf beim
Sichern eines Programms.
MemoryCard
MemSizeErr
Falsche Speichergröße.
Karte muss formatiert werden.
Automatischer Ablauf beim
Sichern eines Programms.
MemoryCard
MemUnderErr!
Falsche Speicheradresse.
Karte muss formatiert werden.
Automatischer Ablauf beim
Sichern eines Programms.
MemoryCard
Missing!
Keine Karte gesteckt.
Karte einstecken.
MemoryCard
Not Valid
Keine gültige Karte.
– Karte korrekt einstecken,
Richtung und Seite kontrollieren.
– Karte wird vor dem Sichern
formatiert.
MemoryCard
Read Err!
52
Karte kann nicht gelesen
werden.
Karte korrekt einstecken,
Richtung und Seite kontrollieren.
12 Fehlersuche
Fehlermeldung
Ursache
Behebung
MemoryCard
Read-Only!
Karte ist als schreibgeschützt
gekennzeichnet.
Karte muss formatiert werden.
Automatischer Ablauf beim
Sichern eines Programms.
MemoryCard
Write Err!
Fehler beim Schreiben auf die Karte.
– Karte korrekt einstecken,
Richtung und Seite kontrollieren.
– Karte beim Sichern nicht
berühren/bewegen.
MID BLOCK
DEFEKTIV!
Regelung oder Elektronik des mittleren Blocks defekt.
Gerät ausschalten.
Service benachrichtigen.
Name Invalid!
Der Programmname enthält
ein ungültiges Zeichen..
Programmnamen erneut eingeben.
POWER ERROR!
Spannungsfehler
oder Sicherung defekt.
Service benachrichtigen.
Printer: OFF LINE
Drucker ist nicht empfangsbereit.
Druckereinstellung "ON LINE"
anwählen.
Printer: no response
Es ist kein Drucker vorhanden oder
der Drucker ist ausgeschaltet.
– Im Menü OPTION/Printer/Print
Protocol "OFF" anwählen.
– Drucker einschalten.
Program is running!
Ein Programm wird abgearbeitet.
Deckeltemperatur kann momentan
nicht geändert werden.
Program too large!
Programmgröße überschritten.
Max. 40 Programmzeilen möglich.
Restarting Program!
Netzausfall oder Gerät kurz ausgeschaltet, während ein Programm
abgearbeitet wird.
Das Programm wird automatisch
fortgesetzt.
RIGHT BLOCK
DEFEKTIV!
Regelung oder Elektronik des rechten
Blocks defekt.
Gerät ausschalten.
Service benachrichtigen.
SLOWING DOWN!
Heiz-/Kühlrate ist verlangsamt.
Bei wiederholtem Auftreten
Service benachrichtigen.
Steps free
Anzeige des freien Speicherplatzes
ab < 100 Steps.
1 Step = 1 Programmzeile
Nicht benötigte Programme löschen
oder auf Personal card speichern.
53
12 Fehlersuche
Fehlermeldung
TSensor_Err
54
Ursache
Behebung
– Zulässige Arbeitsbedingungen
nicht eingehalten.
– Gerät nur bei vorgesehenen
Temperaturen und Luftfeuchtigkeiten betreiben.
– Technischer Defekt.
– Service benachrichtigen.
Value out of range!
Erlaubter Wertebereich überoder unterschritten.
Automatisch wird der erlaubte
Grenzwert eingetragen.
Warn Ramp Max
...
Line ...
Die Rampe ist begrenzt auf 3 K/s.
Eingaben für Rampe und Rampeninkrement prüfen und ggf. ändern.
Warn Ramp Min
...
Line ...
Die Rampe ist begrenzt auf 0,3 K/s.
Eingaben für Rampe und Rampeninkrement prüfen und ggf. ändern.
Warn Temp Max
Temperaturgrenze von 99 °C wird
überschritten. Wird das Programm
gestartet, ist die Temperatur auf
99 °C begrenzt.
Temperatur-Befehle prüfen und eingegebenen Wert des Temperaturinkrements reduzieren, damit nur
Werte unter 99 °C erreicht werden.
Warn Temp Min
Temperaturgrenze von 4 °C wird
unterschritten. Wird das Programm
gestartet, ist die Temperatur auf 4 °C
begrenzt.
Temperatur-Befehle prüfen und eingegebenen Wert des Temperaturinkrements ändern, damit nur Werte
über 4 °C erreicht werden.
Warn Time Max
Die Zykluszeit von 9:59:59 wird überschritten. Wird das Programm gestartet, ist die Zykluszeit auf 9:59:59
begrenzt.
Temperatur-Befehle prüfen und eingegebenen Wert des Zeitinkrements
reduzieren, damit nur Werte unter
9:59:59 erreicht werden.
Warn Time Min
Die Zykluszeit von 0:00:01 wird unterschritten. Wird das Programm gestartet, ist die Zykluszeit auf 0:00:01
begrenzt.
Temperatur-Befehle prüfen und eingegebenen Wert des Zeitinkrements
ändern, damit nur Werte über 0:00:01
erreicht werden.
13 Technische Daten
Mastercycler bzw. Mastercycler gradient
Probenkapazität:
1 Mikrotiterplatte
oder
96 0,2 ml PCR-Gefäße
oder
77 0,5 ml PCR-Gefäße, dünnwandig
Temperaturbereich:
4 bis 99 °C
Temperaturverteilung über den Block:
20 °C bis 72 °C ± 0,6 K
95 °C
± 1,0 K
Blockhomogenität (S 95):
20 °C bis 72 °C ≤ ± 0,4 K
95 °C
≤ ± 0,5 K
Regelgenauigkeit:
± 0,2 K
Temperiergeschwindigkeit:
Heizrate ca. 3 K/s, am Block gemessen
Kühlrate ca. 2 K/s, am Block gemessen
Anzahl der Programme:
max. 99
max. 10 auf einer Personal card
Max. Zyklenzahl:
99
Abmessungen:
Breite:
Tiefe:
Höhe:
Gewicht:
ca. 12,4 kg
Spannung/Frequenz:
230 V, 50–60 Hz / 115 V, 50–60 Hz /
100 V, 50–60 Hz
Leistungsaufnahme:
500 W
500 W
500 W
Betriebsstrom:
2,6 A
5A
6A
Sicherungen:
2 x T 5 A, 250 V
2 x T 6,3 A, 250 V
2 x MT 8 A, 250 V
Überspannungskategorie:
II
Verschmutzungsgrad:
2
Schutzklasse:
I
Arbeitsbedingungen:
15 bis 35 °C, 70 % rel. Feuchte
Lagerbedingungen:
–20 bis 70 °C, 85 % rel. Feuchte
Das Gerät besitzt das
26 cm
41 cm
27 cm
-Zeichen, erfüllt UL 3101-1 und CSA C 22.2 Nr. 1010.1.
Technische Änderungen vorbehalten!
55
14 Bestellinformationen
Bitte verwenden Sie ausschließlich das von uns empfohlene Originalzubehör. Bei Verwendung anderer als
von uns empfohlener Ersatzteile oder Einwegartikel können Funktion oder Sicherheit des Geräts beeinträchtigt werden. Jede Gewährleistung und Haftung für dadurch entstandene Schäden ist ausgeschlossen.
Bestell-Nr.
Beschreibung
5333 000.018
5333 000.026
5333 000.034
Mastercycler
230 V, 50–60 Hz
115 V, 50–60 Hz
100 V, 50–60 Hz
5331 000.010
5331 000.045
5331 000.037
Mastercycler gradient
230 V, 50–60 Hz
115 V, 50–60 Hz
100 V, 50–60 Hz
Zubehör
5331 900.062
Bedienungsanleitung
für Mastercycler und Mastercycler gradient
5331 220.002
in situ Adapter
5332 300.018
Personal card
5331 226.027
Personal card für Temperatur-Validierungssystem
0013 609.349
Sicherung T 5 A, 250 V (1 Stück) für 230 V
0013 565.333
Sicherung T 6,3 A, 250 V (1 Stück) für 115 V
0013 611.432
Sicherung MT 8 A, 250 V (1 Stück) für 100 V
5331 222.005
Temperatur-Validierungssystem
5331 224.008
Temperatursensor für 0,2 ml Gefäßpositionen
Verbrauchsmaterial
56
0030 124.332
PCR-Gefäße 0,2 ml, farblos (1 000 Stück)
0030 124.502
PCR-Gefäße 0,5 ml, farblos, dünnwandig (500 Stück)
0030 124.359
8er Reihe 0,2 ml PCR-Gefäße, farblos, per 120 Stück (= 960 Gefäße)
0030 121.023
Safe-Lock Reaktionsgefäß 0,5 ml, farblos (500 Stück)
0030 128.648
Eppendorf twin.tec PCR Plate 96, skirted, farblos (25 Stück)
0030 128.656
Eppendorf twin.tec PCR Plate 96, skirted, gelb (25 Stück)
0030 128.680
Eppendorf twin.tec PCR Plate 96, skirted, rot (25 Stück)
0030 128.664
Eppendorf twin.tec PCR Plate 96, skirted, grün (25 Stück)
0030 128.672
Eppendorf twin.tec PCR Plate 96, skirted, blau (25 Stück)
0030 128.575
Eppendorf twin.tec PCR Plate 96, semi-skirted, farblos (25 Stück)
0030 128.583
Eppendorf twin.tec PCR Plate 96, semi-skirted, gelb (25 Stück)
0030 128.613
Eppendorf twin.tec PCR Plate 96, semi-skirted, rot (25 Stück)
0030 128.591
Eppendorf twin.tec PCR Plate 96, semi-skirted, grün (25 Stück)
0030 128.605
Eppendorf twin.tec PCR Plate 96, semi-skirted, blau (25 Stück)
14 Bestellinformationen
Verbrauchsmaterial
0030 127.498
Cap Strips, 8er Streifen (25 x 12 Stück)
0030 127.650
Heat Sealing Film (100 Stück)
0030 127.668
Peel-it-Lite, Heat Sealing Folie (100 Stück)
0030 127.676
Pierce-it-Lite, Heat Sealing Folie (100 Stück)
0030 127.480
PCR Film, selbstklebend (100 Stück)
0030 127.471
PCR Foil, selbstklebend (100 Stück)
0030 127.501
in situ Frames, 25 µl (100 Stück)
0030 127.510
in situ Frames, 65 µl (100 Stück)
0030 127.528
in situ Frames, 125 µl (100 Stück)
0030 127.536
in situ Frames, 300 µl (100 Stück)
Empfohlene Hilfsmittel
5425 715.005
Adapter für 0,2 ml PCR Gefäße für 1,5/2,0 ml Rotor (6 Stück) *
5425 716.001
Adapter 0,5/0,6 ml Gefäße für 1,5/2,0 ml Rotor (6 Stück) *
0030 124.235
Arbeitsplatte 8 x 12 für 8er Reihen 0,2 ml PCR-Gefäße (10 Stück)
0030 127.153
Capping Aid, zum Verschließen von Cap Strips (1 Stück)
4830 000.017
Eppendorf Biomaster 4830
und Mastertips
zum kontaminationsfreien Pipettieren
nach dem Direktverdrängerprinzip
im Bereich von 1 bis 20 µl
Biomaster Kit = 1 Biomaster und 96 Mastertips
0030 127.641
Foil Stripper
5390 000.016
Heat Sealer 115 V / 60 Hz
5390 000.024
Heat Sealer 230 V / 50 Hz
3881 000.015
PCR-Cooler 0,2 ml Starter Set (1 x pink, 1 x blue)
3881 000.023
PCR-Cooler 0,2 ml pink
3881 000.031
PCR-Cooler 0,2 ml blue
0030 127.455
PCR Rack, farbig sortiert (10 Stück)
0030 124.243
Rahmen für Arbeitsplatte 8 x 12 (5 Stück)
PCR Reagenzien
siehe Hauptkatalog
* für die Zentrifugation
57
15 Stichwortverzeichnis
A
Annealing 31
Anzeige 8
B
Baudrate 15
Bearbeitungsebene 8, 9, 10, 11, 21, 33, 41, 44
Befehl
AUTO 26, 41
CNTRL 20, 22, 25, 41
FIX 26, 41
GOTO 28, 50
GOTO/REP 41
HOLD 28, 32, 40
LINK 28, 44, 51
NOWAIT 20, 26, 41
PAUSE 28, 37
SOUND 28
WAIT 20, 26, 41
Bestellinformationen 57
BLOCK 18, 25
C
Cursor 7, 8, 31, 34
D
Datum eingeben 15
Denaturierung 29, 30, 31
Druckeranschlussbuchse 6, 45
E
Elongation 29, 31
END 29
F
Füllvolumen 22, 25
G
Gefäßtyp 20, 22, 42
Gradient 3, 4, 14, 26, 27, 29, 31, 36
H
Heizdeckel 4, 17, 18, 20, 26
Helligkeitsregler 6
I
in situ Adapter 3, 19
Inbetriebnahme 5
INTERN 43, 44
Ist-Temperatur 22
58
L
Laufzeit 7, 17, 23
Lüftung 4
-schlitze 5, 6
M
Main-Menu 8, 9, 21, 22
MCARD 43, 44
Menü
Delete 11, 41
Edit 10, 41
Editor 12, 45
FILES 10
GENERAL 15
Gradient 14
Incubate 18, 20, 41
Lid 17, 26
Load 11, 41
New 11, 30, 41
OPTIONS 12, 45
Printer 13
Standard 11, 35
Start 10
VALID 16
N
Netz
-ausfall 16
-schalter 6
-spannung 5
Neues Programm erstellen 29
15 Stichwortverzeichnis
P
Pause 23, 24, 42
PC-Anschlussbuchse 6
Peltierelement 3
Personal card 5, 43, 50, 52
-Leser 6
Proben
-gefäß 19
-menge 20
Programm
abbrechen 8, 24, 42
ändern 33, 34
fortsetzen 24, 42
laden 33
löschen 35, 41
sichern, siehe speichern
speichern 10, 32, 42
starten 21
übertragen 48
unterbrechen 8, 23
-ablauf 47
-ablauf drucken 42, 45
-name 10, 11, 21, 32, 44
-vorlage 11, 35, 41
-zeile einfügen 34
-zeile löschen 34
-zeilennummer 22, 26, 28, 31, 41, 42
V
Verriegelungsknopf 6
Vorzeichen 7
W
Wartung 49
Z
Zeitinkrement 26, 27, 38, 41, 54
Zyklus 31
-zeit 26, 54
R
Rampe 26, 27, 39, 41, 54
Rampeninkrement 26, 27, 41, 54
Restart 15
Resume 24, 42
Run 23
S
Sicherheitshinweise 4, 43
Signalton 15
Soll-Temperatur 22, 26
Stop 23, 24
T
Temperatur 14, 22, 26, 28, 30, 41, 54
-inkrement 26, 27, 38, 39, 41, 54
-optionen 12
Thermoblock 3, 4, 14, 18, 19, 20
tube control 3, 25
U
Uhr stellen 15
59
Contents
1
Introduction. . . . . . . . . . . . . . . . . . . . . . . . . . . . . . . . . . . . . . . . . . . . . . . . . . . . . . . . . . . . . . . . . . 63
2
Safety precautions . . . . . . . . . . . . . . . . . . . . . . . . . . . . . . . . . . . . . . . . . . . . . . . . . . . . . . . . . . . . 64
3
3.1
3.2
3.3
Installation. . . . . . . . . . . . . . . . . . . . . . . . . . . . . . . . . . . . . . . . . . . . . . . . . . . . . . . . . . . . . . . . . . .
Delivery package . . . . . . . . . . . . . . . . . . . . . . . . . . . . . . . . . . . . . . . . . . . . . . . . . . . . . . . . . . . . . .
Setting up the device . . . . . . . . . . . . . . . . . . . . . . . . . . . . . . . . . . . . . . . . . . . . . . . . . . . . . . . . . . .
Starting up the device. . . . . . . . . . . . . . . . . . . . . . . . . . . . . . . . . . . . . . . . . . . . . . . . . . . . . . . . . . .
65
65
65
65
4
4.1
4.2
4.3
Technical description . . . . . . . . . . . . . . . . . . . . . . . . . . . . . . . . . . . . . . . . . . . . . . . . . . . . . . . . . .
Device construction . . . . . . . . . . . . . . . . . . . . . . . . . . . . . . . . . . . . . . . . . . . . . . . . . . . . . . . . . . . .
Keys . . . . . . . . . . . . . . . . . . . . . . . . . . . . . . . . . . . . . . . . . . . . . . . . . . . . . . . . . . . . . . . . . . . . . . . .
Display . . . . . . . . . . . . . . . . . . . . . . . . . . . . . . . . . . . . . . . . . . . . . . . . . . . . . . . . . . . . . . . . . . . . . .
66
66
67
68
5
5.1
5.2
5.3
5.3.1
5.3.2
5.3.3
5.3.4
5.3.5
5.4
5.4.1
5.4.2
5.4.3
5.4.4
5.5
5.6
Description of menus . . . . . . . . . . . . . . . . . . . . . . . . . . . . . . . . . . . . . . . . . . . . . . . . . . . . . . . . . .
Main menu . . . . . . . . . . . . . . . . . . . . . . . . . . . . . . . . . . . . . . . . . . . . . . . . . . . . . . . . . . . . . . . . . . .
Start . . . . . . . . . . . . . . . . . . . . . . . . . . . . . . . . . . . . . . . . . . . . . . . . . . . . . . . . . . . . . . . . . . . . . . . .
FILES . . . . . . . . . . . . . . . . . . . . . . . . . . . . . . . . . . . . . . . . . . . . . . . . . . . . . . . . . . . . . . . . . . . . . . .
Edit . . . . . . . . . . . . . . . . . . . . . . . . . . . . . . . . . . . . . . . . . . . . . . . . . . . . . . . . . . . . . . . . . . . . . . . . .
Load . . . . . . . . . . . . . . . . . . . . . . . . . . . . . . . . . . . . . . . . . . . . . . . . . . . . . . . . . . . . . . . . . . . . . . . .
Standard . . . . . . . . . . . . . . . . . . . . . . . . . . . . . . . . . . . . . . . . . . . . . . . . . . . . . . . . . . . . . . . . . . . . .
New. . . . . . . . . . . . . . . . . . . . . . . . . . . . . . . . . . . . . . . . . . . . . . . . . . . . . . . . . . . . . . . . . . . . . . . . .
Delete . . . . . . . . . . . . . . . . . . . . . . . . . . . . . . . . . . . . . . . . . . . . . . . . . . . . . . . . . . . . . . . . . . . . . .
OPTIONS . . . . . . . . . . . . . . . . . . . . . . . . . . . . . . . . . . . . . . . . . . . . . . . . . . . . . . . . . . . . . . . . . . . .
Editor . . . . . . . . . . . . . . . . . . . . . . . . . . . . . . . . . . . . . . . . . . . . . . . . . . . . . . . . . . . . . . . . . . . . . . .
Printer . . . . . . . . . . . . . . . . . . . . . . . . . . . . . . . . . . . . . . . . . . . . . . . . . . . . . . . . . . . . . . . . . . . . . . .
Gradient . . . . . . . . . . . . . . . . . . . . . . . . . . . . . . . . . . . . . . . . . . . . . . . . . . . . . . . . . . . . . . . . . . . . .
GENERAL . . . . . . . . . . . . . . . . . . . . . . . . . . . . . . . . . . . . . . . . . . . . . . . . . . . . . . . . . . . . . . . . . . .
Lid . . . . . . . . . . . . . . . . . . . . . . . . . . . . . . . . . . . . . . . . . . . . . . . . . . . . . . . . . . . . . . . . . . . . . . . . .
Incubate . . . . . . . . . . . . . . . . . . . . . . . . . . . . . . . . . . . . . . . . . . . . . . . . . . . . . . . . . . . . . . . . . . . . .
69
69
70
70
70
71
71
71
71
72
72
73
74
75
77
78
6
6.1
6.1.1
6.1.2
6.1.3
6.1.4
6.2
6.3
6.4
6.5
6.6
6.7
6.8
Operation. . . . . . . . . . . . . . . . . . . . . . . . . . . . . . . . . . . . . . . . . . . . . . . . . . . . . . . . . . . . . . . . . . . .
Preparation . . . . . . . . . . . . . . . . . . . . . . . . . . . . . . . . . . . . . . . . . . . . . . . . . . . . . . . . . . . . . . . . . .
Loading the samples . . . . . . . . . . . . . . . . . . . . . . . . . . . . . . . . . . . . . . . . . . . . . . . . . . . . . . . . . . .
Sample volume . . . . . . . . . . . . . . . . . . . . . . . . . . . . . . . . . . . . . . . . . . . . . . . . . . . . . . . . . . . . . . . .
Heated lid . . . . . . . . . . . . . . . . . . . . . . . . . . . . . . . . . . . . . . . . . . . . . . . . . . . . . . . . . . . . . . . . . . . .
Temperature-control of the block . . . . . . . . . . . . . . . . . . . . . . . . . . . . . . . . . . . . . . . . . . . . . . . . . .
Switching on the device . . . . . . . . . . . . . . . . . . . . . . . . . . . . . . . . . . . . . . . . . . . . . . . . . . . . . . . . .
Starting a program . . . . . . . . . . . . . . . . . . . . . . . . . . . . . . . . . . . . . . . . . . . . . . . . . . . . . . . . . . . . .
Displaying the running time of a program . . . . . . . . . . . . . . . . . . . . . . . . . . . . . . . . . . . . . . . . . . . .
Interrupting a program . . . . . . . . . . . . . . . . . . . . . . . . . . . . . . . . . . . . . . . . . . . . . . . . . . . . . . . . . .
Continuing an interrupted program . . . . . . . . . . . . . . . . . . . . . . . . . . . . . . . . . . . . . . . . . . . . . . . . .
Aborting a program. . . . . . . . . . . . . . . . . . . . . . . . . . . . . . . . . . . . . . . . . . . . . . . . . . . . . . . . . . . . .
Switching off the device . . . . . . . . . . . . . . . . . . . . . . . . . . . . . . . . . . . . . . . . . . . . . . . . . . . . . . . . .
79
79
79
80
80
80
81
81
83
83
84
84
84
7
7.1
7.1.1
7.1.2
7.1.3
7.1.4
7.1.5
7.1.6
7.1.7
7.1.8
7.1.9
Programming . . . . . . . . . . . . . . . . . . . . . . . . . . . . . . . . . . . . . . . . . . . . . . . . . . . . . . . . . . . . . . . .
Command description. . . . . . . . . . . . . . . . . . . . . . . . . . . . . . . . . . . . . . . . . . . . . . . . . . . . . . . . . . .
CNTRL . . . . . . . . . . . . . . . . . . . . . . . . . . . . . . . . . . . . . . . . . . . . . . . . . . . . . . . . . . . . . . . . . . . . . .
Lid . . . . . . . . . . . . . . . . . . . . . . . . . . . . . . . . . . . . . . . . . . . . . . . . . . . . . . . . . . . . . . . . . . . . . . . . . .
T . . . . . . . .Selection also possible using 1 . . . . . . . . . . . . . . . . . . . . . . . . . . . . . . . . . . . . . . . . . .
HOLD . . . .Selection also possible using 2 . . . . . . . . . . . . . . . . . . . . . . . . . . . . . . . . . . . . . . . . . .
PAUSE . . .Selection also possible using 3 . . . . . . . . . . . . . . . . . . . . . . . . . . . . . . . . . . . . . . . . . .
GOTO . . . .Selection also possible using 4 . . . . . . . . . . . . . . . . . . . . . . . . . . . . . . . . . . . . . . . . . .
SOUND. . .Selection also possible using 5 . . . . . . . . . . . . . . . . . . . . . . . . . . . . . . . . . . . . . . . . . .
LINK . . . . .Selection also possible using 6 . . . . . . . . . . . . . . . . . . . . . . . . . . . . . . . . . . . . . . . . . .
END . . . . . . . . . . . . . . . . . . . . . . . . . . . . . . . . . . . . . . . . . . . . . . . . . . . . . . . . . . . . . . . . . . . . . . . .
85
85
85
86
86
88
88
88
88
88
89
61
Contents
62
7.2
7.2.1
7.2.2
7.3
7.4
7.5
7.6
7.6.1
7.6.2
7.6.3
7.6.4
7.6.5
7.6.6
Creating a new program . . . . . . . . . . . . . . . . . . . . . . . . . . . . . . . . . . . . . . . . . . . . . . . . . . . . . . . . . 89
Programming . . . . . . . . . . . . . . . . . . . . . . . . . . . . . . . . . . . . . . . . . . . . . . . . . . . . . . . . . . . . . . . . . 90
Saving a program . . . . . . . . . . . . . . . . . . . . . . . . . . . . . . . . . . . . . . . . . . . . . . . . . . . . . . . . . . . . . . 92
Modifying a program . . . . . . . . . . . . . . . . . . . . . . . . . . . . . . . . . . . . . . . . . . . . . . . . . . . . . . . . . . . . 93
Creating programs using an example program. . . . . . . . . . . . . . . . . . . . . . . . . . . . . . . . . . . . . . . . 95
Deleting a program . . . . . . . . . . . . . . . . . . . . . . . . . . . . . . . . . . . . . . . . . . . . . . . . . . . . . . . . . . . . . 95
Examples of programming . . . . . . . . . . . . . . . . . . . . . . . . . . . . . . . . . . . . . . . . . . . . . . . . . . . . . . . 96
Gradient PCR (for Mastercycler gradient only) . . . . . . . . . . . . . . . . . . . . . . . . . . . . . . . . . . . . . . 96
Using the "Pause" and "Hold" commands (Example: Hot Start PCR) . . . . . . . . . . . . . . . . . . 97
The temperature increment (Example: Touch Down PCR) . . . . . . . . . . . . . . . . . . . . . . . . . . . . 98
The time increment (Example: Long PCR) . . . . . . . . . . . . . . . . . . . . . . . . . . . . . . . . . . . . . . . . 98
Regullating the temperature-control speed (Example: RAPD-PCR) . . . . . . . . . . . . . . . . . . . 99
Sample cooling and subsequent PCR . . . . . . . . . . . . . . . . . . . . . . . . . . . . . . . . . . . . . . . . . . . . . 100
8
Short instructions. . . . . . . . . . . . . . . . . . . . . . . . . . . . . . . . . . . . . . . . . . . . . . . . . . . . . . . . . . . . 101
9
9.1
9.2
9.3
Personal card . . . . . . . . . . . . . . . . . . . . . . . . . . . . . . . . . . . . . . . . . . . . . . . . . . . . . . . . . . . . . . .
Safety precautions . . . . . . . . . . . . . . . . . . . . . . . . . . . . . . . . . . . . . . . . . . . . . . . . . . . . . . . . . . . .
Operation . . . . . . . . . . . . . . . . . . . . . . . . . . . . . . . . . . . . . . . . . . . . . . . . . . . . . . . . . . . . . . . . . . .
Processing programs . . . . . . . . . . . . . . . . . . . . . . . . . . . . . . . . . . . . . . . . . . . . . . . . . . . . . . . . . .
10
10.1
10.2
Interface description . . . . . . . . . . . . . . . . . . . . . . . . . . . . . . . . . . . . . . . . . . . . . . . . . . . . . . . . . 105
Printer / PC connection. . . . . . . . . . . . . . . . . . . . . . . . . . . . . . . . . . . . . . . . . . . . . . . . . . . . . . . . . 105
Program transfer . . . . . . . . . . . . . . . . . . . . . . . . . . . . . . . . . . . . . . . . . . . . . . . . . . . . . . . . . . . . . . 108
11
Maintenance . . . . . . . . . . . . . . . . . . . . . . . . . . . . . . . . . . . . . . . . . . . . . . . . . . . . . . . . . . . . . . . . 109
12
12.1
Troubleshooting . . . . . . . . . . . . . . . . . . . . . . . . . . . . . . . . . . . . . . . . . . . . . . . . . . . . . . . . . . . . . 110
Error messages . . . . . . . . . . . . . . . . . . . . . . . . . . . . . . . . . . . . . . . . . . . . . . . . . . . . . . . . . . . . . . 110
13
Technical data . . . . . . . . . . . . . . . . . . . . . . . . . . . . . . . . . . . . . . . . . . . . . . . . . . . . . . . . . . . . . . . 115
14
Ordering information . . . . . . . . . . . . . . . . . . . . . . . . . . . . . . . . . . . . . . . . . . . . . . . . . . . . . . . . . 116
14a
Ordering information for USA and Canada . . . . . . . . . . . . . . . . . . . . . . . . . . . . . . . . . . . . . . . 118
15
Index. . . . . . . . . . . . . . . . . . . . . . . . . . . . . . . . . . . . . . . . . . . . . . . . . . . . . . . . . . . . . . . . . . . . . . . 120
103
103
103
104
1 Introduction
The Eppendorf Mastercycler and Mastercycler gradient are PCR devices for molecular biological and
biochemical research laboratories.
Temperature control is carried out with Peltier elements, which enable extremely rapid changes in temperature
of up to 3 °C per second. This allows the temperature of the samples to be controlled extremely rapidly
between 4 °C and 99 °C.
A special "tube control" mode has been developed for temperature-controlling samples in various different
tubes with various different filling volumes.
The thermoblock has been constructed as a universal block which can accommodate microtiter plates in the
8 x 12 format, 96 Eppendorf PCR test tubes of 0.2 ml, 77 thin-walled Eppendorf PCR test tubes of 0.5 ml or
other suitable tubes – without the block having to be exchanged.
With the aid of the in situ Adapter, in situ reactions may be carried out on up to four glass slides.
To prevent the formation of condensation, the devices have a heated lid which has been perfectly tailored to
suit all tubes.
The devices are easy to operate, with user guidance available in the integrated, eight-line display.
Experiments and tests can be documented with the aid of a printer which may be connected up to the devices.
One particular advantage of the Mastercycler gradient is the Gradient function, which greatly facilitates the
optimization of PCR experiments. The gradient enables the temperature across the entire block to be varied
within a range of up to 20 °C; it can be programmed with every temperature step.
The Mastercyclers are authorized cyclers licensed by the Perkin-Elmer Corporation.
63
2 Safety precautions
Before using the Mastercycler or Mastercycler gradient for the first time, please read the complete
operating manual. The Mastercycler or Mastercycler gradient may be used only for performing PCR and
related methods in a research laboratory.
It is essential to observe the following safety precautions:
Voltage:
Before plugging in, compare your power supply with the electrical requirements
listed on the identification plate of the device.
The device must be plugged into a grounded socket.
Before carrying out maintenance or cleaning work or replacing the fuses, switch
off the device and disconnect it from the mains supply.
Dangerous materials:
The Mastercycler or Mastercycler gradient must not be used to process
explosive, flammable and highly reactive substances and must not be operated
in a hazardous or potentially explosive environment.
You must observe the relevant safety regulations when handling pathogenic
material, radioactive substances or other substances hazardous to health.
Liquids:
Please ensure that no liquid enters the device.
Operating environment:
Please ensure that the ventilation for the device remains unblocked at all times.
Risk of injury:
The generally applicable precautionary measures should be followed when
handling the device. In particular, watch out for your hands when closing the lid.
Danger of burning:
The thermoblock, the inside of the heated lid and the micro test tubes / microtiter
plates can rapidly reach a temperature in excess of 50 °C. Care must therefore
be taken to avoid burns!
Do not open the heated lid until the temperatures have decreased to 30 °C.
Do not use any materials (tubes, micro titer plates, sealings, foils, mats) which
are not sufficiently temperature-stable (up to 120 °C).
Caution: Hot Surface
Symbol on the thermoblock:
This symbol warns the user that the thermoblock (▼) or the inside of the lid (▲)
may be hot .
shows that when the Gradient mode is in operation,
the temperature is higher on the right-hand side than on the left-hand side.
Repairs may only be carried out by an authorized specialist. Only use spare parts recommended by
Eppendorf.
64
3 Installation
3.1 Delivery package
The delivery package contains the following items:
1 Mastercycler or Mastercycler gradient
1 Main power cable
1 Operating manual
1 Personal card
1 bag of 0.2 ml PCR test tubes (100 pieces)
1 bag of 0.5 ml PCR test tubes (100 pieces)
3.2 Setting up the device
When setting up the device, please ensure that enough space is available to allow the ventilation slit to remain
uncovered and to allow air to flow under the device for cooling purposes. Please ensure that no objects are
under the device (e.g. lab bench paper).
No special equipment is required for transporting the device. It can be lifted up and carried by being held on
both sides.
Space requirements: Width:
Depth:
Height:
Mains connection:
26 cm
41 cm
27 cm
1 shockproof socket for the Mastercycler / Mastercycler gradient.
If a printer is to be connected up, a second mains connection must be used.
The delivery packaging should be stored in a safe place to enable the device to be shippeded in the event that
repairs are necessary.
3.3 Starting up the device
Remove the adhesive strip on the heated lid and take out the bubble-wrap from below the heated lid.
The Mastercycler / Mastercycler gradient is connected to the mains supply using the mains cable.
Before starting up the device, please compare the power supply with the voltage requirements listed on the
identification plate (see Sec. 4.1, Fig. 3).
The procedure for connecting and starting up a printer is described in Sec. 10.1.
65
4 Technical description
4.1 Device construction
1
2
Fig. 1: Front view
1
2
3
4
Heated lid
Locking button
Display and control panel
Personal card reader
3
4
1
2
3
Fig. 2: Side view
1 Heated lid
2 Thermoblock
(not visible in this picture)
3 Ventilation slit
4 Brightness regulator
5 PC connection socket
6 Printer connection socket
6 54
Fig. 3: Rear view
1
2
3
4
5
66
1
2
3
4
5
Ventilation slit
Main power switch
Fuses
Main power socket
Identification plate
4 Technical description
Mastercycler gradient
5
1
2
3
4
Fig. 4: Display and control panel
1
2
3
4
5
Programming keys
Cursor keys
Control keys
Digit entry block, decimal point and reverse sign key
Display
4.2 Keys
Programming keys
– When this key is pressed, the approximate remaining run time of a program and the time of
the expected end of the program appears in the display for approximately five seconds.
– To select programming options for the "Temperature" command (ramp, gradient,
increment).
– To delete program lines, digits or letters or to reset parameters. Holding down the key
deletes not only individual letters but also a complete name.
– To select a program command or to select from a list.
– A menu item can be selected using the
key instead of the
/
keys.
– The
key can also be used to select from a list and to enter the letters of program
names. The direction of selection of the letters can be changed by pressing the
key.
– To insert program lines during the creation of a program.
67
4 Technical description
Cursor keys
The cursor appears in the display as a dark field.
– If a menu should be selected, the cursor must be moved to that menu and the selection
should then be confirmed by pressing
.
– The cursor is also used to move into, or to change between, input fields. Entries do not
have to be confirmed by pressing
; they are stored immediately.
Control keys
– To exit a menu or to return to the next-highest menu level.
– After a program has been started, the display of the program can be exited, e.g. in
order to work in the programming level.
– To call up a menu which has been selected using the cursor.
– To confirm an entry.
– To quick-start a program from the processing level ("FILES/Edit" menu). If another
program needs to be started, the "Start" menu must be used.
– To cancel or to interrupt a program.
4.3 Display
Press the main power switch on the rear of the device (Sec. 4.1, Fig. 3.2). The device name and the software
version installed appear briefly in the display.
The main menu then appears in the display:
Main-Menu
Start
FILES . .
OPTIONS . .
Lid
Incubate
STANDARD
– –/25.0°
Menu field
❋❋❋
MASTERCYCLER ❋❋❋
gradient 5331
eppendorf
Version ❋.❋❋.❋❋
Lid:105°
10:22:06
Programming field
The eight-line display is divided into two areas. The menu field on the left-hand side contains a list of the
selectable programs. The programming field is used for programming and for setting the device parameters.
68
5 Description of menus
5.1 Main menu
Main-Menu
Start
FILES . .
OPTIONS . .
Lid
Incubate
STANDARD
– –/25.0°
Menu name
Sub-menus
Lid:105°
Program in processing level
Time
10:22:06
Lid temperature
(only when lid is switched on)
Nominal/actual block temperature
A menu or a sub-menu can be called up in three different ways:
1. Select using the
/
keys and confirm by pressing
2. Select using the
key and confirm by pressing
.
.
3. Select the menu using the internal position number (shown in brackets in the text) and confirm by
pressing
.
The program in the processing level can be started immediately by pressing the
key. Menus are exited by
pressing the
key. To access the main menu, it may be necessary to press the
key several times.
Menus written in capital letters have additional sub-items. For ease of reference, the menu name appears on
the left-hand side of the display or as a headline above the menu or as a sub-item.
Overview of the entire menu structure:
Main-Menu
Start
(1)
FILES . .
(2)
Edit
Load
Standard
New
Delete
OPTIONS . .
(3)
Editor
Printer
Gradient
GENERAL . .
To start programs
To program
To change a program in the processing level
To load and change any program
Example program
To create new programs
To delete programs
(1)
(2)
(3)
(4)
(5)
(1)
(2)
(3)
(4)
Clock
Remote
Sound
Etc
VALID . .
System settings
To display additional functions
To connect a printer
To display the temperature distribution
(1)
(2)
(3)
(4)
(5)
To set the clock
To connect a PC
Tone
To test the device
Lid
(4)
To preheat the lid
Incubate
(5)
To preheat the thermoblock and the lid
69
5 Description of menus
5.2 Start
Only programs can be started from the "Start" menu.
The program displayed in the processing level can be started directly by pressing the
key (1).
If a program which has been stored has to be started, it is selected with the cursor keys from the displayed list
after
has been pressed (2) and cofirmed by pressing
.
The "Start" menu has no sub-programs.
Main-Menu
Start
FILES . .
OPTIONS . .
Lid
Incubate
STANDARD
– –/25.0°
Processing level
(1)
(2)
Main-Menu
Start
FILES . .
OPTIONS . .
Lid
Incubate
STANDARD
– –/25.0°
STANDARD
TEST1
TEST2
Main-Menu
Start
FILES . .
OPTIONS . .
Lid
Incubate
Running/STANDARD
95.0/94.7°
Main-Menu
Start
FILES . .
OPTIONS . .
Lid
Incubate
Running/TEST2
– –/25.0°
5.3 FILES
The "FILES" menu is used to change, load, create or delete programs.
Main-Menu
Start
FILES . .
OPTIONS . .
Lid
Incubate
STANDARD
– –/25.0°
FILES . .
Edit
Load
Standard
New
Delete
STANDARD
– –/25.0°
5.3.1 Edit
The "Edit" menu is used to change existing programs. The program which is to be changed may already be in
the "processing level" or it is loaded into the processing level via the "Load" menu. This is applicable for
programs from the internal device memory or from a personal card.
The program which has been changed can be checked by pressing the
key after the program has been
saved under a new name. The processing level is not deleted when this program is saved. The program data
remains stored even when the device is switched off and is overwritten only when the "New" or "Standard"
sub-menu is called up.
Note: If the program which has been changed (without being saved under a new name) is started, there are
then two different programs with the same name (one in the internal memory and one in the processing level).
70
5 Description of menus
5.3.2 Load
"Load" is used to call up a list of existing programs. These programs may be taken from the internal memory
or from a personal card. The selected program is loaded into the "Edit" processing level. If the "Edit"
processing level contains a program which has not been saved, a safety check appears in the display, which
then enables the program to be saved.
If the user does not want to save the program, it is overwritten when the new program is loaded. As the "Edit"
processing level is called up automatically, the program can be changed immediately and can then be tested
for test purposes.
The procedure for loading programs from a personal card is described in Sec. 9.3.
5.3.3 Standard
An example program called "Standard" is available for creating new programs. It is not necessary to rewrite a
program completely; the example program can be supplemented or changed and then saved under a new
name. All programs which are in the internal memory can be used as an example program.
Following a safety check, the example program is loaded into the processing level. The process is described in
more detail in Sec. 7.4.
Although the "Standard" example program cannot be deleted, it can be changed to suit individual
requirements. After the changes have been made, the example program is saved under the name "Standard".
To restore the original example program, the "Standard" program must be deleted in the"Delete" sub-menu.
When "Standard" is called up again, it is the original example program which is then loaded into the
processing level.
5.3.4 New
"New" can be used to call up the processing level automatically. To create a new program, an existing program
is deleted.
The essential input CNTRL BLOCK, Lid =0°, NOWAIT AUTO, end is simulated automatically and the program
is given the provisional title UNNAMED.
5.3.5 Delete
Programs can be deleted from the internal memory or from a personal card. After "Delete" has been selected,
a list of program names appears in the display. A program can be selected from this list using the cursor key
and can be deleted by pressing
. The program in the processing level cannot be deleted.
The procedure for deleting programs from a personal card is described in Sec. 9.3.
71
5 Description of menus
5.4 OPTIONS
The "OPTIONS" menu can be used to define general system settings for the program editor, printer,
time/date, etc.
Main-Menu
Start
FILES . .
OPTIONS . .
Lid
Incubate
STANDARD
– –/25.0°
OPTIONS . .
Editor
Printer
Gradient
GENERAL . .
STANDARD
– –/25.0°
Selection of YES/NO, ON/OFF and other settings can be carried out using the
The menu is exited by pressing the
key.
key.
5.4.1 Editor
OPTIONS . .
Editor
Printer
Gradient
GENERAL . .
Editor Mode
Show Ext. Steps:
YES
STANDARD
– –/22.0°
72
Show Ext. Steps
To display temperature options.
YES
All options (temperature increment, time increment, ramp, ramp increment, gradient) for
each step appear in the display.
NO
Only the nominal temperature and the cycle time appear in the display. If the options
have been defined, the command is marked with an "*" for information purposes when
the program is called up. Nonetheless, the options can be called up by pressing the
key and can then be entered or displayed.
5 Description of menus
5.4.2 Printer
OPTIONS . .
Editor
Printer
Gradient
GENERAL . .
Printer Mode
Printout Editor:
Print Protocol:
NO
OFF
STANDARD
– –/22.0°
Entries are necessary only when a printer is connected.
Printout Editor
YES:
NO:
Print Protocol
ON:
OFF:
The program in the "Edit" processing level is printed out.
If "YES" has been selected, but no printer is accessible, the error message
"Printer: No Response" appears in the display.
Appears automatically when the program printout has finished.
When the program starts, the commands are printed out; during the run, every completed
command is printed out together with the time.
No printout is made.
73
5 Description of menus
5.4.3 Gradient
The Gradient function can be selected with the Mastercycler gradient only.
The Gradient function can be used to vary the temperature distribution across the block.
In every temperature step, the thermoblock can be programmed so that each column has a different
temperature. The lowest temperature is in the cavities on the left-hand side. It then rises gradually across the
block so that the highest temperature is on the right-hand side.
Show Gradient
The "Show Gradient" menu can be used to show which temperature is in which column:
OPTIONS
Editor
Printer
Gradient
GENERAL . .
Tube: 0.2 ml
STANDARD
– –/22.0°
Show Gradient
T=60.0
G=7.0 °C
10:22:06
The tube type "0.2 ml, 0.5 ml, 0.5 ml thin, plate" is selected by
pressing
.
and confirmed by
After a temperature and a gradient have been entered, the temperature distribution
across the block appears in the display:
OPTIONS
Editor
Printer
Gradient
GENERAL . .
STANDARD
– –/22.0°
Settings:
Pos. 1: 52.9C
Pos. 2: 53.2C
Pos. 3: 54.0C
Pos. 4: 55.2C
Show Gradient
Tube: 0.2 ml
T=60.0C G= 7.0C
Pos. 5: 56.9C
Pos. 9: 64.3C
Pos. 6: 58.7C
Pos:10: 65.8C
Pos. 7: 60.6C
Pos.11: 66.9C
Pos. 8: 62.5C
Pos.12: 67.5C
Print Results <OPT>
10:22:06
The gradient may be a maximum of ± 10 °C with a resolution of 0.1 °C. This means that the overall
temperature span is 20 °C. The selected temperature is in the middle of the block.
The left-hand side is temperature-controlled to nominal temperature – gradient
The right-hand side is temperature-controlled to nominal temperature + gradient.
74
5 Description of menus
5.4.4 GENERAL
To enter general settings and to test the device.
GENERAL . .
Clock
Remote
Sound
Etc
VALID . .
– –/22.0°
Clock
Format:
The time in the 24-(military) or 12-hour-clock format (choice of PM or AM) can be
selected using the
key.
Time:
To enter the current time in hours:minutes:seconds.
Date:
To enter the current date as day/month/year.
The month can be selected using the
key.
Remote
Baud rate:
The transmission rate of 19,200, 9,600, 4,800, 2,400 or 1,200 for a
PC connection can be selected using the
key.
Sound
KeyClick:
ON:
OFF:
Every keyclick is confirmed by an acoustic signal.
The acoustic signal for keyclicks is switched off.
Warnings:
ON:
In addition to the warning text, warnings are acknowledged by an
acoustic signal.
No acoustic signal is emitted to acknowledge a warning.
OFF:
Note: Errors are always acknowledged by an acoustic signal,
irrespective of this setting.
Etc
Start with:
MAIN:
LAST:
Auto Restart:
NO:
After the device has been switched on, the main menu appears
in the display.
After the device has been switched on, the most-recently used
menu appears in the display.
A program interrupted by a power failure is not continued.
Attention!
PROGRAM interrupted
Time
Duration
Step:x
Cyc:y
Press any key!
75
5 Description of menus
YES:
Depending on the duration of a power failure, an interrupted program
will automatically continue or can be manually continued or stopped.
Power failure < 3 min:
A currently running program automatically continues if power is
restored within 3 minutes of the commencement of the power failure. A
display indicates when, how long and at which step the program was
interrupted:
AutoRestart!
PROGRAM restarted
Time
Duration
Step:x
Cyc:y
Press any key!
When any key is pressed, the display jumps back to the program view.
If the program is to be cancelled, press the
key and confirm by
.
Power failure > 3 min:
In the event of a longer power failure, an aucistic warning signal is
given as soon as the power supply returns, and the program can be
manually continued or stopped.
PROGRAM
Time
Step:x
Restart:
Decide!
interrupted
Duration
Cyc:y
YES/NO
If the interrupted program is to be continued, select "YES" with
and confirm with
. Press any key to return to the program view.
If the program is to be discontinued, select "NO" with
with
.
VALID . .
76
and confirm
These programs can be used to test the device. The measurements can be documented by
connecting a printer to the device.
The "Validate" and "Calibrate" menus require the temperature-validation system
(order no.: 5331 222.005). This system consists of a special temperature sensor and a personal
card with the corresponding software.
For precise information on operating the "Validate" and "Calibrate" programs, see the operating
manual for the temperature-validation system.
Validate:
To check the device temperature with the aid of a temperature-measuring device.
This measuring device forms part of the temperature-validation system and is
connected via the serial interface of the Mastercycler.
Calibrate:
To align the device temperature with the aid of a temperature-measuring device.
This measuring device forms part of the temperature-validation system and is
connected via the serial interface of the Mastercycler.
5 Description of menus
5.5 Lid
The "Lid" menu in the main menu can be used to determine the temperature of the heated lid and to switch
the heated lid on or off (e.g. to preheat the lid).
Main-Menu
Start
FILES . .
OPTIONS . .
Lid
Incubate
STANDARD
– –/22.0°
Lid Temp
LidTemp:
Heater
105/55°C
is Off
LidTemp:
Nominal/actual temperature.To enter the temperature for the heated lid.
The lid heating switches off when a temperature value of 0 °C is entered.
Heater is On:
Lid heating is on.
Heater is Off:
Lid heating is off.
When sensitive PCRs are carried out, it may be important to delay the start until the lid temperature has
prevented condensation. This can be achieved by programming the "WAIT" setting, which means that the
program does not start until the lid reaches the specified temperature.
In addition, the lid can also be preheated. After the device has been switched on, the "Lid" menu is selected,
the desired lid temperature is entered and "Heater is On" is selected by pressing the
key.
When a program starts, it is the program settings which have priority.
When a program is running, the lid heating cannot be switched on or off.
77
5 Description of menus
5.6 Incubate
The "Incubate" menu in the main menu is used to determine the block temperature and to switch on/off the
temperature control of the block. (e.g. for incubation experiments or to preheat the block). The temperature of
the heated lid is aligned to that of the block.
Main-Menu
Start
FILES . .
OPTIONS . .
Lid
Incubate
STANDARD
– –/22.0°
Block Temp
BlockTemp:
Heater
37/22°C
is Off
BlockTemp:
Nominal/actual temperature. To enter the temperature for the thermoblock.
It is possible to enter values from +4 °C to 99 °C. It is not possible to select a gradient.
Heater is On:
Temperature control of the block is on.
Heater is Off:
Temperature control of the block is off.
Another option is to reduce the program run time if the thermoblock and the heated lid have reached the
required temperature before the program starts.
To bring the thermoblock and the heated lid to the desired temperature, select the "Incubate" menu after the
device has been switched on, enter the desired block temperature and select "Heater is On" using the
key.
If "Incubate" is running, the "Lid" menu cannot be selected.
When a program starts, it is the program settings which have priority.
When a program is running, the temperature control of the block cannot be switched on or off.
To interrupt: If "Heater is On" is in the display, set the device to "Heater is Off" using the
by pressing
.
key and confirm
Caution: If the "Incubate" menu has been selected, the thermoblock and the heated lid may be hot when the
tubes are inserted, which means that there is a high burns risk for the user.
78
6 Operation
6.1 Preparation
6.1.1 Loading the samples
The thermoblock can be loaded with three different types of tubes without needing to be exchanged. It can
accommodate 96 PCR test tubes of 0.2 ml or 77 thin-walled PCR test tubes of 0.5 ml (special tube from
Eppendorf) or 1 microtiter plate (8x12).
To achieve optimal temperature transition, only sample tubes and microtiter plates with a V-shaped base
should be used (see "Ordering information"). Test tubes must fit tightly into the thermoblock and should not
wobble or move in any way. Tubes which are not sufficiently temperature-stable (up to approx. 120 °C) should
not be used.
In general, this also applies to foils used to seal microtiter plates. However, due to the temperature-controlled
lid heating, it is also possible to use foils which would melt above 100 °C. In this case, the lid heating can be
set, for example, to 95 °C.
The thermoblock has 96 narrow positions for 0.2 ml test tubes and microtiter plates and 77 wide positions for
0.5 ml test tubes. To enable the maximum possible number of 0.5 ml test tubes to be inserted into the
thermoblock, the tubes must be positioned in rows. In addition, in order to ensure that the heated lid is closed
evenly, it is strongly recommended to position a tube in each corner of the thermoblock. Loading should be
carried out as follows:
96 x 0.2 ml PCR test tubes
or
microtiter plates (8x12)
(PCR plate 96)
77 x 0.5 ml thin-walled PCR test tubes
(special tube from Eppendorf)
39 x 0.5 ml Eppendorf Safe-Lock micro test tubes
0.5 ml test tubes with wide lid
(e.g. 0.5 ml Eppendorf micro test tubes)
should be loaded in a staggered way
in situ reactions require the in situ Adapter. With the aid of the "pegs" on the base, the metal carrier for a
maximum of four glass slides is inserted into the 0.5 ml positions of the thermoblock.
79
6 Operation
6.1.2 Sample volume
Temperature control can be set to thermoblock or to sample.
The device can adapt to the actual sample quantity and test tube type via the command "CNTRL /TUBE".
For maximum flexibility, the program will prompt for tube sizes and volumes when it is started.
The following sample quantities should be used:
0.2 ml test tubes or "plate": not larger than 50 µl
0.5 ml or 0.5 ml thin-walled test tubes: not larger than 100 µl
When "in situ" is selected, the sample quantity is not taken into consideration.
6.1.3 Heated lid
After the samples have been loaded, the heated lid is closed over the thermoblock and locked using the
locking lever. The locking lever is moved to the right until the correct tube height has been reached. The
symbols indicate the sealing positions for tubes and plates in accordance with the height for a capacity
of 0.5 ml, 0.2 ml or 0.1 ml. When plates are loaded, the position "0.2 ml tube" or "Plate" must be selected
accordingly.
Note: Some types of PCR plates lock into position at the 0.2 ml tube level. Do not force the locking lever when
this happens.
Since the heated lid prevents the liquid from condensing in the upper part of the tube, it is not necessary to
use an oil layer.
Note: Different tube types should not be loaded together as they cannot be sealed correctly by the heated lid.
If it is absolutely necessary to process different tube types simultaneously in the thermoblock, an oil layer is
necessary for smaller tubes.
The lid temperature (up to 110 °C) is controlled automatically by the program. The user can decide whether
the program should start immediately (NOWAIT) or whether it should start after a preset lid temperature has
been attained (WAIT). If the program has to start quickly, the heated lid can be preheated using the "Lid"
menu.
All tubes are easily accessible during the temperature-control procedure since the lid can be opened at any
time.
Caution: To avoid the risk of burns (110 °C) caused by touching the inner surface of the lid or the
thermoblock, do not open the lid while the program is running.
Depending on the processing temperatures used, test tubes and microtiter plates may also be extremely hot.
During in situ reactions, the heated lid is not temperature-controlled and remains open at all times.
6.1.4 Temperature-control of the block
To carry out incubation experiments or to speed up the start of a method, it is possible to temperature-control
the thermoblock with theheated lid. The "Incubate" menu is selected in the main menu, a block temperature is
entered and "Heater" is set to "On".
Caution: Since the thermoblock and the heated lid can become very hot, there is a burns risk for the user
when test tubes and microtiter plates are inserted.
80
6 Operation
6.2 Switching on the device
– Switch on the device using the main
power switch on the rear of the
device.
The current software version
appears briefly in the display.
The main menu then appears.
The program which is ready to be
started appears in the processing
level.
Main-Menu
Start
FILES . .
OPTIONS . .
Lid
Incubate
STANDARD
– –/25.0°
Lid:105°
10:22:06
Main-Menu
Start
FILES . .
OPTIONS . .
Lid
Incubate
STANDARD
– –/25.0°
Lid:105°
10:22:06
❋❋❋
MASTERCYCLER ❋❋❋
gradient 5331
eppendorf
Version ❋.❋❋.❋❋
6.3 Starting a program
– The program in the processing level
can be started immediately by
pressing the
key.
To start another program,
– press
.
A list of the programs appears in the
display.
– Select the program name using the
or
key (the program name
appears with a dark background).
The procedure for starting programs
which are stored on a personal card
is described in Sec. 9.3.
– Press
.
The program starts immediately
after a "Testing Program".
Main-Menu
Start
FILES . .
OPTIONS . .
Lid
Incubate
STANDARD
– –/25.0°
Run a Program:
STANDARD
TEST1
TEST2
Lid:105°
Main-Menu
Start
1
FILES . .
OPTIONS . .
Lid
Incubate
Running/STANDARD
95.0/94.7°
Lid:105°
10:22:06
Run a Program:
T=95.0°
0:00:05
Cyc:4
10:22:06
81
6 Operation
If the program contains the "CNTRL/TUBE"
command (temperature control set to
sample), it is necessary to enter the tube
type and the filling volume after the
program has started.
– Select the tube type: 0.2 ml, 0.5 ml
(e.g. Safe-Lock), 0.5 ml thin (thinwalled tubes), plate (microtiter plate)
or in situ using the
key and
confirm by pressing
.
Main-Menu
Start
FILES . .
OPTIONS . .
Lid
Incubate
Enter Tube
22.0/25.0°
– Enter the filling volume and confirm
by pressing
.
Main-Menu
Start
FILES . .
OPTIONS . .
Lid
Incubate
STANDARD
22.0/25.0°
Tube type 0.2 ml/plate: 5 to 50 µl
Tube type 0.5 ml/thin: 5 to 100 µl
in situ: no entry necessary
If no entries are made for "Tube" and
"Fill.Vol.", the program will not run.
"EnterTube" appears in the main
menu instead of the program name
and a long acoustic signal is emitted
until the entry is made.
After the start of the program and
while it is running, the name of the
program appears in the main menu
in alternation with "Running".
A flashing temperature display
indicates that the nominal
temperature has not been attained
and that heating/cooling is currently
taking place.
– The display of a program can be
exited at any time (e.g. to program
in the "Edit" processing level) by
pressing
.
82
Run a Program:
CNTRL
TUBE
Tube: 0.2 ml
Lid:105°
10:22:06
Run a Program:
CNTRL
TUBE
Fill.Vol.: 20 µl
Lid:105°
10:22:06
Main-Menu
Start
1
FILES . .
OPTIONS . .
Lid
Incubate
Running/STANDARD
95.0/97.0°
Lid:105°
1
2
3
Run a Program:
T=95.0°
0:00:05
Cyc:4
10:22:06
4
1 Program flashes in alternation with "Running"
2 Nominal/actual block temperature
3 Lid temperature
(only when lid is switched on)
4 Program line number, program command
Example: Temperature command (T)
with nominal temperature and cycle length
5 Number of completed cycles
6 Time
5
6
6 Operation
6.4 Displaying the running time of a program
While a program is running, the
approximate run time and the expected
end time of the program can be shown
in the display.
– Press
.
Main-Menu
Run a Program:
Start
Run Time:
1:03
FILES . .
Finish Time:
OPTIONS . .
17/Jun/1997 15:06
Lid
Incubate
Running/STANDARD
22.0/25.0°
Lid:105°
The key is effective only when a
program run appears in the display,
not in the main menu, with other
menus or sub-menus.
Program end
14:02:30
Current time
Run time in hours:minutes
6.5 Interrupting a program
A program can be aborted, paused
or continued at any point by pressing
– Press
Using the
.
.
key, select between:
Stop
To abort the program
Pause To interrupt the program
Run
To return to the display of
the program sequence
– Using the
key, move to "Pause".
– Confirm "Program:PAUSE" by pressing
.
The program is interrupted, time counting
stops and the last nominal temperature is
retained.
Main-Menu
Run a Program:
Start
STANDARD running...
FILES . .
Program:
STOP
OPTIONS . .
Lid
Incubate
Running/STANDARD
95.0/94.5°
Lid:105°
10:22:06
Main-Menu
Run a Program:
STOP !
STANDARD running...
FILES . .
Program:
PAUSE
OPTIONS . .
Lid
Incubate
Paused/STANDARD
95.0/94.5°
Lid:105°
10:22:06
The name of the interrupted program
appears in the main menu in alternation
with "Paused" and the "Start" menu
changes to the display "Stop".
83
6 Operation
6.6 Continuing an interrupted program
The name of the program appears in
the display in alternation with "Paused"
– Press
.
Using the
key, select between:
Stop
To abort the program
Pause
To interrupt the program
Resume To continue the program
– Using the
key, move to "Resume".
– Confirm "Program:RESUME"
by pressing
;
the program is continued.
Main-Menu
Run a Program:
STOP !
STANDARD PAUSED
FILES . .
Program:
PAUSE
OPTIONS . .
Lid
Incubate
Paused/STANDARD
95.0/94.5°
Lid:105°
10:22:06
Main-Menu
Run a Program:
STOP !
STANDARD PAUSED
FILES . .
Program:
RESUME
OPTIONS . .
Lid
Incubate
Paused/STANDARD
95.0/94.5°
Lid:105°
10:22:06
Main-Menu
Run a Program:
STOP !
STANDARD running...
FILES . .
Program:
STOP
OPTIONS . .
Lid
Incubate
Paused/STANDARD
95.0/94.5°
Lid:105°
10:22:06
Main-Menu
Start
FILES . .
OPTIONS . .
Lid
Incubate
STANDARD
22.0/25.0°
14:02:30
6.7 Aborting a program
– Press
.
– Confirm "Program:STOP"
by pressing
.
6.8 Switching off the device
After a program has been completed,
the following appears in the display:
If a new program has to be started, exit
the old program by pressing
.
To switch off the device, move the main
power switch on the rear of the device to
84
>0<
.
Run a Program:
End of program
Lid:105°
7 Programming
7.1 Command description
A program contains two basic commands for controlling the temperature of the thermoblock and of the heated
lid as well as six different commands for programming.
A program can contain up to 40 program lines. The commands may be repeated as desired.
Digits or letters may be entered or selections are made using the
key.
When digits are entered, the message "Value out of range" appears when values are entered which are not
within the given specifications. The permitted limit value is then entered automatically.
FILES...
Edit
Load
Standard
New
Delete
UNNAMED
Edit UNNAMED
CNTRL
LID=0°
NOWAIT
BLOCK
AUTO
- - - - - - - - - - - - -- - - - - - - - - - - - - - - - - - - - - - - - - - - - - - - - - - - 1
T=❋❋❋❋°
+0.0°
R=3.0°/s
G=0.0°
❋❋:❋❋:❋❋
+0:00
+0.0°/s
2
Hold ❋❋❋❋°
ENTER
3
PAUSE
4
GOTO❋❋❋
5
SOUND❋❋
6
LINK❋❋❋❋❋❋❋❋
PRESS ENTER
REP❋❋❋
end
– –/22.0°
10:22:06
7.1.1 CNTRL
With this command is determined the type of temperature control for the block.
BLOCK
The temperature is measured on the thermoblock and the nominal temperature is then set.
TUBE
The software adapts the temperature of the thermoblock to the temperature of the tubes and the
sample quantity. For this reason, the tube type and the filling volume must be entered
immediately after the start of the program. No further entries are necessary when in situ is
selected.
Tube type 0.2 ml or plate:
0.5 ml or 0.5 ml thin:
5 to 50 µl filling volume
5 to 100 µl filling volume
85
7 Programming
7.1.2 Lid
To determine the temperature of the heated lid. If 0 °C is selected, the heated lid remains switched off.
Permitted values
Entry increments
0 to 110 °C
1 °C
In addition to the entry for the temperature of the heated lid, it is also possible to determine the behavior of the
lid temperature at the start and at the end of a program:
At the start
NOWAIT
The program is started, independent of the lid temperature.
WAIT
The program is not started until the programmed lid temperature has been attained.
Note: To accelerate the start of the program, the lid may be preheated using the "Lid" menu.
At the end
FIX
The lid temperature does not depend on the block temperature. The lid heating is switched off at
the end of the program.
AUTO
The lid temperature depends on the block temperature. If 22 °C is maintained for longer than
five minutes, the lid heating switches off; this is also applicable in the case of a Hold command at
temperatures < 22 °C.
The six commands for programming can be called up directly using the allotted number.
7.1.3 T
Selection also possible using 1
To enter the temperature and the cycle time as well as the accompanying specific options.
The options are entered by positioning the cursor on the program line number and pressing the
The options may be entered for every temperature command.
T = ❋❋❋❋°
+ 0.0 °
R = 3 °/s
G = 0.0
T = ❋❋❋❋°
: :
❋❋ ❋❋ ❋❋
86
❋❋:❋❋:❋❋
+ 0:00
+ 0.0 °/s
Nominal temperature, cycle time
Temperature increment, time increment
Ramp, ramp increment
Gradient (for Mastercycler gradient only)
The nominal temperature is entered in degrees Celsius (°C).
Permitted values
4 to 99.0 °C
Entry increments
0.1 °C
The cycle time is entered in "hours:minutes:seconds".
Permitted values
0:00:01 to 9:59:59
Entry increments
1s
key.
7 Programming
± 0.0 °
Temperature increment (± °C): For each cycle, the temperature is increased or decreased by the
value entered here.
Please note that the temperature cannot exceed 99 °C. For example, with a temperature
increment of +0.1 °C and 25 cycles, the starting temperature cannot be greater than 96.5 °C.
First enter the numerical value and then the plus or minus sign.
Permitted values
0.0 to 10.0 °C
Entry increments
0.1 °C
Entry for temperature increase
"+"
Entry for temperature decrease
"–"
± 0:00
Time increment (± s): For each cycle, the time is extended or reduced by the value
(max. 1 minute) entered here.
Entry for time extension
"+"
Entry for time reduction
"–"
Permitted values
0:00 to 1:00
Entry increments
1s
R = 3 °/s
Ramp (K/s): The ramp states the speed of the heating or cooling curve of a cycler. The higher the
value entered, the more rapidly the heating or cooling takes place. Most reactions require rapid
heating or cooling rates, i.e. a high value. For processes in which heating or cooling should take
place slowly, different values may be entered for the ramp.
Permitted values
0.3 to 3 K/s
Entry increments
0.1 K/s
± 0.0 °/s
Ramp increment (± s): For each cycle, the ramp is raised or lowered by the value entered here.
Please note that the ramp cannot exceed 3 K/s, i.e. with an initial ramp entry of 0.3 and a ramp
increment of 0.1, a maximum of 27 cycles is possible. First enter the numerical value and then
the plus or minus sign.
Permitted values
0.0 to 1.0 K/s
Entry increments
0.1 K/s
Entry for increasing the ramp speed "+"
Entry for decreasing the ramp speed "–"
G = 0.0°
Possible with Mastercycler gradient only.
Gradient: When an entry is made here, each column of the block is set to a different temperature.
The nominal temperature set at "T" is in the center of the block. The lowest temperature is on the
left-hand side and increases gradually up to the highest temperature on the right-hand side. This
means that a temperature difference of up to 20 °C across the block can be generated (see
Sec. 5.4.3). The temperature distribution can be viewed in the OPTIONS/Gradient program. With
0.2 ml test tubes, a maximum of 12 different temperatures may be set whereas only 11 can be
set when 0.5 ml test tubes are used.
Please note that the temperature cannot exceed 99 °C, i.e. if a gradient of +10 °C is built up, the
nominal temperature may not be greater than 89 °C.
Permitted values
± 0.0 to ± 10.0 °C
Entry increments
0.1 °C
The gradient has no effect when the "in situ" type is used.
87
7 Programming
7.1.4 HOLD
Selection also possible using 2
The program holds the temperature at the value which was entered. The program is continued or ended by
pressing
.
Note: A program should not begin with a HOLD command and a temperature < 22 °C because the
temperature-control for the lid will not start. If, for example, 4 °C is required at the beginning of a program,
HOLD should be connected to the main program via a LINK command (see Sec. 7.6, "Examples of
programming").
HOLD xx ENTER
Permitted values
Entry increments
7.1.5 PAUSE
4 to 99 °C
0.1 °C
Selection also possible using 3
The program is interrupted and the temperature remains at the value for the last temperature command. The
program is continued by pressing
.
A user-defined text may be entered instead of the preset text "PRESS ENTER".
PAUSE PRESS ENTER
Text length
7.1.6 GOTO
0 to 11 characters
Selection also possible using 4
To enter data for cycle repeats. It is possible to branch to another program line number (GOTO) where the
program should be continued. The number of times this should be carried out (REP) is also given.
GOTO xxx REP xxx
Permitted values
Program line number
Repeats
7.1.7 SOUND
1 to 40
1 to 99
Selection also possible using 5
To emit an acoustic signal (e.g. for displaying a programmed pause or when a program is ended).
SOUND ❋❋
Permitted repeats
7.1.8 LINK
1 to 10 tones
Selection also possible using 6
To link up with another program in the internal memory. Via the LINK command, the current program is ended
and the selected program is started. With the aid of LINK commands, a maximum of five programs may be run
in succession. The CNTRL, Lid, NOWAIT/WAIT, AUTO/FIX commands in the program head are not taken into
consideration during the subsequent programs.
It is not possible to branch to programs in the processing level ("Edit") or on the personal card using LINK
commands (it is possible from the personal card to programs in the internal memory).
LINK ❋❋❋❋❋❋❋❋
Permitted number of programs
5
The name of the program to be called up must be entered (select letters using the
key). If the name of
the program itself is entered, the program goes into an endless loop and can only be cancelled by pressing
"Stop".
88
7 Programming
7.1.9 END
END appears automatically as the last line of a program. It switches off the temperature control for the block
and for the lid.
7.2 Creating a new program
The process for entering program commands is identical for the Mastercycler and the Mastercycler
gradient. A gradient can also be programmed with the Mastercycler gradient.
Example for a program sequence:
Initial denaturation
95 °C for 2 minutes
20 cycles:
Denaturation
Annealing
Elongation
95 °C for 45 seconds
61 °C for 45 seconds
A gradient of ± 10 °C is programmed (with Mastercycler gradient only)
72 °C for 45 seconds
Final elongation
72 °C for 2 minutes
Cooling of samples
22 °C
When the gradient is set at 61 °C ± 10 °C when 12 x 0.2 ml test tubes are used, the temperature distribution in
the individual columns of the thermoclock is as follows:
Tube row
1
Temperature 51.0
2
3
4
5
6
7
8
9
10
11
12
51.3
52.5
54.2
56.5
59.1
61.8
64.5
67.0
69.1
70.6
71.5
When 0.5 ml test tubes are used, the 11 rows of the block have the following temperatures:
Tube row
Temperature
1
2
3
4
5
6
7
8
9
10
11
51.1
51.9
53.3
55.4
57.8
60.5
63.2
65.8
68.1
69.9
71.1
89
7 Programming
7.2.1 Programming
– Select the "FILES" menu
using the
or
key
and call up by pressing
Main-Menu
Start
FILES . .
OPTIONS . .
Lid
Incubate
STANDARD
– –/22.0°
.
– Select the "New" menu using
the
or
key
and call up by pressing
.
CNTRL
BLOCK
– Using the
key
or confirm by pressing
.
LID=105° NOWAIT AUTO
– Enter the values
and press the 1 , >0< , 5 keys.
Change "Nowait" and "Auto" (
key)
or confirm by pressing
.
Initial denaturation
T=95.0°
0:02:00
– Select command T (Temperature)
using the
key (it may be
necessary to press the key
several times)
and confirm by pressing
.
– Enter the temperature,
press the 9 , 5 keys
and confirm by pressing
.
– Enter the time
(seconds:minutes:hours).
Press the >0< , >0< ,
keys
and confirm by pressing
2
90
.
10:22:06
FILES . .
Edit
Load
Standard
New
Delete
UNNAMED
– –/22.0°
Edit UNNAMED
CNTRL
LID=0°
NOWAIT
end
FILES . .
Edit
Load
Standard
New
Delete
UNNAMED
– –/22.0°
Edit UNNAMED
CNTRL
LID=105°
NOWAIT
end
FILES . .
Edit
Load
Standard
New
Delete
UNNAMED
– –/22.0°
Edit UNNAMED
CNTRL
LID=105°
NOWAIT
1
T=❋❋❋❋°
end
FILES . .
Edit
Load
Standard
New
Delete
UNNAMED
– –/22.0°
Edit UNNAMED
CNTRL
LID=105°
NOWAIT
1
T=95.0°
end
FILES . .
Edit
Load
Standard
New
Delete
UNNAMED
– –/22.0°
Edit UNNAMED
CNTRL
LID=105°
NOWAIT
1
T=95.0°
end
BLOCK
AUTO
10:22:06
BLOCK
AUTO
10:22:06
BLOCK
AUTO
: :
❋❋ ❋❋ ❋❋
10:22:06
BLOCK
AUTO
: :
❋❋ ❋❋ ❋❋
10:22:06
10:22:06
BLOCK
AUTO
00:02:00
7 Programming
Denaturation
T=95.0°
0:00:45
Programming: see page 30.
Annealing
T=61.0°
0:00:45
– Press the
key for options for the
temperature command (temperature- and
time increment, ramp, ramp increment,
gradient).
The cursor must be on the program line
number in front of the temperature
command.
– Press the
6
– Press the
4
– Press
,
1
5
FILES . .
Edit
Load
Standard
New
Delete
UNNAMED
– –/22.0°
Edit UNNAMED
1
2
3
Lid 105°
NOWAIT
T= 95.0°
T= 95.0°
T= 61.0°
+ 0.0
AUTO
0:02:00
0:00:45
0:00:45
+0:00
10:22:06
keys and confirm by pressing
.
keys and confirm by pressing
.
to proceed to Gradient or Elongation.
Gradient
Possible with Mastercycler gradient only.
G=10.0°
– Enter the gradient,
press the 1 , >0< keys and
confirm by pressing
.
Elongation
T=72.0°
0:00:45
Select the command T.
– Press the 7 , 2 keys and
confirm by pressing
.
5
– Press the 4
keys and
confirm by pressing
.
Cycle
GOTO 2
REP 19
– Select the GOTO command using
the
key (it may be necessary
to press the key several times)
Confirm by pressing
.
FILES . .
Edit
Load
Standard
New
Delete
UNNAMED
– –/22.0°
Edit UNNAMED
1
T=
2
T=
3
T=
+
R=
G=
10:22:06
95.0°
95.0°
61.0°
0.0
3.0°/s
10.0°
0:02:00
0:00:45
0:00:45
+0:00
+0:0°/s
FILES . .
Edit
Load
Standard
New
Delete
UNNAMED
– –/22.0°
Edit UNNAMED
2
T=
3
T=
+
R=
G=
4
T=
10:22:06
95.0°
61.0°
0.0
3.0°/s
10.0°
72.0°
0:00:45
0:00:45
+0:00
+0:0
FILES . .
Edit
Load
Standard
New
Delete
UNNAMED
– –/22.0°
Edit UNNAMED
3
T= 61.0°
+ 0.0
R= 3.0°/s
G= 10.0°
4
T= 72.0°
5
GOTO❋❋❋
10:22:06
00:00:45
0:00:45
+0:00
+0:0
00:00:45
REP❋❋❋
– Enter the line number for the
beginning of the program section
which is to be repeated.
Confirm by pressing
.
Enter the number of repeats (REP).
Confirm by pressing
.
Note: The total number of cycles is
REP + 1.
91
7 Programming
Final elongation
T=72.0°
0:02:00
Programming see page 30.
Cooling of samples
HOLD
22.0°
ENTER
– Select the HOLD command using
the
key (it may be necessary
to press the key several times)
and confirm by pressing
.
– Enter the temperature.
Confirm by pressing
FILES . .
Edit
Load
Standard
New
Delete
UNNAMED
– –/22.0°
Edit UNNAMED
FILES . .
Edit
Load
Standard
New
Delete
UNNAMED
– –/22.0°
Edit UNNAMED
R= 3.0°/s
G= 10.0°
4
T= 72.0°
5
GOTO 2
6
T= 72.0°
7
Hold
22.0°
10:22:06
FILES . .
Edit
Load
Standard
New
Delete
UNNAMED
– –/22.0°
Edit UNNAMED
UNNAMED not saved
SAVE: YES
ProgName: UNNAMED
FILES . .
Edit
Load
Standard
New
Delete
UNNAMED
– –/22.0°
Edit UNNAMED
UNNAMED not saved
SAVE: YES
ProgName: Gradient
4
5
6
10:22:06
+ 0.0
R= 3.0°/s
G= 10.0°
T= 72.0°
GOTO 2
T= 72.0°
.
7.2.2 Saving a program
– Exit the "New" menu using the
key.
– To save, press the
key; the
device asks for the program name.
10:22:06
In the case of a new program, the device
suggests the name "UNNAMED".
– Confirm the name by pressing
or – if an other name is desired –
delete by pressing
(if the key is held
down, the entire name is deleted; if the
keys is pressed briefly, individual letters
only are deleted).
– Enter the new program name.
Select letters using the
key.
Press the
key to move to the
next position etc.
and confirm by pressing
.
If the program is to be saved under
an existing name, the question
appears:
92
10:22:06
+0:00
+0:0
00:00:45
REP 19
00:02:00
+0:0
00:00:45
REP 19
00:02:00
ENTER
7 Programming
– "Overwrite:YES"
Confirm overwriting by pressing
.
If you do not want to overwrite the
existing program, select "NO" using
the
key, press
and enter
a new name. Confirm the new name
by pressing
.
FILES . .
Edit
Load
Standard
New
Delete
UNNAMED
– –/22.0°
Edit UNNAMED
Testing...
Gradient exists
Overwrite: YES
10:22:06
If a program is not saved ("Save:NO"), it remains in the processing level and can be supplemented or modified
by calling up "Edit". Safety checks in other sub-items prevent a program which has not been saved from being
accidentally overwritten.
The internal memory can accommodate a maximum of 99 programs. The number possible depends on the
length of the programs.
The program in the processing level can be started by pressing the
key.
Note: The procedure for saving programs on a personal card is described in Sec. 9.3.
7.3 Modifying a program
A program which is already in the internal memory or on a personal card can be modified by being loaded into
the processing level. The program resident in the "Edit" processing level is thus deleted. If a program which
has not yet been saved is in the processing level, it can be saved following a safety check prior to deletion.
– Select the "FILES" menu using the
or
key and confirm by
pressing
.
Main-Menu
Start
FILES . .
OPTIONS...
Lid
Incubate
STANDARD
– –/22.0°
– Select the "Load" menu using the
or
key and call up by
pressing
.
A list of existing programs appears in
the display.
– Select the program using the
key and load by pressing
or
.
10:22:06
FILES . .
Edit
Load
Standard
New
Delete
STANDARD
– –/22.0°
Load to Editor
STANDARD
TEST1
TEST2
FILES...
Edit
Load
Standard
New
Delete
STANDARD
– –/22.0°
Edit STANDARD
1
T= 94.0°
2
T= 94.0°
3
T= 44.0°
4
T= 72.0°
5
GOTO 2
6
T= 72.0°
10:22:06
10:22:06
0:02:00
0:00:15
0:00:15
0:00:30
REP 24
0:00:30
93
7 Programming
– Using the
changed.
,
,
,
keys or
– Enter data using the numeric keypad
or select between settings using the
or enter letters using the
key.
, move the flashing cursor onto the parameter which is to be
key
Inserting a program line
– Move the flashing cursor onto the number of the program line in front of which a new command is to
be inserted.
– Press the
key. A new line is inserted above the cursor.
– Select the wanted command using the
key.
Note: Press the
key for entering options regarding the temperature command.
In this case, the cursor must be positioned on the program line number in front of the temperature
command.
Deleting a program line
– Move the flashing cursor to the program line number.
– Press the
key. The line is deleted.
– After a program has been changed, exit the "Edit" processing level by pressing the
– Confirm the safety check "Save:YES" by pressing
key.
.
– The modified program can be saved using the same name, in which the old program is overwritten.
Confirm the check "Overwrite:YES" by pressing
.
If the program should not be overwritten, and a new program is to be created, answer "Overwrite:" with
"NO" (
and
keys) and enter a new program name with
or the numeric keypad.
Caution: If the changed program is not stored, there will be two different programs with the same
name. The program which has been changed is in the processing level and the program which has not
been changed is in the device memory.
The modified program can be started in the processing level
.
– After the end of the program "End of Program" appears in the display. Press the
– If you now want to save the program which has been changed, select "Load" menu with
. "Program not saved – Save YES" appears in the display.
– Press
94
to save the program.
key.
and press
7 Programming
7.4 Creating programs using an example program
It is possible to program quickly with the aid of the "Standard" example program. A program does not need to
be completely rewritten; the sample can be supplemented, modified and then saved under a new name.
– Select the "FILES" menu and call up by pressing
.
– Select "Standard" and call up by pressing
.
The example program is loaded into the processing level. It is structured in the following way:
CNTRL
LID=105°
NOWAIT
1
2
3
4
5
T=94.0°
T=94.0°
T=44.0°
T=72.0°
GOTO 2
6
7
T=72.0°
HOLD
end
BLOCK
AUTO
0:02:00
0:00:15
0:00:15
0:00:30
REP 24
0:00:30
ENTER
22.0°
Temperature control for the block.
Sets heated lid to 105 °C.
NOWAIT = Program is started immediately.
AUTO
= Lid heating is switched off automatically
when temperature (22 °C) is maintained
for more than 5 minutes.
Maintains 94 °C for 2 min. (initial denaturation)
Maintains 94 °C for 15 secs. (denaturation)
Maintains 44 °C for 15 secs. (annealing)
Maintains 72 °C for 30 secs. (elongation)
Repeats 24 times from program step 2 onwards.
The total number of cycles is 25.
Maintains 72 °C for 30 secs. (final elongation)
Cools down to 22 °C and maintains temperature.
Program end
Although the example program cannot be deleted, individual changes can be made. After changes have been
made, the example program must be saved under the name "Standard". To restore the original example
program, the "Standard" program in the "Delete" sub-menu must be deleted. When "Standard" ís called up,
the original example program is reloaded into the processing level.
7.5 Deleting a program
– Select the "FILES" menu and call up by pressing
– Select "Delete" and call up by
pressing
.
A list of the existing programs
appears in the display.
FILES . .
Edit
Load
Standard
New
Delete
STANDARD
– –/22.0°
.
Delete Program
TEST 1
TEST 2
10:22:06
– Select the program name.
– Confirm by pressing
. The program is deleted.
The procedure for deleting programs on a personal card is described in Sec. 9.3.
95
7 Programming
7.6 Examples of programming
The following passage contains several examples of the versatility of the commands and functions of the
Mastercyclers.
7.6.1 Gradient PCR (for Mastercycler gradient only)
The Gradient PCR is used to optimize temperatures in a PCR experiment. The gradient may be programmed
with a temperature range of up to 20 °C with every temperature command.
The most common application is the determination of the optimal annealing temperature (see example), for
which a gradient of, for example, ± 10 °C is built up. The recommended mean gradient is 5 °C higher than the
calculated annealing temperature.
Gradient PCR
Temperature control of tubes
Temperature control of lid
1
2
3
4
5
6
7
96
Initial denaturation
Denaturation
Annealing
Gradient
Elongation
Number of cycles
Final elongation
Cooling and storage
End
Control
lid
Nowait
94°
94°
60°
G = 10°
72°
go to 2
72°
Hold 20°
end
tube
105°
auto
2 min
15 sec
15 sec
30 sec
Rep 29
2 min
enter
7 Programming
7.6.2 Using the "Pause" and "Hold" commands (Example: Hot Start PCR)
The "Pause" command is used to interrupt the program. The most-recently entered temperature is
maintained. A text explaining the reason for the interruption may be entered as required. After confirmation by
pressing
, the program is continued.
The "Hold" command enables all possible temperatures to be maintained until the program is continued by
pressing
.
In the example of a Hot Start PCR listed below, the program is stopped folllowing initial denaturation in order
to add a reaction component. After the final elongation, the block is cooled down to room temperature.
Hot Start PCR
Temperature control of tubes
Temperature control of lid
1
2
3
4
5
6
7
8
Initial denaturation
Pause for adding substance
Denaturation
Annealing
Elongation
Number of cycles
Final elongation
Cooling and storage
End
Control
lid
Nowait
94°
Pause
94°
55°
72°
go to 3
72°
Hold 20°
end
tube
105°
auto
2 min
Adding
15 sec
15 sec
30 sec
Rep 29
2 min
enter
97
7 Programming
7.6.3 The temperature increment (Example: Touch Down PCR)
The temperature increment, which can be programmed as desired with every temperature command, allows
the temperature to be reduced or increased by a defined value with every cycle.
Touch Down PCR can be used to increase the specificity of the PCR by changing the the annealing
temperature in succession from higher to lower temperatures.
In the example given, the annealing temperature is reduced by 1 °C per cycle for the first 16 cycles, until 50 °C
has been attained. At this annealing temperature,14 additional cycles are carried out.
Touch Down PCR
Temperature control of tube
Temperature control of lid
1
2
3
4
5
6
7
8
9
10
11
Initial denaturation
Denaturation
Annealing
Temperature increment
Elongation
Number of cycles
Denaturation
Annealing
Elongation
Number of cycles
Final elongation
Cooling and storage
End
Control
lid
Nowait
94°
94°
65°
–1°
72°
go to 2
94°
50°
72°
go to 6
72°
Hold 20°
end
tube
105°
auto
2 min
15 sec
15 sec
30 sec
Rep 15
15 sec
15 sec
30 sec
Rep 13
2 min
enter
7.6.4 The time increment (Example: Long PCR)
The time increment, which can be programmed as desired with every temperature command, enables a
defined extension of the lag time at a specific temperature for each cycle.
With Long PCR, this function can be used to amplify long fragments for a successive extension of the
elongation.
In the example given, the elongation time is extended by 10 seconds for each cycle, which means that, for the
30th cycle, the elongation time is 290 seconds longer than for the first cycle.
Long PCR
Temperature control of tubes
Temperature control of lid
1
2
3
4
5
6
98
Initial denaturation
Denaturation
Elongation
Time increment
Number of cycles
Final elongation
Cooling and storage
End
Control
lid
Nowait
94°
94°
68°
go to 2
72°
Hold 20°
end
tube
105°
auto
2 min
15 sec
10 min
+0:10 sec
Rep 29
15 min
enter
7 Programming
7.6.5 Regullating the temperature-control speed (Example: RAPD-PCR)
Variable heating and cooling rates, which can be programmed as desired with each temperature command,
enable the temperature-control speed to be aligned to the temperature.
With the RAPD-PCR process or with PCR with A/T-rich primer/template hybrids, it may be necessary to heat
up carefully after annealing.
In the example given, the elongation temperature is attained at a speed of 1 K/s.
RAPD-PCR
Temperature control of tube
Temperature control of lid
1
2
3
4
5
6
7
Initial denaturation
Denaturation
Annealing
Elongation
Heating rate
Number of cycles
Final elongation
Cooling and storage
End
Control
lid
Nowait
94°
94°
55°
72°
R = 1 °/s
go to 2
72°
Hold 20°
end
tube
105°
auto
2 min
15 sec
15 sec
30 sec
Rep 29
2 min
enter
Temperature-control speeds, which may be as slow as the user desires, can be selected by means of program
loops, with which a gradual change in temperature is obtained via temperature increments.
In the following example, the elongation temperature is raised slowly to 72 °C after annealing with the aid of a
program loop.
RAPD-PCR
Temperature control of tube
Temperature control of lid
1
2
3
4
5
6
7
8
Initial denaturation
Denaturation
Annealing
Elongation
Temperature increment
Heating rate
Number of cycles
Number of cycles
Final elongation
Cooling and storage
End
Control
lid
Nowait
94°
94°
55°
56°
+1°
R = 0.3 °/s
go to 4
go to 2
72°
Hold 20°
end
tube
105°
auto
2 min
15 sec
15 sec
7 sec
Rep 16
Rep 29
2 min
enter
99
7 Programming
7.6.6 Sample cooling and subsequent PCR
If sensitive samples should remain cooled until the PCR takes place, the thermoblock must be preheated. This
can be carried out in two ways:
1. Set the "Incu" menu to 4 °C and "Heater is On".
2. Adapt an initial program and connect via a "LINK" command.
For this purpose, the temperature of the thermoblock is brought to 4 °C using the first program. After the
samples have been inserted into the cold thermoblock, the second program with the PCR protocol is
called up via a LINK command.
Programming should take place as follows:
Program 1
CNTRL TUBE
Lid
NOWAIT FIX
The entries in the first program are also valid for the programs which are added
via LINK. The lid setting "Fix" must be selected.
1 Hold 4 °C Enter
The thermoblock cools until the processing program (e.g. PCRPROT) is started
via the LINK command by pressing
.
2. Link PCRPROT
end
Link to the second program with the PCR protocol.
Program 2
CNTRL TUBE
100
e.g. COOL
PCRPROT
If the program also contains the "Tube control" command, further entries for
tube type and filling volume are no longer necessary; the entries made for the
first program are valid for all further programs.
8 Short instructions
It is essential to read the operating manual completely before working with the short instructions.
Switching on the device
Main-Menu
Start
FILES . .
OPTIONS . .
Lid
Incubate
STANDARD
– –/25.0°
Menu name
To start any program
Programming
System settings
To preheat the lid
To temperature-control block and heated lid
Program in processing level
Nominal/actual block temperature
Lid temperature
(only when lid is switched on)
Programming
– Select the FILES menu using the
Lid:105°
10:22:06
Time
/
keys and press
.
FILES . .
Edit
Load
Standard
New
Delete
STANDARD
– –/22.0°
To edit the program in the processing level
To load and edit any program
To load and process the example program
To create a new program
To delete any program
10:22:06
Changing the "Standard" example program
– Select "Standard" using the
key and press
.
– Using the
,
,
,
keys, move the cursor to or between the entry positions.
– Select the program commands using the
key, enter the settings or the texts and confirm by pressing
CNTRL
BLOCK
TUBE
Lid
NOWAIT
WAIT
AUTO
FIX
FILES . .
Edit
Load
Standard
New
Delete
STANDARD
– –/22.0°
To define temperature regulation
For the thermoblock
For different tubes
To determine the lid temperature
To start a program immediately
Program waits for lid temperature
Lid switches off at <22 °C
and time >5 min.
Lid switches off at end of program
1
2
3
.
Edit STANDARD
CNTRL
BLOCK
LID=105°
NOWAIT
AUTO
T=94.0°
0:02:00
T=94.0°
0:00:15
T=44.0°
0:00:15
10:22:06
Program commands
T
Temperatures, times, increments, ramp, gradient
HOLD
To maintain temperature entered until program is continued with Enter (4–99 °C)
PAUSE
To interrupt program until program is continued with Enter (0–11 characters)
GOTO/REP To repeat program parts and number of cycles (1–40 lines, 1–99 repeats)
SOUND
Acoustic signal (1–10 tones)
LINK
To branch to other programs (1–5 programs)
– Enter the options for the temperature command using the
number.
FILES . .
Edit
Load
Standard
New
Delete
STANDARD
– –/22.0°
T
Temperature (0–99°)
Time (0:00:01–9.59:59)
Temperature increment (0.0 –10.0°, + or –)
Time increment (0:00–1:00, + or –)
R Ramp (0.3–3 K/s)
Ramp increment (0.0–1.0 °/s, + or –)
G Gradient (±0,0 – ±10 °C)
(for Mastercycler gradient only)
– Confirm entries by pressing
.
– Complete programming by pressing
– Save the program.
key. The cursor must be positioned on the program line
3
4
5
STANDARD
T=44.0°
T=72.0°
+0.0°
R= 3.0°/s
G=0.0°
GOTO 2
0:00:15
0:00:30
+0:00
+0.0°/s
REP 24
10:22:06
.
101
8 Short instructions
Saving a program
– Exit the program using the
key.
– Answer the question "Save: YES"
by pressing
.
– Define the program name using the
key.
– Confirm the name by pressing
.
FILES . .
Edit
Load
Standard
New
Delete
STANDARD
– –/22.0°
Edit STANDARD
STANDARD not saved
SAVE: YES
ProgName: STANDARD
10:22:06
Adding a program line
– Using the
keys, move the cursor to the front of the line.
/
– Press the
key; a new line is then added above the cursor. Select command required with
.
Deleting a program line
– Using the
keys, move the cursor onto the program line number.
/
– Press the
key; the line is then deleted and the cursor moves to the next line.
System settings
To temperature-control lid and block
To preheat the lid
To print programming
To print program sequence
Incubate menu
Lid menu
OPTION menu
OPTION menu
Starting a program
– Switch on the device. If necessary,
preheat the lid and the block.
– Select the "Start" menu using the
keys and press
.
/
Main-Menu
Start
FILES . .
OPTIONS . .
Lid
Incubate
STANDARD
– –/25.0°
– Select the program name using the
keys and press
.
/
– With CNTRL TUBE, select the tube type
using the
key. Enter the filling volume.
0.2 ml/plate: 5 to 50 µl
0.5 ml/thin: 5 to 100 µl
– Confirm by pressing
.
The program starts immediately.
– To see the program run time, press the
key.
Interrupting a program
– Press the
– Using the
key.
key, select the "Pause" program.
– Confirm by pressing
Block temperature 37 °C, Heater is ON
LidTemp 105 °C, Heater is ON
Printout Editor: YES
PrintProtocol: ON
.
Run a Program:
STANDARD
TEST1
TEST2
10:22:06
Main-Menu
Start
1
FILES . .
OPTIONS . .
Lid
Incubate
Running/STANDARD
95.0/94.5°
Lid:105°
Run a Program:
T=95.0°
0:00:05
Cyc:4
10:22:06
Main-Menu
Run a Program:
Start
STANDARD running . . .
FILES . .
Program:
PAUSE
OPTIONS . .
Lid
Incubate
Paused/STANDARD
95.0/94.5°
Lid:105°
10:22:06
Main-Menu
Start
FILES . .
OPTIONS . .
Lid
Incubate
STANDARD
95.0/94.5°
10:22:06
Continuing an interrupted program
– Press the
– Using the
key.
key, select "Resume".
– Confirm by pressing
.
Stopping a program
– Press the
key.
– Confirm "Stop" by pressing
– Exit the program by pressing
102
.
.
Run a Program:
STANDARD running . .
Program:
STOP
Lid:105°
9 Personal card
Depending on the length of the program, a maximum of ten programs can be stored on a personal card. When
a program is started from a personal card, the program is loaded into a temporary memory (but not into the
internal memory or into the processing level) for the duration of the program processing.
Programs can be transferred to other devices of the Mastercycler, Mastercycler gradient and
Mastercycler personal using the personal card.
For the "Start", "FILES/Load", "FILES/Edit" and "FILES/Delete" menus, a difference will be made between the
memory of the personal card 〈MCARD〉 and the internal memory of the Mastercycler 〈INTERN〉 only when
the personal card has been inserted.
Menus "Start", "FILES/Load" and "FILES/Delete"
Only the programs of a memory appear in the display. The memory which is currently closed appears
in the display at the head of a program list as 〈INTERN〉 or 〈MCARD〉. The closed memory can be
opened by selecting and then confirmed by pressing
. This also closes the previous memory.
Menu
"FILES/Edit"
The memory target (Target) must be selected using the
determined.
key before the program name is
9.1 Safety precautions
The gold-colored contact area on the personal card must not be damaged, scratched or contaminated in any
way. Avoid touching the contact area with your fingers.
Electrostatic charges can destroy stored programs.
9.2 Operation
Inserting the card
– With the arrow facing forwards and the gold-colored contact area facing upwards, insert the card into the
slot under the control panel.
– Insert the card up to the stop. It clicks into place automatically.
Removing the card
– Insert the card up to the stop.
– The card is pushed out by spring pressure and can then be removed.
Formatting the card
A new card must be formatted. The request for formatting appears automatically in the display only when it is
necessary. The request for formatting is also made if the card has been erroneously inscribed.
– "Memory card not valid"
Confirm "Format: Yes" by pressing
.
The nominal/actual steps appear in the bottom line of the display.
103
9 Personal card
9.3 Processing programs
Starting a program from a card
– Select the "Start" menu item and call up by pressing
.
– Select 〈MCARD〉 and call up by pressing
.
If the memory name 〈INTERN〉 appears in the display instead of 〈MCARD〉, this means that the program
memory of the personal card has already been opened.
– Select a program and call up by pressing
.
Note: For starting purposes, programs are not loaded into the internal memory or into the "Edit" processing
level. After the program has ended, the program which has been started by the card is no longer available on
the device.
Deleting a program from a card
– Select the "FILES/Delete" menu and call up by pressing
.
– Select 〈MCARD〉 and call up by pressing
.
If the memory name 〈INTERN〉 appears in the display instead of 〈MCARD〉, this means that the program
memory of the personal card has already been opened.
– Select a program and delete by pressing
.
Loading a program from a card into the processing level
– Select the "FILES/Load" menu and call up by pressing
.
– Select 〈MCARD〉 and call up by pressing
.
If the memory name 〈INTERN〉 appears in the display instead of 〈MCARD〉, this means that the program
memory of the personal card has already been opened.
– Select a program and load by pressing
.
Saving a program on a card
– After a program has been compiled or modified, exit the processing level by pressing
– Confirm the inquiry "Save: YES" by pressing
.
.
– For the inquiry "Target:INTERN", select 〈MCARD〉 using the
key and confirm by pressing
– Enter the program name (max. 8 characters) and confirm by pressing
.
.
Note: The program can be saved under the same name as in the memory of the Mastercycler.
Programs with LINK commands
A program cannot be started from a personal card if it contains program branching – LINK commands – to
other programs on the personal card. It is possible to start the program if branching to another program in the
internal memory of the devices is available.
A program from the internal memory cannot call up a program from the personal card using a LINK command.
104
10 Interface description
10.1 Printer / PC connection
Printer connection
The printer connection socket (25 pins, Centronics parallel interface, PC compatible) is located below the
PC connection socket on the right-hand side of the device (see Sec. 4.1, Fig. 2.6).
Connect the Mastercycler or Mastercycler gradient and printer via a commercially available PC printer
cable. The cyclers and printer must be switched off during installation. If the printer is not used frequently,
the printer cable should be disconnected from the cycler port and only be installed when needed.
The parameters for the printer are set in the "OPTIONS/Printer" menu.
Print programming
Printout Editor: NO
Printing is switched off.
Printout Editor: YES
The program in the "Edit" menu is printed out.
Select "YES" using the
key and confirm by pressing
.
"Printout Editor: NO" is selected automatically after the printout.
Print program protocol
Print Protocol: OFF
The program sequence is not printed out.
Print Protocol: ON
The program sequence is printed out.
105
10 Interface description
Example of a program printout:
✼ ✼ M A ST E R CY C L E R g r a d i e n t 5 3 3 1 ✼ ✼
eppendorf
Version x.xx.xx
Time: 13:41:02
Date: 14/Apr/1999
✼✼✼✼✼✼✼✼✼✼✼✼✼✼✼✼✼✼✼✼✼✼✼✼✼✼
LISTING
Program:
Created:
Step:
CNTRL
LID=105C
NOWAIT
STANDARD
13/Apr/1999
BLOCK
AUTO
1
T = 94.0C
+0.0C
R = 3.0C/s
G = 0.0C
0:02:00
+ 0:00
+0.0C/s
2
T = 44.0C
+0.0C
R = 3.0C/s
G = 0.0C
0:00:15
+ 0:00
+0.0C/s
.
.
.
.
.
.
7
HOLD 22.0C ENTER
END OF LISTING
106
11:46
Program name
Date last stored
10 Interface description
Example of a program protocol:
Prior to the start, the program is printed (see page 46) and during the program sequence, all temperatures
and times are printed in a protocol.
Program ... started at
Initial Blocktemp
Initial Lidtemp
Run Time
Finish Time
Count
Cycle
Step
Command
Time
Completion Time
–
–
–
–
–
–
–
–
–
–
_
Date and time of start of program
Block temperature at start
Lid temperature at start
Estimated run time
Estimated time for end of program
Count of program steps
Count of cycles
Program step no. from programming
Command type and programmed values
Time at end of a command
Time at end of program
Program STANDARD started at Date:
15/Apr/1999
Initial Blocktemp:
24.7 C
Initial Lidtemp:
25 C
Run Time:
1:26
Finish Time:
15/Apr/1999
9:22
7:56:12
Count
Time
Cycle
Step
Command
Tube:0.2 ml
Fill.Vol.:20 µl
CNTRL
TUBE
LID=105C
NOWAIT
1
2
1
1
1
2
AUTO
T=94.0C
+0.0C
R=3.0C/s
G=0.0C
0:02:00
+ 0:00
+0.0C/s
T=94.0C
+0.0C
R=3.0C/s
G=0.0C
0:00:15
+ 0:00
+0.0C/s
7:56:21
7:56:22
7:59:05
7:59:21
.
.
Completion Time:
15/Apr/1999
9:24:55
END OF PROTOCOL
107
10 Interface description
PC connection
The 9 pin PC connection socket (serial interface RS 232) is located above the printer port on the right-hand
side of the device (see Sec. 4.1, Fig. 2.5).
The parameters for the computer are set in the "OPTIONS/GENERAL/Remote" menu.
Selection of transfer rate: Baud rate 19,200, 9,600, 4,800, 2,400 or 1,200
Detailed information about PC connection and the connecting cable required is available on request.
The computer to be connected must correspond to the EN 60950 or UL 1950 regulations.
A special operating manual is available for serial communication. Further information is available on request.
10.2 Program transfer
If programs are stored on a personal card, they can be transferred via the card to other Mastercycler,
Mastercycler gradient and Mastercycler personal devices. Programs created on a Mastercycler personal
can also be transferred to a Mastercycler gradient. The Mastercycler gradient has an additional function,
whereby a Gradient function is added to the temperature command, i.e. a temperature gradient can be built up
in the thermoblock. This function cannot be used when programs are transferred to the Mastercycler and
Mastercycler personal.
108
11 Maintenance
The Mastercycler® / Mastercycler® gradient can be cleaned using water or a mild laboratory cleaning agent.
The device should not come into contact with organic solvents or aggressive solutions. Ensure that no liquid
enters the device. For safety reasons, the device must be switched off and disconnected from the power
supply before cleaning begins.
The electrical safety fuses are located between the main power switch and the main power plug at the rear of
the device. They can be removed by sliding them up one catch. Before the fuses are replaced, the device must
be switched off and disconnected from the mains supply. Only fuses with the correct voltage values may be
used (information on the fuse type can be found at the rear of the device).
The device may only be opened by qualified service personnel. The warranty will not be honored in the event
of damage caused by unauthorized servicing.
109
12 Troubleshooting
Programming errors or errors regarding the handling of the personal card can be eliminated after the cause of
the error has been established.
Technical errors can be caused by interference (e.g. power failure or power fluctuations). In some cases, it is
possible to eliminate the error by switching off the device for a short period. Wait ten seconds before switching
on the device again. If the error recurs, contact a service technician.
12.1 Error messages
110
Error message
Cause
Solution
BLOCK ChkSumErr
Technical defect.
Contact SERVICE.
BLOCK TOO HOT!
Defective regulation or
defective electronics.
Contact SERVICE.
Card changed
Card removed immediately before
being inscribed.
Insert card correctly and repeat
procedure.
Card content not o.k.
Content of card is defective.
Card must be formatted.
Automatic procedure when program
is saved.
Card not in slot
Card removed during saving process.
Insert card correctly and repeat
procedure.
Enter Tube
Not all entries have been made for
a program which has been started.
Enter tube type and sample volume.
Err GOTO (1)
Branching to a program line number
is impossible because this program
line number is in a program area
which has already been selected
for repeating using another GOTO
command.
Check GOTO command and modify
or delete if necessary. Program line
number for additional GOTO
command must not be in a section
which is already addressed by a
GOTO command.
Err GOTO (2)
More than three GOTO commands
used for one program range.
Three GOTO commands can be used
in one program range when the areas
which have been addressed overlay
each other completely, i.e. the
program area of the second
command is greater than that of the
first command. The third GOTO
command must cover an even greater
area than that of the second
command.
Err Invalid
Invalid command.
Parameter has not been entered.
Enter command completely or delete
command.
12 Troubleshooting
Error message
Cause
Solution
Err Link (1)
...
Line ..
LINK command cannot be executed.
Program not found.
Program name and program line of
defective LINK command appear in
the display.
Only programs from the internal
memory can be called up by the LINK
command. Programs on a personal
card and the program in the
processing level ("Edit") cannot be
called up by the LINK command.
Err Link (2)
...
Line ..
Too many programs are connected
by LINK commands.
Program name and program line of
defective LINK command appear in
the display.
A maximum of five programs, i.e. four
LINK commands, can be processed
in succession.
Err No Program
No executable program available in
memory.
Load program from memory or
personal card, or define a program
in "Edit" menu and restart.
FAN ERROR!
Defective internal fan.
Switch off device.
Contact SERVICE.
FAT Full
Number of programs which can be
administrated has been exceeded.
Internal memory: 99 programs
personal card: 10 programs
Delete programs which are not
required.
Internal EE-Err
Technical defect.
Contact SERVICE.
LEFT BLOCK
DEFEKTIV!
Defective regulator or electronics
on left-hand block.
Switch off device.
Contact SERVICE.
LID TOO HOT!
Defective electronics.
Contact SERVICE.
Link not found
Program branching is not possible
because the program which was
supposed to be called up has been
deleted.
Check the LINK command.
Enter the missing program.
Link Error
Program branching is not possible
because the program which was
supposed to be called up has been
deleted.
Check the LINK command.
Enter the missing program.
MCard Error
The memory of the personal card
is defective.
Evaluate further messages.
Memory corrupted
The internal memory is defective.
The internal memory must be
deleted.
This deletes all programs.
111
12 Troubleshooting
Error message
Cause
Solution
Memory Error
The internal memory for programs
is defective.
Evaluate further messages.
Memory full!
Memory is full.
Before storing, delete programs
which are not required.
MemoryCard
(Blank)
Card has incorrect logical
identification and/or is blank.
Card must be formatted.
Automatic procedure when program
is saved.
MemoryCard
Defective!
Card is defective.
Use a new card.
MemoryCard
HdChksumErr
Error in check sum.
Card must be formatted.
Automatic procedure when program
is saved.
MemoryCard
ManIDErr
Incorrect identification.
Card must be formatted.
Automatic procedure when program
is saved.
MemoryCard
MemOverErr!
Incorrect memory address.
Card must be formatted.
Automatic procedure when program
is saved.
MemoryCard
MemRangeErr
Error in memory range.
Card must be formatted.
Automatic procedure when program
is saved.
MemoryCard
MemSizeErr
Incorrect memory size.
Card must be formatted.
Automatic procedure when program
is saved.
MemoryCard
MemUnderErr!
Incorrect memory address.
Card must be formatted.
Automatic procedure when program
is saved.
MemoryCard
Missing!
No card has been inserted.
Insert card.
MemoryCard
Not Valid
Card is invalid.
– Insert card correctly
(check that card is facing in the
correct direction).
– Card should be formatted before
saving begins.
MemoryCard
Read Err!
112
Card cannot be read.
Insert card correctly
(check that card is facing in the
correct direction).
12 Troubleshooting
Error message
Cause
Solution
MemoryCard
Read-Only!
Card is marked as write-protected.
Card must be formatted.
Automatic procedure when program
is saved.
MemoryCard
Write Err!
Writing error on card.
– Insert card correctly
(check that card is facing in
correct direction).
– Do not touch/move card during
saving.
MID BLOCK
DEFEKTIV!
Defective regulator or electronics
on middle block.
Switch off device.
Contact SERVICE.
Name Invalid!
Program name contains an
invalid character.
Enter program name again.
POWER ERROR!
Voltage error or defective fuse.
Contact SERVICE.
Printer: OFF LINE
Printer is not ready to receive.
Select the "ON LINE" printer setting.
Printer: no response
No printer is available or the printer
is not switched on.
– Select "OFF" in the menu
OPTION/Printer/Print Protocol.
– Switch on the printer.
Program is running!
A program is being processed.
Lid temperature cannot be modified
at the moment.
Program too large!
Program is too large.
Max. 40 program lines possible.
Restarting Program!
A power failure occurs or the device
is switched off briefly when a program
is running.
The program continues automatically.
RIGHT BLOCK
DEFEKTIV!
Defective regulator or electronics
on right-hand block.
Switch off device.
Contact SERVICE.
SLOWING DOWN!
The heating rate or cooling rate
has slowed down.
If error recurs, contact SERVICE.
Steps free
Display of free memory spaces
is < 100 steps.
1 step = 1 program line.
Delete programs which are not
required or store them on the
personal card.
TSensor_Err
– Permitted operating conditions
have not been maintained.
– Operate device at permitted
temperature and humidity only
– Technical defect.
– Contact SERVICE.
113
12 Troubleshooting
114
Error message
Cause
Solution
Value out of range!
Value is not within the permitted
value range.
The closest permitted value is
entered automatically.
Warn Ramp Max
...
Line ...
The ramp is limited to 3 K/s.
Check entries for ramp and ramp
increment, and change entries
if necessary.
Warn Ramp Min
...
Line ...
The ramp is limited to 0.3 K/s.
Check entries for ramp and ramp
increment, and change entries
if necessary.
Warn Temp Max
Temperature limits of 99 °C
exceeded. If program is started,
temperature is limited to 99 °C.
Check temperature commands
and reduce value of temperature
increment so that only values below
99 °C can be reached.
Warn Temp Min
Temperature limit of 4 °C not
reached. If program is started,
temperature is limited to 4 °C.
Check temperature commands
and modify values of temperature
increment so that only values above
4 °C can be reached.
Warn Time Max
Cycle time of 9:59:59 exceeded.
If program is started, cycle time is
limited to 9:59:59.
Check temperature commands and
modify values of time increment so
that only values below 9:59:59 can
be reached.
Warn Time Min
Cycle time of 0:00:01 not reached.
If program is started, cycle time is
limited to 0:00:01.
Check temperature commands and
modify values of time increment so
that only values above 0:00:01 can
be reached.
13 Technical data
Mastercycler / Mastercyclergradient
Sample capacity:
1 PCR plate 96
or
96 0.2 ml PCR tubes
or
77 0.5 ml PCR tubes, thin-walled
Temperature range:
4 to 99 °C
Temperature uniformity across the block:
20 °C to 72 °C ± 0.6 K
95 °C
± 1.0 K
Block homogeneity (S 95):
20 °C to 72 °C ≤ ± 0.4 K
95 °C
≤ ± 0.5 K
Control accuracy:
± 0.2 K
Temperature-control speeds:
Heating rate: approx. 3 K/s, measured on the block
Cooling rate: approx. 2 K/s, measured on the block
Number of programs:
max. 99
max. 10 on a personal card
Maximum number of cycles:
99
Dimensions:
Width:
Depth:
Height:
Weight:
approx. 12.4 kg
Voltage/frequency:
230 V, 50–60 Hz / 115 V, 50–60 Hz /
100 V, 50–60 Hz
Power requirement:
500 W
500 W
500 W
Operating current:
2.6 A
5A
6A
Fuses:
2 x T 5 A, 250 V
2 x T 6.3 A, 250 V
2 x MT 8 A, 250 V
Overvoltage category:
II
Pollution degree:
2
Contamination level:
I
Operating conditions:
15 to 35 °C, 70 % rel. humidity
Storage conditions:
–20 to 70 °C, 85 % rel. humidity
The device is
26 cm
41 cm
27 cm
-approved, fulfills UL 3101-1 and CSA C 22.2 No. 1010.1.
Technical specifications subject to change!
115
14 Ordering information
Please use only the accessories recommended by Eppendorf. Using disposables which we have not
recommended can reduce the precision, accuracy and life of the device. We do not honor any warranty or
accept any responsibility for damage resulting from such action.
Order no.
Description
5333 000.018
5333 000.026
5333 000.034
Mastercycler
230 V, 50–60 Hz
115 V, 50–60 Hz
100 V, 50–60 Hz
5331 000.010
5331 000.045
5331 000.037
Mastercycler gradient
230 V, 50–60 Hz
115 V, 50–60 Hz
100 V, 50–60 Hz
Accessories
0013 609.349
Fuse, time-lag, 5 A, 250 V (1 pc.) for 230 V
0013 565.333
Fuse, time-lag, 6.3 A, 250 V (1 pc.) for 115 V
0013 611.432
Fuse, semi time-lag, 8 A, 250 V (1 pc.) for 100 V
5331 220.002
in situ Adapter
5331 900.062
Operating manual
for Mastercycler and Mastercycler gradient
5332 300.018
Personal card
5331 226.027
Personal card for temperature-validation system
5331 222.005
Temperature-validation system
5331 224.008
Temperature sensor for 0.2 ml tube positions
Consumables
0030 124.332
PCR-tubes 0.2 ml, colorless (1000 pcs.)
0030 124.502
PCR-tubes 0.5 ml, colorless, thin-walled (500 pcs.)
0030 124.359
8-strip 0.2 ml PCR tubes, colorless, per 120 pcs. (= 960 tubes)
0030 121.023
Safe-Lock microcentrifuge tubes 0.5 ml, colorless (500 pcs.)
0030 128.648
Eppendorf twin.tec PCR Plate 96, skirted, colorless (25 pcs.)
0030 128.656
Eppendorf twin.tec PCR Plate 96, skirted, yellow (25 pcs.)
0030 128.680
Eppendorf twin.tec PCR Plate 96, skirted, red (25 pcs.)
0030 128.664
Eppendorf twin.tec PCR Plate 96, skirted, green (25 pcs.)
0030 128.672
Eppendorf twin.tec PCR Plate 96, skirted, blue (25 pcs.)
0030 128.575
Eppendorf twin.tec PCR Plate 96, semi-skirted, colorless (25 pcs.)
0030 128.583
Eppendorf twin.tec PCR Plate 96, semi-skirted, yellow (25 pcs.)
0030 128.613
Eppendorf twin.tec PCR Plate 96, semi-skirted, red (25 pcs.)
0030 128.591
Eppendorf twin.tec PCR Plate 96, semi-skirted, green (25 pcs.)
0030 128.605
Eppendorf twin.tec PCR Plate 96, semi-skirted, blue (25 pcs.)
116
14 Ordering information
Consumables
0030 127.498
Cap Strips, (8-strips) (25 x 12 pcs.)
0030 127.650
Heat Sealing Film (100 pcs.)
0030 127.668
Peel-it-Lite, Heat Sealing Foil (100 pcs.)
0030 127.676
Pierce-it-Lite, Heat Sealing Foil (100 pcs.)
0030 127.480
PCR Film, adhesive (100 sheets)
0030 127.471
PCR Foil, adhesive (100 sheets)
0030 127.501
in situ Frames, 25 µl (100 pcs.)
0030 127.510
in situ Frames, 65 µl (100 pcs.)
0030 127.528
in situ Frames, 125 µl (100 pcs.)
0030 127.536
in situ Frames, 300 µl (100 pcs.)
Recommended auxiliary equipment
5425 715.005
Adapter for 0.2 ml PCR tubes for 1.5/2.0 ml rotor (6 pcs.)*
5425 716.001
Adapter for 0.5/0.6 ml tubes for 1.5/2.0 ml rotor (6 pcs.)*
0030 127.153
Capping Aid, sealing PCR tubes and plates (1 pc.)
4830 000.017
Eppendorf Biomaster 4830
and Mastertips
for contamination-free pipetting
according to the positive-displacement principle
in the volume range from 1 µl to 20 µl
Biomaster Kit = 1 Biomaster and 96 Mastertips
0030 127.641
Foil Stripper
0030 124.243
Frame for work tray (set of 5)
5390 000.016
Heat Sealer 115 V / 60 Hz
5390 000.024
Heat Sealer 230 V / 50 Hz
3881 000.015
PCR-Cooler 0.2 ml Starter Set (1 x pink, 1 x blue)
3881 000.023
PCR-Cooler 0.2 ml pink
3881 000.031
PCR-Cooler 0.2 ml blue
0030 127.455
PCR Rack, random colors (10 pcs.)
0030 124.235
Work tray for 0.2 ml PCR tubes (set of 10 )
PCR Reagents
see Main Catalog
* For centrifugation
117
14 a Ordering information for USA and Canada
Please use only the accessories recommended by Eppendorf. Using disposables which we have not
recommended can reduce the precision, accuracy and life of the device. We do not honor any warranty or
accept any responsibility for damage resulting from such action.
Order no.
Description
5333 000.018
5333 000.026
5333 000.034
Mastercycler
230 V, 50–60 Hz
115 V, 50–60 Hz
100 V, 50–60 Hz
5331 000.010
5331 000.045
5331 000.037
Mastercycler gradient
230 V, 50–60 Hz
115 V, 50–60 Hz
100 V, 50–60 Hz
Accessories
0013 609.349
Fuse, time-lag, 5 A, 250 V (1 pc.) for 230 V
0013 565.333
Fuse, time-lag, 6.3 A, 250 V (1 pc.) for 115 V
0013 611.432
Fuse, semi time-lag, 8 A, 250 V (1 pc.) for 100 V
5331 220.002
in situ Adapter
5331 900.062
Operating manual
for Mastercycler and Mastercycler gradient
5332 300.018
Personal card
5331 226.027
Personal card for temperature-validation system
5331 222.005
Temperature-validation system
5331 224.008
Temperature sensor for 0.2 ml tube positions
Consumables
0030 124.367
PCR tubes, 0.2 ml, colorless (1000 pcs.)
0030 124.600
PCR tubes, 0.5 ml, colorless, thin-walled (500 pcs.)
0030 124.383
8-strip 0.2 ml PCR tubes, colorless, per 120 pcs. (= 960 tubes)
22 36 361-1
Safe-Lock microcentrifuge tubes, 0.5 ml, colorless (500 pcs.)
0030 128.648
Eppendorf twin.tec PCR Plate 96, skirted, colorless (25 pcs.)
0030 128.656
Eppendorf twin.tec PCR Plate 96, skirted, yellow (25 pcs.)
0030 128.680
Eppendorf twin.tec PCR Plate 96, skirted, red (25 pcs.)
0030 128.664
Eppendorf twin.tec PCR Plate 96, skirted, green (25 pcs.)
0030 128.672
Eppendorf twin.tec PCR Plate 96, skirted, blue (25 pcs.)
0030 128.575
Eppendorf twin.tec PCR Plate 96, semi-skirted, colorless (25 pcs.)
0030 128.583
Eppendorf twin.tec PCR Plate 96, semi-skirted, yellow (25 pcs.)
0030 128.613
Eppendorf twin.tec PCR Plate 96, semi-skirted, red (25 pcs.)
0030 128.591
Eppendorf twin.tec PCR Plate 96, semi-skirted, green (25 pcs.)
0030 128.605
Eppendorf twin.tec PCR Plate 96, semi-skirted, blue (25 pcs.)
118
14 a Ordering information for USA and Canada
Consumables
0030 127.498
Cap Strips (8-strips) (25 x 12 pcs.)
0030 127.650
Heat Sealing Film (100 pcs.)
0030 127.668
Peel-it-Lite, Heat Sealing Foil (100 pcs.)
0030 127.676
Pierce-it-Lite, Heat Sealing Foil (100 pcs.)
0030 127.480
PCR Film, adhesive (100 sheets)
0030 127.471
PCR Foil, adhesive (100 sheets)
0030 127.501
in situ Frames, 25 µl (100 pcs.)
0030 127.510
in situ Frames, 65 µl (100 pcs.)
0030 127.528
in situ Frames, 125 µl (100 pcs.)
0030 127.536
in situ Frames, 300 µl (100 pcs.)
Recommended auxiliary equipment
5425 715.005
Adapter for 0.2 ml PCR tubes for 1.5/2.0 ml rotor (6 pcs.)*
5425 716.001
Adapter for 0.5/0.6 ml tubes for 1.5/2.0 ml rotor (6 pcs.)*
0030 127.153
Capping Aid, sealing PCR tubes and plates (1 pc.)
22 44 050-1
Eppendorf Positive Displacement Pipette Model 4830
1 Kit = 1 Pipette Plus
96 Mastertips
100 Safe-Lock tubes (0.5 ml)
0030 127.641
Foil Stripper
0030 124.243
Frame for work tray (set of 5)
5390 000.016
Heat Sealer 115 V / 60 Hz
5390 000.024
Heat Sealer 230 V / 50 Hz
22 51 050-9
PCR-Cooler 0.2 ml Starter Set (1 x pink, 1 x blue)
22 51 054-1
PCR-Cooler 0.2 ml pink
22 51 052-5
PCR-Cooler 0.2 ml blue
0030 127.455
PCR Rack, random colors (10 pcs.)
0030 124.235
Work tray for 0.2 ml PCR tubes (set of 10 )
PCR Reagents
see Main Catalog
* For centrifugation
119
15 Index
A
Actual temperature 82
Annealing 91
B
Baud rate 75
BLOCK 78, 85
Brightness regulator 66
C
Command
AUTO 86, 101
CNTRL 80, 82, 85, 101
FIX 86, 101
GOTO 88, 110
GOTO/REP 101
HOLD 88, 92, 100
LINK 88, 104, 111
NOWAIT 80, 86, 101
PAUSE 88, 97
SOUND 88
WAIT 80, 86, 101
Creating new programs 89
Cursor 67, 68, 91, 94
Cycle 91
time 86, 114
D
Display 68
Denaturation 89, 90, 91
E
Elongation 89, 91
END 89
Entering date 75
Example program 71, 95, 101
F
Filling volume 82, 85
G
Gradient 63, 64, 74, 86, 87, 89, 91, 96
H
Heated lid 64, 77, 78, 80, 86
I
in situ Adapter 63, 79
INTERN 103, 104
L
Locking button 66
120
M
Main menu 68, 69, 81, 82
Main power switch 66
Maintenance 109
MCARD 103, 104
Menu
Delete 71, 101
Edit 70, 101
Editor 72, 105
FILES 70
GENERAL 75
Gradient 74
Incubate 78, 80, 101
Lid 77, 86
Load 71, 101
New 71, 90, 101
OPTIONS 72, 105
Printer 73
Standard 71, 95
Start 70
VALID 76
N
Nominal temperature 82, 86
O
Ordering information 116
P
Pause 83, 84, 102
PC connection socket 66
Peltier element 63
Personal card 65, 103, 110, 112
reader 66
Power failure 76
Printer connection socket 66, 105
Processing level 68, 69, 70, 71, 81, 93, 101, 104
Program
line, adding 94
line, deleting 94
line number 82, 86, 88, 91, 101, 102
name 70, 71, 81, 92, 104
sequence 107
sequence, printing 102, 105
– aborting 68, 84, 102
– changing 93, 94
– continuing 84, 102
– deleting 95, 101
– interrupting 68, 83
– loading 93
– saving: see "storing"
– starting 81
– storing 70, 92, 102
– transferring 108
15 Index
R
Ramp 86, 87, 99, 101, 114
Ramp increment 86, 87, 101, 114
Restart 75
Resume 84, 102
Reverse sign 67
Run 83
Run time 67, 77, 83
S
Safety precautions 64, 103
Sample
quantity 80
tube 79
Setting the time 75
Signal 75
Startup 65
Stop 83, 84
T
Temperature 74, 82, 86, 88, 90, 101, 114
increment 86, 87, 38, 99, 101, 114
options 72
Thermoblock 63, 64, 74, 78, 79, 80
Time increment 86, 87, 38, 101, 114
Tube control 63, 85
Tube type 80, 82, 102
V
Ventilation 64
slit 5, 66
121
Sommaire
1
Introduction. . . . . . . . . . . . . . . . . . . . . . . . . . . . . . . . . . . . . . . . . . . . . . . . . . . . . . . . . . . . . . . . . 125
2
Consignes de sécurité . . . . . . . . . . . . . . . . . . . . . . . . . . . . . . . . . . . . . . . . . . . . . . . . . . . . . . . . 126
3
3.1
3.2
3.3
Installation. . . . . . . . . . . . . . . . . . . . . . . . . . . . . . . . . . . . . . . . . . . . . . . . . . . . . . . . . . . . . . . . . .
Envergure de livraison. . . . . . . . . . . . . . . . . . . . . . . . . . . . . . . . . . . . . . . . . . . . . . . . . . . . . . . . . .
Mise en place de l'appareil. . . . . . . . . . . . . . . . . . . . . . . . . . . . . . . . . . . . . . . . . . . . . . . . . . . . . .
Mise en service. . . . . . . . . . . . . . . . . . . . . . . . . . . . . . . . . . . . . . . . . . . . . . . . . . . . . . . . . . . . . . .
127
127
127
127
4
4.1
4.2
4.3
Descriptif technique . . . . . . . . . . . . . . . . . . . . . . . . . . . . . . . . . . . . . . . . . . . . . . . . . . . . . . . . . .
L'appareil . . . . . . . . . . . . . . . . . . . . . . . . . . . . . . . . . . . . . . . . . . . . . . . . . . . . . . . . . . . . . . . . . . .
Descriptif des touches. . . . . . . . . . . . . . . . . . . . . . . . . . . . . . . . . . . . . . . . . . . . . . . . . . . . . . . . . .
Ecran d'affichage . . . . . . . . . . . . . . . . . . . . . . . . . . . . . . . . . . . . . . . . . . . . . . . . . . . . . . . . . . . . .
128
128
129
130
5
5.1
5.2
5.3
5.3.1
5.3.2
5.3.3
5.3.4
5.3.5
5.4
5.4.1
5.4.2
5.4.3
5.4.4
5.5
5.6
Descriptif des menus . . . . . . . . . . . . . . . . . . . . . . . . . . . . . . . . . . . . . . . . . . . . . . . . . . . . . . . . .
Menu principal . . . . . . . . . . . . . . . . . . . . . . . . . . . . . . . . . . . . . . . . . . . . . . . . . . . . . . . . . . . . . . .
Start . . . . . . . . . . . . . . . . . . . . . . . . . . . . . . . . . . . . . . . . . . . . . . . . . . . . . . . . . . . . . . . . . . . . . . .
FILES . . . . . . . . . . . . . . . . . . . . . . . . . . . . . . . . . . . . . . . . . . . . . . . . . . . . . . . . . . . . . . . . . . . . . .
Edit . . . . . . . . . . . . . . . . . . . . . . . . . . . . . . . . . . . . . . . . . . . . . . . . . . . . . . . . . . . . . . . . . . . . . . . .
Load.. . . . . . . . . . . . . . . . . . . . . . . . . . . . . . . . . . . . . . . . . . . . . . . . . . . . . . . . . . . . . . . . . . . . . . .
Standard . . . . . . . . . . . . . . . . . . . . . . . . . . . . . . . . . . . . . . . . . . . . . . . . . . . . . . . . . . . . . . . . . . . .
New. . . . . . . . . . . . . . . . . . . . . . . . . . . . . . . . . . . . . . . . . . . . . . . . . . . . . . . . . . . . . . . . . . . . . . . .
Delete . . . . . . . . . . . . . . . . . . . . . . . . . . . . . . . . . . . . . . . . . . . . . . . . . . . . . . . . . . . . . . . . . . . . . .
OPTIONS . . . . . . . . . . . . . . . . . . . . . . . . . . . . . . . . . . . . . . . . . . . . . . . . . . . . . . . . . . . . . . . . . . .
Editor . . . . . . . . . . . . . . . . . . . . . . . . . . . . . . . . . . . . . . . . . . . . . . . . . . . . . . . . . . . . . . . . . . . . . .
Printer . . . . . . . . . . . . . . . . . . . . . . . . . . . . . . . . . . . . . . . . . . . . . . . . . . . . . . . . . . . . . . . . . . . . . .
Gradient . . . . . . . . . . . . . . . . . . . . . . . . . . . . . . . . . . . . . . . . . . . . . . . . . . . . . . . . . . . . . . . . . . . .
GENERAL . . . . . . . . . . . . . . . . . . . . . . . . . . . . . . . . . . . . . . . . . . . . . . . . . . . . . . . . . . . . . . . . . .
Lid . . . . . . . . . . . . . . . . . . . . . . . . . . . . . . . . . . . . . . . . . . . . . . . . . . . . . . . . . . . . . . . . . . . . . . . . .
Incubate . . . . . . . . . . . . . . . . . . . . . . . . . . . . . . . . . . . . . . . . . . . . . . . . . . . . . . . . . . . . . . . . . . . .
131
131
132
132
132
133
133
133
133
134
134
135
136
137
139
140
6
6.1
6.1.1
6.1.2
6.1.2
6.1.4
6.2
6.3
6.4
6.5
6.6
6.7
6.8
Mode opératoire . . . . . . . . . . . . . . . . . . . . . . . . . . . . . . . . . . . . . . . . . . . . . . . . . . . . . . . . . . . . . 141
Préliminaires . . . . . . . . . . . . . . . . . . . . . . . . . . . . . . . . . . . . . . . . . . . . . . . . . . . . . . . . . . . . . . . . . 141
Garnissage des échantillons. . . . . . . . . . . . . . . . . . . . . . . . . . . . . . . . . . . . . . . . . . . . . . . . . . . . . 141
Volume d'échantillon . . . . . . . . . . . . . . . . . . . . . . . . . . . . . . . . . . . . . . . . . . . . . . . . . . . . . . . . . . . 142
Couvercle chauffant . . . . . . . . . . . . . . . . . . . . . . . . . . . . . . . . . . . . . . . . . . . . . . . . . . . . . . . . . . . 142
Préchauffage du thermobloc. . . . . . . . . . . . . . . . . . . . . . . . . . . . . . . . . . . . . . . . . . . . . . . . . . . . . 142
Mise en marche de l'appareil . . . . . . . . . . . . . . . . . . . . . . . . . . . . . . . . . . . . . . . . . . . . . . . . . . . . .143
Lancement du programme . . . . . . . . . . . . . . . . . . . . . . . . . . . . . . . . . . . . . . . . . . . . . . . . . . . . . . .143
Affichage de la durée du programme . . . . . . . . . . . . . . . . . . . . . . . . . . . . . . . . . . . . . . . . . . . . . . .145
Interruption de programme . . . . . . . . . . . . . . . . . . . . . . . . . . . . . . . . . . . . . . . . . . . . . . . . . . . . . . .145
Reprise d'un programme interrompu . . . . . . . . . . . . . . . . . . . . . . . . . . . . . . . . . . . . . . . . . . . . . . 146
Arrêter un programme . . . . . . . . . . . . . . . . . . . . . . . . . . . . . . . . . . . . . . . . . . . . . . . . . . . . . . . . . 146
Arrêt complet de l'appareil . . . . . . . . . . . . . . . . . . . . . . . . . . . . . . . . . . . . . . . . . . . . . . . . . . . . . . 146
7
7.1
7.1.1
7.1.2
7.1.3
7.1.4
7.1.5
7.1.6
7.1.7
7.1.8
7.1.9
Programmation . . . . . . . . . . . . . . . . . . . . . . . . . . . . . . . . . . . . . . . . . . . . . . . . . . . . . . . . . . . . . .
Descriptif des commandes . . . . . . . . . . . . . . . . . . . . . . . . . . . . . . . . . . . . . . . . . . . . . . . . . . . . . .
CNTRL . . . . . . . . . . . . . . . . . . . . . . . . . . . . . . . . . . . . . . . . . . . . . . . . . . . . . . . . . . . . . . . . . . . . .
Lid (couvercle) . . . . . . . . . . . . . . . . . . . . . . . . . . . . . . . . . . . . . . . . . . . . . . . . . . . . . . . . . . . . . . .
T
Rappel direct par le 1. . . . . . . . . . . . . . . . . . . . . . . . . . . . . . . . . . . . . . . . . .
HOLD
Rappel direct par le 2. . . . . . . . . . . . . . . . . . . . . . . . . . . . . . . . . . . . . . . . . .
PAUSE
Rappel direct par le 3. . . . . . . . . . . . . . . . . . . . . . . . . . . . . . . . . . . . . . . . . .
GOTO
Rappel direct par le 4. . . . . . . . . . . . . . . . . . . . . . . . . . . . . . . . . . . . . . . . . .
SOUND
Rappel direct par le 5. . . . . . . . . . . . . . . . . . . . . . . . . . . . . . . . . . . . . . . . . .
LINK (chainages) Rappel direct par le 6. . . . . . . . . . . . . . . . . . . . . . . . . . . . . . . . . . . . . . . . . .
END . . . . . . . . . . . . . . . . . . . . . . . . . . . . . . . . . . . . . . . . . . . . . . . . . . . . . . . . . . . . . . . . . . . . . . .
147
147
147
148
148
150
150
150
150
150
151
123
Sommaire
7.2
7.2.1
7.2.2
7.3
7.4
7.5
7.6
7.6.1
7.6.2
7.6.3
7.6.4
7.6.5
7.6.6
Création d'un nouveau programme. . . . . . . . . . . . . . . . . . . . . . . . . . . . . . . . . . . . . . . . . . . . . . . .
Programmation . . . . . . . . . . . . . . . . . . . . . . . . . . . . . . . . . . . . . . . . . . . . . . . . . . . . . . . . . . . . . . .
Sauvegarder les programmes. . . . . . . . . . . . . . . . . . . . . . . . . . . . . . . . . . . . . . . . . . . . . . . . . . . .
Modification de programme . . . . . . . . . . . . . . . . . . . . . . . . . . . . . . . . . . . . . . . . . . . . . . . . . . . . .
Création d'un programme à l'aide du modèle. . . . . . . . . . . . . . . . . . . . . . . . . . . . . . . . . . . . . . . .
Effacer un programme . . . . . . . . . . . . . . . . . . . . . . . . . . . . . . . . . . . . . . . . . . . . . . . . . . . . . . . . .
Programmes-types . . . . . . . . . . . . . . . . . . . . . . . . . . . . . . . . . . . . . . . . . . . . . . . . . . . . . . . . . . . .
PCR par gradient (sur Mastercycler gradient uniquement). . . . . . . . . . . . . . . . . . . . . . . . . . . . .
Utilisation des commandes "Pause" et "Hold" (exemple: PCR Hot Start) . . . . . . . . . . . . . . . . . .
L'incrément de température (exemple: PCR Touch down) . . . . . . . . . . . . . . . . . . . . . . . . . . . . . .
L'incrément de temps (exemple: PCR Long) . . . . . . . . . . . . . . . . . . . . . . . . . . . . . . . . . . . . . . . .
Régulation de la vitesse de thermostatisation (exemple: RAPD-PCR). . . . . . . . . . . . . . . . . . . . .
Réfrigération d'échantillons et PCR liées . . . . . . . . . . . . . . . . . . . . . . . . . . . . . . . . . . . . . . . . . . .
8
Mode d'emploi succinct . . . . . . . . . . . . . . . . . . . . . . . . . . . . . . . . . . . . . . . . . . . . . . . . . . . . . . . 163
9
9.1
9.2
9.3
Carte mémoire Personal Card . . . . . . . . . . . . . . . . . . . . . . . . . . . . . . . . . . . . . . . . . . . . . . . . . .
Consignes de sécurité . . . . . . . . . . . . . . . . . . . . . . . . . . . . . . . . . . . . . . . . . . . . . . . . . . . . . . . . .
Mode d'emploi de la carte Personal Card. . . . . . . . . . . . . . . . . . . . . . . . . . . . . . . . . . . . . . . . . . .
Utiliser les programmes . . . . . . . . . . . . . . . . . . . . . . . . . . . . . . . . . . . . . . . . . . . . . . . . . . . . . . . .
10
10.1
10.2
Descriptif de l'interface . . . . . . . . . . . . . . . . . . . . . . . . . . . . . . . . . . . . . . . . . . . . . . . . . . . . . . . 167
Connexion d'une imprimante, d'un ordinateur . . . . . . . . . . . . . . . . . . . . . . . . . . . . . . . . . . . . . . . 167
Transfert de programmes . . . . . . . . . . . . . . . . . . . . . . . . . . . . . . . . . . . . . . . . . . . . . . . . . . . . . . . 170
11
Maintenance . . . . . . . . . . . . . . . . . . . . . . . . . . . . . . . . . . . . . . . . . . . . . . . . . . . . . . . . . . . . . . . . 171
12
12.1
Tableau d'identification d'anomalies. . . . . . . . . . . . . . . . . . . . . . . . . . . . . . . . . . . . . . . . . . . . . 172
Messages d'erreur . . . . . . . . . . . . . . . . . . . . . . . . . . . . . . . . . . . . . . . . . . . . . . . . . . . . . . . . . . . . 172
13
Spécifications techniques . . . . . . . . . . . . . . . . . . . . . . . . . . . . . . . . . . . . . . . . . . . . . . . . . . . . . 177
14
Nomenclature de commande. . . . . . . . . . . . . . . . . . . . . . . . . . . . . . . . . . . . . . . . . . . . . . . . . . . 178
14 a
Nomenclature de commande pour USA et Canada . . . . . . . . . . . . . . . . . . . . . . . . . . . . . . . . . 180
15
Index alphabétique . . . . . . . . . . . . . . . . . . . . . . . . . . . . . . . . . . . . . . . . . . . . . . . . . . . . . . . . . . . 182
124
151
152
154
155
157
157
158
158
159
160
160
161
162
165
165
165
166
1 Introduction
Les Mastercycler et Mastercycler gradient Eppendorf sont des appareils de PCR pour les laboratoires de
recherche de biochimie moléculaire et de biochimie.
La thermostatisation s'effectue par le biais d'éléments électroniques Peltier capable de réaliser des
modifications de température de 3 °C par seconde. Cette performance permet de thermostater très
rapidement les échantillons à la température de consigne entre 4°C et 99°C.
Pour thermostater les échantillons contenus dans différents types de tubes et avec des remplissages
variables, il existe un mode spécial appelé "tube control" spécialement développé à cet effet.
Le thermobloc a été conçu sur le principe du bloc universel qui permet de recevoir les plaques de microtitrage
de format 8 x 12, 96 tubes de PCR Eppendorf de 0,2 ml, 77 tubes de PCR Eppendorf à paroi ultra-mince de
0,5 ml ainsi que tout autre tube adapté.
Un adaptateur in situ permet d'effectuer les réactions in situ sur un ensemble de 4 lames porte-objets au
maximum.
Le couvercle de l'appareil est chauffant pour éviter les dépôts de condensation. Ce couvercle est optimisé
pour être compatible avec tous les types de tubes.
L'utilisation de l'appareil est simple et comporte un tableau de commande intégré avec afficheur à huit lignes.
Le décours des opérations expérimentales peut être transcrit par connexion d'une imprimante externe.
Un avantage particulier du Mastercycler gradient réside précisément dans sa fonction gradient qui permet
de faciliter énormément l'optimisation des essais de PCR. Le gradient permet d'étaler la température sur
l'ensemble du thermobloc sur une amplitude allant jusqu'à 20 °C. Il est programmable à chaque pas de
température.
Les appareils Mastercycler sont des thermocycleurs autorisés livrés avec licence de la Société Perkin Elmer
Corporation.
125
2 Consignes de sécurité
Avant toute utilisation du Mastercycler et Mastercycler gradient, il convient de lire complètement son mode
d'emploi. Les Mastercycler et Mastercycler gradient ne peut être utilisé que pour l’exécution de la PCR et
de méthodes apparentées en laboratoire de recherche.
Par ailleurs, il convient de respecter scrupuleusement les consignes suivantes:
Alimentation électrique:
La tension du secteur doit correspondre aux indications figurant sur la plaque
signalétique de l’appareil.
Le raccordement doit s'effectuer sur une prise comportant une mise à la terre.
Avant toute intervention sur l'appareil: travaux d'entretien, changement de
fusible, nettoyage, il convient au préalable de l'arrêter et de retirer le cordon
secteur.
Substances dangereuses:
La thermostatisation de substances explosibles, inflammables et susceptibles
de réagir violemment est interdite dans le Mastercycler ou Mastercycler
gradient. L’appareil ne doit pas être utilisé dans des pièces où existe un risque
d’explosion.
Dans le cas de manipulation de matériel pathogène, de matières radioactives
ou d’autres matières présentant un risque pour la santé, les prescriptions de
sécurité correspondantes doivent être respectées.
Liquides:
Il convient de s'assurer qu'aucun liquide ne peut s'introduire à l'intérieur de
l'appareil.
Environnement:
Ne pas entraver la circulation de l'air autour de l'appareil.
Risque de blessures:
Lors du fonctionnement de l’appareil, il convient de suivre les consignes de
sécurité en vigueur. La fermeture du couvercle demande d’être particulièrement
vigilant, afin d’éviter les blessures aux mains.
Risques de brûlures:
Le thermobloc, l'intérieur du couvercle, les tubes ou les plaques de microtitrage
peuvent rapidement atteindre des températures supérieures à 50 °C ce qui
constitue un risque de brûlure!
Garder le couvercle fermé pour laisser descendre les températures et n'ouvrir
qu'à 30 °C.
Ne jamais utiliser de matériaux (tubes, plaques de microtitrage, couvercles, films
d'obturation, tapis) insuffisamment thermostables aux températures de l'appareil
(jusqu'à 120 °C).
Caution: Hot Surface
Message de danger sur le thermobloc:
Il signale que certains éléments peuvent être très chauds: thermobloc (▼) ou
intérieur du couvercle (▲).
Le symbole en pointillé indique que la température
de thermobloc est plus élevée à droite qu'à gauche avec la fonction gradient.
Toute intervention technique pour réparation ou autre est strictement réservée à un personnel dûment
qualifié. N'utiliser que des pièces garanties d'origine Eppendorf.
126
3 Installation
3.1 Envergure de livraison
La livraison de l'appareil comprend les éléments suivants:
1 Mastercycler ou Mastercycler gradient
1 Cordon secteur
1 Mode d'emploi
1 Carte Personal Card
1 Sachet de tubes de PCR de 0,2 ml (100 tubes)
1 Sachet de tubes de PCR de 0,5 ml (100 tubes
3.2 Mise en place de l'appareil
L'appareil doit être installé sur un espace suffisamment grand pour que les fentes d'aération latérales restent
totalement libres et que l'air puisse circuler sans entrave. Par ailleurs, il convient de veiller à ne rien mettre en
dessous de l'appareil lui-même.
Pour déplacer l'appareil, aucun accessoire spécial n'est requis. Il suffit de le saisir par les côtés pour le
soulever et le porter.
Espace nécessaire:
Largeur:
Profondeur:
Hauteur:
26 cm
41 cm
27 cm
Raccordement au secteur:
Une prise de courant avec terre pour Mastercycler ou Mastercycler gradient.
Une seconde prise secteur est nécessaire pour raccorder une éventuelle
imprimante.
Conserver le carton d'emballage pour un éventuel renvoi de l'appareil en atelier en cas d'anomalie.
3.3 Mise en service
Elever le ruban adhésif collé par-dessus le couvercle ainsi que le film alvéolé sous le couvercle.
Raccorder le Mastercycler ou Mastercycler gradient au secteur avec le cordon livré avec l'appareil.
Avant de le mettre sous tension, vérifier si la valeur de la tension figurant sur la plaquette d'identification est
compatible avec celle du secteur (voir plaquette d'identification, chap. 4.1; fig. 3).
Le raccordement et l'utilisation d'une imprimante sont décrits au chap. 10.1.
127
4 Descriptif technique
4.1 L'appareil
1
2
Fig. 1: Vue de face
1 Couvercle chauffant
2 Bouton de verrouillage
3 Ecran d'affichage et clavier
de commande
4 Lecteur pour carte Personal Card
3
4
1
2
3
Fig. 2: Vue de côté
1
2
3
4
5
6
Couvercle chauffant
Thermobloc (non visible)
Fentes d'aération
Bouton de réglage de luminosité
Douille pour connexion informatique
Douille pour connexion d'imprimante
6 54
Fig. 3: Vue arrière
1
2
3
4
5
128
1
2
3
4
5
Fentes d'aération
Commutateur secteur
Fusibles
Prise secteur
Plaque d'identification
4 Descriptif technique
Mastercycler gradient
5
1
2
3
4
Fig. 4: Ecran et commandes
1
2
3
4
5
Touches de programmation
Touches de déplacement du curseur
Touches de commande
Bloc numérique, point décimal et touche d'inversion de signe
Ecran
4.2 Descriptif des touches
Touches de programmation
– Lorsque le programme est en cours, la sollicitation de cette touche permet d'afficher pour
5 secondes la durée approximative du temps de fonctionnement ainsi que l'heure probable
de la fin du programme.
– Au cours de la programmation, la sollicitation de cette touche permet d'afficher les options
de la commande température (rampe, gradient, incréments).
– Permet d'effacer les lignes de programme, les chiffres, ou les lettres, ou de revenir sur des
paramètres. La sollicitation prolongée de cette touche permet d'effacer des mots entiers.
– Permet de sélectionner une commande de programme ou de choisir dans une liste.
– Permet de sélectionner un point du menu et se substitue ainsi aux touches de
déplacement du curseur
/ .
– La touche
est nécessaire pour effectuer des sélections dans une liste et pour
programmer les lettres dans la programmation d'un nom de programme. La touche
d'inversion de signe
inverse le sens du défilement des lettres.
– Permet d'insérer des lignes supplémentaires lors de la création d'un programme.
129
4 Descriptif technique
Touches de déplacement du curseur
Le curseur se présente en surbrillance sur l'écran.
– Pour sélectionner un menu, positionner le curseur sur ce menu et valider par la
touche
.
– Le curseur s'utilise également pour se positionner sur des zones à programmer ou
pour passer d'une zone à une autre. Ces données ne nécessitent pas de validation et
sont directement mémorisées.
Touches de commande
– Permet de quitter un menu ou de revenir sur un menu de niveau immédiatement
supérieur.
– Après démarrage d'un programme, permet de quitter la représentation du déroulement
du programme pour travailler, entre autres, sur le niveau de programmation.
– Permet d'appeler un programme sélectionné à l'aide du curseur.
– Assure la validation d'une donnée.
– Permet le démarrage rapide d'un programme du fichier de travail (menu "FILES/Edit").
Pour lancer un autre programme, il convient de passer par le menu "Start".
– Permet d'arrêter ou d'interrompre un programme.
4.3 Ecran d'affichage
Actionner le commutateur secteur situé sur l'arrière de l'appareil (chap. 4.1, fig. 3.2). L'écran d'affichage
indique de façon passagère le nom de l'appareil ainsi que la version du logiciel installé.
Apparaît ensuite le menu principal:
Main-Menu
Start
FILES . .
OPTIONS . .
Lid
Incubate
STANDARD
– –/25.0°
Zone menu
❋❋❋
MASTERCYCLER ❋❋❋
gradient 5331
eppendorf
Version ❋.❋❋.❋❋
Lid:105°
10:22:06
Zone de programmation
L'écran d'affichage comporte huit lignes et se subdivise en deux zones. La zone du menu affiche les
différentes options disponibles du menu . La zone de programmation permet la saisie des paramètres
nécessaires à la programmation ainsi que pour le fonctionnement du système.
130
5 Descriptif des menus
5.1 Menu principal
Main-Menu
Start
FILES . .
OPTIONS . .
Lid
Incubate
STANDARD
– –/25.0°
Nom du menu
Sous-menus
Lid:105°
Programme dans le fichier de travail
Heure d'horloge
10:22:06
température du couvercle
(si le couvercle est en marche)
Température de consigne et température
lue sur le thermobloc
Il existe trois possibilités pour appeler un menu principal ou un sous-menu:
1. Utiliser les touches du curseur
pour sélectionner le menu puis le valider par
/
2. Sélectionner avec l'aide de la touche
et valider par
.
.
3. Sélectionner avec l'aide d'un numéro de position (figurant dans le texte entre parenthèses) et valider par
.
Le programme se trouvant présent au fichier de travail peut être démarré immédiatement en appuyant sur
la touche
. Pour quitter un menu, appuyer sur la touche
. Pour atteindre le menu principal, la
sollicitation multiple de la touche
peut s'avérer nécessaire.
Les menus figurant en lettres capitales comportent eux-mêmes des sous-menus. Pour faciliter la
compréhension des liens, le nom du menu figure dans la moitié gauche de l'écran ou en titre sur le menu
ou le sous-menu.
Schéma de structuration des menus:
Main-Menu
Start
(1)
FILES . .
(2)
Edit
Load
(1)
(2)
Standard
New
Delete
(3)
(4)
(5)
OPTIONS . .
(3)
Editor
Printer
Gradient
GENERAL . .
Démarrage du programme
(1)
(2)
(3)
(4)
Clock
Remote
Sound
Etc
VALID . .
Programmation
Modification du programme du fichier de travail
Charger un quelconque programme
ou le modifier
Modèle de programme standard
Création de nouveaux programmes
Effacer des programmes
Programmation des paramètres système
Affichage de fonctions complémentaires
Connexion d'une imprimante
Affichage du gradient de température
(1)
(2)
(3)
(4)
(5)
Réglage de l'heure
Connexion d'un ordinateur PC
Son
Vérification de l'appareil
Lid
(4)
Préchauffer le couvercle
Incubate
(5)
Préthermostater le thermobloc
et le couvercle chauffant
131
5 Descriptif des menus
5.2 Start
Le menu "Start" ne permet que le démarrage de programmes.
Le menu désigné au fichier de travail peut être démarré directement en actionnant la touche
Pour démarrer un programme se trouvant en mémoire, taper
et ensuite valider par
.
(1).
puis sélectionner dans la liste affichée (2)
Le menu "Start" ne comporte pas de sous-programmes.
Main-Menu
Start
FILES . .
OPTIONS . .
Lid
Incubate
STANDARD
– –/25.0°
Fichier de travail
(1)
(2)
Main-Menu
Start
FILES . .
OPTIONS . .
Lid
Incubate
STANDARD
– –/25.0°
STANDARD
TEST1
TEST2
Main-Menu
Start
FILES . .
OPTIONS . .
Lid
Incubate
Running/STANDARD
95.0/94.7°
Main-Menu
Start
FILES . .
OPTIONS . .
Lid
Incubate
Running/TEST2
– –/25.0°
5.3 FILES
Le menu "FILES" permet de modifier les programmes, de les charger, de les créer ou de les effacer.
Main-Menu
Start
FILES . .
OPTIONS . .
Lid
Incubate
STANDARD
– –/25.0°
FILES . .
Edit
Load
Standard
New
Delete
STANDARD
– –/25.0°
5.3.1 Edit
Le menu "Edit" permet de modifier les programmes déjà existants. Le programme à modifier peut alors déjà
se trouver au fichier de travail ou être chargé à l'aide du menu "Load", après quoi il se présente au fichier de
travail. Il est alors indifférent que le programme provienne de la mémoire résidente de l'appareil ou de la carte
Personal Card.
Le programme modifié peut être visualisé pour contrôle en tapant
après avoir été mis en mémoire sous
un nom de programme. La mise en mémoire n'a pas pour effet d'effacer le fichier de travail. Les données en
mémoire restent enregistrées et conservées même après mise hors tension de l'appareil. Seul l'appel du
menu "New" ou "Standard" permet de les effacer par écrasement.
Nota: Si le programme modifié (sans être enregistré sous un autre nom) est démarré, il existera alors deux
programmes différents sous le même nom, l'un en mémoire interne, l'autre au fichier de travail.
132
5 Descriptif des menus
5.3.2 Load
La commande "Load" permet de rappeler la liste des programmes existants. Ces programmes peuvent être
enregistrés soit en mémoire résidente, soit en carte programme Personal Card. Le programme sélectionné
est chargé au fichier de travail "Edit". Si ce fichier comporte encore un programme non sauvegardé en
mémoire, il apparaît une interrogation de sécurité qui permet ladite sauvegarde préalable.
Si la sauvegarde n'est pas souhaitée, le chargement du programme provoquera l'écrasement de l'existant.
Comme ceci provoque automatiquement l'appel du fichier de travail 'Edit", le programme pourra
immédiatement être modifié et vérifié.
Le chargement d'un programme à partir d'une carte mémoire Personal Card est décrit au chap. 9.3.
5.3.3 Standard
Les nouveaux programmes peuvent être élaborés à partir d'un modèle appelé programme "Standard". Il n'est
pas nécessaire de réécrire en entier un nouveau programme, mais il suffit de compléter le modèle ou de le
modifier, puis de l'enregistrer sous un nouveau nom pour le sauvegarder. Tout autre programme élaboré se
trouvant enregistré en mémoire résidente peut servir de modèle pour élaborer un nouveau programme.
Le programme modèle sera chargé en zone de travail après avoir répondu à la question de sécurité. La
structure est décrite plus en détail au chapitre 7.4.
Le modèle de programmation "Standard" reste conservé en permanence et ne peut être écrasé ou effacé.
Ce modèle peut cependant être modifié. Il suffit de le sauvegarder sous le nom de "Standard" après sa
modification. Si l'on souhaite rétablir la version initiale du modèle "Standard", il convient d'effacer le
programme "Standard" dans le sous-menu "Delete". Lors du nouveau rappel "Standard", le modèle initial sera
chargé dans le fichier de travail.
5.3.4 New
Taper "New" provoque automatiquement l'appel du fichier de travail. Un programme existant sera effacé pour
la création d'un nouveau programme.
Les zones à réponse obligatoire, CNTRL BLOCK, Lid=0°, NOWAIT AUTO, end apparaissent
automatiquement et le programme reçoit provisoirement le nom de UNNAMED.
5.3.5 Delete
Les programmes enregistrés en mémoire interne ou sur carte mémoire Personal Card peuvent être
supprimés. Après sélection de "Delete" apparaît une liste de noms de programmes. Un nom de cette liste
peut être sélectionné avec l'aide des touches du curseur et il suffit de taper ensuite
pour valider la
suppression. Le programme se trouvant au fichier de travail ne peut pas être effacé.
La suppression d'un programme se trouvant enregistré sur une carte mémoire Personal Card se trouve décrit
au chapitre 9.3.
133
5 Descriptif des menus
5.4 OPTIONS
Le menu "OPTIONS" permet de définir les paramètres opérationnels du système en général concernant
l'éditeur du programme, l'imprimante, la date et l'heure, etc.
Main-Menu
Start
FILES . .
OPTIONS . .
Lid
Incubate
STANDARD
– –/25.0°
OPTIONS . .
Editor
Printer
Gradient
GENERAL . .
STANDARD
– –/25.0°
La touche
permet de valider l'une des variantes d'une commande à double réponse tels que
YES / NO, ON / OFF, ainsi que d'autres.
Pour quitter ce menu, taper
.
5.4.1 Editor
OPTIONS . .
Editor
Printer
Gradient
GENERAL . .
Editor Mode
Show Ext. Steps:
YES
STANDARD
– –/22.0°
Show Ext. Steps
Permet d'afficher les options de température.
YES
Permet d'afficher toutes les options relatives à une étape de température (incrément de
température, incrément de temps, rampe, incrément de rampe, gradient).
NO
Seul affichage de la température de consigne et de la durée du cycle. Si certaines
options se trouvent présentes à l'appel d'un programme, la commande sera marquée
d'un "*" pour toute information. Les options peuvent cependant être appelées par la
commande
pour être programmées ou affichées en clair.
134
5 Descriptif des menus
5.4.2 Printer
OPTIONS . .
Editor
Printer
Gradient
GENERAL . .
Printer Mode
Printout Editor:
Print Protocol:
NO
OFF
STANDARD
– –/22.0°
Les paramètres de programmation ne sont nécessaires que si une imprimante est connectée.
Printout Editor
YES:
NO:
Print Protocol
ON:
OFF:
Le programme se trouvant au fichier de travail "Edit" sera imprimé. Si "YES" est
programmé et qu'aucune imprimante ne se trouve branchée, il y a envoi d'un message
d'erreur "Printer: No Response".
Est automatiquement activé lorsque l'impression du programme est terminée.
Les protocoles sont imprimés lors du démarrage d'un programme, au cours de la
marche, toutes les commandes réalisées sont imprimées avec indication de l'heure.
Rien n'est imprimé.
135
5 Descriptif des menus
5.4.3 Gradient
La fonction gradient n'est disponible que sur le Mastercycler gradient.
La répartition de la température peut être étalée sur l'ensemble du thermobloc à l'aide de la fonction gradient.
A chaque incrément de température, le thermobloc peut être programmé de telle sorte qu'il y ait une
température différente sur chacque espace. La température est la plus basse sur le côté gauche et monte
progressivement vers la droite ou elle est la plus élevée à l'extrémité.
Show Gradient
Le menu "Show gradient" permet de visualiser individuellement la température régnant
dans chaque série d'alvéoles:
OPTIONS
Editor
Printer
Gradient
GENERAL . .
Tube: 0.2 ml
STANDARD
– –/22.0°
Show Gradient
T=60.0
G=7.0 °C
10:22:06
Sélectionner le type de tube "0,2 ml; 0,5 ml; 0,5 ml thin ou plate" avec l'aide de la touche
. Valider par
.
Après programmation d'une température et du gradient, l'afficheur indique la répartition
de la température sur l'ensemble du thermobloc:
OPTIONS
Editor
Printer
Gradient
GENERAL . .
STANDARD
– –/22.0°
Settings:
Pos. 1: 52.9C
Pos. 2: 53.2C
Pos. 3: 54.0C
Pos. 4: 55.2C
Show Gradient
Tube: 0.2 ml
T=60.0C G= 7.0C
Pos. 5: 56.9C
Pos. 9: 64.3C
Pos. 6: 58.7C
Pos:10: 65.8C
Pos. 7: 60.6C
Pos.11: 66.9C
Pos. 8: 62.5C
Pos.12: 67.5C
Print Results <OPT>
10:22:06
Le gradient peut être de ± 10 °C au maximum avec une résolution de 0,1 °C, de sorte qu'au final l'amplitude
totale du gradient est de 20 °C. La température sélectionnée est située au milieu du bloc.
Le côté gauche est thermostaté à la température de consigne – gradient
Le côté droit est thermostaté à la température de consigne + gradient.
136
5 Descriptif des menus
5.4.4 GENERAL
Le menu "GENERAL" comporte toutes les commandes nécessaires au paramétrage de l'appareil en général
et à son contrôle.
GENERAL . .
Clock
Remote
Sound
Etc
VALID . .
– –/22.0°
Clock
Format:
La touche
permet de programmer le format du temps d'horloge à indiquer,
soit au format 12 h ou 24 h, c'est à dire PM ou AM en langage anglo-saxon.
Time:
Mise à l'heure en heure:minutes:secondes.
Date:
Réglage de la date sous forme jour/mois/année.
Choisir un mois à l'aide de la touche
.
Remote
Baudrate:
Permet de programmer la vitesse de transmission en baud: 19 200; 9 600;
4 800; 2 400; 1 200 à l'aide de la touche
pour la connexion d'un
ordinateur PC.
Sound
KeyClick:
ON:
OFF:
Chaque sollicitation d'une touche est confirmée par un signal sonore.
L'émission d'un signal sonore est annulée.
Warnings:
ON:
Les avertissements apparaissant à l'écran sont accompagnés
d'un signal sonore.
Aucune émission de signal sonore n'accompagne les avertissements
à l'écran.
OFF:
Nota: Les messages d'erreurs sont toujours accompagnés de signaux
sonores, indépendamment des réglages ci-dessus.
Etc
Start with:
MAIN:
LAST:
Lors de la mise en route, affichage du menu principal.
Lors de la mise en route, affichage du dernier menu utilisé.
Auto Restart:
NO:
En cas d’interruption de programme suite à une panne secteur,
le redémarrage du programme n’aura pas lieu.
Attention!
PROGRAM interrupted
Temps
Durée
Step:x
Cyc:y
Press any key!
YES:
En fonction de la durée de la panne secteur, un programme interrompu
continue de façon automatique ou grâce à une reprise manuelle.
137
5 Descriptif des menus
Panne secteur < 3 min:
La poursuite de l’exécution du programme en cours est automatique,
si dans les 3 minutes qui suivent une panne secteur, le courant est
rétabli. Pour information, le système affiche quand, combien de temps
et à quelle étape du programme l’interruption a eu lieu:
AutoRestart!
PROGRAM restarted
Temps
Durée
Step:x
Cyc:y
Press any key!
Le fait d’appuyer sur une touche quelconque restaure l’affichage du
programme. En tapant une touche quelconque le message
est acquitté. Si on souhaite arrêter le programme, taper la
et valider par
.
Panne secteur > 3 min:
Si la panne secteur est d’assez longue durée, une sonnerie retentit
dès que le courant est rétabli. Il est alors possible de redémarrer le
programme manuellement ou de choisir de ne pas le redémarrer.
PROGRAM
Temps
Step:x
Restart:
Decide!
interrupted
Durée
Cyc:y
YES/NO
Pour reprendre l’exécution du programme interrompu, il faut
sélectionner l’option "YES" en utilisant l’élément
et confirmer par
. Appuyer sur une touche quelconque
permet d’afficher le programme à nouveau.
Pour arrêter l’exécution du programme, il faut sélectionner "NO" en
utilisant l’élément
et confirmer son choix par
.
VALID . .
138
Cette fonction permet de procéder à la vérification de l'appareil. Les valeurs relevées lors du
contrôle peuvent être imprimées.
Les menus "Validate" et "Calibrate" nécessitent le système de validation de la température
(code commande 5331 222.005). Cet ensemble comporte un appareil de mesure de la
température, une sonde de température spéciale et une carte programme Personal Card avec
un logiciel spécialement développé à cet effet.
Les instructions détaillées pour l'utilisation des programmes "Validate" et "Calibrate" se trouvent
décrites dans le mode d'emploi accompagnant les systèmes de validation de la température.
Validate:
Permet de vérifier la température de l'appareil à l'aide d'un appareil spécial
(thermomètre).
Cet appareil fait partie du système de validation. Il se connecte au niveau
de l'interface sérielle du Mastercycler.
Calibrate:
Permet de calibrer la température de l'appareil à l'aide du thermomètre spécial.
Cet appareil fait partie du système de validation. Il se connecte au niveau
de l'interface sérielle du Mastercycler.
5 Descriptif des menus
5.5 Lid
Le menu "Lid" du menu principal permet de programmer la température du couvercle chauffant ou d'arrêter ou
de mettre en marche le chauffage de ce couvercle et permet par exemple de préchauffer le couvercle.
Main-Menu
Start
FILES . .
OPTIONS . .
Lid
Incubate
STANDARD
– –/22.0°
Lid Temp
LidTemp:
Heater
105/55°C
is Off
LidTemp:
Température de consigne et température lue. Permet de programmer la température du
couvercle chauffant. La programmation d'une valeur 0 °C provoque l'arrêt du chauffage.
Heater is On:
Le chauffage du couvercle est actif.
Heater is Off:
Le chauffage du couvercle est inactif.
Pour démarrer certaines PCR particulièrement sensibles, il est important de ne démarrer le programme que
lorsque la température du couvercle permet d'éviter la condensation. Pour ce faire, il convient d'inclure le
réglage "WAIT" lors de la programmation, et ou le programme ne démarre que lorsque la température
programmée pour le couvercle est atteinte.
En outre, le couvercle chauffant peut être préchauffé. Pour ce faire on sélectionne le menu "Lid" lors de la
mise en marche de l'appareil, on programme la température de consigne pour le couvercle, et on sélectionne
"Heater is On" à l'aide de la touche
.
Ces données d'un programme ont alors priorité lors du démarrage du programme.
Aucune intervention concernant le chauffage du couvercle n'est possible au cours du déroulement d'un
programme.
139
5 Descriptif des menus
5.6 Incubate
Le menu "Incubate" du menu principal permet de programmer la température de consigne du thermobloc et
d'activer ou inactiver le chauffage du thermobloc (pour les essais d'incubation ou pour le préchauffage du
bloc). Le thermobloc et le couvercle sont portés simultanément à la température de consigne.
Main-Menu
Start
FILES . .
OPTIONS . .
Lid
Incubate
STANDARD
– –/22.0°
Block Temp
BlockTemp:
Heater
37/22°C
is Off
BlockTemp:
Températures de consigne et température lue. Permet de programmer la température de
consigne du thermobloc. Valeurs de consignes possibles: de +4 °C à 99 °C. Ne permet
pas d'appeler un gradient.
Heater is On:
La thermostatisation du thermobloc est active.
Heater is Off:
La thermostatisation du thermobloc est inactive.
Pour porter le thermobloc et le couvercle chauffant à sa température de consigne, sélectionner le menu
"Incubate" après mise en marche de l'appareil, puis programmer la valeur de la température de consigne du
thermobloc et sélectionner "Heater is On" avec
.
Tant que "Incubate" est en marche, il n'est pas possible de sélectionner le menu "Lid".
Lors d'un démarrage du programme, les consignes de programmation ont alors priorité.
Aucune intervention concernant le chauffage du bloc n'est possible au cours du déroulement d'un
programme.
Interruption: tant que le message "Heater is On" figure au cadran, sélectionner "Heater is Off" à l'aide de
puis valider avec
.
Nota: Lorsque le menu "Incubate" a été activé, le thermobloc et le couvercle peuvent être déjà chauds.
Quand on met les tubes il y a risque de brûlure.
140
6 Mode opératoire
6.1 Préliminaires
6.1.1 Garnissage des échantillons
Le thermobloc peut être garni directement de trois types de tubes, sans le modifier. Les différents tubes
compatibles sont: 96 tubes de PCR de 0,2 ml; 77 tubes de PCR de 0,5 ml à paroi mince (spécial Eppendorf)
ou une plaque de microtitrage (8x12).
Pour assurer un transfert thermique optimum, il convient de n'utiliser que les tubes à fond en forme de V (voir
nomenclature de commande). Il convient en outre de veiller au bon positionnement de ces tubes dans leur
alvéole afin qu'ils ne bougent pas. Les tubes ne présentant pas une compatibilité suffisante aux températures
élevées (jusqu'à 120 °C) ne doivent pas être utilisés.
Cette observation vise également les films obturant habituellement les plaques de microtitrage. Cependant,
le chauffage du couvercle étant réglable, il est possible d'utiliser des films dont la température de fusion est
supérieure à 100 °C. Dans ce cas on programmera une température de consigne de 95 °C pour le couvercle.
Le thermobloc possède 96 petites alvéoles pour tubes de PCR de 0,2 ml et pour plaque de microtitrage,
ainsi que 77 positions pour tubes de 0,5 ml. Pour pouvoir utiliser cette pleine capacité, les tubes doivent être
rangés systématiquement dans le même sens et par rang. Pour que le couvercle puisse assurer une pression
uniforme sur l'ensemble, il est recommandé de positionner un tube dans chaque coin du thermobloc. Le
garnissage est prévu comme suit:
Tubes de PCR, 96 x 0,2 ml
ou
plaque de microtitrage (8x12)
(PCR Plate 96)
Tubes de PCR, 77 x 0,5 ml à paroi mince (thin)
(spécial Eppendorf)
Tubes Safe- Lock Eppendorf, 39 x 0,5 ml
Les tubes de 0,5 ml avec couvercle large comme les tubes
Eppendorf de 0,5 ml doivent être placés en mode décalé
en raison de leur encombrement
L'utilisation de l'adaptateur in situ est nécessaire pour la réalisation de réactions in situ. Le support métallique
pour 4 lames porte-objet comporte un "ergot" qui se positionne dans l'alvéole inférieure de 0,5 ml du
thermobloc.
141
6 Mode opératoire
6.1.2 Volume d'échantillon
La thermostatisation peut être orientée soit vers le thermobloc, soit vers l'échantillon. La commande
"CNTRL/TUBE" permet d'adapter la thermostatisation au volume réel d'échantillon et au type de tube.
Le volume d'échantillon ne devrait pas excéder:
50 µl sur les tubes de PCR de 0,2 ml ou sur les plaques
100 µl sur les tubes de 0,5 ml "thin" ou 0,5 ml normaux.
La sélection "in situ" ne permet pas de tenir compte du volume d'échantillon.
6.1.3 Couvercle chauffant
Lorsque le thermobloc est garni de tubes, rabattre le couvercle chauffant et le verrouiller à l'aide du levier.
Pour ce faire, tourner le levier de verrouillage vers la droite pour atteindre le niveau correspondant au type du
tube. Les symboles représentent les positions de fermeture pour tubes ou plaques correspondant aux
capacités de 0,5 ml, 0,2 ml, ou 0,1 ml. Selon les plaques, on choisira alors la position "tube 0,2 ml" ou
"plaque".
Le couvercle chauffant ayant pour effet d'éviter le dépôt de condensation sur la partie haute des tubes, il n'est
pas nécessaire de déposer une couche d'huile sur l'échantillon.
Nota: Le mélange de différents types de tubes pour une seule manipulation n'est pas conseillé, des
problèmes de fermeture de couvercle pouvant alors se poser.
Si le mélange de différents types de tubes s'avérait inévitable, il conviendrait de recouvrir les échantillons
d'une pellicule d'huile.
La température (jusqu'à 110 °C) du couvercle est pilotée automatiquement par le programme. L'utilisateur
peut décider si son programme doit démarrer immédiatement (NOWAIT) ou s'il doit démarrer que si la
température de consigne du couvercle est atteinte (WAIT). Si le programme doit démarrer rapidement, le
couvercle pourra être préchauffé selon une procédure accessible par "Lid".
Tous les tubes restent accessibles en permanence au cours du programme, le couvercle pouvant être ouvert
à tout moment.
Avertissement: Si le couvercle est ouvert en cours de programme, il est chaud et il existe un risque de
brûlure (110 °C) au contact de la surface interne du couvercle et du thermobloc.
Par ailleurs, les tubes et les plaques de microtitrage peuvent être très chauds en fonction des phases du
cycle.
Pour les réactions in situ, le couvercle n'est pas chauffé et reste toujours ouvert.
6.1.4 Préchauffage du thermobloc
Pour accélérer certains essais d'incubation ou pour démarrer rapidement certaines méthodes, le thermobloc
pourra être chauffé par le couvercle chauffant peuvent être préchauffés. Pour ce faire, sélectionner le menu
"Incubate" dans le menu principal, programmer une température et positionner "Heater" sur "On".
Avertissement: En mode chauffage, le thermobloc et l'intérieur du couvercle peuvent présenter des
températures très élevées. Il convient dès lors d'être très prudent en installant les tubes ou la plaque pour
écarter le risque de brûlure.
142
6 Mode opératoire
6.2 Mise en marche de l'appareil
– Actionner le bouton marche / arrêt
situé sur l'arrière de l'appareil.
L'écran afficheur indique brièvement
le nom du type d'appareil avec sa
version logicielle.
Le fichier de travail du menu
principal indique le programme qui
est prêt à démarrer.
Main-Menu
Start
FILES . .
OPTIONS . .
Lid
Incubate
STANDARD
– –/25.0°
Lid:105°
10:22:06
Main-Menu
Start
FILES . .
OPTIONS . .
Lid
Incubate
STANDARD
– –/25.0°
Lid:105°
10:22:06
❋❋❋
MASTERCYCLER ❋❋❋
gradient 5331
eppendorf
Version ❋.❋❋.❋❋
6.3 Lancement du programme
– Pour démarrer immédiatement le
programme se trouvant au fichier
de travail, taper la touche
.
Pour démarrer un autre programme,
procéder comme suit;
– taper
:
à l'écran apparaît une liste de
programmes.
– Sélectionner un programme en
déplaçant le curseur
ou
.
(Le nom du programme est en
surbrillance).
Pour démarrer un programme se
trouvant sur une carte mémoire
Personal Card, se reporter au
chapitre 9.3.
– Valider en tapant
:
le programme procède à une
vérification (Testing Program) puis
démarre immédiatement après.
Main-Menu
Start
FILES . .
OPTIONS . .
Lid
Incubate
STANDARD
– –/25.0°
Run a Program:
STANDARD
TEST1
TEST2
Lid:105°
Main-Menu
Start
1
FILES . .
OPTIONS . .
Lid
Incubate
Running/STANDARD
95.0/94.7°
Lid:105°
10:22:06
Run a Program:
T=95.0°
0:00:05
Cyc:4
10:22:06
143
6 Mode opératoire
Si le programme comporte une commande
"CNTRL/TUBE" (régulation de la
température sur l'échantillon), il est
nécessaire de compléter la programmation
par la saisie du type de tube et de leur
volume de remplissage.
– Sélectionner de la touche
le type
de tube: 0,2 ml; 0,5 ml (Safe-Lock);
0,5 ml thin (à paroi mince) ou plate
(pour la plaque de microtitrage) ou
in situ.
Valider par
.
Main-Menu
Start
FILES . .
OPTIONS . .
Lid
Incubate
Enter Tube
22.0/25.0°
– Saisir le volume de remplissage et le
valider par
.
Main-Menu
Start
FILES . .
OPTIONS . .
Lid
Incubate
STANDARD
22.0/25.0°
Tube type 0,2 ml / plate: de 5 à 50 µl
Tube type 0,5 ml / thin: de 5 à 100 µl
In situ ne nécessite aucune saisie.
Si la saisie de données concernant
"Tube" et "Fill.Vol." n'est pas effectuée,
le programme ne peut pas être réalisé.
Au menu principal apparaît alors le
message "Enter Tube" à la place du
nom du programme et le signal sonore
reste actif jusqu'à ce que la saisie
soit faite.
Lorsque le programme est en cours
de réalisation, le cadran indique le
nom du programme en cours
alternant avec le message
"Running".
La température clignote indiquant
que la consigne n'est pas encore
atteinte, soit pour chauffer, soit pour
refroidir.
– L'affichage d'un programme peut
être abandonné à tout instant en
tapant
. On peut ainsi se
rendre au fichier de travail "Edit"
pour programmer.
144
Run a Program:
CNTRL
TUBE
Tube: 0.2 ml
Lid:105°
10:22:06
Run a Program:
CNTRL
TUBE
Fill.Vol.: 20 µl
Lid:105°
10:22:06
Main-Menu
Start
1
FILES . .
OPTIONS . .
Lid
Incubate
Running/STANDARD
95.0/97.0°
Lid:105°
1
2
3
Run a Program:
T=95.0°
0:00:05
Cyc:4
10:22:06
4
5
1 Le programme clignote en alternance avec "Running"
2 Température de consigne / mesurée
3 Température du couvercle chauffant
(ou travail avec chauffage au couvercle)
4 Numéro de la ligne de programme,
commande de programme
et dans l'exemple cité: commande de température (T)
avec température de consigne et longueur du cycle
5 Nombre de cycles réalisés
6 Heure d'horloge
6
6 Mode opératoire
6.4 Affichage de la durée du programme
Il est possible de faire afficher au cours du
déroulement d'un programme le temps
approximatif de la durée d'un programme
et l'heure probable de sa fin.
– Taper
.
Main-Menu
Run a Program:
Start
Run Time:
1:03
FILES . .
Finish Time:
OPTIONS . .
17/Jun/1997 15:06
Lid
Incubate
Running/STANDARD
22.0/25.0°
Lid:105°
Cette touche n'est active que
lorsque le déroulement du
programme est affiché. Elle est
inactive dans le menu principal, dans
les autres menus ou sous-menus.
Fin de programme
14:02:30
Heure d'horloge actuelle
Durée en heures:minutes
6.5 Interruption de programme
Un programme peut être interrompu, arrêté ou
repris à n'importe quel moment en actionnant la
touche
.
– Taper
.
Ensuite sélectionner à l'aide de la
touche
entre les options suivantes
Stop
Pause
Run
– Avec
arrêter le programme
interrompre le programme
retour sur l'affichage du
déroulement du programme
sélectionner "Pause".
– Valider "Program:PAUSE" par
,
le programme est interrompu,
le décompte du temps s'arrête,
la dernière température de consigne
est maintenue.
Main-Menu
Run a Program:
Start
STANDARD running...
FILES . .
Program:
STOP
OPTIONS . .
Lid
Incubate
Running/STANDARD
95.0/94.5°
Lid:105°
10:22:06
Main-Menu
Run a Program:
STOP !
STANDARD running...
FILES . .
Program:
PAUSE
OPTIONS . .
Lid
Incubate
Paused/STANDARD
95.0/94.5°
Lid:105°
10:22:06
Le nom du programme alterne avec le
message "Paused" et le menu "Start"
passe sur le message "Stop".
145
6 Mode opératoire
6.6 Reprise d'un programme interrompu
Au cadran, le nom du programme interrompu alterne avec "Paused".
– Taper
.
A l'aide de la touche
choisir entre
Stop
arrêter le programme
Pause interrompre le programme
Resume reprendre la suite du programme
– Pointer "Resume" à l'aide de
.
– Taper
pour valider
"Program:RESUME",
le programme sera continué.
Main-Menu
Run a Program:
STOP !
STANDARD PAUSED
FILES . .
Program:
PAUSE
OPTIONS . .
Lid
Incubate
Paused/STANDARD
95.0/94.5°
Lid:105°
10:22:06
Main-Menu
Run a Program:
STOP !
STANDARD PAUSED
FILES . .
Program:
RESUME
OPTIONS . .
Lid
Incubate
Paused/STANDARD
95.0/94.5°
Lid:105°
10:22:06
Main-Menu
Run a Program:
STOP !
STANDARD running...
FILES . .
Program:
STOP
OPTIONS . .
Lid
Incubate
Paused/STANDARD
95.0/94.5°
Lid:105°
10:22:06
Main-Menu
Start
FILES . .
OPTIONS . .
Lid
Incubate
STANDARD
22.0/25.0°
14:02:30
6.7 Arrêter un programme
– Taper
.
– Valider "Program:STOP" en tapant
.
6.8 Arrêt complet de l'appareil
Lorsqu'un programme est complètement
terminé, le cadran afficheur donne les
indications ci-contre:
Run a Program:
End of program
Lid:105°
Si l'on souhaite relancer un nouveau
programme, quitter le programme en
tapant
.
Si l'on souhaite arrêter l'appareil, positionner sur
l'appareil.
146
>0<
le commutateur d'arrêt / marche situé à l'arrière de
7 Programmation
7.1 Descriptif des commandes
Pour programmer, on dispose en principe de deux commandes de base pour la thermostatisation du
thermobloc et du couvercle chauffant et de 6 commandes différentes pour le déroulement du programme.
Un programme peut comporter jusqu'à 40 lignes de programme, avec des commandes pouvant se répéter
aussi souvent que nécessaire.
La programmation s'effectue par saisie de chiffres ou de lettres ou par sélection d'une commande à l'aide de
la touche
.
Le nombre de chiffres admissibles étant limité, le message "Value out of range" apparaît lorsque la capacité
est dépassée par excès ou par défaut et la seule valeur limite admissible est enregistrée.
FILES...
Edit
Load
Standard
New
Delete
UNNAMED
Edit UNNAMED
CNTRL
BLOCK
LID=0°
NOWAIT
AUTO
- - - - - - - - - - - - -- - - - - - - - - - - - - - - - - - - - - - - - - - - - - - - - - - - 1
T=❋❋❋❋°
+0.0°
R=3.0°/s
G=0.0°
❋❋:❋❋:❋❋
+0:00
+0.0°/s
2
Hold ❋❋❋❋°
ENTER
3
PAUSE
4
GOTO❋❋❋
5
SOUND❋❋
6
LINK❋❋❋❋❋❋❋❋
PRESS ENTER
REP❋❋❋
end
– –/22.0°
10:22:06
7.1.1 CNTRL
Cette commande définit le mode de thermostatisation du thermobloc.
BLOCK
La température est mesurée sur le thermobloc et la température de consigne est réglée en
conséquence.
TUBE
La température du thermobloc est pilotée par le logiciel par un mode adapté au type de tube et
au volume d'échantillon. Ce mode de thermorégulation exige que le type de tube et son volume
de remplissage soient saisis immédiatement après la commande "Start". Lors de la sélection
"in situ", aucune programmation supplémentaire n'est nécessaire.
Volumes d'échantillon possibles:
5 à 50 µl sur les tubes de PCR de 0,2 ml ou sur les plaques
5 à 100 µl sur les tubes de 0,5 ml "thin" ou 0,5 ml normaux
147
7 Programmation
7.1.2 Lid (couvercle)
Permet de programmer la température du couvercle. La programmation de la valeur 0 °C équivaut à arrêter la
couvercle.
Valeurs admissibles
Valeur de l'incrément
0 à 110 °C
1 °C
En plus de la valeur de la température du couvercle chauffant, on enregistre également le degré des
températures initiale et finale d'un programme.
Début de programme
NOWAIT
Le programme démarre indépendamment de la température du couvercle.
WAIT
Le programme démarre uniquement lorsque la température de consigne du couvercle est
atteinte.
Note: pour accélérer le démarrage du programme, on peut préchauffer le couvercle chauffant
par le biais du menu "Lid".
Fin de programme
FIX
La température du couvercle est indépendante de celle du thermobloc. Le chauffage du
couvercle continu à la fin du programme.
AUTO
La température du couvercle dépend de celle du thermobloc. Pour des températures < 22 °C
et des durées > 5 min, le chauffage est coupé. Il en est de même pour une commande HOLD
avec des températures < 22 °C.
Les six commandes préparées pour la programmation peuvent être rappelées directement par un numéro de
rappel direct.
7.1.3 T
Rappel direct par le 1
Permet de programmer la température et la durée de cycle ainsi que leurs options spécifiques.
Pour programmer les options, positionner le curseur sur le numéro de la ligne de programme puis taper la
touche
.
Les options sont programmables pour toute commande de température.
T = ❋❋❋❋°
+ 0.0 °
R = 3 °/s
G = 0.0
T = ❋❋❋❋°
: :
❋❋ ❋❋ ❋❋
148
❋❋:❋❋:❋❋
+ 0:00
+ 0.0 °/s
Température de consigne, durée du cycle
Incrément de température, incrément de temps
Rampe, incrément de rampe
Gradient (sur Mastercycler gradient uniquement)
La température de consigne se programme en degrés Celsius.
Valeurs admissibles 4 à 99,0 °C
Incréments
0,1 °C
La durée du cycle se programme en "heures:minutes:secondes".
Valeurs admissibles 0:00:01 à 9:59:59
Incréments
1s
7 Programmation
± 0.0 °
Incrément de température (± °C): lors de chaque cycle, la température augmente ou diminue de
la valeur programmée ici.
Il est à noter que la température ne peut pas être supérieure à 99 °C. Il en résulte que la
température de départ ne peut être supérieure à 96,5 °C si l'incrément de température est de
+ 0,1 °C et le nombre de cycles de 25. Composer en premier le chiffre, puis indiquer le signe.
Valeurs admissibles
0,0 à 10,0 °C
Incréments
0,1 °C
Programmation de l'augmentation de température
"+"
Programmation de la diminution de température
"–"
± 0:00
Incrément de temps (± s): lors de chaque reprise de cycle le temps s'allonge ou se raccourcit de
la valeur (maximum 1 minute) programmée ici.
Programmation de l'augmentation du temps
"+"
Programmation de la diminution du temps
"–"
Valeurs admissibles
0:00 à 1:00
Incréments
1s
R = 3 °/s
Rampe (K/s): La rampe indique la vitesse à laquelle le thermocycleur effectue son chauffage ou
sa réfrigération. Plus la valeur est grande, plus le chauffage ou le refroidissement est rapide.
Pour la plupart des réactions, on souhaite un chauffage ou un refroidissement rapide, c'est à dire
une valeur élevée. Pour les procédures nécessitant une montée ou un abaissement des
températures lent, on peut programmer différentes valeurs de rampes.
Valeurs admissibles
0,3 à 3 K/s
Incréments
0,1 K/s
± 0.0 °/s
Incrément de rampe (± s): lors de chaque cycle, la rampe augmente ou diminue de la valeur
programmée ici.
Il convient de noter que la rampe ne peut pas devenir supérieure à 3 K/s, c'est à dire que si la
rampe de départ est de 0,3 et que l'incrément a été fixé à 0,1 le nombre maximum de cycles
possibles sera de 27. Composer en premier le chiffre, puis indiquer le signe.
Valeurs admissibles
0,0 à ± 1,0 K/s
Incréments
0,1 K/s
Programmation pour augmentation de la vitesse de rampe "+"
Programmation pour diminution de la vitesse de rampe
"–"
G = 0.0°
Sur Mastercycler gradient uniquement.
Gradient: lorsqu'il y a programmation et saisie de données, chaque secteur du thermobloc est
conditionné à une température différente. La température de consigne programmée sous "T"
se situe au milieu du thermobloc. La température la plus basse est à gauche. Elle monte
progressivement de gauche à droite pour être la plus élevée à l'extrême droite. Cette disposition
permet ainsi de produire un gradient de température d'une amplitude de 20 °C sur l'ensemble du
bloc (voir chapitre 5.4.3). La visualisation de la répartition du gradient peut être effectuée au
programme OPTIONS/gradient. En garnissant le bloc de tubes de 0,2 ml on peut obtenir
12 températures différentes et 11 avec les tubes de 0,5 ml.
Il convient de noter que la limite physique de la température de l'appareil est de 99 °C. En
pratique, cela veut dire que pour réaliser un gradient de + 10 °C, la température de consigne ne
devra pas être supérieure à 89 °C.
Valeurs admissibles
± 0,0 à ± 10,0 °C
Incréments
0,1 °C
Le mode in situ n'accepte pas de gradient.
149
7 Programmation
7.1.4 HOLD
Rappel direct par le 2
Le programme maintient la température à sa valeur de consigne. En tapant
repris ou terminé.
, le programme peut être
Nota: Un programme ne devrait pas être démarré avec une commande "HOLD" à une température <22 °C,
car le chauffage du couvercle ne démarrerait pas. Si un programme nécessite une température de 4 °C par
ex. il conviendrait de lier la fonction "HOLD" avec une commande du programme principal. Se reporter à
l'exemple traité au chapitre 7.6.
HOLD xx ENTER
Valeurs admissibles
Incréments
7.1.5 PAUSE
4 à 99 °C
0,1 °C
Rappel direct par le 3
Le programme est interrompu et la température reste sur la valeur de la dernière consigne. En tapant
le programme repart.
Le texte "PRESSS ENTER" qui est préinstallé, peut être remplacé par un texte personnalisé.
PAUSE PRESS ENTER
Longueur de texte
7.1.6 GOTO
0 à 11 caractères
Rappel direct par le 4
Permet de programmer des répétitions cycliques. Le branchage renvoie vers un autre numéro de ligne de
programme (GOTO) et le programme continue. En outre, on indique le nombre de répétitions (REP).
GOTO xxx REP xxx
Valeurs admissibles
Numéro de lignes de programme
Nombre de répétitions
7.1.7 SOUND
1 à 40
1 à 99
Rappel direct par le 5
Permet l'émission d'un signal acoustique. Exemple: pour effectuer une pause préprogrammée ou pour
signaler la fin d'un programme.
SOUND ❋❋
Nombre de répétitions admissibles
7.1.8 LINK
1 à 10 signaux
Rappel direct par le 6
Permet le lien avec un autre programme de la mémoire interne. Par la commande LINK, le programme actuel
se termine et le programme sélectionné commence. En choisissant les commandes LINK, on peut effectuer
5 programmes successifs au maximum. Dans ce cas les commandes définies au début du programme, à
savoir CNTRL, Lid, NOWAIT/WAIT, AUTO/FIX ne sont pas prises en considération.
La commande LINK ne permet pas de lier les programmes situés au fichier de travail ("Edit") ou se trouvant
sur carte mémoire Personal Card (Possible cependant avec la carte Personal Card vers les programmes de la
mémoire interne).
LINK ❋❋❋❋❋❋❋❋
Nombre admissible de programmes
5
Ce qu'il faut enregistrer c'est le nom du programme à appeler pour le traitement (à composer en choisissant
les lettres avec la touche
). Si c'est le nom du programme en cours qui est lui-même composé, il se répète
à l'infini et ne peut être arrêté que par la touche "Stop".
150
7 Programmation
7.1.9 END
END apparaît automatiquement comme la dernière ligne d'un programme. Cette commande arrête la
thermostatisation du thermobloc et du couvercle et termine le programme.
7.2 Création d'un nouveau programme
La saisie des commandes de programmation est identique sur Mastercycler et sur Mastercycler gradient.
En plus des autres fonctions, le Mastercycler gradient accepte la programmation d'un gradient.
Exemple pour le déroulement d'un programme:
Dénaturation initiale
95 °C pendant 2 minutes
20 cycles:
Dénaturation
Hybridation
Extension
95 °C pendant 45 secondes
61 °C pendant 45 secondes
Sur Mastercycler gradient on programme à ce niveau
un gradient de ±10 °C
72 °C pendant 45 secondes
Extension finale
72 °C pendant 2 minutes
Refroidissement des échantillons
22 °C
En programmant un gradient de 61 °C ± 10 °C on obtient une répartition des températures comme suit avec
12 tubes de PCR de 0,2 ml pour chacun des espaces du thermobloc:
Série tubes
1
Température 51,0
2
3
4
5
6
7
8
9
10
11
12
51,3
52,5
54,2
56,5
59,1
61,8
64,5
67,0
69,1
70,6
71,5
Avec l'utilisation de tubes de 0,5 ml, les 11 rangs du bloc sont aux températures suivantes:
Série tubes
1
2
3
4
5
6
7
8
9
10
11
Température
51,1
51,9
53,3
55,4
57,8
60,5
63,2
65,8
68,1
69,9
71,1
151
7 Programmation
7.2.1 Programmation
– Sélectionner le menu "FILES" avec
le curseur
ou
, valider l'appel
par
.
– Sélectionner le menu "NEW" avec
le curseur
ou
, valider par
.
CNTRL
BLOCK
– Modifier lavec la touche
valider par
.
ou
LID=105° NOWAIT AUTO
– Programmer les valeurs:
taper les touches 1 , >0< ,
modifier "Nowait" et "Auto"
(touche
) ou valider par
5
,
– Programmer la température:
taper 9 , 5 ,
et valider par
.
152
.
,
>0<
,
FILES . .
Edit
Load
Standard
New
Delete
UNNAMED
– –/22.0°
Edit UNNAMED
CNTRL
BLOCK
LID=0°
NOWAIT
AUTO
end
FILES . .
Edit
Load
Standard
New
Delete
UNNAMED
– –/22.0°
Edit UNNAMED
CNTRL
BLOCK
LID=105°
NOWAIT
AUTO
end
FILES . .
Edit
Load
Standard
New
Delete
UNNAMED
– –/22.0°
Edit UNNAMED
CNTRL
BLOCK
LID=105°
NOWAIT
AUTO
T=❋❋❋❋°
❋❋:❋❋:❋❋
end
FILES . .
Edit
Load
Standard
New
Delete
UNNAMED
– –/22.0°
– Programmer le temps, dans l'ordre:
secondes, minutes, heures
>0<
10:22:06
10:22:06
10:22:06
.
Dénaturation initiale
T=95.0°
0:02:00
– Sélectionner la commande T
(température) avec la touche
,
au besoin actionner la touche à
répétition, valider par
.
Taper les touches
et valider par
Main-Menu
Start
FILES . .
OPTIONS . .
Lid
Incubate
STANDARD
– –/22.0°
2
,
FILES . .
Edit
Load
Standard
New
Delete
UNNAMED
– –/22.0°
1
10:22:06
1
Edit UNNAMED
CNTRL
BLOCK
LID=105°
NOWAIT
AUTO
T=95.0°
❋❋:❋❋:❋❋
end
10:22:06
1
Edit UNNAMED
CNTRL
BLOCK
LID=105°
NOWAIT
AUTO
T=95.0°
00:02:00
end
10:22:06
7 Programmation
Dénaturation
T=95.0°
0:00:45
Pour la programmation: voir page 30
Hybridation
T=61.0°
0:00:45
– Pour les options concernant la commande
"température" (Temp., incrément de temps,
rampe, incrément de rampe, gradient)
appuyer sur la touche
. Le curseur
devra être positionné devant la commande
"température" à la ligne de programme.
FILES . .
Edit
Load
Standard
New
Delete
UNNAMED
– –/22.0°
– Taper les touches
6
,
1
et valider par
.
– Taper les touches
4
,
5
et valider par
.
– Continuer avec
10:22:06
jusqu'à gradient ou extension.
Gradient
N'est possible que sur Mastercycler
gradient.
G=10.0°
– Programmer le gradient:
taper les touches 1 , >0< et valider
par
.
Extension
T=72.0°
0:00:45
Sélectionner la commande T
– Taper les touches 7 , 2 et valider
par
.
– Taper les touches
par
.
1
2
3
Edit UNNAMED
Lid 105°
NOWAIT
AUTO
T= 95.0°
0:02:00
T= 95.0°
0:00:45
T= 61.0°
0:00:45
+ 0.0
+0:00
4
5
et valider
Cycle
GOTO 2
REP 19
– Sélectionner la commande GOTO
par la touche
, au besoin
actionner la touche plusieurs fois
et valider par
.
FILES . .
Edit
Load
Standard
New
Delete
UNNAMED
– –/22.0°
FILES . .
Edit
Load
Standard
New
Delete
UNNAMED
– –/22.0°
FILES . .
Edit
Load
Standard
New
Delete
UNNAMED
– –/22.0°
1
2
3
T=
T=
T=
+
R=
G=
Edit UNNAMED
95.0°
0:02:00
95.0°
0:00:45
61.0°
0:00:45
0.0
+0:00
3.0°/s
+0:0°/s
10.0°
10:22:06
2
3
4
T=
T=
+
R=
G=
T=
Edit UNNAMED
95.0°
0:00:45
61.0°
0:00:45
0.0
+0:00
3.0°/s
+0:0
10.0°
72.0°
00:00:45
10:22:06
3
4
5
Edit UNNAMED
T= 61.0°
0:00:45
+ 0.0
+0:00
R= 3.0°/s
+0:0
G= 10.0°
T= 72.0°
00:00:45
REP❋❋❋
GOTO❋❋❋
10:22:06
Programmer le numéro de la ligne
du segment de programme à répéter
et valider par
.
Programmer le nombre de
répétitions (REP),valider par
.
Nota: le nombre total de cycles est
de REP + 1.
153
7 Programmation
Extension finale
T=72.0°
0:02:00
Pour la programmation, voir page 30
Refroidissement des échantillons
HOLD
22.0°
ENTER
– Sélectionner la commande HOLD
par la touche
, actionner au
besoin la touche à répétition,
puis valider par
.
FILES . .
Edit
Load
Standard
New
Delete
UNNAMED
– –/22.0°
FILES . .
Edit
Load
Standard
New
Delete
UNNAMED
– –/22.0°
4
5
6
Edit UNNAMED
+ 0.0
+0:00
R= 3.0°/s
+0:0
G= 10.0°
T= 72.0°
00:00:45
GOTO 2
REP 19
T= 72.0°
00:02:00
10:22:06
4
5
6
7
Edit UNNAMED
R= 3.0°/s
+0:0
G= 10.0°
T= 72.0°
00:00:45
GOTO 2
REP 19
T= 72.0°
00:02:00
Hold
22.0°
ENTER
10:22:06
– Programmer la température
et valider par
.
7.2.2 Sauvegarder les programmes
– Quitter le menu "New" par
.
– Pour sauvegarder "YES" taper
. Apparaît ensuite la question
sur le nom du programme.
FILES . .
Edit
Load
Standard
New
Delete
UNNAMED
– –/22.0°
Edit UNNAMED
UNNAMED not saved
SAVE: YES
ProgName: UNNAMED
10:22:06
Pour un nouveau programme, le système
propose "UNNAMED".
– Valider le nom par
ou – si un
autre nom est souhaité – l'effacer par
(une pression prolongée sur la touche
a pour effet d'effacer le nom complet, une
pression par impulsion efface lettre par lettre).
– Taper le nouveau nom du
programme. Sélectionner les lettres
avec la touche
et passer sur la
position suivante etc. à l'aide du
curseur
,
valider par
.
Si on envisage de sauvegarder un
programme sous un nom déjà
existant, le système pose la question
de l'écrasement ou non:
154
FILES . .
Edit
Load
Standard
New
Delete
UNNAMED
– –/22.0°
Edit UNNAMED
UNNAMED not saved
SAVE: YES
ProgName: Gradient
10:22:06
7 Programmation
– "Overwrite:YES".
Pour l'écraser taper
.
– Si le programme existant ne doit pas
être écrasé, sélectionner "NO" à
l'aide de
, et après avoir validé
par
, taper un nouveau nom,
puis valider par
.
FILES . .
Edit
Load
Standard
New
Delete
UNNAMED
– –/22.0°
Edit UNNAMED
Testing...
Gradient exists
Overwrite: YES
10:22:06
Si un programme n'est pas sauvegardé ("Save:NO"), il reste au fichier de travail et peut être complété par
appel de "Edit" ou être modifié. Le système pose toujours une question de sécurité afin d'éviter que des sousmenus ne soient écrasés par inadvertance.
Le système possède une capacité mémoire pour 99 programmes au maximum. Le nombre effectif est
fonction de la longueur des programmes individuels.
Le programme se trouvant au fichier de travail peut être lancé par la touche
.
Nota: La sauvegarde d'un programme sur carte mémoire Personal Card est décrite au chapitre 9.3.
7.3 Modification de programme
Un programme existant chargé par transfert de la mémoire résidente ou de la carte Personal Card vers le
fichier de travail. Le programme se trouvant au fichier de travail "Edit" sera alors effacé. Si le programme se
trouvant au fichier de travail n'a pas encore été sauvegardé, il peut l'être après la question de sécurité posée
avant l'écrasement.
– Appeler le menu "FILES" à l'aide
du curseur
ou
et valider par
.
– Sélectionner le menu "Load" avec
le curseur
ou
et valider par
.
Le système affiche la liste des
programmes disponibles.
– Sélectionner le programme à l'aide
du
ou
et valider par
.
Main-Menu
Start
FILES . .
OPTIONS...
Lid
Incubate
STANDARD
– –/22.0°
FILES . .
Edit
Load
Standard
New
Delete
STANDARD
– –/22.0°
FILES...
Edit
Load
Standard
New
Delete
STANDARD
– –/22.0°
10:22:06
Load to Editor
STANDARD
TEST1
TEST2
10:22:06
1
2
3
4
5
6
Edit STANDARD
T= 94.0°
0:02:00
T= 94.0°
0:00:15
T= 44.0°
0:00:15
T= 72.0°
0:00:30
GOTO 2
REP 24
T= 72.0°
0:00:30
10:22:06
155
7 Programmation
– En utilisant les touches
modifier.
,
,
,
ou
, positionner le curseur clignotant sur le paramètre à
– Introduire la valeur à partir du pavé numérique ou choisir un réglage avec la touche
ou programmer des lettres avec la touche
.
Insérer une ligne de programme
– Positionner le curseur sur le numéro de ligne du programme avant laquelle une nouvelle commande
doit être insérée.
– Taper la touche
, une nouvelle ligne s'intercale au-dessus du curseur.
– Sélectionner la commande voulue avec la touche
.
Nota: Pour entrer les options concernant la température, taper la touche
;
le curseur doit se trouver sur la ligne de programme de la commande de température.
Effacer une ligne de programme
– Déplacer le curseur clignotant sur le numéro de ligne de programme.
– Taper la touche
; la ligne est effacée.
– Quitter le fichier de travail "Edit" après la modification de programme en tapant
– A la question de sauvegarde "Save:Yes", répondre en validant par
.
.
– Le programme modifié peut être sauvegardé sous le même nom, ce qui a pour effet d’écraser l’ancien
programme. Pour cela valider la question de sécurité "Overwrite: YES" par
.
– Si l'ancien programme ne doit pas être écrasé, et s'il s'agit de créer un nouveau programme
supplémentaire, répondre à la question de sécurité "Overwrite" par "NO"(avec
et
) et définir un
nouveau nom de programme avec
ou le champ numérique.
Attention: Si le programme n'est pas sauvegardé, il existera deux programmes différents sous le
même nom. Au fichier de travail se trouvera le programme modifié et dans le fichier résident se trouve
le programme non modifié.
Il est possible de démarrer dans le fichier de travail le programme modifié en utilisant l’élément
– A la fin du programme, s’affiche le message "End of program". Taper
.
– S'il s'agit à présent de sauvegarder le programme modifié, choisir le menu "Load" avec
Le cadran afficheur indique "Program not saved – Save YES".
– Sauvegarder le programme avec
156
.
.
, taper
.
7 Programmation
7.4 Création d'un programme à l'aide du modèle
Pour créer rapidement un nouveau programme, on peut se servir du programme-modèle se trouvant dans
le système. Il permet de créer un programme en complétant simplement le modèle, en le modifiant et en le
sauvegardant sous un nouveau nom.
– Sélectionner le menu "FILES" et valider par
.
– Sélectionner "Standard" et valider par
.
Le programme-modèle est chargé sur le fichier de travail. Il est structuré comme suit:
CNTRL
LID=105°
NOWAIT
BLOCK
Régulation de la température du thermobloc
Température du couvercle à 105 °C
NOWAIT = démarrage immédiat du programme
AUTO
= le chauffage du couvercle s'arrête
automatiquement si la température (22 °C)
est maintenue plus de 5 minutes
Maintenir à 94 °C pendant 2 min
(dénaturation initiale)
Maintenir à 94 °C pendant 15 s (dénaturation)
Maintenir à 44 °C pendant 15 s (hybridation)
Maintenir à 72 °C pendant 30 s (extension)
Cycle de 24 répétitions à partir du segment de
programme 2. Au total, le nombre de cycles sera
de 25.
Maintenir à 72 °C pendant 30 s (extension finale)
Refroidir à 22 °C et maintenir la température
Fin de programme
AUTO
1
T=94.0°
0:02:00
2
3
4
5
T=94.0°
T=44.0°
T=72.0°
GOTO 2
0:00:15
0:00:15
0:00:30
REP 24
6
7
T=72.0°
HOLD
end
22.0°
0:00:30
ENTER
Le programme-modèle reste maintenu en permanence en l'état et ne peut être effacé. Mais il peut être
durablement modifié. Après cette modification, il devra de nouveau être sauvegardé sous le nom de
"Standard". Pour rétablir le modèle initial de ce "standard", il convient d'aller dans le sous- menu "Delete" pour
effacer "Standard". Après cela, la version initiale de ce modèle standard réapparaîtra au chargement dans le
fichier de travail.
7.5 Effacer un programme
– Sélectionner le menu "FILES" et valider par
– Sélectionner "Delete" et valider par
.
Le cadran- afficheur présente la liste
des programmes présents.
.
FILES . .
Edit
Load
Standard
New
Delete
STANDARD
– –/22.0°
Delete Program
TEST 1
TEST 2
10:22:06
– Sélectionner un nom de programme.
– Valider par
. Le programme est effacé.
L'effacement d'un programme résidant sur carte programme Personal Card est décrit au chapitre 9.3.
157
7 Programmation
7.6 Programmes-types
Ci-après sont présentés un certain nombre d'exemples illustrant les multiples possibilités d'utilisation des
commandes et des fonctions du Mastercycler.
7.6.1 PCR par gradient (sur Mastercycler gradient uniquement)
La fonction gradient est utilisée pour l'optimisation des températures pour un essai de PCR donné. Le
gradient peut être programmé avec une amplitude de température allant jusqu'à 20 °C en option avec chaque
commande de température.
L'application la plus commune se situe dans la détermination de la température optimale d'hybridation
(voir exemple). Pour ce faire, on établit par exemple un gradient de température de ± 10 °C. La valeur
moyenne conseillée du gradient est de 5 °C au-dessus de la température d'hybridation calculée.
PCR par gradient
Thermostatisation des tubes
Thermostatisation du couvercle
1
2
3
4
5
6
7
158
Dénaturation initiale
Dénaturation
Hybridation
Gradient
Extension
Nombre de cycles
Extension finale
Refroidissement pour conservation
Fin
Control
lid
Nowait
94°
94°
60°
G = 10°
72°
go to 2
72°
Hold 20°
end
tube
105°
auto
2 min
15 sec
15 sec
30 sec
Rep 29
2 min
enter
7 Programmation
7.6.2 Utilisation des commandes "Pause" et "Hold" (exemple: PCR Hot Start)
La commande "Pause" interrompt le programme avec maintien de la température. Pour définir la raison de la
pause, on peut alors insérer un texte. En actionnant la touche
, on reprend la poursuite du programme.
La commande "Hold" autorise cette procédure en maintenant la température quelconque à sa consigne
jusqu'à la reprise et relance du programme par la touche
.
Dans l'exemple Hot-Start PCR ci-après on provoque l'arrêt du programme après une dénaturation initiale pour
ajouter une composante réactive. Après l'extension finale, le bloc est refroidi jusqu'à la température ambiante.
PCR Hot Start
Thermostatisation des tubes
Thermostatisation du couvercle
1
2
3
4
5
6
7
8
Dénaturation initiale
Interruption pour ajout
Dénaturation
Hybridation
Extension
Nombre de cycles
Extension finale
Refroidissement pour conservation
Fin
Control
lid
Nowait
94°
Pause
94°
55°
72°
go to 3
72°
Hold 20°
end
tube
105°
auto
2 min
Ajout
15 s
15 s
30 s
Rep 29
2 min
enter
159
7 Programmation
7.6.3 L'incrément de température (exemple: PCR Touch Down)
L'incrément de température qui peut être programmé en option avec chaque commande de température,
permet d'abaisser ou de relever la température d'une valeur définie avec chaque cycle.
La PCR Touch Down permet d'obtenir une meilleure spécificité de la PCR par modifications successives de la
température d'hybridation, de valeurs élevées vers des valeurs plus basses.
L'exemple traité ci-après comporte une température d'hybridation réduite chaque fois de 1 °C au cours des
16 premiers cycles jusqu'à 50 °C au final. A la suite de cette température d'hybridation viennent ensuite se
greffer 14 autres cycles.
PCR Touch Down
Thermostatisation des tubes
Thermostatisation du couvercle
1
2
3
4
5
6
7
8
9
10
11
Dénaturation initiale
Dénaturation
Hybridation
Incrément de température
Extension
Nombre de cycles
Dénaturation
Hybridation
Extension
Nombre de cycles
Extension finale
Refroidissement pour conservation
Fin
Control
lid
Nowait
94°
94°
65°
–1°
72°
go to 2
94°
50°
72°
go to 6
72°
Hold 20°
end
tube
105°
auto
2 min
15 s
15 s
30 s
Rep 15
15 s
15 s
30 s
Rep 13
2 min
enter
7.6.4 L'incrément de temps (exemple: PCR Long)
L'incrément de temps qui peut être programmé avec chaque commande de température, permet d'augmenter
le temps d'activité à une certaine température d'une valeur définie à chaque cycle.
Cette fonction peut s'utiliser dans la Long PCR pour l'amplification de fragments longs pour une prolongation
progressive de la phase d'extension.
Dans l'exemple présent, on prolonge chaque cycle de 10 secondes, de sorte qu'au final, après 30 cycles, la
durée du cycle est de 290 s de plus qu'au premier.
"Long" PCR
Thermostatisation des tubes
Thermostatisation du couvercle
1
2
3
4
5
6
160
Dénaturation initiale
Dénaturation
Extension
Incrément de temps
Nombre de cycles
Extension finale
Refroidissement pour conservation
Fin
Control
lid
Nowait
94°
94°
68°
go to 2
72°
Hold 20°
end
tube
105°
auto
2 min
15 s
10 min
+0:10 s
Rep 29
15 min
enter
7 Programmation
7.6.5 Régulation de la vitesse de thermostatisation (exemple: RAPD-PCR)
Des taux d'échauffement et de refroidissement disponibles en option à l'intérieur de chaque commande
de température permettent de doser la vitesse du chauffage.
La conduite des procédures RAPD-PCR ou avec les PCR utilisant des amorces / modèles riches en A/T peut
parfois exiger un chauffage doux après l'hybridation.
Dans la méthode traitée en exemple ci-après, on atteint la température d'extension à la vitesse de 1 K/s.
RAPD-PCR
Thermostatisation des tubes
Thermostatisation du couvercle
1
2
3
4
5
6
7
Dénaturation initiale
Dénaturation
Hybridation
Extension
Du taux d'échauffement
Nombre de cycles
Extension finale
Refroidissement pour conservation
Fin
Control
lid
Nowait
94°
94°
55°
72°
R = 1 °/s
go to 2
72°
Hold 20°
end
tube
105°
auto
2 min
15 s
15 s
30 s
Rep 29
2 min
enter
Des boucles de programme permettent d'obtenir des taux d'échauffement aussi lents que nécessaire et sont
obtenus par des modifications des températures par des incréments successifs.
Dans l'exemple suivant, on chauffe à une température d'extension de 72 °C après l'hybridation à l'aide d'une
boucle de programme.
RAPD-PCR
Thermostatisation des tubes
Thermostatisation du couvercle
1
2
3
4
5
6
7
8
Dénaturation initiale
Dénaturation
Hybridation
Extension
Incrément de température
Du taux d'échauffement
Nombre de cycles
Nombre de cycles
Extension finale
Refroidissement pour conservation
Fin
Control
lid
Nowait
94°
94°
55°
56°
+1°
R = 0,3 °/s
go to 4
go to 2
72°
Hold 20°
end
tube
105°
auto
2 min
15 s
15 s
7s
Rep 16
Rep 29
2 min
enter
161
7 Programmation
7.6.6 Réfrigération d'échantillons et PCR liées
S'il s'agit de maintenir réfrigérés en permanence, jusqu'à leur utilisation en PCR, des échantillons
particulièrement fragiles, on peut préréfrigérer le thermobloc. Deux possibilités se présentent:
1. Appeler le menu "Incu" et programmer 4 °C et "Heater is On".
2. Faire précéder d'un premier programme et le lier à l'aide d'une commande "Link".
Le thermobloc est porté à la température de 4 °C à l'aide d'un premier programme. Après installation des
échantillons dans le thermobloc refroidi, on rappelle le 2è programme contenant le protocole de la PCR à
l'aide d'une commande de chaînage "Link".
La programmation dans son ensemble serait la suivante:
Programme 1
CNTRL TUBE
Lid
NOWAIT FIX
Les données du premier programme sont valables pour
les programmes associés avec LINK. Il convient de sélectionner la commande
"Fix" pour le couvercle.
1 Hold 4 °C Enter
Le thermobloc assure la réfrigération jusqu'à ce que la touche
soit
activée pour provoquer le démarrage du programme proprement dit
(PCRPROT, par exemple) par l'intermédiaire de la commande "Link".
2 Link PCRPROT
end
Commande de liaison avec le protocole de PCR.
Programme 2
CNTRL TUBE
162
nom: FROID
nom: PCRPROT
Si le programme comporte la commande tube Control, il n'est pas nécessaire
de programmer d'autres éléments, les données du premier programme restent
valables pour tous les programmes suivants.
8 Mode d'emploi succinct
Le mode d'emploi succinct ne doit être utilisé qu'après avoir pris connaissance du mode d'emploi en son entier.
Mettre l'appareil sous tension
Nom du menu
Démarrage d'un programme quelconque
Programmation
Paramètres du système
Thermostater le couvercle chauffant
Thermostater le bloc et le couvercle chauffant
Programme se trouvant au fichier de travail
Température de consigne / lue sur le thermobloc
Température du couvercle
(le cas échéant)
Main-Menu
Start
FILES . .
OPTIONS . .
Lid
Incubate
STANDARD
– –/25.0°
Lid:105°
10:22:06
Heure d'horloge
Programmation
– Sélectionner le menu "FILES" avec le curseur
Modifier le programme se trouvant au fichier de travail
Charger un programme et le travailler
Charger le programme-modèle et le modifier
Création d'un nouveau programme
Annuler un programme choisi
/
et valider par
.
FILES . .
Edit
Load
Standard
New
Delete
STANDARD
– –/22.0°
10:22:06
Modifier le programme-modèle "Standard"
– Charger le programme "Standard": le sélectionner avec le curseur
et valider par
.
– Déplacer le curseur
,
,
,
vers les zones de réglages ou à compléter.
– Sélectionner les commandes de programme à l'aide de
, saisir les réglages et composer les textes, valider par
CNTRL
BLOCK
TUBE
Lid
NOWAIT
WAIT
AUTO
FIX
FILES . .
Définir les paramètres de la thermorégulation
Edit
Thermorégulation sur le thermobloc
Load
Thermorégulation sur différents types de tubes
Définir la température du couvercle
Standard
Démarrage immédiat du programme
New
Le programme attend que la température
du couvercle soit atteinte
Le couvercle s'arrête à T <22 °C
et un temps >5 min
Le couvercle s'arrête à la fin du programme
Delete
STANDARD
– –/22.0°
1
2
3
.
Edit STANDARD
CNTRL
BLOCK
LID=105°
NOWAIT
AUTO
T=94.0°
0:02:00
T=94.0°
0:00:15
T=44.0°
0:00:15
10:22:06
Commandes de programme
T
HOLD
PAUSE
Températures, temps, incréments, rampes, gradient
Maintenir la température de consigne jusqu'à ce que l'ordre de continuer soit donné par la commande Enter (4–99 °C)
Interruption d'un processus; cette commande reste active jusqu'à ce que l'ordre de continuer soit donné par la touche
Enter (0–11 signes)
GOTO/REP Répétition d'un segment de programme et nombre de cycles (1–40 lignes, 1–99 répétitions)
SOUND
Signal acoustique (1–10 tonalités)
LINK
Dérivation vers d'autres programmes chainés (1–5 programmes)
– Saisir les options relatives à la température par la commande
T
Température (0–99°)
Temps (0:00:01–9.59:59)
Incrément de température (0,0–10,0°, + ou –)
Incrément de temps (0:00–1:00, + ou –)
R Rampe (0,3–3 K/s)
Incrément de rampe (0,0–1,0 °/s, + ou –)
G Gradient (±0,0 – ±10 °C)
(sur Mastercycler gradient uniquement)
– Valider les saisies par
.
– Terminer la programmation par
– Sauvegarder le programme.
FILES . .
Edit
Load
Standard
New
Delete
STANDARD
– –/22.0°
. Le curseur doit se trouver sur le numéro de ligne.
3
4
5
STANDARD
T=44.0°
T=72.0°
+0.0°
R= 3.0°/s
G=0.0°
GOTO 2
0:00:15
0:00:30
+0:00
+0.0°/s
REP 24
10:22:06
.
163
8 Mode d'emploi succinct
Sauvegarde d'un programme
– Quitter le programme en tapant
.
– Répondre à la question "Save:YES" par
une validation
.
– Définir le nom d'un programme en utilisant
la touche
.
– Valider le nom en tapant
.
FILES . .
Edit
Load
Standard
New
Delete
STANDARD
– –/22.0°
Edit STANDARD
STANDARD not saved
SAVE: YES
ProgName: STANDARD
10:22:06
Insérer une ligne de programme
– Positionner le curseur
sur le début d'une ligne.
/
– Taper la touche
; une nouvelle ligne se trouve insérée au-dessus du curseur. Sélectionner la commande
Effacer une ligne de programme
– Positionner le curseur sur le numéro de la ligne de programme en utilisant les touches de curseur
– Taper la touche
; la ligne s'efface et le curseur se positionne sur la ligne suivante.
/
.
.
Programmation des paramètres systèmes
Pour la programmation des températures
du bloc et du couvercle
Pour préchauffer le couvercle
Pour imprimer la programmation
Pour imprimer les séquences de programme
Menu Incubate
Menu Lid
Menu OPTION
Menu OPTION
Démarrer un programme
– Mettre l'appareil en marche. Au besoin
préchauffer le couvercle et le bloc.
– Sélectionner le menu "Start" en utilisant
les touches
puis taper
.
/
– Sélectionner le nom du programme en
utilisant les touches
puis taper
/
.
– Avec CNTRL TUBE sélectionner le type
de tube en utilisant la touche
.
0,2 ml / plate: 5 à 50 µl
0,5 ml / thin: 5 à 100 µl
– Valider en tapant
. Le programme
démarre immédiatement.
– Pour visualiser le temps de fonctionnement du programme, taper la touche
.
Interruption d'un programme
– Taper la touche
.
– Utiliser la touche
pour sélectionner
le programme "Pause".
– Valider par
.
Main-Menu
Start
FILES . .
OPTIONS . .
Lid
Incubate
STANDARD
– –/25.0°
164
10:22:06
Run a Program:
T=95.0°
0:00:05
Main-Menu
Run a Program:
Start
STANDARD running . . .
FILES . .
Program:
PAUSE
OPTIONS . .
Lid
Incubate
Paused/STANDARD
95.0/94.5°
Lid:105°
.
pour sélectionner "Resume".
.
Run a Program:
STANDARD
TEST1
TEST2
Main-Menu
Start
1
FILES . .
OPTIONS . .
Lid
Incubate
Running/STANDARD
95.0/94.5°
Lid:105°
Reprise d'un programme interrompu
– Taper la touche
– Utiliser la touche
– Valider par
Température du bloc 37 °C, chauffage marche (Heater is ON)
LidTemp 105 °C, chauffage marche (Heater is ON)
Printout Editor: YES
PrintProtocol: ON
Cyc:4
10:22:06
10:22:06
8 Mode d'emploi succinct
Arrêter un programme
– Taper la touche
– Valider "Stop" par
.
.
– Quitter le programme en tapant
.
Main-Menu
Start
FILES . .
OPTIONS . .
Lid
Incubate
STANDARD
95.0/94.5°
Run a Program:
STANDARD running . .
Program:
STOP
Lid:105°
10:22:06
165
9 Carte mémoire Personal Card
Selon la longueur des programmes mis en mémoire sur cette carte, celle-ci peut contenir jusqu'à
10 programmes. Lorsqu'un programme est lancé à partir d'une carte Personal Card, les données sont
transférées sur la machine dans une mémoire tampon pour la durée de son utilisation. Elles ne sont pas
chargées dans la mémoire interne ni dans le fichier de travail.
La carte Personal Card permet de transférer les programmes entre les appareils de type Mastercycler,
Mastercycler gradient et Mastercycler personal.
Les menus "Start", "FILES/Load", "FILES/Edit" et "FILES/Delete" ne font la différence entre la mémoire de la
carte Personal Card 〈MCARD〉 et la mémoire interne du Mastercycler 〈INTERN〉 que si la carte est inserée.
Menus "Start", "FILES/Load" et "FILES/Delete"
L'affichage des programmes ne concerne qu'une seule mémoire. La mémoire provisoirement fermée
est indiquée en tête de la liste des programmes sous forme de 〈INTERN〉 ou 〈MCARD〉. En
sélectionnant la mémoire fermée et en tapant
, la mémoire est ouverte alors que la
précédante est fermée.
Menu
"FILES/Edit"
La mémoire cible (Target) doit être sélectionnée à l'aide de la touche
du programme.
avant de déterminer le nom
9.1 Consignes de sécurité
Les contacts dorés de la carte Personal Card ne doivent pas être endommagés, rayés ou souillés. Il convient
également d'éviter tout contact manuel.
Certaines charges électrostatiques sont susceptibles de détruire les programmes en mémoire.
9.2 Mode d'emploi de la carte Personal Card
Insertion de la carte dans le lecteur
– Introduire la carte dans le lecteur situé sous le pupitre de commande en suivant le sens de la flèche
(contacts dorés vers le haut).
– Pousser la carte jusqu'en butée où elle est automatiquement encliquetée.
Extraction de la carte
– Repousser la carte jusqu'en butée.
– Le ressort provoque ensuite son éjection partielle où elle peut être reprise.
Formatage de la carte
Une nouvelle carte doit être formatée. L'ordre de formatage est donné automatiquement par la machine
uniquement si besoin est. En cas d'anomalie sur une carte mal enregistrée, l'appareil demande également un
formatage.
– "Memory card not valid".
"Format: Yes" valider par
.
La ligne inférieure indique les pas effectifs / consigne.
165
9 Carte mémoire Personal Card
9.3 Utiliser les programmes
Démarre un programme à partir d'une carte
– Sélectionner le menu "Start" et valider par
.
– Sélectionner 〈MCARD〉 et valider par
.
Si en tête de liste figure 〈INTERN〉 à la place de 〈MCARD〉, la mémoire-programme de la carte Personal
Card se trouve alors déjà ouverte.
– Sélectionner un programme et le valider par
.
Nota: Les programmes des cartes ne sont pas chargés dans la mémoire interne de la machine ou sur le
fichier de travail "Edit". Lorsque le programme lancé à partir d'une carte est terminé, il n'est plus présent sur
l'appareil.
Effacer un programme sur une carte
– Sélectionner le menu "FILES/Delete" et le valider par
.
.
– Sélectionner 〈MCARD〉 et valider par
Si en tête de liste figure 〈INTERN〉 à la place de 〈MCARD〉, la mémoire-programme de la carte Personal
Card se trouve alors déjà ouverte.
– Sélectionner un programme et l'effacer par la commande
.
Charger un programme d'une carte dans le fichier de travail
– Sélectionner le menu "FILES/Load" et le valider par
.
– Sélectionner 〈MCARD〉 et valider par
.
Si en tête de liste figure 〈INTERN〉 à la place de 〈MCARD〉, la mémoire-programme de la carte Personal
Card se trouve alors déjà ouverte.
– Sélectionner un programme et le charger par la commande
.
Sauvegarder un programme sur une carte
– Après création ou modification d'un programme dans le fichier de travail, quitter en tapant
– Valider la question de sécurité "Save:YES" par
– Après la question "Target:INTERN", utiliser la touche
.
.
.
pour sélectionner 〈MCARD〉 et valider par
– Composer un nom de programme (8 caractères maximum) et valider par
.
Nota: Le programme de la carte peut être sauvegardé sous le même nom que celui de la mémoire résidente
de la machine.
Programmes avec commandes LINK
Un programme de la carte Personal Card ne peut pas être lancé s'il comporte des commandes de liens de
programmes vers d'autres programmes de la carte Personal Card. Le lancement est possible s'il existe un lien
vers un programme de la mémoire interne des appareils Mastercycler.
Un programme de la mémoire interne ne peut pas appeler un programme de la carte Personal Card par une
commande LINK.
166
10 Descriptif de l'interface
10.1 Connexion d'une imprimante, d'un ordinateur
Connexion d'un imprimante
La douille de connexion pour imprimante (25 broches, interface parallèle Centronics, compatible PC) se
trouve sur la droite de l'appareil, sous la douille de connexion pour PC; (voir chapitre 4.1, fig. 2.6).
Effectuer la connexion entre l'imprimante et le Mastercycler ou Mastercycler gradient à l'aide d'un câble
d'imprimante-PC standard du commerce. Lors de la connexion, les appareils doivent être hors tension
(Mastercycler / Mastercycler gradient et imprimante). En cas d'utilisation épisodique de l'imprimante, il
convient de retirer la liaison et de n'effectuer la connexion qu'en cas de besoin.
Pour paramétrer la machine pour l'imprimante, appeler le menu "OPT/Printer".
Impression du programme
Printout Editor: NO
L'impression est arrêtée.
Printout Editor: YES
Le programme présent dans le menu "Edit" est imprimé.
Pour cela, sélectionner "YES" à l'aide de
et valider par
Après impression, il y a commutation automatique sur
"Printout Editor:NO".
Impression du protocole du programme
.
Print Protocol: OFF
Le déroulement du programme ne sera pas imprimé.
Print Protocol: ON
Le déroulement du programme est imprimé.
167
10 Descriptif de l'interface
Exemple d'impression d'un programme:
✼ ✼ M A ST E R CY C L E R g r a d i e n t 5 3 3 1 ✼ ✼
eppendorf
Version x.xx.xx
Time: 13:41:02
Date: 14/Apr/1999
✼✼✼✼✼✼✼✼✼✼✼✼✼✼✼✼✼✼✼✼✼✼✼✼✼✼
LISTING
Program:
Created:
Step:
CNTRL
LID=105C
NOWAIT
STANDARD
13/Apr/1999
BLOCK
AUTO
1
T = 94.0C
+0.0C
R = 3.0C/s
G = 0.0C
0:02:00
+ 0:00
+0.0C/s
2
T = 44.0C
+0.0C
R = 3.0C/s
G = 0.0C
0:00:15
+ 0:00
+0.0C/s
.
.
.
.
.
.
7
HOLD 22.0C ENTER
END OF LISTING
168
11:46
Nom du programme
Date de la dernière sauvegarde
10 Descriptif de l'interface
Exemple d'impression d'un programme expérimental:
Le programme est imprimé avant le lancement (voir page 46) et au cours du déroulement du programme,
toutes les températures et tous les temps sont imprimés.
Program ... started at
Initial Blocktemp
Initial Lidtemp
Run Time
Finish Time
Count
Cycle
Step
Command
Time
Completion Time
–
–
–
–
–
–
–
–
–
–
_
date et heure du lancement du programme
température du thermobloc lors du départ
température du couvercle lors du départ
évaluation de la durée approximative du programme
heure de fin de programme (env.)
comptage des pas de programme
comptage du nombre de cycles
numéro du pas de programme de la programmation
type de commande et valeurs programmées
heure de fin d'une commande
heure de la fin du programme
Program STANDARD started at Date:
15/Apr/1999
Initial Blocktemp:
24.7 C
Initial Lidtemp:
25 C
Run Time:
1:26
Finish Time:
15/Apr/1999
9:22
7:56:12
Count
Time
Cycle
Step
Command
Tube:0.2 ml
Fill.Vol.:20 µl
CNTRL
TUBE
LID=105C
NOWAIT
1
2
1
1
1
2
AUTO
T=94.0C
+0.0C
R=3.0C/s
G=0.0C
0:02:00
+ 0:00
+0.0C/s
T=94.0C
+0.0C
R=3.0C/s
G=0.0C
0:00:15
+ 0:00
+0.0C/s
7:56:21
7:56:22
7:59:05
7:59:21
.
.
Completion Time:
15/Apr/1999
9:24:55
END OF PROTOCOL
169
10 Descriptif de l'interface
Connexion d'un ordinateur PC
La douille de connexion à 9 broches pour PC (interface sérielle RS 232) est située sur le côté droit de
l'appareil, au-dessus de la douille de connexion pour l'imprimante (voir chapitre 4.1, fig. 2.5).
Pour paramétrer la machine pour la connexion informatique, appeler le menu "OPT/GENERAL/Remote".
Vitesses de transmission en Baud: 19 200; 9 600; 4 800; 2 400; 1 200.
Des renseignements détaillés pour la connexion informatique et le câble sont disponibles sur demande.
L'ordinateur à connecter doit être conforme aux normes EN 60 950 et UL 1950.
Un mode d'emploi spécifique pour la communication sérielle est disponible sur demande.
10.2 Transfert de programmes
Les programmes stockés sur carte mémoire Personal Card peuvent être transférés sur tous les appareils
de type Mastercycler, Mastercycler gradient et Mastercycler personal. Les programmes créés sur
Mastercycler personal peuvent être transférés sur Mastercycler gradient. Mastercyclrr gradient possède
des fonctions supplémentaires: la commande de température a été étendue en une fonction gradient. Cette
caractéristique lui permet de réaliser un gradient de température sur le bloc. Cette fonction n'existe pas sur le
Mastercycler et sur le Mastercycler personal.
170
11 Maintenance
Les éventuelles souillures peuvent être enlevées avec un peu d'eau ou un produit nettoyant doux du
laboratoire.
Préserver l'appareil de tout solvant organique et de produits chimiques agressifs. Aucun liquide ne doit
pénétrer à l'intérieur de l'appareil. Avant de procéder au remplacement des fusibles, il convient de mettre
l'appareil en position arrêt et de retirer le cordon secteur. Pour nettoyer l'appareil, il convient de toujours
arrêter l'appareil et de retirer le cordon secteur pour des raisons de sécurité.
Les fusibles électriques sont situés entre le commutateur et le connecteur à l'arrière de l'appareil. Pour y
accéder et pour procéder à un éventuel remplacement, repousser le capuchon verrouillable vers le haut.
N'utiliser que des fusibles dont les spécifications correspondent rigoureusement. Pour les valeurs, se reporter
à la plaque d'identification située à l'arrière de l'appareil.
Toute intervention à caractère technique est strictement réservée à un technicien dûment qualifié. La garantie
devient caduque en cas d'intervention non autorisée.
171
12 Tableau d'identification d'anomalies
Les anomalies résultant d'erreurs de programmation ou de mauvaise utilisation des cartes Personal Card
peuvent être corrigées après identification.
Certaines anomalies techniques peuvent avoir des origines externes: coupure secteur, variations de tension
du secteur, etc. Dans certains cas, faire une manœuvre d'arrêt / marche peut être suffisant pour provoquer la
remise à l'état initial. Attendre cependant env. 10 s avant la remise en marche. Si l'anomalie se reproduit, il
convient de faire appel à un technicien de service après-vente.
12.1 Messages d'erreur
172
Message d'erreur
Cause
Remède
BLOCK ChkSumErr
Défaut technique
Faire appel au service après-vente.
BLOCK TOO HOT!
Régulation ou électronique
défectueux.
Faire appel au service après-vente.
Card changed
Carte retirée immédiatement avant
l'enregistrement.
Insérer correctement la carte
et répéter la procédure.
Card content not o.k.
Erreur dans le contenu de la carte.
Formater la carte. Processus
automatique lors de la sauvegarde
d'un programme.
Card not in slot
La carte a été retirée au cours de
la sauvegarde.
Insérer correctement la carte
et répéter le processus.
Enter Tube
Les données sont manquantes
pour démarrer le programme.
Saisir le type de tube et le volume
d'échantillon.
Err GOTO (1)
Retour vers un numéro de ligne de
programme impossible, celui-ci se
trouvant dans un domaine du
programme ou une autre
commande GOTO a été rappelée
pour répétition.
Vérifier les commandes GOTO, au
besoin les modifier ou les annuler.
Le numéro de ligne de programme ne
doit pas se trouver dans un segment
déjà utilisé pour une autre commande
GOTO.
Err GOTO (2)
Plus de trois commandes GOTO
ont été utilisées pour un domaine
de programmation.
Trois commandes GOTO peuvent
être utilisées dans un segment de
programme, si les domaines
concernés se superposent
totalement.
C.à.d. que le segment considéré de
la deuxième commande est plus
grand que celui de la première
commande. La troisième commande
GOTO, à son tour doit englober un
domaine encore plus grand.
Err Invalid
Commande non valide,
le paramètre n'est pas programmé.
Saisir la commande de façon
complète ou l'effacer.
12 Tableau d'identification d'anomalies
Message d'erreur
Cause
Remède
Err Link (1)
...
Line ..
La commande LINK ne peut pas être
exécutée.
Le programme n'est pas trouvé.
Le nom du programme et la ligne
de la commande LINK erronée sont
affichés.
Seuls les programmes de la mémoire
interne peuvent être rappelés pour
une commande LINK, les programmes de la carte Personal Card et
ceux du fichier de travail ("Edit") sont
exclus.
Err Link (2)
...
Line ..
Trop de programmes se trouvent liés
par des commandes LINK. Le nom
du programme et la ligne de la commande LINK erronée sont affichés.
5 programmes au maximum,
c.à.d. 4 commandes LINK peuvent
être successivement utilisées.
Err No Program
Aucun programme réalisable n'est
disponible en mémoire.
Charger un programme à partir de la
mémoire ou de la carte Personal
Card, ou définir un programme dans
le menu "Edit" et relancer.
FAN ERROR!
Turbine de ventilation défectueuse.
Arrêter l'appareil.
Faire appel au service après-vente.
FAT Full
Le nombre de programmes gérables
est dépassé.
La capacité de la mémoire interne est
de 99 programmes,
celle de la carte Personal Card
de 10 programmes.
Effacer les programmes inutiles.
Internal EE-Err
Défaut technique.
Faire appel au service après-vente.
LEFT BLOCK
DEFEKTIV!
Régulation ou électronique du bloc
gauche défectueuse.
Arrêter l'appareil.
Faire appel au service après-vente.
LID TOO HOT!
Electronique défectueuse.
Faire appel au service après-vente.
Link not found
Arborescence du programme
impossible, le programme appelé
ayant été effacé.
Vérifier l’instructions LINK;
créer le programme manquant.
Link Error
Arborescence du programme
impossible, le programme appelé
ayant été effacé.
Vérifier l’instructions LINK;
créer le programme manquant.
MCard Error
La mémoire de la carte Personal
Card comporte une erreur.
Exploiter les messages
complémentaires.
Memory corrupted
La mémoire interne est défectueuse.
La mémoire interne doit être effacée.
Tous les programmes seront ainsi
effacés.
Memory Error
La mémoire interne des programmes
est défectueuse.
Exploiter les messages
complémentaires.
173
12 Tableau d'identification d'anomalies
Message d'erreur
Cause
Remède
Memory full!
La mémoire est saturée.
Eliminer les programmes non utilisés.
MemoryCard
Blank
La carte comporte une erreur de
reconnaissance logique ou elle
est vide.
La carte doit être formatée.
Processus automatique lors de la
sauvegarde d'un programme.
MemoryCard
Defective!
La carte mémoire est défectueuse.
Utiliser une carte neuve.
MemoryCard
HdChksumErr
Erreur de somme de contrôle.
La carte doit être formatée.
Processus automatique lors de la
sauvegarde d'un programme.
MemoryCard
ManIDErr
Erreur d'identification.
La carte doit être formatée.
Processus automatique lors de la
sauvegarde d'un programme.
MemoryCard
MemOverErr!
Fausse adresse de fichier.
La carte doit être formatée.
Processus automatique lors de la
sauvegarde d'un programme.
MemoryCard
MemRangeErr
Erreur de domaine de mémoire.
La carte doit être formatée.
Processus automatique lors de la
sauvegarde d'un programme.
MemoryCard
MemSizeErr
Erreur de taille de mémoire.
La carte doit être formatée.
Processus automatique lors de la
sauvegarde d'un programme.
MemoryCard
MemUnderErr!
Erreur d'adresse de mémoire.
La carte doit être formatée.
Processus automatique lors de la
sauvegarde d'un programme.
MemoryCard
Missing!
Aucune carte dans le lecteur.
Insérer une carte dans le lecteur.
MemoryCard
Not Valid
Carte non valide.
– Insérer correctement la carte,
vérifier le sens et le côté.
– La carte est formatée avant la
sauvegarde.
174
MemoryCard
Read Err!
Lecture de la carte impossible.
Insérer correctement la carte,
vérifier le sens et le côté.
MemoryCard
Read-Only!
La carte est une carte sécurisée
pour la lecture seulement.
La carte doit être formatée.
Processus automatique lors de la
sauvegarde d'un programme.
12 Tableau d'identification d'anomalies
Message d'erreur
Cause
MemoryCard
Write Err!
Erreur d'écriture sur la carte.
Remède
– Insérer correctement la carte,
vérifier le sens et le côté
– Ne pas toucher la carte lors de la
sauvegarde
MID BLOCK
DEFEKTIV!
Régulation ou électronique du bloc
central défectueuse.
Arrêter l'appareil.
Faire appel au service après-vente.
Name Invalid!
Le nom du programme comporte
un signe incompatible.
Composer à nouveau le nom du
programme.
POWER ERROR!
Anomalie de tension
ou fusible défectueux.
Faire appel au service après-vente.
Printer: OFF LINE
L'imprimante n'est pas prête
à recevoir.
Programmer le mode imprimante
"ON LINE".
Printer: no response
Imprimante absente ou à l'arrêt.
– Au menu, sélectionner OPTION/
Printer/Print protocole "OFF".
– Mettre l'imprimante en marche.
Program is running!
Un programme est en cours
de réalisation.
La température du couvercle ne peut
pas être modifiée temporairement.
Program too large!
Le programme est trop grand.
Possibilité max pour 40 lignes
de programme.
Restarting Program!
Coupure secteur ou arrêt de
l'appareil sur le bouton au cours
de la réalisation d'un programme.
La reprise du programme s'effectue
automatiquement.
RIGHT BLOCK
DEFEKTIV!
Régulation ou électronique du bloc
droit défectueuse.
Arrêter l'appareil.
Faire appel au service après-vente.
SLOWING DOWN!
La vitesse de chauffe ou de
refroidissement est ralentie.
Faire appel au service après-vente
en cas de nouvelle manifestation.
Steps free
Affichage de l'espace mémoire
disponible à partir de <100 pas
1 pas = 1 ligne de programme
Effacer les programmes non utilisés
ou les stocker sur carte Personal
Card.
TSensor_Err
– Non-respect des conditions
de travail environnantes.
– N'utiliser l'appareil que dans les
conditions ambiantes
admissibles de température et
d'humidité.
– Défaut technique.
– Faire appel au service aprèsvente.
175
12 Tableau d'identification d'anomalies
176
Message d'erreur
Cause
Remède
Value out of range!
Programmation d'une valeur
incompatible par excès ou par défaut.
La valeur limite admissible est
automatiquement prise en compte.
Warn Ramp Max
...
Line ...
La rampe est limitée à 3 K/s.
Vérifier les valeurs programmées
pour la rampe et l'incrément de
rampe; au besoin corriger.
Warn Ramp Min
...
Line ...
La rampe est limitée à 0,3 K/s.
Vérifier les valeurs programmées
pour la rampe et l'incrément de
rampe; au besoin corriger.
Warn Temp Max
La température limite de 99 °C est
dépassée. Si le programme est lancé,
la température sera limitée à 99 °C.
Vérifier les commandes de
température et réduire les incréments
de température programmés pour
que les valeurs à atteindre soient
inférieures à 99 °C.
Warn Temp Min
La température limite de 4 °C est
dépassée en limite inférieure. Si le
programme est lancé, la température
sera limitée à 4 °C.
Vérifier les commandes de
température et réduire les incréments
de température programmés pour
que les valeurs à atteindre soient
supérieures à 4 °C.
Warn Time Max
La durée du cycle de 9:59:59 est
dépassée. Si le programme est lancé,
la durée du cycle sera limitée à
9:59:59.
Vérifier les commandes de
température et réduire les incréments
de temps programmés pour que les
valeurs à atteindre soient inférieures
à 9:59:59.
Warn Time Min
La durée du cycle de 0:00:01 est
dépassée en limite inférieure. Si le
programme est lancé, la durée du
cycle sera limitée à 0:00:01.
Vérifier les commandes de
température et réduire les incréments
de temps programmés pour que les
valeurs à atteindre soient supérieures
à 0:00:01.
13 Spécifications techniques
Mastercycler ou Mastercycler gradient
Capacité en échantillons:
1 plaque de microtitrage
ou
96 tubes de PCR de 0,2 ml
ou
77 tubes de PCR de 0,5 ml à paroi mince
Gamme des températures:
4 à 99 °C
Homogénéité des températures du bloc:
20 °C à 72 °C ± 0,6 K
95 °C
± 1,0 K
Homogénéité thermique du bloc (S 95):
20 °C à 72 °C ≤ ± 0,4 K
95 °C
≤ ± 0,5 K
Justesse de la régulation:
± 0,2 K
Vitesse de chauffe:
Taux de chauffe env. 3 K/s mesuré sur le bloc
Taux de refroidissement env. 2 K/s mesuré sur le bloc
Nombre de programmes:
Max. 99
Sur carte Personal Card: 10
Nombre de cycles max.:
99
Dimensions:
Largeur:
Profondeur:
Hauteur:
Poids:
Env. 12,4 kg
Alimentation:
230 V, 50–60 Hz
115 V, 50–60 Hz
100 V, 50–60 Hz
Puissance:
500 W
500 W
500 W
Courant:
2,6 A
5A
6A
Fusibles:
2 x T 5 A, 250 V
2 x T 6,3 A, 250 V
2 x MT 8 A, 250 V
Catégorie surtension:
II
Degré de pollution:
2
Classe de protection:
I
Ambiante admissible:
15 à 35 °C; Humidité rel. 70 %
Conditions d'entreposage:
–20 à 70 °C; Humidité rel. 85 %
L'appareil possède le marquage
26 cm
41 cm
27 cm
, est conforme à la norme UL 3101-1 et CSA C 22.2 No. 1010.1.
Toutes modifications techniques réservées!
177
14 Nomenclature de commande
Nous vous conseillons de toujours utiliser les pièces garanties Eppendorf d'origine. L'utilisation de pièces de
rechange ou d'articles consommables autres que ceux que nous préconisons peuvent gravement
compromettre la sécurité et le bon fonctionnement de l'appareil. Dans ce cas la garantie devient caduque et
nous déclinons toute responsabilité en cas de dommages.
Code commande
Désignation
5333 000.018
5333 000.026
5333 000.034
Mastercycler
230 V, 50–60 Hz
115 V, 50–60 Hz
100 V, 50–60 Hz
5331 000.010
5331 000.045
5331 000.037
Mastercycler gradient
230 V, 50–60 Hz
115 V, 50–60 Hz
100 V, 50–60 Hz
Accessoires
5331 220.002
Adaptateur pour PCR in situ
5332 300.018
Carte mémoire Personal Card
5331 226.027
Carte Personal Card pour système de validation de la température
0013 609.349
Fusible T 5 A, 250 V pour version 230 V (50–60 Hz) la pièce
0013 565.333
Fusible T 6,3 A, 250 V pour version 115 V (50–60 Hz) la pièce
0013 611.432
Fusible MT 8 A, 250 V pour version 100 V (50–60 Hz) la pièce
5331 900.062
Mode d'emploi
Mastercycler et Mastercycler gradient
5331 224.008
Sonde de température pour position tube 0,2 ml
5331 222.005
Système de validation de la température
Consommables
0030 124.332
Tubes 0,2 ml pour PCR, incolore, le mille
0030 124.502
Tubes 0,5 ml pour PCR, incolore, paroi mince, le 500
0030 124.359
Barrette de 8, Tubes 0,2 ml pour PCR, incolore (= 960 unités)
0030 121.023
Tubes Safe-Lock 0,5 ml, incolore, le 500
0030 128.648
Eppendorf twin.tec PCR Plate 96, skirted, incolore, les 25
0030 128.656
Eppendorf twin.tec PCR Plate 96, skirted, jaune, les 25
0030 128.680
Eppendorf twin.tec PCR Plate 96, skirted, rouge, les 25
0030 128.664
Eppendorf twin.tec PCR Plate 96, skirted, vert, les 25
0030 128.672
Eppendorf twin.tec PCR Plate 96, skirted, bleu, les 25
0030 128.575
Eppendorf twin.tec PCR Plate 96, semi-skirted, incolore, les 25
0030 128.583
Eppendorf twin.tec PCR Plate 96, semi-skirted, jaune, les 25
0030 128.613
Eppendorf twin.tec PCR Plate 96, semi-skirted, rouge, les 25
0030 128.591
Eppendorf twin.tec PCR Plate 96, semi-skirted, vert, les 25
0030 128.605
Eppendorf twin.tec PCR Plate 96, semi-skirted, bleu, les 25
178
14 Nomenclature de commande
Consommables
0030 127.498
Barrette de 8 capuchons, les 25 x 12 unités
0030 127.650
Film de thermosoudage pour plaques de PCR, les 100
0030 127.668
Peel-it-Lite, Feuilles de thermosoudage pour plaques de PCR, les 100
0030 127.676
Pierce-it-Lite, Feuilles de thermosoudage pour plaques de PCR, les 100
0030 127.471
Feuille autocollante pour plaques de PCR, les 100
0030 127.480
Film autocollant pour plaques de PCR, les 100
0030 127.501
Cadre de PCR in situ, 25 µl, les 100
0030 127.510
Cadre de PCR in situ, 65 µl, les 100
0030 127.528
Cadre de PCR in situ, 125 µl, les 100
0030 127.536
Cadre de PCR in situ, 300 µl, les 100
Auxiliaires recommandés
5425 715.005
Adaptateur pour tubes de PCR 0,2 ml; pour rotor 1,5/2,0 ml, les 6 *
5425 716.001
Adaptateur pour tubes de 0,5 / 0,6 ml; pour rotor 1,5/2,0 ml, les 6 *
0030 124.243
Cadre pour plaque de travail 8 x 12, les 5
0030 127.641
Décolleur pour film et feuille
4830 000.017
Eppendorf Biomaster 4830
et Mastertip
pour pipettage sans contamination
sur principe du déplacement direct
sur volumes de 1 à 20 µl
Biomaster Kit = 1 Biomaster et 96 Mastertips
0030 127.153
Outil pour encapuchonner les capuchons des barrettes
3881 000.015
PCR-Cooler 0,2 ml ensemble de base Starter set ( 1 x pink, 1 x blue)
3881 000.023
PCR-Cooler 0,2 ml pink
3881 000.031
PCR-Cooler 0,2 ml blue
0030 124.235
Plaque de travail 8 x 12 pour barrettes de 8 tubes PCR de 0,2 ml, les 10
0030 127.455
Portoir PCR, coloris assortis, les 10
5390 000.016
Thermosoudeur pour plaques de PCR, 115 V / 50–60 Hz
5390 000.024
Thermosoudeur pour plaques de PCR, 230 V / 50–60 Hz
Réactifs pour PCR
Voir le catalogue principal
* pour la centrifugation
179
14 a Nomenclature de commande pour USA et Canada
Nous vous conseillons de toujours utiliser les pièces garanties Eppendorf d'origine. L'utilisation de pièces de
rechange ou d'articles consommables autres que ceux que nous préconisons peuvent gravement
compromettre la sécurité et le bon fonctionnement de l'appareil. Dans ce cas la garantie devient caduque et
nous déclinons toute responsabilité en cas de dommages.
Code commande
Désignation
5333 000.018
5333 000.026
5333 000.034
Mastercycler
230 V, 50–60 Hz
115 V, 50–60 Hz
100 V, 50–60 Hz
5331 000.010
5331 000.045
5331 000.037
Mastercycler gradient
230 V, 50–60 Hz
115 V, 50–60 Hz
100 V, 50–60 Hz
Accessoires
5331 220.002
Adaptateur pour PCR in situ
5332 300.018
Carte mémoire Personal Card
5331 226.027
Carte Personal Card pour système de validation de la température
0013 609.349
Fusible T 5 A, 250 V pour version 230 V (50–60 Hz) la pièce
0013 565.333
Fusible T 6,3 A, 250 V pour version 115 V (50–60 Hz) la pièce
0013 611.432
Fusible MT 8 A, 250 V pour version 100 V (50–60 Hz) la pièce
5331 900.062
Mode d'emploi
Mastercycler et Mastercycler gradient
5331 224.008
Sonde de température pour position tube 0,2 ml
5331 222.005
Système de validation de la température
Consommables
0030 124.367
Tubes 0,2 ml pour PCR, incolore, le mille
0030 124.600
Tubes 0,5 ml pour PCR, incolore, paroi mince, le 500
0030 124.383
Barrette de 8, Tubes 0,2 ml pour PCR, incolore (= 960 unités)
22 36 361-1
Tubes Safe-Lock 0,5 ml, incolore, le 500
0030 128.648
Eppendorf twin.tec PCR Plate 96, skirted, incolore, les 25
0030 128.656
Eppendorf twin.tec PCR Plate 96, skirted, jaune, les 25
0030 128.680
Eppendorf twin.tec PCR Plate 96, skirted, rouge, les 25
0030 128.664
Eppendorf twin.tec PCR Plate 96, skirted, vert, les 25
0030 128.672
Eppendorf twin.tec PCR Plate 96, skirted, bleu, les 25
0030 128.575
Eppendorf twin.tec PCR Plate 96, semi-skirted, incolore, les 25
0030 128.583
Eppendorf twin.tec PCR Plate 96, semi-skirted, jaune, les 25
0030 128.613
Eppendorf twin.tec PCR Plate 96, semi-skirted, rouge, les 25
0030 128.591
Eppendorf twin.tec PCR Plate 96, semi-skirted, vert, les 25
0030 128.605
Eppendorf twin.tec PCR Plate 96, semi-skirted, bleu, les 25
180
14 a Nomenclature de commande pour USA et Canada
Consommables
0030 127.498
Barrette de 8 capuchons, les 25 x 12 unités
0030 127.650
Film de thermosoudage pour plaques de PCR, les 100
0030 127.668
Peel-it-Lite, Feuilles de thermosoudage pour plaques de PCR, les 100
0030 127.676
Pierce-it-Lite, Feuilles de thermosoudage pour plaques de PCR, les 100
0030 127.471
Feuille autocollante pour plaques de PCR, les 100
0030 127.480
Film autocollant pour plaques de PCR, les 100
0030 127.501
Cadre de PCR in situ, 25 µl, les 100
0030 127.510
Cadre de PCR in situ, 65 µl, les 100
0030 127.528
Cadre de PCR in situ, 125 µl, les 100
0030 127.536
Cadre de PCR in situ, 300 µl, les 100
Auxiliaires recommandés
5425 715.005
Adaptateur pour tubes de PCR 0,2 ml; pour rotor 1,5/2,0 ml, les 6 *
5425 716.001
Adaptateur pour tubes de 0,5 / 0,6 ml; pour rotor 1,5/2,0 ml, les 6 *
0030 124.243
Cadre pour plaque de travail 8 x 12, les 5
0030 127.641
Décolleur pour film et feuille
22 44 050-1
Eppendorf Pipettage par déplacement direct, model 4830
1 Kit = 1 Pipette Plus
96 Pointes Mastertip
100 Tubes Safe-Lock (0,5 ml)
0030 127.153
Outil pour encapuchonner les capuchons des barrettes
22 51 050-9
PCR-Cooler 0,2 ml ensemble de base Starter set ( 1 x pink, 1 x blue)
22 51 054-1
PCR-Cooler 0,2 ml pink
22 51 052-5
PCR-Cooler 0,2 ml blue
0030 124.235
Plaque de travail 8 x 12 pour barrettes de 8 tubes PCR de 0,2 ml, les 10
0030 127.455
Portoir PCR, coloris assortis, les 10
5390 000.016
Thermosoudeur pour plaques de PCR, 115 V / 50–60 Hz
5390 000.024
Thermosoudeur pour plaques de PCR, 230 V / 50–60 Hz
Réactifs pour PCR
Voir le catalogue principal
* pour la centrifugation
181
15 Index alphabétique
A
Adaptateur in situ 125, 141
Affichage 130
Auto 148, 163
B
Bloc numérique 129
BLOCK, thermobloc 140, 147
Bouton verrouillage 128
C
Cadran 130
Carte
personal Card 127, 165, 172, 174
programme 127, 165, 172, 174
Chaînage 150, 166, 173
Clock, horloge 137
CNTRL = contrôle 142, 144, 147, 163
Commande 147
Commutateur secteur 128
Connexion PC 128
Coupure secteur 138
Couvercle chauffant 126, 139, 140, 142, 148
Création nouveau programme 151
Curseur 129, 130, 153, 156
Cycle 153
D
Date, programmer 137
Delete = effacer, annuler 133, 163
Dénaturation 151, 153
Douille connexion imprimante 128, 167
Durée
de cycle 148, 176
de marche 129, 139, 145
E
Echantillon 141, 142
Edit, modifier 132, 163
Editor 134, 170
Effacer ligne 156
Elément Peltier 125
END
= fin 151
Extension, élongation 151, 153
F
Fente d'aération 127, 128
Fichier 132
de travail 130, 131, 132, 133, 143, 155,
163, 166
Files
= fichier 132
Fix
= fixe 148, 163
182
G
General 137
GOTO = aller à 150, 172
GOTO/REP 163
Gradient 125, 126, 136, 148, 149, 151, 153, 158
Grille d'aération 126
H
Heure 137
Hold
= maintie 150, 154, 162
Hybridation 135, 151, 153
I
Imprimante 135
Imprimer déroulement programme 164, 167
Incrément de température 148, 149, 160, 161,
163, 176
Incrément de temps 148, 149, 160, 163, 176
Incrément rampe 148, 149, 163, 176
Incubate 140, 142, 163
Incubation 140, 142, 163
Insérer ligne 156
In situ 125, 141
Instruction de sécurité 126, 165
INTERN 165, 166
L
Lecteur personal card 128
Lid
= couvercle 139, 148
Link
= chaînage 150, 166, 173
Load
= charger 133, 163
M
Maintenance 171
MCARD 165, 166
Menu 130, 131, 143, 144
principal = main menu 130, 131, 143, 144
Mise
à l'heure 137
en service 127
Modifier 155, 156
N
New
= nouveau 133, 152, 163
Nomenclature de commande 178
Nowait = sans attente 140, 142, 148, 163
Numéro ligne 144, 148, 150, 153, 163, 164
O
Options 134, 167
15 Index alphabétique
P
Pause 145, 146, 164, 150, 159
Personal Card 127, 165, 172, 174
Printer 135
Programme 147
charger 155
continuer 146, 164
démarrer 143
déroulement 169
effacer 157, 163
interrompre 130, 145
mémoriser 132, 154, 164
modèle 133, 157, 163
modifier 155, 156
nom 132, 133, 143, 154, 166
sauvegarder 132, 154, 164
transférer 170
arrêter 130, 146, 164
V
Valid 138
Validation 138
Ventilation 126
Vitesse de transmission en Baud 137
Volume
de remplissage 144, 147
échantillon 142
W
Wait
= attente 142, 148, 163
R
Rampe 148, 149, 161, 163, 176
Restart 137
Resume, arrêter 146, 164
Run 145
S
Secteur 128, 137
Sécurité 126, 165
Signal acoustique sonore 137, 150
Sound = son 137, 150
Standard 133, 157
Start 132
Stop 145, 146
Signe 129
T
Température 136, 144, 148, 150, 152, 163, 176
de consigne 144, 148
lue 144
tube 125, 147
options 134, 167
Thermobloc 125, 126, 136, 140, 141, 142
Tonalité avertissement 137
Tube
control 125, 147
échantillon 141
type 142, 144, 164
volume 144, 147
183
184
Indice
1
Avvertenze di sicurezza . . . . . . . . . . . . . . . . . . . . . . . . . . . . . . . . . . . . . . . . . . . . . . . . . . . . . . . 186
2
Istruzioni abbreviate. . . . . . . . . . . . . . . . . . . . . . . . . . . . . . . . . . . . . . . . . . . . . . . . . . . . . . . . . . 187
3
Manutenzione . . . . . . . . . . . . . . . . . . . . . . . . . . . . . . . . . . . . . . . . . . . . . . . . . . . . . . . . . . . . . . . 189
185
1 Avvertenze di sicurezza
Prima di utilizzare il Mastercycler o, rispettivamente, il Mastercycler gradient, per favore, leggete
completamente le istruzioni per l’uso. Il Mastercycler o, rispettivamente, il Mastercycler gradient deve
essere utilizzato esclusivamente per eseguire la PCR ed applicazioni simili del laboratorio di ricerca.
E’ assolutamente necessario rispettare le seguenti disposizioni:
Tensione elettrica:
La tensione di rete deve corrispondere alle indicazioni riportate sulla targhetta di
identificazione.
L’apparecchio deve essere collegato ad una presa di corrente con messa a terra.
In caso di lavori di manutenzione, sostituzione di fusibili e pulizia
dell’apparecchio, occorre in precedenza averlo spento ed aver scollegato la
spina rete.
Sostanze pericolose:
Nel Mastercycler o, rispettivamente, il Mastercycler gradient è vietato
termostatare sostanze esplosive, infiammabili e a violenta reazione. Entrambi gli
apparecchi non si devono far funzionare in locali esposti al pericolo di
esplosione. Durante l’impiego di materiale patogeno, sostanze radioattive o altre
sostanze nocive alla salute dell’uomo si devono assolutamente osservare le
norme di sicurezza vigenti in materia.
Liquidi:
Occorre assicurarsi che nessun liquido penetri nell’apparecchio.
Ambiente circostante:
Non è consentito che la ventilazione dell’apparecchio venga ostacolata.
Pericolo di ferimento:
Durante l’impiego dell’apparecchio, osservare sempre le misure precauzionali
generali vigenti in materia. Inoltre, occorre prestare particolare attenzione alle
mani durante la chiusura del coperchio.
Pericolo di ustioni:
Il termoblocco, il lato interno del coperchio riscaldante ed i reattori / piastre di
microtitolazione raggiungono molto presto delle temperature superiori ai 50 °C.
Vi è pericolo di ustioni!
Tenere chiuso il coperchio riscaldante fino a quando sono state raggiunte delle
temperature intorno a o inferiori a 30 °C.
Non si devono usare materiali (recipienti, piastre di microtitolazione, chiusure,
pellicole, feltri) che non siano abbastanza resistenti alla temperatura (fino a circa
120 °C).
Caution: Hot Surface
Simbolo sul termoblocco:
Dà una segnalazione di avvertimento per un termoblocco (▼) eventualmente
caldo oppure per un interno di coperchio caldo (▲).
mostra che nel caso di funzionamento a gradiente la
temperatura sul lato destro è maggiore di quella sul lato sinistro.
Le riparazioni sono riservate allo specialista. Utilizzare solo parti di ricambio originali Eppendorf.
186
2 Istruzioni abbreviate
Lavorate con le Istruzioni abbreviate solo dopo che avete acquistato familiarità con le istruzioni per l’uso
complete.
Accendere l’apparecchio
Main-Menu
Start
FILES . .
OPTIONS . .
Lid
Incubate
STANDARD
– –/25.0°
Nome del menu
Avvio di un programma qualsiasi
Programmare
Impostazioni di sistema
Pre incubare il coperchio riscaldante
Incubare il blocco ed il coperchio riscaldante
Programma in livello elaborazione
Temperatura richiesta / effettiva del blocco
Temperatura del coperchio
(solo quando il coperchio è acceso)
Lid:105°
10:22:06
Ora
Programmazione
– Selezionare il menu FILES con
/
,
.
FILES . .
Edit
Load
Standard
New
Delete
STANDARD
– –/22.0°
Elaborare il programma a livello elaborazione
Caricare un programma qualsiasi ed elaborarlo
Caricare il modello di programma ed elaborarlo
Creare un nuovo programma
Cancellare un programma qualsiasi
10:22:06
Modificare il modello di programma "Standard"
– Selezionare "Standard" con
,
.
– Con
,
,
,
posizionare il cursore nelle posizioni di immissione oppure spostarlo tra le posizioni di immissione.
– Con
selezionare i comandi del programma, immettere le impostazioni oppure i testi; confermare con
.
CNTRL
BLOCK
TUBE
Lid
NOWAIT
WAIT
AUTO
FIX
Definire la regolazione della temperatura
Per il termoblocco
Per diversi recipienti
Stabilire la temperatura del coperchio
Avvio immediato del programma
Il programma attende la temperatura
del coperchio
Il coperchio si spegne a T <22 °C
e tempo >5 min.
FILES . .
Edit
Load
Standard
New
Delete
STANDARD
– –/22.0°
1
2
3
Edit STANDARD
CNTRL
BLOCK
LID=105°
NOWAIT
AUTO
T=94.0°
0:02:00
T=94.0°
0:00:15
T=44.0°
0:00:15
10:22:06
Il coperchio si spegne alla fine del programma
Comandi del programma
T
HOLD
PAUSE
GOTO/REP
SOUND
LINK
Temperature, tempi, increment, rampa, gradiente
Mantenere la temperatura immessa, fino a quando si continua con Enter (4–99 °C)
Interruzione finché non si ripristina con Enter (0–11 caratteri)
Ripetere parti di programma e numero di cicli (1–40 righe, 1–99 ripetizioni)
Segnale acustico (1–10 suoni)
Diramazione ad altri programmi (1–5 programmi)
– Immettere le opzioni del comando con
. Il cursore deve trovarsi sul numero di riga.
FILES . .
Temperatura (0–99°)
Edit
Tempo (0:00:01–9.59:59)
Load
Incremento di temperatura (0,0 –10,0°, + oppure –)
Incremento di tempo (0:00–1:00, + oppure –)
Standard
R Rampa (0,3–3 K/s)
New
Incremento della rampa (0,0–1,0 °/s, + oppure –) Delete
G Gradiente (±0,0 – ±10 °C)
STANDARD
(solo per il Mastercycler gradient)
– –/22.0°
T
– Confermare le immissioni con
– Chiudere la programmazione
– Salvare il programma.
3
4
5
STANDARD
T=44.0°
T=72.0°
+0.0°
R= 3.0°/s
G=0.0°
GOTO 2
0:00:15
0:00:30
+0:00
+0.0°/s
REP 24
10:22:06
.
.
187
2 Istruzioni abbreviate
Salvare il programma
– Lasciare il programma con
.
– Rispondere alla domanda "Save:YES" con
.
– Definire il nome del programma con
– Confermare il nome con
.
.
FILES . .
Edit
Load
Standard
New
Delete
STANDARD
– –/22.0°
Edit STANDARD
STANDARD not saved
SAVE: YES
ProgName: STANDARD
10:22:06
Aggiungere una riga di programma
– Posizionare il cursore con
all’inizio della riga.
/
– Premere
, una nuova riga viene aggiunta sopra il cursore. Selezionare l’istruzione desiderata con
Cancellare una riga di programma
– Posizionare il cursore sul numero della riga di programma mediante
/
– Premere
. La riga viene cancellata. Il cursore salta alla riga successiva.
Impostazioni del sistema
Incubare il coperchio ed il blocco
Preriscaldare il coperchio
Stampare la programmazione
Stampare lo svolgimento del programma
Menu Incubate
Menu Lid
Menu OPTION
Menu OPTION
Avviare il programma
– Accendere l’apparecchio, eventualmente
preriscaldare il coperchio oppure il coperchio
ed il blocco.
– Selezionare il menu "Start" con
/ ,
.
– Selezionare il nome del programma con
.
/ ,
– Nel caso di CNTRL TUBE selezionare il tipo
di recipiente con
. Immettere Fill.Vol.
0,2 ml/plate: da 5 a 50 µl
0,5 ml/thin: da 5 a 100 µl
– Confermare con
.
Il programma parte immediatamente.
– Con
vedere la durata del programma.
Interrompere il programma
– Premere
– Con
– Con
.
selezionare il programma "Pause".
confermare.
.
.
Temperatura del blocco 37 °C, il riscaldatore (Heater) è ON
LidTemp 105 °C, il riscaldatore (Heater) è ON
Printout Editor: YES
PrintProtocol: ON
Main-Menu
Start
FILES . .
OPTIONS . .
Lid
Incubate
STANDARD
– –/25.0°
Run a Program:
STANDARD
TEST1
TEST2
10:22:06
Main-Menu
Start
1
FILES . .
OPTIONS . .
Lid
Incubate
Running/STANDARD
95.0/94.5°
Lid:105°
Run a Program:
T=95.0°
0:00:05
Cyc:4
10:22:06
Main-Menu
Run a Program:
Start
STANDARD running . . .
FILES . .
Program:
PAUSE
OPTIONS . .
Lid
Incubate
Paused/STANDARD
95.0/94.5°
Lid:105°
10:22:06
Main-Menu
Start
FILES . .
OPTIONS . .
Lid
Incubate
STANDARD
95.0/94.5°
10:22:06
Riprendere un programma interrotto
– Premere
– Con
– Con
.
selezionare "Resume".
confermare.
Fermare un programma
– Premere
– Con
.
confermare lo "Stop".
– Lasciare il programma con
188
.
Run a Program:
STANDARD running . .
Program:
STOP
Lid:105°
3 Manutenzione
La sporcizia si può rimuovere con acqua oppure con un detersivo delicato da laboratorio.
L’apparecchio va protetto da solventi organici e da agenti chimici aggressivi. Nessun liquido deve penetrare
nell’apparecchio. Per motivi di sicurezza, quando si esegue la pulizia, l’apparecchio deve sempre essere
spento e la spina rete scollegata.
I fusibili elettrici si trovano tra l’interruttore rete e la spina rete, sul retro dell’apparecchio. Spingendo verso
l’alto un nottolino di arresto diventa possibile rimuoverli e sostituirli. Prima di sostituire i fusibili, occorre
spegnere l’apparecchio e scollegare la spina rete. E’ consentito utilizzare solamente dei fusibili con i valori
di tensione corretti (una targhetta con i dati relativi al tipo di fusibili si trova sul retro dell’apparecchio).
L’apparecchio può venire aperto solo da uno specialista qualificato. La garanzia decade in caso di un
intervento non autorizzato sull’apparecchio.
189
190
Contenido
1
Avisos de seguridad . . . . . . . . . . . . . . . . . . . . . . . . . . . . . . . . . . . . . . . . . . . . . . . . . . . . . . . . . . 192
2
Instrucciones breves . . . . . . . . . . . . . . . . . . . . . . . . . . . . . . . . . . . . . . . . . . . . . . . . . . . . . . . . . 193
3
Mantenimiento . . . . . . . . . . . . . . . . . . . . . . . . . . . . . . . . . . . . . . . . . . . . . . . . . . . . . . . . . . . . . . 195
191
1 Avisos de seguridad
Antes de usar el Mastercycler o el Mastercycler gradient, lea completamente las instrucciones de uso. El
Mastercycler o el Mastercycler gradient sólo debe usarse para la realización del PCR y métodos afines en
el laboratorio de investigación.
Han de respetarse necesariamente las siguientes normas:
Tensión eléctrica:
La tensión de red tiene que coincidir con los datos indicados en la placa de
características.
El aparato tiene que estar conectado a una caja con toma a tierra.
En trabajos de mantenimiento, cambio de fusible y limpieza del aparato éste
tiene que desconectarse previamente y sacarse el conector de la red.
Substancias peligrosas:
Las substancias explosivas, inflamables y de fuerte reacción no deben
temperarse en el Mastercycler o el Mastercycler gradient. Ambos aparatos no
deben ponerse en servicio en locales sujetos a explosiones.
En el trato de material patógeno, substancias radioactivas u otras substancias
tóxicas para la salud deben respetarse las normas de seguridad
correspondientes.
Líquidos:
Ha de garantizarse que no penetre humedad en el aparato.
Alrededores:
No debe impedirse la ventilación del aparato.
Peligro de lesiones:
En el manejo del aparato deben respetarse las medidas de precaución
generalmente válidas. Al cerrar la tapa han de cuidarse especialmente las
manos.
Peligro de quemaduras:
El bloque térmico, el lado interior de la tapa calefactora y los recipientes de
reacción/placas de microtitraje alcanzan muy rápidamente temperaturas
superiores a los 50 °C. ¡Peligro de quemaduras!
Mantener cerrada la tapa calefactora hasta que se hayan alcanzado
temperaturas alrededor de los 30 °C o inferiores.
No deben usarse materiales (recipientes, placas de microtitraje, cierres, láminas
plásticas, esteras) que no sean suficientemente resistentes a la temperatura
(hasta 120 °C).
Caution: Hot Surface
Símbolo en el bloque térmico:
Avisa de un posible bloque térmico (▼) caliente o lado interior caliente de la tapa
calefactora (▲).
Indica que en un servicio de gradiente la temperatura
del lado derecho está más caliente que la del lado izquierdo.
Los trabajos de reparación están reservados a personal especializado. Usar solamente piezas originales
Eppendorf.
192
2 Instrucciones breves
Trabaje con las instrucciones breves solamente después de haberse familiarizado con las instrucciones de
uso detalladas.
Conectar el aparato
Main-Menu
Start
FILES . .
OPTIONS . .
Lid
Incubate
STANDARD
– –/25.0°
Nombre de menú
Iniciar un programa cualquiera
Programación
Ajustes del sistema
Temperado previo de la tapa calefactora
Temperado de la tapa calefactora y del bloque
Programa en procesamiento
Temperatura de bloque teórica/real
Temperatura de la tapa
(sólo si está conectada la tapa)
Lid:105°
10:22:06
Hora
Programación
– Seleccionar menú FILES con
/
,
.
FILES . .
Edit
Load
Standard
New
Delete
STANDARD
– –/22.0°
Editar el programa en procesamiento
Cargar y procesar cualquier programa
Cargar y procesar muestra del programa
Crear nuevo programa
Borrar cualquier programa
10:22:06
Cambiar muestra de programa "Standard"
– Seleccionar "Standard" con
,
.
– Mover el cursor con
,
,
,
a las posiciones de entrada o entre éstas.
– Seleccionar comandos de programa con
, entrar ajustes o texto; confirmar con
CNTRL
BLOCK
TUBE
Lid
NOWAIT
WAIT
AUTO
FIX
Definir la regulación de temperatura
Para el bloque térmico
Para diferentes recipientes
Determinar temperatura de tapa
El programa arranca inmediatamente
El programa espera a la temperatura
de la tapa
La tapa se desconecta con T <22 °C
y hora >5 min.
FILES . .
Edit
Load
Standard
New
Delete
STANDARD
– –/22.0°
1
2
3
.
Edit STANDARD
CNTRL
BLOCK
LID=105°
NOWAIT
AUTO
T=94.0°
0:02:00
T=94.0°
0:00:15
T=44.0°
0:00:15
10:22:06
La tapa se desconecta al final del programa
Comandos de programa
T
HOLD
PAUSE
GOTO/REP
SOUND
LINK
Temperaturas, tiempos, incrementos, rampa, gradiente
Mantener la temperatura programada hasta que se continúe con Enter (4–99 °C)
Interrumpir hasta que se prosigna con Enter (0–11 caracteres)
Repetir partes del programa y número de ciclos (1–40 líneas, 1–99 repeticiones)
Señal acústica (1–10 sonidos)
Desviación a otros programas (1–5 programas)
– Entrar las opciones del comando de temperatura con
T
Temperatura (0–99°)
Hora (0:00:01–9.59:59)
Incremento de temperatura (0,0 –10,0°, + o –)
Incremento temporal (0:00–1:00, + o –)
R Rampa (0,3–3 K/s)
Incremento de rampa (0,0–1,0 °/s, + o –)
G Gradiente (±0,0 – ±10 °C)
(sólo con Mastercycler gradient)
– Confirmar las entradas con
– Cerrar la programación con
– Memorizar la programación.
. El cursor debe estar posicionado en el número de línea.
FILES . .
Edit
Load
Standard
New
Delete
STANDARD
– –/22.0°
3
4
5
STANDARD
T=44.0°
T=72.0°
+0.0°
R= 3.0°/s
G=0.0°
GOTO 2
0:00:15
0:00:30
+0:00
+0.0°/s
REP 24
10:22:06
.
.
193
2 Instrucciones breves
Salvar el programa
– Salir del programa con
.
– A la pregunta: "Save: YES" responder con
.
– Definir el nombre mover de programa con
– Cerrar el nombre con
.
.
FILES . .
Edit
Load
Standard
New
Delete
STANDARD
– –/22.0°
Edit STANDARD
STANDARD not saved
SAVE: YES
ProgName: STANDARD
10:22:06
Introducir una línea de programa
– Mover el cursor con
delante de la línea.
/
– Apretar
, se introduce una nueva línea encima del cursor. Seleccionar la orden deseada con
.
Borrar una línea de programa
– Mover el cursor con
al número de línea de programa.
/
– Apretar
. La línea se borra. El cursor salta a la línea siguiente.
Ajustes del sistema
Temperar la tapa y el bloque
Precalentar la tapa
Imprimir la programación
Imprimir la secuencia de programa
Menú Incubate
Menú Lid
Menú OPTION
Menú OPTION
Iniciar programa
– Conectar el aparato, posiblemente
precalentar tapa o tapa y bloque.
– Seleccionar el menú "Start" con
/
.
– Seleccionar nombres de programa con
.
/ ,
,
– En CNTRL TUBE seleccionar tipo de
recipiente con
. Entrar Fill.Vol.
0,2 ml/placa: 5 hasta 50 µl
0,5 ml/thin:
5 hasta 100 µl
– Ver tiempo de funcionamiento del
programa con
.
Interrumpir programa
.
– Seleccionar programa "Pause" con
– Confirmar con
.
Main-Menu
Start
FILES . .
OPTIONS . .
Lid
Incubate
STANDARD
– –/25.0°
Run a Program:
STANDARD
TEST1
TEST2
10:22:06
Main-Menu
Start
1
FILES . .
OPTIONS . .
Lid
Incubate
Running/STANDARD
95.0/94.5°
Lid:105°
– Confirmar con
.
El programa arranca inmediatamente.
– Apretar
Temperatura de bloque 37 °C, Heater conectado (ON)
Temperatura Lid 105 °C, Heater conectado (ON)
Printout Editor: YES
PrintProtocol: ON
.
Run a Program:
T=95.0°
0:00:05
Cyc:4
10:22:06
Main-Menu
Run a Program:
Start
STANDARD running . . .
FILES . .
Program:
PAUSE
OPTIONS . .
Lid
Incubate
Paused/STANDARD
95.0/94.5°
Lid:105°
10:22:06
Main-Menu
Start
FILES . .
OPTIONS . .
Lid
Incubate
STANDARD
95.0/94.5°
10:22:06
Proseguir programa interrumpido
– Apretar
.
– Seleccionar "Resume" con
– Confirmar con
.
.
Parar programa
– Apretar
194
.
– Seleccionar "Stop" con
.
– Salir del programa con
.
Run a Program:
STANDARD running . .
Program:
STOP
Lid:105°
3 Mantenimiento
Las suciedades pueden limpiarse con agua o con un detergente de laboratorio suave.
El aparato debe protegerse contra soluciones orgánicas o productos químicos agresivos. No debe caer
ningún líquido dentro del aparato. Por motivos de seguridad, en trabajos de limpieza el aparato debe estar
siempre desconectado y el enchufe sacado de la toma de red. Los fusibles eléctricos se encuentran en el
lado trasero del aparato entre el interruptor y el conector de red. Empujando hacia arriba un trinquete, pueden
sacarse y cambiarse. Antes de cambiar los fusibles, el aparato debe estar desconectado y el enchufe sacado
de la toma de red. Sólo deben usarse fusibles con valores de tensión correctos (en el lado trasero del aparato
hay un aplaca con datos sobre el tipo de fusibles)
El aparato sólo debe ser abierto por un especialista cualificado. Se pierde la garantía del aparato si se
interviene sin autorización.
195
Eppendorf AG
22331 Hamburg · Germany
Phone: +49 40-5 38 01-0
Fax:
+49 40-5 38 01-556
e-mail: [email protected]
Internet: www.eppendorf.com
Application Hotline:
Phone: +49 180-3 66 67 89
e-mail:
[email protected]
Brinkmann Instruments, Inc.
One Cantiague Road,
P.O. Box 1019
Westbury, New York 11590-0207
(USA)
Phone: 800-645-3050
Fax:
516-334-7506
e-mail: [email protected]
Internet: www.brinkmann.com
Printed in Germany
eppendorf® is a registered trademark