1
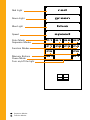
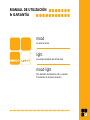
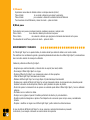
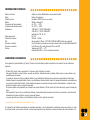
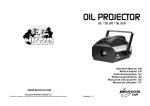
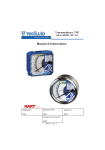
0
4
OPERATION MANUAL
& WARRANTY
mood
temporary state of mind
light
energy that stimulates the sense of sight
mood-light
The next dimension of light, style and self-expression.
The dawning of a new experience.
0
5
Red Light
-
red
+
Green Light
-
green
+
Blue Light
-
blue
+
Speed
-
speed
+
Color Mode
Sequence Modes
Function Modes
C1 S1 S2 S3
F1 F2 F3 F4
F5
Memory Buttons
Pause Mode
Turn on/off the light
F6
on
M1
off
P1
Sequence Modes: Chill (S1), Motion (S2), Action (S3)
Function Modes: Random (F1), Fusion (F2), Pulse (F3), Rave (F4), Ray (F5), Moments (F6)
THE MOOD-LIGHT ‘object’
This Operation Manual provides important information on how to use the Mood-Light ‘object’. Please read the Operation
Manual carefully and follow all the steps to get started.
Contents / Accessories:
1) Mood-Light ‘object’
2) Remote Control
3) 2 x AAA Batteries
4) AC/DC Power Adaptor
5) Operation Manual
GETTING STARTED
A) Installation
1) Connect the Power Adaptor to the Mood-Light ‘object’ and to the socket.
2) Insert two AAA Batteries into the Remote Control.
3) The Mood-Light ‘object’ has built-in rechargeable batteries. Keep the Mood-Light ‘object’ connected to the power adaptor
for about 24 hours to fully charge the batteries before use.
Once the Mood-Light ‘object’ is fully charged, you can disconnect it and operate it without connecting the power adaptor
for 6-10 hours. Optionally, you can keep the Mood-Light ‘object’ connected to the power adaptor, while it’s on.
When the batteries are low, the Mood-Light ‘object’ will turn off and the batteries must be recharged (see insert for charging
instructions). Connect the power adaptor and charge the Mood-Light ‘object’ again. The Mood-Light ‘object’ should be
off while charging.
NOTE: The Mood-Light ‘object’ is controlled by RF (radio frequency) and can be operated by remote control with a distance
of up to 10 meters.
Caution: The Mood-Light ‘object’ is not waterproof. Do not place the Mood-Light ‘object’ in water or put it in
the dishwasher, as doing so may damage internal parts. You may fill the Mood-Light ‘object’ with water or ice. Clean
with wet cloth only.
0
6
B) To Turn The Mood-Light ‘object’ Power On/Off
Press the ON button on the remote control to turn-on the Mood-Light ‘object’. Note: The default start up condition of the
Mood-Light ‘object’ will be ON when the power is connected for the first time.
After turning the Mood-Light ‘object’ on, you can choose from the Color Mode, the Sequence Modes, the Function Modes,
or the Pause Mode as described below.
Press the OFF button on the remote control to turn-off the Mood-Light ‘object’.
MOOD-LIGHT ‘object’ FUNCTIONS
A) Color Mode
You can create and save any color on the Mood-Light ‘object’.
By changing the intensity of the three primary colors: red, green and blue you can blend unlimited secondary colors.
1) To Create a Color
Press the COLOR (C1) button on the remote control to create any color for the Mood-Light ‘object’. The Mood-Light
‘object’ will blink once in acknowledgement of the remote’s command.
Press RED (+) or (-) to increase or decrease the amount of red.
Press GREEN (+) or (-) to increase or decrease the amount of green.
Press BLUE (+) or (-) to increase or decrease the amount of blue.
See Illustration 1 (Color Chart Subtractive), page 24
See Illustration 2 (Color Chart Additive), page 24
Mix Chart:
Magenta = mix Blue and Red
Yellow = mix Green and Red
Cyan = mix Green and Blue
White = evenly mix Red, Green and Blue
To return to the default Color Mode at any time, press COLOR (C1) button on the remote control; this will reset any previous
setting you may have made. You can then proceed to create colors as described above.
0
7
2) To Save a Color
To save your last color, press the MEMORY (M1) button on the remote control continuously until the Mood-Light ‘object’
blinks once in acknowledgement of your command. The current color will be saved.
You can change a saved color with a new color, by pressing the MEMORY (M1) button again until the Mood-Light
‘object’ blinks once. This setting will be saved even during removal of power.
B) Sequence Modes
There are three pre-programmed, animated light sequences: Chill, Motion and Action.
1) Chill
Seductive, tranquil, relaxed - Chill is a light sequence to sooth your mind and calm your soul.
This Sequence can be displayed in four different color tones:
Press CHILL (S1) on the remote control to start the Chill Sequence in red color tones.
Press CHILL (S1) again to change to green color tones.
Press CHILL (S1) again to change to blue color tones.
Press CHILL (S1) again to white color tones.
To stop the Chill Sequence and start another mode - press any other button.
2) Motion
Interchanging waves crashing into psychedelic colors and effects – Motion is a light sequence to stimulate your senses.
Press MOTION (S2) on the remote control to start the Motion Sequence.
To stop the Motion Sequence and start another mode - press any other button.
3) Action
Fusion of techno and beat effects – Action is a light sequence of intense energy that will thrill your mind.
Press ACTION (S3) on the remote control to start the Action Sequence.
To stop the Action Sequence and start another mode - press any other button.
C) Function Modes
You can display six active light functions and control the speed of the functions.
1) Random
The Random Function is a display of unlimited and changing combinations of colors.
This function can use any random colors, or be limited to bright colors.
Press RANDOM (F1) on the remote control to start the Random Function with all the colors.
0
8
Press RANDOM (F1) again to limit the Random Function to bright colors.
Press SPEED (+) or (-) to increase or decrease the speed of the Random Function.
To stop the Random Function and start another mode - press any other button.
2) Fusion
The Fusion Function is a display of colors fading and changing gradually.
Press FUSION (F2) on the remote control to start the Fusion Function.
Press SPEED (+) or (-) to increase or decrease the speed of the Fusion Function.
To stop the Fusion Function and start another mode - press any other button.
3) Pulse
The pulse function is a display of pulsating light effects.
This function is available in four different color groups: Red, Green, Blue, and White, or in multiple colors:
Press PULSE (F3) on the remote control to start the Pulse in Red.
Press PULSE (F3) again to change to Green.
Press PULSE (F3) again to change to Blue.
Press PULSE (F3) again to change to White.
Press PULSE (F3) again to change to interchanging colors.
Press SPEED (+) or (-) to increase or decrease the speed of the Pulse Function.
To stop the Pulse Function and start another mode - press any other button.
4) Rave
The Rave Function is a display of rave dancing light effects.
This function can be displayed in one of four colors (Red, Green, Blue, White), or in interchanging colors:
Press RAVE (F4) on the remote control to start the Rave Function in Red.
Press RAVE (F4) again to change to Green.
Press RAVE (F4) again to change to Blue.
Press RAVE (F4) again to change to White.
Press RAVE (F4) again to change to interchanging colors.
Press SPEED (+) or (-) to increase or decrease the speed of the Rave Function.
To stop the Rave Function and start another mode - press any other button.
5) Ray
The Ray Function is a display of random lightning and thunder effects.
This function can be displayed in one of four colors (Red, Green, Blue, White), or in random colors:
Press RAY (F5) on the remote control to start the Ray Function in Red.
Press RAY (F5) again to change to Green.
Press RAY (F5) again to change to Blue.
0
9
Press RAY (F5) again to change to White.
Press RAY (F5) again to change to random colors.
Press SPEED (+) or (-) to increase or decrease the speed of the Ray Function.
To stop the Ray Function and start another mode - press any other button.
6) Moments
The Moments Function is a series of flowing color sequences, with pauses in between.
Press MOMENTS (F6) on the remote control to start the Moments Function.
Press SPEED (+) or (-) to decrease or increase the off periods and the speed of the sequences.
To stop the Moments Function and start another mode - press any other button.
D) Pause Mode
You can pause during any sequence or function at any time to hold a current color or light display.
Press PAUSE (P1) on the remote control to pause.
Optionally, you can press the MEMORY (M1) button on the remote control as described in ‘Save a Color’ to save the current
color display.
To stop the Pause Function and start another mode - press any other button.
CARE AND MAINTENANCE
The Mood-Light ‘object’ is a product of superior design and quality and should be treated with care. The suggestions below
will help you to fulfill any warranty obligations and to enjoy this product for many years.
When using the Mood-Light ‘object’:
-
Make sure it is properly and securely positioned.
Do not place the Mood-Light ‘object’ under water.
Keep it and all its parts out of children’s reach.
Use indoors only.
Do not use or store it in dusty or dirty area - the lighting parts can lose brightness.
Do not install or store in hot areas. High temperatures can shorten the life of electronic items, damage batteries, and warp
or melt certain plastics.
- Do not attempt to open, alter, or tamper with the Mood-Light ‘object’. Non-expert handling may damage the unit and
may cause injury to the user.
- Do not tamper with or replace any internal parts.
- Do not drop, knock, or shake the Mood-Light ‘object’. Rough handling can break internal circuit boards and lights.
1
0
- When cleaning, do not use harsh chemicals, cleaning solvents, or strong detergents. Wipe the Mood-Light ‘object’ with
a soft wet cloth in a mild soap-and-water solution.
- Do not paint or alter it in any way. This can change the lighting effects and appearance of the product.
- After not using the Mood-Light ‘object’ for a long period of time, reset the Mood-Light ‘object’ before use.
If the Mood-Light ‘object’ or its accessories are not working properly, contact your nearest qualified service facility.
TECHNICAL SPECIFICATIONS
Color Range
Source
Source Life
Control
Operating Temperature
Storage Temperature
Power Supply
Operation Voltage
Current Consumption
Battery Operation
Standby Current
Backup Current
Testing Condition
-
millions of additive RGB colors with variable intensity
ultra bright LED (light emitting diodes)
predicted source life 50,000 hours under normal operating conditions
RF Remote Control
range 0ºC ~ +70ºC
range –20ºC ~ +80ºC
120V AC I/P, 7.5V DC 800mA O/P or
230V AC I/P, 7.5V DC 800mA O/P
listed UL, CUL, CE, GS
DC 7.5V
500mA – 1A Max.
4 AA size 1.2V 1300-1600mAH LiMH rechargeable battery (installed inside unit)
4mA (turn off by remote, RF receiver remain on)
6uA (Vcc under 4V, RF receiver turned off)
Temperature +25ºC ~ -2ºC, humidity 65% RH+/- 5% as standard testing condition
LIMITED WARRANTY
Traxon guarantees that this Mood-Light 'object' is free from defects in material and workmanship according to the following terms and
conditions:
- The warranty of the Mood-Light 'object' is valid for 12 months from the date of its purchase.
- This limited warranty does not cover damages due to improper installation, improper testing, or problems with electrical power usage
not in accordance with specification.
- Traxon is not responsible for any damages due to unauthorized repair, unauthorized modifications and alteration of the Mood-Light 'object'.
- During the limited warranty period, Traxon or its authorized distributors will either repair or replace any defective product or parts thereof
with new or factory rebuilt replacement items, and return the product to the consumer in working condition. No charge will be made to
the consumer for either parts or labor in repairing or replacing the product.
- The repaired product will be guaranteed for the balance of the original warranty period, or for ninety days from the date of repair, whichever
is longer.
1
1
- Upon request from Traxon or its authorized distributors the consumer must provide the purchase receipt and other information such as the
product serial number to prove the date and place of purchase.
- Transportation, delivery and handling charges incurred in the return of the product to and from Traxon or its authorized distributors will be
borne by the customer.
The consumer shall have no coverage or benefits under this limited warranty if any of the following conditions are applicable:
- The product has been subject to abnormal use, abnormal condition, improper storage, exposure to moisture or dampness, exposure to
excessive temperature or other such environmental conditions, unauthorized modifications, unauthorized connection, unauthorized repairs,
misuse, neglect, abuse, accident, alteration, improper installation, acts of God, spillage of foods or liquids, maladjustment of customer
controls or other acts which are beyond reasonable control of Traxon, including deficiencies in consumable parts such as fuses. Breakage
or damages unless caused directly by defects in materials and workmanship and normal wear and tear of the product.
- Traxon was not notified by the consumer of the alleged defect or malfunction of the product during the applicable limited warranty period.
- The product serial number has been removed, defaced or altered.
- The product was used with or connected to accessories not supplied by Traxon.
If a problem develops during the limited warranty period the consumer should take the following steps:
1) The consumer shall contact his/her local and authorized distributor.
2) The consumer shall arrange for the product to be delivered to the authorized distributor. Expenses, related to removing the product
from an installation are not covered under this warranty. Expenses related to transportation to the distributor are not covered by
this warranty.
3) The consumer will be billed for any parts or labor charges not covered by this limited warranty.
4) The consumer shall be responsible for expenses related to reinstallation of the product.
5) If the product is returned to the nearest distributor after the expiration of the warranty period Traxon and its distributor’s normal
service policies shall apply and the consumer will be charged accordingly.
Any implied warranty of merchantability, or fitness for a particular purpose or use, shall be limited to the duration of the foregoing written
warranty. Otherwise, the foregoing warranty is the purchaser’s sole and exclusive remedy and is in lieu of all other warranties, express or
implied. Traxon shall not be liable for incidental or consequential damages or a loss of anticipated benefits or profits.
All warranty information, product features and specifications are subject to change without notice.
1
2
( S H O P
D E A L E R ’ S
S T A M P
A N D
D A T E )
[email protected] www.mood-light.com
1
3
BEDIENUNGSANLEITUNG
UND GARANTIE
mood
ein vorübergehender Gemütszustand
light
eine Energieform, die den Sehsinn stimuliert
mood-light
Eine neue Dimension von Lichtdesign, Lifestyle und
Selbstdarstellung. Eine in Dämmerung gehüllte
Erfahrung.
1
4
IHR MOOD-LIGHT ‘object’
Die Bedienungsanleitung gibt wichtige und detaillierte Informationen zur Handhabung Ihres Mood-Light ‘objects’. Lesen Sie
die Bedienungsanleitung sorgfältig durch und befolgen Sie genau alle beschriebenen Schritte, um das Mood-Light ‘object’ in
Betrieb zu nehmen.
Inhalt / Zubehör
1) Mood-Light ‘object’
2) Fernbedienung
3) 2 AAA-Batterien (Mikrozellen)
4) AC Power Adapter (Ladestation)
5) Bedienungsanleitung
INBETRIEBNAHME
A) Installation
1) Schließen Sie den Power Adapter (Ladestation) am Mood-Light ‘object’ und an der Steckdose an.
2) Legen Sie die mitgelieferten AAA-Batterien (Mikrozellen) in die Fernbedienung ein.
3) In Ihrem Mood-Light ‘object’ befindet sich ein Akku. Lassen Sie das Mood-Light ‘object’ für ca. 24 Stunden auf dem
Power Adapter, bis der Akku vor der ersten Benutzung vollständig aufgeladen ist. Optional können Sie das Mood-Light
‘object’ bedienen während es mit dem Power Adapter verbunden ist. Wenn der Akku zu schwach ist geht das Mood-Light
‘object’ aus. Der Akku muss neu geladen werden. Schliesen Sie das Mood-Light ‘object’ an das Ladegerat an, um den
Akku neu aufzuladen. Das Mood-Light ‘object’ sollte wahrend des Ladevorgangs ausgeschaltet sein.
ANMERKUNG: Ihr Mood-Light ‘object’ wird über eine Funkfrequenz (RF) gesteuert und kann aus einer Entfernung
von bis zu 10 Metern bedient werden.
Warnung: Ihr Mood-Light ‘object’ ist nicht wasserdicht. Positionieren Sie es daher nicht unter Wasser;
die innenliegende Technik könnte beschädigt werden.
1
5
B) Ein- und Ausschalten
Drücken Sie die ON-Taste, um das Mood-Light ‘object’ einzuschalten.
Anmerkung: Die Standardeinstellung des Mood-Light ‘objects’ ist ON, wenn es über den Power Adapter zum ersten mal
angeschlossen wird.
Drücken Sie die OFF-Taste, um das Mood-Light ‘object’ auszuschalten.
FUNKTIONEN
A) Color Mode
Sie können jede beliebige Farbe für Ihr Mood-Light ‘object’ kreieren und speichern.
Durch Veränderung der Intensität der drei Grundfarben rot, grün und blau können Sie eine unbegrenzte Anzahl sekundärer
Farben bilden.
1) Entwerfen einer Farbkombination
Drücken Sie die Taste COLOR (C1), um eine Farbe für Ihr Mood-Light ‘object’ zu bilden. Das Mood-Light ‘object’ blinkt
einmal zur Bestätigung des Befehls.
Drücken Sie RED (+) oder (–), um die Intensität der Farbe rot zu erhöhen oder zu vermindern.
Drücken Sie GREEN (+) oder (–), um die Intensität der Farbe grün zu erhöhen oder zu vermindern.
Drücken Sie BLUE (+) oder (–), um die Intensität der Farbe blau zu erhöhen oder zu vermindern.
Siehe Abb. 1 (Karte für subtraktive Farbmischung), Seite 24
Siehe Abb. 2 (Karte für subtraktive Farbmischung), Seite 24
Mischkarte:
Magenta = Blau und Rot mischen
Gelb = Grün und Rot mischen
Cyan = Grün und Blau mischen
Weiß = Rot, Grün und Blau in gleicher Intensität mischen
Sie können jederzeit in den Color Mode zurückkehren, indem Sie die Taste COLOR (C1) drücken.
Dadurch werden alle vorherigen Eingaben gelöscht und es kann mit dem Entwurf einer neuen Farbkombination begonnen
werden.
1
6
2) Speichern einer Farbkombination
Um die letzte Farbeinstellung zu speichern, drücken Sie die Taste MEMORY (M1) so lange, bis das Mood-Light ‘object’
zur Bestätigung einmal blinkt. Die Farbe, die das Mood-Light ‘object’ zu diesem Zeitpunkt zeigt, wird gespeichert.
Sie können eine gespeicherte Farbe jederzeit in eine andere Farbe wechseln, indem Sie die Taste MEMORY (M1) wieder
bis zum Blinksignal drücken.
Einstellungen bleiben auch dann gespeichert, wenn die Stromversorgung unterbrochen wird.
B) Sequence Modes
Im Sequence Mode können drei vorprogrammierten Farbsequenzen dargestellt werden: “CHILL”, “MOTION” und “ACTION”.
1) Chill
Als ruhiger, verführerischer, entspannter Gemütszustand ist CHILL eine vorprogrammierte Farbsequenz, die Geist und Seele
beruhigt. Diese Sequenz kann in vier verschiedenen Farbtönen dargestellt werden.
Drücken Sie die Taste CHILL (S1), um die Chill-Sequenz in roten Farben zu starten.
Drücken Sie die Taste CHILL (S1) nochmals, um zu grünen Farben zu wechseln.
Drücken Sie die Taste CHILL (S1) nochmals, um zu blauen Farben zu wechseln.
Drücken Sie die Taste CHILL (S1) nochmals, um zu weißen Farben zu wechseln.
Durch Drücken einer beliebigen Taste wird die Chill-Sequenz gestoppt und es kann ein anderer Modus gestartet werden.
2) Motion
Mit wechselnden Wellen, die in psychedelische Farben und Effekte hineinplatzen, ist MOTION eine vorprogrammierte
Farbsequenz von tobenden Bewegungen, die die Sinne stimuliert.
Drücken Sie die Taste MOTION (S2), um die Motion-Sequenz zu starten.
Durch Drücken einer beliebigen Taste wird die Motion-Sequenz gestoppt und es kann ein anderer Modus gestartet werden.
3) Action
Mit der Verschmelzung von Techno- und Beat-Effekten ist ACTION eine vorprogrammierte Farbsequenz von intensiver
Energie, die Ihren Geist beflügeln wird.
Drücken Sie die Taste ACTION (S3), um die Action-Sequenz zu starten.
Durch Drücken einer beliebigen Taste wird die Action-Sequenz gestoppt und es kann ein anderer Modus gestartet werden.
C) Function Modes
Im Function-Mode können sechs aktive Farbfunktionen dargestellt und das Tempo gesteuert werden: “RANDOM”, “FUSION”,
“PULSE”, “RAY”, “RAVE” und “MOMENTS”.
1
7
1) Random
Die zufälligen Effekte zeigen eine unbegrenzte Zahl von Kombinationen verschiedener Farben. Diese Funktion kann für
beliebige Farbkombinationen gewählt werden und ebenso für Zufallskombinationen von leuchtenden Farben.
Drücken Sie die Taste RANDOM (F1), um die Zufallsfunktion mit beliebigen Farben zu starten.
Drücken Sie die Taste RANDOM (F1) nochmals, um die Zufallsfunktion mit leuchtenden Farben zu starten.
Drücken Sie SPEED (+) oder (–), um die Geschwindigkeit der Zufallsfunktion zu erhöhen oder zu vermindern.
Durch Drücken einer beliebigen Taste wird die Zufallsfunktion gestoppt und es kann ein anderer Modus gestartet werden.
2) Fusion
Die Fusion-Funktion zeigt langsam verblassende und wechselnde Farben.
Drücken Sie die Taste FUSION (F2), um die Fusion-Funktion zu starten.
Drücken Sie SPEED (+) oder (–), um die Geschwindigkeit der Fusion-Funktion zu erhöhen oder zu vermindern.
Durch Drücken einer beliebigen Taste wird die Fusion-Funktion gestoppt und es kann ein anderer Modus gestartet werden.
3) Pulse
Die Pulse-Funktion zeigt pulsierende Farbeffekte. Es kann zwischen vier verschiedenen und wechselnden Farben gewählt
werden.
Drücken Sie die Taste PULSE (F3), um die Pulse-Funktion in roter Farbe zu starten.
Drücken Sie die Taste PULSE (F3) nochmals, um zu grüner Farbe zu wechseln.
Drücken Sie die Taste PULSE (F3) nochmals, um zu blauer Farbe zu wechseln.
Drücken Sie die Taste PULSE (F3) nochmals, um zu weißer Farbe zu wechseln.
Drücken Sie die Taste PULSE (F3) nochmals, um zu Wechselfarben zu wechseln.
Drücken Sie SPEED (+) oder (–), um die Geschwindigkeit der Pulse-Funktion zu erhöhen oder zu vermindern.
Durch Drücken einer beliebigen Taste wird die Pulse-Funktion gestoppt und es kann ein anderer Modus gestartet werden.
4) RAVE
Die Rave-Funktion aktiviert eine Zufallsfolge von Blitzeffekten. Es kann zwischen vier verschiedenen Farben und Zufallsfarben
gewählt werden.
Drücken Sie die Taste RAVE (F4), um die Rave-Funktion in roter Farbe zu starten.
Drücken Sie die Taste RAVE (F4) nochmals, um zu grüner Farbe zu wechseln.
Drücken Sie die Taste RAVE (F4) nochmals, um zu blauer Farbe zu wechseln.
Drücken Sie die Taste RAVE (F4) nochmals, um zu weißer Farbe zu wechseln.
Drücken Sie die Taste RAVE (F4) nochmals, um zu Zufallsfarben zu wechseln.
Drücken Sie SPEED (+) oder (–), um die Geschwindigkeit der Rave-Funktion zu erhöhen oder zu vermindern.
Durch Drücken einer beliebigen Taste wird die Rave-Funktion gestoppt und es kann ein anderer Modus gestartet werden.
5) RAY
Die Ray-Funktion zeigt Farbeffekte zum Ray-Tanz. Es kann zwischen vier verschiedenen und wechselnden Farben gewählt
1
8
werden.
Drücken Sie die Taste RAY (F5), um die Ray-Funktion in roter Farbe zu starten.
Drücken Sie die Taste RAY (F5) nochmals, um zu grüner Farbe zu wechseln.
Drücken Sie die Taste RAY (F5) nochmals, um zu blauer Farbe zu wechseln.
Drücken Sie die Taste RAY (F5) nochmals, um zu weißer Farbe zu wechseln.
Drücken Sie die Taste RAY (F5) nochmals, um zu Wechselfarben zu wechseln.
Drücken Sie SPEED (+) oder (–), um die Geschwindigkeit der Ray-Funktion zu erhöhen oder zu vermindern.
Durch Drücken einer beliebigen Taste wird die RAY-Funktion gestoppt und es kann ein anderer Modus gestartet werden.
6) MOMENTS
Die Moment-Funktion zeigt Farbabfolgen mit längeren Ruhezeiten zwischen den einzelnen Sequenzen.
Drücken Sie die Taste MOMENTS (F6), um die Funktion zu starten.
Drücken Sie SPEED (+) oder (–), um die Ruhezeiten und die Geschwindigkeit der Sequenzen zu erhöhen oder zu vermindern.
Durch Drücken einer beliebigen Taste wird die Moment-Funktion gestoppt und es kann ein anderer Modus gestartet
werden.
D) Pause Mode
Sie können während jeder Funktion anhalten, um die aktuelle Farbeinstellung “einzufrieren”. Drücken Sie dazu die Taste PAUSE
(P1).
Wahlweise können Sie auch die Taste MEMORY (M1) drücken, um die aktuelle Anzeige abzuspeichern.
Drücken Sie nochmals die Taste PAUSE (P1), um mit der aktuellen Sequenz oder Funktion fortzufahren.
PFLEGE UND WARTUNG
Ihr Mood-Light ‘object’ ist ein Erzeugnis von höchster Qualität und einzigartigem Design und sollte deshalb mit großer Sorgfalt
behandelt werden. Die folgenden Ratschläge werden Ihnen helfen, die Pflichten aus der begrenzten Garantie zu erfüllen, damit
Sie über viele Jahre Freude an Ihrem Mood-Light ‘object’ haben.
Bitte beachten Sie folgende Punkte:
-
Stellen Sie sicher, dass das Mood-Light ‘object’ ordnungsgemäß und sicher aufgestellt bzw. gelagert ist.
Positionieren Sie das Mood-Light ‘object’ nicht unter Wasser.
Halten Sie das Mood-Light ‘object’ und das Zubehör außerhalb der Reichweite kleiner Kinder.
Betreiben Sie das Mood-Light ‘object’ nur in Innenräumen.
Lagern oder betreiben Sie das Mood-Light ‘object’ nicht an staubigen oder schmutzigen Stellen (die Leuchtkraft könnte
an Intensität verlieren).
1
9
- Das Mood-Light ‘object’ sollte nicht an Orten mit großer Hitze aufgestellt oder gelagert werden (hohe Temperaturen
verkürzen die Lebensdauer von Elektroteilen, schädigen Batterien und verformen oder schmelzen Kunststoffteile).
- Versuchen Sie nie, das Mood-Light ‘object’ zu öffnen oder zu verändern (Eingriffe durch Laien könnten zu Beschädigungen
führen oder den Eingreifer verletzen).
- Versuchen Sie nie, Leuchtdioden (LED) zu verändern oder zu ersetzen.
- Das Mood-Light ‘object’ sollte nie fallen gelassen, gestoßen oder geschüttelt werden. Grober Umgang kann die
Schaltplatinen/Lampen im Innern zerstören.
- Verwenden Sie zur Reinigung keine aggressiven Chemikalien oder Reiniger. Das Mood-Light ‘object’ sollte nur mit einem
weichen Tuch gereinigt werden, das in einer milden Seifenlauge angefeuchtet wurde.
- Das Mood-Light ‘object’ sollte nicht bemalt werden (Farbeffekte und das Erscheinungsbild könnten sich verändern).
- Sollten Sie das Mood-Light ‘object’ eine längere Zeit nicht eingeschaltet haben, fahren Sie das Programm mit Hilfe des
Resets neu hoch bevor Sie die Schale in Betrieb nehmen.
Sollte das Mood-Light ‘object’ oder sein Zubehör nicht ordnungsgemäß funktionieren, wenden Sie sich an den nächstgelegenen
Kundendienst.
TECHNISCHE ANGABEN
Farbspektrum
Lichtquelle
Lebensdauer der Lichtquelle
Bedienung
Arbeitstemperatur
Lagerungstemperatur
Stromversorgung
Betriebsspannung
Stromstärke
Testbedingungen
2
0
-
Millionen additiver RGB-Farben mit variabler Intensität
ultrahelle Leuchtdioden (LEDs)
Prognose: 50.000 Stunden (unter normalen Betriebsbedingungen)
RF Fernbedienung
zwischen 0 und +70 °C
zwischen –20 und +80 °C
120V AC I/P, 7.5V DC 800mA O/P oder
230V AC I/P, 7.5V DC 800mA O/P
Stromversorgung unter UL, CUL, CE und GS gelistet
7.5 V Gleichstrom
500mA - maximal 1A
Temperatur zwischen +25 und – 2°C
relative Luftfeuchte 65 % ± 5 % als Standardtestbedingung
BEGRENZTE GARANTIE
- Traxon garantiert gemäß den nachfolgenden Bedingungen, dass das Mood-Light ‘object’ frei ist von Fehlern in Material und Herstellung.
- Die begrenzte Garantie für das Mood-Light ‘object’ besitzt 12 Monate Gültigkeit ab Kaufdatum. Davon unberührt bleibt die gesetzlich
vorgeschriebene Gewährleistungsfrist.
- Die begrenzte Garantie deckt keine Schäden ab, die durch unsachgemäße Handhabung, Probleme mit der Stromversorgung oder
vorschriftswidrigen Gebrauch entstanden sind.
- Traxon haftet nicht für Schäden, die durch nichtautorisierte Reparaturen oder Veränderungen verursacht worden sind.
- Innerhalb der Garantiefrist werden Traxon oder die autorisierten Händler ein defektes Gerät oder defekte Teile ordnungsgemäß reparieren
und anschließend in funktionstüchtigem Zustand an den Käufer zurückgeben. Dem Käufer werden dafür weder für Ersatzteile noch für
geleistete Reparaturen oder Ersatz des Mood-Light ‘object’ Kosten in Rechnung gestellt.
- Die begrenzte Garantie besteht weiter für das reparierte Gerät während der verbleibenden Zeit der ursprünglichen Garantiefrist, mindestens
aber für 90 Tage ab dem Zeitpunkt der Reparatur.
- Auf Anfrage von Traxon oder dem autorisierten Vertreter muss der Käufer anhand eines Kassenbelegs oder anderer geeigneter Dokumente
nachweisen, wo und wann er das zu reparierenden Mood-Light ‘objects’ erworben hat.
- Verpackungs- und Versandkosten, die im Zusammenhang mit der Beförderung des Gegenstandes von Traxon oder einem der autorisierten
Händler entstehen, gehen zu Lasten des Käufers.
Der Käufer verwirkt den in der begrenzten Garantie festgelegten Schutz, wenn eine der folgenden Bedingungen zutrifft:
- Das Erzeugnis wurde unvorschriftsmäßig oder unter unvorschriftsmäßigen Bedingungen gebraucht, war unsachgemäß gelagert oder installiert,
war hoher Feuchtigkeit oder hohen Temperaturen ausgesetzt, unterlag vergleichbar widrigen Umweltbedingungen, wurde unautorisiert
modifiziert, angeschlossen oder repariert, missbraucht, misshandelt, verändert, oder wurde Opfer höherer Gewalt, eines Verschüttens von
Flüssigkeiten oder Speisen, wurde an den Bedienelementen falsch eingestellt oder in anderer Weise einer Behandlung ausgesetzt, die
außerhalb der Kontrolle von Traxon lag, einschließlich Defekten in Verbrauchsmaterialien wie Sicherungen, sowie bei Bruch oder Schaden,
sofern sie nicht das unmittelbare Resultat von Fehlern in Material oder Verarbeitung sind oder von gewöhnlicher Abnutzung des Produkts;
- Traxon wurde nicht innerhalb der Garantiefrist von dem Defekt oder der Fehlfunktion des Mood-Light ‘objects’ in Kenntnis gesetzt;
- Die Seriennummer auf der Rückseite des Mood-Light ‘objects’ wurde entfernt, verändert oder unkenntlich gemacht;
- Das Mood-Light ‘object’ wurde benutzt oder angeschlossen mit oder an Zubehör, das nicht von Traxon mitgeliefert worden ist;
Sollte während der begrenzten Garantiefrist ein Problem auftreten, sollte der Käufer folgende Schritte unternehmen:
1) Der Käufer bringt das Mood-Light ‘object’ zum Zwecke der Reparatur oder des Umtauschs an den Ort des Kaufs zurück.
2) Der Käufer sorgt dafür, dass das Mood-Light ‘object’ an den autorisierten Händler zurückgeliefert wird. Kosten, die durch das
Entfernen des Geräts aus einer Befestigung entstehen, werden dabei nicht abgedeckt.
3) Dem Käufer werden Ersatzteile und Arbeitsleistung in Rechnung gestellt, die von dieser begrenzten Garantie nicht abgedeckt
sind.
4) Der Käufer trägt die Kosten für die erneute Anbringung des Mood-Light ‘objects’.
5) Sollte das Mood-Light ‘object’ nach Ablauf der Garantiefrist beim nächstgelegenen Händler eintreffen, müssen die Kosten
dem Käufer entsprechend in Rechnung gestellt werden.
Jegliche implizierte Garantie der Marktgängigkeit oder Eignung für einen bestimmten Zweck oder Gebrauch beschränkt sich auf die Dauer
2
1
der vorgenannten begrenzten Garantie. Darüber hinaus ist die begrenzte Garantie einziges und ausschließliches Rechtsmittel des Käufers, unter
Ausschluss aller anderen ausdrücklichen oder implizierten Garantien. Traxon haftet nicht für Begleit- oder Folgeschäden oder den Verlust
erwarteten Gewinns oder Nutzens.
Sämtliche Garantieinformationen, Produkteigenschaften und -angaben können jederzeit ohne Ankündigung geändert werden.
( F E L D
F Ü R
H Ä N D L E R S T E M P E L
U N D
K A U F D A T U M )
[email protected] www.mood-light.com
2
2
2
3
2
4
Subtractive
Additive
Color Chart: Illustration 1
Color Chart: Illustration 2
CIE Chromaticity
CIE Chart
2
5
2
6
MANUAL DE UTILIZACIÓN
& GARANTÍA
mood
un estado de animo
light
una energía estimulante del sentido visual
mood-light
Otra dimensión de iluminación, estilo y expresión.
El nacimiento de una nueva experienca.
2
7
SU MOOD-LIGHT ‘object’
Este manual contiene informaciones detalladas e importantes de su Mood-Light ‘object’. Para disfrutar plenamente del MoodLight ‘object’, le aconsejamos lea atentamente las noticias y siga paso a paso las instrucciones.
Contenido / Accesorios
1) Mood-Light ‘object’
2) Mando a distancia
3) 2 pilas AAA
4) Adaptador de corriente AC/DC
5) Manual de utilización
PREPARACION
A) Instalación
1) Enchufe el adaptador al Mood-Light ‘object’ y a la corriente.
2) Coloque las 2 pilas AAA en el mando a distancia.
3) Su Mood-Light ‘object’ contiene una pila recargable. Enchufe el Mood-Light ‘object’ a la corriente con el adaptador durante
24 horas para obtener una carga completa de la pila. Una vez el Mood-Light ‘object’ cargado puede desenchufarlo y
utilizarlo sin cable durante 6 horas. Si lo desea tambien puede dejarlo enchufado.
NOTA: Su Mood-Light ‘object’ funciona con un mando à distancia RF (radio frecuencia) para obtener una distancia de utilisación
de 10 metros.
Precaucion: Su Mood-Light ‘object’ no es hermético. No colocar el Mood-Light ‘object’ en el agua, podria dañar
la parte electronica interior. Puede rellenar el Mood-Light 'object' con cubitos de hielo o agua en el hueco previsto
a ese uso. Limpiar con un trapo humedo.
B) Mood-Light On/Off
Pulse el botón ON del mando a distancia para encender su Mood-Light ‘object’.
Nota : tratándose de la primera utilización, el Mood-Light ‘object’ se encenderá aleatoriamente.
Una vez encendido puede activar y programar el Mood-Light ‘object’, utilizando las funciones Color, Séquense o Function
como indicado a continuación.
2
8
Pulse el botón OFF del mando a distancia para apagar su Mood-Light ‘object’.
FUNCIONES DEL MOOD-LIGHT ‘object’
A) Modo Color
Puede realizar y memorizar distintos colores o combinaciones de colores de su Mood-Light ‘object’.
Utilizando los 3 colores de base: rojo, verde y azul se puede obtener un numero ilimitado de mezclas de colores.
1) Realizar un color
Pulse el botón COLOR (C1) de su mando a distancia, para realizar un color. El Mood-Light ‘object’ se apagara 1 vez
brevemente.
Pulse RED (+) o (-) para aumentar o disminuir la intensidad del color ROJO.
Pulse GREEN (+) o (-) para aumentar o disminuir la intensidad del color VERDE.
Pulse BLUE (+) o (-) para aumentar o disminuir la intensidad del color AZUL.
Ver ilustración 1 (Abanico de colores), page 24
Ver ilustración 2 (Abanico de colores), page 24
Abanico de mezclas:
magenta = mezcla de azul y rojo
amarillo = mezcla de verde y rojo
cyan = mezcla de verde y azul
blanco = mezcla de rojo, verde y azul
Para volver en modo “Color” pulse el botón COLOR (C1) de su mando a distancia. A continuación podra realizar otro
color.
2) Programación de un combinado de colores
Para programar un color, pulse el botón MEMORY (M1) de su mando a distancia manteniéndolo asta que se confirme
la selección con un parpadeo. El color que aparece en su Mood Light ‘object’ esta entonces programado.
Para cambiar y programar en cualquier momento un nuevo color pulse el botón MEMORY (M1) hasta la señal de
parpadeo.
2
9
B) Modo Sequence
Con el modo Séquense aparece en la pantalla 3 animaciones distintas pre-programadas: Chill, Motion y Action.
1) Chill
Seducción, tranquilidad y relajación. El modo - Chill – es una suave animación que procura un sentimiento de tranquilidad
espiritual y relajación mental.
La funcion CHILL aparece en varios colores.
Pulse el botón CHILL (S1) de su mando a distancia para activar la animación que aparecera en rojo.
Pulse una vez mas el botón CHILL (S1) para obtener una animación verde.
Pulse una vez mas el botón CHILL (S1) para obtener una animación azul.
Pulse una vez mas el botón CHILL (S1) para obtener una animación blanca.
Para desactivar el modo Chill y activar otro modo – pulse otro botón.
2) Motion
Distintas oleadas de colores y efectos psicodélicos. El modo – Motion – es una animación de colores y movimientos
que procuran una estimulación de los sentidos.
Pulse el botón MOTION (S2) de su mando a distancia para activar la animación.
Para desactivar el modo Motion y activar otro modo – pulse otro botón
3) Action
Un efecto “techno” y “beat”. El modo – Action – es una animación de fusiones tecnicolores y efectos «beat» que procura
una extraordinaria energía mental.
Pulse el botón ACTION (S3) de su mando a distancia para activar la animación.
Para desactivar el modo Action y activar otro modo – pulse otro botón
C) Modo Function
Se puede visualizar 6 distintas animaciones de colores y ajustar la velocidad de cada una.
1) Random
Aparición simultáneamente de un numero ilimitado de cambios de colores. Esta función aparece tambien en colores
suaves.
Pulse el botón RANDOM (F1) de su mando a distancia para activar la animación.
Pulse una vez mas el botón RANDOM (F1) de su mando a distancia para activar la animación en colores suaves.
Pulse el botón SPEED (+) o (-) para aumentar o disminuir la velocidad del modo Random.
Para desactivar el modo Random y activar otro modo – Pulse otro botón.
3
0
2) Fusion
Escala progresiva de cambios de colores.
Pulse el botón FUSION (F2) de su mando a distancia para activar la animación.
Pulse el botón SPEED (+) o (-) para aumentar o disminuir la velocidad del modo Fusion.
Para desactivar el modo Fusion y activar otro modo – pulse otro botón.
3) Pulse
La función Pulse aparece como un parpadeo de varios colores. Esta función aparece en 4 colores distintos.
Pulse el botón PULSE (F3) de su mando a distancia para activar la animación que funcionara en rojo.
Pulse una vez mas el botón PULSE (F3) para obtener pulsaciones verdes.
Pulse una vez mas el botón PULSE (F3) para obtener pulsaciones azules.
Pulse una vez mas el botón PULSE (F3) para obtener pulsaciones blancas.
Pulse una vez mas el botón PUSLE (F3) para obtener pulsaciones de distintos colores.
Pulse el botón SPEED (+) o (-) para aumentar o disminuir la velocidad del modo Pulse.
Para desactivar el modo Pulse y activar otro modo – pulse otro botón.
4) Rave
Aparición de colores en relámpagos. Esta función aparece en 4 colores distintos.
Pulse el botón RAVE (F4) de su mando a distancia para activar la animación que aparecera en rojo.
Pulse una vez mas el botón RAVE (F4) para obtener una animación verde.
Pulse una vez mas el botón RAVE (F4) para obtener una animación azul.
Pulse una vez mas el botón RAVE (F4) para obtener una animación blanca.
Pulse una vez mas el botón RAVE (F4) para obtener una animación de distintos colores.
Pulse el botón SPEED (+) o (-) para aumentar o disminuir la velocidad del modo Rave.
Para desactivar el modo Rave y activar otro modo – pulse otro botón.
5) Ray
Aparición de colores rotativos. Esta función aparece en 4 colores distintos.
Pulse el botón RAY (F5) de su mando a distancia para activar la animación que aparecera en rojo
Pulse una vez mas el botón RAY (F5) para obtener una animación verde.
Pulse una vez mas el botón RAY (F5) para obtener una animación azul.
Pulse una vez mas el botón RAY (F5) para obtener una animación blanca.
Pulse una vez mas el botón RAY (F5) para obtener una animación de distintos colores.
Pulse el botón SPEED (+) o (-) para aumentar o disminuir la velocidad del modo Ray.
Para desactivar el modo Ray y activar otro modo – pulse otro botón.
3
1
6) Moments
Apariciones consecutivas de distintos colores con tiempos muertos (sin luz).
Pulse el botón MOMENTS (F6) de su mando a distancia para activar la animación.
Pulse el botón SPEED (+) o (-) para aumentar o disminuir la velocidad del modo Moments.
Para desactivar el modo Moments y activar otro modo – pulse otro botón.
D) Mode pause
Puede efectuar una pausa en cualquier momento, cualquiera secuencia y cualquier color.
Pulse el botón PAUSE (P1) de su mando a distancia para efectuar una pausa.
Pulse el boton MEMORY (M1) de su mando a distancia para programar el momento seleccionado con la pausa.
Para desactivar el modo Pause y activar otro modo – pulse otro botón
MANTENIMIENTO Y CUIDADOS
Su Mood-Light ‘object’ es un aparato diseño, de máxima calidad que deberá de utilizarse con mucho cuidado.
Para satisfacer a las condiciones de garantía y aprovechar plenamente durante años de su Mood-Light ‘object’, le recomendamos
lean con mucha atención los consejos de utilización.
Instalando y utilizando su Mood-Light ‘object’:
- Asegúrense que este bien instalado y colocado sobre un suporte (una mesa) estable.
- No sumergir el Mood-Light ‘object’ en el agua
- No dejar el Mood-Light ‘object’ o sus componentes a mano de niños pequeños.
- Utilice el Mood-Light ‘object’ únicamente en el interior.
- Mantener el Mood-Light ‘object’ en un lugar limpio. El polvo disminuye la luminosidad.
- No almacenar o instalar el Mood-Light ‘object’ en un lugar demasiado caliente. Las temperaturas muy elevadas pueden
disminuir la duración de vida del aparato, dañar las pilas y desalterar las partes de plástico.
- No abrir el aparato. La intervención de una persona no autorizada puede dañar el Mood-Light ‘object’ y hacer su utilización
peligrosa.
- No intentar sacar o cambiar los diodos.
- No dejar caer ni golpear el aparato. El maltrato podría dañar los diodos y la parte electrónica.
- No utilizar productos detergentes o químicos. Para limpiarlo solo es necesario pasar un trapo suave y eventualmente
húmedo.
- No pintar o modificar en ningún caso el Mood-Light ‘object’, podría cambiar los efectos luminosos.
En caso de defecto del Mood-Light 'object' o de sus accesorios, contacten directamente su proveedor.
Le informará y le aconsejará si necesario un servicio técnico de reparación.
3
2
INFORMACIONES TECNICAS
Abanico de colores
Origen
Duración de vida
Mando
Temperatura de funcionamiento
Temperatura de almacenamiento
Alimentacion
Voltaje operacional
Corriente de consume
Pila
Consumo en standby
Consumo en memoria
Pruebas
-
millones de colores RGB additives con intensidad variable
Diodos ultra luminosos
estimada a 50000 horas en uso normal
Mando a distancia RF
de –0ºC ~ +70ºC
de –20ºC ~ +80ºC
120V AC I/P, 7.5V DC 800mA O/P o
230V AC I/P, 7.5V DC 800mA O/P
certificado UL, CUL, CE, GS
DC 7.5V
500 mA - 1A Max.
pila recargable 4 AA size 1.2V 1300-1600 Mah LiMH (incluida en el aparato)
4 mA. (consumo de coriente por el receptor cuando recibe una señal ON del mando RF)
6 uA (Vcc bajo 4V, cuando el receptor RF esta en OFF)
Temperatura +25ºC ~ -2ºC
Humedad 65% RH+/- 5% en condiciones normales
CONDICIONES DE GARANTIA
Traxon garantiza el aparato Mood-Light ‘object’ (Traxon) contra todo defecto posible de producción o de material, bajo las condiciones
siguientes:
- El Mood-Light ‘object’ tiene una garantía de 12 meses a partir de la fecha de compra.
- Esta garantía limitada no cubre los daños causados por maltrato, utilización abusiva y problemas eléctricos que no sean conforme a las
especificaciones del aparato.
- La garantía de Traxon no cubre los problemas debidos a una modificación efectuada por una persona no autorizada por el fabricante.
- Durante el tiempo de la garantía limitada, Traxon o sus distribuidores oficiales harán el cambio o la reparación del aparato o parte defectuosa,
con piezas de recambio del fabricante. Traxon devolverá el aparato al consumidor en buen estado de funcionamiento. La mano de obra y
piezas de recambio no serán a cargo del consumidor.
- El aparato arreglado será garantizado por el tiempo de la garantía limitada, o 90 días a partir de la fecha del arreglo, según el tiempo más
largo.
- A la demanda de Traxon o de sus distribuidores oficiales, el consumidor deberá presentar una factura de su proveedor u otro documento
demostrando la prueba de la fecha y lugar de compra del aparato.
- Los gastos de envió hasta Traxon o sus distribuidores oficiales serán a cargo del consumidor.
La garantía no será de aplicación en los siguientes casos:
Si el aparato ha sido utilizado anormalmente, en condiciones anormales, si ha sido almacenado o instalado de manera no conforme, si estuvo
en un lugar húmedo y tiene marcas de moho, si estuvo bajo temperaturas muy elevadas o en malas condiciones de medio ambiente, si ha
3
3
sido modificado o transformado por una persona no autorizada, si a recibido malos tratos, si a recibido proyecciones de liquido o otros
productos o si ha sido manipulado de manera considerada como impropia por la empresa Traxon. La garantía no cubre los daños causados
por problemas electricos tal como defecto de fusibles o problemas de corriente, excepto si los problemas han sido causados por el aparato
mismo, habiendo sido utilizado correctamente.
Si Traxon no ha sido informado, por el consumidor, del mal funcionamiento o defecto del aparato, en el período de la garantía limitada. Si
la etiqueta con el numero de serie detrás del aparato, ha sido despegada o encolada o modificada. Si el aparato ha sido utilizado a pesar
de su defectuosidad causando daños mas importantes.
Si el aparato a sido conectado con otros accesorios que los de Traxon.
Para garantizar el aparato, deberá el consumidor:
1)
2)
3)
4)
5)
devolver el aparato donde lo ha comprado.
tomar a su cargo los gastos de envió hasta el distribuidor autorizado, y tener en cuenta que los gastos de desmontaje o de instalación
no son cubiertos por la garantía limitada.
tomar a su cargo todos gastos de mano de obra y otros que los indicados en la garantía limitada.
tomar nota que la garantía limitada no cubre la instalación del aparato.
tomar a su cargo los gastos y consecuencia si el aparato no ha llegado al distribuidor en el período de la garantía limitada.
Toda garantía o promesa de venta que no sean las mencionadas en este documento no serán aceptadas por Traxon. La única garantía valida
es la formulada por el fabricante. Traxon no será responsable de perdidas debidas a una acción promocional que no ha dado el resultado
esperado por el cliente.
Toda información o especificación podrá ser cambiada sin preaviso.
( S E L L O
D E L
D I S T R I B U I D O R
Y
F E C H A )
[email protected] www.mood-light.com
3
4
3
5
GUIDE D’ UTILISATION
ET GARANTIE
mood
un état d´esprit temporaire
light
une énergie qui stimule le sens visuel
mood-light
Une autre dimension de lumière, style et expression.
La naissance d’une nouvelle expérience.
3
6
VOTRE MOOD-LIGHT ‘object’
Ce mode d’emploi vous procure toutes les informations importantes et détaillées sur l’utilisation de votre Mood-Light ‘object’.
Afin de profiter pleinement de votre Mood-Light ‘object’, nous vous recommandons de lire attentivement la notice et d’en
suivre les instructions étape par étape.
Contenu/Accessoires:
1) Mood-Light ‘object’
2) Commande à distance
3) 2 AAA batteries
4) AC/DC Adaptateur de réseau
5) Mode d’emploi
PREPARATION
A) Installation
1) Brancher l’adaptateur au Mood-Light ‘object’ et à la prise de courant.
2) Insérer les 2 Batteries AAA dans la commande à distance.
3) Votre Mood-Light ‘object’ possède une batterie rechargeable. Brancher le Mood-Light ‘object’ à une prise de courant par
l’adaptateur pendant 24 heures afin que la charge soit complète.
Lorsque votre Mood-Light ‘object’ est complètement chargé, vous pouvez le déconnecter, il sera opérationnel sans fil
pendant 6 heures. Vous pouvez également continuer à l’utiliser avec son adaptateur de courant.
Lorsque la batterie du Mood-Light ‘object’ est déchargée, celui-ci va clignoter. Brancher le Mood-Light ‘object’ à la prise
de courant pour le recharger.
NOTE: Votre Mood-Light ‘object’ est piloté par RF (radio fréquence) afin d’obtenir une distance de control de 10 mètres.
Precaution: Votre Mood-Light ‘object’ n’est pas étanche à l’eau. Ne pas placer votre Mood-Light ‘object’ dans l’eau,
cela risquerait d’endommage la partie électronique intérieure. Vous pouvez introduire des glaçons ou de l’eau uniquement
dans le creux du Mood-Light ‘object’ prévu à cet effet. Nettoyer à l’aide d’un chiffon humide.
3
7
B) Position Mood-Light ‘object’ On/Off
Appuyez sur la touche ON de votre commande à distance pour allumer votre Mood-Light ‘object’.
Note: Le Mood-Light ‘object’ s’allume par défaut lors de la première utilisation.
Lorsque votre Mood-Light ‘object’ est allumé vous pouvez activer et programmer votre Mood-Light ‘object’, en utilisant les
fonctions Color, Sequence, Function ou Pause comme indiqué dans la notice.
Appuyez sur la touche OFF de votre commande à distance pour éteindre votre Mood-Light ‘object’.
FONCTIONS MOOD-LIGHT ‘object’
A) Mode Color
Vous pouvez créer et sauvegarder des couleurs ou combinaisons de couleur de votre Mood-Light ‘object’.
En utilisant les 3 couleurs de bases rouge, vert et bleu vous pouvez obtenir une palette infinie de couleurs.
1) Créer une couleurs
Appuyez sur COLOR (C1) de la commande à distance pour créer une couleur. Le Mood-Light ‘object’ va clignoter une
fois.
Appuyez sur RED (+) ou (-) afin d’augmenter ou diminuer l’intensité de la couleur ROUGE.
Appuyez sur GREEN (+) ou (-) afin d’augmenter ou diminuer l’intensité de la couleur VERTE.
Appuyez sur BLUE (+) ou (-) afin d’augmenter ou diminuer l’intensité de la couleur BLEUE.
Voir Ilustracion 1 (Color Chart Subtractive), page 24
Voir Ilustracion 2 (Color Chart Additive), page 24
Choix de mélanges:
magenta = mélange bleu et rouge
jaune = mélange vert et rouge
cyan = mélange vert et bleu
blanc = mélange rouge, vert et bleu
Pour retourner à tout moment dans le mode ”Color”, appuyez sur la touche COLOR (C1) de votre commande à distance.
Vous pouvez ensuite procéder à une nouvelle sélection et choix de couleur.
3
8
2) Sauvegarder une couleurs
Pour sauvegarder une couleur, appuyez sur la touche MEMORY (M1) de votre commande à distance jusqu’à la confirmation
effectuée par un clignotement. La couleur de votre Mood-Light ‘object’ est sauvegardée.
Pour remplacer une couleur précédemment sauvegardée, il suffit d’appuyer sur la touche MEMORY (M1) correspondante
à la couleur que vous désirez remplacer, jusqu’à obtenir un signal d’un clignotement.
B) Mode Sequence
Vous pouvez obtenir 3 animations différentes, pré-programmées: Chill, Motion et Action.
1) Chill
Séduction, tranquillité et relaxation - Le mode - Chill - est une douce animation qui procure une tranquillité d’esprit et
paix de l’âme.
Cette séquence peut apparaître en différentes couleurs.
Appuyez sur la touche CHILL (S1) de votre commande à distance pour activer cette animation qui apparaîtra en rouge.
Appuyez à nouveau sur la touche CHILL (S1) pour une animation en couleur vert.
Appuyez à nouveau sur la touche CHILL (S1) pour une animation en couleur bleu.
Appuyez à nouveau sur la touche CHILL (S1) pour une animation en couleur blanc.
Pour arrêter le mode Chill et activer un autre mode – appuyez sur une autre touche.
2) Motion
Une alternance de vagues qui s’écrasent tour à tour, aux couleurs et effets psychédéliques. Le mode – Motion – est une
animation qui procure une stimulation des sens.
Appuyez sur la touche MOTION (S2) de votre commande à distance pour activer cette animation.
Pour arrêter le mode Motion et activer un autre mode – appuyez sur une autre touche.
3) Action
Un effet “techno” et “beat”. Le mode – Action – est une animation qui procure une intense énergie suivie du grand frisson.
Appuyez sur la touche ACTION (S3) de votre commande à distance pour activer cette animation.
Pour arrêter le mode Action et activer un autre mode – appuyez sur une autre touche.
C) Mode Function
Vous pouvez faire paraître 6 différentes animations dont la vitesse est réglable.
3
9
1) Random
Apparition d’une combinaison infinie de changement de couleurs. Cette fonction apparaît également en couleurs douces.
Appuyez sur la touche RANDOM (F1) de votre commande à distance pour activer l’animation.
Appuyez à nouveau sur la touche RANDOM (F1) de votre commande à distance pour activer l’animation en couleurs
douces.
Appuyez sur la touche SPEED (+) ou (-) pour augmenter ou diminuer la vitesse du mode Random.
Pour arrêter le mode Random et activer un autre mode – appuyez sur une autre touche.
2) Fusion
Dégradé progressif de changement de couleurs.
Appuyez sur la touche FUSION (F2) de votre commande à distance pour activer le mode Fusion.
Appuyez sur la touche SPEED (+) ou (-) pour augmenter ou diminuer la vitesse du mode Fusion.
Pour arrêter le mode Fusion et activer un autre mode – appuyez sur une autre touche.
3) Pulse
Palpitations de couleur ou de variations de couleurs. Cette fonction apparaît en 4 couleurs différentes.
Appuyez sur la touche PULSE (F3) de votre commande à distance pour activer le mode Pulse et obtenir des pulsations
rouges.
Appuyez à nouveau sur la touche PULSE (F3) pour obtenir des pulsations vertes.
Appuyez à nouveau sur la touche PULSE (F3) pour obtenir des pulsations bleues.
Appuyez à nouveau sur la touche PULSE (F3) pour obtenir des pulsations blanches.
Appuyez à nouveau sur la touche PULSE (F3) pour obtenir des pulsations de différentes couleurs.
Appuyez sur la touche SPEED (+) ou (-) pour augmenter ou diminuer la vitesse du mode Pulse.
Pour arrêter le mode Pulse et activer un autre mode – appuyez sur une autre touche.
4) Rave
Apparition de couleurs en éclaire. Cette fonction apparaît en 4 couleurs différentes.
Appuyez sur la touche RAVE (F4) de votre commande à distance pour activer le mode Rave en couleur rouge.
Appuyez à nouveau sur la touche RAVE (F4) pour obtenir des changements verts.
Appuyez à nouveau sur la touche RAVE (F4) pour obtenir des changements bleus.
Appuyez à nouveau sur la touche RAVE (F4) pour obtenir des changements blancs.
Appuyez à nouveau sur la touche RAVE (F4) pour obtenir des changements de différentes couleurs.
Appuyez sur la touche SPEED (+) ou (-) pour augmenter ou diminuer la vitesse du mode Rave.
Pour arrêter le mode Rave et activer un autre mode – appuyez sur une autre touche.
5) Ray
Apparition de couleurs en rotation. Cette fonction apparaît en 4 couleurs différentes.
Appuyez sur la touche RAY (F5) de votre commande à distance pour activer le mode Ray en couleur rouge.
4
0
Appuyez à nouveau sur la touche RAY (F5) pour obtenir des changements verts.
Appuyez à nouveau sur la touche RAY (F5) pour obtenir des changements bleus.
Appuyez à nouveau sur la touche RAY (F5) pour obtenir des changements blancs.
Appuyez à nouveau sur la touche RAY (F5) pour obtenir des changements de différentes couleurs.
Appuyez sur la touche SPEED (+) ou (-) pour augmenter ou diminuer la vitesse du mode Ray.
Pour arrêter le mode Ray et activer un autre mode – appuyez sur une autre touche.
6) Moments
Apparitions consécutives de couleurs différentes avec des moments neutre sans lumière.
Appuyez sur la touche MOMENTS (F6) de votre commande à distance pour activer la fonction.
Appuyez sur la touche SPEED (+) ou (-) pour augmenter ou diminuer la vitesse du mode Moments.
Pour arrêter le mode Moments et activer un autre mode – appuyez sur une autre touche.
D) Mode pause
Vous pouvez effectuer une pause sur n’importe quelle séquence à n’importe quel moment et sur n’importe quelle couleur.
Appuyez sur la touche PAUSE (P1) de votre commande à distance pour faire une pause.
Appuyez sur la touche MEMORY (M1) de votre commande à distance pour sauvegarder la ou les couleur(s) qui apparaît
(apparaissent) au moment de la pause.
Pour arrêter le mode Pause et activer un autre mode – appuyez sur une autre touche.
ENTRETIEN ET MAINTENANCE
Votre Mood-Light ‘object’ est un appareil Design, de haute qualité qui doit être utilisé avec le plus grand soin. Afin de satisfaire
aux conditions de garantie et de profiter pleinement durant de longues années de votre Mood-Light ‘object’, nous vous
recommandons de suivre attentivement les conseilles d’installation et d’utilisation.
Lors de l’installation et utilisation de votre Mood-Light ‘object’:
-
Assurez-vous qu’il soit installé et pausé en toute sécurité sur un support stable.
Ne pas placer ni plonger le Mood-Light ‘object’ dans l’eau.
Gardez le Mood-Light ‘object’ et tous composants hors de porté des enfants.
Gardez le Mood-light ‘object’ dans un endroit sec (utilisation intérieure).
Ne pas utiliser ou entreposer le Mood-Light ‘object’ dans un endroit sale ou poussiéreux qui diminuerait la luminosité de
celui-ci.
- Ne pas l’entreposer ou le placer dans un endroit trop chaud. Des températures trop élevées pourraient réduire la durée
de vie des composants électroniques, endommager les piles et déformer ou faire fondre les éléments en plastique.
4
1
- Ne pas ouvrir l’appareil. L’intervention d’une personne non qualifiée peut endommager le Mood-Light ‘object’ et le rendre
dangereux à l’utilisation.
- Ne pas essayer d’enlever ou de changer les diodes.
- Ne pas laisser tomber, secouer ou brutaliser l’appareil. Une manipulation brutale pourrait endommager les diodes et les
circuits intérieurs.
- Ne pas utiliser de produits détergents, chimiques ou d’entretiens. Pour le nettoyer passez un chiffon doux, légèrement
humide si nécessaire.
Les projections de liquide, l’humidité et toutes autres solutions contenant des minéraux, peuvent attaquer les circuits
électroniques.
- Ne pas peindre ou modifier en aucune façon le Mood-Light ‘object’, cela pourrait avoir des conséquences sur ses effets
lumineux.
En cas de dysfonctionnement du Mood Light ‘object’ ou de ces accessoires, nous vous invitons à contacter votre vendeur.
Il vous informera et si nécessaire vous dirigera vers un service de réparation compétant.
SPECIFICATIONS TECHNIQUES
Gamme de couleurs
Source
Durée de vie
Commande
Température de fonctionnement
Température de stockage
Alimentation
Voltage opérationnel
Courant consommé
Pile
Consommation en standby
Consommation en mémoire
Testes
4
2
-
des millions de couleurs RGB additives avec une intensité variable
Diodes lumineuses ultra vives (lumière émise par les diodes)
durée de vie estimée à 50 000 heures sous des conditions normales d`utilisations.
Commande à distance RF
de –0ºC ~ +70ºC
de –20ºC ~ +80ºC
120V AC I/P, 7.5V DC 800mA O/P ou
230V AC I/P, 7.5V DC 800mA O/P
agrément UL, CUL, CE, GS
DC 7.5V
500 mA -1A Max.
pile rechargeable 4 AA size 1.2V 1300-1600Mah LiMH (inclus dans l’appareil)
4mA (courant consommé par le récepteur lorsqu’il reçoit un signal ON de la commande
à distance)
6 uA (Vcc sous 4 V, lorsque le récepteur RF est en OFF)
Température +25ºC ~ -2ºC
Humidité 65% RH+/- 5% dans des conditions normales
CONDITIONS DE GARANTIE
Traxon garantie l’appareil Mood-Light ‘object’ (Traxon) contre les défauts possibles de production ou de matériel aux conditions suivantes:
- Le Mood-Light ‘object’ est garanti 12 mois à compter de la date d’achat.
- Cette garantie limitée ne couvre pas les dégâts dus à une mauvaise utilisation, manipulation ou autres problèmes électriques non conformes
aux spécifications de l’appareil.
- Traxon ne prend pas en garantie des problèmes survenants d’une réparation ou modification effectuée par une personne non autorisée.
Pendant la période de garantie limité, Traxon ou ses distributeurs officiels se chargent de remplacer ou réparer tout l’appareil ou partie de
l’appareil défectueux, par de nouvelles pièces ou des pièces de rechanges venant du fabricant. Traxon retournera l’appareil au consommateur
en bon état de fonctionnement. La main-d’œuvre et pièces détachées ne seront pas à charge du consommateur.
- L’appareil réparé sera garanti jusqu’à la fin de la période de garantie initiale, ou pendant 90 jours à partir de la date de réparation, suivant
la période la plus longue.
- A la demande de Traxon ou de ses distributeurs officiels, le consommateur devra fournir une facture ou autres documents prouvant la date
et lieu d’achat de l’appareil.
- Les frais d’envoi de l’appareil vers Traxon ou ses distributeurs officiels, seront à charge du consommateur.
La garantie ne sera pas d’application dans les cas suivants:
- Si l’appareil à subit une utilisation anormale, dans des conditions anormales, un stockage ou installation incorrecte, s’il a été exposé à
l’humidité et contient des traces de moisissures, s’il a été exposé à des températures excessives ou autres mauvaises conditions d’environnement,
s’il a subit des modifications ou transformations par une personne non autorisée, s’il a subit un choc ou mauvais traitement, s’il a subit
des projections de liquides et autres produits ou s’il a subit des manipulations considérées comme impropre par la société Traxon. La
garantie ne couvre également pas les dommages causés par des problèmes électriques tel que fusibles, coupure de courant, excepté si
ce problème provient directement d’un défaut de l’appareil ayant été utilisé normalement.
- Si Traxon n’a pas été informé du mauvais fonctionnement ou défauts de l’appareil, par le consommateur, dans cette période de garantie
limitée. Si l’étiquette comprenant le numéro de série à l’arrière de l’appareil a été retirée, recollée ou modifiée. Si le défaut ou la destruction
de l’appareil est du à une utilisation malgré son mauvais fonctionnement ou défaut.
- Si l’appareil a été utilisé ou connecté avec des accessoires non fournis par Traxon.
Pour que l’appareil soit pris en garantie, le consommateur devra :
1) retourner l’appareil au lieu d’achat.
2) prendre à sa charge les frais d’envoi vers son distributeur autorisé, tenant compte que les frais de démontage de l’installation ne
sont non plus pas couverts par la garantie limité.
3) assumer tous frais de main d’œuvres et autres que ceux repris dans la garantie limité.
4) tenir compte que les éventuels frais de réinstallation de l’appareil ne sont pas couvert par la garantie limité.
5) assumer tous les frais et conséquences, si l’appareil est retourné au distributeur après la date limite de garantie.
Toutes garanties ou promesses de ventes non conformes à celles mentionnées ci-dessus, ne seront pas prises en charges par Traxon. La
seule garantie valable est celle fournie par le fabricant. Traxon n’est en aucun cas responsable de pertes dues à une action promotionnelle
qui n’aurait pas apporté le résultat espéré par le client.
4
3
Toutes informations ou spécifications de la garantie, pourront être changées sans avis au préalable.
( C A C H E T
D U
D I S T R I B U T E U R
E T
D A T E )
[email protected] www.mood-light.com
4
4
4
5